Community Brag Posts
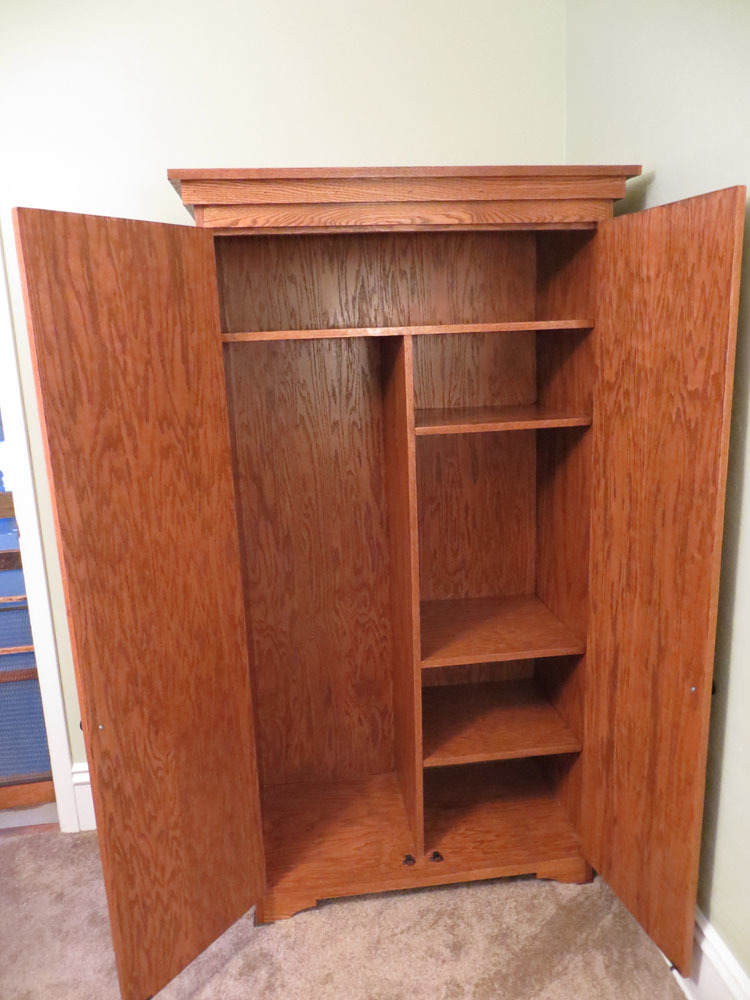
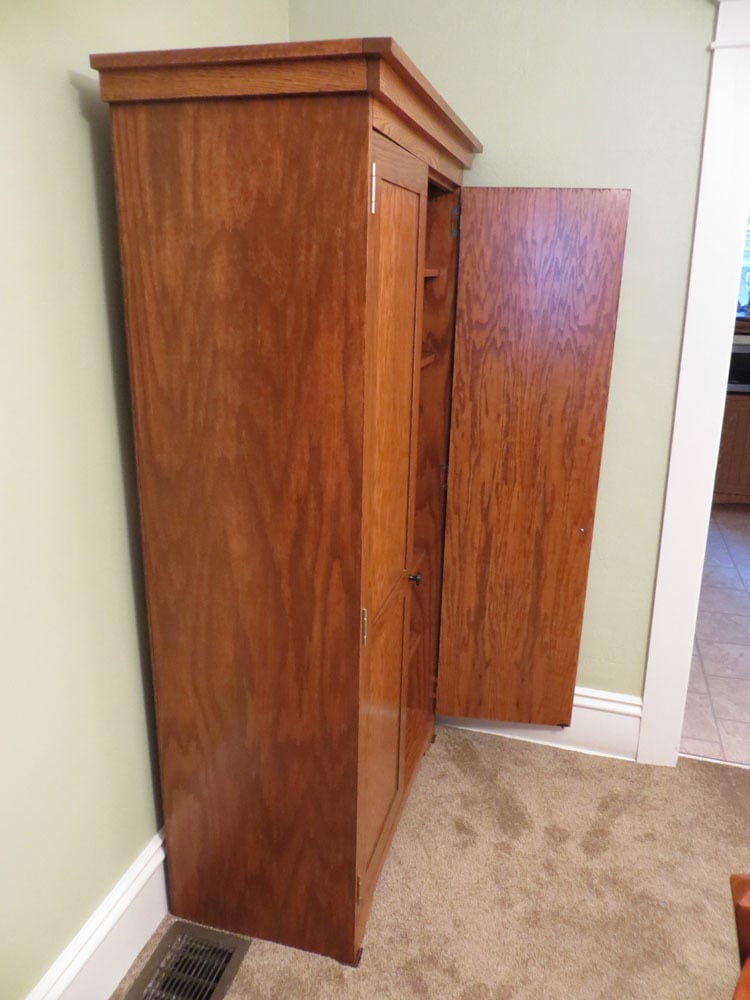
Simple Armoire
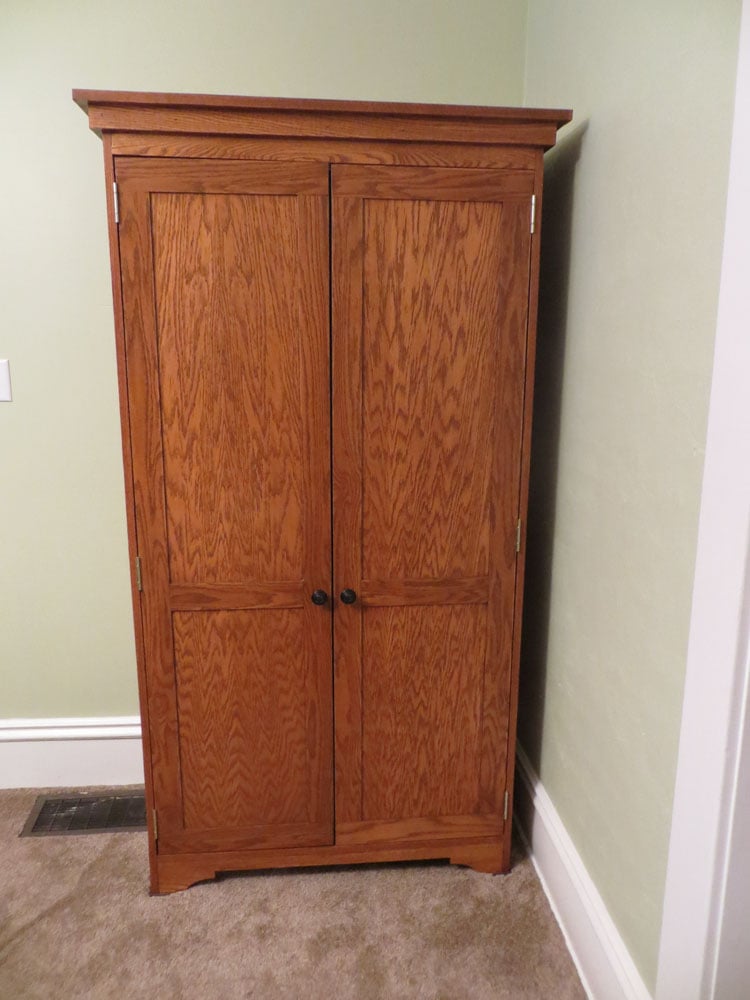
This project actually was a lot bigger than we thought it would be. Hubby and I are almost newbies, and we thought we could knock this off in a week or two! It actually ended up taking us 6 months to finish, although to be honest we didn't work on it consistently.
We needed a replacement for an old coat closet that was falling apart, and decided to tweak the design for the simple armoire to fit what we need, which is basically coats, table cloths, shoes, and just about anything else we want to hide away in our dining room. It's 18 inches deep by 36 inches wide. Since we couldn't find 18 inch wide wood planks, and aren't skilled enough to make them yet, we went with a hardwood plywood and covered the edges of the plywood with iron on veneer. It turned out very well; you can't really tell that it's plywood unless you know what you're looking for.
I will say that I couldn't find the kind of hinges called for in the plans, not even on the internet. So hubby and I went with 1 inch non-mortise hinges. They worked well, though they were a bit hard to hang for a couple of novices.
Built from Plan(s)
Estimated Cost
$300-$400
Estimated Time Investment
Week Long Project (20 Hours or More)
Finish Used
I brushed on Zar Provincial oil stain and finished with two coats of Minwax satin poly (three coats on the doors).
Recommended Skill Level
Intermediate
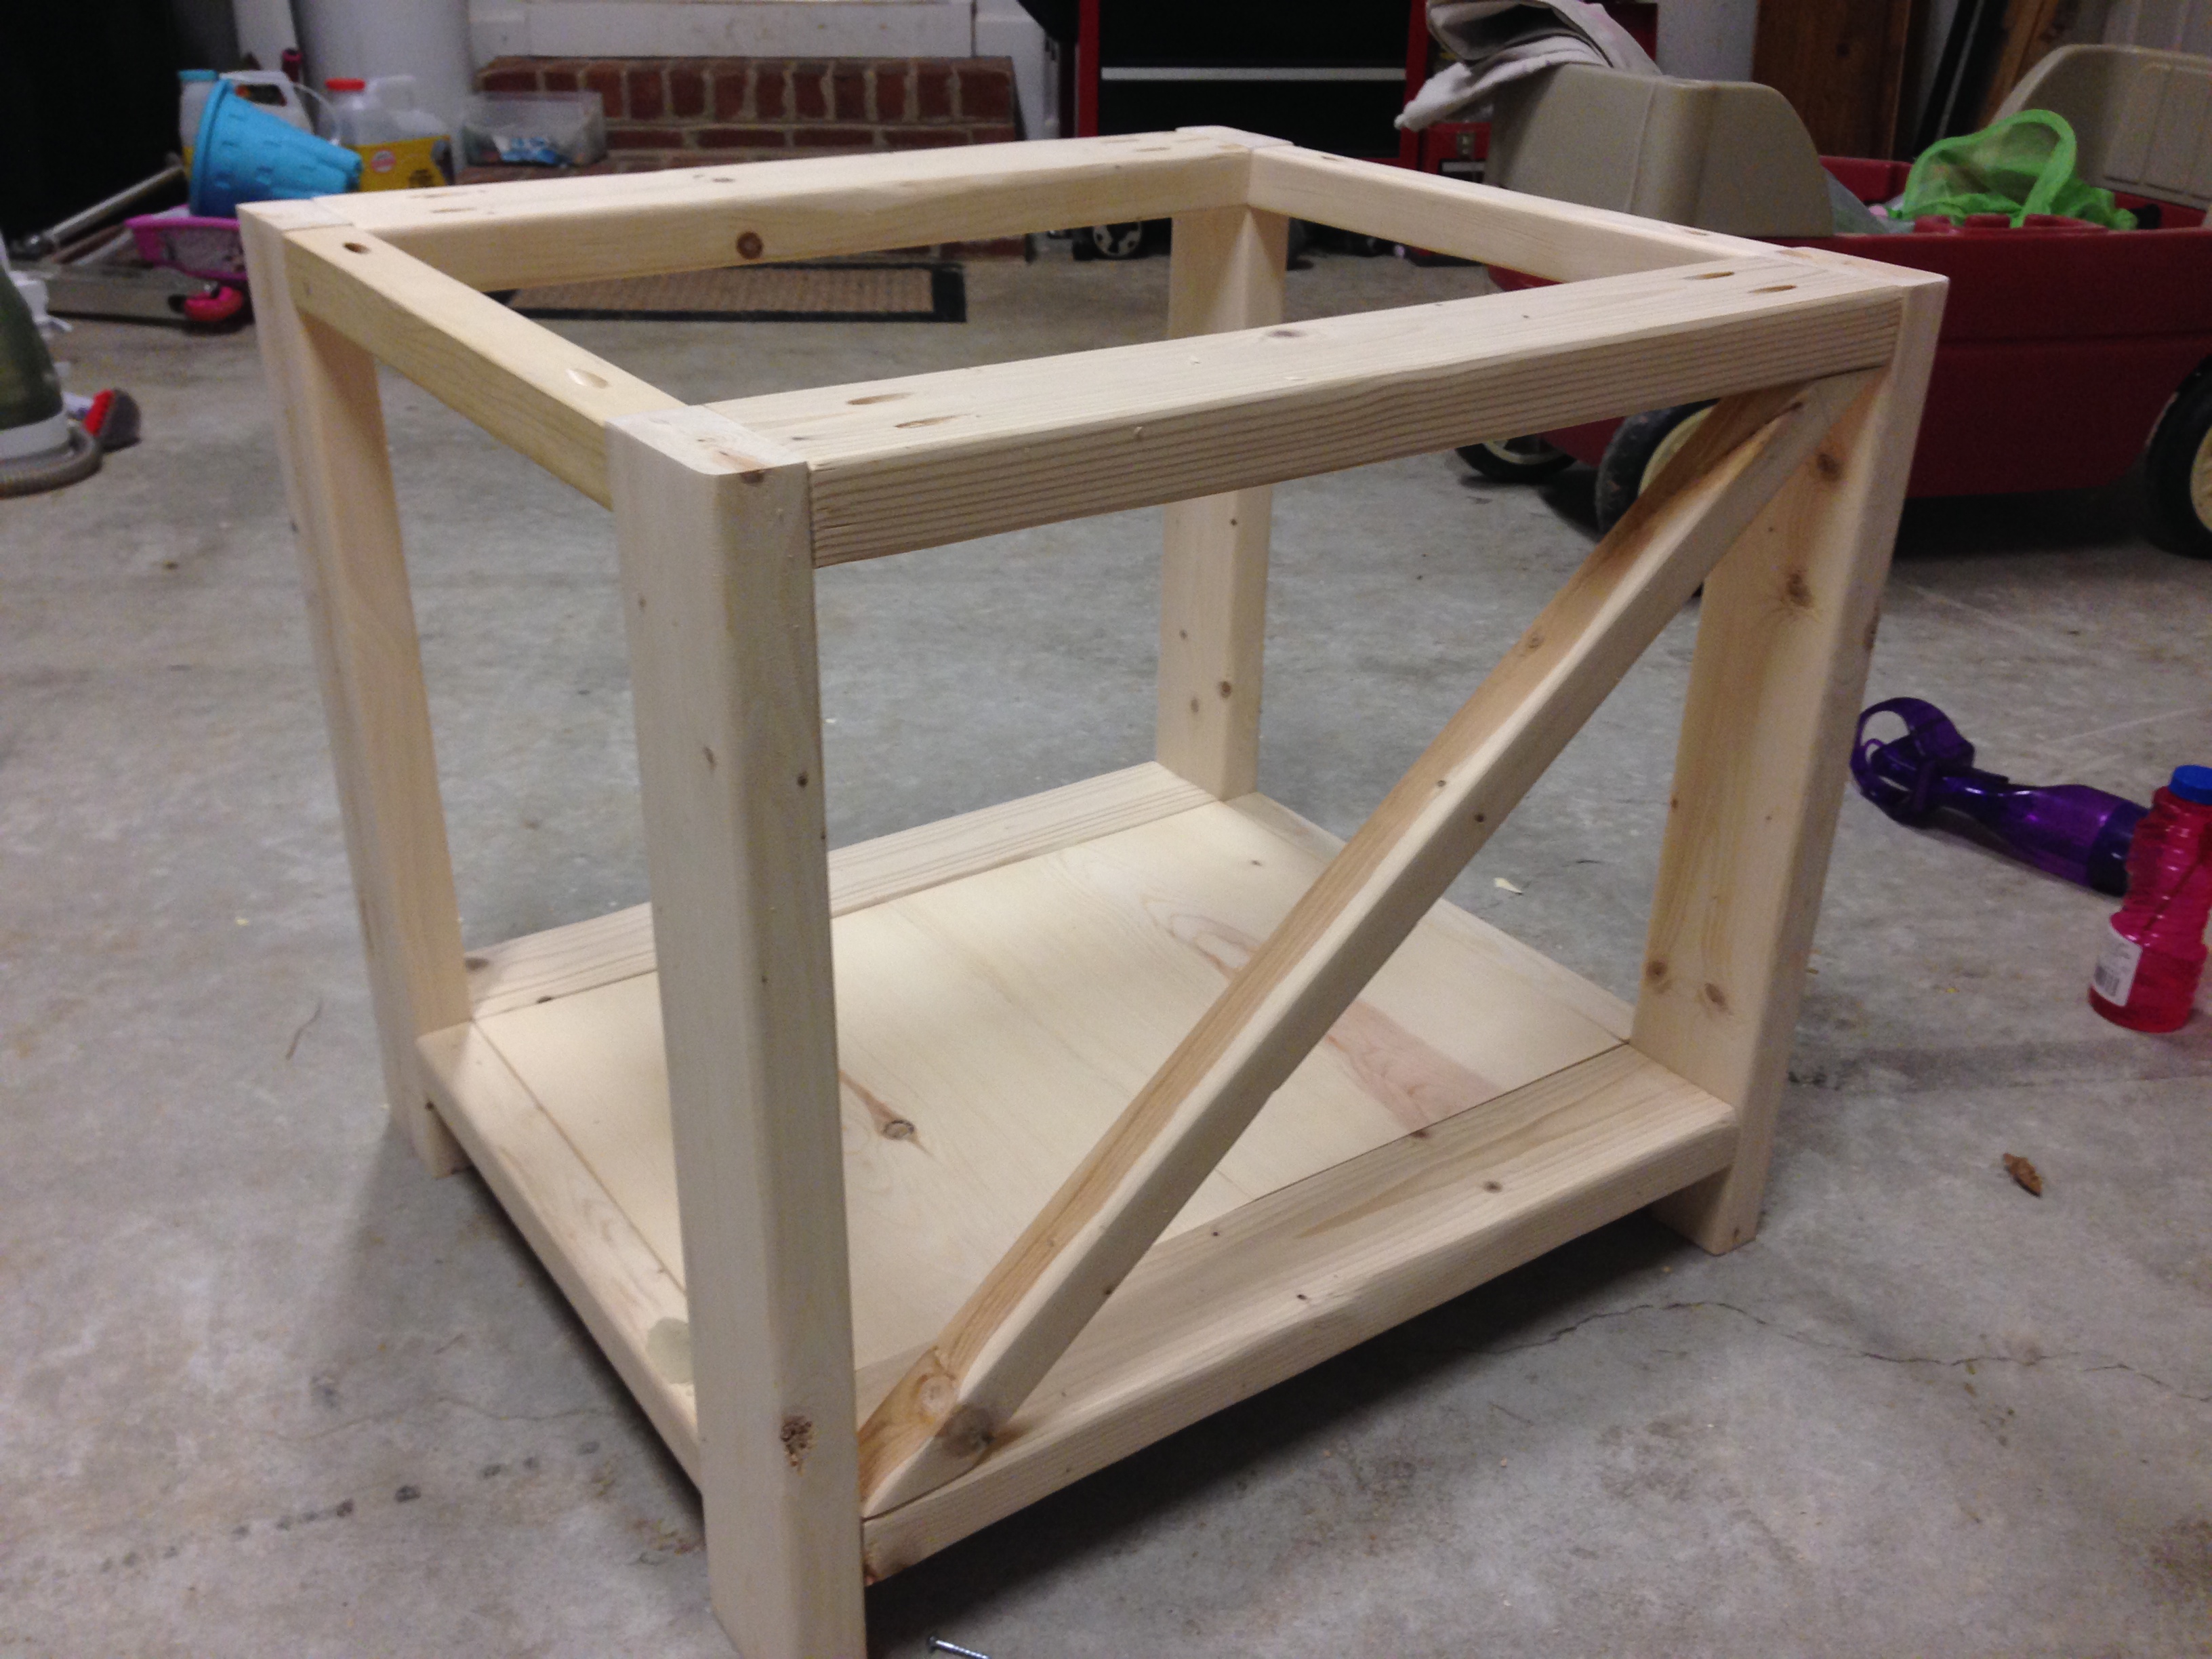
Truss 2x4 table with breadboard and framing

I loved this table and made 2 for my husbands birthday...during COVID-19. He and his twin turned 60 and hadn’t seen each other since the quarantine in California...to celebrate with immediate family only I made 2 for our back yard so we could see each other 6 feet apart! So we could be all in this together but socially distant! This was my first project ever! I had to go to Home Depot and point at what I wanted because I sure didn’t know what they were called...but Ana’s clear plans made it possible! Thank you Ana!
I added breadboards and framed it! Both of them!
Estimated Time Investment
Weekend Project (10-20 Hours)
Finish Used
Varathane natural deck finish
Bookrack

Super easy bookrack made in an afternoon. Great addition to any childs room or maybe even a smaller version for an avid readers bathroom.
Estimated Cost
$50 includes paint
Estimated Time Investment
Afternoon Project (3-6 Hours)
Finish Used
furniture quality white paint.
Recommended Skill Level
Starter Project
Rustic X End Table

This was my first shot at something more technically challenging than a simple desk. it was a fun project and I will probably going to make a few other pieces that have the metal accent hardware. We love the look of the dark stain (Rust-oleum, Kona) along with the blackened brackets. turns out the Kreg Jig drill bit was the perfect size for the 3/8" bolt I threaded into the lower legs


Estimated Cost
I'm unsure of the cost because I used a supply of wood I purchased months beforehand for a different project that I never started. The brackets for the corners cost about $12 at Lowes. I remember them being pricier than I expected... Sorry, folks =(
Estimated Time Investment
Weekend Project (10-20 Hours)
Finish Used
Rust-oleum, Kona flavored and a poly sealer to protect it from the kid's drinks =/
Recommended Skill Level
Beginner

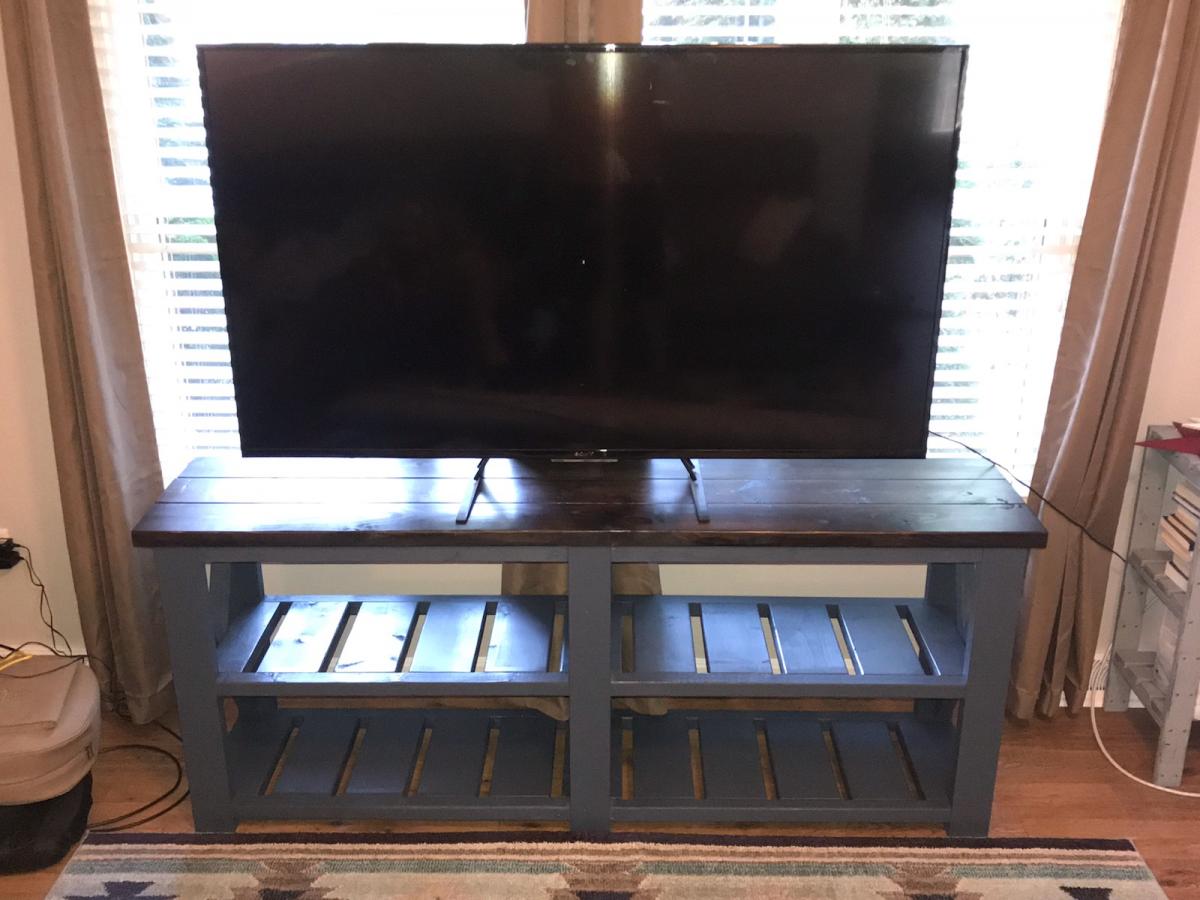
Rustic X TV console
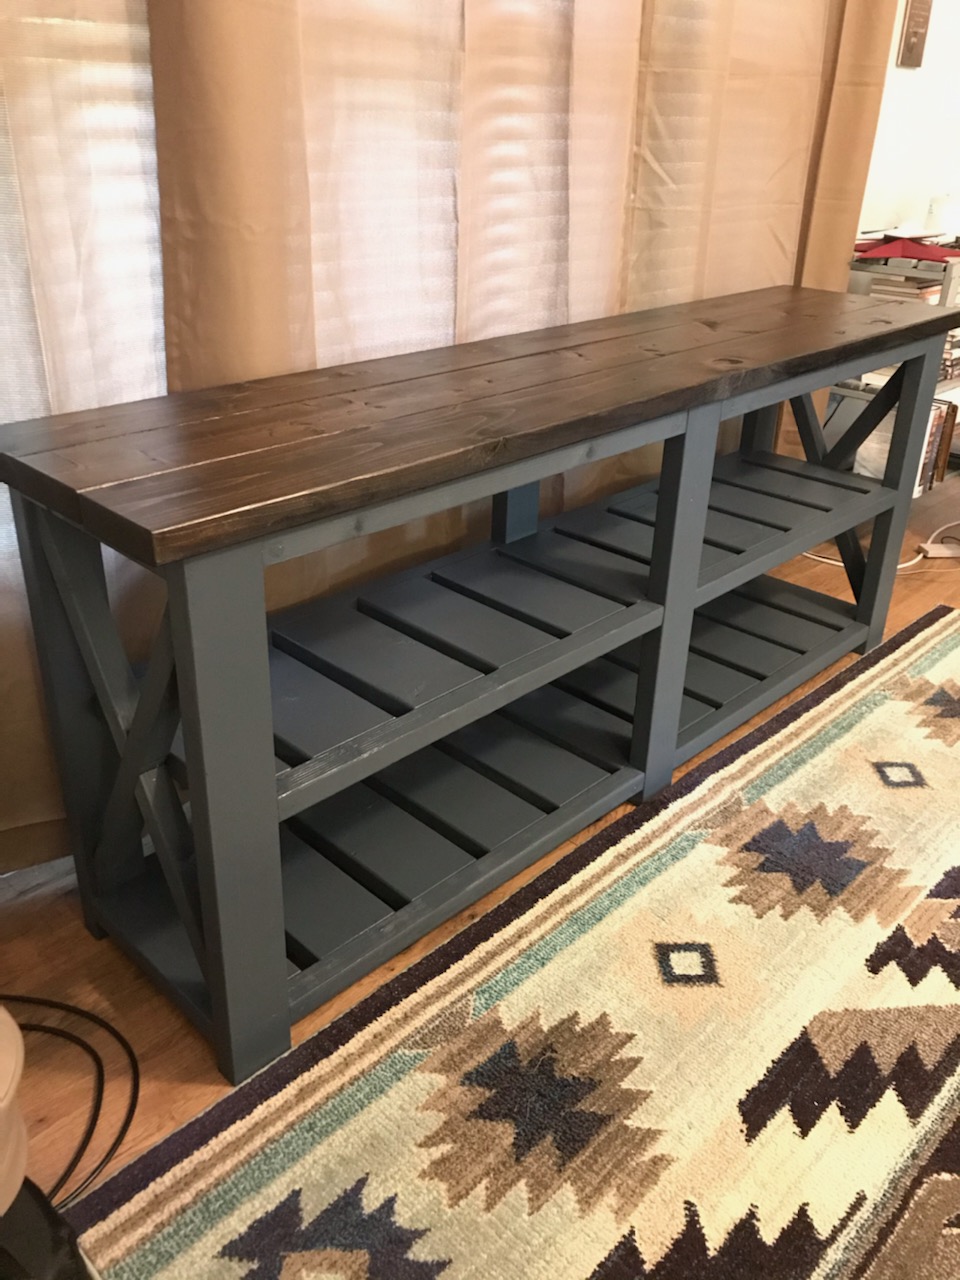
Built the rustic x tv console table.
Built from Plan(s)
Estimated Cost
80
Estimated Time Investment
Weekend Project (10-20 Hours)
Finish Used
Dark walnut stain
Night view paint
Night view paint
Recommended Skill Level
Beginner
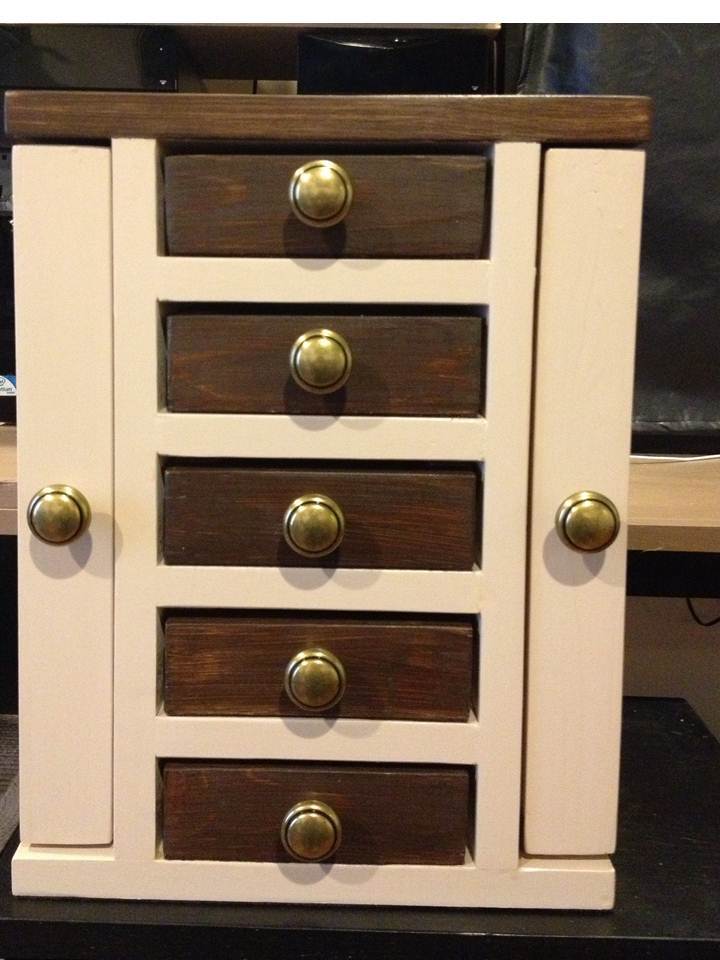
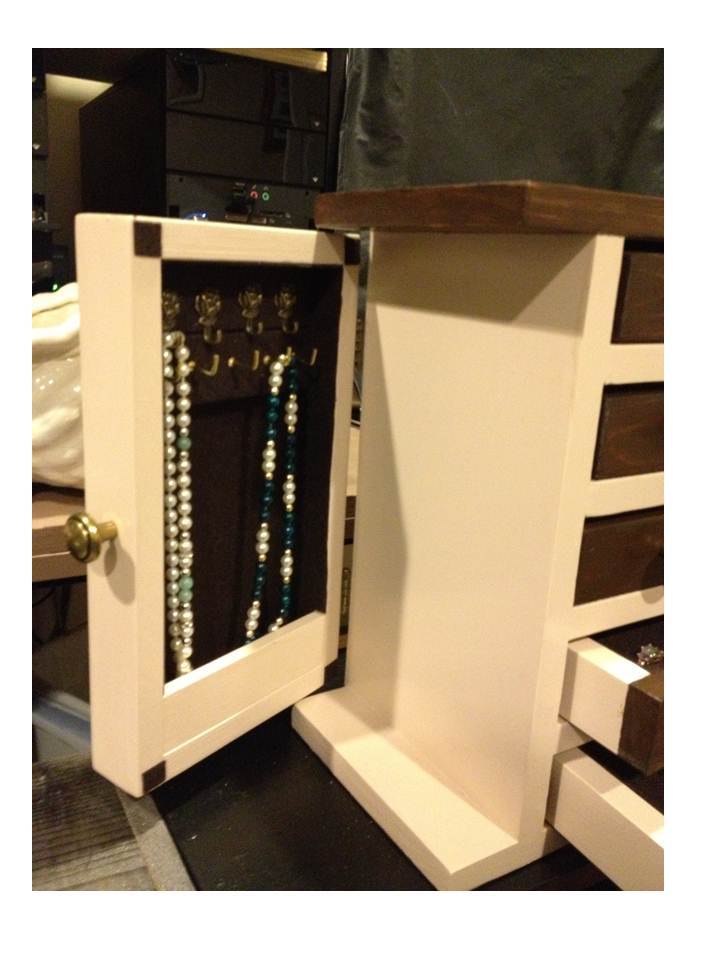
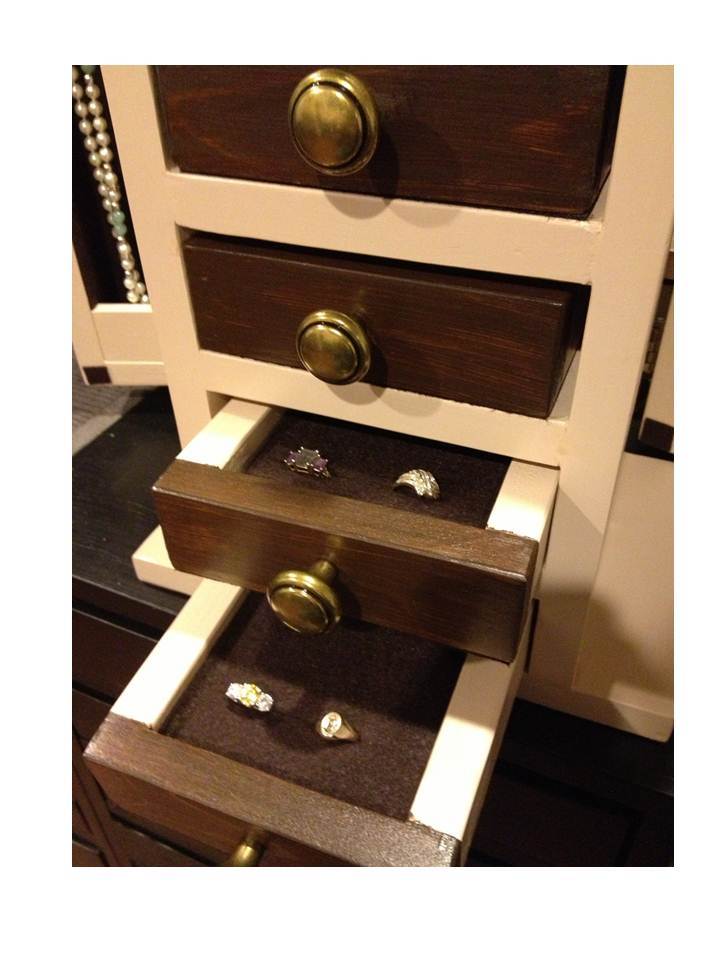
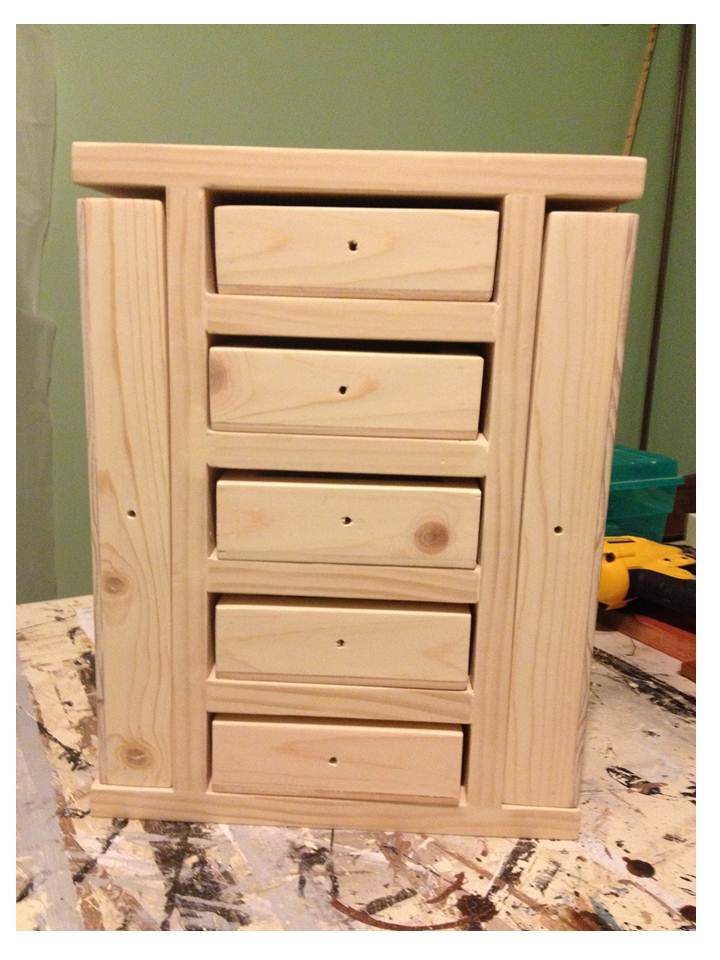
Fancy Jewelry Box
12/16/14 UPDATE: Posted a plan for this project, linked in this brag post
This is a variation of the Easy Jewelry Box plan. The completed measurement is 11” wide, 14 ½” high, and 7 ½” deep. This one has a center “tower” with 5 drawers 5 ½” wide, and a wide overhang on the top and bottom, which covers the 2 side doors that open out for hanging necklaces. The drawers are lined with embossed felt, and the drawer bottoms and insides of doors are covered with sticky-back felt. The 2 removable ring drawer inserts are some scraps of 1” foam, covered with scraps of the sticky-back felt, with slits cut into the foam with a utility knife (cut the slits into the felt first, attach it to the foam, then cut the slits into the foam). Cost breakdown: antique brass knobs: $28, sticky back & embossed felt: $14, hooks: $15, wood: $35, hinges: $7, paint: $5. (already on hand: finish nails, glue, sandpaper, left over stain & poly) . I worked on this a few hours a day over a long weekend, probably about 12 hours total. Finishing took most of this time, the build was actually only a couple of hours.

Built from Plan(s)
Estimated Cost
$104
Estimated Time Investment
Weekend Project (10-20 Hours)
Finish Used
Box and doors: 3 coats Benjamin Moore “Harmony”, sanded between coats, and 1 coat Minwax water based wipe on poly. Top and drawer fronts: 1 coat Minwax Express Color in Walnut, and 1 coat Minwax water based wipe on poly.
Recommended Skill Level
Beginner
Comments

Tue, 12/16/2014 - 16:52
Fancy Jewelry Box Plan posted
Hi jgg2006, I just posted the plan:
http://ana-white.com/node/13664
Also if you click the orange highlighted link for Fancy Jewelry Box, it will take you to the plan. The full plan is a .pdf attachment to that post, appearing just below "finish used".
:)
Joanne
camp loftbed playhouse conversion

We loved the playhouse loft bed, but not the complexity or cost of materials. Then we found the camp loft bed with stairs. It was mostly 2x4 and 2x6 construction. We then cut out holes in plywood for door and windows then screwed it to the bed frame. The other deviation from the plan was making the stairs steeper we needed them to take less space. We just used 2x6 for the stringer and treads. the stairs are at a 30 degree angle instead of a 45. We also attached the rails using brackets from Rockler. This bed is super sturdy. Beware - it took us about 3 days from buying wood to painted completion. For the paint, we just used semi gloss latex, but my paint person recommended a paint additive called Floetrol to make the paint self leveling and prevent brush marks - it really does work well. Materials including wood, brackets, mattress and paint cost us around $500.
Estimated Time Investment
Weekend Project (10-20 Hours)
Finish Used
Latex wall paint - semi gloss
Recommended Skill Level
Beginner
Comments

Wed, 07/06/2016 - 10:16
how'd you get in the room?
Did you leave it in a few pieces and then put it together fully in the bedroom? How big is the bedroom? We are adding a slide and using a ladder instead of stairs. Thanks! Yours looks great!
Handmade by: Joe and Steph
My husband and I made this for my daughter for Christmas. It was a huge hit!
Built from Plan(s)
Estimated Time Investment
Weekend Project (10-20 Hours)
Finish Used
3 coats of white chalk paint and one coat of matte glaze
Recommended Skill Level
Beginner
Richard's Work Bench
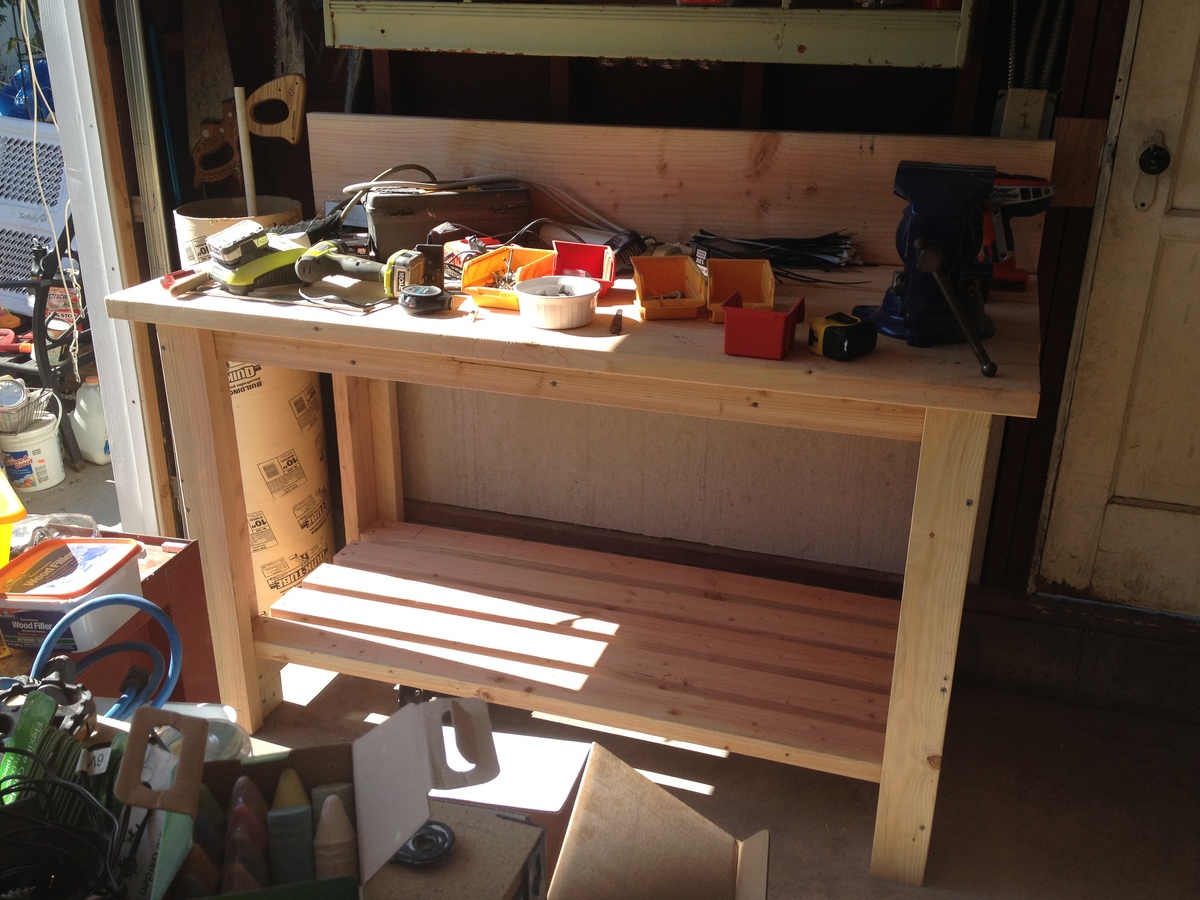
We have been doing some work in our garage and the old workbench had to be dismantled. My husband asked for a new workbench for father's day, but I didn't like any of the ones we saw at the stores. I told my husband that I could build a better one for cheaper and he said ok (although I don't think he really had much faith in it turning out). We bought the wood and then, after putting the baby down for a nap, knocked this thing out in 2 or 3 hours. It was very easy, just straight cuts and screwing the pieces together. I did the whole thing myself with a little help from my brother at the end. My husband loved it and showed off pictures of his Father's Day present to his boss and co-workers. We probably spent about $60 in materials and it really did just take a few hours. I changed the dimensions to fit our space and needs. We had some extra wood left over so we added a back-stop to the top to keep things from rolling off the back and I made the bottom shelf deeper. It was a fun and easy project to do.

Built from Plan(s)
Estimated Cost
$60
Estimated Time Investment
An Hour or Two (0-2 Hours)
Finish Used
Unfinished
Recommended Skill Level
Beginner
Farmhouse Queen Headboard
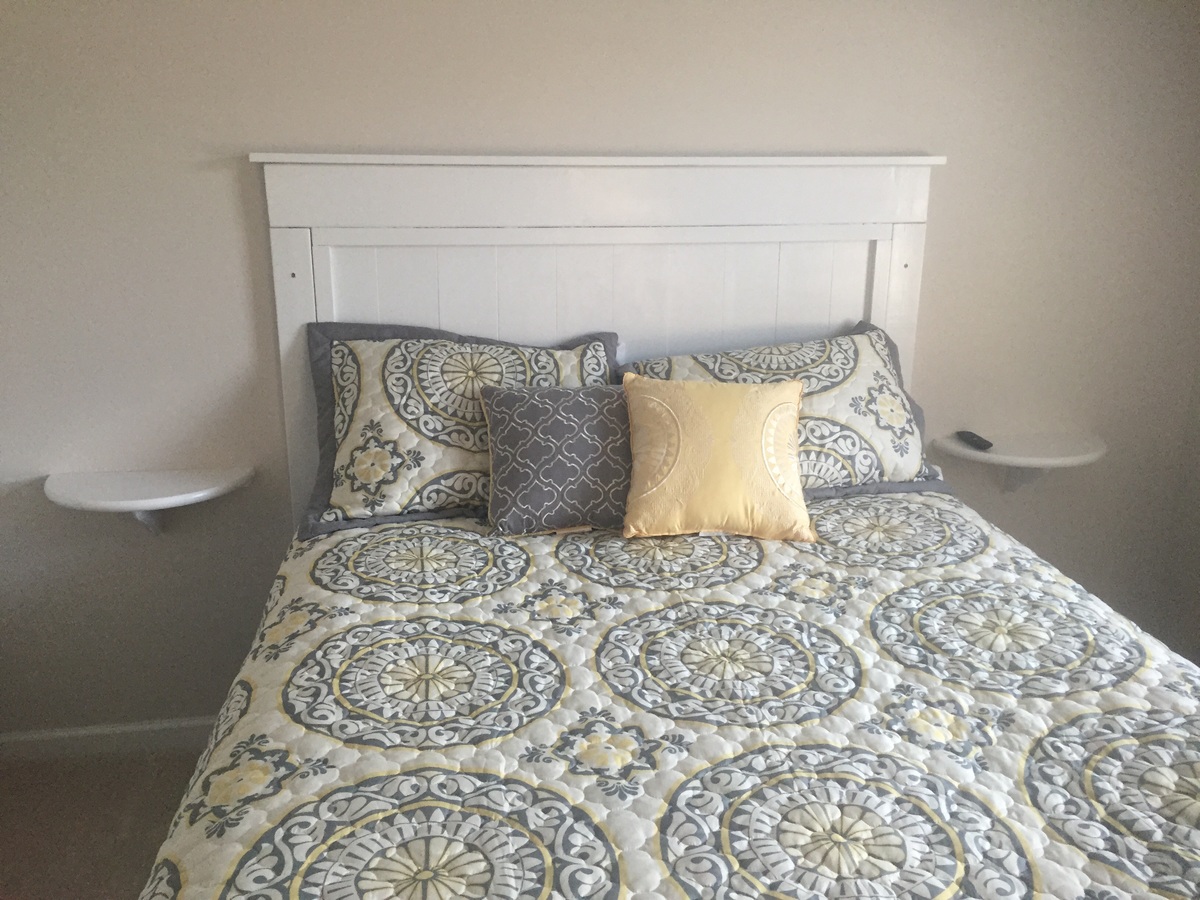
I built this on the floor of my apartment with just a drill for power tools. (Lowes cut the wood for me.) After two years of having the headboard up without stain or paint, I painted it white and moved it into my guest room of my new house. I also made the two little bedside shelves.
Built from Plan(s)
Estimated Cost
$50 + $10 for shelves
Estimated Time Investment
Weekend Project (10-20 Hours)
Finish Used
White paint
Recommended Skill Level
Beginner
Outdoor sofa
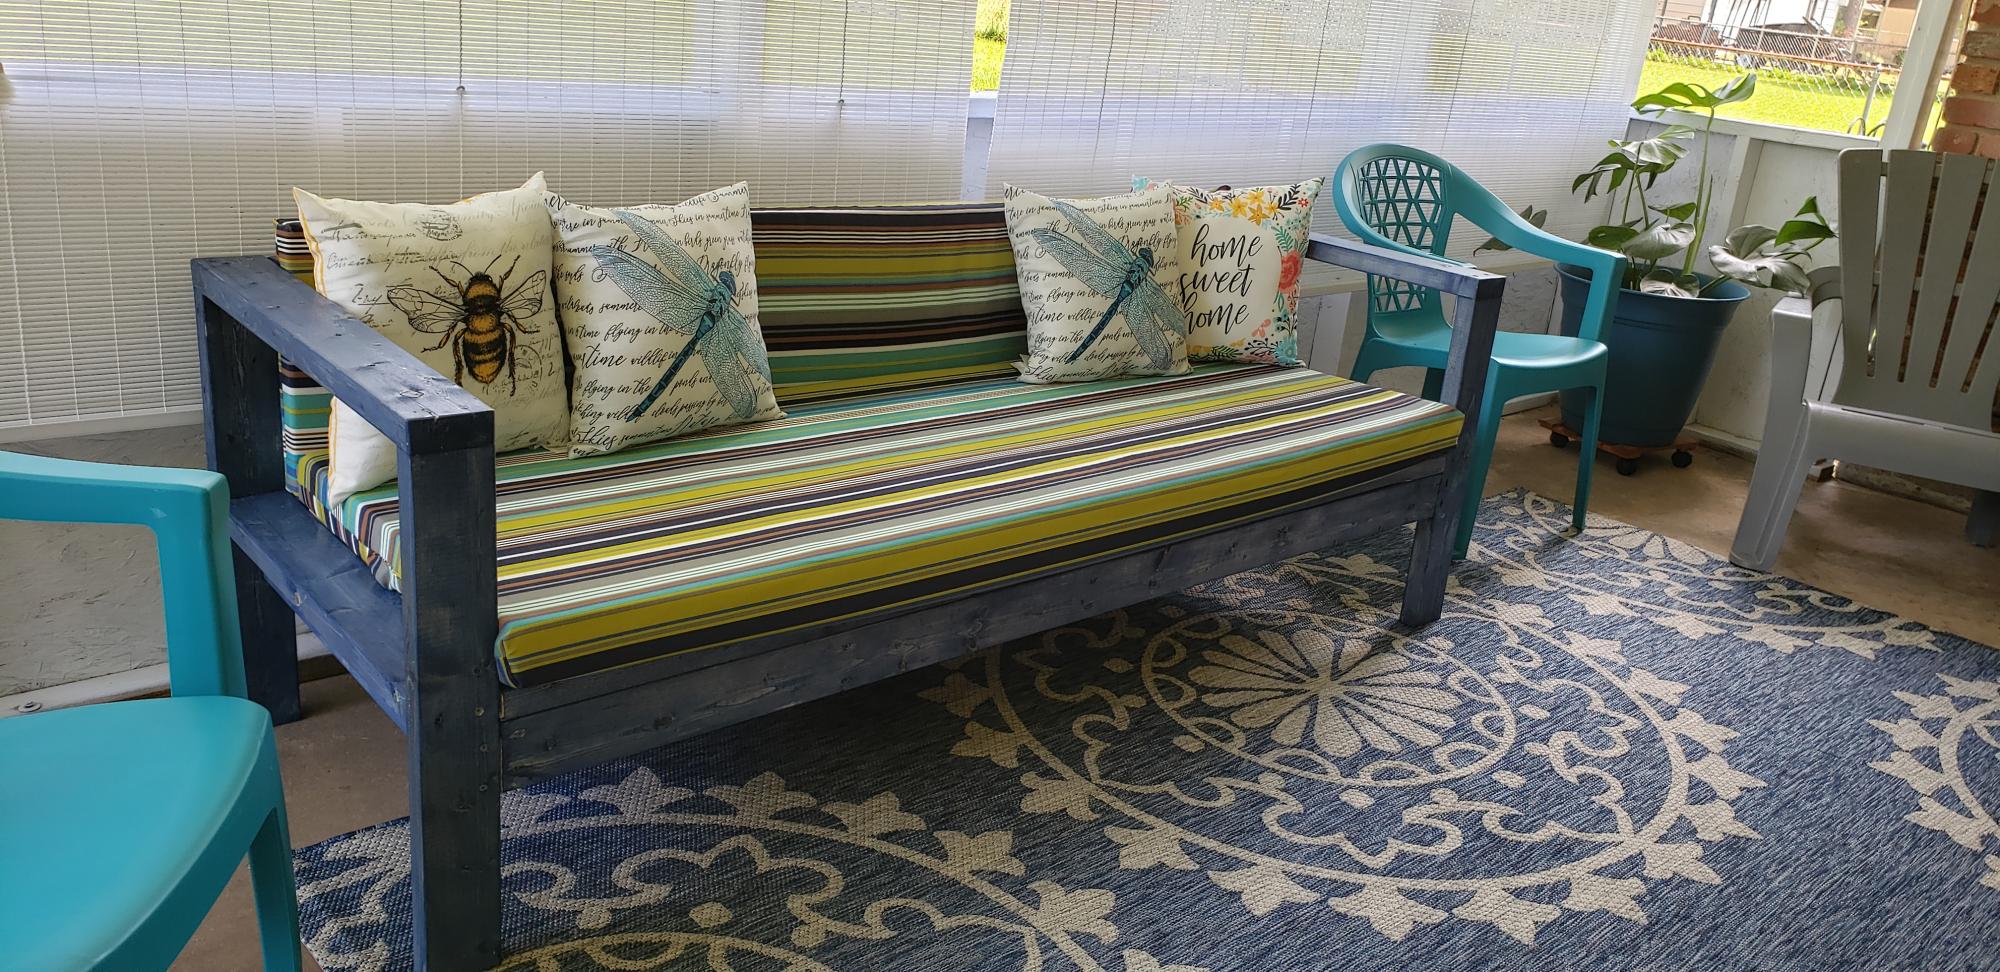
Created using the outdoor sofa plans. The cushions were created from 3" foam on the bottom and 2" foam on the back. The color us denim blue stain that was leftover from a previous job.
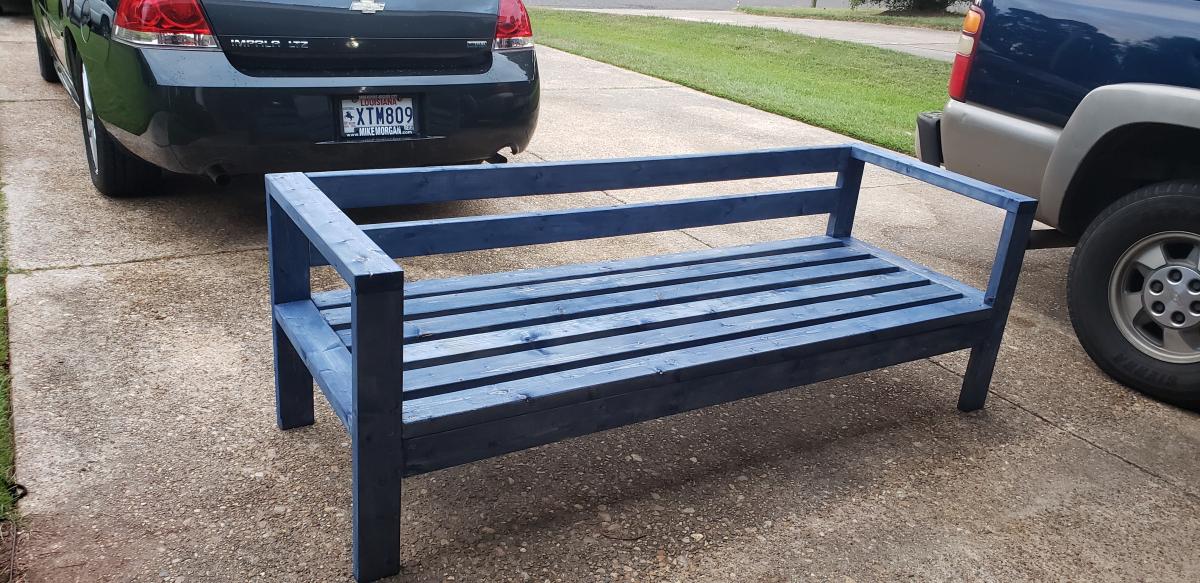
Estimated Cost
~50
Estimated Time Investment
Day Project (6-9 Hours)
Finish Used
denim blue stain
Recommended Skill Level
Beginner


Double Decker kitchen island

We took the basic plan but made it a smidge higher (36" high) and added a second shelf. The island is longer that the plans, at 60". Provides us space for all our pantry items.
Built from Plan(s)
Estimated Time Investment
Weekend Project (10-20 Hours)
Recommended Skill Level
Intermediate
Hall Tree

For the top I followed the plans for the most part. I made this for my mother for Christmas and she wanted shelves under the bench instead of a storage bin so I modified the original bench plans. I purchased the baskets for $12.99 each from "At Home" and the medium size fits pretty good.
Built from Plan(s)
Estimated Time Investment
Week Long Project (20 Hours or More)
Finish Used
I used Minwax "Early American" stain and finished with gloss polyurethane. The rustic looking wood on the back is actually paneling that had been printed that way.
Recommended Skill Level
Intermediate
Office space - ladder desk and shelves
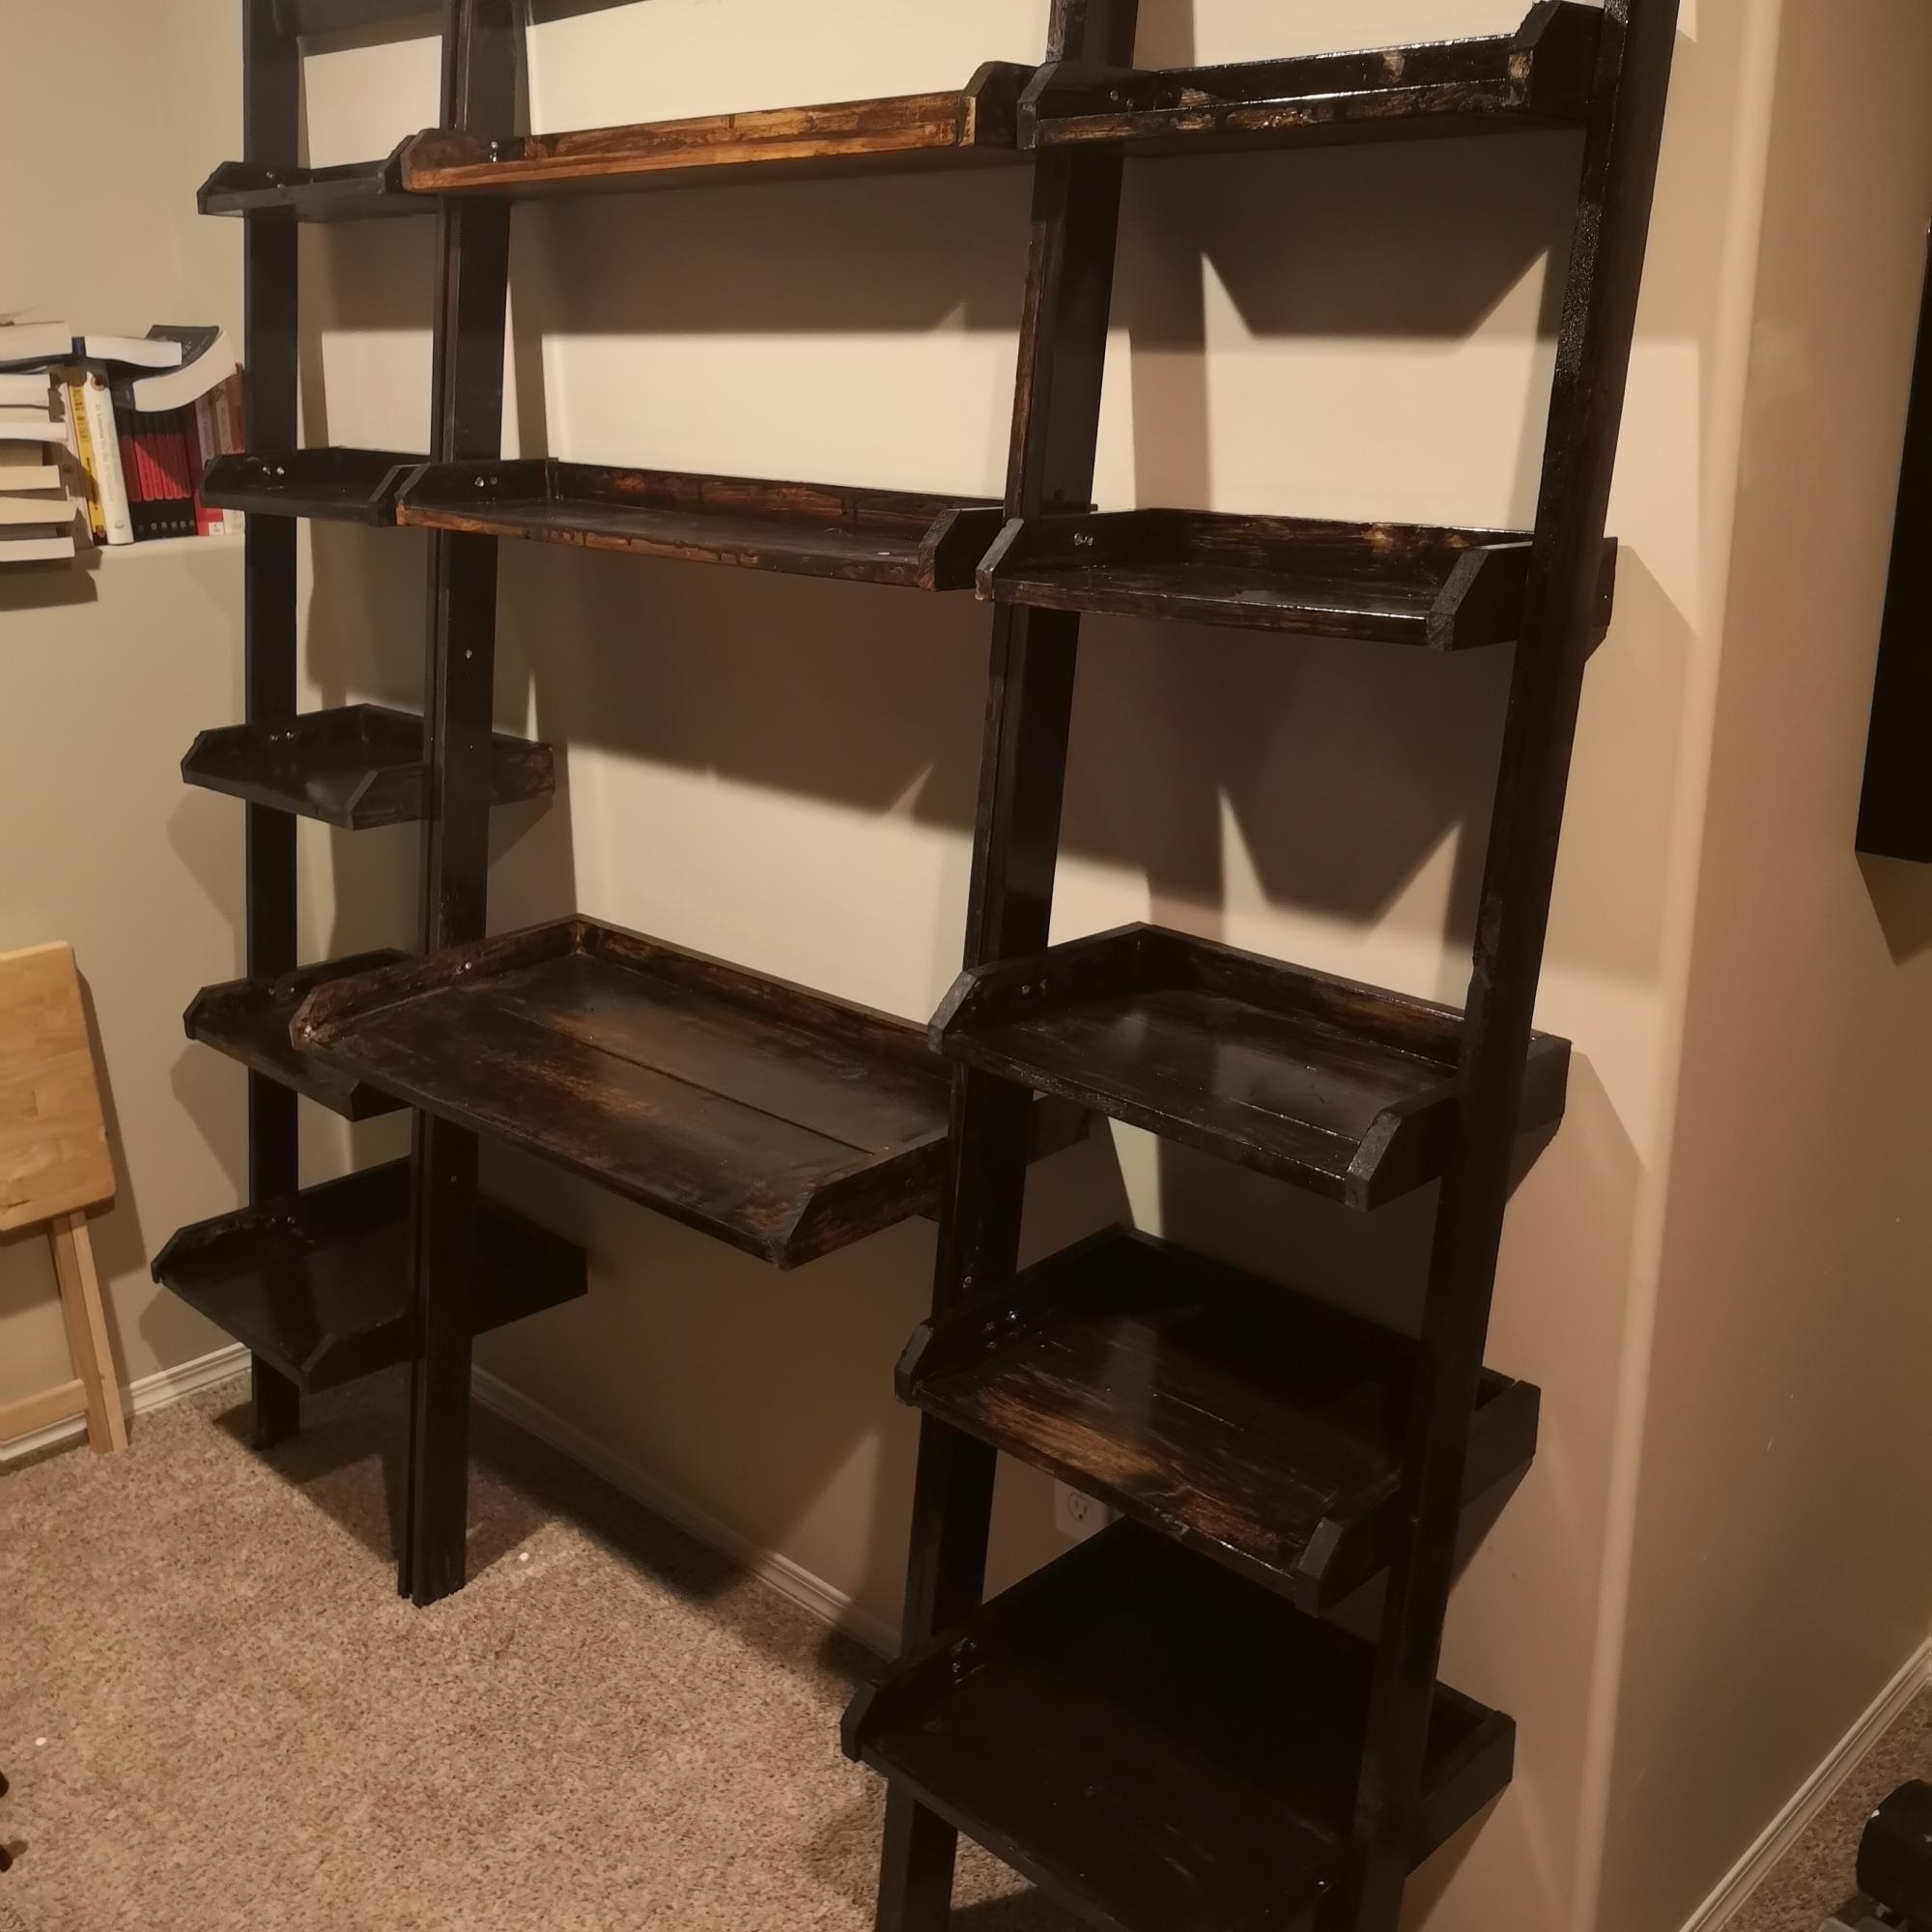
My wife needed an office space and the ladder desk and bookshelves was the perfect plan for it. In fact when I was looking at the pictures and plans online she thought I was looking at an online furniture store! She said "I like that,we should buy that" I made the desk part first and surprised her with it one evening.
Unfortunately I don't have a garage and not a lot of tools, so the desk is mostly hand cut and some of the bookshelf as well. I finally borrowed a mitre to finished off the cuts and (redo the ones I screwed up) It is a little rough but I love this space! And so does my wife!. My next project I hope to improve my staining skills! Lol. I admit I'm kinda proud of it. On to more projects!
Built from Plan(s)
Comments
Pam the Goatherd
Wed, 11/07/2012 - 21:32
That's a nice, modern twist
That's a nice, modern twist on using up a scrap of wood!