Community Brag Posts

First project ever

Submitted by Anonymous (not verified) on Thu, 04/21/2016 - 18:53

I challenged my husband who is new to any woodworking project to make me this table! That he did!!

Estimated Cost
$250 (benches and table)
Estimated Time Investment
Weekend Project (10-20 Hours)
Finish Used
Rustoleum American walnut
Recommended Skill Level
Starter Project

DIY Stinctly Made Crib

Submitted by Anonymous (not verified) on Thu, 03/26/2020 - 10:15

While I found the plans a little difficult to follow as there were steps left out, missing measurements, and misinformation, it was an easy project and I'm so glad I made it. Even at 21 weeks pregnant it was totally doable alone. The only thing I needed my husband for was to hold the side rails at the correct height.

Estimated Time Investment
Week Long Project (20 Hours or More)
Finish Used
Kona by Varathane
Recommended Skill Level
Beginner

Modern Chairs, Modern Loveseat, and the 2x4 Outdoor Coffee Table

Submitted by Anonymous (not verified) on Wed, 04/29/2020 - 19:58

I took this opportunity while quarantined to make this set. I think it came out really beautifully!

Finish Used
Shou sugi ban, Simple Finish by Maker Brand, and Total Boat Halcyon Clear.

I used a blow torch to burn each board. Then I used a wire brush to remove soot, and washed with water and allowed to dry completely. I opted for pocket holes for the chairs and love seat. After assembling, I finished with Simple Finish by Maker Brand ($40/qt), and top coated with Total Boat Clear Halcyon ($32)

Outdoor Play Kitchen!

Submitted by Anonymous (not verified) on Thu, 12/28/2023 - 08:57

We modified Ana White’s excellent Mud Kitchen plans, adding a third section and scaling the whole thing slightly larger to be a better size for our 4 and 6 year old grand daughters. It was so much fun to make and accessorize!

Built from Plan(s)
Seasonal And Holiday

Laundry Pedestal

Submitted by Kamoanui on Tue, 06/30/2020 - 09:42

This was quick build. First time for us using trim, so we wasted a few feet getting the angles right. We attached the legs directly to the frame, and did not use the metal brackets. We also did not build the floor frame. We measured how high/wide the laundry baskets ($3/piece at Target!) were, and made it to fit them. We added a piece of rubber mat to the top (bought at Lowe's). A few weeks later we helped our daughter and son in law build one for their new house!

Estimated Cost
$40
Estimated Time Investment
Afternoon Project (3-6 Hours)
Finish Used
White satin paint
Recommended Skill Level
Beginner

2x4 modern Adirondack Chair (modified)

Submitted by Anonymous (not verified) on Thu, 07/02/2020 - 17:45

I was so excited to find the plans for these awesome chairs, I’ve built 7 this season already—the modification happened as an accident, but I loved the result !

Estimated Cost
$30
Estimated Time Investment
An Hour or Two (0-2 Hours)
Finish Used
MinWax Aged Oak and Black paint
Recommended Skill Level
Intermediate

Comments

Seasonal And Holiday

Coop and run for Six

Submitted by Anonymous (not verified) on Sat, 09/24/2016 - 08:10

We wanted our chickens to have plenty of room for when we ere not home and could not let them free range in the yard.  One of the six was a rooster-- and long story-- but we don't have him any more-- so 5 chickens now enjoy this coop/run.  It cost about $300 in supplies.  It is 16 feet long.

Built from Plan(s)
Estimated Cost
$300
Estimated Time Investment
Weekend Project (10-20 Hours)
Finish Used
unfinished
Recommended Skill Level
Intermediate

Comments

Farmhouse Tables

Submitted by Anonymous (not verified) on Wed, 05/15/2024 - 08:28

I used red mahogany 225 minimax stain along with 3 coats of diamond wood finish I gave it a very quick sanding with 600 grit sand paper right before the last coat of the diamond finish and it came out silky smooth and the color really pops. I am just a beginner and I thought this project was gonna be quick and easy because I'm used to having to plain all my wood and get it all ready before putting it together I slapped this together in no time but finishing it without a spray gun after it was all together was a very lengthy process.

Painters Ladder

Submitted by Slappy on Mon, 01/09/2017 - 18:12

The legs and trim were made from 2x4 that I cut down to size with the table saw. Plywood from a chicken coup I made from Ana''s chicken coup plan was used for the shelf base.

Built from Plan(s)
Estimated Cost
Free, made from scrap wood.
Estimated Time Investment
Afternoon Project (3-6 Hours)
Finish Used
Clear gloss polyurethane and blue paint semi gloss, left over from the chicken coup.
Recommended Skill Level
Intermediate

Planter bench

I built this bench for a Christmas present. She loves to work in her garden and I thought this would be the perfect touch. The plans were easy to follow. I made a few minor adjustments to fit the lumber I had on hand. The center bench is only 4 foot wide so I could conserve on the amount of 2x4 I had to buy. I thought the bench turned out great!

Estimated Cost
$130
Estimated Time Investment
Weekend Project (10-20 Hours)
Finish Used
Golden oak stain
Recommended Skill Level
Beginner

Comments

Great Plan for Garage Shelf!

Submitted by edapina on Wed, 11/26/2014 - 07:35

This was an easy project to complete in an afternoon that does not require any advance woodworking skills

Estimated Cost
About a $120 bucks considering that I had to buy all the wood and a box of 2 1/2 In screws!
Estimated Time Investment
Afternoon Project (3-6 Hours)
Finish Used
No finish used.
Recommended Skill Level
Beginner

Comments

edapina

Wed, 12/10/2014 - 09:41

This is my second completed project with plans and ideas from your website. Thanks for your good work!

Gabriel Wall System Hanging Organizer

This was a very fun project to build. I pretty much followed the directions that were posted, but I used 1x6's instead of 1x4's because I wanted more storage space on the shelves. I also used 1/2" iron piping instead of 3/4" and am happy with how it turned out. Since the guest bathroom is gray, we didn't want to stain the wood and chose to do an easy to do "weathered" (directions below) look. Now all we need to do is replace the ugly shower curtain!

Estimated Cost
$40 (paint not included).
Estimated Time Investment
Day Project (6-9 Hours)
Finish Used
"Weathered" look – First, paint a gray undercoat of paint and let dry. Secondly, coat the piece with paraffin wax (especially the edges and corners). Next, paint a top coat of white and let dry. Lastly, scrape off the wax (with a razor blade), to your liking, to give it the "weathered" look.
Recommended Skill Level
Beginner

Comments

tgrott

Wed, 03/30/2016 - 06:41

Love the weathered/distressed look you did.  Can you share your technique for the paint job?

tgrott

Wed, 03/30/2016 - 06:42

I;m sorry!! I just noticed that you did share the paint job!  Thanks! :P

tgrott

Wed, 03/30/2016 - 06:43

I;m sorry!! I just noticed that you did share the paint job!  Thanks! :P

stuffed animal problem

Submitted by bhoppy on Sat, 10/03/2015 - 14:36

There were a few of these floating around pinterest so I just looked at a few pictures and kinda winged it.  It is made almost just like Jamie’s except I used additional 2x2’s as you can see in the pics… I needed something to thread the bungee cords through.  I tied them off on the top and bottom.  I ordered a roll of pink bungee cord off of amazon.  This is actually two years old as you can see from how much it has filled up.  I also went back and added additional rows of bungee cord between all the others as stuffed animals were falling out.  Again, I winged it.  Having plans will make this build much easier!!

Built from Plan(s)
Estimated Cost
$50
Estimated Time Investment
Weekend Project (10-20 Hours)
Finish Used
primed with kilz and satin white paint I already had
Recommended Skill Level
Starter Project

Comments

mrsloveless

Mon, 01/18/2016 - 13:19

Where did you purchase the 2x2's and 1x3's? Are they furring strips or pressure treated lumber? Thanks!

Farmhouse Bench

Submitted by pwky on Thu, 10/24/2013 - 15:03

First time building furniture. This turned out much better than I thought. After this I probably could've build the farmhouse table myself instead of paying way too much for my wood dining table. Only if I have found Ana's site sooner. :)

Having a Kreg jig also made the whole process much easier.

Estimated Cost
$40 without the stain
Estimated Time Investment
Day Project (6-9 Hours)
Finish Used
Rustoleum Kona and Minwax pre-stain conditioner and semi-gloss poly
Recommended Skill Level
Beginner

Corner Cabinet

Submitted by Chuck1522 on Mon, 01/13/2014 - 10:32

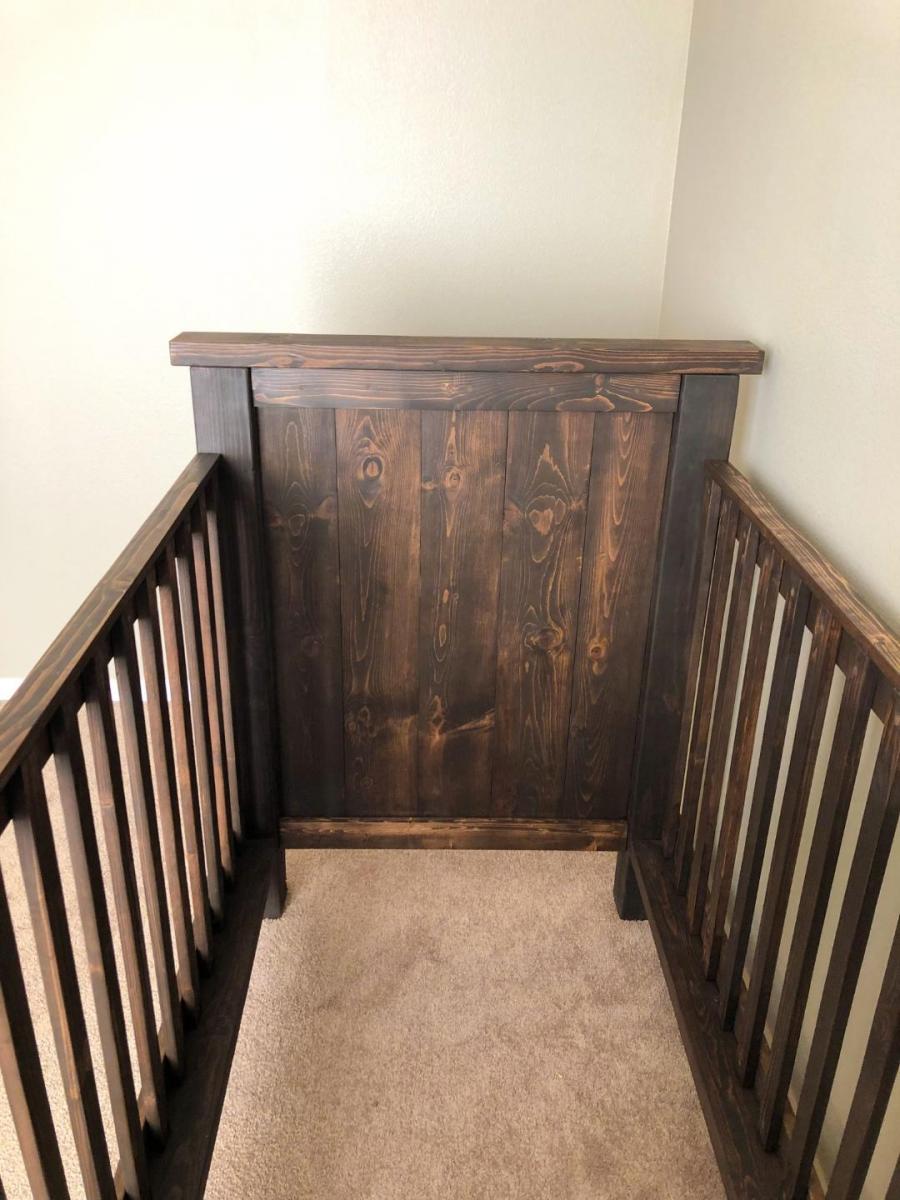
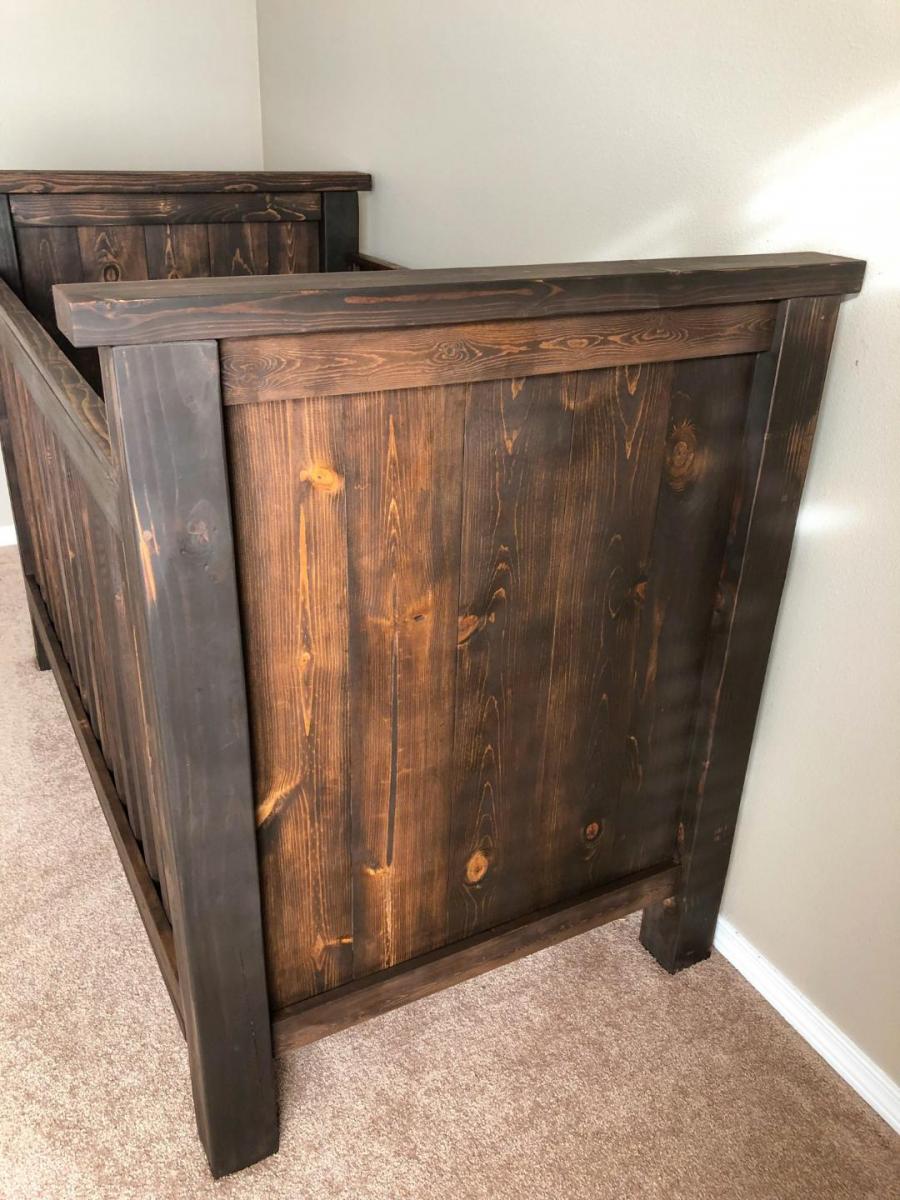
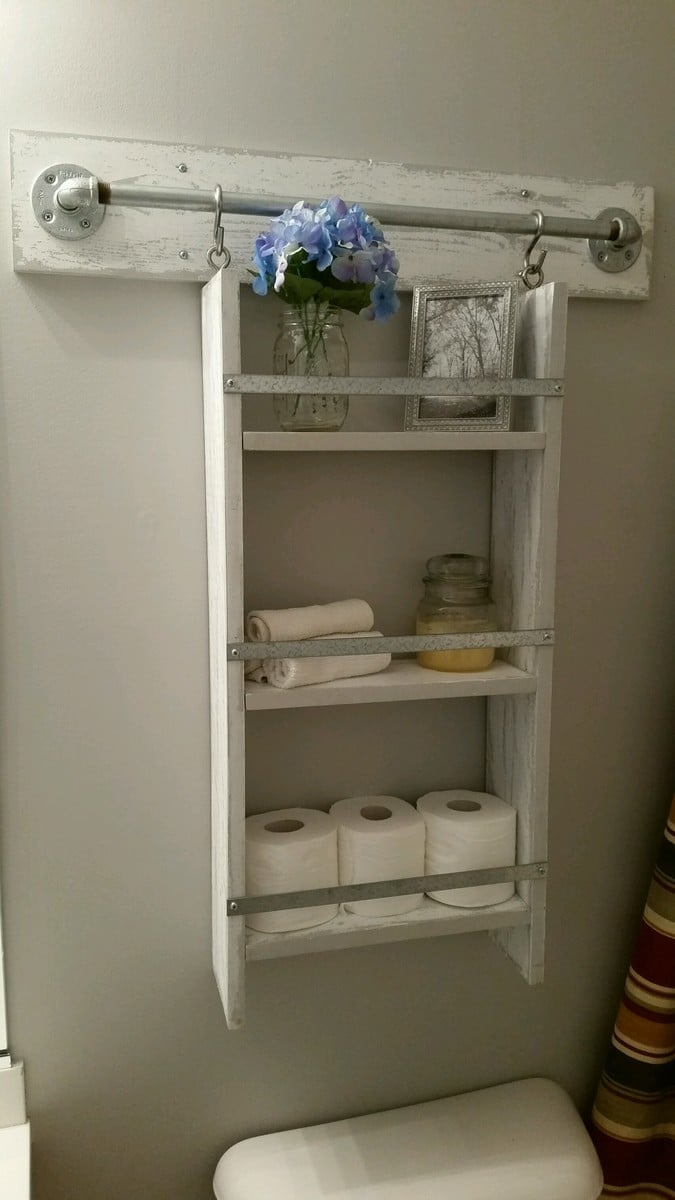
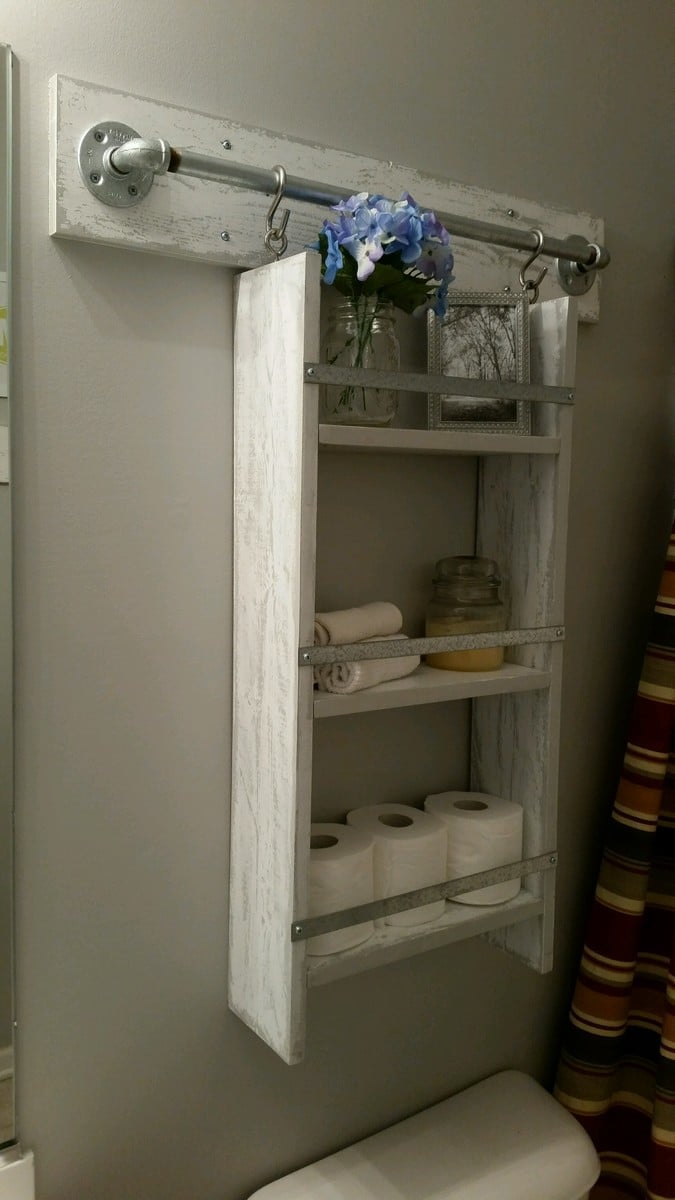
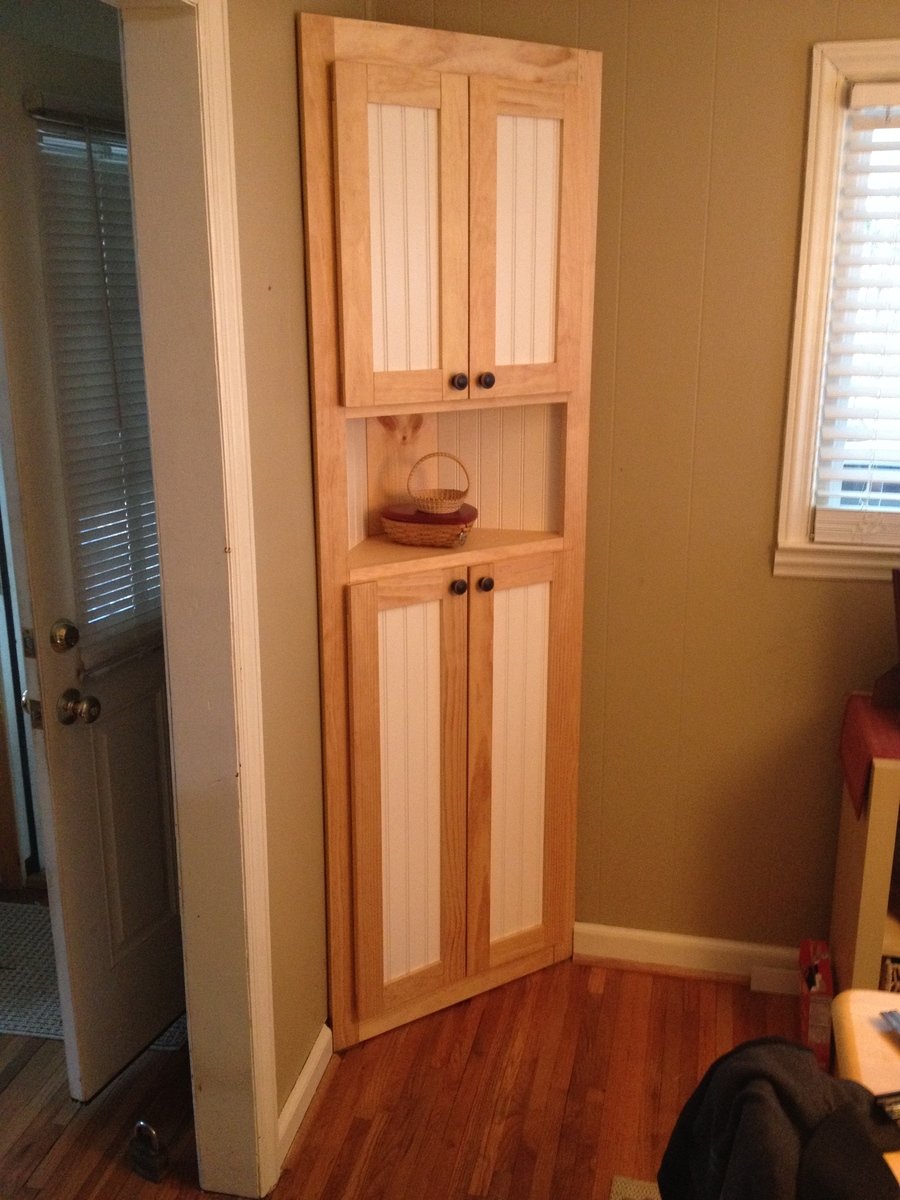
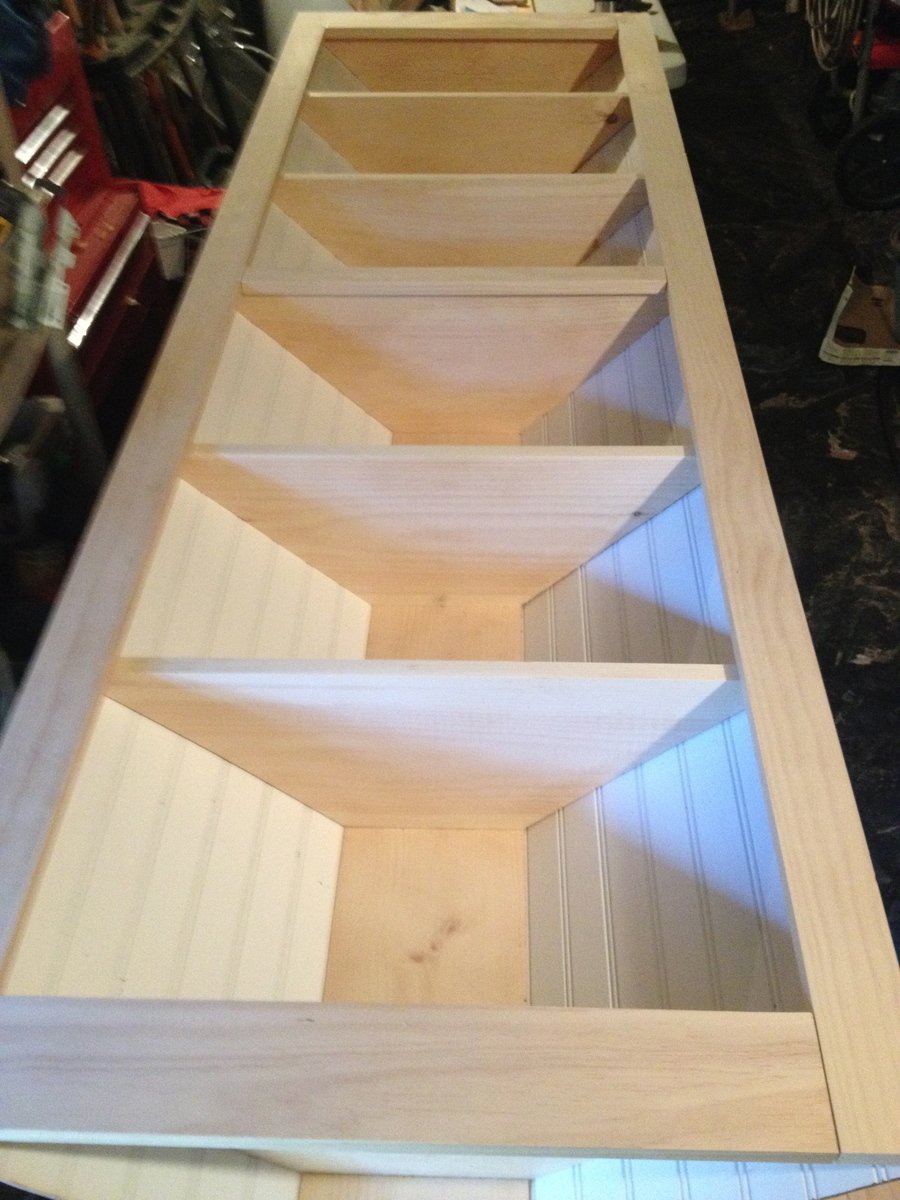
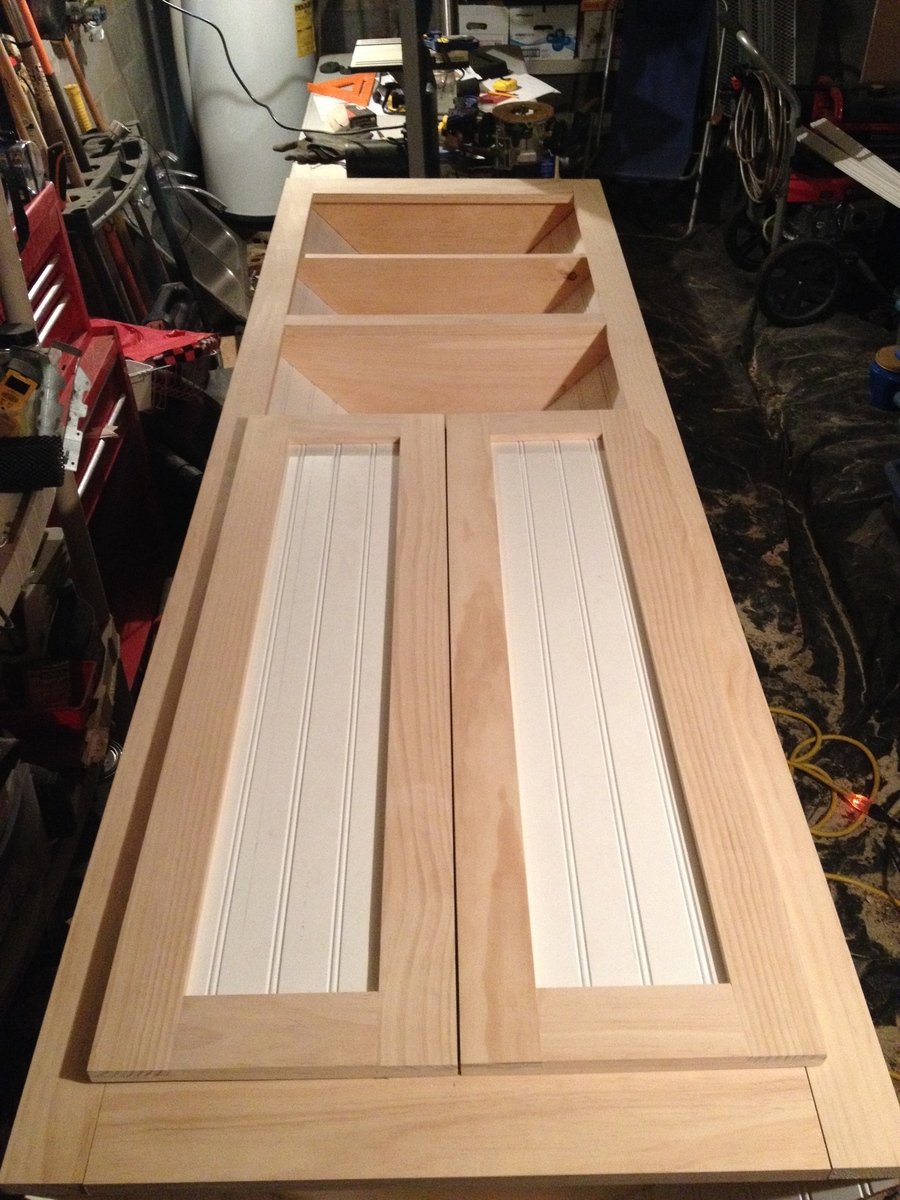
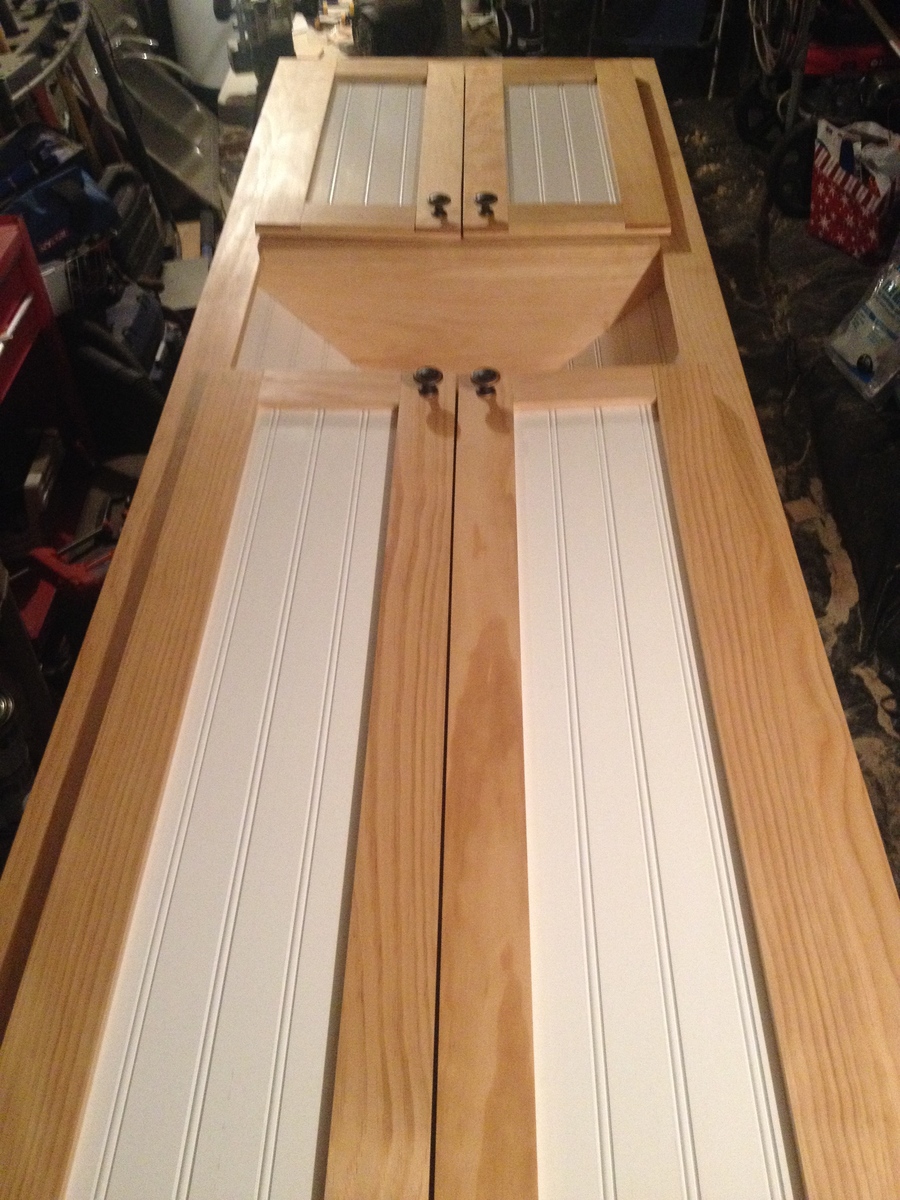
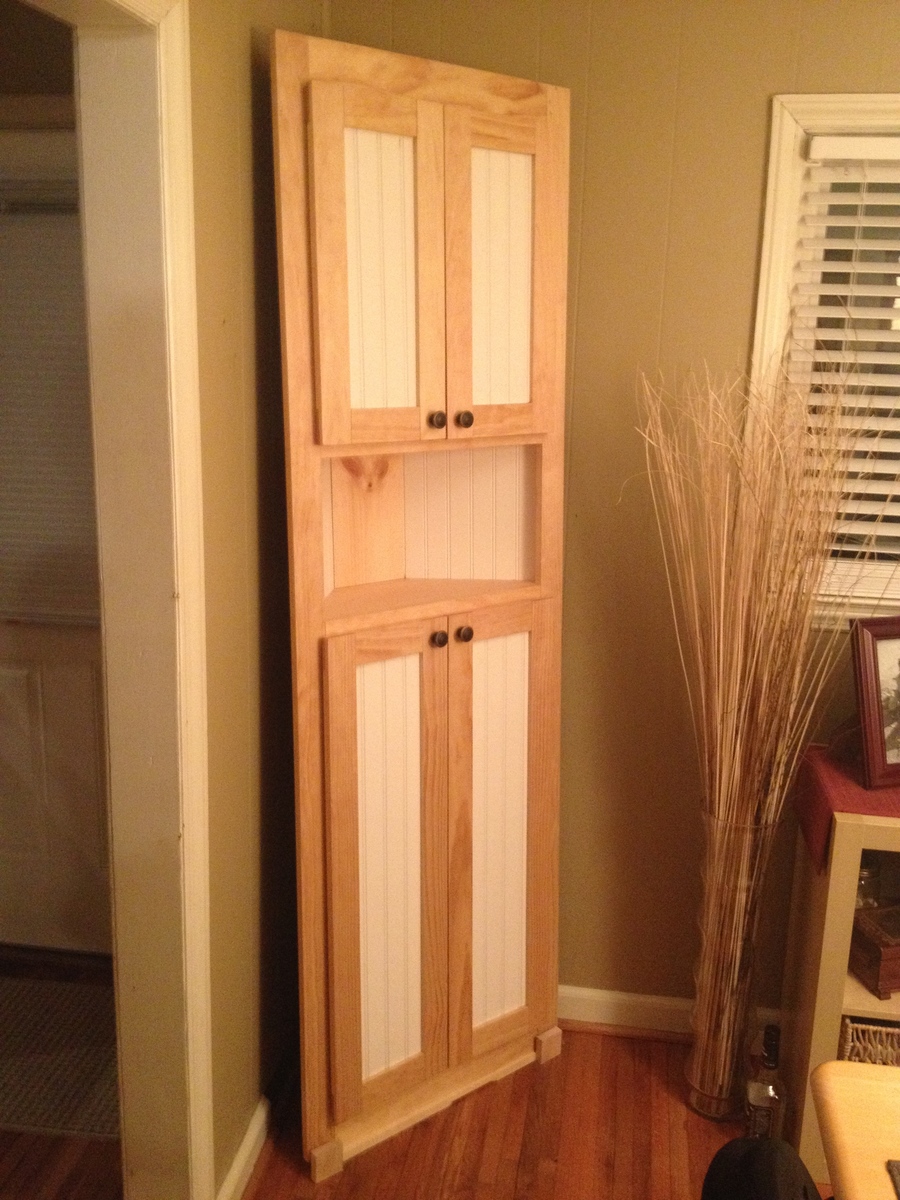
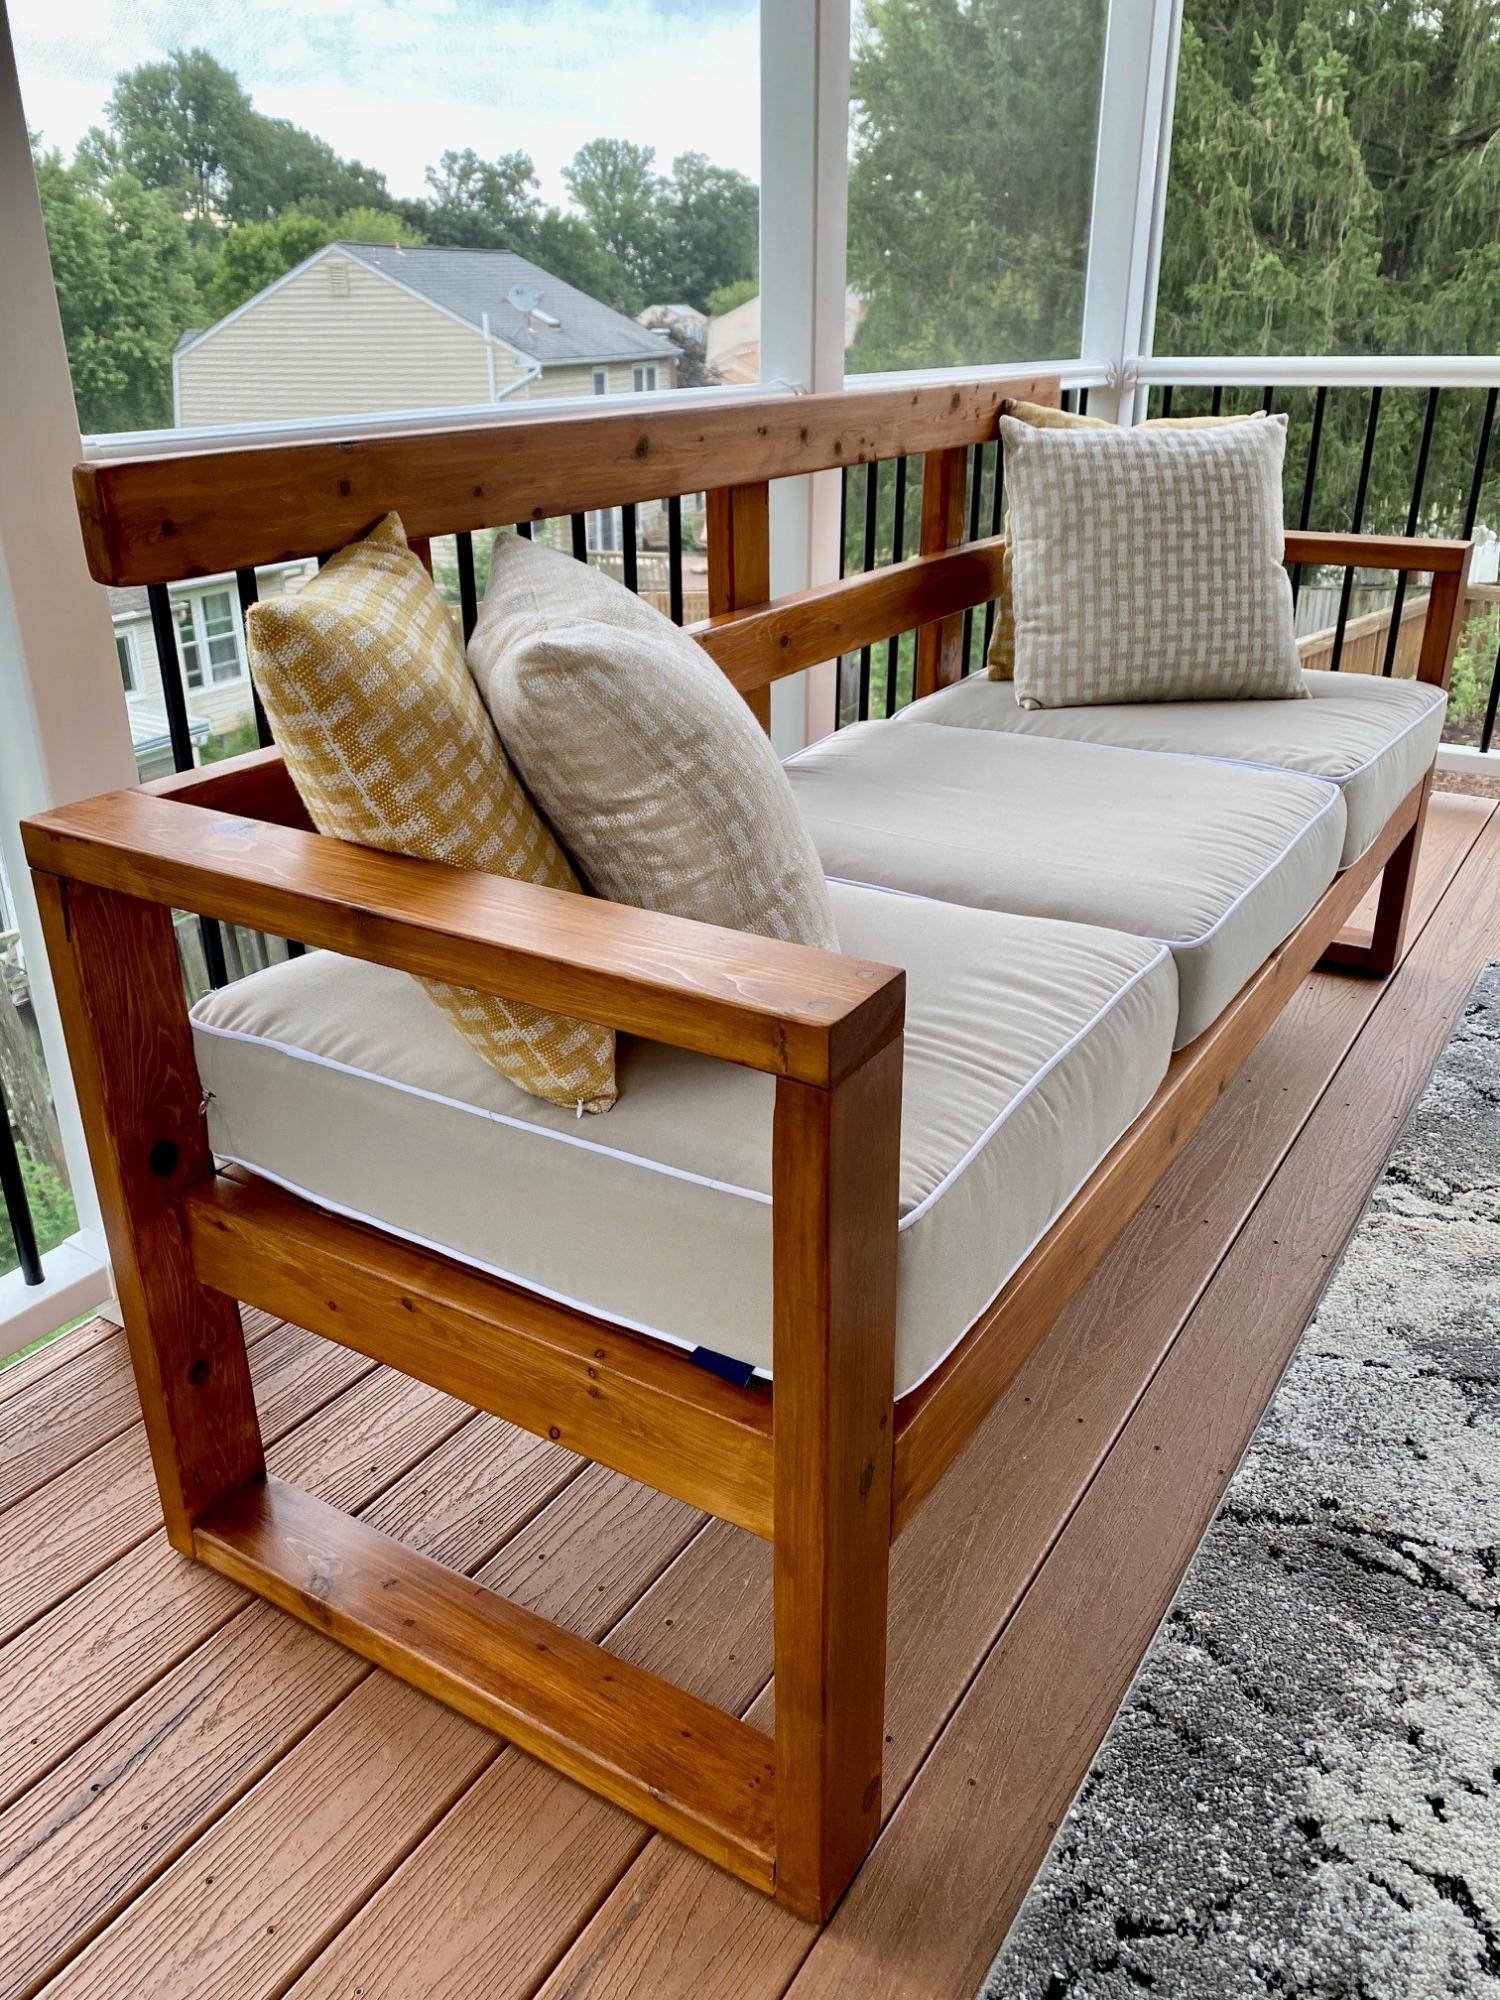
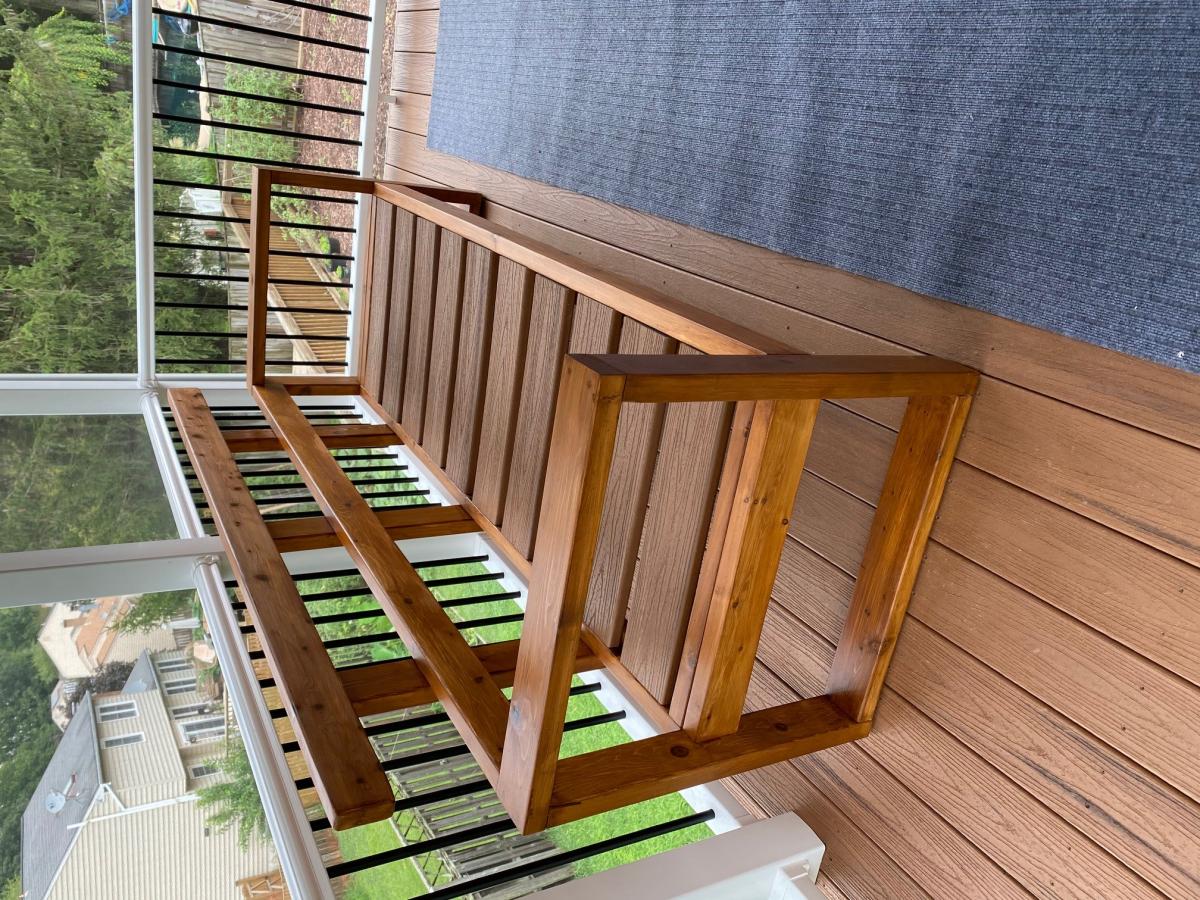
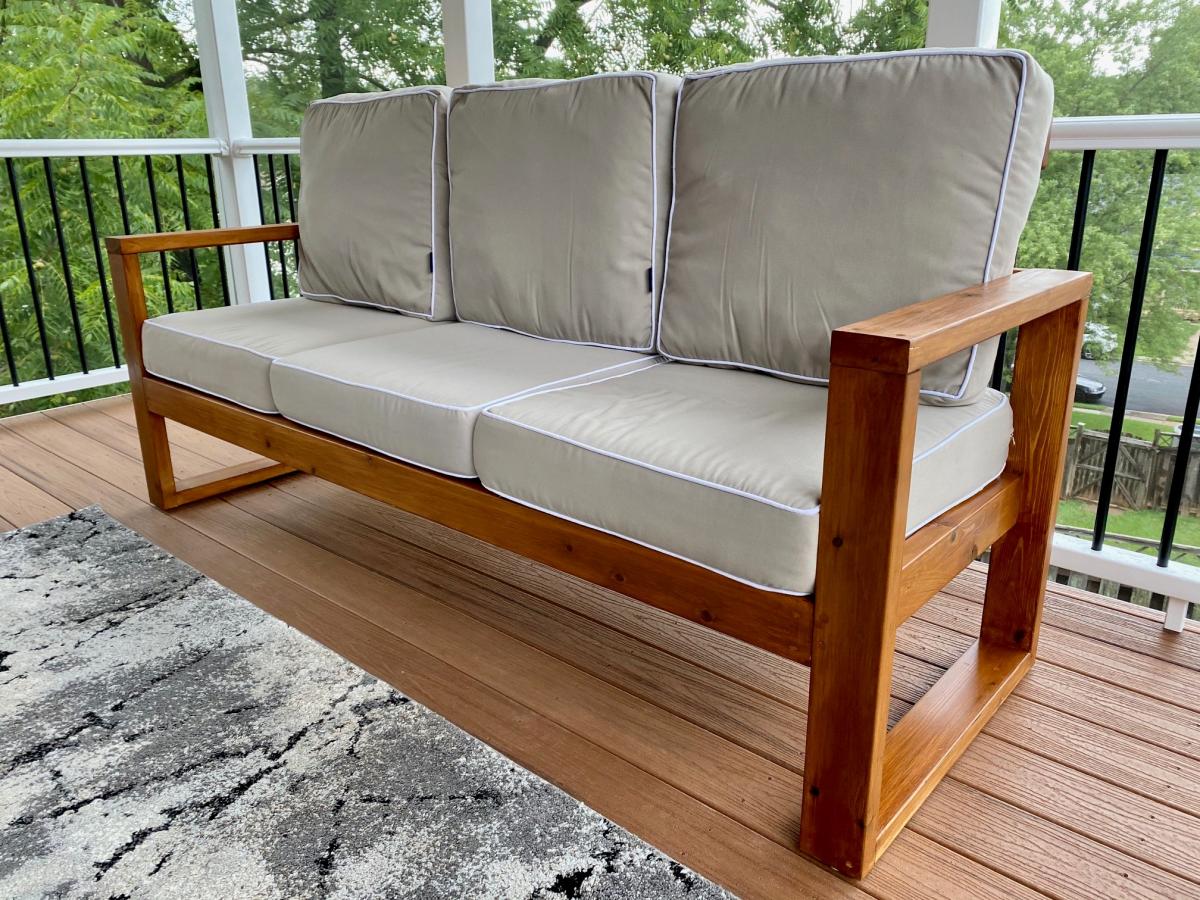
This was a corner cabinet I made. The purpose of this cabinet is to be used as a pantry. My kitchen is quite small, and in turn I was always having to sacrifice cabinet space for pantry items. Total man hours was about 20 give or take the occasional trip to HD or Lowes.

I found this project quite enjoyable. I don't have much of a workshop area so space was tight. I had to constantly move my tools around to make room for the cabinet while I built it.

The plans supplied by this website were simple and straight-forward. I didn't need any specialty tools or have to use any weird joinery. All in all I would give this project an 8 out of 10. There were a couple of areas I feel I can improve on.

After having posted this picture on several social media sites my friends took notice, Now I'm getting all kinds of requests. Not sure if I will entertain any. It's just nice to see a vision come to life.

Thanks for the taking a gander at my work.

Built from Plan(s)
Estimated Time Investment
Weekend Project (10-20 Hours)
Finish Used
Following the instruction on the bottle. I first applied three coats of wipe-on Teak Oil finish (Found at your local HD or big box retailer). Sanding with 220 between each coat. After all those coats were dry, about 72 hours, I applied two coats of wipe-on Polyurethane (again, found at your local HD). Before applying the last coat of wipe-on Poly I lightly rubbed the surface down with 0000 steel wool. This rubbing was done again after the last coat of wipe-on Poly was applied. I really feel this set the piece off and made it that much better. Be advised...I also used a tack cloth to remove any dust and debris between each coat of finish applied.
Recommended Skill Level
Intermediate

Comments

Jake

Mon, 01/13/2014 - 15:50

I also built a corner cabinet from the same plans and yours is by far the best. You obviously have the patience it takes to get the best out of your project. Looking for more from you.

Ill Just Paint It

Tue, 04/08/2014 - 18:33

Thank you so much for your vision! I've been looking for the perfect corner cabinet for at least a year! All the other plans within these plans are ok and would've worked, but I just felt like I wanted something more. I am in love with your doors! They look great! I may make mine a bit larger, but will most definitely add doors the same way you did. Unfortunately, it's not on the top of my priority list, but it will be this summer!!! Great work!

Rachel
www.illjustpaintit.com

balloongal247

Wed, 04/09/2014 - 06:30

This cabinet is beautiful! I love the natural wood look, and I too think the doors looks great.

DIY storage shed with mower ramp and steps

Submitted by lookitsash on Thu, 07/28/2016 - 15:29

I used ideas on your site for inspiration for my current back yard shed.  I did a lot of research before choosing one.  If you've never built a shed before from scratch, it can be a little daunting, especially if its a larger shed.  I also documented my whole process from the laying the foundation to putting the last nail on the shingles.  Here's the link for you to my blog post:

http://www.justmeasuringup.com/blog/the-shed-project-phase-1

It was a lot of fun for me, and a huge wow factor to impress my friends ;)  I store everything in there from my riding mower to all my patio furniture in the wintertime.  It's such a useful thing to have.

I spent around $1500 and it took about 2 months to complete (working on it while having a full time job - otherwise would have finished a lot faster)

Estimated Cost
$1500
Estimated Time Investment
Week Long Project (20 Hours or More)
Finish Used
Used T-11 siding with several coats of exterior primer and paint
Recommended Skill Level
Intermediate

Comments

lookitsash

Sun, 07/31/2016 - 17:44

Thanks!   I looked at a bunch of different door trims online and found this pattern that I liked.  The mitre saw made quick work out of it, and it only took about 10 minutes to cut and install.

Outhouse

Submitted by kraftdan on Sun, 05/31/2020 - 10:54

Added shingles and a 3" vent in the back. Also made it a 2-seater to prolong time between dig-outs and extended the roof overhang. Two inch T&G siding seemed like overkill. I used regular 1x8. Painted it to blend in with the woods.

Built from Plan(s)
Finish Used
Exterior paint
Recommended Skill Level
Intermediate

Garden Bench!!

Submitted by Nathan1342 on Mon, 08/06/2012 - 12:09

I built this for my wife for an anniversary present. She had wanted a garden bench for some time but the ones that she wanted were between $500-$700 which is ridiculous for this type of bench. So, I did a search on here for garden benches but there weren't really any plans for them and the few brag plans were not really the type of bench I was looking for. I printed off a few pictures of benches that I liked and got to work. The front and back legs a 2x6 and a 1x6 glued together and then cut to be straight. I wanted something thicker then just a plain old 2x6. If I had to do this again though, I would have just glued 3 1X6's together. The reason being, is that 1x6's usually do not have a rounded edge and a 2X6 does. So needless to say when you glue them together you have a nice little gap on either side. Without a table saw to take this off, its pretty difficult to get a straight cut. But I ended up getting it right after sweating for a few hours in the garage. The bench stands 36 inches high, 48inches wide and about 18 inches deep. The seat height is right at 18in also.

In the unfinished pictures I actually had the depth being 24 inches. After sitting on it though it was just way to deep. So I pulled it apart, made the adjustments and its now much more comfortable to sit in.

If anyone has any questions or wants more details feel free to drop me a line!

Thanks!

Estimated Cost
85
Estimated Time Investment
Weekend Project (10-20 Hours)
Finish Used
Oil based acrylic paint
Recommended Skill Level
Beginner

Comments

Torwart13

Tue, 06/16/2015 - 11:25

So legs are about 2 1/4" square? Are the seat supports 2x4's? Back cross pieces 2x4? Slats 1x4"?

smz1919

Wed, 06/17/2015 - 12:39

how did you get the curve on the back legs?

In reply to by smz1919

Nathan1342

Fri, 06/19/2015 - 13:34

I glued a 2x6 and a 1x6 together to get the thickness. Now that i have a table saw and a jointer this entire process would have been much easier but after getting it to look like one solid piece i just outlined the slant i wanted and cut it using a jig saw.

smz1919

Fri, 06/19/2015 - 20:17

So the back slats are just glued in place right? I wonder if it would be easier to use a biscuit joiner or not

Mikeyw221

Sun, 10/23/2016 - 17:46

on the back legs how high up did you go before you started cutting the angle? and was it around 15 degrees fromt he edge?

SawdustMaker21

Wed, 05/26/2021 - 08:32

Hi Nathan
Love the look of the bench. Would you have a list of material requirements. I intend to make a bench like this and would like to know the measurements of the top back spar (the shaped one).
Here in the Uk our timber yards do not always supply the same cuts as the US so I need to have some idea of the pieces I need
Many thanks

King classic storage bed

Submitted by Anonymous (not verified) on Tue, 07/07/2020 - 10:08

Built fairly close to original plans. Though we did modify slightly to create a slightly taller bed.

We placed a simple - but sturdy 2x4 frame between the sides. The span seemed a bit wide and we did not want any sagging.

We skipped the optional drawers, instead we will be building lightweight wooden storage crates to fit the storage spaces specifically.

Not a hard project. Though be sure to measure twice before you cut. 🤣

Built from Plan(s)
Estimated Time Investment
Weekend Project (10-20 Hours)
Finish Used
VALSPAR SIGNATURE INTERIOR PAINT & PRIMER in ebony field.
Recommended Skill Level
Intermediate

Benchright Farmhouse Bench

Submitted by Huthbert on Thu, 09/06/2012 - 05:09

Our first Ana white project! My husband and I are both really excited with the results. We plan on making the table too. I followed the plan and added comments/details/changes we made on my blog http://thehuth.blogspot.com/2012/09/diy-pottery-barn-bench.html I added pictures to follow along the steps from the tutorial.

Estimated Time Investment
Weekend Project (10-20 Hours)
Finish Used
2 coats- Minwax Oil-Based Dark Walnut Wood Stain
2 coats- Minwax Polyurethane
Recommended Skill Level
Beginner