Community Brag Posts
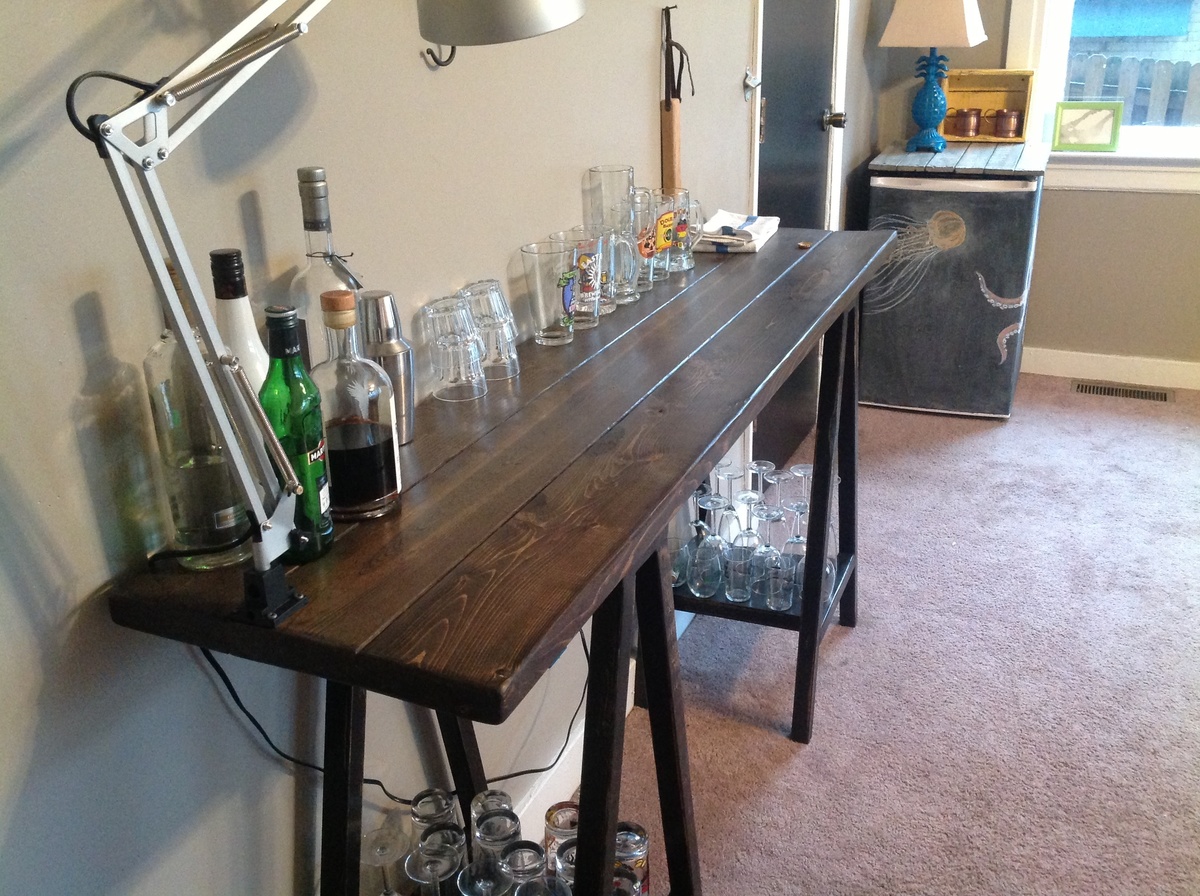
Simple Sawhorse table 36" height
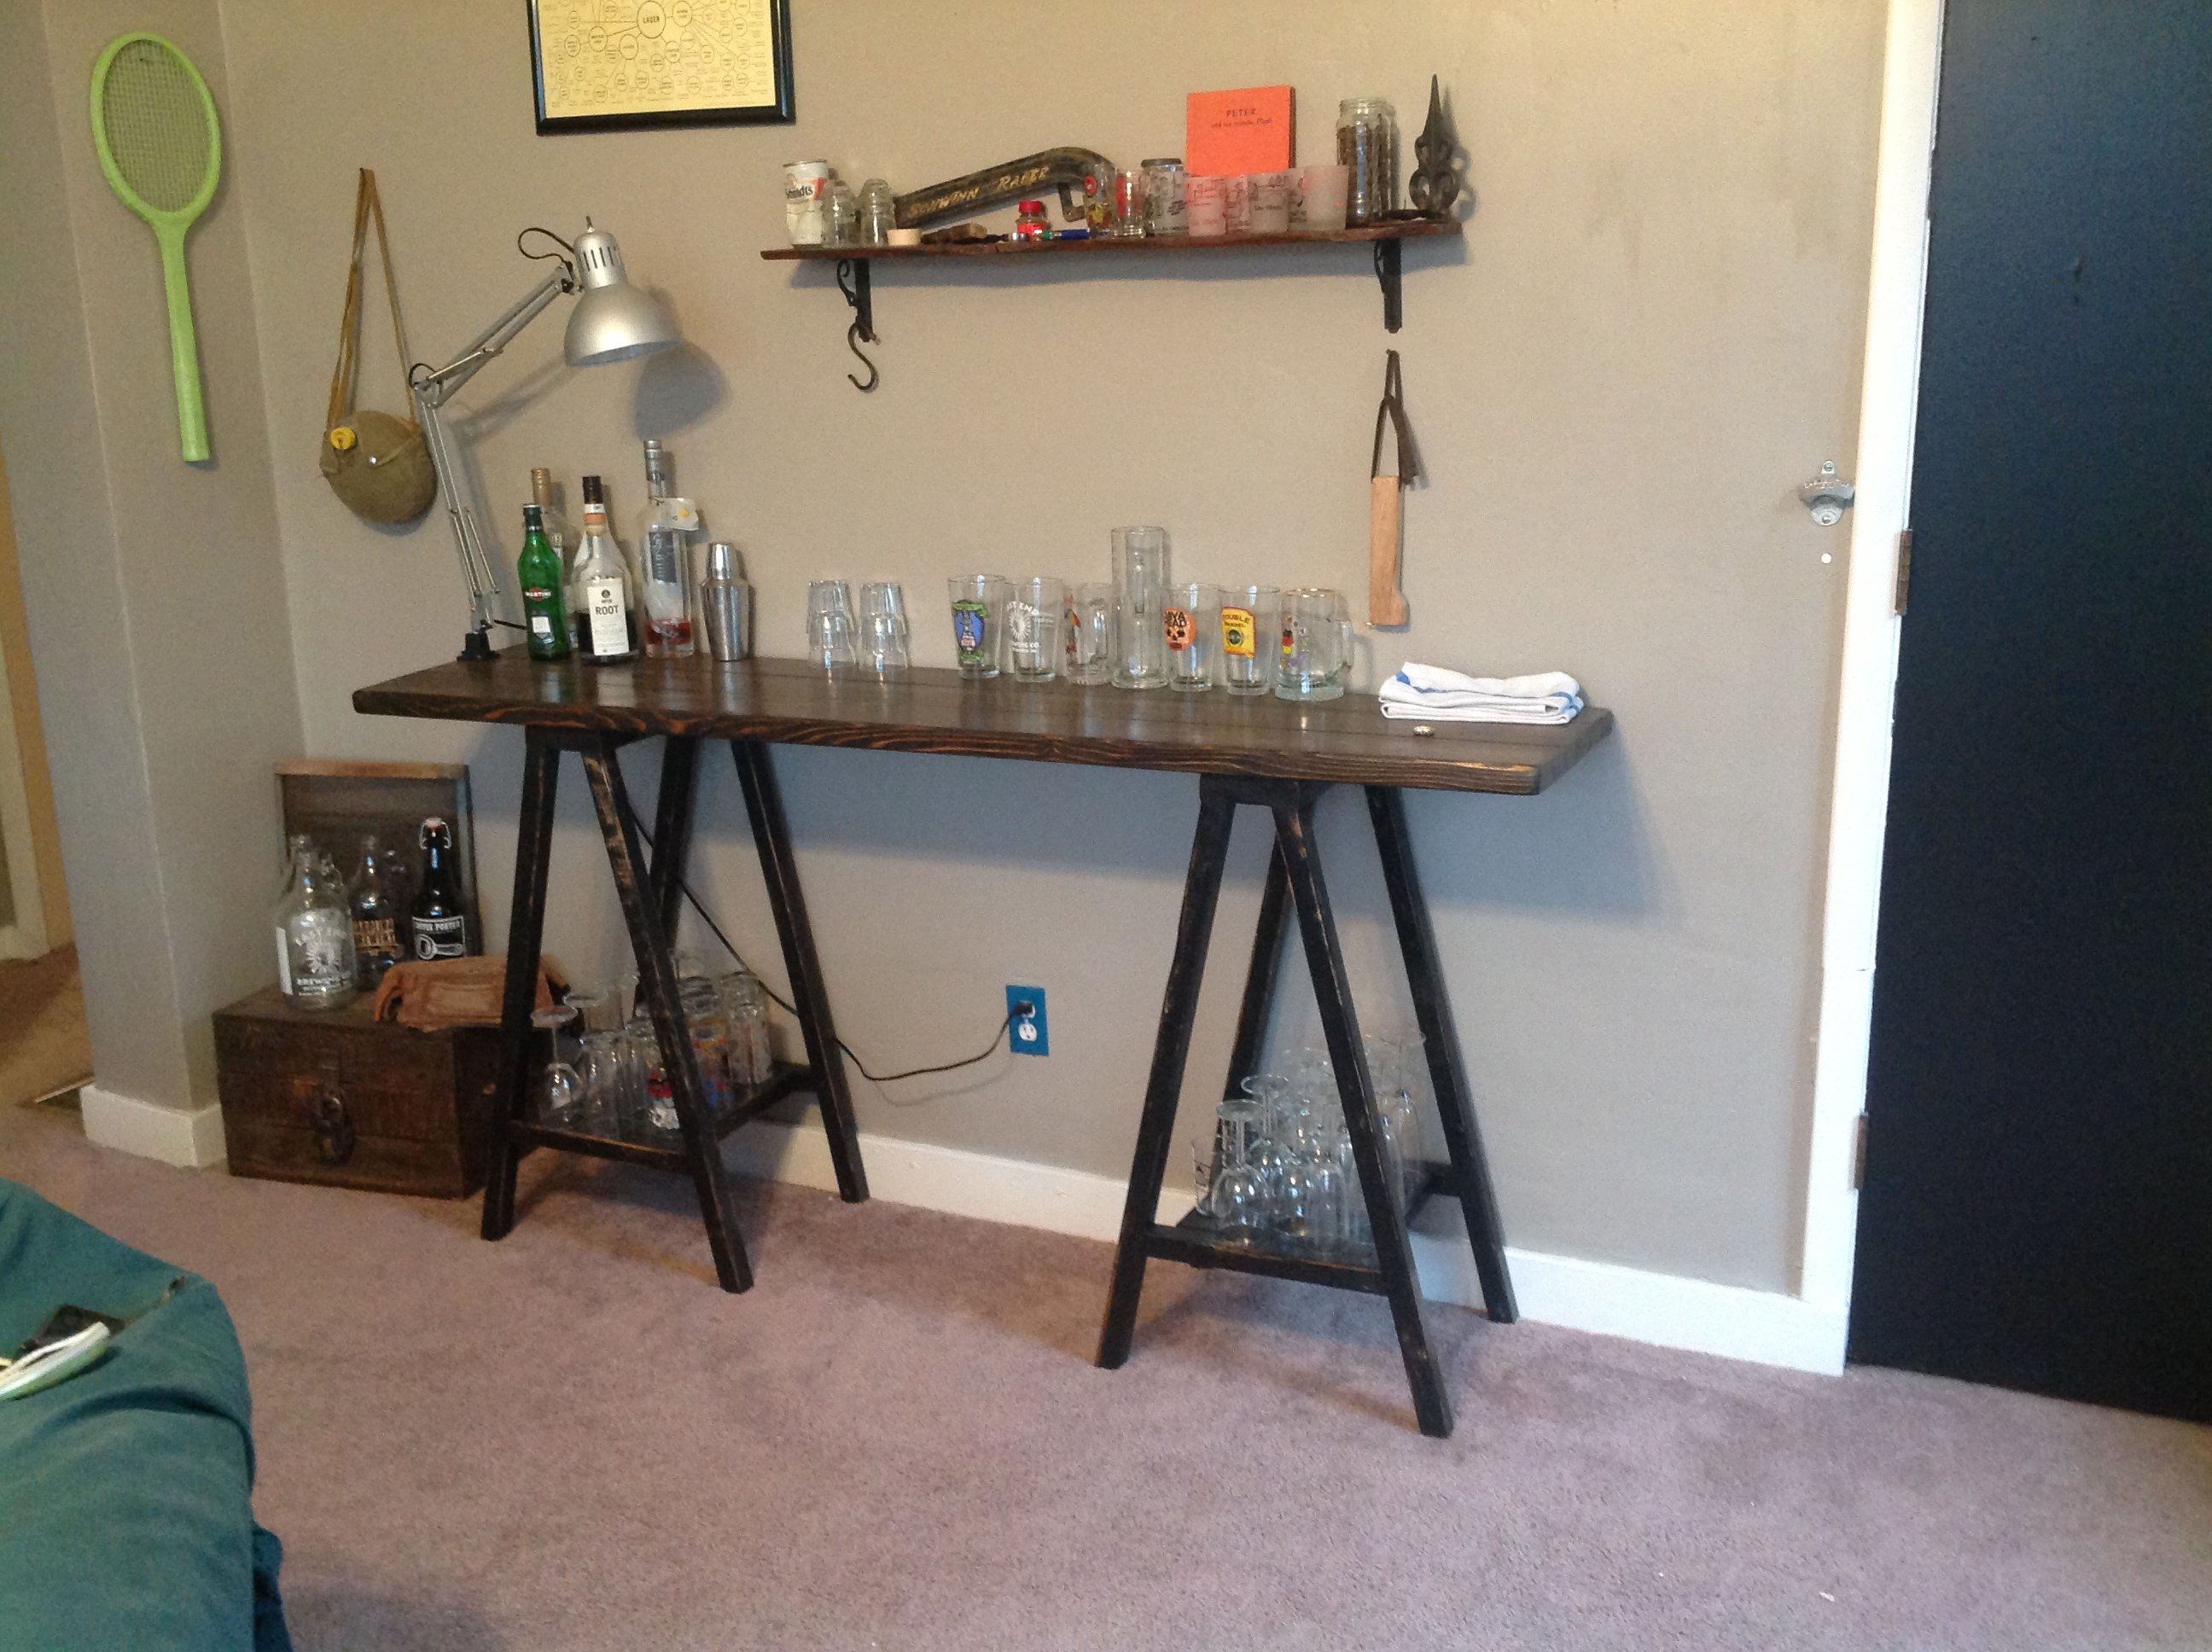
Like many others have mentioned, I wanted a 36" high table so I could use it as a bar. Ana mentioned that it would be too wide at 15 degrees so perhaps 10, after busting out some trigonometry I found that 10 degrees would give you about a 16" base and 15 would give you a 24" base. So, 12.5 degrees it came to be if you want a 20" base.
Many have said it takes 4 2x2's, that definitely holds true with this modification.
Here are my measurements, otherwise the cuts and assembly are the same as the original:
All angles are now 12.5 degrees rather than 15.
The legs are 33 3/4" from end to end
The outside edges of the legs should come to 20 1/4" wide for the base.
The stretcher will stay the same 13 3/4" on the bottom length, just cut at 12.5 degrees.
The stretcher is now 7 3/8" up from the ground, I found it was easiest to measure 7 1/2" up along the inside of the legs and line the bottom of the stretcher up at this mark.
And that's it!
A tip I used was clamping 4 2x2's together to get all the legs even, this only works if you have a sliding compound miter saw. I also recommend doing the straight cuts first and then leave the saw set at 12 1/2 degrees until you finish the project, this will keep cuts consistent.
Other modifications I made were to shorten the depth to 16 1/2" and use 2x6's for the top, I needed a narrow table in the room. I also made the depth of the sawhorses only 15 inches so the top would have a 3/4" overhang in front and back, I think this cleaned up the look some.
Built from Plan(s)
Estimated Cost
Less than $50 for wood, paint, stain and screws
Estimated Time Investment
Day Project (6-9 Hours)
Finish Used
Minwax Jacobean oil based stain for the top. The sawhorses are painted black, sanded and then rubbed with Minwax Jacobean.Minwax finishing paste for the whole thing.
Recommended Skill Level
Beginner
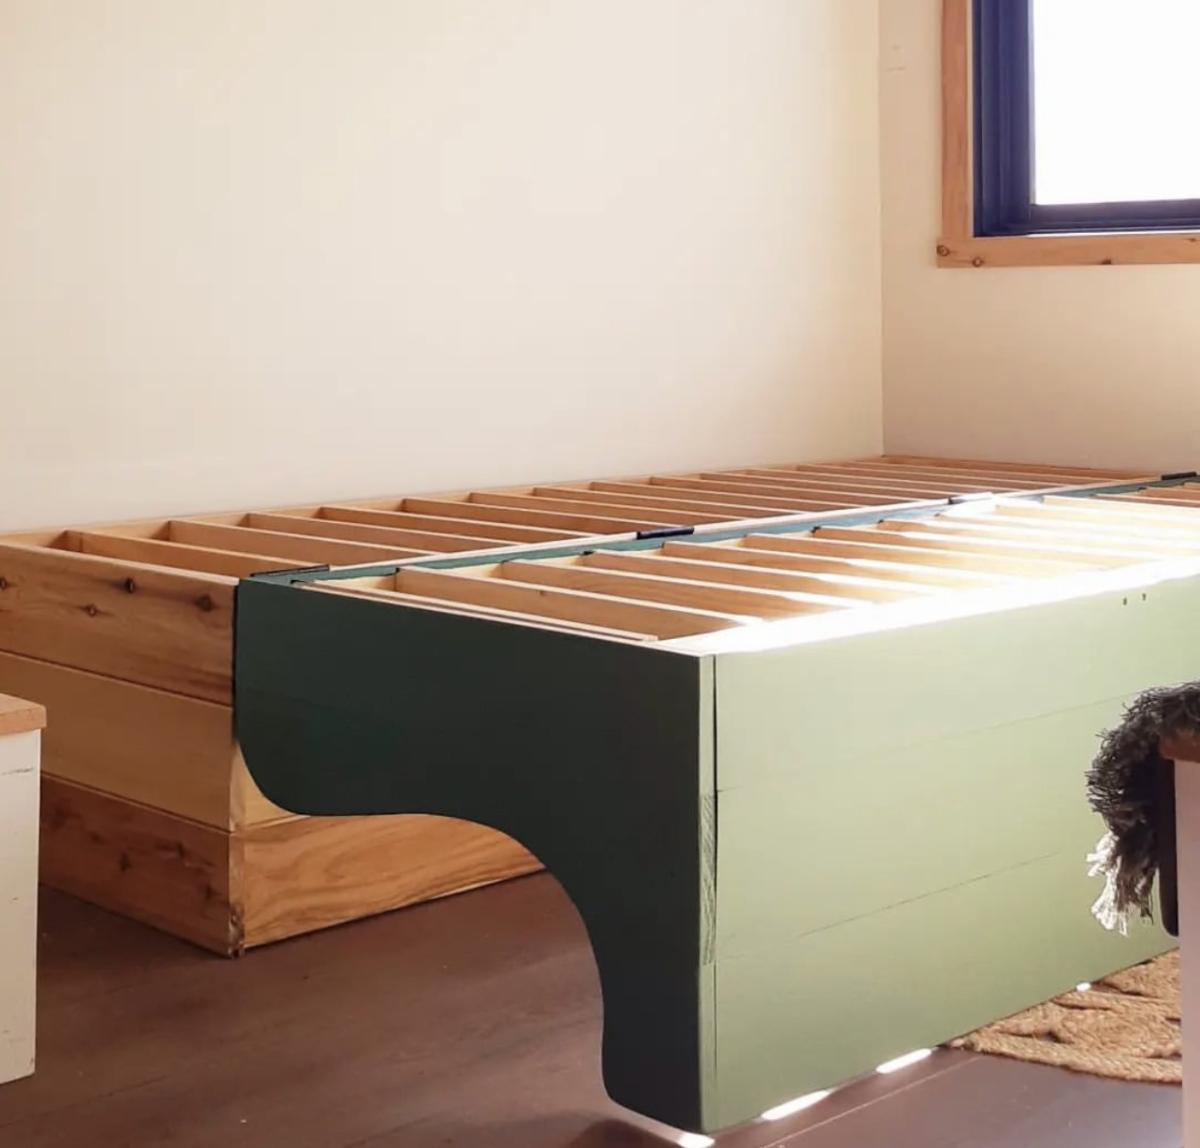
Tiny House Flip Sofa Bed - by Deirdre

Modified from our twin sleeper chair plan, this amazing hinged sofa bed was built and shared by #tinybuilderau
Built from Plan(s)
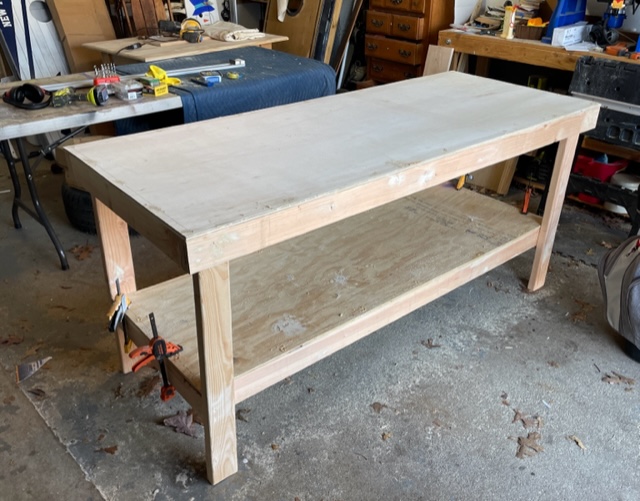
Guitar Workbench
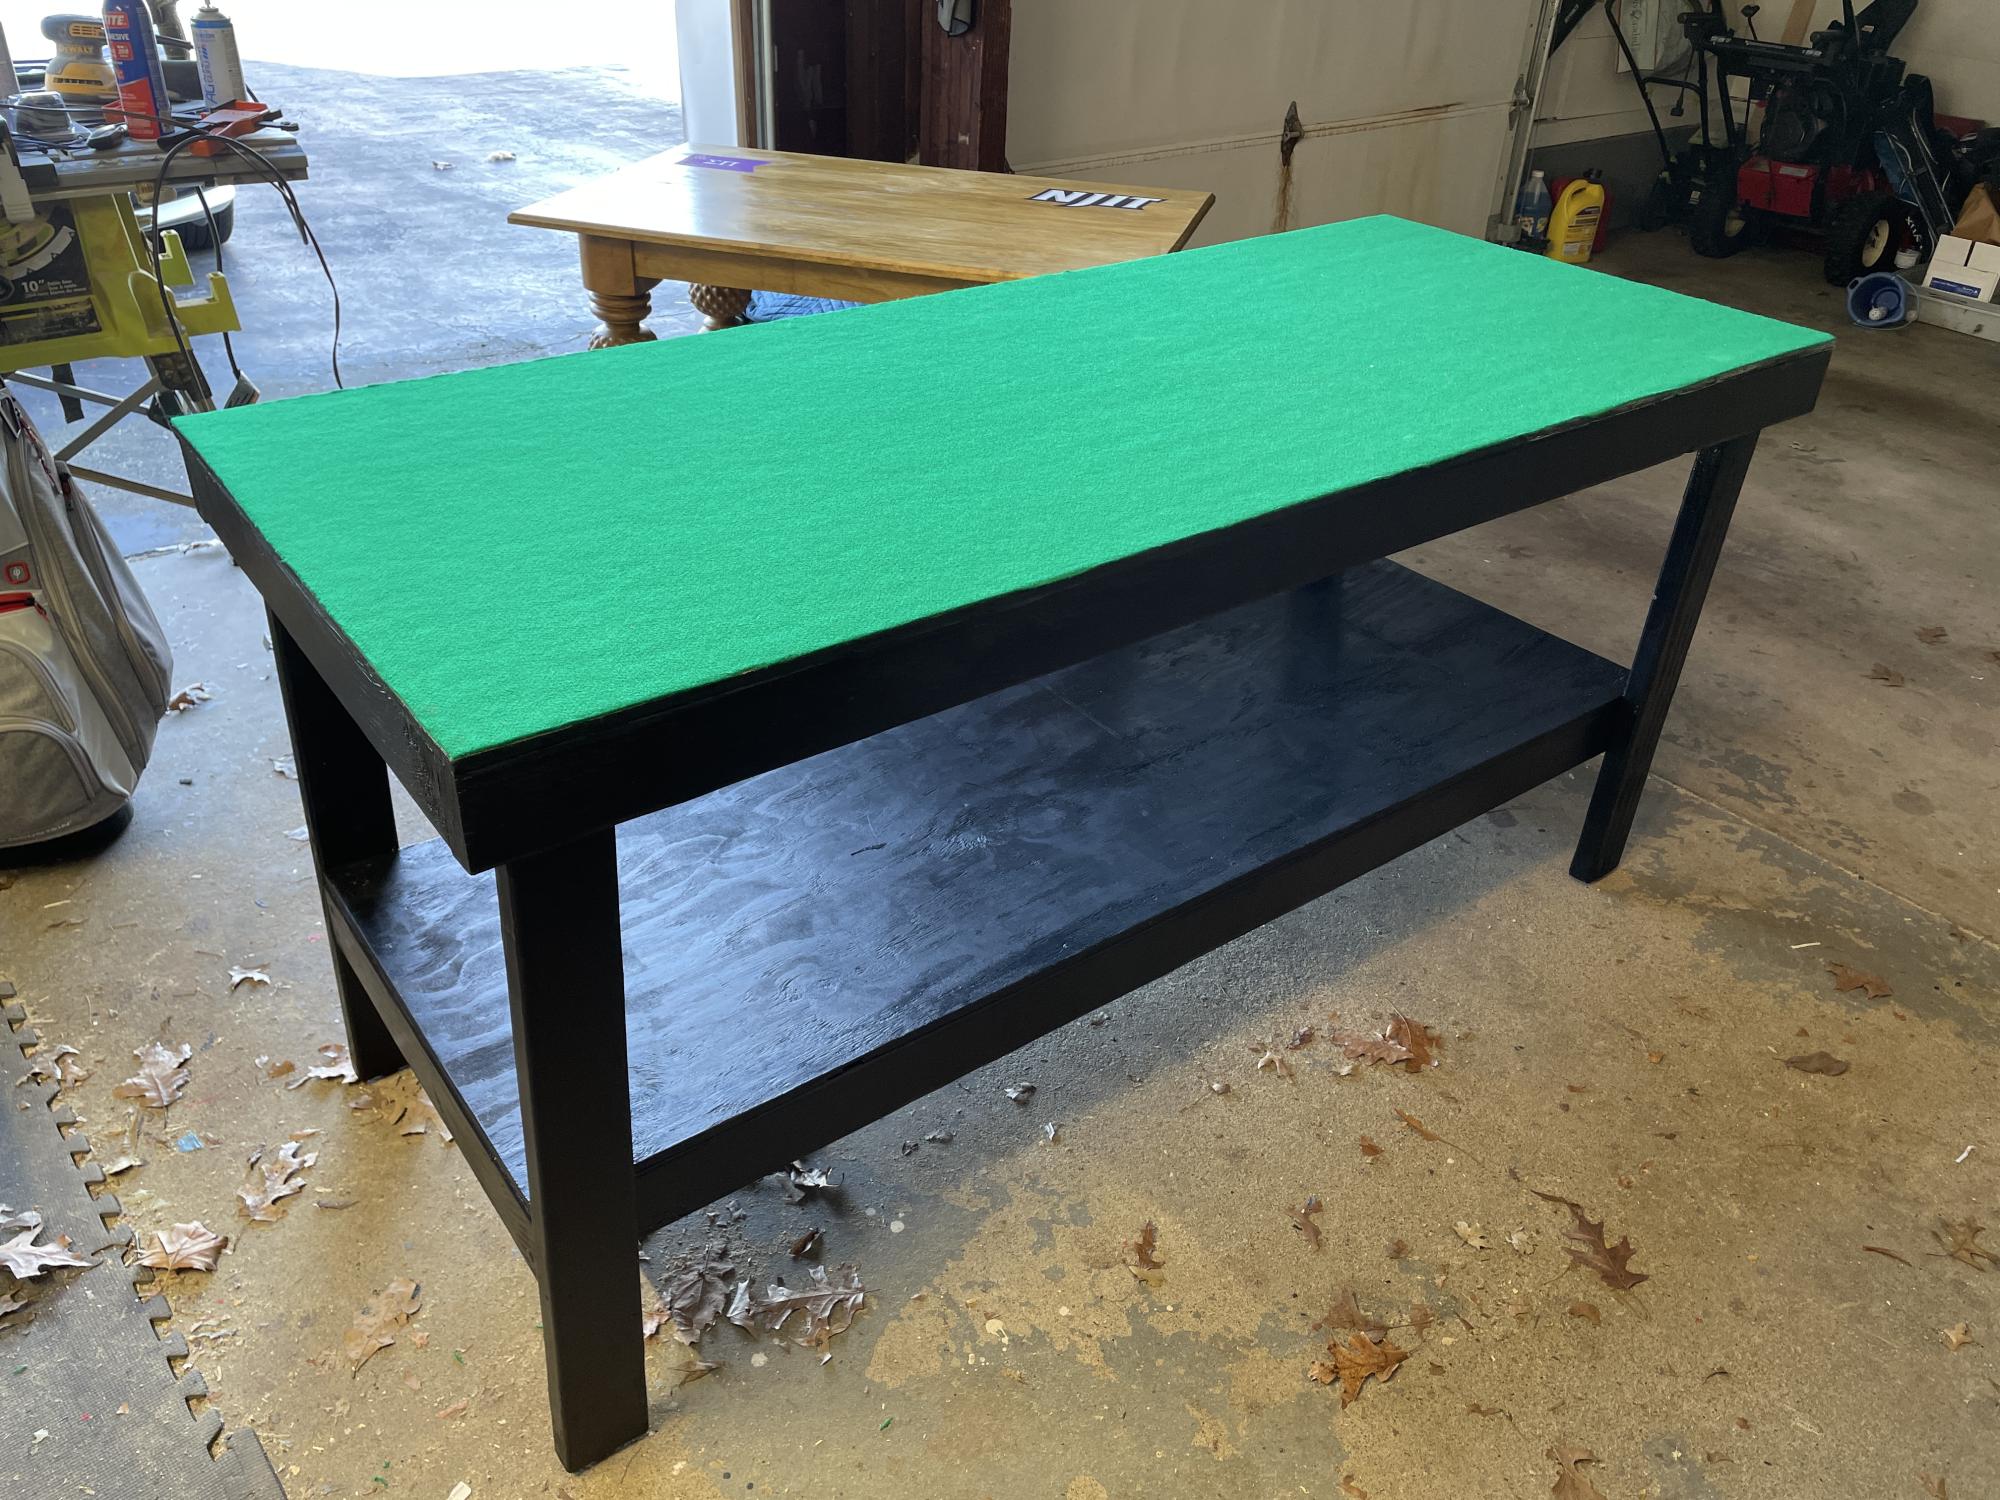
I built this 6' workbench for your garage or workshop but converted it to a guitar workbench for a local music store. I added a felt fabric top so his technician could repair guitars without scratching or damaging his instruments. Painted it black to give it some flair. Check out my other work at www.customwoodcreations48.com
Built from Plan(s)
Comments
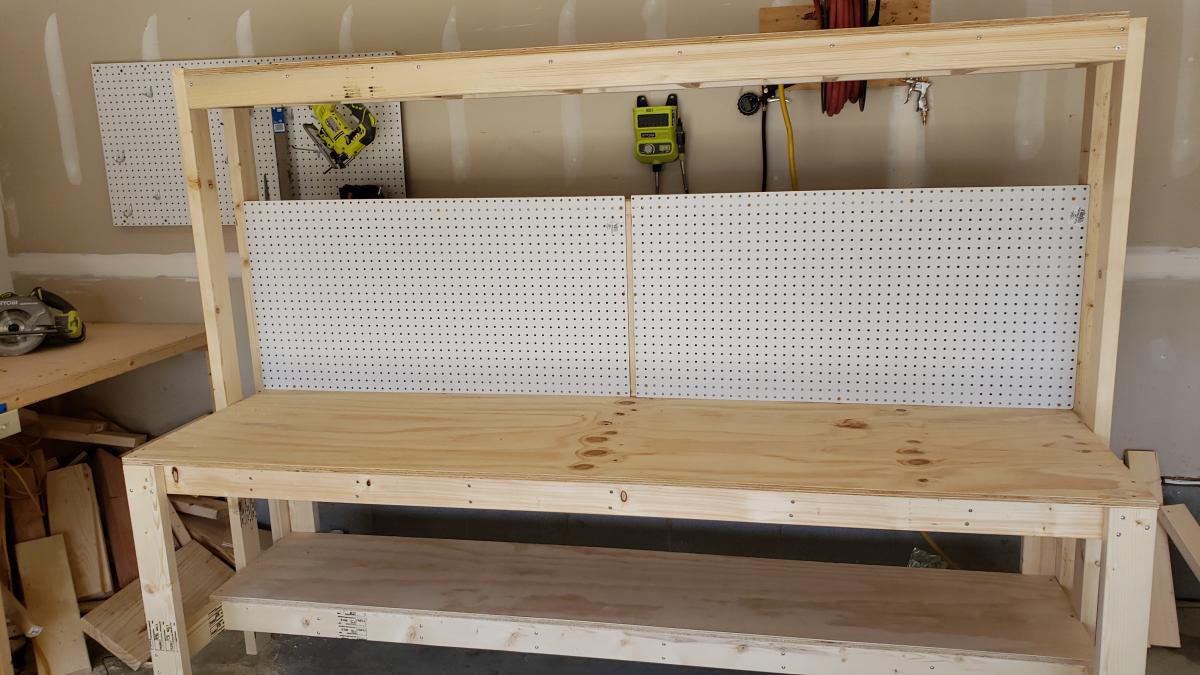
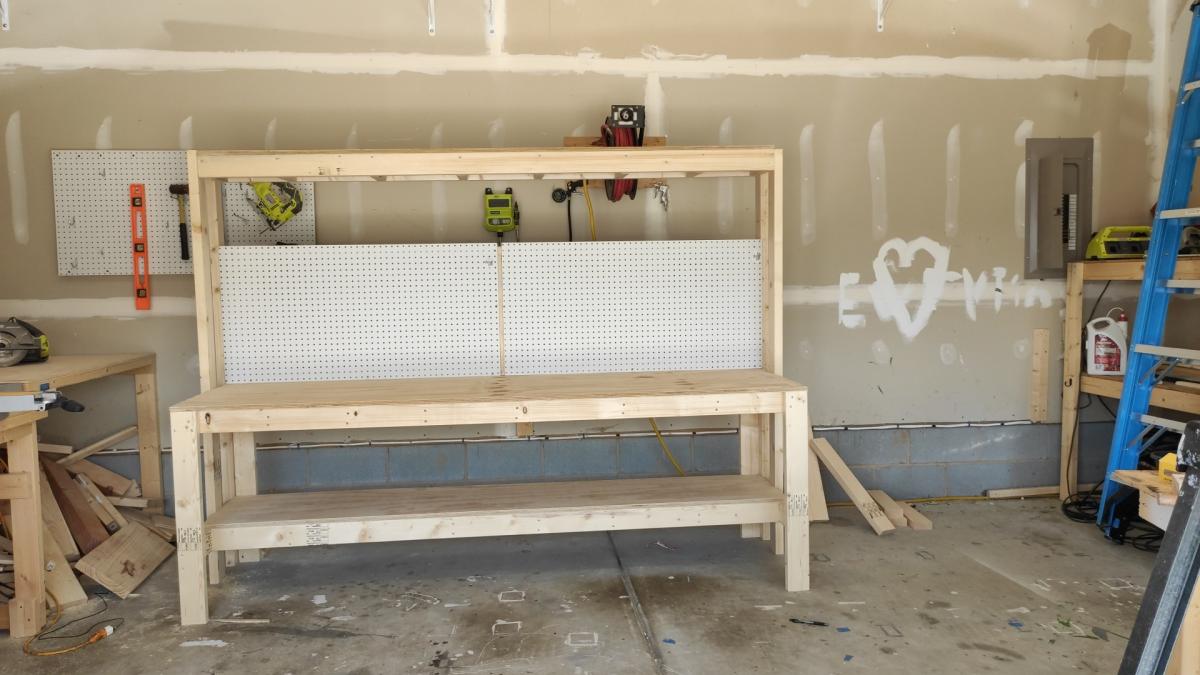
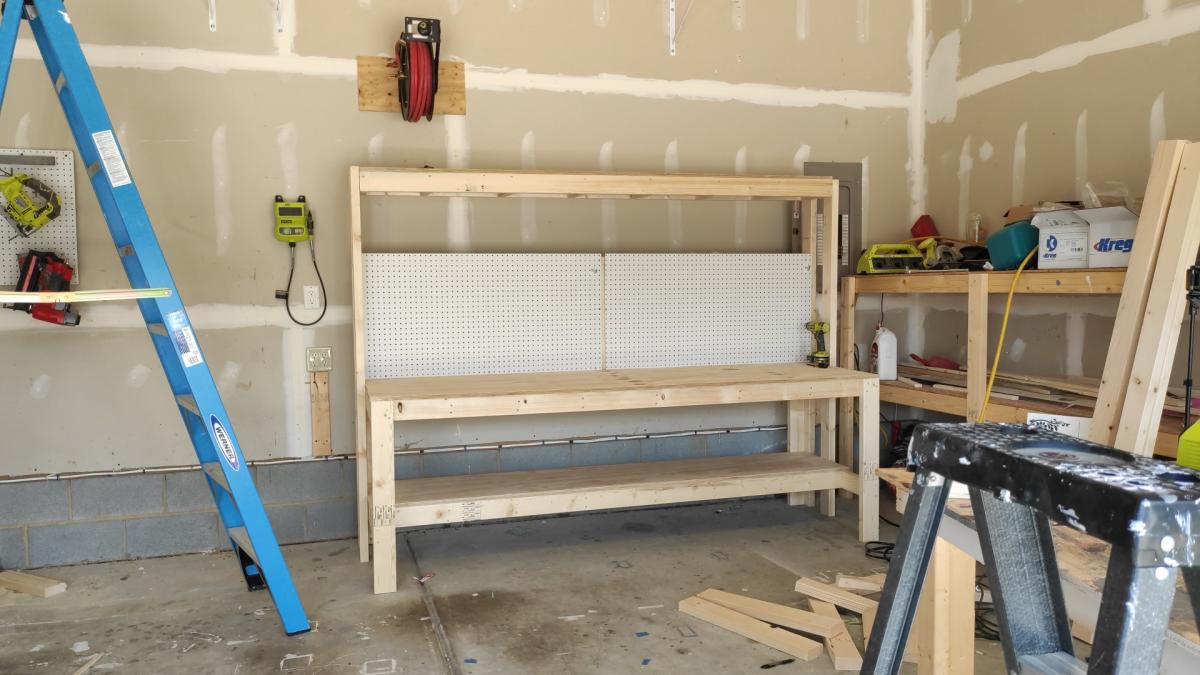
Workbench with pegboard
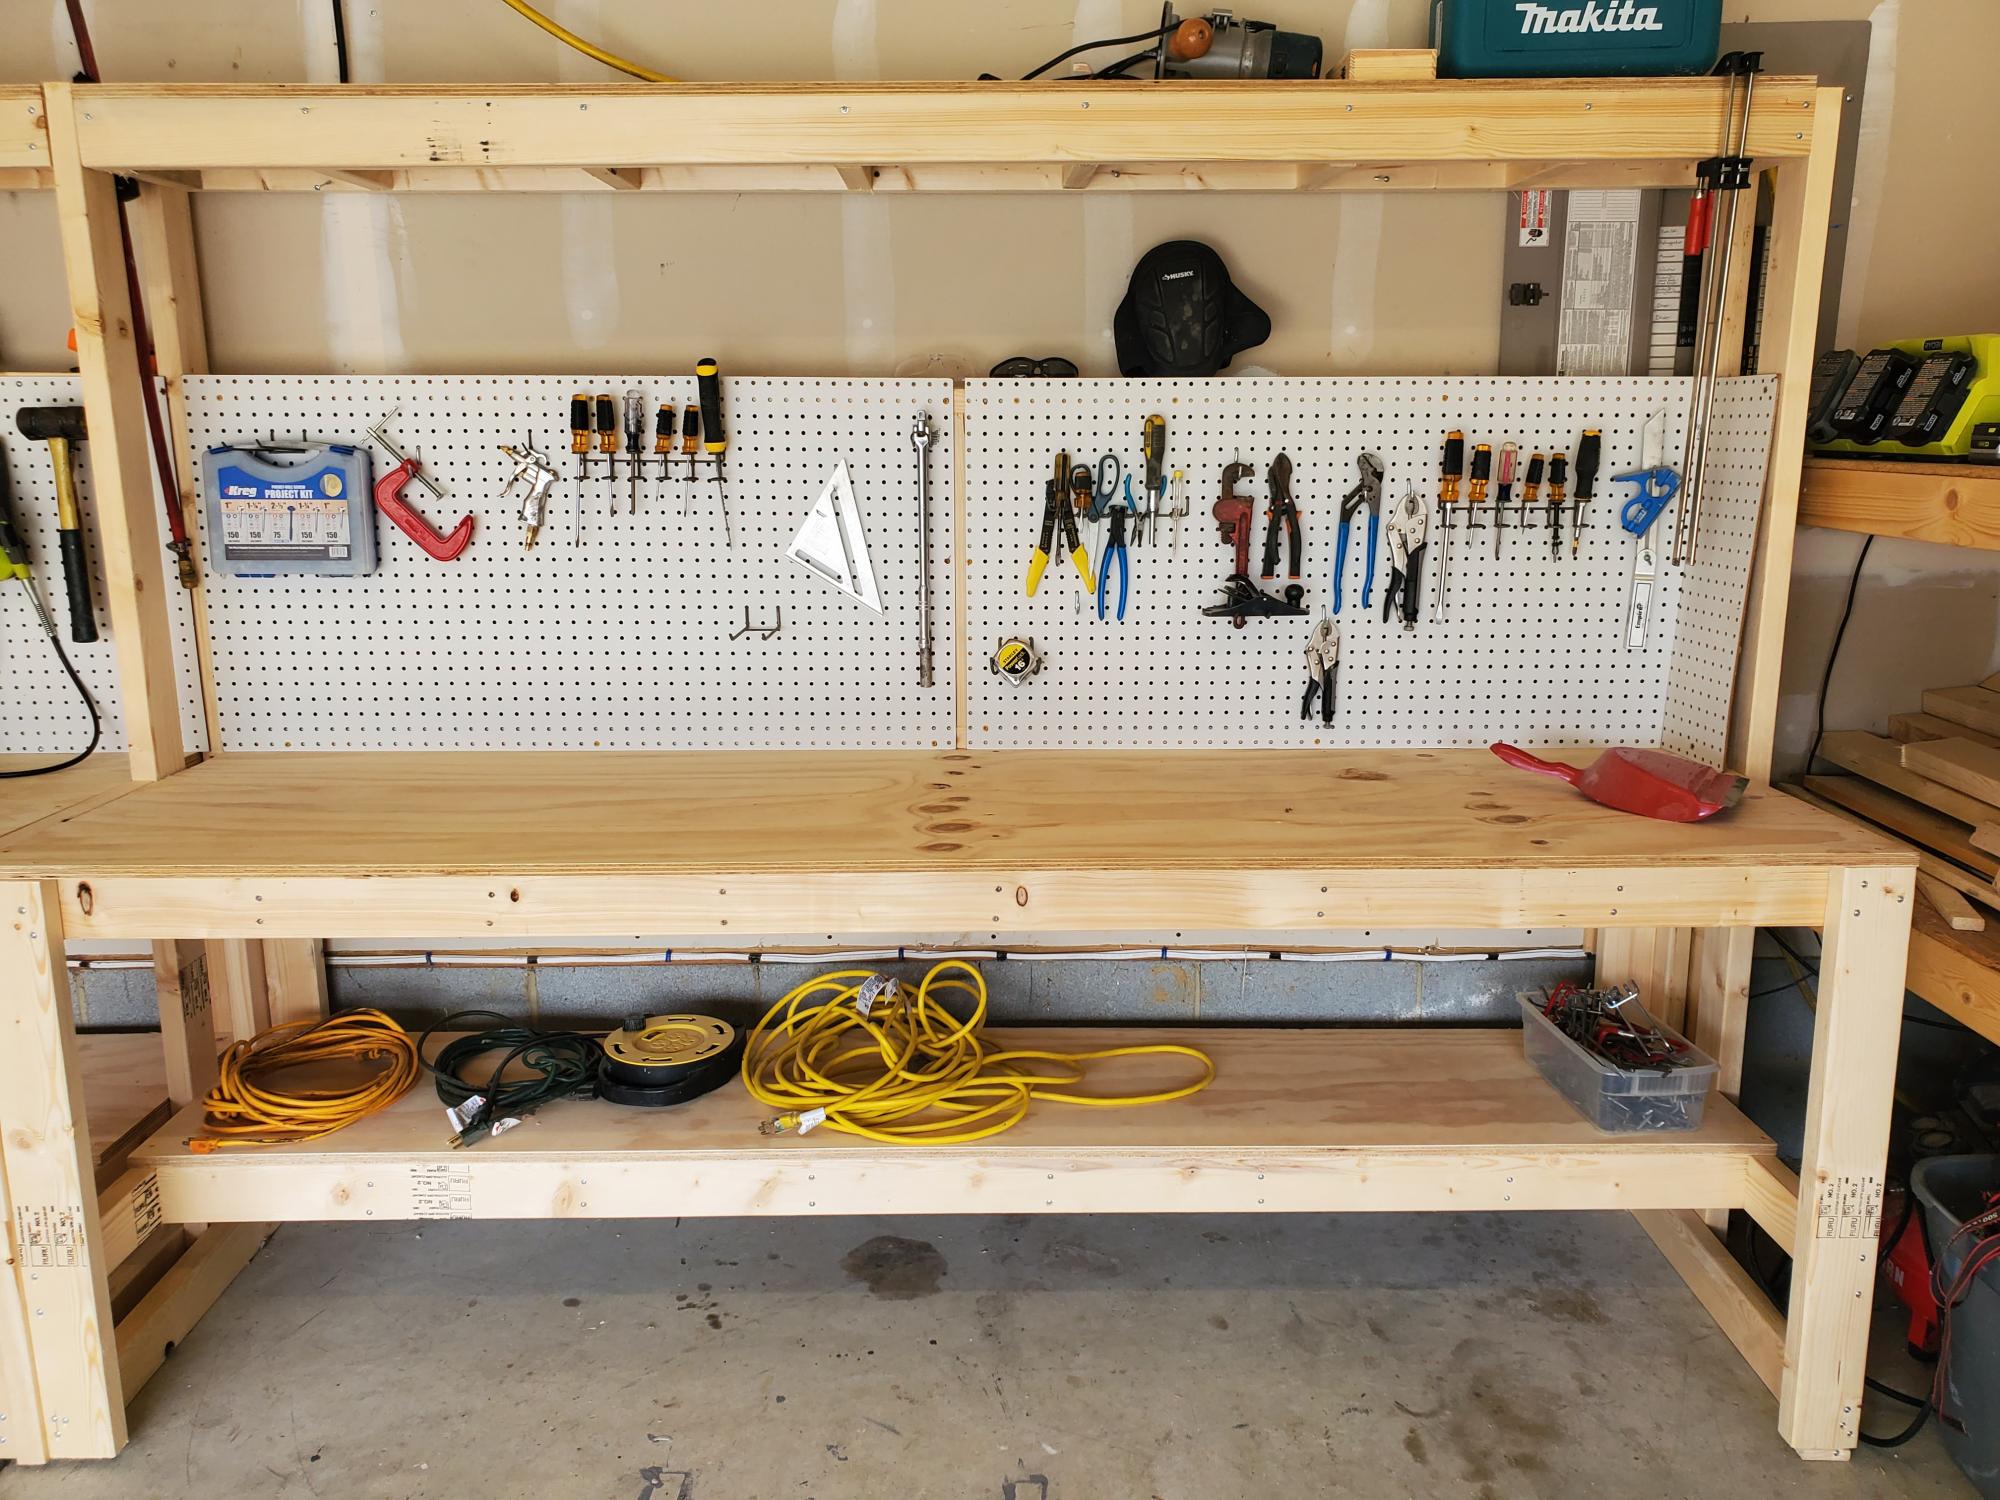
I made a workbench for my garage it was pretty easy. I also made an instructional youtube video if you want to learn how to make it. #diy #workbench #bench
Estimated Cost
125
Estimated Time Investment
Afternoon Project (3-6 Hours)
Finish Used
none
Recommended Skill Level
Beginner
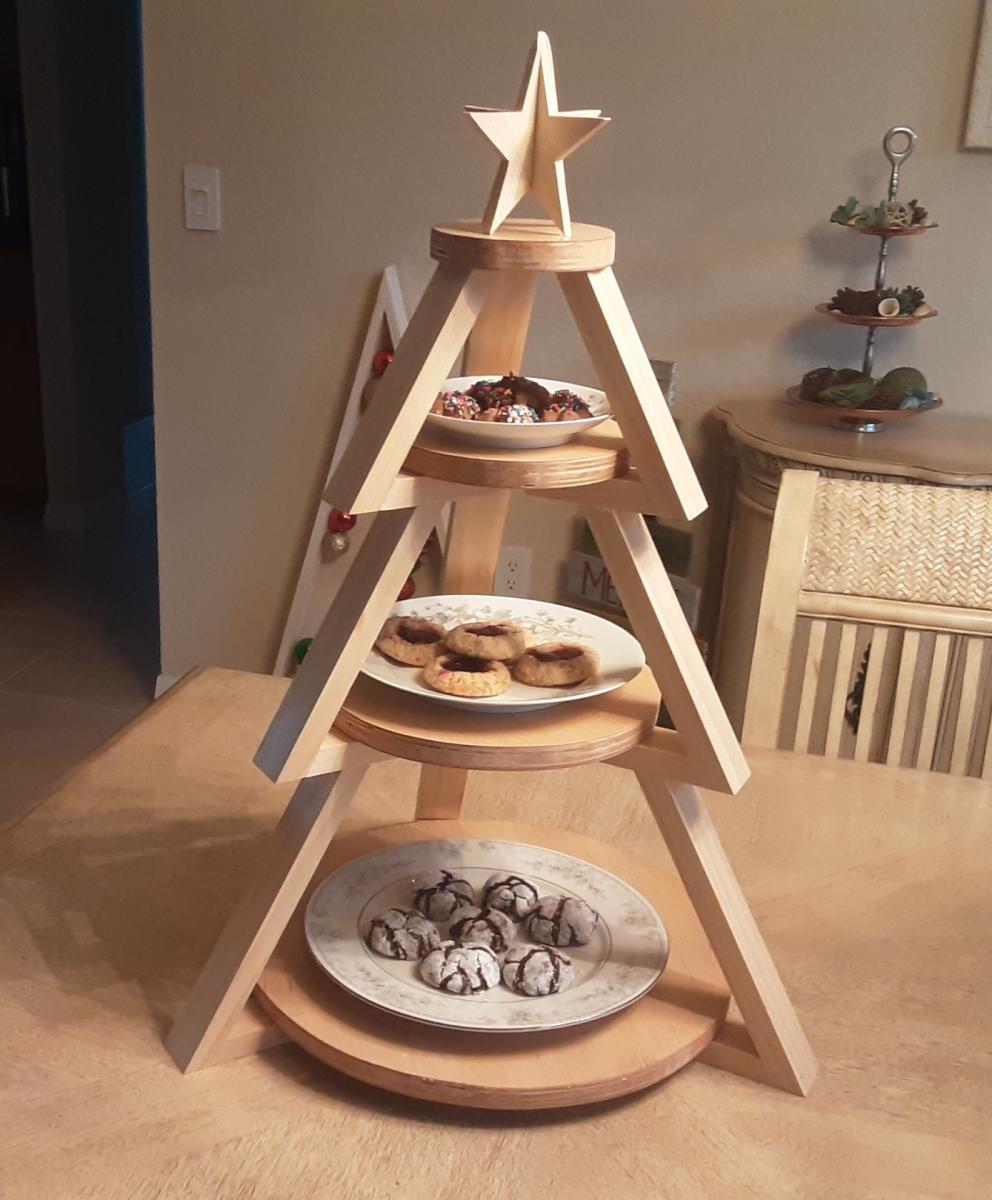
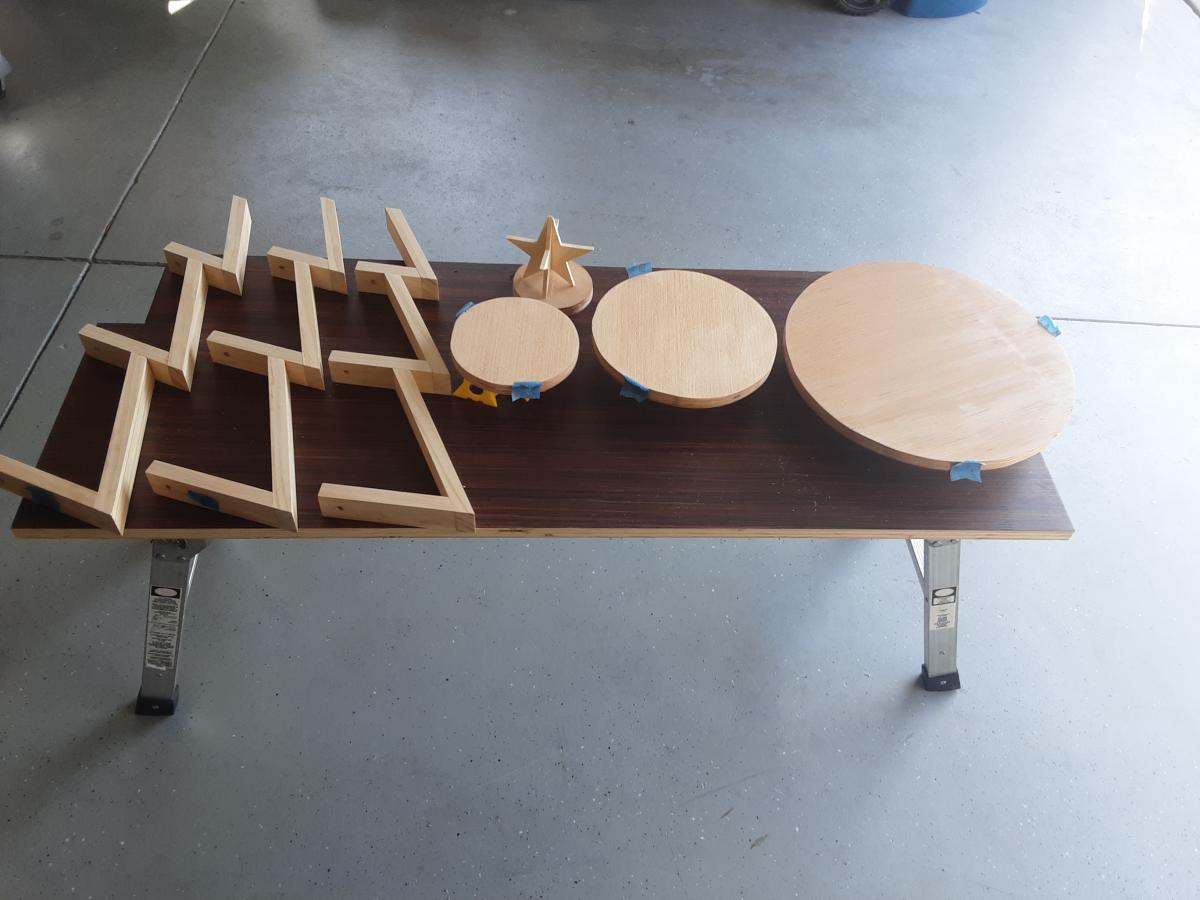
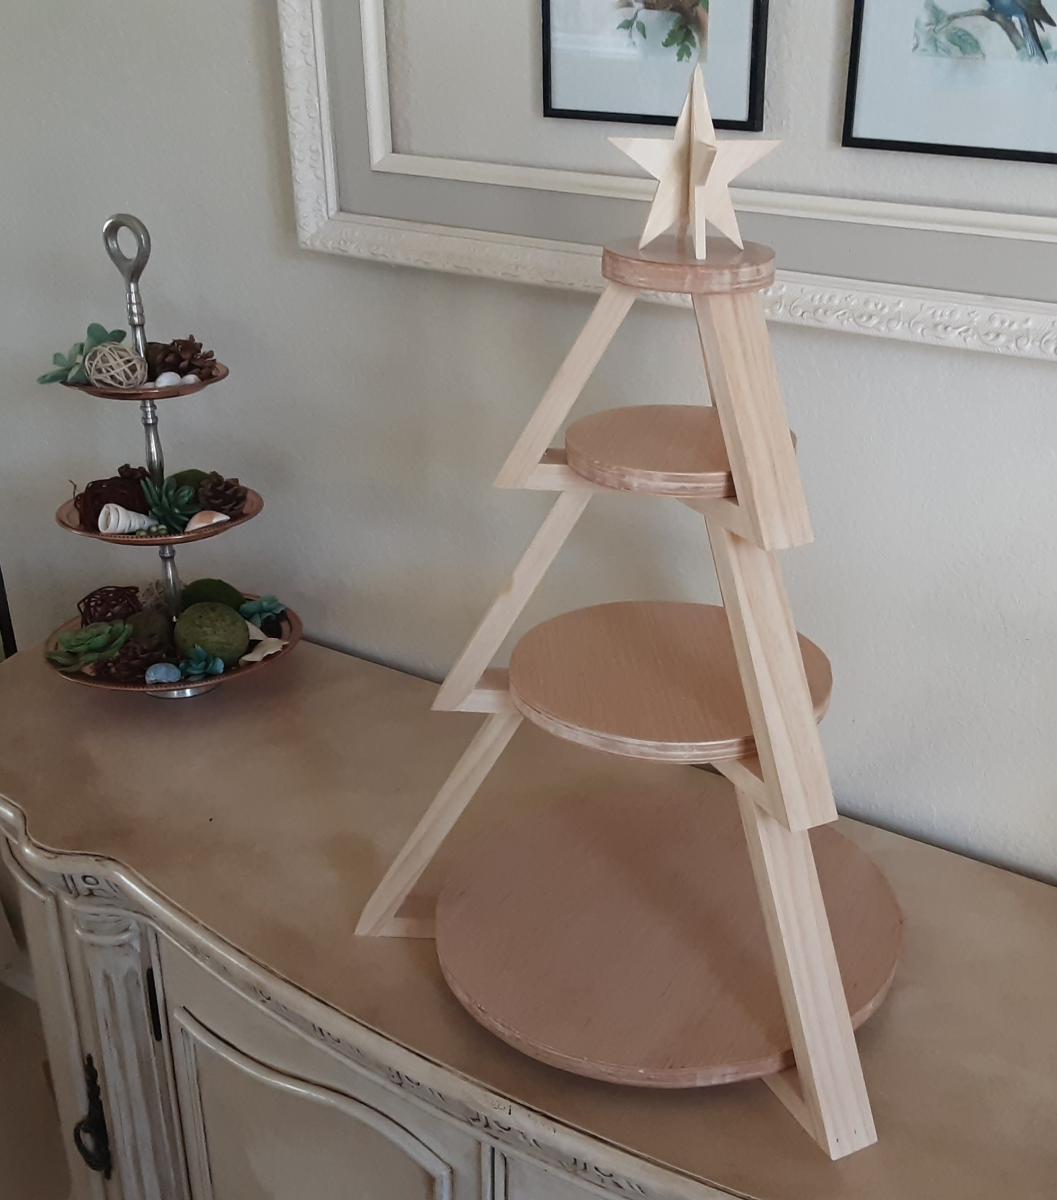
Christmas 3-tier cookie stand

Inspired by Shara of Woodshop Diaries, created this 3 tier tray for displaying cookies for Santa. Added a 3 dimensional star as the topper and simply followed the excellent photos and schematics on Shara's website.
Estimated Cost
$5
Estimated Time Investment
Afternoon Project (3-6 Hours)
Finish Used
Minwax paste wax
Recommended Skill Level
Beginner
Comments
modern Adirondack chairs
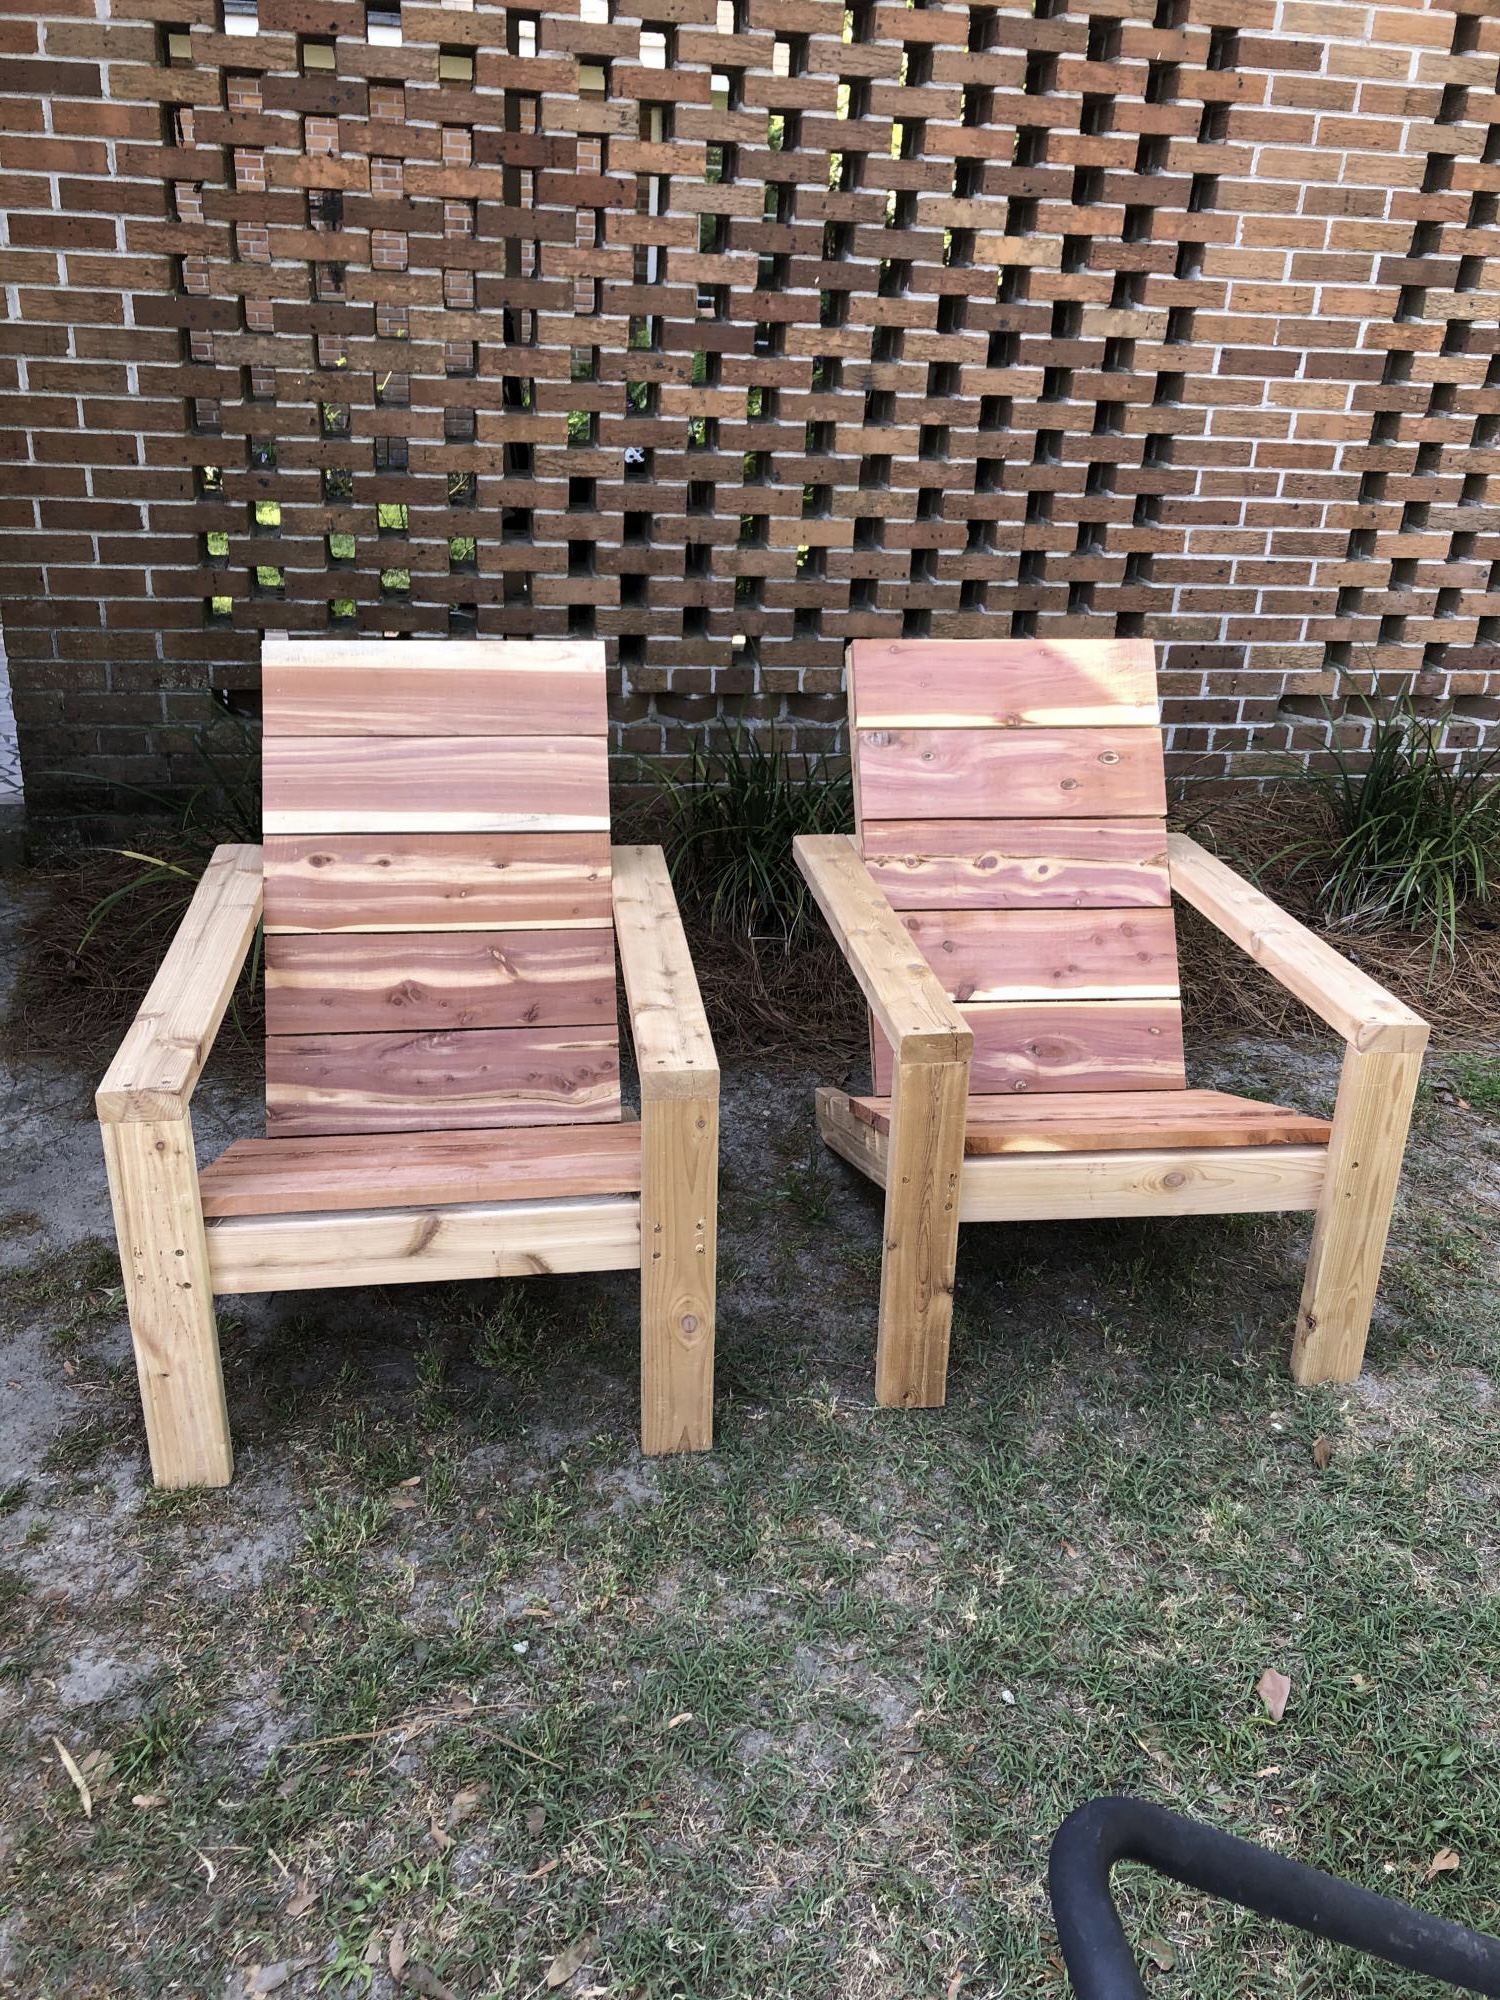
After a cabin remodel I had some left over 1X6 red cedar that I wanted to use and these chairs looked like a great project. After buying some white cedar 2X4's , here's my first 2. Thanks for the plans.
Built from Plan(s)
Estimated Cost
about $50 a chair
Estimated Time Investment
An Hour or Two (0-2 Hours)
Comments
Teenage Mutant Ninja Turtle Bed
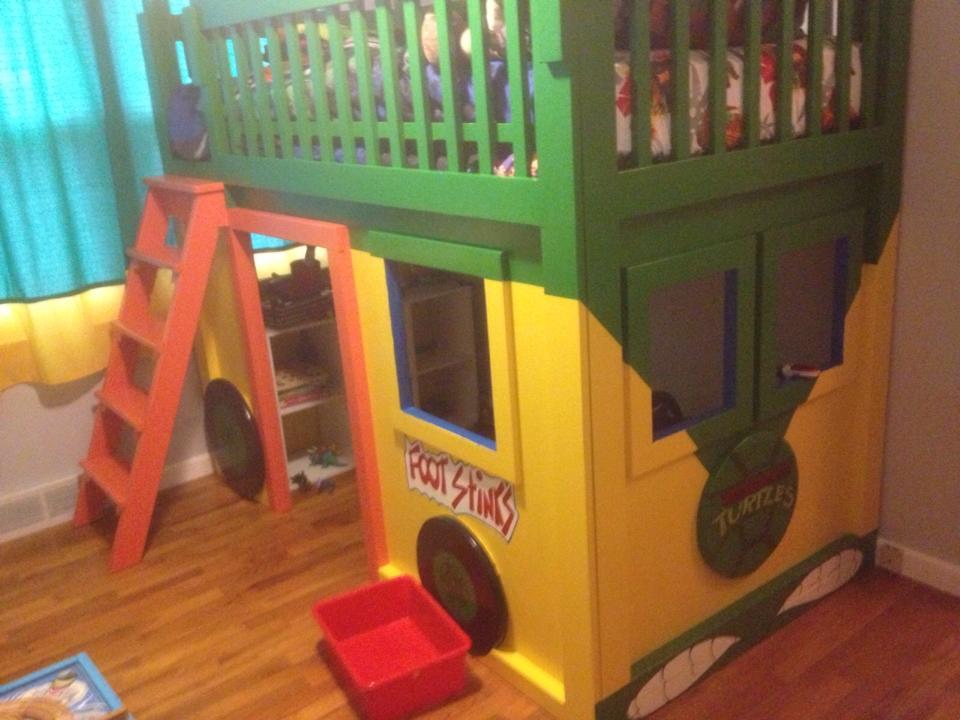
For this project, we followed the plans for the Firetruck Bed and also modified them a bit to fit our needs in the room. From start to finish, this project took two weeks to complete and cost us roughly $200 to build and $100 to paint. We were lucky though in that nearly everything we needed to purchase was on special or sale.
Built from Plan(s)
Estimated Cost
$300
Estimated Time Investment
Week Long Project (20 Hours or More)
Finish Used
Clark & Kensington latex paint & Minwax polycrylic clear coat (semi-gloss)
Recommended Skill Level
Intermediate
Comments
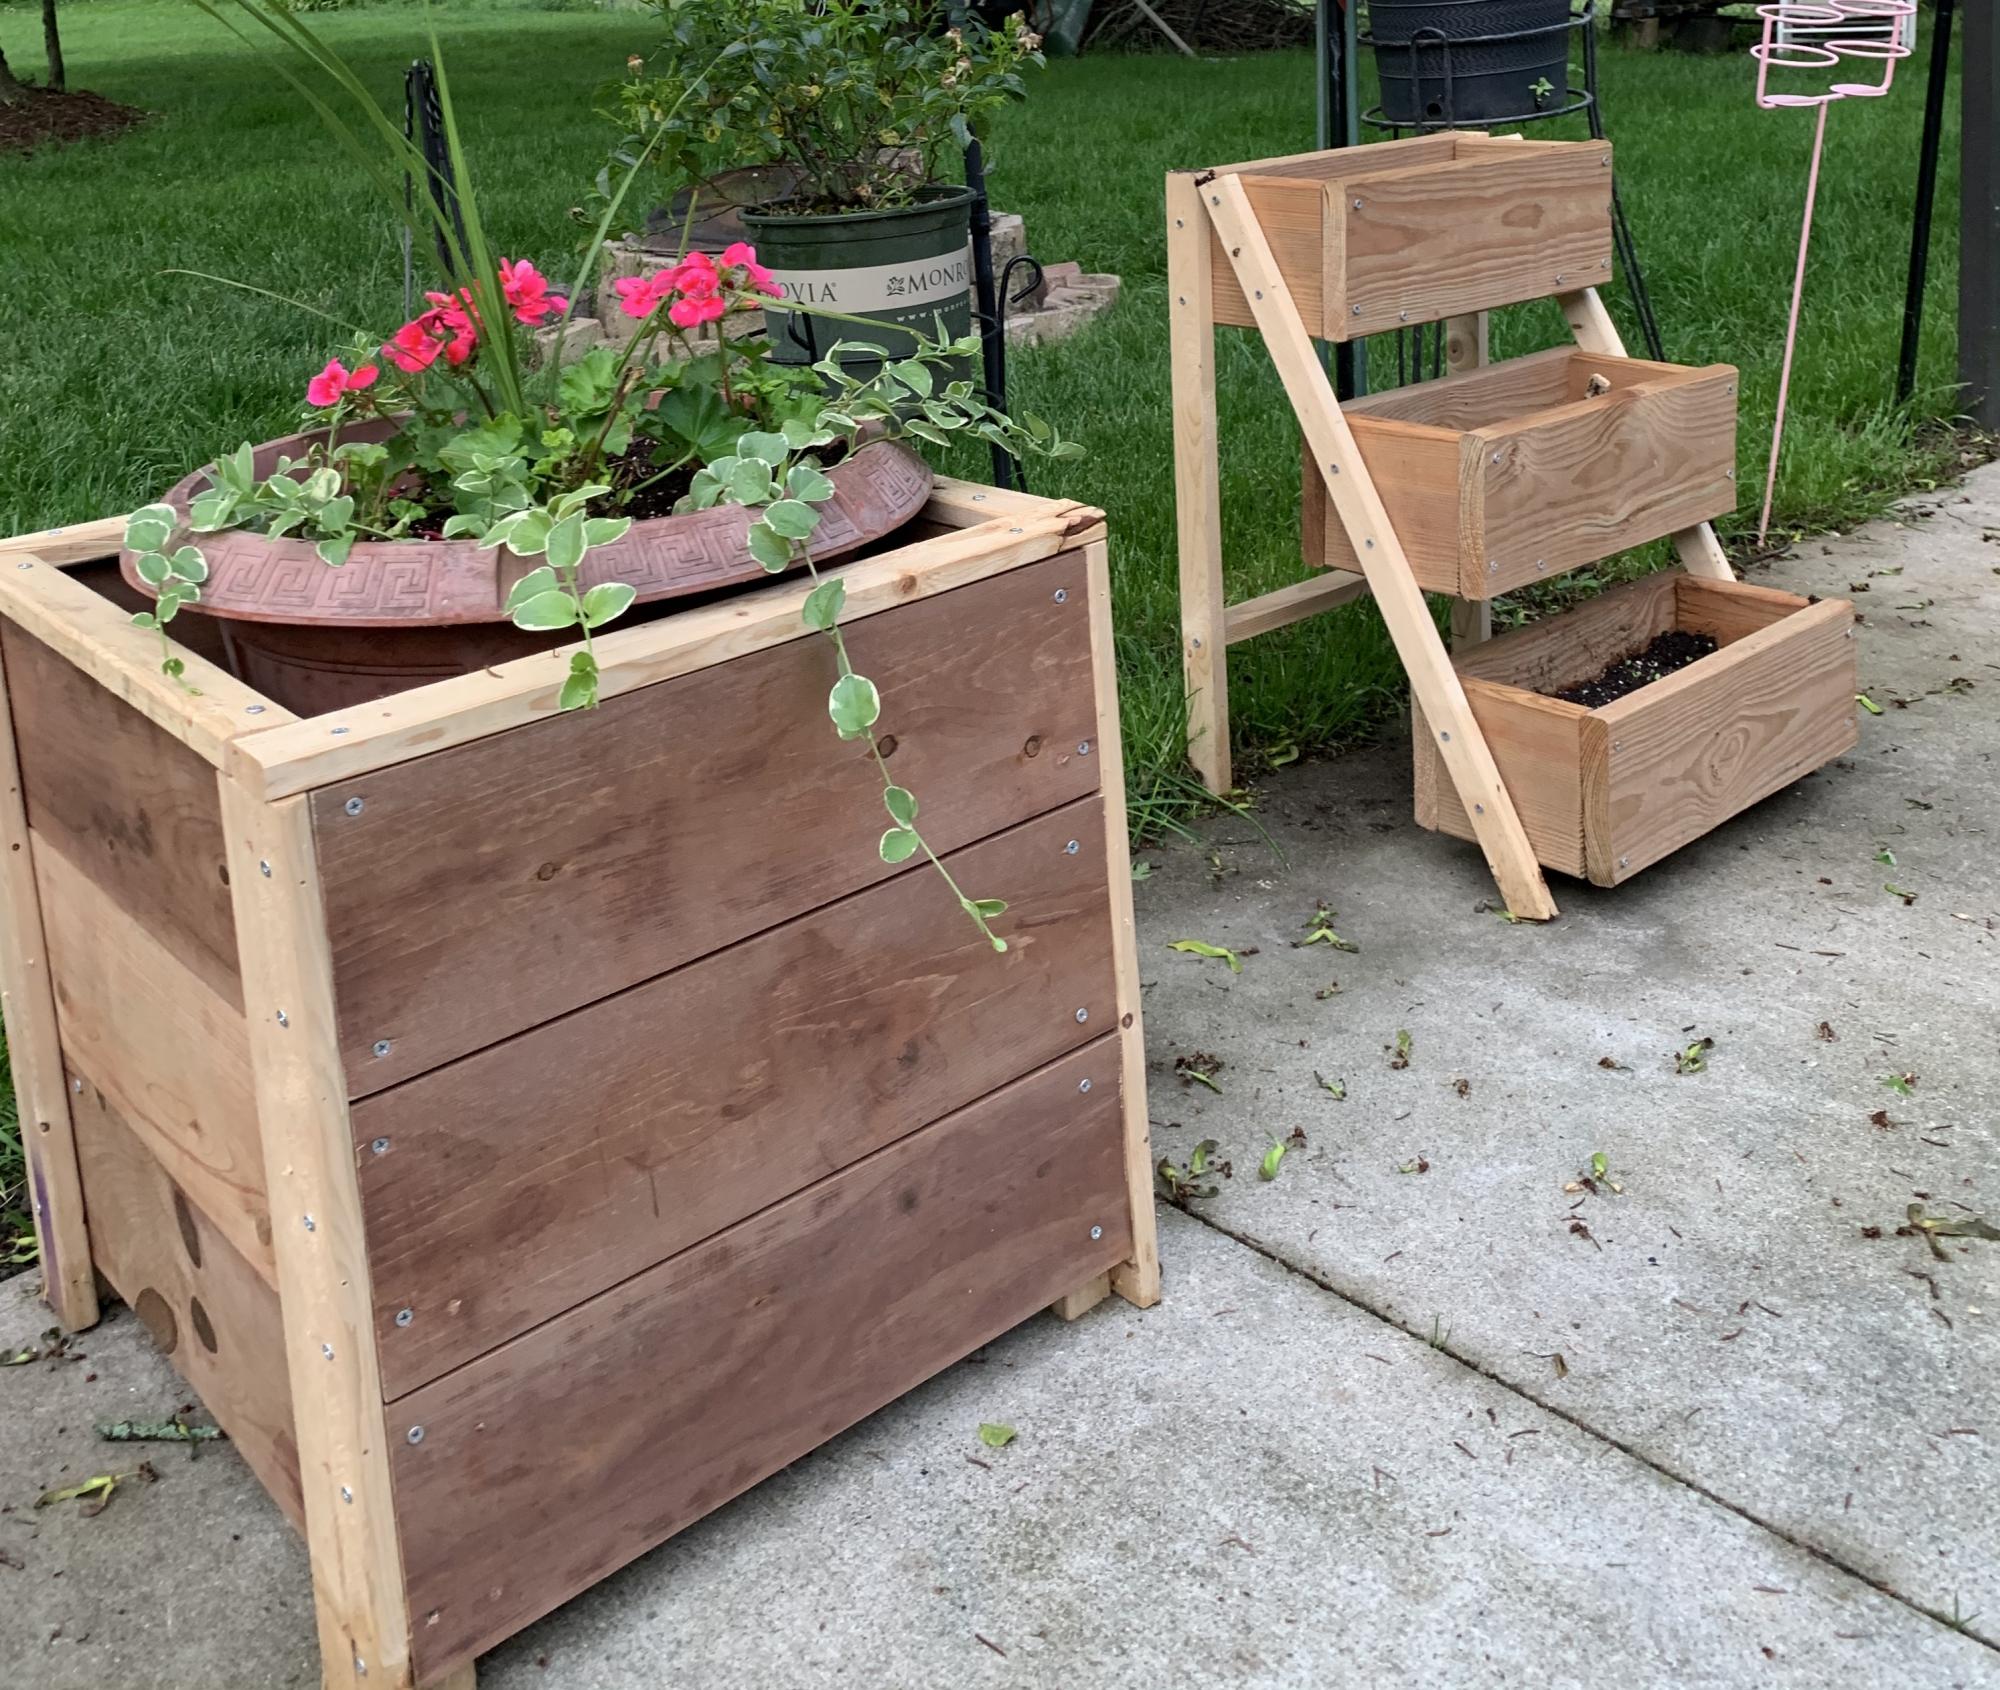
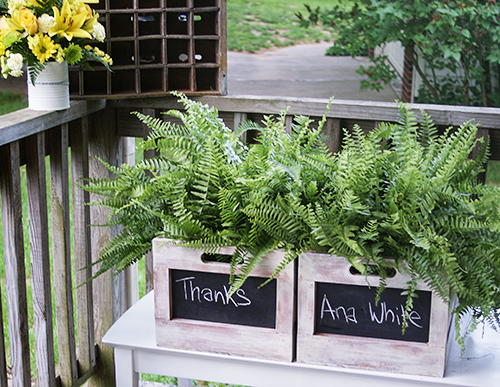
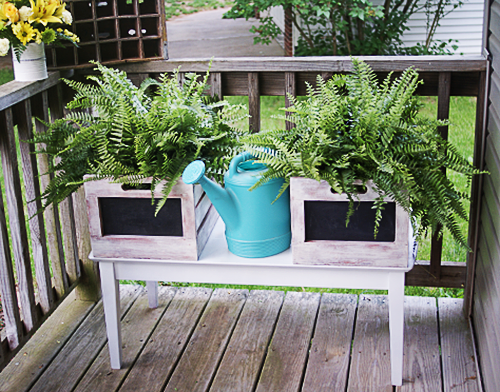
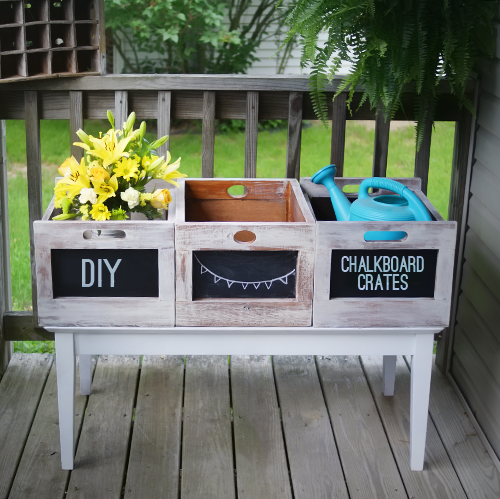
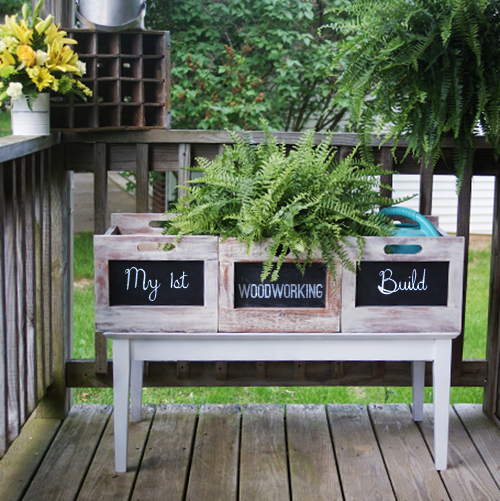
Chalkboard Crate Planters
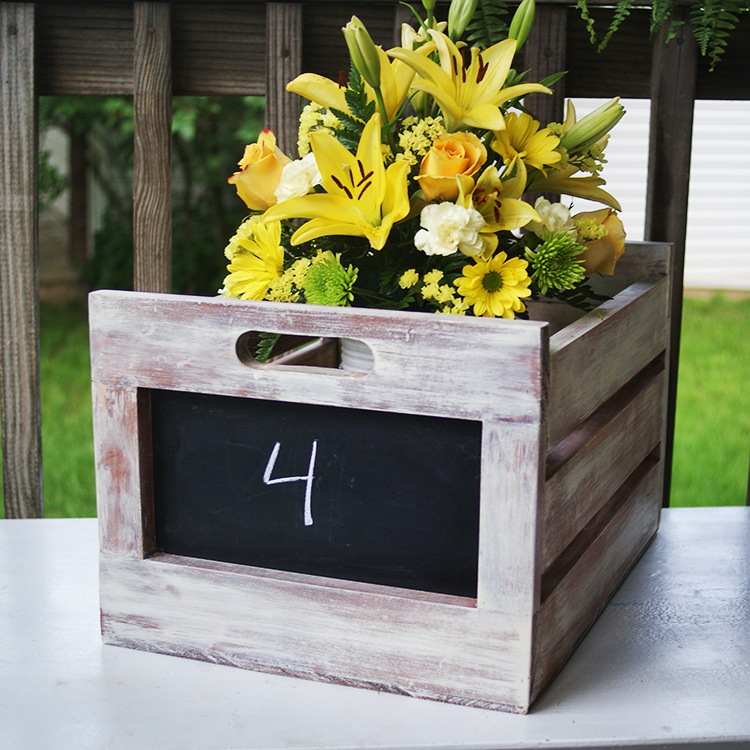
I made 3 crates using Ana Whites Chalkboard Produce Crate plan. It was my first woodworking project, was totally doable, and has created a monster. The middle crate in the photos was the first one, and I added extra 1x3s on the sides because I thought I didn't want the gaps between the side boards. Changed my mind for the second 2. I wanted a chippy finish so I stained with glaze and burnt umber by Golden, followed by a topcoat of dry brushed Titan Buff. I sealed with CeCe Caldwell Aging Wax.
Built from Plan(s)
Estimated Time Investment
Afternoon Project (3-6 Hours)
Finish Used
Stained with acrylic glaze and burnt umber by Golden, followed by a topcoat of dry brushed Titan Buff
Recommended Skill Level
Starter Project
Comments

Thu, 08/29/2013 - 18:29
These are beautiful. :) You
These are beautiful. :) You did a fantastic job!
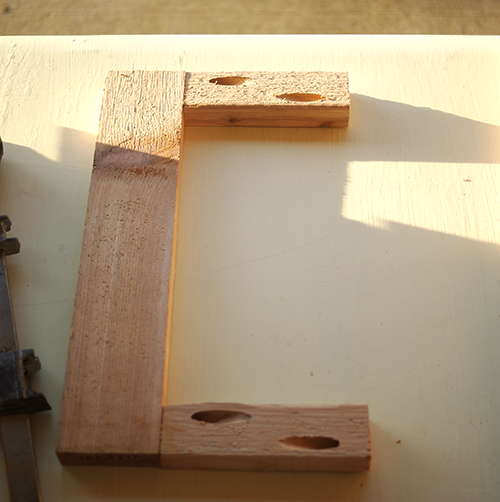
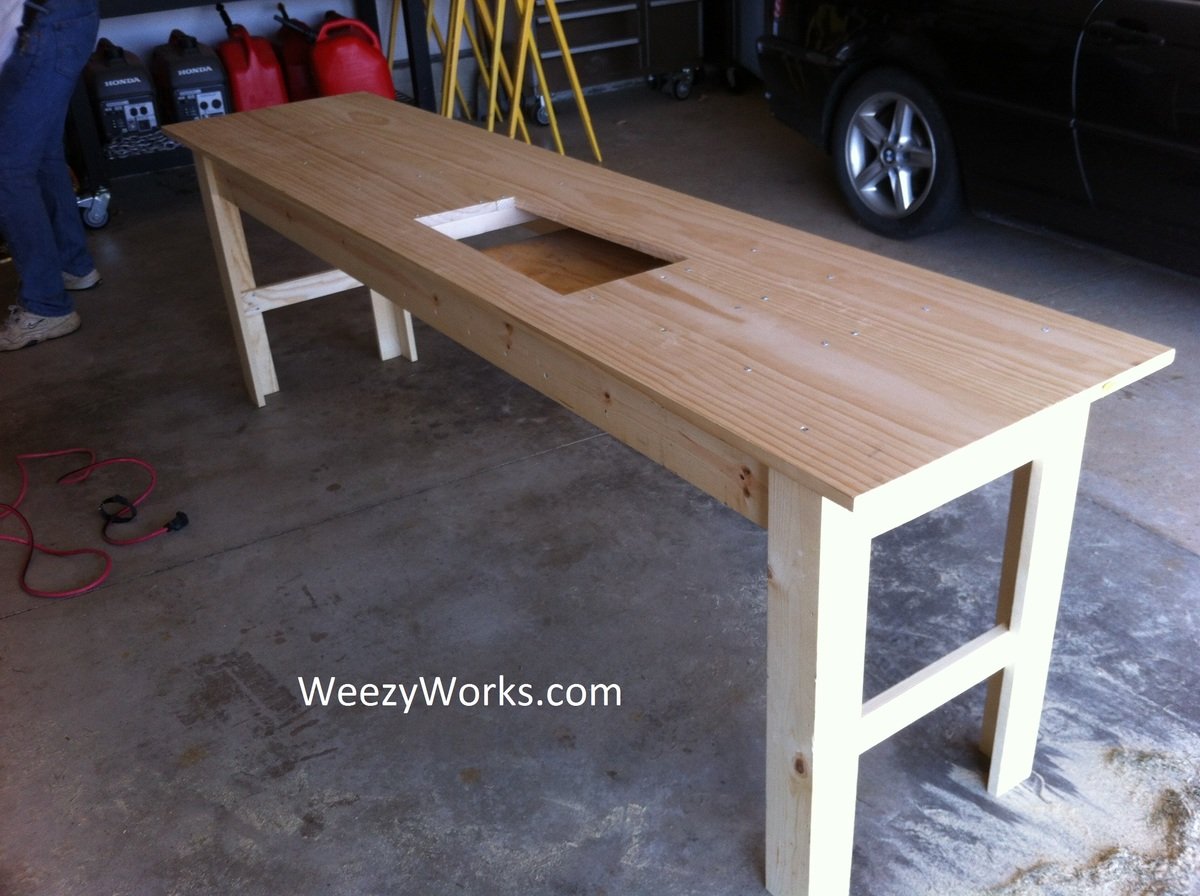
Narrow Sewing Table
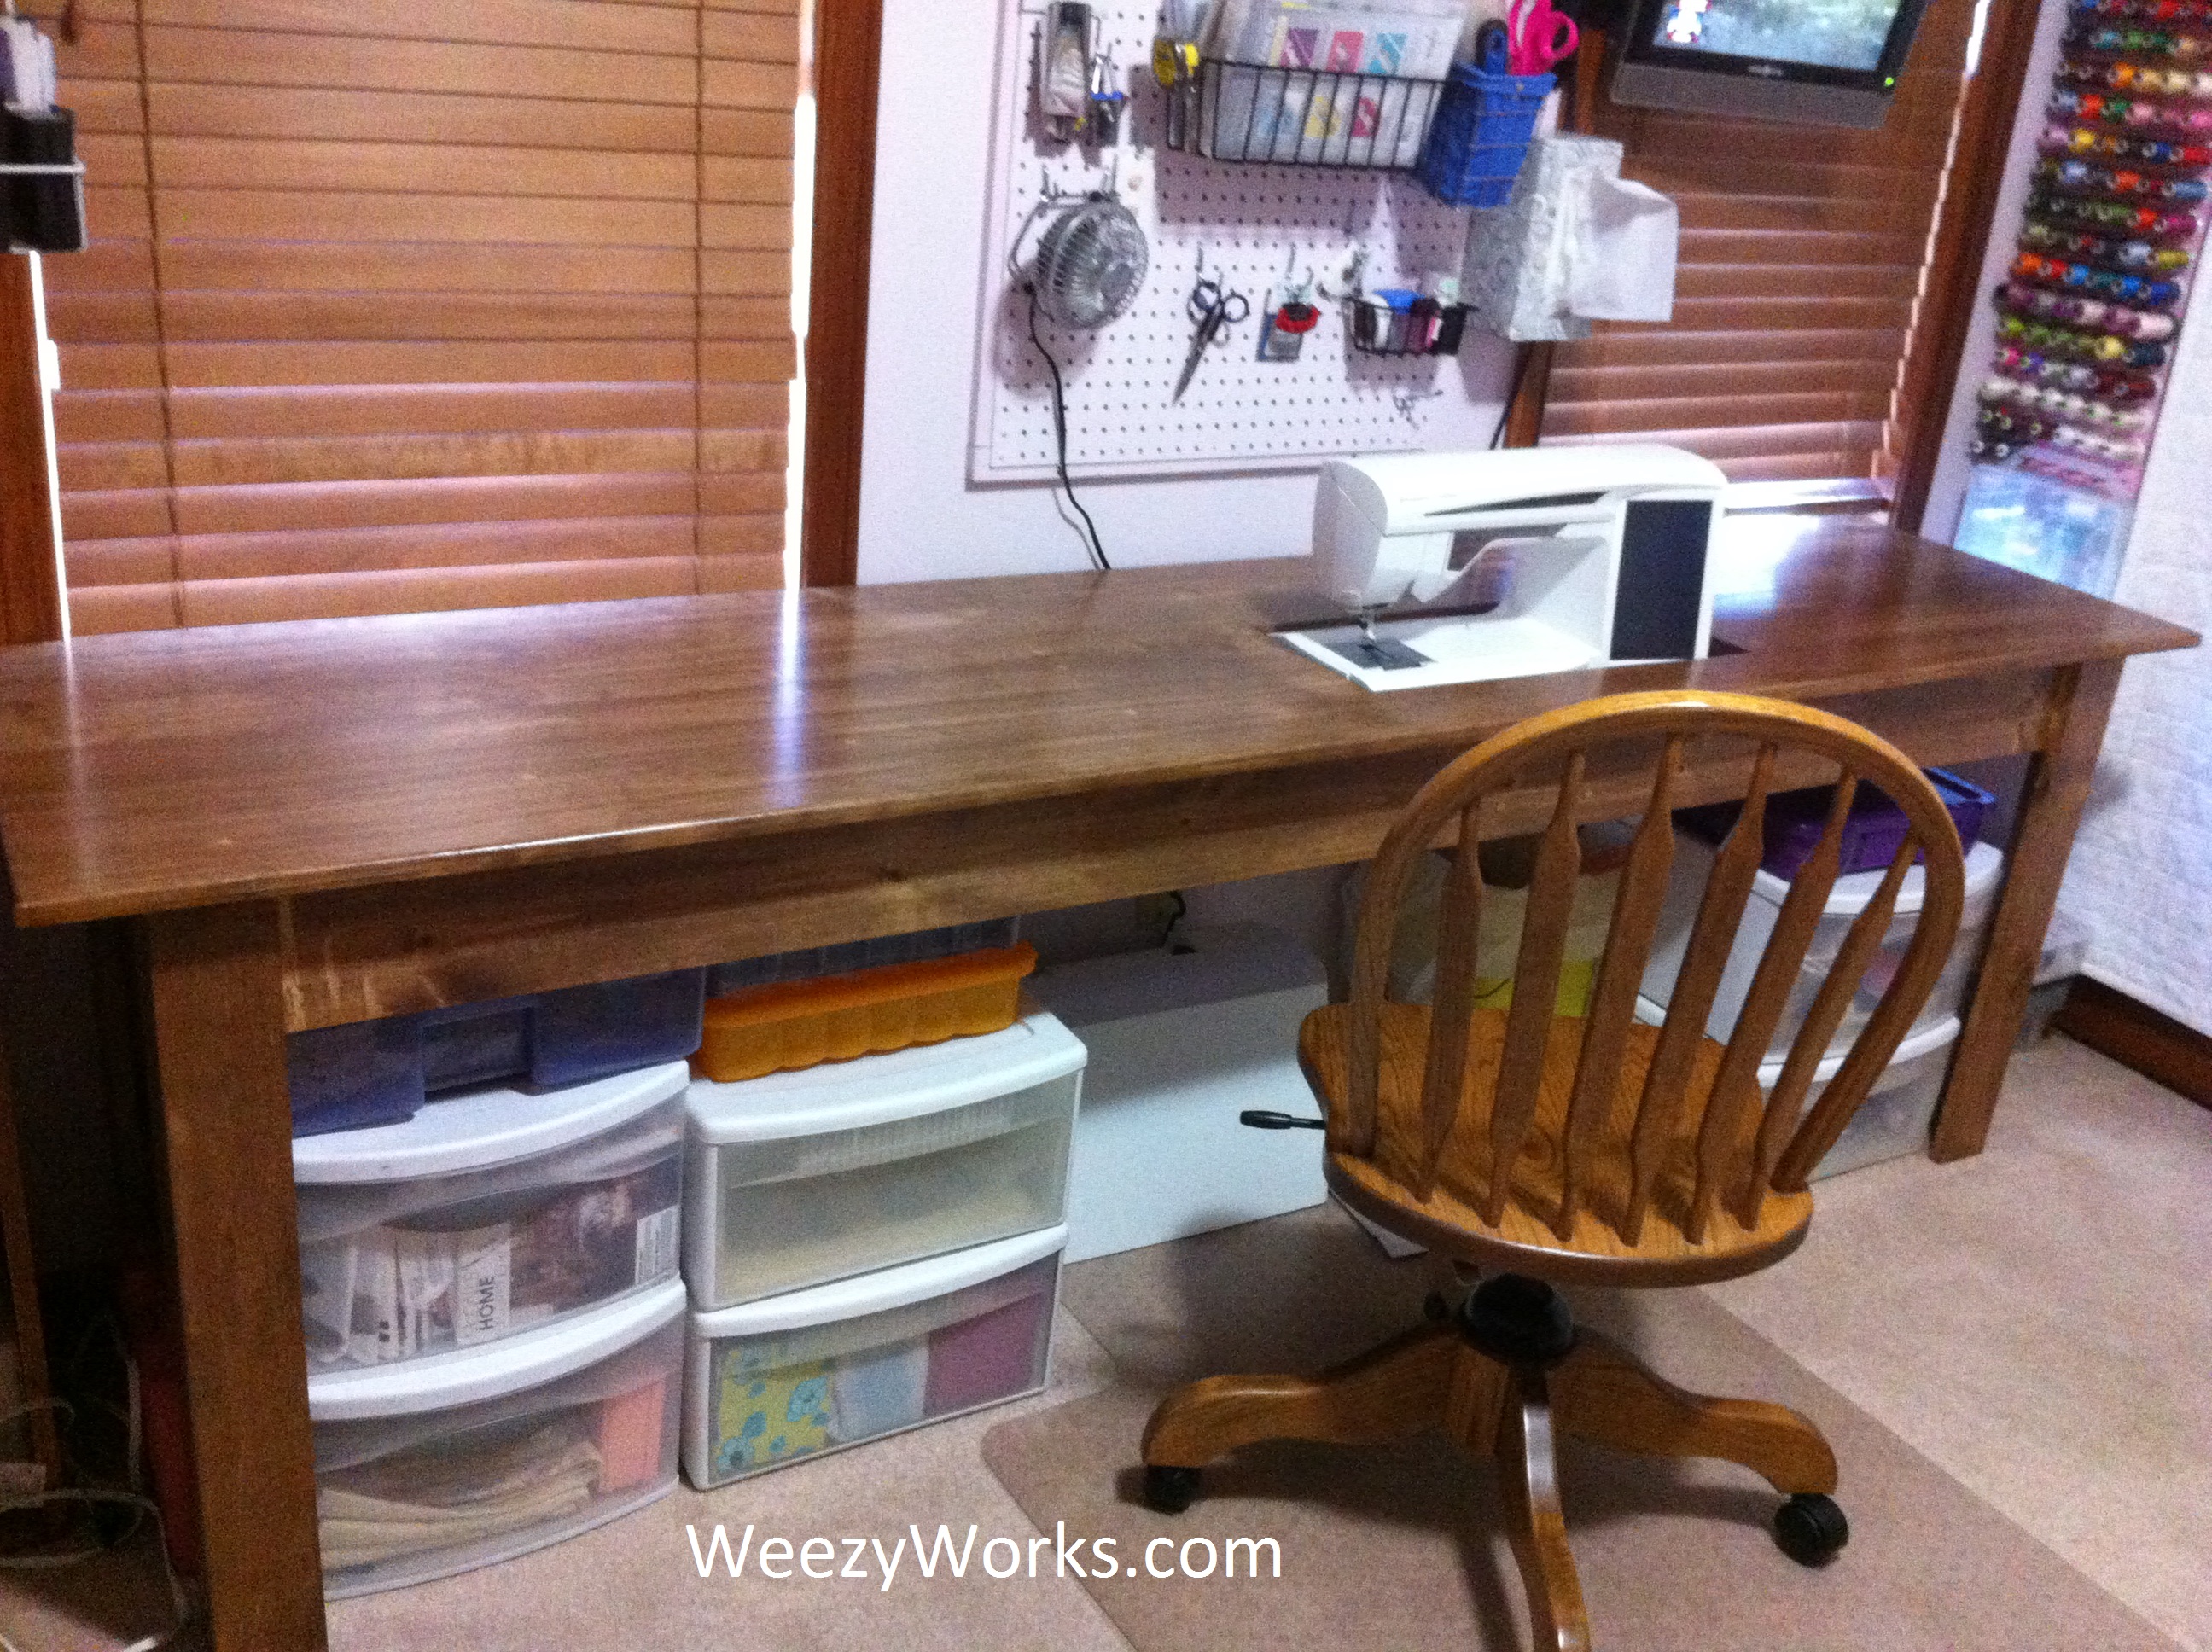
Ive been looking for a sewing table to fit my space. but found none for less than $500 and they were quite small. I found a post at quiltedcupcake.com that linked me to another blog, linking me here. I modified the plan to be about 2 feet wide and cut a hole to fit my sewing machine. There is a support in the bottom to hold my machine level with the tabletop. When I make this in the future, I will splurge on a fine hardwood. This plan was easy to build and looks great! Just what I was looking for :D
Estimated Cost
$125
Estimated Time Investment
Weekend Project (10-20 Hours)
Finish Used
Dark stain and satin polyurethane
Recommended Skill Level
Beginner
Comments
Sat, 09/15/2012 - 16:38
Thank you! This project was
Thank you! This project was very easy to build and would be very easy to make in a smaller size. I'm so glad I did it, free motion quilting is so much easier with this table.
Wed, 08/26/2020 - 07:13
Good morning Ana, Where can…
Good morning Ana,
Where can i get the plans for this table.
Sun, 09/16/2012 - 10:11
Oh man. . . .
Now, I've just got to make it! I love to free motion quilt and that would make it easier. With each baby I've had my quilting space has diminished (of course it's worth it) but now I think I will reclaim some space ;)
Tue, 02/26/2013 - 14:14
Plans Please
Cannot seem to find the plans for this project. Please post them.
In reply to Plans Please by SinKitty71
Tue, 02/26/2013 - 17:40
I used the plans for the
I used the plans for the narrow farmhouse table (search in the plans tab) and made a few modifications for my sewing machine.
Thu, 06/20/2013 - 12:27
What size boards did you use
What size boards did you use for the top of the table?
Tryde Coffee Table
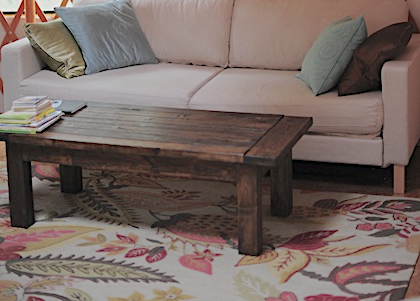
We made the Tryde Coffe table using 100% reclaimed wood
Built from Plan(s)
Estimated Time Investment
An Hour or Two (0-2 Hours)
Finish Used
Ebony stain
Recommended Skill Level
Starter Project
Comments
Sun, 06/26/2011 - 13:38
Great job!!
Also wanted to say I LOVE YURTS!!!! I want one! :) Fantastic idea for accomodation.
Mon, 06/27/2011 - 19:25
love your work and the yurt
How do you like the yurt??? The table looks terrific!
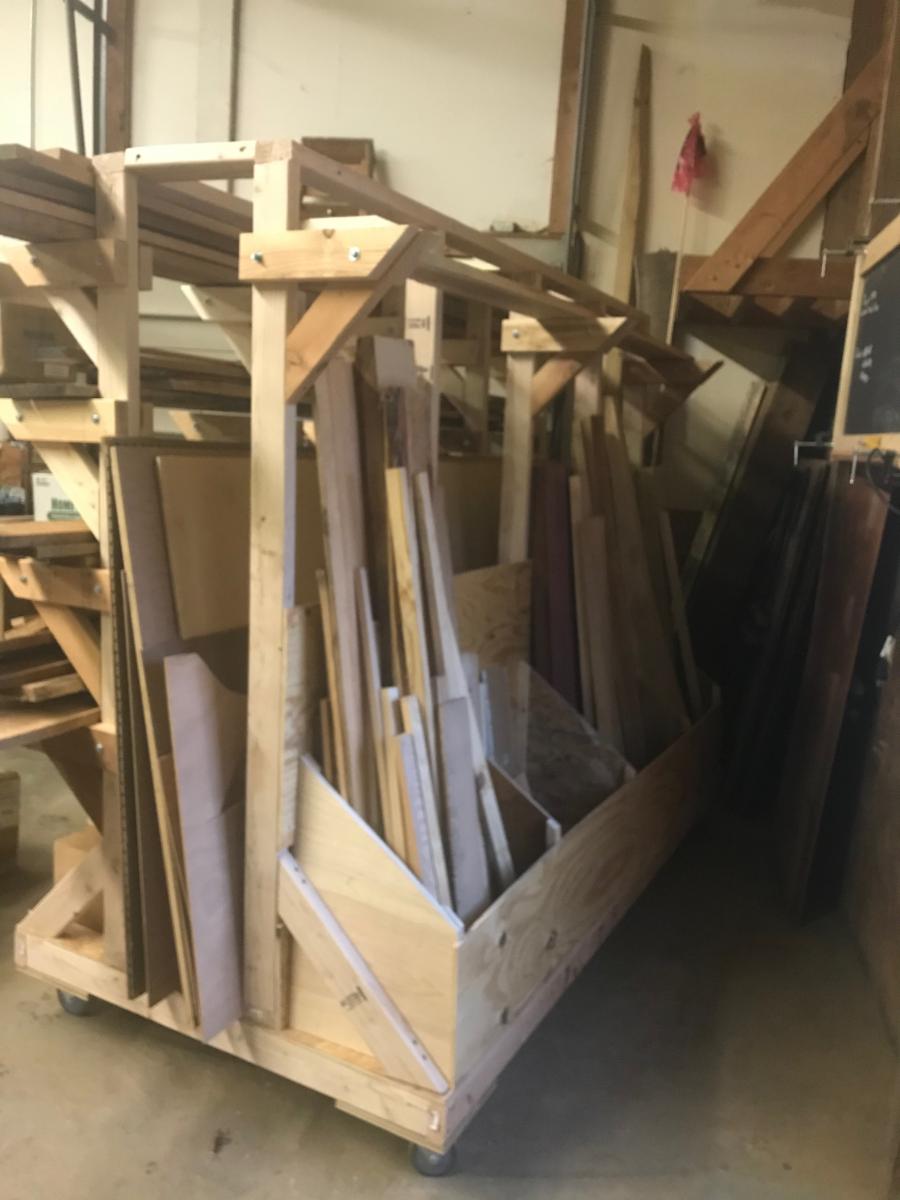
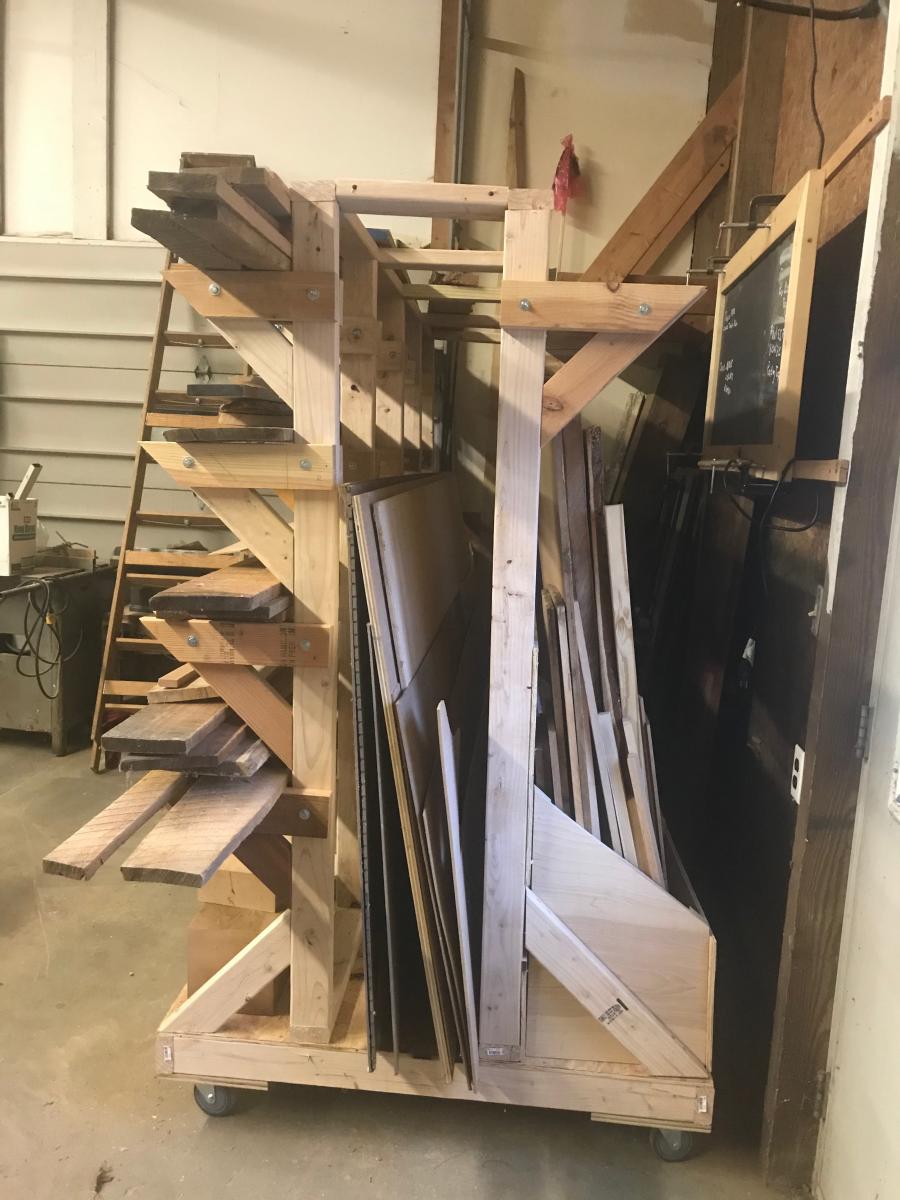
Ultimate lumber and plywood storage
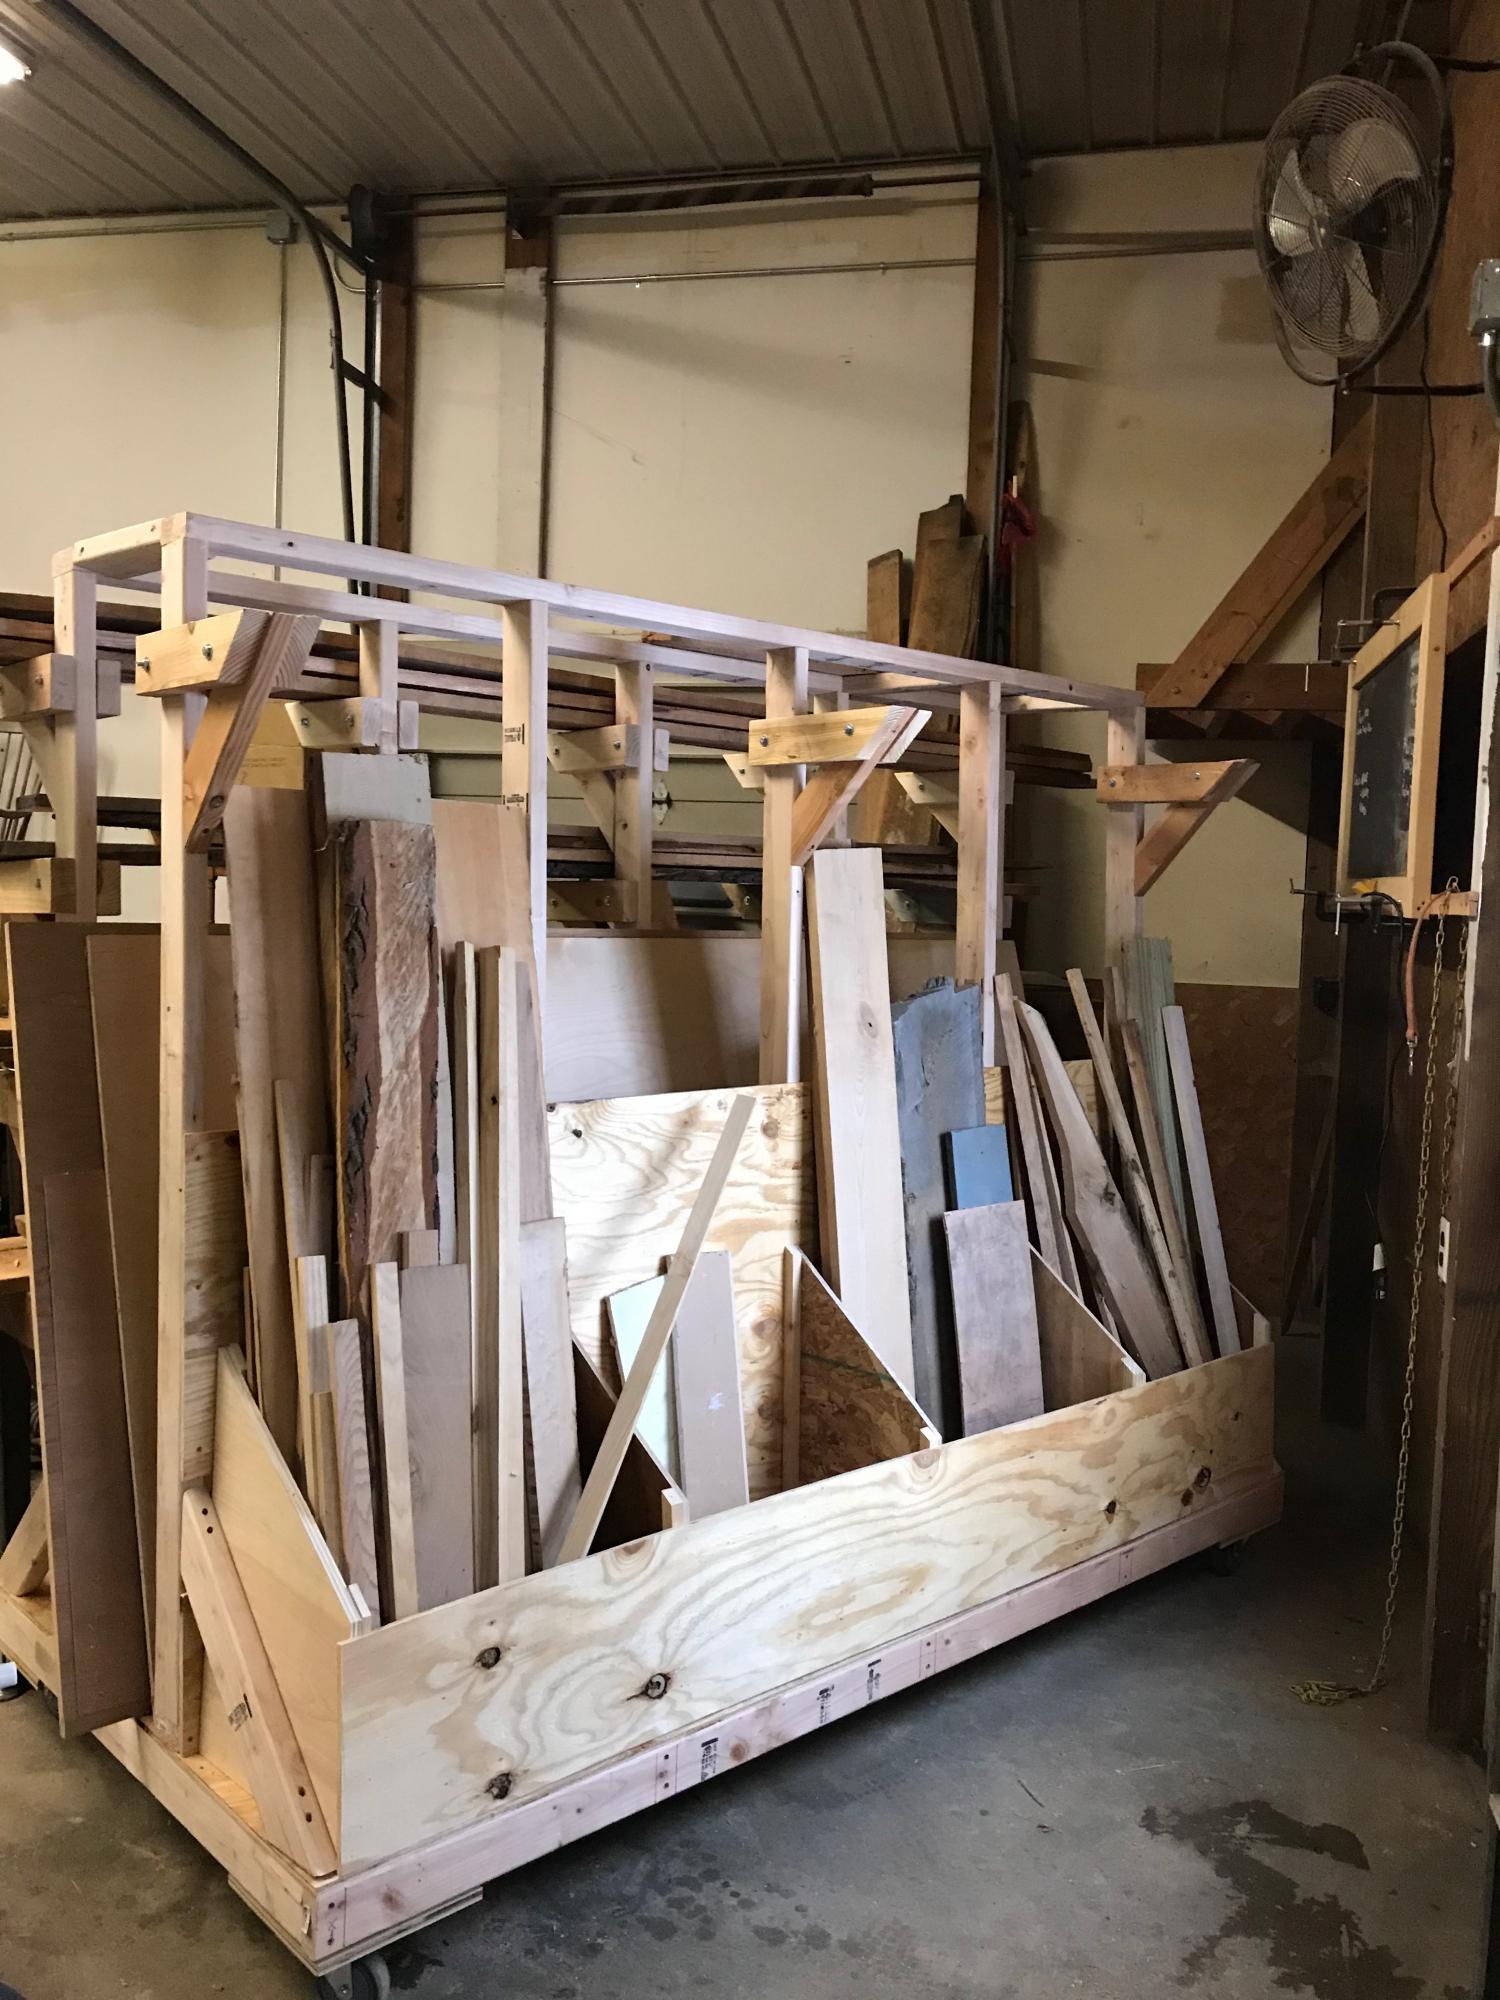
I followed the plans for the wood storage rack pretty closely. The shelf brackets made from 2x4's are quite sturdy. The entire rack is easy to move around on the 4 inch casters. This project took about 4 days to build and was well worth the time and money. All my wood is in one place now- sheets, long boards and short boards. Everything is easy to find and my shop is a lot neater, now.
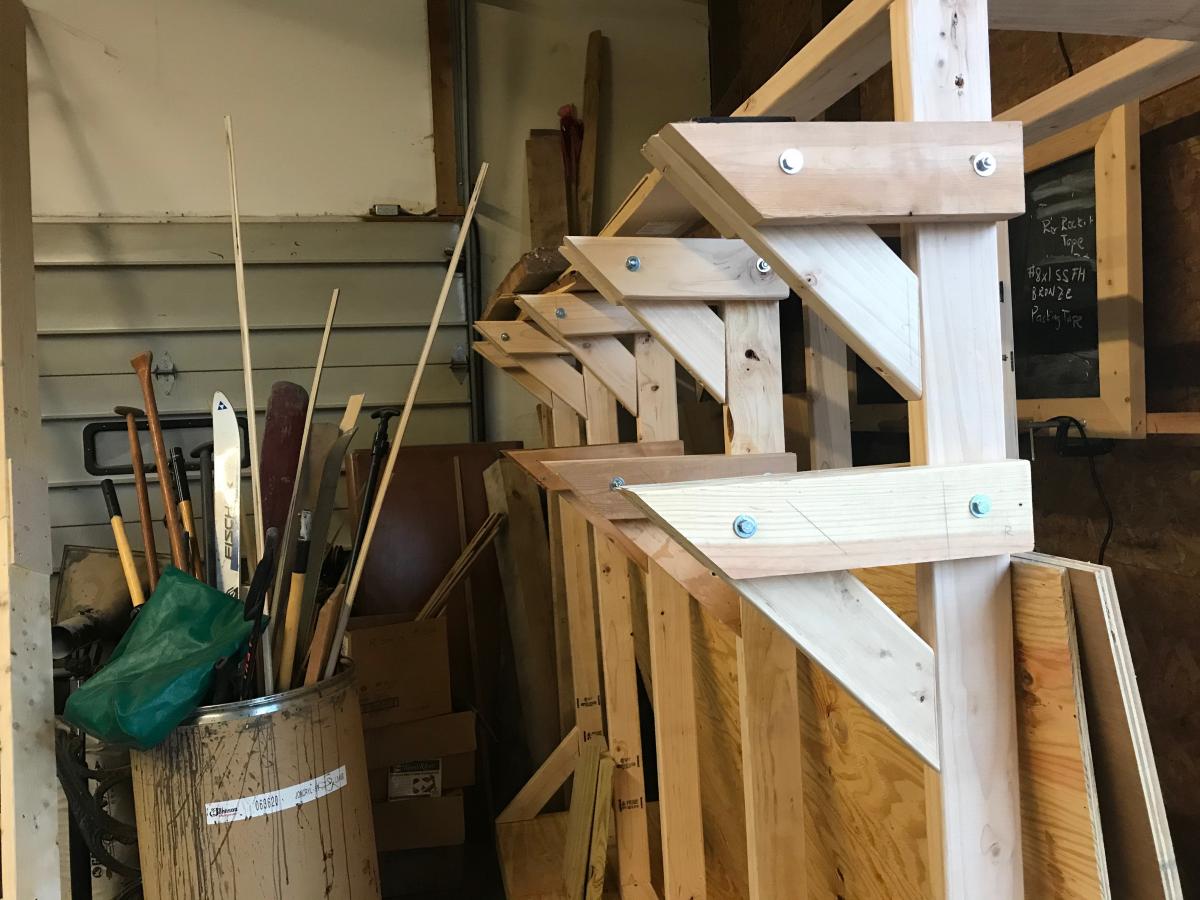
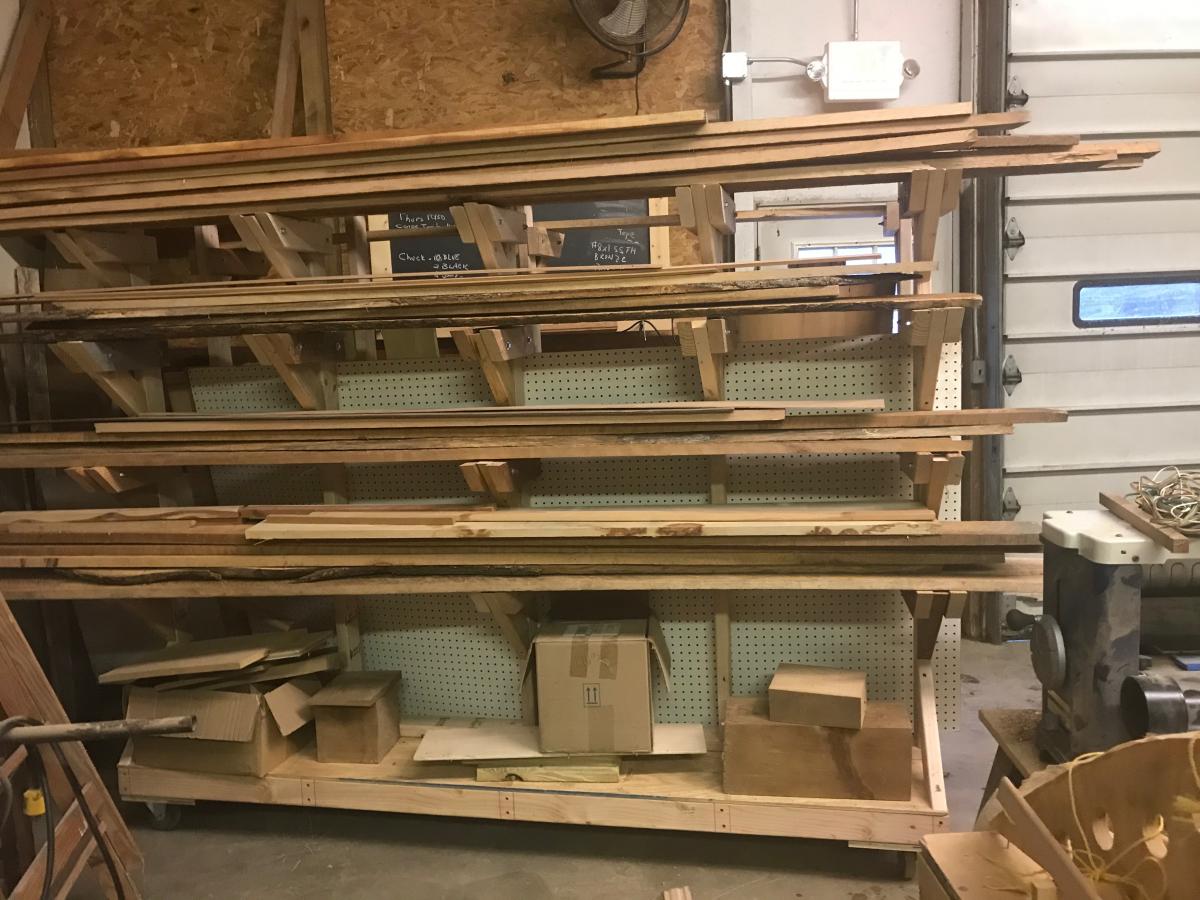
Built from Plan(s)
Estimated Cost
$100
Estimated Time Investment
Week Long Project (20 Hours or More)
Finish Used
unfinished
Recommended Skill Level
Intermediate
Our new garden beds. Thank you!
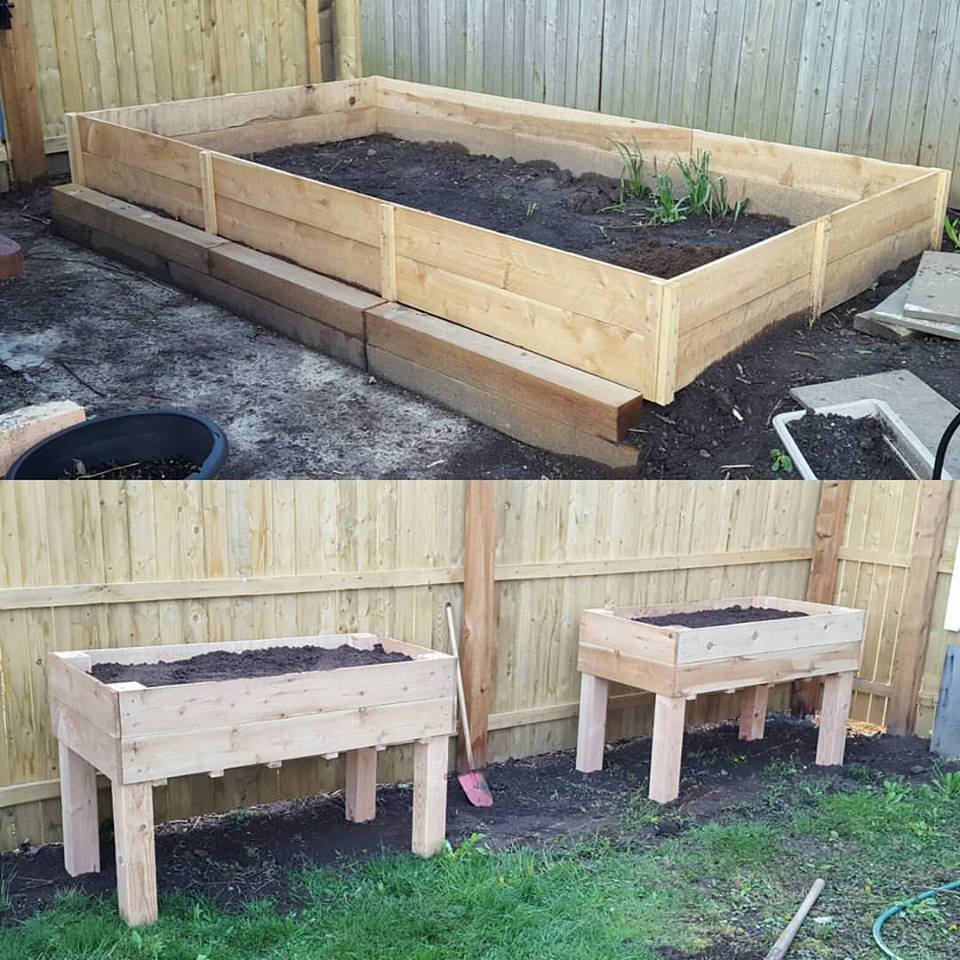
I'm only moderately handy and these were fun and pretty easy.
Learned a lot and got better as I went along.
I found ways to make it as cheap as possible, probably did all three projects for 150 bucks.
Built from Plan(s)
Estimated Cost
Around $150
Estimated Time Investment
Afternoon Project (3-6 Hours)
Recommended Skill Level
Beginner
Coffee Station with Tilt-out Trash
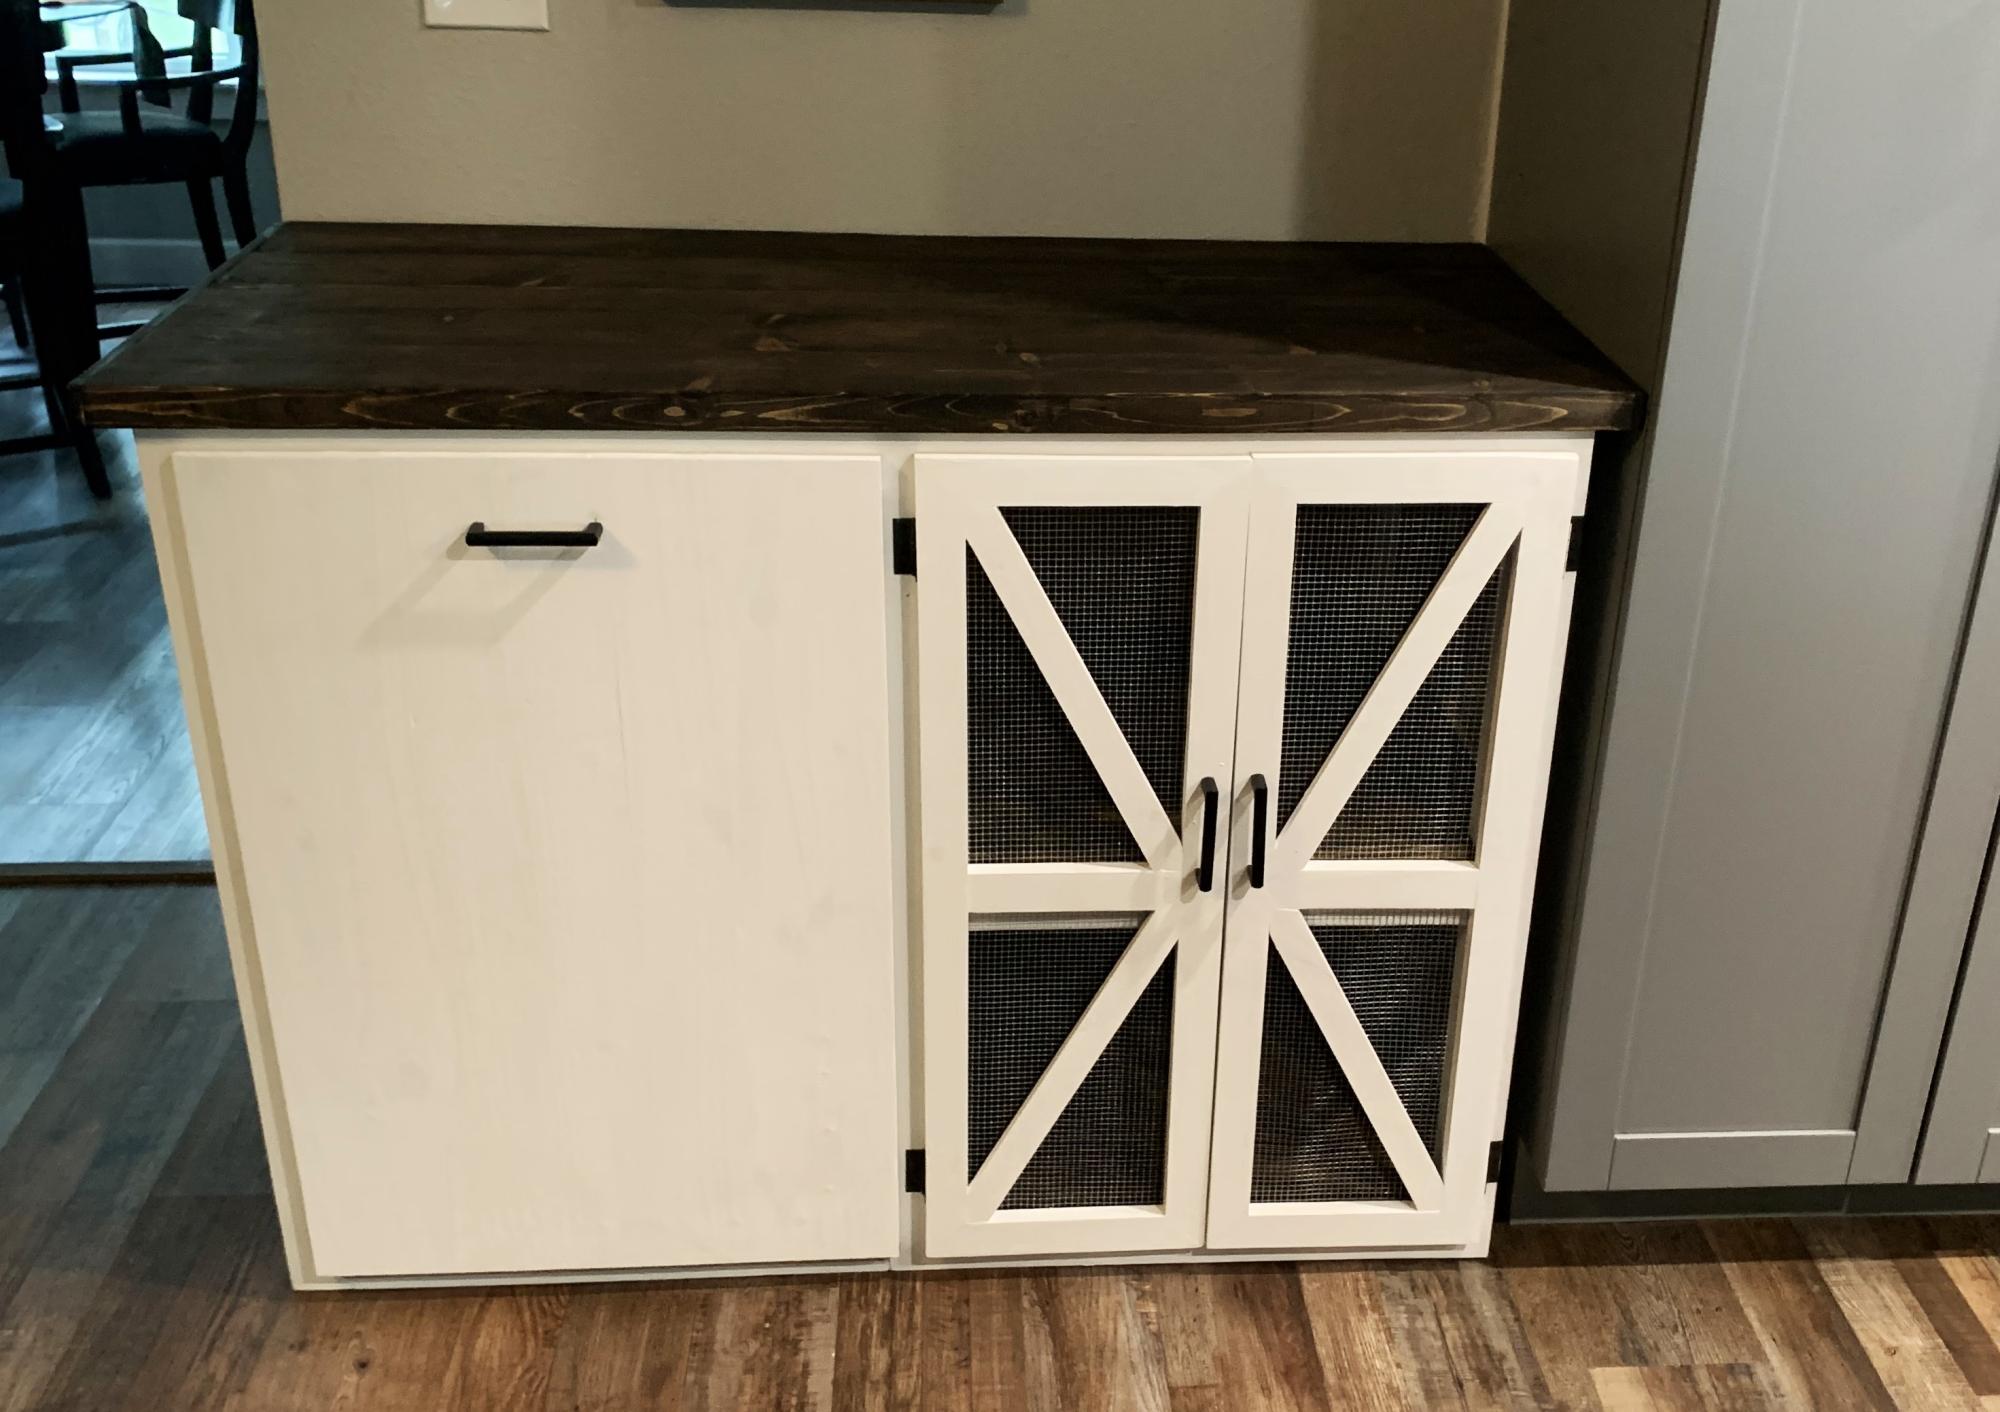
Coffee station with trash can holder and storage.
Royce and Lynn Ledford
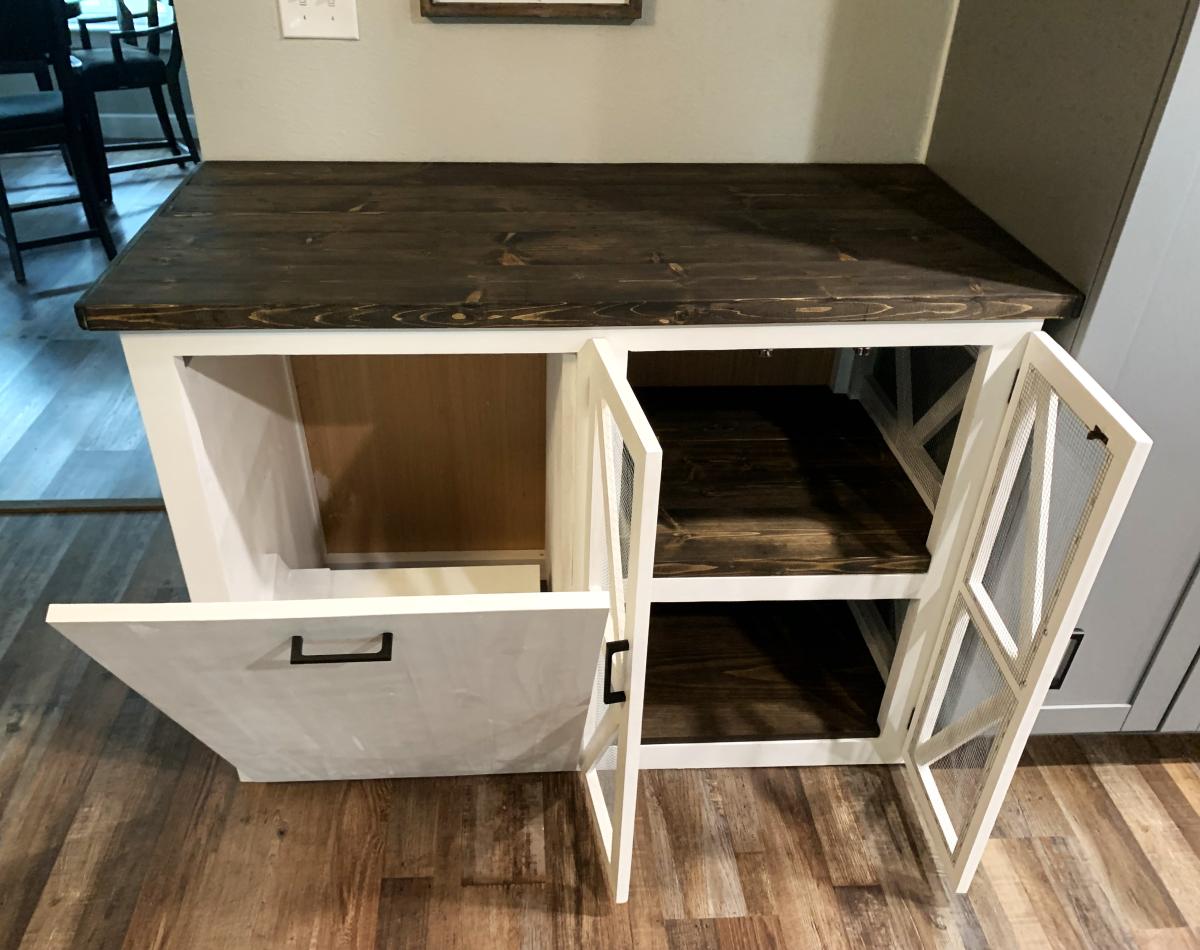
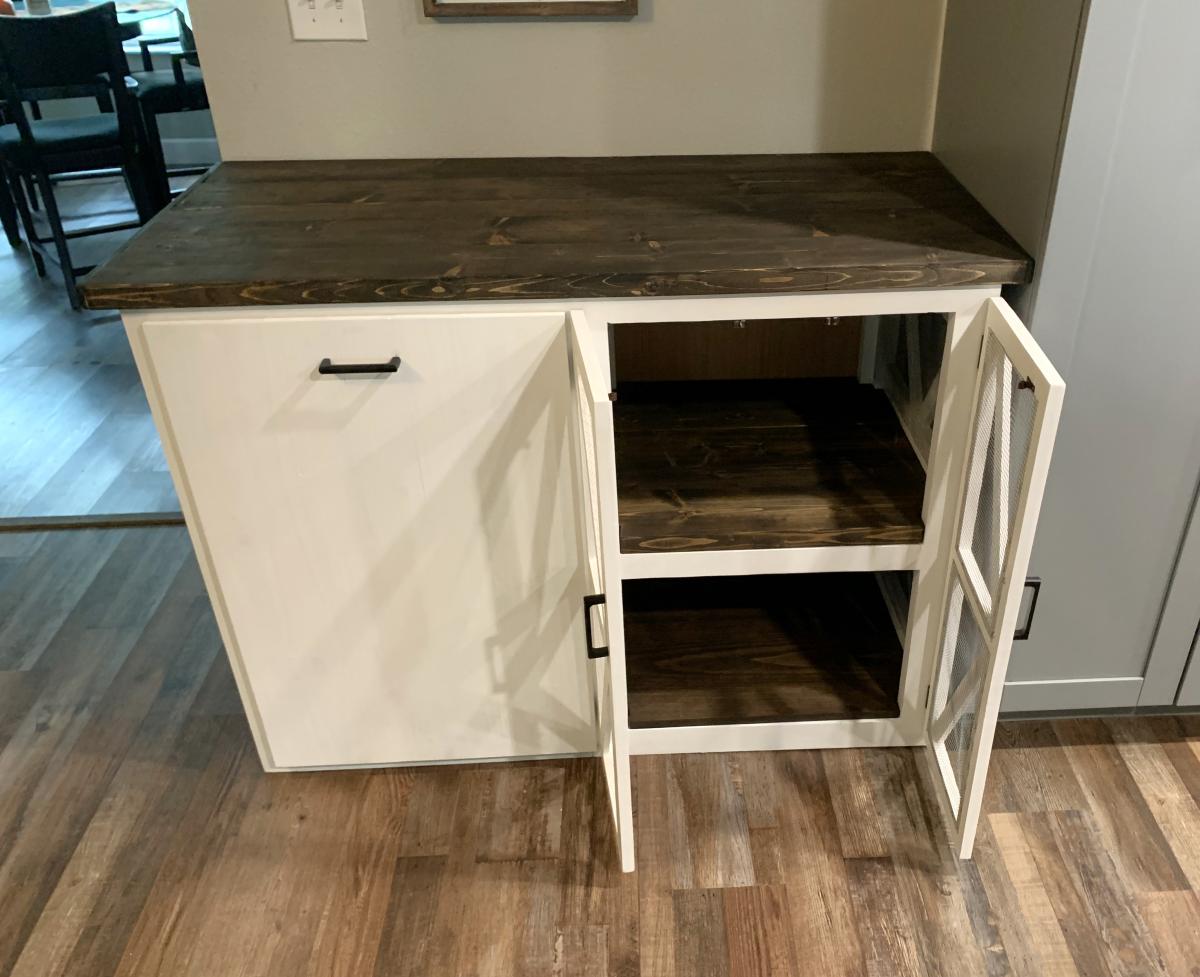
Built from Plan(s)
Super Easy, Super Awesome! Thank you Ana & Ashley

Loved this Coffee Table and wanted to suprise the wife for christmas, so being my first project I got started! had no idea what I was doing but they were great instructions, and the KREG JIG is AMAZING. altered the plans a bit to make it a rectangular coffee table (added 12 inches) instead of square to fit our living room better. Now to tackle the next project!
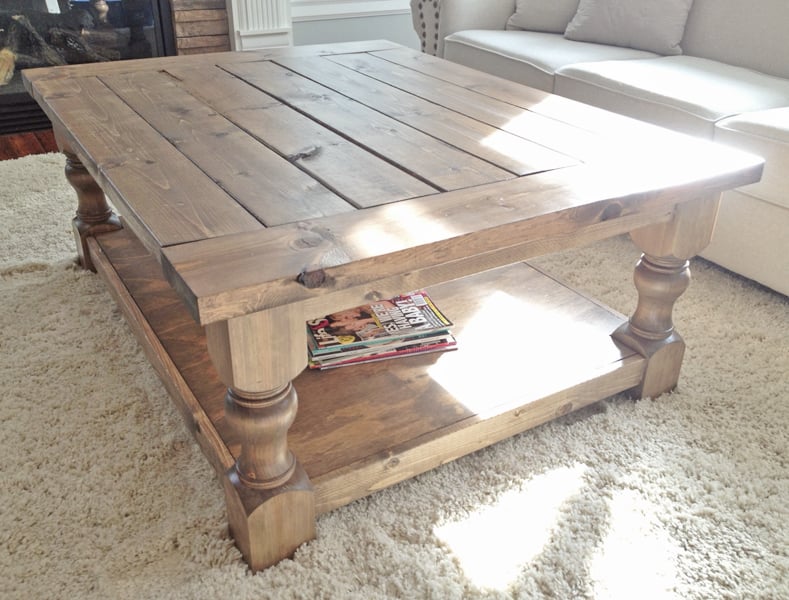
Built from Plan(s)
Estimated Cost
$200
Estimated Time Investment
Weekend Project (10-20 Hours)
Finish Used
Used 2 different stains to get a brown/gray finish. just one coat of each!
Minwax Weathered Oak & Minwax Special Oak.
Minwax Weathered Oak & Minwax Special Oak.
Recommended Skill Level
Beginner
Comments
Wed, 03/19/2014 - 07:39
I absolutely LOVE the finish
I absolutely LOVE the finish on this, thank for sharing!!! For the estimated cost you put $100, is that without including the cost of the turned legs? Did you get the legs through Osborne? I think I NEED to make this coffee table and use that finish!
In reply to I absolutely LOVE the finish by MichelleC
Wed, 03/19/2014 - 09:02
Thanks Michelle!
Now that you brought it to my attention you are absolutely right, I completely forgot about the cost of the legs. including the cost of those, it does come to $200 dollars, ill change that. I also did get the legs from Osbourne. As for the finish yes do it! I am really happy with how it turned out :) thanks again and let me know when your coffee table is done so i can check it out!
Cheers,
Justin
Wed, 03/19/2014 - 09:55
if you dont mind me asking,
if you dont mind me asking, in what order did you apply the stains?
In reply to if you dont mind me asking, by 2nervous2build
Wed, 03/19/2014 - 11:47
Hey 2nervous2build
not at all! here is a link as to what I followed.
http://ana-white.com/2013/05/vintage-graybrown-stain-pine
Ana shows exactly what to do :) mine didnt turn out as dark as her project, but am still lovin the table none the less. :)
Cheers,
Justin
Wed, 03/19/2014 - 09:55
if you dont mind me asking,
if you dont mind me asking, in what order did you apply the stains?
Sat, 04/26/2014 - 17:54
Amazing first build and the finish is TO DIE FOR!
Wow, congrats on your first build! It turned out amazing! And that finish? OMGosh, so incredibly beautiful! I love it! Thanks for sharing!
Tue, 05/20/2014 - 13:32
Hey!
Thank you Jen for checking out the coffee table! thanks for the compliment as well!
Tue, 05/20/2014 - 13:32
Hey!
Thank you Jen for checking out the coffee table! thanks for the compliment as well!
In reply to AWESOME 1st Build by RE
Fri, 01/02/2015 - 09:48
Thank you! Cheers, Justin
Thank you!
Cheers,
Justin
Fri, 01/02/2015 - 09:47
Hey Mandybeck!
Sorry for such a late response! incase you still needed to know, I made a typo and I did mean special walnut.
Thanks!
Cheers,
Justin
Fri, 07/17/2015 - 12:59
stain
Being as yours is much lighter (and i like it more than the darker). Did you use the wood conditioner and how long did you leave the stain on for? it almost looks like once it was on you were wiping it off. Love it well done :)
Also, do any of you guys use the paste wax when finished? I was thinking about following the stain with some poly to seal it. any suggestions?
Wed, 08/19/2015 - 09:47
An excellent finished project
An excellent finished project. Did you use 2x6 for the top as your wood looks a tad thinner?
Wed, 08/19/2015 - 09:47
An excellent finished project
An excellent finished project. Did you use 2x6 for the top as your wood looks a tad thinner?
Wed, 08/19/2015 - 13:58
Table Legs
Can you tell which legs and size you used from osborne?
Project looks amazing!
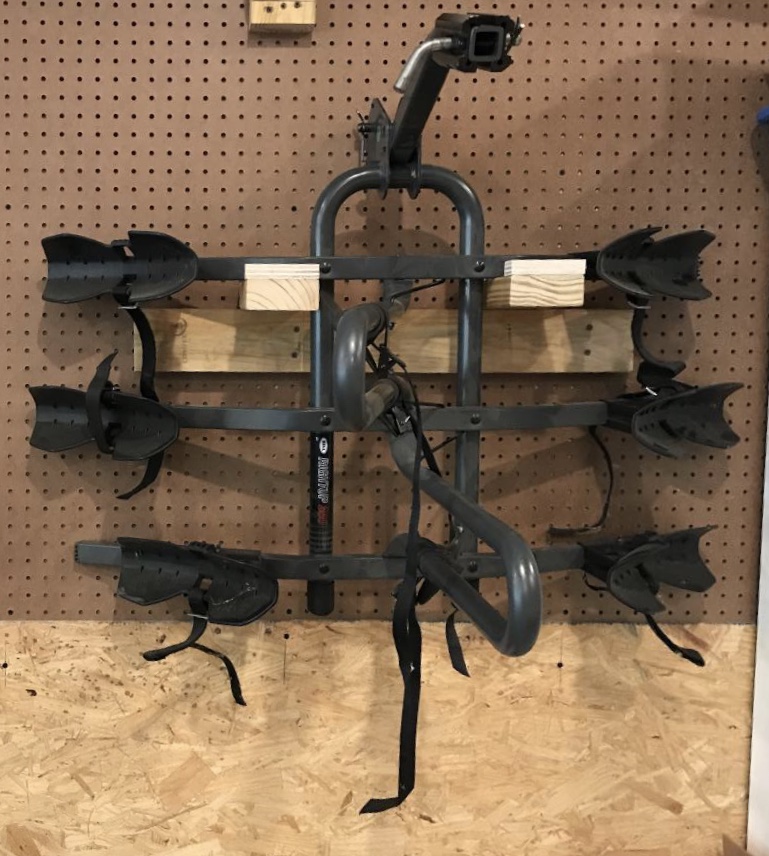
Tool Organizer
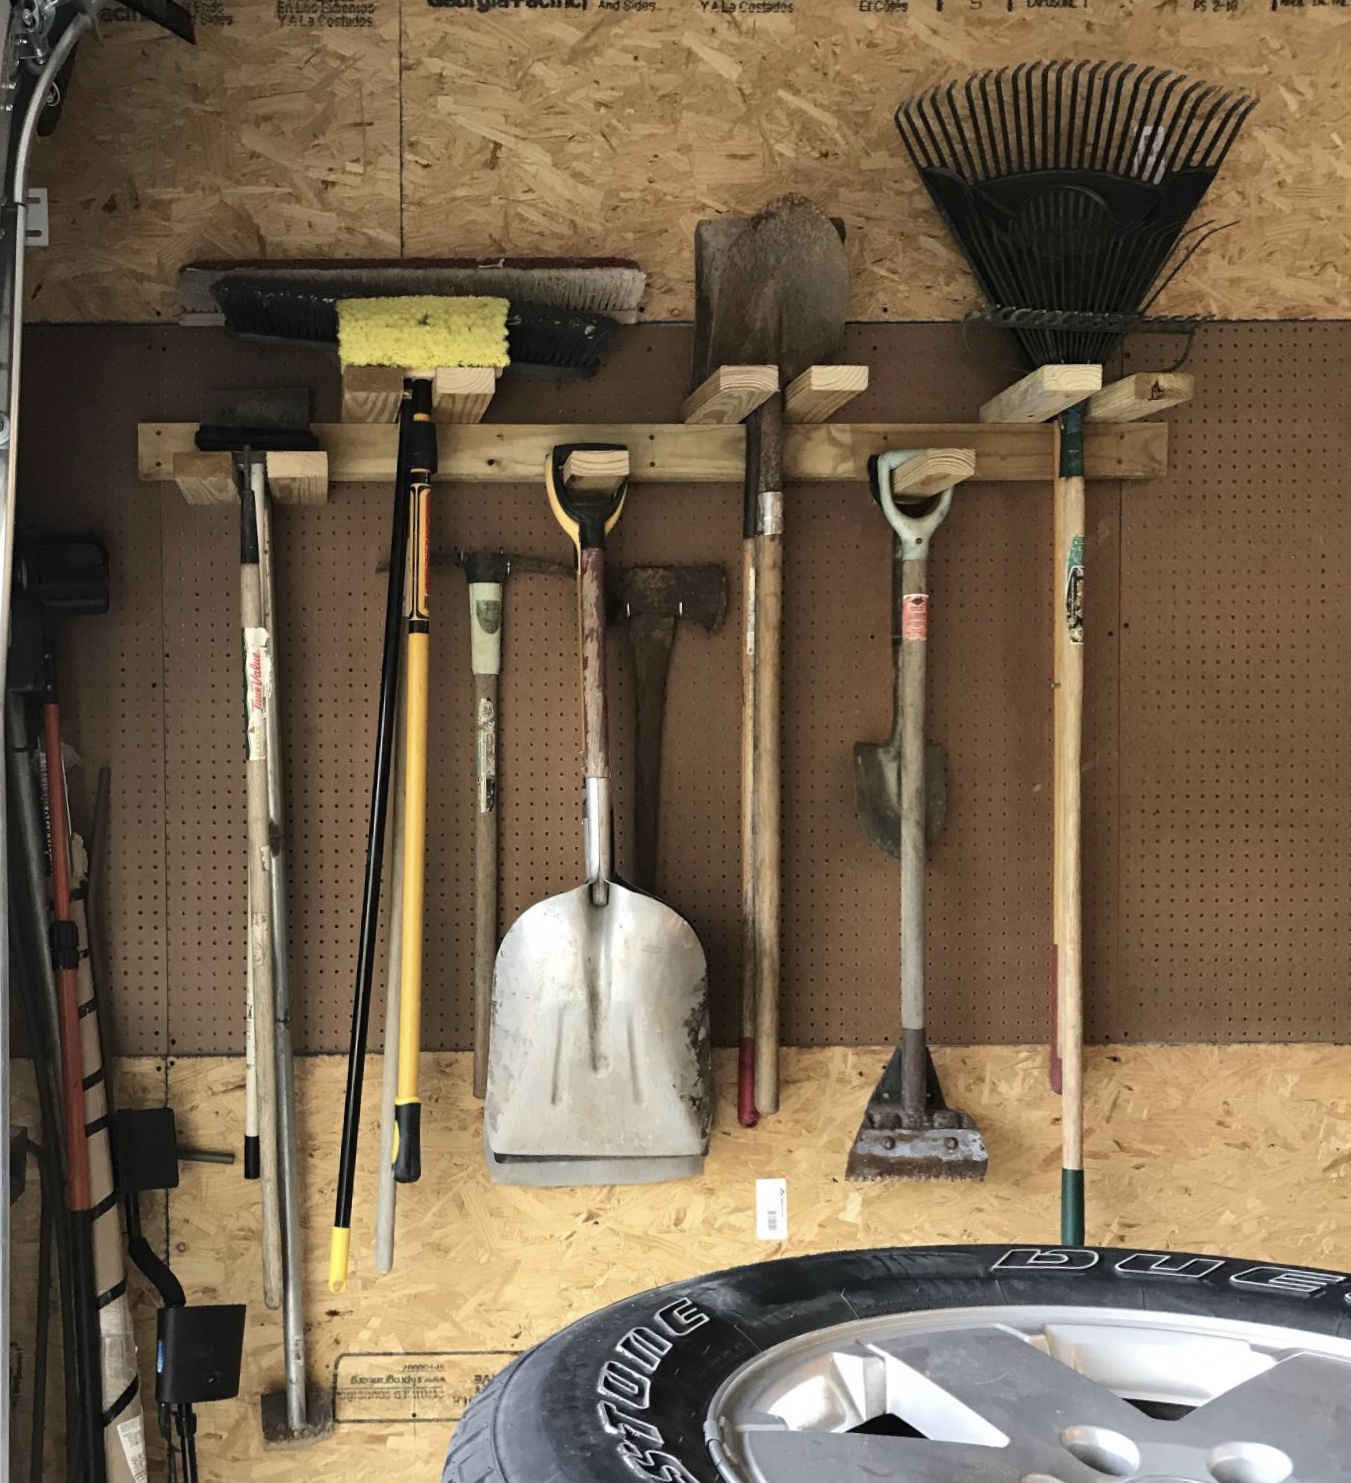
I’m very happy with my tool organizer. I also used the tool organizer idea for bracket to hang our bicycle rack. We love the way it all came out. Thank you so much for sharing!
We run a fence company. The best thing about this project is that it cost me $0!! I used 2X4 cutoffs that we were going to trash!
Built from Plan(s)
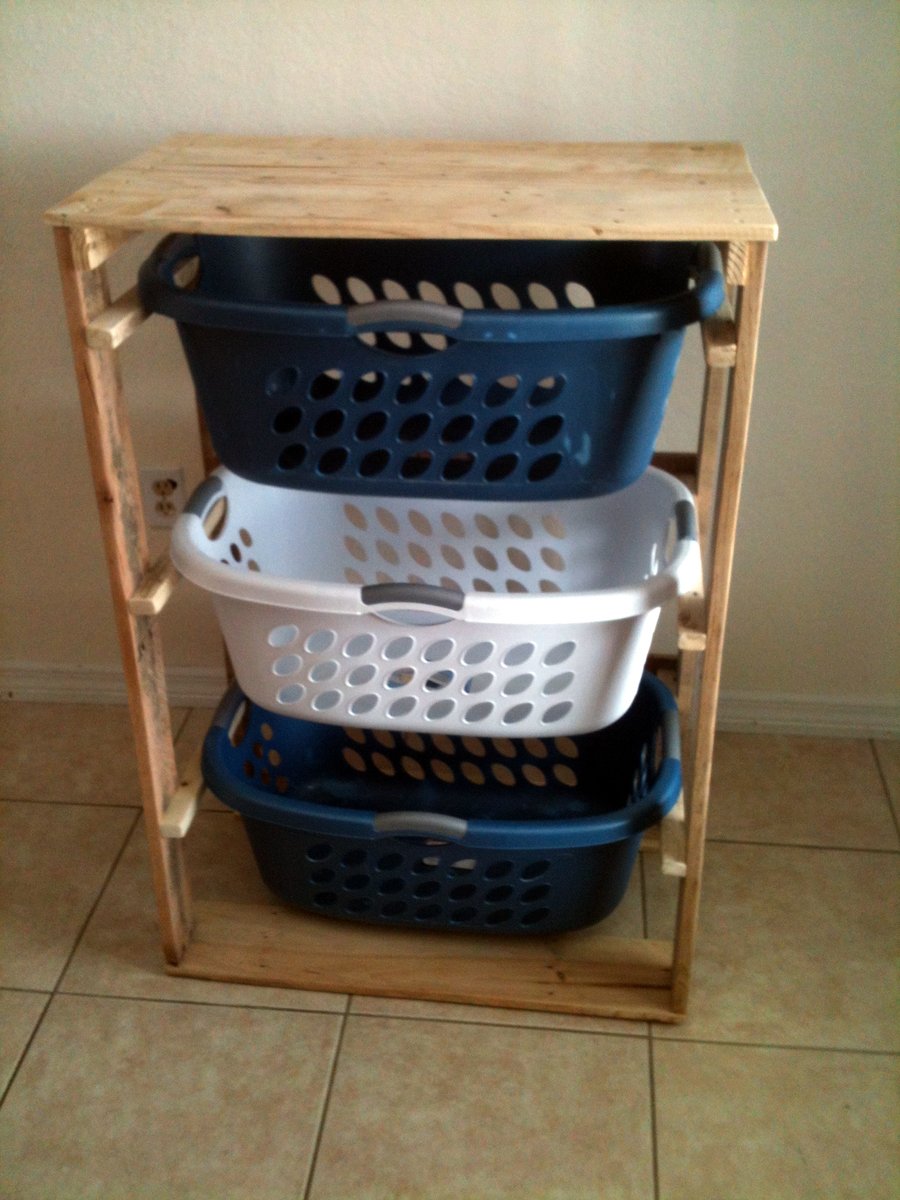
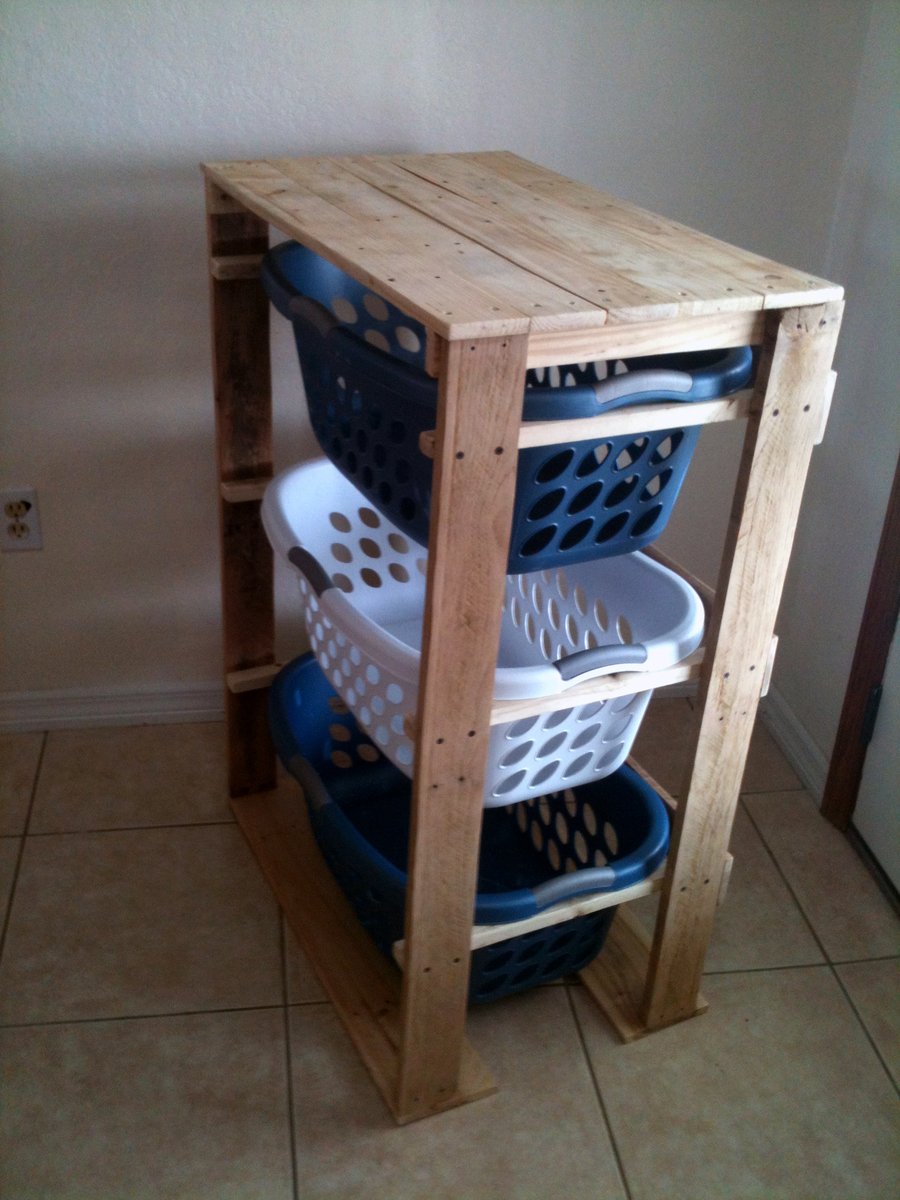
Pallirondack Laundry Basket Dresser
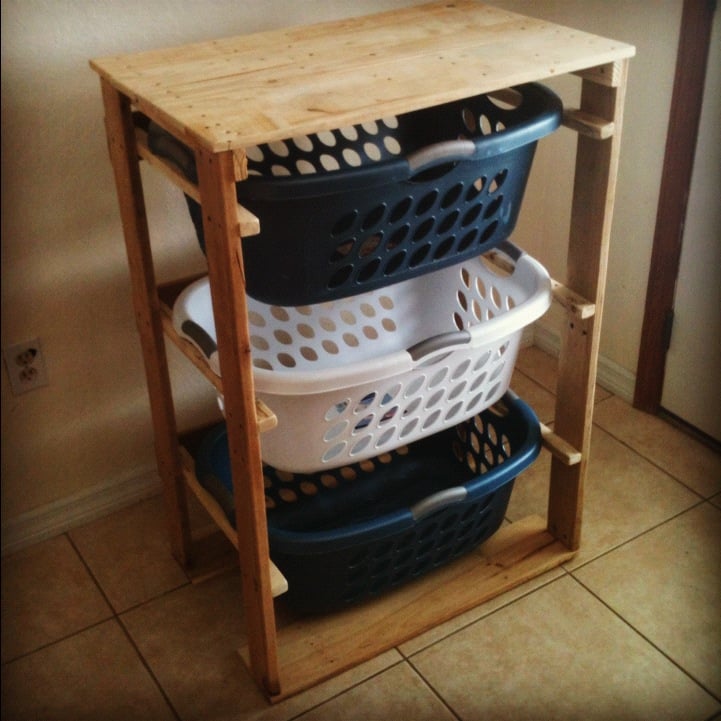
I showed my wife the Laundry Dresser featured on Ana White's website and she asked if I could make one for her, but not quite so tall. I also turned the orientation to fit our laundry room space. I used primarily oak from recycled pallets to build the Laundry Basket Dresser. She wanted a work space on top, so folded laundry, empty baskets, etc. all have a temporary resting place depending on the day. From start to finish, it took me about 6 hours. She plans to stain the piece at some point, but its already in use, so I'm not 100% sure that will ever happen until we move or something. ;-) Great idea and laundry room organization!

Built from Plan(s)
Estimated Cost
Half a box of screws
Estimated Time Investment
Afternoon Project (3-6 Hours)
Recommended Skill Level
Intermediate
Comments

Sat, 09/08/2012 - 17:39
very nice!!
Great job on this!! I love the open sides!! Thanks for sharing. :-)
Mon, 09/10/2012 - 10:22
great job`
I love the open sides, plus it makes it much more feasible to build with scraps repurposed wood, which I love. Thanks for the inspriation
Sun, 10/19/2014 - 06:16
perfect use of pallet wood
I have a pallet sitting against the garage that would be perfect for this
Looks fab, great job.
Fri, 01/09/2015 - 12:27
Laundry baskets...
Hi, I really like this project but was curious what size laundry basket you are using in the project?
Sun, 06/14/2015 - 20:16
laundry baskets
Soooo I made this according to the measurements and no laundry basket I find fit. Kind of dissapointed in the fact that this cool thing I just built doesn't have any baskets that will fit it. Any advice on finding a basket that fits?
Fri, 07/10/2015 - 20:14
Same here. No basket fits.
Same here. No basket fits. Did you ever find one?
Fri, 07/10/2015 - 20:56
Build to fit
I think the idea is to build it to fit the baskets you have or buy some and build around them.
DIY Murphy Wall Bed
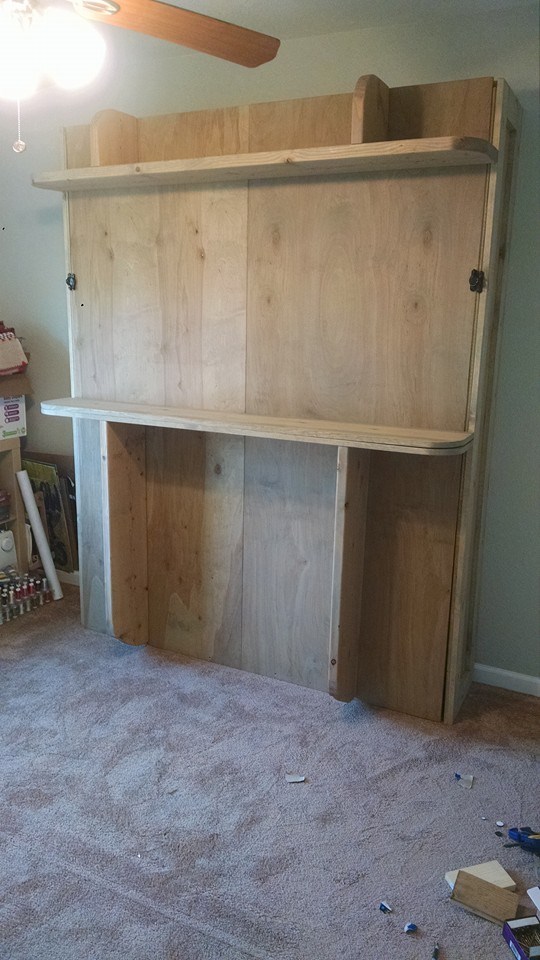
Just finished up my Murphy Bed project. Hope you like.
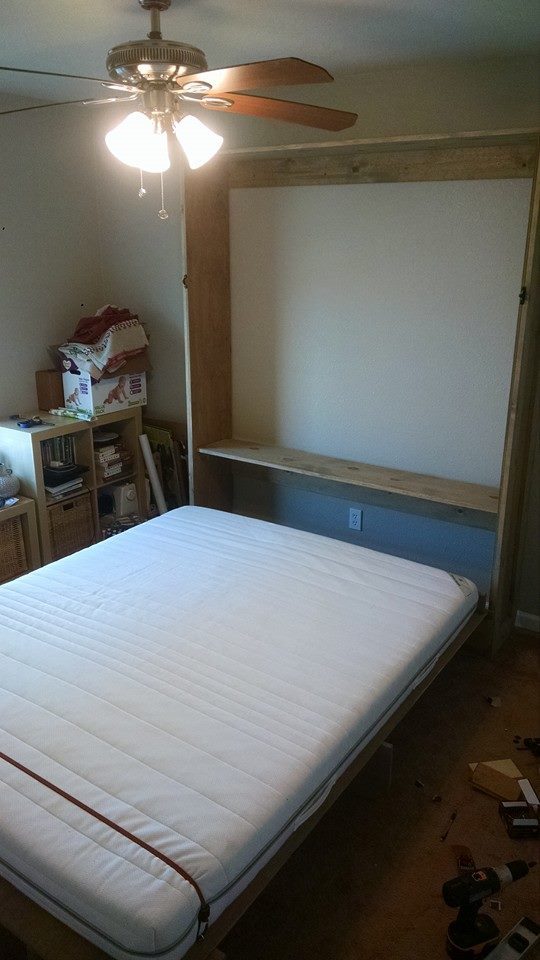
Built from Plan(s)
Estimated Cost
280.00
Estimated Time Investment
Weekend Project (10-20 Hours)
Finish Used
Weathered Oak Stain
Recommended Skill Level
Intermediate
Comments

Mon, 03/09/2020 - 20:30
Amazing. I’ve seen these and…
Amazing. I’ve seen these and have been looking for plans. May just have to dive in and interpret from pictures. You did a really great job, nice work.
Wed, 12/22/2021 - 14:06
The plans are for a…
The plans are for a different bed than the one in the picture.
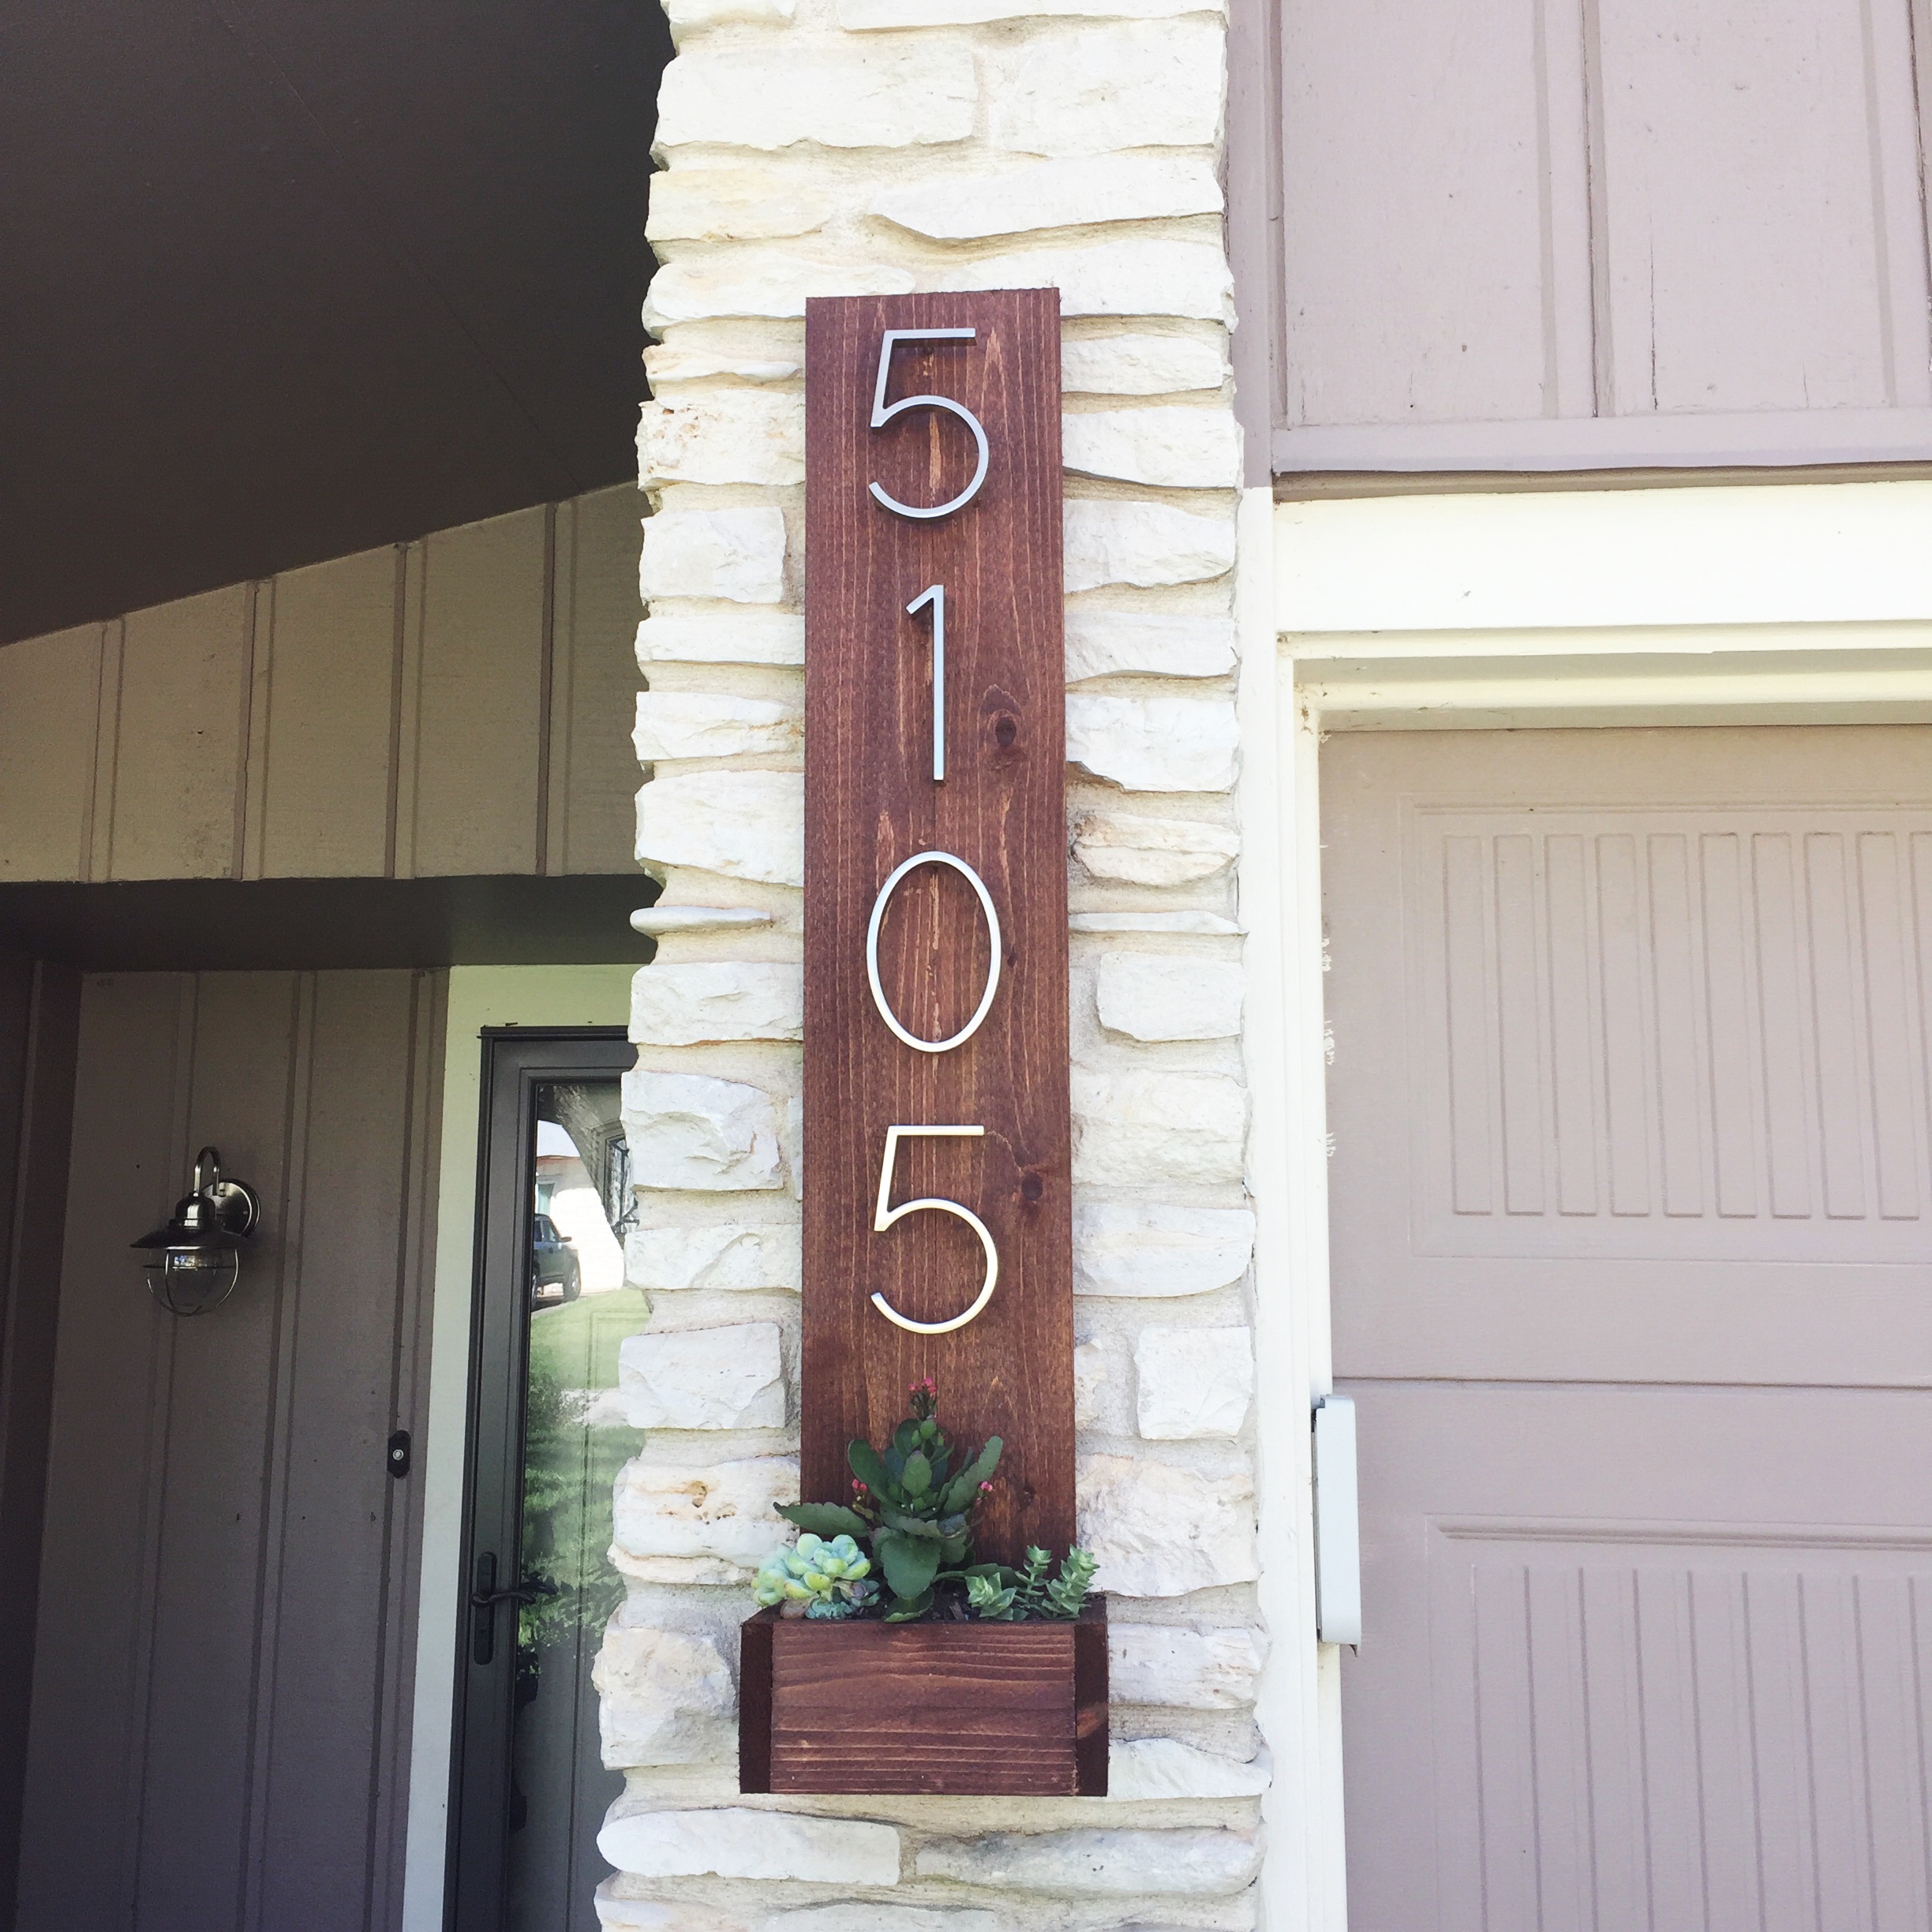
Cedar Street Number Planter
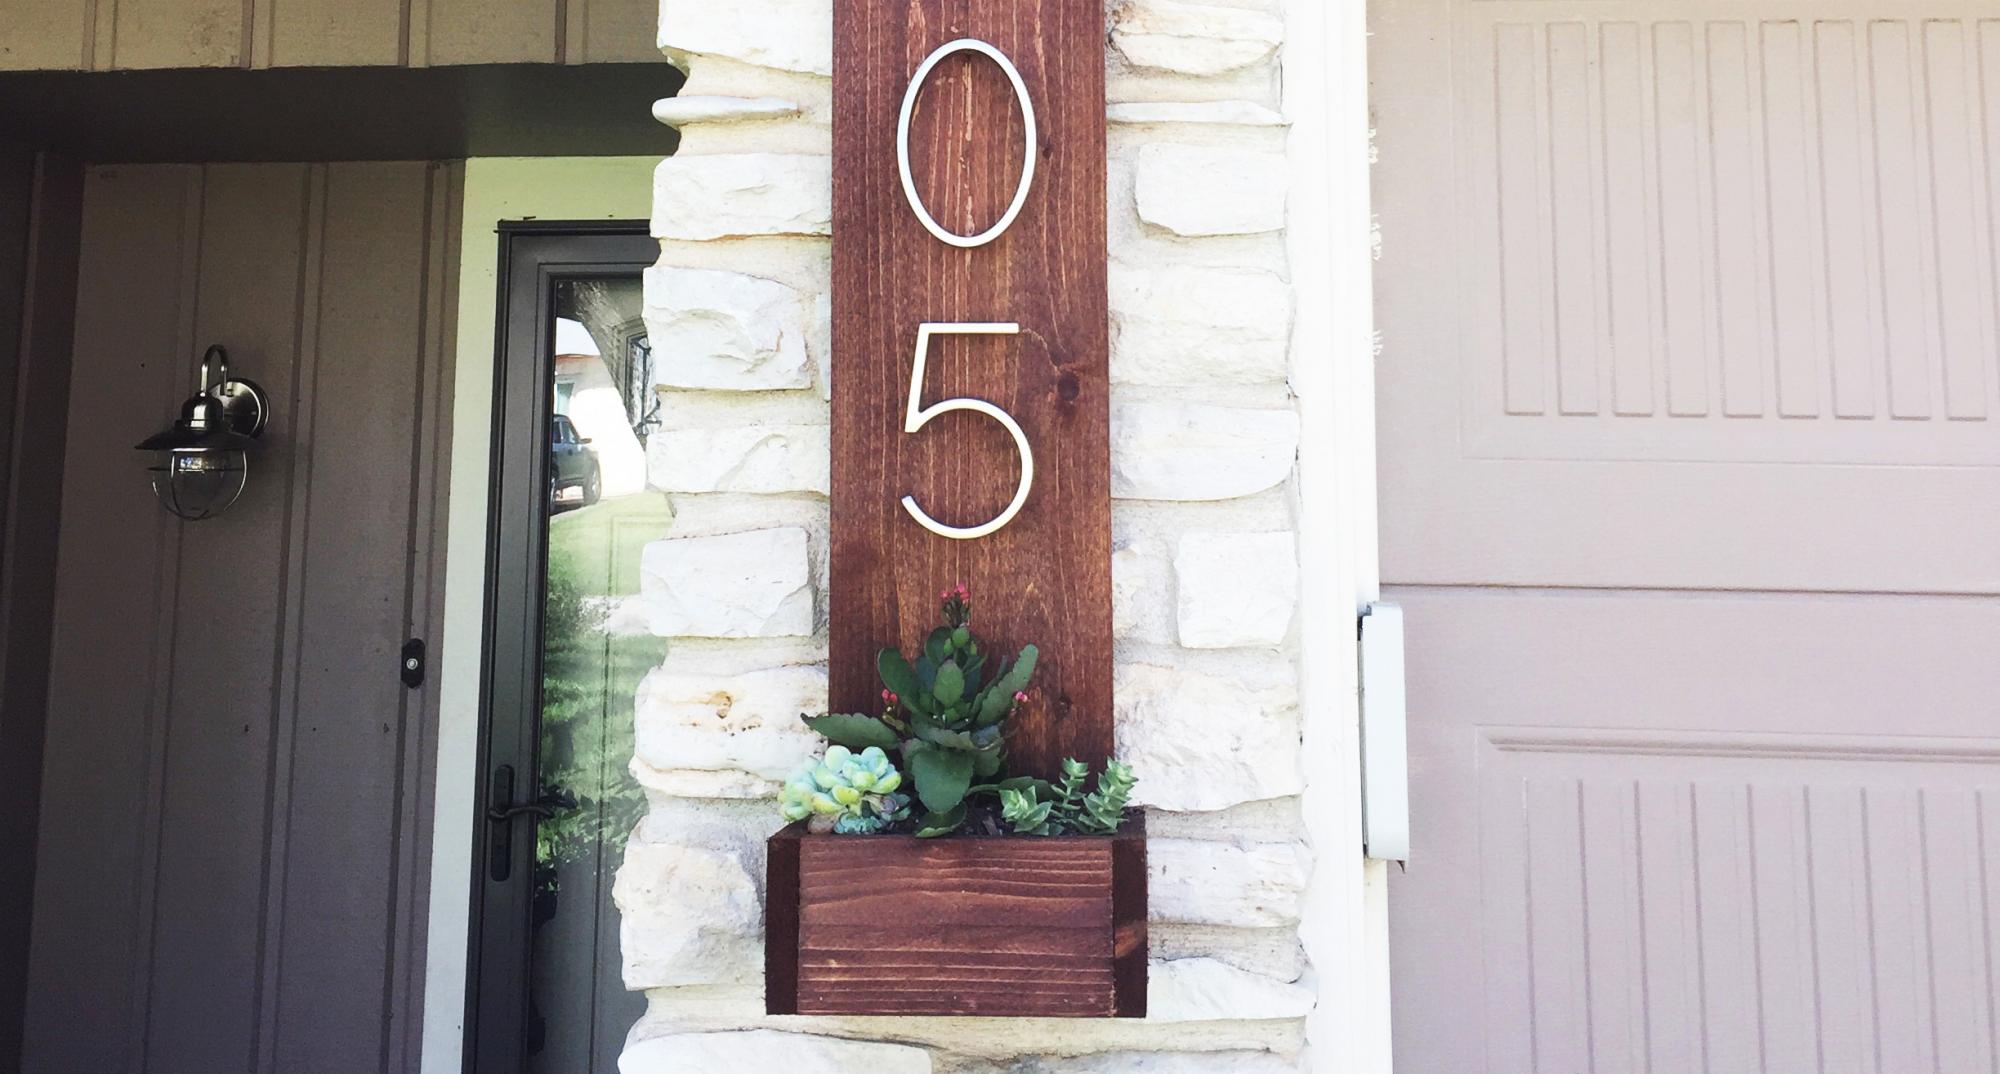
I was looking for a way to give our house some better curb appeal and decided our stree numbers could use a facelift. The majority of money spent on this project was for the numbers since I had enough spare cedar laying around.
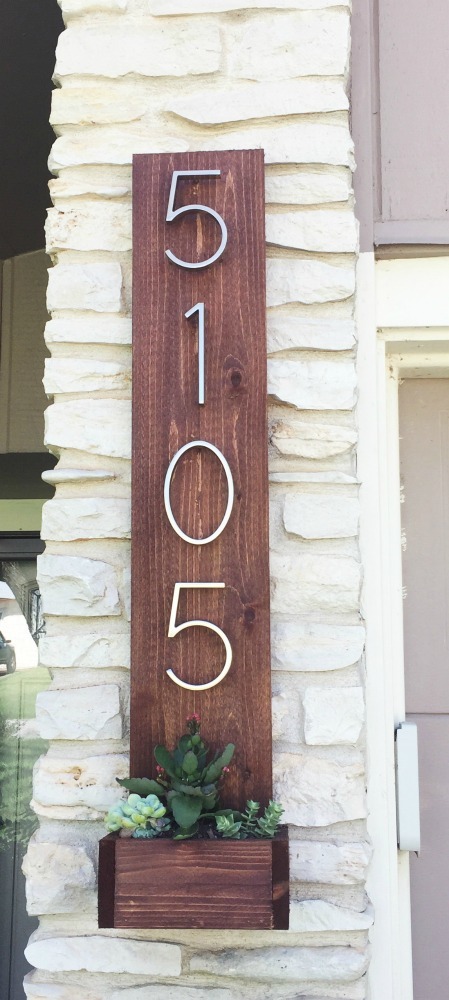
Built from Plan(s)
Estimated Time Investment
An Hour or Two (0-2 Hours)
Finish Used
Sedona Red
Recommended Skill Level
Starter Project
Comments
In reply to Numbers by jesseamber
Mon, 10/10/2016 - 09:02
I got them from Home Depot. I
I got them from Home Depot. I think you can also probably find them online through Amazon.
In reply to Numbers by jesseamber
Mon, 10/10/2016 - 09:03
numbers
I got the numbers at Home Depot. I'm pretty sure you can also find them online through Amazon.
Mon, 10/24/2016 - 15:34
Measurements
So pretty! What are the measurements. Did you use real plants ?
Husky Farmhouse Table
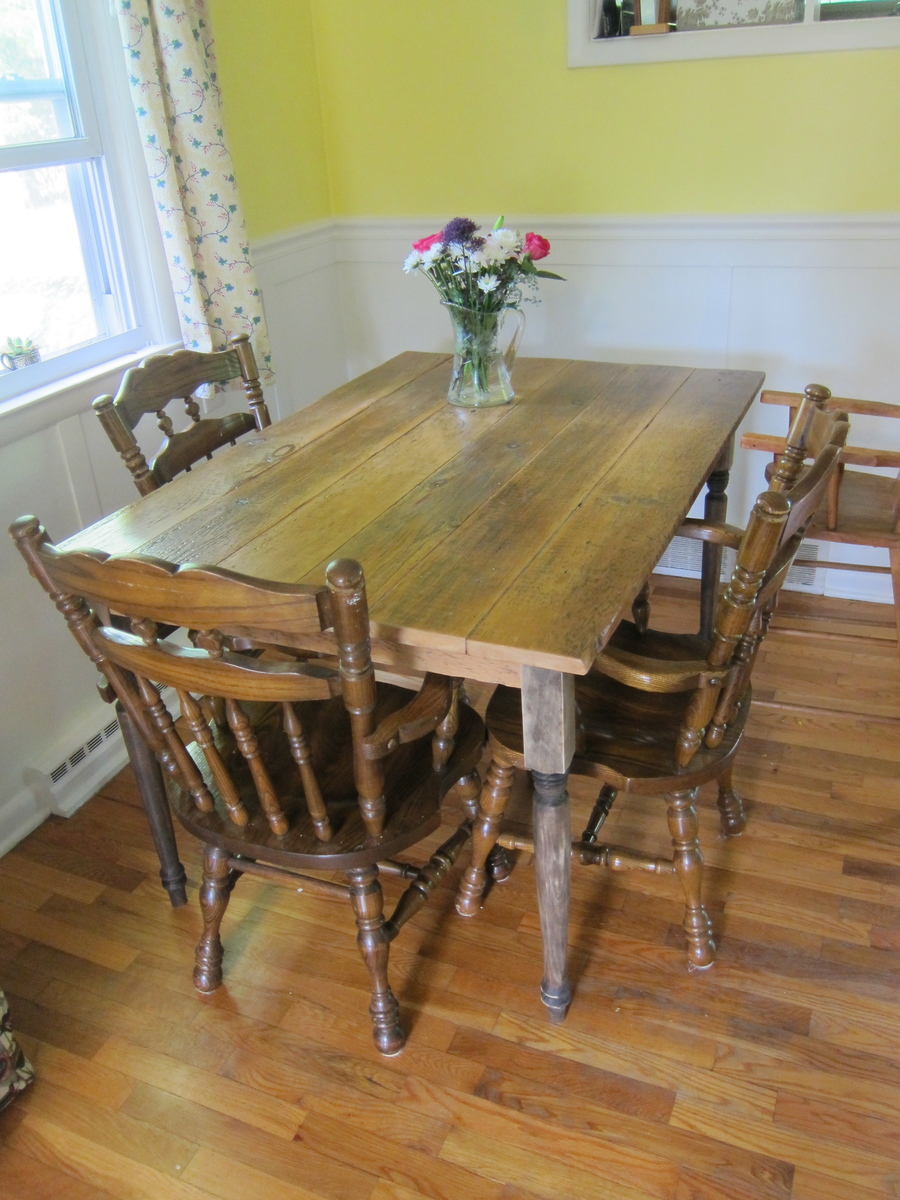
I've been wanting to build a "plank" style farmhouse table for a long time. I used metal corner brackets to allow for easy removal of legs of the table. However, I found the corner brackets quite hard to work with. I think they're probably sturdier than just pocket holes, so I guess that's good.
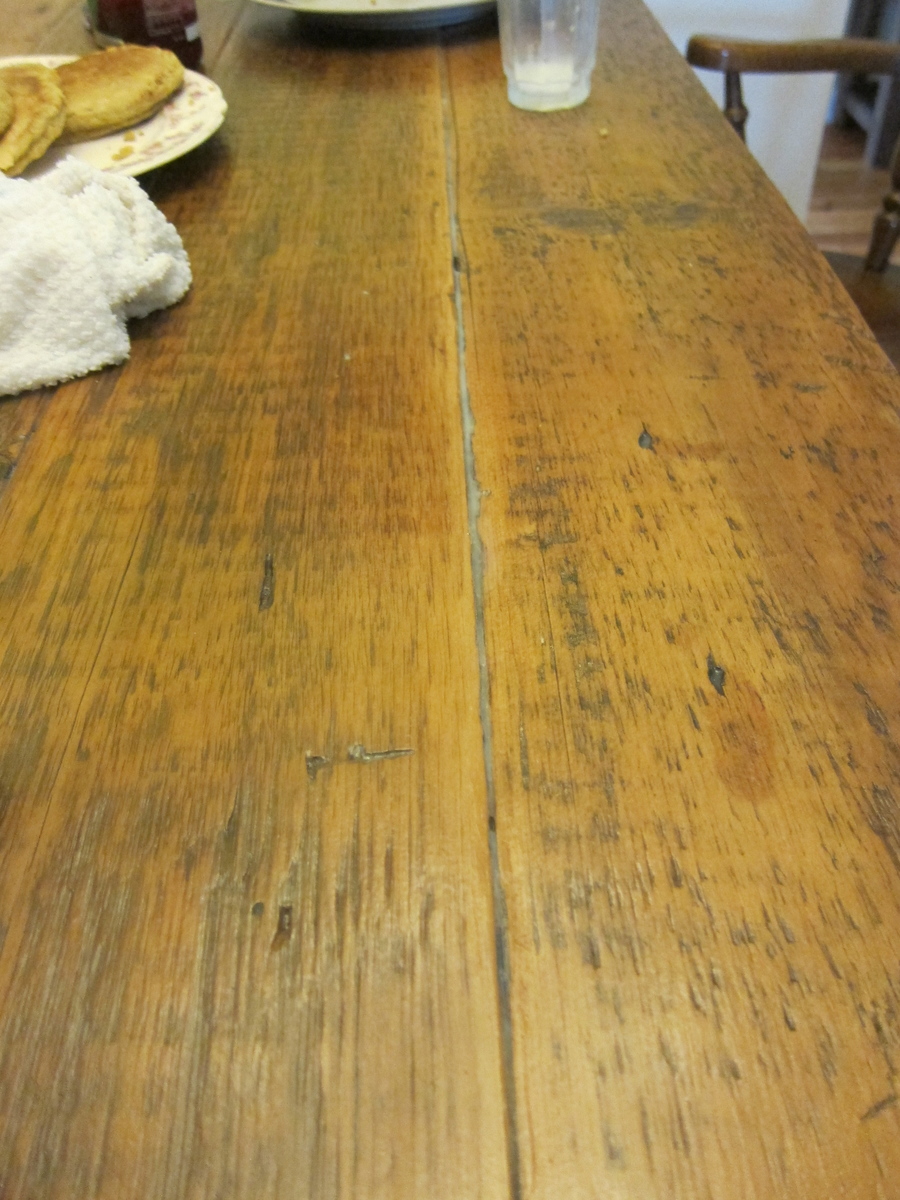
I used 100-year old barn wood and it looked so beautiful. BUT...I have a two year old and I'm expecting another child soon, so I wanted to plug up some of the gaps in the wood (like old nail holes that went the entire way through the boards) and put something down to preserve the quality of the wood.
After researching a lot of ways to fill in the gaps in wood tables, I tried a few things.
First I tried clear silicone. I think this would have been a great option if the holes were just a little bit smaller. It ended up just looking like plastic in the spaces, though. So I scooped that out and then tried wood filler. The wood filler looked terrible under polyurethane, though, and no matter how much I tried to get them to match, it just looked like a different color. Finally, I ended up using painter's tape on the bottom of the table under slats and holes and filling them slowly with polyurethane (I used an eyedropper for this task!). It worked really well. I should also say that I sanded the already planed boards as much as possible to reduce the gaps between boards.
I'm really pleased with my new table!
I used only poly on the top. The wood is its natural color.
Thanks for the idea, Ana!

Built from Plan(s)
Estimated Cost
Maybe $100 (wood, brackets, legs, poly)
Estimated Time Investment
Weekend Project (10-20 Hours)
Finish Used
Clear, water-based polyurethane.
Recommended Skill Level
Beginner
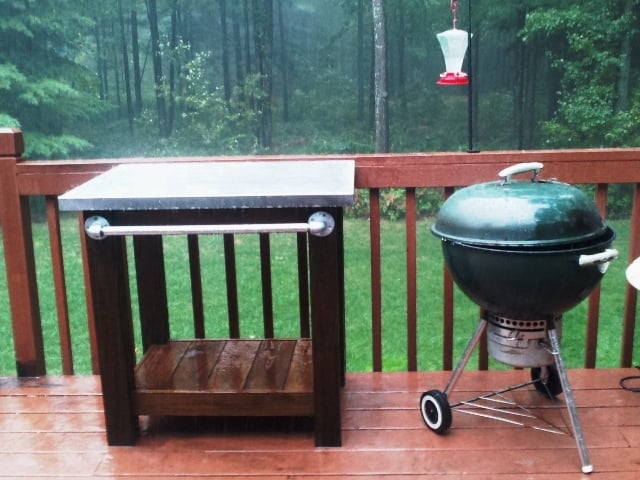
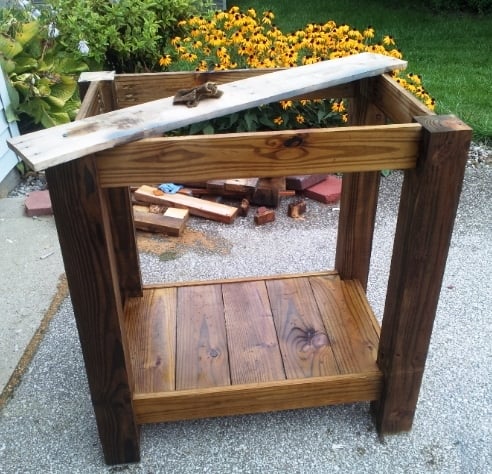
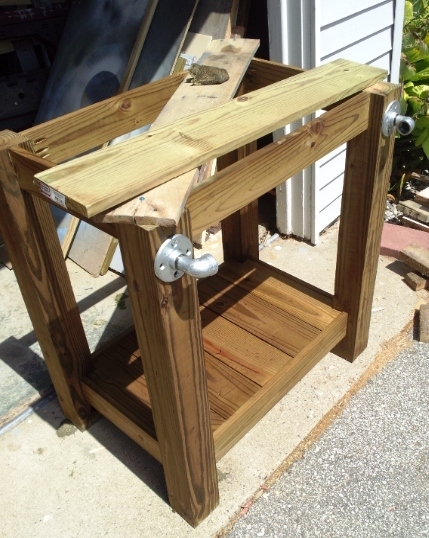
Grill table with stainless steel top

I made this table to go next to an outdoor grill to be used as a food prep area or just a surface for holding ingredients (instead of using the deck railing!). The top is stainless steel which fits tightly over 2 3/4" pieces of plywood laminated together. The bar/handle in front is made out of galvanized pipe. All wood was treated.
Legs - 4x4 posts
Bottom shelf - 1x6's
Sides - 1x4's
Top - 2 pieces of 3/4" plywood laminated together with a stainless steel top (custom fit) over top
Towel bar - galvanized pipe (cut and threaded to size at Lowe's), floor flanges and 90 degree elbows
Estimated Cost
$120
Estimated Time Investment
Day Project (6-9 Hours)
Finish Used
I used Kona stain but since it was over treated wood the stain did not take as dark as it should have. I will have to restain this piece after it has completely dried out.
Recommended Skill Level
Intermediate
Comments

Thu, 05/15/2014 - 10:33
Stainless Top
Sorry about the late reply! Yes, I just gave my dimensions to a local steel supplier and they made the top. I think I have about $40 into the stainless. They didn't weld the corners but I've never had an issue with them.

Sat, 04/26/2014 - 15:41
Stainless steel sheet metal
I too would like to know your source for the sheet metal.

In reply to Stainless steel sheet metal by Pursuit of Handyness
Thu, 05/15/2014 - 10:35
Stainless Top
I just found a local steel supplier, told them what I need and they formed the top. It cost me around $40 (without welding of the corners). I took a fine grit sandpaper to it afterward to scuff it up so it didn't look so bright.
Wed, 04/30/2014 - 12:55
Grill table with stainless steel top
I would like to know are there any plans available to make this table? I am very impressed of its design.
In reply to Grill table with stainless steel top by AMR4412
Thu, 05/15/2014 - 10:46
Plans for top
No...I didn't have any plans when I built it but it's a very simple concept. I chose to use all treated wood since I knew it would be sitting outside unprotected. However, my 4x4 posts weren't square so this caused a lot of problems and everything was built to fit. I believe I just used 4x4's, 1X6s (for the bottom shelf) and 1x4s for the sides (top and bottom). For the top, I just laminated 2 pieces of 3/4" plywood together to bulk it up and then had the stainless top built to fit. It fit perfectly so I didn't glue it to the plywood. This makes it easy to remove and clean, if necessary. For the galvanized pipe (towel bar), I bought it at Lowe's and had them cut/thread it to fit my dimensions.