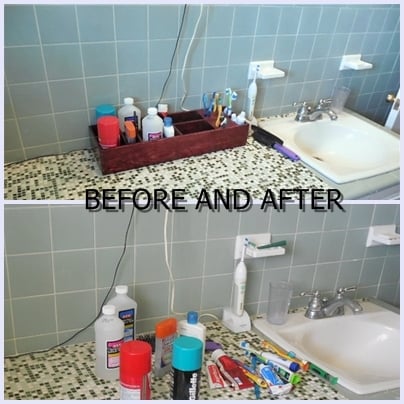
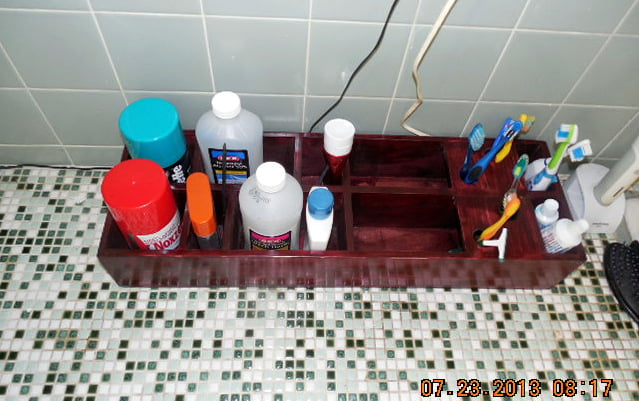
Community Brag Posts

Teen Girl's Bedroom

Submitted by Anonymous (not verified) on Mon, 07/04/2016 - 17:47

This was built for my daughter, who is 12. The storage bins were bought at Bed, Bath, and Beyond.

Built from Plan(s)
Estimated Cost
$200
Estimated Time Investment
Day Project (6-9 Hours)
Finish Used
Semi gloss white
Recommended Skill Level
Intermediate

Dumpster Dresser

Love Ana's Dumpster Dresser. It is the perfect addition to our guest bedroom!

Built from Plan(s)

Comments

nekeroom58

Thu, 08/20/2020 - 07:39

Your dumpster dresser looks great I hope that mine looks as good as yours. I'm making the Dumpster dresser and it's turning out pretty good would I be able to post my picture of the dresser here?

Rustic X Coffee Table in Cedar

Submitted by daveJay on Fri, 04/11/2014 - 07:16

This is my first real piece of furniture I've built. We decided to build it in Western Red Cedar because our local home improvement store had a good selection of it. It was pricier than pine, but it holds stain really well and is really beautiful.

I modified the plan and bought a 4x4 for the legs, then I cut that down to 3" x 3" exactly with my table saw. That way it doesn't look like a standard cut of wood, but something more custom. As a result I had to put corner notches in my bottom piece so that it would fit in with the legs. That was tricky to do, but would have been easier if I had a jigsaw

I made a few measuring errors and had to correct it by trimming down the table top so there was only an inch overhang on the edges. So this is actually a few inches less deep than the plan called for, but it worked out ok I think.

With the X's I laid them on top of the legs and traced a line to cut rather than trying to cut an exact miter. I also traced it so that I'd cut a bit off of the top and side of the corner so that it fits in nice and snug on both edges.

I also traced the intersection lines. Then I set my table saw (don't have a circular saw) to 1/2 an inch and just cut out several notches in between the intersection lines so the to X pieces could overlap each other. A "halved joint" I believe it's called.

Built from Plan(s)
Estimated Cost
$120
Finish Used
I finished it with a coat of Minwax Honey Maple gel stain followed by some Minwax Paste Finishing Wax. Just put a thin layer of wax on, wait for it to dry several minutes and then buff it out with a clean rag till it's got a nice shine.
Recommended Skill Level
Beginner

Distressed cabinet

Submitted by Doug B on Thu, 07/07/2016 - 13:30

A cabinet that I built from inexpensive material. The top is construction grade 2x6 with the front edge cut with a jigsaw set on an angle to form a faux live edge, biscuit join with pocket screws from the underside to add other 2x6 boards to obtain the depth required. After sanding I masked off about 1 inch in from the live edge with a wavy edge before staining then removing the masking tape to apply varnish. I have replaced temporary screws in "gate hinges" with better quality screws since this photo was taken.

The cabinet was built from new cedar fence boards & the rounded corner pieces at the front edges are round fence posts with a 1/4 notch cut out to wrap around the corner.

Estimated Time Investment
Weekend Project (10-20 Hours)
Finish Used
Flat white paint.
Recommended Skill Level
Intermediate

Modified Grandy Barn Door Console

Submitted by dickeydee on Sun, 05/03/2020 - 18:32

Modified the plans to shorten the console. Used hinged doors because of the cost of the sliding door hardware. Added wine rack and wine glass holder. Added multi colour LED light strips to the top centre.

Built from Plan(s)
Estimated Cost
$300
Estimated Time Investment
Week Long Project (20 Hours or More)
Finish Used
Stain was a 50/50 mix of Briarstone and Flagstone. Semi gloss finish as well as semi gloss white paint.
Recommended Skill Level
Intermediate

My daughter's beautiful dress up wardrobe

Submitted by Motsy on Thu, 06/21/2012 - 12:31

This project was very much needed in my house! My daughter loves playing dress up and is obsessed with all things pink and princess-y. It has been driving me crazy that she doesn't play dress up as much as she wants to, though, and the reason why is because we didn't have a good way to store/display her things. Up until we built this it all stayed in this storage bin, but since you had to pull it out in order to even see it, she never played with it. So once I saw this plan I knew it had to be ours. I'm so glad we did it! It turned out beautifully!

My husband built it (his second woodworking project), and, like his last project, he did a great job. No complaints or issues at all. I primed (although I doubt that was necessary) and painted it. I actually did all of the painting other than the letters before he built it, and that turned out nicely. My only complaint was the letters. I bought some stencils from Hobby Lobbby and used a smaller brush to paint them on. For one thing I wish I had of been more careful and paid more attention to how straight the letters were. For another, although you can't tell unless you're up close, there are spots where the paint pooled up under the stencil. My husband sanded it down as much as he could without messing it up, but it's still there a little. I'm no painting expert so I'm not sure how to go about doing this without having that happen. Even with those things, though, I'm so happy with it, and my daughter has been happily playing dress up all week!

Estimated Cost
$30 for lumber
Estimated Time Investment
Afternoon Project (3-6 Hours)
Recommended Skill Level
Beginner

Double Twin Lift Bed.

Submitted by rojohn on Sun, 04/13/2014 - 14:15

My sister asked me to look into building a double loft bed for my two nieces, since the younger was outgrowing her bed and found a plan for one from "The Hand Made Home". http://www.thehandmadehome.net/2011/08/how-to-build-a-loft/
I didn't love how their plan had a rope ladder and no center support in back, so I changed that up. Took around 50 hours work time total, but was a lot of fun and both of my nieces totally loved it, so it was well worth the time and energy! :-)

Estimated Time Investment
Week Long Project (20 Hours or More)
Finish Used
4 coats of Minwax Satin Polyutethane
Recommended Skill Level
Intermediate

Rustic x hall tree

Submitted by Kristi88 on Tue, 05/05/2020 - 15:03

This was my first project and was a great one for someone just starting out. I really enjoyed the building part but was disappointed in how the stain turned out. I stained it with sunbleached by varathane but then made the mistake of finishing it with an oil based polyurethane which turned the color slightly green.

Built from Plan(s)
Estimated Cost
150 CAD
Estimated Time Investment
Day Project (6-9 Hours)
Finish Used
Sunbleached by varathane with a polyurethane finish.
Recommended Skill Level
Beginner

Wood Christmas Tree

Submitted by Anonymous (not verified) on Thu, 12/28/2023 - 14:10

Christmas tree for hospital when my wife works. We used 1x4 lumber with 4x4 spacers. She painted tin cans and put greenery in them and we cut a star for the top with a scroll saw.

Wendell Londsey

Seasonal And Holiday

Simple Potting Bench

This is a very simple weekend project, it took longer to put the finish on than to build it. It is made out of spruce and pine shelves. The finish is done with homemade vinegar steel wool stain for the shelves and paint for the legs. We distressed the legs by sanding and wiping stain in some areas. Finished with 3 coats of exterior poly.

Estimated Cost
50
Estimated Time Investment
Afternoon Project (3-6 Hours)
Finish Used
homeade stain , paint , varathane diamond outdoor finish
Recommended Skill Level
Beginner

Comments

Cyn-d Williams (not verified)

Sun, 07/29/2012 - 15:37

I love the potting bench that you want to build from the Southern Living magazine.
How can I get my hands on those plans?

Apothecary Console

Submitted by Jorlik on Wed, 04/16/2014 - 09:08

Built straight off the plans except I added drawer slides.

Built from Plan(s)
Estimated Cost
250
Estimated Time Investment
Week Long Project (20 Hours or More)
Recommended Skill Level
Intermediate

Re-tie-r-ment Ottoman

Submitted by Anonymous (not verified) on Wed, 07/13/2016 - 21:30

Use those ties and a suit you aren't using anymore now that you are retired! Sit back and relax!!

Built from Plan(s)
Estimated Time Investment
Weekend Project (10-20 Hours)
Recommended Skill Level
Beginner

Double Drawer Channing Computer Desk

Submitted by Ji on Sun, 07/01/2012 - 15:44

We made some alterations to Shanty2Chic's design. Rather than one side open we made two cabinets with drawers. It made it a little longer and deeper than expected but we are still happy with the desk.
We have a six month old baby, so we build during naps and when we can convince grandma to watch her.

Built from Plan(s)
Estimated Cost
$200
Estimated Time Investment
Weekend Project (10-20 Hours)
Finish Used
Minwax American Walnut and Briwax.
Recommended Skill Level
Intermediate

Comments

JoanneS

Sun, 07/01/2012 - 16:21

Wow, this looks amazing! Looks better than what you would see at a furniture store, and the finish is so beautiful! Awesome job.

Ji

Mon, 07/02/2012 - 11:57

Thanks alot! My husband and I were worried about the staining process. The stain didn't look very good at first but after a couple more coats it started to get better. We love to build but we are still struggling with finishing.

Jason S (not verified)

Wed, 08/22/2012 - 20:44

Ji,

If you are finishing soft woods, especially pine, it is woth the few dollars it costs to but some pre-finish wood conditioner. The conditioner will help eliminate the irregularities in stain color on soft woods. It doesn't really cost too much and it really does help eliminate blotches, streaking and helps get a more consistent color.

Modern Craft Table for Two

This was my first project! I love this site. My husband and I needed a work space we could share. I loved the width of the craft table so I extended it to the full 8ft of plywood available and added a support shelf. Voila! Table for two!

Built from Plan(s)
Estimated Cost
$400
Estimated Time Investment
Week Long Project (20 Hours or More)
Finish Used
Red Mohogany
Recommended Skill Level
Beginner

Modified Modern Farmhouse Bed Frame

My husband and I built the Modern Farmhouse Bed Frame, but we modified it. We wanted a taller bed, so we cut our 4x4’s at 18” instead of what the plans called for of 14”. We stained it in Minwax - Dark Walnut and used Polycrylic in Clear Matte to finish it. We also made our own matching nightstands as we preferred taller and different ones than the ones shown as the matching set on this site. We are so in love! The bed is super sturdy!

Built from Plan(s)
Estimated Cost
125
Estimated Time Investment
Weekend Project (10-20 Hours)
Finish Used
Minwax - Dark Walnut and Polycrylic in Clear Matte
Recommended Skill Level
Intermediate

Comments

DIY Armoire Cabinet

Submitted by Anonymous (not verified) on Thu, 01/04/2024 - 08:17

After searching for a long time for a storage piece to fit the space I needed I finally decided to build one! Thank you for the plans! (Of course I had to size it down and adjust it to fit my needs.) Absolutely love it!

Patricia Cable

Built from Plan(s)

Craft Desk

Submitted by grandmaof2 on Wed, 07/04/2012 - 11:13

I found some measurements from this site and another site in order to build my craft desk. Thanks Ana

Recommended Skill Level
Intermediate

Comments

Back