Community Brag Posts

Mudroom bench
We built upon the mudroom bench plans. The length dimensions had to be modified to fit our room, but for the most part we stuck to the directions. We switched to metric for this project and it was the best decision. Make sure you have a Kreg Jig.
Built from Plan(s)
Estimated Cost
350
Estimated Time Investment
Week Long Project (20 Hours or More)
Recommended Skill Level
Intermediate
Seasonal And Holiday
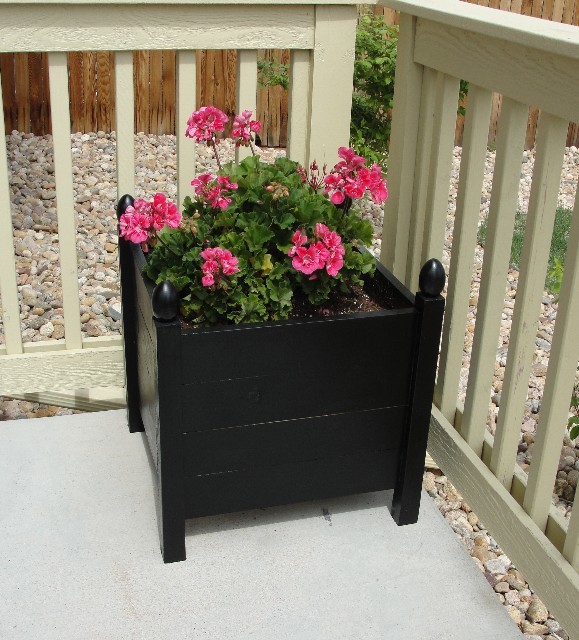
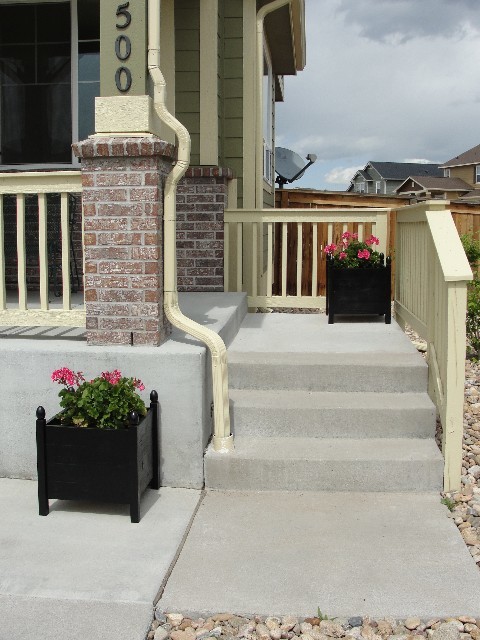
Square Planters
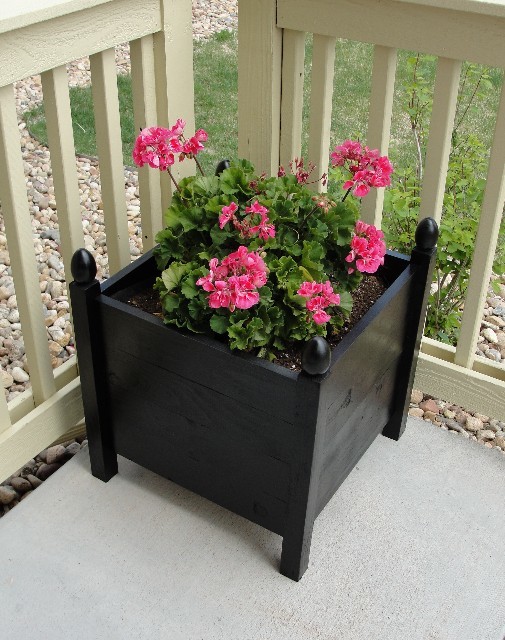
When Ana posted plans for these a few weeks back I knew they would be perfect for the front of my house. Instead of putting them on the never ending "to do" list, I just made them!
I kreg jigged them all together.
I used wooden eggs from the craft store for the finials.
Lined them with landscaping fabric.
Fairly easy to make and I love them, but I think I need a couple more :)
Built from Plan(s)
Estimated Cost
$20
Estimated Time Investment
Afternoon Project (3-6 Hours)
Finish Used
Kryon black satin spray paint
Recommended Skill Level
Beginner
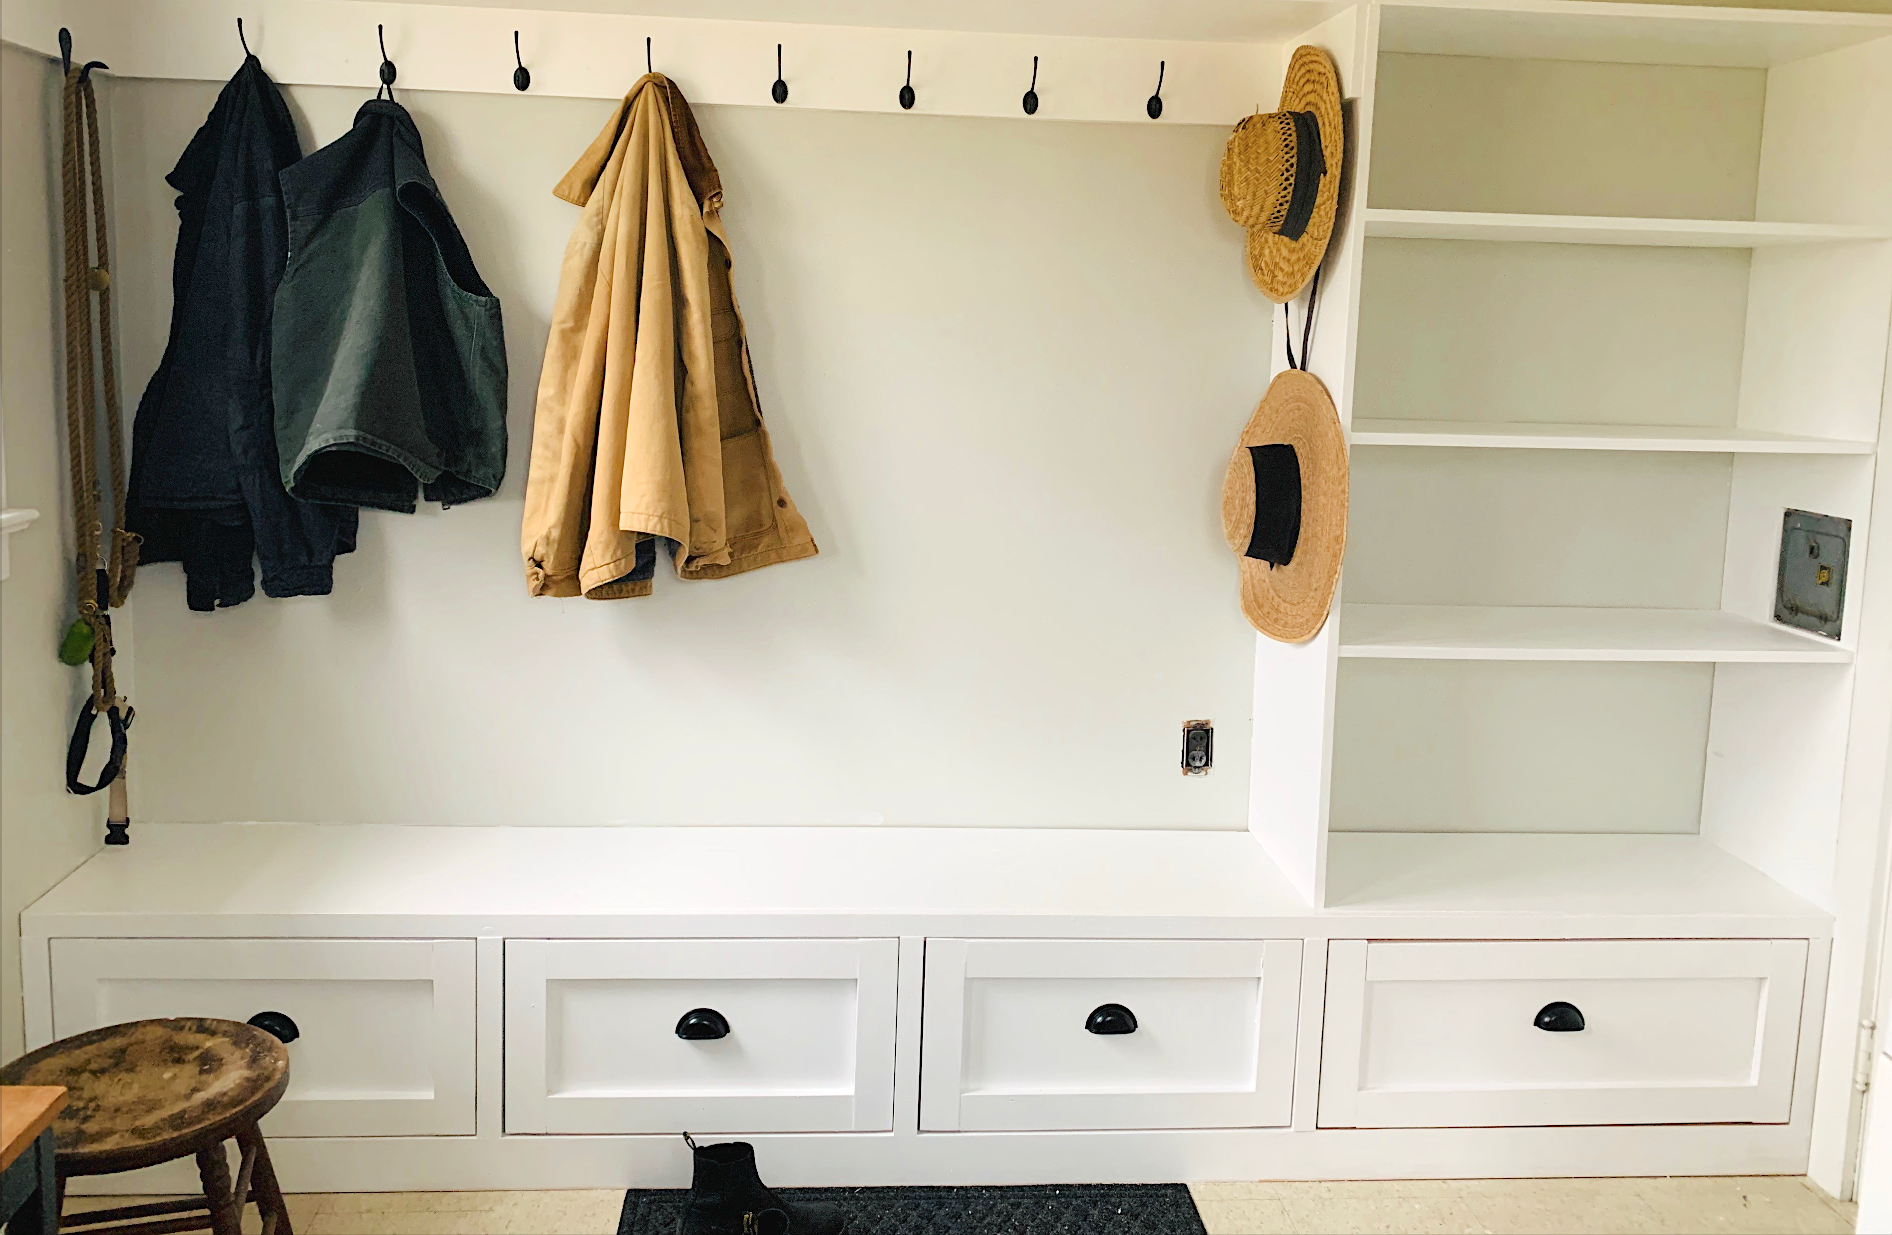
Barn beam ledge with hidden storage
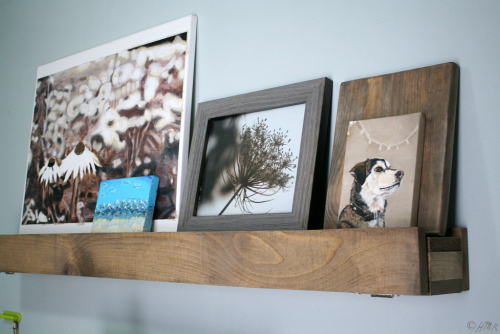
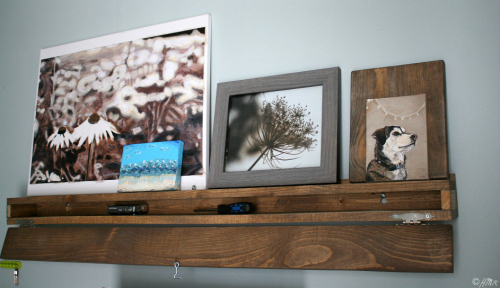
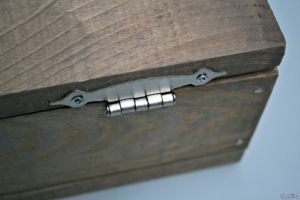
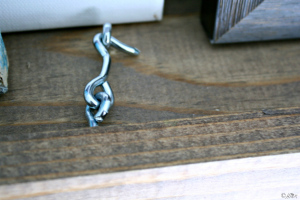
I modified this plan to allow for interior storage space within the shelving. Rather than nailing the front board on, I attached two lower hinges so that it functions as a drop-down panel. The front panel then secures to the top board with a centrally located screw-in hook and eye (not visible if the top of your ledge is above eye-level).
Built from Plan(s)
Estimated Cost
$15
Estimated Time Investment
Afternoon Project (3-6 Hours)
Finish Used
Finish in photos created using: http://ana-white.com/2013/08/rustic-yet-refined-wood-finish
...Later discovered a similar but less toxic approach using green tea followed by steel wool dissolved in vinegar.
...Later discovered a similar but less toxic approach using green tea followed by steel wool dissolved in vinegar.
Recommended Skill Level
Starter Project
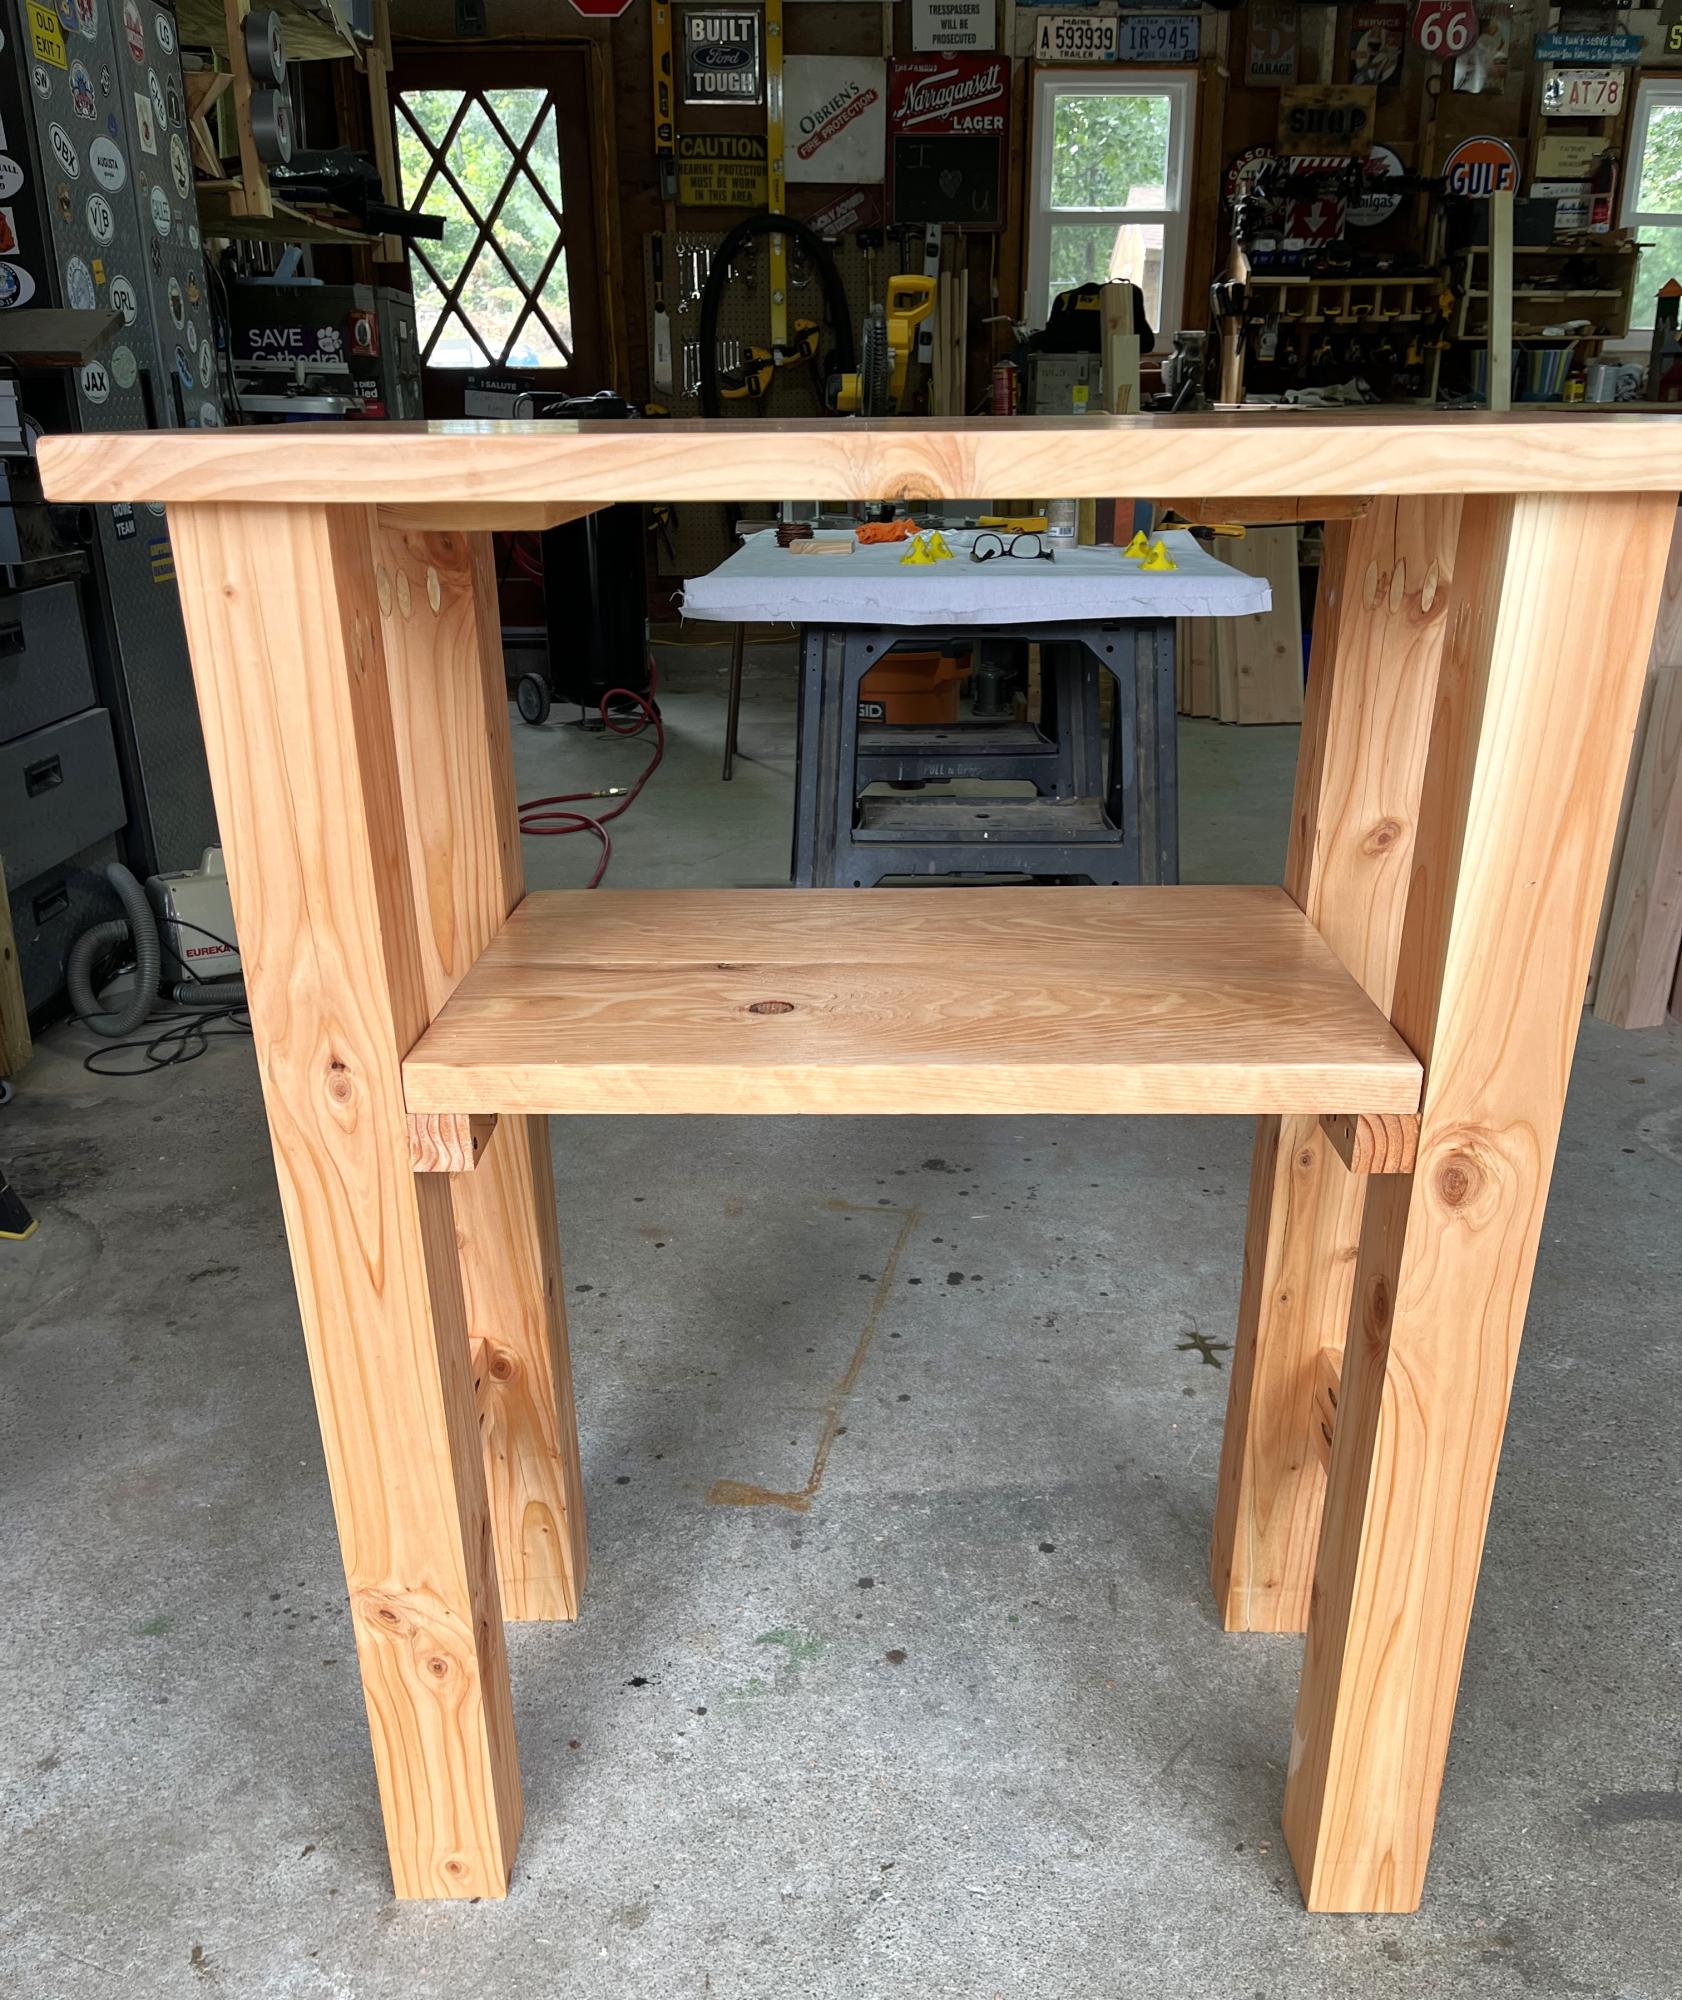
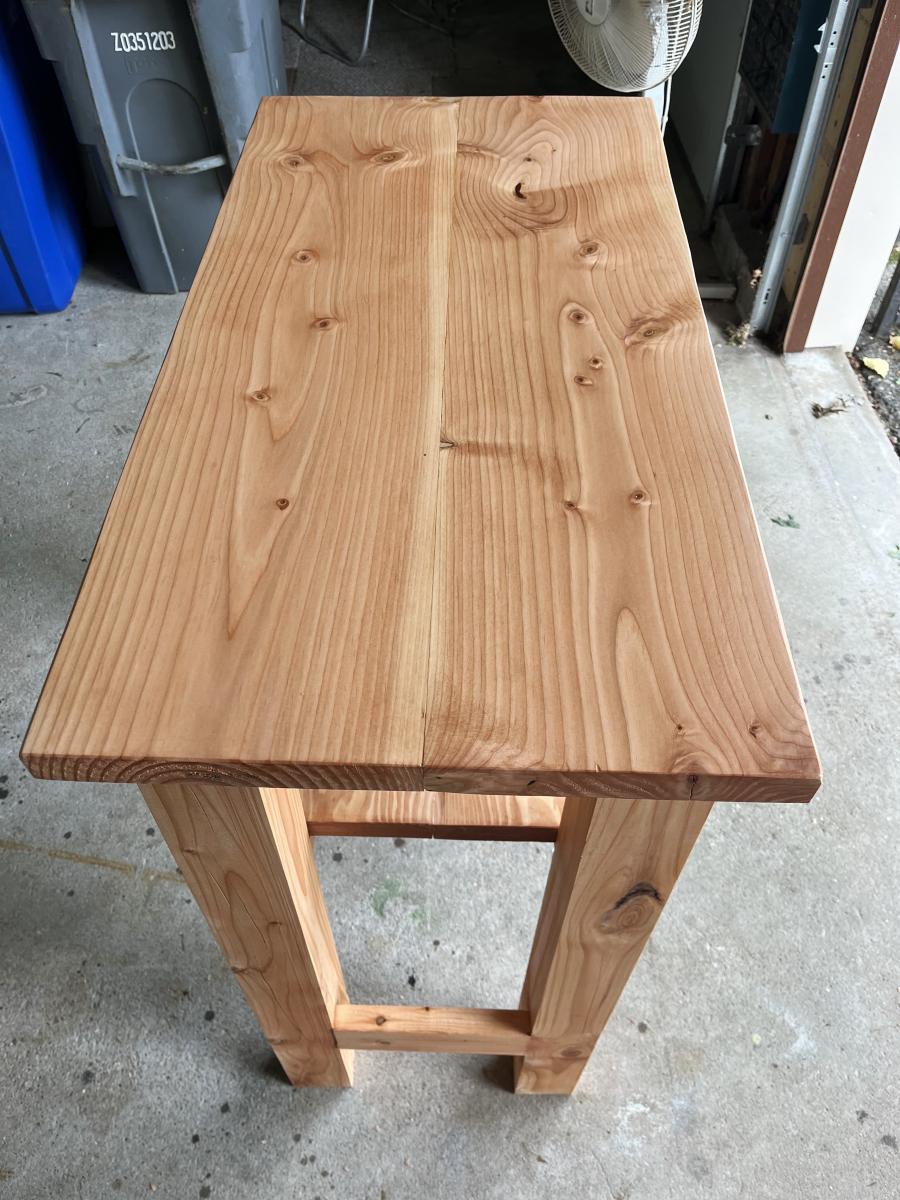
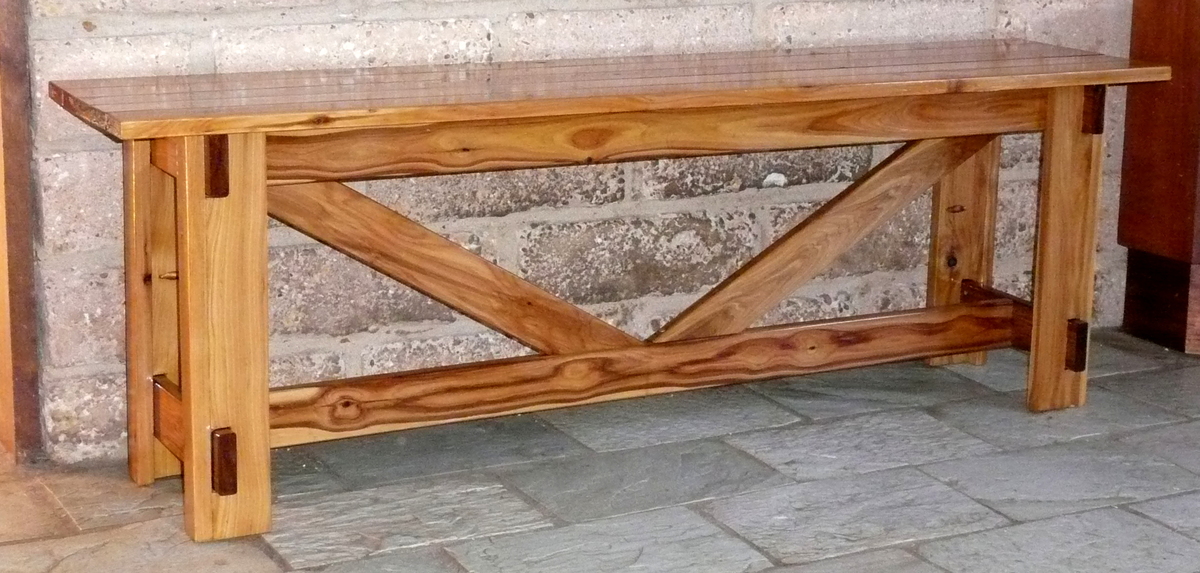
Sofa Table with Reclaimed Wood Top
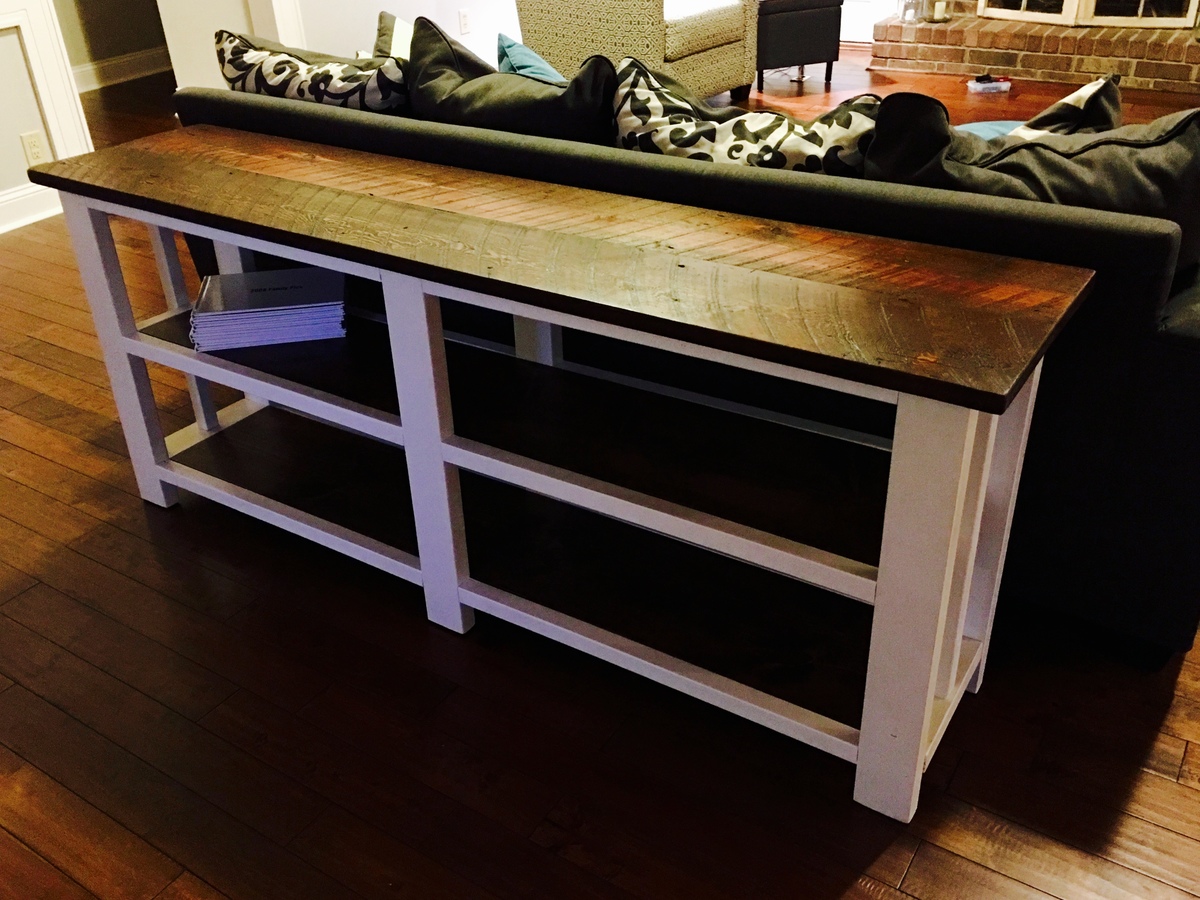
I took the Rustic X Console plans and used some rouch sawn pine and hemlock from a reclaimed lumber yard. We left some of the character (nail holes, saw marks, imperfections) in the table top for a more rustic look.
Built from Plan(s)
Estimated Time Investment
Day Project (6-9 Hours)
Finish Used
White is Olympic Assure Ultra White Satin (primer + paint) and stain is Minwax Special Walnut and then I applied Minwax wipe-on satin poly.
Recommended Skill Level
Intermediate
Bar door console
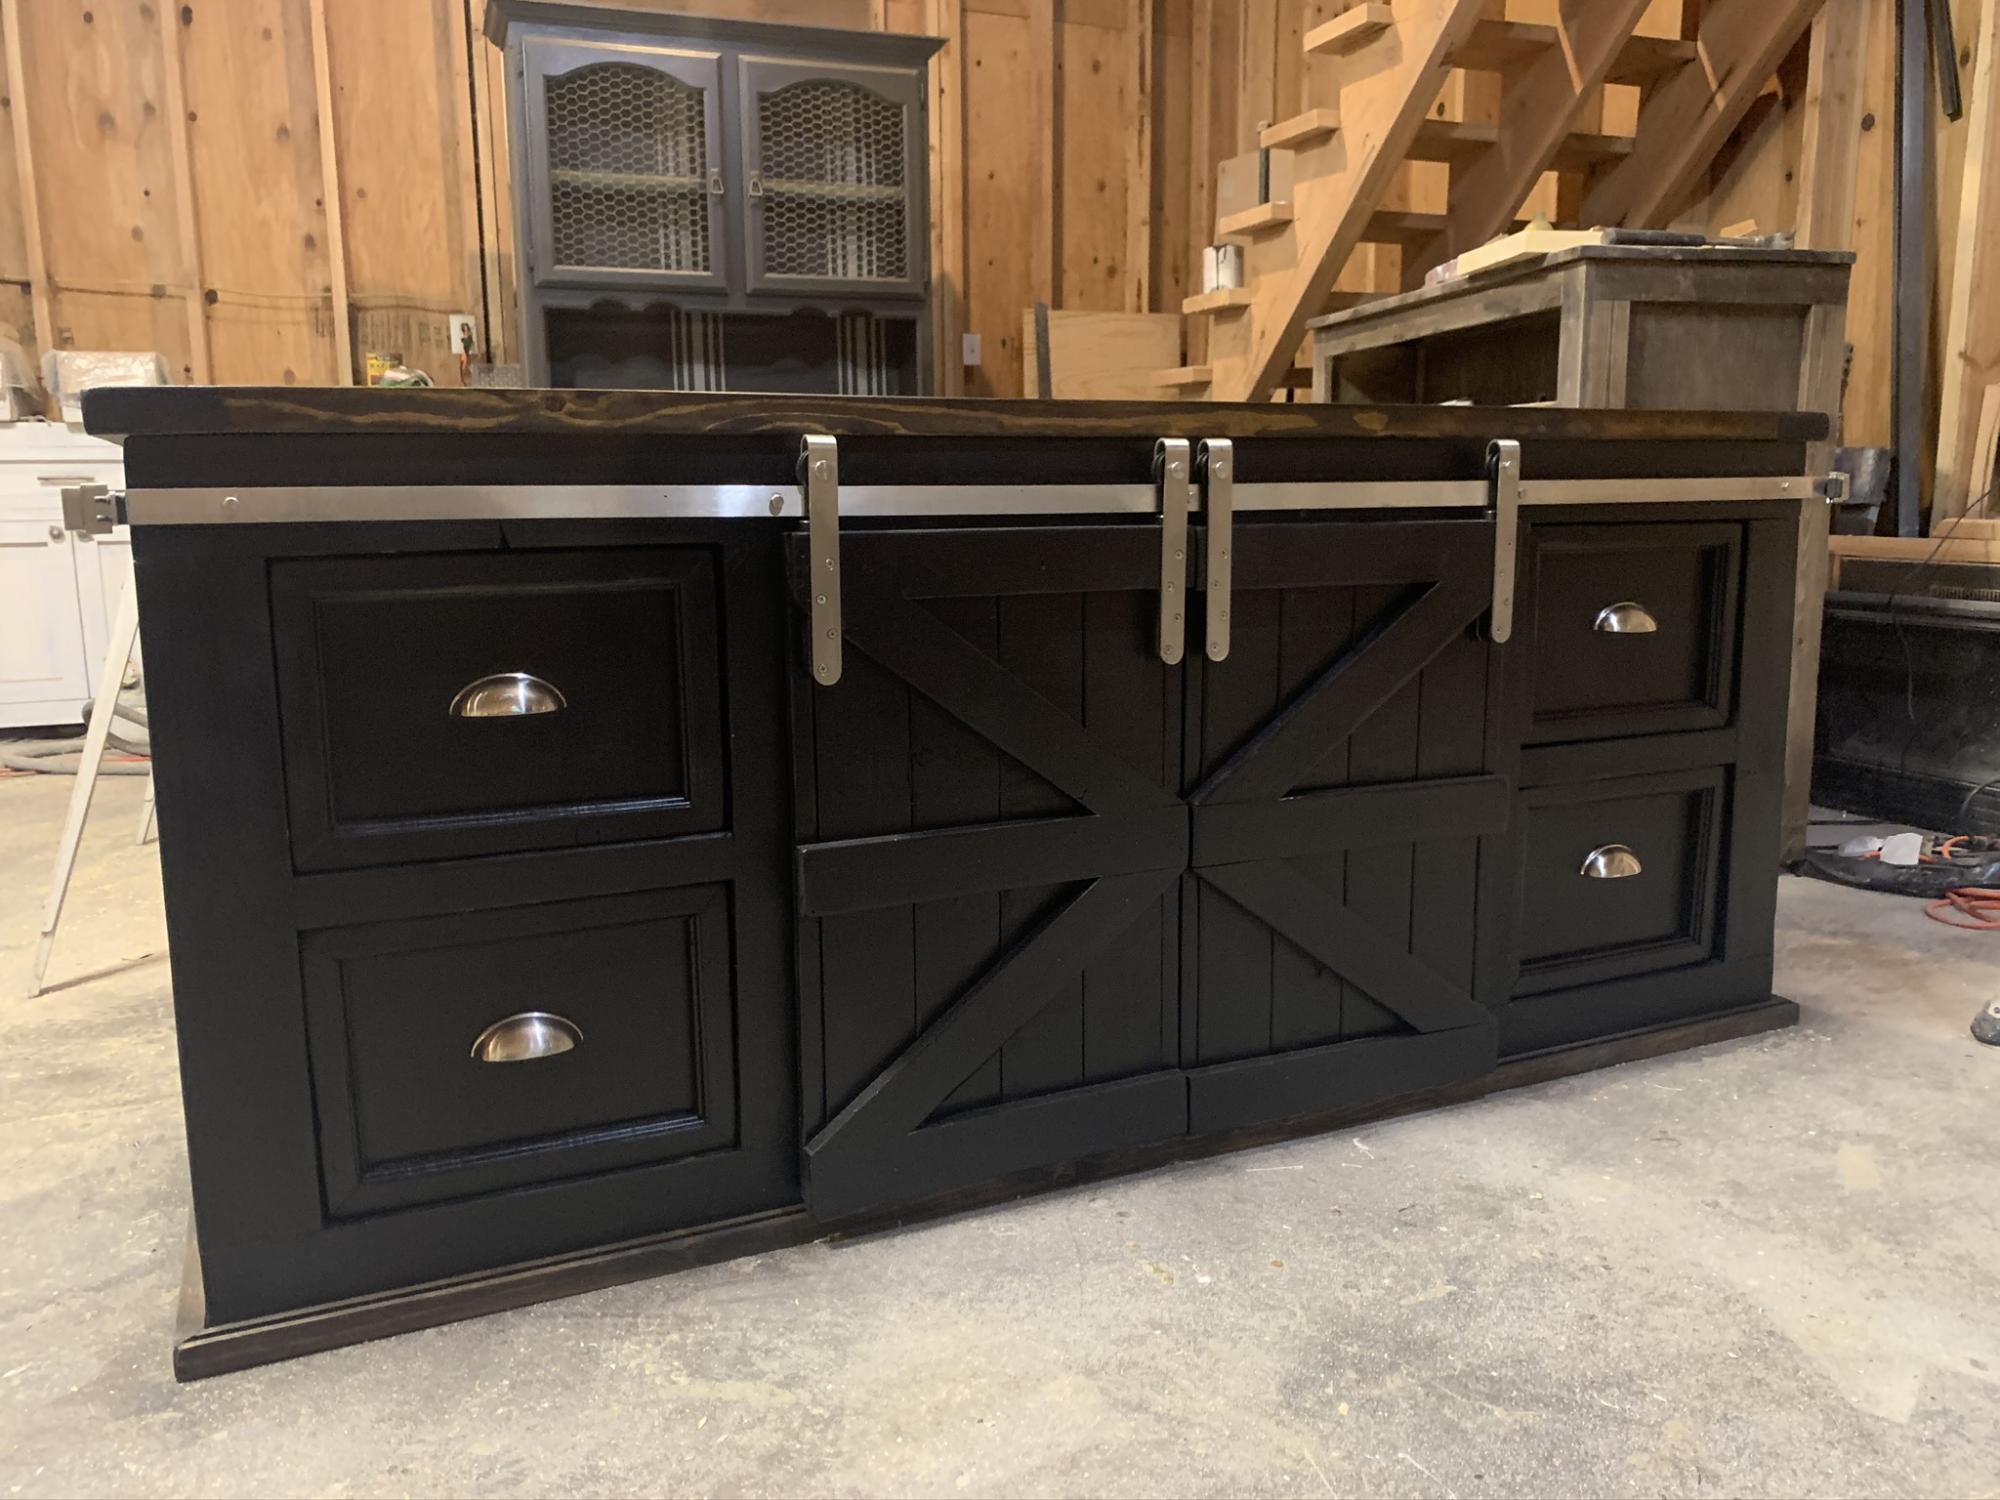
Hand made barn door console with drawers
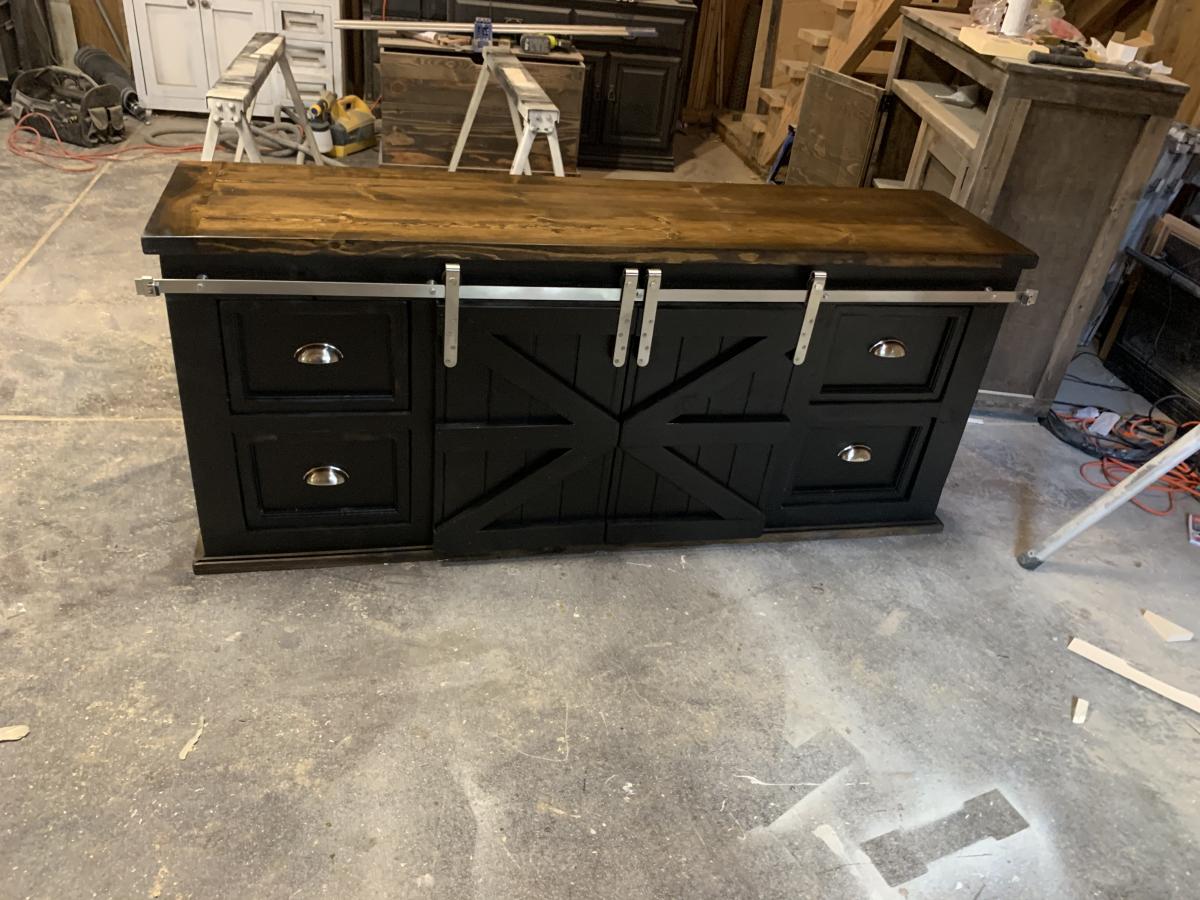
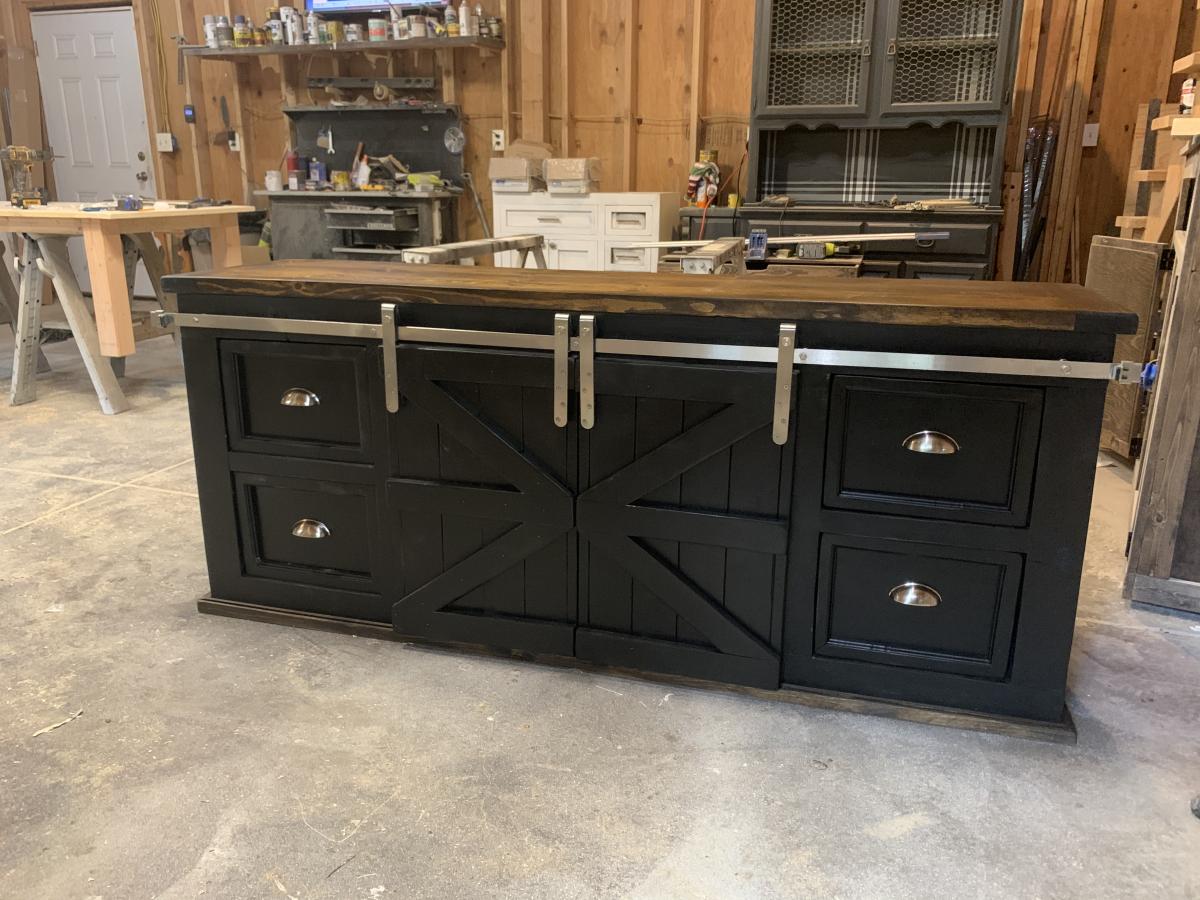
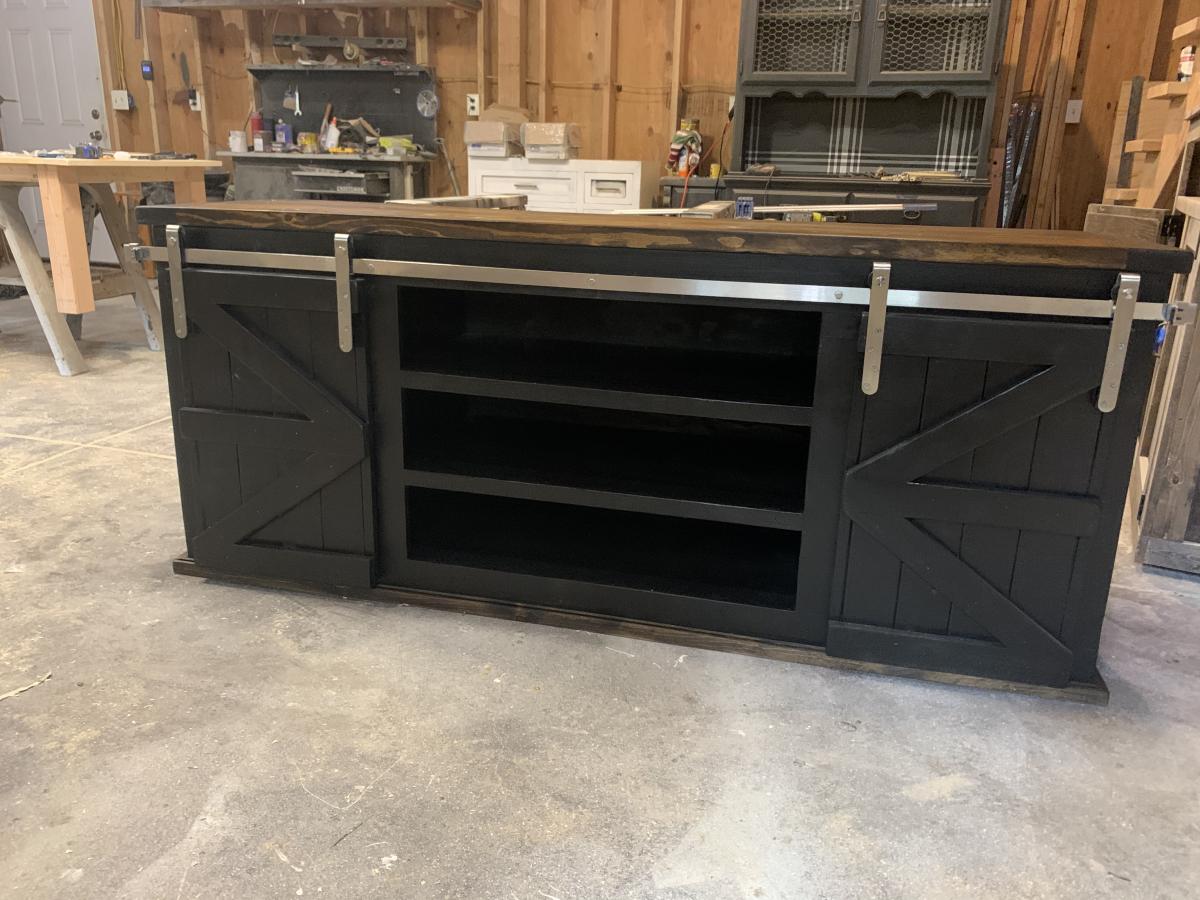
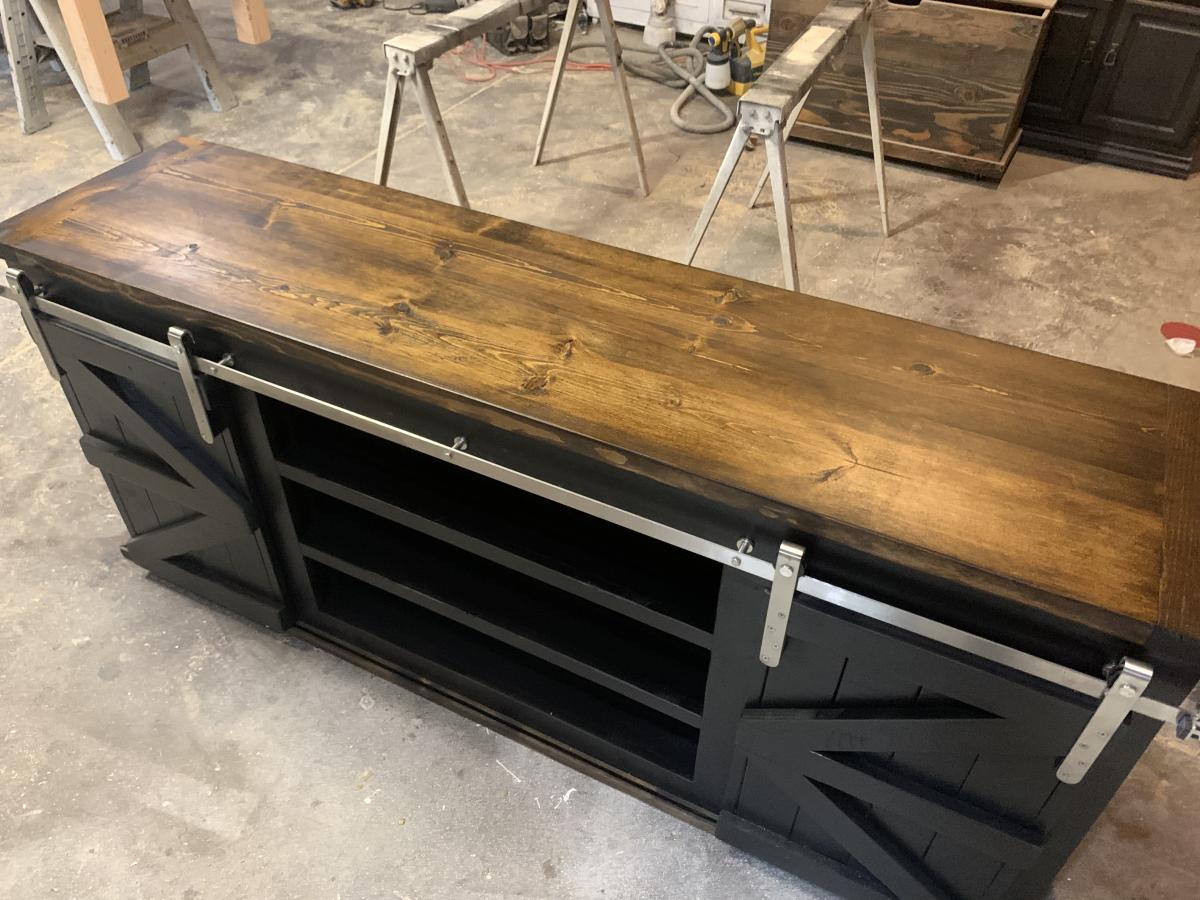
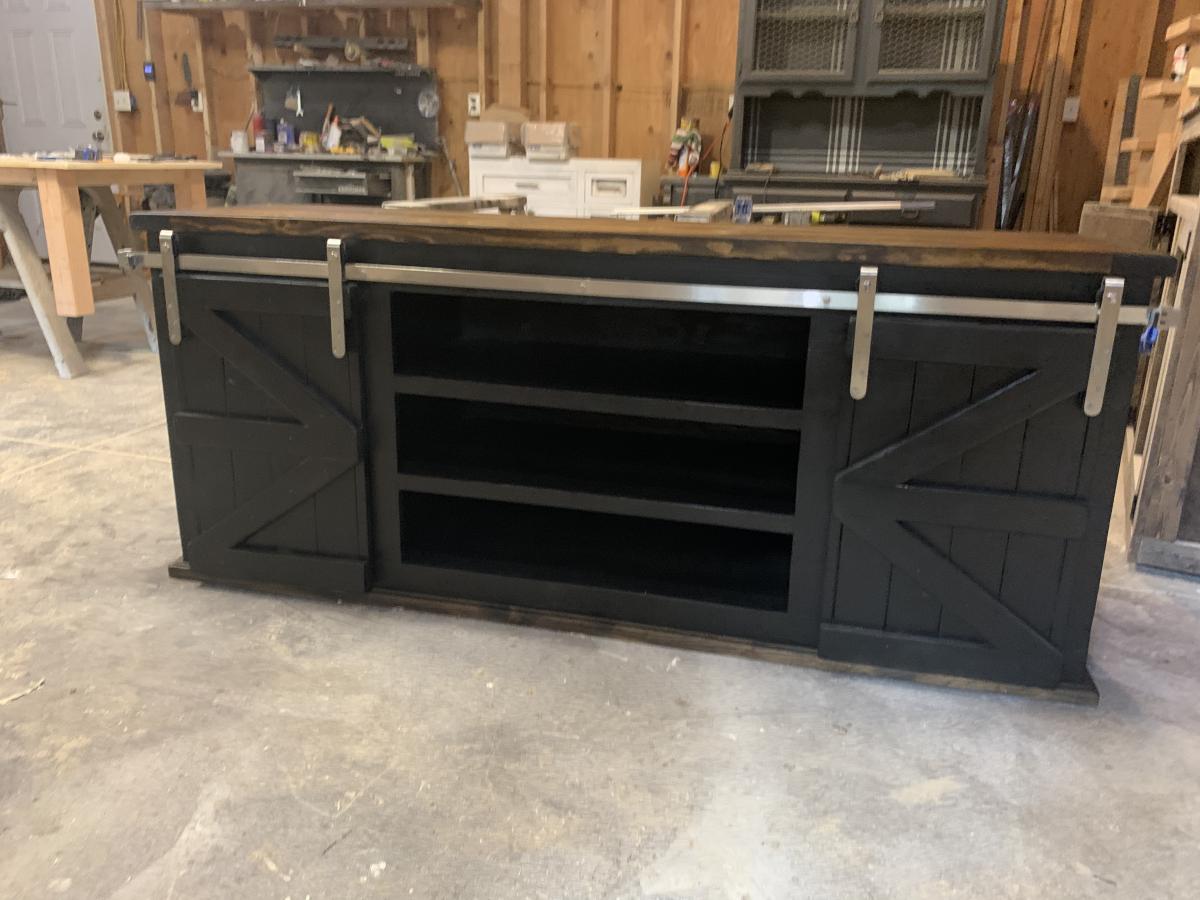
Built from Plan(s)
Estimated Cost
160
Estimated Time Investment
Weekend Project (10-20 Hours)
Finish Used
Stain and varnish
Recommended Skill Level
Intermediate
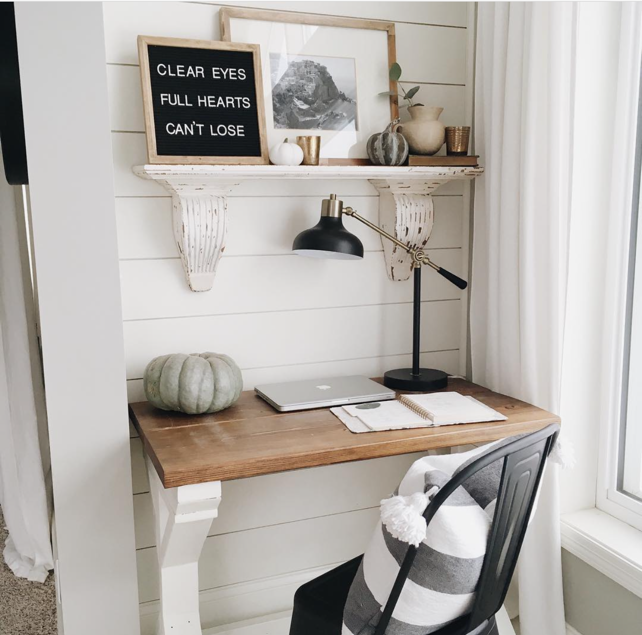
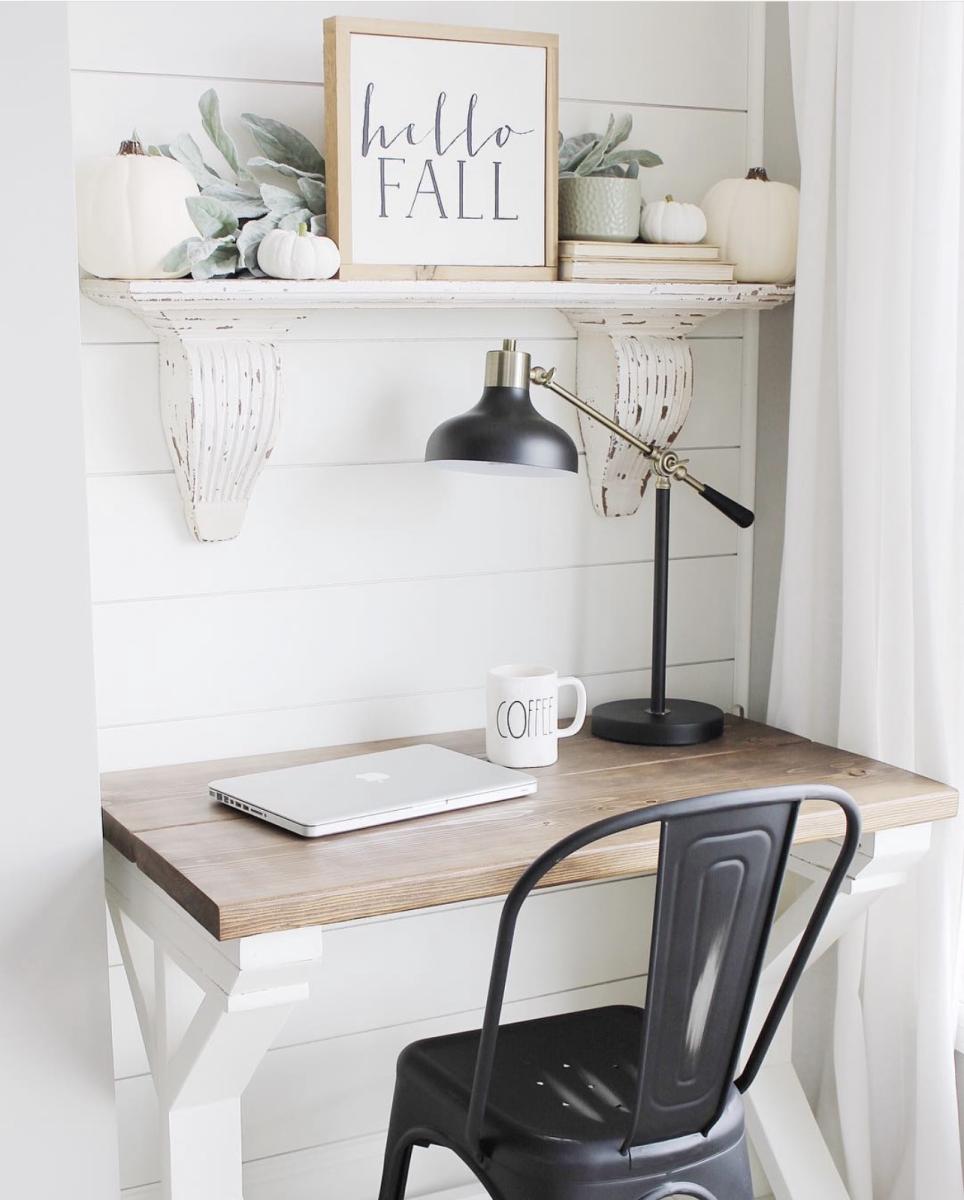
White Farmhouse Desk
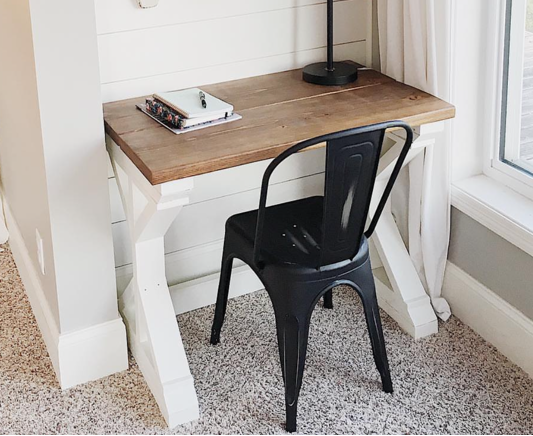
Pretty white farmhouse desk by textured.living.interiors on Instagram

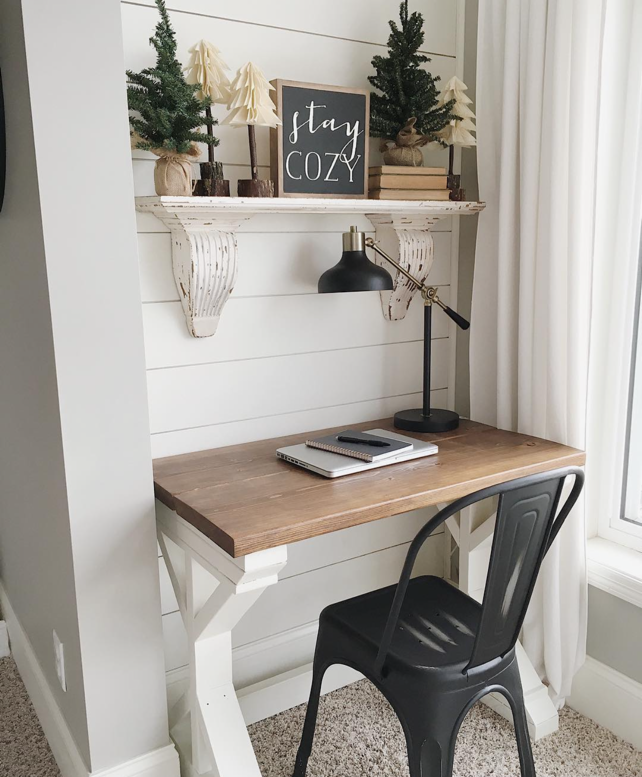
Built from Plan(s)
Seasonal And Holiday
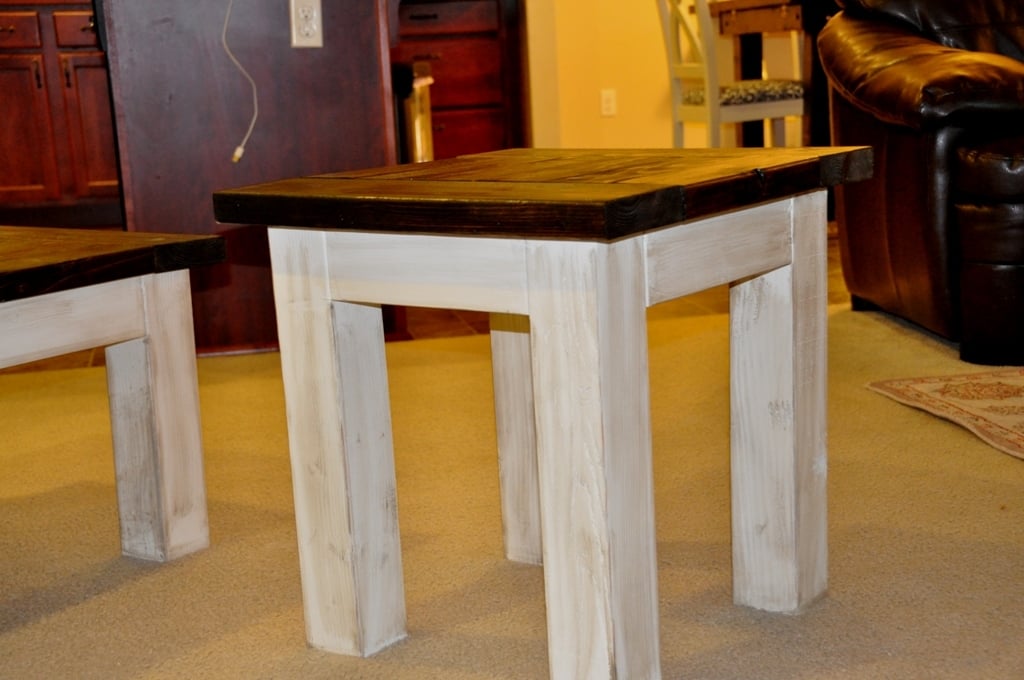
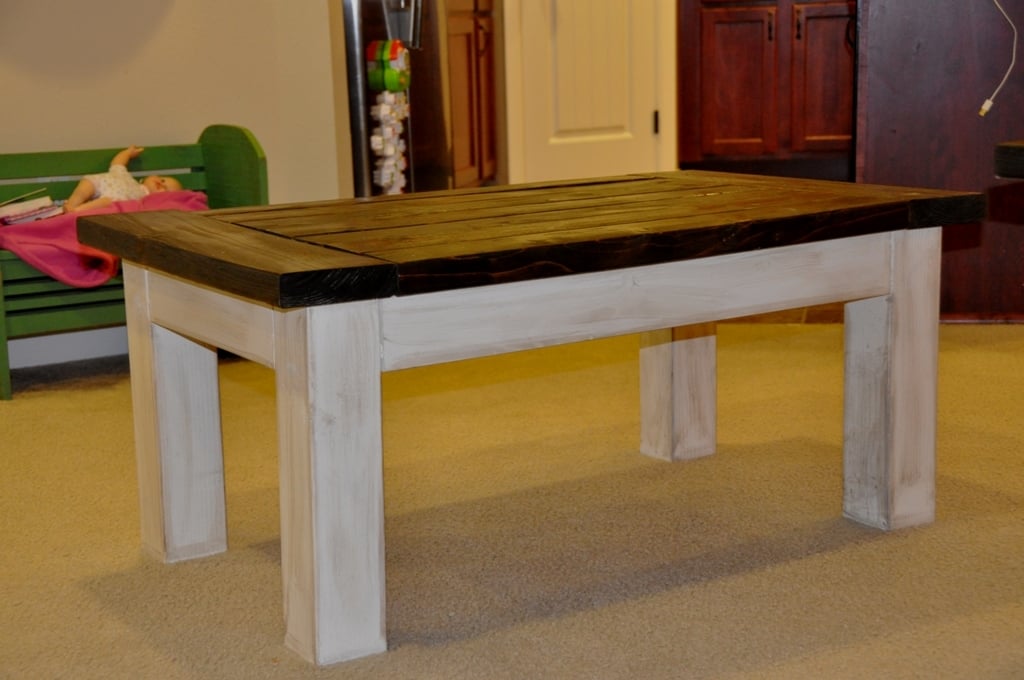
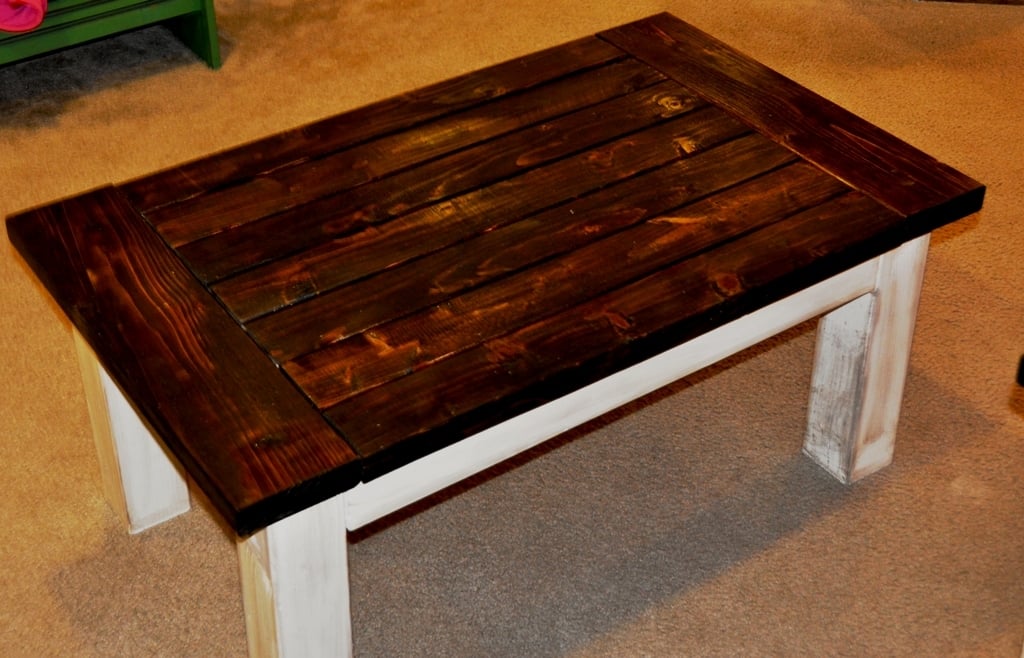
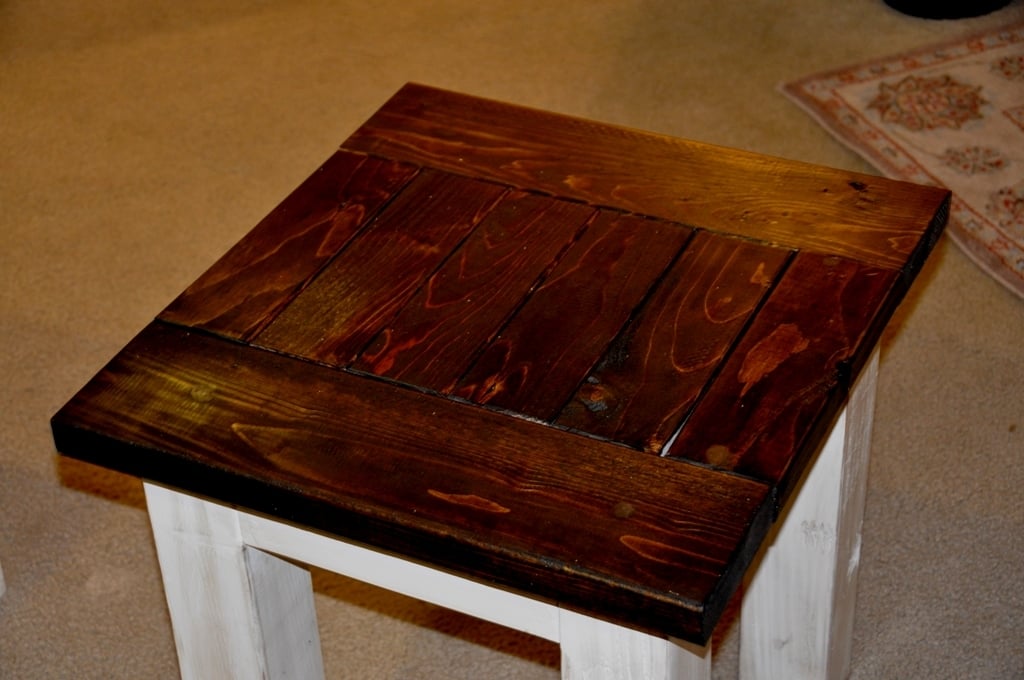
Tryde Coffee and Side Table
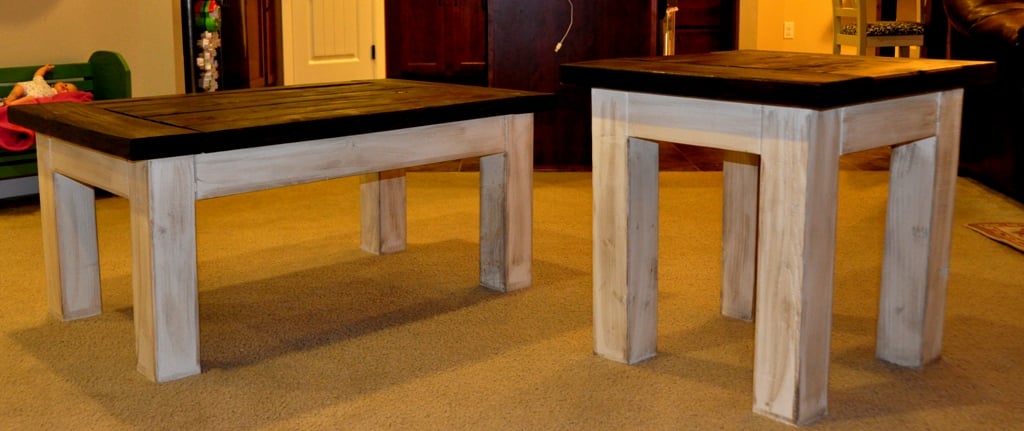
We were looking for a cheap project for the weekend. We found the plans for the Tryde Coffee Table here on Ana White's site and we decided to give it a try. We knocked off about 10 inches so it would fit in the living room, what I found out was that 10 inches knock off allowed me to build side table with a few pieces of scrap wood we had sitting around in the garage. The plan is to build the matching entertainment center with hutch attachment. That will make my living room 90% built by me. The finish on this is Rustoleum American Accent Heirloom white with Minwax Walnut stain rubbed into the paint for the aged look and the top is dark walnut stain with 2 coats of poly.
Built from Plan(s)
Estimated Cost
$28.00 with some 4x4's from the scrap pile
Estimated Time Investment
Afternoon Project (3-6 Hours)
Finish Used
Rustoleum American Accent Heirloom white with Minwax Walnut stain rubbed into the paint for the aged look and the top is dark walnut stain with 2 coats of poly.
Recommended Skill Level
Beginner
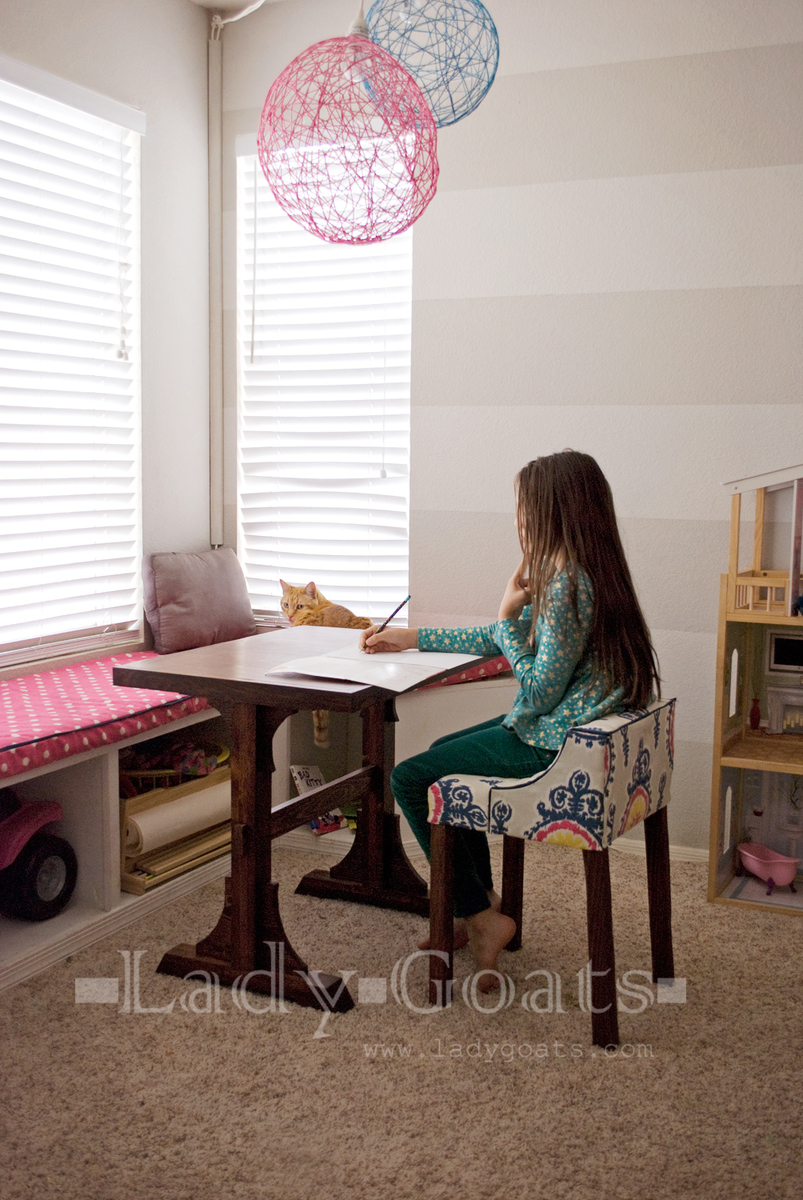
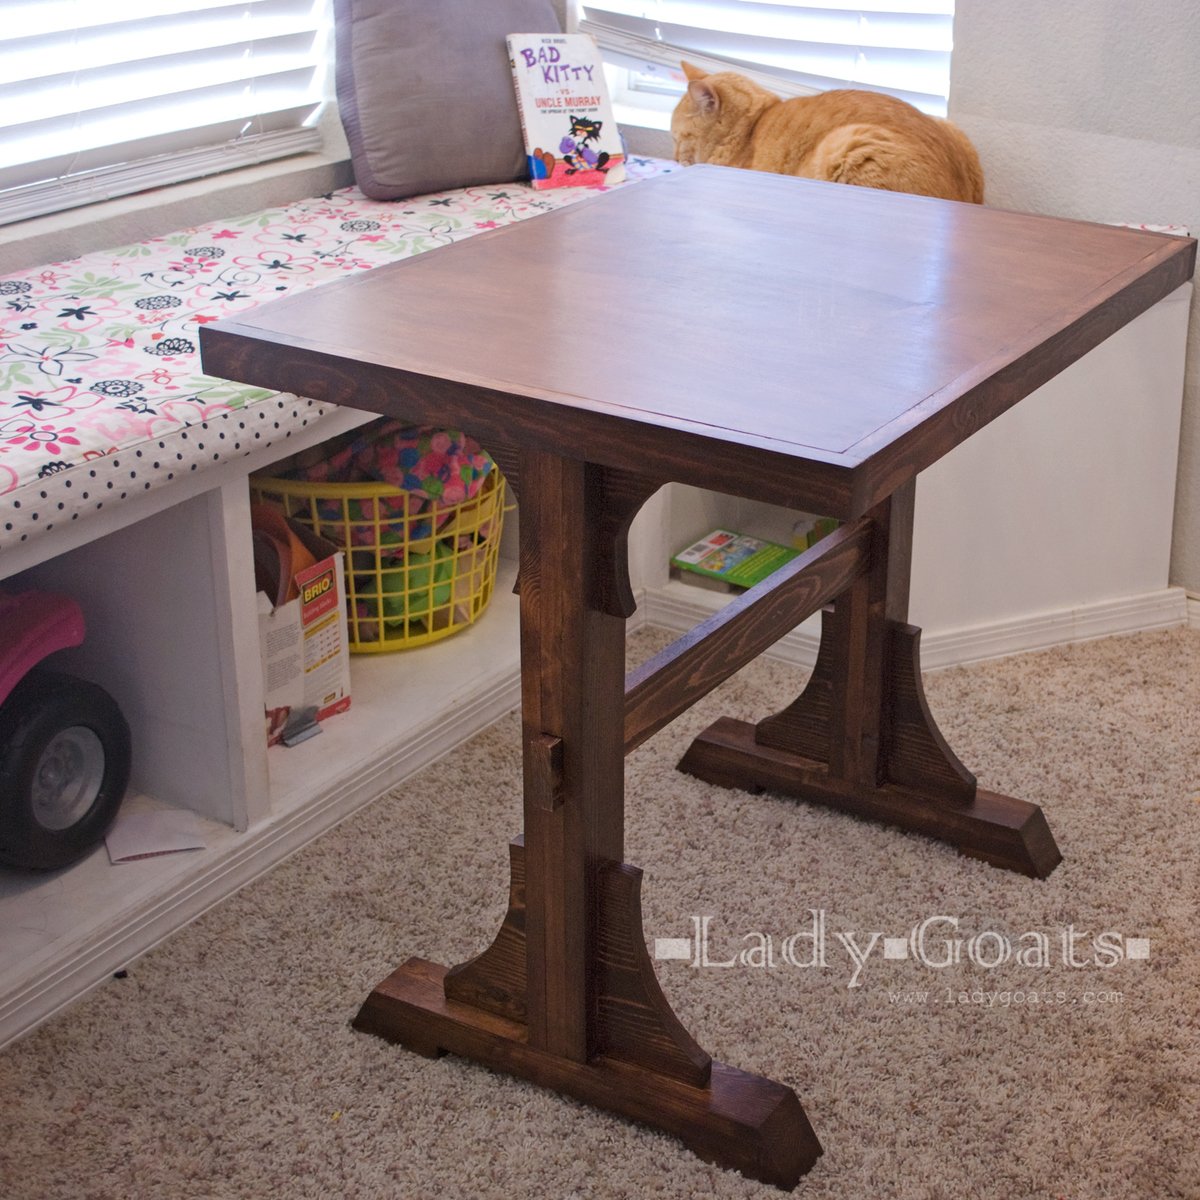
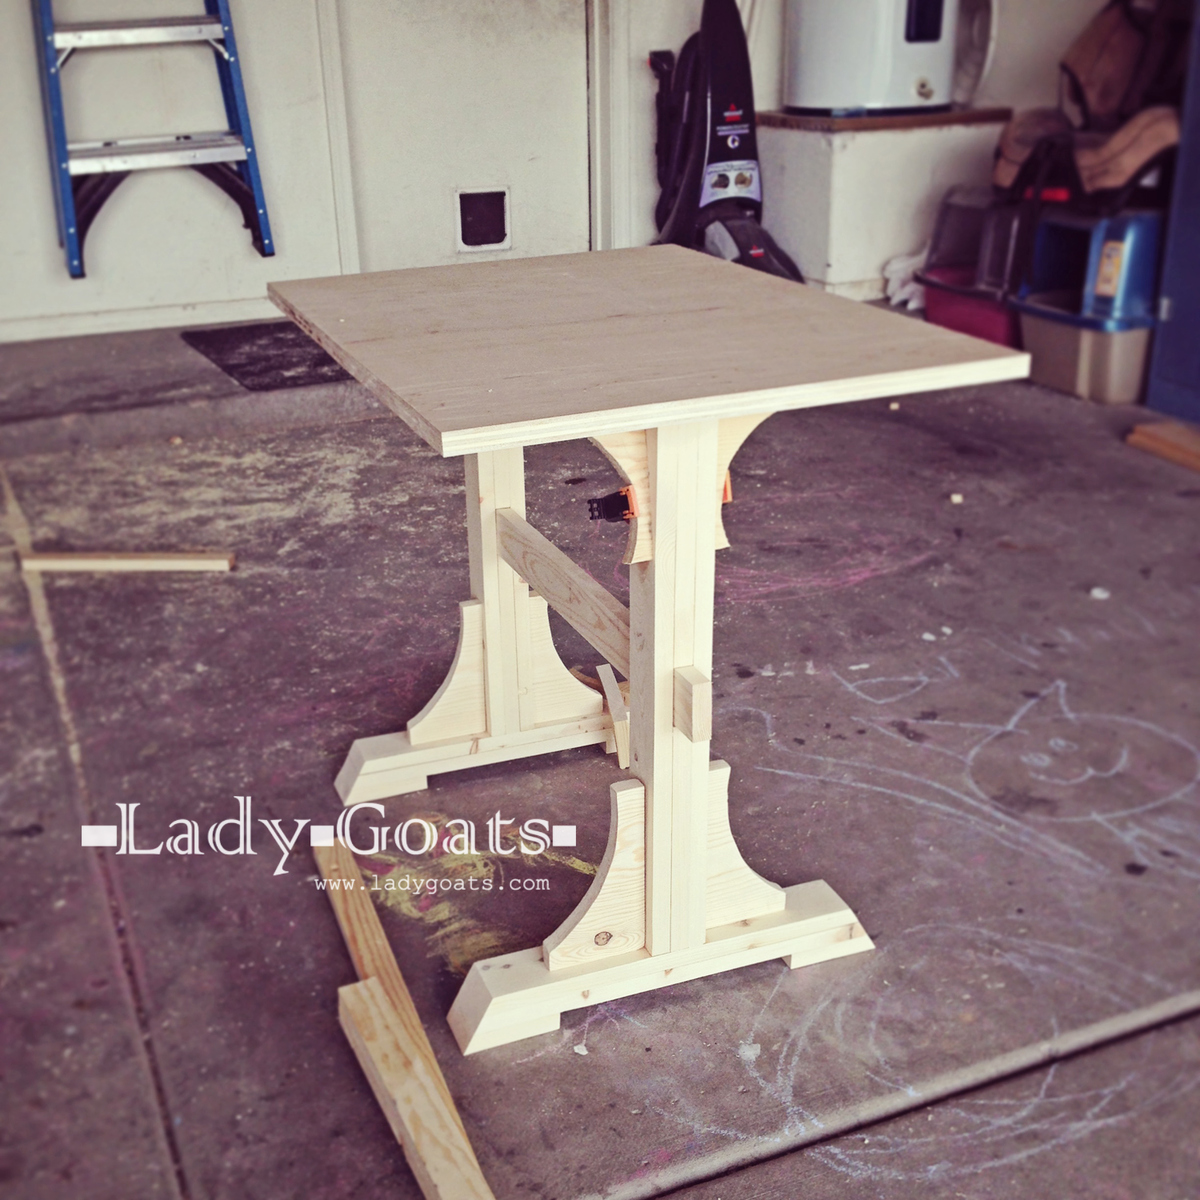
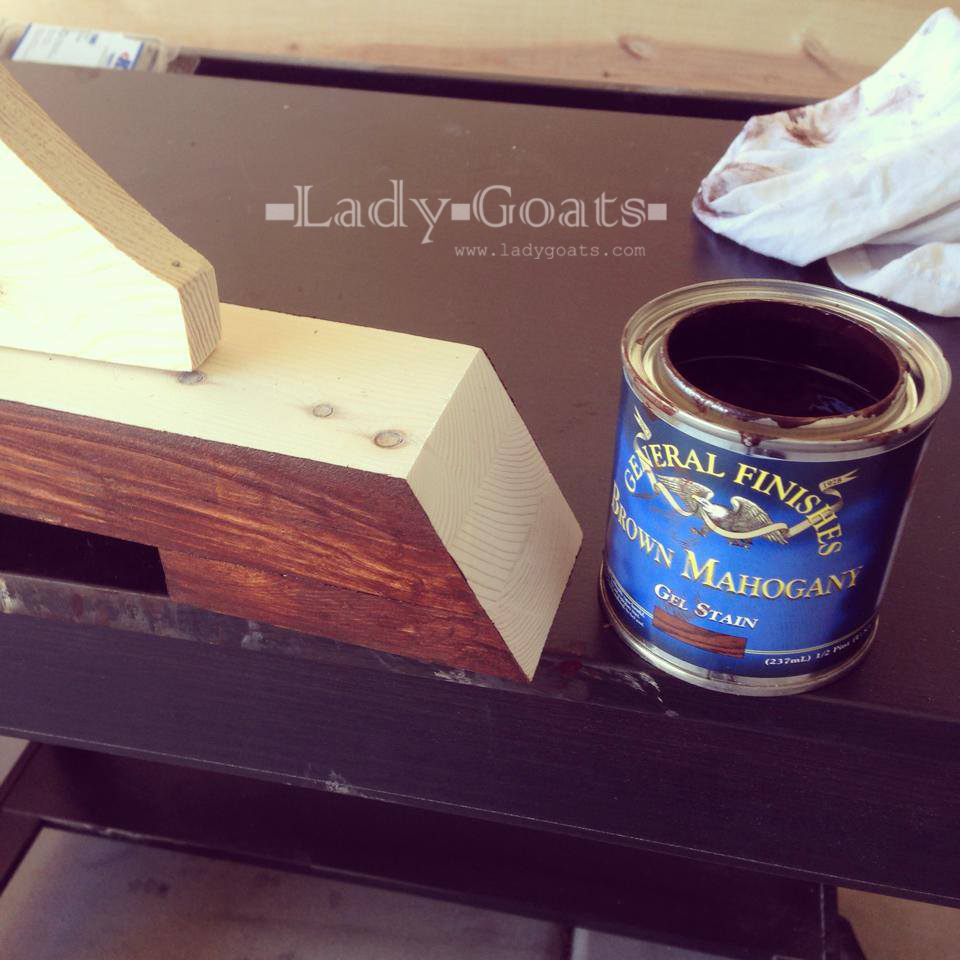
Big Kid Play Room Table
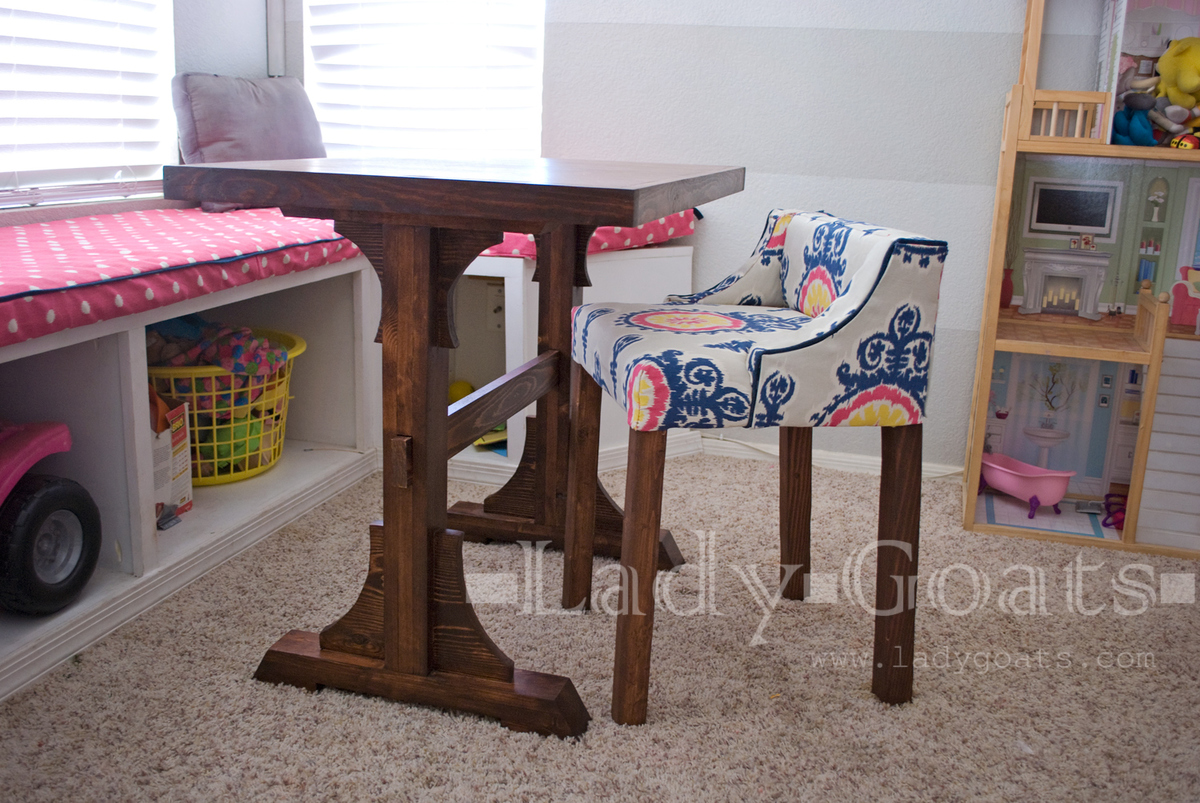
I needed a bigger kid play room table because my girls have outgrown our play table and chairs from IKEA. We have a window seat, and it seems the consensus is that pedestal tables are the best for window seats, but they're not really my style. I let the big kid pick one, and she chose the triple pedestal farmhouse table! I obviously couldn't follow the plans for that, so I more used them for inspiration, and lessened the size of everything. **UPDATE** I posted plans for this modification here.
Built from Plan(s)
Estimated Time Investment
Afternoon Project (3-6 Hours)
Finish Used
General Finishes gel stain in Brown Mahogany (two coats) followed by three coats of General Finishes Arm-R-Seal Urethane (0000 steel wool between all coats).
Recommended Skill Level
Intermediate
Comments

I Absolutely Love My DIY Ladder Shelf/Desk Unit
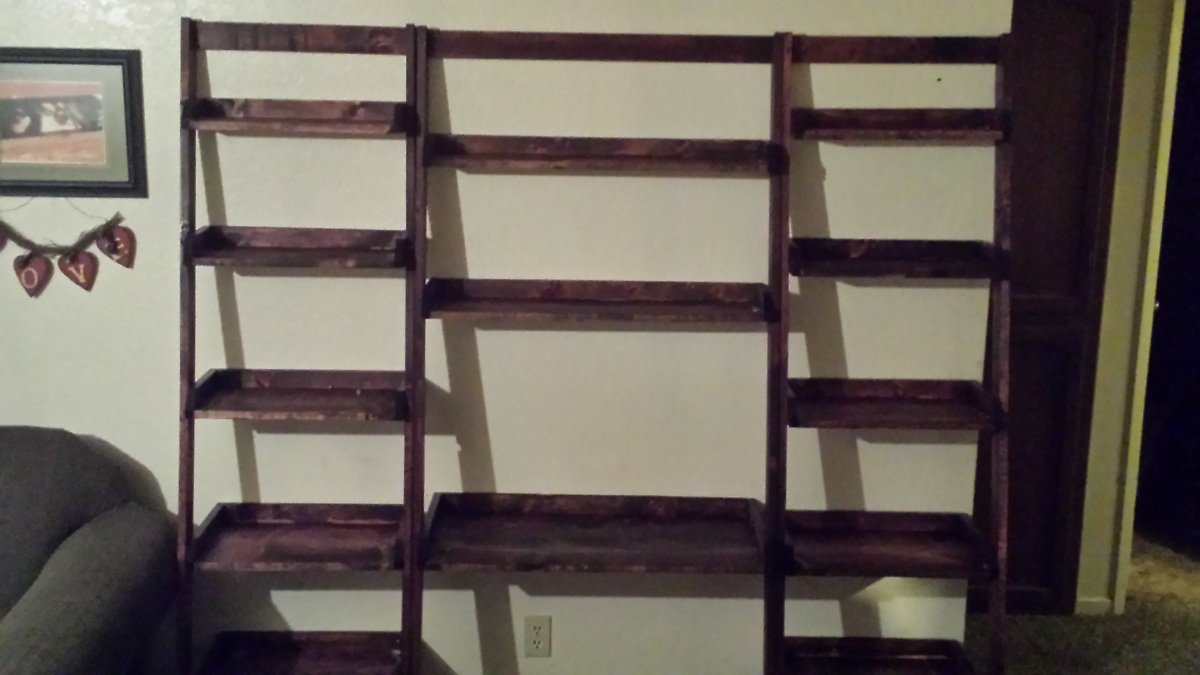
I have refinished wood, but this was the first time I ever built something from scratch with my own two hands. I have always loved ladder shelves and loved the idea of having a ladder style desk. I looked for plans and couldn't find any. I had to get rid of an old desk and the day I threw it out, I found Ana White's plans. For nearly the same price as the particle board ones sold at stores, I figured I could buy all the tools and materials to do it myself and customize it....and then i would have the tools to use on future projects. As a beginner with no technique or skill, working between overtime hours, it took me about 2 weeks to finish. I had to work on it in stages. Cutting the boards all the exact same length was by far my biggest challenge. I even had a Home Depot employee cut me two extra pieces and he couldn't even get them perfect. A stop block really would have made this a lot easier. I stuck very closely to the plans except I made my book shelves 18" wide to accommodate my printer. I also added a slide out tray under the desk shelf (not in picture). I made quite a few mistakes, but the finished project looks amazing in my living room. I should have taken another picture after it was all set up with my desk supplies. This picture doesn't do it justice. I love it so much, I may just build another one to serve as an entertainment center on the opposite wall.
Built from Plan(s)
Estimated Cost
Less than $150 for wood, screws, stain. I also bought a mini kreg jig for $20
Estimated Time Investment
Week Long Project (20 Hours or More)
Finish Used
Minwax Red Mahogany Stain
Recommended Skill Level
Beginner
DIY Gable Roof Greenhouse
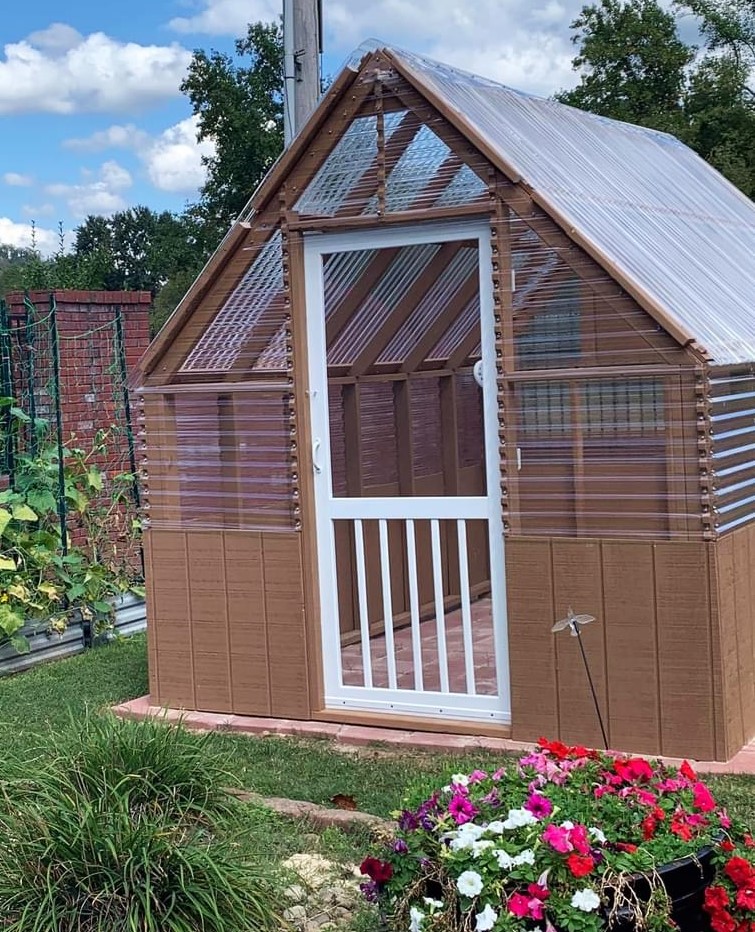
I love my new Ana White designed greenhouse! It was amazingly easy to build and the material shopping list ensured there was very little waste or materials leftover after the build. I can’t wait to get started using it.
Bill Crabtree
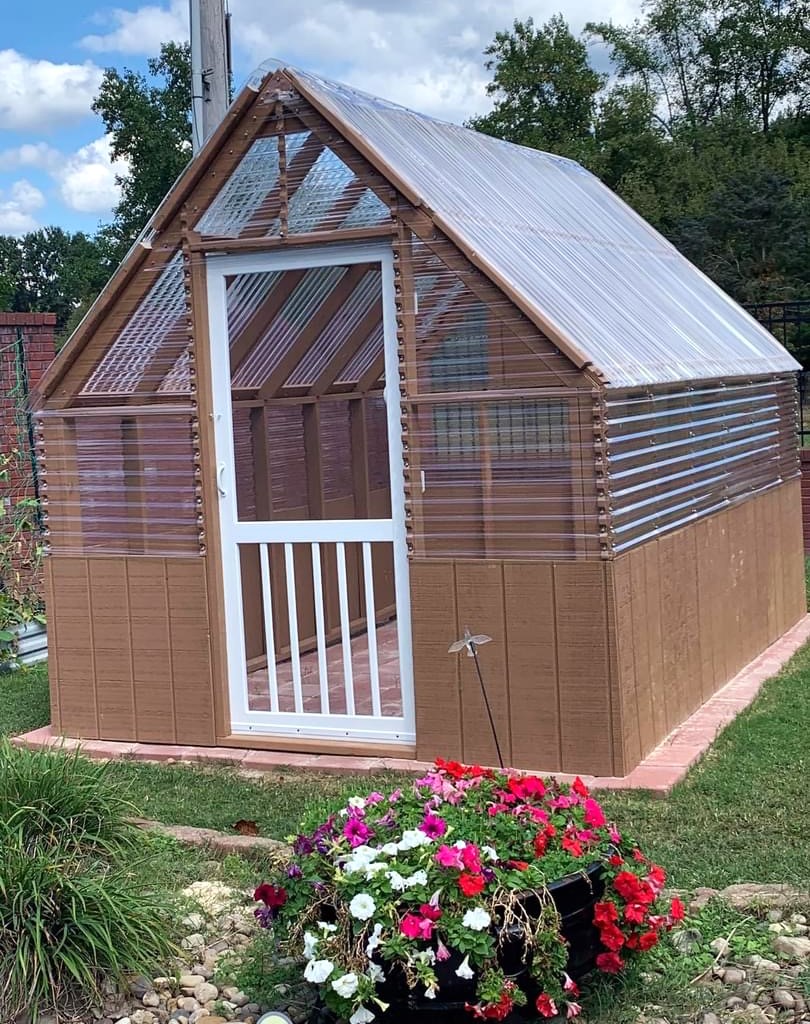
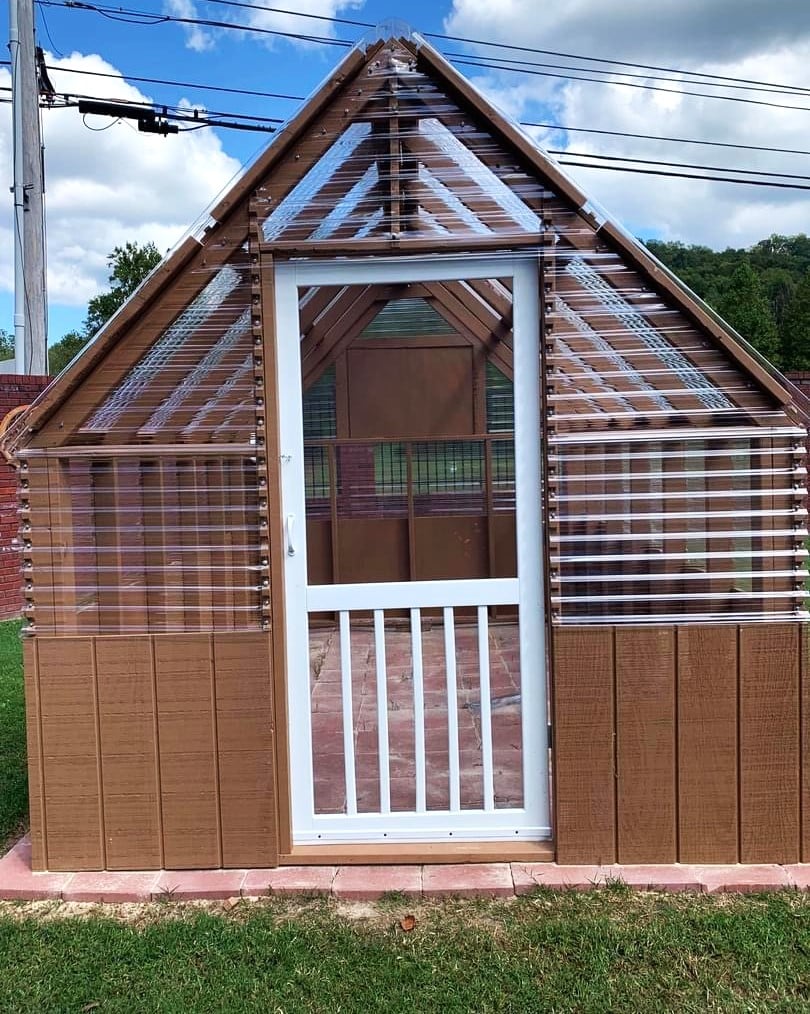
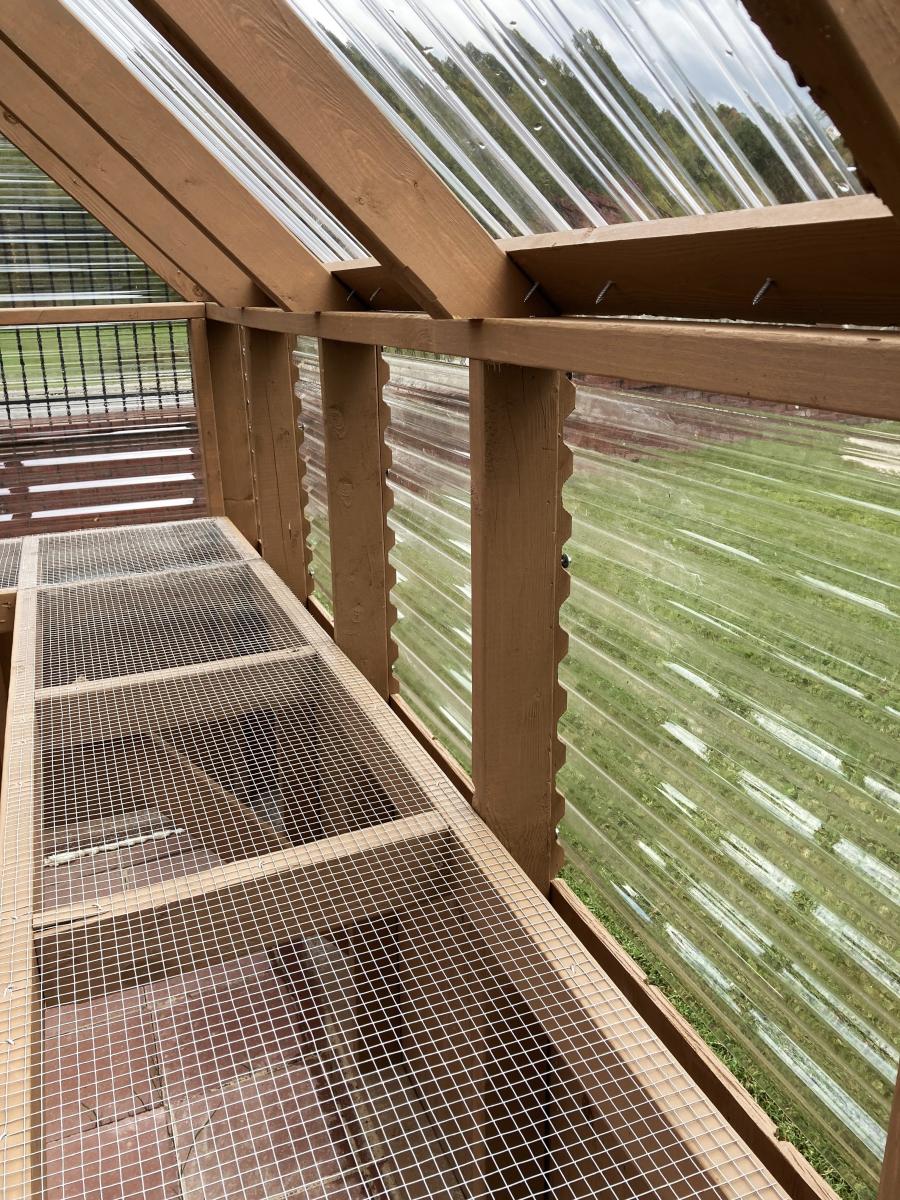
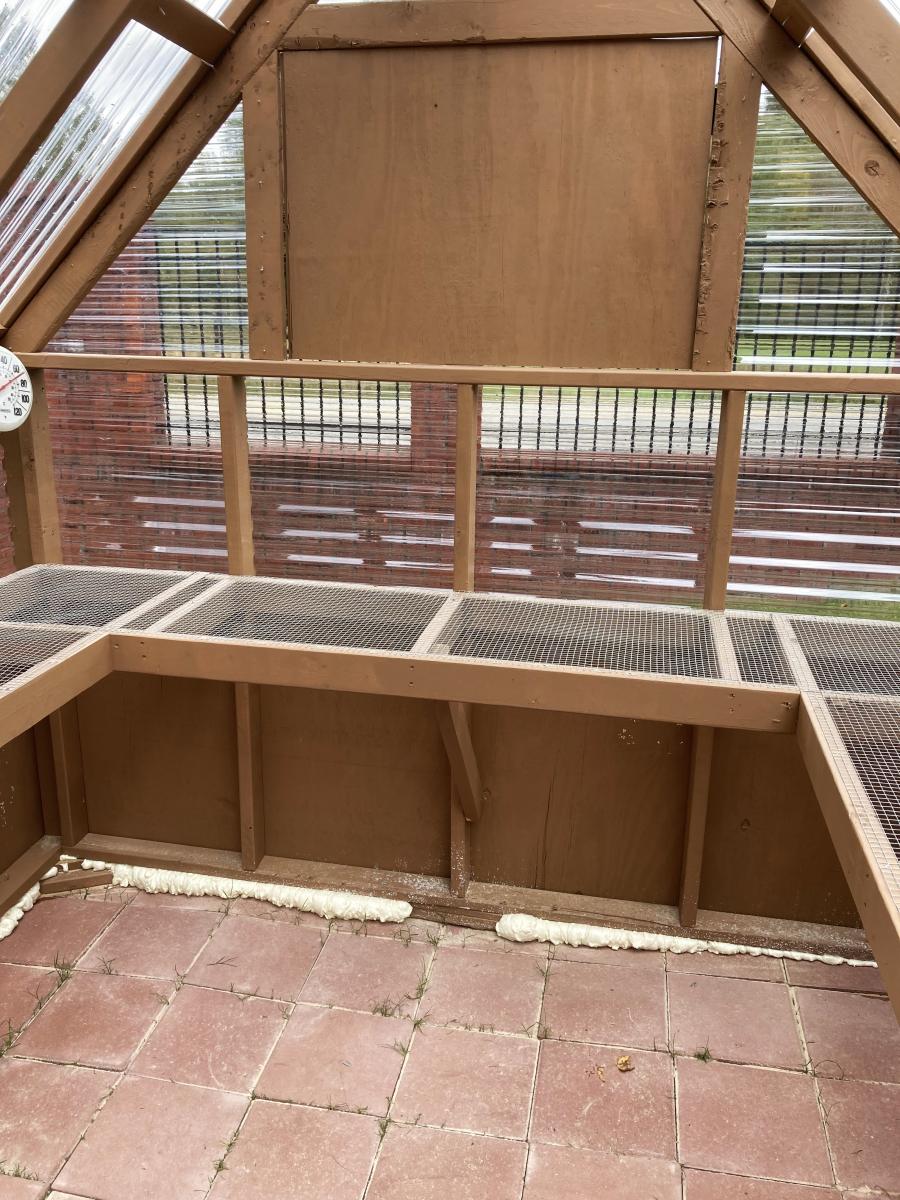
Built from Plan(s)
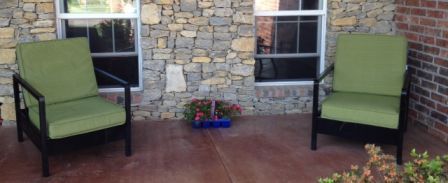
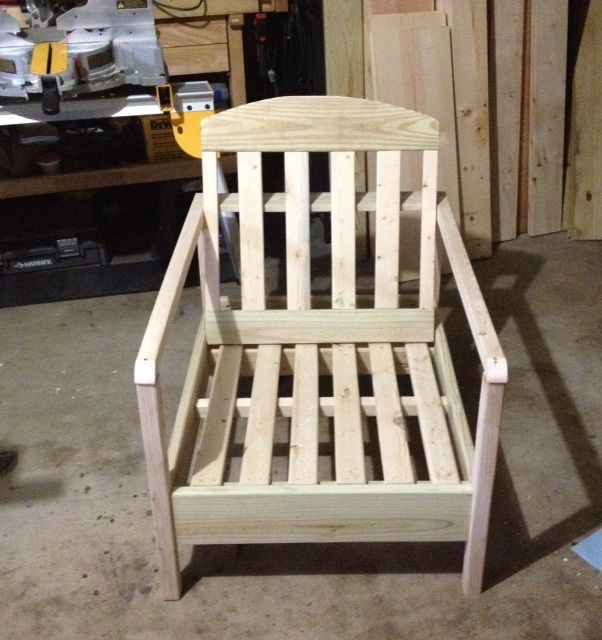
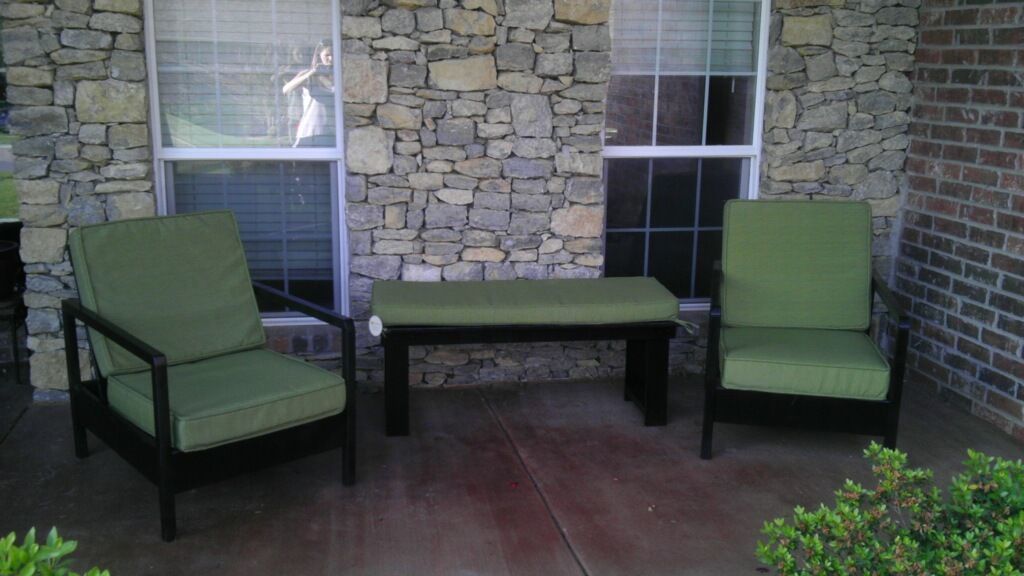
simple outdoor chairs
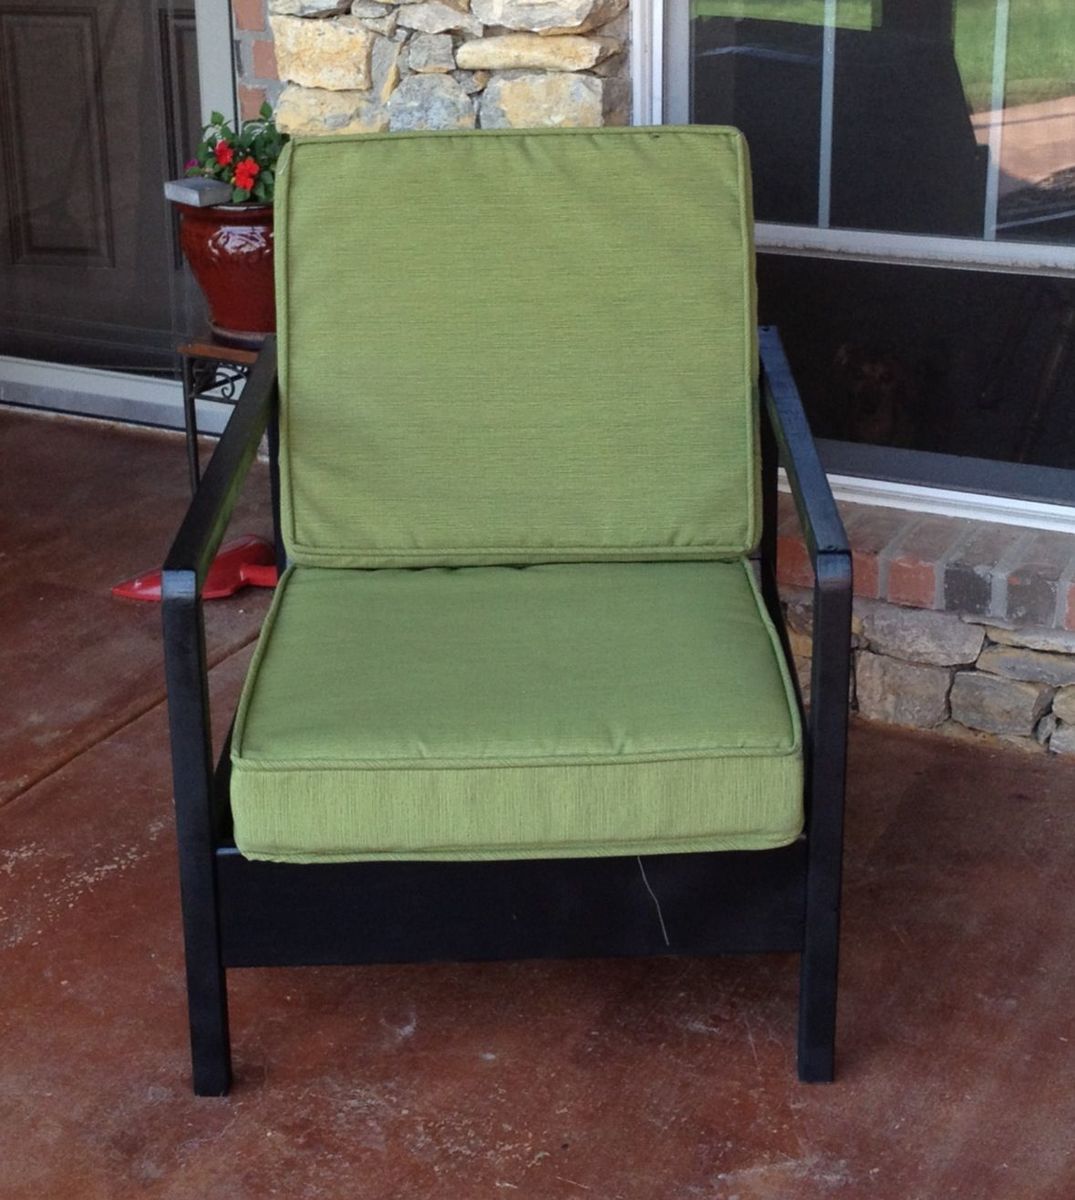
My sister needed outdoor chairs and these were perfect for her front porch. I made them as a birthday gift (she got them a few weeks early). The cushions were bought at Garden Ridge for $60 for each set and the wood was all scrap wood left over from other projects. These really are easy to make!
I am thinking of making the couch for my mom since the chairs turned out to be so comfortable and relaxing to sit on.
Built from Plan(s)
Estimated Time Investment
Weekend Project (10-20 Hours)
Finish Used
Rustoleum black flat spray paint for wood and finished with a gloss spray.
Recommended Skill Level
Beginner
Comments
Tue, 05/15/2012 - 14:27
I love the green cushions
I love the green cushions with the black. Your sister is very lucky!

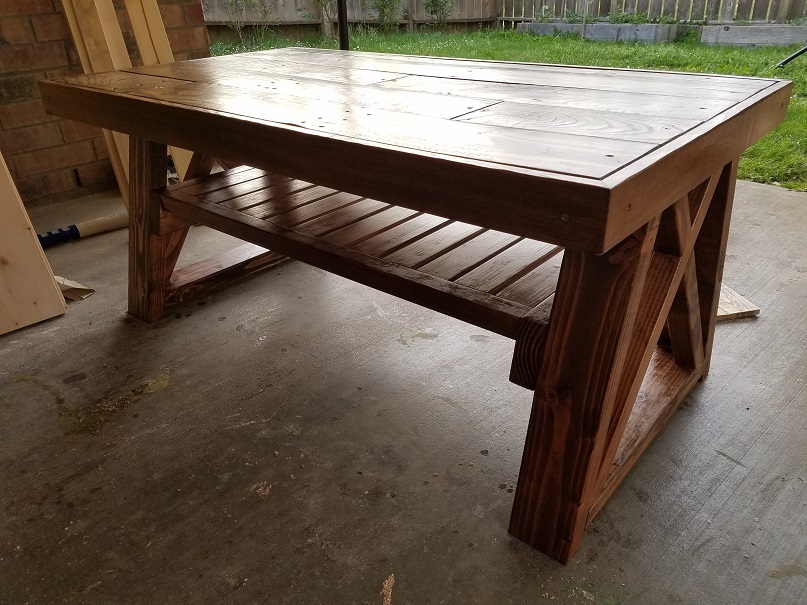
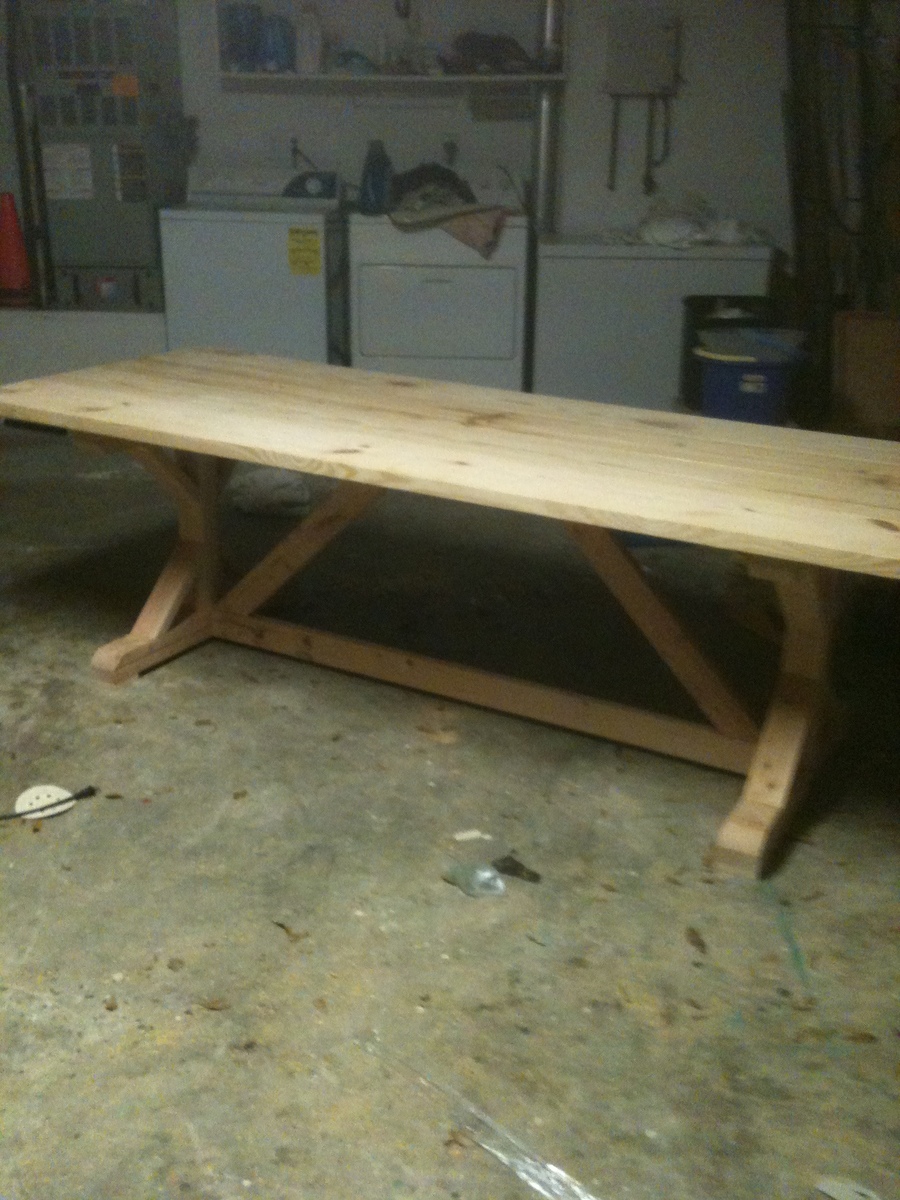
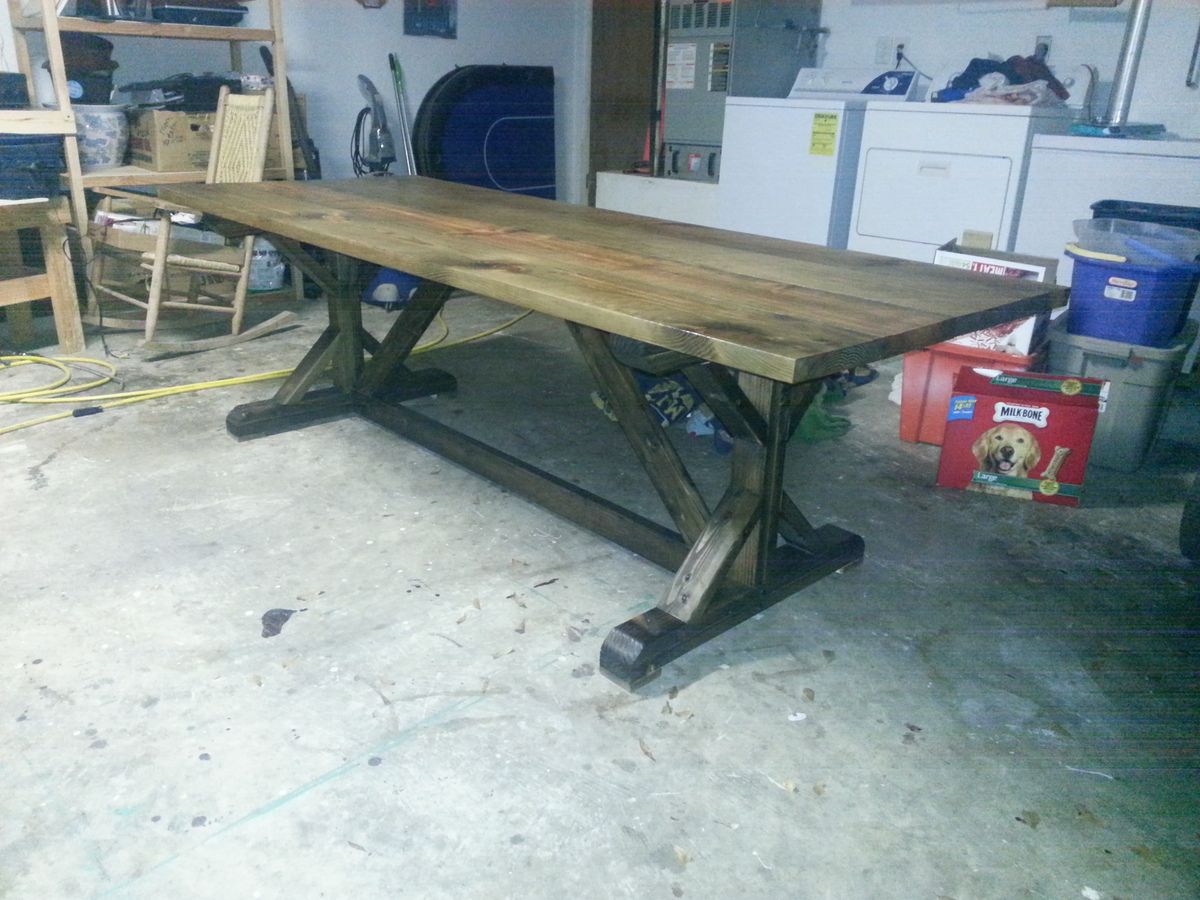
farm house table
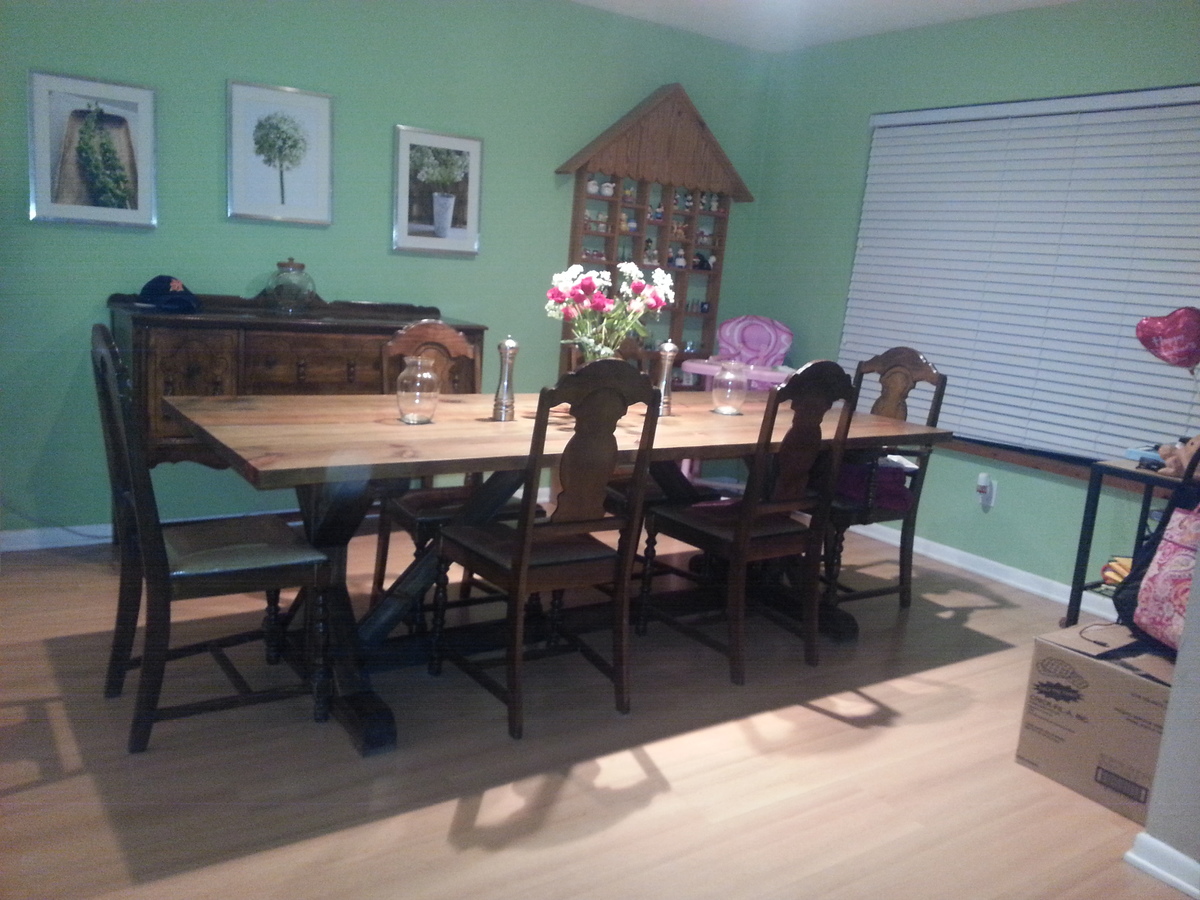
With the new addition to the family it seems that most holidays everyone in the family will be coming to our house. So with that in mind we needed a new table to fit everyone. Ana you great website has pulled me out of a jam yet again. Finding the plans for this table was a life saver. Hope you all enjoy!
For the finish I found a website that showed me how to mix steel wool, vinegar and tea together to make a beautiful stain. It took a couple coats and a couple days to dry but I think it turned out great. Even though it was kind of scary at first when it started to turn shades of green rather than a dark color but after the stain soaked in and it dried it turned out the way i wanted it.


Built from Plan(s)
Estimated Cost
$200.00
Estimated Time Investment
Week Long Project (20 Hours or More)
Finish Used
steel wool, vinegar, tea and polly.
Recommended Skill Level
Intermediate
Comments
In reply to Beautiful table by sgilly
Tue, 02/18/2014 - 14:59
Thank you!
Thanks, My wife loved it as well!
Rebecca Media Center-Side Base
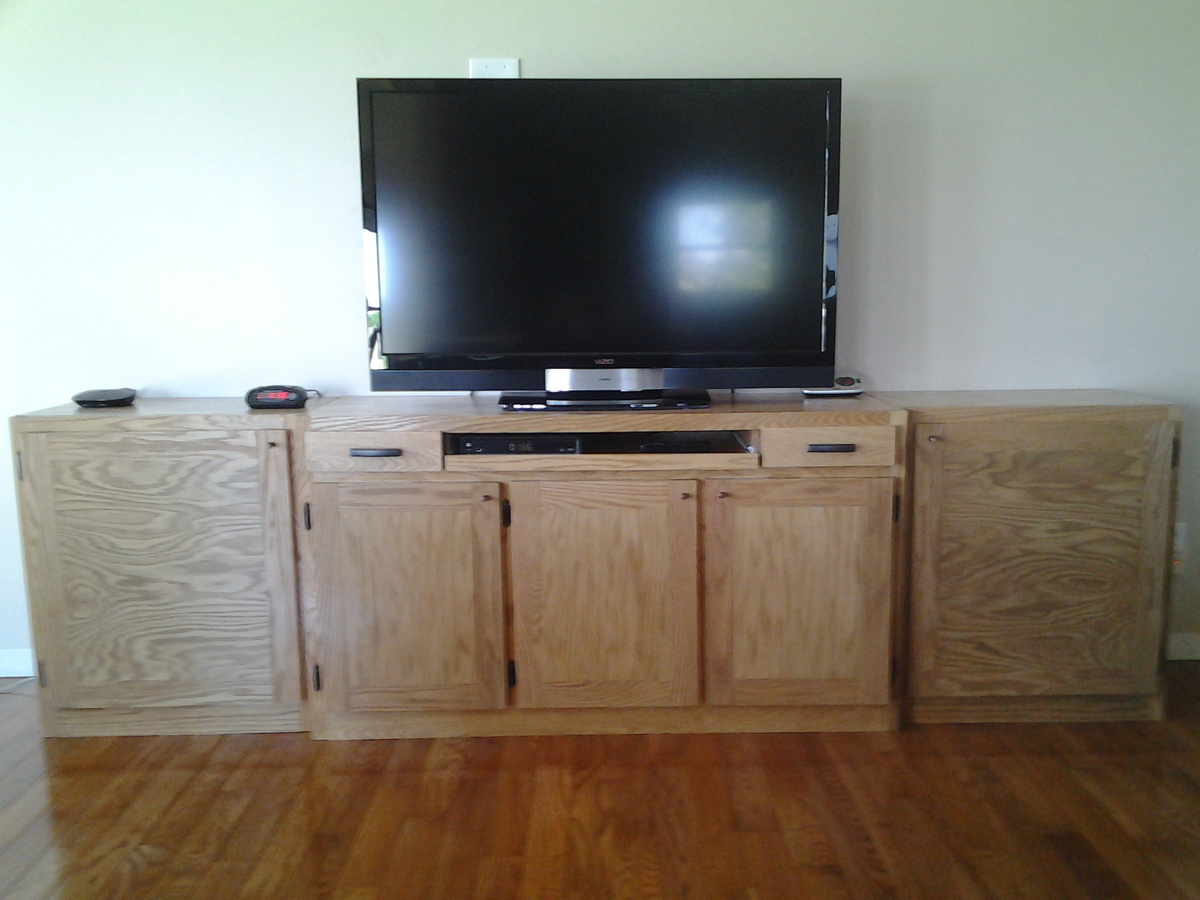
Oak Plywood and Oak Trim
We just love your work and detailed plans!
Hubby and I built the Console Unit and now the Base Units and plan to add on the hutches. We built the units only 30" tall vs. the 34-1/2" height from the plans. We used oak plywood and oak trim and finished it with a Minwax Fruitwood Stain and Minwax Polyurethane Seal. My hubby loves to make You Tube videos and made one of our work and posted it at:
https://www.youtube.com/watch?v=YtB6LK1xEHg
Keep up the great work and we plan to post more pics!
Built from Plan(s)
Estimated Cost
$100 for 1 piece of oak plywood and approximately 3 pieces of oak trim. We also used approximately 40 kreg jig screws.
Estimated Time Investment
Weekend Project (10-20 Hours)
Finish Used
Minwax Fruitwood with Polyurethane Seal. Watch the video to see it applied at:
https://www.youtube.com/watch?v=YtB6LK1xEHg
https://www.youtube.com/watch?v=YtB6LK1xEHg
Recommended Skill Level
Intermediate
Corner Entertainment Center with Barn Doors
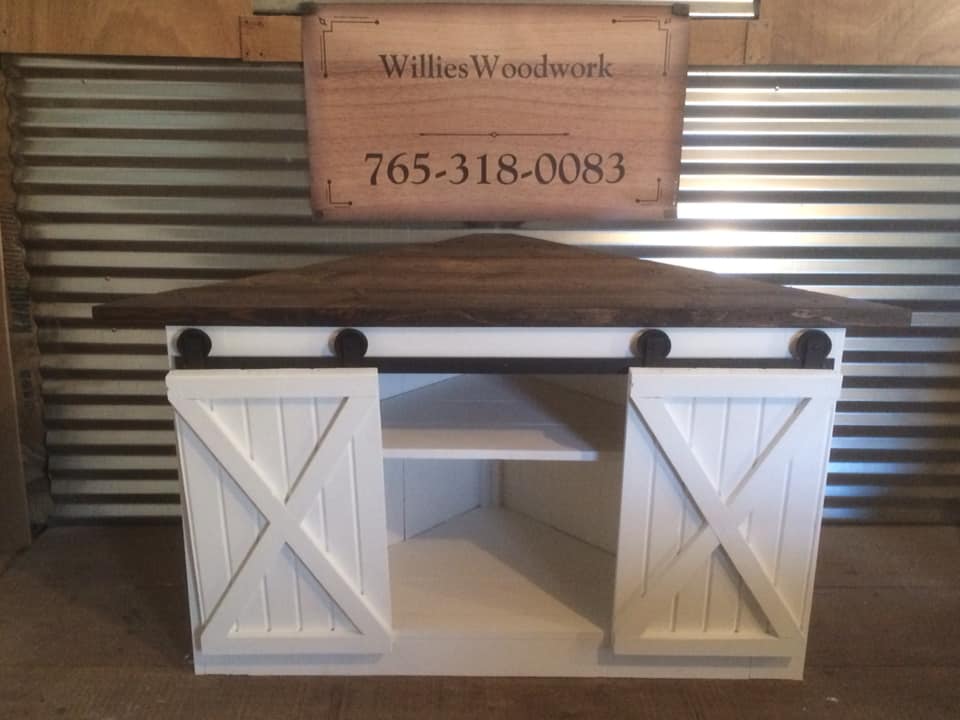
Built by Willies Woodwork
Built from Plan(s)
Easy DIY Twin Beds
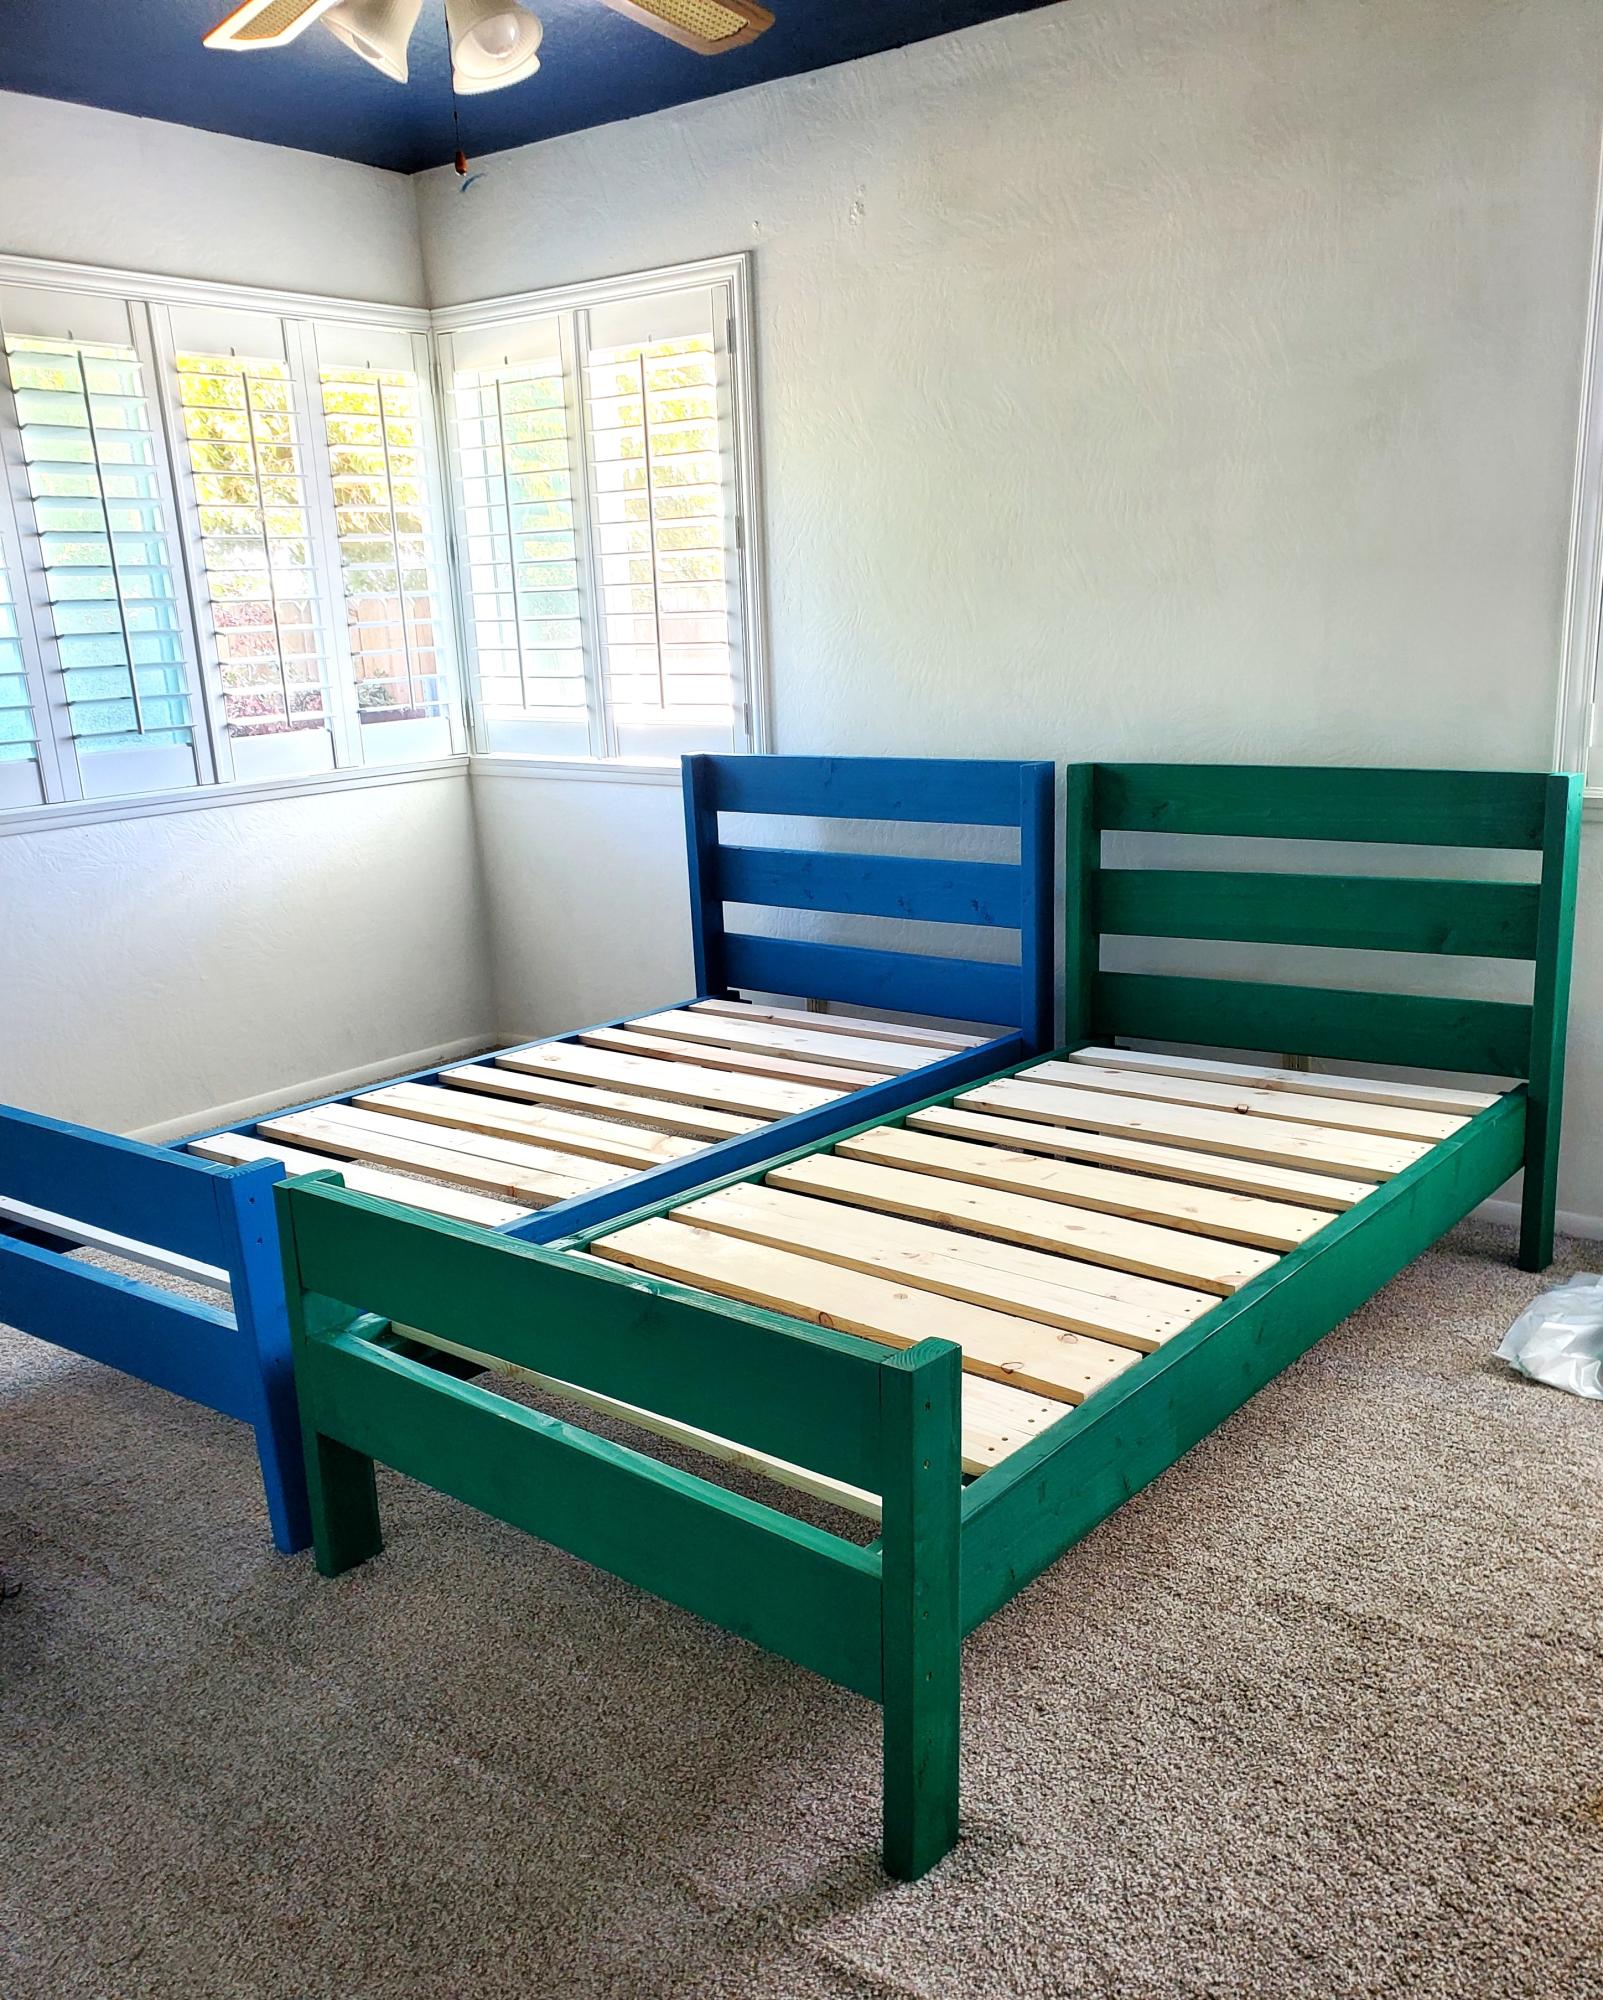
I have twins and they were fastly growing out of their toddler beds, so when I found Ana's plan for the easy twin bed (I made XL twin beds) I was ecstatic. In less than 4 days, both beds were built, painted, and ready for bedding!
BonjourTwinMama
Built from Plan(s)
Addicted to benches
Ana's benches are soo addictive - I had to try my hands at this one! It is meant for the porch on the new house to be built sometime next (?) year. I must say, I didn't quite manage to get accurate cut-outs with the jig saw, but the design is quite forgiving. The timber is Cypress Pine - an Australian native - sold as fence pickets in the convenient size of 65mmx20mm. I love the grain and variation in colors, ranging from chocolate to blond, and think it is totally underrated. The is top made from 5 planks, so a little wider than the original plans.
Built from Plan(s)
Estimated Cost
$28 for timber, finish was a relic found in the garage
Estimated Time Investment
Day Project (6-9 Hours)
Finish Used
3 coats of clear, exterior grade oil based polyurethane
Recommended Skill Level
Beginner
Comments

Master Closet Overhaul
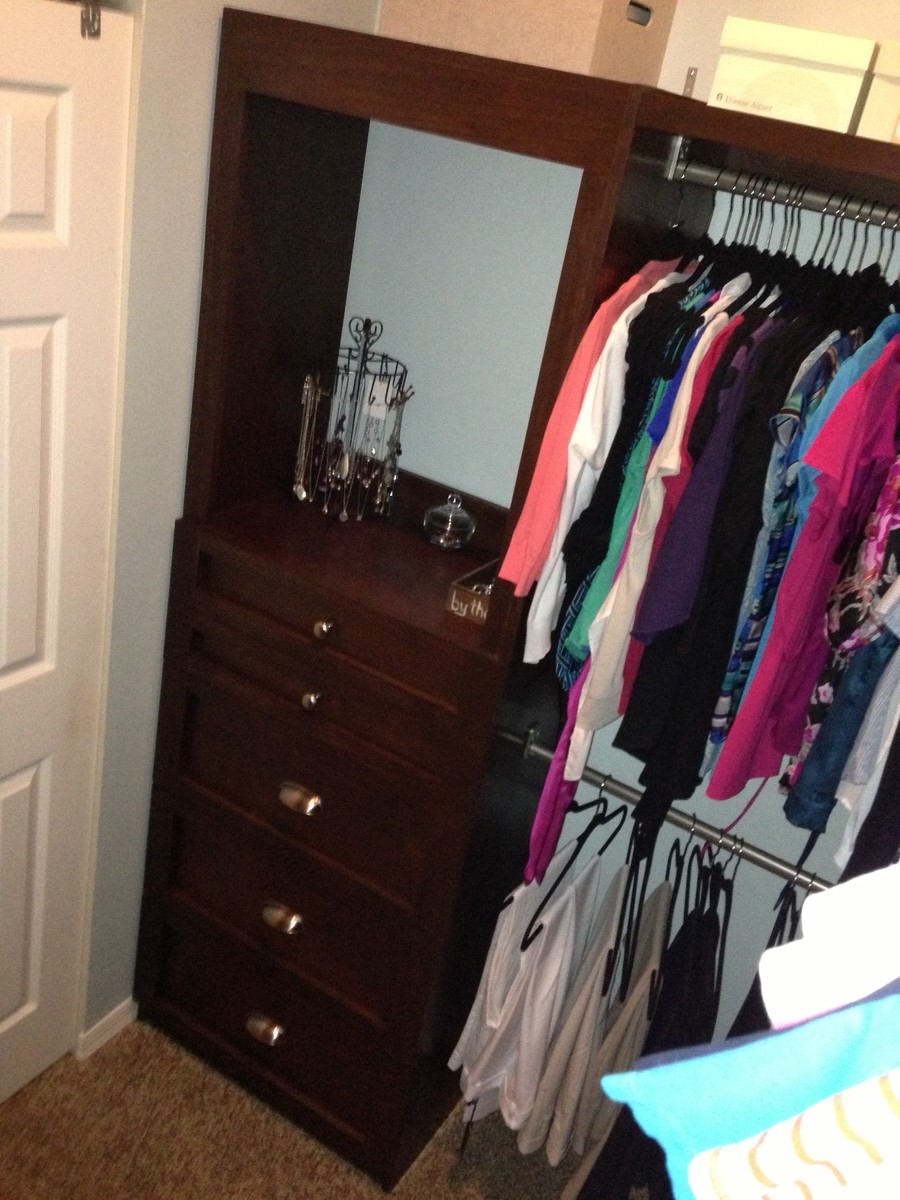
This project was desperately desired and needed! We had old wire shelving which previous owners of the home had installed improperly and were falling off the wall. This took about 6 weeks from start to finish, but I am SO happy with the results. Unfortunately, here in south Florida, our homes are built with metal studs which are more often than not spaced all over the place. So, attaching anything to a wall securely is next to impossible. I believe I've gotten things as securely attached as possible and things seem to be holding up really well. The icing on the cake was my mother-in-law purchasing 100 Huggable Hangers for me for my birthday! The OCD in me was ecstatic! Anyhow, thanks Ana for the great plans and helping bring custom organization to our homes!
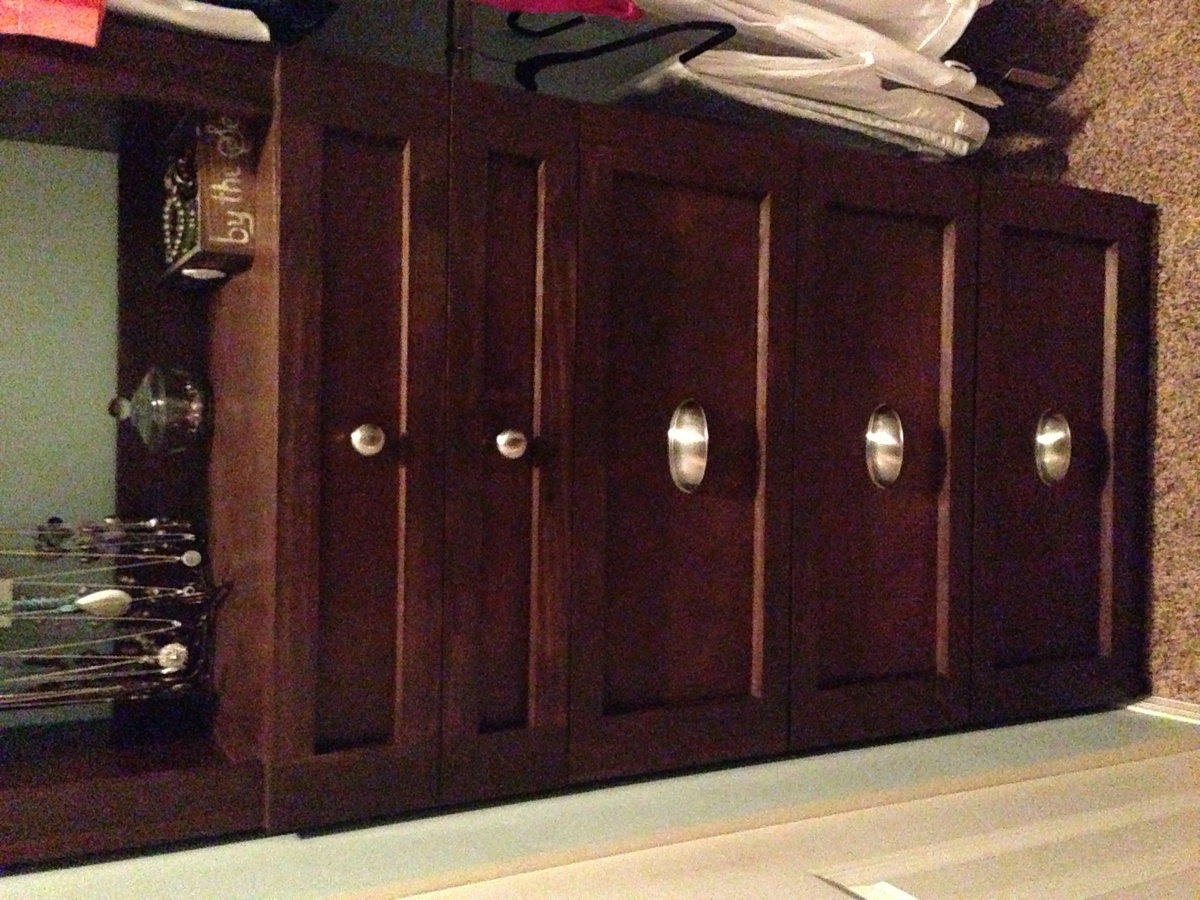

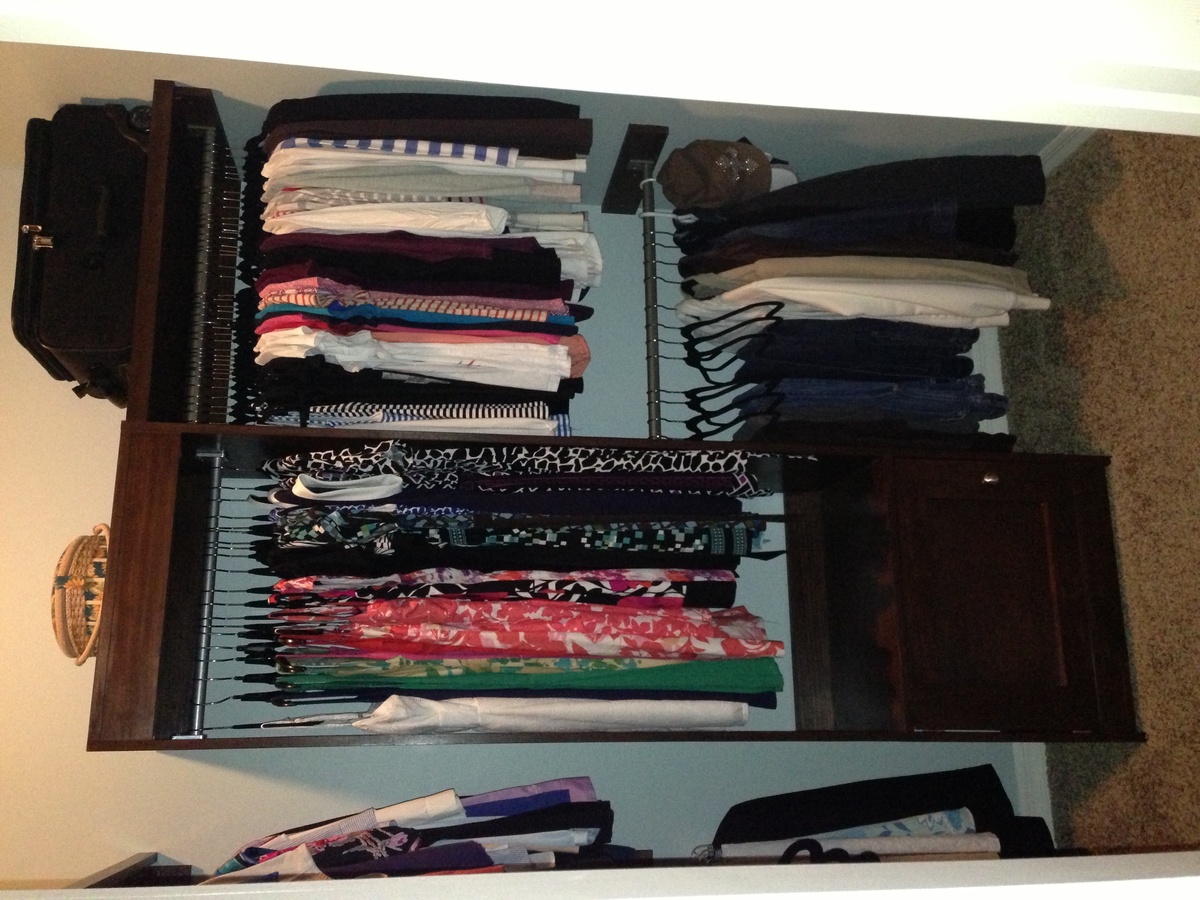
Built from Plan(s)
Estimated Cost
$375
Estimated Time Investment
Week Long Project (20 Hours or More)
Finish Used
Varathane Ultimate Stain in Carrington (LOVE-5 stars) and satin polycrylic
Recommended Skill Level
Intermediate
Indoor Playhouse Fun
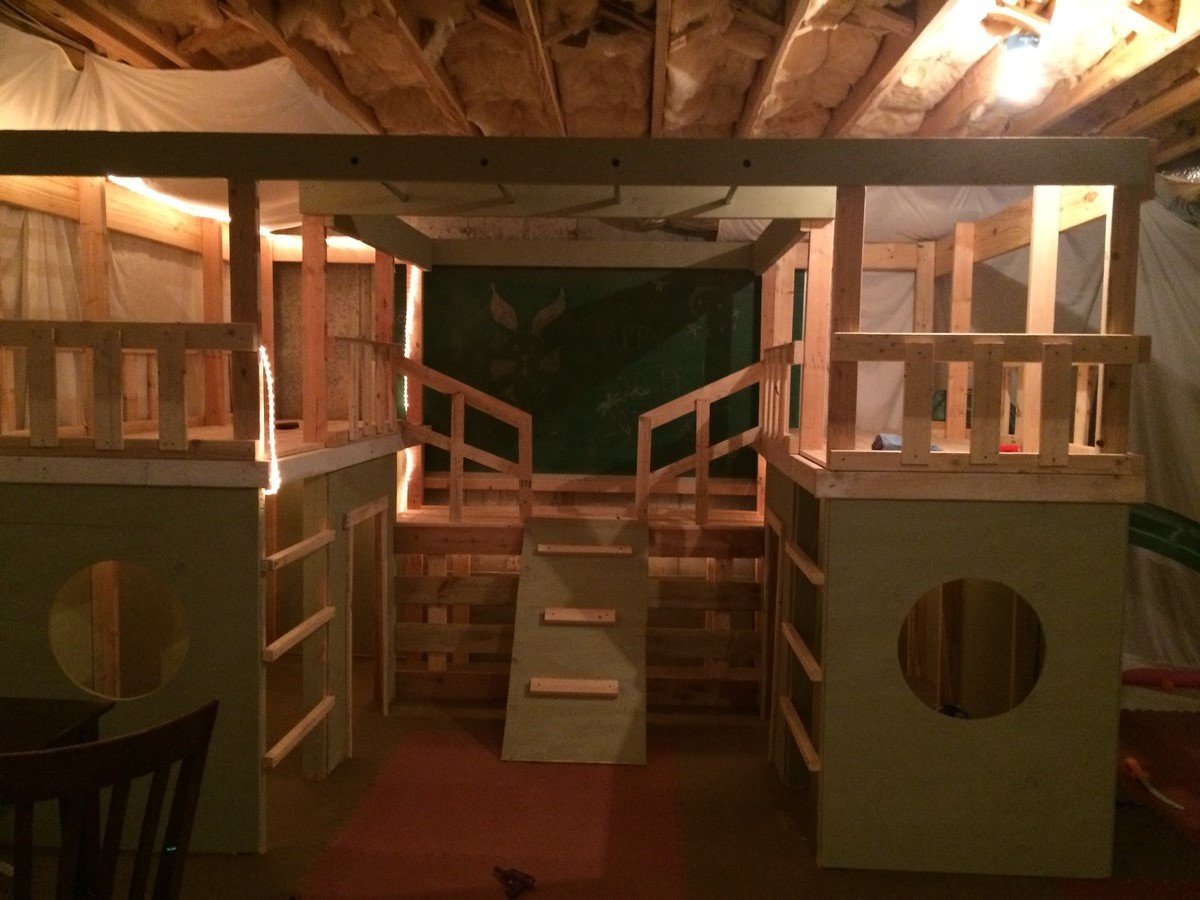
This project was a success!! I had a week of vacation that I dedicated to this great project! The directions were easy to follow...thank you Ana!
I managed to get the slide from someone's outdoor play set that they were giving away :) I secured it to the side of the upper level. It's been the kids favorite part!
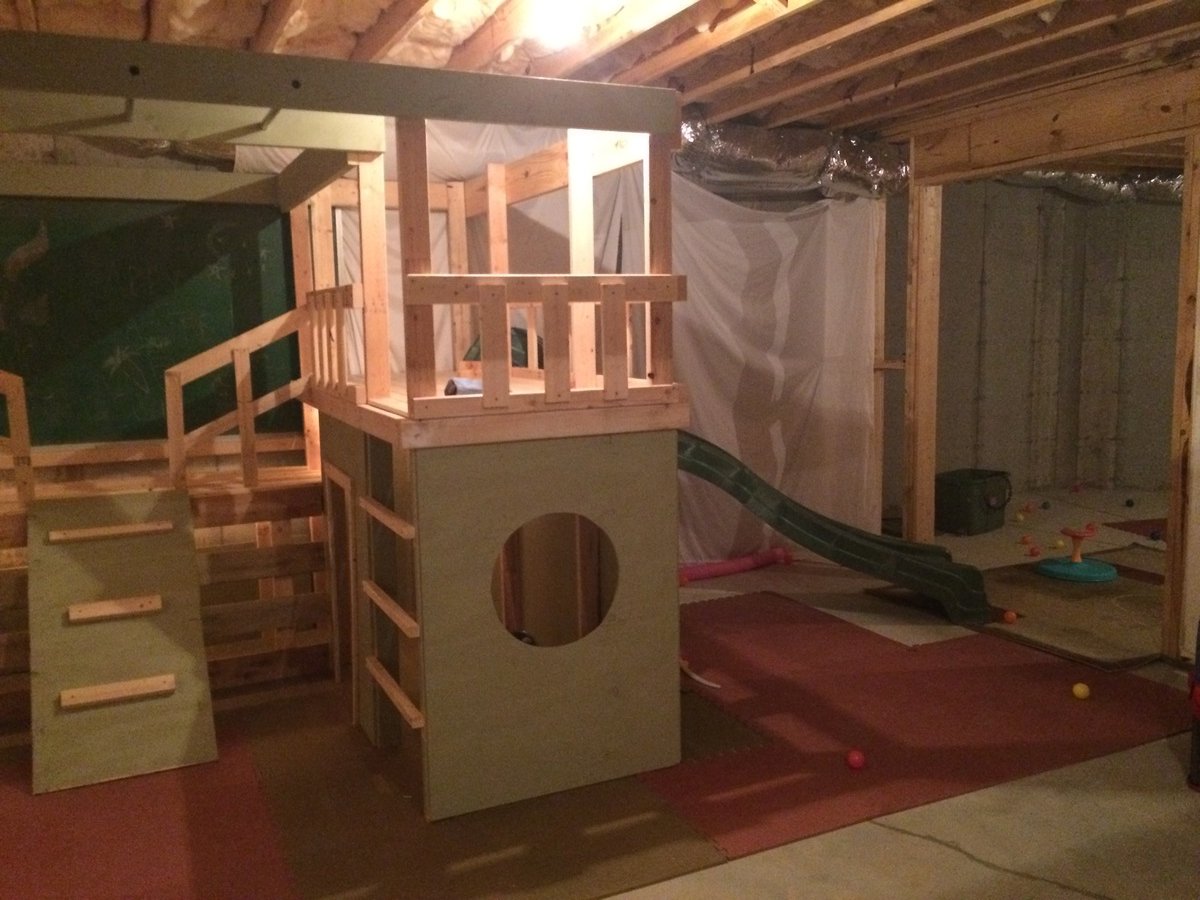
Built from Plan(s)
Estimated Time Investment
Week Long Project (20 Hours or More)
Recommended Skill Level
Intermediate