Community Brag Posts
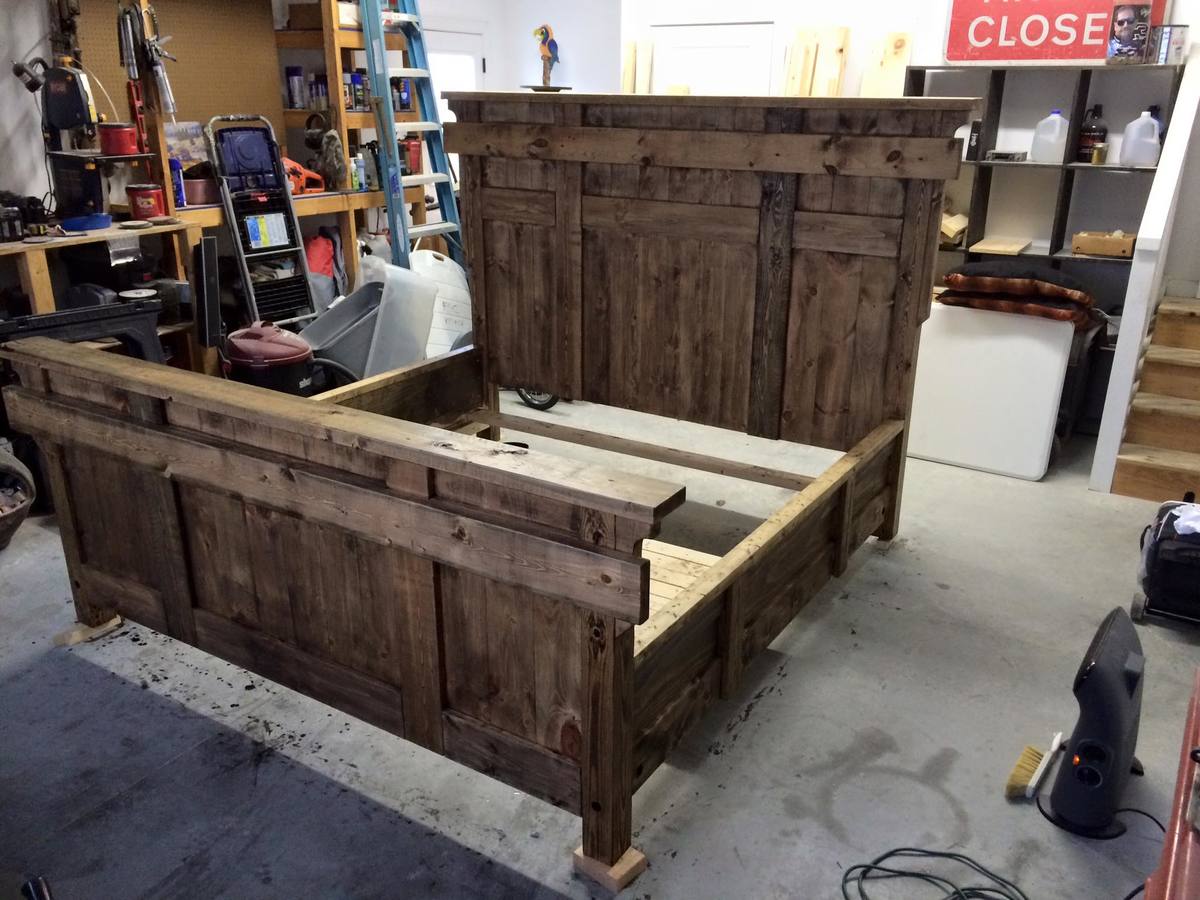
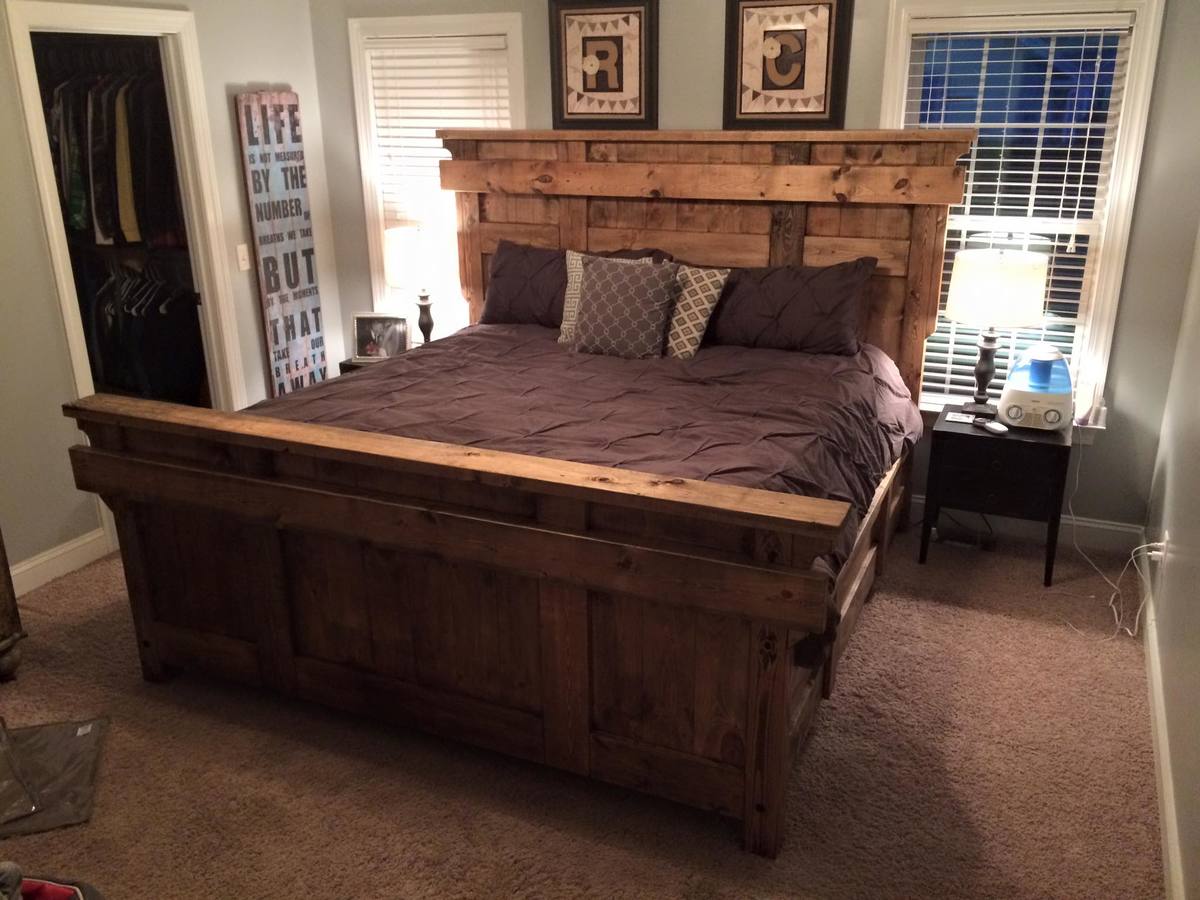
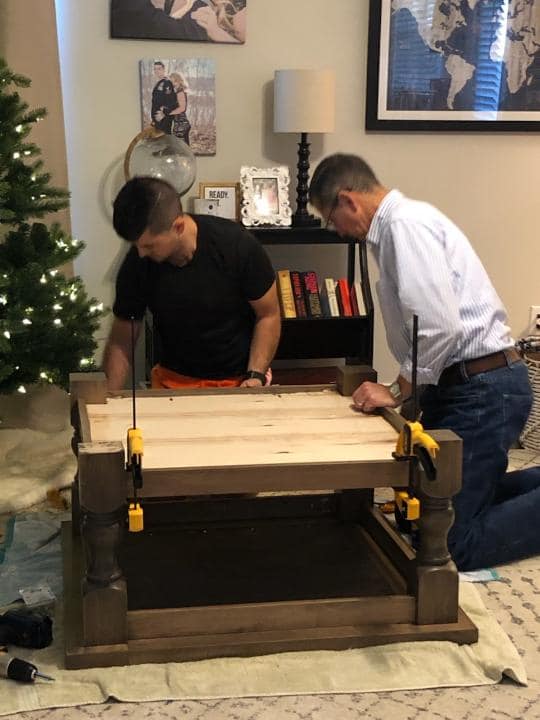
King Farmhouse Bed Frame

I spent 3 weekends building this for a friend. It was alot of work but it came out great!! He got the plans from Shanty-2-chic. We modified the plans alot to make it a truly unique piece.
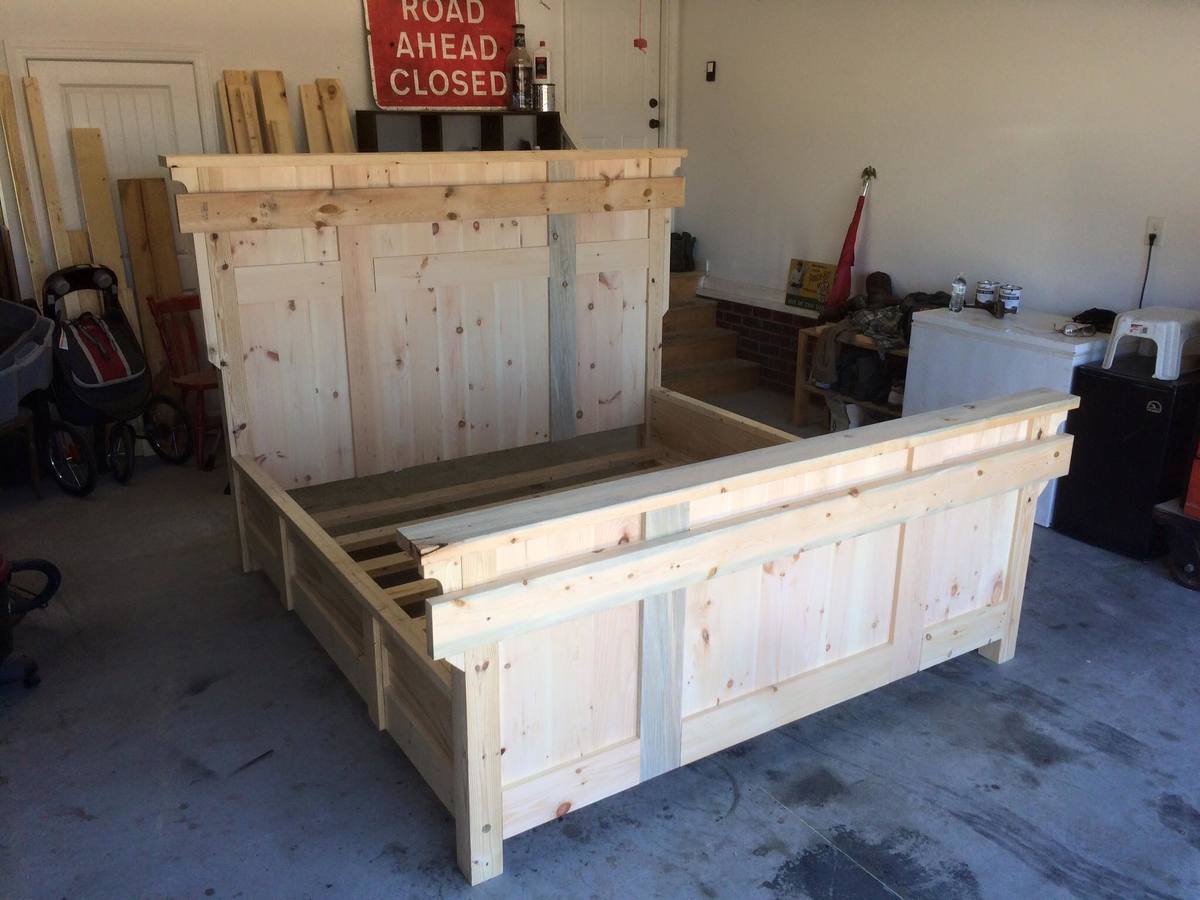
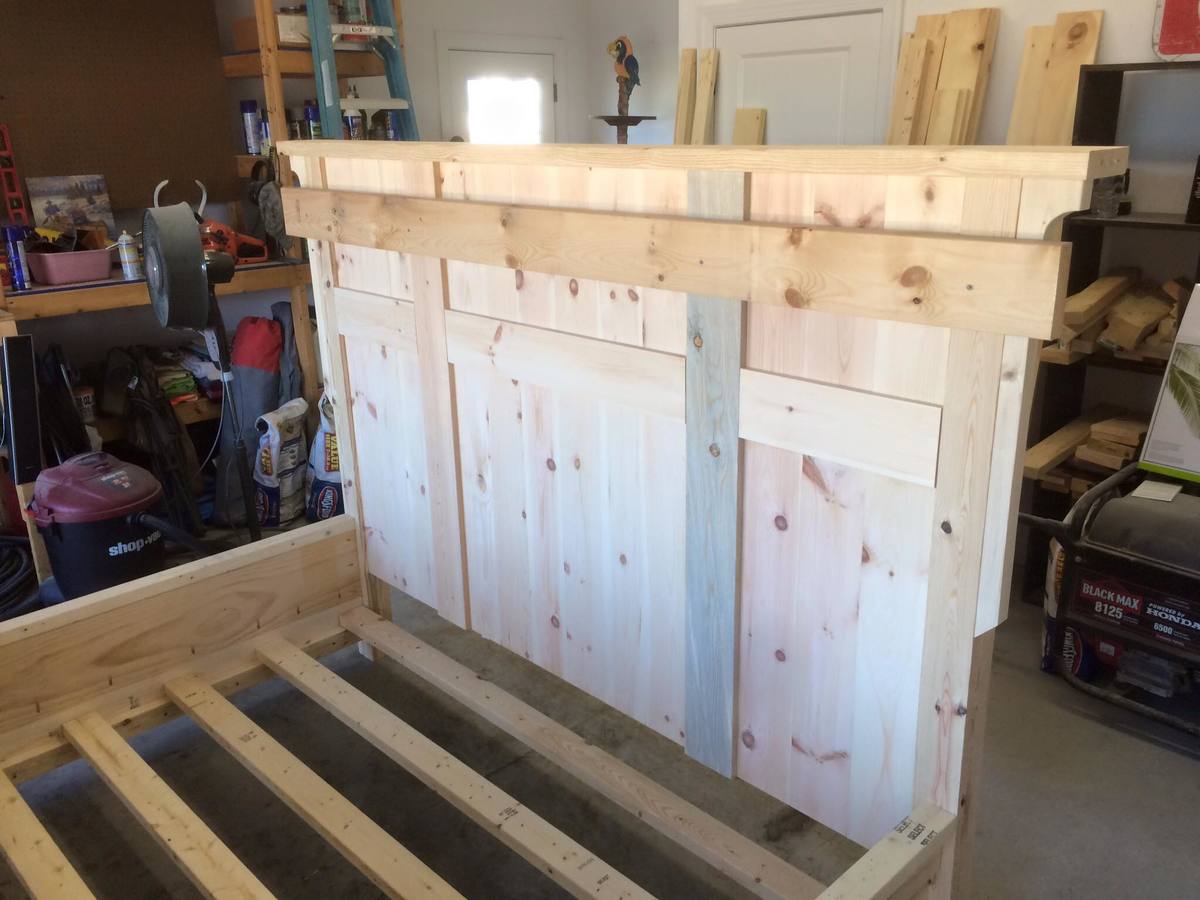

Built from Plan(s)
Estimated Cost
$400
Estimated Time Investment
Week Long Project (20 Hours or More)
Finish Used
varathane ash
Recommended Skill Level
Advanced
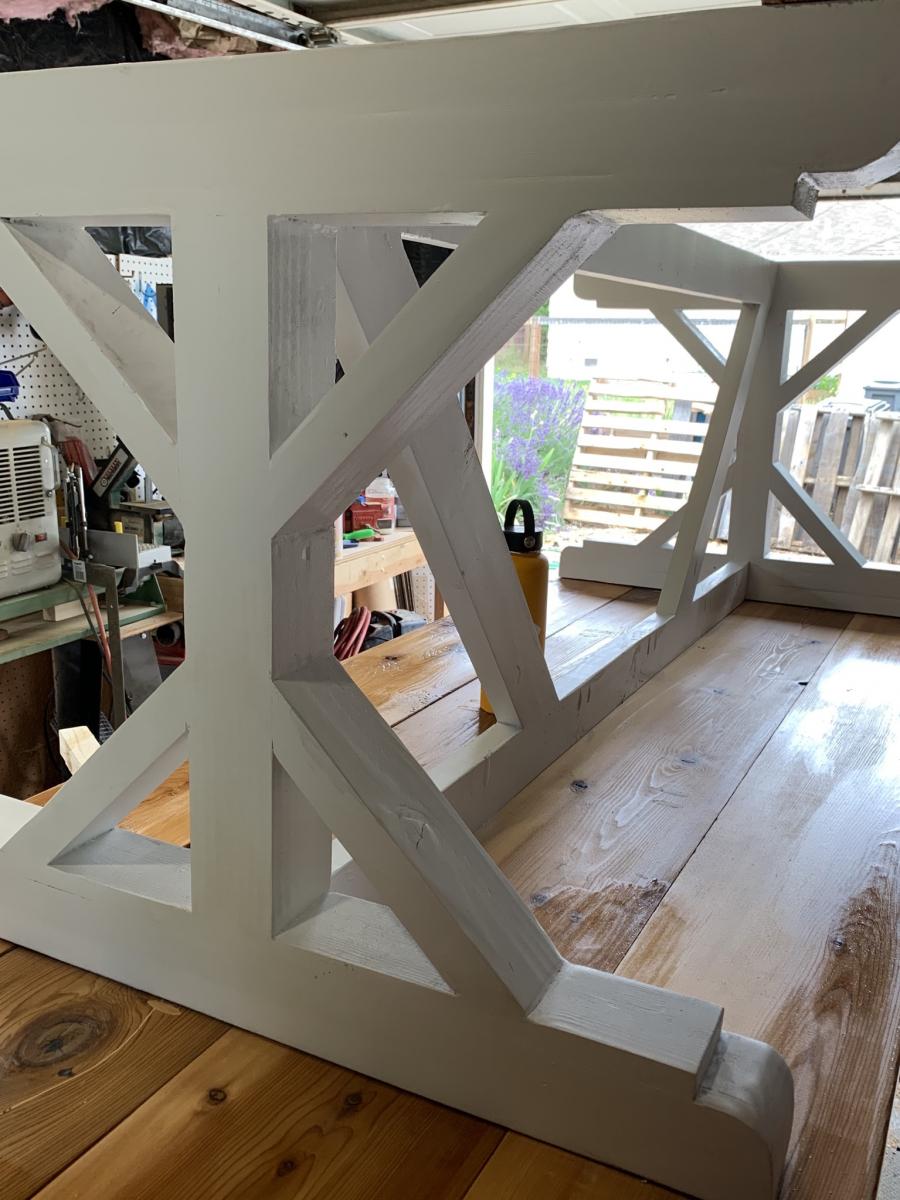
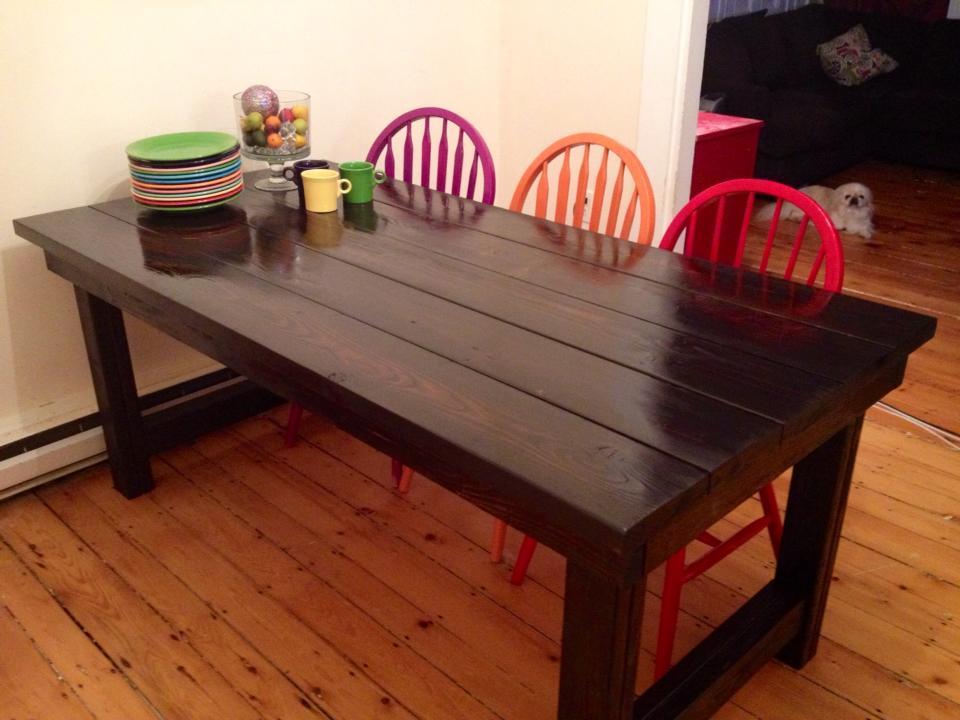
Fancy X Farmhouse Table
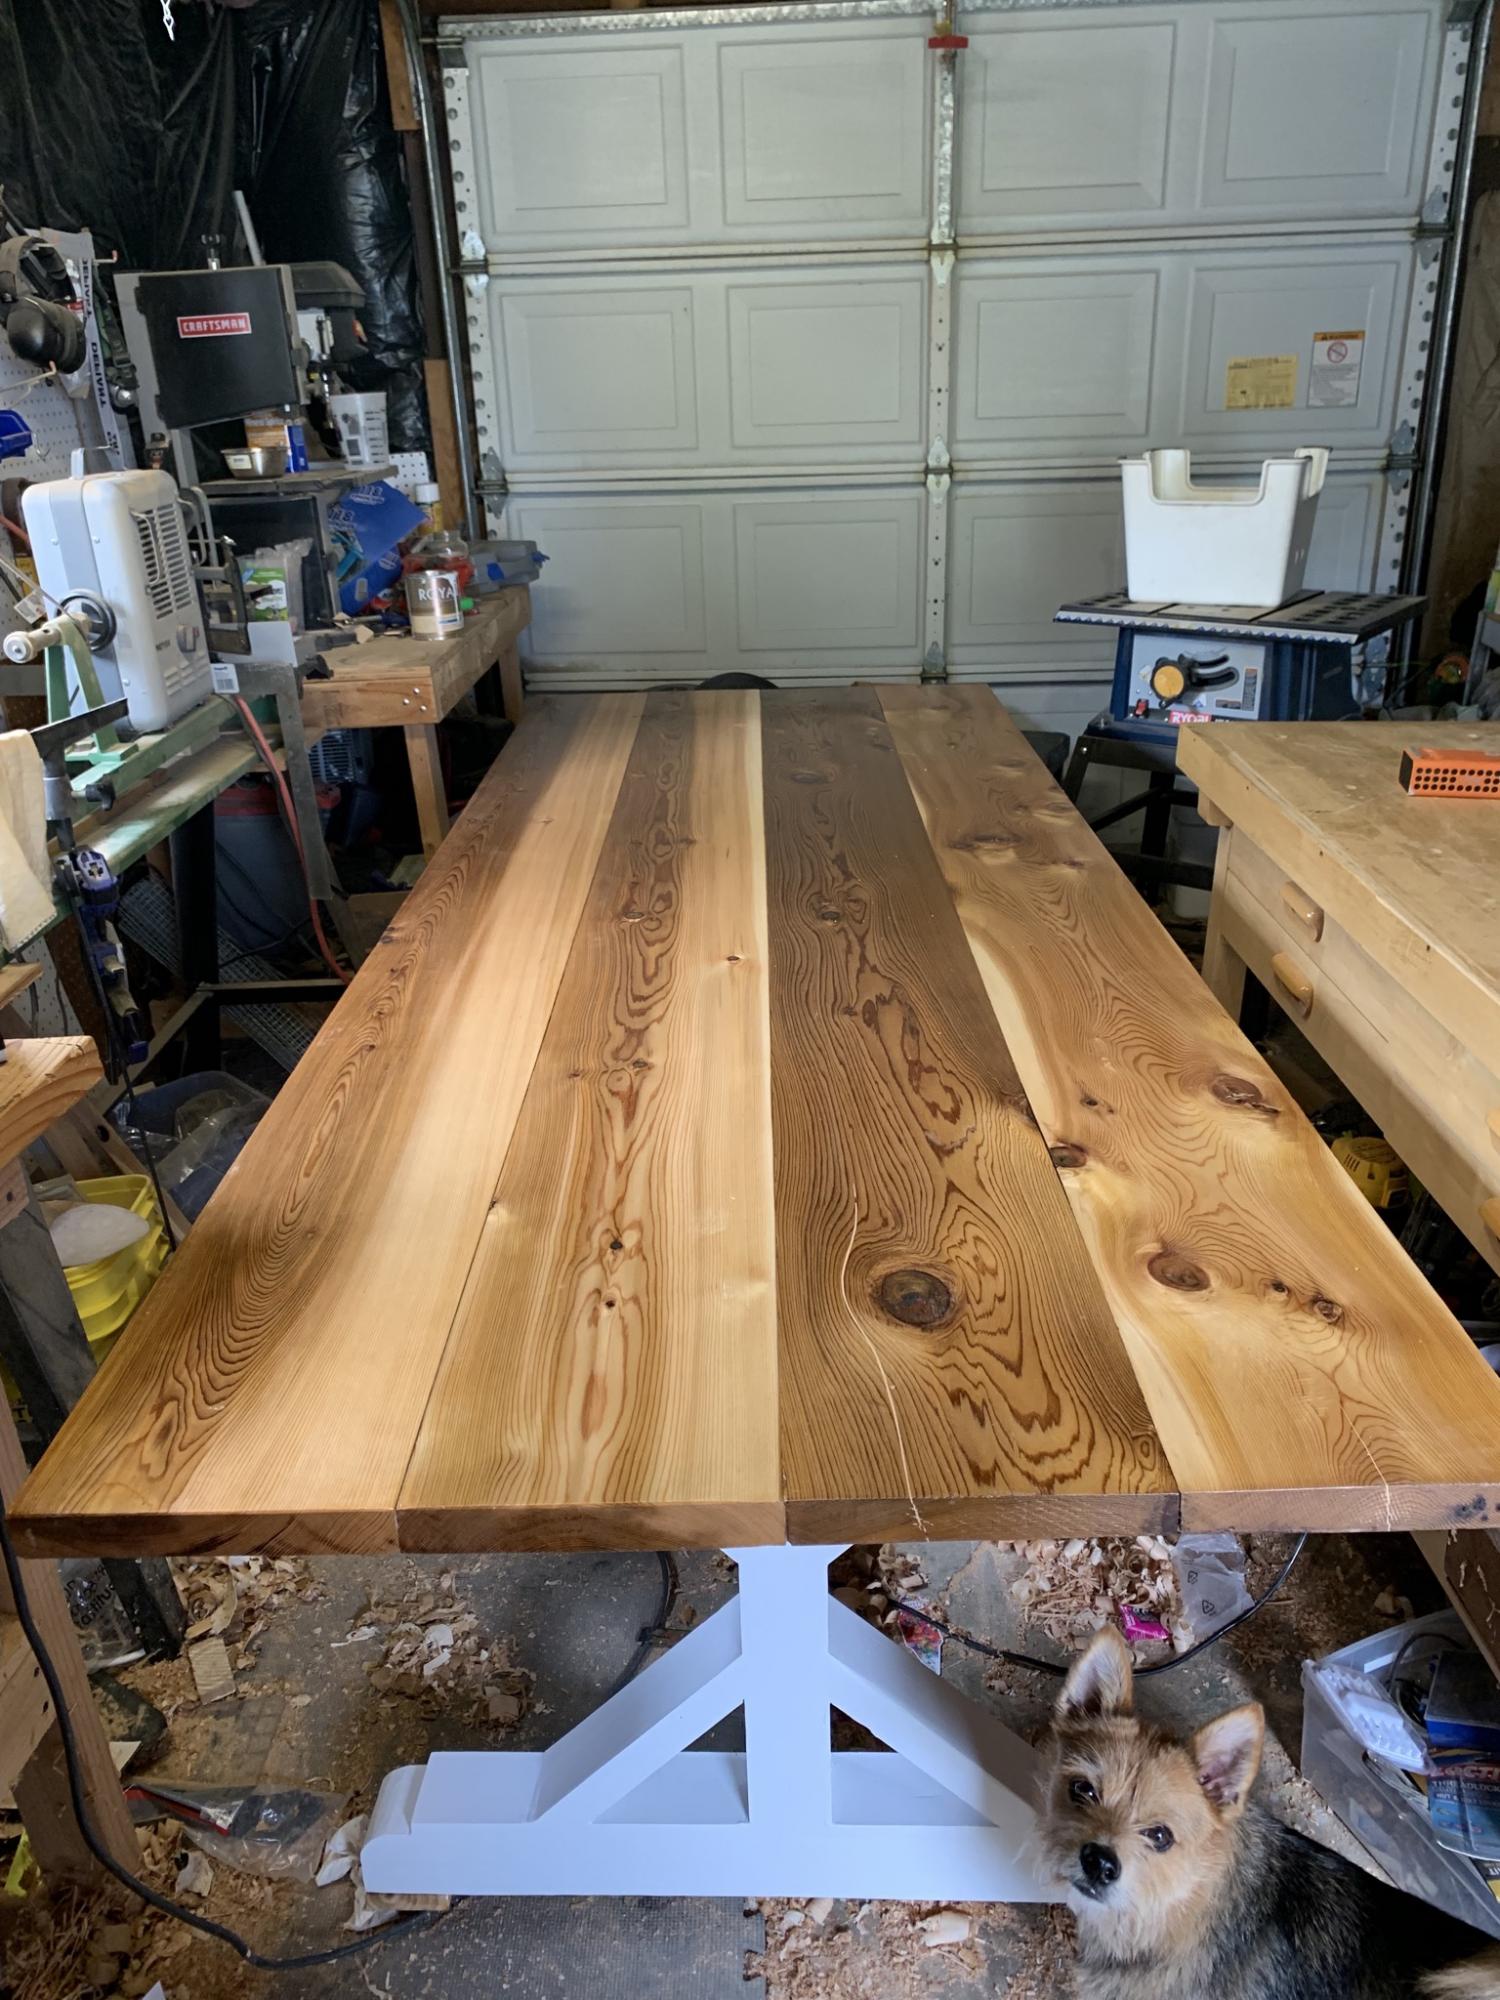
Table top is tight knot cedar, sealed with ship n shore, 7 coats spar urethane.
Base is fir, sealed and painted in latex outdoor paint:
Estimated Cost
225 (cedar was 150).
Estimated Time Investment
Week Long Project (20 Hours or More)
Finish Used
Spar Urethane
Recommended Skill Level
Intermediate
Comments
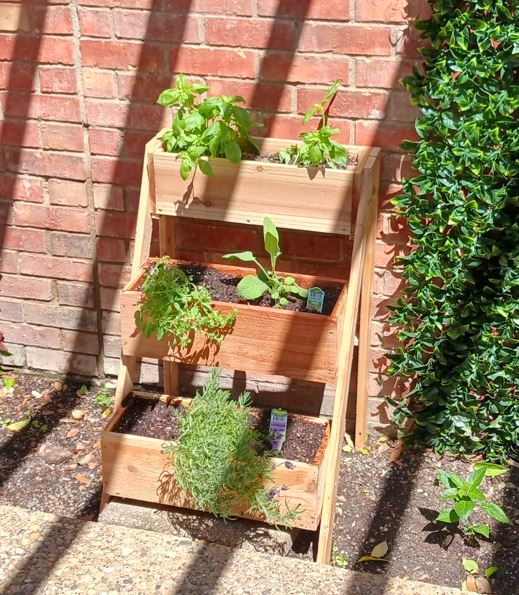
Planters!
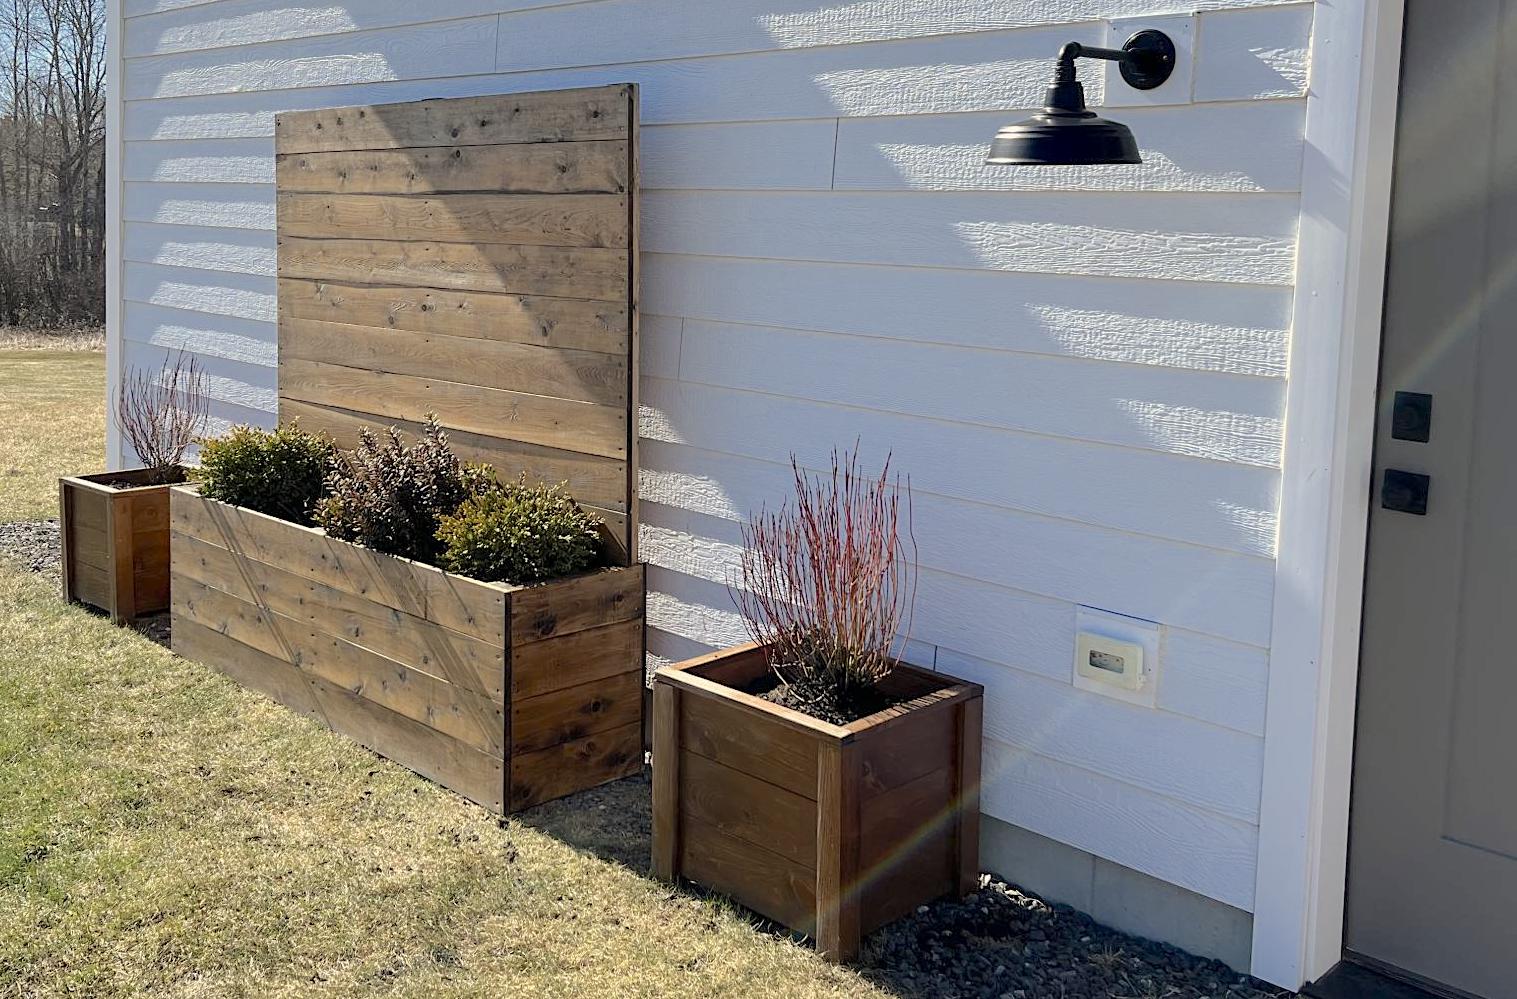
These planters are exactly what we needed to warm up this blank siding! The smaller planters are made from pine, the larger from cedar.
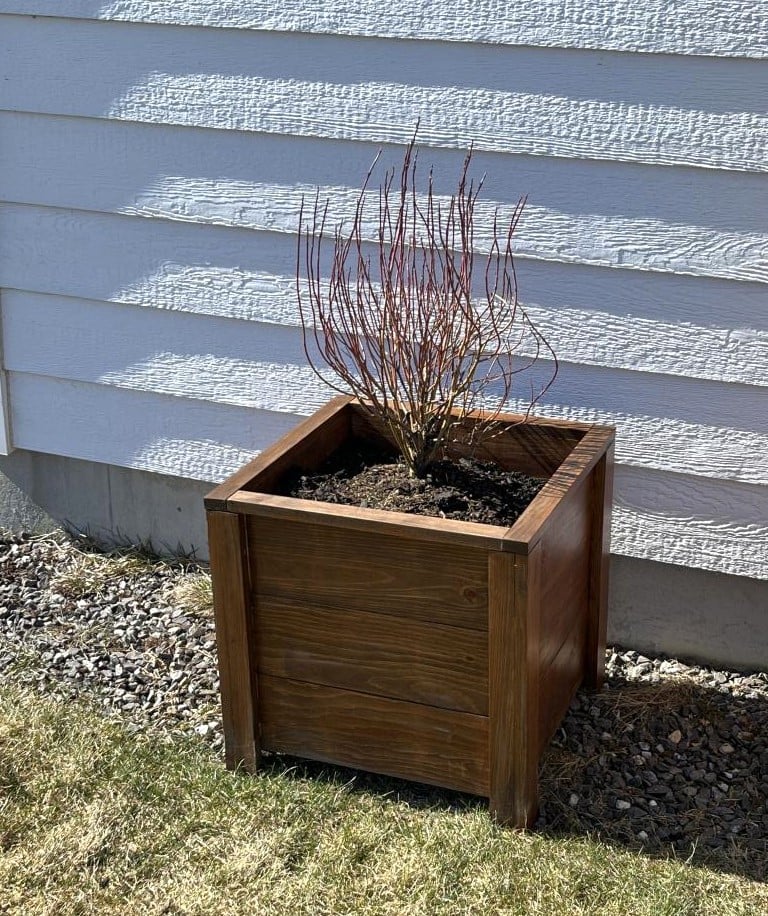
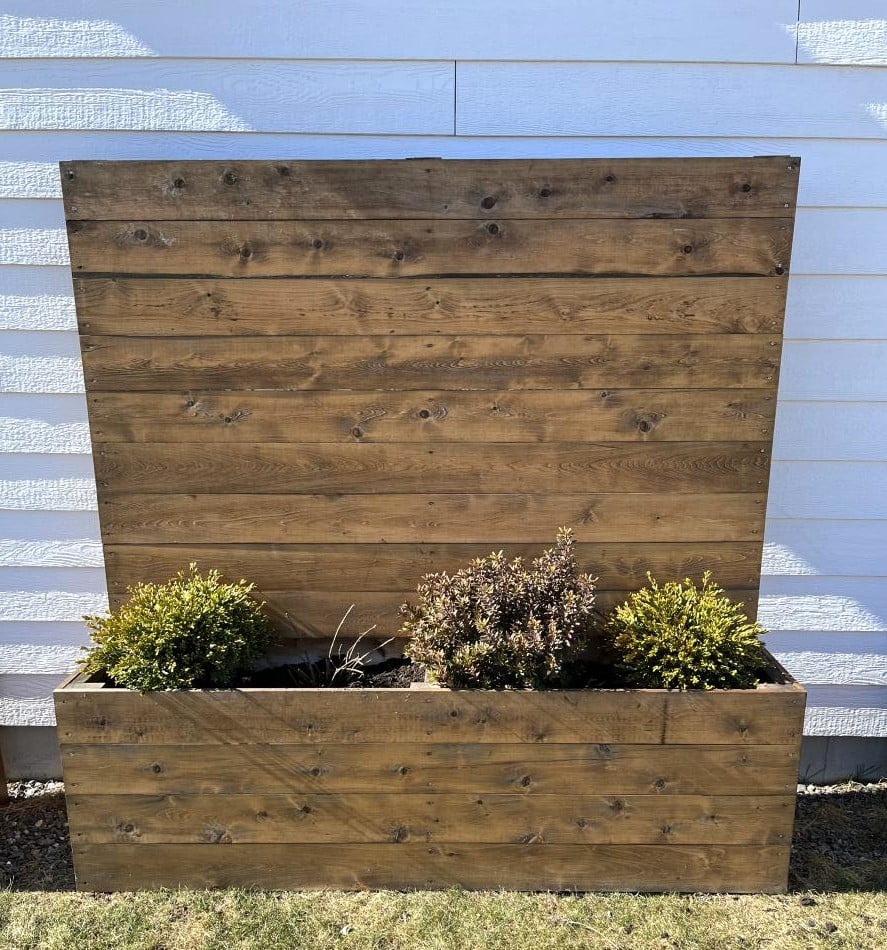
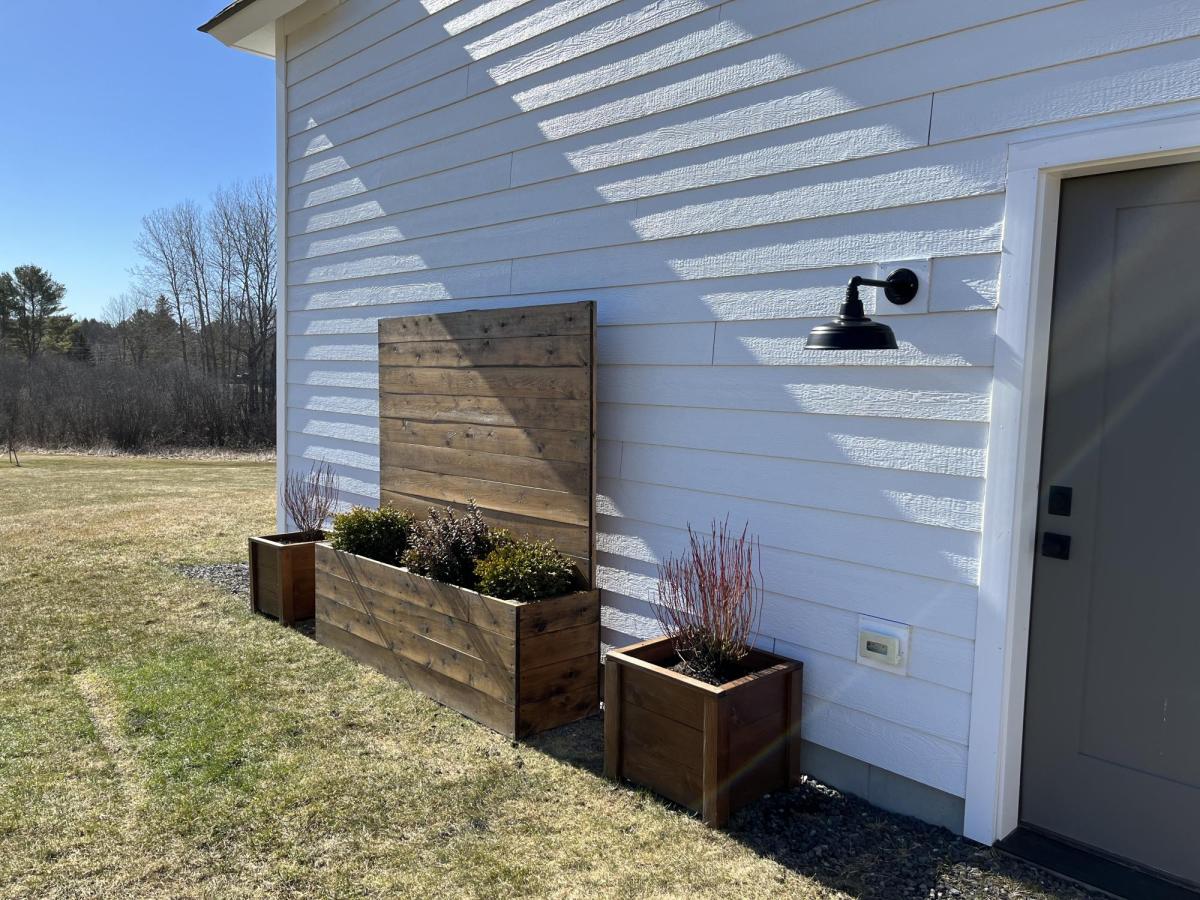
Built from Plan(s)
Comments
Easy Shelf
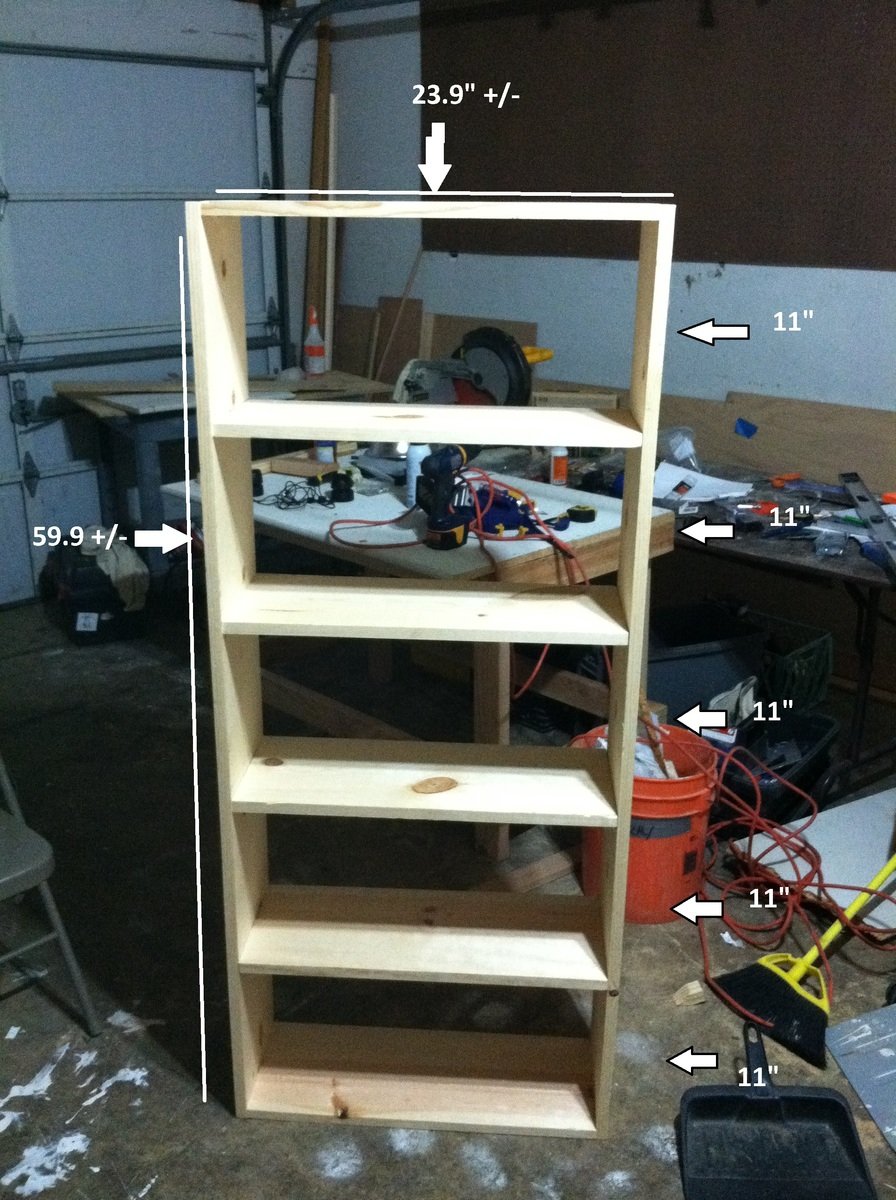
Here is a pretty simple shelf I built for my closet. Left it backless b/c I wear a 12 1/2 and needed my shoes to be able to hang out back a bit. The top 2 I am using for folded tshirts I don't hang, like undershirts and tank tops.
Material List:
1- 1x10x10 -$13.00 (2 side boards)
2- 1x10x6 - $8.00x2=16 (6 shelves)
24 1 1/4 pocket screws. Had these on hand, could sub for 1 1/2 wood screws if you do not have pocket scew jig set.
Tools:
Tape measure
Quick Square
Miter saw ( which I used) or a Circular saw
Drill
Cut list
*2-59.9+- side boards
*The 1x10x10 was exactly 10ft long, so I marked off 5 feet with a line. Then I just cut on the line with the miter saw. This left me with 2 equal boards. Lets say 59.9 give or take a MM or so. Doesnt matter as long as they are even. If you mess the cut up, stack them on top of each other and recut to equal.
*6-23.9+- Shelves
*Again the 1x10x6 was exactly 6ft, so I made 2 lines, one at 2ft, the next at 4ft. Split them when cutting, and had 3 equal boards. Size can be smaller if you like, this is how I did it.
Now the fun part, and probably second longest time consuming part, behind drilling pocket holes.
I took the 2 side boards and clamped them so they would be flush and even side by side. (both face down side to side so you have one clamped board of 1x20x59.5 so to speak) I used my quick square to mark off .75(thickness of shelf boards). Start at the bottom or top, draw line. then,start next at 11 inches, step and repeat.In the end should have 5 shelves exactly 11 inches apart.
I next predrilled my 6 shelf boards with 2 pocket screw holes on each side, about 3 1/2 inches from each edge. This was most time consuming, you could use 1 1/2in screws and go from side boards into shelf boards and save time, also if you don't have pocket hole jig.
Assembling, I started at bottom, attached side boards to both side of bottom shelf, and worked my way up.The lines you pre-drew act as marker for next shelf,and help a ton when trying to keep everything square. The last one,top part, should be snug to put in. I find its best to do this way as everything keeps square as long as you have straight lumber.
Cost overall-$30.00 since I had screws, total time was around 2 hours to complete, and this was me having to explain everything to the little one lol
Estimated Time Investment
An Hour or Two (0-2 Hours)
Finish Used
I didn't do anything but sand down rough edges. This may get painted, but for now its in the closet as is. Since I used pocket holes, staining or painting would be easier since there is no need for wood filler. Sand and go. Nice little shelf for around 30.00. Enjoy and PS Dont mind the mess in my garage lol
Recommended Skill Level
Starter Project
Comments
Tue, 12/20/2011 - 13:55
Side dowels
Decided to add some side dowels on both side to hang belts,scarfs,ect. Will post pics up once I add them.
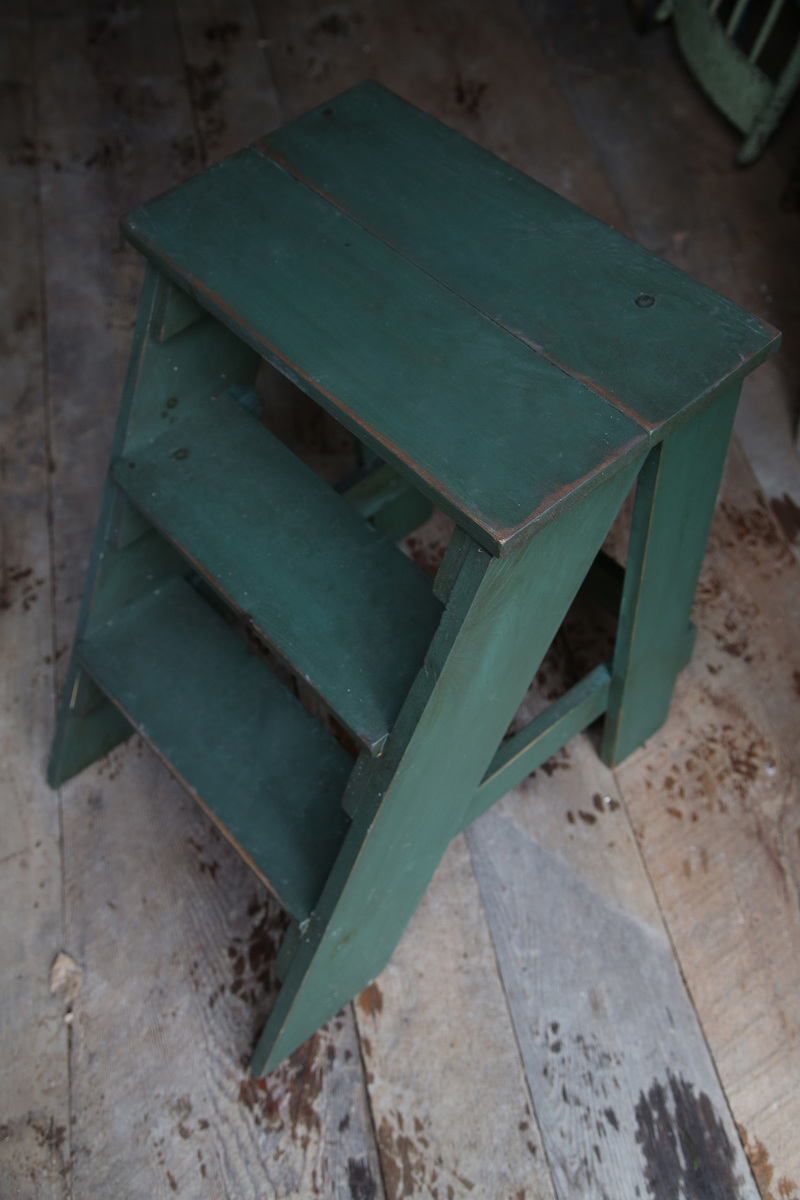
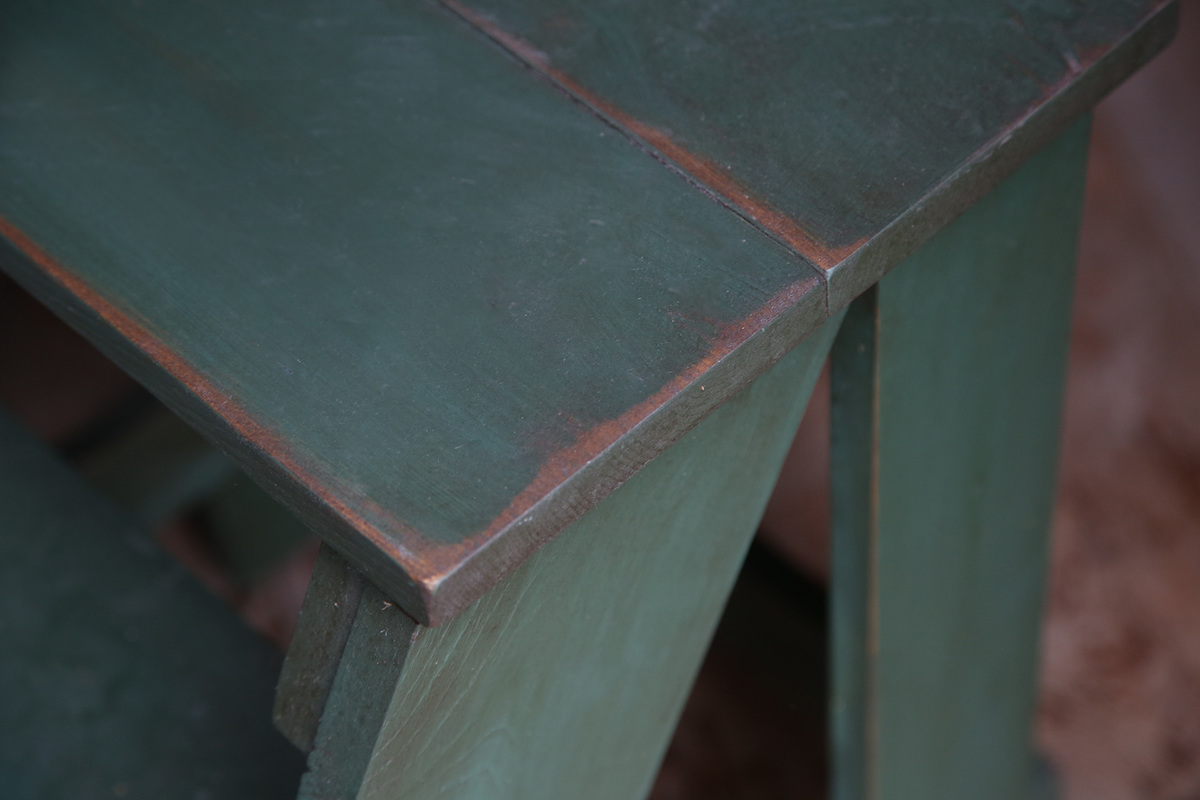
Rustic Stepstool
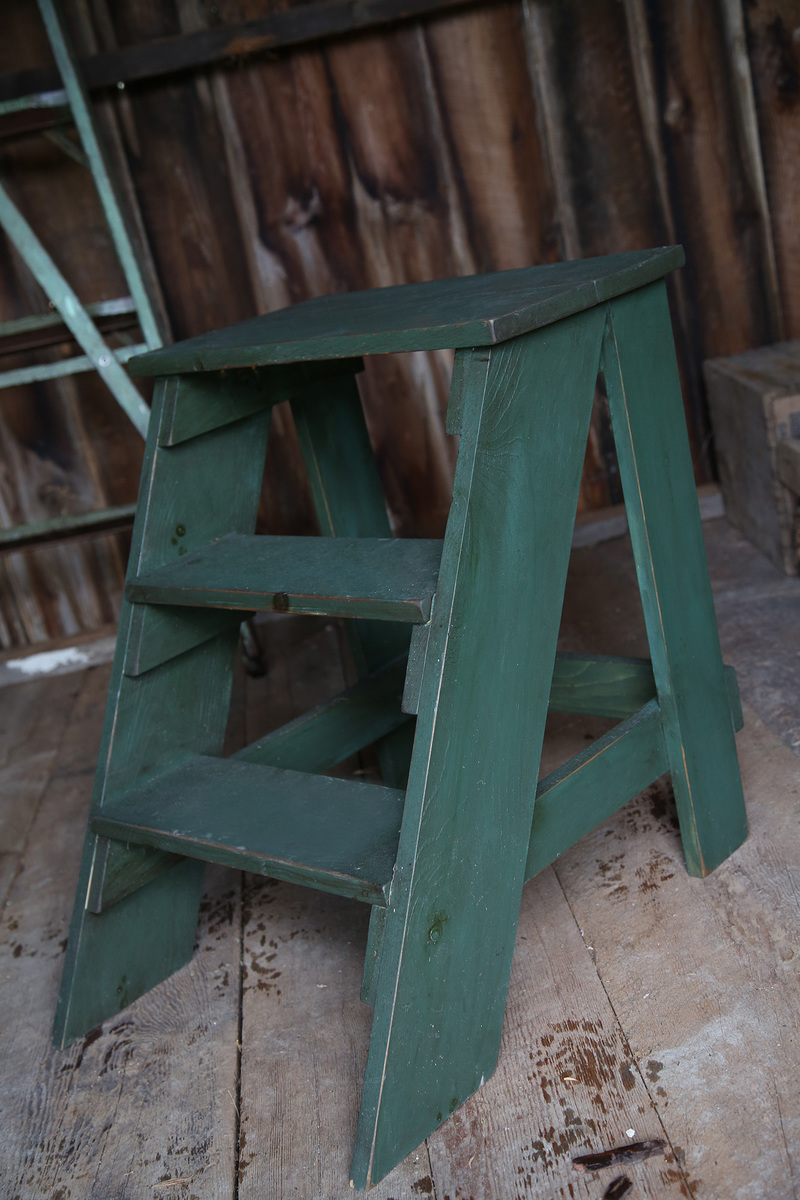
I'm loving the finish on this, and it's a useful little project.
Built from Plan(s)
Estimated Cost
15
Estimated Time Investment
Afternoon Project (3-6 Hours)
Finish Used
I painted it green, and then sanded the edges. I covered the whole thing in the walnut gel stain. This darkened the green and stained the newly exposed wood.
Recommended Skill Level
Beginner
Our farm house table
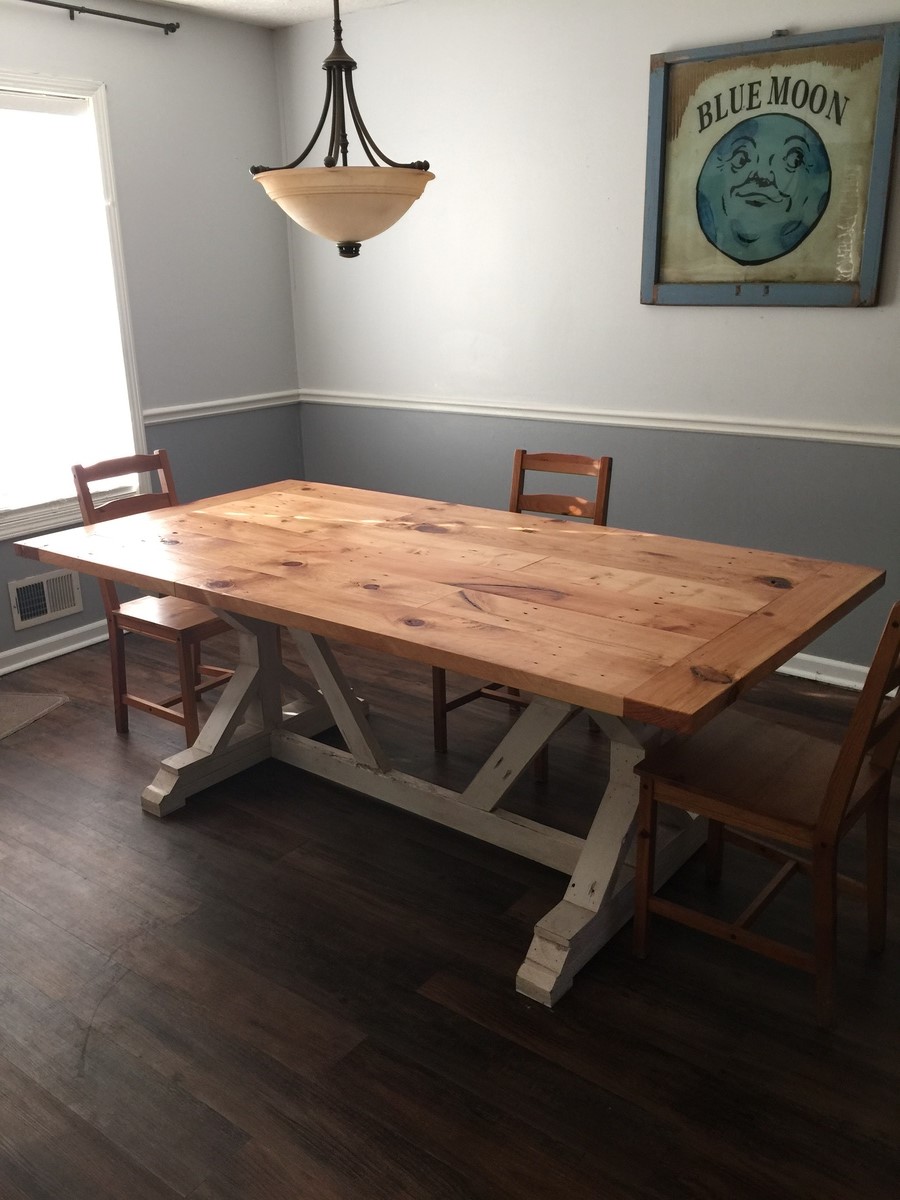
This table took me a few days to build and finish over my Christmas vacation. It's made completely of reclaimed wood. I left as many defects as I could to give it character. I'm finishing a bench for it now. Building this has brought the family together again. We are now eating at the table each night instead of in front of the tv. This table Is going to be in our family for many years to come. Thanks for your great plans Ana.
Built from Plan(s)
Estimated Cost
$20 for pocket screws and stain.
Estimated Time Investment
Weekend Project (10-20 Hours)
Finish Used
Minwax Golden Pecan stain on top. Three coats of Minwax Satin Laquer.
The base is painted with some old off white semi gloss latex I had in the garage, then rubbed with some dark walnut stain.
The base is painted with some old off white semi gloss latex I had in the garage, then rubbed with some dark walnut stain.
Recommended Skill Level
Intermediate
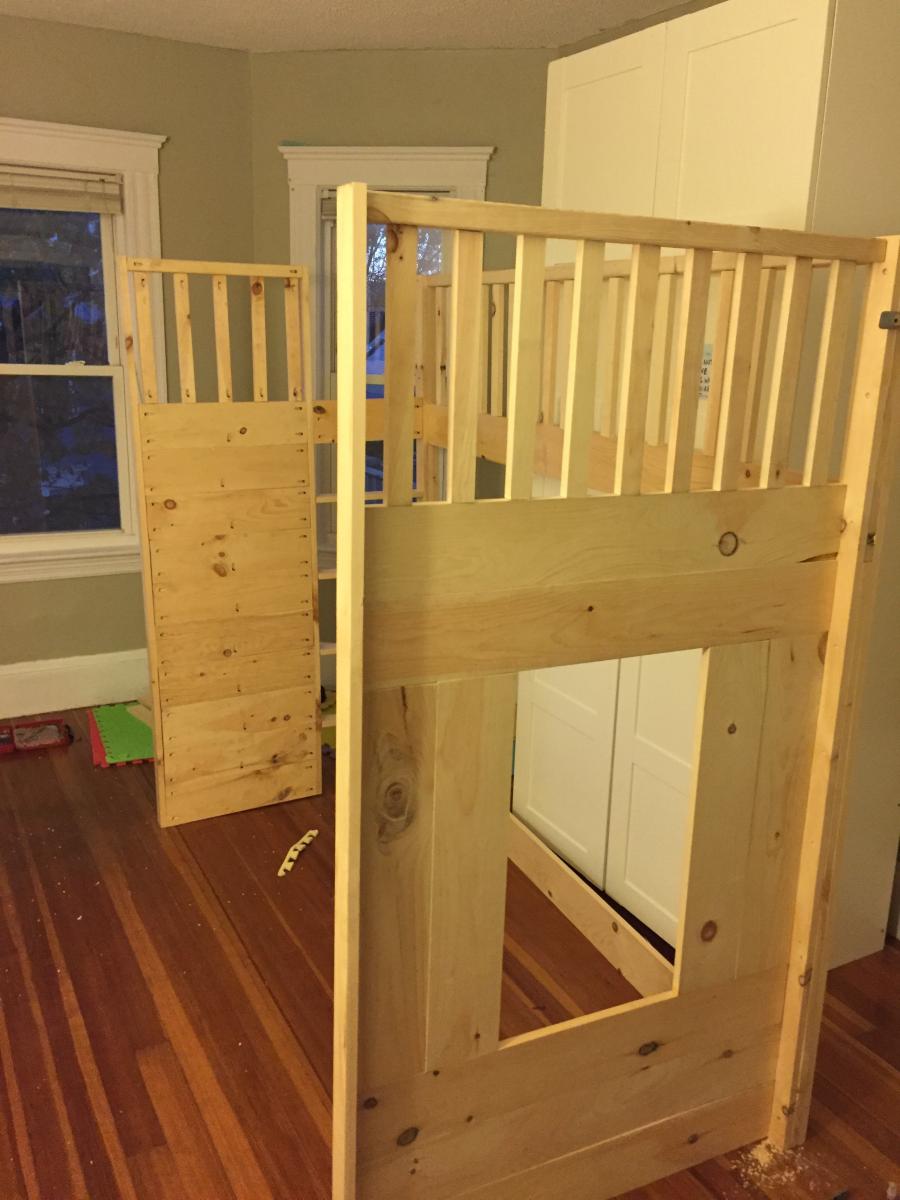
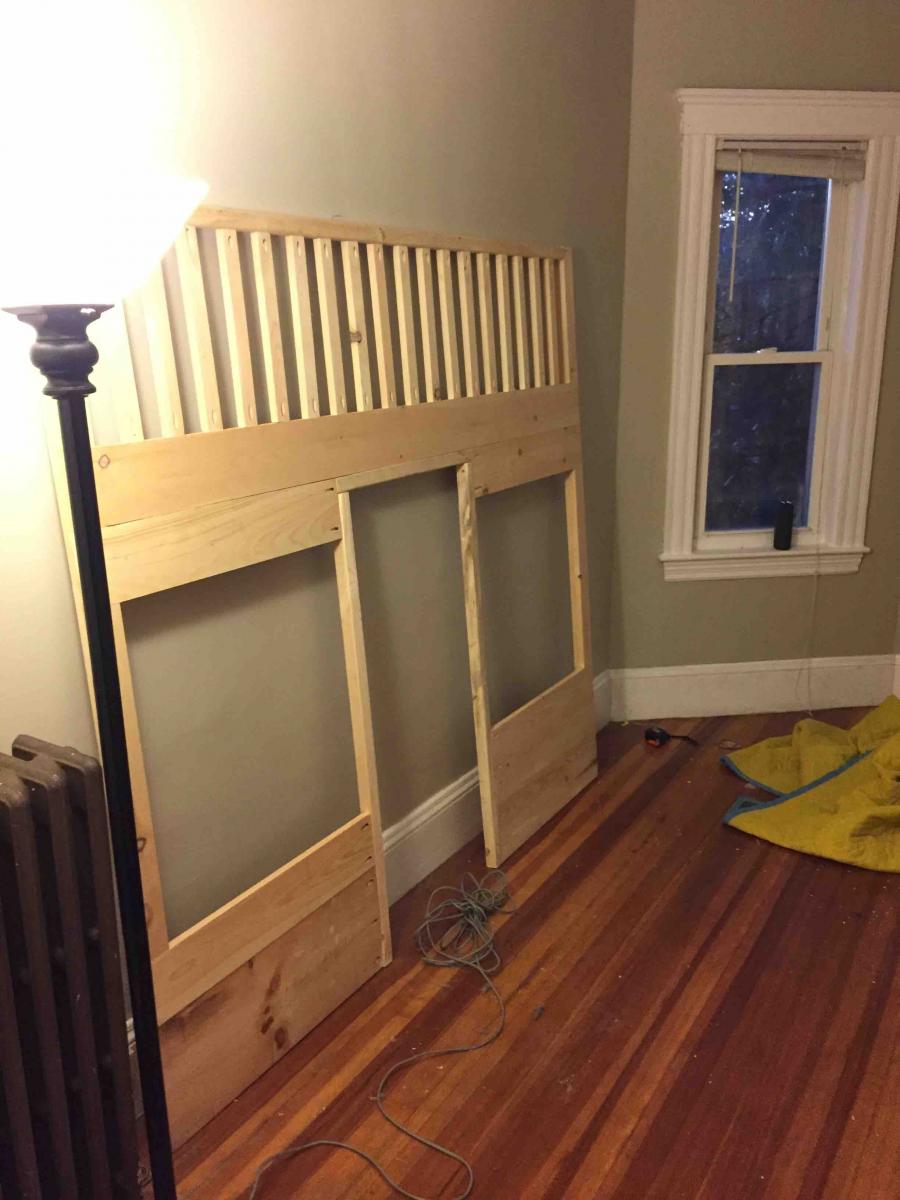
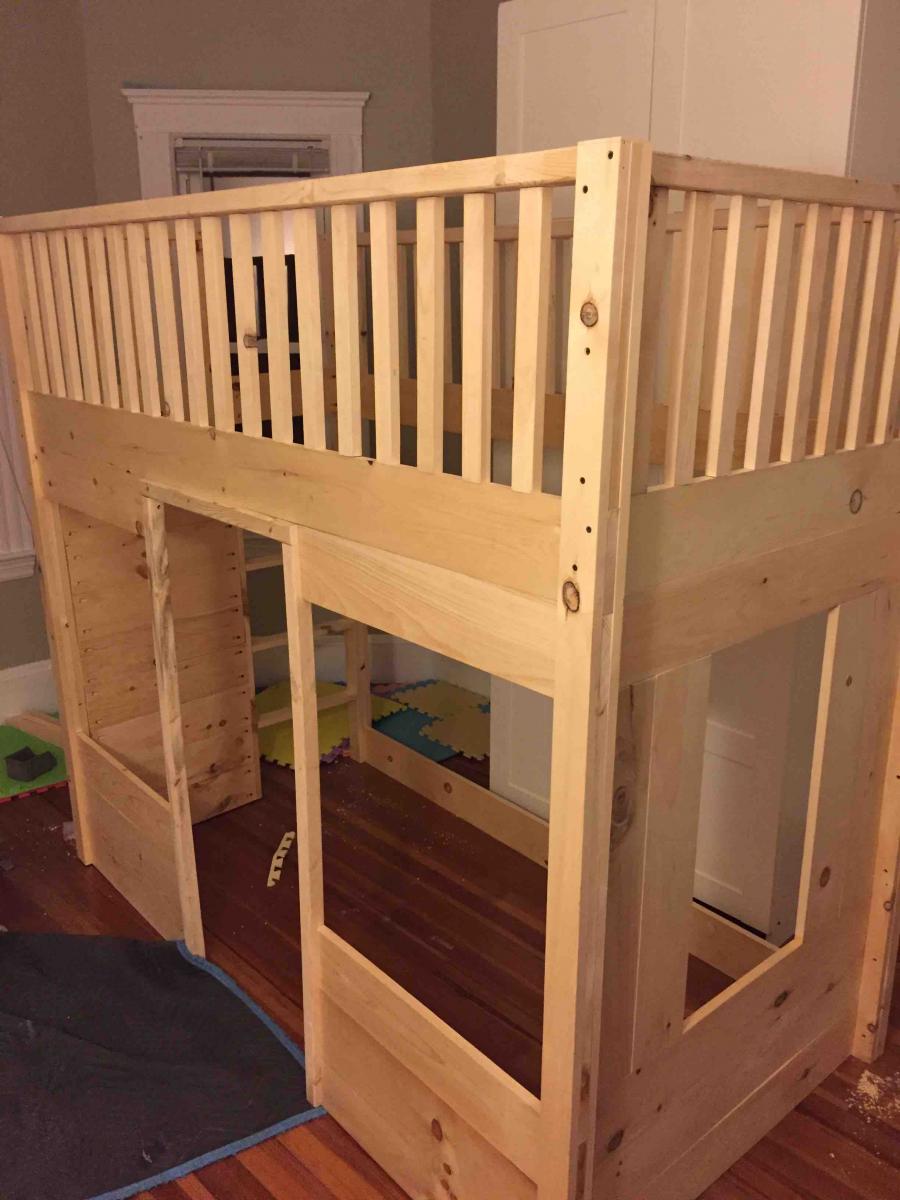
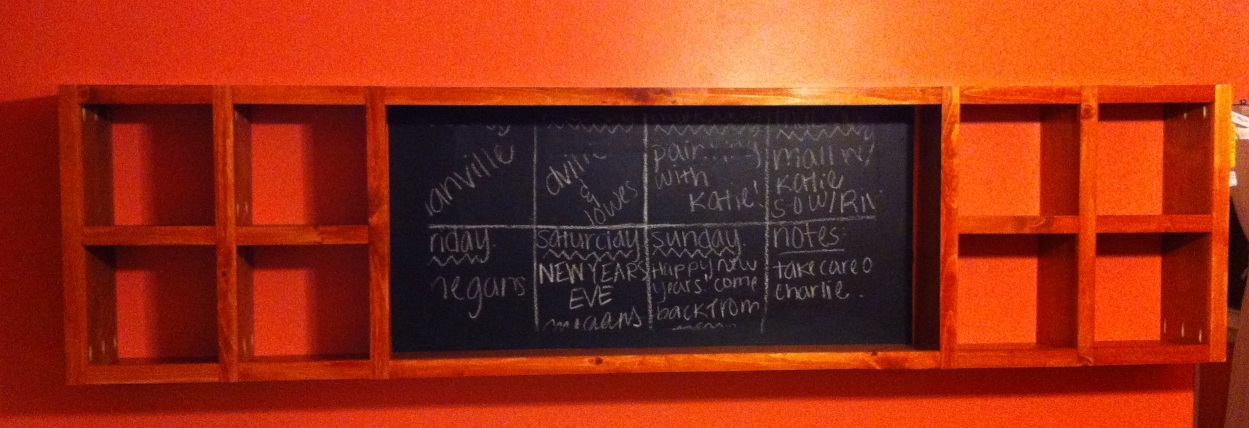
Little Cottage Loft Bed
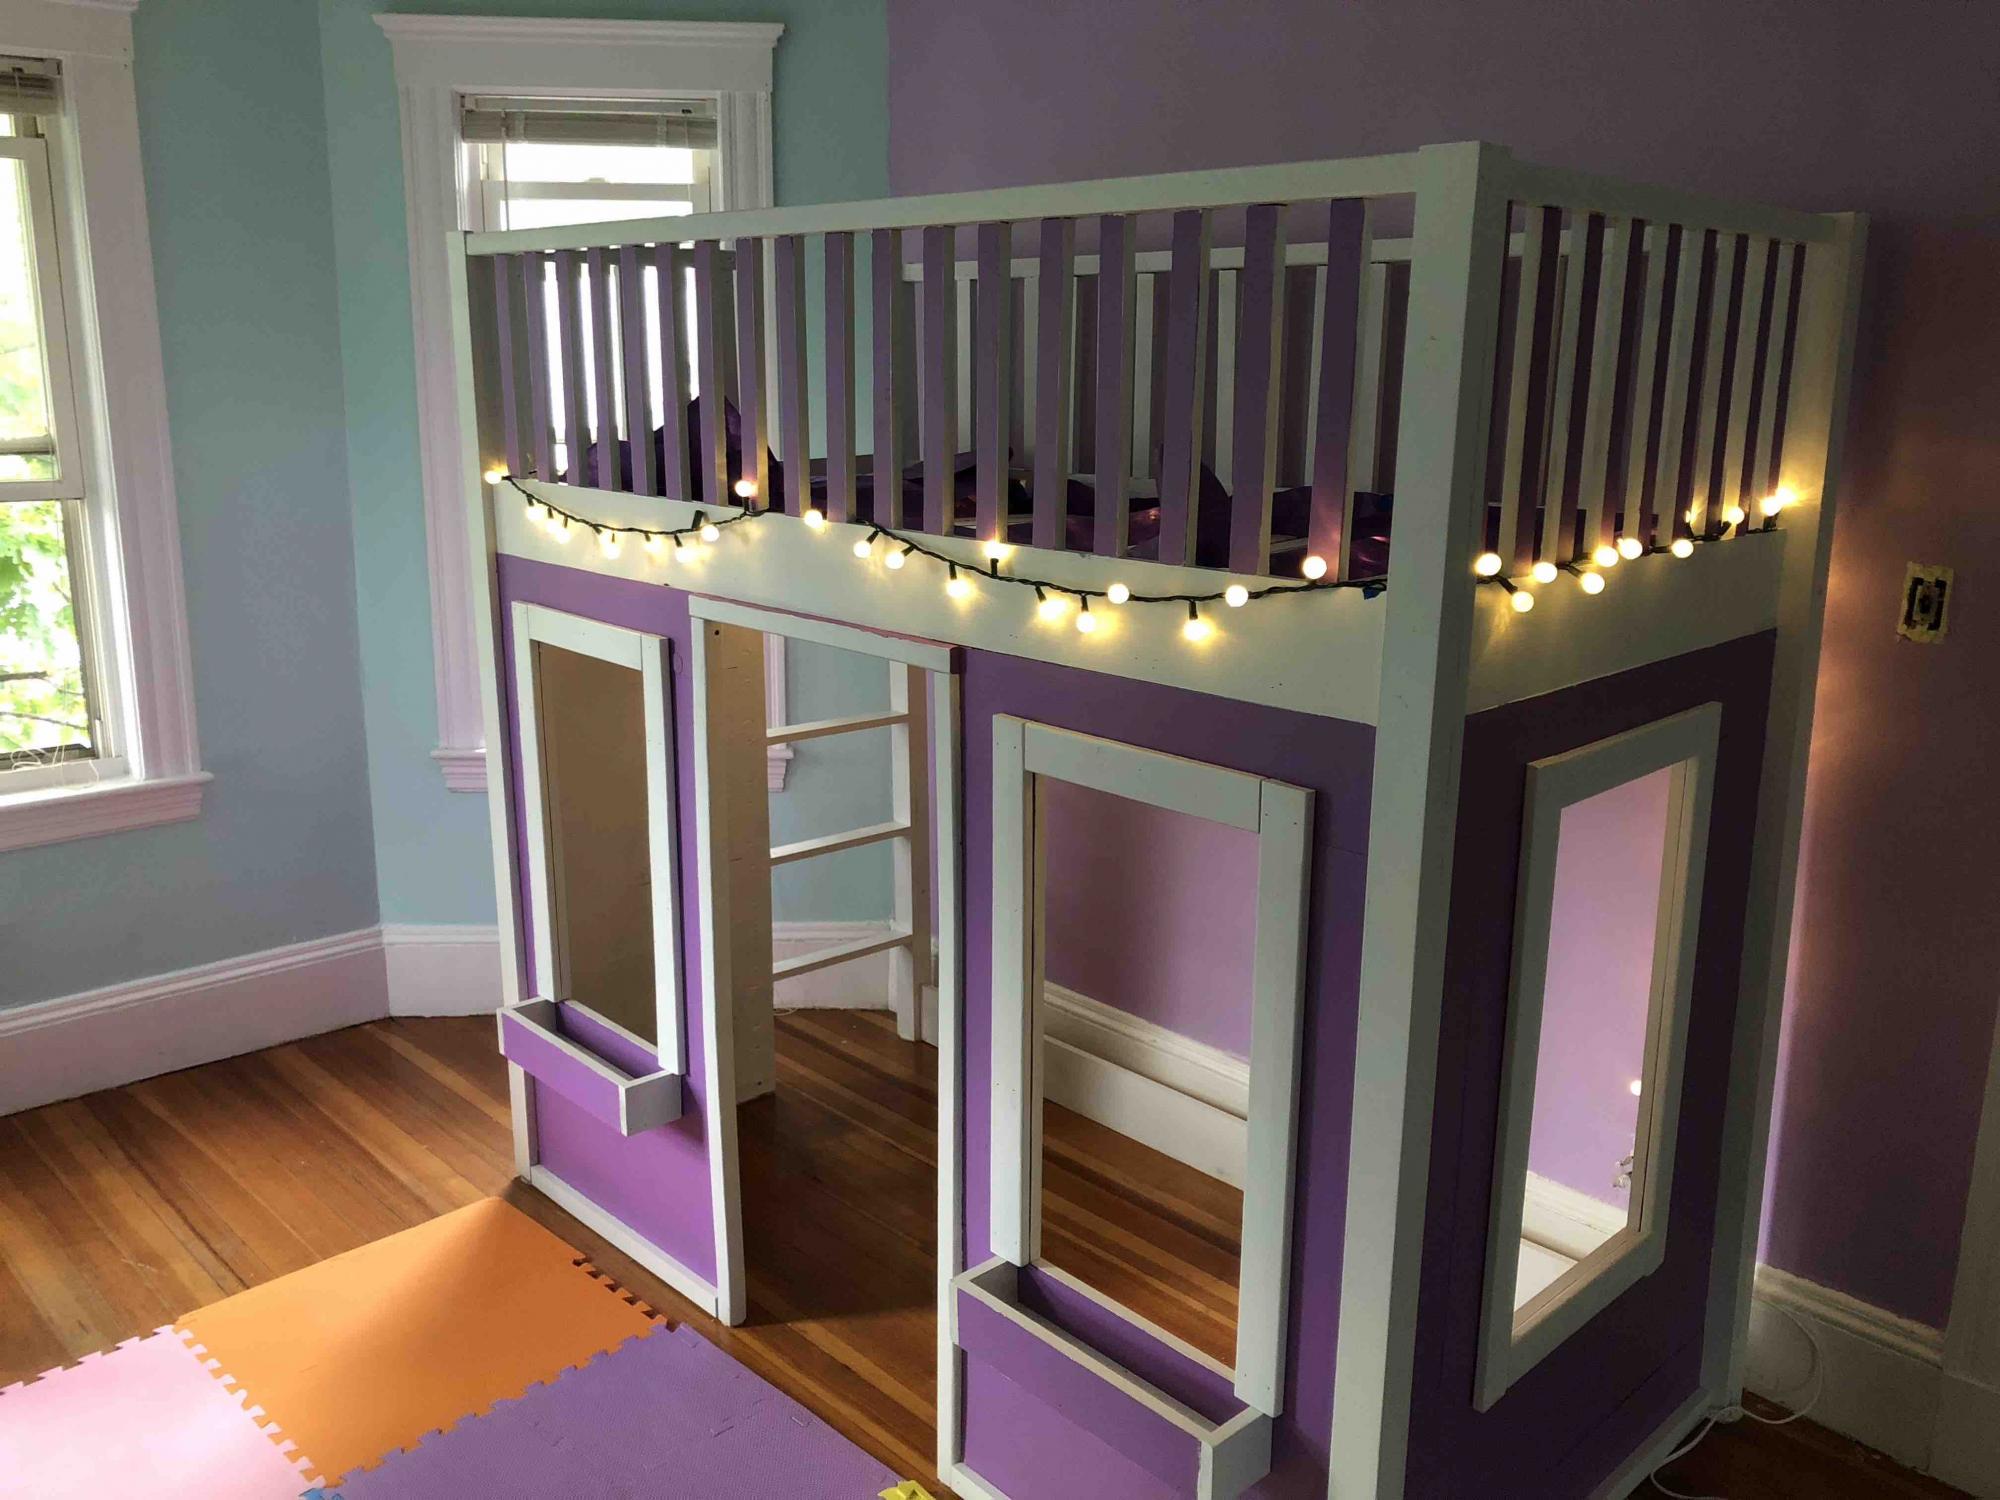
My daughter absolutely loves this bed, and everyone who comes over can't help but to compliment it. I was able to build it in 4 pieces in the basement then carry them up to our apartment and put them all together. It was not an easy build especially since I kept making little mistakes and had to go back and fix them. For example I did not use wood glue at first for the bars so after I screwed them all into place i relaxed they wobbled and twisted so I had to unscrew all of them, add glue and screw them all back in. But overall the instructions were pretty simple to follow and I am very happy with the way it came out.
Built from Plan(s)
Estimated Cost
$300
Estimated Time Investment
Week Long Project (20 Hours or More)
Finish Used
Chalkboard paint
Recommended Skill Level
Intermediate
Comments

Wed, 07/17/2019 - 10:15
Love this bed! The color is…
Love this bed! The color is great! Thank you for submitting your brag posts, we appreciate it!
Simple and fast

Took me maybe 30 minutes to put this together. Used 1-5/8 spacing, every other row is a little tight, but they work.
Built from Plan(s)
Comments
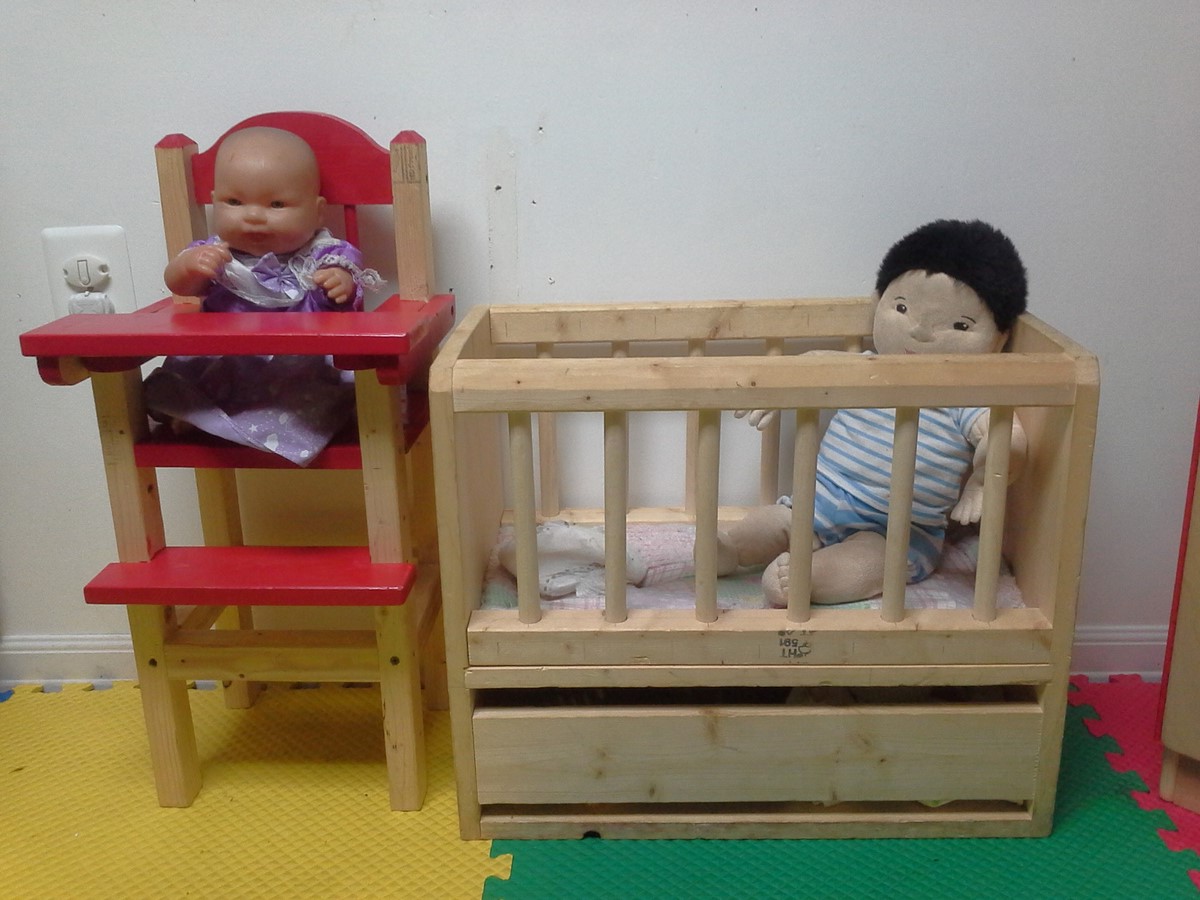
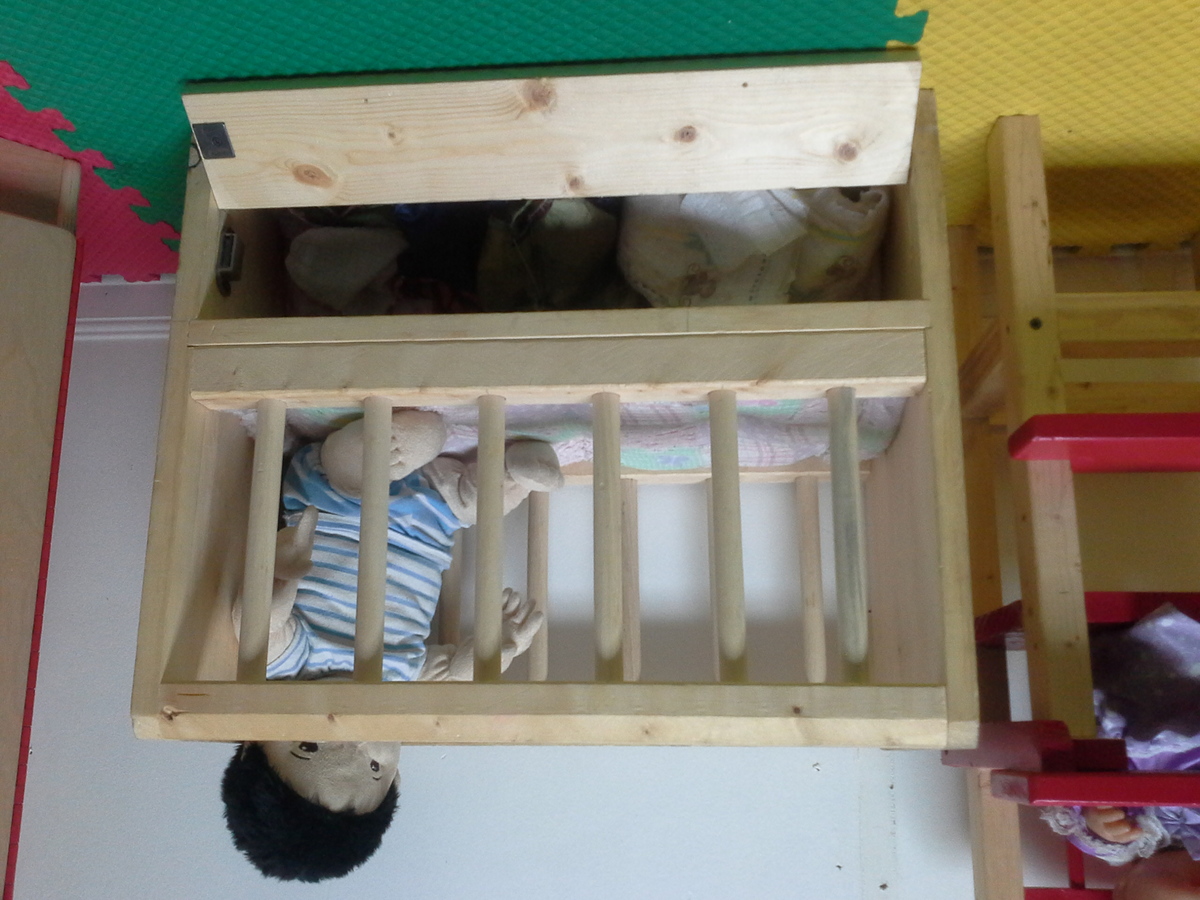
Two bunk beds for my girls...
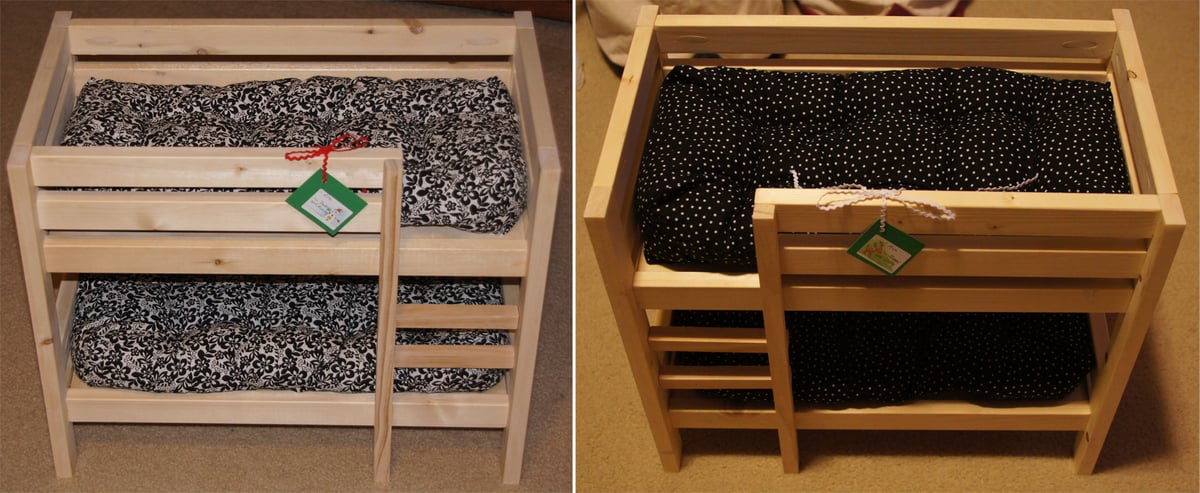
I made two different versions and reversed side the ladders were on. I learned from the mistakes I made on the first bed and the second one came together a little easier.
I left them natural and the girls will pick a paint color in the spring.
Although I can sew, my wife made both sets of mattresses along with a bunch of doll clothes.
Built from Plan(s)
Estimated Time Investment
Week Long Project (20 Hours or More)
Recommended Skill Level
Beginner
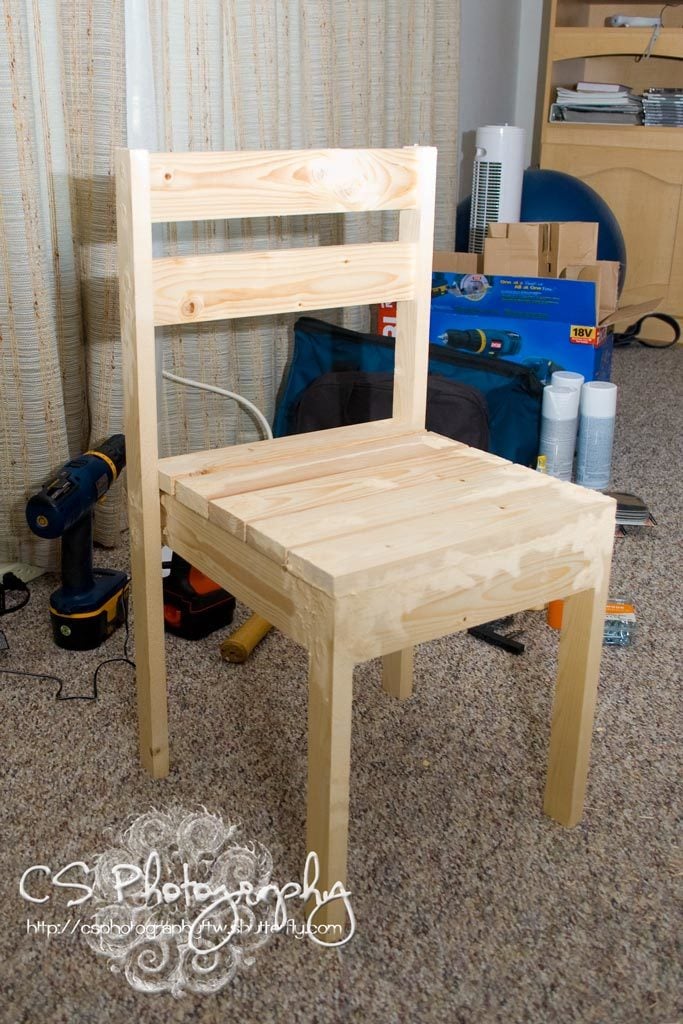
just.plain.chair.
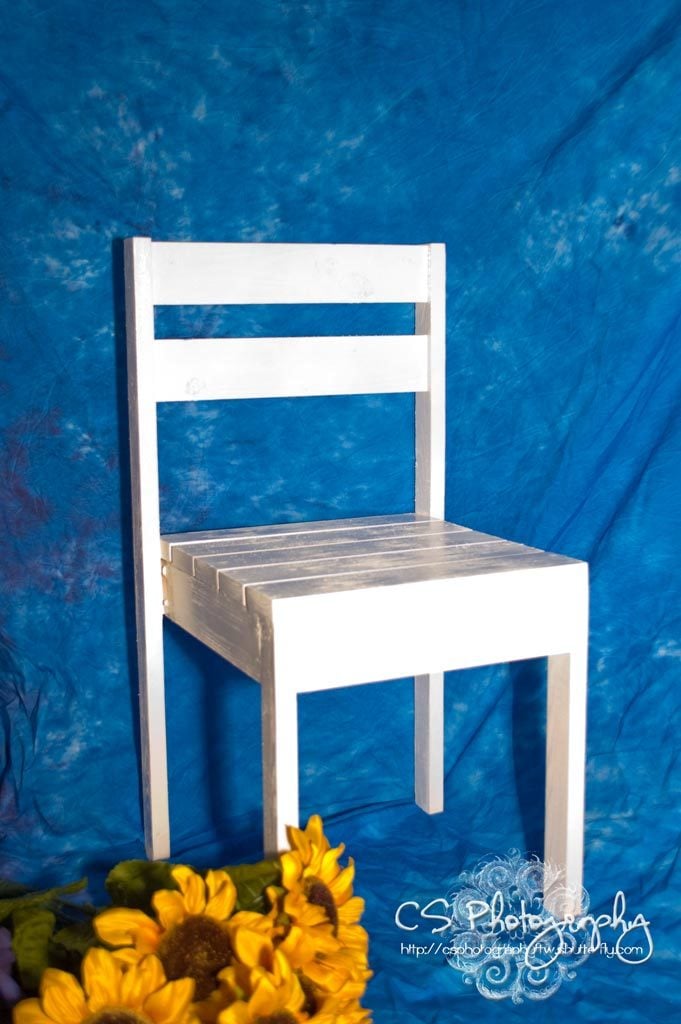
I guess I never got around to sharing my finished chair! I'm almost ashamed to...1) because it was so long ago when I made it and 2) because everyone else's looks so great!

Built from Plan(s)
Estimated Cost
$5
Estimated Time Investment
An Hour or Two (0-2 Hours)
Finish Used
white glossy paint
Recommended Skill Level
Starter Project
Comments

Thu, 11/14/2013 - 09:20
Your chair looks good. I
Your chair looks good. I like clean, white furniture. It looks so fresh.
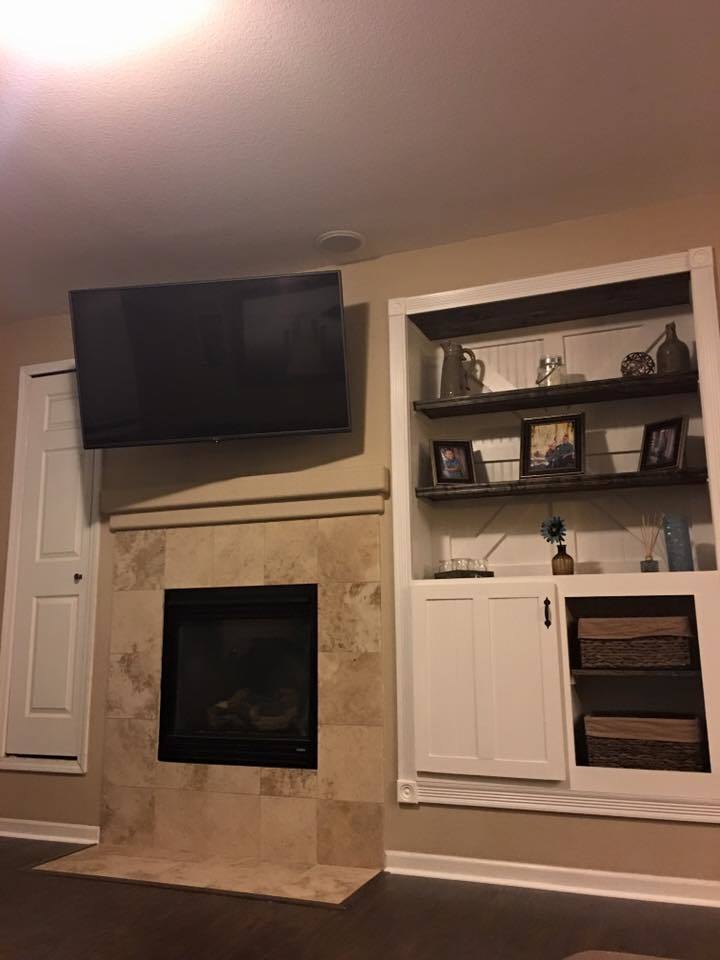
Media Center - Built-in
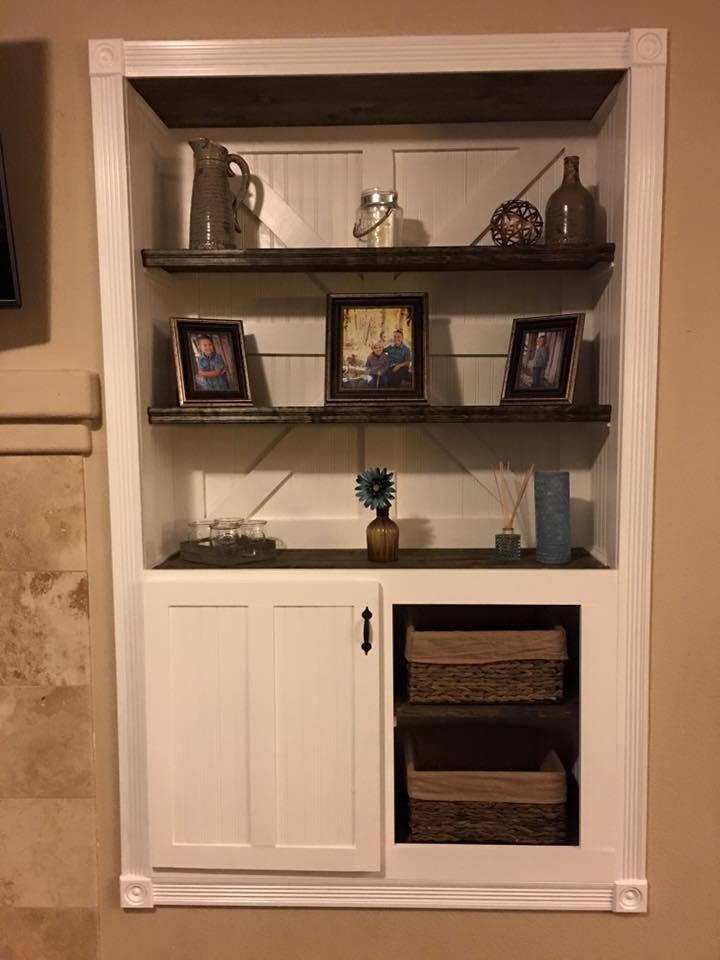
We built and designed this as we went. All the wires are concealed behind the back of the center and all the media equipment is in the cabinet. Everything was custom built for roughly $400 and it took about 2 days.
Estimated Cost
$400
Estimated Time Investment
Weekend Project (10-20 Hours)
Recommended Skill Level
Intermediate
Salad bar with handles
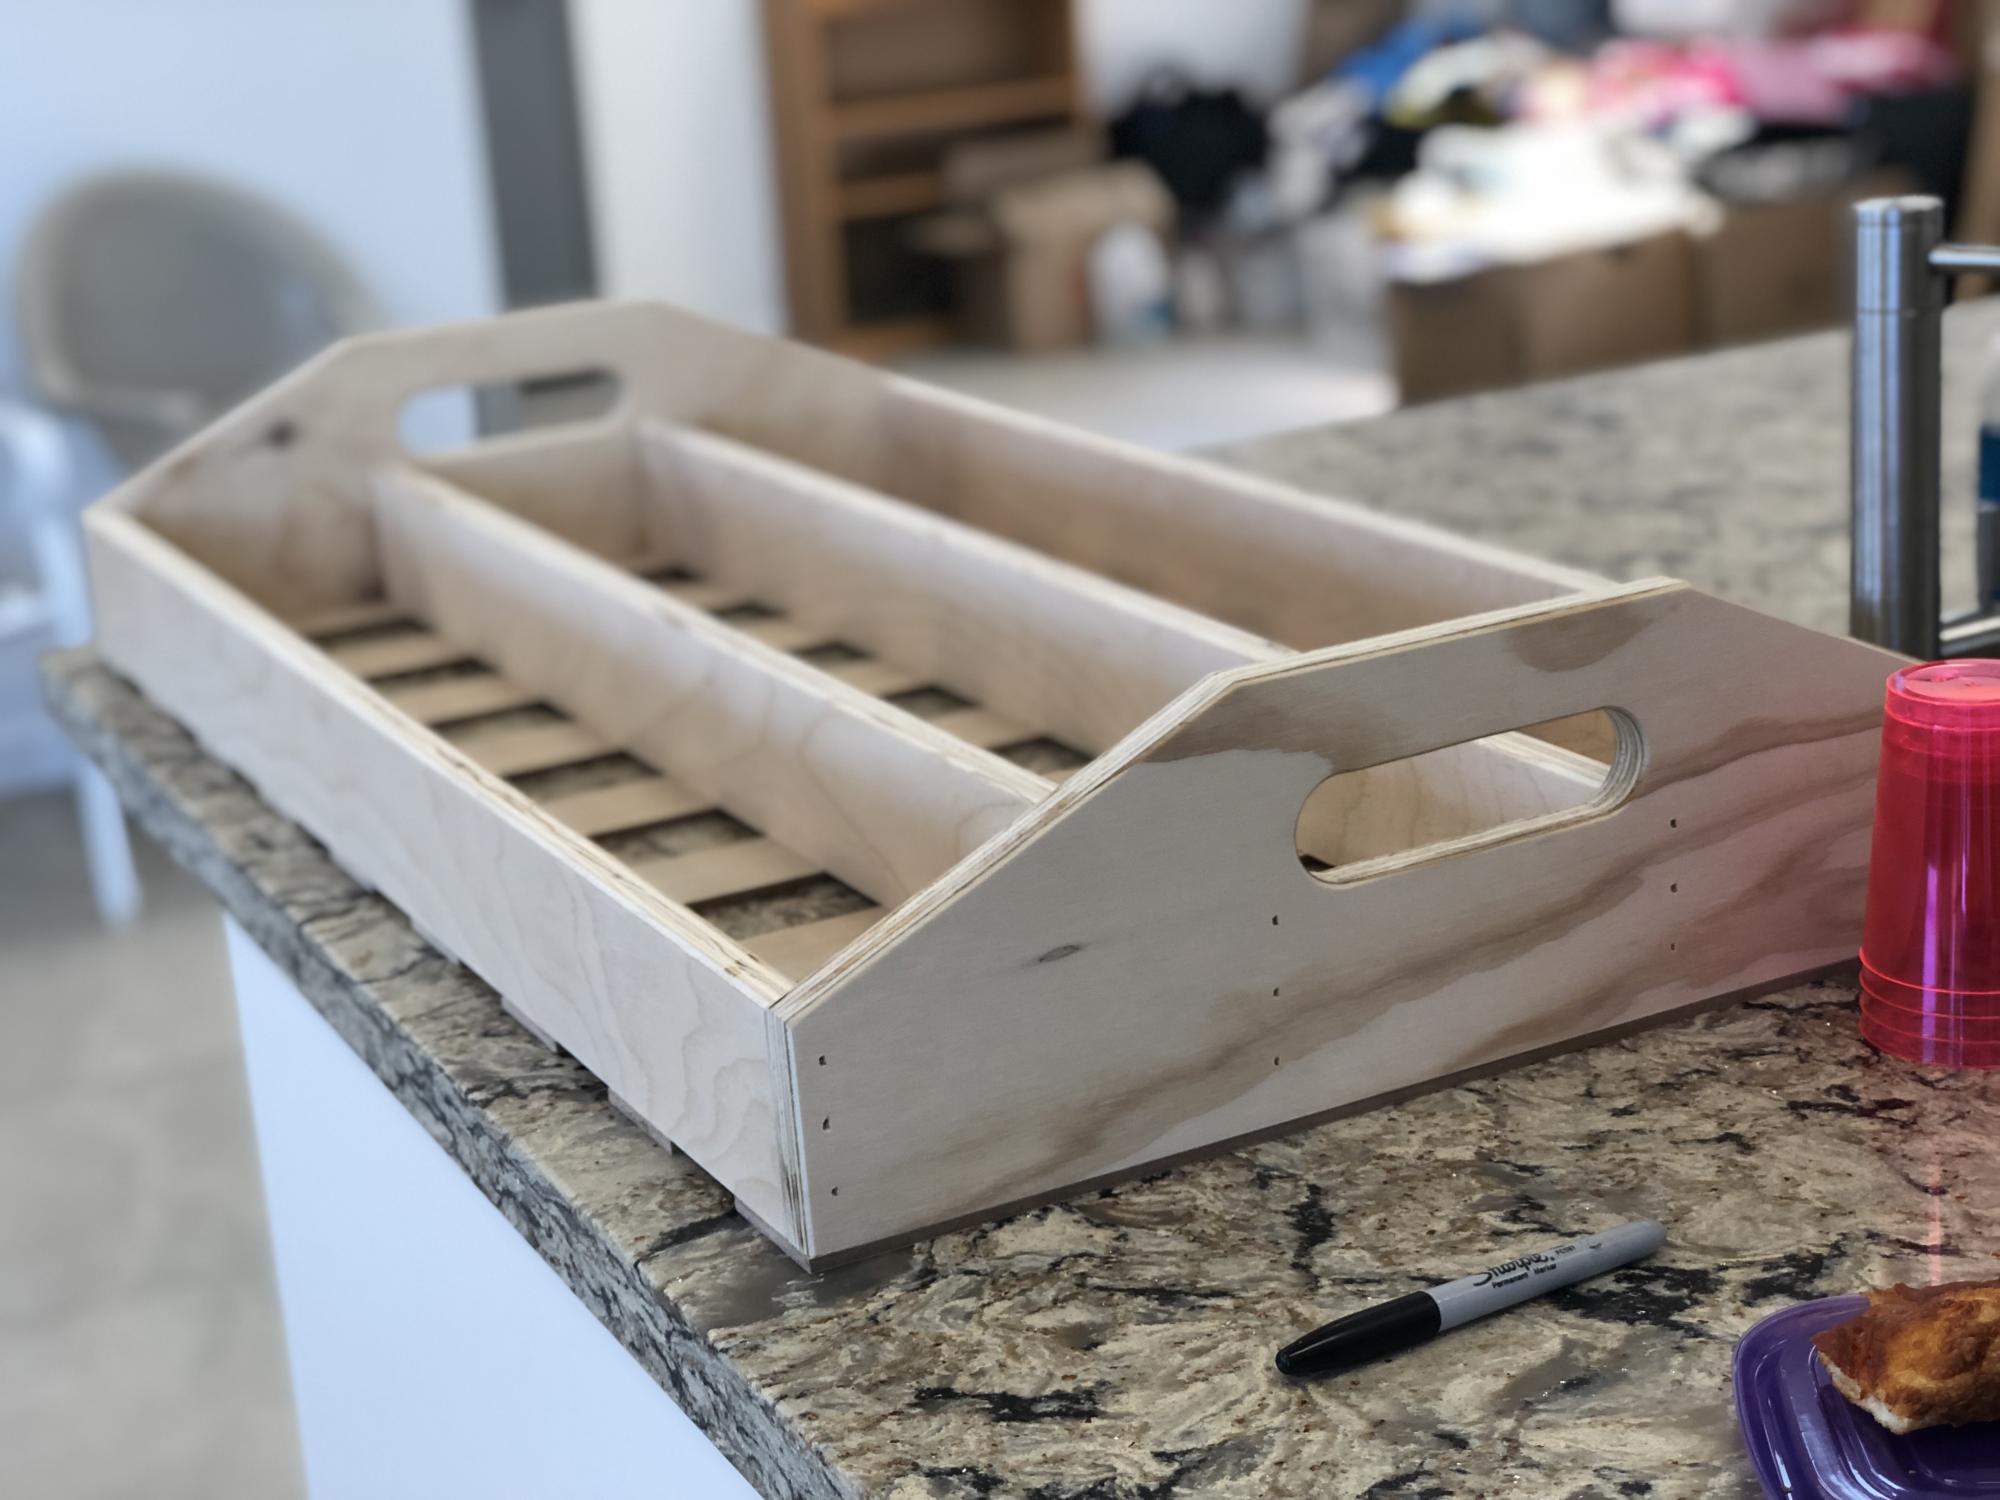
My husband made this with a few tweaks: taller dividers to be even with the sides, smoothing of edges, and handles! It was perfect for our salad bar and pizza party!
Estimated Cost
$0 (used scrap plywood)
Estimated Time Investment
Afternoon Project (3-6 Hours)
Finish Used
none, but we plan to use butcher block oil/sealer
Recommended Skill Level
Beginner
Comments
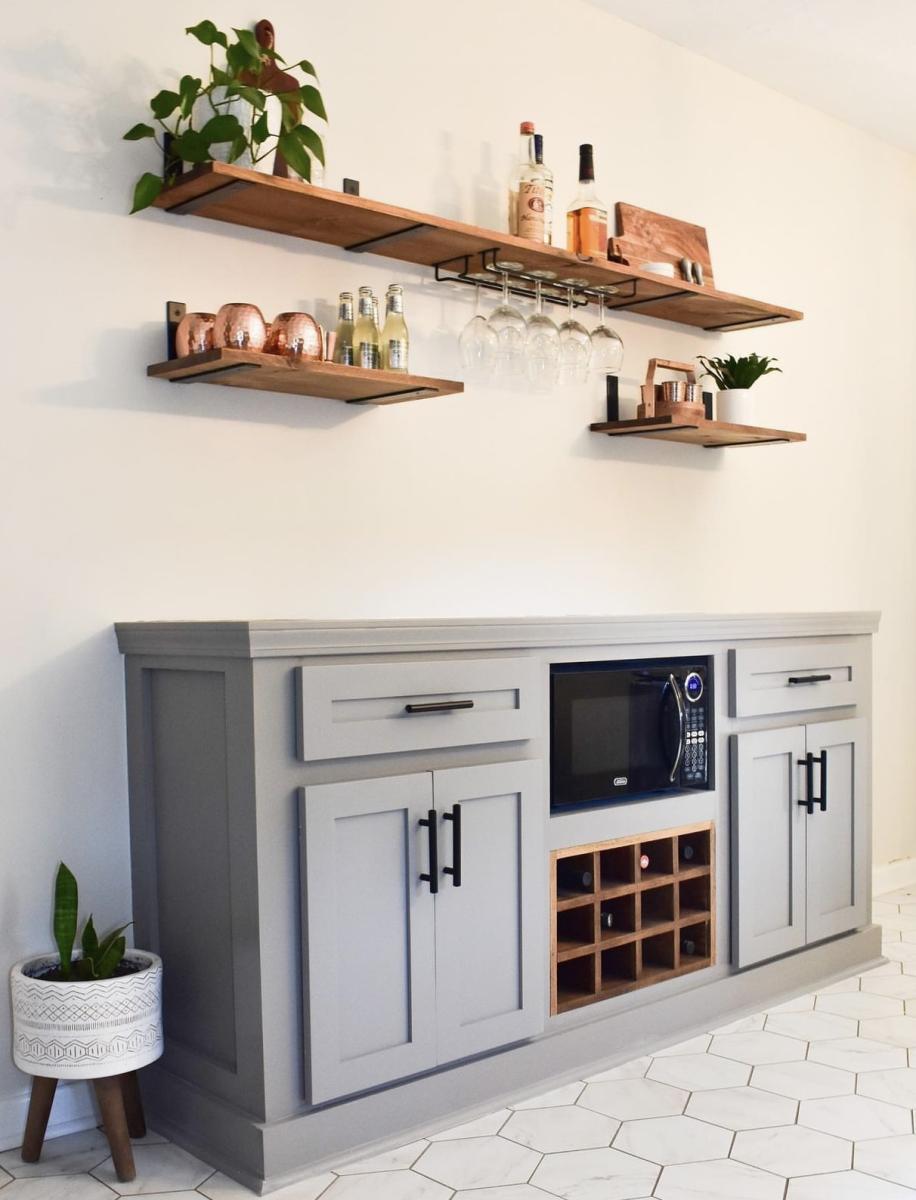
Sideboard Cabinet with Microwave and Wine Storage
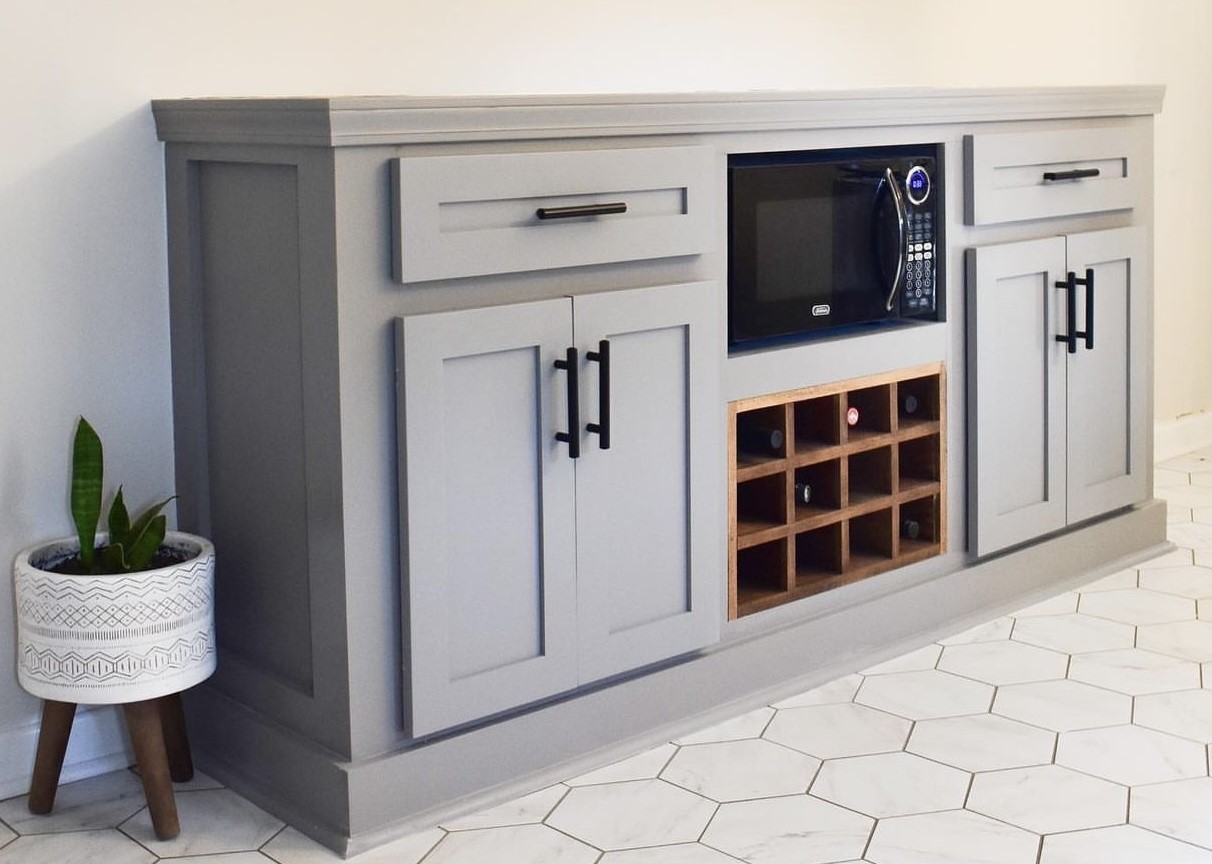
"I took a dead spot in our kitchen and designed it into a functional space that also added value to our home!
I built the frame using the sideboard plans by Ana White & Shanty2Chic. From there I designed it to fit our needs perfectly."
Built from Plan(s)
Distressed console table (free)

Ana's simple, cheap and easy console table, made entirely with repurposed and scrap wood, so it was free! The plan was great, and it was easy to adjust to the wood I had on hand. The distressed finish was fun to do too.
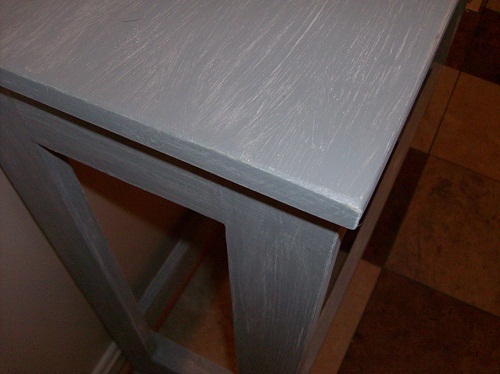
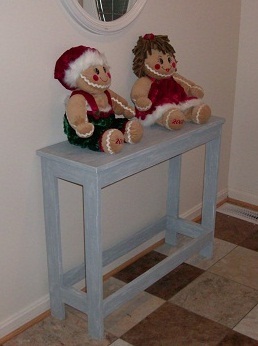
Built from Plan(s)
Estimated Cost
free (everything was scrap wood, and paint was left over)
Estimated Time Investment
Afternoon Project (3-6 Hours)
Finish Used
white paint, then a coat of gray over the white, and sanded to reveal the white. Paint was left-over that we had on hand.
Recommended Skill Level
Beginner
HAPPIER HOMEMAKER FARMHOUSE TABLE
This was our first Ana White project. We knew we wanted to do a table, and decided this was the easiest one for first-timers without a kreg jig (YET!). We made things even SIMPLER by having Lowe's do ALL the cutting for us! I didn't even know they would do that, but they will.... and happily so!
The project went VERY well and we are delighted with our new table. We used Rustoleum "Kona" stain and we used Rustoleum spray gloss poly because Lowes had a bunch of cans of it on clearance. We were happy with the results, though it may not be the best indoor product in the future ;-)
The project took us about 4-6 hours to build, and then we just sanded a little each evening, and the next weekend we stained and poly.
Estimated Time Investment
Weekend Project (10-20 Hours)
Finish Used
Rustoleum Kona Stain
Rustoleum gloss spray poly
Rustoleum gloss spray poly
Recommended Skill Level
Starter Project
Comments
Tue, 11/19/2013 - 19:30
Looks fantastic! I want to
Looks fantastic! I want to make one just like this. The dark stain looks beautiful! Great job.
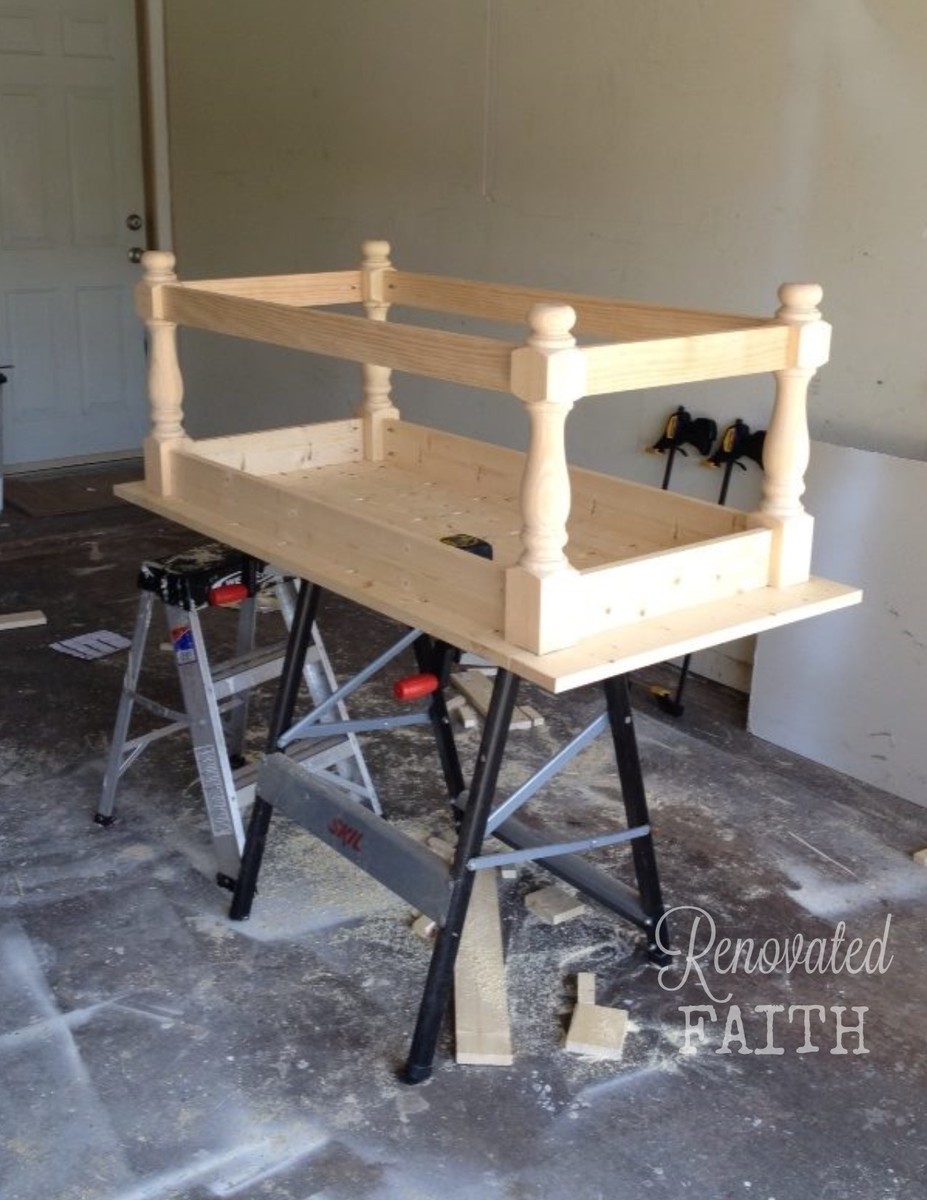
Turned Leg Coffee Table with Shelf
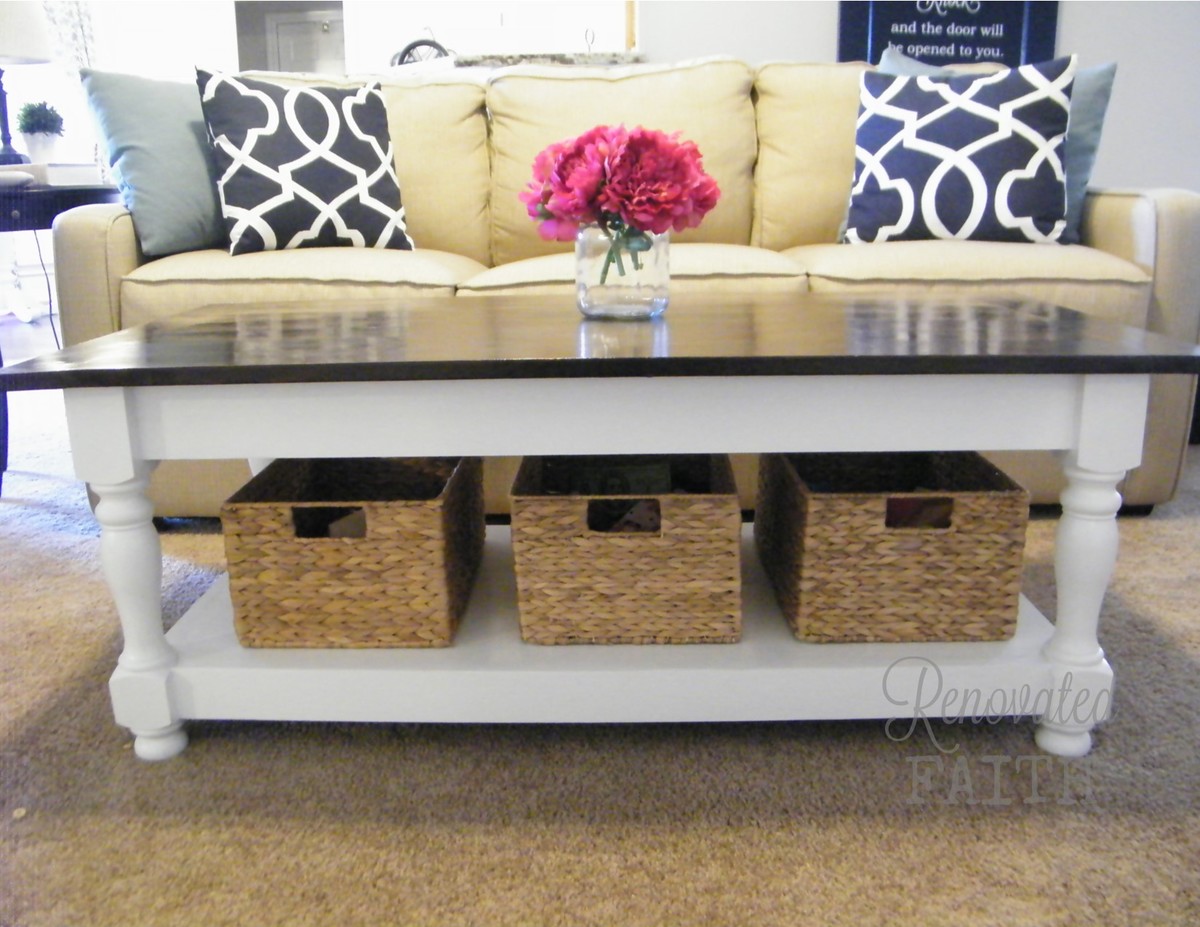
We combined the plans for the Turned Leg Coffee Table and the Corona Coffee Table to add the storage shelf for toys. Visit my blog for more details and pictures:
Built from Plan(s)
Estimated Cost
Using low-grade pine, we spent about $180.
Estimated Time Investment
Weekend Project (10-20 Hours)
Finish Used
Faux top stain using Minwax Gel Stain and Behr paint. Details are at www.renovatedfaith.com
Recommended Skill Level
Beginner
Corona Coffee Table - Square
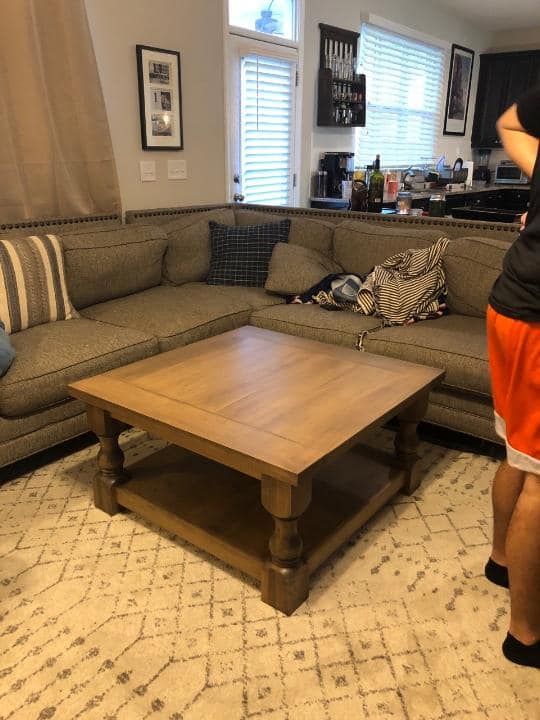
Built this table out of solid Maple, which made it much more expensive to build, but such a beautiful piece of furniture. I bought the legs from Osborne Wood. One thing I did to cut down on cost was to use 1" X 6" wood for the 5 center table-top boards instead of the 2" X 6" called for in the plans. Underneath those, I put a piece of 3/4" plywood to increase the thickness to match the (4) 2" X 6" outer edges. This is not visible unless you climb under the table to look at it from underneath but I think it actually helped to create a flat (almost seamless) table top. Thank you for the plans! I put a lot of work into this piece and I think it will remain in my family for generations!
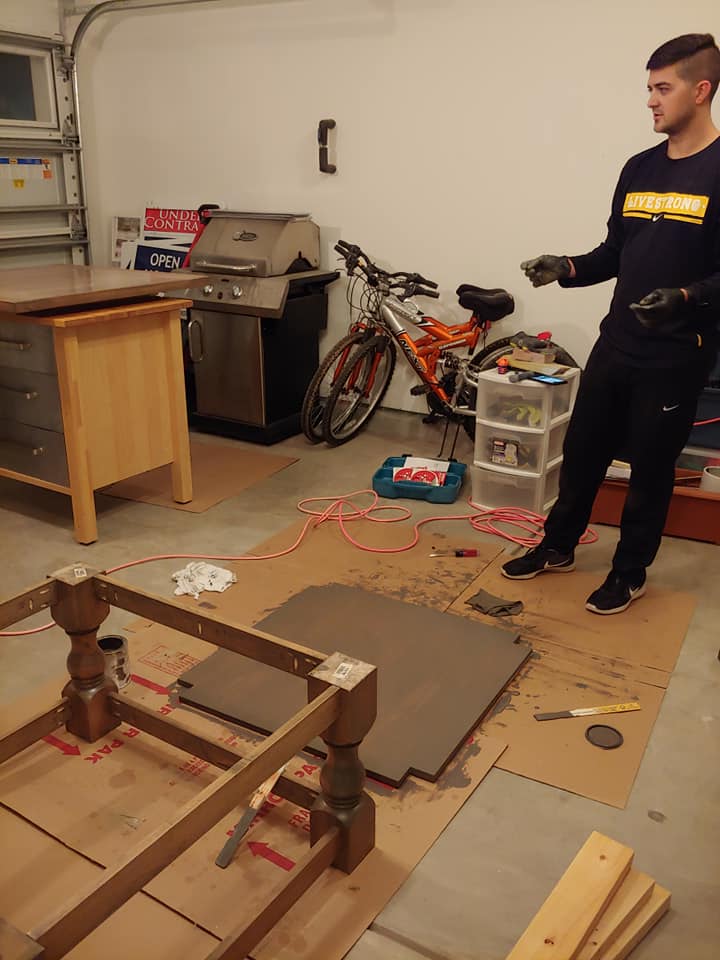
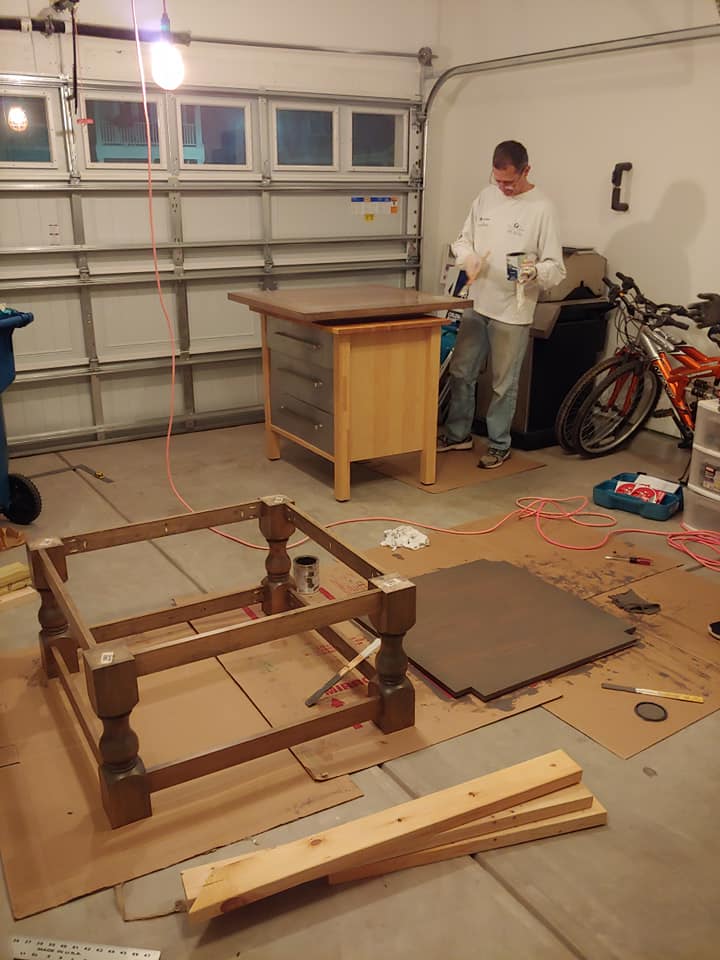
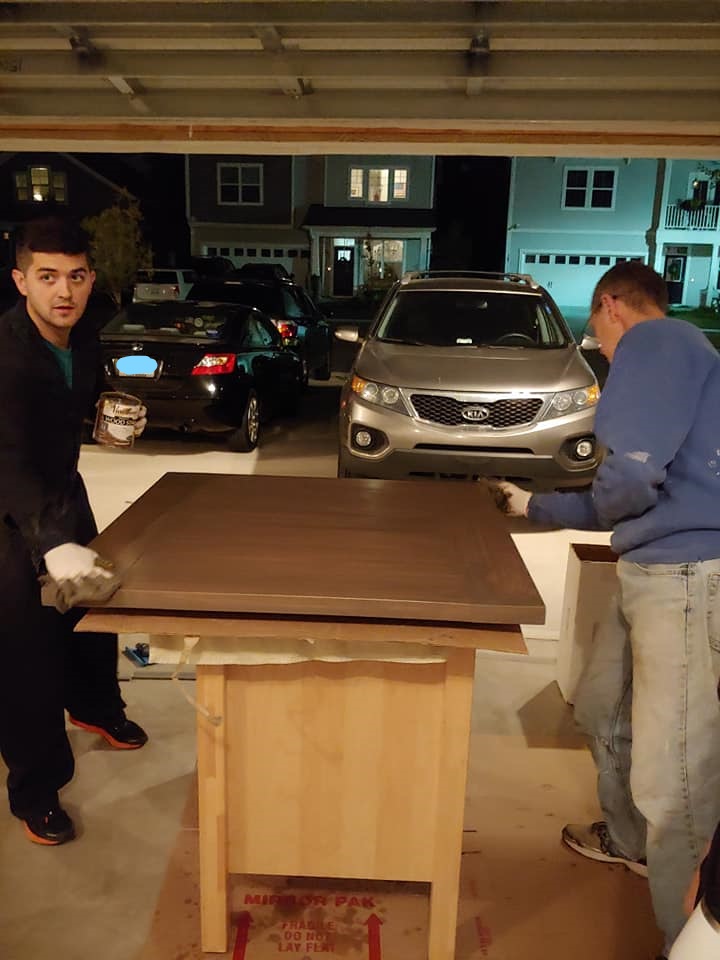
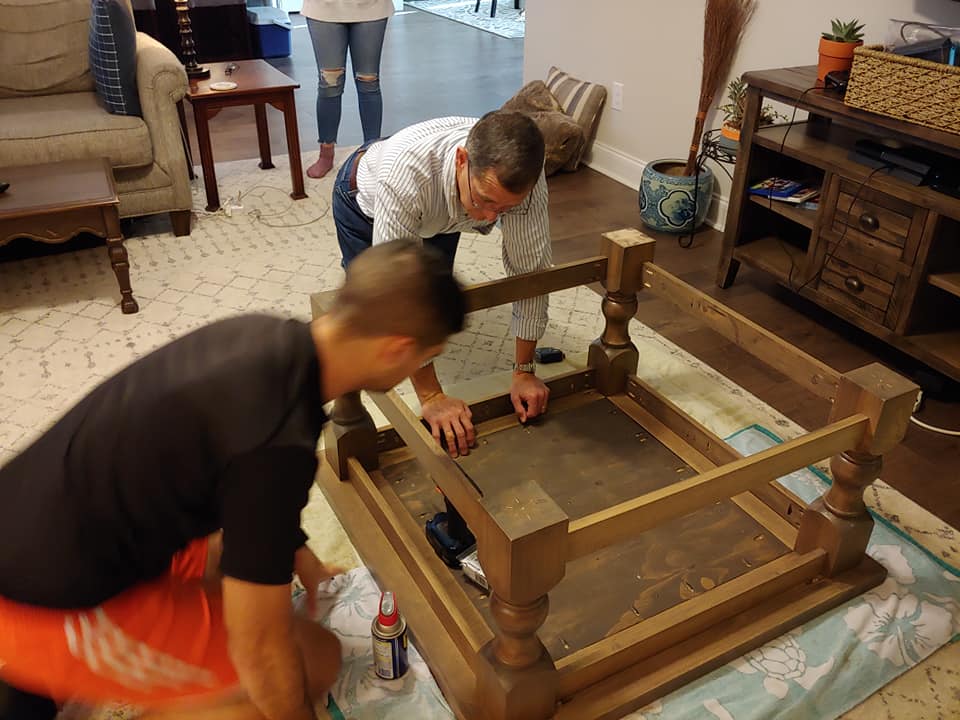
Built from Plan(s)
Estimated Cost
$700.00 (
Estimated Time Investment
Weekend Project (10-20 Hours)
Finish Used
-3 coats of Varathane Stain (the color is Briarsmoke)
-2 coats of Varathane Polyurethane (Matte Finish)
-2 coats of Varathane Polyurethane (Matte Finish)
Recommended Skill Level
Intermediate
Cedar 3 tier planter
I made the boxes a little wider than the plans called for but still came out great. I'm very happy. Thanks Ana for the inspiration.
Built from Plan(s)
Comments
Shadowbox Shelving Unit
This project is all about using a Kreg Jig. My daughter asked for some shadowboxes to go around her chalkboard. 1 piece of 3/4" plywood and a few 1x2's later - here it is. It's really just an 8' x 2' box with the window panes inside - super simple, but does require a compact drill. Mounted to the wall using a ledger board underneath, then, pocket holes in the top shelf to join it to the studs. Quite sturdy. One day I'll learn Sketch-Up well enough to make this into a plan.
Estimated Time Investment
Weekend Project (10-20 Hours)
Finish Used
Rustoleum Classic Cherry Stain, Shellac clear. The wood was sanded to 400 grit, then stained via cloth. Shellac sprayed on via Preval as the air compressor was on strike.
Recommended Skill Level
Intermediate
Farm house bench
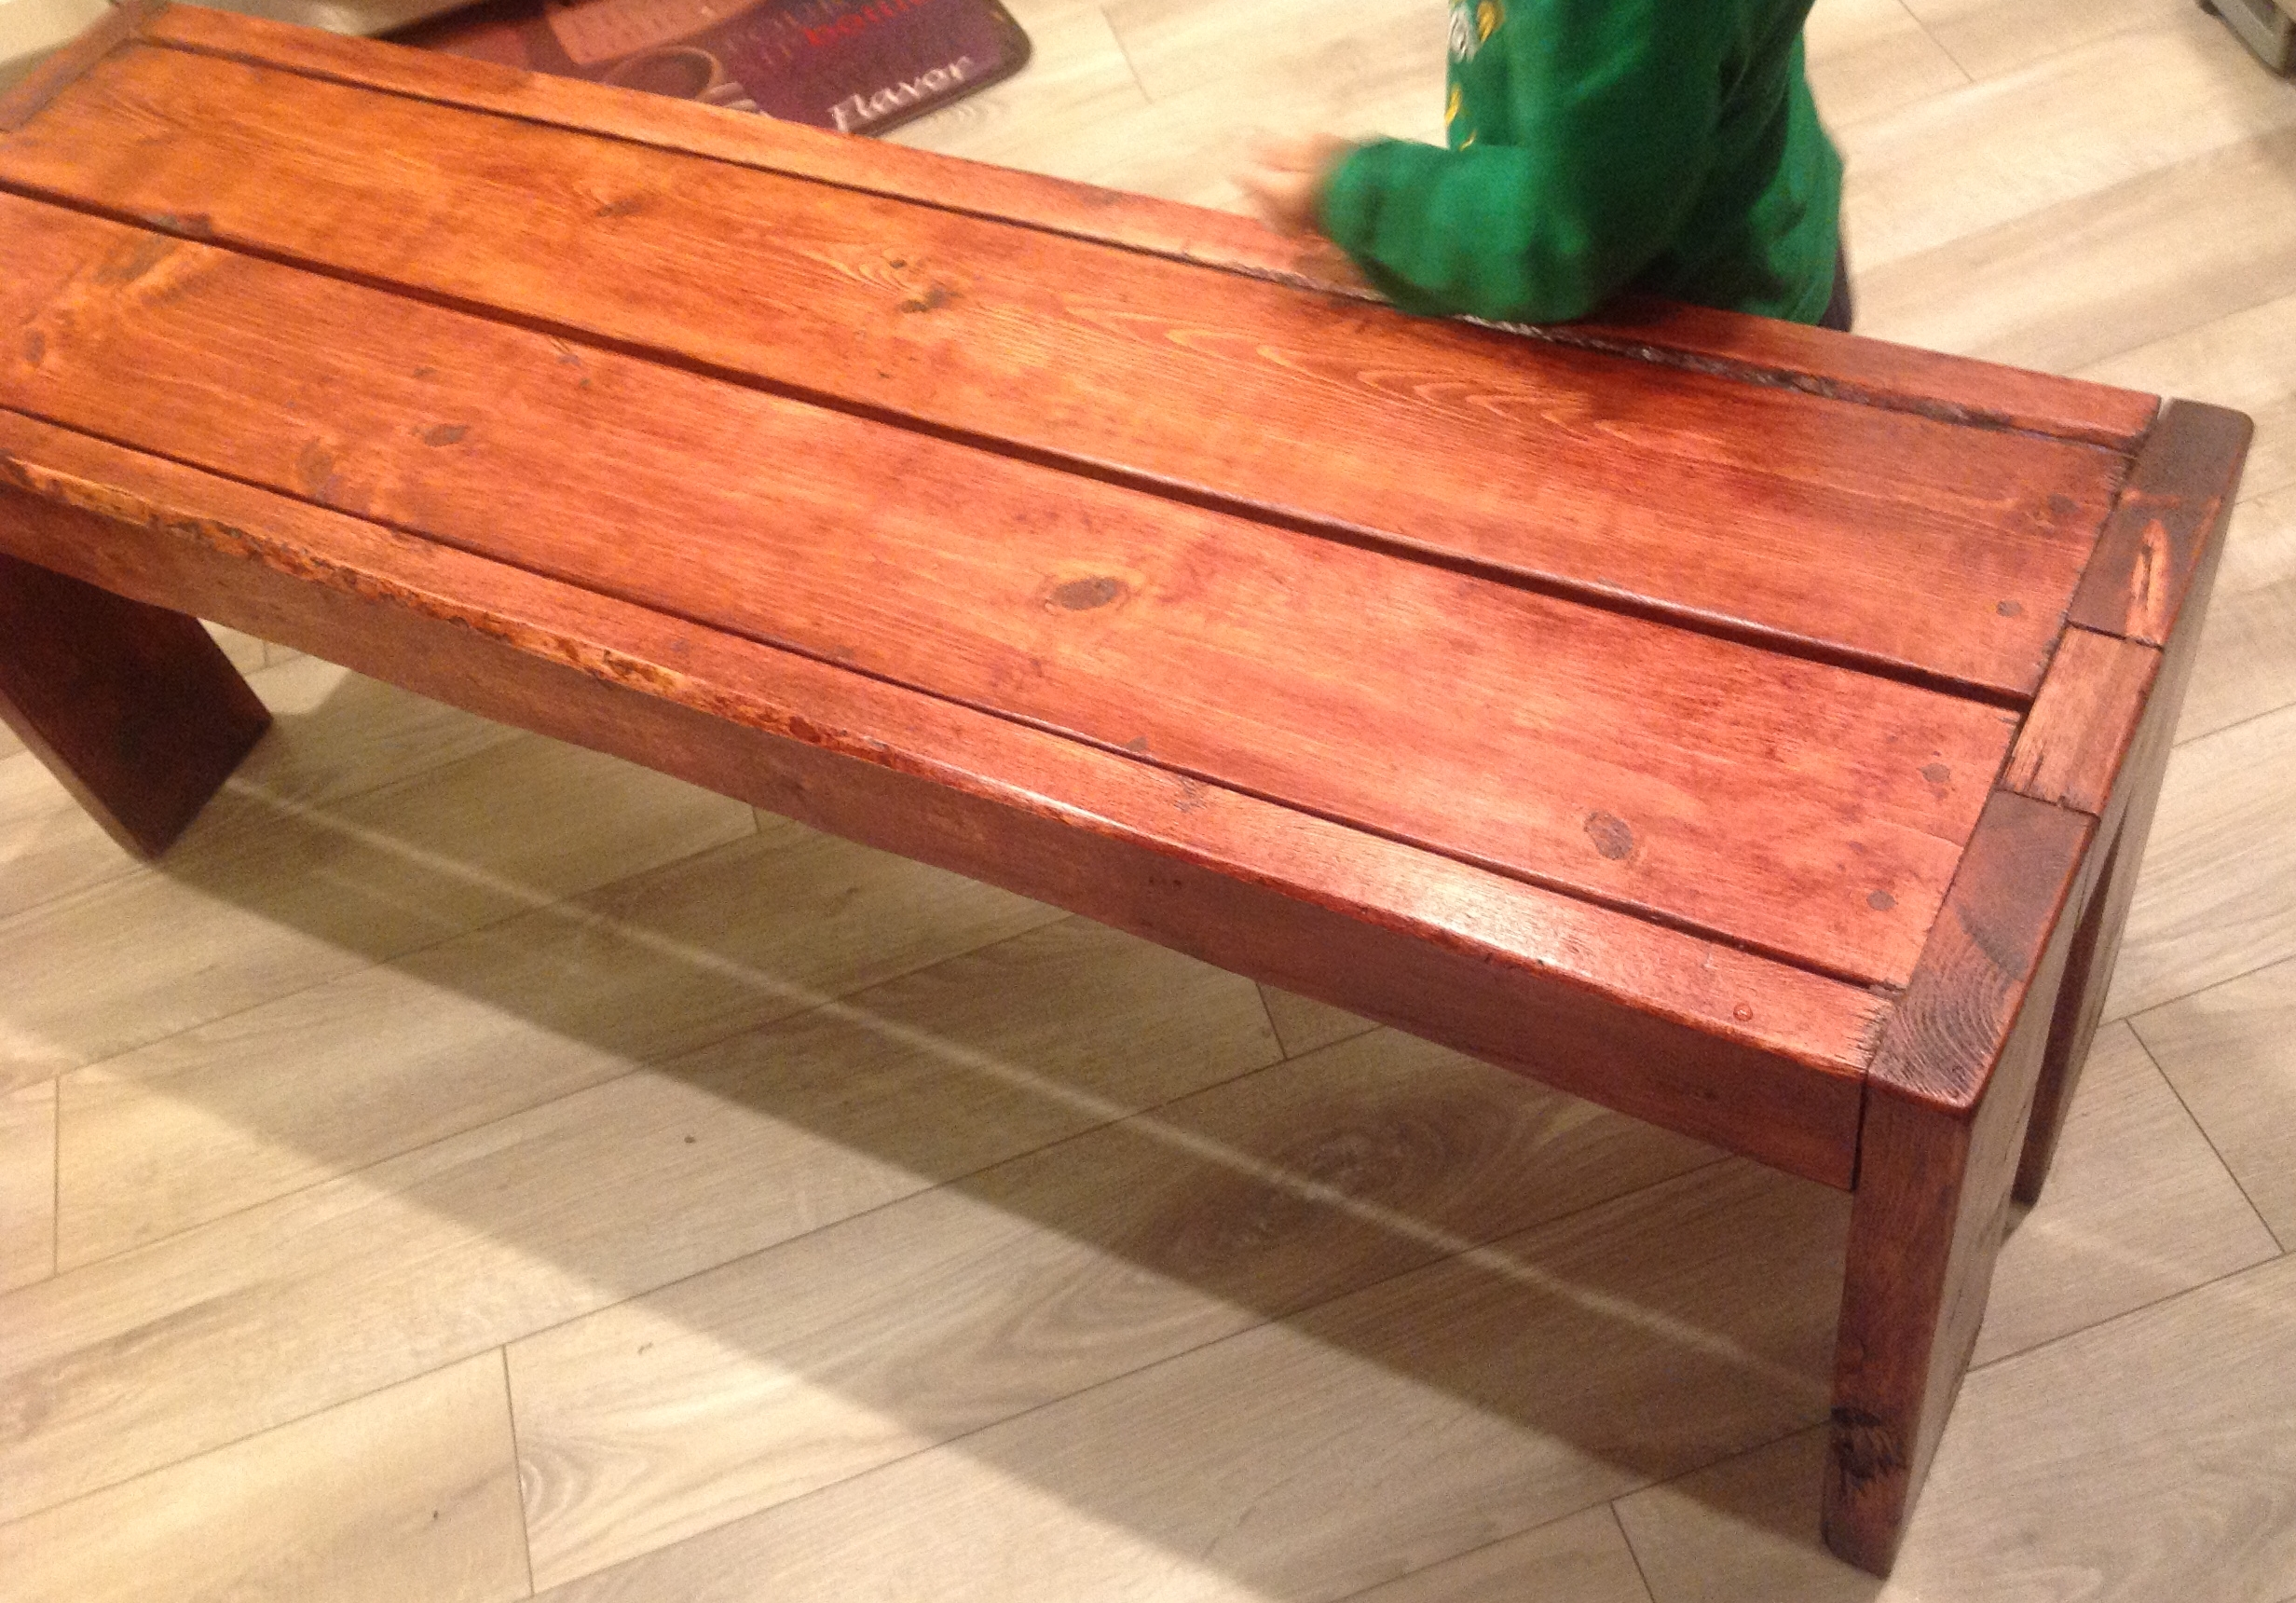
Made from scrap wood left in the empty lots besides me, from framing crews.
Cost me just the time, screws, sand paper and stain.
Made all the cuts with a skillsaw, by saving the $$$ I have now went and bought a mitre and table saw. YAY!
Built from Plan(s)
Estimated Cost
$5
Estimated Time Investment
Afternoon Project (3-6 Hours)
Finish Used
2 in 1 Miniwax PolyShades, Bombay Mahogany. 2 coats.
Recommended Skill Level
Beginner