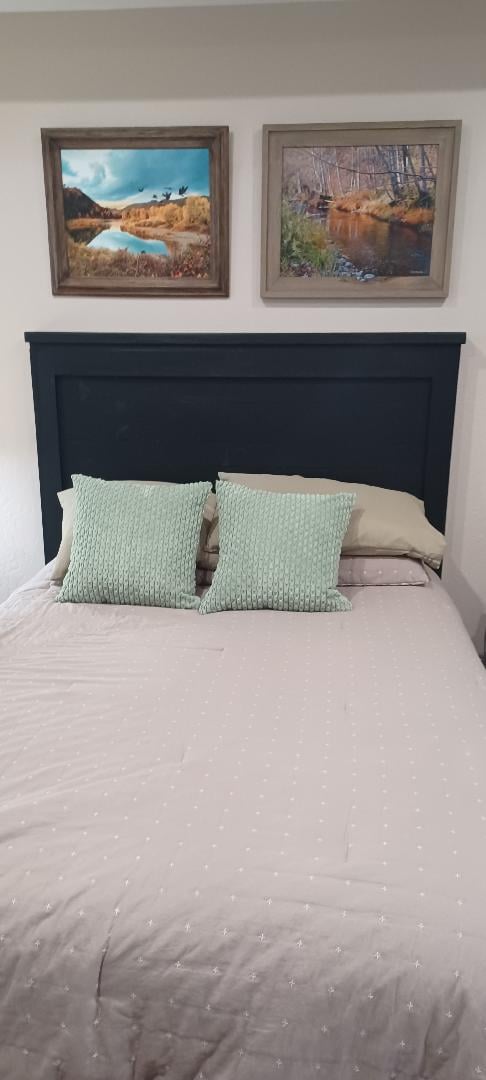
Master Bedroom Update with New Bed!
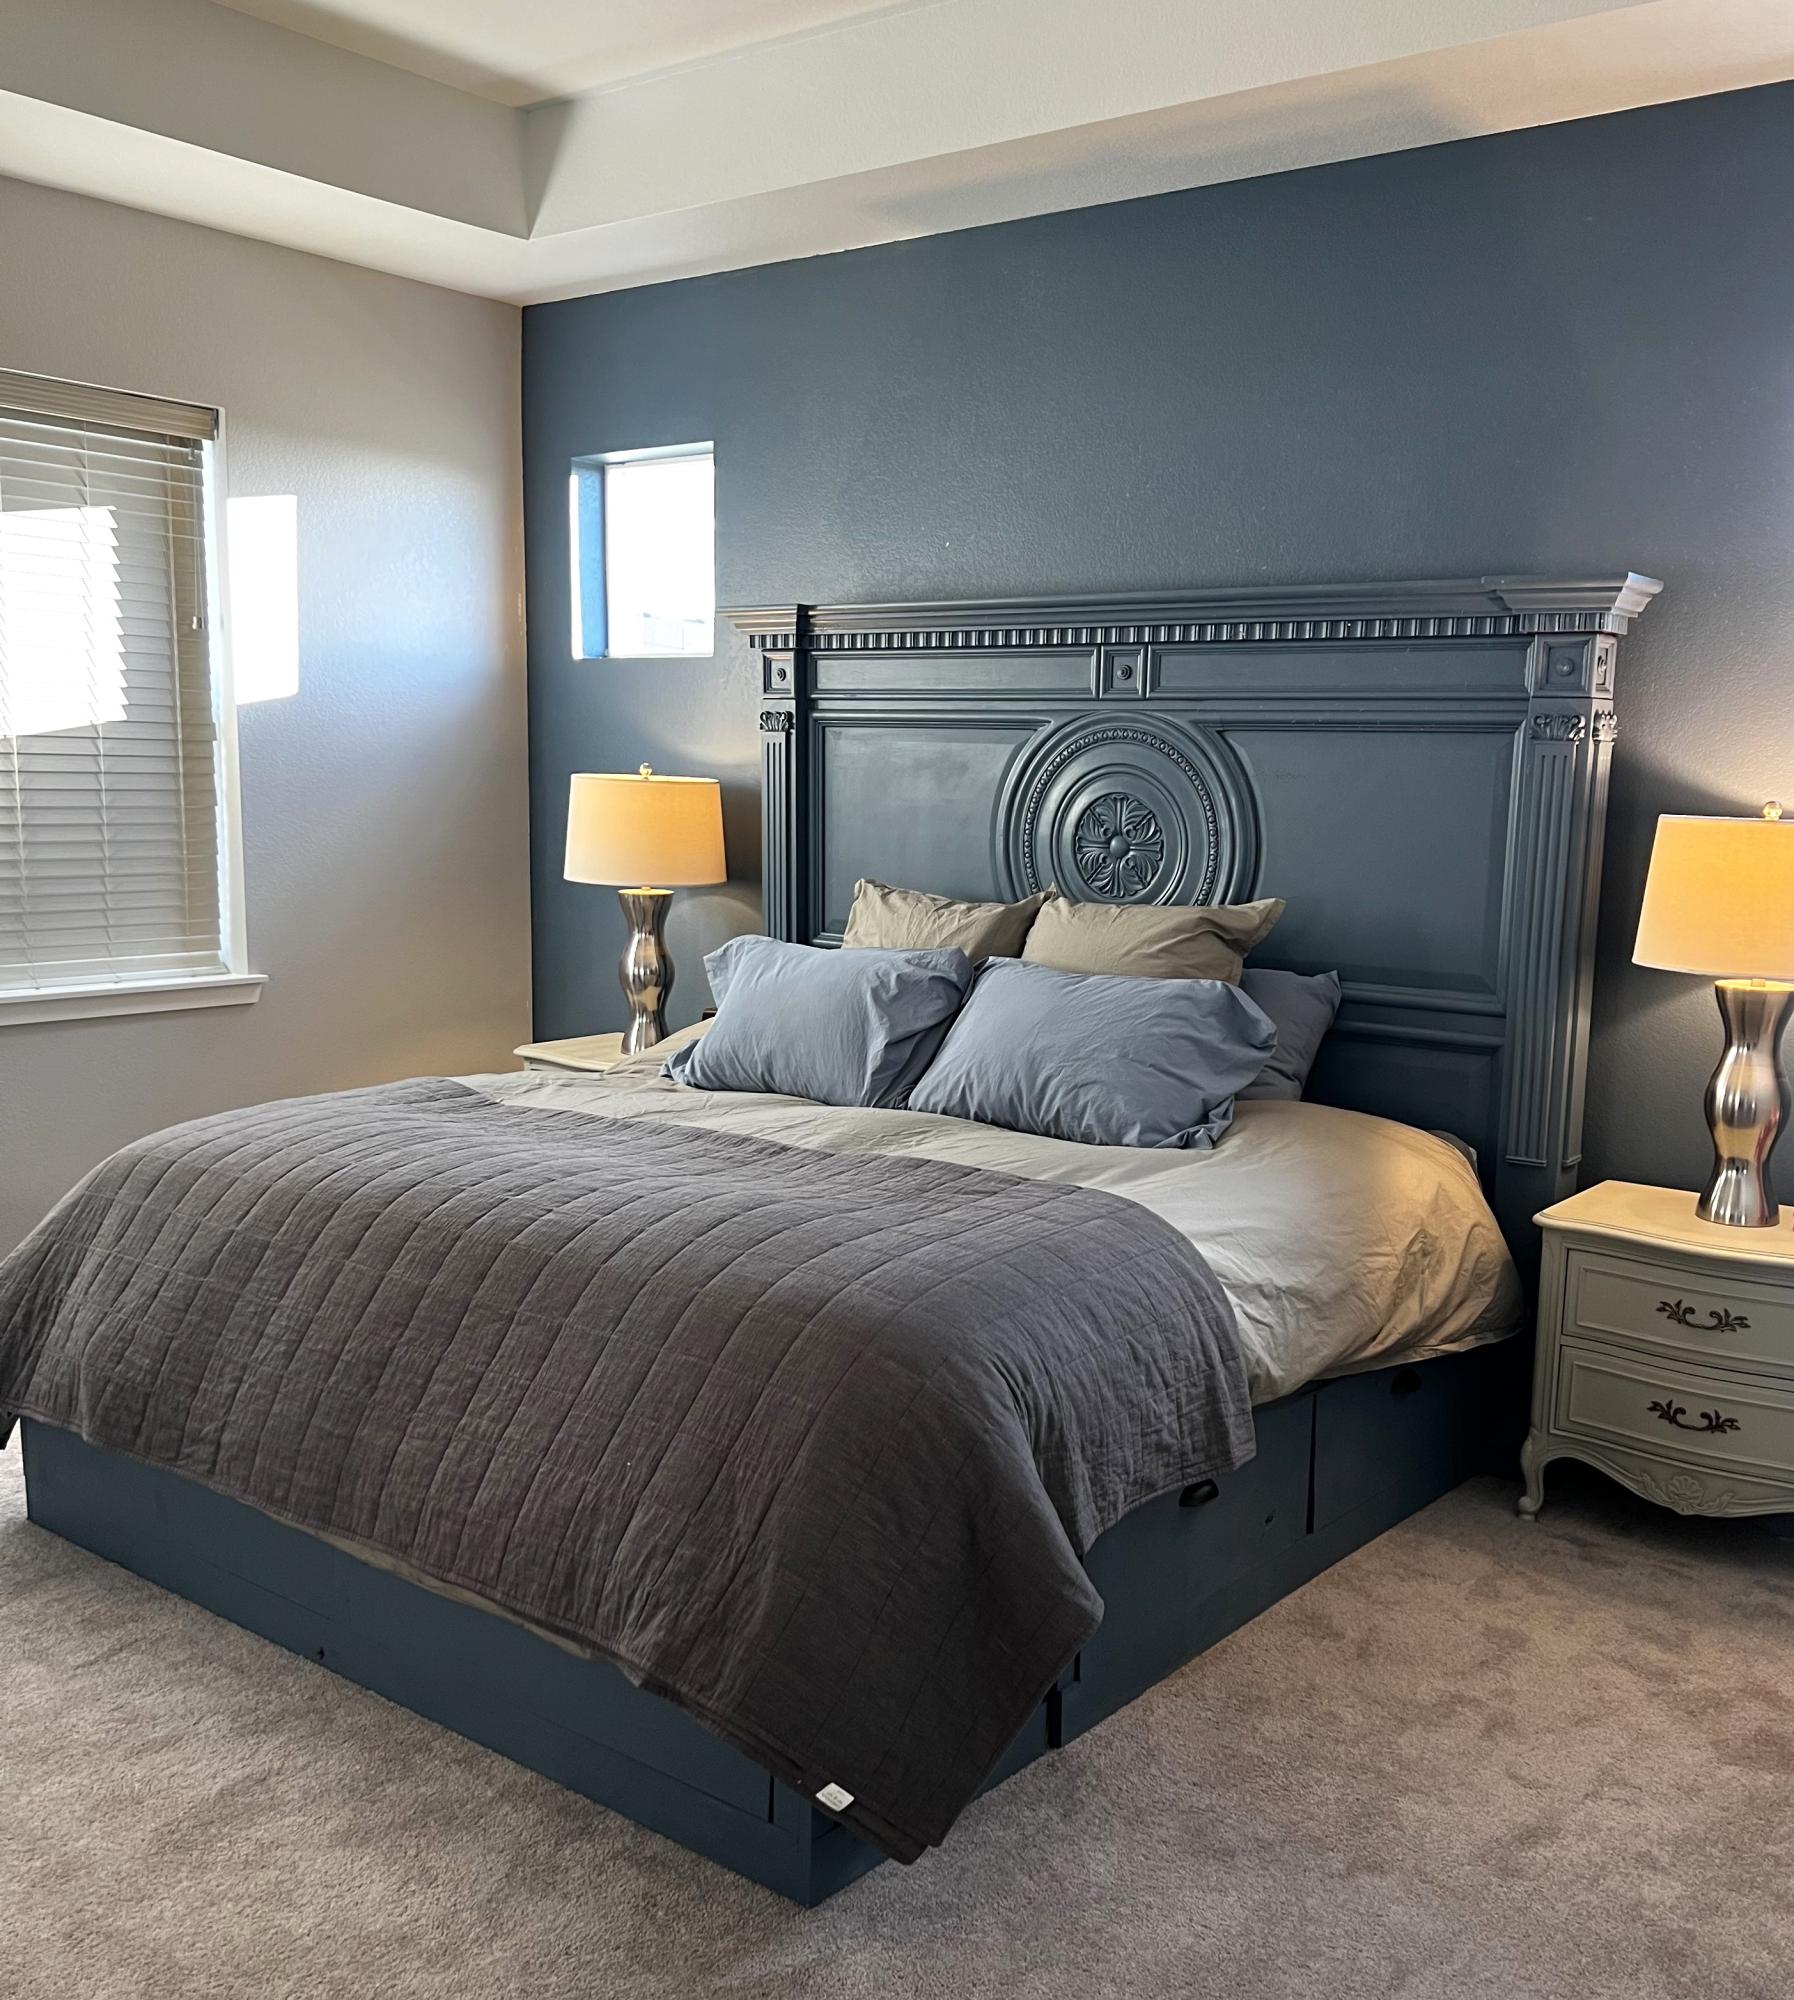
Master bedroom makeover ❤️ bed plans are from Ana White
Built from Plan(s)
Master bedroom makeover ❤️ bed plans are from Ana White
Loved this build had to make it smaller but wow.
Paula
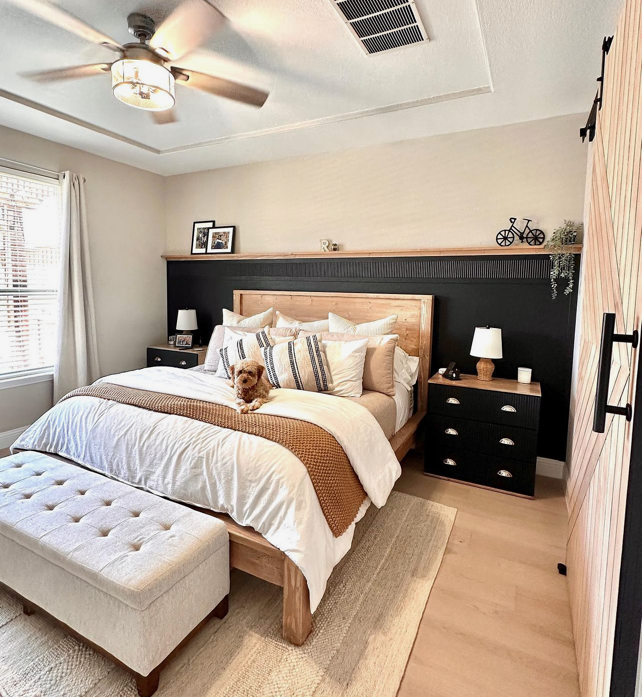
King Sized bed with Storage. Added a found headboard and found Nightstands!
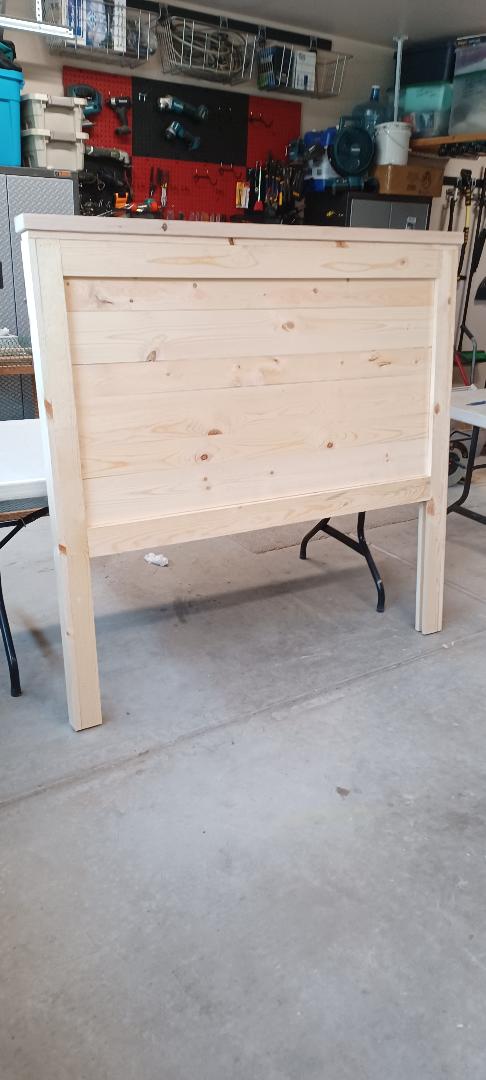
A novice at best

I always love warching woodworking but felt so inspired to do it myself when i watched your videos. I decided to make the modern farmhouse table but using stain and paint I already had. While I followed all the instructions, my 1×10 ended up being a 1x12 (incorrectly labeled) and threw the design off a little bit. I had to modify the plan to accommodate the larger size but I love the end result just as much! Thank you so much for sharing your videos and plans.
Thank You for this Headboard Plan. It was very easy. Other than painting it I completed it in less than 3 hours. A nail gun sure saves some time. Everyone loved it. They wanted me to put clear coat on it because it looked really good, but I ended up painting it to match my other bedroom furniture which is Black.
Scott Boyd
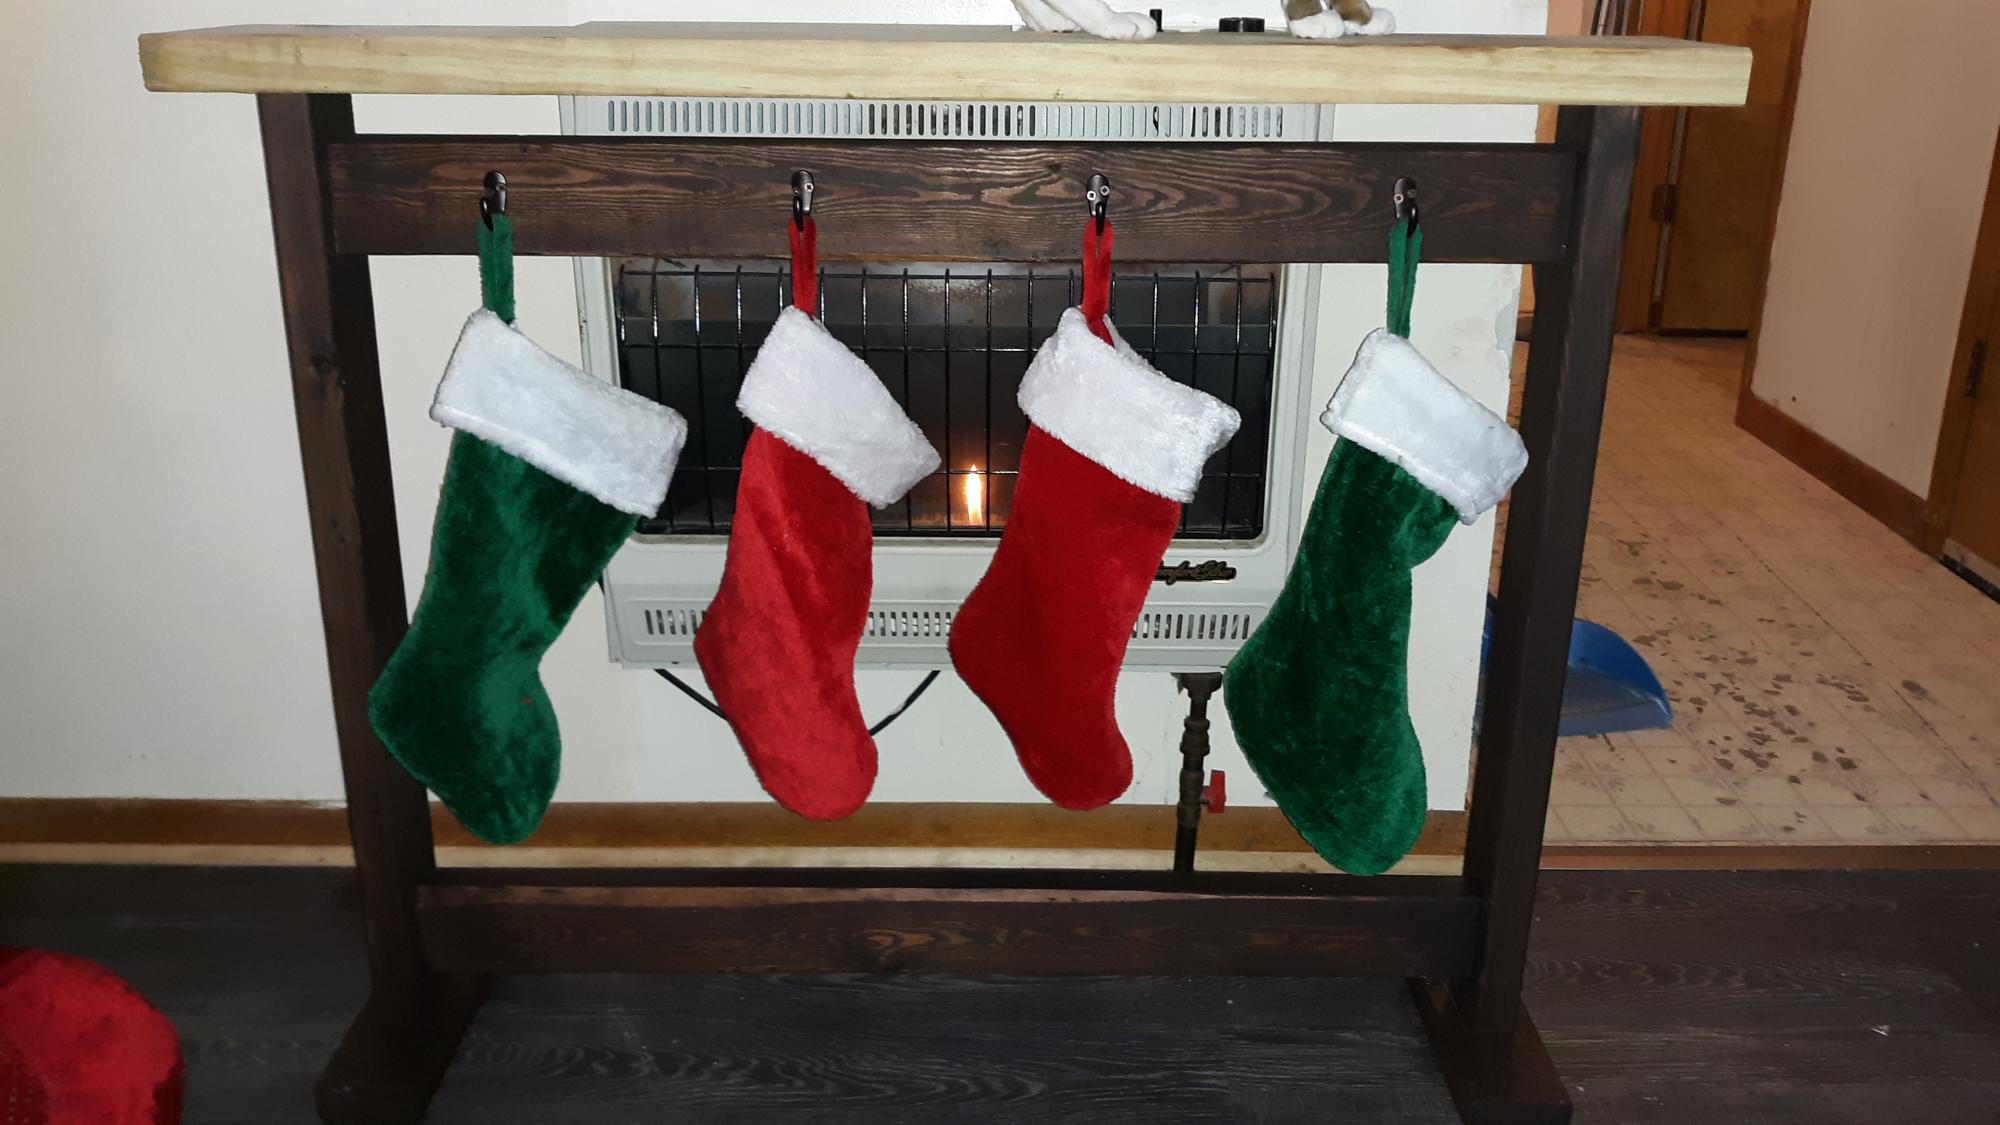
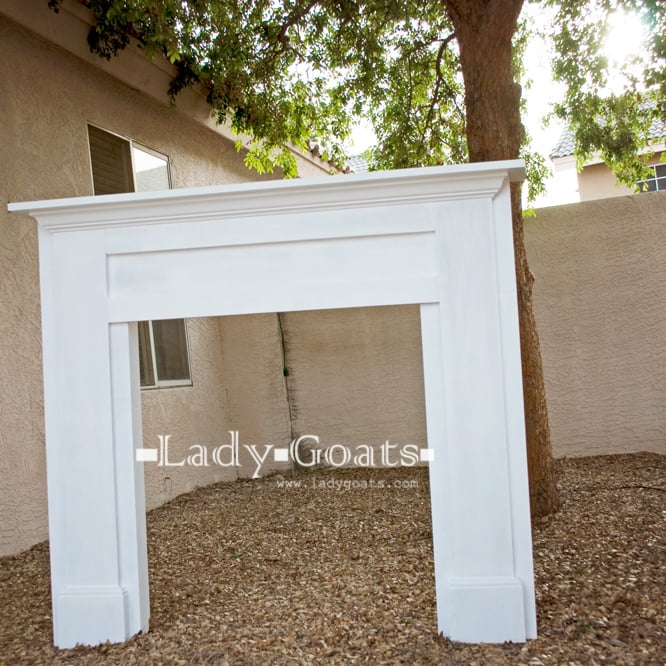
We have a vent-less gas wall heater, but had no mantel for hanging stockings. Thanks to the new plan, we have the perfect solution! We already had the 2X4s left over from the simple panel bed project, so we only purchased hooks and stains for this.
We shortened the width to accommodate 4 stockings instead of 5 (we cut the 2 cross pieces 9 inches shorter). We also decided to add a large 2X6 cap to mimic a mantel, which really seems to tie it all together much better. We love this and have ideas now on how to make slight changes so it will more easily slide "over"/around the wall heater
(yes, we are not keeping it that close while stockings are hung, so as to not risk catching fire)
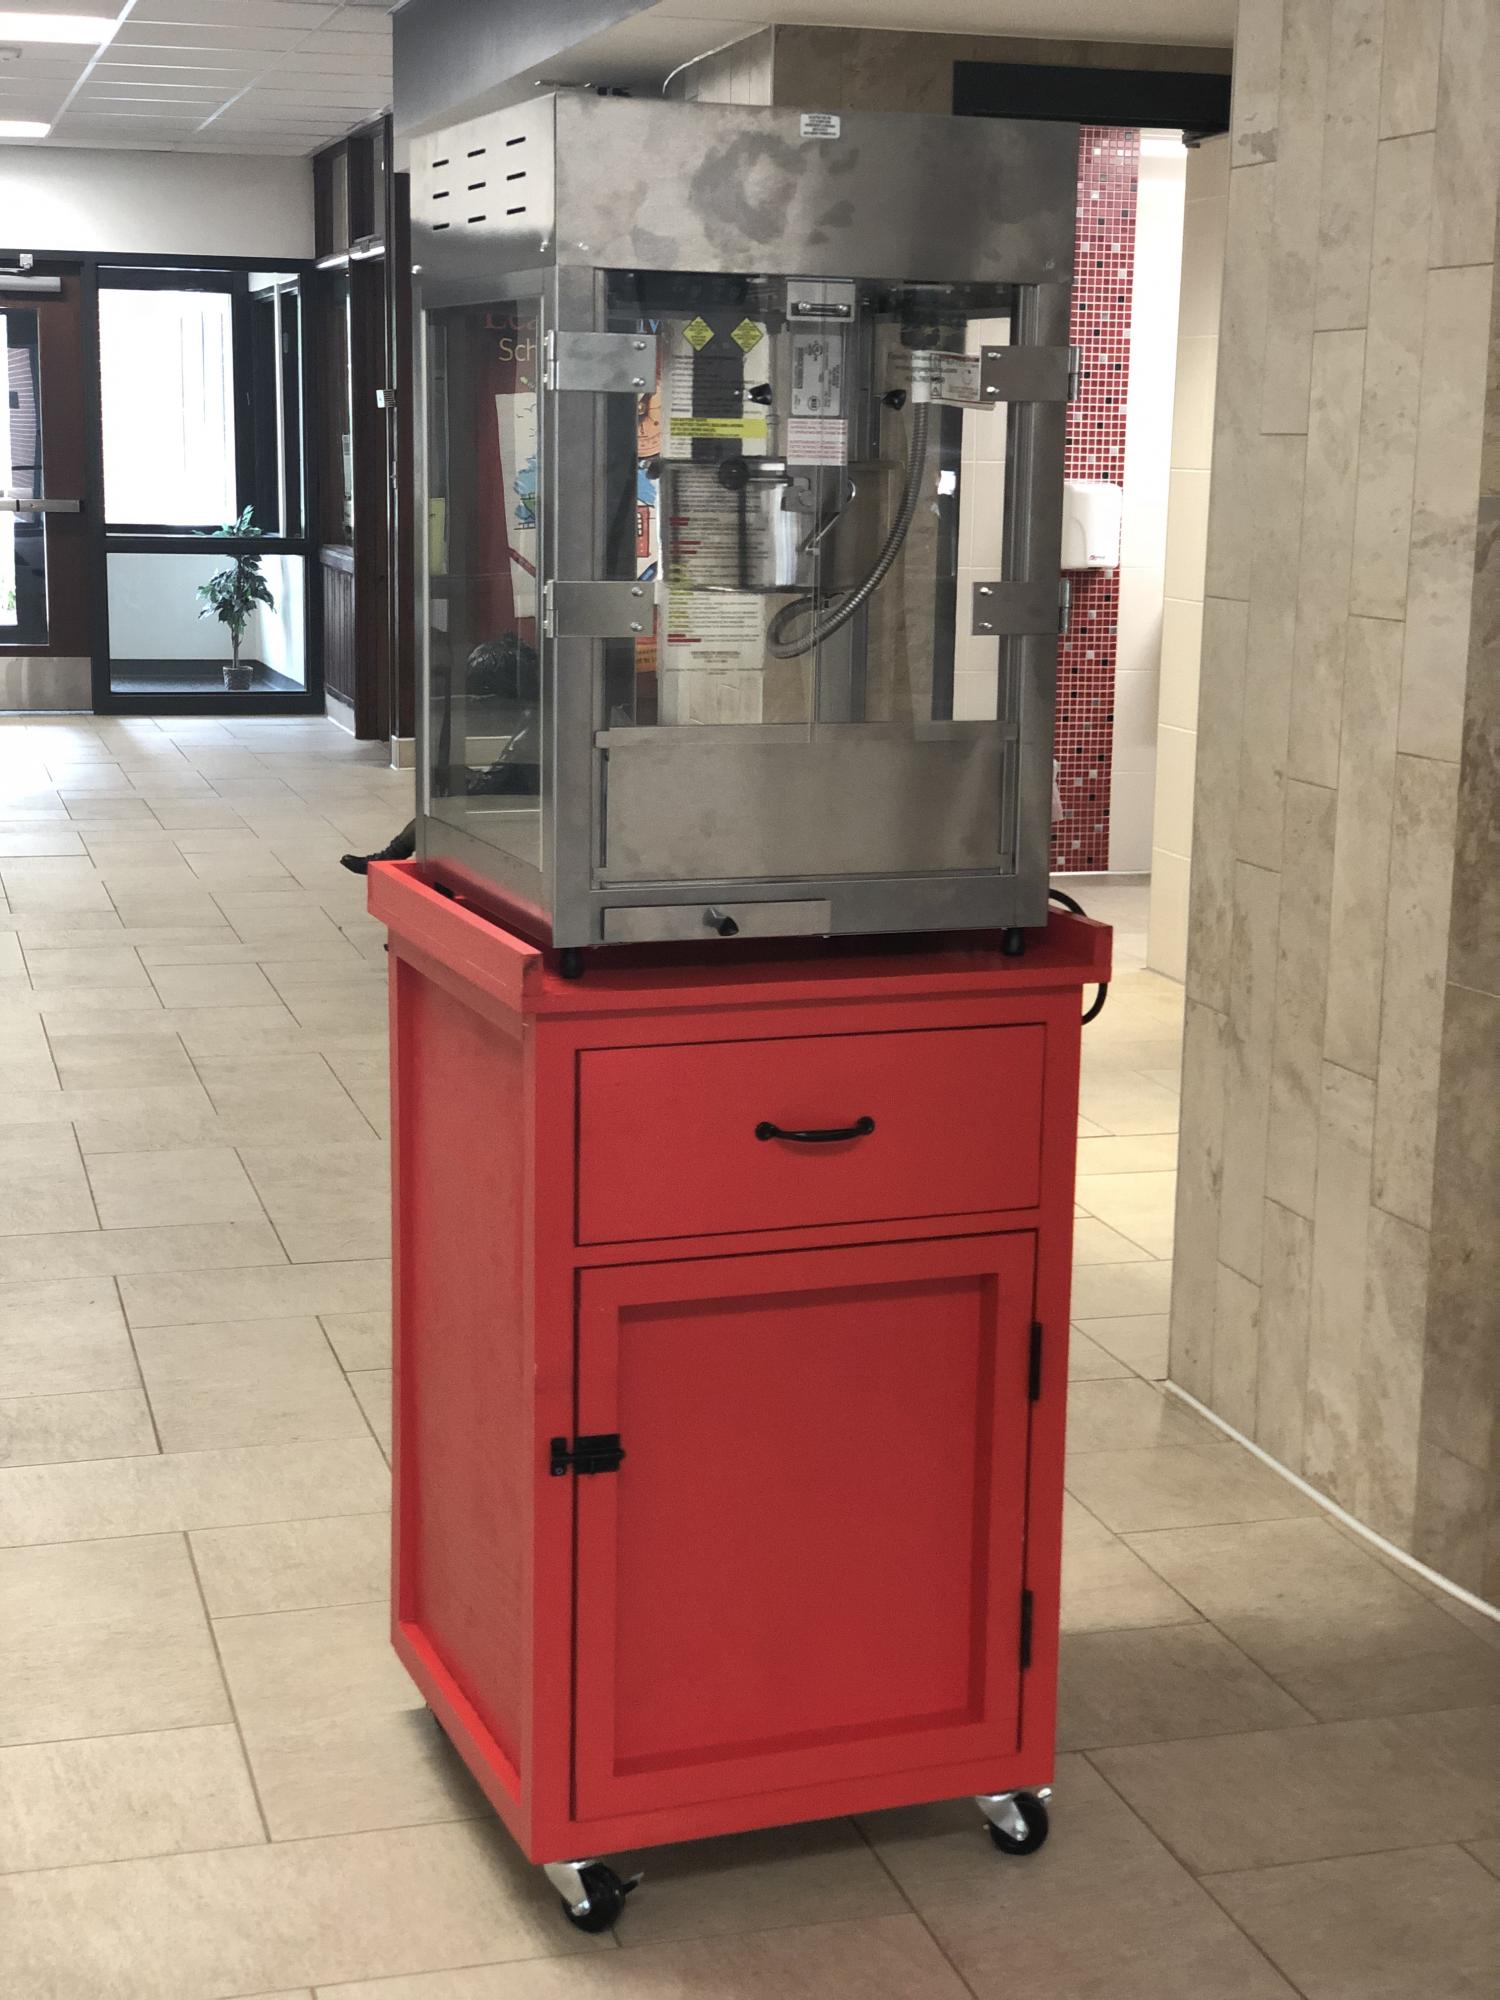
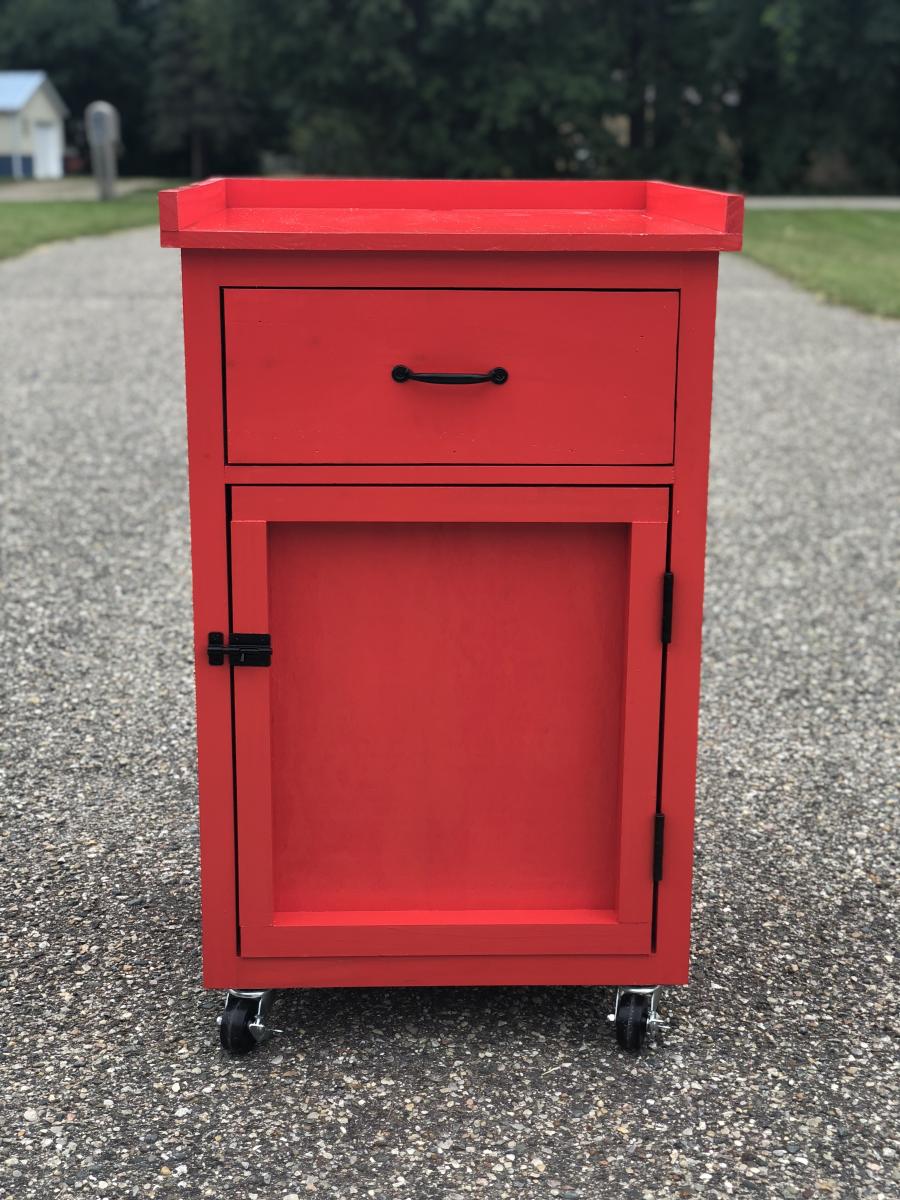
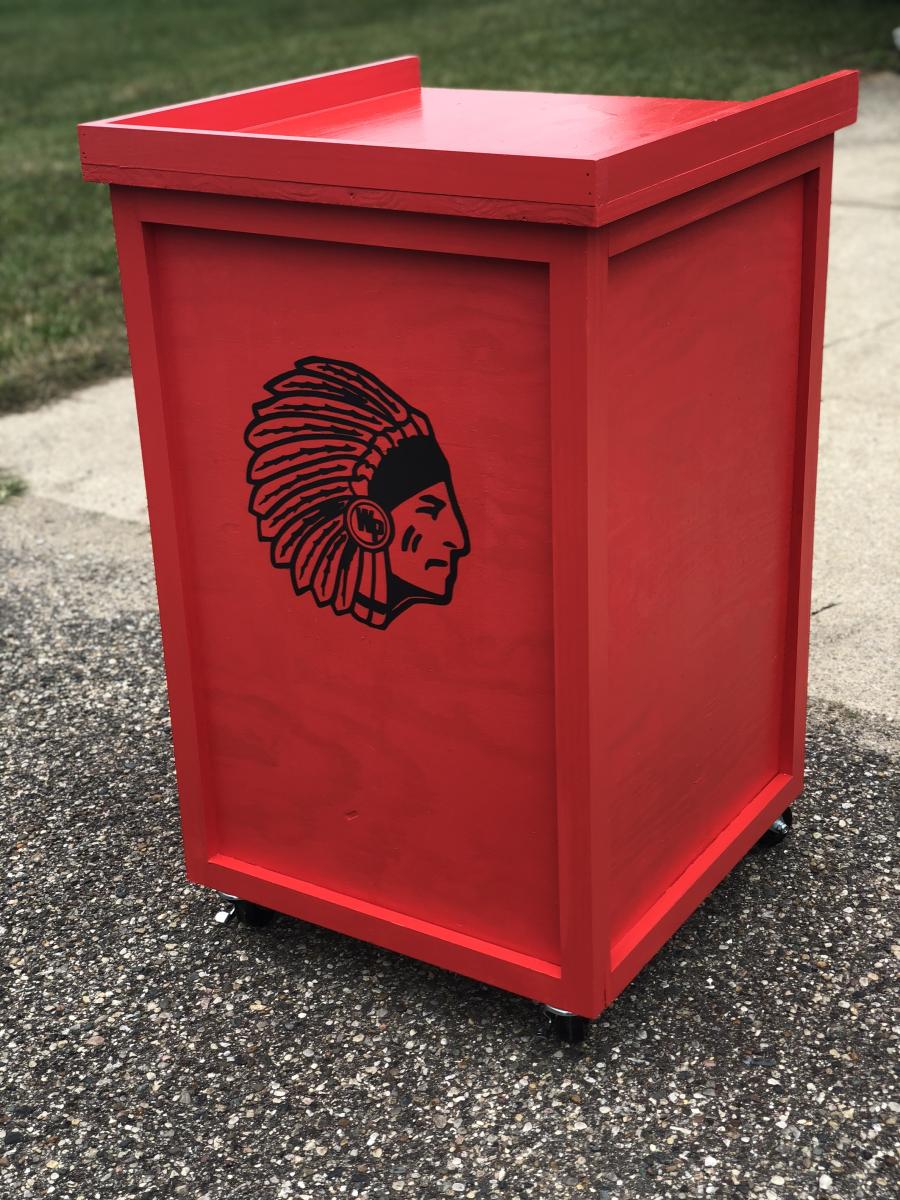
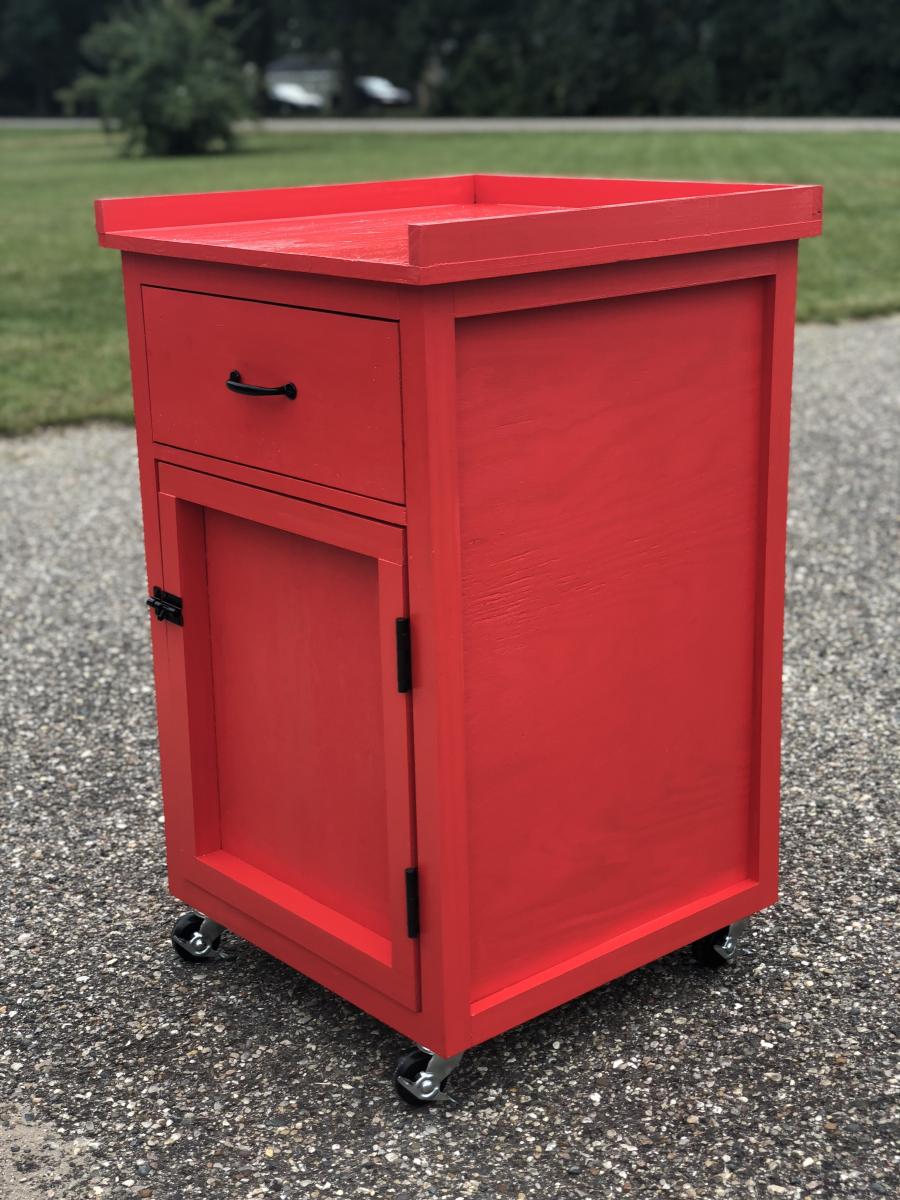
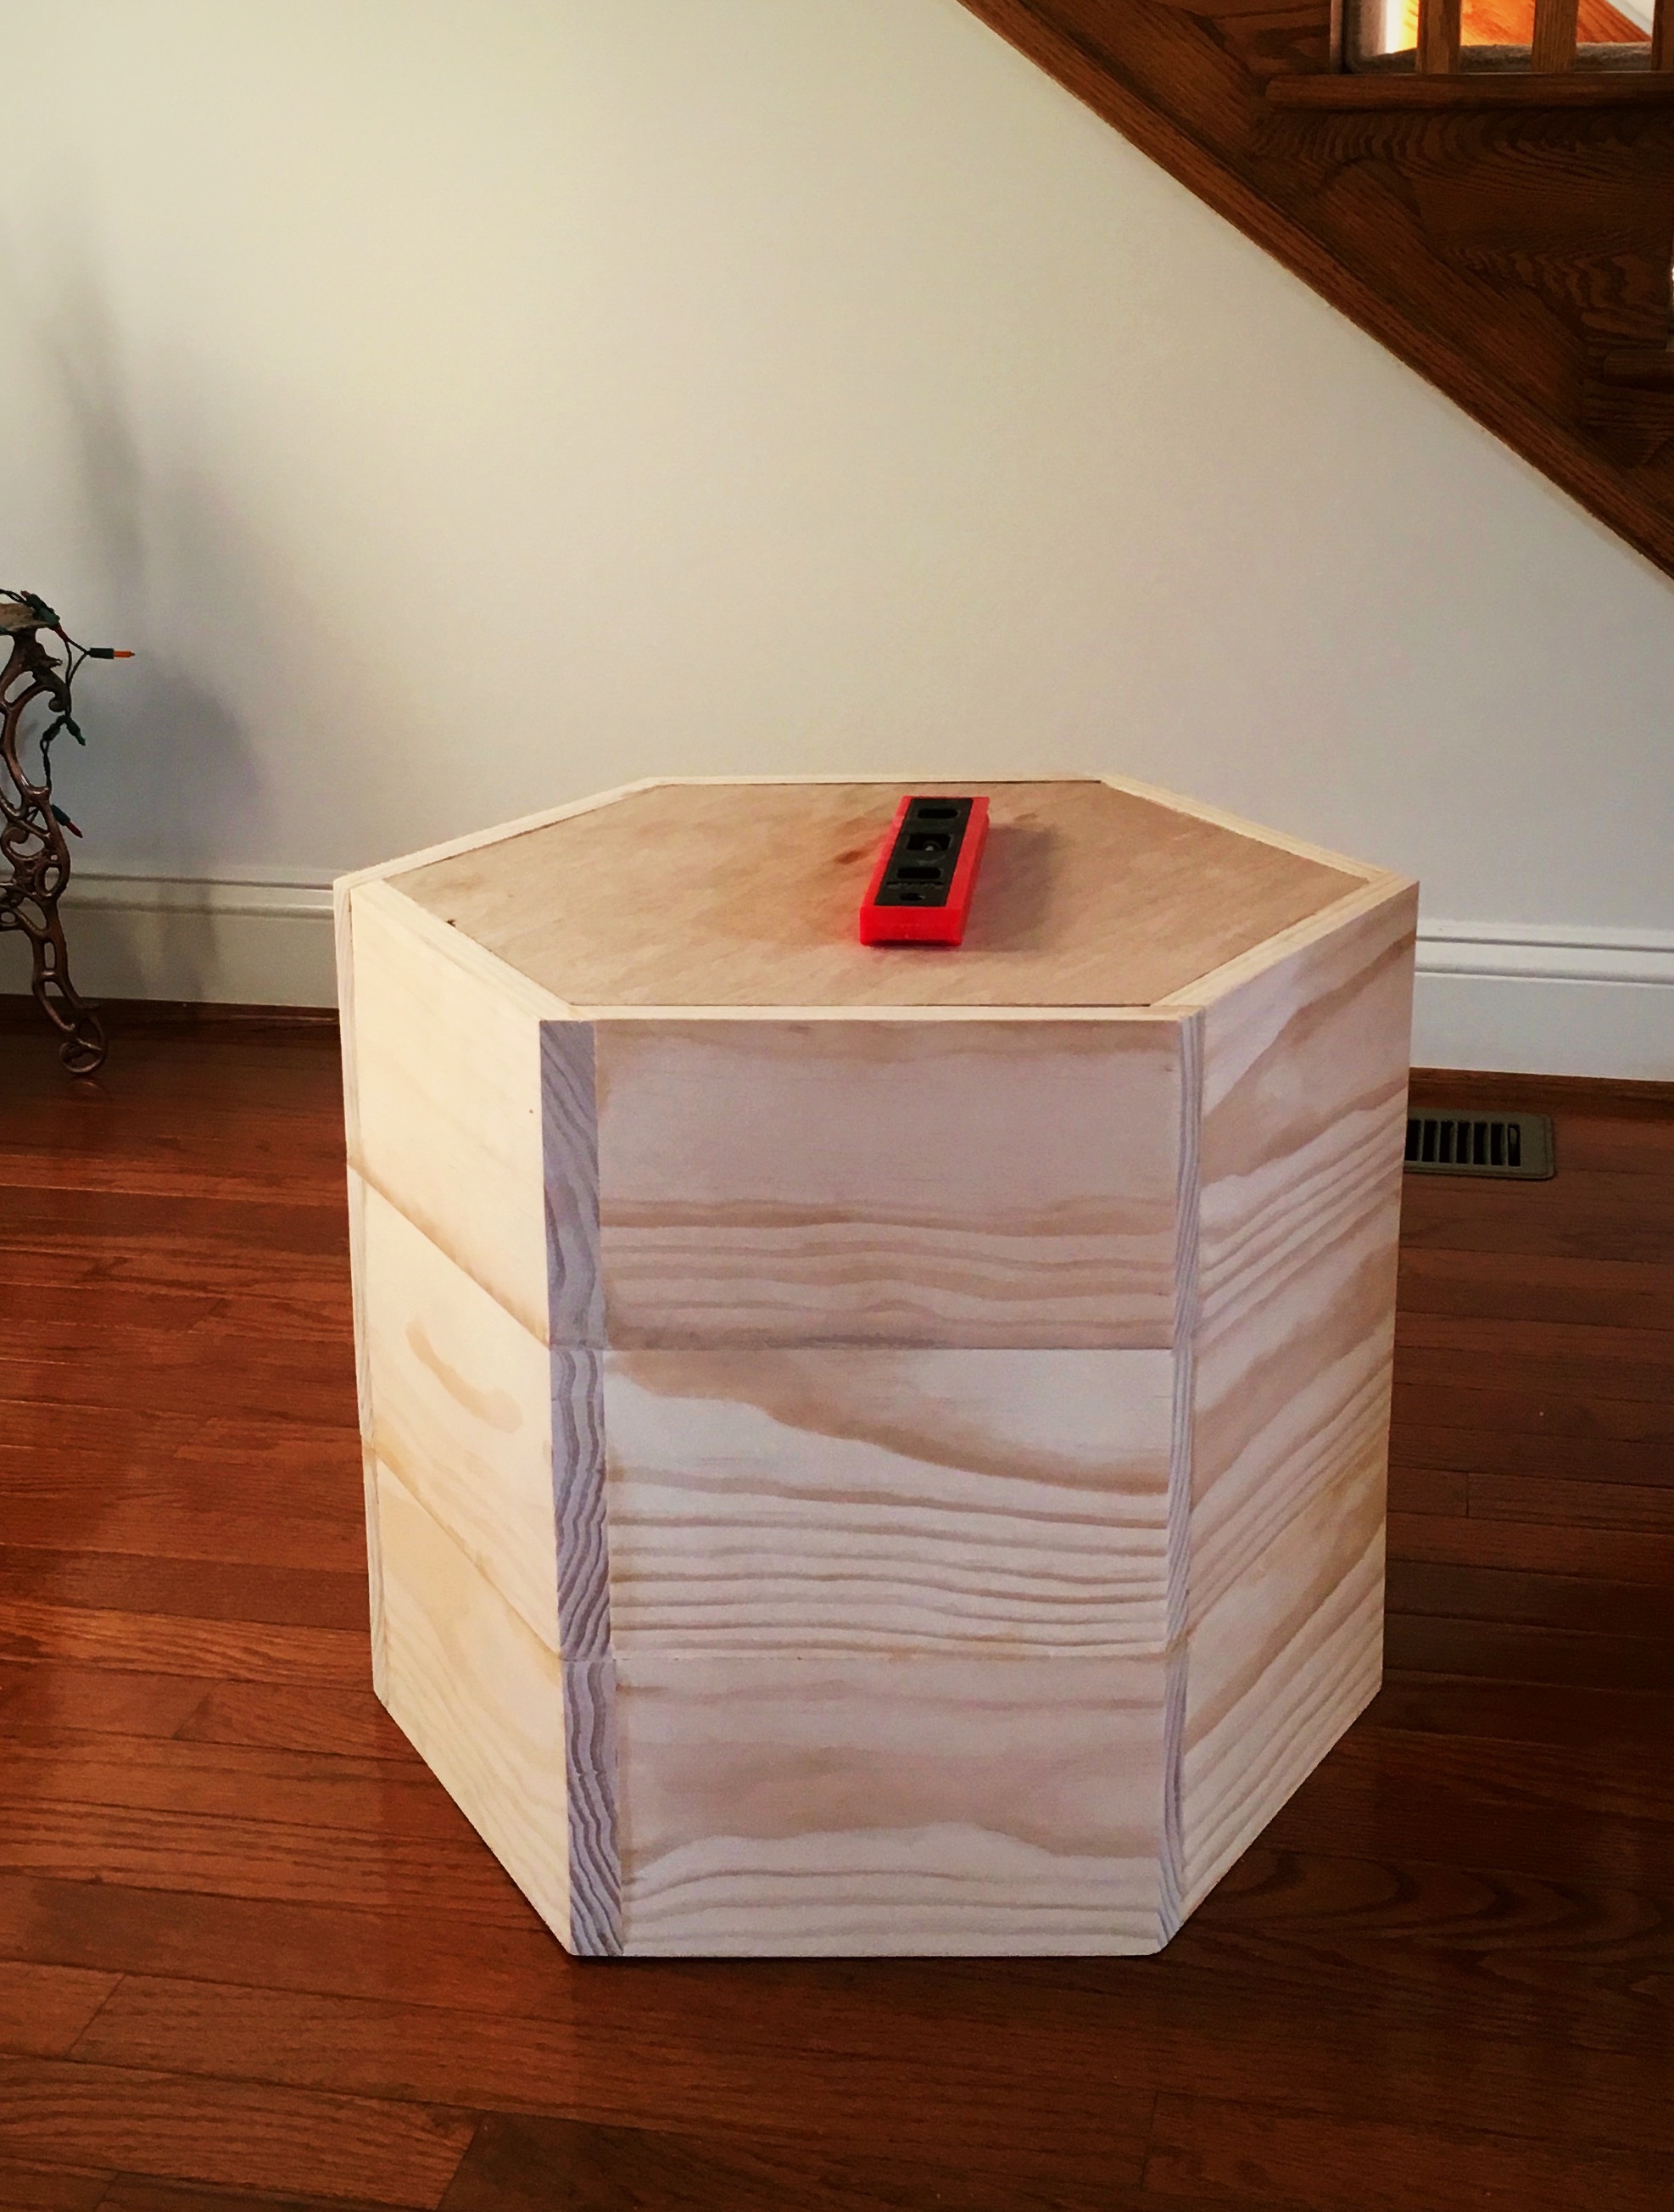
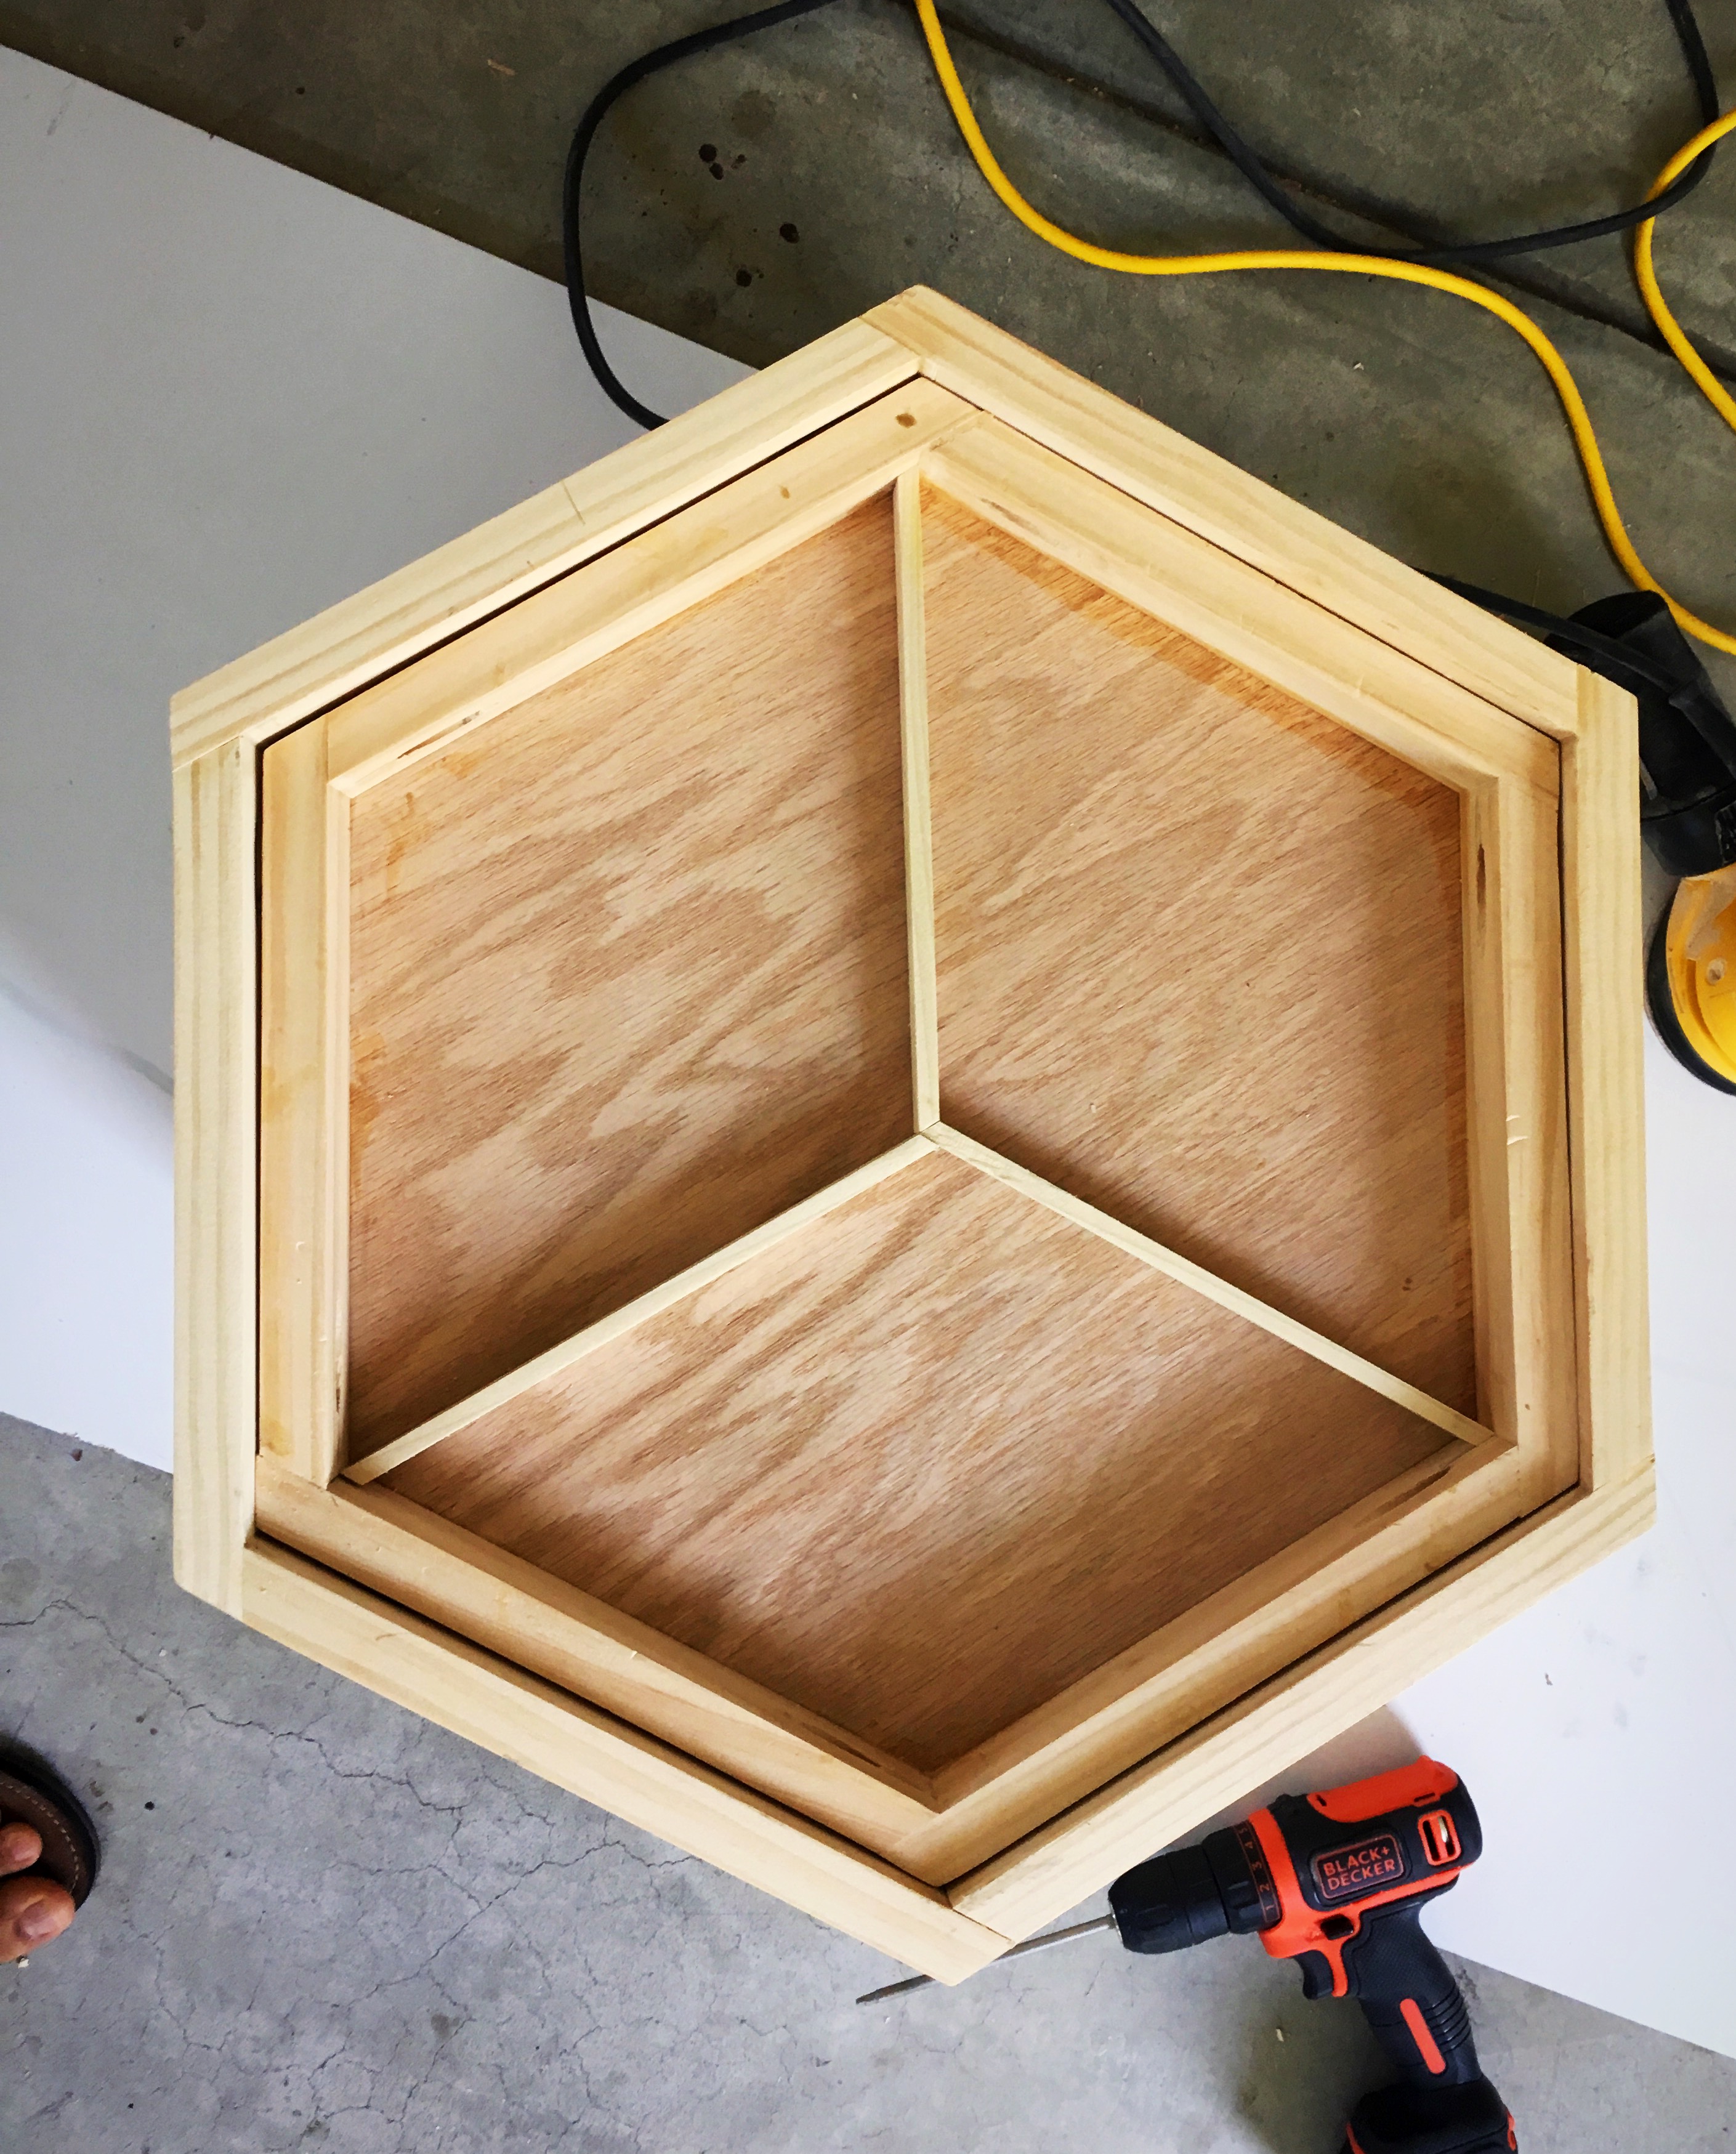
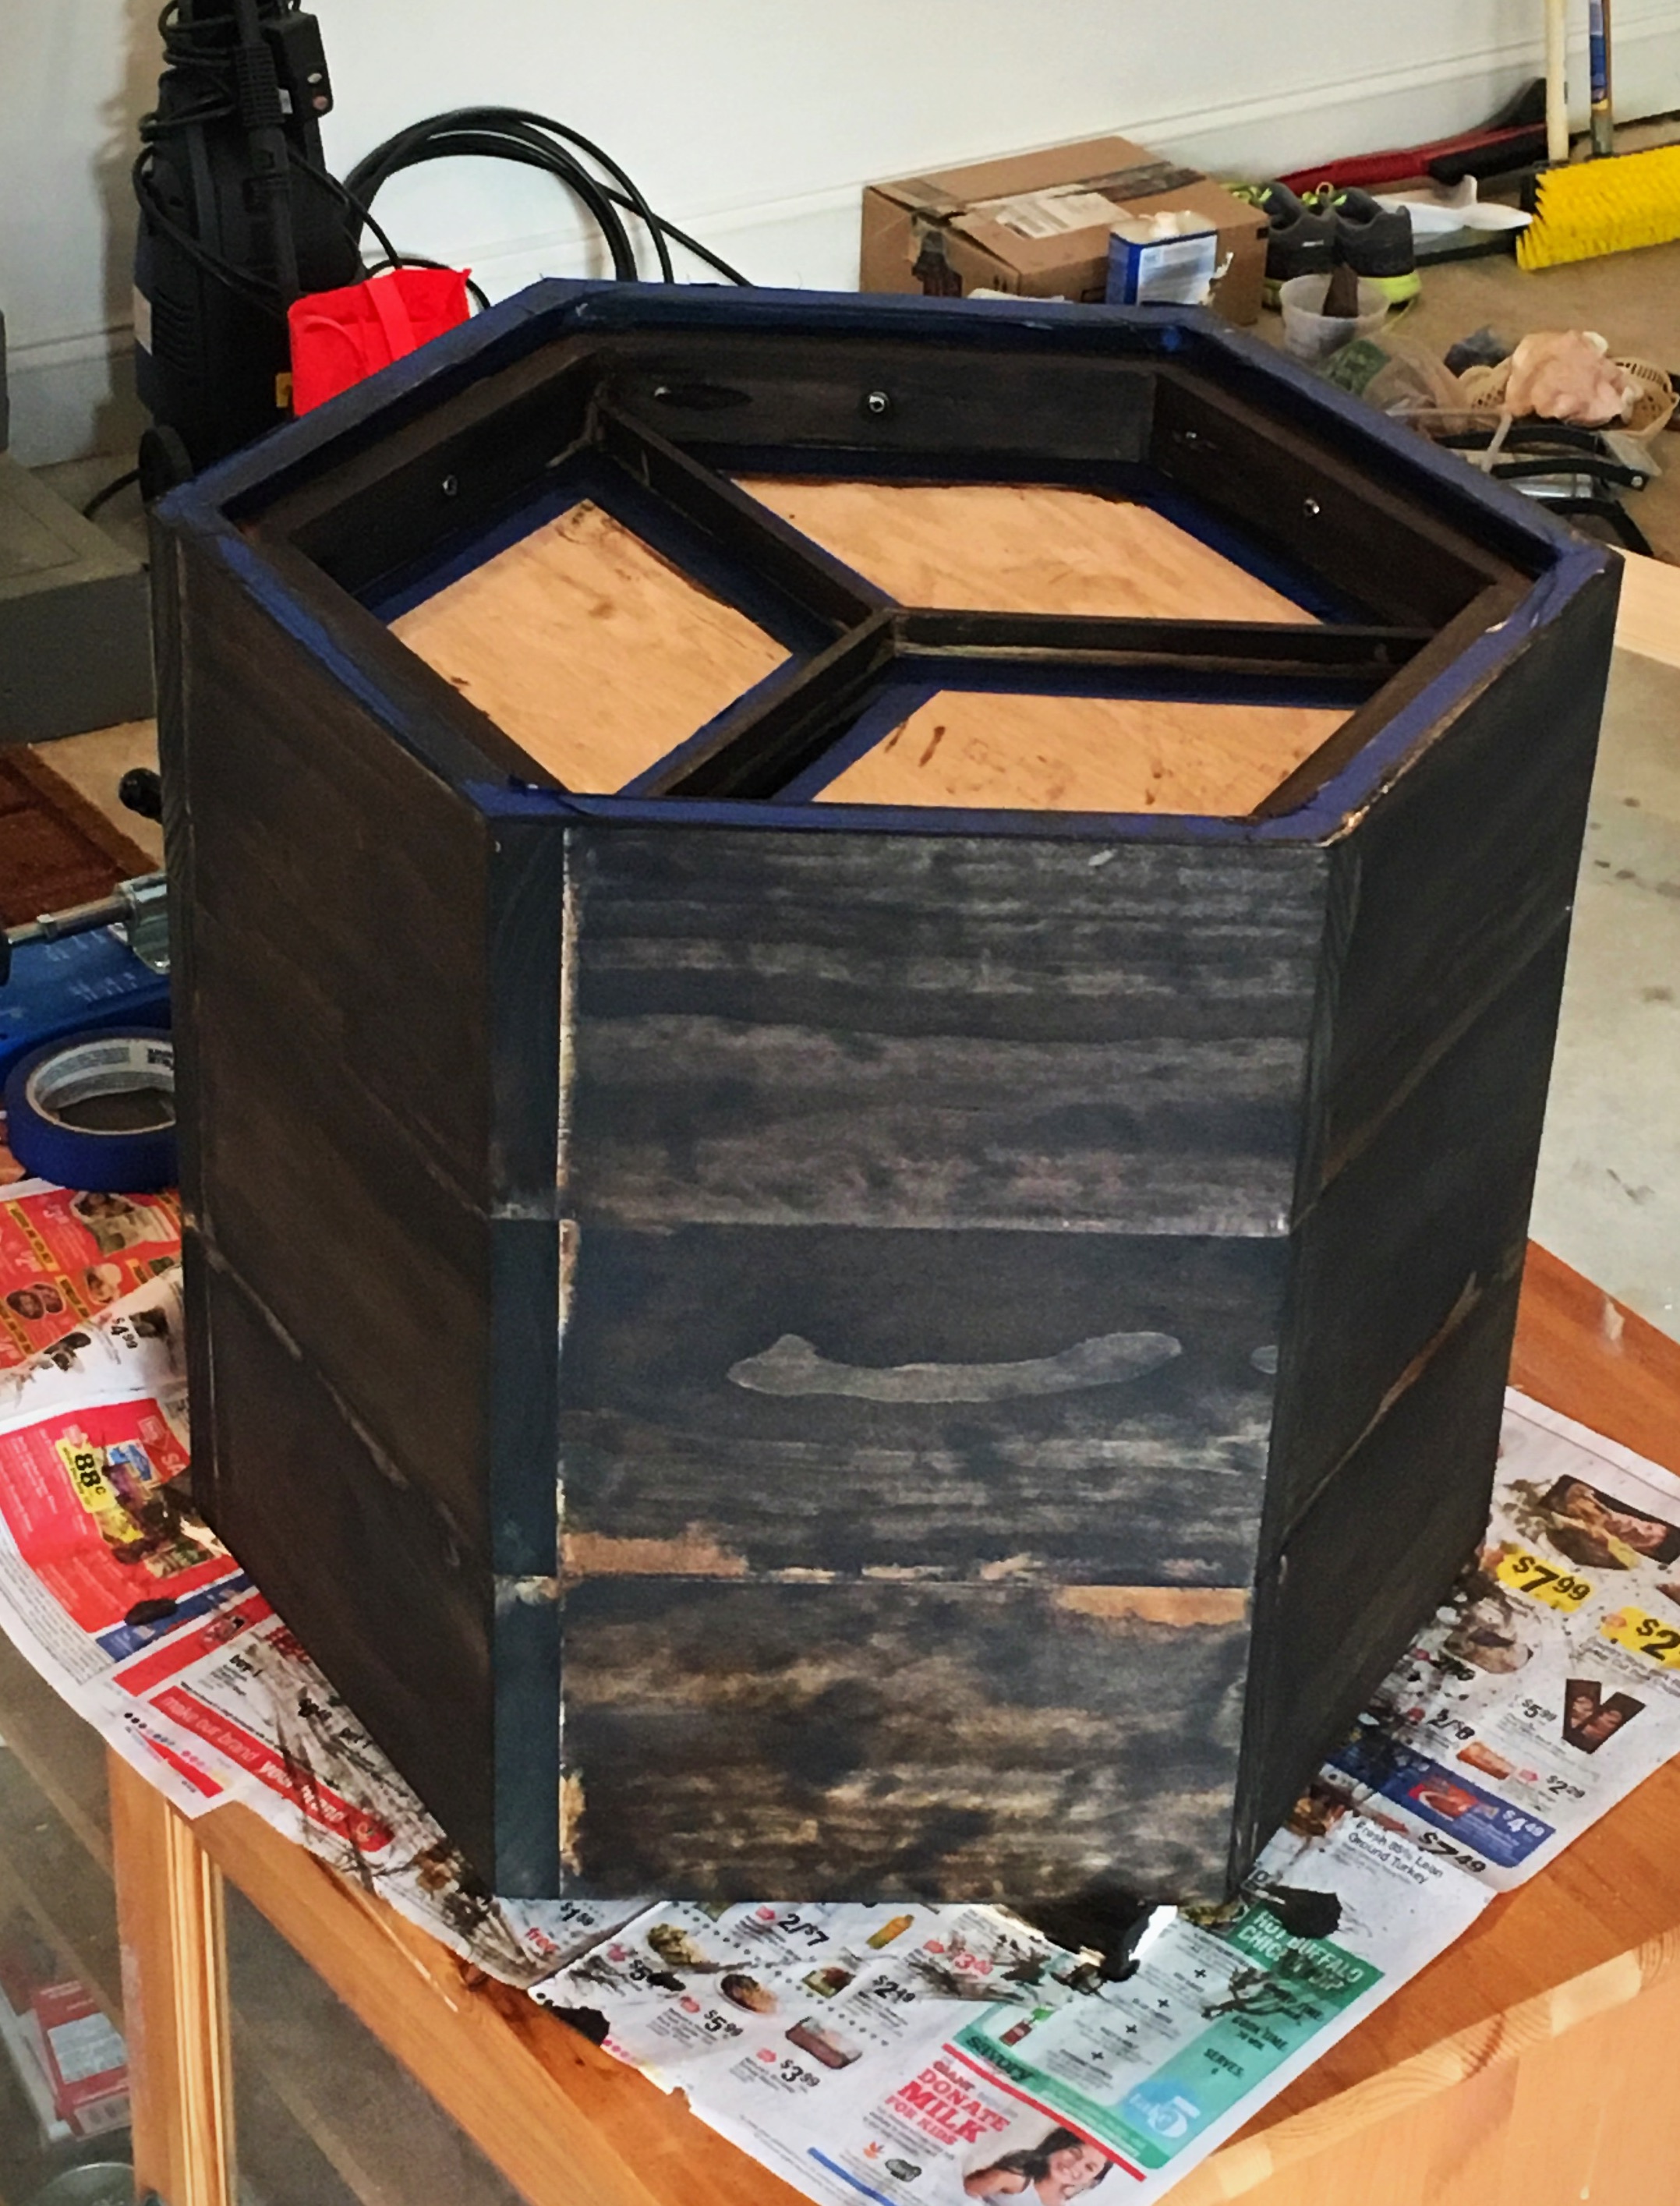
My parent organization at the elementary school had just bought a brand new popcorn machine but had nowhere to store it. So, I offered to try my hand at building a stand with storage. I knew that we needed the stand to be mobile as the idea was to pop the popcorn in different classrooms for incentives, etc. I modified the kitchen prep cart to have a large cabinet underneath to store the popcorn, bags, etc. The pullout drawer was home to the measuring cups, directions, etc. I used my Cricut and cut out our school logo, placed on the popcorn machine and then polyurethaned it to the side. It turned out great!!! I could not be happier :)
Wed, 08/21/2024 - 20:38
How can I download the plans for this popcorn stand? Maybe I’m just blind.
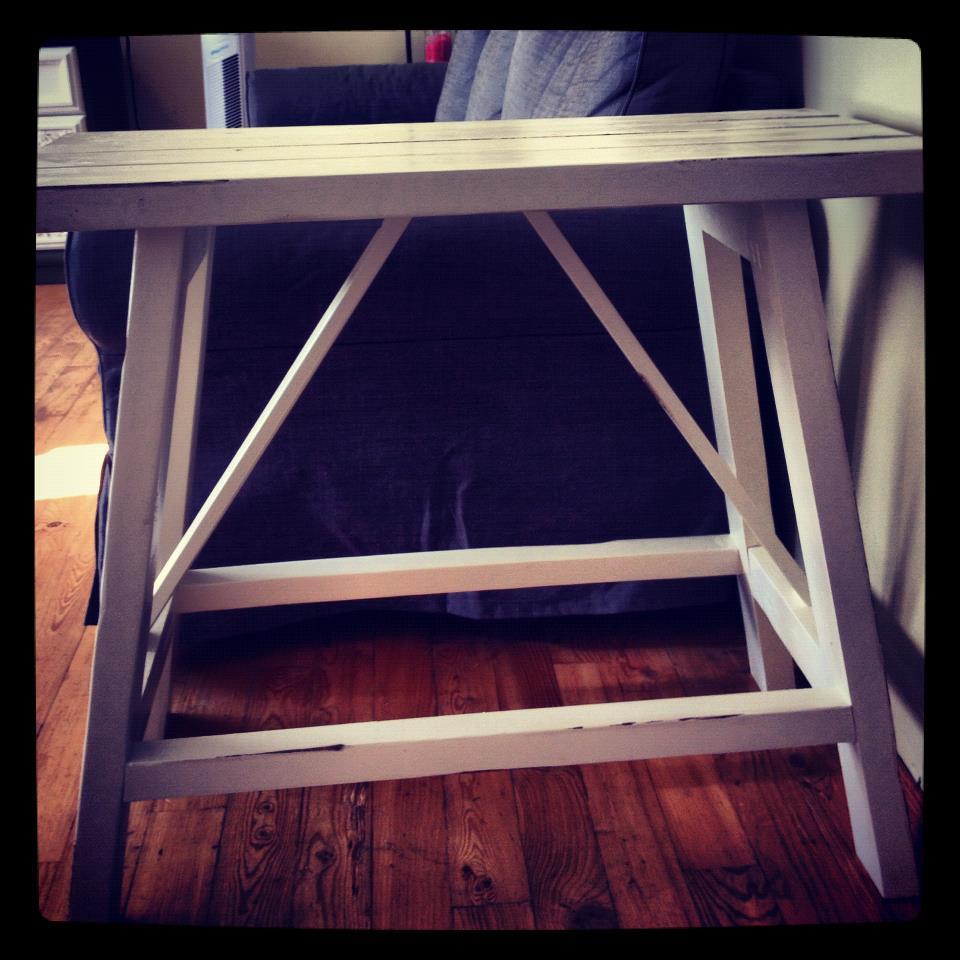
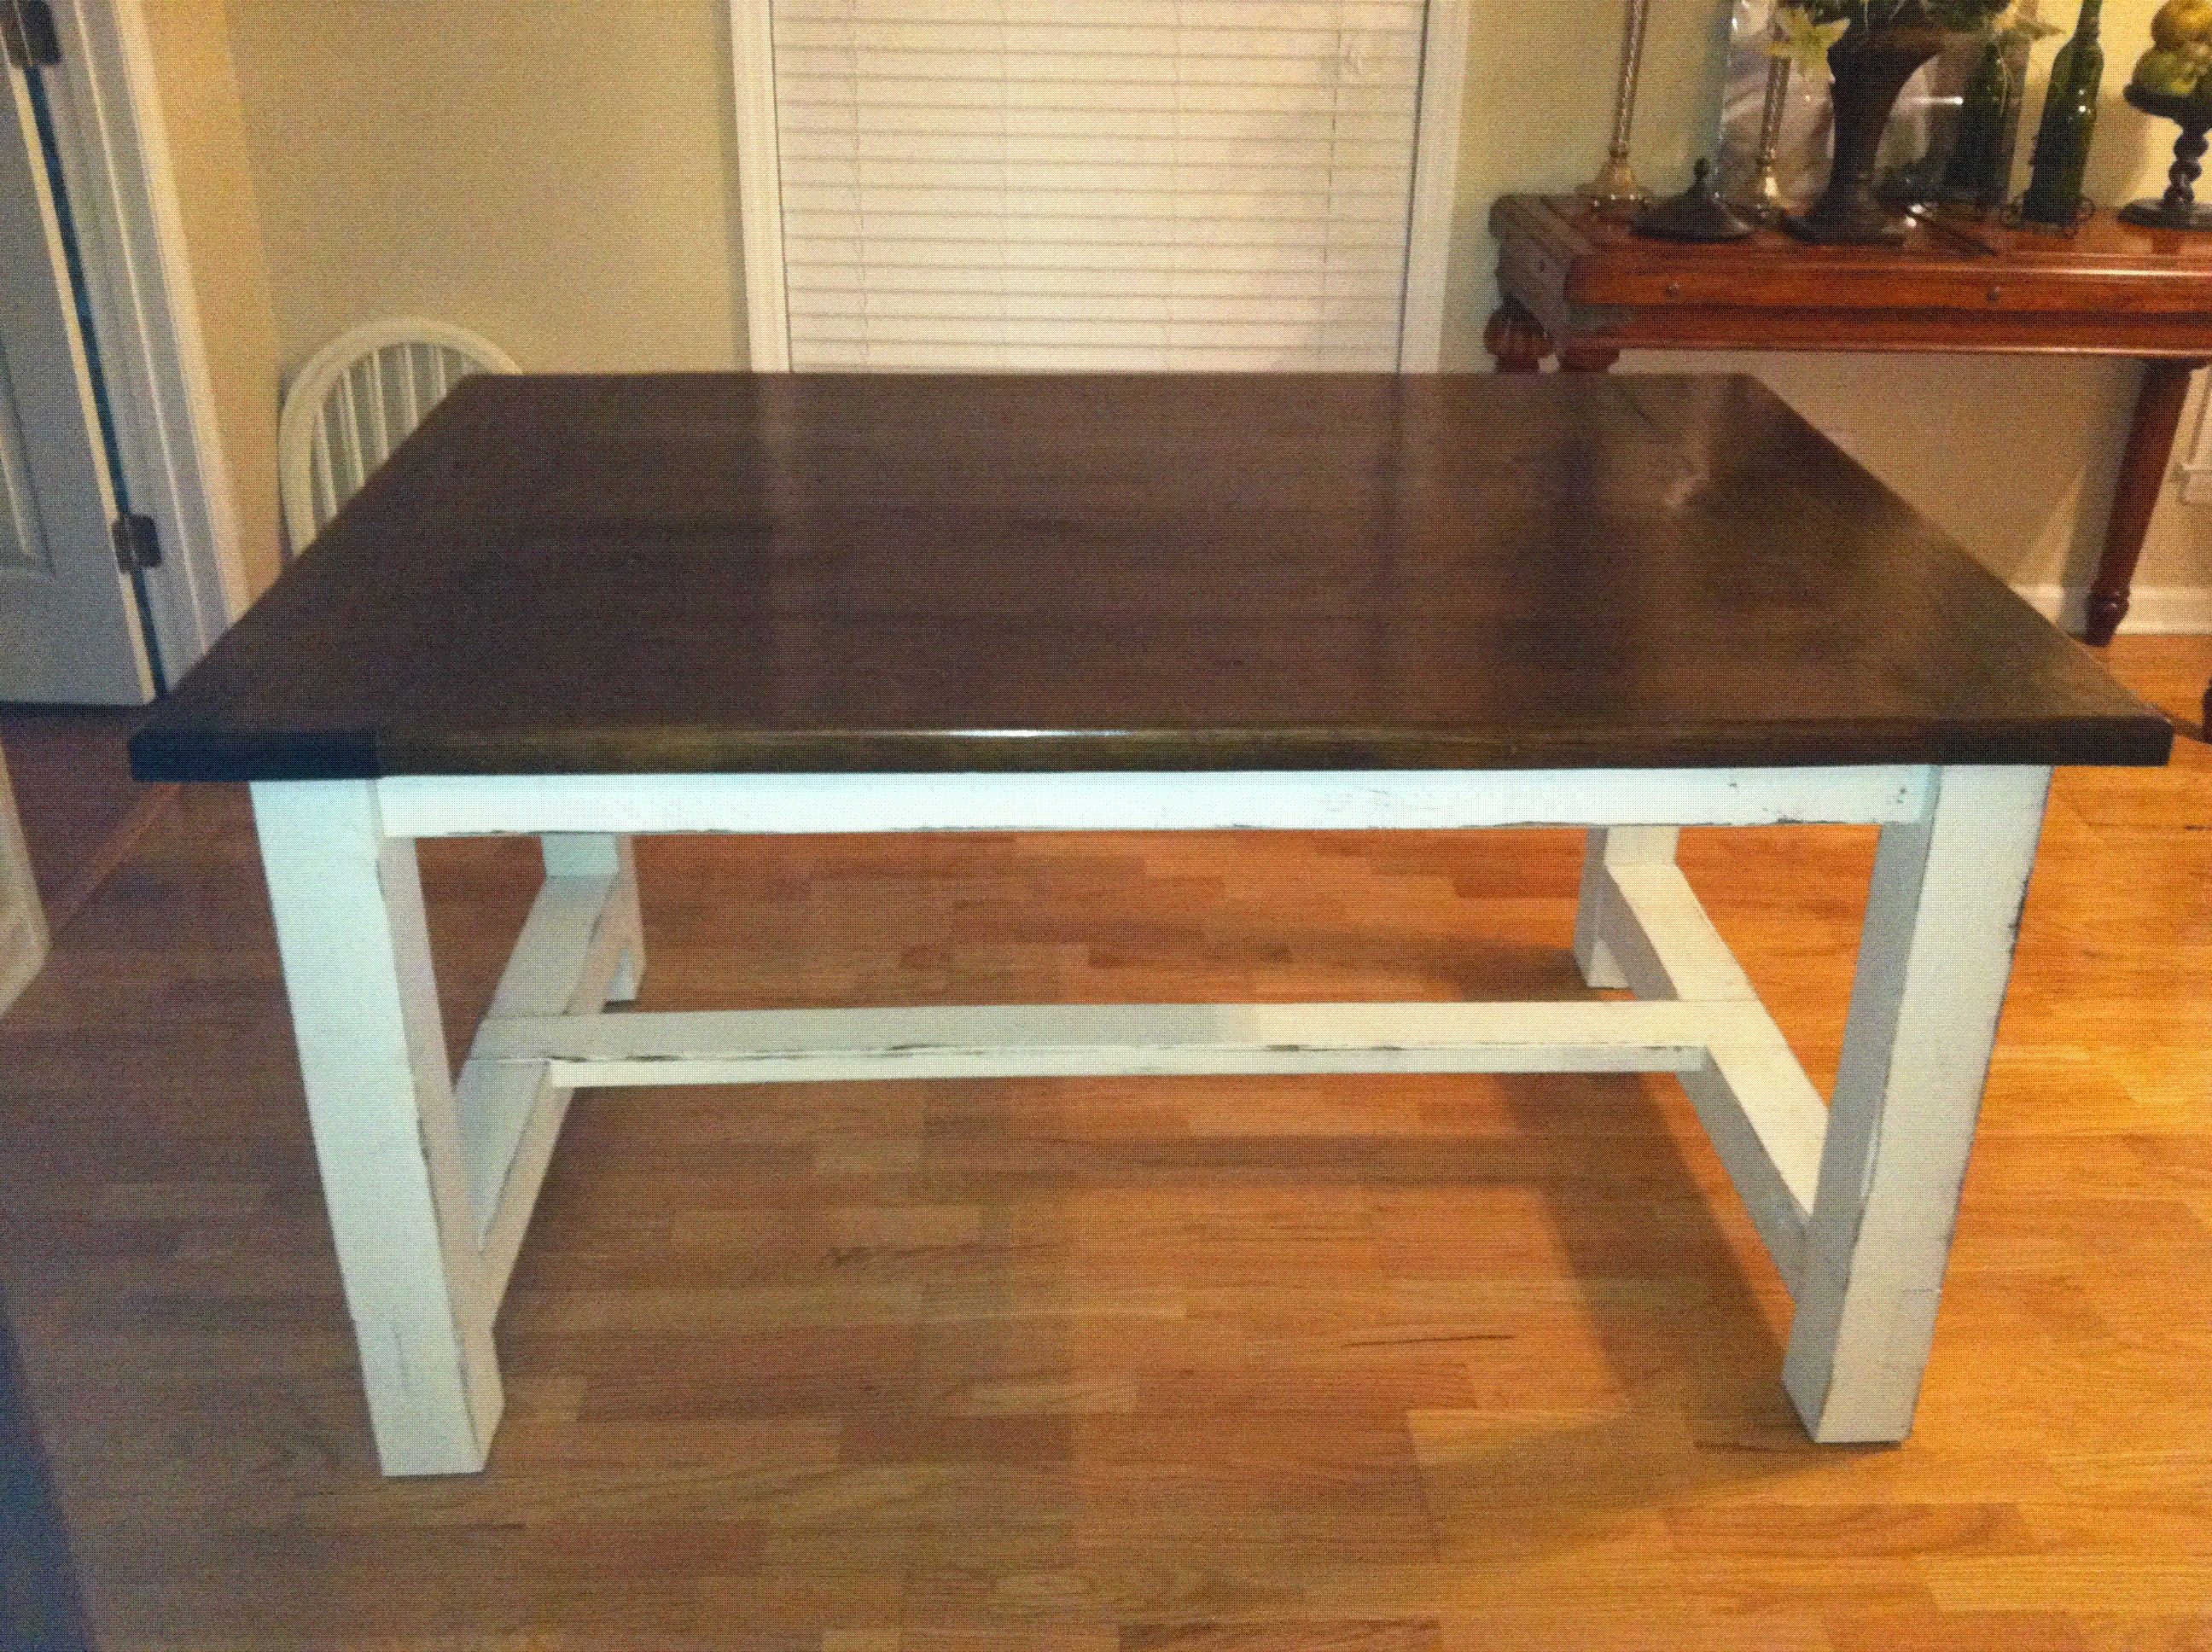
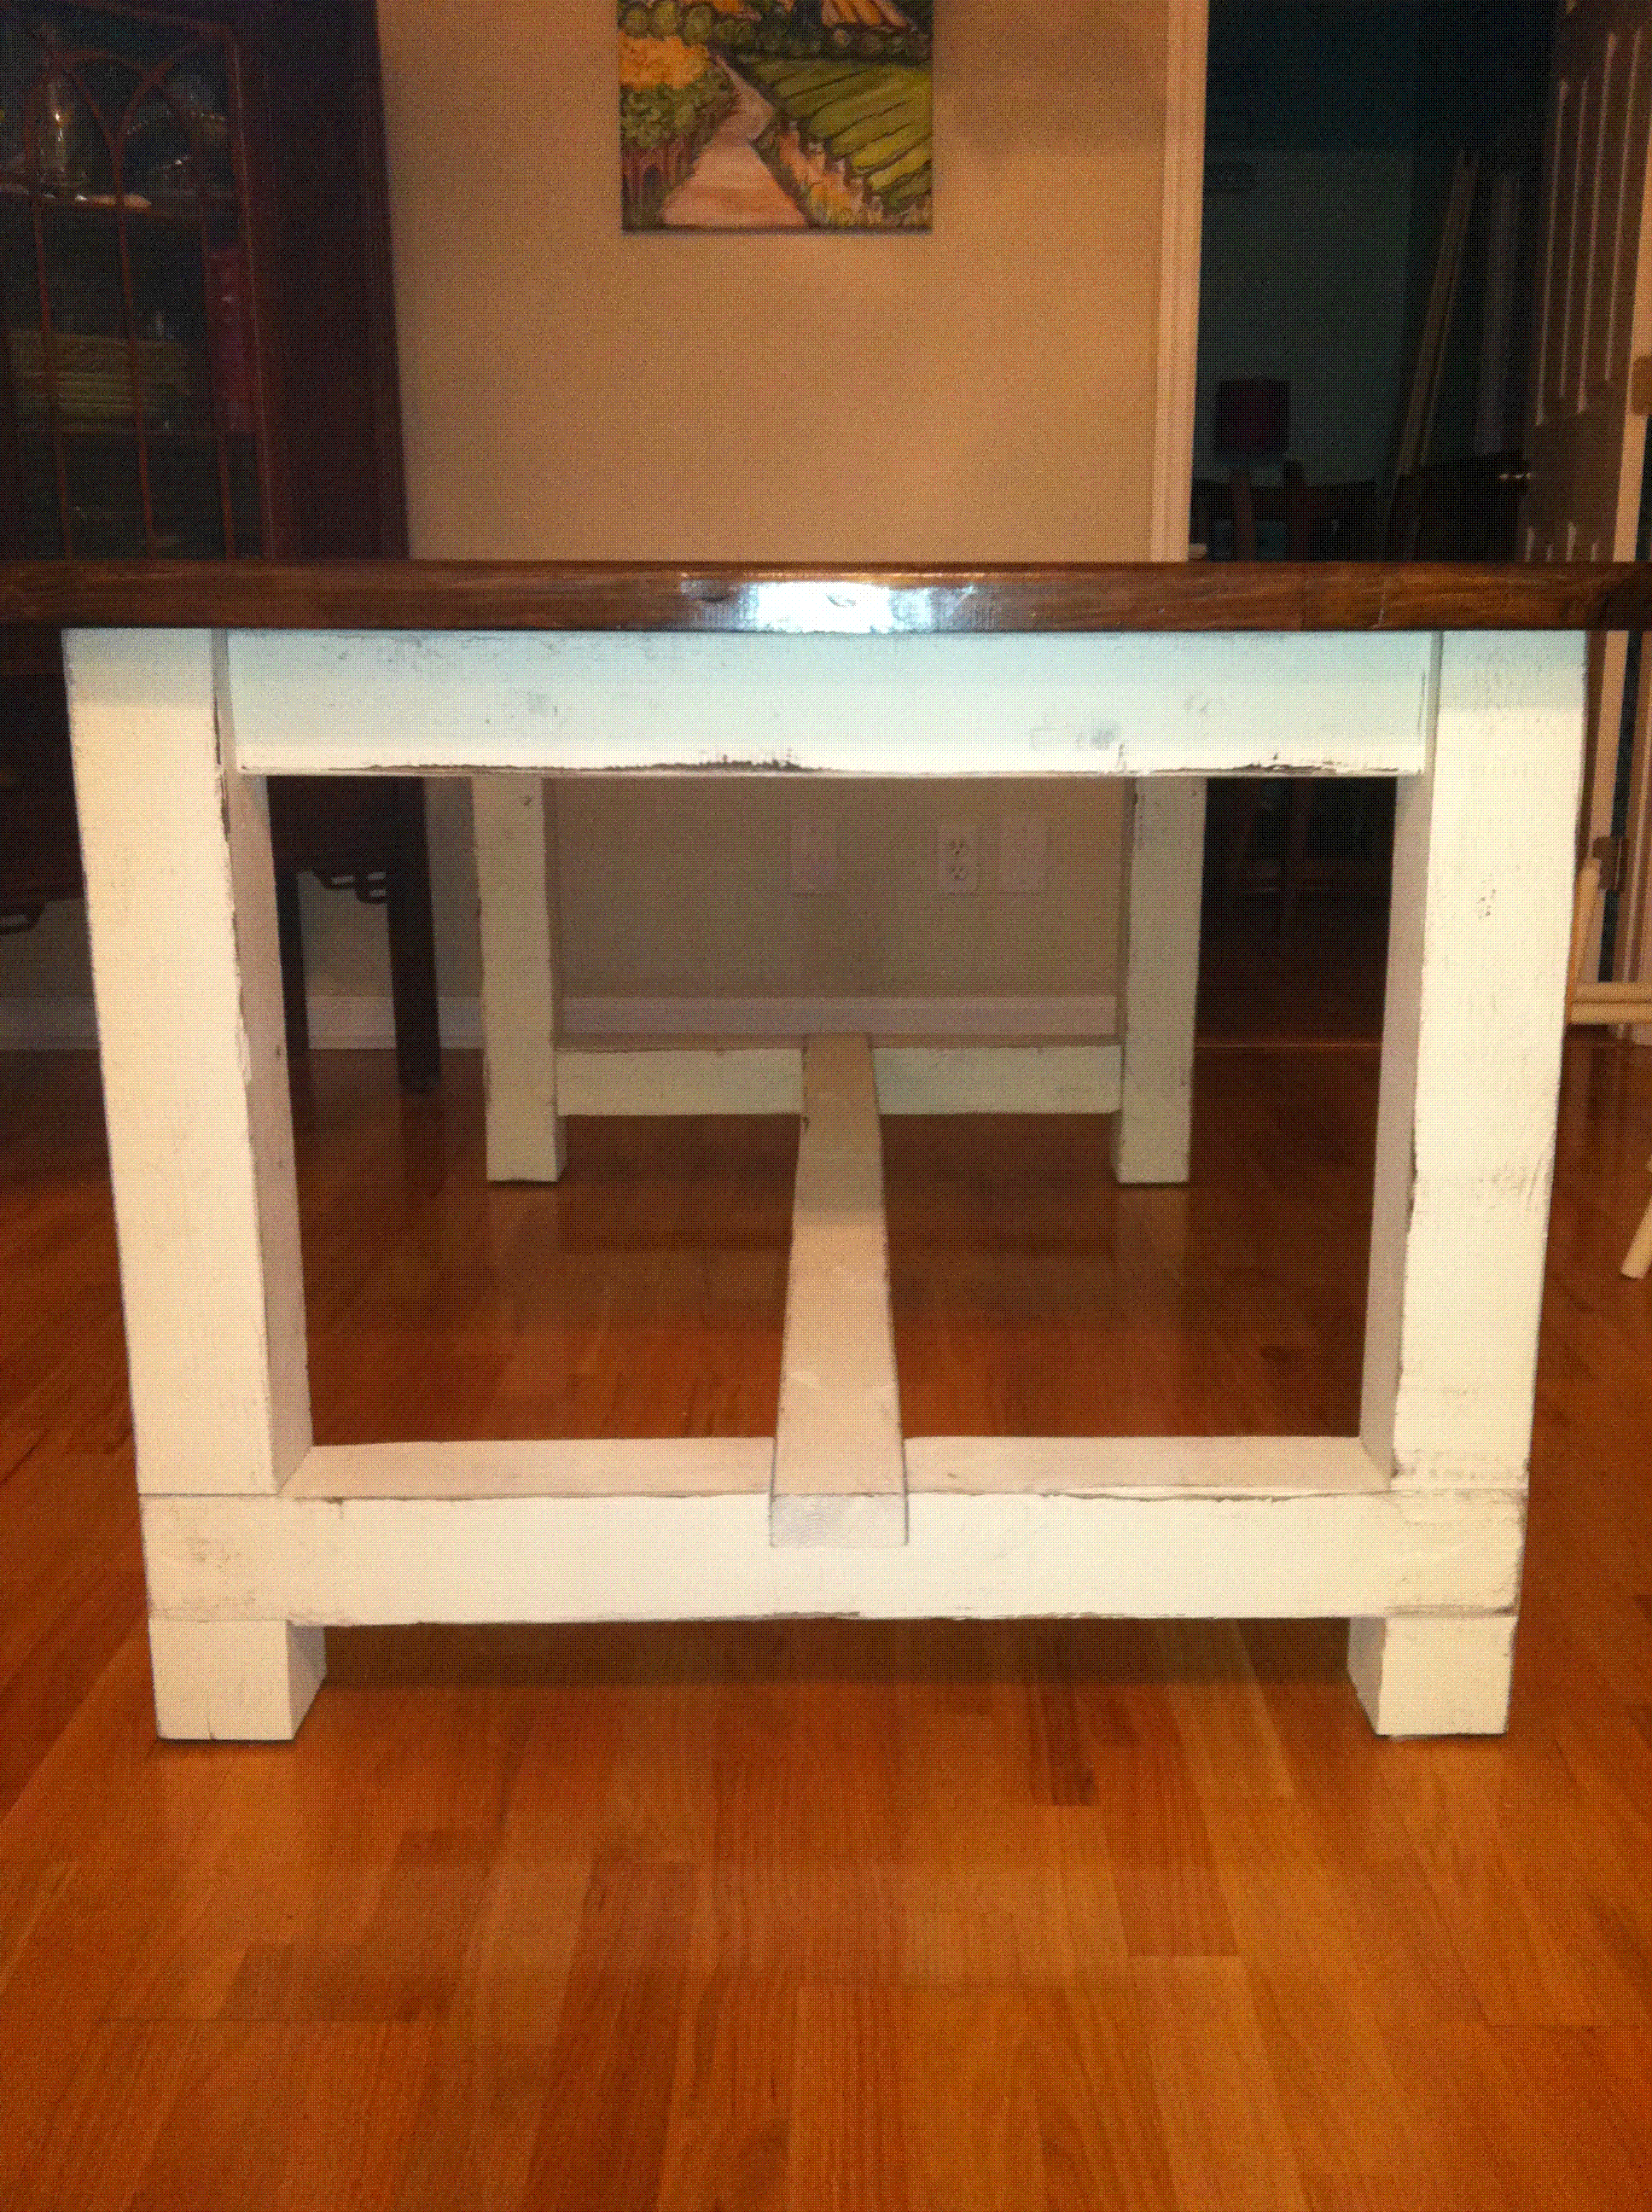
Rustic X Console Table with a Two Tone Finish
Built a fireplace using Mimi's Faux Mantle plans - I think it turned out great!
Built from Purebond plywood because I can't find straight boards in bigger sizes in my area (EVER!) and used fir 1x's for everything else.
Finished with three coats of Behr paint/primer in ultra white. I will not buy Behr again. Personal preference.
I tried this as my first ever project after going through different plans and technique. I did great (I think :-) ) until end and think i screwed up with staining. There is dried glue left on the surafce which i thought i sanded but appeared as soon as i stained.
Feed back / comments on the design and please suggest a way to fix the staining issue.
Change out the dowels with some molding and stained. Wife loves it!
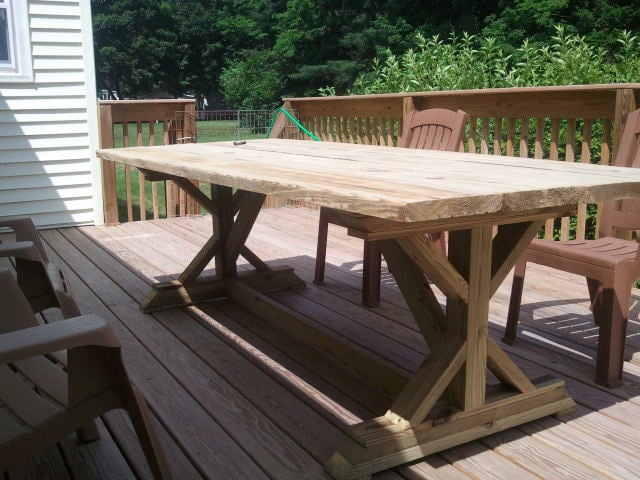
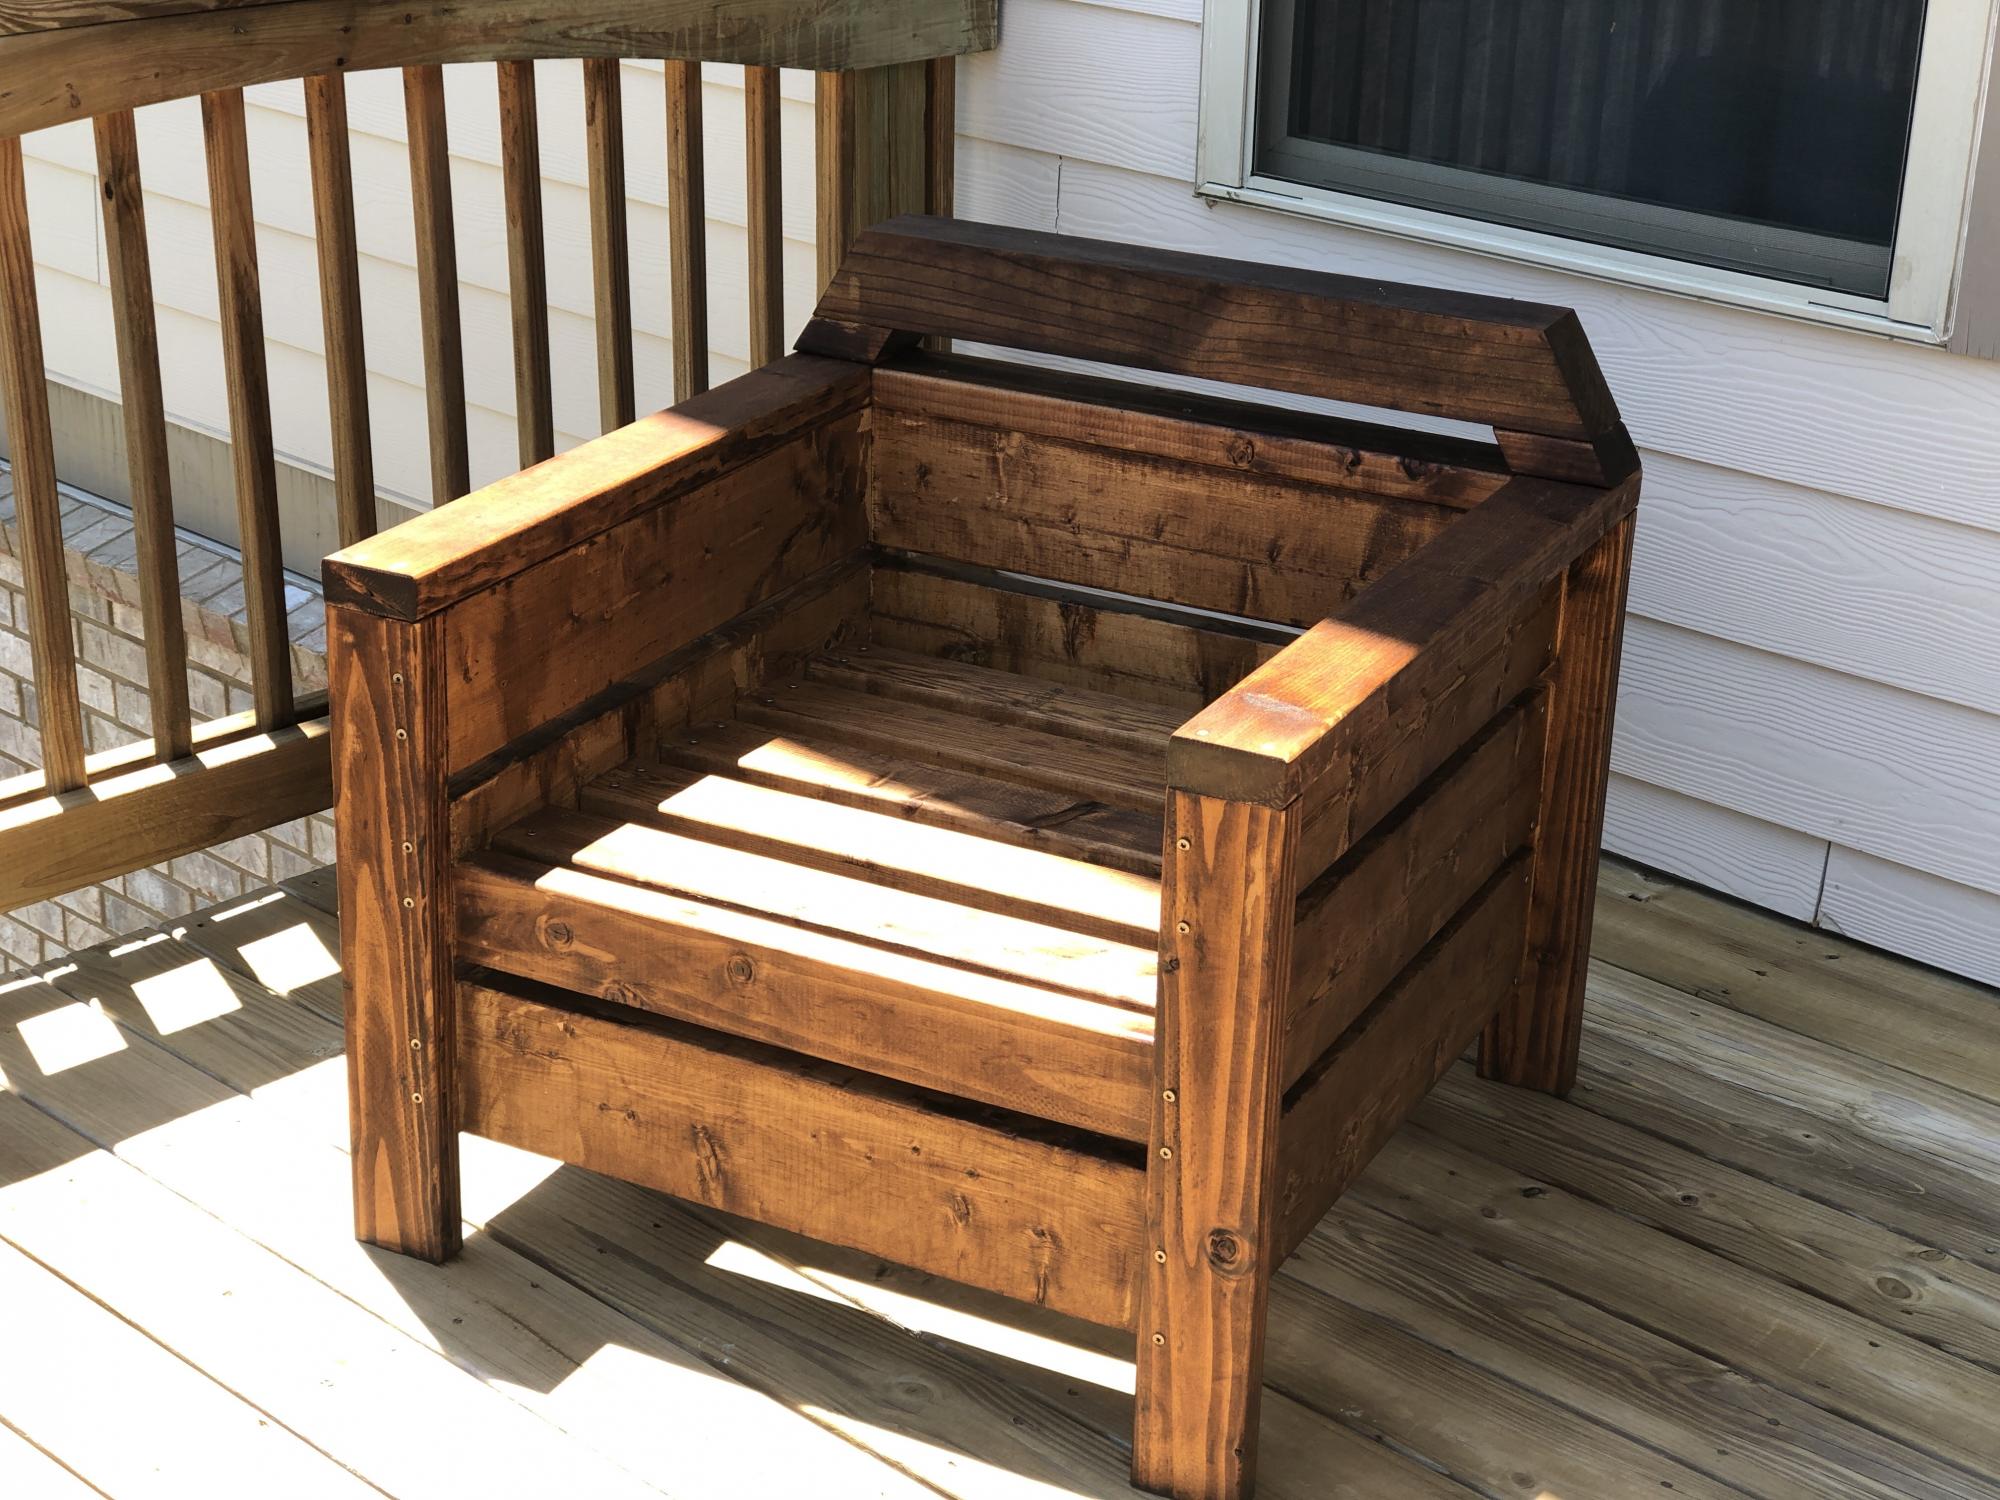
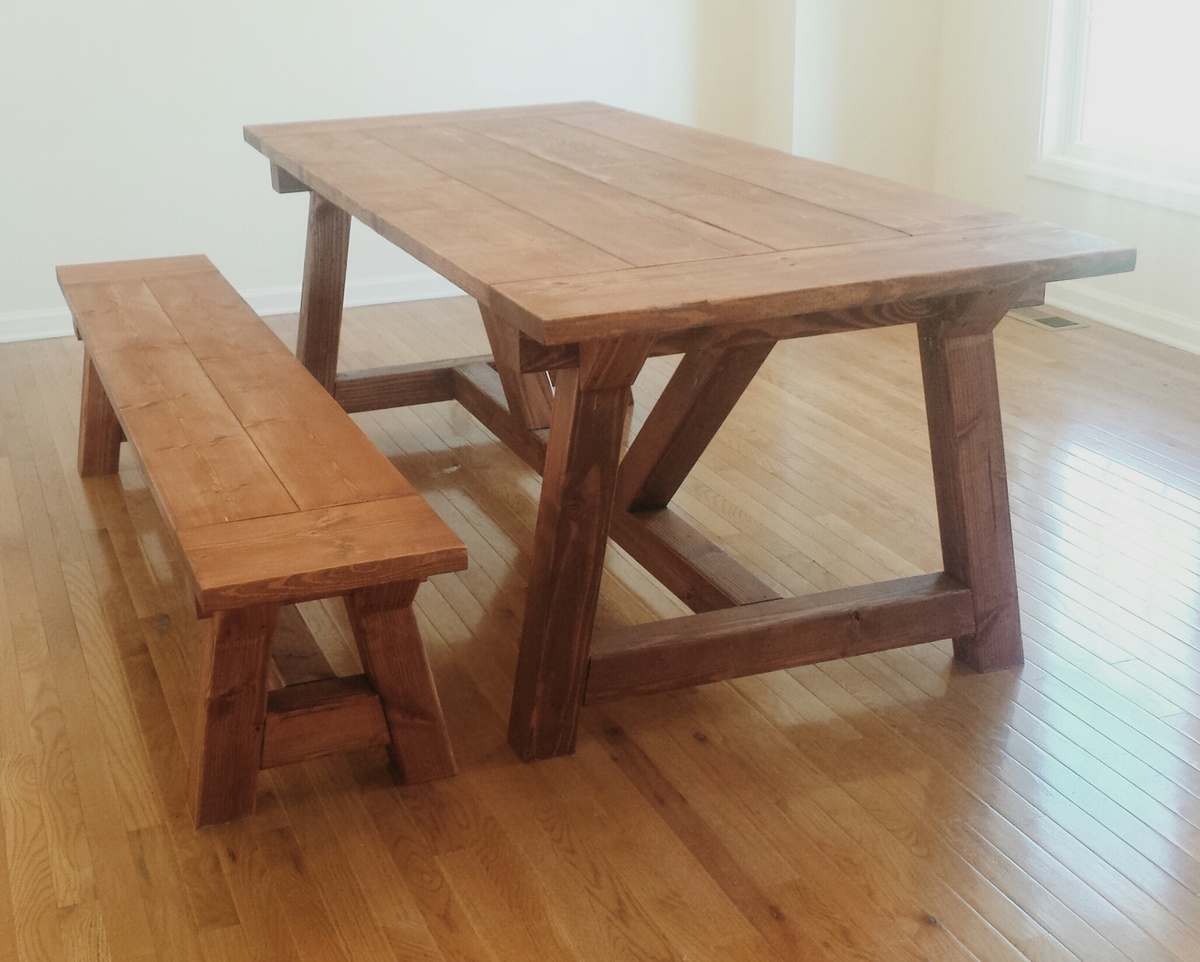
Needed a table for our deck, but didn't want to spend the $400-500 on sets at the store. Followed the plan for the most part and it was fairly easy to build. The only thing I did differently was in building the ends was put the "X" supports in after making the "I" shape in case I was off with my cuts.
Spent an hour cutting all the pieces on a Friday night and about 3 hours assembling Saturday morning. Table was ready to eat lunch on!
Wed, 06/20/2012 - 12:12
This is amazing! I really want to build this, but the plans seemed really confusing to me. Did you use a kreg jig for this?
In reply to This is amazing! I really by benfoldsfivealive
Thu, 07/05/2012 - 12:05
I did not use a Kreg jig because i dont havd one and I didn't try to hide my screws. I did pre-drill all my holes so that I didn't split any boards... and my dad is a carpenter so he helped me attach the 2 cross pieces (which is the only part I had trouble with) to the ends, which we did by just angling the screws in. I will try to take a few more detailed pics in the next few days so you can get a better idea of how I did it.
In reply to This is amazing! I really by benfoldsfivealive
Wed, 06/20/2012 - 19:15
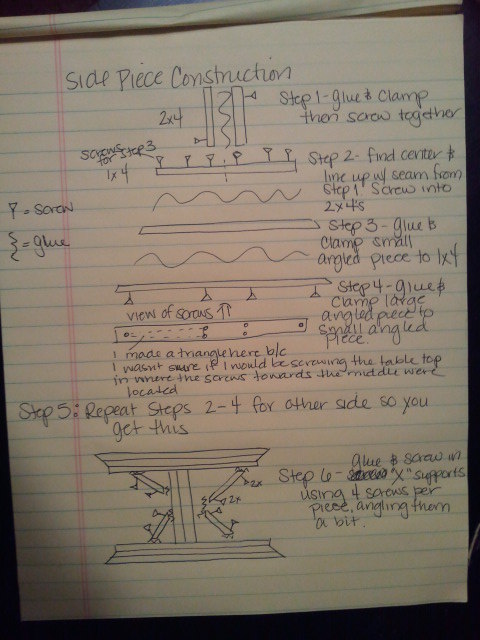
Posted an explanation of how I made the side pieces. Hope it helps!
Mon, 07/02/2012 - 03:37
Hi, great build !
Could you please explain how and from where did you screw the curved pieces at the bases ?
same question for the table top boards ?
Thank you!
In reply to Quick question by I Rub (not verified)
Thu, 07/05/2012 - 12:03
If you look at the first drawing I have attached it will show you where to screw the curved pieces in. I screwed through the 1 x 4 to attach the smaller curved piece. Then I would screw through the larger curved piece into the smaller curved piece to attach it.
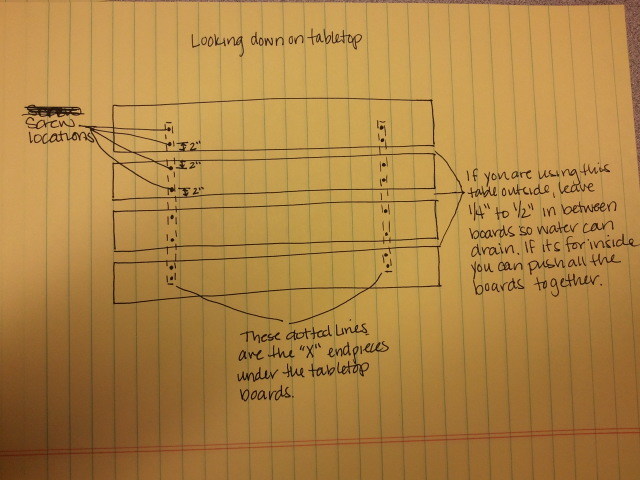
The table top pieces I screwed in from the top into the side pieces that you build first. I used 2 screws per board per side. The 2 boards in the middle should have screws at least 2 inches in from each side. The 2 boards on the end will have one set of screws 2 inches from the side that is next to the boards in the middle. The second set of screws will end up in about the middle of the outside boards. I'm going to attach another drawing to explain. Let me know if this helps.
Mon, 07/09/2012 - 11:22
I plan on building the table this week, will use your advice. Much appreciated.
Sun, 07/15/2012 - 16:20
Thank you for posting this. I started the project yesterday and I started with putting the cross braces on first and it did not turn out leveled. I thought that I would try to put it together first and then add the cross braces but was scared if it would hold. Thanks to your post I feel more confidant about it. I am going to make a run to the big box store and start over. Its okay because this is my very first build and I am just happy with my first 45 degree cut with my new circular saw ;) I guess its a learning process.
Thanks again for your post,
Gus
In reply to Thank you for posting this. I by Gus (not verified)
Thu, 07/19/2012 - 07:58
Glad I could help! Good luck with your build!!!
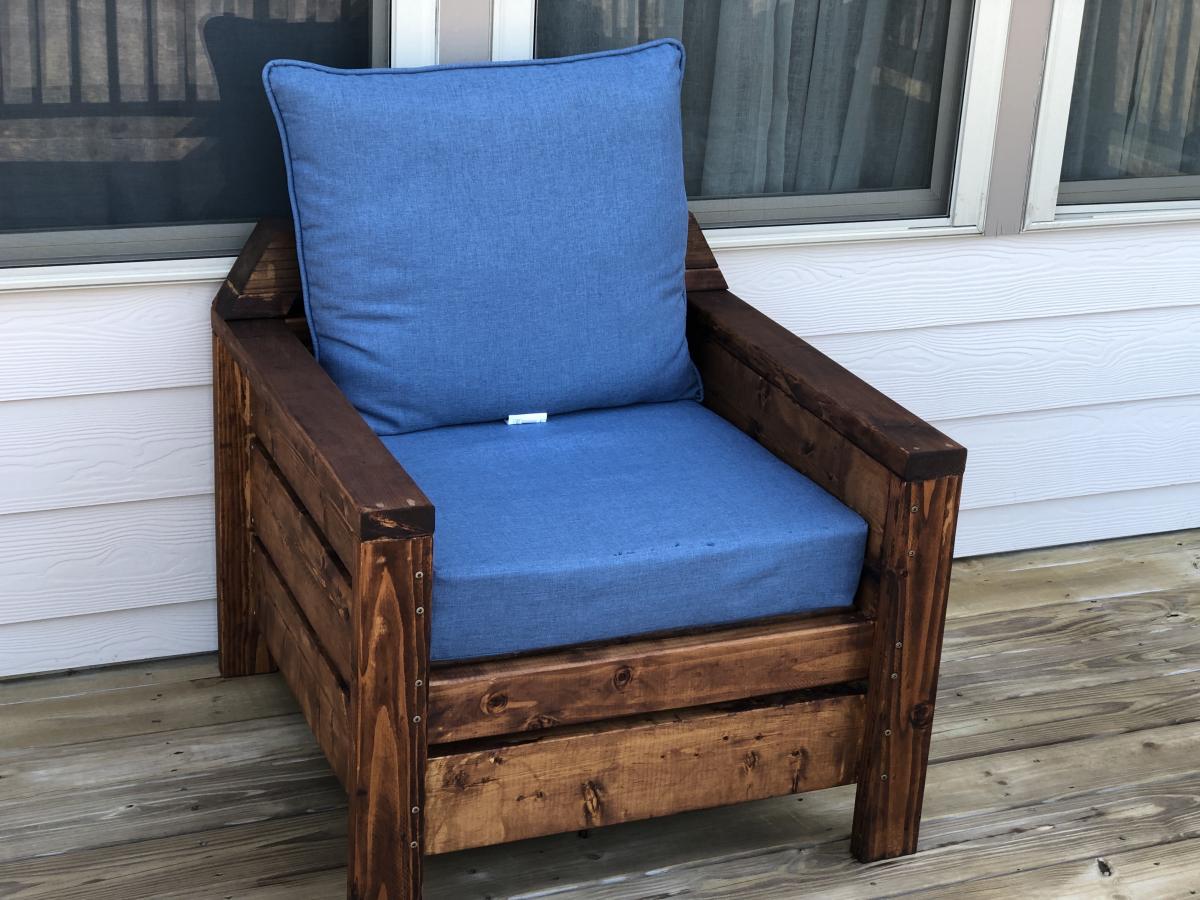
I Love the modern look of these chairs but definitely felt a little uncomfortable without the back rest so decided to add a little more back rest.
Great plan and easy directions to follow - my first wood working project.

Mon, 06/01/2020 - 07:29
Do you have measurements for back rest addition?
I loved making this! I had to travel about 2 hours to get the DF 4x4s which was the only pain in making it. This was my third big project and it wasn't hard at all! It's super heavy so it was a litte tough to turn it over. It only took me about 3 days to make it once I had all the wood.
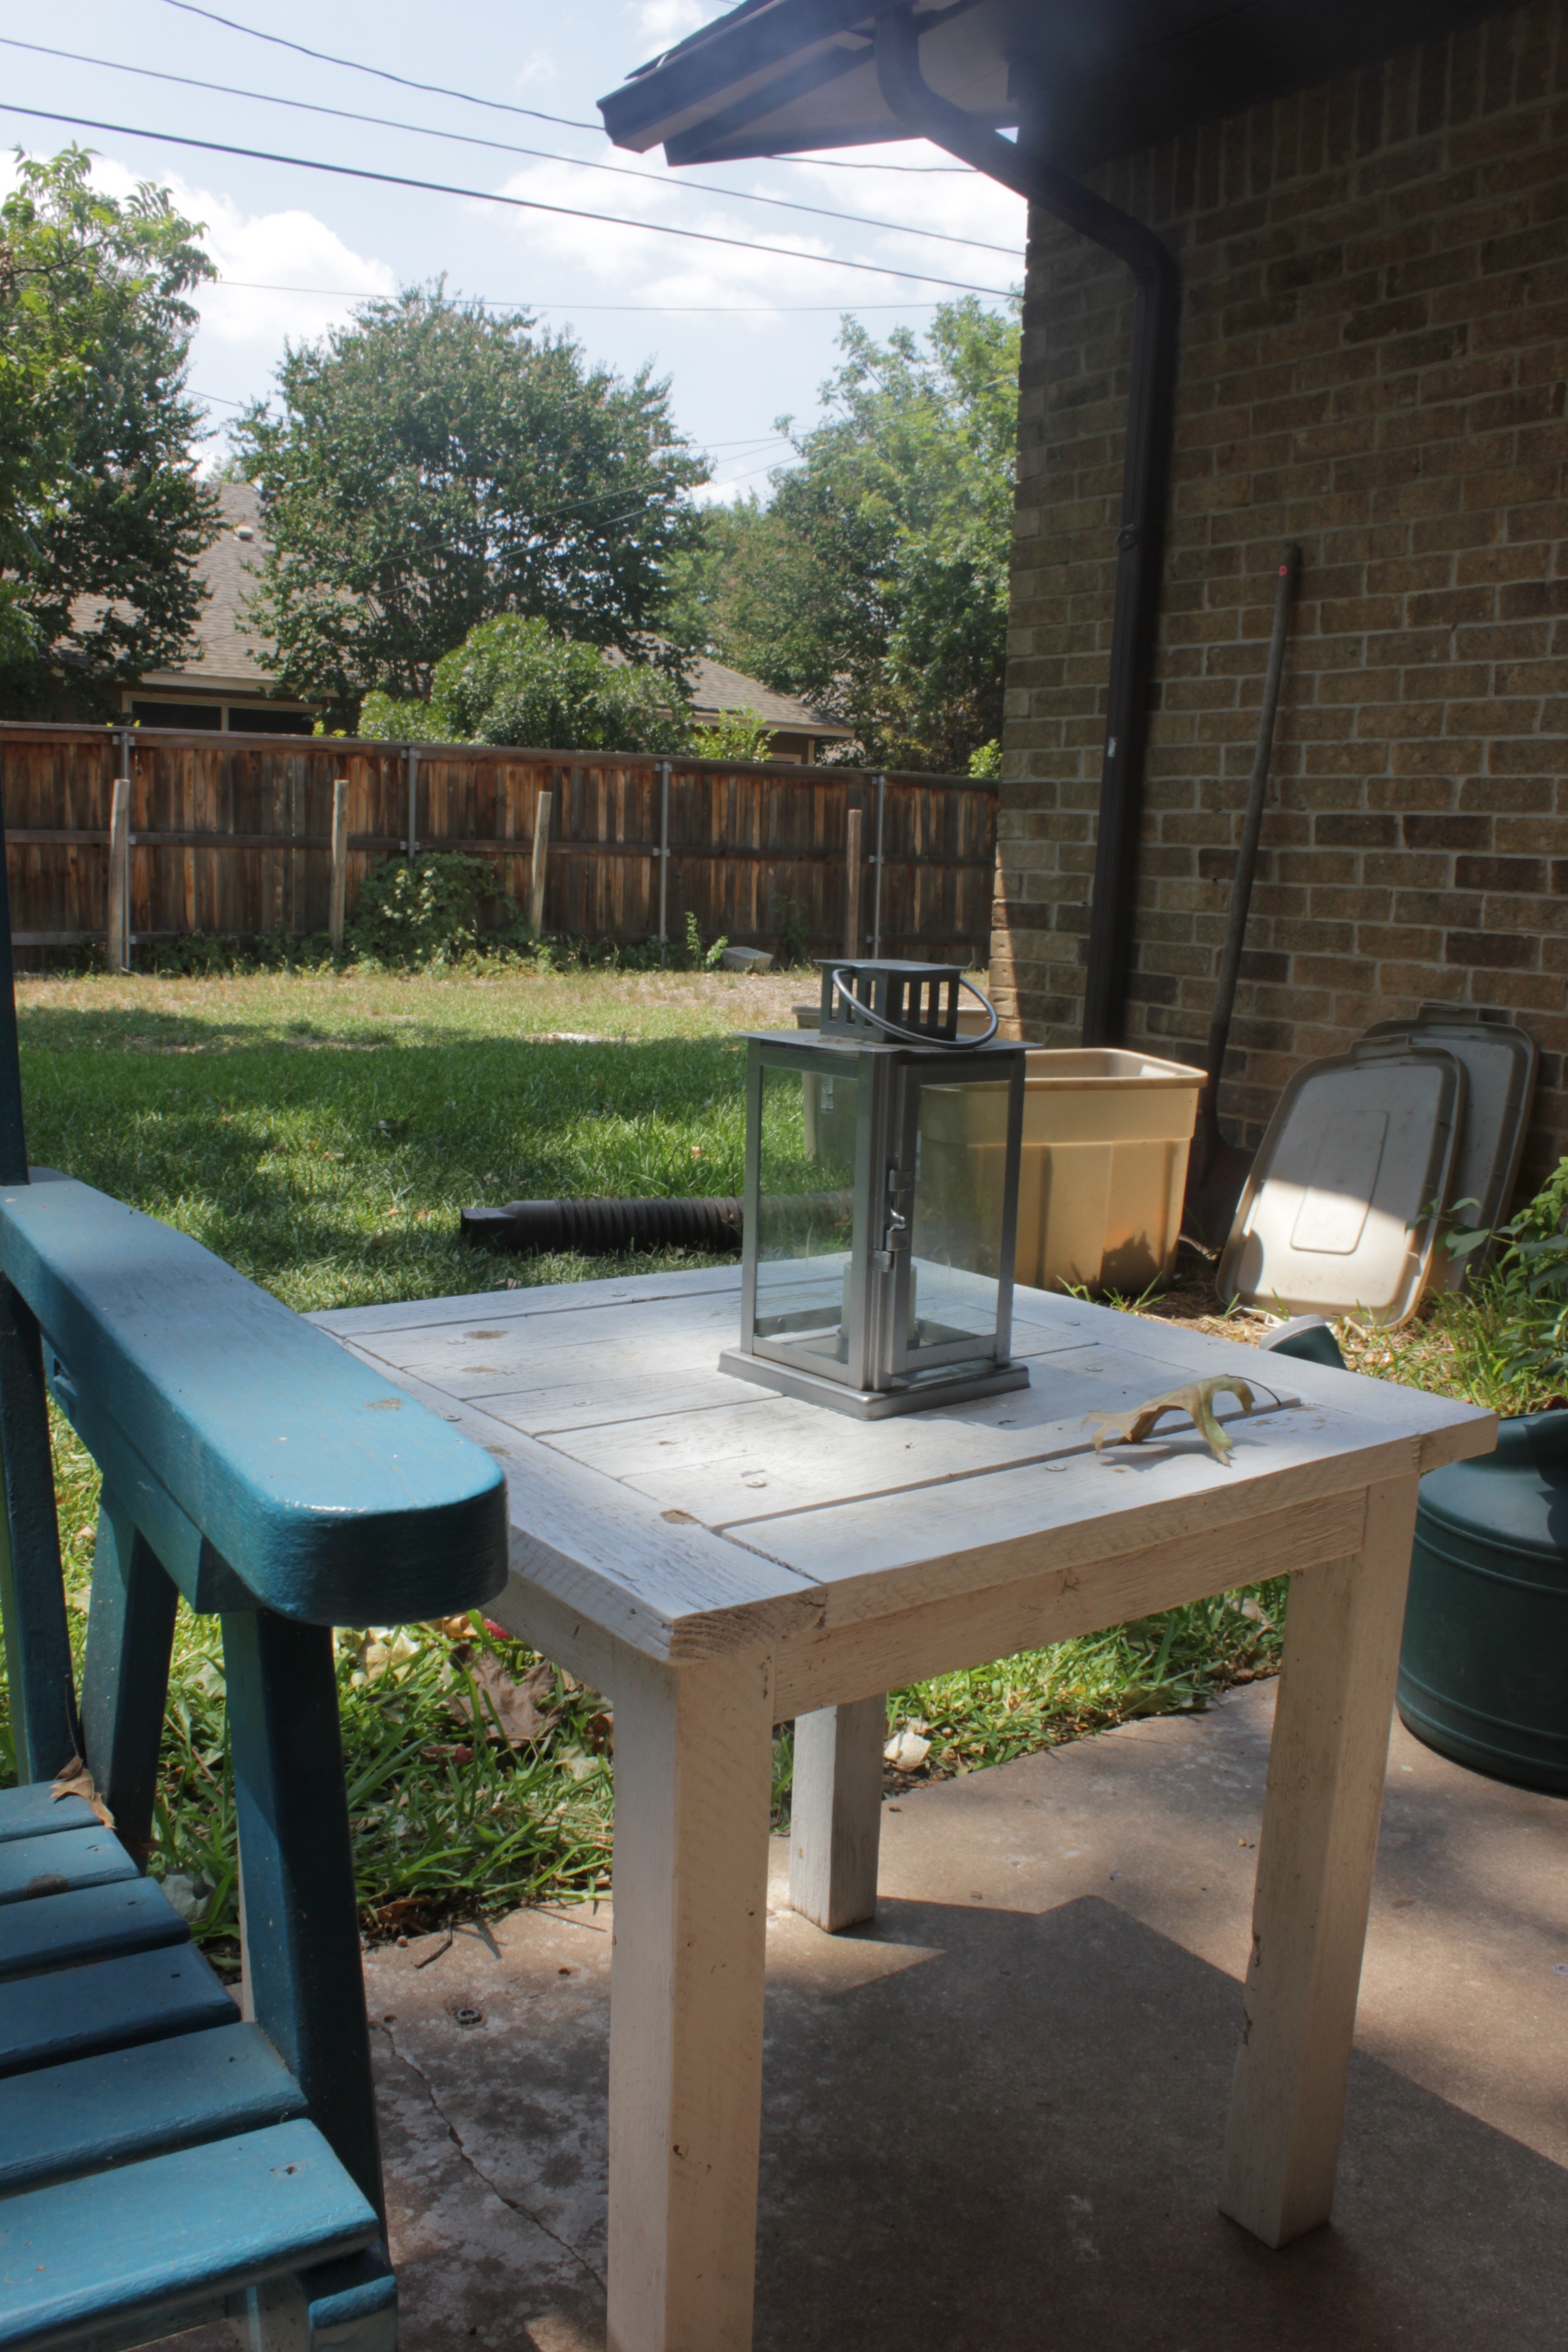
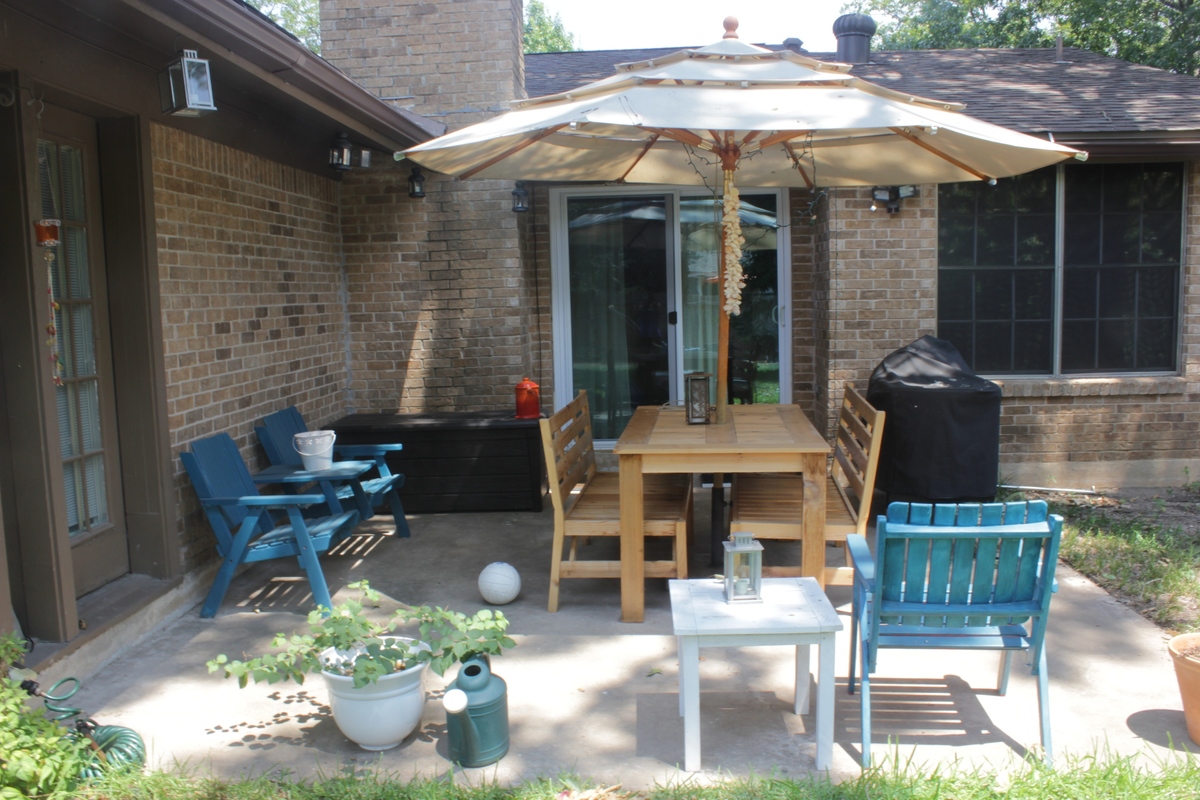
This little table was part of a larger overhaul for my patio, which was just a sad little slab before. I threw it together from scraps I had after building the table and benches. For some reason my Kreg jig did not like me that day so I built it using wood screws.
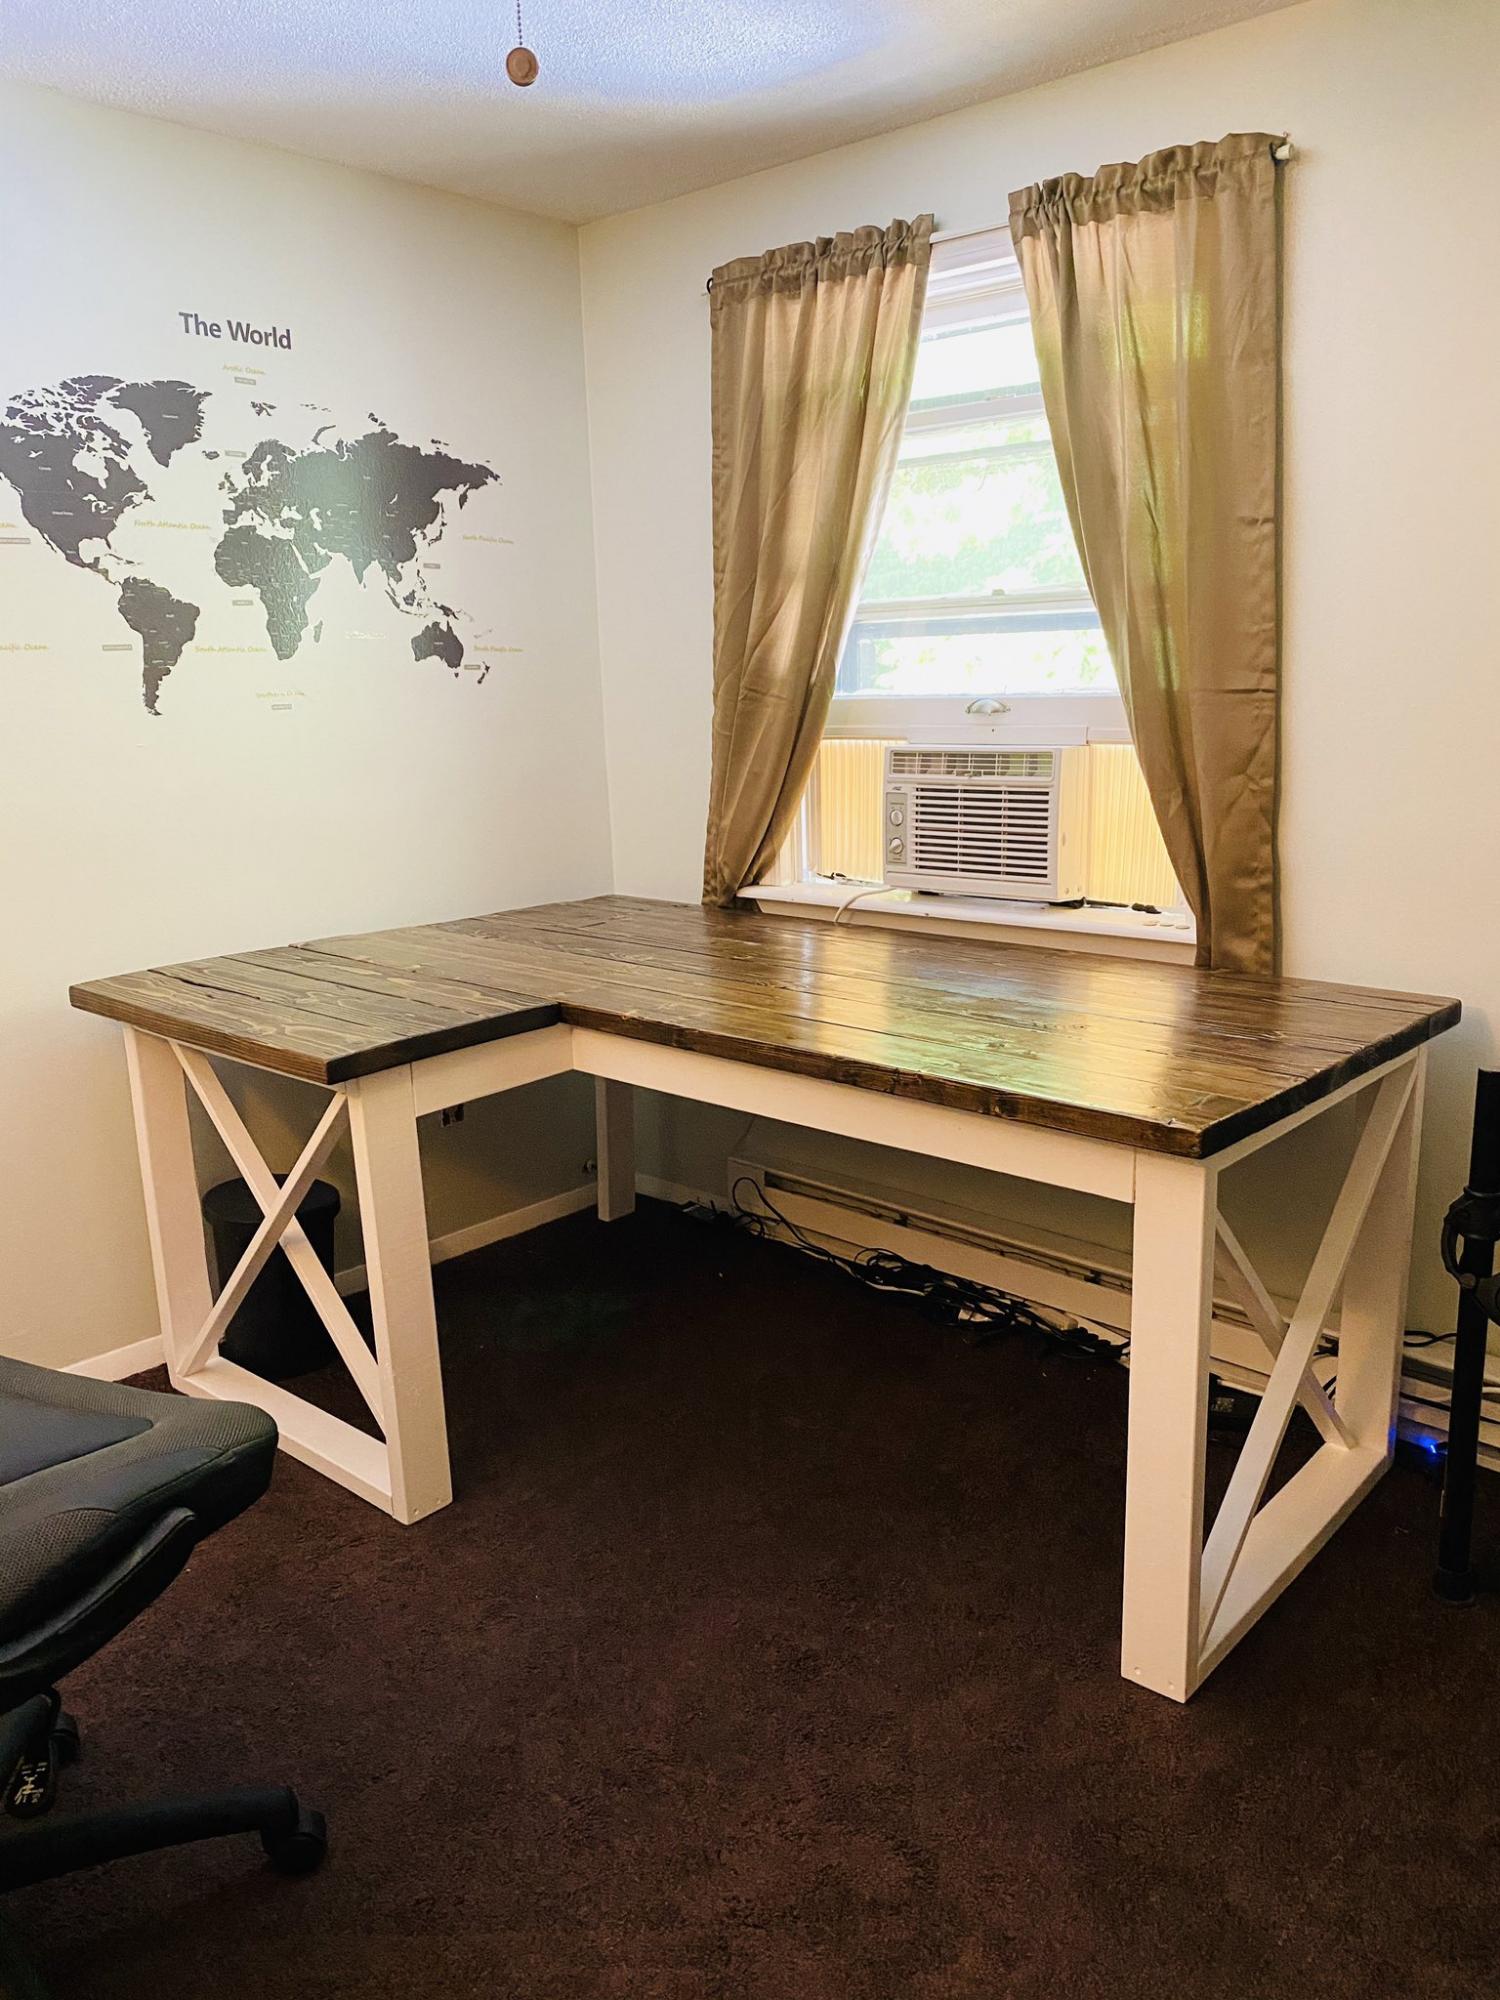
Made the move to working from home because of the pandemic. After 2 months and no end in sight, I decided I needed a better workstation. Built this in about 5 days. Really nice sturdy desk but make sure you measure how big it is first, I think I could have shrank this down by one less 2x6 on the top. It's a very large desk from the plans.
I built these as end tables in my living room. I made one narrower (only 14") by subtracting 3 1/2" from the end measurements and only using 4 2x4's on the top. Quick build, only about 2 hours to put together ( :) ), but the finishing took a while.
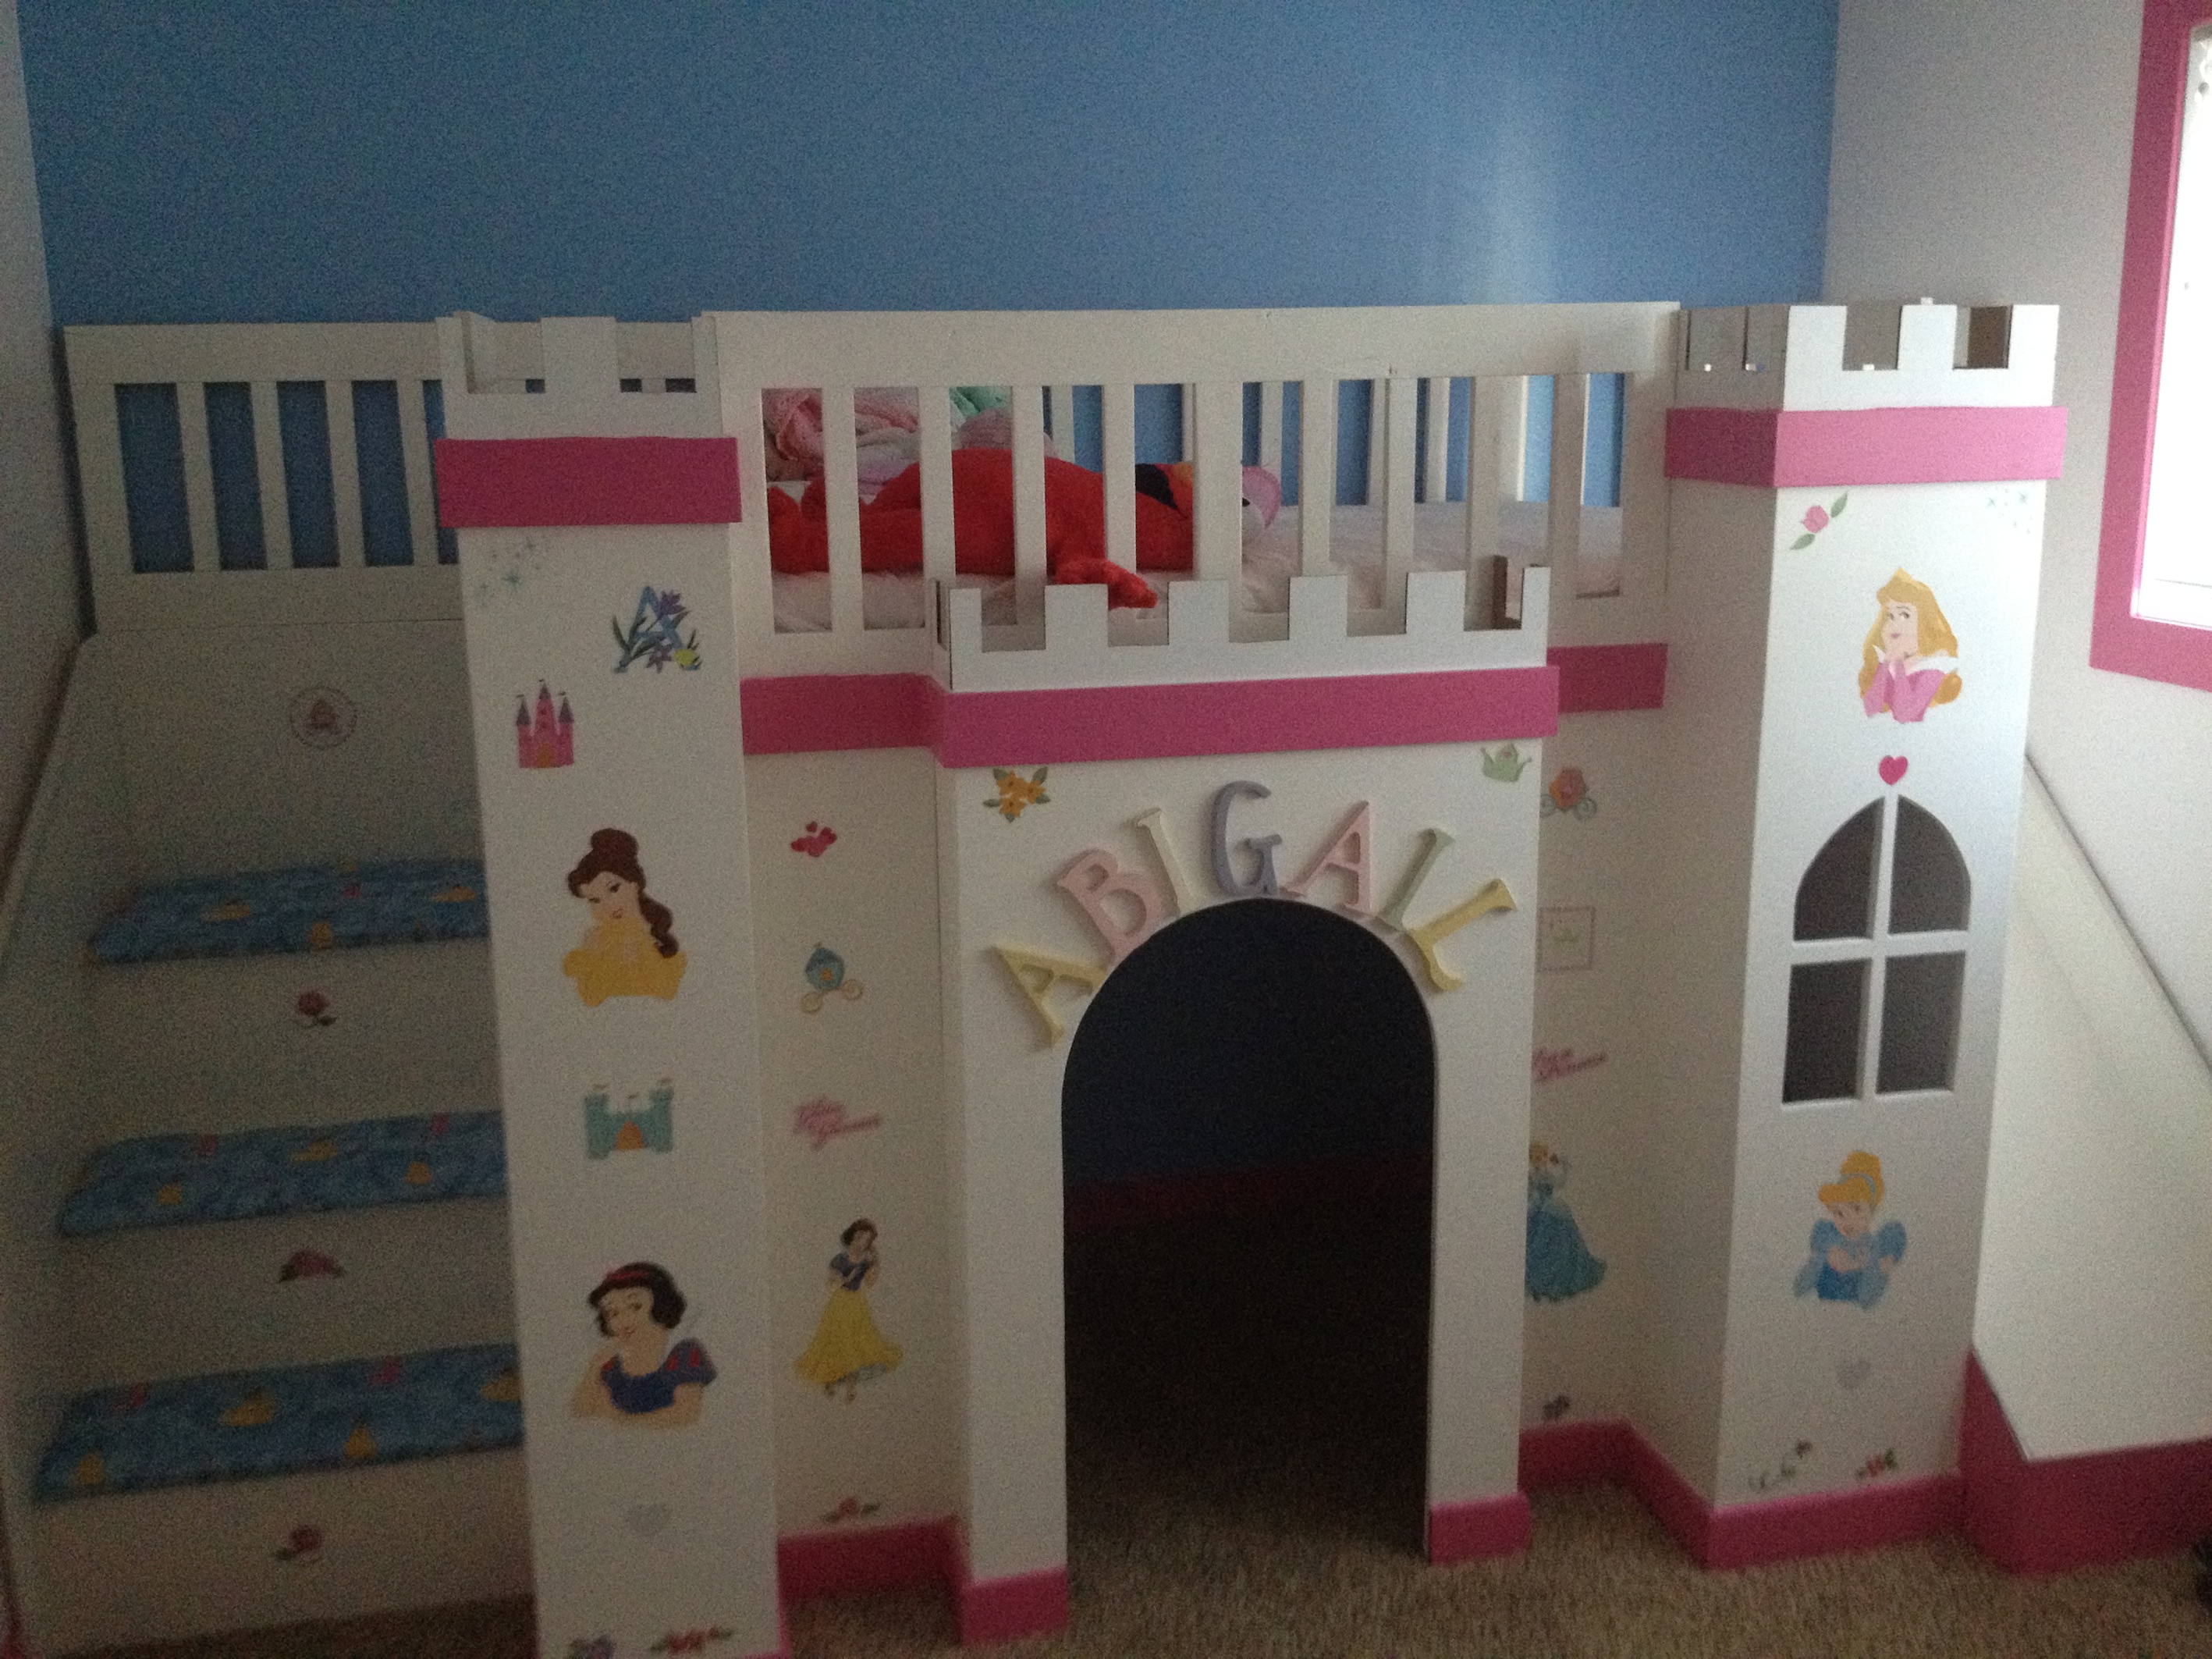
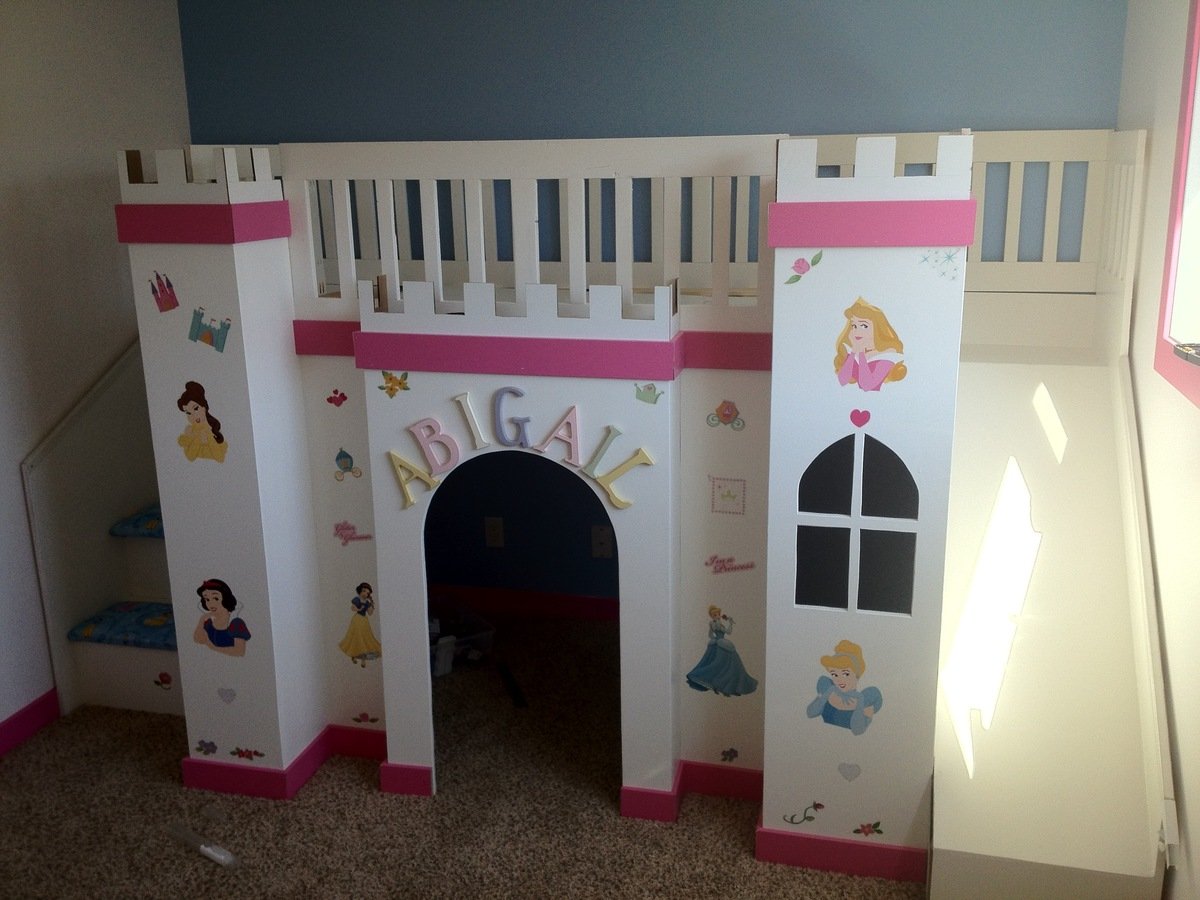
I took on this project about 3-months, I was inspired by the excellent plans provided by fsmumford. I made a couple of modifications, adding a small bump out in the middle, to enhance the castle look, fabric covered seat cushions on the stairs, and an added 2x2 in the middle of the bed to add extra support.
Thanks to fsmumford for the awesome inspirations and great step by step guide.

Just finished this to make the most of the little good weather we get in the UK. 2x4 sofa with sectional Chaise section and coffee table

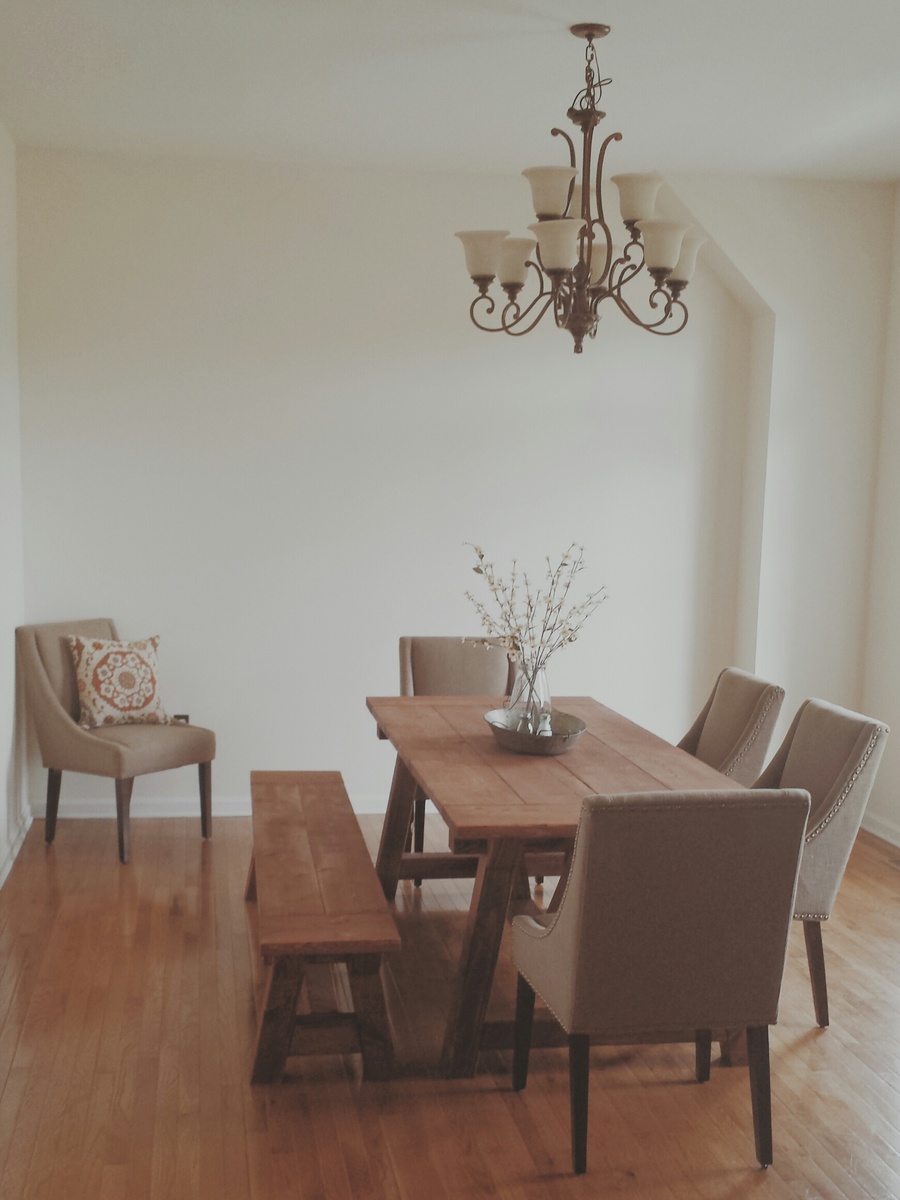
Custom Farmhouse Table built using plan by Ana White!
Wed, 12/19/2012 - 15:10
Trying to get the plans for the farmhouse dining table
Tue, 02/24/2015 - 14:12
definetly going to use this building plan but scale it down by 50% and make a cute, sturdy, lasting coffee table. Thank you for the plans
Comments
Ana White Admin
Wed, 08/02/2023 - 15:35
Stunning upgrade!
This looks amazing, love that wall too!!!