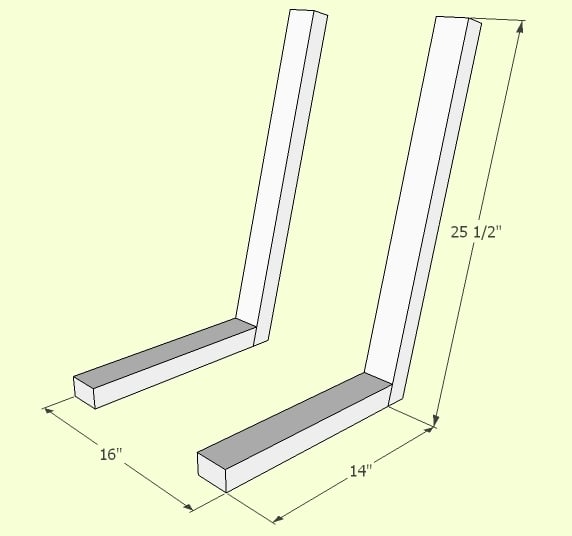
Outdoor Bench with Tilted Back Rest
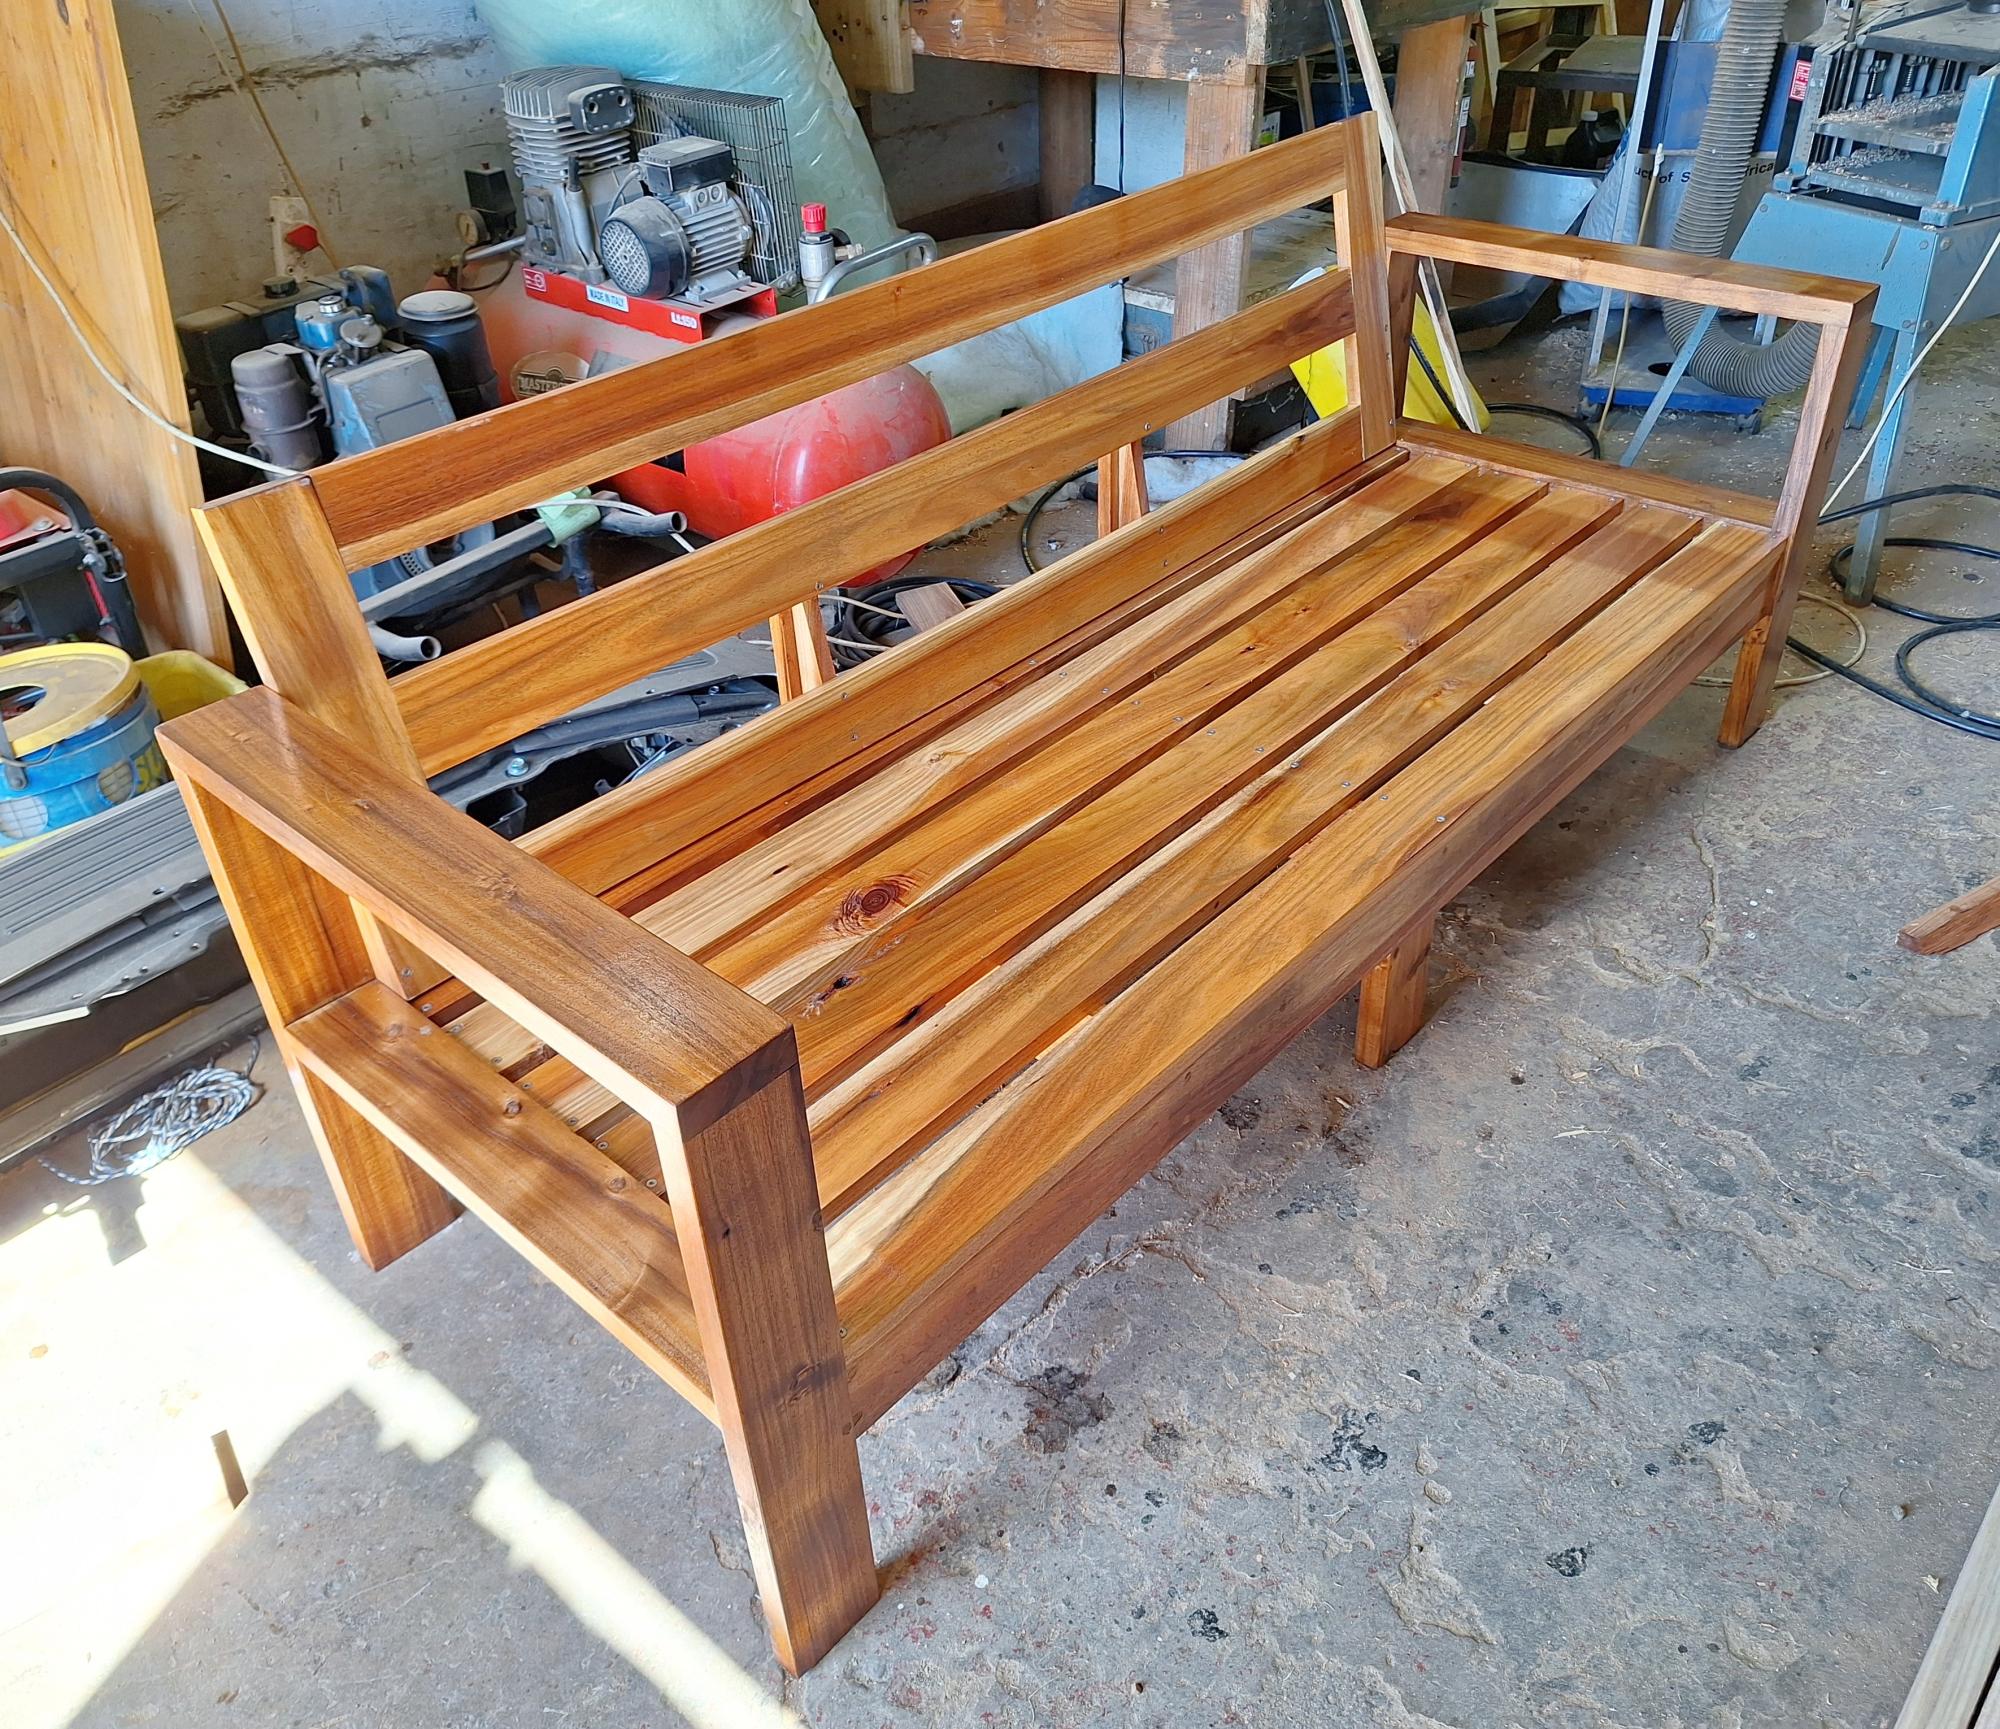
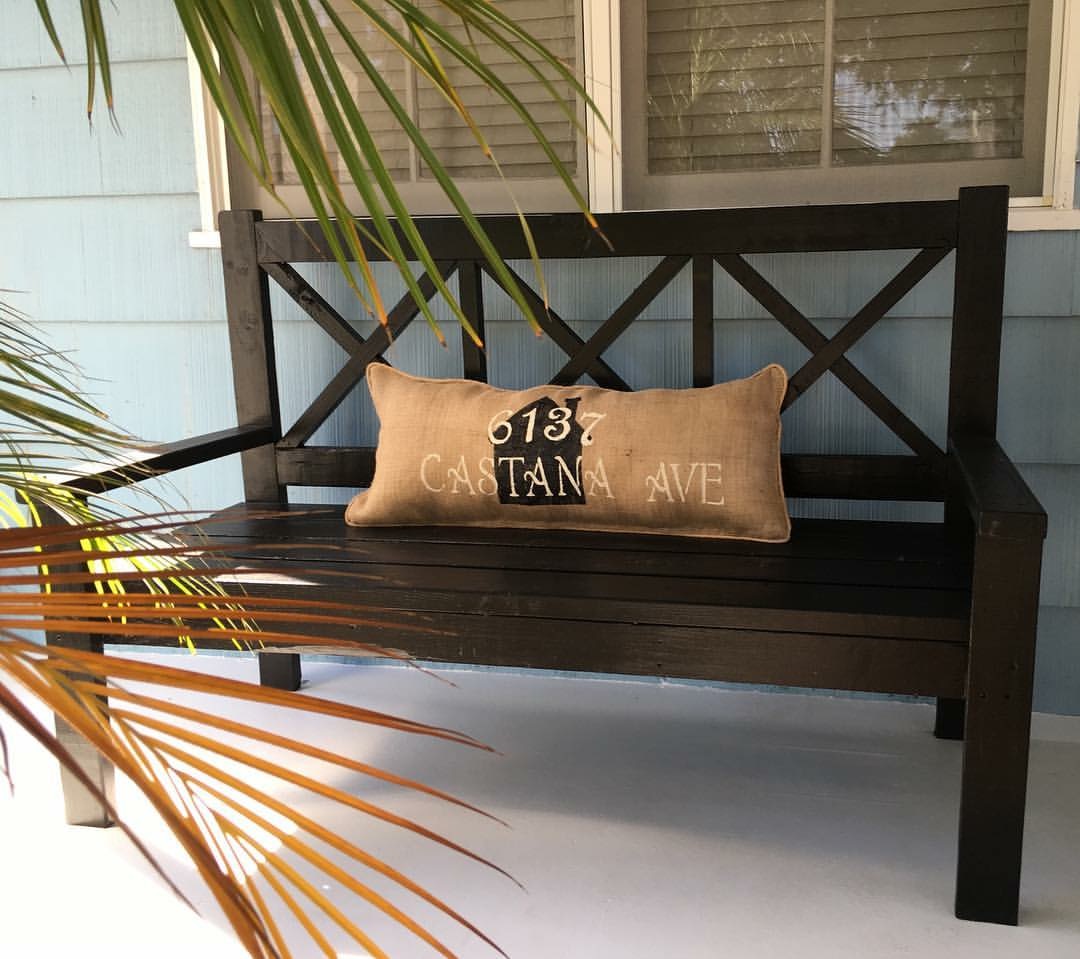
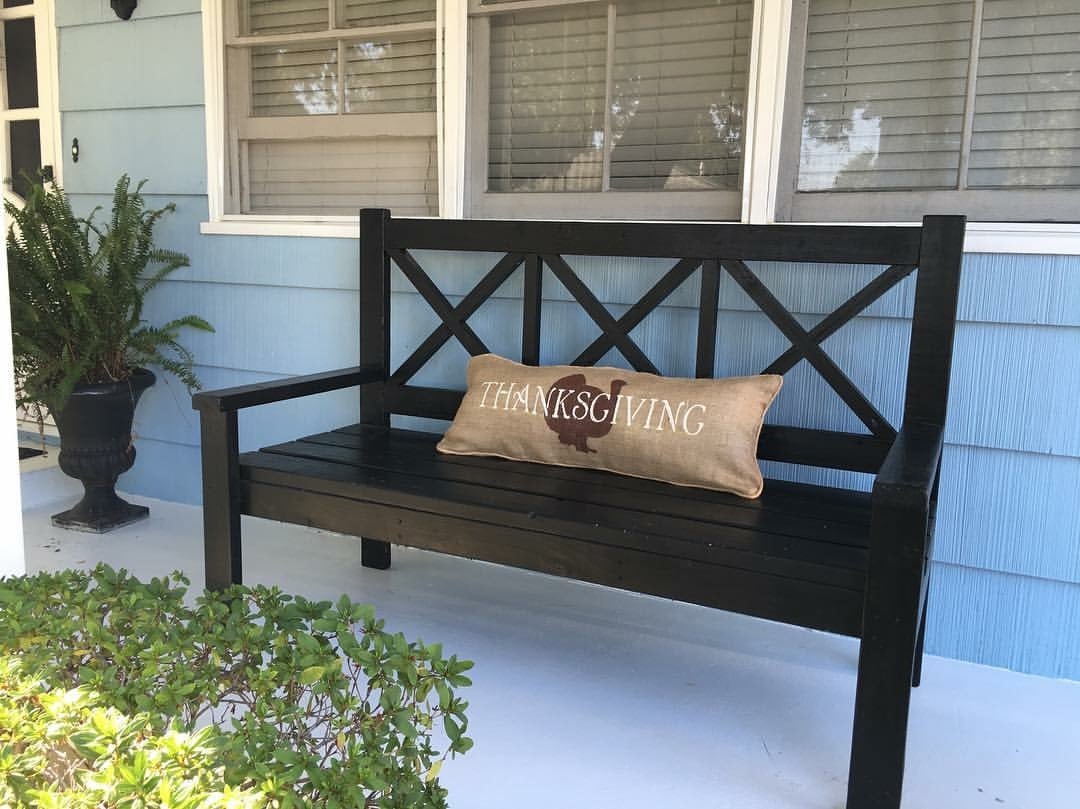
I built this outdoor sofa out of Blackwood. I tweaked Ana's plan to include a backrest and a support in the front, as my planks are only 23mm thick.
Gordon Smith
Built from Plan(s)
I built this outdoor sofa out of Blackwood. I tweaked Ana's plan to include a backrest and a support in the front, as my planks are only 23mm thick.
Gordon Smith
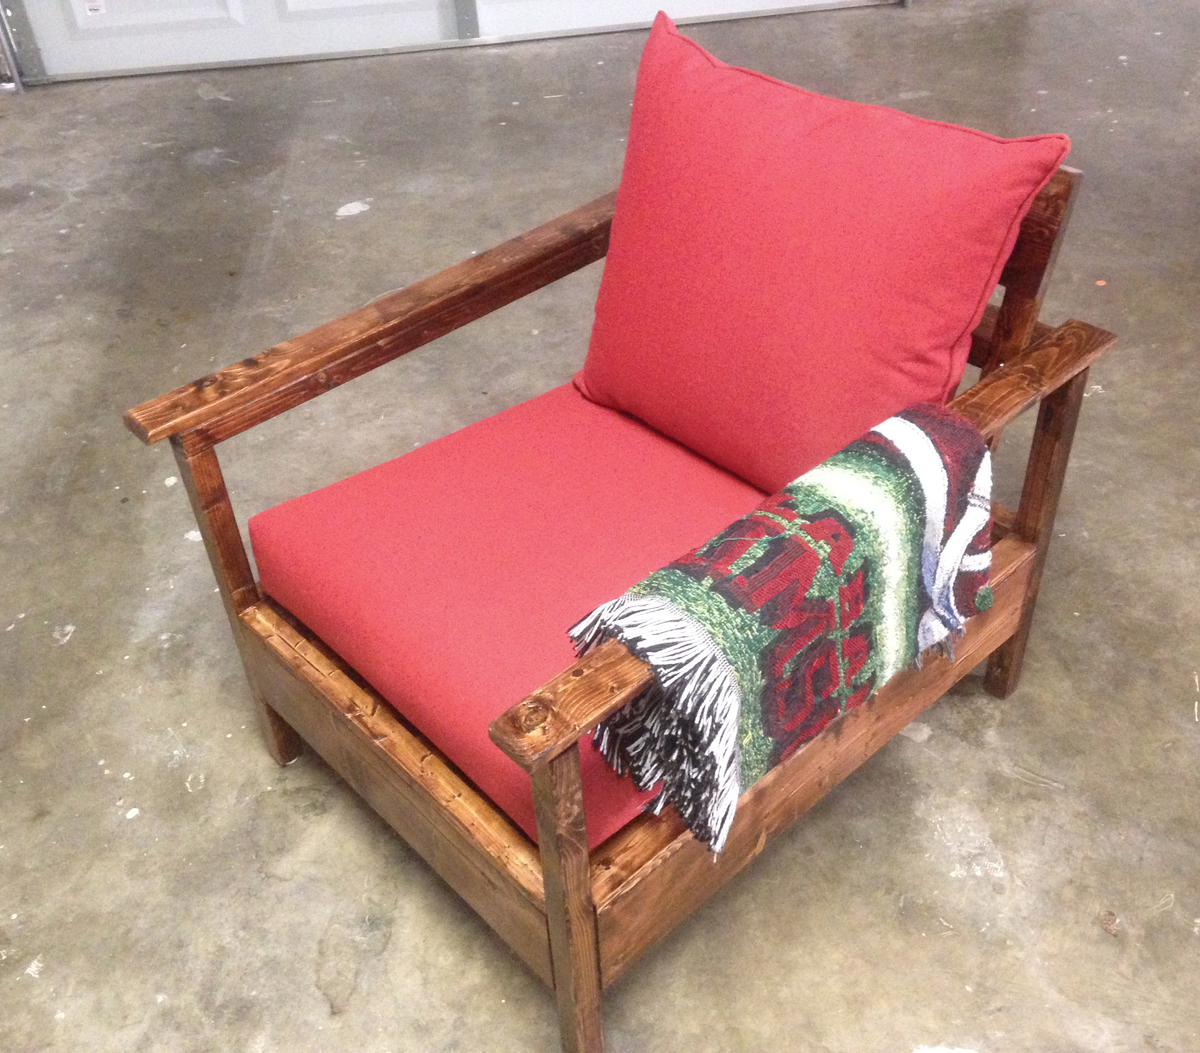
We needed extra seating for friends to come over for football game days, so I took the outdoor chair plans and decided to use it for a den chair. Simple build, but I did add some 1x3 boards on the rails for more comfortable armrests. Add some appropriate color cushions and it's ready for football season! Quick assembly, but as usual, staining and clear-coating took the bulk of the time spent.
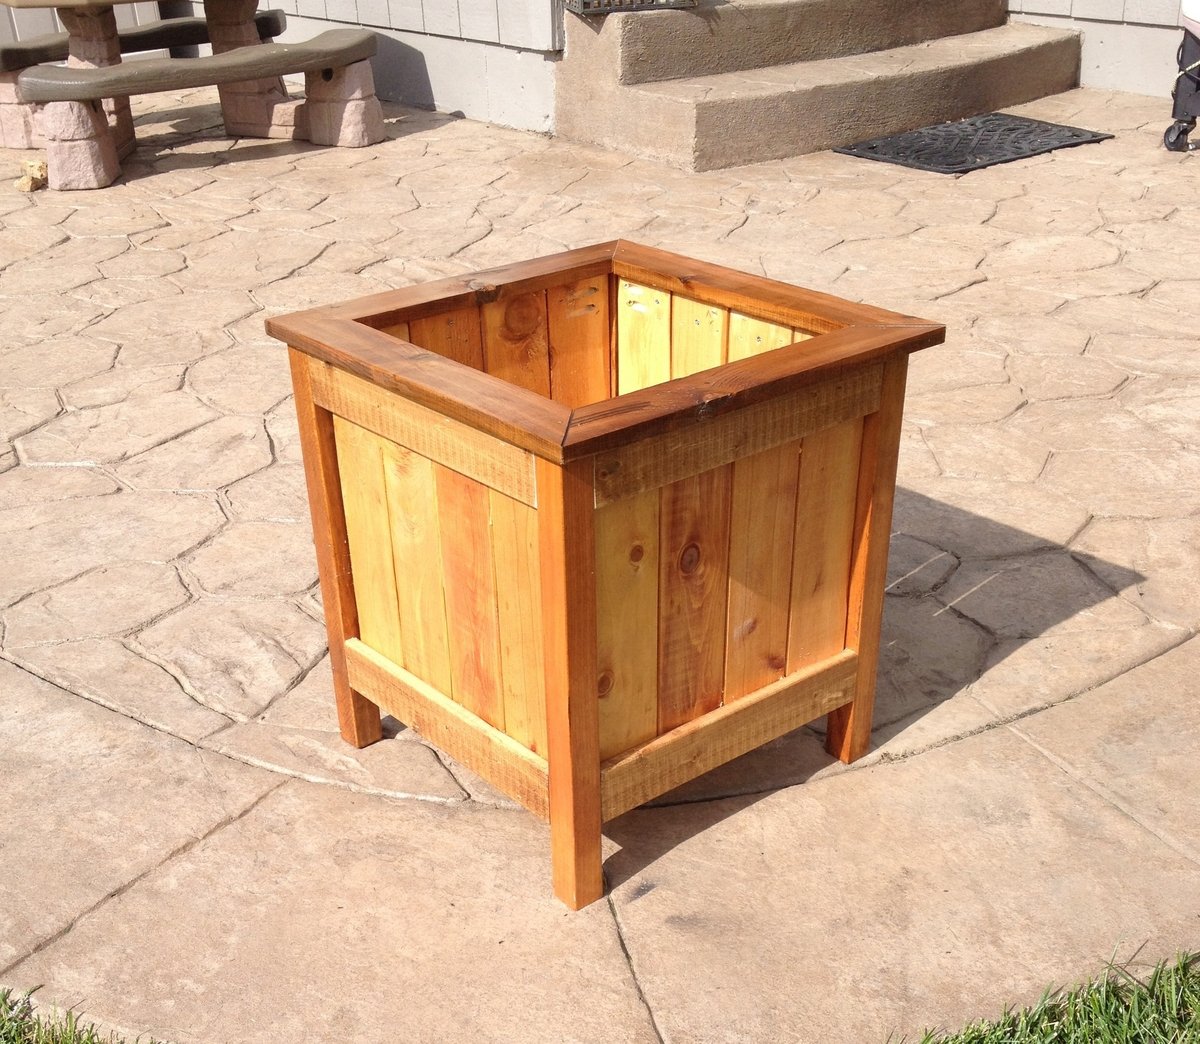
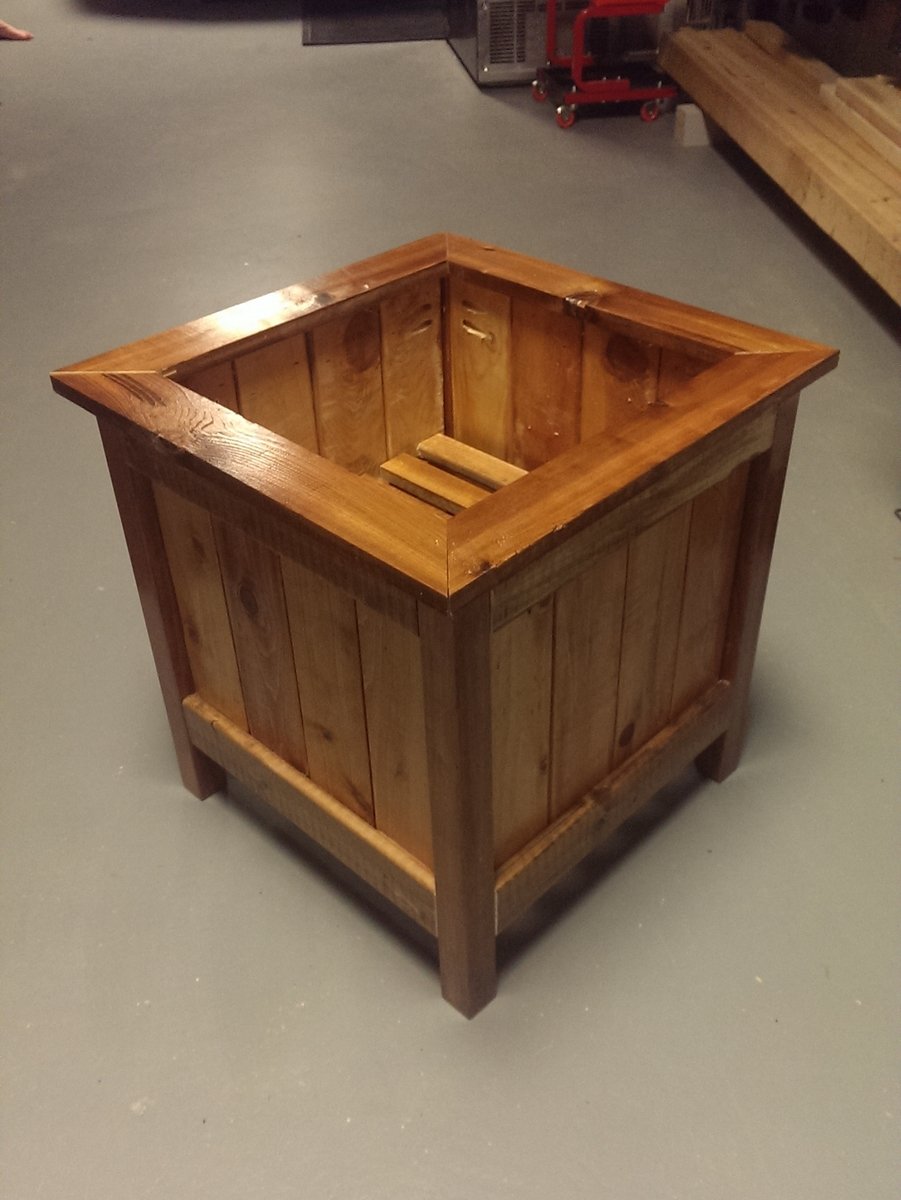
I used the main plan for ideas, but opted to use 3.5 inch pickets instead, which allowed for a smaller planter that wasn't as big. Also chose to miter 1x3s for the top which I think really finishes it off. Sanded everything with a belt sander to 220 grit. Used min wax golden pecan plus three coats of poly inside and out. Finished size was about 17x17. Tile spacers work great to keep the gaps even!
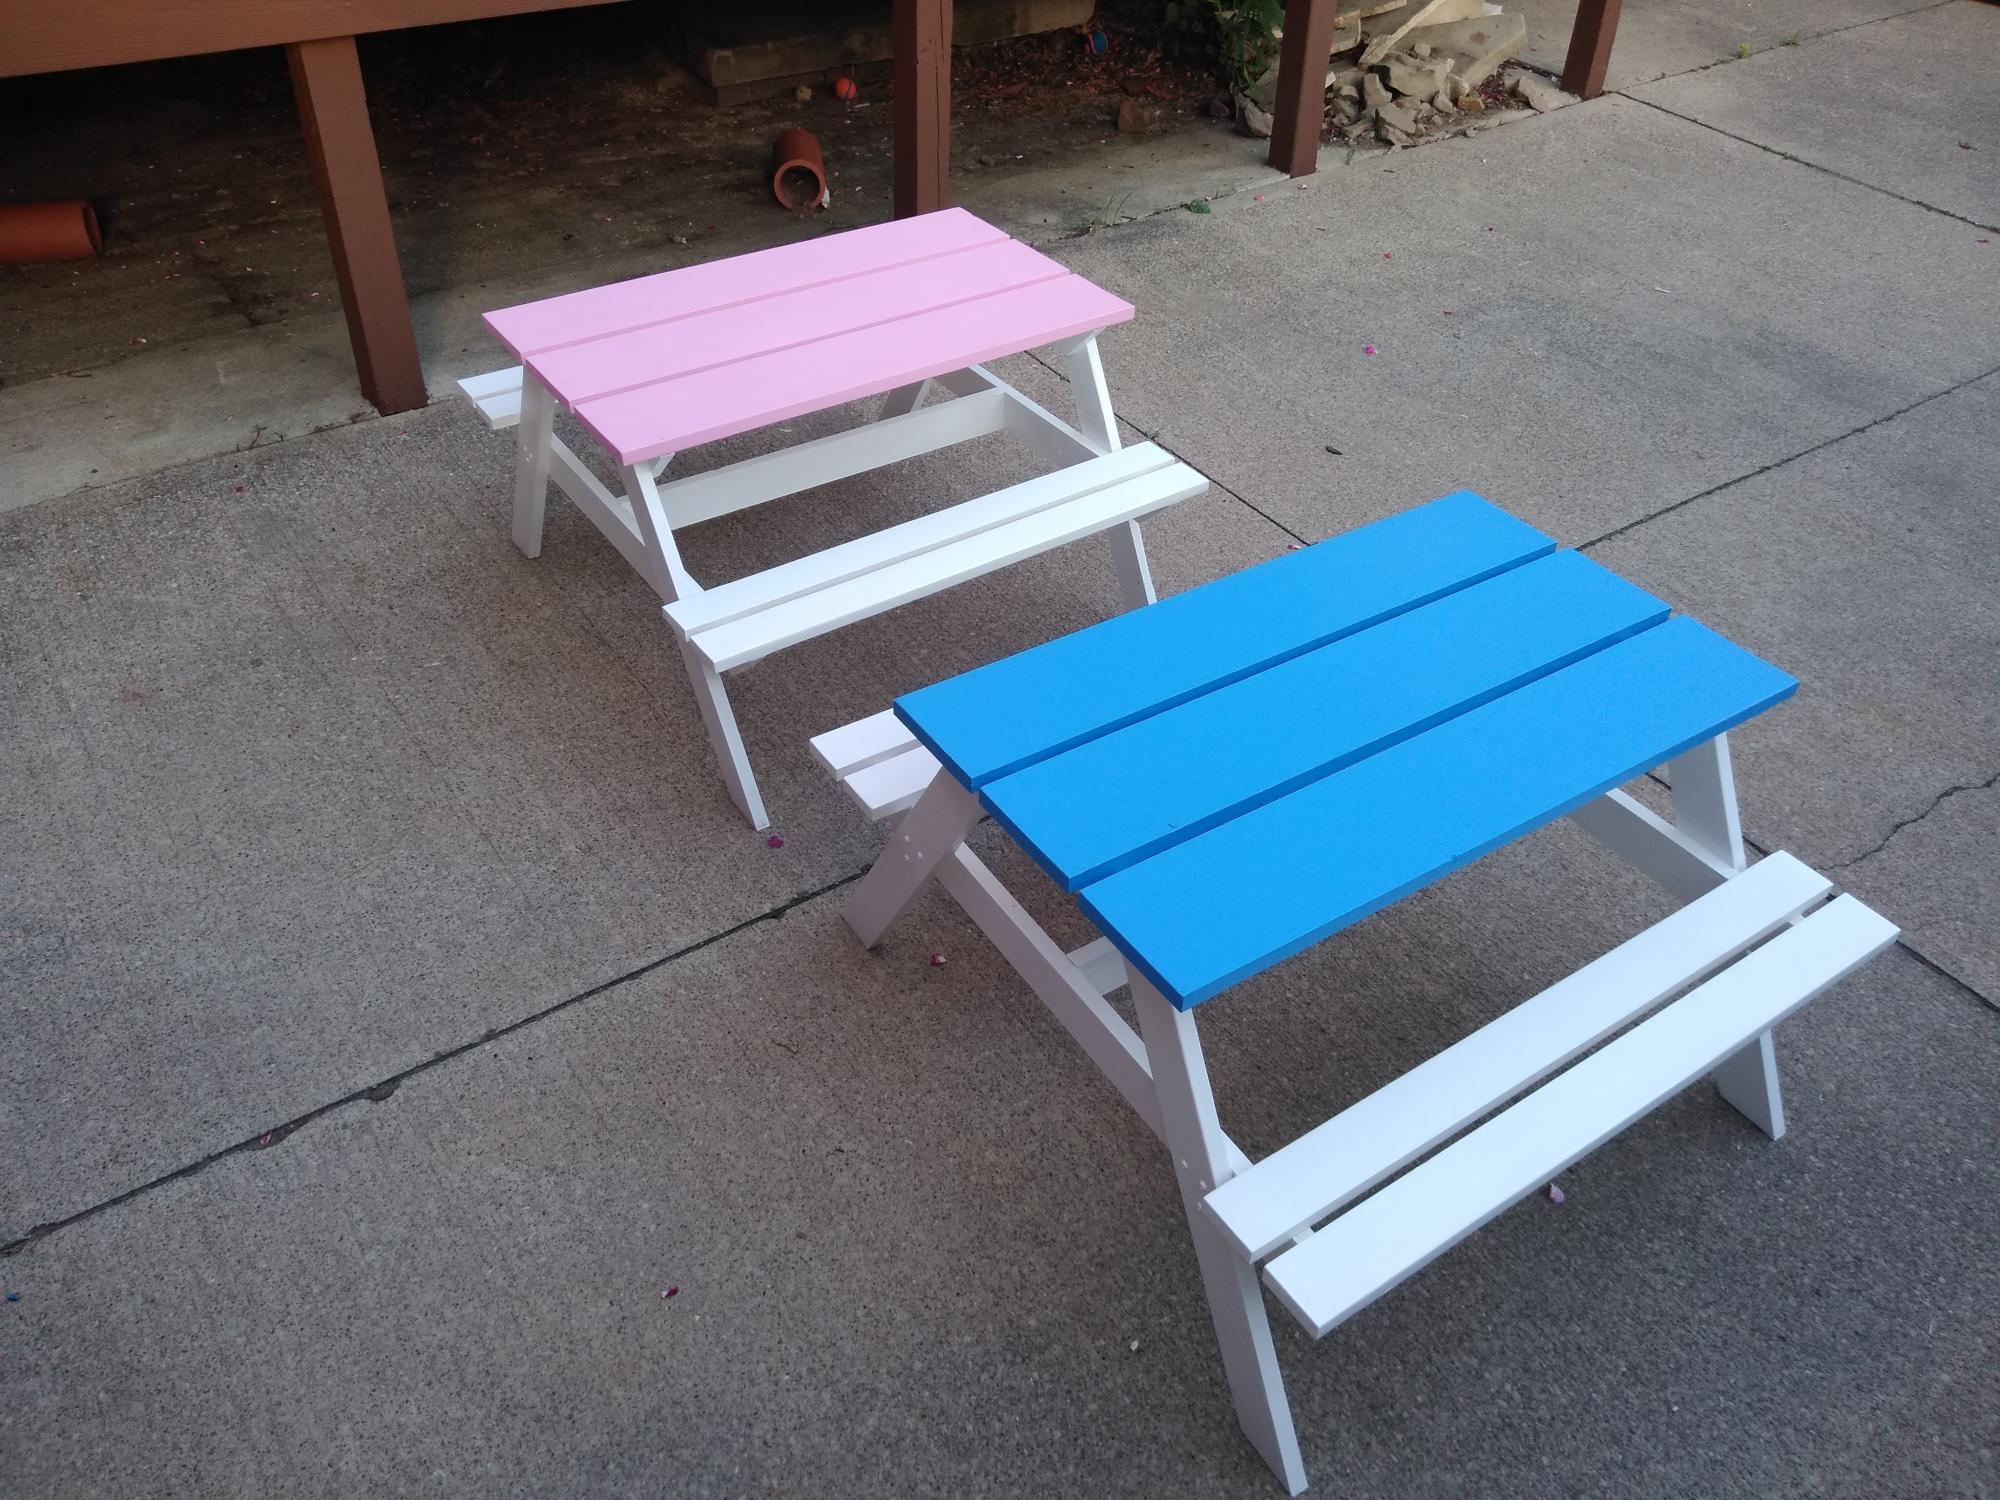
Two of the toddler size picnic tables I made for our niece and nephews
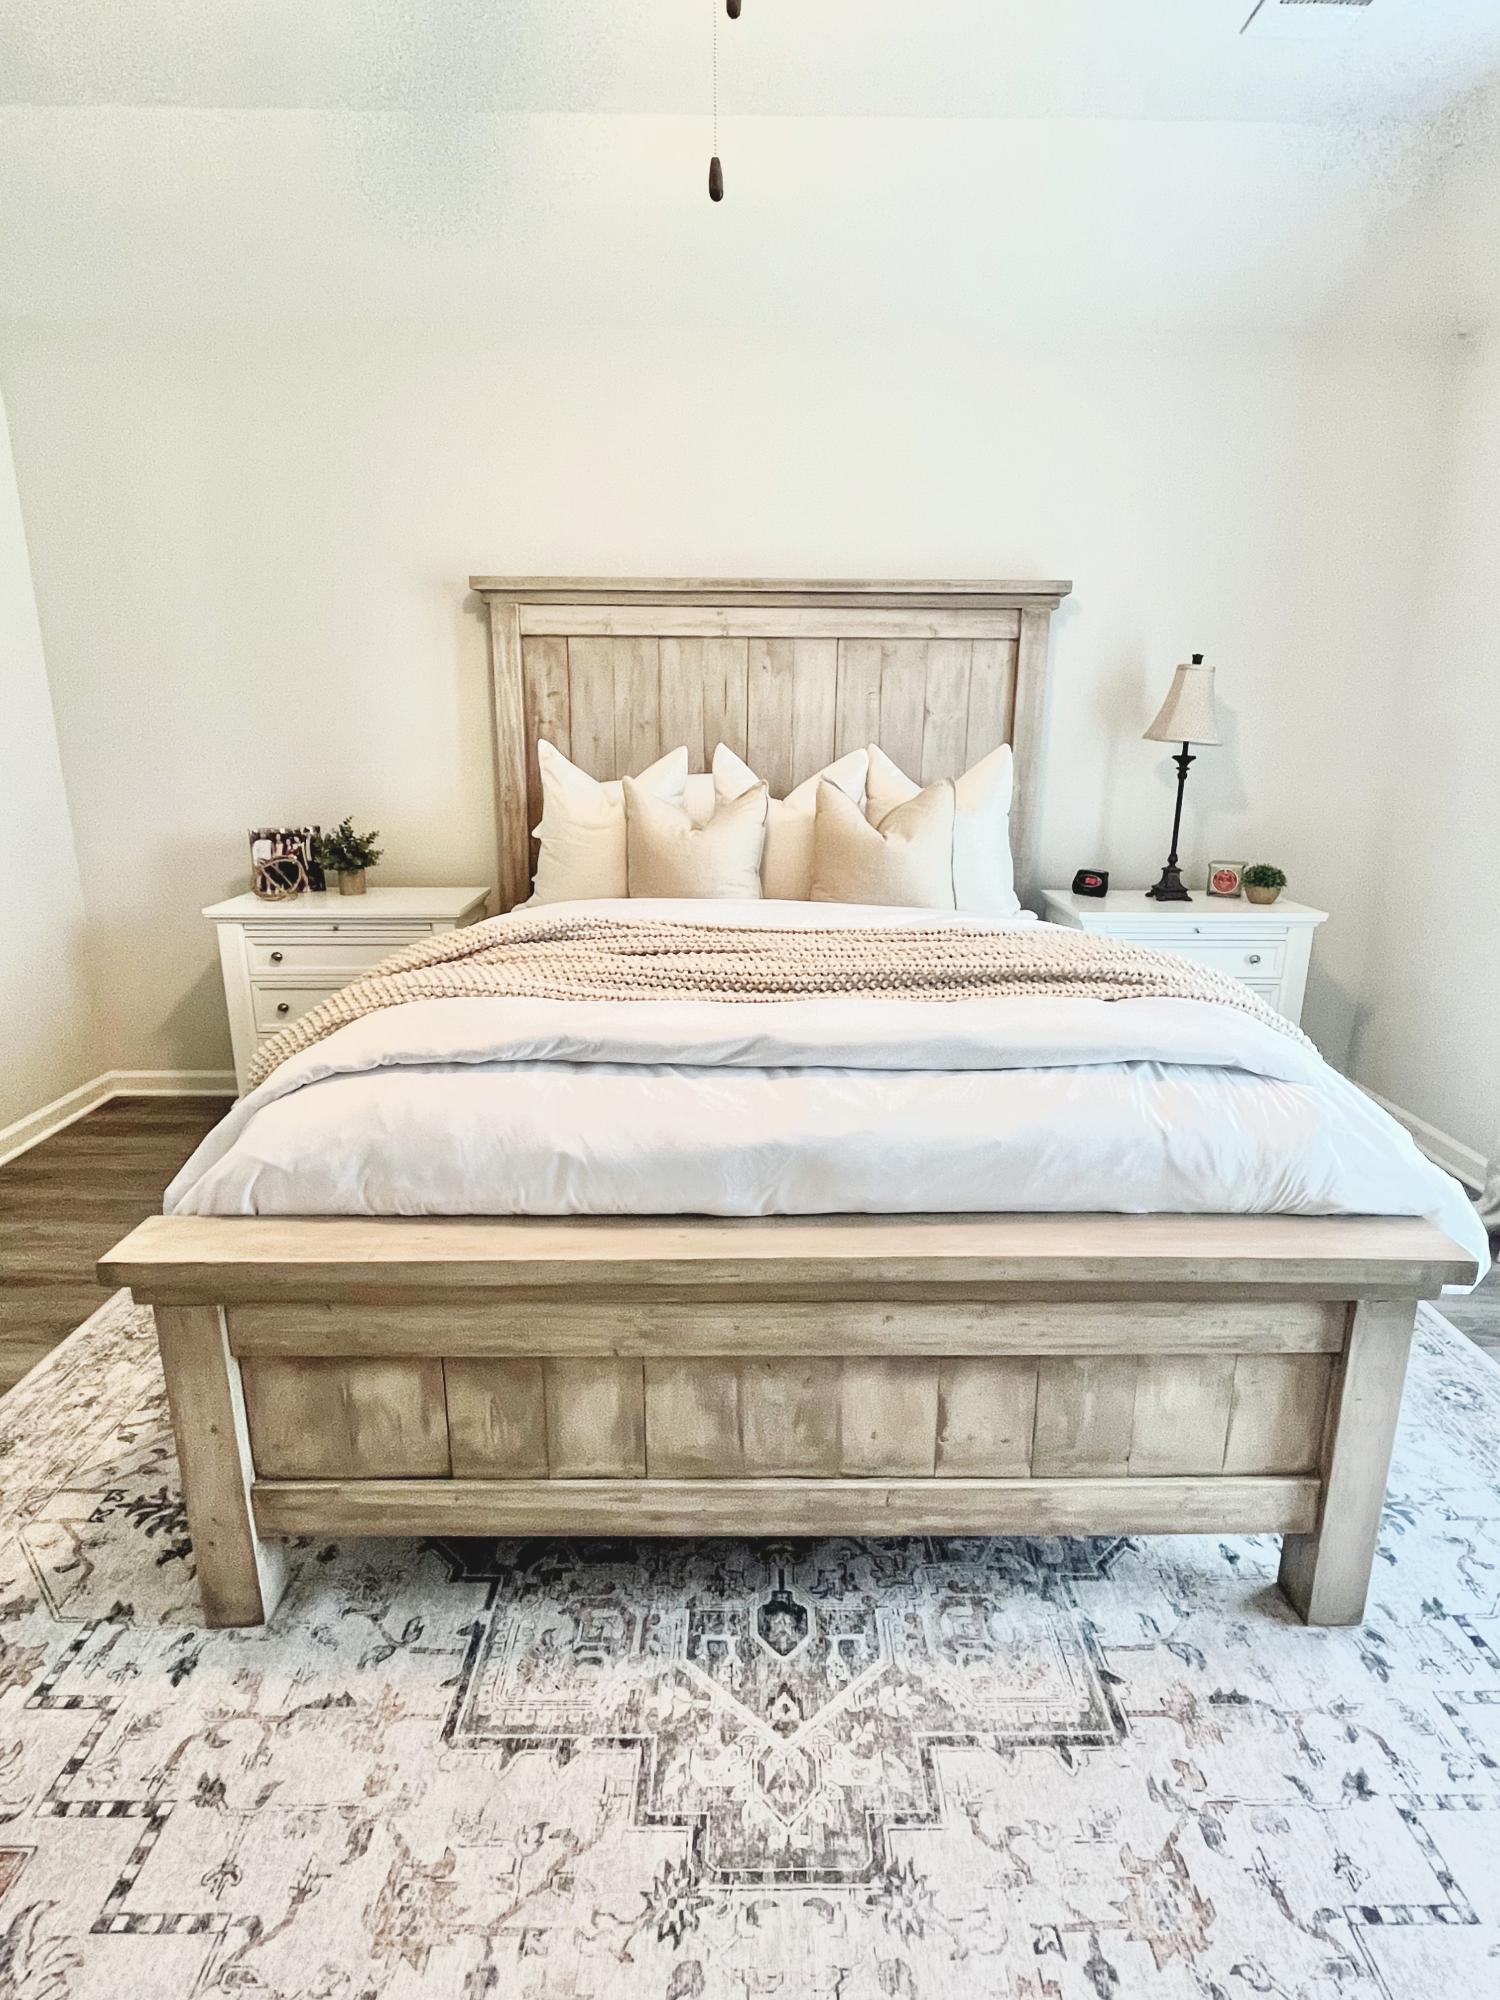
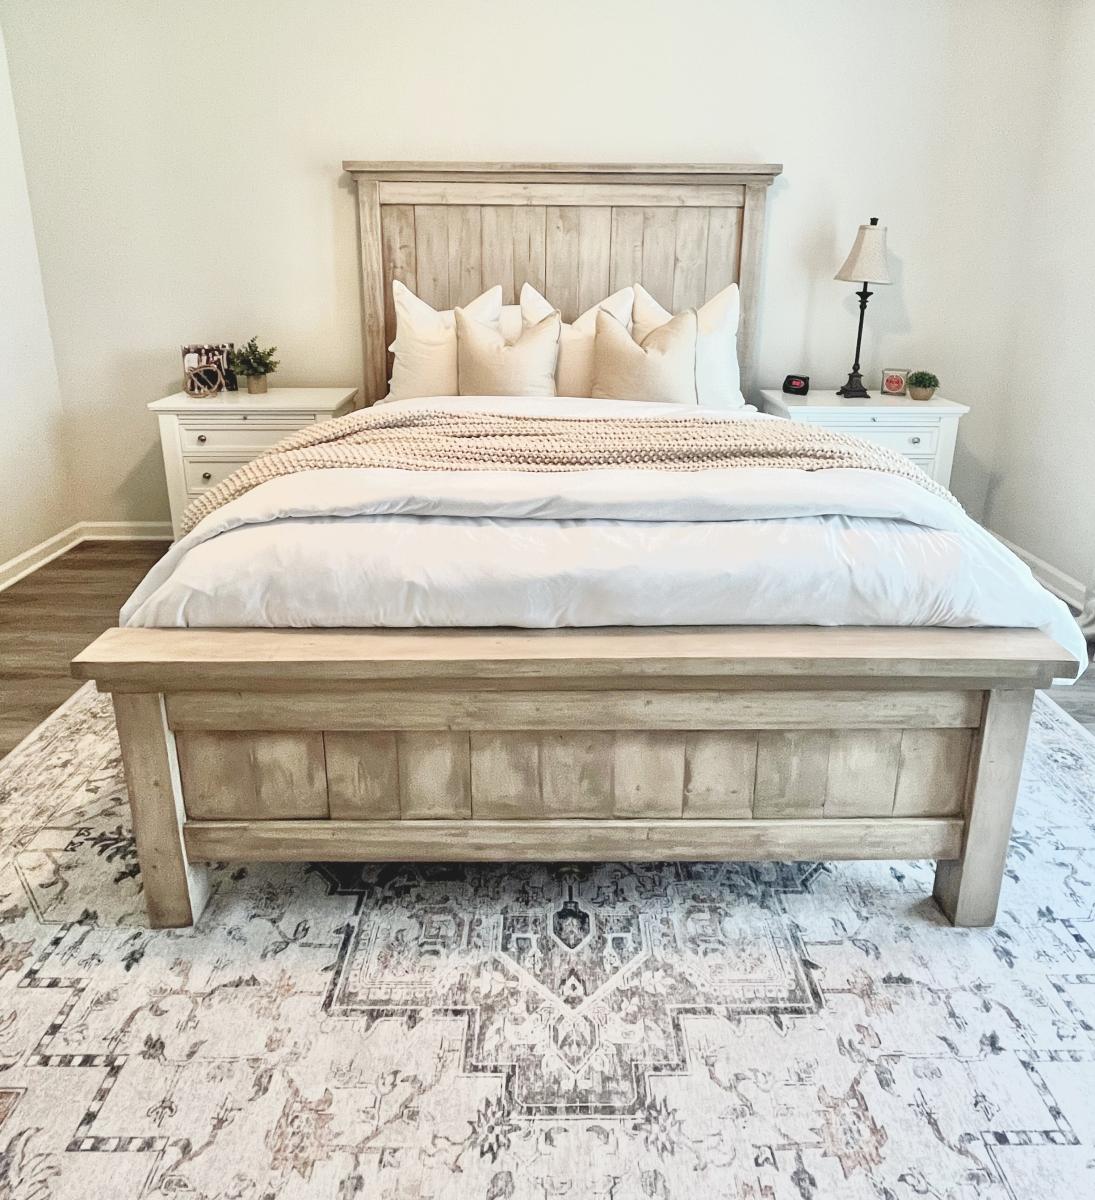
Absolutely love this bed! Thank you Ana!
Brianne Sing

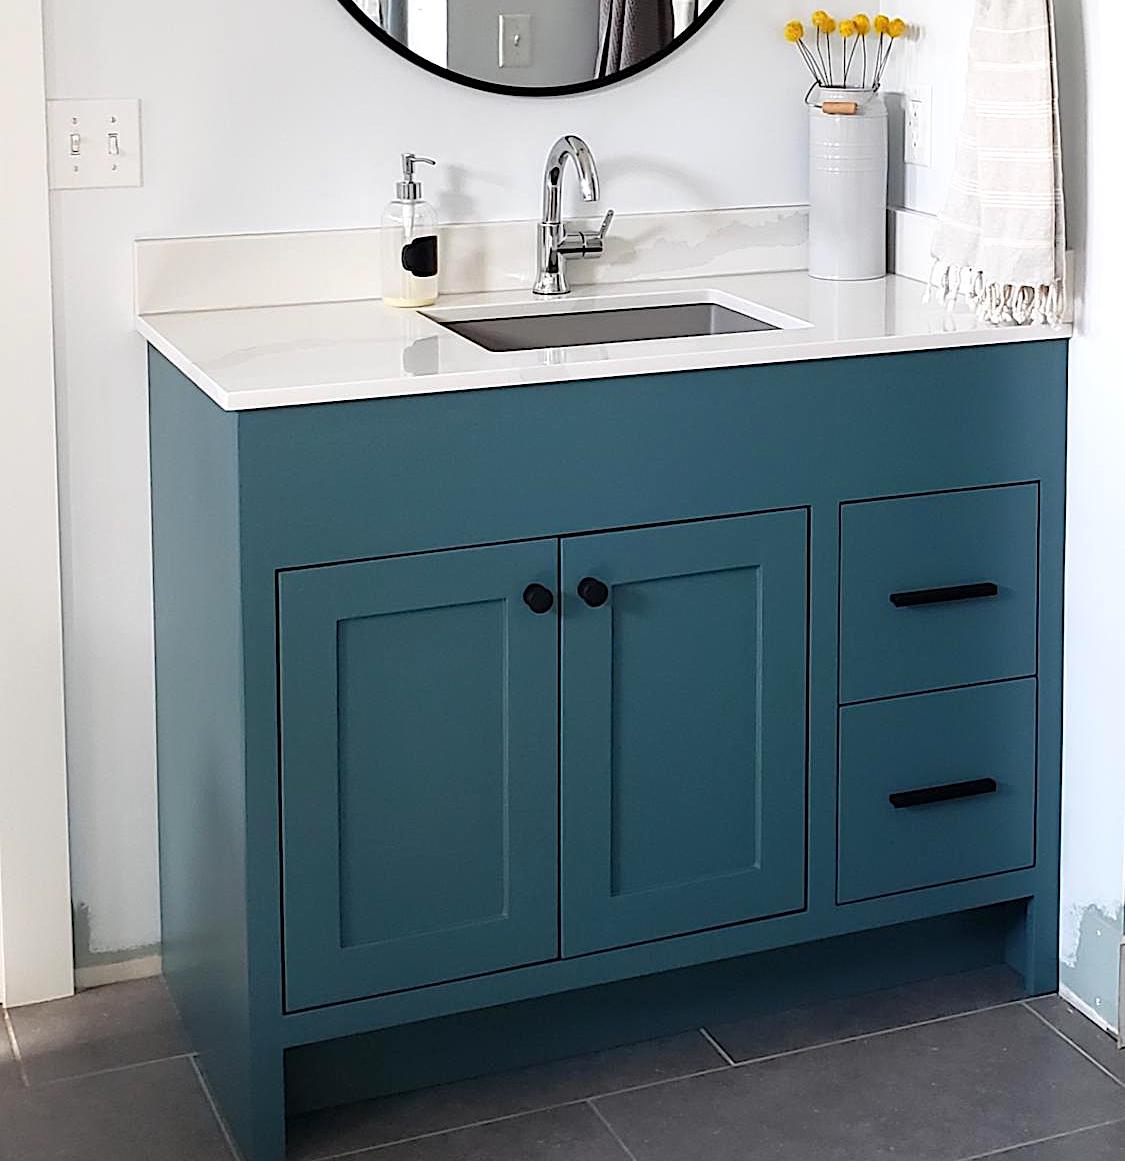
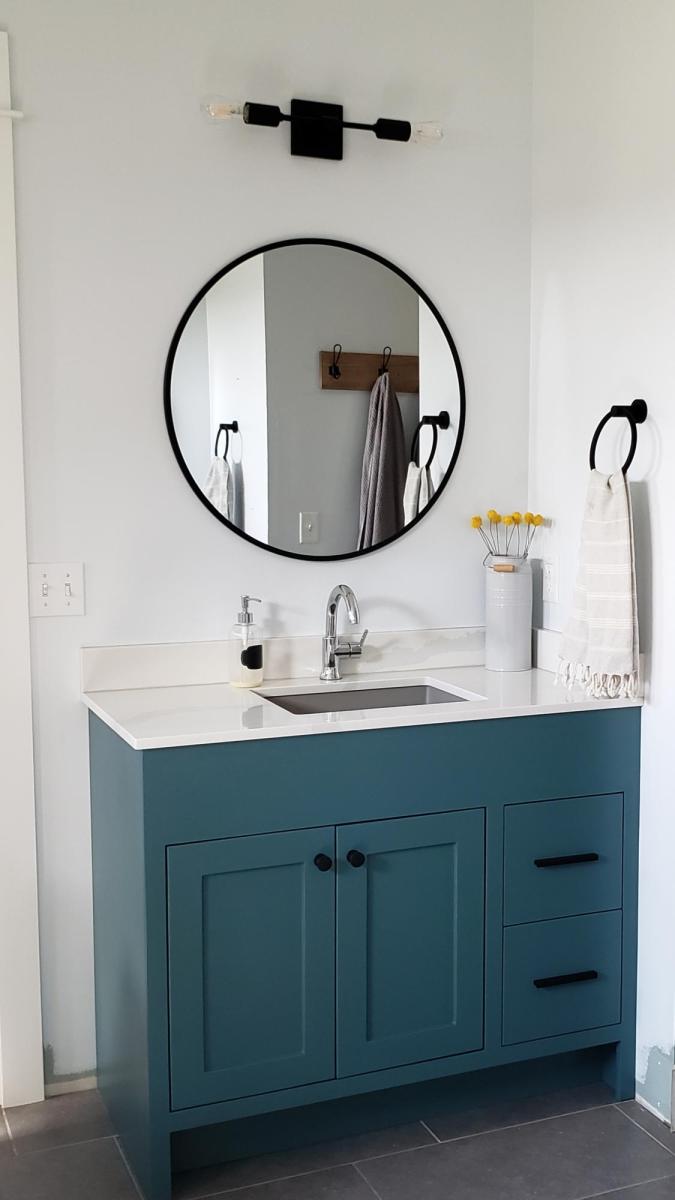
Needed a custom build to fit the plumbing and size requirement for my master bath.
Wed, 04/21/2021 - 10:01
This is exactly the size I need to build, potentially with the same plumbing requirements. Would you mind sharing your plans, please?
Tue, 06/13/2023 - 18:29
This is the exact size and style I am looking for as well. Would you mind sharing the plans with me as well?
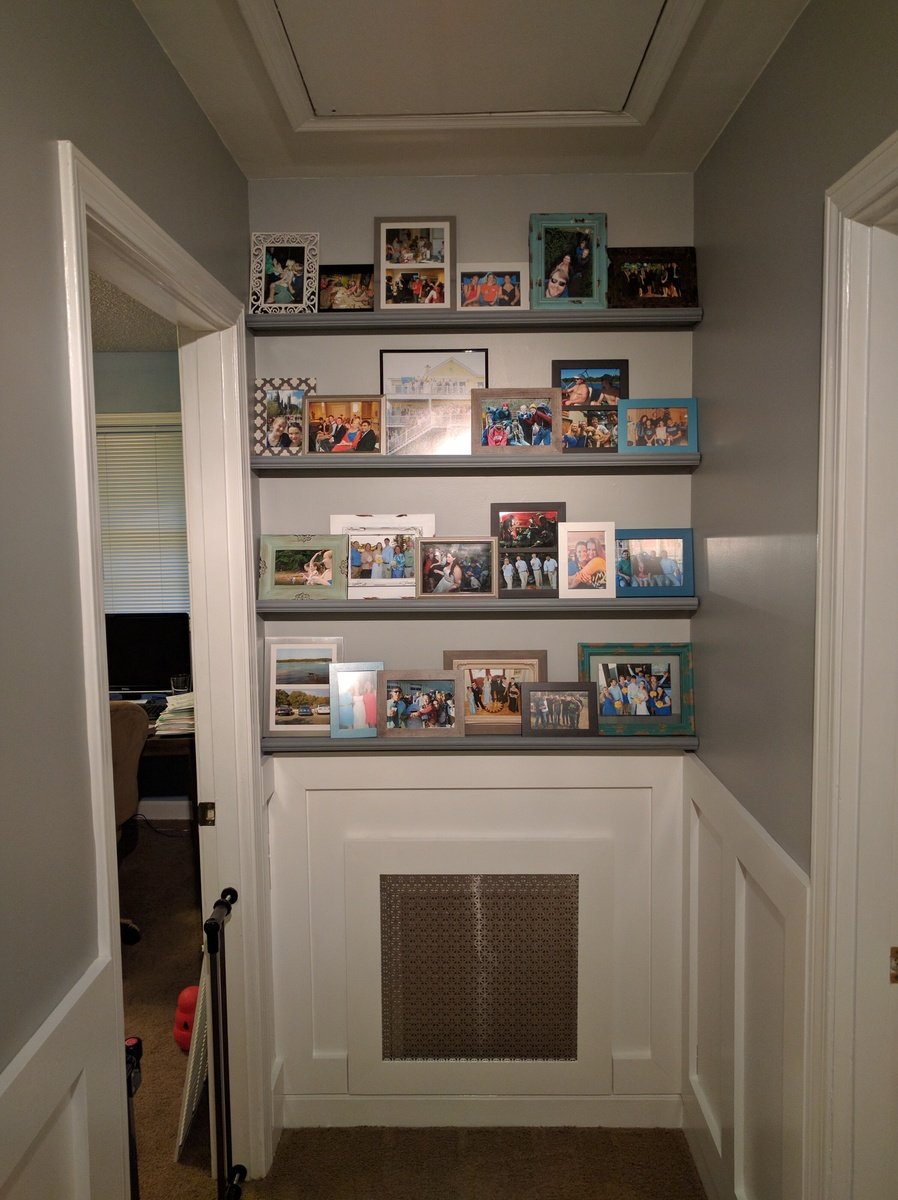
$10 Ledges made with 1x3s instead of 1x4s and fronted with cute trim pieces I found at Orange store. Finished with Behr Marque sample paint that didn't make the cut for the hallway walls (color: Gotham Gray).

Sat, 09/24/2016 - 10:33
Love this! The trim really makes the shelves beautiful!

I've been wanting to buy or make a sandbox for my son for a couple of years now. Since seeing this on Ana White I knew I had to make it. My son is 4 yo and I didn't think the 4' square sandbox would be big enough for him, so I made it bigger. Ours is 6' square. Materials: 4@1x8x6' 12@1x6x6' 2x4 - used leftovers from another project 8 hinges 4 handles decking screws Cut lengths: 2@1x8 cut to 71.5 (long sides of the box) 2@1x8 cut to 70.5 (short sides of the box) did not cut the 1x6 boards (top planks) - actually designed the other boards to fit their length to prevent cutting (saving time) (note that original plan uses 1x4 planks - I used 1x6s so I could use the same number of planks but cover a larger area) 4@2x4 cut to 11.5 (arm rests) 4@2x4 cut to 18.5 (back supports) followed instructions for assembly otherwise. At my husbands suggestion we put the handles on the sides and can easily open from either side - prevents having to lean over to the middle to open (back saver) I finished the project in 4 hours including clean up and a couple of small breaks. This is my first Ana White project. It was a lot of fun to build and I hope my son will enjoy it for years to come!

Sat, 09/01/2012 - 20:59
Wow, this is just what I need! I've been wanting to make a sandbox for under the playhouse but the other plan was too small. This would be great for the little guys. Thanks!
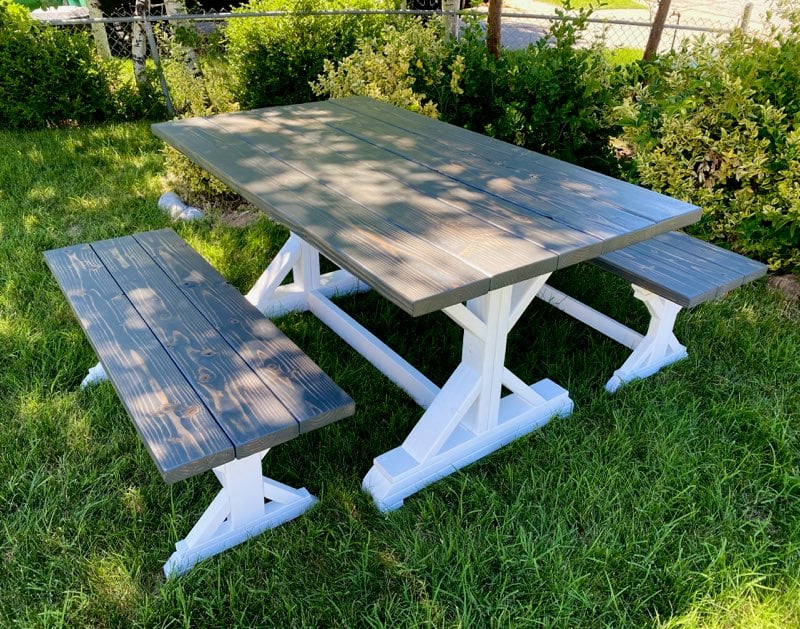
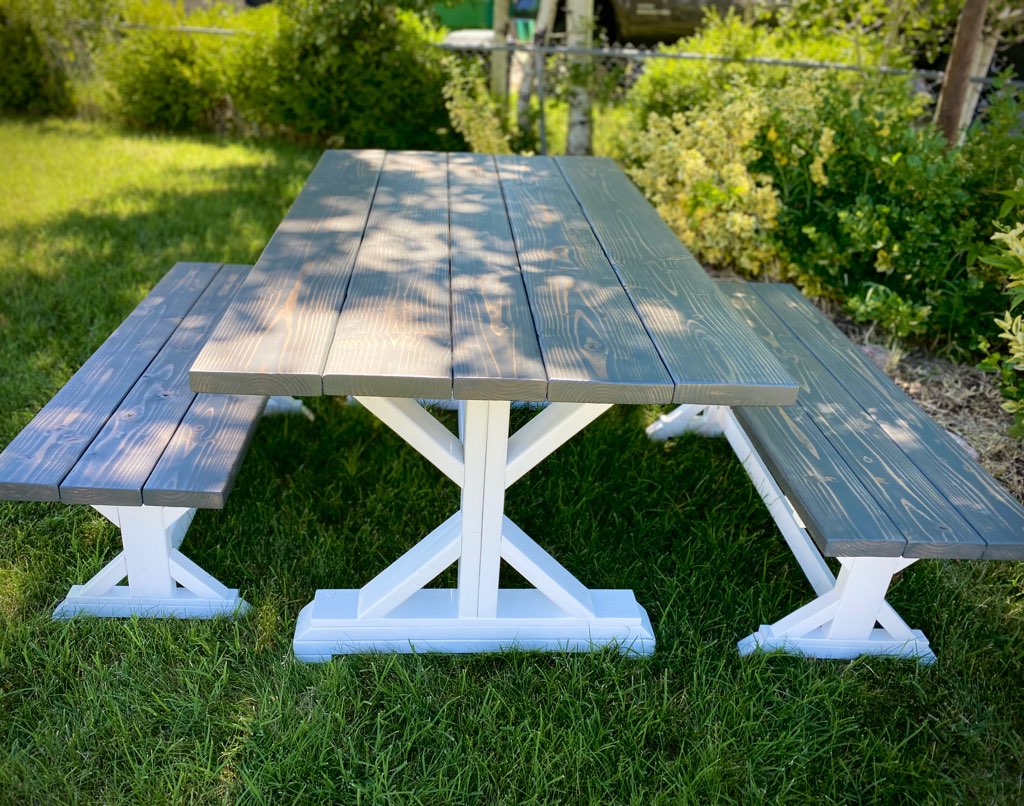
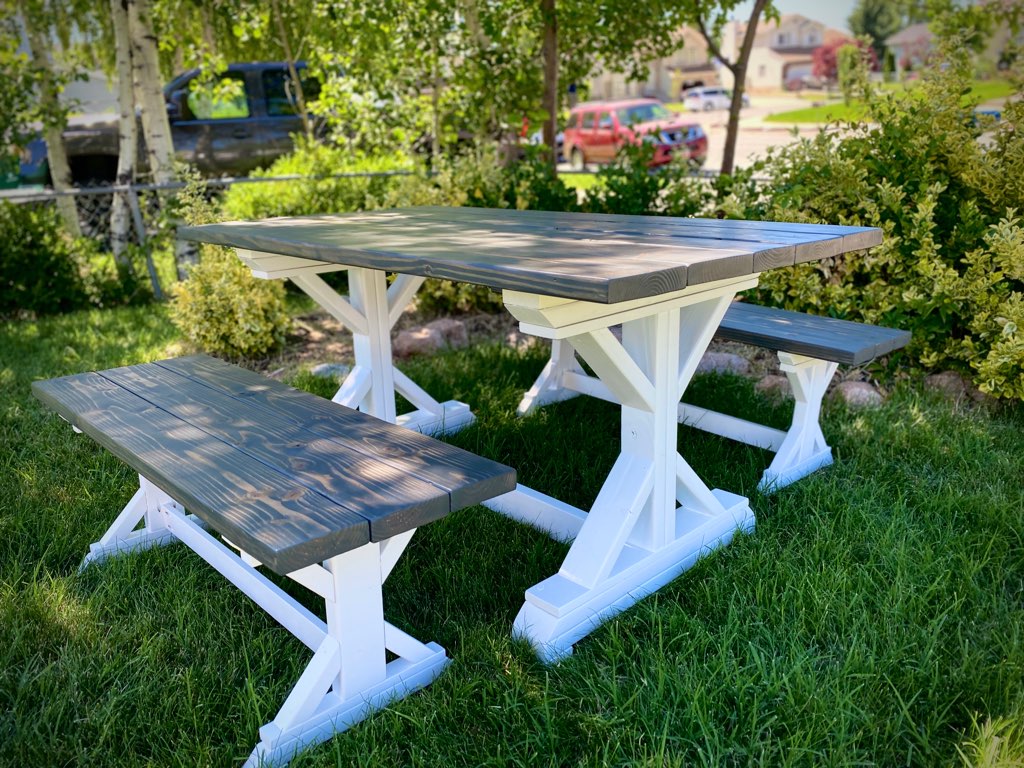
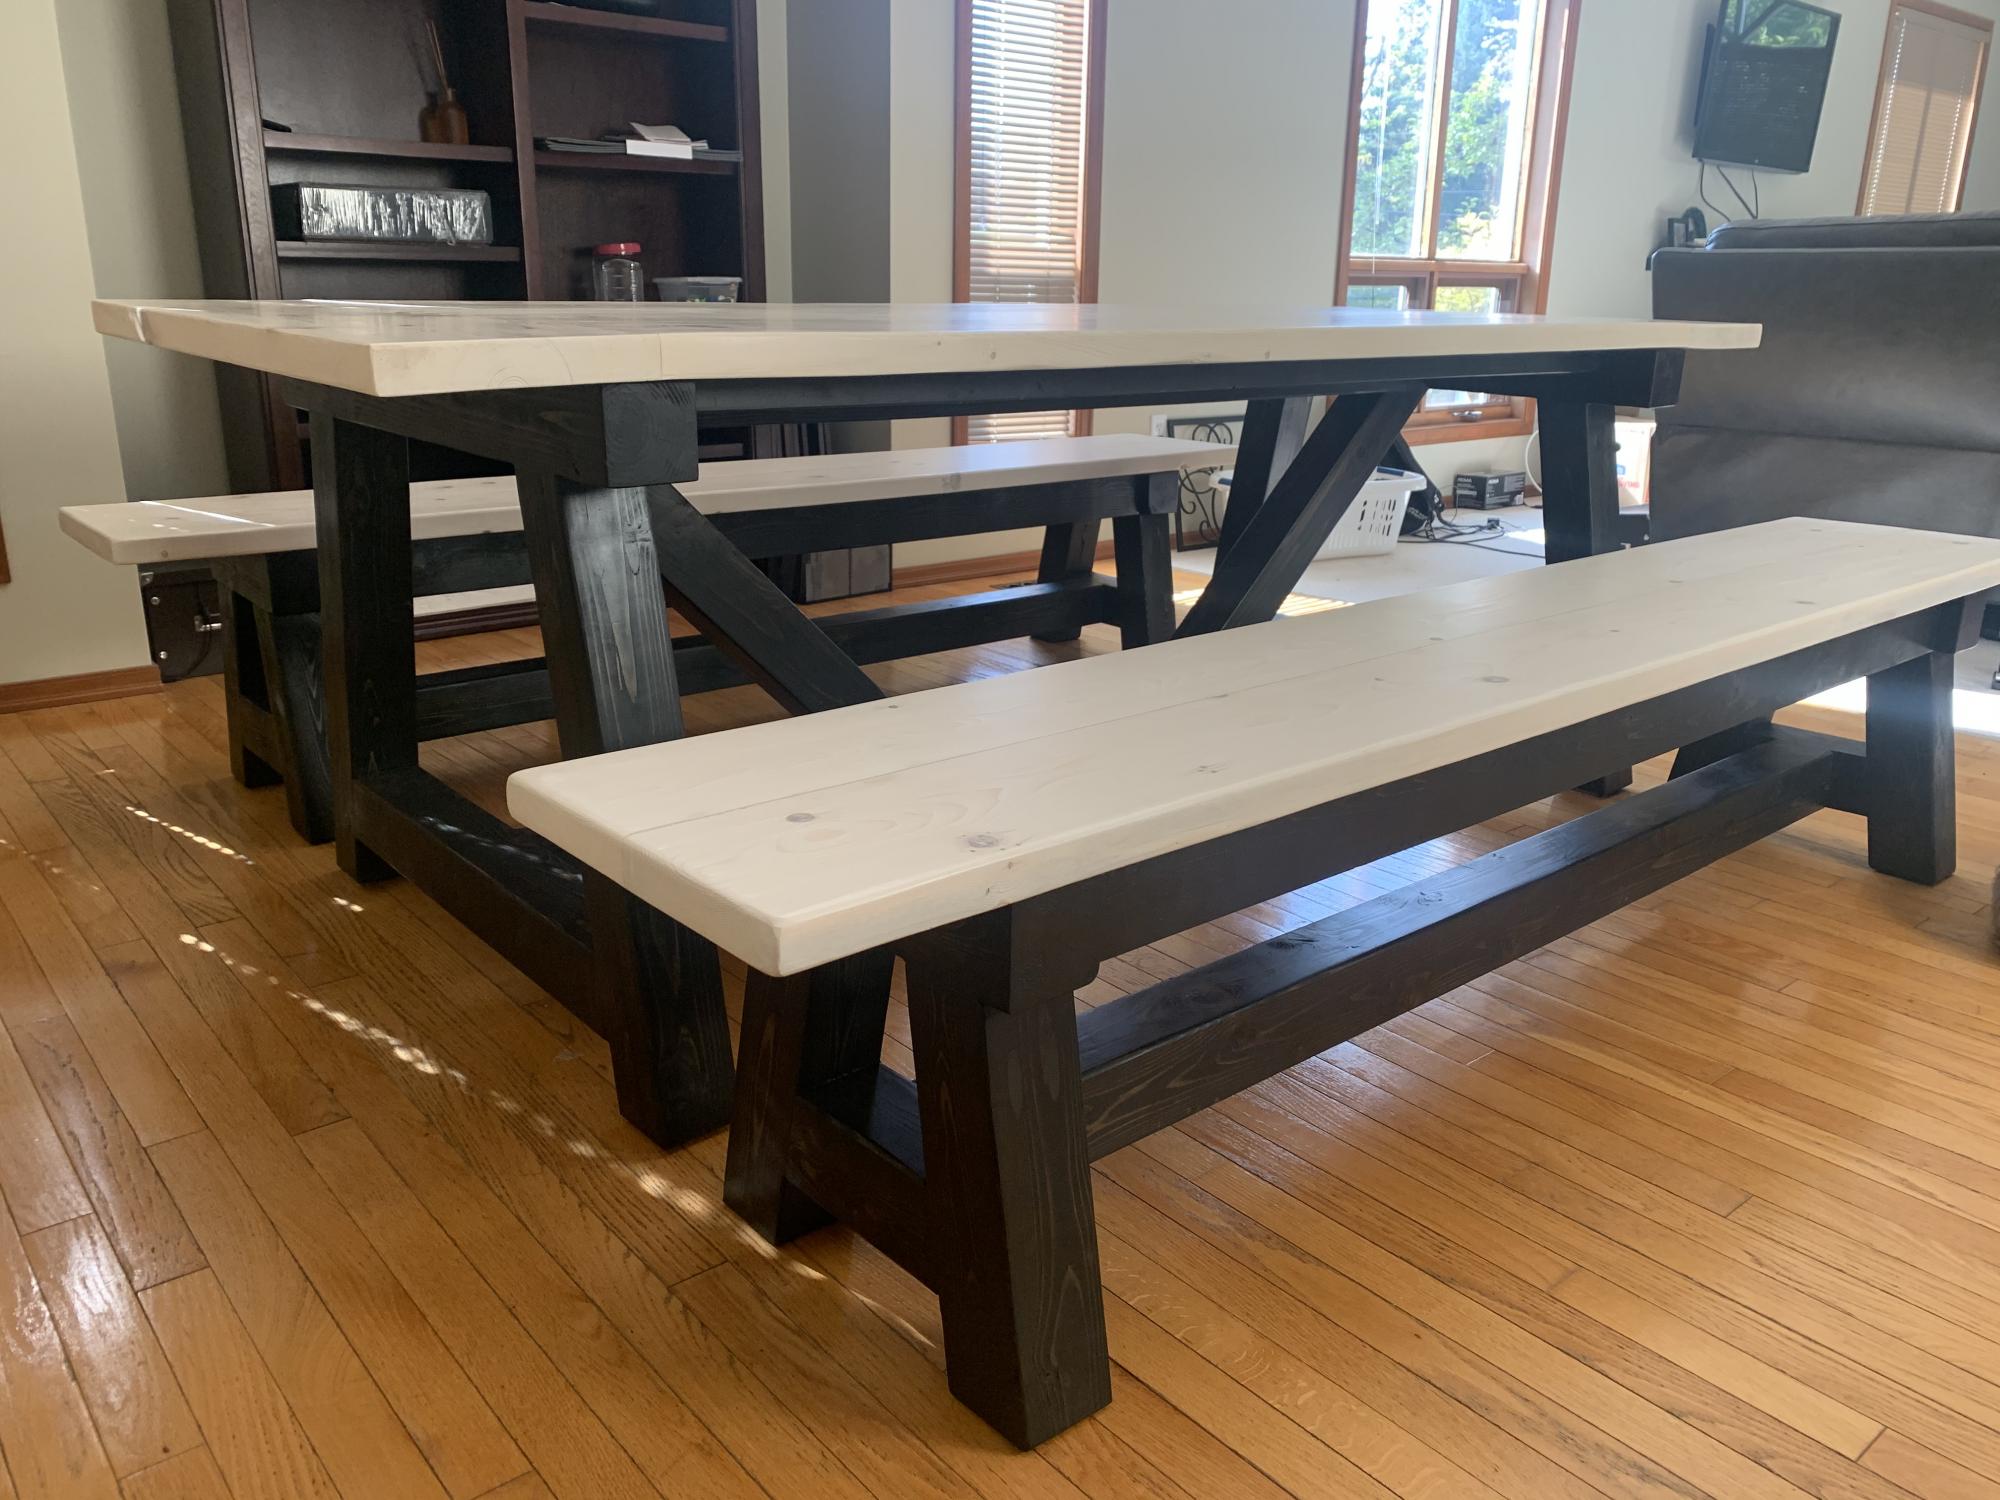
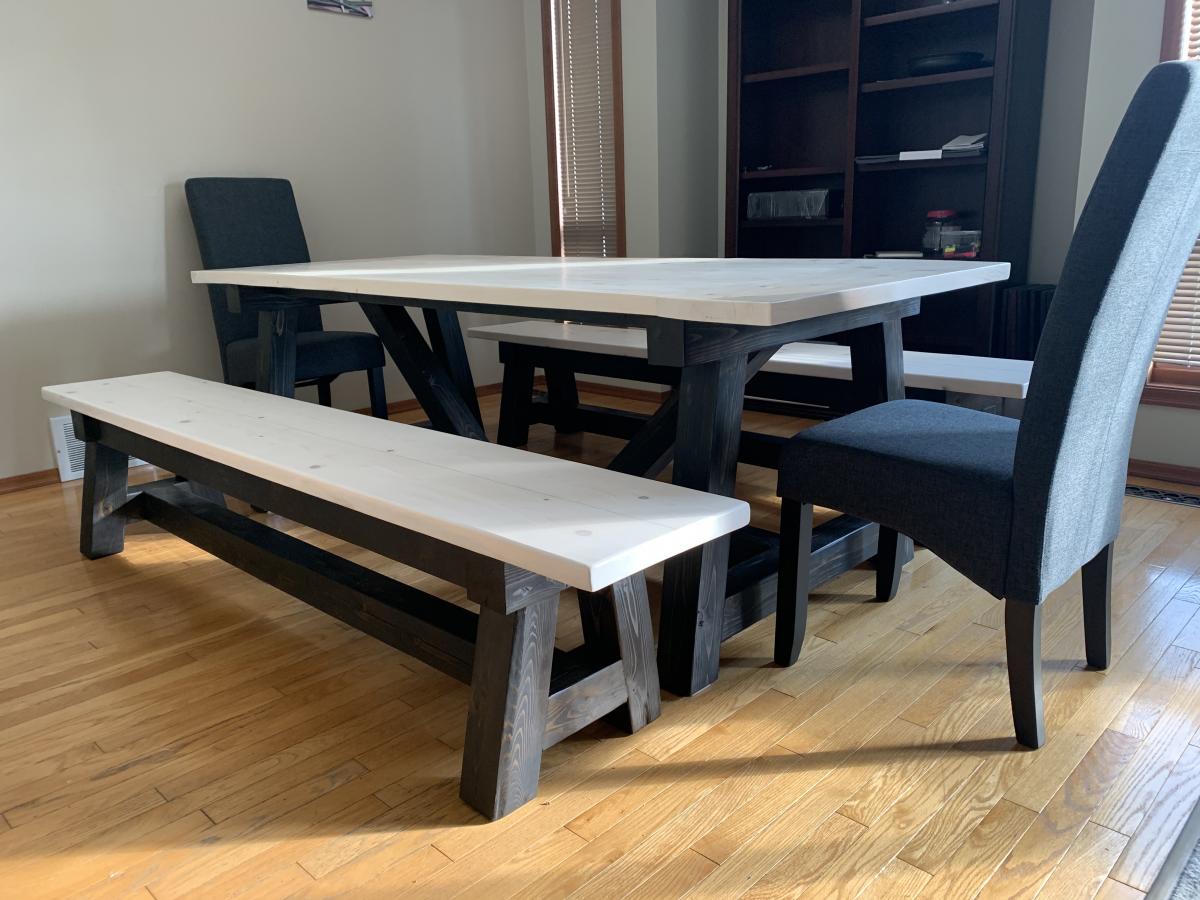
Modified the size of the Fancy X Farmhouse table, down to 34-1/2" x 60", and the benches to fit fully under the table.
The only thing I wish I could change with these plans is how you attach the tabletop. Because you are stacking wood for the base, and there are no aprons, you have to attach the top by going through the table top. But wood filler and stain hides them well enough, but I'm never the biggest fan of going from the top. I prefer to hide the screws on the underside.
Other than that, I love building this table.
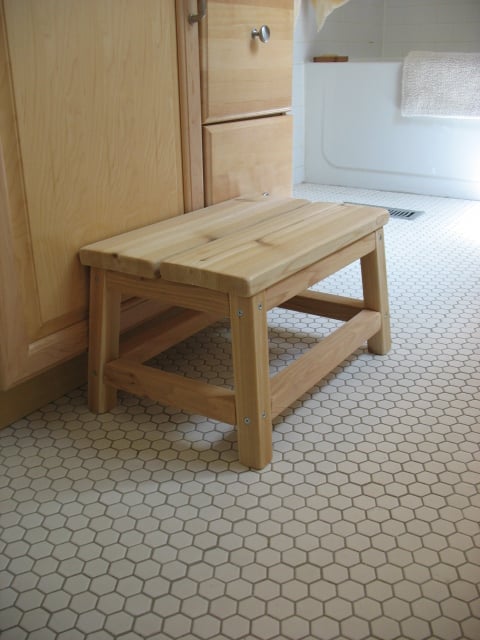
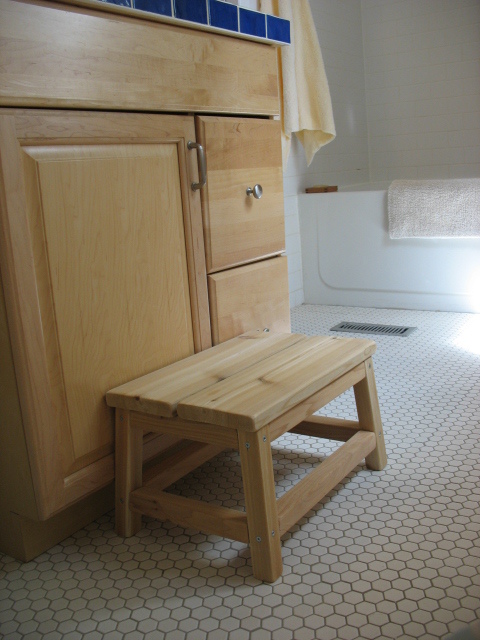
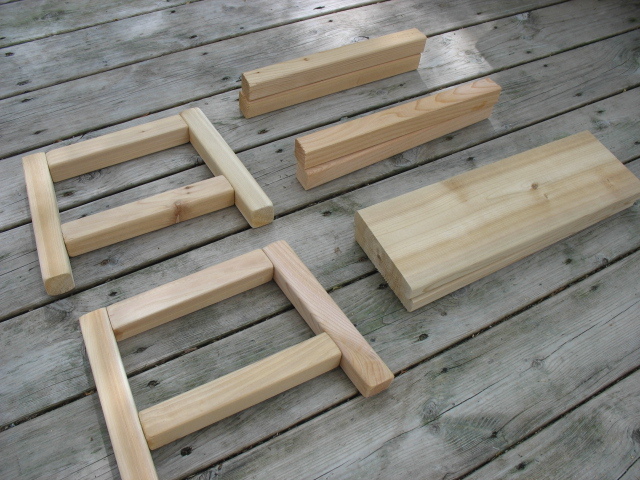
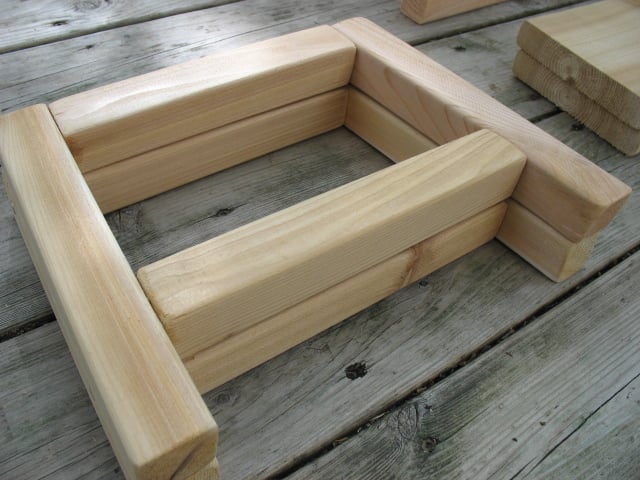
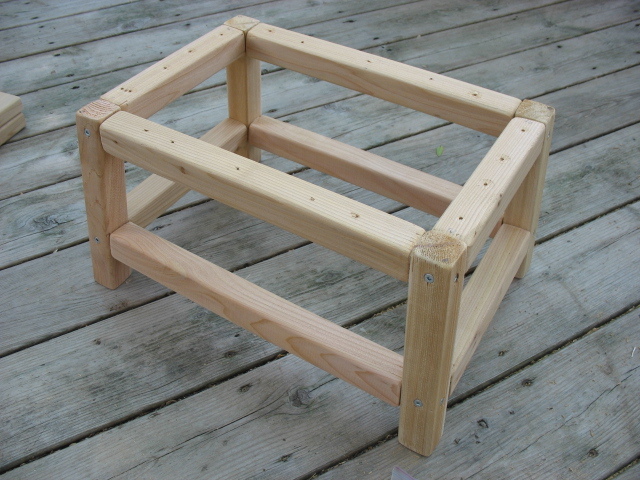
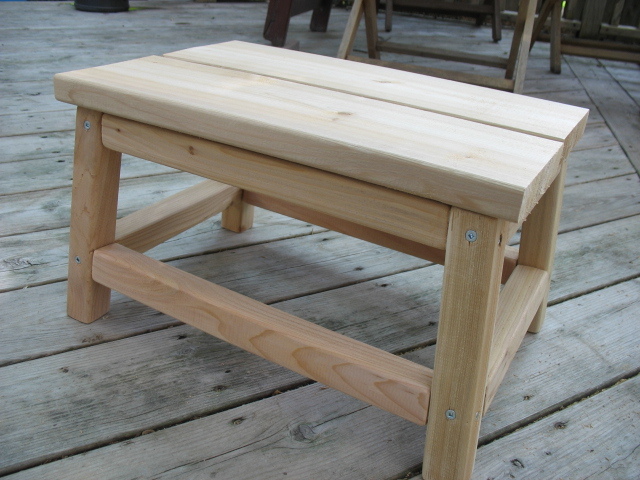
After searching the town high and low for a 10" high wooden stool, I decided to make one. Ana had the perfect stool pattern to modify for our needs - A little shorter, a little wider.....et Voila!
It's the perfect height for little ones to reach the taps in the bathroom, as well as helping out in the kitchen from time to time. And, the cedar smells wonderful.
Finished height: 10"
Top measures: 11.25" x 16.5" (2 boards, cut 16.5" long + a space in the middle)
Footprint: 12.375" x 17.375"
I also lined up the rails (instead of staggering them), similar to the Harriet Higher Chair plans. The joint will be weaker, but I prefer the cleaner lines on such a short step stool.
Thanks Ana for the great plans!
Ana, First time I have every attempted any kind of woodwork/building furniture other than building Ikea stuff. The plans were very easy to follow and now I want a chop saw for xmas. I roped my daughter in to help me and we completed the project in 2 days. Husband was totally blow away by our achievement. I love it and feel accomplished. Away to work on the table and further benches/seating over the next few weeks. Pauline
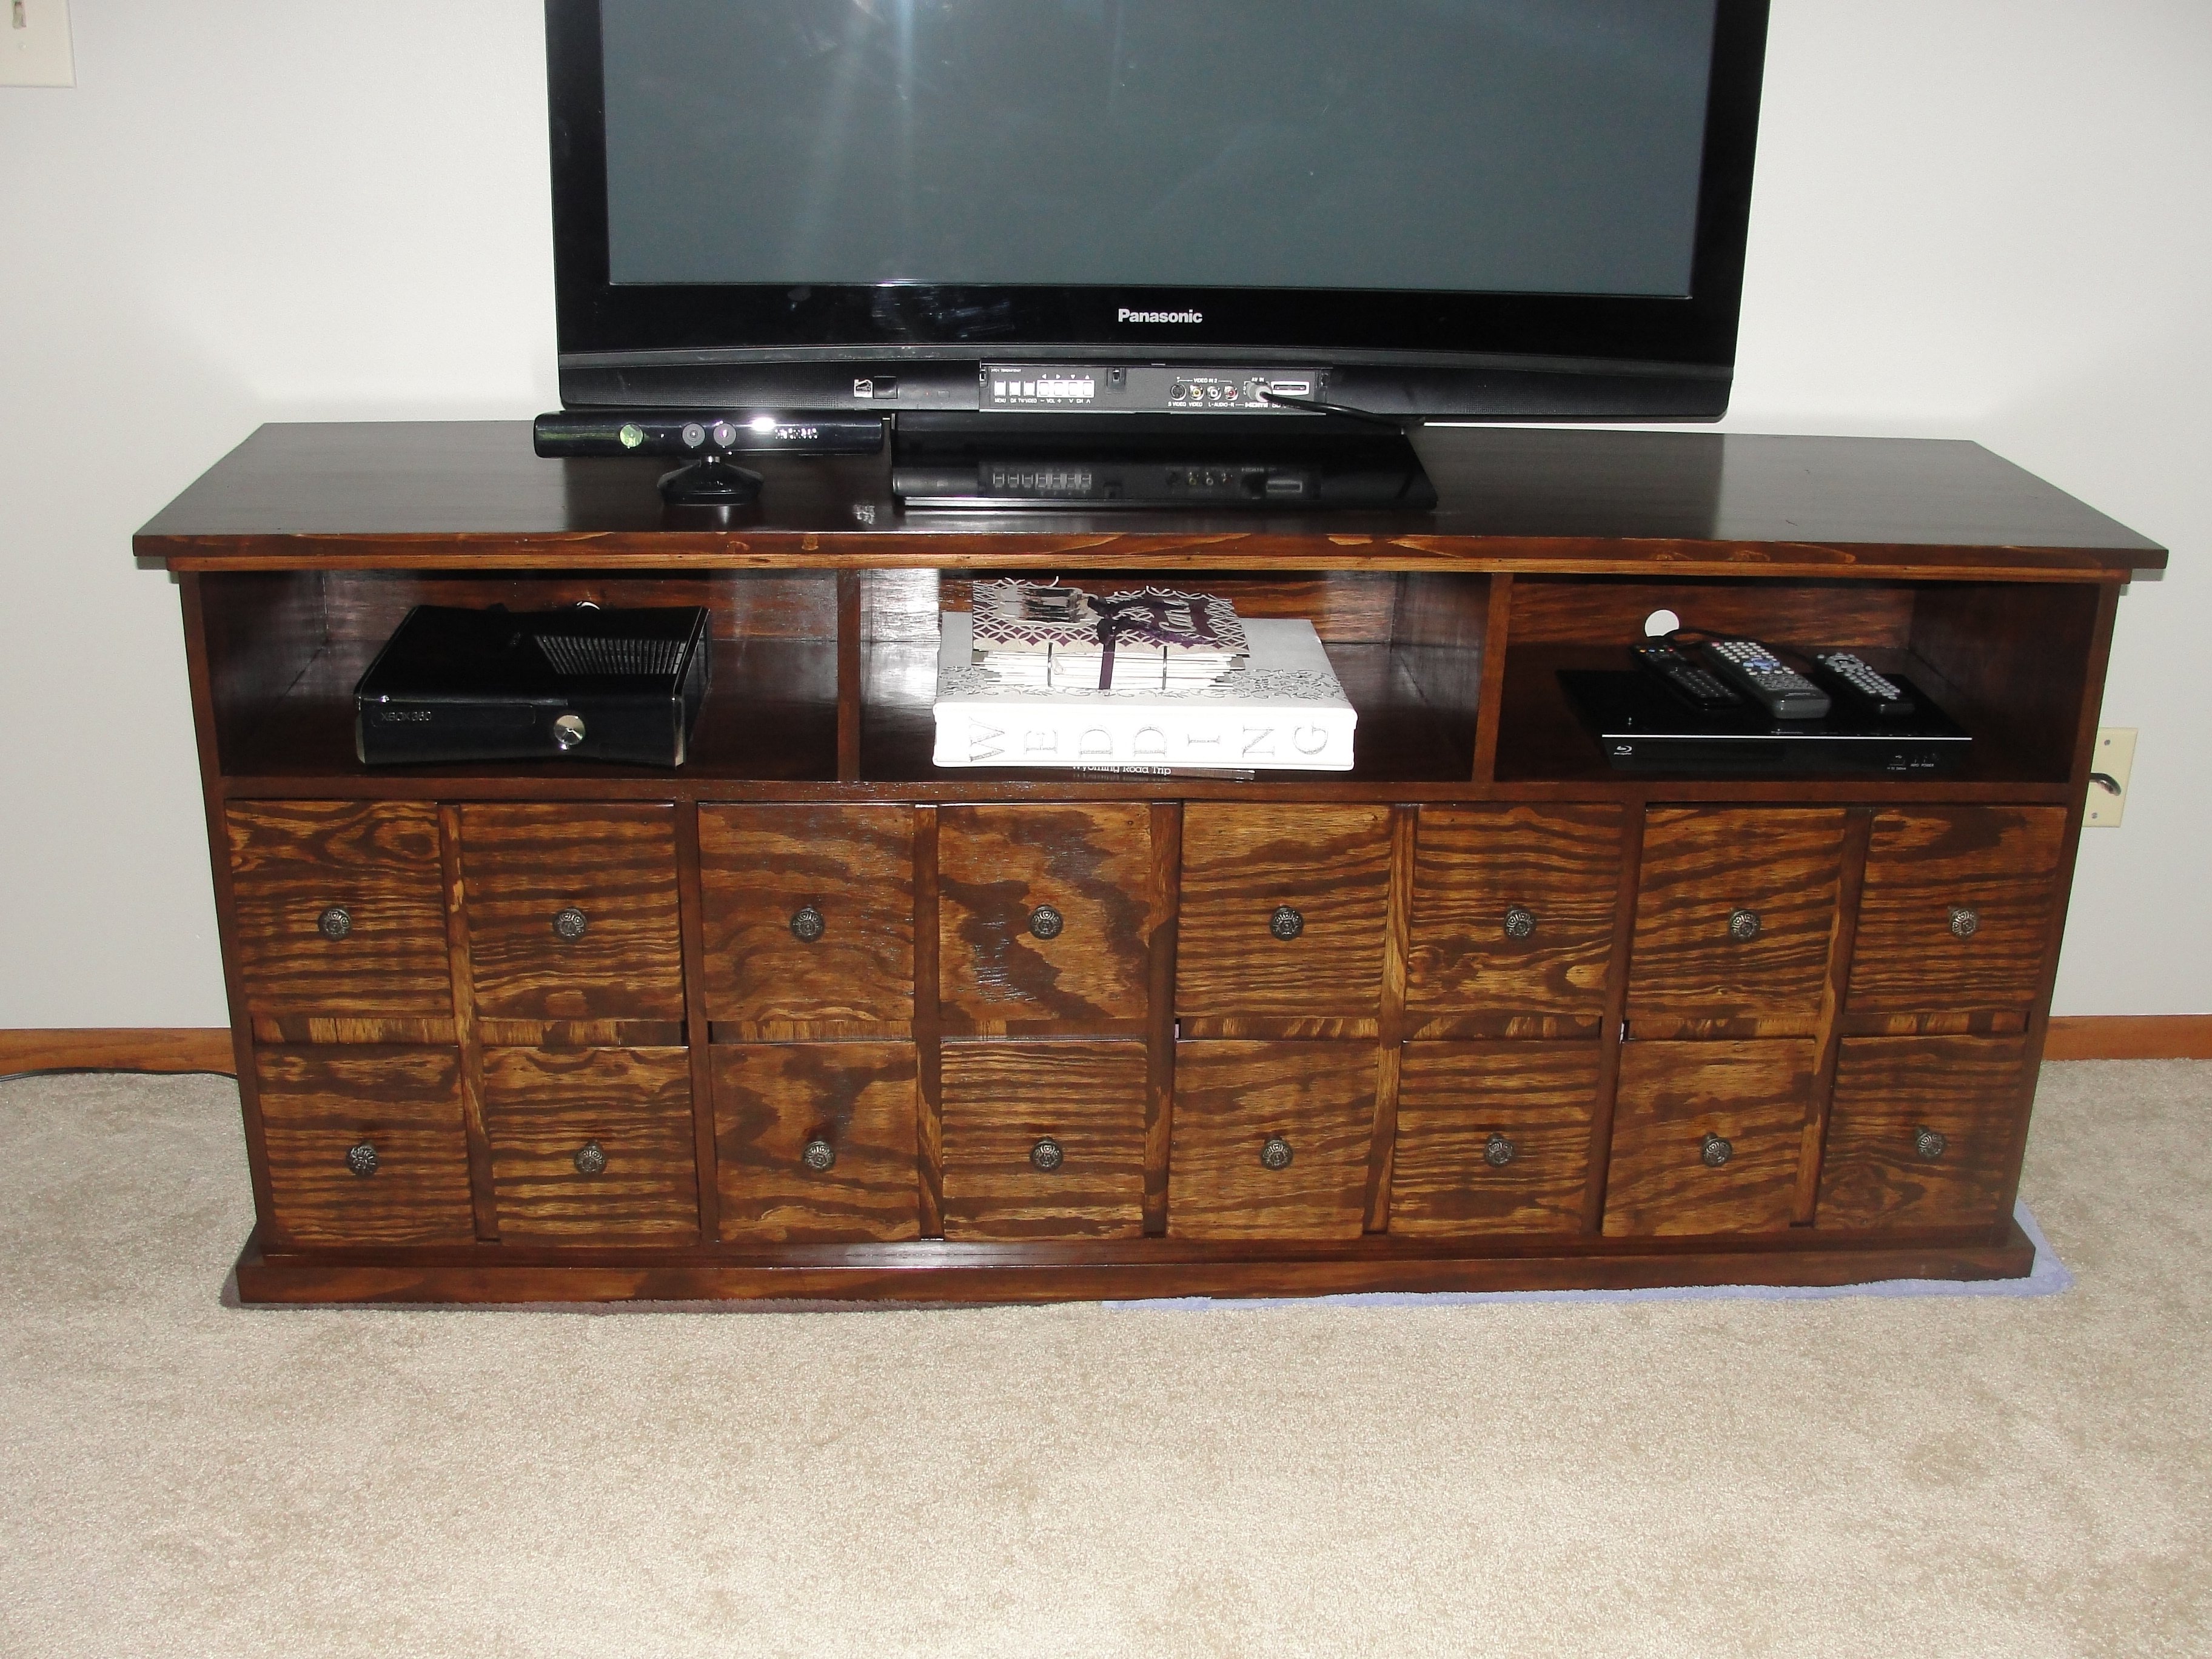
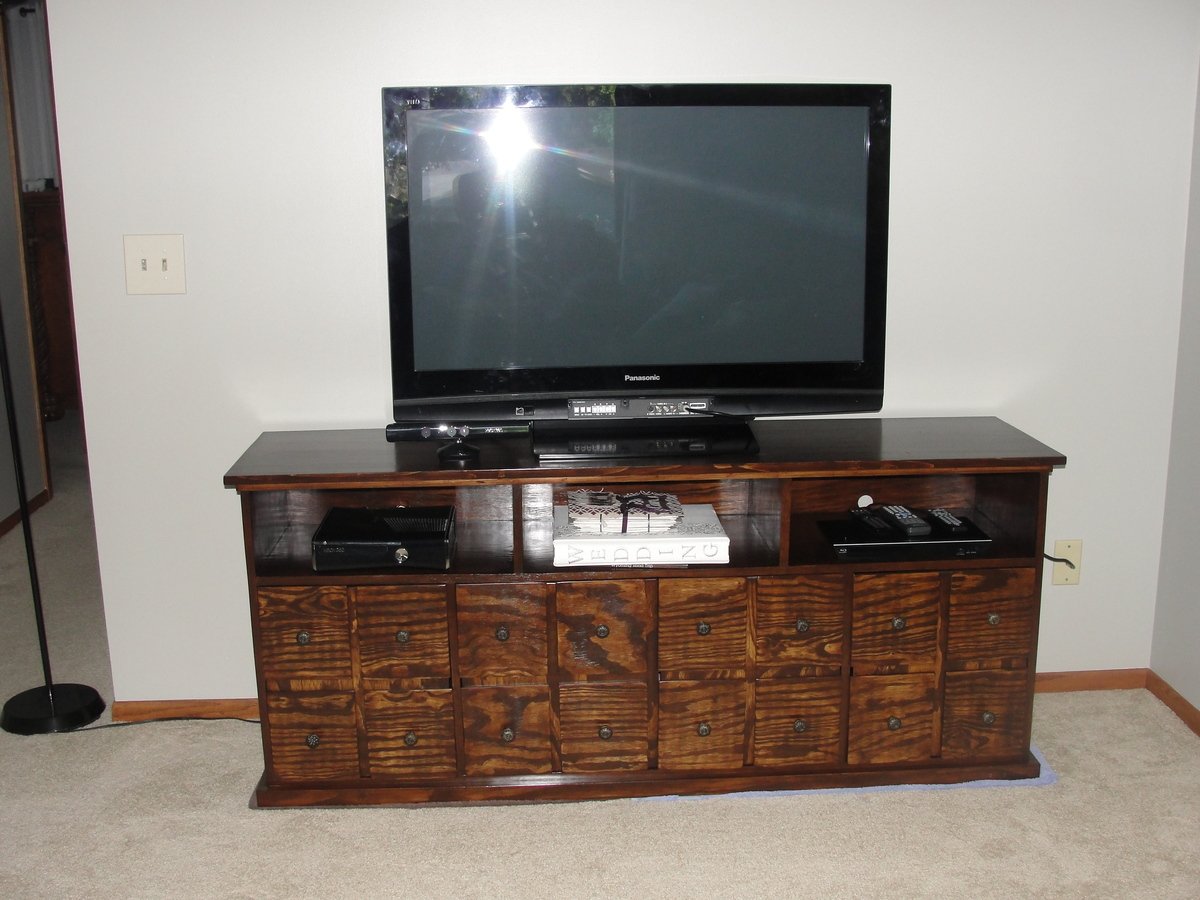
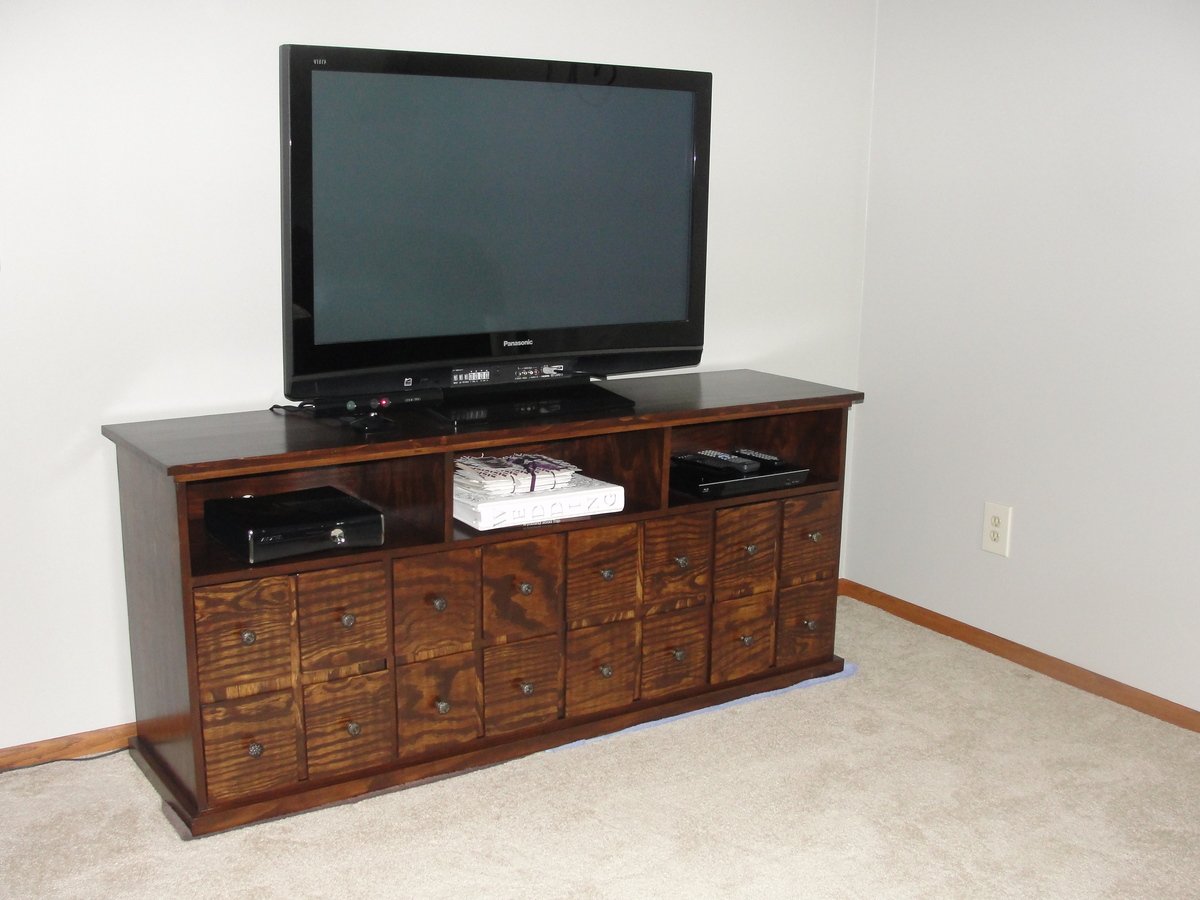
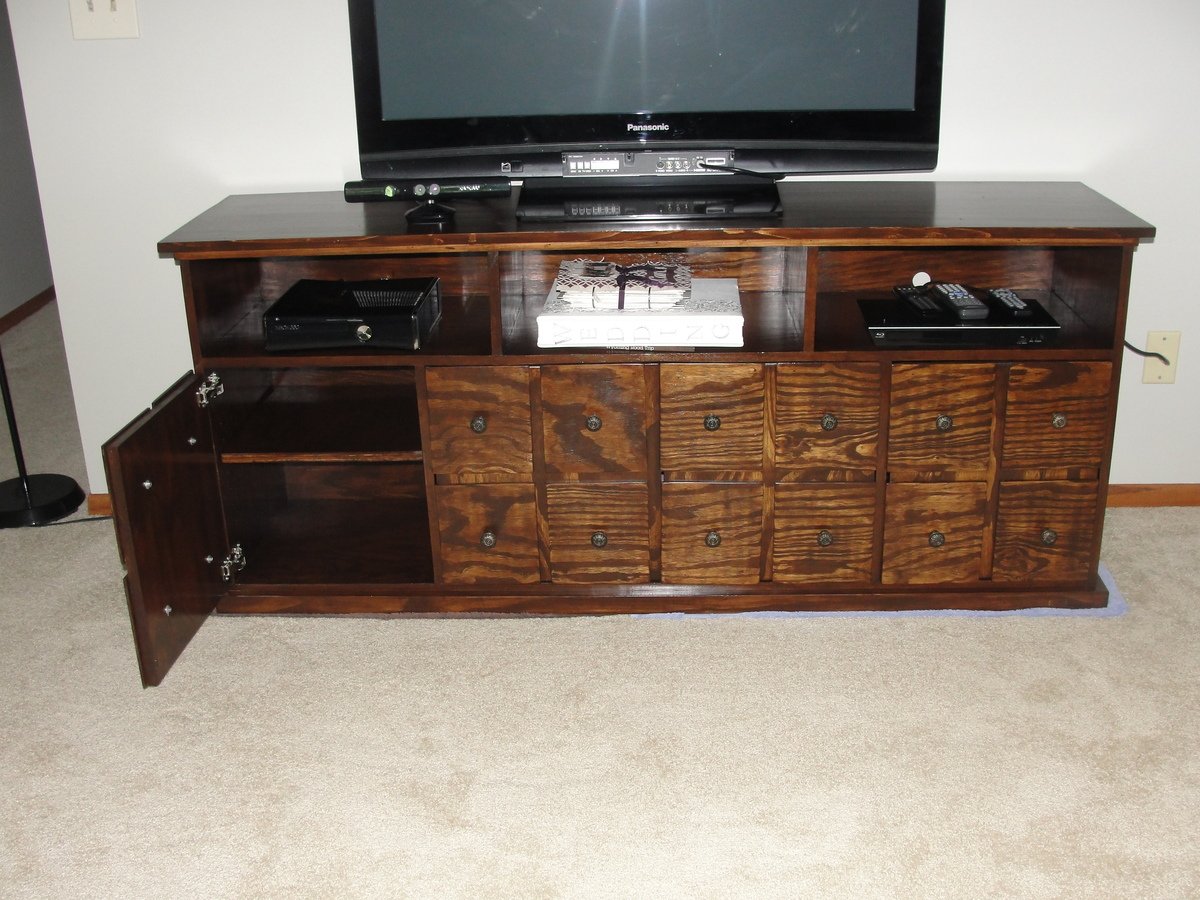
I completed this project using pine plywood for the body and doors and a pine board for the top. Modifications included omitting the drawers and adding doors instead. Side doors open up to adjustable shelves, which I used the Kreg Shelf Pin Jig to create the holes. The hardest part was fitting the doors. I would suggest waiting until the unit is build, then cut to size leaving space for your paint or polyurethane finish. The hinges are from Lowes and the knobs are from Hobby Lobby. I did add veneer edging to the front as well as the sides of the doors- this was a bit messy and I spent a lot of time sanding off the adhesive that seeped out the sides. I used an old iron I picked up at Goodwill so I wouldn't ruin my clothing iron.
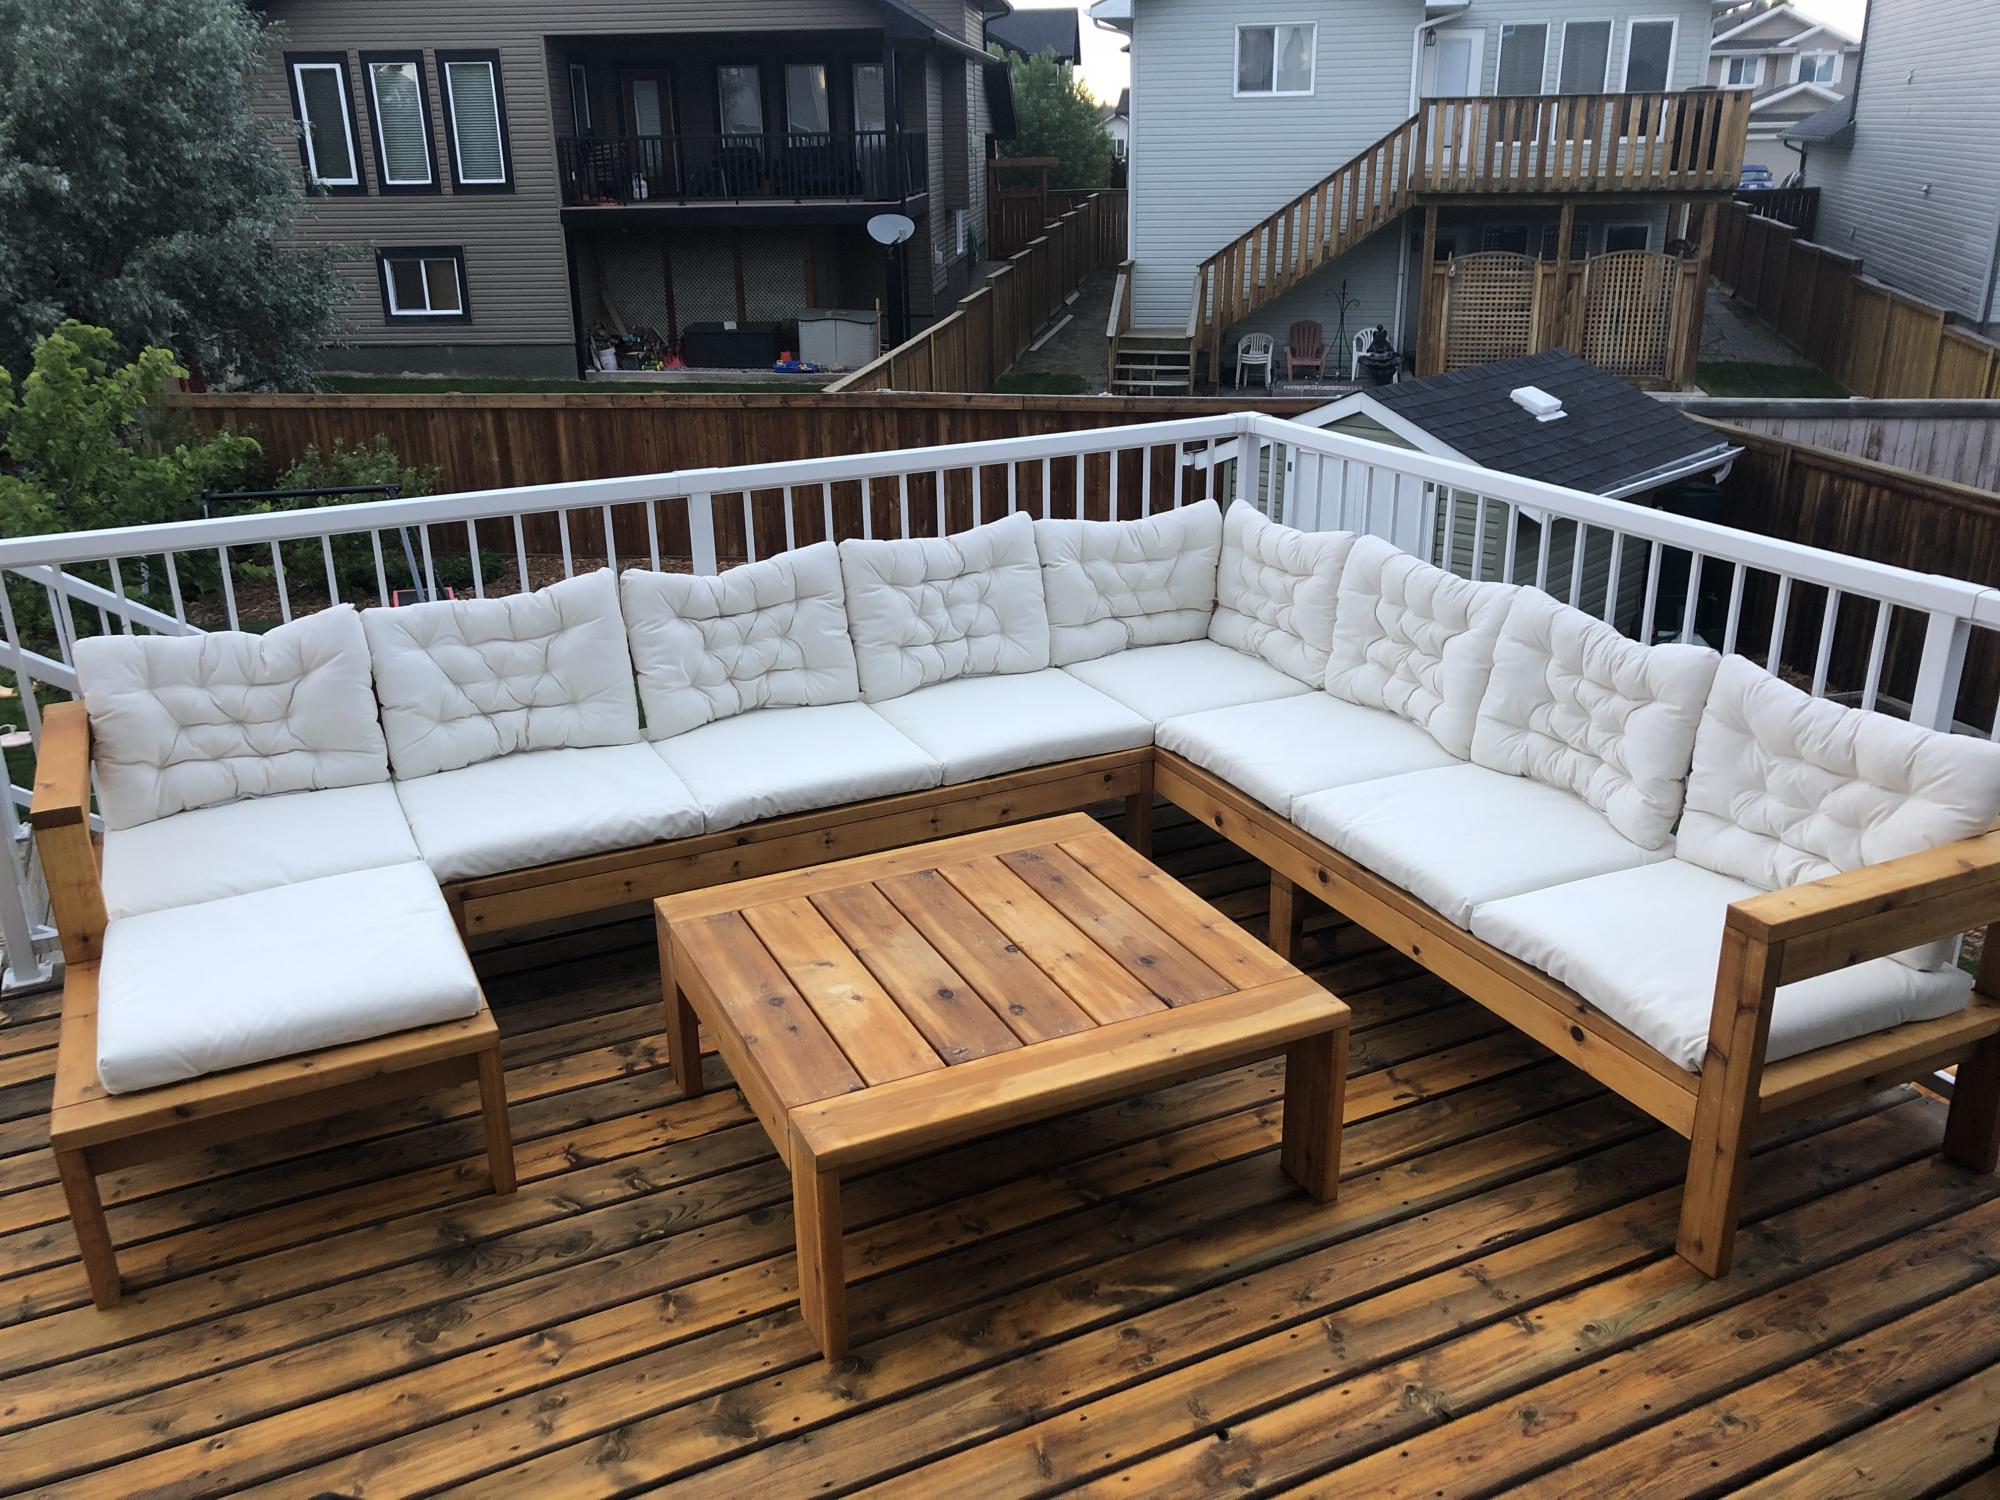
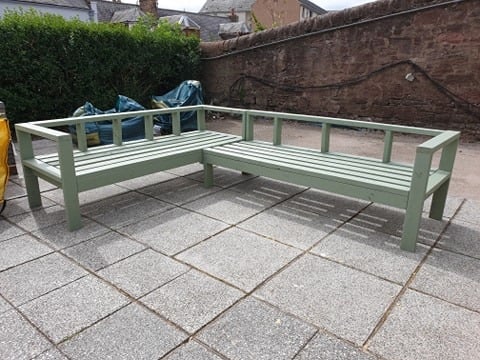
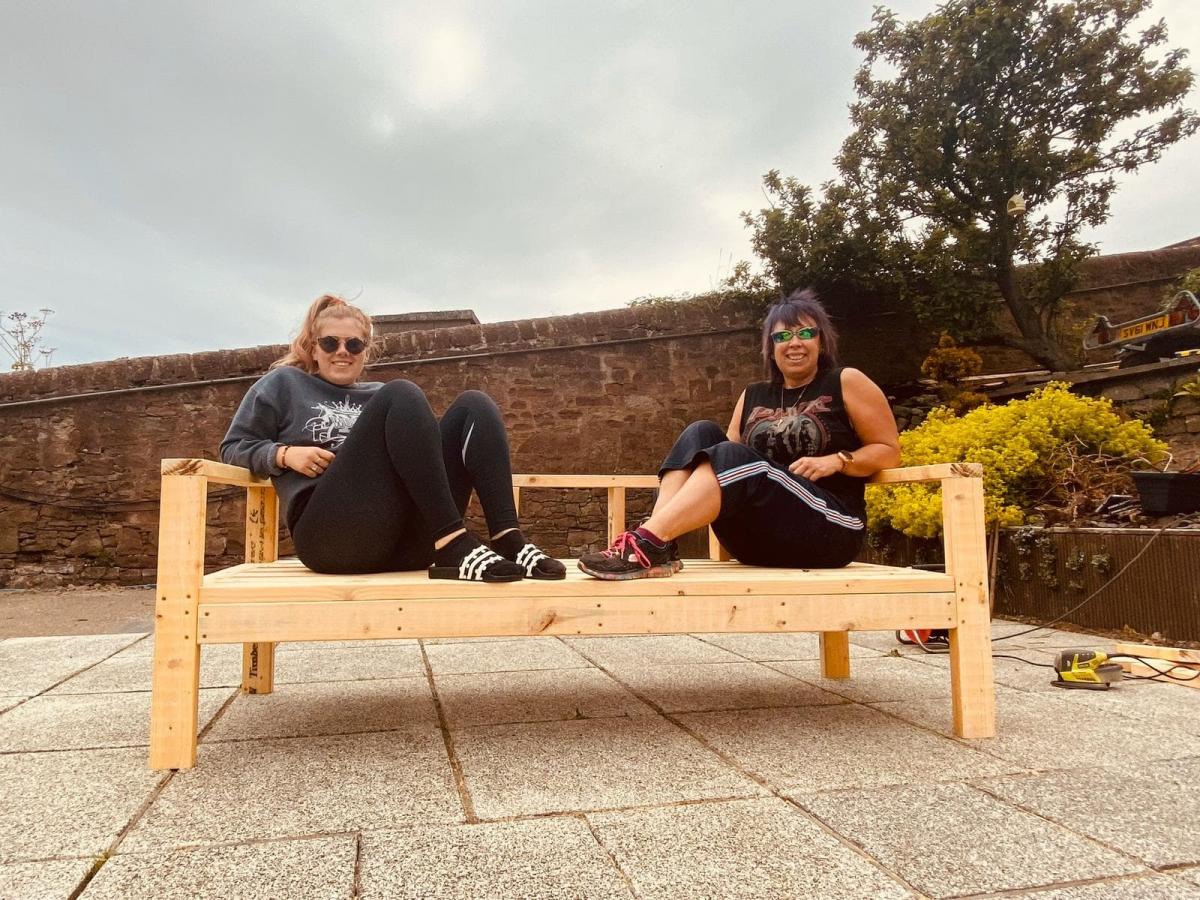
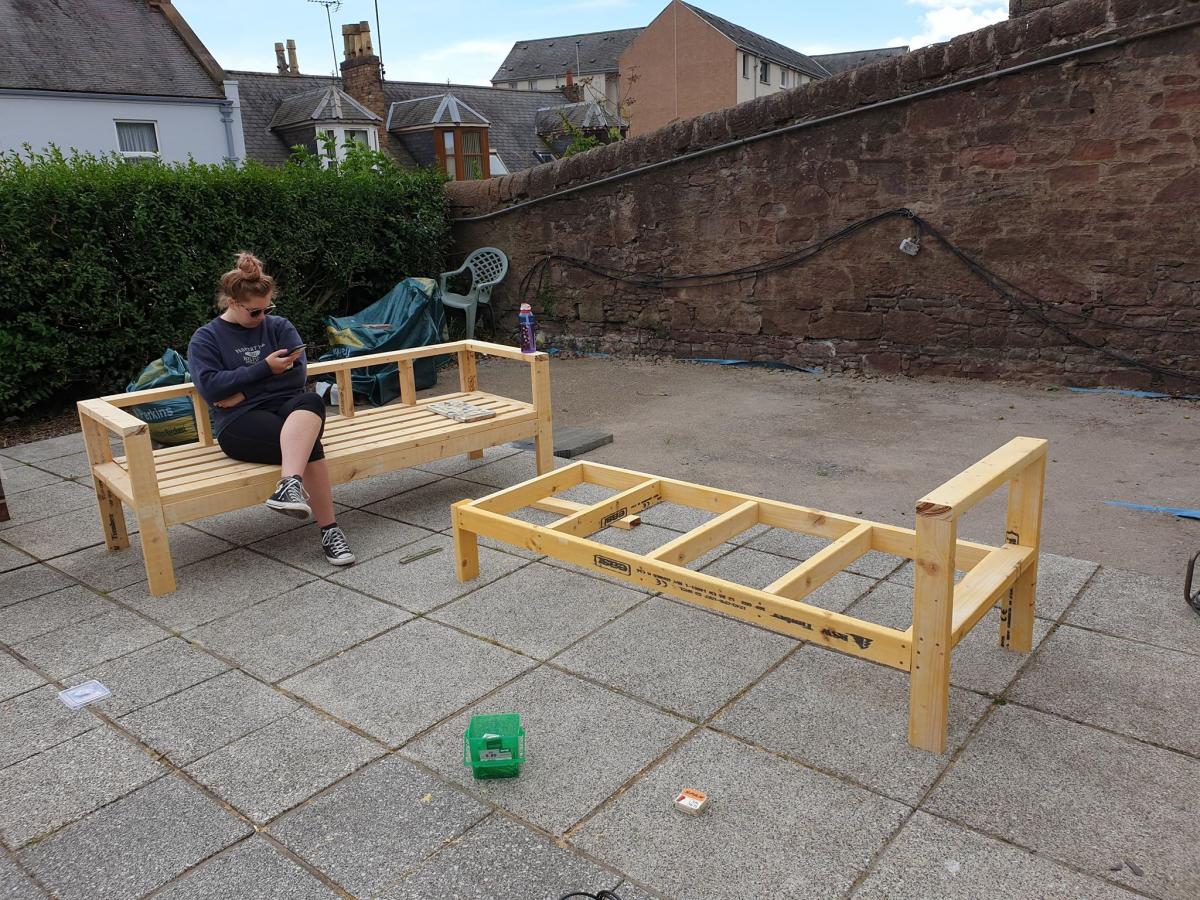
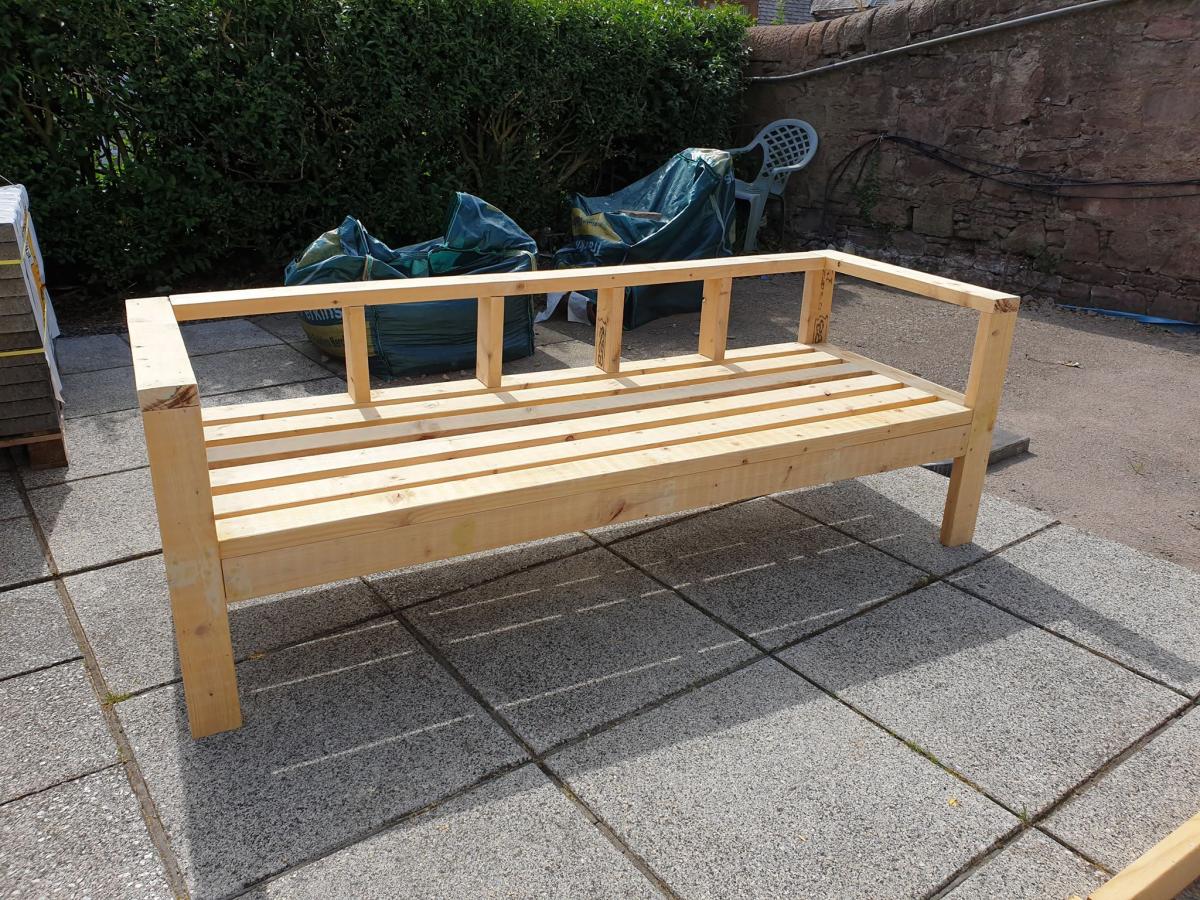
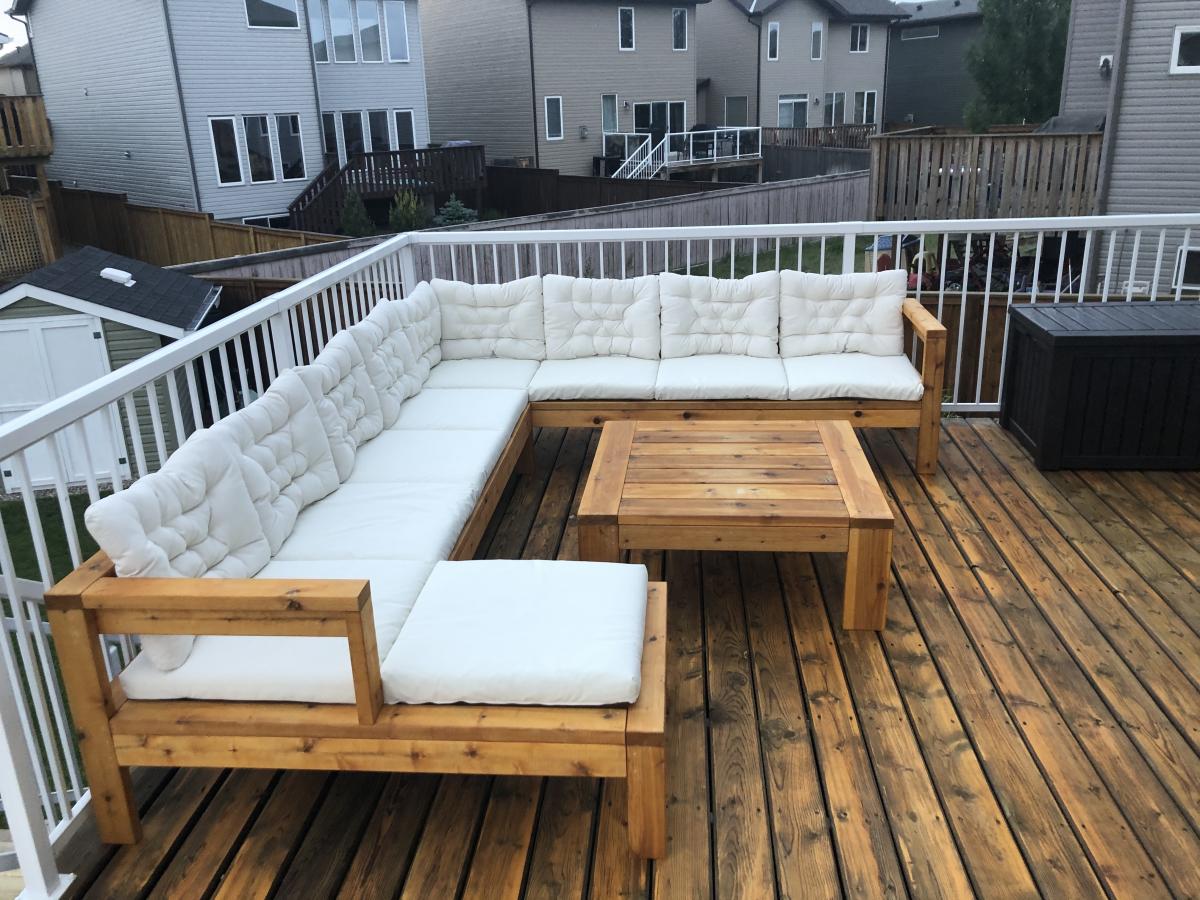
Modified the plans of the outdoor sofa and sectional piece to create this set, then added cushions from IKEA.
Wed, 02/21/2024 - 10:27
I'm building the sectional this weekend, and saw your addition to the end piece and am going to steal your idea. Very nice.
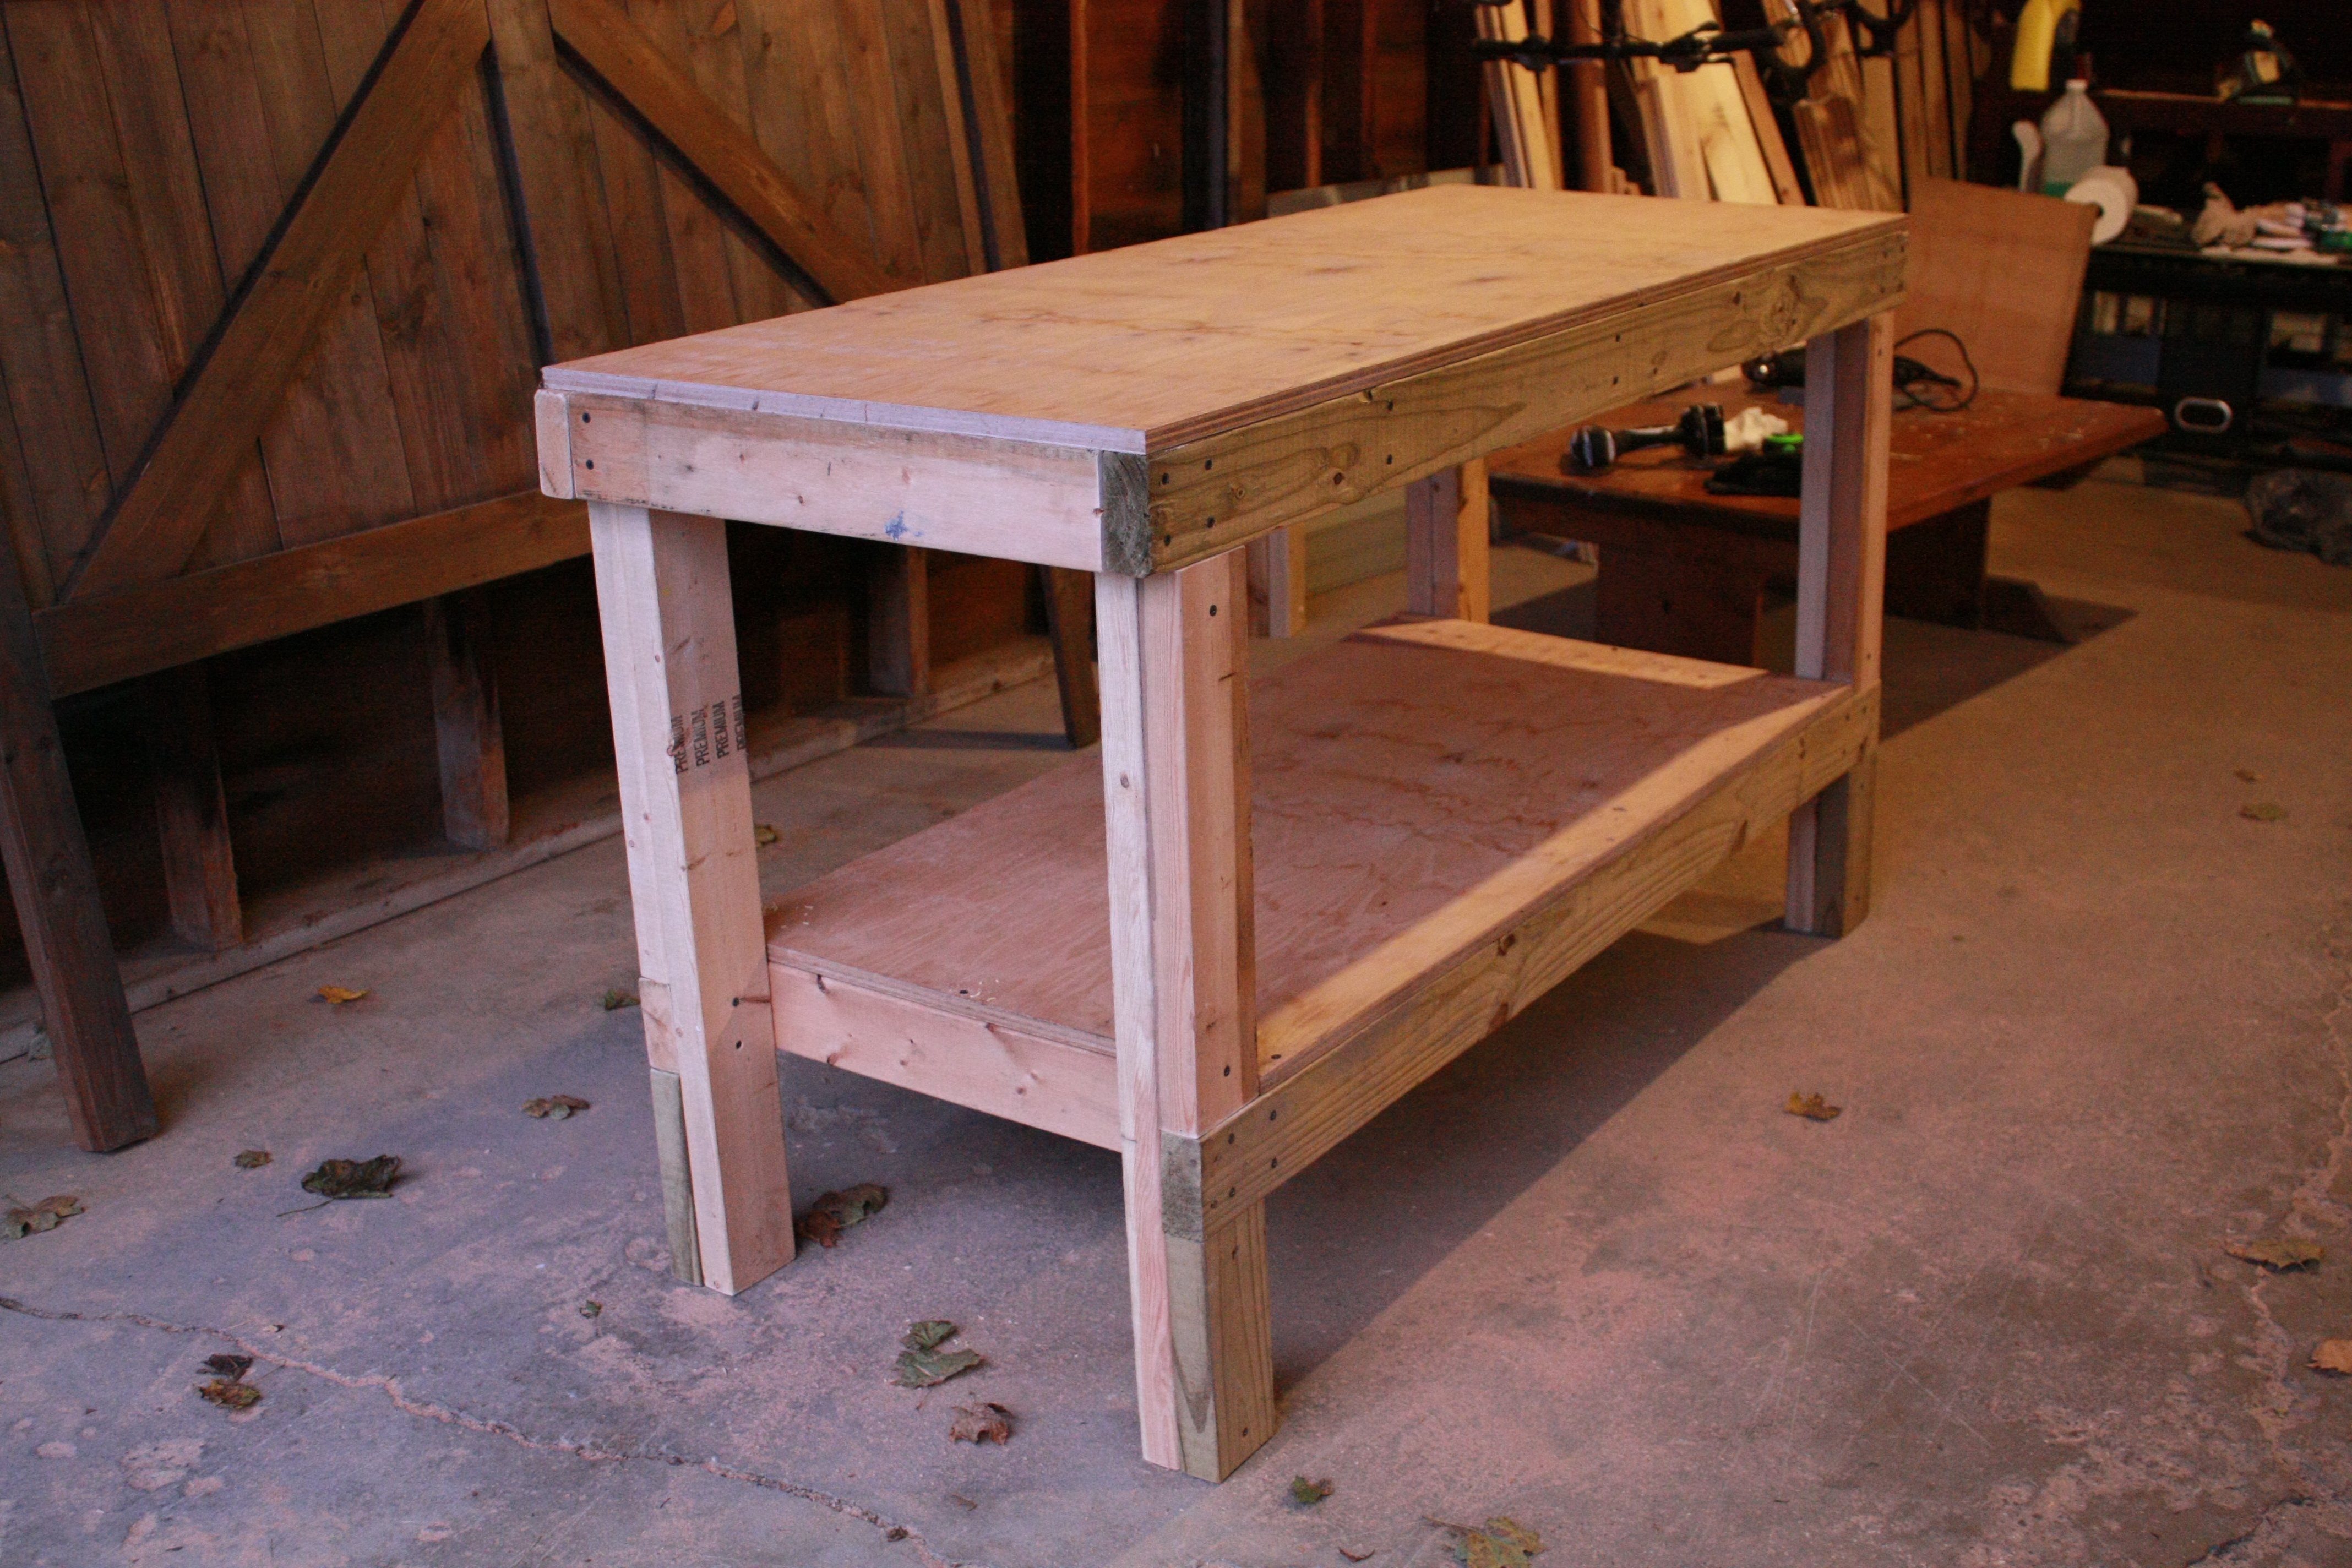
After diving head-first into this website and too many projects to mention, I decided it was about time to have a workbench. I received some free scrap wood from my neighbor so I spent a quick couple of hours putting this together. The plans were great and it went together very quickly. Looking forward to using this for more projects!
Sat, 11/24/2012 - 06:04
Hi Ana .. I`m lookin into building a single bed frame and head and foot board . Do you have any input that would help me along the way here.. Any info would be great . Love your work . and you look great as alway`s . Thanks in advance , and hope to hear back from you soon. Bye for now , and be safe .. Claude . G :-)

I used a combination of the farmhouse table and the tryde coffee table (but on a larger scale). I don't have a Kreg drill or any of that and so I just screwed from the top side down. Since I knew the screws would show, I decided to take a platinum/shiny silver Sharpie to color over the screw heads to make them stand out.
The legs were a 2x4s glued and screwed together. Can't find any untreated 4x4 at the local Lowes or Home Depot, so this was my next best option.
I used a few coats of Rustoleum Dark Walnut and then Rustoleum Semi-Gloss poly.
I have since made a new bench with the same main design, but just to a small scale. Also, I did it opposite of the top. The table is 2x4 with 2x6 breadboard ends. The bench is 2x6 with 2x4 breadboard ends.


Mon, 10/22/2012 - 09:12
It is just regular whitewood 2x4s glued and screwed together. Then I just used wood filler to make it look llike a 4x4.
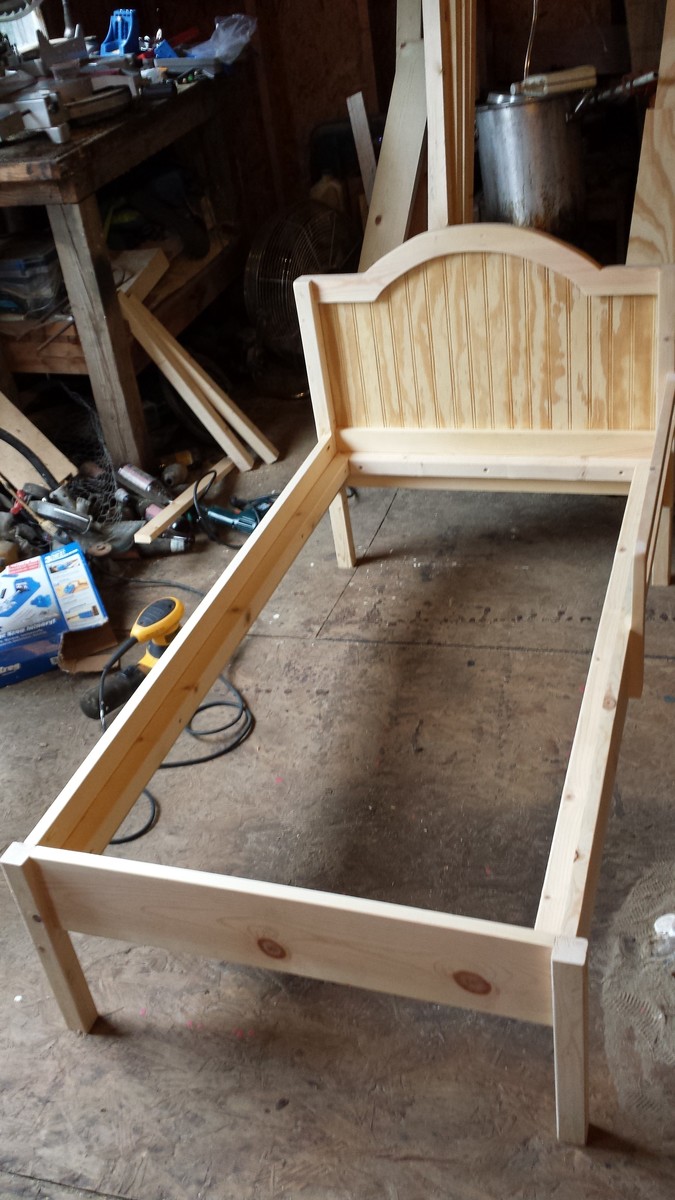
This is The Traditional Wood Toddler Bed. Built straight from the plans. Worked out great and my daughter loved it!
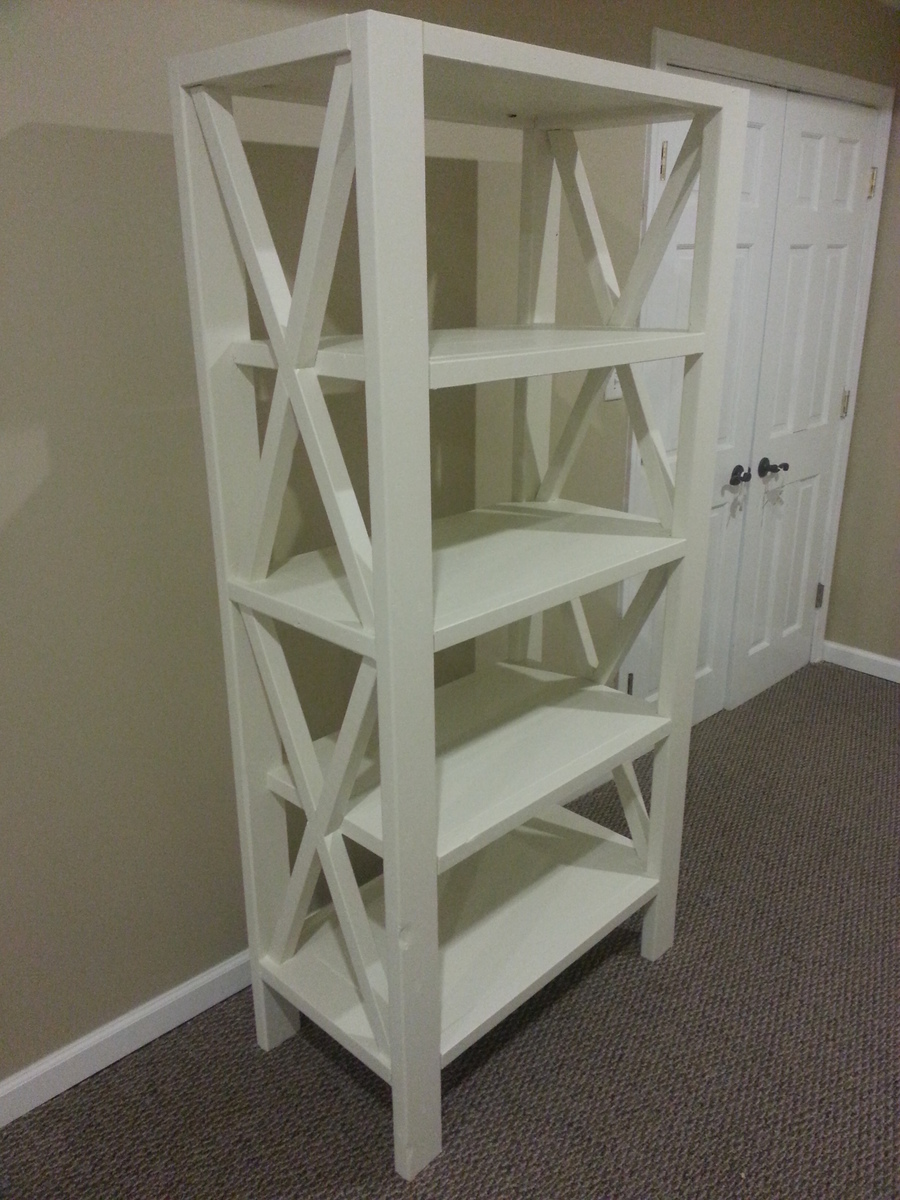
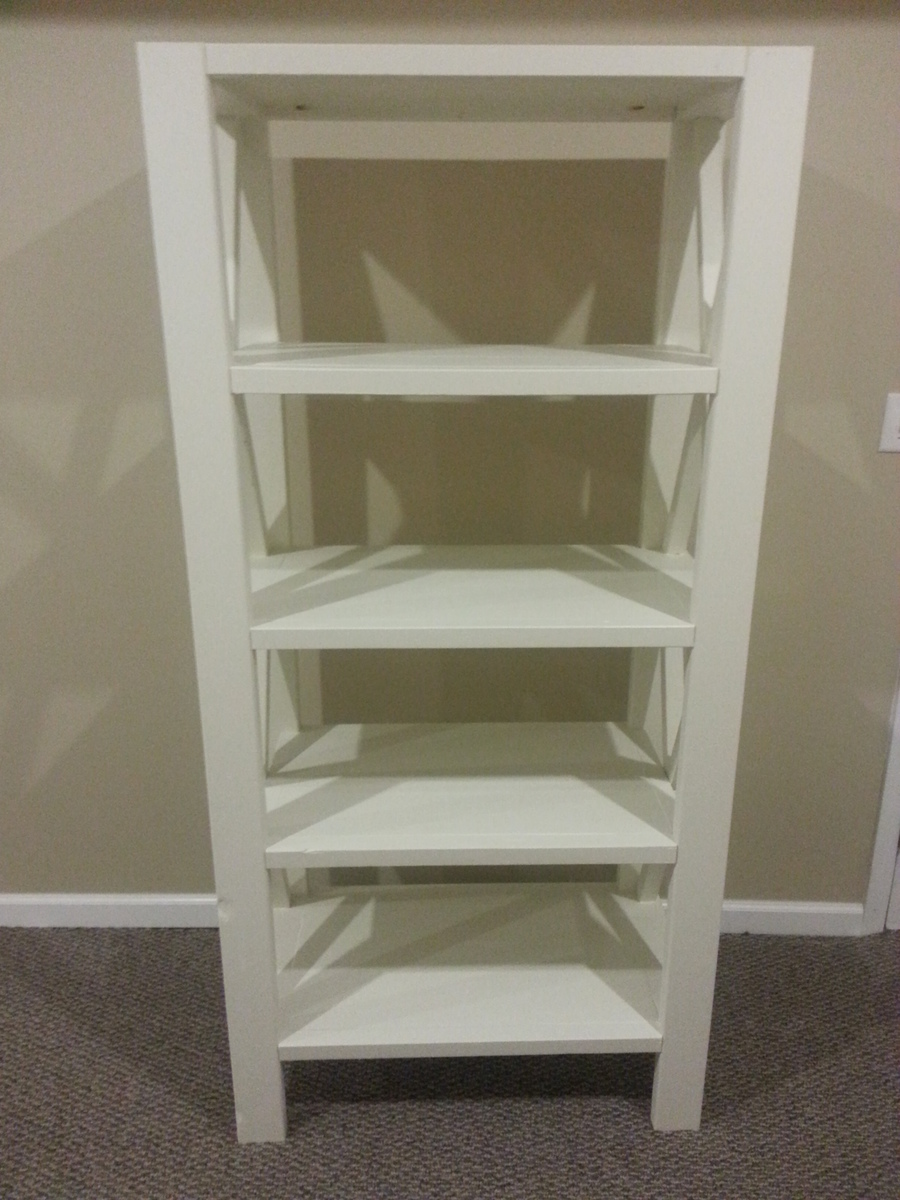
X Bookshelf. Followed Ana's great plan, only change was to spare 1x4s that I planked for shelves. Finished with antique white milk paint. Very happy with result.
My first furniture project. Made the 4x4 Truss table and matching benches. I used cedar for the 4x4’s as they are the only kind of untreated 4x4’s available here other than knotty pine for $9 a foot. The rest is spruce as that’s what most dimensional lumber here is. The only changes I made were to the pocket holes. I didn’t feel 2 on 1 side would be a tight enough joint so for the table I put them where the plans called for them and then 2 more on the opposite side. I filled in the visible pocket holes with 1/2 dowels and sawed them off flush
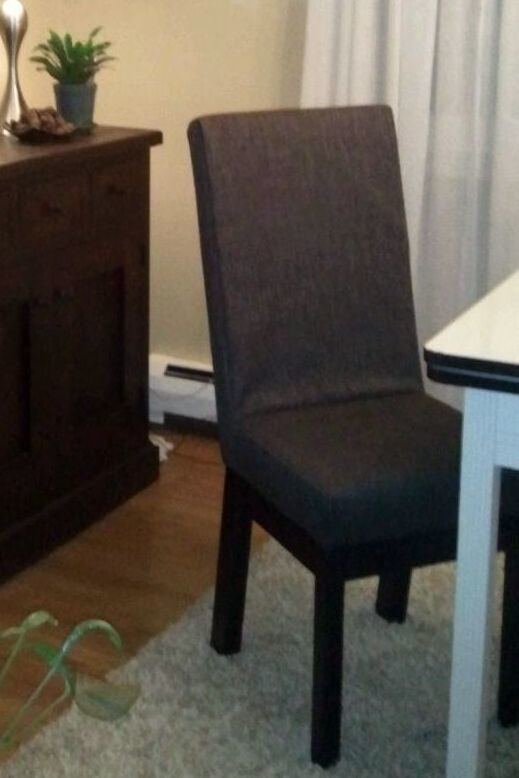
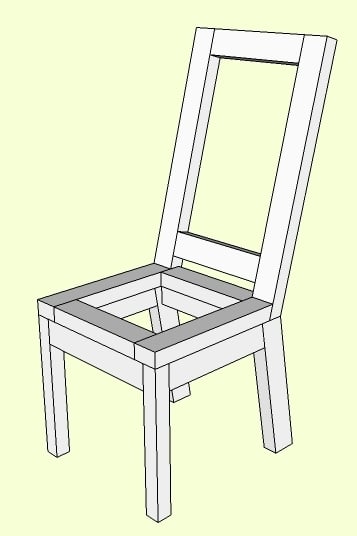
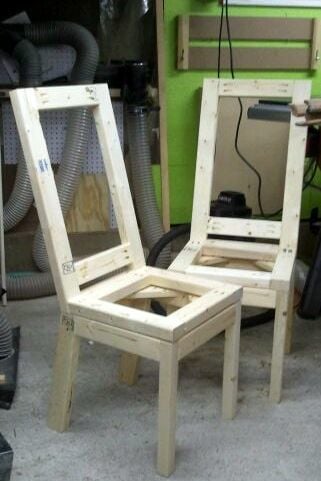
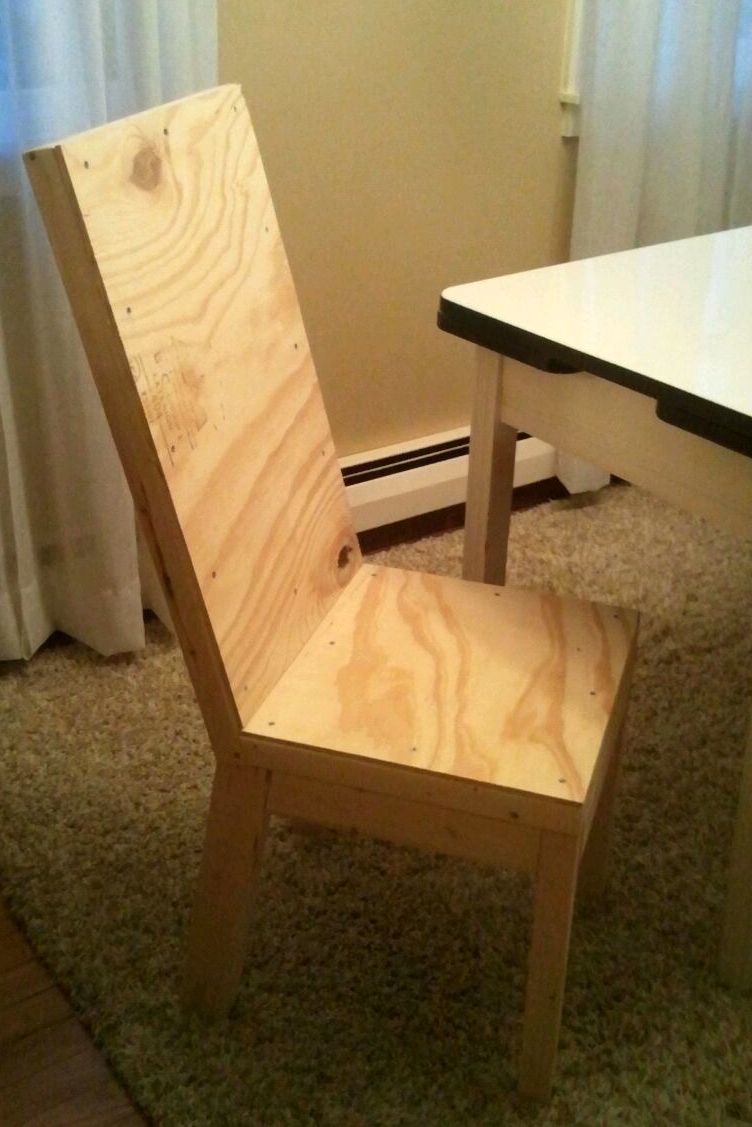
I bought some cool Parson Chairs to use with my grandparent's 1950s style porcelain top table. Unfortunately, the chairs were way too big to fit between the legs of the table. My friend said she was surprised I didn't build my own chairs in the first place... that's when I remembered seeing a Parson Chair plan on Ana White! I liked the overall design of the chair in the plan, but I wanted to make some changes to make it my own. I made the chair narrower to fit between the legs of my table, changed the angle of the rear legs from 15 degrees to 10 degrees, increased the rear legs from 2x2s to 2x3s and made the back taller. This was my FIRST sewing project and I'm really pleased with the way it turned out!
Wed, 01/02/2013 - 06:25
These look beautiful! Would you mind giving me your opinion on their comfort to sit in? Also, do you mind sharing where and what kind of foam padding you used for the seat? Thank you - and great job!
In reply to A question, please... by mikejillnelson
Wed, 01/02/2013 - 18:32
Thank you! They are actually really comfortable to sit in and no one believes I made them! I'm 5' 4", so I should mentioned that I shortened the leg to 14.5" and also shortened the measurement for the depth of the seat to 14". I got a high density foam chair pad from joann.com, but they are also available in the JoAnn store. I cut the chair pad to fit my seat with an electric kitchen knife then wrapped the chair pad with 1/2" batting (got that in the JoAnn store). Hope that helps. Let me know if you have any other questions. Thank you again for your compliments!
Wed, 06/26/2013 - 15:44
How much narrower and how much taller did you make the chair? I LOVE your design much more than the original. The narrower frame and taller back make it look much classier in my opinion. Please get back to me when you can. Thank you!!
Tue, 11/26/2013 - 18:03
Sorry I didn't see your question earlier... thank you for the compliments on my redesign :) I posted a new pic with the dimensions for the back and seat. Thank you again and let me know if you have any other questions.
We built 2 XLarge Porch Benches,they where easy to build & look fabulous! Best part was it was a fraction of the cost if I were to buy these new!!! Thank you Ana!!!
-Sandra

After Xmas I decided we needed a better place to keep our growing collection of board games. I made mine a bit deeper to fit our longer board games. Also, put a 3rd door on it. We also needed a central place to charge our phones and tablets. Paired with the top of the bedside charging table this cabinet is the perfect solution. Thank you!