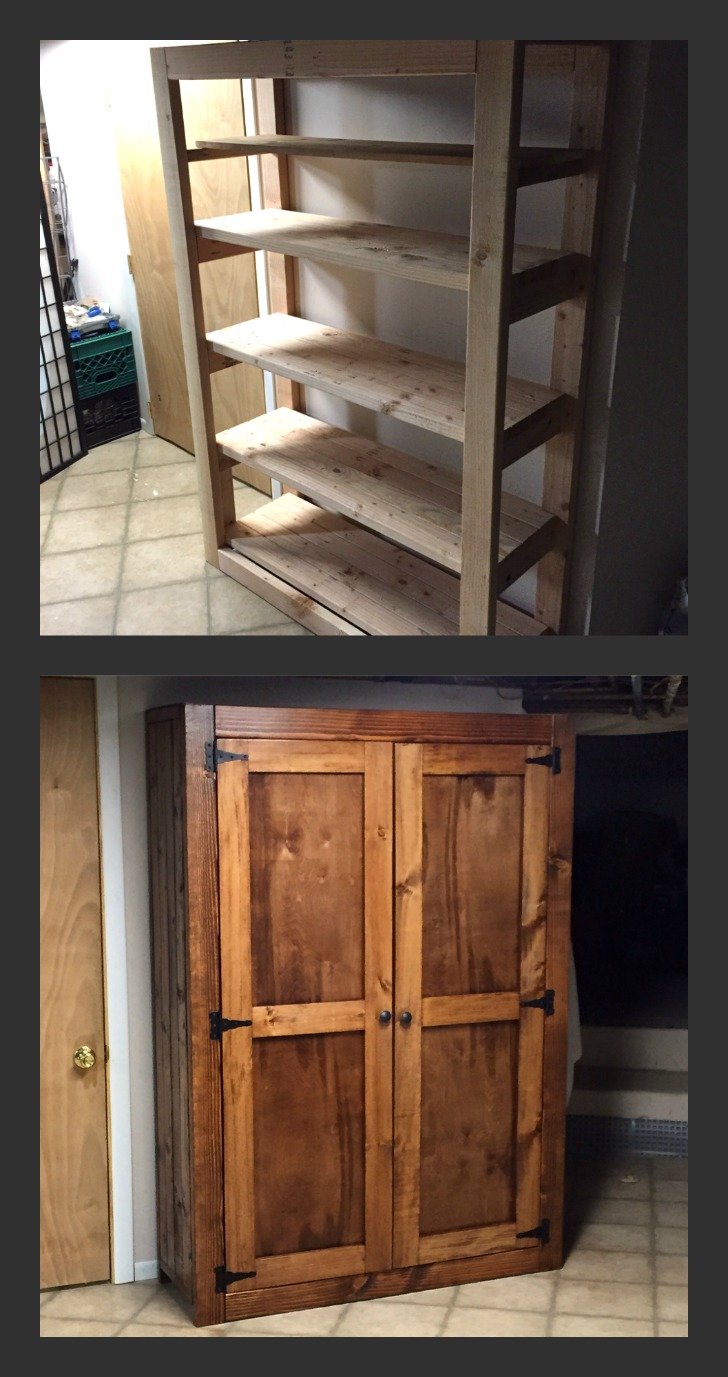
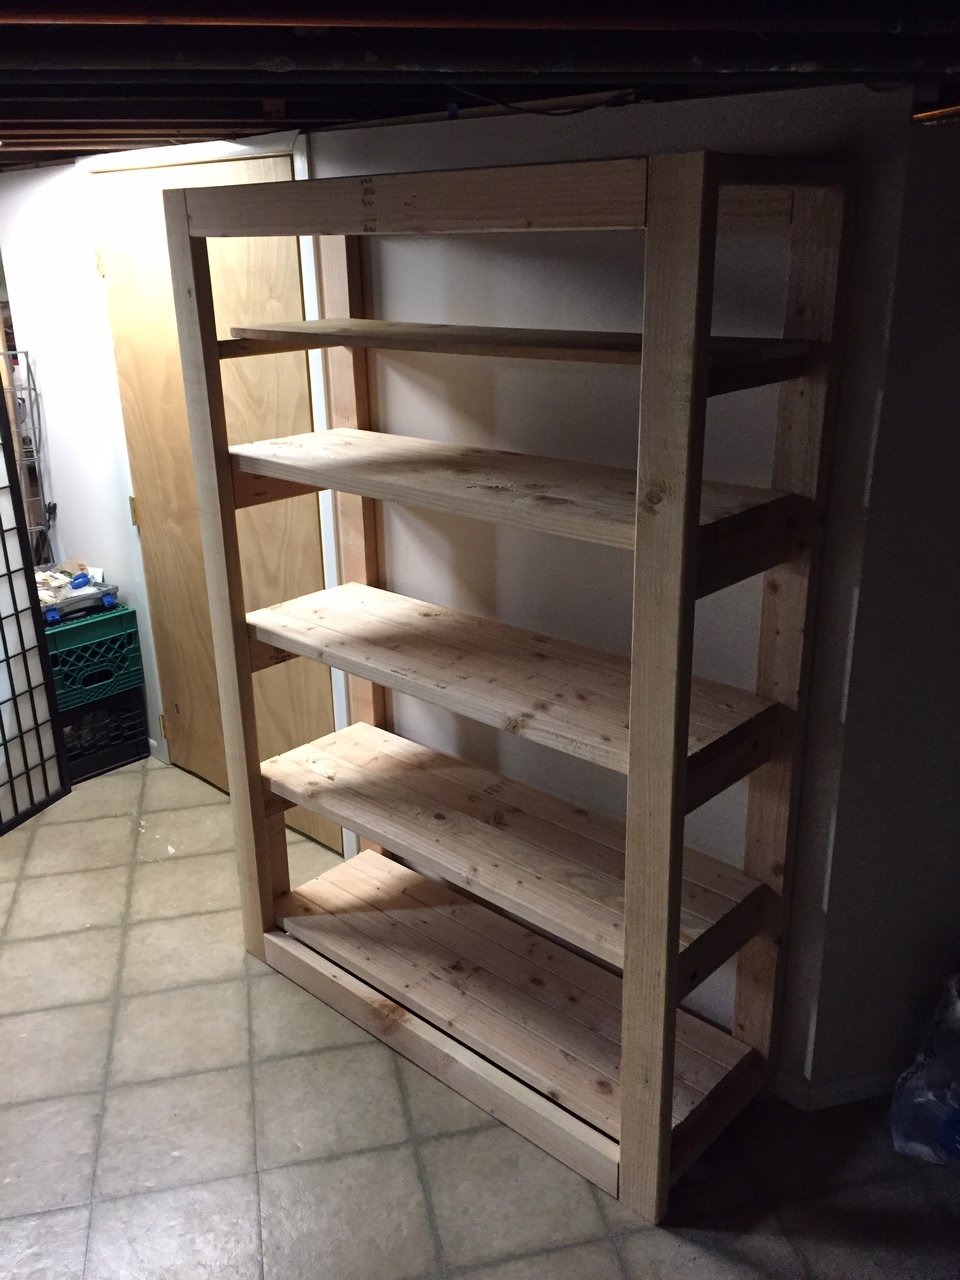
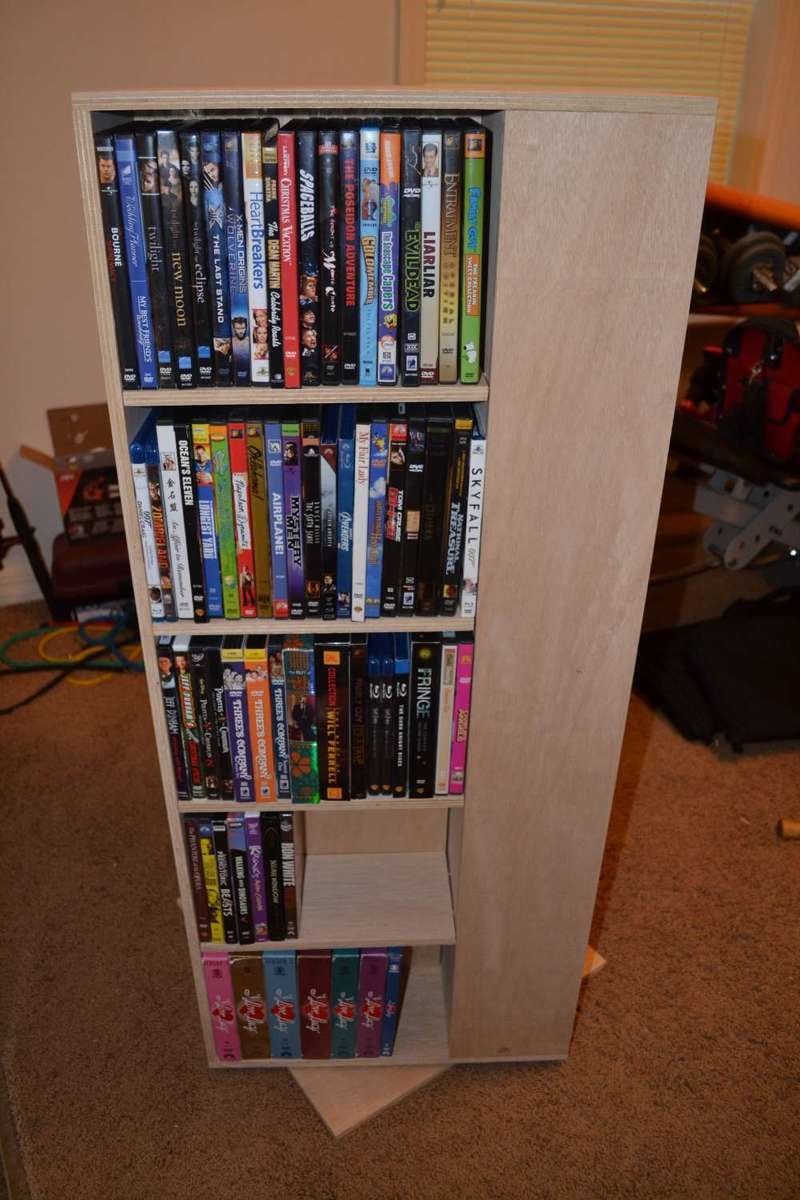
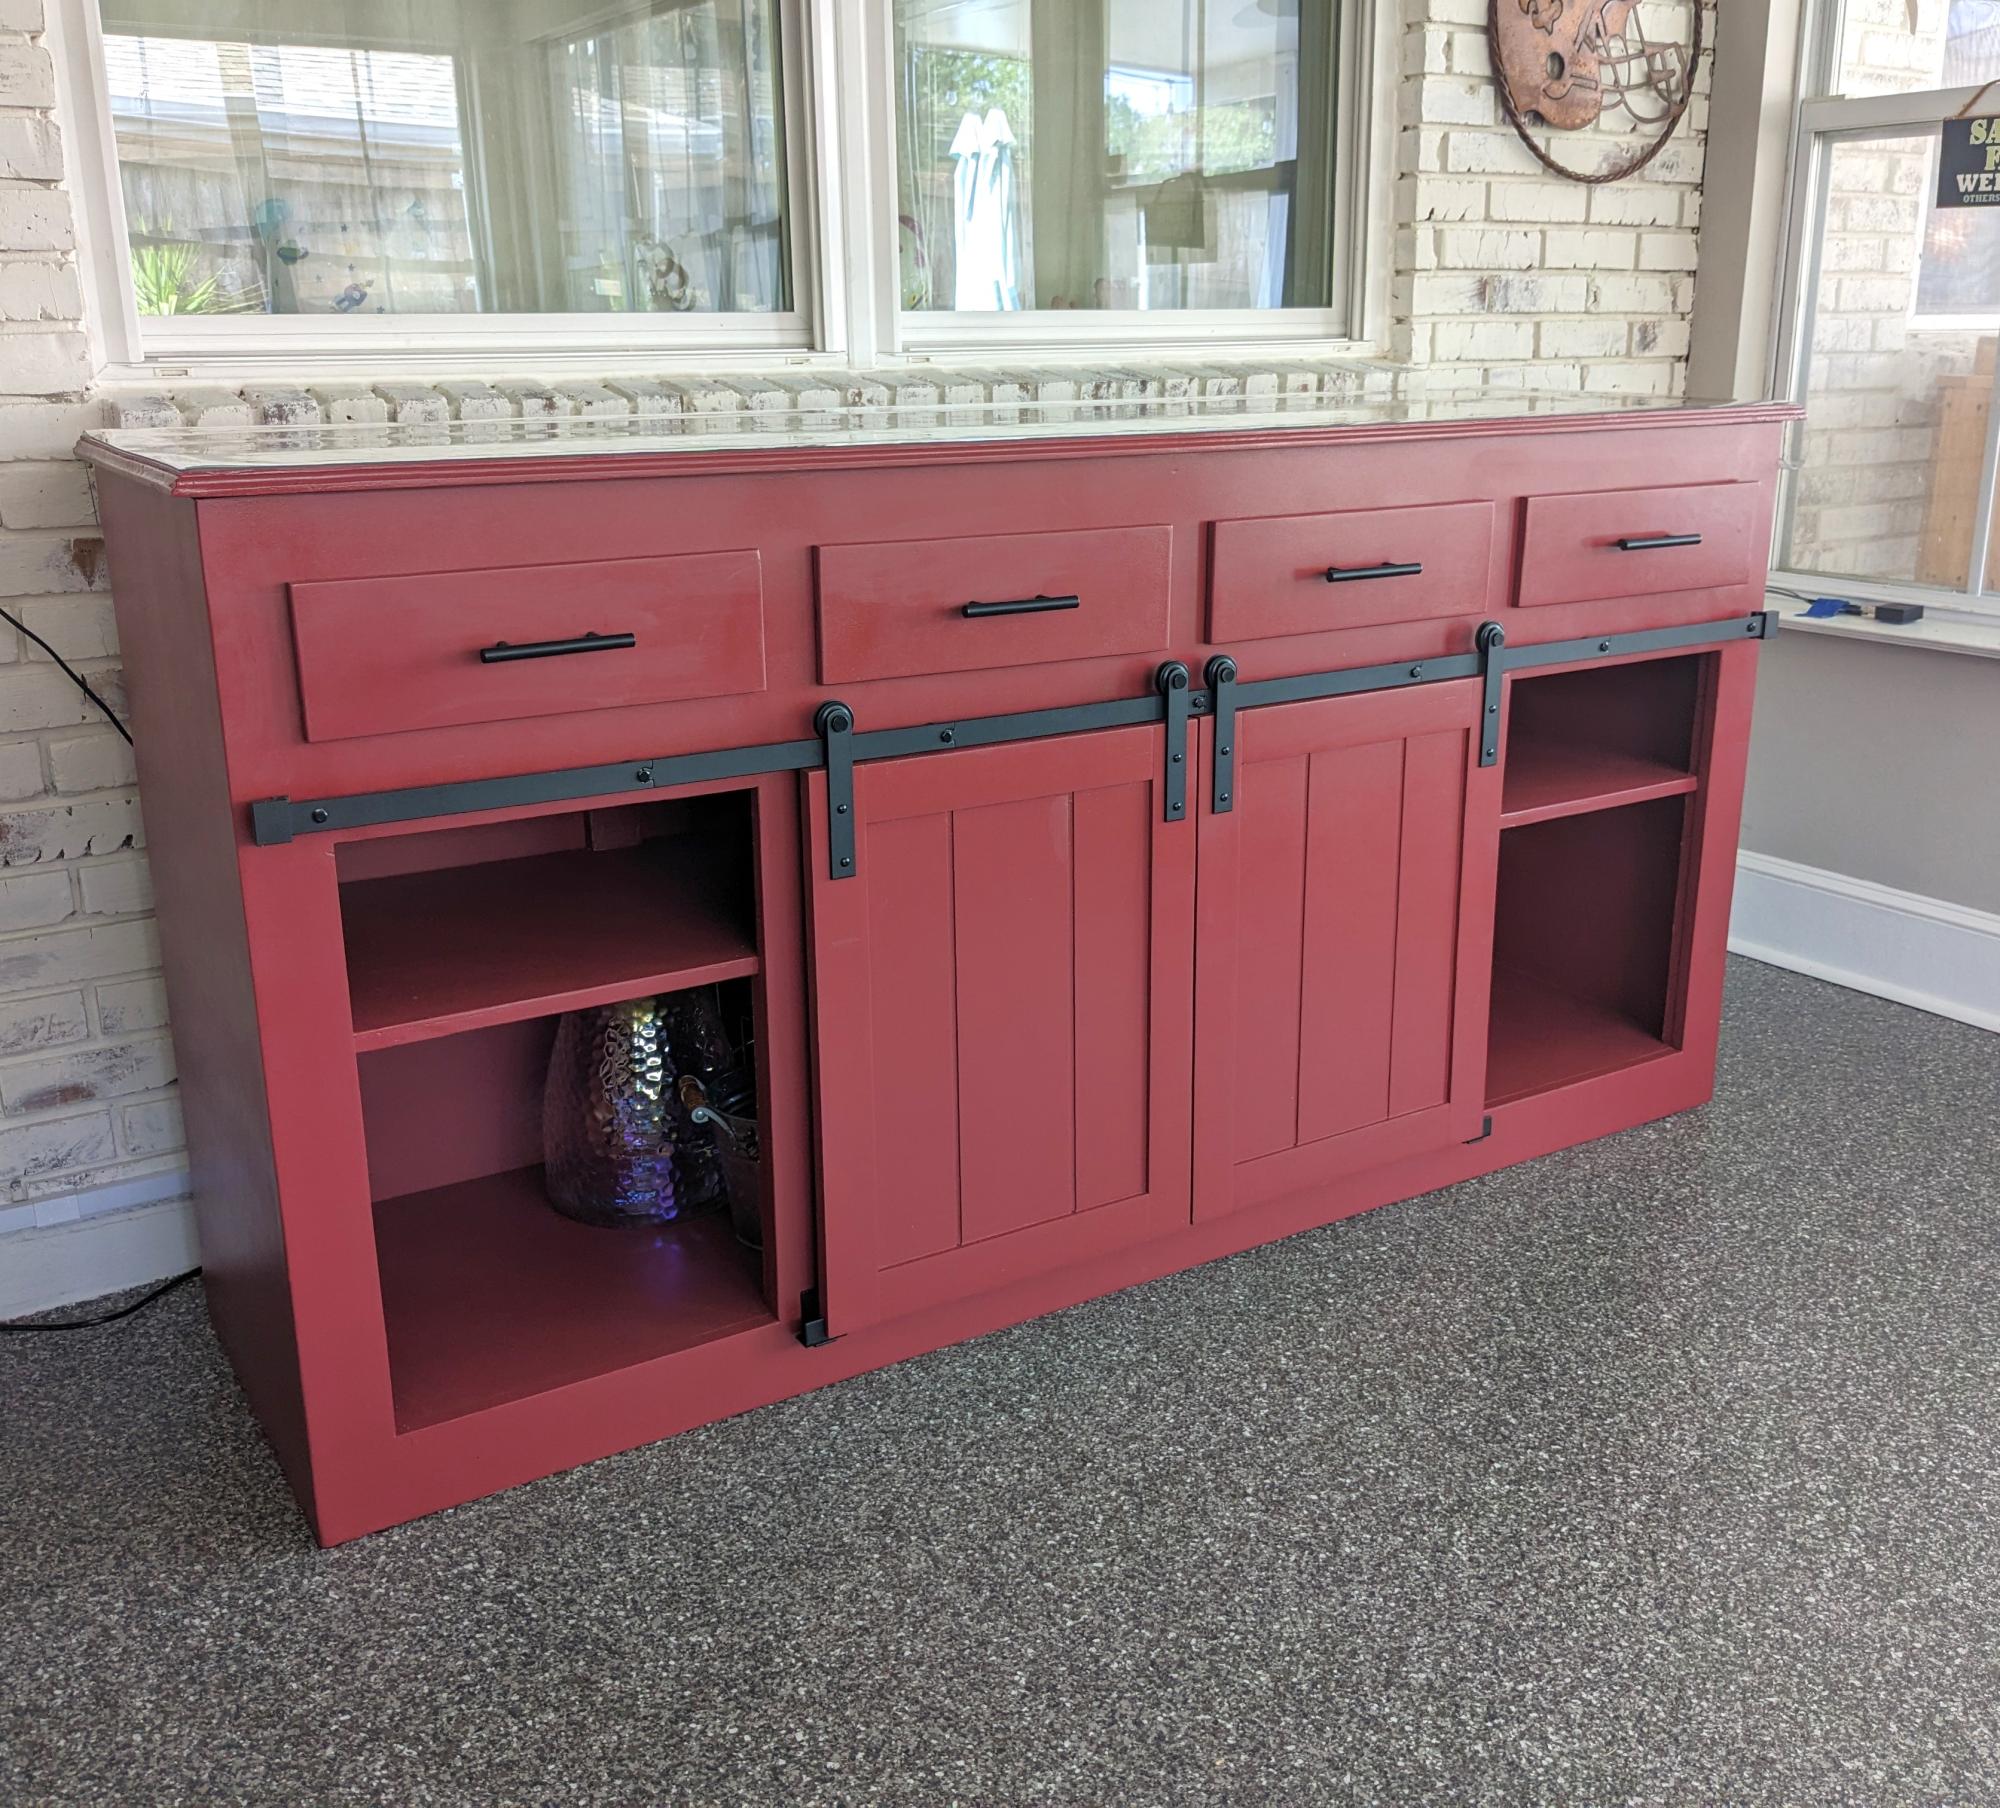
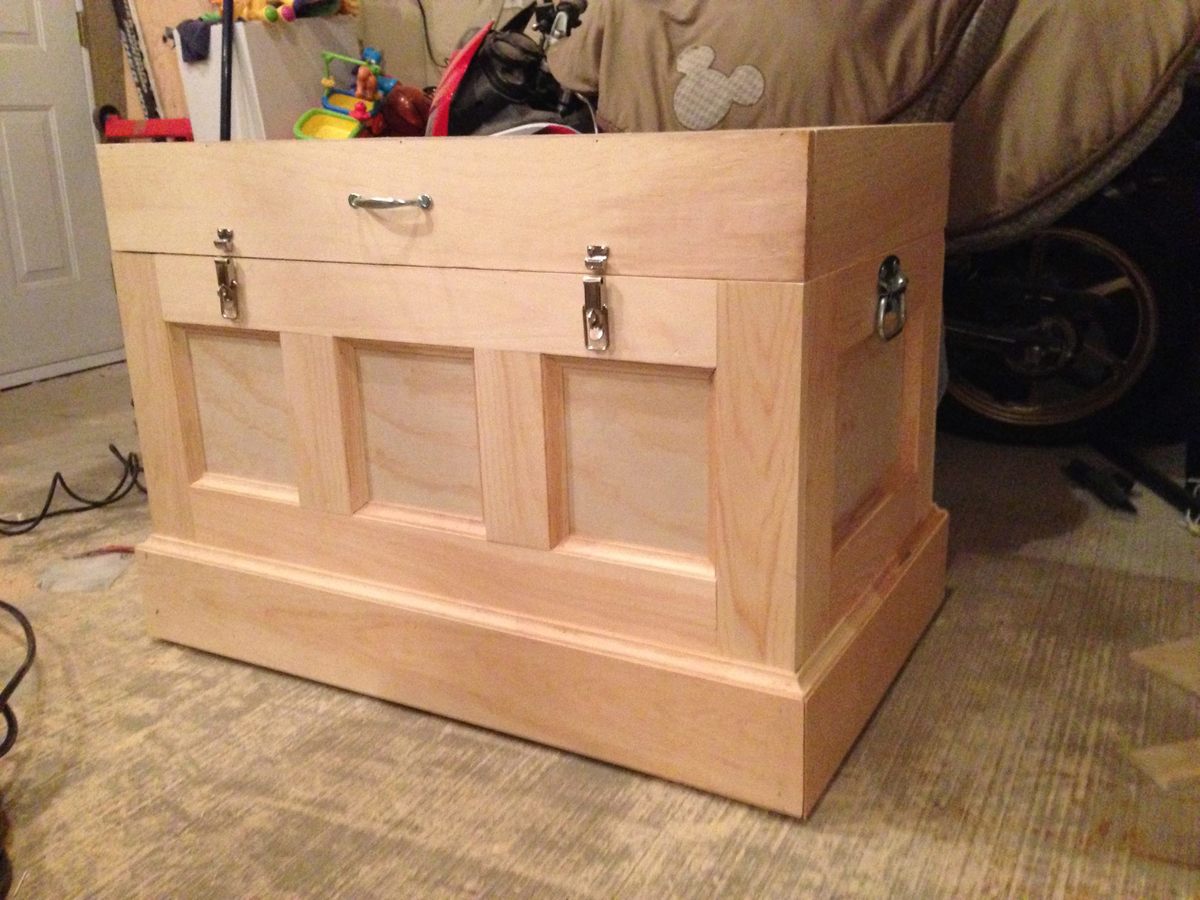
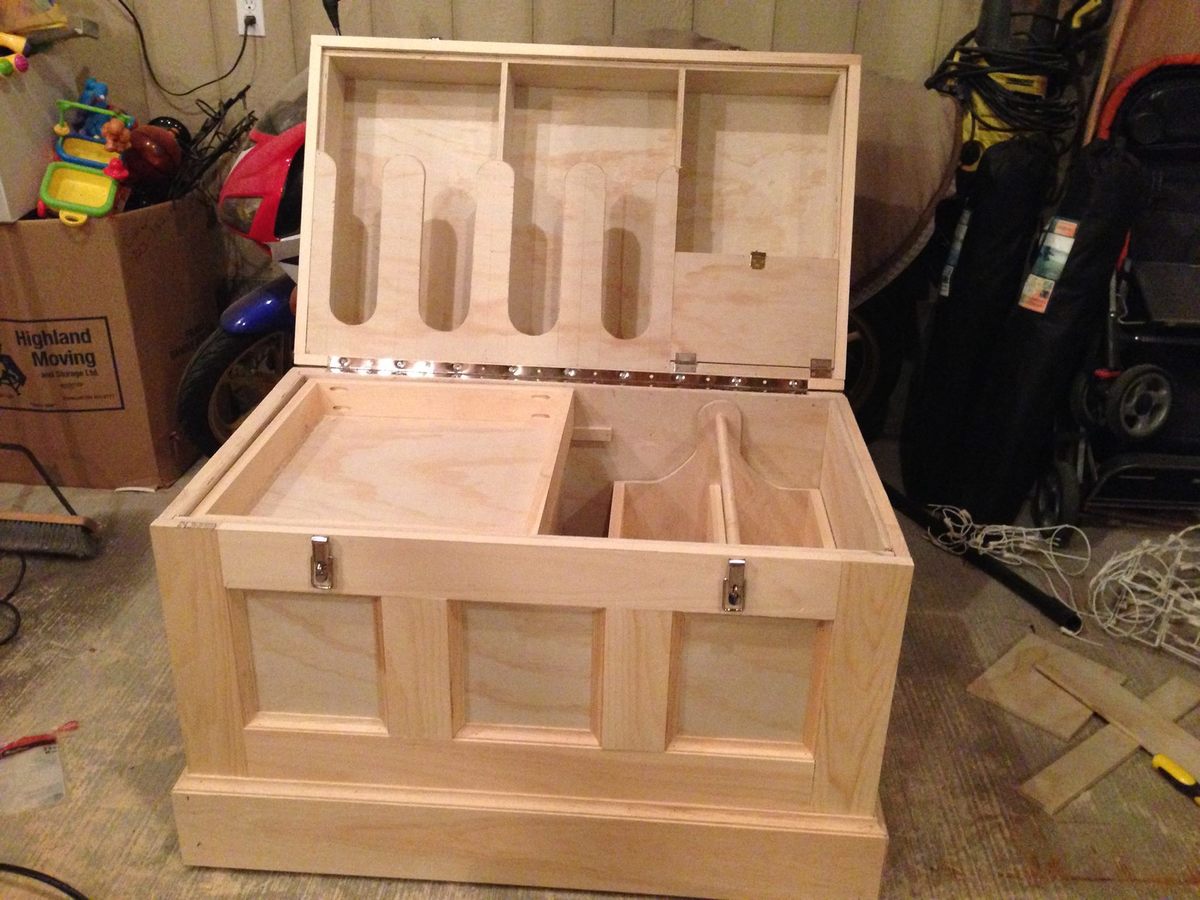
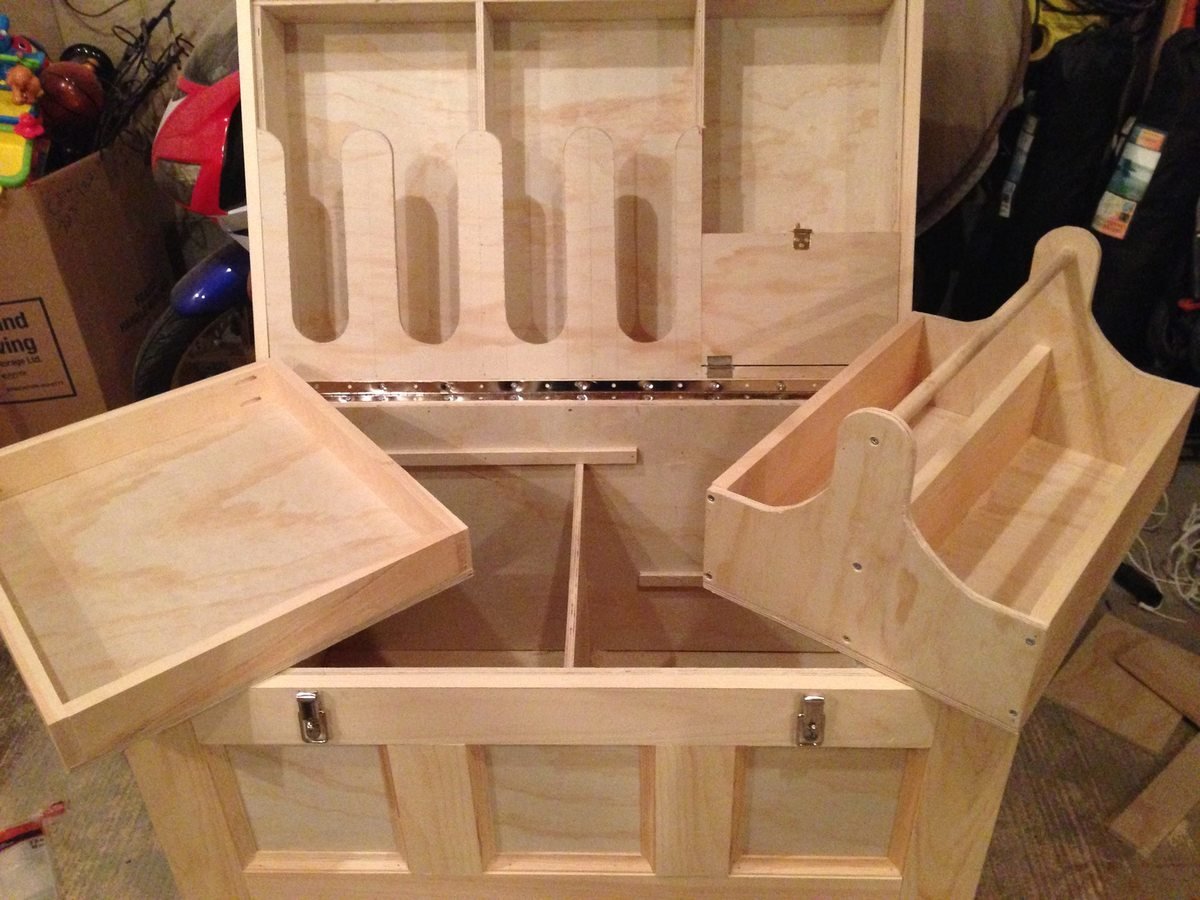
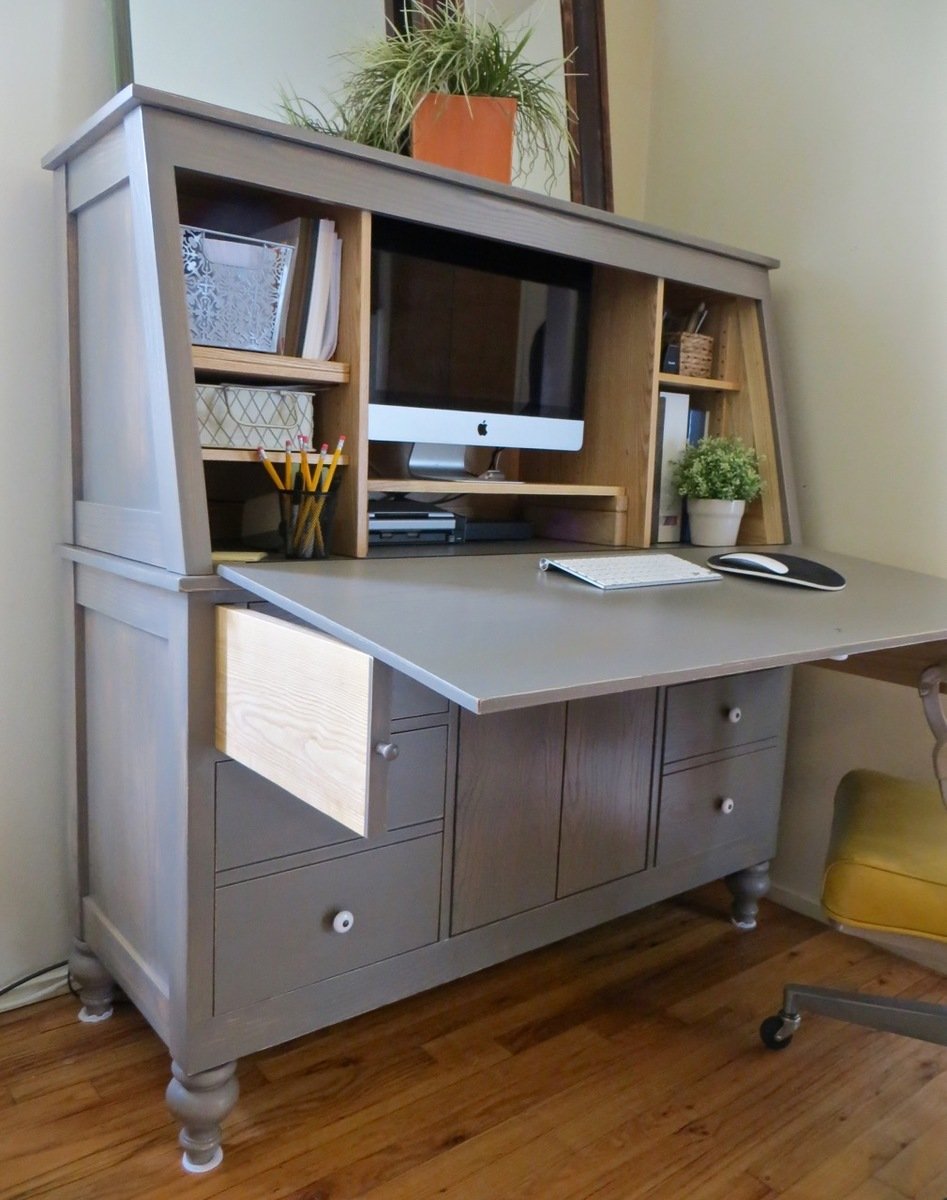
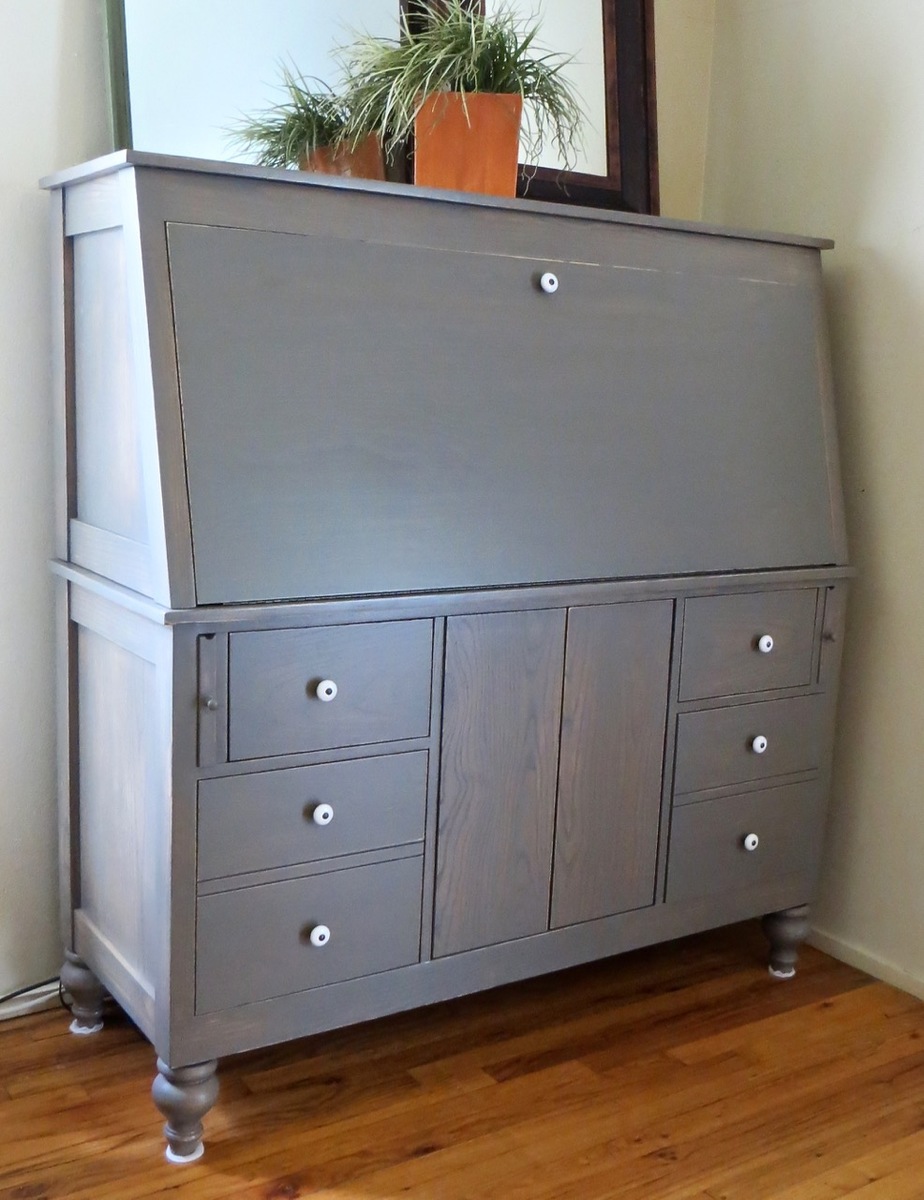
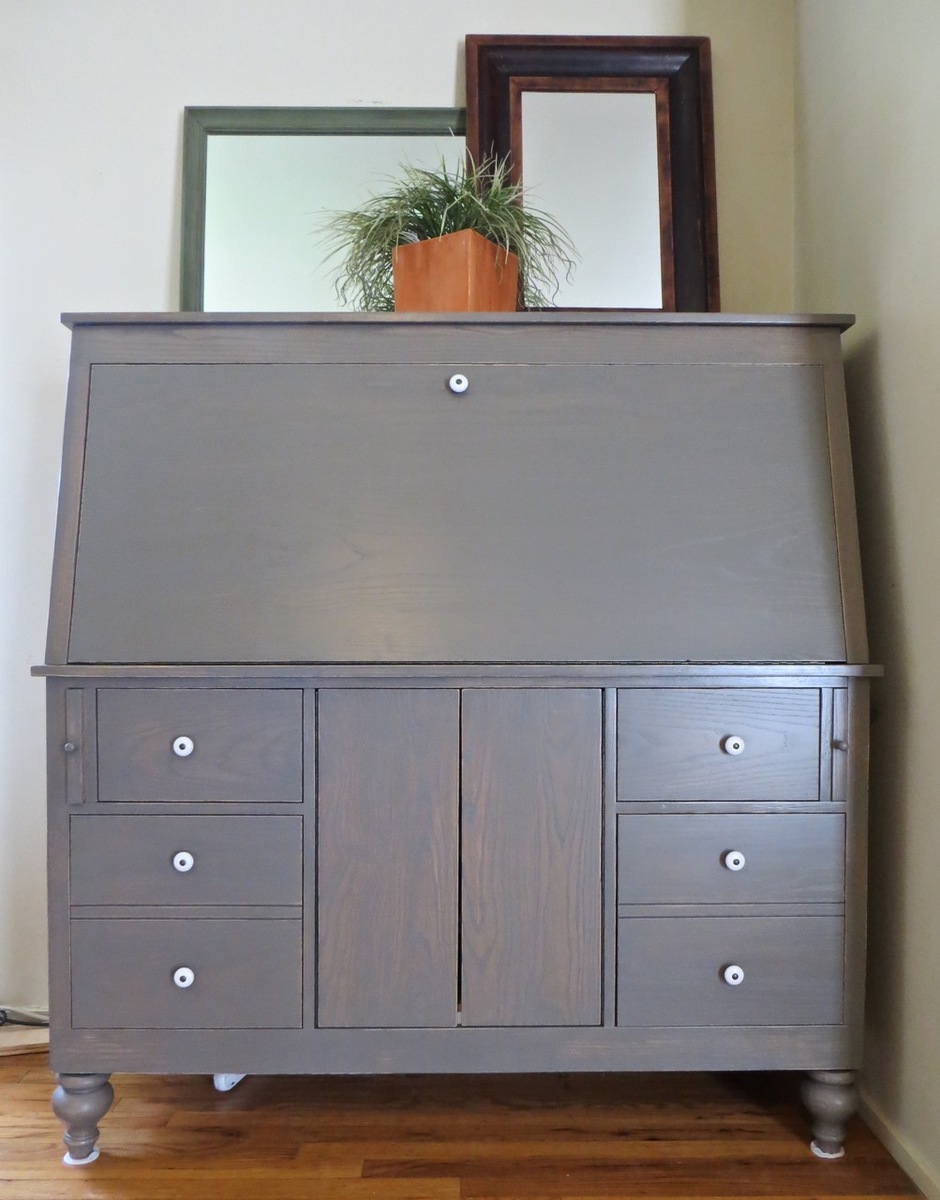
Community Brag Posts

2x4 DIY Pantry

Submitted by Michael K on Thu, 08/15/2019 - 11:50

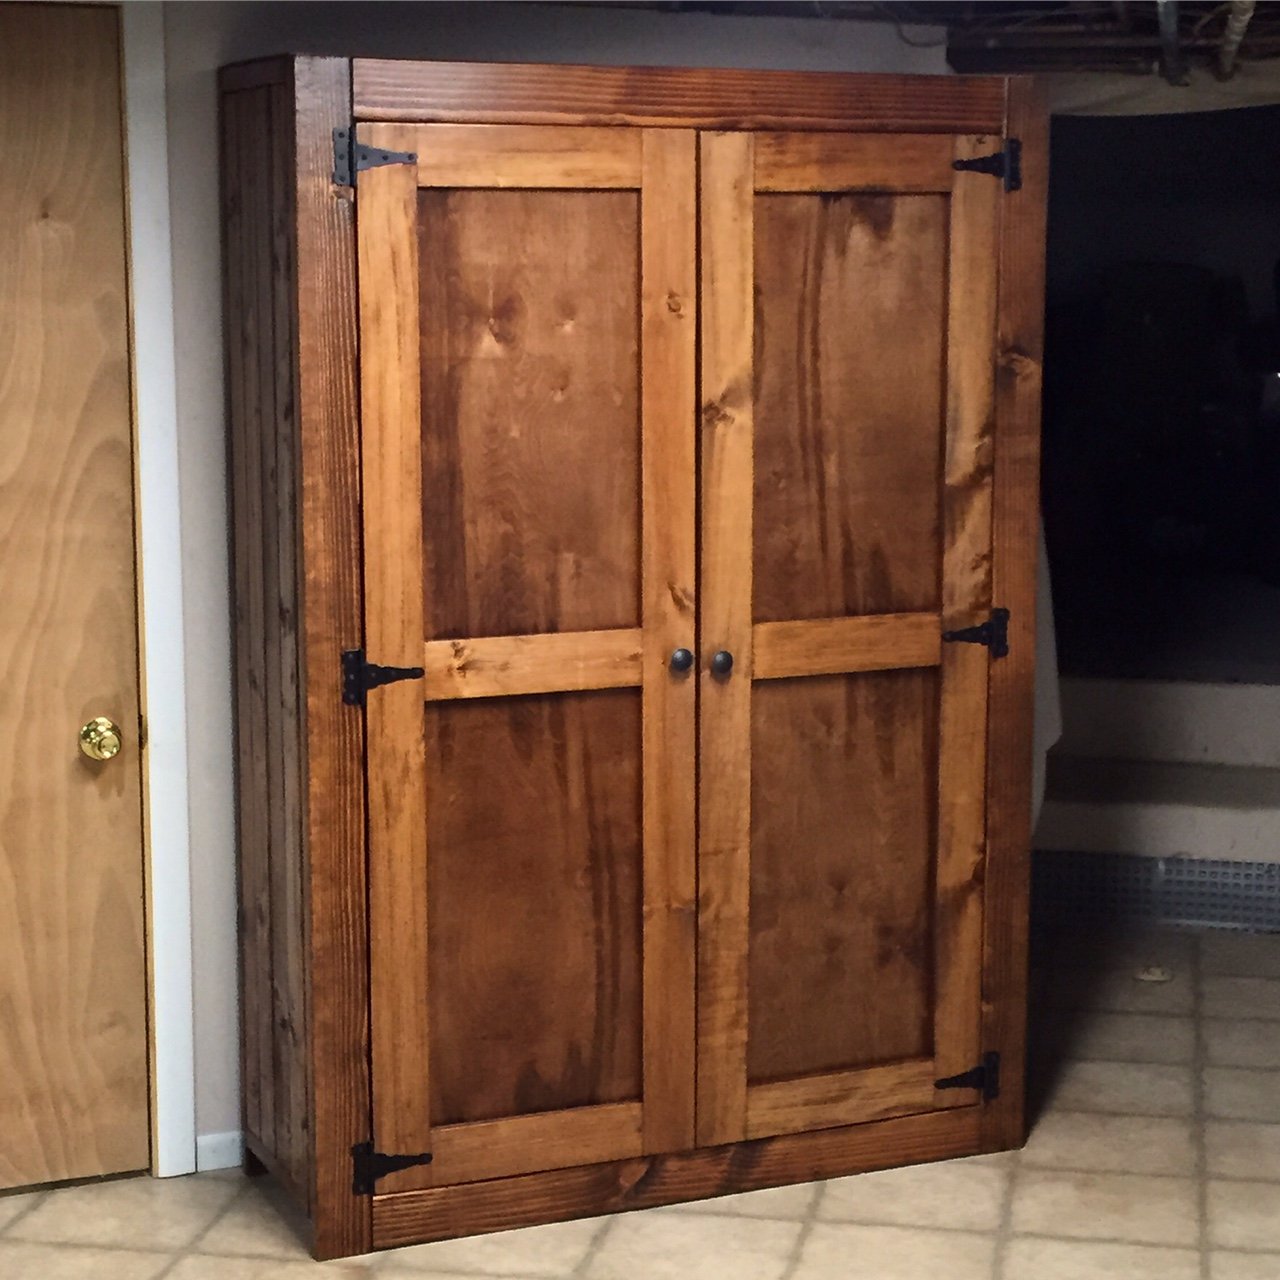
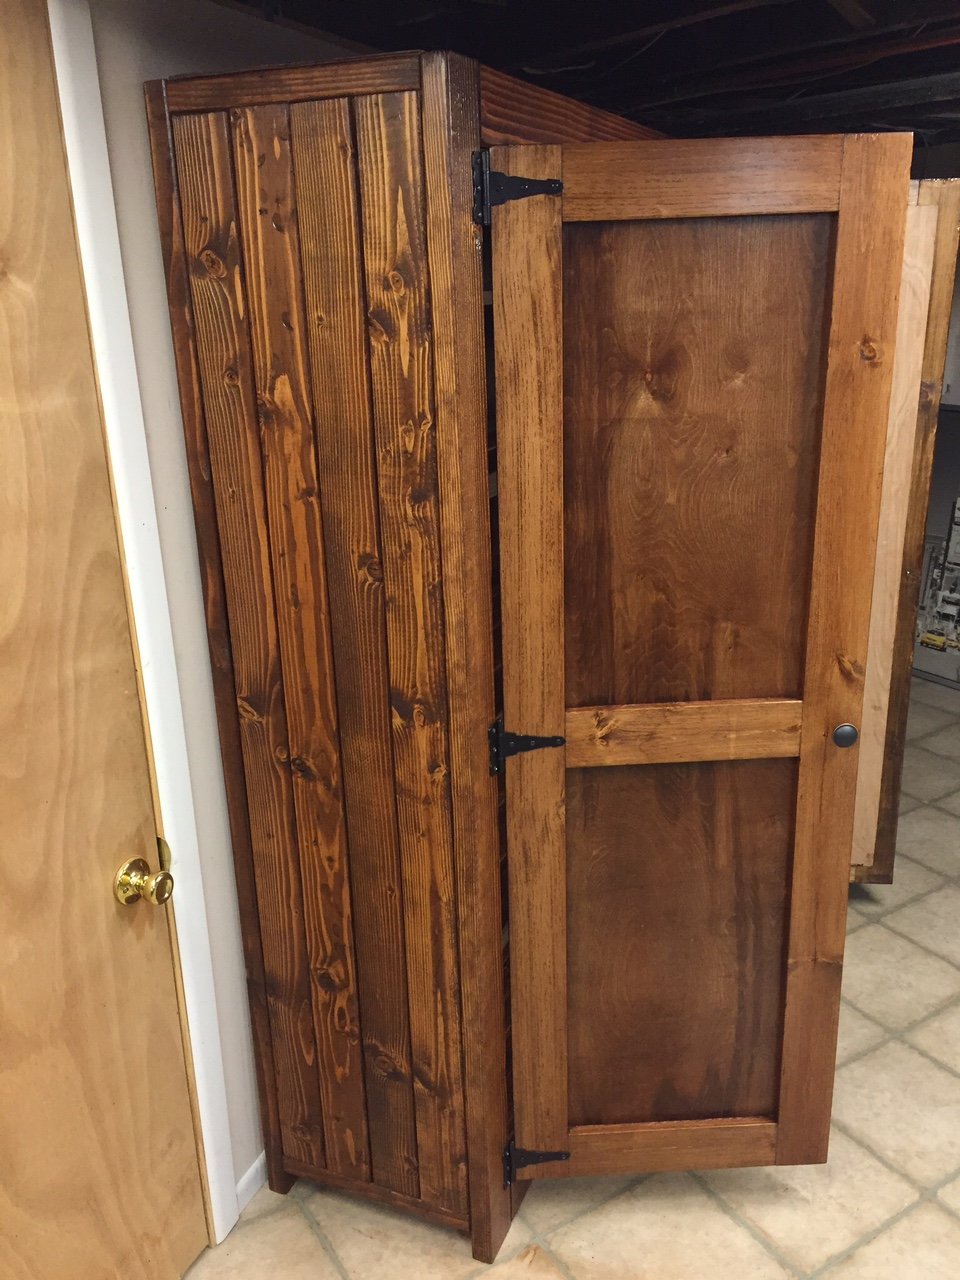
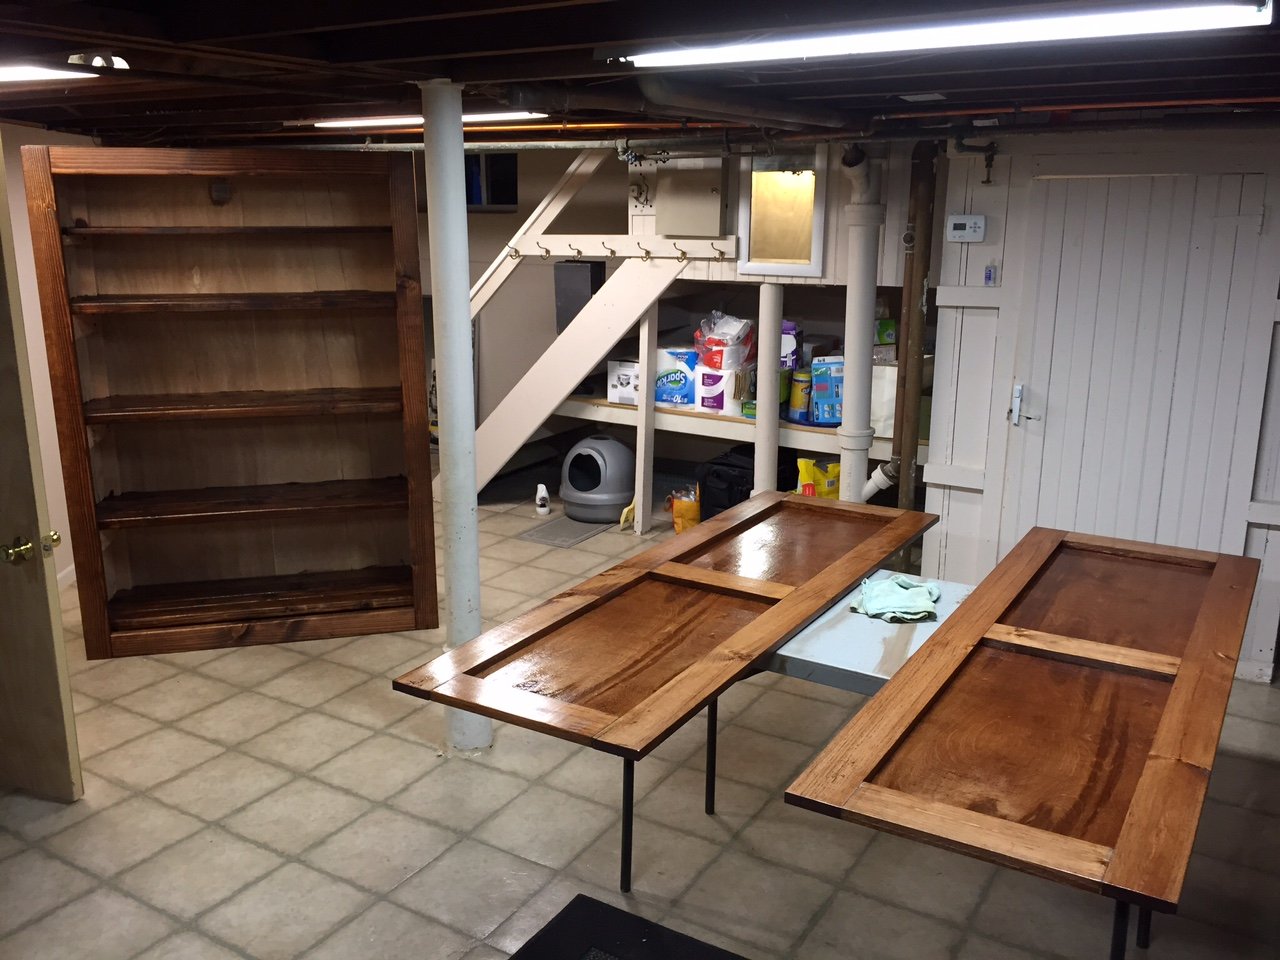
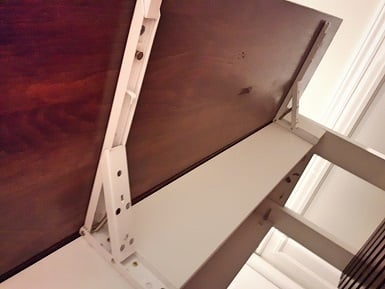
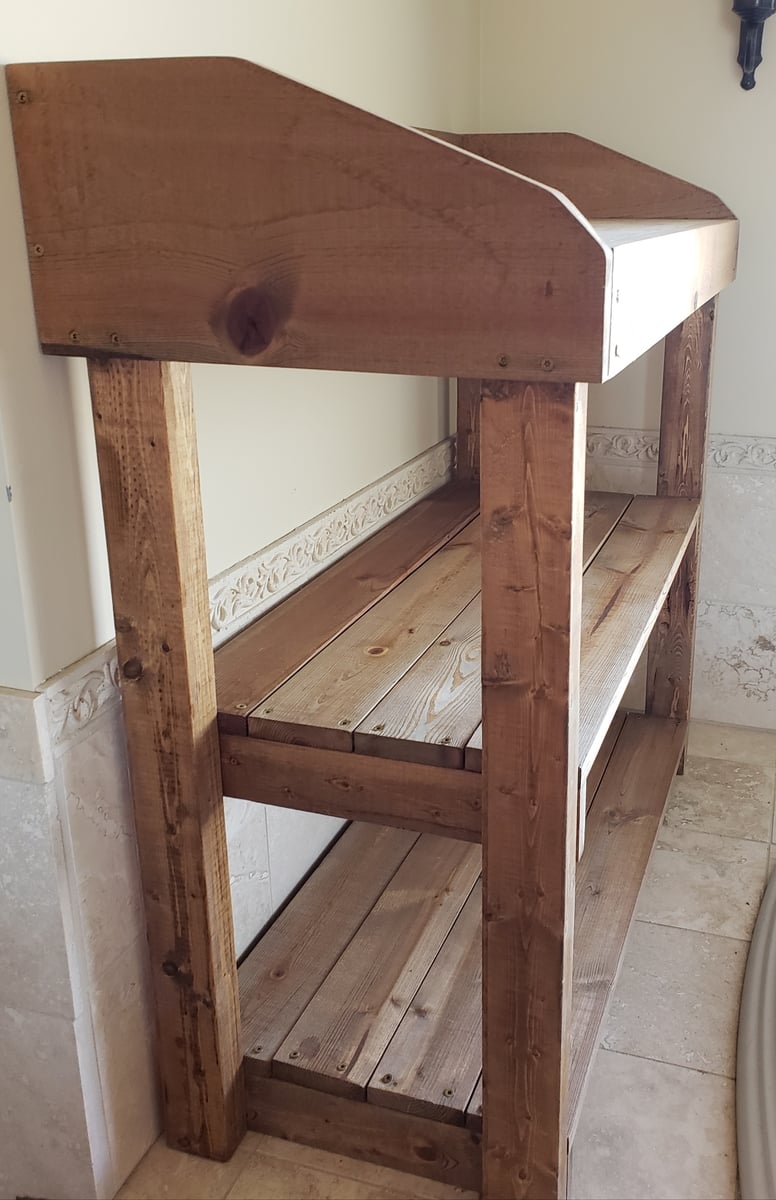
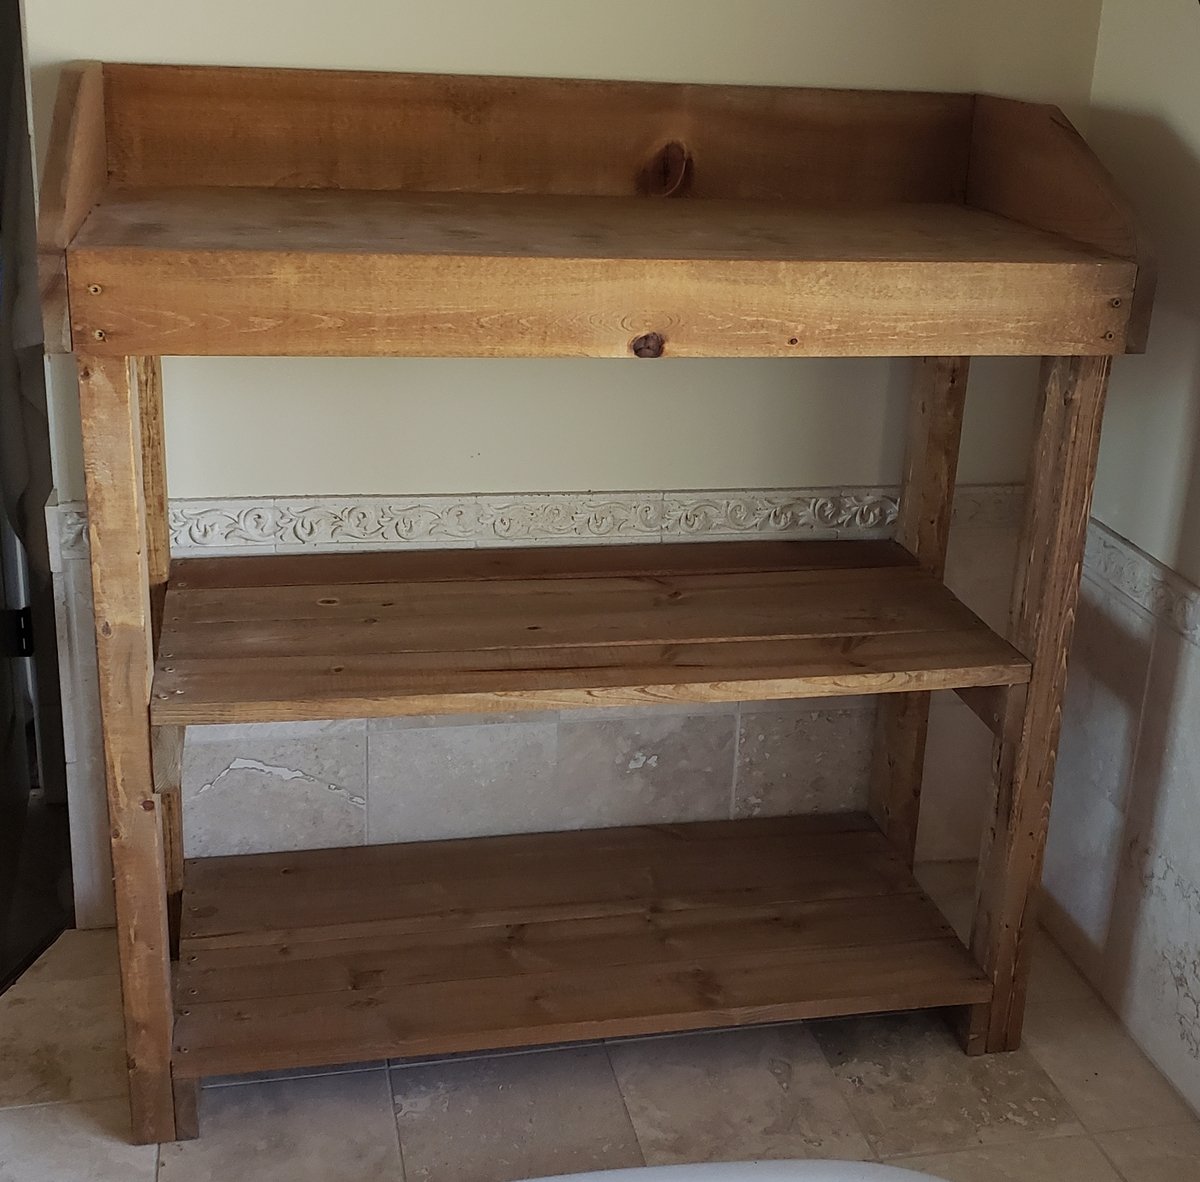
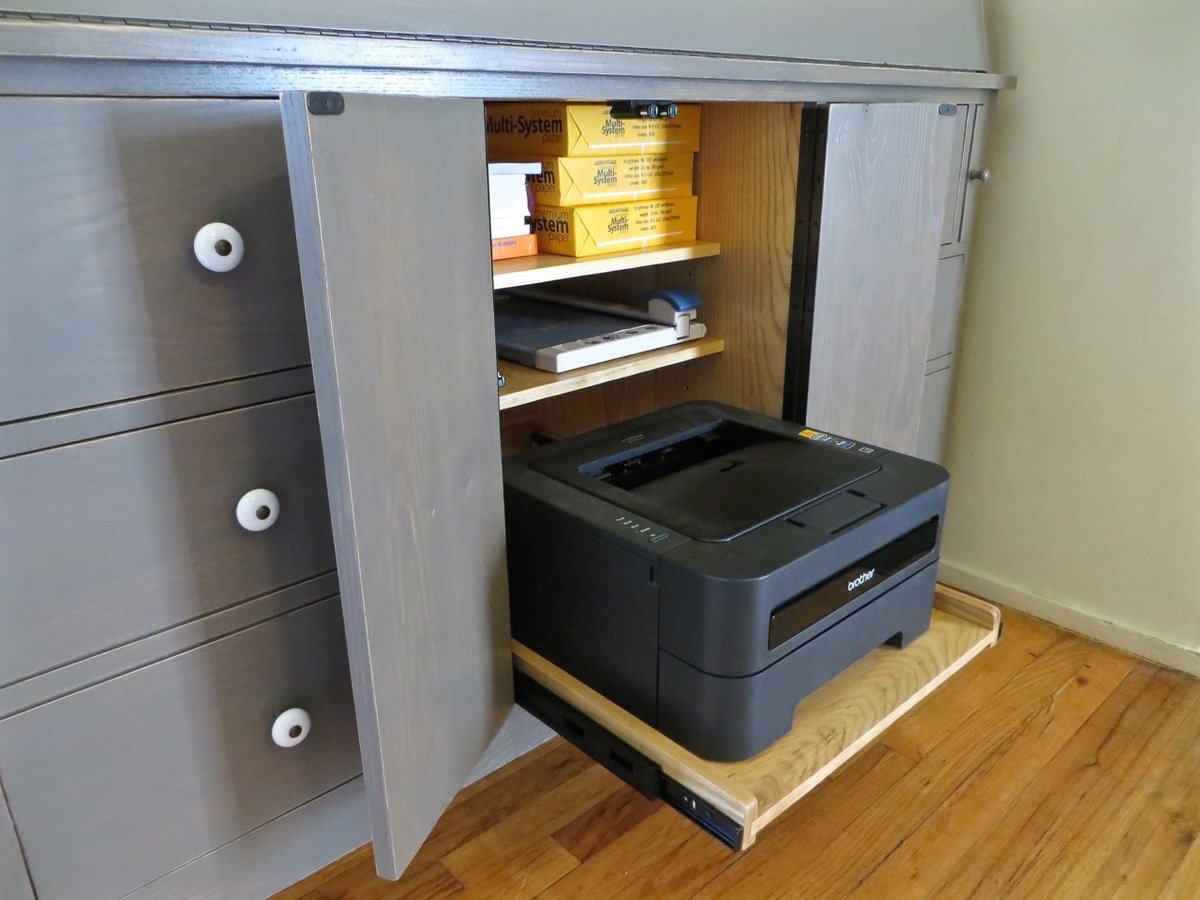
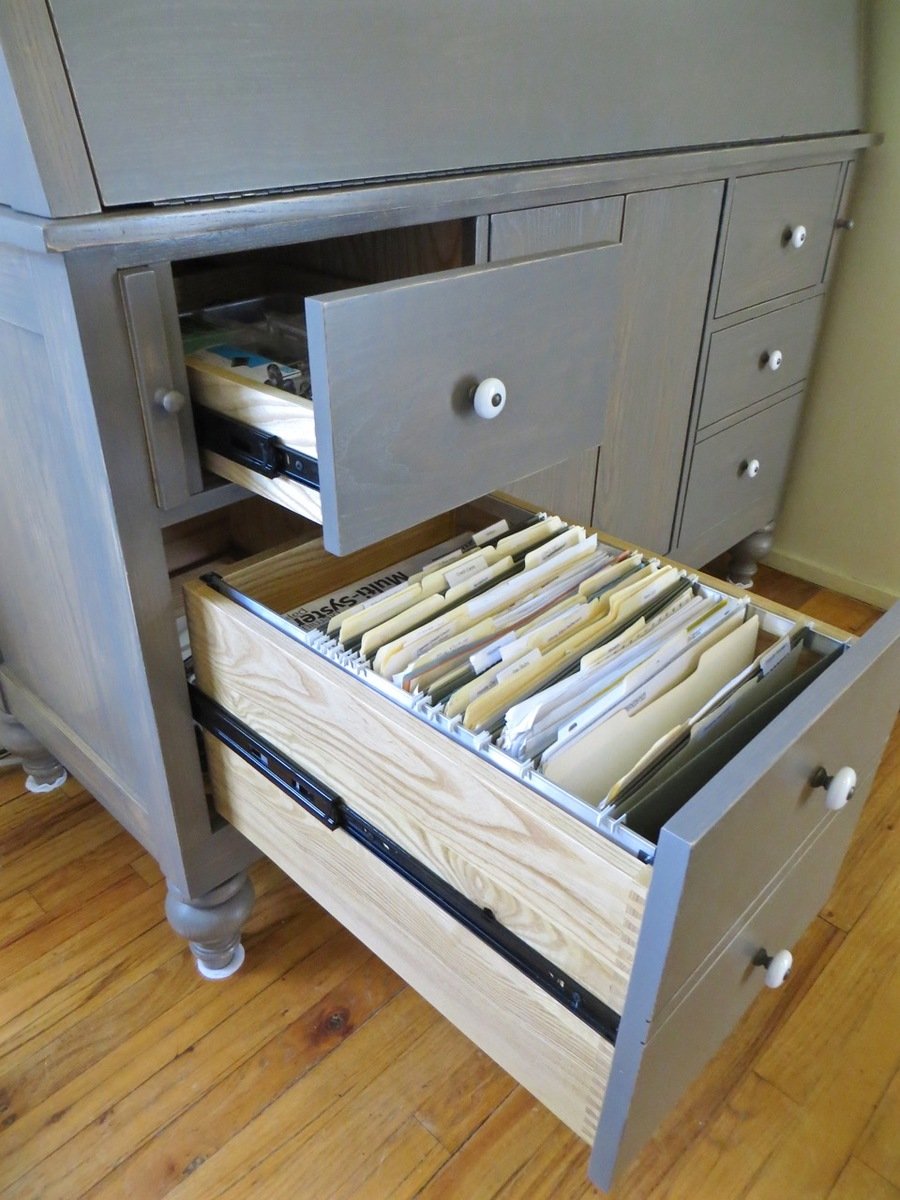
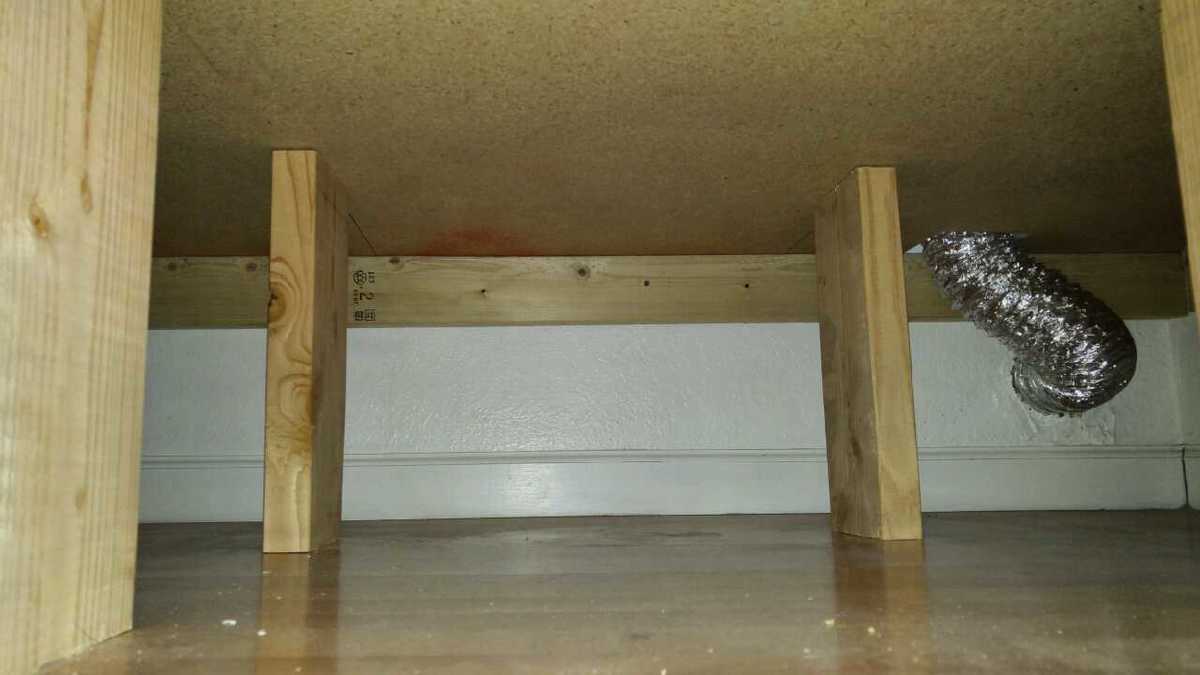
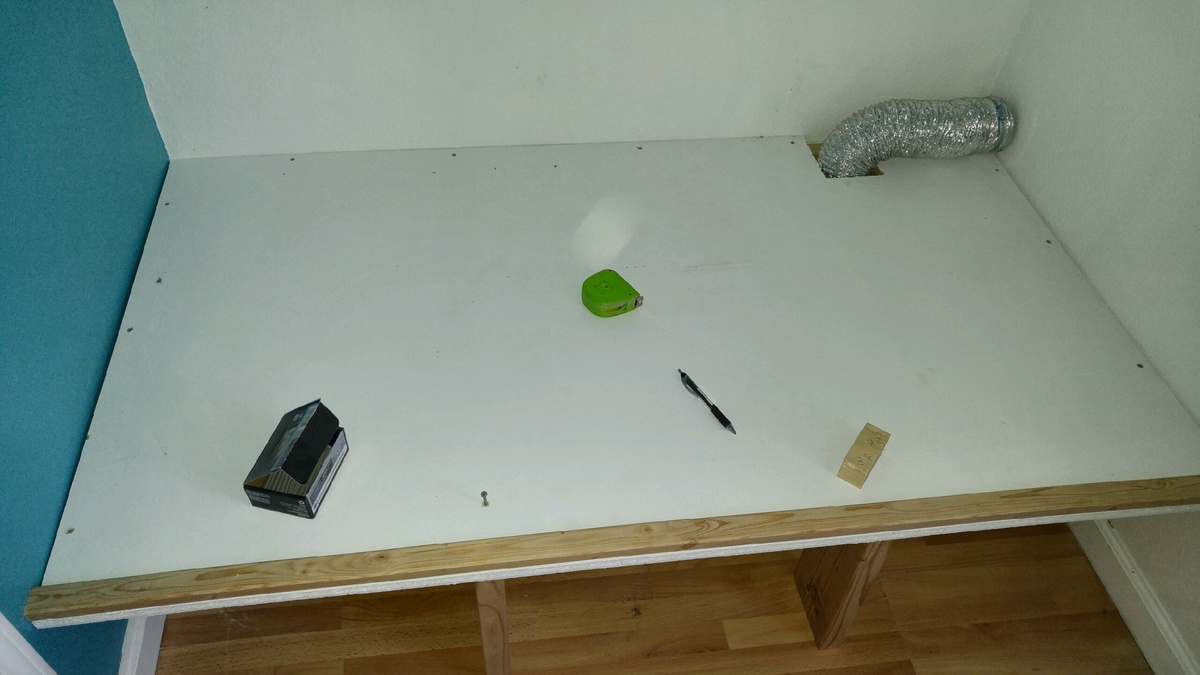
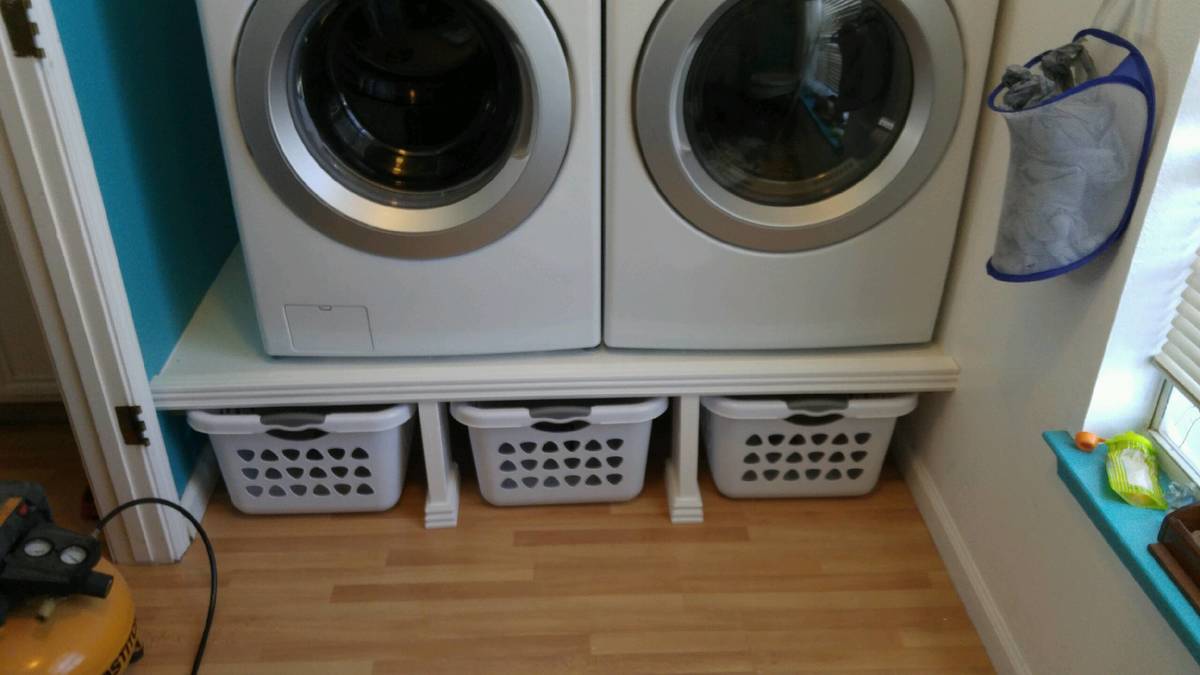
Anything is possible when you put your mind to it. This is my 4th DIY furniture project. First time working on cabinet/doors. Installing them straight was the biggest challenge. The side of the pantry is actually four 2x4's. I measured the frame so tightly that I had to use a hammer to bang in the fourth 2x4 on each wall, also adding a distressed look in the process. The pantry is very large, 48in wide and about 17 inches deep. Our kitchen lacks storage space and we could use a little more space for food and also pots, pans etc. The staircase to our basement is off our kitchen, so I placed the pantry right at the bottom of the staircase for easy access. I am thrilled with how this came out considering the time and effort it took. Very gratifying. Build on!

diy pantry made from 2x4s

Estimated Cost
$180-$200
Estimated Time Investment
Week Long Project (20 Hours or More)
Finish Used
Miniwax English Chestnut
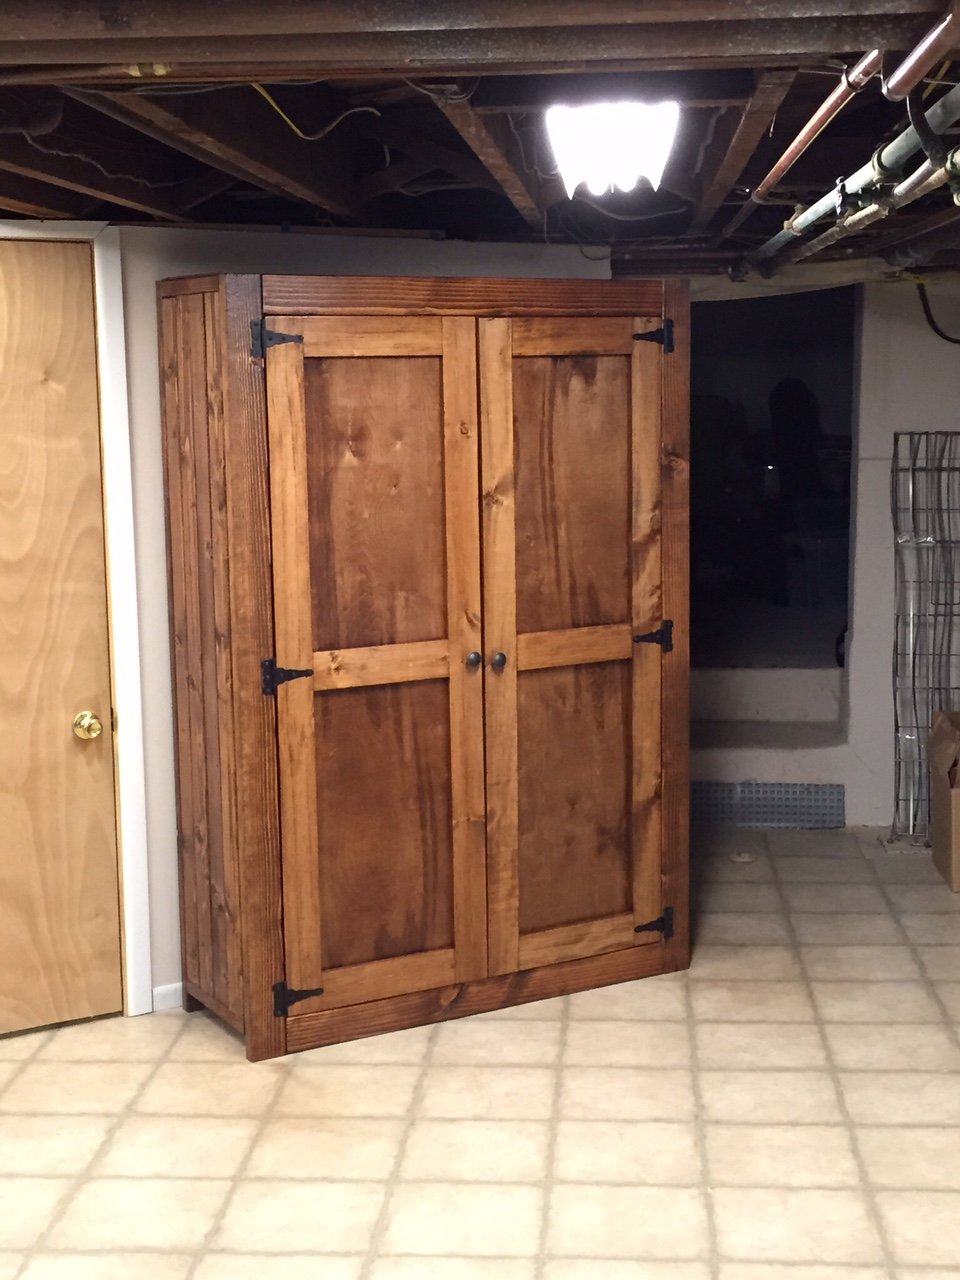
Miniwax Semi Gloss Poly
Recommended Skill Level
Intermediate

Comments

Michael K

Thu, 03/05/2015 - 07:51

Thanks, to the both of you! Possibly the most fun part of this project was buying a Ryobi Airstrike Brad Nailer. That thing is fun to use! Used it for the back of the doors, back of the pantry and also for the door stops.

denverdave66

Sat, 07/23/2016 - 18:21

I am thinking about building one but I am not sure if my skill level is up to this yet. I am going to attempt to build the Kentwood Bookshelf and see how that goes. I am remodeling my office and want real wood shelves instead of that pressed wood junk. Great job on your build.  I love this website!

langgin26

Sat, 01/13/2018 - 18:09

Hey Michael I really love the pantry and would love to make this exact one but there is not enough info on the sizes and what all you used for all the wood. If you have  time I would greatly appreciate it if you could give us some more info thank you 

Steve Phil

Fri, 12/25/2020 - 10:42

Haha. Nice. But ya did not pound it in ... You persuaded it in as old timber framers would say using an old mallet called a Commander. 😉

Red Hen Home's Farmhouse Storage Bed

I made the Farmhouse Storage bed for my son's room, which also has to double as the guest room. It has a planked headbord and footboard. I made the slats in removable sections under the mattress to access the storage between the drawer boxes. Also modified the drawers somewhat to use less wood (basically they don't have a double-thickness front). I also used 1/2" plywood to cut down on the weight of the drawers, and they seem to work great! I used iron-on veneer to cover up the raw edges of the plywood on the drawer boxes. More information and pictures on my blog! http://redhenhome.blogspot.com/2013/06/the-handbuilt-bedroom-pt-4-bed.h… http://redhenhome.blogspot.com/2013/07/the-handbuilt-bedroom-pt-6-drawe…

Estimated Cost
$250
Estimated Time Investment
Weekend Project (10-20 Hours)
Finish Used
Custom mix of Minwax Antique Walnut/Weathered Oak stain.
Recommended Skill Level
Intermediate

Comments

My Simple Outdoor Lounge Chair with 2x4 modification

I modified this chair with 2x4's as the base and 2x2 for decoration on arms, this is prior to sanding and finishing

Built from Plan(s)
Estimated Cost
$15-$20 dollars, depending on local lumber prices and finishing options.
Estimated Time Investment
An Hour or Two (0-2 Hours)
Finish Used
Unfinished
Recommended Skill Level
Beginner

Comments

RandyW

Sat, 06/13/2020 - 16:33

I always take my sander to the sharp edges and round them off

Modified firepit bench

Submitted by kkushner on Sat, 08/15/2020 - 23:11

I built the one bench using the original plan with the storage and table top unit but needed two additional seating benches to go around the firepit without the bulk of the backside of the bench.

I modified the original plan as follows:

Shopping List:
(2) 2X6X8
(3) 2X4X8
(2) 1X6X8

Cutting List:
(2) 2X4X17" front legs, 15 degree cuts, parallel long to short
(2) 2X4X23" back support, 15 degree cuts, parallel long to short
(2) 2X4X20.75" back legs, 15 and 60 degree cuts, not parallel long to long
(2) 2X4X24.75" under seat, 15 degree cuts, not parallel long to long
(2) 2X4X30" bottom support, 15 degree cuts, not parallel long to long
(1) 2X4X42" bottom cross brace between leg sets, 90 degree cuts
(2) 2X6 cut equally in half, 3 for the seat and 1 for the top plate
(2) 1X6 cut equally in half, 3 for the back rest and 1 to be tucked under the seat overhang

Estimated Cost
$40.00
Estimated Time Investment
An Hour or Two (0-2 Hours)
Finish Used
Brown outdoor wood preservative.
Recommended Skill Level
Beginner

Comments

jwood4

Thu, 09/08/2022 - 11:23

Great work! Have you had any tipping issues with the benches without the table back? If you kneel on the bench backwards and lean on the back do you think it would tip? Ha I clearly have kids around to be asking such strangely specific questions... TIA!

kkushner

Sat, 02/25/2023 - 08:56

I built these for my daughter/son-in-law and their young family. I have grandkids that use them and have never tipped them. However a strong wind gust 100km/hr did flip one over but not the other. I would suggest adding a horizontal ground level ‘foot’ extension on one or both back legs to alleviate any concerns of tipping.

Catio heaven

Submitted by bhoppy on Fri, 09/04/2020 - 15:43

Ana doesn’t have a plan for a catio but she does for a playhouse and a cedar shed made from 2x2’s. I sort of combined my knowledge from making her plans over the last 10 years and came up with this for my cats. It was fun to make!! My baby kitten is loving it. I used garden fencing and stapled it to the outside and pocket holes for the walls. I made each wall individually like the playhouse then connected them once in place.


Estimated Cost
$250
Estimated Time Investment
Week Long Project (20 Hours or More)
Finish Used
Cabot semi transparent outdoor deck and fence stain. ($9 oops section)
Recommended Skill Level
Intermediate

Comments

Wifey

Wed, 06/09/2021 - 12:36

Thank you for sharing! My daughter wants a cat for her birthday but it can't be inside due to our son's allergies. Roaming outside isn't really an option because we have coyotes. We are going to use one of these in combination with an underground electric fence.

Seasonal And Holiday

Drop Leaf Kitchen Island

Submitted by Boab on Wed, 03/01/2017 - 19:01

When I recently moved into a space with a kitchen and living room attached, I quickly realized that I wouldn't have room for a full size dinner table. I had seen extendable kitchen tables but none fit the bill, I was looking for something more compact. I also liked the idea of a bar / island with storage underneath, and I had noticed some had a drop leaf on 1 side which would be useful – but why not have 2 leafs for more dining space? When I decided to build my own table to fit these requirements it was difficult to find any plans out there, especially with drop leafs. Through lots of experimenting and research I finally built what I had envisioned: a kitchen island / bar with cart storage and two folding table leafs which expand to about 31/2 feet squared of eating / drinking area. I went through this trial and error process so you don’t have to, find more pictures and instructions here: http://bacheloronabudget.com/diy-drop-leaf-kitchen-island-cart/

Estimated Cost
$250
Estimated Time Investment
Weekend Project (10-20 Hours)
Finish Used
-Minwax Special Walnut Stain
-Minwax Wipe-on Poly
-White Paint (I used Rust-oleum Linen White)
Recommended Skill Level
Beginner

Clubhouse based on Ana's Plan

Submitted by MattSl on Tue, 05/03/2011 - 09:18

I used Ana's plan as a base.

I changed it from 8x8 to 8x12, made the 4x4x8's to 4x4x10' for a higher main platform and swing platform, and added a 12' long monkey bar set to the other side. Also, an 8' climbing wall and a plank walkway to accompany the two slides.

For the clubhouse, I used Hardiplank 4x8 sheets for the siding and an EZ-Framer kit for the structure itself.

The slides I purchased from Lowes, monkey bars from Amazon, and the swing frame braces from Amazon as well. The swing kits I got from ebay.

Estimated Cost
1500
Estimated Time Investment
Week Long Project (20 Hours or More)
Recommended Skill Level
Intermediate
Seasonal And Holiday

Douglas Fir live edge slabs supported by industrial black iron pipe

Submitted by Anonymous (not verified) on Tue, 01/22/2019 - 19:42

I began the project by ripping 6” strips of sanded pine plywood. I attached those to the walls using brad nails and wood glue. Filled the holes with glaziers putty and sanded lightly once dry. Primed and painted to finish.  

I then had a local mill rough cut the lumber for the shelves. I stripped the bark (except one which I loved so I left it on) and sanded at 120, 180 and 220. I drilled 1 1/4” holes to fit the pipe through and finished the wood with 4 coats of Varathane Diamond Finish clear coat. 

I used Varsol and some elbow grease to remove the black coating on all the gas  pipe. 

Finally i pieced it all together! 

Estimated Cost
$800 CDN
Estimated Time Investment
Week Long Project (20 Hours or More)
Finish Used
Varathane Diamond Finish
Recommended Skill Level
Intermediate

Great weekend project...the "love swing"

Submitted by Don Ellery on Mon, 05/19/2014 - 15:49

A great weekend project...the "love swing"! I used the plan from Ana for the swing seat and added two arm rests from left over 1x6, rounded them off and sanded.

I cobbled together an A-frame to hang everything, made from five 8 foot 4x4s and two 8 foot 2x6s laminated together for the stretcher. Assembled with 1/2" galvanized carriage bolts and hung with 1/4" chain.

Definitely going to want a good miter saw for the A-Frame angles (the top ones are a bit tricky to get everything lined up)

Love it! Thanks for another great plan Ana..and of course..Shanty2Chic!

Built from Plan(s)
Estimated Cost
$200 ish..including the A-Frame... the hardware and chain can be pricey!
Estimated Time Investment
Day Project (6-9 Hours)
Finish Used
Behr exterior weatherproofing stain - Chocolate.

Just 2 thin coats, dries fast...second coat can be applied later the same day.
Recommended Skill Level
Beginner

Comments

Carpenters Daughter

Mon, 12/12/2016 - 17:09

Could you please post the plans to build the a frame as well? I really love what you did and would like to copy it! Great Job!

Don Ellery

Wed, 07/19/2017 - 11:31

Hi! I wish I could, but I didn't take any notes on the angles or lengths when I made this and I left it with the house when we moved. 

Outdoor sectional and coffee table

Submitted by Rynhffr on Mon, 07/06/2020 - 21:06

Loved these plans! Was my first project I tackled trying my hand with a new hobby of wood working to stave off quarantine craziness :-) finished project looked awesome and got me started working on other plans on the site.

**note**
Side table was just sanded and refinished, wasn't built just tried to match.

Estimated Cost
400
Estimated Time Investment
Weekend Project (10-20 Hours)
Recommended Skill Level
Beginner

Rustic Bathroom Storage Self Dry Sink

Submitted by kwildman on Sat, 12/29/2018 - 05:47

No plan was used but I did use many techniques that I learned from this site.  I took features from several different plans.  I love how it turned out.  

Estimated Cost
30
Estimated Time Investment
Afternoon Project (3-6 Hours)
Finish Used
Dark walnut danish oil
Recommended Skill Level
Beginner

My First Project: Spinning DVD Rack

Submitted by Dan Y. on Sat, 07/13/2013 - 20:19

I was looking online for a spinning DVD rack to buy when I stumbled across a picture of a custom built rack. I decided to give it a try and this is the result. This is the first project I've done outside of basic shelves and it was a great learning experience. The overall fit and finish isn't quite where I'd like it to be but overall I think it turned out pretty well. I was able to find a 12" lazy Susan at a hardware store that supports over 300lbs and worked perfectly for this project.

I used pocket holes for the shelves, finishing nails for the top and screws for the bottom and lazy Susan. I also used pocket holes to attach the shelf backs and hid them behind the shelves. One thing I definitely won't use next time is spray paint/enamel. The finish isn't nearly as nice as I wanted and it cost far more than I was expecting.

This is also my first time using SketchUp and I'm really impressed with it. I've uploaded a copy of the plans.

Criticism and suggestions are appreciated.

-Dan

Estimated Cost
$170
Estimated Time Investment
Weekend Project (10-20 Hours)
Finish Used
Rust-Oleum Universal Satin Spray Paint - Espresso Brown
Rust-Oleum Crystal Clear Enamel
Recommended Skill Level
Starter Project

Comments

Val Manchuk

Sun, 07/14/2013 - 11:35

I like this spinning DVD unit! Coincidentally, I just finished using spray enamel to redo some cupboard door handles. It's horrible stuff! I ended up sanding it off, and doing it over in flat black. I roughed up the edges with 180 grit to antique them a bit. Looks much better!

Football Lockers DIY

Submitted by Anonymous (not verified) on Mon, 09/11/2023 - 11:27

Here are a few pictures of the football lockers I built for our school. I used your mudroom locker plans and changed the dimensions to accommodate the boys' football gear. It worked great! I built 6 sets of 4 lockers, for a total of 24 lockers. I also used one of your plans to build 6 benches for the fieldhouse. Three for the home locker room and three for the visitor locker room. Each locker is 30 inches wide and 6 feet tall. 

Melinda Glenn

Barn Door Console with Drawers

Submitted by Anonymous (not verified) on Mon, 05/06/2024 - 13:27

Being a newby to woodworking, I wasn't sure if I could tackle this build. I saw pictures on your website and decided to give it a try. However, my wife wanted drawers so I made the doors a little shorter in order to add the 4 drawers but keep the height at 36". Thanks for your inspiration. I'm getting more comfortable everyday.
 

Louis Villarrubia


Greenhouse

Submitted by Anonymous (not verified) on Tue, 01/05/2021 - 08:08

We made some modifications to the greenhouse to include a bench with three levels, a working bench and a square foot garden. We also put it on concrete to keep all the weeds out from the bottom as well.

Built from Plan(s)
Estimated Cost
2500.00
Finish Used
We start our own seeds and plan to grow 15 different varieties of vegetables inside this greenhouse all year long.
Recommended Skill Level
Intermediate

Comments

Tack Box

Submitted by Evandgc on Tue, 12/30/2014 - 16:21

I made this box for my wifes christmas present. She has been riding horses for sometime and is planning on doing some shows. I built this box from Mimi's storage bench design, made it bigger, added a deeper box top and created the rest from looking at pictures online. Its all made of pine plywood and pine boards to keep it light. I added 4 castors to the bottom to make it easily moveable and hid them with the moulding around the bottom. Still has to be sanded and stained before it hits the barn. Its 39W X 24D X 29H. I used a piano hinge and routered the back to set the hing in. Added cove moulding around the bottom and to all the boxes around the front and side. Used a lot of pocket holes and finsh nails. Took me longer than it could have, because I planned everything as I went.  I will add more pictures when its finsihed. I would rate it intermediate to advanced depending on your skills with certain tools. 

Built from Plan(s)
Estimated Cost
Will all the hardware, wood materials, screws etc, I think it cost me around $250-$300
Estimated Time Investment
Week Long Project (20 Hours or More)
Finish Used
not finished yet
Recommended Skill Level
Intermediate

Comments

Chicken Run with Turkey House

Submitted by vendo on Wed, 10/13/2021 - 10:03

My daughter helped me build this enclosure. We used Ana's chicken run plan, but just made it taller so we could walk in easily. We added an overhang to store food and pellets under, for the supports we used Ana's easy shelves angle support plan, and finally we used the playhouse base plan for the base of turkeys house. All plans used are linked below. We ran the chicken wire out under the structure and still need to bring in some large rocks or pavers, but so far no issues with predators. Turkey was getting too big to fit in the smaller coop, so we decided to have fun with his house and used cedar fence pickets and some treated 2x4's, built a box and jig sawed the shape of a turkey. As you can see in the first photo the ladder for turkey wasn't big enough, all the other chickens were in his house, lol. So I beefed up the ladder and he happily can put himself up at night now:) Overall a super successful project, I wasn't sure what to do with the top and just at that point, the neighbor walked over and offered the metal, talk about a huge win and the perfect solution! We attached the run to the previous smaller structure and now they have so much more room and are laying like crazy:) Finally, I think this would make a great dog kennel as well...

Drop-Down Door Hutch Desk

Submitted by danicarby on Thu, 05/14/2015 - 13:47

I designed this desk from another desk I built. With this one, I wanted the overall foot-print smaller but still something that was able to organize all our office stuff and be able to close everything to keep it clutter-free. We have a small apartment, and although this desk is about the size of an up-right piano, it works perfectly into our living space!

I made it out of raw hardwood (Ash) and because I knew just the wood alone would make this desk heavy/bulky to move I made the top hutch removable. It's held in place by wood pegs (dominos). All the shelves are adjustable and the drawers are full-extension (something I've never had - wahoo)! The drop-down door is help up by 2 pull-out boards on each side (my first desk had chains). I spend a lot of money on this desk because I knew it was a chance in a lifetime to make and wanted it to be perfect and something that would last generations.

I built the main carcass off of plans/measurements I designed, but then all the insides, drawers, shelves, doors, etc where made as I built (because just a millimeter difference in building changes everything)!

If you want more pictures/descriptions of the building process I wrote about it in a 4-part series on my blog.

Estimated Cost
$1,000 for all wood & supplies
Estimated Time Investment
Week Long Project (20 Hours or More)
Finish Used
To achieve the ash gray color I used "General Finishes" brand water-based stains (equal mixtures of Walnut, Antique Oak & Whitewash) with 1/2 ratio of Pre-Stain Conditioner (bought from Woodcraft). I did 2-3 coats stain, lightly sanded and sprayed 2 coats of Ceramithane clearcoat using HVLP sprayer (sanding with 550 grit paper in between).
Recommended Skill Level
Intermediate

Comments

Farmer’s. Market Stall

Submitted by Cockroach on Wed, 12/22/2021 - 13:31

I made this for my daughter this year for Christmas. I’m pretty proud of how it turned out.

Built from Plan(s)

Comments

Washer/Dryer Pedestal

Submitted by Codding58 on Mon, 03/28/2016 - 11:00

I tailored my pedestal to work with the limited space that I had to work with. I began by "cleating" a 2x4 board to the studs on the back and side walls using 1/4" lag bolts. I then laid a sheet of 3/4" MDF on top and screwed that down to the cleats. Afterwards I built the supporting 2x6 legs underneath and screwed those to the top MDF board. We put a strip of 1x2 across the top-front side to keep the machines from ever "walking off" the pedestal. We then painted and trimmed out the front face and the legs. The wife is very pleased with the project, and loves the added space in our laundry room because we can now store the dirty clothes underneath the machines.

Estimated Cost
Around $50 including the molding, MDF, lag bolts, and paint. The 2x6 boards were left over scrap, but would not have added much to the total.
Estimated Time Investment
Afternoon Project (3-6 Hours)
Finish Used
White Paint (baer)
Recommended Skill Level
Beginner
Back