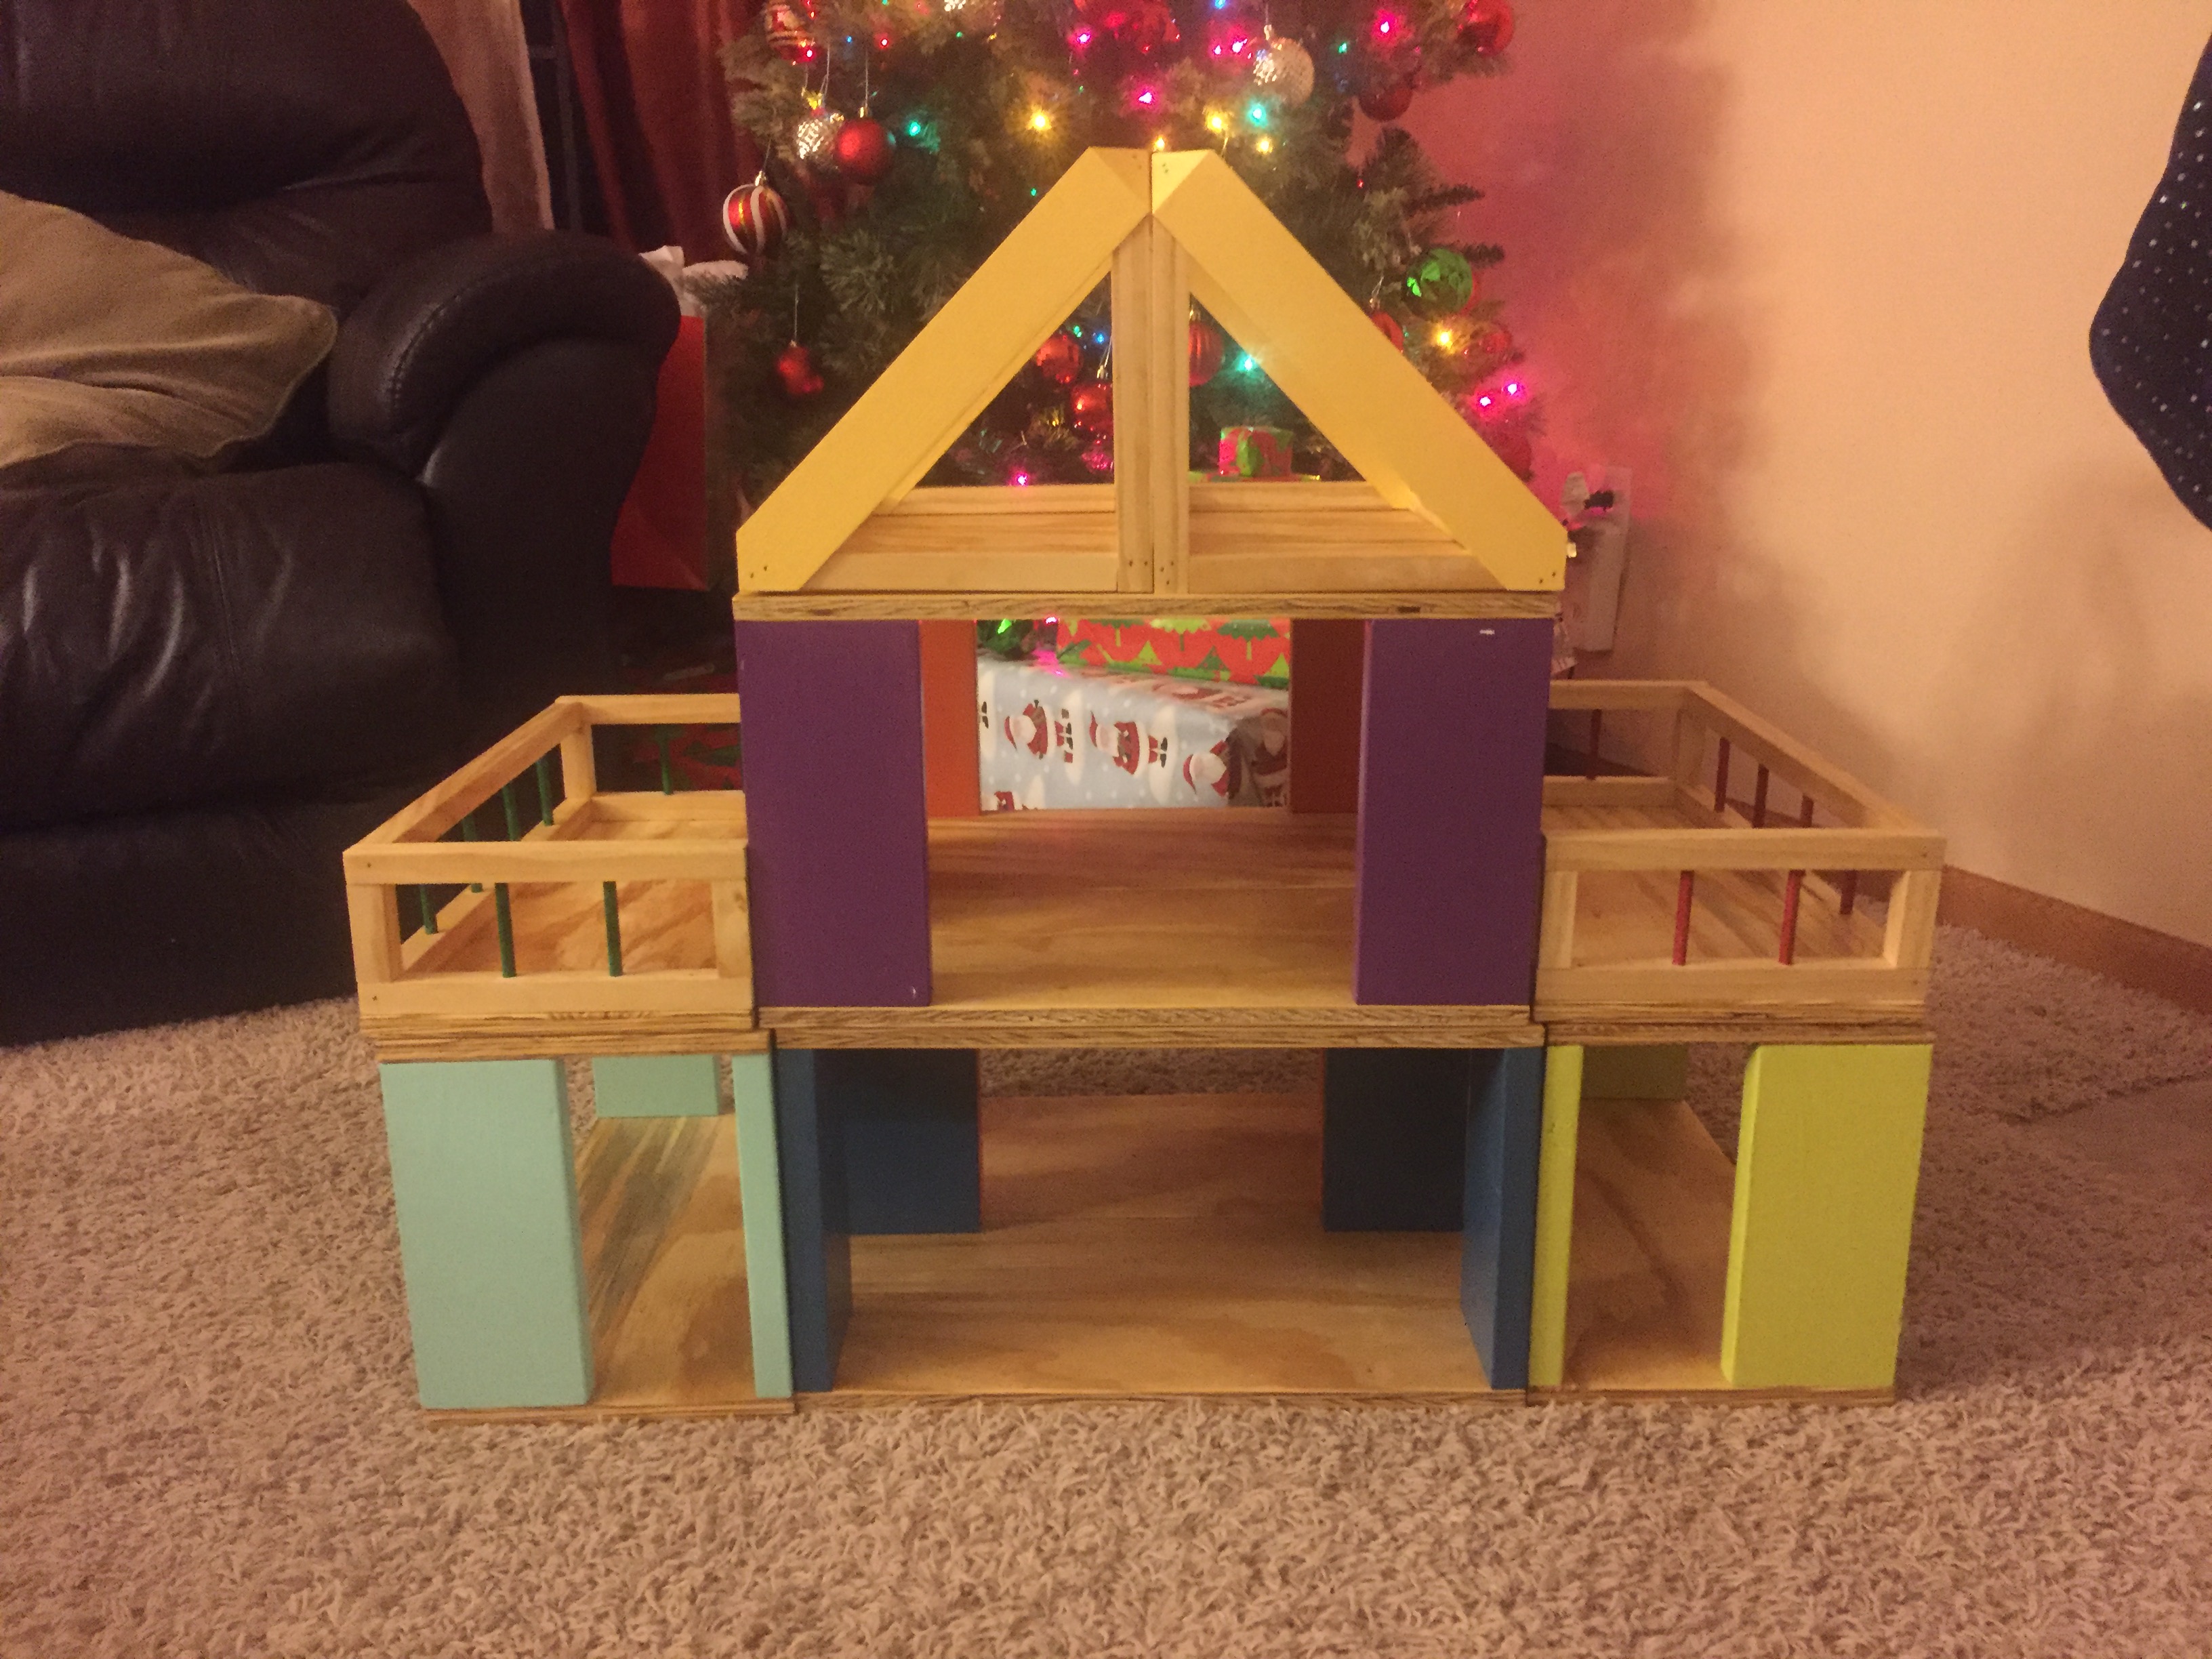
Community Brag Posts

Multi-tone Shoe Bench

Submitted by bmrankin on Thu, 04/17/2014 - 07:07

This was the easiest and fastest project ever! We built it out of 2x12's instead of 1x12's but i wish we had done it with 2x16's because baskets are a little hard to find in these dimensions and I would like it a little deeper. But I still love it!

When we bought the wood, we had Home Depot just make all the cuts for us. so when we got home, we just had to assemble it. It went together in about an hour {we did have to make a few adjustments because we used 2x's instead of 1x's but nothing too hard}. We decided to add some screws to the 1x4 back and side rails instead of just nails so that they would be more sturdy. We have 3 kiddos and know that they will be pulled on, walked on, ran into a lot.

The finishing took me about a day to do with lots of breaks in-between.

We stained the seat with Minwax Dark Walnut and then taped it off so that I could pain the rest white. After 3 coats of white paint, I sanded the edges and rubbed the same stain all over it. It made the edges dark and make the paint an off white. Then we put two coats of clear coat on top.

We used some scrap beadboard that we had instead of plywood. I love the finished look!!!

It cost us about $50 or less for the wood. I don't know exactly because we had a few other supplies to get there too. But it was cheap!

Estimated Time Investment
Afternoon Project (3-6 Hours)
Recommended Skill Level
Beginner

Garage Shelving

Submitted by Anonymous (not verified) on Sat, 07/16/2016 - 17:17

I am a beginner diy'er and this was one of my first projects.  Also it was my first time using the Kreg jig and I loved it!  My shelving system was around 8 feet tall, 12 feet wide and 30 inches deep.  I added some extra cleats to support my deeper shelves (30") and also used thicker (5/8") plywood.  This was a fun and easy project to do!  Thanks so much!

Estimated Cost
$150
Estimated Time Investment
Day Project (6-9 Hours)
Finish Used
none
Recommended Skill Level
Beginner

Raised Bed Garden Mother's Day Present

My 15 year old daughter and I built this as a Mother's Day gift. We used basic ideas from plan, but while looking for wood we came across stair treads and decking posts that we thought would work. We were very happy with the results. This thing is very solid and much better quality than the more expensive kits you can buy.

Estimated Cost
$130 plus plants and dirt
Estimated Time Investment
Weekend Project (10-20 Hours)
Recommended Skill Level
Beginner

Little Boy's Upholstered Toddler Bed

Such a darling bed and plans. I'm so glad I found it! I built it with a friend for her little boy, so he could use it as a couch later on, and it is just darling with the black pleather and nailhead trim she picked out.

I marked it as an intermediate project more for the upholstery part of it. I'd call it a beginner building project, though. :)

Thanks, Ana!!

Built from Plan(s)
Estimated Cost
$60
Estimated Time Investment
Day Project (6-9 Hours)
Recommended Skill Level
Intermediate

Comments

Pam the Goatherd

Wed, 07/04/2012 - 04:34

That looks great! I never would have thought of doing it with pleather. I've been trying to decide what seating to make for my son who lives in a one bedroom apartment and needs a place for his sister or friends to crash when they come to visit. I'm going to show him this and see what he thinks.

Moses Basket Rocker

Submitted by bd on Sat, 04/19/2014 - 14:15

Pretty much followed the plan, except I raised the height of the platform. I intended to make the legs longer, but I forgot and cut them to the length on the plan. It looks like the sides of the basket aren't supported as well, but the basket stays in just fine.

I also added little wings on the end to support the ends of the basket. I wanted to be able to remove the basket from the cradle without screwing it in, but also wanted the basket to be secure so I added the little wings. It was easy.

Overall a pretty easy project, except the rockers are time consuming. They're not hard to make, you just need to take your time.

Built from Plan(s)
Estimated Time Investment
Weekend Project (10-20 Hours)
Finish Used
Sample paint on the clearance shelf - can't remember the color name.
Recommended Skill Level
Intermediate

Newbie succeeds at Farm Table

This is the first project my husband and I tackled since we were in middle school, (when you built things like clocks and puzzles). We had virtually no tools, a limited workspace, and a compact car to transport lumber in. Believe me when I say - if we can do this, anyone can!!!! 


We bought a circular saw and sander, and had a power drill on hand. We were working on a very tight budget, so we bought a Kreg Jig mini instead of a full  sized jig. I also borrowed a few hand clamps from our parents. I thought the Kreg Jig mini would be a MASSIVE pain, but it actually worked really well (as long as you have hand clamps).


We used regular SPF lumber for the planks and aprons and cedar posts for the legs, all purchased at HD. Best advice - take your time looking for boards that aren't warped. Even in the end, we had a couple of imperfect boards, but it didn't inhibit our construction at all like some previous posters experienced. We did all the cuts at home EXCEPT the cedar posts (We got the people at HD to do this for us. They did it for free).


The build was straight forward. We had to do a few modifications (as our table is just over 5ft in length), but if anything I think the smaller size made things easier. We measured twice and cut once. As long as you take your time, it's easy. We even modified the plans so we can add an extension leaf should we need more room in the future.


We sanded every inch of the table. No joke - this step played a HUGE roll in making our table look and feel good. Some of the planks on the table top were a little uneven, so at the last minute we invested in a cheap hand planer - it still isn't perfect, but it definitely helped a lot.


To finish, we used Wood Conditioner. I'm glad we did. I've stained other things in the house without it, but the wood conditioner definitely gives the finish a richer, more professional look. We used Minwax dark walnut, and we topped it off with Waterbased poly (just what we already had hand). 


For our first project, we are very satisfied. It took us about 3 days (off and on). We will be making a bench for our table soon. I look forward to doing more projects in the future! Thank you :)

Estimated Cost
$300 (including most tools)
Estimated Time Investment
Weekend Project (10-20 Hours)
Finish Used
minwax Wood conditioner
Minwax dark walnut
Semi-gloss poly
Recommended Skill Level
Starter Project

Planters for under $20

Submitted by emilacious on Mon, 05/11/2020 - 16:27

Used treated wood and stained it with a misting sealant from Lowe’s! Modified a few things and gave it to my mother-in-law for Mother’s Day! She loved it.

Built from Plan(s)
Estimated Cost
$25
Estimated Time Investment
Afternoon Project (3-6 Hours)
Recommended Skill Level
Beginner

Sofa Charging Table

Submitted by Anonymous (not verified) on Mon, 01/08/2024 - 10:10

We wanted a shallow table behind our sofa where we could charge our phones and laptops while relaxing in the evening. I used three 1” X 6” pieces of cherry, connected with pocket holes, and put a small gusset in the corners. With a couple of power strips inserted in the top and plenty of polyurethane, that was it!

His Hands

Football Bat Shelves

This is a simple shelf to hold the reference books I keep on my desk at work. That's now how it started out though. It was supposed to be a laptop stand, but a small mistake turned it into this. Rather than toss it as scrap, I decided to make lemonade.

I'd love to link a plan, but all you really need to do is take a 1x10, cut legs (mine are 8 inches long), and join them to the ends with pocket hole screws.

Estimated Cost
10
Estimated Time Investment
An Hour or Two (0-2 Hours)
Finish Used
Custom toner made from General Finishes polycrylic and Espresso stain.
Recommended Skill Level
Starter Project

Easy Work Bench- My first build

This was my very first build. I used all 2x4's except for the top with was a project board from Lowes. I also used pocket holes instead of 2in screws.

Built from Plan(s)
Estimated Cost
$40
Estimated Time Investment
Afternoon Project (3-6 Hours)
Finish Used
No finish
Recommended Skill Level
Starter Project

Rustic X End Table

Submitted by TheNardDog on Fri, 07/22/2016 - 20:46

One of two rustic x end tables built for our living room! We also built the coffee table to go with it. All together the wood for the two end tables cost about 65 dollars but that doesn't include stair, jig screws, finishing nails for the x's, hardware, and the black spray paint for the hardware. We used a lot of the same stuff however for the coffee table so it wasn't too bad! they came out great!

Estimated Cost
40-60
Estimated Time Investment
Afternoon Project (3-6 Hours)
Finish Used
Dark Walnut
Recommended Skill Level
Beginner

Rustic X Console Table Build

Submitted by amandak778 on Wed, 05/13/2020 - 06:55

This was the first time I've ever set out to build something 100% on my own. I saw a photo of this table and fell in love and decided why not build it?! Made my material list, got all the supplies, and refused to let my husband help in any way shape or form :). I was able to finish the build and get paint on in a day and stained the 2nd day so one weekend later - I have my table!!!

The directions were great and now I'm working on my 2nd project and planning my third! Even started acquiring my own tools so I don't have to use the hubby's lol ;)

Built from Plan(s)
Estimated Time Investment
Weekend Project (10-20 Hours)

iTable

Submitted by I Rub on Sat, 07/07/2012 - 14:45

Easy build. Great and sturdy results.
Great build for beginners and for some learning experience with a Kreg Jig. Table looks great and bulky.

Built from Plan(s)
Estimated Time Investment
Day Project (6-9 Hours)
Recommended Skill Level
Beginner

Comments

zendup

Sun, 08/11/2013 - 19:21

Did you use treated or untreated 4x4s? I am unable to find untreated ones where I live. Your table finish looks beautiful and I was curious as to whether or not your posts were treated.

JessicaHall

Sun, 08/11/2013 - 21:15

I was wondering the same thing myself about the 4x4's. Where I live the treated ones are about $7 and the untreated about $30. Also I have heard that you may have trouble staining or painting your treated 4x4's. I want to make a coffee table from one of your plans but I do not want to spend that much just on a 4x4. :/ Beautiful table though!

Corona Coffee Table

This was one of the easiest builds. When I saw this plan I knew it was perfect for my living room. Its a big coffee table but doesn't look that way in the pictures since it works well with my big sofa.

I stained the base before I attached the top which helped. I also didn't attach the top until it was in the living room since the top alone is pretty heavy. I also had my local HD cut the plywood.

Built from Plan(s)
Estimated Time Investment
Afternoon Project (3-6 Hours)
Finish Used
Rustoleum Dark Walnut (1 coat)
Recommended Skill Level
Beginner

Comments

Parson's Tower Desk - Slightly Modified.

Submitted by Anonymous (not verified) on Mon, 07/25/2016 - 11:42

This was a great / simple plan that mostly fitted my needs. i made a few modifications;

1.  wider 'human' well - extended the width by 6"

2.  Deeper desktop - Extended to 24"

3.  2.5x.75" trim piece around table top - simple MDF 

4.  plywood on top of 2x2 frames - for all shelves and table top.


(the dimensional modifications required 2 additional 2x2 @8')


I like a larger leg well to shift around in on those long days, so i extended the width by 6" all applied to the foot well.  I was still able to use only 1 8x4 piece of .75" sanded plywood.   I use 2 computers and a second monitor on one, so I deepened the desktop from 18 to 24" to accomidate my technology.  This then required an adjustment to all 15" 2x2s used on the sides, and the shelve stretchers. I prefered to use a Plywood on top of frame method for all shelves and tabletop, for stregnth and asthetics. This required me to make a notch into all 4 corners of each shelf. To accomplish, be sure to start with a squared piece of plywood cut to dimensions, and measure the from the insides of the cutouts for precise fit.  The under shelf frames were still affixed with pocket hole screws, the tops of each were screwed to the frame with 2" wood screws (pre drilled) and smoothed over with wood filler.  the top received the same, 2x2 frame around the perimiter, along with two additional 21" supports (at the same location as the inner legs from the towers). The top was the affixed with 2" wood screws, and smoothed with wood filler.  


For asthetic purposes, I put in a 2.5x.75" trim piece around the top (to hide the frame/plywood seam) This actually worked out great!!  It is mounted flush with the plywood top , 2" wood screws about every 12 inches and a healthy amount of wood glue. (be careful, these come pre-faced with a layer of white.. something.. this does not make a good glueing surface.  Sand down before glueing to the tabletop.).  Screws were countersunk, add wood filler to smooth.  the best part of the trim is that it extendes .25" below the wood frame (1.5" frame, with   .75" plywood on top = 2.25" total thickness). this allows allowed me to not screw the towers into the top.  The legs fit in underneath the top, butted to the top's frame, and the recess created by the trim holds them in place! This will make for super simple moving should I need to relocate my desk; just lift off the top, and it's in 3 pieces!!   this step adds a bit of work and $ (really not too much, 3 2.5"x.75" MDF trim pieces adds an additionan $12, and mounting only took an additional 20 minutes.)


I finished with a two tone top quality paint job, two coats of primer, 2 coats of paint, 2 coats of Polyurathane (3 on the tabletop).


All in all, it worked fantastically!!! it is incredibally sturdy.  The plans are simple to follow, and easy to modify, just do the math, and draw it out..


Thank You Ana!


-MikeG.

(ps. the white one is Winnie, the Brown is Henry).

Built from Plan(s)
Estimated Cost
?? maybe $100?? but that included too much top quality paint, and the worlds best urethane. wood is cheap in Oregon.
Estimated Time Investment
Weekend Project (10-20 Hours)
Finish Used
Kilz Latez Primer
Baer Black - Flat
Baer Moroccon Red - Flat
General Finishes Arm-R-Seal (gave it a satin finish on Flat paint.. not what i was going for, but i love how it looks)
Recommended Skill Level
Beginner

Short version of cedar shed

Submitted by Anonymous (not verified) on Sat, 05/16/2020 - 14:35

We wanted a shorter version, so that it would hide behind this fence. I just needed somewhere to store lawnmower, wheelbarrow, and a few yard supplies. I started putting the roof on hinges, but the gas struts couldn't support the 170 pound roof. So it's fixed in place (stronger structure anyway). That's why I went with 2x4's for the framed walls instead of 2x2's.

Built from Plan(s)
Estimated Cost
600
Estimated Time Investment
Weekend Project (10-20 Hours)
Finish Used
Not yet finished, will get to that.
Recommended Skill Level
Intermediate

Comments

Custom Farmhouse Bed

Submitted by Anonymous (not verified) on Mon, 01/15/2024 - 18:16

We used Ana’s Farmhouse queen bed plans to build a replacement for our master suite. We did change a few things such as instead of construction grade lumber I used red and white oak and went with dowels and tenons rather than pocket hole screws. I also lowered the height significantly due to us having a really thing mattress with pillow tops. The result has been wel received by 'management' as well as her friends. Thank You Ana!

Back Patio Woodworks

Built from Plan(s)

Entertainment Center

Submitted by Dave-Mac on Mon, 07/09/2012 - 13:10

I got the inspiration for this from the entertainment centers that kristenlotz and azca33 (mostly azca33).

I built this over about 5 months in my spare time. It took a lot of wood and a lot of time. I will post plans and a breakdown of supplies if there is any interest.

Estimated Cost
$500
Estimated Time Investment
Week Long Project (20 Hours or More)
Finish Used
I filled all the visible pocket holes with stainable wood filler. After everything was put together, I sanded everything with 150 grit sandpaper. I used a palm sander for the plywood and hand sanded the pine trim and moulding. Then I vacuumed up the dust and wiped it clean with a damp rag. I applied Minwax Mahogany gel stain with white t-shirt rags I bought from Lowe's. If there was any excess of stain I would just wipe it off after about 5 minutes or so. I let that dry for at least 24 hours. Then I applied a coat of Minwax Clear Semi Gloss fast drying Polyurethane. Then I lightly sanded everything with 220 grit sandpaper. Vacuumed and cleaned again. Then another coat of the poly.
Recommended Skill Level
Intermediate

Comments

Misty Tillema

Mon, 07/09/2012 - 15:58

Wow, what a beautiful entertainment center! I love stained wood, and this would match my house perfectly. I'm not ready to take on a project this big yet, but when I am, I want to build it. Great job!

MARGARET (not verified)

Sun, 08/19/2012 - 07:14

This is a beautiful entertainment center. You did a wonderful job. My husband has been looking for plans to build one for us and very much likes this. Is there any way he can find out what material is needed and how you did this?

smbeddard

Sun, 08/19/2012 - 14:08

Dave, this looks great. It is exactly what I want to build for our family. It would be great if you could post the plans. Thanks.

azca33

Mon, 08/27/2012 - 17:49

Great job with the entertainment center, it looks great! Now you can enjoy not only sitting on the coach and watching TV, but sitting back and basking in the greatness of your skills! Good work!

kristenlotz

Mon, 12/31/2012 - 14:26

I love this project Dave-Mac. When I saw it I knew you must have gotten your inspiration from our brag. It is gorgeous. If we were to do our entertainment center again, I think we would incorporate a lot of the things you did with yours. I love that you did a stain instead of paint! Also the thicker stiles and the inset doors are amazing. We created plans for ours on our woodworking blog. Hopefully that helps others get started on their project. It's a lot of work, but it is a fraction of the cost of buying one. Great job! Here is the link to the plans:

http://www.jrlwoodworking.com/2012/12/furniture-plans-custom-entertainm…

kristenlotz

Mon, 12/31/2012 - 14:27

I love this project Dave-Mac. When I saw it I knew you must have gotten your inspiration from our brag. It is gorgeous. If we were to do our entertainment center again, I think we would incorporate a lot of the things you did with yours. I love that you did a stain instead of paint! Also the thicker stiles and the inset doors are amazing. We created plans for ours on our woodworking blog. Hopefully that helps others get started on their project. It's a lot of work, but it is a fraction of the cost of buying one. Great job! Here is the link to the plans:

http://www.jrlwoodworking.com/2012/12/furniture-plans-custom-entertainm…

DMac

Thu, 03/07/2013 - 10:17

It depends on what you are looking for. How complicated of a project are you looking to have built? If it is something on this site then I could build it for you.

This is Dave-Mac by the way. I couldn't figure out how to reset my password so I just made a new account.

DIY RH Dining Table

Submitted by vlilly on Sun, 04/27/2014 - 13:22

I loved making this! I had to travel about 2 hours to get the DF 4x4s which was the only pain in making it. This was my third big project and it wasn't hard at all! It's super heavy so it was a litte tough to turn it over. It only took me about 3 days to make it once I had all the wood.

Estimated Cost
$175-$200
Estimated Time Investment
Weekend Project (10-20 Hours)
Finish Used
Stained with Rustoleum American Walnut, then applied a coat of Rustoleum Poly in matte.
Recommended Skill Level
Intermediate
Back