Community Brag Posts
Dining Table 4x4 Truss Bench
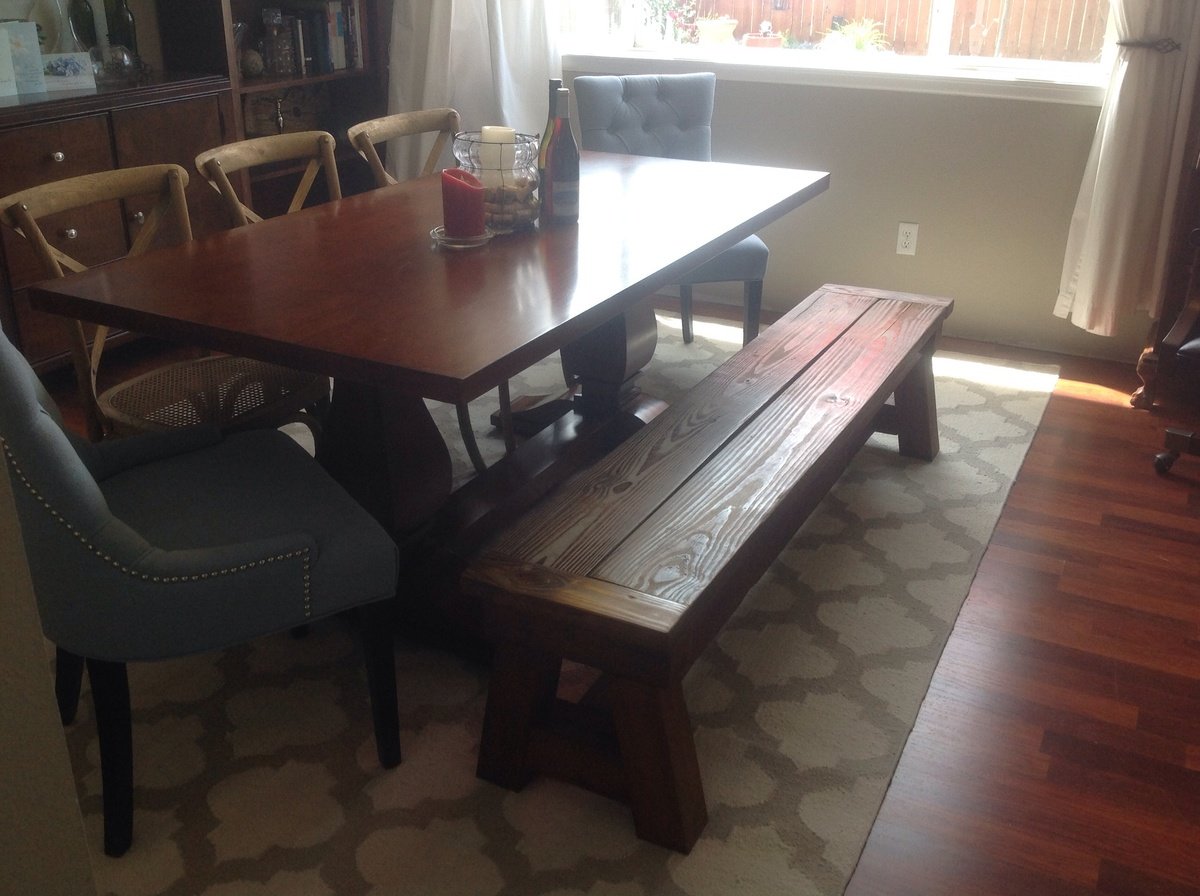
Using the 4x4 Truss Bench plan (http://ana-white.com/2013/10/plans/4x4-truss-benches), we built this bench using entirely reclaimed lumber. (We had removed an old patio and part of a fence.) We already had all of the lumber, screws, etc. so the only cost to us for this project was the cost of the stain.
We modified the plan slightly, using 2x4s on the ends.
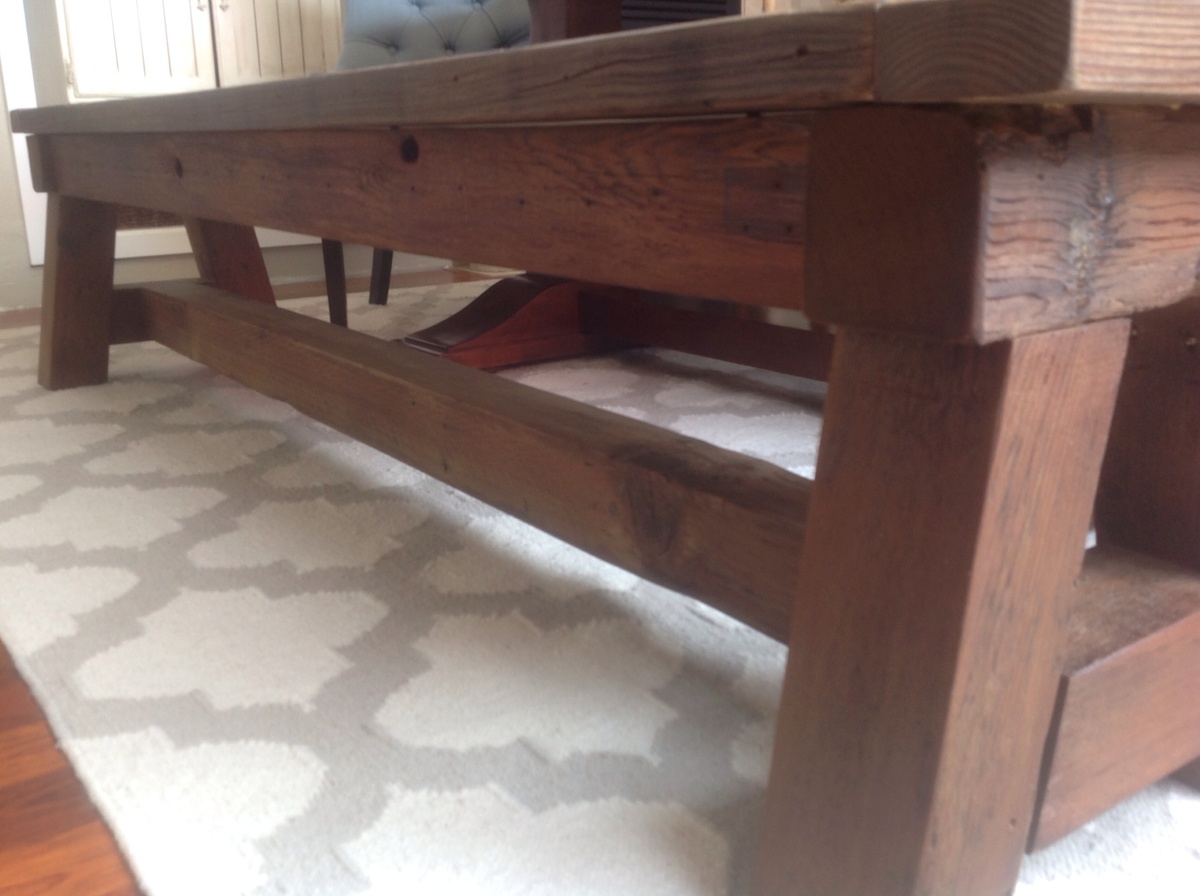
My husband is obsessed with decking screws. Thus the entire bench is held together with 2 1/2 inch decking screws. (Unfortunately, we purchased our Kreg Jig a day following the completion of this project.)
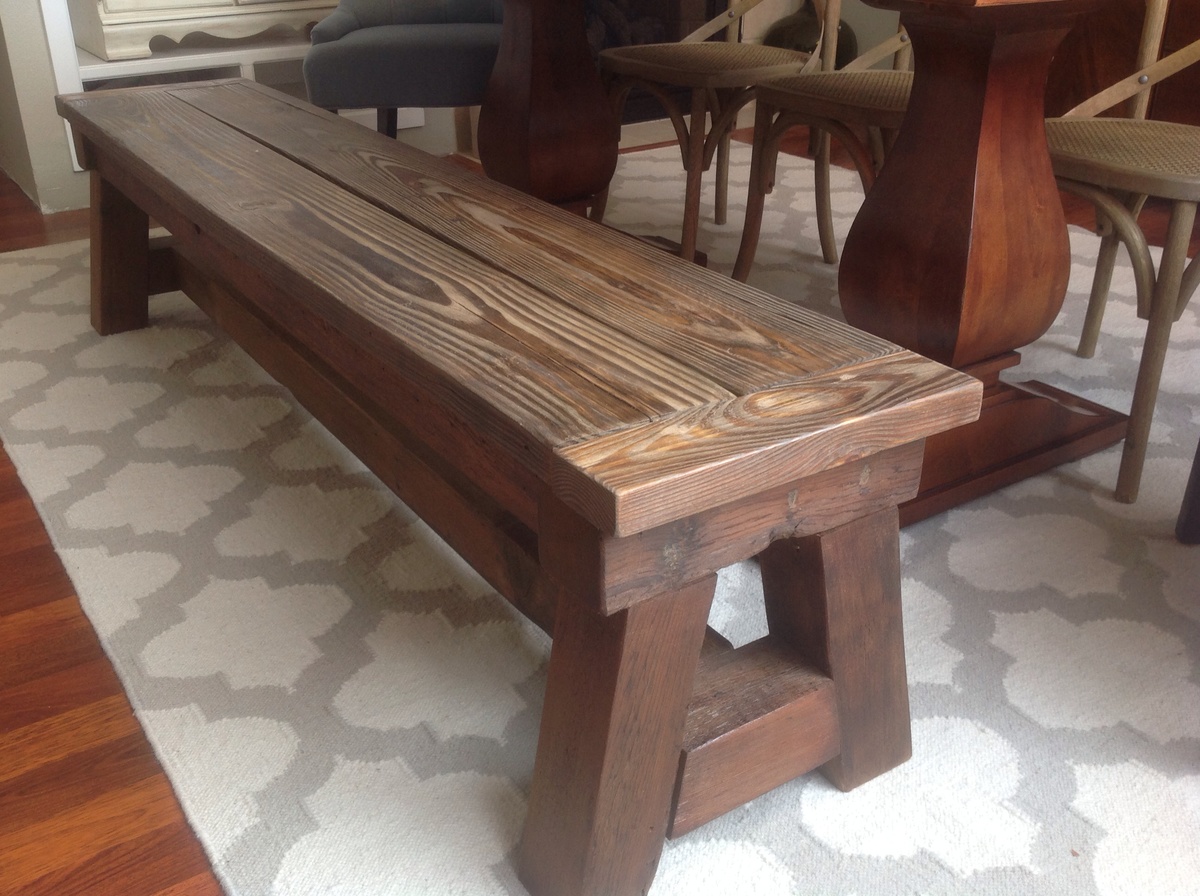
Because the lumber was very old and weathered, there is a lot of character to the wood. There were some incredibly soft spots which made sanding a challenge, and some of the boards were somewhat warped. However, we still really like the way it turned out.
I sanded (and sanded and sanded) using 60 grit, then 80... then 120... then 220. I filled the screw holes with wood filler (and sanded again). I then conditioned the wood with Minwax pre-stain wood conditioner. I used Minwax Early American oil based stain on the entire project. I then went over the top only with Minwax Weathered Oak. After about 36 hours of drying time, I used 2 coats of Minwax Fast-Drying clear semi-gloss polyurethane.
This bench is a beast! I'm sure it weighs over 75 pounds. It is extremely solid, and quite beautiful in our dining room. The plans were easy to follow, and the whole thing went together fairly quickly. (It would have been completed even more quickly had we had our Kreg Jig at the time. Lesson learned.)

Built from Plan(s)
Estimated Cost
$10
Estimated Time Investment
Day Project (6-9 Hours)
Finish Used
I sanded (and sanded and sanded) using 60 grit, then 80... then 120... then 220. I filled the screw holes with wood filler (and sanded again). I then conditioned the wood with Minwax pre-stain wood conditioner. I used Minwax Early American oil based stain on the entire project. I then went over the top only with Minwax Weathered Oak. After about 36 hours of drying time, I used 2 coats of Minwax Fast-Drying clear semi-gloss polyurethane.
Recommended Skill Level
Beginner
Hannah canopy bed full tufted

I loved he Hannah canopy bed for my daughter but felt like it was missing something. I decided to tuft the headboard and I used rhinestone buttons to give it that girly look with a small pop of glam. The tufting took probably 12 hours in total but totally worth it. We then followed all the instructions on how to build the bed with the exception of having any screws go in through the sides of the fabric on the headboard. We used plates to hold the headboard in place and screwed around the edges. It was time consuming but we love how it came together.
Estimated Cost
$150
Estimated Time Investment
Week Long Project (20 Hours or More)
Finish Used
I mixed classic grey and and special walnut (equal parts) and did a liming glaze to give it that restoration hardware look
Recommended Skill Level
Intermediate
Narrow Cottage End Tables
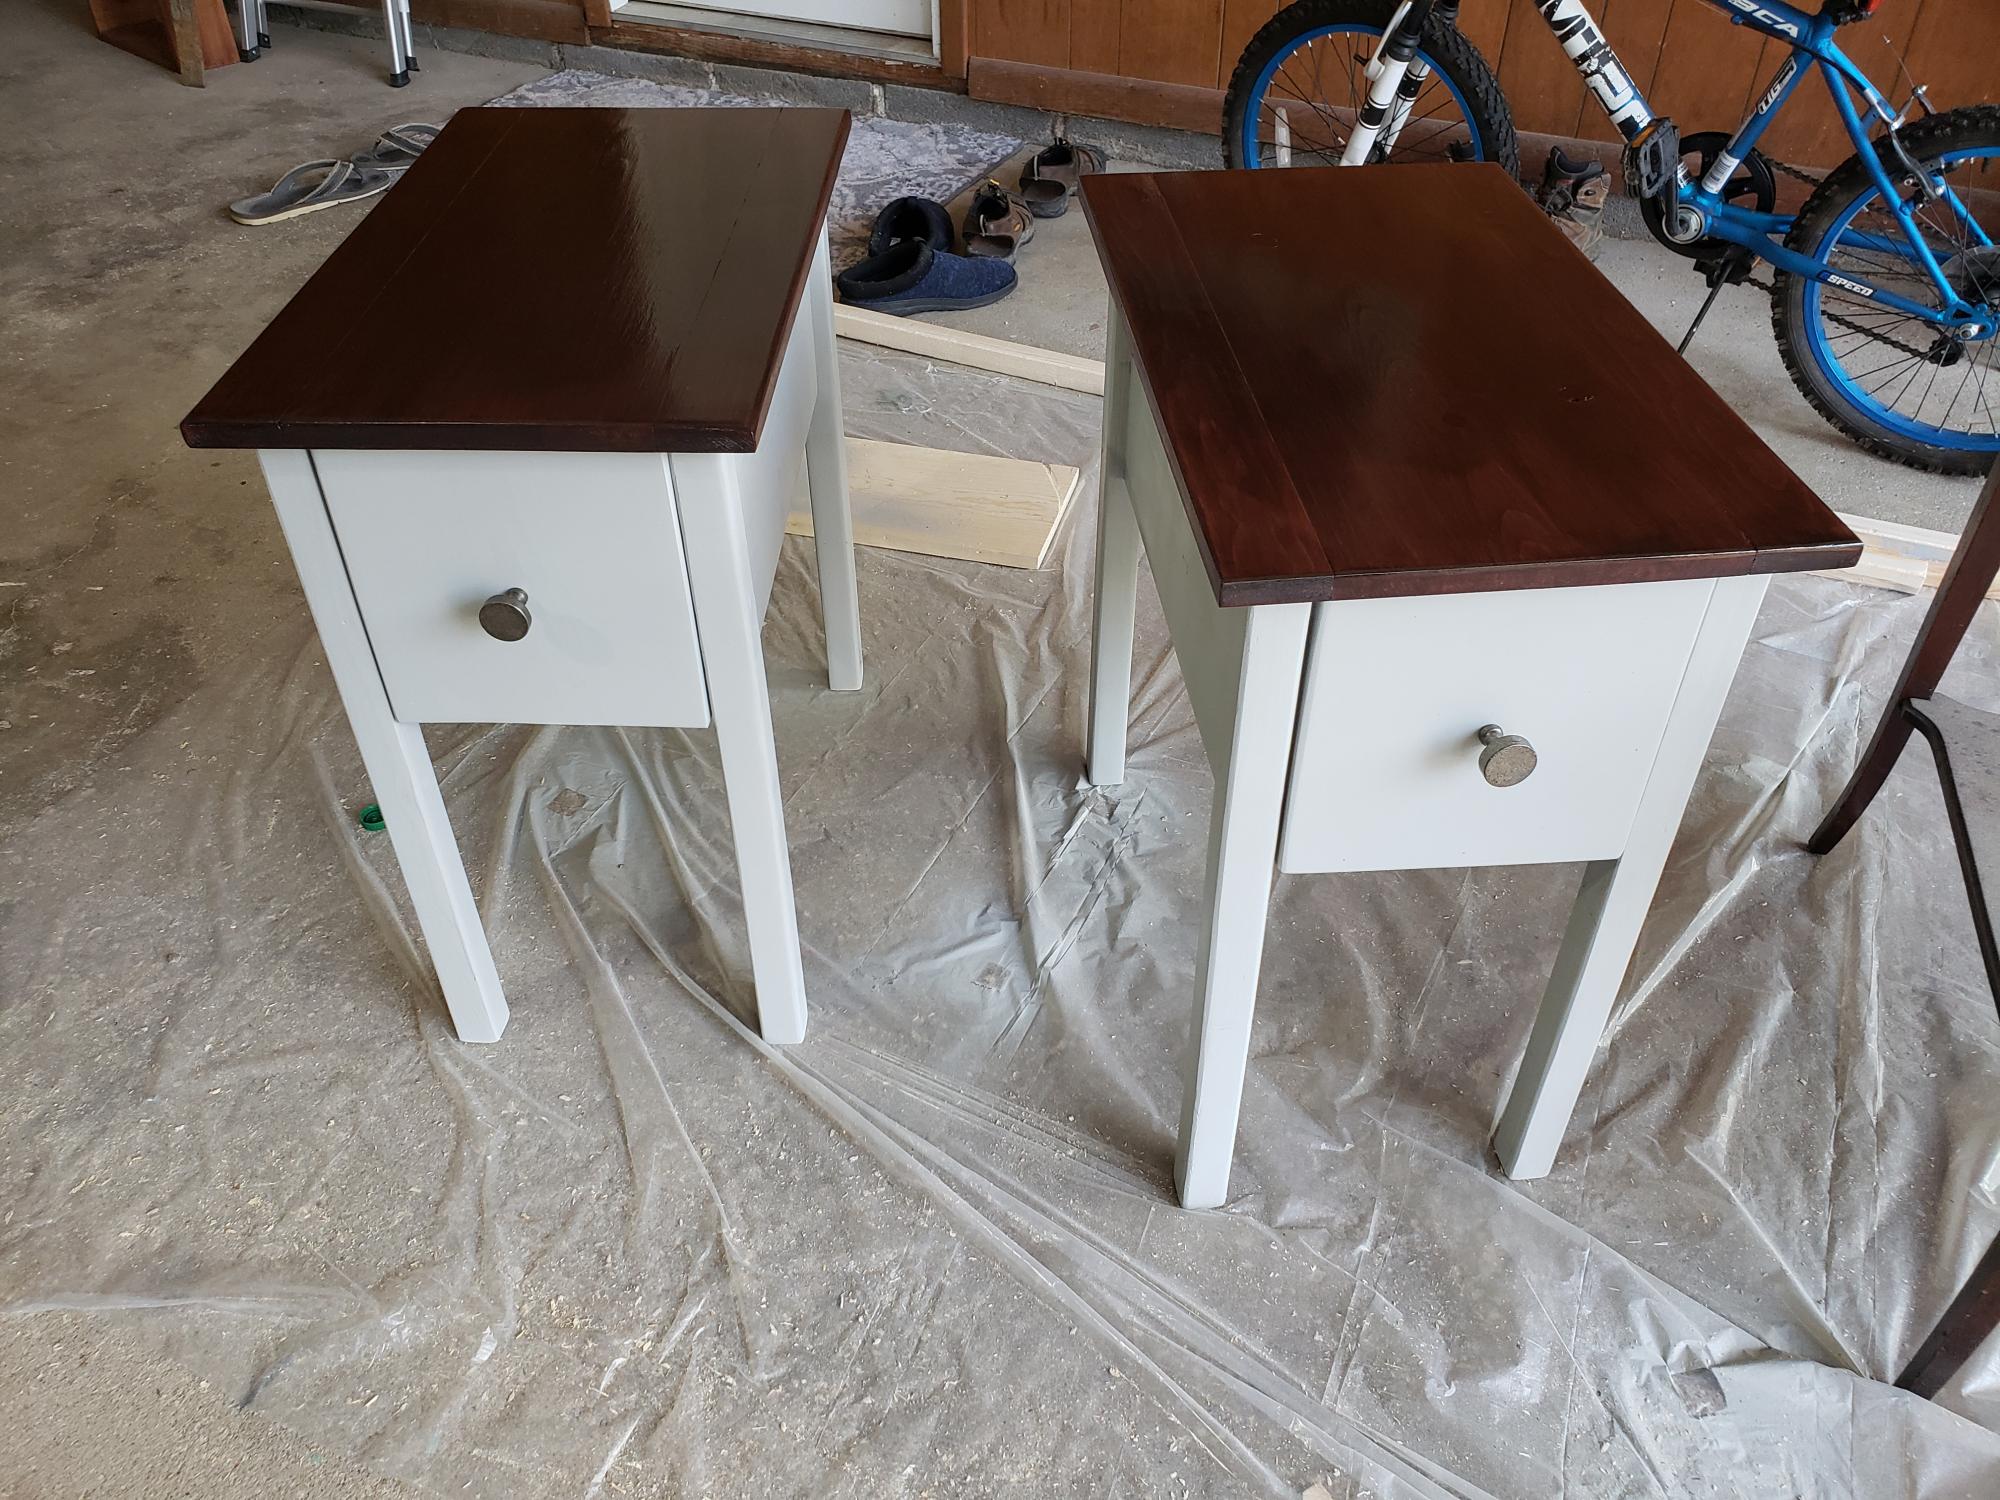
Perfect for for my living room
Built from Plan(s)
Estimated Time Investment
Weekend Project (10-20 Hours)
Recommended Skill Level
Intermediate
Outdoor Farm Table

Farmhouse Table with pocket holes.
Duffsdesignsnc
Built from Plan(s)
Collapsible luggage rack

To build:
2 x 4s
1 1/4" dowel rods - x3
2 1/2" wood screws screws
1 1/2" PVC pipe (for spacers) - cut at 3/8" thick - x2
Needed:
Hole saw kit
powerful 3/8" drill or 1/2" drill
Jig saw
Miter saw
sandpaper
wood filler
paint


Estimated Cost
$20 each
Estimated Time Investment
Afternoon Project (3-6 Hours)
Finish Used
White enamel semi-gloss
Recommended Skill Level
Beginner
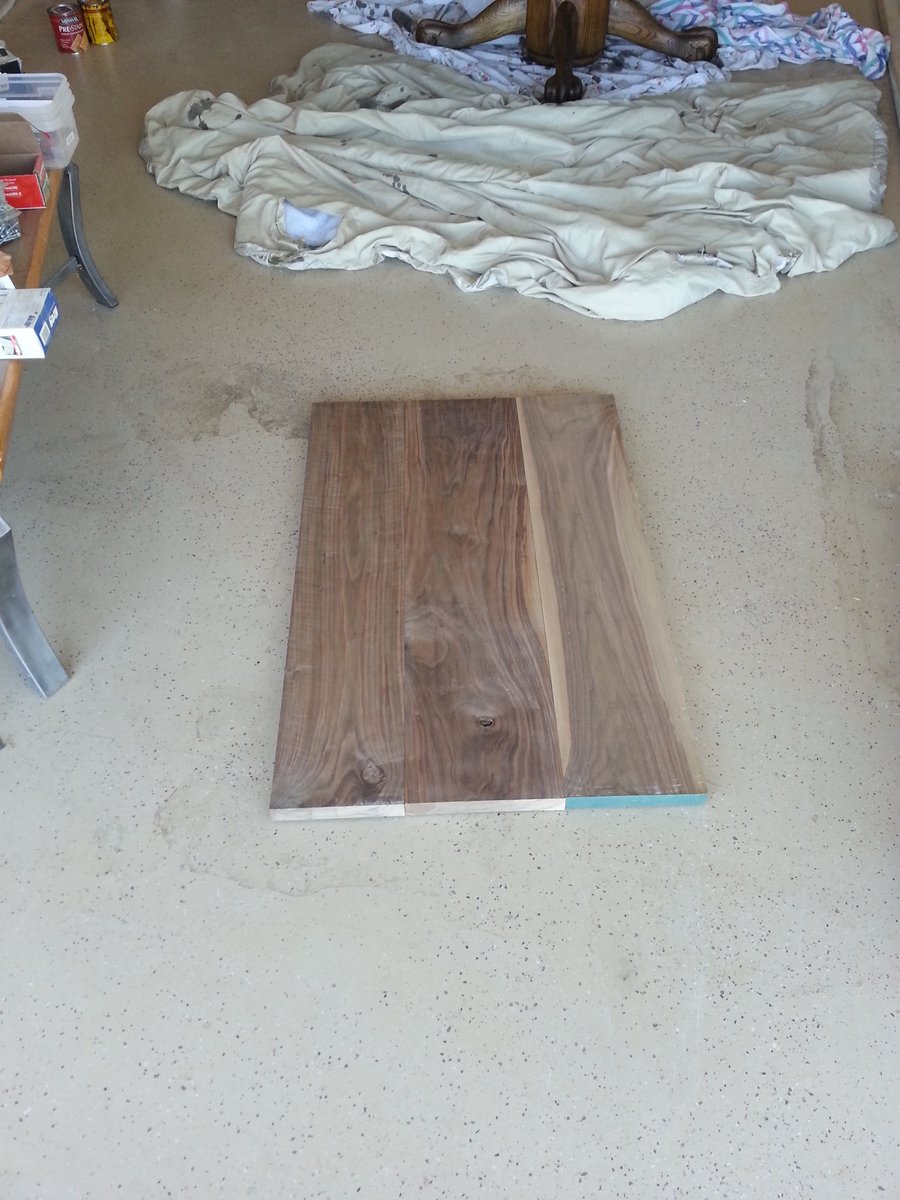
Walnut end table pet kennel
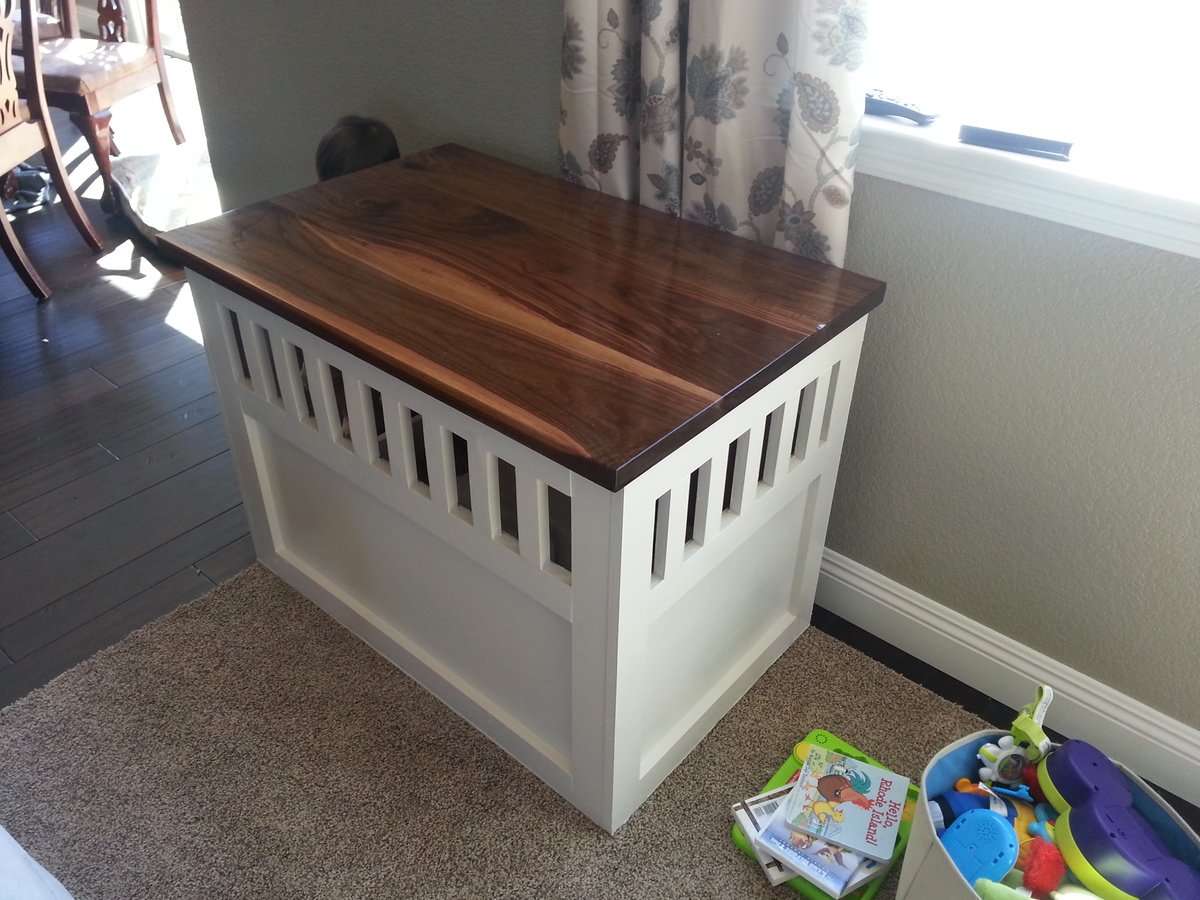
Was a great project! Was surprisingly easy to put this together. Modified the plans slightly and used all 1x3" boards for the edges (instead of 1x2"). Made the top out of left over walnut from the truss farmhouse table we made earlier in the month. Painted off-white (fledgling). Highly recommend buying decorative hinges as it made a big difference in the look.
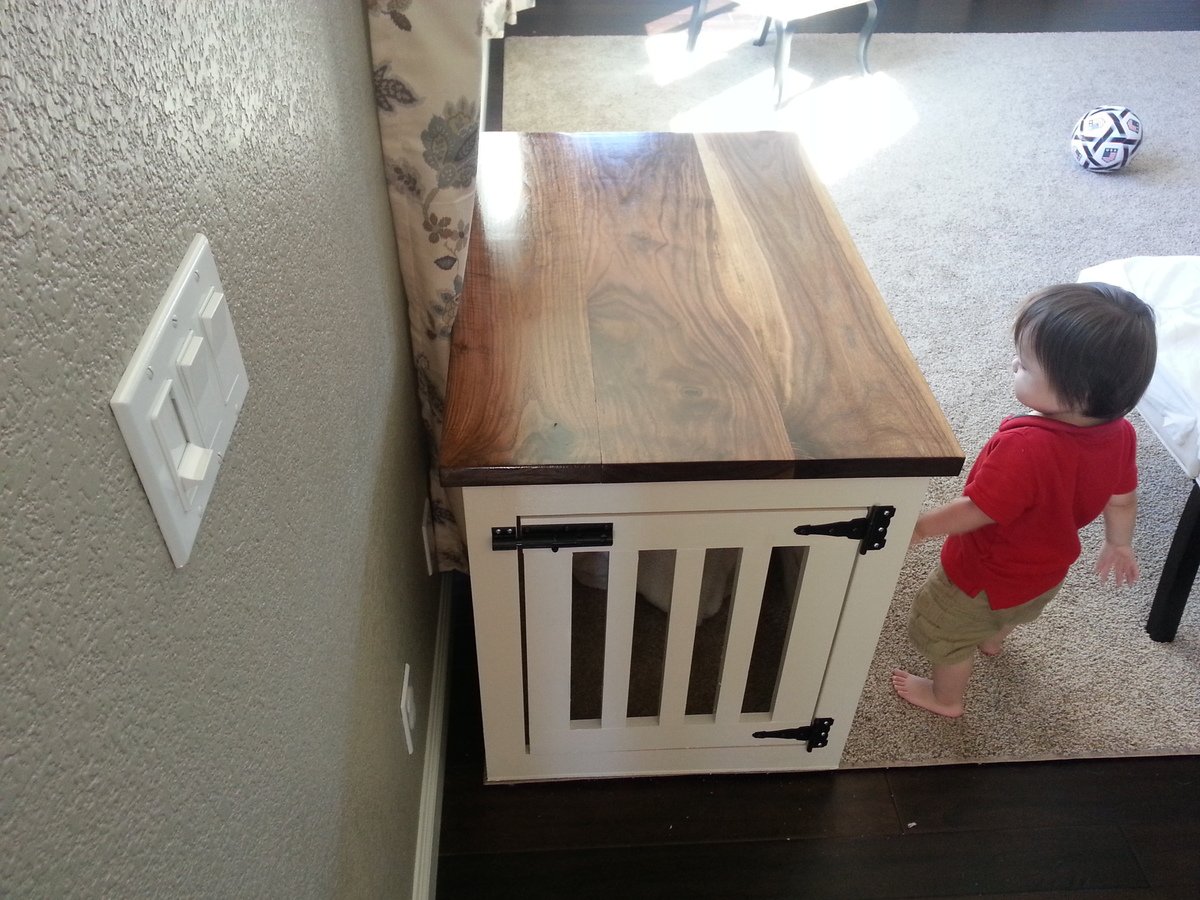
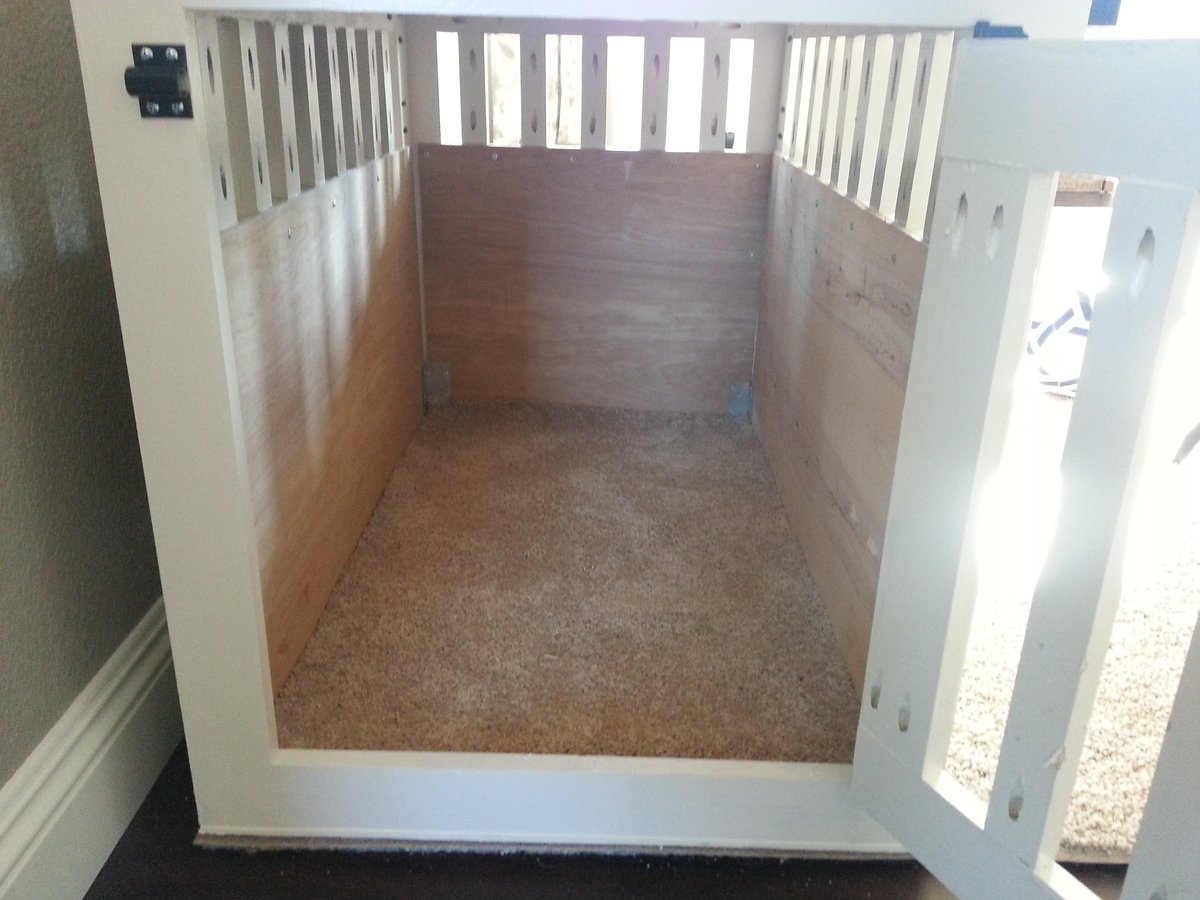
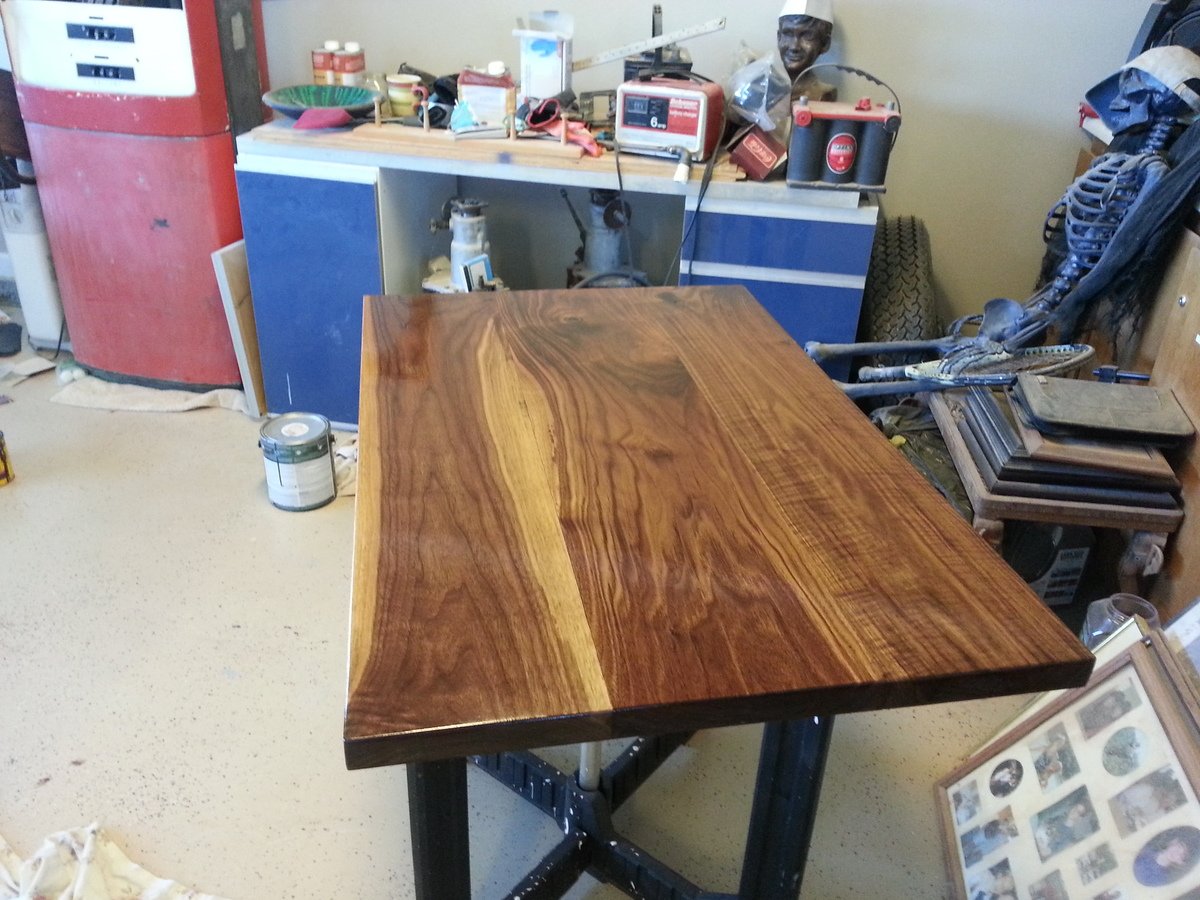
Built from Plan(s)
Estimated Cost
$120
Finish Used
Waterlox original for the walnut and fledgling (off-white) pain for the rest.
Recommended Skill Level
Beginner
Comments
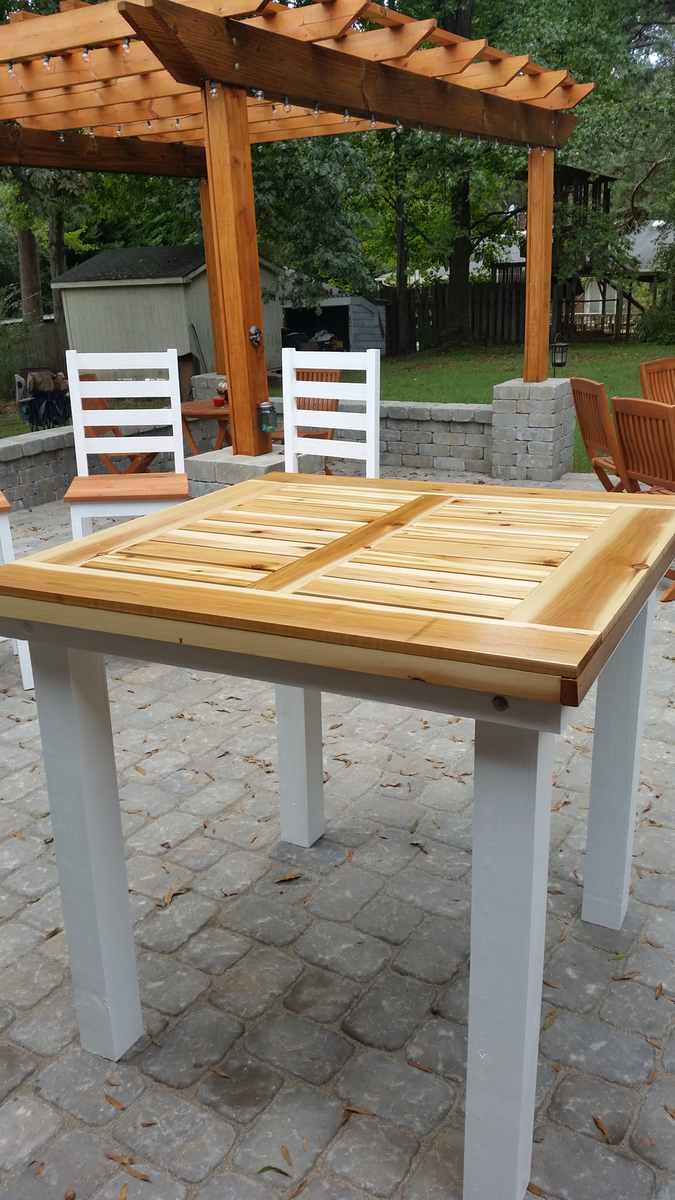
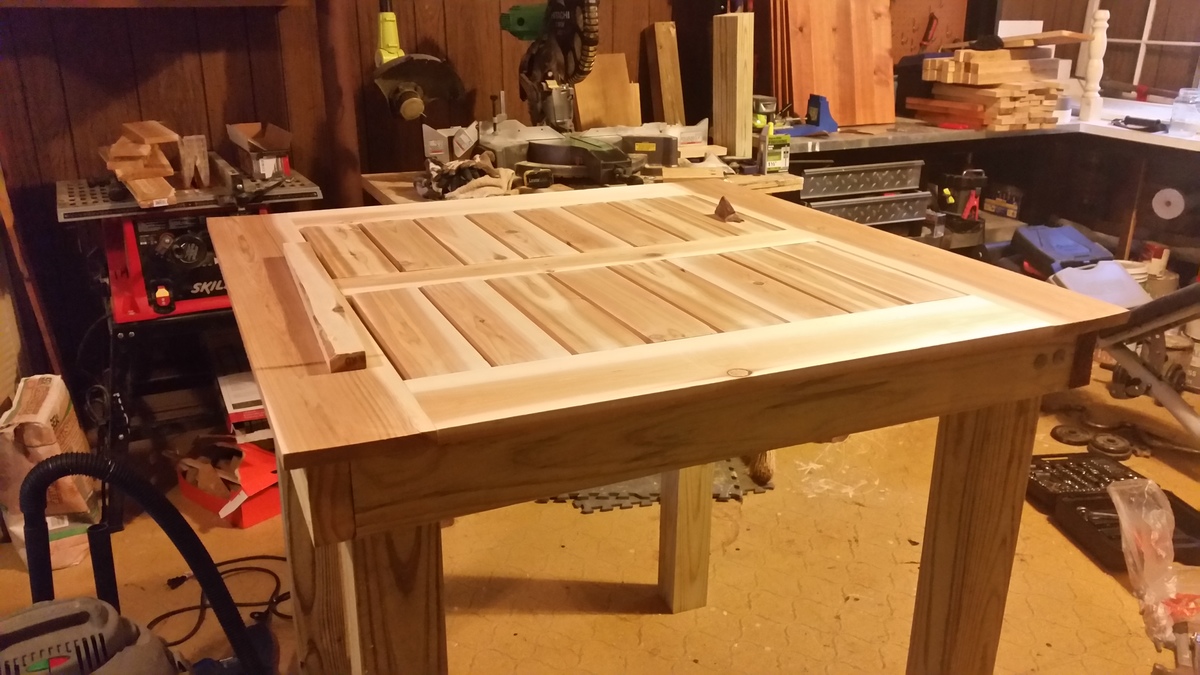
Cedar Top Pub Table
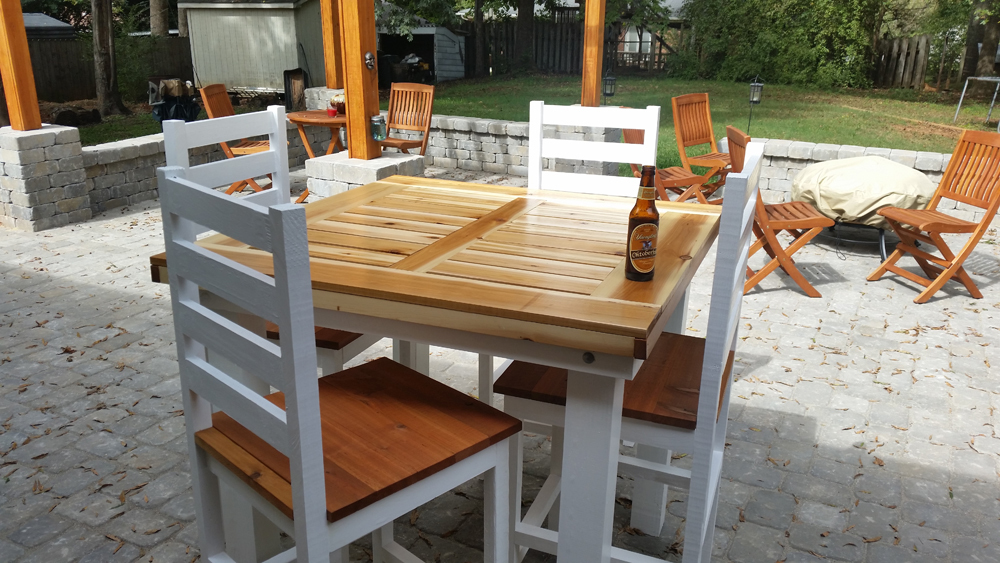
Ana Whites site is always my first stop for inspiration, she always has good designs and diagrams. I usually use her plans as a rough guide, and then tweak them as needed.
For this table, I made it 42" square, and adjusted the height.
The main difference is I built this from PT pine, and cedar as this is going to be an outdoor table, and I would like it to last. I painted the frame with 3 coats of exterior semi gloss paint, and used Helmsman spar urethane for the top. I did not stain the wood, as I love the color variations of natural cedar.
I also used galvanized carriage bolts to connect the legs. This increased the costt, but I wanted to be able to remove the legs. For more in depth connection details see my blog.
The table turned out quite well, is very sturdy and has gotten quite a few compliments, thanks Ana for the inspiration to build cool stuf! I love building STUFF!
Built from Plan(s)
Estimated Cost
$150
Estimated Time Investment
Weekend Project (10-20 Hours)
Finish Used
Exterior semi gloss paint
Helmsman spar urethane for tabletop
Helmsman spar urethane for tabletop
Recommended Skill Level
Beginner
Sandbox with Benches
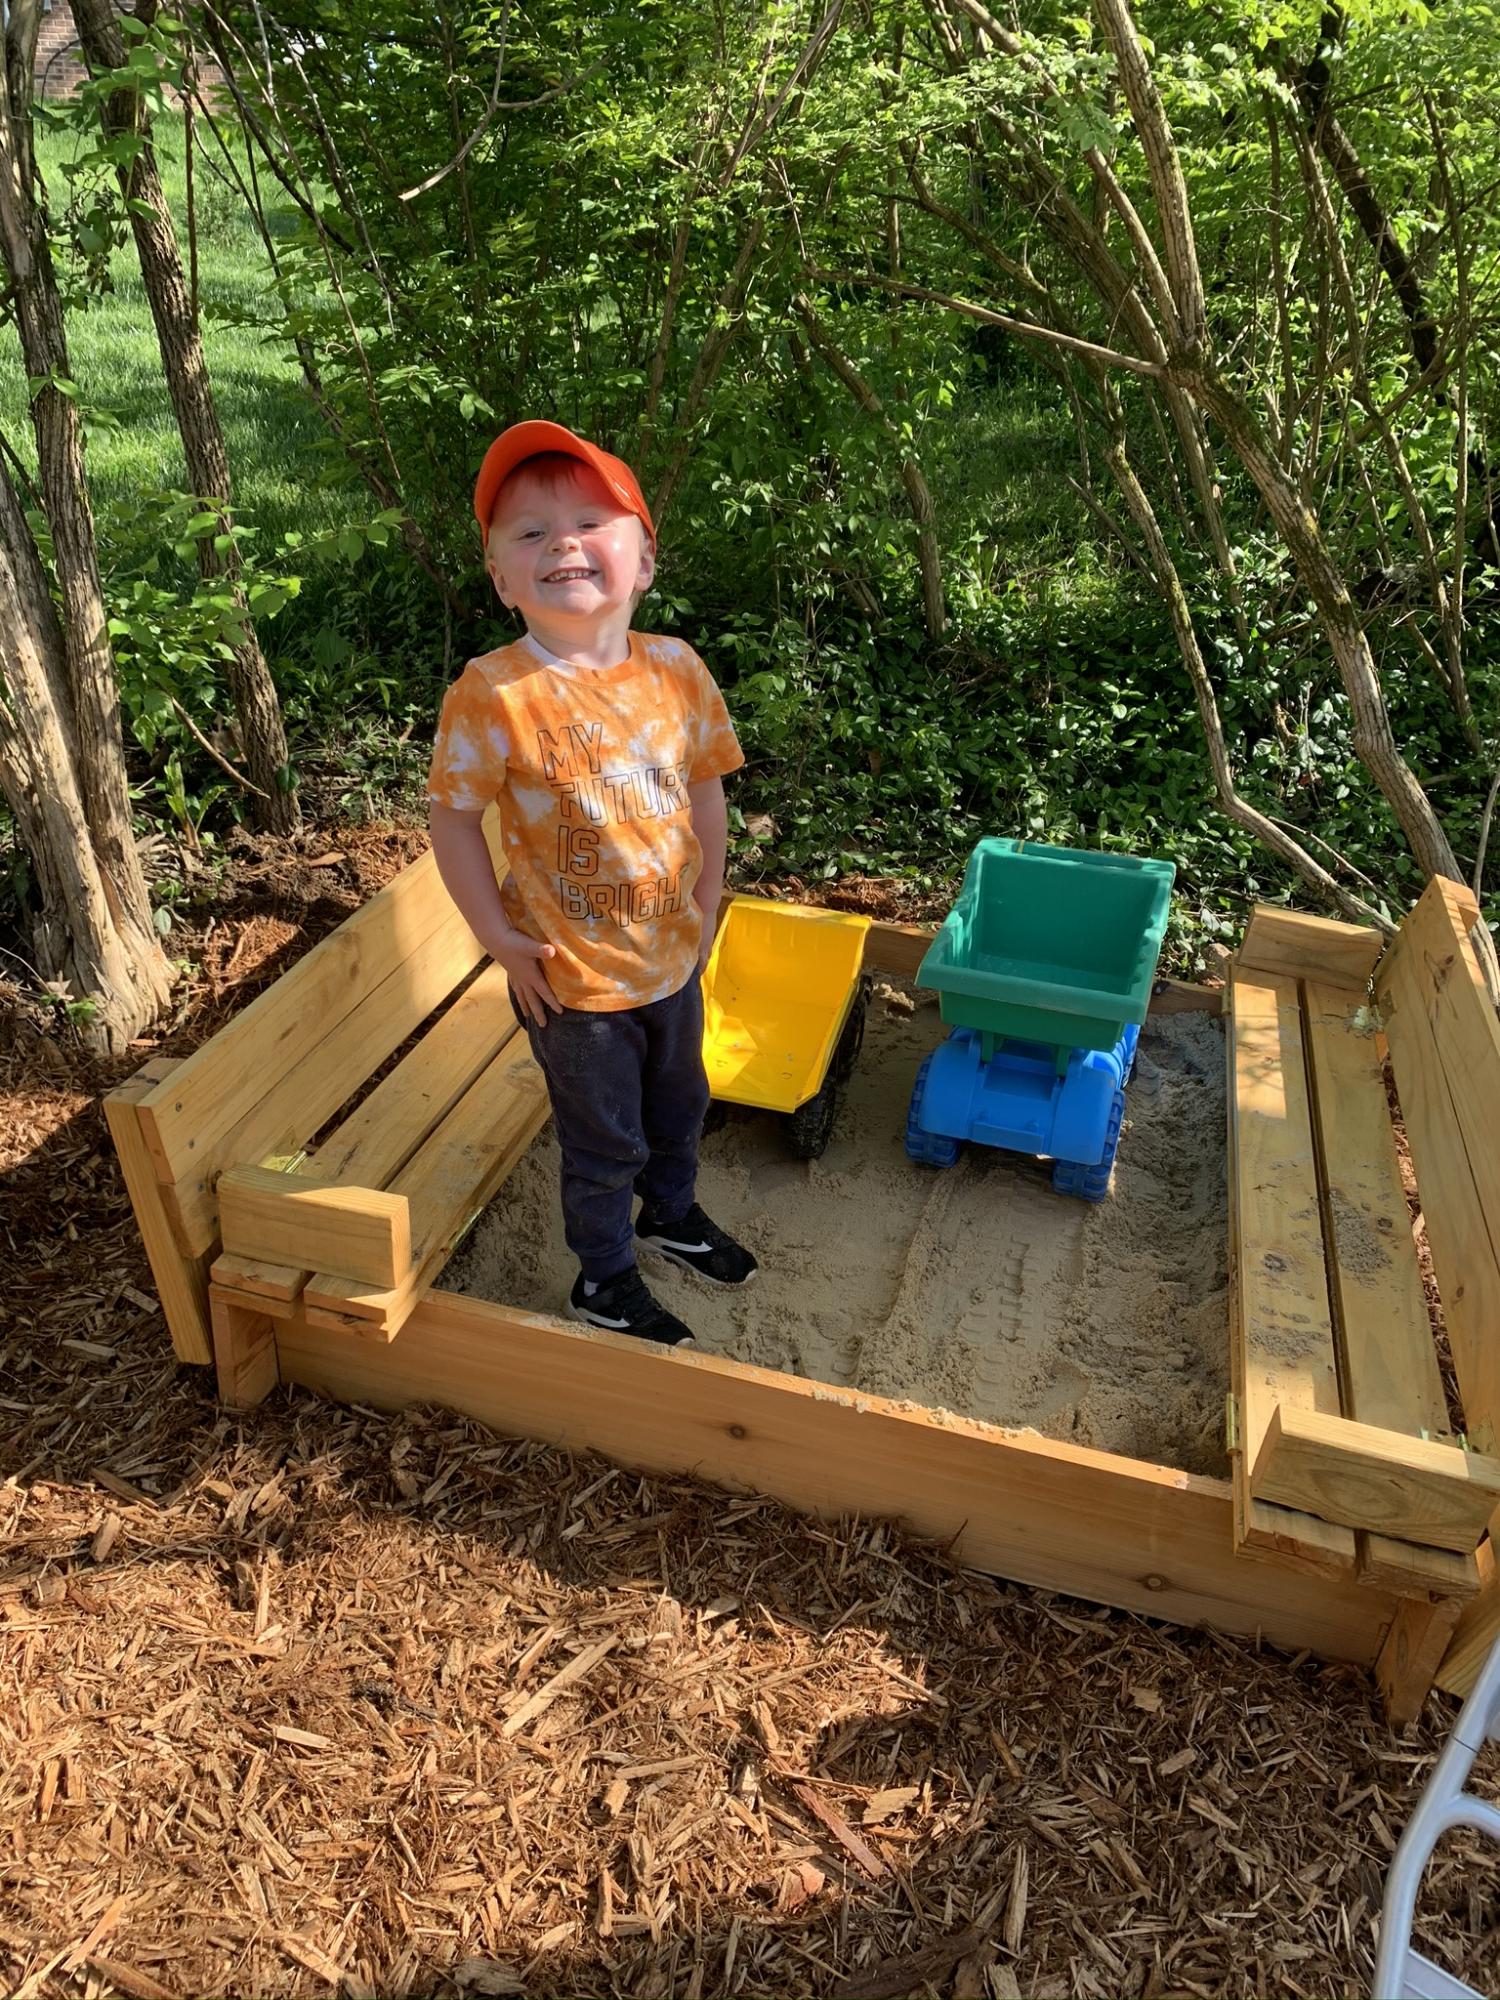
Awesome sandbox !!
I’ve made a couple of these . One thing to save you money that I switched to on my second one is making the frame from 2x material vs 1x. Looks better too and is more sturdy .
Built from Plan(s)
Estimated Cost
$65
Estimated Time Investment
Afternoon Project (3-6 Hours)
Finish Used
Cedar deck stain/sealer
Recommended Skill Level
Beginner
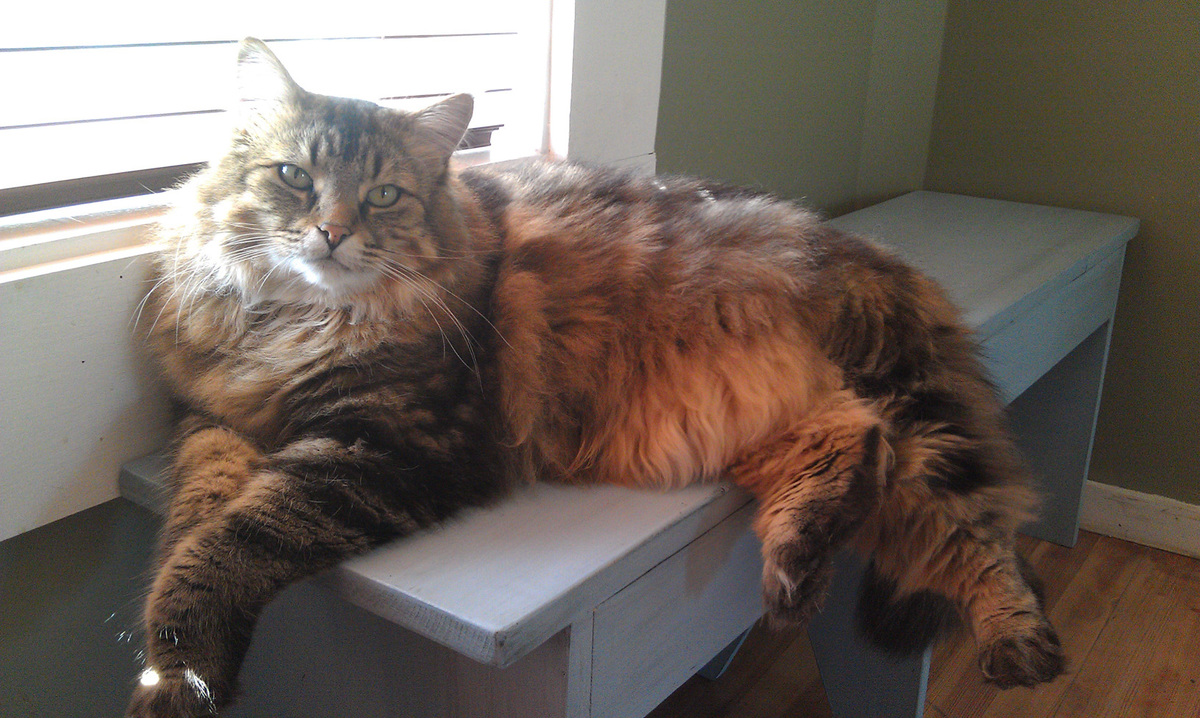
My first build
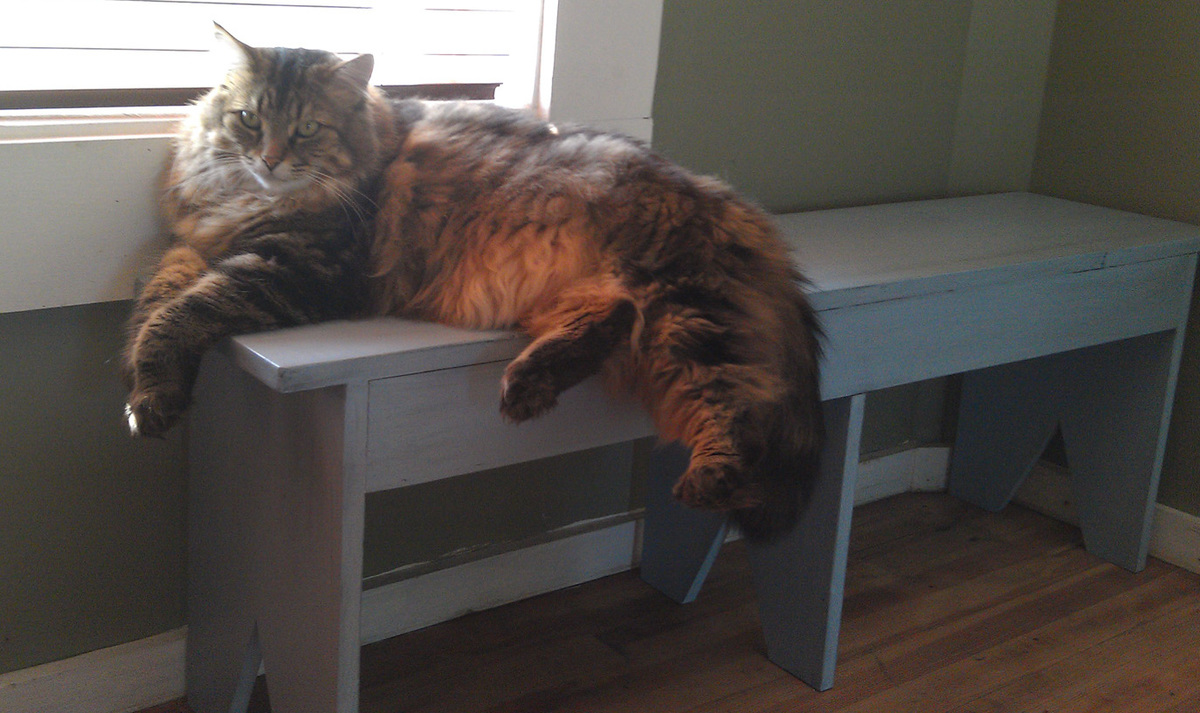
This was my first attempt at building and I learned a lot such as if you drop pine, it cracks in half - and - when cutting with a jigsaw, cut inside the lines....you can always trim more off, but you can't put it back - and - my dogs can distress a piece of furniture faster than I can if I put it under "thier" window....whether I want them to or not!
This was a great beginner project and gives a fast, satisfying result. As you can see, it has become the cat's bench...can't get a picture of it without him, he lives on it!
Just a couple of notes: I cut the legs more according to the plan diagram than the pretty cuts Patrick made on his...I wasn't ready for that. Also, I didn't have my glasses outside with me, so my measurements on the legs are probably not right. I made the top shorter because I wanted it for a specific space (which didn't work out, see note about about dogs and distressing....ugh!).
Also, this probably should have taken me just an hour or so, but I had my Kreg jig set all wrong and first had shallow pocket holes (see note above about pine breaking when dropped) and then made them too deep (learned to use wood filler)! That's when I finally got my butt into the house to get my glasses to read the dang directions (again!).
Thanks Patrick and Ana for giving me such a great, easy beginner project!
Built from Plan(s)
Estimated Cost
$15.00
Estimated Time Investment
Afternoon Project (3-6 Hours)
Finish Used
I used a homemade chalk paint with a recipe I found on Pinterest. The base was Benjamin Moore's Niagara Falls cut with about 20% white. I then mixed a half and half mixture of black paint (Ace Hardware's India Ink) with a glaze base (Behr) and distressed it a touch.
Recommended Skill Level
Starter Project
Comments
Fri, 09/07/2012 - 23:18
Awesome!
It looks great! I'm no expert at building by any means, but whether it's your 1st or 100th project, there's always something to learn :) Good for you for trekking through all the hiccups you encountered, it can get discouraging when there's problem after problem - but seeing the final results makes it all worth it. I love the color you chose! And it seems like you made your fur baby very happy :D

Sat, 09/08/2012 - 17:54
Looks super!
Congrats on your first project! Looks super! The color and distressing are beautiful. Great idea with the DIY chalk paint, too! :)
Sun, 09/09/2012 - 13:24
First Project
If you're happy with it, than its a winner! It looks like a decent bench, but really can't tell with the cat in the way....just kidding. Congrats and I look forward to your next post!

Farmhouse table

This project started on a Saturday and I moved it into the house the following Friday. All that being done with two little cherubs running around and making demands of me every 10 minutes. Super easy build and my first time.


Estimated Cost
140
Estimated Time Investment
Week Long Project (20 Hours or More)
Finish Used
Walnut stain and satin polyurethane. Both rustoleum.
Recommended Skill Level
Beginner
Rustic Bench
This was one of my first builds ever! I'm hooked!
Built from Plan(s)
Estimated Cost
$20
Estimated Time Investment
Day Project (6-9 Hours)
Recommended Skill Level
Intermediate
Modern Outdoor Chair from Pallet wood- OH MY
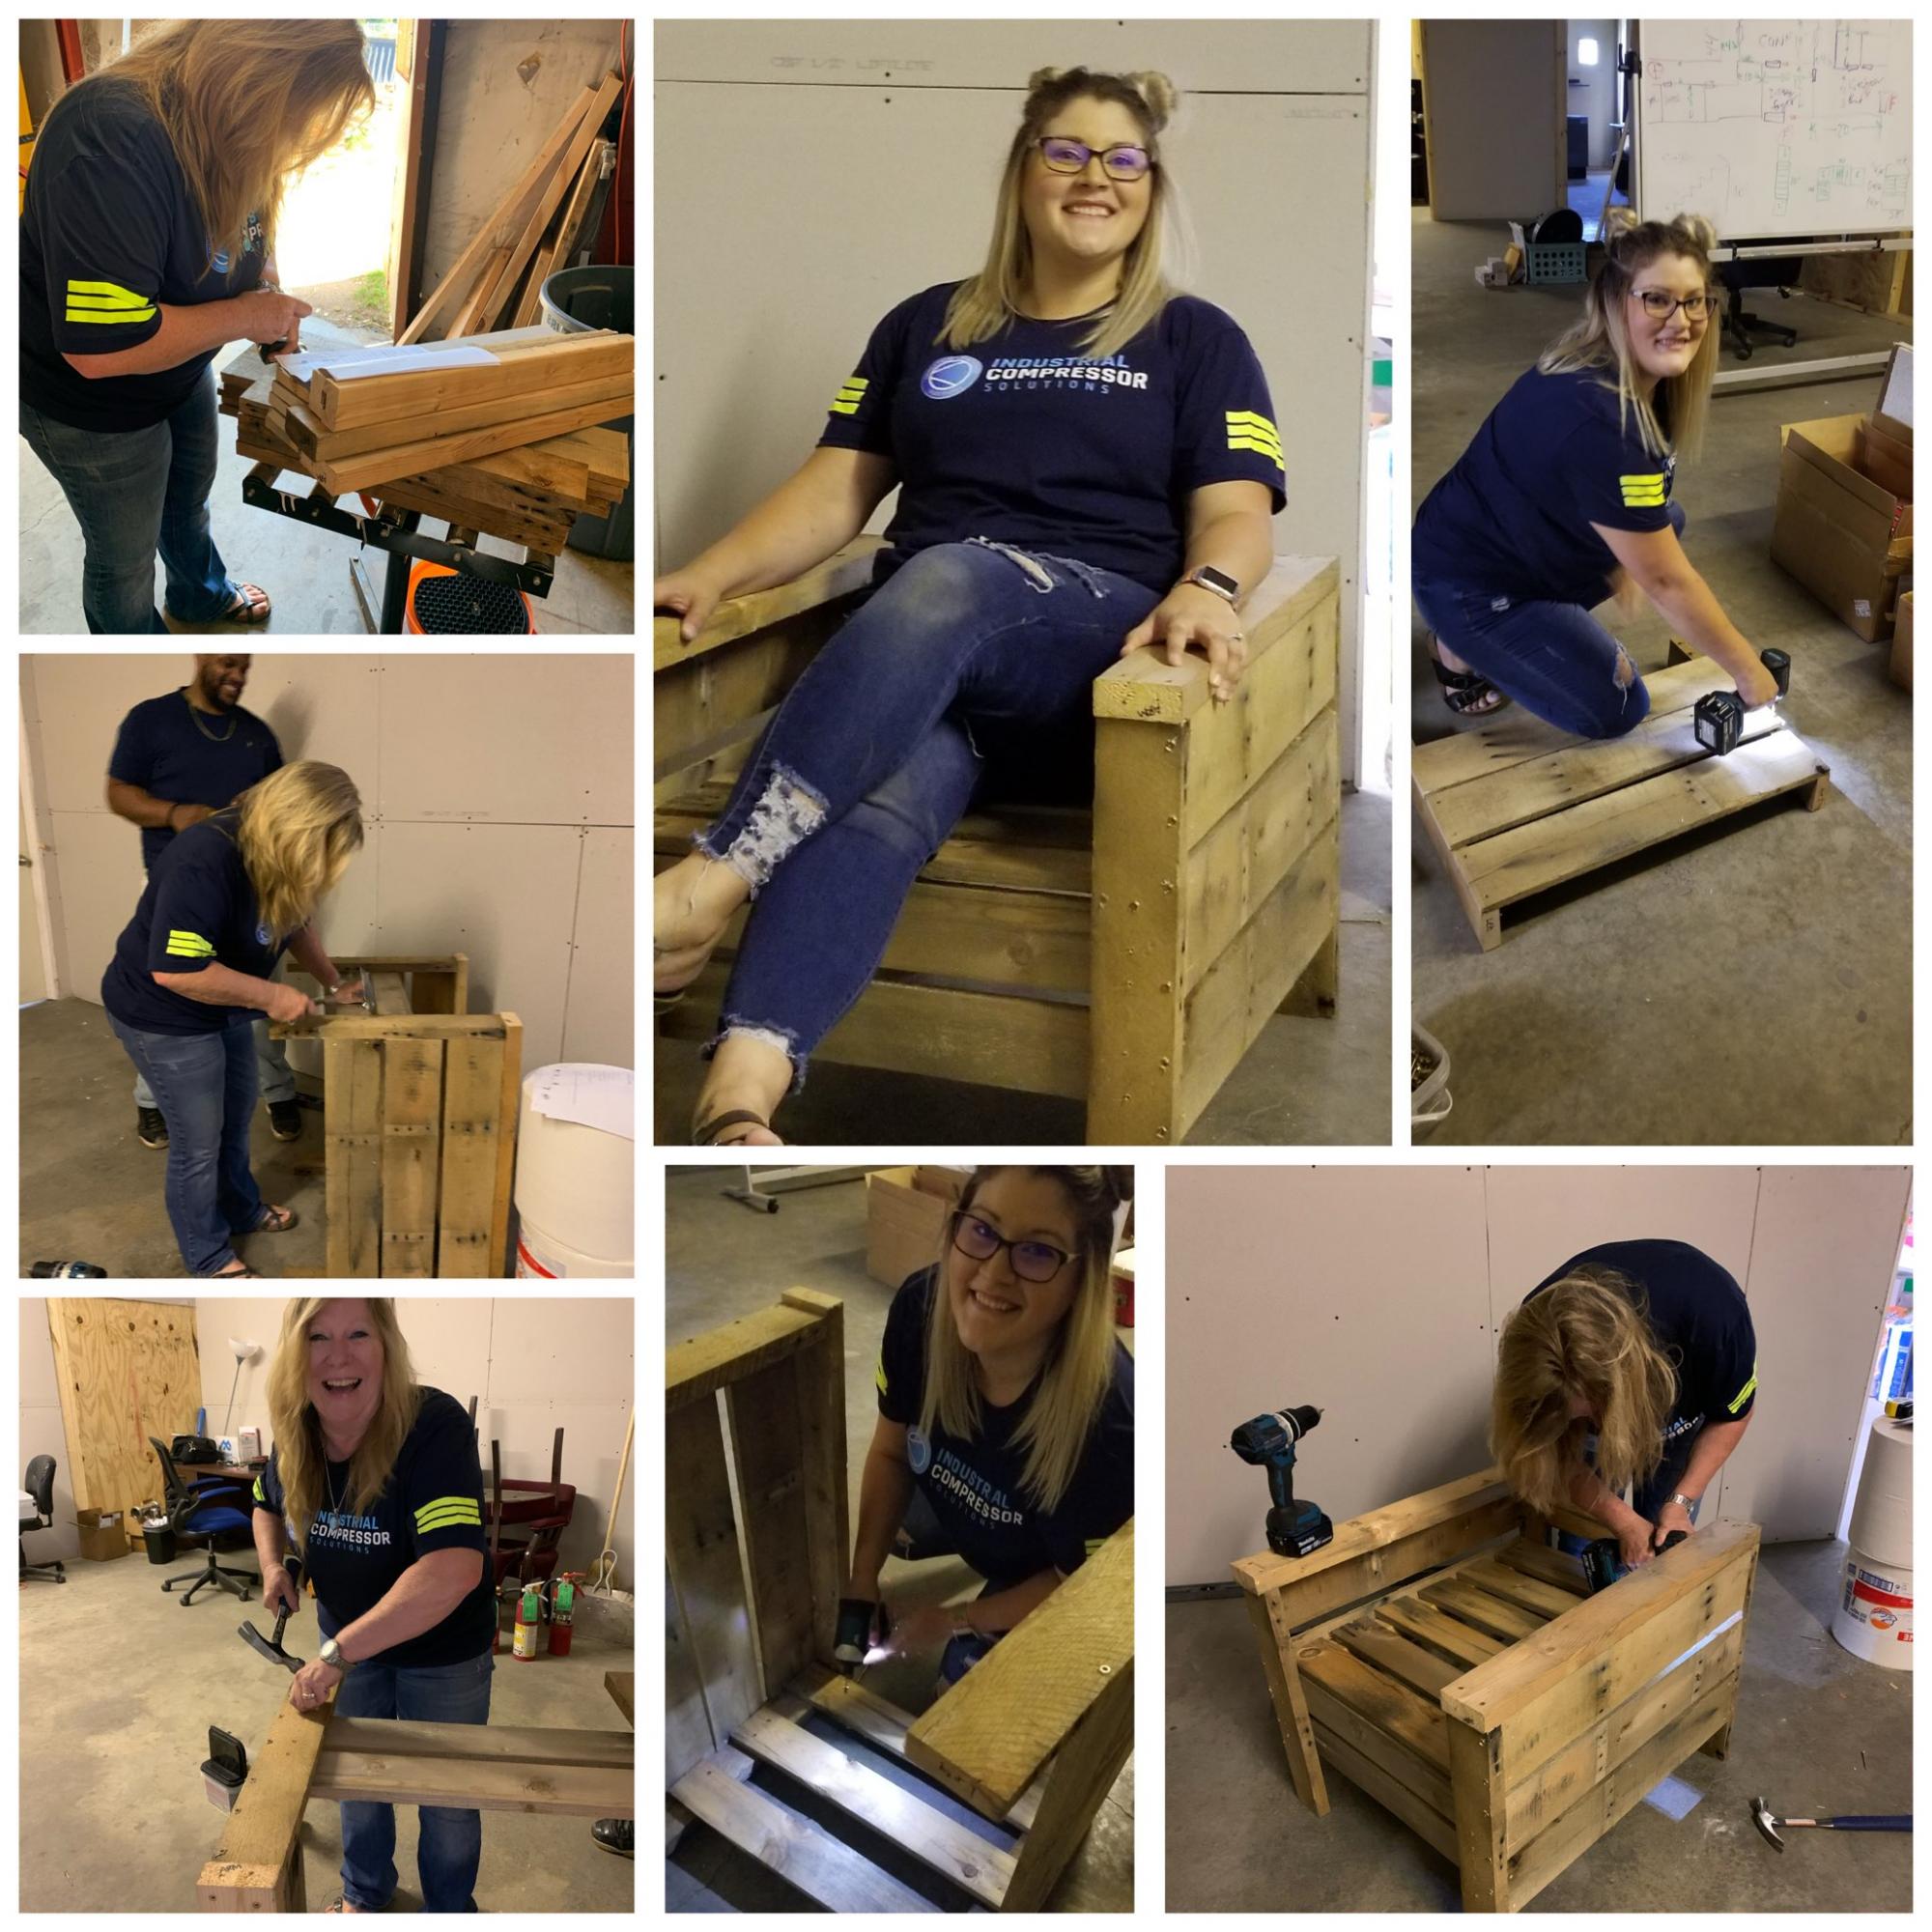
It's a Friyay! and we have a bunch of used pallets at work the boss is wanting to get rid of. Well he is on vacay so ....
We (me and my office manager) had to alter the directions a bit but the end result is great. This was our first project and tools were very limited. Even so its a win win and we will be making more. Thank you Ana!
Built from Plan(s)
Estimated Cost
FREE
Estimated Time Investment
An Hour or Two (0-2 Hours)
Finish Used
none yet but paint is being considered
Recommended Skill Level
Beginner
DIY Wood Patio Furniture
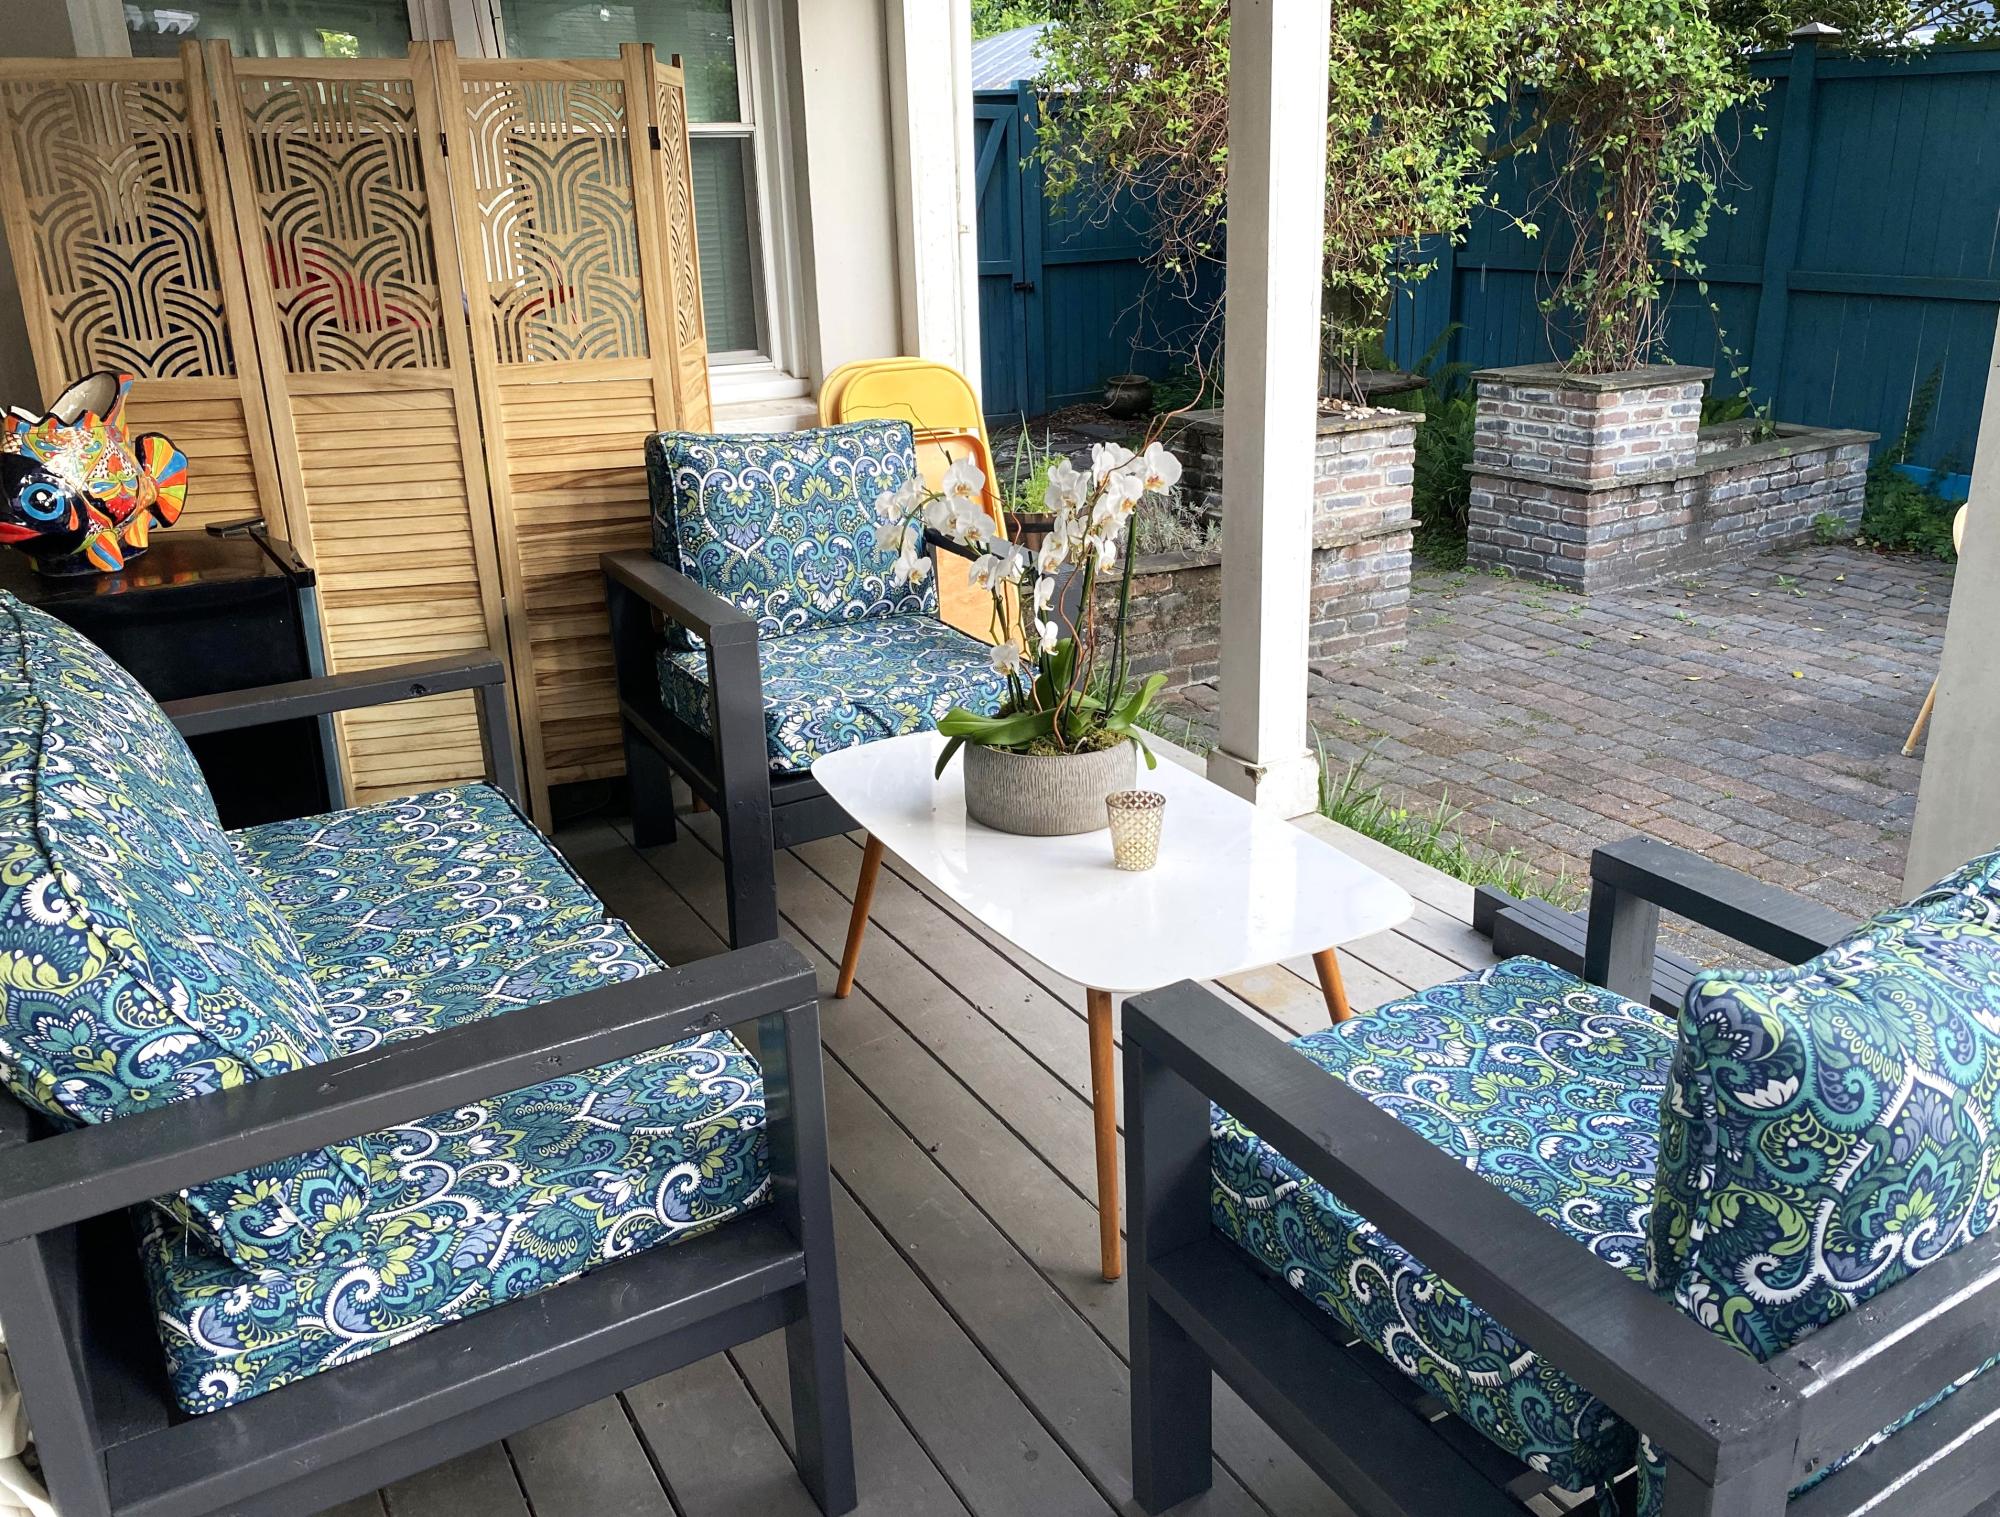
We built our patio furniture with your outdoor chair and couch plans! Thank you thank you!
Candice
Built from Plan(s)
$40 Funky X Desk
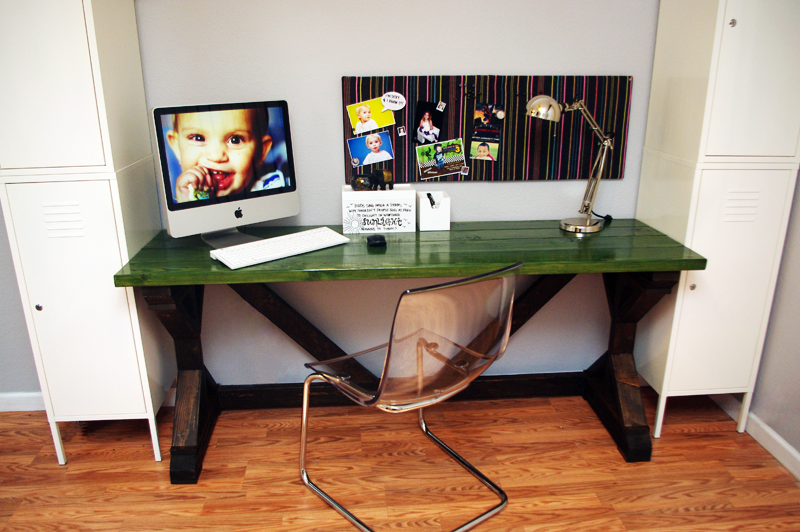
Building the desk was pretty straightforward. I actually saved a little money going with the 2x6s (4 of them was under half the price of a pine project panel) rather than the panel which I actually brought home first. I went with the 2x6s instead because it felt sturdier, and the straightest panel I could find was a little warped (which I didn't want to force).
My biggest piece of advice is, if you don't have a wood planer, DO NOT use a Kreg Jig to assemble the top first. 2xWhatevers just don't seem to "lay" the way you want them to if they're all connected together. I built the legs, added supports and then used glue and 2" finish nails to secure the top, butting them up as close as I could (there's only very minimal gaps, ~1/16 or less) It is SOLID. I filled in the nail holes with Elmer's stainable wood filler. After staining, I used a tiny artist brush with the stain on the filler so it could penetrate a little longer. Worked like a charm!
We decided to go with a color stain on top because it's going in a craft room/office so we wanted it to be bright and fun to get our creative juices flowing. The walls are a light gray so we figured we could afford some color :)
Built from Plan(s)
Estimated Cost
$40 for wood
Estimated Time Investment
Afternoon Project (3-6 Hours)
Finish Used
TOP STAIN - Minwax water based stain in Botanical (on the can it says not to let it penetrate for more than three minutes but that's too long, IMO. I had much better results using a rag and rubbing it in, leaving a wet edge while wiping excess off immediately to avoid blotchiness.)
TOP TOPCOAT: Safecoat Acrylacq in Gloss (LOVE this stuff - and water based, though you can use it over oil based too, after 24 hours)
LEGS STAIN: Minwax oil-based in Dark Walnut
LEGS TOPCOAT: Rustoleum Polyurethane in Matte (like used in Shanty2Chic's post)
TOP TOPCOAT: Safecoat Acrylacq in Gloss (LOVE this stuff - and water based, though you can use it over oil based too, after 24 hours)
LEGS STAIN: Minwax oil-based in Dark Walnut
LEGS TOPCOAT: Rustoleum Polyurethane in Matte (like used in Shanty2Chic's post)
Recommended Skill Level
Beginner
Comments
Tue, 10/21/2014 - 09:08
Pocket Holes for top
I did use pocket hole screws for the top. It wasn't ideal but it worked. I had to use long pipe clamps and two pieces of 3/4in wood strips under the pipes to create flat pressure on the top across the seam. I found that if I din't use the brace the top with the pocket hole screws in the middle would cause it to bow in the center with the ends upward as if I were over tightening. Once I prevented the bowing with clamps and flat boards it came together smooth and flat.
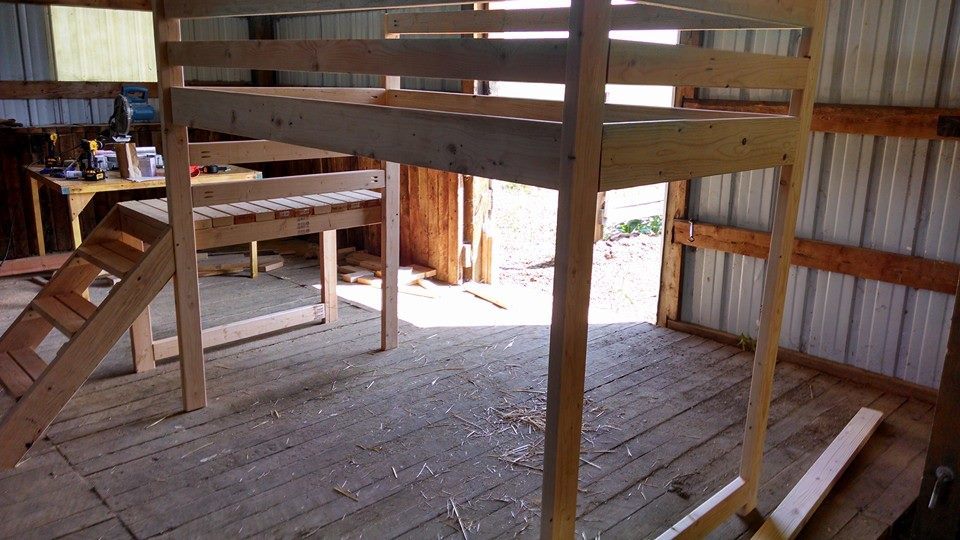
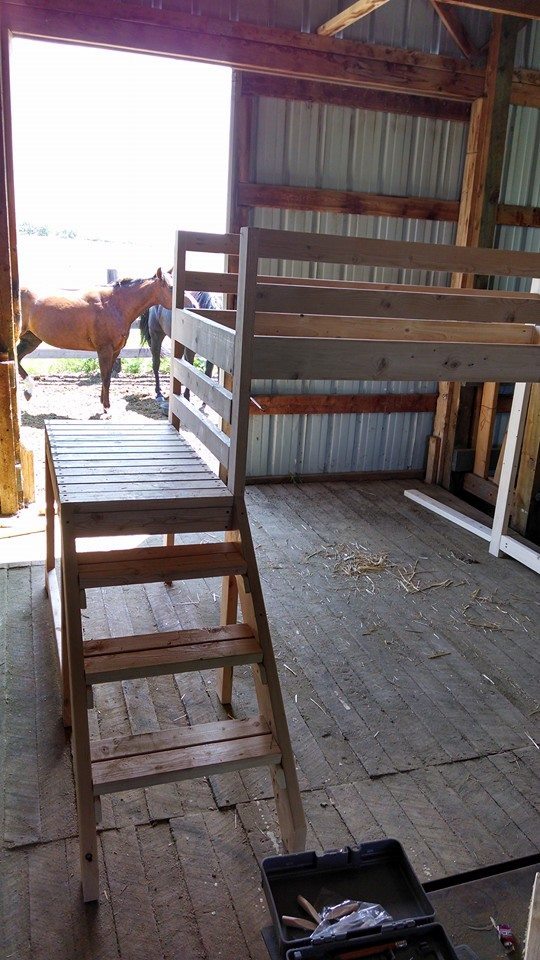
Camp Loft Bed With Stairs, Junior Height
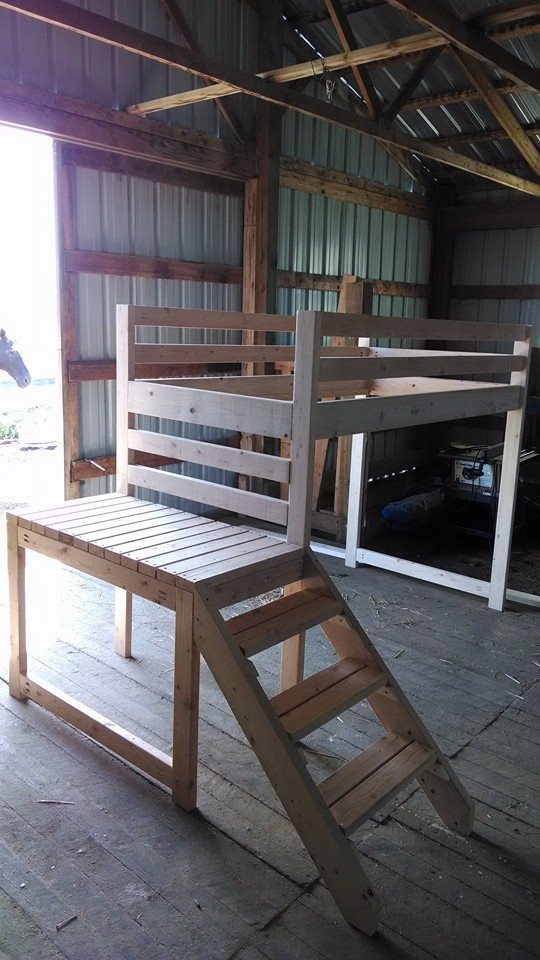
This project was meant to be a birthday present for my niece; however, after showing it to other people, there are now multiple people that are interested in having their own, understanding that I will be able to make it for much cheaper than buying an equivalent project from a store. It was a fun project and took little time to complete with minimal resources required....and for cheap
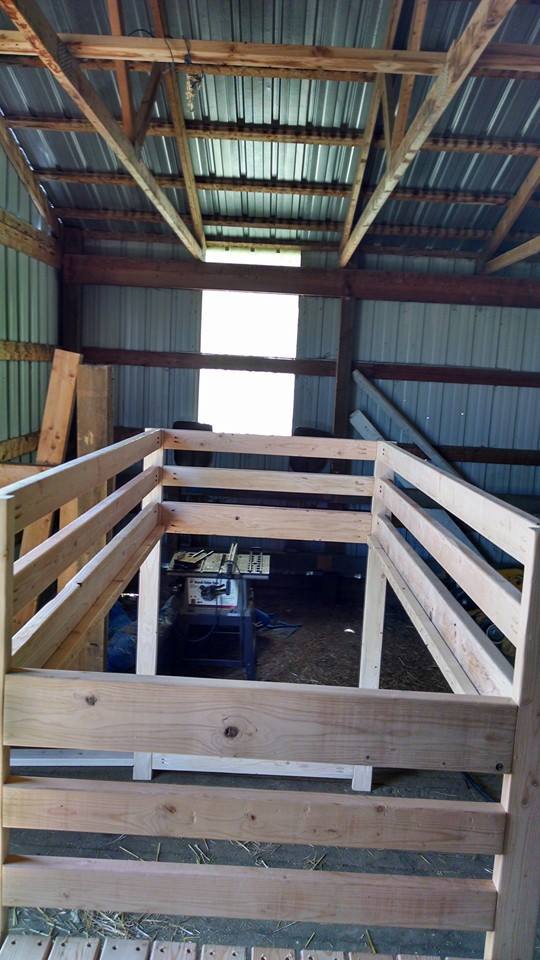
Built from Plan(s)
Estimated Cost
$100
Estimated Time Investment
Weekend Project (10-20 Hours)
Finish Used
No finish was used. This is a project I am putting up for sale and decided it would be best for the buyer to decide what they want to do with it.
Recommended Skill Level
Beginner
Fancy x farmhouse table

Barnwood fancy x farmhouse table.
Built from Plan(s)
Estimated Cost
$100
Estimated Time Investment
Weekend Project (10-20 Hours)
Finish Used
Barnwood sanded down to achieve that golden brown, while leaving the aged texture in the cracks. Left natural.
Recommended Skill Level
Intermediate
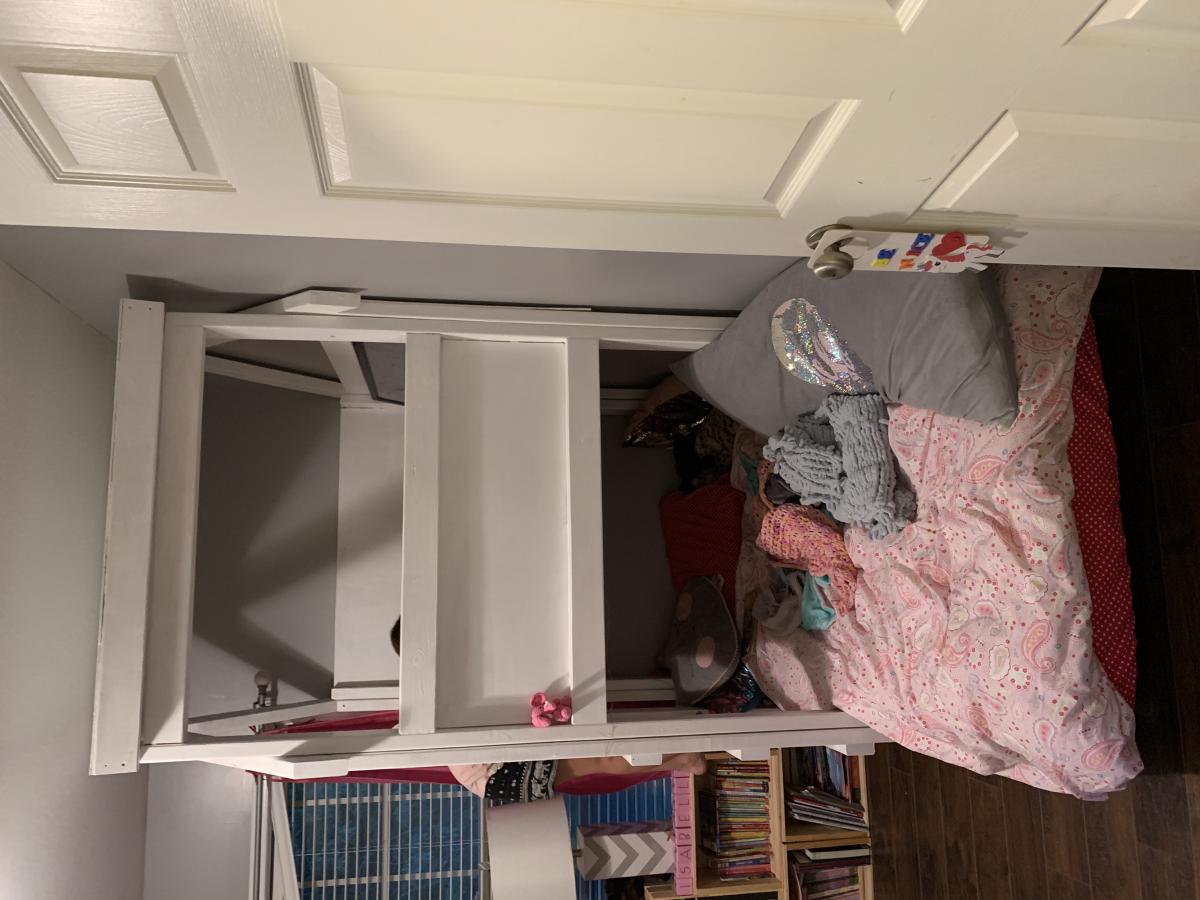
Indoor playhouse bed tower
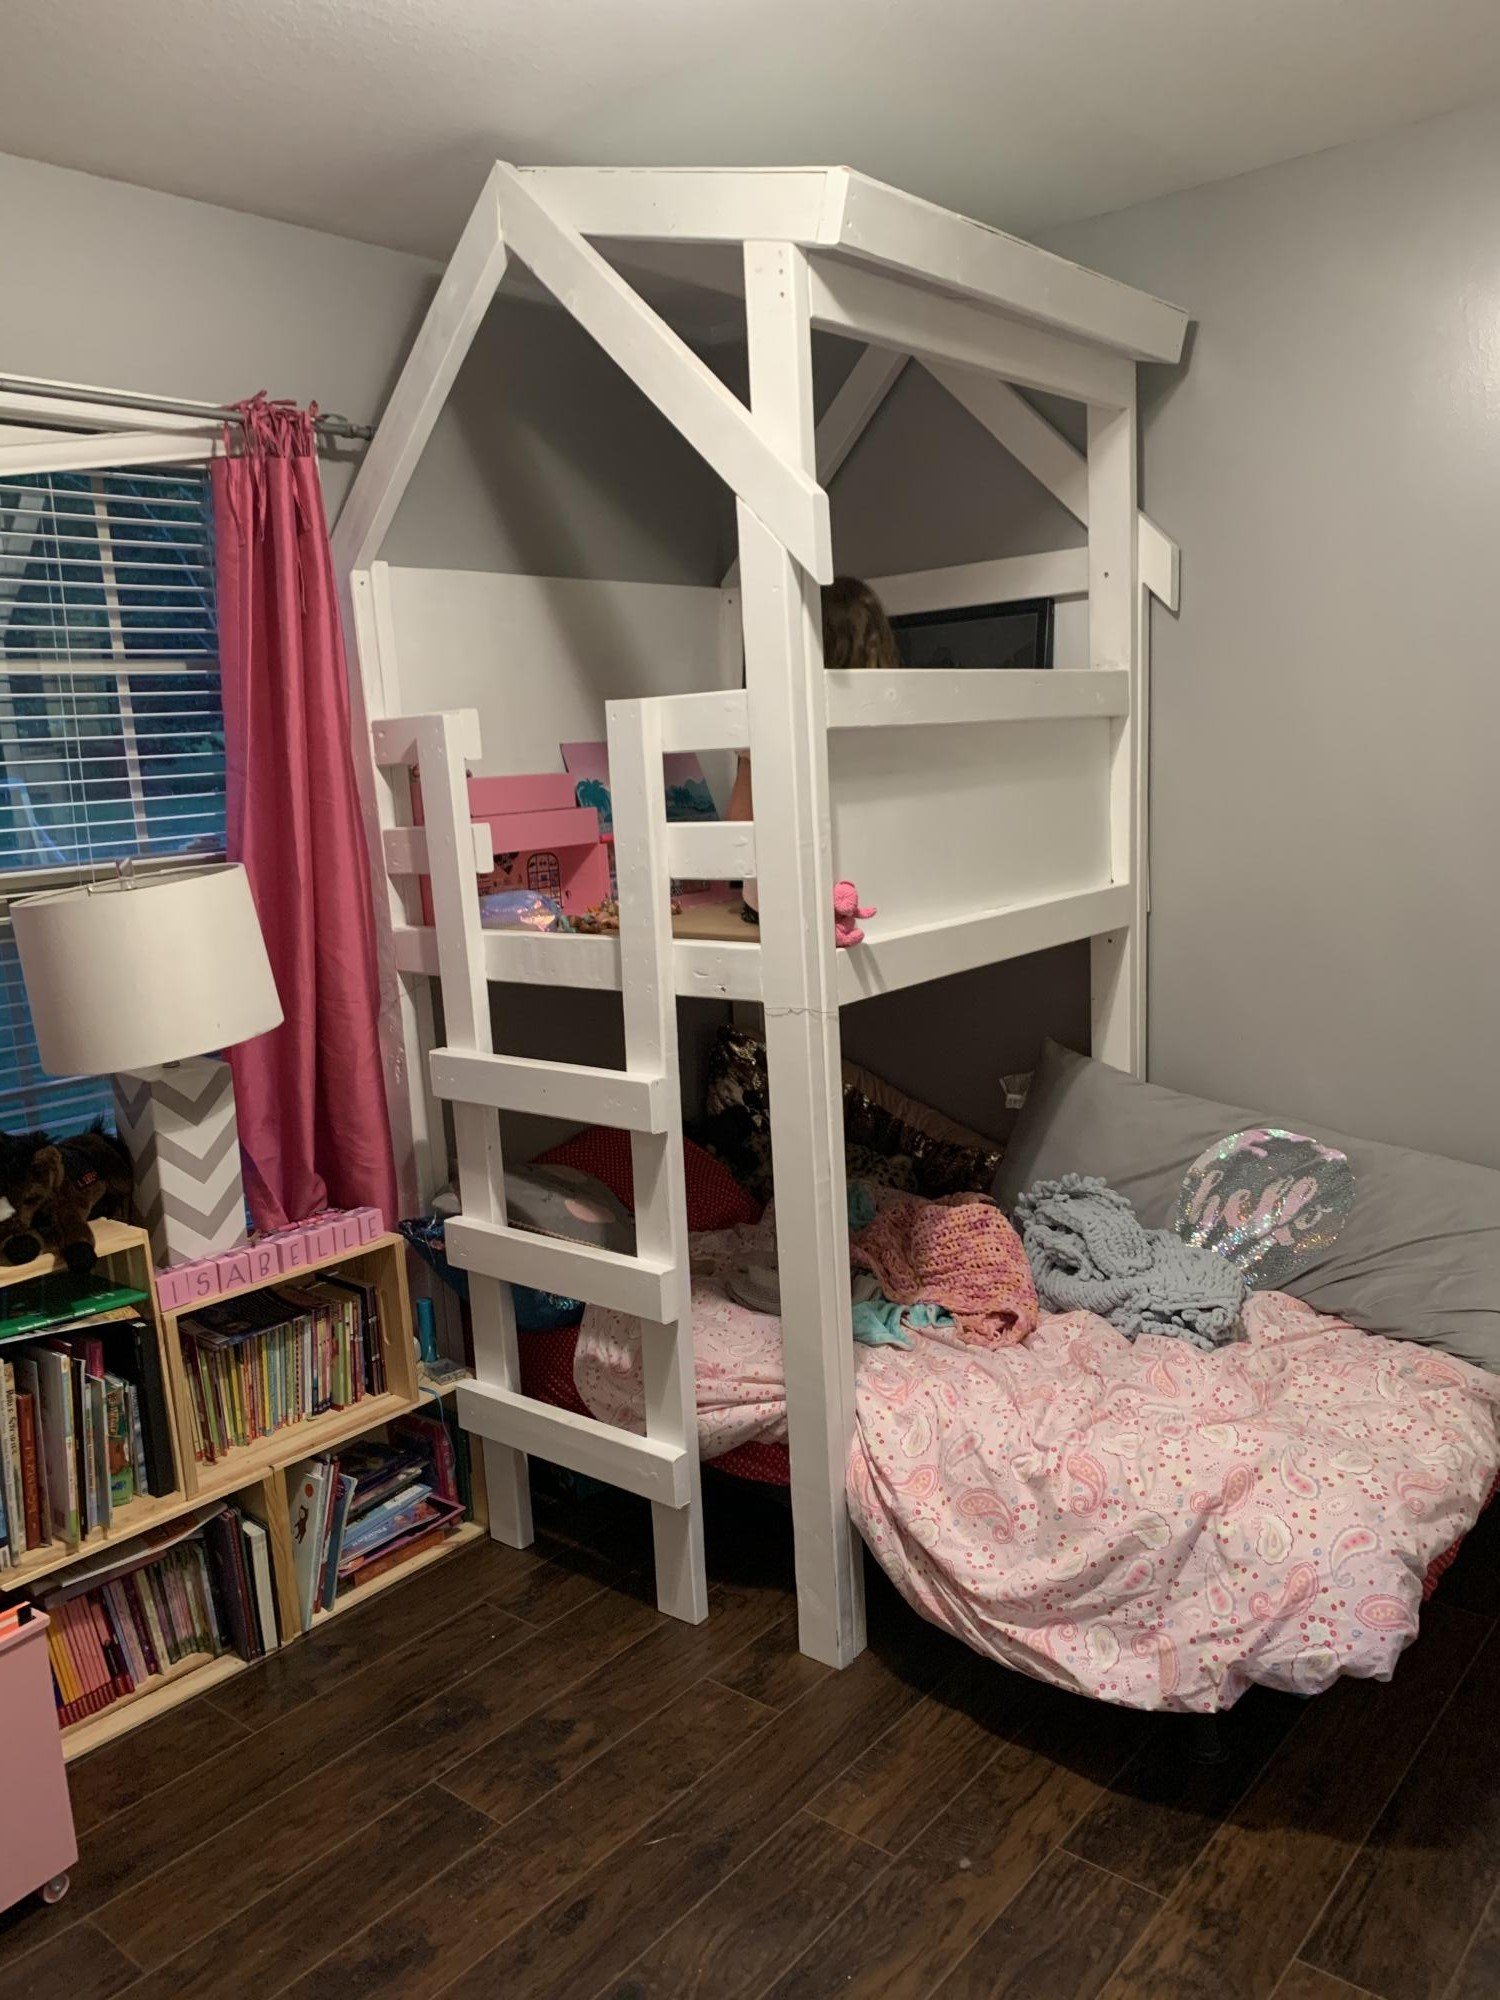
Indoor playhouse above twin bed. Cost about $190. Took two full days. Built using the plans off this site. The inside play area is 42in by 39in. The plans have the mattress on the ground. I have a dog that sheds like crazy so I have her mattress on a metal frame but plant to build a low to the ground platform bed.
Built from Plan(s)
Estimated Cost
190
Estimated Time Investment
Weekend Project (10-20 Hours)
Finish Used
I painted it white with just a Valspar ultra white primer and paint in one. I may do trim in another color later.
Make sure to get perfect 2x4s!!! No twists bends splits etc!
Make sure to get perfect 2x4s!!! No twists bends splits etc!
Recommended Skill Level
Intermediate
Toddler Loft Bed
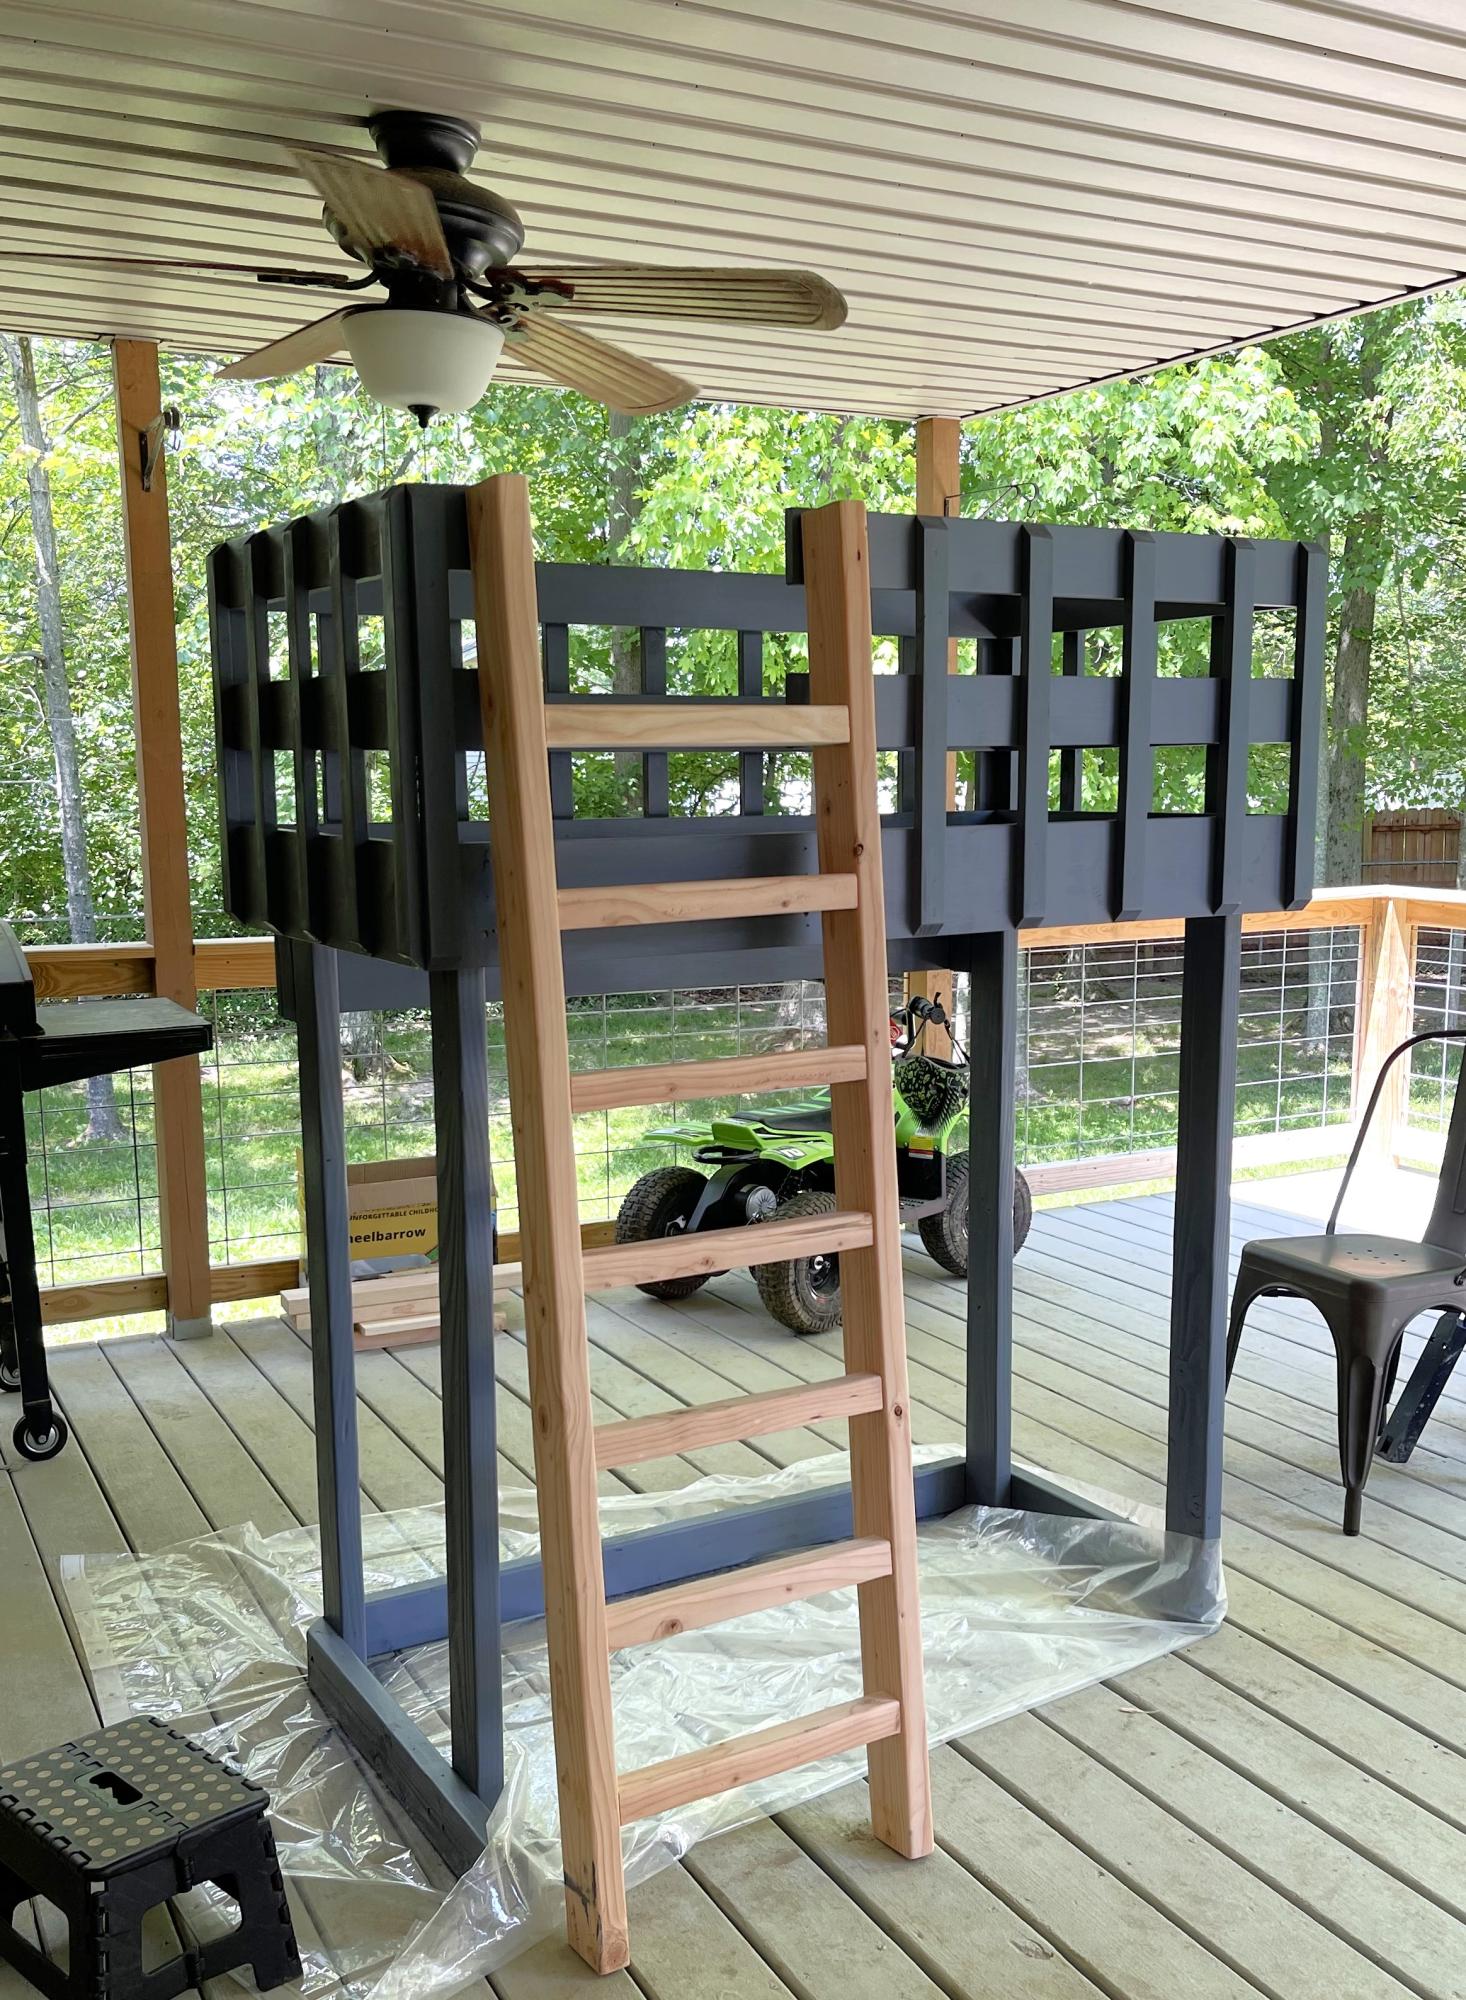
My husband and I modified this bed quite a bit to make it work for our 4 year old grandson. We made it 60” tall and it holds a crib mattress and spring base. Considering it is for a 4 year old, we did add a brace on the back of the bed, so it could be anchored to wall studs to prevent tipping.
After the painting was completed, we had to head home, so I will share “completed” photos later. By the way, he loves his “Big Boy bed”!
Built from Plan(s)
A Baby Shower Gift...
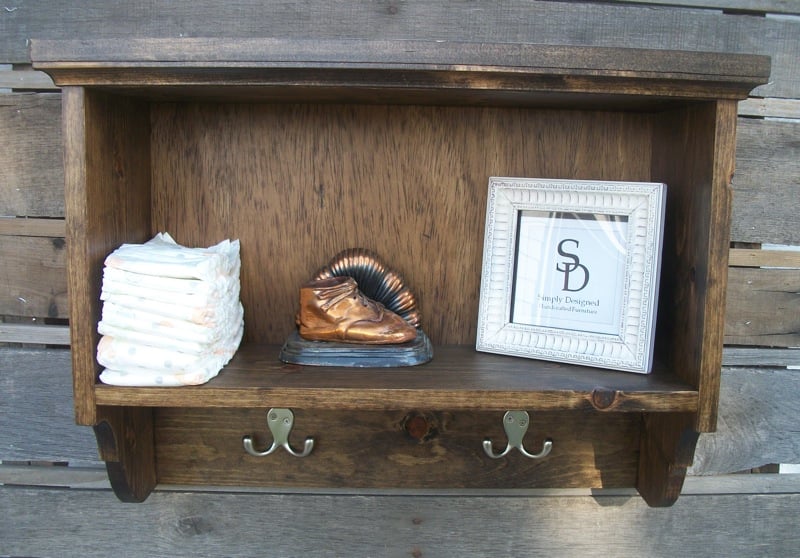
I built this for a friends upcoming baby shower! She has yet to receive it so I hope she loves it. It was super easy to build, even the fancy scrolling at the bottom of the sides was relatively easy. I can say that only because I'm an experienced builder, but for someone new to this, it could be daunting. Just go slow and try it out on practice boards first!
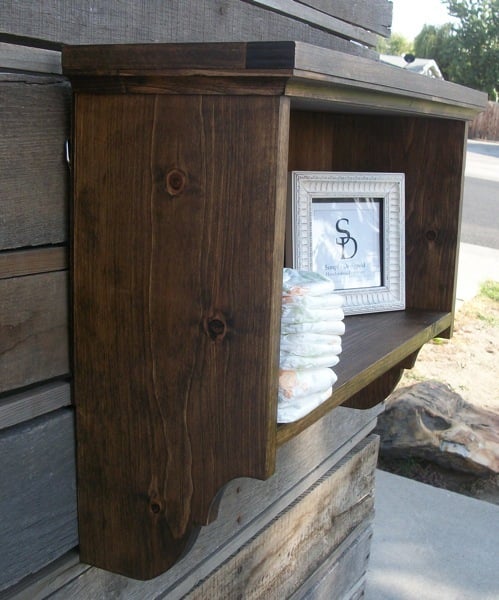
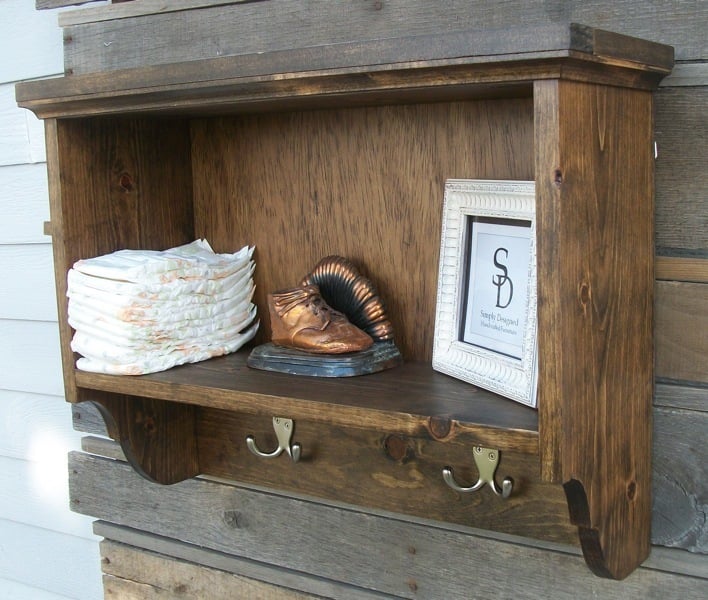
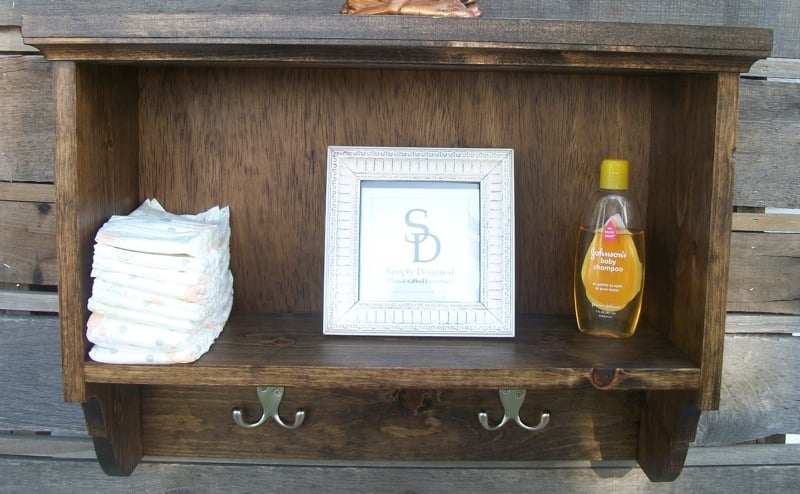
Built from Plan(s)
Estimated Cost
about $20
Estimated Time Investment
Afternoon Project (3-6 Hours)
Finish Used
Minwax Antique dark walnut and spray on polyurethane
Recommended Skill Level
Beginner
Comments
Wed, 08/17/2016 - 11:01
Hi,
Hi,
Do you ever make pieces for other people? I absolutely love this, but we live in a small apartment and don't have the space or resources to have the right tools for the job. We're newlywed students on a budget too, so any I've found in stores have been way out of our price range.
Just thought I'd ask, since I think the one you made here is beautiful!
Ella's sandbox

So easy and fun!

Estimated Cost
$130
Estimated Time Investment
Day Project (6-9 Hours)
Recommended Skill Level
Beginner
Comments
Fri, 07/11/2014 - 22:09
My lil princess asked today...
She comes to me an says DADDY ( with a straight face)
* i want a merry go round *
Um i cant afford that hunny, she says w. out a pause -But you build everything else-
...I froze.
lol well Ana my dear friend I think I need your help on this one...
