Community Brag Posts
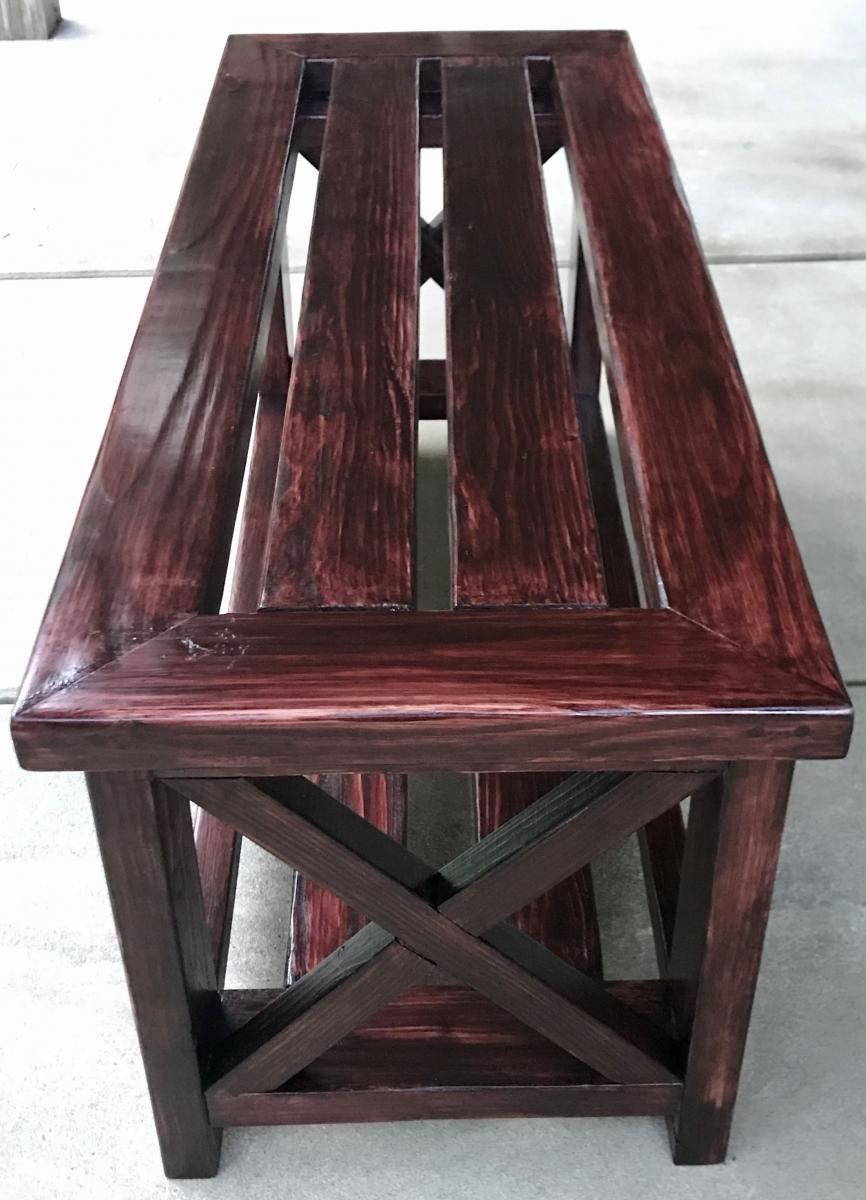
Hall Entry Bench
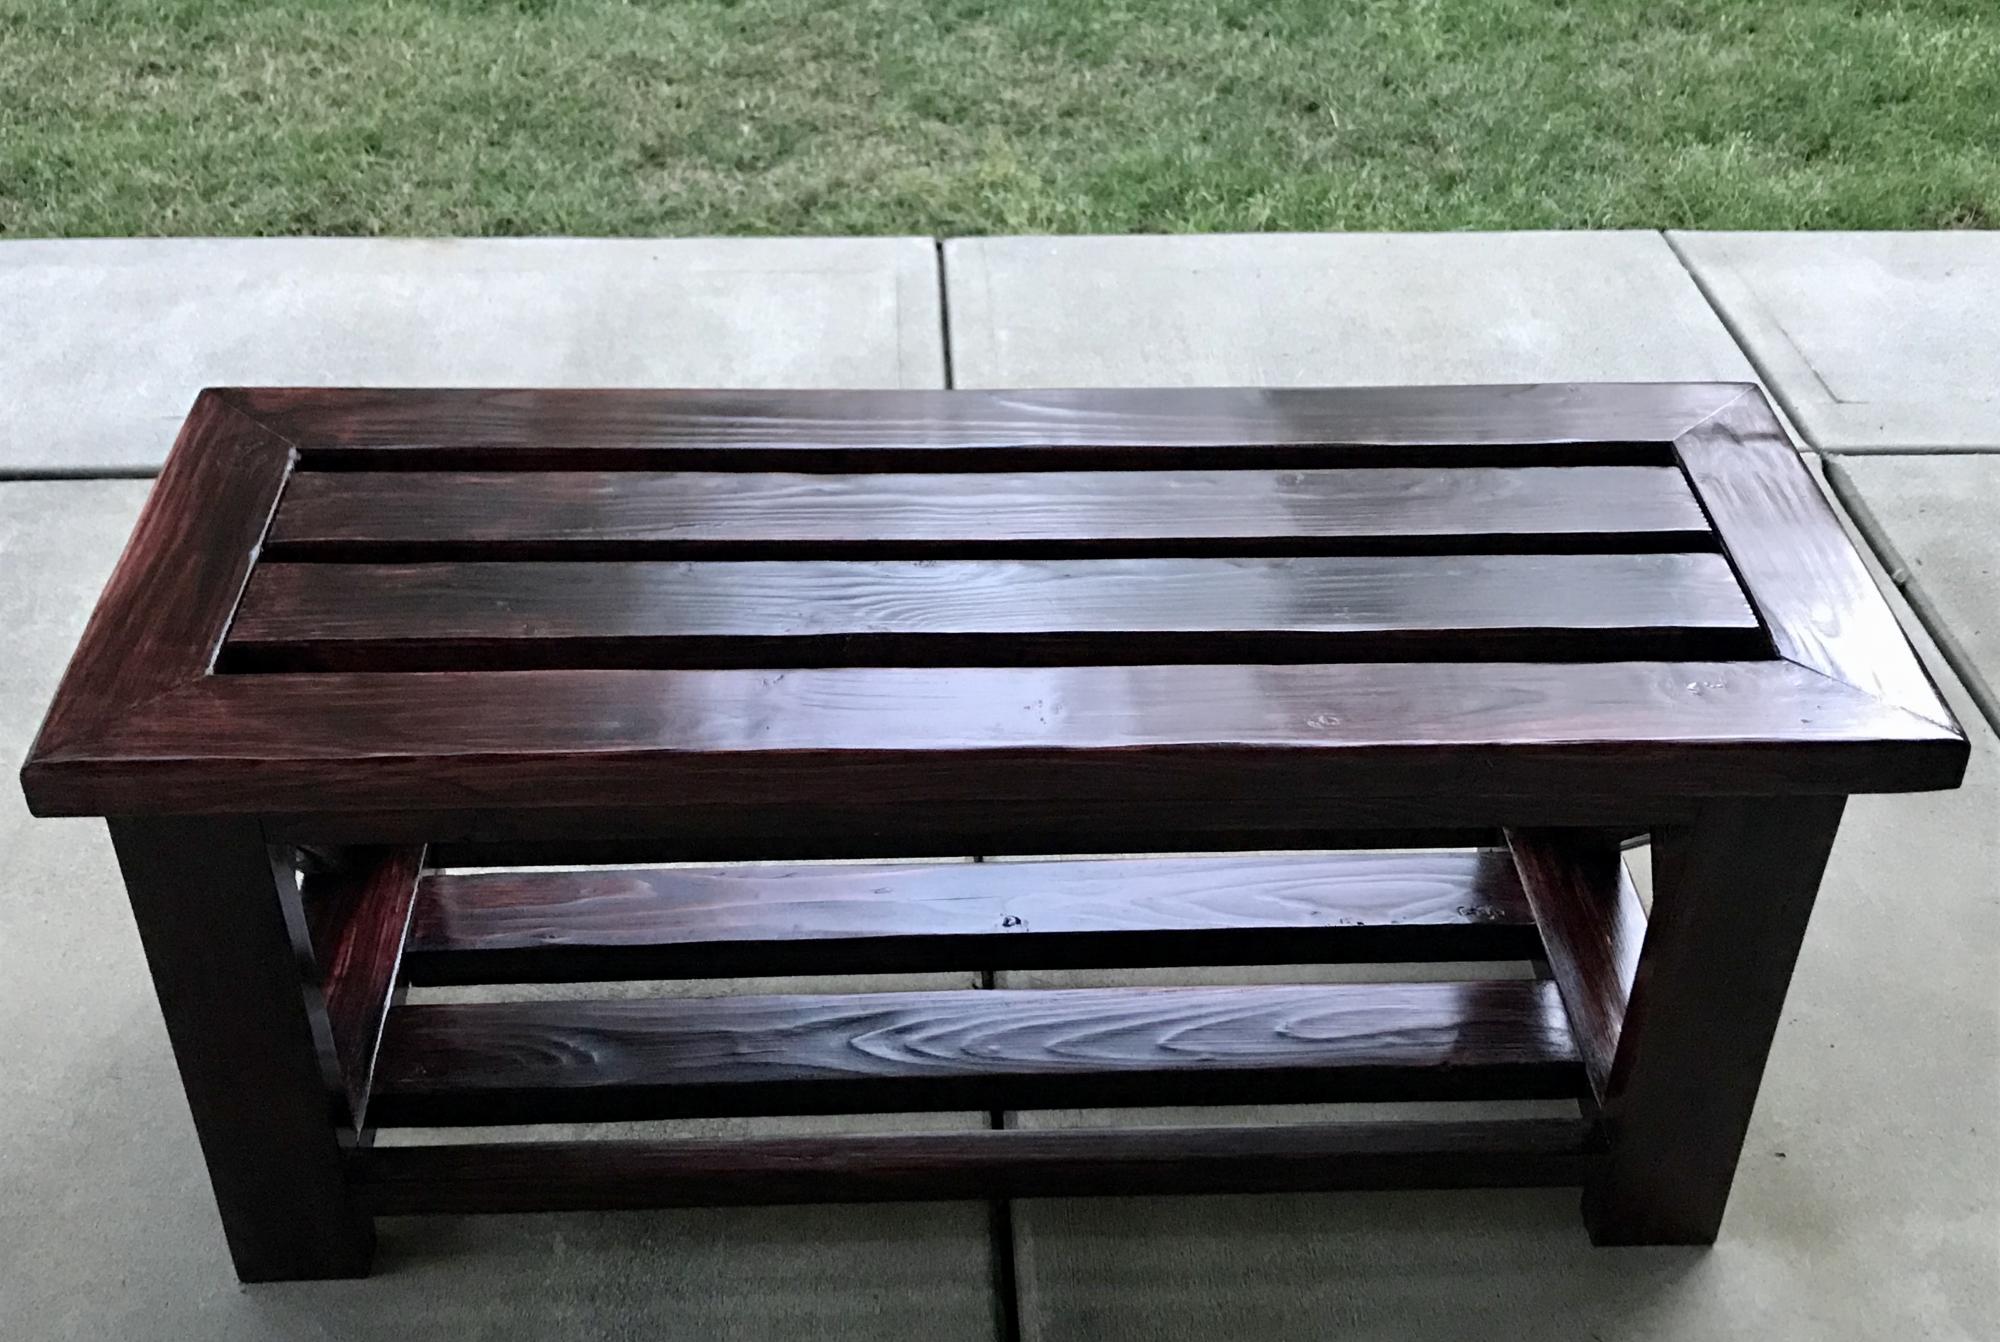
My first piece of furniture using the plans as guidance. Needed something to organize the shoes that accumulated at the front door.
Estimated Cost
40
Estimated Time Investment
Day Project (6-9 Hours)
Finish Used
Varathane that was a stain and poly in one. Mahogany was the color with a gloss finish.
Recommended Skill Level
Beginner
Hockey Corn Hole Board
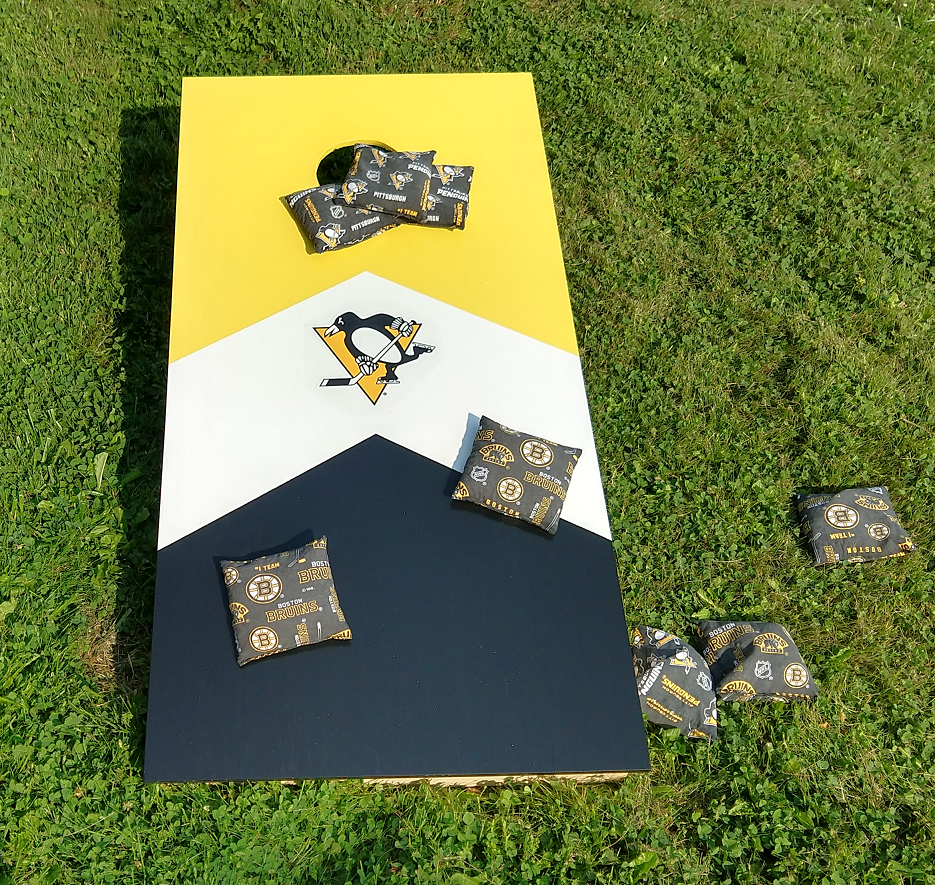
Did one with Bruins as well. Wife made the bags. Did another set with LA Rams for my brother.
Built from Plan(s)
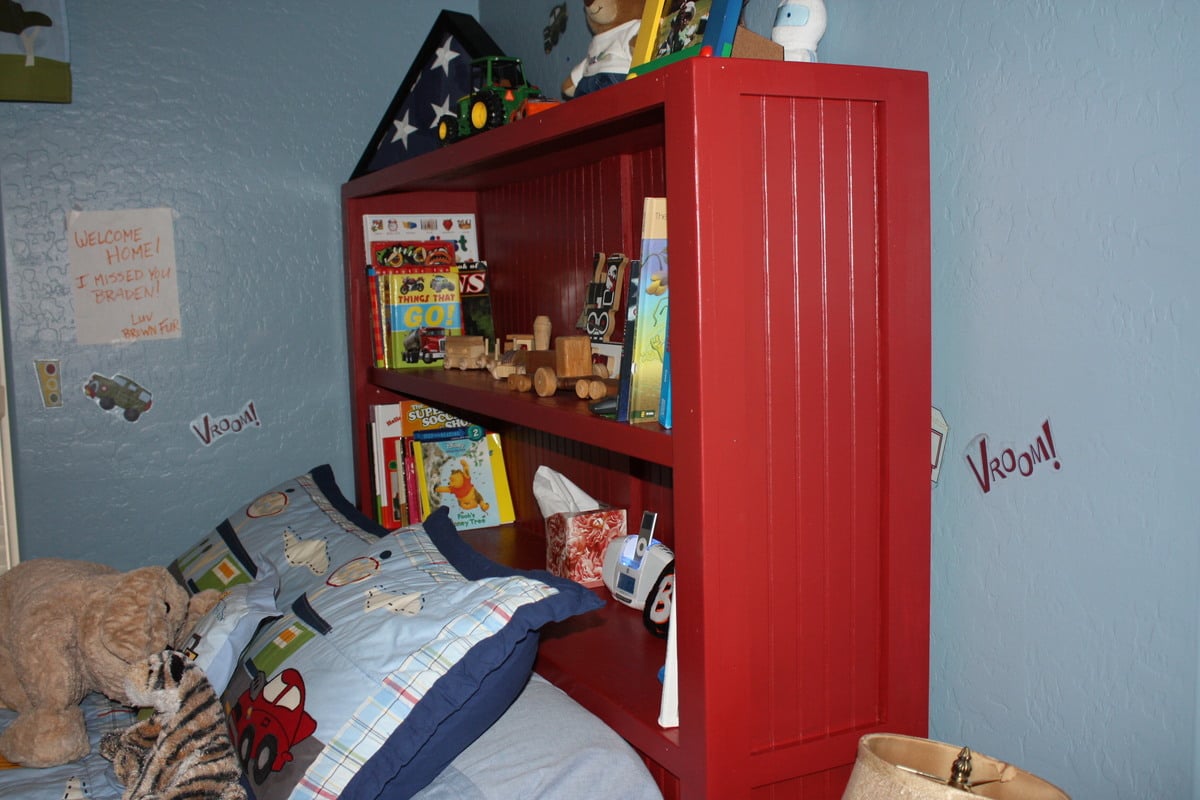
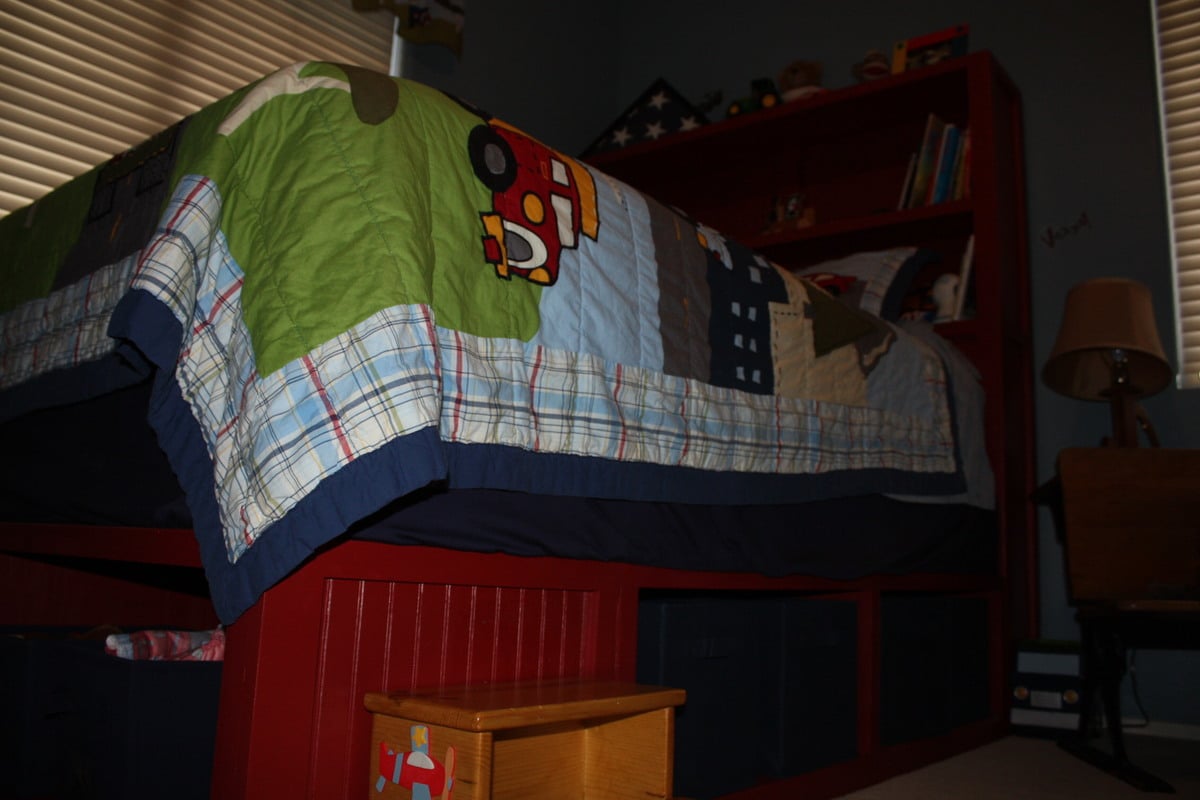
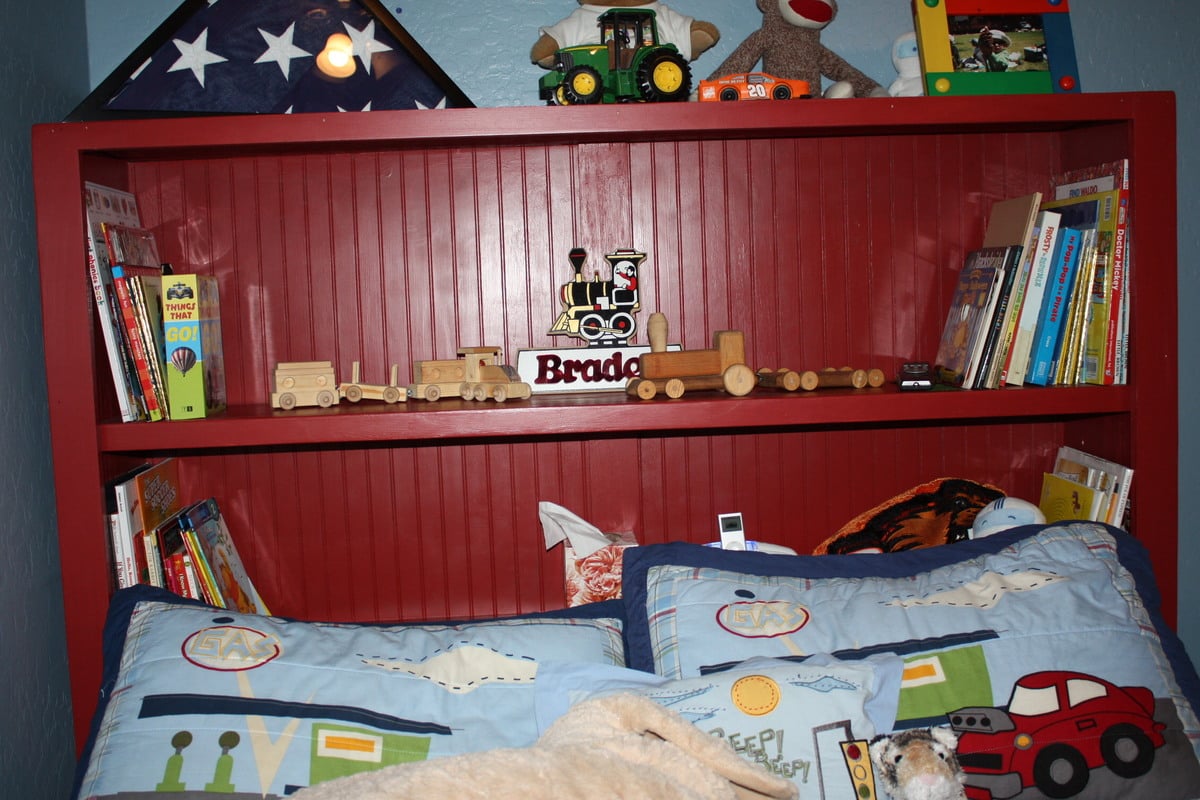
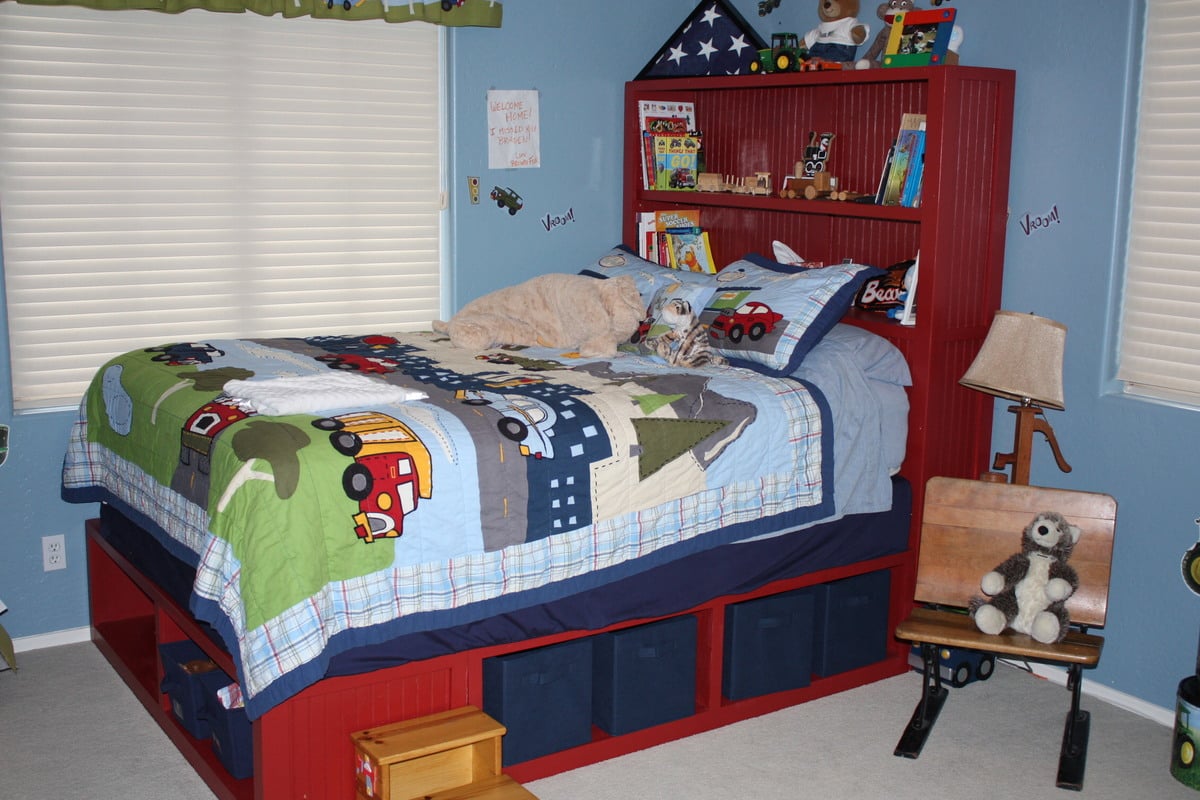
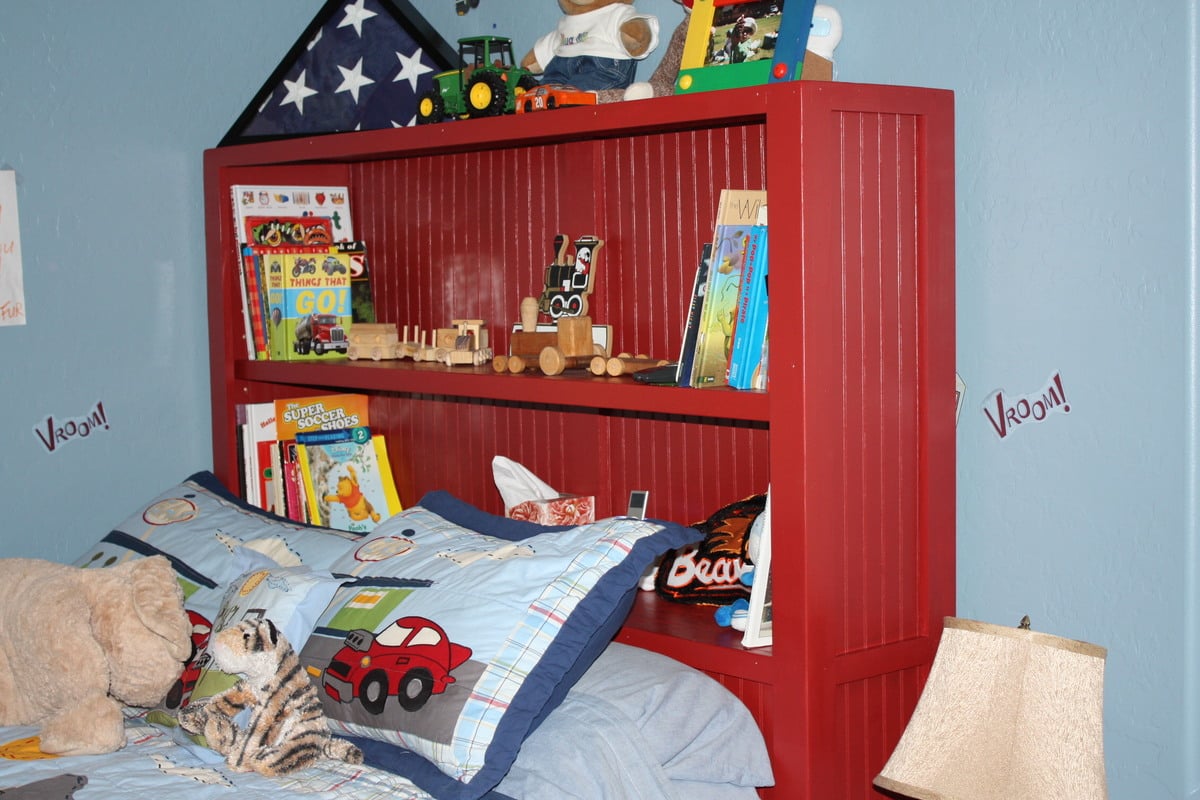
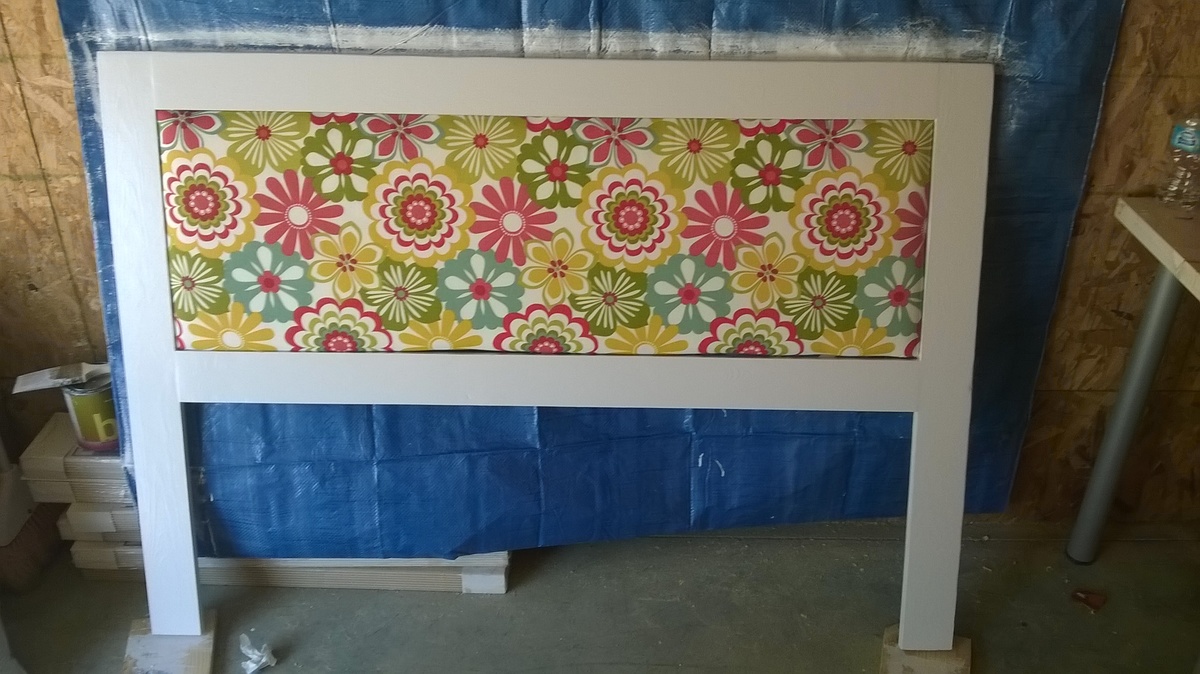
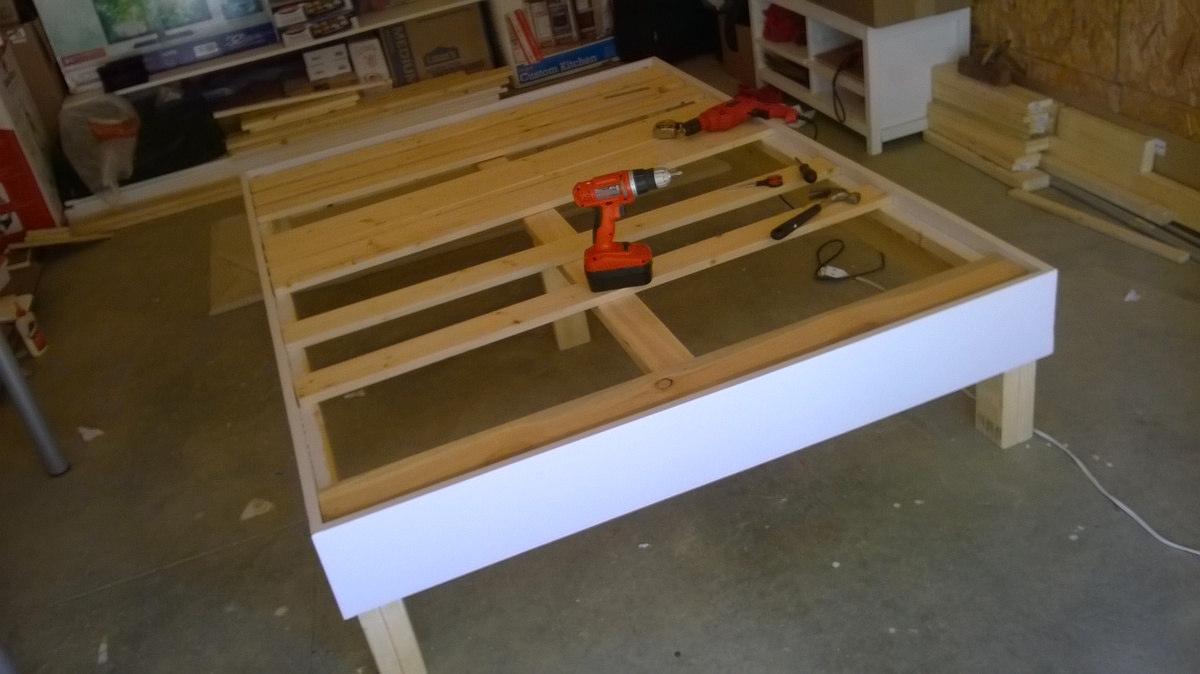
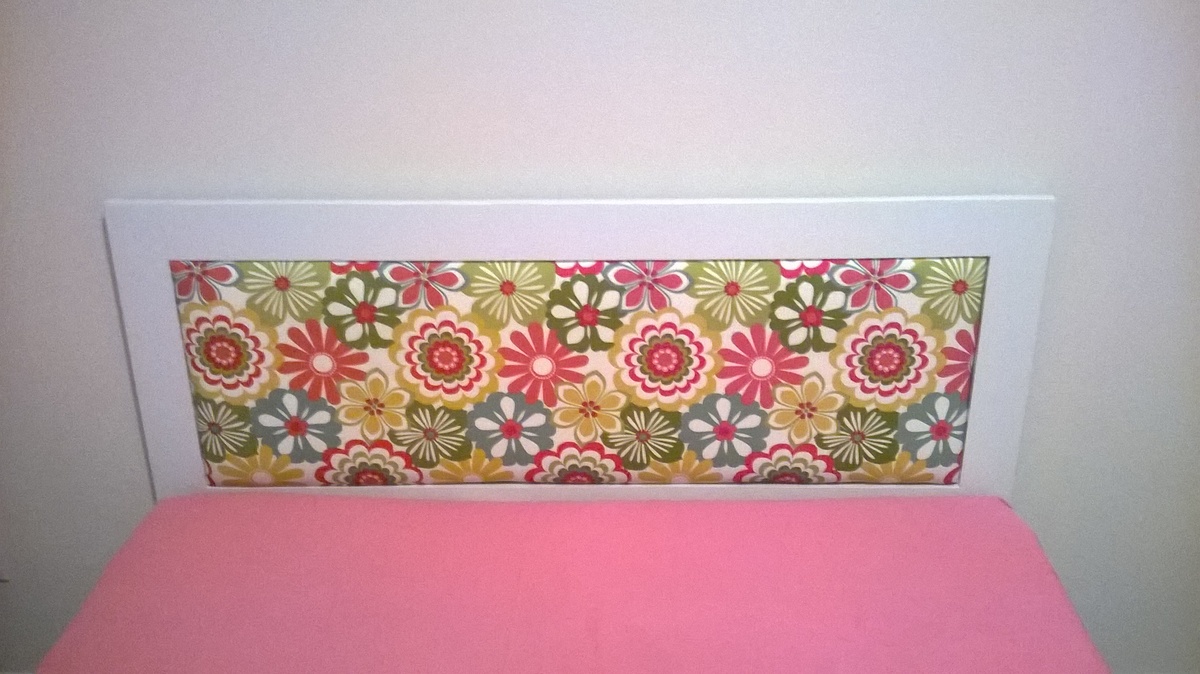
Queen Storage Bed
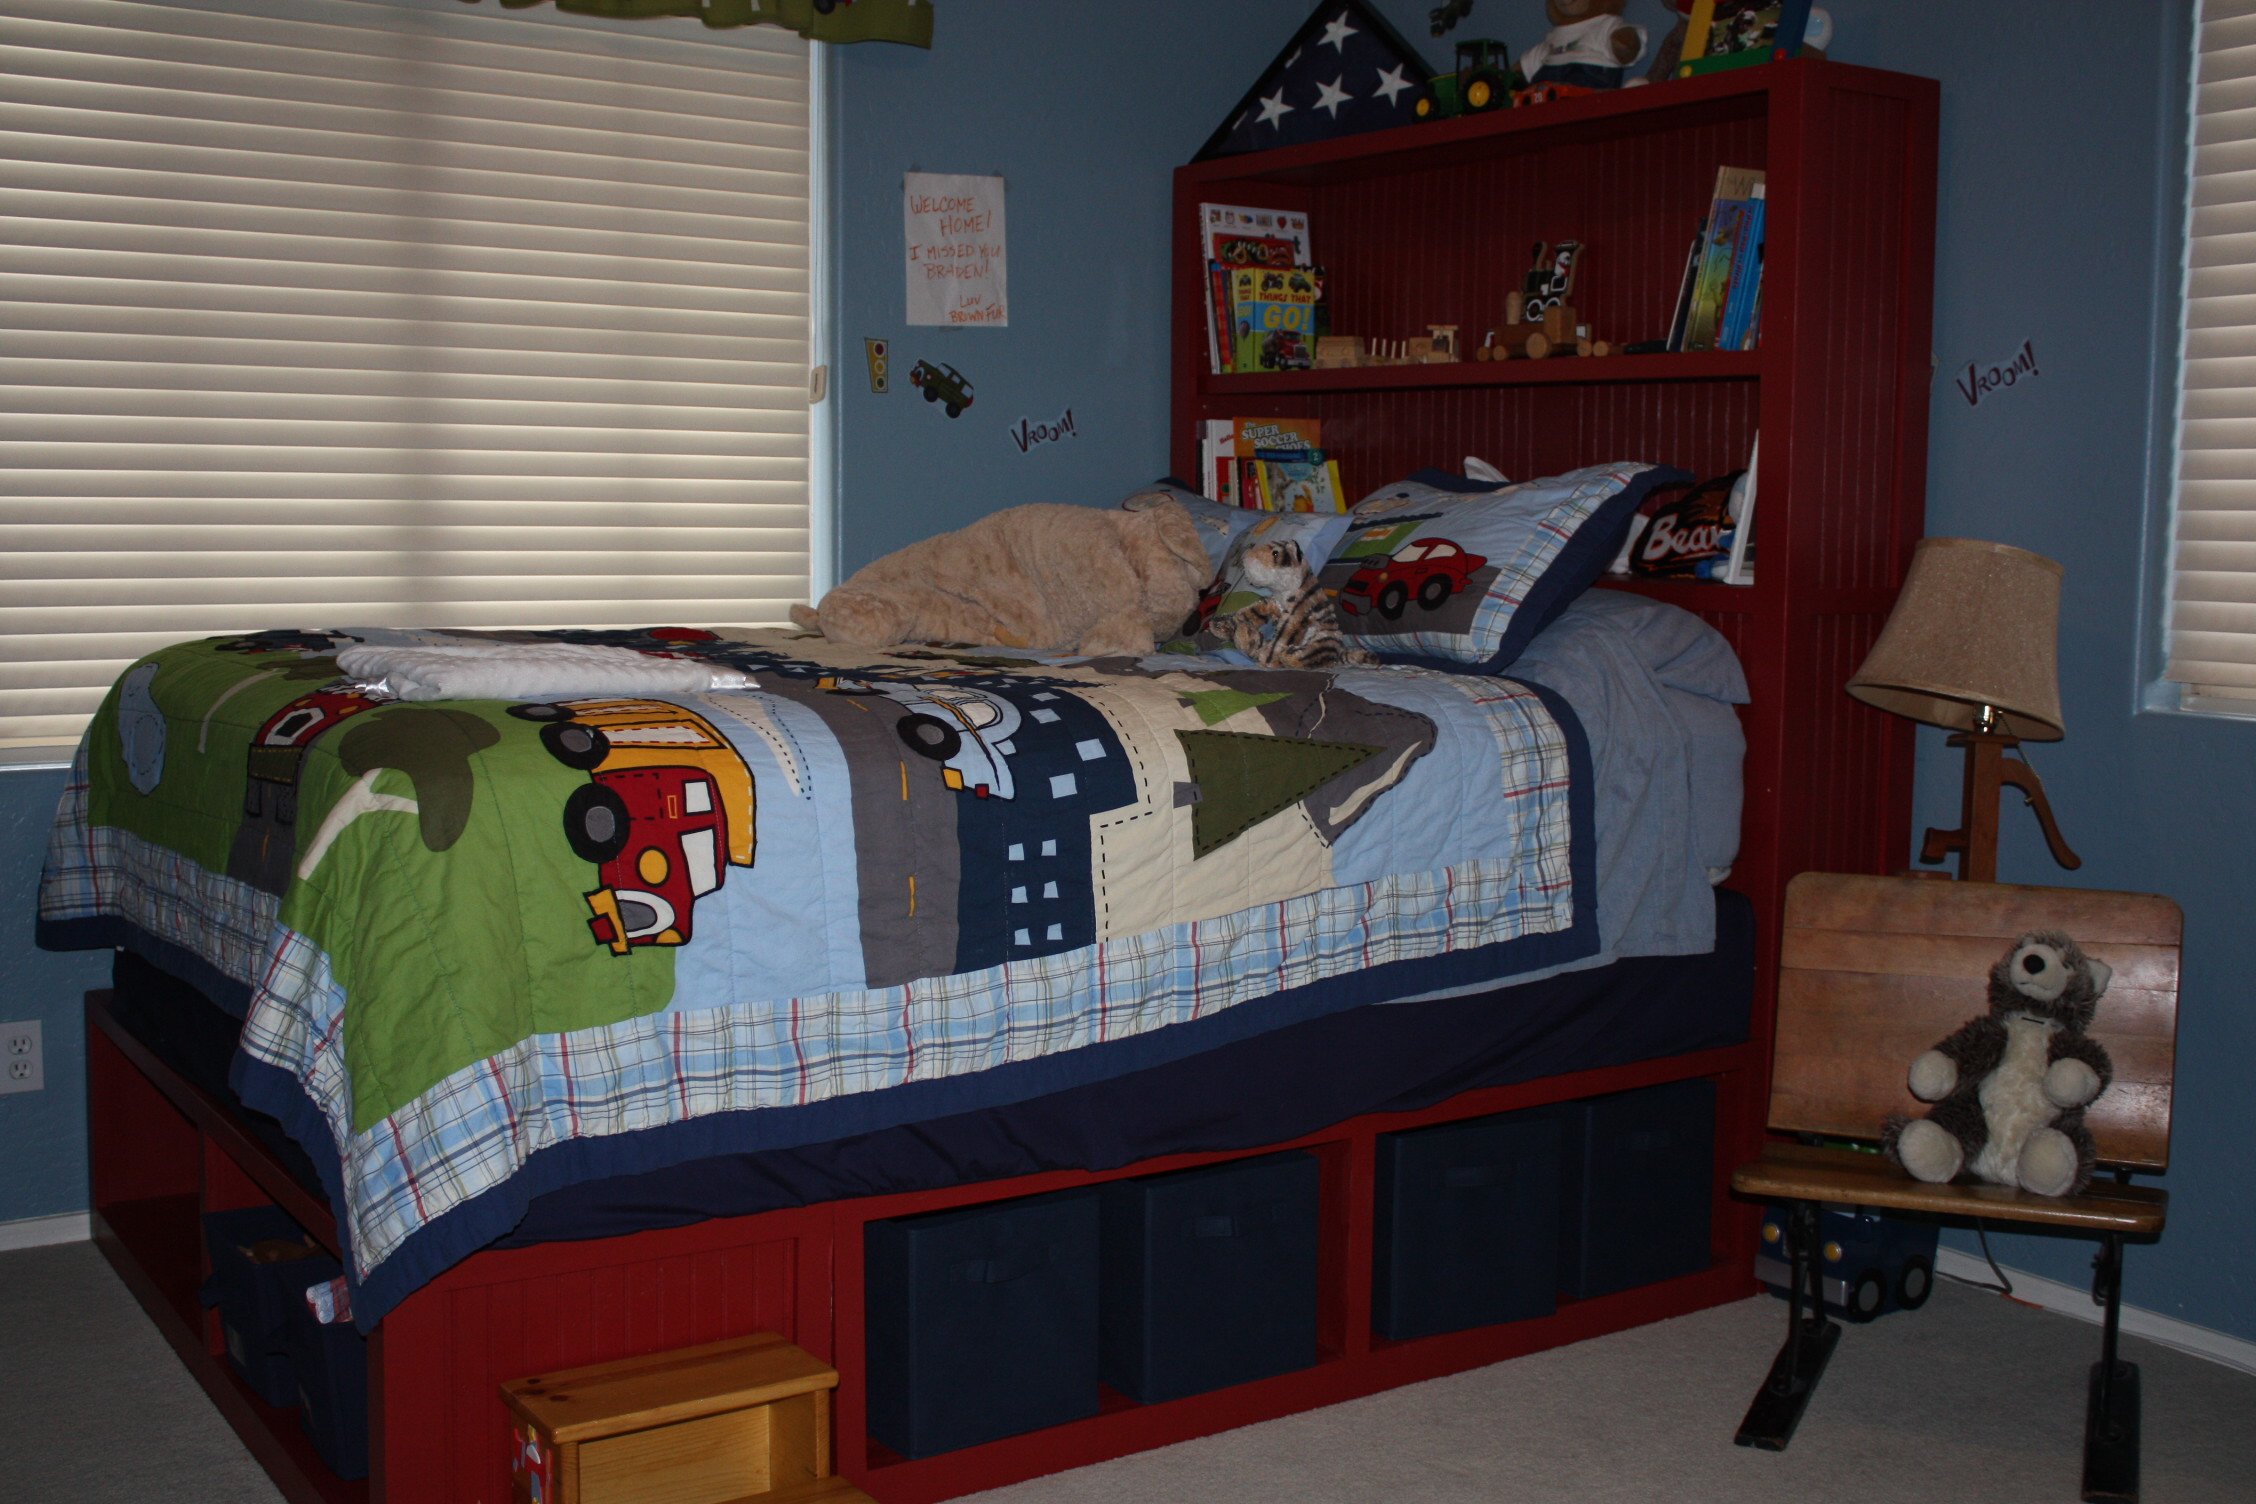
My boy was sleeping on a queen box spring / mattress sitting on the floor; figured he needed a bed and the storage bed seemed just the ticket.
Found some beadboard on clearance for $16 a 4x8 sheet so picked up about 5 sheets. It was on clearance since it was prefinished. Not a big deal since I knew I'd be painting the bed (had to prime the stained wood first). I think the beadboard adds a nice touch on the ends.
Haven't built drawers yet, but the wife kind of likes the looks of the cubby bins so drawers can wait.
The headboard wasn't from any plan; just followed the same basic concept as the bed; sides are 3/4 plywood, but I rabbitted out the trim in order to insert the 1/4 beadboard. Used some scrap hardboard pegboard as a template for the shelf pin holes on the inside of the headboard to enable an adjustable shelf.
The bed sits up a little high for our liking, but eventually we will remove the boxspring and just set the mattress on the bed frame; just have to figure out where to store the boxspring . .
I miss the family when they're out of town, but at least I get a lot of projects done . . .
Built from Plan(s)
Estimated Time Investment
Weekend Project (10-20 Hours)
Finish Used
Behr Interior Paint
Recommended Skill Level
Beginner
Comments

Thu, 08/30/2012 - 17:19
Beautiful!
This is beautiful. Love your colors and use of beadboard! Great job! I love the bins too....really terrific!
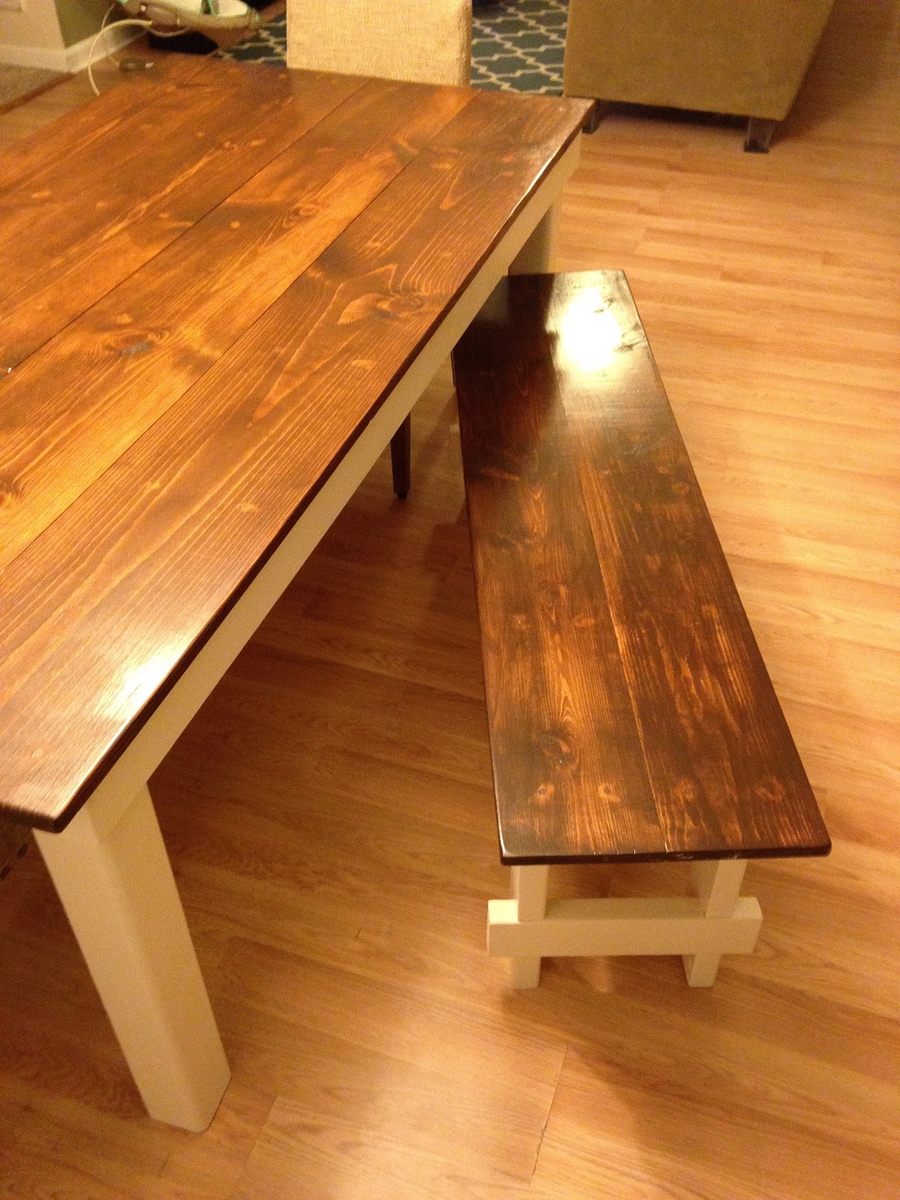
My Very Own Rustic Table
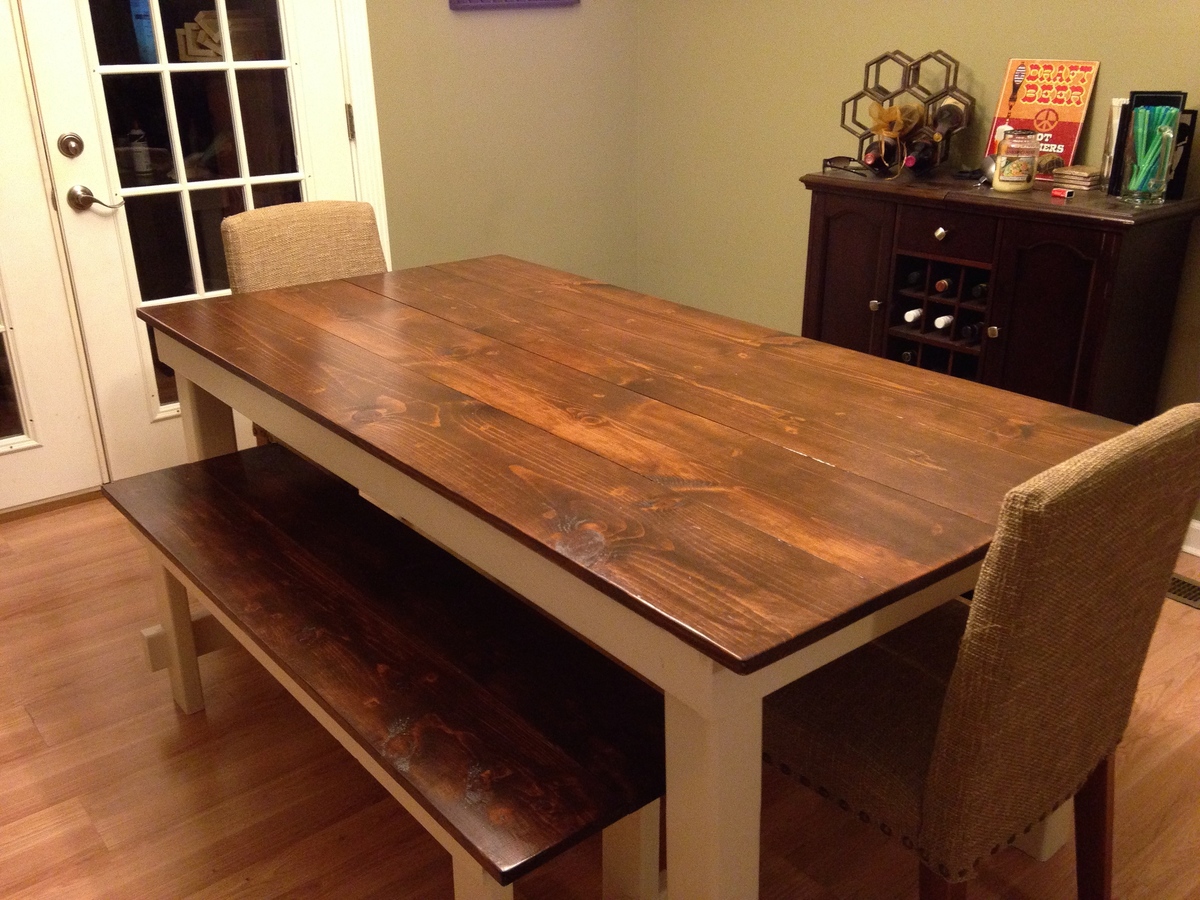
I wanted a farmhouse table look, but no too county. I think that this table accomplished that.
I debated a while with staining the entire table or staining the top and painting the legs. I'm really glad that I decided to paint the legs. I think it turn out great.
This was my first DIY wood project. I'm pretty much addicted now. Every time my wife wants to get a new piece of furniture, I always tell her that I can probably build it.
Built from Plan(s)
Estimated Cost
$150
Estimated Time Investment
Weekend Project (10-20 Hours)
Finish Used
Rust-Oleum Ultimate American Walnut Oil Wood Stain on Top
White paint on legs & aprons
White paint on legs & aprons
Recommended Skill Level
Intermediate
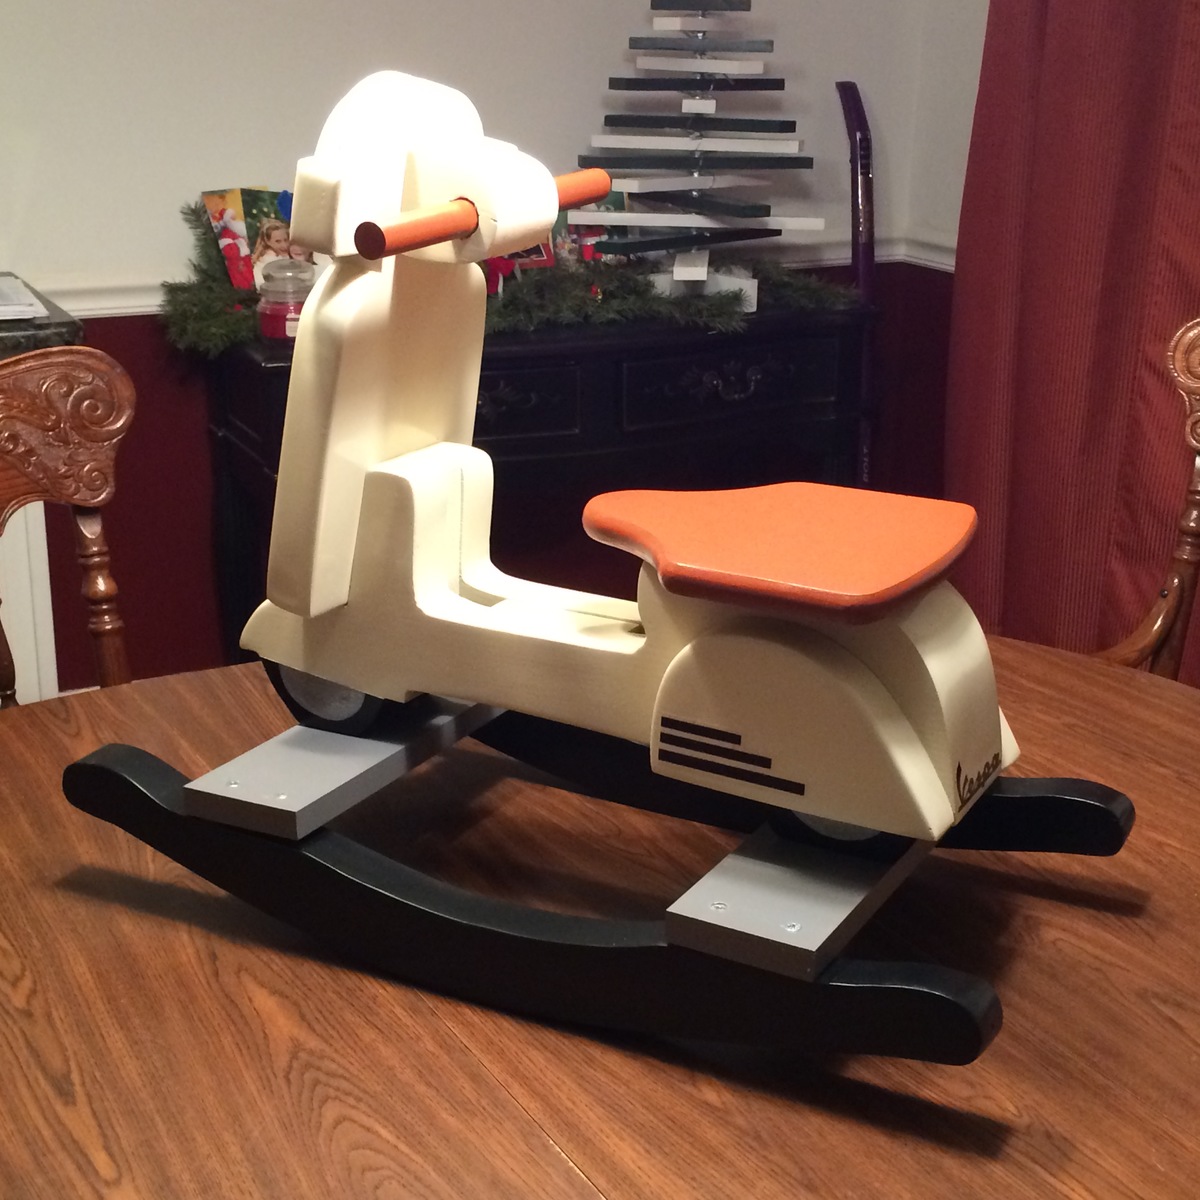
E's scooter
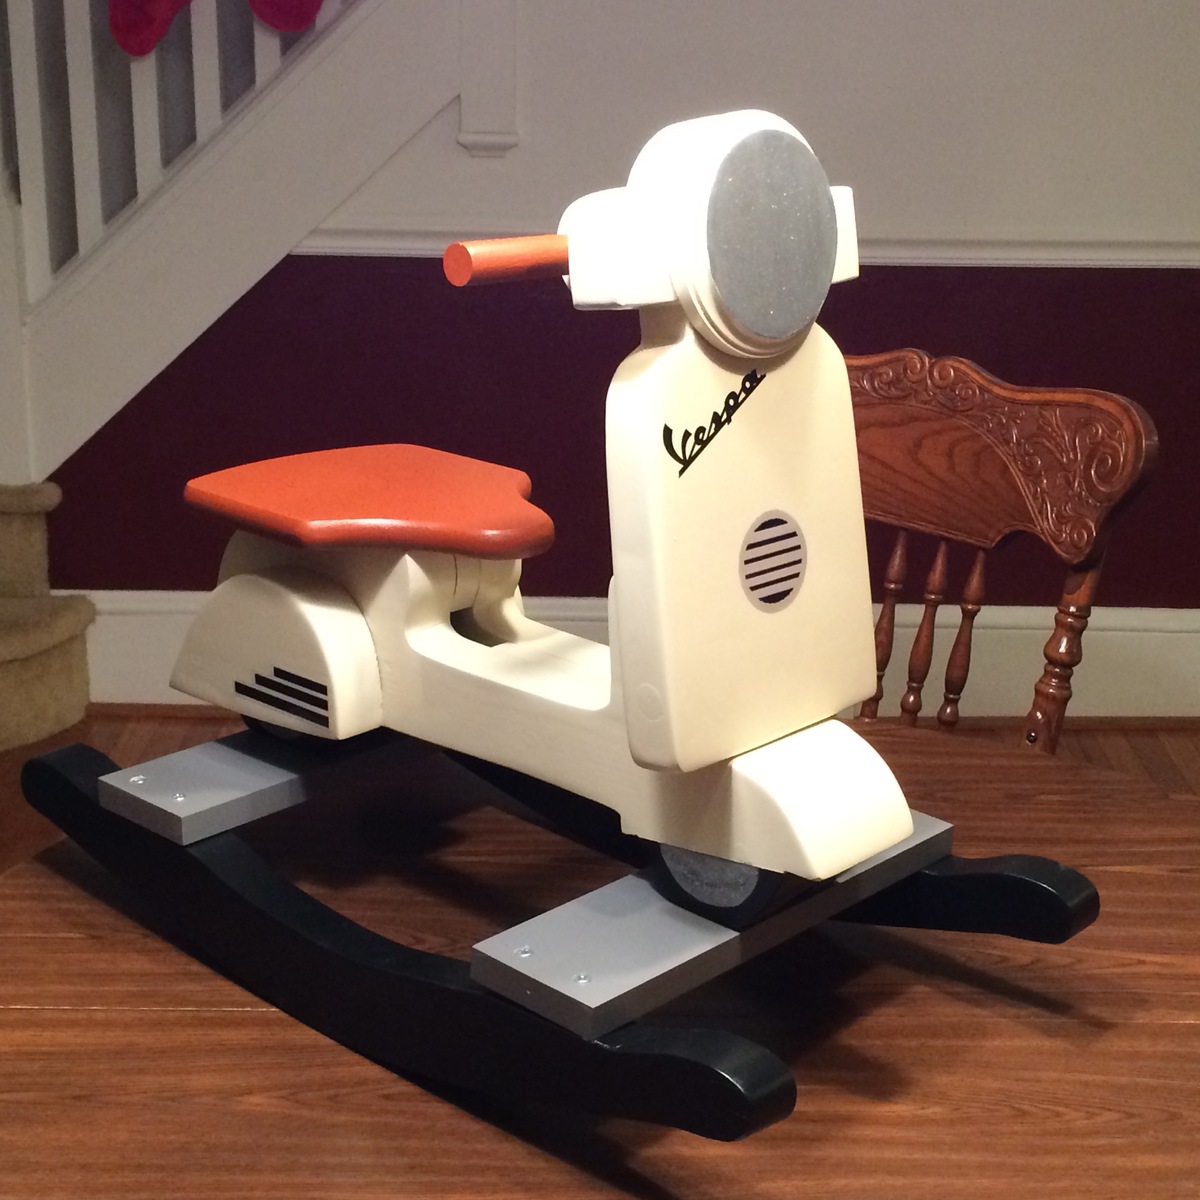
Fairly easy to make with a jigsaw and sander. I would suggest to whomever makes one of the Charlie scooters to use a hardwood as some of the section in the handlebar area can be fragile when weight is applied.
Built from Plan(s)
Estimated Time Investment
Weekend Project (10-20 Hours)
Finish Used
Automotive enamel paint and clear coat
Recommended Skill Level
Beginner
Chaise success!
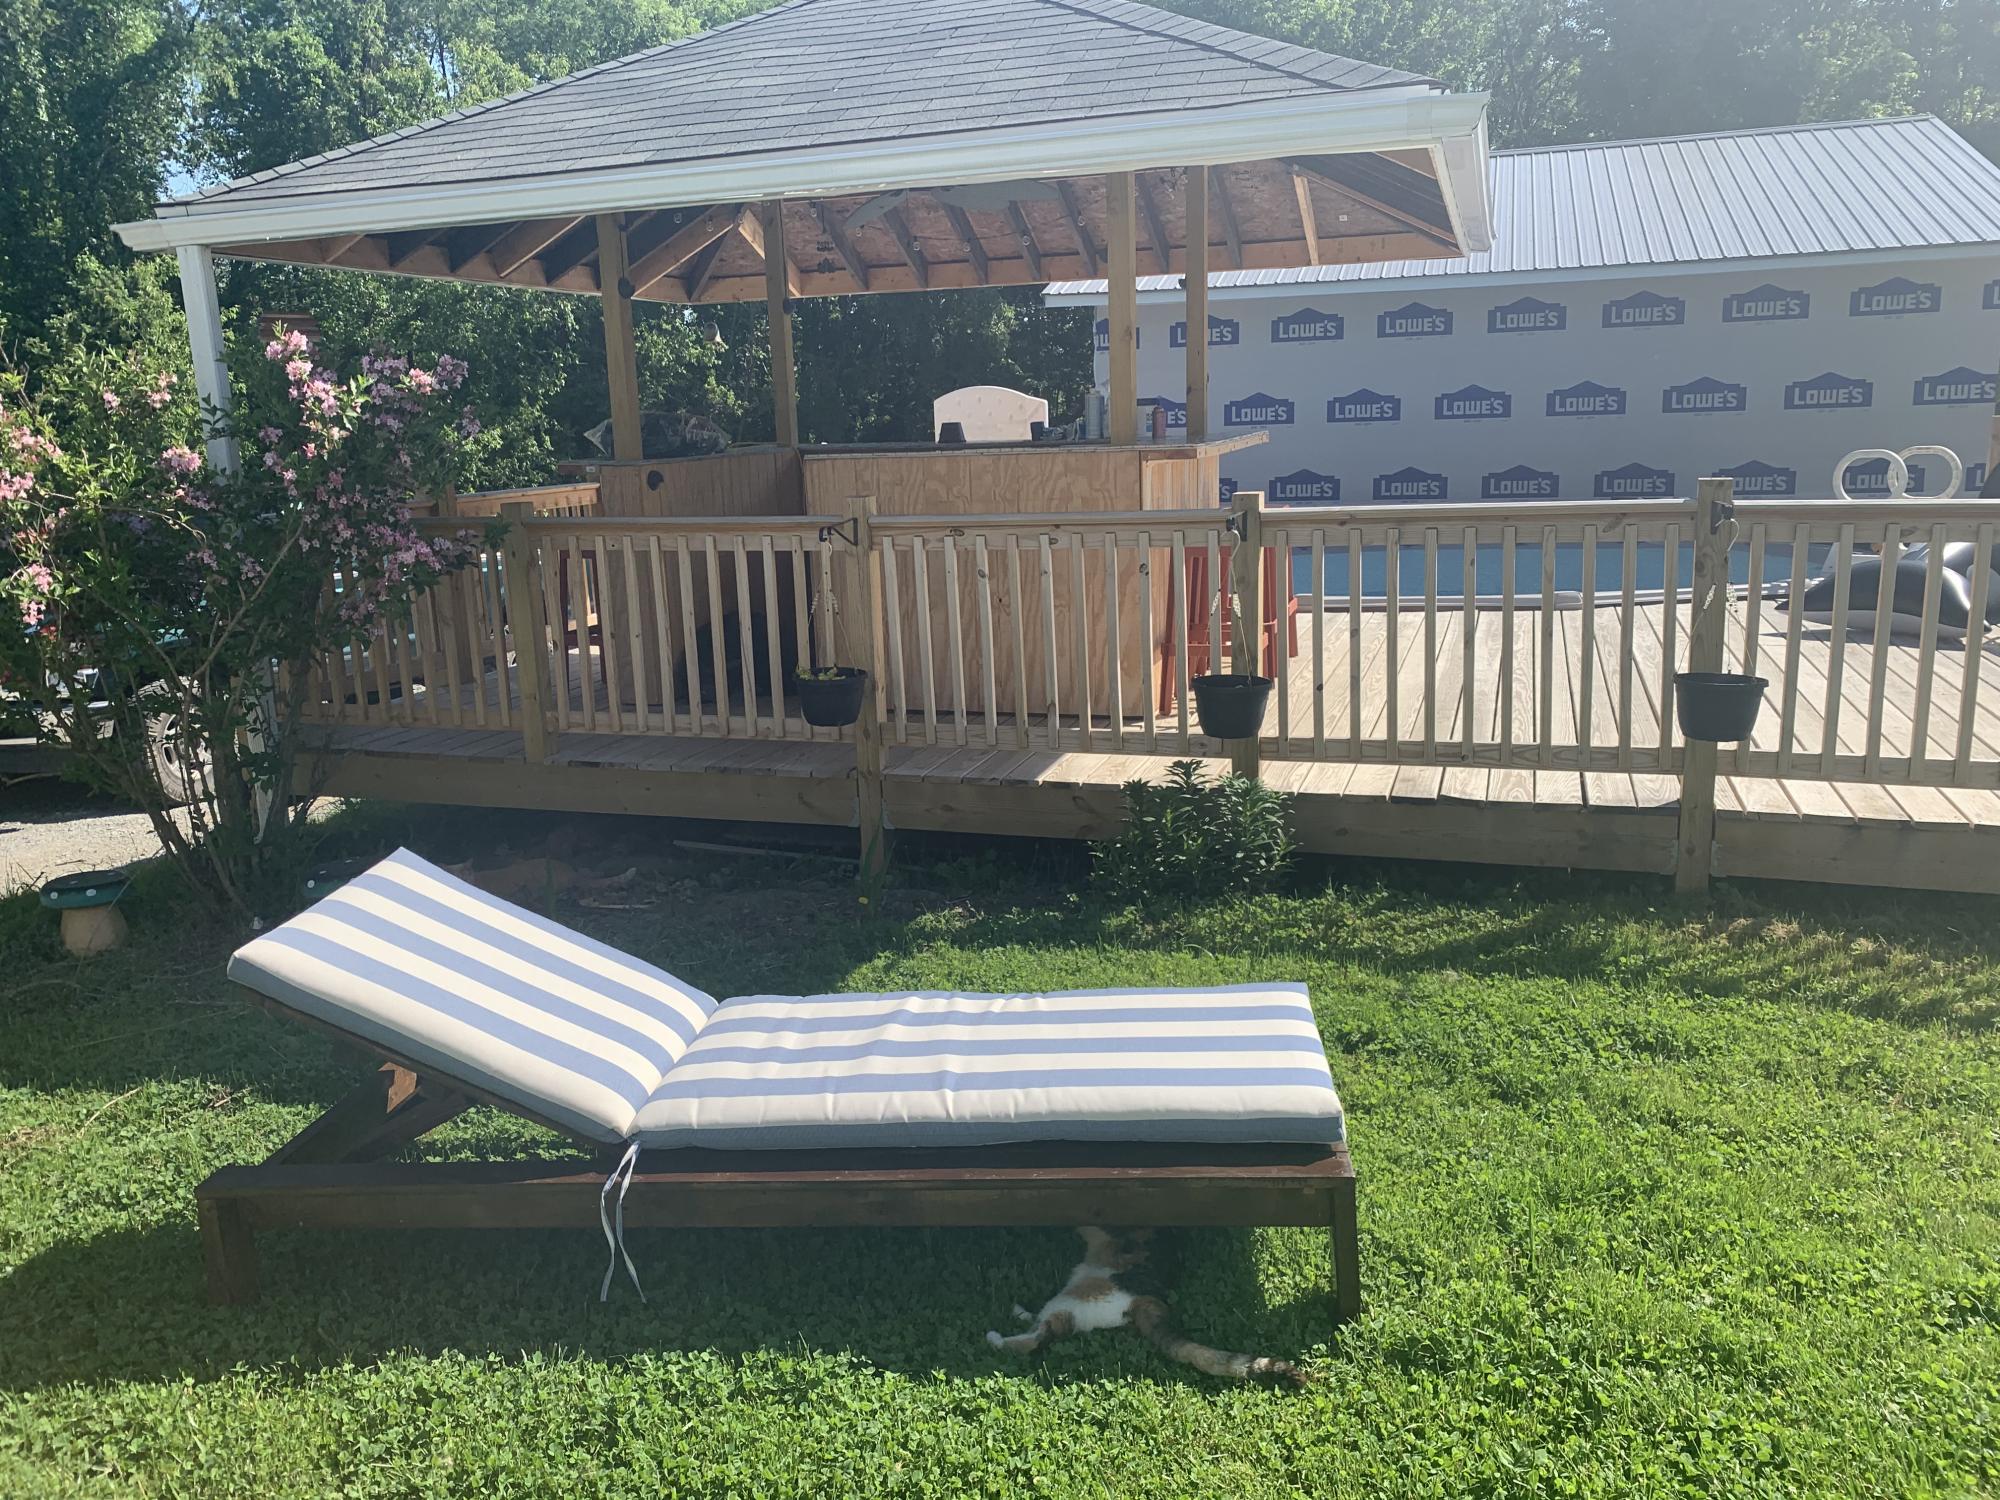
This is my first project, I’m soooo happy with how it turned out!

Built from Plan(s)
Estimated Cost
$90
Estimated Time Investment
Day Project (6-9 Hours)
Finish Used
Walnut stain + acrylic top coat
Recommended Skill Level
Beginner
Comments

Wed, 05/27/2020 - 11:16
Looks awesome!!! Thank you…
Looks awesome!!! Thank you so much for sharing photos!
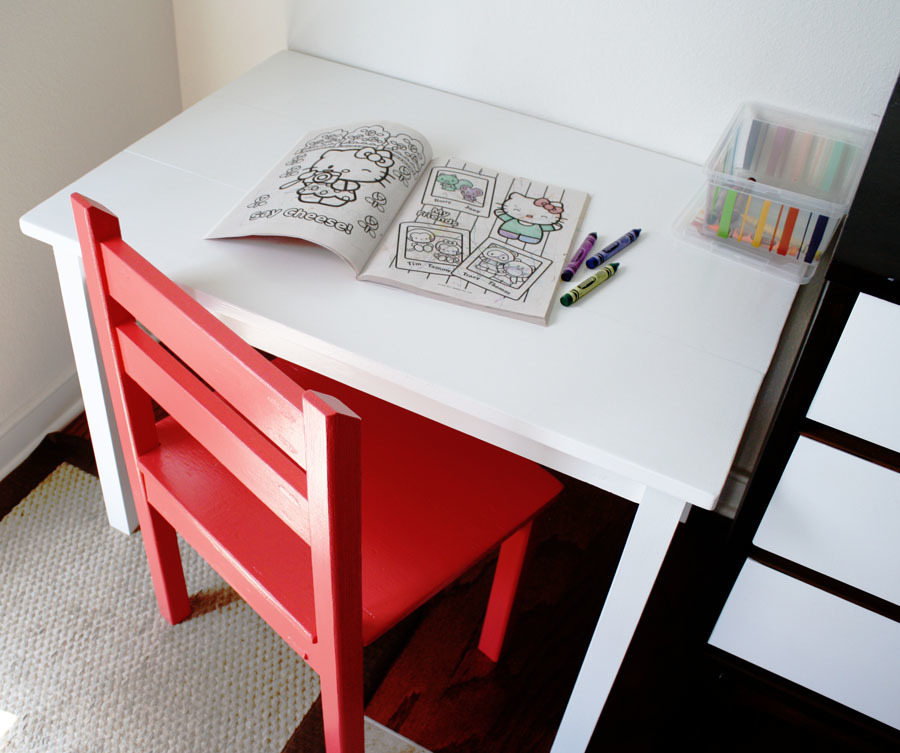
Farmhouse Craft Station
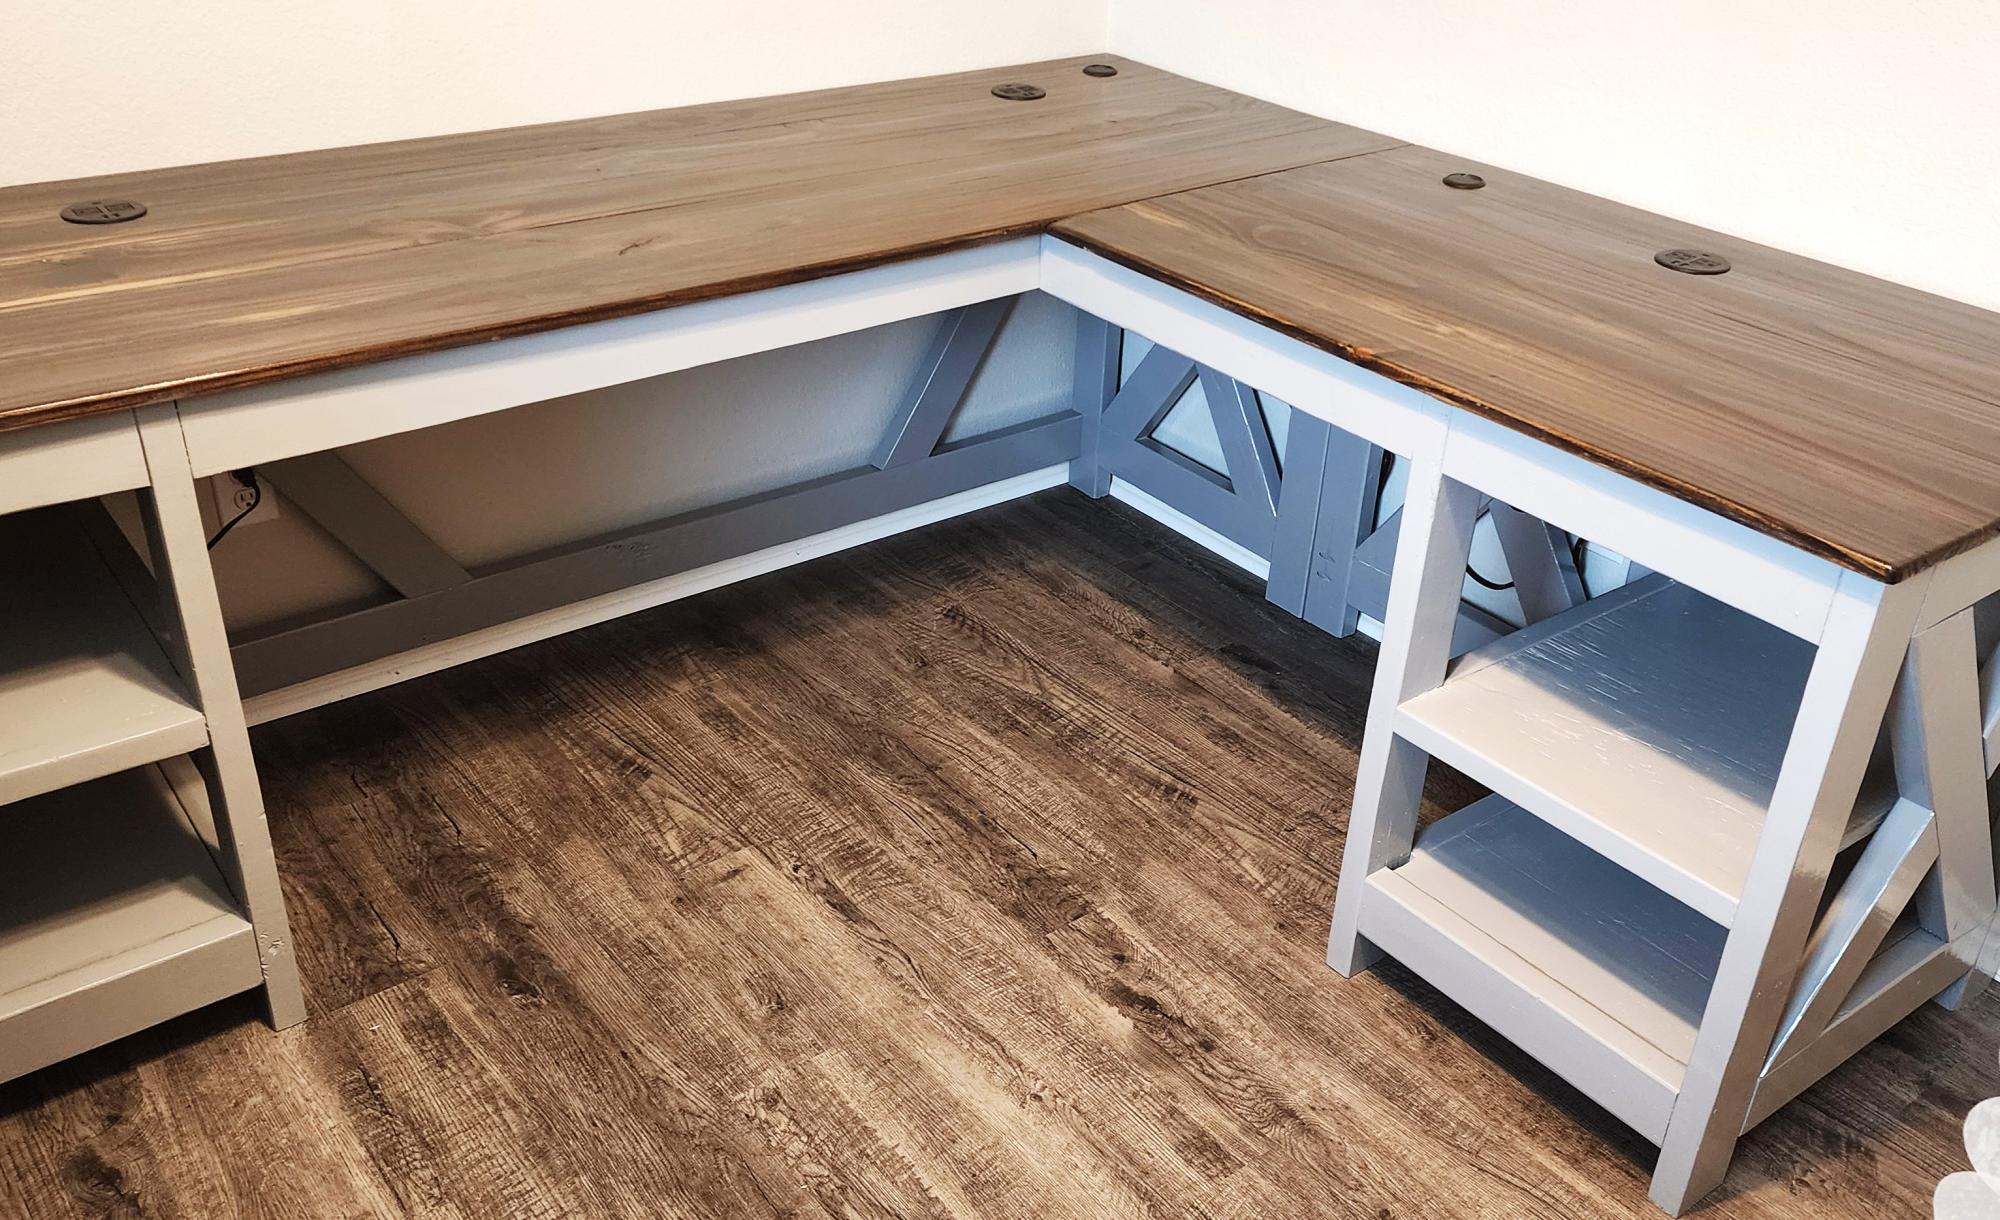
Desk for my wifes craft room.
Joshua Moore
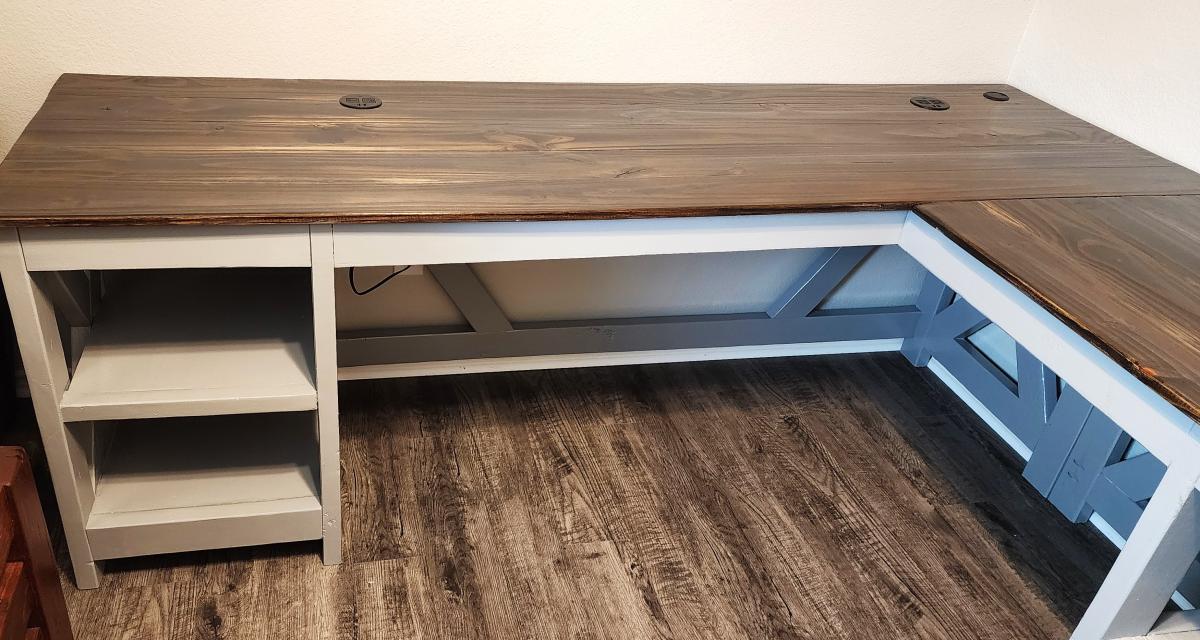
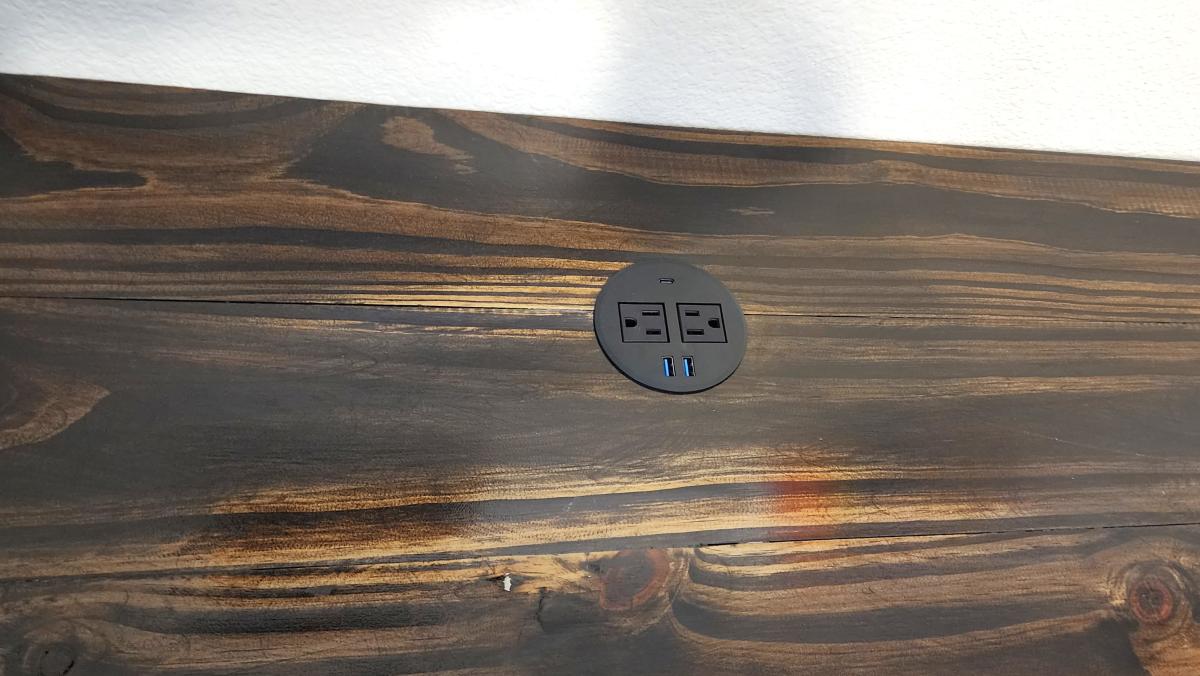
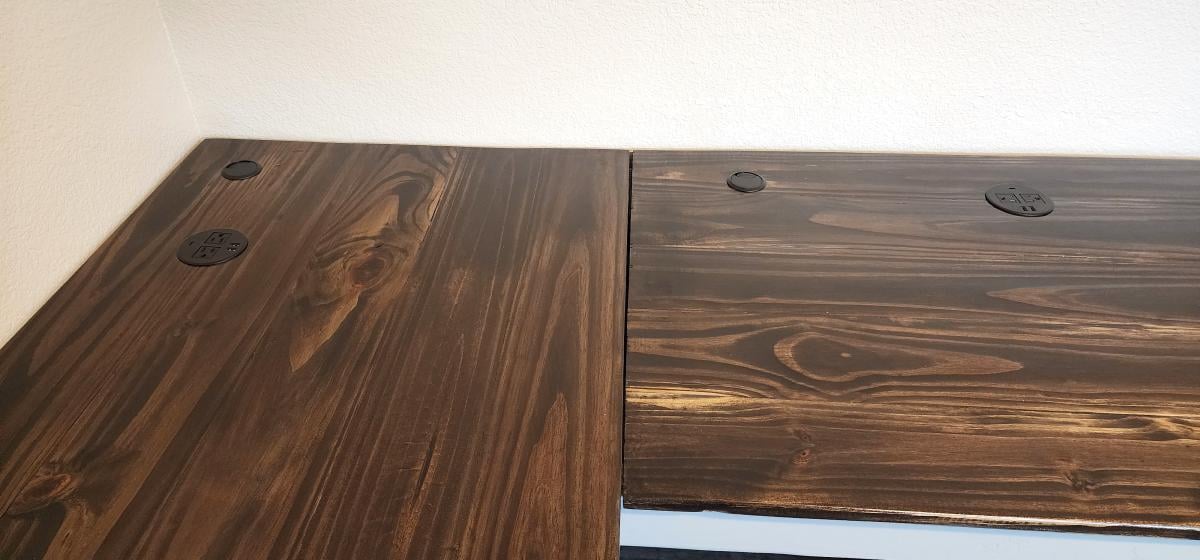
Built from Plan(s)
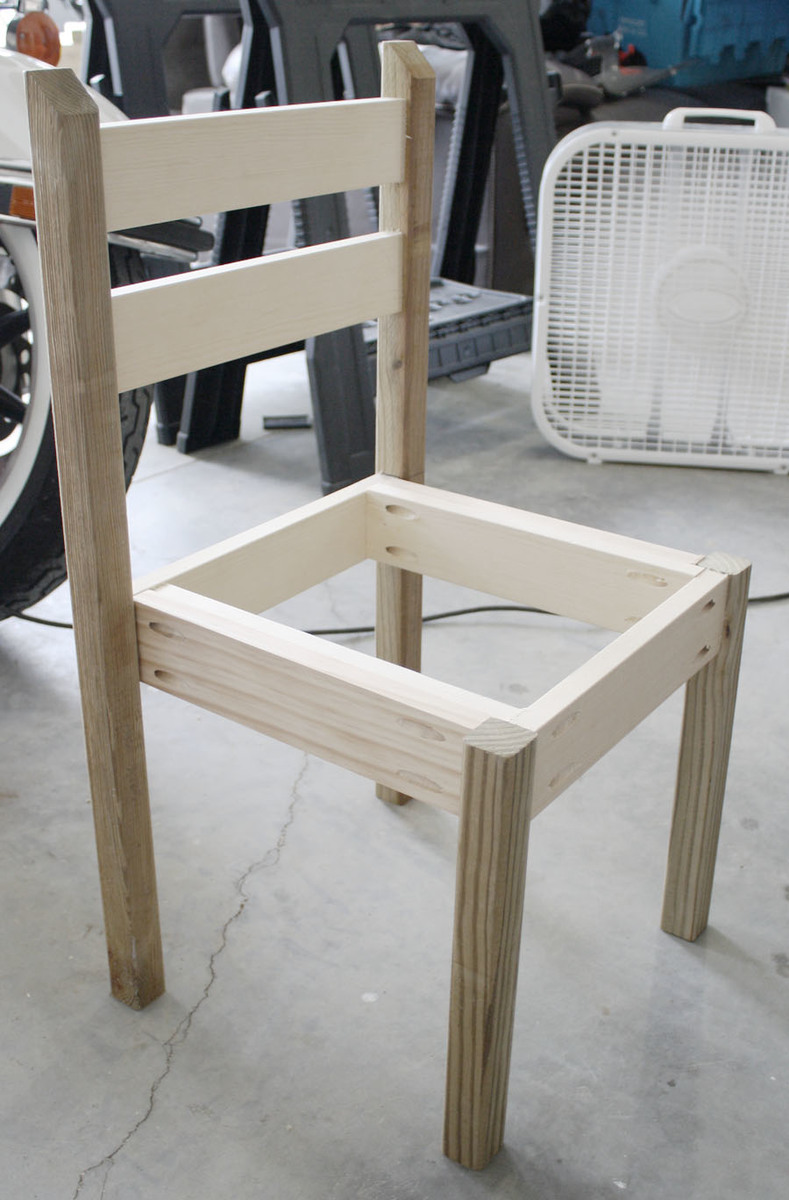
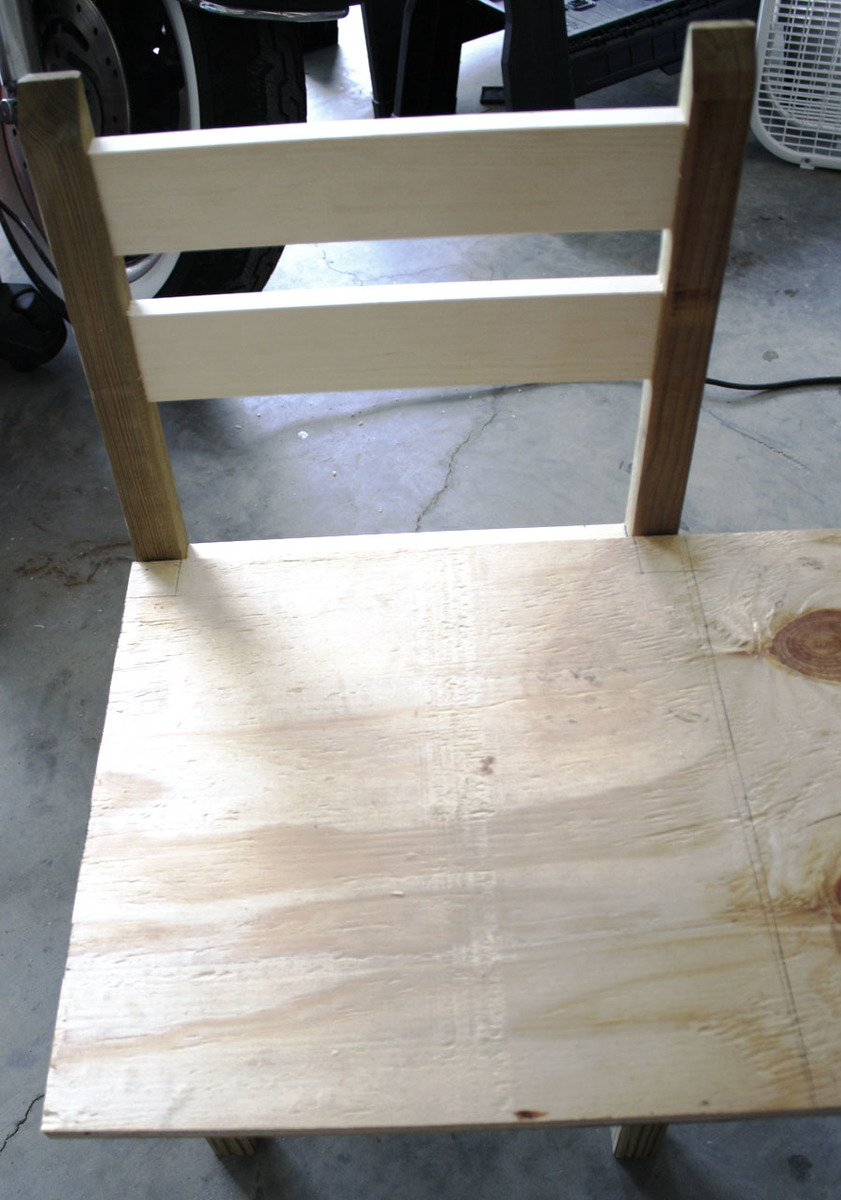
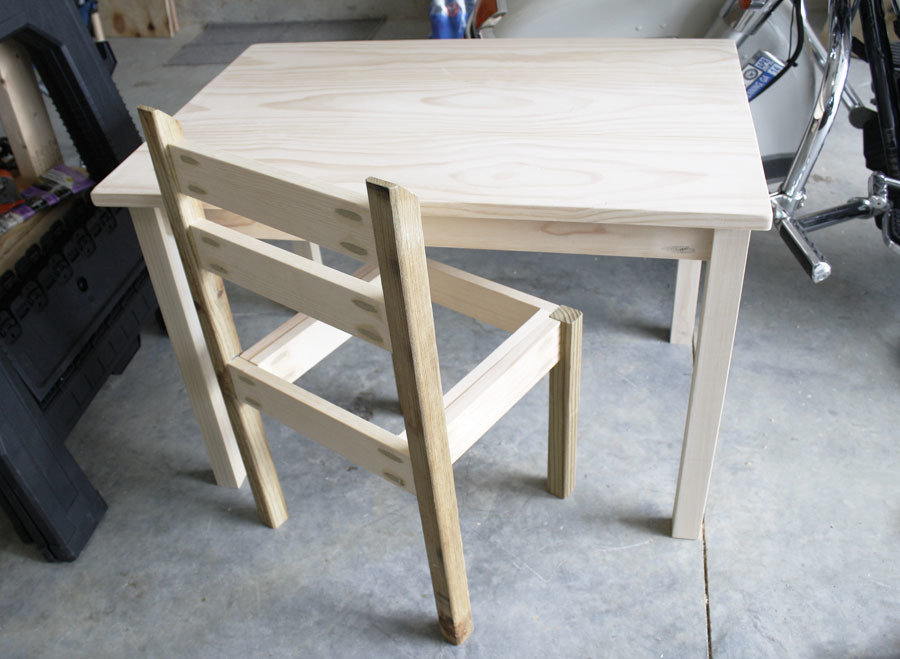
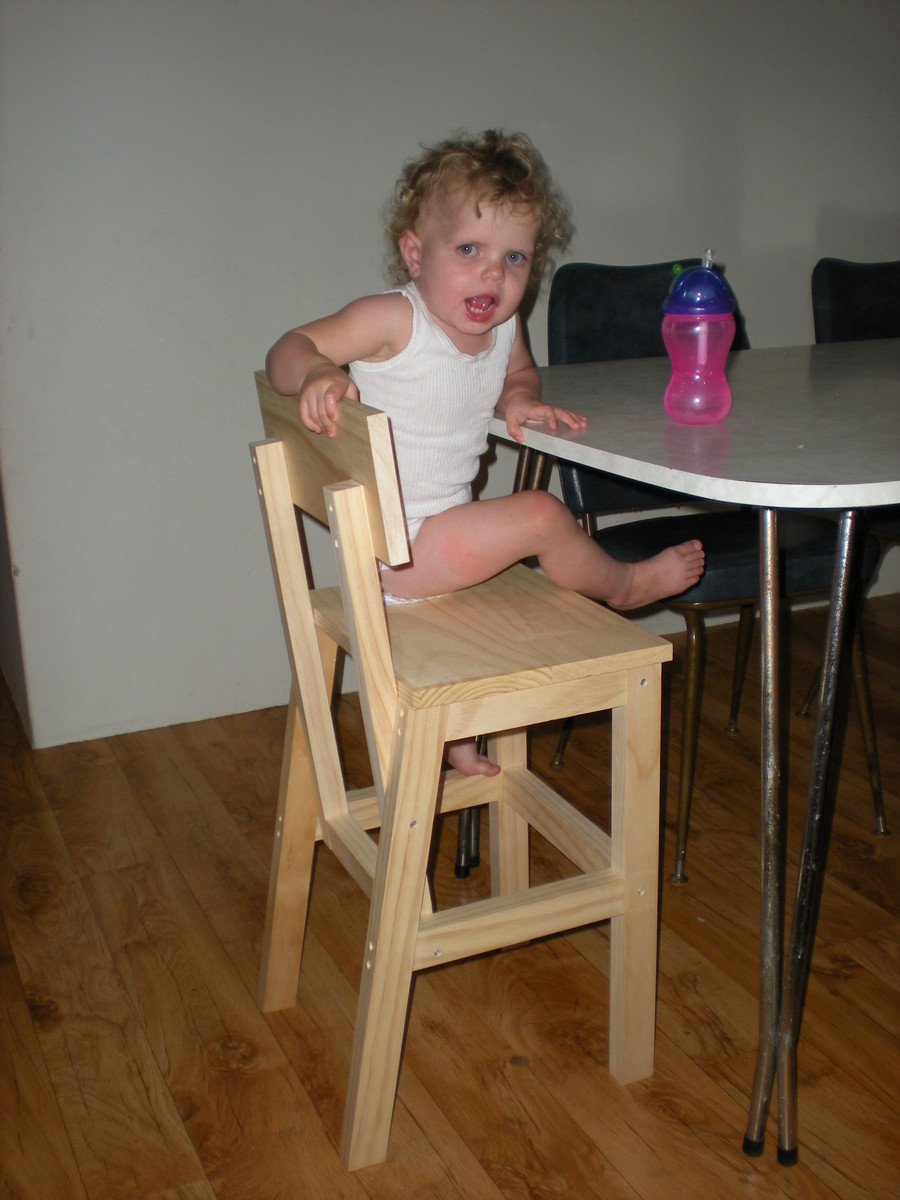
Kiddie Chairs
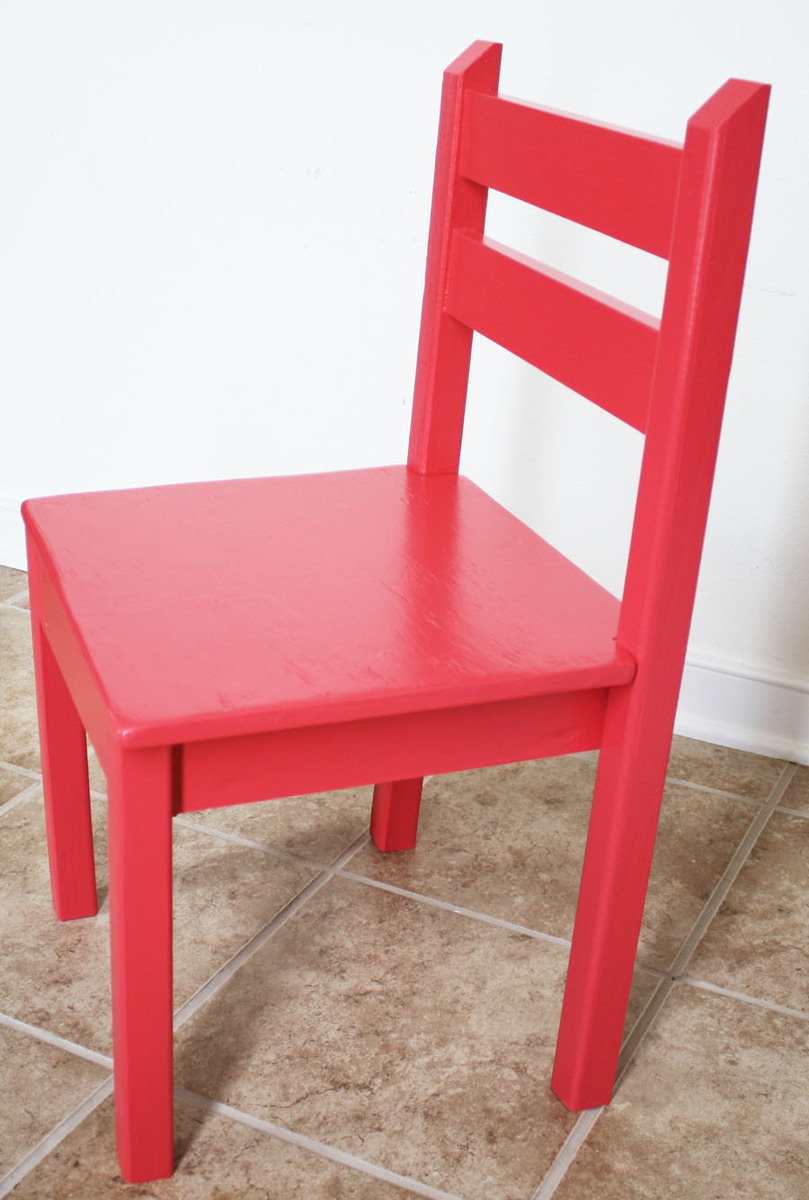
These chairs were easy to build, although I modified Ana's plans a little bit. I opted for solid wood 2x2s for the legs (I wanted it to be sturdier), and a solid seat instead of a slatted one. I notched out the back of the seat so it would fit flush against the back legs. Because of my modifications, my chair was just a couple bucks more.
Also, I was so excited to find solid wood balusters for the chair legs - they're not only better quality, but cheaper than furring strips!
Check out my blog link for a complete play-by-play!
Estimated Cost
$7.00
Estimated Time Investment
Afternoon Project (3-6 Hours)
Finish Used
Primed with Zinsser 3-in-1 Primer, then painted with Red Valspar Paint found in the "Oops" section of Lowes. Three coats of Rustoleum Satin Polyurethane.
Recommended Skill Level
Beginner
Comments

Mon, 07/23/2012 - 08:25
Nice. I like the solid seat.
Nice. I like the solid seat. Much easier to keep clean from kid grime.
Amy's "My Chair"
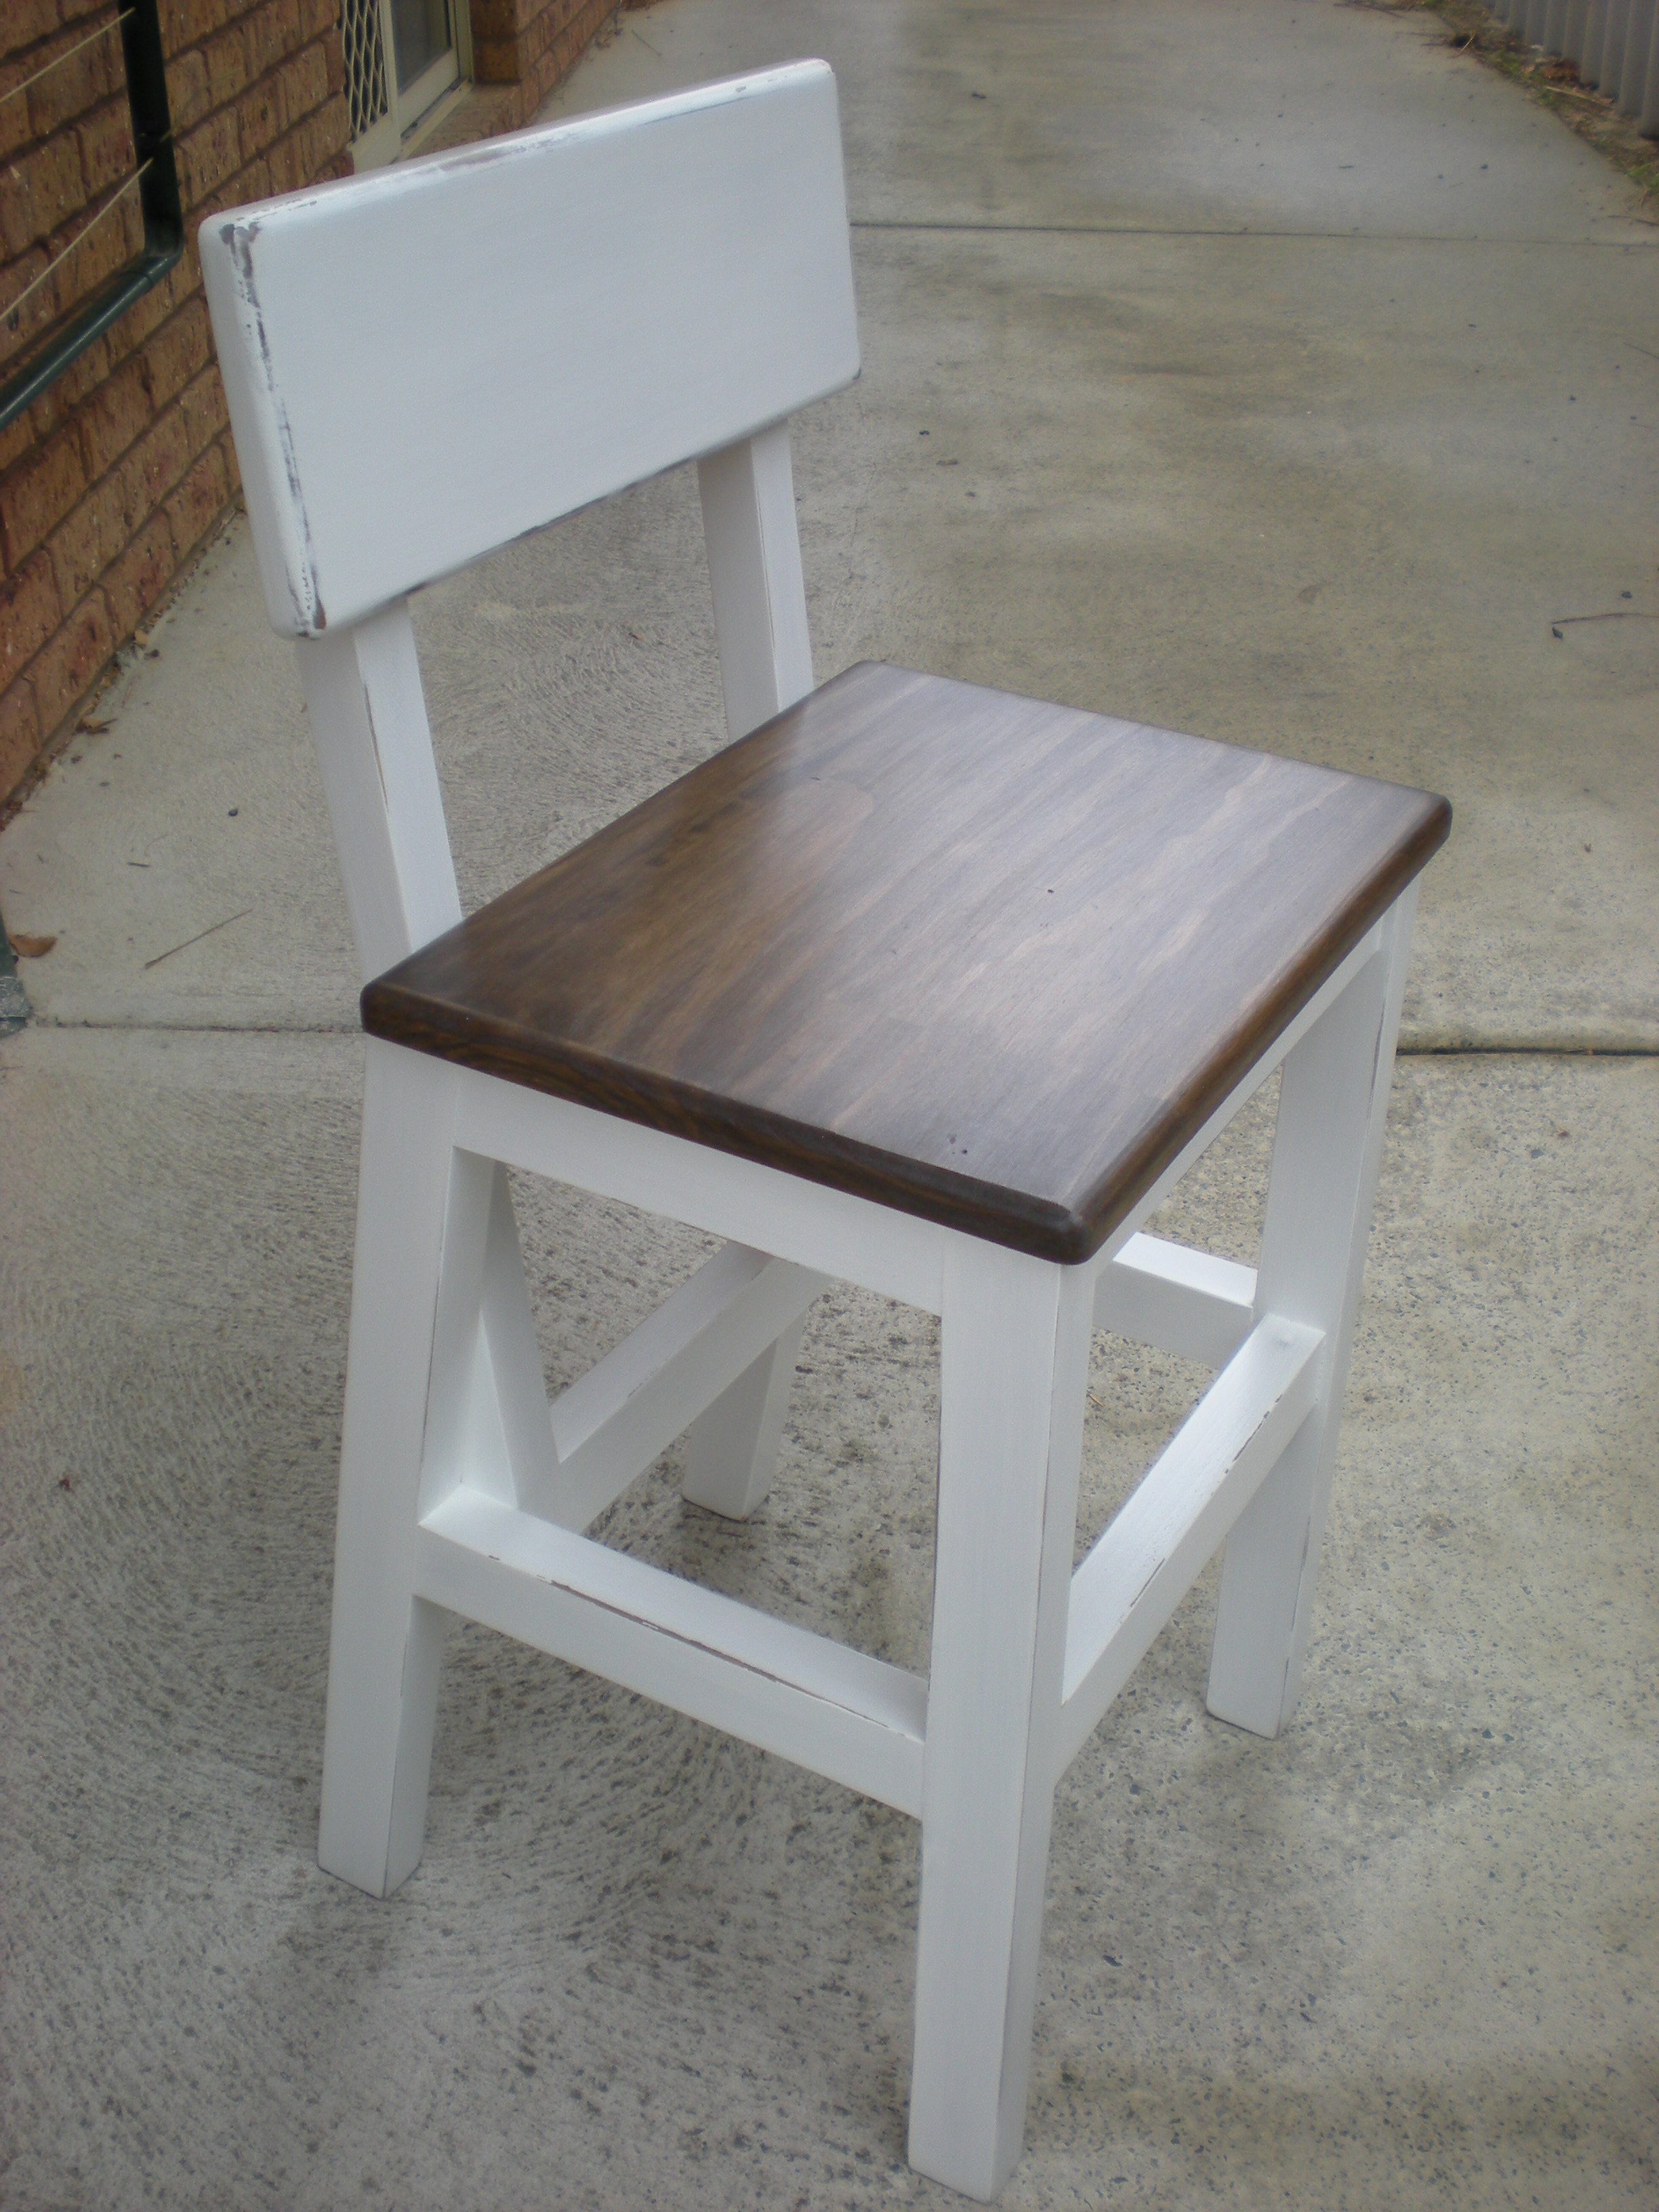
My daughter needed a chair that wasn't as bulky as our high chair but higher than a normal dining chair. This plan was perfect. I changed the dimensions to suit what I needed. The actual building took only a couple of hours but the finishing seemed to take forever. I probably spent about a week just on the finishing. I distressed it to help disguise the inevitable bumps and grubby handprints.
Built from Plan(s)
Estimated Cost
AUD$20
Estimated Time Investment
Afternoon Project (3-6 Hours)
Finish Used
Cabots stain - burnt gum, dulux vivid white, clear water-based varnish.
Recommended Skill Level
Beginner
Comments
Mon, 05/01/2017 - 16:30
Chairs size
Is this adaptable for adult size with no back. Looking for something like this to slide under a new kitchen desk.
Tue, 08/27/2019 - 19:18
This is beautiful! So much…
This is beautiful! So much prettier than a high chair or booster seat!
2x10 Step Stools

My kids needed a step stool and I had some scrap wood (2x10) left over from a previous project
Built from Plan(s)
Estimated Cost
20 dollars
Estimated Time Investment
Weekend Project (10-20 Hours)
Finish Used
Minwax (weathered oak stain)
Minwax polycrylic protective finish
Minwax polycrylic protective finish
Recommended Skill Level
Starter Project
Comments

Thu, 08/18/2016 - 20:12
Thank you! The dimensions are
Thank you! The dimensions are the same as the Ana White "Simple 1x10 Single Step Stool" except I used 2x10's instead of 1x10's like the plans called for. I also used some scrap pallet wood to make a design on the top of the stool.
- Stool height: 7 1/2" for legs, 1 1/2" for top, and 1/2" for scrap pallet wood; which gives a total height of 9"
- Stool width: 9 1/4" x 16"
- 5 degree angle cuts were made on the legs
Wed, 04/17/2024 - 09:21
Are the rails a 2x10 cut in…
Are the rails a 2x10 cut in half.? Or is it pallet wood?
Kids Tree Fort
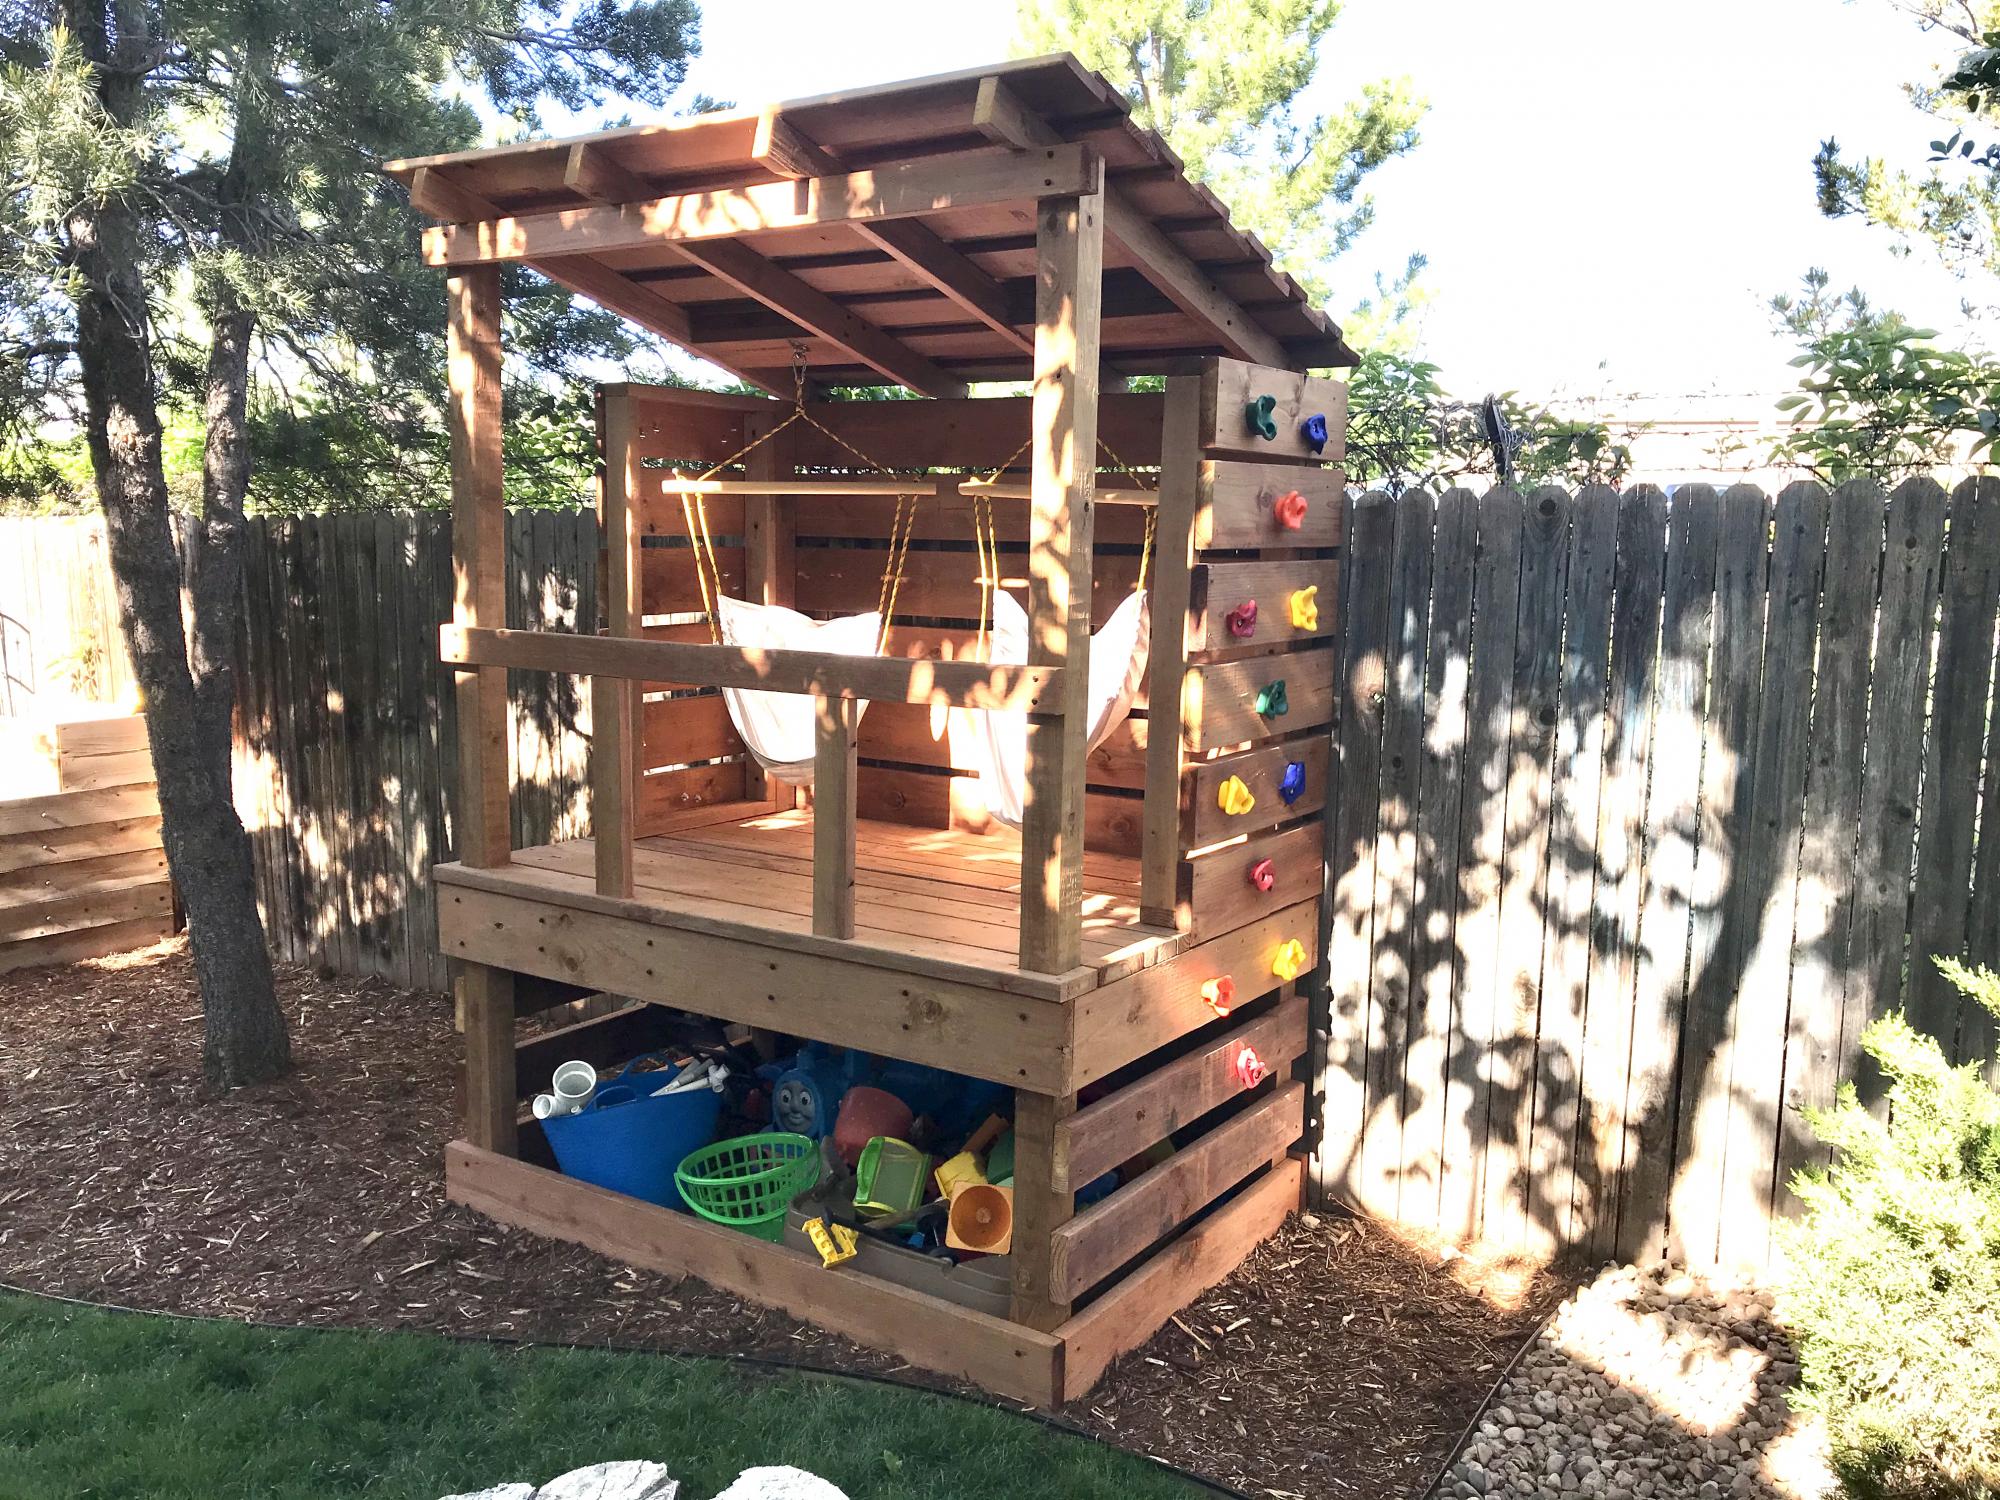
Built a fort for the boys with two climbing walls, a spot for their toys, and added some hammock swings
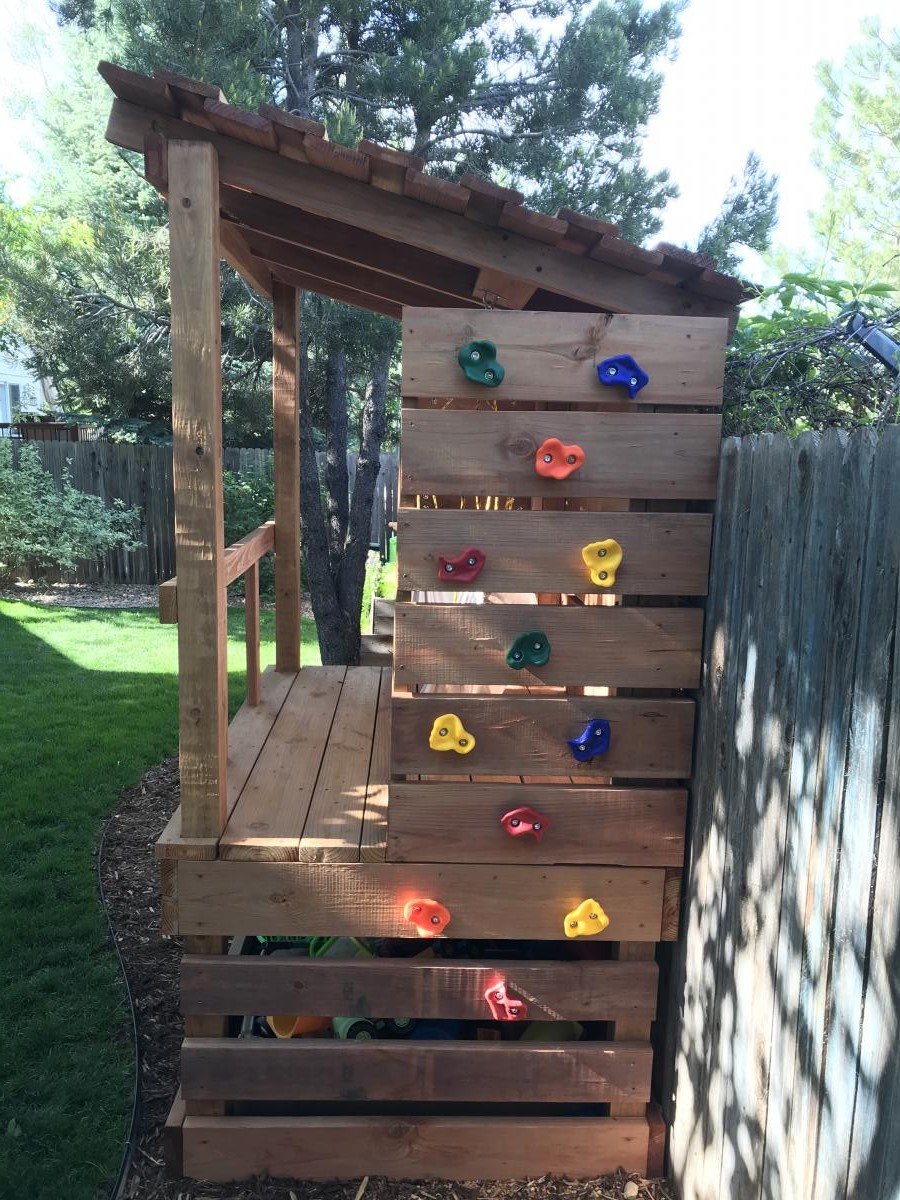
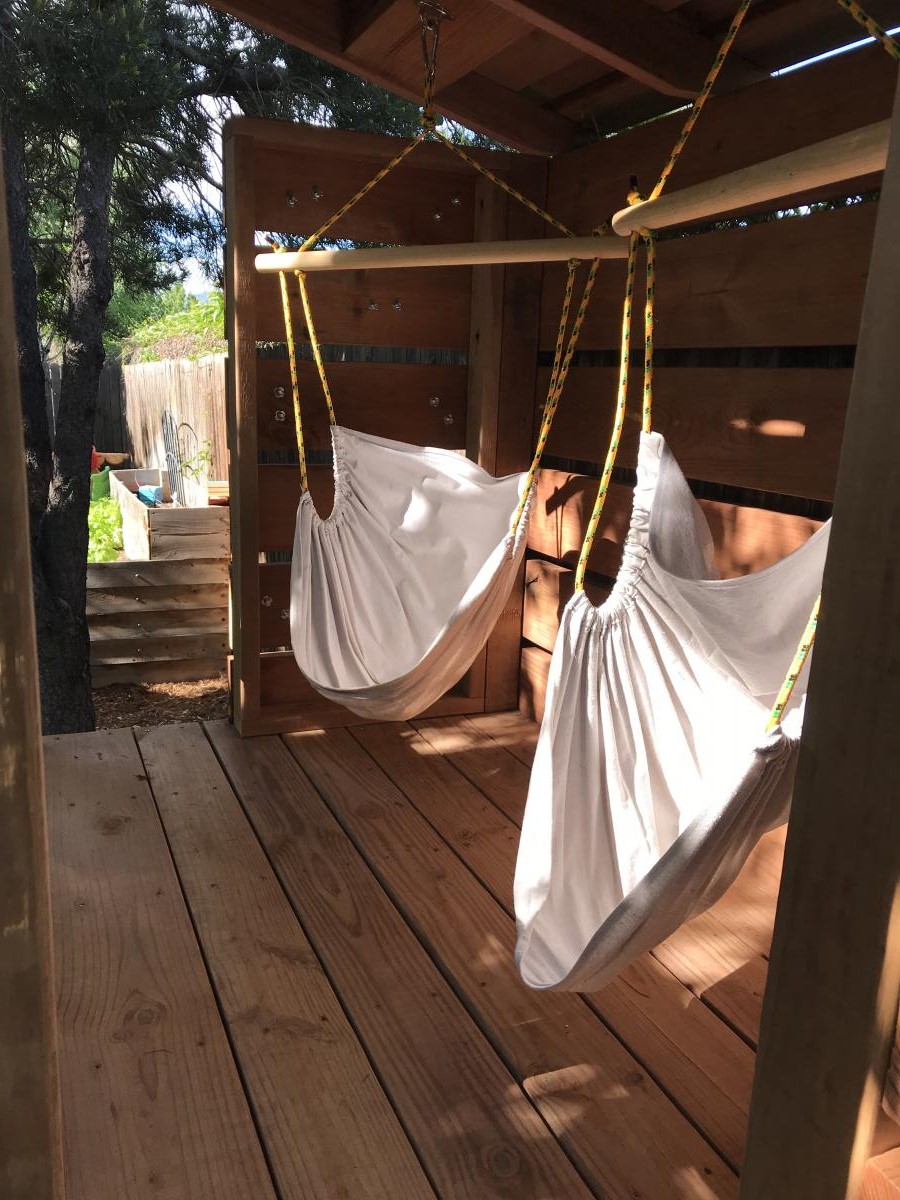
Built from Plan(s)
Estimated Cost
~$600
Estimated Time Investment
Week Long Project (20 Hours or More)
Finish Used
No stain, left natural
Recommended Skill Level
Advanced
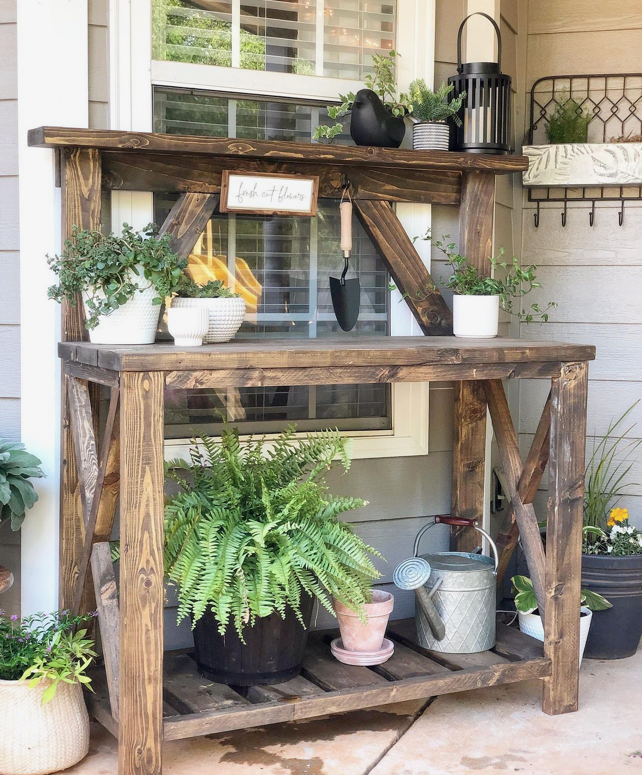
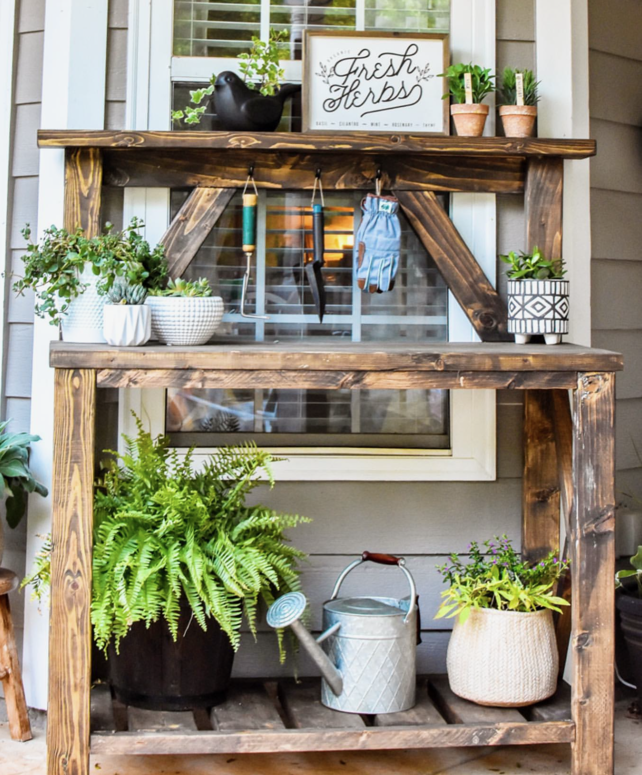
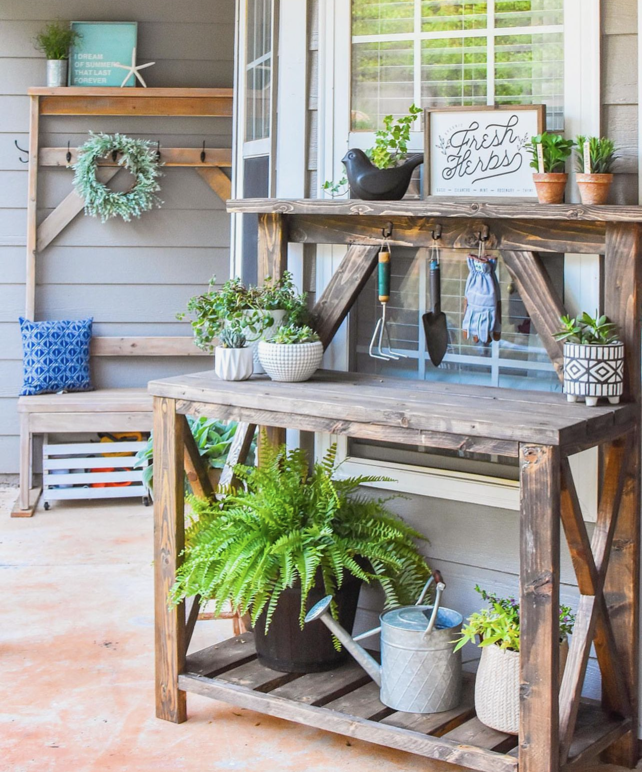
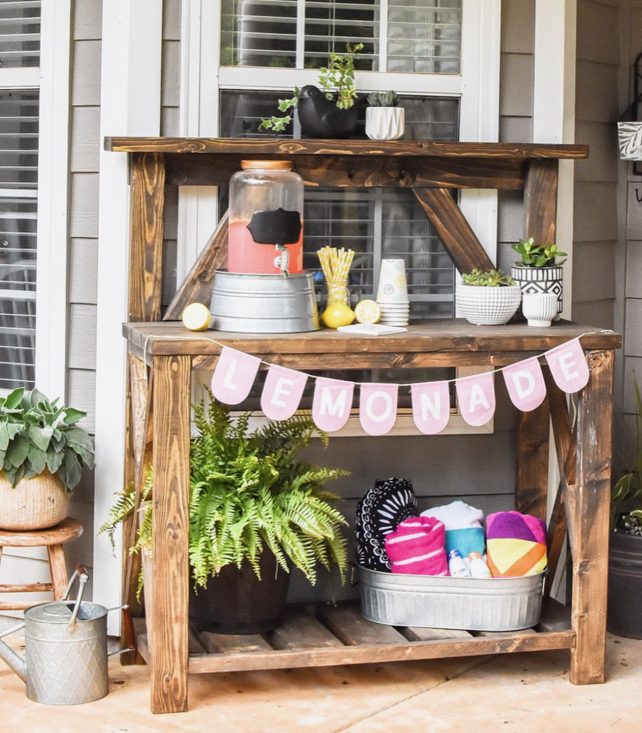
Rustic Potting Bench
Full Bed with upholstered headboard

First of all, thanks Ana for the wonderful plans. I made this in full size mainly from the farmhouse bed plan with some modifications. The headboard is made of 1x4s with an upholstered pegboard. Instead of using 4x4 post for legs, i glued 2x4s studs together and later wrapped them with fabric instead of painting them.
This looks great in our second bedroom.
Built from Plan(s)
Estimated Cost
$70
Estimated Time Investment
Weekend Project (10-20 Hours)
Finish Used
Valspar Glossy White
Recommended Skill Level
Intermediate
leaning bathroom shelf
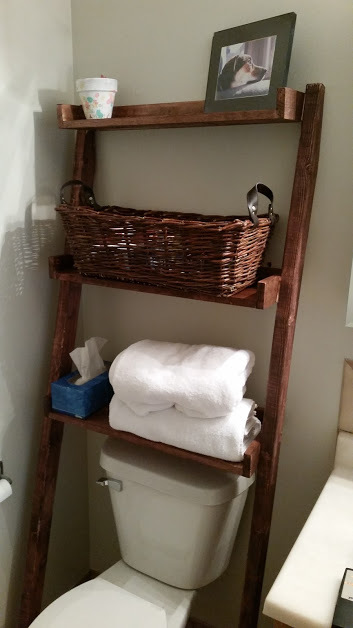
This was a pretty easy build, always a plus when you're looking for more storage. I'm not sure about the darkness of the stain though; I usually go with a walnut to match the rest of the house and wanted to try something different. This seems like a bit much. Might be easier to build an entire second set vs re-doing the stain though...
Built from Plan(s)
Estimated Cost
$25
Estimated Time Investment
Afternoon Project (3-6 Hours)
Finish Used
Minwax red mahogany
Recommended Skill Level
Beginner
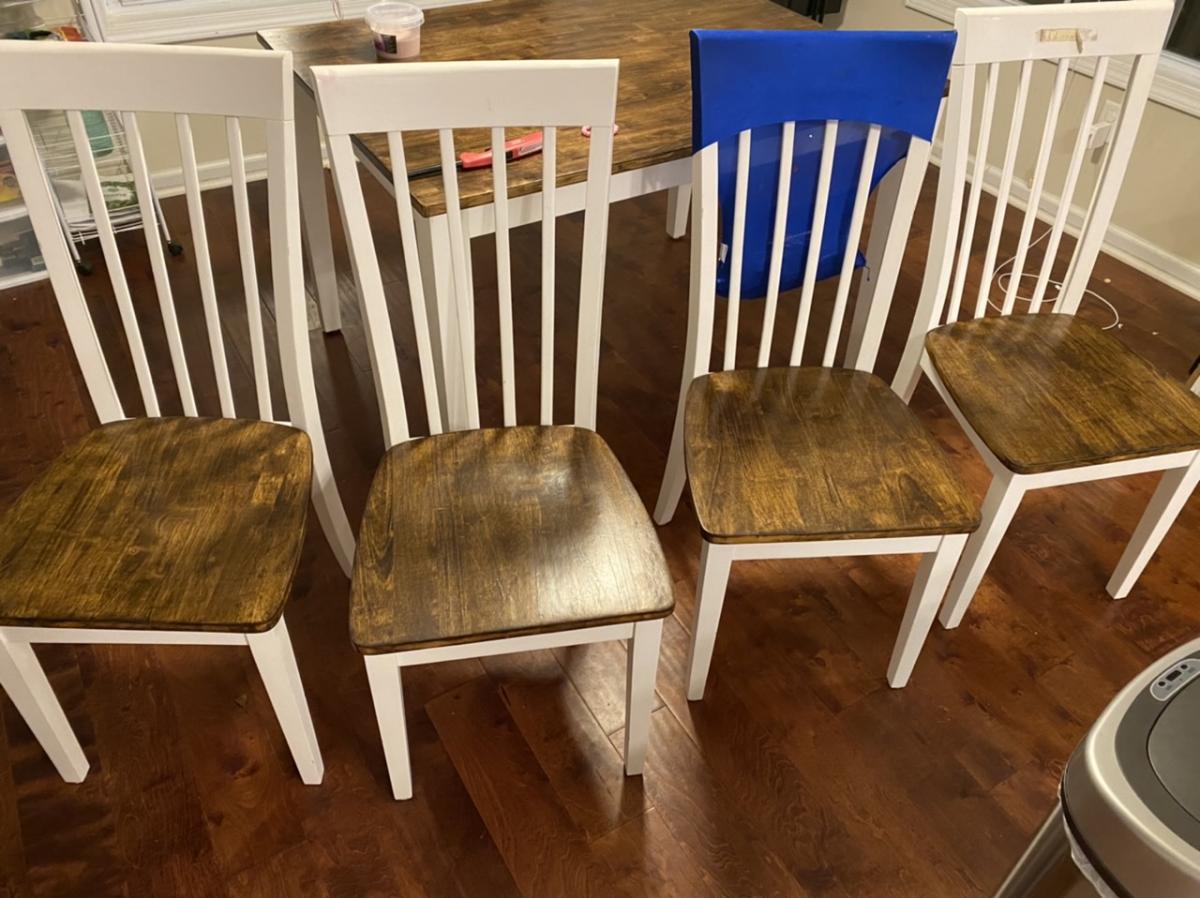
Refinished kitchen table and chairs
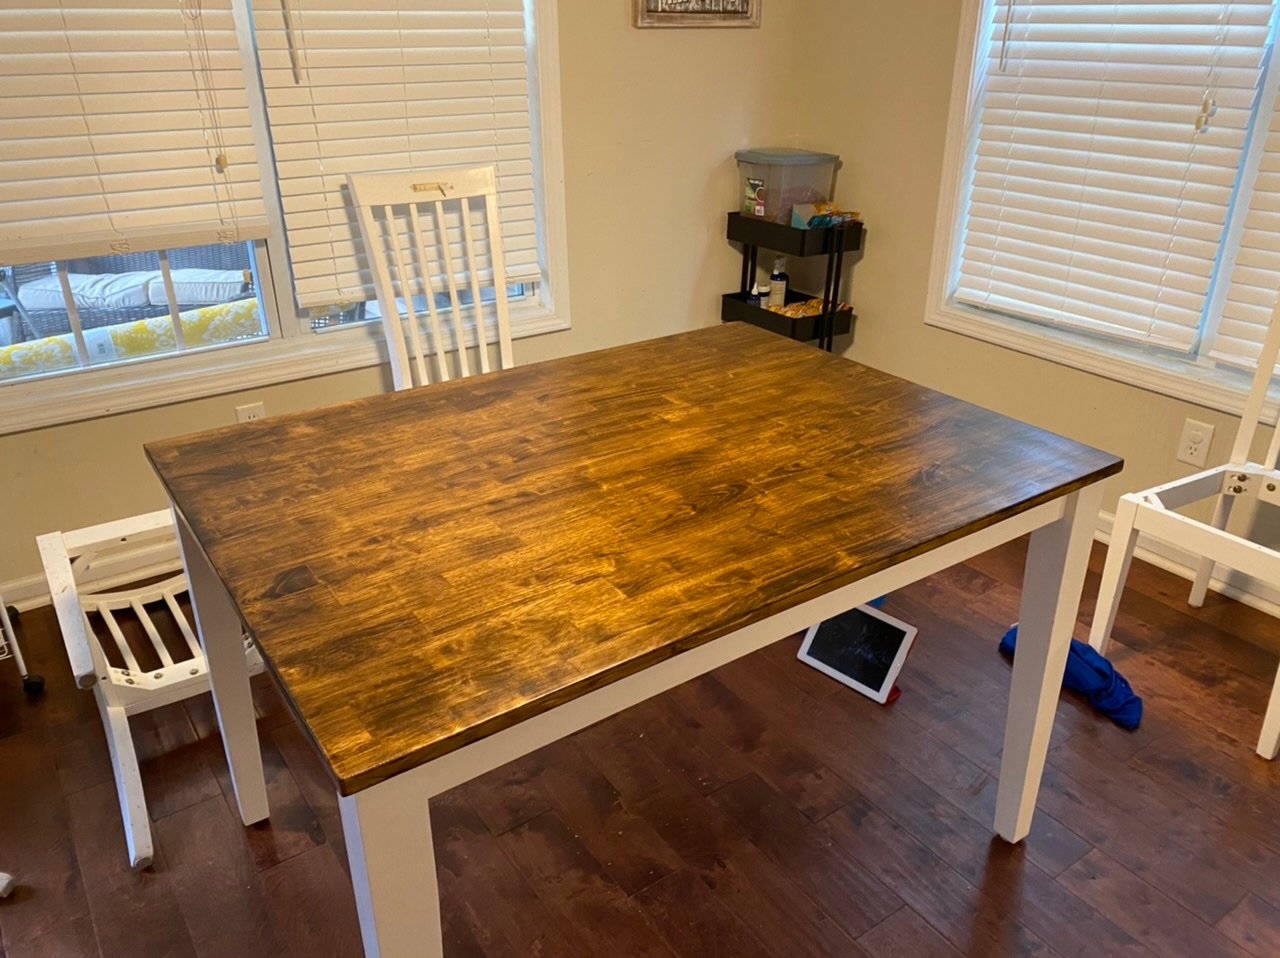
My kitchen table needed something, so instead of buying new, I sanded and used a dark stain on the table top and chair seats. It looks like whole new table! This wasn’t from a plan, but used skills I learned building from Ana’s plans! Off to build the Little Helper tower now!
Estimated Cost
Less than $50
Estimated Time Investment
Weekend Project (10-20 Hours)
Finish Used
Dark walnut stain
Recommended Skill Level
Beginner
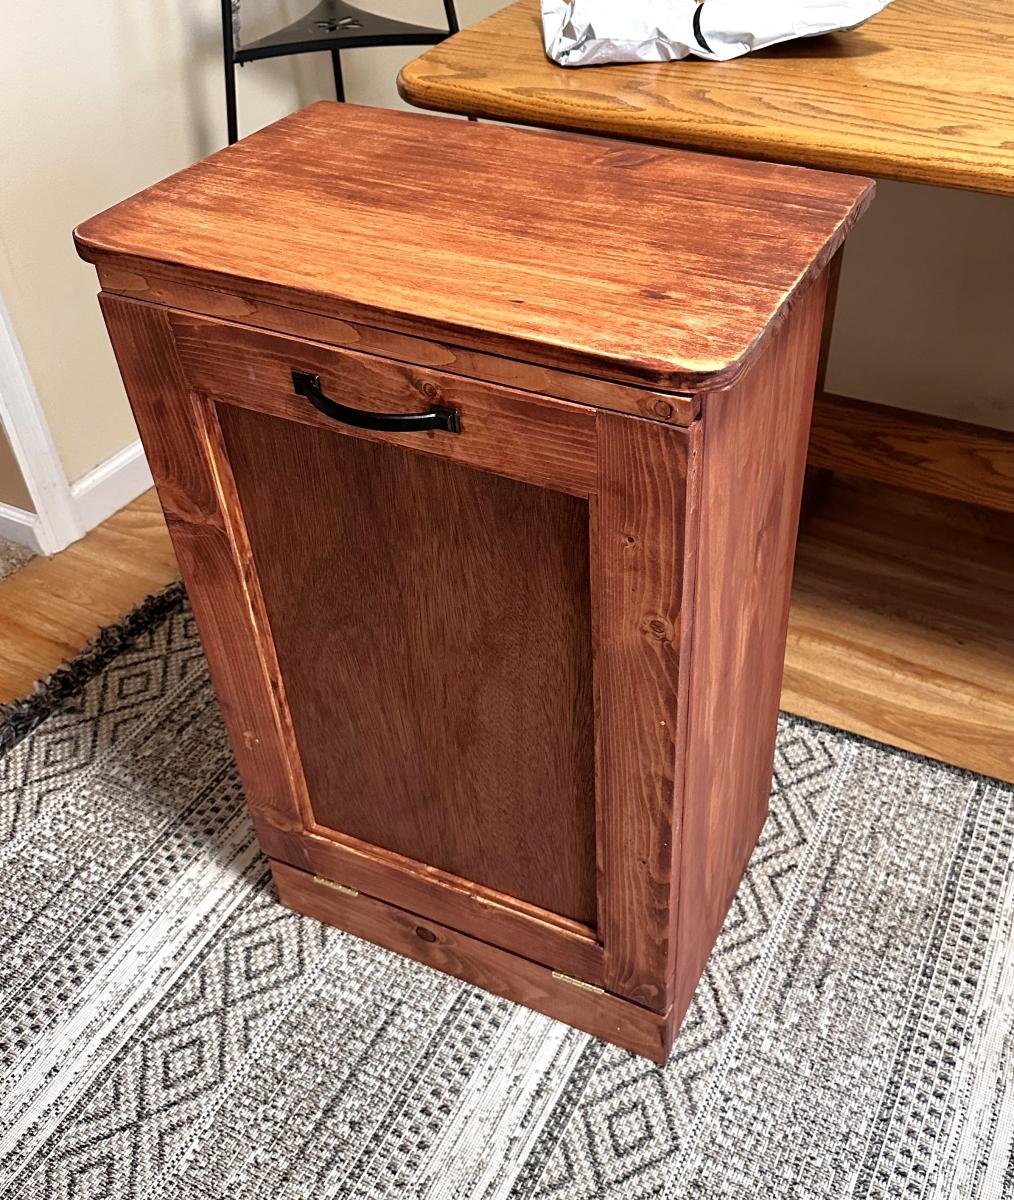
Trash with Lift-up Storage
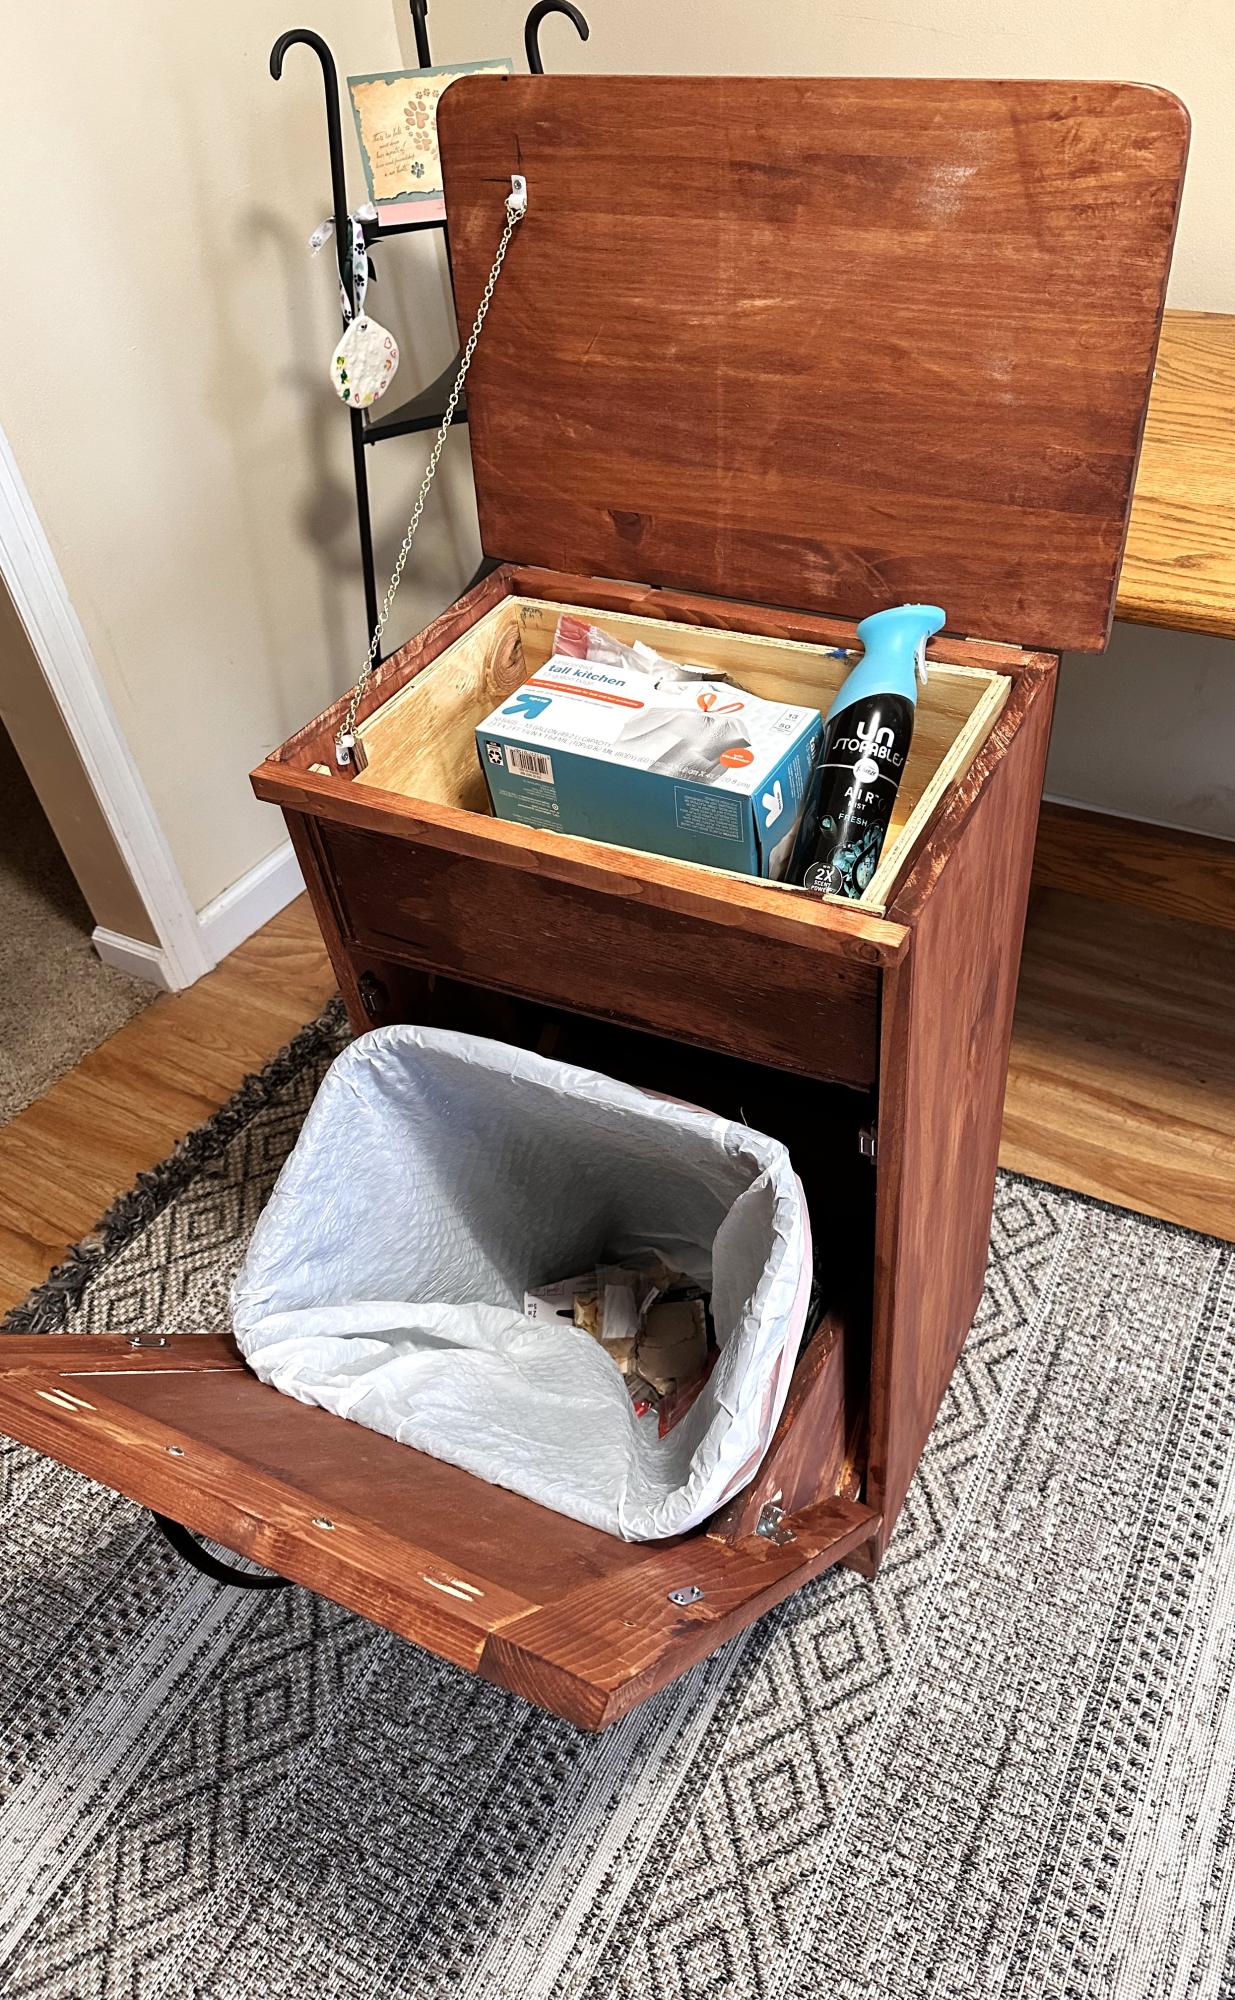
Replacing a trash bin for a friend whose cats could not get into. At the last minute I thought a little hiding area on top would give them some storage for bags and things. Had to go one size down on the Rubbermaid to allow for clearance when tilting open. They love it, the cats hate it.
Built from Plan(s)
Bathroom shelf with hooks
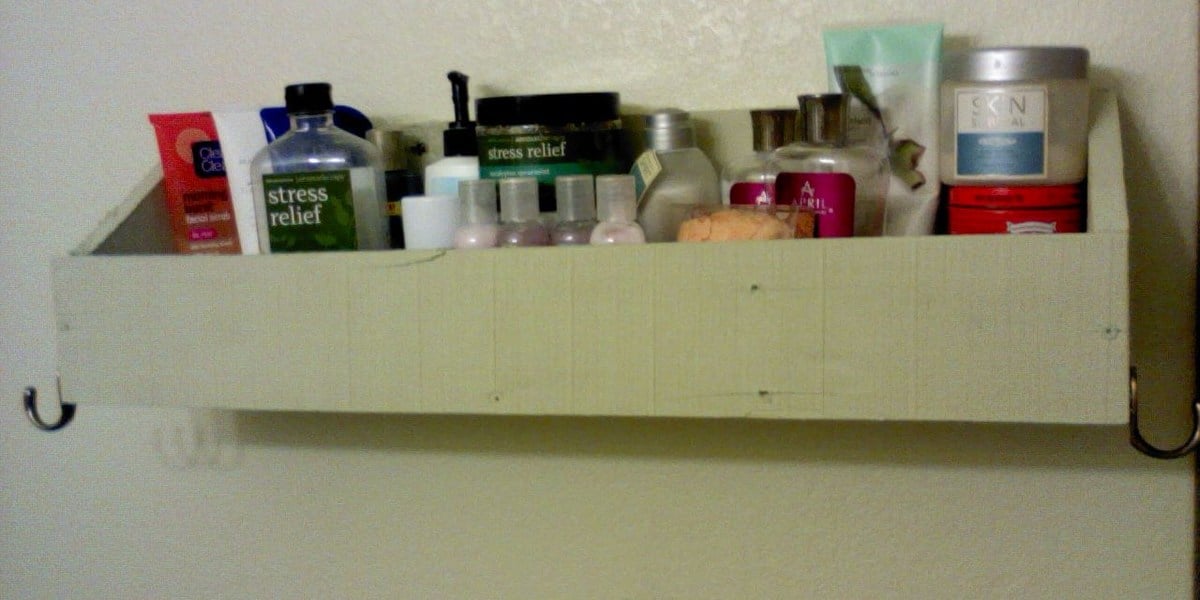
This was inspired by your Flat Wall Bookshelf and made using a piece of 1x6, a piece of 1x4, and a smidge of recycled paint. We added towel hooks to the ends (the same ones that kept pulling out of the wall), and mounted the whole thing to studs in the bathroom. Thanks for the plans!
Estimated Cost
$0.10 out of pocket
Estimated Time Investment
Day Project (6-9 Hours)
Finish Used
Unknown pale green Martha Stewart paint from a recycling center. Cost: $0.50 for the quart.
Recommended Skill Level
Beginner
LOVE MY SHED!!!
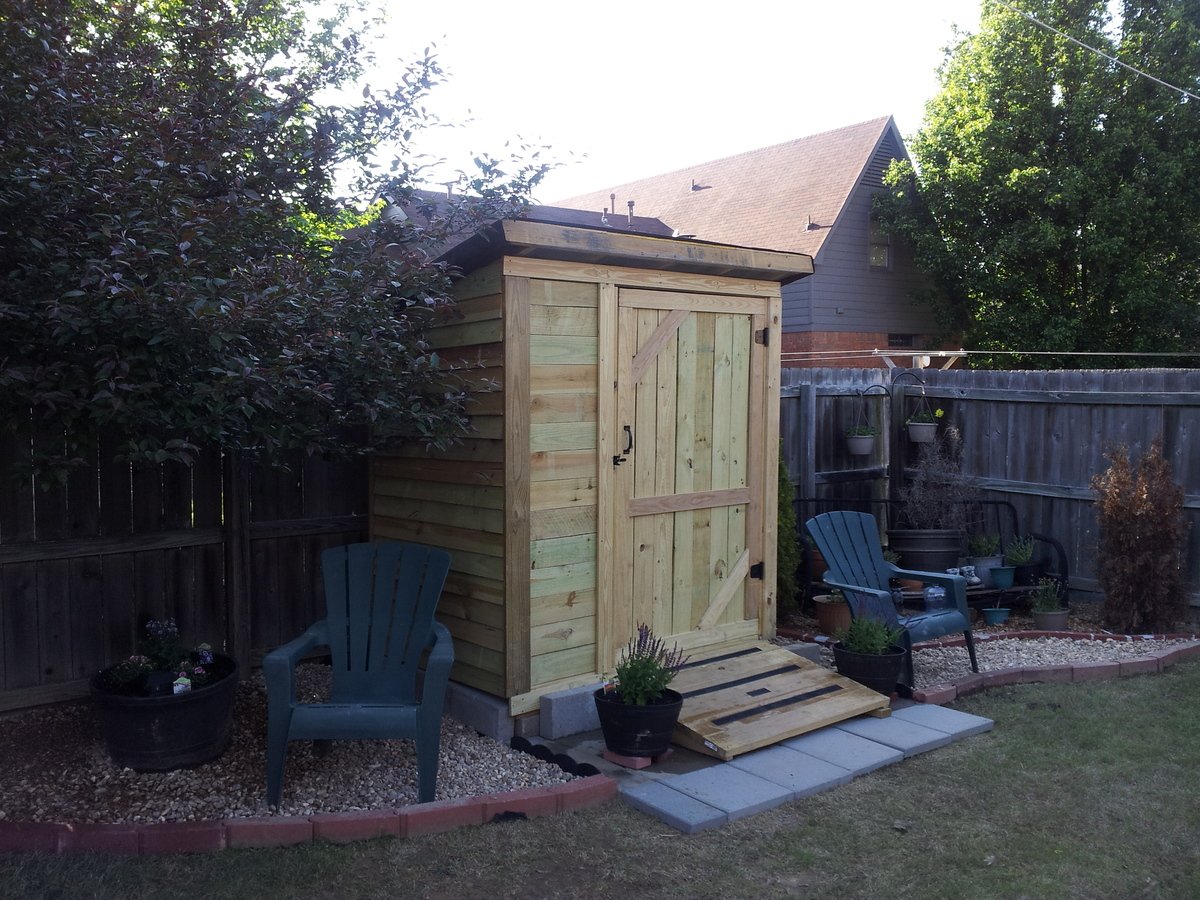
I saw this storage shed plan and loved it. I did make a few changes because I needed a 4' x 8'. I also built a shed floor to secure it too so I built the shed frame using 2x4's.
I also put the lower ends of the side walls in the rear to assist with water runoff.
Because I wanted the option to add shelves on the left side I decided to put one larger door on the right front only and added some contrast by vertically placing the pickets on the opposite side. I'm presently waiting for my shingles to arrive. After that I'll stain it. I really enjoyed putting this together, learned a lot.
My next project will be the outdoor sectional. I'll be making 5 pieces, 1 corner and 5 armless pieces. Can't wait to start.
Happy building,
Keep Safe
Built from Plan(s)
Recommended Skill Level
Beginner
Comments
Wed, 08/03/2016 - 06:03
Measurements
I absolutely love this shed and the way you altered the design with one door. Can you please send me the measurements you used for this project? I would love to build this for my yard!
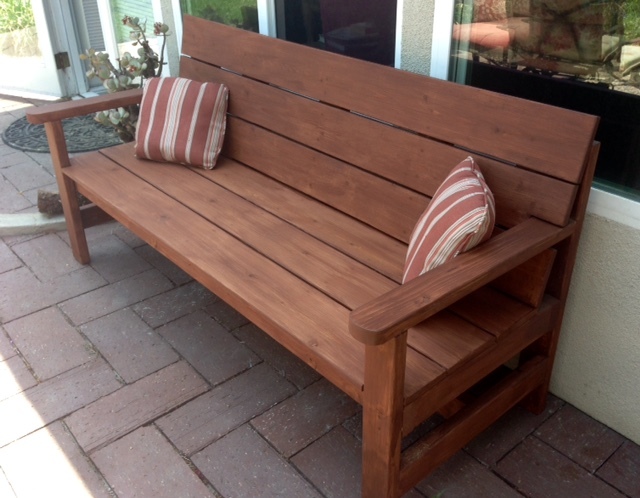
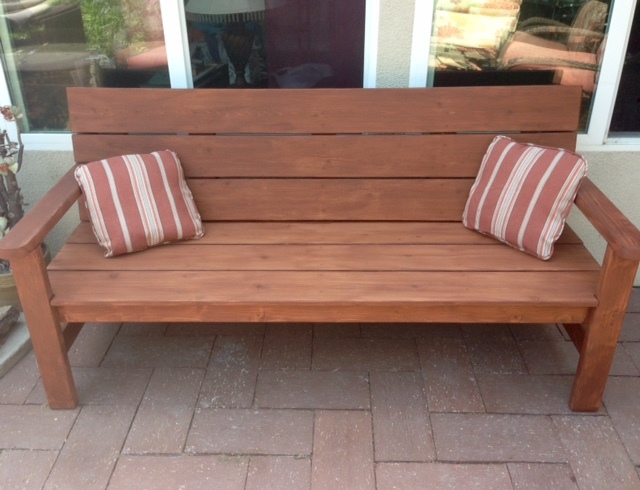
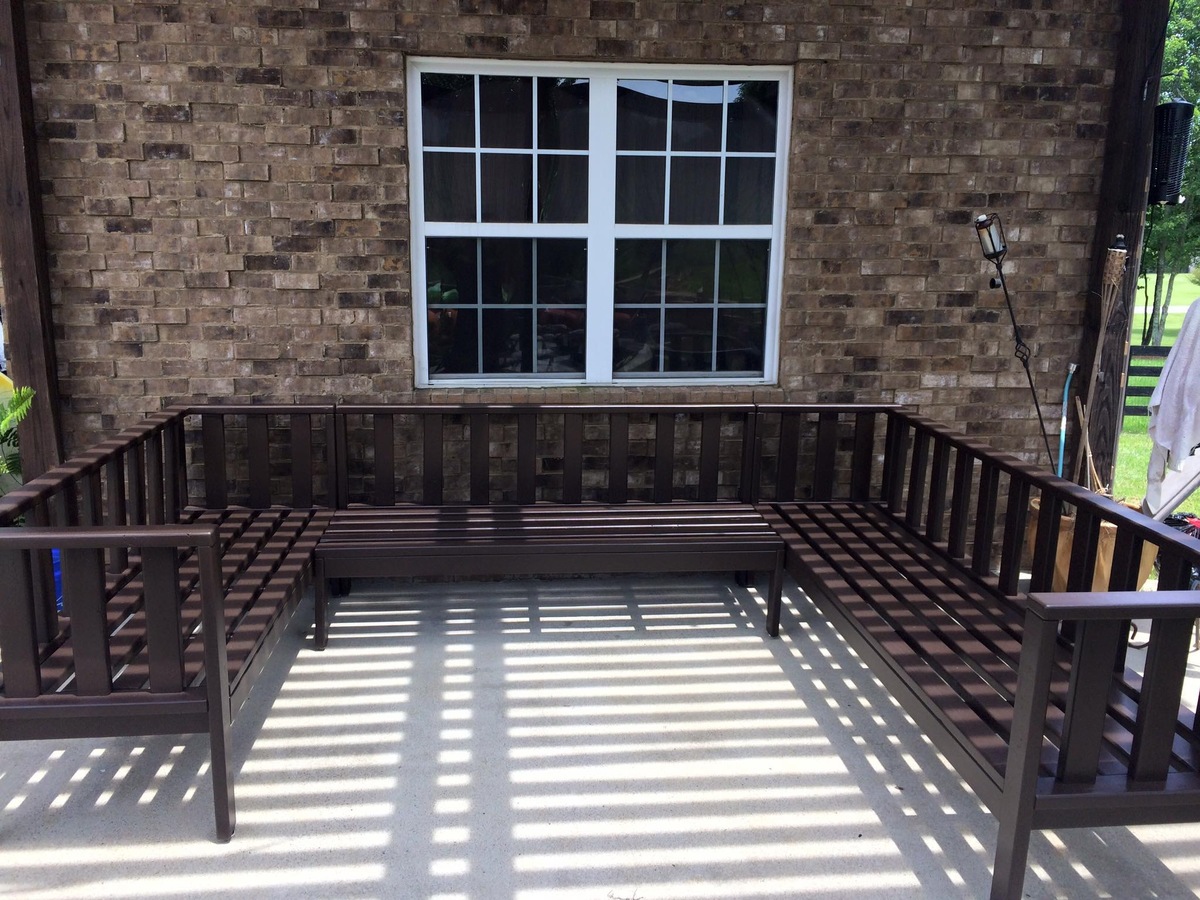
My Outdoor Sectional Couch
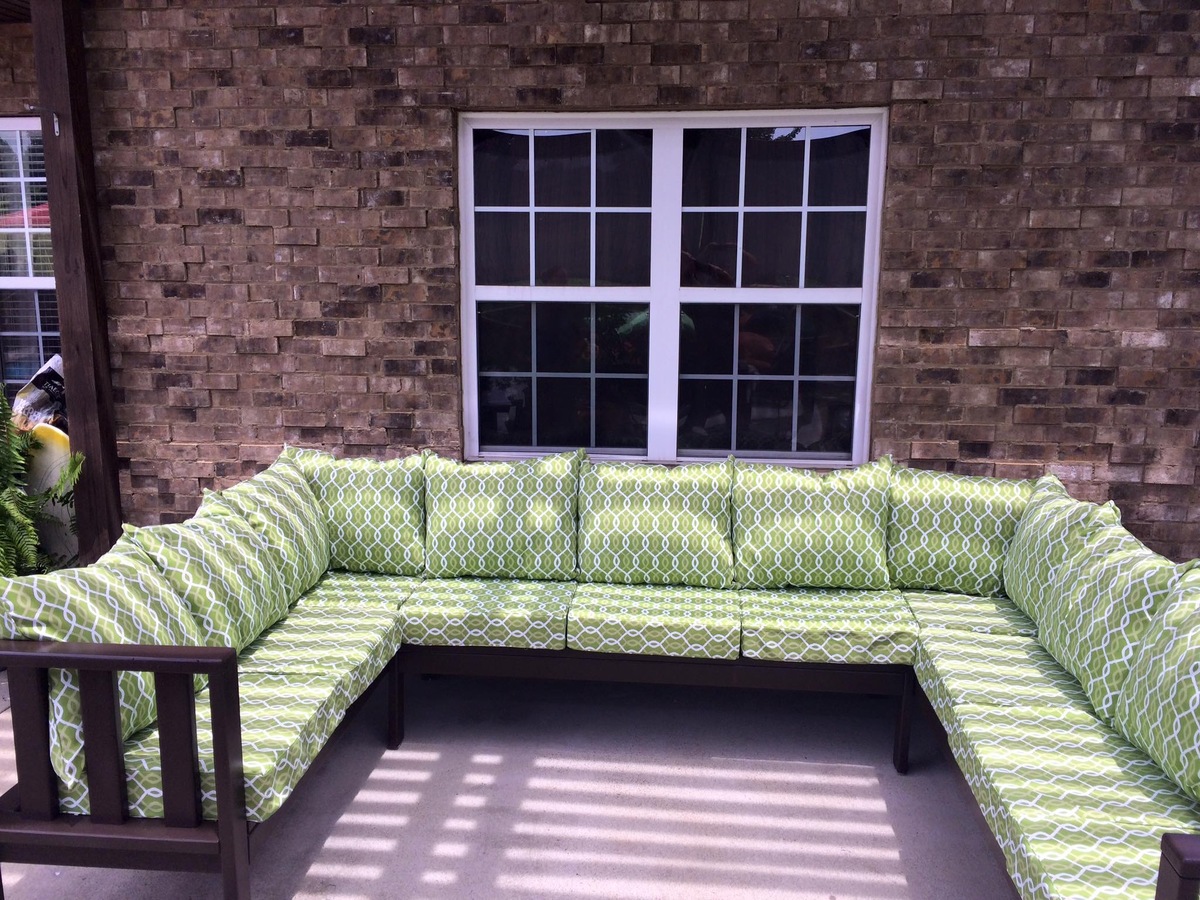
This was built off Ana's Outdoor Couch plans. I just made some additional things to it and made it larger.
I added the vertical back supports so the cushions don't slip out the back. I raised the seat height to 17".
Estimated Cost
$600-$800 including the cushions.
Estimated Time Investment
Week Long Project (20 Hours or More)
Finish Used
Oil primer and Latex Paint.
Recommended Skill Level
Intermediate

Comments
Steve.Denoon
Sun, 04/25/2021 - 06:18
Plans
Are there plans available for this bench? It looks great