Community Brag Posts

Our take on Modern Chairs

Submitted by Anonymous (not verified) on Tue, 04/28/2020 - 17:27

This was our first try at chairs and they came out super! Even our Yellow Lab, Cassie was pleased! We made a few mistakes on the first chair which were easily corrected. The only thing I would add to the buy list is a 2x2 .

Estimated Cost
$40
Estimated Time Investment
Afternoon Project (3-6 Hours)
Finish Used
Thompson’s Water Seal

Classic Bunks Lowered

Submitted by Ballowe on Fri, 06/15/2012 - 21:47

No major changes to the design. Just took the overall height of the ceiling, subtracted the 4" that we wanted to keep off the floor (to avoid any mildew issues, as they are in a lake house), and divided the rest in half. That told us how much space to put in between the bunks. :)

Built from Plan(s)
Finish Used
Some shade of blue that I can't remember right now. :)
Recommended Skill Level
Beginner

Farmhouse bed

Submitted by Frnsic01 on Wed, 04/09/2014 - 21:06

My husband and I made this for our son since we were transitioning him from a toddler bed. The ones we looked at in stores were cheaply made and horribly expensive.

Built from Plan(s)
Estimated Cost
100
Estimated Time Investment
Weekend Project (10-20 Hours)
Finish Used
Olympic Annapolis blue in flat
Recommended Skill Level
Beginner

Comments

Farmhouse King Bed Frame

Submitted by mshelley on Wed, 07/06/2016 - 20:59

I decided to build the Farmhouse King Bed. I liked the look of the frame and am happy with the outcome. This was my very first piece of furniture I've ever built. Already started on my Farmhouse Bedside Tables!!! 

Estimated Cost
$200-$250
Estimated Time Investment
Week Long Project (20 Hours or More)
Finish Used
I used a Stone White paint, True Turquoise and a dark stain to let the trim pop. Finished with a semi-gloss clear coat.
Recommended Skill Level
Beginner

Workbench for miter saw

Submitted by Kate_14 on Fri, 05/01/2020 - 14:32

We built this workbench adapting Ana's plans. We did not build the carts yet.

It is very practical! We just love it!

Estimated Cost
100$
Estimated Time Investment
Day Project (6-9 Hours)
Finish Used
None
Recommended Skill Level
Beginner

Farmhouse Media Console

Submitted by Anonymous (not verified) on Tue, 12/26/2023 - 12:37

I ask my kids and spouses if they would like me to build something special for Christmas each year . Last year I surprised my daughter with a beautiful coffee table. This year she said Dad can you make us a TV stand that is a similar look to the coffee table. She provided me dimensions and had this piece in time for Christmas. Love your website Ana.

Thad

Built from Plan(s)

Coastal Chic Designs - Rustic Console Table

This is my first time ever building anything. I am so excited with the outcome. This site has so much to offer and I look forward to adding many more brags :)

Built from Plan(s)
Estimated Cost
$120.00
Estimated Time Investment
Weekend Project (10-20 Hours)
Finish Used
Minwax Stain, Sea Foam Chalk Paint, Minwax Wood Polish
Recommended Skill Level
Beginner

Comments

jordane18

Fri, 05/24/2013 - 08:43

I know I'm late, but I was wondering if you had more detail on how you finished the wood? I'd love to recreate this!

Reclaimed Wood Outdoor Storage Shed

Submitted by Cubdriver on Sat, 04/12/2014 - 14:52

Most of the “Lessons Learned” and “Building Tips” are in the last paragraph

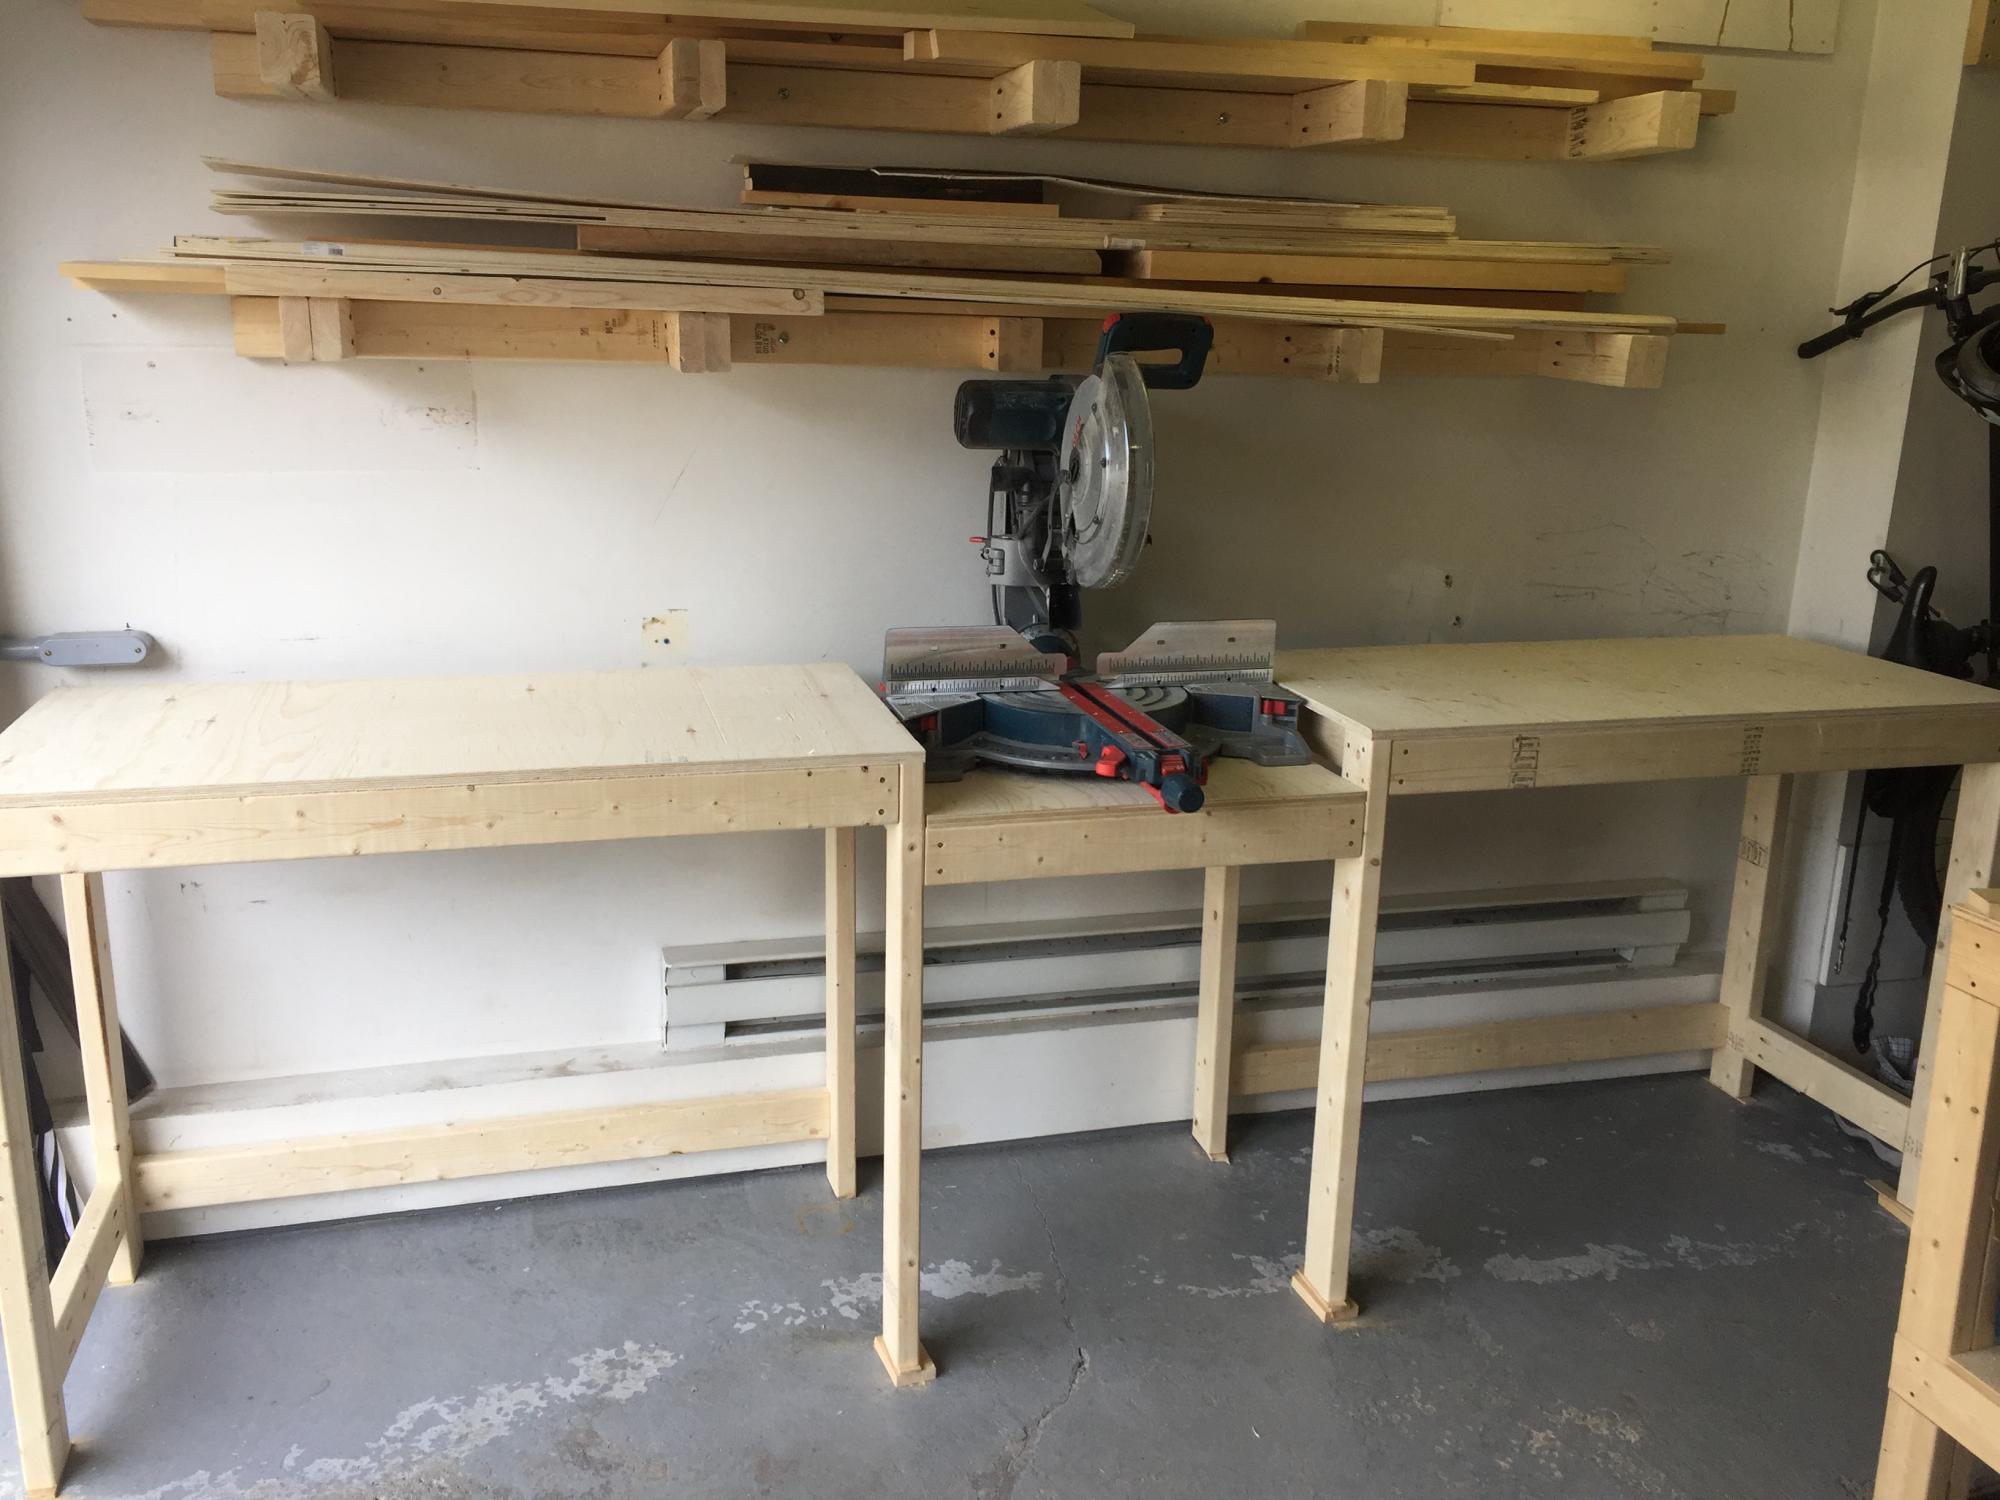
I used to hate woodworking. I majored in engineering in college and my job as a pilot requires me to be a perfectionist, and I could never build anything "right," which frustrated me. Recently, my wife and I found a house that we really liked, but it had not been updated since it was built in 1978, so….it was going to need some work. We bought the house in December 2103 and have been slowly remodeling it. This was our first house that was not new. I realized at some point in this journey that there is absolutely no reason why I could not do much of this myself. I “allowed” myself to mess things knowing that I could mess them up quite a few times vice the cost of hiring a professional. So my DIY journey began. I started by actually getting some of the right tools - aka a Miter Saw (I bought a Hitachi dual bevel compound miter saw off of Craig's list for $100) and suddenly realized that accurate cuts were easy to make using the miter saw vice my circular saw (sans a saw guide – I did not know about that concept until recently). I have watched hundreds of youtube videos and read numerous books over the past few months, gained a ton of knowledge and am actually becoming quite proficient, even to my perfectionist eyes, at fixing things around the house – i.e. patching drywall, refinishing doors, building raised garden beds, etc.

Well all of this remodeling has taken up a significant portion of our garage, the homemade paint tent walls are one of the major culprits….so, we needed some more space. I would love to build a detached workshop, but do not have the budget and may not have the space for it. So we looked at sheds at the big box stores and they looked horrible and there was no way that was going to be an option. Then I looked at the garage again, and my wife and I were almost on the verge of buying one, accepting its ugliness for 2 years and then trying to sell it on the internet since we needed some more space and wanted to get our garden tools on the same side of the fence as our raised garden beds A couple of weeks prior this though, I had found Ana’s site and liked some of the furniture she had on it, but had regulated it to the “later” pile since we already had a ton of furniture and I was more worried about closet shelves then a new bookcase. Fortunately, I had the foresight to send it to my wife and told her to view it, because it looked cool. Well, while she was killing some time on a hold one day, she stumbled upon the outdoor shed design and sent it to me on a Wednesday night. We talked about it and even though we had “other” remodeling plans that weekend, I dropped everything a decided to build it.

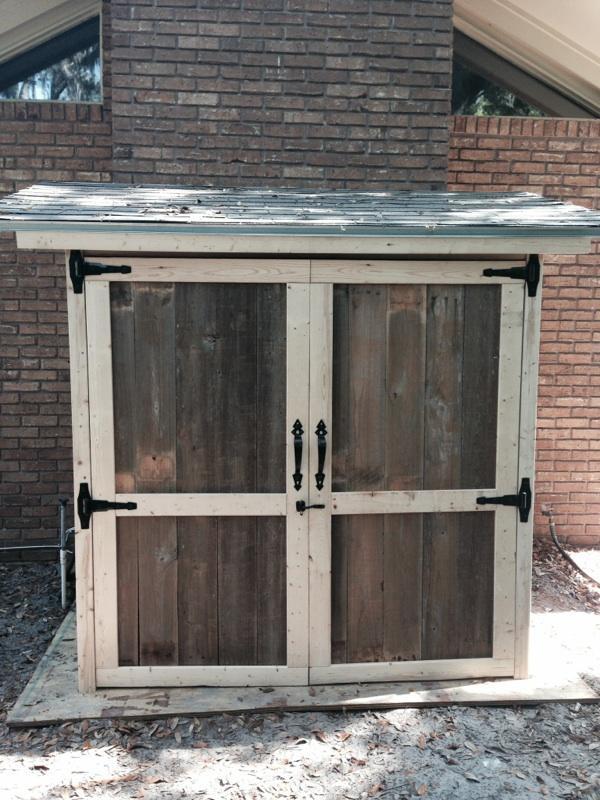
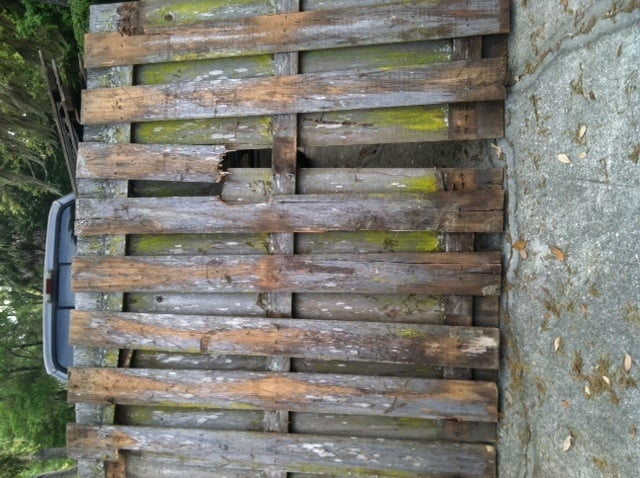
Cedar fence pickets are virtually impossible to find in Florida. Finding Cedar 2x6s and 4x4s for our raised garden was difficult and the fence pickets proved to be impossible in 2 days. The big box stores (Orange and Blue) do not sell them in Fl, but Cypress seems to be the wood of choice (for natural rot resistance, etc). New Cypress fence pickets are difficult to find (I actually did not find any), but reclaimed ones are easy. So off to the fencing store I went on my way home from work the next day. I bought 7 panels of reclaimed fencing for $35 and took them home. Once I looked at them, I started to wonder if I had lost my mind, because they were going to require a ton of work and sorting to make them usable. I felt pot committed though, since I had them and no real idea what to do with them if I did not use them. Thus, I began to strip the pickets off. I sorted through them - long ones for the front and back vice short ones for the sides – and began sizing them. It turned out to take forever to utilize the reclaimed wood – since I had to strip them off the fence panels, sort them, remove the staples and nails, cut them, and finally pressure wash them before I could use them. I finally Pac Man-ed my way through it though. When I build my next shed, I am just going to use treated pine or find new cypress pickets. I literally spent 6-9 hours of time getting the fence pickets ready for use, and have a ton of junk ones leftover (that were cracked, split, rotted, etc) that I need to get rid of and have no idea how.

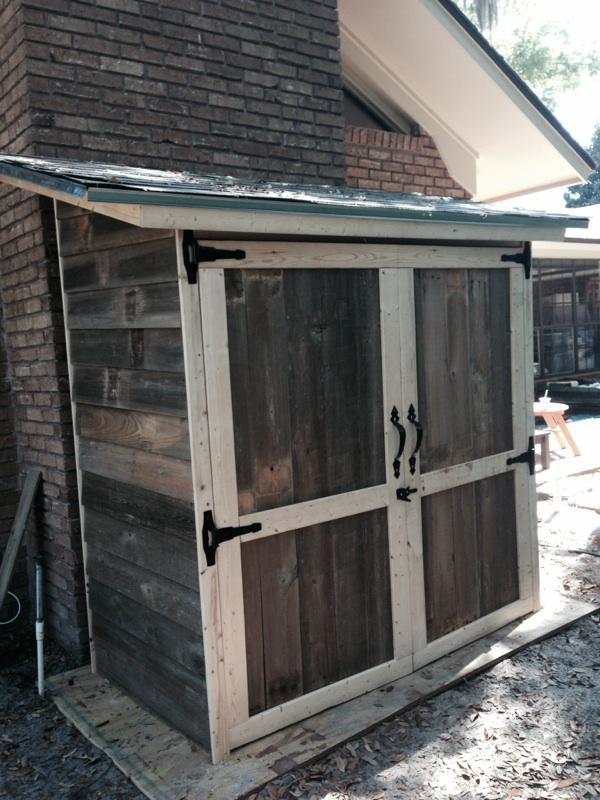
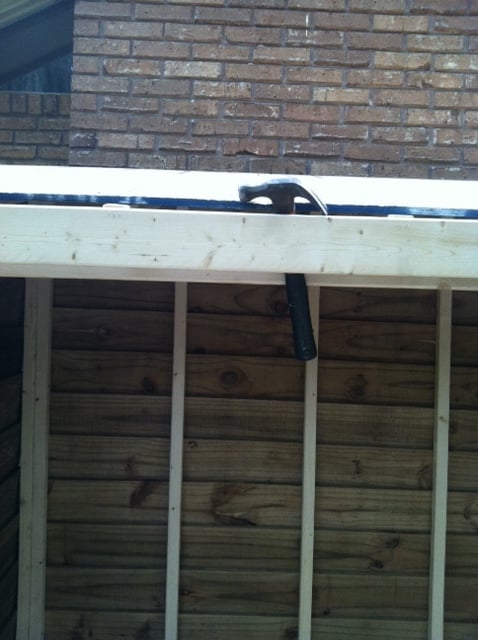
From there, the build was pretty simple, I ended up using treated pine pickets for the back (since I did not have enough good cypress) and was not willing to drive across town to get 150 more pickets (about 1 in 10 were good enough to use for the door) that I would have spend hours sorting and eventually have to get rid of. I was very hesitant to make all the cuts at once, because I did not trust myself and the plan, but that was never an issue. Overall, I felt the framing was pretty simple. The roof turned out to be a bit of bear to do by myself. I managed to wrangle the plywood on top without help, but the pitch was such that it would not stay up by itself. So if you find yourself doing it by yourself, a hammer will make a decent makeshift stopgap (see picture). I could not have gotten the roof on alone without the use of a friend of mine’s cordless framing nailer, however, the true moral of this story is – GET HELP WHEN YOU ARE ATTACHING THE PLYWOOD TO THE ROOF. Help would have saved me about an hour, but my wife was working and I was alone and unafraid. From there, the roof was pretty easy. I put drip edge all the way around. I put it under the shingles on the front and the sides and over the shingles in the back based on the research that did. Two great youtube videos to help are the “Lowes” one on how to shingle a shed and the “Ask This Old House” one on roofing. I used 3 pieces of 10’ drip edge (actually 4, because I messed one up) and 2 packs of shingles. From there, the doors were easy but tedious and I was done. We mounted ours on top of ¾ in piece of severe weather plywood (aka treated pine) since it was going to be on top of dirt and not concrete. That required some finessing on the doors with the jigsaw since the plywood was not exactly flat. Also, when doing the roof, I was specifically told not to use severe weather plywood. None of the roofing nails were galvanized that I could find so I used just a normal piece of plywood, just like they use on the roof of your house, and it worked great. If you use non-galvanized nails with treated pine, them chemicals will cause the nails to rot. Lastly I used silicone caulk around the aft drip edge to ensure that it did not leak. I used the same latch that Lady Goats and Ana recommended, however, my doors remain open approximately 2-3 inches, despite the fact that the latch is so tight it is difficult to open. I am going to replace the latch with two swing down levers from the top piece of trim when I get back in town. I will post pictures if I remember. I had planned to wait and post this until I stained it, however, that has been delayed by multiple trips out of town over the past two weekends due to work and I was afraid if I did not post I would forget some of the salient points that I learned.

Good luck and Cheers,
Cubdriver

Built from Plan(s)
Estimated Time Investment
Week Long Project (20 Hours or More)
Recommended Skill Level
Intermediate

Comments

Walnut stain clubhouse bed

Submitted by Anonymous (not verified) on Sat, 07/09/2016 - 23:43

My son saw a similar bed online that he wanted, but unfortunately we couldn't purchase it due to the 9' ceiling requirement. So, while searching for another store that might carry an 8' ceiling version, I found the instructions to build your own clubhouse bed on Ana's site. I have no idea what possessed me into thinking that I could build this myself, as I have never built anything before, but....I went for it. I bought all the tools and lumber, and took my time with building it. It was a great learning experience! As a divorced mother of two, I feel proud that I was able to build this completely on my own. My kids now look at me like I am some superhero that can build anything. (They are busy compiling a list of other things they would like me to build!) Thanks Ana for the instructions and the inspiration! 

Built from Plan(s)
Estimated Cost
$400
Estimated Time Investment
Week Long Project (20 Hours or More)
Finish Used
Varathane Dark Walnut Semi-Gloss water based Stain
Recommended Skill Level
Beginner

Rustic Entryway Bench

Submitted by Anonymous (not verified) on Thu, 12/28/2023 - 13:58

Enteranceway Bench. Can be used indoors or out. 2 x 4 for legs. 1x10x 6 for top. Stained Expresso. Sealed for outdoor use.

@Superior_Chalk on FB and IG.

Modified "Simple Outdoor Dining Table"

Submitted by hlibby on Mon, 06/25/2012 - 10:23

I really loved the look of the benches for this table, so decided to change the top of the table to have a side slat. We painted it to go with our porch.

Built from Plan(s)
Estimated Time Investment
Afternoon Project (3-6 Hours)
Finish Used
Behr Outdoor Paint and Primer in one 2 coats.
Recommended Skill Level
Beginner

Comments

Herb Garden Planter { $2 }

This is the fourth time I have made these to give as gifts. They are just so cute, easy, inexpensive, and versatile. Now that the growing season is among us, Im sure Ill be making even more.

Estimated Time Investment
An Hour or Two (0-2 Hours)
Finish Used
sanded, white latex paint, then applied minwax polycrilic
Recommended Skill Level
Starter Project

First build for First Child!

Submitted by Travisoff on Tue, 07/12/2016 - 23:32

This was my first piece I have ever built. I probably spent just as much time on the finishes as I did building it. It is something I am so proud to give to my newborn son Beckham and I could not have done this without the plans and inspirations from this site. Can't wait for my next build!!!

Estimated Cost
$350
Estimated Time Investment
Week Long Project (20 Hours or More)
Finish Used
Paint with an antique glaze. Dark Stain and tung oil for the top surface. I also stained the insides of the drawers!
Recommended Skill Level
Intermediate

Entry Way Bench

Built this plan and it came out amazing. I used a sheet of siding for the back to really bring out some grains!

Built from Plan(s)
Estimated Cost
100
Estimated Time Investment
Day Project (6-9 Hours)
Finish Used
Matte white bher paint
Recommended Skill Level
Intermediate

Bar stool becomes porch table!

We had a couple of these bar stools from our apartment-living days. We didn't have a need from them in our house since we have no bar -- so my husband made a small porch table that we DID need.

You can read about it here: http://crabandfish.blogspot.com/2012/06/fish-made-porch-table.html.

Thanks!! :)

Estimated Cost
$0
Estimated Time Investment
An Hour or Two (0-2 Hours)
Finish Used
high gloss black spray-paint, greenish-blue oops! paint
Recommended Skill Level
Beginner

Farmhouse King Bed

Submitted by bmrankin on Thu, 04/17/2014 - 06:59

We followed the king sized Farmhouse bed with a few changes. We added 5 inches to the footboard so that it was almost flush with the mattress. This was just a personal preference. The bed went together pretty easy and looks amazing in our room. We LOVE it!

Since we did the king sized plans, the side runner boards do not fit inside of the headboard but we did make them flush with inner edge {attached to the front though instead of to the side}. Since we did this, we had to go and buy brackets to attach the side rails to the headboard and footboard. We also had to go back in and cut off the 3 inches that they add to the side rails for it to be able to be screwed to the inside of the headboard. Just a few minor adjustments and it all came together great.

We finished it with minwax dark walnut and two coats of clear coat.

We already had the stain and clear coat so this project cost us about $170 for the wood.

Estimated Time Investment
Weekend Project (10-20 Hours)
Recommended Skill Level
Intermediate

Fillman Storage Bed Queen Size

Submitted by smclarke79 on Sat, 07/16/2016 - 16:11

Fillman storage bed made using the plans for the twin. I changed the measurements to fit a queen. This took about 2 and half weeks to build and stain. The head board and foot board were built as pieces and then stained, then put together after as the stain was earlier to apply and avoid blotching. The drawers were straight forward. Thanks to kreg and the rip cut for making it easy to cut the plywood easier to handle. I used about 4 sheets of 3/4 inch oak, 1 sheet of 3/4 inch plywood select for the drawer boxes. Then 1/4 inch plywood for the back and bottoms of the drawers. I used euro slides which I put on after I had the boxes made. I used a router to route the edges for the faces of the drawers. We used a royal mahogany colour for the stain and used 3 coats and then one clear coat. This was a big project for me, and my first big project. I have a few extra pictures that I will upload later showing the building phases.  materials used, oak, plywood, pine and spruce lumber for the legs of the head and foot board. I live in a northern community in Canada and material is hard to get here. I used what was available. Estimated that this project costed about 400 to 500. 

Estimated Cost
400 To 500
Estimated Time Investment
Week Long Project (20 Hours or More)
Finish Used
Royal Mahogany
Recommended Skill Level
Beginner

Mother's Day Gift

Submitted by Bunlimited on Sun, 05/10/2020 - 10:12

My son and I made this quick for a gift. Thanks so much for the excellent plans. A couple modifications to use supplies on hand. Turned out great! Remember to fasten seat down before putting on arms.

Finish Used
White exterior paint and stained & varnished seat and back design. Used 1 x's intead of of 2 x 6's for seat.

Comments

Back