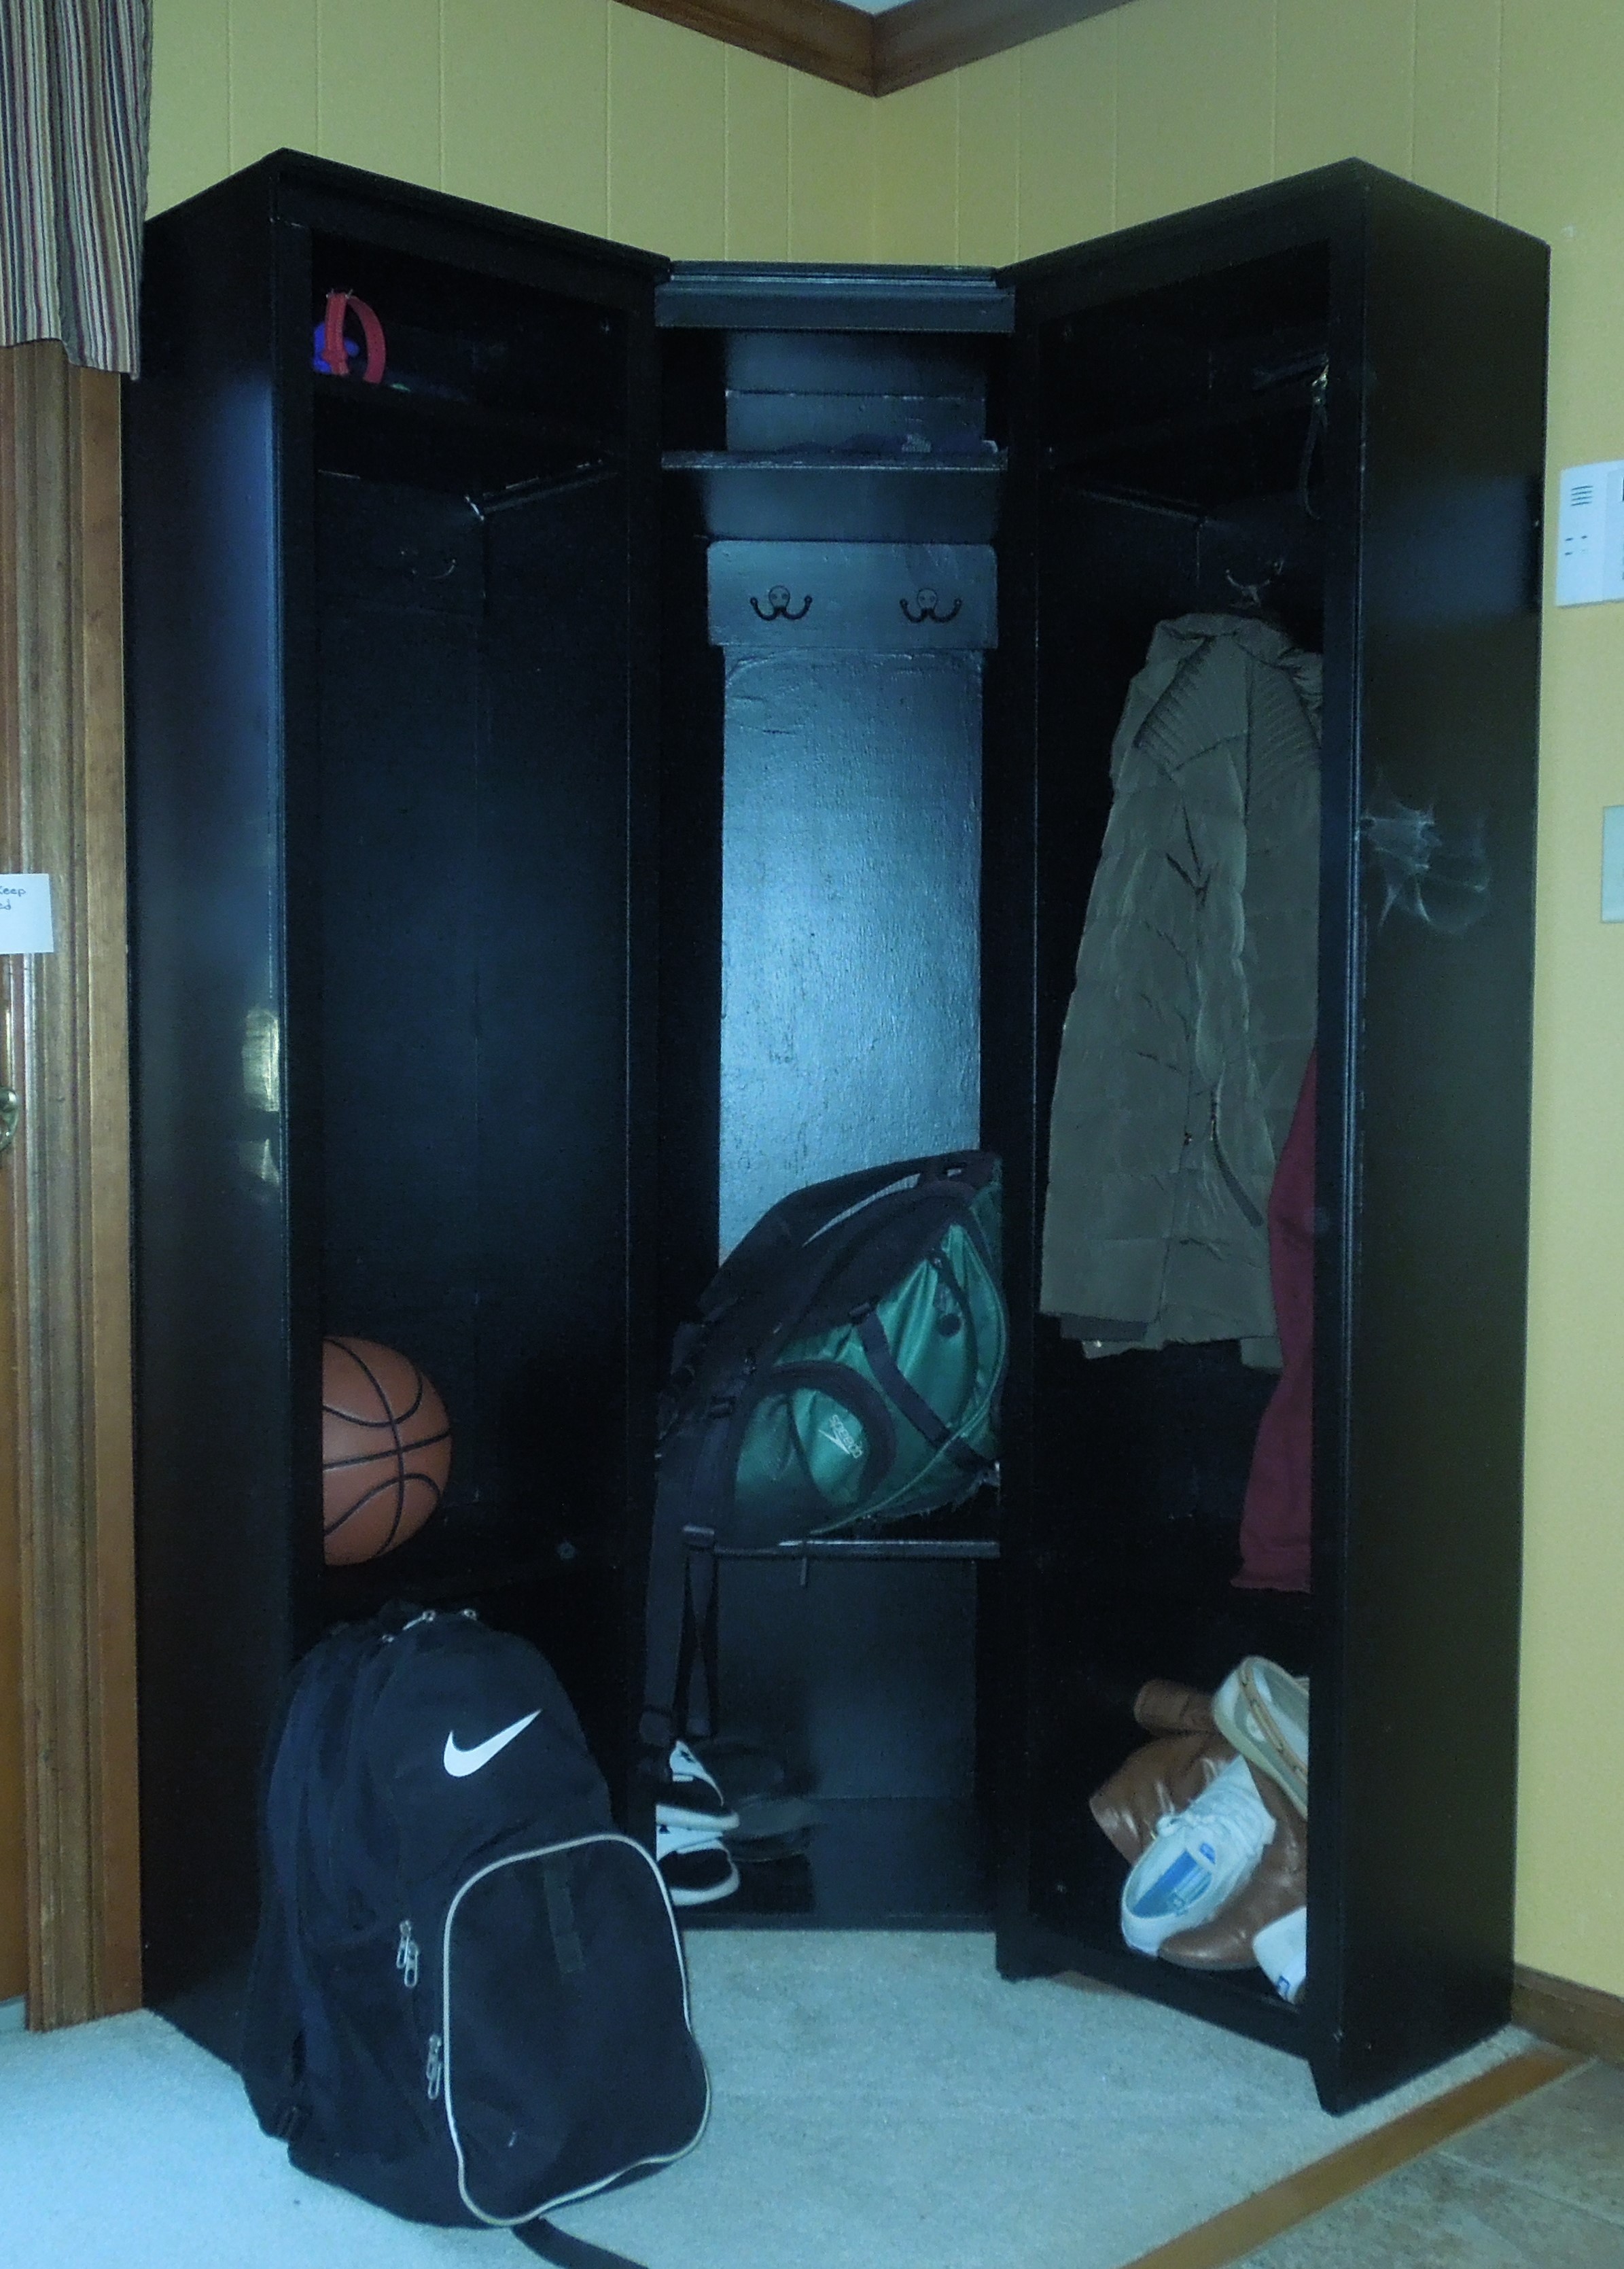
Community Brag Posts
Media Console
This is the first project my husband and I have made. Funny enough, it was suggested in the directions to not do this as a first project. We had already gotten the materials and our minds were already made up on building this media console. We just took it one board and one nail at a time. Sometimes we would take one step forward only to turn around and take two steps backwards. We learned A LOT on this project. Needless to say, we loved working together and building our own furniture... We will be building more for sure!
![](/sites/default/files/3154820790_1358918759.jpg)
![](/sites/default/files/3154820791_1358918759.jpg)
![](/sites/default/files/3154820792_1358918759.jpg)
![](/sites/default/files/3154820793_1358918759.jpg)
Comments
4x4 Truss Beam Table
![](/sites/default/files/IMAG0358.jpg)
I used old gumwood and pine for the table top. Just finished renovating 1930’s house and saved some old wood from the baseboards, fireplace mantel, etc. Used craigs jig to connect them for table top. I was only ¾ inch thick, a bit too thin for my liking, so I added bottom frame from new ¾ inch pine then enclosed the whole table top with the 1.5 inch frame from old wood leftovers. Legs all new 4X4 fir beams. Came out quite nice and definitely unbreakable! Thanks for the plans, Anna!
![](/sites/default/files/IMAG0402.jpg)
![](/sites/default/files/IMAG0358_0.jpg)
![](/sites/default/files/IMAG0343.jpg)
![](/sites/default/files/IMAG0340.jpg)
Comments
Love this project.
This project was completed in a weekend. I was really proud of the result.
Wall shelf cubby
![](/sites/default/files/20201130_165634.jpg)
Quick and easy build thanks for the plans it really made this very quick and easy. The kids love this for their school stuff!
![](/sites/default/files/20201130_165625.jpg)
Comments
Christmas Chalkboard Sign "For unto us a Child is born"
![](/sites/default/files/IMG_5375.jpg)
Great little project that doesn't take much time. We'll be using it on our fireplace mantle this Christmas season.
![](/sites/default/files/IMG_5376_0.jpg)
Comments
Fri, 11/21/2014 - 09:25
Wow this is super cute! Your
Wow this is super cute! Your stars look even better than mine!
Farmhouse Bench
My husband and I built this bench for a wedding gift. We love the plan, so easy to follow and alter measurements to adjust size. We finished it with a whitewash finish.
Entryway Bench
![](/sites/default/files/image0%20%281%29.jpeg)
Thanks Ana for all you do here on your site and help bring out the inner woodworker in all of us. This is now my third project (first brag post) that I have done off your site. I took one of your Farmhouse X designs and modified it slightly to create this Entryway Bench for my daughter as a Christmas present and potential future keepsake for the grandkids. The bench measurement are 6'L x 18"H x 16"D.
![](/sites/default/files/image1_8.jpeg)
![](/sites/default/files/image2_8.jpeg)
![](/sites/default/files/image3_7.jpeg)
Comments
Fri, 12/11/2020 - 09:46
I like what you did there!
It looks fantastic, and will be enjoyed by all! Thanks for sharing:)
Wed, 12/16/2020 - 08:29
Thank you. I am looking…
Thank you. I am looking forward to my next project.
Storage Chaise Lounge
![](/sites/default/files/3154821036_1359233965.jpg)
It took the husband and I a good 3 days to finish this project. You can read more of my experience with this chaise on our blog:
http://tonyandkristine.blogspot.com/
For the plans, I found them at Lazy Liz on Less blog:
http://lazylizonless.blogspot.com/2012/05/it-took-me-while-to-decide-wh…
![](/sites/default/files/3154821037_1359233965.jpg)
![](/sites/default/files/3154821038_1359233965.jpg)
Childrens Toy Box
![](/sites/default/files/10612914_10152608302326859_9200614887653559776_n.jpg)
I used MDF and Pine for this build.
I used a pneumatic door lift for the lid so that it will stay open and not fall on little heads or fingers.
I hand painted the stars and text.
Comments
Mon, 11/24/2014 - 12:03
This is super cute! I love
This is super cute! I love the colors that you chose!
In reply to This is super cute! I love by Ana White
Tue, 11/25/2014 - 03:17
Thanks Ana :)
Thanks Ana :)
In reply to What color blue did you use by David2015
Sat, 02/21/2015 - 04:33
G'day David,
G'day David,
I used Rust-Oleum® 2X Ultra Cover: colour: Seaside.
I absolutely love this colour.
Cheers... Naomi
Fun!
Thank you for such clear and fun plans. This coffee table is the first piece of furniture I have built and I can't wait to make a complementary side table and console. I used the Minwax Dark Walnut stain and three coats of Minwax oil-based polyurethane, and sanded between each coat. I made the end pieces of the tabletop with leftover 2x2s and then added the center support beneath the tabletop before securing or to the frame to help keep it flat.
Farmhouse Table/Bench and Floating Shelves
![](/sites/default/files/easy%20to%20build%20floating%20shelves.jpeg)
My daughter wanted to create the Farmhouse look for her New England home. Had so much fun building the Table, Bench and Floating shelves. The Plans were perfect, and of course customizable (she wanted it a little shorter). My next project is a real workbench for my garage. I think the only issue is the New Jersey winters.
![](/sites/default/files/TAble_0.jpeg)
![](/sites/default/files/62956224956__FA304782-FACF-4F7E-9A76-8EDF027545DF_0_0.jpeg)
Comments
White Tail Deer Head Mount Plaque
![](/sites/default/files/3154821122_1359365960.jpg)
I did this project for my father's birthday this February. Any ideas to improve it let me know. I hand drew the plaque on the back. I used some old brass when I went hunting in the past.
Have fun and be careful.
I do have plans if people want them.
Comments
Mon, 01/28/2013 - 08:15
HAHAHA! NO WAY!
This is too cool! Is it too much to ask for a daytime photo? This is great!
Gift Bookshelf from Wedding Wall
![](/sites/default/files/Marriage%20First%20Bookshelf%20from%20Wedding.jpg)
This project followed the plans at http://ana-white.com/2012/03/plans/kentwood-bookshelf with a major customization twist. The backing is actually made from a photo op wall I built for our daughter’s wedding. The wall was ten feet tall the bookshelf backing is from some of the lettering boards.
Comments
Drop Leaf Kitchen Island
![](/sites/default/files/DIY%20Kitchen%20Island%20Drop%20Leaf%203%20%20Panels.png)
When I recently moved into a space with a kitchen and living room attached, I quickly realized that I wouldn't have room for a full size dinner table. I had seen extendable kitchen tables but none fit the bill, I was looking for something more compact. I also liked the idea of a bar / island with storage underneath, and I had noticed some had a drop leaf on 1 side which would be useful – but why not have 2 leafs for more dining space? When I decided to build my own table to fit these requirements it was difficult to find any plans out there, especially with drop leafs. Through lots of experimenting and research I finally built what I had envisioned: a kitchen island / bar with cart storage and two folding table leafs which expand to about 31/2 feet squared of eating / drinking area. I went through this trial and error process so you don’t have to, find more pictures and instructions here: http://bacheloronabudget.com/diy-drop-leaf-kitchen-island-cart/
![](/sites/default/files/DIY%20Kitchen%20Island%20with%20two%20Drop%20Leafs.jpg)
![](/sites/default/files/20170105_195931_Fotor_rsz.jpg)
-Minwax Wipe-on Poly
-White Paint (I used Rust-oleum Linen White)
Barn Door Bookcase/Pantry
![](/sites/default/files/PXL_20201220_215759457-01_0.jpg)
Despite relatively high ceilings, we have a small, pantryless kitchen and needed more shelf space. Couldn't be happier with how this turned out. Besides taking off 2 inches in width to make sure it would fit in the space, I followed the measurements exactly.
Made just one modification with the instructions involving the face frame. I first assembled it together per the instructions, but it was just not lining up with the carcass well at all when I went to attach it. Before the glue got too dry, I made the quick decision to take the face frame apart and just apply the individual pieces of it one at a time to the carcass. I figured this could maybe leave some very small gaps where the face frame pieces joined each other, but that seemed better than what it would look like leaving it as is, with almost no section flush with the carcass. This ended up being the absolutely right choice. Everything was very very close to flush and there ended up being virtually no gaps. If I ever built again, I would do the same and attach each piece like that.
My only other struggle was at the very end attaching the barn door hardware. Nothing wrong with the hardware or the instructions, I just ended up installing the rail too high up on my first attempt. Because this piece has a top that slightly overhangs and gives that nice little lip, it means there is a maximum height which you can't go above when installing the rail hardware. If you go too high, like I did, the rollers that are attached to the door will physically not fit on the rail, b/c that lip will be in the way. This might be very obvious to most people but I thought I'd mention it. Once things clicked, I just had to get some new measurements and redrill the holes a bit lower(but not too low b/c then you will have a gap!).
I decided to leave the door natural wood after seeing someone else's finished piece posted here and given how dark my stain was, I also left the plywood back panel natural. It's still a bit light now and it may even take 2 or 3 years, but I know pine can do a decent job darkening up.
Lastly, I did put a whole quart of satin polyurethane on this over 5 coats. Each coat but the last was cut with %50-%25 paint thinner applied with a foam brush. Yes it did take a long time but seeing it up close, it was absolutely worth it. I would recommend it for anyone making this project.
![](/sites/default/files/PXL_20201220_220021986-01_0.jpg)
Comments
Mon, 12/21/2020 - 13:29
Perfect solution and so pretty!
It looks like you made an excellent choice, love the two tone finish too! Thanks for sharing:)
Triple Pedestal Farmhouse table with metal accents
![](/sites/default/files/3154821302_1359557206.jpg)
We followed the plan exactly as instructed, but instead of cutting the arch accents out of wood, we simply attached decorative shelving brackets to the legs.
![](/sites/default/files/3154821305_1359557206.jpg)
![](/sites/default/files/3154821306_1359557206.jpg)
Comments
Wed, 01/30/2013 - 13:31
Looks good! The use of metal
Looks good! The use of metal brackets really makes it a unique piece.
Thu, 01/31/2013 - 07:31
Nice addition!
Your table looks awesome, particularly with your L-brackets. Would you mind sharing where you got the L-brackets?
Thu, 01/31/2013 - 07:36
Metal brackets
Of course! They are decorative shelf brackets we picked up at Lowes.
Woven Back Bench
![](/sites/default/files/IMG_0836%20a.jpg)
This took approximately a week to build, but was fairly simple. Drew arm rests freehand and applied 3 - 4 coats of Helmsmen.
![](/sites/default/files/IMG_0832a.png)
![](/sites/default/files/IMG_0816.png)
Comments
Sat, 12/06/2014 - 12:27
Thanks!
I built this at the local college woodshop and I am very happy with how it turned out. Our comminity is so very lucky to have a community college that has a wood shop and a huge spray booth. (Wood Shop 1 & 2 as well as Cabinet Building 1 & 2)
Great storage
![](/sites/default/files/IMG_20170219_080100.jpg)
I made my shelves 16 ft by 6ft by 2ft - added another plank to each shelf to increase the width. I compensated for the slope along the garage wall by offsetting all the screw-in points in the front legs half an inch. This thing is HEAVY.
I anchored the unit to the wall by securing 2 scrap 2x4s to the studs - 1 at the 2nd set of legs and 1 at the far right legs - and screwing the unit legs into the 2x4s. This way, I didn't have to line the unit up precisely with the studs.
![](/sites/default/files/IMG_20170220_104950.jpg)
![](/sites/default/files/IMG_20170219_141748.jpg)
Potting Bench
![](/sites/default/files/9DF9E2D8-9B10-4E22-873C-A6BC7C531C51.jpeg)
I am a complete newbie to anything woodworking. I just turned 60 and used a drill for the first time about 9 months ago. Thanks to Anna and her plans and videos, I have developed some some self confidence in this art and absolutely loving it.
Farmhouse coffee table and king size bed is next.
Thank YOU Anna!!! You totally rock!!!!!!!!
Comments
In reply to Amazing! by Ana White Admin
Tue, 01/19/2021 - 14:31
Awwwww thank you sooooo much…
Awwwww thank you sooooo much! That means so much coming from you! I appreciate you. 🤗🤗
Comments
Ana White Admin
Sat, 11/28/2020 - 10:41
Awesome!
Yes! Love the added hutch:) Thanks for sharing