Community Brag Posts

Octagon table

Submitted by Tjkelly on Fri, 01/16/2015 - 15:52

Great table which serves as our everyday table, easily fits 6 people 

Estimated Cost
$200
Estimated Time Investment
Week Long Project (20 Hours or More)
Finish Used
Cherry
Recommended Skill Level
Intermediate

Comments

First Wood Project Ever

Submitted by jendon on Sat, 03/20/2021 - 19:48

This was my first project ever. My goal was to finish it before my husband came home. The self tapping screws were wonderful to use. My husband thought I bought it. He was very impressed and proud of my new hobby. I cannot wait to build the planters next. Thank you Ana for the video and plans. It is amazing what you can do with great directions.

Finish Used
Walnut

Comments

Boys costume closet

Submitted by Shm mommy on Wed, 03/13/2013 - 13:44

Costume closets aren't just for girls. A great place for all the superhero, pirate and ninja clothes.

Estimated Time Investment
Afternoon Project (3-6 Hours)
Recommended Skill Level
Beginner

Dog Gate

Submitted by shellyward on Tue, 01/20/2015 - 13:20

We needed a way to confine the dogs in one room when not supervised to protect our new living room furniture.  I wasn't willing to pay the price it would cost for a gate large enough (if I could even find one), so I started the hunt for a plan. I couldn't find exactly what I wanted so I took ideas from several and this is the result. This folds into itself and against the pass thru bar when not in use.

Estimated Cost
$75
Estimated Time Investment
Weekend Project (10-20 Hours)
Finish Used
Minwax Red Oak Stain and black spray paint for the rungs
Recommended Skill Level
Beginner

Comments

shellyward

Thu, 01/22/2015 - 09:39

Thanks! I will try to get something written up in the next few days and add it to the post.

Espresso Farmhouse Console Table

Submitted by MacandFab on Mon, 03/29/2021 - 04:28

I built the farmhouse console table over the course of 3 weekends. A relatively easy build, the pocket hole were the most time consuming. Its made mostly of Douglas Fir, and pine for the 2x2's. It's a heavy piece, it weighs about 250 lbs - ish. But the wife loves it, as it will be going in our kitchen.

Built from Plan(s)
Estimated Cost
$125
Estimated Time Investment
Weekend Project (10-20 Hours)
Finish Used
Minwax Espresso top with 3 coats of poly and a solid black stain on the bottom.
Recommended Skill Level
Beginner

Comments

Kentwood Nightstand

Submitted by srf99 on Fri, 03/15/2013 - 06:16

My husband and I wanted modern version of the Kentwood Night Stand. We had to modify the cut list a bit to change up the dimensions for what we wanted for our space.

Estimated Time Investment
Weekend Project (10-20 Hours)
Finish Used
Varathane in Kona (2 coats of stain with at least 2 hours of drying between each coat; 1 week of dry time before applying poly mainly because I couldn't find the time to work on the table more) + Varathane polyurethane (3 coats with 2 hours dry time between each coat + cured for 5 days)
Recommended Skill Level
Beginner

Comments

Blue Cubbie

Submitted by adeath on Thu, 01/22/2015 - 11:52

This is the second of two bathroom cubbies from Ana's book.  I did the first one as in the book. I decided I wanted a different look for the second one.  I also wanted to try out some different finishing techniques.  This unit features Annie Sloan chalk paint in Aubusson Blue over Behr Pure Premium white as a base.  The shelves are finished in Minwax espresso.  The whole thing was rubbed down with Minwax finishing paste wax.  I am really happy with the overall look and feel of the piece.

Built from Plan(s)
Estimated Cost
60
Estimated Time Investment
Day Project (6-9 Hours)
Finish Used
Aubusson Blue chalk paint from Annie Sloan, Minwax Espresso stain.
Recommended Skill Level
Beginner

Comments

Cabin Sectional

Submitted by Anonymous (not verified) on Sun, 04/23/2017 - 07:40

Spent my time home from work building this for the cabin this summer. will be using coushions from ikea that are water and uv resistant as well as double sealed with removable covers for washing. 

Estimated Cost
120 dollars
Estimated Time Investment
Week Long Project (20 Hours or More)
Finish Used
dark walnut and an oil based varnish
Recommended Skill Level
Beginner

Desk with Hutch

We had an old mdf desk who's time was up. Thank goodness Ana had the sweetest plans. I just put a couple of plans together to build our very sturdy desk. It has file cabinet and an open base. I modified the side hutch for the cabin collection. I Made it one conclusive piece and added two doors.

Estimated Time Investment
Week Long Project (20 Hours or More)
Finish Used
cabot Red oak, polyeurathane gloss coat
Recommended Skill Level
Intermediate

Our family tree

Submitted by NickMyatt on Mon, 01/26/2015 - 17:40

I built this easy wall art project from Ana's plans.  The brown stain did not fit our color scheme so I used Minwax Classic Gray stain.  I didn't want to use new fence boards so I used wood from a pallet that our new woodstove came on.  Dimensions 3' x 3'.  The letters turned out great but were tedious and required a very small brush.  The plans called for a final sanding but I decided to keep it as is - I liked the crisp finish and was scared I would ruin the project after all that work.  

Built from Plan(s)
Estimated Cost
$10
Estimated Time Investment
Day Project (6-9 Hours)
Finish Used
Minwax Classic Gray wood stain and indoor latex paint in satin finish.
Recommended Skill Level
Beginner

Comments

Made by Ralph and Amee.

Submitted by Anonymous (not verified) on Tue, 04/25/2017 - 19:46

My dad did most of the work, I just assisted and did the research. Most of all -- we enjoyed working together and are proud of the project.

Our tables measured 3X6. Thank you for sharing your plans!

Estimated Cost
$250
Estimated Time Investment
Weekend Project (10-20 Hours)
Finish Used
Raised gardens. We used a water seal to help the table last longer. We used fencing slats to keep costs and weight down. We reinforced with 2x4's.
Recommended Skill Level
Beginner

Barn Door Vanity

I previously made a table console with an open bottom for a friend. I thought I’d try this with a hanging cabinet in our guest bath. The mini barn door hardware I purchased from Amazon, but the shortest track I could find was 30.” So I had to chop down to 24” the cabinet's width. I definitely enjoyed making this and can see where I can improve productivity next time. This thing was heavy!

Estimated Cost
100
Estimated Time Investment
Weekend Project (10-20 Hours)
Finish Used
White cabinet paint
Recommended Skill Level
Intermediate

Comments

My First Build: Console Table

Submitted by smitty22 on Wed, 03/20/2013 - 11:58

Well, I've finished my first building project! I think it turned out well considering that it was my first. I really liked the simplicity of the plans for this console table. I intended to follow the plans exactly, but made some modifications in the end (due to not realizing my 1x12 was not the correct width.) Regardless, I'm thrilled with the final product!

Estimated Time Investment
Afternoon Project (3-6 Hours)
Finish Used
Winwax Dark Walnut
Recommended Skill Level
Beginner

Comments

JoanneS

Wed, 03/20/2013 - 15:51

Looks super! Congrats on your first build! Looks very professional, and your finish is just lovely!

smitty22

Sun, 03/24/2013 - 06:56

Thank you for the compliment, Joanne! I'm really excited to attempt more projects!

Farmhouse bed

Submitted by MEFISH12 on Sat, 01/31/2015 - 05:48

I built this bed for around $100 and is probably my most favorite piece of furniture in my house. The plans are pretty simple but i did change the way the side rails were attached to the head and foot boards just to make it a lil easier for anyone else to put together or take apart. I used a metal framing clip to incase the 2x10. that way the side rails can easily be taken off and on they just slide in or out of the clip. Also I had to make the 4x4s as I couldnt find any in or around augusta,ga that were not treated..So I took two 2x10s and glued them together and ripped downt the board to get a 3 1/2"x 3" post.

To get my distressed look. I stained all the boards with dark walnut and then put two coats of Snow Bound (color) paint over it and then simply used a wet sand block and slowly sanded all the paint off to get my disired look. I did each board separate then then put everything together.

This project was alot fun and will probably be building a few friends one soon as im getting alot of request to make them


Estimated Cost
$100
Estimated Time Investment
Week Long Project (20 Hours or More)
Finish Used
Dark Walnut and sherwin williams Snow Bound
Recommended Skill Level
Beginner

Custom Dog Kennel

Submitted by Anonymous (not verified) on Sat, 04/29/2017 - 17:35

Why not treat your furry best friend like part of the family with a high end custom dog crate. This is an easy way to hide those ugly wire crates while providing another table space. Also has a top that opens up for easy access cleaning. More pictures of my work is available at:

https://www.facebook.com/Deezknotswoodworking/

Or on
PINTEREST: Ngo DIY Furniture


DIMENSIONS
4ft long X 2ft wide X 32" high 

Estimated Cost
$250
Estimated Time Investment
Week Long Project (20 Hours or More)
Finish Used
Rustoleum Oil Base Flat white, Varathane Ebony stain, Varathane Polyurethane Matte
Recommended Skill Level
Intermediate

Milk- painted ash dog crate

Submitted by JoshMonroe on Sat, 03/23/2013 - 09:55

This project was based on your plans and dimensions, with a few modifications. I created more slats (41 in all!), and spaced them a bit differently. I also added a pull out tray on the bottom, lined with thick plastic, to ease cleanup if necessary. The crate was painted with soldier blue milk paint and finished with two coats of boiled linseed oil. Finished off with brass barrel bolts and hinges. Our schnauzer loves it!

Built from Plan(s)
Estimated Cost
$60
Estimated Time Investment
Weekend Project (10-20 Hours)
Finish Used
Boiled linseed oil over milk paint
Recommended Skill Level
Intermediate

My Little Blue Kitchen

Submitted by emdion on Tue, 02/03/2015 - 18:16

I was so excited to find these plans because I wasn't thrilled with the idea of paying a lot of money for a play kitchen that was mediocre. I was inspired by other brag posts to modify the plans to suit my needs so I did just that.

The fridge, following the advice of others, was made taller to give a little more realstic ratio. The biggest difference is that I knew I wanted three pieces: the stove, the sink, and a prep counter, so I made all three without tops and screwed them together.

The stove I measured and made a nice white surface that covered the entire oven and stuck out a little to the left. I painted and attached 4 black circles as the burners. I also managed to find a cookie drying rack that was the perfect size for this plan and mounted it inside instead of a shelf.

For the remaining areas, I got lucky and found a clearance countertop at my nearest Lowes so we cut that down to size and attached it to the sink/prep counter to combine them. We also cut a hole in the center for a metal mixing bowl used as the sink, and included a cheap bathroom faucet to complete the sink. The curtain was a custom sewn addition by me to simply give it a different look than the shelves to the right.

Estimated Cost
$300, not including some extra parts to cover mistakes we made (always measure twice and cut once!!!)
Estimated Time Investment
Week Long Project (20 Hours or More)
Recommended Skill Level
Intermediate

Rustic farmhouse table w/mirror shine

Submitted by Anonymous (not verified) on Tue, 05/02/2017 - 12:35

My wife came to me with a request to build her a rustic, farmhouse style table and bench. She had researched a bit and found your site. Just completed today. 8x47. We have a large family so I changed the dimensions a bit. I also added an epoxy resin finish for durability and mirror bright shine. All we have to do now is buy chairs. Now she wants a matching "server". Happy wife, happy life.  :-)


The table is make of 2x10 heavy pine, 4x4's and 2x4's. I used 6 inch and 4 inch tru lock screws as well as 3.5 inch Kreg pocket screws 


Estimated Cost
Rough estimate, including the epoxy resin, $500
Estimated Time Investment
Week Long Project (20 Hours or More)
Finish Used
Minwax Special Walnut Stain & Epoxy Resin finish
Recommended Skill Level
Intermediate

Modified 2X4 Truss Style Farm Bench

Submitted by Bigherd on Wed, 04/21/2021 - 05:13

I had a customer that like the 2x4 truss style farm bench but wanted one only 30" long to be used as an entry way bench. Sine this bench is 18" shorter than the 48" bench i caused the truss to be at a very steep angle. It did not look good so the I deleted the truss from this 30" wide bench. The customer was very happy how it turned out.

Built from Plan(s)
Estimated Cost
$30
Finish Used
primer, paint, stain
Recommended Skill Level
Beginner

Farmhouse Queen Bed with removable rails

Submitted by sunnydays on Fri, 02/06/2015 - 14:05

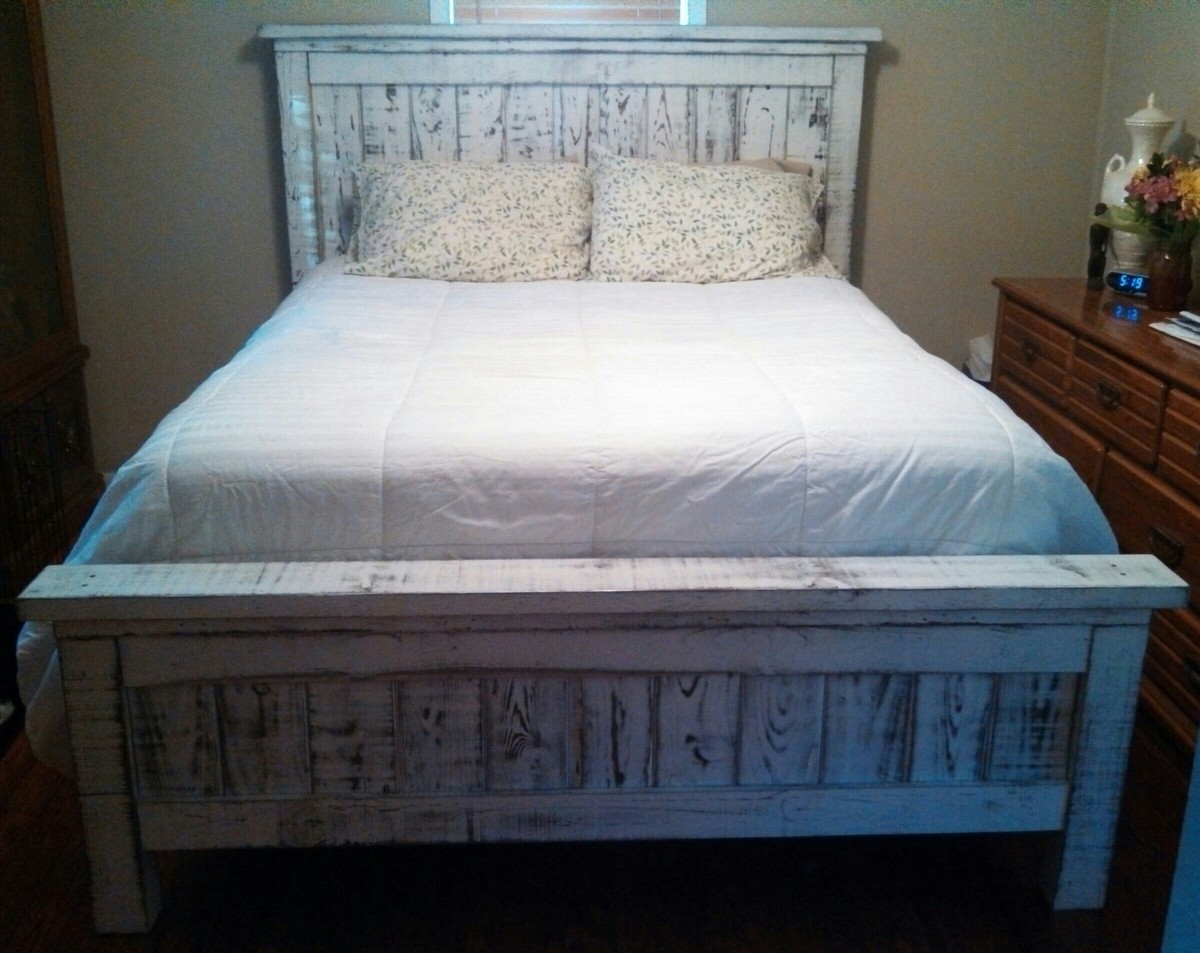
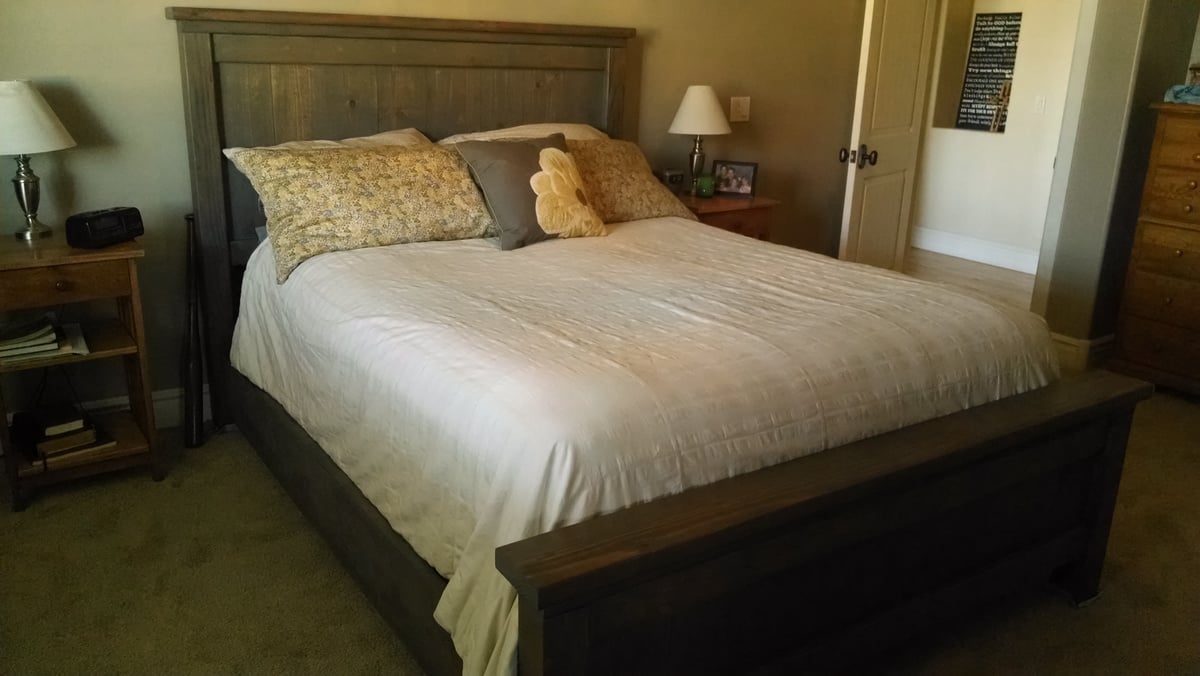
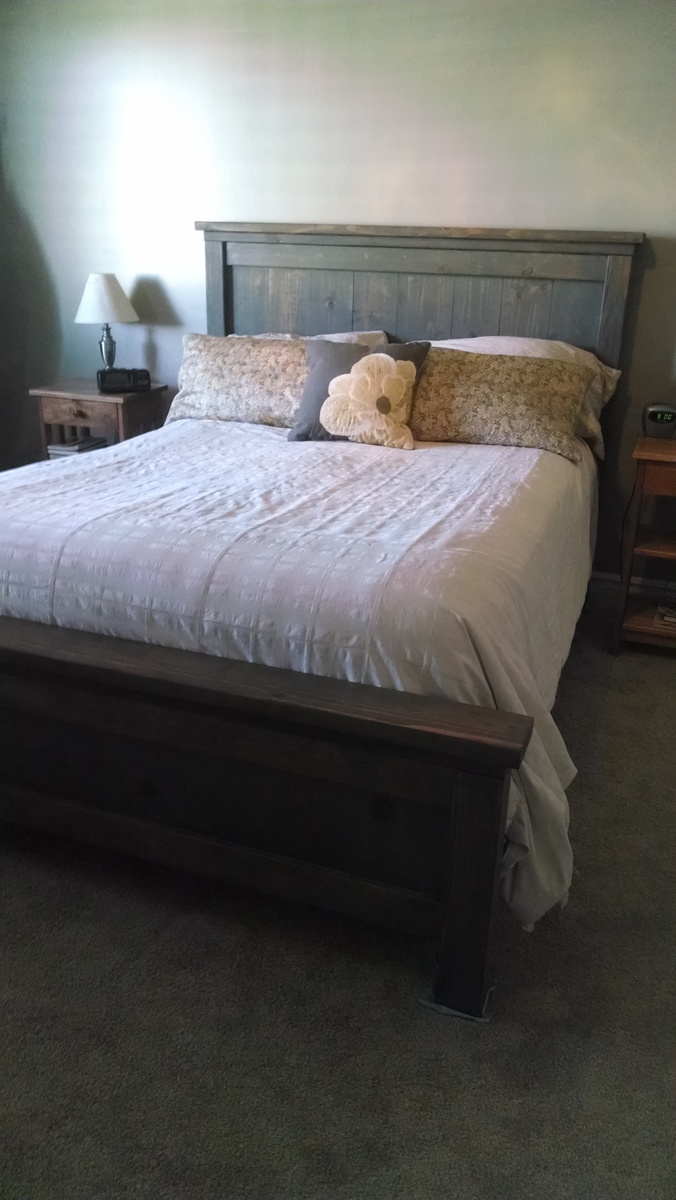
After dreaming about a new bed for ages, I finally built up the nerve to make our own.  This was actually pretty easy, but it helped to have hubby there for some parts, just because of the size and weight of this thing.

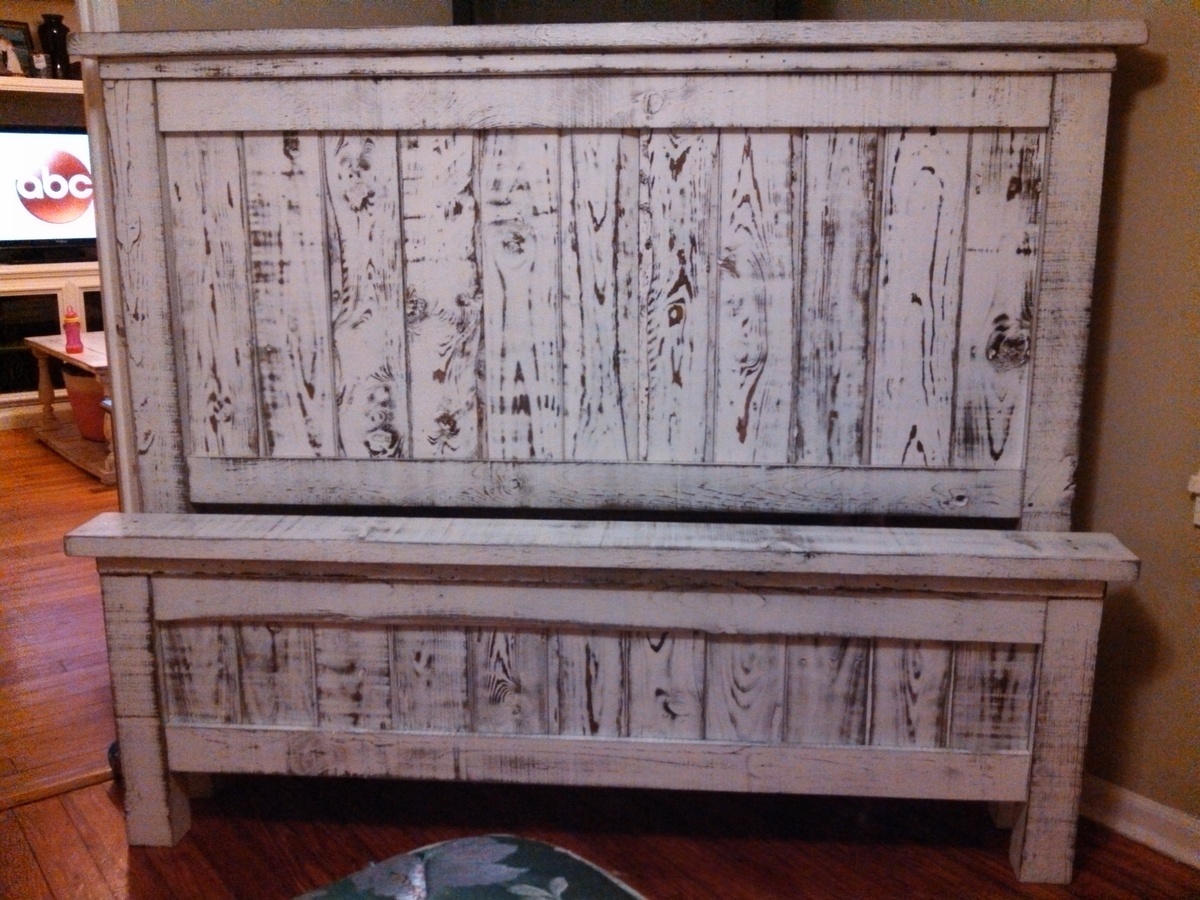
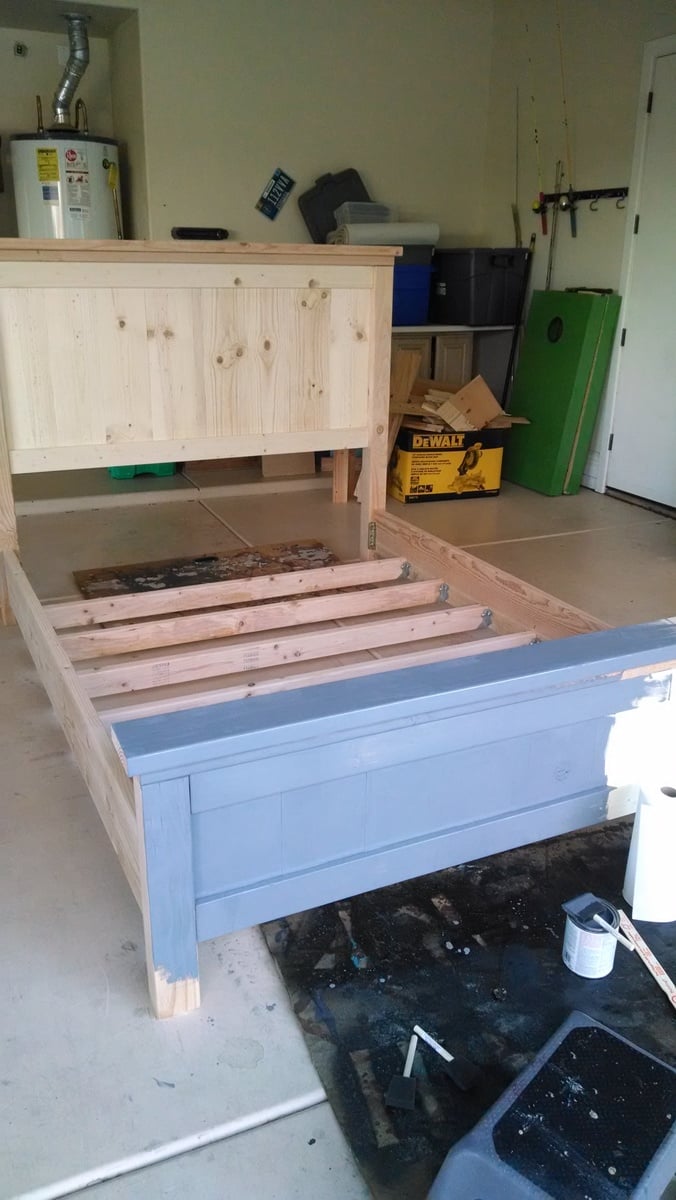
My 1x8s were 7.25", so to compensate, I just added a single 1x2 in the middle.  Perfect fit!

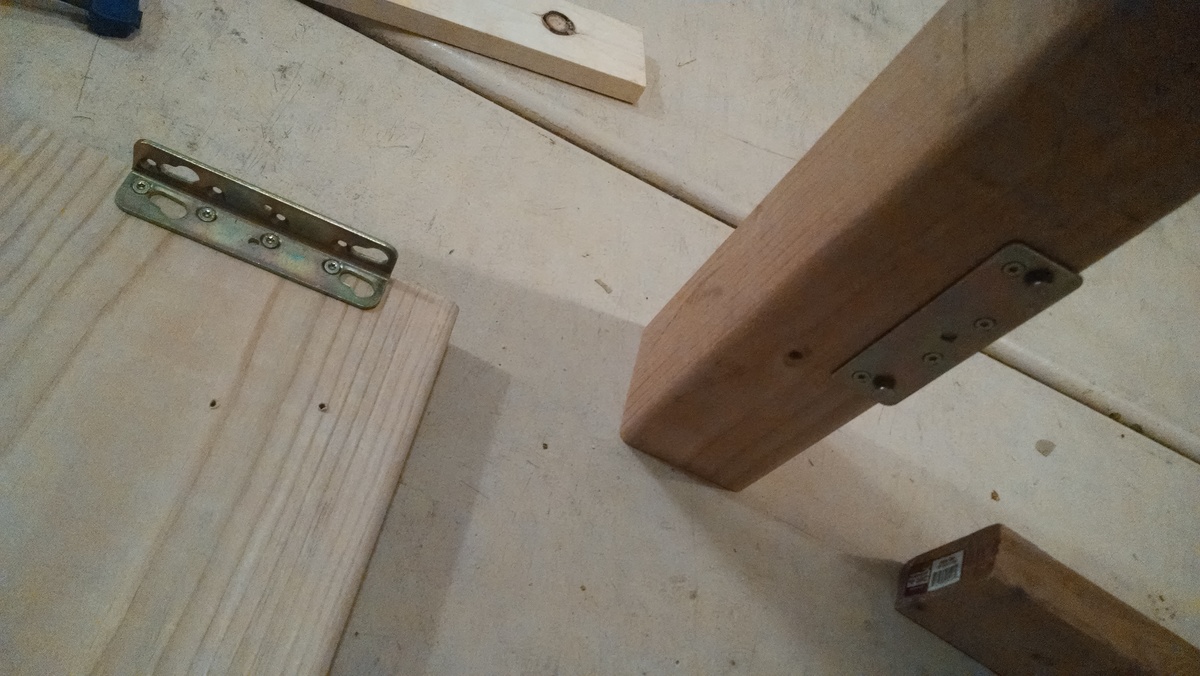
We like to move (!) so we modified the bed to be easily moveable.  I purchased some heavy duty bed hardware from Amazon ($25) and deck/joist hangers from Lowes. 

I put the deck hangers on the bottom of the 2x10s, and the 2x4s sit vertically and free in the hangers.  So, next time we move, we'll just pick up the 2x4s, and unlock the 2x10s from the head & footboards and take off!  :) 

We lowered the 2x10s so that the total height of the mattress + box spring + vertical 2x4s wouldn't be too high for me to climb on to every night.  I have knocked my toe nail on the side rail a couple of times already, so maybe in hindsight I should have raised it a teensy bit.  

I did forget to decrease the length of the side rail, since we didn't hang it on the inside like Ana did.  That's an easy fix, though.

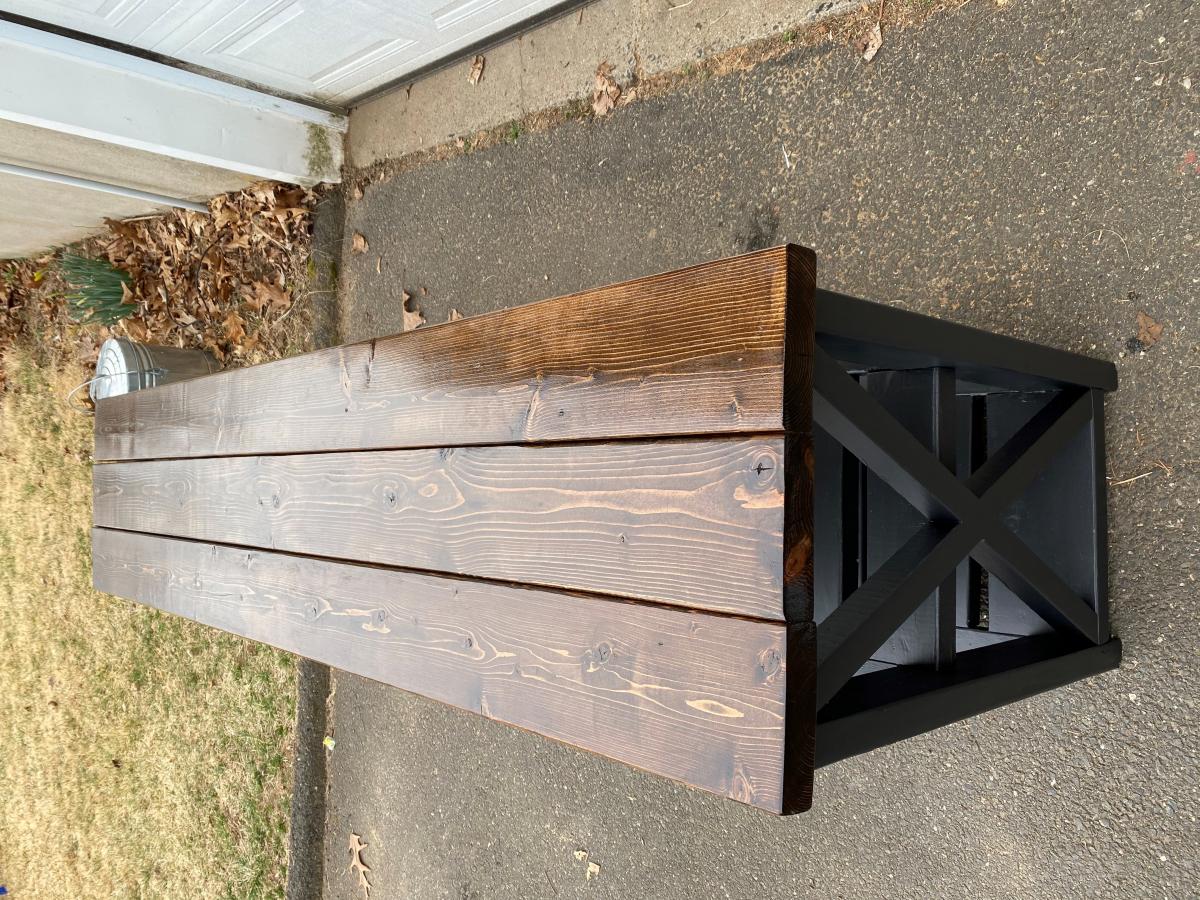
For the finish I used Weathered Gray stain first....and freaked out because it looked SO gray!  But I convinced myself it would turn out, so I kept going.  Next I did some heavy sanding, followed up by Special Walnut stain.  Finished up with a coat of furniture wax over the layers.   

We LOVE our new bed!  Thanks, Ana, for the plans and your website!  Next up: replacing those 1999-era side tables and dresser!  :) 


Built from Plan(s)
Estimated Cost
$150
Estimated Time Investment
Weekend Project (10-20 Hours)
Recommended Skill Level
Beginner

Comments

jlp

Thu, 11/05/2015 - 09:57

Love the changes made to the bed.  Will definately make it easier to move (or put in the room in the first place.).  You mentioned that you had to shorten your side rails.  How long did they need to be?

Penny Flip Puzzle

Submitted by mtairymd on Fri, 05/05/2017 - 11:29

This is my spin on the Wooden Nickel Brain Teaser Puzzle produced by Creative Crafthouse. The design is simple - make slots for nine pennies in a row. I made the design more complicated by adding hardwood inlay on the sides and adding a built in compartment for the pennies when the game is being stored.

The object of the puzzle is to remove the coins from the board.

Setup:

  • Place nine coins in the slots. The order of heads vs. tails should be random.

Rules:

  • The person playing may flip any one coin before starting the game.

  • You can only remove coins facing heads.

  • Once a head facing coin is removed, you must flip the neighboring coins over. Note that blank spaces (gaps) do not count as neighbors.

  • Keep removing heads and flipping neighbors.

  • Can you remove all the coins?

More Info: https://www.instructables.com/id/Penny-Flip-Puzzle/

Video Solution: https://youtu.be/htWBFFLR_EM

Estimated Cost
$2
Estimated Time Investment
Afternoon Project (3-6 Hours)
Finish Used
None
Recommended Skill Level
Beginner