Can Shelf Organizer
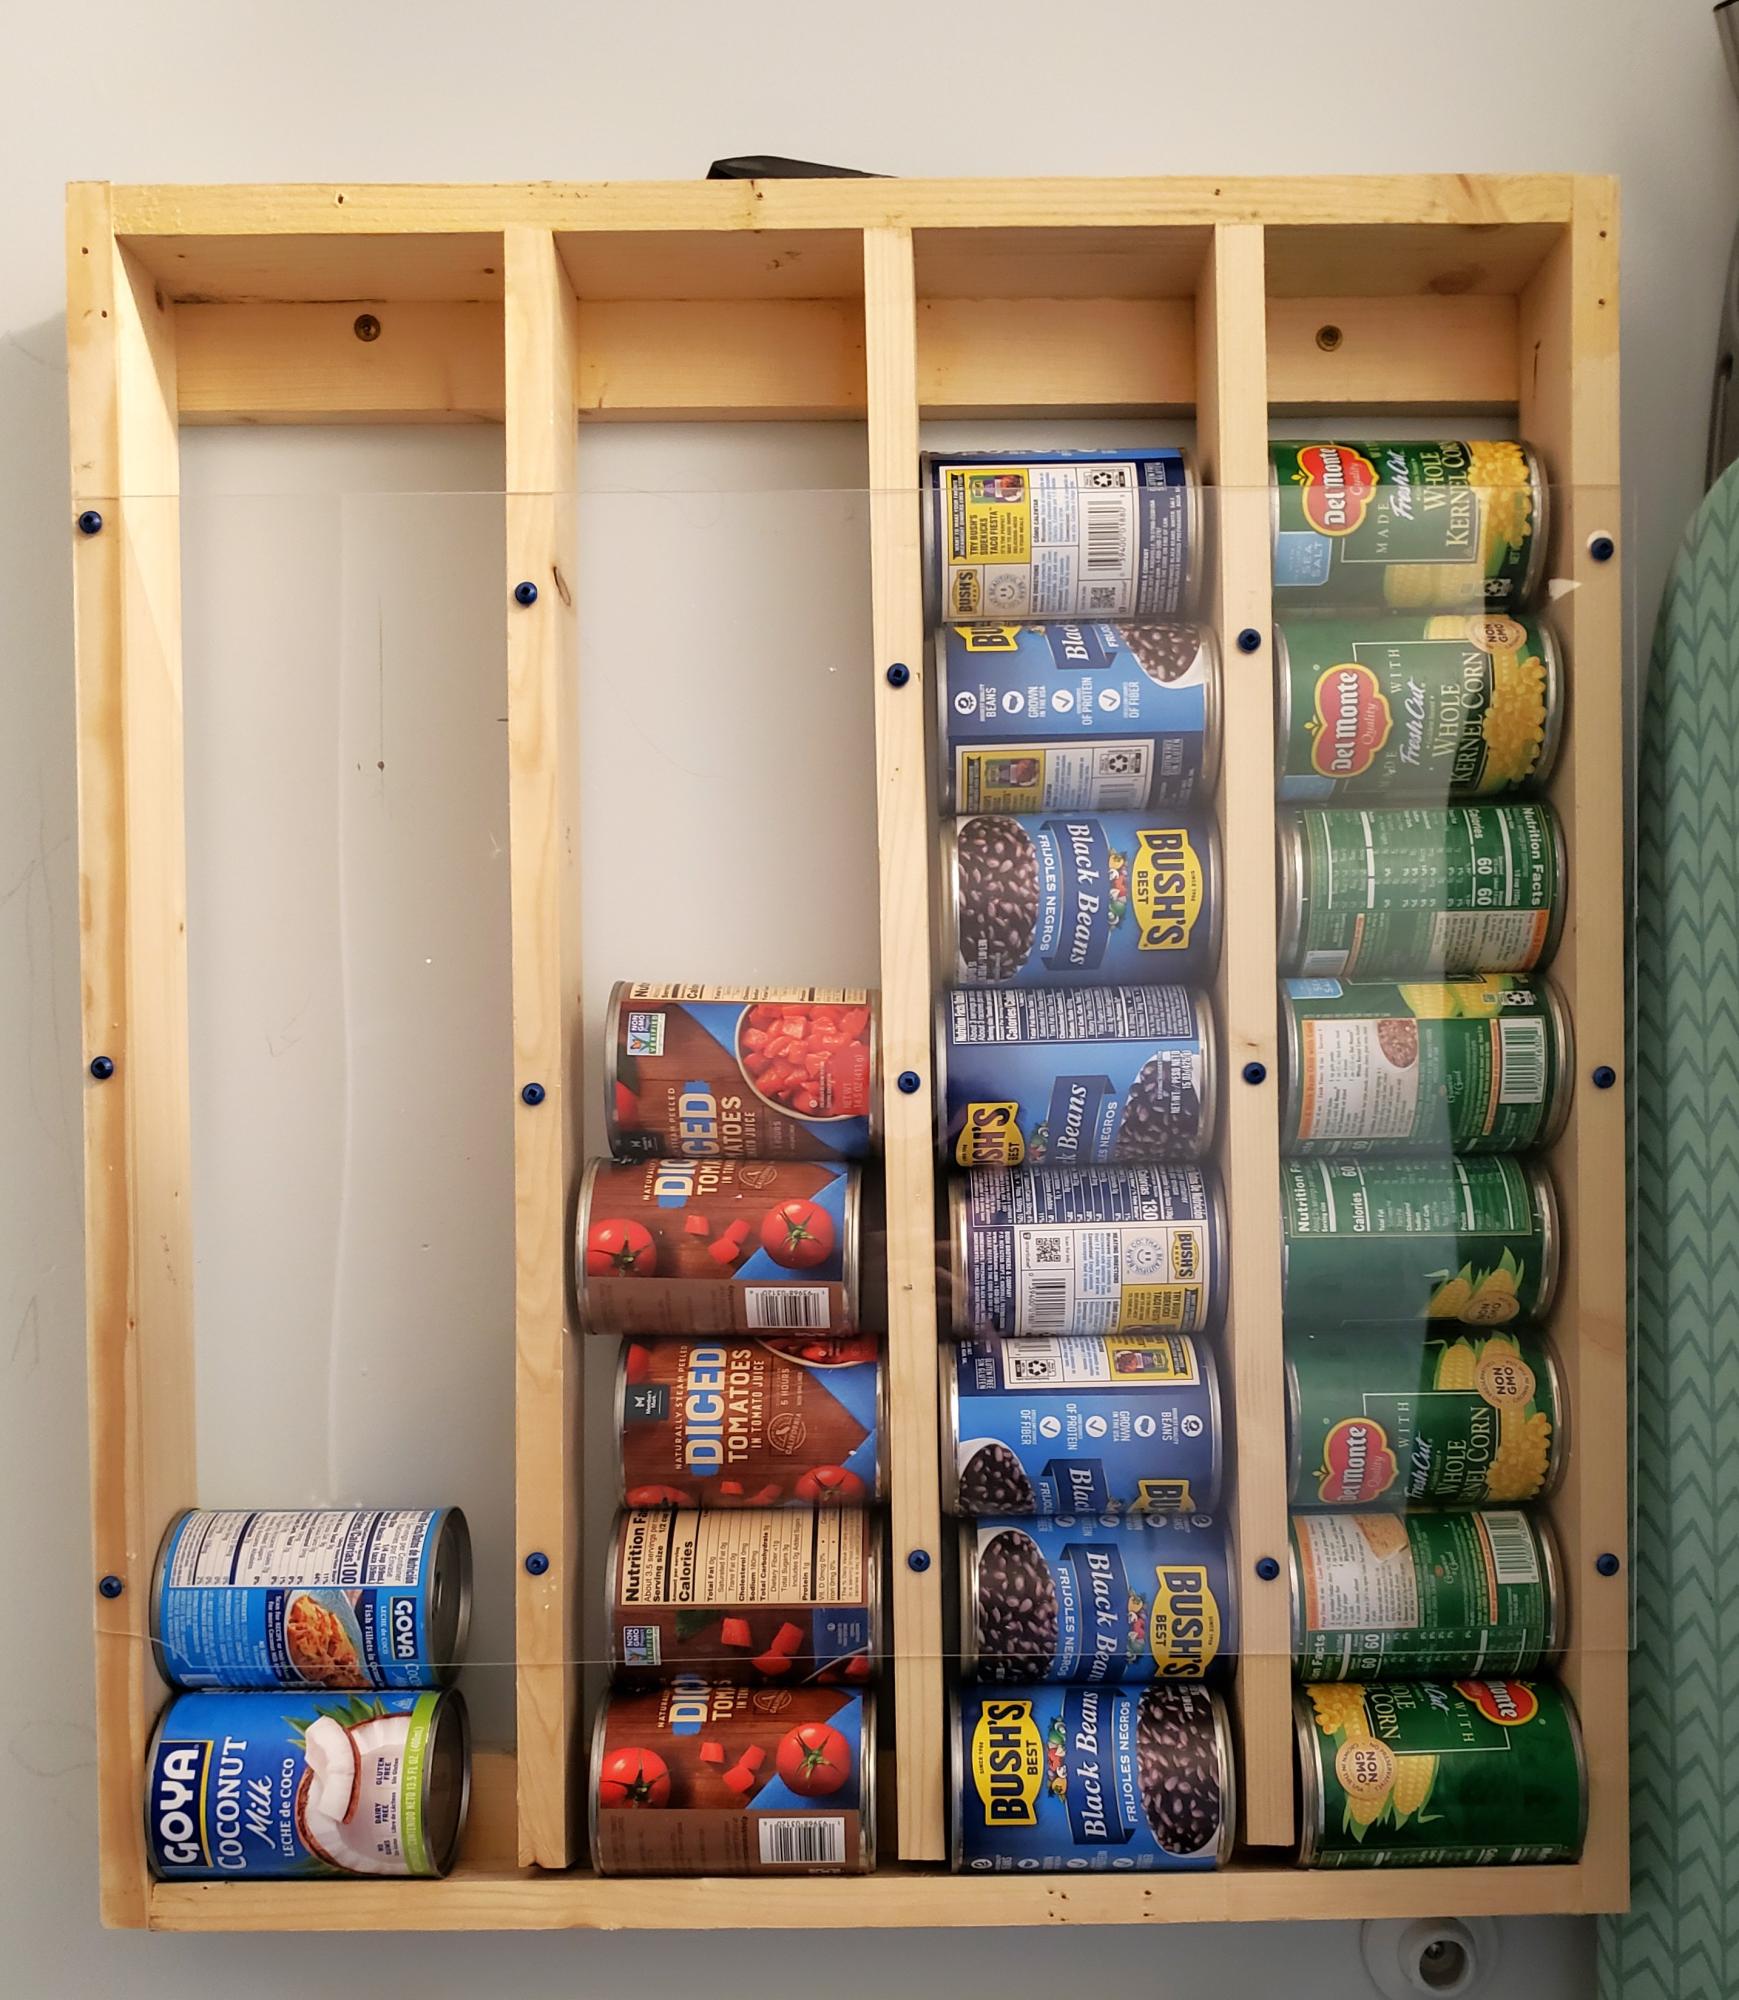
We didn't paint it, but between two newbies, it only took an afternoon. It has freed up a ton of space in the cabinets!
Hattie
Built from Plan(s)
We didn't paint it, but between two newbies, it only took an afternoon. It has freed up a ton of space in the cabinets!
Hattie
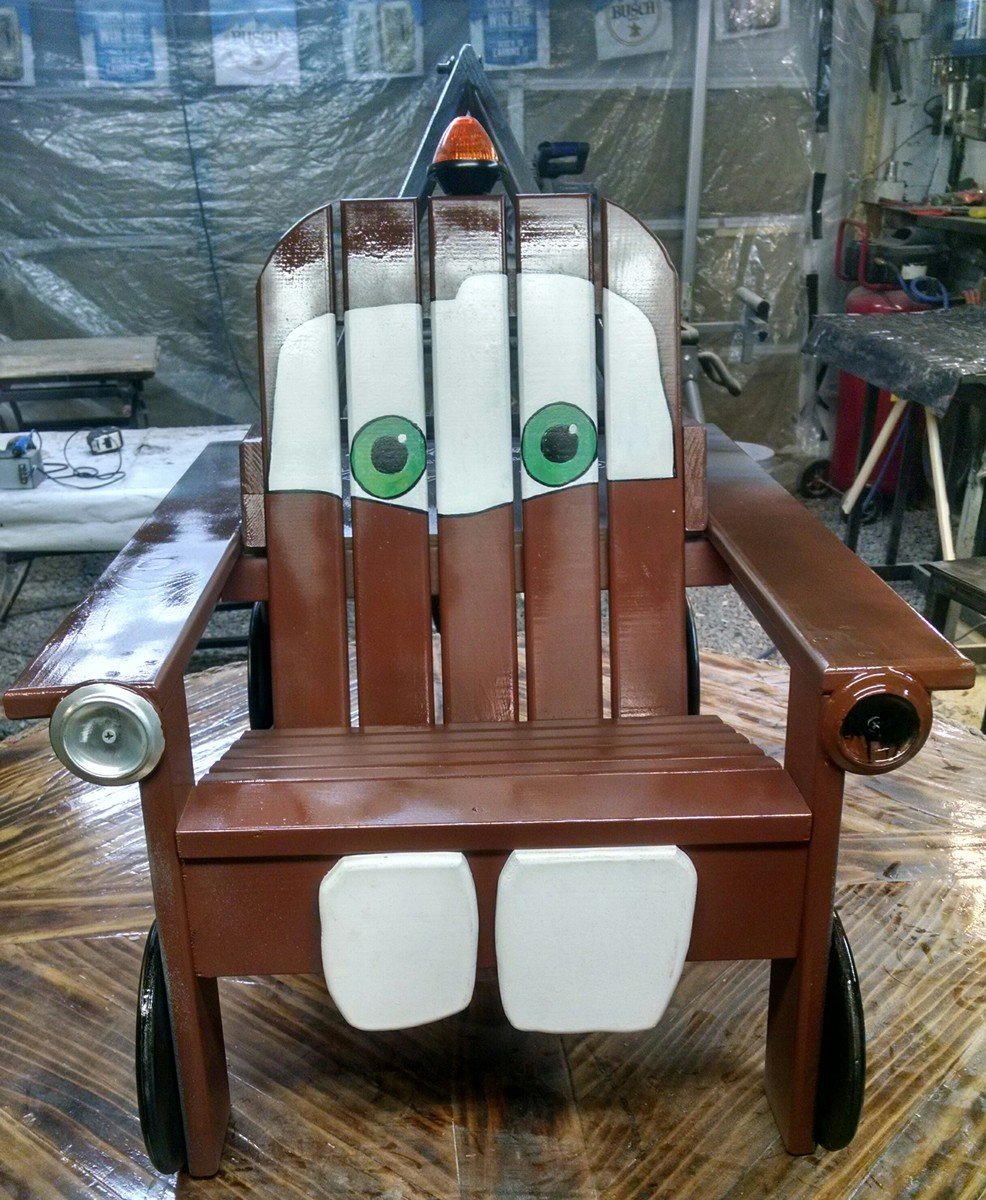
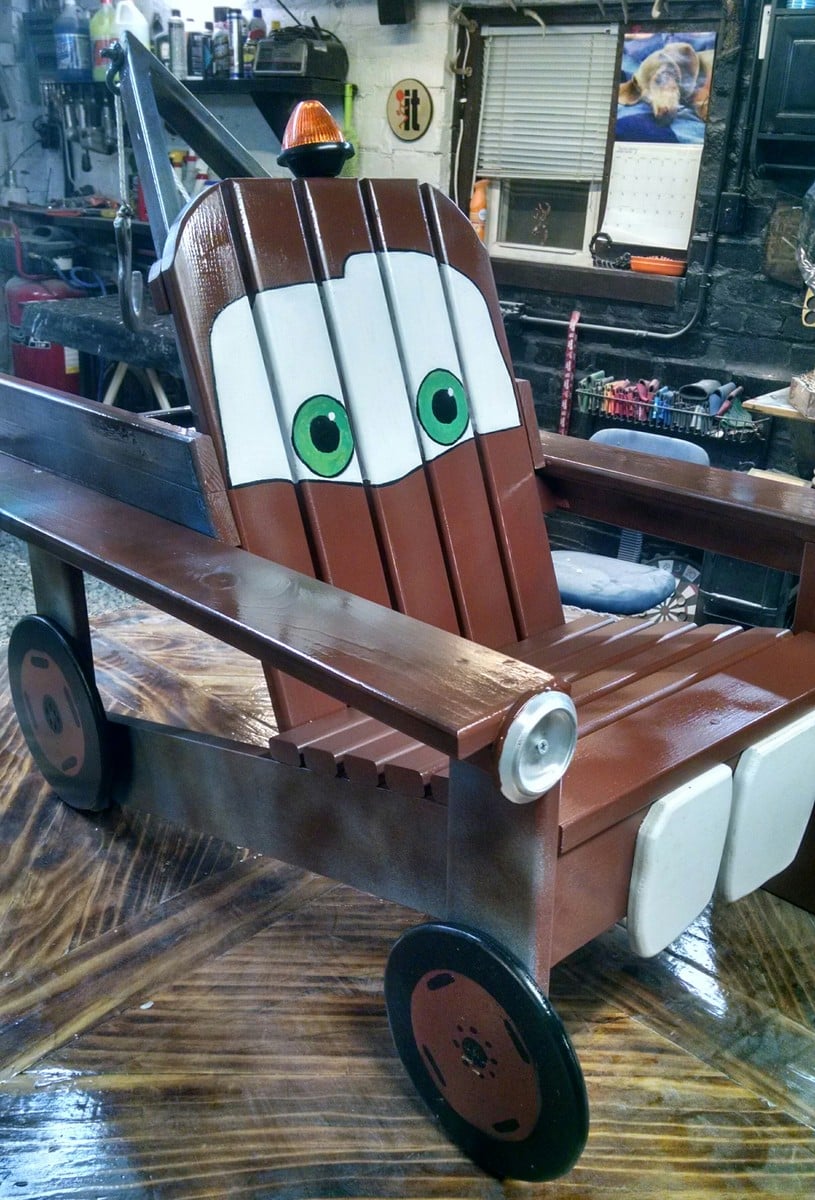
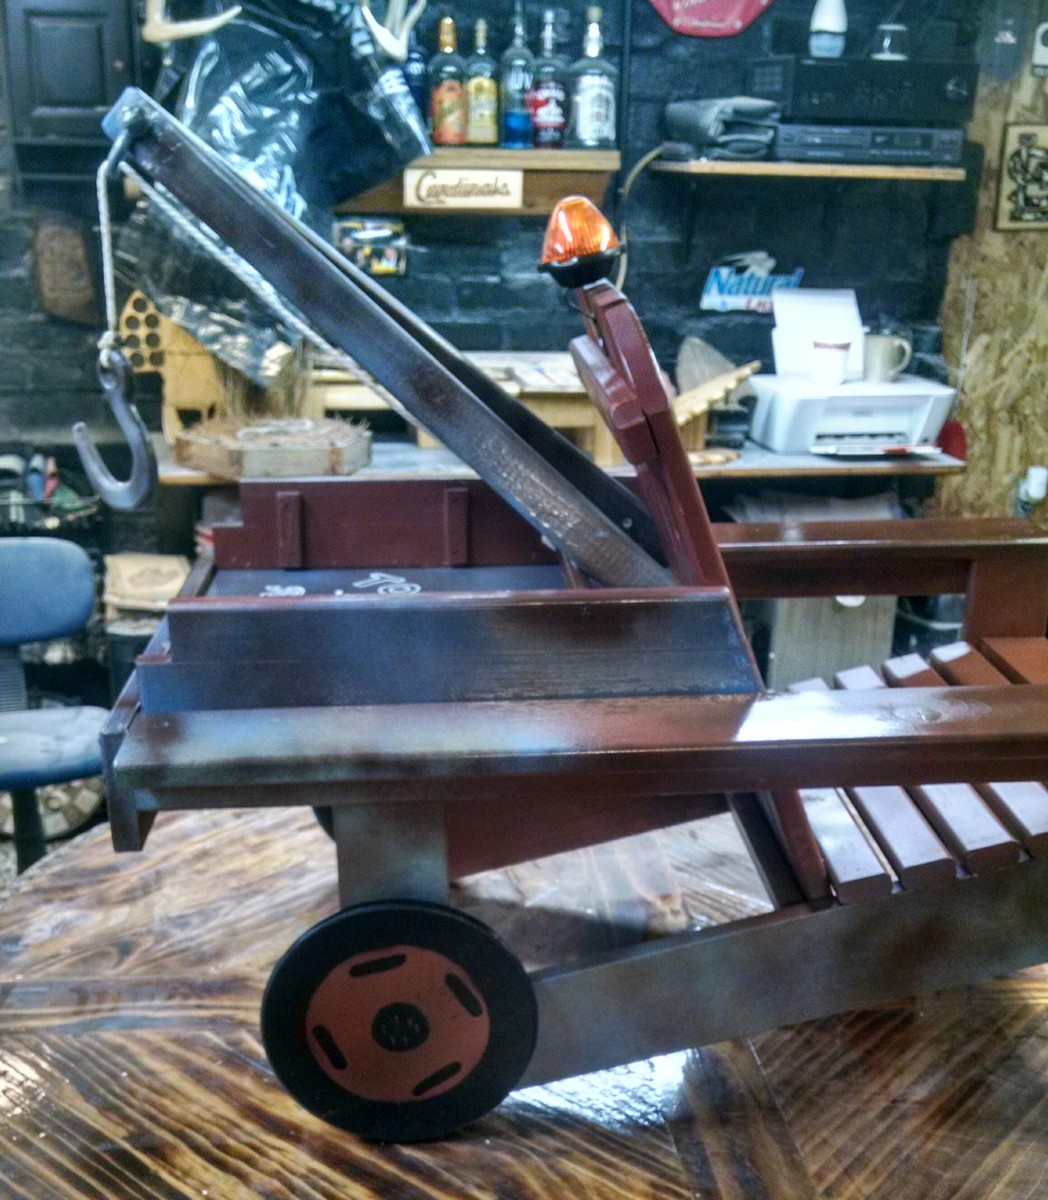
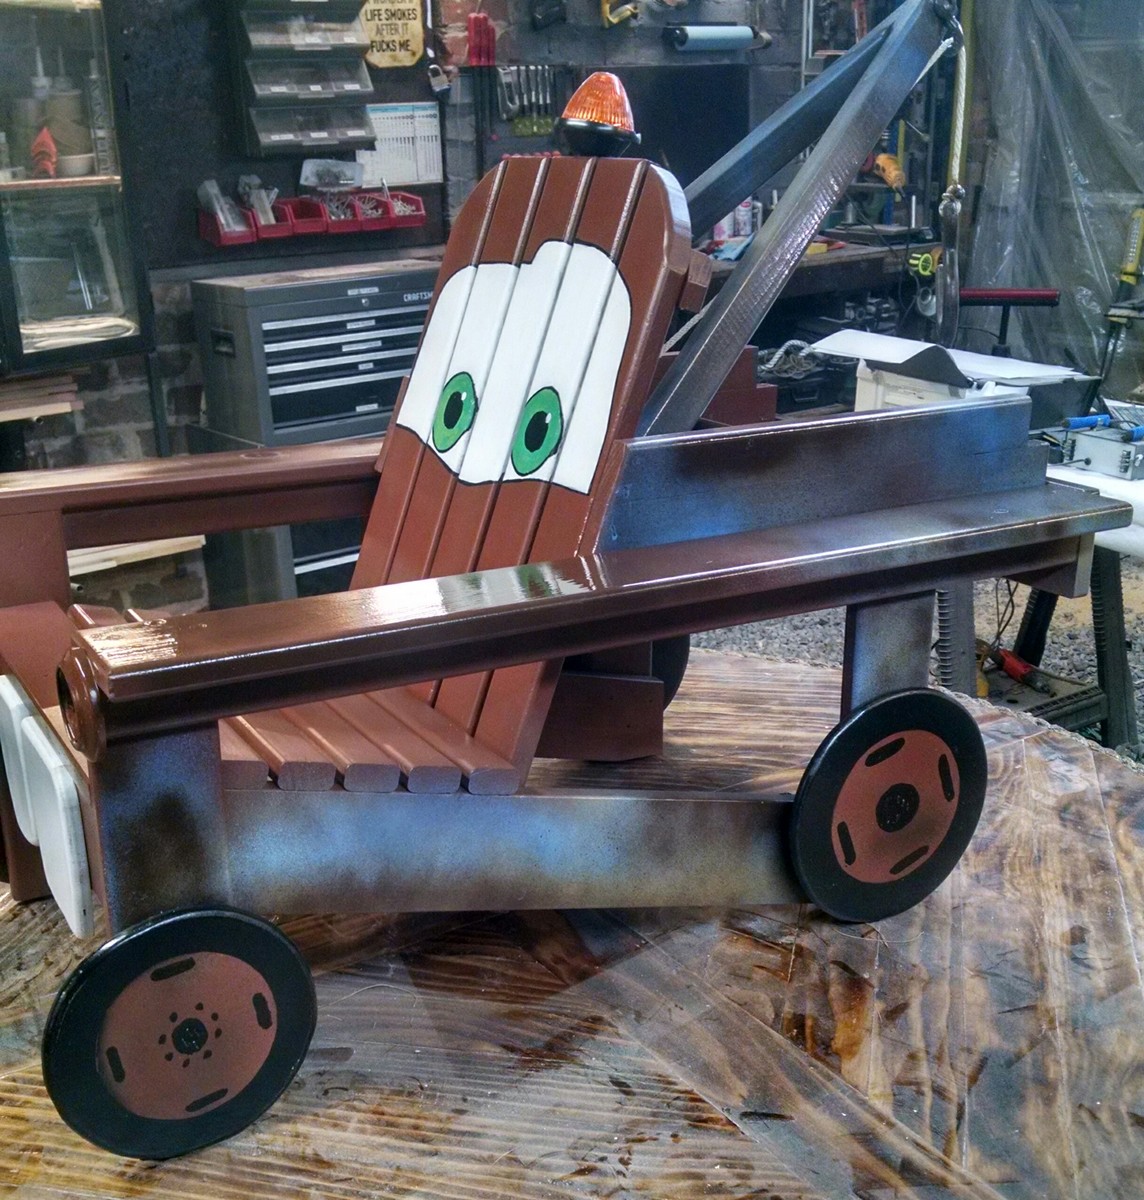
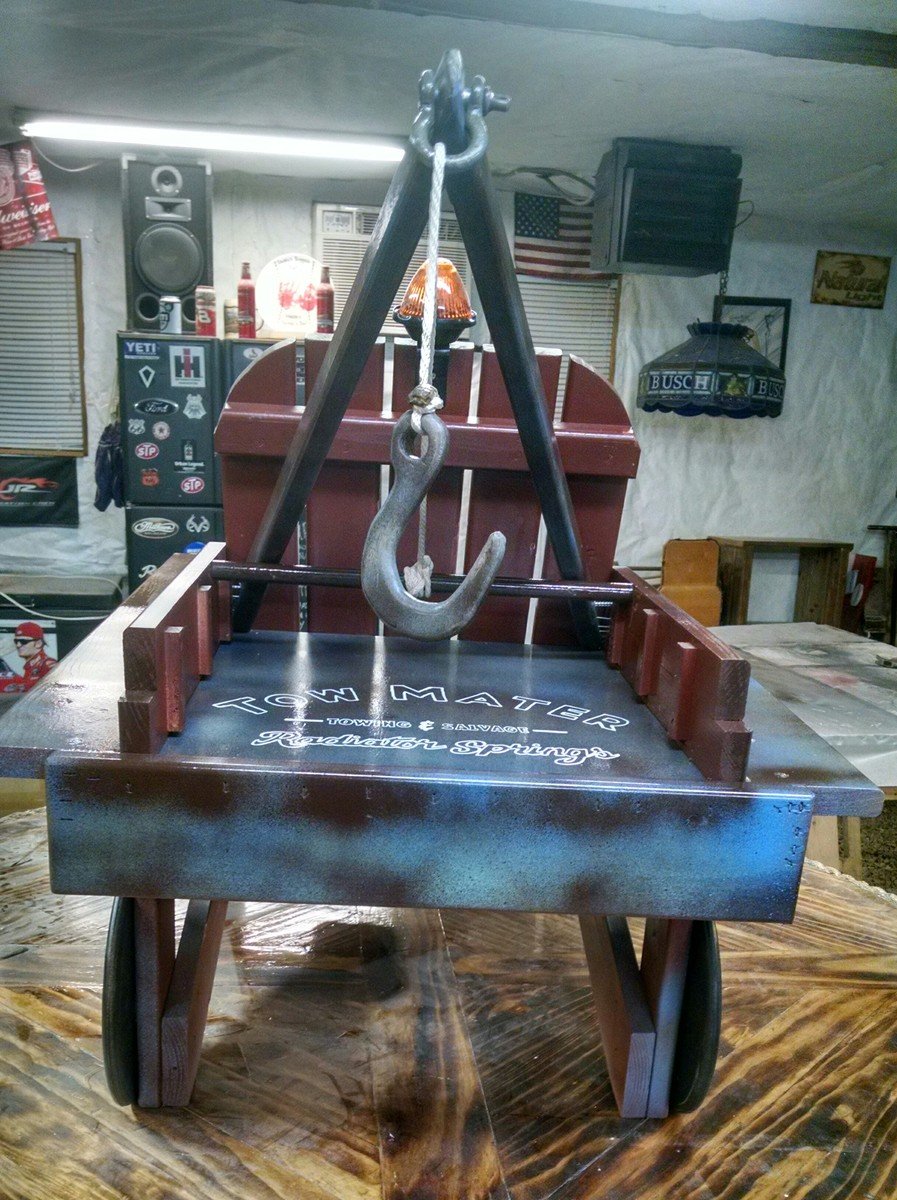
I made this chair for my 3 year old son who is obsessed with Disney Cars based off of Ana's
Super easy little Adirondack chair plans.

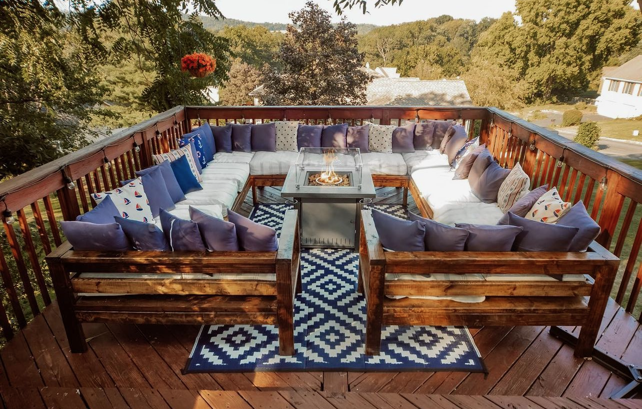
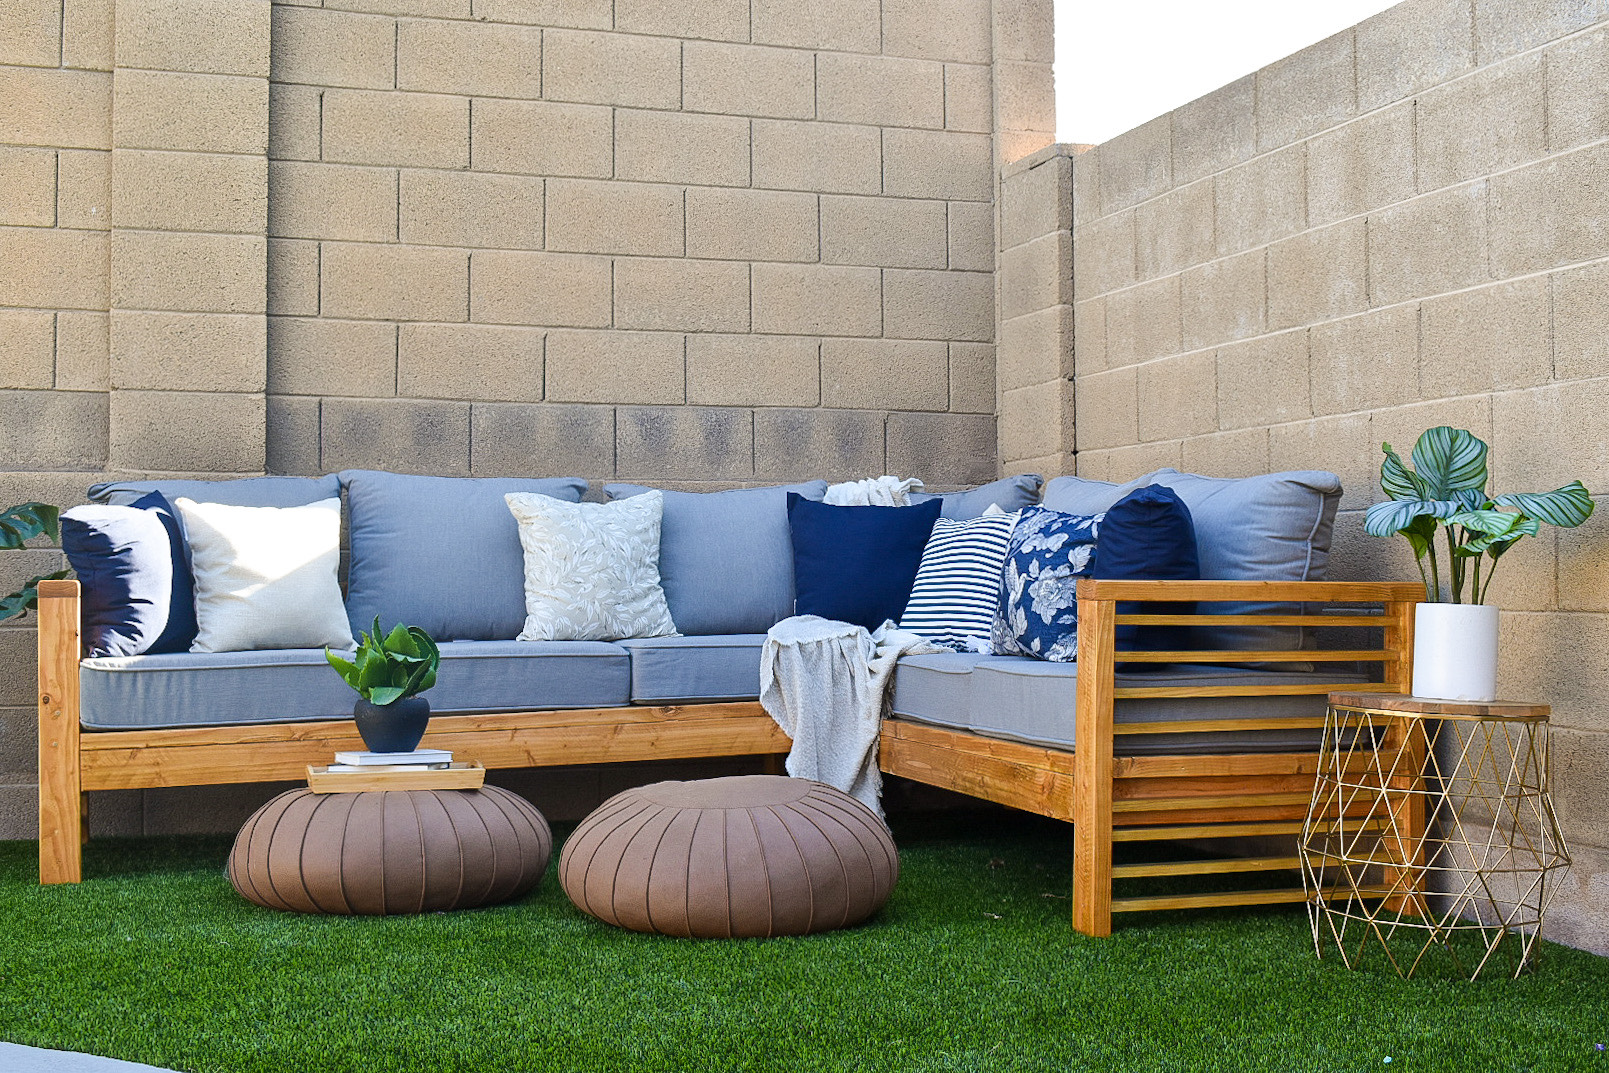
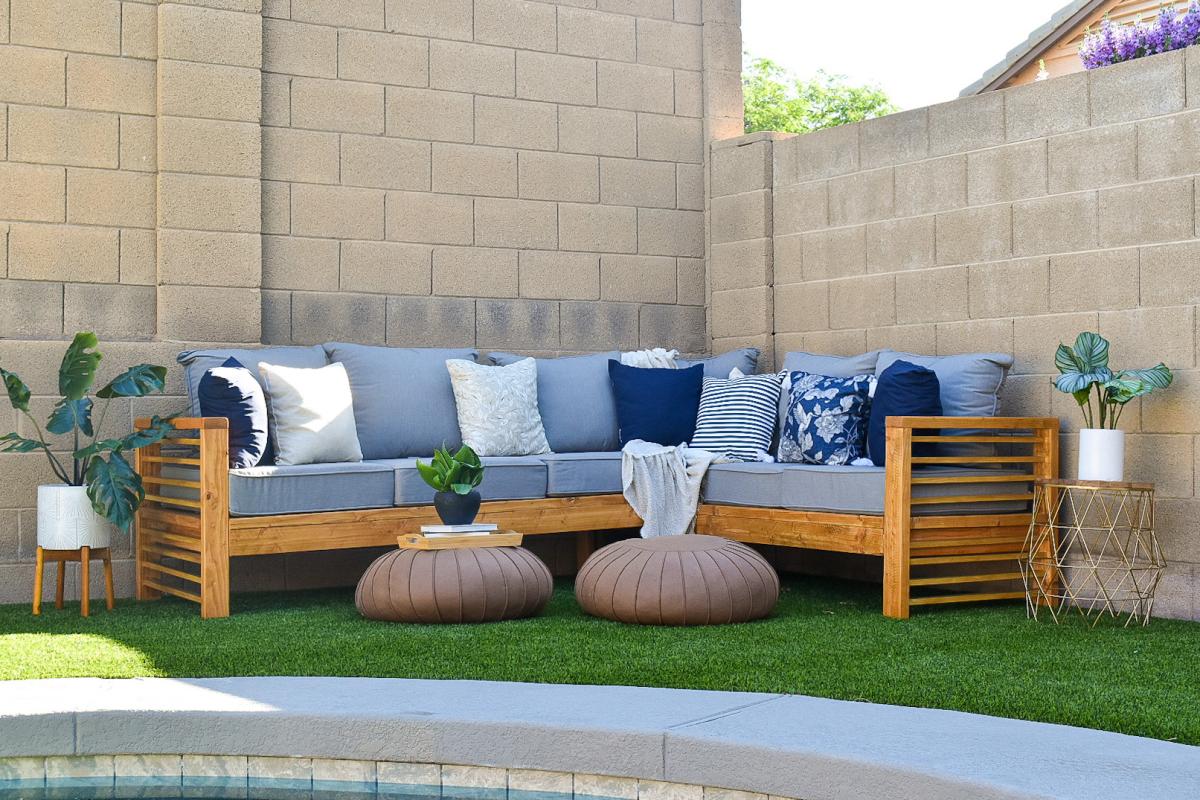
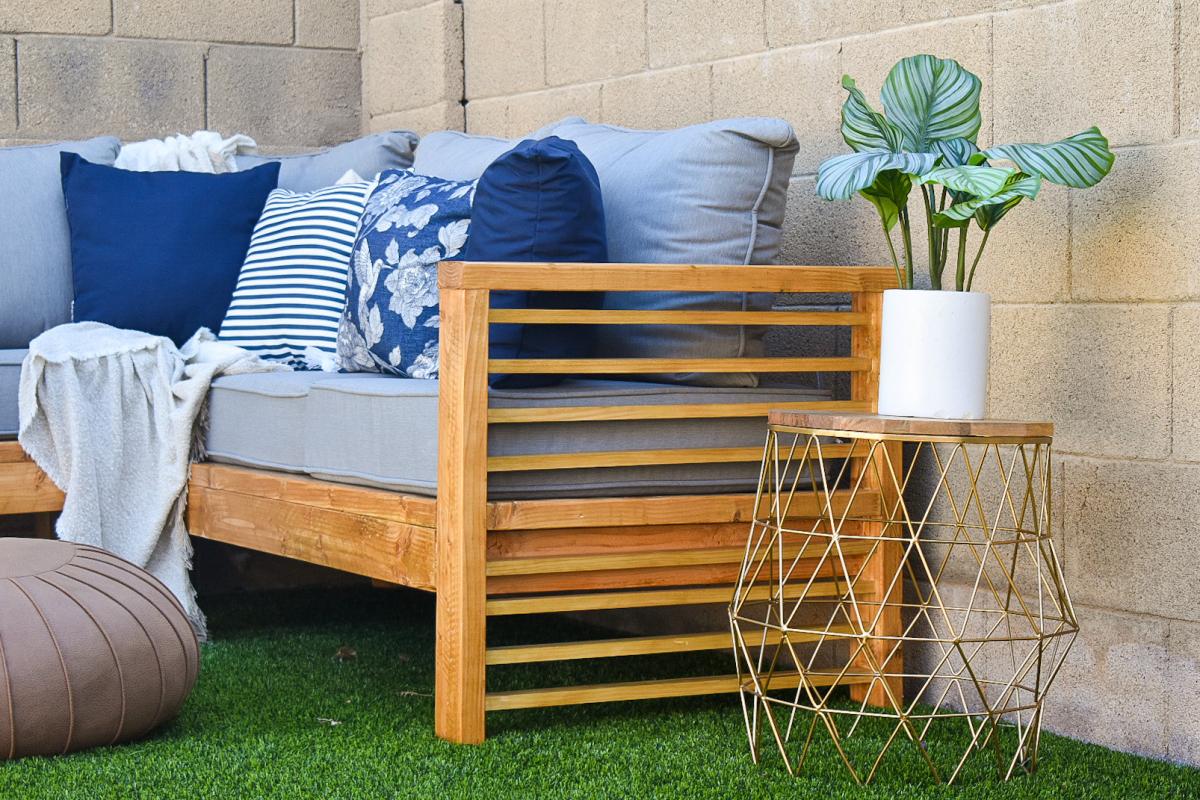
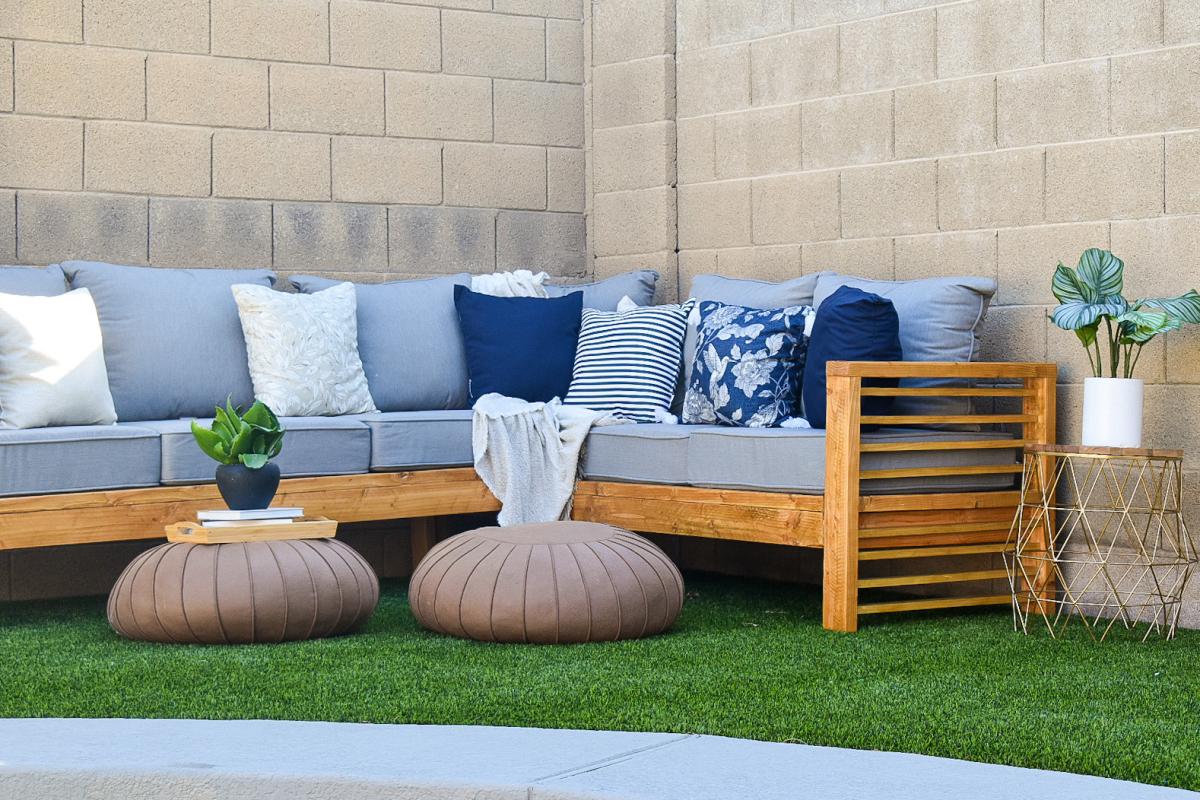
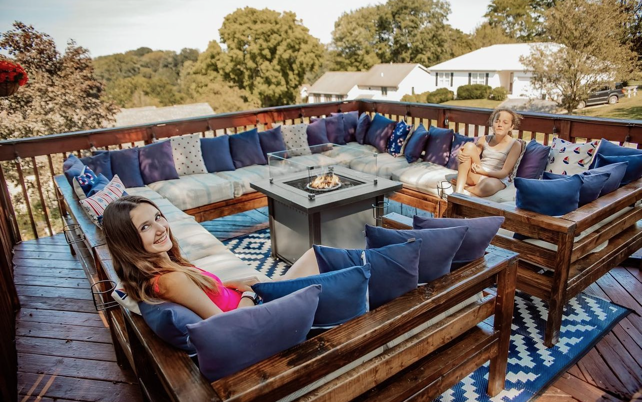
Outdoor Sectional

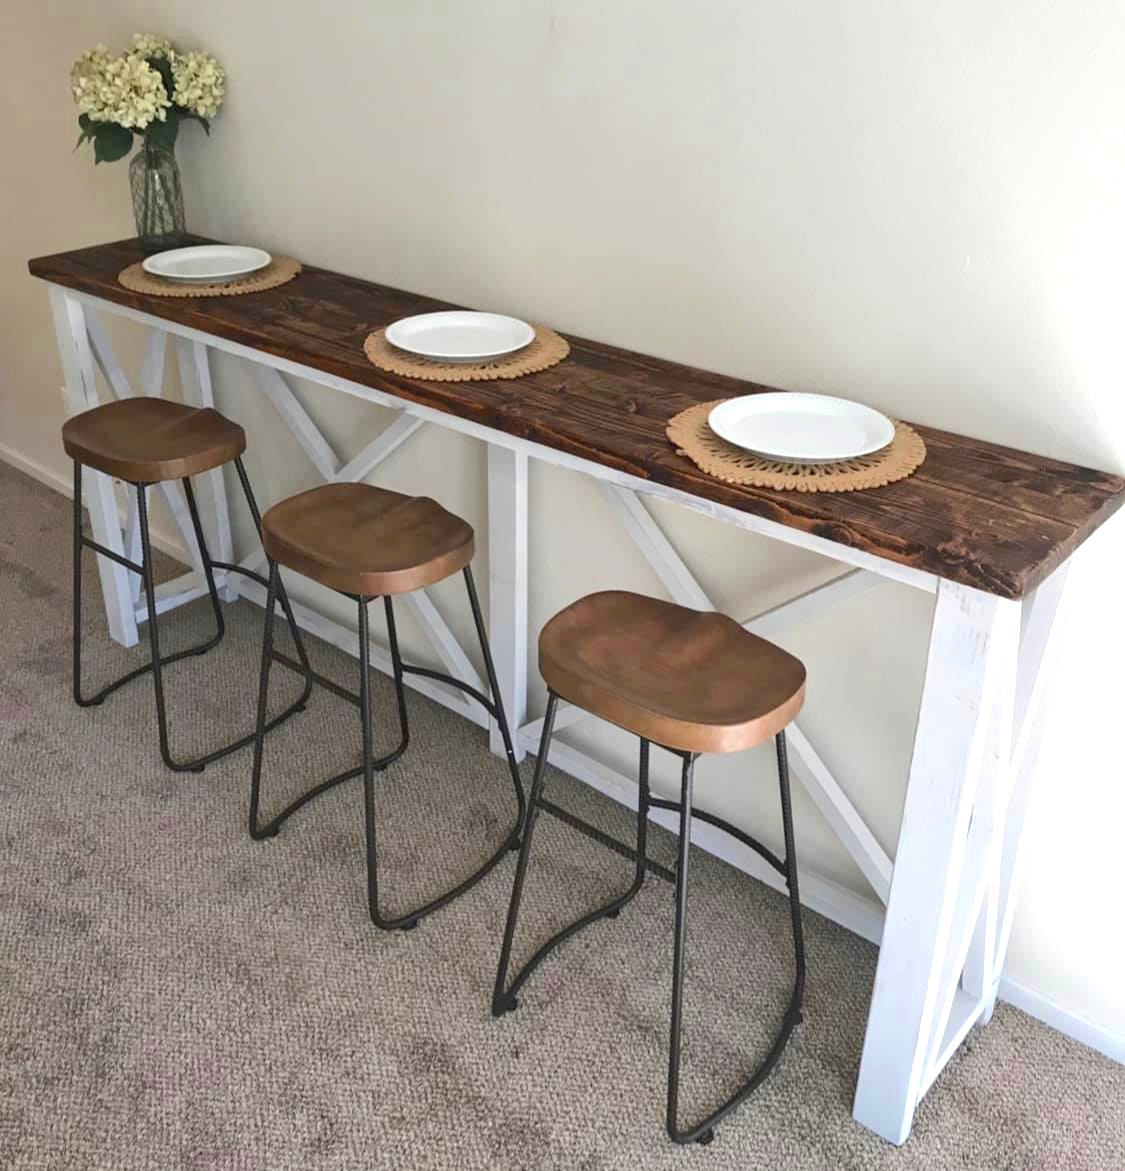
Hand made breakfast bar check us out on Facebook marney Marie
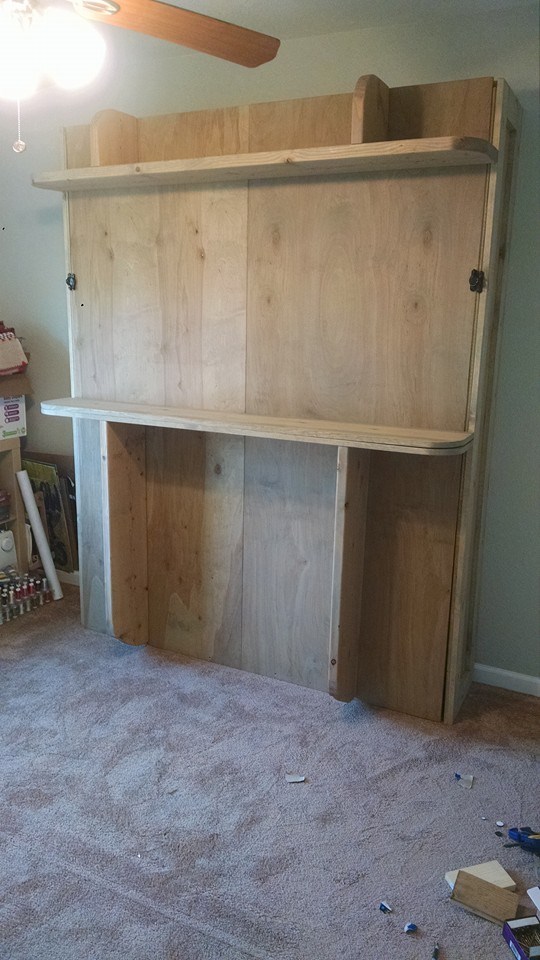
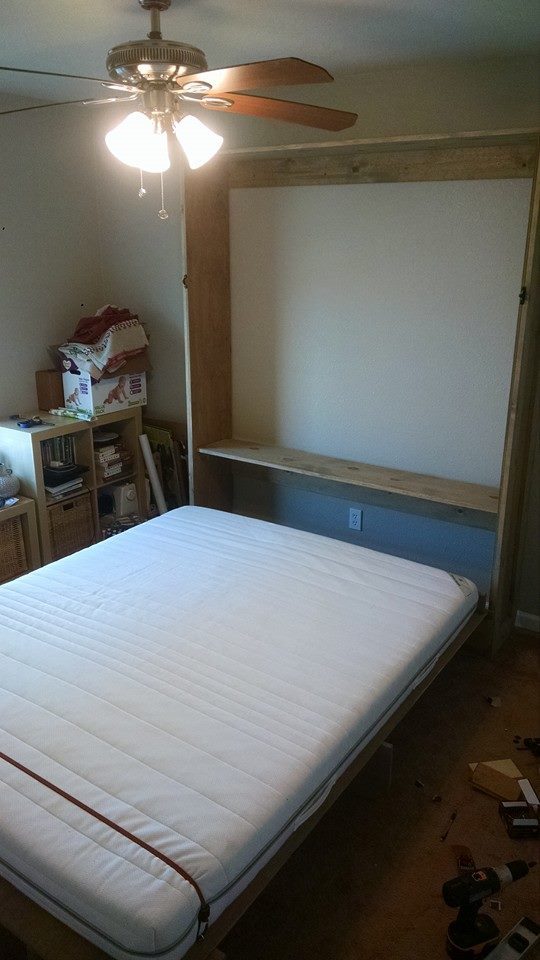
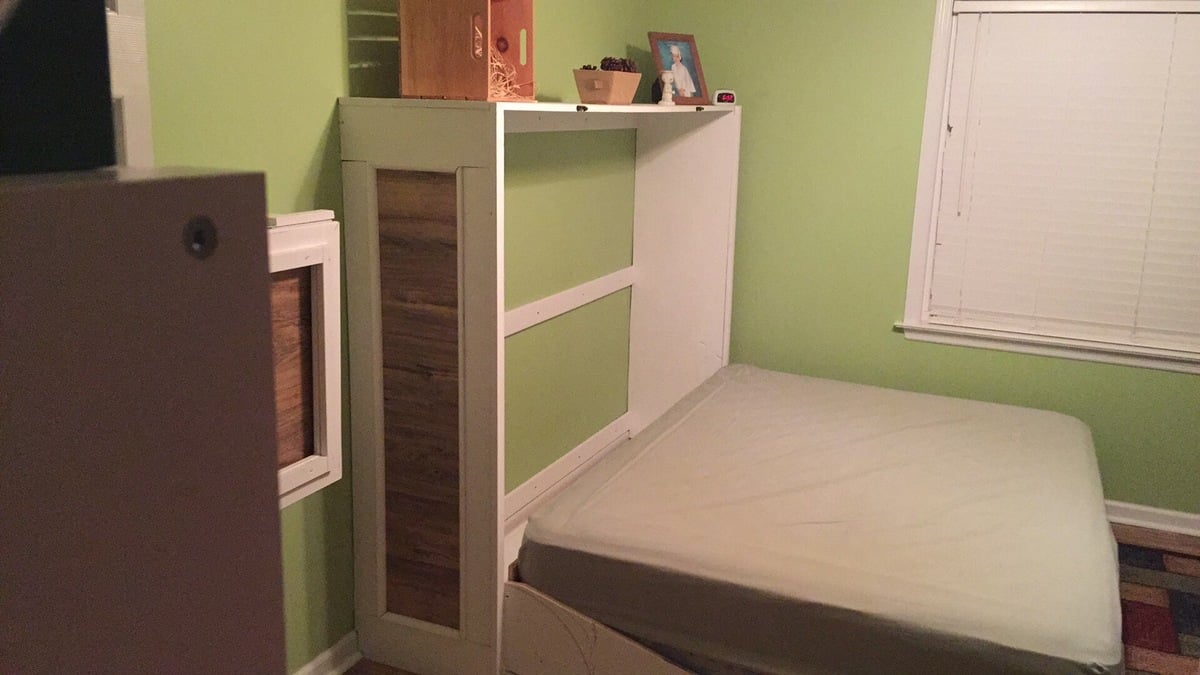
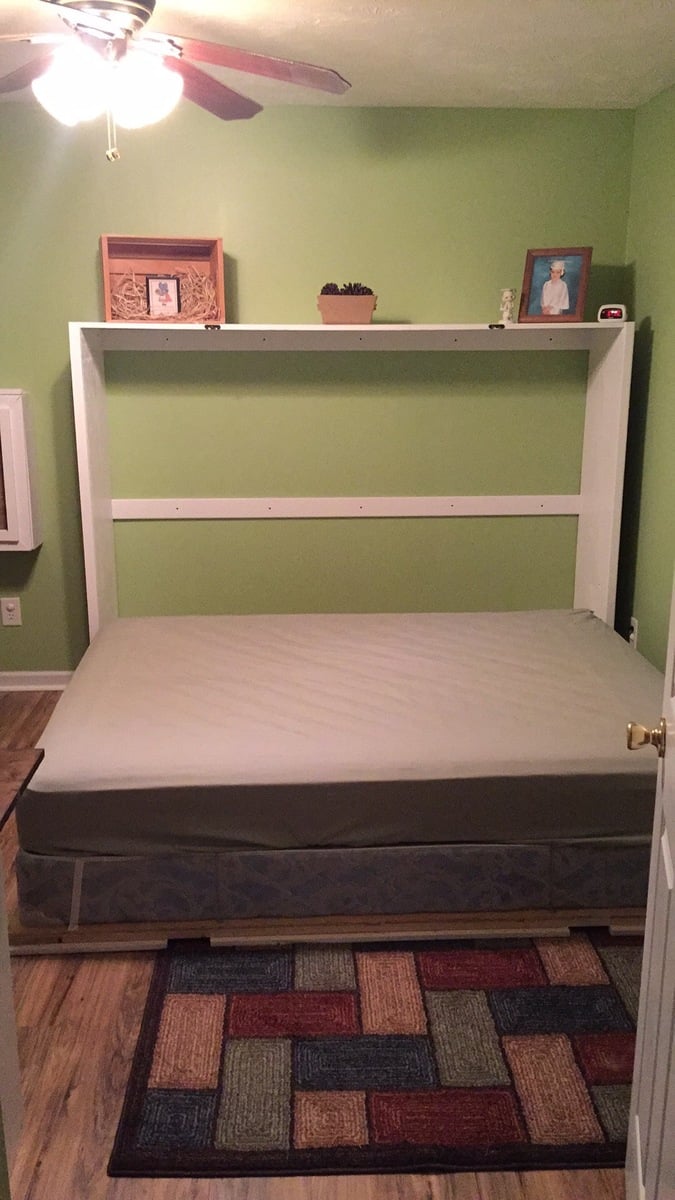
Just finished up my Murphy Bed project. Hope you like.
Mon, 03/09/2020 - 20:30
Amazing. I’ve seen these and have been looking for plans. May just have to dive in and interpret from pictures. You did a really great job, nice work.
Wed, 12/22/2021 - 14:06
The plans are for a different bed than the one in the picture.
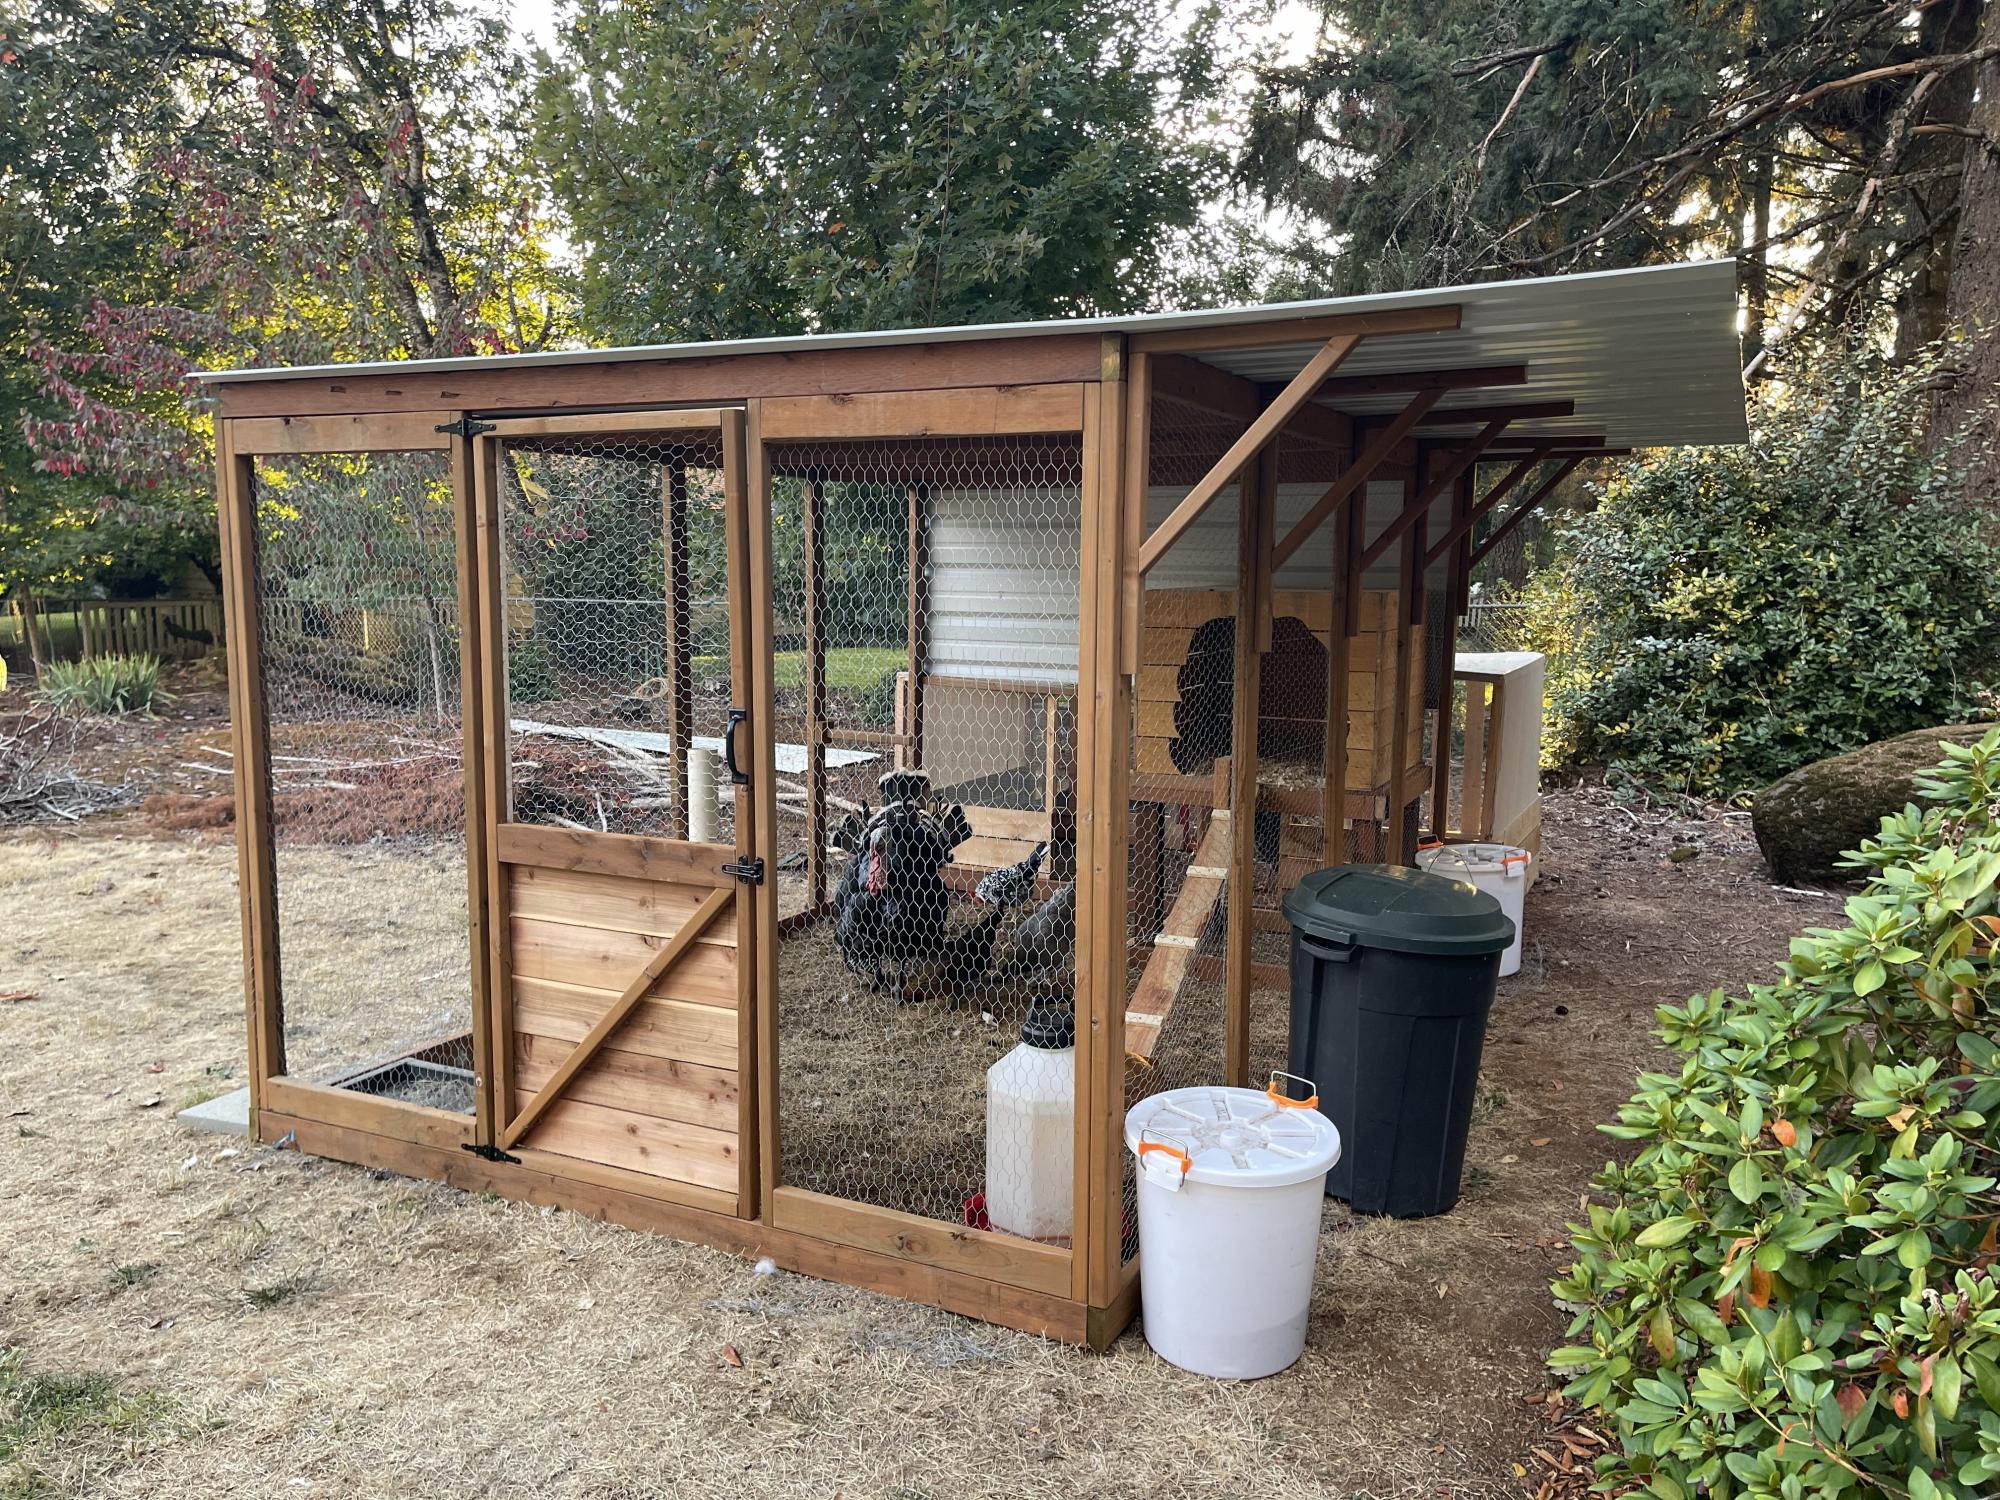
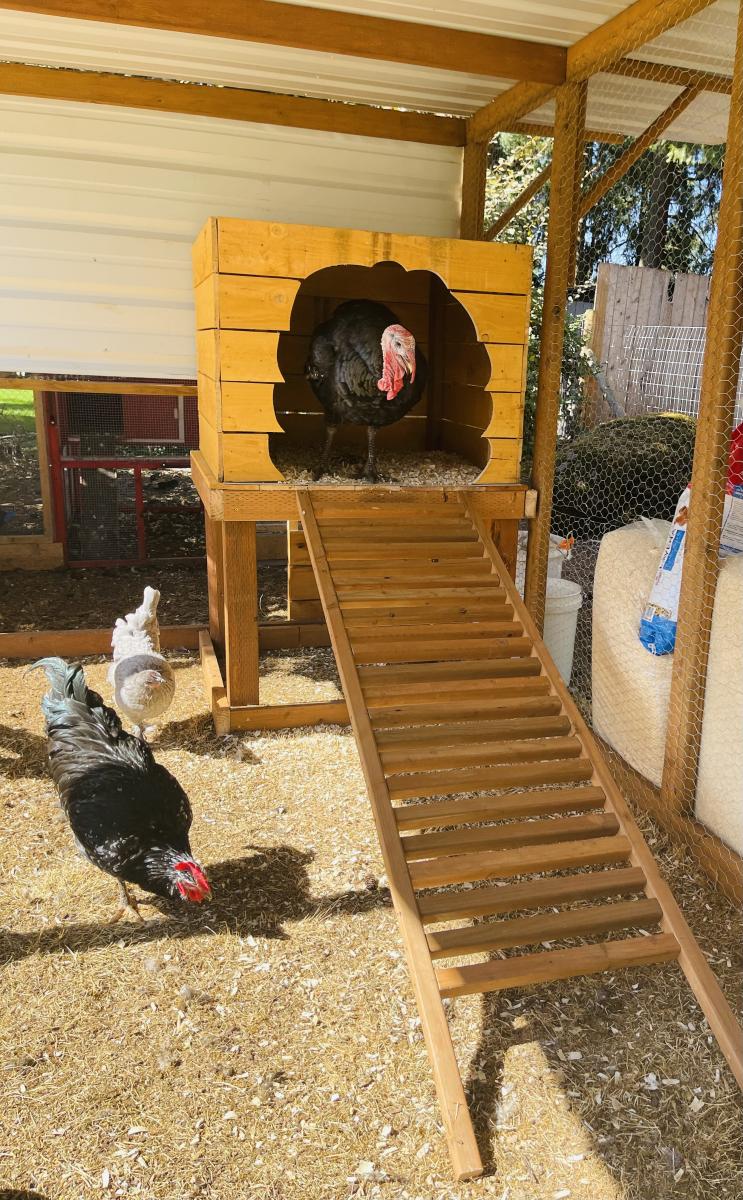
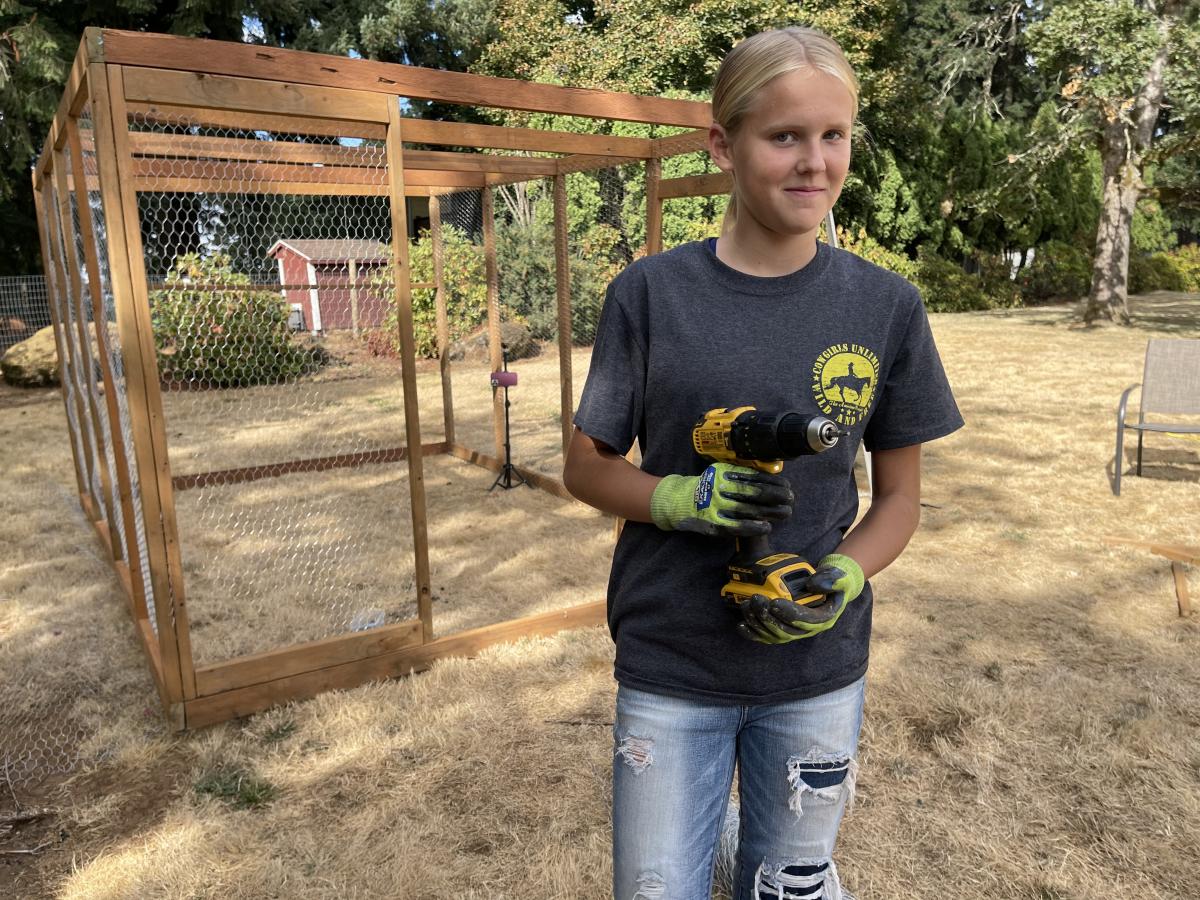
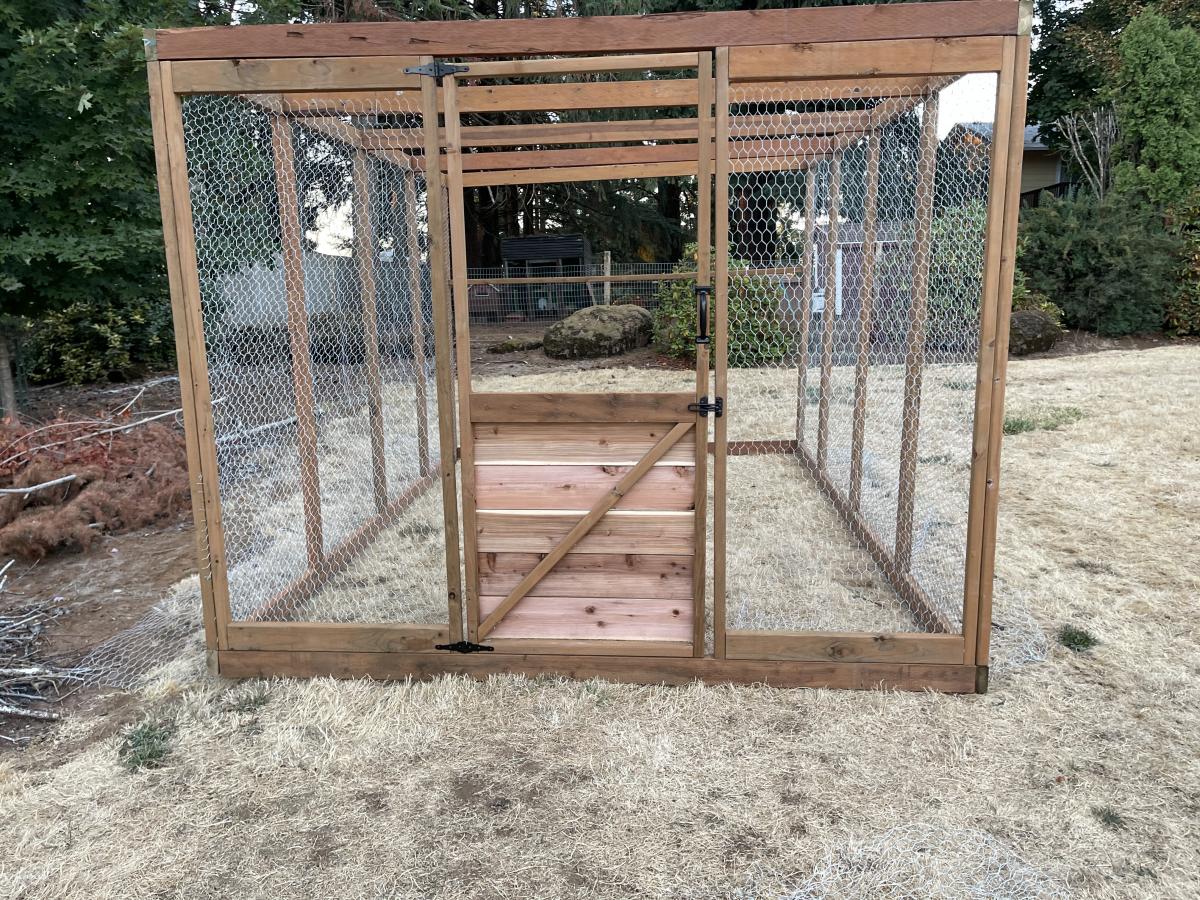
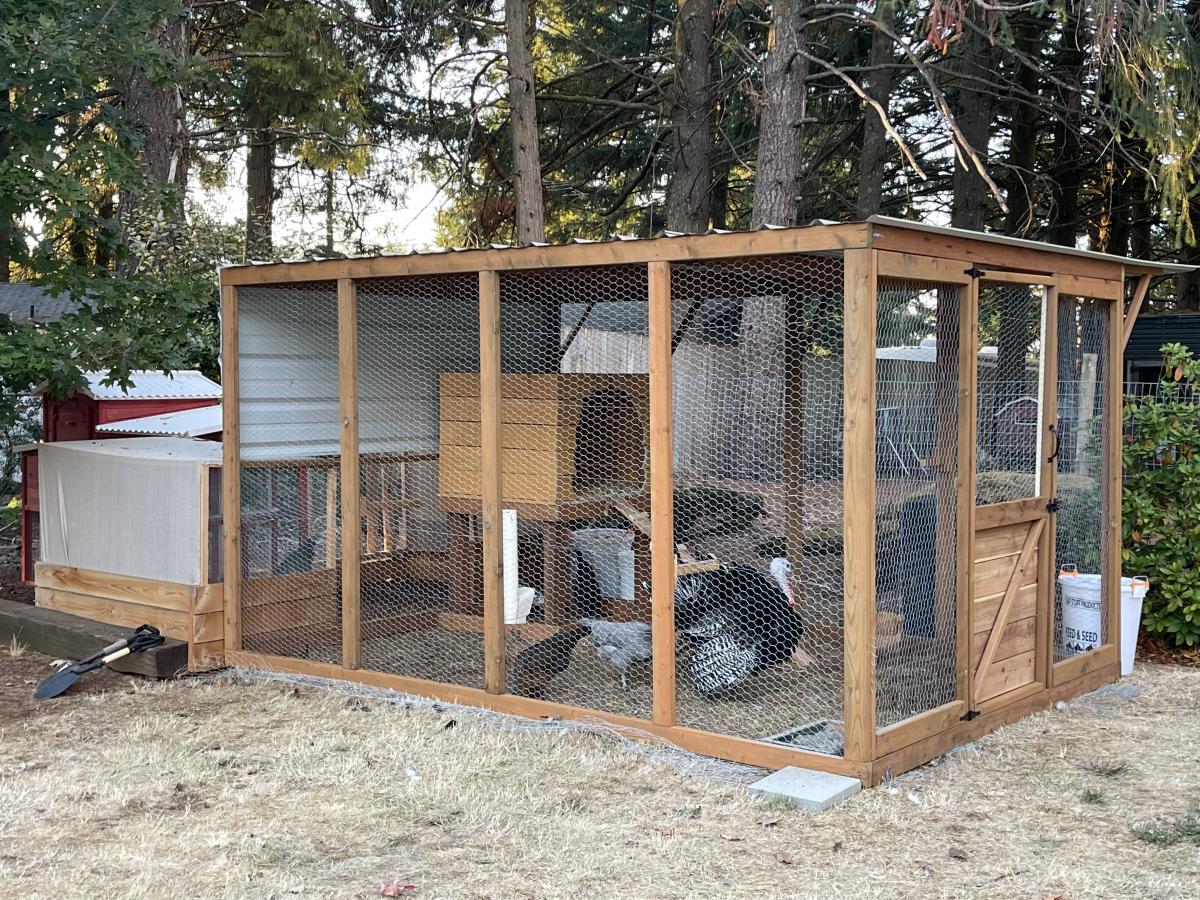
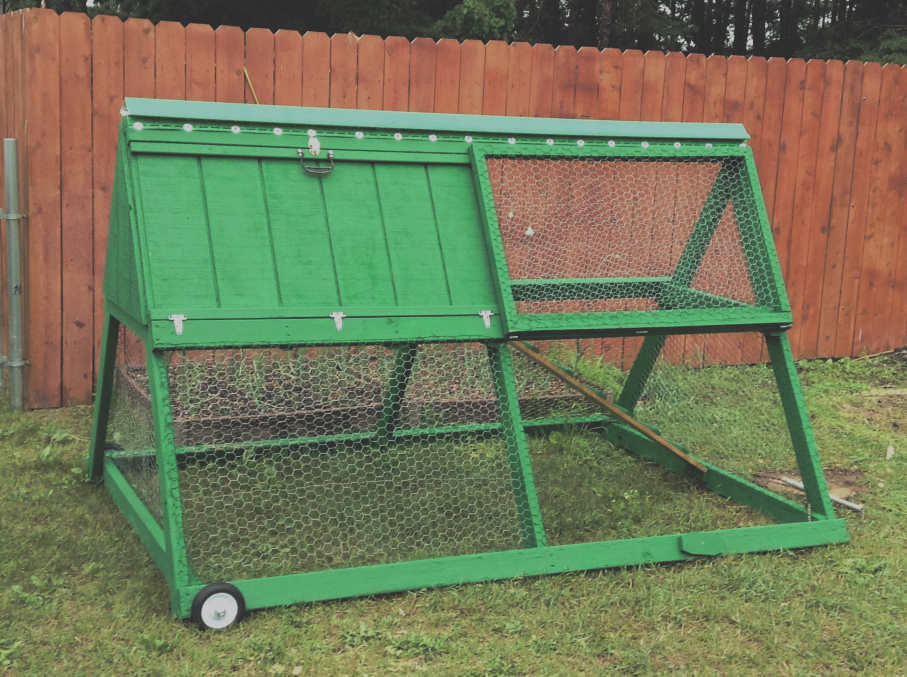
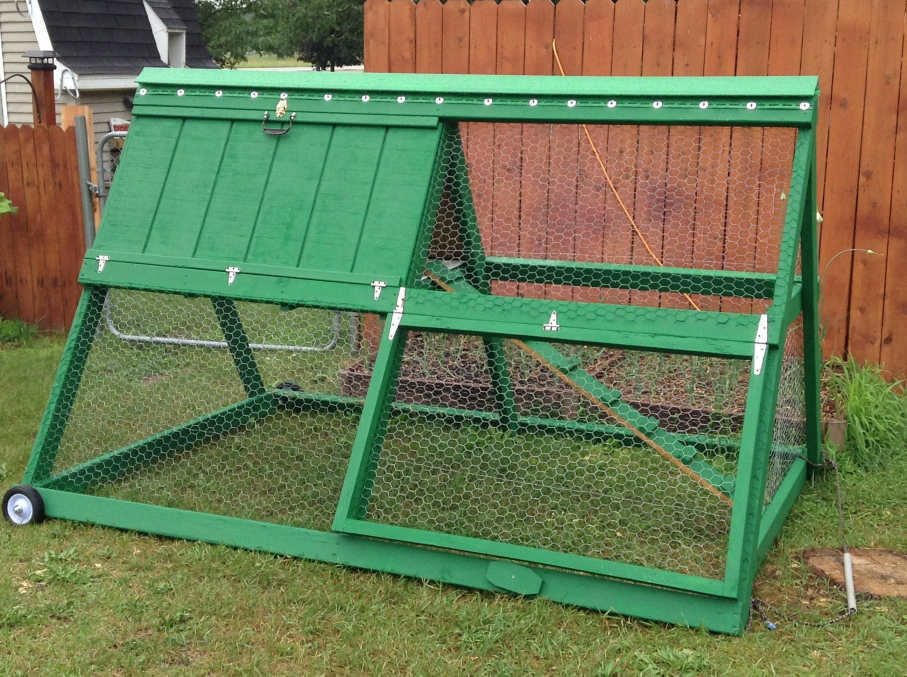
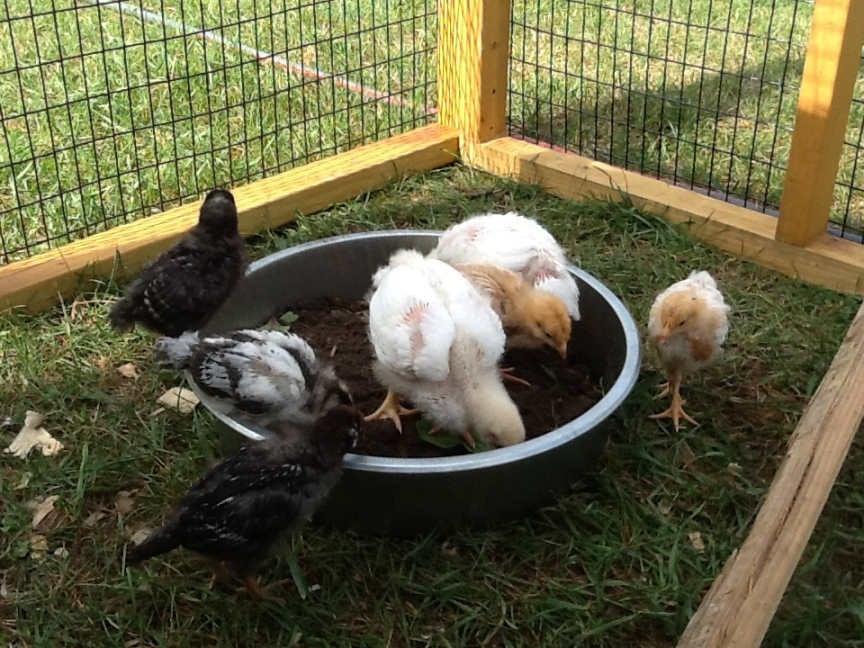
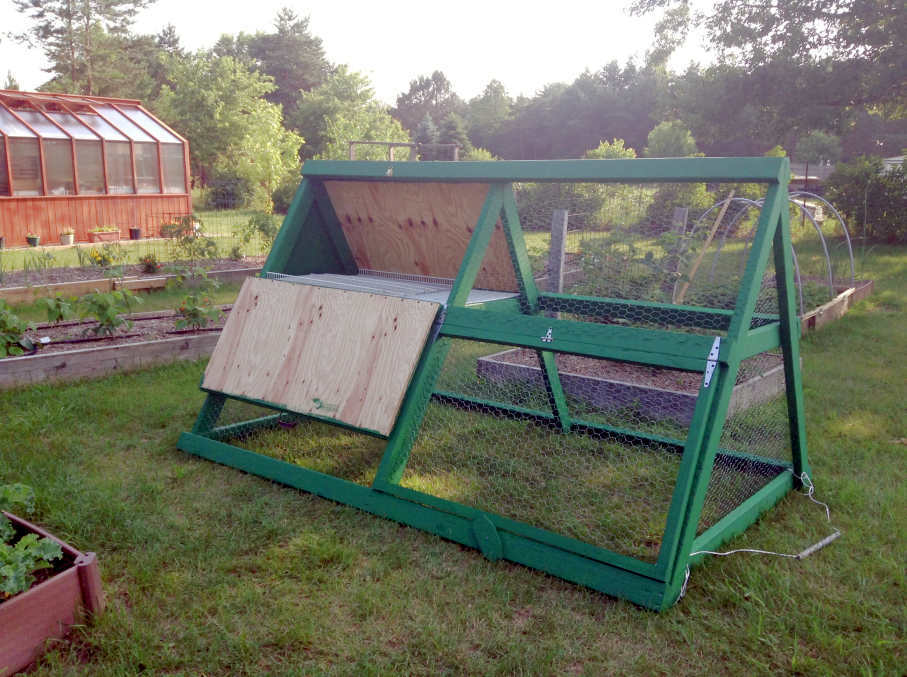
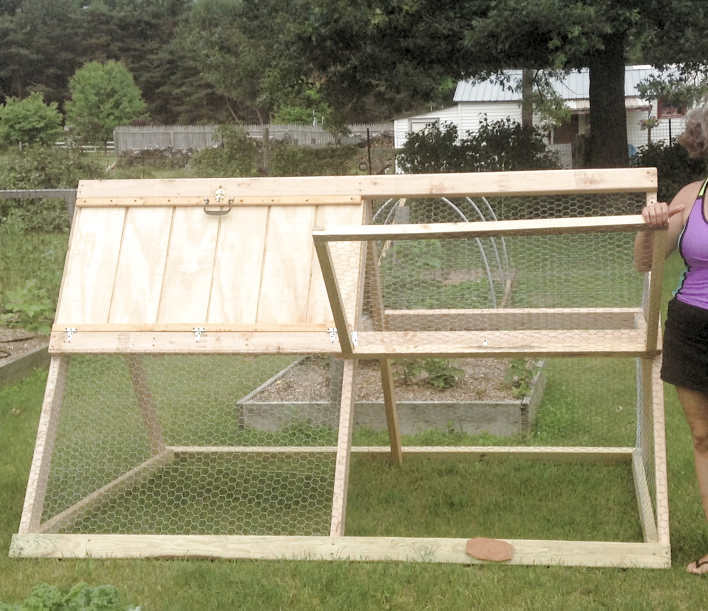
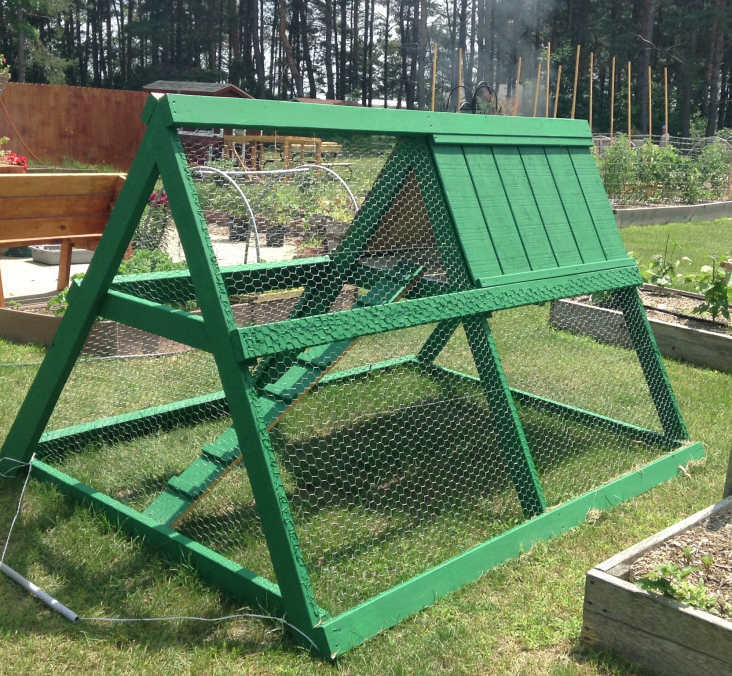
My daughter helped me build this enclosure. We used Ana's chicken run plan, but just made it taller so we could walk in easily. We added an overhang to store food and pellets under, for the supports we used Ana's easy shelves angle support plan, and finally we used the playhouse base plan for the base of turkeys house. All plans used are linked below. We ran the chicken wire out under the structure and still need to bring in some large rocks or pavers, but so far no issues with predators. Turkey was getting too big to fit in the smaller coop, so we decided to have fun with his house and used cedar fence pickets and some treated 2x4's, built a box and jig sawed the shape of a turkey. As you can see in the first photo the ladder for turkey wasn't big enough, all the other chickens were in his house, lol. So I beefed up the ladder and he happily can put himself up at night now:) Overall a super successful project, I wasn't sure what to do with the top and just at that point, the neighbor walked over and offered the metal, talk about a huge win and the perfect solution! We attached the run to the previous smaller structure and now they have so much more room and are laying like crazy:) Finally, I think this would make a great dog kennel as well...
New to raising chickens, but eager to jump right in to it.
We bought a pre-made coop for the main home for our new chicks and it's very nice, not something I could do myself since I'm not yet at that level, but I saw this chicken tractor and thought it would come in handy for what I have in mind so I made up my mind to build it.
The lumber, chicken wire, staples, and wheels are all store bought new and came to about $75. The materials we had on hand were the screws, hinges, plastic coated metal shelving (used in the nesting area, I thought that would make it easy to clean), paint, and the corner piece of vinyl siding for the roof cap (hubby's brilliant idea, and I painted it green with spray paint for vinyl).
I did not try to build it quickly, I don't really know how much time it took me, but if I had to guess I'd guess total time would amount to about 3 afternoons, by myself.
I wanted to leave the top on the one side open with the option to slap on the other boards if/when the need arises. I have the other t1-11 panels that can sit right in those areas because I stapled the chicken wire in a way that would allow it.
I also added a flip up panel as seen in the pictures for access. I didn't want a small door that I would have a hard time getting to things in there. I'm so glad I added this feature, it sure gives plenty of room for me to maintain the food and water dispensers as well as get in there and catch the little chickies :)
I wanted it green to blend into the wooded background in our backyard. I didn't want to take any beauty away from the cedar greenhouse and fencing we added last year, and this tractor would be moved from time to time and I felt this green that we had on hand was perfect to help it blend in rather than stand out.
This thing is heavy! I have a hard time moving it around and usually need my husband to move it so I won't hurt myself. I am considering some options... I don't like the rope I have on it to pull it, any suggestions would be appreciated.
As with the other items I've made with Ana's plans, this was fun and pretty easy to make. I love this site! Soon I will take on my next project, I've bought and gathered the materials, I'm anxious to get started :)
Thank you for looking :)
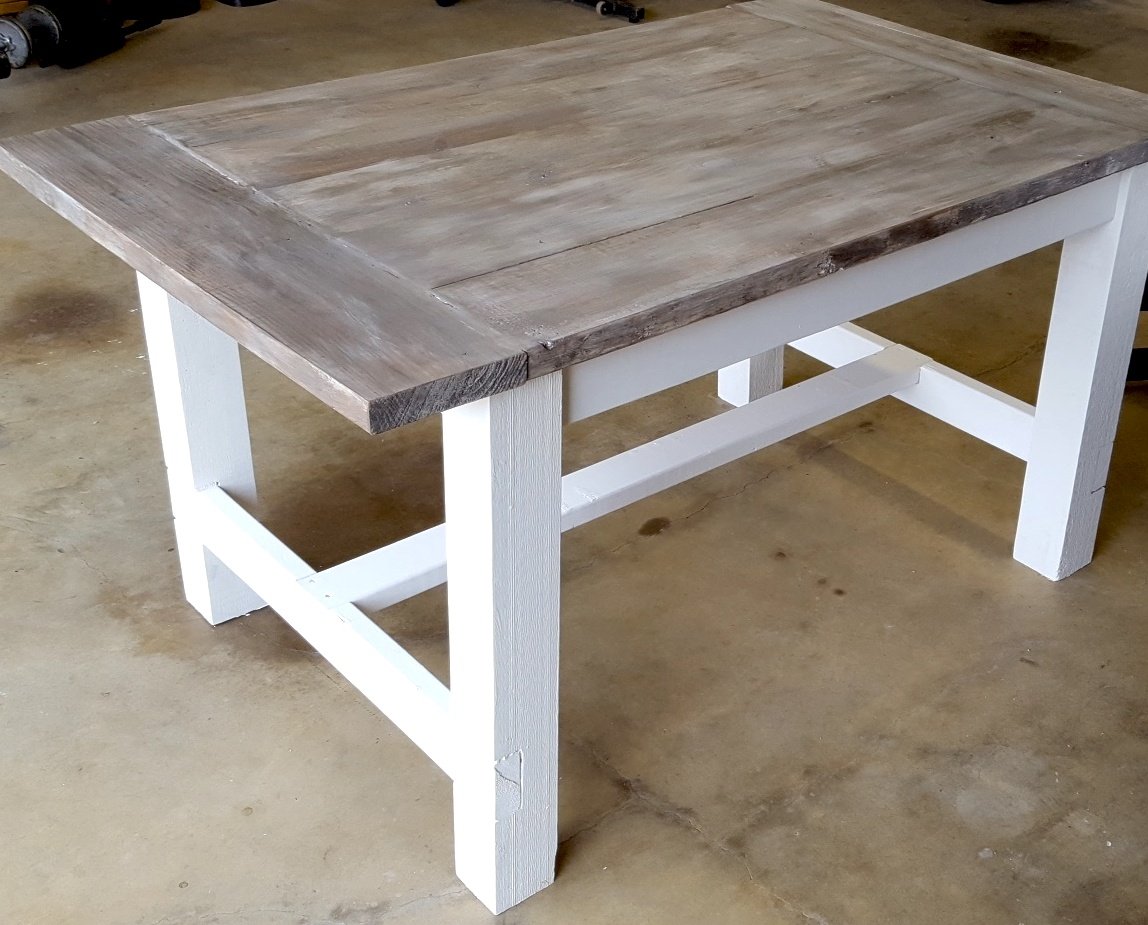
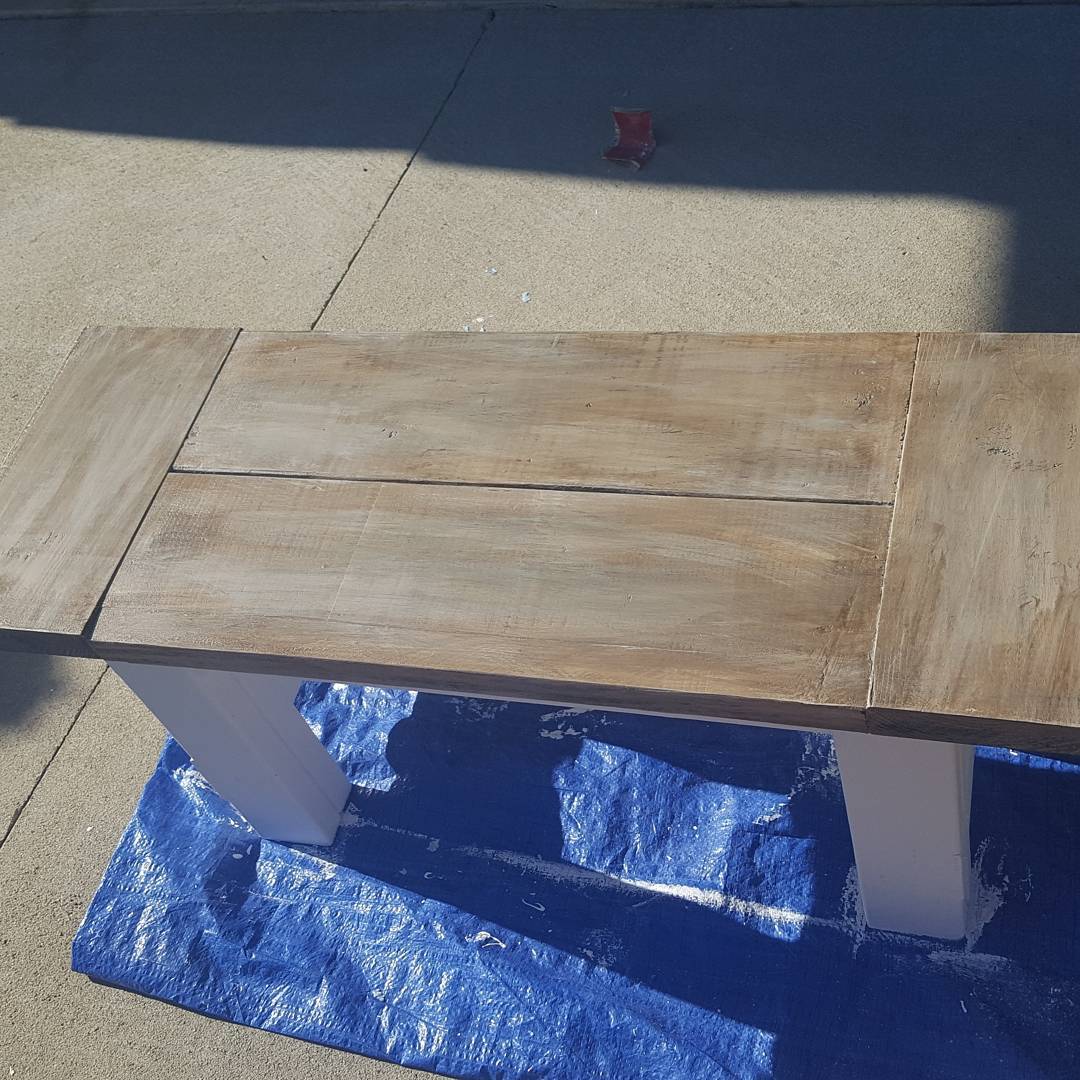
We went off the Farmhouse table and bench design but had to customize the length of the table and bench so that it fit in our kitchen space. The table was our first ever project and we made a few mistakes but learned from them and built the bench and are hoping to move up to the Farmhouse bed and then the fullstorage bed.
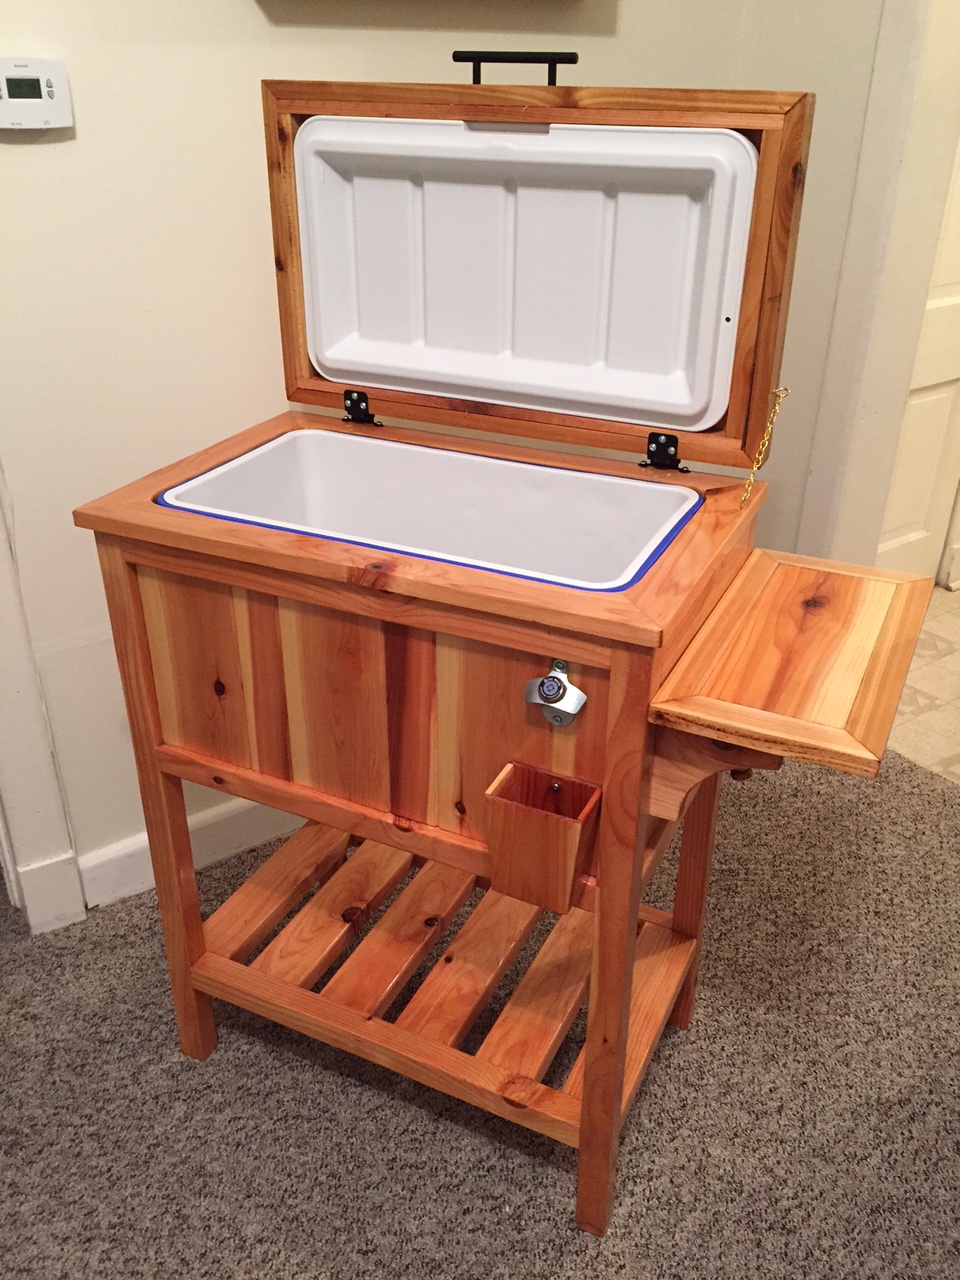
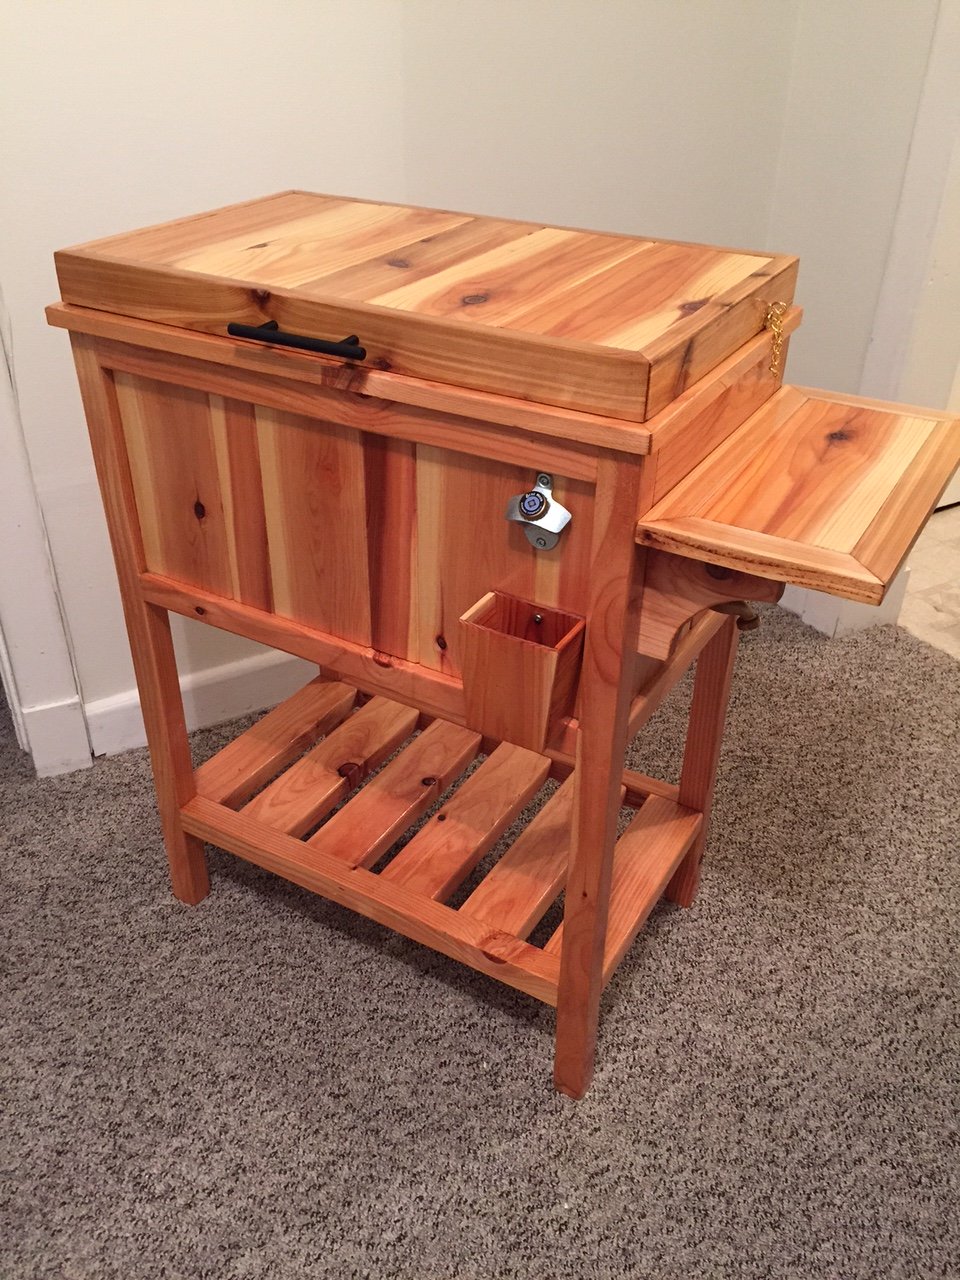
This is the cooler stand presented by Jenny from Birdsandsaoap. Very easy to build and always ends up with someone asking to buy it or have you make them one.
Wed, 06/10/2015 - 11:34
The plans for this can be found at the following web adress: http://ana-white.com/2013/06/plans/wood-cooler-birds-and-soap
Hope this helps
Wed, 09/21/2016 - 08:07
New to this site. How do I get the plans for the Wooden Cooler Stand?
Thank you!
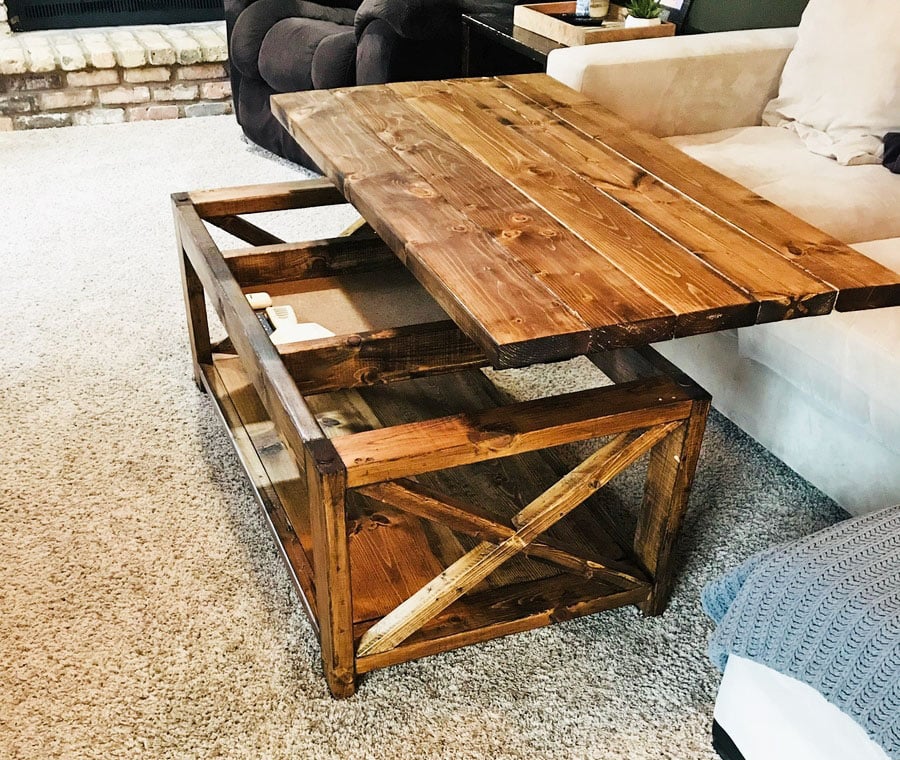
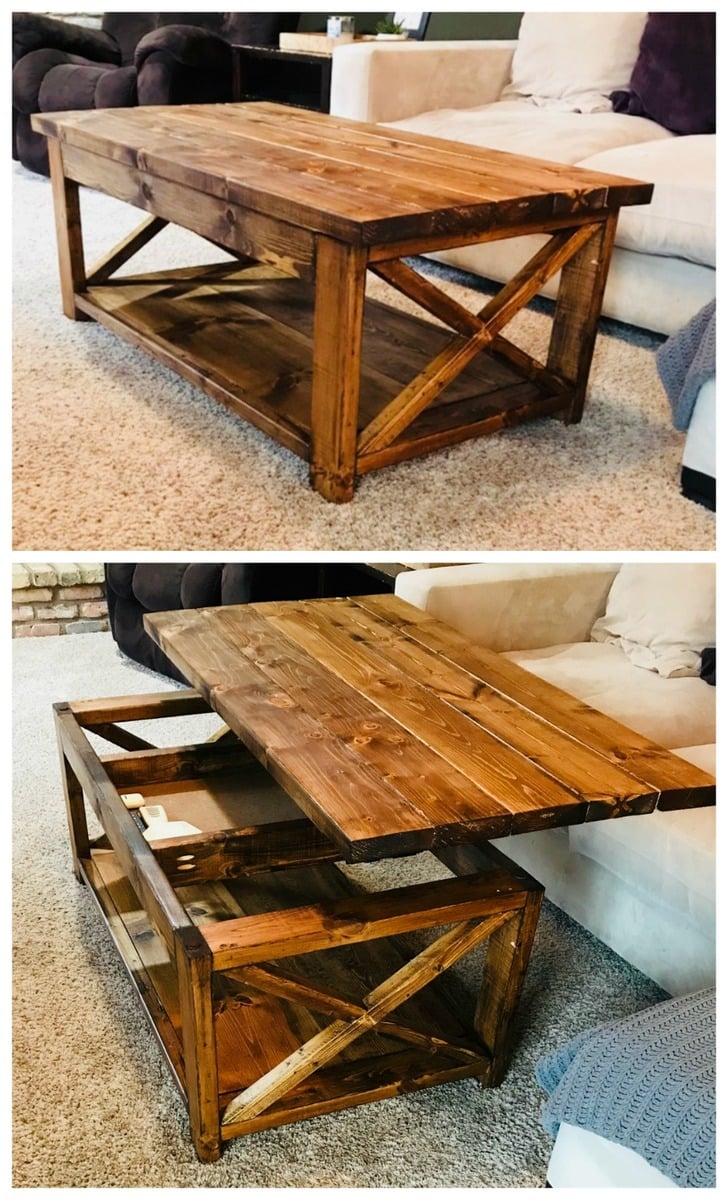
Instead of attaching the top to the coffee table base as done in the plans, the top is attached using a set of coffee table lift top hinges.
Fri, 08/21/2020 - 23:38
Looks wonderful, love the finish. What kind of stain did you use?
Wed, 09/30/2020 - 19:59
I love this table. It is just what l have been looking for. Is there any instructions. I would love to make this.
thanks
peggy
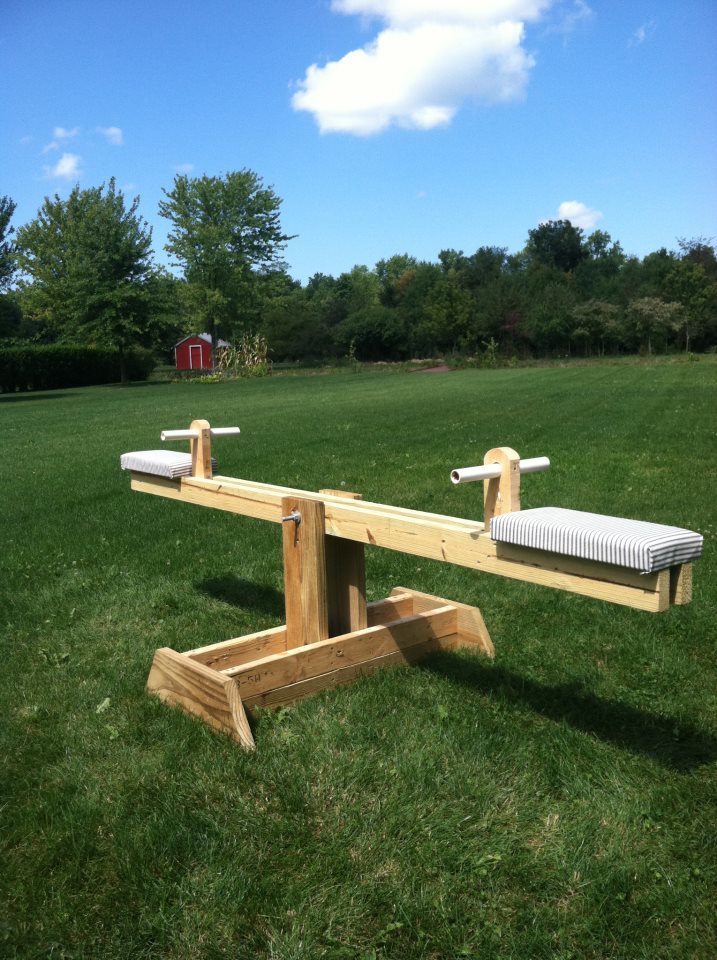
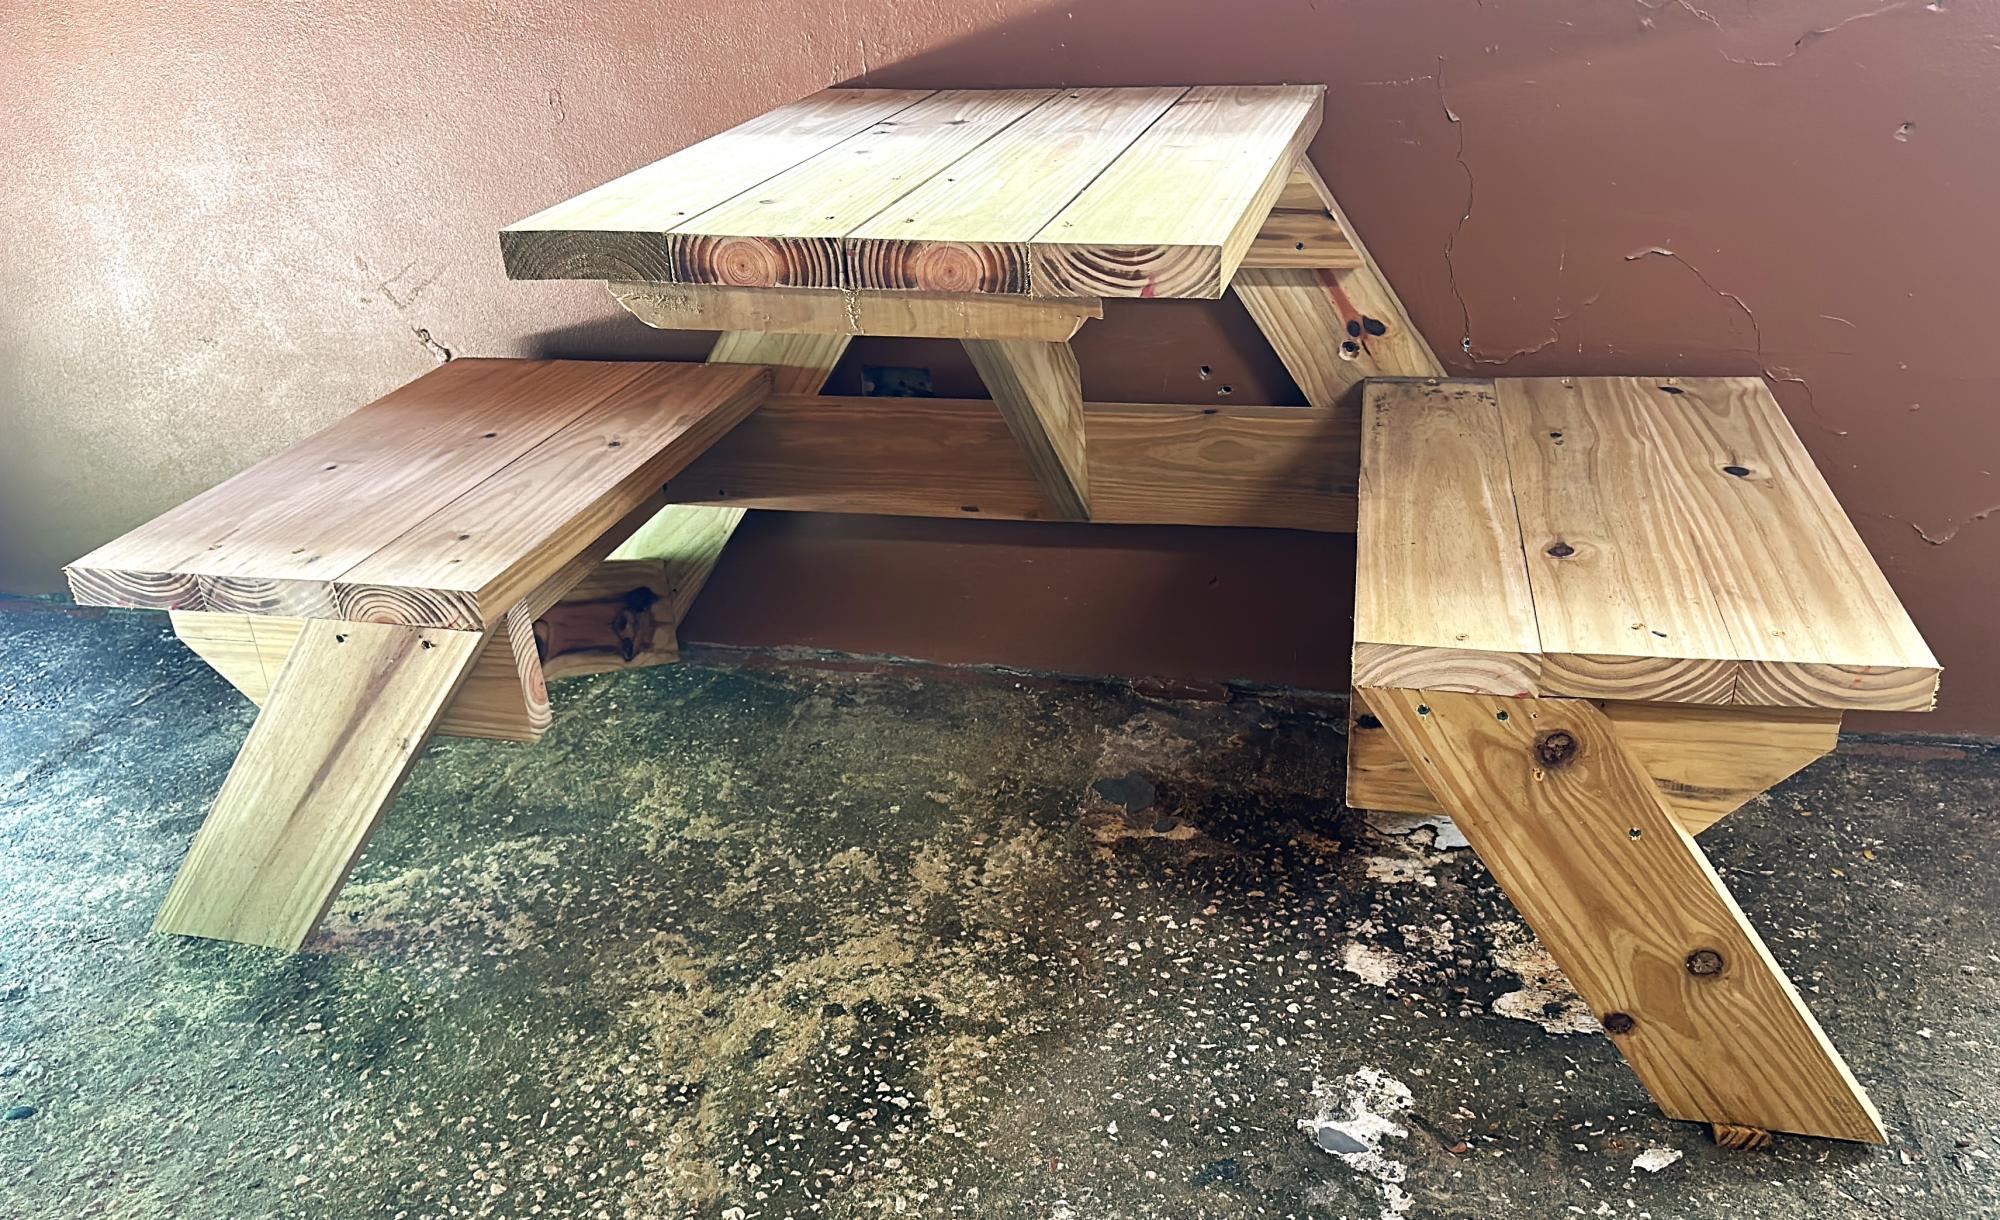
This is one of the cheapest projects for my kids I have ever completed!! And the most rewarding. I think everyone of my neighbors has been on the teeter totter...including adults :) My kids just love it and I am thinking of making a few for my nephews for Christmas. I was able to find all the wood I needed in my scrap pile. I had the PVC pipe and bolt already also so all I had to make a trip to the store for was the foam for the seats. My son helped me build this in an hour. I liked the unfinished look so I just sprayed it with a little Thompson Water Seal. Thank you Ana White!!
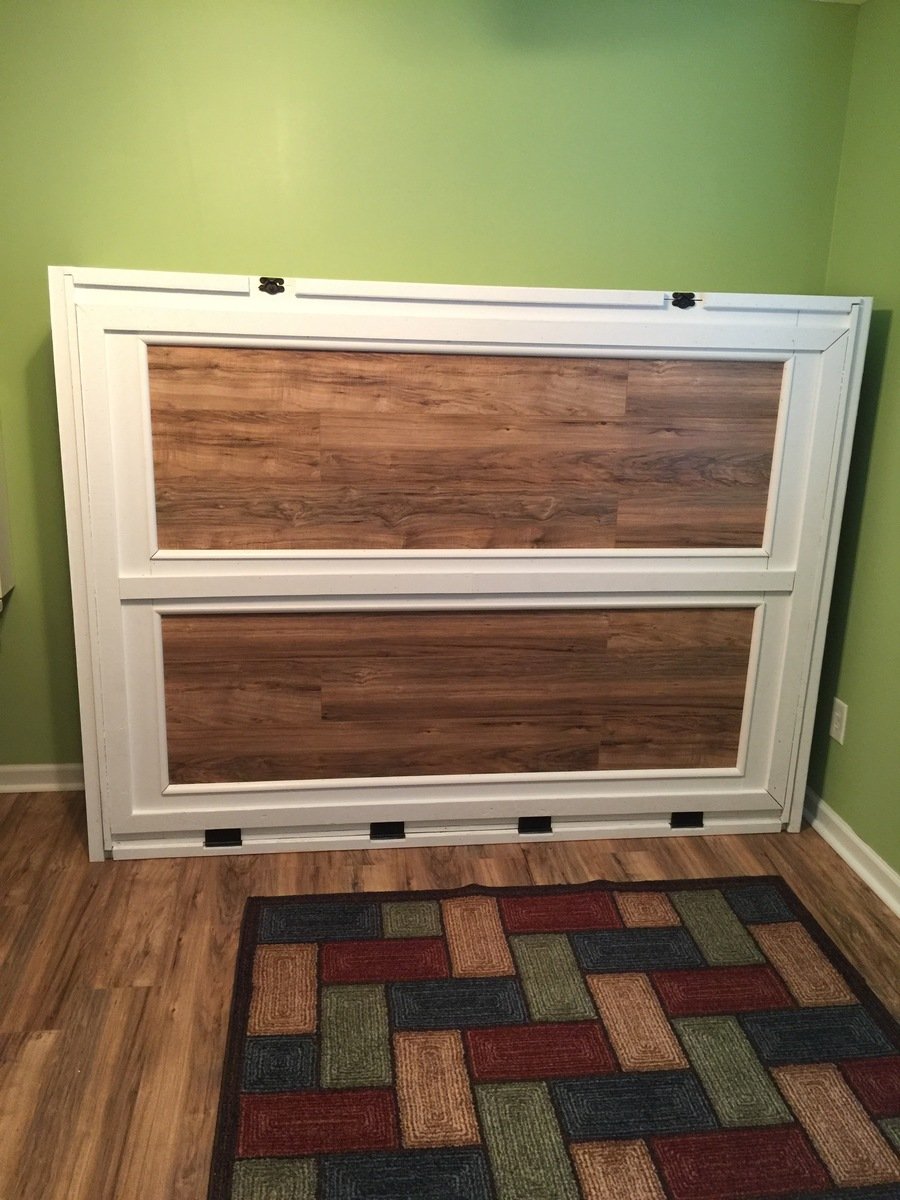
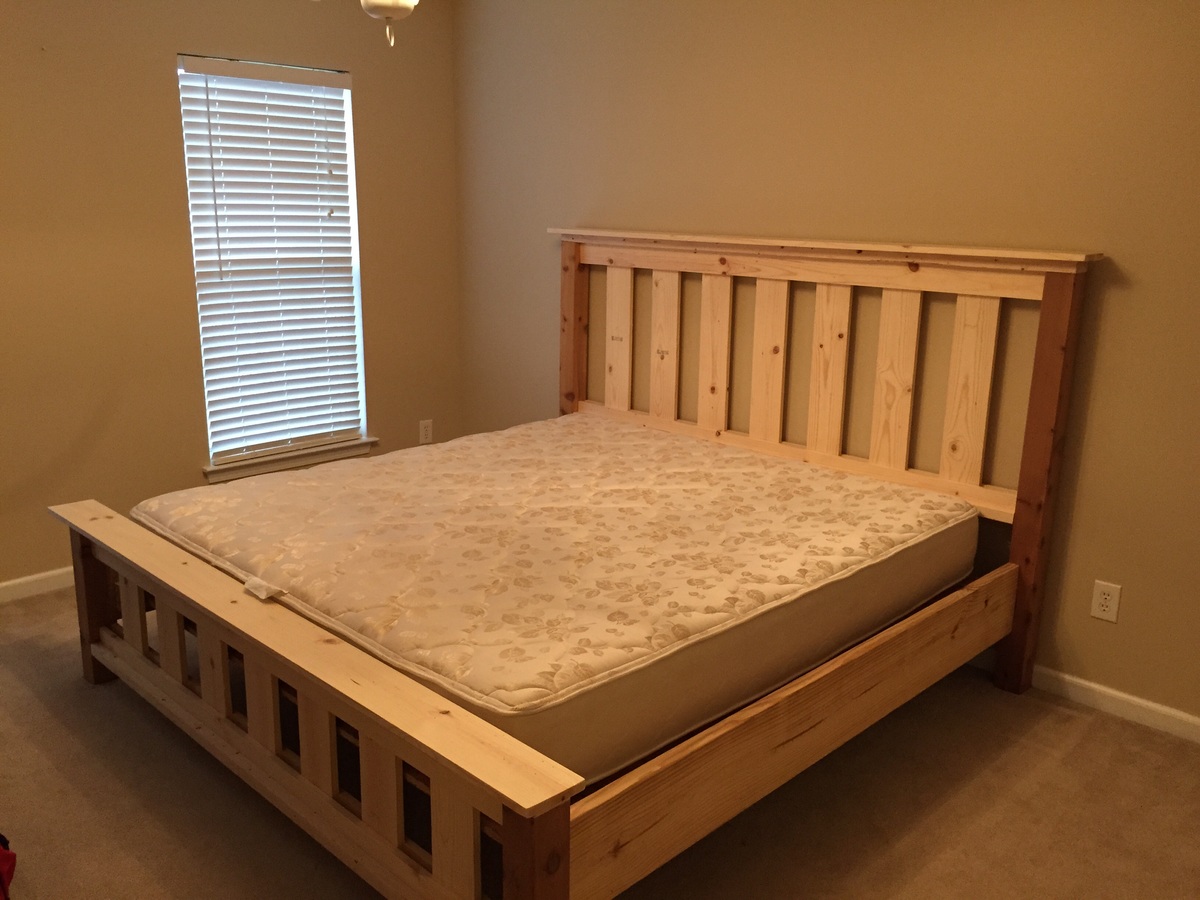
Not too bad of a project but had to a good bit of guess work so I could changed the plans for a queen size bed and flip in on its side.
Sun, 05/29/2016 - 18:50
Good evening!
I am new at wood working, and would be very interrested in knowing the different measurements you changed to get from a twin to queen murphy bed. If it is posted on this page, I tried but couldn't find it. Thank you for your help. Have a good day.
Marie-Julie

Thank you! You've helped me look like a true carpenter who knows what he's doing! My whole family is impressed with my woodwork lately, and now I'm addicted. I've done your seesaw, bar table and stools plus the treehouse in 2 weeks. Thank you for sharing your plans!


Made 2 of these for my coffee shop in Puerto Rico. Easy instructions. Thank you!
Javiel Cardona
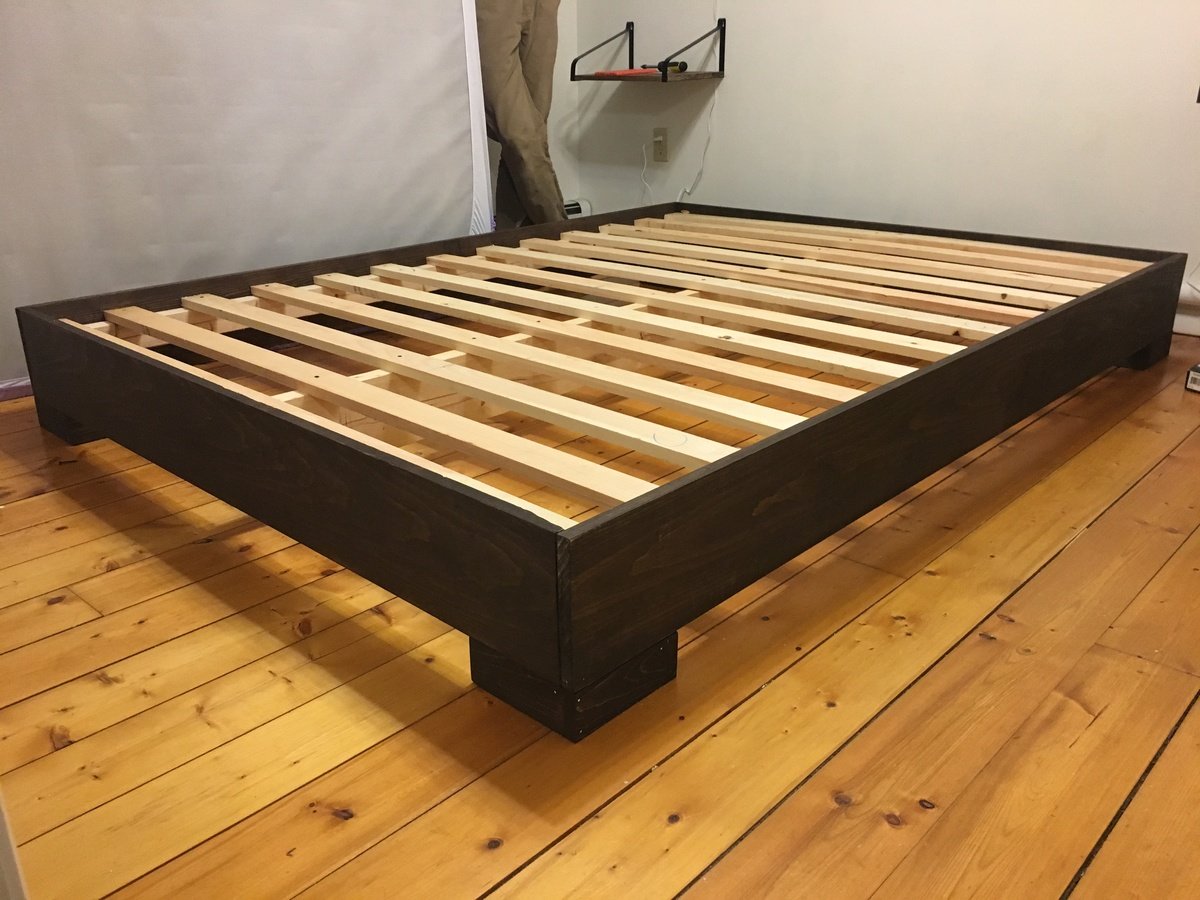
I got tired of sleeping on the floor like college kids, but I didn’t want to buy a junky particle board bedframe. My husband and I are novice woodworkers. Even still, we bought the lumber around noon and managed to finish the whole project in about 5-6 hours! We used a Kreg jig for the first time and it was pretty simple. I am really pleased with how this turned out, and I can’t wait to try more of Ana’s plans in the future.
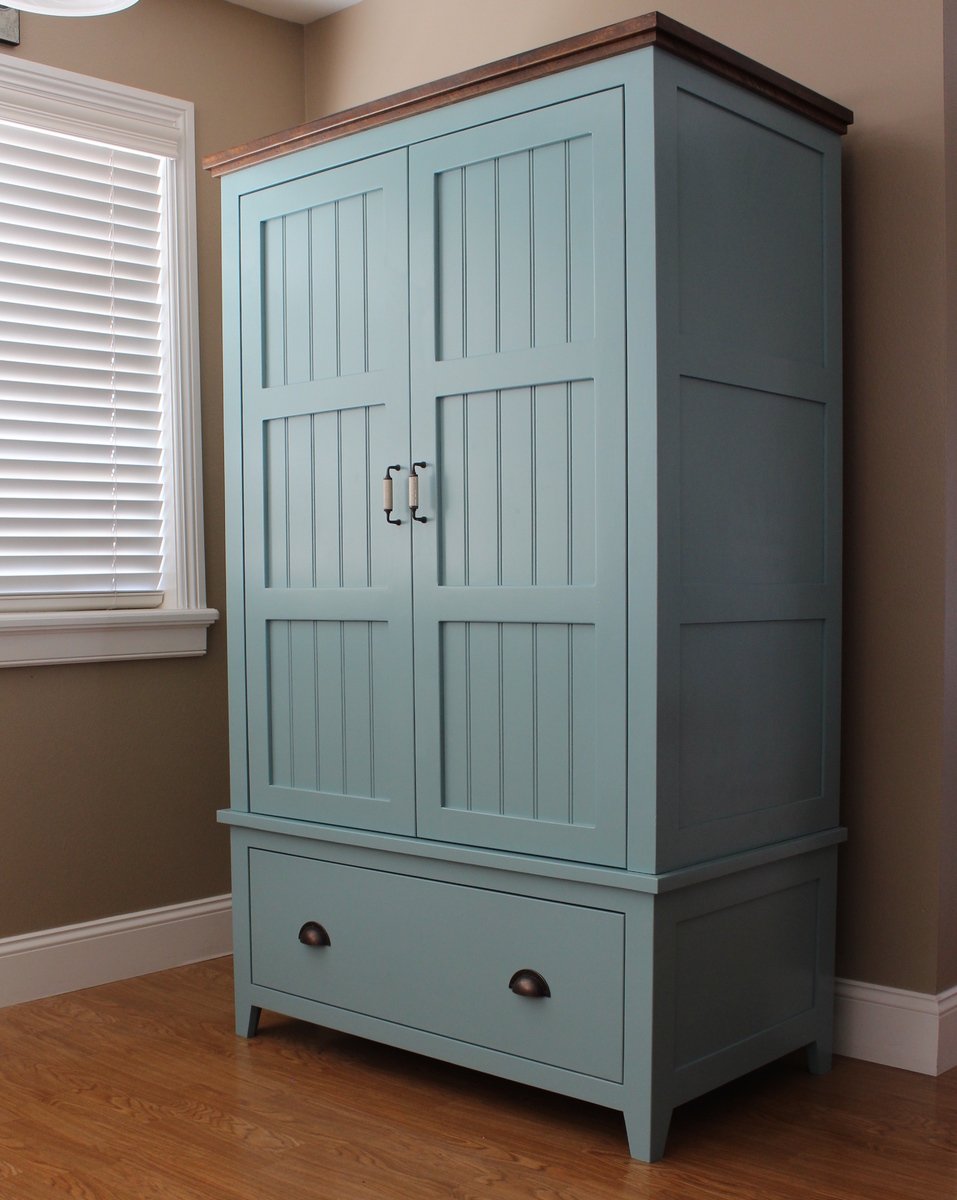
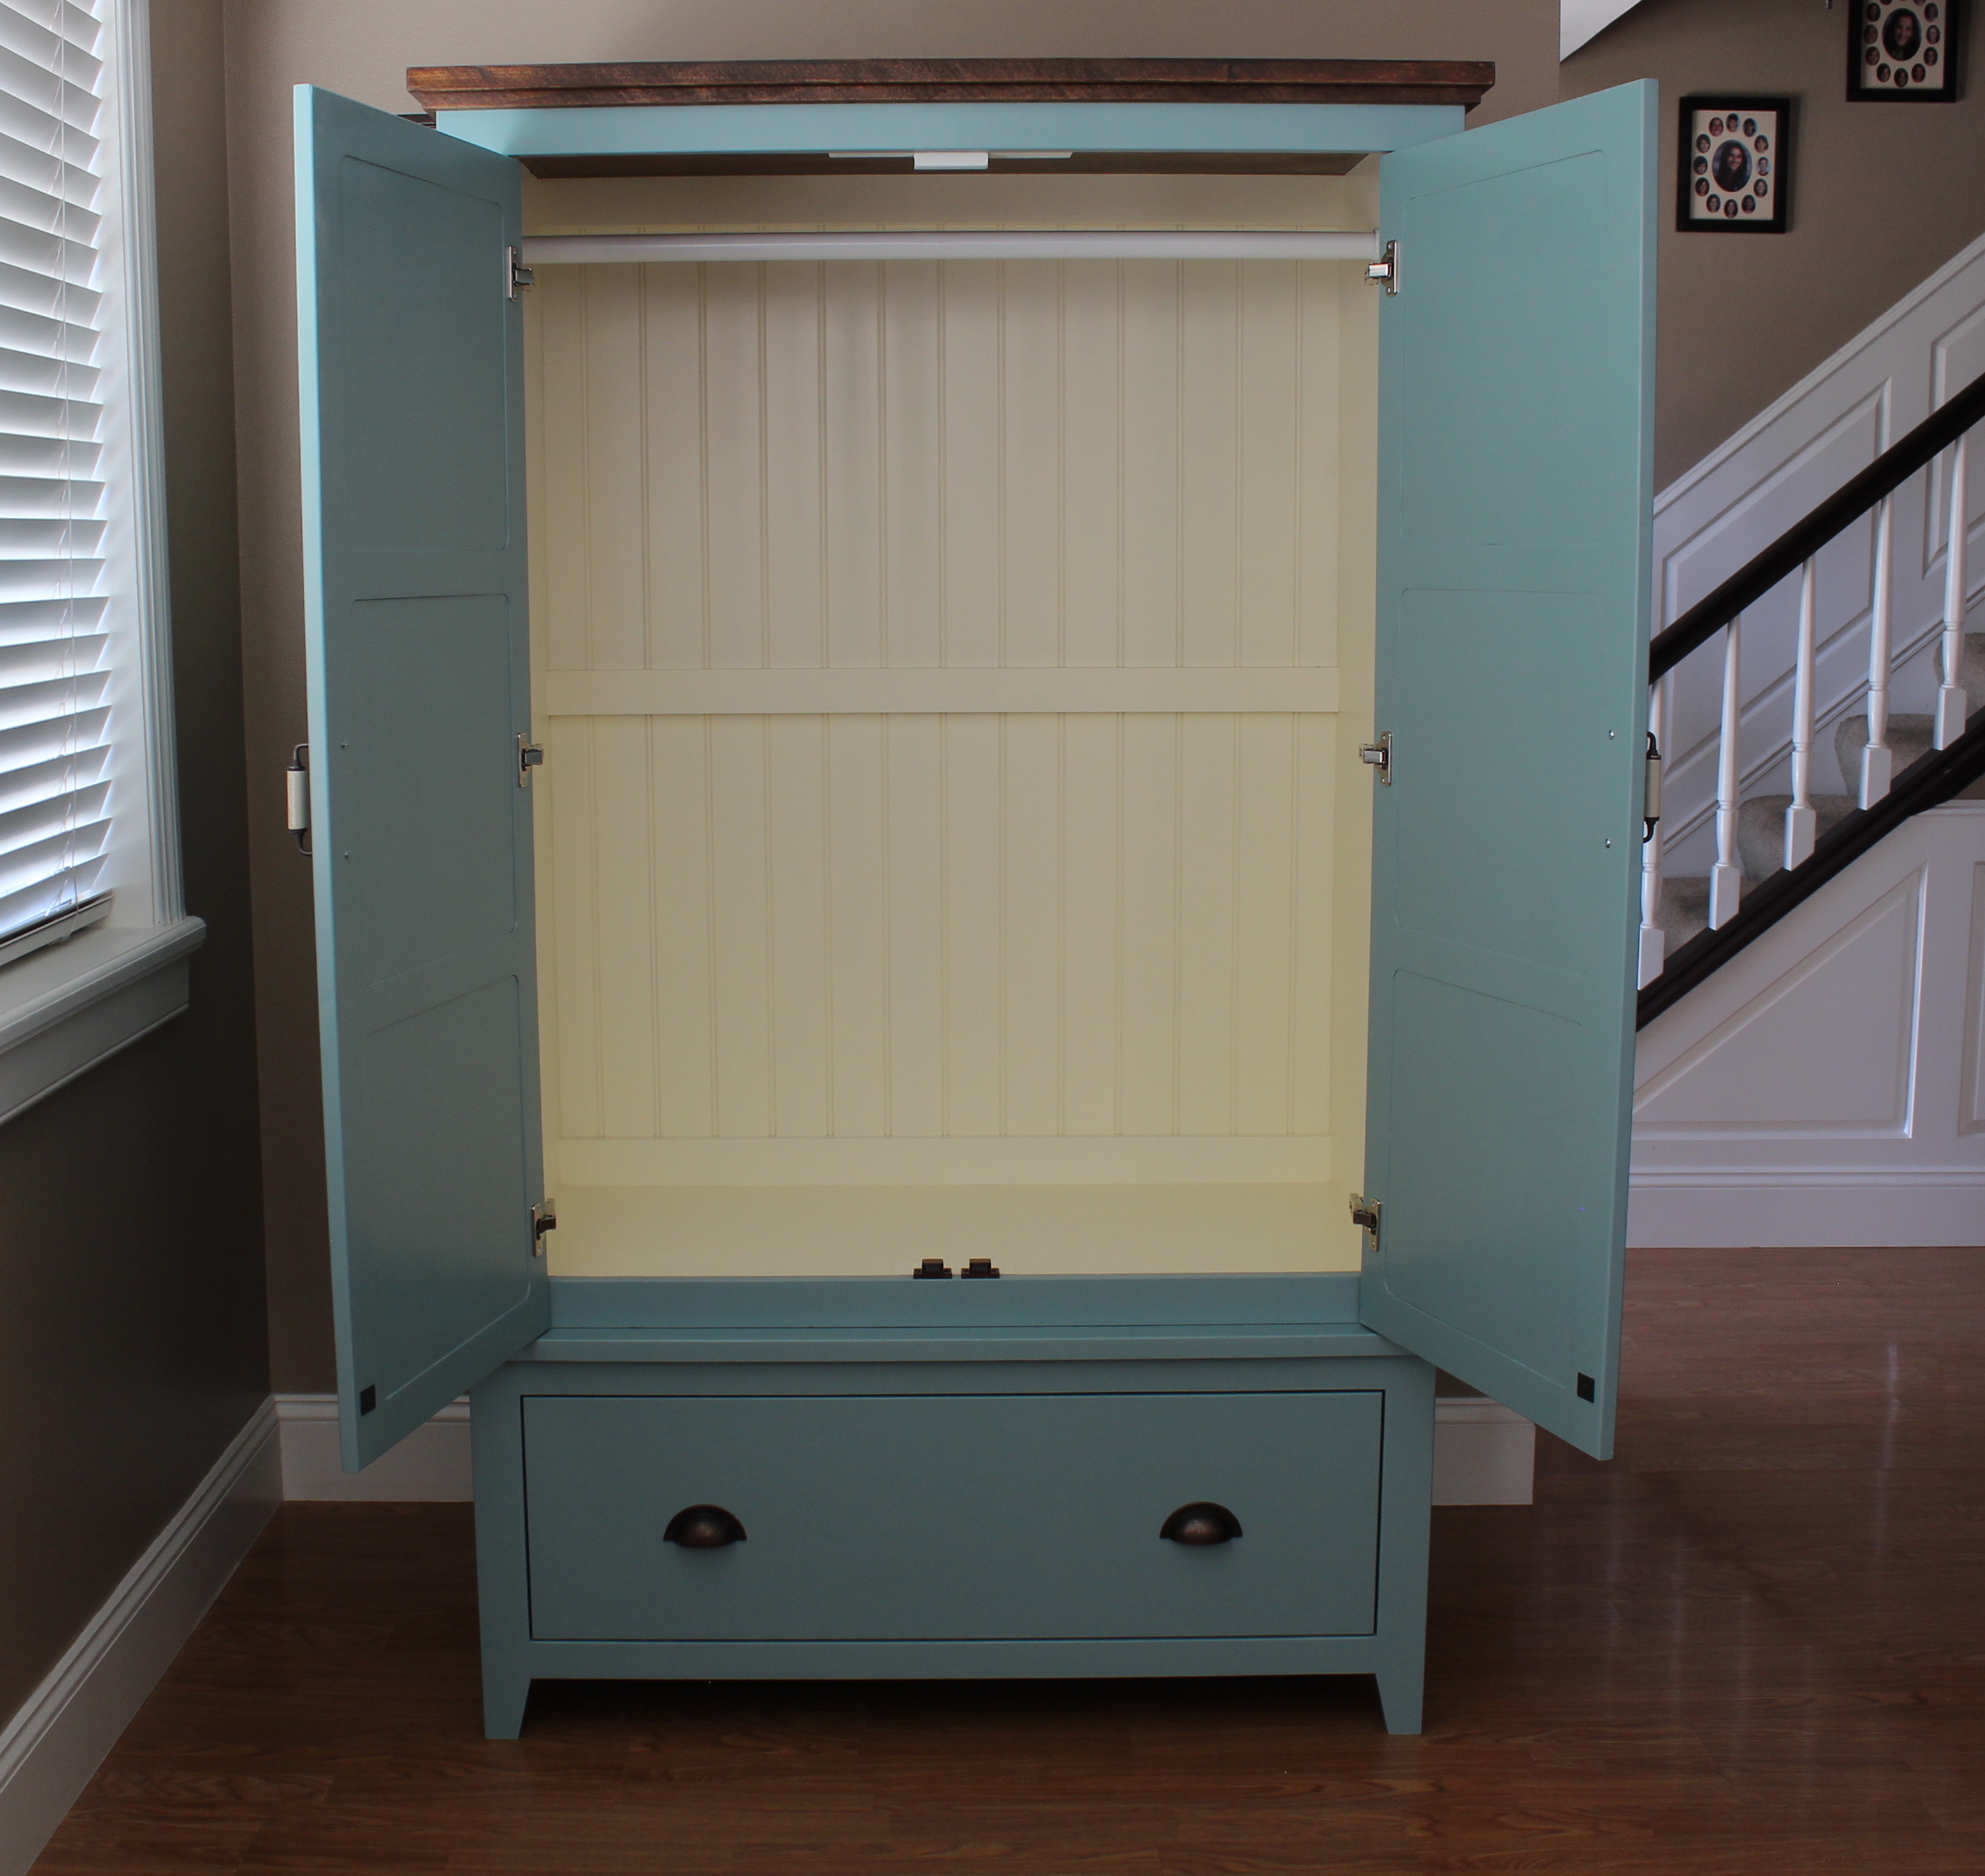
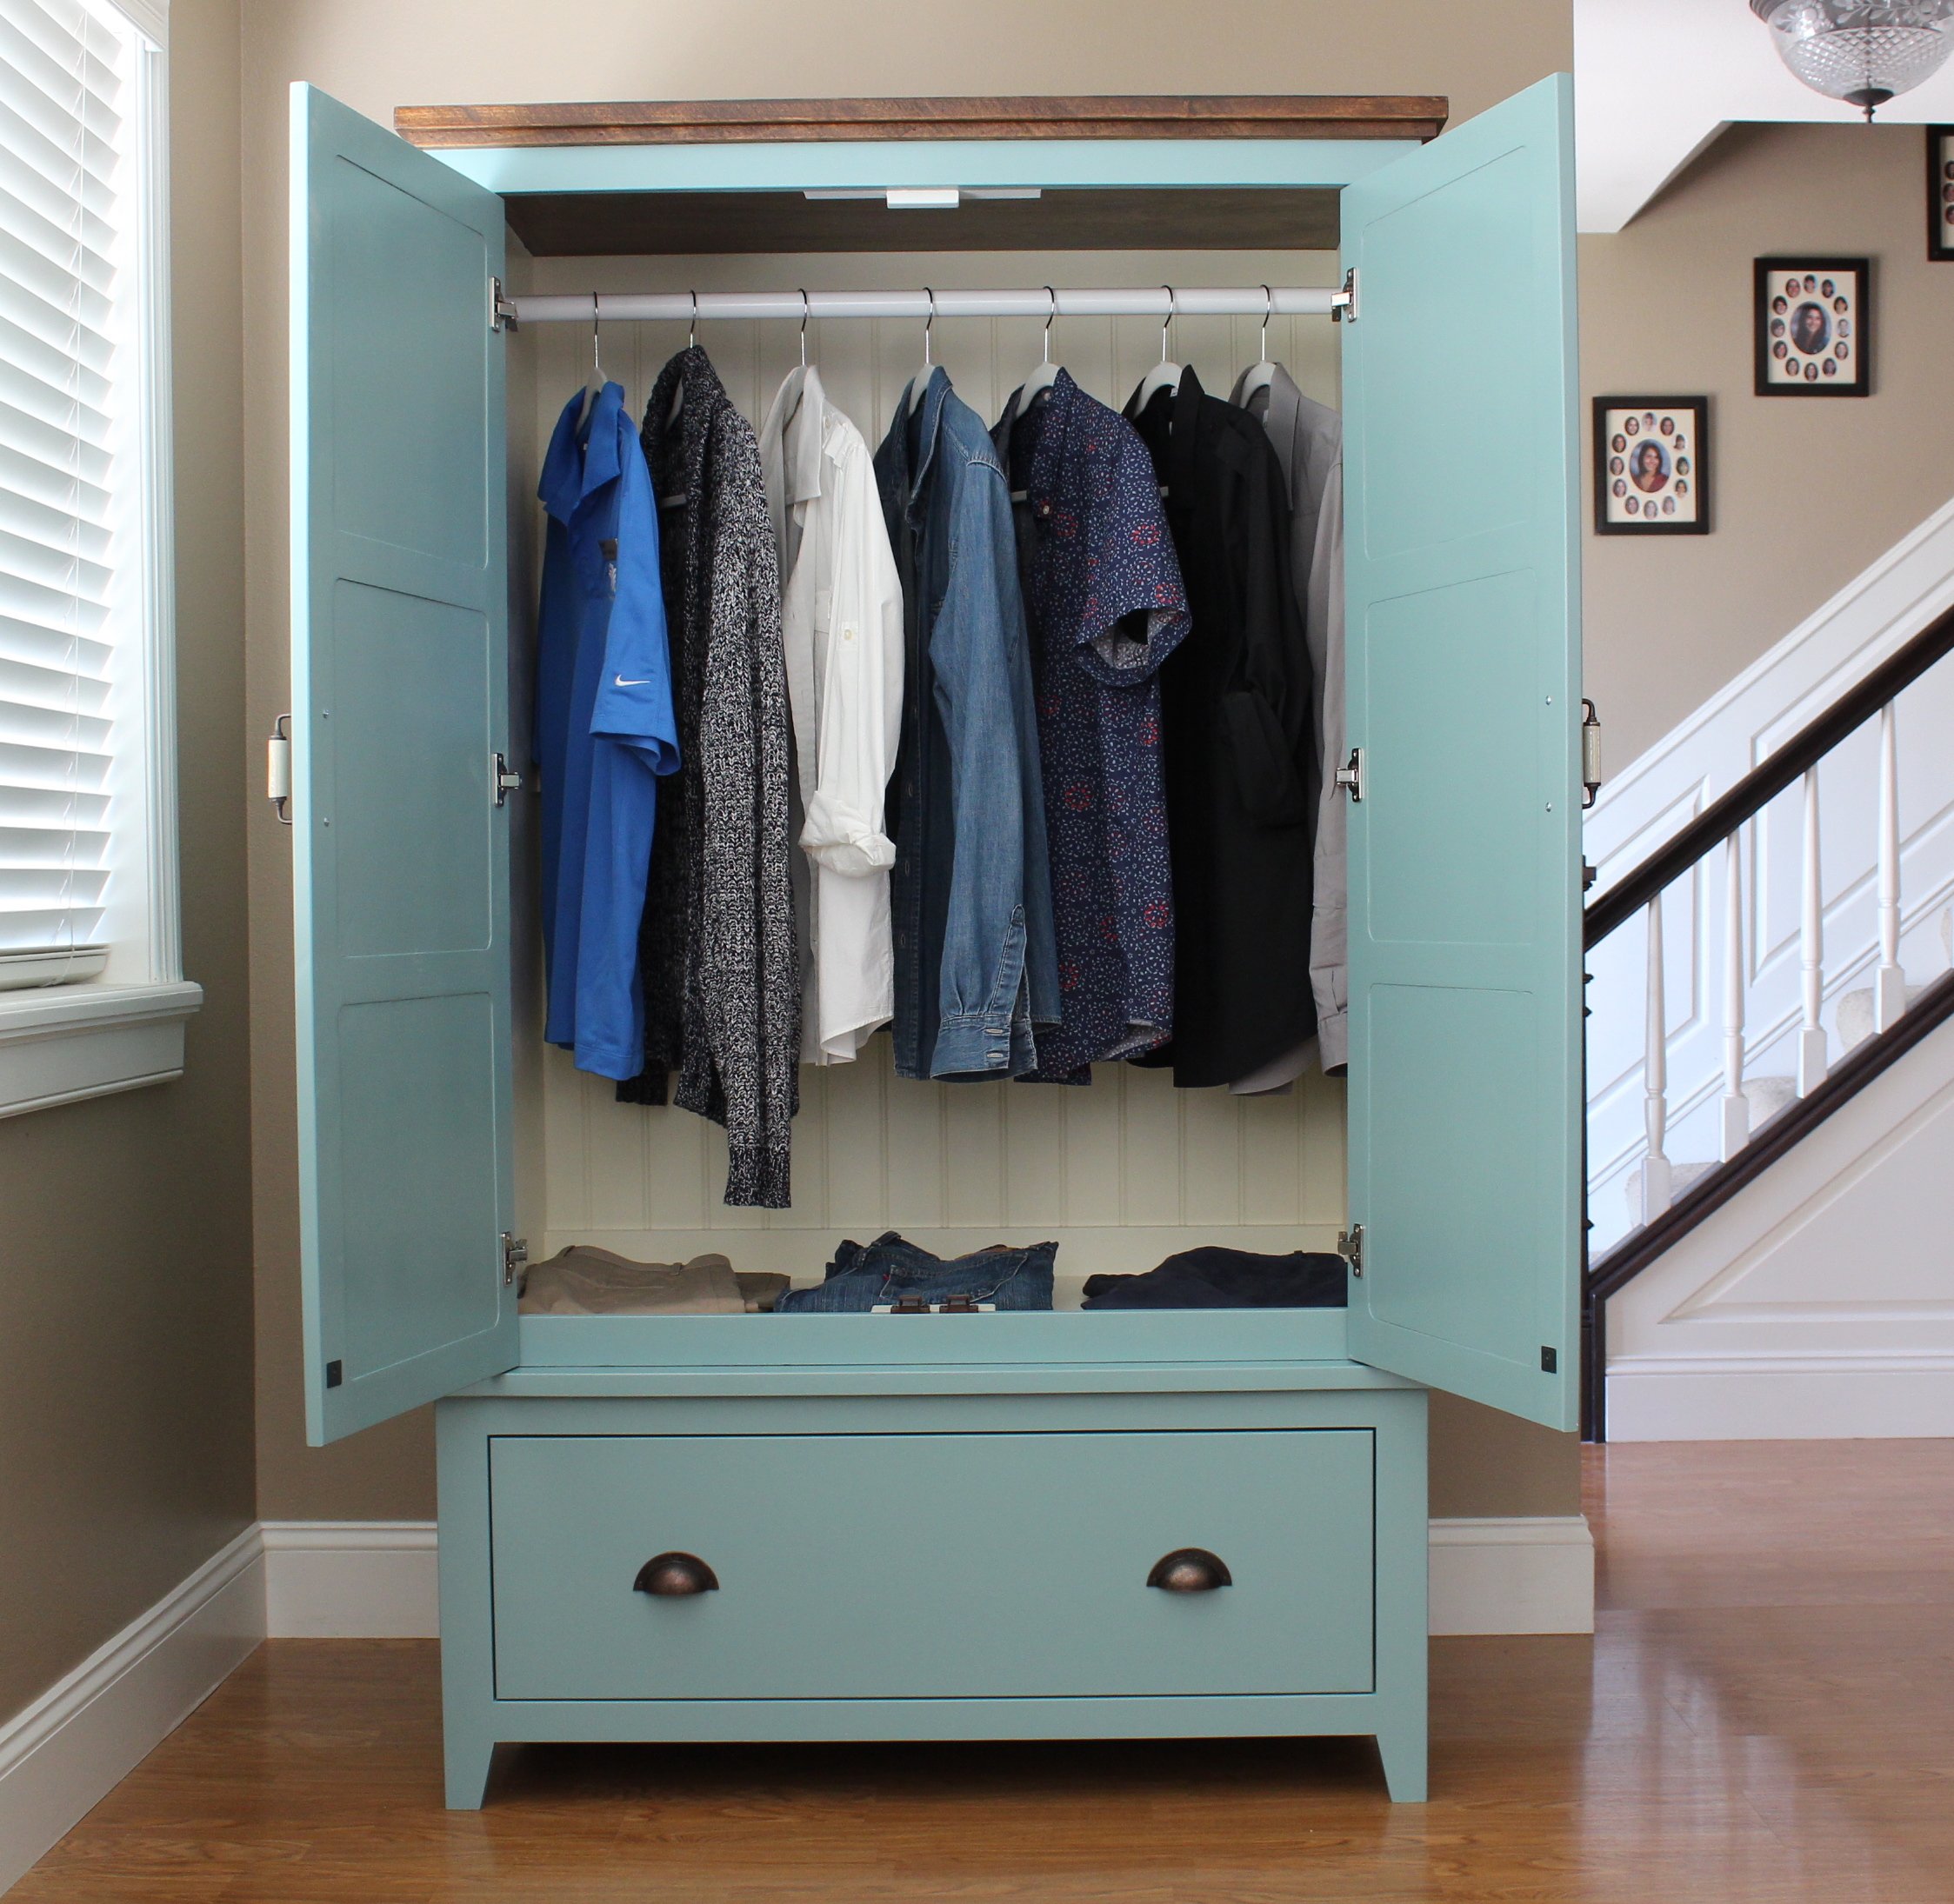
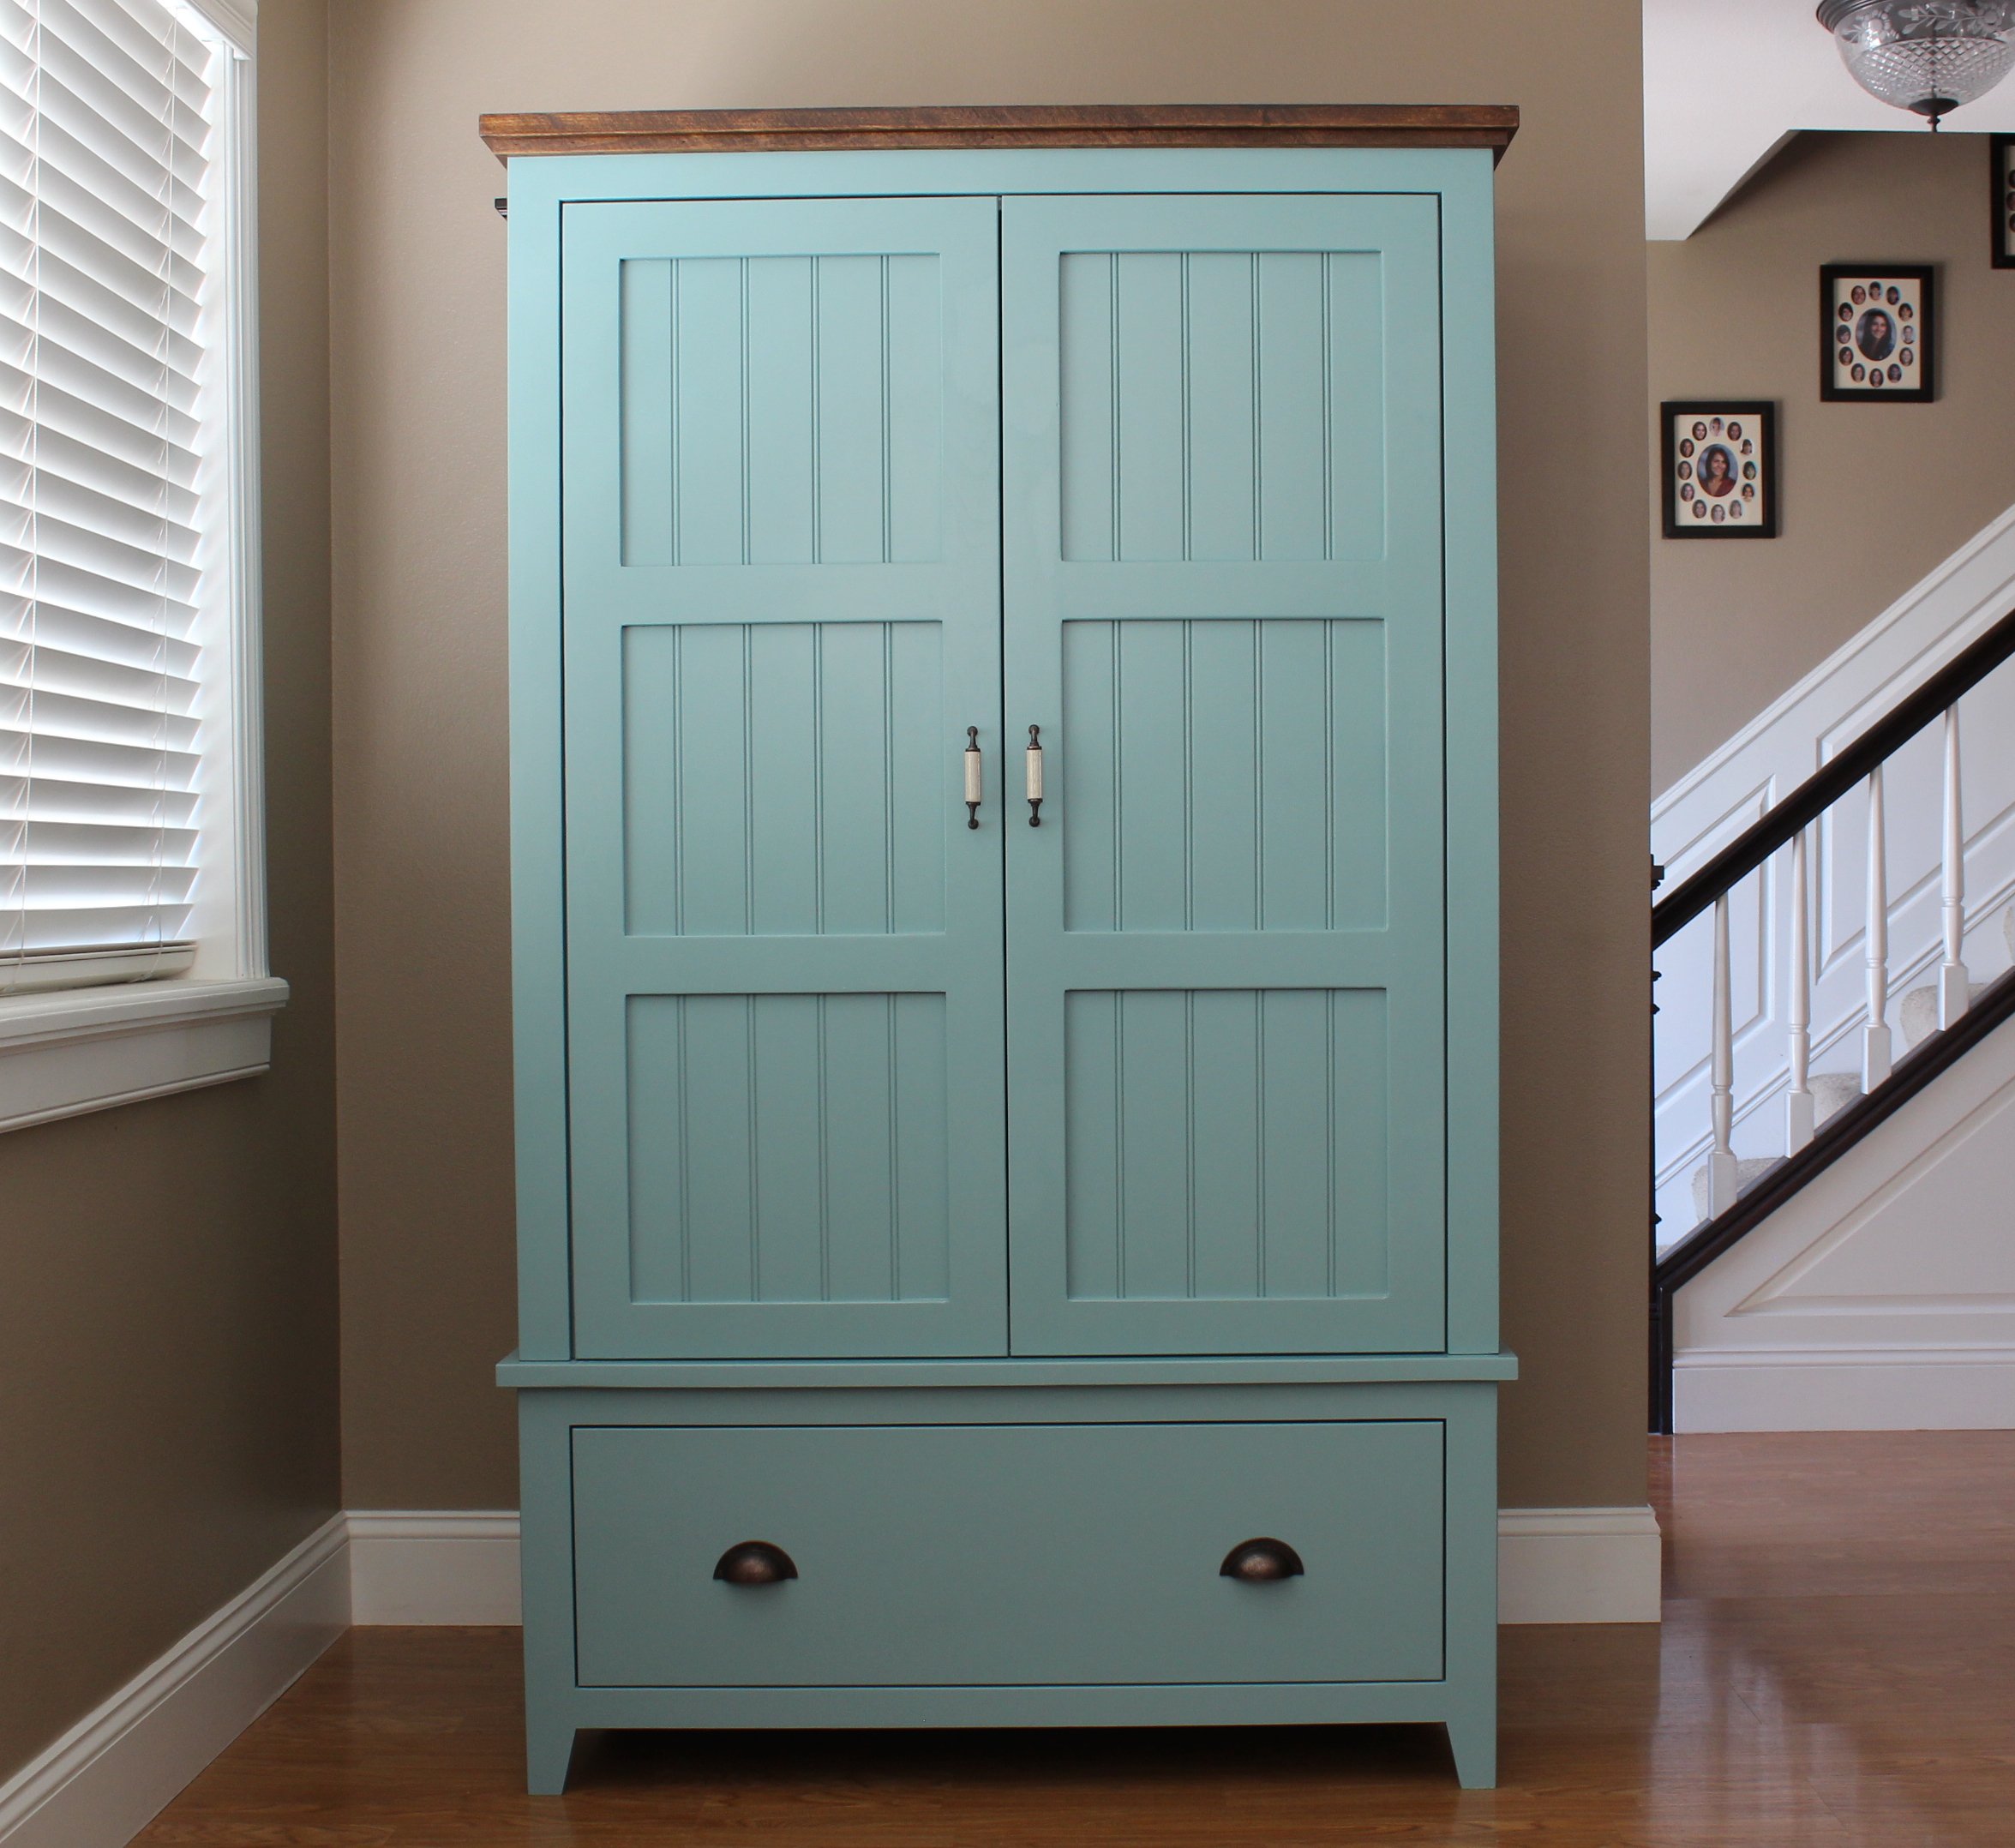
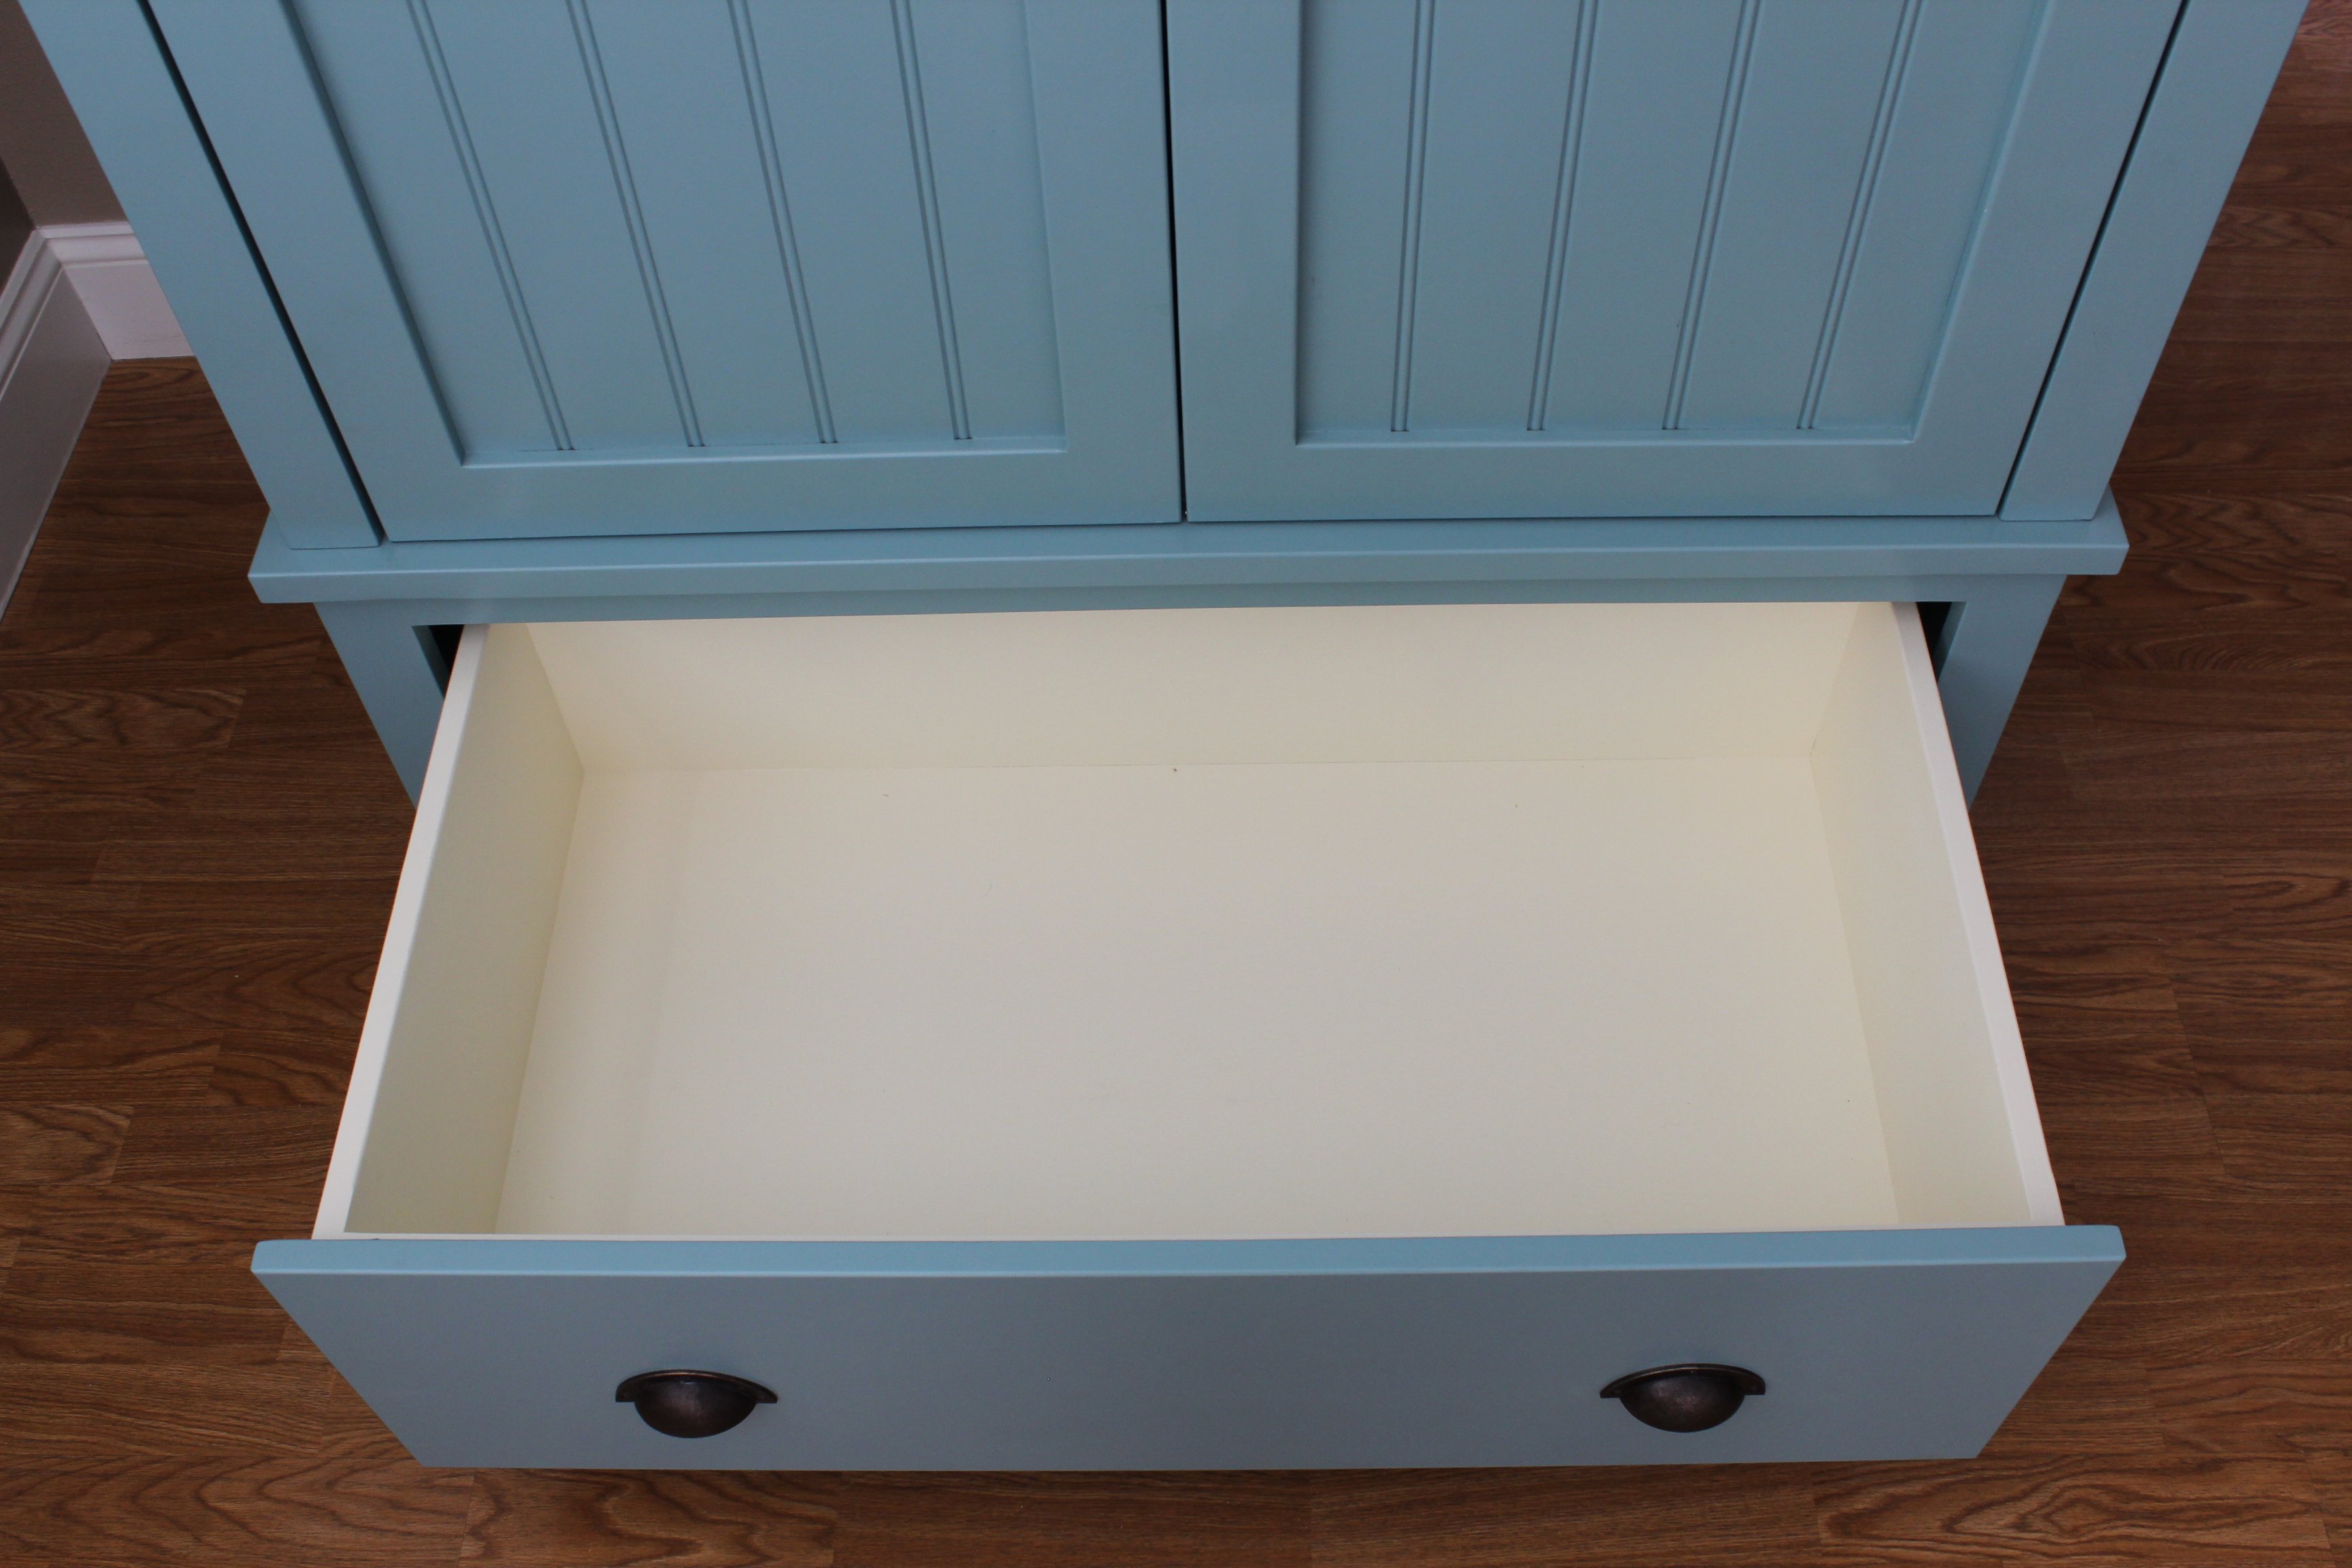
This is probably one of my favorite pieces I have built. Challenging but fun. I built it as two separate sections, an upper and lower cabinet to make it easier to carry indoors. I added a full-extension drawer below for storage. The two-toned paint combination did take a lot of extra time. Because I used an airless spraying to paint I had to tape and cover each section separately.


Fri, 03/06/2015 - 10:43
WOW it looks awesome the extra time spent on the painting was more than worth it looks spectacular. I bet you also could make a great profit selling this Wardrobe either on line or in a consignment shop, if I had the need for one and the money I would defiantly buy one!!

Sat, 03/07/2015 - 18:55
I love all the attention to detail. Great job! I especially love the color selection. How did you achieve the look of the top stained piece?
In reply to I love all the attention to by handmadewithash
Mon, 03/09/2015 - 22:01
Hi Ashley,
The top was built separate, stained, varnished and then attached to the painted wardrobe. :)
- Brad
Sun, 03/08/2015 - 07:36
This looks awesome! I love the the paint finish and it your profession work

Mon, 03/09/2015 - 17:30
I agree this is your best so far...which is hard to say b/c all your projects are amazing! I love the style, the paint colors, the stained top, and the hardware!
In reply to Beyond Beautiful by TwoCuteKids
Mon, 03/09/2015 - 22:02
Thank you so much! :)
Sat, 03/19/2016 - 15:06
It looks really great!
I have fallen in love with it the second I saw it and somehow I am now convinced that I need a new wardrobe ;)
I guess you don't have plans for the wardrobe laying around - but would you mind doing a fast sketch (just a simple one on paper) with all the measurements noted? I would be thrilled to try building it myself in the summer.
Greetings from Germany!
Sat, 03/19/2016 - 15:07
It looks really great!
I have fallen in love with it the second I saw it and somehow I am now convinced that I need a new wardrobe ;)
I guess you don't have plans for the wardrobe laying around - but would you mind doing a fast sketch (just a simple one on paper) with all the measurements noted? I would be thrilled to try building it myself in the summer.
Greetings from Germany!
Tue, 07/18/2017 - 05:43
Are there plans used for this beautiful piece? I do not see any links. Help please!! I absolutely need to make this armoire :) :)

Fri, 01/03/2020 - 08:09
Anyway I can get plans for this beautiful piece?
Mon, 01/03/2022 - 05:53
Love this wardrobe! Are there plans available to build it?
Thank you.
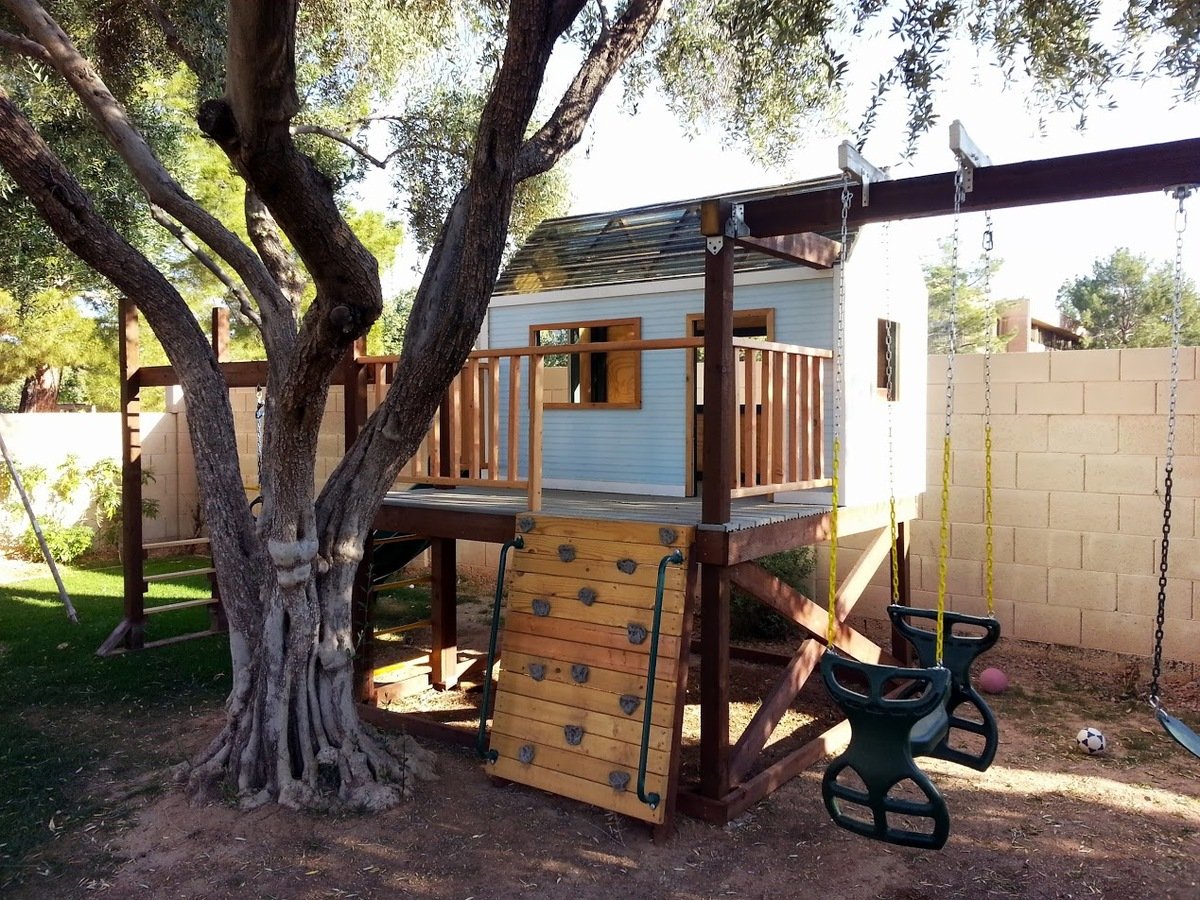
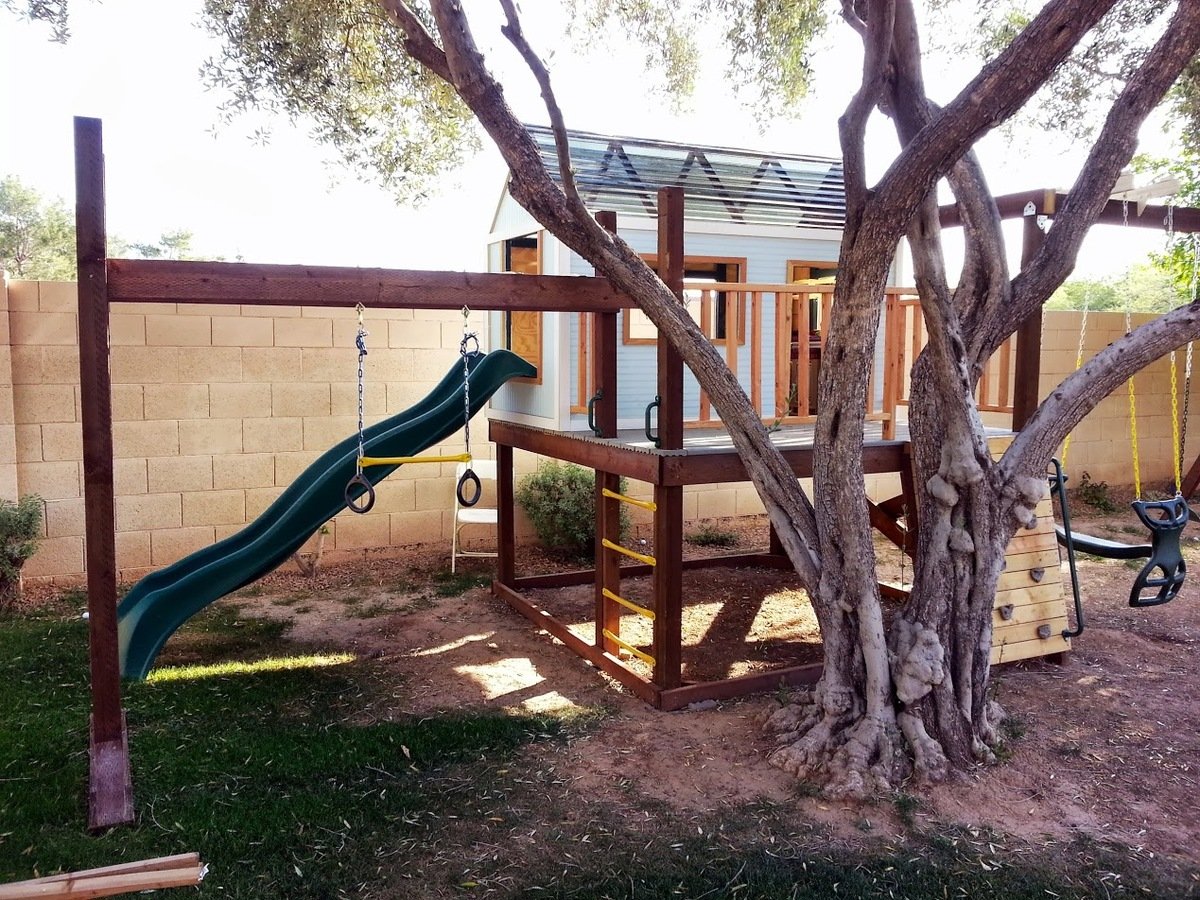
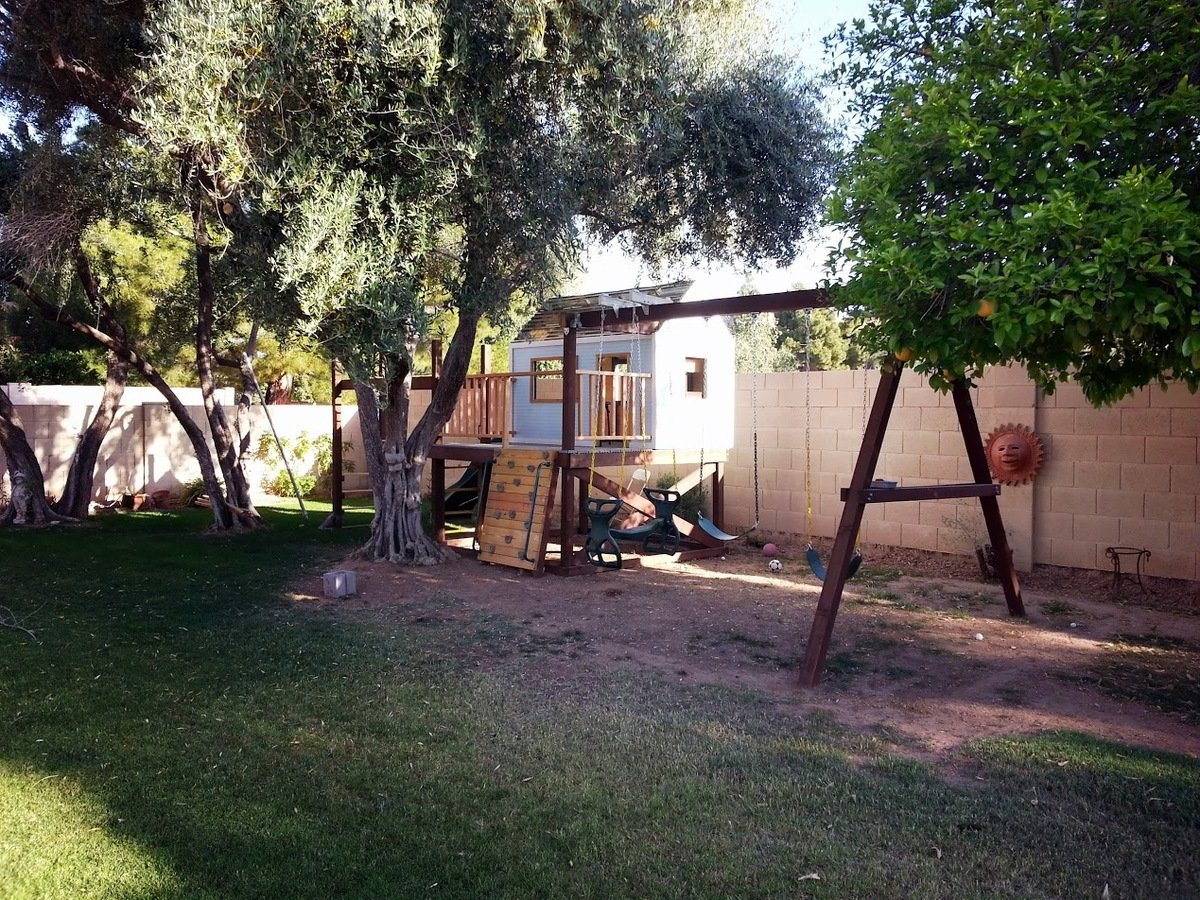
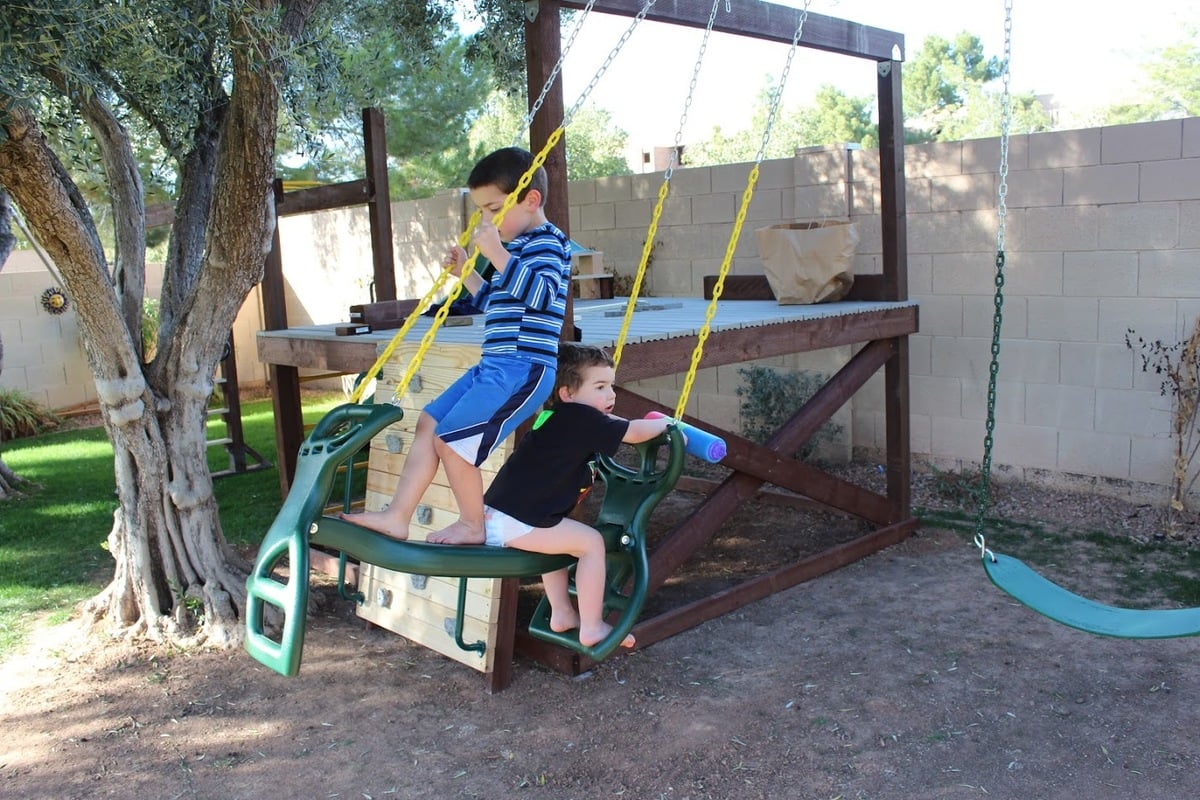
My second building project... this one took quite a while, building in the evenings after the kids went to bed.
The playhouse is based off of Ana's Playhouse Building series, with some modifications to fit the space in my backyard and accommodate climbing wall, monkey bars, and slide.
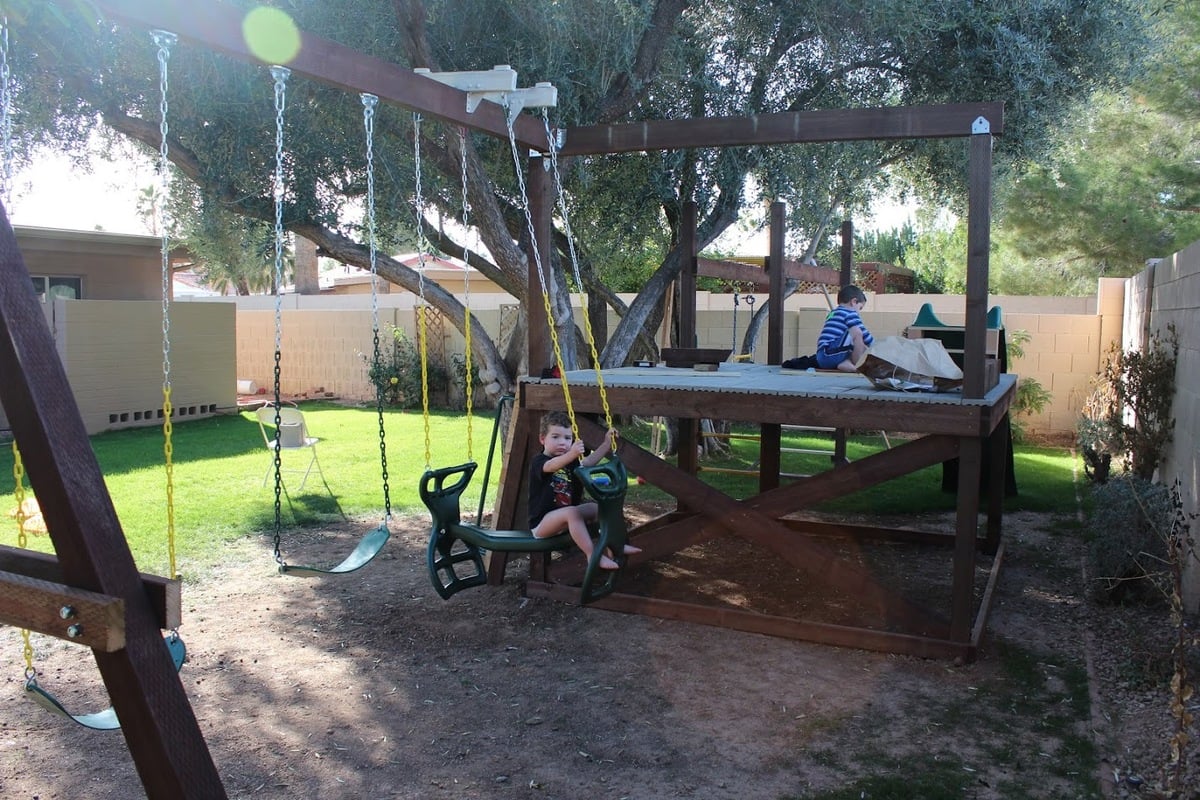
To put the main deck structure into the ground for sturdiness while protecting from moisture, I dug out 5 holes to fit single hole cinder blocks (4 corners plus an extra 4x4 for the monkey bars; you can see an leftover block on the ground in one of the pictures). I placed some brick in the holes, then the cinder blocks on top. I then partially filled the cinder blocks with sand, put the pre-built deck in the cinder block holes (with help - it's heavy!), and then filled the rest of the cinder block holes with sand. It's worked remarkably well - the deck has been up for about a year now. I also sprayed some clear waterproof sealant on the bottom part of each beam near the ground for extra protection (deck, monkey bars, climbing walls, and swingset A-frame). This has allowed me to still run sprinklers near/around the playset and even grow grass underneath the swings!
Materials used:
* Playhouse: pine, plywood, Suntuf solar grey polycarbonate corrugated roofing panels (I live in Arizona, so little rain to worry about but lots of heat - the sheeting lets light in but blocks most of the UV rays, corrugated shape also provides venting at top when placed sideways)
* Deck/Swingset/Monkey bars: treated lumber, composite decking, pine for railings, monkey bars purchased from Amazon
* Climbing wall: pine, treated lumber, handholds/railing bought off ebay/Amazon
* Swings/slide/bongos/wheel, telescope: purchased from Amazon
Modifications:
* Turned playhouse 90 degrees to be in back of the deck, with swingset coming off the side. This meant the support beam for the swingset had to pass through the playhouse - modified the frame for that wall slightly and created a notch for the beam to pass through.
* Slide comes out one end of playhouse - made the "window" on that end larger than the plans called for in order to give room for the slide.
* Monkey bars come off one side of the deck - used extra 4x4 here to create support for the bars, and used extra bars to make a ladder on this side
* Climbing wall instead of ladder for main entrance
* Put large window in back wall of the playhouse
* Added cross bracing to side of decking on swingset end to make it more solid/cut down on sway when swinging
Tue, 04/29/2014 - 20:41
This is phenomenal - just the plan & design we've been looking for. Can you upload a few more pictures? Any sketches you can provide? Shopping list? Really great job - I hope your kids love it. It looks awesome.
Wed, 09/10/2014 - 14:03
Thanks! It's certainly nestled in right behind that tree - I originally was going to place it in between that tree and another one but then decided to just place it behind them in order to take better advantage of shade (critical in AZ) and fit in everything I wanted to put on it (monkey bars, swings, slide, climbing wall)

Mon, 07/08/2019 - 00:48
We've been looking at these type of players for our son, and good grief! Prices are astronomical for playsets that are NOTHING like this. This absolutely an amazing place for those boys to make memories. You're amazing! Do you mind if I ask what it cost once it was finished? I never imagined that it would cause a tic in my eye to look at the kids from Lowe's or anywhere else for that matter.
Tue, 08/20/2019 - 10:14
I don't remember how much it cost in the end... but probably around $900? That may include getting some tools that I needed but didn't have at the time. The slide was the most expensive single piece I bought - I think I got it from Amazon.
When it was all done, I remember thinking that what I got for my money was *way* beyond what I would have gotten by purchasing a kit or a pre-built play structure. Plus, by going my own way, I was able to build it to fit my space and the needs/abilities of my kids.
While the whole thing is big and looks like an intimidating build, it really isn't bad - the platform is a fairly blank base to design everything else off of, and is incredibly sturdy. Everything else is a discrete part that branches off of the platform and can be planned out as you need. Adding the monkey bars required putting in a 5th upright (the first 4 are the corners), but that was an easy modification since I knew I wanted it before building the platform. The playhouse just sat on top of the platform (screwed down, of course).
Sat, 08/01/2020 - 20:40
Hello. This is pretty cool, probably the best modification that I am looking for from Ana's default plans. Could you please add some more detail on the right side wall, and how you incorporated the support beam through the playhouse? (with maybe a picture from inside of that wall). And secondly, if you can add the dimensions for the monkey bar setup on the left side of the deck? Thanks, much appreciated
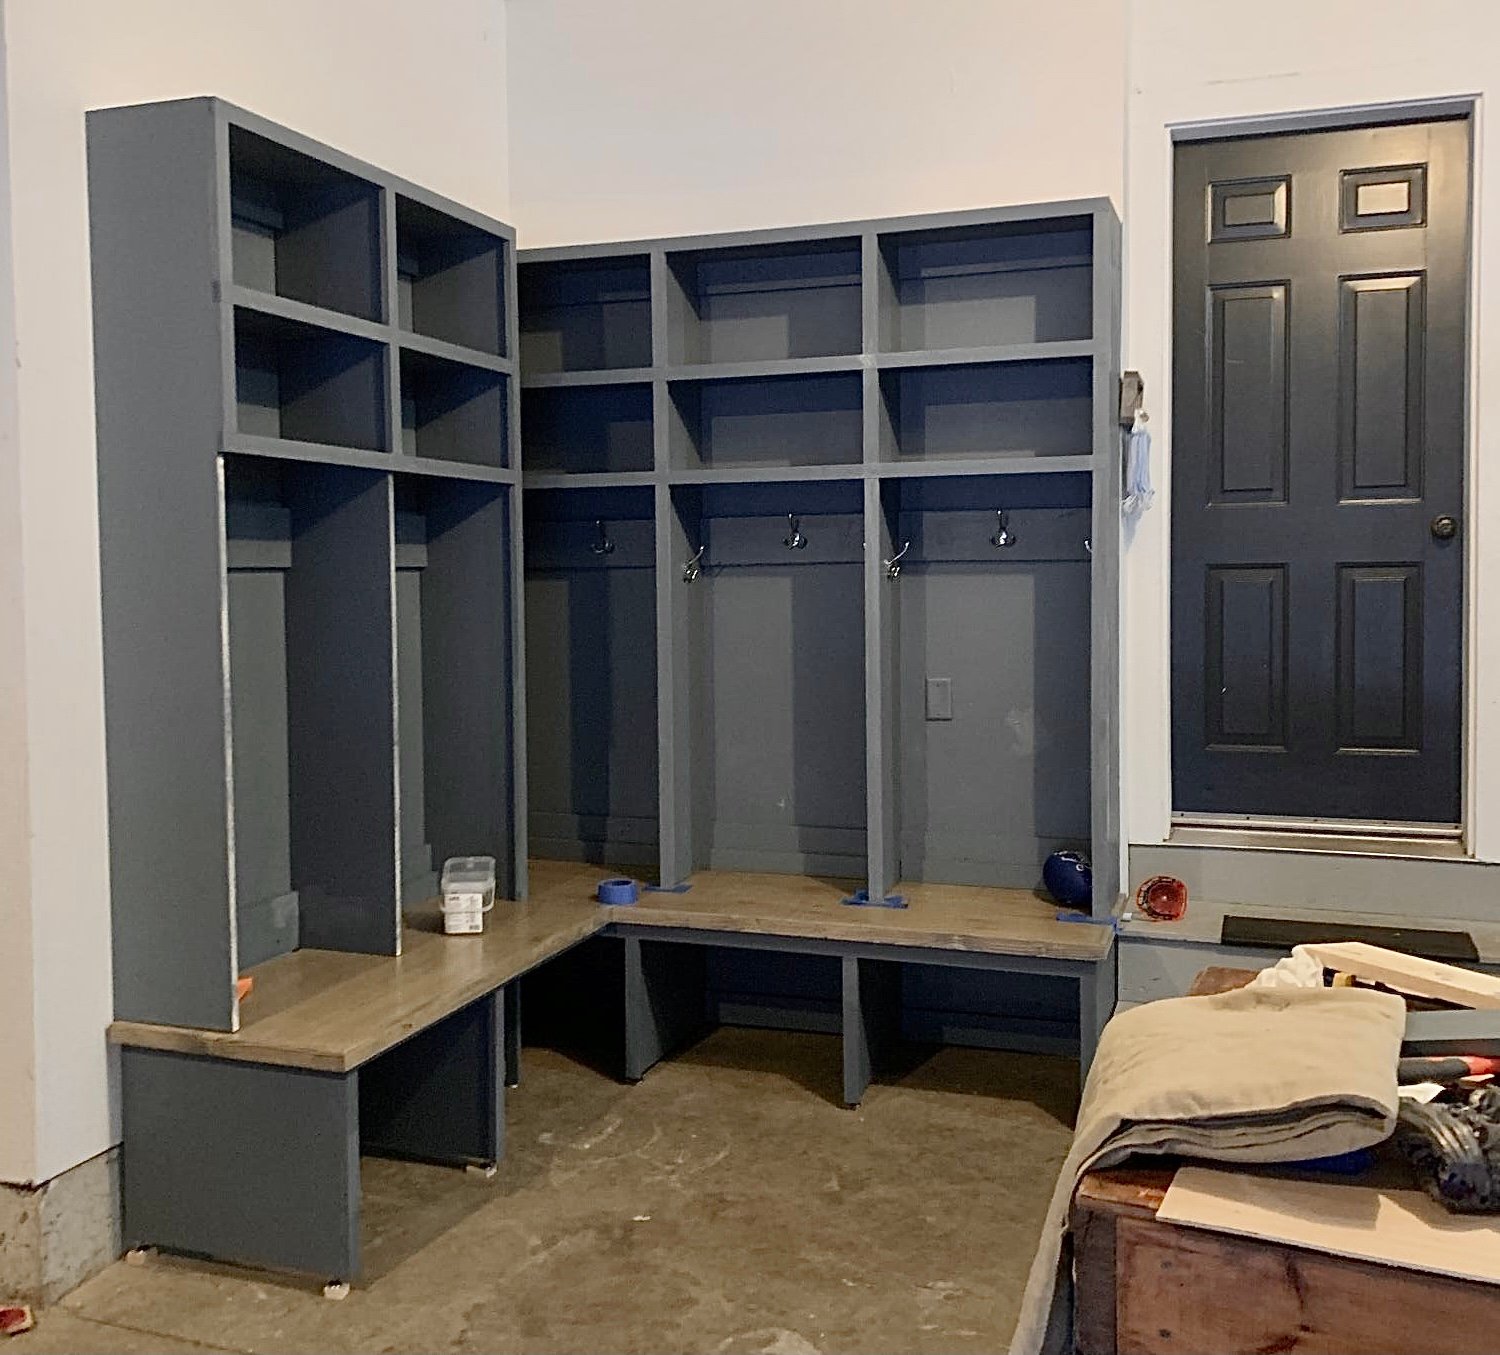
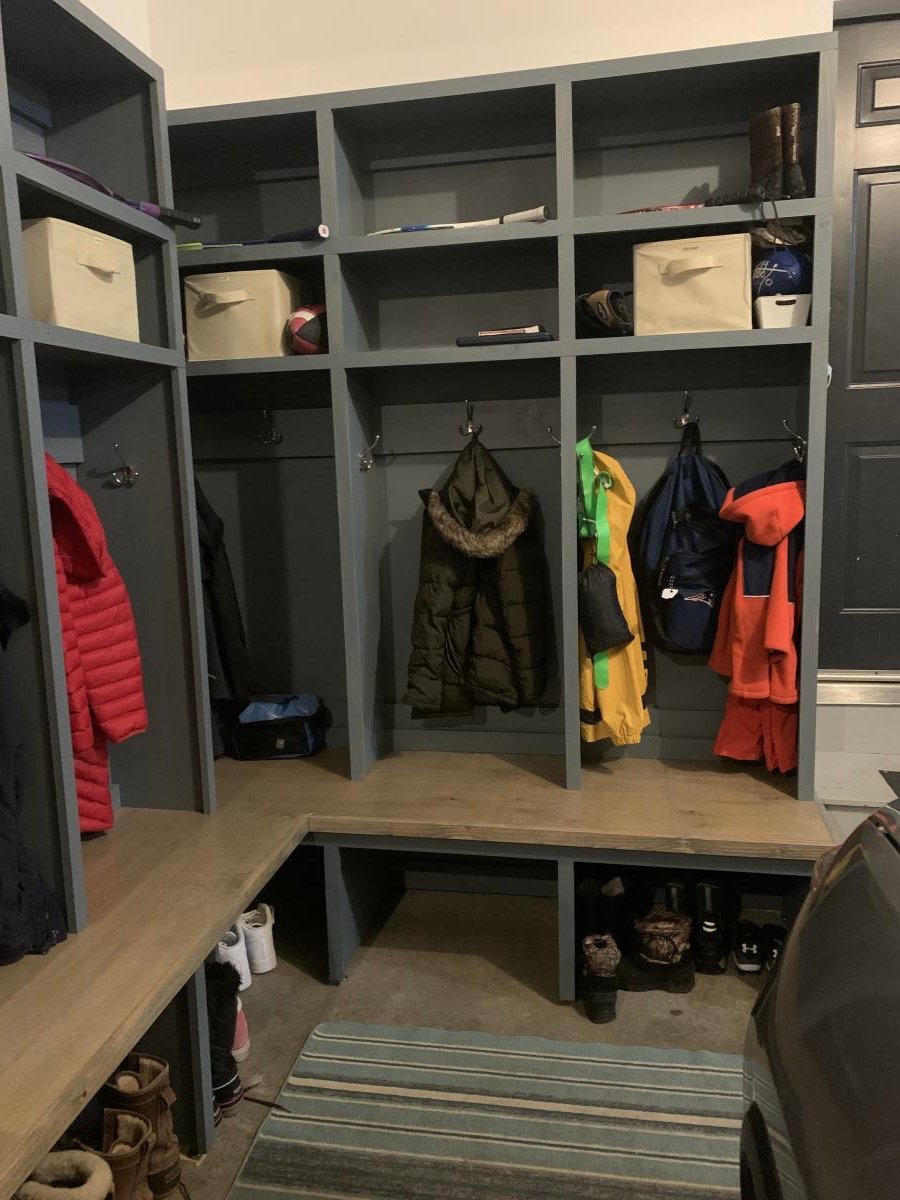
I used ShelfHelpNow which I LOVED! Got it delivered at the start of a snowstorm! Would never have made it then if I had to go get the wood myself!
Got so many compliments and requests
To build this.
Thank you for your easy plans and wonderful ideas!
In hindsight I would have either connected the two units or separated them more. I’m more a wing it/see how it goes type of builder for myself rather than a planner. 🤣
Diane
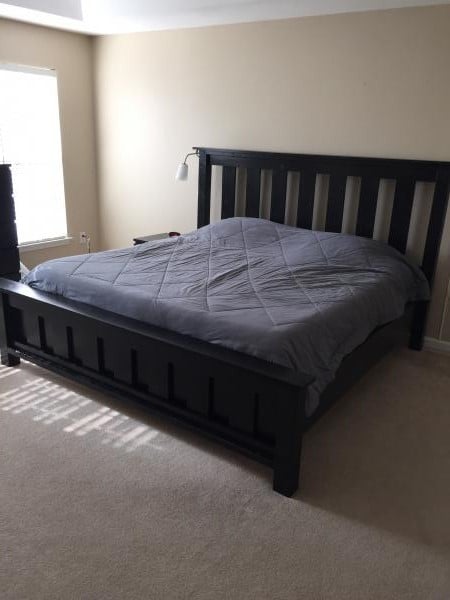
The project went relatively well. Had to readjust in order to fit our king. I used 2x4s and 2x4 joist hangers to support the mattres.

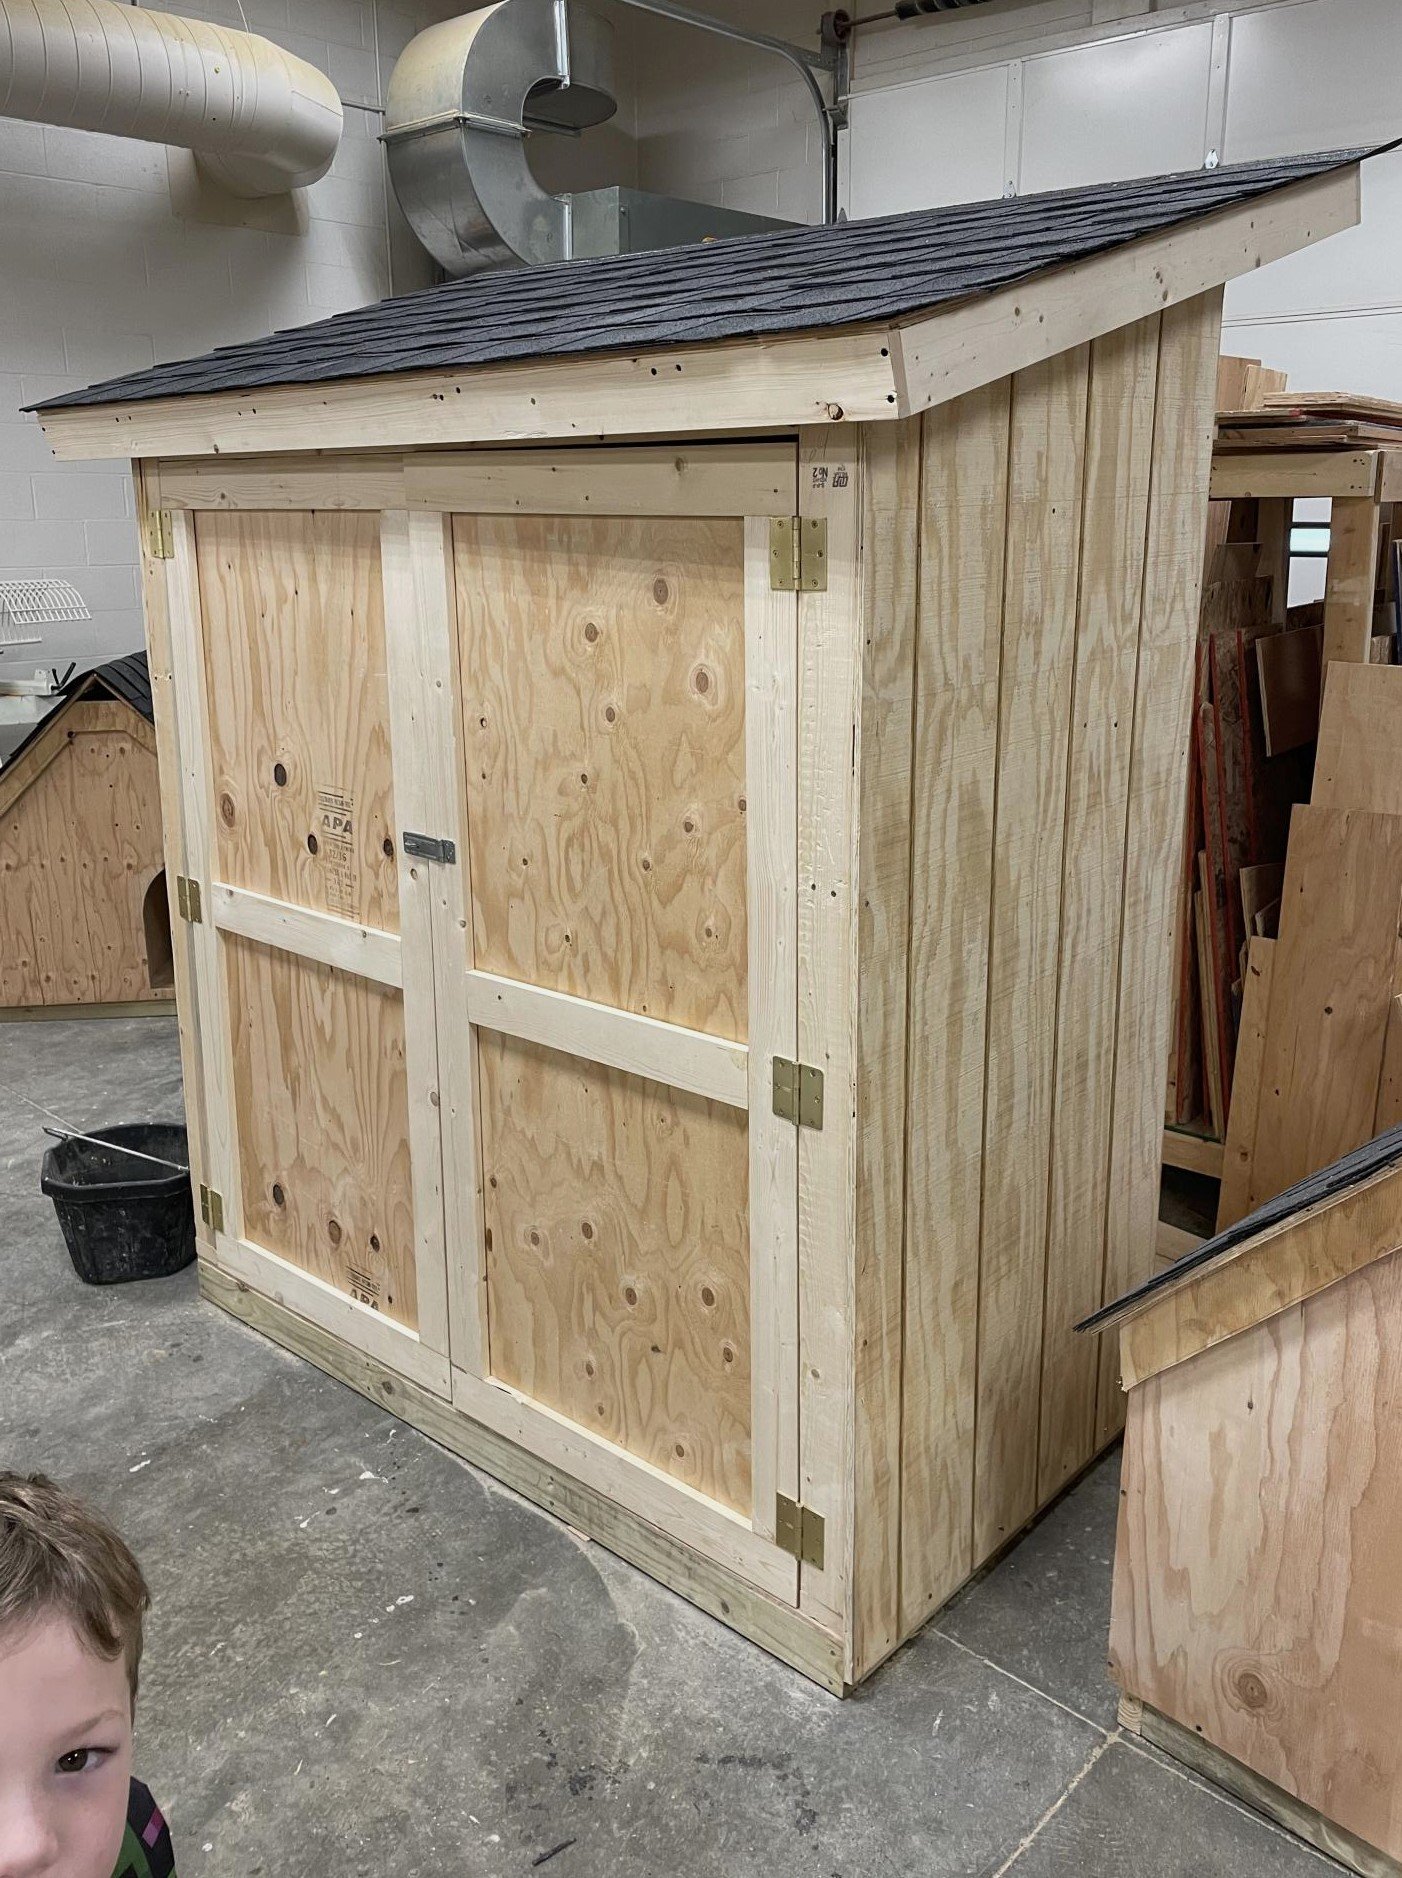
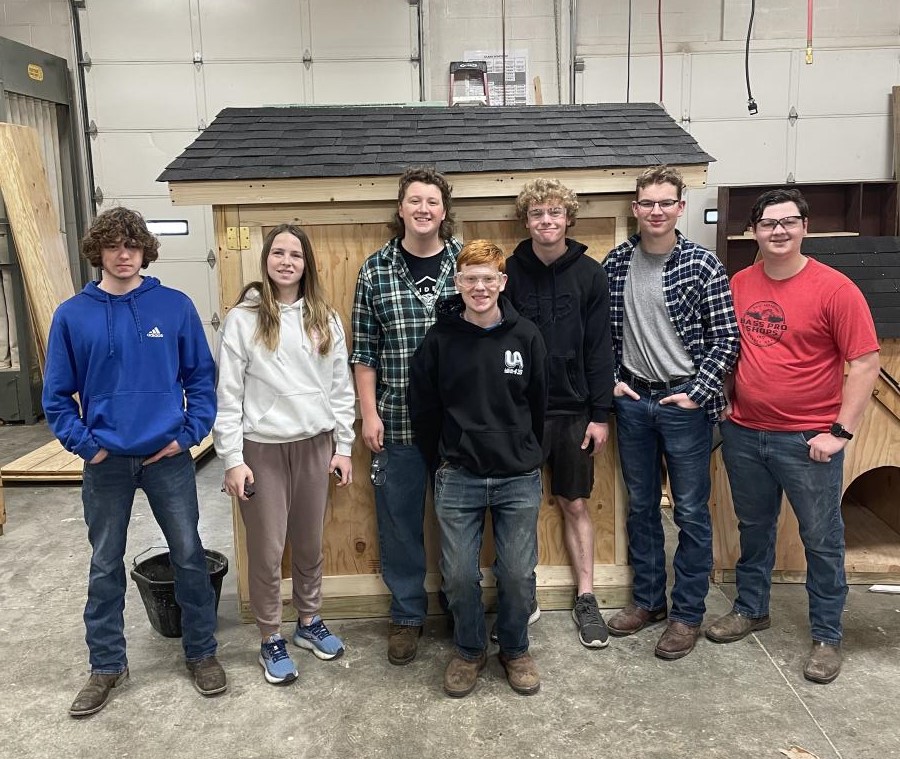
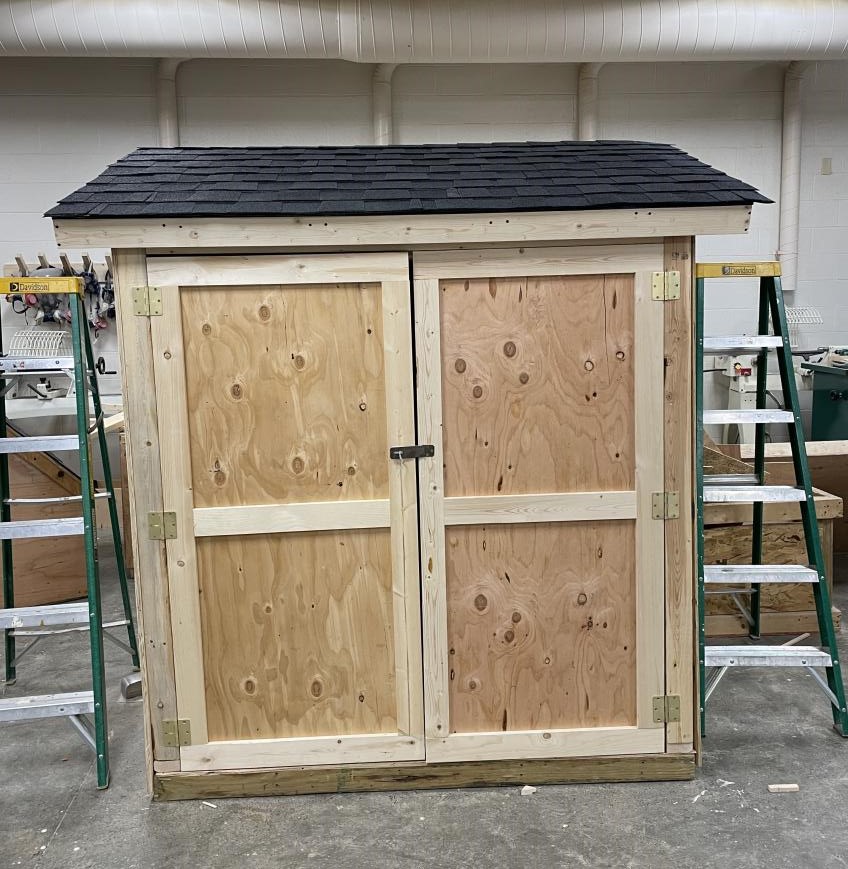
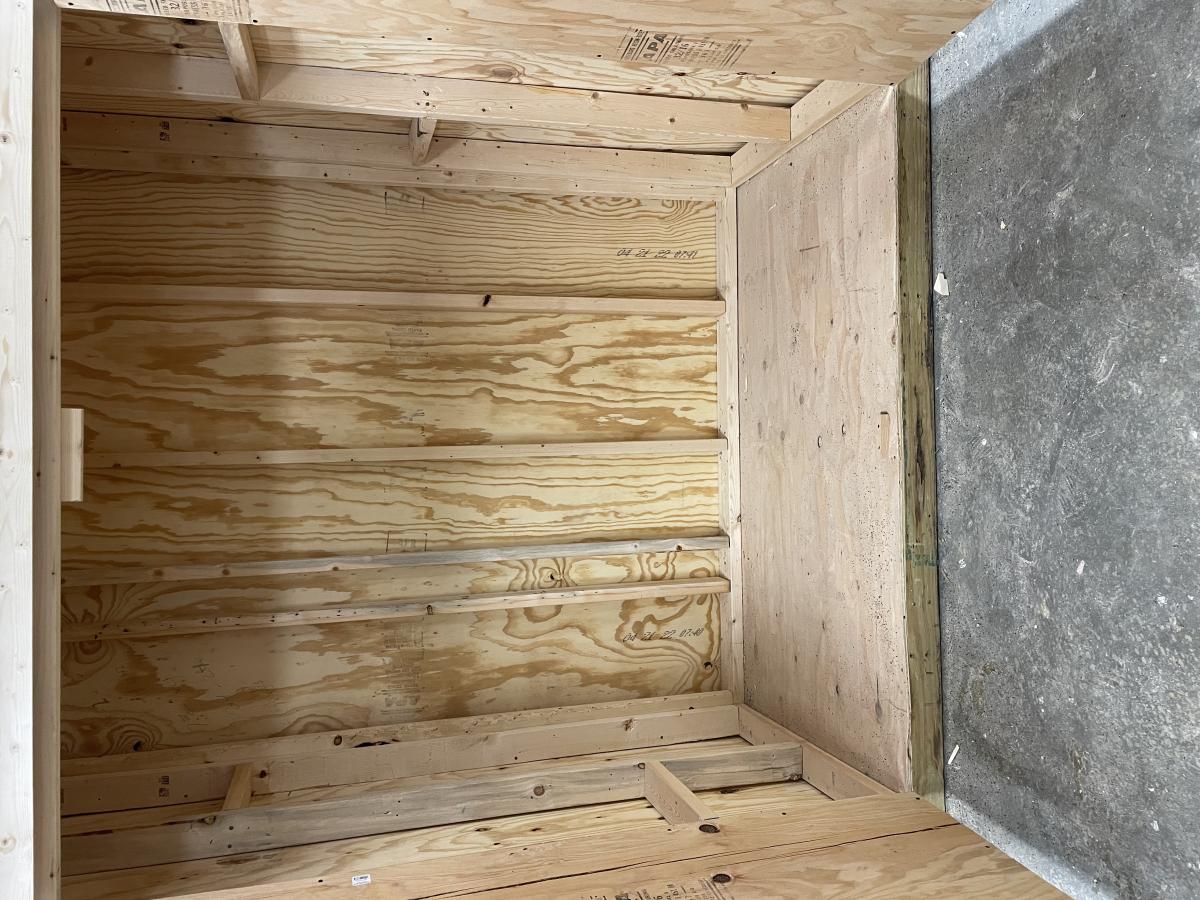
I’m a first year teacher of construction class at Waterloo High School in Illinois. We recently used your Small Cedar shed instructions with some modifications for a class project. It’s a bear getting cedar right now, so we used T1-11 for the outside and 2x4 for the frame.
Sat, 03/25/2023 - 09:14
Very fun and job well done! Thank you for sharing.