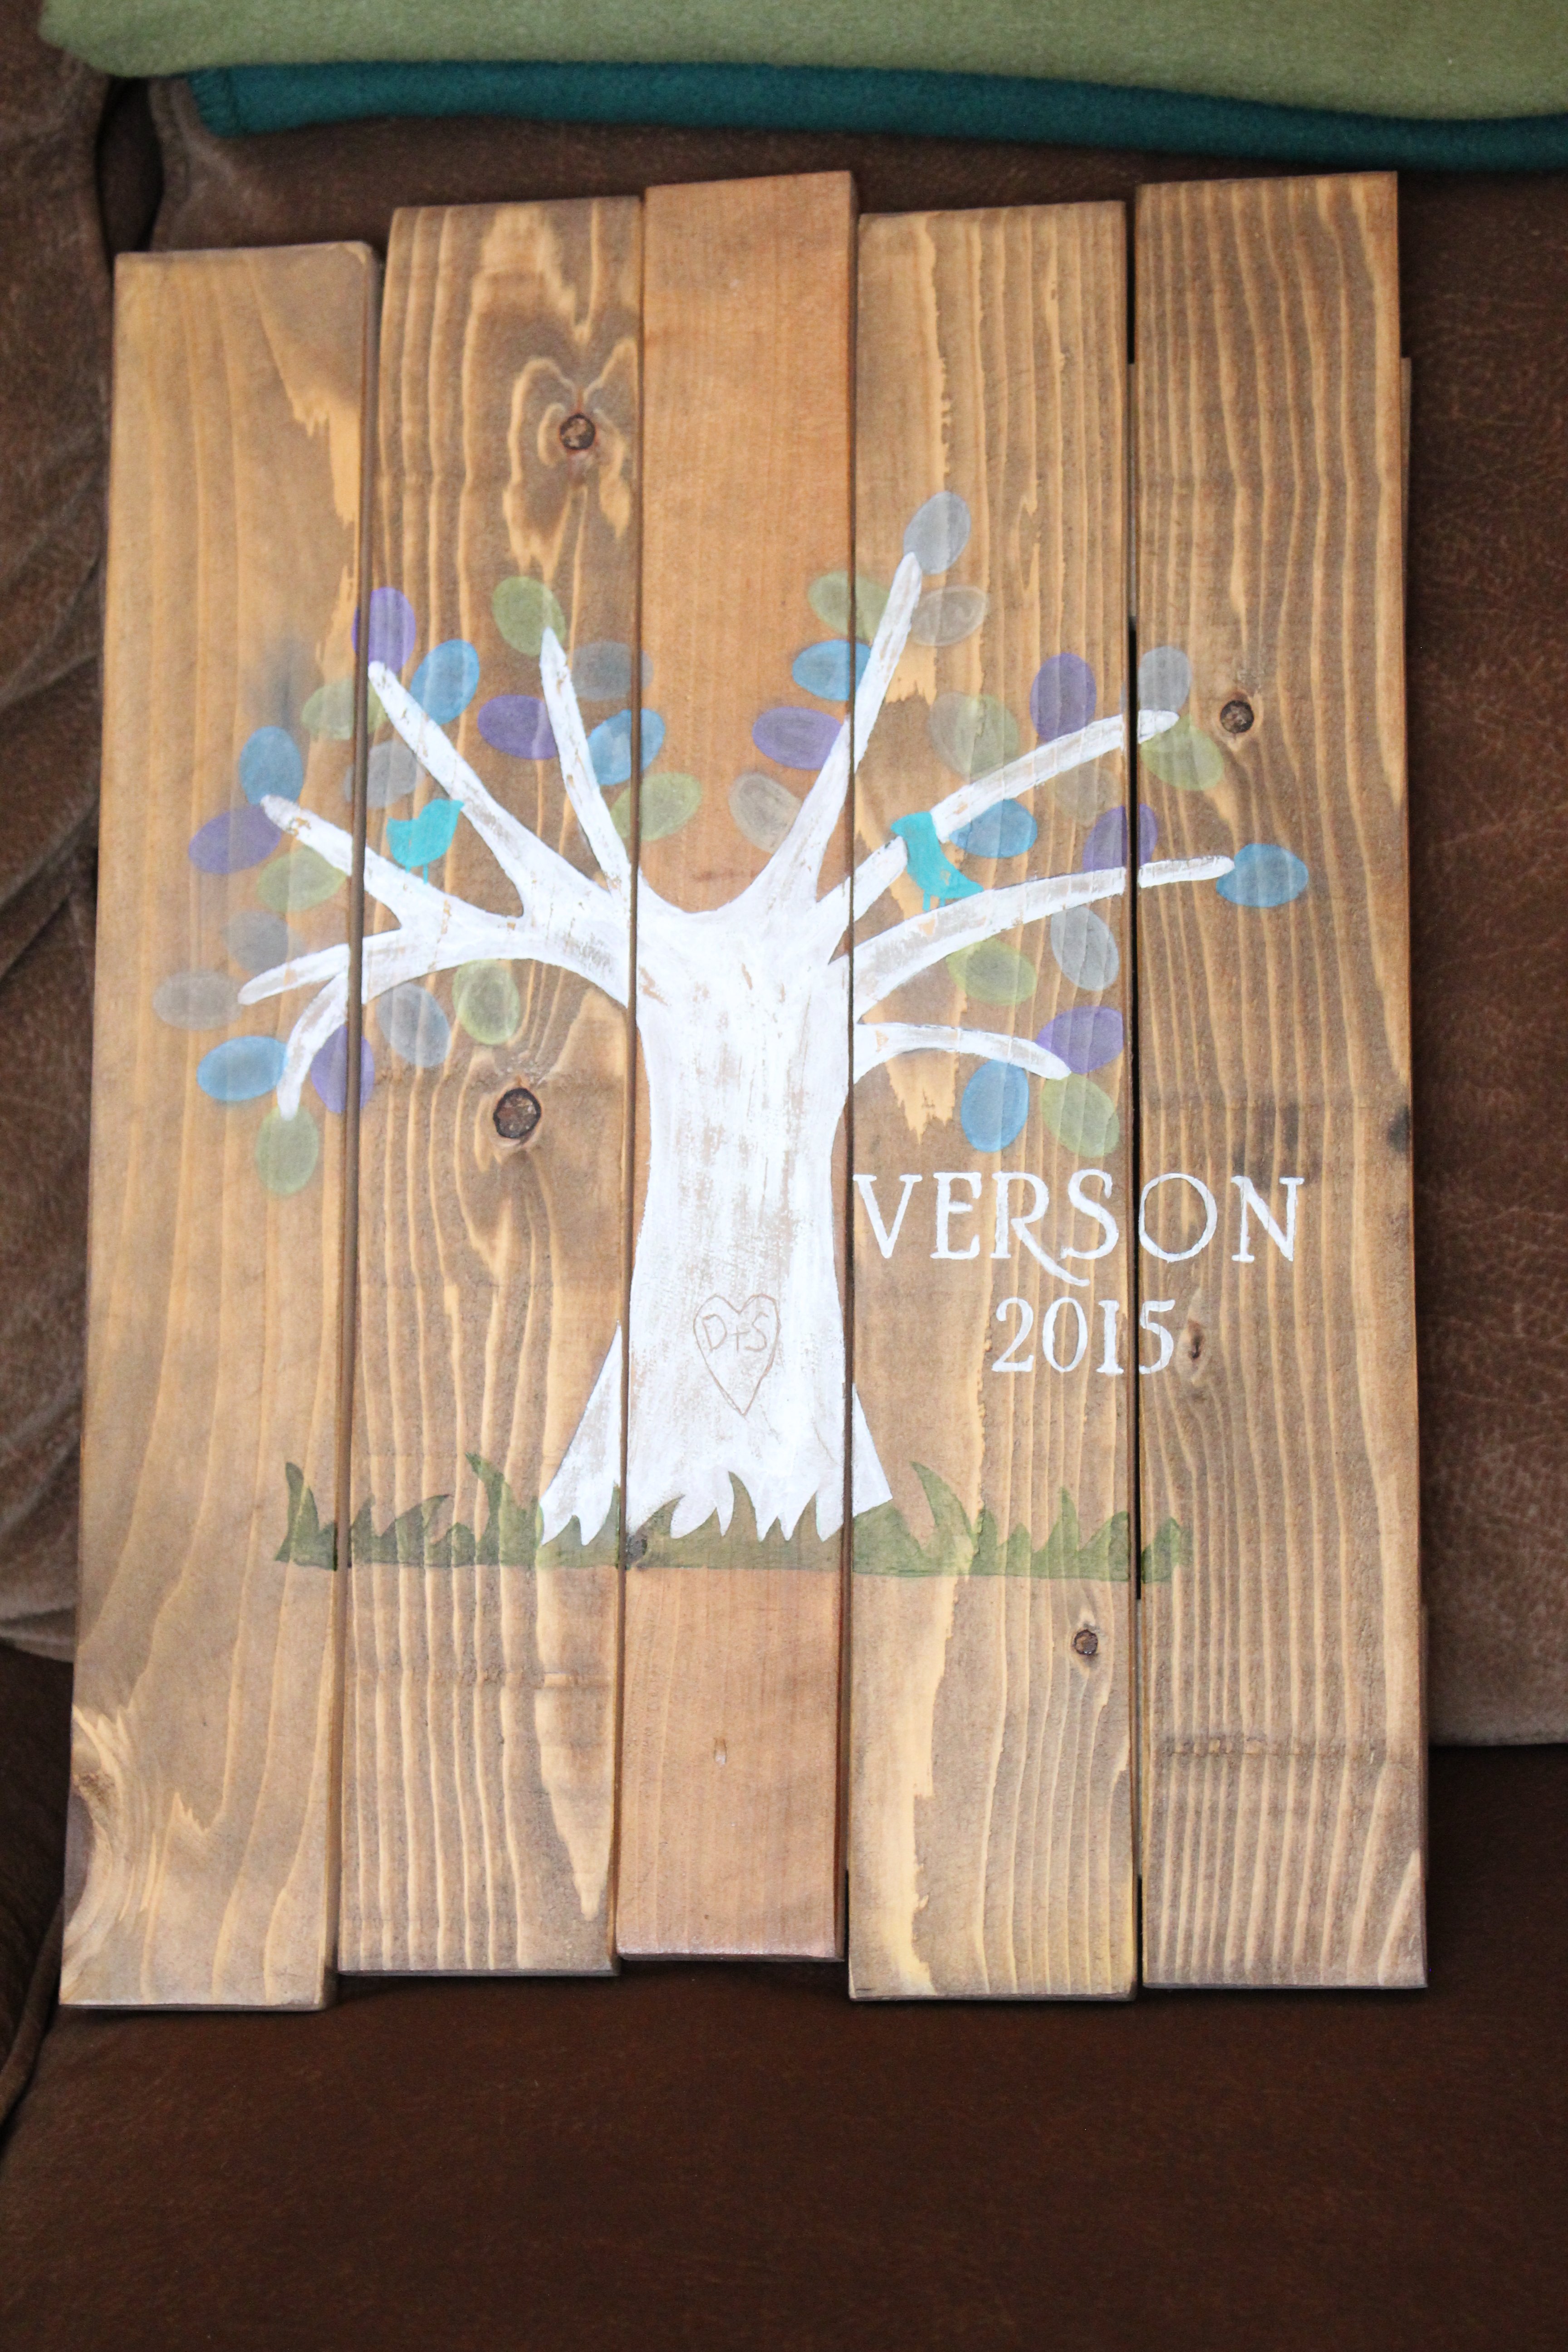
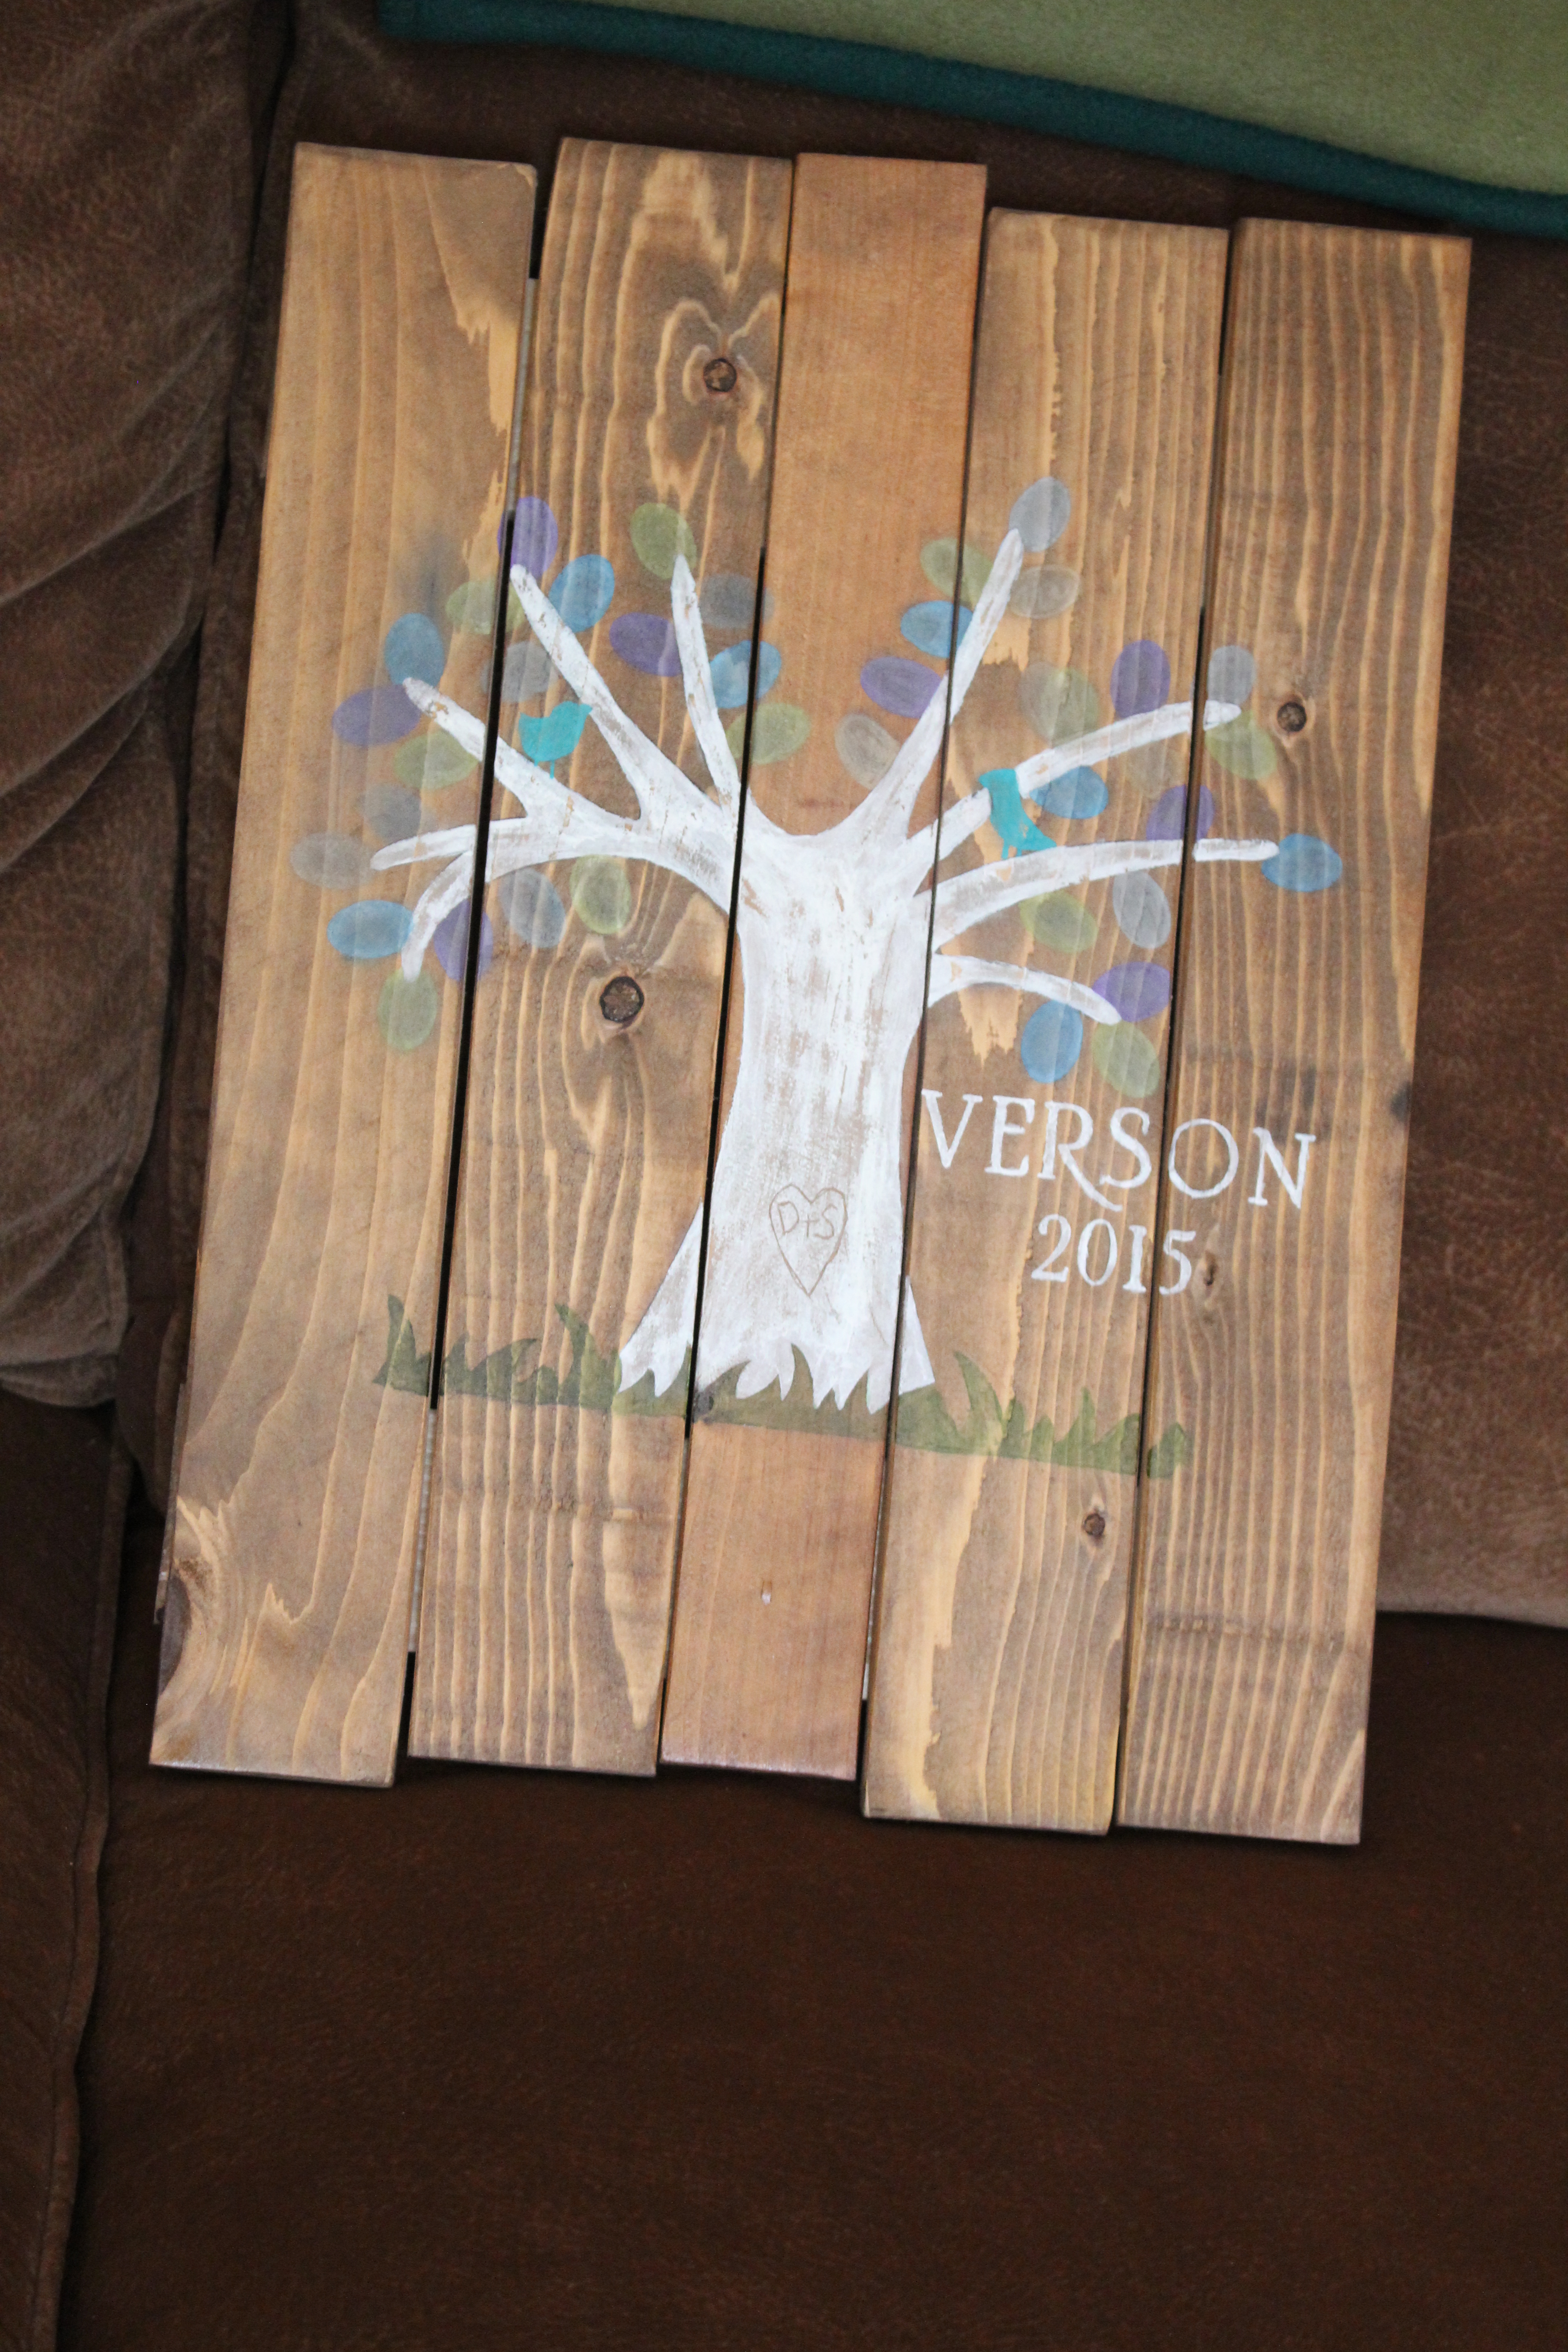
Community Brag Posts
Modified Farmhouse Bed
This was our first "Big" build.... Our bed. I modified the footboard as I like taller footboards and it keeps the mattress in super snug!!!! Love this bed with light stain!!!! Also we used tongue and groove boards for the head and footboard!!! Went together so nice!!!
A Big Patio Planter
I have a really boring backyard patio so I thought I would spice it up with flowers but I could not find a plan for a large right angle planter. So I made up my own.
The planter is made from cedar fencing but pine for the top trim and the corner legs. The legs have grooves that the sides slide into and are not screwed or glued in place. That is so you can remove the top trim and then just pull the sides out to replace them as needed or to even change the size of the planter.
This planter is 18" high so it is comfortable to sit on but that also means you will need a lot of soil to fill it up. Mine took 26 40lb bags which is over 1/2 ton of soil. Add water and that planter is here to stay. But it also means that there is a large tendency for the sides to bulge along the bottom so I placed stop blocks along the bottom base and screwed into the base.
I planted Angelonia for color and sage, oregano, and thyme for spice. It was fun to build and came out well but it was expensive as the soil along was nearly $60. Add another $50 for lumber and screws and you have exceeded the magic $100 mark. Still a good deal, however.
Comments
Wed, 06/05/2013 - 10:14
Thanks for a Good Idea
Thanks for a very good idea. If I ever do another on I will incorporate your suggestion.
Wed, 06/05/2013 - 10:17
Thanks for a Good Idea
Thanks for a very good idea. If I ever do another on I will incorporate your suggestion.
Sun, 06/09/2013 - 06:05
I don't know what it would do
I don't know what it would do cost-wise, but you could also use gravel to fill the bottom of the planter to give it better drainage.
Rustic X Coffee Table First
Came across this plan as my first wood working project. Took the corner brackets to a different level, spoke with a local blacksmith who created the brackets for me to give it a more rustic feel. Created the nails, same way they were done in the early 1800's.
Total time took me longer than normal since this was my first project. Otherise I could see hammering out one of these a day (excluding waiting for stain to dry)
Very excited to keep going, thanks for the great site Anna!
My first build!
My first build I ever did back early 2016.
Mud Room Bench and Cabinets
This is actually a mash up of Ana's "Mudroom Bench with Easy Drawers" design, and a "Mudroom Lockers" post by Infarrantly Creative. The end result is a 66" W x 98" H x 19 1/4" D built-in bench with 2 drawers and 4 cabinets. I did the cabinets first, to easily support them while installing on a temporary ledger board without the bench in the way. Unlike Infarrantly, I did not have existing cabinets to re-purpose, but I found 30W x 24H x 12D cabinets that practically matched the adjoining kitchen in both color and style. I also added matching pulls and handles to tie both rooms together. I almost went with taller cabinets to the ceiling, but this approach with Crown Molding "not-to-ceiling" matches the kitchen cabinets. I also bought matching trim pieces for the ends and across the bottom so anything touching the cabinets matched in color and texture. In hindsight, the color-matched paint was so close, though, I could have saved some cash by cutting and painting those pieces instead. Everything gray below this point is 1x material cut to spec and then painted. The bench is based on Ana's design (modified to two drawers) with Infarrantly's stained top. The top is a pine board from HD stained to closely match our LVP in that room, and the entire first floor. You will notice the top rail of the bench frame (attached to the top with Kreg pocket holes to minimize visible nails/screws) is also stained to give illusion of a thicker slab. The stain closely matches our LVP in that room, and the entire first floor. This was my first time building drawers, but thanks to Ana's "Easy" drawer design, it still worked out pretty well. The drawer frame technique (instead of faces) made everything a little more forgiving (which I definitely needed). After painting and reinstalling, I noticed that some of the reveal around the drawers did not line up evenly and straight around them. I simply adjusted the rails (drawer side), and the middle upright between them, without needing to remove or rebuild the drawers or the frames - WHEW! Between the cabinets and bench, I used 1x12's and 1x2's, down the sides - although you could leverage the existing wall finish. I also added vertical shiplap to the back, but again you could leave the existing wall finish or use beadboard. It is painted teal to coordinate with the adjoining kitchen's tile and backsplash. I added the Hummingbird coat hooks, since we love those feathered visitors around our deck in the summer. Thanks to both Ana White and Infarrantly Creative for inspiring this addition to our new home.
Comments
Thu, 10/14/2021 - 08:04
First time building drawers!?
That is amazing! Thank you so much for sharing, what a beautiful space you created!
Mon, 09/12/2022 - 11:59
Stunning work!
Thank you for sharing, such a perfect mash-up of plans, it came out beautiful~
Factory Cart Coffee Table
Cedar Planter with Trellis
I put the two planter boxes on this site together to get a perfect little lattice box for the space by my door. I get lots of compliments and hopefully soon I will have yummy jasmine welcoming my guests.
Dresser
My wife and I are expecting our first child, a baby girl, in September. I decided that I was going to make as much of the furniture as possible, and started with this dresser/changing table.
This is the first project I've made with drawers, and they were a bit of a challenge. Other than that building the dresser was straight forward. The drawer fronts are made from up-cycled deck boards and the knobs are from Anthropologie
red mahogany Varathane stain rubbed with black shoe polish
Comments
Square benchright
I really like the legs of this table but wanted a square, planked top. I also used a stencil that I got from amazon for the design.
Corn Hole Game
Made these as a wedding gift for my niece and her husband. I found the peel and stick skins on Amazon for about $30 for a set of two. Makes a really cool looking top although I will say it also makes it much more delicate to scratches and scuffs. I decided to add 1/8" trim pieces all around the edge of the stock 2x4 plywood since it's not a perfect 2 feet by 4 feet measurement. That also allowed me to fold the edge of the peel and stick skins to where they were then underneath the trim board that was glued and nailed in. I think it gave it a perfect looking edge. I also mounted led corn hole lights (also purchased on Amazon) that make it fun to play in the dark. Another great plan Ana! My niece is going to be stoked!
Total cost for all materials used was around $116 but keep in mind I added extra things not mentioned in the plans. Without those additions it would have been about $50 so very inexpensive.
Comments
Thu, 10/21/2021 - 15:43
Super Cool!
Yes, your niece is going to love it! Love the added details, it really takes the fun up a notch!
Two-tone kingsize bed- extra tall
My First Project
My husband and I had a problem. We were tired of sleeping on a mattress on the floor, and most beds were out of the question because my husband is tall. 6'7" tall. Ana White's plan looked perfect, but I had never built anything before, unless you count an improvised 'clean the gutters from the ground" stick.
I knew I had to make something that could be taken apart because we are renters right now, so it will take a little bit of work, but after some modifications to the plans, it will come apart when it needs to. We are also not small big humans, so the bed is appropriately beefed up where it needed to be- to accommodate 2 big humans, 2 fairly large dogs, 150 lb latex foam mattress, and any future kids.
I also had to make changes to the King size plans because Ana's original plans have the mattress oriented sideways, which would be too short for us.
For extra storage space, a hangout for dust bunnies and dogs, and a just a plain tall bed for tall people, I made the foot-board posts taller, and attached the rails higher than the plans indicate. I also made a platform for our mattress to sit on out of 2x4's, 2x6's, and 3/4" plywood. This bed is STURDY.
To support the slats and mattress well, I hung a 2x6 with joist hangers in the middle of the bed frame (see picture below), and it stops the 2x4 slats and plywood from bending in the middle.
Poly coat to be applied... later. When we will be away for a couple days after applying it.
$55 fancy x desk turned kitchen table
I was making the fancy x desk, and my wife suggested building a bench to go with it to make it a bar style kitchen table to take up less space in our kitchen. So I looked up plans for a bench on here (providence bench looked best with it), and built it. I painted it with rust-oleum American accents spray paint for wood, metal, and plastic in glossy black and surprisingly it looked amazing!
Magazine rack
This is my first project, just to see if I could actually build something. I used some wood and paint we had lying around the garage, since I didn't want to put money into something I might screw up! This turned out to be pretty easy, despite the wood being a little warped from sitting in the garage for years. It's not perfect, but now I have a place to store my husband's golf magazines that were cluttering up the bathroom -- and the courage to try something bigger!
Comments
Mini Bedside Table
My take on the Mini Farmhouse Bedside Table using a combination of new and repurposed pine. Using a 3/8” round over bit and router I softened the edges of the top and the shelf. I substituted a ‘plank’ look on the sides instead of the solid flat which the plan calls for. Finished with a scuffed paint and contrasting dark stain which makes the piece stand out.
Modern farmhouse style bed
We are so happy with our new bed. Made the headboard a foot lower. Like it a bit better this way. Thanks Ana for the awesome plans Greetings from Belgium Marrah and Erik
Comments
Rustic X End Table
I altered the dimensions slightly so that it wouldn't be overbearing in my living room. It is much shorter than the plan suggests, and the length and width are also changed. I used framing 2x4 and 2x6 lumber, so I had to sand the heck out of it to make it nice and smooth. It looks great next to the console table. Good plan.
Castle Bed
Friends asked me to design a princess/castle bed for their daughter. It needed to fit a single/twin size mattress and fit a 61 inch space they had so I designed the overall width to be 60 inches.
It is all made from solid planks apart from the two big shelves in the headboard which are plywood.
They wanted the sides close to the headboard to be raised as well so their little girl didn't roll out the bed.
Not added the slats yet as it is off to the paint shop to be sprayed Pink!! I will post more photos once painted and will also post plans soon once finished them.
Hope the little girl likes it when she sees it.
Comments
Vespa ride-on
I made the plans a little different. I had more support to the front, made the base wider, and added swivel wheels instead of rockers.
Cabin style bed
This was my version of the cabin bed plans on this site.
My son loves it and of course my wife does too..
Comments
Playhouse Loft Bed
This is my first KOW project...I built the playhouse loft bed for my daughter, Kayla. She named it Lofty Cottage. I used leftover pink paint from painting her table and chair set for the inside of the playhouse. I made the letterbox from scraps and the half-door from the door cutout. I added hardware that matches the hardware on her other furniture. I made the banner by hand and hand painted the birdhouse and the sign. She loves it! Thanks for the great plans Ana! Can't wait to start on something new now!
Comments
Ana White Admin
Sat, 10/09/2021 - 12:38
Awesome!
Way to go, this looks great!