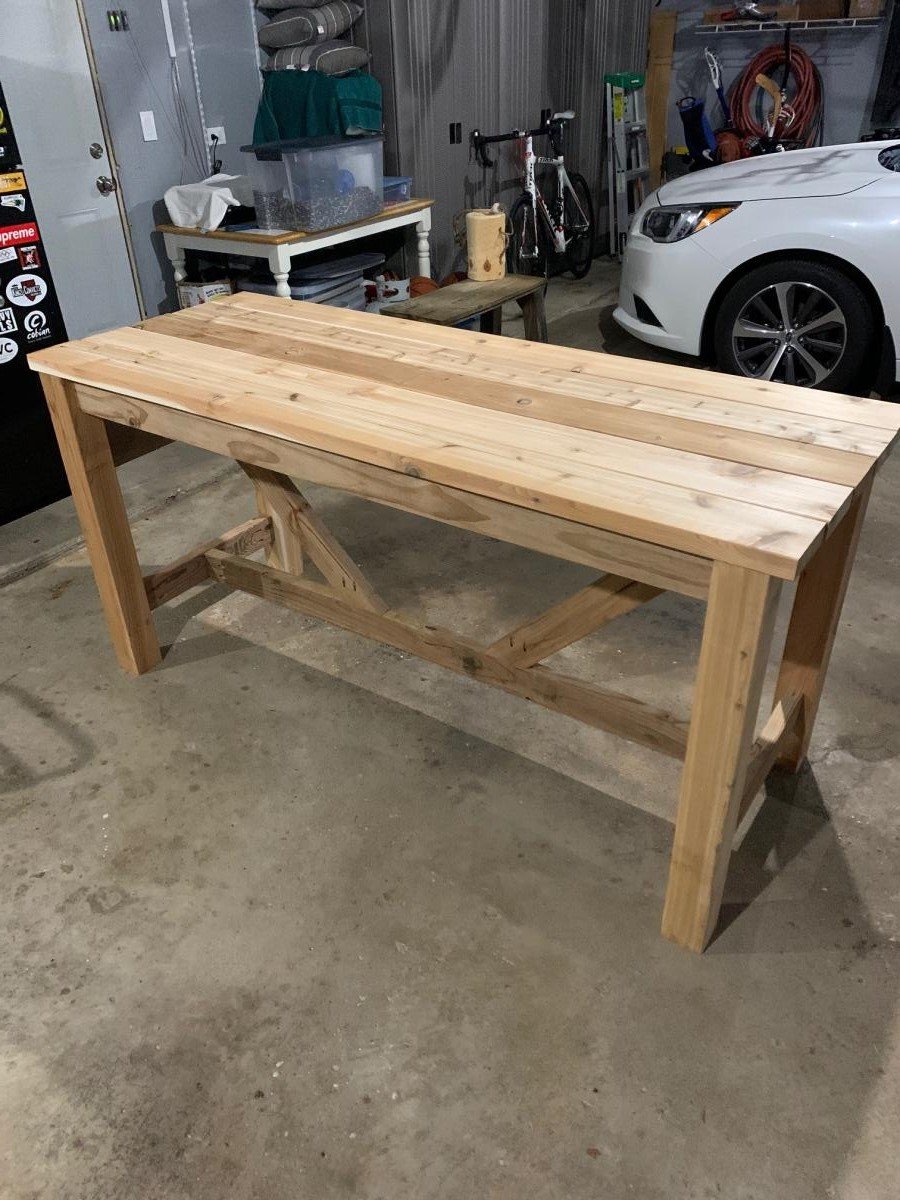
Community Brag Posts

Fancy Jewelry Box

Submitted by Matt L on Mon, 06/29/2020 - 19:52

Great plans and a fun build. I made some modifications. My drawers are 1.5” high and 10” long. It allowed for 6 drawers. Overall height is 13.75” and length is 17.5”.

I used rabbits and dados rather than butt joints. There is flocking in the drawers.

Built from Plan(s)
Estimated Time Investment
Week Long Project (20 Hours or More)
Finish Used
Garnet Shellac at a 2# cut. Wiped on. I used 4 coats sanding with 400 grit after coats 2 and 3. I used 0000 steel wool after coat 4. Then I applied Paste wax.
Recommended Skill Level
Intermediate

2 x 4 Garage Shelves Built into Basement Storage!

Hello Everyone! This is my FIRST brag post here on Ana-White.com - but not the first project that we've built from her awesome plans. :) 

We have an unfinished basement that desperately needed some shelving because 1. It's our workshop in the Winter and 2. We don't have an official 'storage' room in the basement of our split level home. When I saw these plans I immediately thought they could be modified to fit our space and get my stuff off the floor! 

I modified the plans just enough to fit our space. After reading through them completely, I realized for an 8 ft wide space (beside the stairs) I only needed three supports for the shelves. Easy! The only trick was fitting the shelf into the space AFTER installing the shelves. Because I had walls on two sides (unlike the tutorial) I couldn't do the shelves as the last step. 

I LOVE how these turned out! They are a strong as a ladder (we tested them... :)) and they hold everything I need them to, and a little bit more. It's a definite improvement on my previously messy, cluttered, saw-dust covered space ... :) 

Estimated Cost
Our space was 8ft tall by 8ft wide, so we ended up purchasing about $60 worth of 2x4s to complete the project. We also used 2.5" screws, which are around $4 per box of 75.
Estimated Time Investment
Afternoon Project (3-6 Hours)
Finish Used
None - we left the wood bare and natural because it's just for storage - not for looks. :)
Recommended Skill Level
Beginner

Simple Play Kitchen

Submitted by Anonymous (not verified) on Sun, 06/04/2023 - 13:03

I made this play kitchen as a Christmas present for my kids, and it’s been a big hit! It’s built mostly from leftover hardwood plywood, and a couple of 1x12 pine boards. The oven knobs and faucet were cut from redwood scraps and attached with 1/2” dowels to freely rotate. The vertical surfaces were painted with leftover house paint and sealed with water-based polycrylic. It was a fun build, and I learned some new skills (like installing hinges)! Thanks for the plans!

Comments

Planked Wood Sideboard - Rustic Yet Refined

Submitted by becada on Mon, 03/03/2014 - 08:06

This was my first finished project using plans from Ana's site, and I am very pleased with the finished product. Every aspect of the finished sideboard is based on something from the site. I started with the plans for the Planked Wood Sideboard, and made no modifications as the dimensions were perfect for our basement family room. I decided to inset the back (http://www.friendly-home.net/2012/02/gigantic-rustic-sideboard.html) as Ana explained that Hillary had done, and love the final result. This will allow us to use this to potentially divide a room in an open concept space at some point in the future.

For the finishing process, I decided to follow the "Rustic Yet Refined" finish tutorial highlighted on both the Ana-White site (http://ana-white.com/2013/08/rustic-yet-refined-wood-finish) and Jen Woodhouse House of Wood (http://jenwoodhouse.com/blog/2013/06/07/diy-dining-table/). I fully intended to complete the 9 step process, but found that after we applied the Minwax pre-stain wood conditioner, followed by Minwax special walnut stain and wiped it off within 15-30 seconds, the finish mirrored the restoration hardware finish that we were going for. We decided not to proceed with layering on the weathered oak or applying the whitewash, and went straight to the spar urethane satin coats.

Overall, the project was a success, but was difficult to finish during the Minnesota winter as it was unbelievably cold and was forced to complete the finishing process in our basement/laundry room, which extended the length of the project. I am very excited to begin building other pieces from Ana's plans.

Built from Plan(s)
Estimated Cost
$250-300
Estimated Time Investment
Week Long Project (20 Hours or More)
Finish Used
Minwax pre-stain wood conditioner; Minwax Special Walnut (natural bristled brush); Helmsman Spar Urethane in Clear Satin (natural bristled brush)
Recommended Skill Level
Intermediate

Comments

John's Washer/Dryer Pedestal

Submitted by coveyjt on Sun, 06/12/2016 - 10:59

The wife has a hard time bending down so she wanted pedestals for the washer and dryer.  The metal ones with a drawer were too tall.  I showed her Sausha's and she really loved that design.  I basically used the same construction plans idea from Sausha's project and some tips from Ryan's brag post.  But, I wanted to beef it up some.  I didn't like the L-bracket to attach the top and 4X4 legs.  It didn't seem sturdy enough for me.  I used my table saw to square the edges on the 4X4 posts and the 2X6 rails.  Then I used my Kreg jig and glued and screwed everything together.  I liked Ryan's trim ideas, so I used baseboard trim for the bottom and flipped it for the top trim.  I made a 1/2" lip so if it were to vibrate, the washer/dryer would not fall.  I put the trim on the bottom of the legs and was considering putting on the top but I put some different trim all the way around the bottom of the 2X6 rails.  The wife liked that.  I also added some carpet on the top to cut down on vibration and to help keep the units in place. I also put some 4X4 pieces of carpet on the bottom to keep the noise down and to help in moving it. I primed and used an gravity sprayer to paint it.  Then I put 3 coats of polyacrylic to help in cleaning and to cut down on scratches from the laundry baskets. 

laundry pedestals diy

Estimated Cost
150.00
Estimated Time Investment
Week Long Project (20 Hours or More)
Finish Used
Paint
Recommended Skill Level
Intermediate

Comments

zoolander

Wed, 06/29/2016 - 14:31

I think you could probably drive a truck on top of yours.  :)  I was a bit concerned about the strength of the construction when I first decided to build it, but I decided that since it would be stationary once I have it in place and the only force would be straight down, it would be fine.  Once I got it put together, it was actually sturdier than I thought it was going to be...from a horizontal force perspective.  Virtically, that thing could hold 100 washer/dryer pairs...the plywould would give out before the 2x4s and 4x4s would even budge.

Anyway, nice work!  I love the Kreg Jig...I need one of those. 

2x4 sectional outdoor sofa

Submitted by Anonymous (not verified) on Tue, 05/12/2020 - 08:10

My first Ana White project. My friend Shelley and I are RN's, and she got me hooked on woodworking. I started with cushions from Lowes ( in the sizes that you recommended)to see if I loved the sectional for a few years. I loved it so much I decided to have custom Sunbrella fabric ones made. Even though the custom ones were more expensive, it has been worth it. They go perfect with my California Mission style home. Now I want to add the armless one and make it a U-shape. I did add a piece at the bottom back of each sofa to hold the cushions in. The seat cushions would slide out the back when sitting on the sofa. I made the coffee table to match. Our family loves it!

Estimated Cost
building materials for sofa $250. Custom Sunbrella Fabric cushiosn $2000
Estimated Time Investment
Weekend Project (10-20 Hours)
Finish Used
Stained with Carrington Minwax and sealed with spray Shellac
Recommended Skill Level
Beginner

Comments

Single Simple Modern Outdoor Lounger

Submitted by Anonymous (not verified) on Fri, 04/22/2011 - 12:18

Modified the double lounger plans into 2 single loungers. I liked the idea of the boards running the long way rather than from side to side like the single lounger plan. These were pretty easy to build. All assembled with a Kreg for hidden screws. Made with Sanded and super polyurethaned cedar (3 or 4 coats). turned out beautiful with the matching boards running from head to toe!

Estimated Time Investment
Weekend Project (10-20 Hours)
Finish Used
Multiple coats of polyurethane with sanding between each coat.
Recommended Skill Level
Intermediate
Seasonal And Holiday

Outdoor Sectional

I scaled back the length of the sofa by a few inches and I made the sectional only one seat to fit my space on the deck. This was my first woodworking project that I did by myself. I got the cushions for more than 1/2 off at Ikea so the whole project cost about $150 ($80 for the cushions). It took me about a week to complete but the total time was less than 10 hours to build and stain. I'm pretty happy with how it turned out.

Estimated Cost
$150
Estimated Time Investment
Weekend Project (10-20 Hours)
Finish Used
Pittsburgh Paints Stain & Sealant in One for Decks, Fences, & Siding in Walnut. I brushed on the exterior stain just like a paint. I did the top part of the sofa first, then flipped it over and stained the bottom. Read instructions on the label.
Recommended Skill Level
Beginner

Comments

Rustic Modern TV Console

Just finished up this unique TV console.  Built from reclaimed pallet wood. 

Estimated Cost
$150.00
Estimated Time Investment
Weekend Project (10-20 Hours)
Finish Used
Clear coat of wax
Recommended Skill Level
Advanced

Comments

Templar

Mon, 12/02/2019 - 22:10

Hi there Im new to site and also have the issue of not seeing the plans for this Rustic Modern TV Console. Are they available and Im doing something wrong or??

Swing Slide Playset for Grandson

Submitted by shellyward on Wed, 05/20/2020 - 09:22

We are used to seeing our grandson every weekend but during the 2020 COVID quarantine we were unable to do so. Instead, we filled our time building him a swing set for our backyard. He loved it!! We are going to add more to the swing side but the hardware I want isn't available right now (apparently there is a lot of swing set building going on during this time). I look forward to many years of playing on this with our grandson and hopefully additional grandkids in the future... Our cost was pretty high mainly because our first round of lumber came from a local lumberyard that was willing to deliver within a few days (big box was going to take several weeks) and they had what is supposed to be higher end lumber (not sure I am convinced of that)....also, i chose some pretty expensive hardware (brackets) just for the added security.....

Estimated Cost
1800-2000
Estimated Time Investment
Week Long Project (20 Hours or More)
Finish Used
not done yet but will be staining/sealing when the wood is ready
Recommended Skill Level
Intermediate

Comments

Seasonal And Holiday

Modern Outdoor Bench

Submitted by Anonymous (not verified) on Tue, 08/09/2016 - 16:29

Great plans!  I modified the bench by adding a slanted back (which enabled me to put the slats closer together), extending and curving the front of the arms and extended the seat to the outside of the legs.


Recommended Skill Level
Intermediate

Comments

Outdoor bar table

Submitted by hueybp on Tue, 07/21/2020 - 20:06

Not quite finished but love the table already. Trying to decide how to stain/paint it. The Kreg jig was a must for this project. It was my first of hopefully many! I used cedar for the 4x4s and 2x6 top pieces. The 2x4s are treated lumber (only because there were no more cedar ones....apparently lumber is getting hard to get lately!!!). Anyway....thanks for the great plans and motivation for this project.

Built from Plan(s)
Estimated Cost
Lumber was about $150 bucks (I bought mitre saw and kreg jig, too)
Estimated Time Investment
Afternoon Project (3-6 Hours)
Finish Used
Will probably use semi transparent stain
Recommended Skill Level
Beginner

Farmhouse Storage Bed With Hidden Drawer

Submitted by Beekeeper on Wed, 12/10/2014 - 17:35

Ana, thanks for these plans! They inspired me to make my first bed build. I also want to thank all of you that added brag posts! They gave me ideas for some of the modifications that I made. I did this build by mixing your Queen Farmhouse and Queen Farmhouse Storage bed plans. I also added a number of modifications to suit my own preferences. The drawer boxes I changed by building a faceplate (I didn't want the plywood ends exposed), and by increasing in depth to maximize some additional storage. Since I increased the drawer sizes, I went with the euro roller bearing slides. I increased the foot-board height to be slightly higher than the mattress. I also designed the footboard to have a removable inner section with hidden latches on the inside. I did this because I wanted to make use of the "dead space" between the drawer boxes. I then used this space to house a hidden drawer, that is approx six feet deep (I couldn't help myself-I love hidden drawers wink
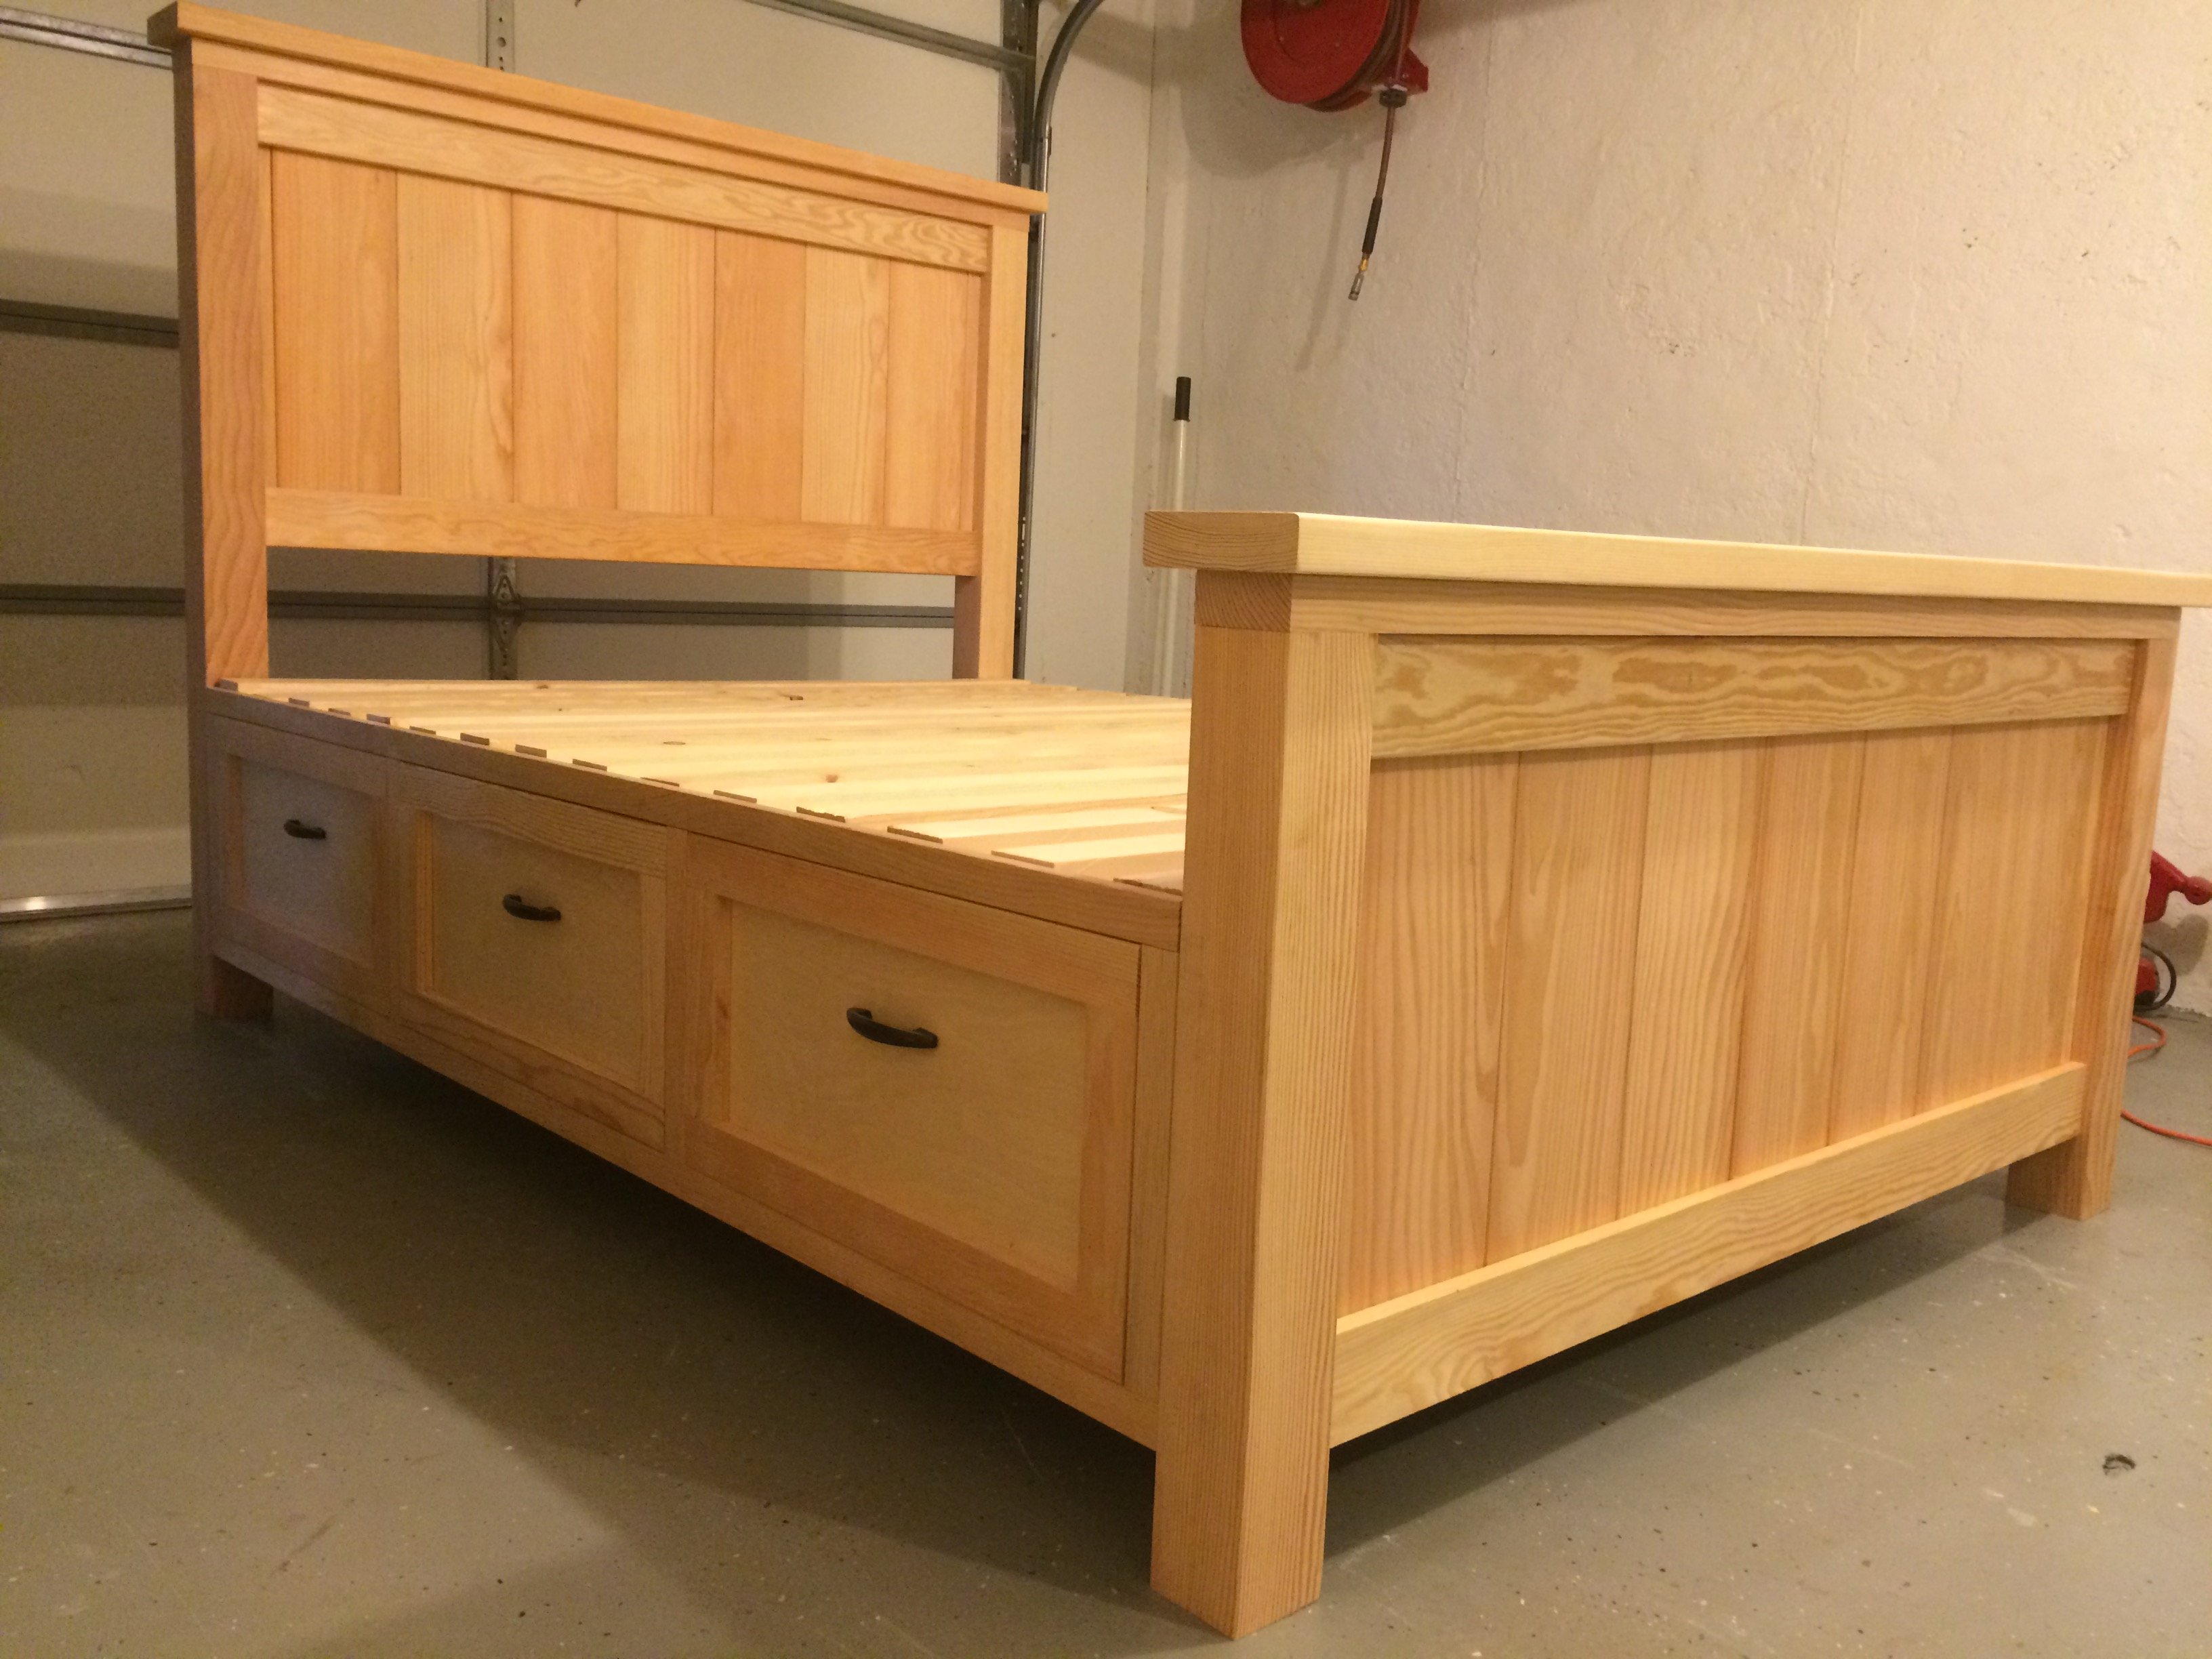
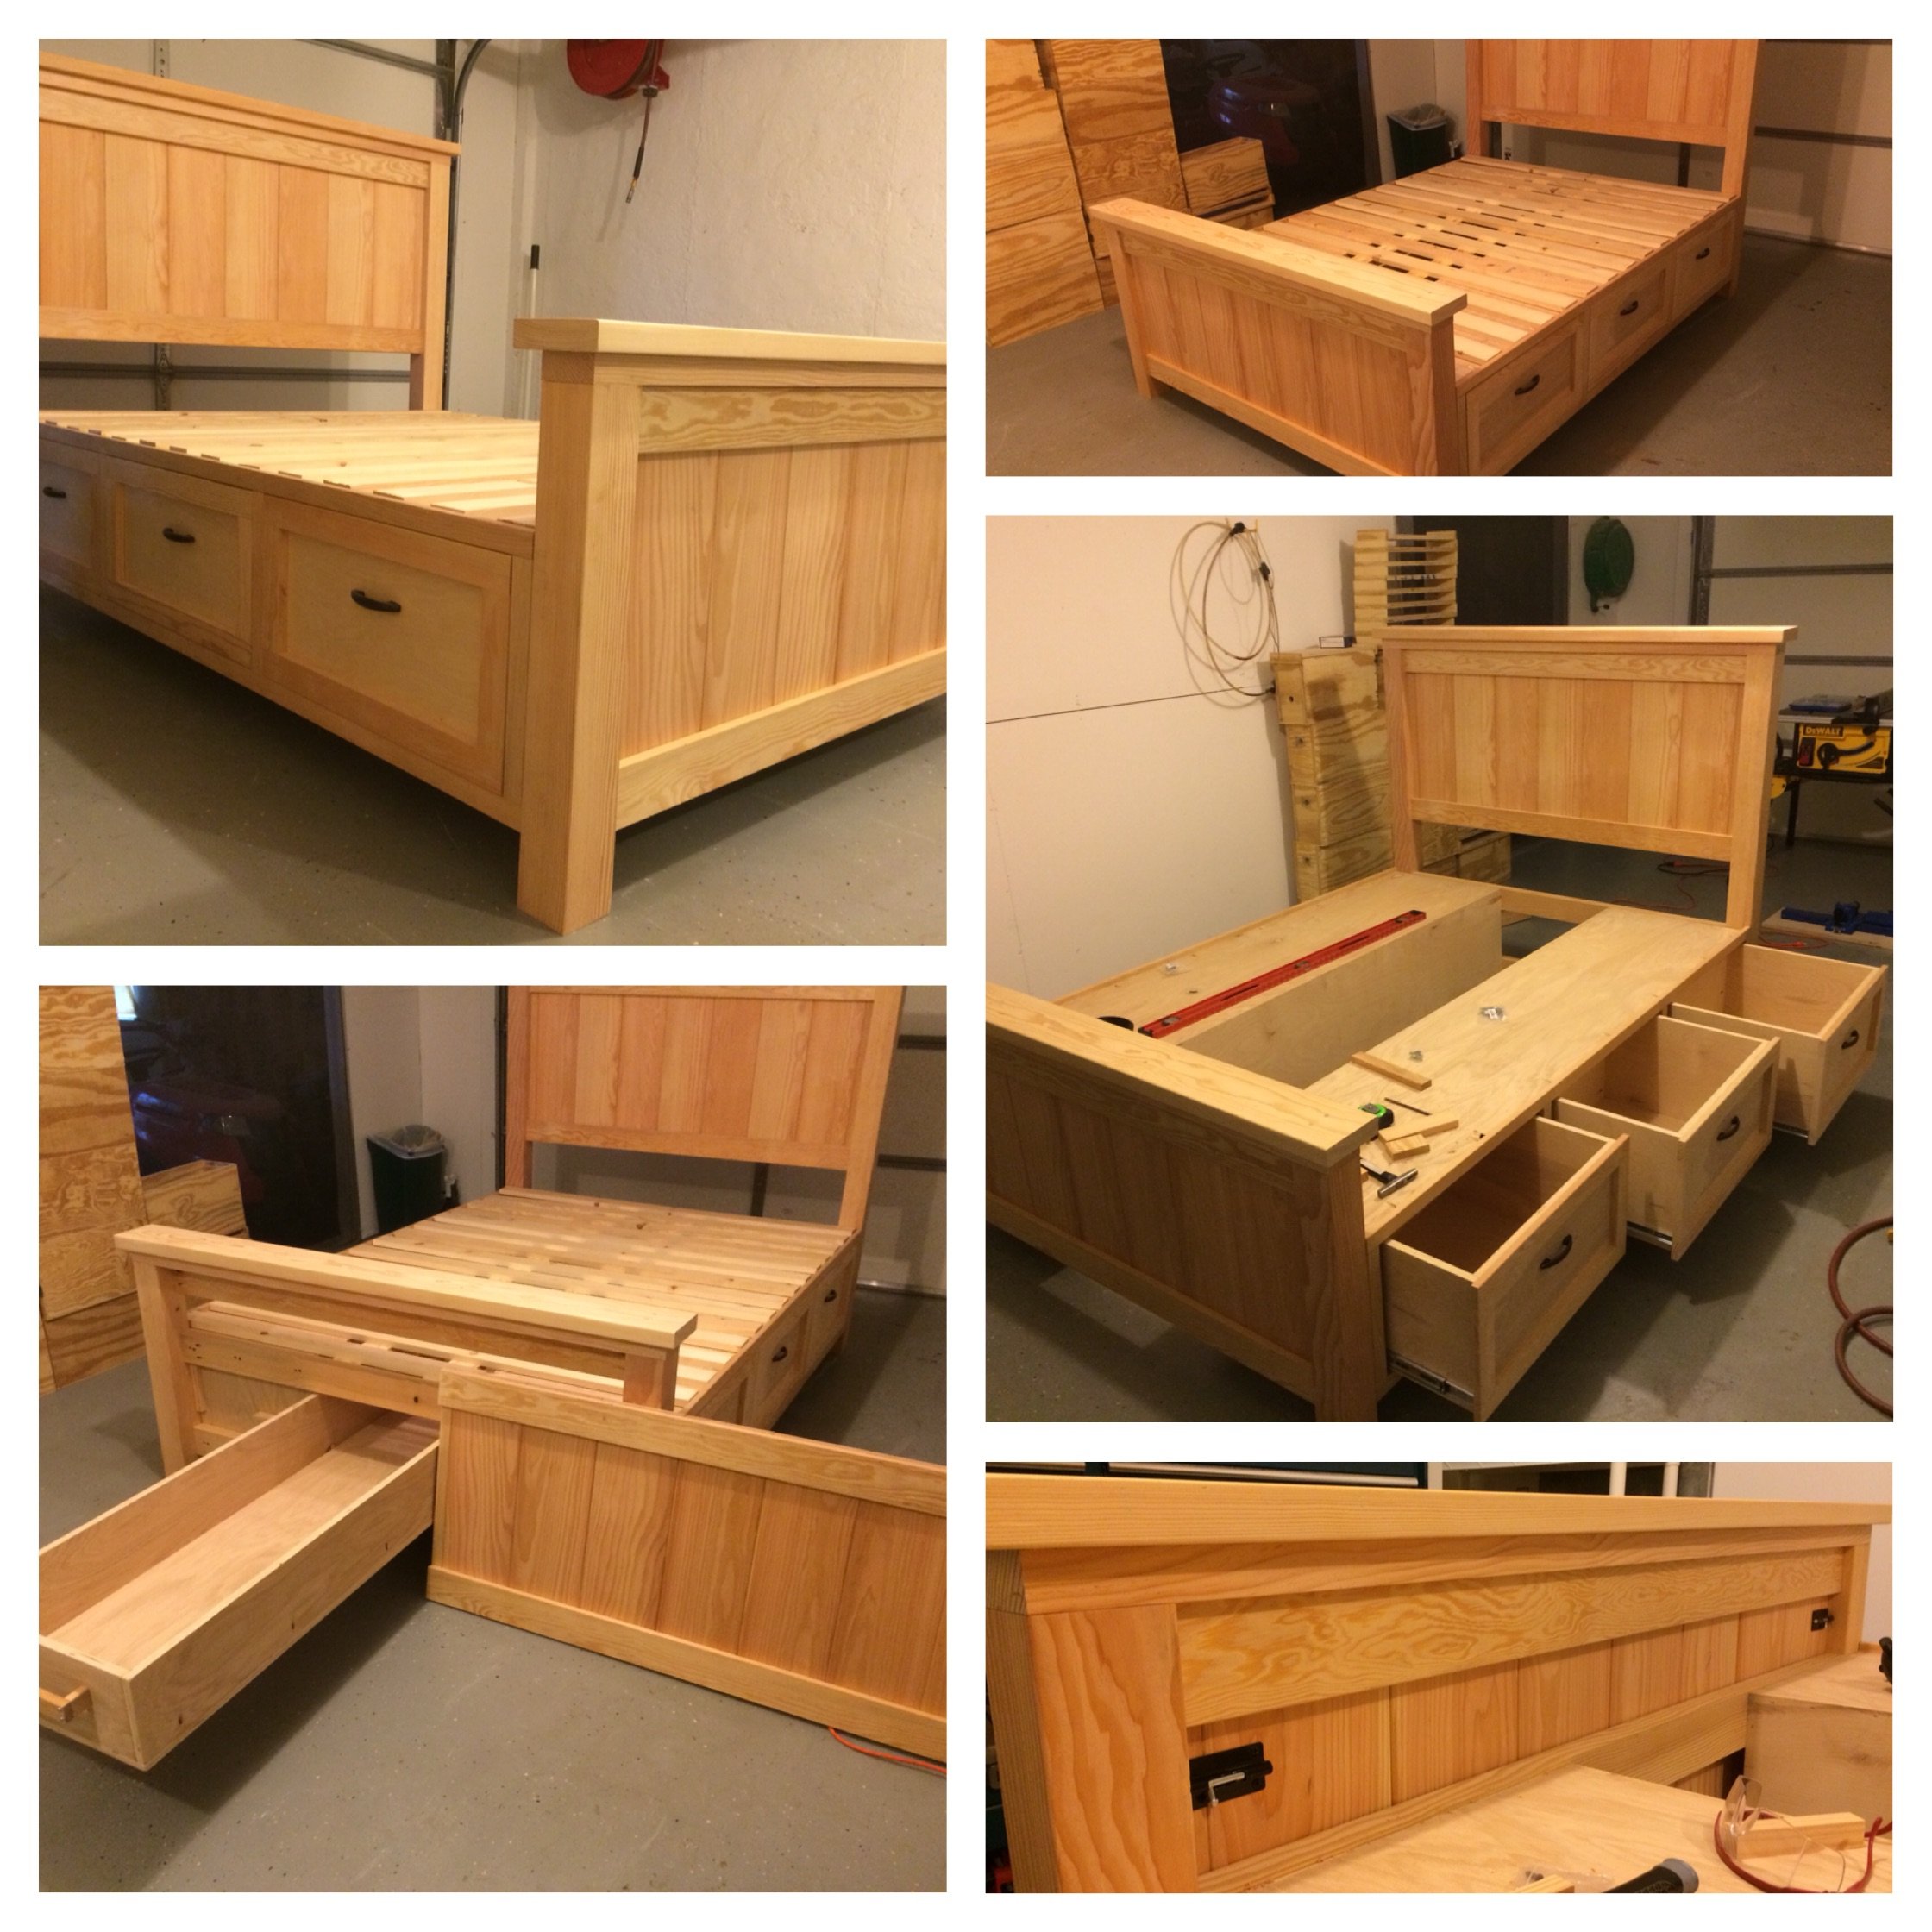
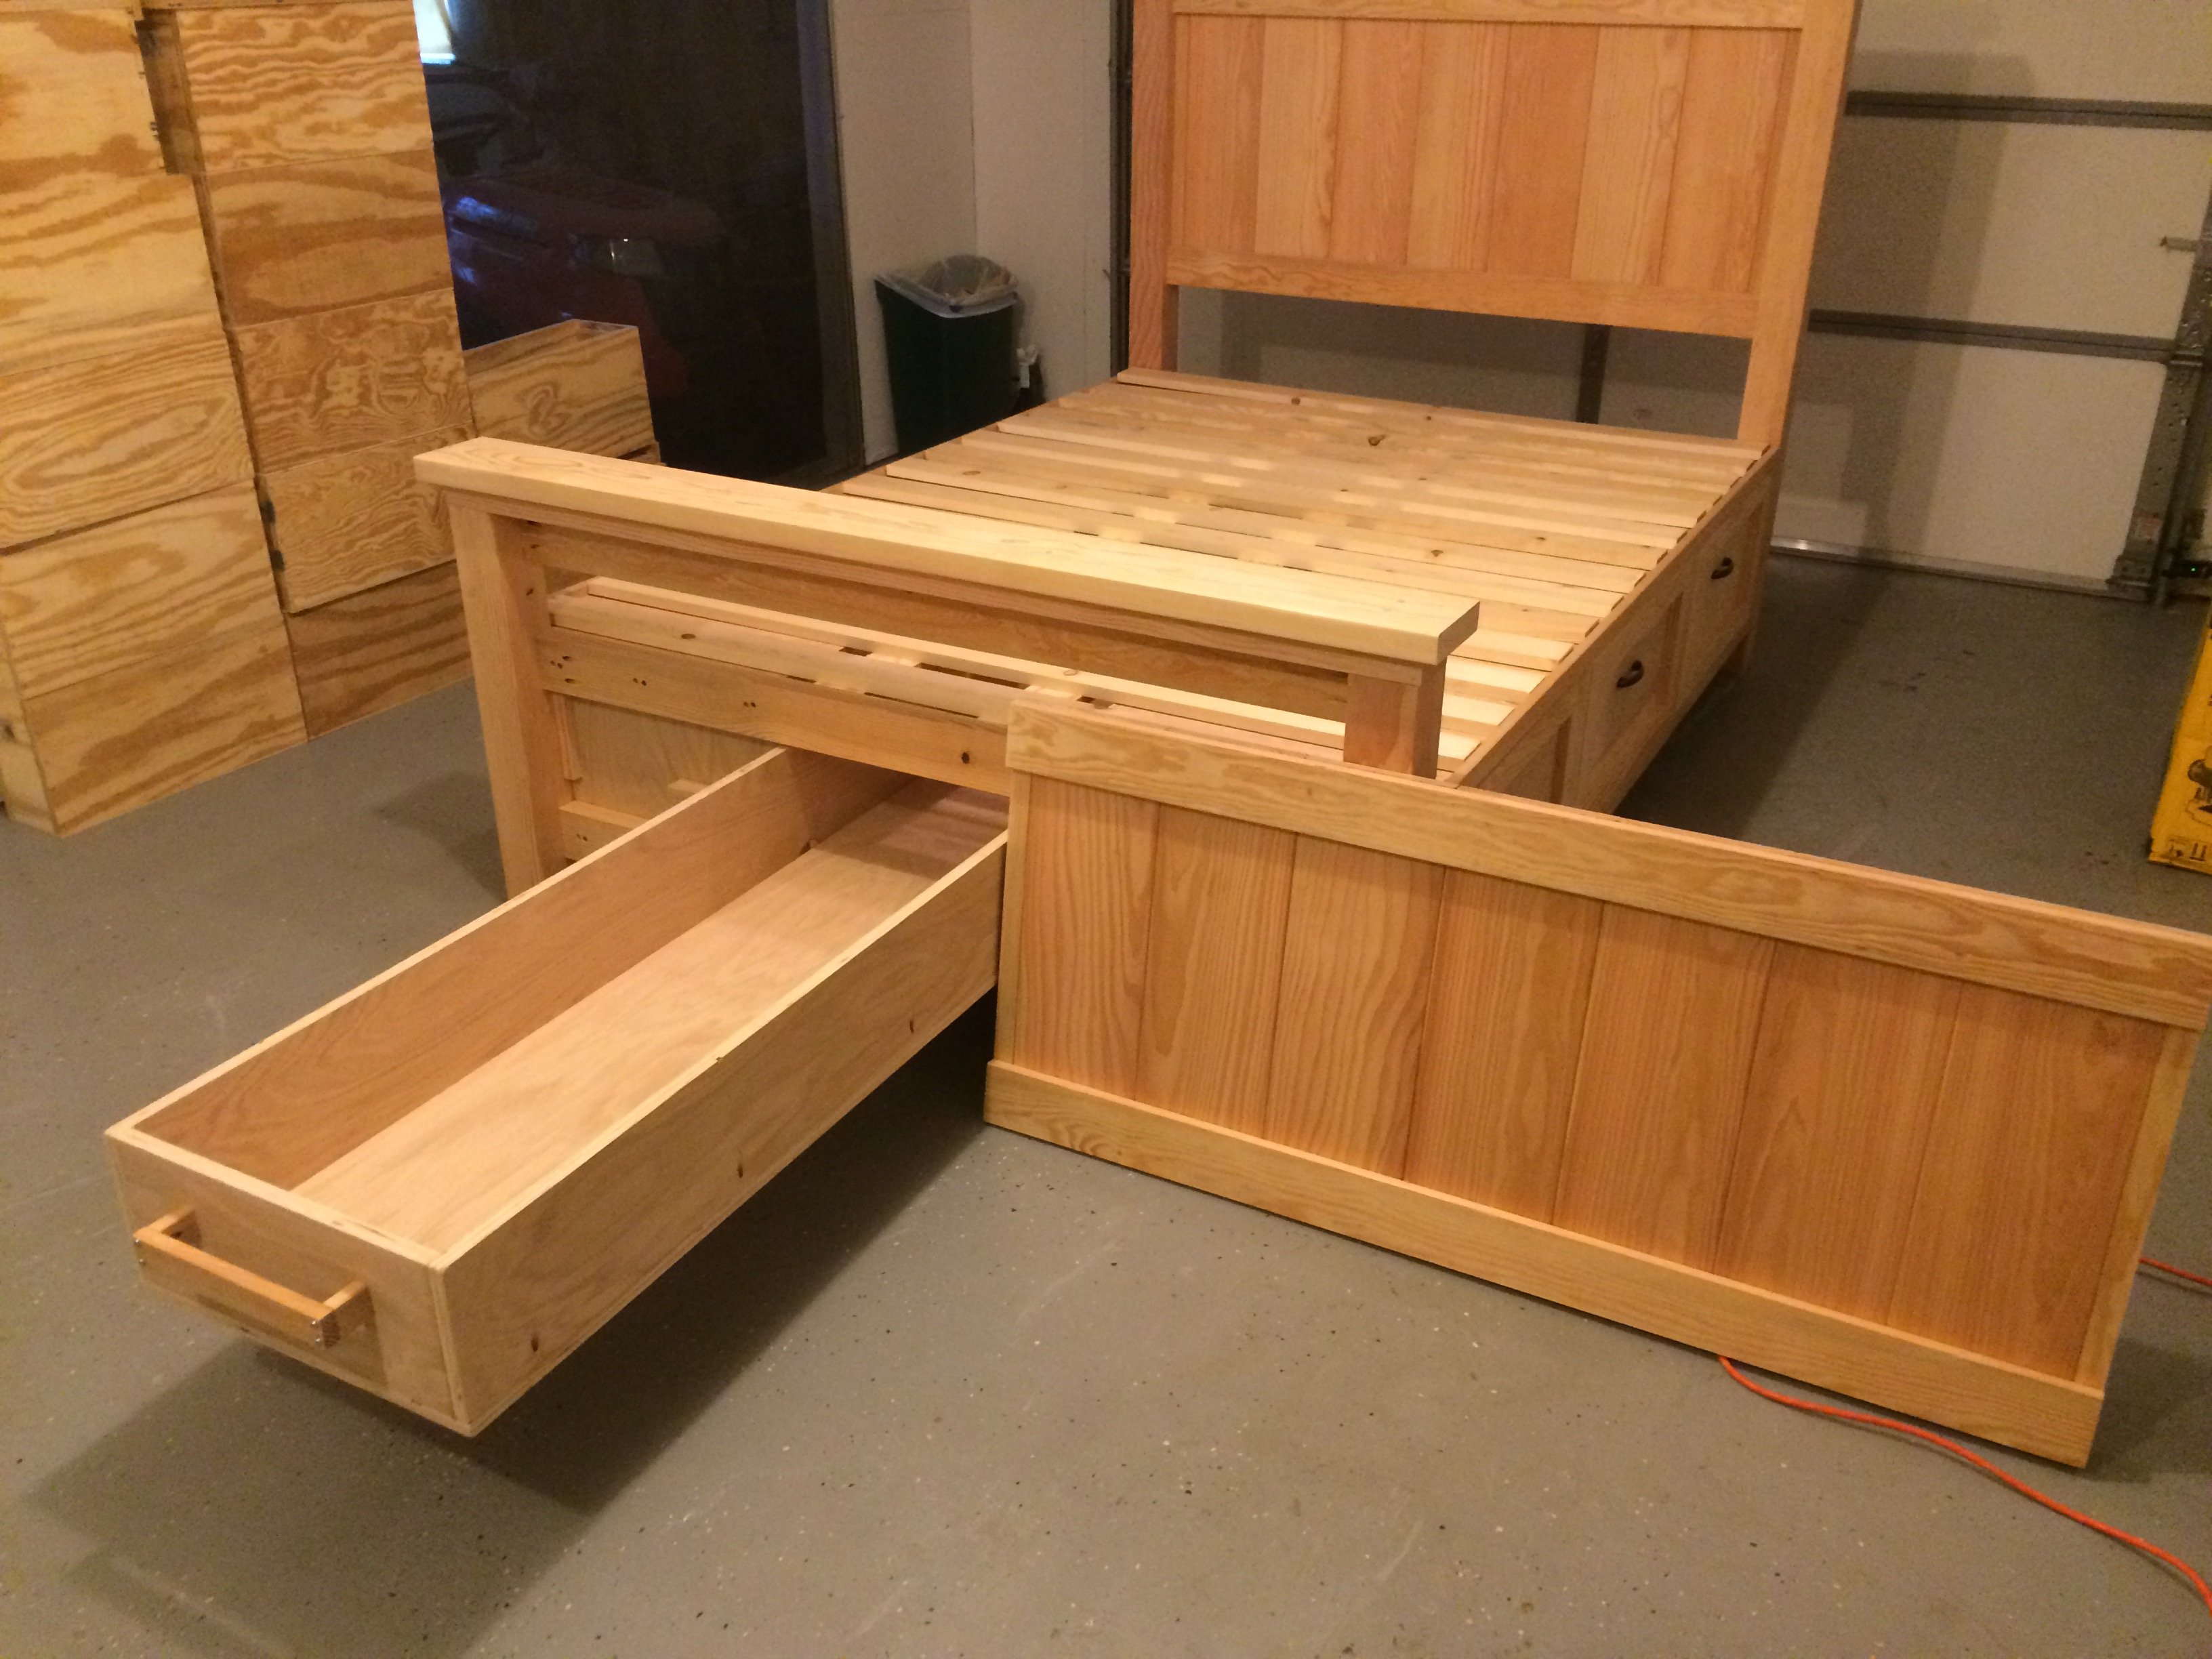
). Because I added the hidden drawer, I changed the opptional center support to 4X4 blockes that were pocket screwed under the center of the boxes. I ended up using birch plywood and fir for this build. For my first bed build I'm fairly happy with how it came out. Thanks again!

Estimated Cost
I didn't keep exact track of the cost of this bed, but I think it was about $800.
Estimated Time Investment
Week Long Project (20 Hours or More)
Finish Used
I haven't got there yet, but I am planning on putting a mahogany stain and then a polyurethane. All
Recommended Skill Level
Intermediate

Comments

spiceylg

Thu, 12/11/2014 - 07:41

This is your first build and you did all of those awesome modifications?! Really impressive and it looks perfect! Congrats and welcome to the community!

In reply to by spiceylg

Beekeeper

Sun, 12/14/2014 - 06:03

Thanks for the compliments! It was a fun learning experience. Making all the modifications definitely slowed down the build, but also made it more rewarding!

beckbg

Fri, 12/12/2014 - 13:18

I just started my bed (mostly out of Baltic Birch) and am wondering where you were able to find such nice 4x4s. Your bed is gorgeous! No luck here. I bought redwood, but really wanted fir for the sharper edges. It's my first project, too. I also bought same drawer slides, but the soft close. Didn't want the slam. I figure building it will be the easy part compared to procuring nice 4x4s! Hope you can help!

In reply to by beckbg

Beekeeper

Sun, 12/14/2014 - 06:01

Thanks! The 4x4s I found at a place called Better Living Building Supply. They had a pretty nice assortment of fir, including the 4x4s, so that is why I chose it for the build. Finding the 4x4s slowed down my start on the build. Our local Lowes only had them in treated pine.

athingvall

Sat, 09/05/2015 - 20:47

Thank you for the pictures, the bed turned out Awesome.  I was wondering about the latching system for the foot of the bed.  Do you think a piano hinge on the lower would work too?  Also on the center drawer did you use rollers or is it just friction?  Can't wait to start the build.

Thanks

Codding58

Mon, 02/15/2016 - 14:11

This is excellent!!!   I really like this, so much in fact that the wife is going to have to get used to it too. lol   But really, GREAT work!    Any chance you could post a pic and or comment about how you attached that removeable end?    i think this is the best part!    Cheers!

Kmaynard19

Tue, 12/10/2019 - 08:42

Beekeeper,  Awesome build!!!  Have you posted your altered plans anywhere?  I'm very interested in your build, I was wondering about some aspects of it and how you approached it.  Plans would clear it up instead of bothering you with all my questions.

NinjaPinky

Sat, 06/20/2020 - 09:06

I, like many others, have been wondering if you'd share your plans for this modification. It just looks so great!

tammis50401

Mon, 11/16/2020 - 15:42

Bed turned out awesome. I was wondering if you have the plans for the bed with a list of supplies it took to make this bed. I so want this bed it's just what we are needing

Great job

Cedar Raised Garden Beds - 3 Tiers

Steps:

1) Cut the boards to the specs below or adjust to your space

2) Kreg Jig the cut boards along each of the sides (length wise and on the ends) for attaching and making a box.  

3) Make 3 separate boxes, don't assemble until you move to location.  I used 4x4 cedar posts in the corners of the base box to add stability.  I used 2x2 pine in the front corners of boxes 2 and 3 for stability.  Install these after the dirt has been added so you can hammer in as a stake, attach with screws on front and sides.  I created 2 stakes for boxes 2 and 3 and added to the front to prevent bowing when the dirt is added.

Box Dimensions:

1) (base) 70.5" L x 46 W x 4 cedar boards high

2) 70.5" L x 32 W x 2 cedar boards high

3) 70.5" L x 16 W x 2 cedar boards high

Estimated Time Investment
Day Project (6-9 Hours)
Recommended Skill Level
Beginner

Slat Bench

Cost: $45
Made this bench smaller than the plan so it measures 48" X 18". Using it in a spare bedroom so it will eventually get stained to match the wood furniture.

Estimated Cost
45
Estimated Time Investment
Afternoon Project (3-6 Hours)
Finish Used
Haven't stained the wood, can't decide on a color.
Recommended Skill Level
Starter Project

Comments

Rapturee

Mon, 12/04/2017 - 09:17

That was my idea as well, to shorten it. My wife just asked me if we could part with a few chairs on the back side of our dining room table and if i would make a bench or two across the back wall. Well "of course" i said hahah!!  Nice job on yours!!   :{)

Mom's Jelly Cabinet

Our first DIY furniture project. We told friends it was an assignment from couples therapy. lol Don't look too close or you will see the many flaws, but I can say it has character and will serve its purpose.

We had problems with the doors. I think they are true and plum, but the cabinet, not so much. They hang a little cockeyed, but they do swing. The plans for the doors didn't quite match the cabinet, but we are newbies so we could have misread the plans.

The hinges and latch are from the blue store - painted matte black from a can from the original nasty brass. The red is Balero and the shelves are a coordinating tan from Sherwin Williams. A coat of Minwax Polycrylic for protection. We used square wire from the blue store for the doors. We didn't router the doors to inset the wire, a stapler worked fine.

It was an absolute great first project that Husband & I enjoyed tremendously. Mom has been looking for a jelly cabinet for 6 months without success. Old functional furniture pieces just aren't manufactured anymore. This cupboard fit the bill perfectly.

Estimated Cost
$80 for wood and another $80 for paint and supplies
Estimated Time Investment
Weekend Project (10-20 Hours)
Finish Used
Sherwin Williams Balero Red and coordinating Tan with Minwax Polycrylic Spray
Recommended Skill Level
Beginner

Comments

Maira (not verified)

Tue, 10/23/2012 - 08:01

This is awesome. Seriously. You two did such a great job and your mom will enjoy it for many years. That red with the black hardware looks so great.

aruchti

Tue, 12/13/2016 - 07:41

Hi, I can't seem to find the plans for this, the PDF is just a PDF of the thread. I'd love to make this as a coffee stand. thanks!

aruchti

Tue, 12/13/2016 - 07:44

Hi, I can't seem to find the plans for this. would love to make this for a coffee stand. can you provide the link to the plans?


thanks!

Williams Sonoma Inspired Chicken Coop

Submitted by Anonymous (not verified) on Tue, 11/10/2020 - 18:46

We took some creative liberties on the Williams Sonoma inspired coop posted here. Because we don’t get a whole ton of sun in our backyard, we eliminated the herb garden planter and instead built a longer run. We also made the coop a bit wider to accommodate for the inevitable chicken math. And, you’ll notice the vent both shaped differently and is a bit higher. This was to increase air flow, avoid the dreaded draft, and to lend a more Scandinavian vibe. We also decided to place the chicken exit on the outside wall to allow for more living space under the coop itself. The project took about a month to complete, dedicated to only working weekends. And, it was very much over budget! Who knew wood is so expensive?! But overall, the outcome was even better than I expected. The chickens love it and I don’t mind looking at it!

P.S. this was a pretty advanced project. The fractions alone had me yelling “uncle!” Thankfully my husband is pretty handy, and my father-in-law (career in the construction industry) had a few pointers, so they took the lead in executing. I chose the paint colors and suggested the deviations from the original blue print. ;-)

Estimated Cost
$1000
Estimated Time Investment
Week Long Project (20 Hours or More)
Finish Used
Sherwin Williams Iron Ore in matte
Recommended Skill Level
Advanced

Comments

racbino

Wed, 11/18/2020 - 12:55

Thank you! Yes, I suppose everyone is wanting wood for home improvement projects now that we're not leaving the house! Also, I didn't mean to post a picture of my son and his friends. Am I able to delete?

joshwilson28

Thu, 01/14/2021 - 07:43

does this roof have the same angle as the 'Small Chicken Coop with Plans'? It seems to be 'less steep'. Wanting to start this project next weekend and trying to get my mind wrapped around everything!. Thanks.

Seasonal And Holiday
Back