Community Brag Posts
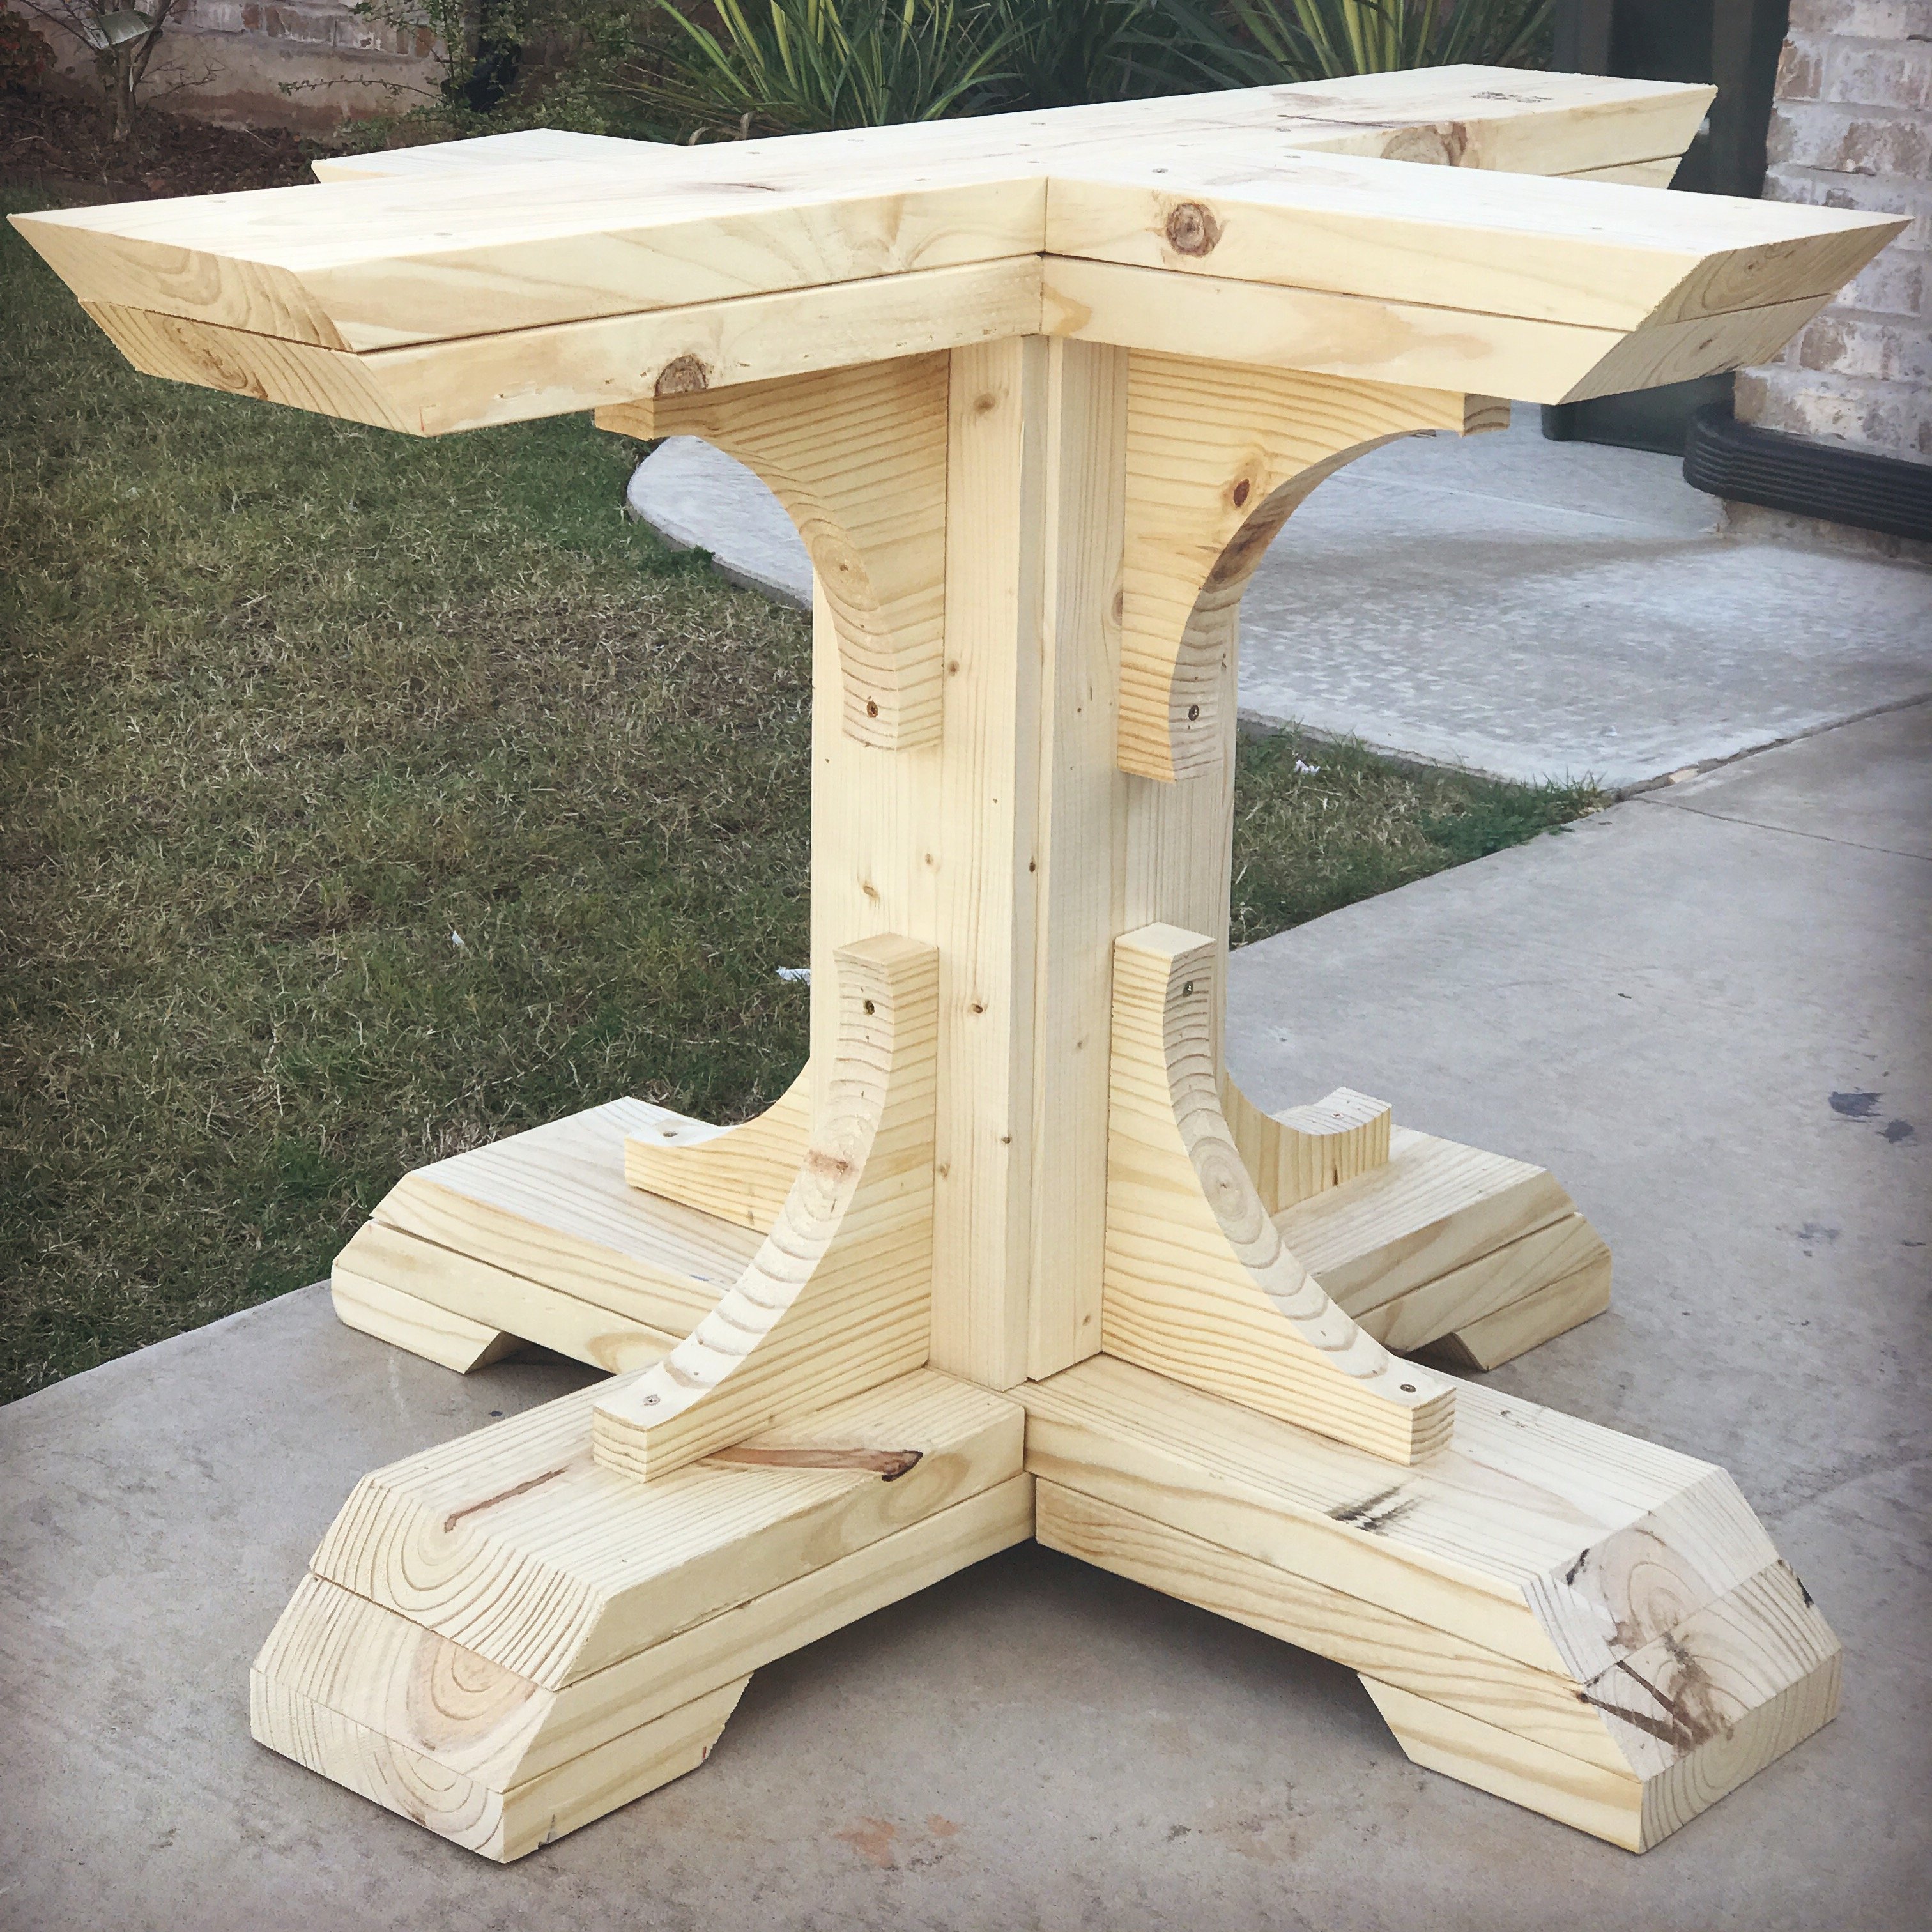
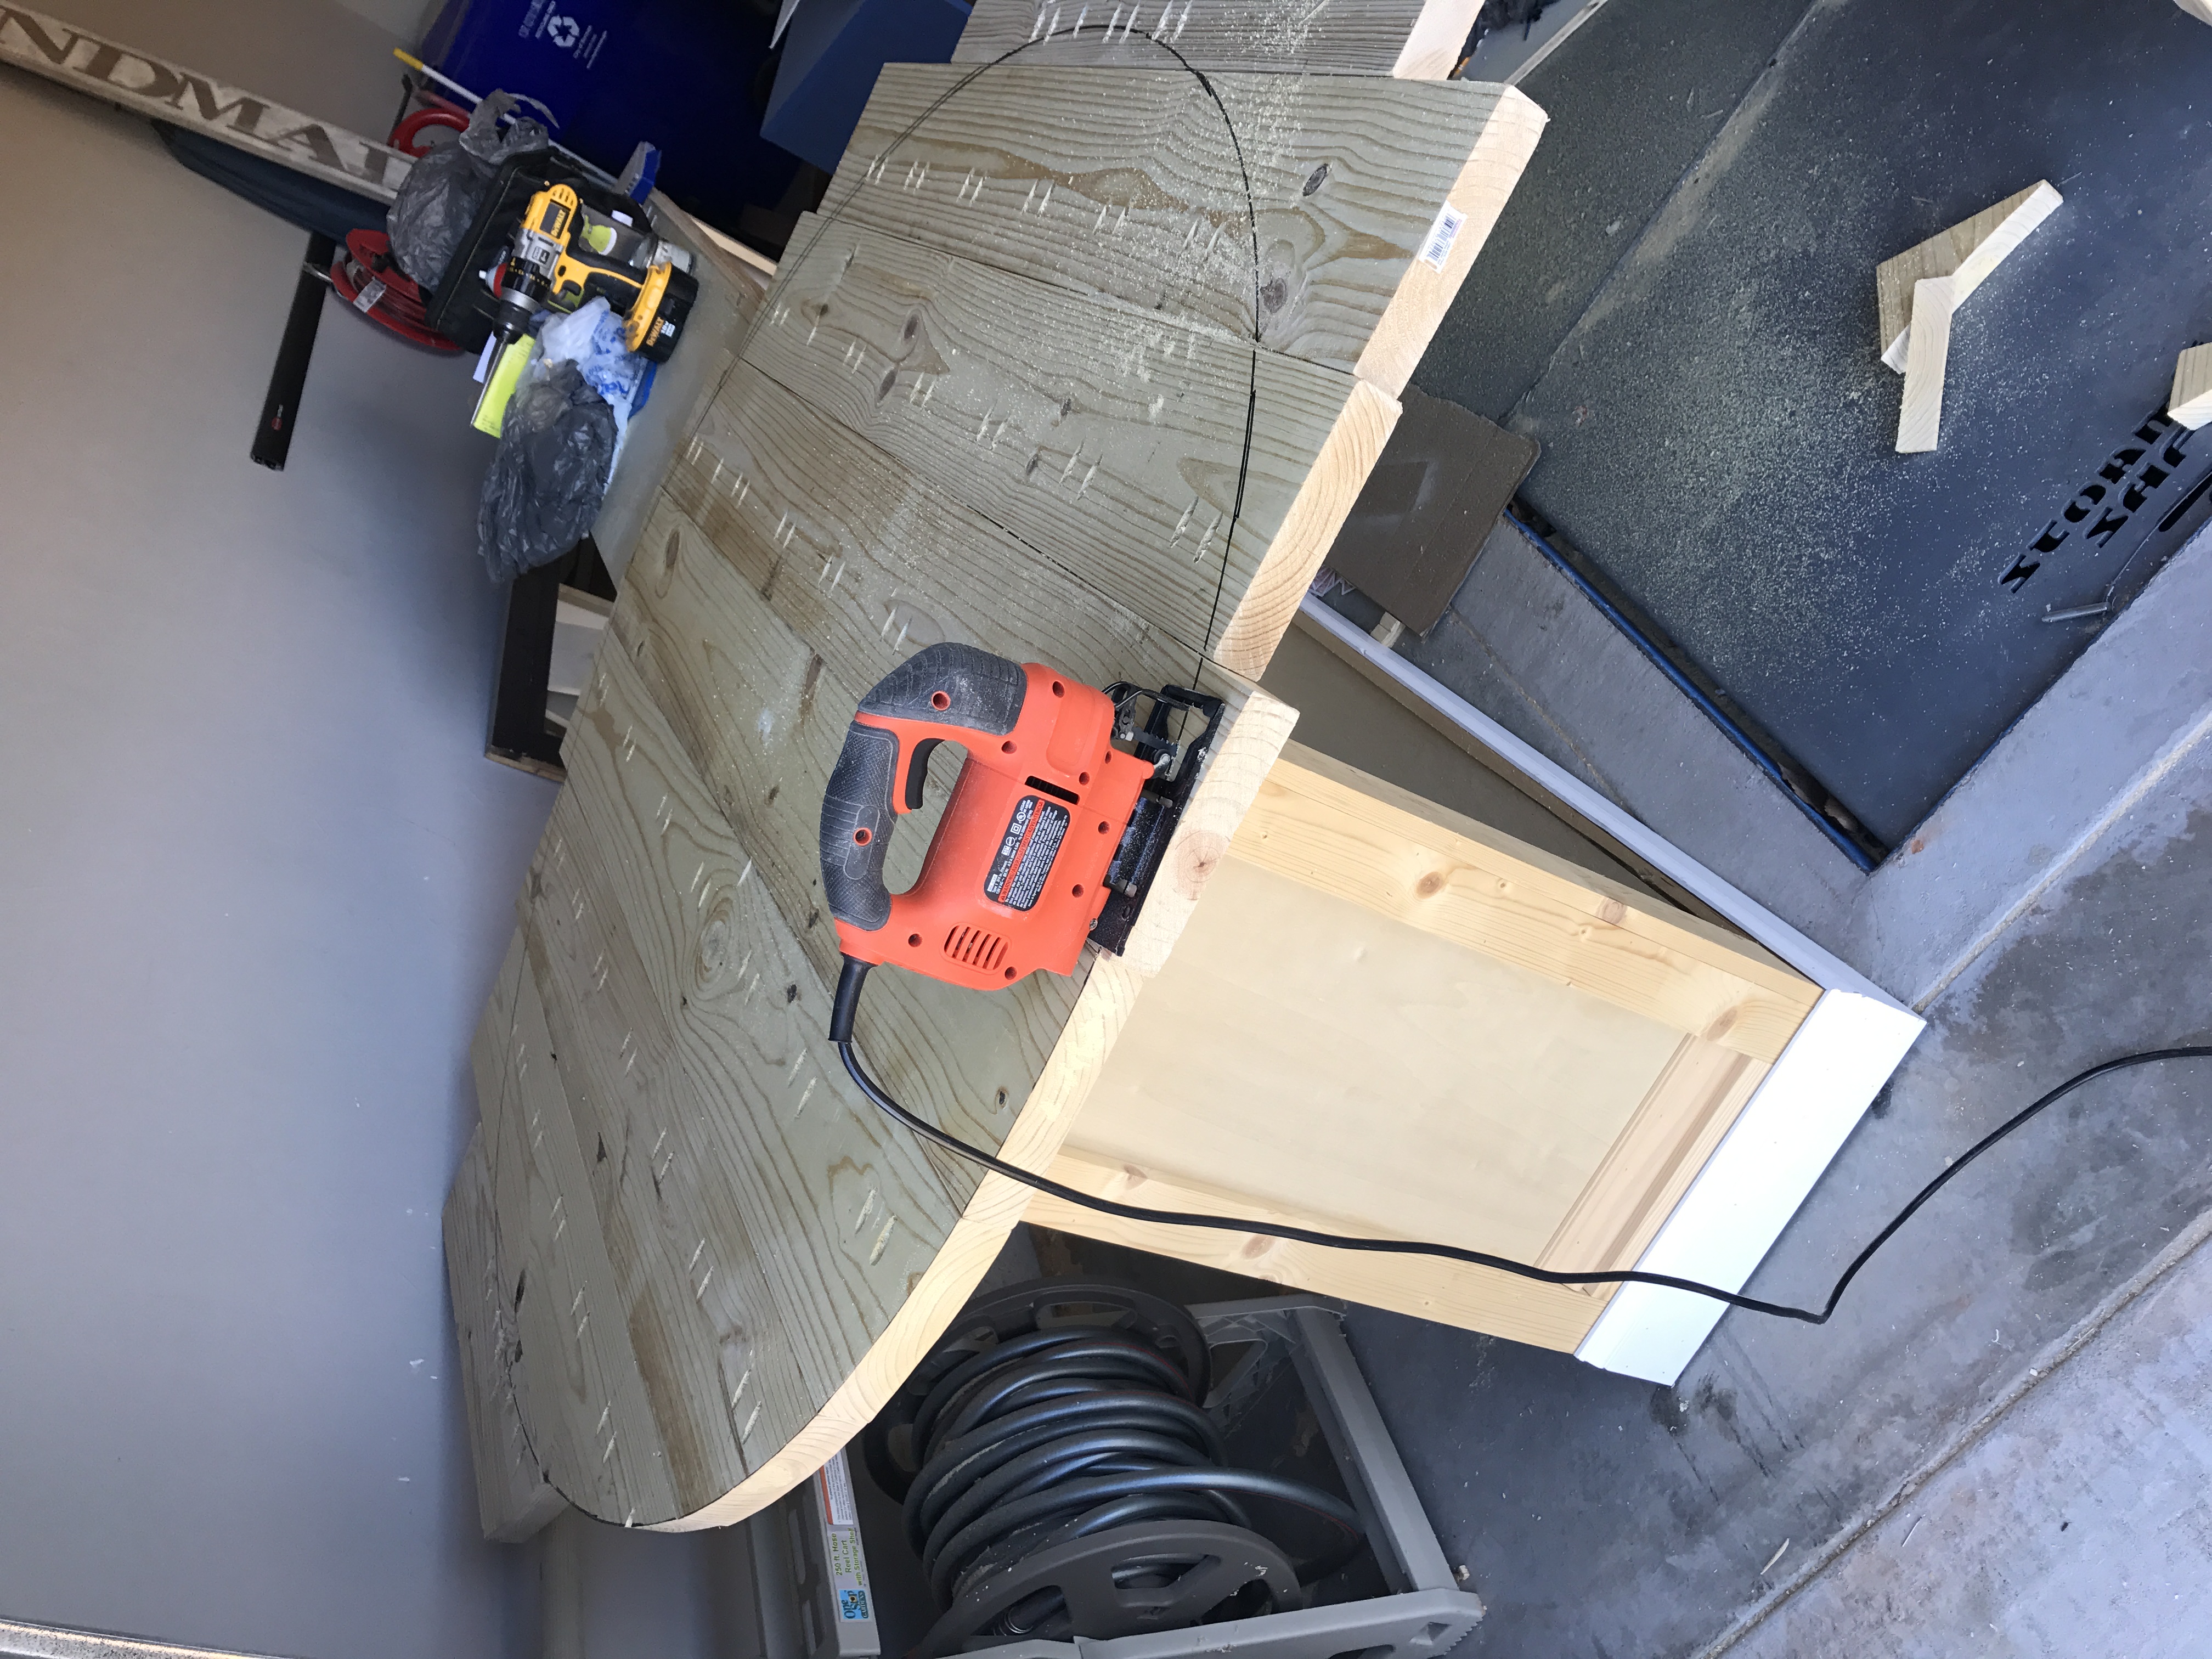
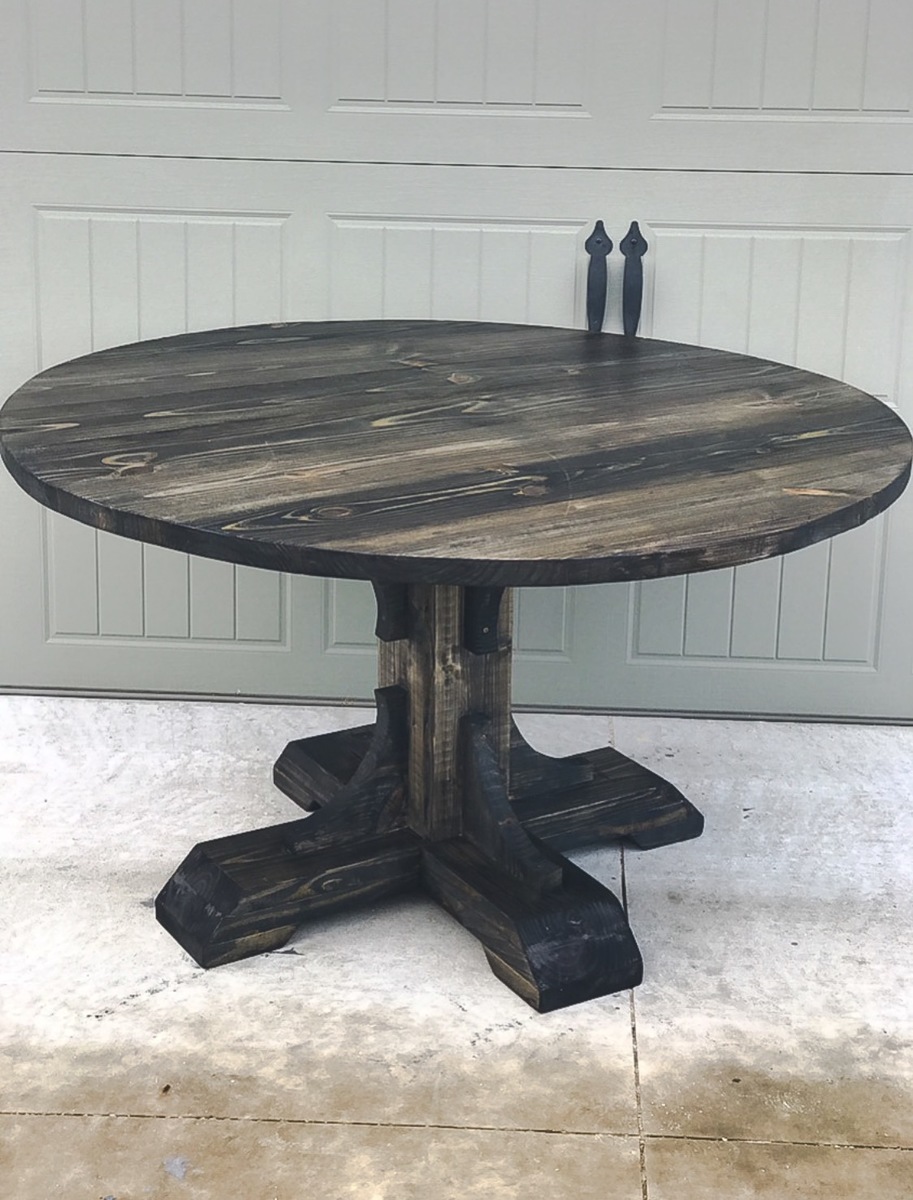
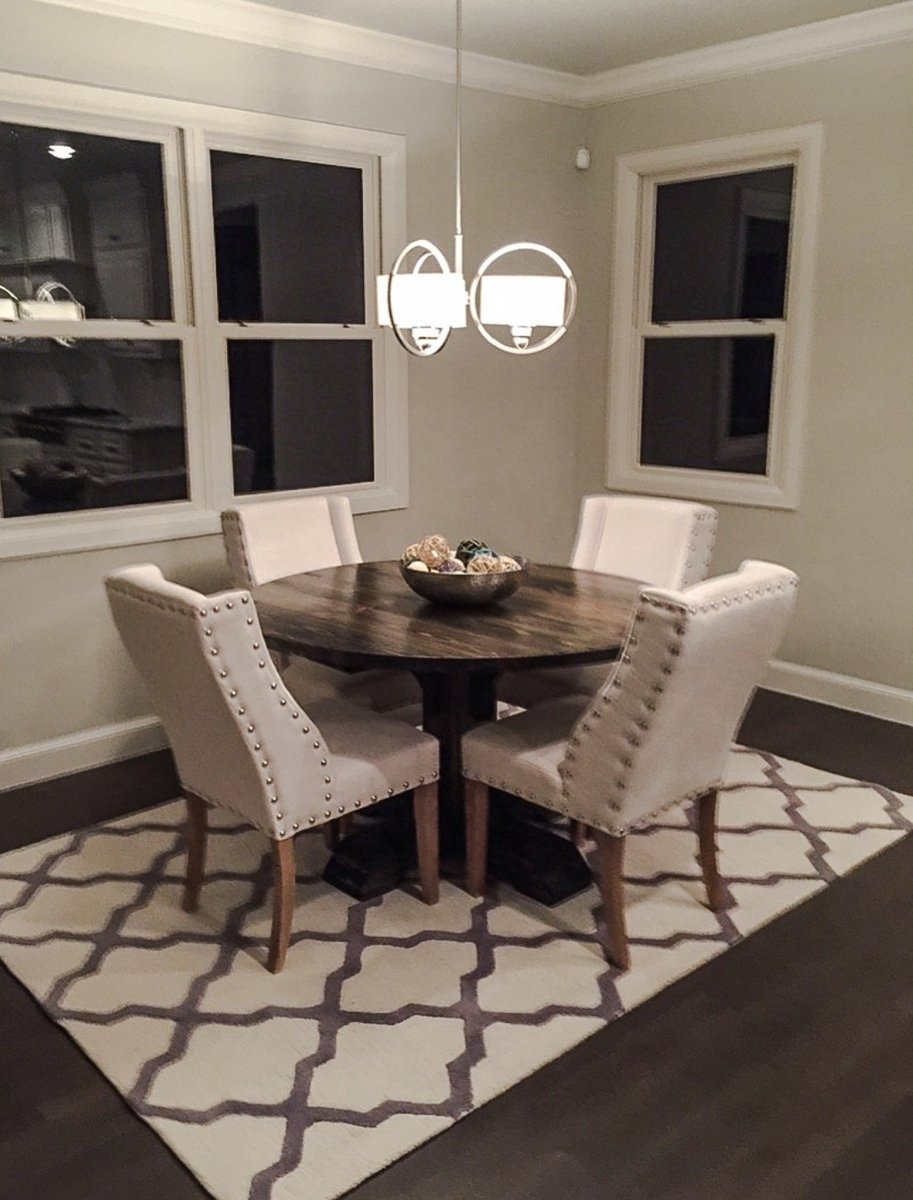
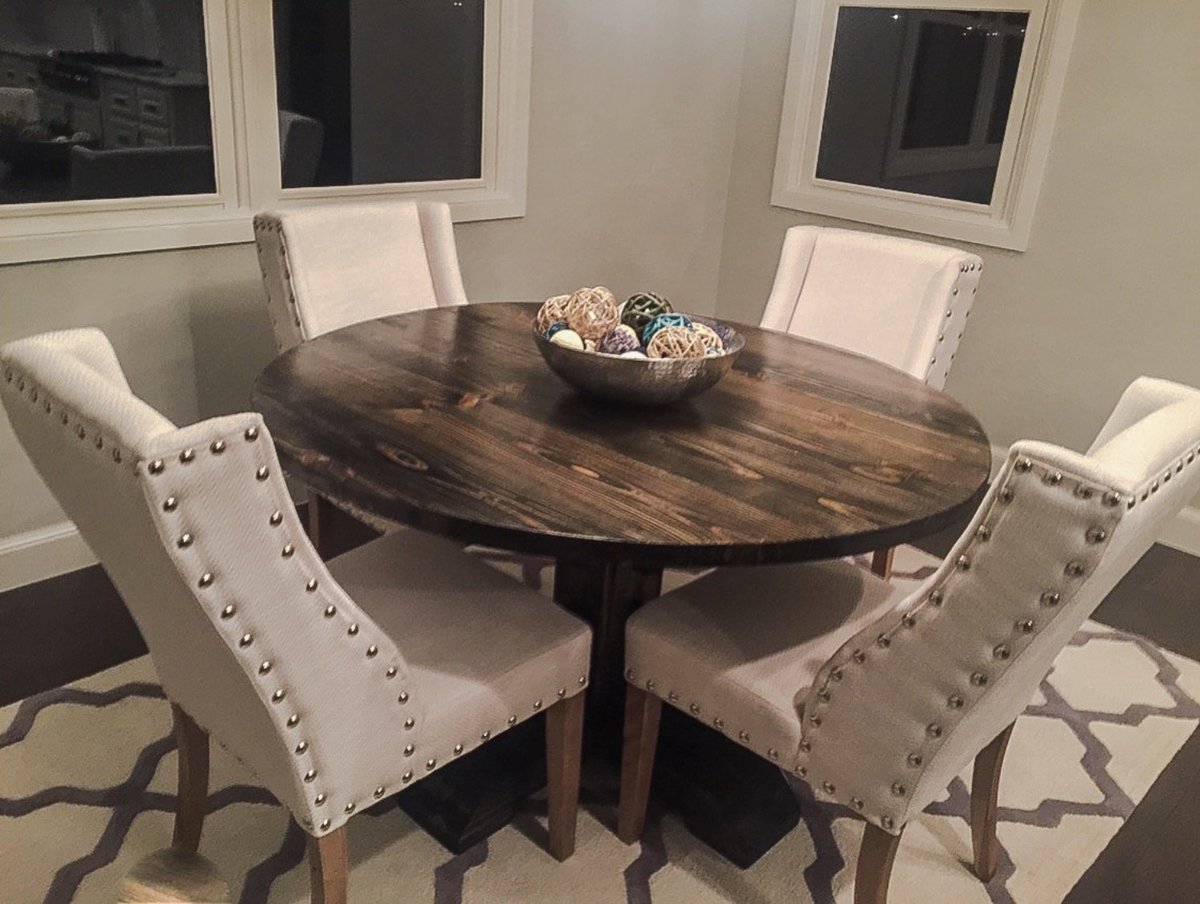
54" Round Pedestal Table
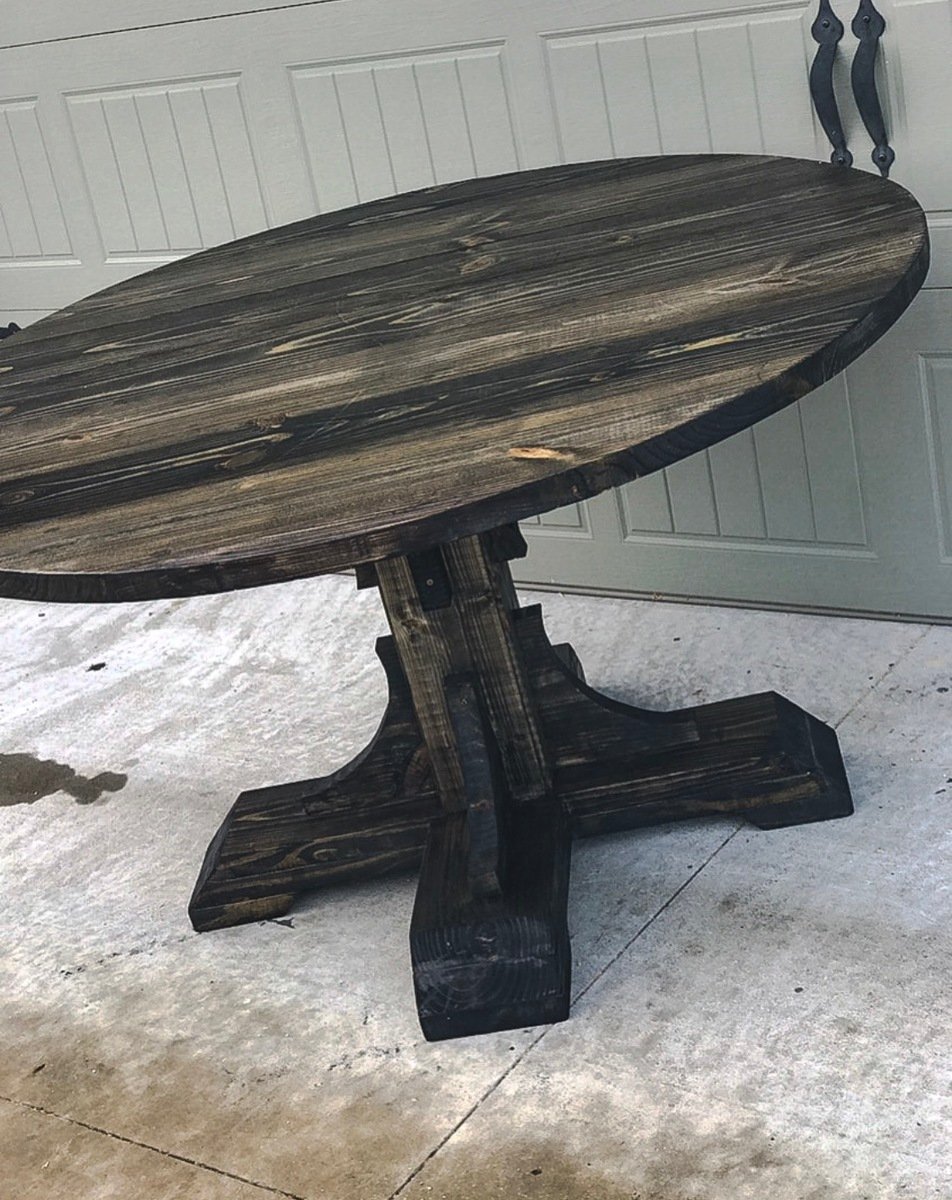
This was such a fun build. Instead of the square table top I opted for a 54" round table top and I also altered the plans for the base. I upped the size for each board used to give it a chunkier look ( Ex: instead of 2x4s, I used 2x6s and so on)
Built from Plan(s)
Estimated Cost
$110
Estimated Time Investment
Weekend Project (10-20 Hours)
Finish Used
1 Coat Minwax - Wood Conditioner
1 Coat Minwax - Ebony
3 Coats Minwax - Polycrylic
1 Coat Minwax - Ebony
3 Coats Minwax - Polycrylic
Recommended Skill Level
Intermediate
Comments
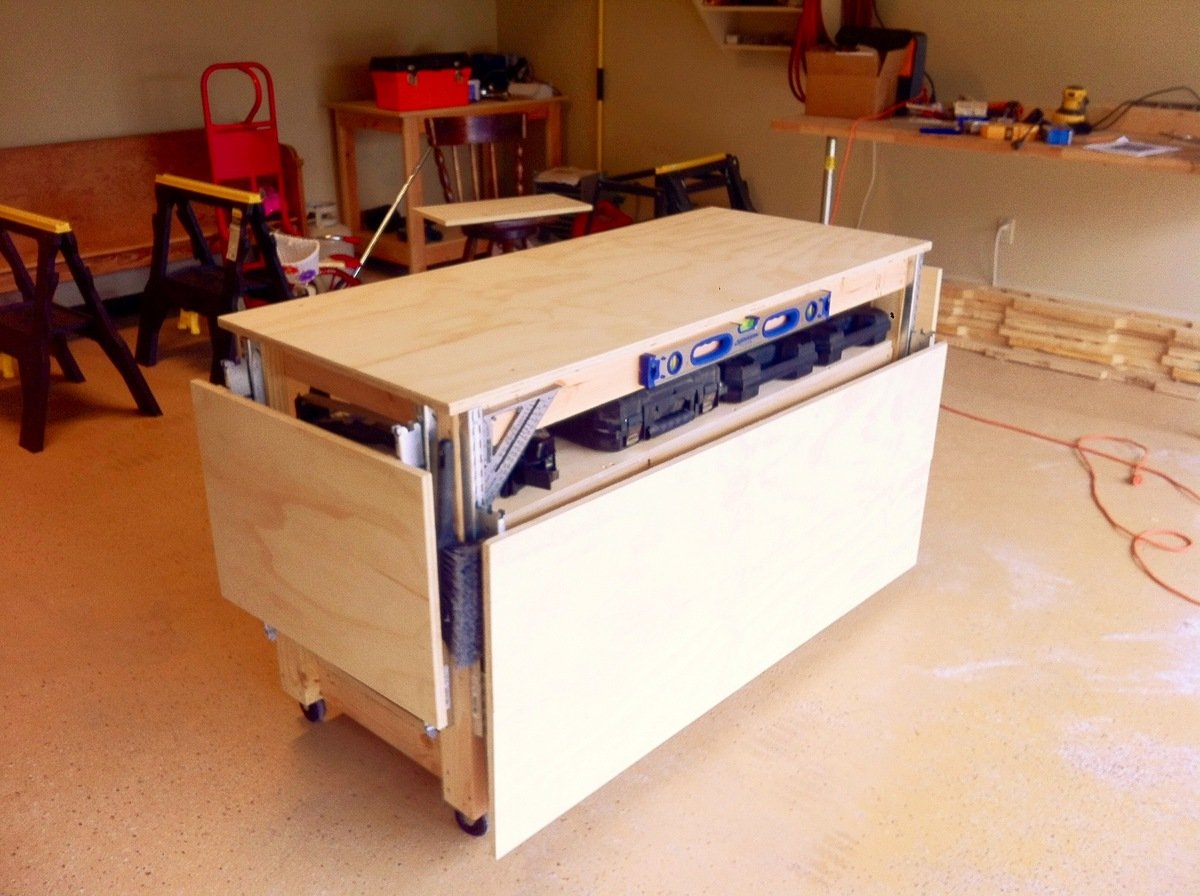
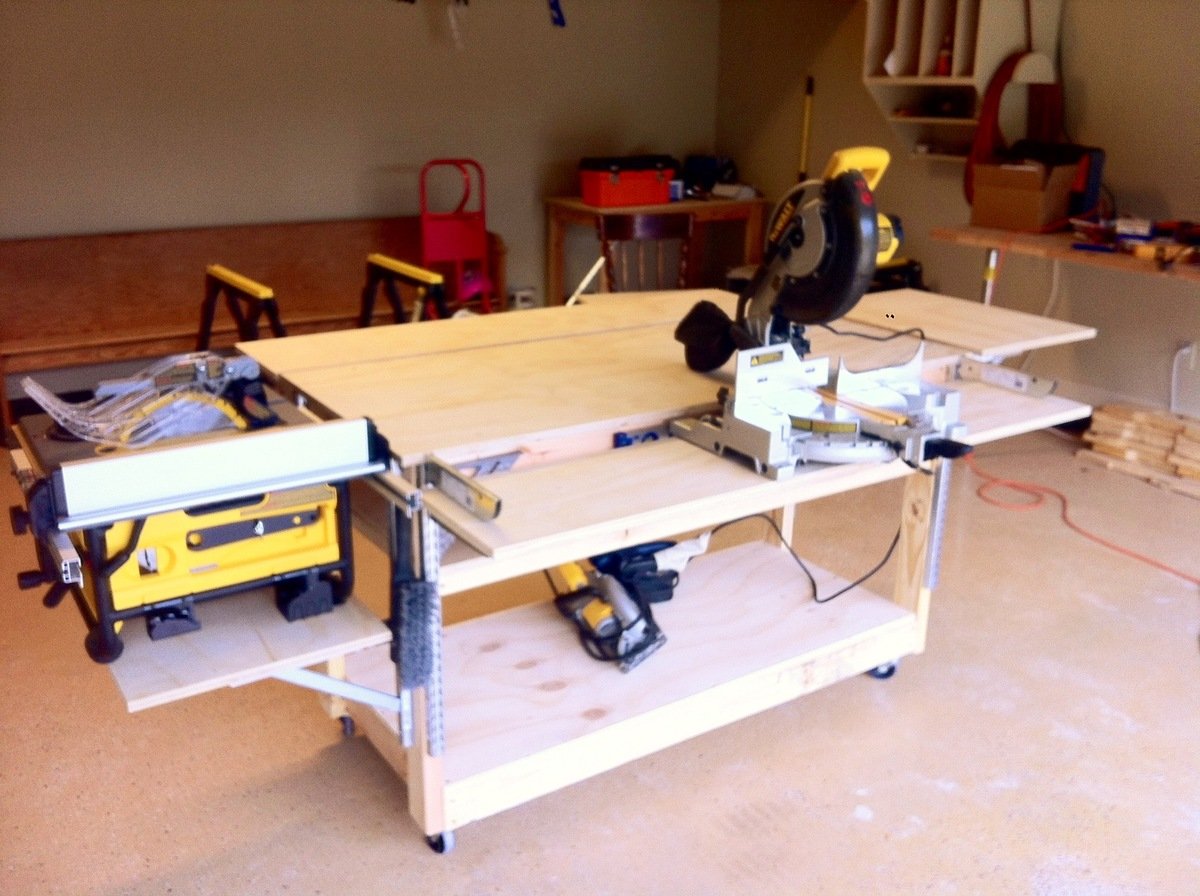
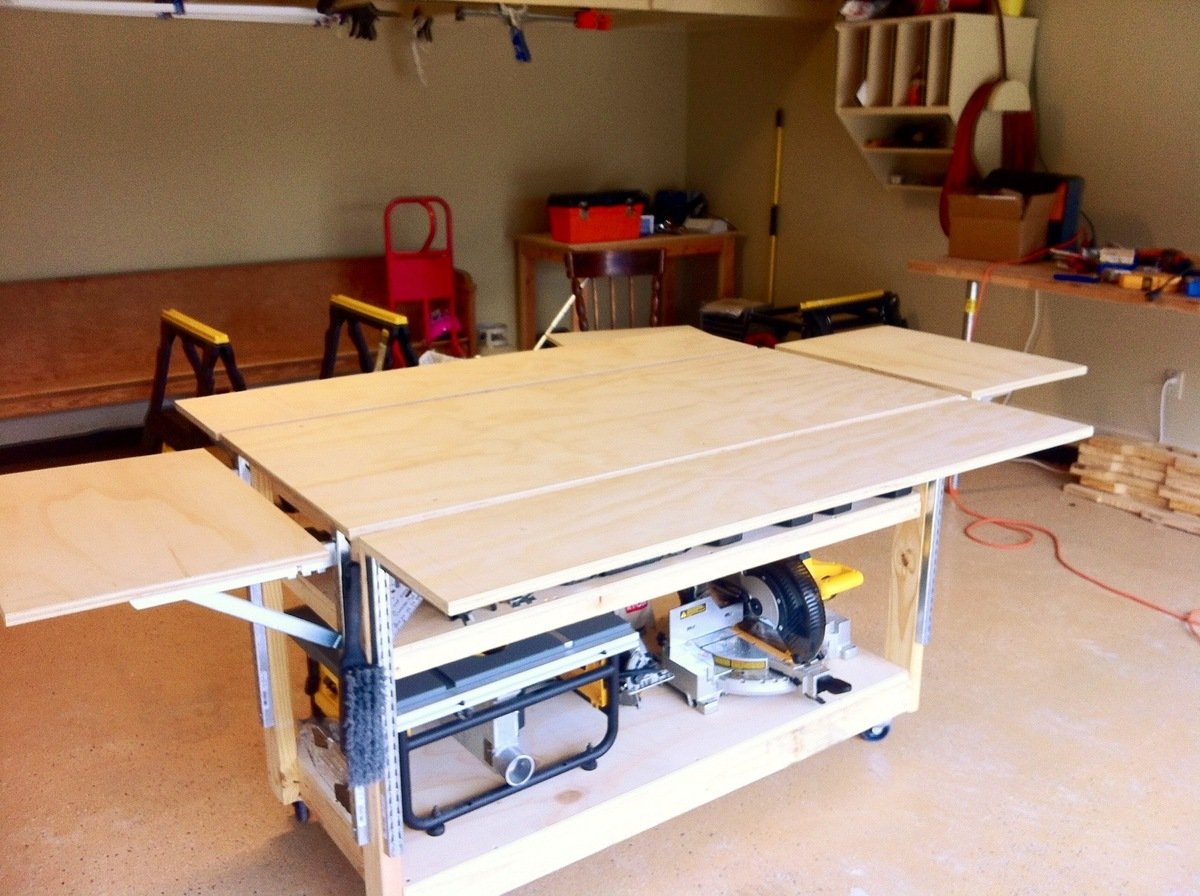
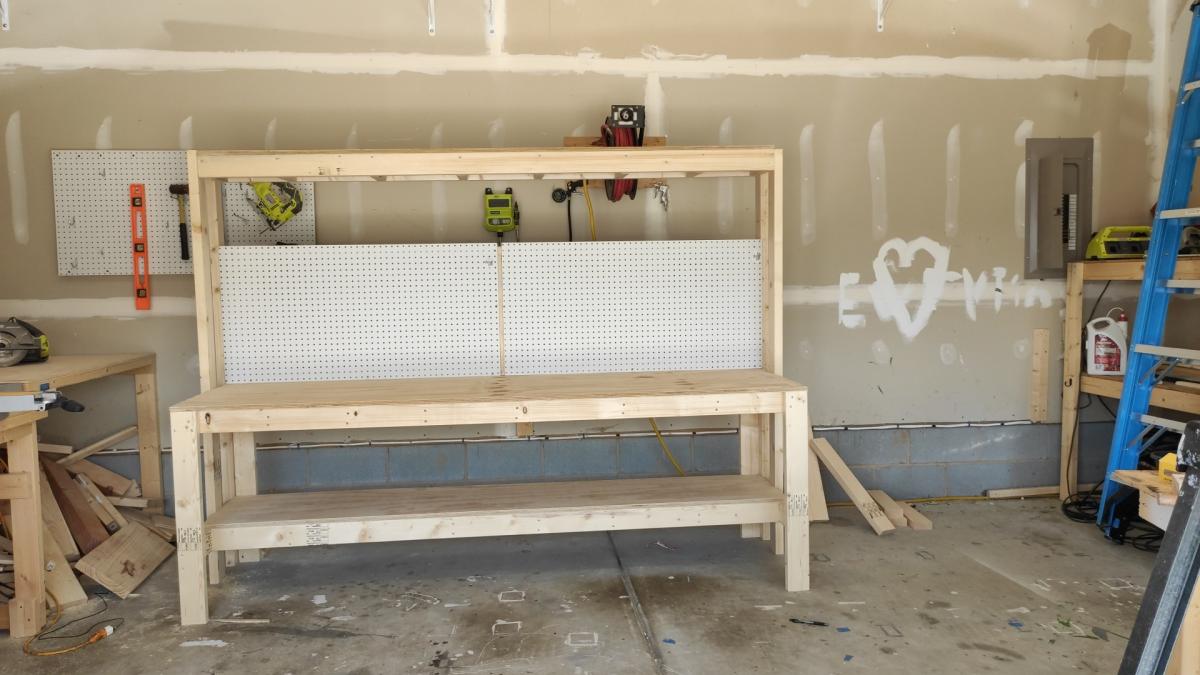
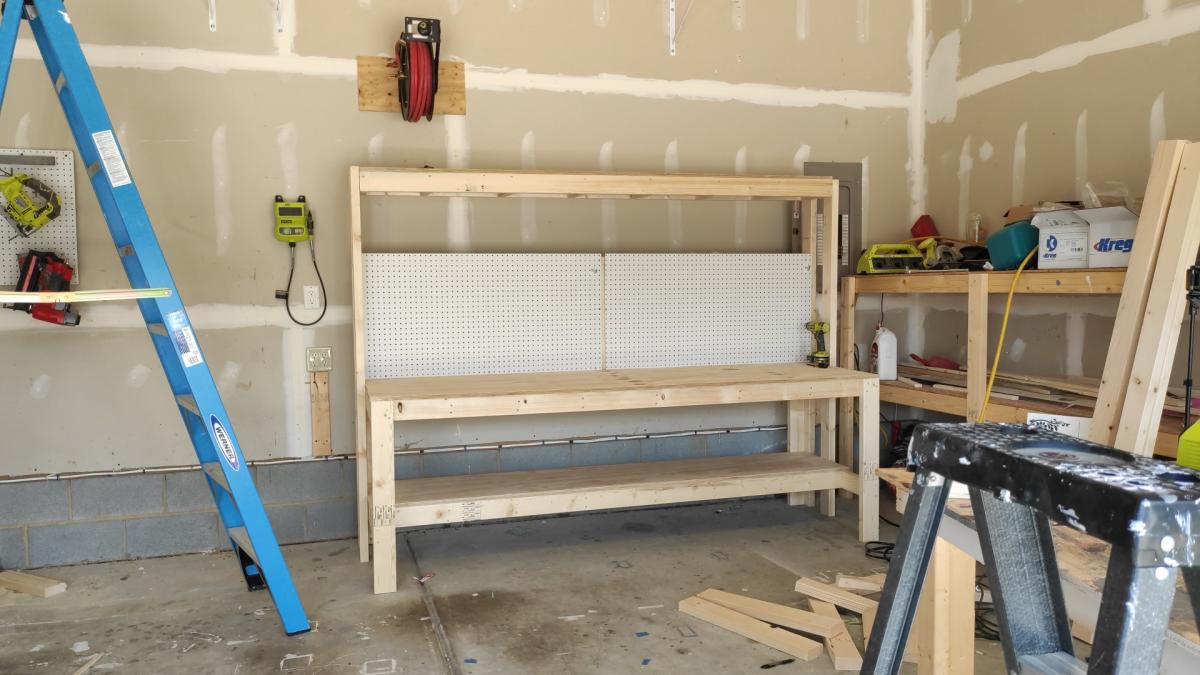
Do-It-All Mobile Workbench
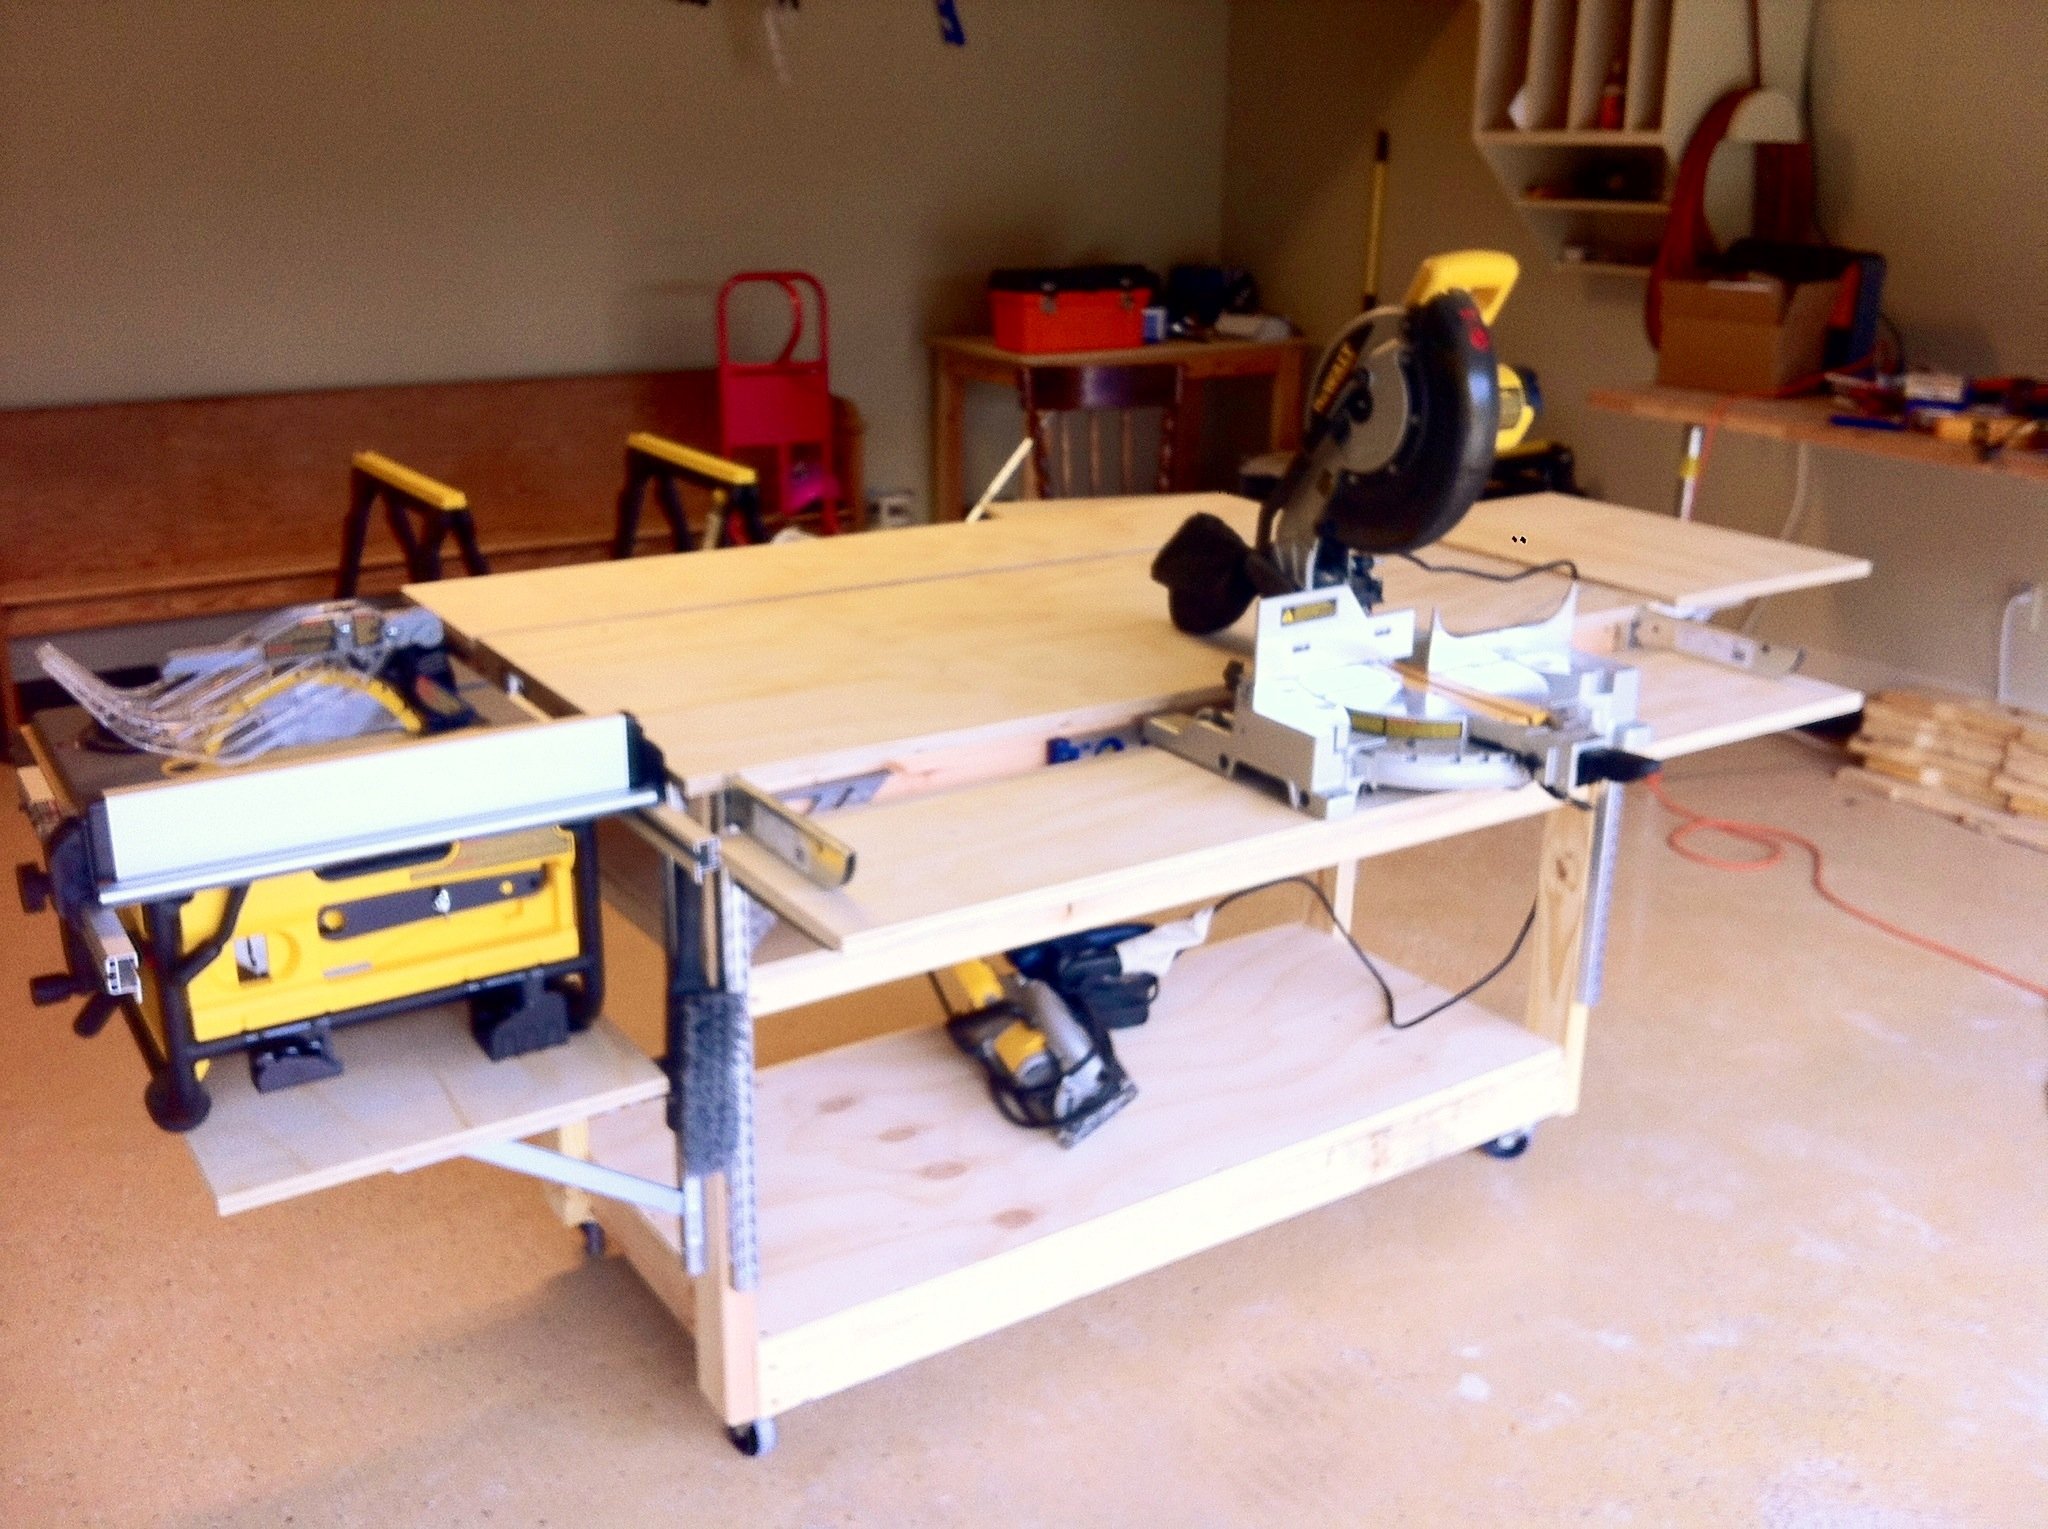
The need for a proper workbench in my garage/shop is a must, but. So is space! I already have a fold down workbench I’ve made with ¾ inch pipe & a door, but. I just need something that can handle all my tools. So, I stumbled upon these plans from the Family Handyman & couldn’t find a reason why this wouldn’t work in my shop. It has room for storage, can easily accommodate my tools & most importantly fold up to store. Easy to build too! Make sure you read all the plans first as some of the materials could be pricey, but well worth it. Technically it’s taken 2 months to build this bench, as I operate on a firefighter/teacher’s budget & during the holiday season no doubt. I ordered all the shelf standards & brackets through Amazon, $210.00 for those alone, but they hold so much weight to support your tools I figure it’s worth it. The rest materials (wood, screws) were purchased at Home Depot for around $150.00. The plans called for ¾ inch ply & it was $45.00 per sheet. However they did have a smaller thickness for $22.00 per sheet & was only a 1/32 inch thinner. I plan on topping all my surfaces with some ¼ inch tempered hardboard later on so I knew it would work. That also left me adjusting my screw size to mount my brackets. Due to the reduction in thickness of the plywood all my #8-1 inch screws needed to be adjusted to ¾ inch so to not screw through the ply. I also hit the molding isle to nab some pieces to use as furring strips to use under the shelves before attaching the brackets. This way I can sand each strip to match before mounting to make sure it lined up flat with the center top. One more thing; where it says “drill 1/8 inch hole in brackets make sure you use 1/8 inch pop rivets. I barrowed a pop rivet gun & was handed some rivets as well. Popped two & they had to be trashed because the rivet size turned out to be 5/32. So I stepped up in drill bit size & it all worked out. As I said, I’ll be topping it with some ¼ inch hardboard. I also plan to run it’s own electrical with an outlet on each post. I hope you all enjoy & this can help!
Estimated Cost
$350.00
Estimated Time Investment
Weekend Project (10-20 Hours)
Recommended Skill Level
Beginner
Comments
Thu, 11/29/2012 - 07:03
That is awesome!
This is by far the best workbench I have ever seen!!! Thanks for sharing. And excellent choice of table saw and miter saw.

In reply to That is awesome! by Rusty Cottage
Thu, 11/29/2012 - 14:59
Small rip saw
If I had it to do over I'd had gotten the contractor grade portable saw from Dewalt. The smaller version I have is the same 10" saw, but. It's maximum rip capasity is only 16. The other will at least rip a sheet of ply in 1/2.
Thanks for the kind words on the bench! I hope everyone that may find this valuable will. The plans came out of a 2005 issue & were hard to find on the internet.
Thu, 07/04/2013 - 18:28
Need Plans
I love this work bench and would love to build it but i cant find them. Could you post them or email them to me please. uniquetrio2000 [at] gmail [dot] com
Thu, 10/23/2014 - 09:04
Work Bench Plans
After some searching, found the plans at http://us.readersdigest.com/images/offer/fh/project_plans/pdf/FH05DJA_W…. Hope that helps. This is on my list of things to make very soon.
Wed, 10/22/2014 - 13:31
Standards & Brackets for Bench
I bought all the standards and brackets at Menards for $87.58 and this price included tax and shipping.
Mon, 12/10/2018 - 16:55
Do it all workbench plans
Thanks for sharing! Good job! Any chance you'd share palns? No luck on inet or with provided link. Thanks!
Wed, 08/07/2019 - 12:48
perfect workbench
This is the perfect workbench that I’d like to build. Could I get the plans for it?
Thu, 03/12/2020 - 12:46
Were you able to locate the…
Were you able to locate the plans?
The link in this thread doesn’t seem to be active.
Sun, 07/12/2020 - 17:59
I found the PDF download for…
I found the PDF download for these plans, here is the link:
https://docplayer.net/28130746-Do-it-all-mobile-workbench.html
The only place where I could find them, FH doesn't have them online any more.

Tue, 12/08/2020 - 17:57
Future Instructable?
Great build. I would love to see an instructable on this. :) Thank you for sharing..
Asian inspired outdoor bench (no screws!)
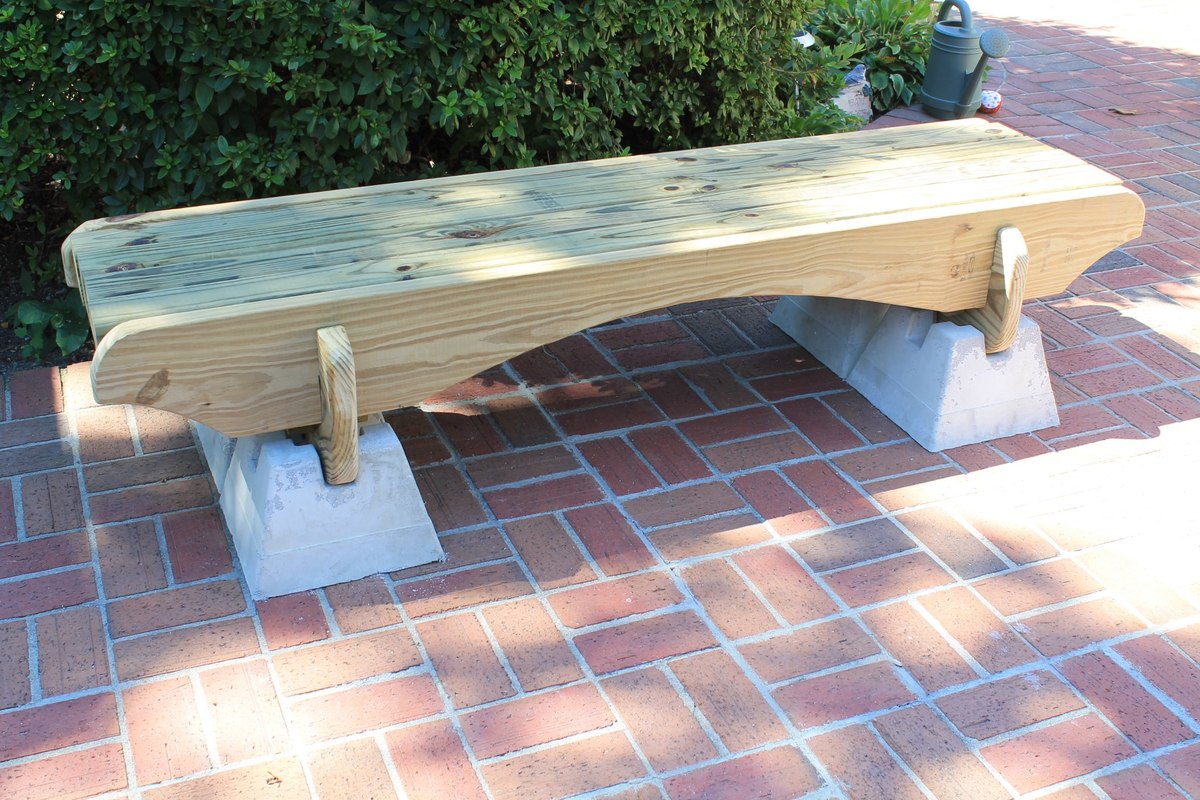
This is made by using treated lumber and concrete deck piers. The genius of this bench is that there are no screws. It fits together like a puzzle and sits on concrete deck piers. I left it untreated for a bit and decided to let the piers stay gray. The original plans called for the piers to be stained black and a stain to be applied to the wood. I wanted to post this as inspiration but will add the link to the template for the wood pieces at a later time.
Estimated Time Investment
Afternoon Project (3-6 Hours)
Finish Used
I have future plans to use simple decking stain in a cherry color for the wood part and black concrete stain for the concrete deck piers.
Recommended Skill Level
Beginner
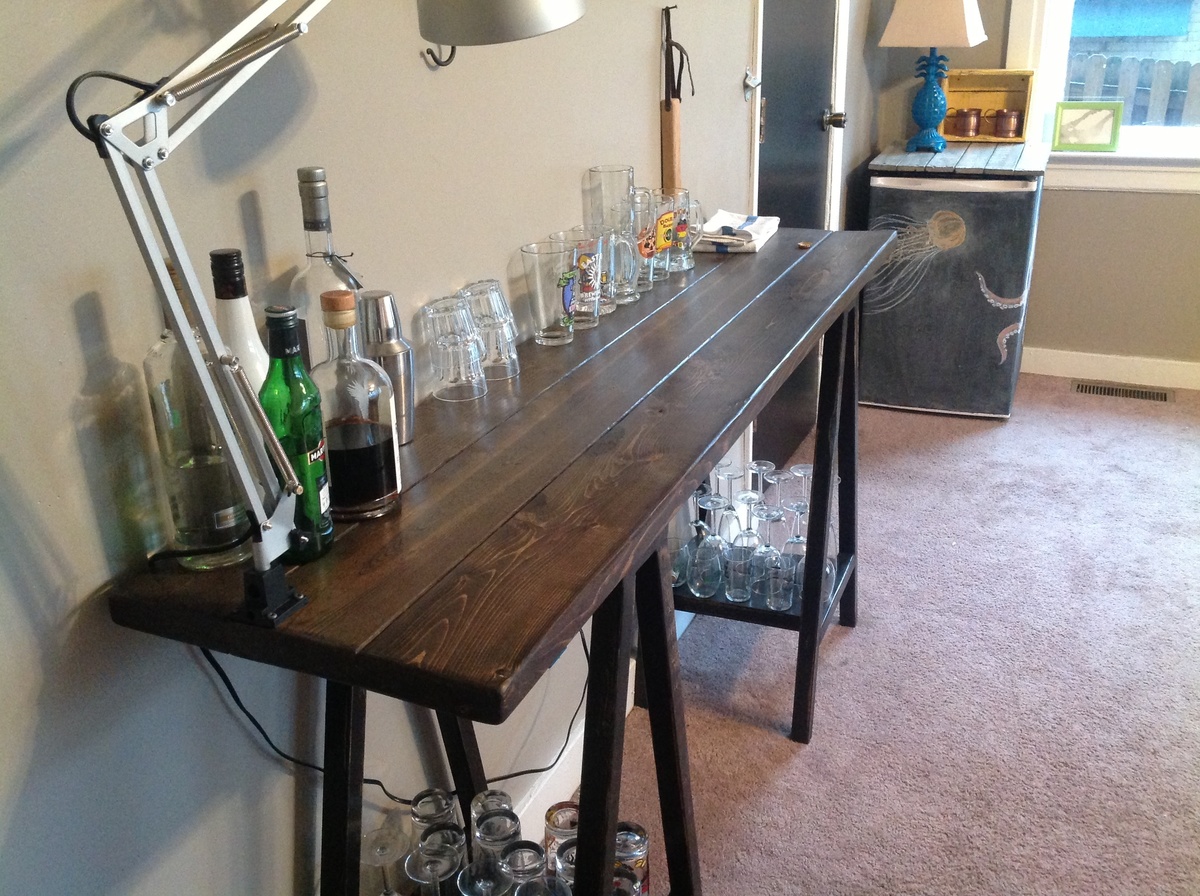
Simple Sawhorse table 36" height
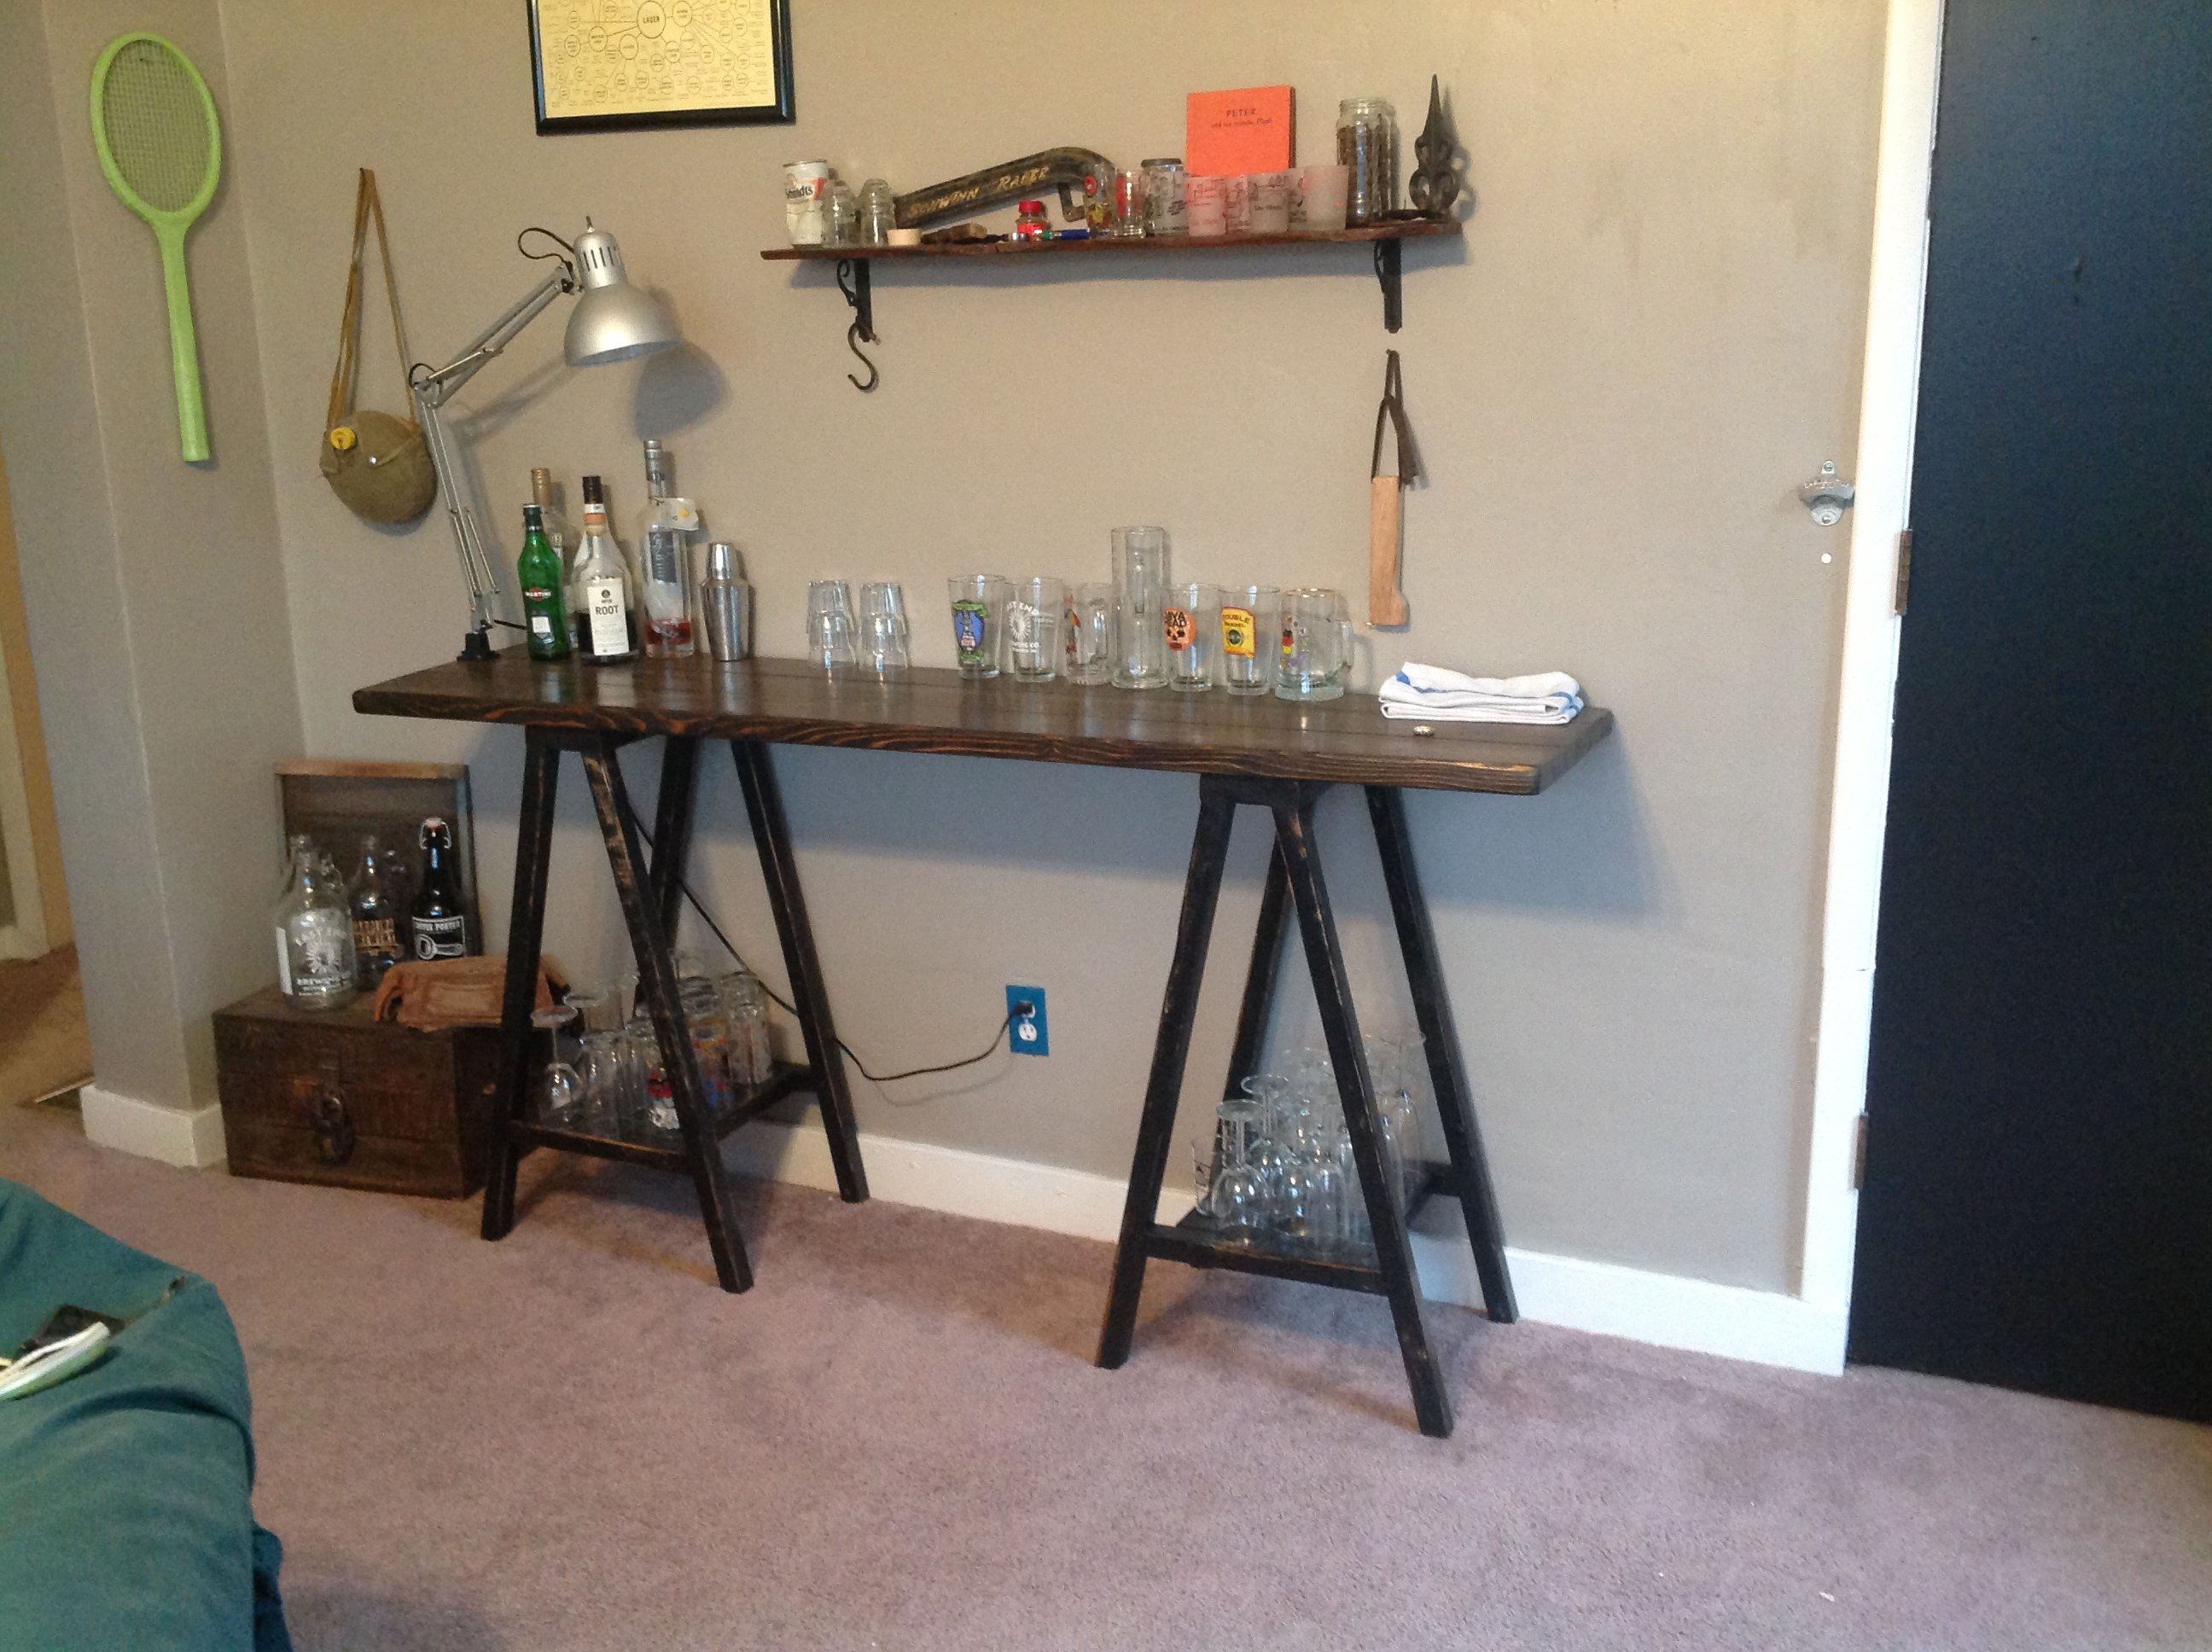
Like many others have mentioned, I wanted a 36" high table so I could use it as a bar. Ana mentioned that it would be too wide at 15 degrees so perhaps 10, after busting out some trigonometry I found that 10 degrees would give you about a 16" base and 15 would give you a 24" base. So, 12.5 degrees it came to be if you want a 20" base.
Many have said it takes 4 2x2's, that definitely holds true with this modification.
Here are my measurements, otherwise the cuts and assembly are the same as the original:
All angles are now 12.5 degrees rather than 15.
The legs are 33 3/4" from end to end
The outside edges of the legs should come to 20 1/4" wide for the base.
The stretcher will stay the same 13 3/4" on the bottom length, just cut at 12.5 degrees.
The stretcher is now 7 3/8" up from the ground, I found it was easiest to measure 7 1/2" up along the inside of the legs and line the bottom of the stretcher up at this mark.
And that's it!
A tip I used was clamping 4 2x2's together to get all the legs even, this only works if you have a sliding compound miter saw. I also recommend doing the straight cuts first and then leave the saw set at 12 1/2 degrees until you finish the project, this will keep cuts consistent.
Other modifications I made were to shorten the depth to 16 1/2" and use 2x6's for the top, I needed a narrow table in the room. I also made the depth of the sawhorses only 15 inches so the top would have a 3/4" overhang in front and back, I think this cleaned up the look some.
Built from Plan(s)
Estimated Cost
Less than $50 for wood, paint, stain and screws
Estimated Time Investment
Day Project (6-9 Hours)
Finish Used
Minwax Jacobean oil based stain for the top. The sawhorses are painted black, sanded and then rubbed with Minwax Jacobean.Minwax finishing paste for the whole thing.
Recommended Skill Level
Beginner
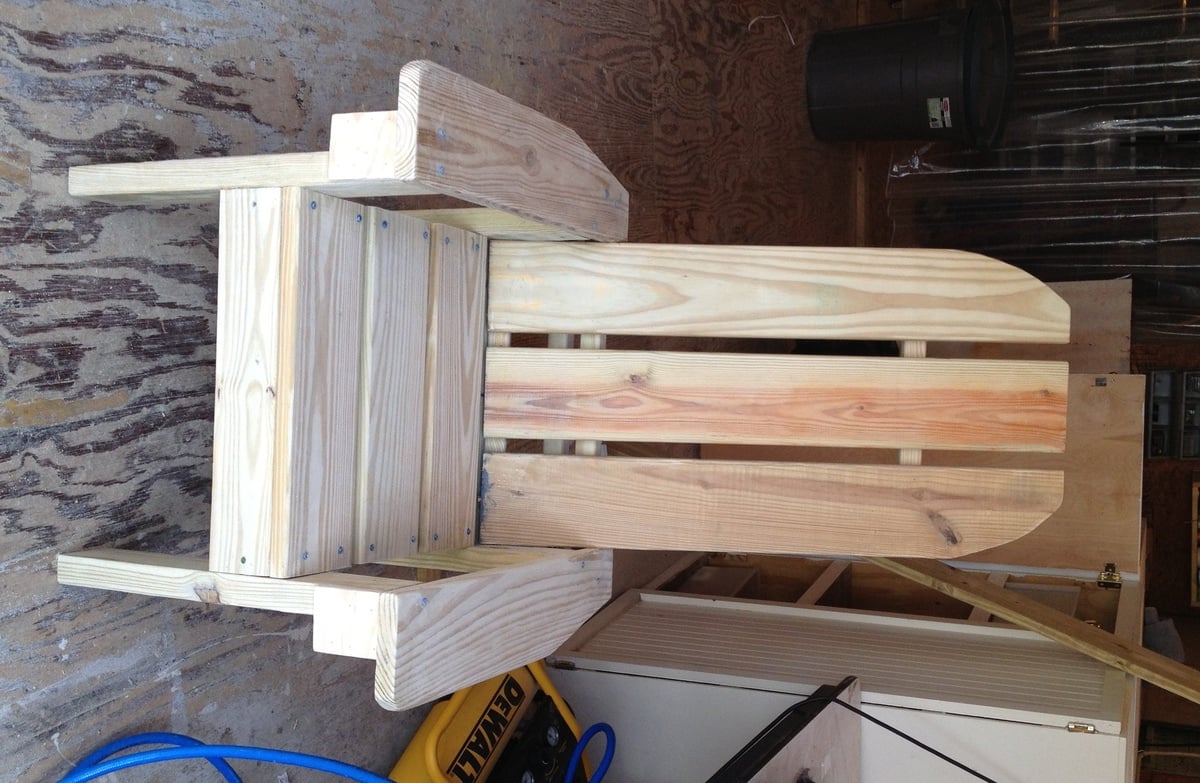
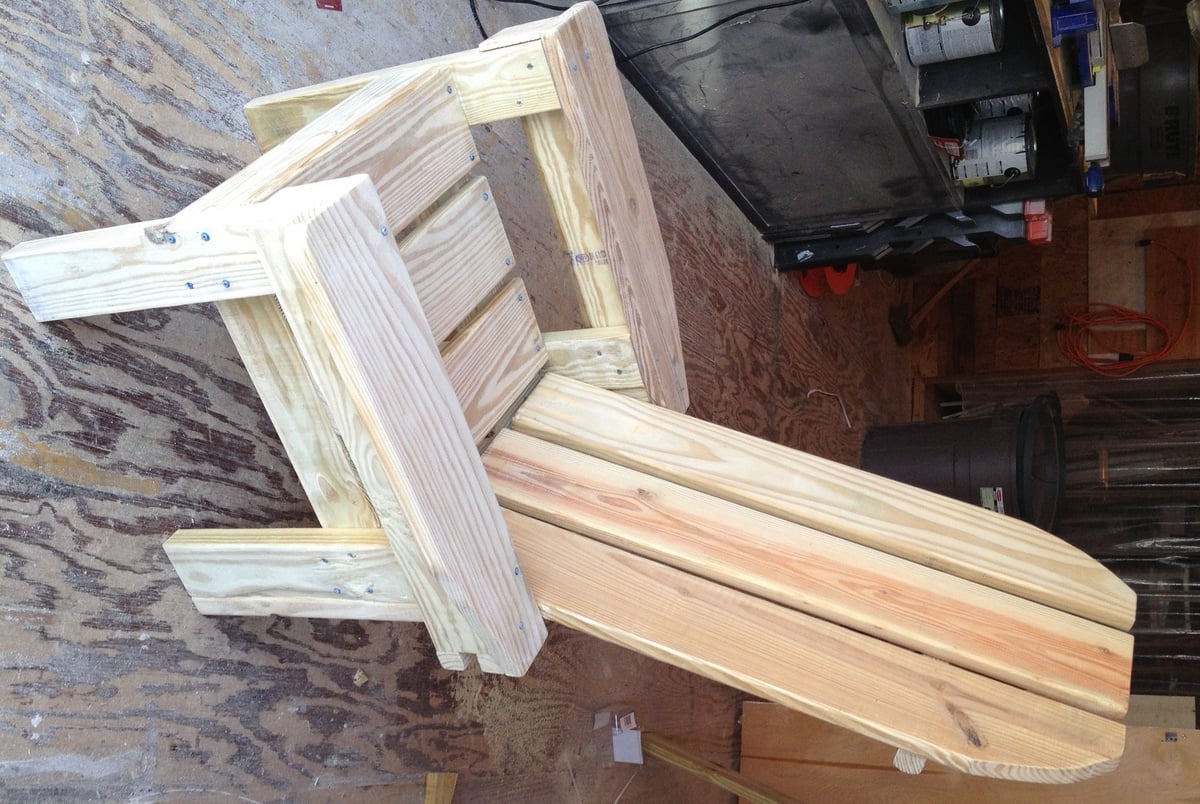
Adirondack Chairs
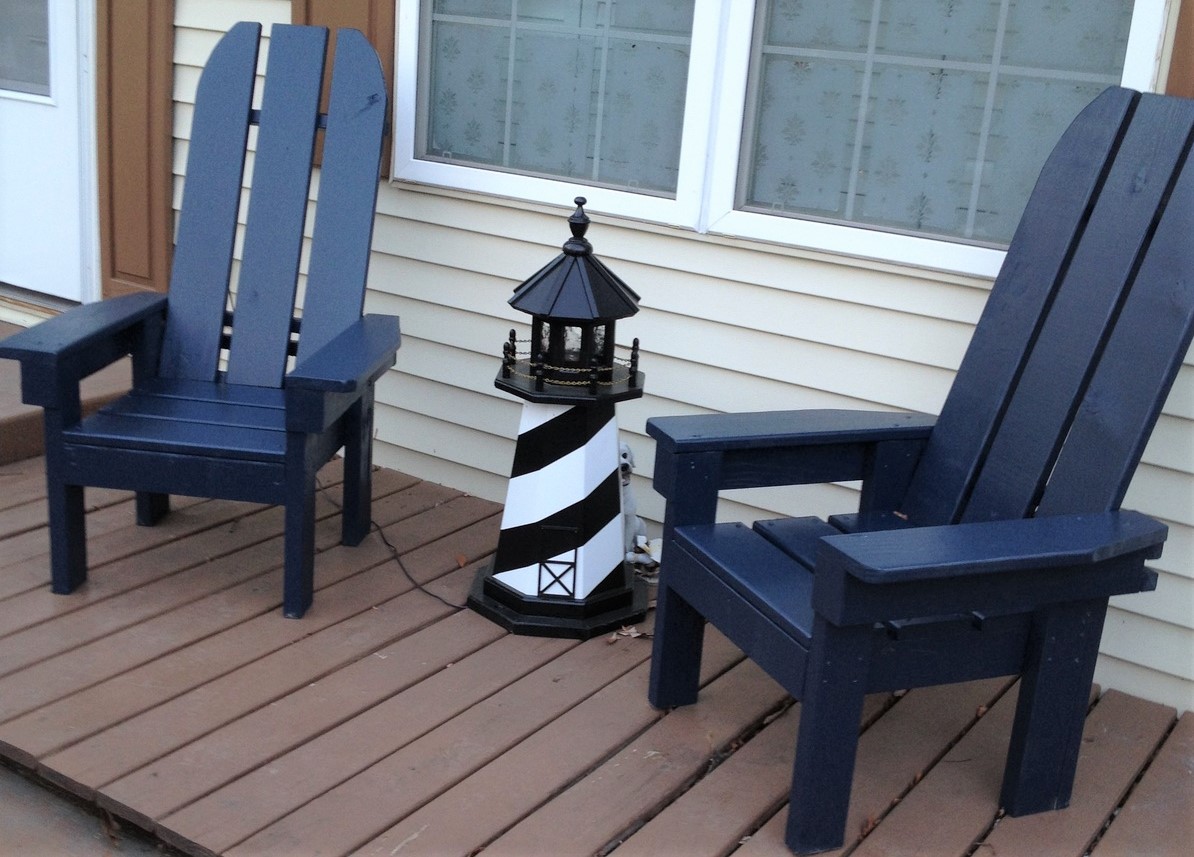
These sturdy chairs are a wonderful replacement for plastic deck chairs! They are nice and heavy, and won't blow over in a storm! This project is a mix of Ana's Adirondack Chairs and the Simple Outdoor Lounge Chair. I combined ideas from the two plans to use the extra lumber we had left over from an outside project from last year. Left-over lumber included some 2x4 for the bottom frames, some 5/4 decking board for the seat, back, and arms, and a few balusters at the back. Most of the lumber was left over, so I only had to spend $20 for 2 boxes of Kreg screws and 2 pc 5/4 x 8 decking board. Finished with some left over exterior latex semi gloss paint. This was a fun weekend project - built the chairs on one day, and finished the sanding and painting the next day. My next project is a little outdoor table to go with them, and I have a few scraps left over to use for that. These chairs have received lots of compliments, and we've given Ana's web site name to several admirers. Ana, thank you for your wonderful plans!
Built from Plan(s)
Estimated Cost
$20
Estimated Time Investment
Weekend Project (10-20 Hours)
Finish Used
Ace Royal exterior semi-gloss paint in navy blue (left over paint from about 5 years ago, was color-matched, so it doesn't have a name).
Recommended Skill Level
Beginner
Comments

Sun, 09/28/2014 - 18:15
Adirondack chair plans
Hi Mepaganjr,
I used the plan for the Simple Outdoor Lounge Chair
http://ana-white.com/2010/05/plans/simple-outdoor-lounge-chair
as my guide for the seat part, and the slant of the back,
and used Ana's Adirondack Chair
http://ana-white.com/2010/05/furniture-plans-adirondack-chair-ana.html
as the inspiration for the tall chair back and front legs. I did several adjustments to fit the mixture of sizes of 2x and 5/4 scrap wood that I had available. I traced a paint can lid to make the curve on the top of the chair backs.
A great plan that has a similar seat and legs is the Adult Adirondack Chair, which is in Ana's book, The Handbuilt Home, on page 174. That's a great plan because it only uses six 1x4's an one 1x2. If I hadn't been using up the mixed scrap lumber, I would have used the Adult Adirondack Chair plan.
Happy building! :) Joanne
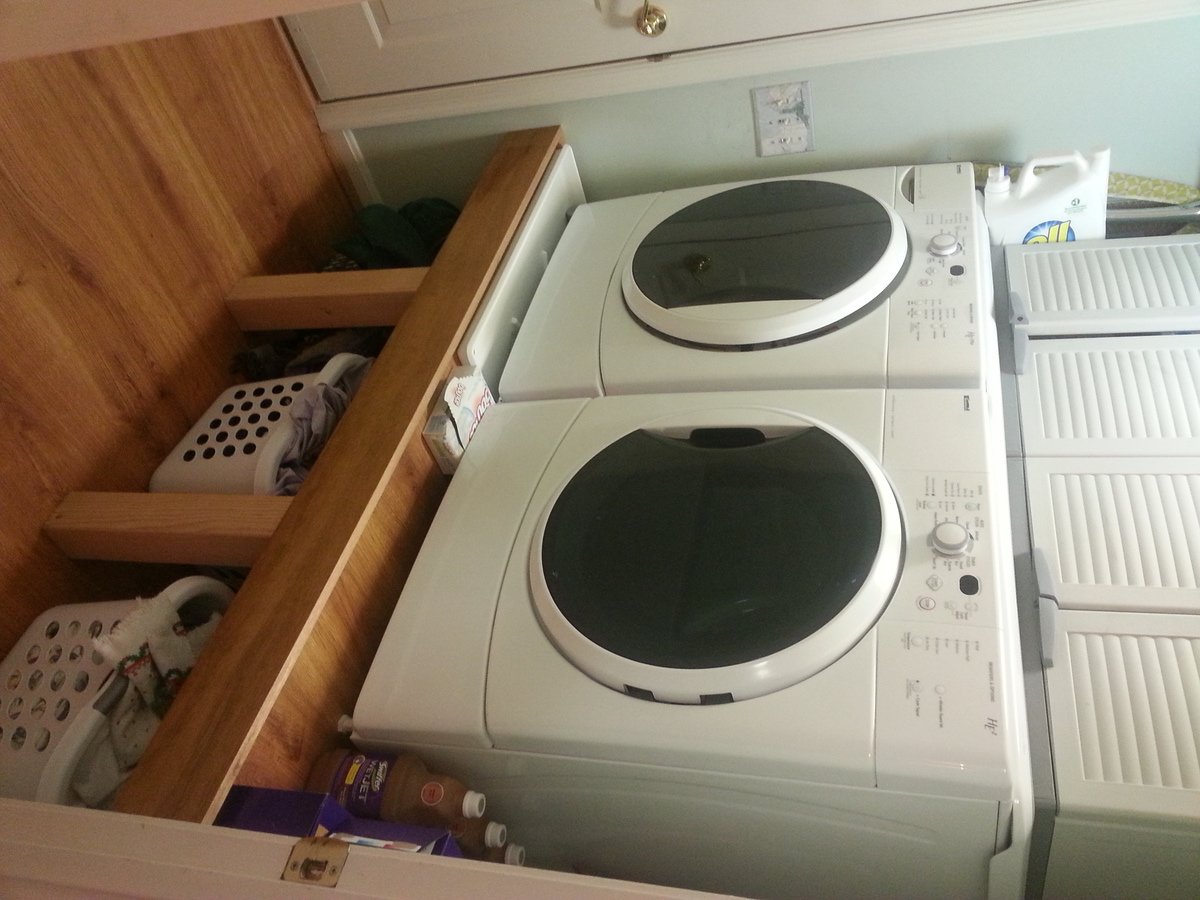
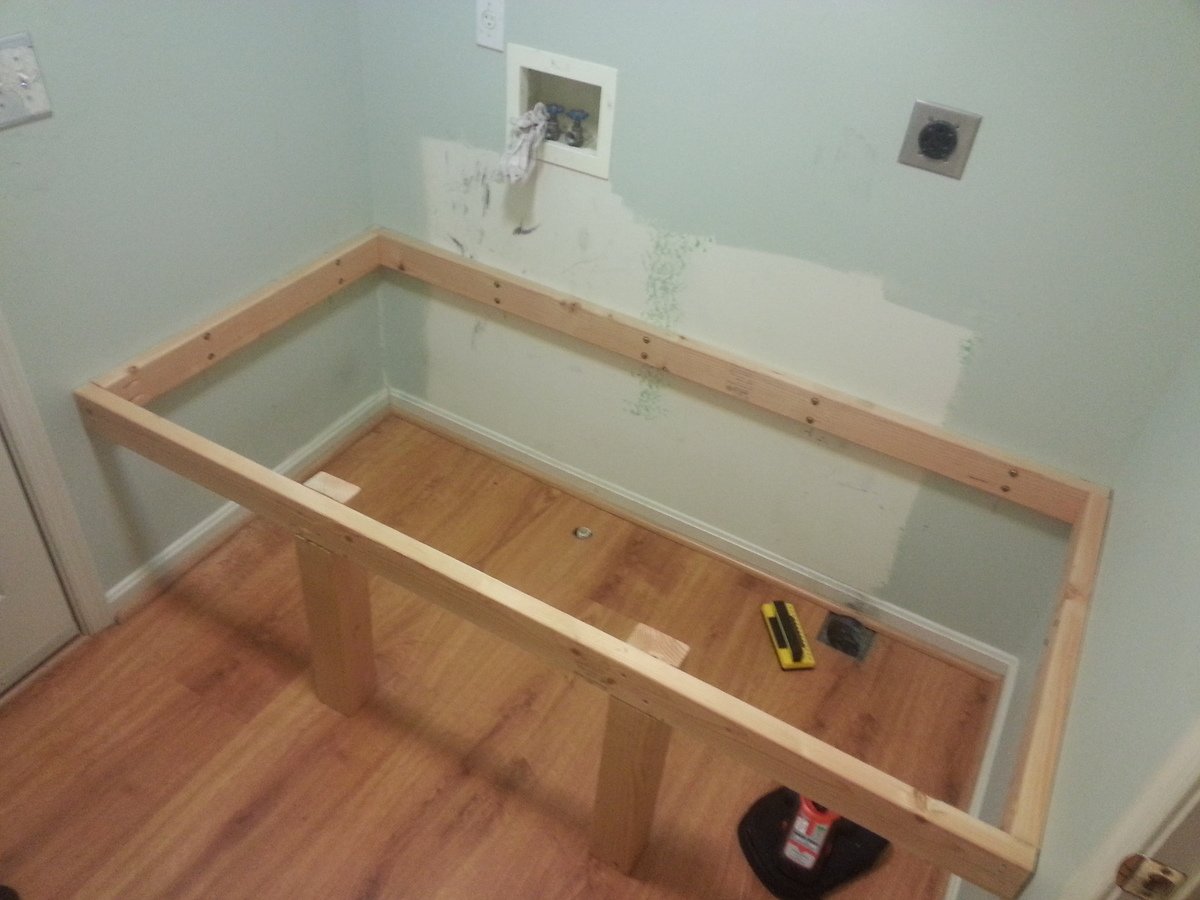
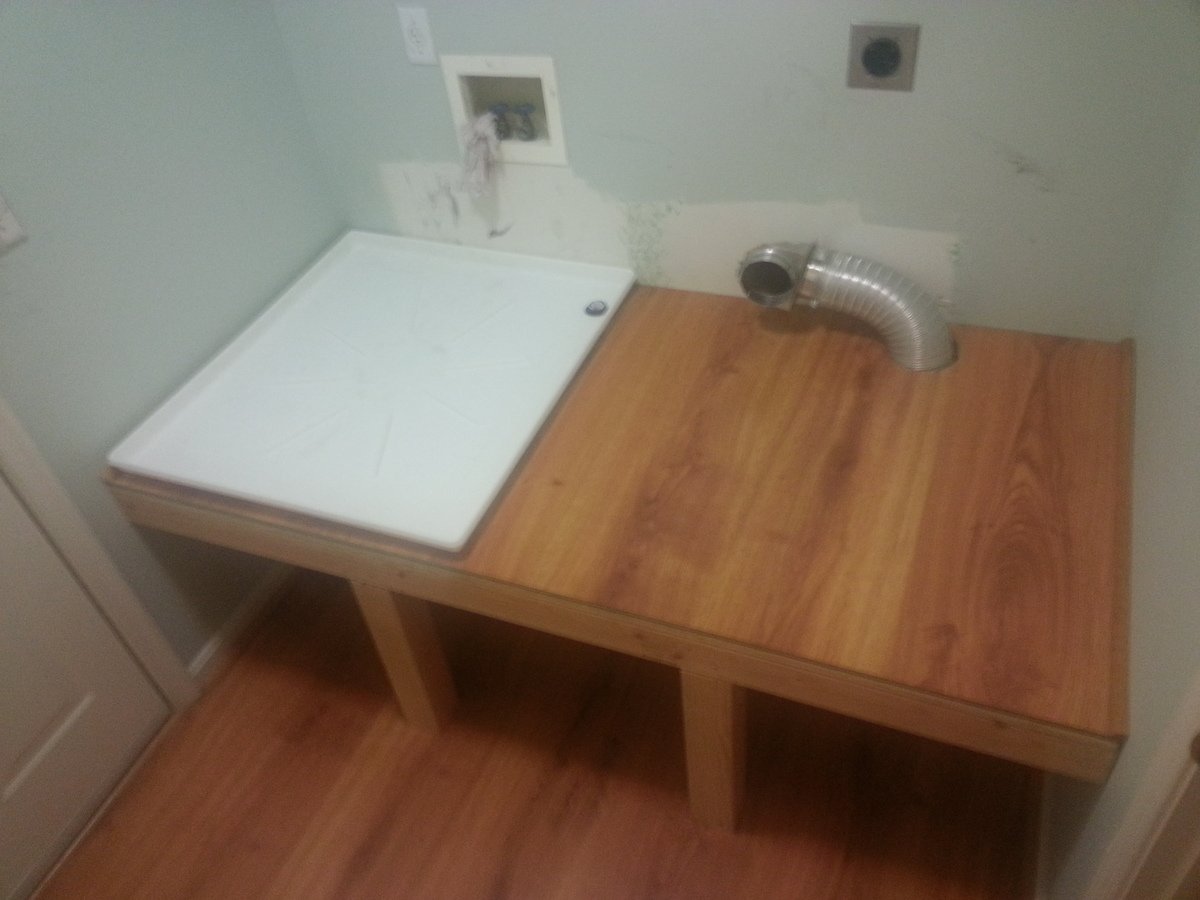
Washer/Dryer Platform Pedestal
THE MOTIVATION
After a recent washer outage (that I was ultimately able to repair myself), my wife and I talked about eventually replacing our front-loading washer/dryer set. One of the bullets I hate biting is paying the exhorbitant prices for the matching pedestals for new washer/dryer sets.
Having just bought a good set of cordless powertools, and having watched my father when I was a kid build countless household fixtures, window dressings, furniture pieces, etc., I decided to try my hand and construct a permanent platform for our current washer/dryer set, thereby eliminating the need to ever buy manufacturer pedestals again.
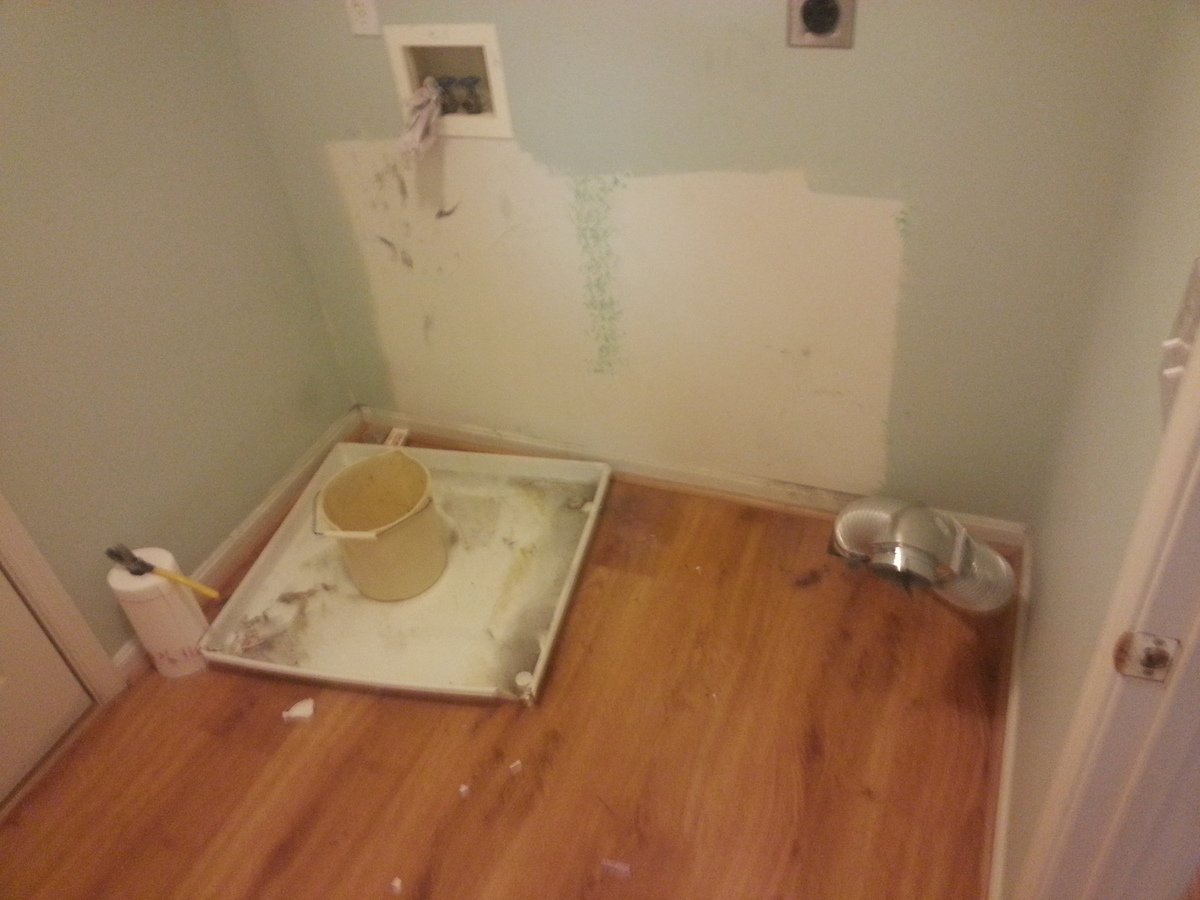
The existing pedestals were a standard 15" high, with a storage drawer, which we felt was still not high enough for comfort. And, the washer pedestal drawer was entirely inaccessibl due to the 2" walls on the washer drain pan, so its drawer was totally useless, wasted space.
And, lastly, we really wanted more space for clothes baskets full of laundry, which we generally stacked (full and haphazardly) on top of the machines.
THE CHALLENGES
The largest challenges were mainly logistics, and gravity. The washer/dryer would have to be unavailable for at least 2-3 days while they sat disconnected in the next room waiting for their new home. So I coordinated with the family so they'd know when they needed to have their laundry done, or tough it out until I was done.
There was no way to know for sure what the drain connection for the washer pan looked like until I got the washer out. So it was a small gamble that I'd be able to get the parts needed to extend the drain pipe up to the new platform right when I was ready for them. Fortunately, this was no issue at all.
The biggest challenge turned out to be toward the end when it came time to lift our 230-lb. washer onto the new platform. I seriously considered disassembling the washer to the point that I could remove its molded concrete counter-weights, but instead (and arguably stupidly) elected to use a large hydraulic car jack to raise the washer. This ultimately worked, but I have to STRONGLY ADVISE AGAINST trying this.
THE SPACE
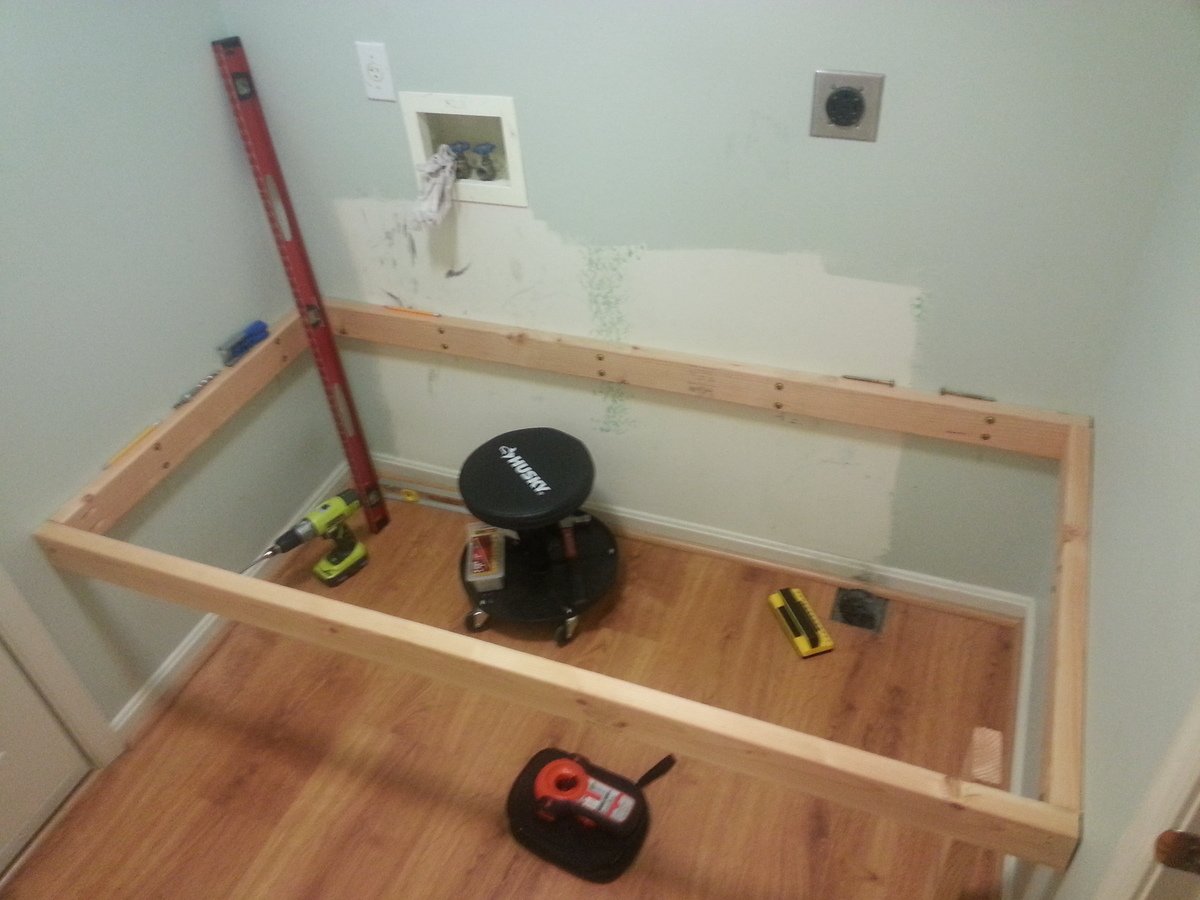
Our laundry room is also the "mud room" between our kitchen and the garage. It is only large enough for the two machines, and the walk way between the two doors--in total, about 70.5" square. Building the platform from wall-to-wall made the most sense, and minimized framing by fastening edge framing directly to the wall studs.
THE PLAN
Pretty basic: 2x4's all around for the edge framing--back and sides fastened directly to the wall studs, and front 2x4 supported by two, notched 4x4 legs. 3/4" plywood for the subsurface, and 1/4" laminate faux-wood flooring on top (left over from reflooring, so it matches the floor below). Bore holes for the washer pan drain and the dryer vent. 1" quarter-round molding on the sides, and 5.5" face piece flush with the top of the molding across the front (spare lauan I had looks perfect). I also made a point of putting the machines on the platform before the face piece since it might have been in the way or damaged.
Anyone will tell you that it's best to at least sketch out what you want to do so you can minimize surprises, forgotten parts, etc. I, of course, did virtually none of that, and made several course changes and corrections along the way. For this project, I was lucky that I didn't need to backtrack at any point, and probably won't learn this lesson any time soon anyway. However, you SHOULD.
TAKE-AWAYS
The main mistake I made was while gathering the platform dimensions for cutting the plywood. It was only blind luck that kept me from having to do it more than once (and having to buy more than one 4x8 sheet). I know that it's actually very unlikely that two adjacent walls are perfectly square, so I made a point to measure the width between the walls at the back and at the front--and, sure enough, found a 1/8" difference--wider at the front. But when I measured and marked the plywood for cutting, I measured both distances from the precut edge, and then cut. By doing this, I inadvertently assumed that one of the back corners was perfectly square.
What I should have done was used a carpenter's square in each back corner to extend a square line from the back edge to the front, and then measured from the square lines to their respective side wall. This would have accounted for neither back corner being square.
Fortunately, my mistake wasn't big enough to keep the plywood from fitting, but it was very, VERY close.
GIDDY
I honestly couldn't be happier with the finished project (or more smug). We've raised the washer/dryer 9" higher than they were (24" off the floor), and we now have basket storage underneath all the way across. I placed two 24" plastic cabinets on top, which still leaves room for the detergent right over the soap inlet on the washer.
And, most importantly, I got to use every powertool I own. Kinda beats "the quick brown fox jumped over the lazy dog" thing, huh?

Built from Plan(s)
Estimated Cost
Most of my project made use of spare lumber and materials I've had on hand forever. The 4x8 sheet of plywood was about $30 at Home Depot.
Estimated Time Investment
Weekend Project (10-20 Hours)
Finish Used
Natural. No finishing, staining, or painting. Lauan has a natural stained oak coloring, so it was perfect for the facing. (A soft wood, Lauan--"lao-AHN", also sometimes called "Philippine Mahogany" simply for the darker color--used to be as readily available as pine, but I haven't seen it in stores for many years.)
Recommended Skill Level
Intermediate
Comments
Fri, 04/17/2015 - 19:54
Love the built-in look of these!
Thanks for sharing the ins and outs of your project! Looks great!
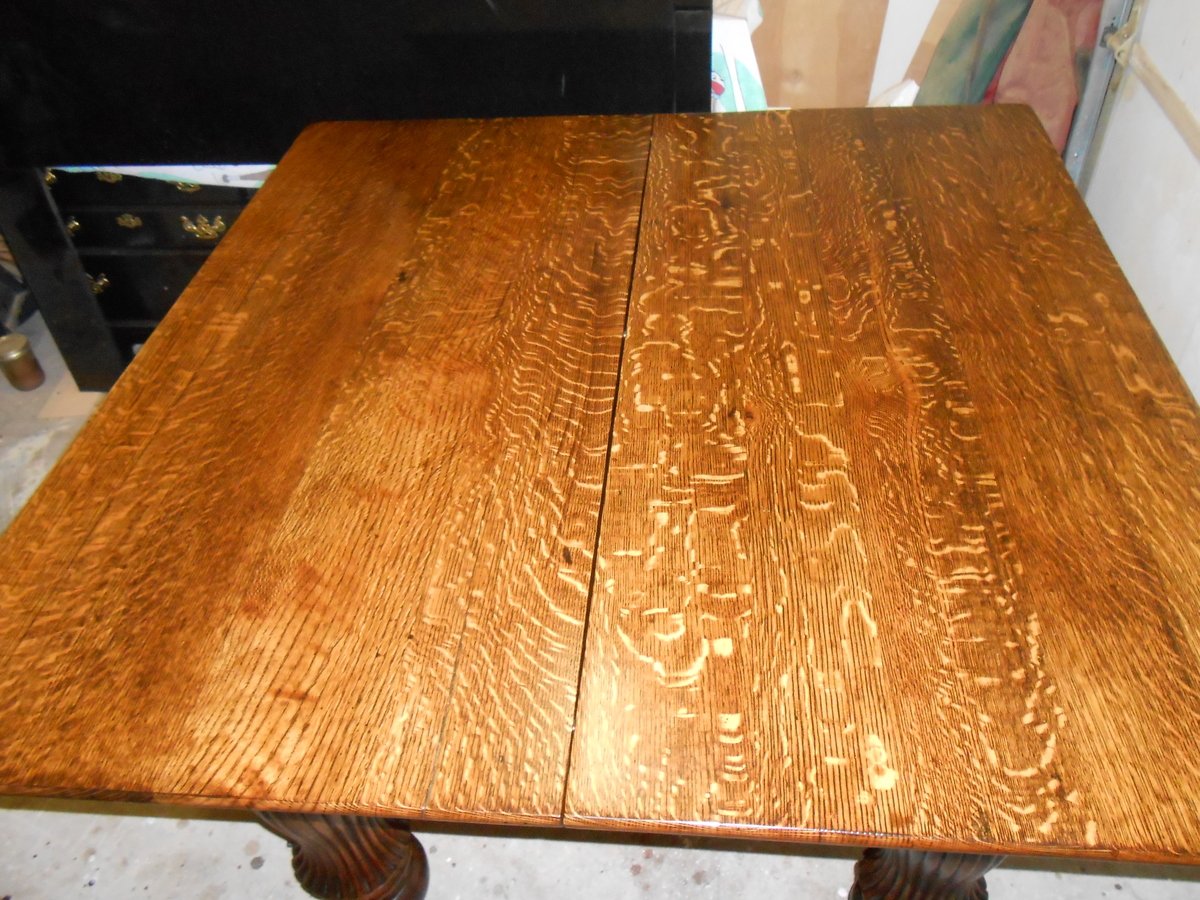
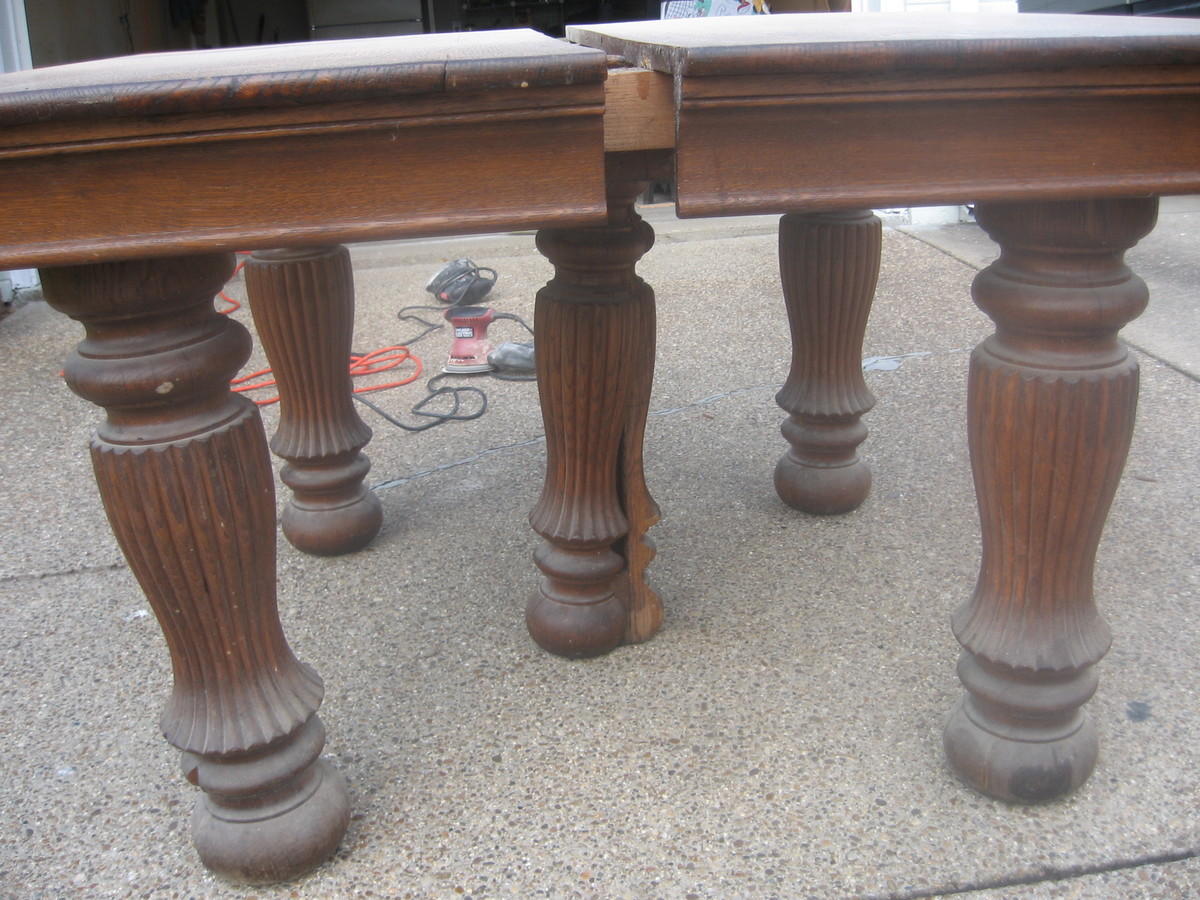
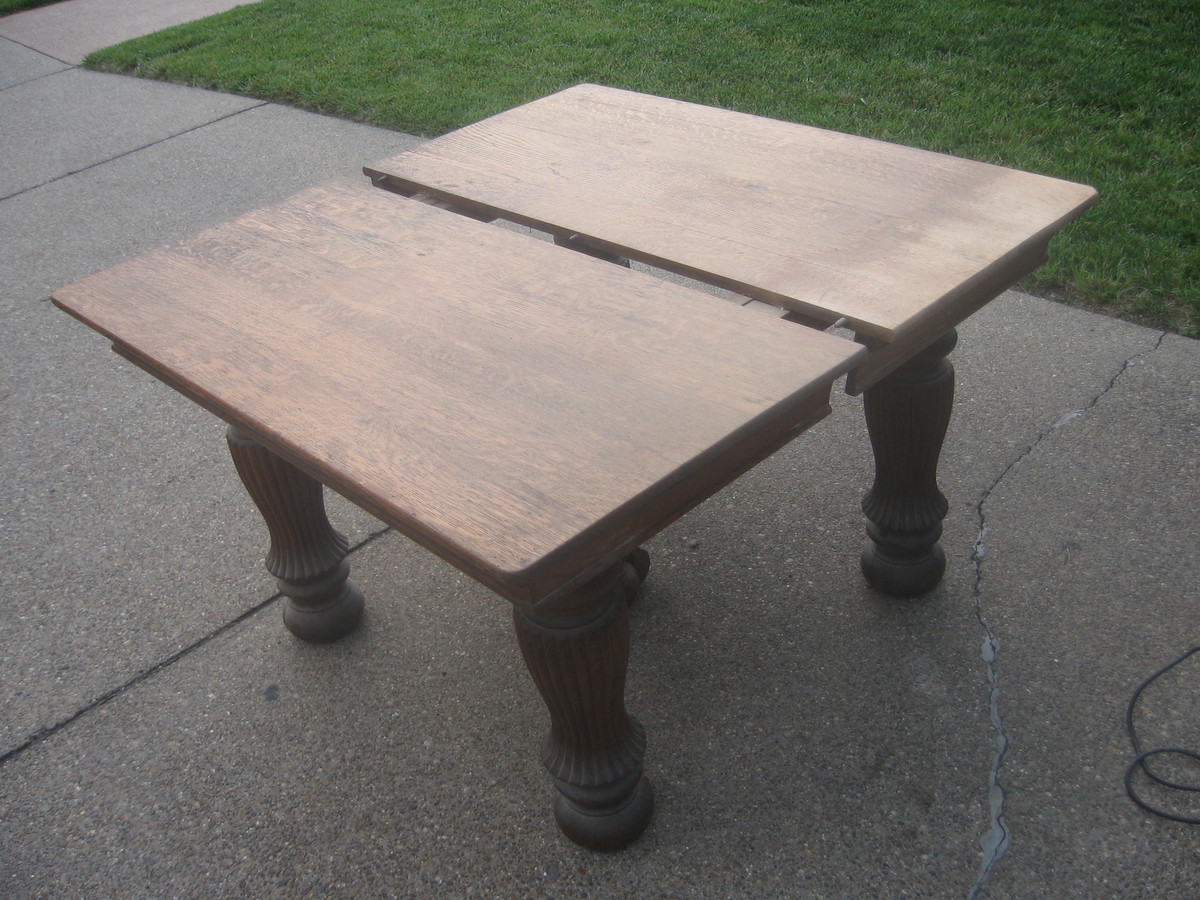
Antique Quartersawn White Oak Dining Table
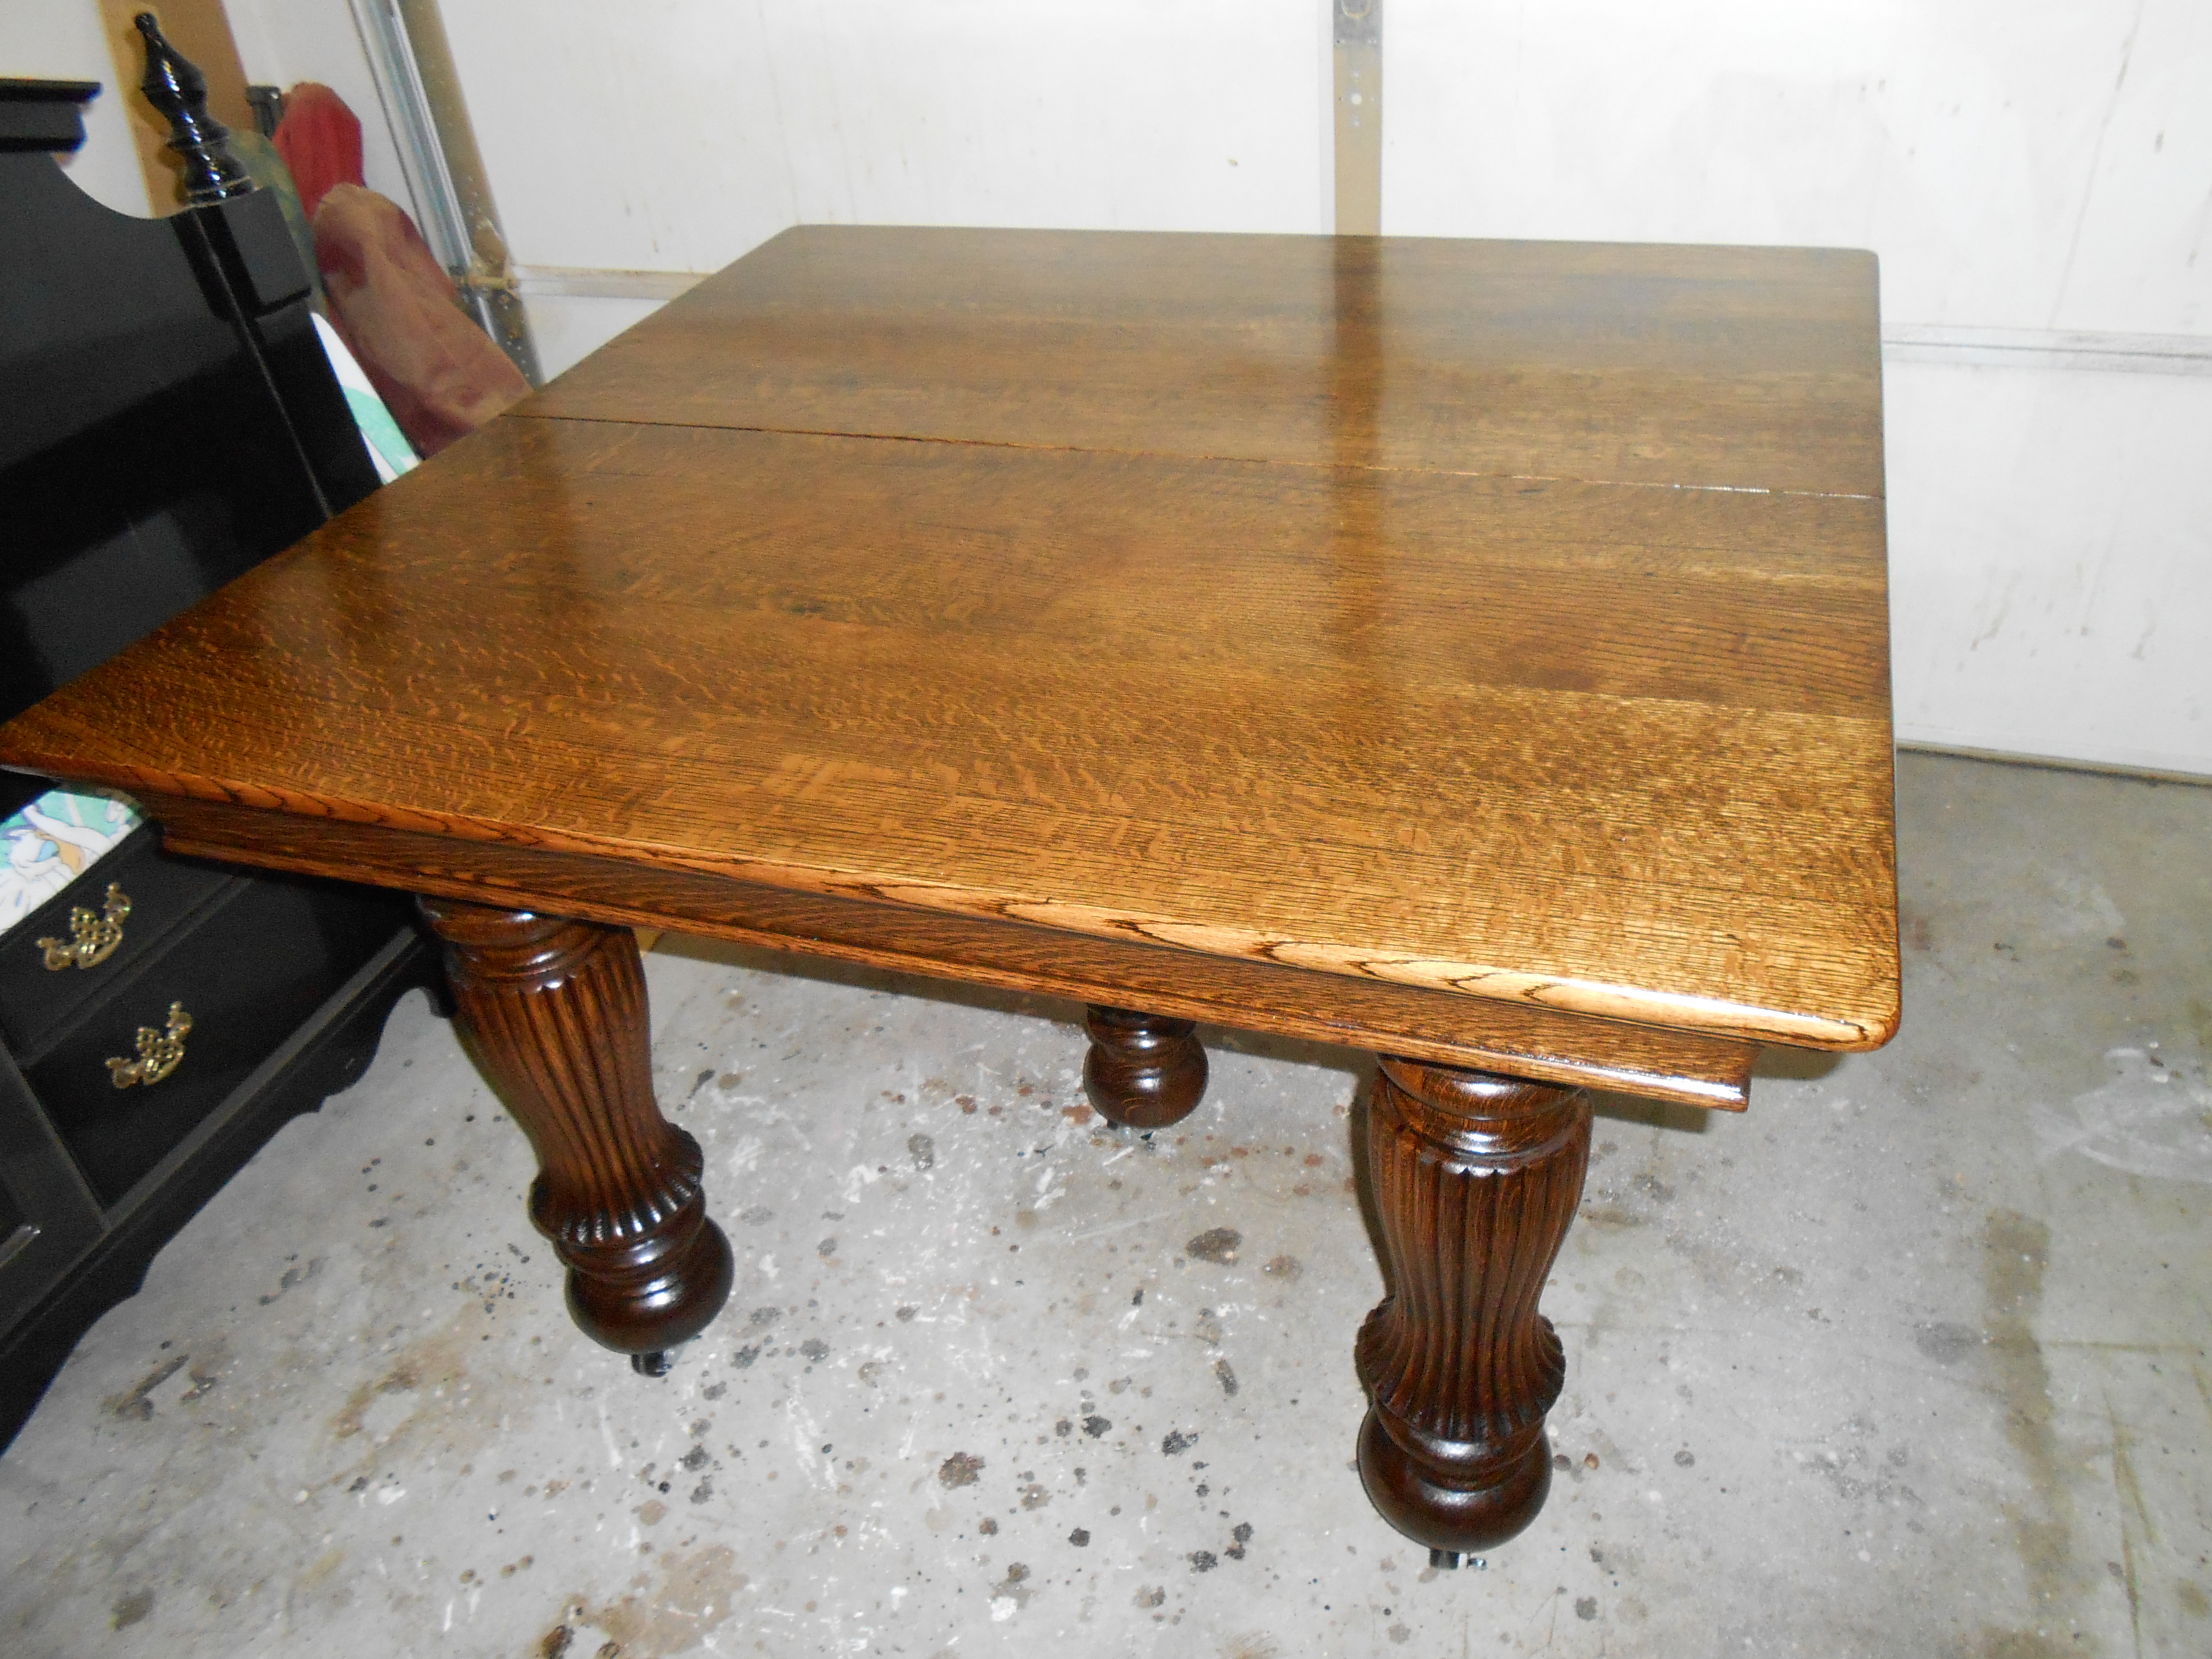
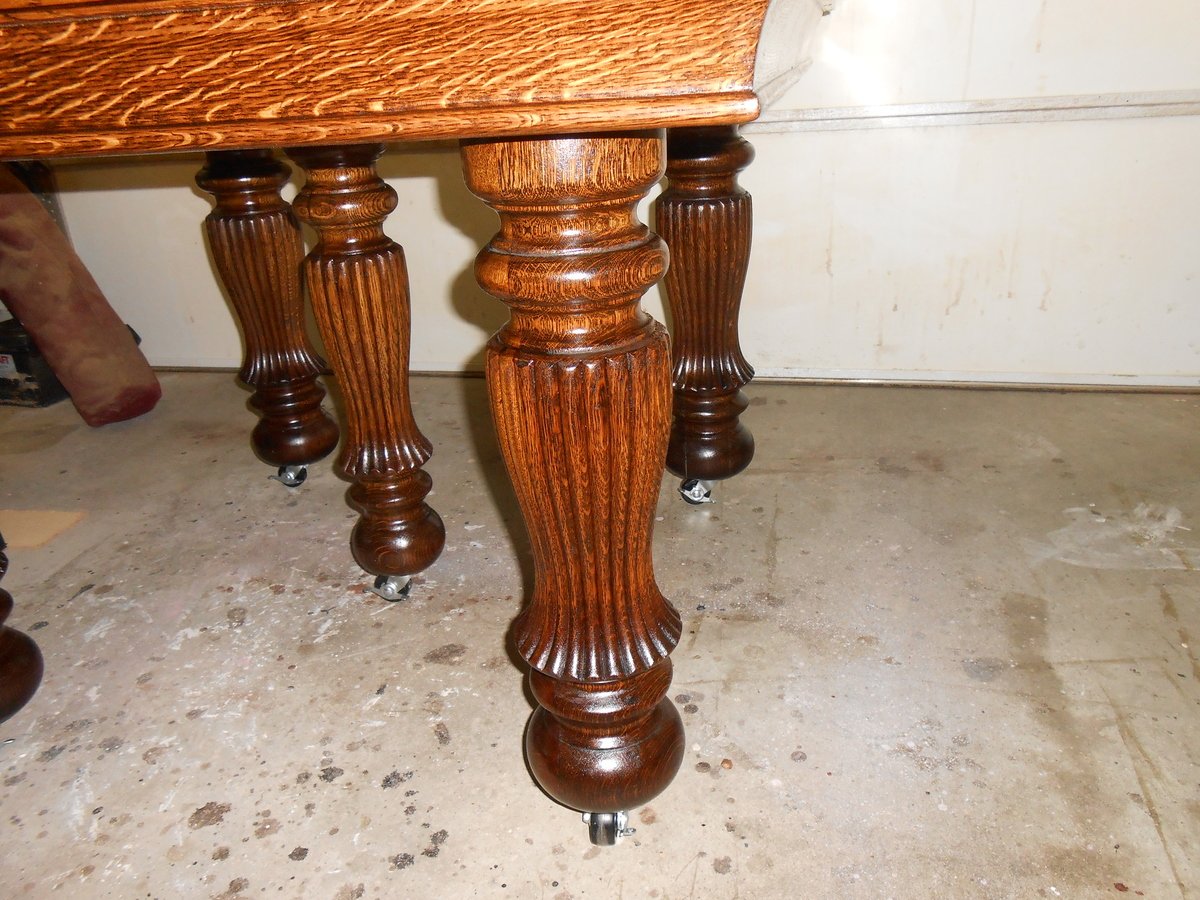
This is a solid, quartersawn white oak 5-legged dining table. It was originally built in the late 19th or early 20th century. The table was in need of a refinish. The massive turned and fluted legs were full of cracks, chips, and splits.
I took the table completely apart and began stripping and sanding. The legs were re-glued where needed and clamped. I filled the cracks, splits, and and chips with wood filler, sanded, and repeated until I was happy with the results. I replaced some bracing and replaced the screws where needed. Heavy duty casters were added. They have brakes/stops that can be locked to keep the table from rolling on a hardwood or tile floor.
Once the final sanding was completed, I applied 2 coats of Minwax Dark Walnut stain with a foam brush. I wiped down after each coat after waiting 10-15 minutes or so. After drying I began applying Minwax Fast Drying (oil based) polyurethane. The table received 3 coats and the top received 6 coats. I hand sanded with 220 grit sandpaper between coats.
After applying the final coat of poly to the top, I allowed it to cure 48 hours. I then hand sanded the top very lightly using 400 grit paper. I did the same using 0000 steel wool. I then added a few drops of dish soap to a cup of water and wet sanded with the 0000 steel wool. I used a circular motion to remove any scratches. I then wiped down the table and buffed out two coats of Johnson Past Wax with an orbital buffer. It resulted in a super smooth finish.
I am very happy with the results. By the way the table if for sale ($600) and is located in Evansville, Indiana.
Estimated Cost
$80
Estimated Time Investment
Week Long Project (20 Hours or More)
Finish Used
Minwax Dark Walnut Stain (2 coats) and Minwax Fast Drying (oil based) polyurethane.
Recommended Skill Level
Beginner
DIY Greenhouse
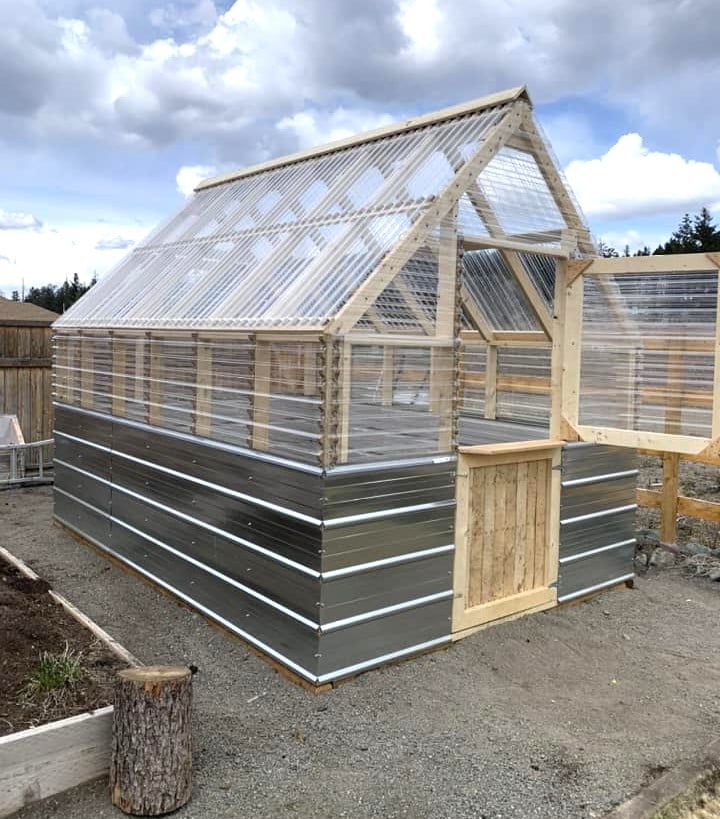
DIY Greenhouse by Trenton Kirby on Facebook!
Built from Plan(s)
DIY Home Gym Storage
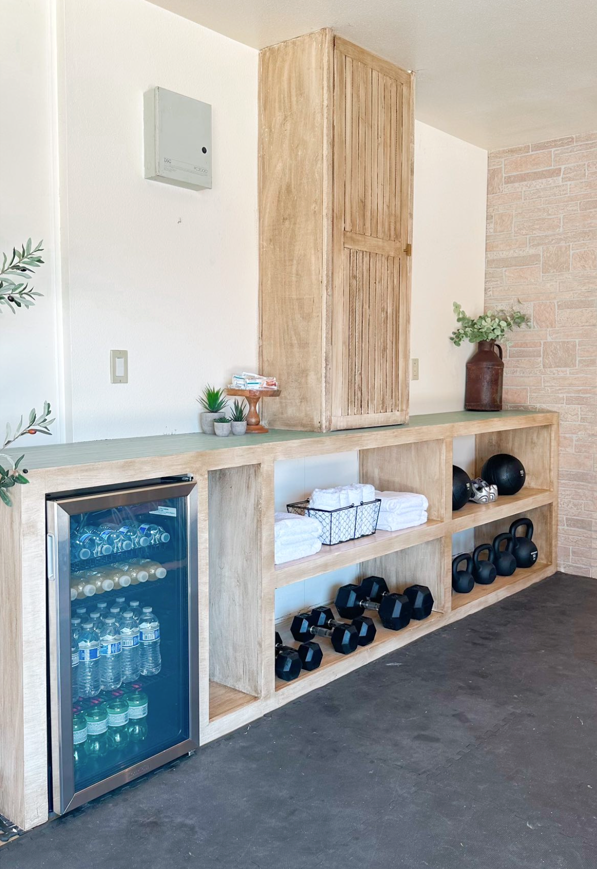
Fabulous home gym by Nailgun Nelly!
*Incorporated and modified the grand waterfall console plan
Built from Plan(s)
Outdoor Sectional

I had so much fun building this! I got a little creative with the corner section and decided to make it a table. I built a small hatch so that I could put in a container for ice and cold beer. When the hatch is not in use, the container can be removed and the hatch can be closed to provide more table space. I also added drink holders!


Built from Plan(s)
Estimated Time Investment
Week Long Project (20 Hours or More)
Finish Used
none yet
Recommended Skill Level
Beginner
Cement top modification
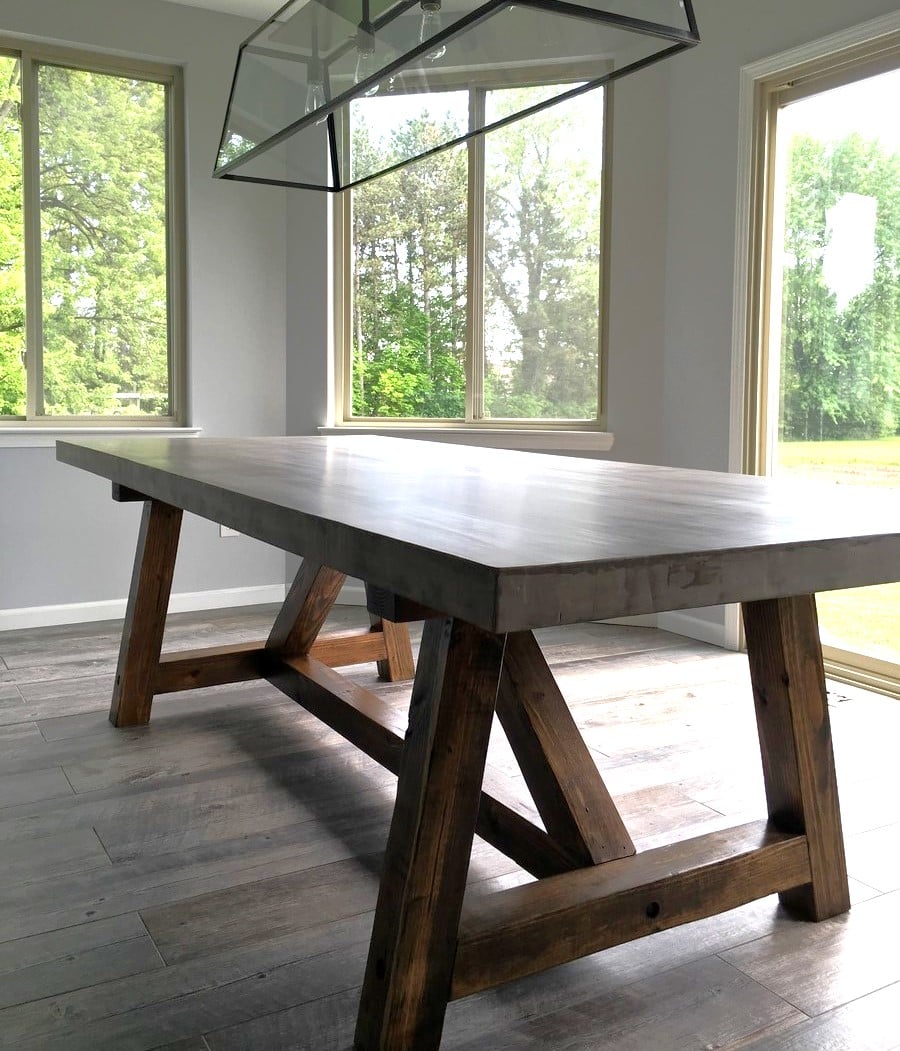
Instead of a wood top I used 2x 3/4" sheets of plywood plus 1/2" backer board to create a thicker top and used Ardex feather finish cement in 4 coats sanded and finished with Mexeseal sealant, recommended 4 coats of semi-gloss plus 2 coats of satin to get a matte finish (recommended by manufacturer) I followed the concrete countertop blog from "Young House Love" but used a different sealant when I contacted the safe coat manufacturer and they recommended their Mexeseal product.
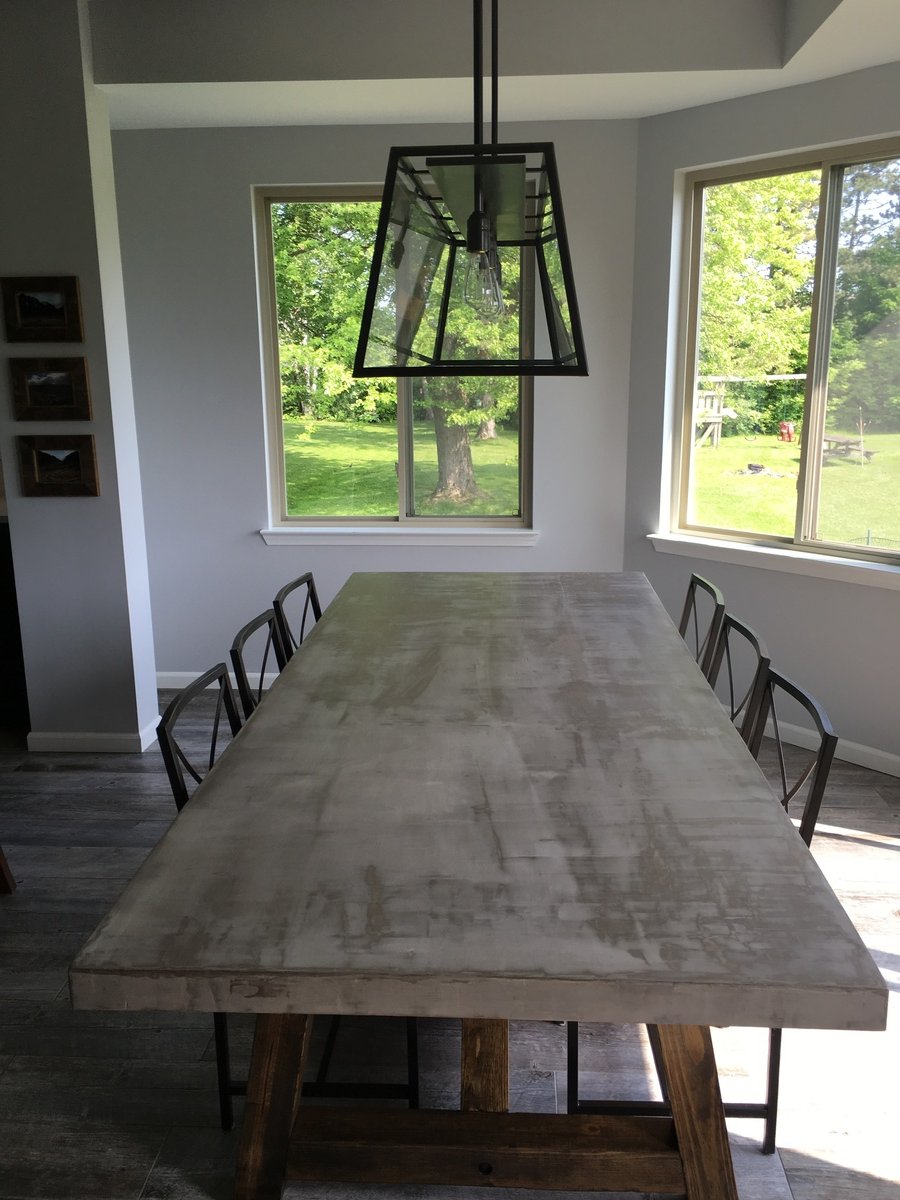
Built from Plan(s)
Estimated Time Investment
Week Long Project (20 Hours or More)
Finish Used
Ardex Feather Finish Cement
Safe coat Mexeseal Sealant (4 coats semi-gloss plus 2 coats satin for a matte finish)
Stain on base: Minwax weathered oak and dark walnut
Poly on base: 2 coats of Minwax satin poly
Safe coat Mexeseal Sealant (4 coats semi-gloss plus 2 coats satin for a matte finish)
Stain on base: Minwax weathered oak and dark walnut
Poly on base: 2 coats of Minwax satin poly
Recommended Skill Level
Beginner
Barn Door Bookcase/ Side Pantry
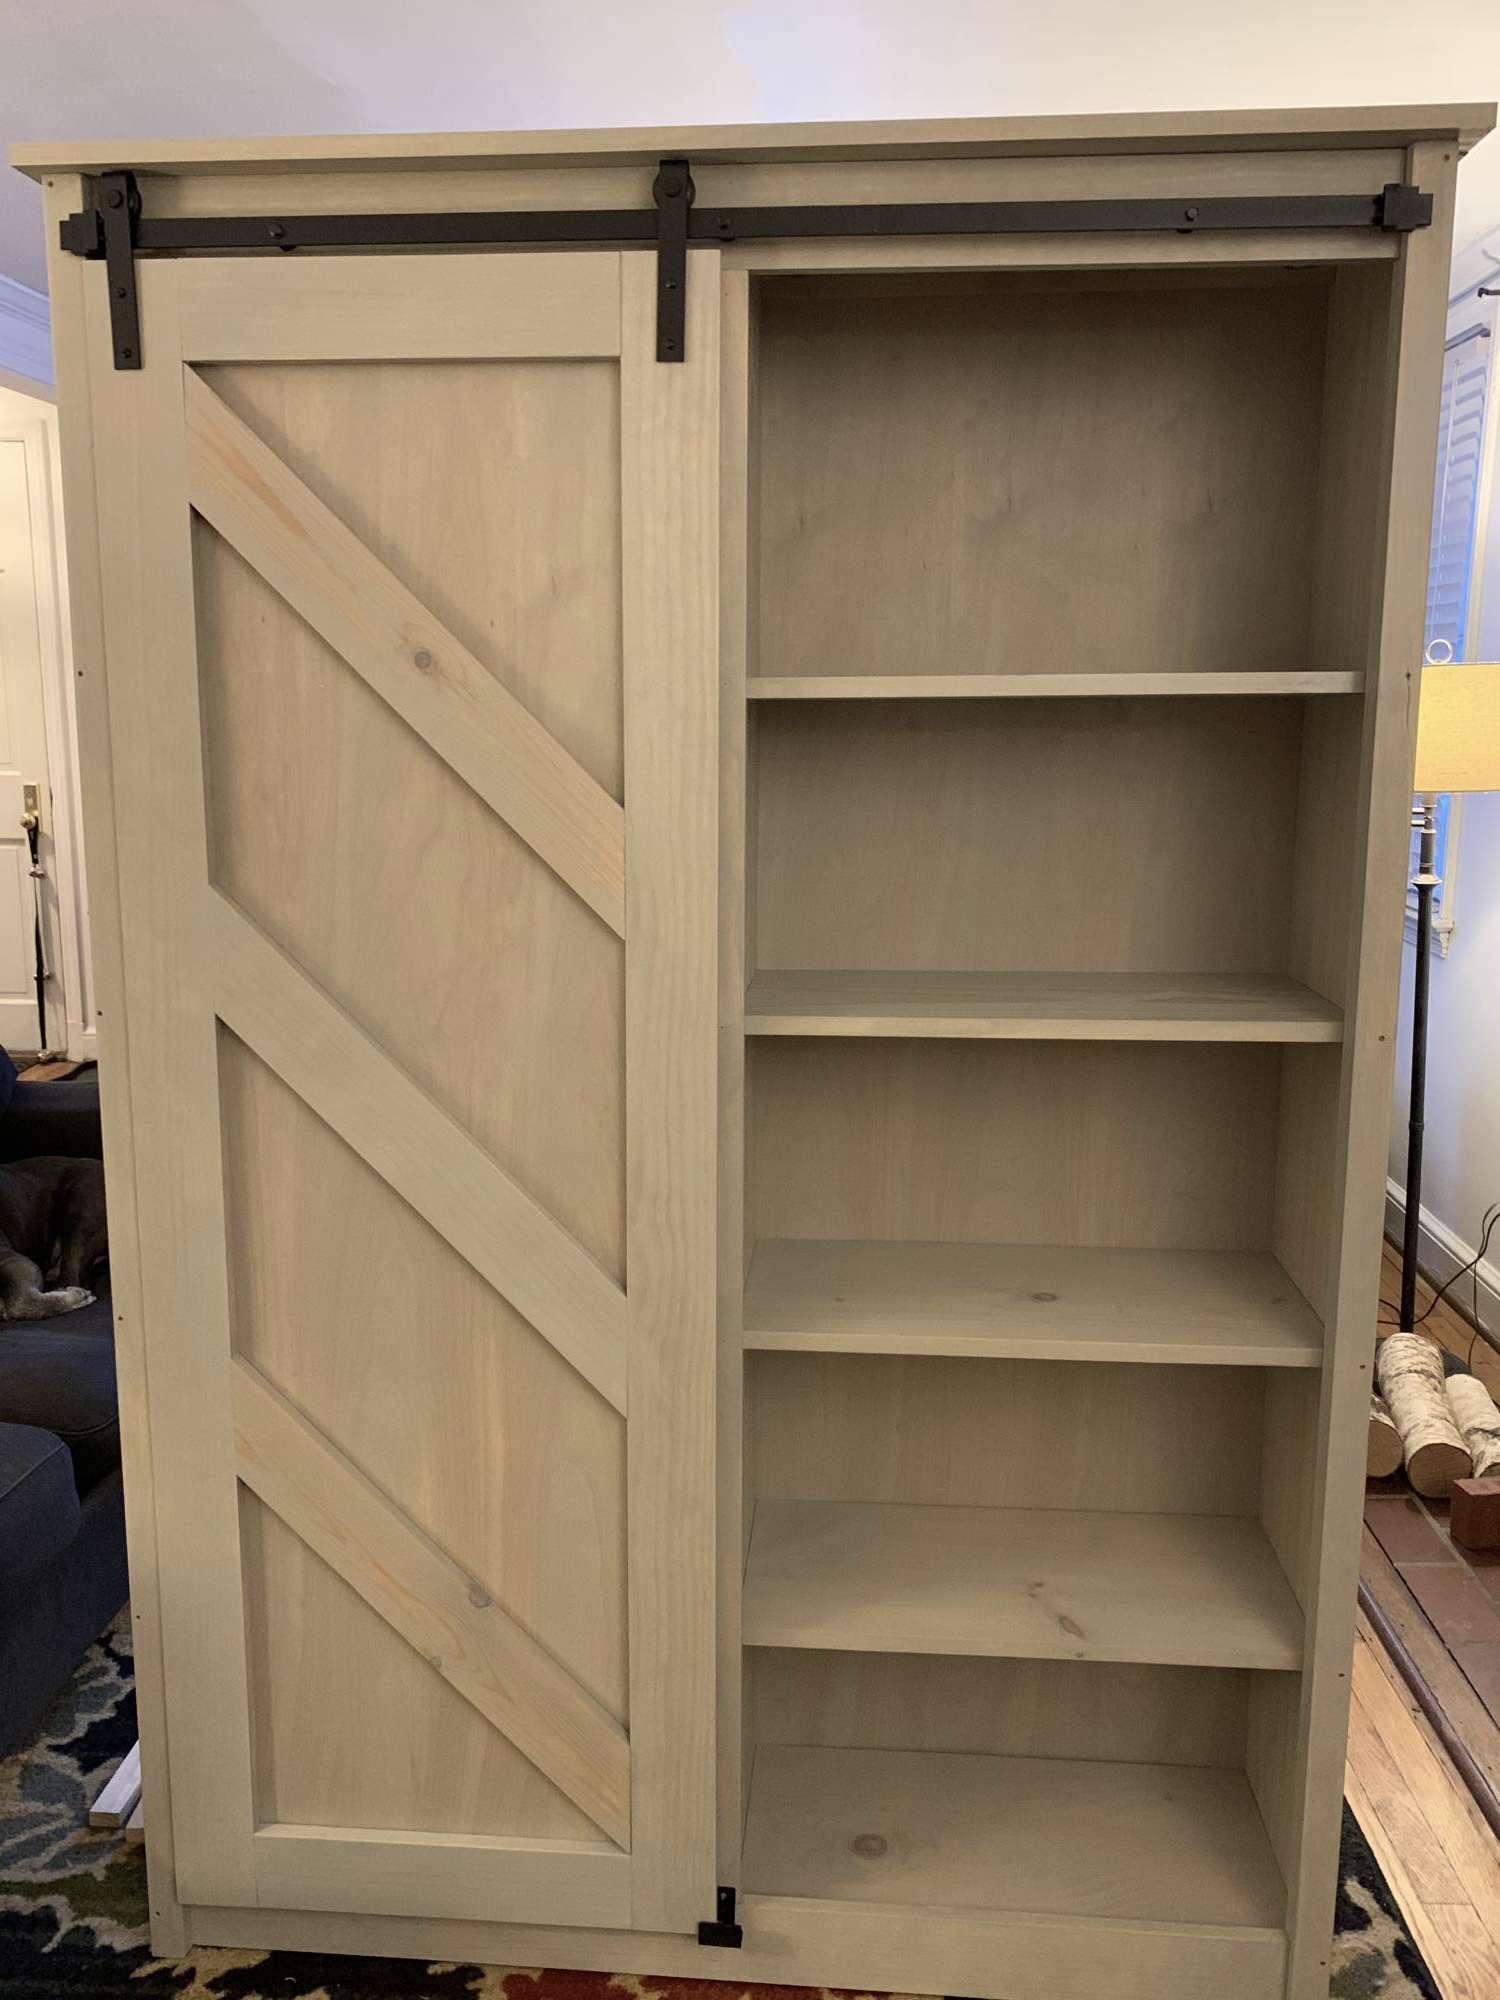
This took a lot of time and money but I like the way it looks. We have 4 kitchen cabinets and one drawer and no room for more so storage is tight.
Built from Plan(s)
Estimated Cost
400
Estimated Time Investment
Week Long Project (20 Hours or More)
Finish Used
Same as Ana’s
Recommended Skill Level
Advanced
Comments

Garage Shelving
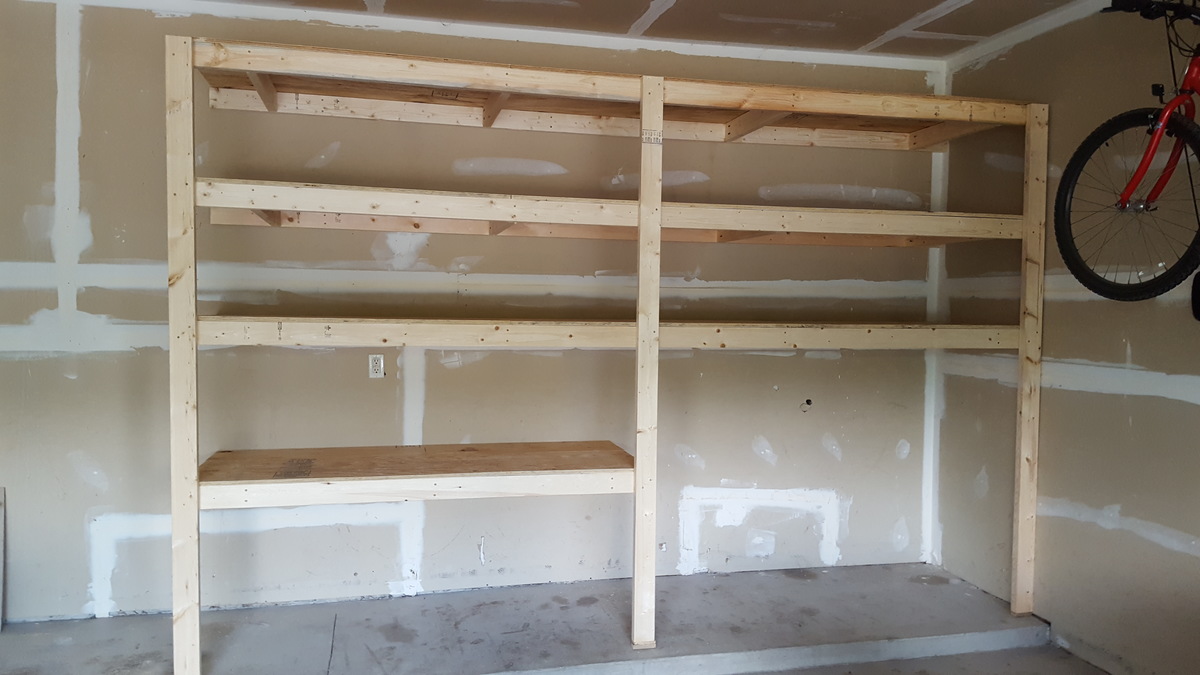
I am a beginner diy'er and this was one of my first projects. Also it was my first time using the Kreg jig and I loved it! My shelving system was around 8 feet tall, 12 feet wide and 30 inches deep. I added some extra cleats to support my deeper shelves (30") and also used thicker (5/8") plywood. This was a fun and easy project to do! Thanks so much!
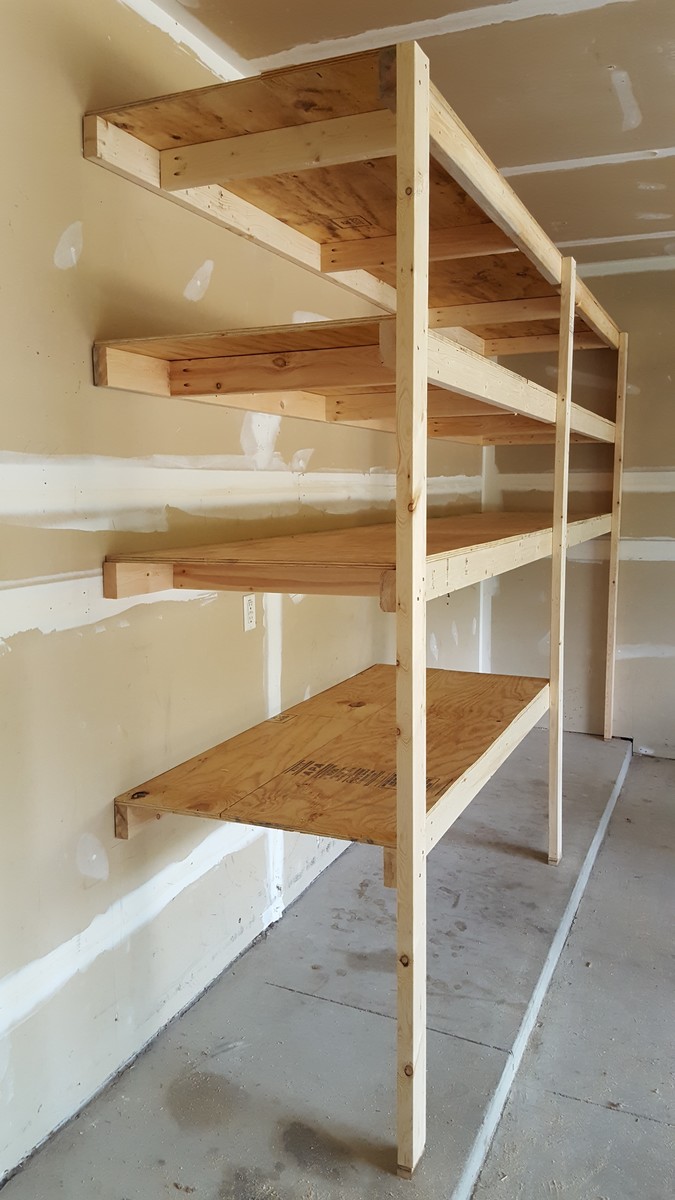
Estimated Cost
$150
Estimated Time Investment
Day Project (6-9 Hours)
Finish Used
none
Recommended Skill Level
Beginner
Short version of cedar shed
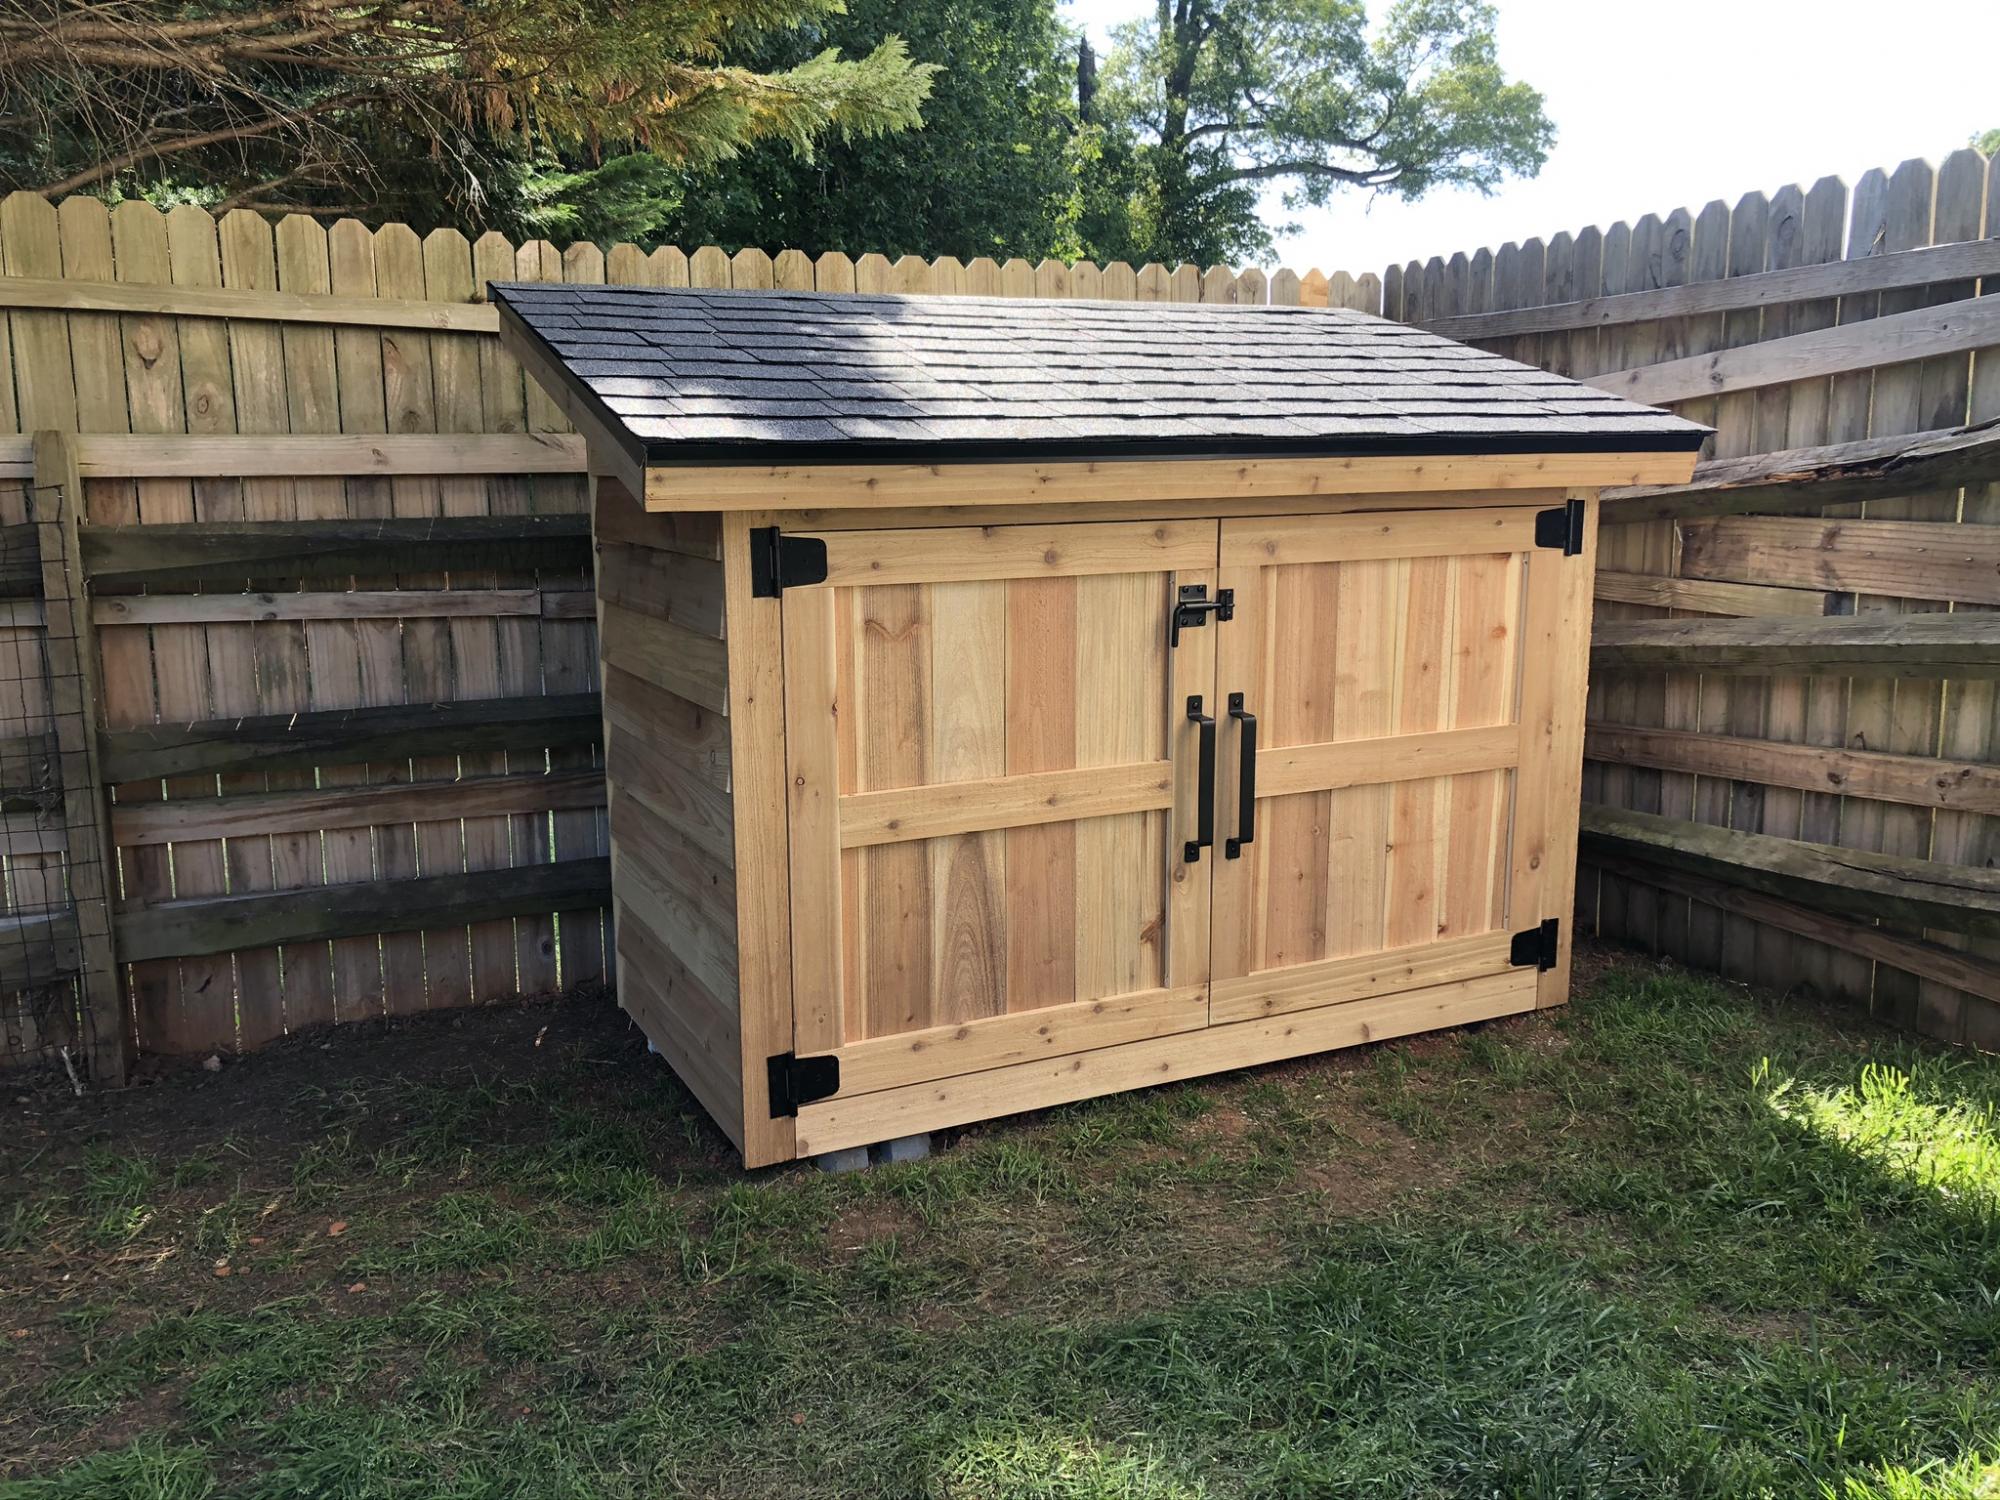
We wanted a shorter version, so that it would hide behind this fence. I just needed somewhere to store lawnmower, wheelbarrow, and a few yard supplies. I started putting the roof on hinges, but the gas struts couldn't support the 170 pound roof. So it's fixed in place (stronger structure anyway). That's why I went with 2x4's for the framed walls instead of 2x2's.
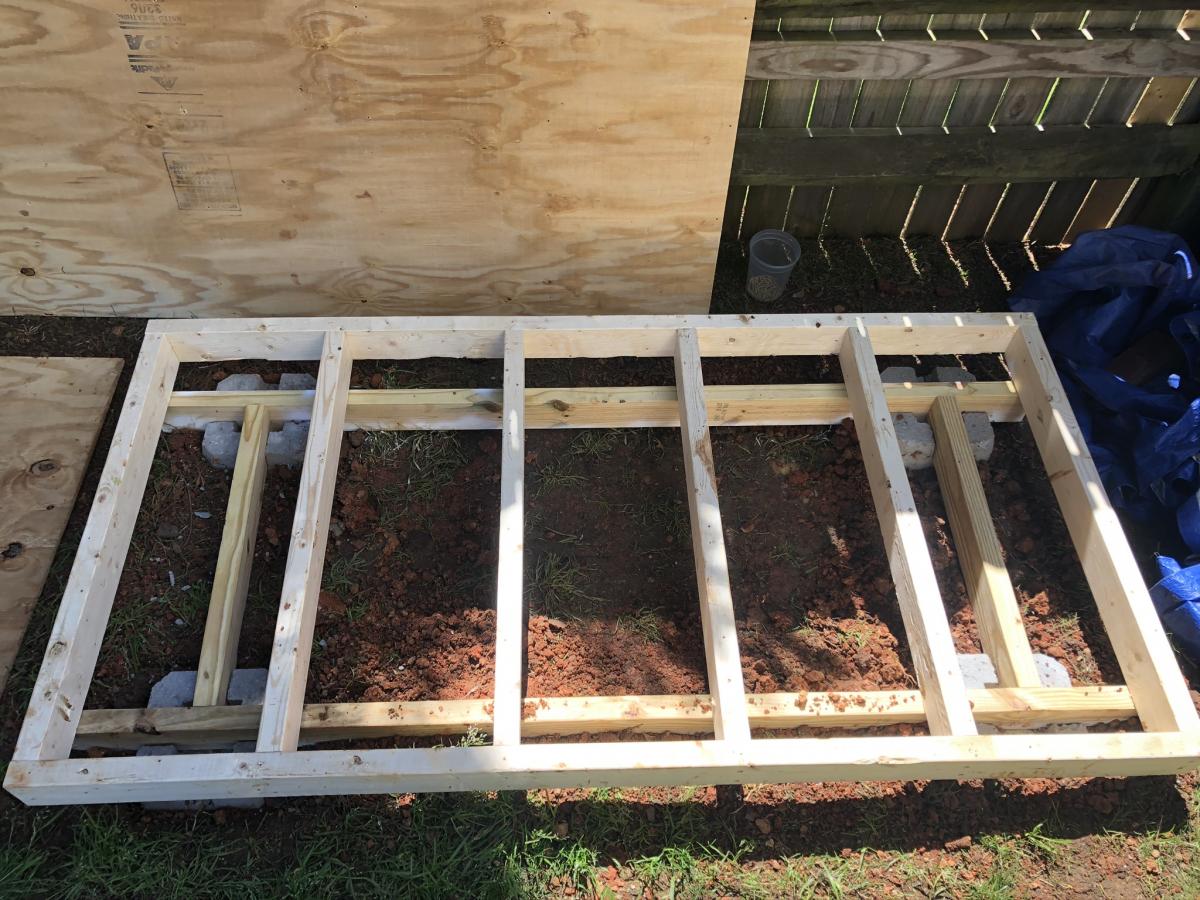
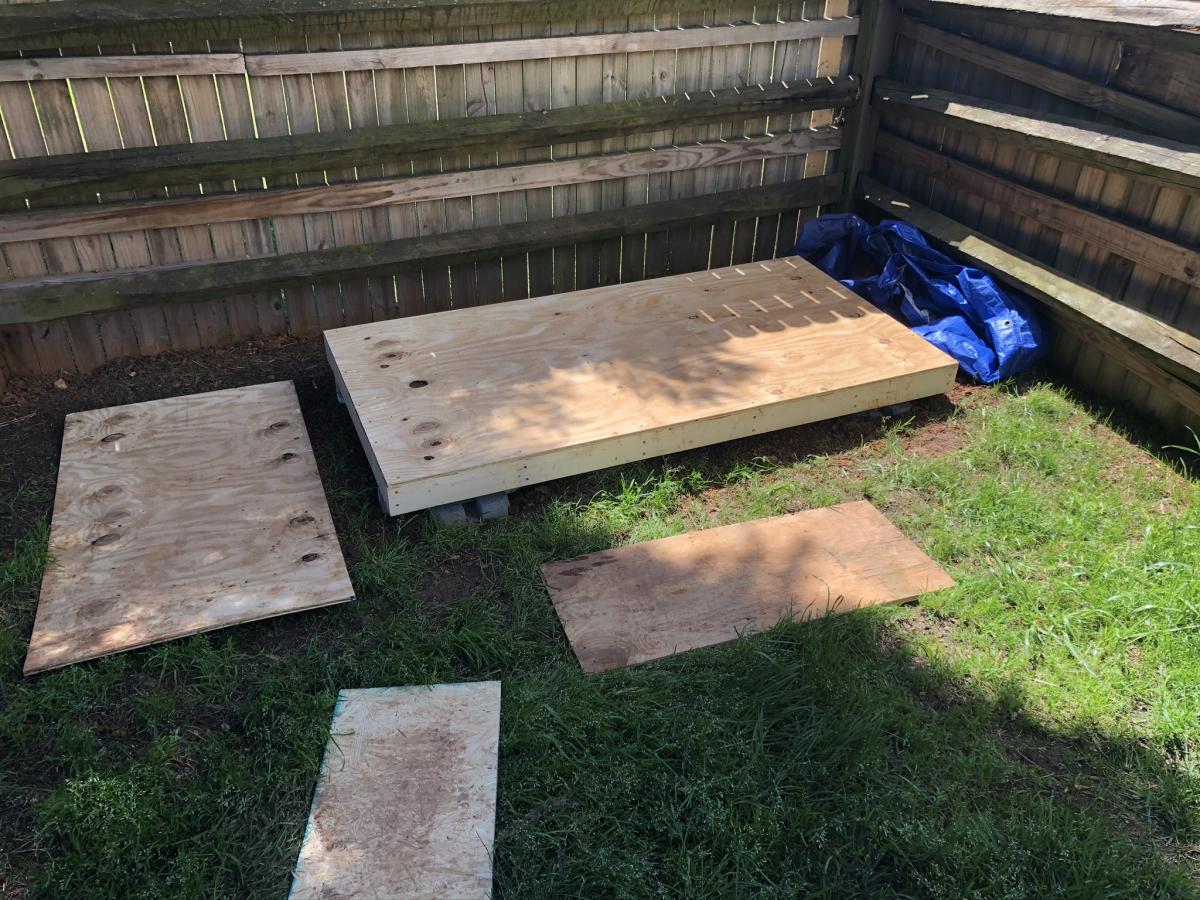
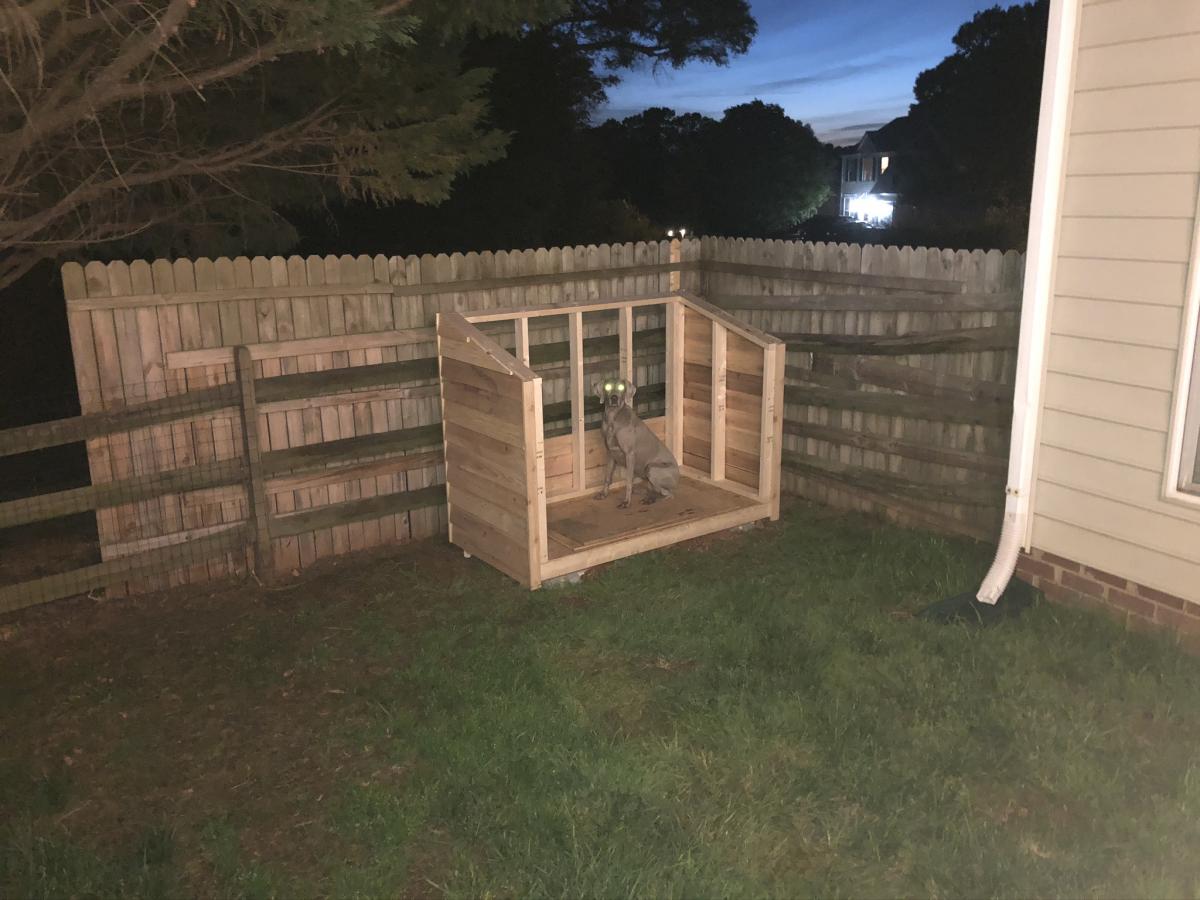
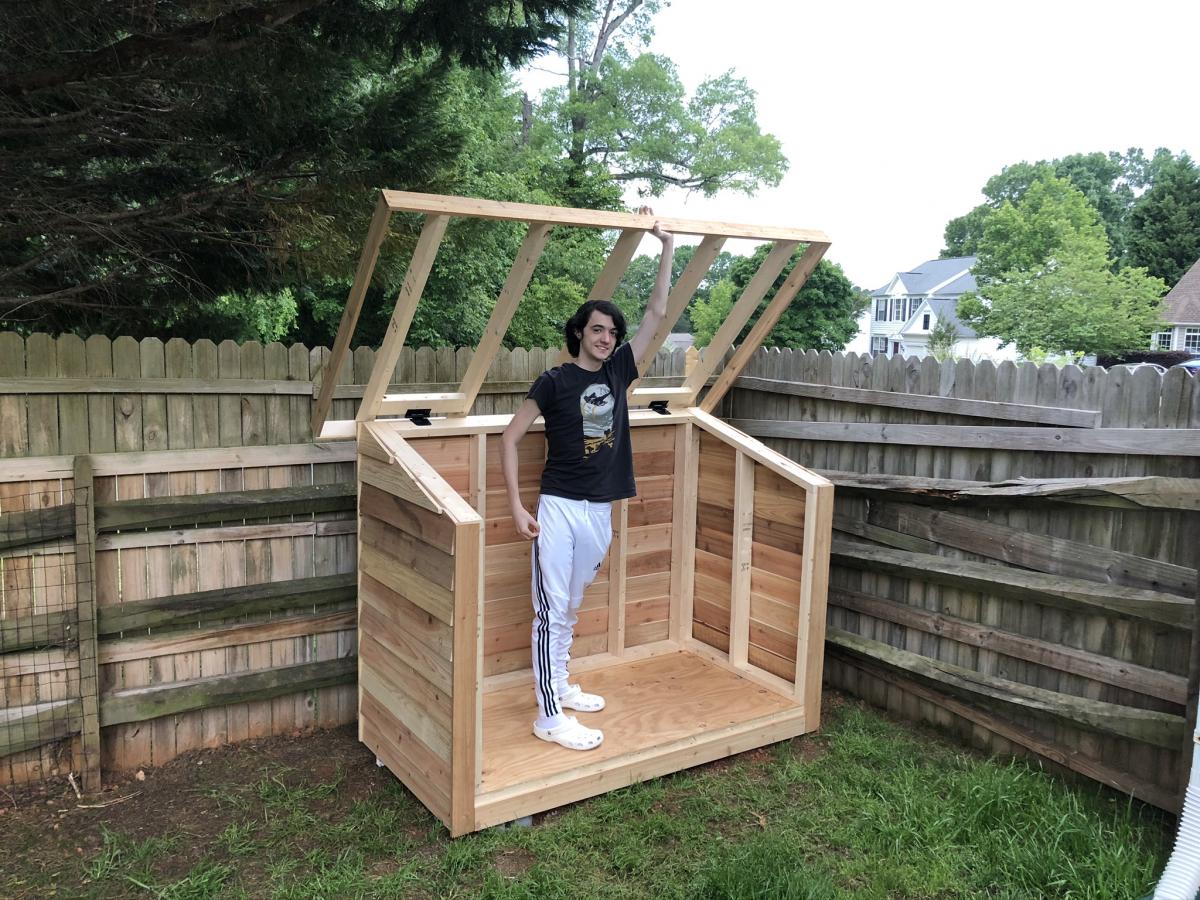
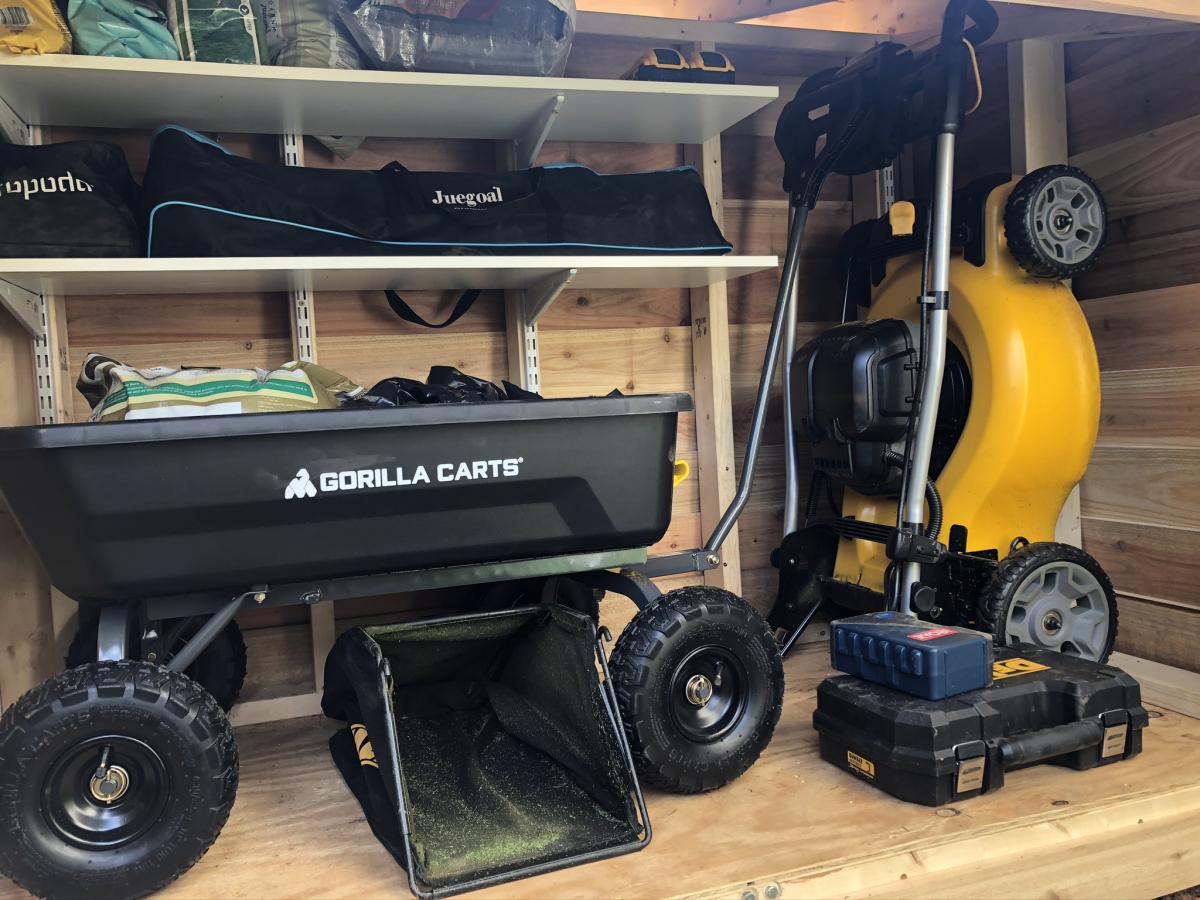
Built from Plan(s)
Estimated Cost
600
Estimated Time Investment
Weekend Project (10-20 Hours)
Finish Used
Not yet finished, will get to that.
Recommended Skill Level
Intermediate
Comments

Thu, 06/11/2020 - 17:15
Very Nice modification. Two…
Very Nice modification. Two thumbs up! May I please ask you for the dimensions of the shed?
Cool cooler box!
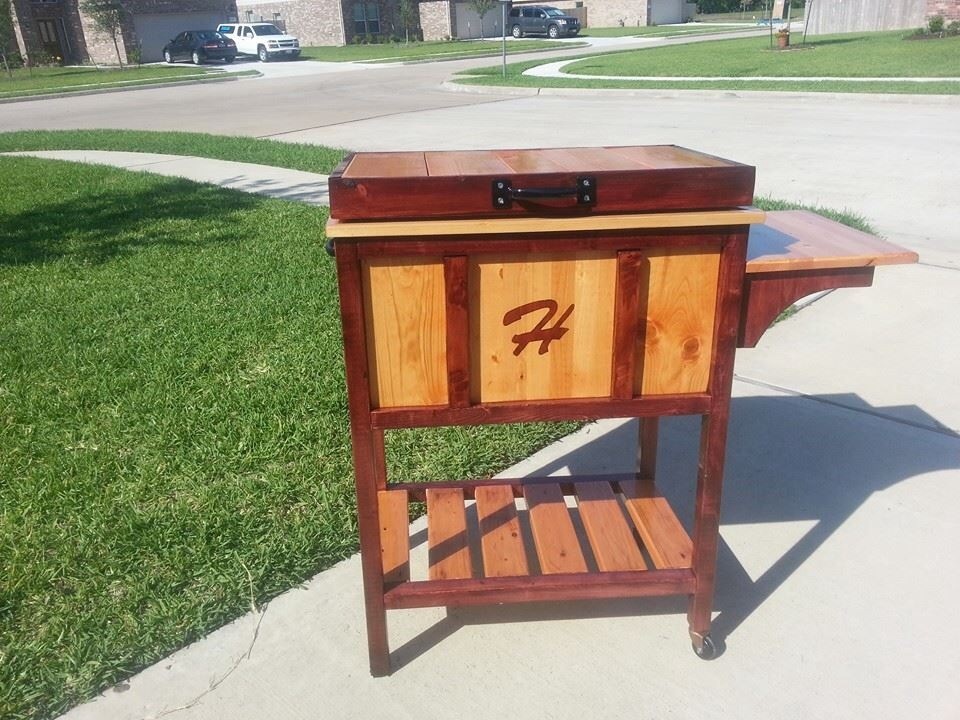
Thanks so much for the plans for this project. It was a lot of fun, and it turned out great!
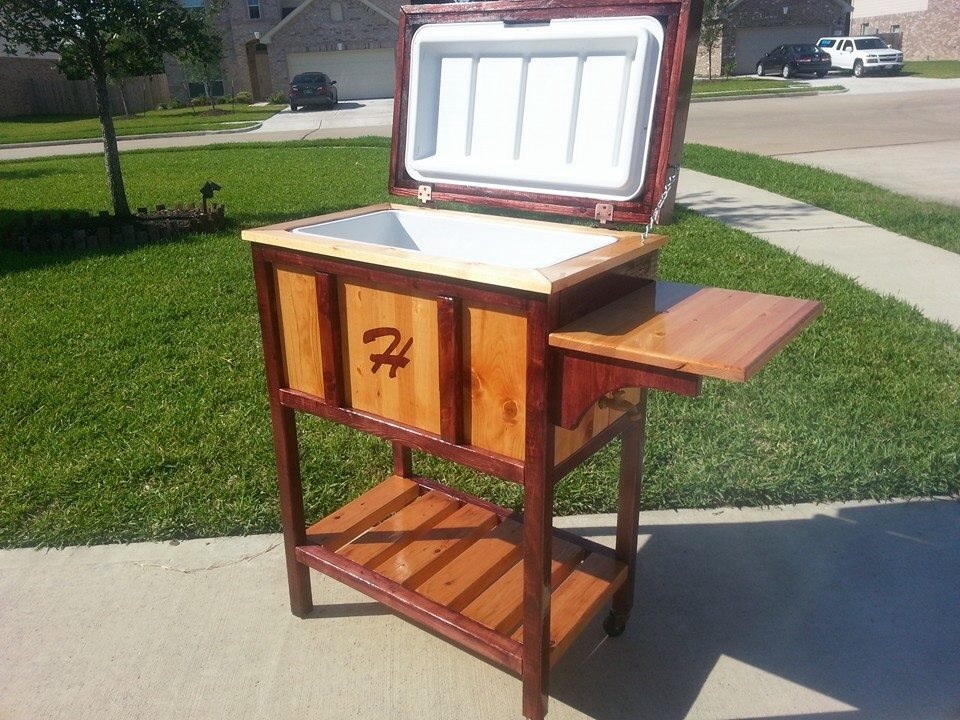
Built from Plan(s)
Estimated Cost
75.00
Finish Used
Red Oak gel stain and Golden Pecan stain. Clear coated by spraying high impact clearcoat
Recommended Skill Level
Beginner
Comments
Sat, 05/17/2014 - 11:54
Cool Cooler Box
Really, really nice!!! I love your color scheme! Classy look!

Sun, 05/18/2014 - 12:07
Really sick! Love the
Really sick! Love the contrast. Did you use treated pine?
Workbench with pegboard
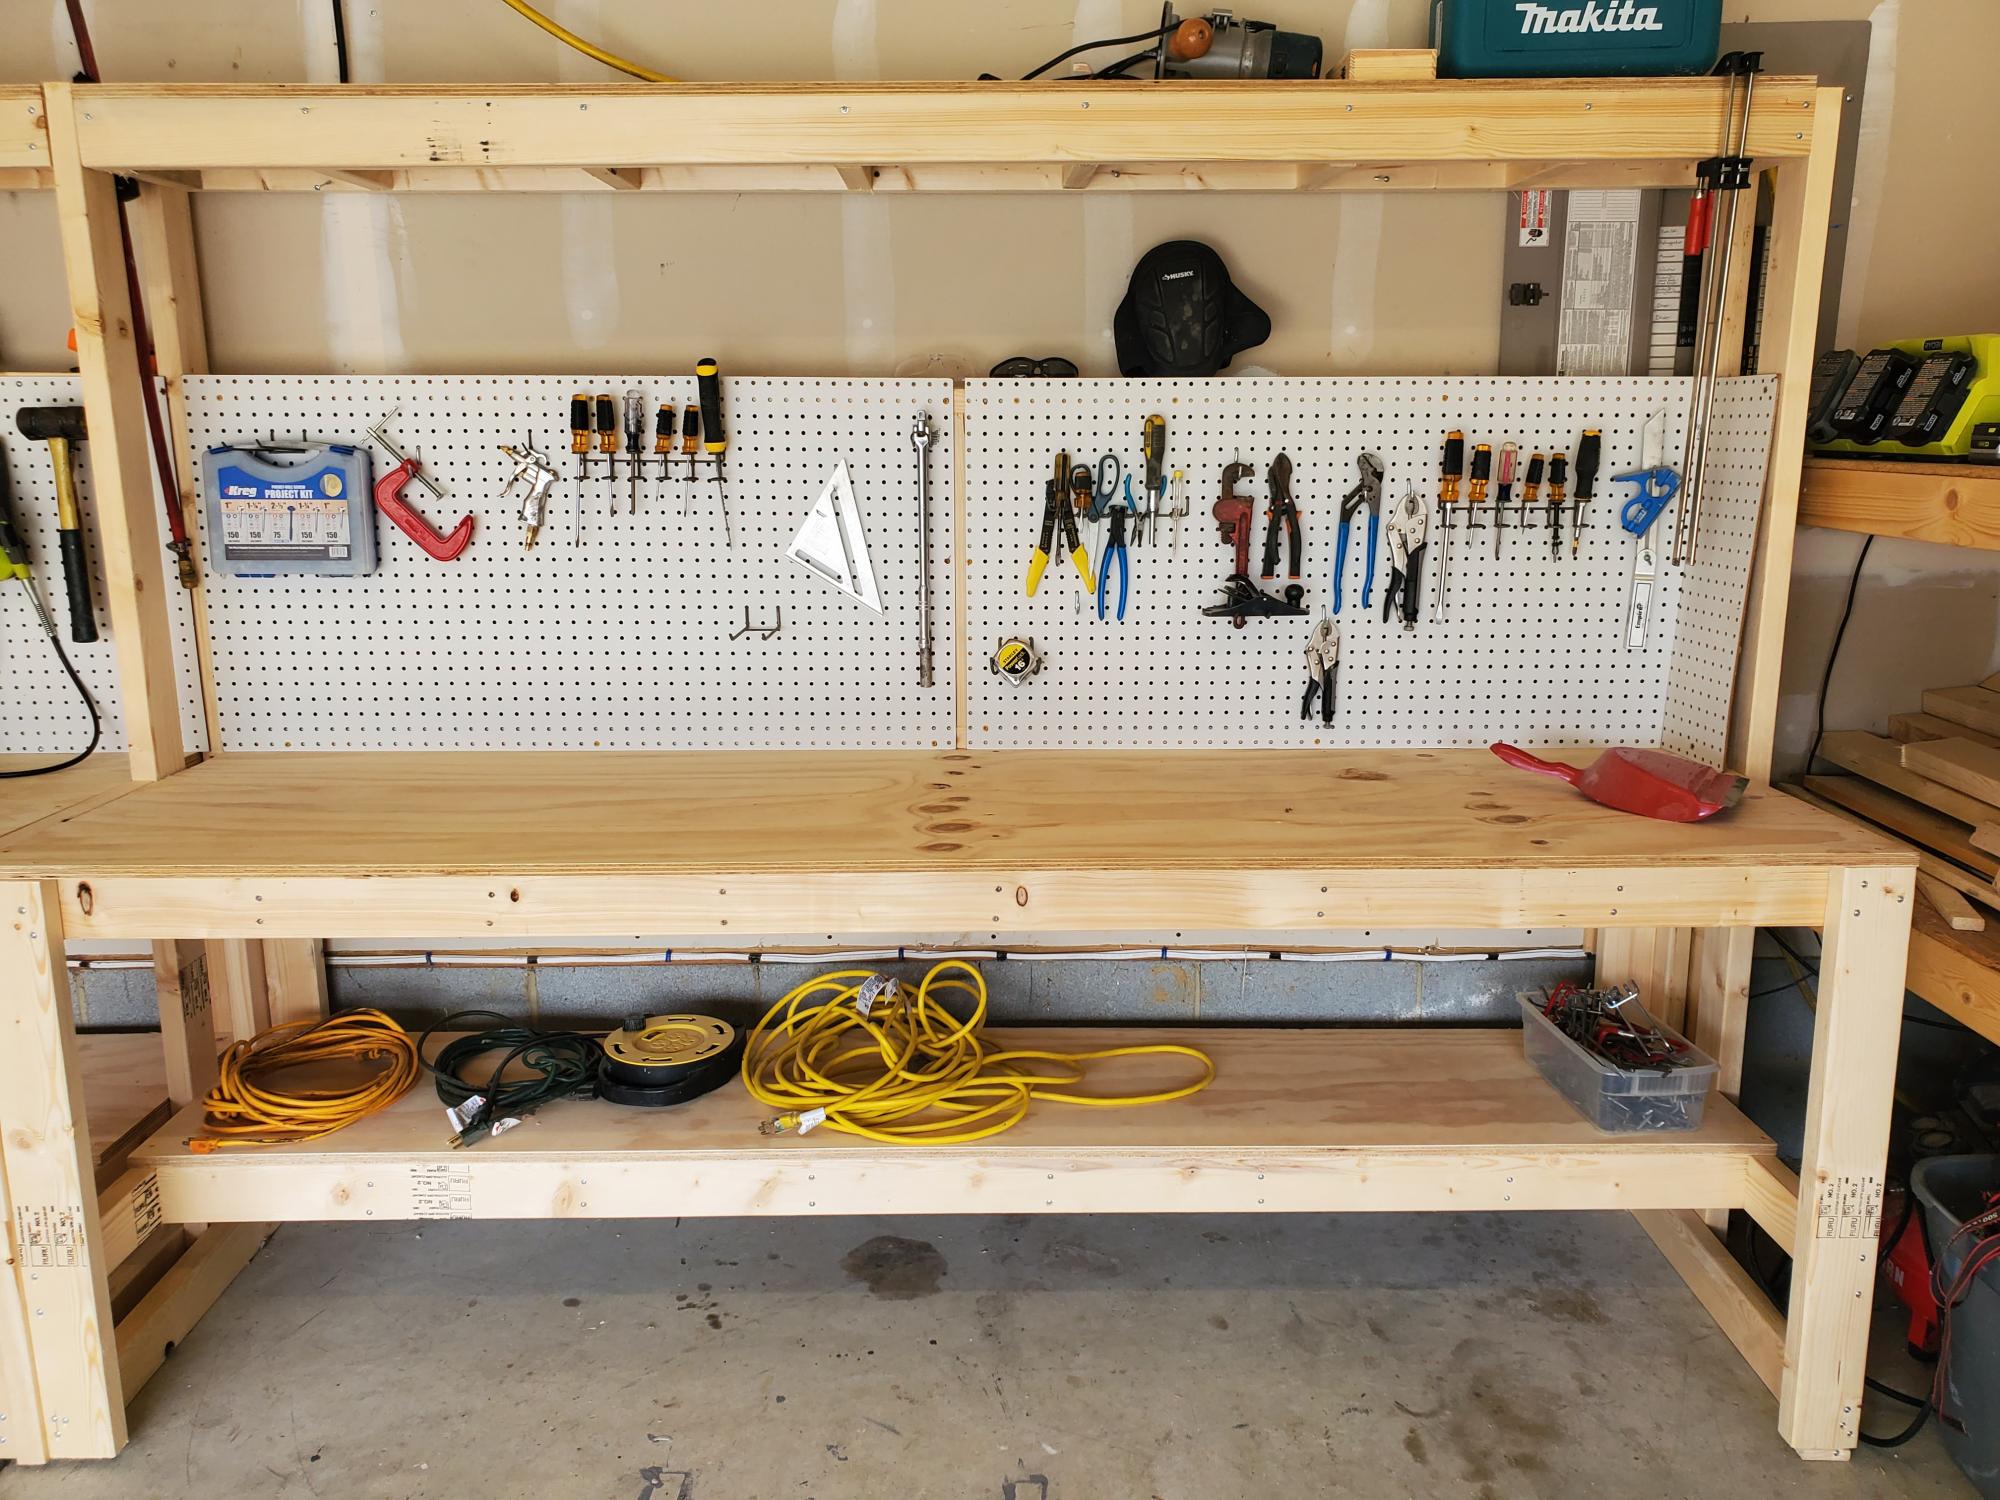
I made a workbench for my garage it was pretty easy. I also made an instructional youtube video if you want to learn how to make it. #diy #workbench #bench
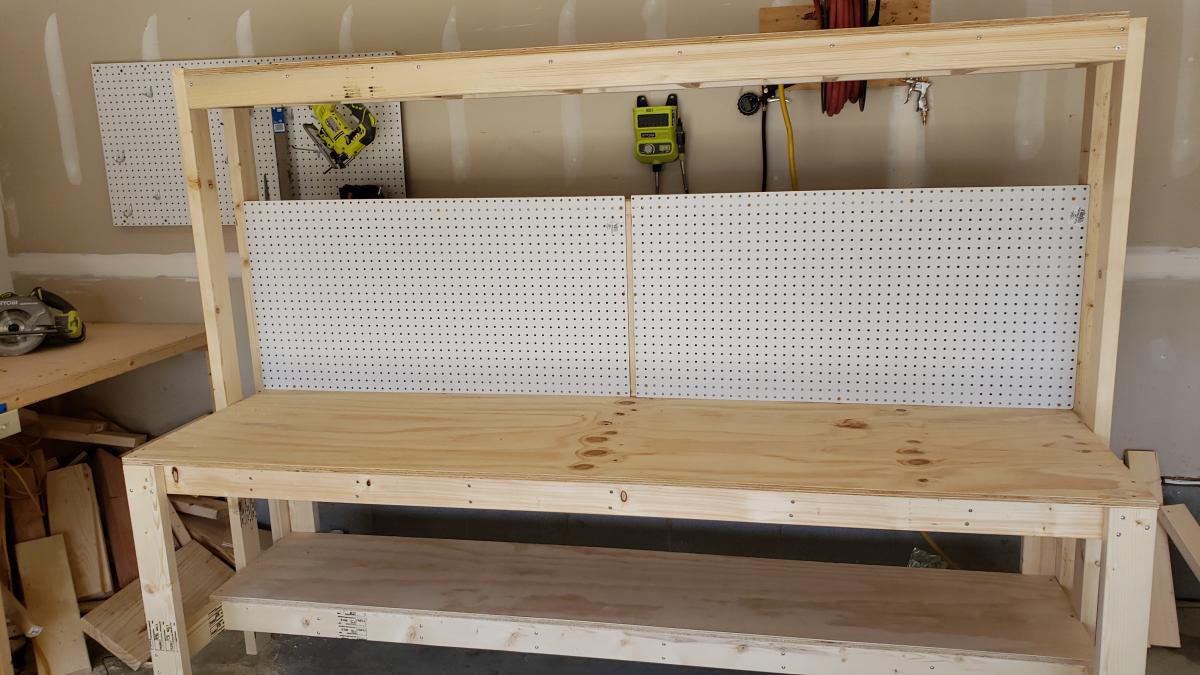
Estimated Cost
125
Estimated Time Investment
Afternoon Project (3-6 Hours)
Finish Used
none
Recommended Skill Level
Beginner
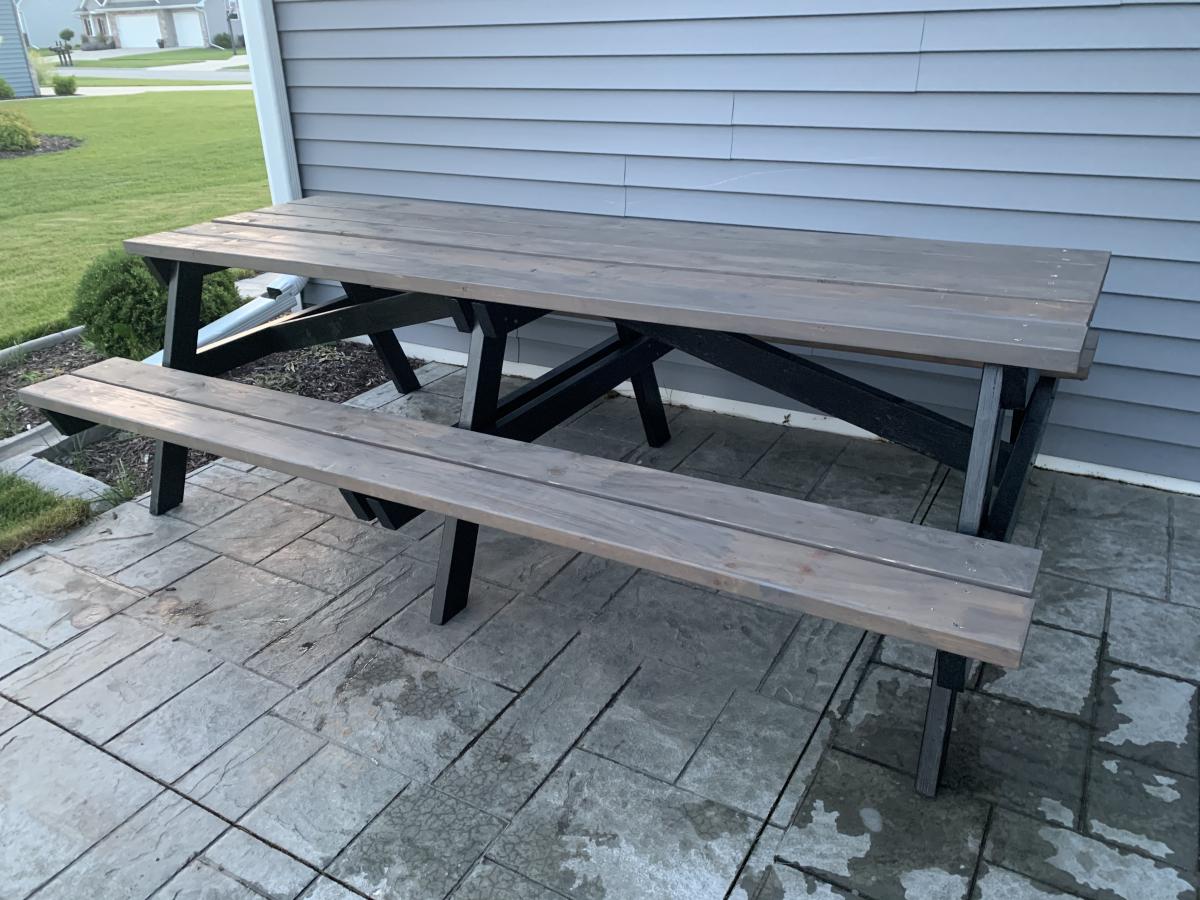
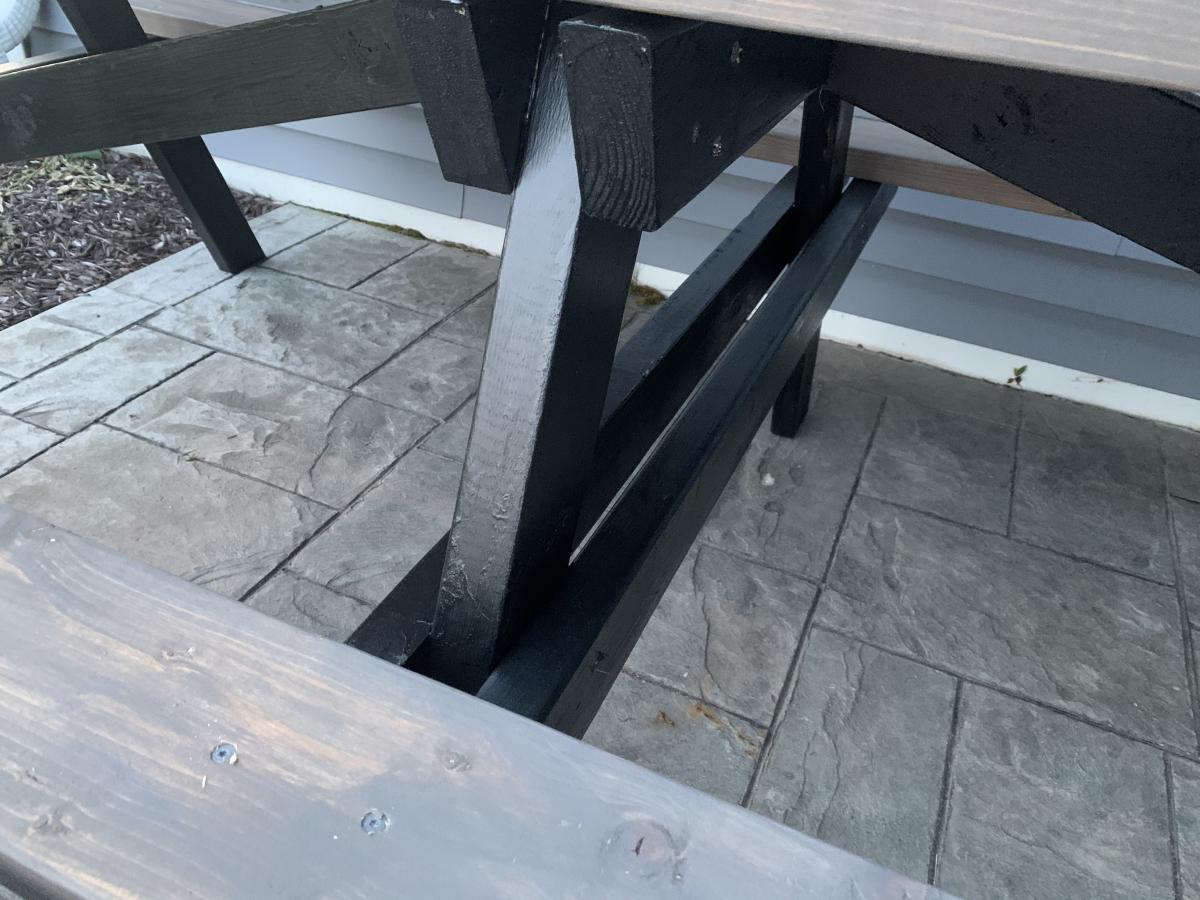
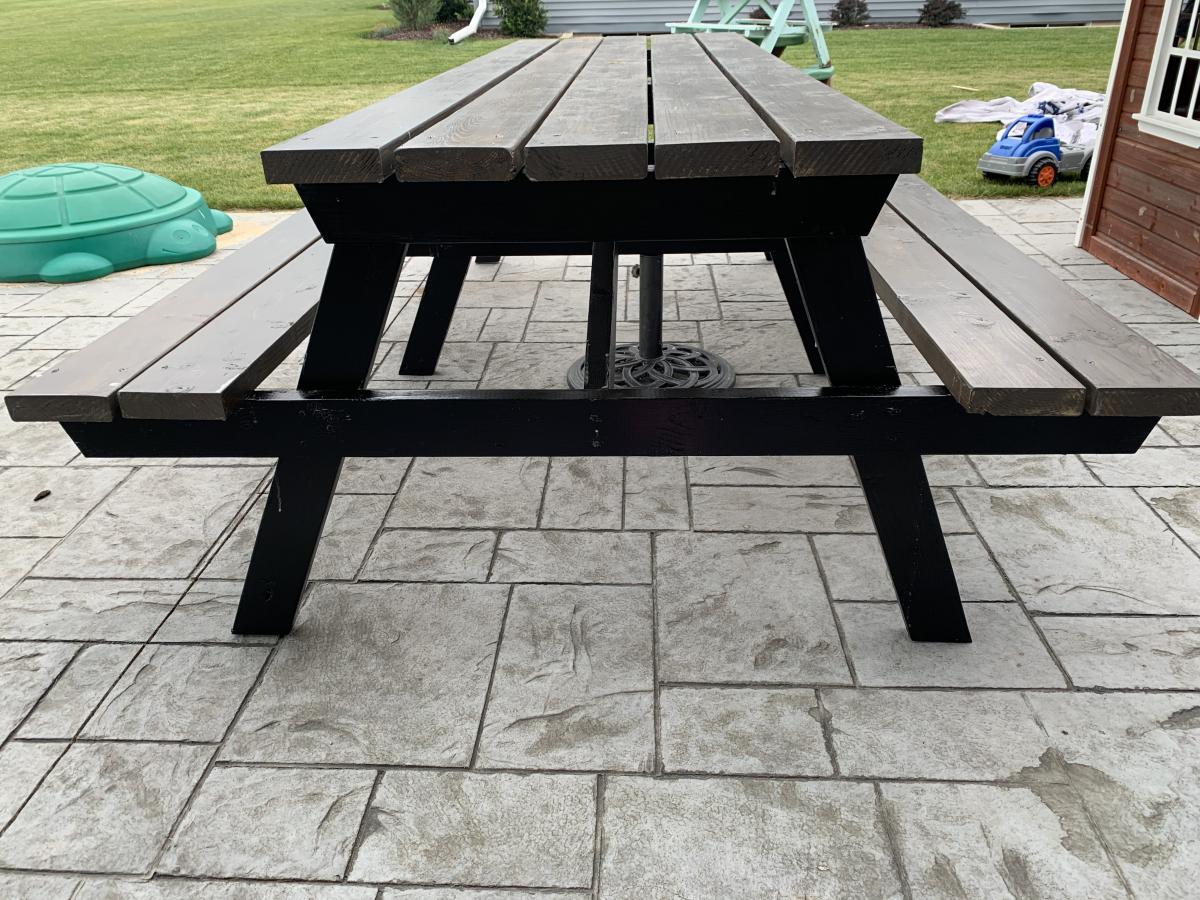
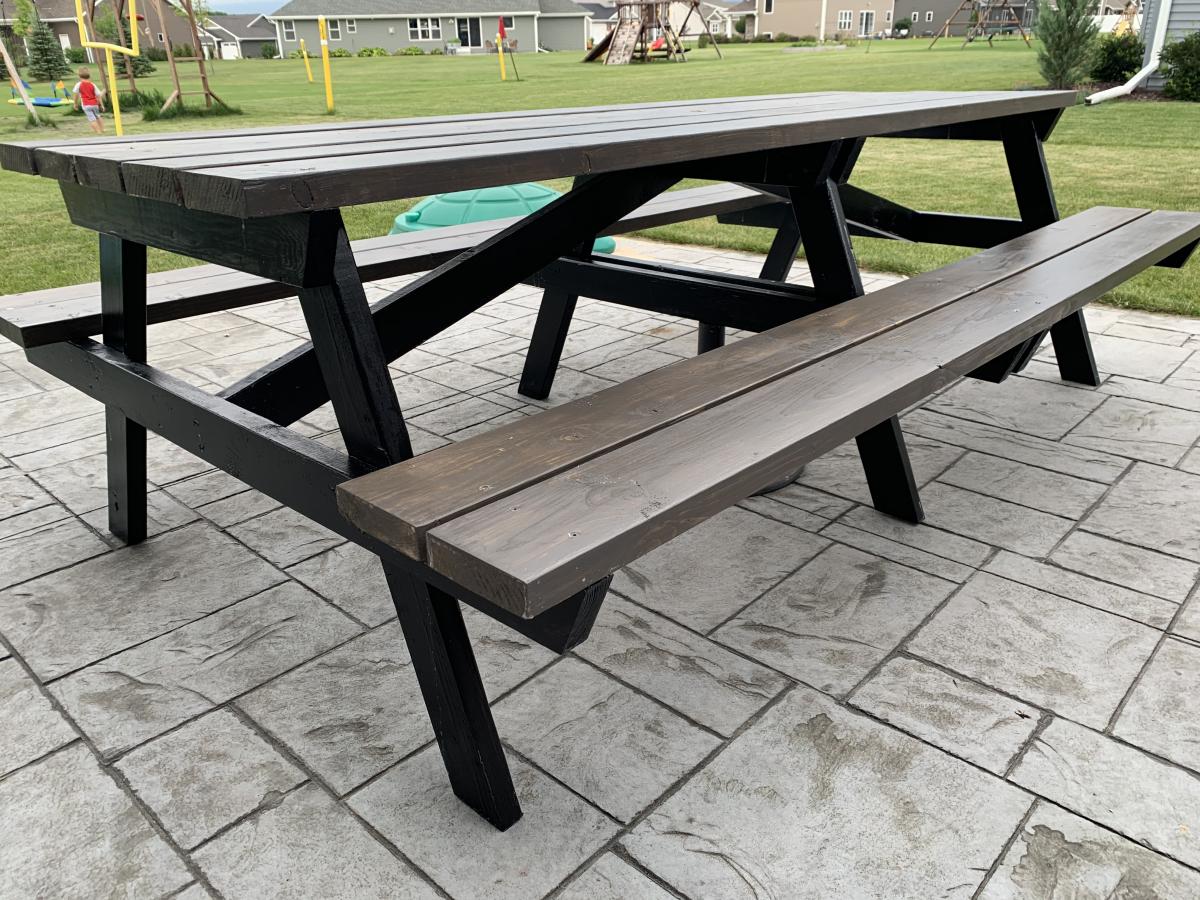
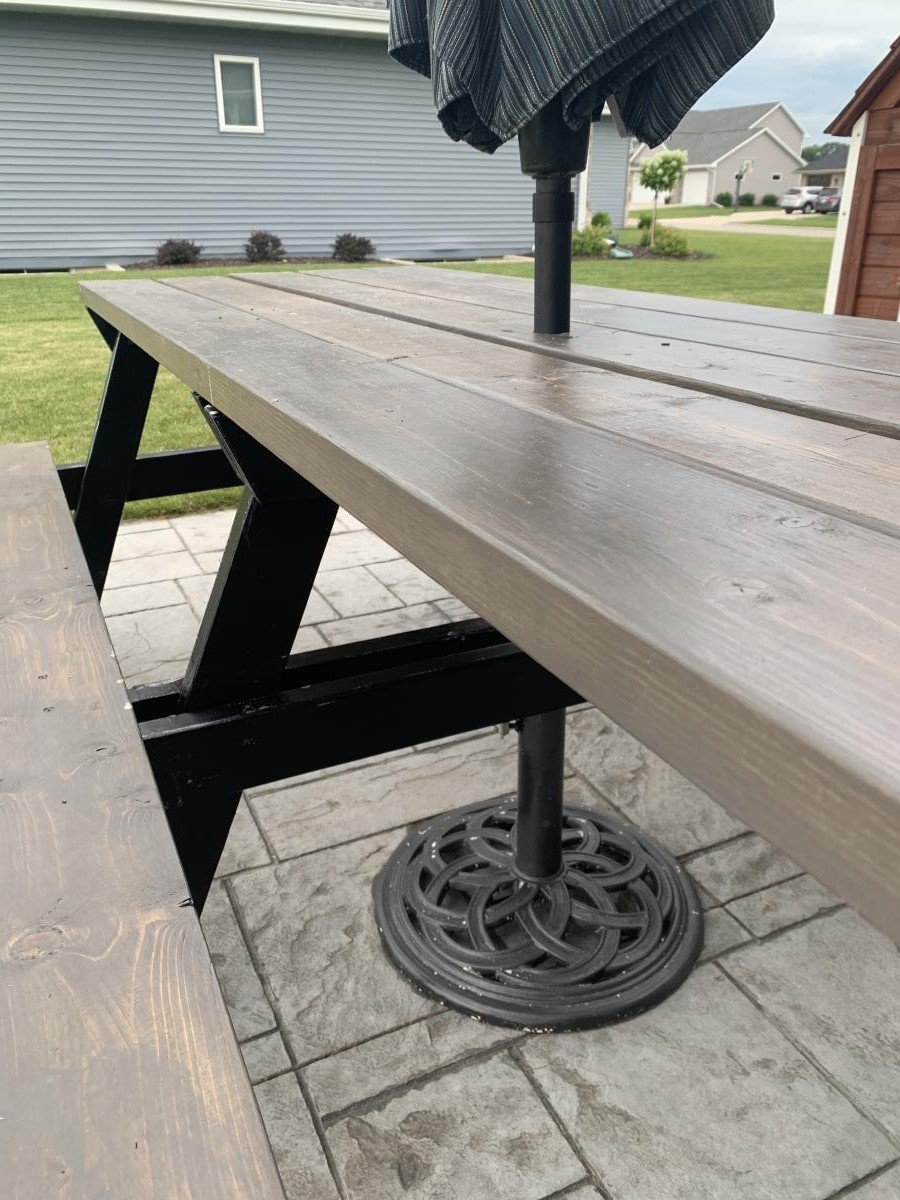
8 foot picnic table
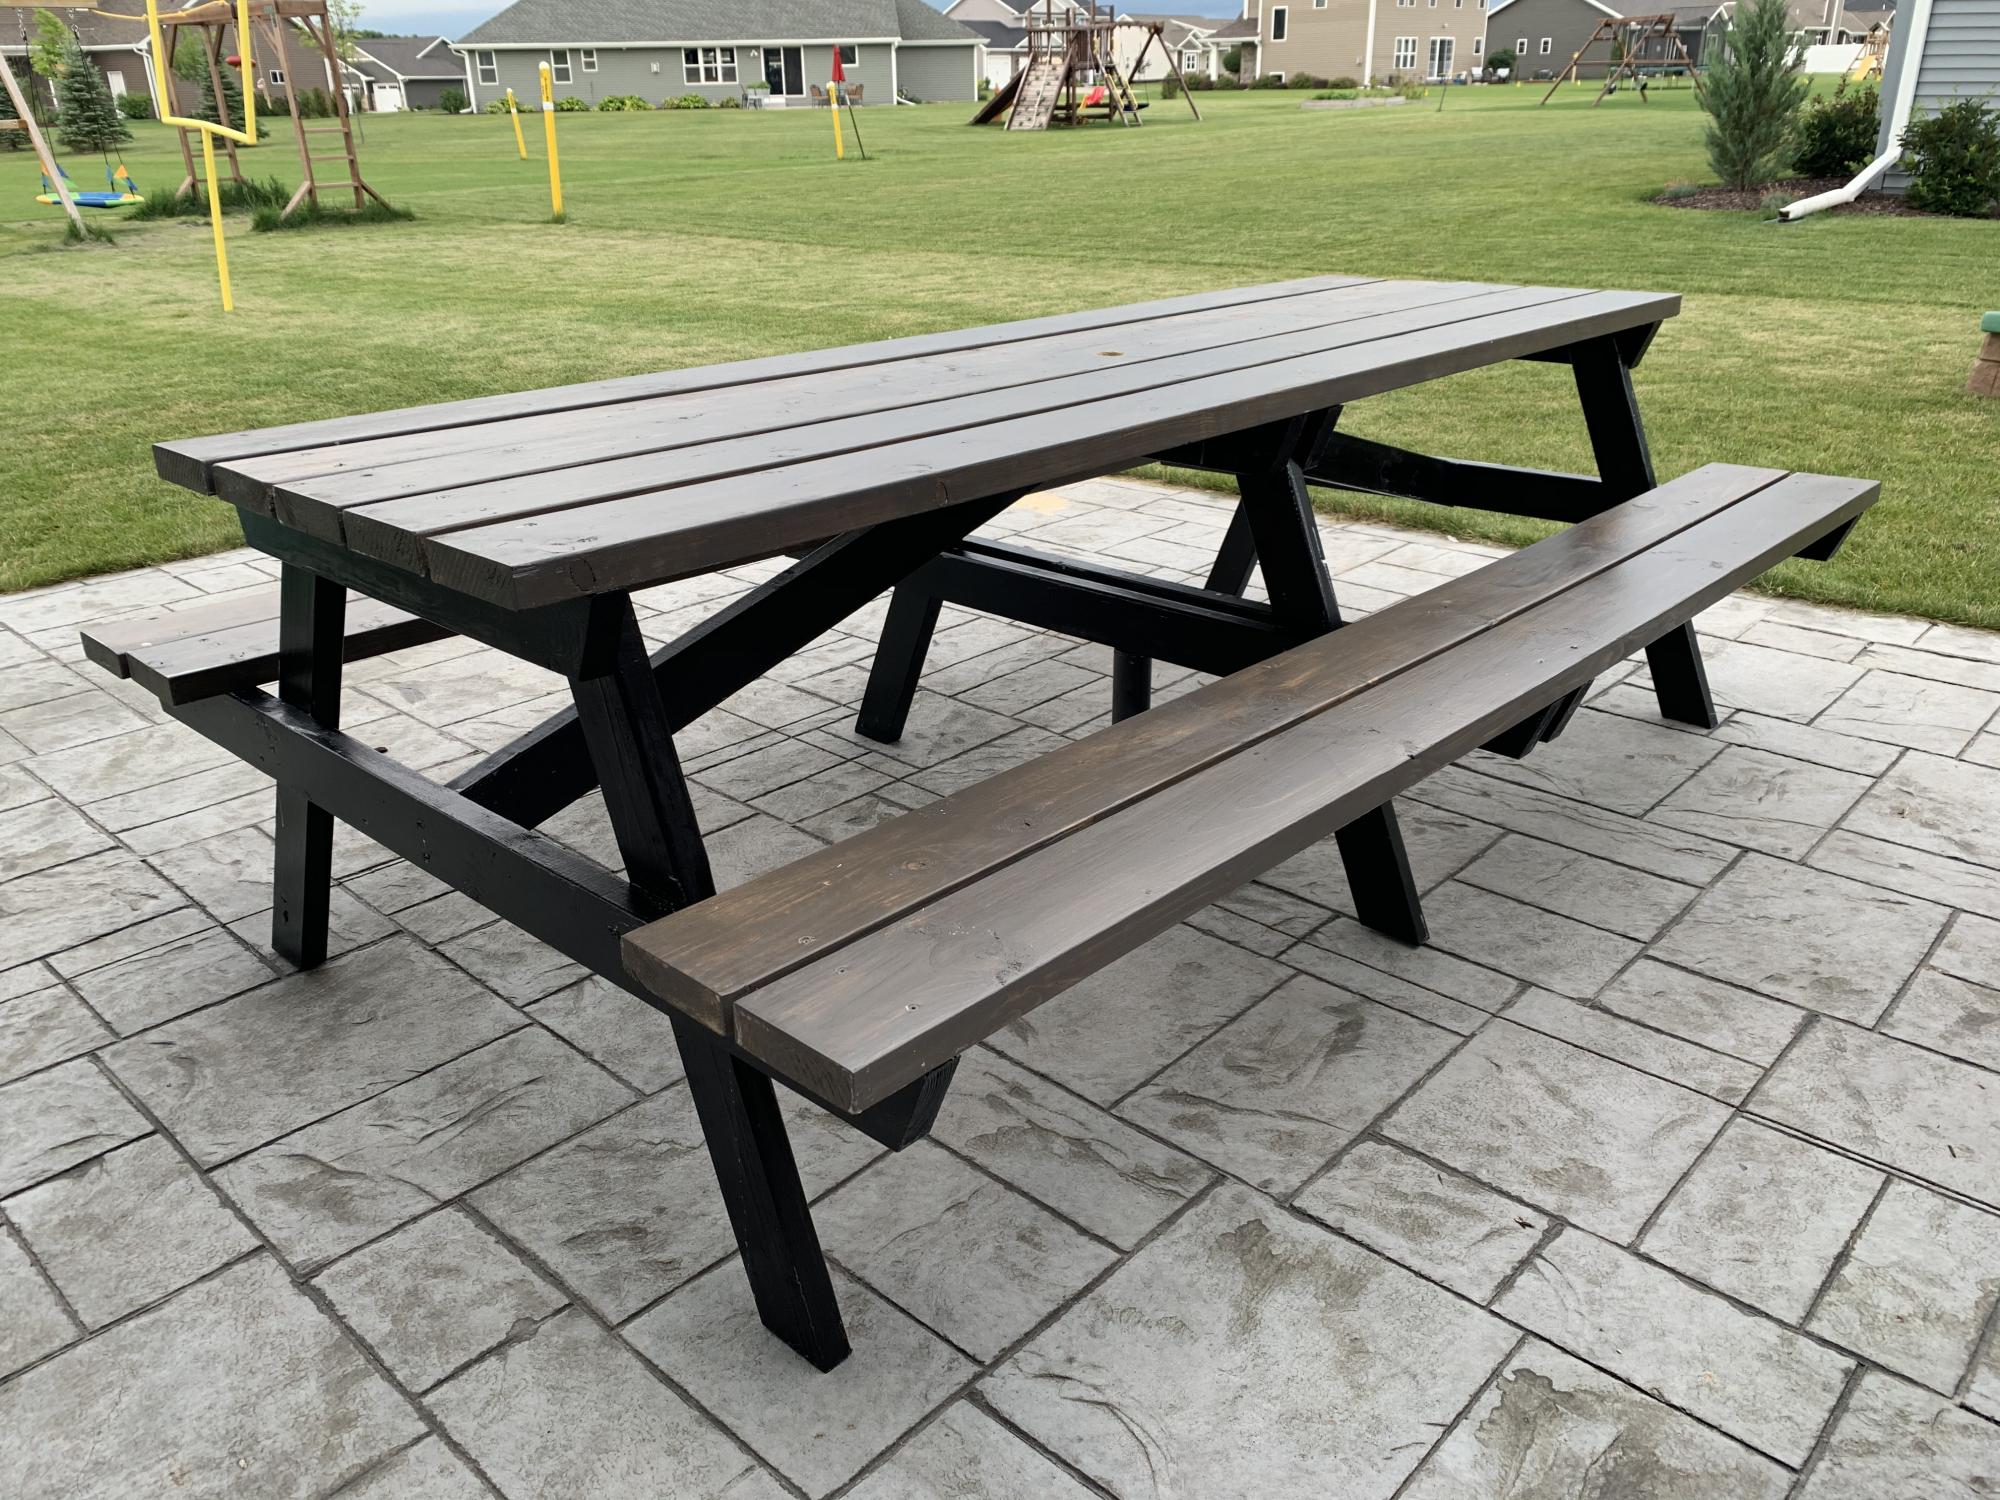
This picnic table was a quick build and turned out amazing. I modified the center base support by adding an extra table top support and seat support board to the opposite side of the center legs to give the table symmetry to accommodate an umbrella hole. I also shortened both cross supports by an inch to make sure the base wouldn’t be longer than the top boards. The space between the center table support boards and seat support boards is the perfect size to fit a standard umbrella. I used a 1 3/4” hole saw to make the umbrella hole. The build and stain/paint took me about 5 hours but additional time is needed to properly seal the table. I used untreated pine. Treated pine may give the table longevity but it would also add a lot of weight to an already heavy table. This was a relatively easy and quick build and is a great size to fit my whole family plus a couple guests! I’m happy with how it turned out and would recommend this build to anyone looking for a budget friendly and simple patio table.
Built from Plan(s)
Estimated Cost
$75
Estimated Time Investment
Day Project (6-9 Hours)
Finish Used
Varathane Briarsmoke for the top and Rustoleum Canyon Black Satin for the base. Sealed with 2 coats of Varathane Helmsman Spar Urethane
Recommended Skill Level
Beginner
Comments

Sat, 07/18/2020 - 13:17
Thank you Abby!!! Your…
Thank you Abby!!! Your picnic table turned out amazing, I love the added umbrella modification!
My attempt
Couldn't find anything that would fit my area and this seemed to work out perfect. Almost done with the other side. I will post pic of finished products.
Built from Plan(s)
Comments
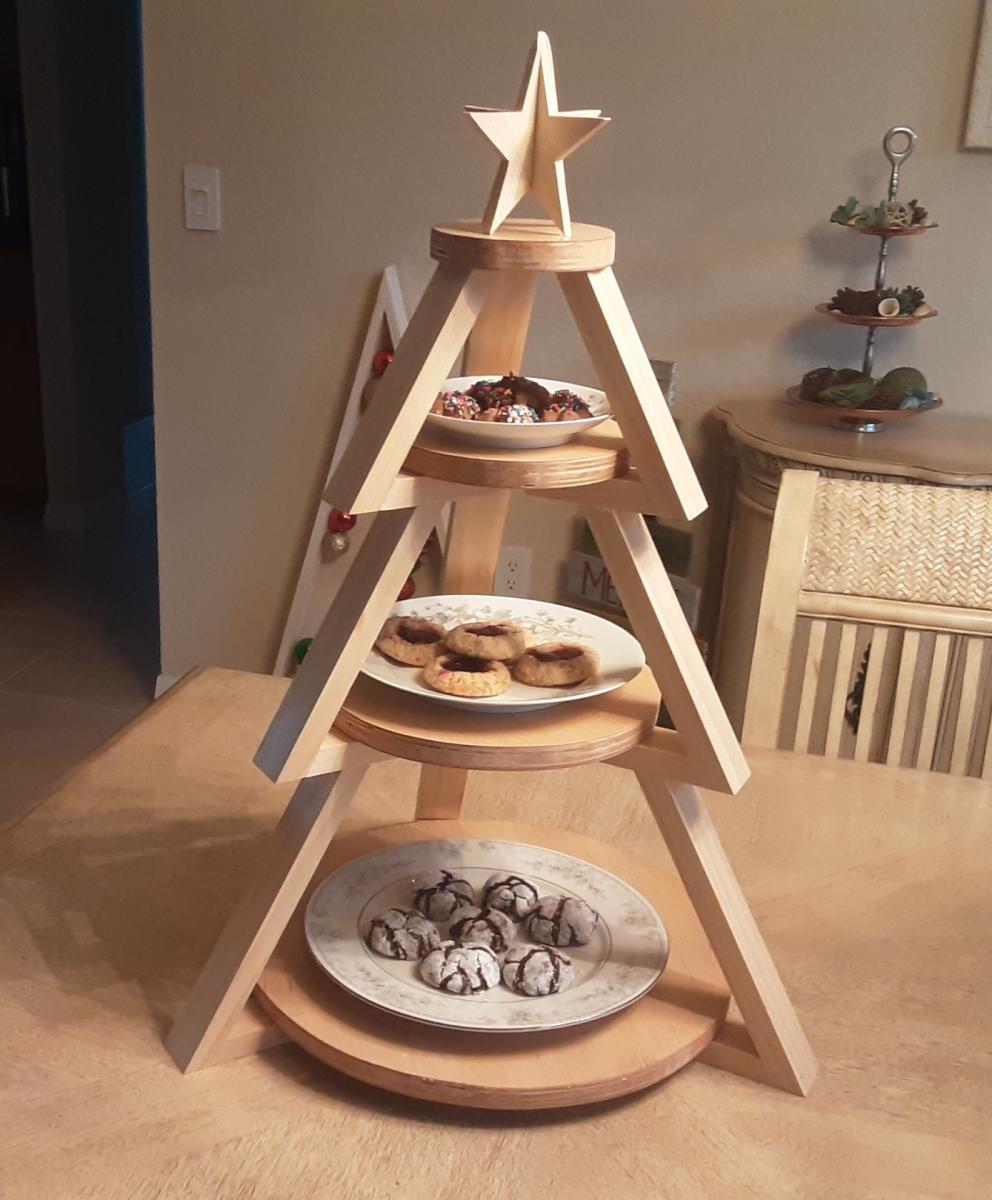
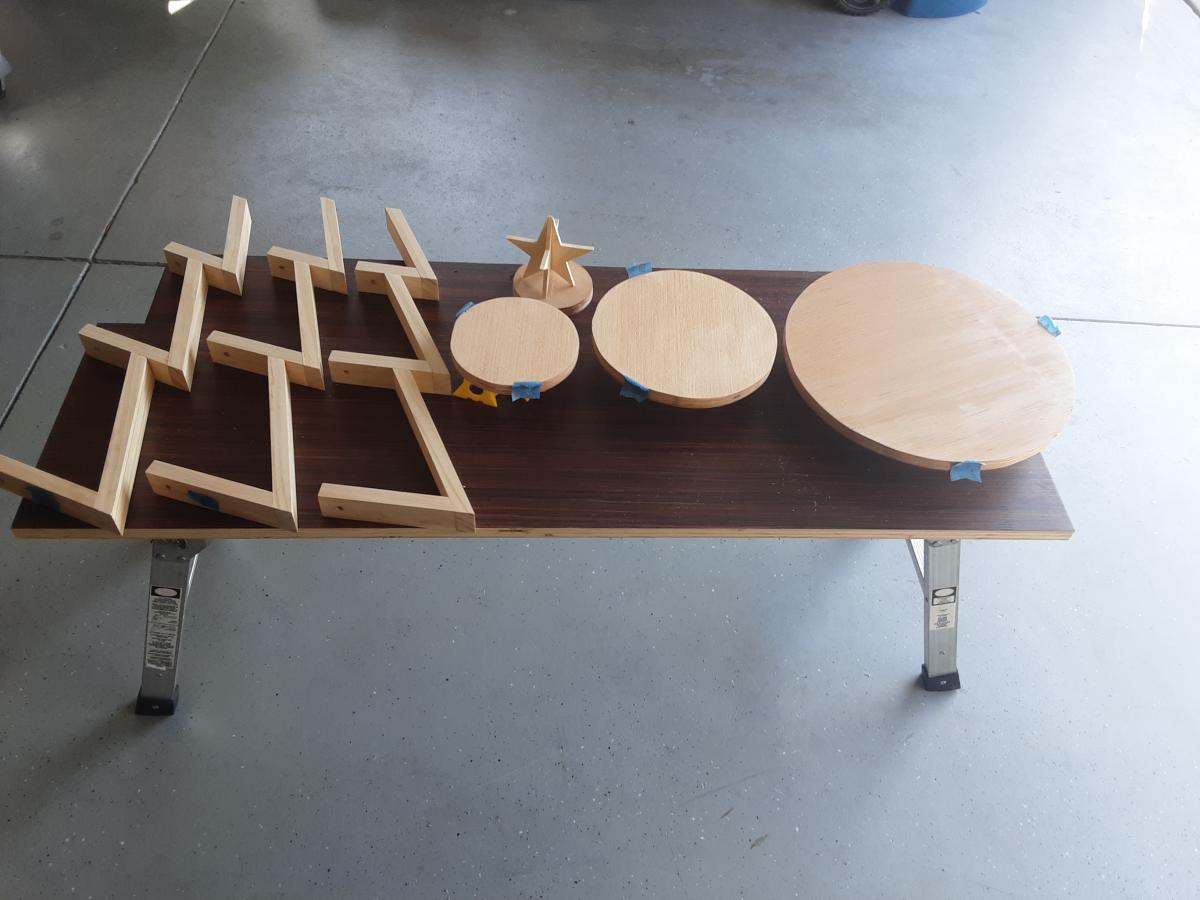
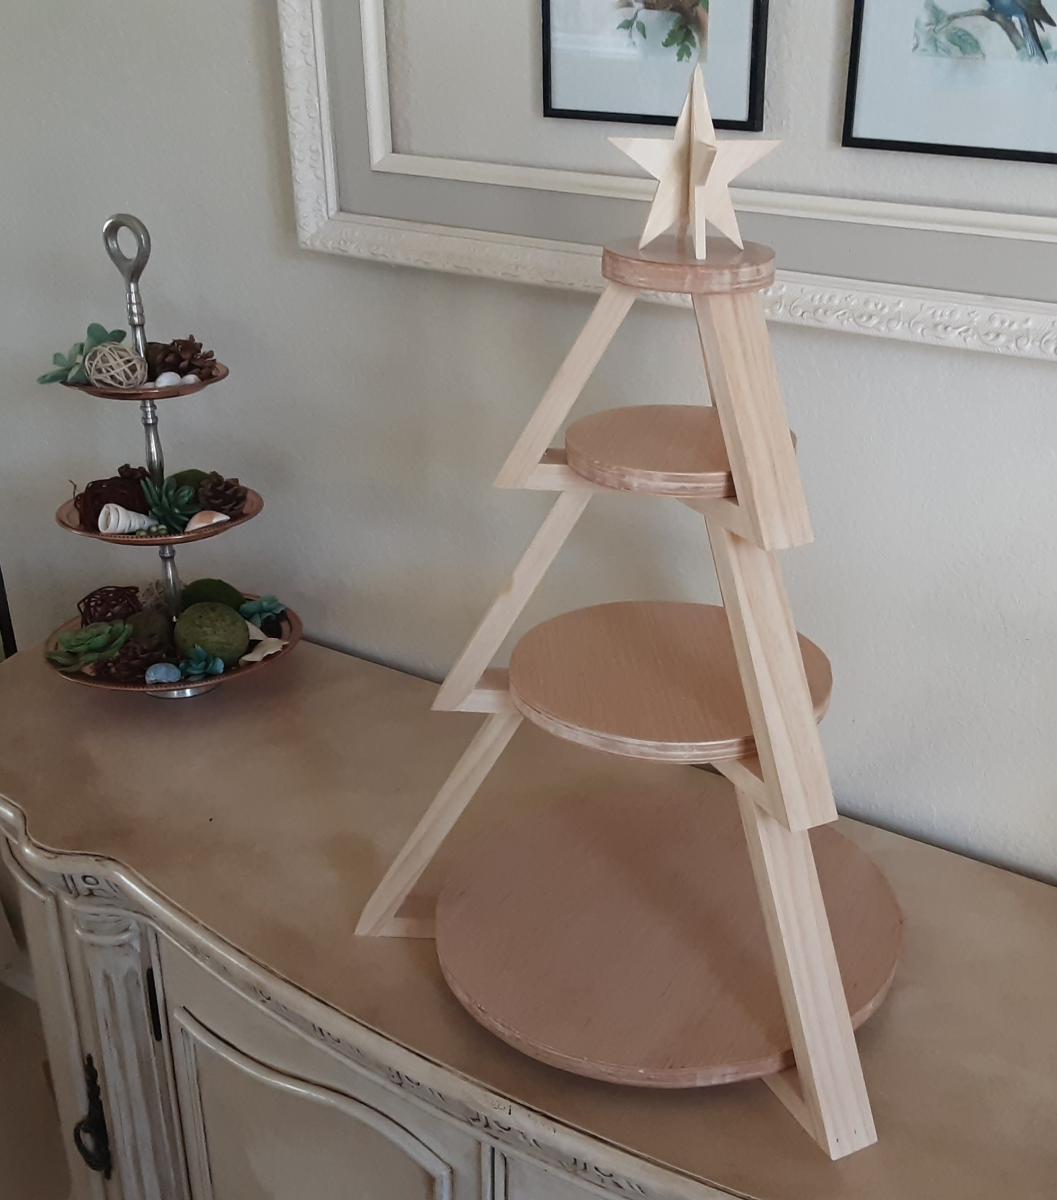
Christmas 3-tier cookie stand

Inspired by Shara of Woodshop Diaries, created this 3 tier tray for displaying cookies for Santa. Added a 3 dimensional star as the topper and simply followed the excellent photos and schematics on Shara's website.
Estimated Cost
$5
Estimated Time Investment
Afternoon Project (3-6 Hours)
Finish Used
Minwax paste wax
Recommended Skill Level
Beginner
Comments
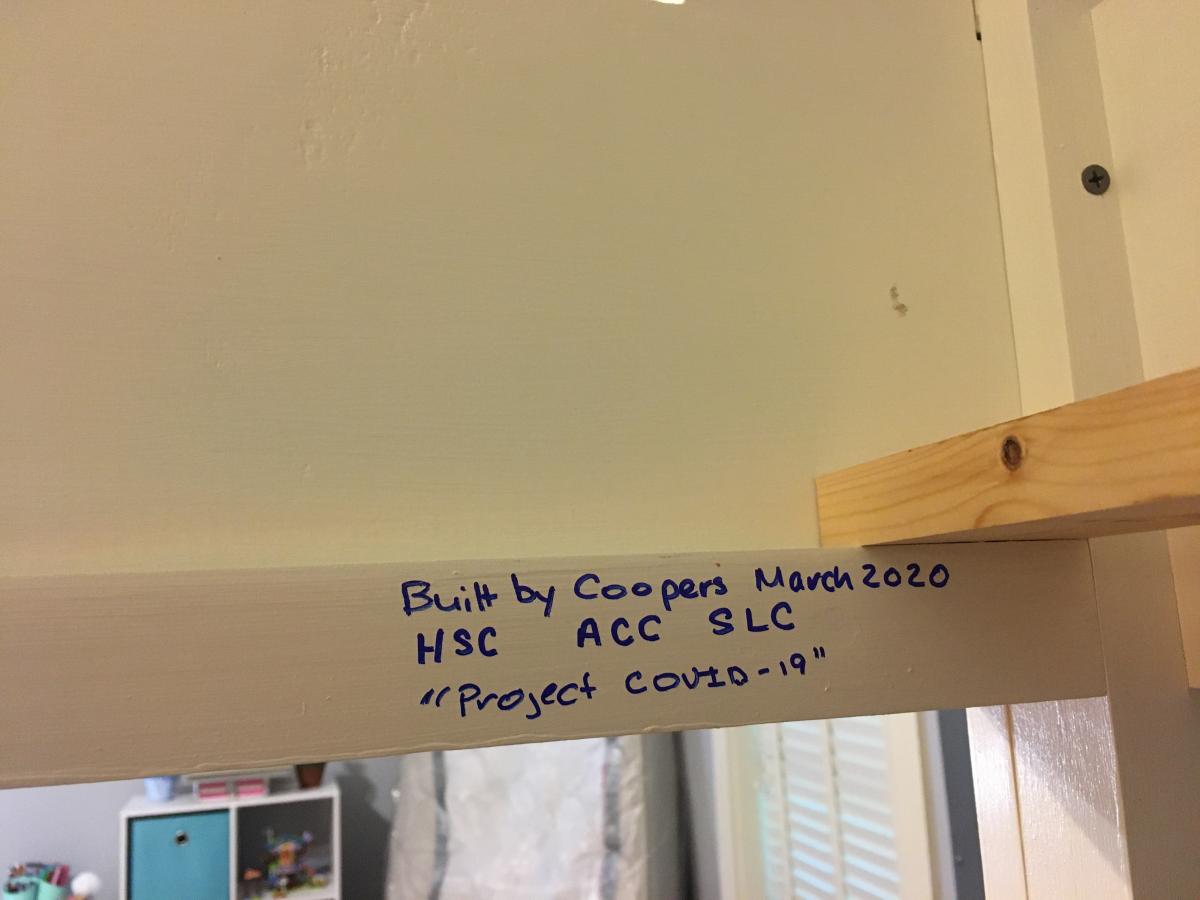
Loft bed
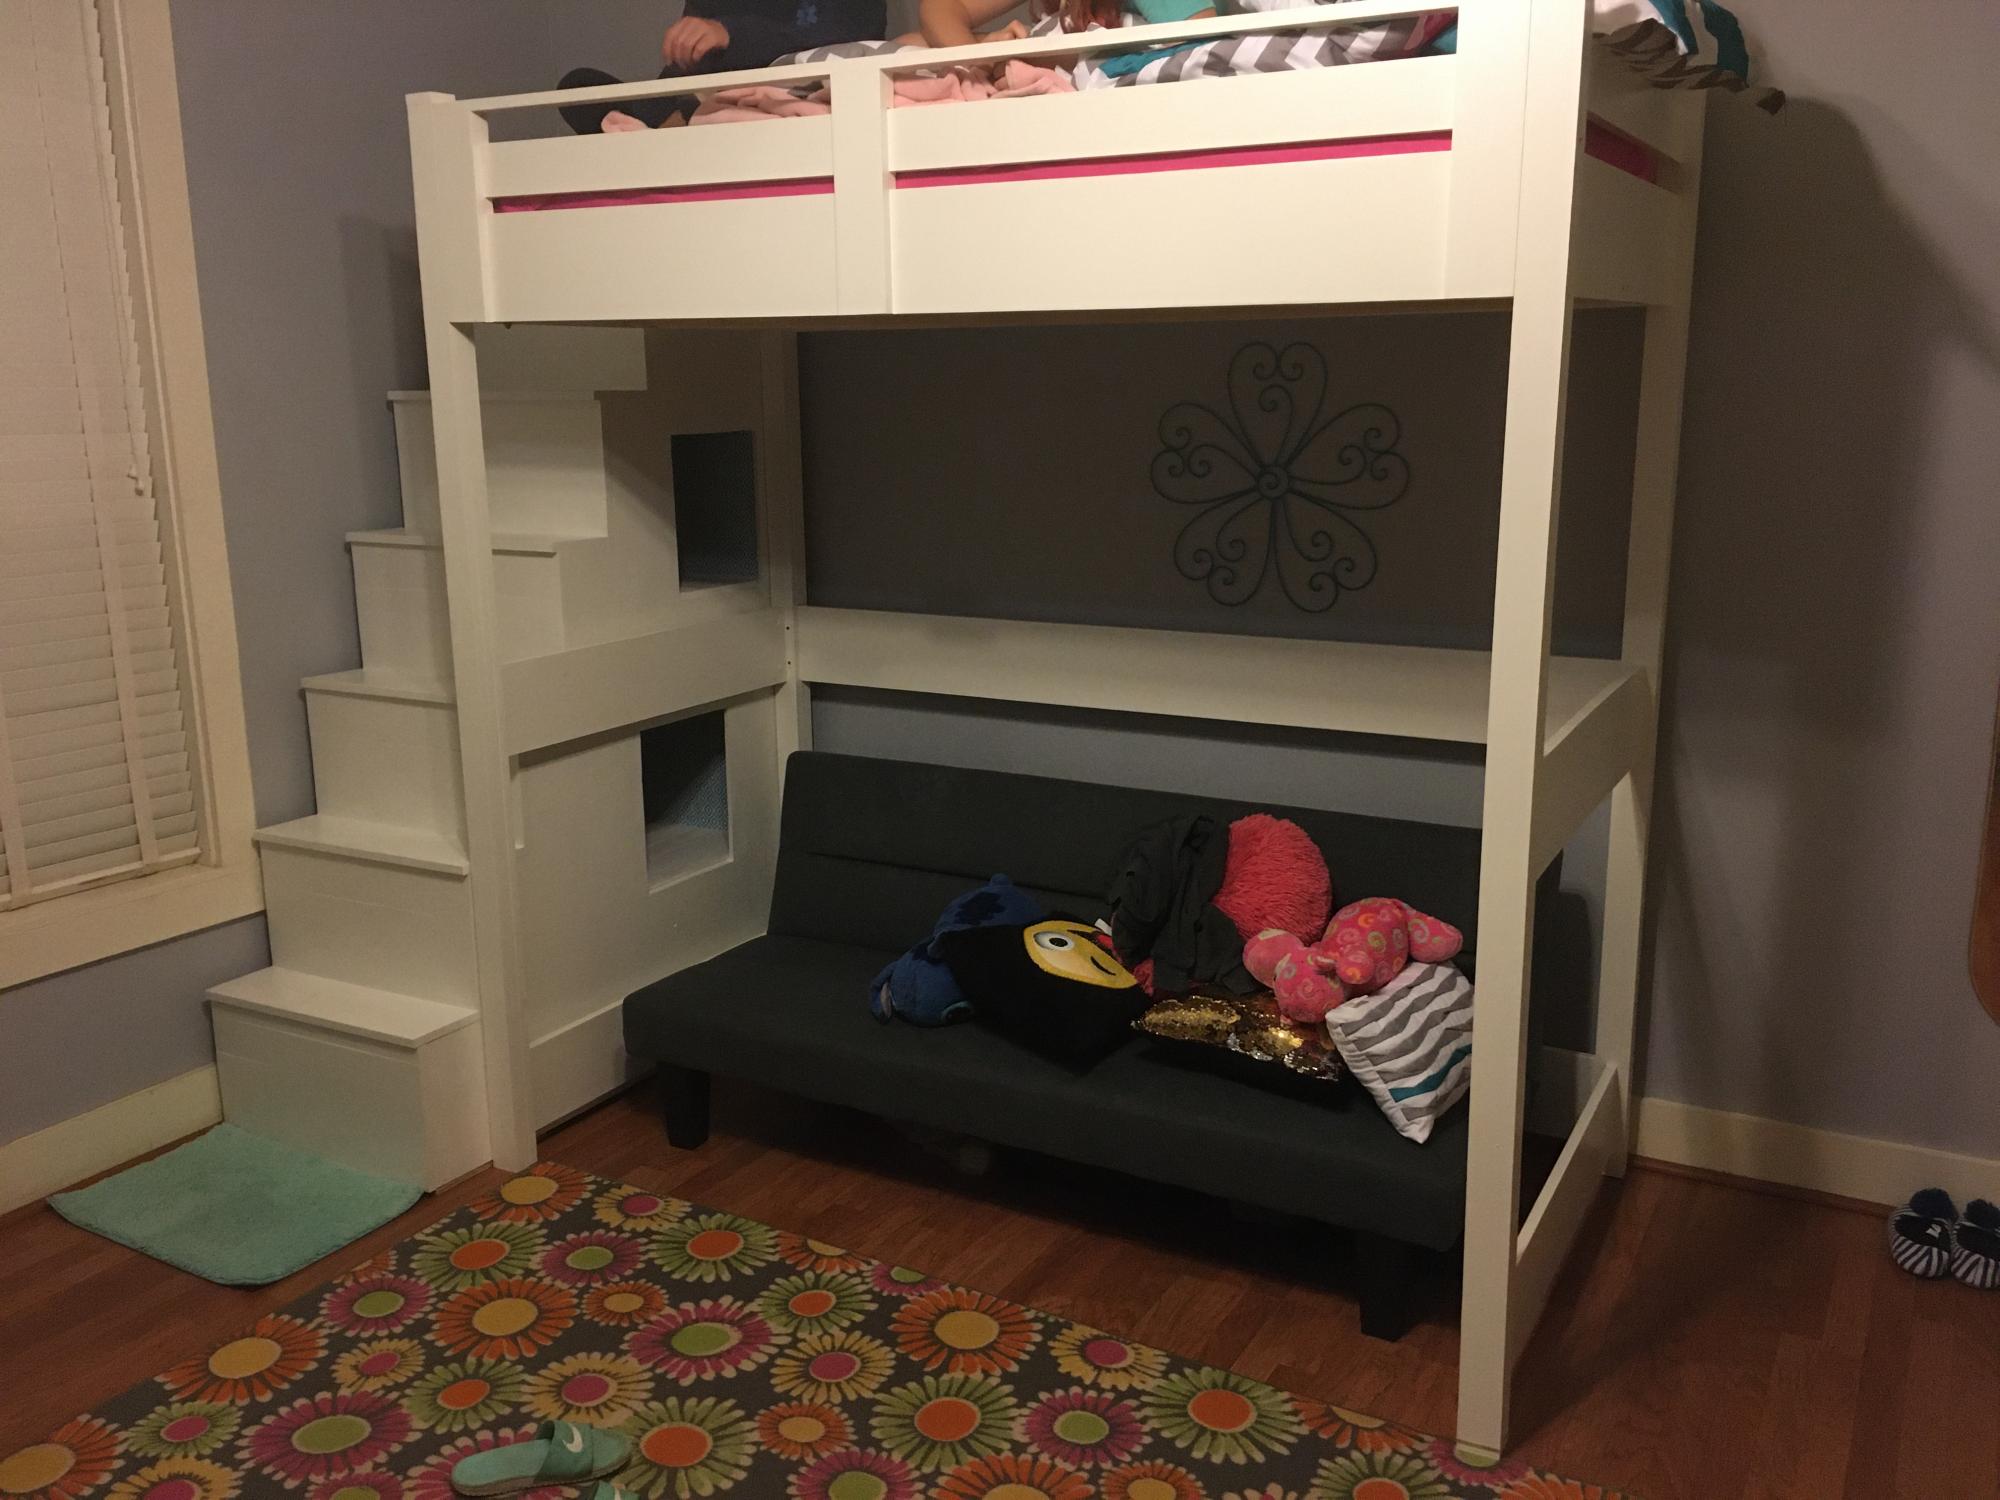
My daughter had been asking for a loft bed that she could place a futon under. This plan was exactly what I needed! I made the bed taller so she would be able to stand under it (we have 10’ ceilings - old house). And, I replaced the ladder with a staircase with built-in cubbies.
This was our first project of 2020 and we started it during the first part of the quarantine, so it got named “Project COVID-19.”
Built from Plan(s)
Estimated Cost
$200
Estimated Time Investment
Week Long Project (20 Hours or More)
Finish Used
White latex paint
Recommended Skill Level
Intermediate
Comments
Sat, 01/09/2021 - 09:49
Great job!
Great mods making it higher and the stairs look great too! Thanks for sharing:)