Community Brag Posts
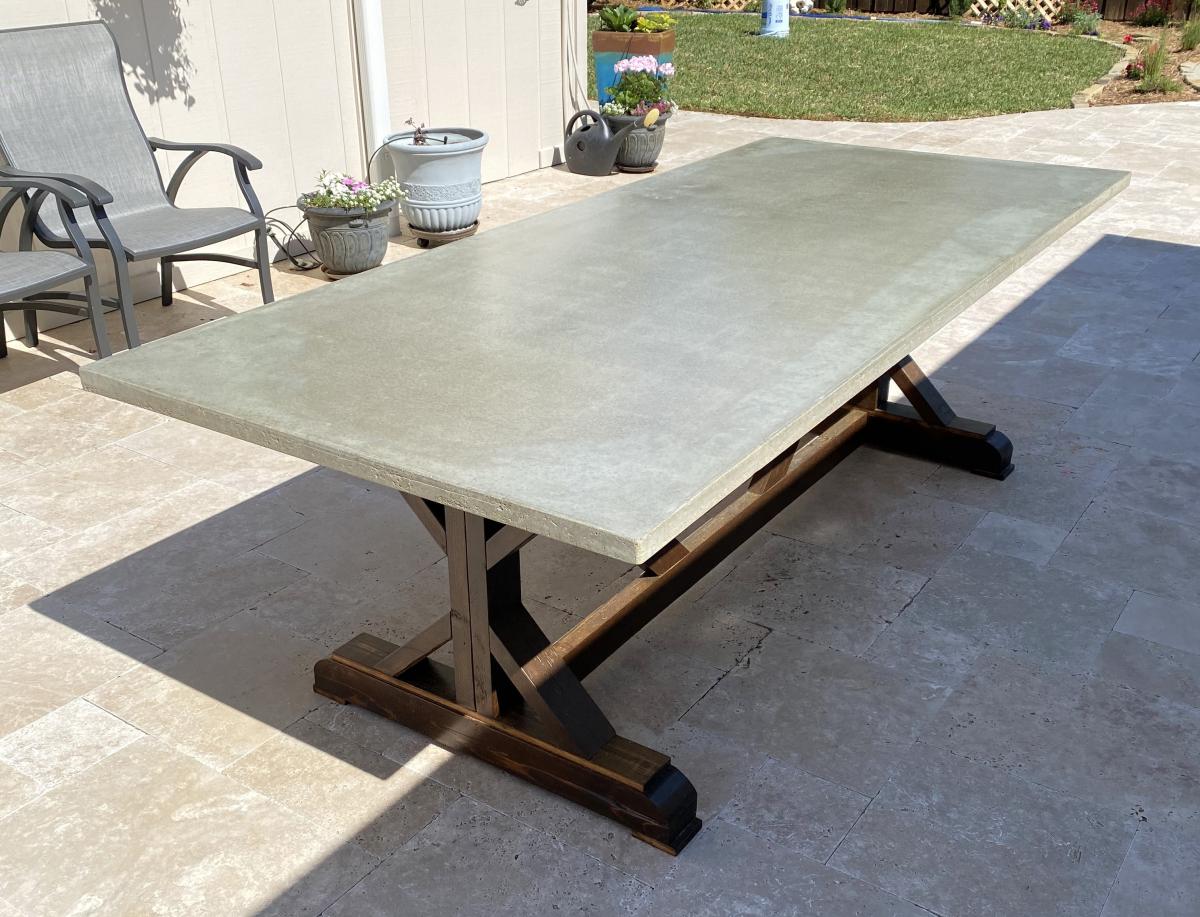
Outdoor Table with Concrete Top
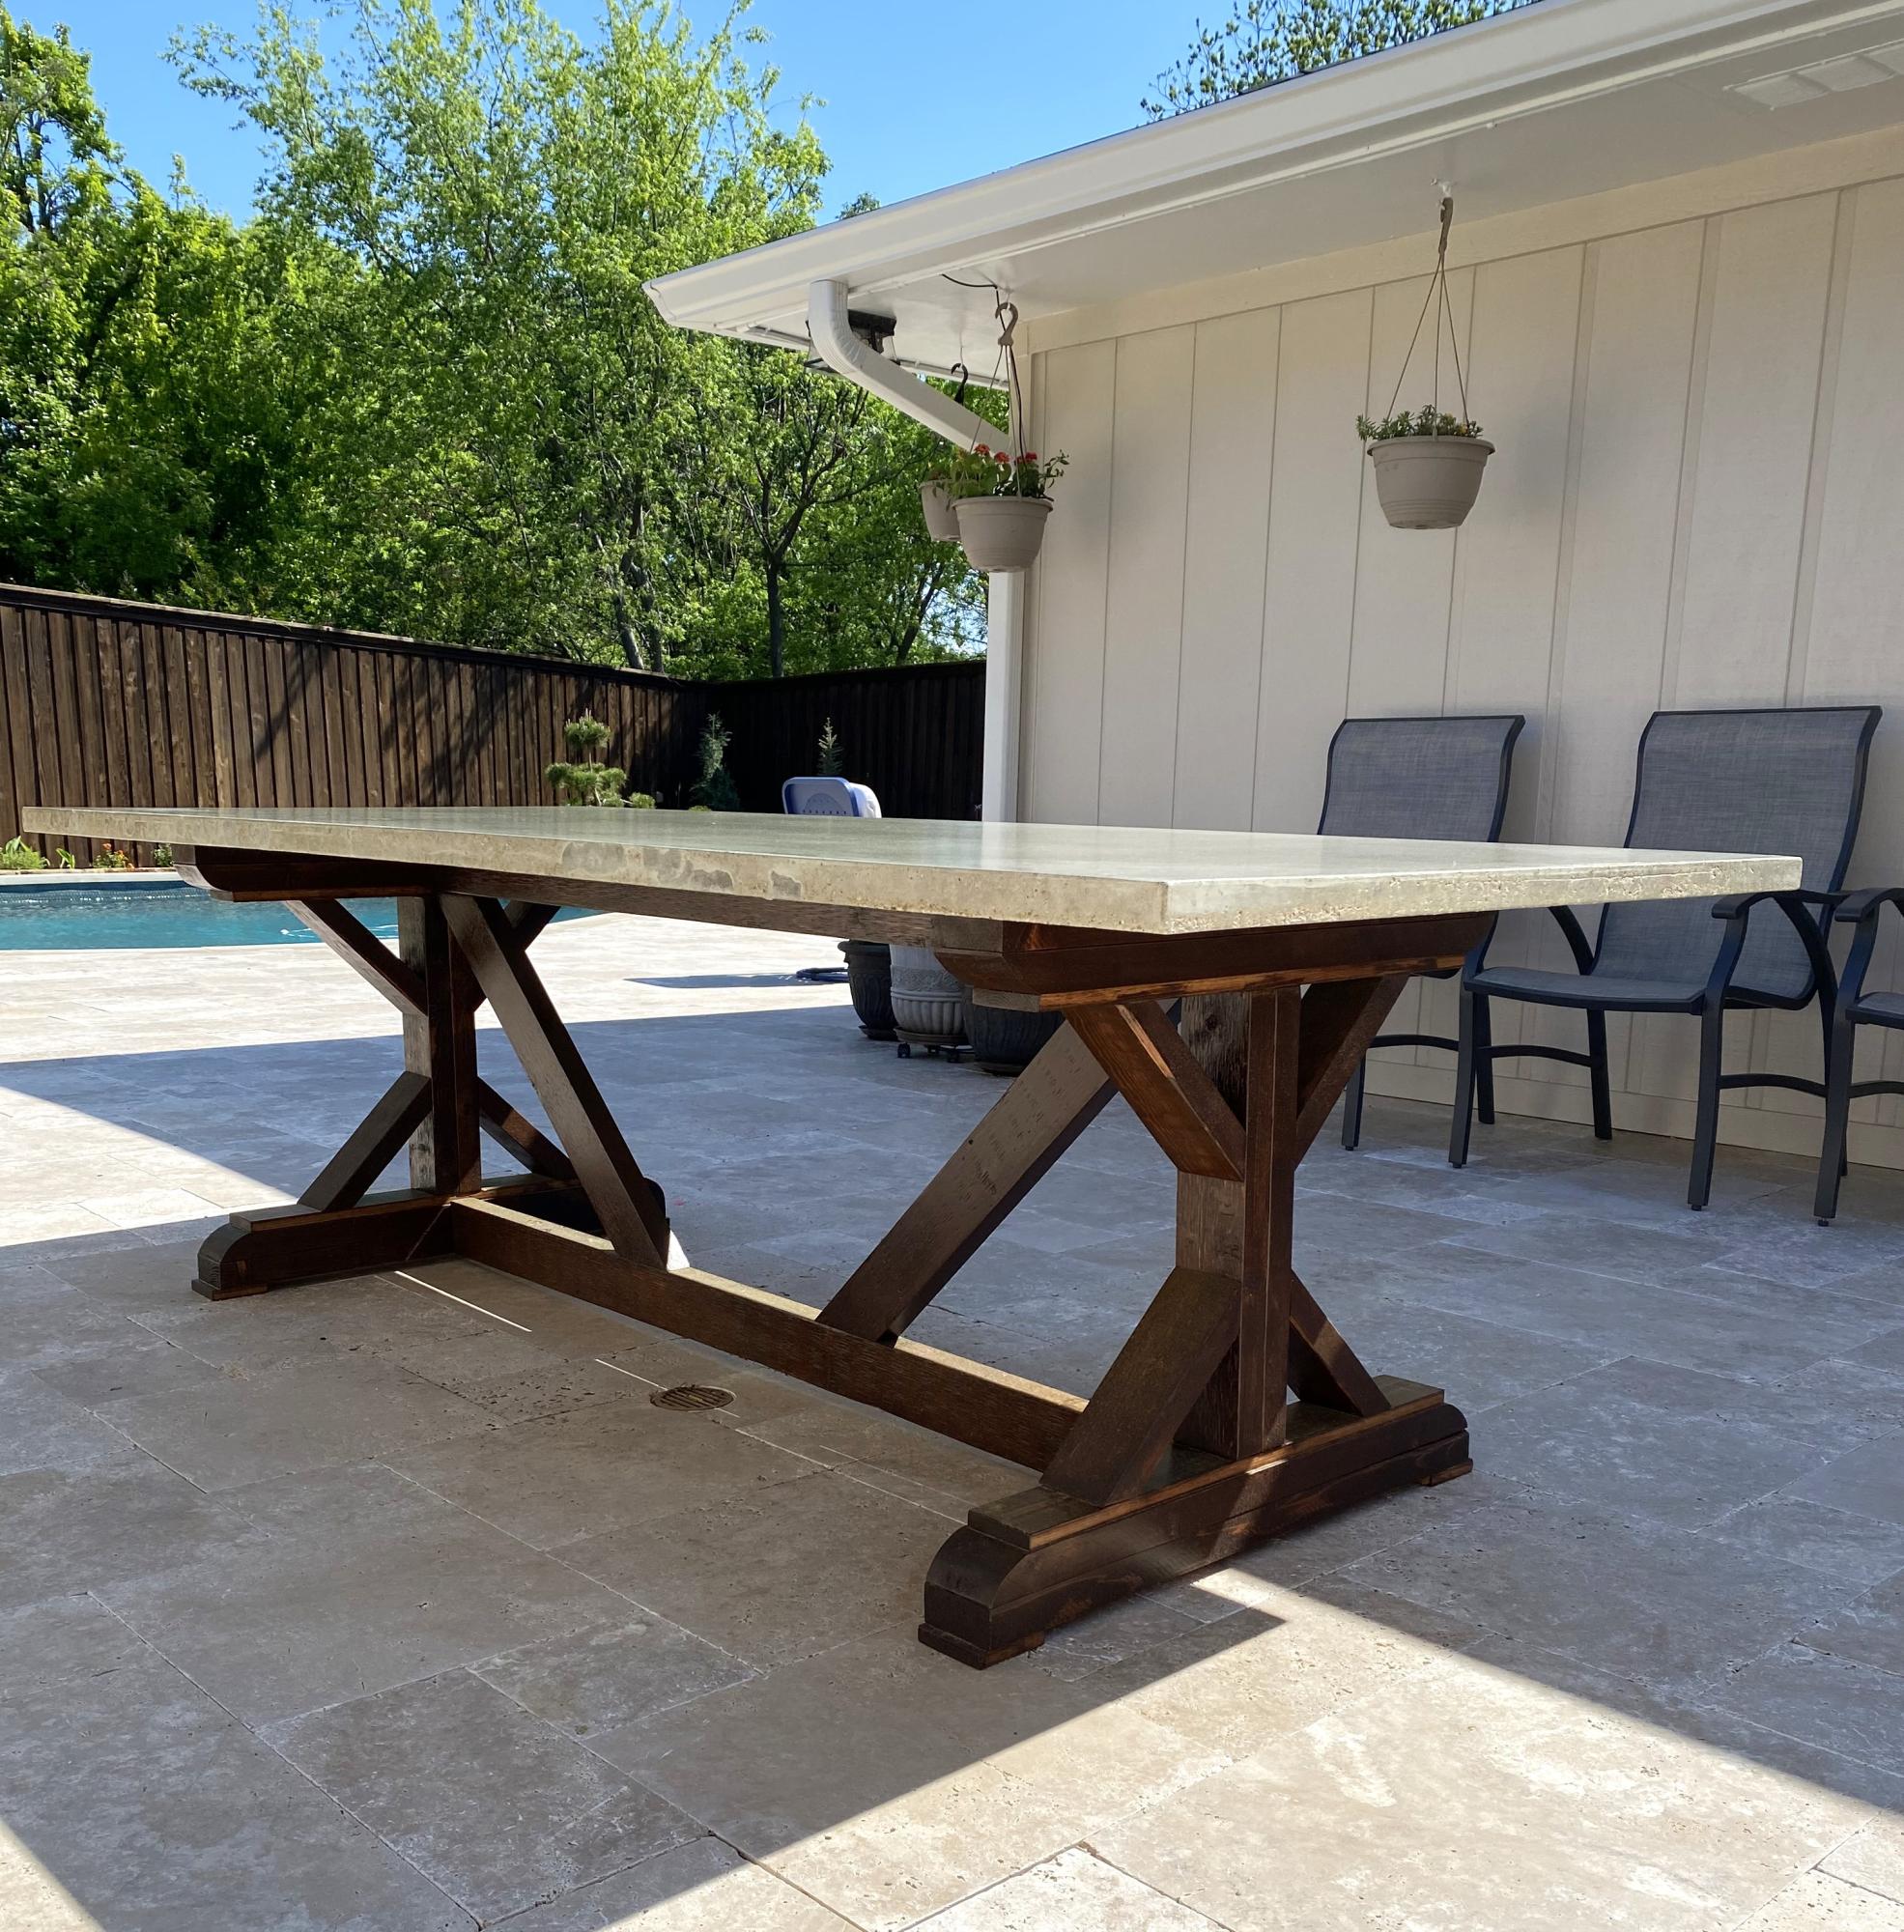
Fancy X Farmhouse Table in stained cedar with concrete table top. Concrete top made using 4’x8’ melamine coated MDF boards for form, reinforced with welded wire fabric, standard Quikrete concrete mix.
MDeMotte
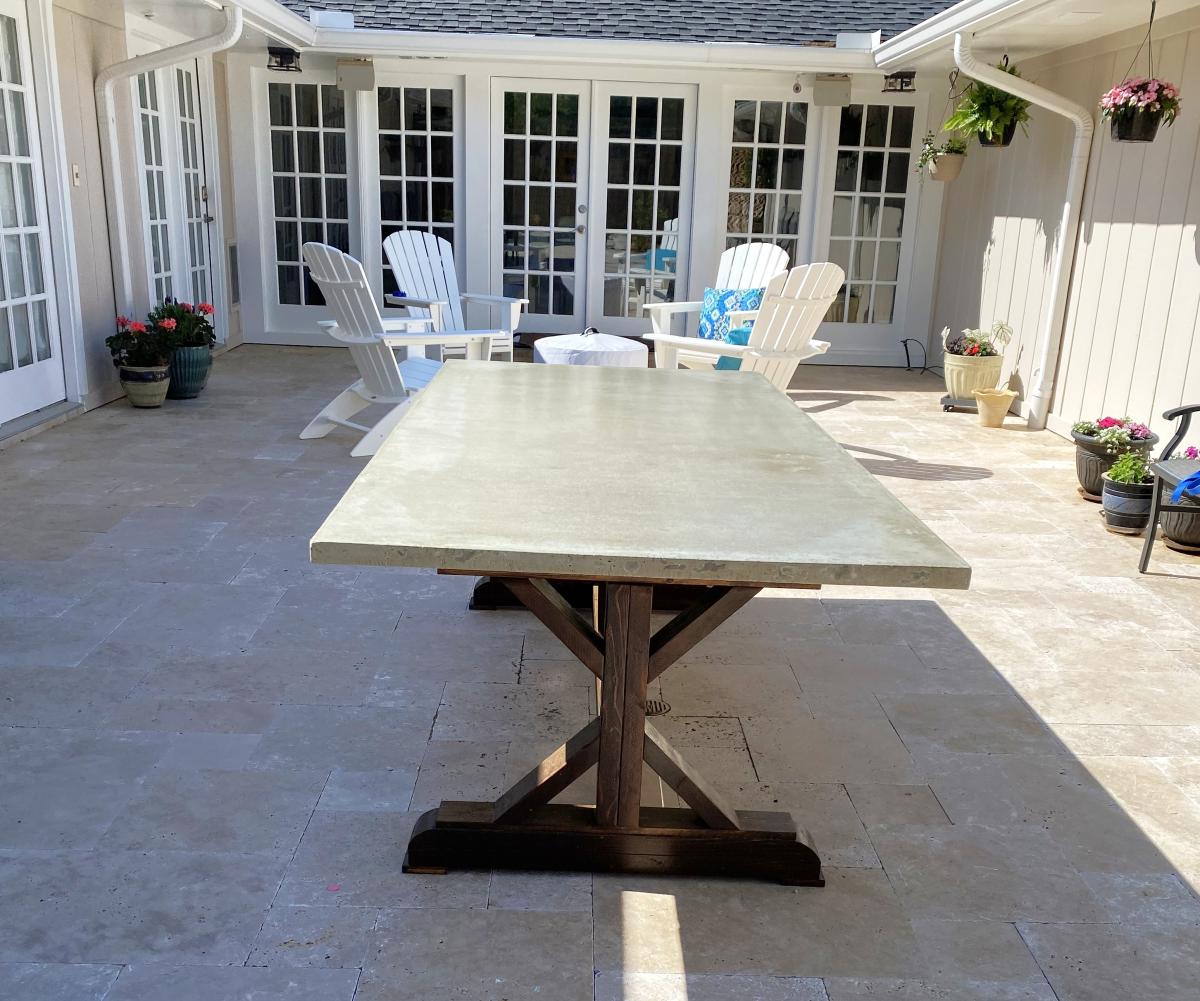
Built from Plan(s)
Essential Bed with Super Simple Nightstands
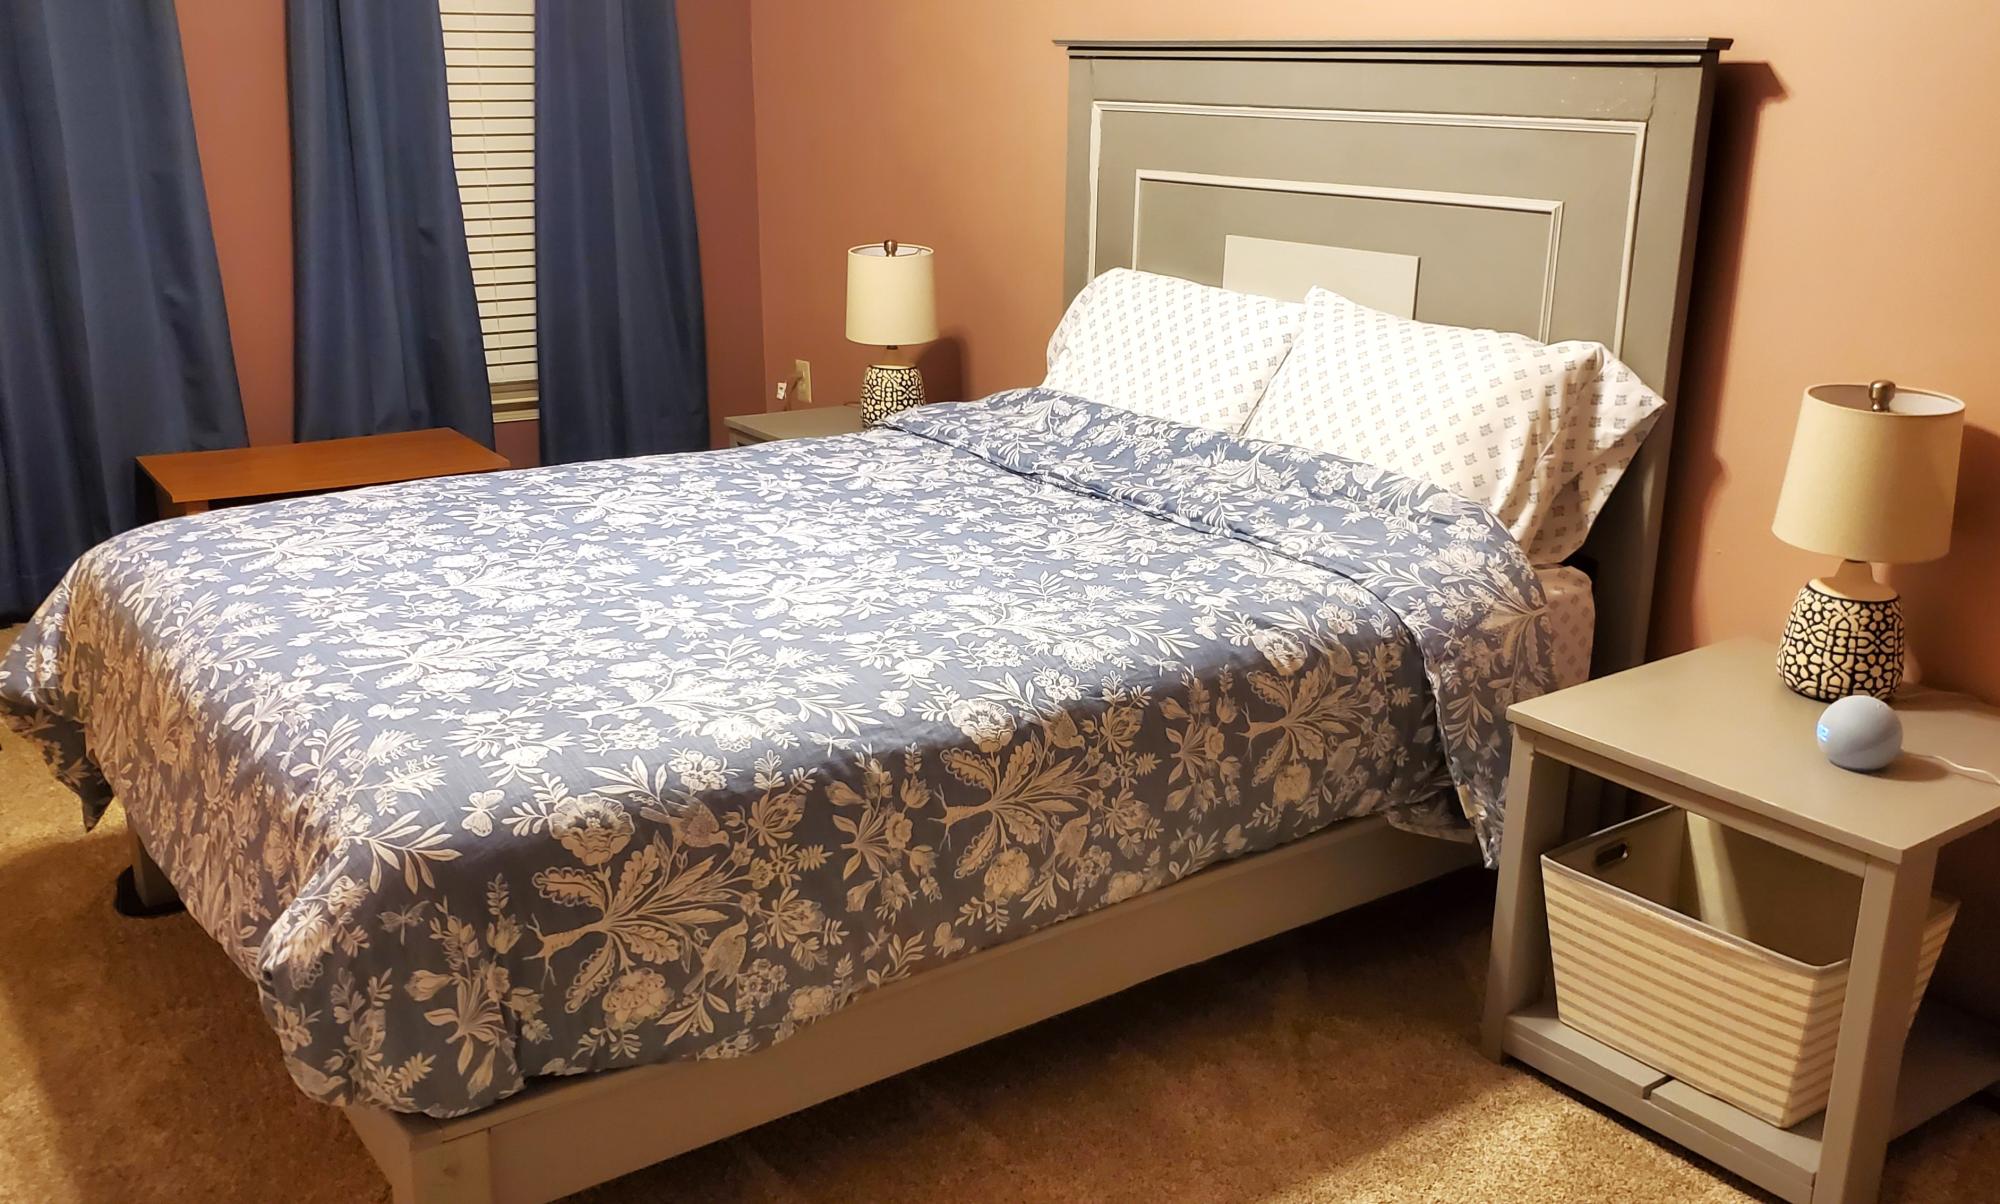
Essential bed frame with headboard customized from various Ana's bed plans. Side table nightstand from Ana's plans - easy and simple build. Great thanks to Ana and Jen for all they do.
Kentwood Bookshelf

This was one of my first bigger builds. I am so happy with the way it turned out!
Built from Plan(s)
Estimated Time Investment
Day Project (6-9 Hours)
Finish Used
Golden Oak. I applied the stain with a foam brush and wiped off excess after about five minutes.
Recommended Skill Level
Beginner
Comments

Thu, 05/10/2012 - 10:32
So stunning! It's gorgeous!
So stunning! It's gorgeous! I just love the wood!
Thu, 05/19/2016 - 19:05
THIS BOOKCASE IS MAGNIFICENT !
This bookcase wouldn't be out of place amongst the Pottery Barn's bookcases. In fact, it inspired me to go out this afternoon and buy some cedar boards so I can start building my own version first thing tomorrow. Thank you, Becky.
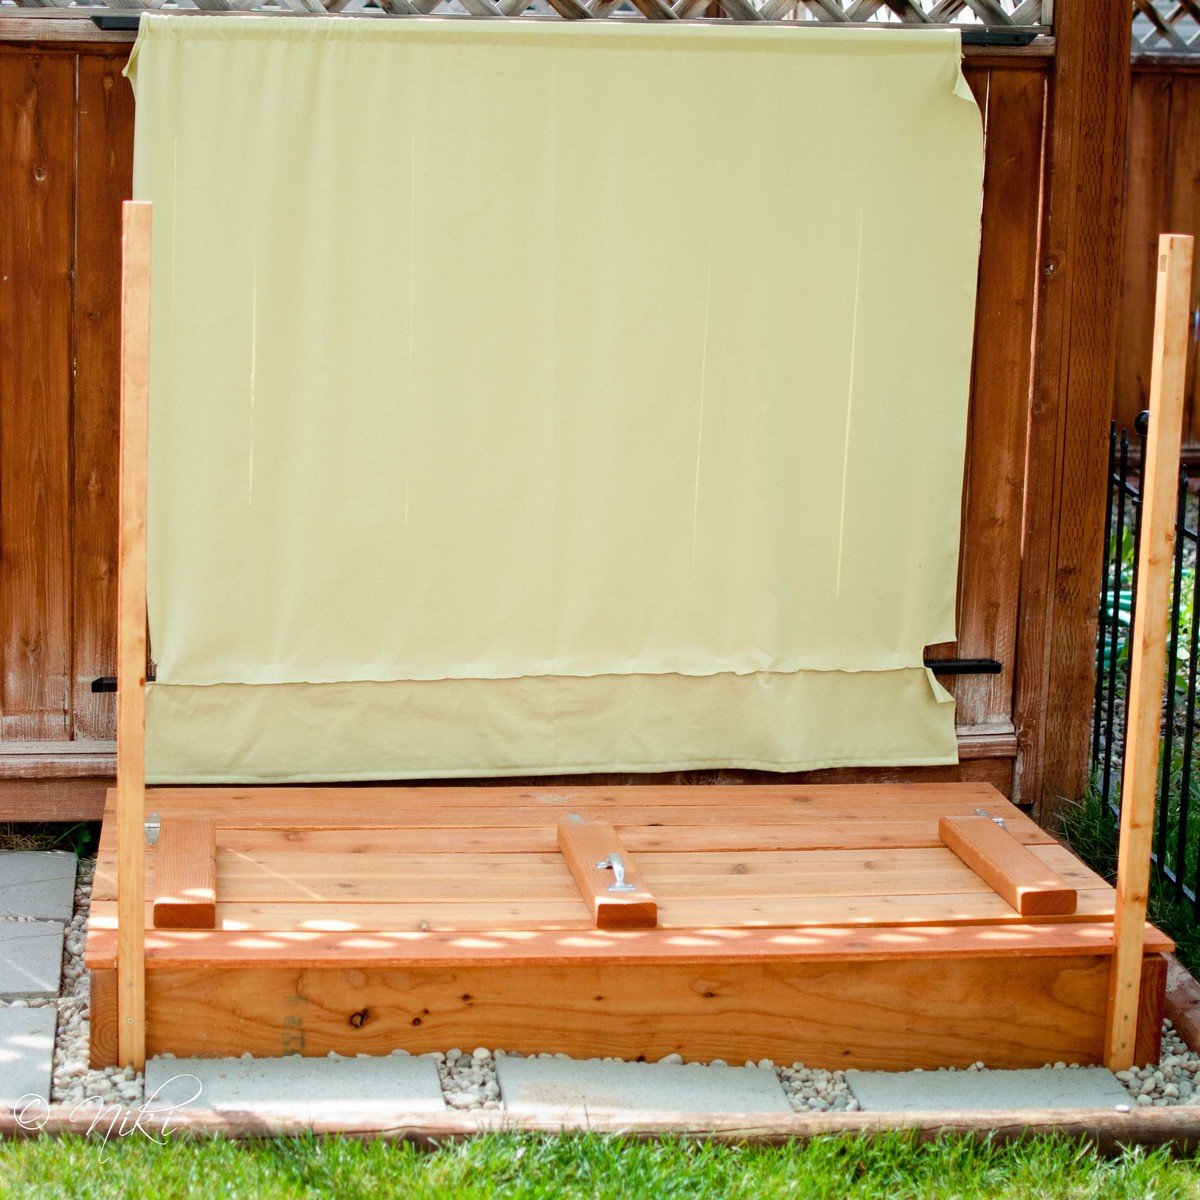
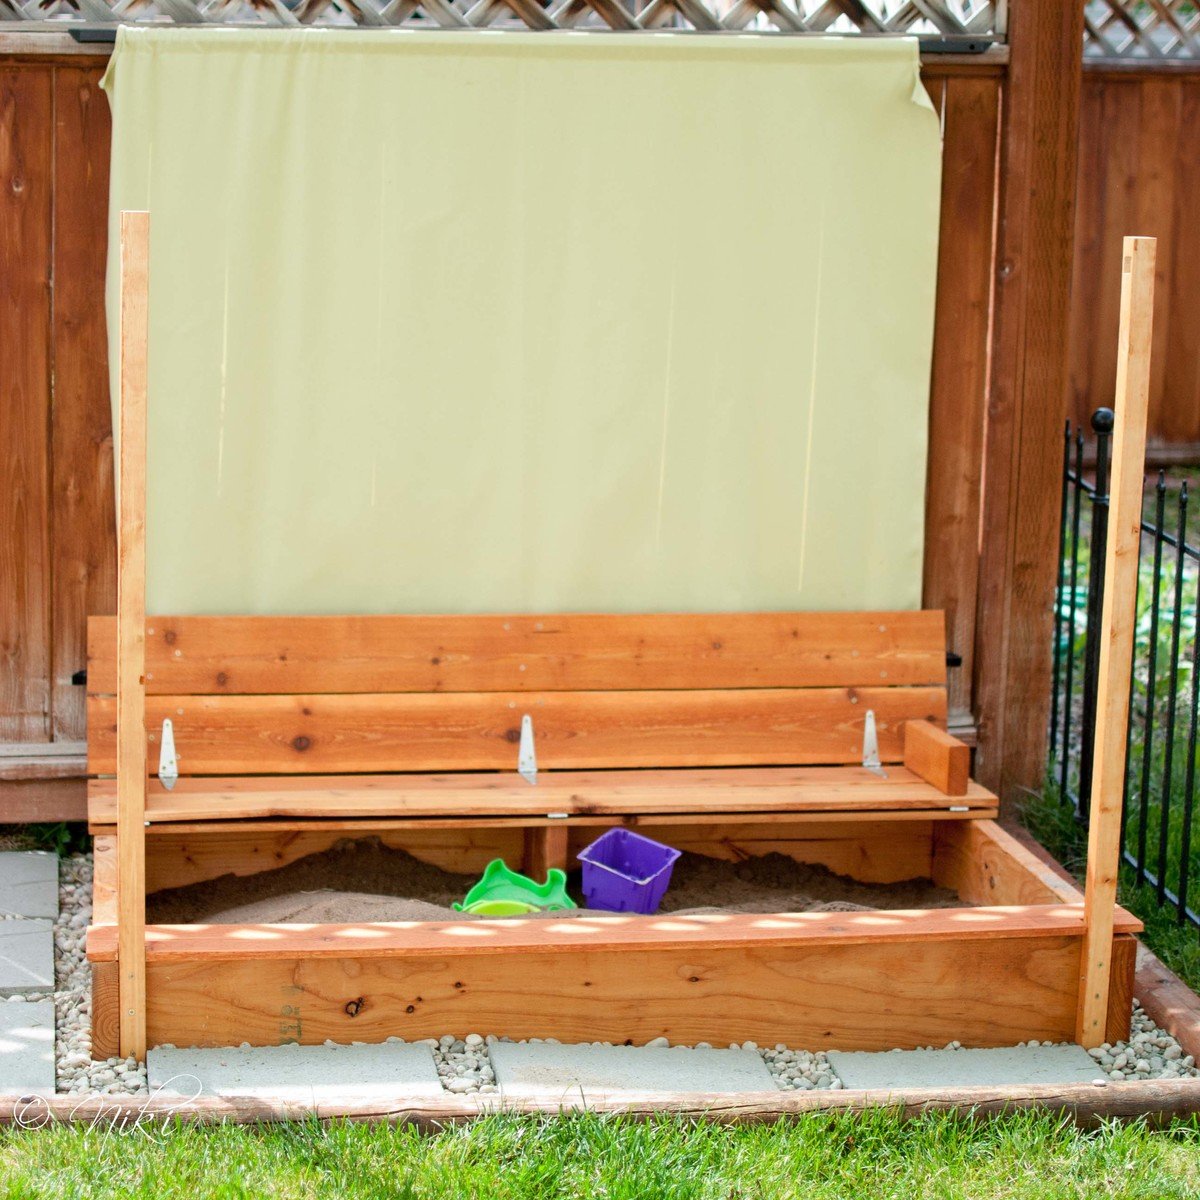
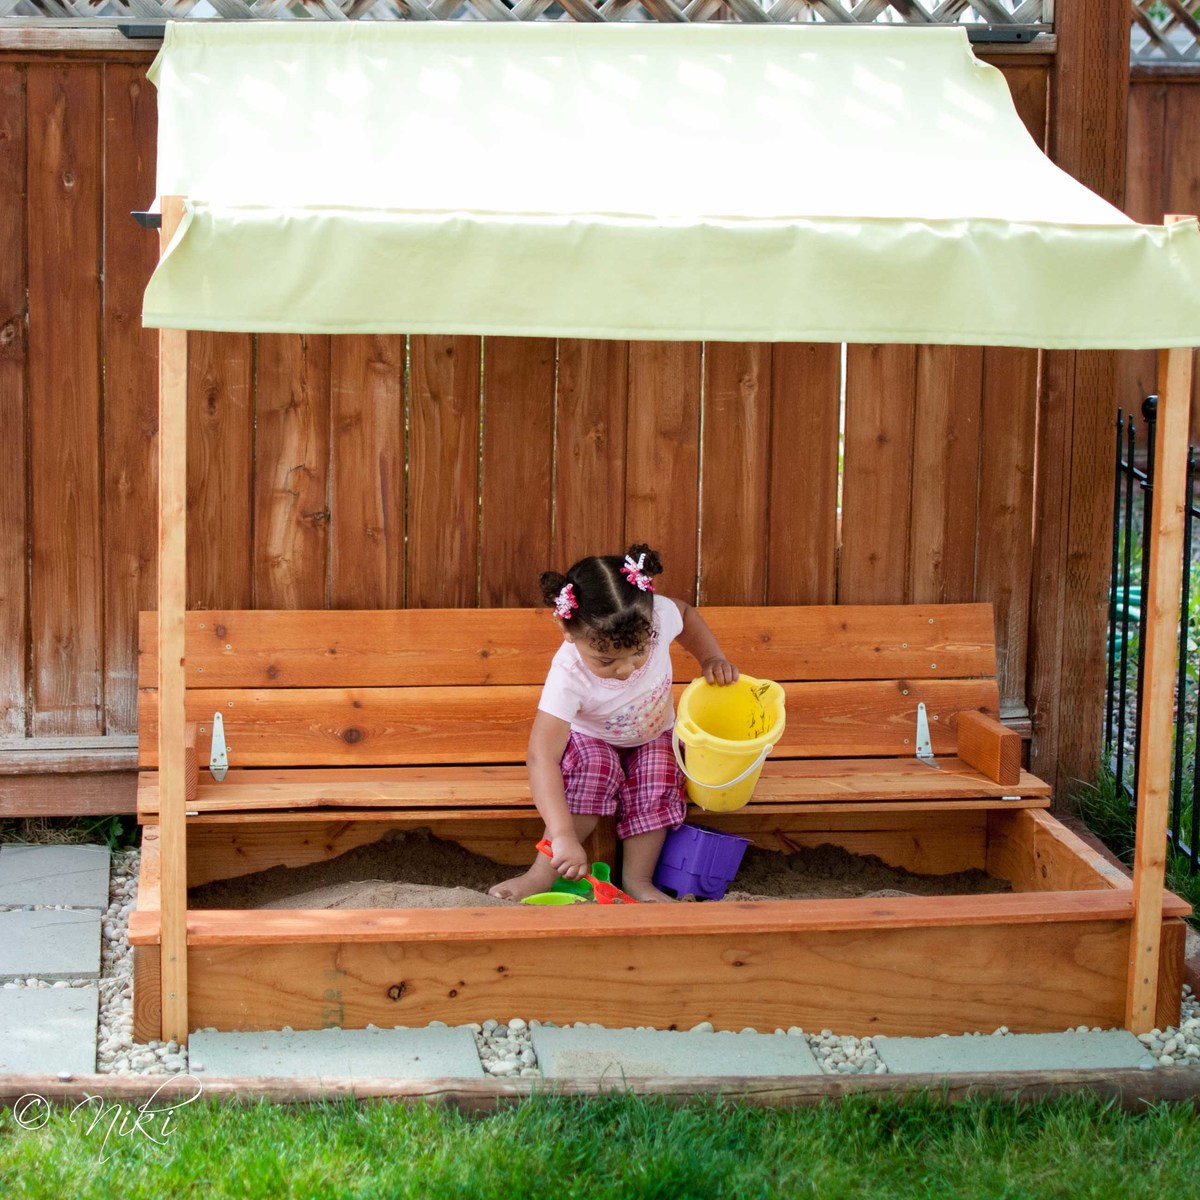
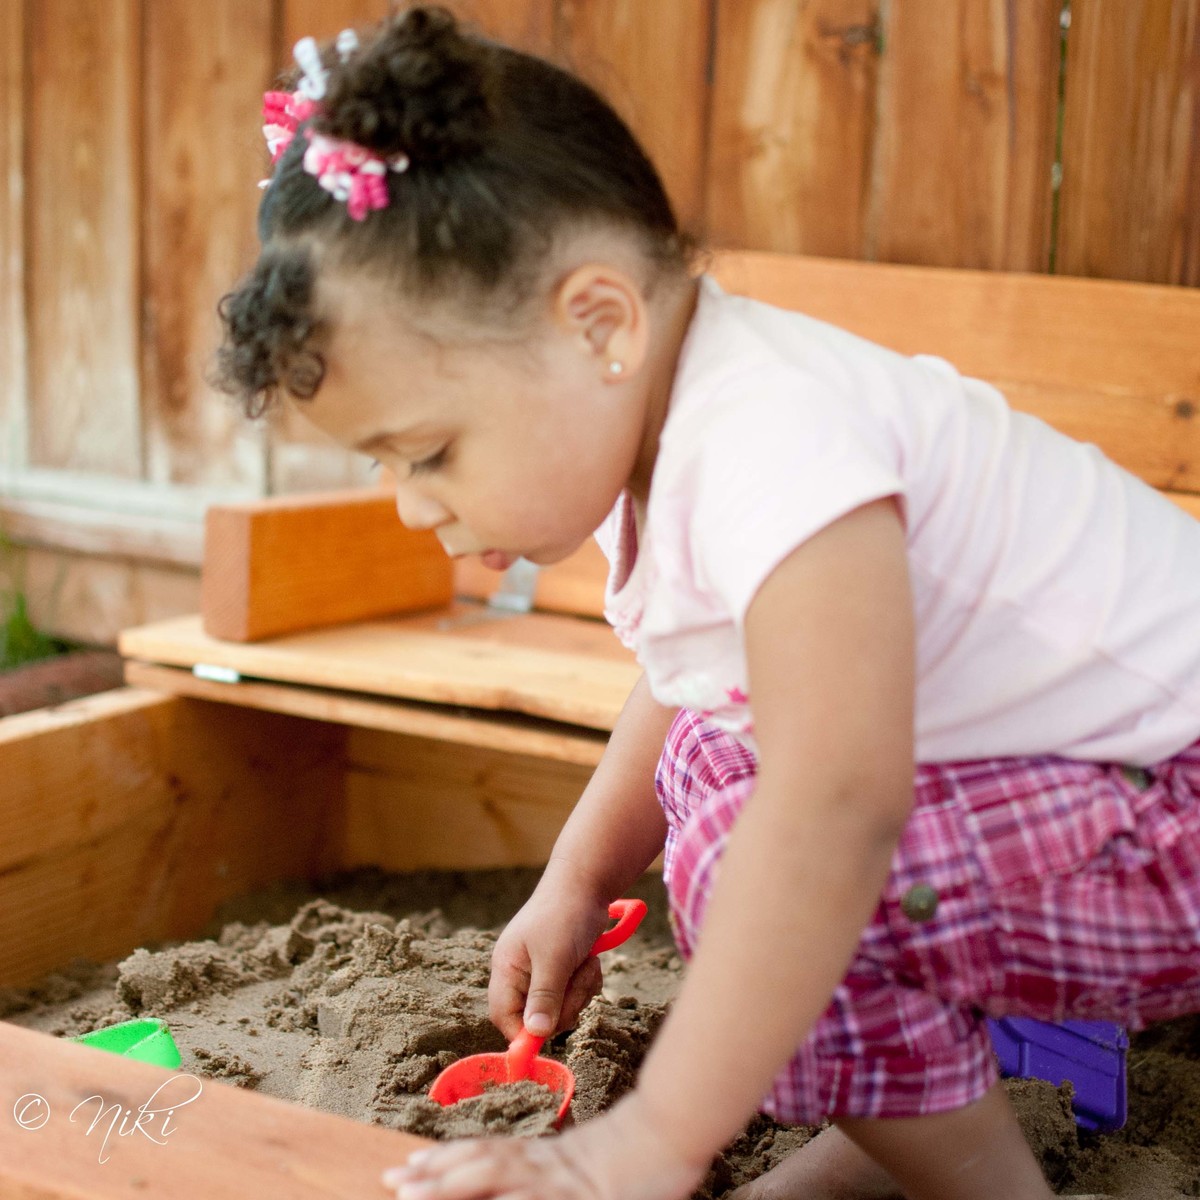
Modified Sandbox with built in seat
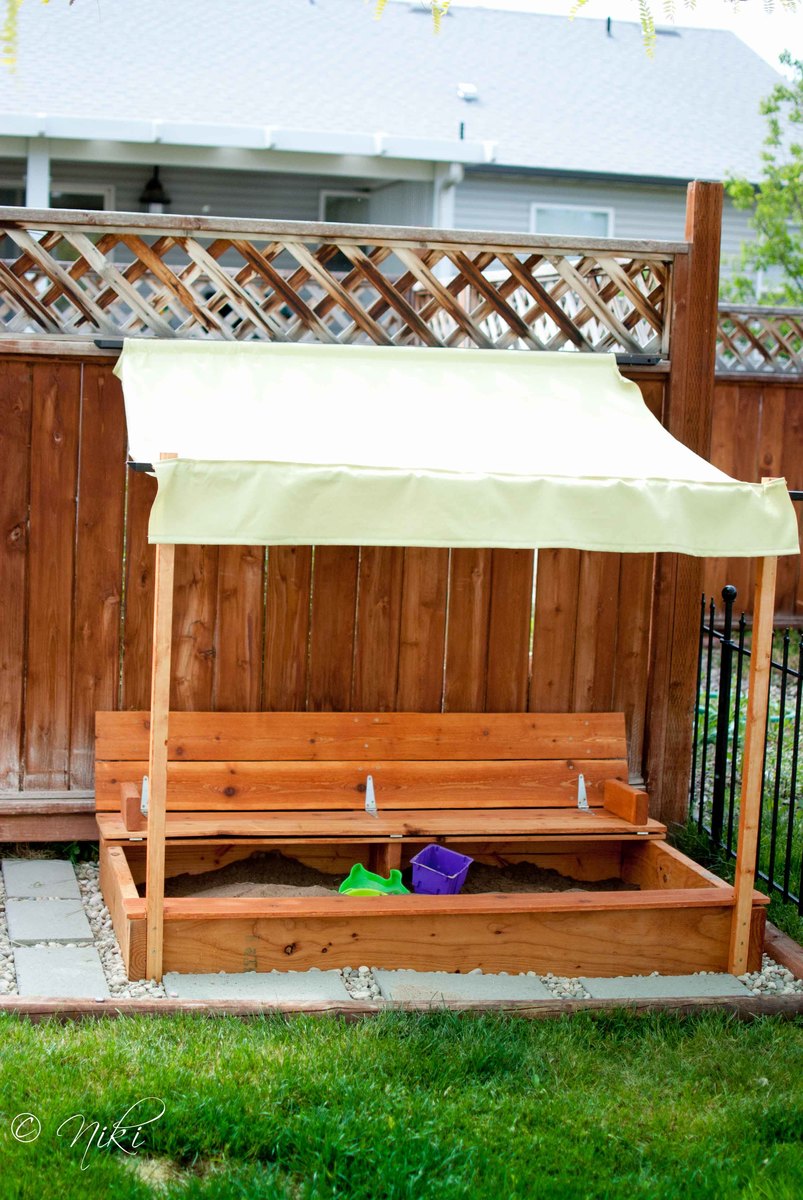
"Cellar? What cellar? We don't have a cellar... Oh, you mean the new sand box! Here, let me get some shade too."
I'm not sure why, but I can never seem to follow plans exactly. I guess that's not entirely true. I CAN follow plans exactly, but I almost never do. Maybe it's some sort of passive rebellion or something, but I usually have to put my own spin on the things that I build. Sometimes it works out in my favor. Sometimes not. This build was a little of both.
I decided to only build one bench in our sand box. This cut down on a lot of supplies. By making it longer a single bench and making it longer, it covers about the same amount of square feet, just in a rectangle instead of a square. When pricing lumber, I noticed that 2x8's were cheaper than 1x8's. So I went with those instead. It can't hurt to beef up the sides a little, right? This required some easy calculations on the cut list. I also decided to use 1x6 fence planks instead of 1x4 whitewood or pine. The fence planks were cheap, and I figured they would look nice in the back yard. They are also naturally pest and rot resistant. They required extra sanding to take the rough off. However, this is one place that I'm thinking the modification didn't work in my favor. The fence planks are not as thick as the whitewood. This combined with the increased length makes the the top pieces feel pretty weak. I put a little support piece under the bench. I'm quite sure the bench would not have held up well without the support.
Because this is an outdoor piece, I dry fit everything, and then stained everything before assembling it, to make sure all of the edges were well protected.
Cost breakdown (not including canopy)
Fence planks $14
2x8x8 $11
hinges $9
handle $2
stain $10

Built from Plan(s)
Estimated Cost
About $50
Estimated Time Investment
Day Project (6-9 Hours)
Finish Used
Preserva-wood in Pacific Redwood color (aka the cheapest outdoor stain I could find)
Recommended Skill Level
Beginner
Comments
Thu, 03/07/2013 - 08:49
LOVE your sandbox!!!
I just love the changes you made to this sandbox! Can you tell me what you used for the construction of the canopy? Thanks!
Shed Ramp Build
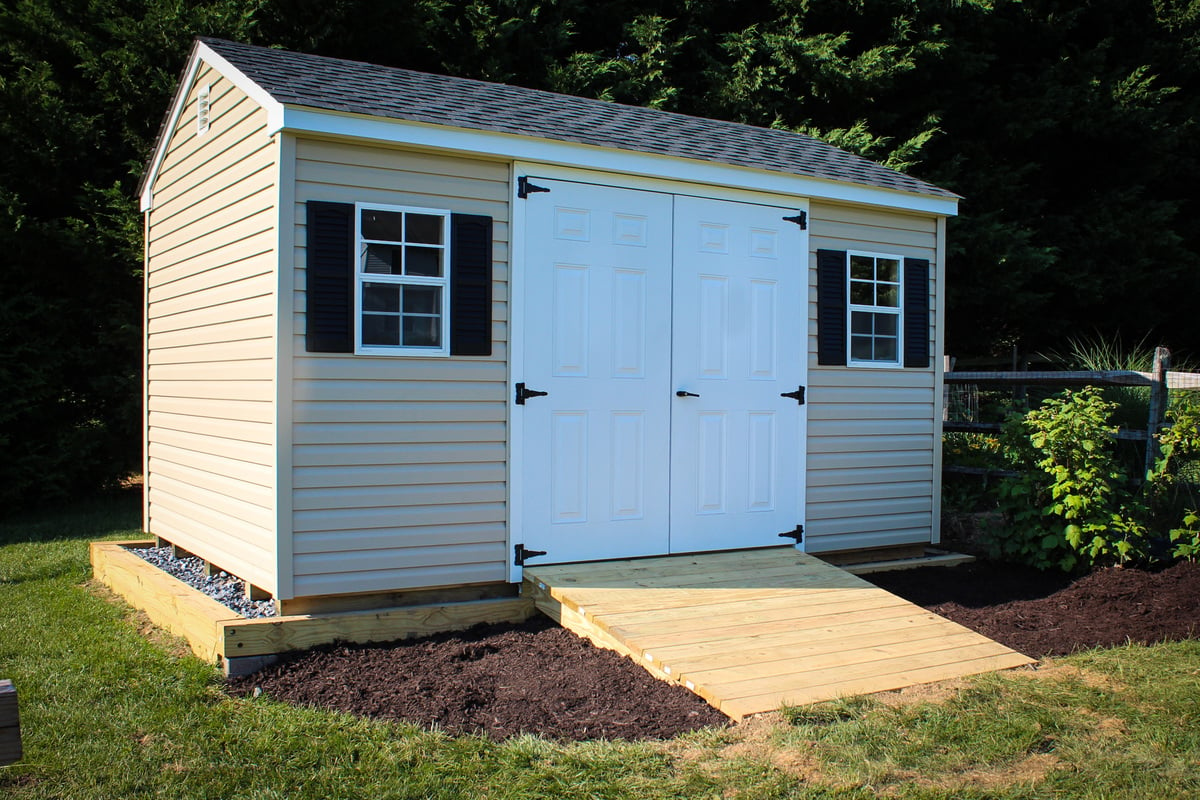
Build Instructions:
http://www.instructables.com/id/Shed-Ramp/
Video:
My garage was starting to get cramped so I decided I needed a shed for the lawn/garden equipment. I thought about building one but bailed and decided to purchase a 10’ x 14’ shed with 6’ wide doors from the nearby Amish community. To not be a total slacker, I decided I could at least build the foundation and ramp. I’ve never built a ramp so I did a little research online and found that there are an abundance of styles, both good and bad. Anyway, this is my attempt at ramp design. Hope someone finds it useful.
Estimated Cost
$100
Estimated Time Investment
Weekend Project (10-20 Hours)
Finish Used
None
Recommended Skill Level
Beginner
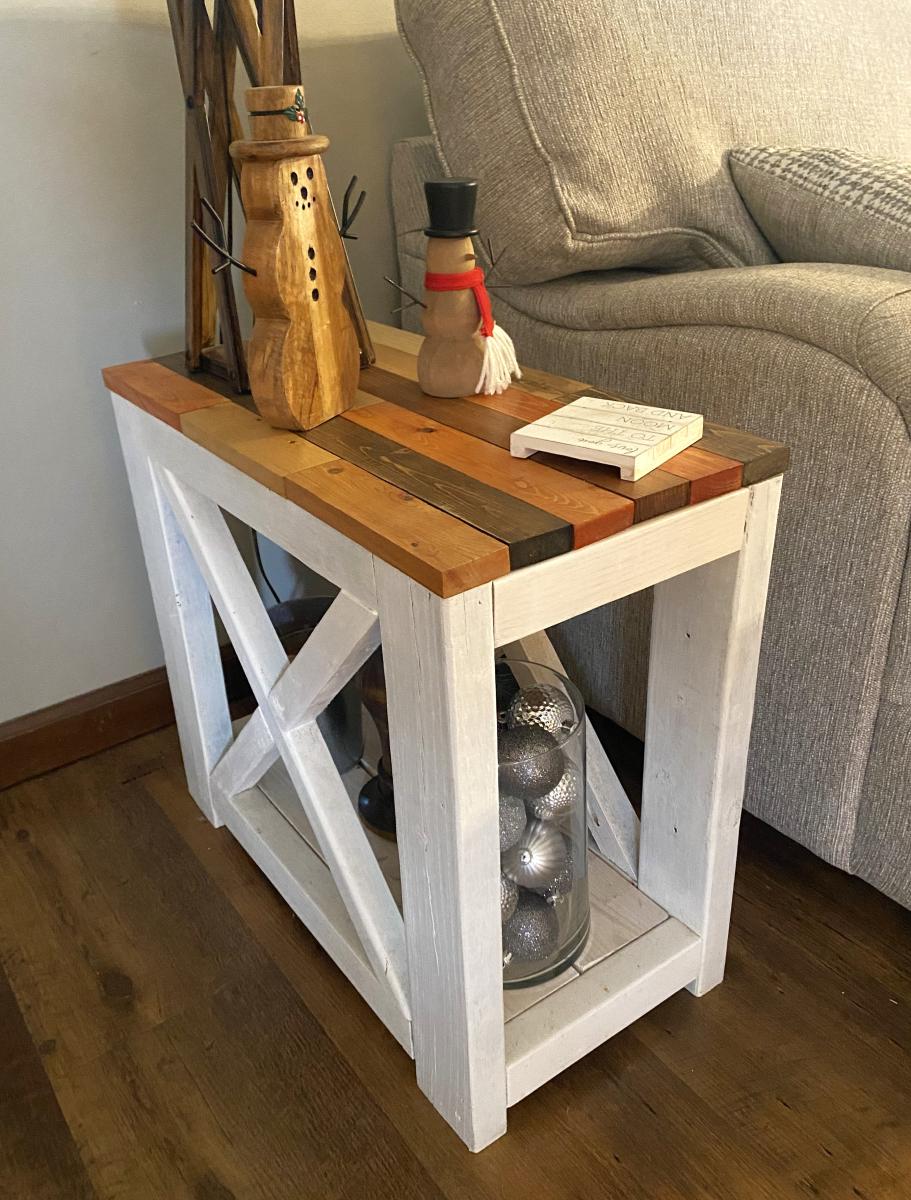
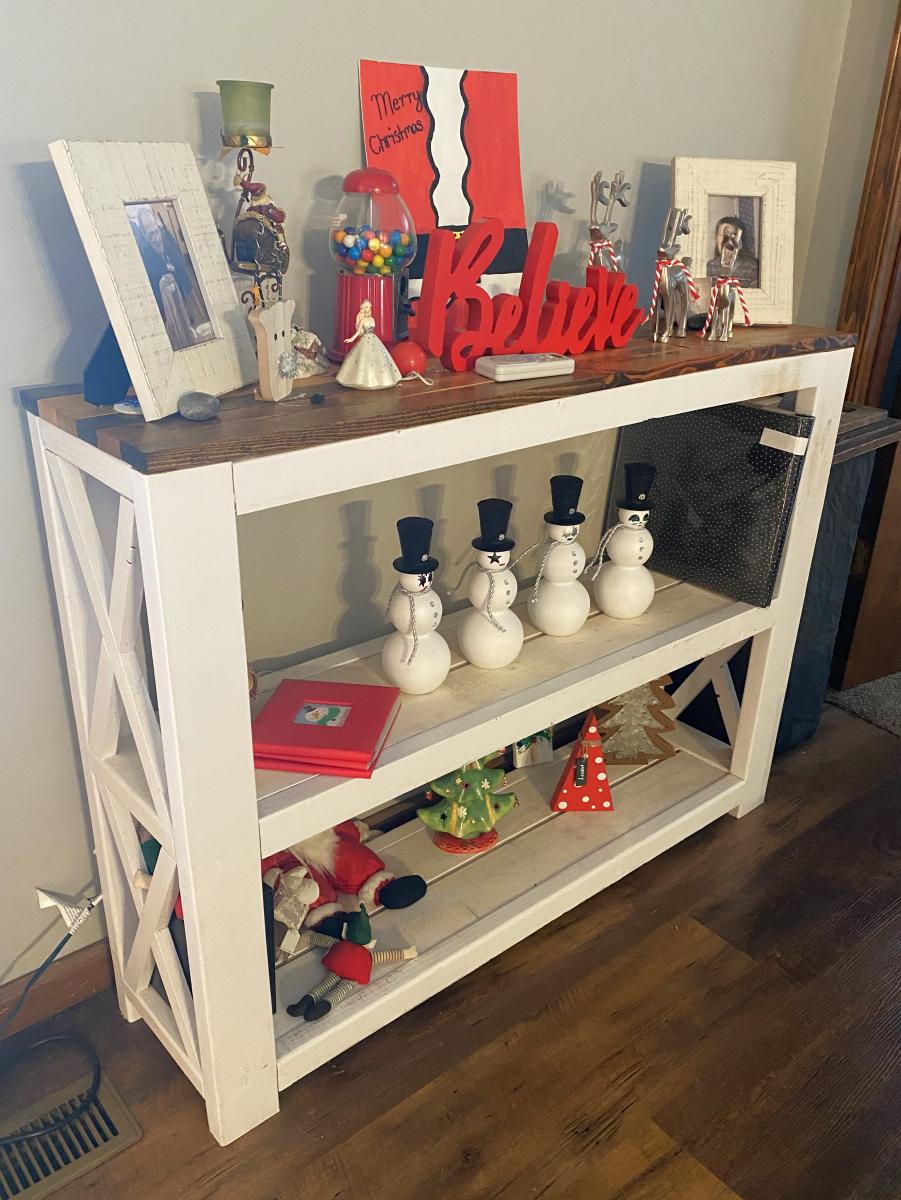
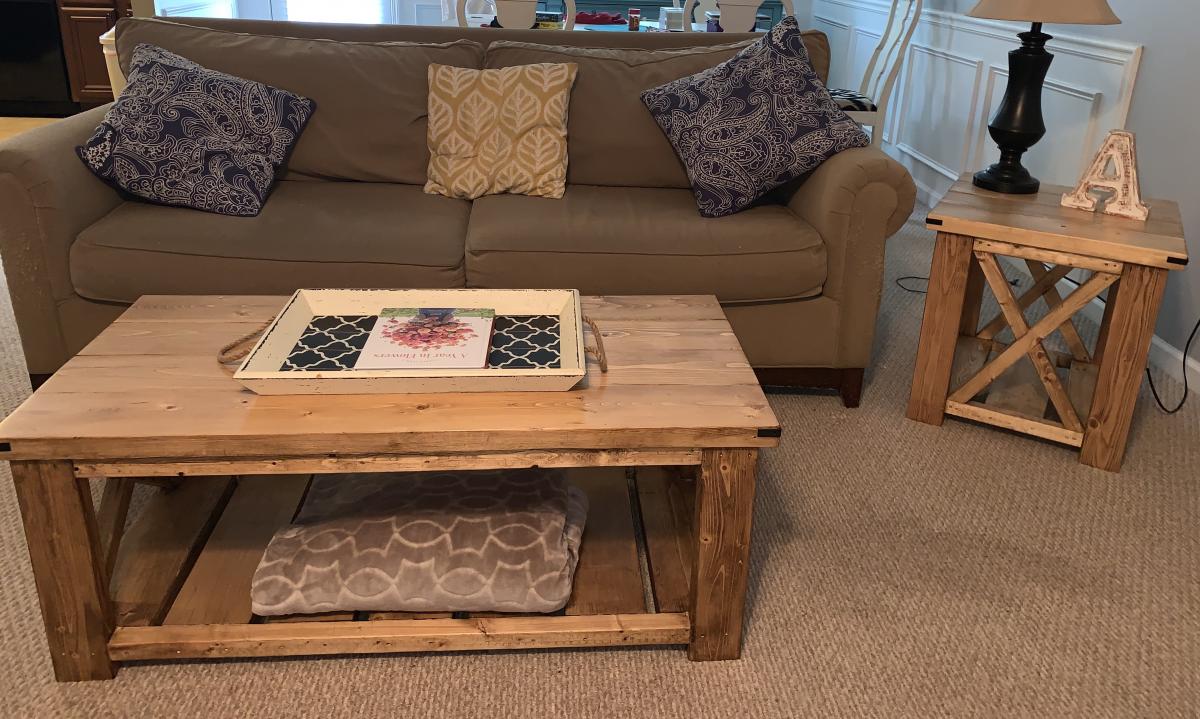
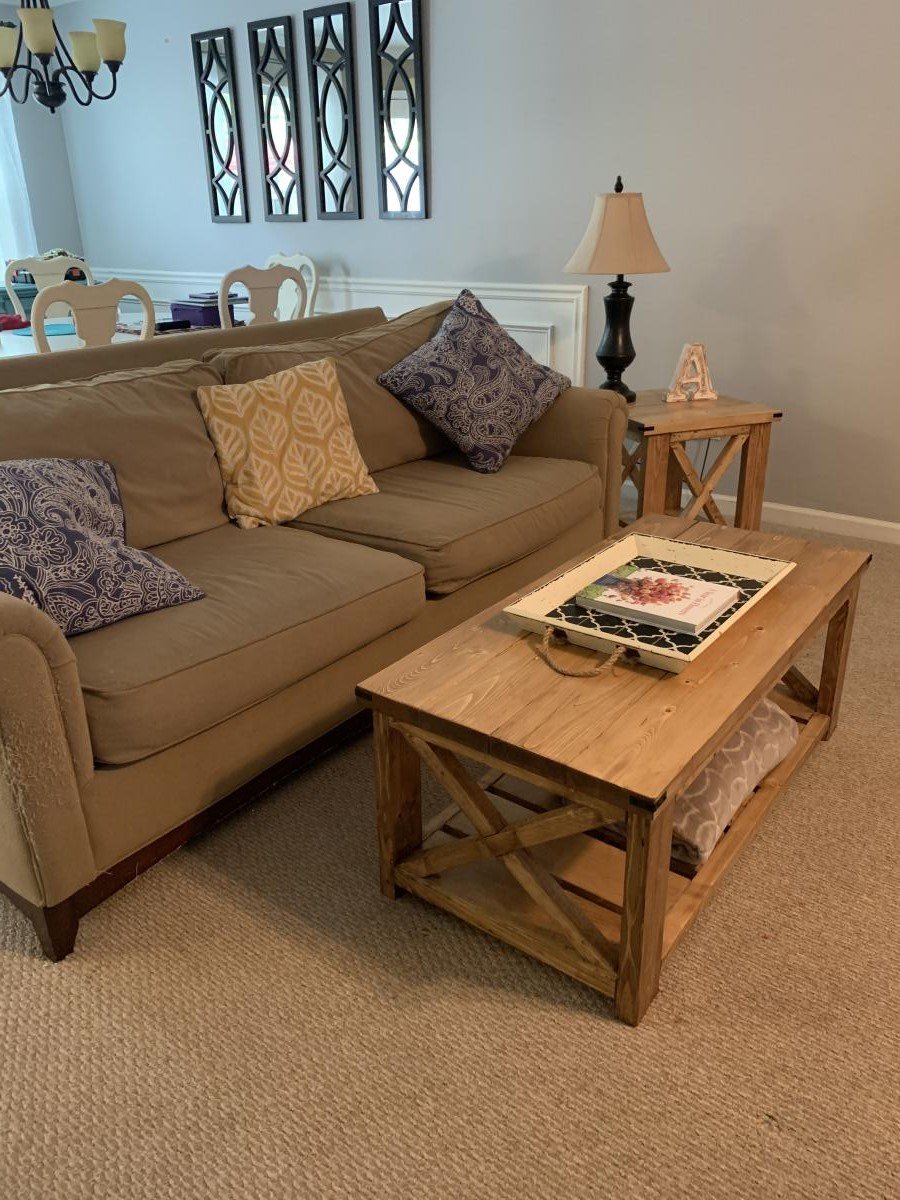
Rustic X Furniture
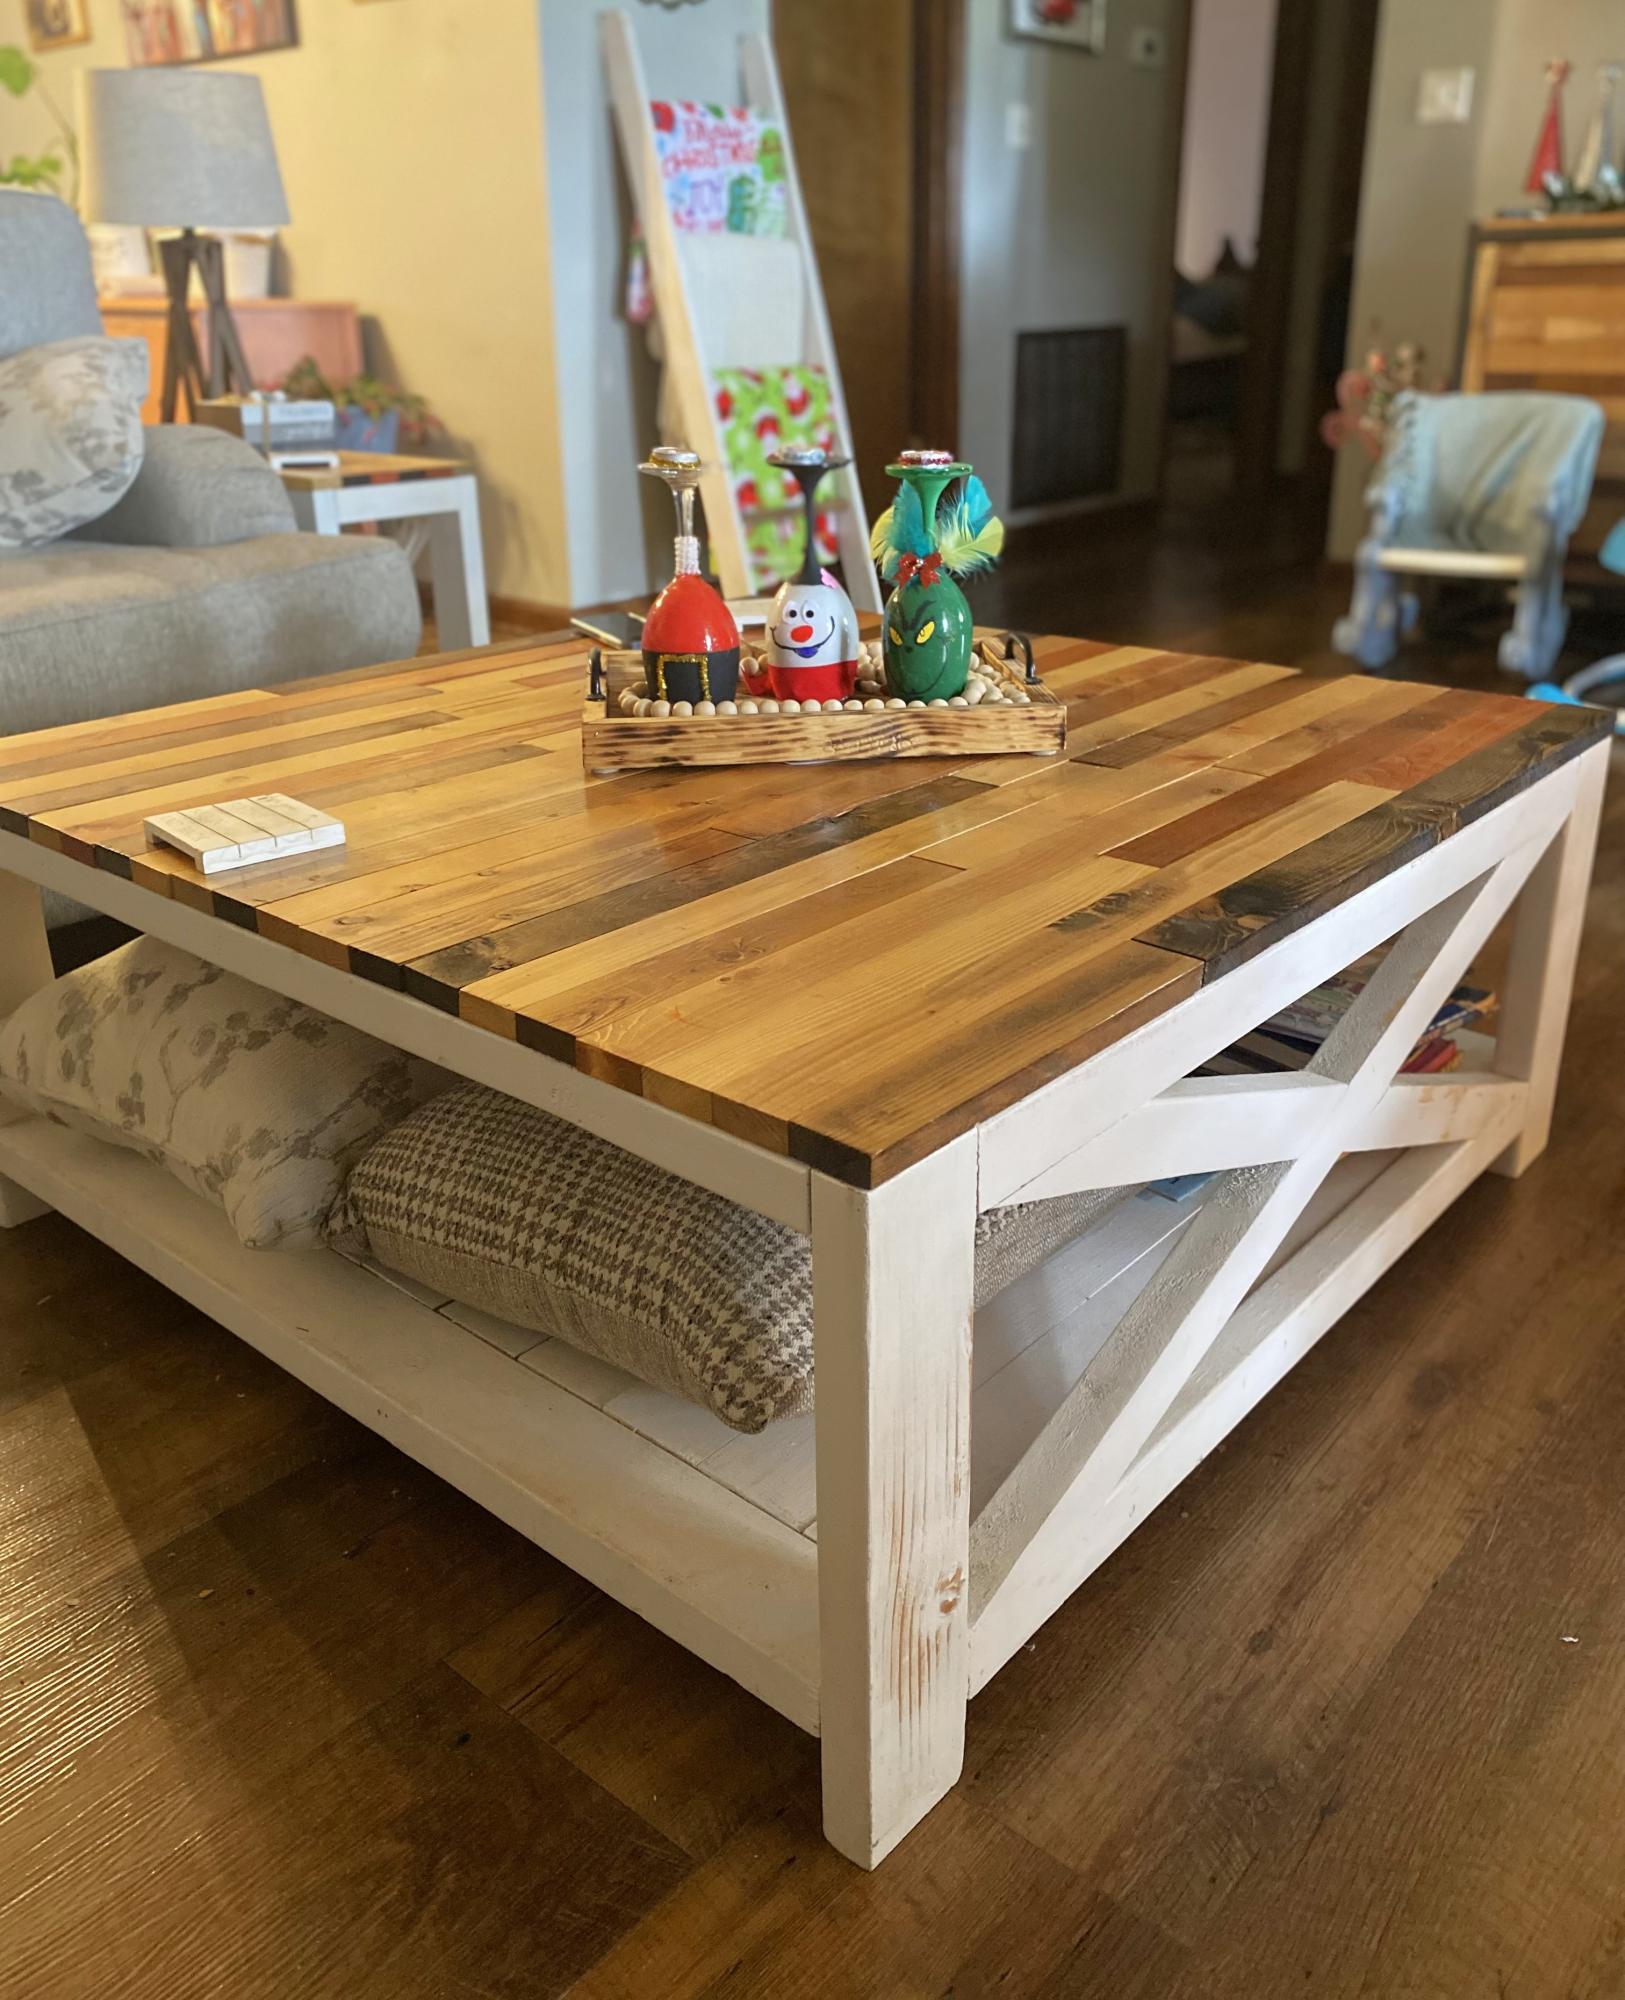
Farmhouse end tables, sofa table, and coffee table from farmhouse table plans, made tops flush with the sides no overhangs, tops made with scrap split 1x4’s in the scrap piles from Lowe’s and Home Depot, cut down to 2” wide strips, 5 different color stains.
Dale & Connie Putman
Built from Plan(s)
Comments
Garage Shelving
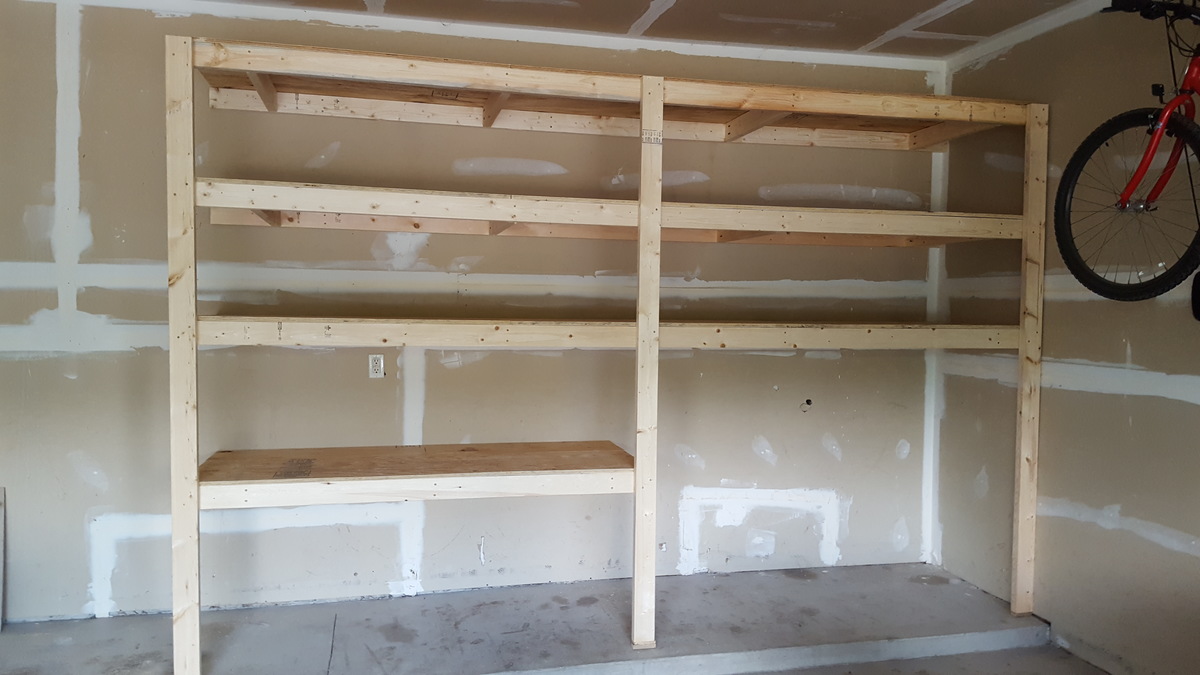
I am a beginner diy'er and this was one of my first projects. Also it was my first time using the Kreg jig and I loved it! My shelving system was around 8 feet tall, 12 feet wide and 30 inches deep. I added some extra cleats to support my deeper shelves (30") and also used thicker (5/8") plywood. This was a fun and easy project to do! Thanks so much!
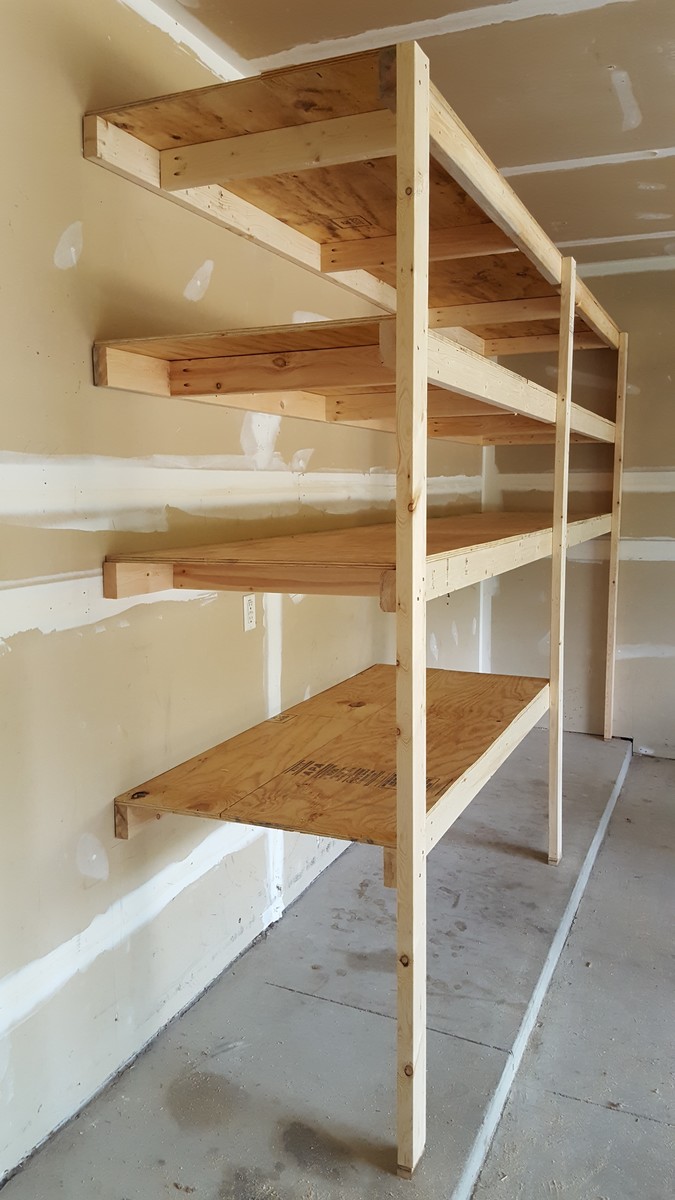
Estimated Cost
$150
Estimated Time Investment
Day Project (6-9 Hours)
Finish Used
none
Recommended Skill Level
Beginner
Modern Park Bench
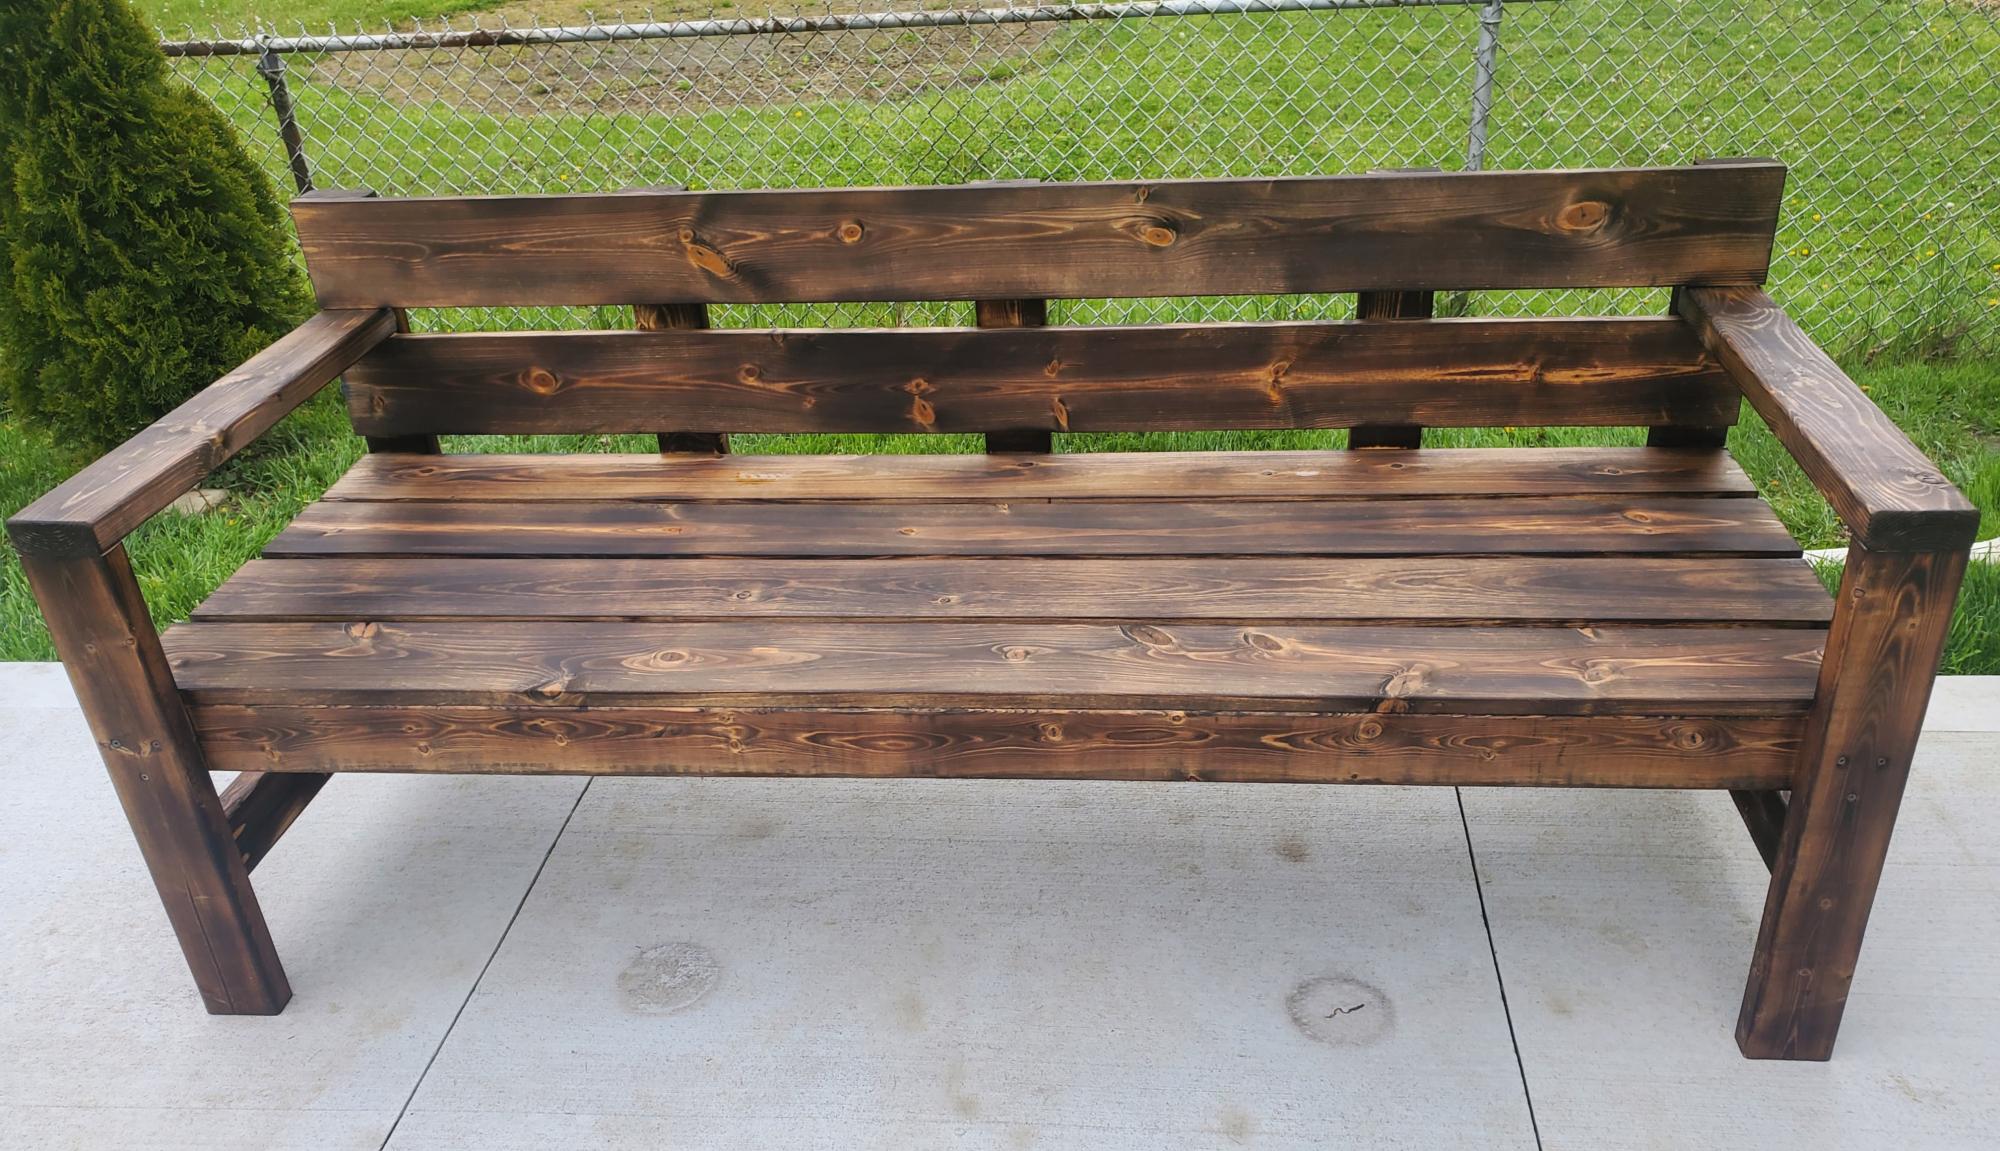
I made the Modern Park Bench with a shou sugi ban treatment for my first wood working project. Love it & so does my pug Maximus! Thanks Ana for the easy to follow step by step instructions! Already looking forward to my next build.
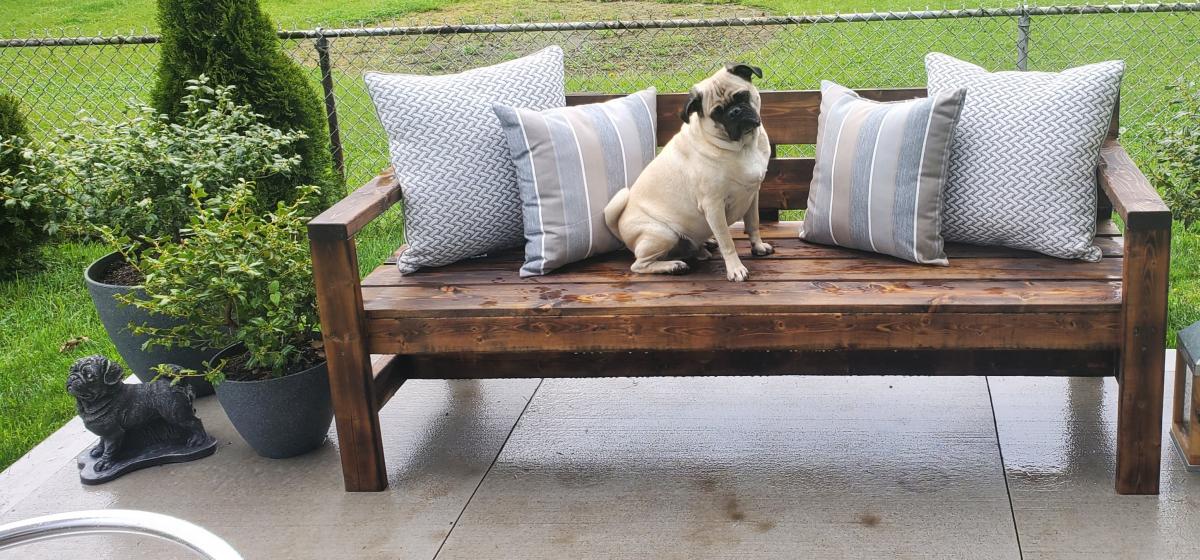
Built from Plan(s)
Estimated Time Investment
Afternoon Project (3-6 Hours)
Finish Used
Shou sugi ban
Farmhouse Beginner coffee Table
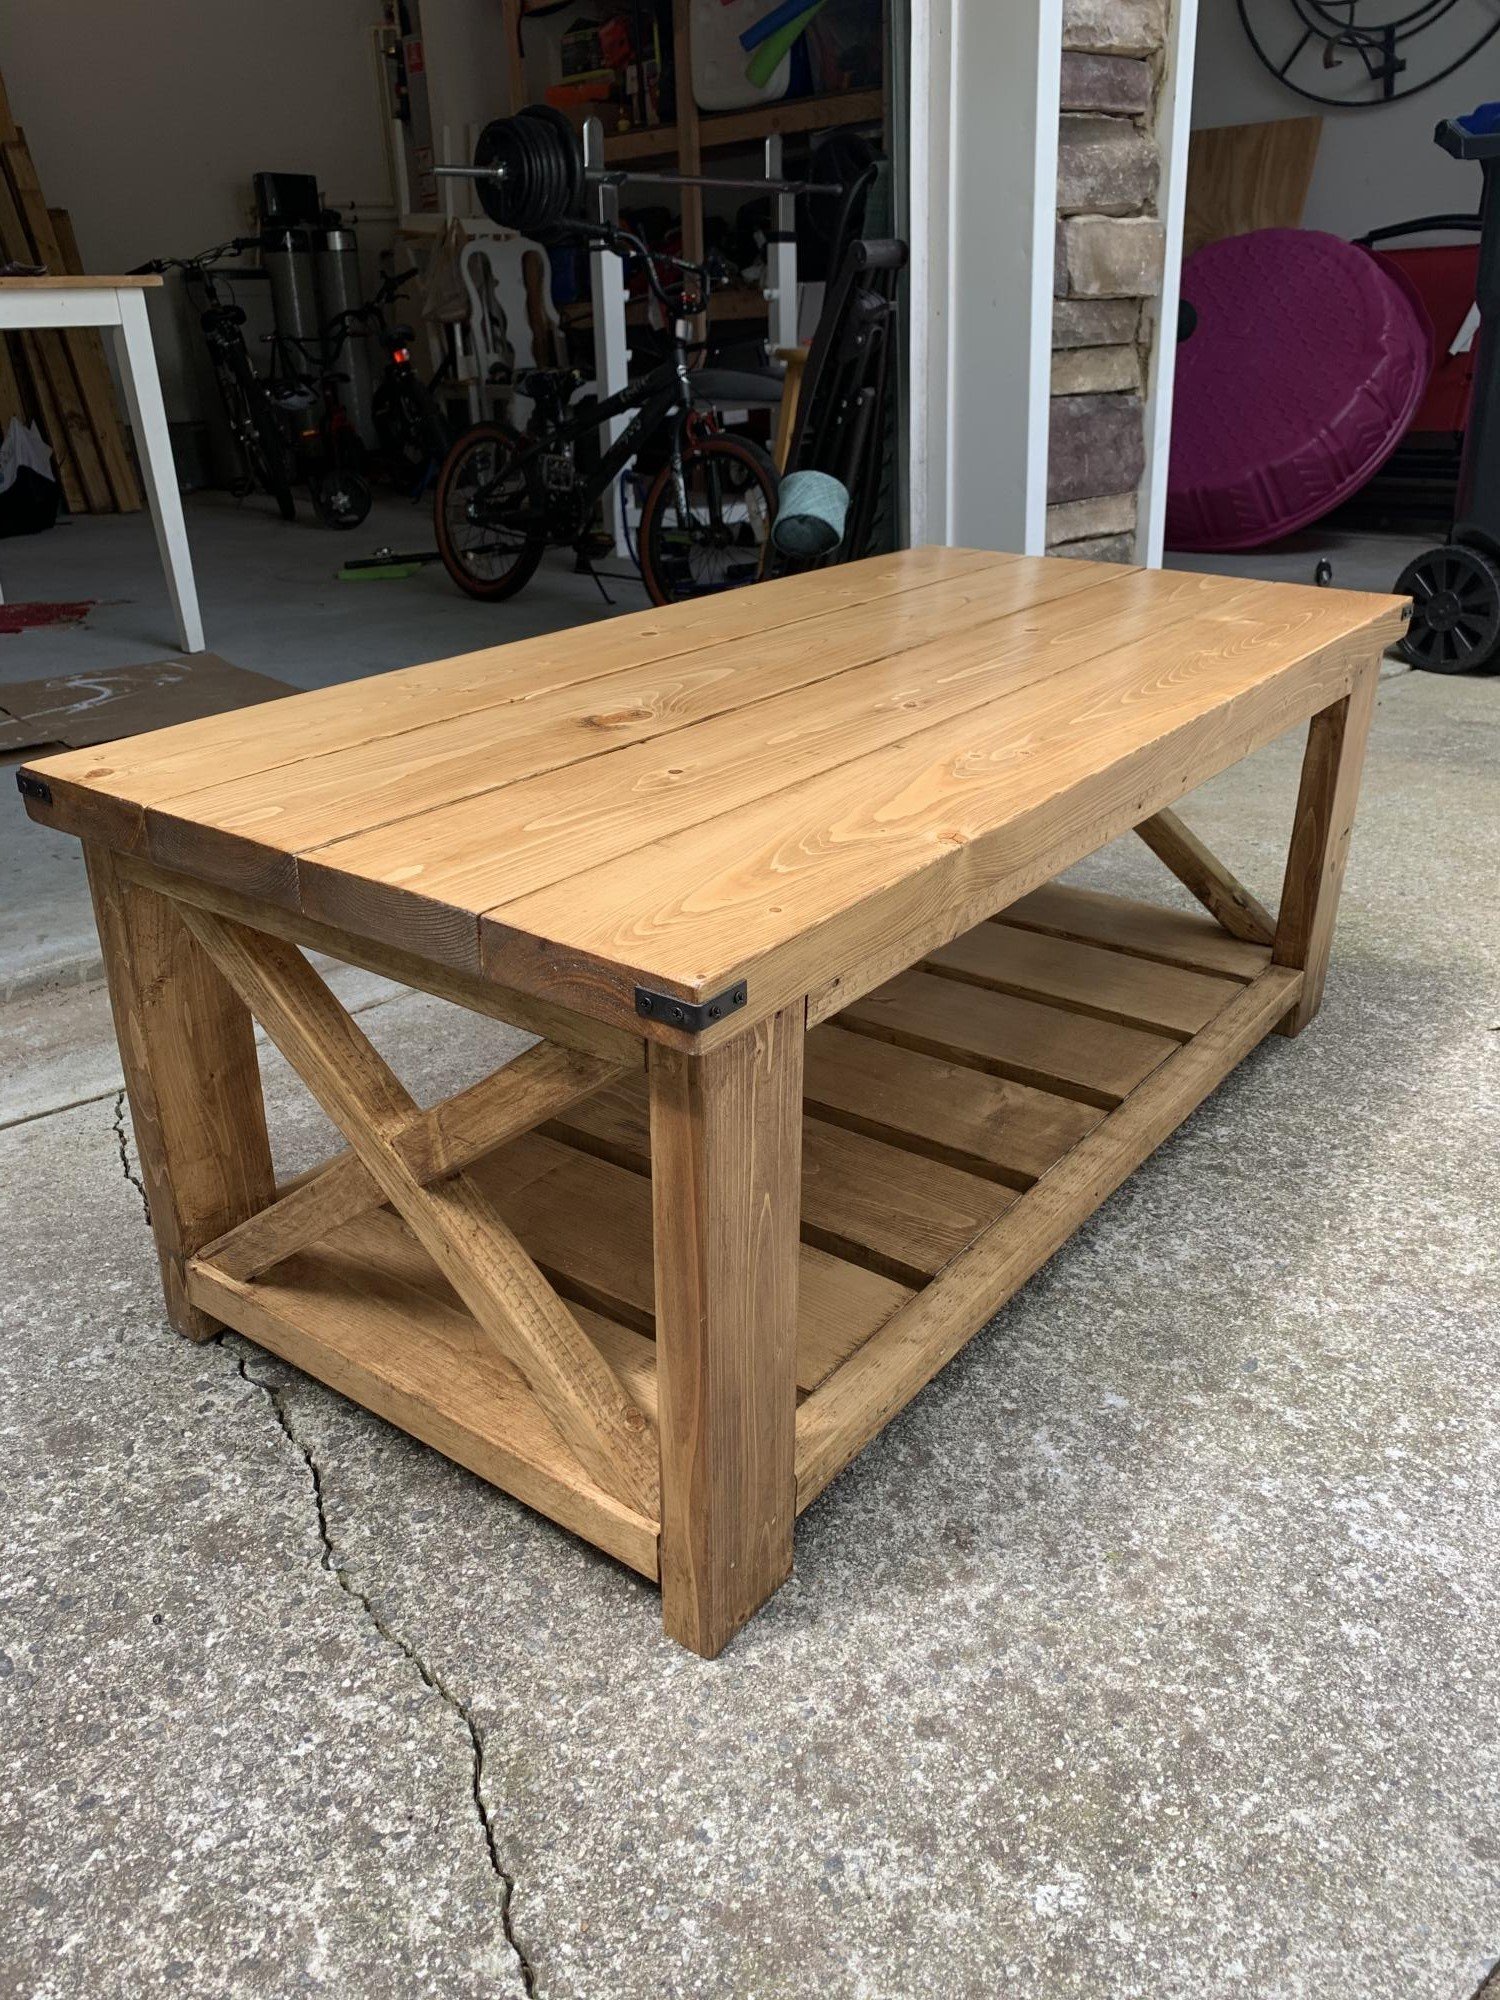
So Fun!! My first ever wood build!! I’m completely addicted now ha! Thank you so much! I’m learning so much from watching your videos.
Built from Plan(s)
Estimated Cost
$50
Estimated Time Investment
Weekend Project (10-20 Hours)
Finish Used
Varathane Golden Oak with one coat of shellac spray and Varathane oil based polyurethane to protect from liquids
Recommended Skill Level
Beginner
Truss End Tables
I built these as end tables in my living room. I made one narrower (only 14") by subtracting 3 1/2" from the end measurements and only using 4 2x4's on the top. Quick build, only about 2 hours to put together ( :) ), but the finishing took a while.
Built from Plan(s)
Estimated Time Investment
Day Project (6-9 Hours)
Finish Used
Primer, 2 coats of an off-white Beautitone Matte finish paint, distressed by sanding and gouging with a 9-in-one tool and rubbing Miniwax Dark Walnut stain in the gouges with a Q-tip, then wiping off. Finally 2 coats of Miniwax Polyacrylic.
Recommended Skill Level
Intermediate
DIY stowable boxing speed bag platform
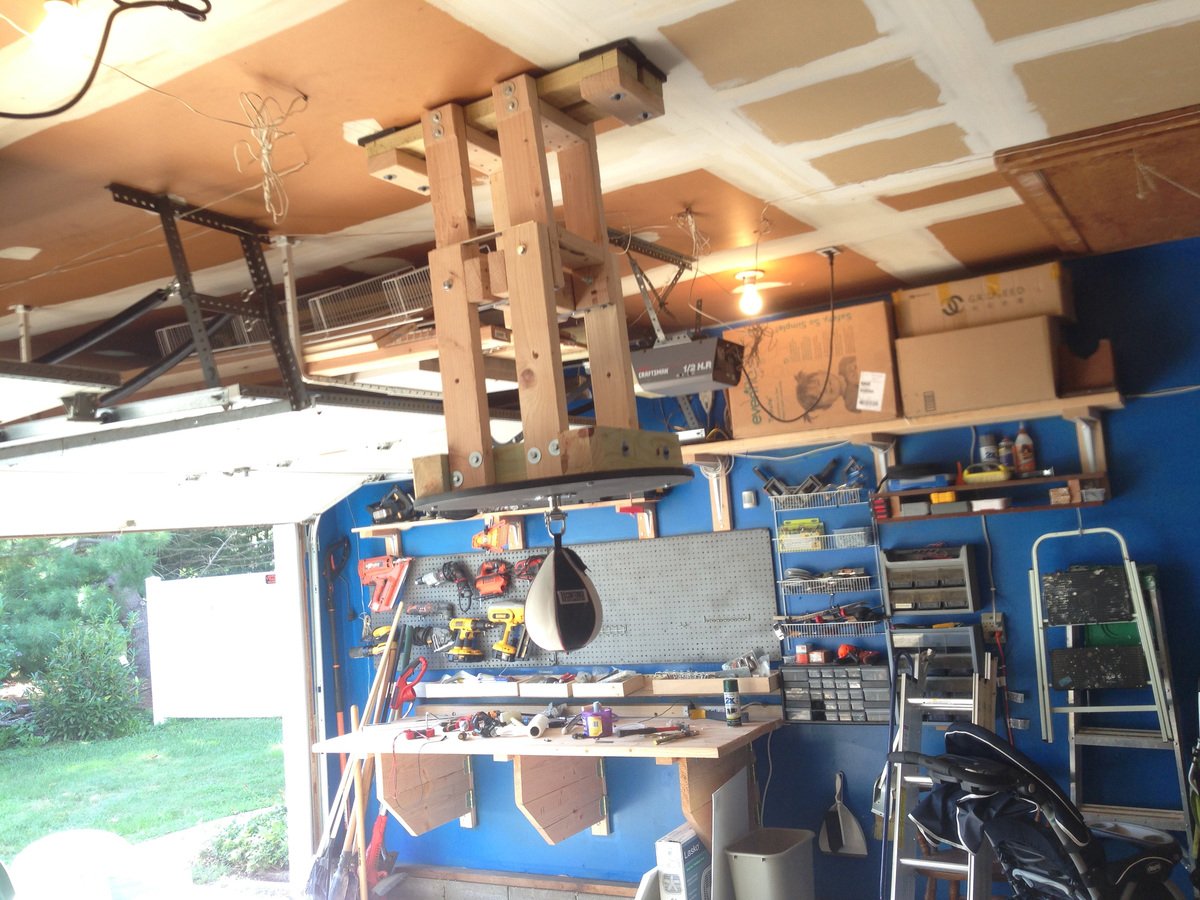
I’m an avid boxer and wanted to be able to work out in the convenience of my garage without making too much noise, and still make it easy to carry out normal garage functions (workshop and parking the car). I came up with an original design of a speed bag platform that locks away in a raised position, completely out of the way for normal garage usage. Then it unbolts and slides down when ready to engage. I also used rubber dampeners where I mounted it to the ceiling rafters to reduce vibrations and cut down on noise travelling through the house.
I documented the whole project in my blog post at http://www.justmeasuringup.com/blog/diy-boxing-speed-bag-station-that-stows
I work on a lot of projects in the garage, and having a speed bag right in the middle is a great way to take a short break in the middle of it all - or when I bang my thumb with the hammer and want to release some anger :)
Estimated Cost
$40 (used all scrap wood, so cost was really low)
Estimated Time Investment
Weekend Project (10-20 Hours)
Finish Used
none used
Recommended Skill Level
Beginner
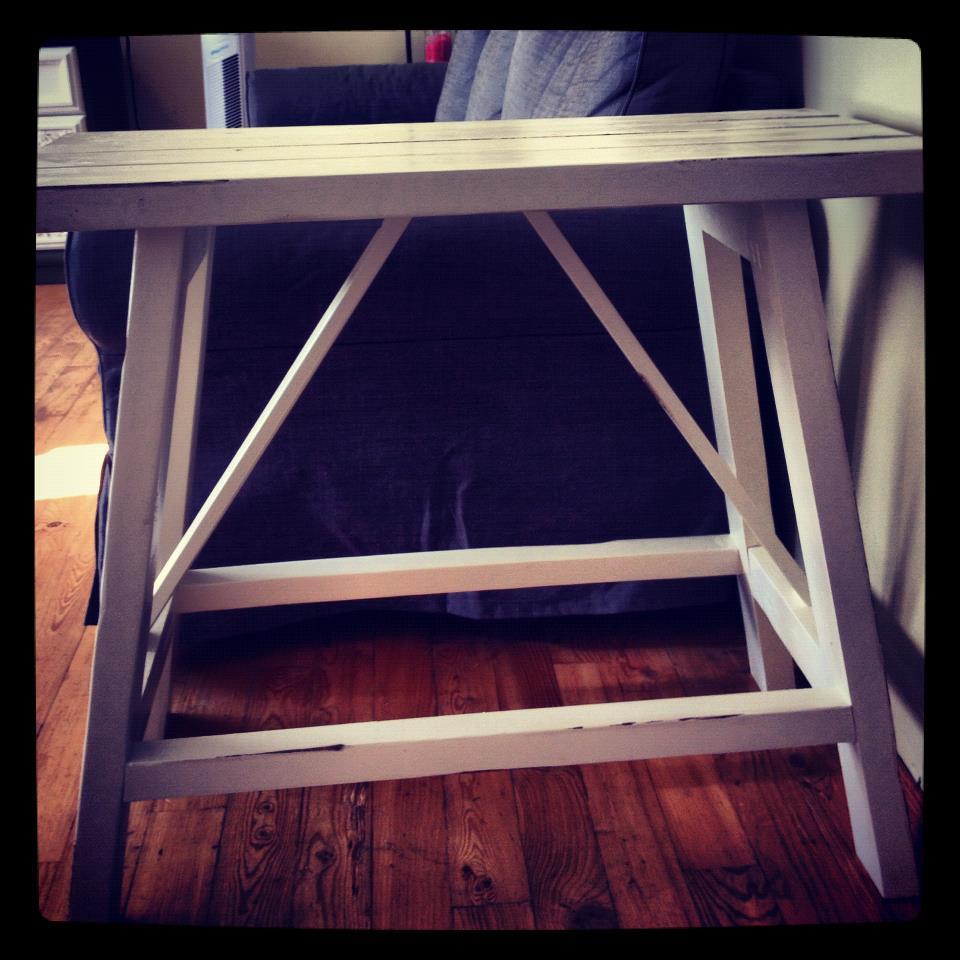
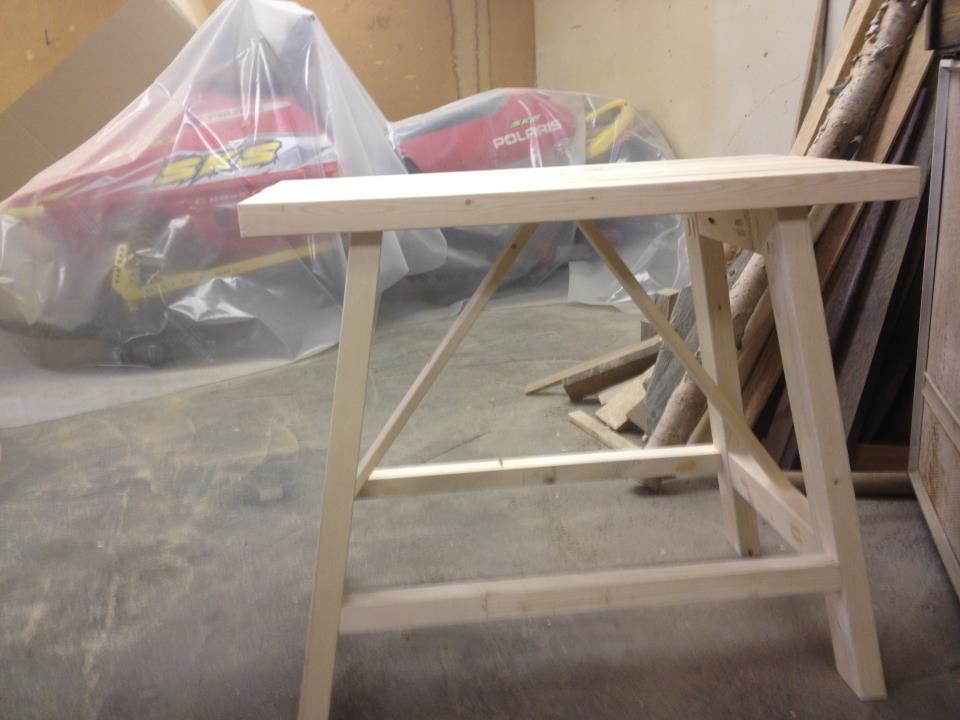
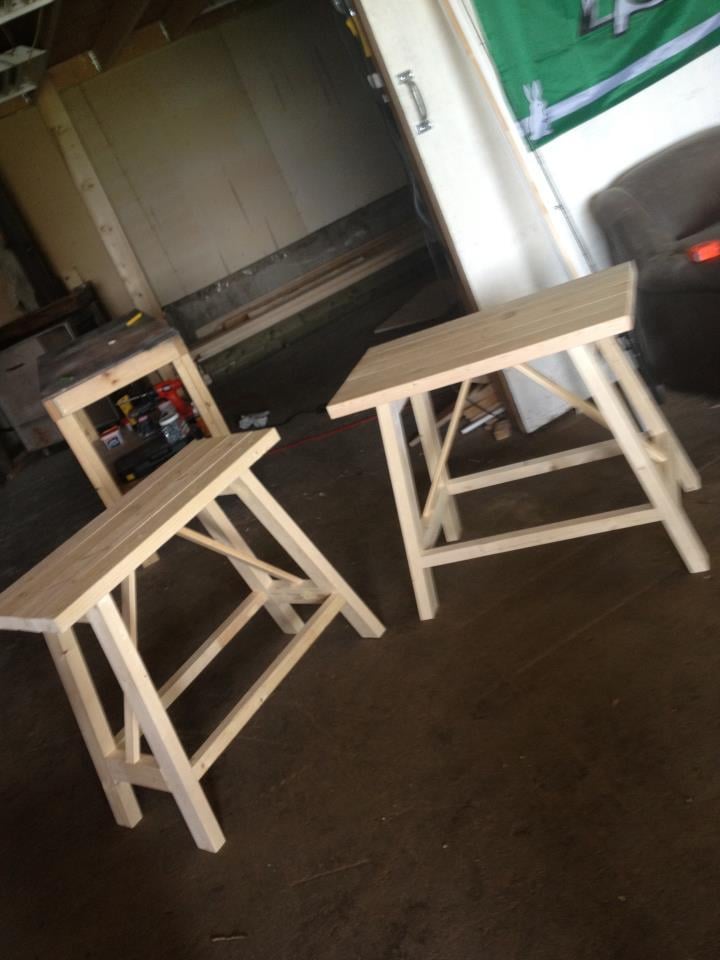
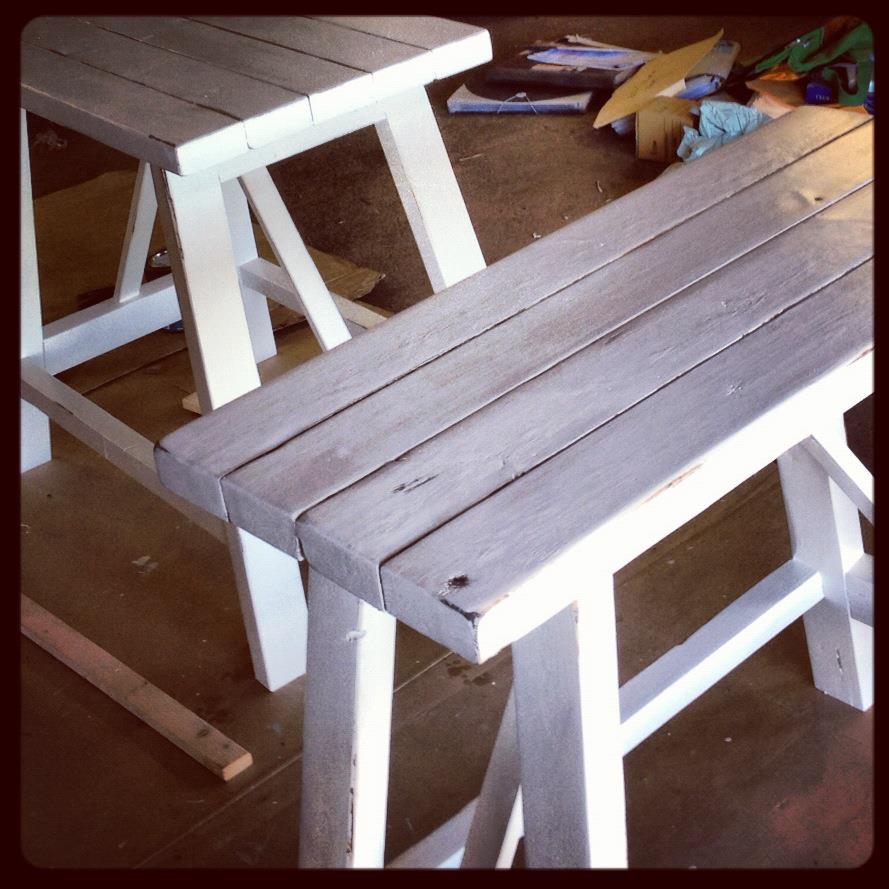
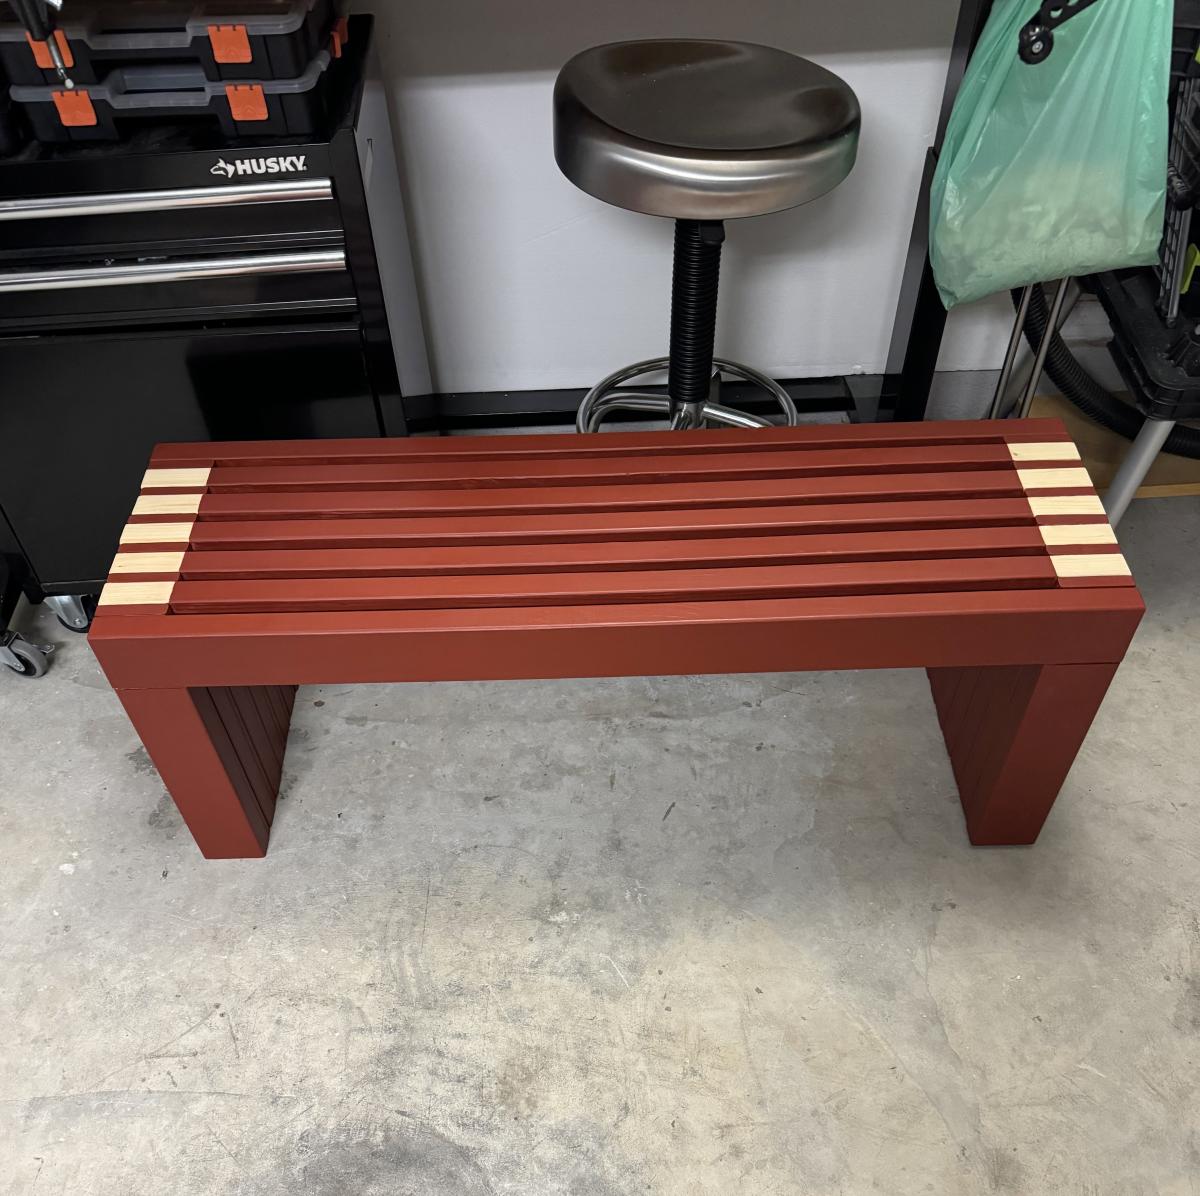
Wood Slat Bench
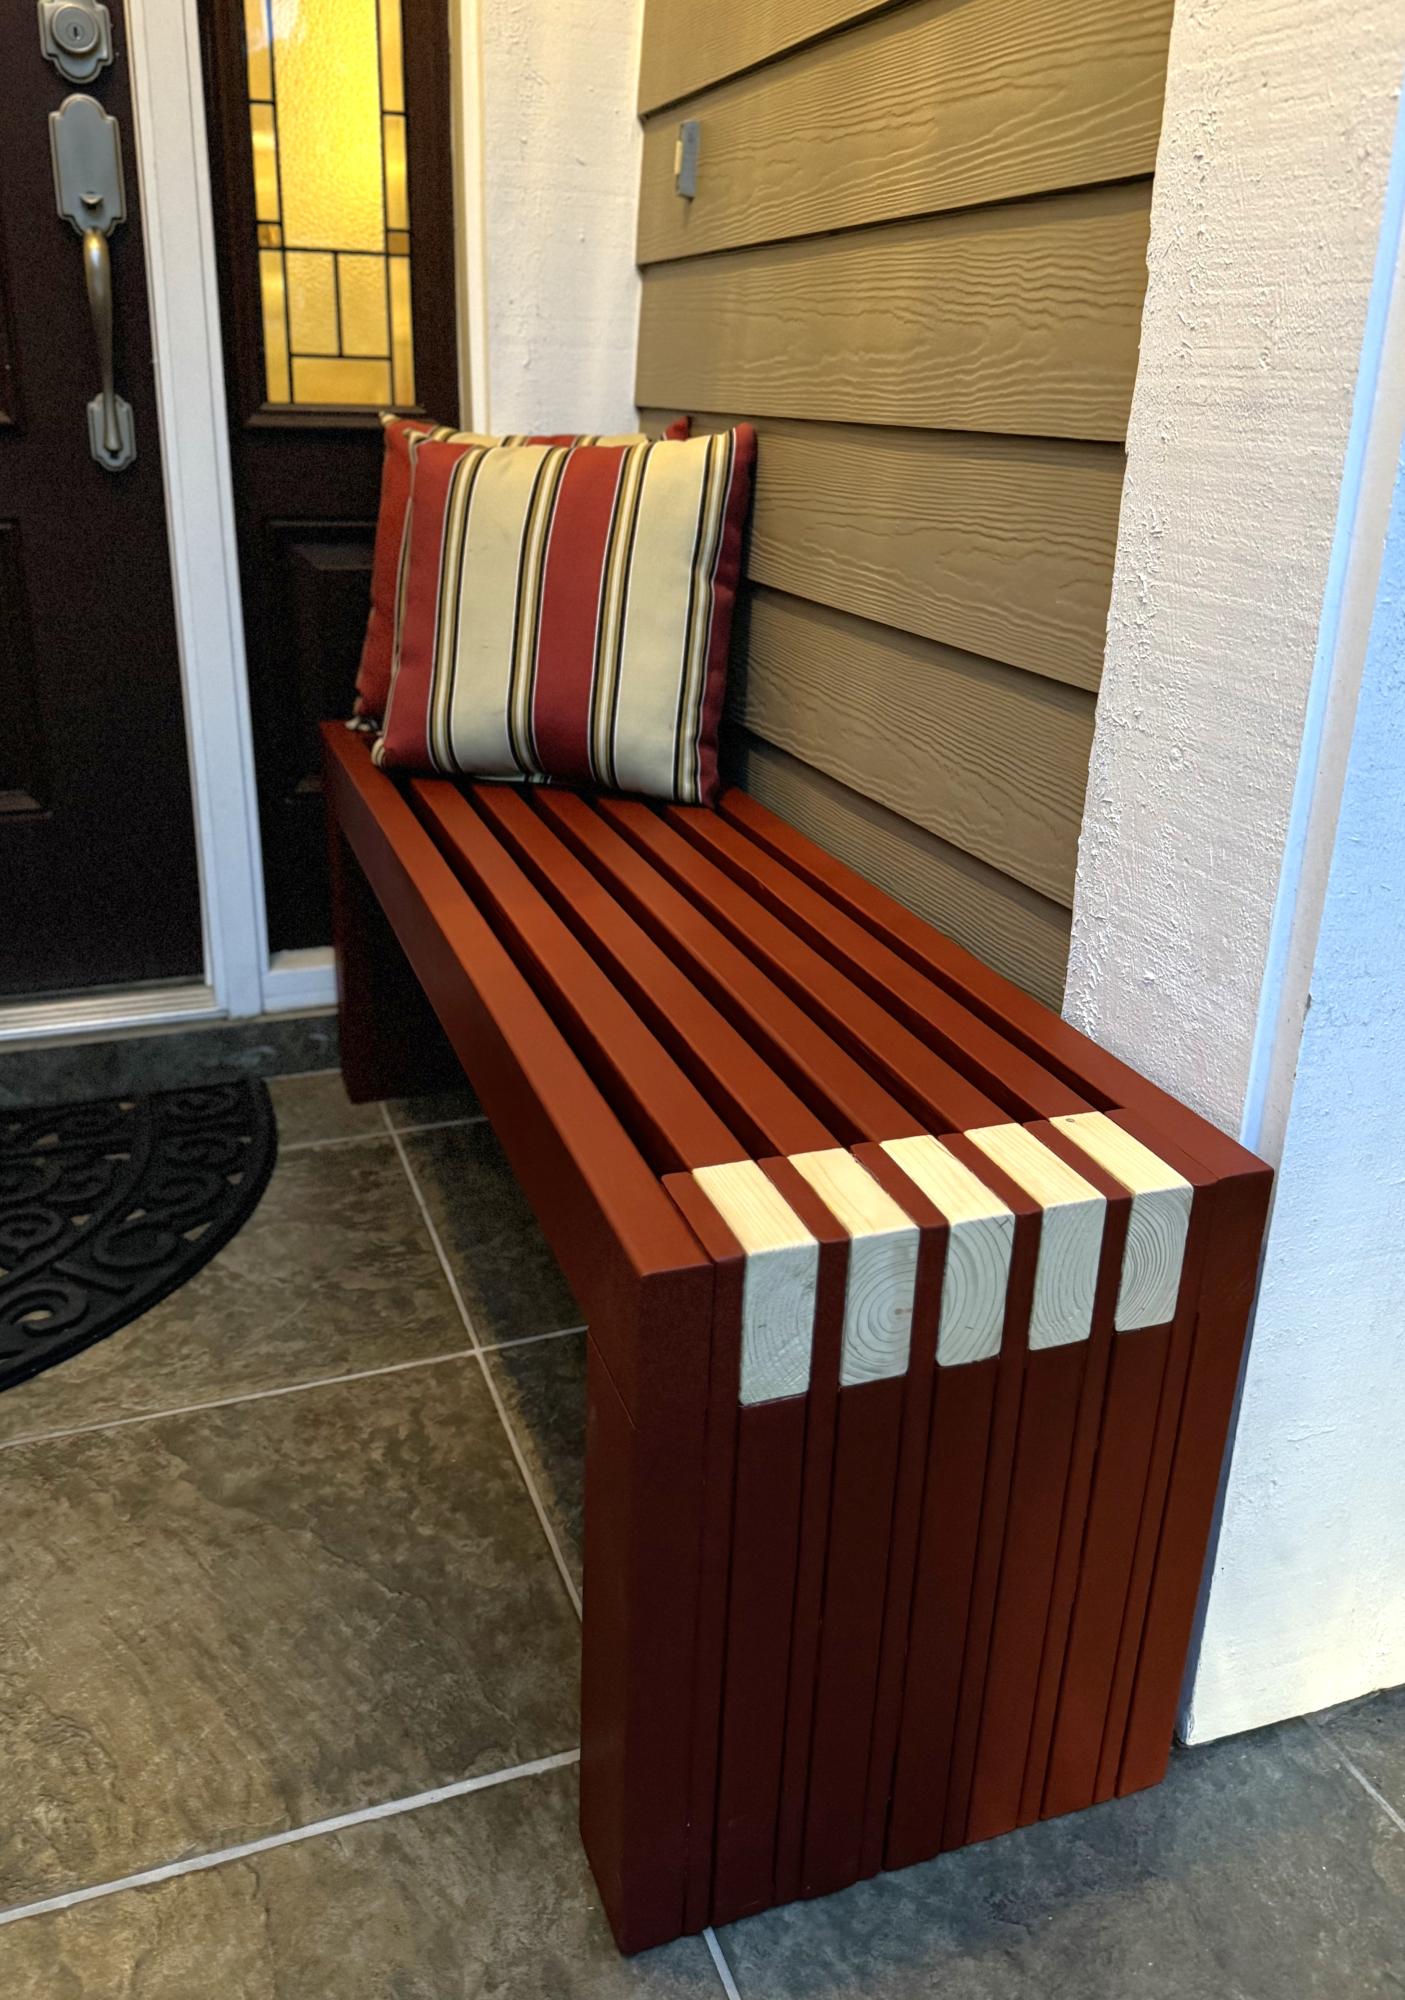
Recently identified this wonderful website. Thank you for the plan and really enjoying the process of building the furniture from scratch.
Built from Plan(s)
2’x4’ Adirondack
Simply fun project, and so Nice in USE! Used pine all the way!
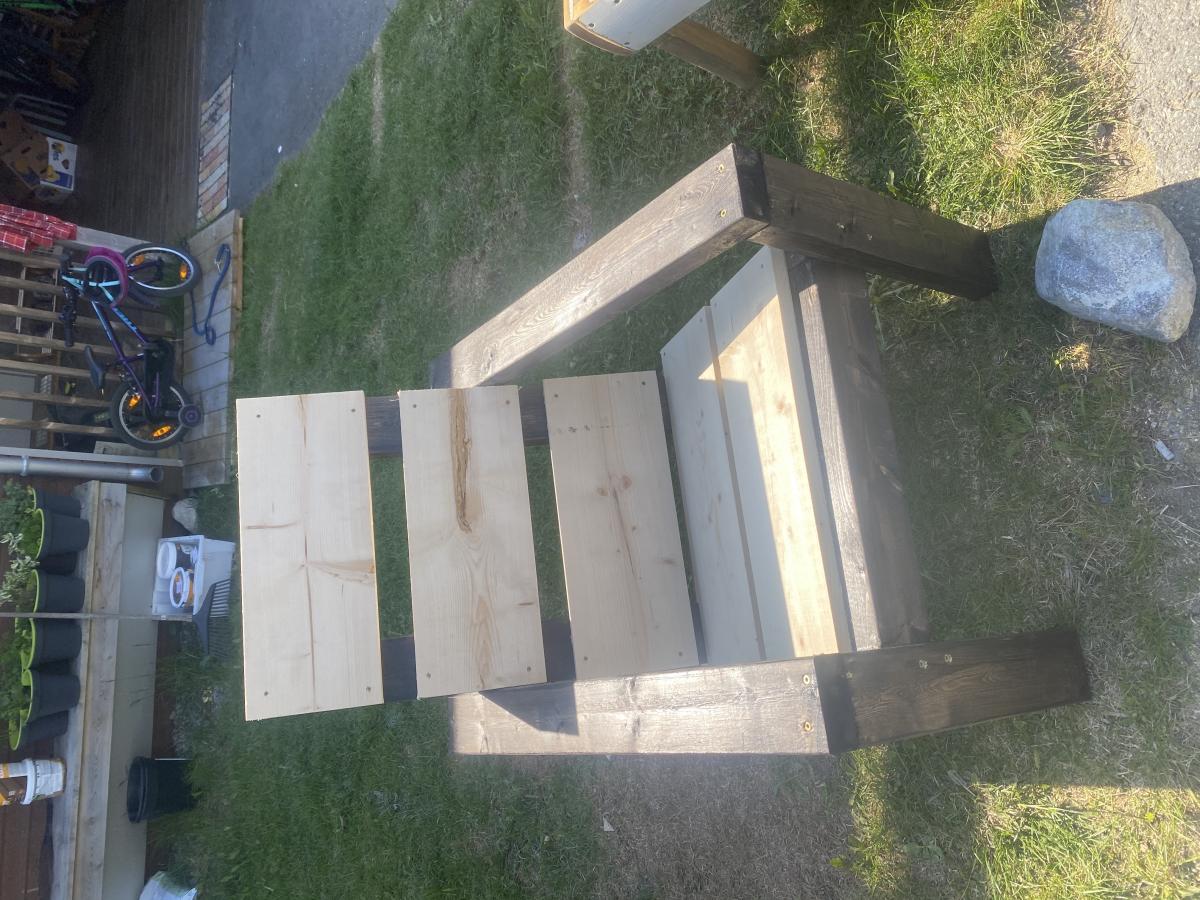
Built from Plan(s)
Estimated Time Investment
Afternoon Project (3-6 Hours)
Finish Used
Black Stain
Recommended Skill Level
Intermediate
Adirondack chair build!
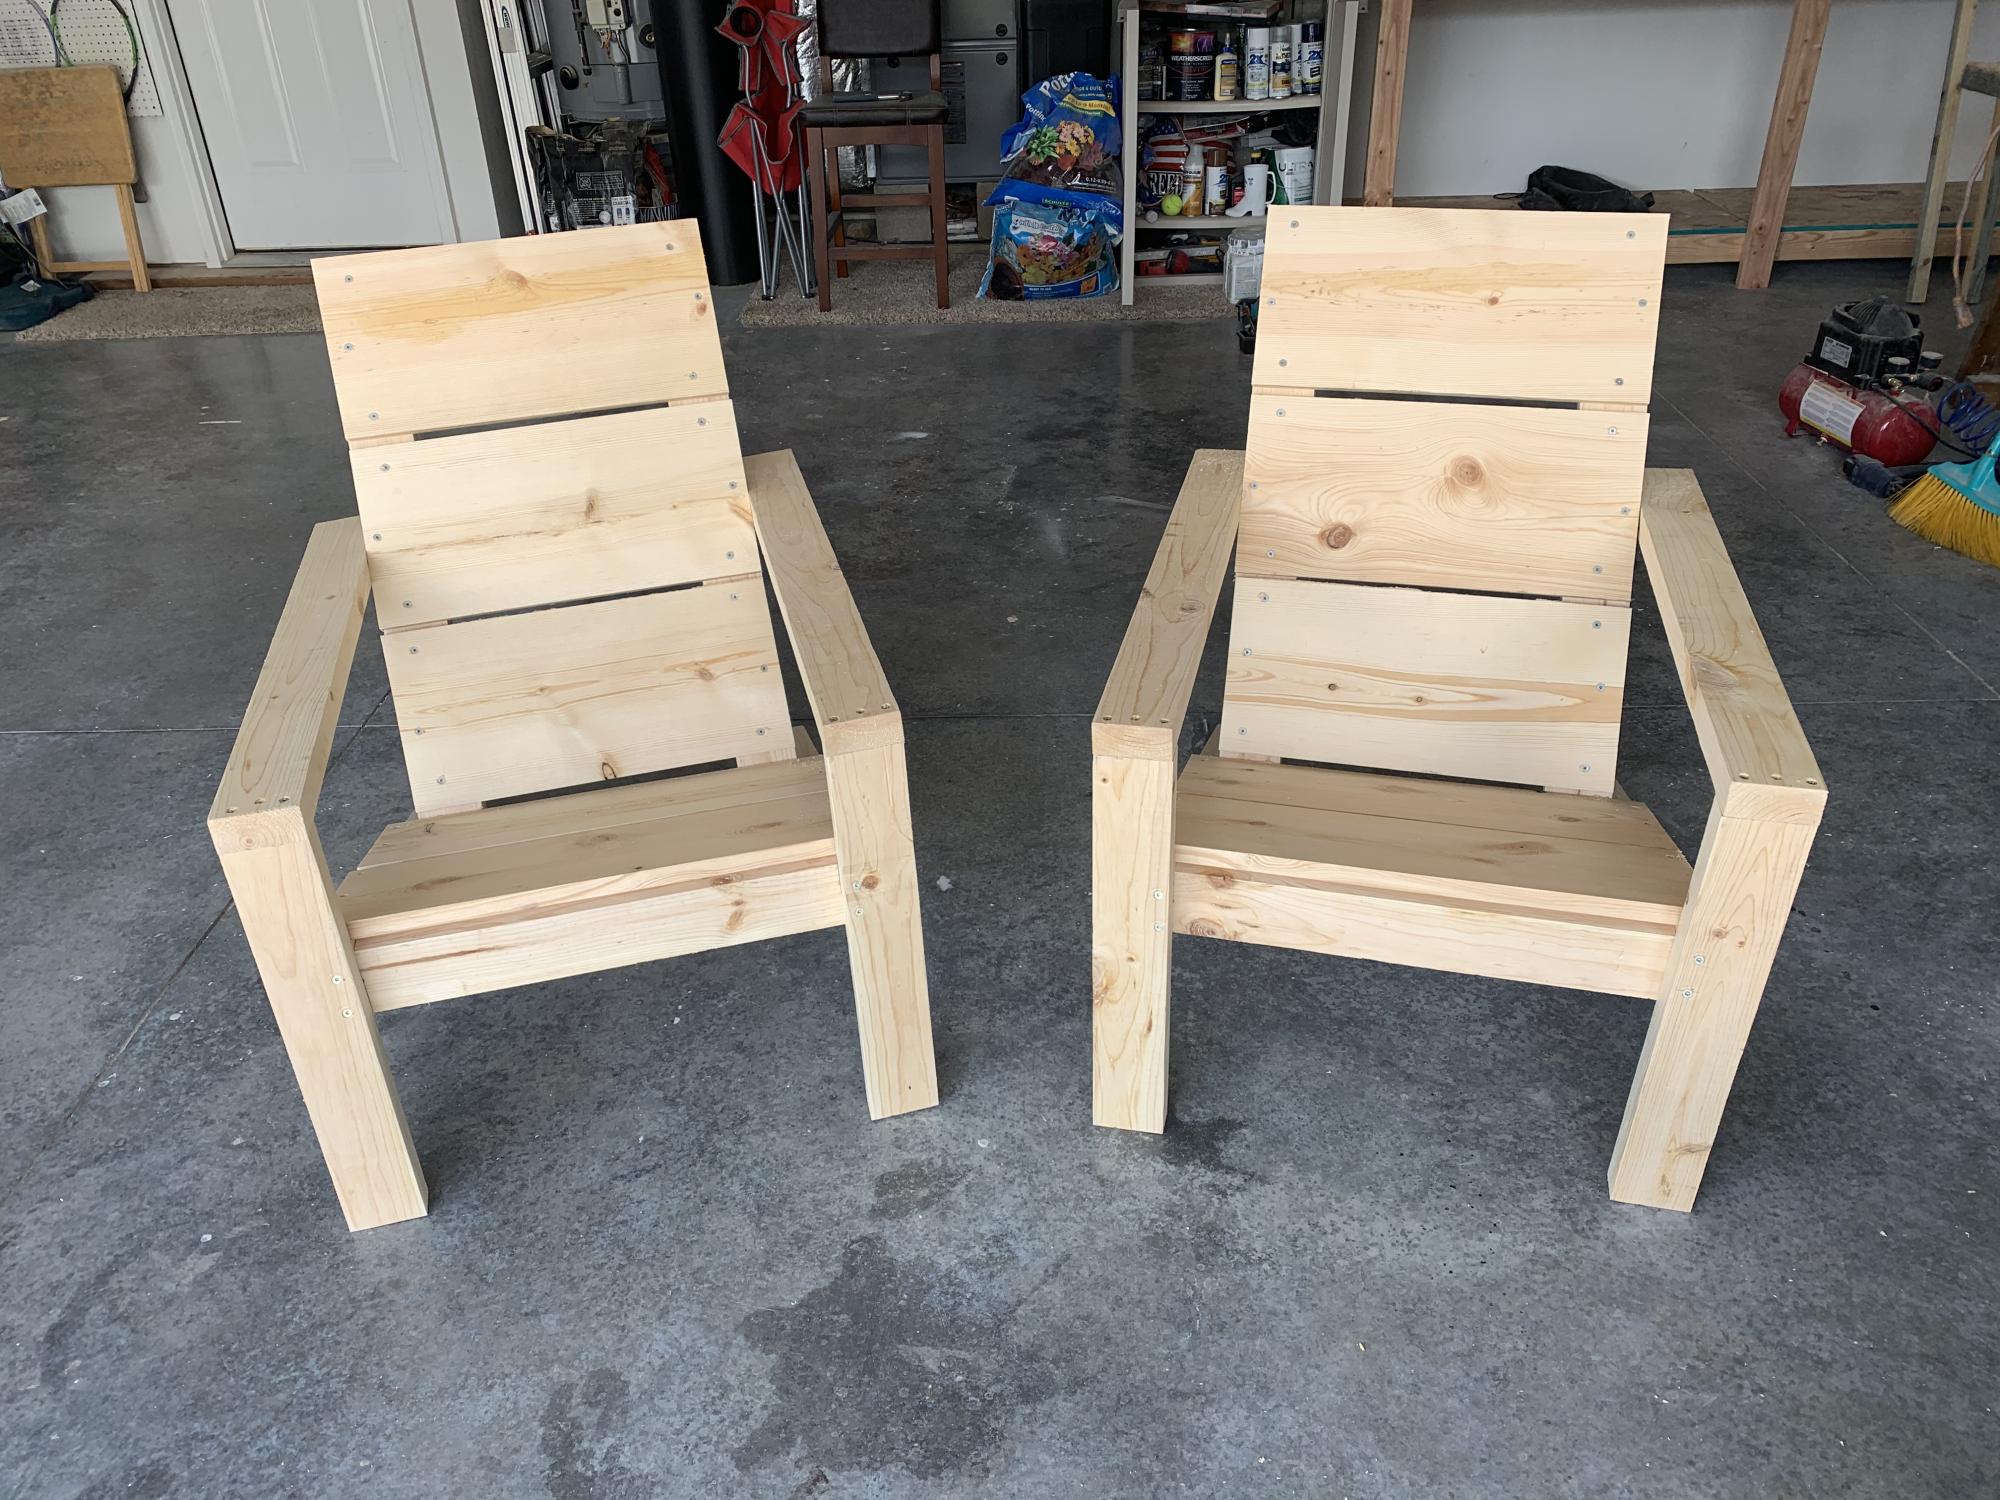
Such easy plans to follow! Thanks, as always!!!
Built from Plan(s)
Modified Farmhouse Dining Table
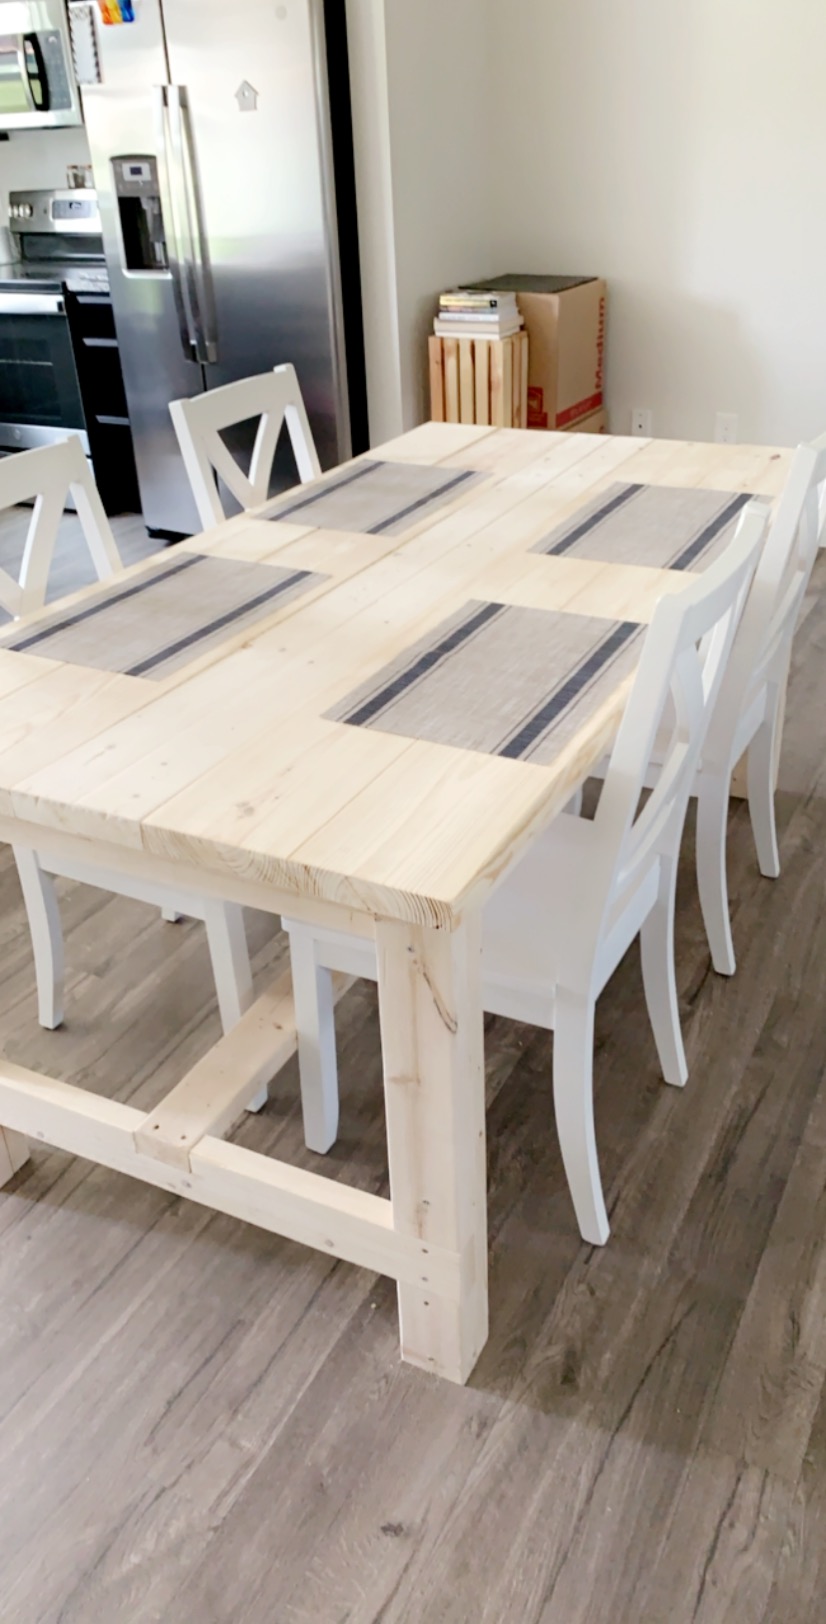
Had to make modifications for size, errors, and personal preference, but we love this table! Still deciding on all white paint or a 2-tone finish. Also- first time using a Kreg jig. What an amazing tool.
Built from Plan(s)
Estimated Cost
100
Estimated Time Investment
Afternoon Project (3-6 Hours)
Recommended Skill Level
Intermediate
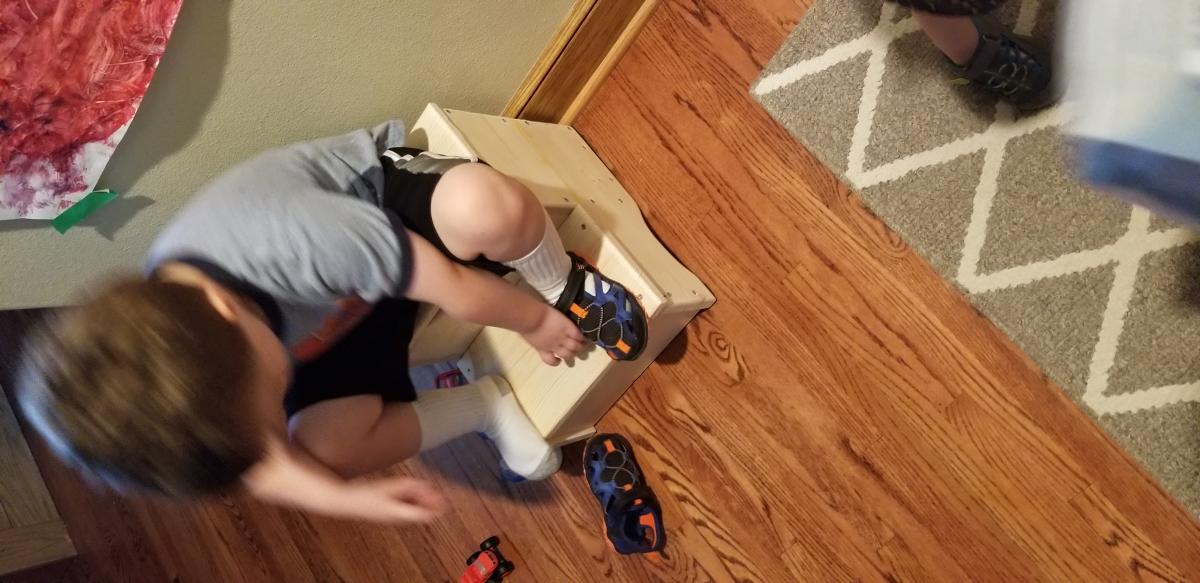
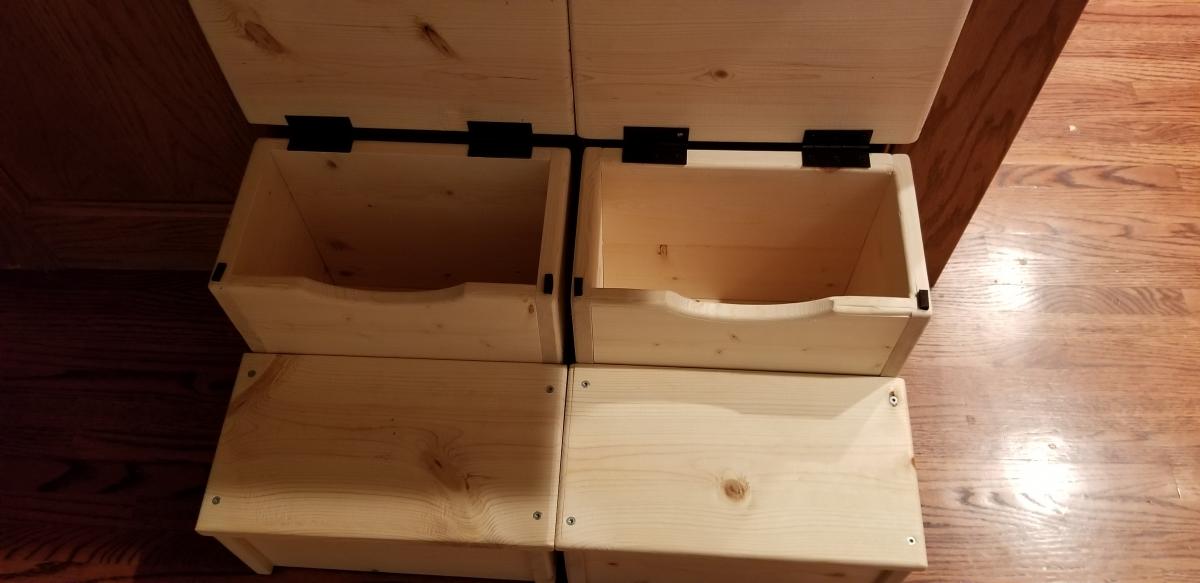
Kid's Storage Step Stool
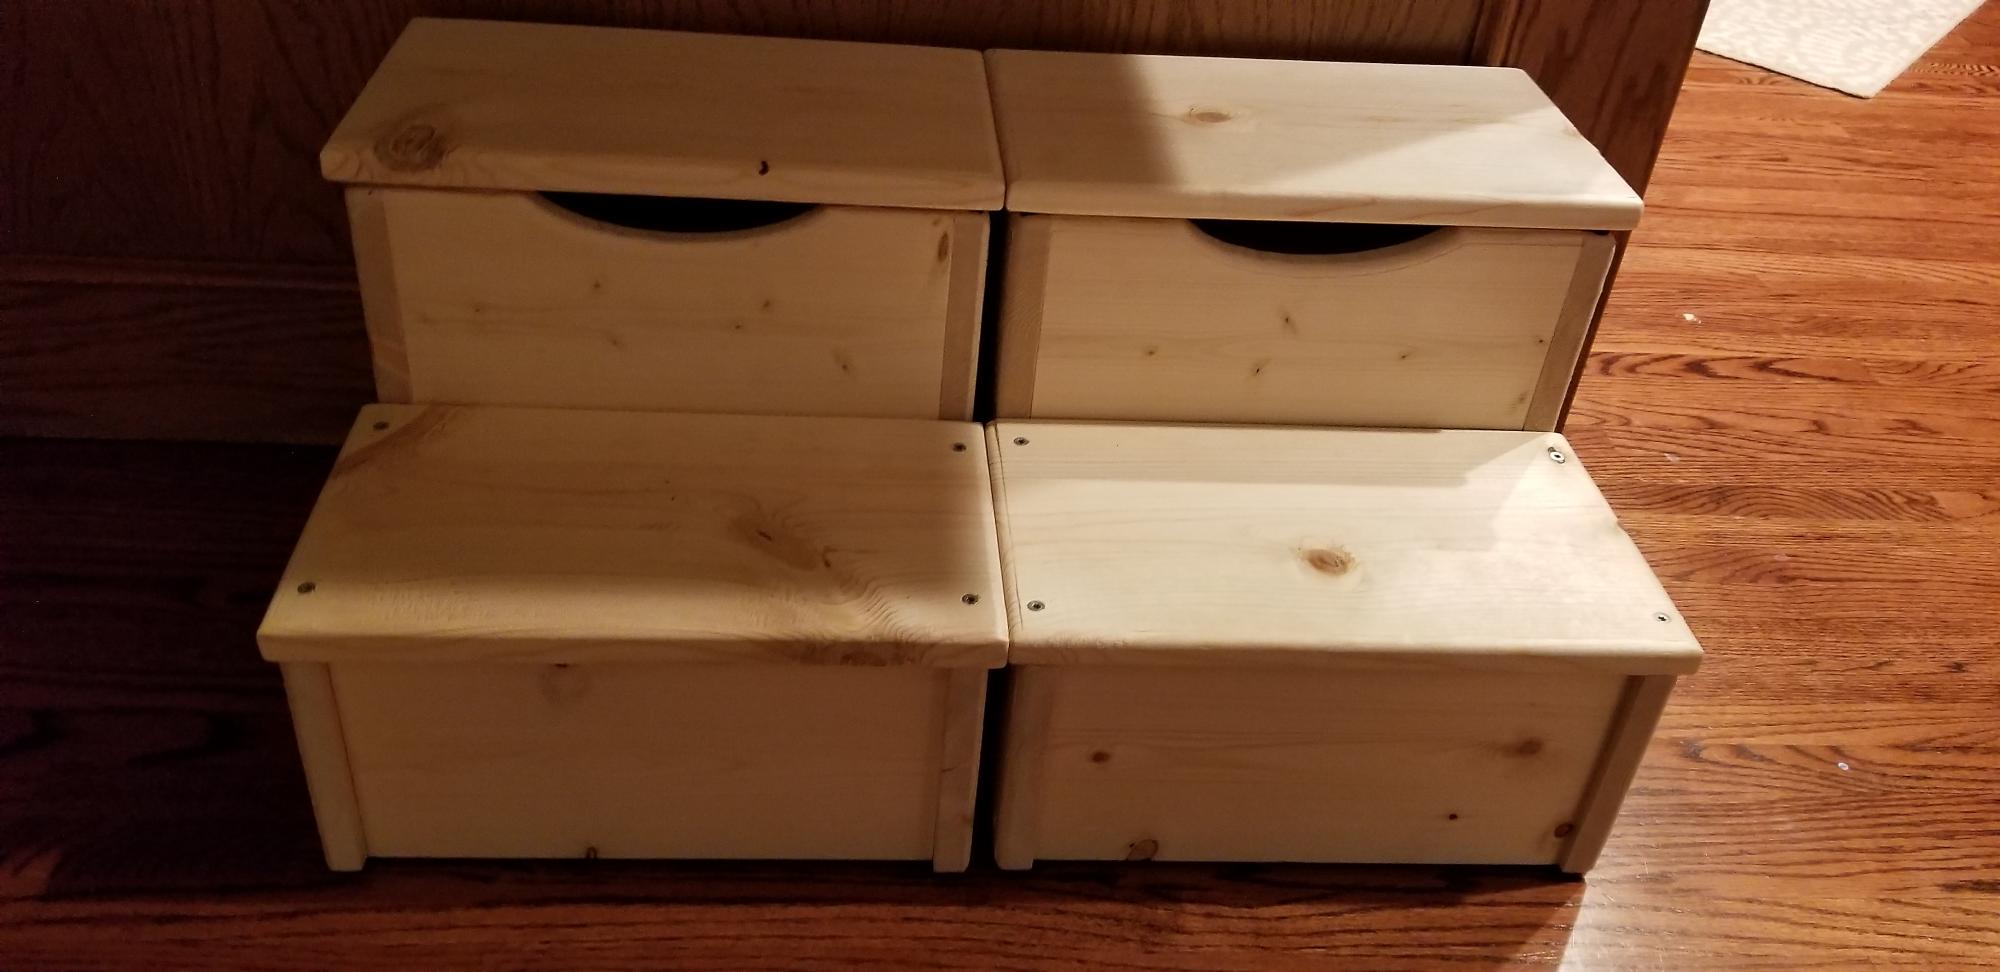
I'm a beginning wood worker enthusiast. I've been slowly collecting plans, tools, supplies and I'm certainly not efficient when it comes to projects- even "beginner" projects like this.
While there's still more finishing to do, I cranked these out over the weekend with a myriad of interruptions - so it's hard to say how long these would really take. I didn't have 12" boards, so glued 1 x 6" pieces together into the shape I needed. Then assembled each with 1 1/4" screws, routed the sides, sanded and cleaned them. The kids will paint them their favorite colors and then I'll put a clear coat on top to finish them up. Once painted and ready, I'll add hands to each side as well as rubber runners to the bottom for stability. These are really nice for toddlers to use while they put on or take off their shoes and put into the storage bin.
Built from Plan(s)
Estimated Cost
~ $30/stool
Estimated Time Investment
Weekend Project (10-20 Hours)
Finish Used
A few things:
1) Assembly of the stool- I assembled mine by fitting them together and using 24" clamps to hold them in place, adjusting each part so it was square to the other parts (sides to front/back pieces, etc. then pre-drilled and assembled with 1 1/4" screws placed at even intervals. Many of the brag posts look like people glued them together. Wood gluing is great which is often stronger than screws- the wood itself will give way before the glue does, I've seen proof of it. At the time of my construction, I needed to assemble them and use them right away so I opted for screws instead.
2) Adding the hinge- Duct-taping it to test out the best fit works really well, but there are at least 3 ways to attach this:
a) hinge on the inside of both the stool and top step
i) non-flush - allows for a felt stopper to minimize wood to wood noise when closing.
ii) flush - mortise or rout out the 1/8" (or whatever the depth of your hinge is) space for the hinge by tracing the hinge location and using a short depth mortise bit OR using a set of wood chisels- not everyone has a router (I had to borrow one from the in-laws...)
b) hinge on the back side- no mortise needed, but be aware of how far back you want the step lid to be able to go, full or 90 degrees from the start.
c) hinge on the inside of one side- i.e.: have the hinge on the outside of the stool and the inside of the step or vice versa.
3) The finish- Mine is still a work in progress- My kids are going to do a family project day with me and paint them their favorite colors. Once they finish painting (with touch-ups by Dad) I'll finish it with a top coat to seal/protect the paint.
Recommended Skill Level
Beginner
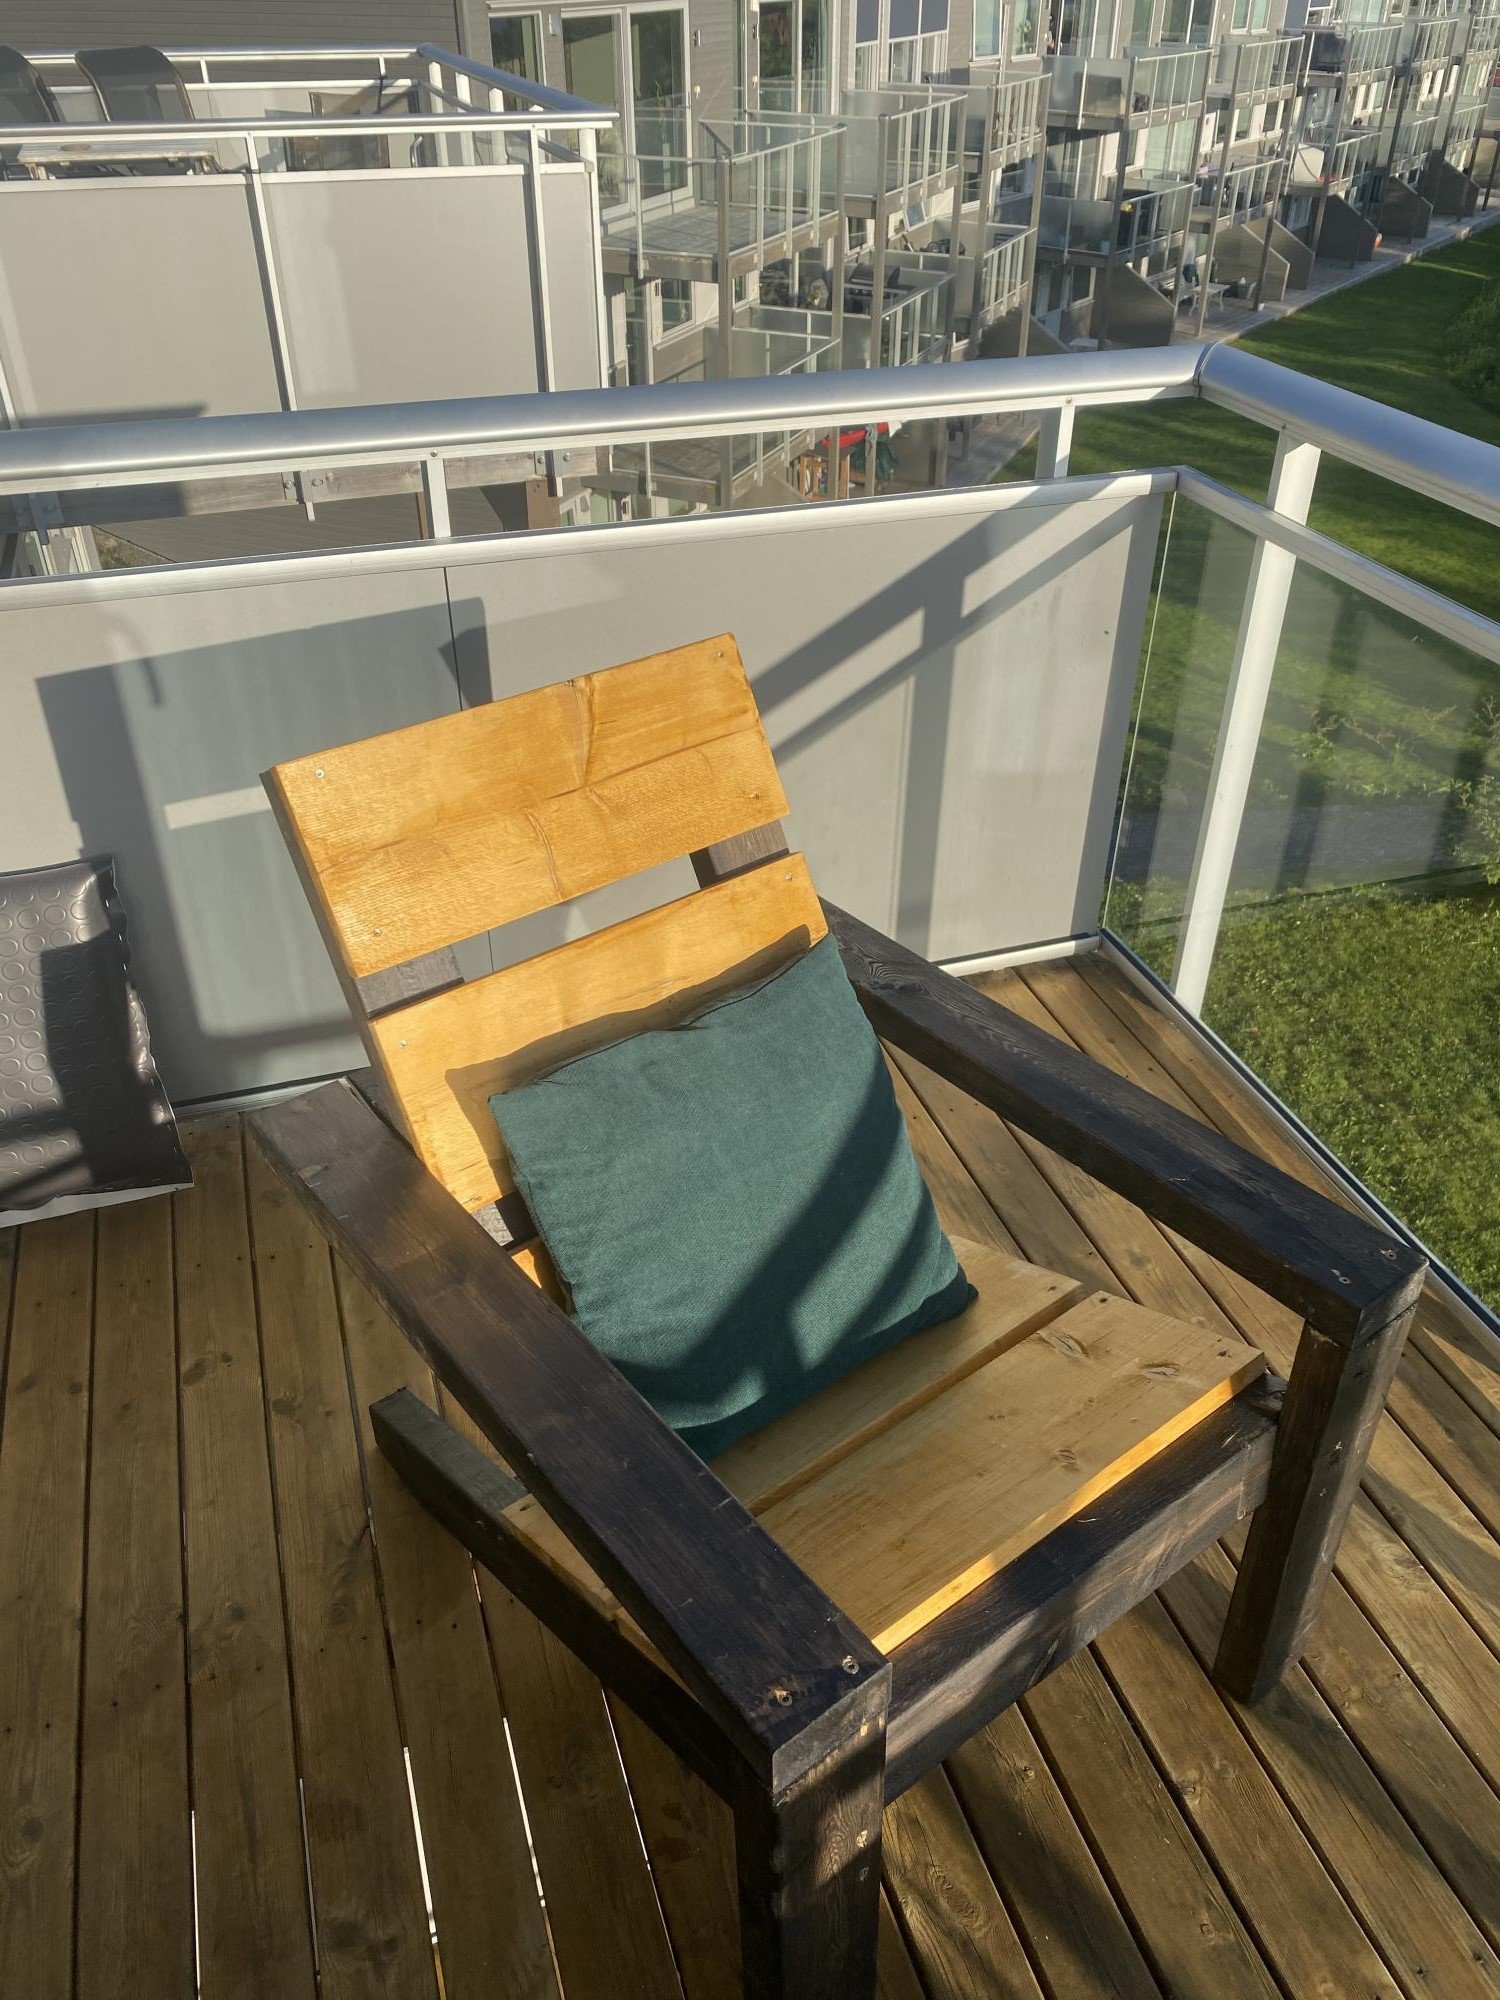
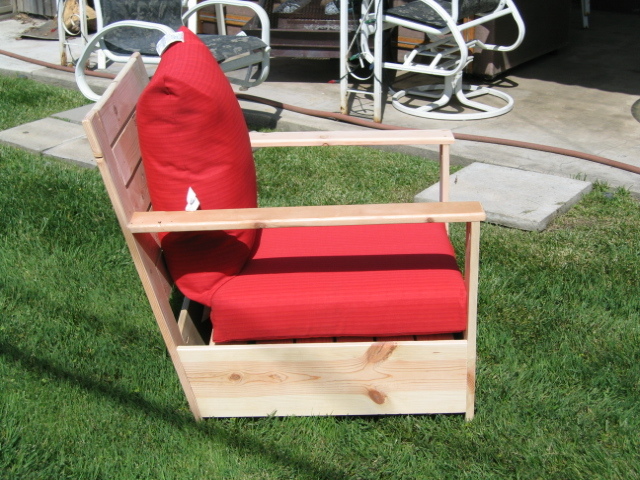
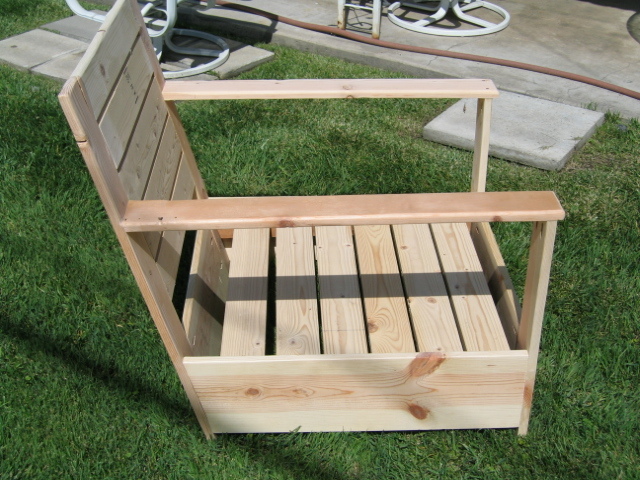
Bristol Outdoor Lounge Chair
I am a computer programmer by trade, a husband/father/cook/baker by avocation. I can read and write music. I am new to woodworking, and look forward to building with Ana's excellent plans.
Bristol Outdoor Lounge Chair
Friends,
This is my first woodworking project in a long time. When I found the plans from OPD at Ana's site, I thought, I can do that! It turns out I was both right and wrong.
I bought the wood; I ordered a Kreg Jig from amazon; I searched for inexpensive pillows. My wife is a terrific seamstress, and we looked for fabric and foam. Yikes, is foam expensive!
Anyhow, I measured everything twice, made my cuts and figured out how to cut the 15º angled cuts. Then I drilled all of the pocket holes - what a chore.
My good friend has a complete wood shop. He has more power tools than Sears. Me, I've got a hollow-core door on two plastic sawhorses, a jig saw, chop saw, power drill and screw gun. I wanted to do this myself, so I did not use any specialty tools.
I built the chair without glue. Since this is a prototype, I wanted to be able to dismantle it. I built it to the specs provided, and discovered three things:
1. Attaching the back as a separate piece at a 15º angle is weak. "Weak as water," someone has said.
2. Butt joinery is an imprecise science when soft wodd is used.
3. The chair was too dang big!
So I took it apart. I changed the width of the front and back panels to 20 1/2", and re-used the arm supports.
I cut one end of each side panel to 75º.
The two back supports are a single piece of 1" x 4", 32" in length. This, coupled with the angled cut on the side panels, eliminates the weak joint at the back.
I shortened the depth (from front to back) by about 3", but the box for the bottom cushion is still too big. Next time the box will be 25" square.
In using butt joinery, I found that the back supports and side rails and the front apron all went together well. Perhaps I set the depth gauge incorrectly on the Kreg drill bit, because the 90º joints are not as clean as the flat joints. Then again, the more I do this, the better at it I will get.
I know that some of the joint holes are too deep, and this let the screw penetrate through the joint. Careful measurement before drilling all of the holes is crucial, and demands one's attention. I found myself checking the stop ring on the drill bit several times as I progressed, to make sure it was still set properly.
Using the Kreg Jig is not hard; it takes a bit more effort than they lead you to believe. I found myself wishing for three hands when joing 90º joints.
When the chair was assembled, I rounded the edges with a 3/8" router bit, followed by a thorough sanding. We found very inexpensive 4" foam pillows at Wal-Mart, and you can see the result.
I think the chair looks good, it is really comfy, and there will be more projects before the leaves fall this autumn.
Built from Plan(s)
Estimated Time Investment
Day Project (6-9 Hours)
Finish Used
None - it's a prototype ;-)
Recommended Skill Level
Beginner
Basement Storage Shelves
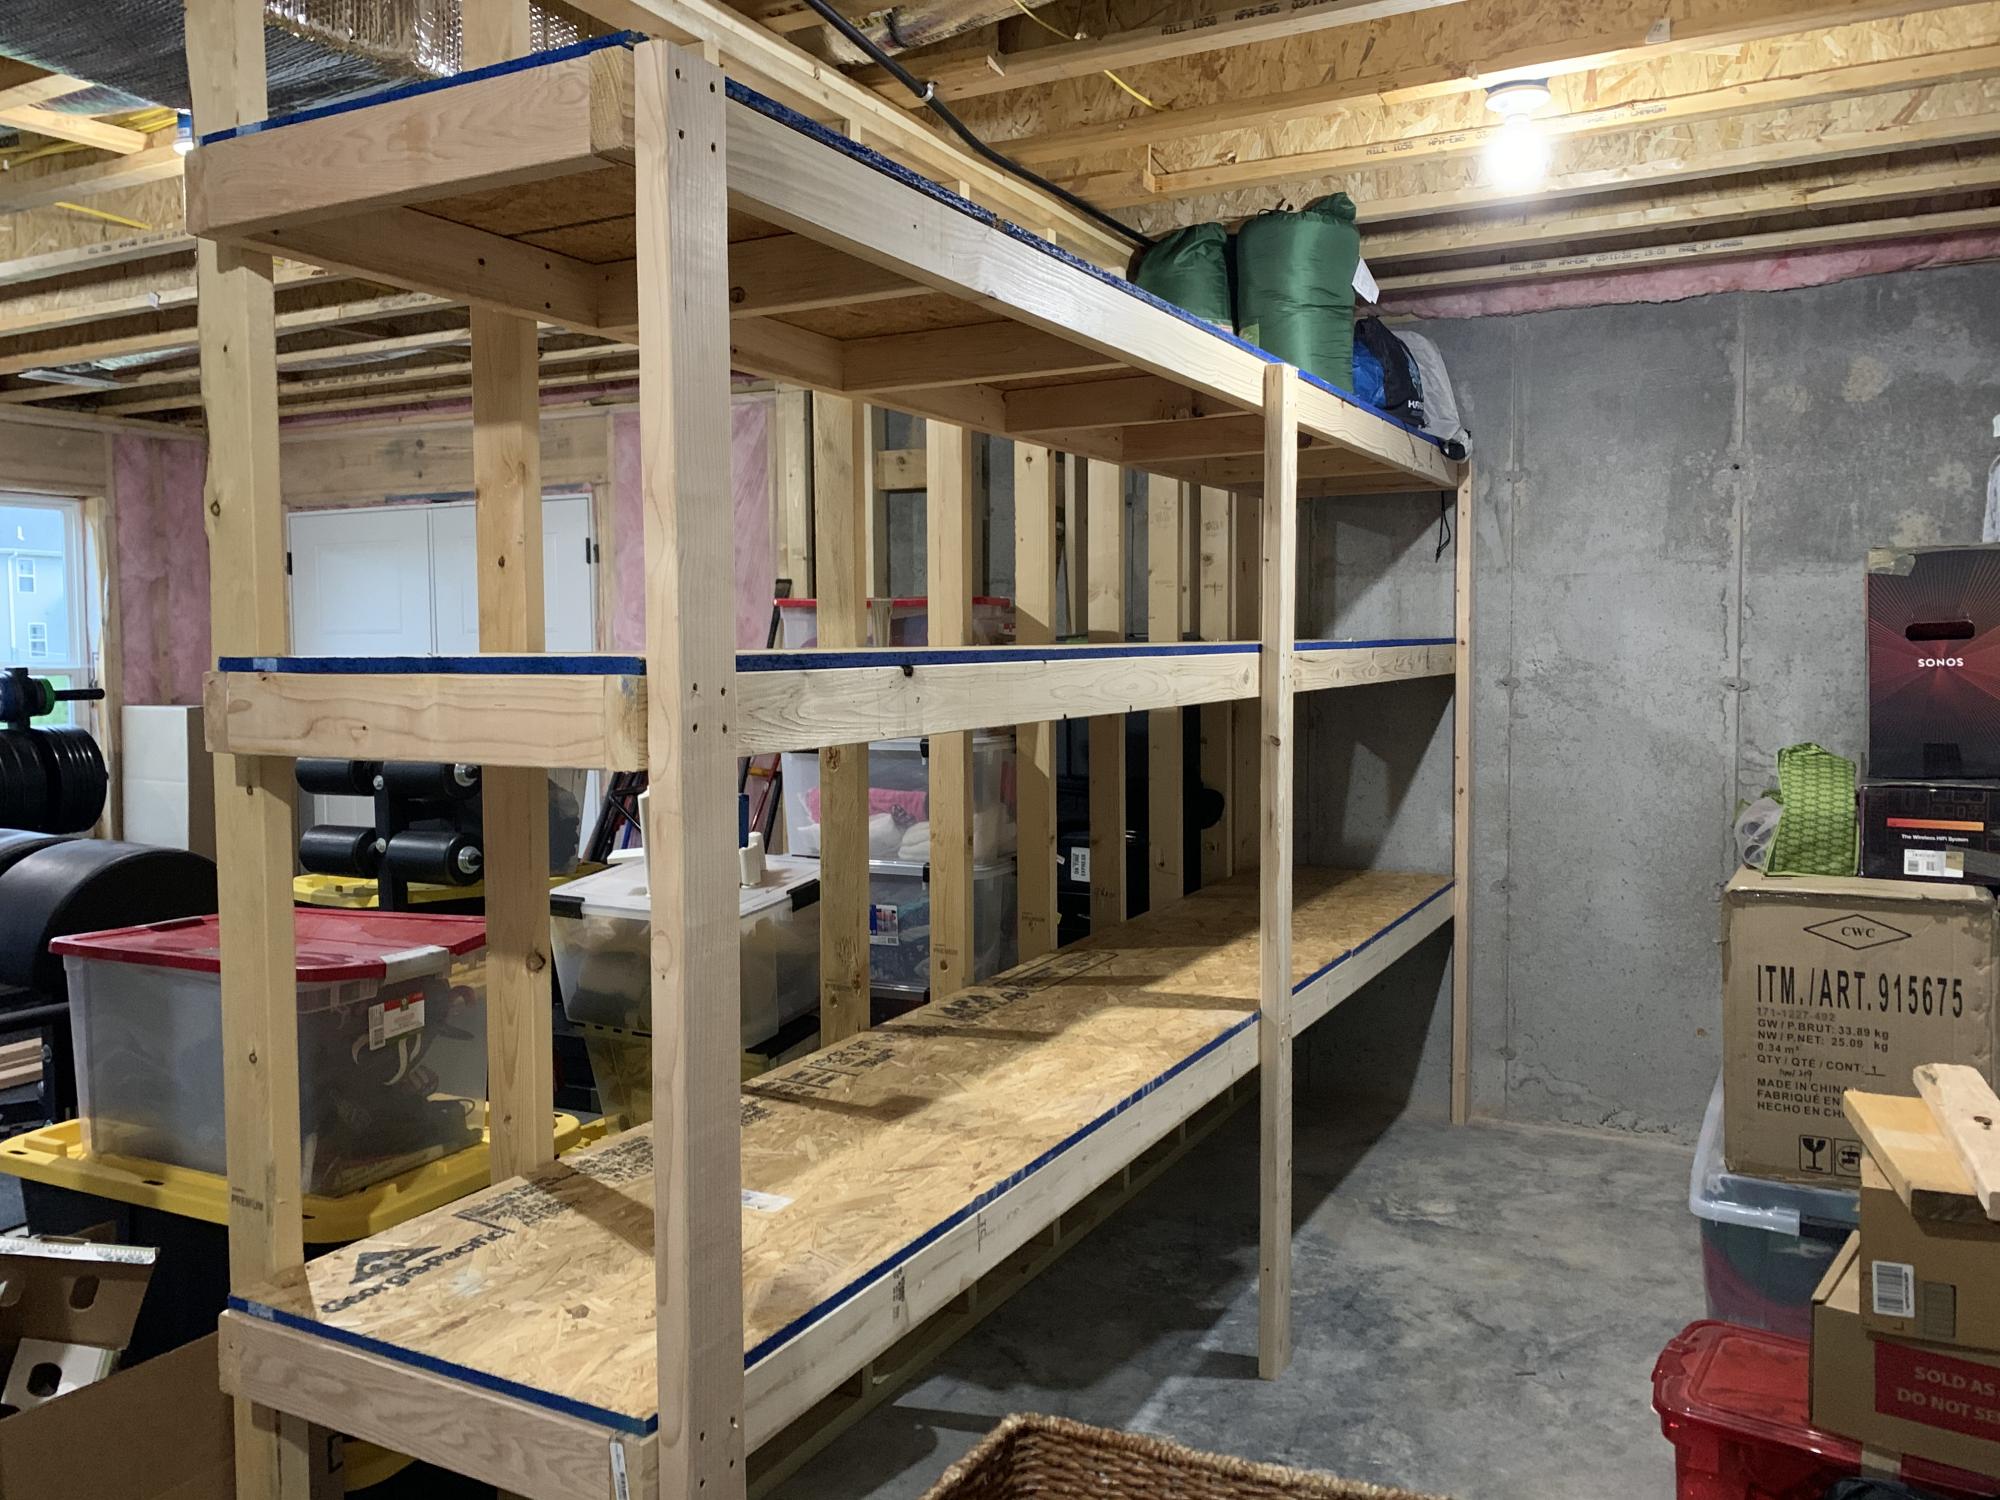
We just moved into a new home and had a huge open storage area in the unfinished portion of our basement and we’ve got a lot of stuff so we needed to make the best use of that space and these shelves deliver big time. This shelf is 12’ long by 2’ deep with 2 each 24” and 18” tall shelves. Really simple construction and I got to use my Kreg HD jig for the first time on the cleats so these bad boys are SOLID! My wife love this one so much I’m building another one in the opposite side of the wall with all 4 shelves at 18” tall.
Built from Plan(s)
Estimated Cost
150
Estimated Time Investment
Afternoon Project (3-6 Hours)
Recommended Skill Level
Beginner
Restoration Hardware Style Coffee Table
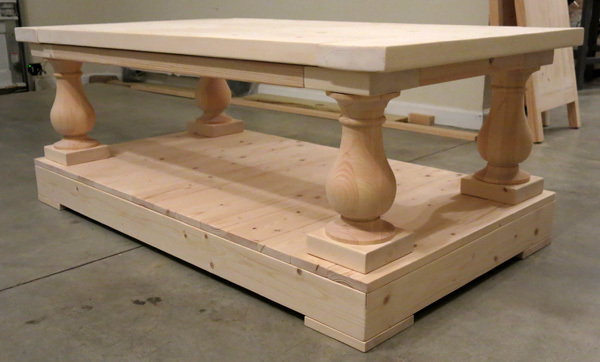
Restoration hardware style coffee table. We saw a coffee table we liked but didn't want to spend $2000 on. Designed my own and managed to build for $200. Main expense was the $130 for the legs from Osbornewood.com.
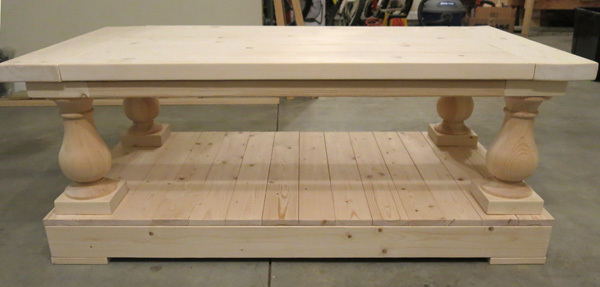

Estimated Cost
$200
Estimated Time Investment
Weekend Project (10-20 Hours)
Finish Used
Not sure yet - need to find a color that will look good!!
Recommended Skill Level
Beginner
Comments
Tue, 11/04/2014 - 13:29
beautiful!!
I love this, I have been wanting to make a really nice coffee table. I this this is gorgeous!

In reply to beautiful!! by rachelbebop
Tue, 11/04/2014 - 13:35
Thanks!
Thanks for the comment. It is actually pretty easy to make too which is the good part :-)
Fri, 05/13/2016 - 06:18
Restoration Hdwe coffee table
I went to Osbournewood.com for the legs. All I got was a listing of other companies selling them. The cheapest was $69. How did you get four for $130 or where did you go for that price?
Fri, 05/13/2016 - 06:18
Restoration Hdwe coffee table
I went to Osbournewood.com for the legs. All I got was a listing of other companies selling them. The cheapest was $69. How did you get four for $130 or where did you go for that price?
Fri, 05/13/2016 - 06:18
Restoration Hdwe coffee table
I went to Osbournewood.com for the legs. All I got was a listing of other companies selling them. The cheapest was $69. How did you get four for $130 or where did you go for that price?
Fri, 05/13/2016 - 06:18
Restoration Hdwe coffee table
I went to Osbournewood.com for the legs. All I got was a listing of other companies selling them. The cheapest was $69. How did you get four for $130 or where did you go for that price?
Fri, 05/13/2016 - 06:19
Restoration Hdwe coffee table
I went to Osbournewood.com for the legs. All I got was a listing of other companies selling them. The cheapest was $69. How did you get four for $130 or where did you go for that price?
Modified Grandy Console with inset doors
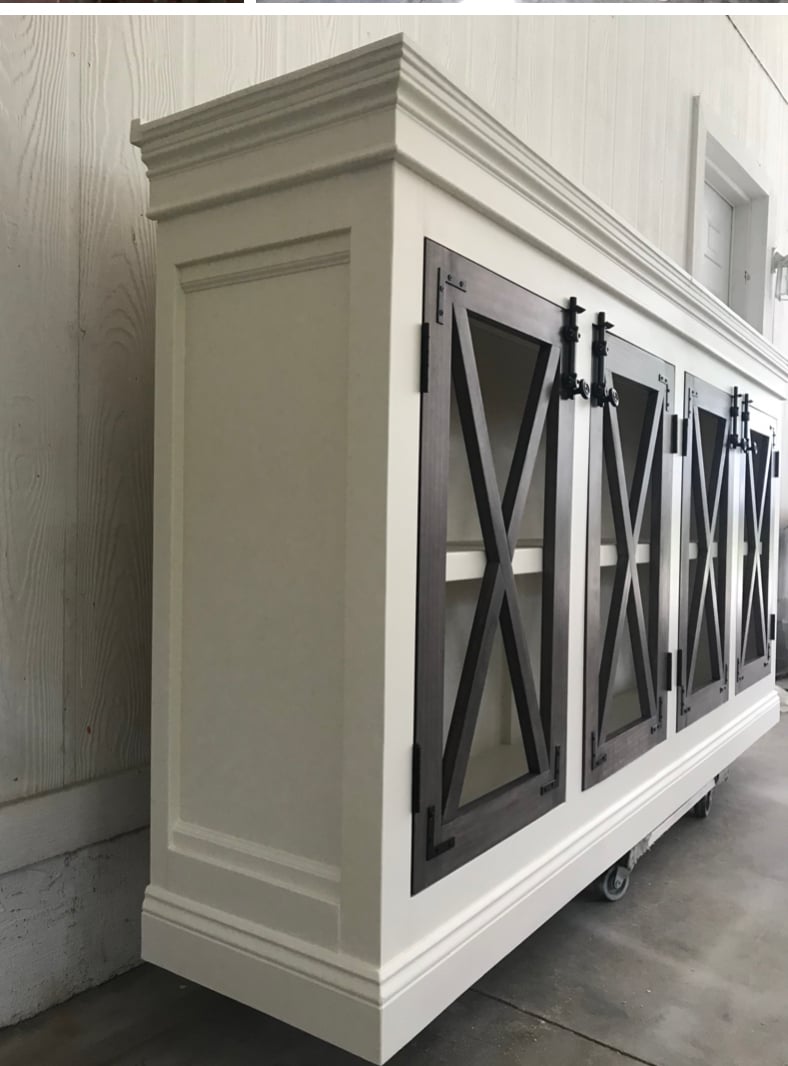
I wanted to switch things up. I have made and sold many of the Grandy consoles with barn doors but my current new (to us) home was more modern traditional, definitely not very farm house. The Grandy plan makes a solid piece of furniture which is exactly what I need for it to survive amongst the giant teenagers that we are raising BUT I wanted to switch up the doors and add some traditional elements with a pop of modernish hardware. Make sure that your face frame openings are square. Add some non-mortise hinges, latch bolts and L brackets and this plan appears transformed!
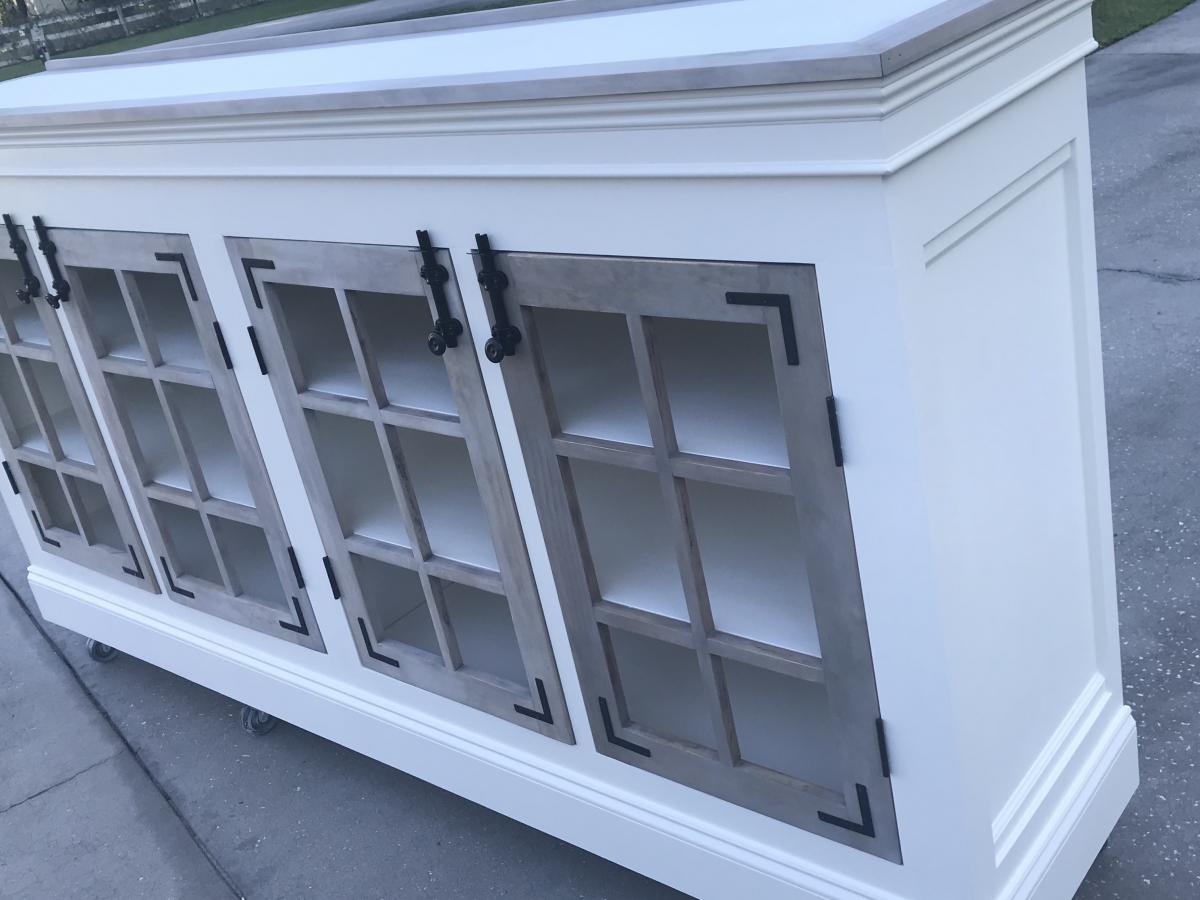
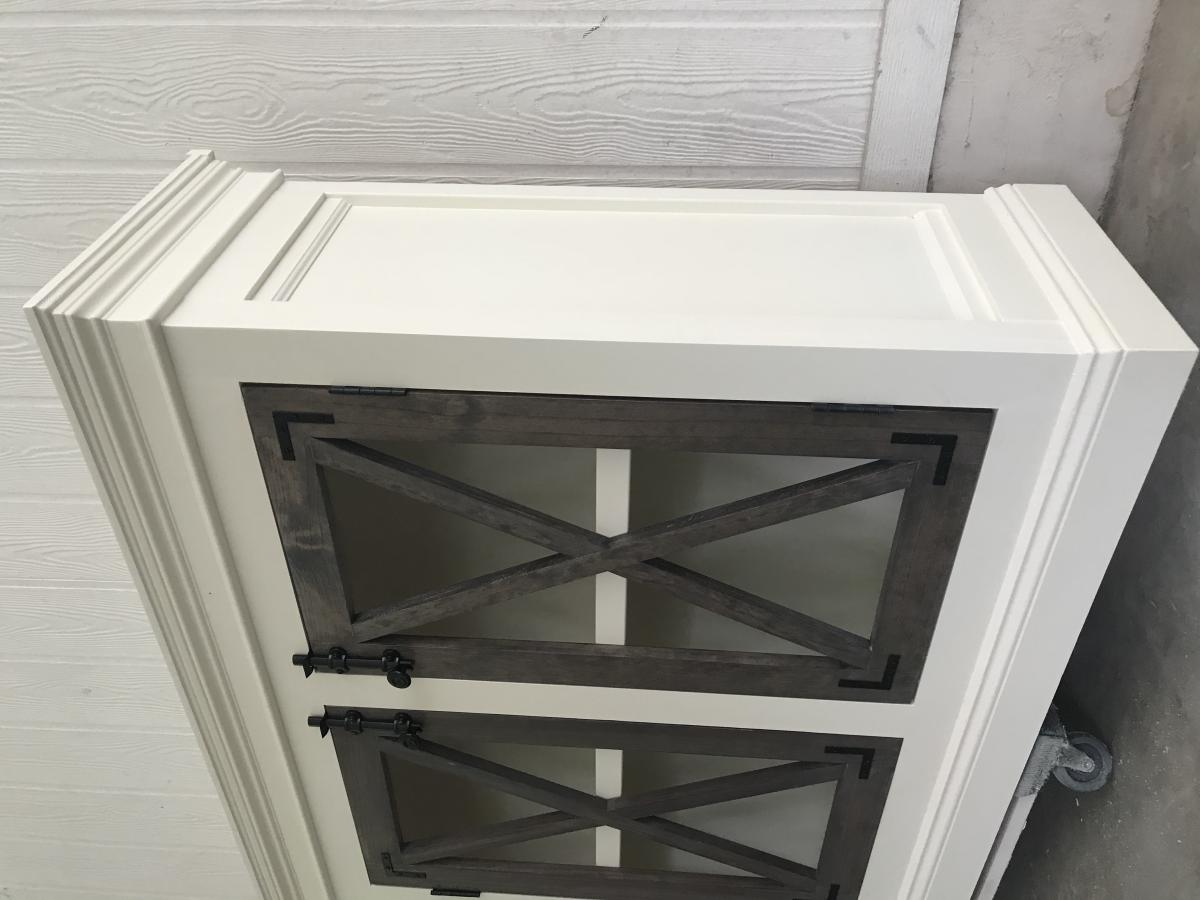

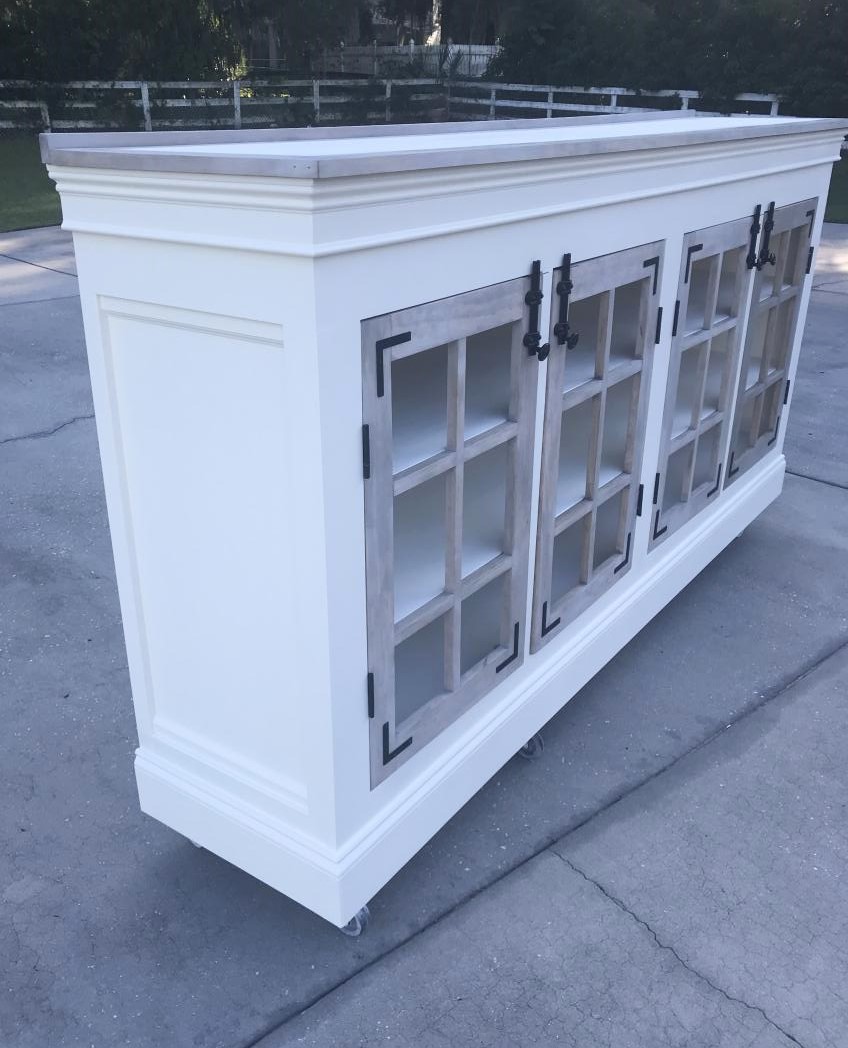
Built from Plan(s)
Estimated Time Investment
Weekend Project (10-20 Hours)
Finish Used
Kilz primer, sw Dover white with a poly clear coat for added durability. Sand between all coats (time consuming but it adds a professional edge to your finishes).I use a critter sprayer from Amazon for the exterior and for poly. Foam rollers for the inside. Stain color for X doors was kona and lighter toned doors was a process (see Instagram post) but involved white wax.
Recommended Skill Level
Intermediate
Comments
Sat, 11/28/2020 - 10:29
Transformed beauty!
Love the added elements for a traditional look! Stunning:)