Community Brag Posts

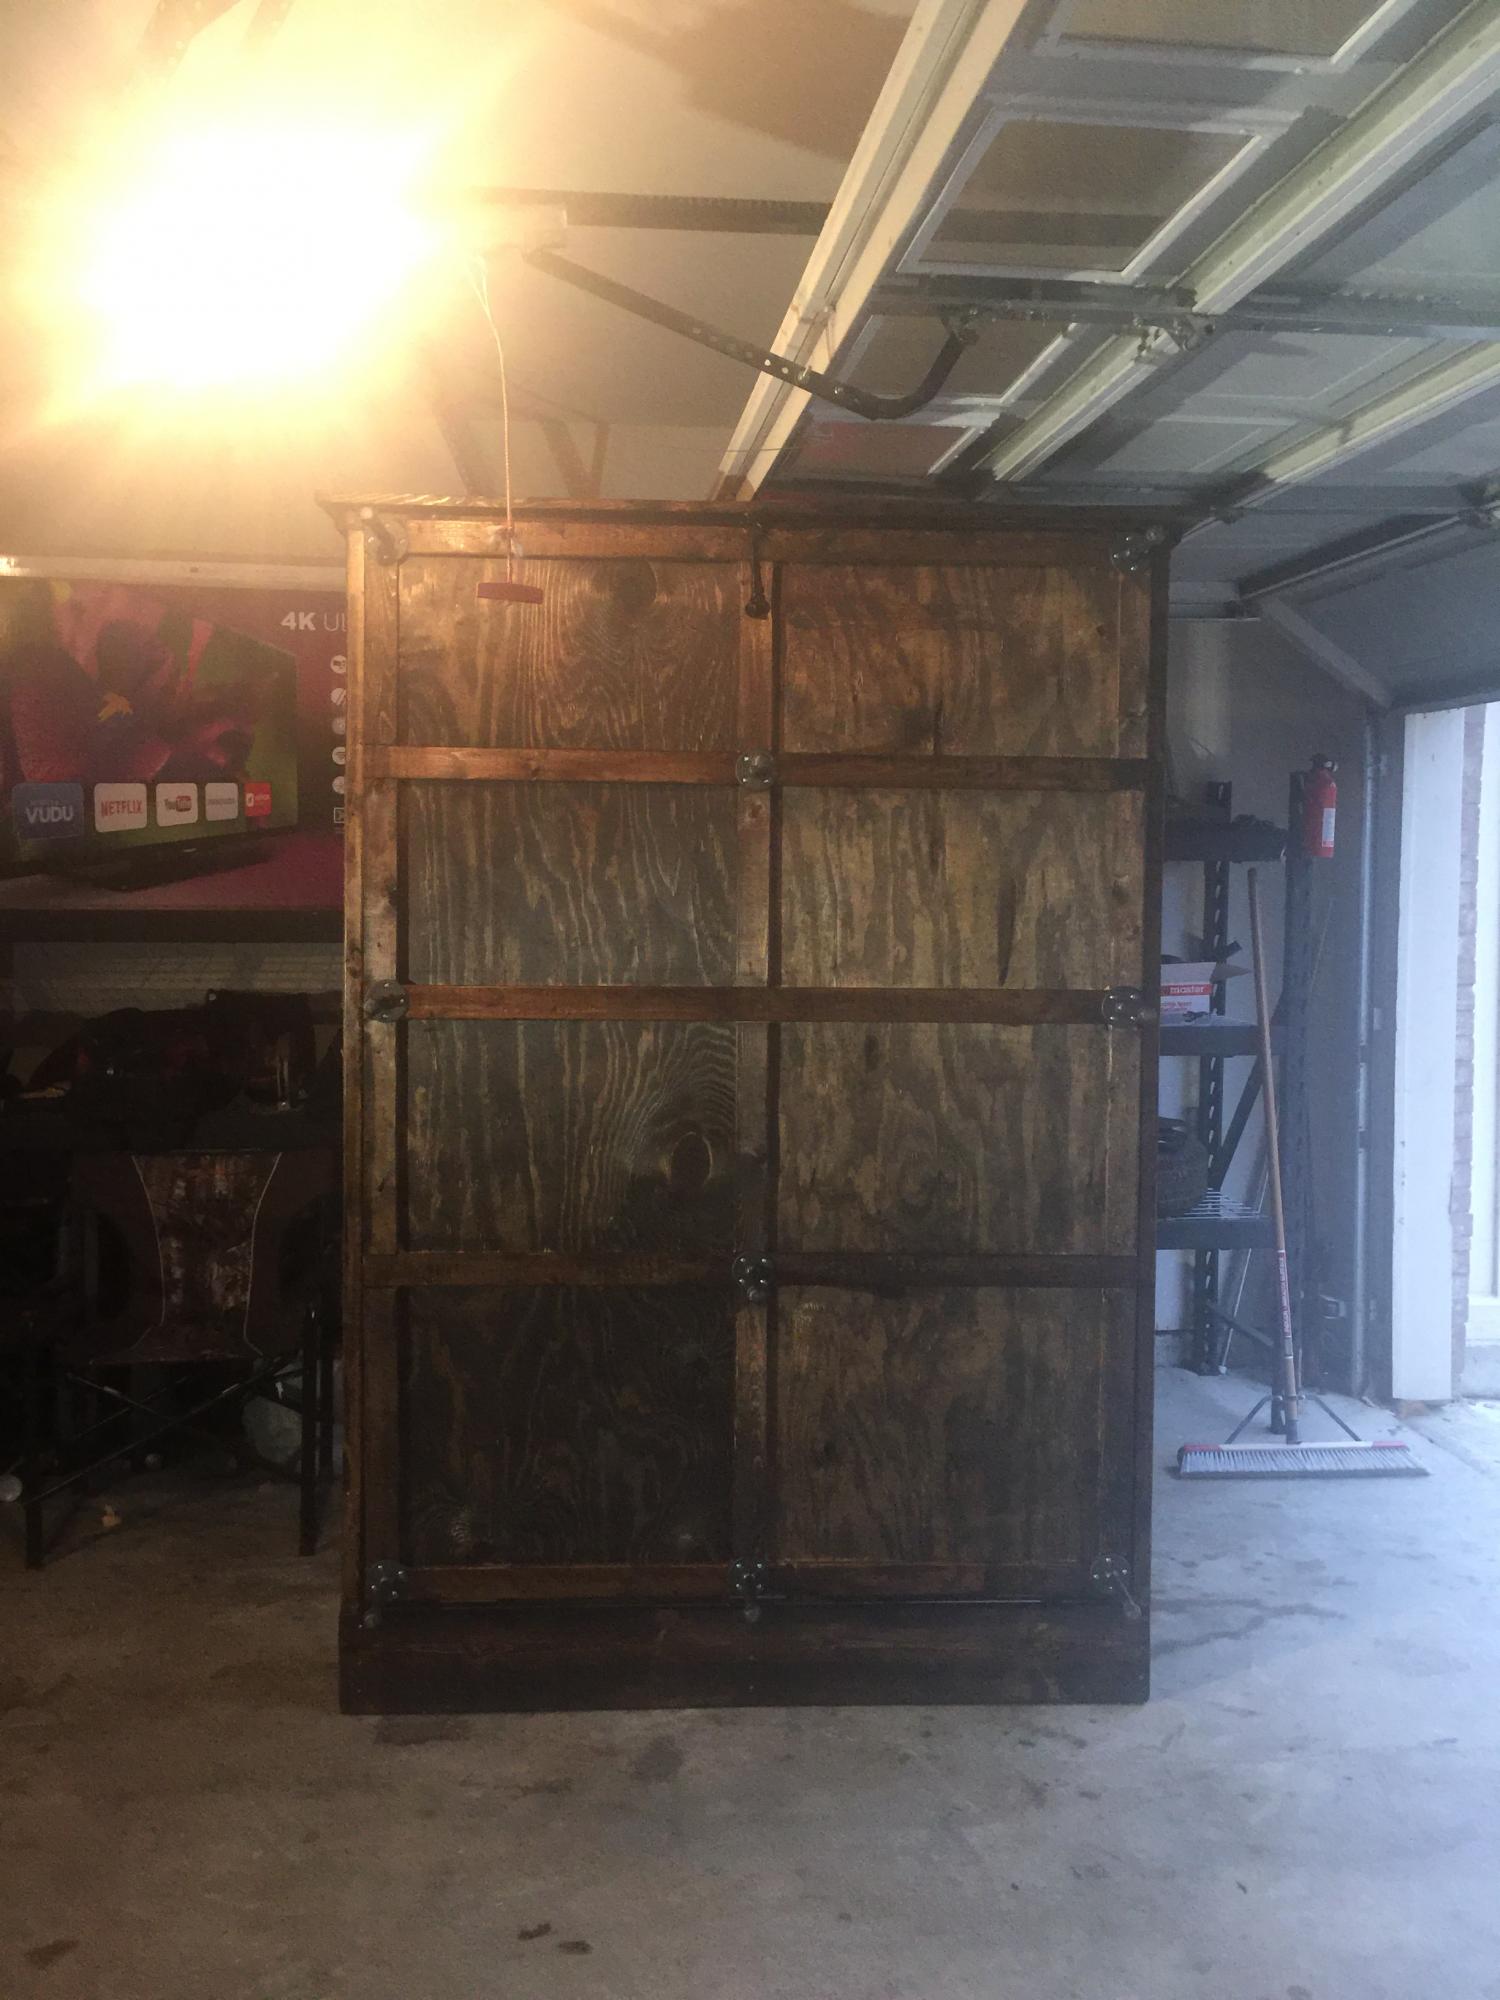
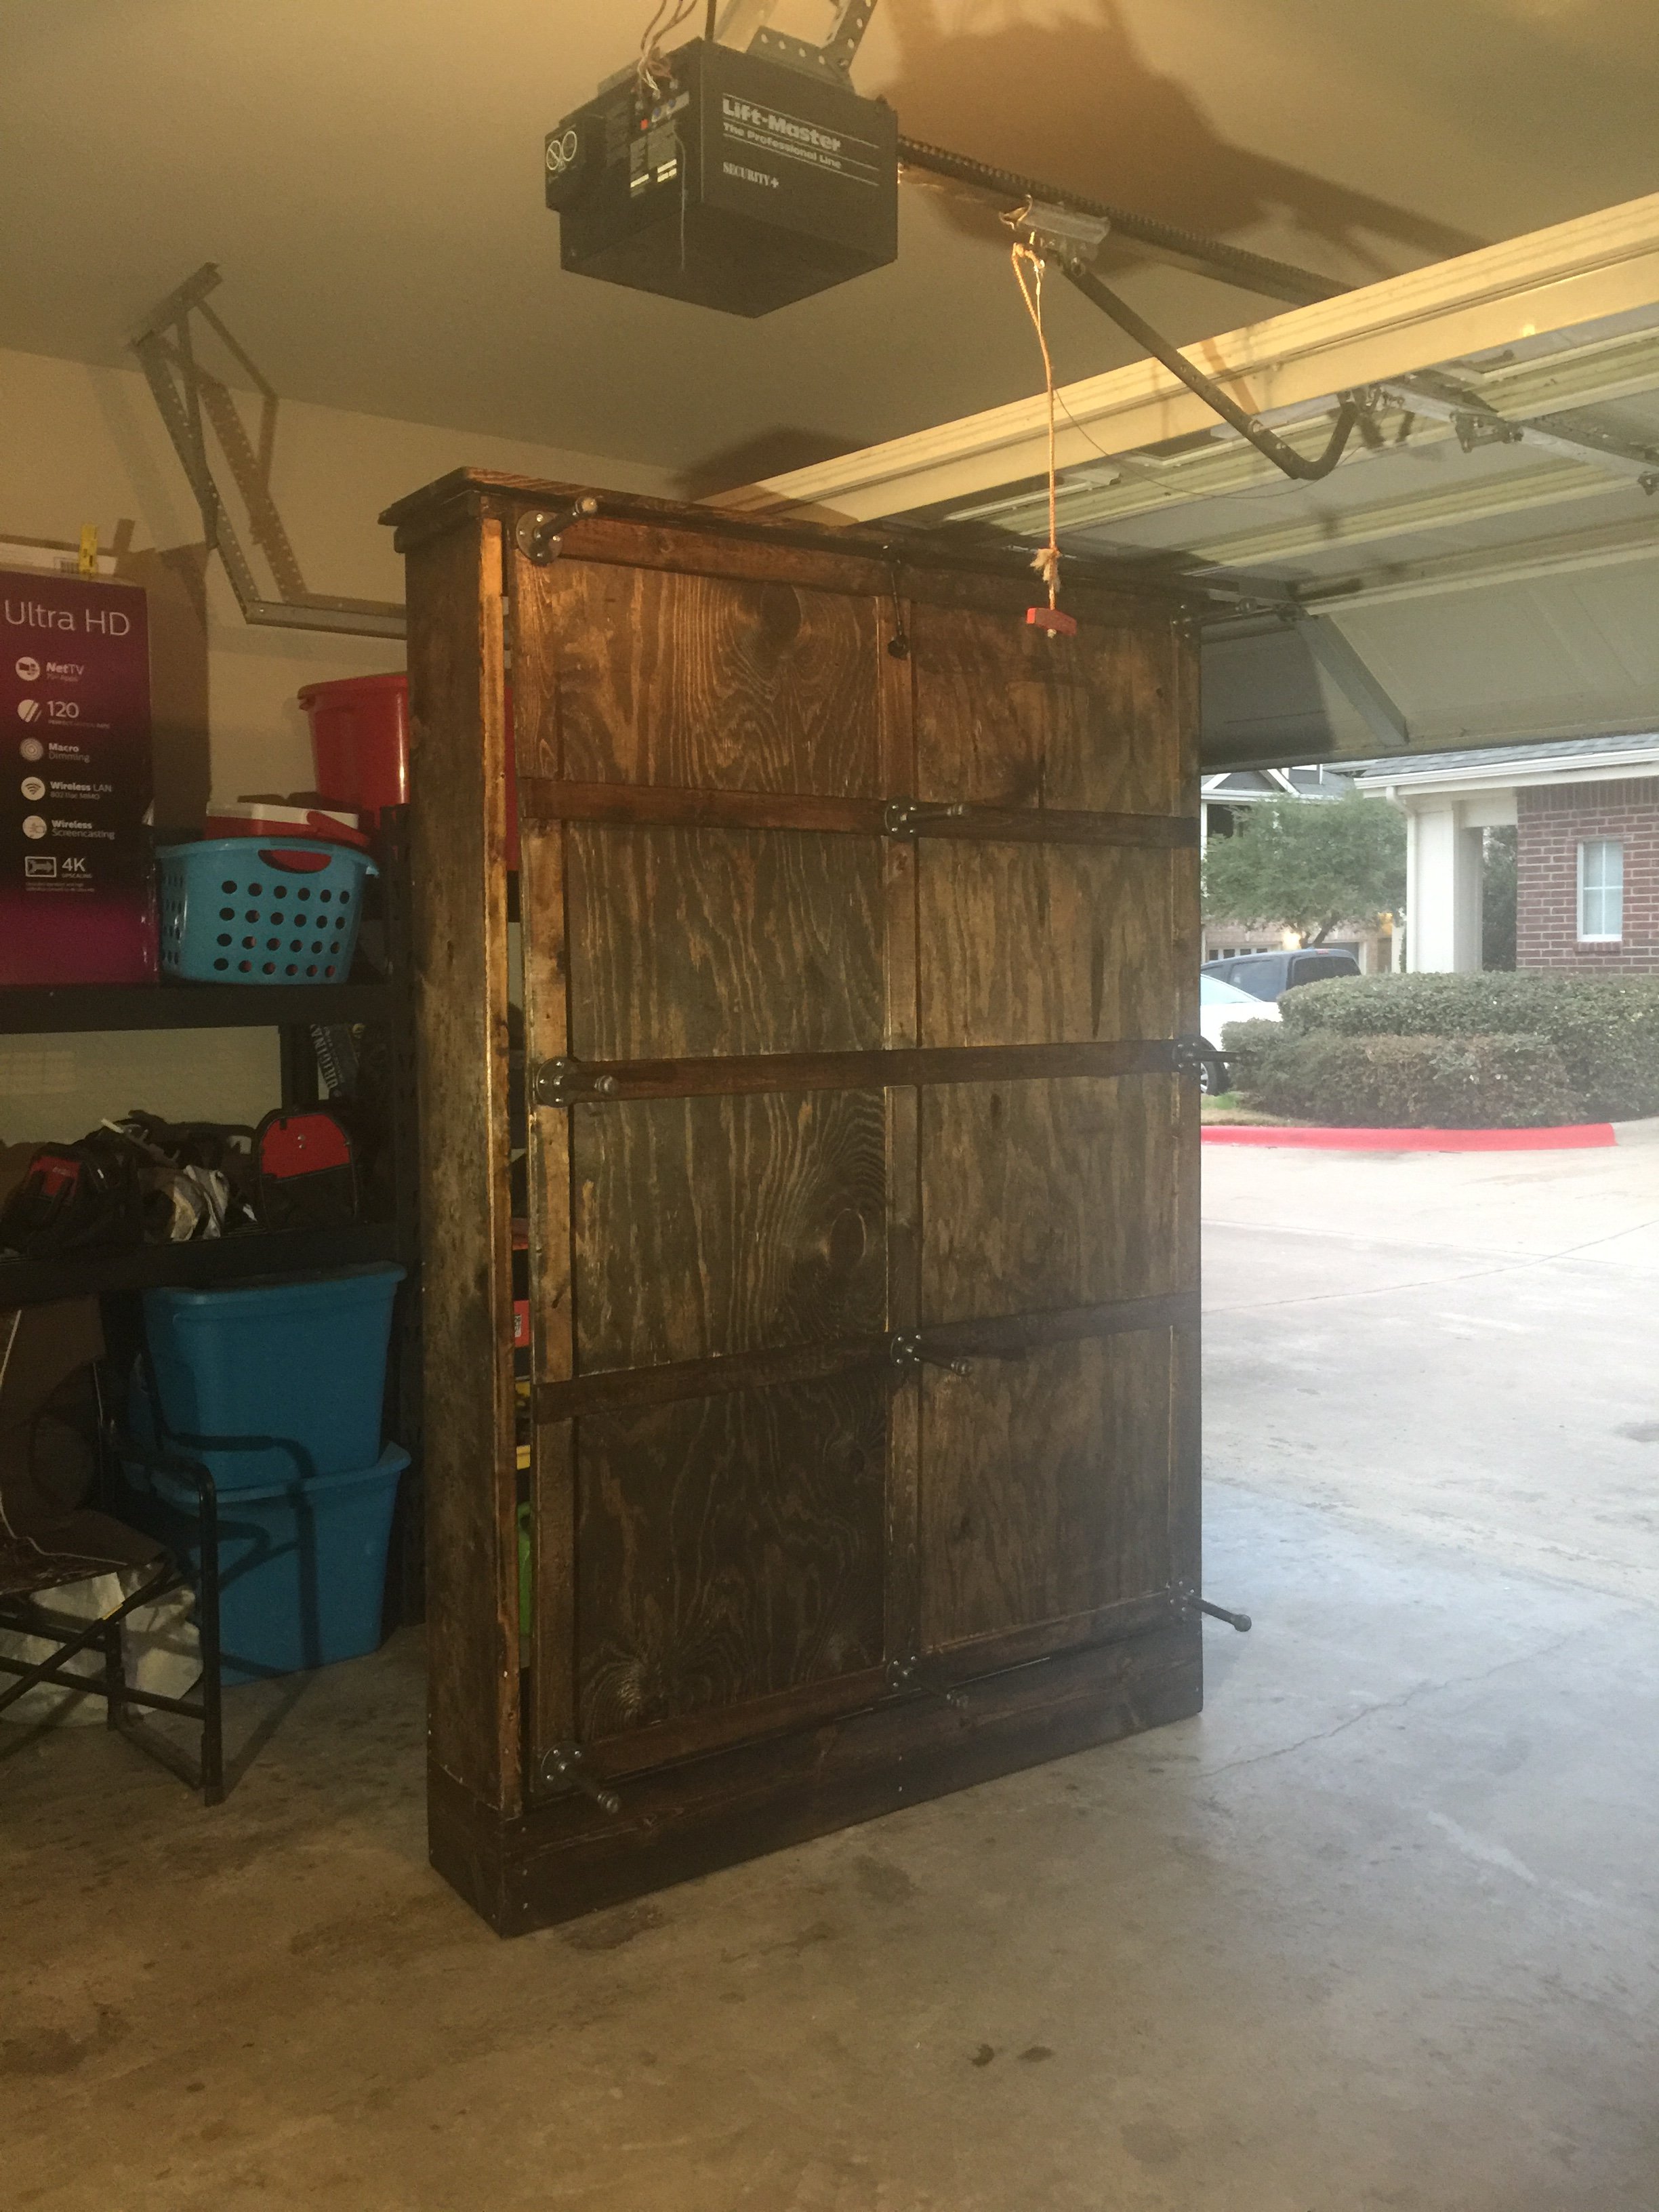
Podium for My Wife's Classroom

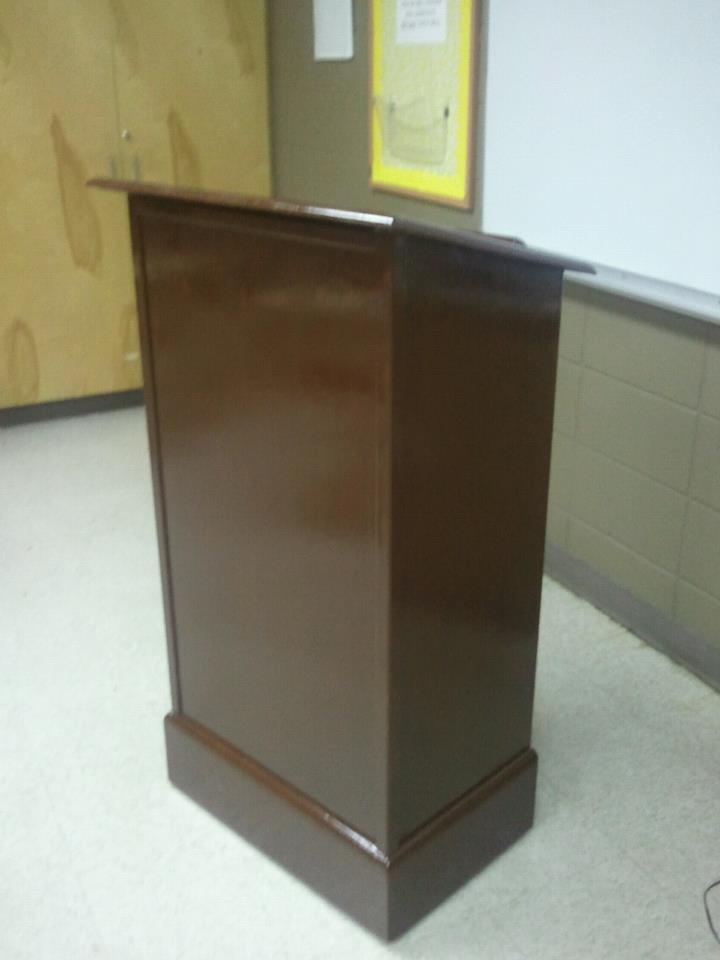
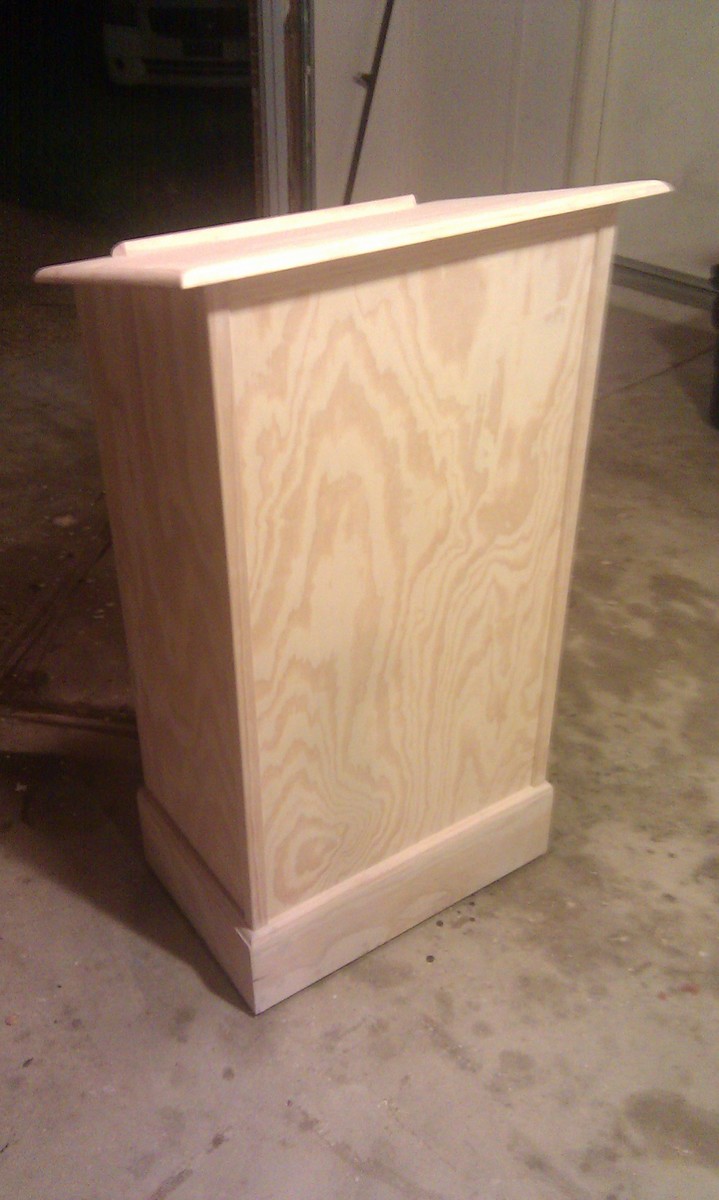
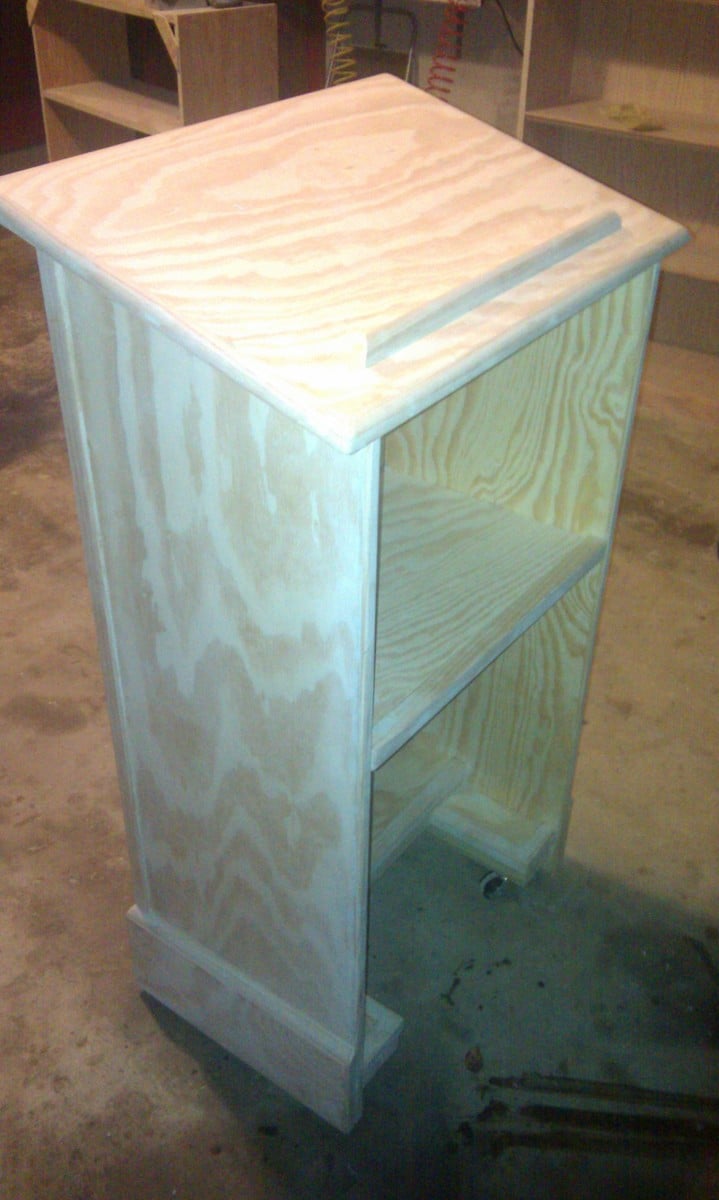
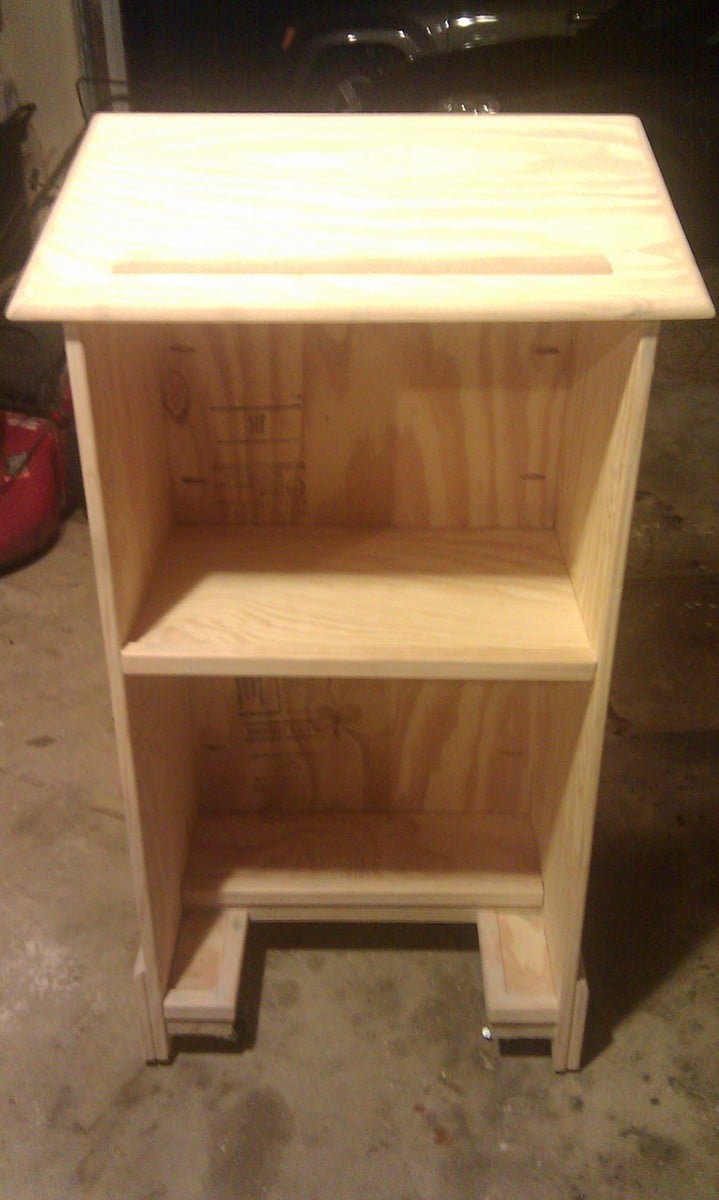
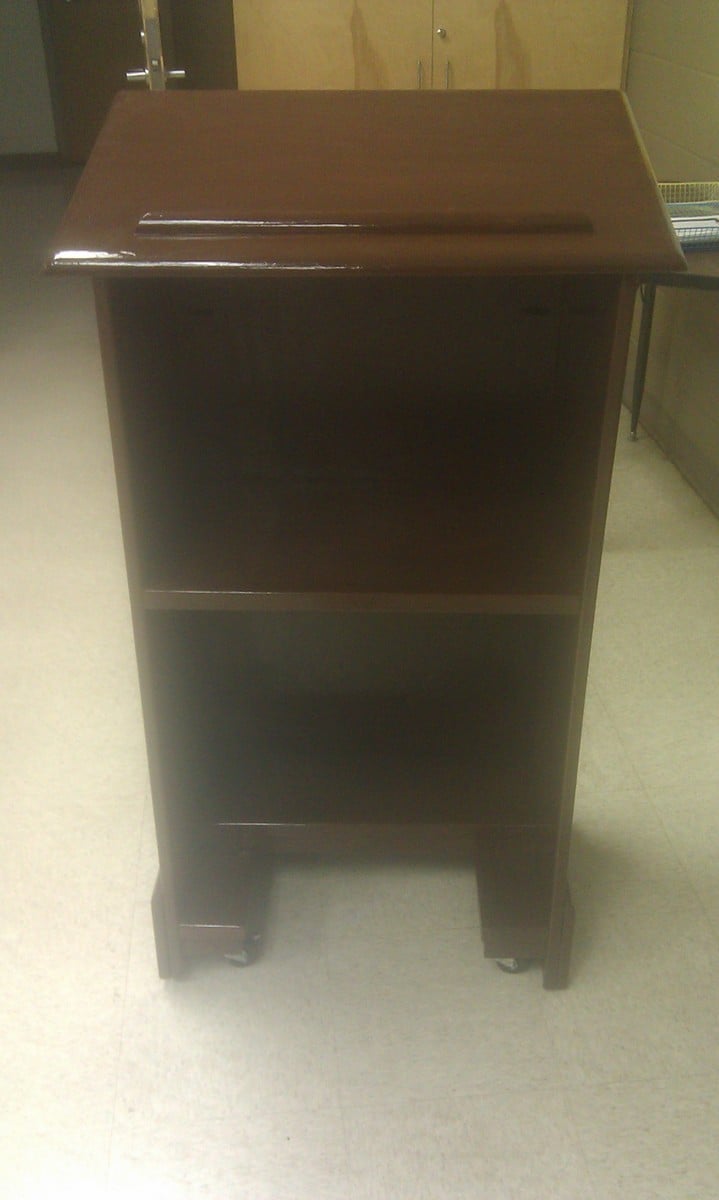
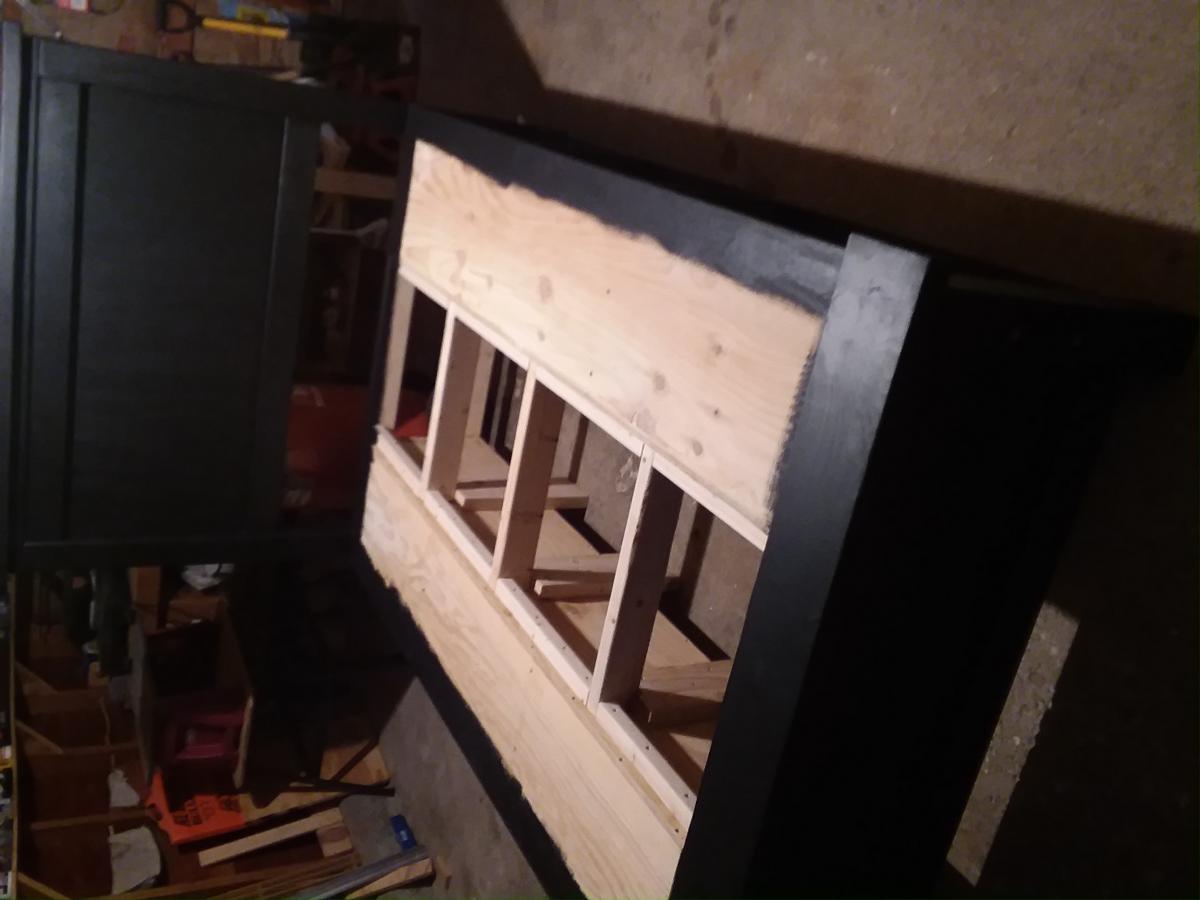
This is my first try at building furniture. I've built larger things in the past like decks and a fort for my nephews, but never furniture. Even though I used the plans to build the main box, I did change up the bottom and added some new stuff. I added wheels to the bottom my wife could easily move it around her classroom. I didn't want to put a square base on it because I thought it might hit her ankles when she was standing close to it. So I sort-of notched it out to give an opening for her feet and I used some scraps to create a short shelf at the bottom. I also added more trim that the plans call for. I cut strips of the pine plywood for the base molding and topped it with quarter round. I used corner trim for the front corners, the self inside and the bottom notched shelf. I also used screen trim for the back of it. I think it came out nice and I've very pleased with it. I used 2 coats of Minwax PolyShades American Chestnut on it.

Built from Plan(s)
Estimated Time Investment
Weekend Project (10-20 Hours)
Finish Used
Minwax PolyShades American Chestnut
Recommended Skill Level
Beginner

Full Size Loft

So I had an IKEA DELSEV single bed frame which i bought off someone who didn't need it anymore. Great sturdy bed for $25, but I wanted more space in my rental room, so I decided to go loft given the generous ceiling height. I did some research for ideas to convert my current bed, and found the perfect one at your site! I made modifications to your plans so that I would be able to walk underneath without having to slouch, and adjusted some measurements to integrate the IKEA bed frame. The project only cost me $38 worth of timber, screws were pinched (with permission!) from my landlord's stash, and this was the result after 3 days of cutting, sanding, partial assembly, staining and varnishing, and final assembly! The small tin of stain and varnish was originally for a wooden rack project for my vintage bicycle, and i managed to cover both rack and bed frame with the entire tin, down to the very last drop!

Estimated Cost
$38
Estimated Time Investment
Week Long Project (20 Hours or More)
Finish Used
British Paints Stain and Varnish, Maple Satin
Recommended Skill Level
Intermediate

Butcher Block Modern Box Frame Coffee Table and Console Table

While staging my most recent flip house, I needed some accent tables for the living room.  I picked up a butcherblock countertop at IKEA, then created two end tables and 1 coffee table.  I loved Ana's simple design, and I thought it was a great balance to the warm butcherblock top.  Thank you Ana for a great plan as always!

Estimated Cost
<$100 for all 3 tables! The countertop cost $75.
Estimated Time Investment
Afternoon Project (3-6 Hours)
Finish Used
White semigloss on leg frames
Recommended Skill Level
Beginner

Comments

Farmhouse Storage Bed

Submitted by Jack-1961 on Wed, 06/17/2020 - 06:29

The plans for this bed were great! I made 2 queens and one double bed using these plans with minor modification to add extra durability. Instead of using screws to attach the head and footboards, I used carriage bolts. I added 2X6s for additional bed feet (3 per side) as well as 2X4s (unattached-for ease of being able to move the bed). I also used 3/4" ply instead of slats in the middle section of the bed, this also allows for additional hiding/storage space in the middle of the bed. I could have chose to go another step forward and added hinges and an inset door handle to that middle ply for ease of using that space.

Estimated Time Investment
Week Long Project (20 Hours or More)
Recommended Skill Level
Beginner

My version of the small chicken coop

Submitted by Anonymous (not verified) on Wed, 09/07/2016 - 12:58

Plans for this coop were fantastic. It was a lot of work, but really fun to build.  As hard as I tried to keep the cost down, it cost probably close to $300 in materials, but it is well worth it compared to the quality of similar priced premade coops.  I did not want the garden bed, so I enclosed the run fully with hardware cloth. I also added a 2" lip around the cutout in the floor so they wouldn't push all of the bedding down the hole. 

Estimated Cost
~$300
Estimated Time Investment
Weekend Project (10-20 Hours)
Recommended Skill Level
Intermediate

Comments

Lady Goats

Wed, 09/07/2016 - 13:17

I just got your email and had to run over to check it out. Looks great!! That was a great idea to add the lip to the opening (am I weird for not using bedding in the coop? We just have the painted floor that we scoop out every day). 

The red roof and the flower box are making me swoon <3

Double Wide Camp Loft Bed!

Have two boys who where in need of more floorspace to play. Saw the great plans for the Camp Loft and decided to make a double wide. One platform and two beds.

All in all went together as designed. Eliminated the stairs for a ladder. Works great if you have a long wall.

Estimated Cost
$85 for all the wood; 50 for stain and poly
Estimated Time Investment
Weekend Project (10-20 Hours)
Finish Used
Minwax
Recommended Skill Level
Beginner

Comments

Heavy Bench for New Greenhouse - Modified Farmhouse Table

Submitted by Tonya P on Wed, 09/12/2012 - 11:38

Before my new greenhouse was even delivered and built, I was searching for ideas on potting / greenhouse benches. The company wanted nearly as much $$ for the benches as they did for the greenhouse. By accident I came upon Ana's site. I saw the Farmhouse Table plans, then I saw Handy Andy's modification of the plan, and I was inspired to build them myself!
I found a big pallet of 2x pieces of wood at Menards for $25. They usually set out a pallet of odds and ends that are of "like" items. These were about 3.5' long pcs of 2x10's and 2x8's and such (I have enough of these to do the other benches I want to build... and then some!). I also used some 2x4's that came off a really nice sturdy pallet that we picked up for free, and the rest were just boards we had around the shed.
Hubby was willing to help me with this project, but I wanted to do it myself. He did help with the heavy lifting, and I do appreciate that :) Once I had the frame built, we had to move it into place in the greenhouse otherwise we would not have been able to get it in there. And now that it's complete... it's HEFTY!!! And believe me, it's not going to shift about! lol I also put 2x4's across the bottom of the legs so that it wouldn't sink down into the pea stone floor.
The benches basic construction is the Farmhouse Table, but I added a bottom shelf, a little like Handy Andy's. I must say, because this was not a fine piece of furniture, I was not as intimidated or nervous. It was great for my first ever big project :) It took me some time to complete it, over the course of 2 days, but then I also have to cook and clean and work and garden and a hundred other things in a day :) So, I was in no hurry, but it was a very fun project and I'm SO glad I took it on.
I will be building more of these benches to fill up my beautiful new 10x14 Cedar Built Greenhouse.
Thank you Ana, and Handy Andy!!! I couldn't have done it without your examples!
~ Tonya

Estimated Cost
$10 more or less
Estimated Time Investment
Day Project (6-9 Hours)
Finish Used
Cedar colored stain sealer.
Recommended Skill Level
Beginner

Tapered planter

Submitted by Anonymous (not verified) on Mon, 07/13/2020 - 07:40

Next time, I will cut the 1x2 and 1x3 at the 5 degree angle to match the top and bottom planes...
Thanks for the idea! It is great

Built from Plan(s)
Estimated Cost
30.00
Estimated Time Investment
An Hour or Two (0-2 Hours)
Finish Used
Sanded with 80 grit and clear polyurethane
Recommended Skill Level
Beginner

Bay Window Standalone Desk

Submitted by jonnymac on Sat, 07/19/2014 - 16:16

This is a bay window standalone desk. The desk has an enormous top and fits snugly into the bay window. It did not have to be attached to the wall. There are four pieces in total: the top, 2 base units and a support that spaces the desks at 36" and further secures the top.

The base unites are built from the File Base Classic Wall Storage System and the top is glued up 2x12s that were planed down and straight edged.

Estimated Cost
$175.00
Estimated Time Investment
Weekend Project (10-20 Hours)
Finish Used
The bottom was painted with Chalk paint from Lowes and the top is stained with one coat of Jacobean. Both top and bottom were sealed with a Minwax Protective top coat.

This was my first desk to build and learned a great deal. Looking forward to my next project!
Recommended Skill Level
Intermediate

Under Fort Sandbox Cover

Submitted by millerhero on Tue, 07/29/2014 - 06:47

Thanks to inspiration from Ana's post on the Sand Box with Built-in seats, I've retrofit our Jungle Fort (http://www.detailedplay.com/Jungle-Fort-Swingset.htm) with the sandbox cover/bench system. I've upgraded the lumber dimensions to 2x4s and 2x6 to accommodate the increased 67.5" span.

Built from Plan(s)
Estimated Time Investment
Day Project (6-9 Hours)
Recommended Skill Level
Beginner

Baby Ray's New Closet!

Submitted by Katurn89 on Wed, 11/14/2018 - 08:24

This was the second building project I've ever completed. I had to make a few adjustments to make it fit the size of ray's closet, but it was totally worth it. most of the work was in the measuring, sanding, and sealing of the wood. Ftting the frames can be a little tricky if your planks aren't perfectly straight. Otherwise, this project was pretty straight forward and can be done in just a few days depending on how much time you have to dedicate to it. Thanks Ana!

Built from Plan(s)
Estimated Cost
About $150
Estimated Time Investment
Week Long Project (20 Hours or More)
Finish Used
Early American stain and polyurethane
Recommended Skill Level
Beginner

Outdoor Sectional and Pallet Coffee Table

Submitted by Anonymous (not verified) on Sun, 11/20/2016 - 17:56

Hi Ana! 

My husband used your plans to build the 2x4 outdoor cedar sectional :) He did it in 1 day and it couldn't have been easier! He even tried first time working with pallets to make a small table and it came out perfectly too! Can't wait to enjoy family time on our new back porch.

Thanks Again & Love From Austin ❤️

Kathleen 

Estimated Cost
$350
Estimated Time Investment
Day Project (6-9 Hours)
Finish Used
Stain
Recommended Skill Level
Beginner

Comments

meredithl

Thu, 10/24/2019 - 16:35

Hi, your furniture is beautiful.  May I ask:   Where did you find your cushions?  And what color/ brand stain did you use?  Lovely job.

Seasonal And Holiday

Adirondack Chairs and Table

Submitted by marretje74 on Sat, 08/09/2014 - 13:44

My first project ever... Had a bit trouble convert it all to metric measurements (I'm from the Netherlands), but as you can see it turned out pretty well. I get a lot of compliments, even from the (teenage) friends of my children! They really like to hang out in our back garden all of the sudden ;-)

Estimated Time Investment
Week Long Project (20 Hours or More)
Finish Used
Wood-stain, teak colour
Recommended Skill Level
Intermediate

Murphy Bed

Submitted by Anonymous (not verified) on Mon, 02/13/2017 - 19:21

More difficult build then I'm used too. Modified it to fit a full mattress but I think it turned out great! It's a lot cheaper to build than most Murphy beds to purchase out there on the market. Enjoyed these plans. Thank you Ana!

Estimated Cost
$250
Estimated Time Investment
Weekend Project (10-20 Hours)
Finish Used
Dark walnut
Recommended Skill Level
Intermediate

Garden shed

Submitted by Anonymous (not verified) on Sat, 11/28/2020 - 13:19

Our take on the small garden shed. Ours is 4 1/2 by 7 feet. We used cedar fence pickets and 2x4 construction. Left over shingles from when our house was built. We are definitely not roofers or framers, also chasing around a 3 year old didn't make things easier. Turned out beautiful for what we want it for. Just rustic enough. Great intermediate project.

Built from Plan(s)
Estimated Cost
$400
Estimated Time Investment
Weekend Project (10-20 Hours)
Finish Used
Thompson's clear water seal will be applied this summer.
Recommended Skill Level
Intermediate

Comments

Seasonal And Holiday

Bi-Fold Closet Doors

We wanted to replace the vented / painted bi-fold closet doors in our Master Suite with something that was warmer and more consistent with the decorating motif of the house.  We priced out various wood bi-fold doors and were shocked at the $350 - $600 price range of what was available.   We decided that building them ourselves was a much better choice.

The frames are made from 1” Knotty Pine and the panels are from ¼” Knotty Pine.   Frames were made to fit and assembled w/ Kreg screws & Glue.  Rabbet channels were cut w/ the router and the panels were brad nailed & glued.

It was finished w/ the same stain used on our Knotty Pine ceilings / walls and finished w/ a satin varnish for a perfect match to our house.

This was a very straightforward, quick & inexpensive alternative to purchasing expensive bi-fold doors.   

The doors took about 15 hours to build / sand and 10 hours to finish.   Total cost was around $100. 


Estimated Time Investment
Week Long Project (20 Hours or More)
Finish Used
Custom stain and satin varnish.
Recommended Skill Level
Beginner

Comments

White Washed Queen Headboard

Submitted by sawdust on Tue, 02/12/2013 - 11:39

This is my first piece of furniture I've ever made from a plan. I would recommend this for someone who is new to the craft. I also sanded each board before I put it together. I just find this easier to do than sanding it afterwards. Plus, it gives me the chance to look at the grain and see where I might want it. Both the stain and clear coat I used can be washed out of your brush with soap and water.

Estimated Cost
$90.00
Estimated Time Investment
Weekend Project (10-20 Hours)
Finish Used
Minwax white wash pickling stain - one application with a foam brush.
A very forgiving stain and easy to use.
Minxax Polycrylic clear satin - one coat with a paint brush.
Recommended Skill Level
Starter Project

Comments

spiceylg

Wed, 02/13/2013 - 05:18

Really like the white wash look, great job! Also, love the bedding and the tray. Did you make that tray, too?

Back