Community Brag Posts

$40 Ping Pong table top game

With Father's Day rolling in, my sons and I needed a gift, stat! My husband thinks that Table Tennis is the quintessential father-son activity, so that was an obvious choice.
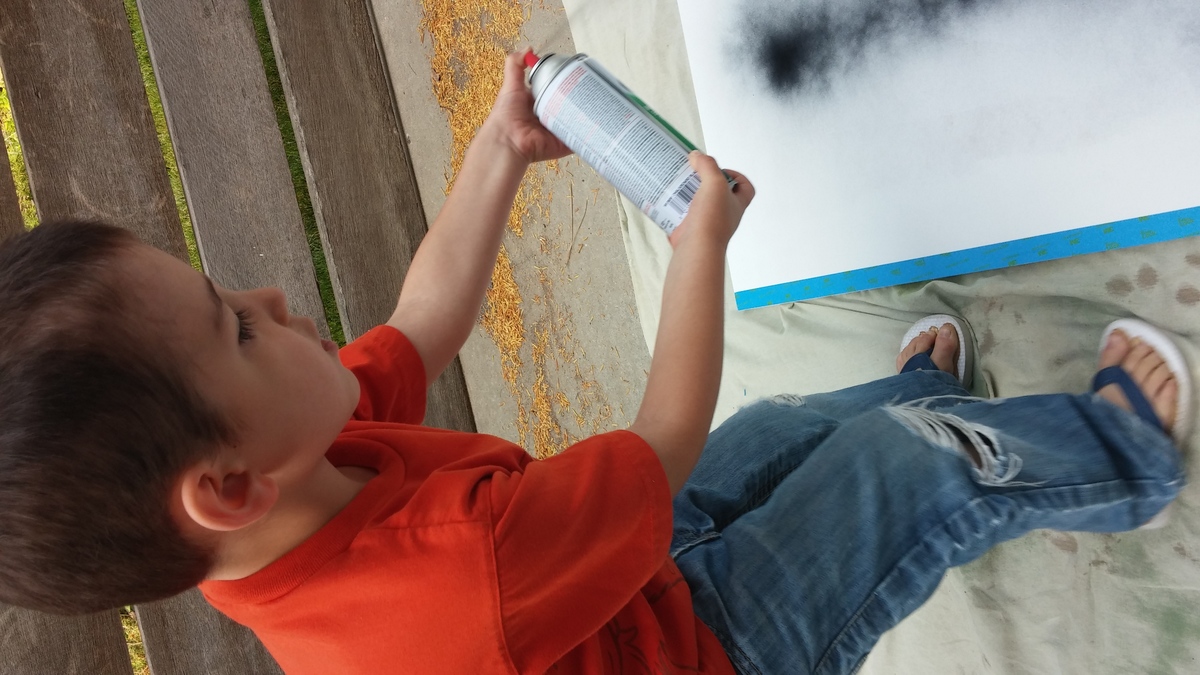
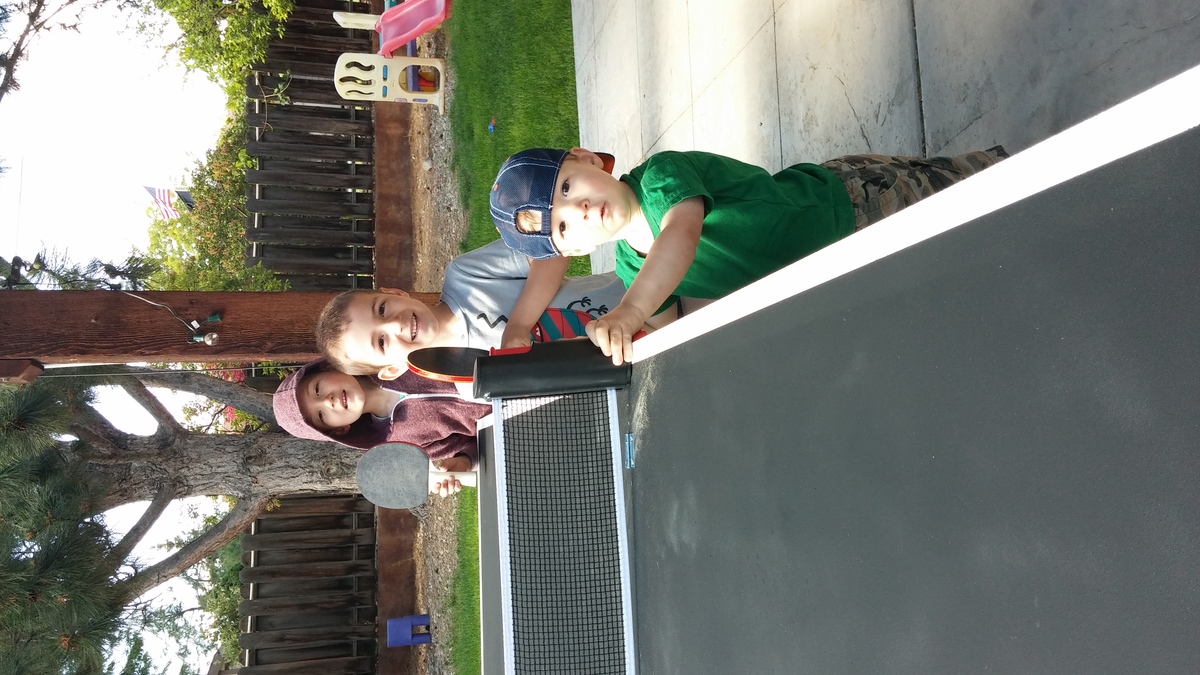
We needed something easy to make, easy to store, and budget friendly. With a 6, 4, and 2 year old helping out, I made a foldable mdf ping pong table that could easily be placed on our picnic table outside.
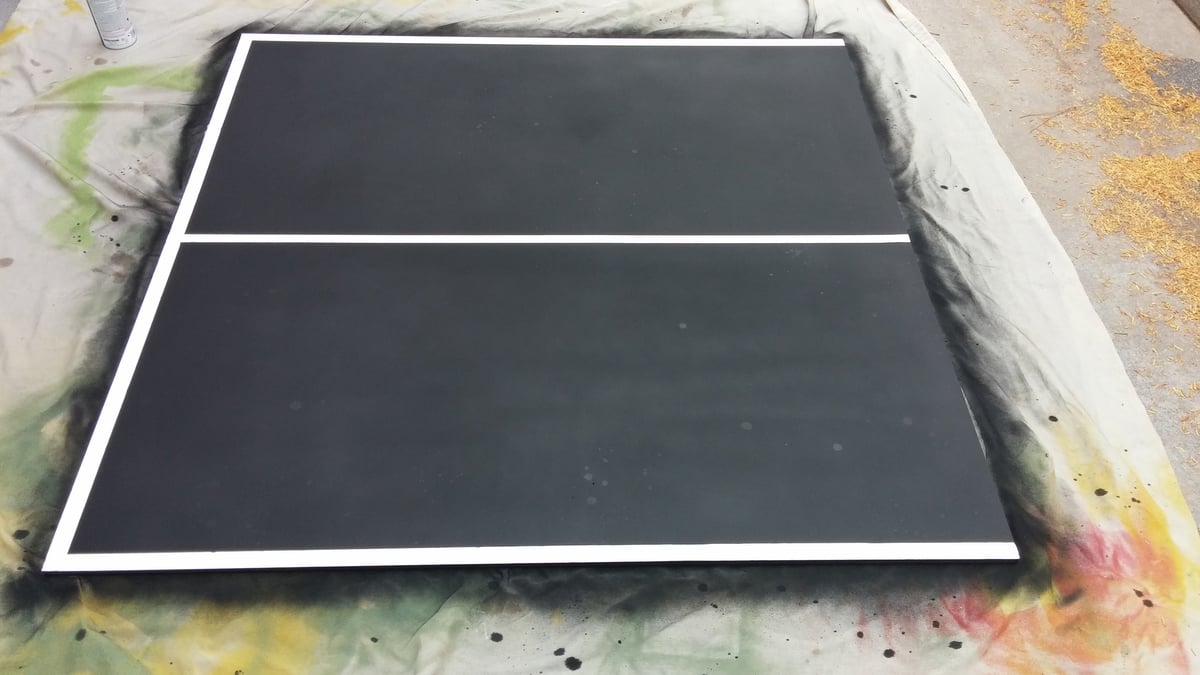
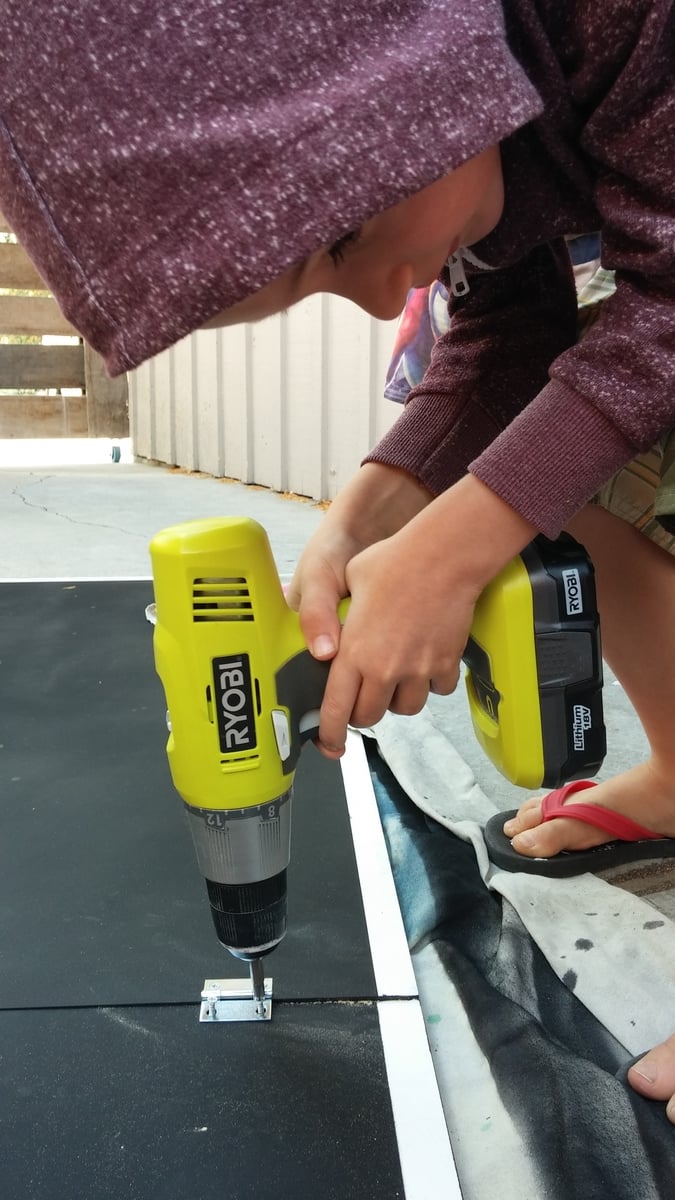
We had home depot cut the mdf in half, primed it, taped off some lines, spray painted it with chalkboard paint (bonus, you can keep score!), and screwed 4 small hinges to attach the 2 halves. We added a removable table tennis net, some paddles and balls, and have played nearly every day!

Estimated Cost
$40
Estimated Time Investment
Afternoon Project (3-6 Hours)
Finish Used
Chalkboard spray paint
Recommended Skill Level
Starter Project

Comments

Cedar Patio Table

Submitted by rygy on Thu, 07/03/2014 - 18:19

I grabbed this idea from one of the brag posts linked off of Ana's easy dining table post. The entire table top is made from clear Western Red Cedar. The legs are made from 4x4 cedar fence posts (the clearest I could find). The table top is 5ftx5ft. All the joints were made using Kreg's pocket hole kit.I did change a couple of things from the original picture that was posted:

1. I notched out the 4x4 cedar legs to accept the main frame of the table top (which provides the best support possible) and also bolted though the leg and frame. Not to mention it gives it a more finished look than simply putting the legs inside the frame and bolting through.

2. I also made a custom bracket to support an umbrella so that I did not have to have bulky umbrella stand under the table (see attached pic)

I finished the table and bench with two coats of Teak Oil. I am not convinced this was the best choice, but it sure did look awesome the first month after it was complete. The colour of the cedar has faded a bit now that it has been out in the elements for two months. Any further suggestions on great finishes that hold up to the weather are appreciated.

Estimated Cost
$290.00
Estimated Time Investment
Weekend Project (10-20 Hours)
Finish Used
Teak Oil
Recommended Skill Level
Intermediate

Comments

mmeixner

Thu, 06/30/2016 - 20:50

I really love this table. Could you provide more details on construction, or post more photos of under the table? What is the table top's thickness? Looks like you used 13 boards 1x4 and the outside boards seem to be 1x8 but I'm not sure. Also, how did you attach the table top to the base ?

thank you, great work!

Michael

Freestyle X diningtable with fancy benches

Submitted by JSteenberg on Fri, 09/21/2012 - 03:48

Even though the summer has come to an end, I decided it was time for some new furniture for my small garden in the city. I looked in different stores, but for a student the prices were very much out of range. I then decided that perhaps it would be cheaper to build by myself and an interesting project as I've never worked with wood in a 1:1 scale. I came across the plans for the fancy x, table and farmhouse table and figured that it should be something like that. I made the table and benches in Sketchup, but wasn't really sure about a variety of the aesthetic solutions. I then tweeked it and tried to come up with a new design for the benches that would mach the x shape without just repeating it, and i came up with the final design through a lot of experimentation. The benches can be made by a complete novice, and the table is also quite easy if you have the necessary tools. I'll give it a finish this spring, perhaps just paint it. I've received very good feedback on the project, and even though the benches are quite fancy, you sit very well in them and I think the aesthetics are somewhat accounted for by the easy assembly and comfort. Thanks for the inspiration, and I hope it will inspire you to build even more! The plan is in millimeters, and the planks are standard european sizes, but it should translate ok. PLAN Direct Download: https://dl.dropbox.com/u/2622939/X%20Diningtable%20with%20fancy%20bench…

Estimated Time Investment
Weekend Project (10-20 Hours)
Finish Used
None atm
Recommended Skill Level
Beginner

Modular Office L-Shaped Desk

I used baltic birch ply (two sheets) plus some 1x3s and 1x2s. I had to modify the dimensions to suit my space (a wall space between a window and sliding glass door.

The dimensions of the 1x2"s we a little hard to adjust. Mostly my math.

 I still need to add drawers, but I like the color contrast between the top, base and trim.

I used General Finishes Java gel stain for the top. General Finishes driftwood for the bottom trim. Basic white paint for the bases. I also used General Finishes High Performance Poly (2 coats). 

If I had to do it again, I would paint the bases in the Driftwood color and wax the whole thing. Also, I wouldn't apply the stain in hot sun. It came out really dark and was impossible to wipe off the excess. Also, never leave a ironed on edge banding in the sun. This lost adhesion and I had to re-iron it on.

Fun project. First use of pocket holes. 

I love the fact that it's modular and the angle gives you twice as much surface area. I get the feeling this will be with me for years to come in some room or another.

-Dallas

Built from Plan(s)
Estimated Cost
140
Estimated Time Investment
Weekend Project (10-20 Hours)
Finish Used
General Finishes Java Gel Stain
General Finishes Milk Paint - Driftwood
White Paint
General Finishes High Performance Polyurethane
Recommended Skill Level
Beginner

Comments

jackie scinto

Wed, 08/27/2014 - 21:01

So glad to have seen this post. I am thinking of making this desk for my daughter. Have been looking for a corner desk unit with open file bases. I found Ana's site and have made the sandbox w/bench plan, and it was not that hard. Of course I some help from a family member, and I think he would be help out with this plan as well. I am not sure of what a pocket hole is, can you tell me in laywoman's terms what that would be. Just to be sure, these plans consist of Office Corner Desktop Plan and the Modular Office Narrow Open File Base Plan. Also, did you use a Kreg Jig? I have found one at a local woodworking hobby shop, but i am wondering if the expense is worth it, any thoughts?

saelmc

Thu, 08/28/2014 - 10:38

Hi Jackie,

Ana has provided an informative video about drilling pocket holes with the Kreg jig, for those who are wondering how it's done. You'll find it here: http://ana-white.com/2011/11/drilling-your-first-pocket-hole and then you can decide if you think it will be worth it to spend the money on a jig.

Also, if you're concerned about the price, look around on the internet (like Amazon.com for example) and you'll see that there are different models available at various prices. The junior model is quite inexpensive and you might be able to buy it at a better price than the hardware store sells it for.

Good luck with your project!

Simple Playhouse

Submitted by Anonymous (not verified) on Mon, 07/27/2020 - 12:06

My first big project and my kids couldn't be happier. I'm pretty proud too, just don't take a square or level anywhere near it :)

Comments

Seasonal And Holiday

reclaimed wood headboard boat wood style

Submitted by gvandy on Tue, 07/29/2014 - 05:20

I copied the boat wood painting technique using the colors of my daughters room and it turned out wonderful. It really is as easy as it looks on the tutorial! You can see more of my stuff on anexceptionalife.com

Estimated Cost
$85
Estimated Time Investment
Weekend Project (10-20 Hours)
Finish Used
We stained the entire headboards with Early American minwax, and then used 5 colors to layer the paint using a block of wood and letting each color dry between coats. We did what we liked and covered any mistakes with another color. Super easy. we finished with helmsman clear poly in satin and did 2 coats with no sanding in between.
Recommended Skill Level
Beginner

Picnic table cover table bench

Submitted by project101 on Wed, 08/19/2020 - 14:59

I bought the treated lumber from a local liner yard. I enjoyed doing this as it is so versatile. My daughter uses it for her outdoor art projects. I made 2 of them. Took 3 hours after work to cut and put them together and another hour to sand. I haven’t painted or stained them but will wait a few months.

Estimated Cost
100 dollars for 2 benches
Estimated Time Investment
Day Project (6-9 Hours)
Finish Used
None so far
Recommended Skill Level
Beginner

Faux Mantle

Submitted by Anonymous (not verified) on Sat, 12/17/2016 - 09:44

Super easy project. Was able to have it in my house in 3 days. I used a LED RGB light strip inside to be able to light it up. It came with a remote control which is very handy. I drilled a small hole near the bottom for the IR sensor to stick into. I modified the plans only slightly to be able to make a attachement point for the light strip.

Estimated Cost
$111.20 if you buy the materials and use them once.
$95.49 if you price out the materials on amounts actually used.
Estimated Time Investment
Weekend Project (10-20 Hours)
Finish Used
Gray base paint primer and a topcoat of Linen White Chalked Paint. Sanded to show some of the under gray.
Recommended Skill Level
Beginner

Tilt Out Wooden Trash Bin

Submitted by paigers01 on Mon, 01/09/2017 - 11:27

Tilt Out Wooden Trash Bin

After 7 years of our trash can sitting out in the open, my wife decided we needed to do something about it. I saw the plans for this tilt out wooden trash bin, and slightly modified it using tongue and groove for the face panel.


Estimated Cost
$50-$75
Estimated Time Investment
Afternoon Project (3-6 Hours)
Finish Used
Minwax English Chestnut
Recommended Skill Level
Beginner

Simple Outdoor Chairs for the Firepit

Submitted by Retta on Fri, 10/03/2014 - 19:27

I used Ana's plan and made ten of these for our firepit area.  The only thing that I changed was the back brace pieces....I couldn't get 1x2s so just used 2x2's.  

Built from Plan(s)
Estimated Cost
$300 including paint
Estimated Time Investment
Week Long Project (20 Hours or More)
Finish Used
Exterior paint.
Recommended Skill Level
Intermediate

Large Porch Bench

Submitted by Anonymous (not verified) on Tue, 01/31/2017 - 23:45

We built 2 XLarge Porch Benches,they where easy to build & look fabulous! Best part was it was a fraction of the cost if I were to buy these new!!! Thank you Ana!!! 

-Sandra 

Estimated Time Investment
Weekend Project (10-20 Hours)
Recommended Skill Level
Beginner

Rustic X Desk

Submitted by CarolinaL on Wed, 11/18/2020 - 14:48

I finally got tired of my computer set up being on my sewing table. I will be working from home for quite some time and I'm so glad I finally have a designated desk for work.

This desk came out perfect. It's not too difficult but the X did take some time to get right. Used Ana's video instructions.

Built from Plan(s)
Estimated Cost
$60
Estimated Time Investment
Weekend Project (10-20 Hours)
Finish Used
Minwax Provincial for the top
White satin paint for the base.
Recommended Skill Level
Intermediate

Comments

Kids Loft Bed

Submitted by kdins31 on Mon, 03/06/2017 - 10:25

Turned my daughter's ordinary room into a cool hangout for many years to come.  The frame fits a twin with a decent buffer on 3 sides for "stuff."  I also built the headboard with a shelf for more "stuff!" Loft is 4' off the floor.  Headboard was made with with 2/3" frame and scrap 5" t&g boards leftover from other project.  Bed frame is made of 2x8s lag bolted to wall and supported by 4x4.  Railing is made from 2x4s, 1x2s and 1x3s.  The stain is a walnut Danish oil. Under the bed there are LED lights shining down on the seating area.  The couch is made up of two separate folding chairs that turn into beds for sleepovers.  Couches were purchased from Walmart and I built the base.  Built in shelf in wall uses primed 1x4s.


Estimated Time Investment
Weekend Project (10-20 Hours)
Finish Used
White paint. Medium Walnut Danish oil.
Recommended Skill Level
Intermediate

Wood Wagon

Submitted by tnaudio on Thu, 12/18/2014 - 06:52

This is a variation of the wood wagon design http://ana-white.com/node/13430. I wanted old 2 year old to be able to use it in the lawn so I changed the wheels and steering over to a more traditional wagon wheel. We will be giving to him for Christmas. I had a lot of fun building this for my son. I hope he loves it.

Built from Plan(s)
Estimated Cost
75 dollars
Estimated Time Investment
Weekend Project (10-20 Hours)
Finish Used
Minwax Early American
Minwax Satin Polyurethane
Recommended Skill Level
Beginner

Comments

Joey Oc

Mon, 12/14/2015 - 12:41

Love the plans. I would, however, like to follow the modified plans to make it suitable for outdoor/grass areas. If any one could help me with that I'd be very grateful. 

Kitchen Shelves

Submitted by Renren_13 on Sun, 02/24/2013 - 10:08

I recently painted my kitchen cabinets with a Rust-Oleum Cabinet Transformations kit, and I wanted to add some matching shelves for items I could store above the stove and coffee maker.

Built from Plan(s)
Estimated Cost
$15
Estimated Time Investment
An Hour or Two (0-2 Hours)
Finish Used
Rust-Oleum Cabinet Transformations tinted to Toasted Almond with the dark glaze. I used Minwax Polyurethane in Semi-Gloss instead of the finished included with the Cabinet Transformations kit.
Recommended Skill Level
Starter Project

Comments

Lumber Scrap wood portable Cart

Submitted by Kingspiper on Fri, 03/31/2017 - 13:03

Cut-off lumber cart on heavy duty 3 inch locking swivel casters.  Used 3/4 copper pipe and 3/4 plywood with a couple of pine wood scraps.  Keeps things neat and clean. :)

Estimated Cost
125.00
Estimated Time Investment
Weekend Project (10-20 Hours)
Finish Used
Dark walnut stain and plain walnut oil
Recommended Skill Level
Beginner

Comments

Gigantic planked sideboard

This was my second project and my first piece of furniture I built from Ana's plans. We have a vaulted ceiling in the hallway near my entry and needed a really big piece to fill up the large blank wall. I always hated the space but now I Love It. The Gigantic sideboard is perfect there. I finished it with milk paint and paste wax. If you inspect it closely it is not perfect but for my first piece... I love it and it's supposed to be rustic right!

Built from Plan(s)
Estimated Cost
I did not keep track of how much I spent but I'll say roughly 200 to 250 .
Estimated Time Investment
Week Long Project (20 Hours or More)
Finish Used
I first used wood conditioner then sanded, sanded, and sanded. For the paint I used General Finishes Coastal Blue and topped it with minwax paste wax.
Recommended Skill Level
Intermediate

Comments

Better than Ikea Side Table

I wanted to find a perfect entryway table and looked EVERYWHERE for one that fit what I had made up in my head - then I finally thought - duh, I'll just make it. So I did! And I ADORE it. To top it off, 4 months later, Ikea came out with the exact project I had made (colors and all) for more than double what it cost to make it! 

Built from Plan(s)
Estimated Cost
About 100 EUR but I did not have anything so I had to buy everything new.
Estimated Time Investment
Weekend Project (10-20 Hours)
Finish Used
a 3-in-1 primer/paint/finish (2 coats) and basic wood stain (1 coat) topped with a light clear paint coating. Also used filler in the creases/cracks to create a more comprehensive look.
Recommended Skill Level
Beginner

Comments

julie franks

Mon, 01/26/2015 - 08:08

Just wanted to say I much prefer your table, it has great dimensions to it. I hope you're chuffed with the result. :)

Fantastic Furn…

Tue, 09/29/2015 - 02:05

To top it off, 4 months later, Ikea came out with the exact project

Knock down! Made me smile there! Our of curiosity - did you design your table as a flat pack furniture unit (which came to my mind as you mentioned Ikea and most of Ikea's furnishing requires flat pack assembly) and if yes is it a dismantable piece of furniture? Is taking it apart would be harder than putting it together?

Cheers, 
Barth

Beer carriers

Submitted by Anonymous (not verified) on Thu, 04/20/2017 - 15:23

I love the vintage look with old license plates.  @theshopbycecilia

theShop-woodwork and design

Estimated Time Investment
An Hour or Two (0-2 Hours)
Recommended Skill Level
Starter Project