Cottage Style Greenhouse
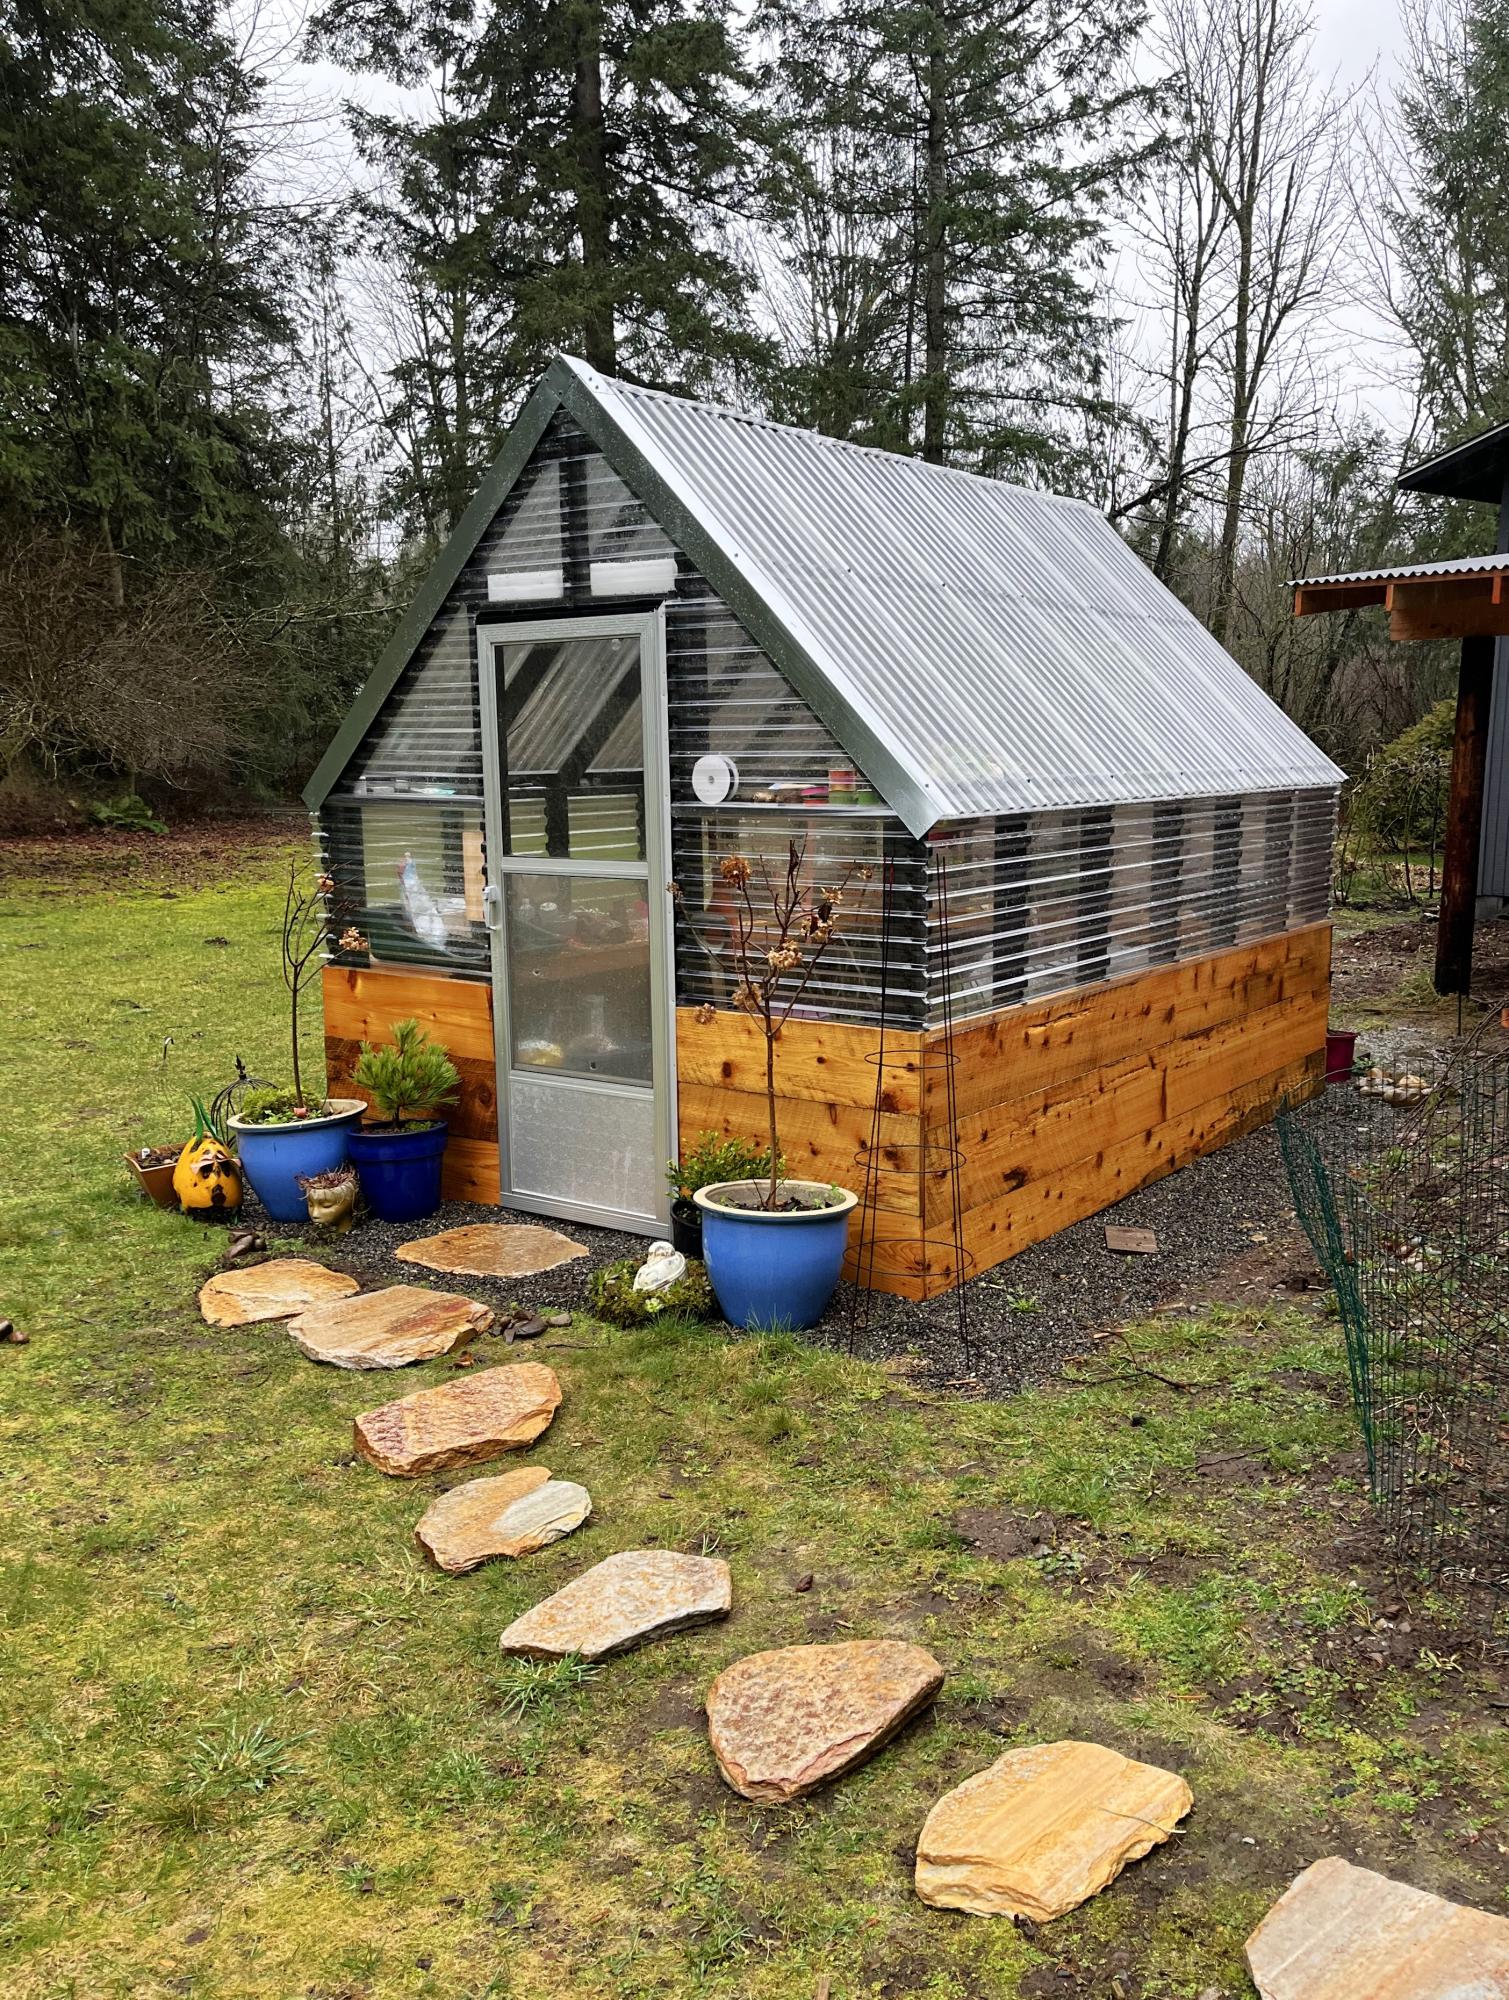
Best looking greenhouse and great size!
Mary McLachlan
Built from Plan(s)
Best looking greenhouse and great size!
Mary McLachlan
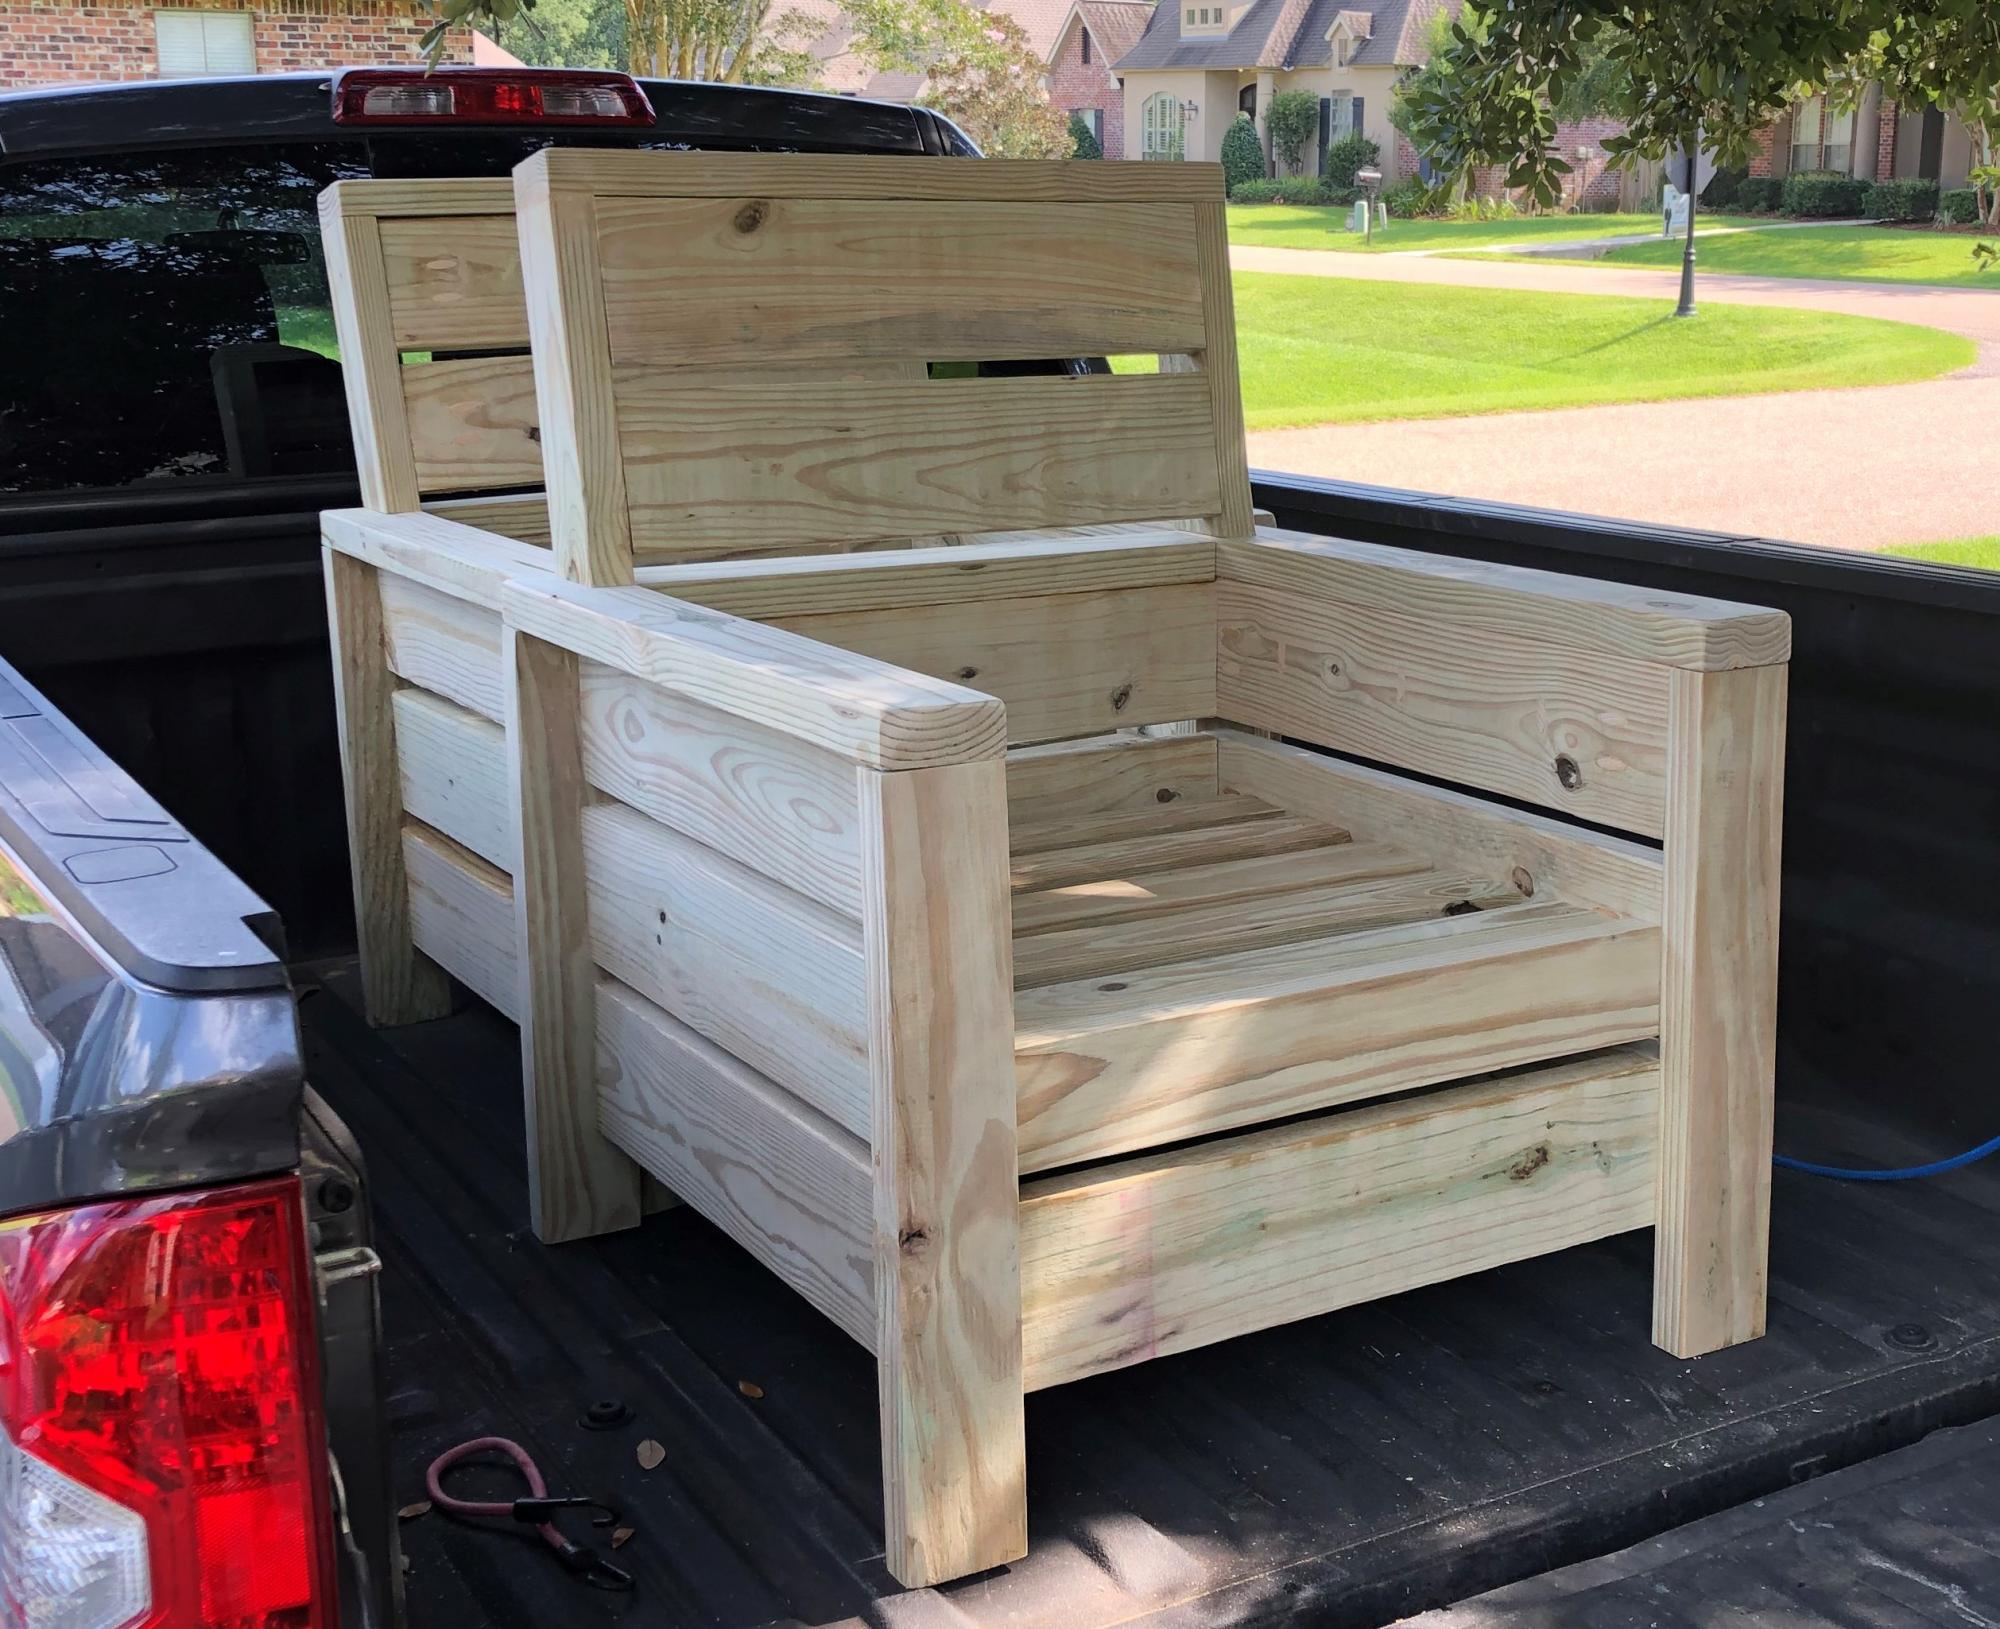
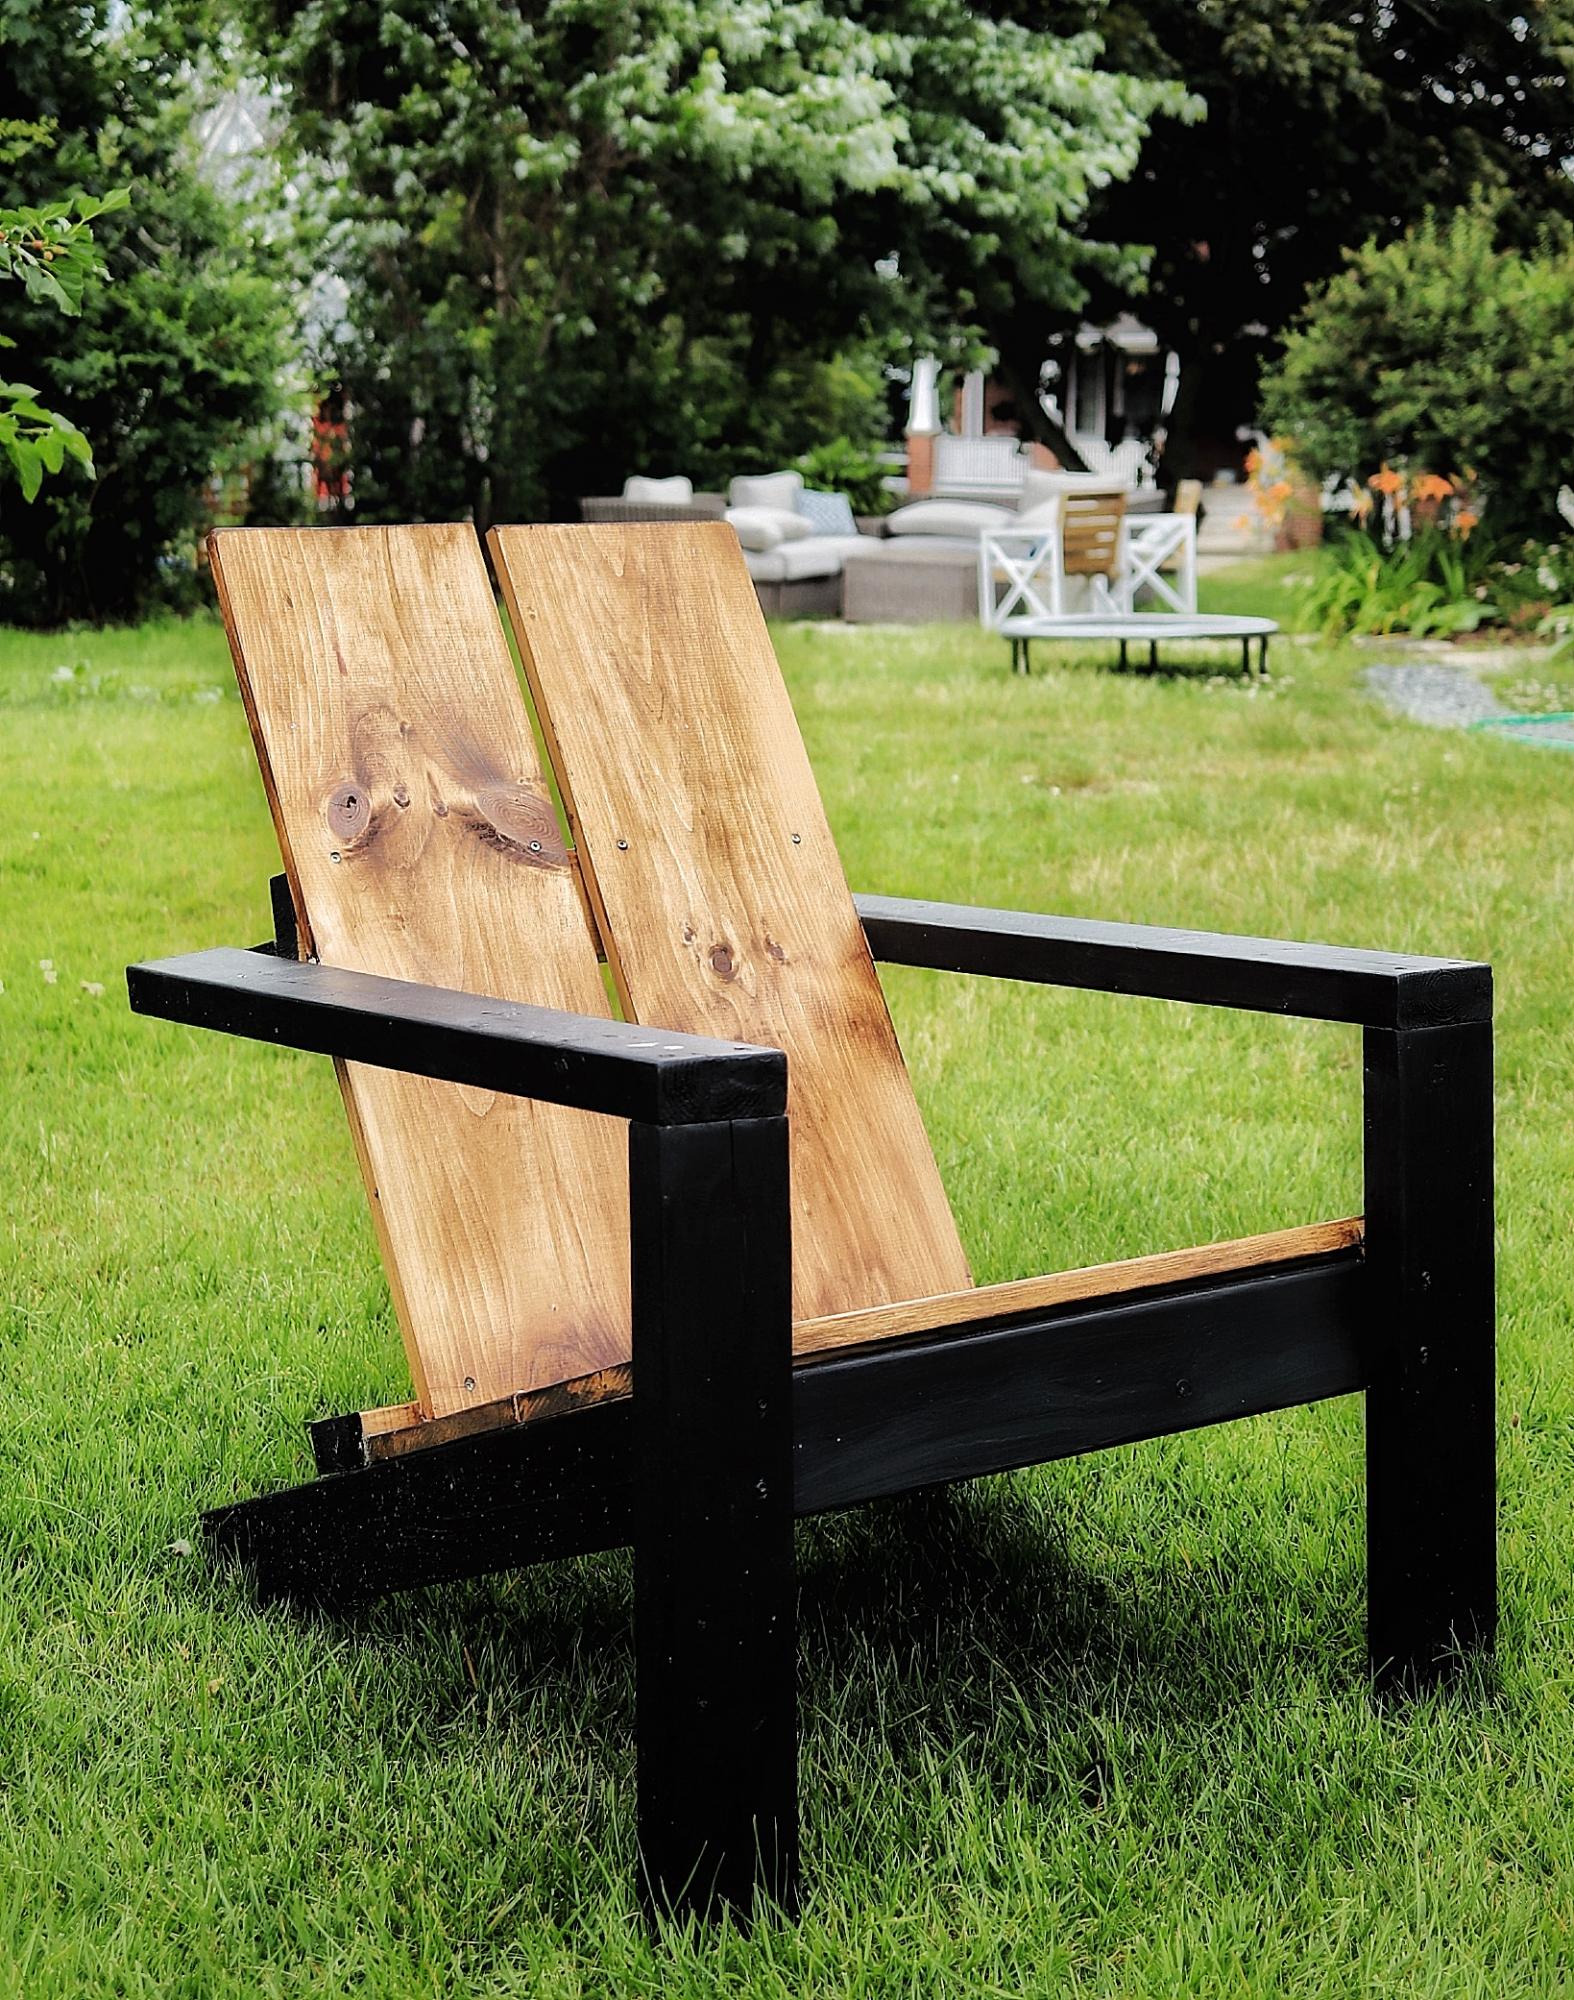
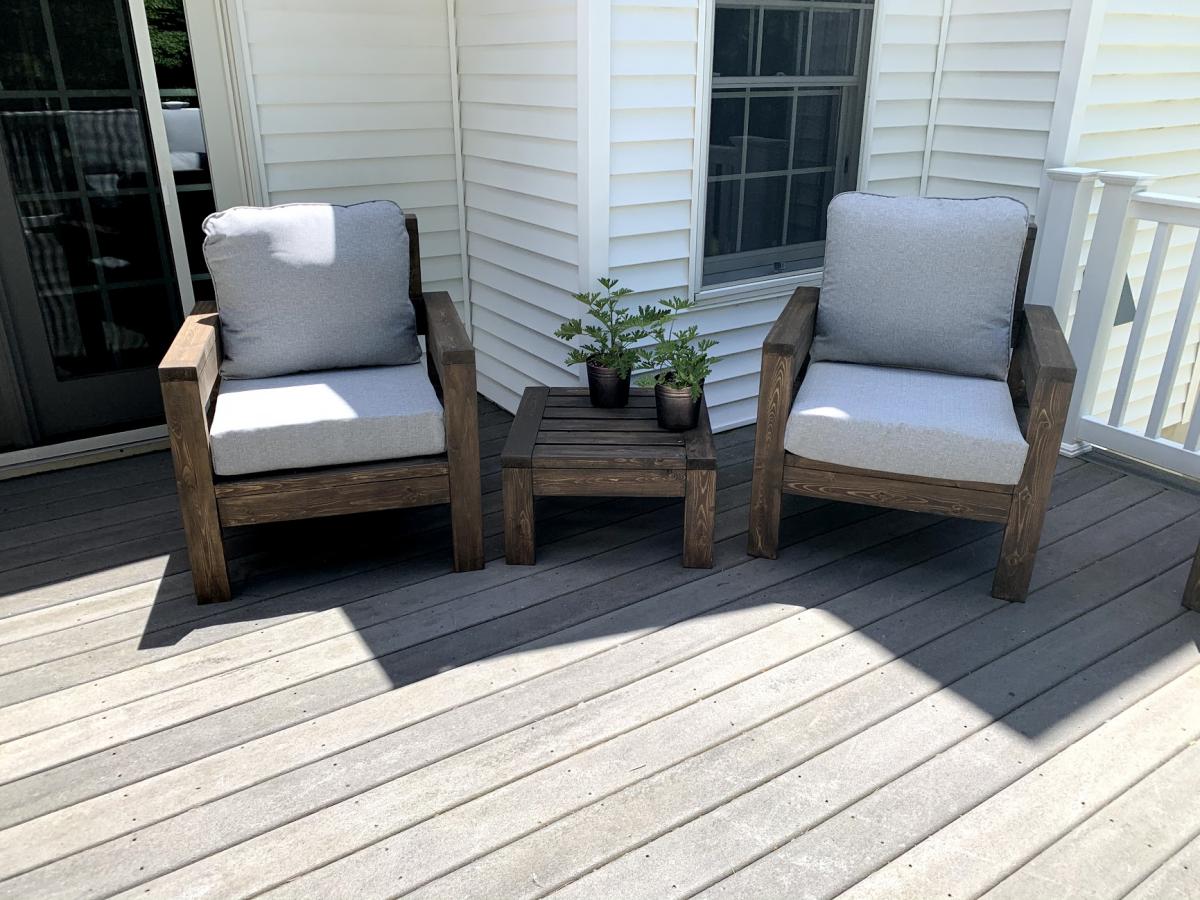
Per request of my wife, I opted to add a backrest to the chair. I feel as though my backrest design keeps with the style of the original build. I accomplished this by cutting the 2x4 vertical arms of the backrest at 13 inches with a 10 deg miter cut at the base. This allows you to keep with the 3/4" on the 2x6 backrest slats. I finished it off with a 2x4 top plate. I'd also note that I made slight modifications to the plans to accommodate 24" cushions.
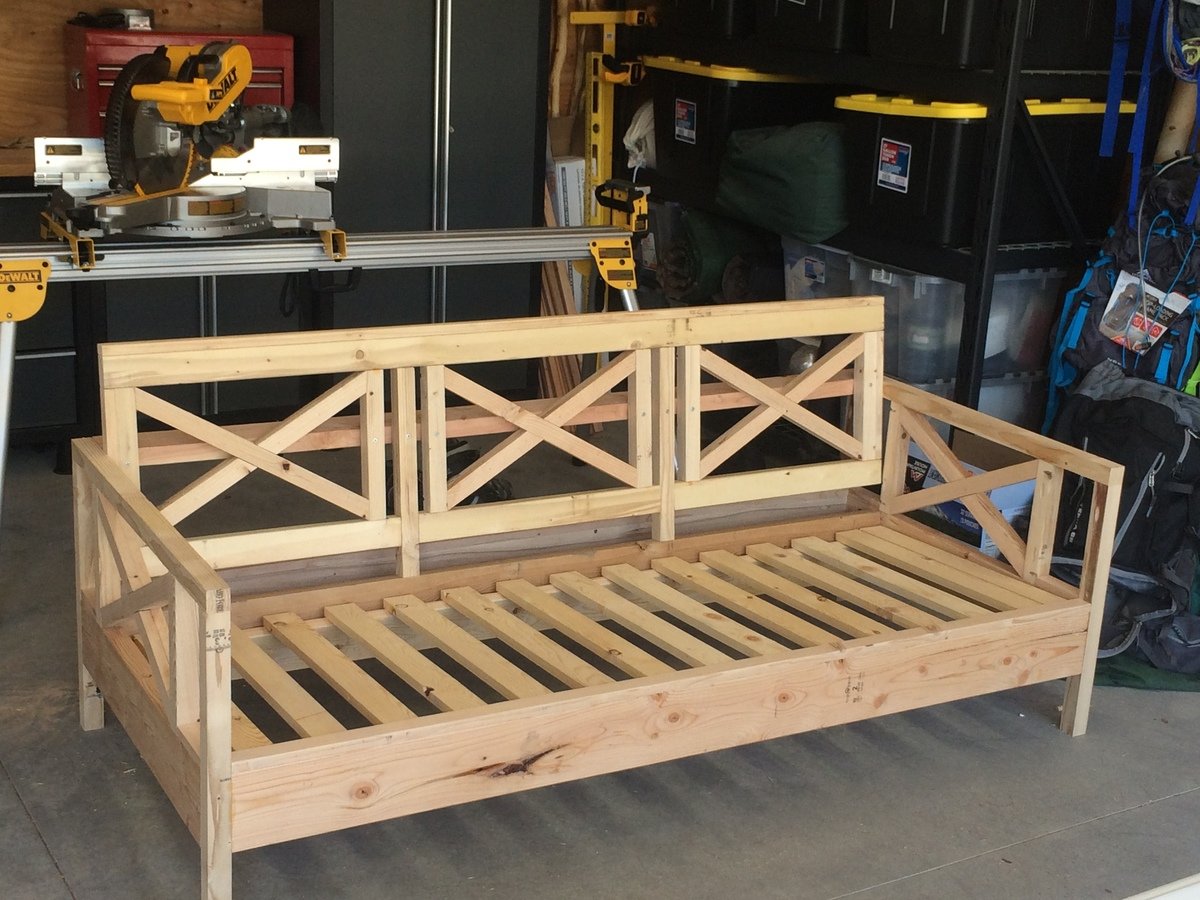
I was in love with the RH Merida set because of its clean lines and modern style. Also, the plan seemed simple enough that I could re-create it without a pattern. The only thing that I did not like about it is the lack of arms. I really like to have a place to put my arm or my beverage :) - so I added arms to the design.

Thu, 05/30/2019 - 18:45
It’s beautiful! Do you have a set of plans that you might be willing to share?
Wed, 05/20/2020 - 10:45
This is Awesome. I'm halfway in the middle as i thought I could complete without plans. Do you have any plans could share. Please....
Fri, 06/19/2020 - 15:54
were you able to get plans? I would LOVE plans too! we want to try and re-create this and would prefer NOT to get stuck!
Fri, 06/19/2020 - 15:55
Would LOVE to get plans, would even pay for them! Found rough drawings online but they are chicken scratch and hard to interpret!

Steps:
1) Cut the boards to the specs below or adjust to your space
2) Kreg Jig the cut boards along each of the sides (length wise and on the ends) for attaching and making a box.
3) Make 3 separate boxes, don't assemble until you move to location. I used 4x4 cedar posts in the corners of the base box to add stability. I used 2x2 pine in the front corners of boxes 2 and 3 for stability. Install these after the dirt has been added so you can hammer in as a stake, attach with screws on front and sides. I created 2 stakes for boxes 2 and 3 and added to the front to prevent bowing when the dirt is added.
Box Dimensions:
1) (base) 70.5" L x 46 W x 4 cedar boards high
2) 70.5" L x 32 W x 2 cedar boards high
3) 70.5" L x 16 W x 2 cedar boards high


I was so excited to find the plans for these awesome chairs, I’ve built 7 this season already—the modification happened as an accident, but I loved the result !

Thu, 03/04/2021 - 10:59
This is absolutely gorgeous! I love the modification!
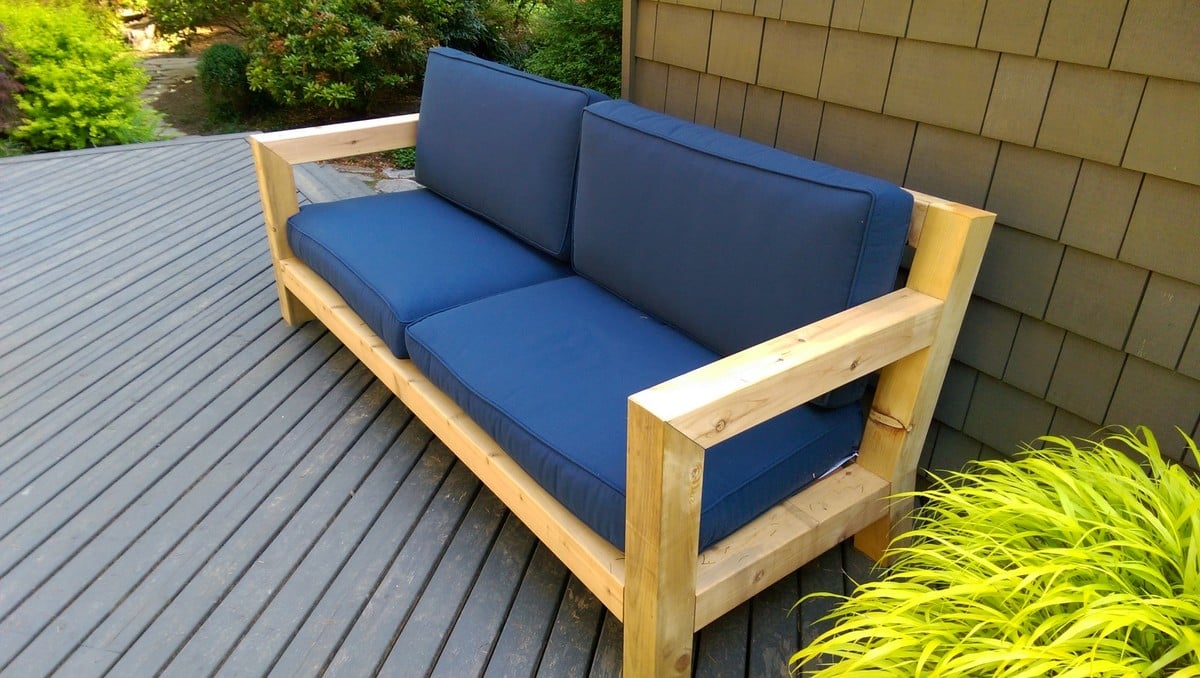
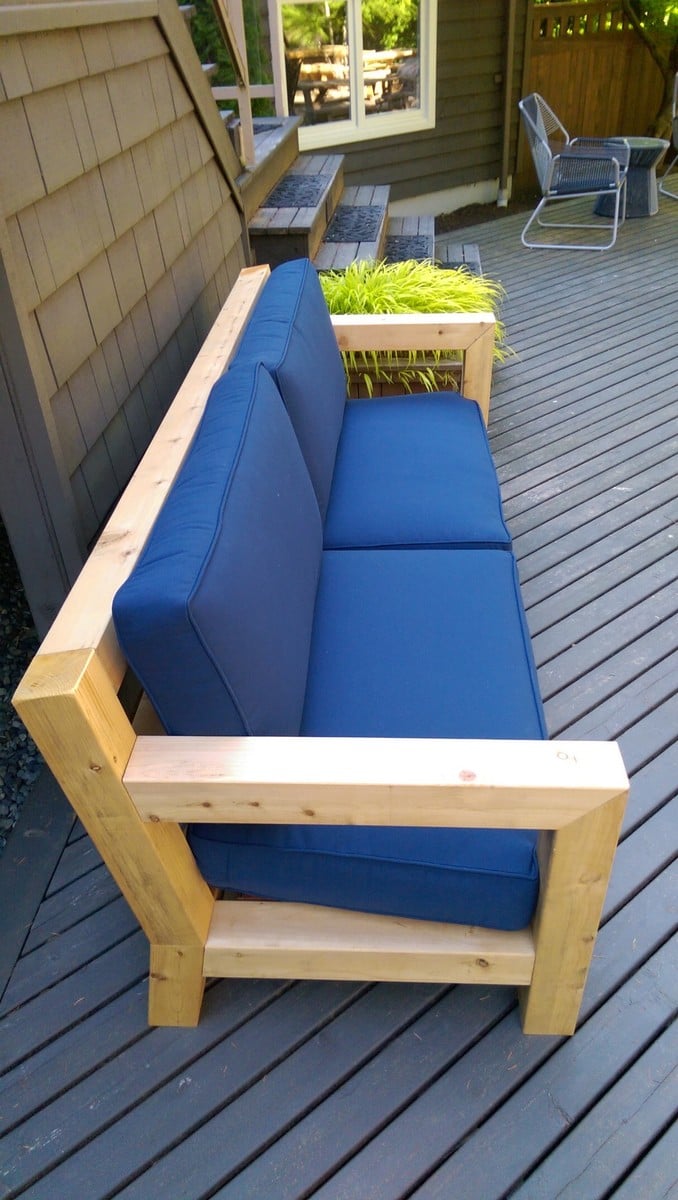
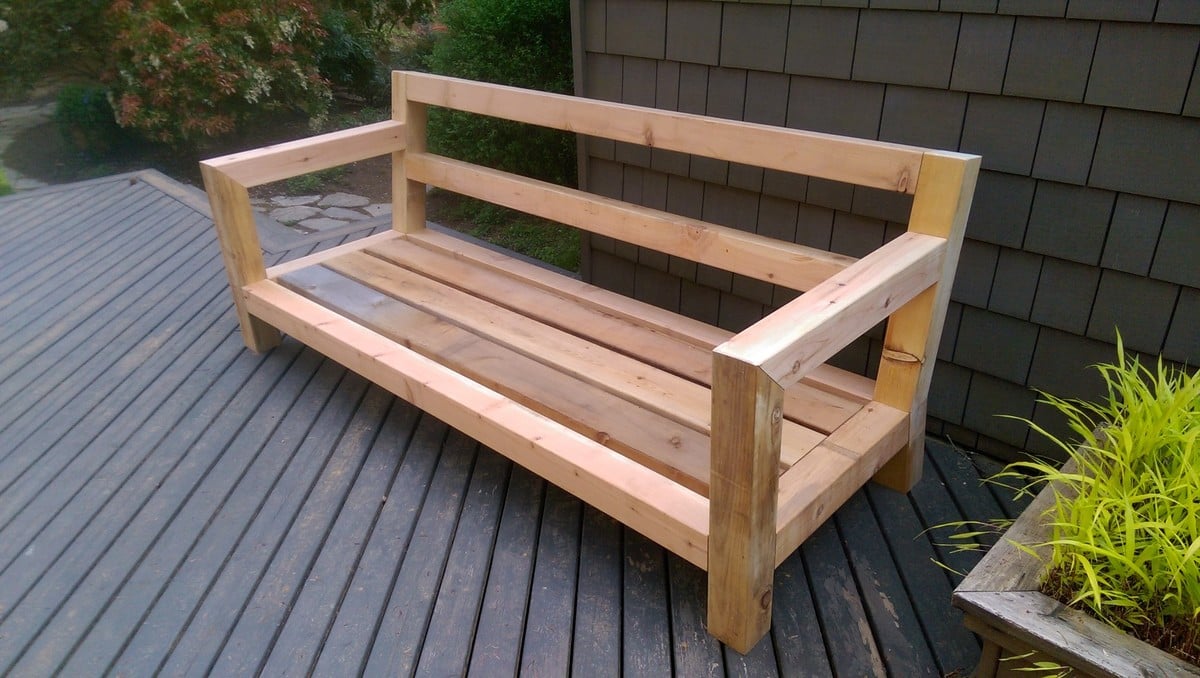
First wood project, thanks for the great plans Ana! I made the bottom cushions using 3" thick firm foam, 2" thick memory foam, and 1" thick batting (purchased in bulk and then cut to size), and covered them with outdoor fabric. The back cushions are 4" thick soft foam. I added easily removable/washable drop cloth covers on top of all the cushions. I don't have a finish on the clear redwood, but might add a clear coat to protect it. The memory foam makes this sofa very luxerious!
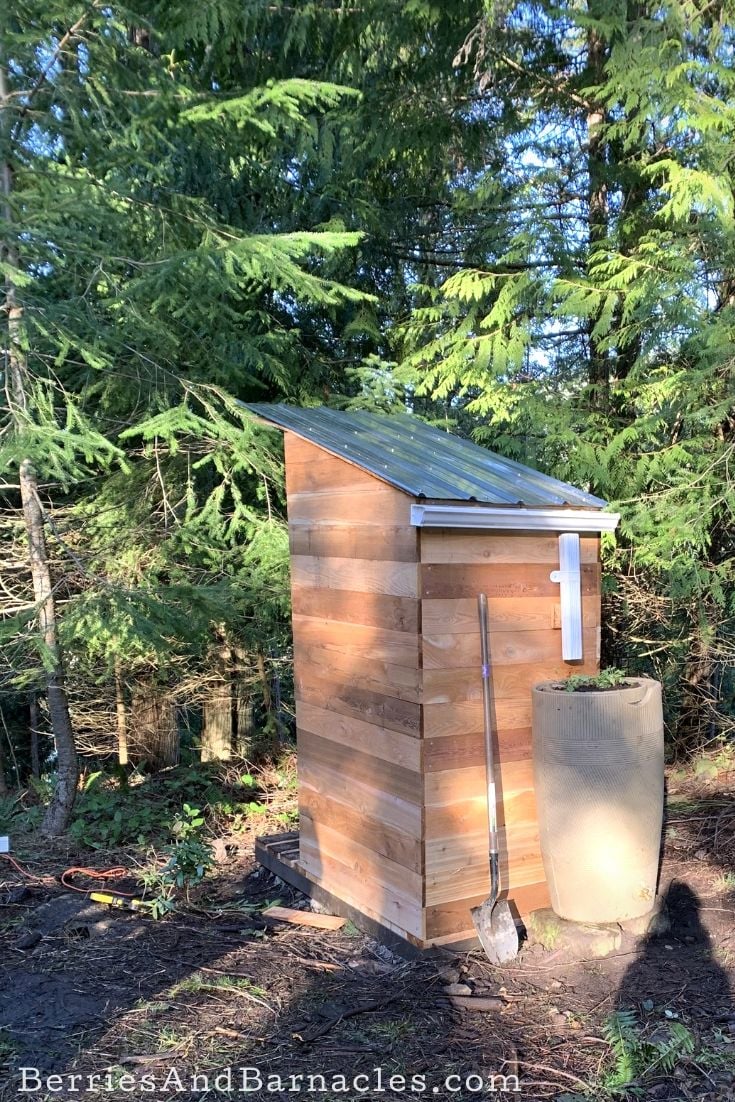
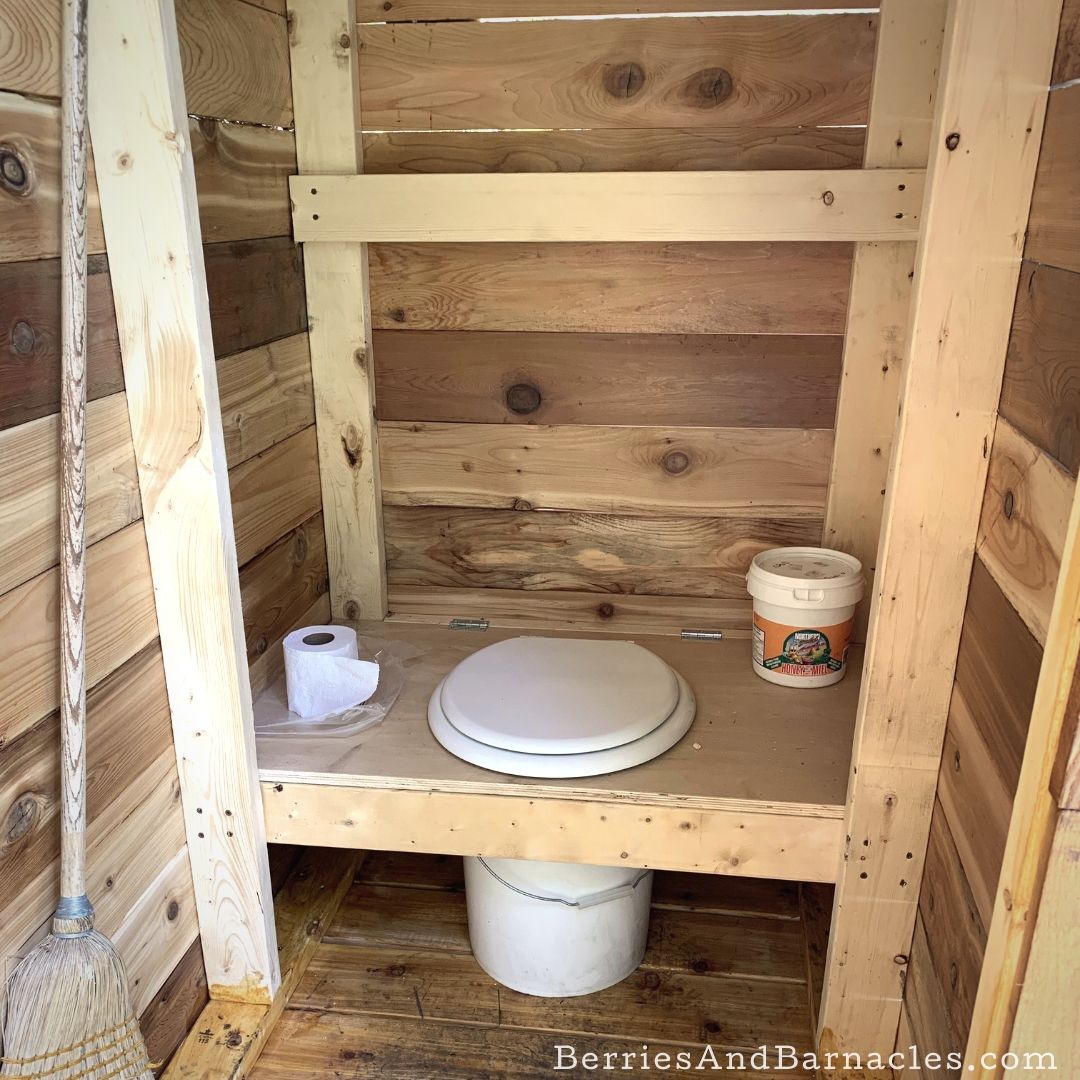
We built this composting toilet as one of the first things we did on our piece of vacant land. (How can you build anything else without somewhere to go when nature calls?)
An eco-friendly design was important to us, so we used cedar fencing instead of plywood. Otherwise, we followed Ana White's simple outhouse plans. It came out perfectly! It even has a rain barrel for hand washing.
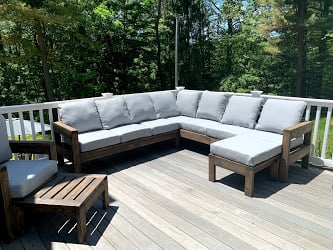
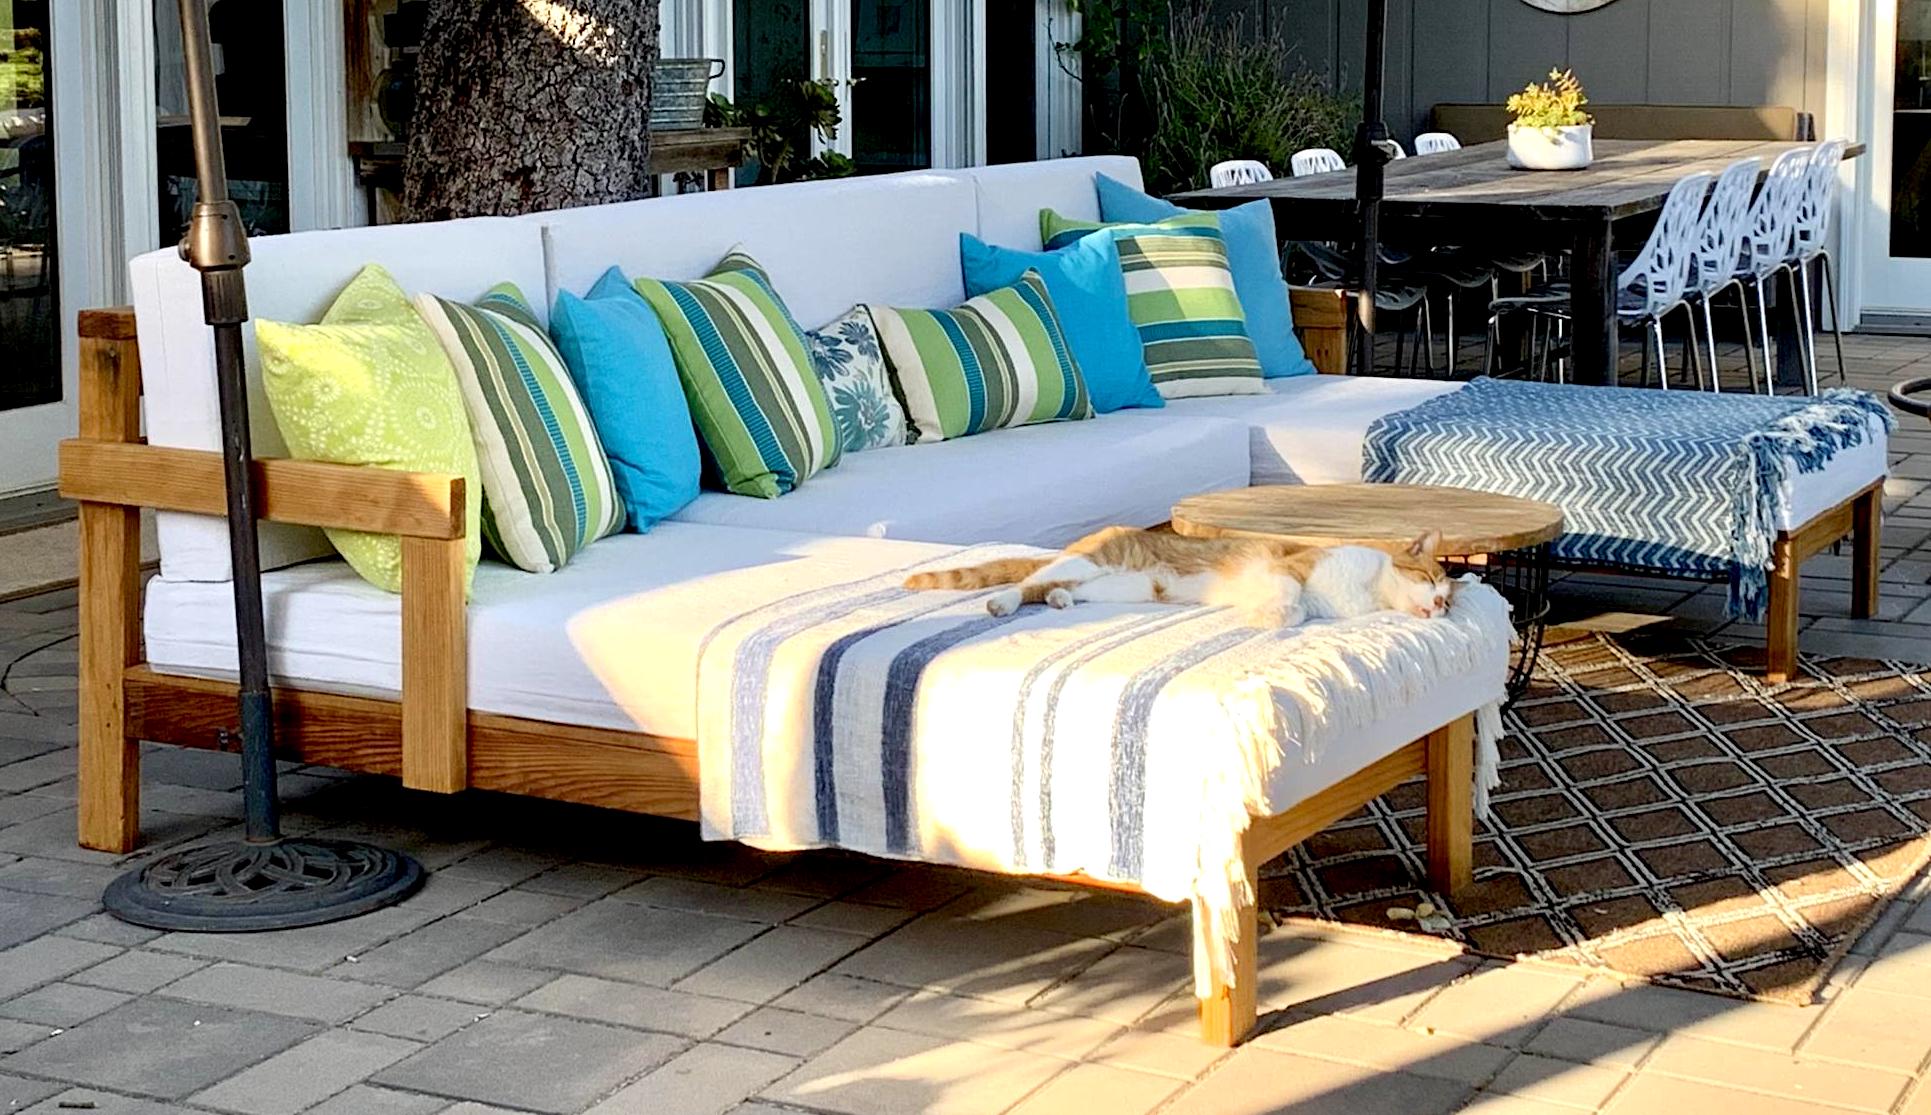
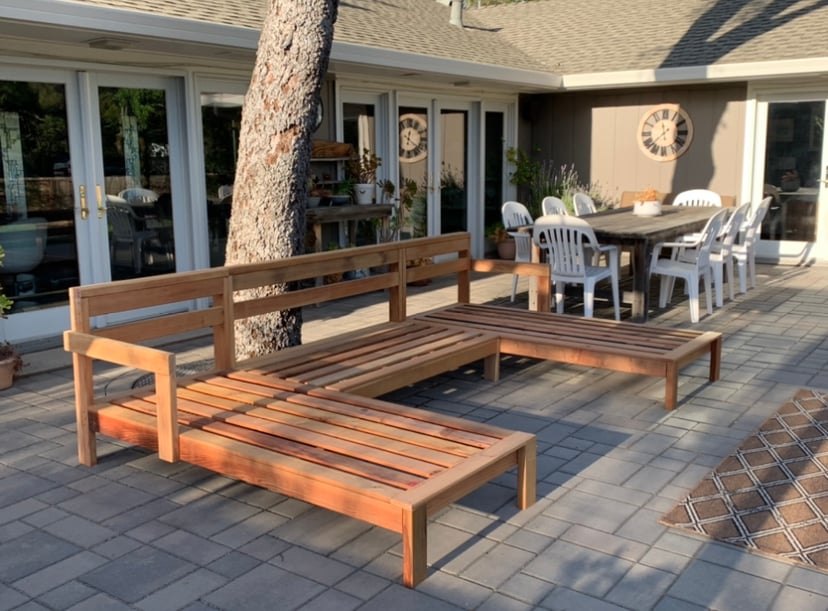
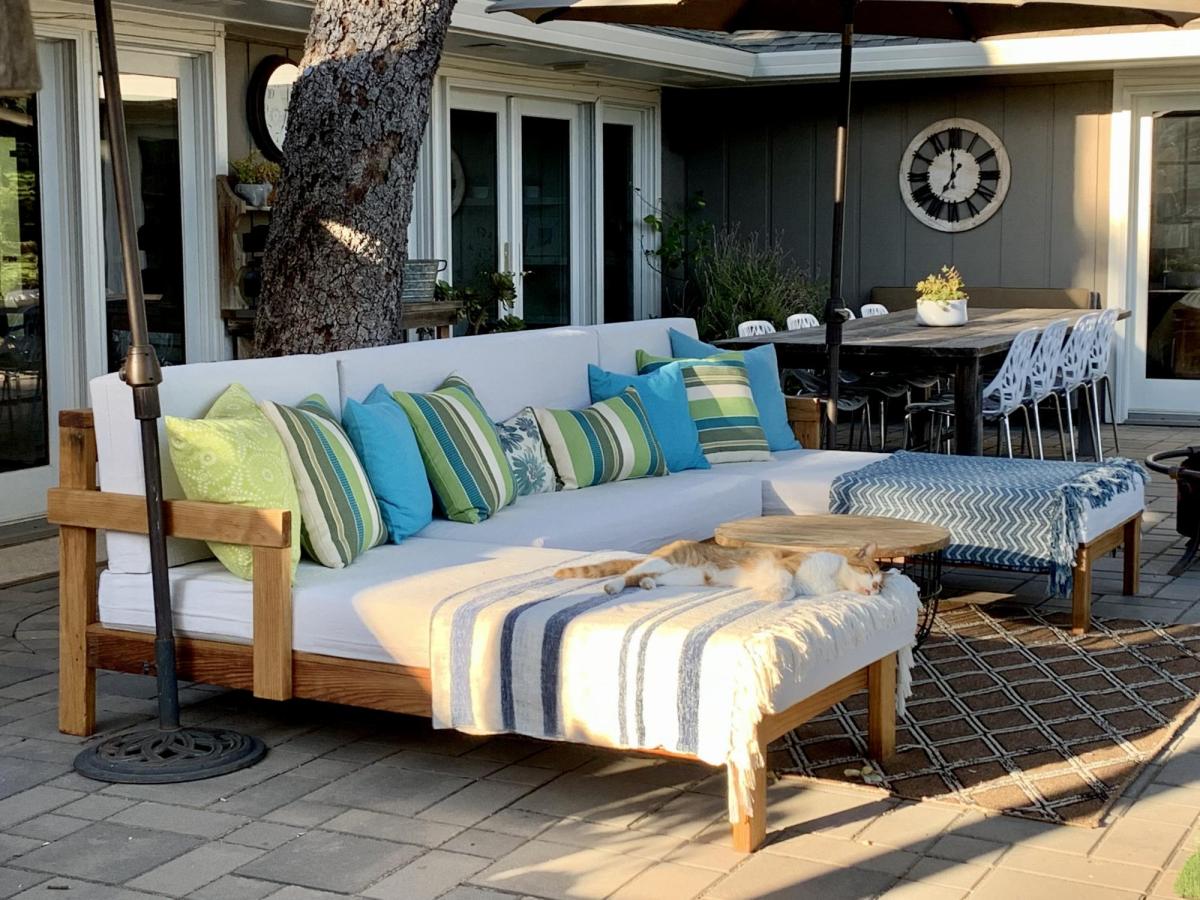
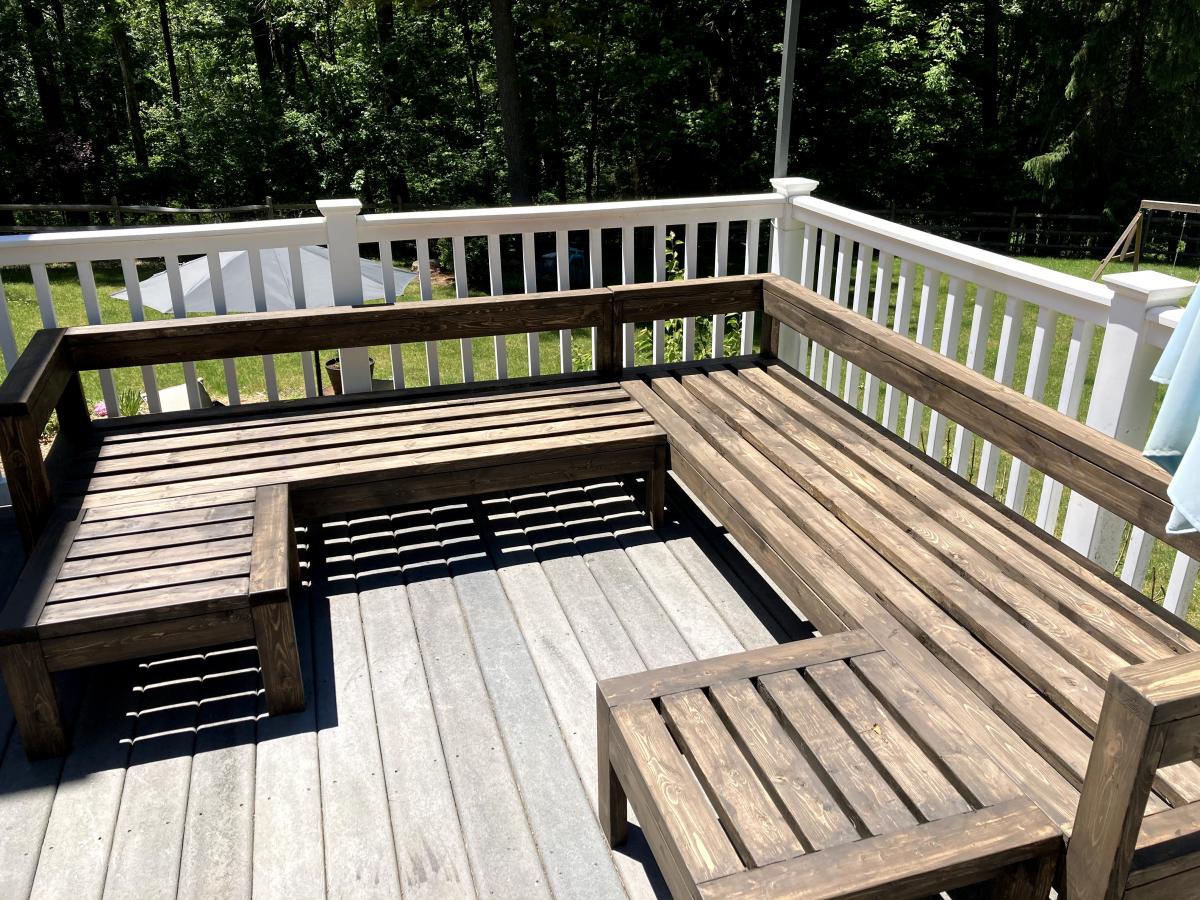
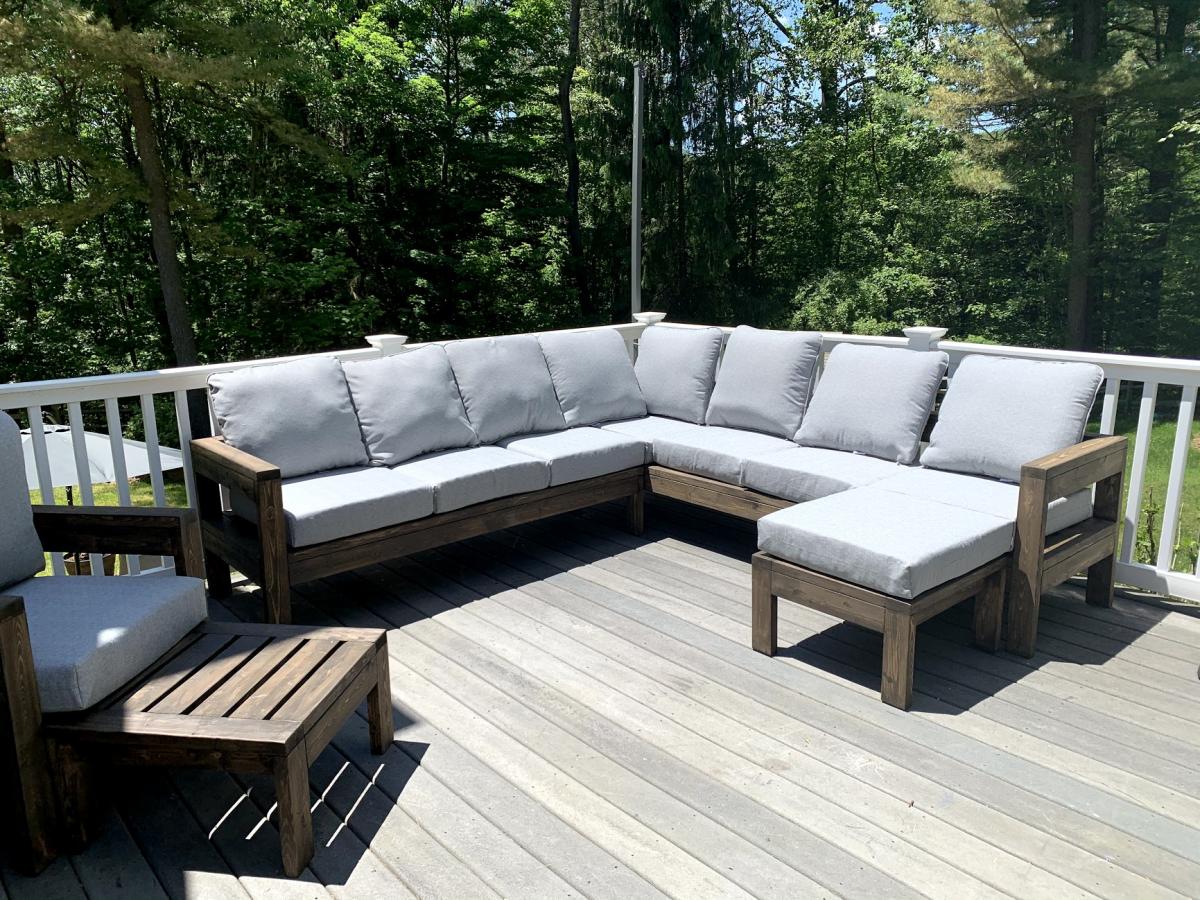
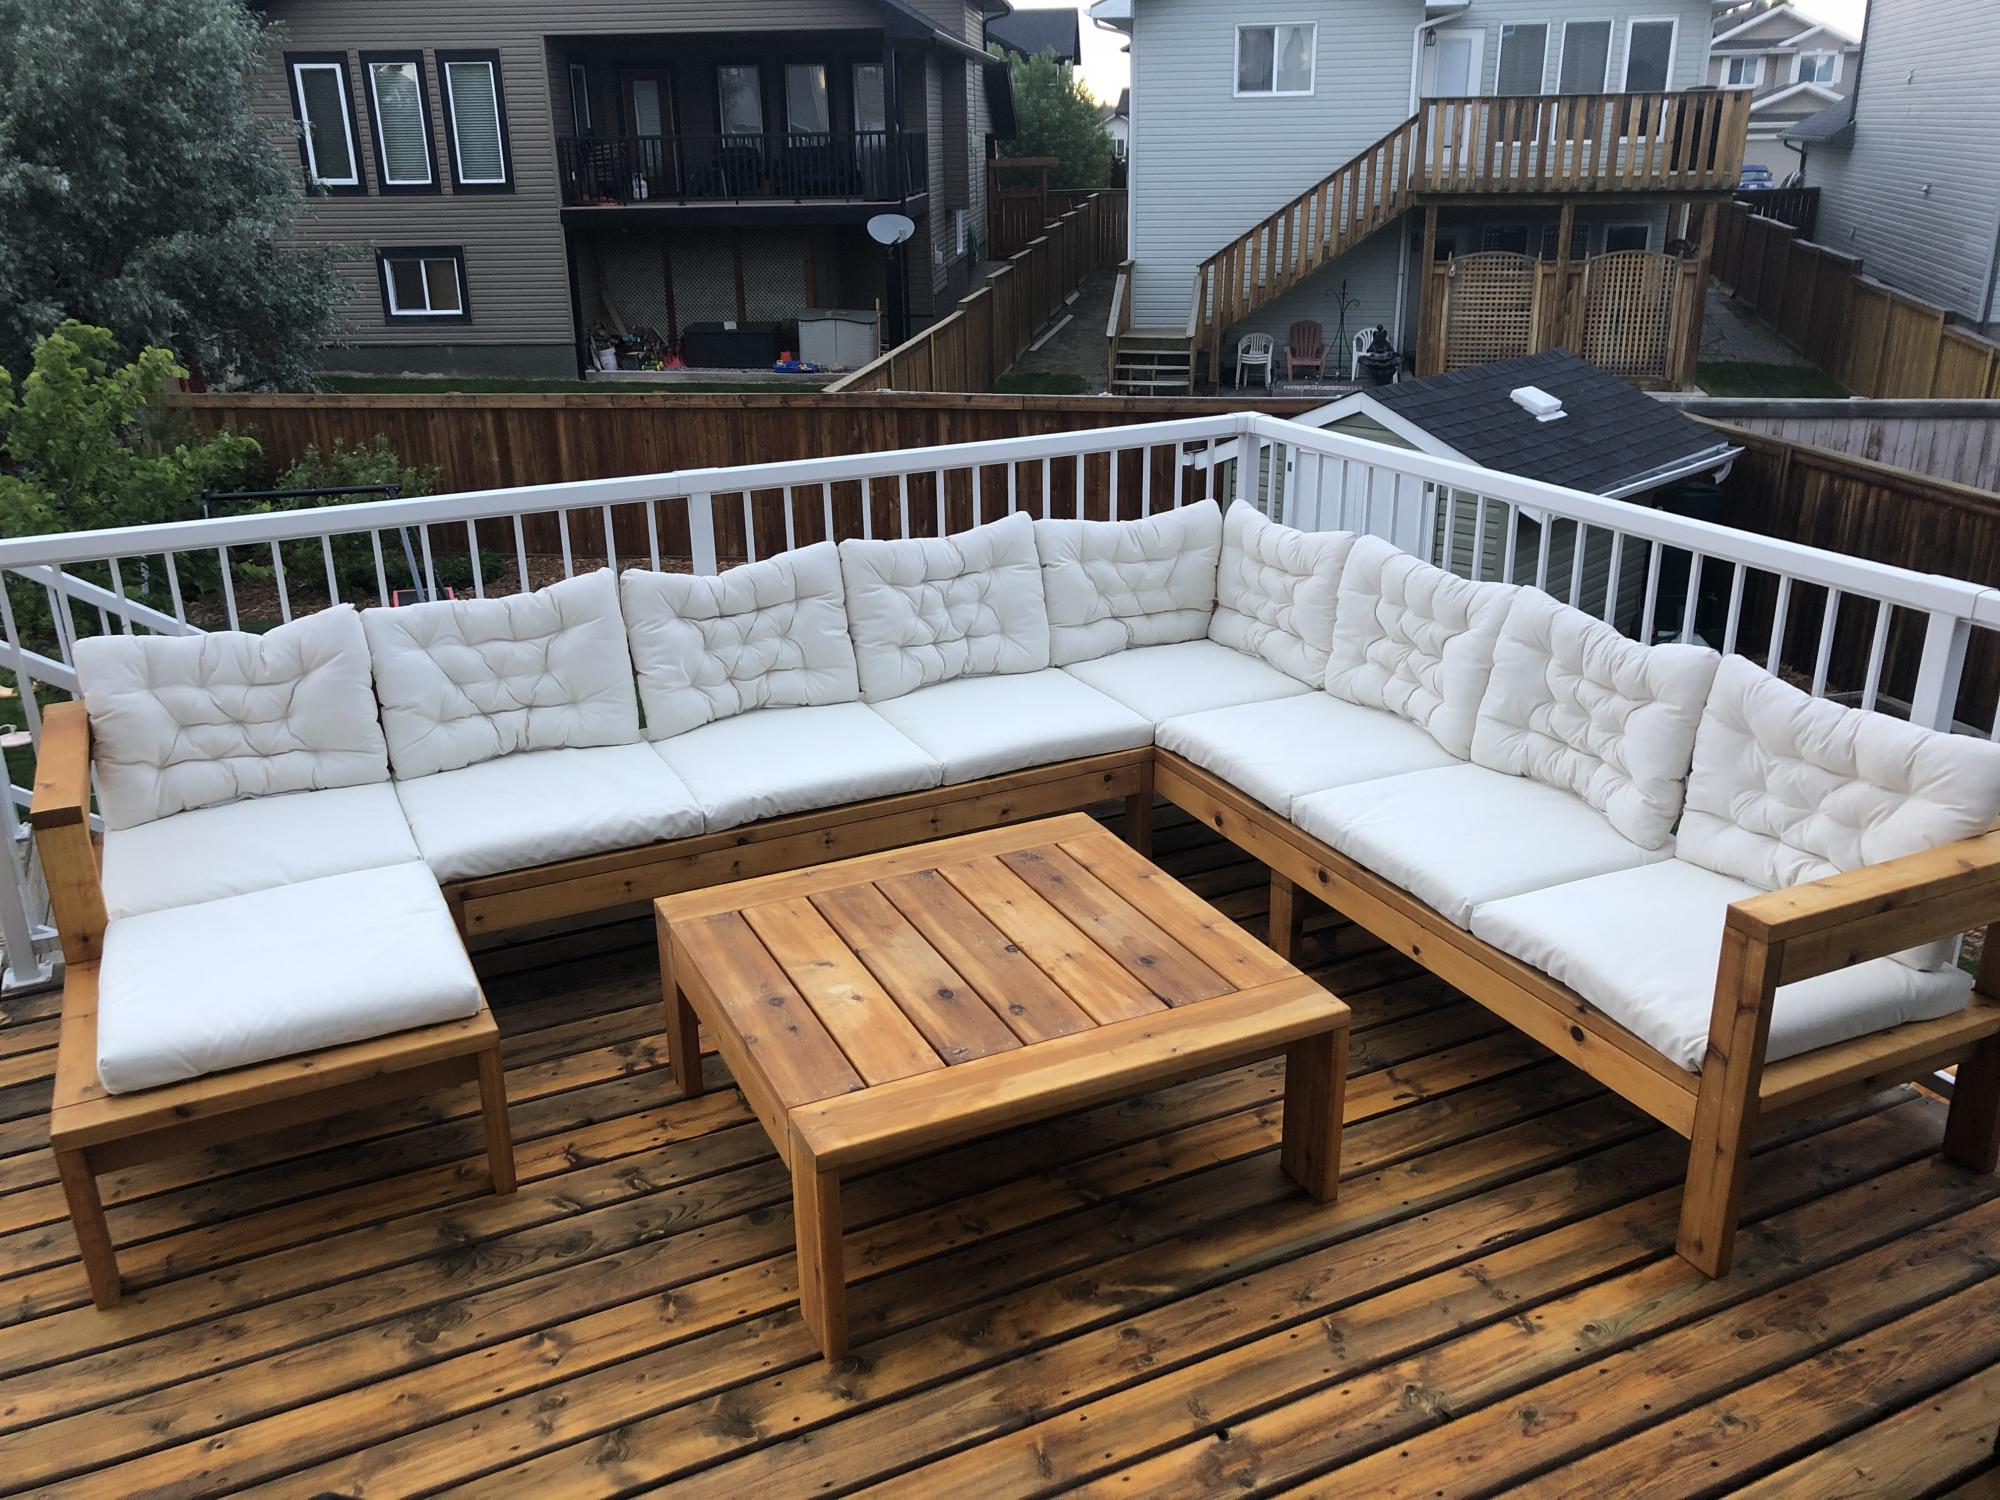
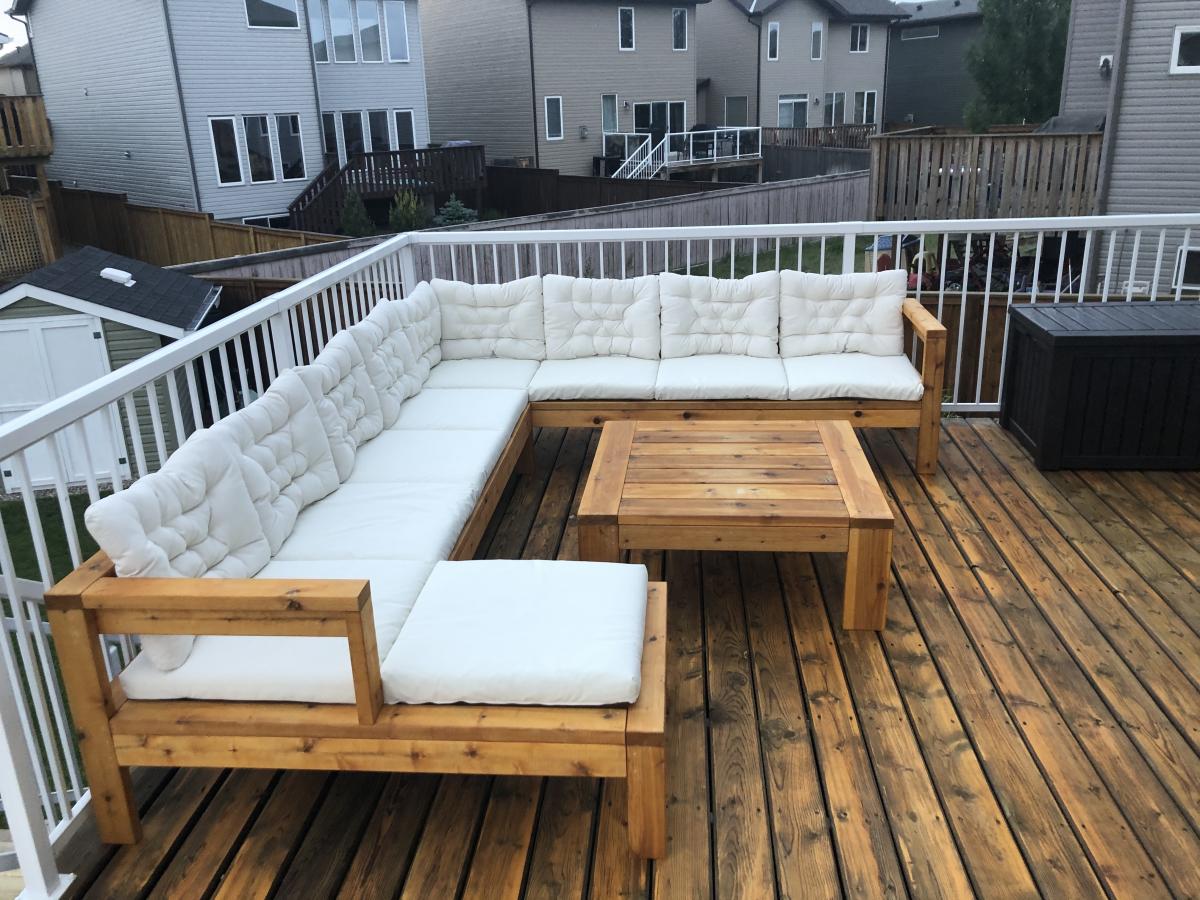
We were looking for outdoor furniture for our deck, and for the size and amount we needed it would have cost us at least $2000. We really like the idea of having an outdoor sectional that we can also use for dining, and we had trouble finding a set we liked. We found Ana's plans for the 2x4 Outdoor Sectional, and i loved the look. After seeing what others have done with the plans, I thought I would be able to modify it to get everything we needed for much less cost than buying a set.
We ended up extending the size of the 2x4 outdoor sofa by one 24" section, for a total length of 96". I then used the same design to make two outdoor chairs, just reduced the length to 24". I modified the 2x4 outdoor coffee table plans to create two ottoman's that can be moved around to make the seating more lounge style Finally, I modified the coffee table plans to make a 5 foot outdoor dining table. All in all, it took about a week and I couldn't be happier with how it turned out!

Mon, 08/02/2021 - 09:44
Looks amazing! What method did you use (pocket holes, dowels, deck screws, etc) to join the visible portions like the arms?

I modified this chair with 2x4's as the base and 2x2 for decoration on arms, this is prior to sanding and finishing

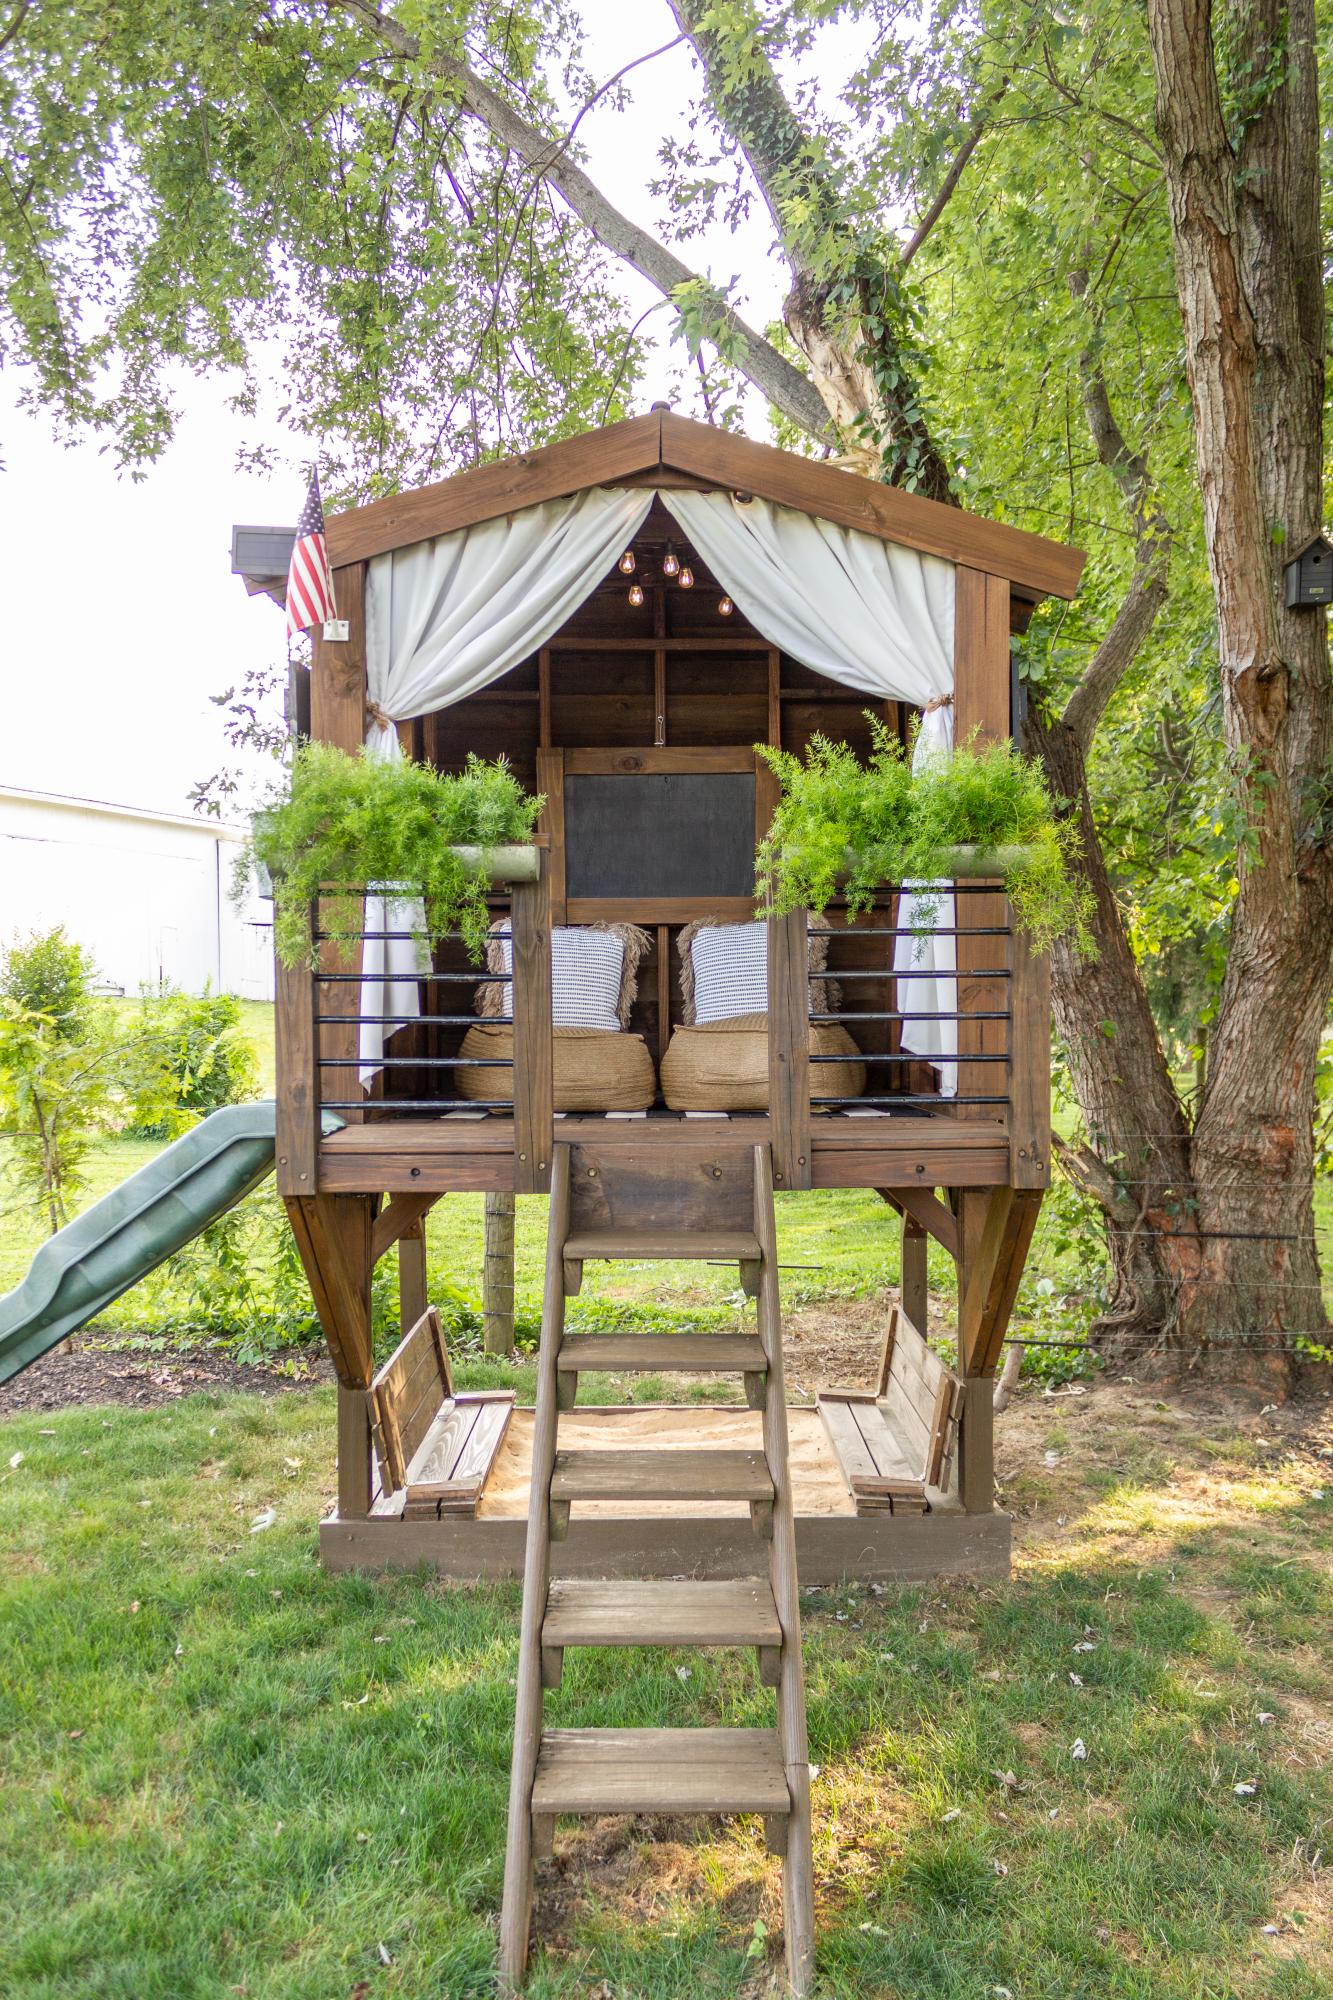
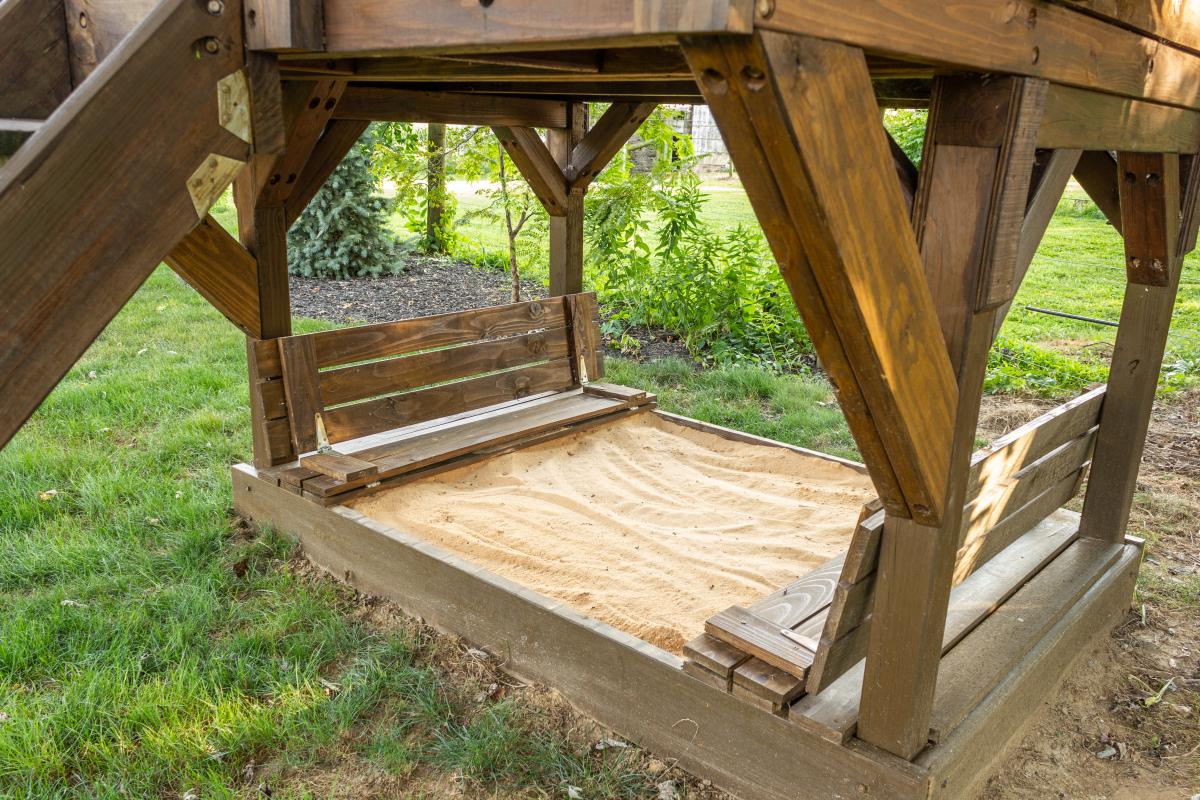
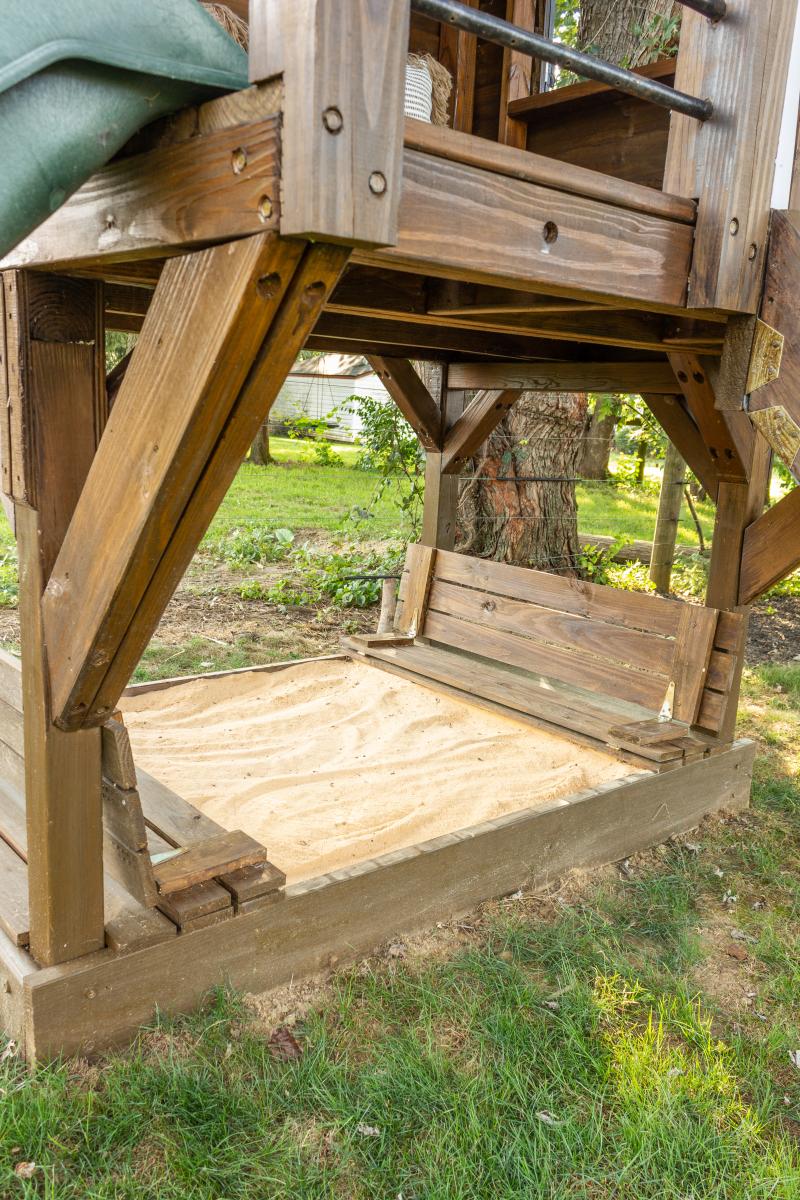
The base of our playhouse felt like the perfect spot to use the sandbox plan with built-in seats. The bench seats actually fold flat to create a lid for the sandbox when it’s not in use. I followed Ana’s plans exactly and used the list of materials she provided. The only modification I made was eliminating the back supports. It was not necessary for me to add the back supports since we have the playhouse posts to support the back of the bench.
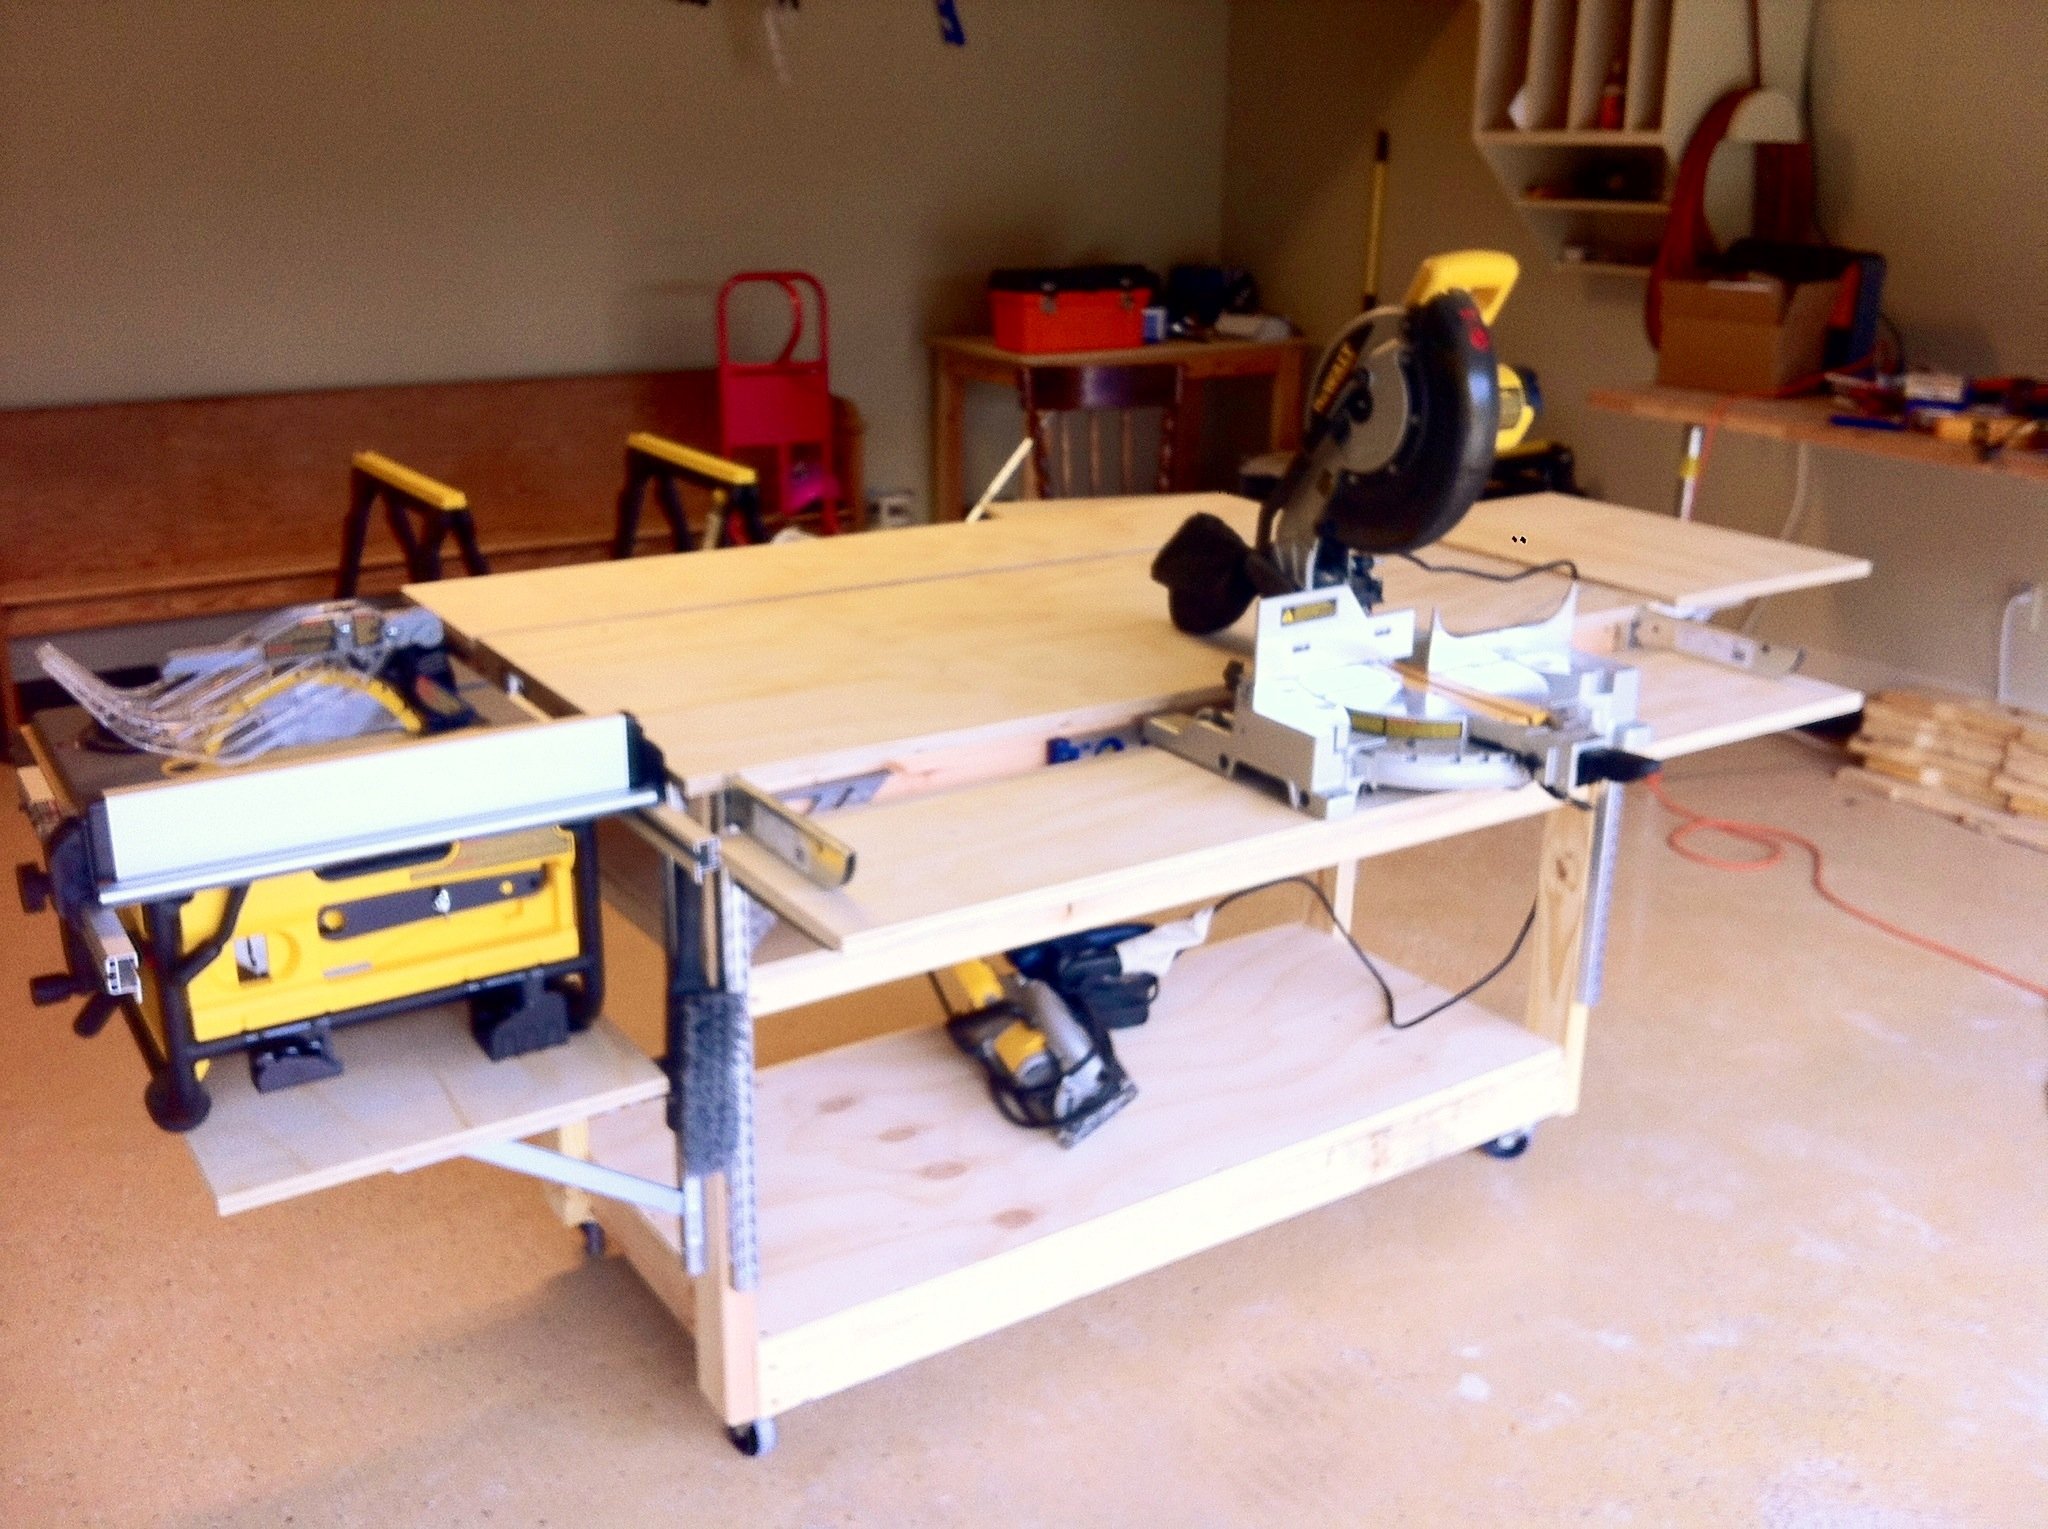
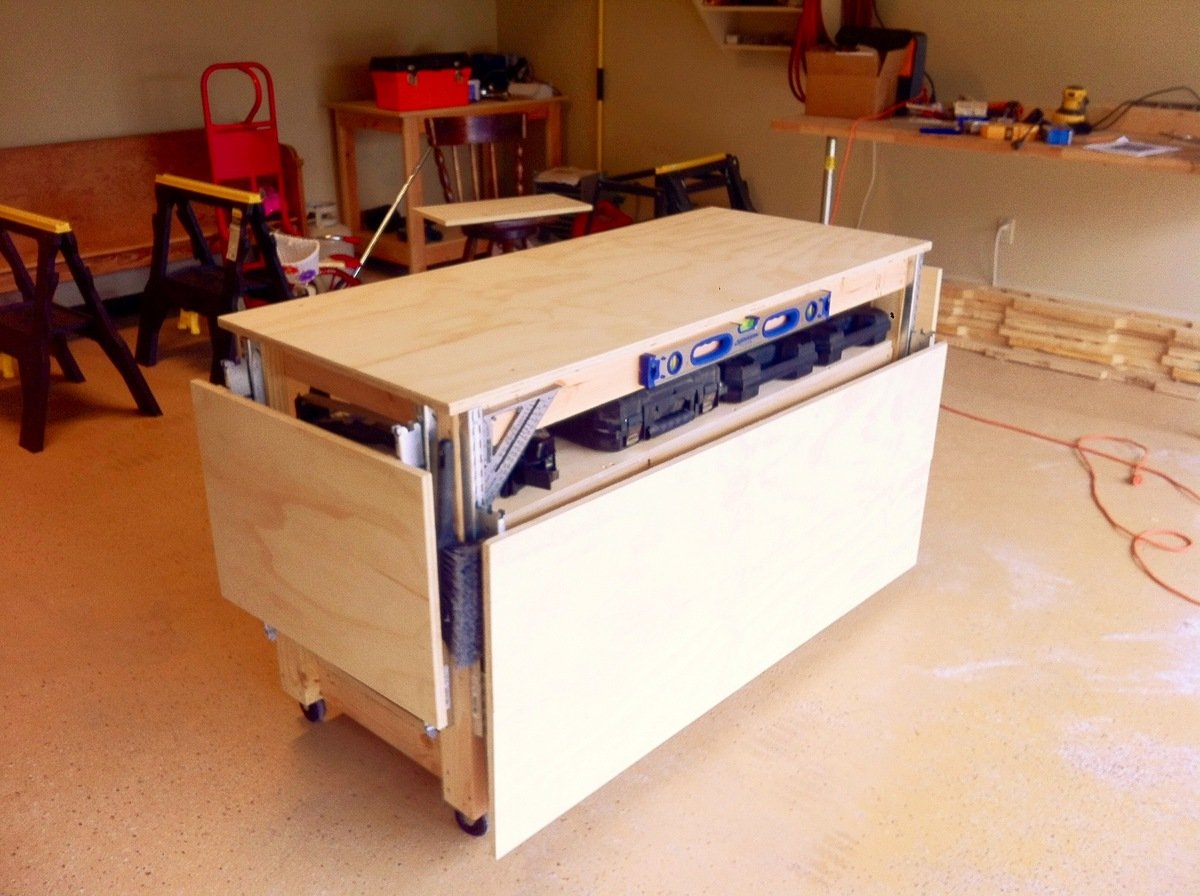
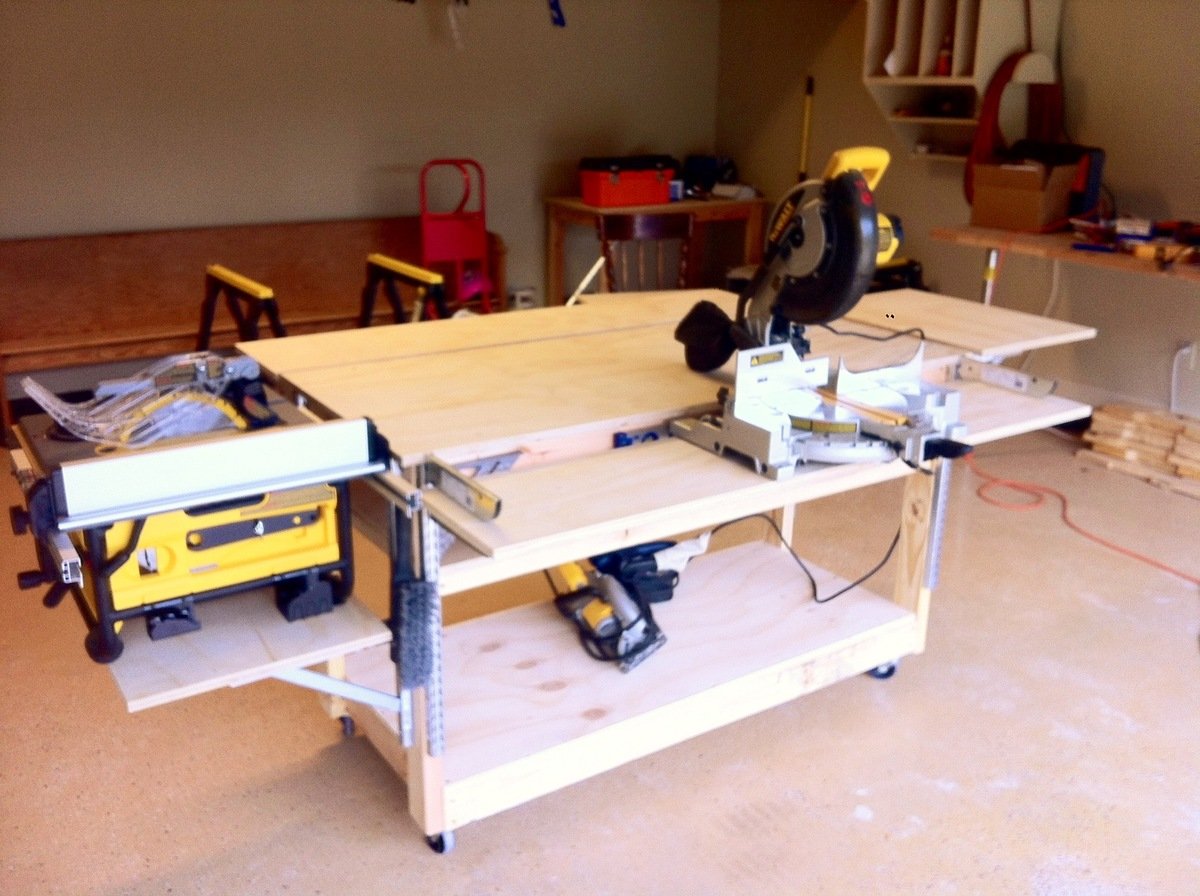
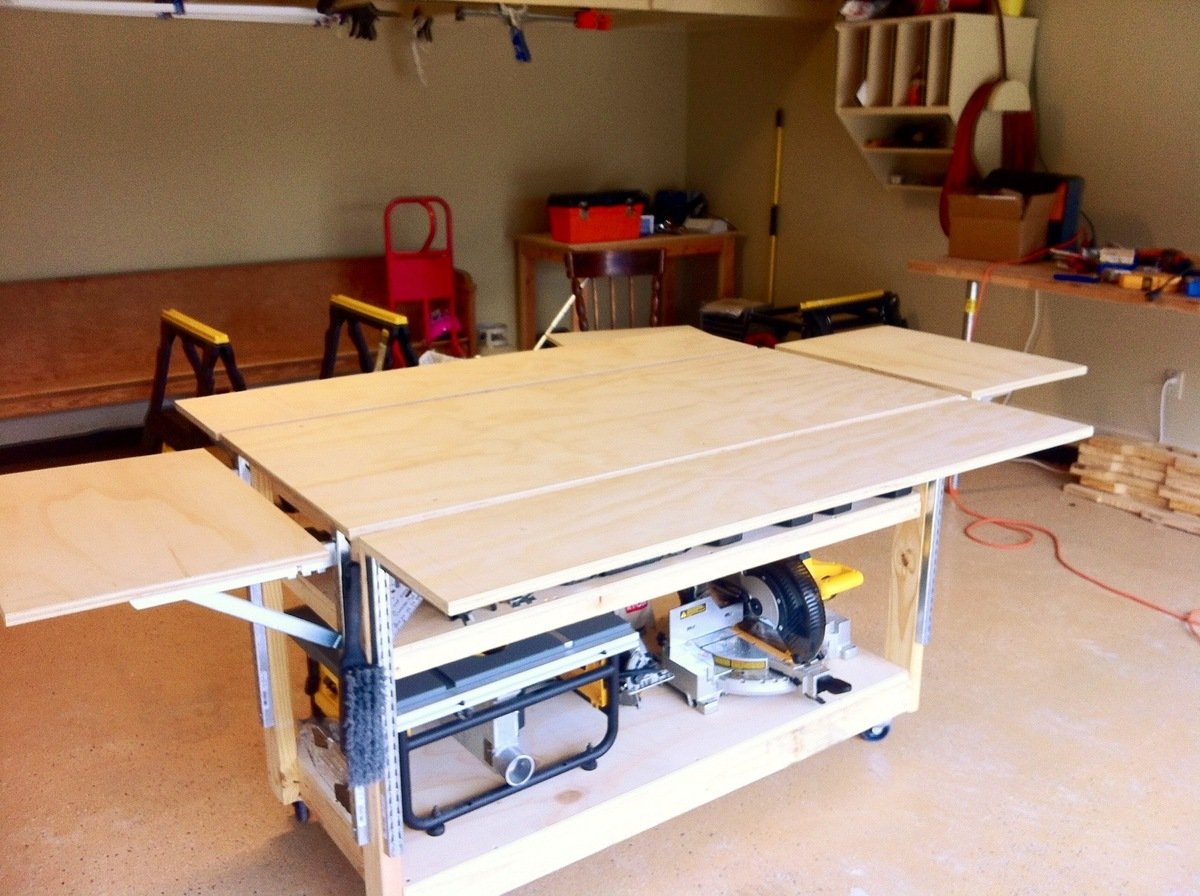
The need for a proper workbench in my garage/shop is a must, but. So is space! I already have a fold down workbench I’ve made with ¾ inch pipe & a door, but. I just need something that can handle all my tools. So, I stumbled upon these plans from the Family Handyman & couldn’t find a reason why this wouldn’t work in my shop. It has room for storage, can easily accommodate my tools & most importantly fold up to store. Easy to build too! Make sure you read all the plans first as some of the materials could be pricey, but well worth it. Technically it’s taken 2 months to build this bench, as I operate on a firefighter/teacher’s budget & during the holiday season no doubt. I ordered all the shelf standards & brackets through Amazon, $210.00 for those alone, but they hold so much weight to support your tools I figure it’s worth it. The rest materials (wood, screws) were purchased at Home Depot for around $150.00. The plans called for ¾ inch ply & it was $45.00 per sheet. However they did have a smaller thickness for $22.00 per sheet & was only a 1/32 inch thinner. I plan on topping all my surfaces with some ¼ inch tempered hardboard later on so I knew it would work. That also left me adjusting my screw size to mount my brackets. Due to the reduction in thickness of the plywood all my #8-1 inch screws needed to be adjusted to ¾ inch so to not screw through the ply. I also hit the molding isle to nab some pieces to use as furring strips to use under the shelves before attaching the brackets. This way I can sand each strip to match before mounting to make sure it lined up flat with the center top. One more thing; where it says “drill 1/8 inch hole in brackets make sure you use 1/8 inch pop rivets. I barrowed a pop rivet gun & was handed some rivets as well. Popped two & they had to be trashed because the rivet size turned out to be 5/32. So I stepped up in drill bit size & it all worked out. As I said, I’ll be topping it with some ¼ inch hardboard. I also plan to run it’s own electrical with an outlet on each post. I hope you all enjoy & this can help!
Thu, 11/29/2012 - 07:03
This is by far the best workbench I have ever seen!!! Thanks for sharing. And excellent choice of table saw and miter saw.

In reply to That is awesome! by Rusty Cottage
Thu, 11/29/2012 - 14:59
If I had it to do over I'd had gotten the contractor grade portable saw from Dewalt. The smaller version I have is the same 10" saw, but. It's maximum rip capasity is only 16. The other will at least rip a sheet of ply in 1/2.
Thanks for the kind words on the bench! I hope everyone that may find this valuable will. The plans came out of a 2005 issue & were hard to find on the internet.
Thu, 07/04/2013 - 18:28
I love this work bench and would love to build it but i cant find them. Could you post them or email them to me please. uniquetrio2000 [at] gmail [dot] com
Thu, 10/23/2014 - 09:04
After some searching, found the plans at http://us.readersdigest.com/images/offer/fh/project_plans/pdf/FH05DJA_W…. Hope that helps. This is on my list of things to make very soon.
Wed, 10/22/2014 - 13:31
I bought all the standards and brackets at Menards for $87.58 and this price included tax and shipping.
Mon, 12/10/2018 - 16:55
Thanks for sharing! Good job! Any chance you'd share palns? No luck on inet or with provided link. Thanks!
Wed, 08/07/2019 - 12:48
This is the perfect workbench that I’d like to build. Could I get the plans for it?
Thu, 03/12/2020 - 12:46
Were you able to locate the plans?
The link in this thread doesn’t seem to be active.
Sun, 07/12/2020 - 17:59
I found the PDF download for these plans, here is the link:
https://docplayer.net/28130746-Do-it-all-mobile-workbench.html
The only place where I could find them, FH doesn't have them online any more.

Tue, 12/08/2020 - 17:57
Great build. I would love to see an instructable on this. :) Thank you for sharing..

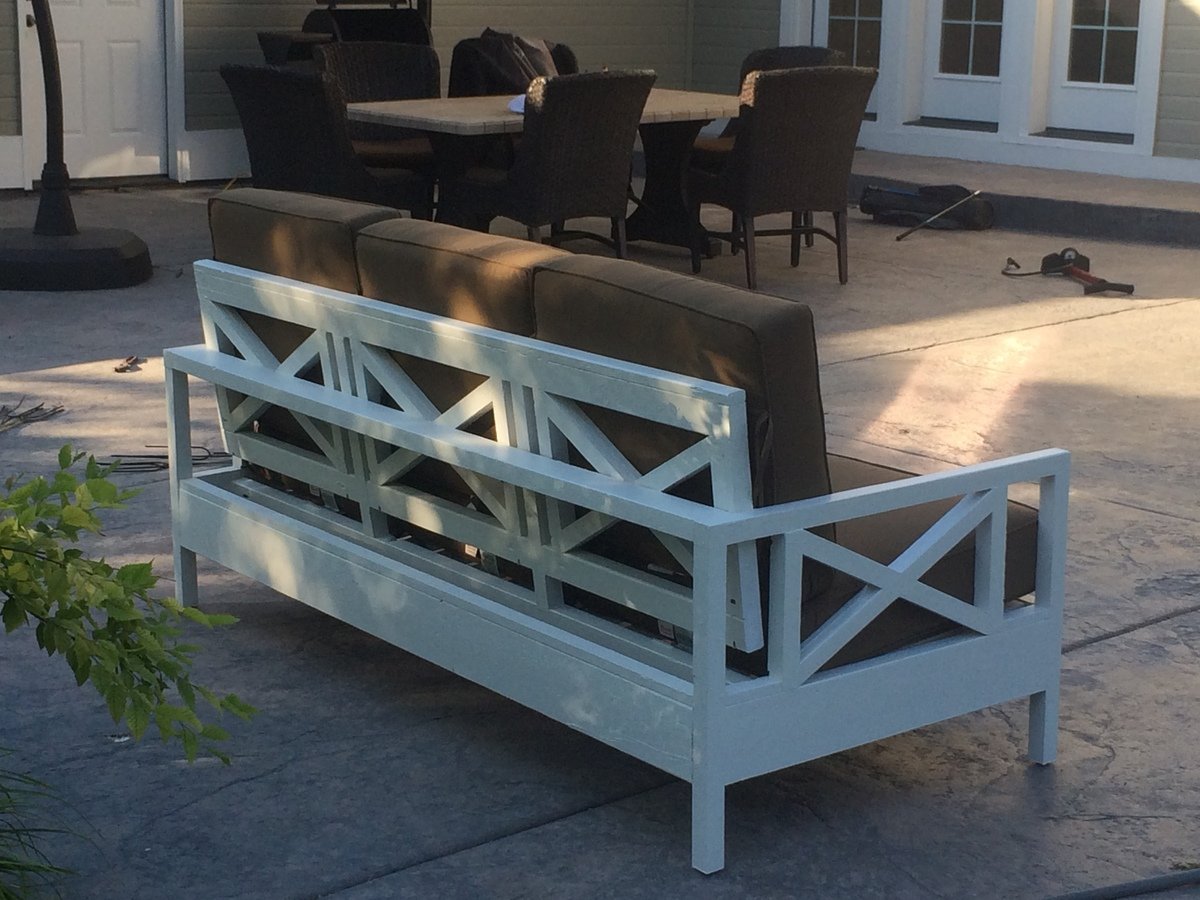
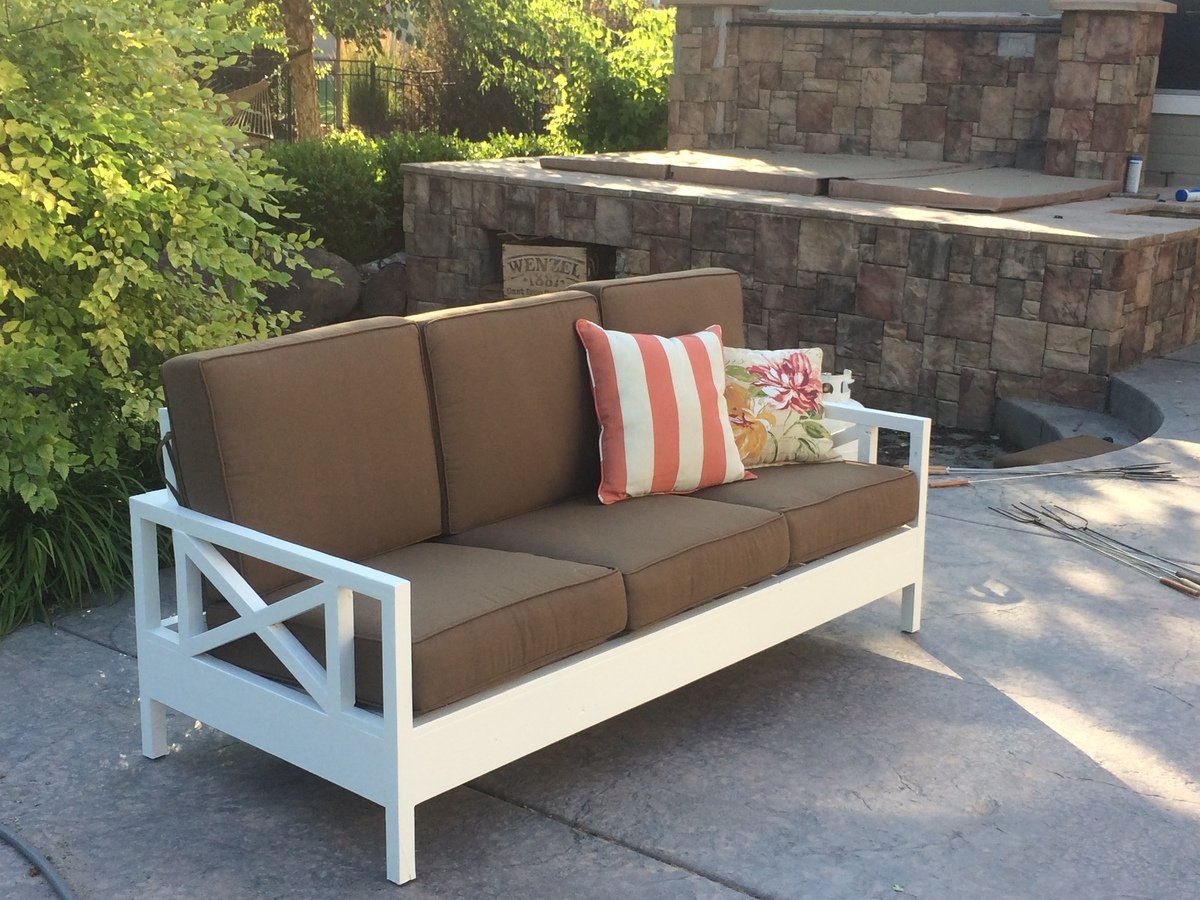
My wife loves the X pattern of the Weatherly Sofa, but wanted the tilted back from the Simple White Outdoor Sofa. This was our best of both worlds effort!
Tue, 06/11/2019 - 05:25
Can you share where you got your cushions please?
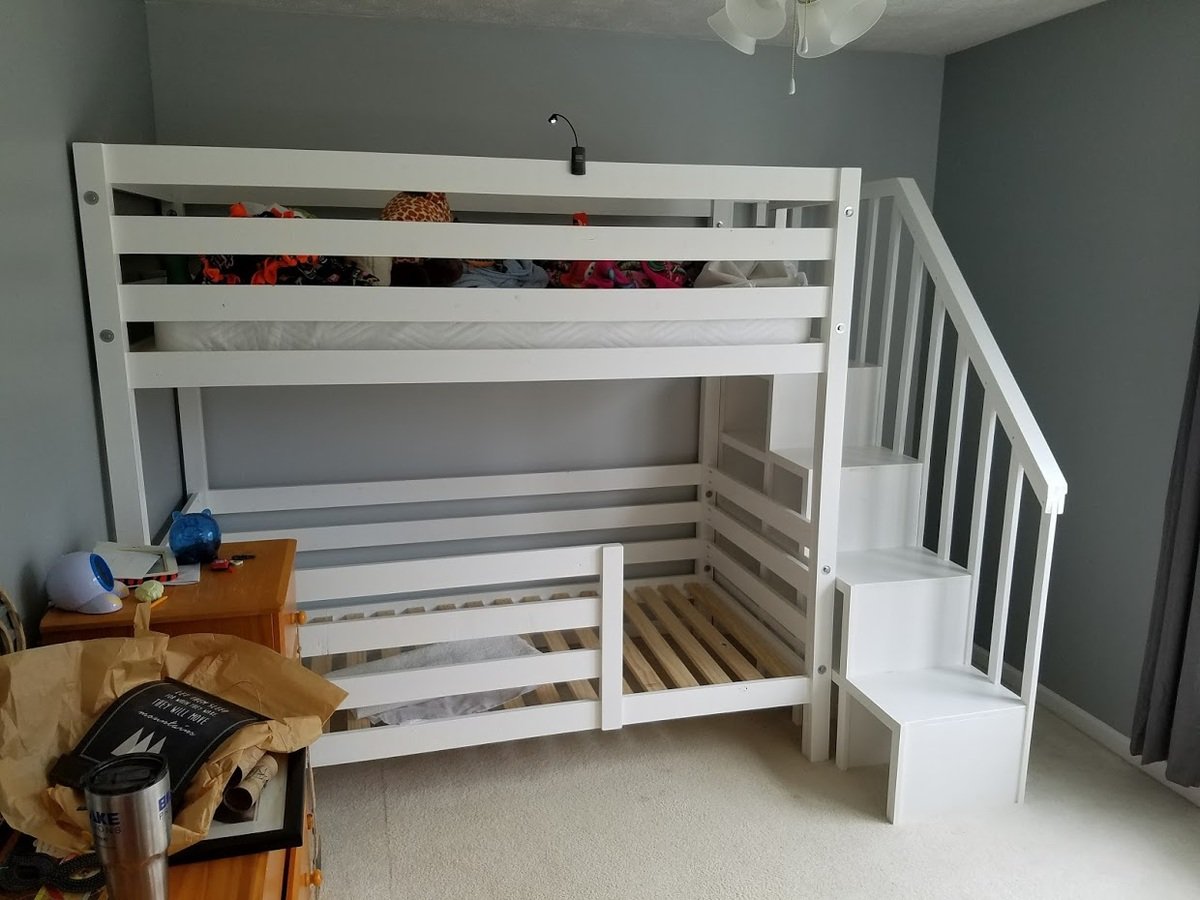
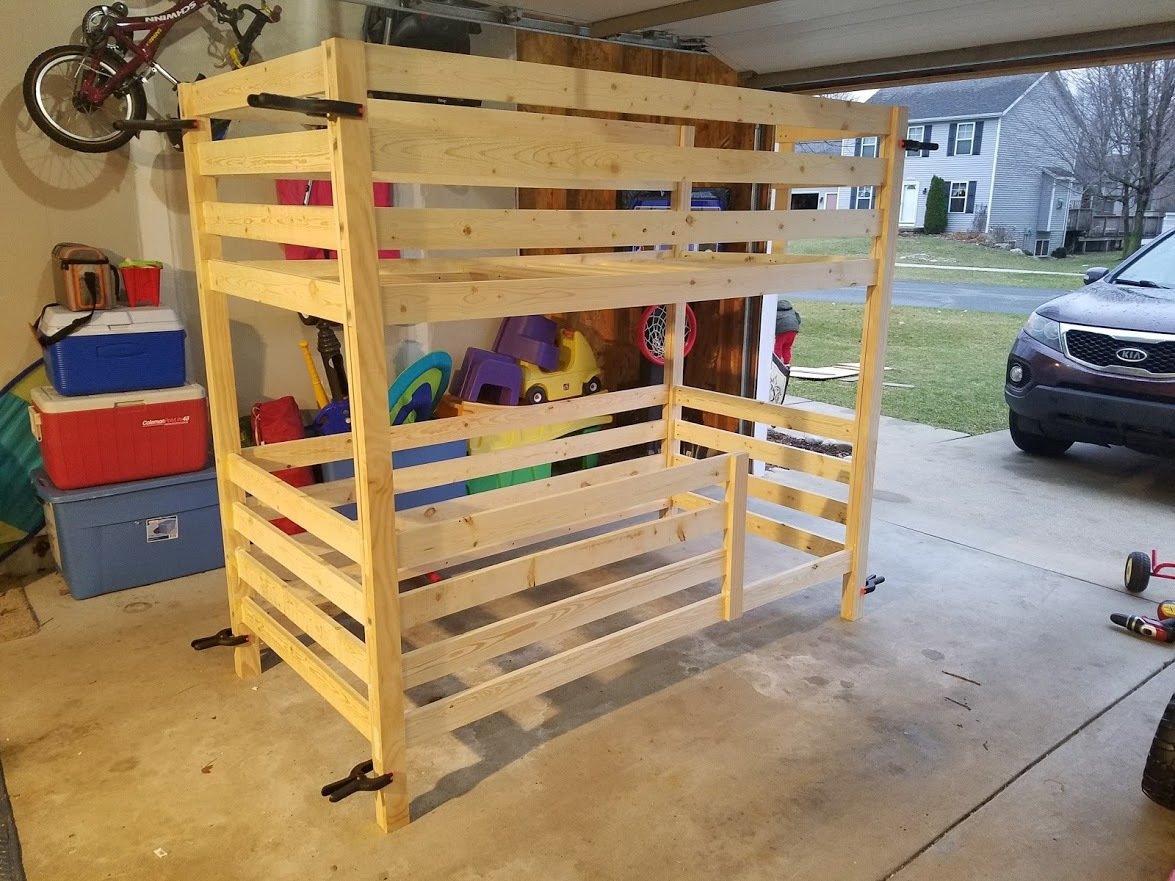
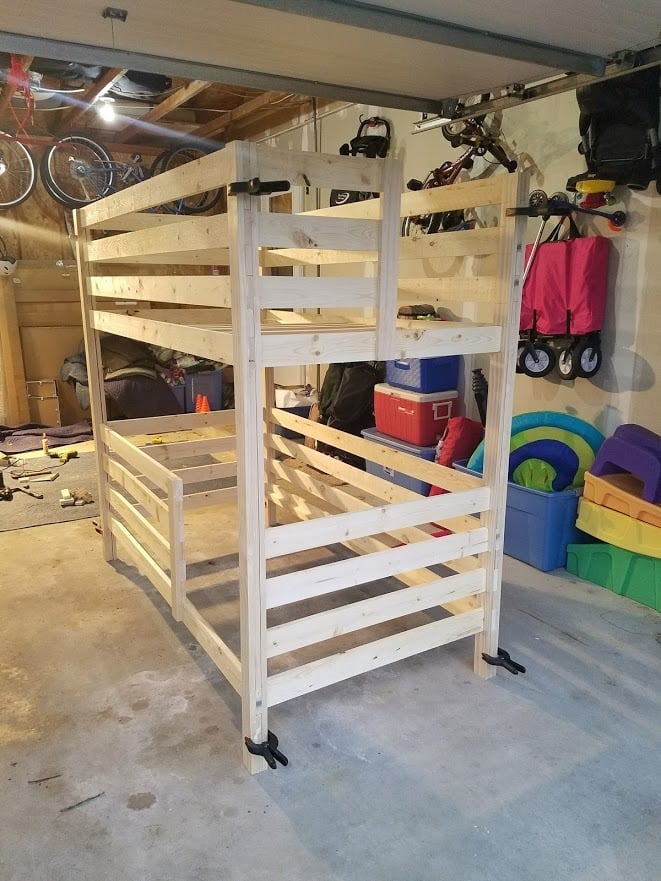
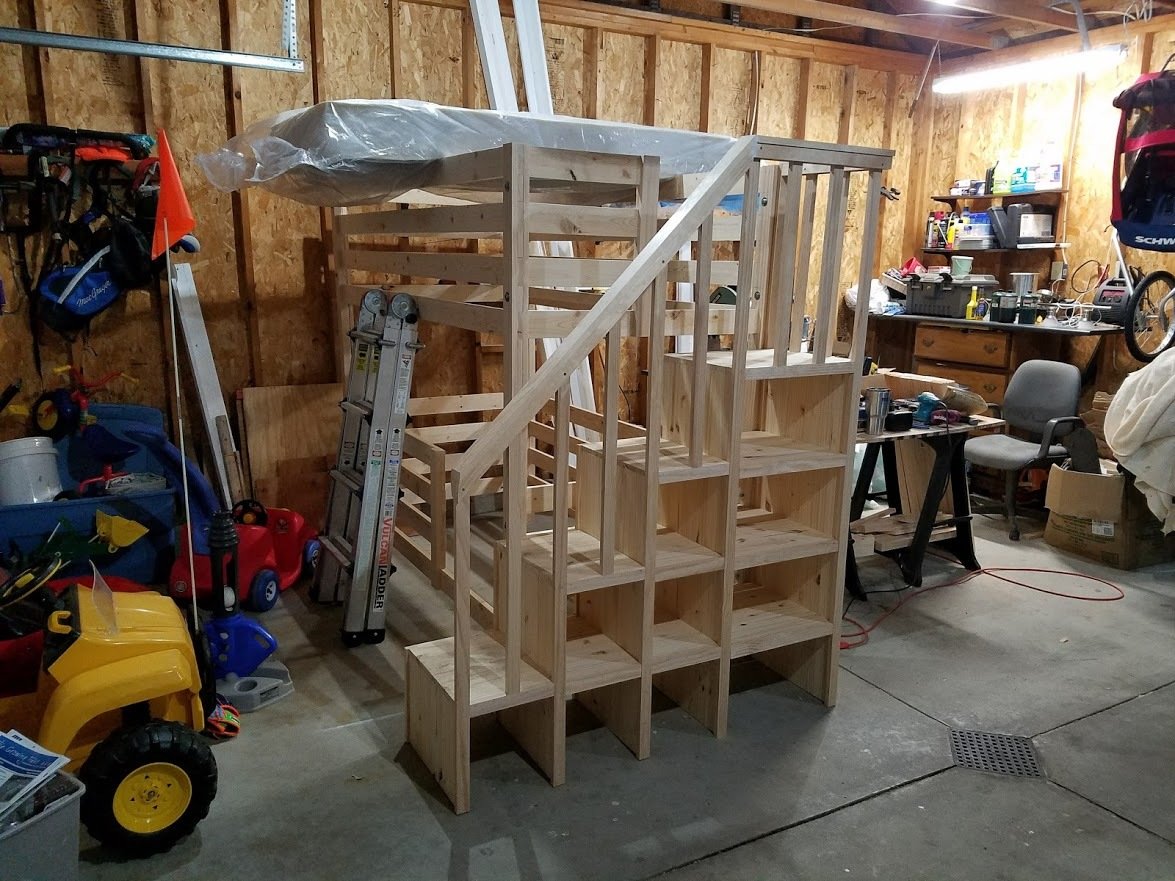
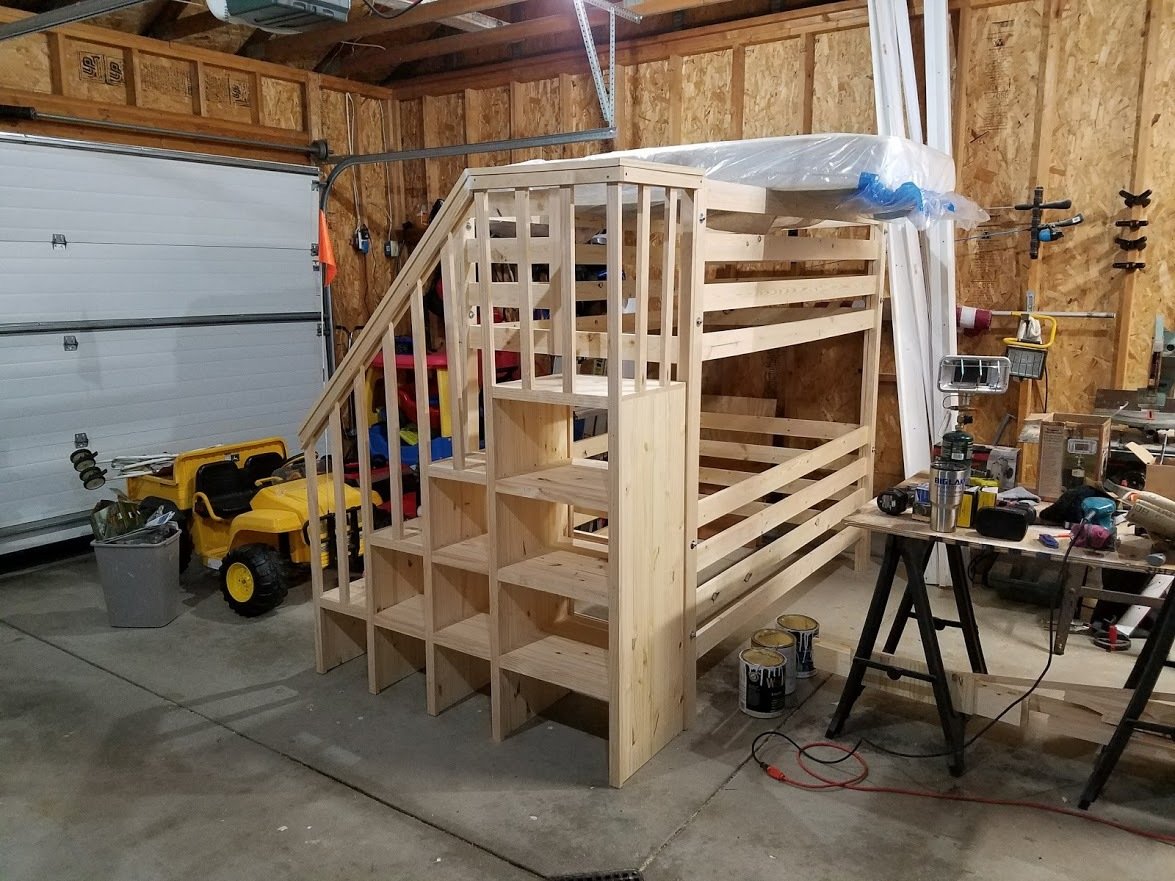
I modified the plans for the Classic Bunk beds by making them 74" tall instead of 63" and added a fourth slat all the way around to add more protection from potential falls. I created one opening in the front for my youngest to get into the bottom bunk, and built slats about 2/3's across the front to act as a gaurd rail. I created another opening on the side for my oldest to get into the top bunk with stairs instead of ladders to again prevent falls. I had to modify the Sweet Pea stairs to accomodate for the extra height in the bunk beds, simplified the railings, and I created each cubby to be big enough to use cloth storage totes that were 11x11x11. Sanded the whole bed and stairs so the corners and edges were all rounded and smooth, and put two coats of white Deck and Porch paint to stand up to the the boys running up and down. I used brackets to secure the stairs to the bed, and sixteen 3" bolts to bind the bed together. Precut and drilled 17 slats for each bed seperated them 2" apart. Spent a few hours every night during the week measuring, cutting, glueing, drilling and assembling the bed and stairs. Spent an entire weekend sanding and painting. Very happy with the way these beds turned out. Overall cost of the project including the paint was around $400.
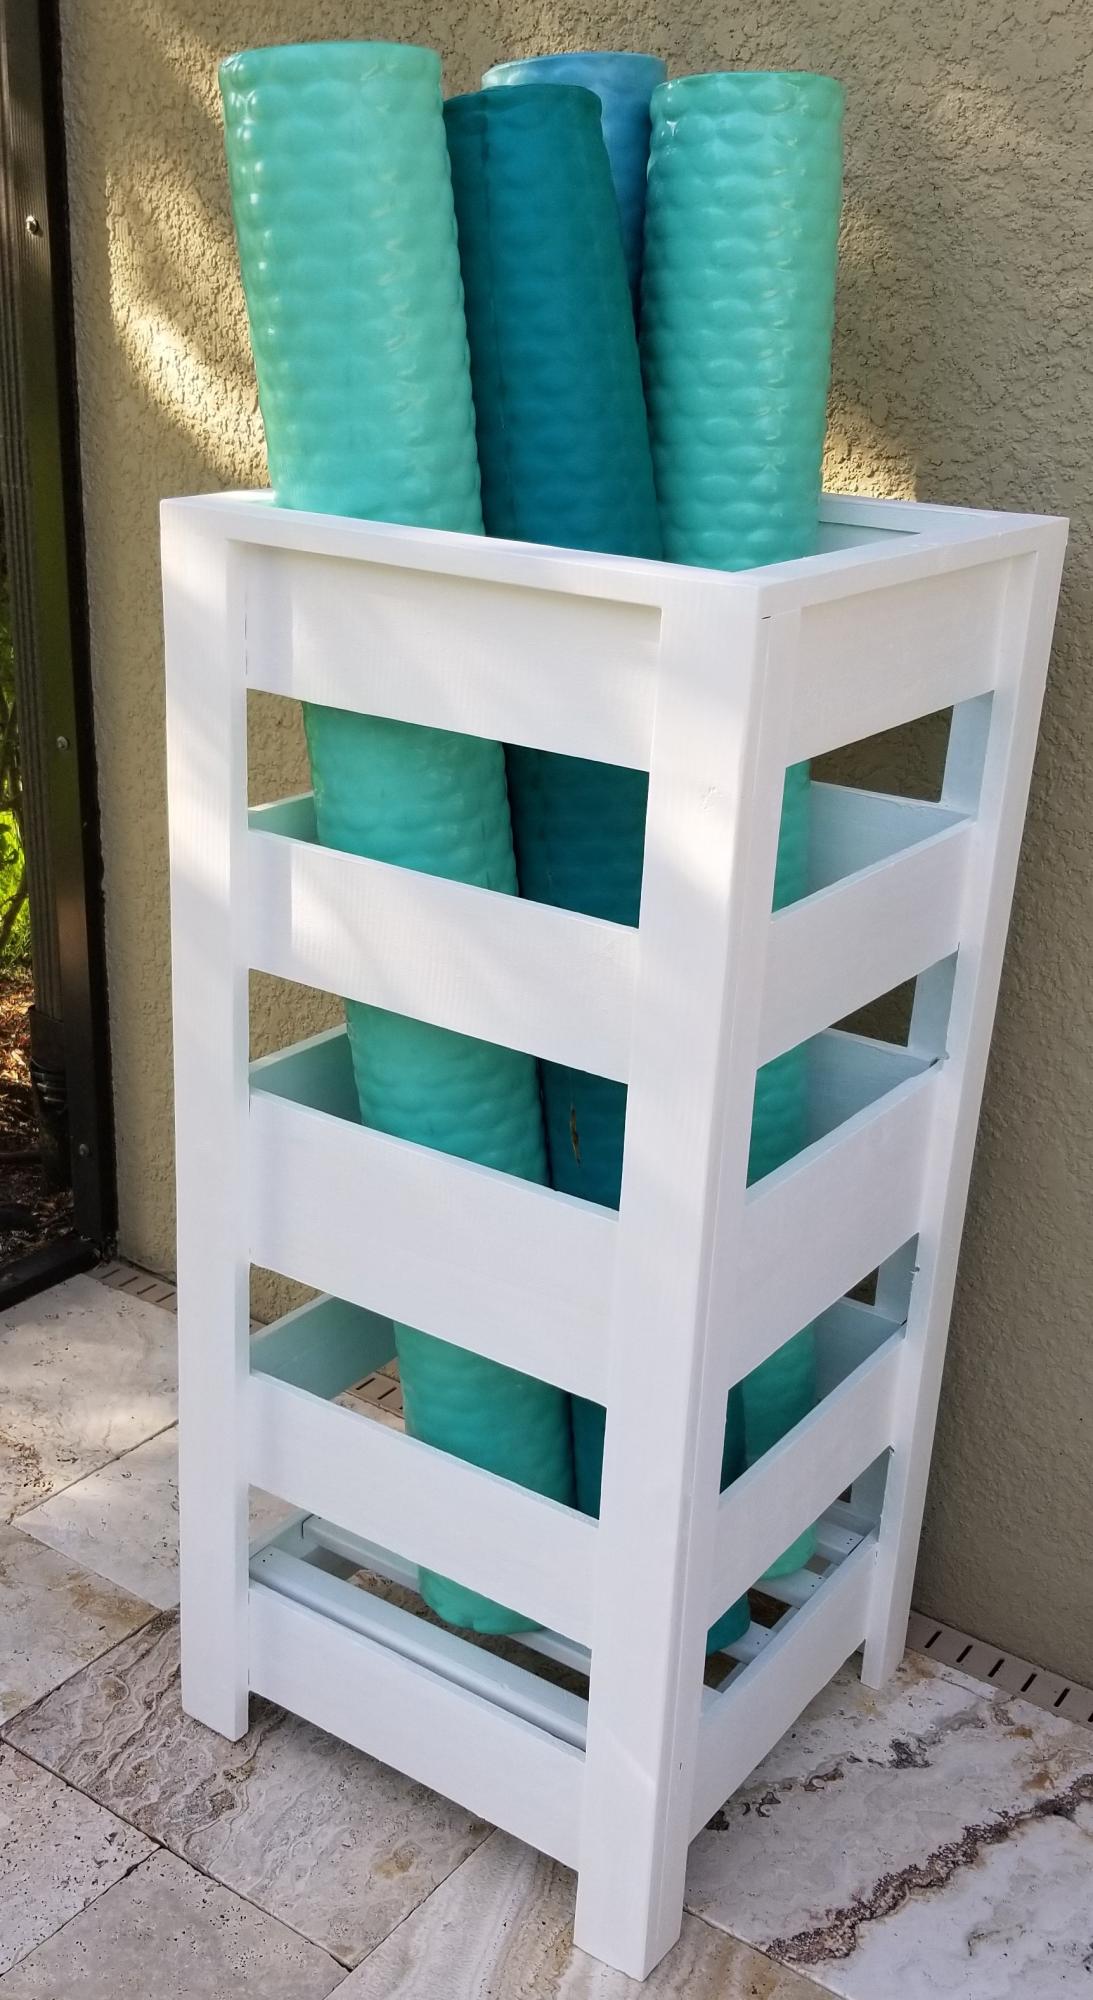
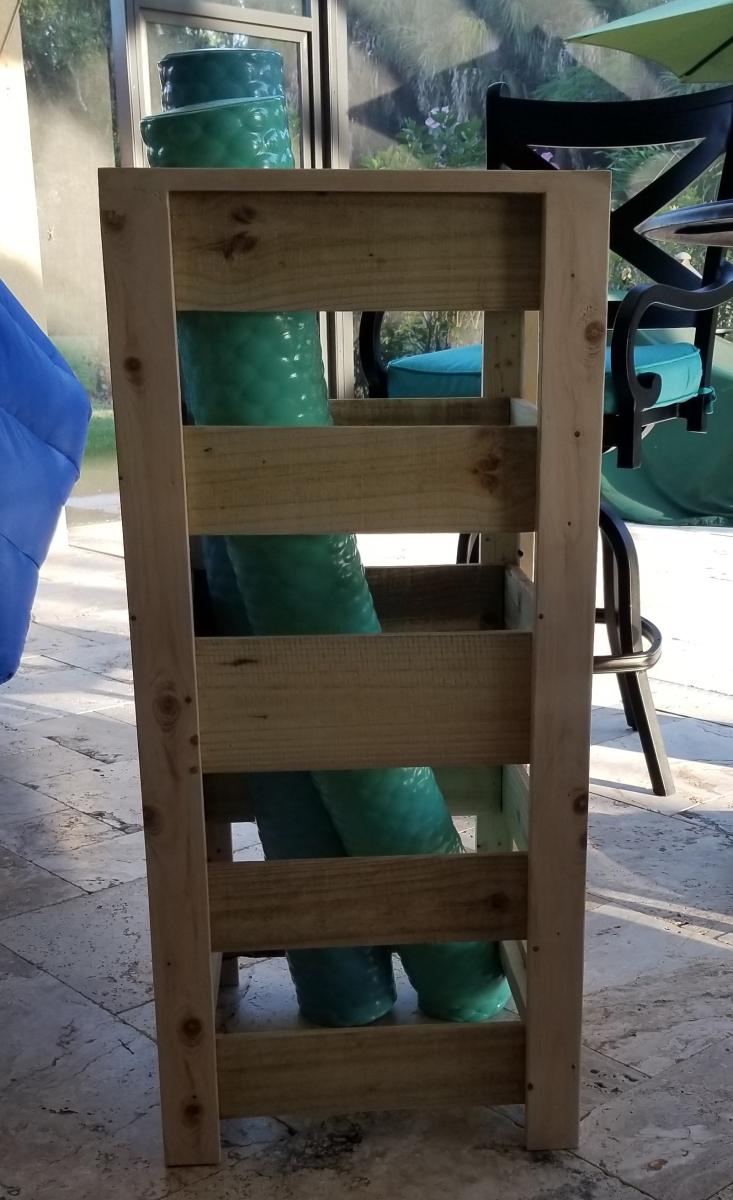
I modified the plans for the planter box to make a holder for Pool Noodles. I made it 40" tall and used 4-4" fence pickets and 1-5.5" fence pickets. I used a 4" spacer and the openings worked out perfect. I stained inside and out since it would show with 2 coats of the solid stain. It is perfect! Thank you so much for the inspiration and plans!
Mon, 06/06/2022 - 14:04
This is so smart and looks great too, thank you for sharing!
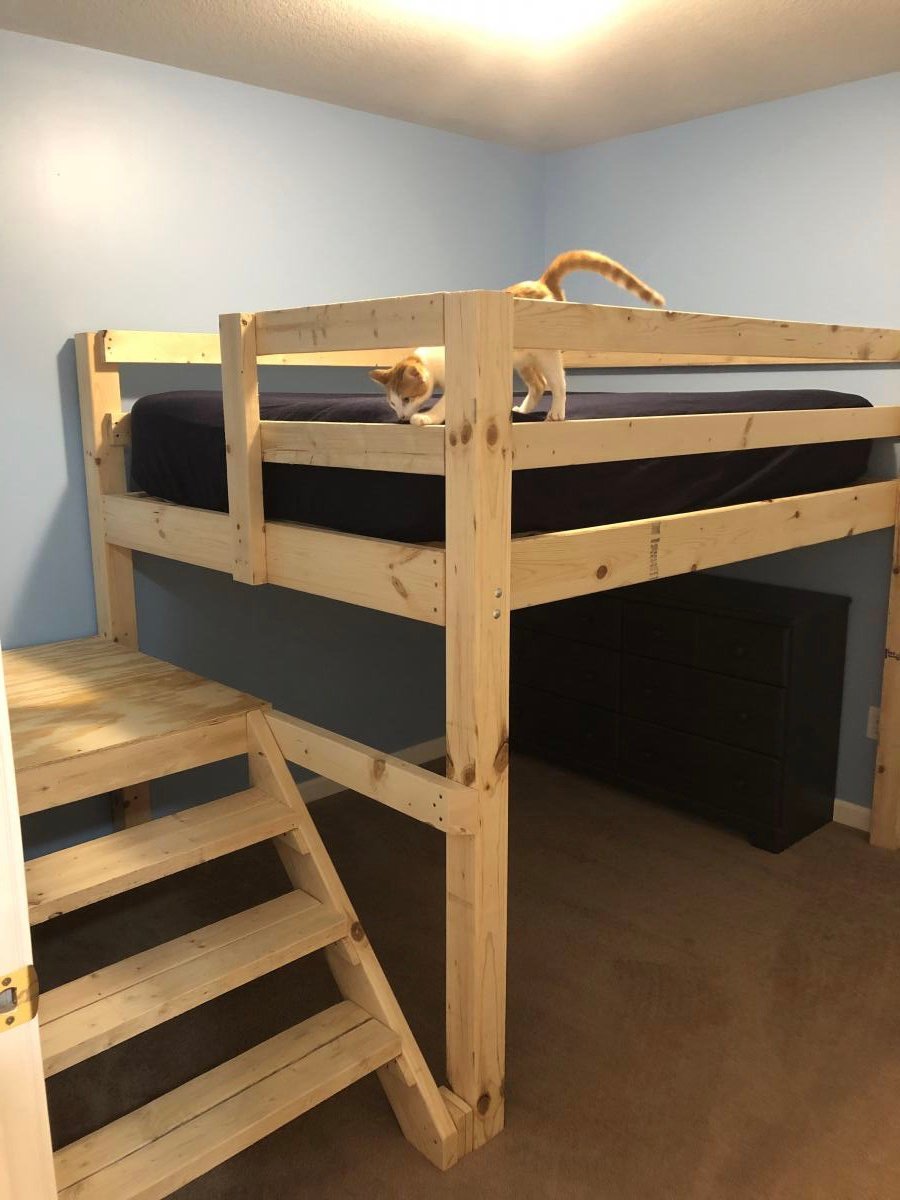
Built a full size loft bed for my kids but wanted something safer than having them climb up and down a ladder so used the Camp Loft Bed plans to add the platform and stairs. It is much easier for the kids. Going to finish by covering the platform and stairs with carpet.
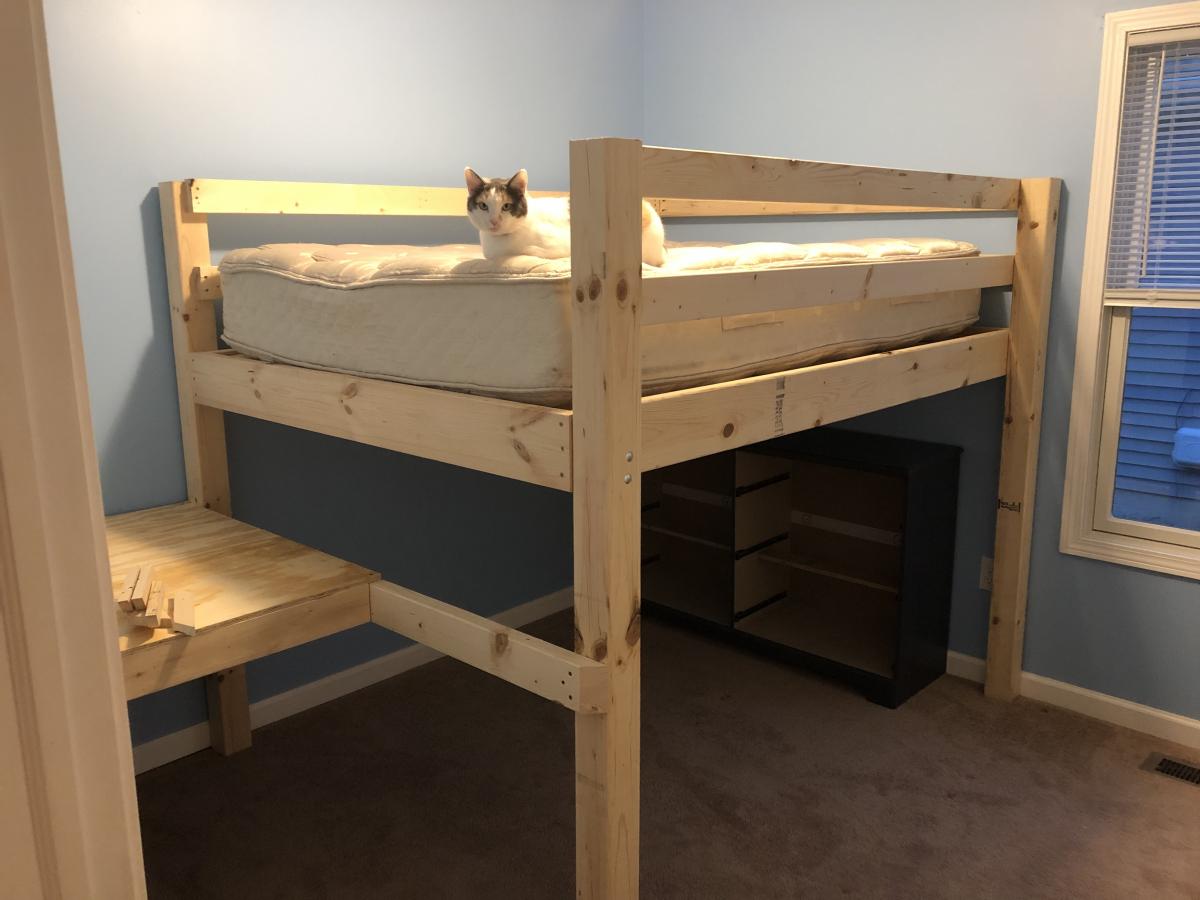
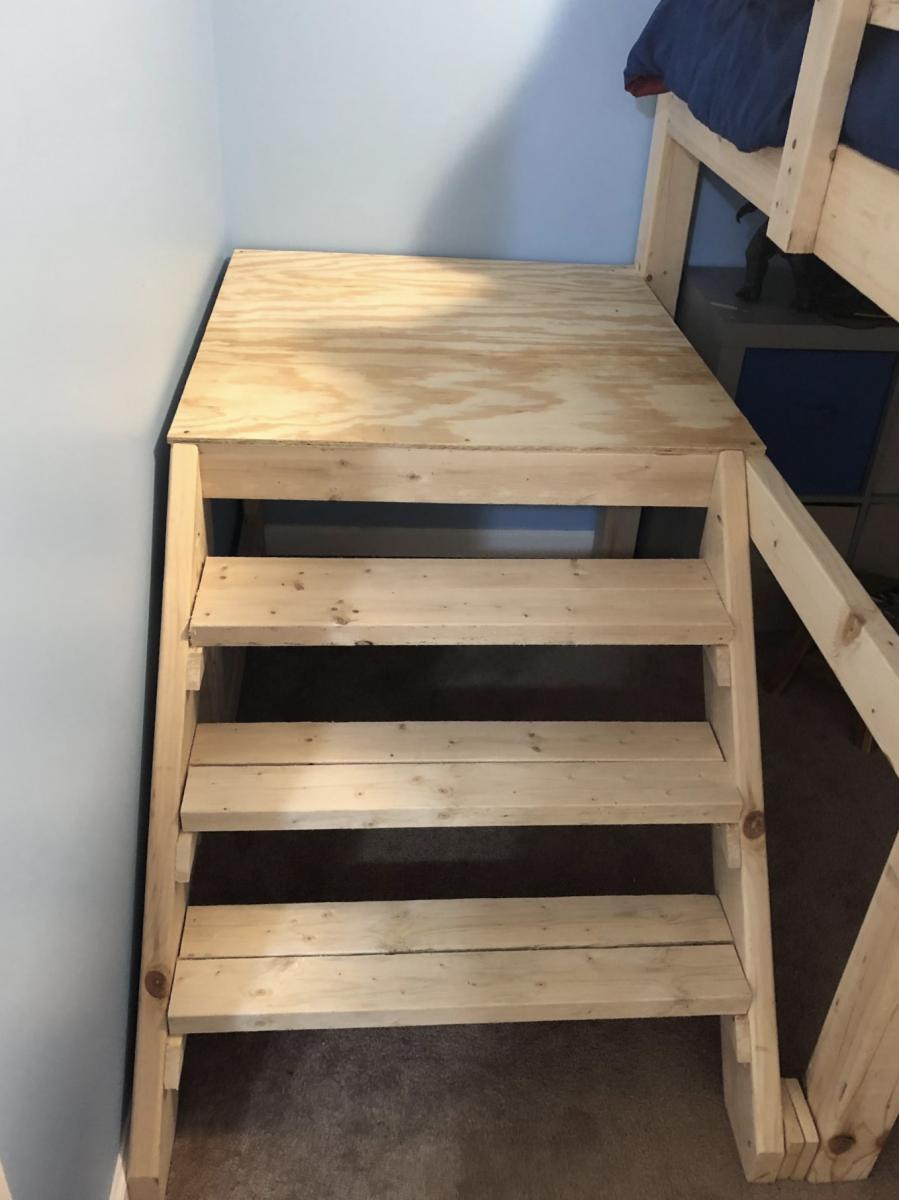
Wed, 10/02/2019 - 09:51
I really like how the platform is only half way so the stairs are inset, this is very smart and good use of space.
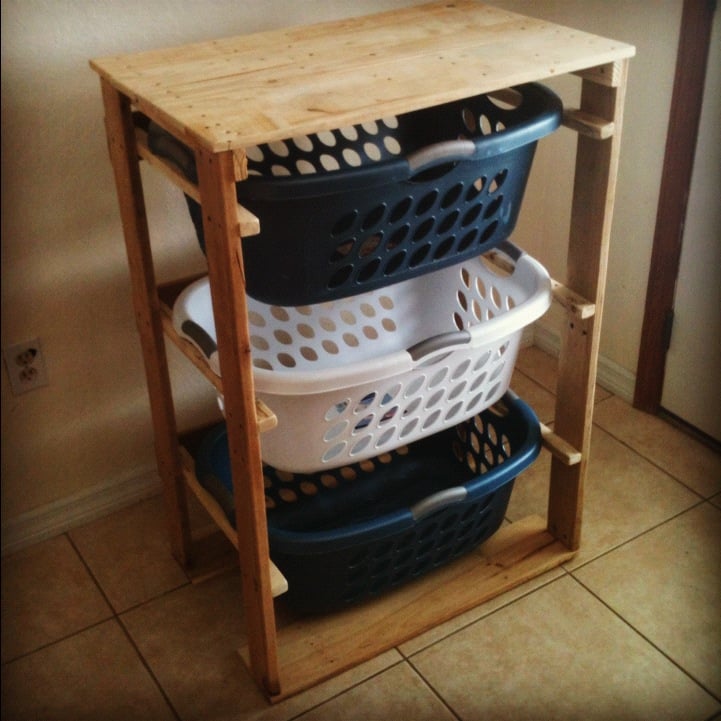
I showed my wife the Laundry Dresser featured on Ana White's website and she asked if I could make one for her, but not quite so tall. I also turned the orientation to fit our laundry room space. I used primarily oak from recycled pallets to build the Laundry Basket Dresser. She wanted a work space on top, so folded laundry, empty baskets, etc. all have a temporary resting place depending on the day. From start to finish, it took me about 6 hours. She plans to stain the piece at some point, but its already in use, so I'm not 100% sure that will ever happen until we move or something. ;-) Great idea and laundry room organization!
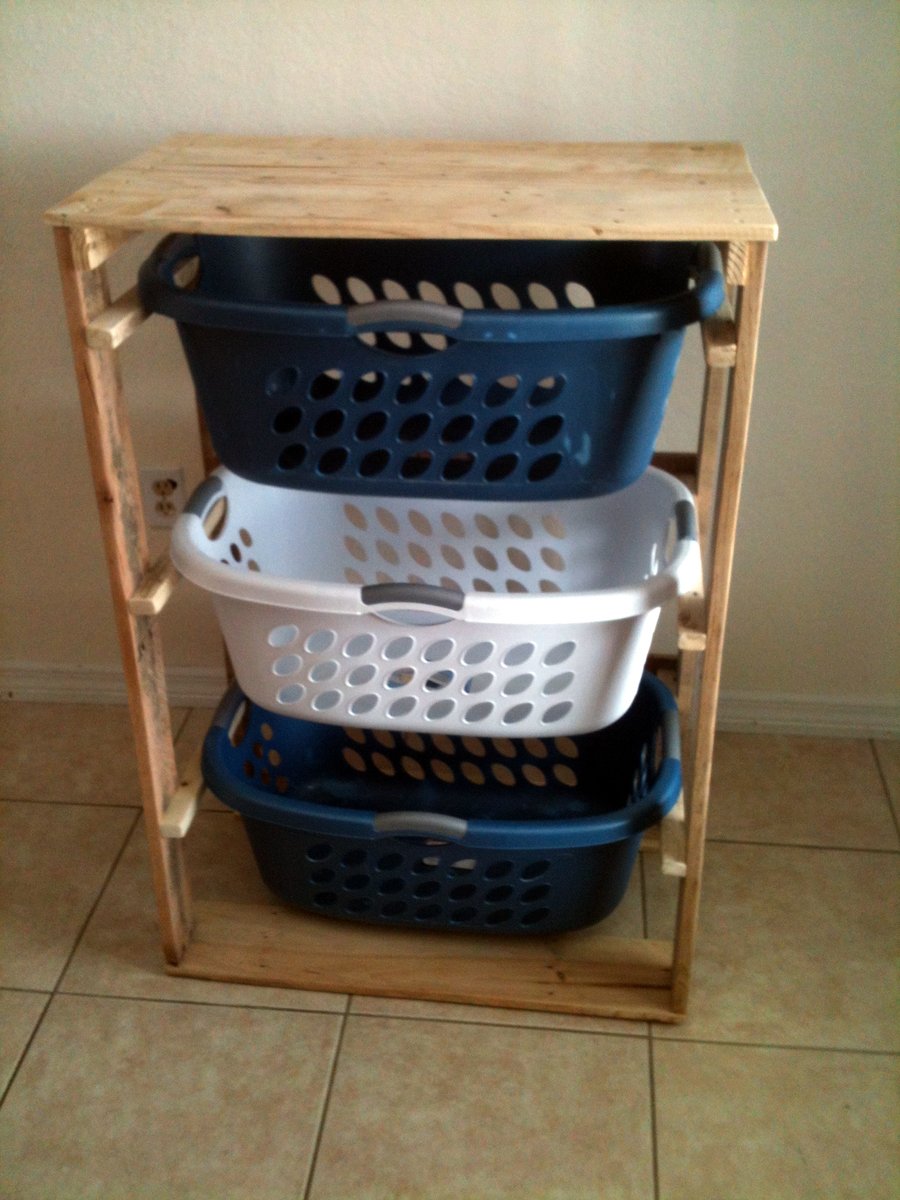

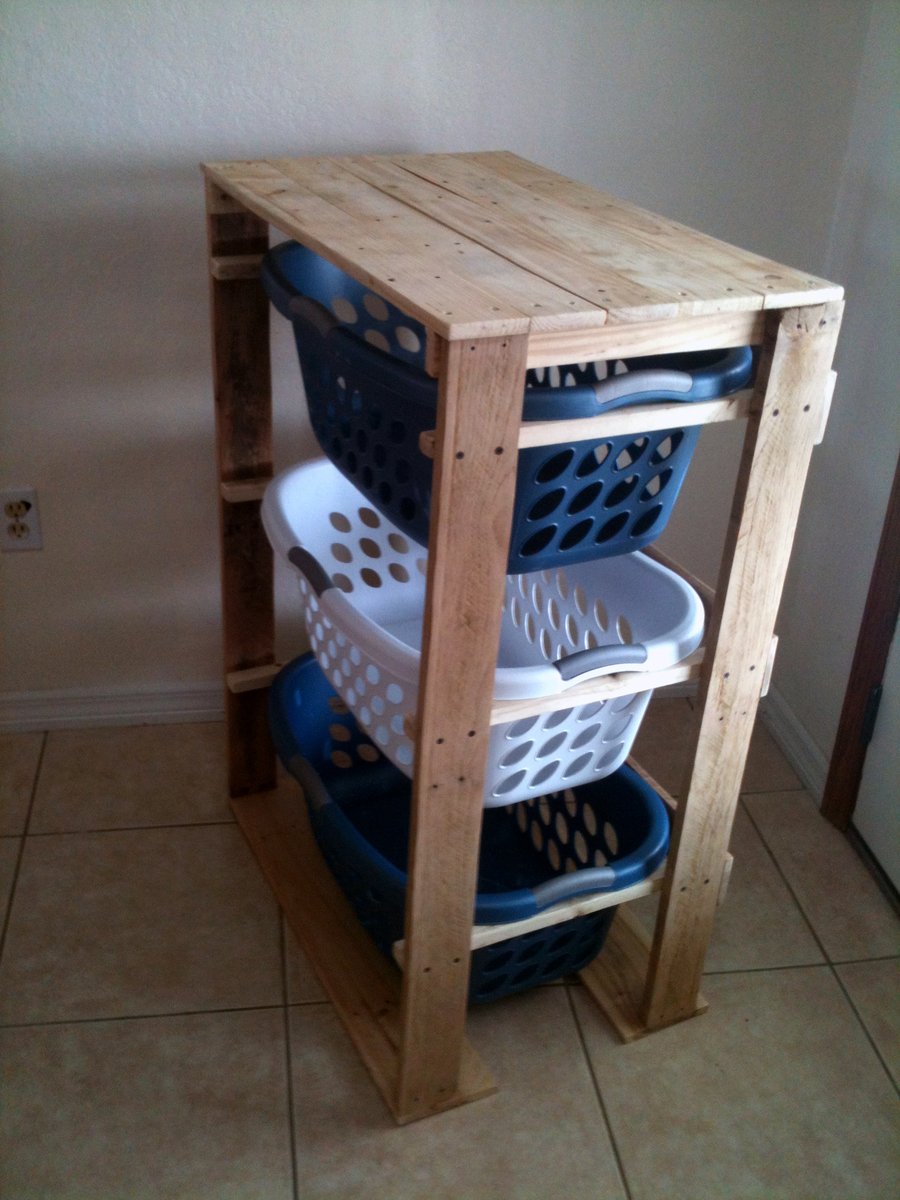

Sat, 09/08/2012 - 17:39
Great job on this!! I love the open sides!! Thanks for sharing. :-)
Mon, 09/10/2012 - 10:22
I love the open sides, plus it makes it much more feasible to build with scraps repurposed wood, which I love. Thanks for the inspriation
Sun, 10/19/2014 - 06:16
I have a pallet sitting against the garage that would be perfect for this
Looks fab, great job.
Fri, 01/09/2015 - 12:27
Hi, I really like this project but was curious what size laundry basket you are using in the project?
Sun, 06/14/2015 - 20:16
Soooo I made this according to the measurements and no laundry basket I find fit. Kind of dissapointed in the fact that this cool thing I just built doesn't have any baskets that will fit it. Any advice on finding a basket that fits?
Fri, 07/10/2015 - 20:14
Same here. No basket fits. Did you ever find one?
Fri, 07/10/2015 - 20:56
I think the idea is to build it to fit the baskets you have or buy some and build around them.
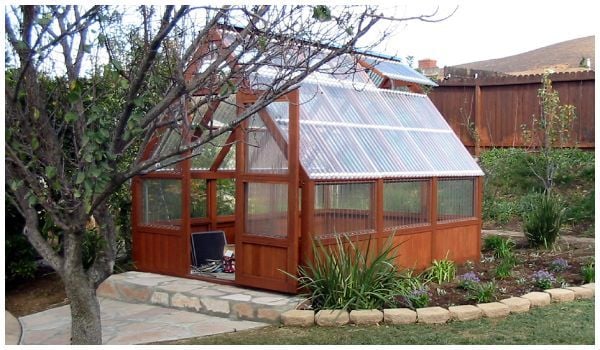
I saw the barn shaped greenhouse plan but preferred a regular roof pitch. I did however incorporate the corrugated polycarbionate as a covering. I find it odd that you guys installed the polycarbonate horizonitally instead of vertically.
Anyway thanks for the info on polycarbonate.
Tue, 09/01/2020 - 17:47
Love this! I really prefer the roofline on your greenhouse. Did you modify Ana's design, or did you get plans from another site? Would love to replicate your design if possible-very elegant.
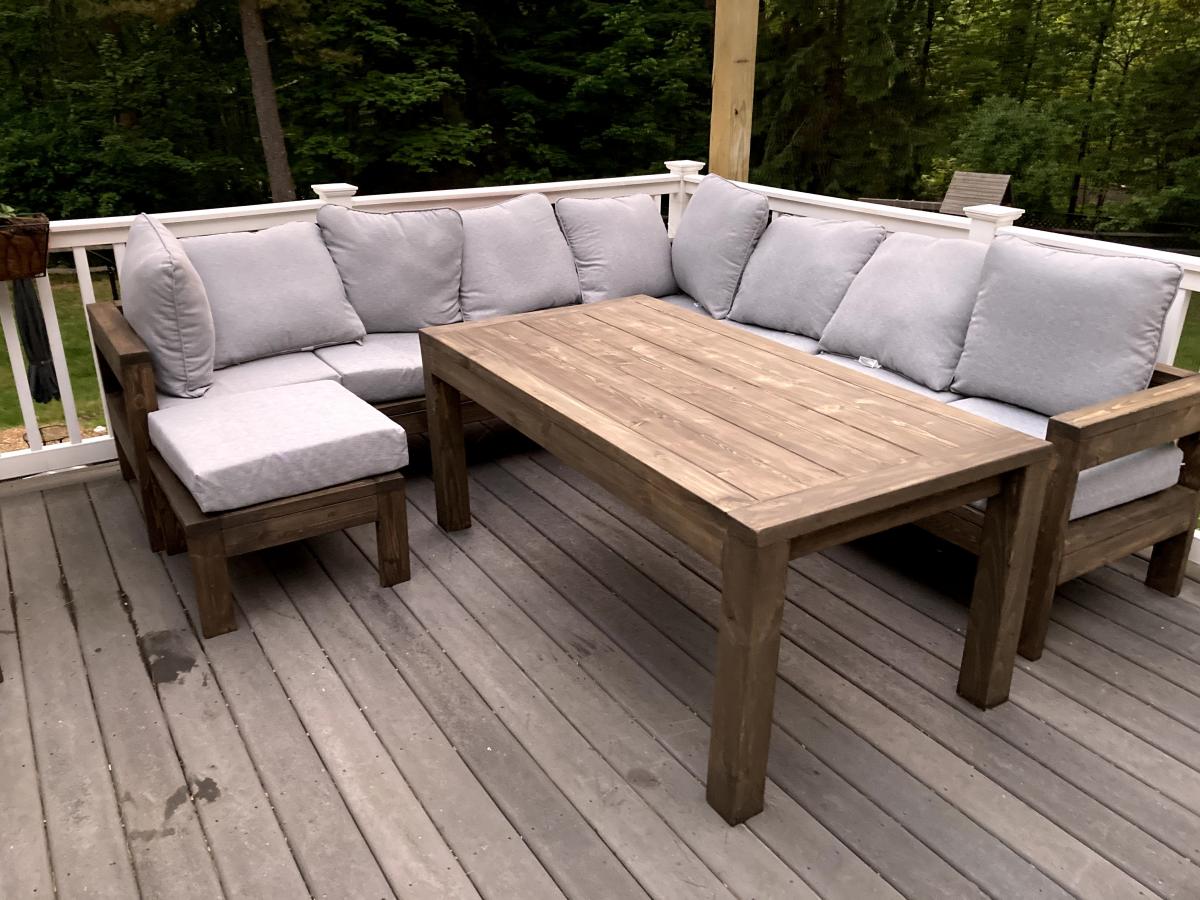
Modified the plans of the outdoor sofa and sectional piece to create this set, then added cushions from IKEA.
Wed, 02/21/2024 - 10:27
I'm building the sectional this weekend, and saw your addition to the end piece and am going to steal your idea. Very nice.
Hi Ana!
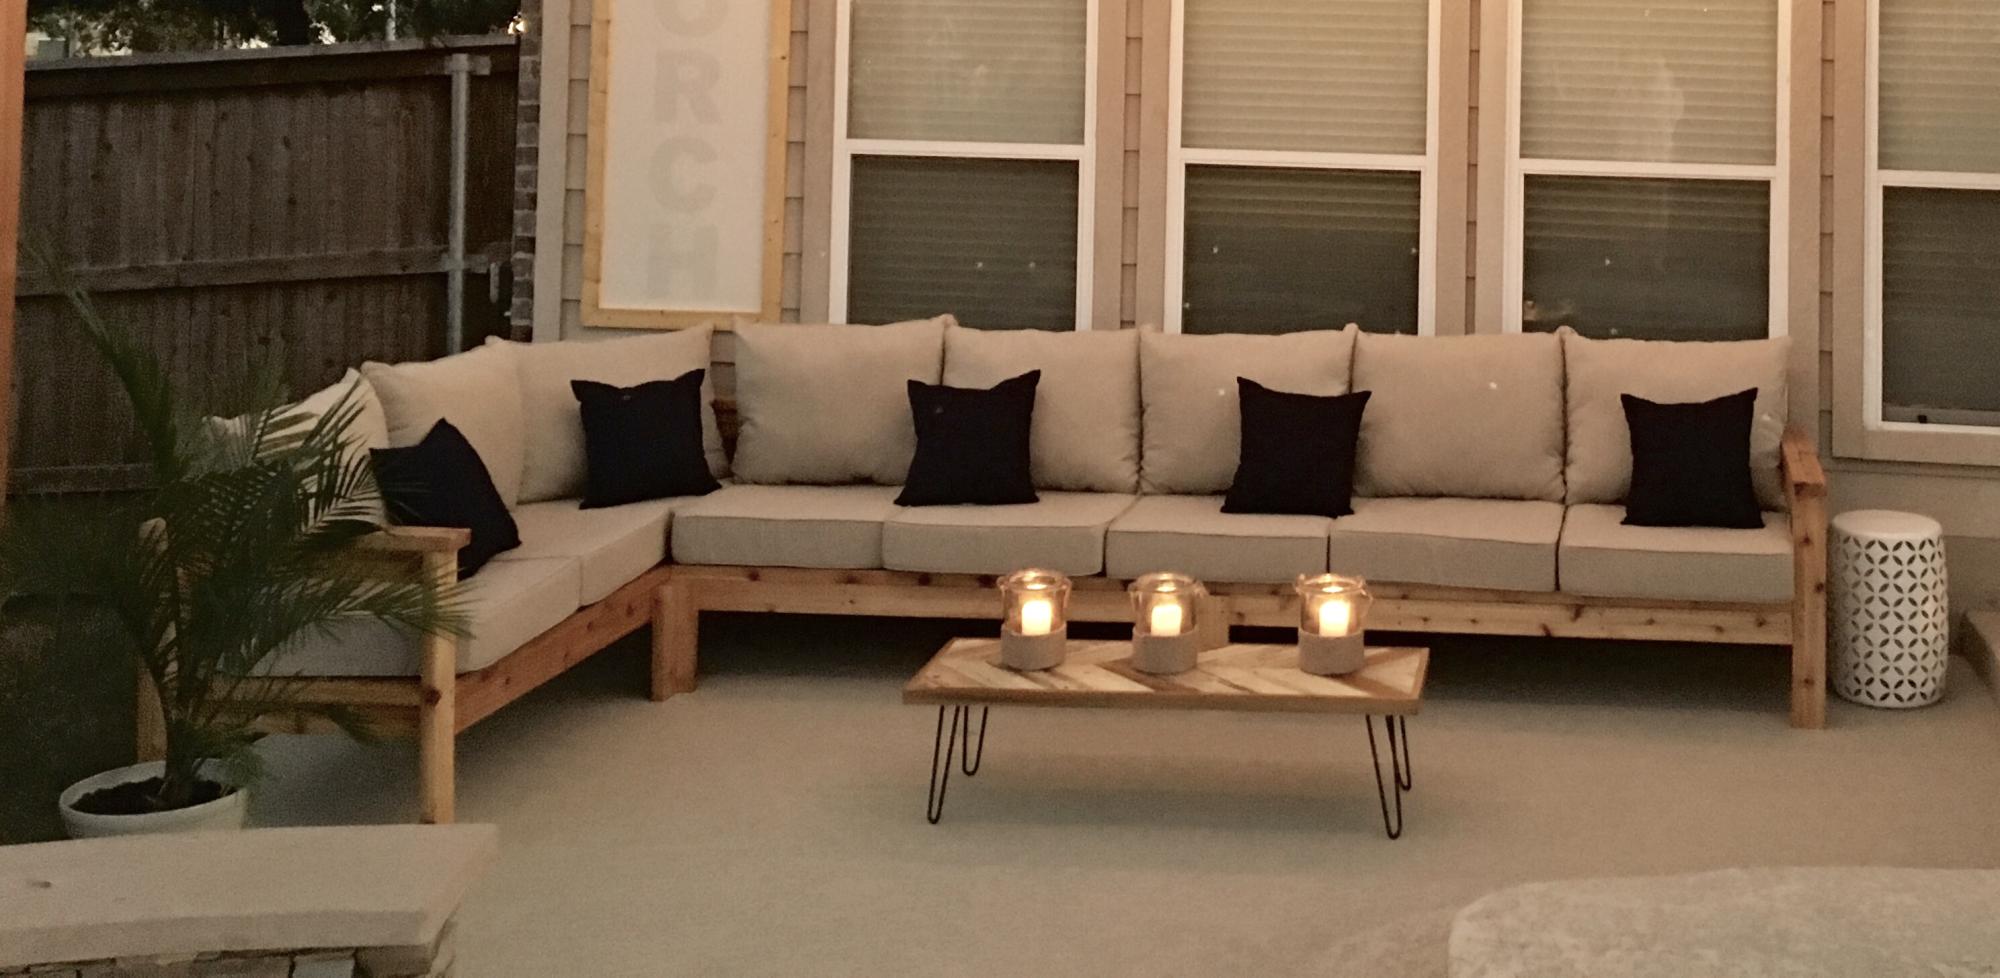
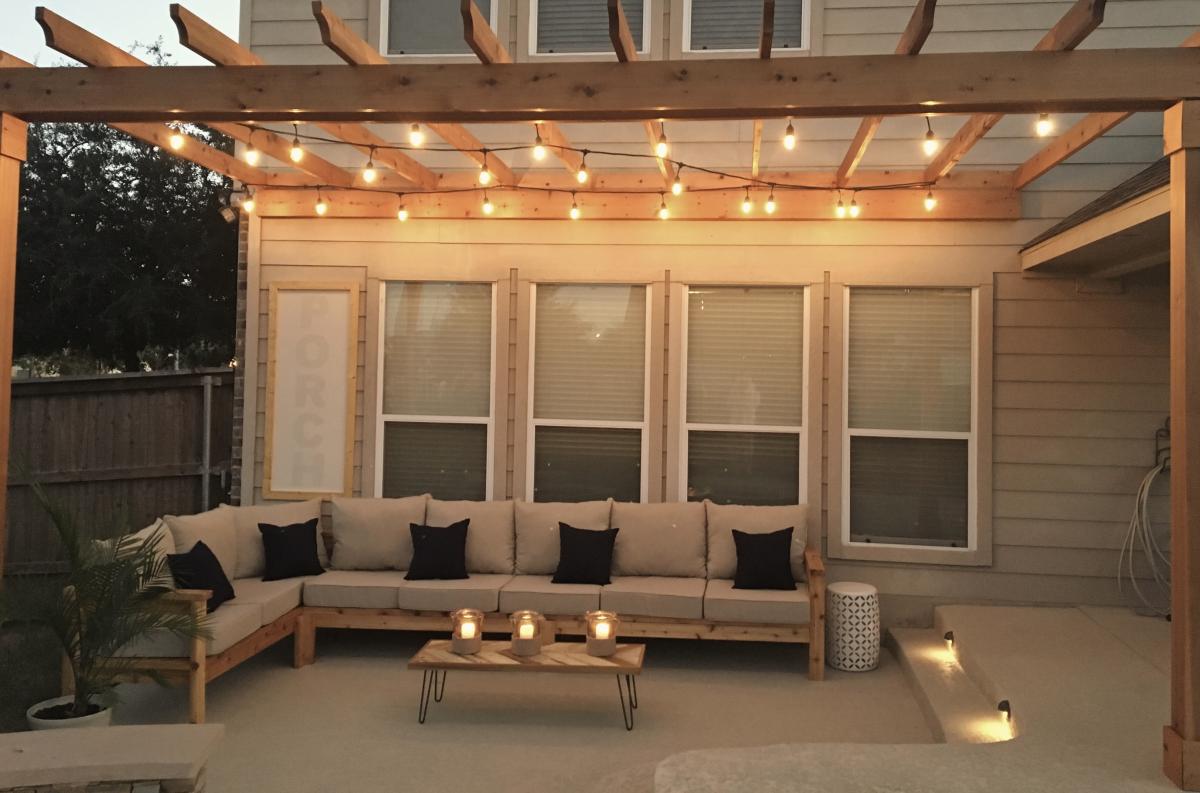
My husband used your plans to build the 2x4 outdoor cedar sectional :) He did it in 1 day and it couldn't have been easier! He even tried first time working with pallets to make a small table and it came out perfectly too! Can't wait to enjoy family time on our new back porch.
Thanks Again & Love From Austin ❤️
Kathleen
Thu, 10/24/2019 - 16:35
Hi, your furniture is beautiful. May I ask: Where did you find your cushions? And what color/ brand stain did you use? Lovely job.
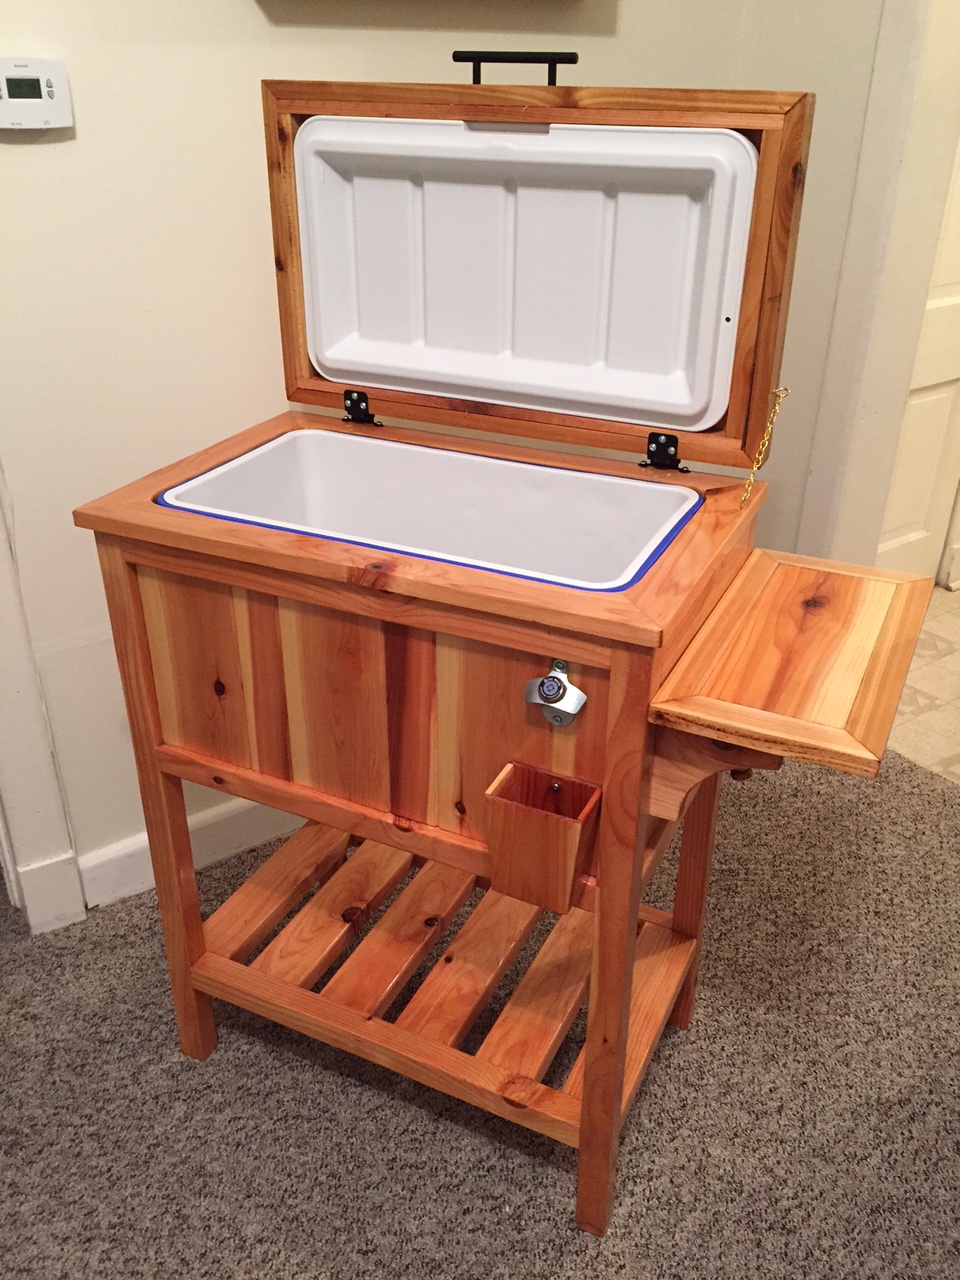
This is the cooler stand presented by Jenny from Birdsandsaoap. Very easy to build and always ends up with someone asking to buy it or have you make them one.
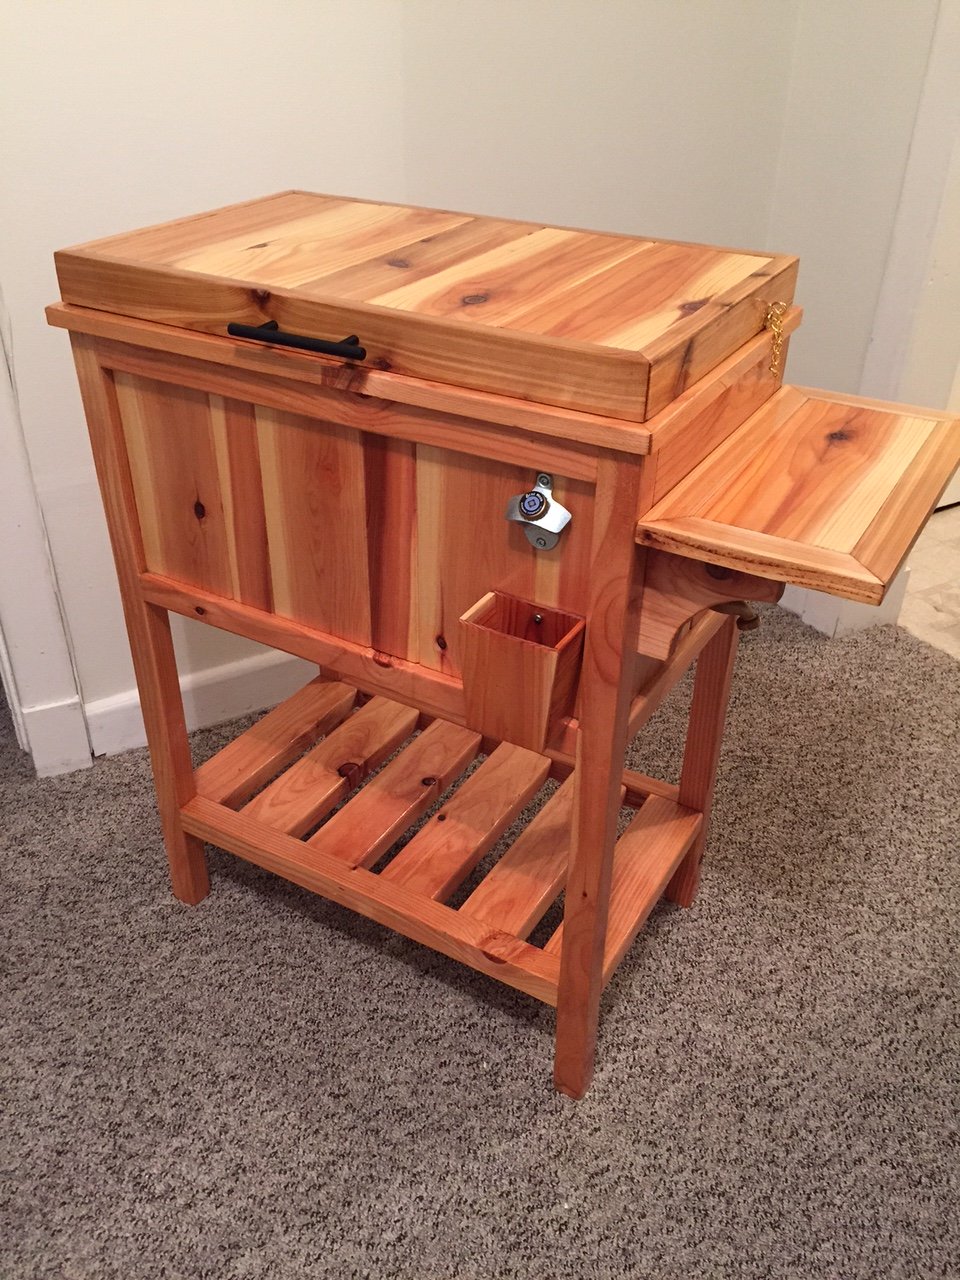
Wed, 06/10/2015 - 11:34
The plans for this can be found at the following web adress: http://ana-white.com/2013/06/plans/wood-cooler-birds-and-soap
Hope this helps
Wed, 09/21/2016 - 08:07
New to this site. How do I get the plans for the Wooden Cooler Stand?
Thank you!
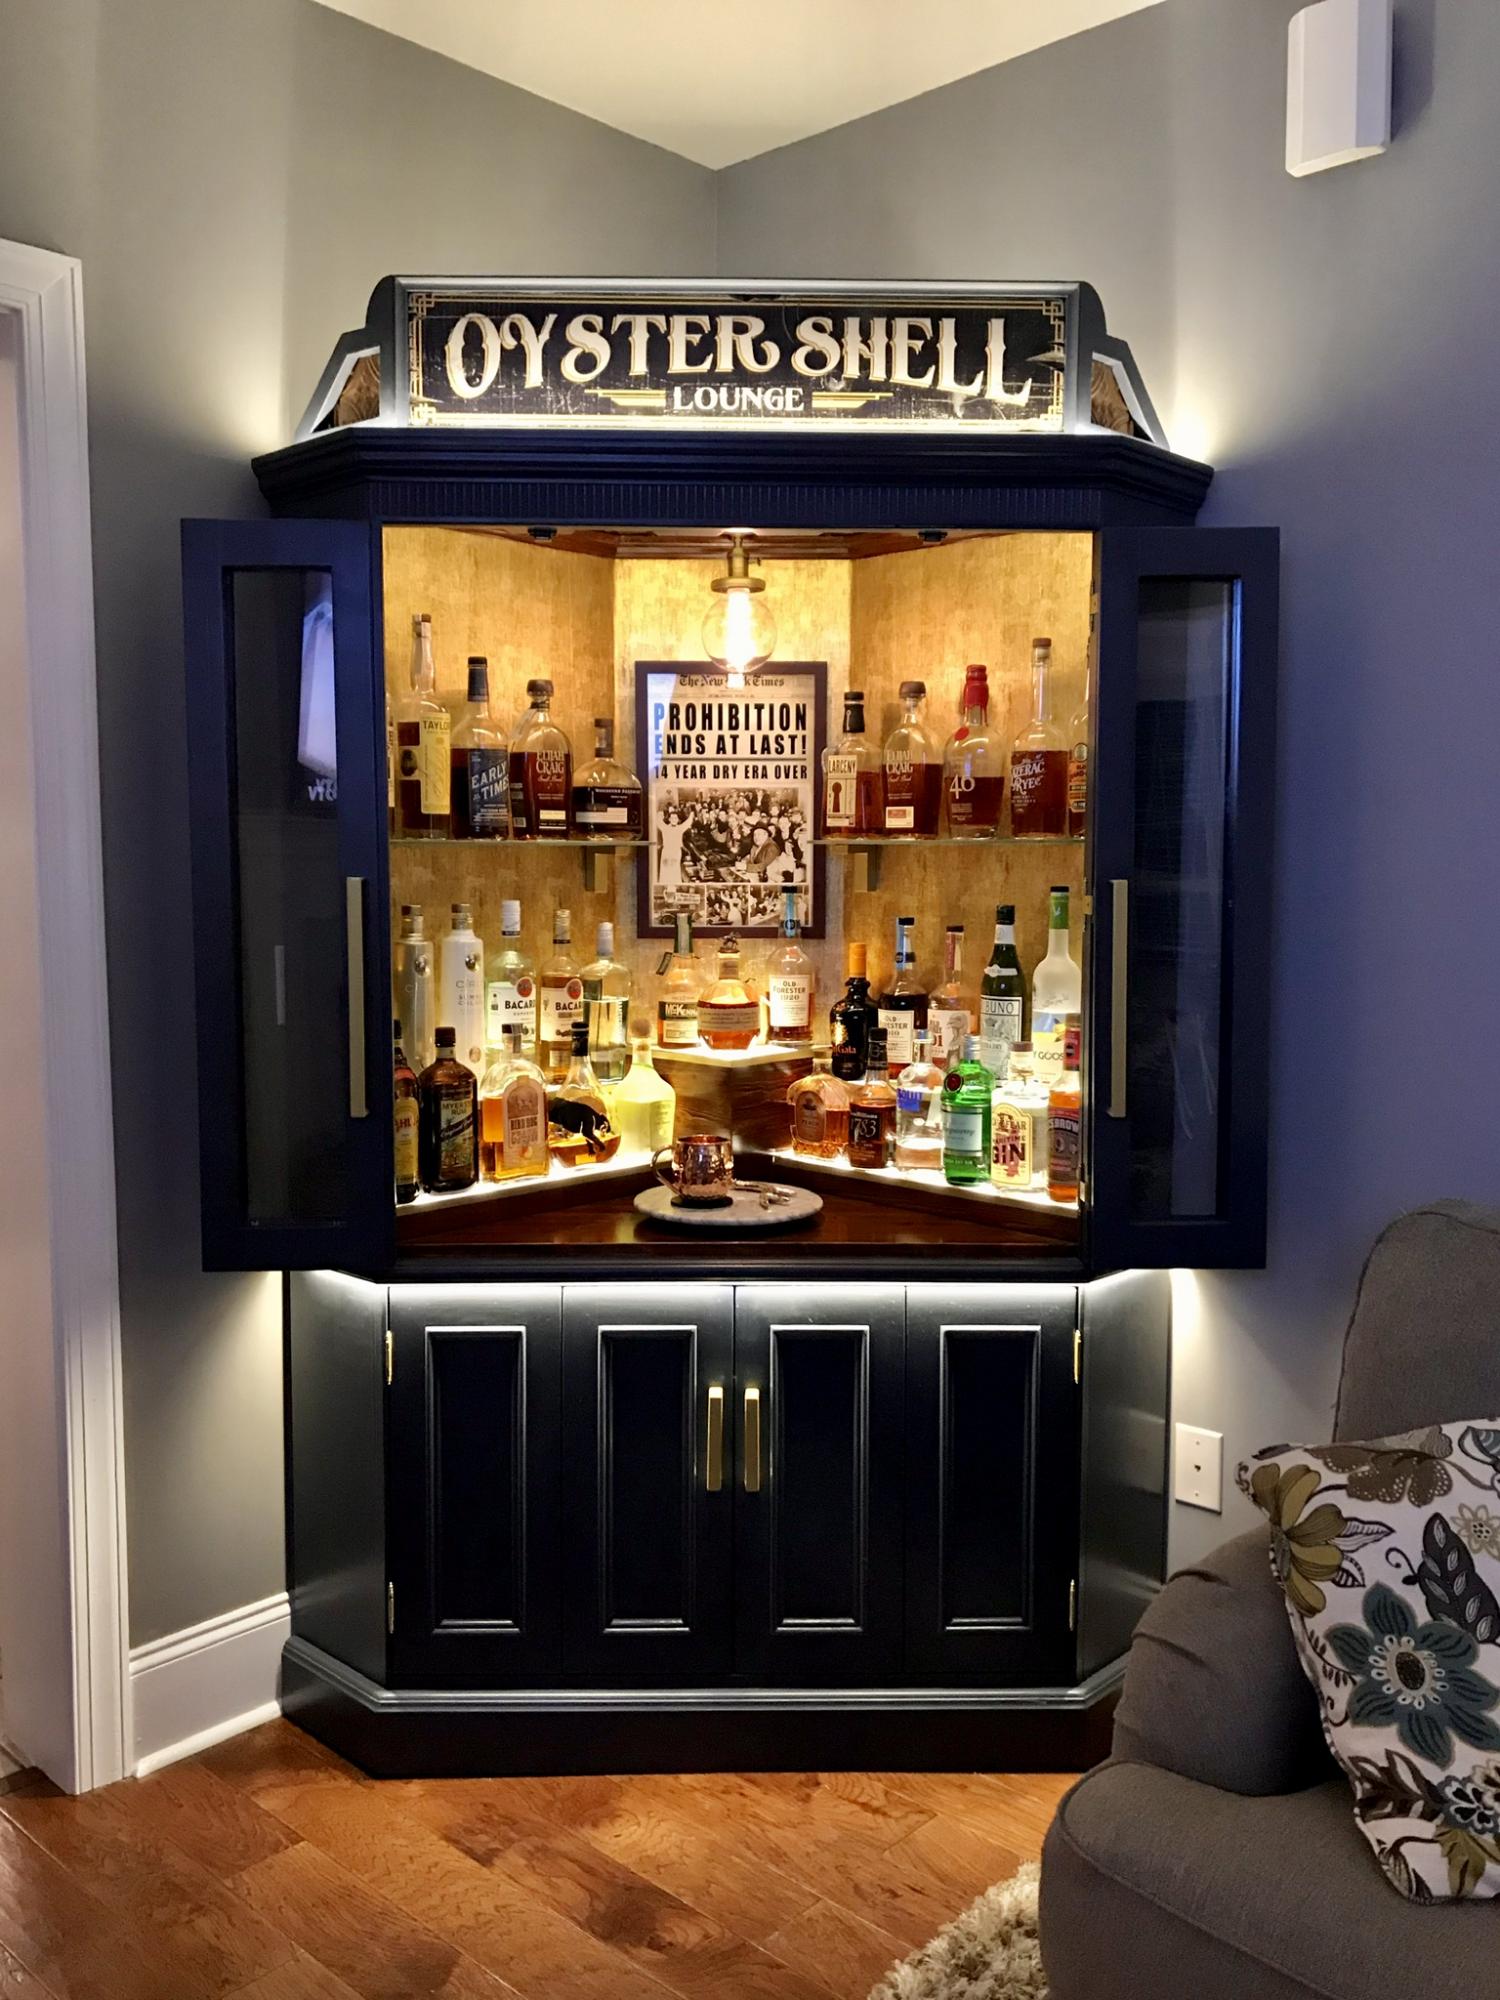
I bought this tv corner cabinet for $40. I spent many hours turning into my perfect bar cabinet. I built a custom lighted liquor display. I have posted photos of the transformation.
Thu, 03/18/2021 - 00:07
Wow that beautiful do you have directions on what you did?
Tue, 07/06/2021 - 19:04
So this is not your project? Because there isn't much information or a before and after picture. This gave me an idea for our home.
Sun, 08/15/2021 - 18:34
Yes, this is my project. What would you like to know?
Wed, 12/29/2021 - 06:41
This looks beautiful and authentic at the same time. Love how it gives me a theatre vibe! cabinet makers mornington