Community Brag Posts

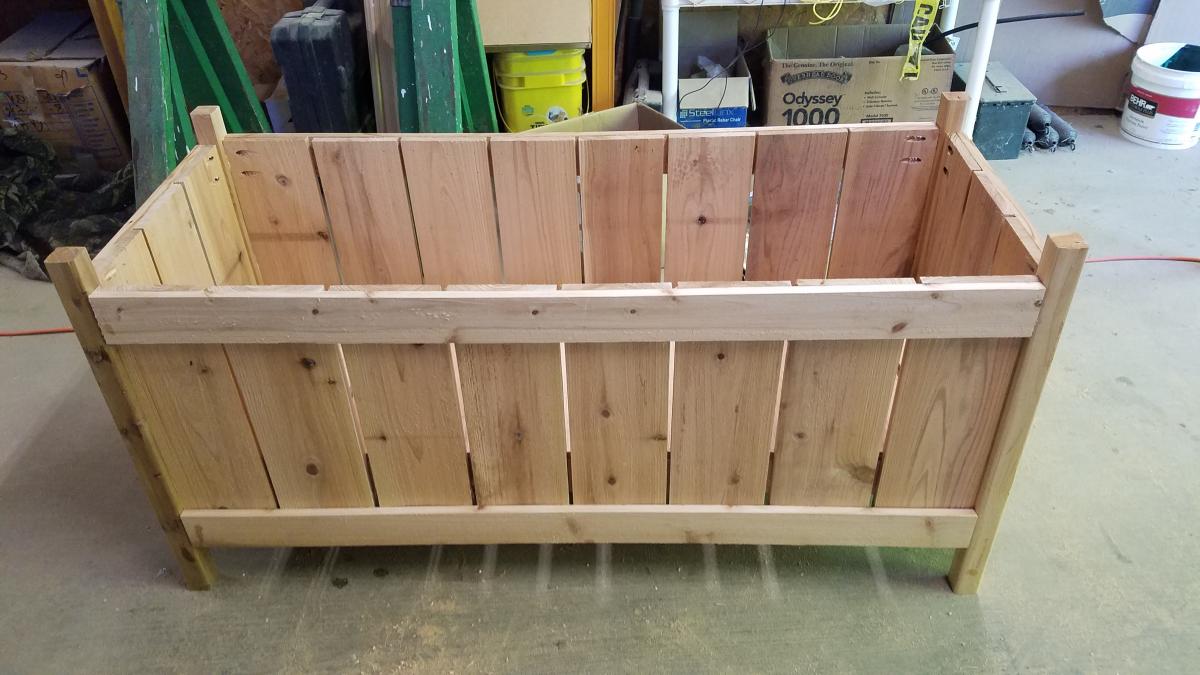
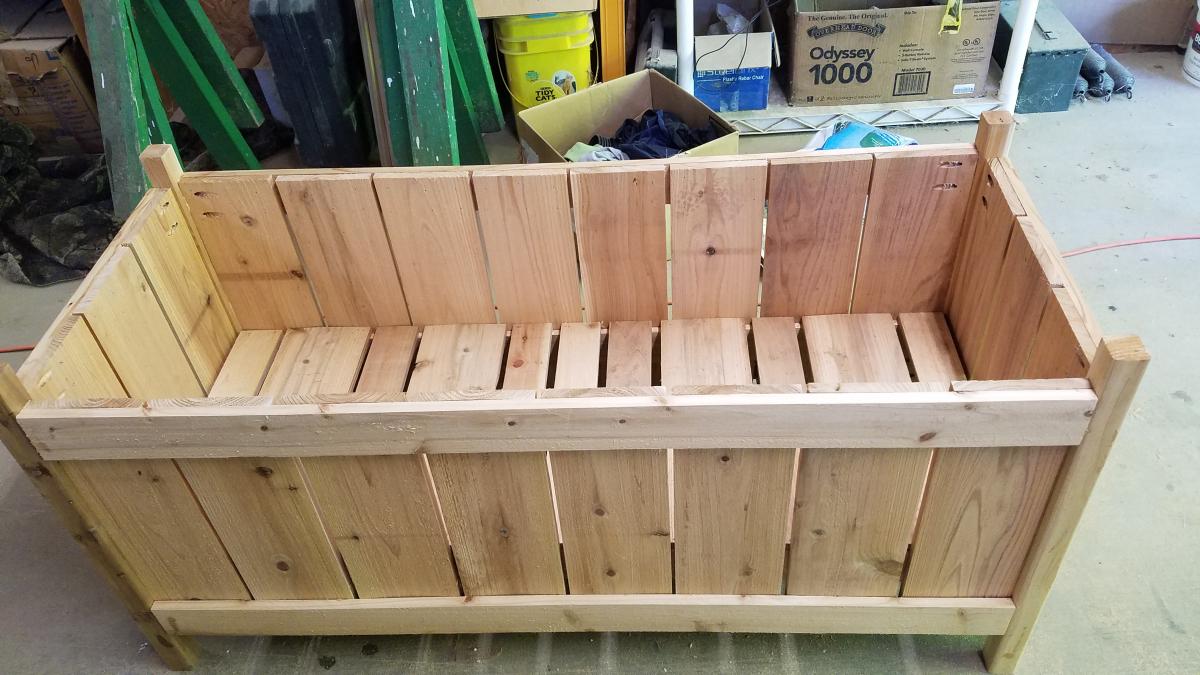
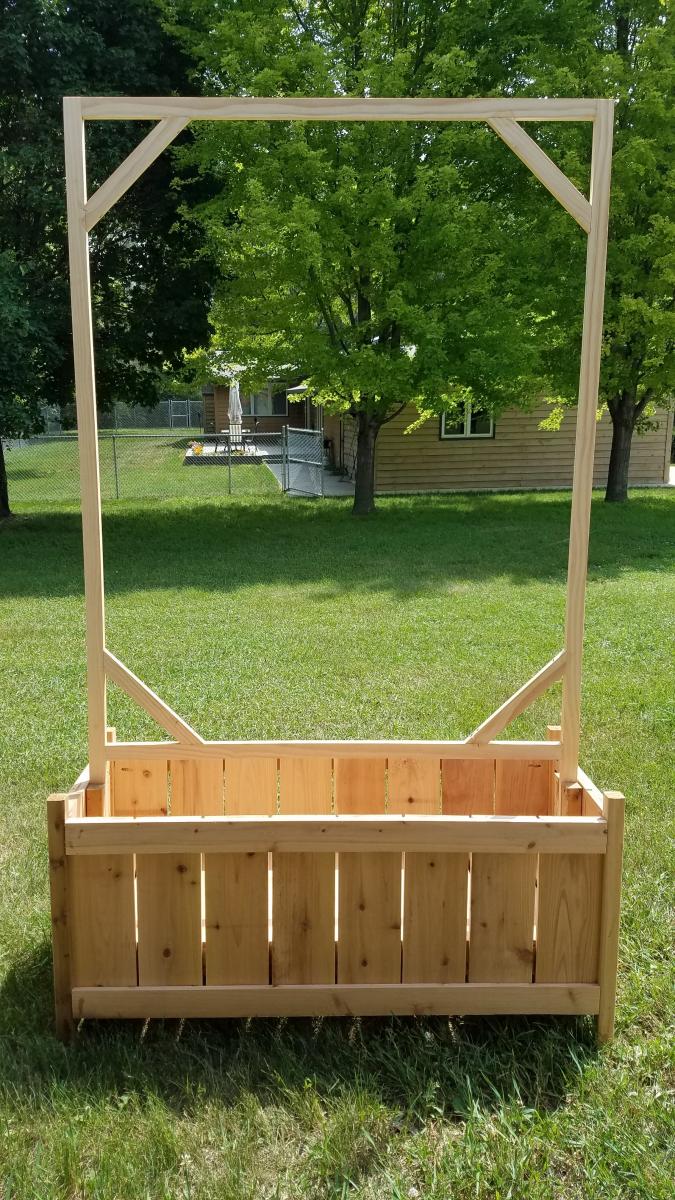
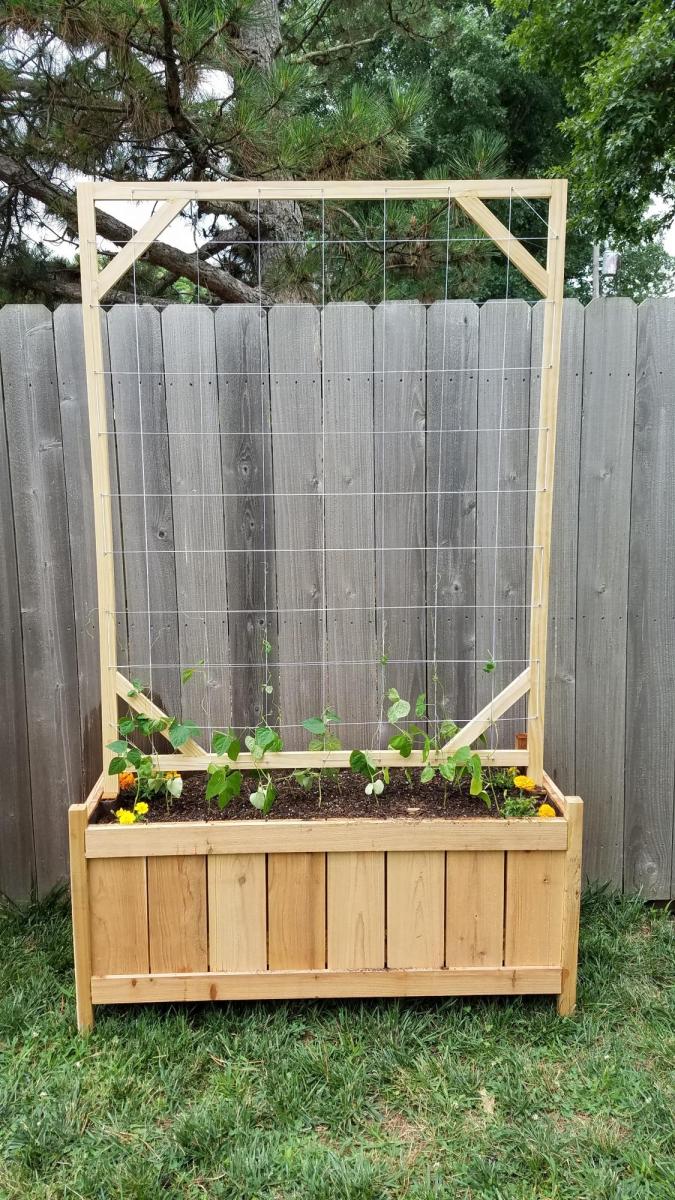
Cedar Planter for Pole Beans

Submitted by swhitead on Mon, 07/20/2020 - 10:41

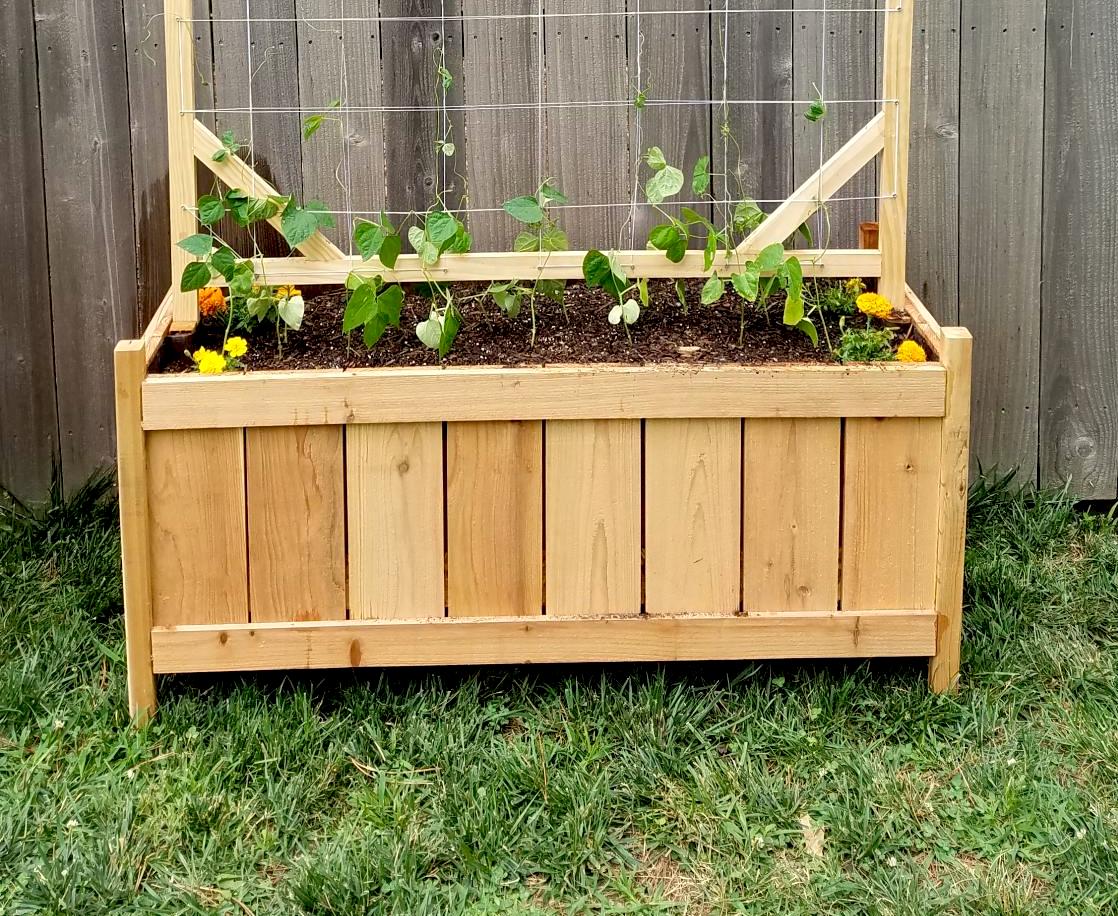
Increased width of box to 46" by using 8 fence boards instead of 3. put base at 12" down, lined box with landscaping fabric to hold dirt. Created trellis with 1x2 boards with 10" long corner braces, spaced screws 6" apart around edges and weaved cotton thread to create the trellis. Used 12" scraps of 2x2 to create a "slot" inside the center of the planter to support the trellis. Added container mix and green pole beans started in egg cartons earlier in the spring.

Built from Plan(s)
Estimated Cost
$35
Estimated Time Investment
Day Project (6-9 Hours)
Finish Used
None
Recommended Skill Level
Intermediate
Seasonal And Holiday

Laundry Basket Rack

This was a great last minute Christmas gift. Took me a little over two hours. Made completely out if pallet wood.

Comments

Modified L Shaped Desk

This was my first woodworking project in a couple years. I modified the size to make it about 60" on each side. Now that  I am working from home now due to COVID-19 for the foreseeable future this has been perfect to use in order to have two monitors and enough room on the sides for other work. 

Estimated Cost
70
Recommended Skill Level
Beginner

Comments

Slatted double vanity - FINALLY finished!

I was a bit over my head with this one but I am so far very happy with the project. It is not quite finished. The marble was installed last week and we are awating the plumber to come back to hook up the sinks. I will install the second slatted shelf once the plumbing is in. Will post finished pictures soon. The mirror is made from 6x6 posts from the lumber yard. We had a friend cut them to size using a band saw. We made the mirror frame based on a picture I found on Houzz.com. The mirror glass was something I picked up off of craigslist for next to nothing and removed from the original frame. It is HEAVY (~200lbs) and attached to the wall with metal brackets. We purchased the sinks/faucets on ebay. 


Estimated Cost
For the vanity alone: $200-250
Estimated Time Investment
Weekend Project (10-20 Hours)
Finish Used
I used Hilary's vinegar/steel wool solution to age the wood, then sanded and finished with the vermont natural coatings polywhey in satin.
Recommended Skill Level
Intermediate

Comments

Simple Outhouse

I built this outhouse to go with a dry cabin I'm working on, and also as an emergency backup for my house. I used treated lumber on the base/deck and splurged on T-111 for the siding. I wanted to use greenhouse polycarbonate for the roof, but found a piece of metal roofing in my shed that was exactly the right size so I used that instead. I thought about doing a fancy cutout on the door but ended up going with a half moon because it was easy. I'm thinking about cutting out stars of different sizes all over the rest of the door to let in more light. I'll trim and stain it next summer.

Built from Plan(s)
Estimated Cost
$450 - I used T-111 which is $40/sheet here in Alaska. I also used treated lumber where recommended and stainless steel screws.
Estimated Time Investment
Weekend Project (10-20 Hours)
Recommended Skill Level
Beginner

Comments

CH

Mon, 01/13/2020 - 15:25

WHAT HAPPENS TO THE 'STUFF' THAT YOU DEPOSIT IN THE TOILET?  I DIDN'T READ ANYTHING ABOUT DIGGING A PIT/TREATMENTS, ETC.  PLEASE LET ME KNOW.  THANK YOU!  CH.

Clubhouse based on Ana's Plan

Submitted by MattSl on Tue, 05/03/2011 - 09:18

I used Ana's plan as a base.

I changed it from 8x8 to 8x12, made the 4x4x8's to 4x4x10' for a higher main platform and swing platform, and added a 12' long monkey bar set to the other side. Also, an 8' climbing wall and a plank walkway to accompany the two slides.

For the clubhouse, I used Hardiplank 4x8 sheets for the siding and an EZ-Framer kit for the structure itself.

The slides I purchased from Lowes, monkey bars from Amazon, and the swing frame braces from Amazon as well. The swing kits I got from ebay.

Estimated Cost
1500
Estimated Time Investment
Week Long Project (20 Hours or More)
Recommended Skill Level
Intermediate
Seasonal And Holiday

Outdoor sectional and coffee table

Submitted by Rynhffr on Mon, 07/06/2020 - 21:06

Loved these plans! Was my first project I tackled trying my hand with a new hobby of wood working to stave off quarantine craziness :-) finished project looked awesome and got me started working on other plans on the site.

**note**
Side table was just sanded and refinished, wasn't built just tried to match.

Estimated Cost
400
Estimated Time Investment
Weekend Project (10-20 Hours)
Recommended Skill Level
Beginner

Gate-Leg Sewing Table

My husband and I built this table as our first project. We followed all of the dimensions from Ana's "Small Sewing Table" project here: http://ana-white.com/2010/10/plans/sewing-table-small-spaces?page=1 The only thing we changed was the size of the table top and the legs. We were worried about putting my heavy sewing machine on top of the leaf called for in the plan, so we created gate legs to support the leaves. Since the legs were going to be folded up in between the base and each leaf, we extended the center portion of the table top to accommodate the change. After it was assembled and stained, I decided that I didn't like the solid color, so I stenciled on a pattern with white latex enamel paint (what I had on hand) and continued to paint the base. After lightly scuffing it up with the sander, I layered 3 coats of poly on top. It has held up well, even after many large quilt projects! I just LOVE my sewing table!

Built from Plan(s)
Estimated Cost
$120
Estimated Time Investment
Weekend Project (10-20 Hours)
Finish Used
Golden Oak Minwax Stain
Polycrilic
Valspa Latex Enamel in Satin White
Recommended Skill Level
Beginner

Comments

TinyHouser

Fri, 08/05/2016 - 13:41

Hi there. Could you please tell me what the brackets are you used with the gateleg? Do you remember where you got them? Thank you!!!

Ultimate Workbench/Miter Station

Submitted by Anonymous (not verified) on Mon, 03/06/2023 - 15:32

This plan is exactly what I needed for my workspace. I ended up adding some slat wall pieces and cabinets above from cubicles in an old office nearby that closed down for a tool wall and storage. I left the right opening empty due to how unlevel my floors are. I may close it in later with drawers or cabinets, but it will be my sitting workspace for now. I trimmed out the edge with 1x2s and painted and stained everything for aesthetics.

Comments

Modern Outdoor Sofa and Loveseat

Modified the loveseat plans and created a sofa as well. No one that sees these thinks I built them. They look so much nicer than anything you can buy!

Estimated Cost
$350
Estimated Time Investment
Week Long Project (20 Hours or More)
Finish Used
First coat SW New Ebony Stain
second coat Varathane Briarsmoke
Recommended Skill Level
Beginner

Comments

Farmhouse Table 1

Used the plans here to make the table. Modified the dimensions slightly to fit my space by re-drawing the plans in AutoCAD 3D. Added stainless steel adjustable feet to the legs for leveling. Wanted to keep the wood up off the ground since this table sits on my back patio. Amazon link for feet: https://www.amazon.com/gp/product/B08VRPCDNL/ref=ppx_yo_dt_b_asin_title…

Built from Plan(s)
Estimated Cost
$220.00
Estimated Time Investment
Weekend Project (10-20 Hours)
Finish Used
Minwax Espresso Stain on top
Minwax Satin Polyurethane on top
Sherwin Williams Exterior Latex Paint - White on base
Recommended Skill Level
Beginner

Comments

Mudroom Bench

Submitted by BeingHome on Sat, 02/23/2013 - 22:26

With much needed seating in the mudroom, an unused space (nook) was used to build a mudroom bench and shelf. No plans were used. I basically looked on-line and mentally drew up an idea of how I wanted the final product to look.  


There were some setbacks such as not like the knock down textured walls (after partially painting the bench). I ended up covering the textured walls with hardboard and repainted.


A bench cushion was made for added comfort and style.


Complete tutorial for the bench is here and the bench cushion tutorial is here.


Thank you.


Julie

Estimated Time Investment
Weekend Project (10-20 Hours)
Finish Used
Behr Ultra (paint and primer in one) in ultra white finish.
Recommended Skill Level
Beginner

Comments

Cleverly6

Thu, 05/16/2013 - 13:48

Thank you so much for the idea and plan. I used it to turn an extra laundry room that we have off of our garage into a much needed mudroom. The most challenging project I have ever done before is hanging blinds. But with your help and some from the Home Depot employees, I did it! Our family is more than happy with it. Thanks!!!

BeingHome

Sun, 08/25/2013 - 22:28

Thank YOU so much! I would love to see a picture of your new mudroom area. :) I am happy the plans helped and of course Home Depot. ;)

Sorry for my delayed response. :(

BeingHome

Sun, 08/25/2013 - 22:28

Thank YOU so much! I would love to see a picture of your new mudroom area. :) I am happy the plans helped and of course Home Depot. ;)

Sorry for my delayed response. :(

Kendal Dresser - upgraded

Submitted by Mobrien07 on Tue, 02/03/2015 - 15:59

I added front drawer trim & a walnut stained top to this already great design  


Built from Plan(s)
Finish Used
Minwax Special Walnut
Varathane clear coat
Sherwin Williams high gloss white
Recommended Skill Level
Intermediate

Comments

kmom721

Sat, 06/22/2019 - 08:44

It looks like they just bought some moulding and attached it


Workbench

Submitted by jaimej on Sun, 04/28/2013 - 18:38

This is our 2nd project - we liked building the bookshelf so much, we decided we're gonna keep going and need a good workbench. Got these plans from the Family Handyman Website (http://www.familyhandyman.com/DIY-Projects/Woodworking/Workbenches/how-…). They claim the cost to be $50, but it was closer to $80 for us - still a GREAT project and easy to put together with the nail gun.

Built from Plan(s)
Estimated Time Investment
Afternoon Project (3-6 Hours)
Finish Used
none
Recommended Skill Level
Beginner

Comments

LARGE FARMHOUSE TABLE

Submitted by mdbennes on Mon, 11/23/2015 - 09:25

I used Ana's plans for this project, but had to deviate since I built it for a friend who needed a table for 14!!  This thing is huge, 12 feet long, and about 44 inches wide.  I made it out of pine, 2x8s for the top but stuck to the plans for the frame.  It weighs about 200lbs or more, and had to move it with 4 guys...used an enclosed trailer to move it from my house to theirs. They love it so that's all that counts!  Oh ya, in the picture, you will see Ana's rustic X console table too! 

Estimated Cost
$150
Estimated Time Investment
Weekend Project (10-20 Hours)
Finish Used
Minwax English Chestnut stain, then a GLOSS polyurethane
Recommended Skill Level
Beginner

Sandbox with Cover

The cover is a tonneau cover for a pickup truck. It's for a 6.5' truck bed so if you notice, I had to ad a 2x4 and one more picket on top to accommodate the extra length. 

The cover would add a ridiculous amount of money to the project but it was repurposed.  I found it on a truck that was in an accident and going to the scrap yard. I think it it came out great and my grandson loves it.

John

Built from Plan(s)

Storage Bed with Drawers and Rustic Planked Headboard with Lights

Submitted by jjmaldon on Sat, 02/08/2020 - 10:22

Base is classic storage king and the headboard was custom made to fit the size of the room. Enjoyed this project and the extra storage the drawers are providing. Thanks for the sharing the design plan; worked perfectly. 

Built from Plan(s)

Comments

Podium for My Wife's Classroom

This is my first try at building furniture. I've built larger things in the past like decks and a fort for my nephews, but never furniture. Even though I used the plans to build the main box, I did change up the bottom and added some new stuff. I added wheels to the bottom my wife could easily move it around her classroom. I didn't want to put a square base on it because I thought it might hit her ankles when she was standing close to it. So I sort-of notched it out to give an opening for her feet and I used some scraps to create a short shelf at the bottom. I also added more trim that the plans call for. I cut strips of the pine plywood for the base molding and topped it with quarter round. I used corner trim for the front corners, the self inside and the bottom notched shelf. I also used screen trim for the back of it. I think it came out nice and I've very pleased with it. I used 2 coats of Minwax PolyShades American Chestnut on it.

Built from Plan(s)
Estimated Time Investment
Weekend Project (10-20 Hours)
Finish Used
Minwax PolyShades American Chestnut
Recommended Skill Level
Beginner

Big Sandbox with Lid

Submitted by flinchball on Mon, 09/21/2020 - 13:18

Made the sandbox 6x6. Recessed it so it sits flush with the timber’s around our fire pit area. I added extra armrests in the middle that double as supports when the lid is closed in case anyone wants to walk on it. Filled the sandbox full enough that the armrests sit on the sand when closed. It’s very sturdy now for walking on and the kids have tons of room to play. Thanks for a great plan to work from.

Built from Plan(s)
Estimated Cost
$100
Estimated Time Investment
Day Project (6-9 Hours)
Finish Used
Boiled linseed oil.
Recommended Skill Level
Beginner

Comments

Rustic Adirondack Bench (love seat)

I loved the Rustic Adirondack Chair so much I felt I needed to make a bench in the same style. I had to be a little creative with the chair plans and modify them to make my bench work. I am absolutely thrilled with how it came out! I already have a friend who has requested a chair and bench (love seat) for his son's wedding gift!

Estimated Cost
Material costs for the wood was $85-ish. Wood prices are nuts right now!
Recommended Skill Level
Intermediate

Comments

mjackson41995@…

Fri, 08/20/2021 - 16:37

You can make the 1x10 in any length you want. I’m planning on making a loveseat too and The measurements I chose for the seating area will be 48” long (which is the size for 2 seat cushions).

The Step 1 in Ana’s plan, all measurements will be the same.

Step 2: The two 2x4 horizontal supports will be cut at 48”.

Step 3: the two 1x10 seat panels will be 3 inches longer than the horizontal supports. So you will cut the 1x10 seat panels at 51”.

Step 4: Instead of two, you will need THREE seat supports. So cut three 2x4’s @ 32 3/4”. The third seat support will go in the middle of the other seat supports, drilled to the horizontal back support.

Step 5: Attach your back bottom horizontal support which will be a 2x4 at 48”.

Step 6: Attach the 1x10 seat back panels. You will cut (3) 1x10 @ 48”.

Here is the cut list for the loveseat version of Ana’s Adirondack plan. These are the lengths I chose. So with this cut list your loveseat should be big enough for two 24x24” seat cushions. I plan to add cushions for extra comfort.

My cut list:
(2) 2x4 @ 31 3/4”
(2) 2x4 @ 19 1/2”
(2) 2x4 @ 33 1/4” Cut at 20 degrees as per Ana’s plan.
(3) 2x4 @ 48” Horizontal supports. One goes behind your calves.
The other connects the end frames/arm rests at the back.
(2) 1x10 @ 51” Seat panels.
(3) 2x4 @ 32 3/4” Vertical supports for the back panels.
(3) 1x10 @ 48” The back panels.