Community Brag Posts

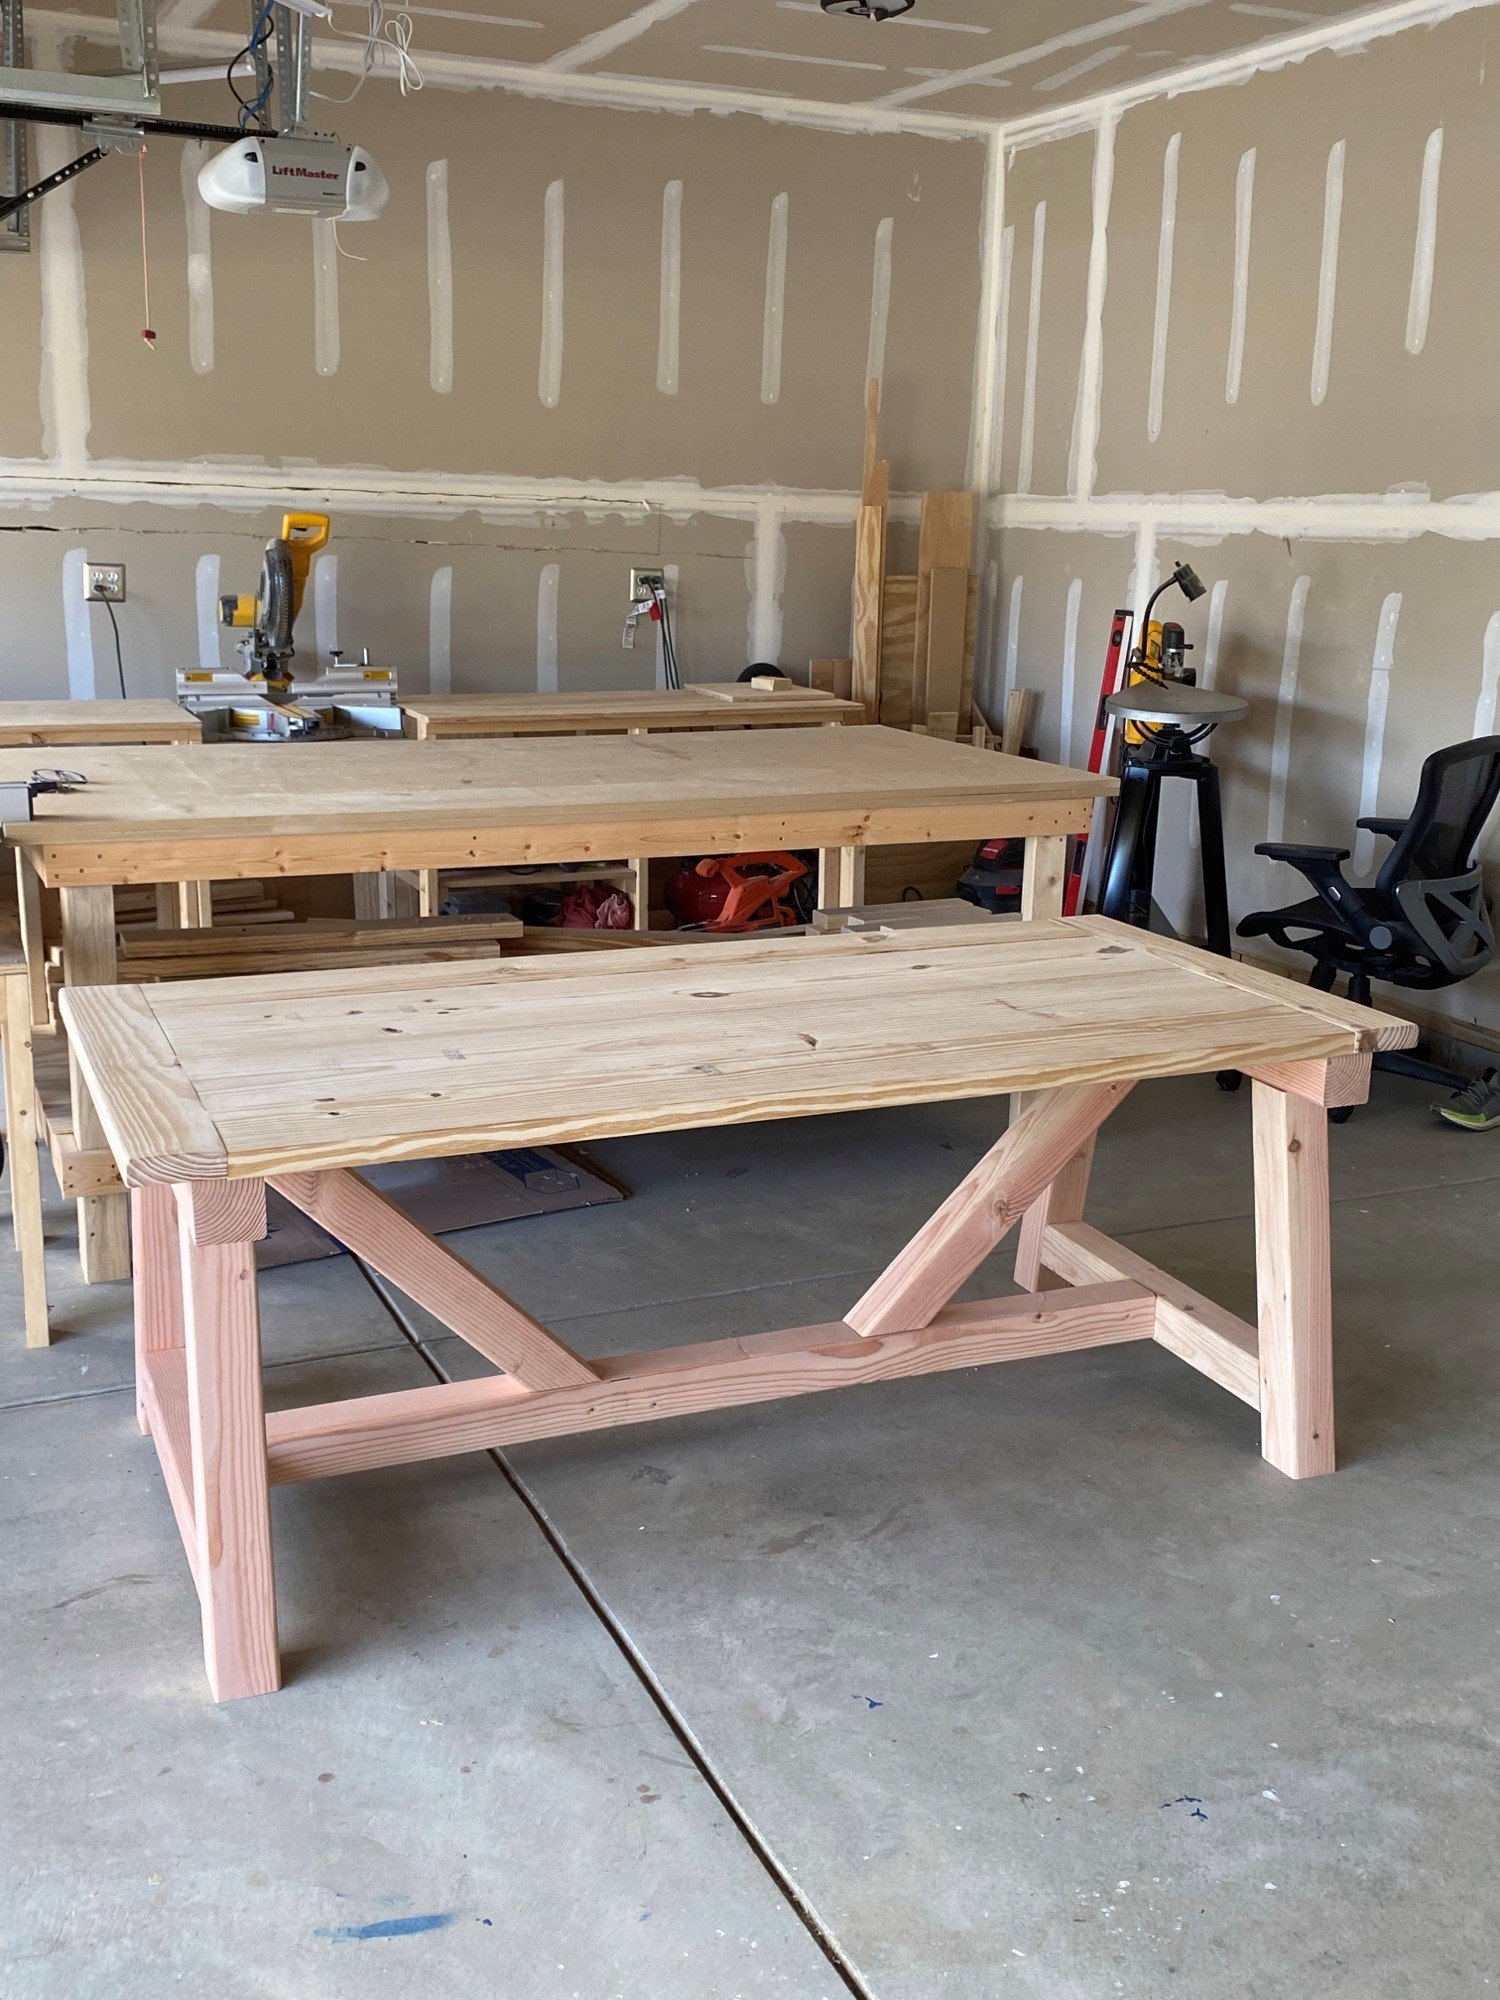
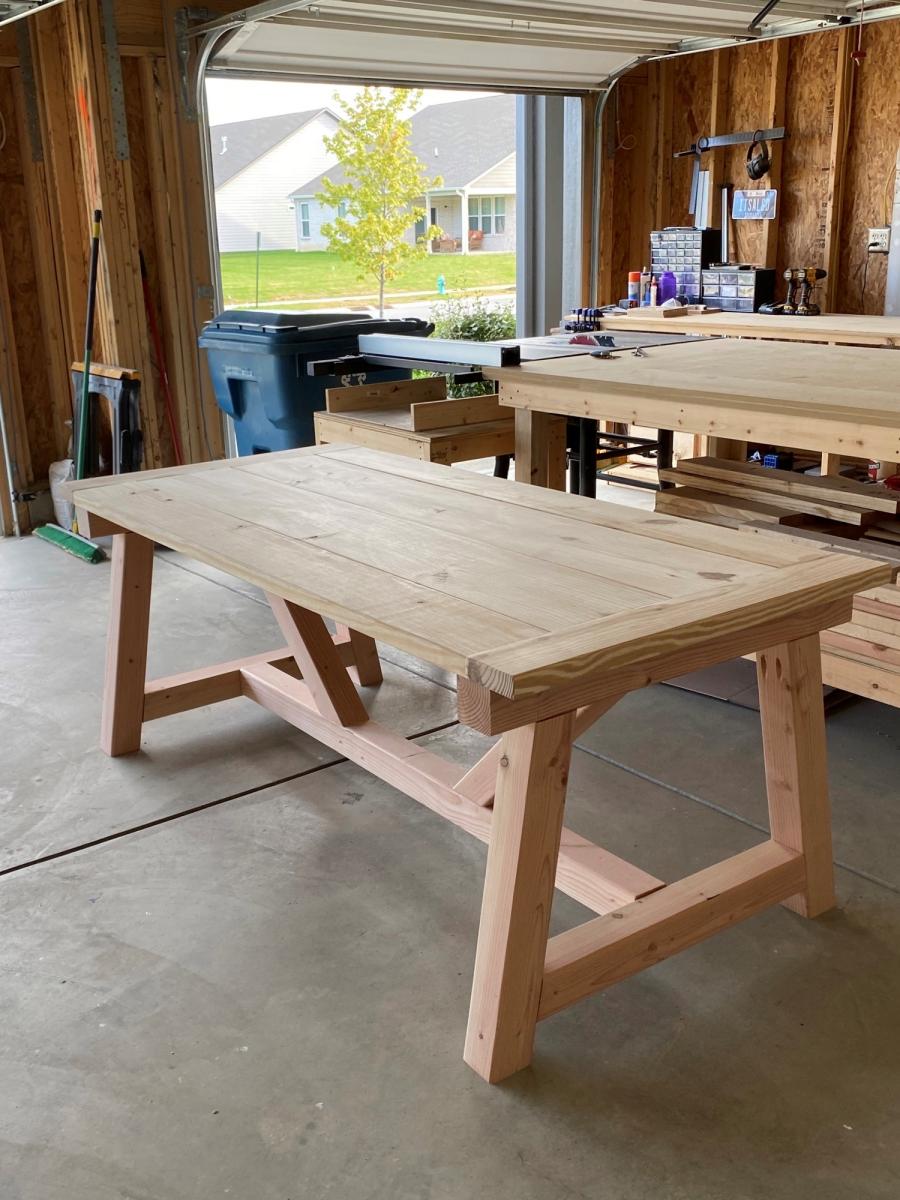
Double Pedestal 6' Farmhouse Table

Submitted by g82martin on Sat, 05/17/2014 - 20:38

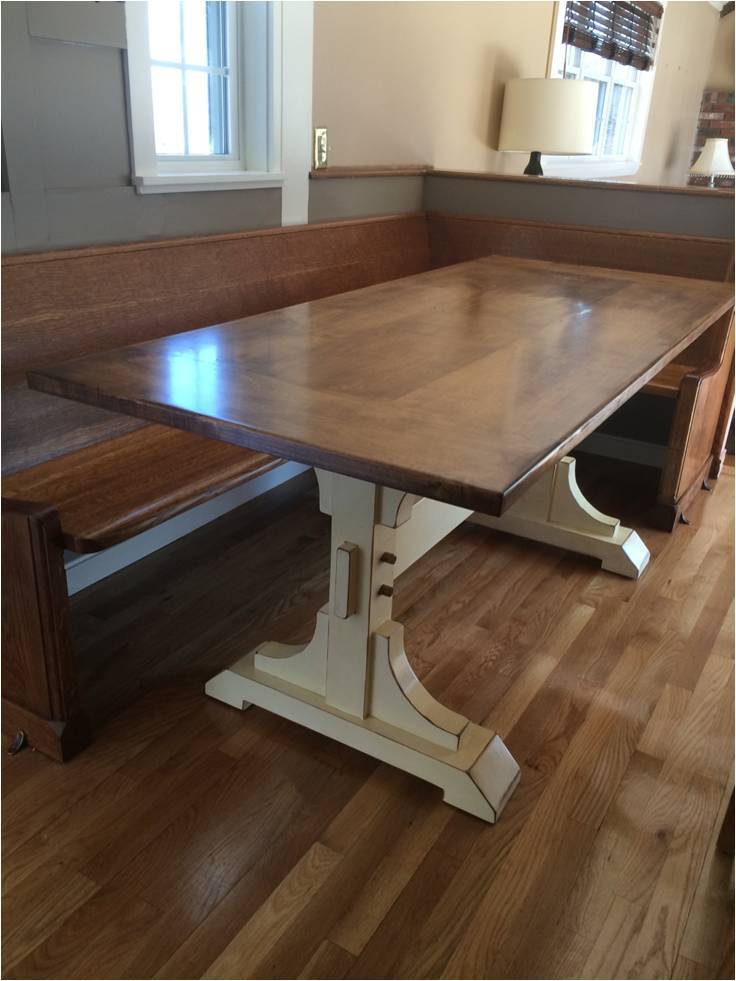
Farmhouse table made from distressed (worm hole) maple.

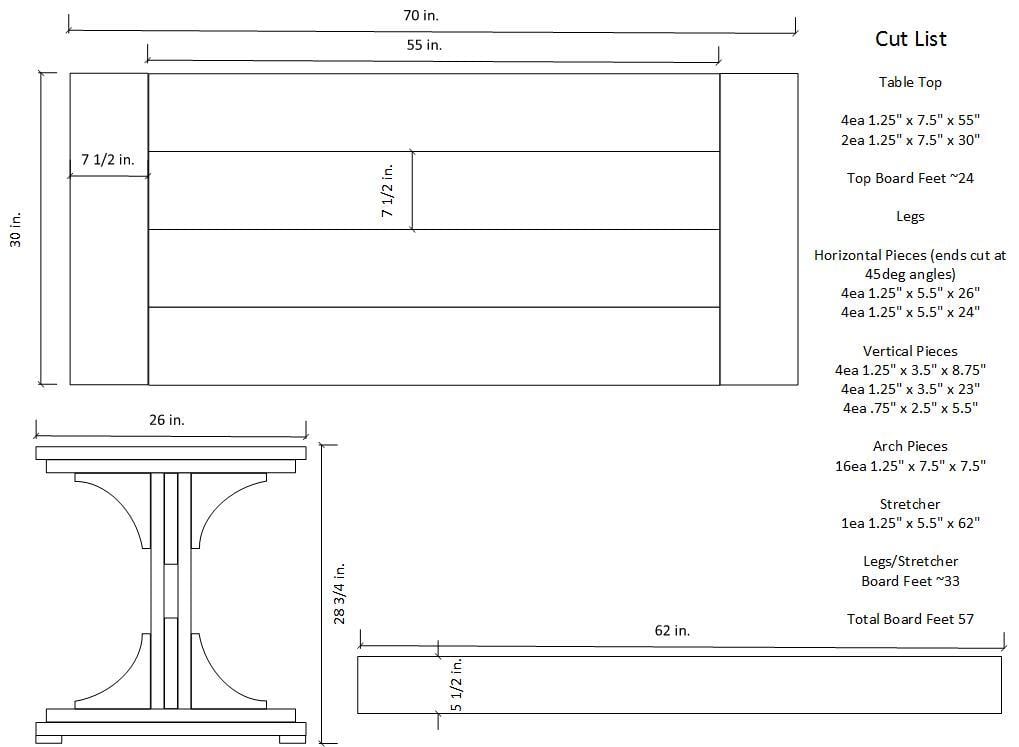
My neighbor was able to get me the 5/4 distressed maple for about $2/bd ft - I ended up buying 100 board feet and had plenty leftover. The finished board feet for this project was about 60 if I remember correctly. So the $200 was the bulk of the expense. The only other costs were sand paper, I bought a Kreg Jig, screws, Minwax Marker, paint, stain and urethane (much of which I already had).

It came out better than I anticipated. The antique white finish was not difficult at all.

Tip - When following the instructions for the finish here, I applied the first coat of urethane with a brush almost immediately after applying the Minwax marker to all of the sanded edges. I did this in haste, but ended up with some unexpected results that really added a nice touch. The stain from the marker incorporated a bit into the urethane as I brushed it giving it an antique, yellow hue. At first I thought I made a big mistake, but it turned out to add a really nice look.

Built from Plan(s)
Estimated Cost
$250
Estimated Time Investment
Week Long Project (20 Hours or More)
Finish Used
Antique White using Minwax Stain Marker - http://ana-white.com/2012/09/antique-white-using-minwax-stain-marker
Recommended Skill Level
Intermediate

Comments

g82martin

Mon, 05/19/2014 - 07:29

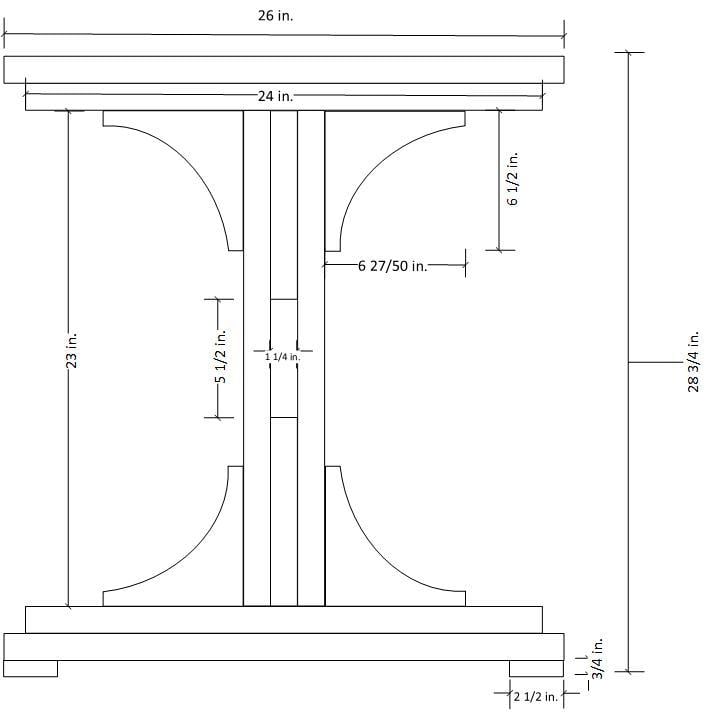
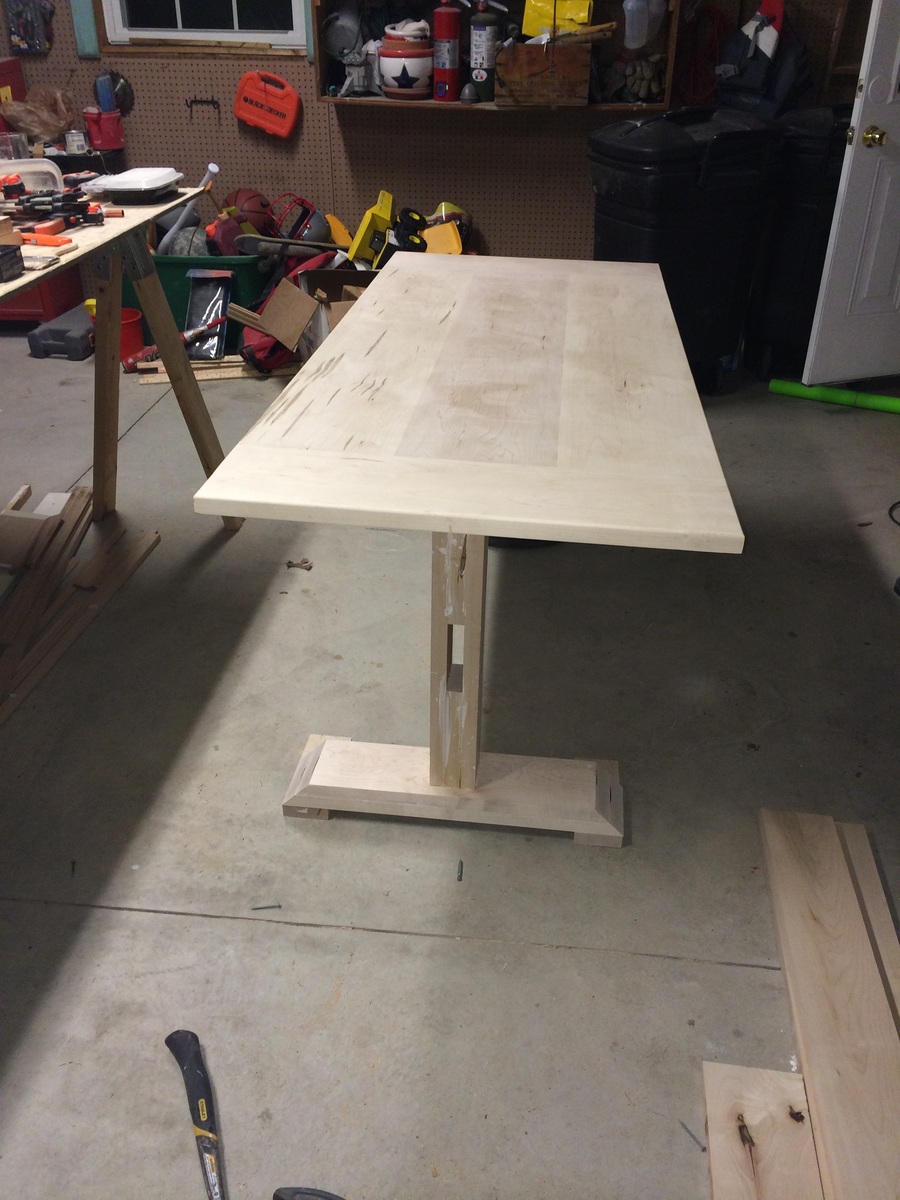
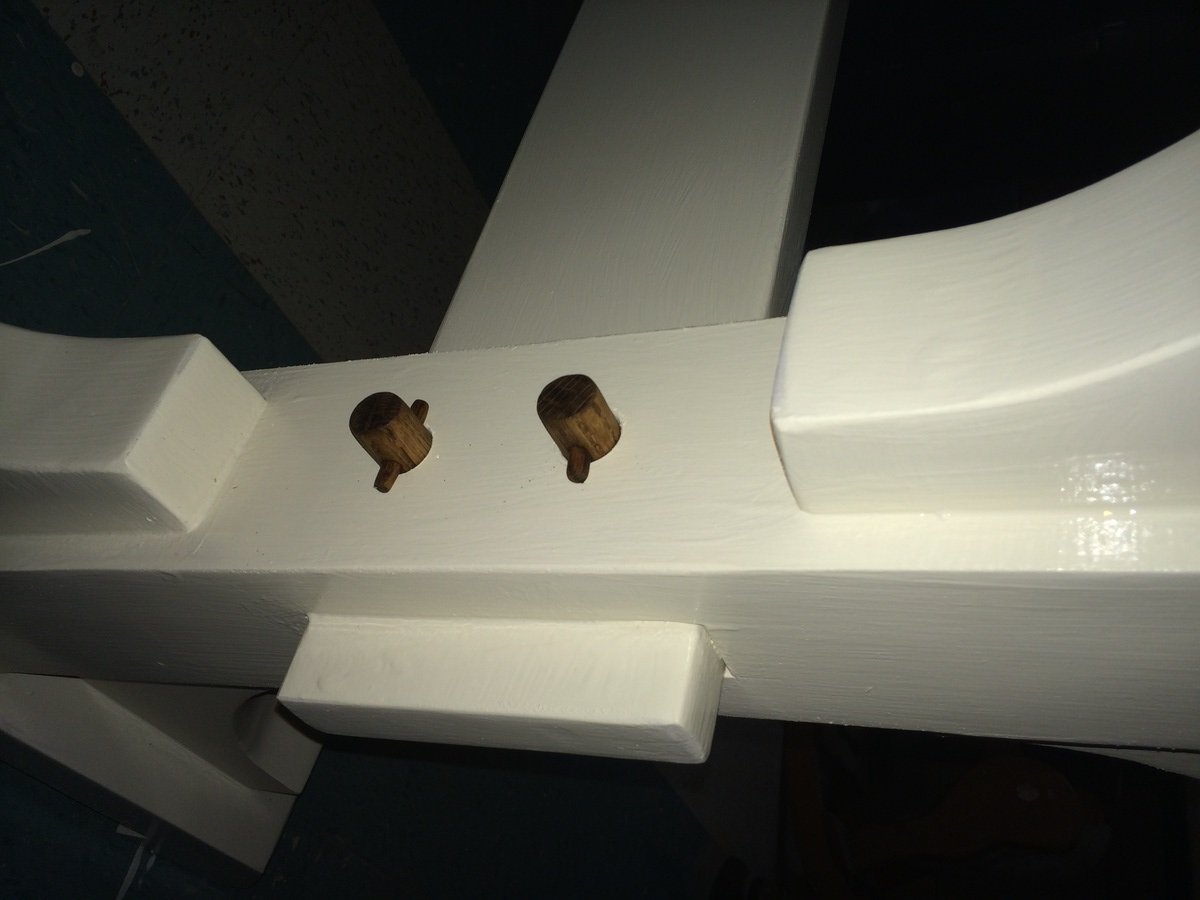
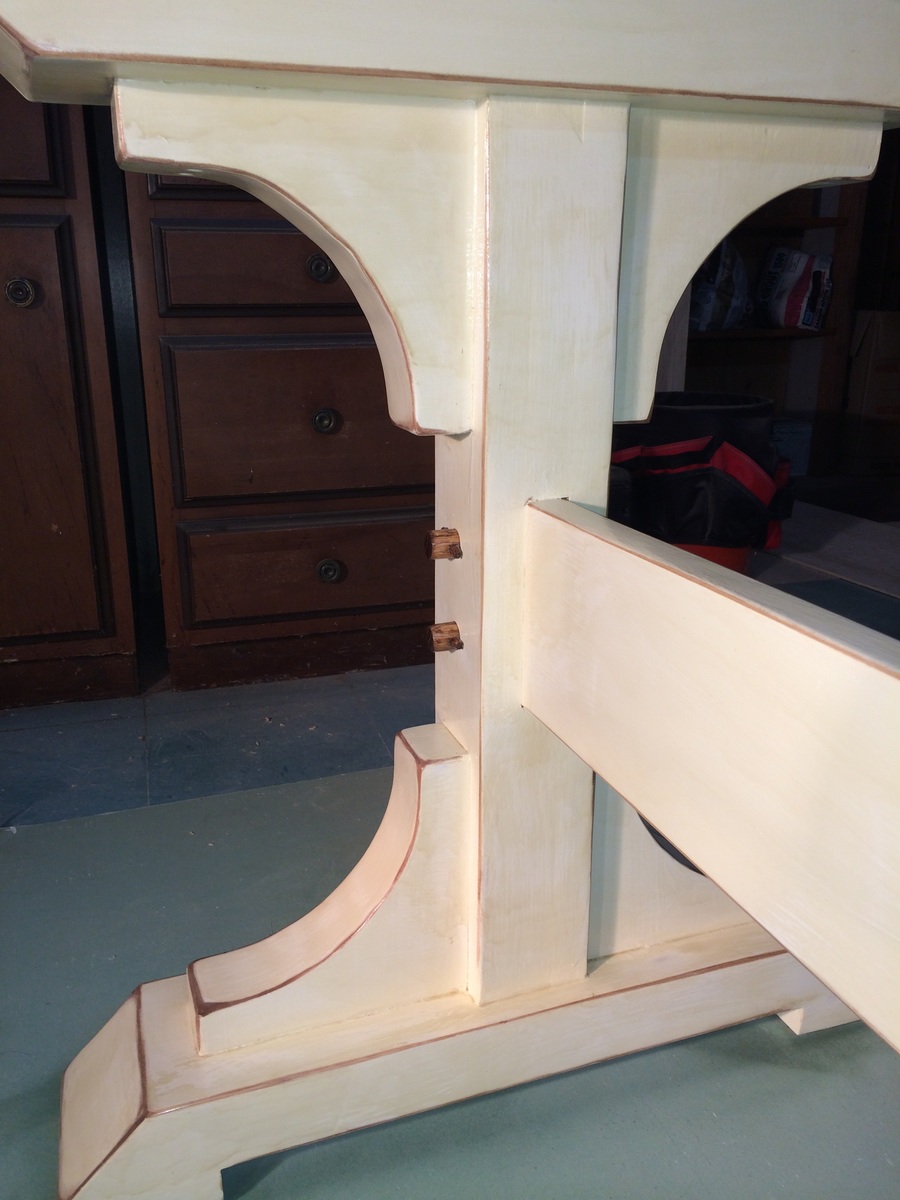
CSaintD - The top can be removed as I did not glue it. I set 3 dowels on top of each of the 2 legs so that the top would always lign up correctly if disassembled and reasembled. The stretcher could be removed, but would probably cause some damage to the finish as it was a tight fight when I finished it. The stretcher would be removed by removing the dowel pegs that I fabricated on each leg.

g82martin

Mon, 05/19/2014 - 08:26

I cheated a bit on the top. My neighbor who got me the wood works in a furniture reupholsery shop. He planed and joined the boards for me, which saved me a good amount of time. I'm confident I could have done this at home with my table saw, miter saw and hand plane, but what he did in 2 hours probably would have taken me 10.

bclute

Mon, 05/19/2014 - 08:06

Table looks great! Great antique finish on the base and your table top looks nice a smooth.

bclute

Mon, 05/19/2014 - 08:06

Table looks great! Great antique finish on the base and your table top looks nice a smooth.

KathrynK13

Fri, 01/01/2016 - 12:00

I love the table...but I wanted to ask about the booth?  Is that a church pew?  Did you make it?  Any tips for recreating it?

Lenaluv87

Fri, 08/05/2016 - 20:35

Love the dowels you added! Planning on building this exact table pretty close to your dimensions and have a very long church pew as well! Trying to decide between L-ing my pew and cutting to straigjy 6'. Do you mind sharing the dimensions of your pew? And how did you miter the pew?

Master Bath Barn Door

Submitted by Anonymous (not verified) on Fri, 03/17/2017 - 16:34

Created this door with pine wood tongue and groove lumber and pine wood planks. Purchase barn door hardware / track from Jet.com and door handles from Hobby Lobby. 


This replaced my Master bath door and I think came out pretty good. Thank you for the ideas!!!  Jeff M.   Brownstown, Mi

Estimated Cost
Wood 55.00
Handles 2 for 8.00
Stain ( left overs)
Barn door track 54.00

Total $117.00 and 10 % Military discount at lowes
Estimated Time Investment
Weekend Project (10-20 Hours)
Finish Used
Minwax. Mix of Kona and Driftwood Grey
Recommended Skill Level
Intermediate

Drop Leaf Mobile Kitchen Island

Submitted by jkjackson on Sun, 03/14/2021 - 11:19

This was born out of the need for more counter space in our galley kitchen. We don't have the space to add an island. Especially around the holidays, it would be great to have extra space for making cookies, serving big meals, etc. I used Ana's Small Kitchen Island Prep Cart plans for inspiration. I adapted the dimensions to fit at the end of our counters when not in use and added a drop leaf to give us almost 4 additional feet of butcher block counter top when we need it. I used scrap lumber that I had for the cabinet and had an extra drawer handle that matches our kitchen cabinets but bought the butcher block, locking casters, drawer slide and hardware for the legs. Also, the weight of the butcher block makes it want to tip when it's away from the cabinet with the drop leaf down so I added a lead counter weight inside the drawer.

Estimated Cost
$150-200
Estimated Time Investment
Weekend Project (10-20 Hours)
Finish Used
Behr paint for the cabinet, food grade mineral oil and cutting board wax for the butcher block
Recommended Skill Level
Advanced

Comments

jkjackson

Sat, 07/24/2021 - 16:59

Sure! I used a 4 foot butcher block and cut it down. The horizontal part is 13 1/2" and the drop leaf part is 32 1/8" attached with a piano hinge. The legs need to be cut and hinged to fit when folded up. This one is made so that the drop leaf fits right under the overhang of the kitchen countertop that it is next to so it's snug against the cabinet and not an issue but, if you want it to be freestanding, the weight of the butcher block will pull it over if you don't weight the cabinet down with something as well. I got a 5 pound lead bar from Amazon in case we need to use it somewhere else. I hope that helps! Let me know if you have any other questions.

DIY Greenhouse

Submitted by aww92 on Mon, 05/31/2021 - 17:42

i followed the instructions for the DIY Greenhouse and even though there are a few warts and freckles neither the wife nor the flowers are complaining

Built from Plan(s)
Estimated Cost
$1200.00
Estimated Time Investment
Week Long Project (20 Hours or More)

Comments

Single Simple Modern Outdoor Lounger

Submitted by Anonymous (not verified) on Fri, 04/22/2011 - 12:18

Modified the double lounger plans into 2 single loungers. I liked the idea of the boards running the long way rather than from side to side like the single lounger plan. These were pretty easy to build. All assembled with a Kreg for hidden screws. Made with Sanded and super polyurethaned cedar (3 or 4 coats). turned out beautiful with the matching boards running from head to toe!

Estimated Time Investment
Weekend Project (10-20 Hours)
Finish Used
Multiple coats of polyurethane with sanding between each coat.
Recommended Skill Level
Intermediate
Seasonal And Holiday

My Ikea Lack Inspired Bookshelf

This was my third project, but it is my favorite to date!

Estimated Time Investment
Day Project (6-9 Hours)
Finish Used
2 coats of Benjamin Moore Natura paint in Banana Yellow
2 Coats of poly acrylic
Recommended Skill Level
Beginner

Comments

joyreneeb (not verified)

Tue, 09/20/2011 - 12:16

Can you give a price estimate on your project? Looks great, btw!

In reply to by joyreneeb (not verified)

CapriciousElle

Fri, 09/30/2011 - 21:21

The lumber was about $25 and the paint I ordered online with a few other colors, but it is listed at $21.99. I only ordered a quart. Everything else I already had around the house. I hope that helps!

American Girl Dollhouse with Farmhouse Bed, Bunk Bed, and Furniture

Submitted by Anonymous (not verified) on Tue, 01/08/2019 - 08:46

I've been building Ana White American Girl doll furniture for my two daughters for the last three years, culminating with my biggest build of all - a modified version of Ana's dollhouse.

My wife kept telling me it would end up being huge, and she was right.  The great news is that it doubles as storage when the girls aren't playing!  2 Bedrooms, kitchen, living room, bathroom, and upstairs bonus room for dance and gymnastics.  78" tall x 76" wide, mounted to the wall studs for safety.   Lots of joy in our home on Christmas day.  Thanks Ana!

Estimated Cost
$300
Estimated Time Investment
Week Long Project (20 Hours or More)
Recommended Skill Level
Intermediate

Comments

Raised Wood Planters by Urban Wood Solutions

Planters build by Urban Wood Solutions

Comments

Fire Pit Swings

My wife saw something like this on Pinterest and desperately wanted one. The one she saw was hexagonal in shape. We didn't need as many swings so we went with just a plain square shape. We used 6x6s for the legs and posts across the top and used 4x4s for the angled support pieces. We built the swings using the plan from this website. All the materials can be picked up at the blue and orange stores. However when it came to the springs for the swings, the blue store was 1/3 of the price of HD. The legs are 12' long and buried 4' under the ground and cemented in for strength. Luckily I am retired military and was able to rent an auger for 1/2 the price of HD or the blue store. You could do it by hand but it saved us hours and lots of back pain. We found our dimensions for the size we wanted and spray painted dots on the ground where the posts were going to go. We dug the holes and stuffed the 6x6s in them. Using a post level we made sure they were plum. We braced them and added the quickrete and left them to setup over night. The next day we had to make sure all the tops were level with each other. This is where having some knowledge of physics paid off. I took clear tubing and screwed it above the height that I wanted on one post and then screwed the other end to another post. Fill it with water until the water level on the first post is where I wanted it (8 feet high) and it will automatically fill it level on the other end. There is a picture of this above. Water will always level itself out. I had to do this because my yard is at a slight down hill grade. We marked it and cut the tops off to make it level. After attaching the 6x6s on the top with 8" lag bolts it was time to paint. After painting was done we built 3 swings from Ana's plans. We shortened them by 6" to give room to walk between the legs and the swings. All in all it was a great project that only took two dedicated weekends. My wife still has to paint the swings though.

Built from Plan(s)
Estimated Cost
$600ish
Estimated Time Investment
Week Long Project (20 Hours or More)
Finish Used
We used an oil base Black Barn Paint from the blue store.
Recommended Skill Level
Intermediate

Comments

jkread

Wed, 05/27/2015 - 22:38

It sounds and looks like the top 6x6s are mitered and sit on top of the end of the vertical posts. I'd say at least one lag bolt each way to hold the mitered corner together and then at least one in each piece down into the vertical to hold it in place.

carewarner

Mon, 04/27/2020 - 10:24

WOW, LOVE!!! This is simply gorgeous! What a warm and welcoming addition to your yard. And thanks for sharing your method of finding level for your posts on your sloped yard. I absolutely love it!

Seasonal And Holiday

Stone Fireplace Entertainment Center

Submitted by Anonymous (not verified) on Sat, 03/02/2024 - 11:14

We took out the tv entertainment cabinet and built a frame for a 60” electric fireplace. We found the ledger rock to match the wall I completed two years ago and then I tiled the rock over the backer board and installed the fireplace. The wood on top of the fireplace came from an oak tree that was growing through our deck. I milled the wood and joined three boards to give me the depth I needed, sanded, stained and put a poly finish on it. Love the final result and we gained 6” of space in the room.

Wes Silvey

Play House

Submitted by Anonymous (not verified) on Tue, 05/02/2017 - 21:12

Made from plans on website. Granddaughters favorite color is purple so that's the theme. Siding and room match house.  

Estimated Cost
$800
Estimated Time Investment
Week Long Project (20 Hours or More)
Finish Used
Flower boxes from scrap 1x4 with artificial flowers. Inside painted walls purple and white and ceiling is sky color.
Recommended Skill Level
Intermediate

4x4 Truss Beam Table

Submitted by Anonymous (not verified) on Mon, 10/04/2021 - 13:07

I followed the plans for the 4x4 Truss Beam Table and it turned it out great! I definitely recommend the Kreg Jig HD for the 4x4's. I used non HD Kreg screws for the table top.

It's much easier to build it upside down to ensure you get all your pocket holes underneath. Also, use duct tape to keep the 45 degree angle posts clamped as it's much easier when screwing together.

As a bonus for the family I built it for, I cut their name out with my scroll saw and added as a personal touch for the piece.

Built from Plan(s)

Comments

DIY Wooden bench

Submitted by Julisib on Tue, 04/19/2022 - 10:13

Thanks Ana for the plans. A new bench / bookshelves for our daughter's bedroom.

Built from Plan(s)

Comments

Chicken Coop

Submitted by Anonymous (not verified) on Sun, 07/10/2022 - 12:26

Great for a small flock of 5 or less.  

Comments

Seasonal And Holiday

Queen Murphy Bed

Submitted by Jenga on Sun, 12/06/2015 - 12:59

Not too bad of a project but had to a good bit of guess work so I could changed the plans for a queen size bed and flip in on its side.

Estimated Cost
$200 if you already have the bed
Estimated Time Investment
Week Long Project (20 Hours or More)
Finish Used
White Paint and laminate flooring left over from the floor.
Recommended Skill Level
Beginner

Comments

Arilie

Sun, 05/29/2016 - 18:50

Good evening!

I am new at wood working, and would be very interrested in knowing the different measurements you changed to get from a twin to queen murphy bed. If it is posted on this page, I tried but couldn't find it. Thank you for your help. Have a good day.

Marie-Julie

Garage shelves

Submitted by Queequeg on Thu, 03/31/2016 - 14:35

This is my first project ever built. I can't thank you enough for this site. I already have several other projects I want to build around the house because of this site. Thank you so much!

Estimated Cost
$150 for the wood. And some extra for the stain.
Estimated Time Investment
Weekend Project (10-20 Hours)
Finish Used
Minwax walnut water-based stain
Recommended Skill Level
Beginner

Comments

Queequeg

Thu, 03/31/2016 - 14:36

Didn't realize the photos were rotated. Can't figure out how to fix that!  Oh well.  :)


Tryed Side Table with Shelf

Submitted by papadaddy on Mon, 05/21/2012 - 18:59

All the wood is from pallets, which you can find for free at local big box stores.
I added the shelf with the same support system used for the table top.
Made with as little cost as possible so materials are not too much.

Material:
A few pallets
Wood screws

Tools:
Table Saw
Miter Saw
Drill
Sander
Measuring Tape
Square
Pencil and Paper
Stain
Brush
Shop Cloth

This is my first Project :)

Built from Plan(s)
Estimated Cost
$7
Estimated Time Investment
Afternoon Project (3-6 Hours)
Finish Used
1 coat of Red Mahogany 225, applied with a brush and rubbed with a shop cloth after 15 minutes.
Recommended Skill Level
Beginner

Comments

anderjes

Tue, 02/12/2013 - 07:55

Do you have blue prints or suggested measurements for this table?

Back