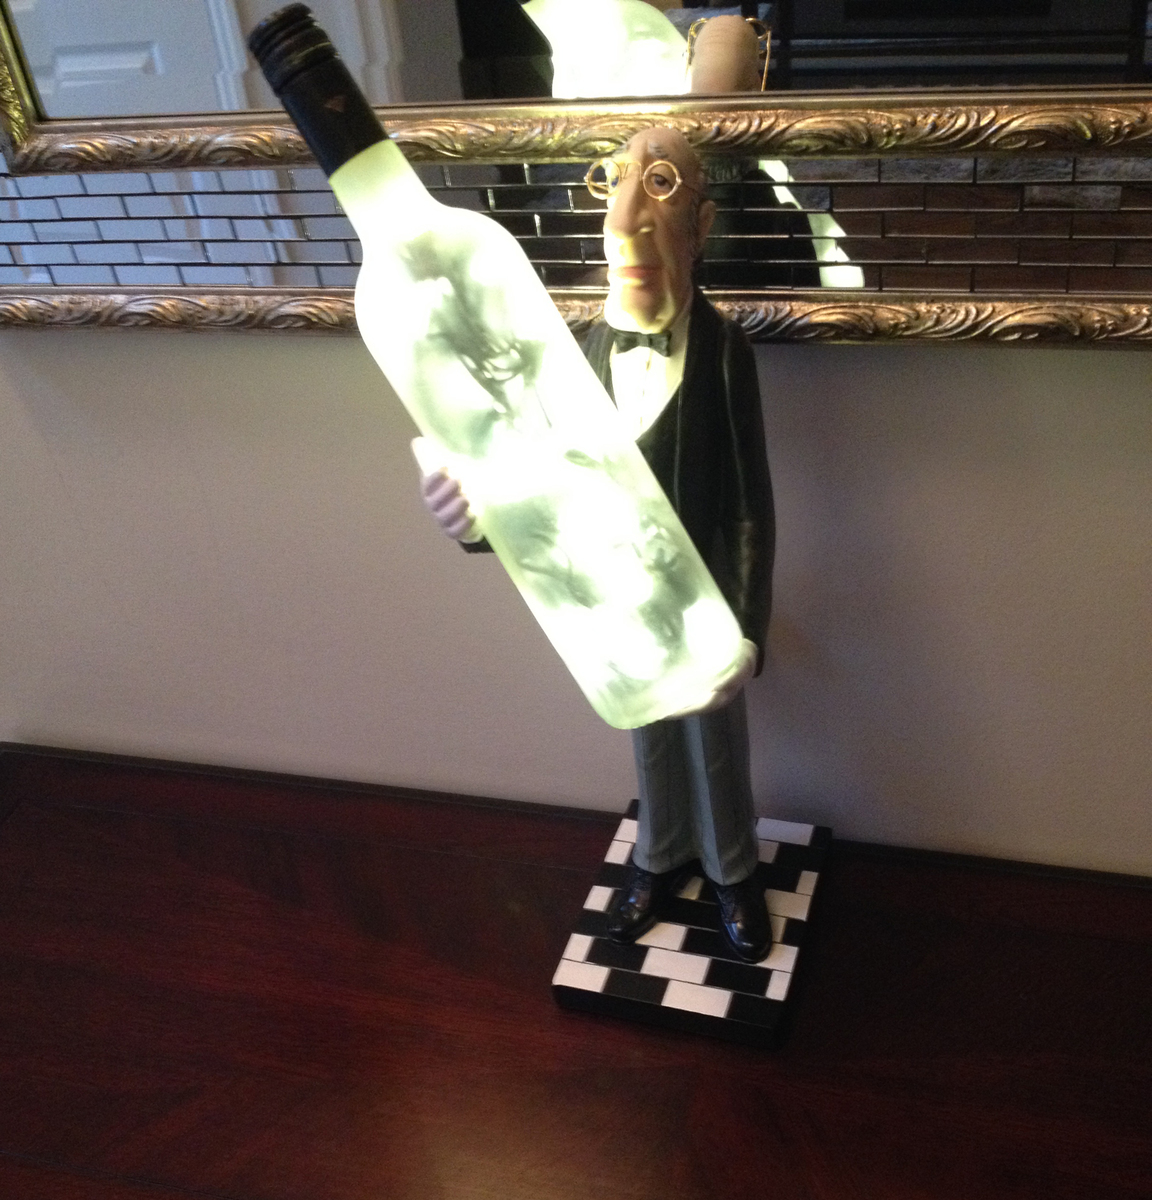
Community Brag Posts

Distressed cabinet

Submitted by Doug B on Thu, 07/07/2016 - 13:30

A cabinet that I built from inexpensive material. The top is construction grade 2x6 with the front edge cut with a jigsaw set on an angle to form a faux live edge, biscuit join with pocket screws from the underside to add other 2x6 boards to obtain the depth required. After sanding I masked off about 1 inch in from the live edge with a wavy edge before staining then removing the masking tape to apply varnish. I have replaced temporary screws in "gate hinges" with better quality screws since this photo was taken.

The cabinet was built from new cedar fence boards & the rounded corner pieces at the front edges are round fence posts with a 1/4 notch cut out to wrap around the corner.

Estimated Time Investment
Weekend Project (10-20 Hours)
Finish Used
Flat white paint.
Recommended Skill Level
Intermediate

Modified Grandy Barn Door Console

Submitted by dickeydee on Sun, 05/03/2020 - 18:32

Modified the plans to shorten the console. Used hinged doors because of the cost of the sliding door hardware. Added wine rack and wine glass holder. Added multi colour LED light strips to the top centre.

Built from Plan(s)
Estimated Cost
$300
Estimated Time Investment
Week Long Project (20 Hours or More)
Finish Used
Stain was a 50/50 mix of Briarstone and Flagstone. Semi gloss finish as well as semi gloss white paint.
Recommended Skill Level
Intermediate

My daughter's beautiful dress up wardrobe

Submitted by Motsy on Thu, 06/21/2012 - 12:31

This project was very much needed in my house! My daughter loves playing dress up and is obsessed with all things pink and princess-y. It has been driving me crazy that she doesn't play dress up as much as she wants to, though, and the reason why is because we didn't have a good way to store/display her things. Up until we built this it all stayed in this storage bin, but since you had to pull it out in order to even see it, she never played with it. So once I saw this plan I knew it had to be ours. I'm so glad we did it! It turned out beautifully!

My husband built it (his second woodworking project), and, like his last project, he did a great job. No complaints or issues at all. I primed (although I doubt that was necessary) and painted it. I actually did all of the painting other than the letters before he built it, and that turned out nicely. My only complaint was the letters. I bought some stencils from Hobby Lobbby and used a smaller brush to paint them on. For one thing I wish I had of been more careful and paid more attention to how straight the letters were. For another, although you can't tell unless you're up close, there are spots where the paint pooled up under the stencil. My husband sanded it down as much as he could without messing it up, but it's still there a little. I'm no painting expert so I'm not sure how to go about doing this without having that happen. Even with those things, though, I'm so happy with it, and my daughter has been happily playing dress up all week!

Estimated Cost
$30 for lumber
Estimated Time Investment
Afternoon Project (3-6 Hours)
Recommended Skill Level
Beginner

Double Twin Lift Bed.

Submitted by rojohn on Sun, 04/13/2014 - 14:15

My sister asked me to look into building a double loft bed for my two nieces, since the younger was outgrowing her bed and found a plan for one from "The Hand Made Home". http://www.thehandmadehome.net/2011/08/how-to-build-a-loft/
I didn't love how their plan had a rope ladder and no center support in back, so I changed that up. Took around 50 hours work time total, but was a lot of fun and both of my nieces totally loved it, so it was well worth the time and energy! :-)

Estimated Time Investment
Week Long Project (20 Hours or More)
Finish Used
4 coats of Minwax Satin Polyutethane
Recommended Skill Level
Intermediate

Rustic x hall tree

Submitted by Kristi88 on Tue, 05/05/2020 - 15:03

This was my first project and was a great one for someone just starting out. I really enjoyed the building part but was disappointed in how the stain turned out. I stained it with sunbleached by varathane but then made the mistake of finishing it with an oil based polyurethane which turned the color slightly green.

Built from Plan(s)
Estimated Cost
150 CAD
Estimated Time Investment
Day Project (6-9 Hours)
Finish Used
Sunbleached by varathane with a polyurethane finish.
Recommended Skill Level
Beginner

Wood Christmas Tree

Submitted by Anonymous (not verified) on Thu, 12/28/2023 - 14:10

Christmas tree for hospital when my wife works. We used 1x4 lumber with 4x4 spacers. She painted tin cans and put greenery in them and we cut a star for the top with a scroll saw.

Wendell Londsey

Seasonal And Holiday

Simple Potting Bench

This is a very simple weekend project, it took longer to put the finish on than to build it. It is made out of spruce and pine shelves. The finish is done with homemade vinegar steel wool stain for the shelves and paint for the legs. We distressed the legs by sanding and wiping stain in some areas. Finished with 3 coats of exterior poly.

Estimated Cost
50
Estimated Time Investment
Afternoon Project (3-6 Hours)
Finish Used
homeade stain , paint , varathane diamond outdoor finish
Recommended Skill Level
Beginner

Comments

Cyn-d Williams (not verified)

Sun, 07/29/2012 - 15:37

I love the potting bench that you want to build from the Southern Living magazine.
How can I get my hands on those plans?

Apothecary Console

Submitted by Jorlik on Wed, 04/16/2014 - 09:08

Built straight off the plans except I added drawer slides.

Built from Plan(s)
Estimated Cost
250
Estimated Time Investment
Week Long Project (20 Hours or More)
Recommended Skill Level
Intermediate

Re-tie-r-ment Ottoman

Submitted by Anonymous (not verified) on Wed, 07/13/2016 - 21:30

Use those ties and a suit you aren't using anymore now that you are retired! Sit back and relax!!

Built from Plan(s)
Estimated Time Investment
Weekend Project (10-20 Hours)
Recommended Skill Level
Beginner

Double Drawer Channing Computer Desk

Submitted by Ji on Sun, 07/01/2012 - 15:44

We made some alterations to Shanty2Chic's design. Rather than one side open we made two cabinets with drawers. It made it a little longer and deeper than expected but we are still happy with the desk.
We have a six month old baby, so we build during naps and when we can convince grandma to watch her.

Built from Plan(s)
Estimated Cost
$200
Estimated Time Investment
Weekend Project (10-20 Hours)
Finish Used
Minwax American Walnut and Briwax.
Recommended Skill Level
Intermediate

Comments

JoanneS

Sun, 07/01/2012 - 16:21

Wow, this looks amazing! Looks better than what you would see at a furniture store, and the finish is so beautiful! Awesome job.

Ji

Mon, 07/02/2012 - 11:57

Thanks alot! My husband and I were worried about the staining process. The stain didn't look very good at first but after a couple more coats it started to get better. We love to build but we are still struggling with finishing.

Jason S (not verified)

Wed, 08/22/2012 - 20:44

Ji,

If you are finishing soft woods, especially pine, it is woth the few dollars it costs to but some pre-finish wood conditioner. The conditioner will help eliminate the irregularities in stain color on soft woods. It doesn't really cost too much and it really does help eliminate blotches, streaking and helps get a more consistent color.

Craft Desk

Submitted by grandmaof2 on Wed, 07/04/2012 - 11:13

I found some measurements from this site and another site in order to build my craft desk. Thanks Ana

Recommended Skill Level
Intermediate

Comments

Our Farmhouse bed :)

Submitted by drewant on Sat, 04/19/2014 - 19:34

My wife and I wanted to upgrade to a king size bed and we stumbled upon this website and are so glad we did. My dad and I built this over the course of a month, working a couple hours at a time as time permitted. It was a fun build and the plans are easy to follow. I encourage anyone building these beds to find the exact measurement of your mattresses and modify the plans accordingly.

Estimated Cost
$300
Estimated Time Investment
Week Long Project (20 Hours or More)
Finish Used
Valspar antique white in semi-gloss 4 coats
Recommended Skill Level
Intermediate

Comments

wthalin

Mon, 02/20/2017 - 13:43

I plan to make a bed very similar to what you did. I like the idea that it has a headboard and footboard with storage on the sides. How did you end up fastening the head and footboards to the body of the bed?

JanieMR

Mon, 02/20/2017 - 21:06

Bought your book and I love it, pouring through it every nite.  Planning to make the full size farmhouse bed.   Got lots of tools in the Garage and taking inventory of what's in there and what I'll need, (none have been used in a few years).  So glad my husband left all the tools behind when he left.

I've already built the worktable and saw horses. 


JanieMR

Mon, 02/20/2017 - 21:07

Bought your book and I love it, pouring through it every nite.  Planning to make the full size farmhouse bed.   Got lots of tools in the Garage and taking inventory of what's in there and what I'll need, (none have been used in a few years).  So glad my husband left all the tools behind when he left.

I've already built the worktable and saw horses. 


Spice rack customized for my space

Submitted by Imadeit on Wed, 07/20/2016 - 13:22

At the end of the day, my spice rack did not look anything like Ana's plan, but it did make my creative juices start.

I hung mine on my wall.  I used a premade panel as the backing which I then stained.  I boxed in the panel with a thin 1x2 along the sides so that the hanging wire would not show.  The shelves are 1x3 trimmed with the same 1x2 to provide a ledge so that the spice bottles won't fall off.

Still waiting on my labels to arrive so have not loaded up the jars yet!  Splurged on the jars from a specialty bottle company.  They are high grade impact resistant plastic that is super clear and lightweight.  The lids have a hinged top with one side having shaker holes and the other open to be able use a measuring spoon.

So proud of the finished result.  Thanks Ana!

Built from Plan(s)
Estimated Cost
$300 since I bought 100% of the material. Of this, $125 was the bottles.
Estimated Time Investment
Day Project (6-9 Hours)
Finish Used
Dark oak MinWax stain with satin poly included. Annie Sloan chalk paint with a 60/40 mix of avocado and English yellow with her clear wax on top.
Recommended Skill Level
Beginner

chicken coop

Submitted by namaste7 on Mon, 05/11/2020 - 22:10

Modified to make the coop bigger and the planter smaller. Added 1" foam insulation on the inside and changed the design to use the "deep litter" method. This means the coop bottom goes all the way to the bottom of the support beam rather than using a removable tray. Added a steel roof with a ridge vent at the top. The chicken run under the coop is lined with buried hardware cloth so no animals can dig under the coop. All hinges are mortised and doors flush mounted. The coop is wired for power for a heat lamp. The planter is lined with a metal tray. The coop can be separated into two pieces so you can move it or rotate the top 180 deg if needed (so you can get to the eggs from the left or right side). Great plans, thanks Ana!

Estimated Time Investment
Week Long Project (20 Hours or More)
Finish Used
cedar deck stain. Olympic. brand
Recommended Skill Level
Advanced

Comments

Seasonal And Holiday

Dresser Bunk Built-in

Submitted by Anonymous (not verified) on Tue, 01/09/2024 - 08:32

It started with the rustic rolling dresser. I wanted to try to build a dresser, but my girls needed a bunk bed. I modified the dresser to support a bunk bed. 2 little nooks for the girls, rock solid beds and a beautiful dresser.

HisAndHersOriginals

Built from Plan(s)

Comments

Entryway shelf

Submitted by solomonson on Fri, 07/06/2012 - 14:13

I built this ages ago but never got around to posting. This was my first build to replace a coat tree that my baby was using to pull himself up with. Hanging it up was more difficult than building it! The amount of storage on this thing is amazing.

Estimated Time Investment
Afternoon Project (3-6 Hours)
Finish Used
I used Valspar black spray paint.
Recommended Skill Level
Beginner

loft bed for 18" doll

Submitted by mollyb on Tue, 04/22/2014 - 21:46

My daughter had asked about American Girl doll beds two summers ago. She looked at several plans on this site and chose this one.

A huge thanks to my neighbor who lent me his compound miter saw.

My 9 yr. old son and 10.5 yr. old daughter helped with pocket holes and screws. The were also helpful in determining next steps when I got "stuck".

Started this project last summer. By fall, when life got crazy, stopped the project. Finished details this spring.

Note: Chair was a garage sale find and repainted.

I'm a recovering perfectionist. If I wasn't so particular, I probably could have finished this in a weekend, but it took me much longer.

I attached photos of the finished bed and before painting. I'm very visual...hoping the photos will help someone else.

I have a few more photos. If anyone needs to see more views, please feel free to contact me.

Hoping to build more projects before my neighbor needs his saw back!

Estimated Time Investment
Weekend Project (10-20 Hours)
Finish Used
sanded, primed, behr interior semi-gloss (color: daylight lilac).

(Thank you Little Stuf for the plans)
Recommended Skill Level
Beginner

Cubbies Caddy

Submitted by Anonymous (not verified) on Sat, 07/23/2016 - 13:42

Just a fun tool caddy for the sports lover (Cubs or other teams) out there.  It has a beer opener on the side so you honestly don't have to move when cracking open a cold one.  Be it soda or beer that doesn't require you to twist it off.  

Estimated Cost
10 dollars
Estimated Time Investment
An Hour or Two (0-2 Hours)
Finish Used
Chalk paint
Recommended Skill Level
Beginner
Back