Community Brag Posts

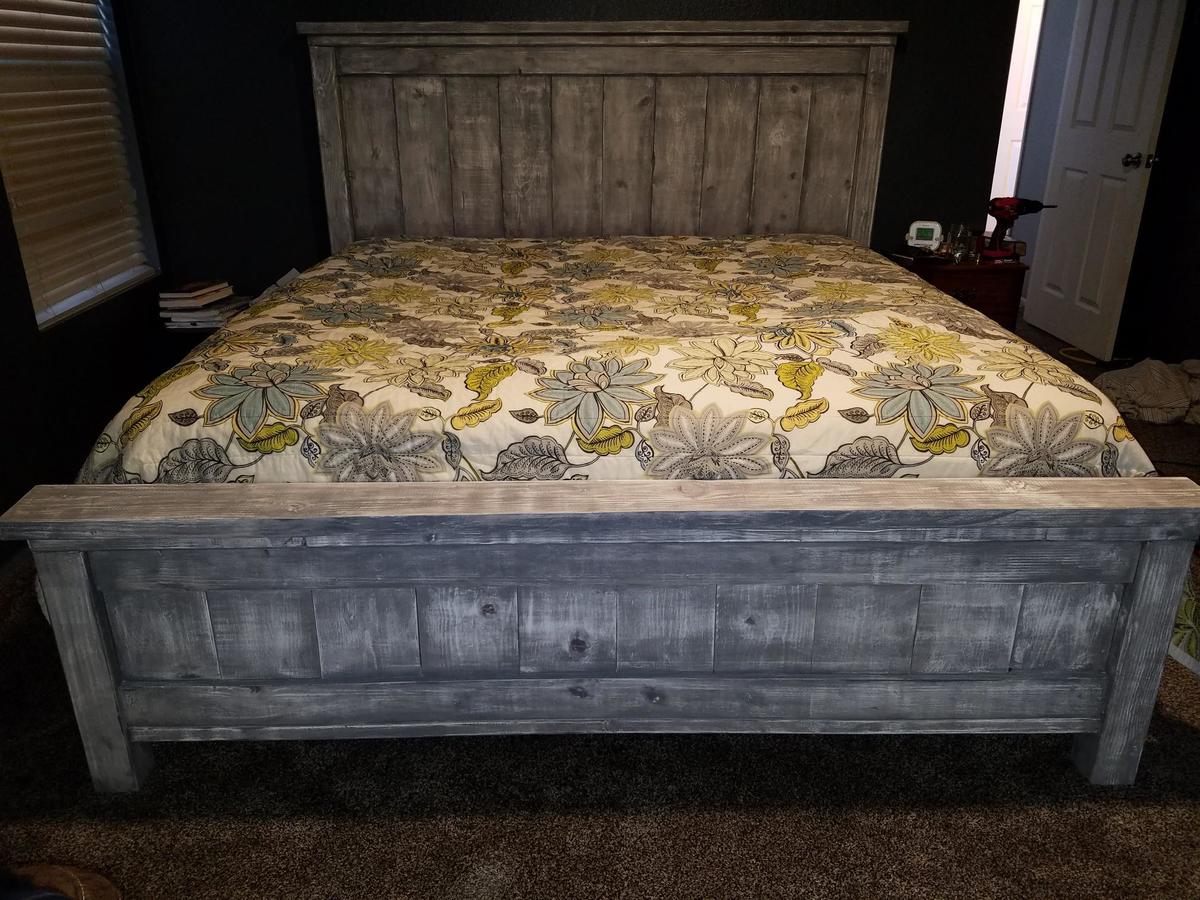
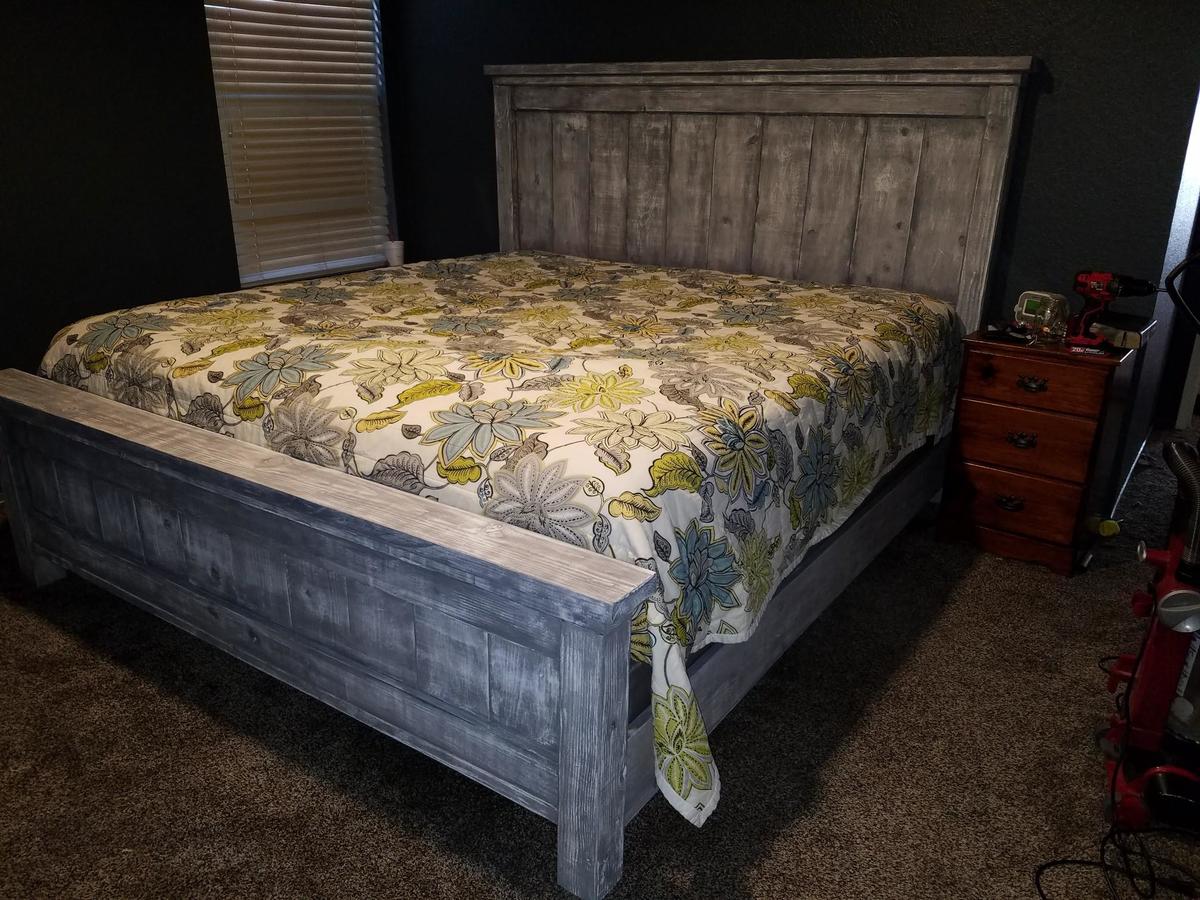
King Farmhouse Bed
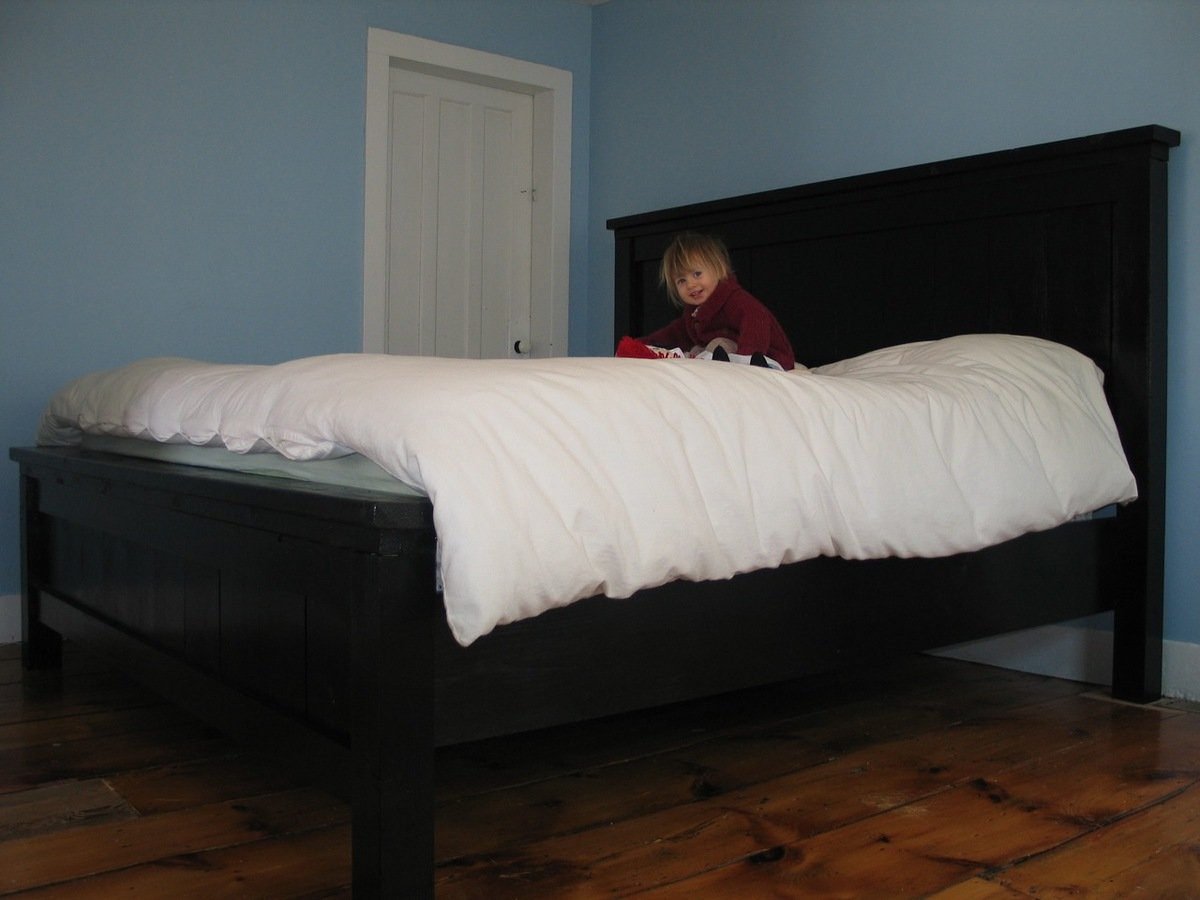
My first big build (modified to turn the 'right' way), after the kids table and chair set. It's not perfect, but its awesome! And mega sturdy. I even managed to use the Kreg Jig to attach the side rails to the end posts for extra sturdiness.
Advice: Get straight boards the first time. Yikes.
Project took a month all told, mostly due to the little angel sitting on the bed.
Now I've got a so many ideas swimming in my head. Built-ins in every room!
Thanks Ana!
Built from Plan(s)
Estimated Cost
$250 (Wood and more wood, sand paper, expensive paint, and more wood)
Estimated Time Investment
Week Long Project (20 Hours or More)
Finish Used
Benjamin Moore Hi-Gloss Black. A quart was not quite enough, but maybe I shouldn't have painted the invisible parts too. Also shouldn't have listened to the sales guy that I didn't need primer. Primer = cheap. Benjamin = expensive.
Recommended Skill Level
Beginner
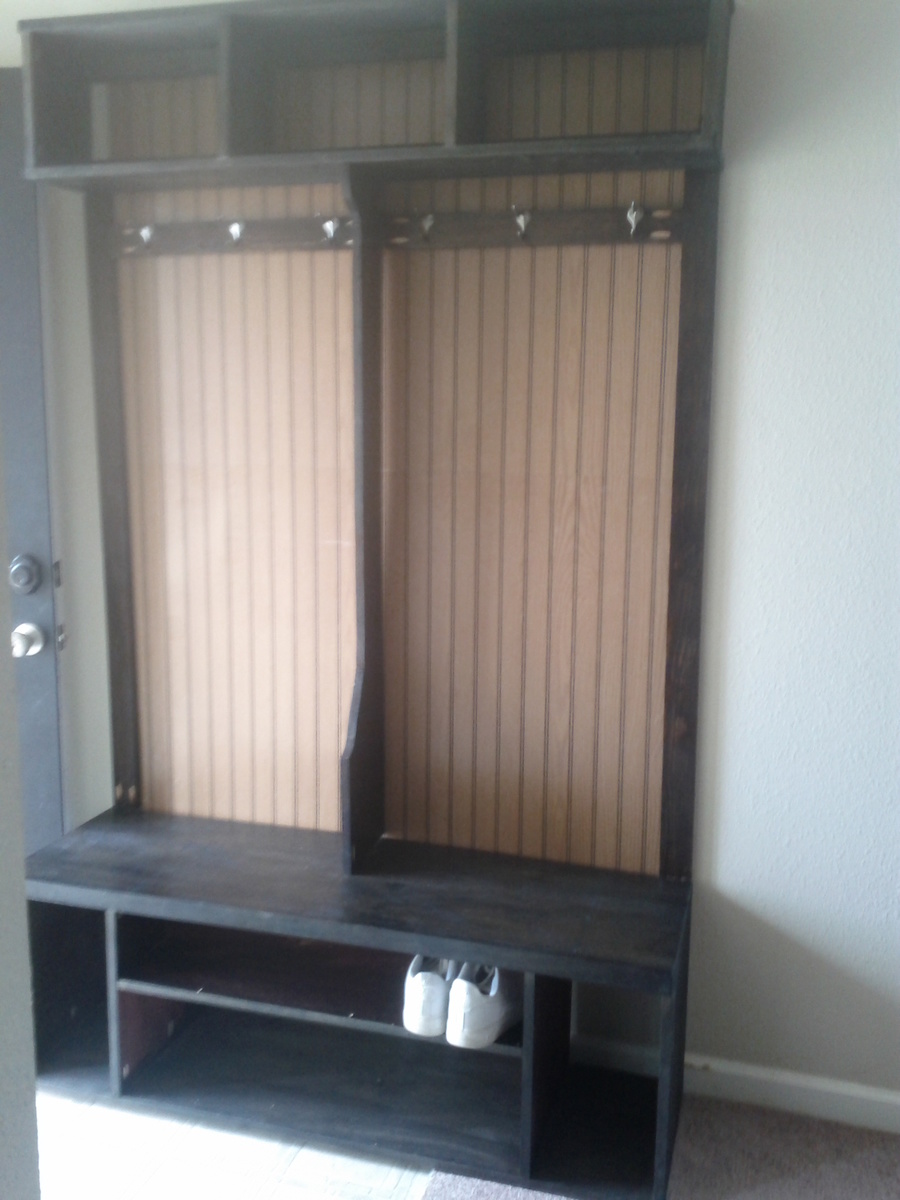
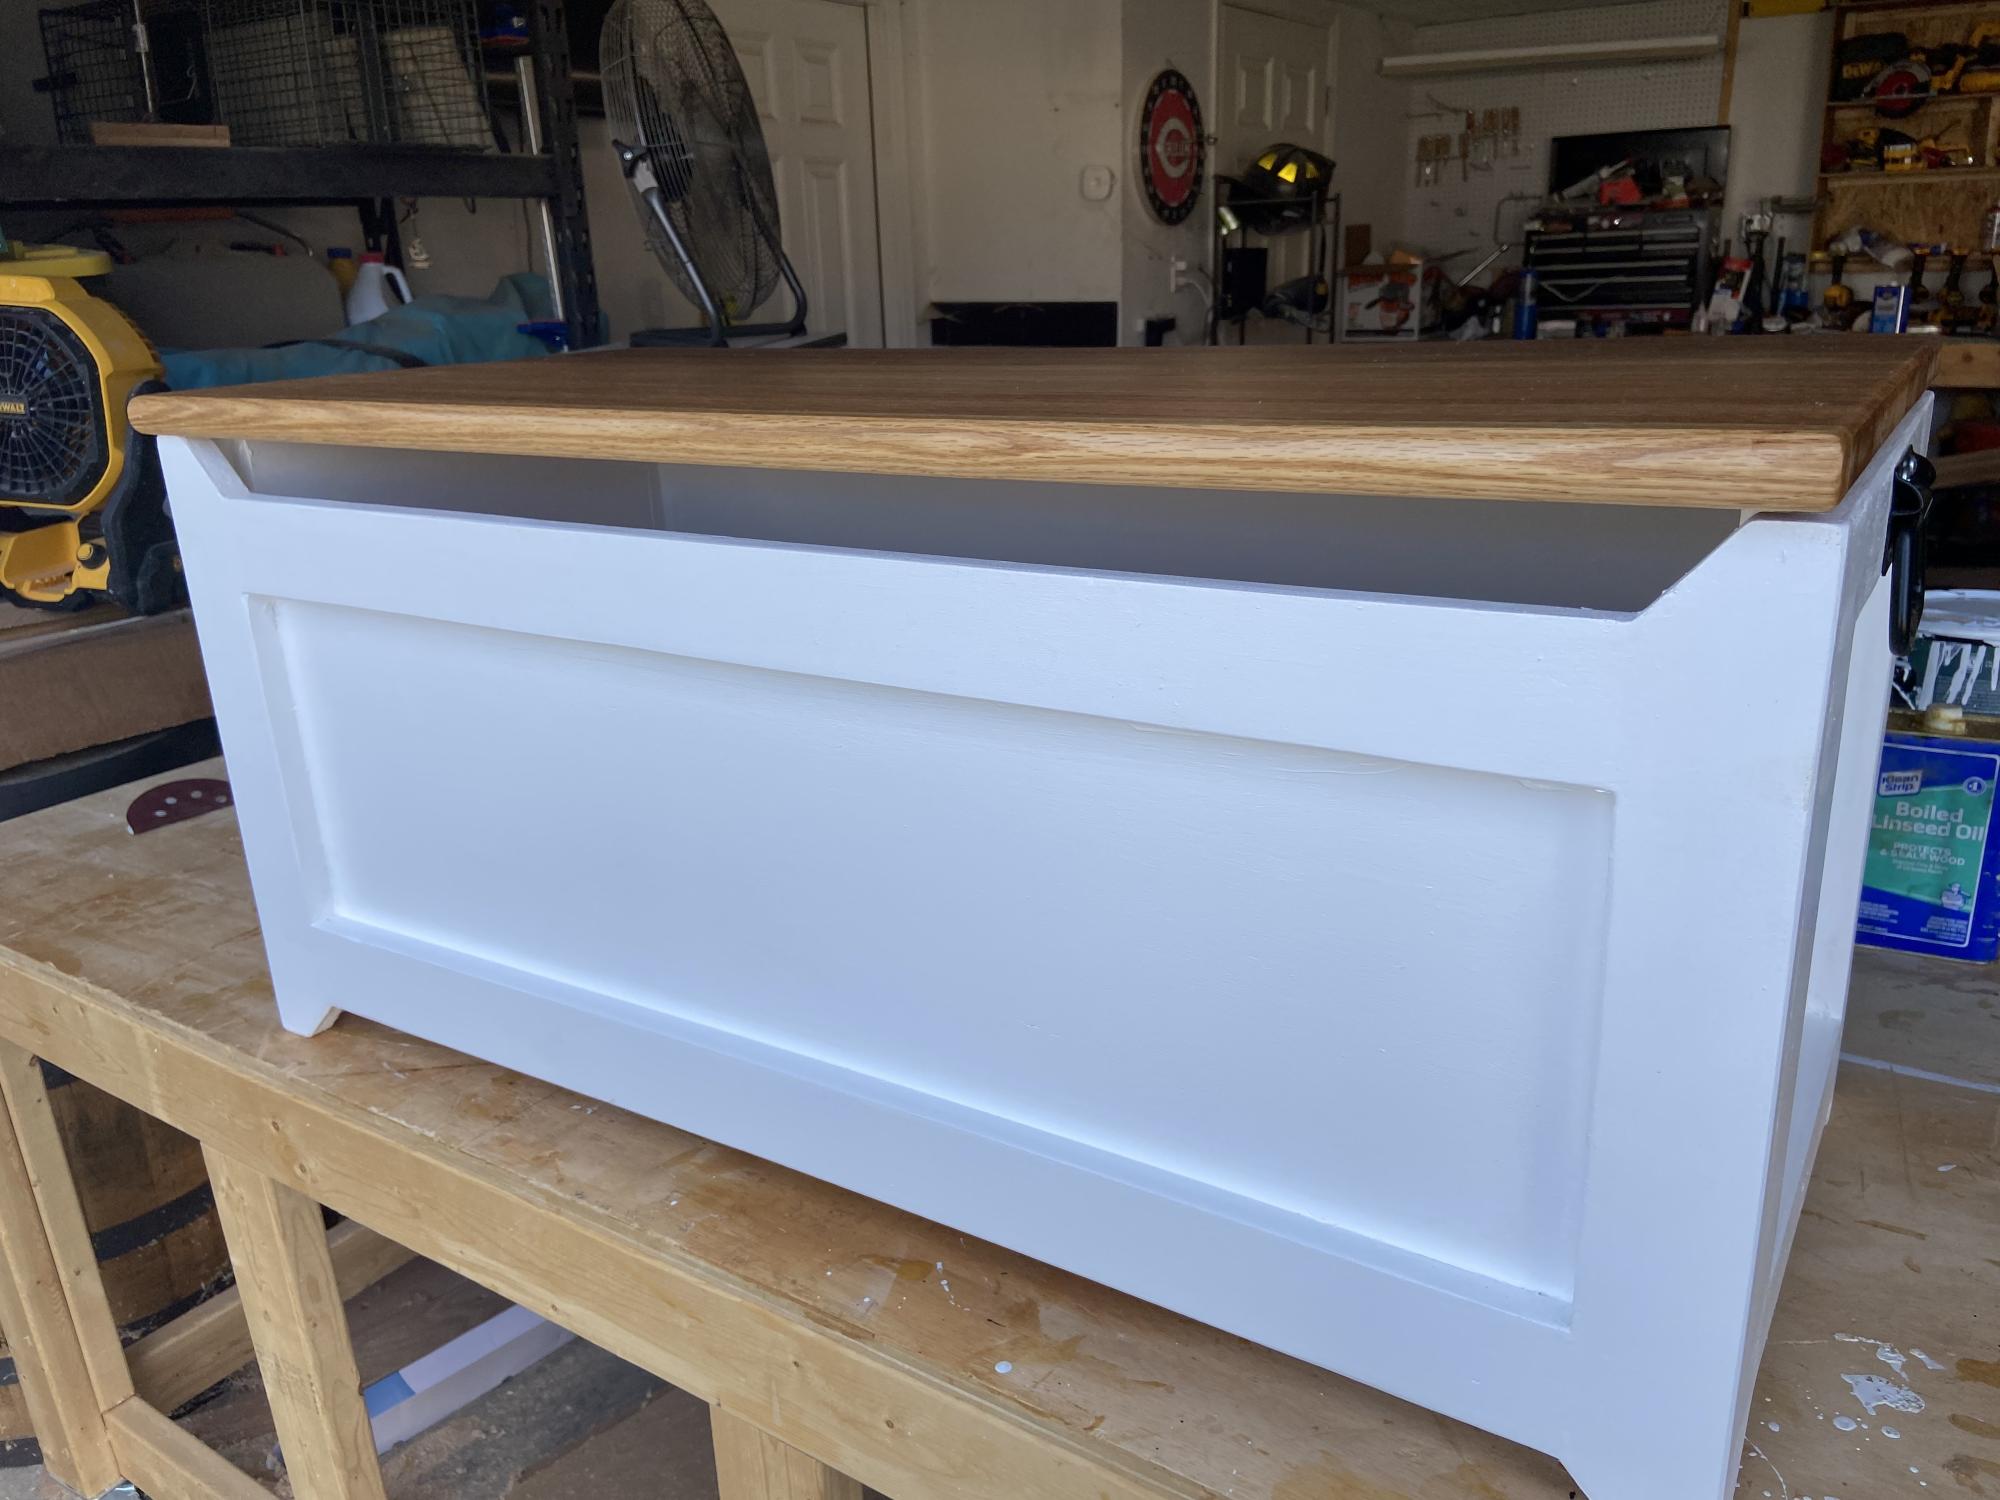
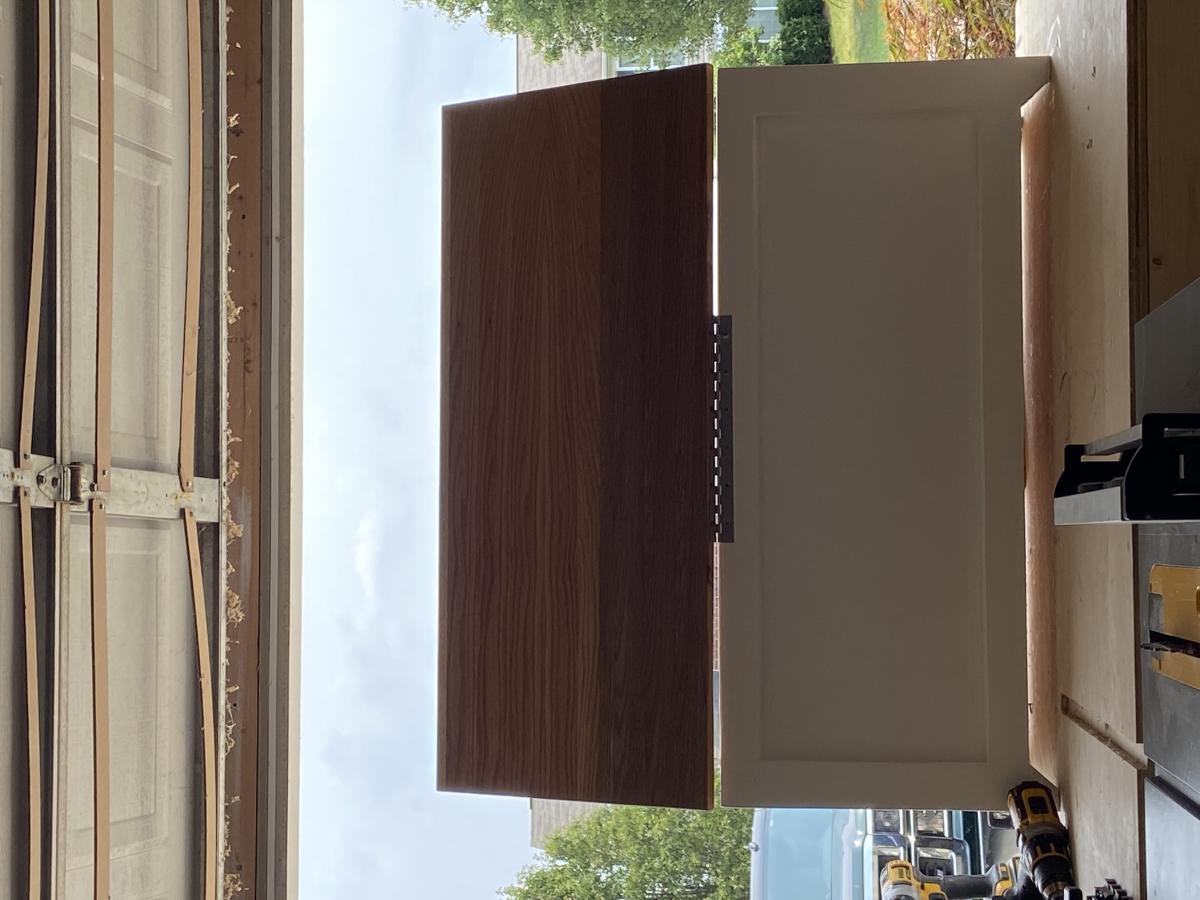
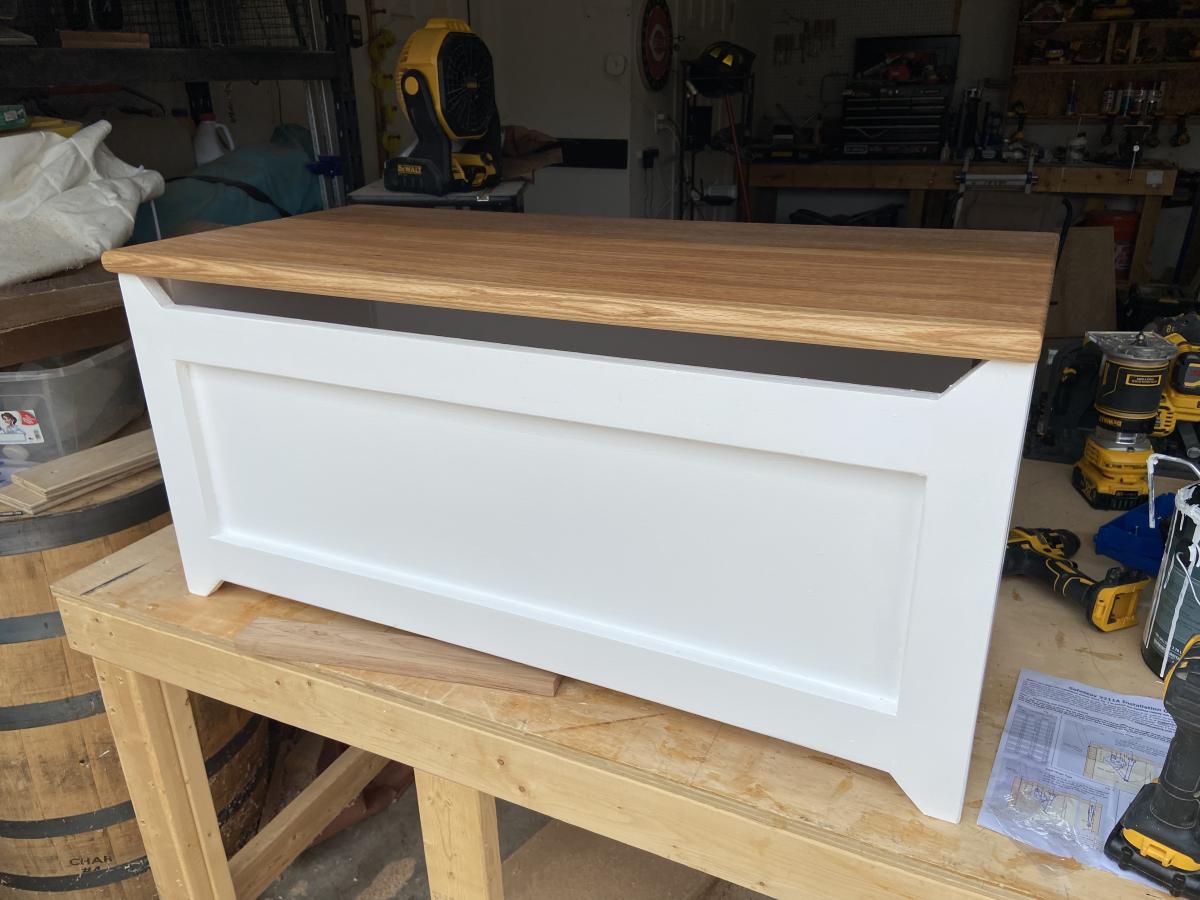
Mini-Mudroom hutch
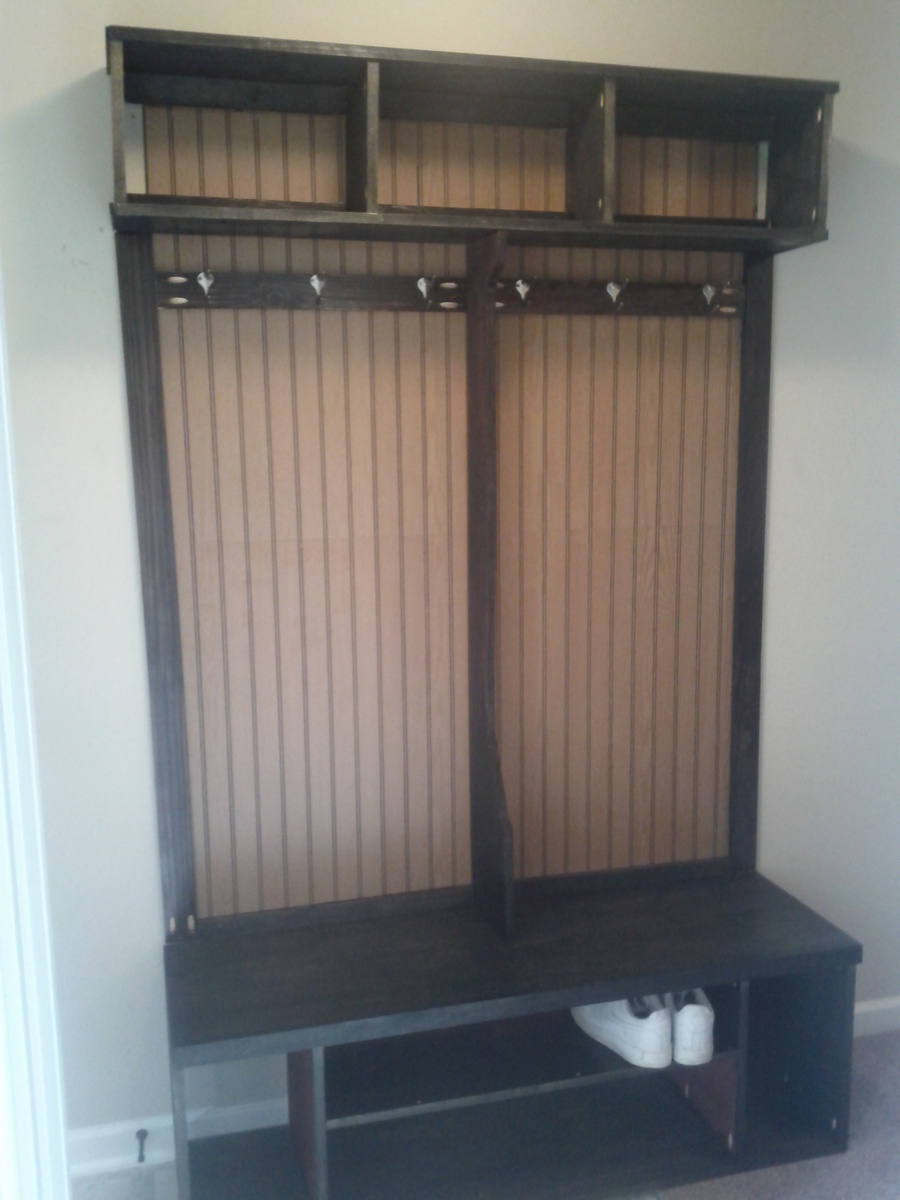
A simple mudroom hutch for my small entry way. Come on in take of your shoes, hang up your coat, and put away your hat. Make yourself tahome. This was inspired by the Yellow mudroom hutch I found on this site.
Estimated Cost
80.00
Estimated Time Investment
Weekend Project (10-20 Hours)
Finish Used
Mixed stain Minwax black and red. Mix to the shade you like and allow plenty of dry time.
Recommended Skill Level
Beginner
Round Trestle Table

Table was a fairly straight forward build. The only thing I'd do differently if I were to make another one is to paint the base pieces before assembling. Once the base is together its hard to get in between the angled supports. I ended up having to use my paint sprayer to paint the base because brushing it on was just not working for me. I ended up buying the round top piece from the Blue big box store and it was around $11 so that put the cost of this table over the price quoted in the plans.
Built from Plan(s)
Estimated Cost
$20
Estimated Time Investment
An Hour or Two (0-2 Hours)
Finish Used
Base is painted with SW ProClassic in Bright White. Top is stained with Rustoleums Weathered Gray.
Recommended Skill Level
Beginner
Comments
Modern Farmhouse Bed
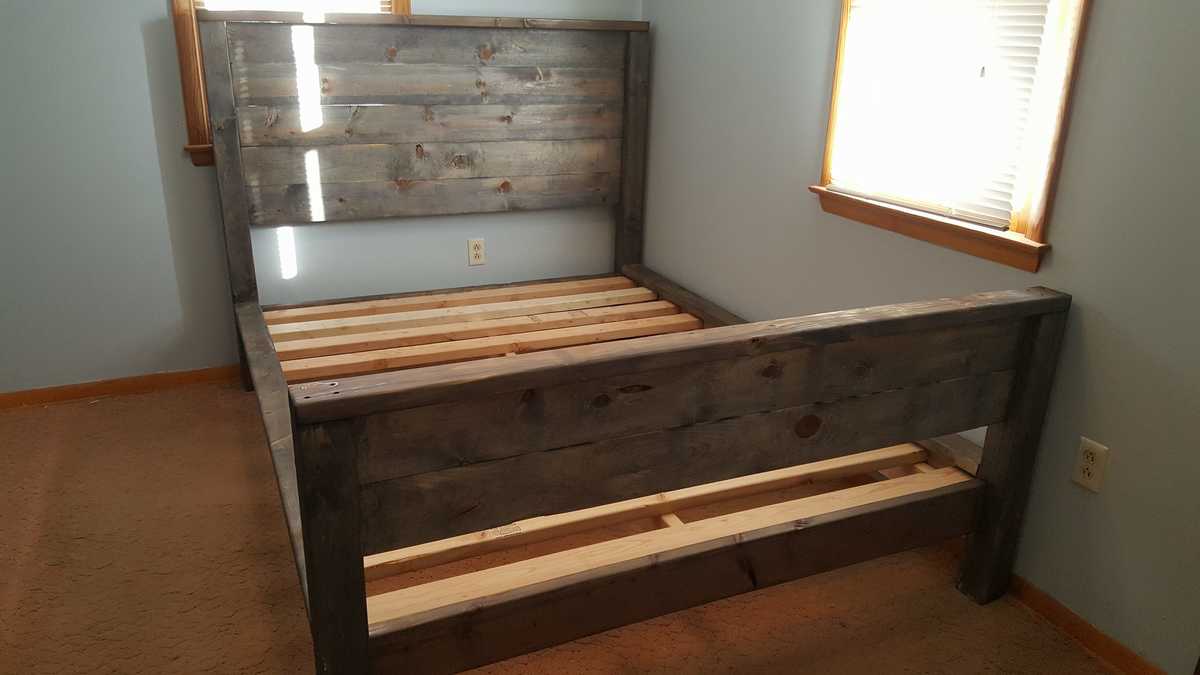
I had so much fun building this bed. I was able to bring home the wood and have it all built in one evening. It took the most time sanding. Once the entire bed was sanded smooth and stamp marks from the mill removed, I started the weathering process. I tried a spray bottle and wasted so much of the material. It ran and streaked. Once I figured it out, I took a foam brush and applied the aging liquid. It worked beautifully and came out perfectly even with the rough start.
Built from Plan(s)
Estimated Cost
$150-$200
Estimated Time Investment
Day Project (6-9 Hours)
Finish Used
Rust-Oleum Weathered Wood Accelerator with Rust-Oleum Lacquer
Recommended Skill Level
Beginner
Comments

Mon, 06/03/2019 - 15:26
This is really beautiful! I…
This is really beautiful! I love the footboard.
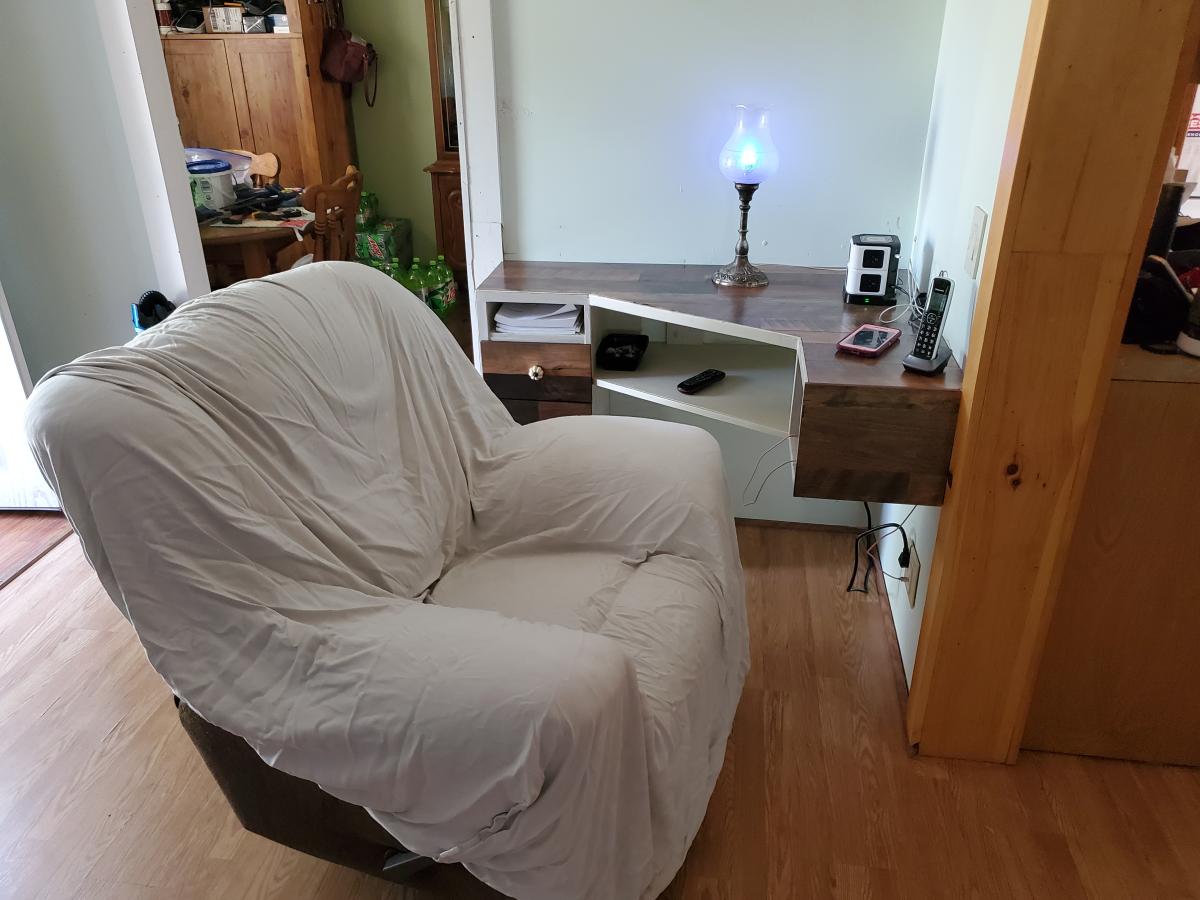
Floating Corner Desk
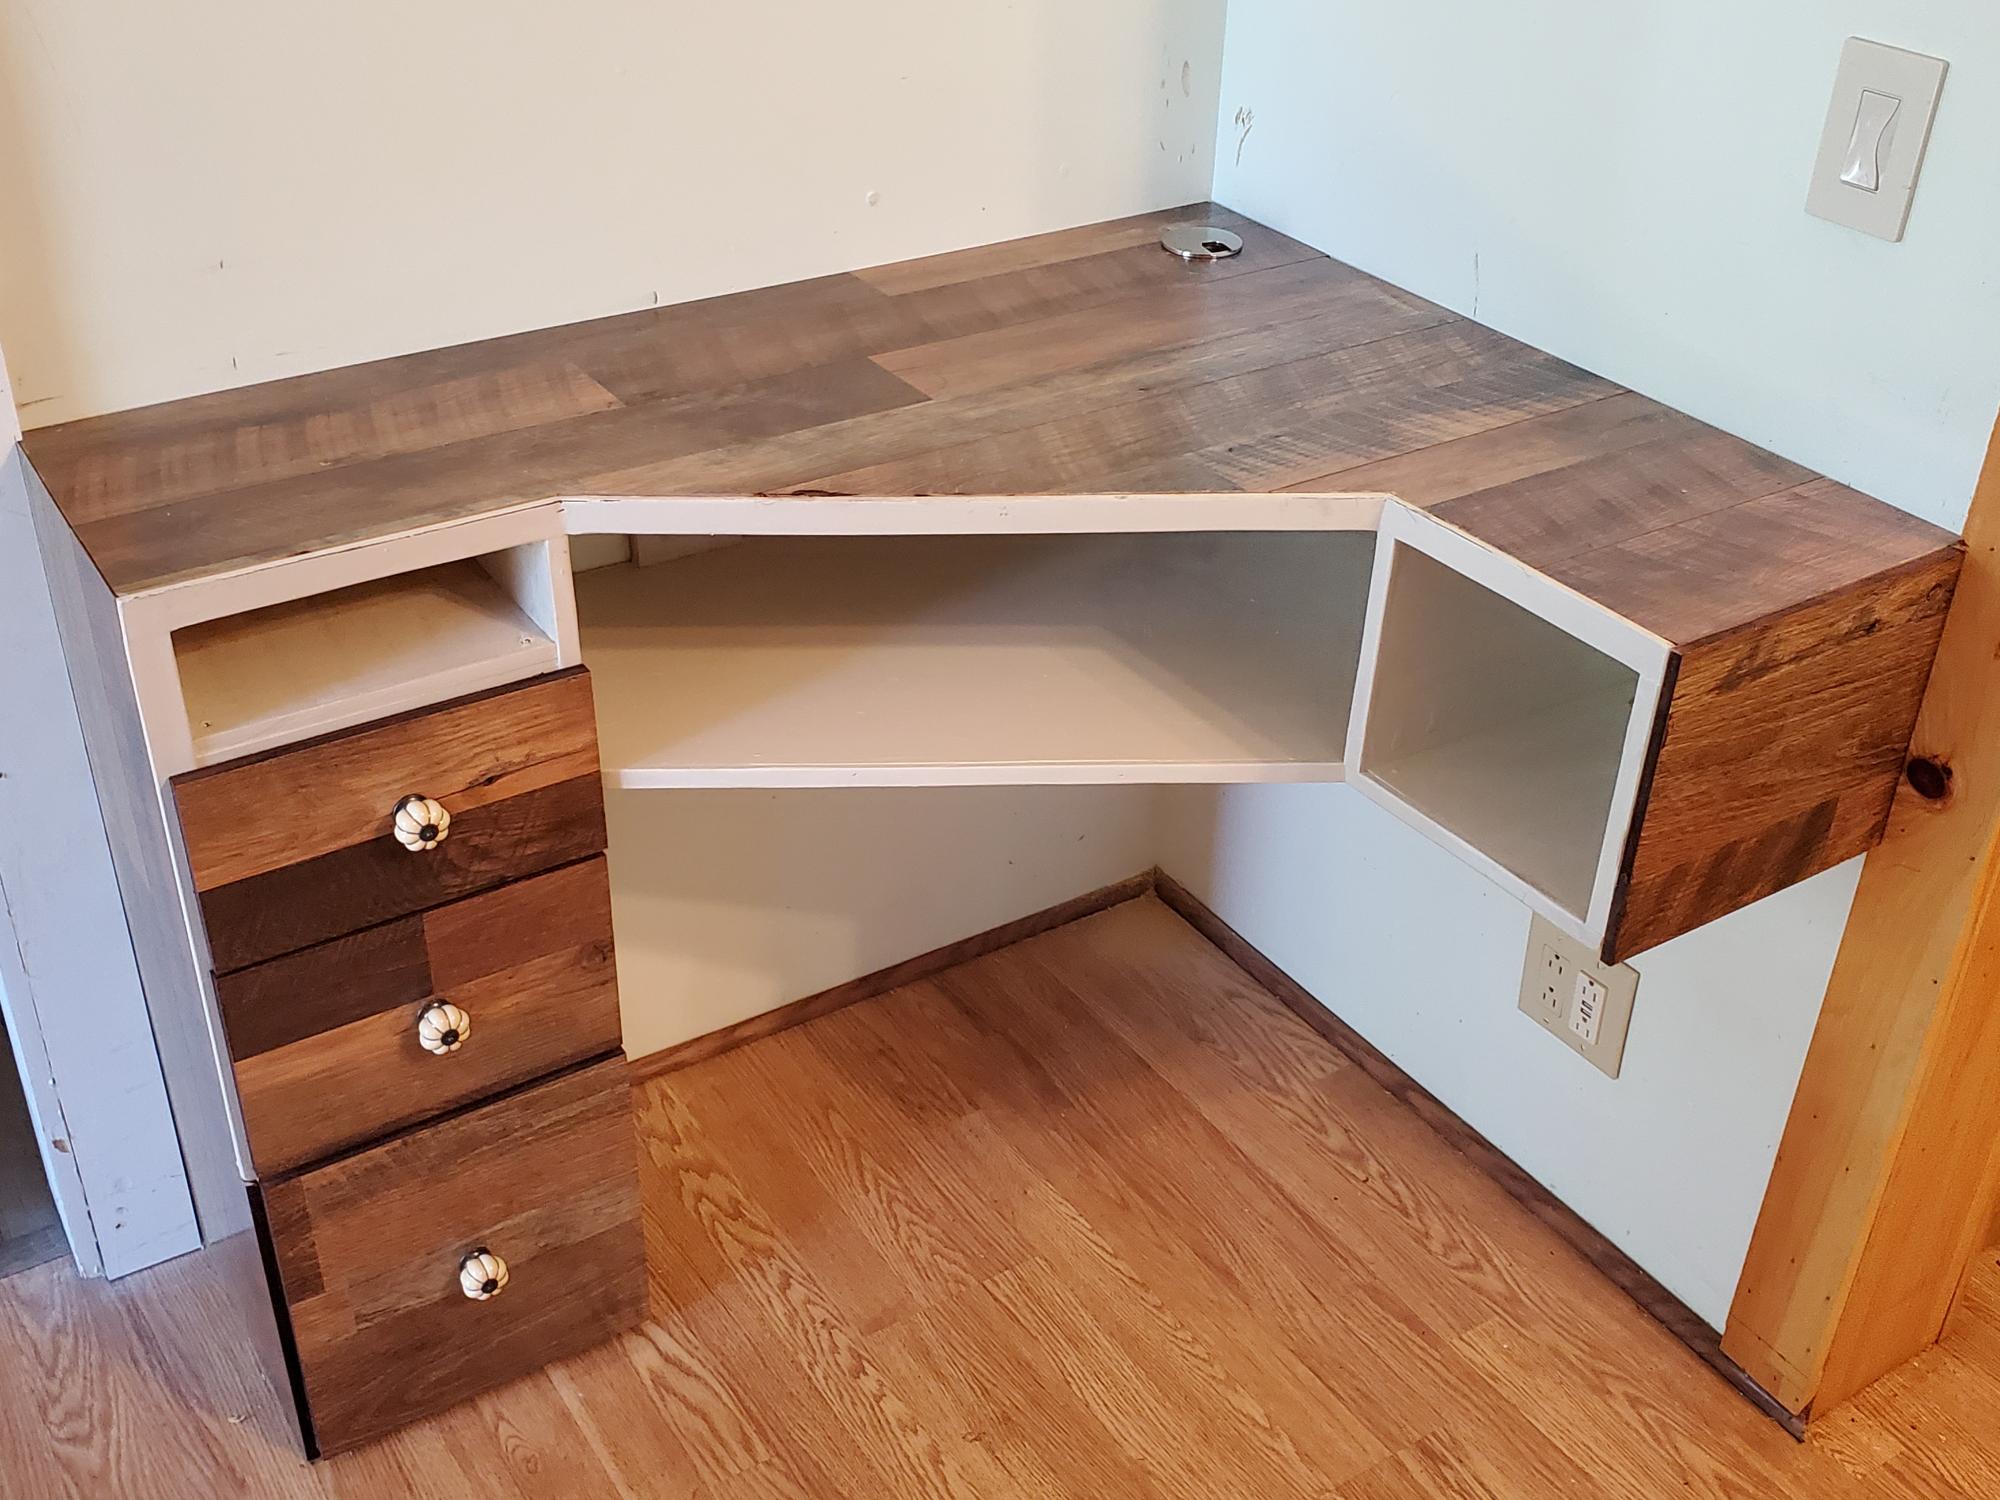
I was looking to build a desk for my wife. I searched around on YouTube for ideas and came up with this one: https://youtu.be/IN0j34WDlg4. I made a few modifications and added a few features to come up with this corner desk.
1 sheet 3/4" blond wood plywood.
1/4 sheet of 1/2" plywood for the drawers.
1 box 10mm laminate flooring.
1/4" trim cut from poplar for the edges of the plywood.
It took my wife and I about 2 days to complete the project.
Comments
Balin Console Table

Well, I finally decided to tackle this project! I still need to finish the bottom of the legs and sand some of the fillings, but I had to bring it in rthe light so that I could see it better. Building the actual console was pretty easy, it was the drawers that gave me fits. This is my third project with drawers so I'm determined get the hang of building them. It took a while to finish because I stained it, then didn't like the way the stain turned out, and decided to go ahead and paint it black.
Thanks Ana for your plans and inspiration.


Built from Plan(s)
Estimated Time Investment
Day Project (6-9 Hours)
Finish Used
Valspar Black with satin polyurethane
Recommended Skill Level
Intermediate
King Headboard
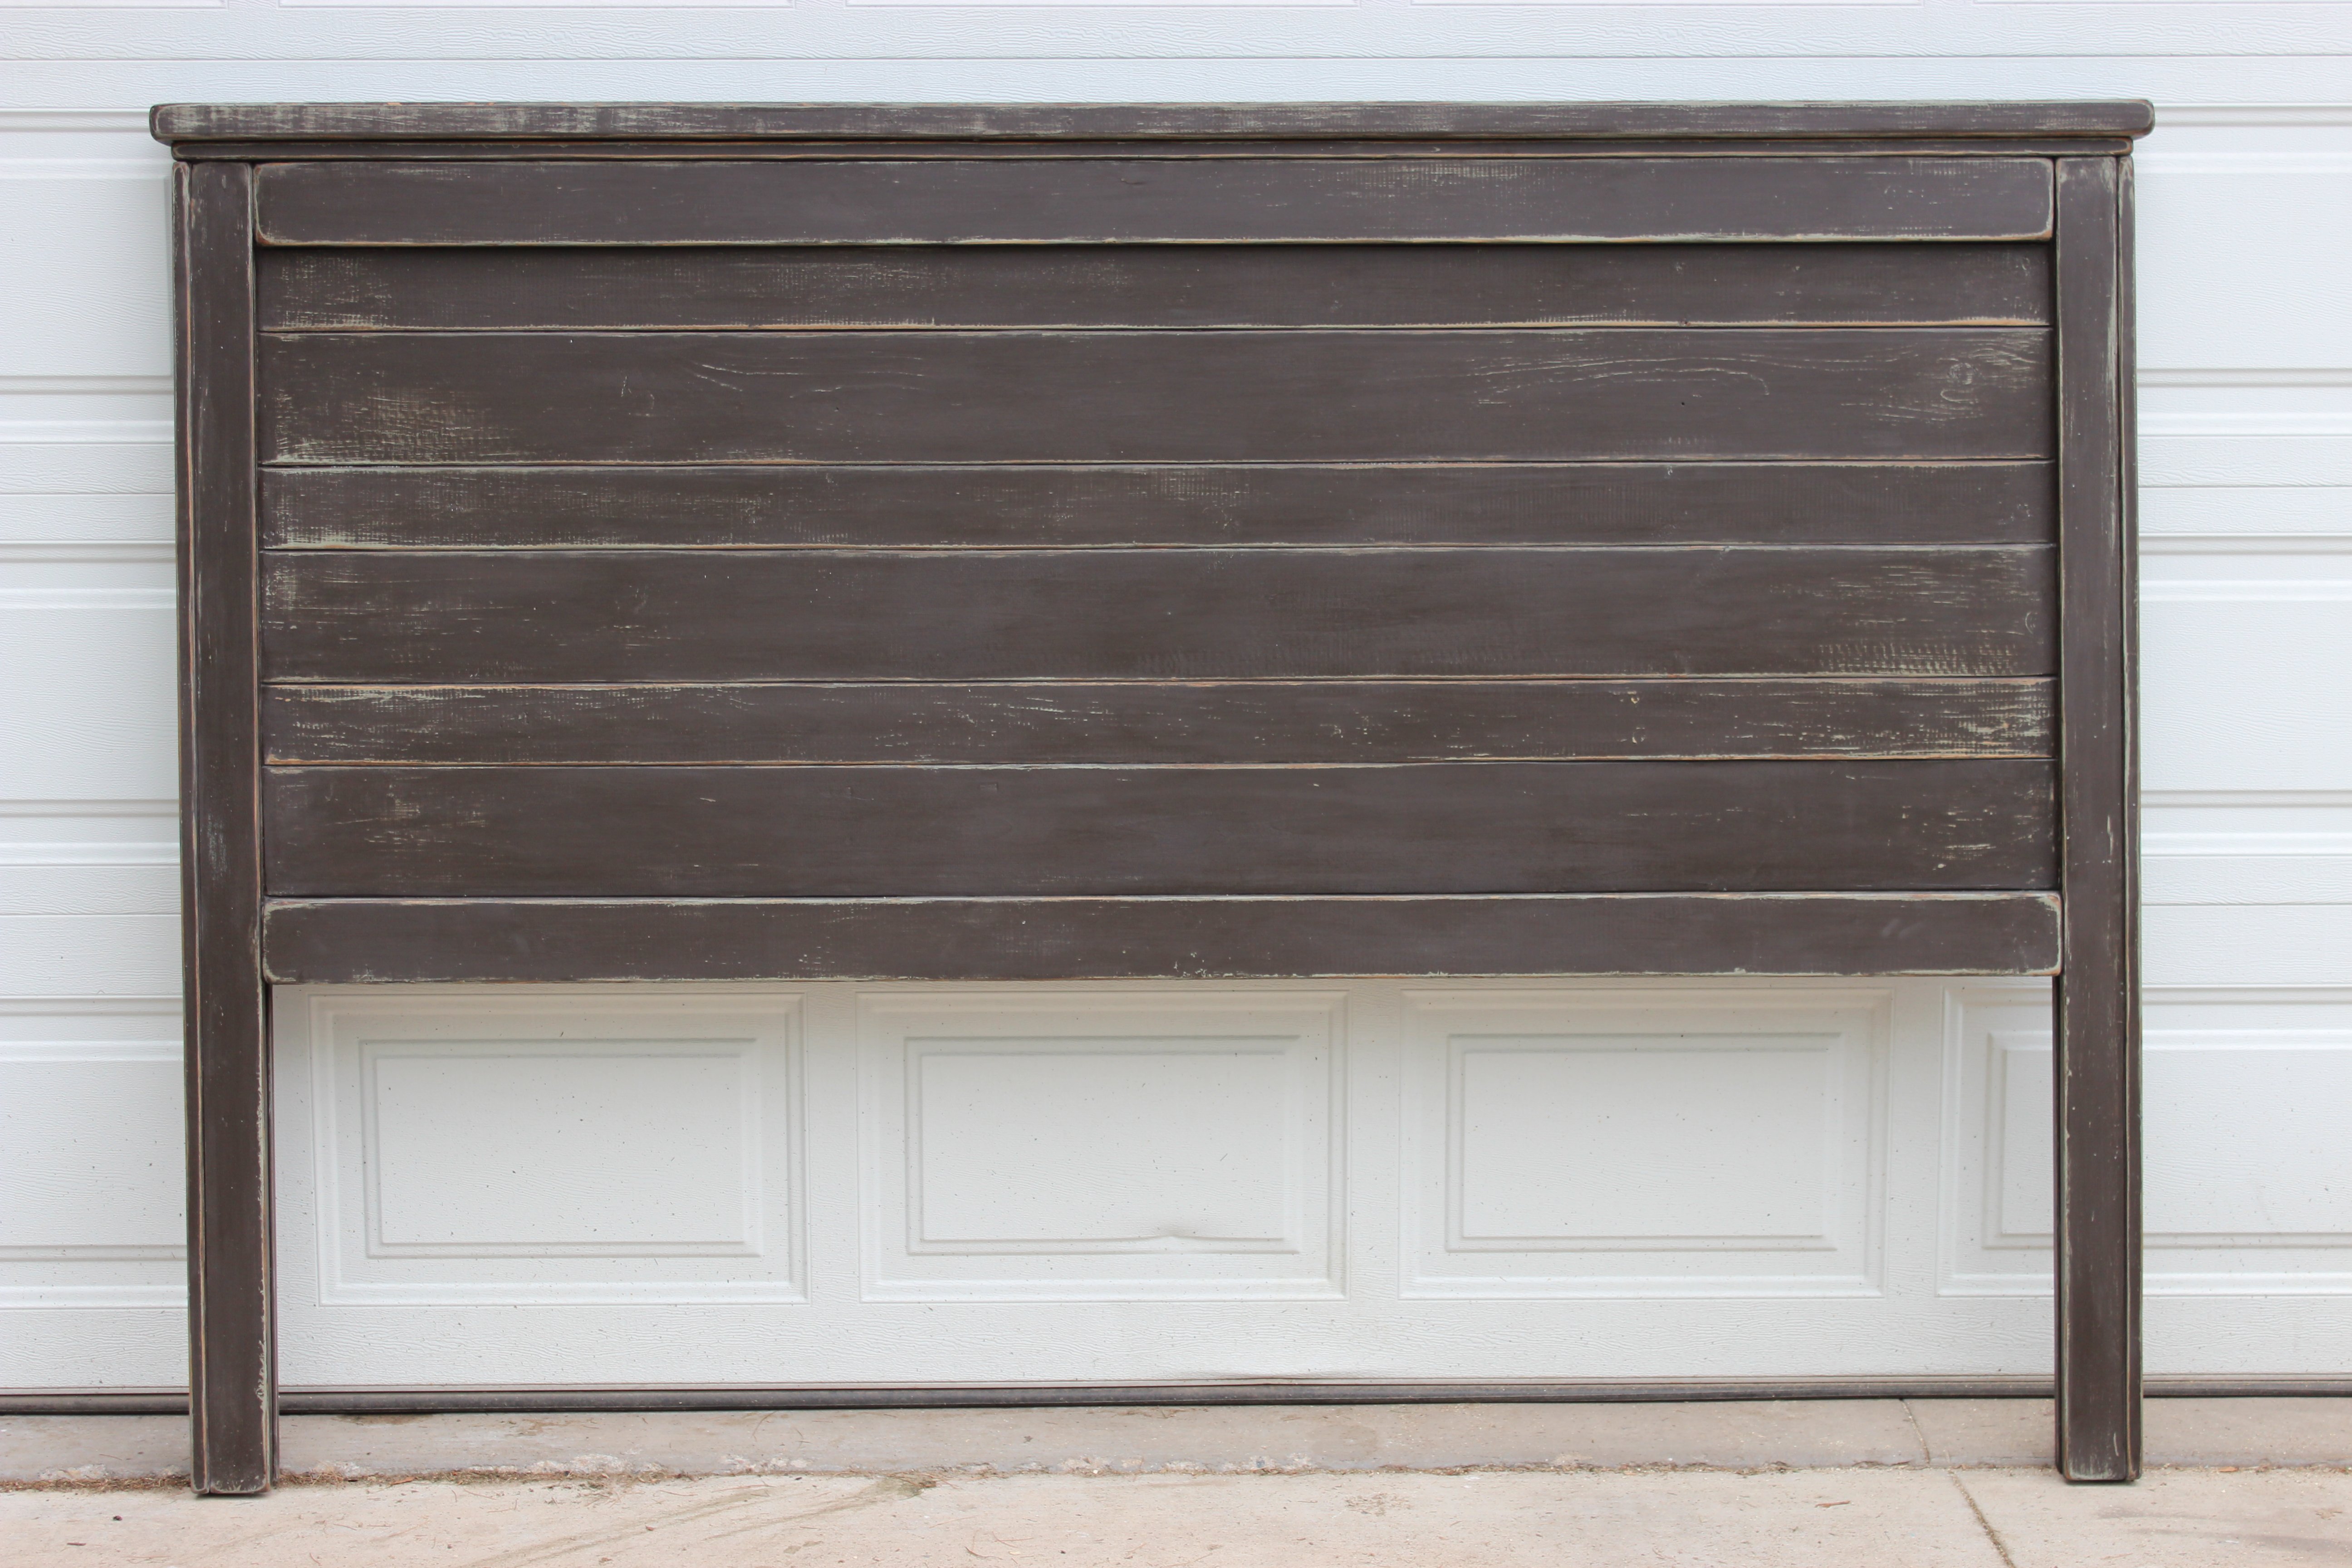
First project build!!! Plans were easy to follow. Built Memorial Day weekend. This is a very solid and heavy headboard with a lot of character. Bought all the wood at Home Depot. All grade 2 pine except for the 1x4's. They are only sold in select pine. I cut all the wood myself as I followed the plans in each step. Didn't want to make any mistakes being to short with cuts. I used wood glue and all nails for this project and it is sturdy!. I didn't really see in the plans where to use the kreg jig. Although I'm sure it was used in the back of the headboard where the boards "butt" together. Instead I put an extra board for support in the back which worked out really well.
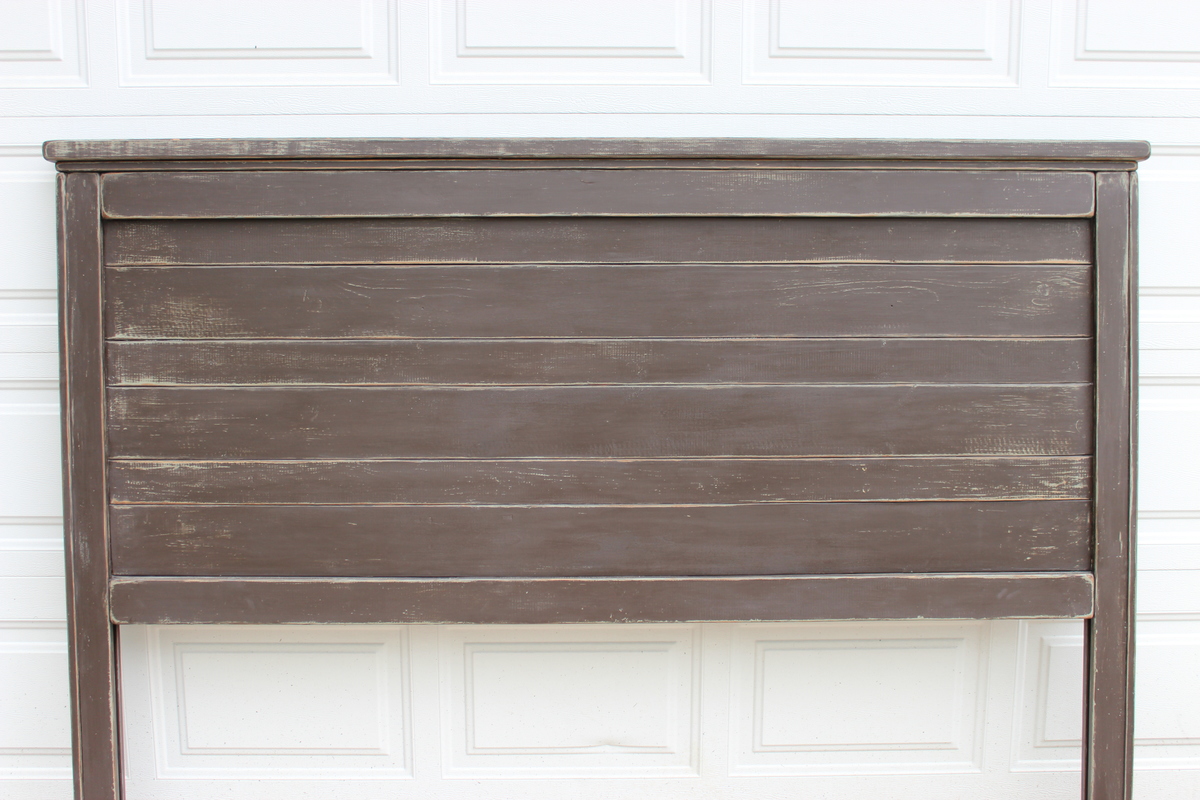
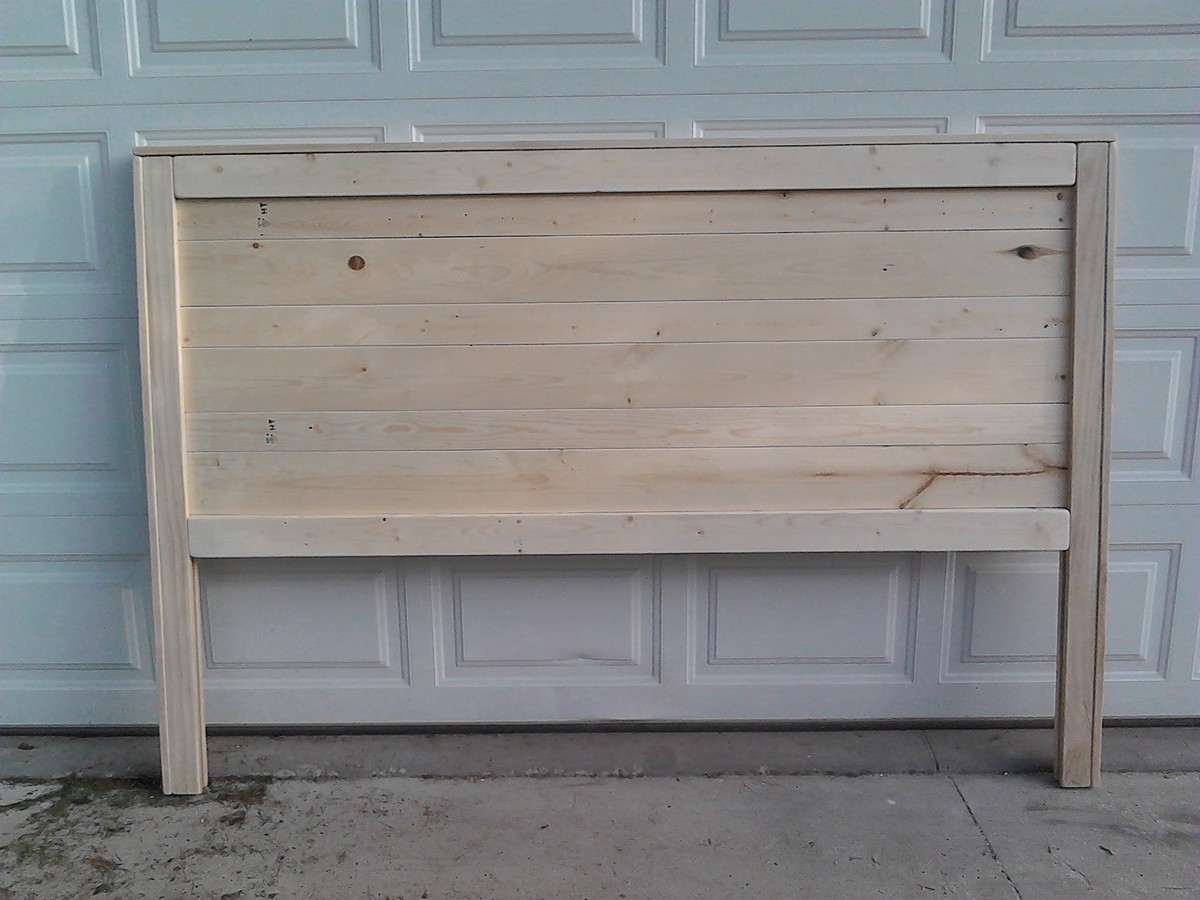
Built from Plan(s)
Estimated Cost
$75.00
Estimated Time Investment
Weekend Project (10-20 Hours)
Finish Used
I used BEHR paint. I used a flat finish. Painting base color first in a very light earthy green and then on top of that a dark brown. I wanted a worn look to the headboard, so after paint all dry I sanded it. This brought out the first color from underneath as well as areas being taken right down to bare wood. I then stained it with a dark walnut finish followed by a soft matte finish poly. I did have to buy extension plates to attach to my bed frame because the legs of the headboard did not completely line with the holes of the frame. Easy fix. Then just drilled holes with 1/4 inch bit into legs and attached to frame with bolts.
Recommended Skill Level
Beginner
Comments
Fireplace Wall Remodel
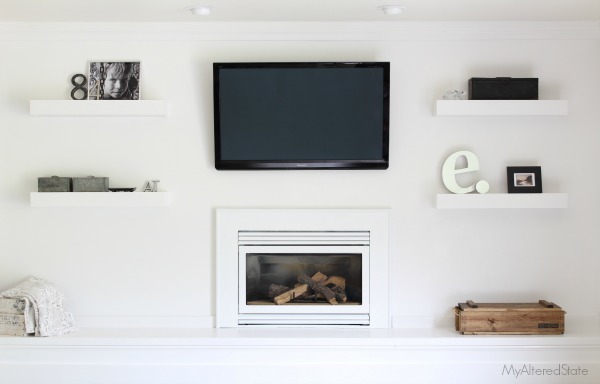
I needed a solution to my shelving problem. I wanted something clean looking, modern, and white to flank both sides of my fireplace. Count on Ana White to come up with a plan. Within seconds of sitting down to surf her site, I found that perfect plan to build four floating shelves.

Built from Plan(s)
Estimated Time Investment
Day Project (6-9 Hours)
Recommended Skill Level
Intermediate
Adjustable table
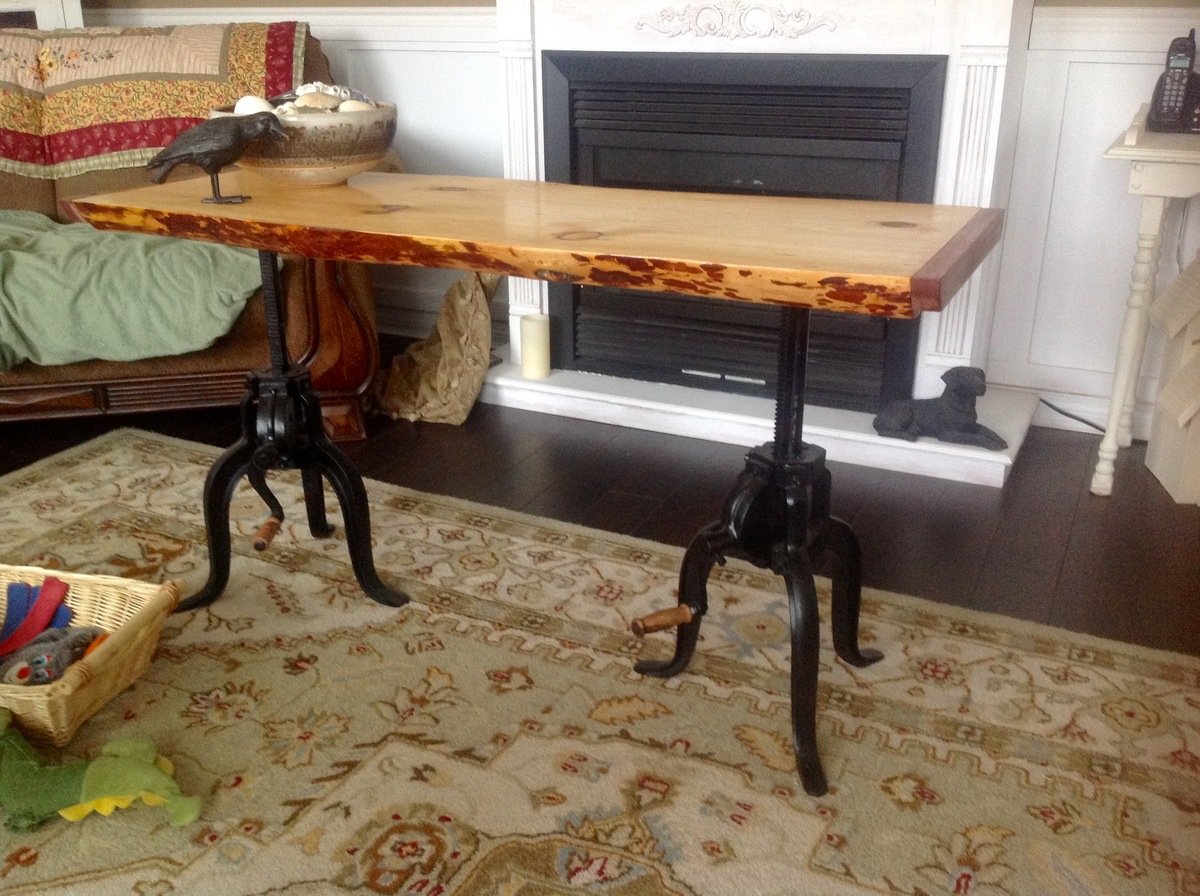
Adjustable height table made from a pair of adjustable stools, stools had the cast iron bases with a crank handle mechanism. I removed the wooden seats & installed a live edge board onto the 2 bases, table can now be a coffee table, sofa table, TV table or whatever you chose.
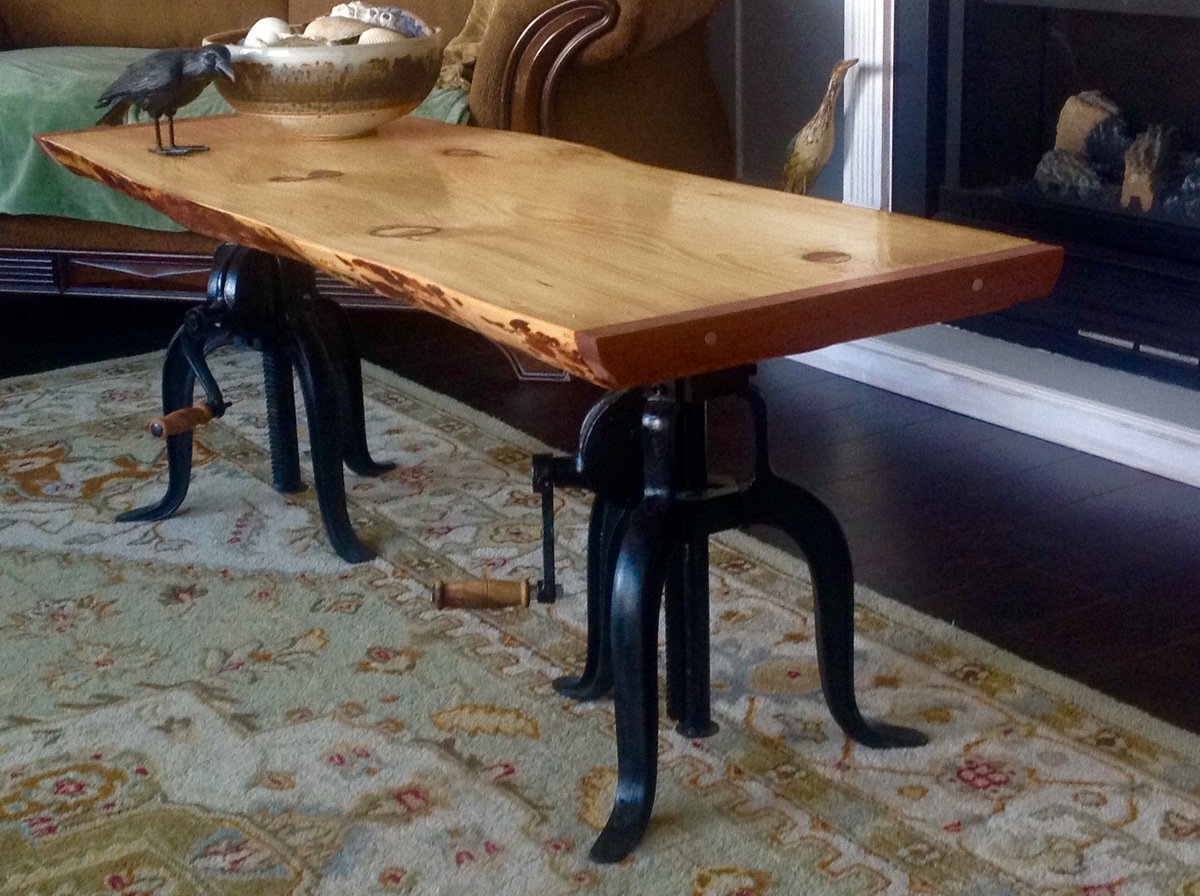
Estimated Time Investment
Weekend Project (10-20 Hours)
Finish Used
Tung oil
Recommended Skill Level
Beginner
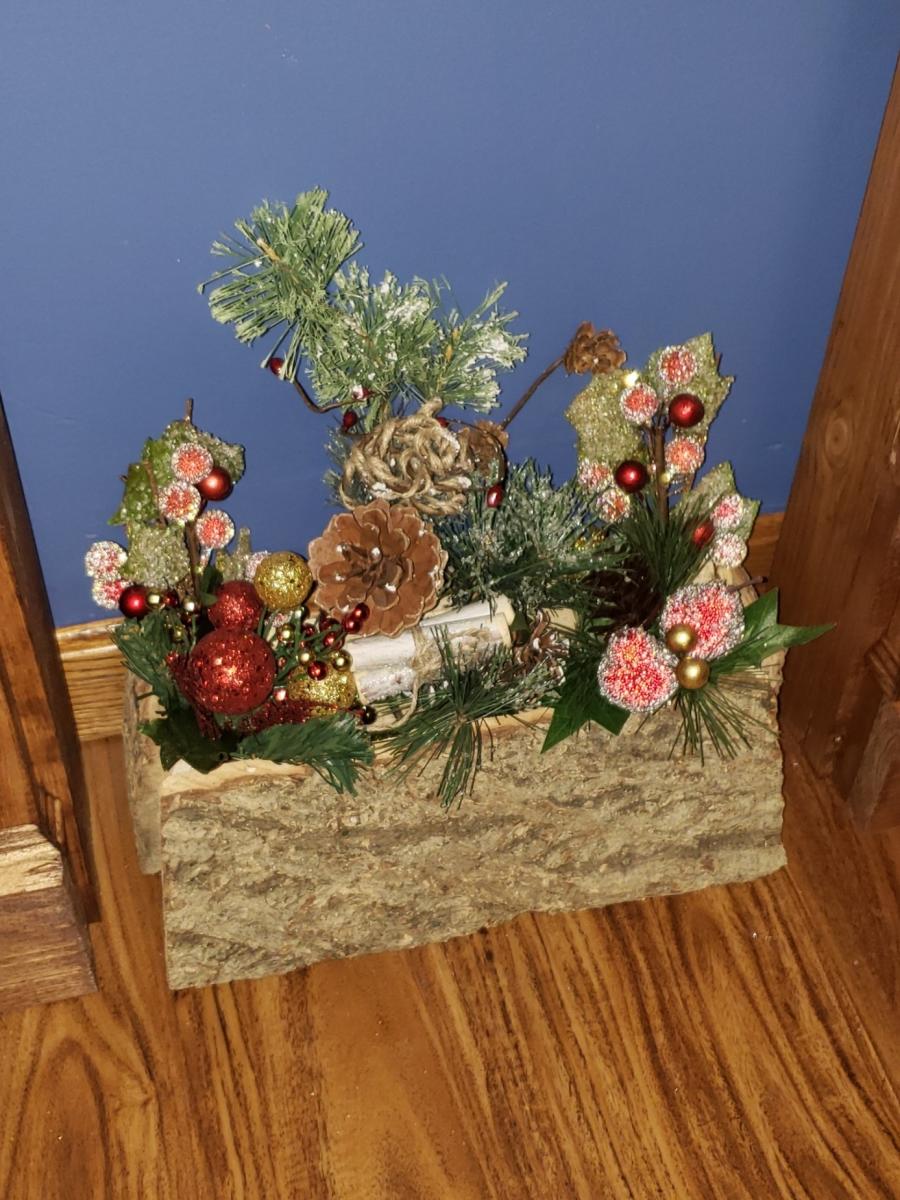
Faux Fireplace
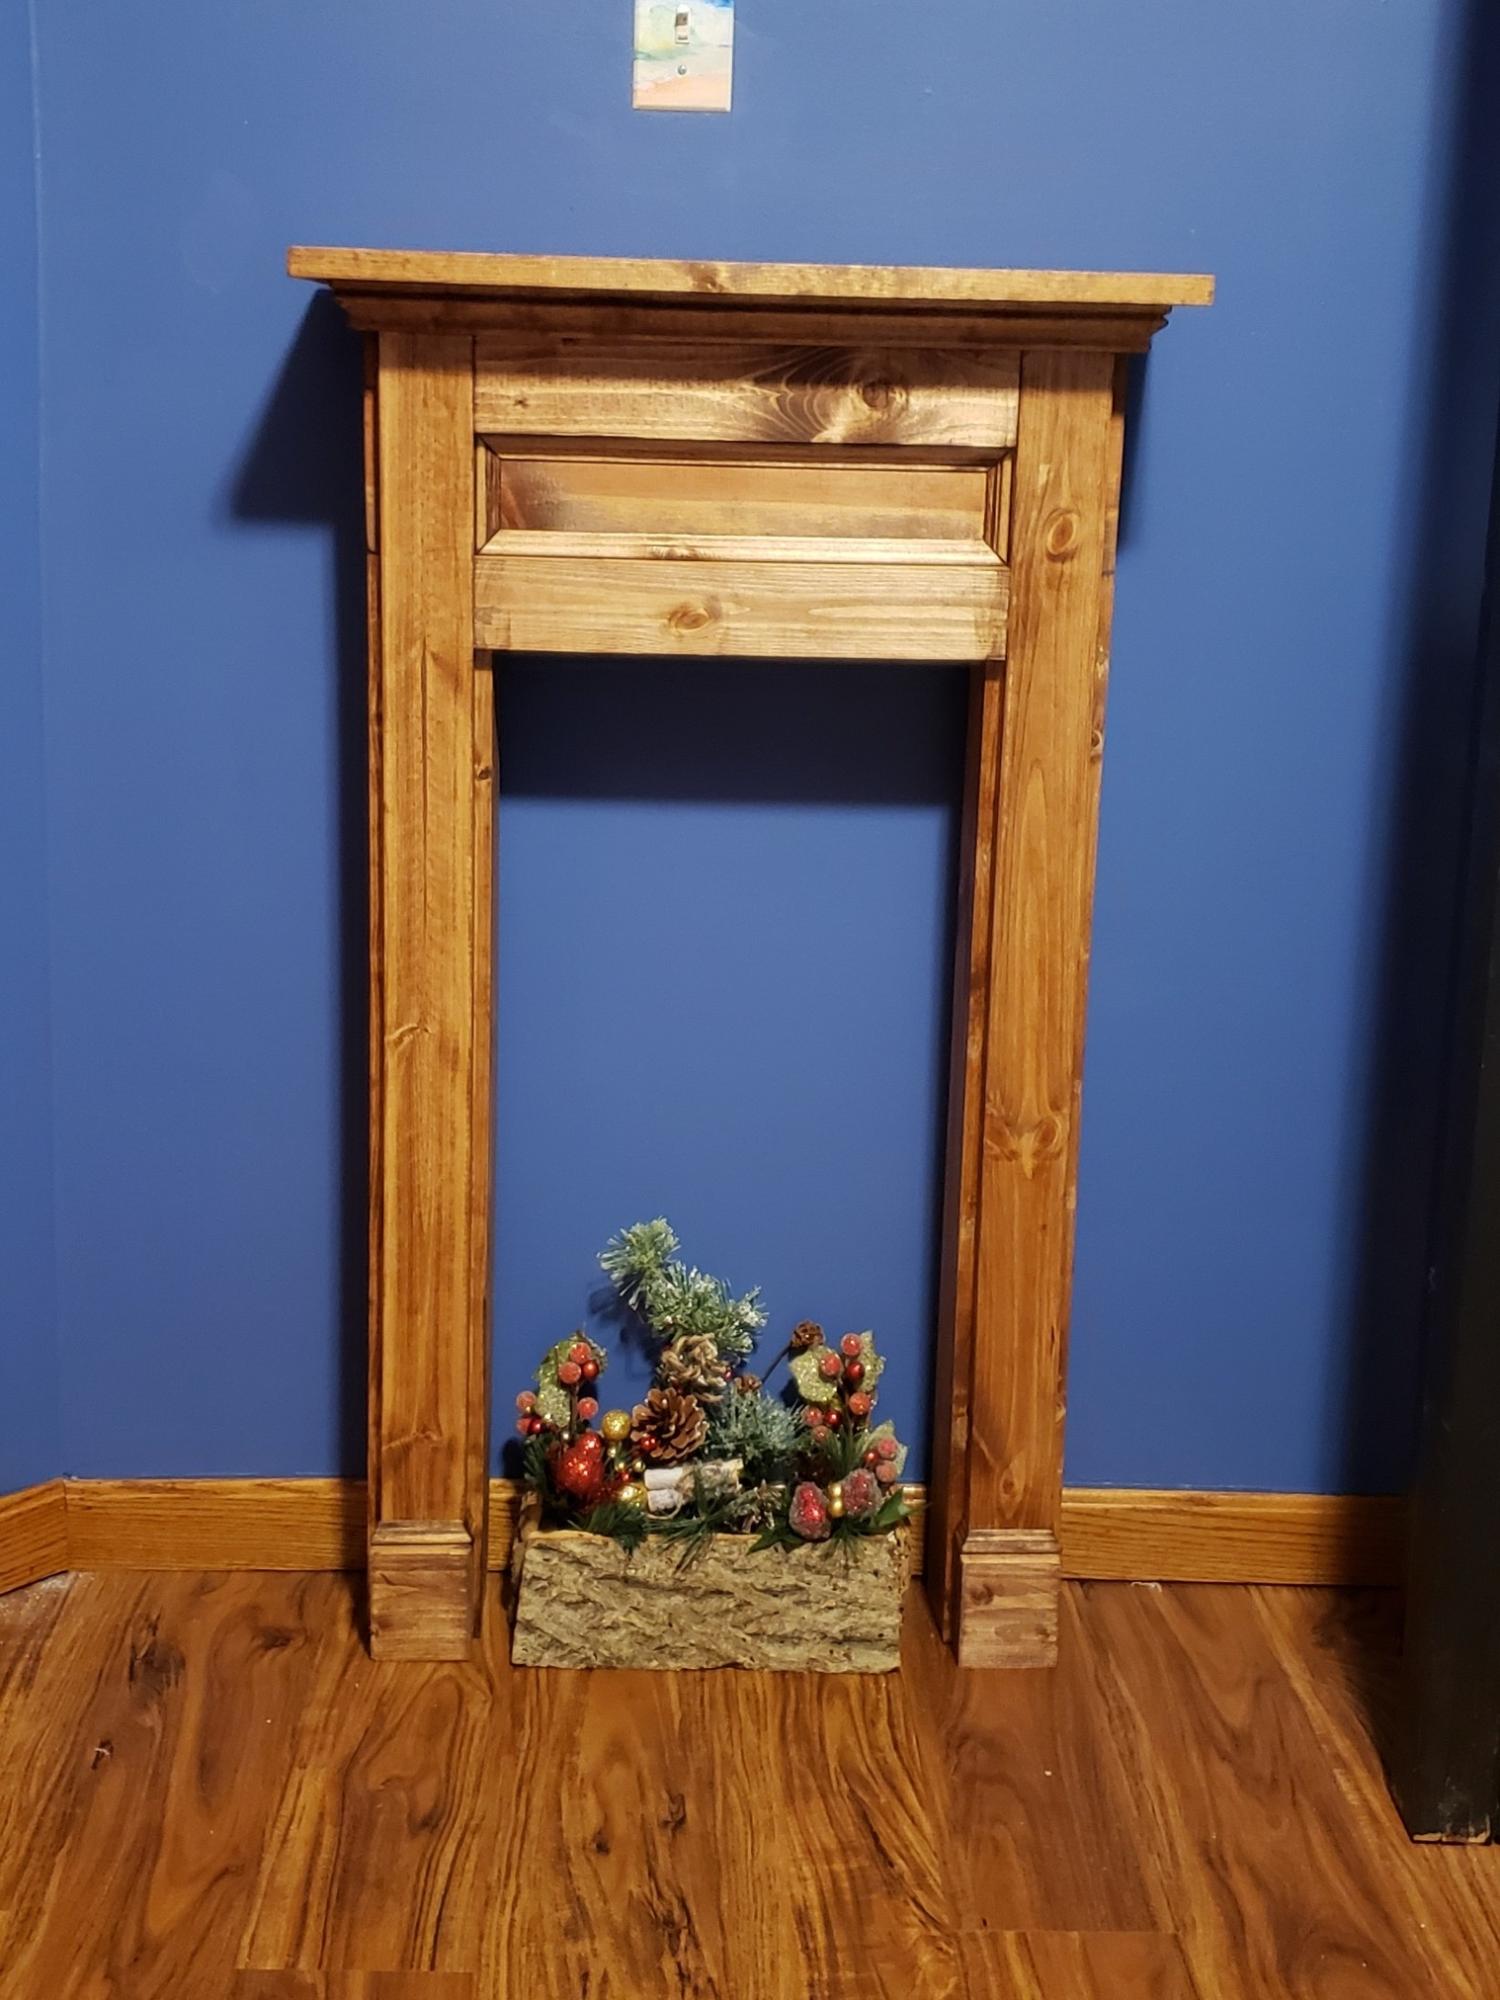
This is a modified version of Mimi's fireplace, adjusted to fit an area only 24" wide.
Fireplace is 21" wide at the mantle.
The Yule log was made from a supermarket log by cutting off the face and cutting down the rest of the log to make the planter.
Comments
Thu, 12/16/2021 - 07:44
The wood is white pine…
The wood is white pine finished with Minwax Early American with 10.32's red added per quart.
Subway Tile Bookcase

Our latest project... I love it!
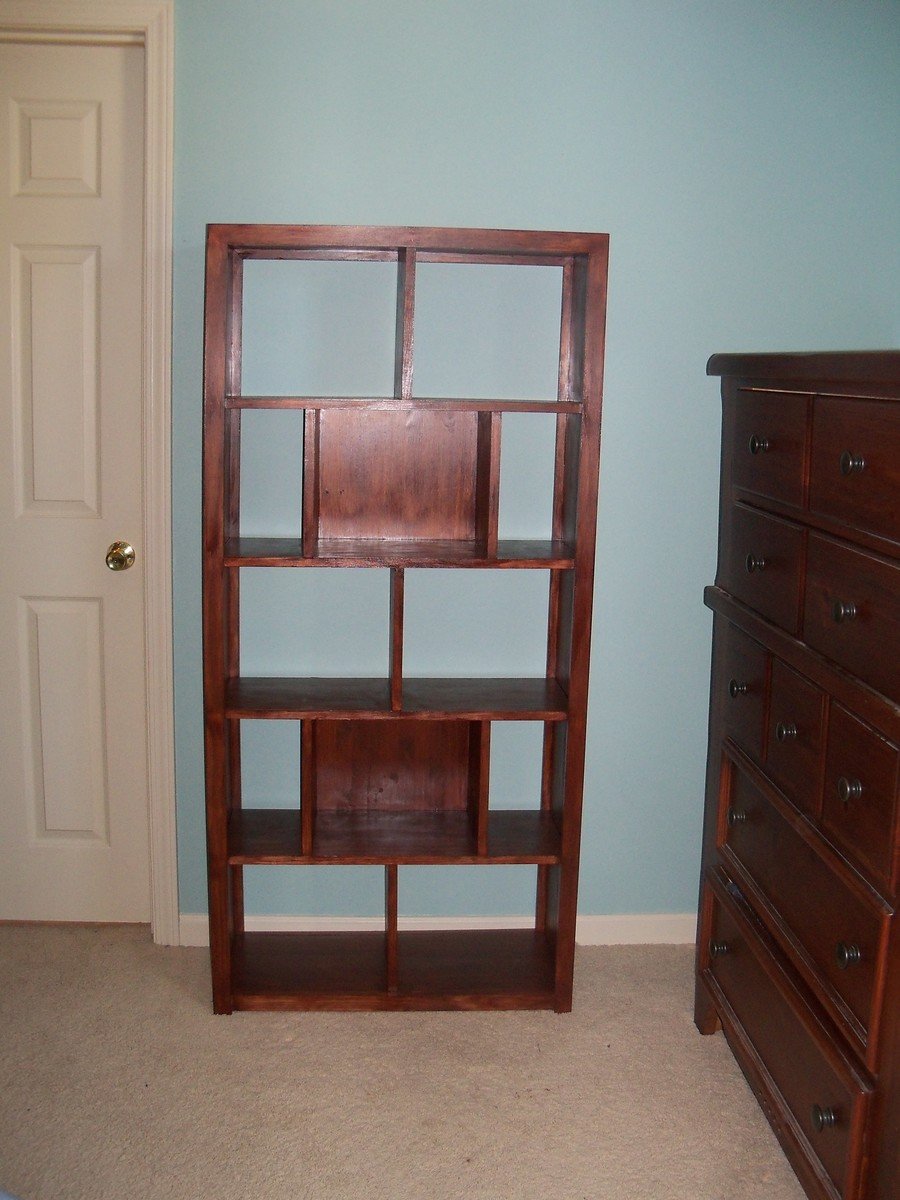
Built from Plan(s)
Estimated Time Investment
Afternoon Project (3-6 Hours)
Finish Used
Minwax Polyshades
Recommended Skill Level
Intermediate
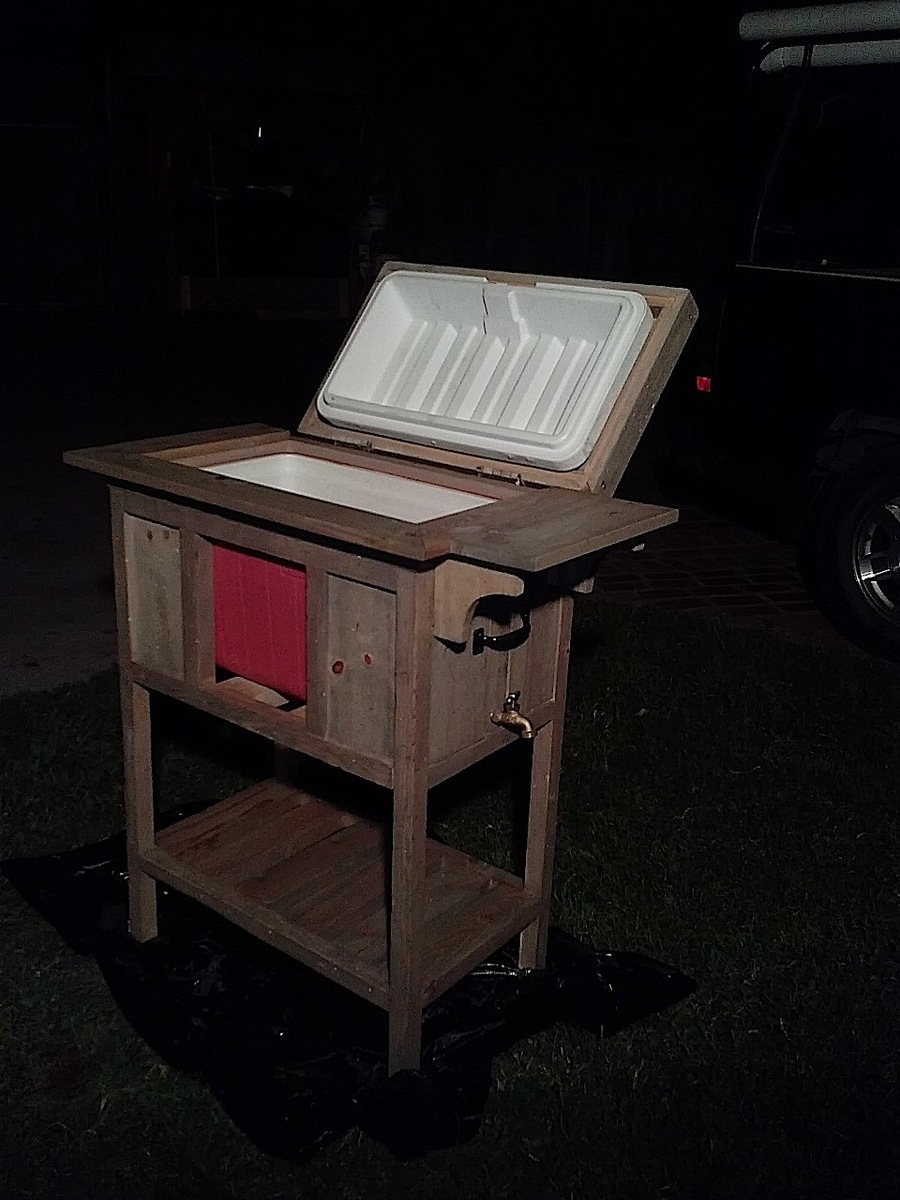
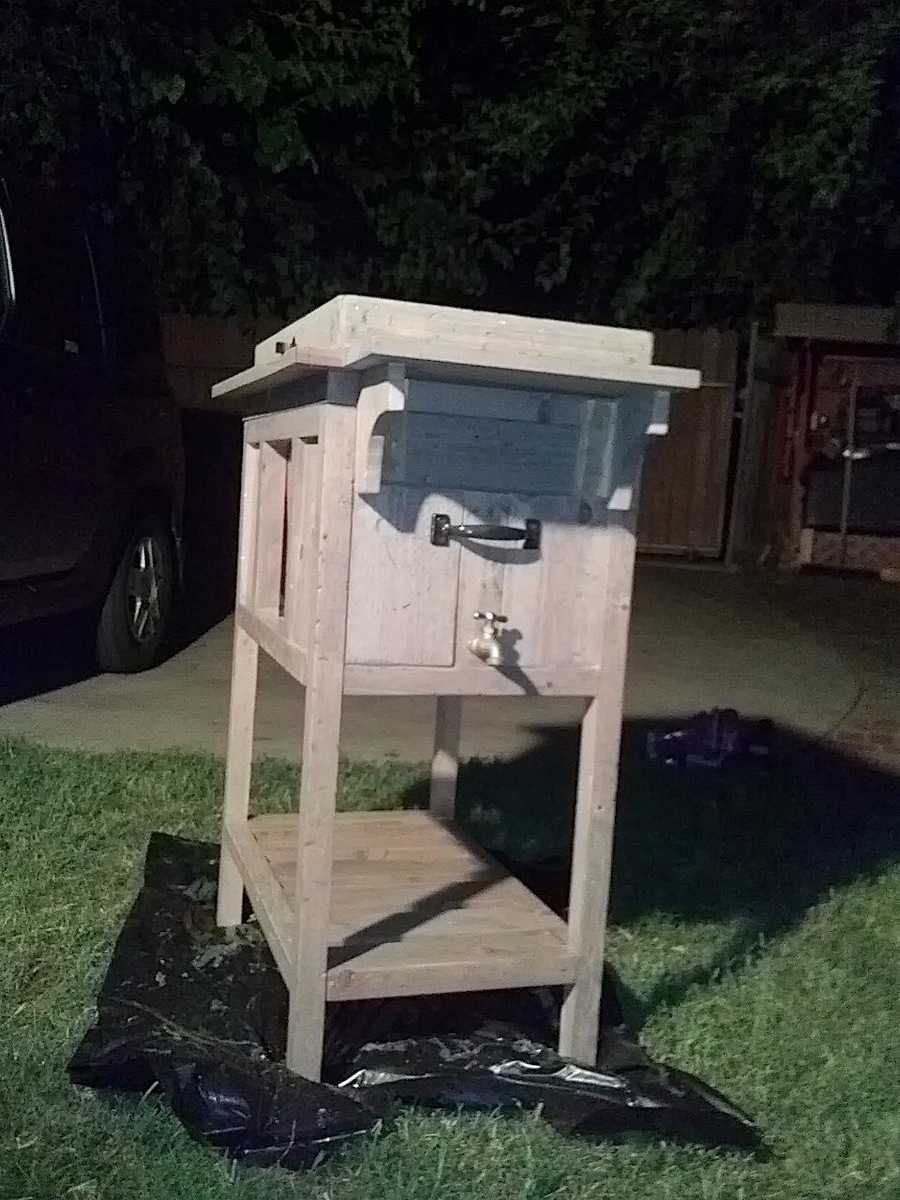
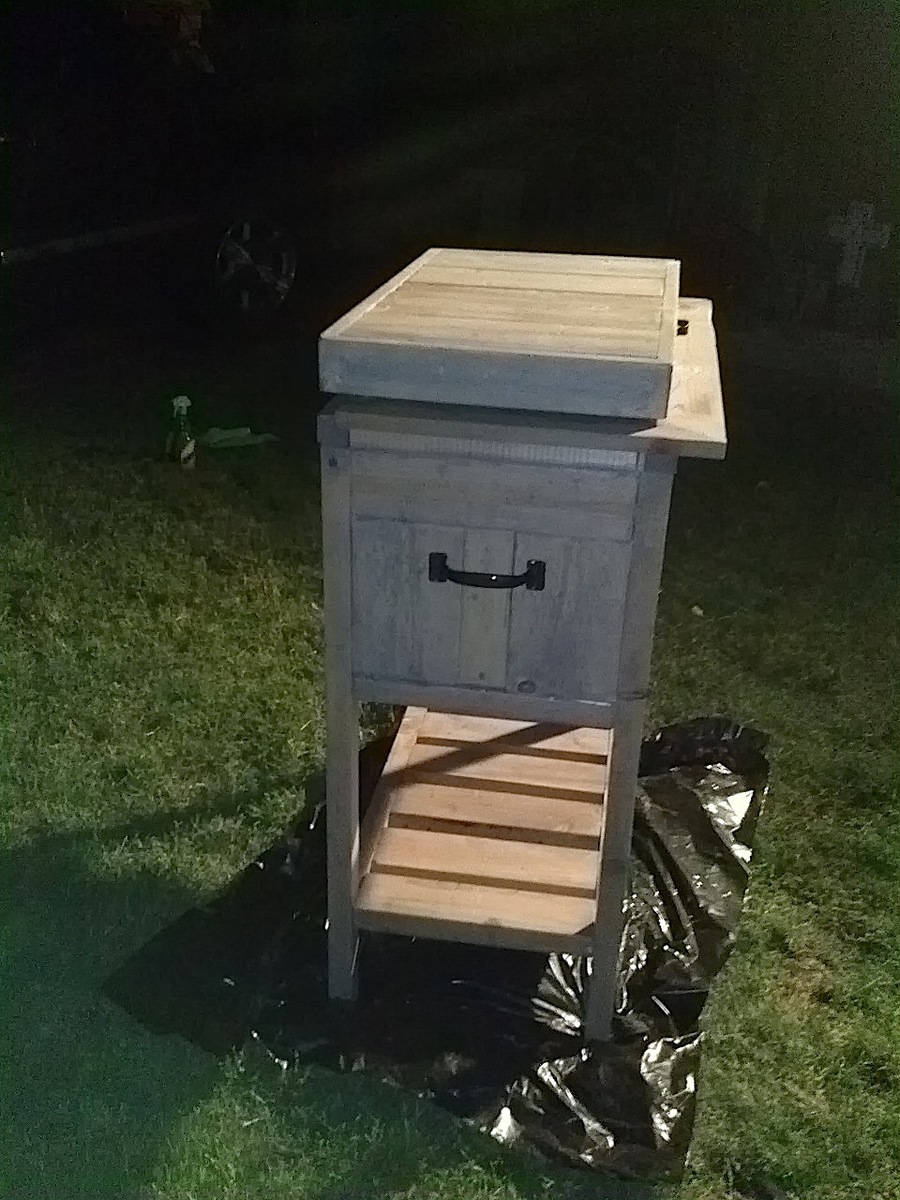
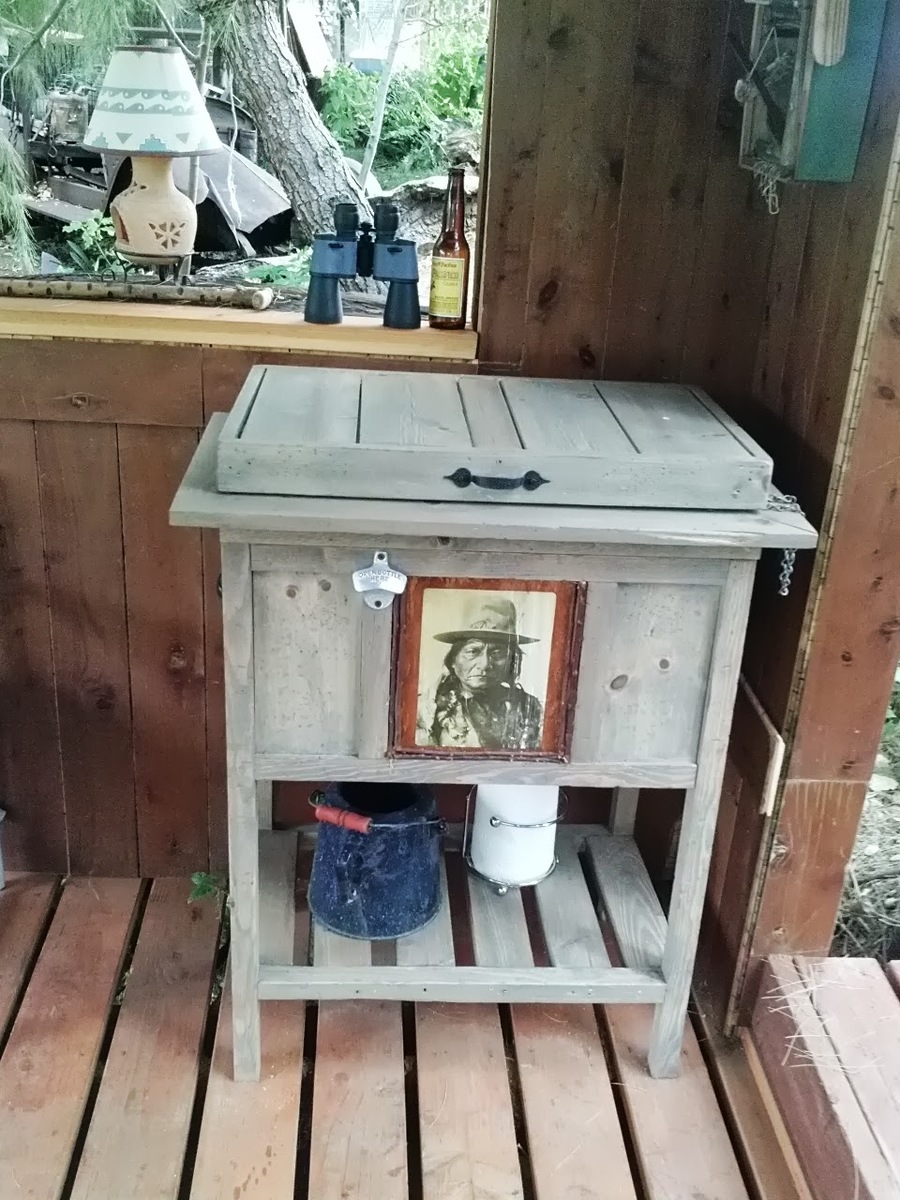
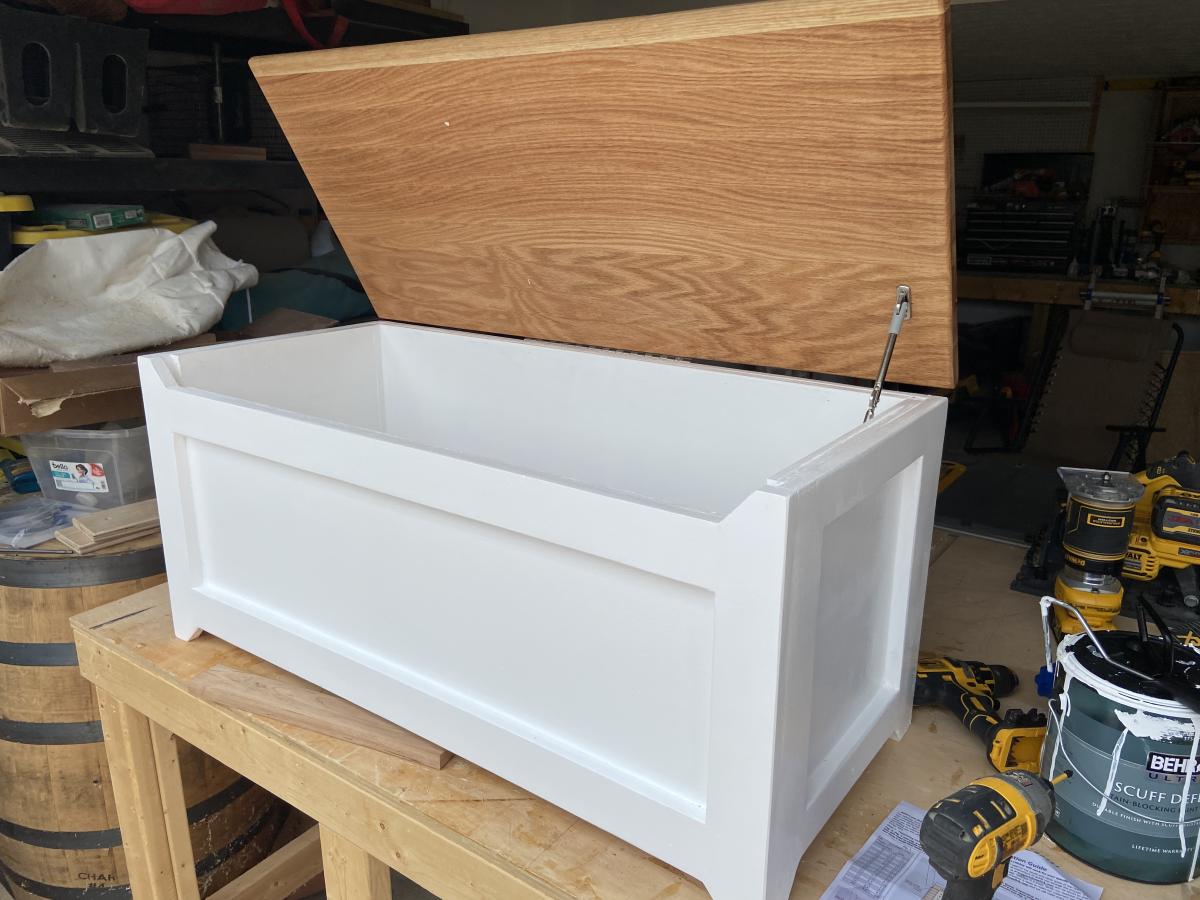
Cooler, Natural Rustic look 4 my Pops
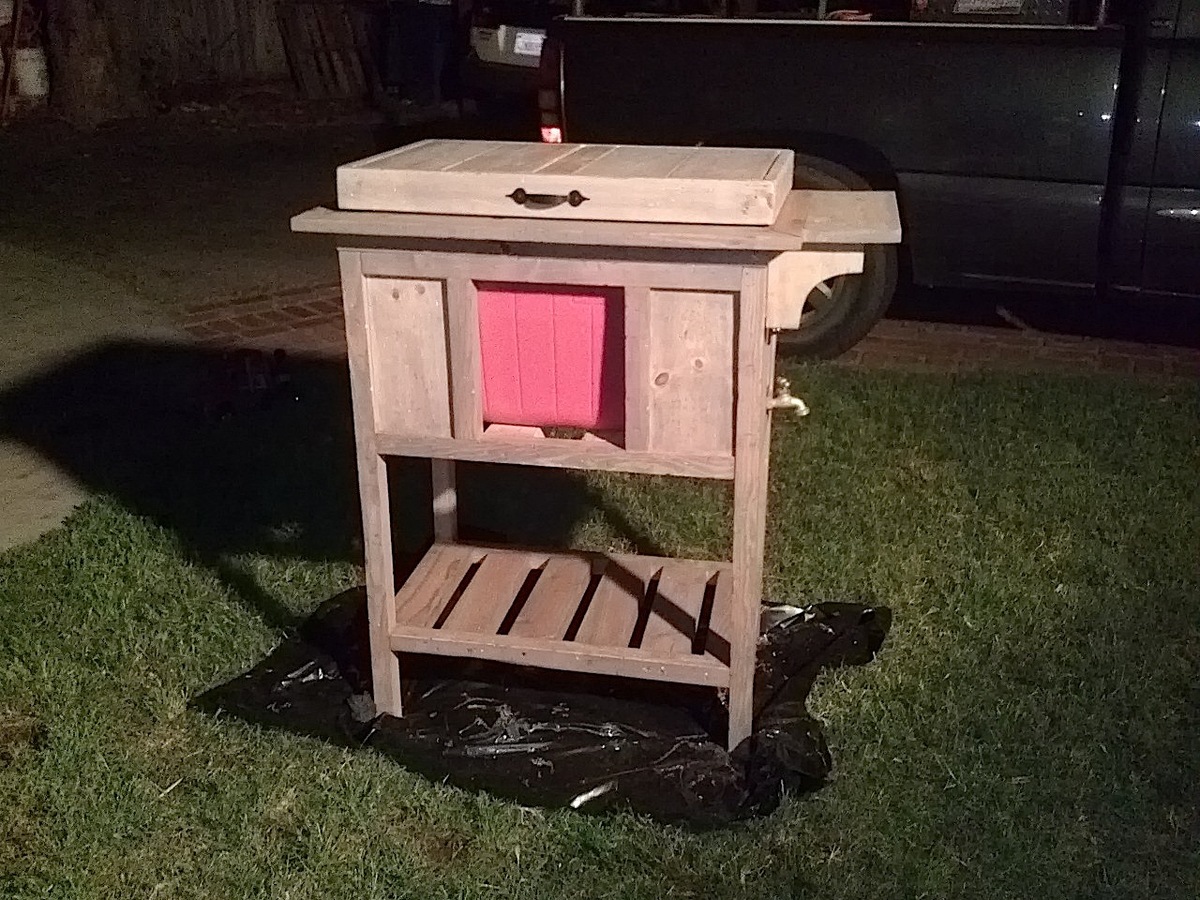
1st I want to say, the part thats uncovered on the middle will be covered but Im letting pops customize that spot with a picture or whatever he chooses.
My dad made most everything I have ever had in life including the house I live in. So I wanted to make him something this dad's day that he could really use and enjoy. He just built a hang out place in his back yard that I call "his fort" Since he's in his 60's now and a little more mellow, he has a lot of little parties with friends, family, basically anyone who wants to come hang out in his back yard. lol. (He claims to have made the fort a covered stage for my 12 year old and his band. But I know the truth. hehe. it's his fort :) ) So I thought this cooler stand would come in handy. He saw me working on it a few days before fathers day and told me he was afraid I was gonna make his something girly. hehe. He's such a man's man. I love my pops and am soooo happy he likes my gift. Its already in use in the fort. hehe

Built from Plan(s)
Estimated Cost
$50 bucks or so but I had the cooler and hinges
Estimated Time Investment
Day Project (6-9 Hours)
Finish Used
I used Minwax Weathered Oak. You can't really tell in the pictures because at that time it had only 1 coat and the pine needed 2 coats to really even tell its there. But it turned out really nice, my dad's a mountain man so he loves rustic-y things. After stain I sprayed it with Minwax Poly (I can't remember the full name sorry) its the one in a spray can. Satin finish so you cant see any gloss
Recommended Skill Level
Intermediate
Comments


Sat, 07/06/2013 - 09:40
This turned out great! Every
This turned out great! Every adult needs a fort, your Dad is a lucky man!
In reply to This turned out great! Every by birdsandsoap
Sun, 07/07/2013 - 00:27
:)
Thank you, I'm just returning some of his hand made hard work. Thank you for the best father day idea ever. I'm sure I would have made him some girly thing if I hadn't come across your cooler plans. hehe. He is so happy with it and its held up, even with regular use and his heavy hand. :P it's the only thing keeping things cool in his fort and he brags to all of his friends about how his daughter made it for him.
Thanks again!
~Melody
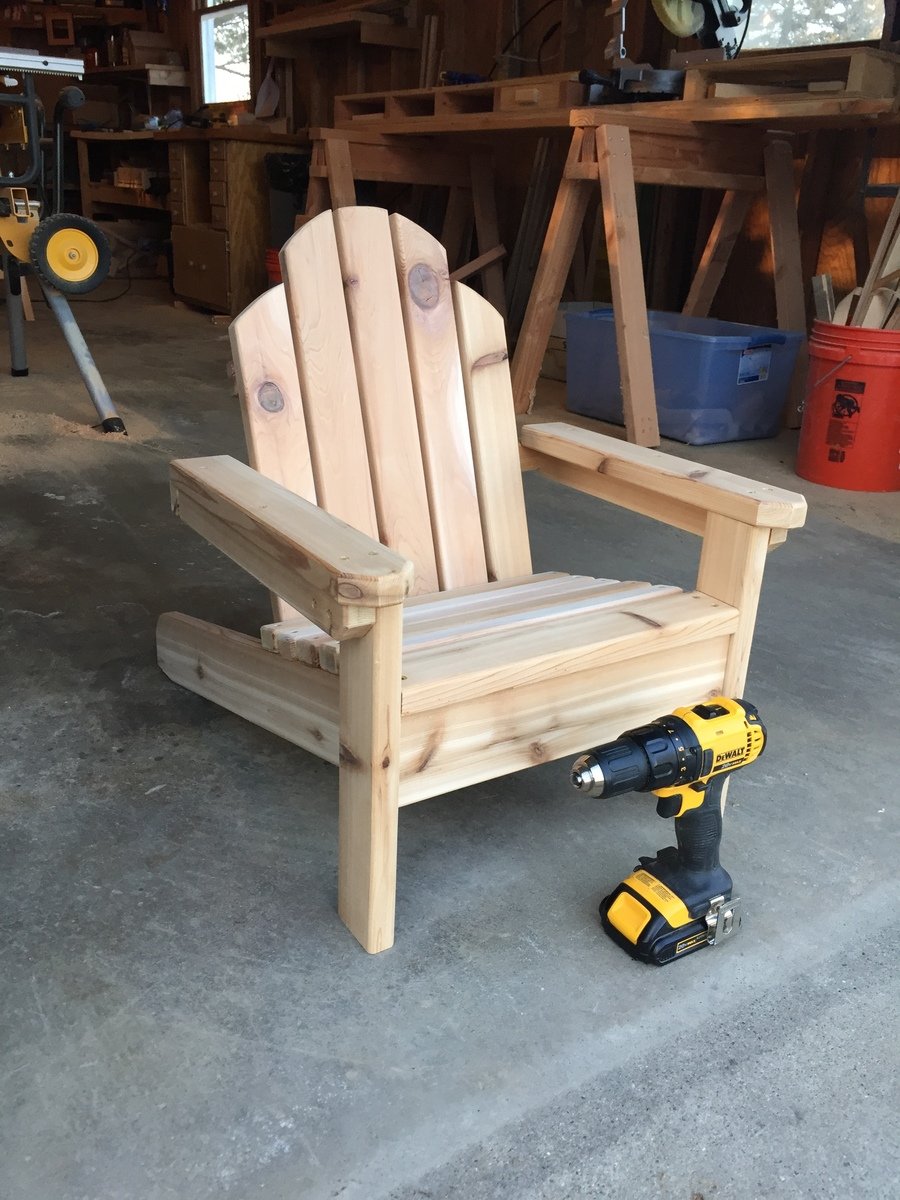
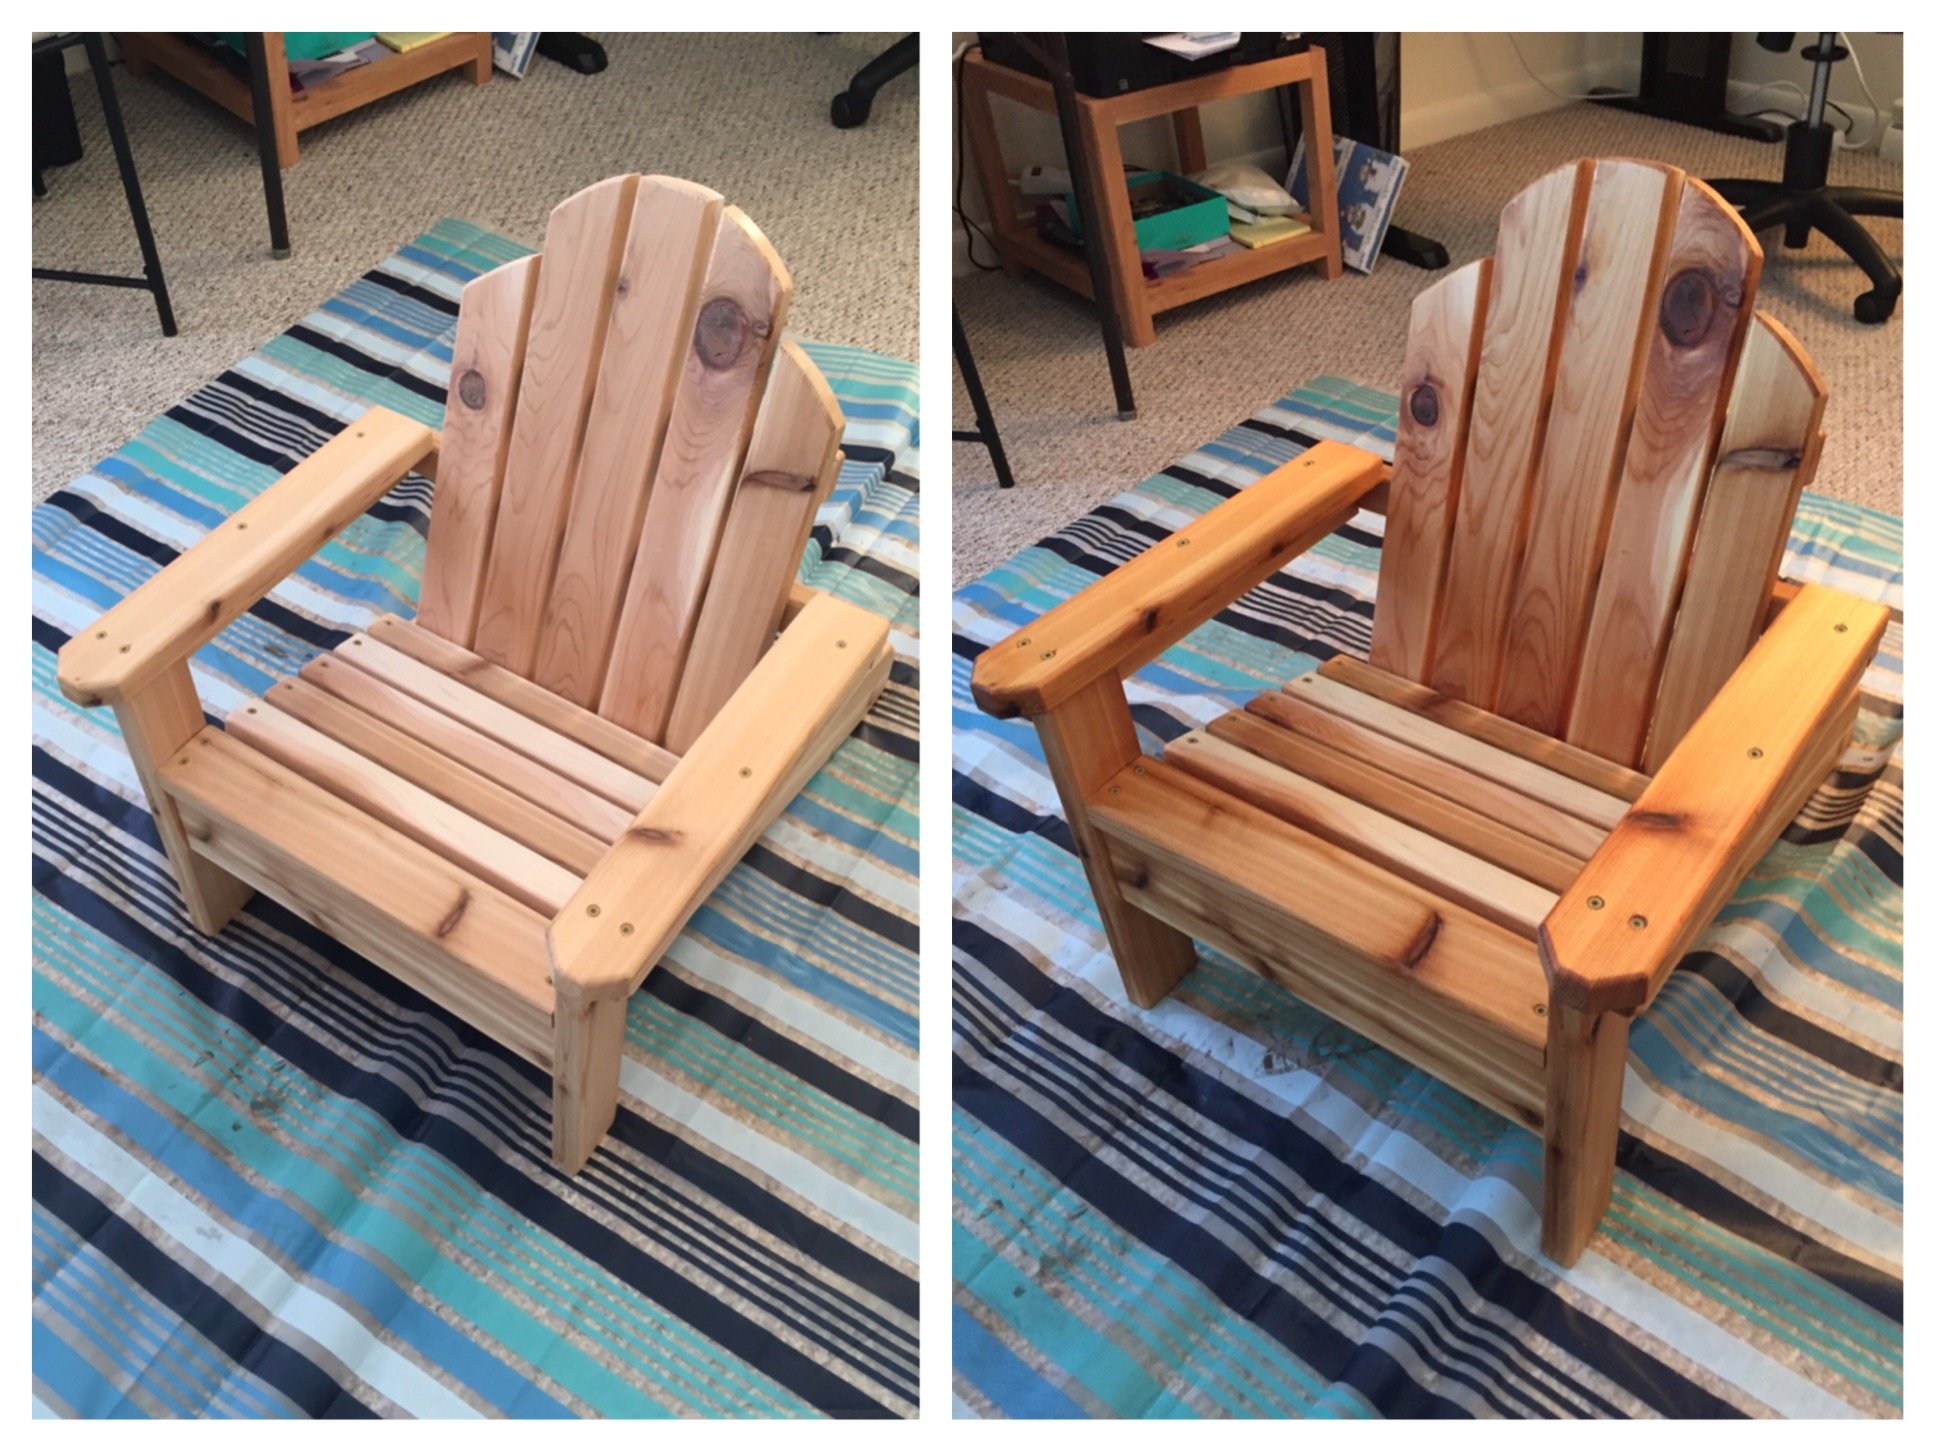
Mini Adirondack Chair
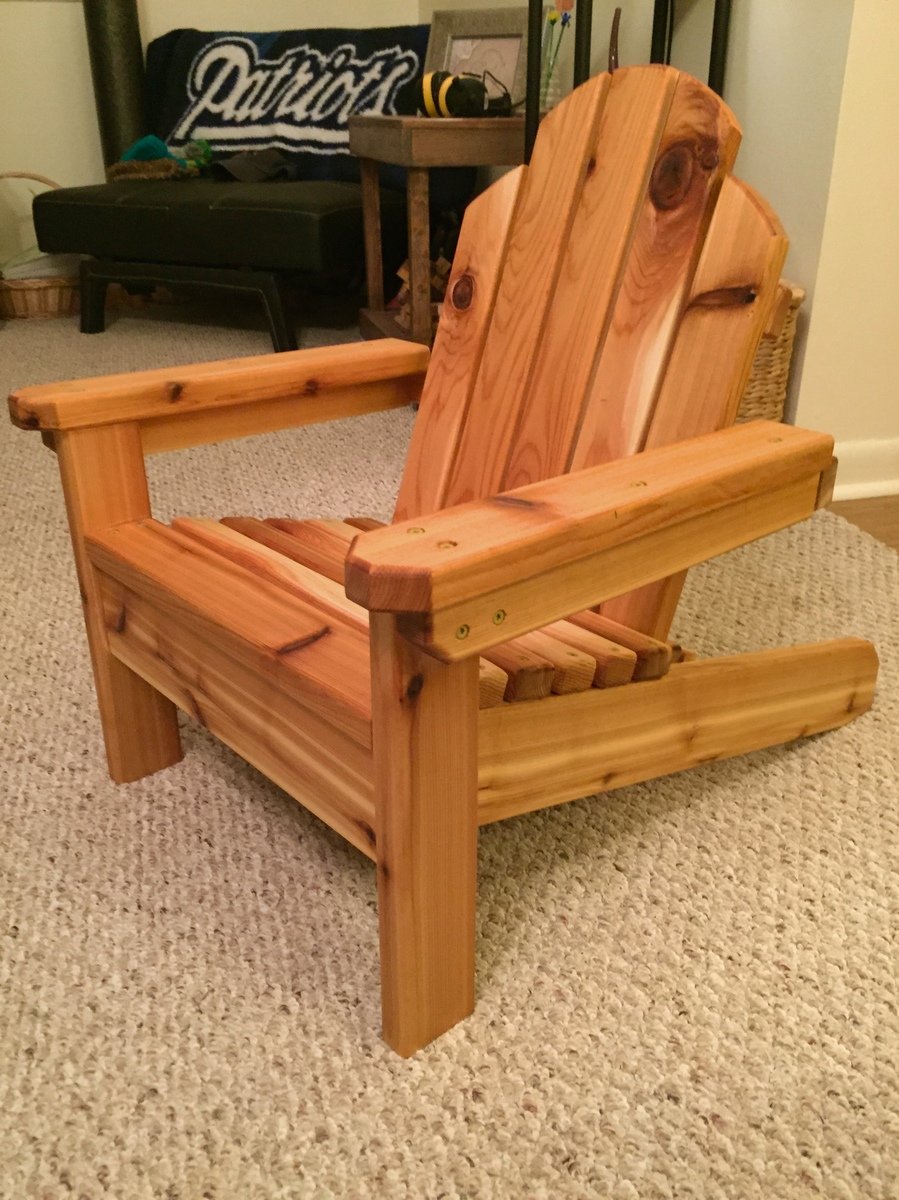
This was a fun little project that I built for a friend, whose son was turning one year old. I used 5/4 cedar deck boards and ripped them down to size. For a finish I used Watco's teak oil. I love the way it brings out the cedar's natural tones. You can see in one of my pictures the before/after when applying the teak oil.
Built from Plan(s)
Estimated Cost
$30
Estimated Time Investment
Weekend Project (10-20 Hours)
Finish Used
I used Watco Teak oil for a finish and applied as directed by the can.
Recommended Skill Level
Intermediate
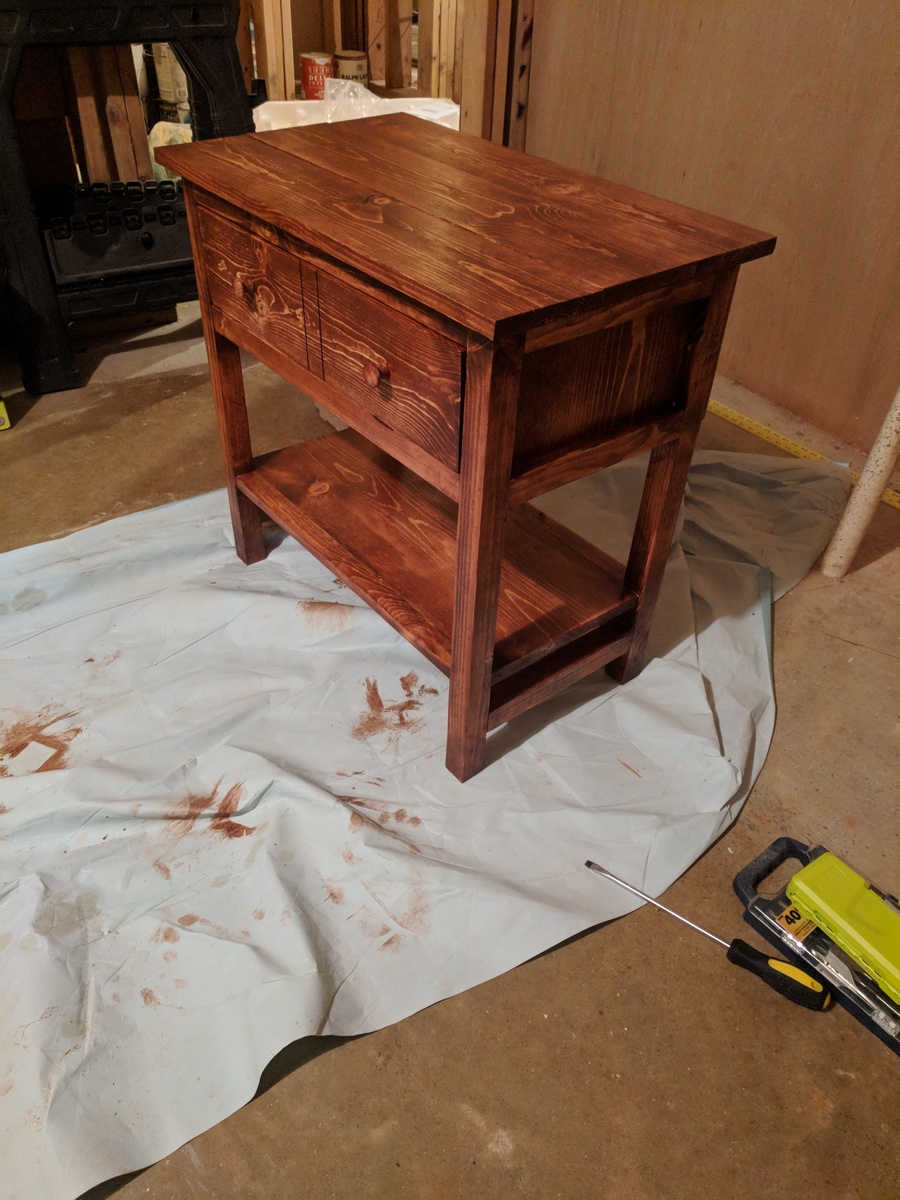
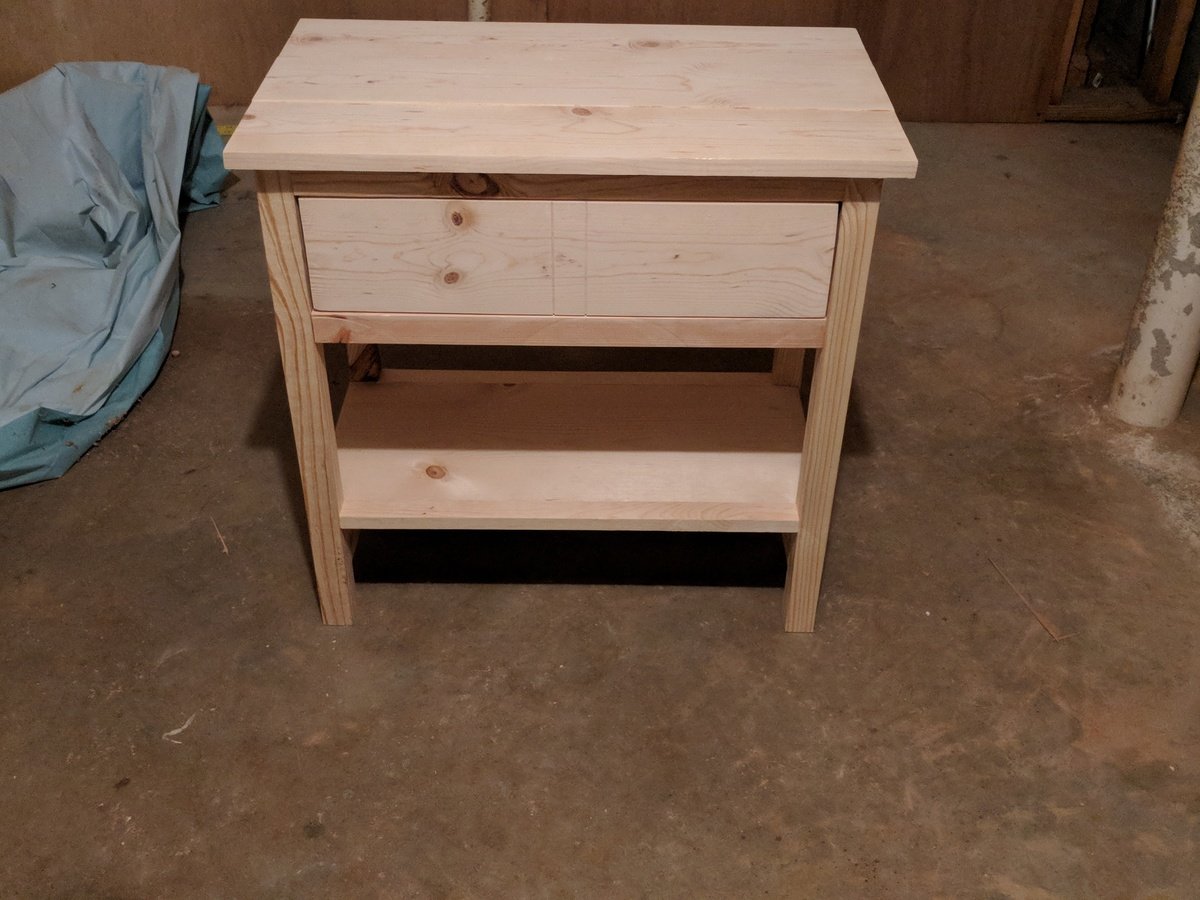
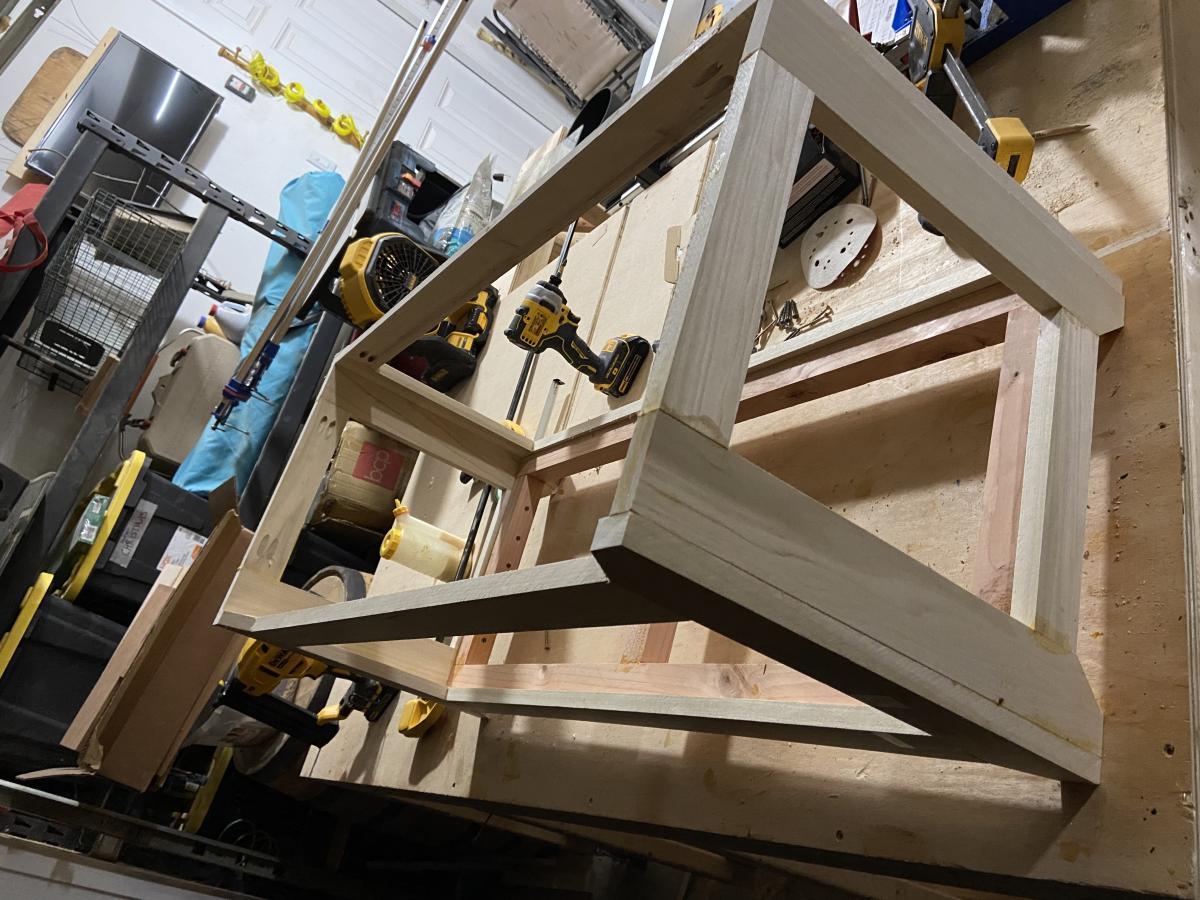
Farmhouse Bedside Table
Building a pair with this one first for my wife. First time using the table saw to rip the 2x2s and 1x2s and I'll never use.anything without a square edge again! Arm-R-Seal from General Finishes is the best!
Built from Plan(s)
Estimated Cost
$50
Estimated Time Investment
Day Project (6-9 Hours)
Finish Used
Varathane American Walnut and General Finishes Arm r Seal in satin
Recommended Skill Level
Beginner
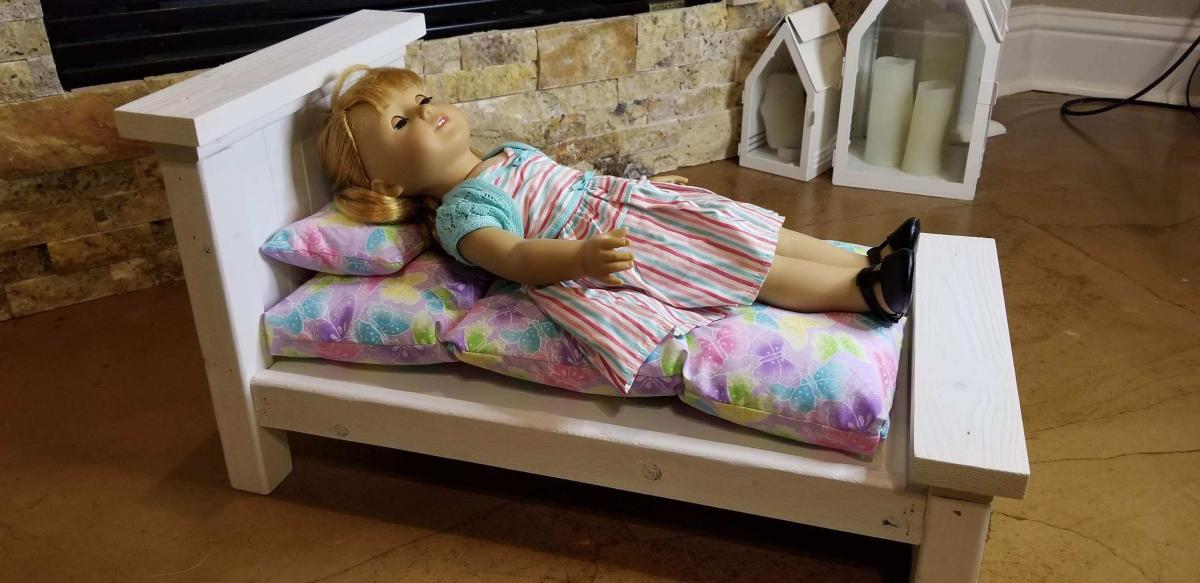
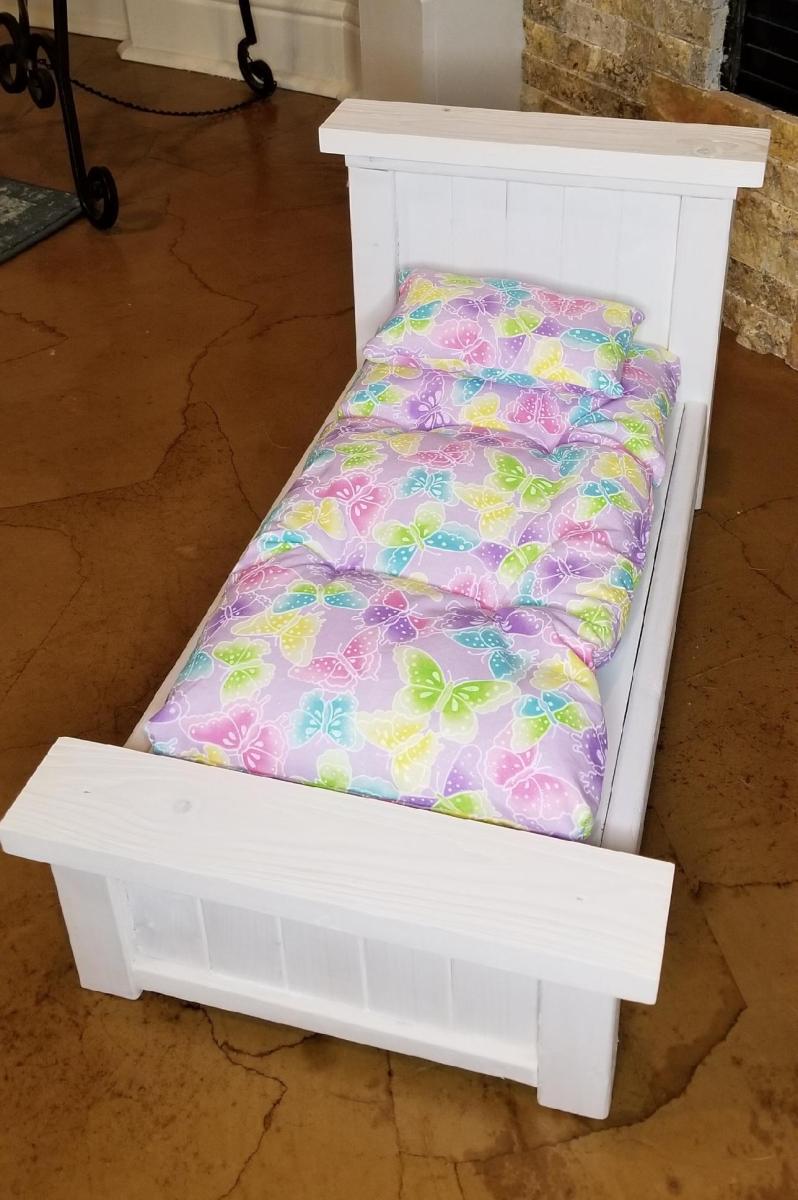
Farmhouse Doll Bed

Created from scraps using Ana’s plans for the bed and the mattress.
Built from Plan(s)
Comments

Fri, 12/24/2021 - 14:33
Thanks for the great plans…
Thanks for the great plans and making the mattress so simple (for those of us who feel like just threading a sewing machine is like playing the game Mouse Trap while under the influence! 😄)
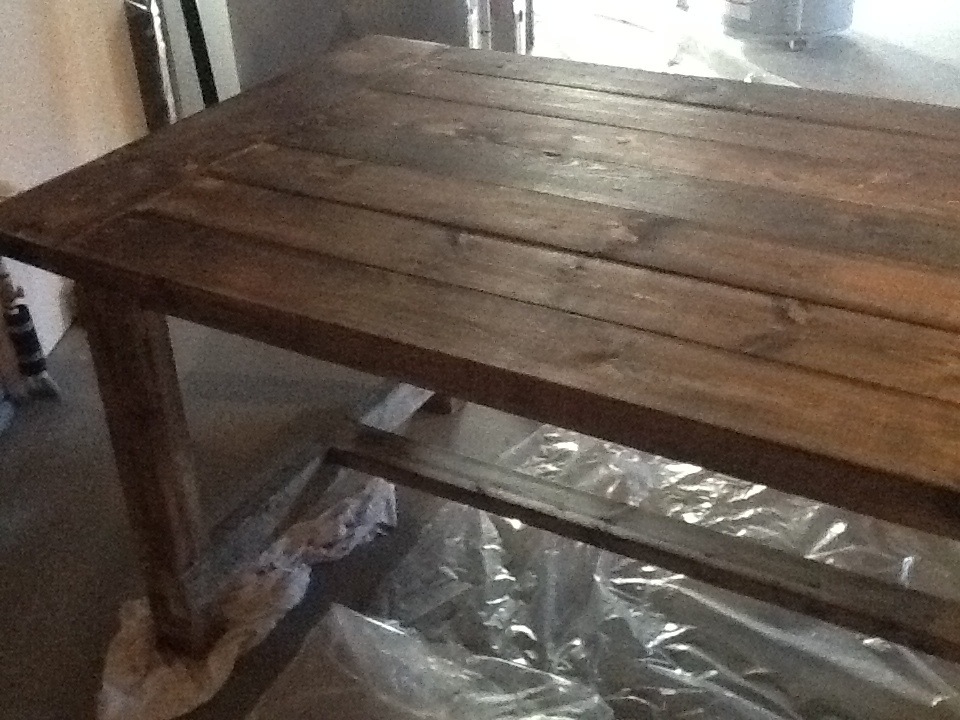
Farmhouse Table
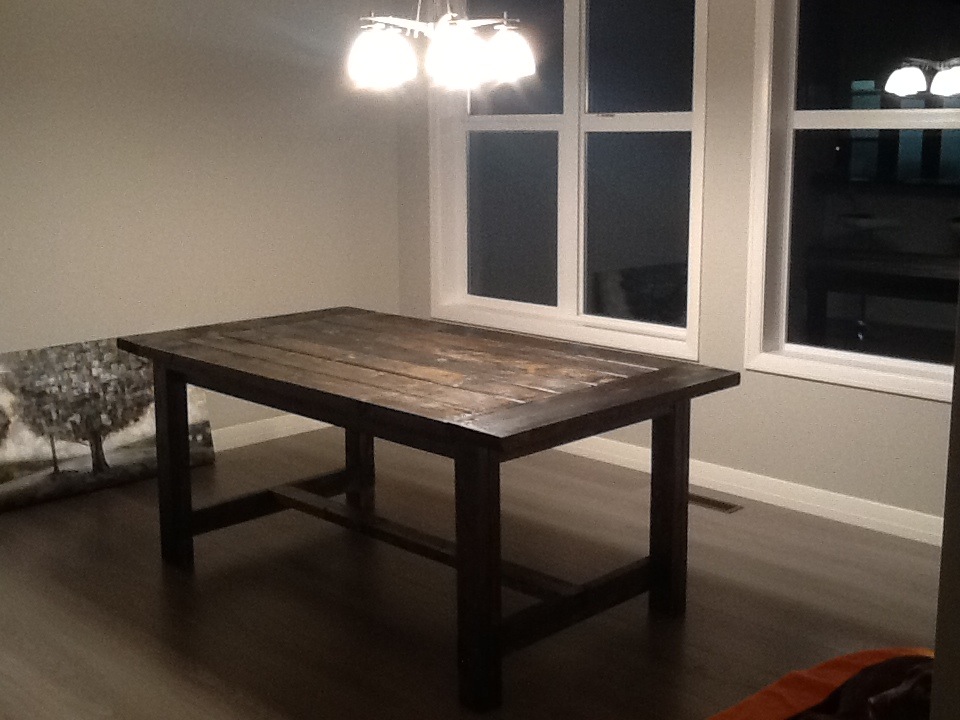
This was our first project. A bunch of "nfl widows" decided to make these tables together. While building with friends is fun, doing all the cuts and prep work for three tables at once will take forever!
If I did it again:
1) Let your wood fully dry out before laying the top boards - it will warp and lift a bit
2) Stain the top and all sides of the 2x6s - if they do warp you don't want to see unstained wood
3) Be extremely careful with your glue - stain will not stick to glue
4) Wood filler does not stain the same as the wood and you will be able to see it
5) Attach your end boards to the 2x6s first. Otherwise they will tend to sag and tilt down.
Estimated Cost
90
Estimated Time Investment
Weekend Project (10-20 Hours)
Finish Used
Ebony Stain - Minwax with two coats of semi gloss sealant
Recommended Skill Level
Beginner
Bunk bed
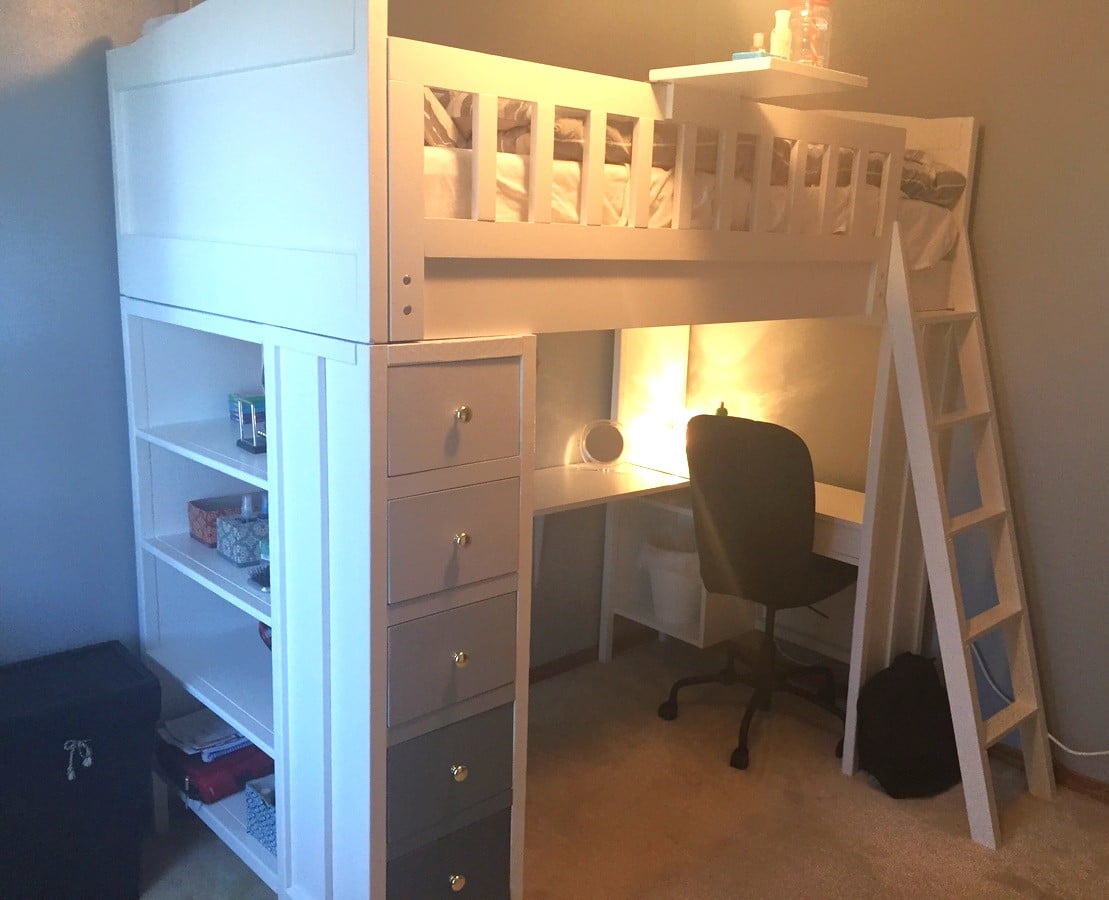
Bunk bed system. My daughter picked the colors. She loves it
Built from Plan(s)
Estimated Time Investment
Week Long Project (20 Hours or More)
Recommended Skill Level
Intermediate
Comments

Wed, 06/03/2015 - 08:42
Great Job!!! I really like
Great Job!!! I really like the ombre look for the drawers.
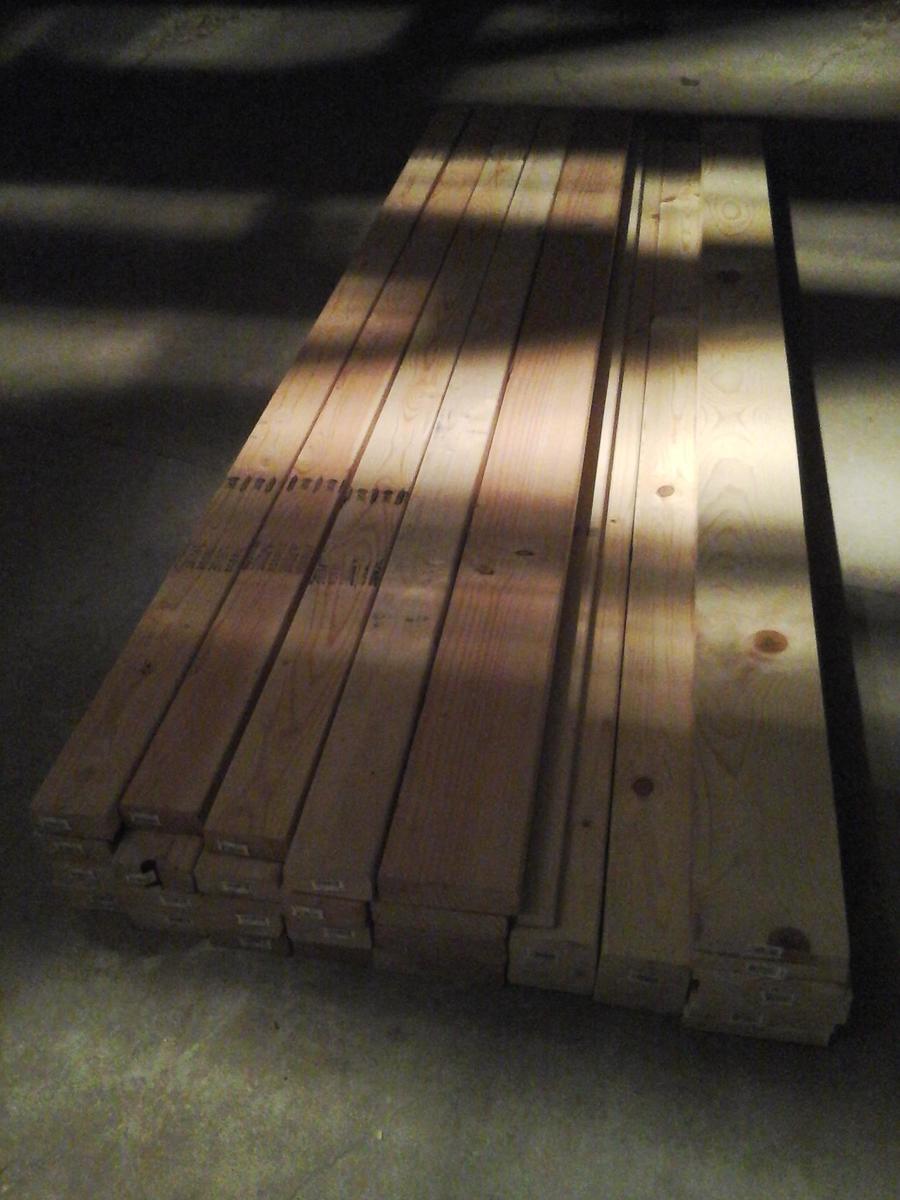
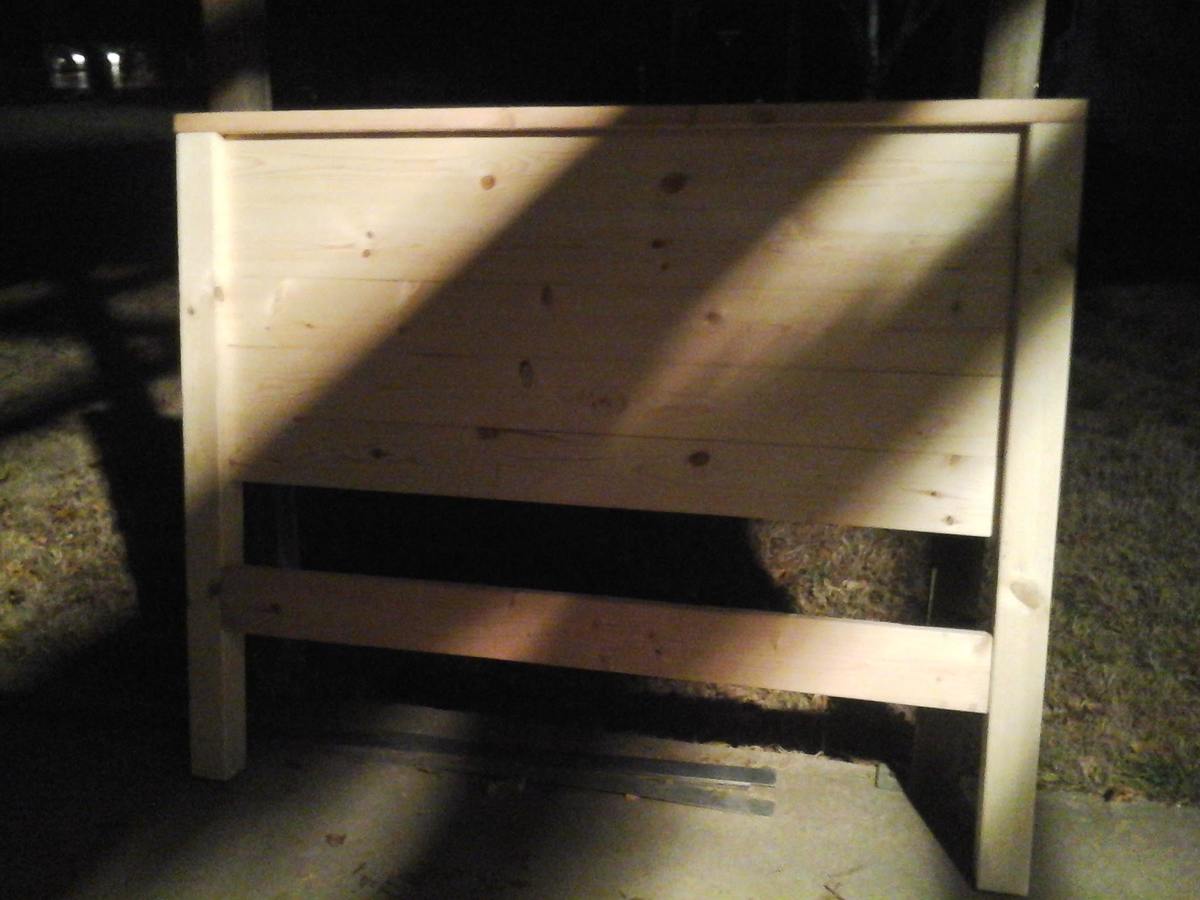
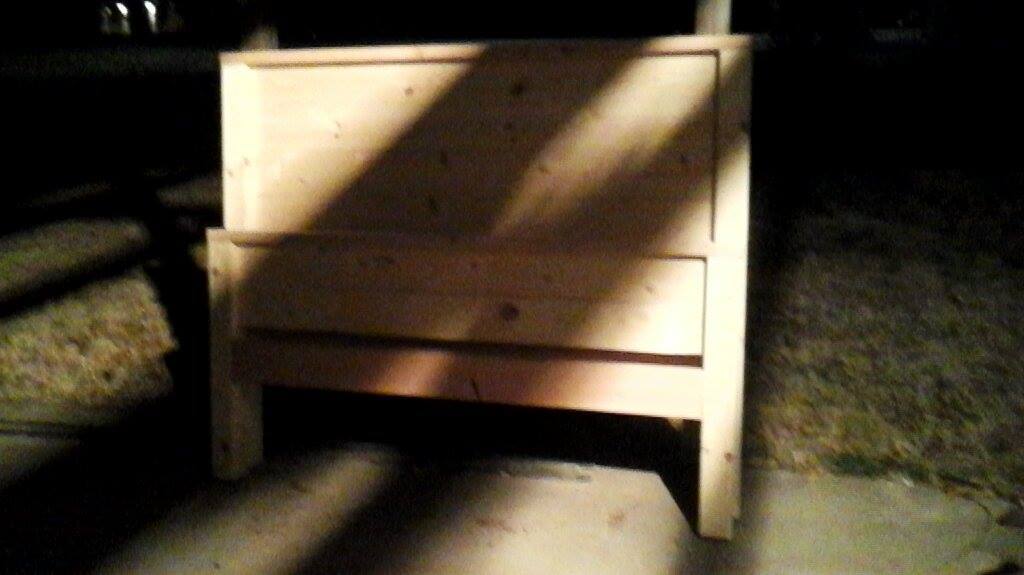
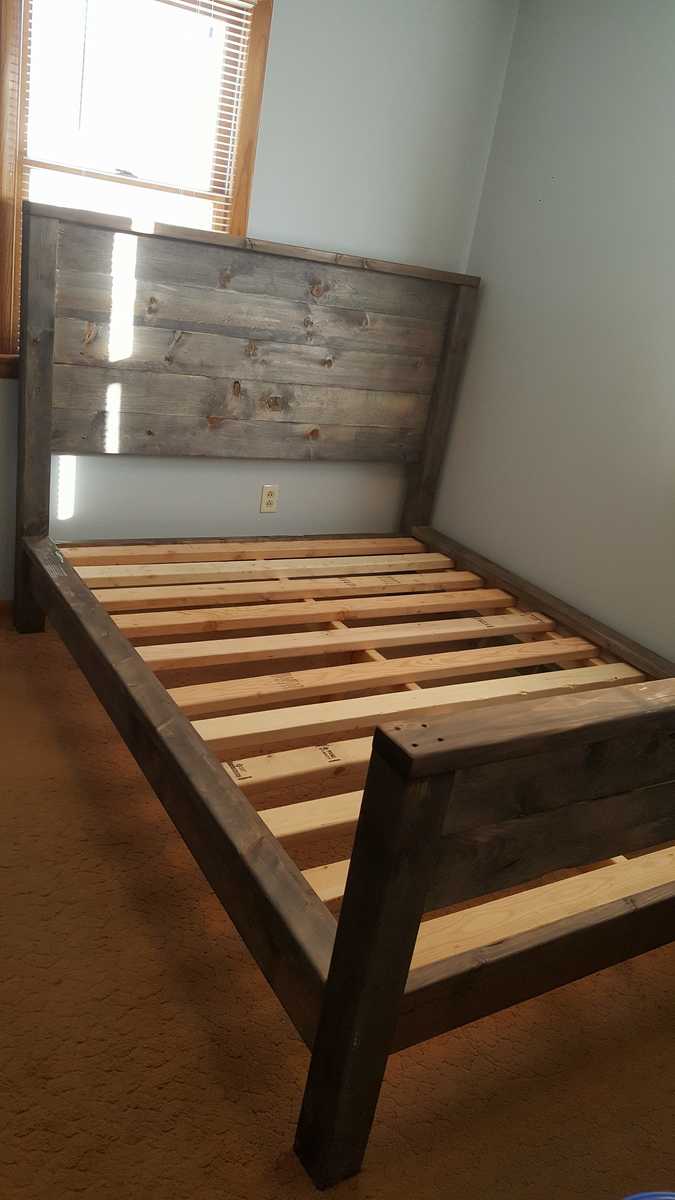
Farmhouse King
We built this to the dimensions on the Farmhouse King plan we used Hardware from our old bed to attach the headboard and footboard to the siderails The finish was a coat of white paint sanded and then a coat of weathered grey stain and then additional sanding to weather it a bit
Built from Plan(s)
Estimated Time Investment
Weekend Project (10-20 Hours)
Finish Used
White paint Satin
Weathered grey stain
Sanding after both applications
Weathered grey stain
Sanding after both applications
Recommended Skill Level
Beginner
You chest
Ana White’s plans are the best I’ve seen. Some are easy and some are challenging builds. She’s so very encouraging in her videos. She makes me feel like I can keep on building. I’m very happy to say I started my business from her inspirations.
Built from Plan(s)
Comments
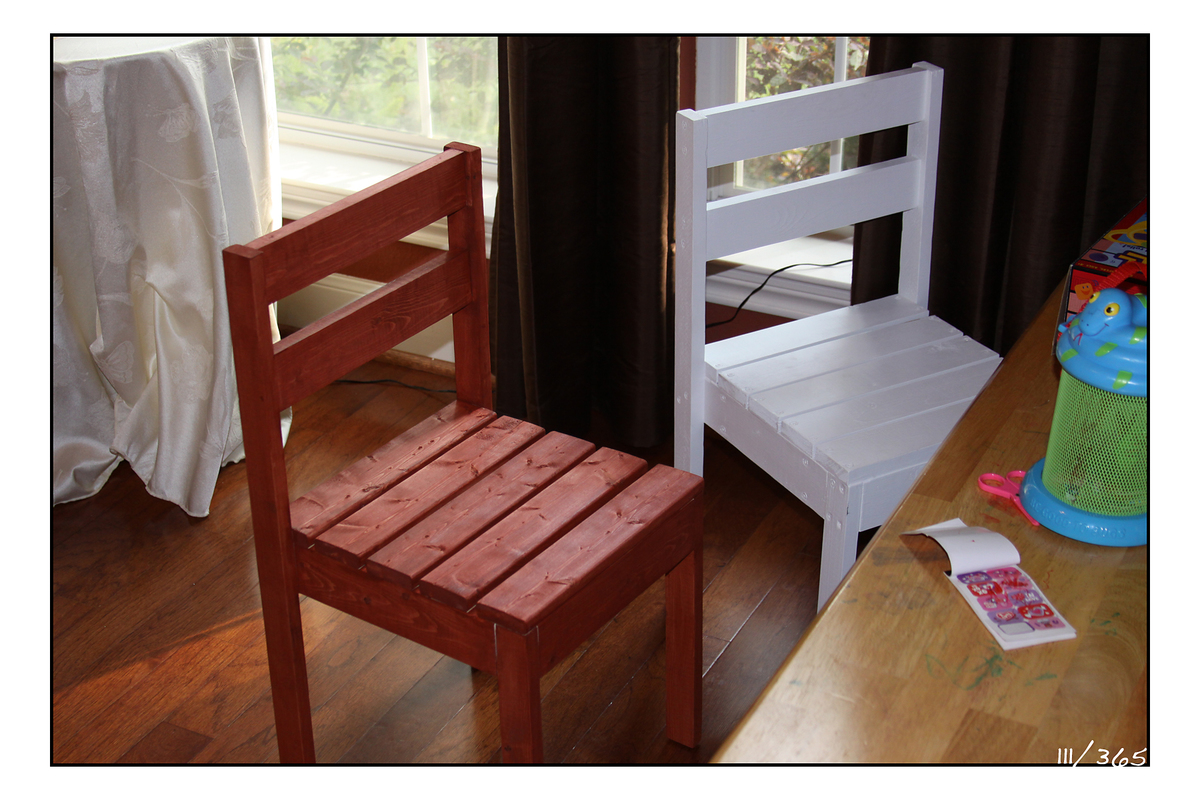
Simple kids chairs
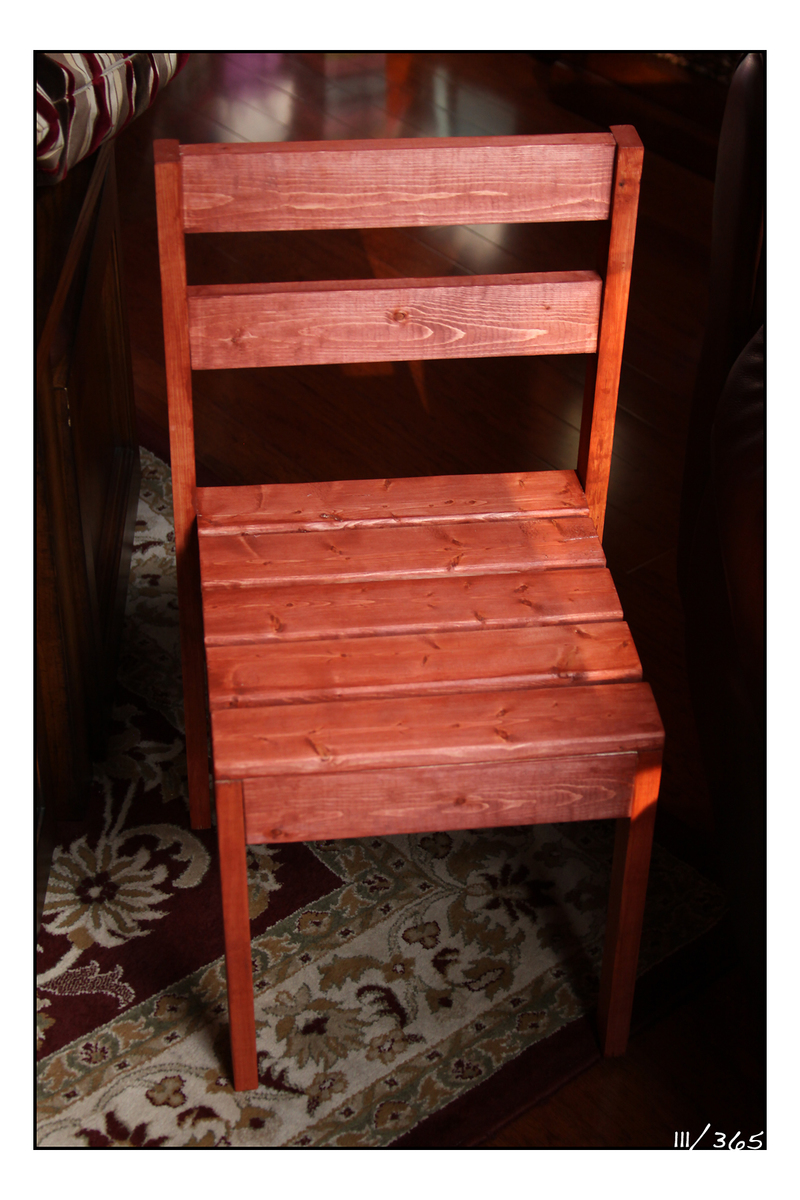
I built two of the $4 kids chairs for my two kiddos. After building the first one (the white one) I changed the plan a little to use pocket hole screws as much as possible to avoid the visible screw heads on the seat slats. I really love how the red one turned out.
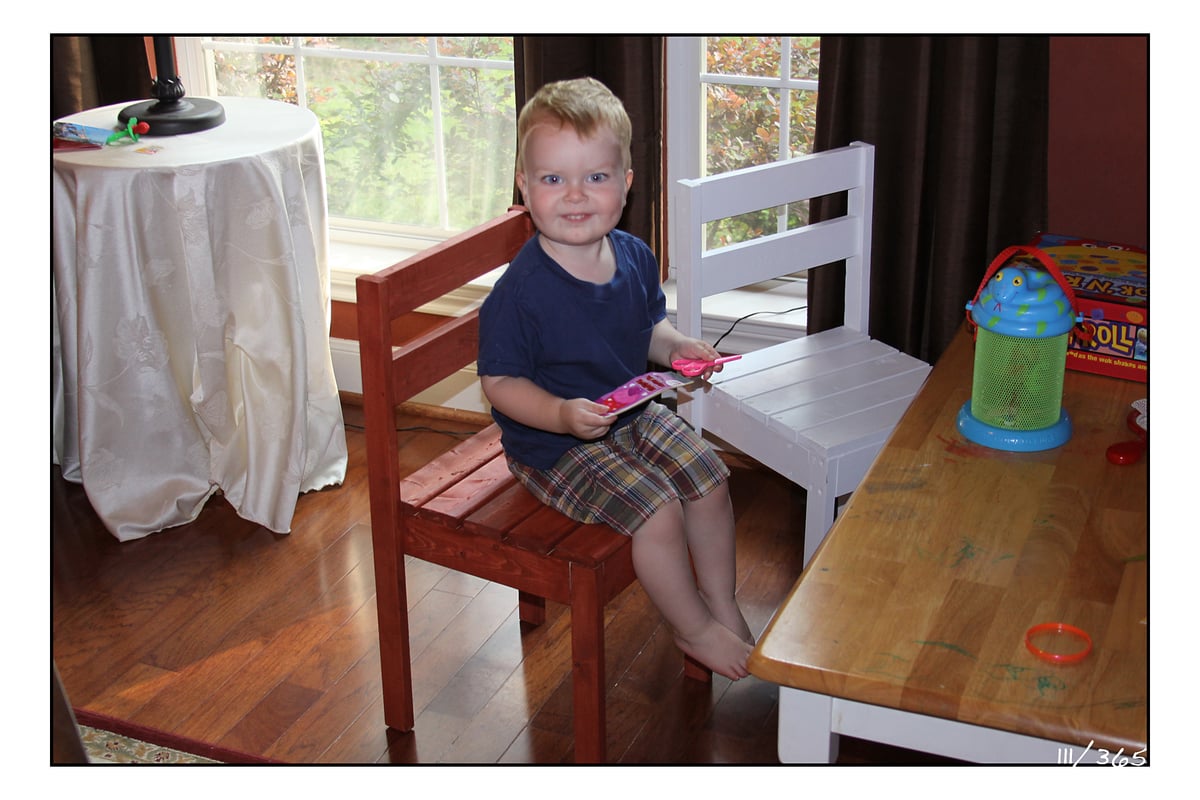
Estimated Cost
$5
Estimated Time Investment
Afternoon Project (3-6 Hours)
Finish Used
One the white one I used spray primer and white spray paint. On the red one I used Minwax wipe on stain. It was really easy to use.
Recommended Skill Level
Starter Project
Comments
Ana White Admin
Wed, 11/24/2021 - 10:46
WOW!
Such an amazing bed, thank you for sharing!