Community Brag Posts
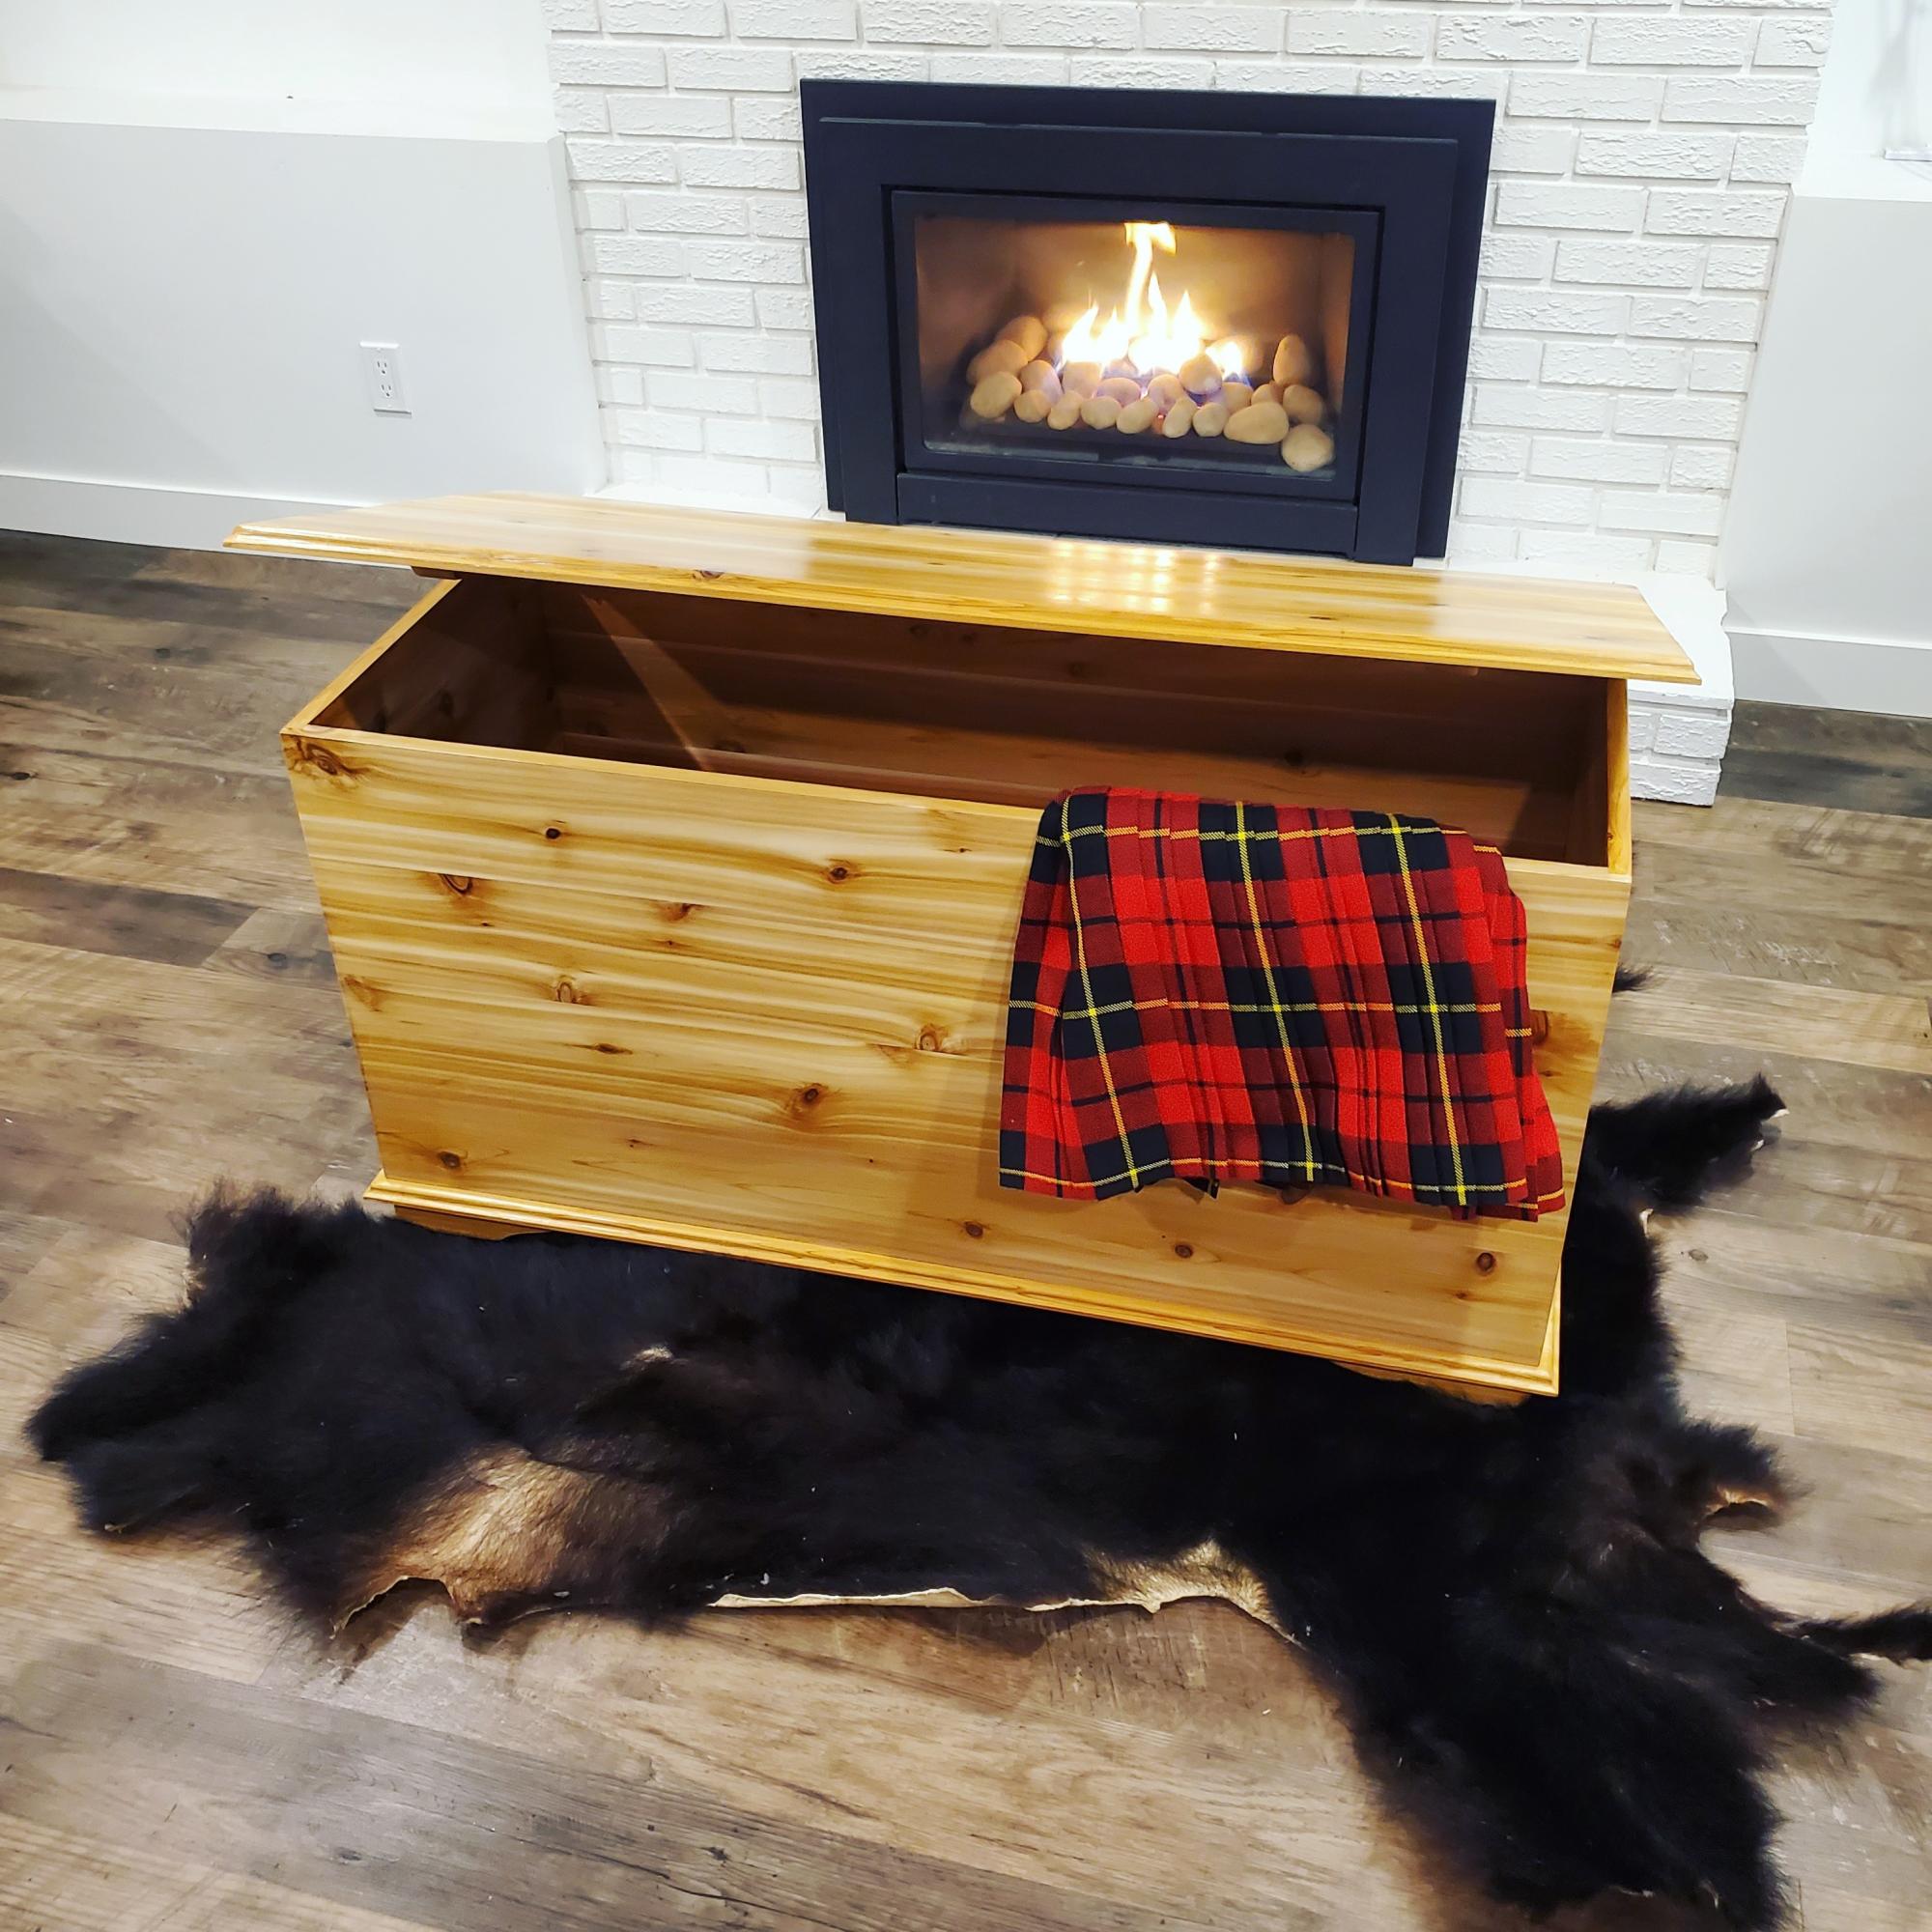
Simple and Elegant Side Tablel
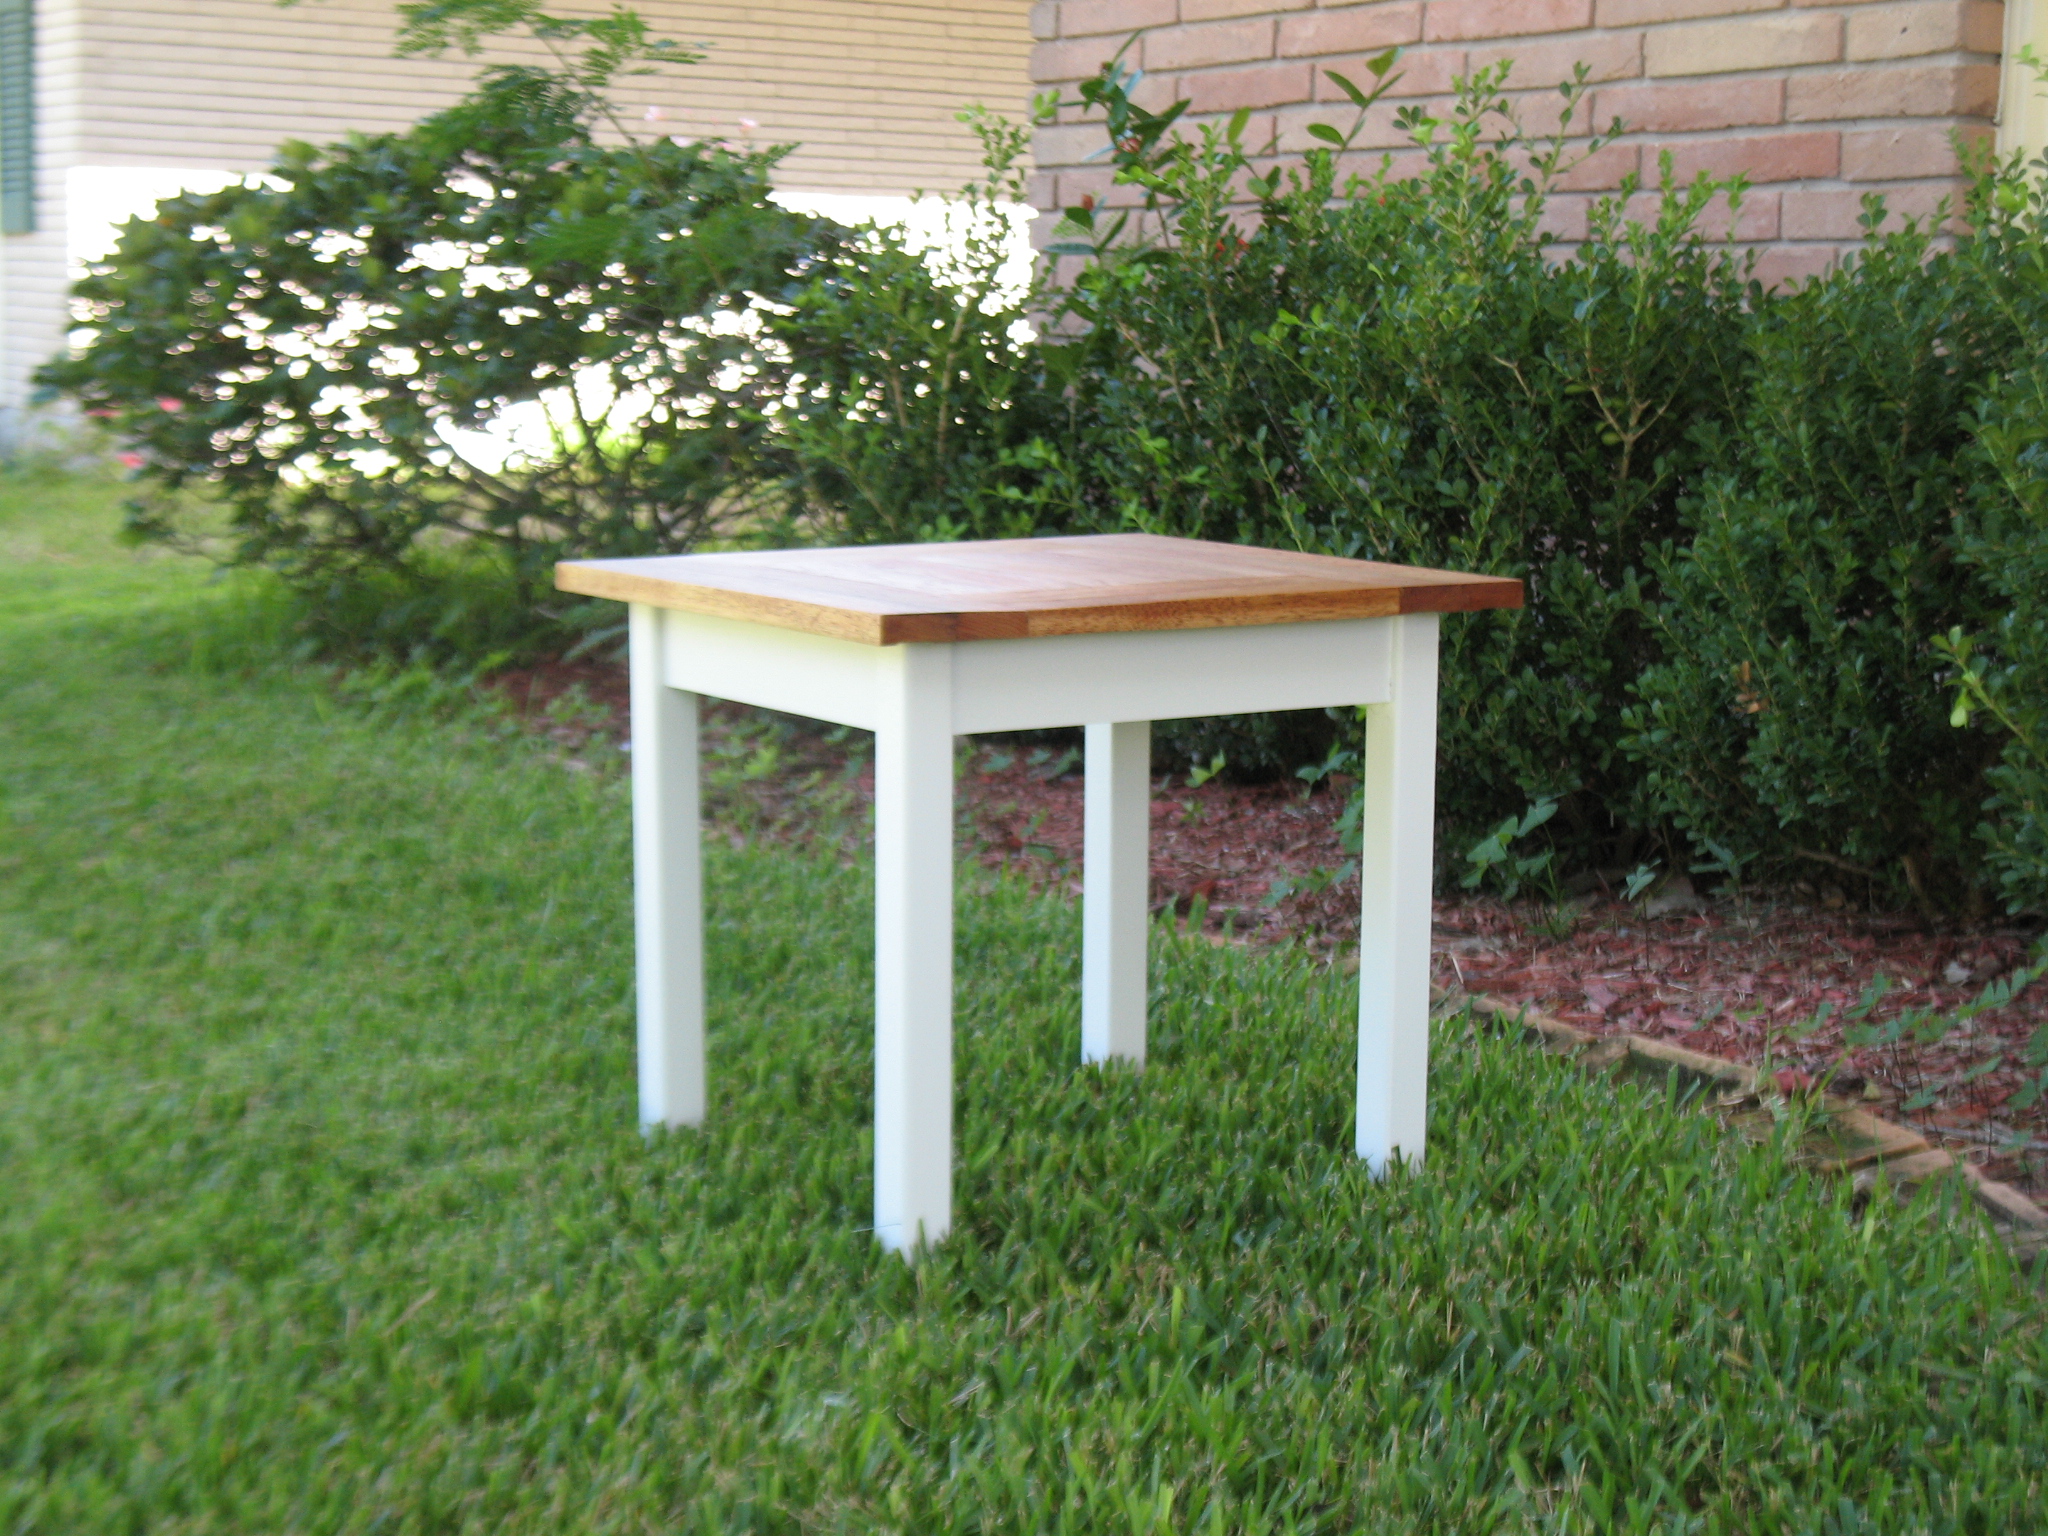
This small but elegant side table was made based upon a plan from The Design Confidential. A friend of mine gave me a lot of 3/4" solid oak flooring that her deceased husband (11 years ago) had stored in a shed. It is beautiful. So I made this little table using the wood for the top. I made the top by putting Tightbond III glue in the flooring grooves and then clamping the pieces together. Then after the glue dried I used my flooring saw to rip the tongues and grooves so I have one solid piece of flooring/top. I also did not glue the top to the base but just used pocket hole screws from the underside to hold it on the base. The reason was in case the top or base became damaged it would be easily removable for repair.
Estimated Cost
Wood free so screws and glue maybe $5
Estimated Time Investment
Afternoon Project (3-6 Hours)
Finish Used
For the top I used two coats of Minwax Golden Oak. The base of the table is three coats of Rustoleum Satin White Enamel.
Recommended Skill Level
Intermediate
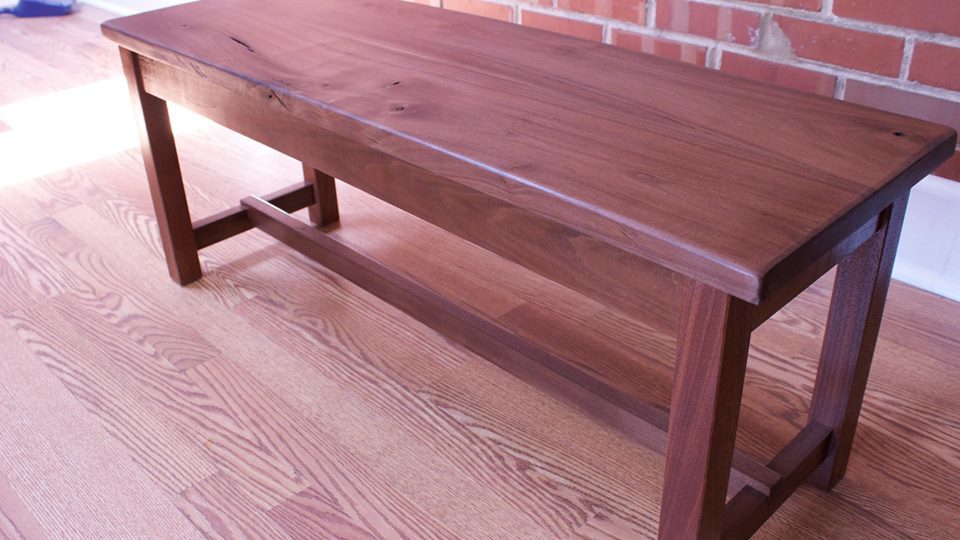
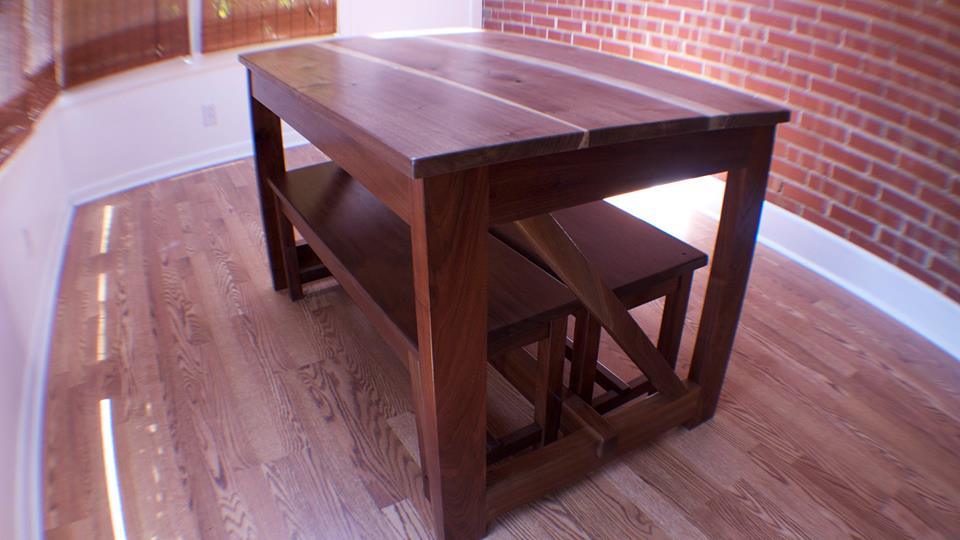
Walnut Dining Table
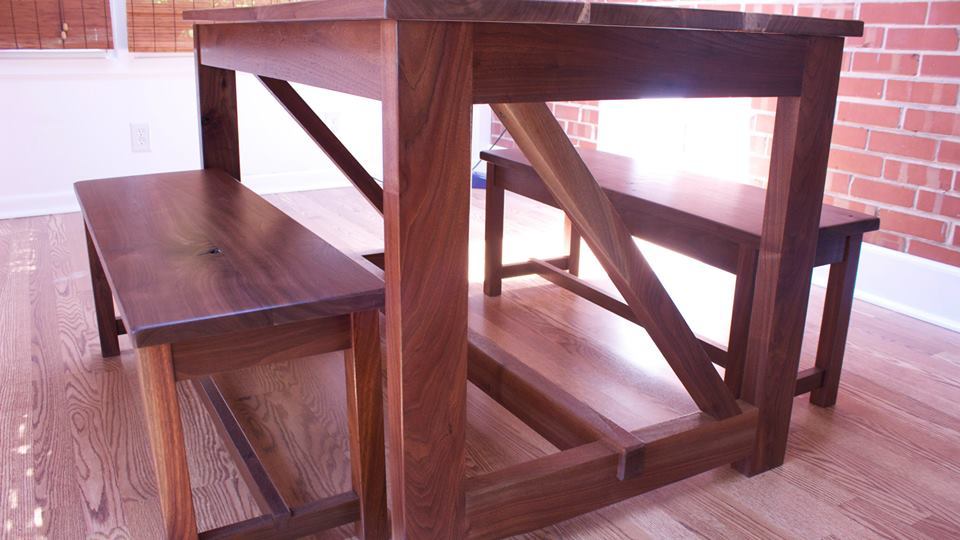
This table was a lot of fun to make it wasn't too hard. The hardest part was cutting the dados. If you have a table saw, it's not as hard. I hope you watch the video of how it was made.
http://youtu.be/ymz3Zim79Lo?list=PLRGcaQeW9svX5lRtTc9w2LrOzEFoez3j0
Estimated Time Investment
Weekend Project (10-20 Hours)
Finish Used
Shellac and Polyurethane
Recommended Skill Level
Intermediate
Themed Adirondack Chairs
I created one chair as a proof of concept and stained after it was put together. I then create the other two frames and then stained and varnished (4 coats) the frames and the seat pieces before connecting them. I then added the vinyl emblems to two of the chairs and applied a final coat of varnish over the emblems. Very comfortable and we love how they look.
Built from Plan(s)
Estimated Cost
$150 for three (includes the vanish and stain)
Estimated Time Investment
Week Long Project (20 Hours or More)
Finish Used
Varathane tintable base - Navy
Varathane tintable base - White
Halacyon rugged gloss varnish
Oracal Vinyl 651
Varathane tintable base - White
Halacyon rugged gloss varnish
Oracal Vinyl 651
Recommended Skill Level
Beginner
Small Workbench
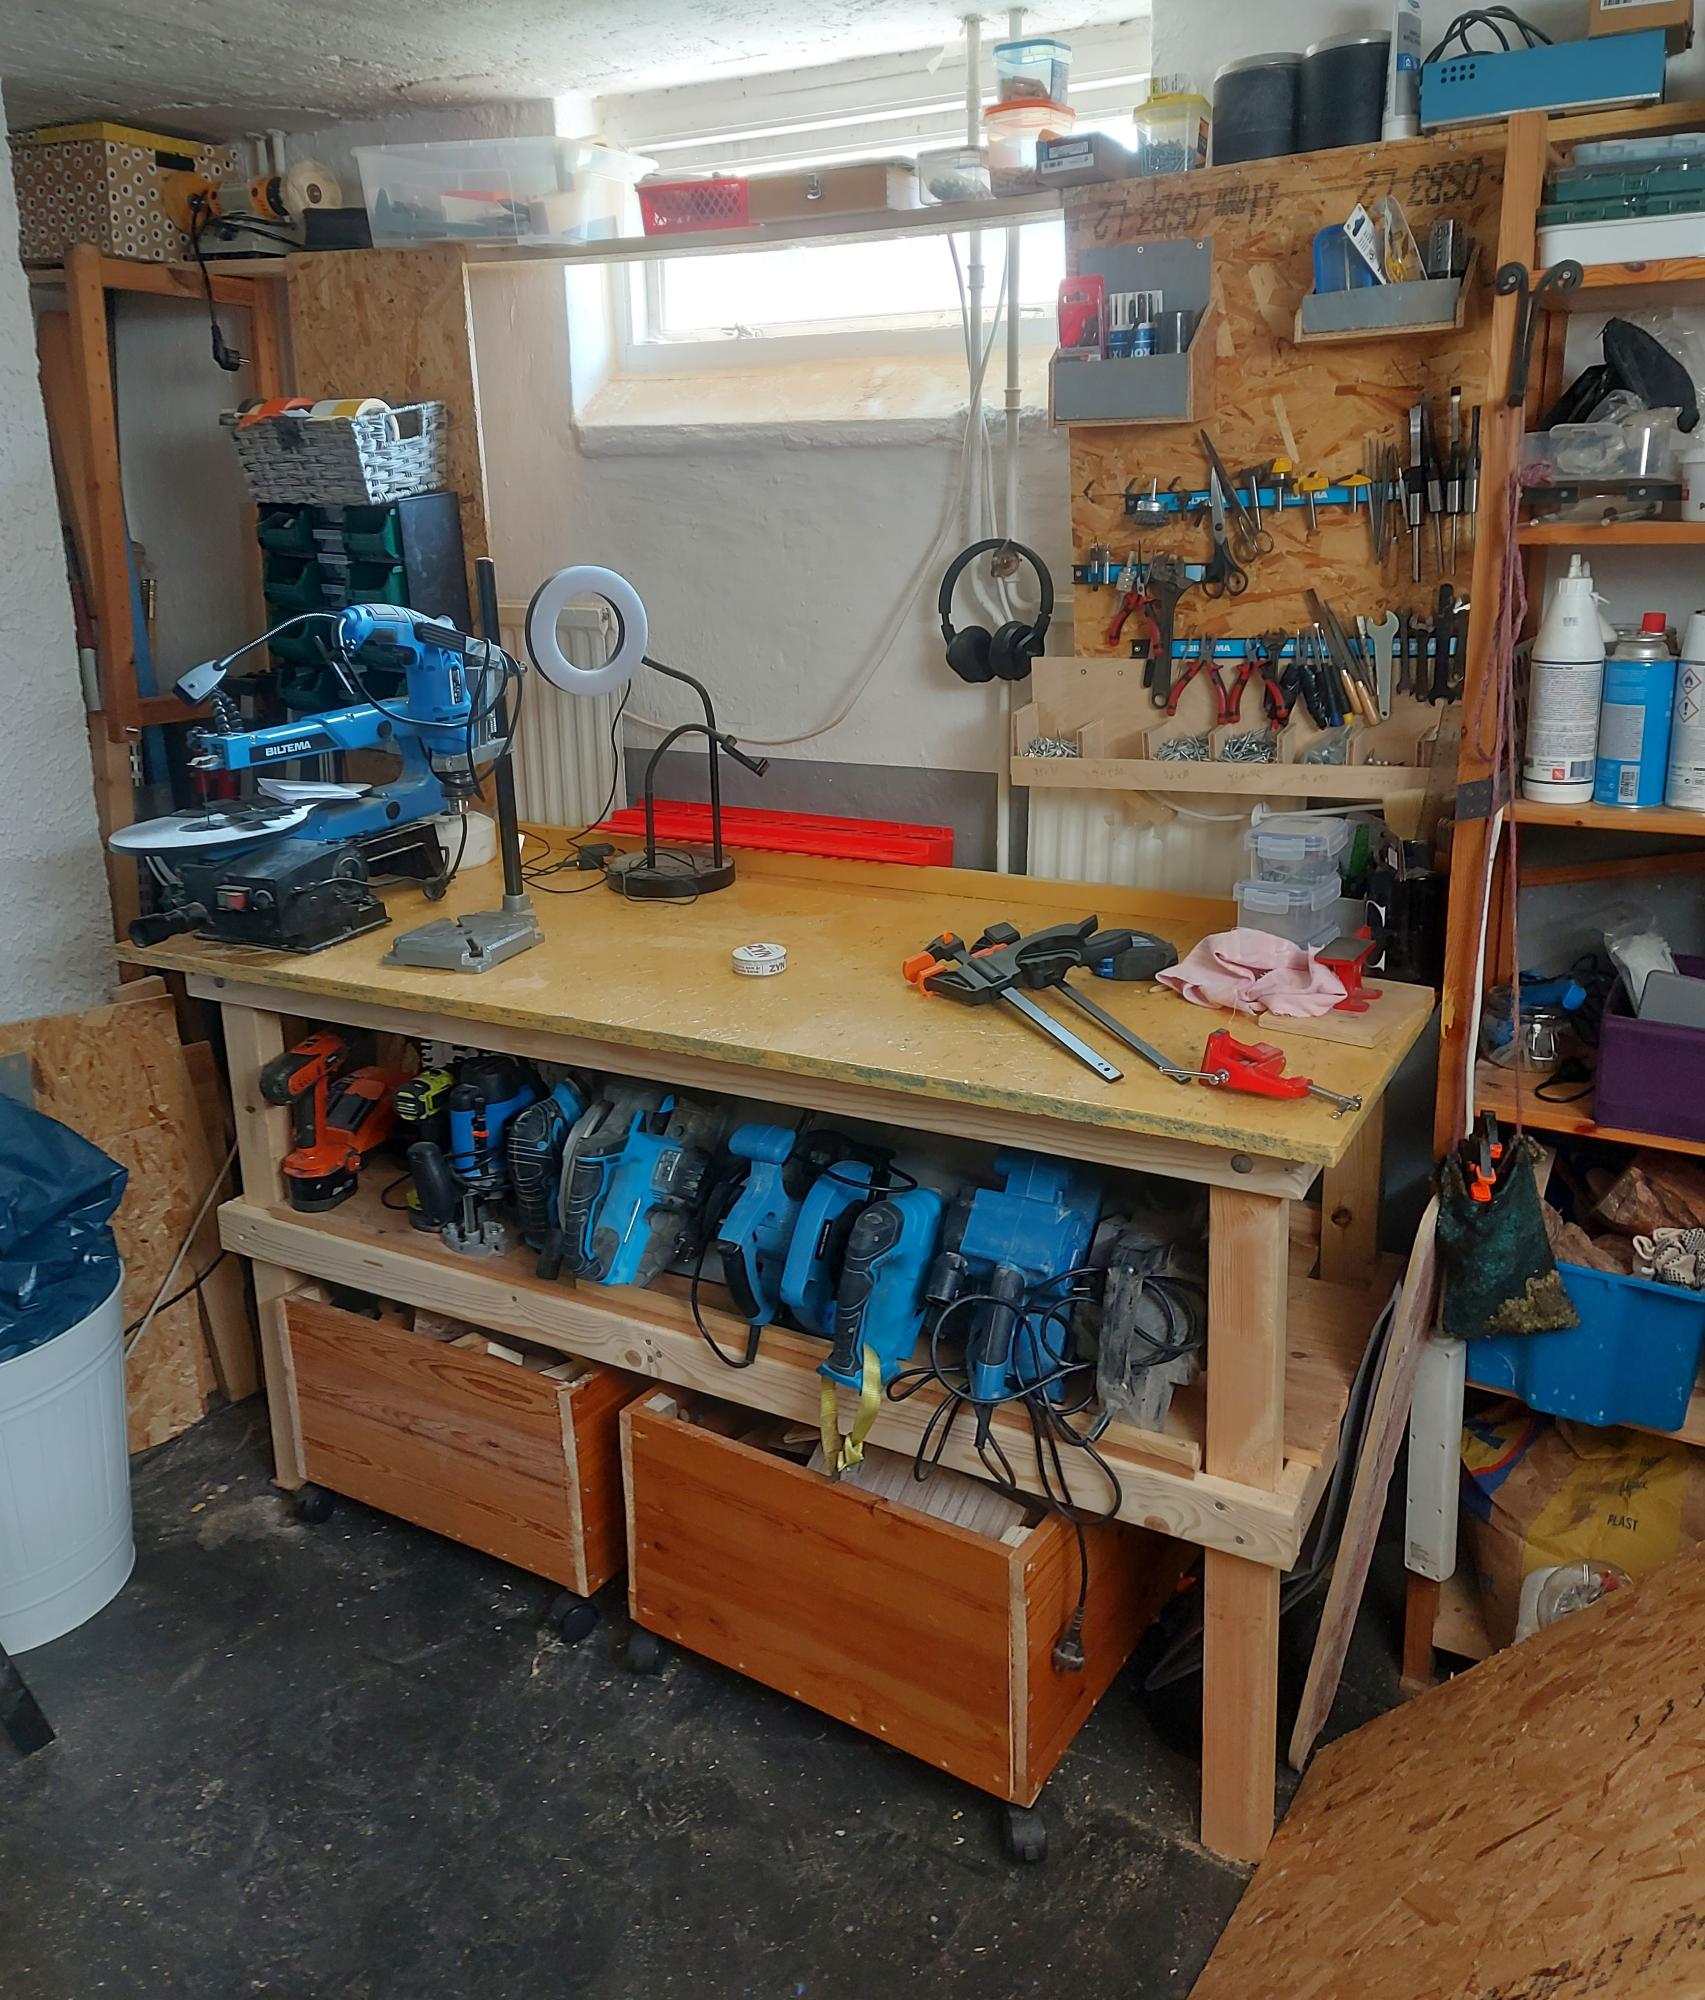
My working area is 7 square metre, so I had to think how to get the most in it. I found Anas working bench and made me my own bench.
Built from Plan(s)
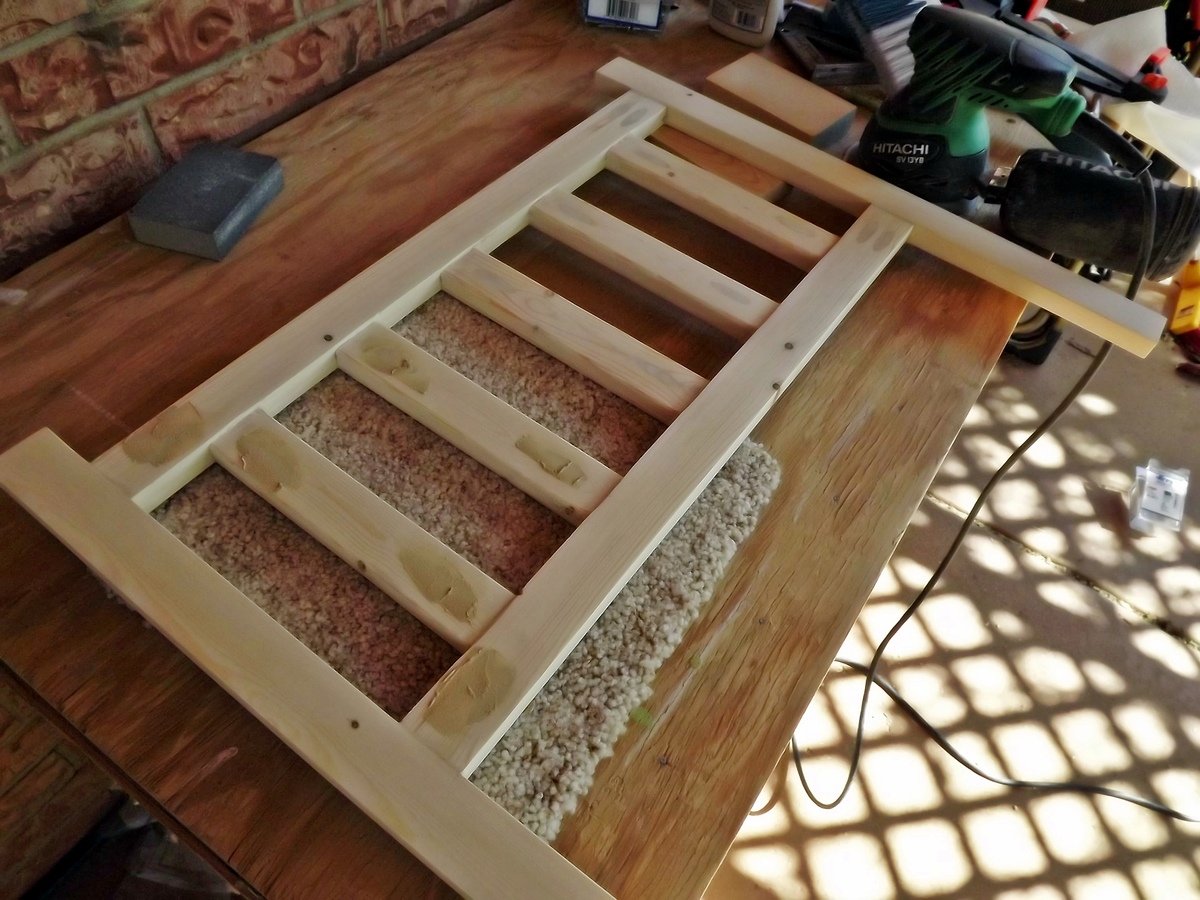
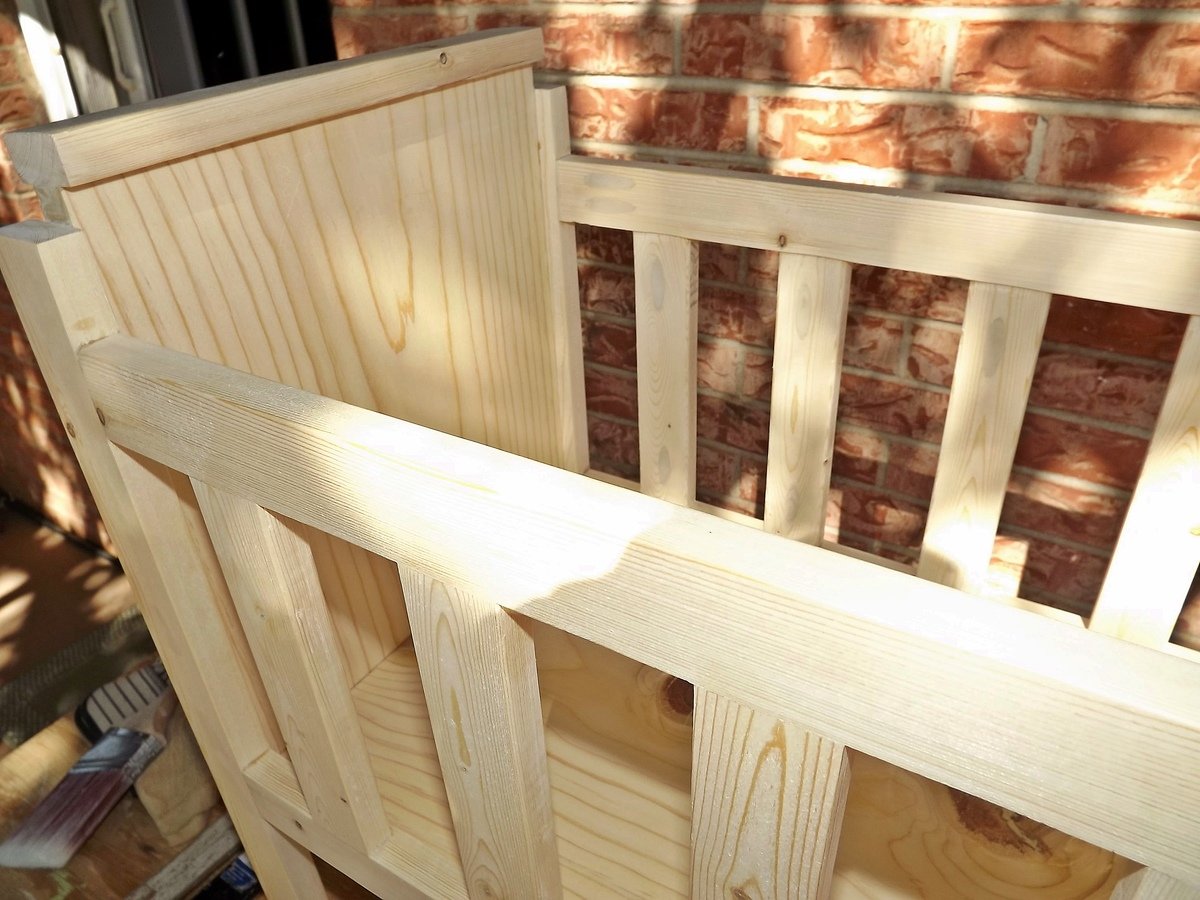
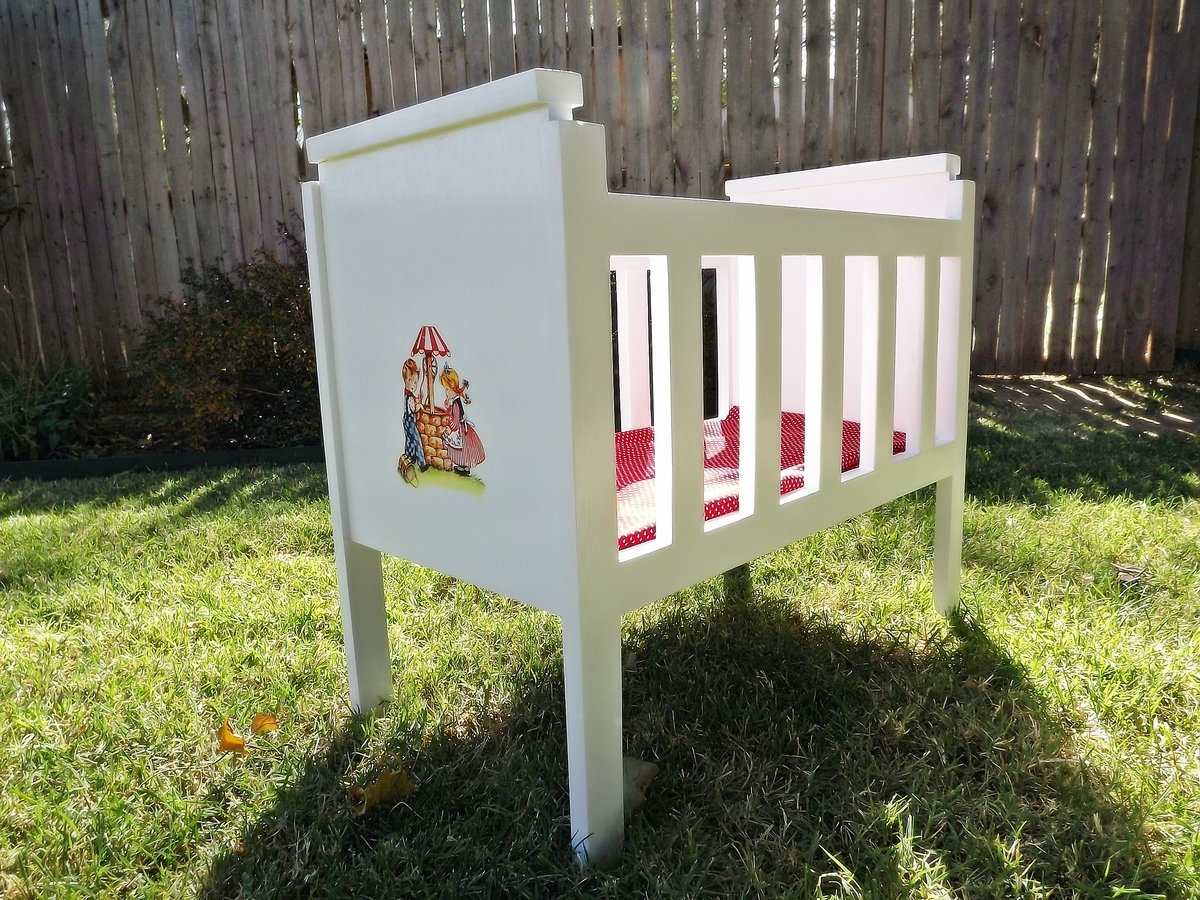
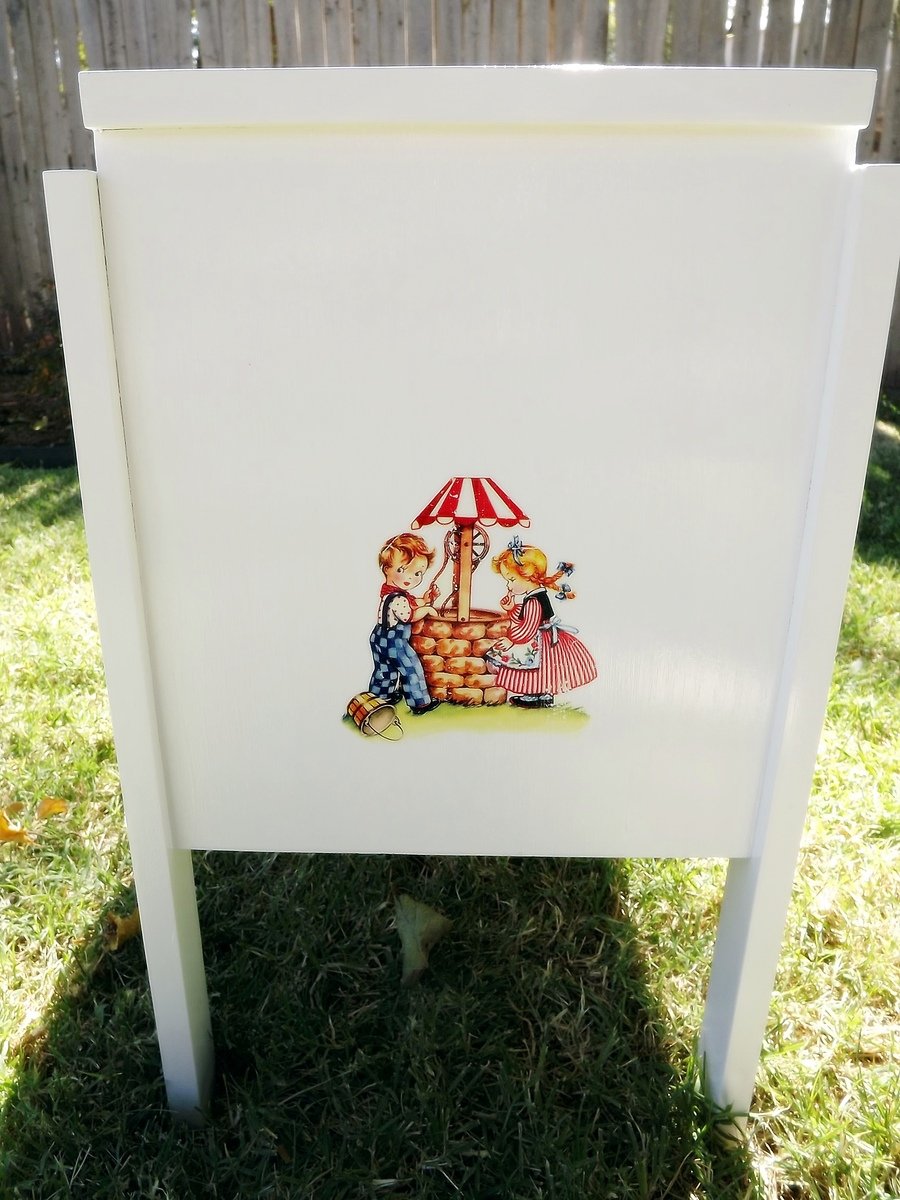
Fancy Doll Crib, Modified
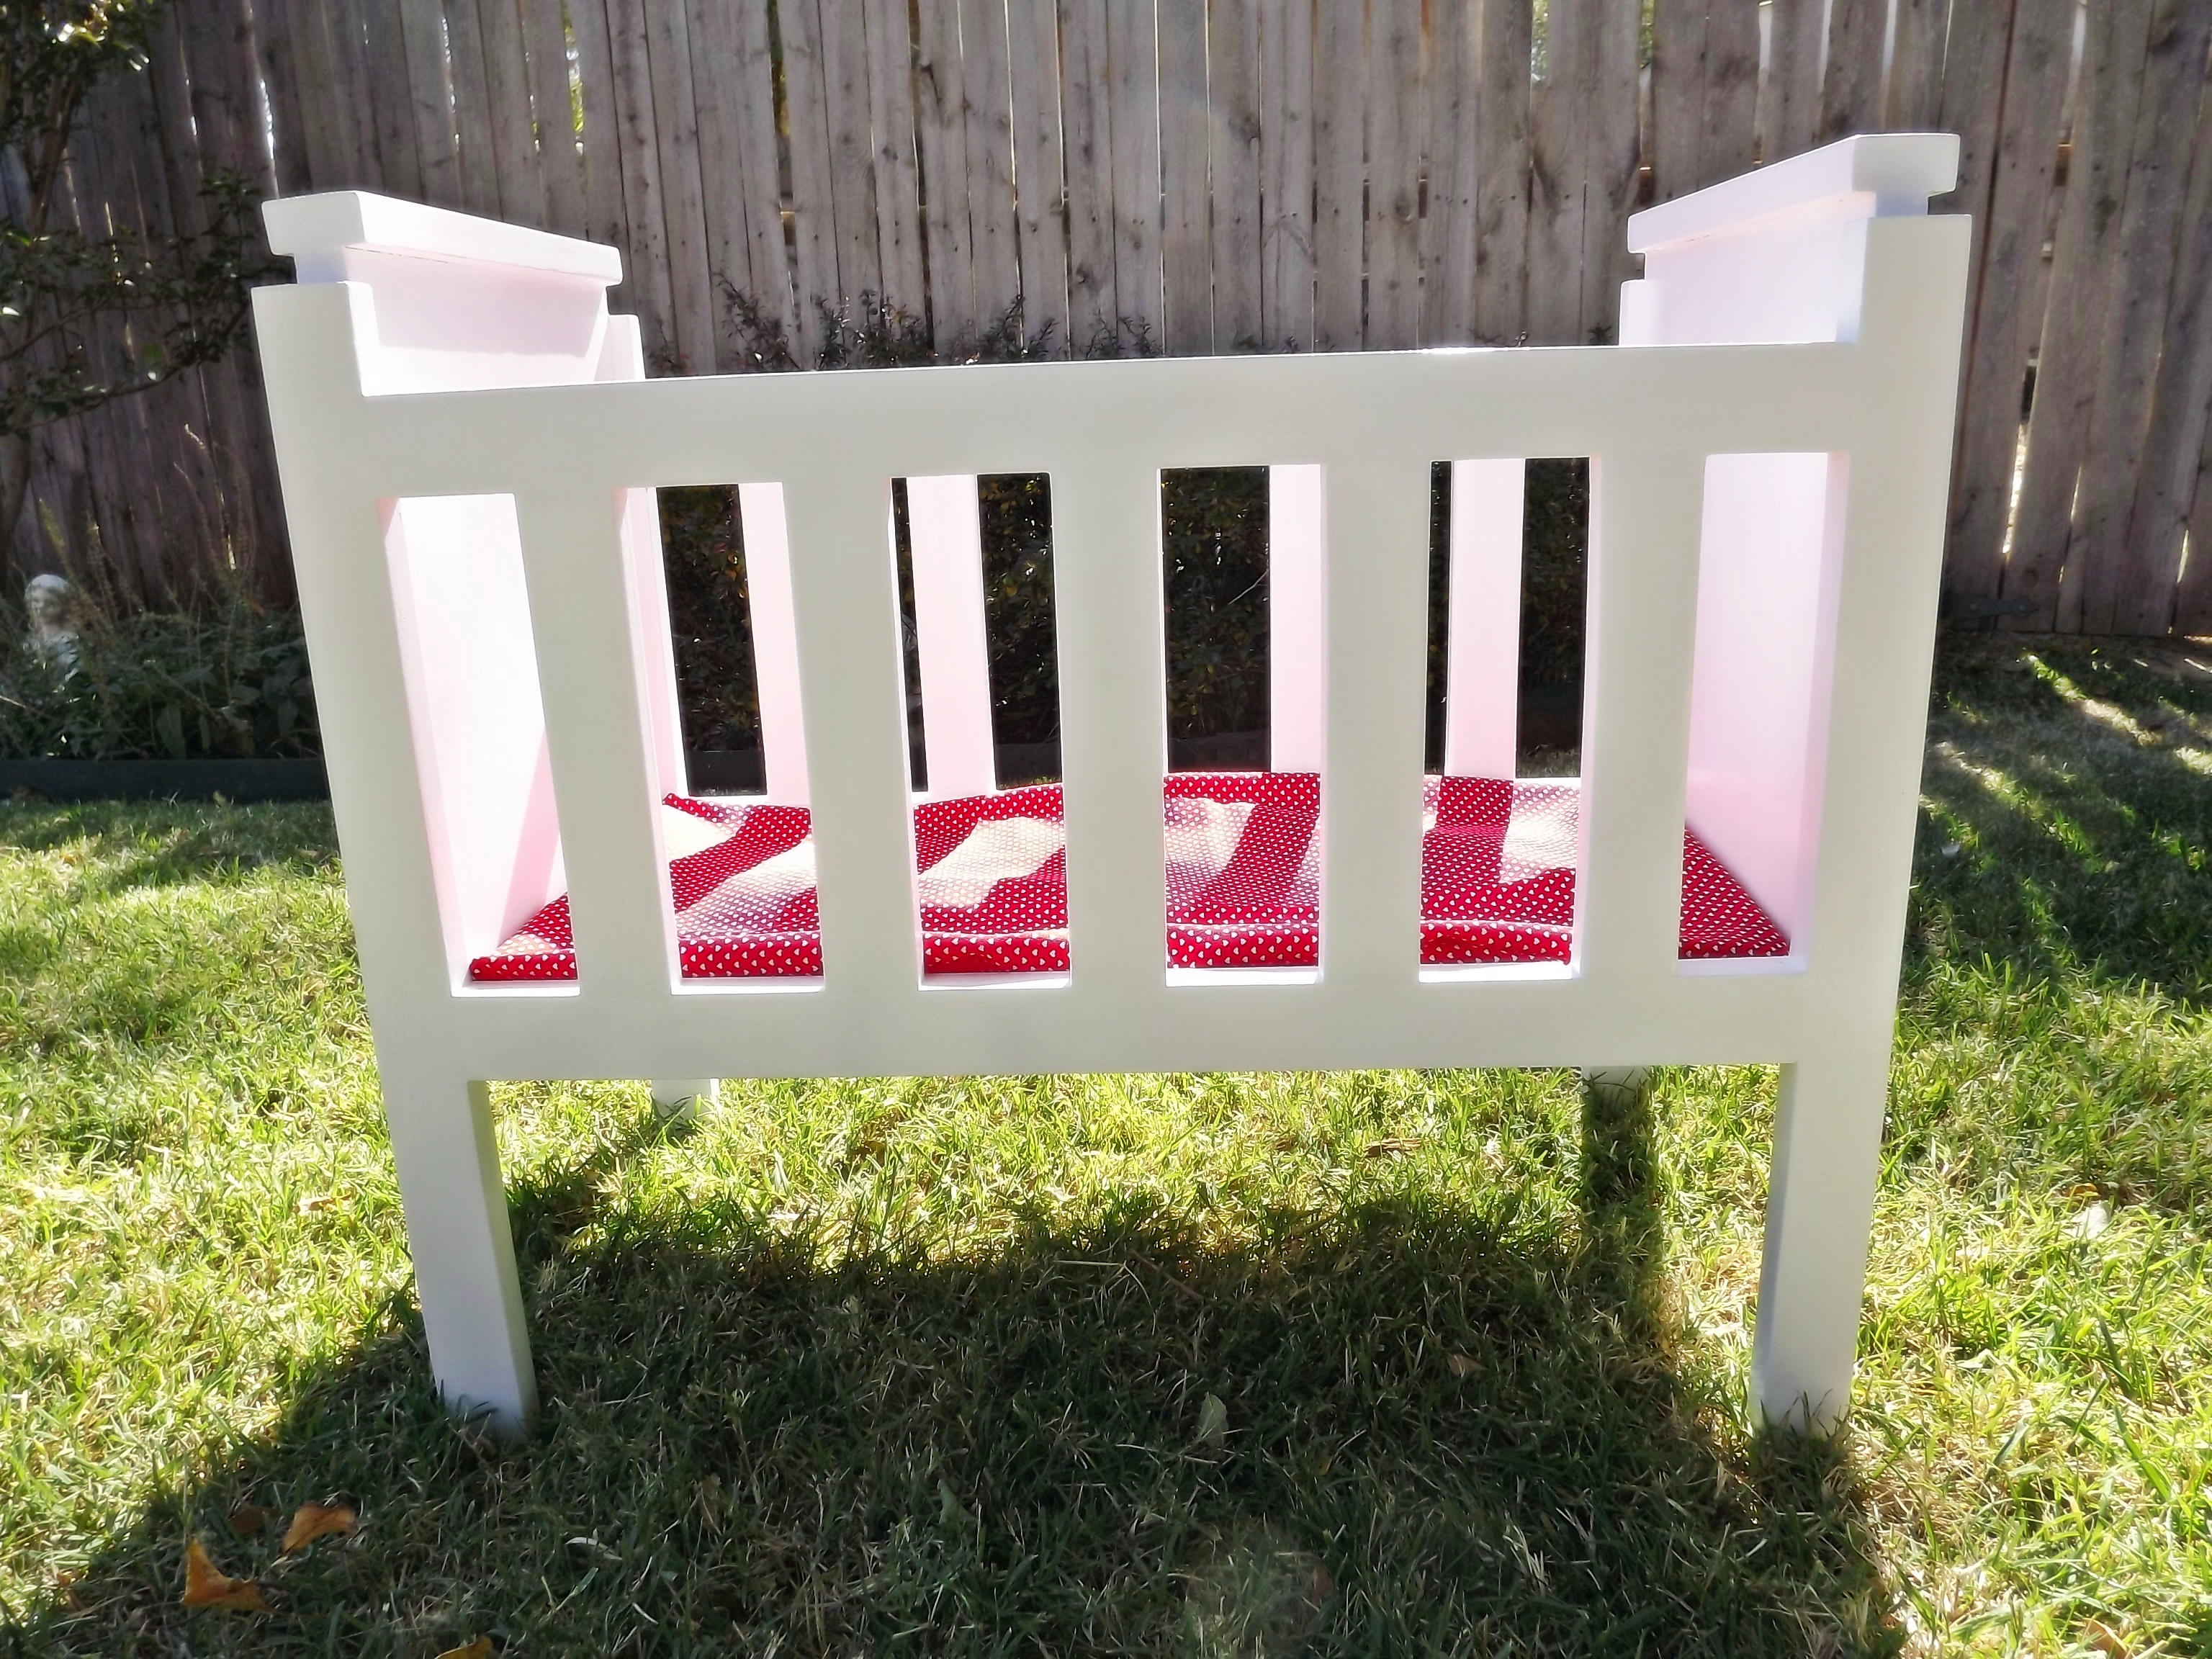
This doll crib is for another grandniece who loves both her baby boy and girl dolls, hence the Jack and Jill decal. This bed is modified from the Fancy Doll Crib plans using 1 x 2 for the side rails instead of dowels, and also a flat top. It is also larger than the plans: 21" long and 20" legs. My sister found a vintage J & J fabric piece which we plan to use as the mattress cover.
I said this is a day project but it takes me several days in between other activities, and I am very slow and methodical. (I also make sure to fill in all of the pocket holes with wood filler, usually two "coats" to get them perfectly level with the surrounding wood. After painting, it's very hard to tell where the fasteners are unless you know where to look.) It would take most people much less time than I. This is my 5th doll bed, and I have at least one more to go.
Built from Plan(s)
Estimated Cost
Around $25.00 including the paint
Estimated Time Investment
Day Project (6-9 Hours)
Finish Used
Valspar glossy white spray paint over Kilz primer; protected the decal with several thin coats of Modge Podge.
Recommended Skill Level
Beginner
Solar Birdhouse
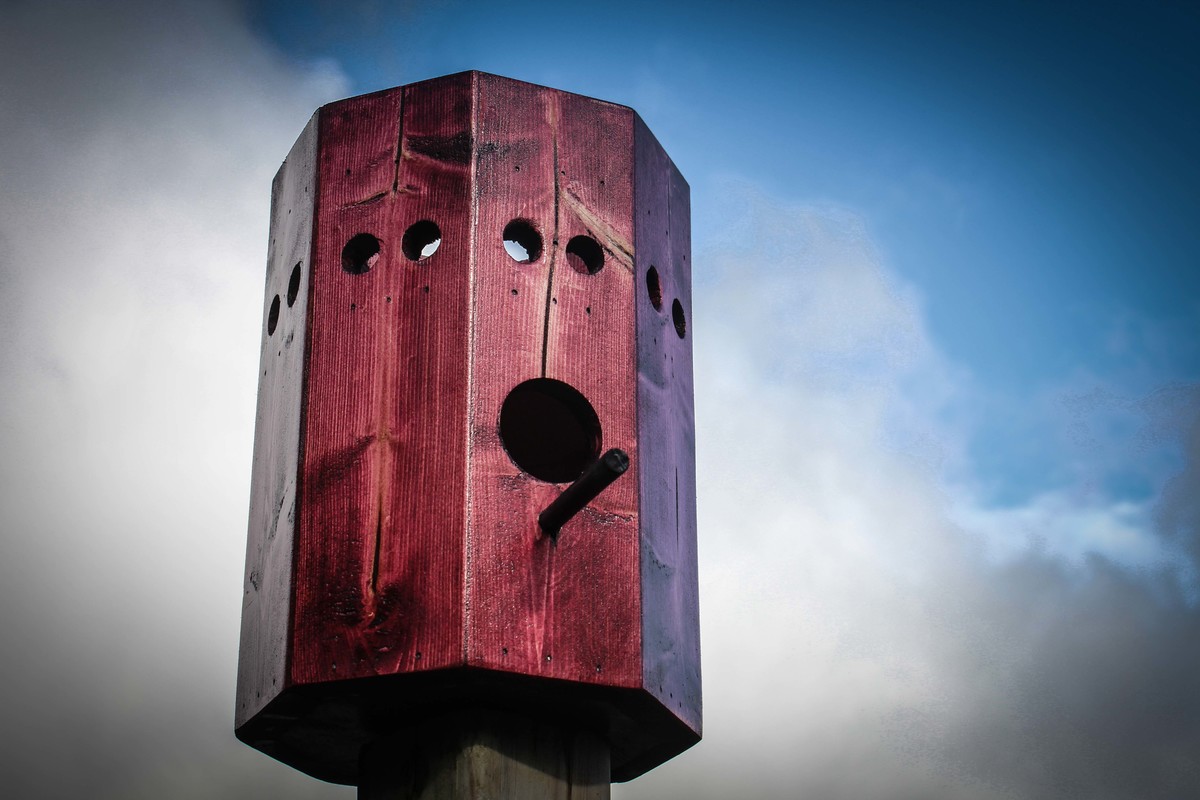
Simple/Fun project
Build Instructions:
http://www.instructables.com/id/Solar-Birdhouse/
Video of the build:
https://www.youtube.com/watch?v=SU5ffvweSjQ
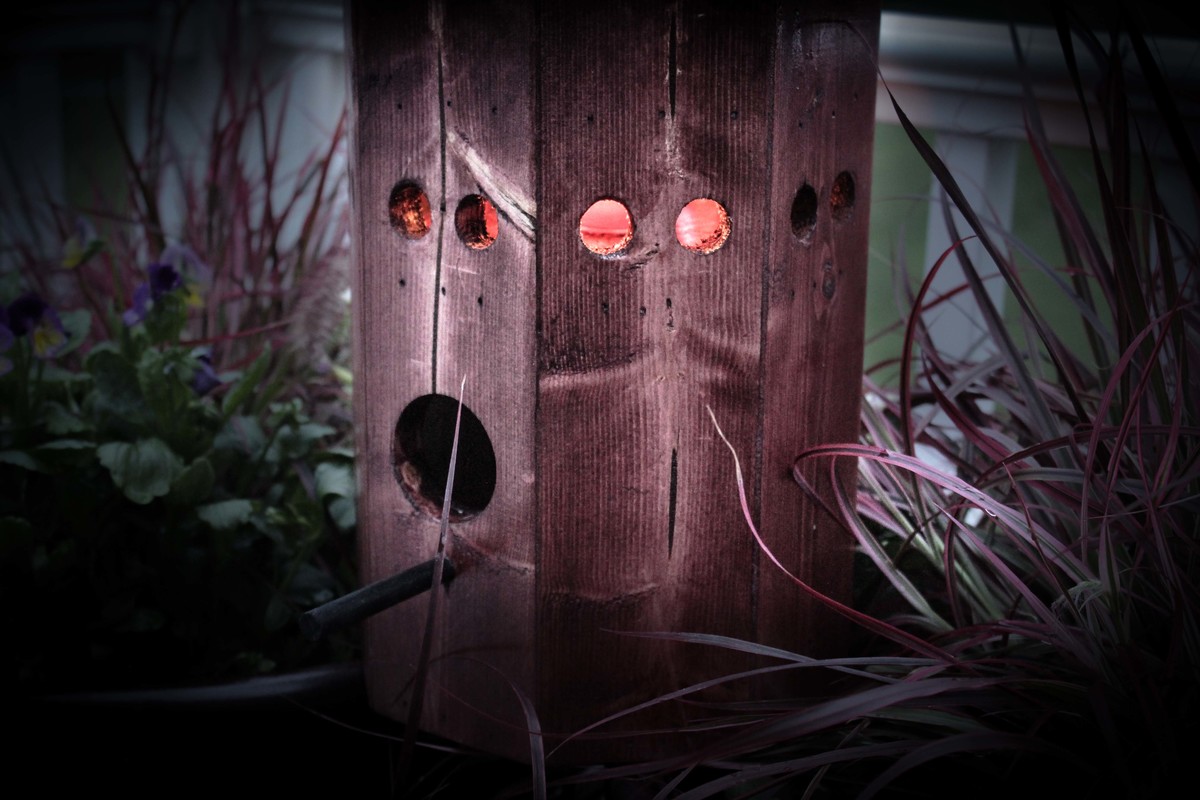
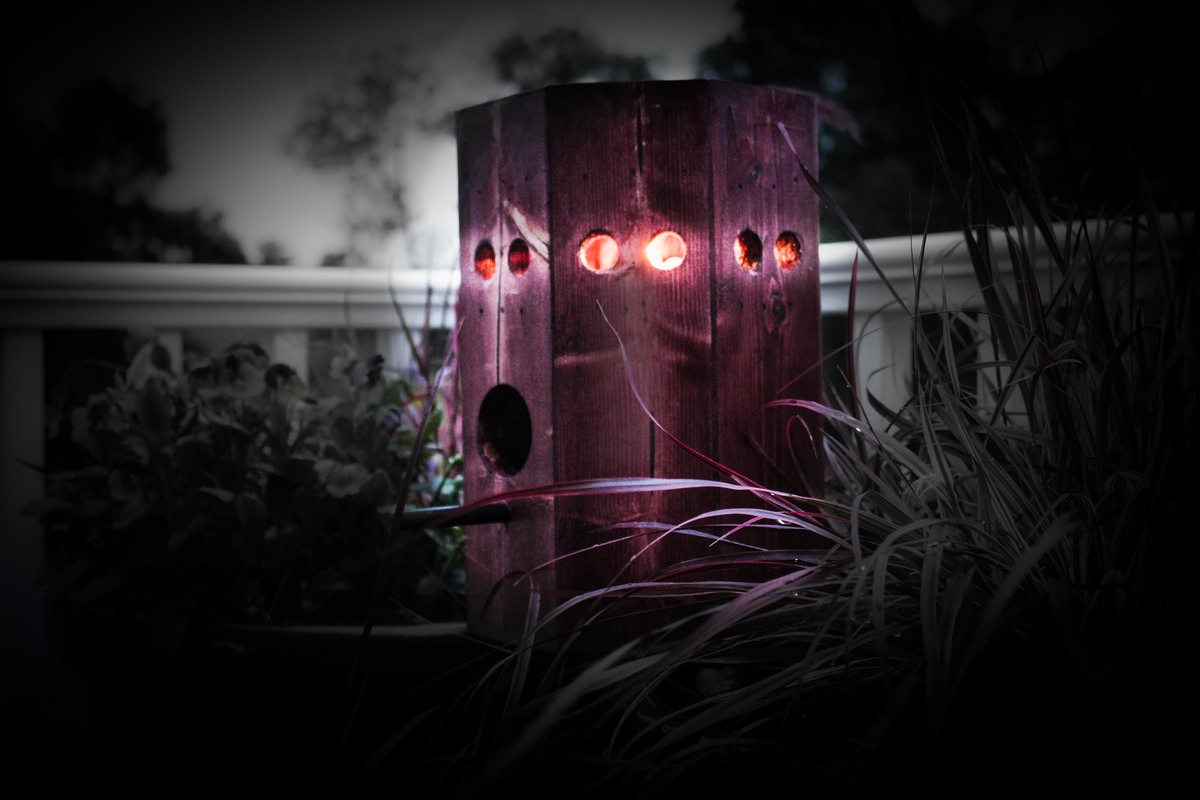
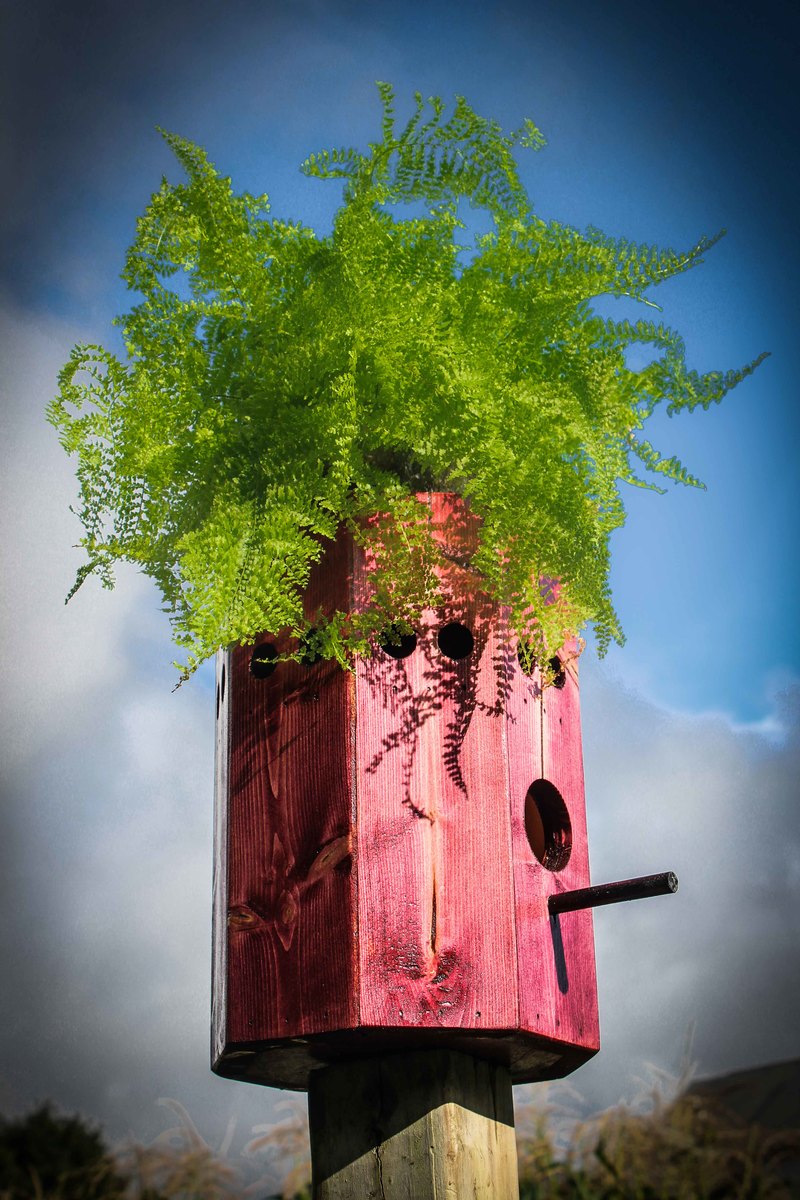
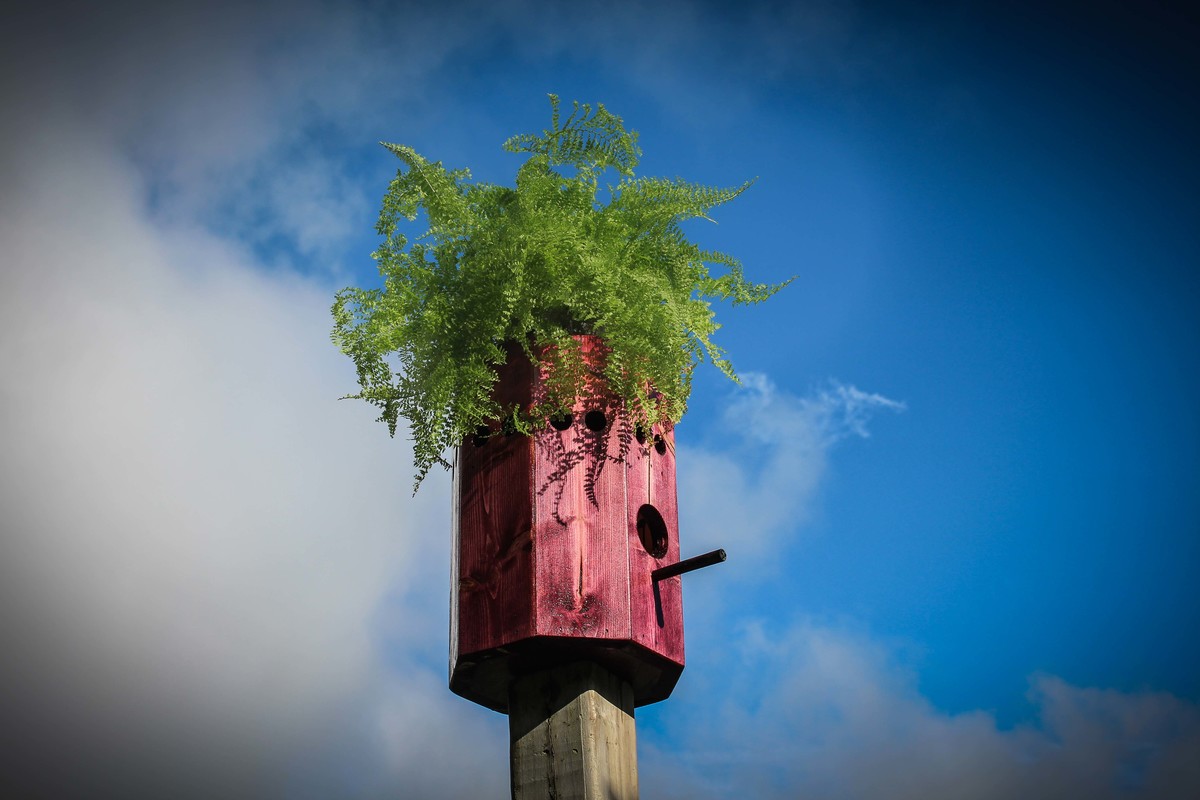
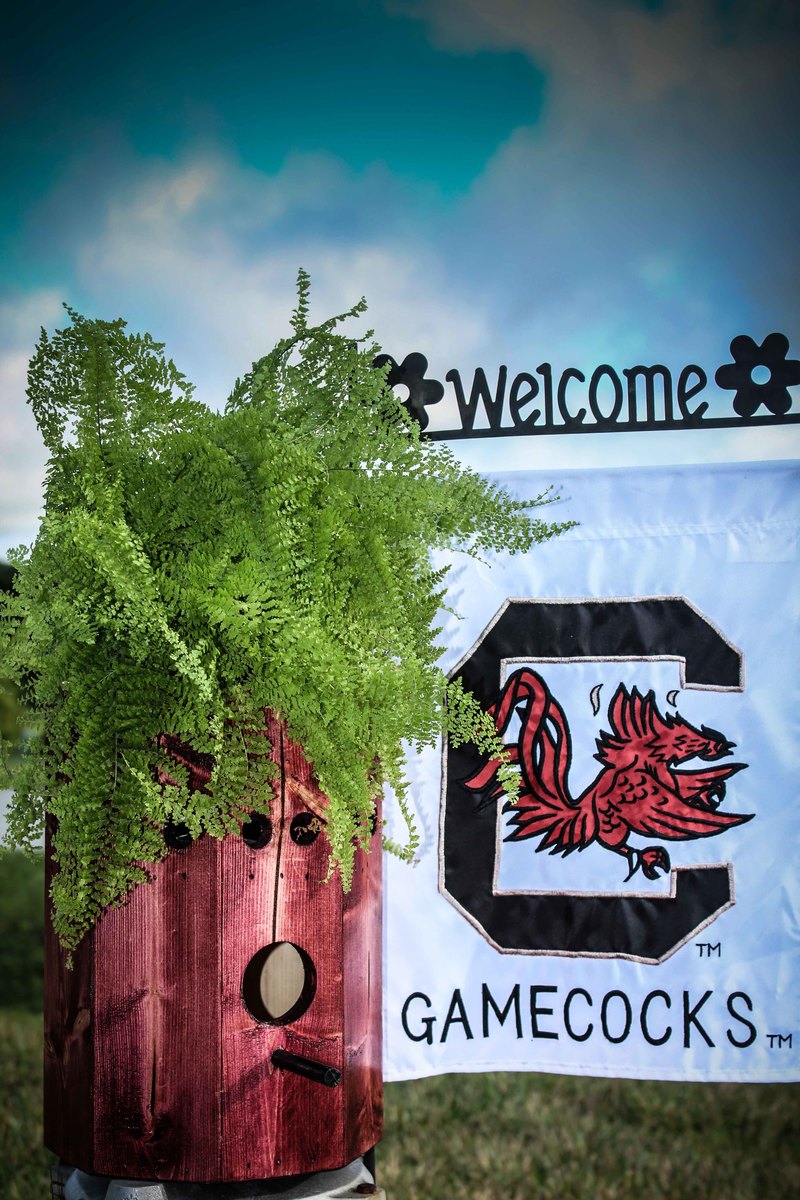
Estimated Time Investment
Afternoon Project (3-6 Hours)
Finish Used
Stain
Recommended Skill Level
Beginner
Comments
Kitchen Nook

I wanted a corner kitchen table. I used the farm house table plans and made up the bench!
Built from Plan(s)
Estimated Cost
$280
Estimated Time Investment
Week Long Project (20 Hours or More)
Finish Used
Walnut
Recommended Skill Level
Intermediate
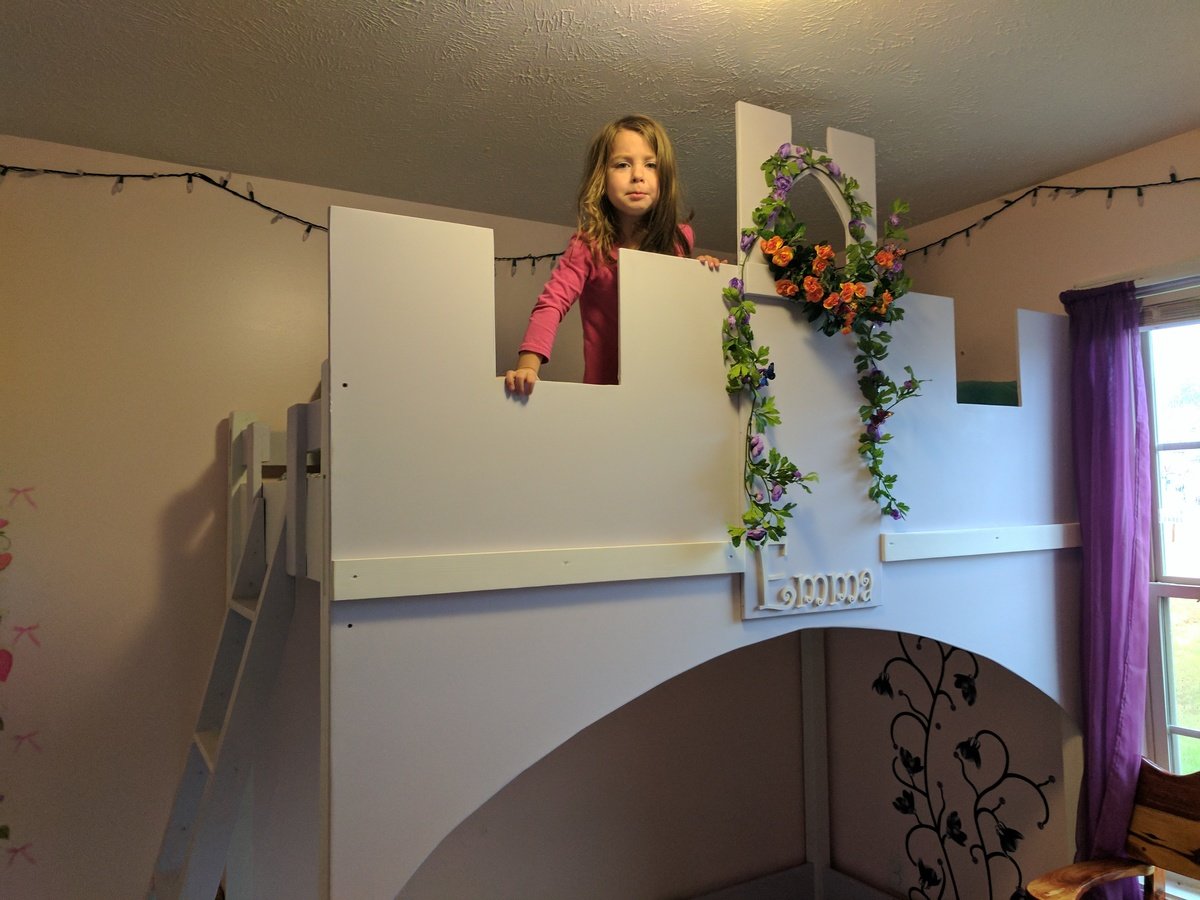
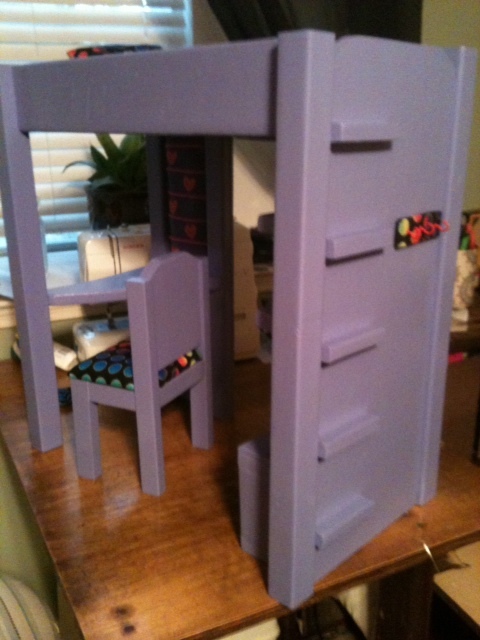
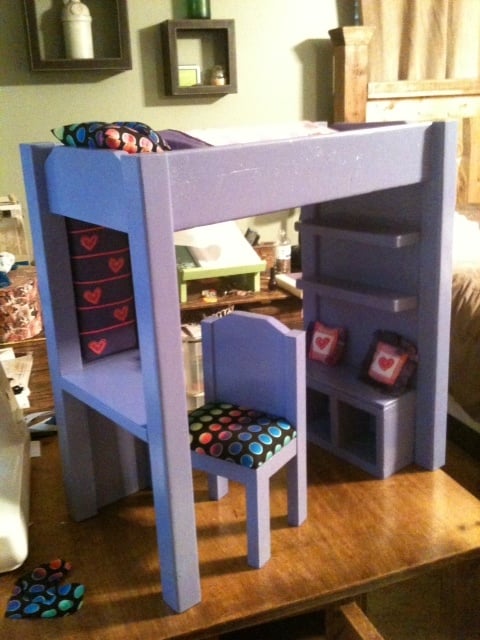
Loft bed for american girl or 18" doll
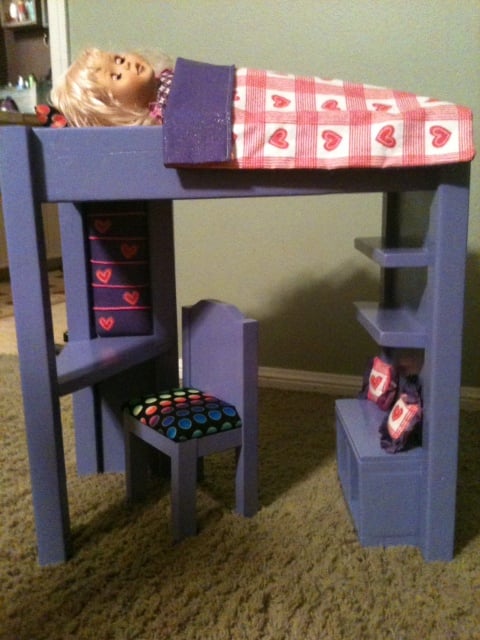
My niece wanted the purple AG loft bed for her doll. Since, the one online is $225 and back ordered until December...I came up with this one for free! I used scrap wood and fabric that I had left over from other projects. The bed has a built in desk top, shelves, cubbies, ladder, bulletin board, and coat hooks. It took me a couple of hours to build the bed and the chair and about an hour to sew the comforter and pillows. The painting took a little longer because I was out of purple spray paint! grrrrrrr!
Estimated Time Investment
Afternoon Project (3-6 Hours)
Finish Used
Kilz primer first and then, I mixed a dark purple gloss with some white to get the lavender colored paint.
Recommended Skill Level
Beginner
Comments

Thu, 11/08/2012 - 17:50
The bed is awesome!
Do you have a time frame when you plan to post your plans? My daughter wants one of these for Christmas and was going to get started trying to reverse engineer based on photos. Then decided to check internet and found this! Would love to get plans do not care if scanned pieces of paper. Thank you!
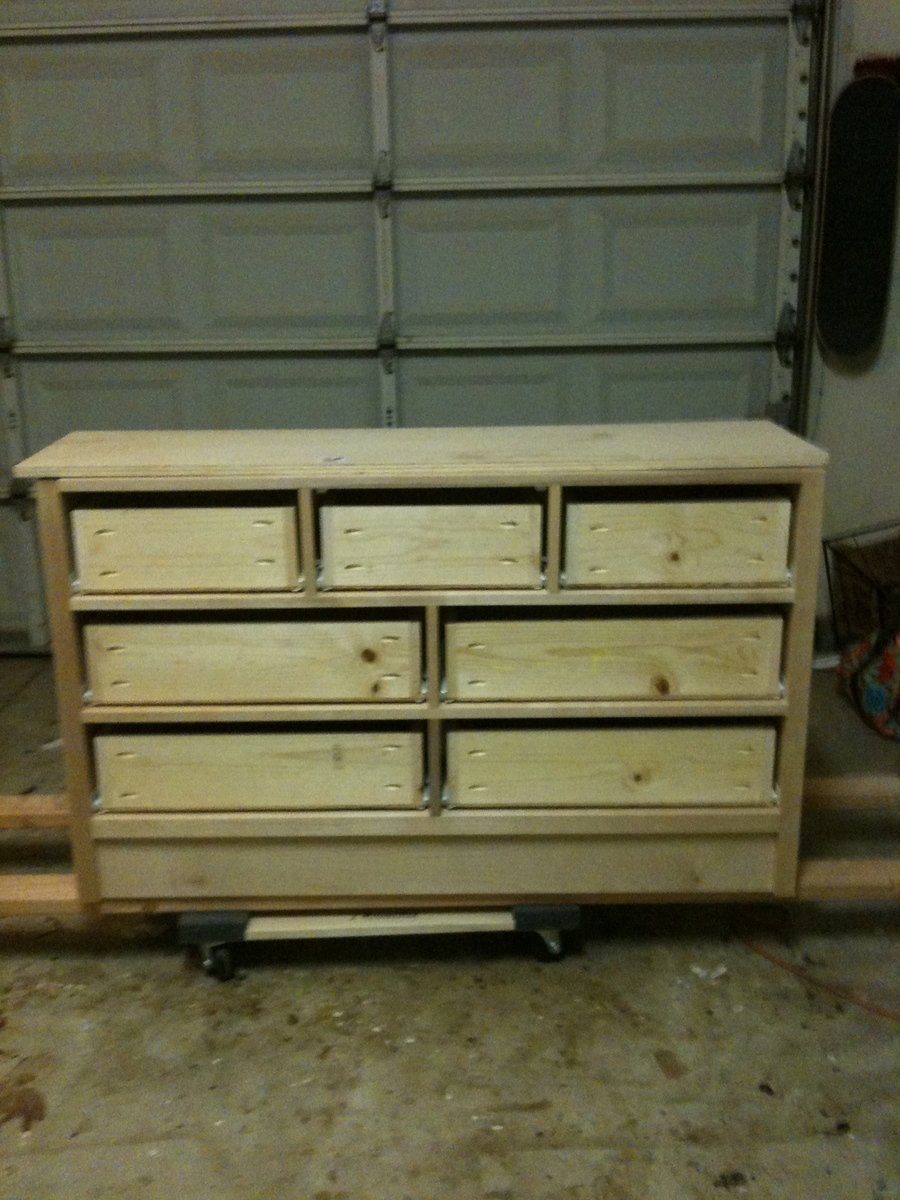
Kendal Dresser
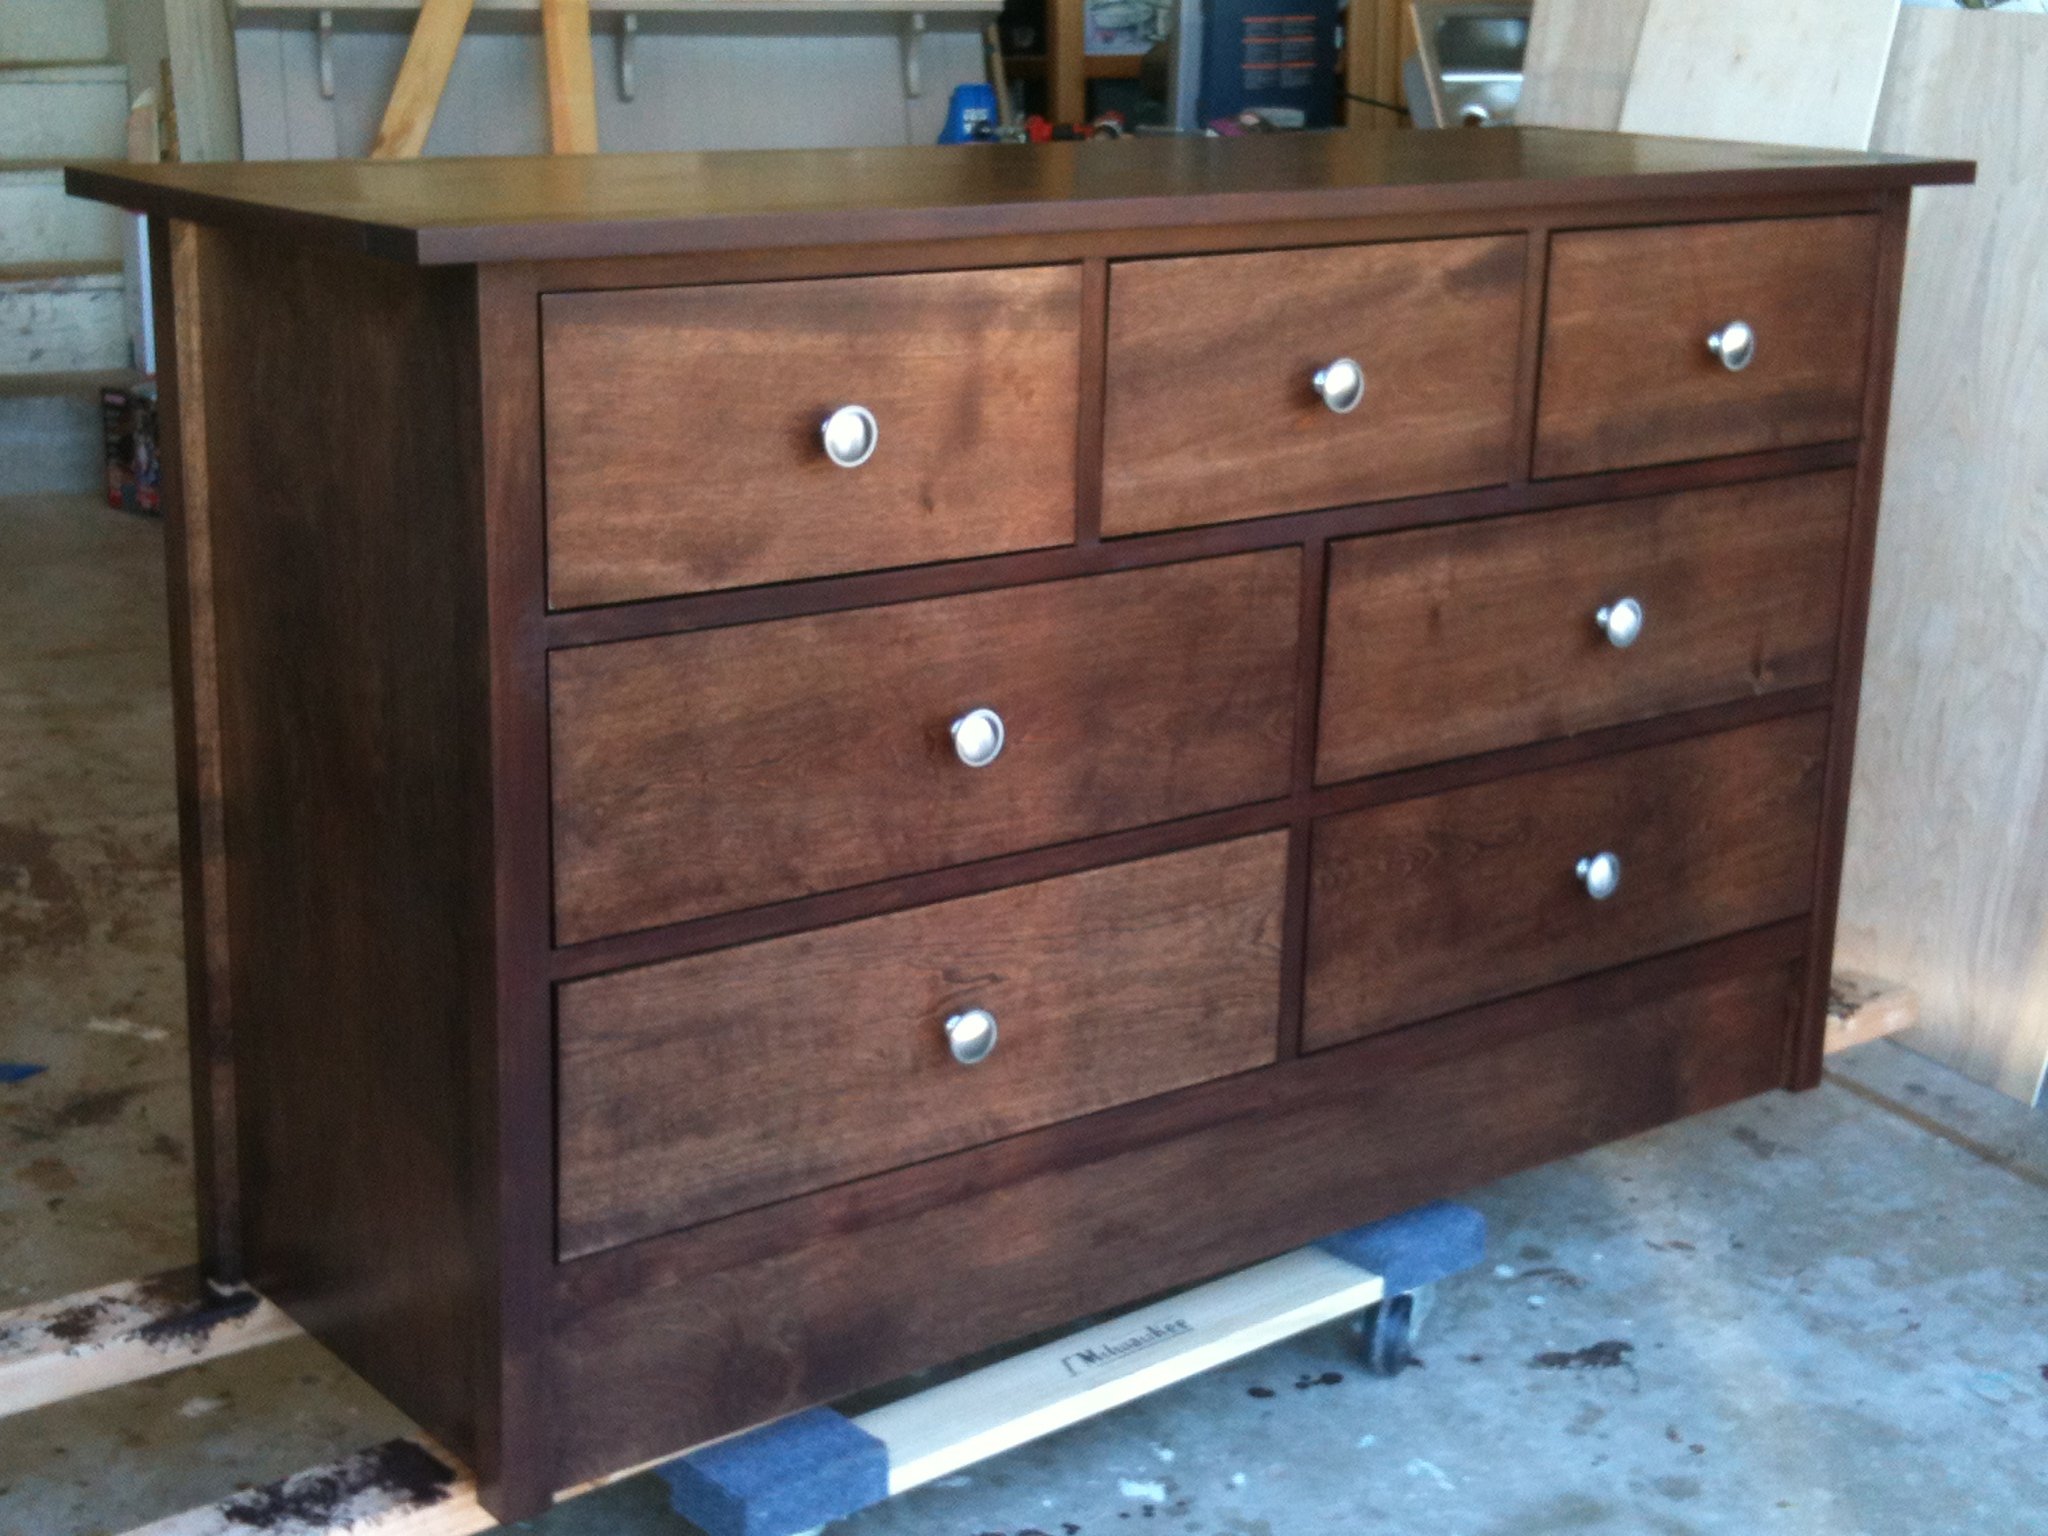
My cousin is having a baby boy and needed a dresser for the little guy. I made this for her as a shower present. I love that it was made to fit her needs and that it is made out of solid wood. Not at all like the cheaply made dressers costing much, much more in the retail stores.
The blog from Katie and John from Sew Woodsy was not only helpful but very cute. Kudos to Katie for attempting a large project while prego. It couldn't have been easy.
The only change I made other than the color was covering the space under the dresser. She didn't want to have to collect toys from underneath the dresser or clean dust.
The plans were awesome and I would recommend reading the blog from Sew Woodsy. Their comments were helpful and so were the pictures.
Built from Plan(s)
Estimated Cost
300.00
Estimated Time Investment
Weekend Project (10-20 Hours)
Finish Used
ZAR Wood Stain in Moorish Teak and ZAR clear stain finish
Recommended Skill Level
Intermediate
Comments
Wed, 08/20/2014 - 09:45
Wow! This is beautiful! It is
Wow! This is beautiful! It is one of the designs I like the best if we ever decide to build a dresser, as well. :) I will keep your finish in mind.
Sat, 01/03/2015 - 19:38
Building Materials
Congrats, your piece is a beauty. Please, can you tell me what type of wood you used for the drawer fronts.
They seem so clear. AKA Knot Free. I have done a work up on material costs and have not come close to the estimated 300.00. So I was thinking that maybe you splurged on "Clear" Pine boards for the front facing elements. Thanks in advance for your answers.... Happy New Year!
Tue, 01/06/2015 - 12:44
$300 is the number I'm coming
$300 is the number I'm coming up with for #2 or better S4S pine boards plus stain and clear coat. #2 graded pine is definitely not clear. I'd like to know what kind of wood you planning to use and where you are getting it because this is the cheapest I can find in the Pacific Northwest.

In reply to $300 is the number I'm coming by tylerrencher
Sun, 07/12/2015 - 20:00
I've checked out Frost
I've checked out Frost Hardwood and I love their products. They have clear wood that they can mill down to size but it is very pricey. I'm saving up for a really nice dresser but until then I'm gonna stick to the birch plywood at home depot and birch boards that I get from my local specialized lumber houses. Thank you for your comment and I hope your turns out to your liking. I think what really makes this dresser is the stain and finish I used. That was recommended by a professional painter friend who does this kind of thing everyday. The info for that is on my post.
In reply to Building Materials by dhendy13
Sun, 07/12/2015 - 19:54
I'm so sorry I didn't know
I'm so sorry I didn't know there were questions on this post. The dresser did cost me a little over $300.00. The whole thing was made out of birch which I got at a local lumber house that specializes in furniture grade wood. This probably doesn't help you anymore since I'm sure you've already made your dresser.
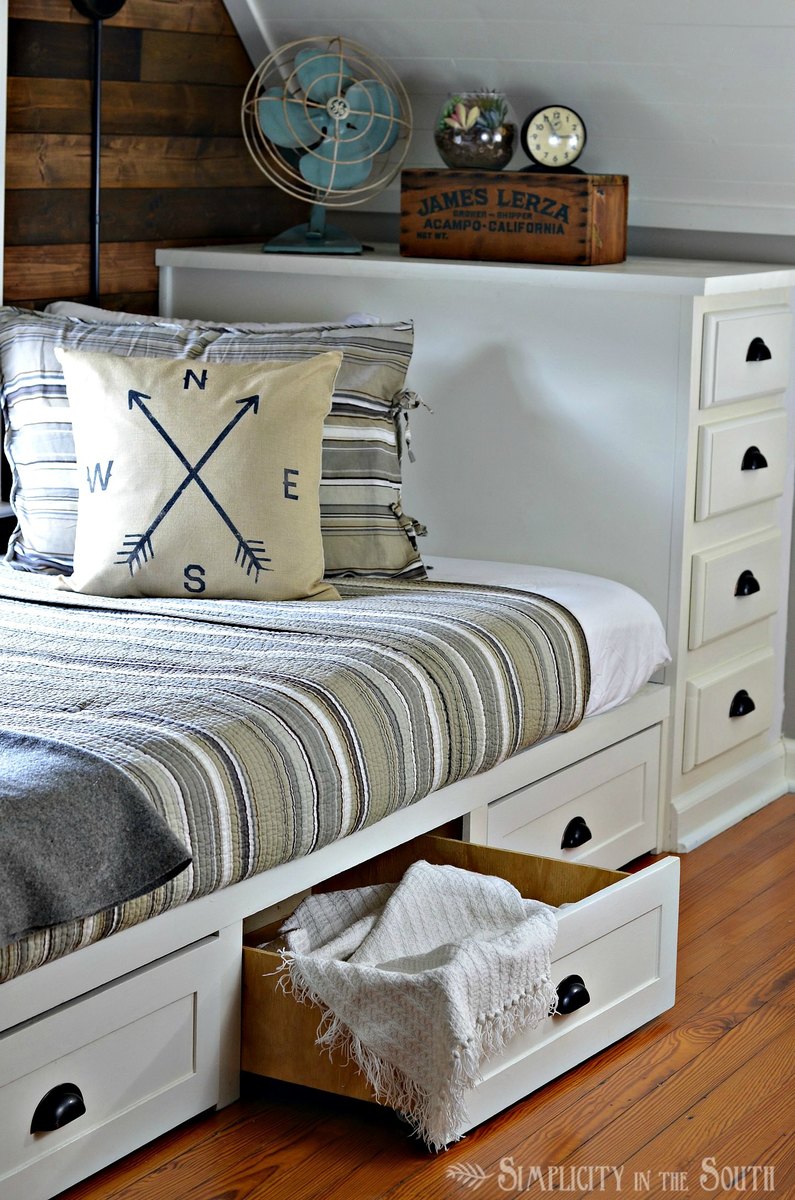
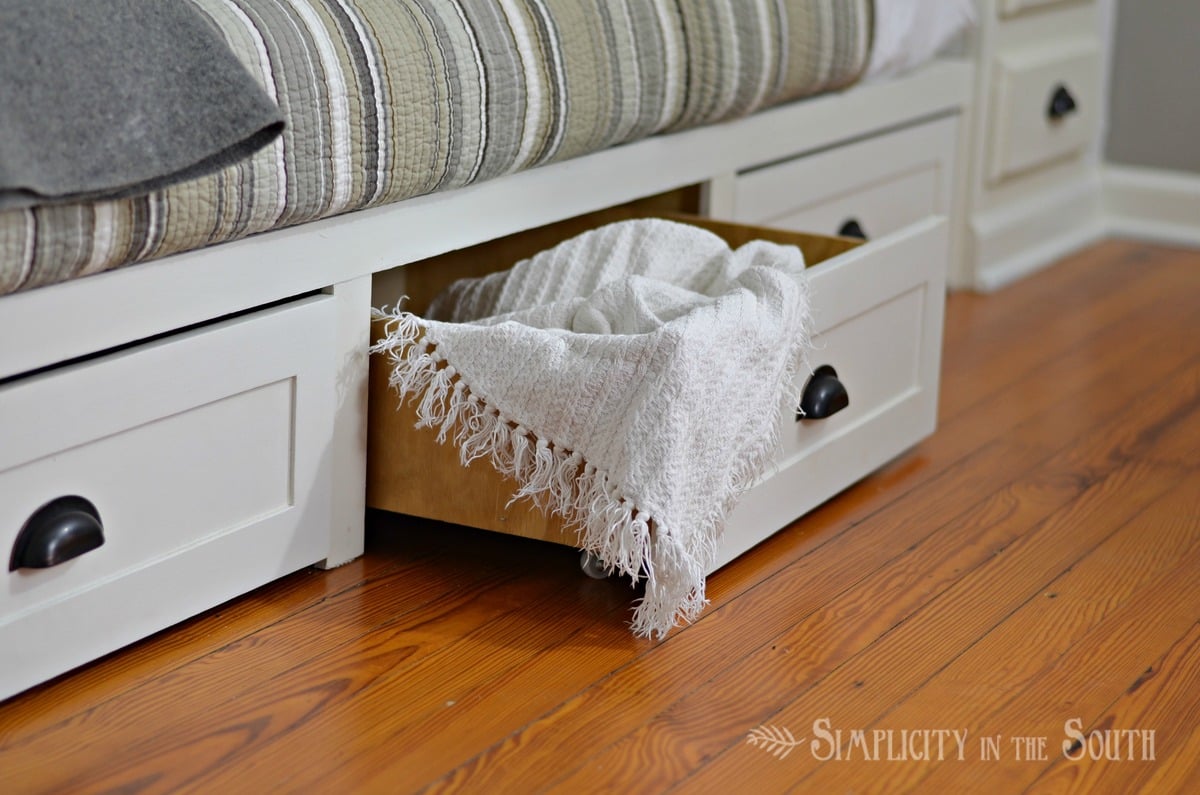
Built-In Bed with Trundle Drawers
My oldest son's room is only 97 square feet. We needed to add the maximum amount of storage in the small, awkwardly-shaped room. My husband and I decided to make a built-in bed using a couple of stock cabinets to flank the bed. Using Ana White's plans, we made 3 rolling trundle drawers to go underneath.
Built from Plan(s)
Estimated Cost
Cost for the trundle drawers, themselves, with the hardware was $14.00 per drawer. The total cost for the built-in bed, trundle drawers, and 2 cabinets that flank the bed was $480.
Estimated Time Investment
Weekend Project (10-20 Hours)
Finish Used
Painted
Recommended Skill Level
Intermediate
Comments

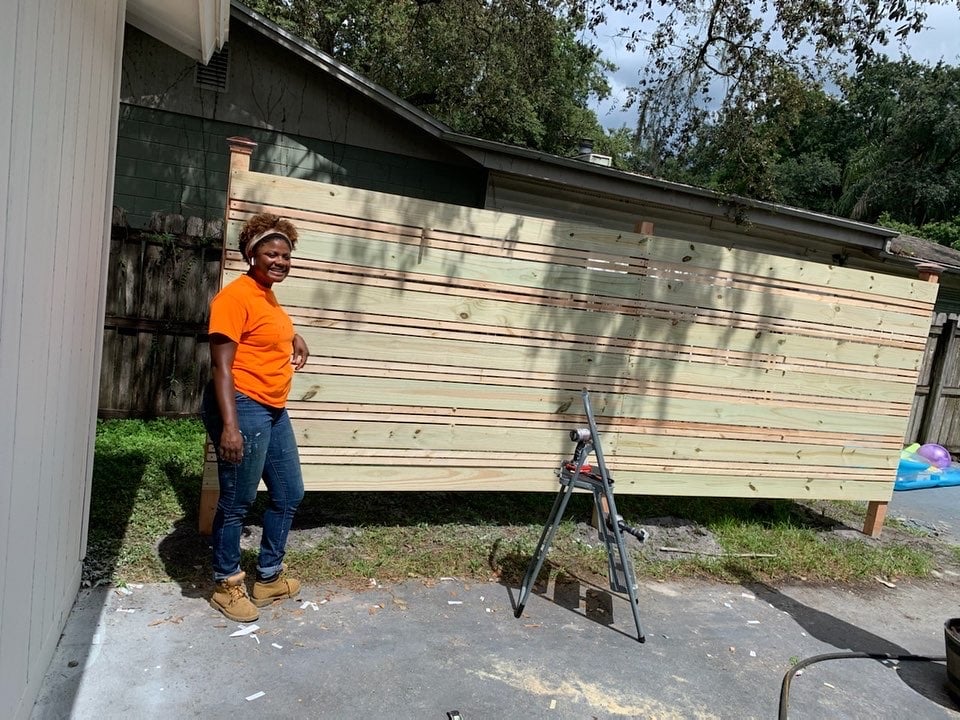
Outdoor Privacy Wall
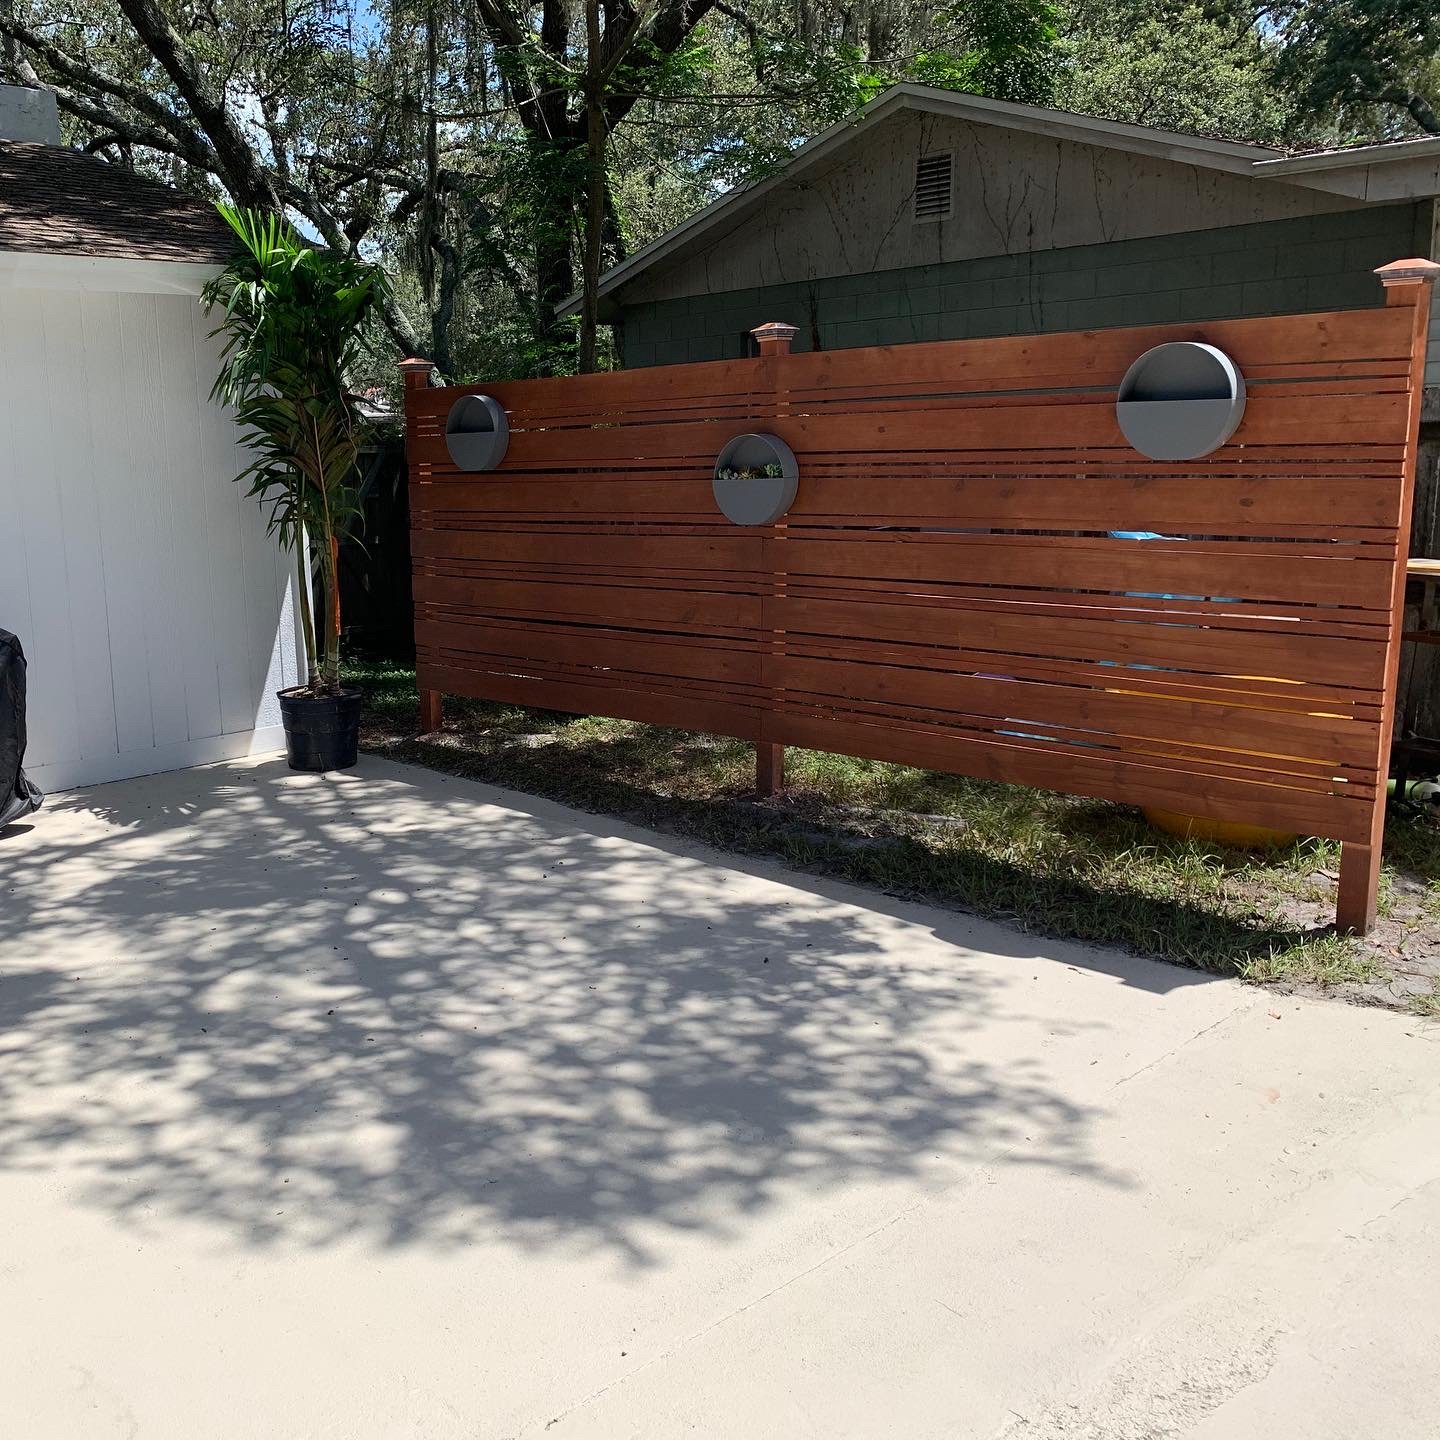
I built this wall to give us a little privacy when our family wants to lay out and go swimming. Also, to hide our neighbor’s ugly fence! The length for all pieces are 8’ long for no cutting and the widths are 1x2, 1x6, 4x4 with 3/4” spacing and about 100 or so deck screws. I modified the pattern from a photo of a fence I seen on HomeDepots YouTube.
Estimated Cost
140
Estimated Time Investment
Afternoon Project (3-6 Hours)
Finish Used
Thompson Waterseal - Semi Transparent - Autumn Brown
Recommended Skill Level
Beginner
Wood Herb Planter
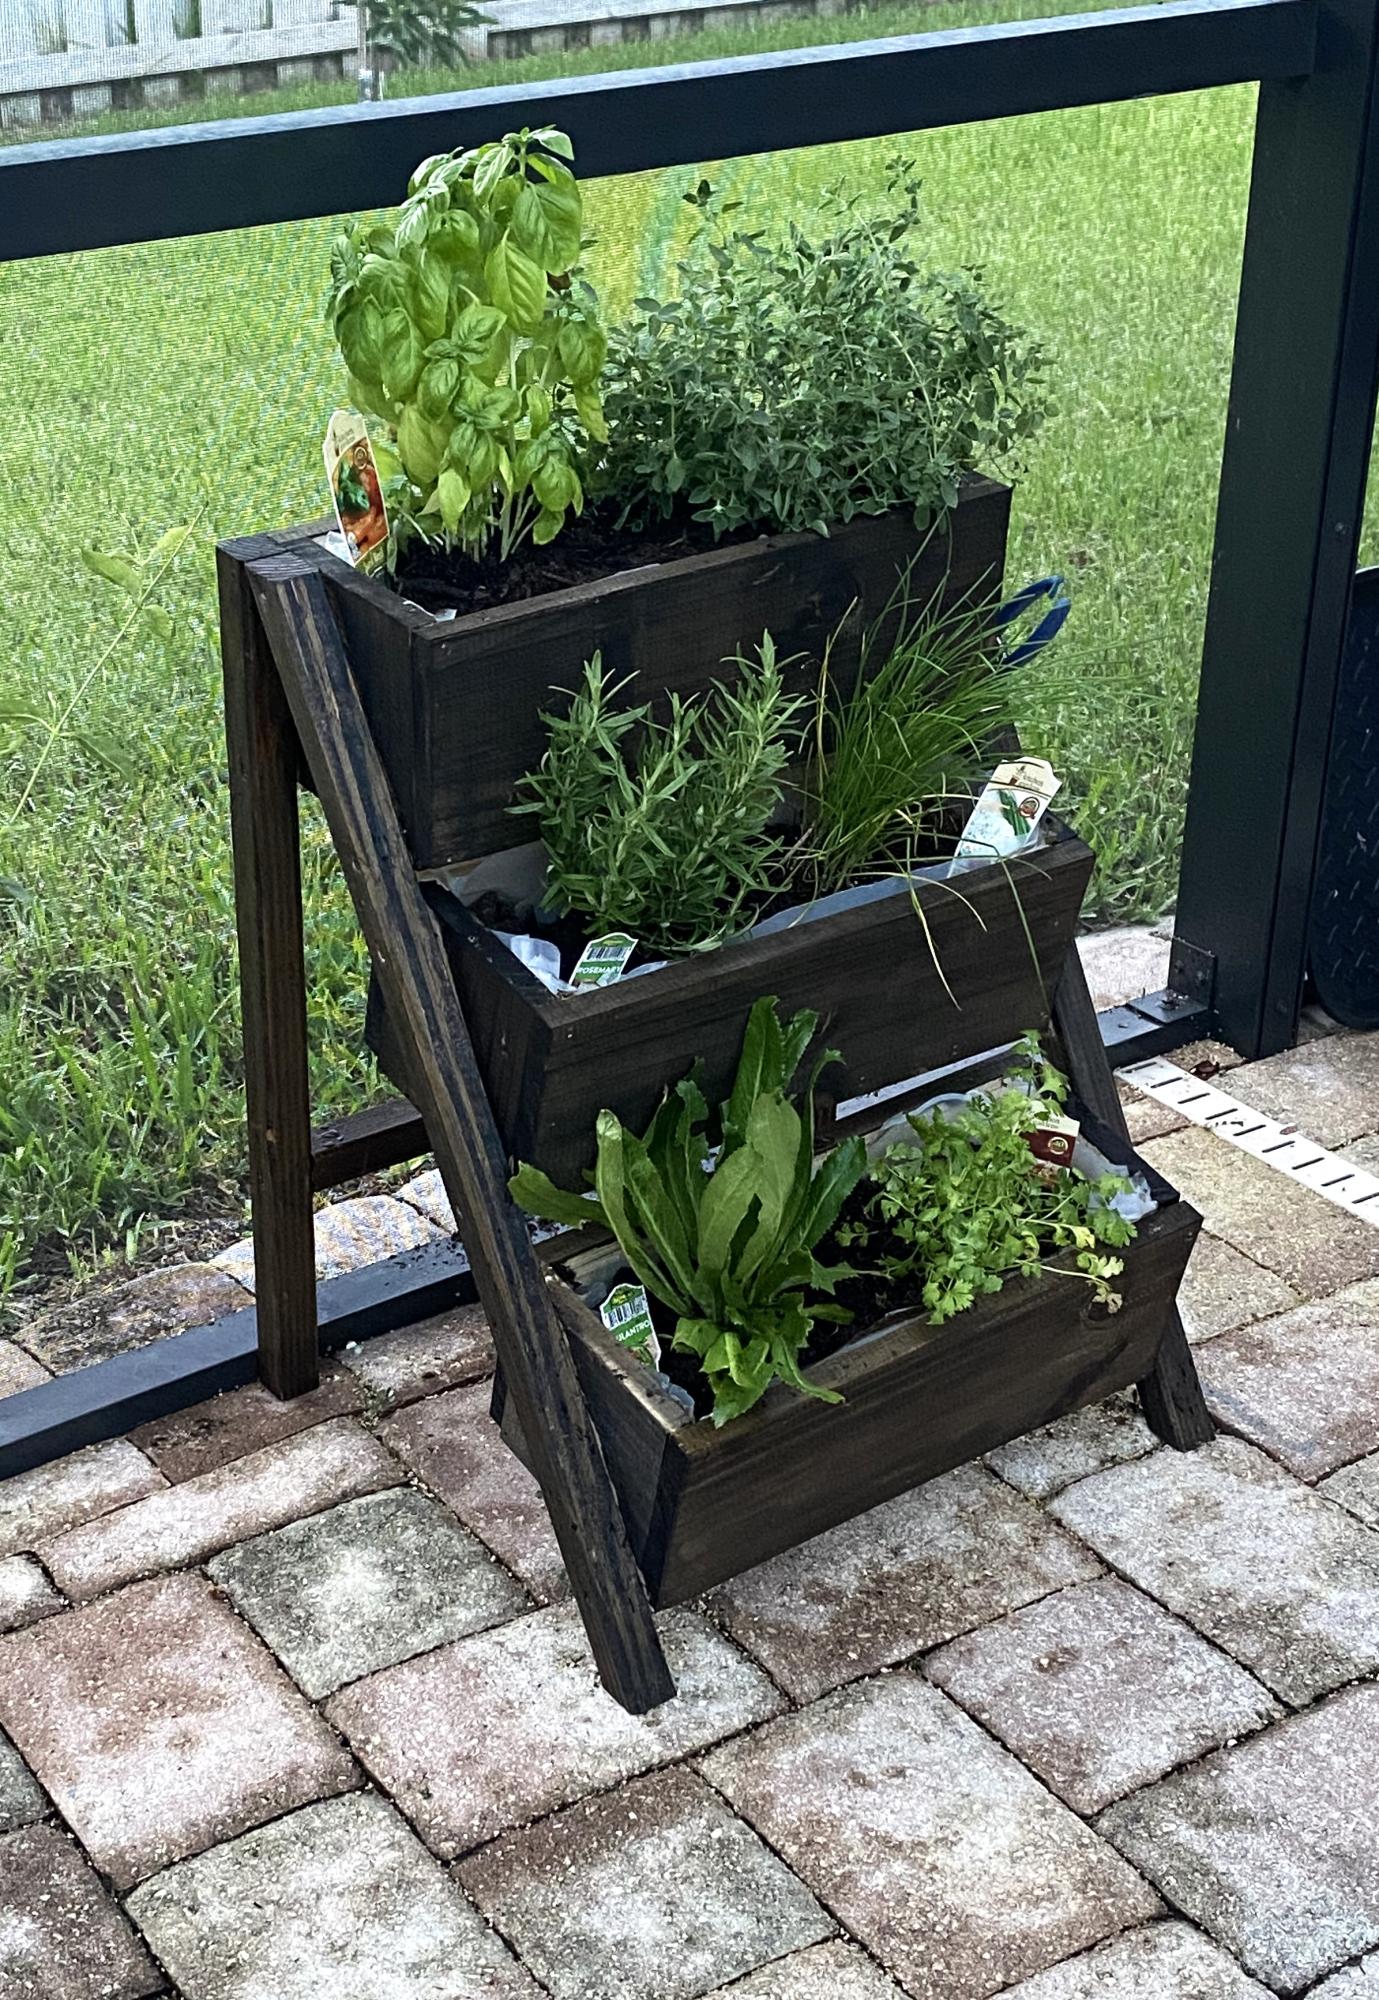
DIY Wood Tiered Herb Planter
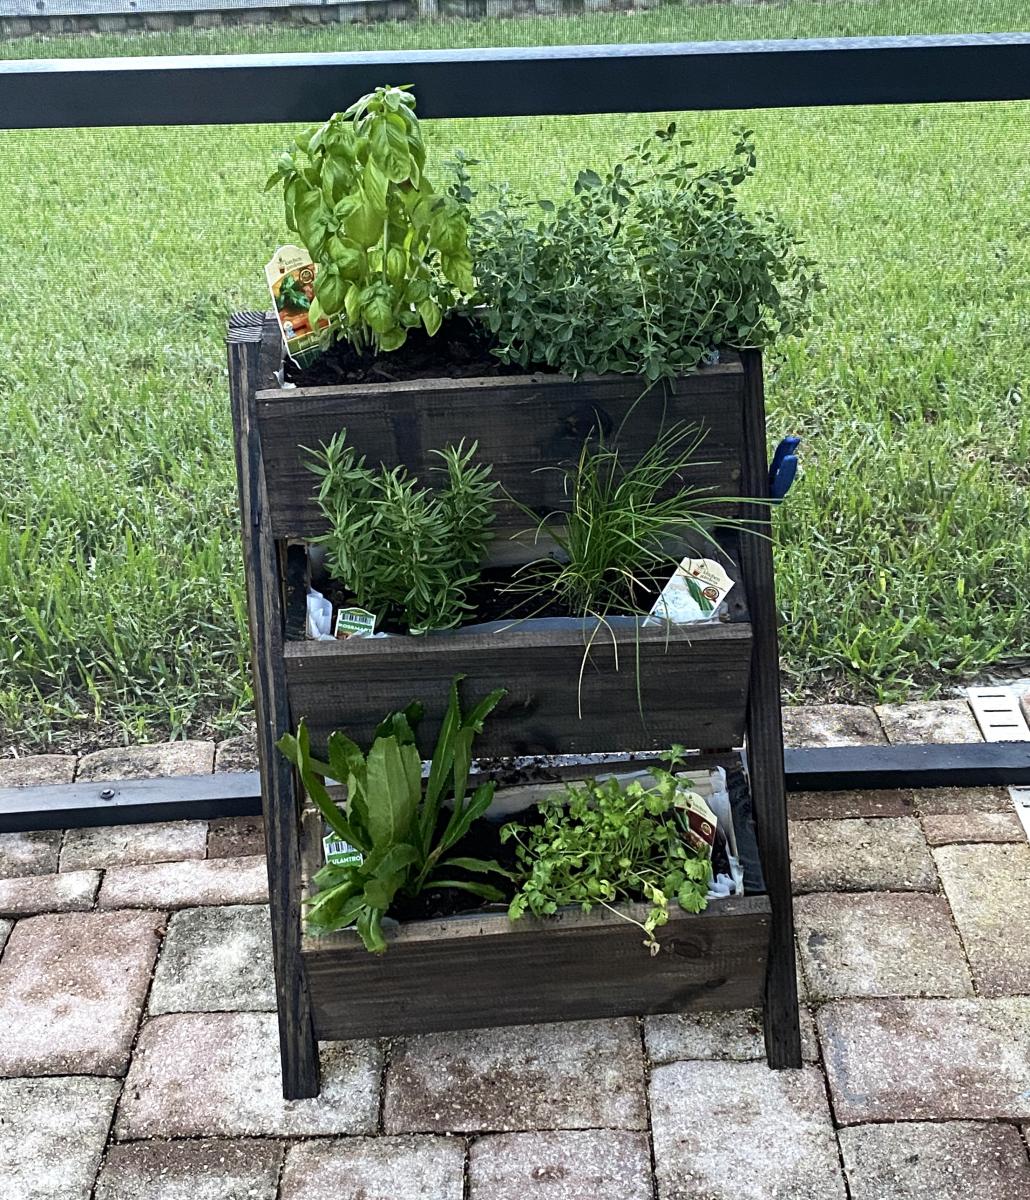
Built from Plan(s)
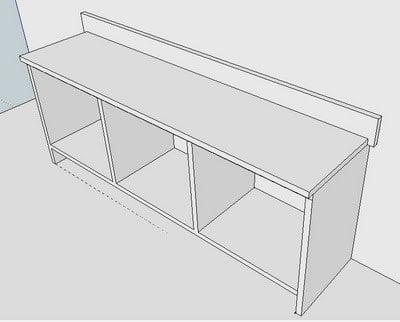
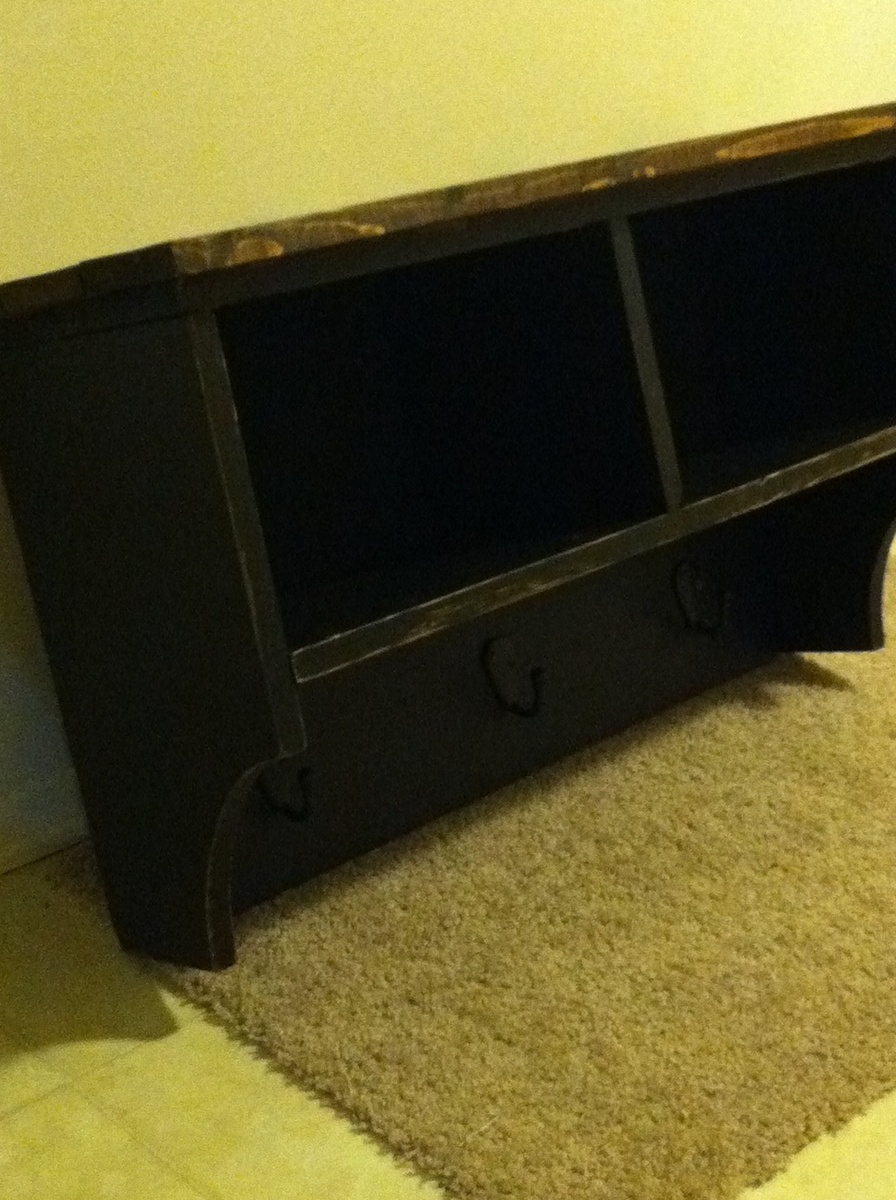
Entryway Cubby from Book
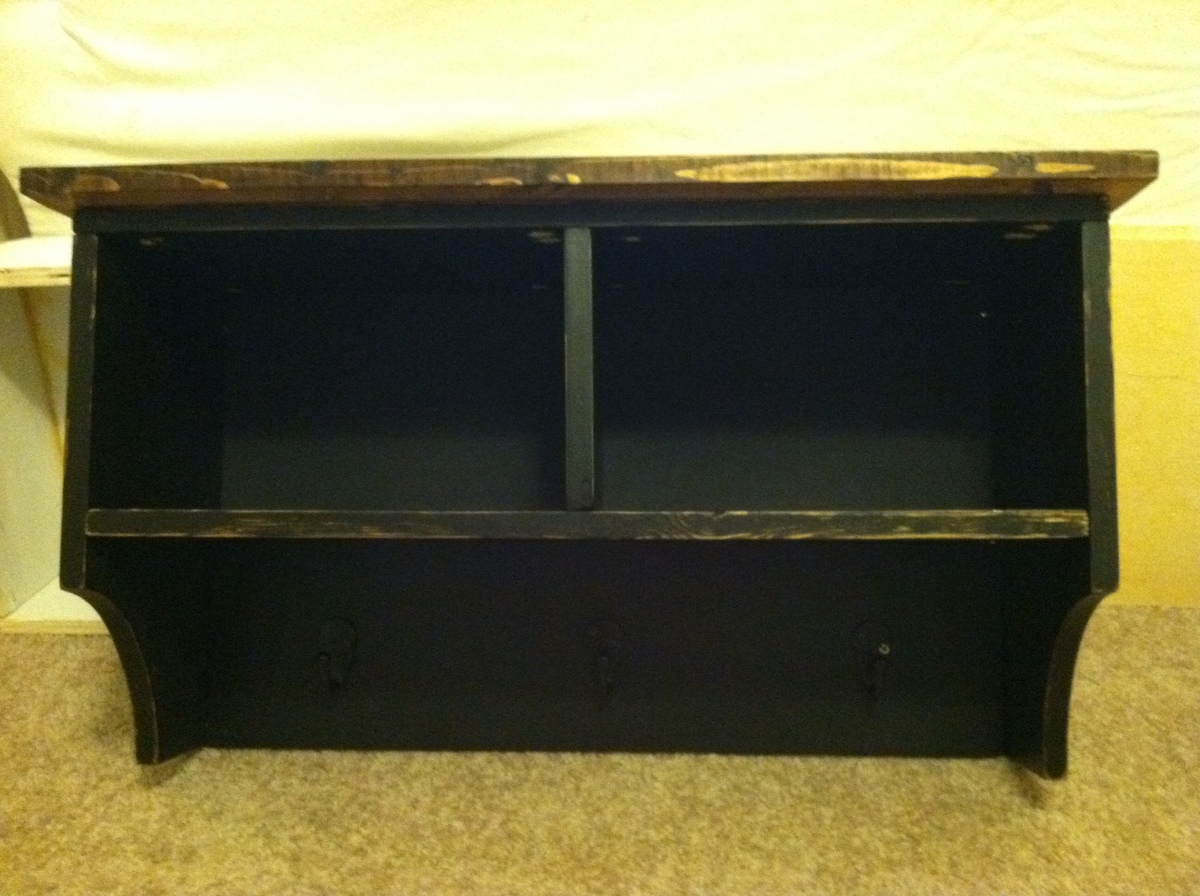
I have been wanting to build an entryway cubby for some time now and was excited to see these plans in the book! (Awesome job, by the way!). I modified the plans to fit my entryway space and also used all wood left over from other projects. I added the wood top too. Now I just have to figure out how to hang it!
I'm actually in the process of finishing the Apothecary media console so I used this project to test out the finish I was thinking about using.
Paint: Behr Premium Plus in Beluga, Flat finish
Wood stain: Minwax Dark Walnut, 2-3 coats (I did pre-condition the wood before staining)
Poly: Rustoleum Ultimate Soft Touch Matte
I love the Rustoleum soft touch poly-it dries so beautifully.
I did glaze the edges, too.
I'm planning to build the bench next and finally my entryway will be organized (hard with a 2 1/2 year old!)
Built from Plan(s)
Estimated Cost
Nothing, I used left over wood from other projects
Estimated Time Investment
Day Project (6-9 Hours)
Finish Used
Paint: Behr in Beluga, flat
Stain: Minwax Dark Walnut
Poly: Rustoleum Soft Touch Ultimate in Matte
Used a glaze over the edges
Stain: Minwax Dark Walnut
Poly: Rustoleum Soft Touch Ultimate in Matte
Used a glaze over the edges
Recommended Skill Level
Beginner
Ana-White's Modern Park Bench
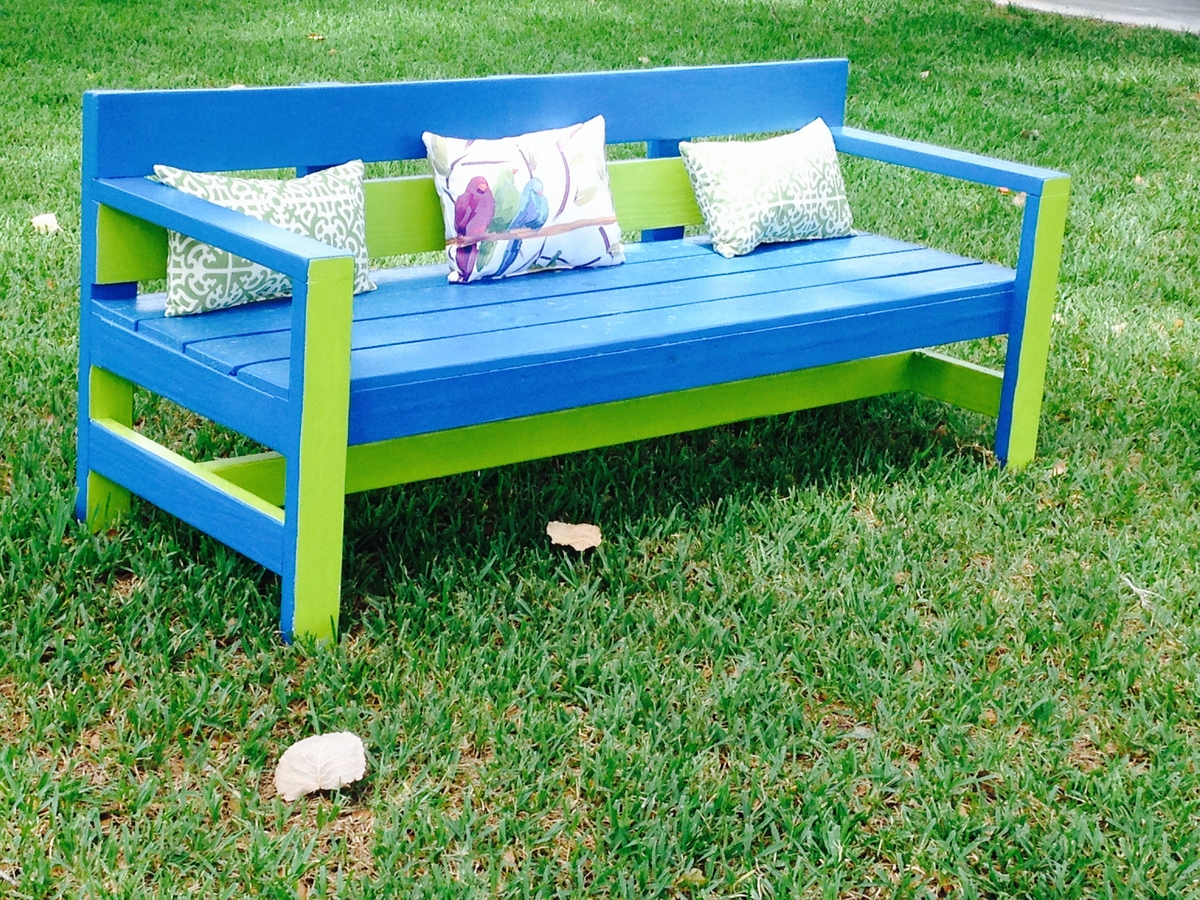
I told my husband that I wanted to try a project since he was getting to have all the fun building around the farm. So we bought the materials and started this bench. It was so easy. The only things he helped me with were some of the measurements and to speed things along :) some of the cutting. The project took us about 2 days. I had some paint I was going to use on another project so I just used it. I have the bench under some trees by my grandkids' swing. Thank you Ana for all the plans you graciously share. I have made a point to visit your sponsors' websites and actually visit their stores when I am able. Go for it ladies. You can do it!!!
Estimated Cost
$72
Estimated Time Investment
Day Project (6-9 Hours)
Finish Used
We used Kilz first since I only had a pint of each color and I wanted to be sure I had enough. We still used 2 coats of each color. We bought the Valspar paint at Lowes which by the way, has the worst website ever.
Recommended Skill Level
Intermediate
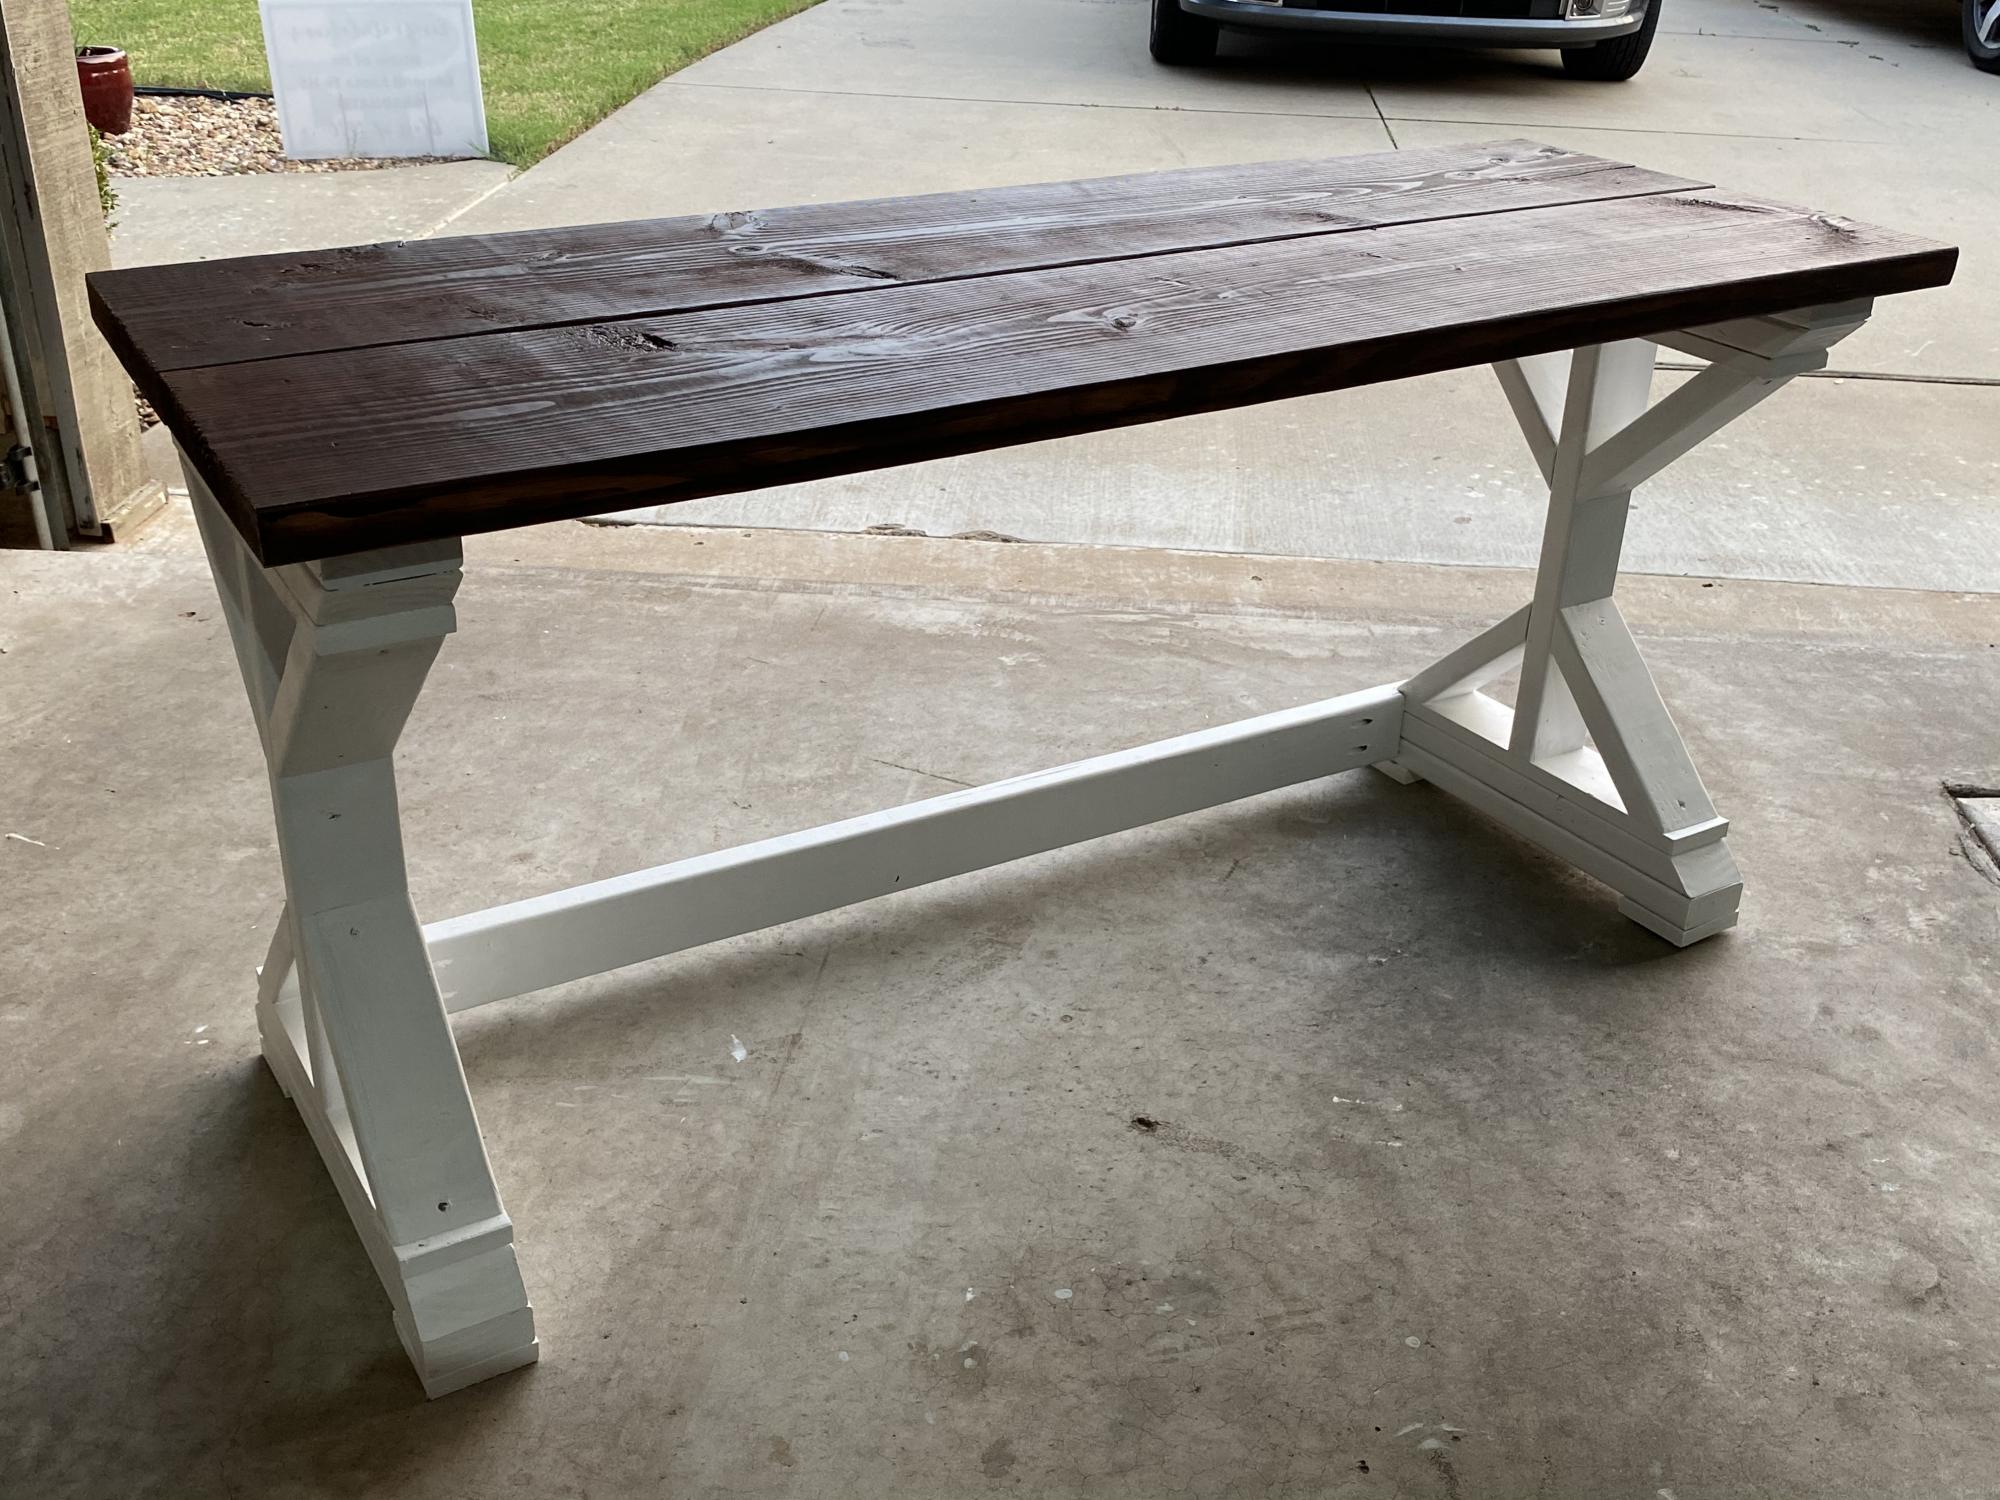
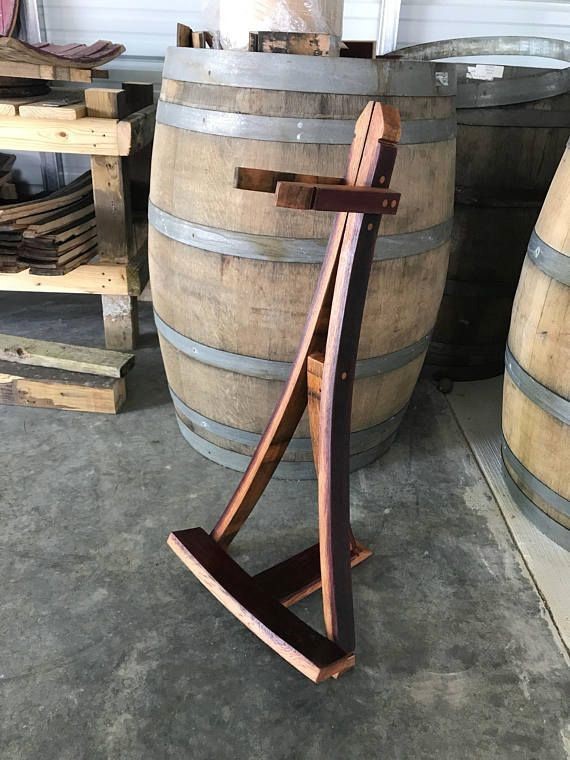
Rustic X Console with a twist
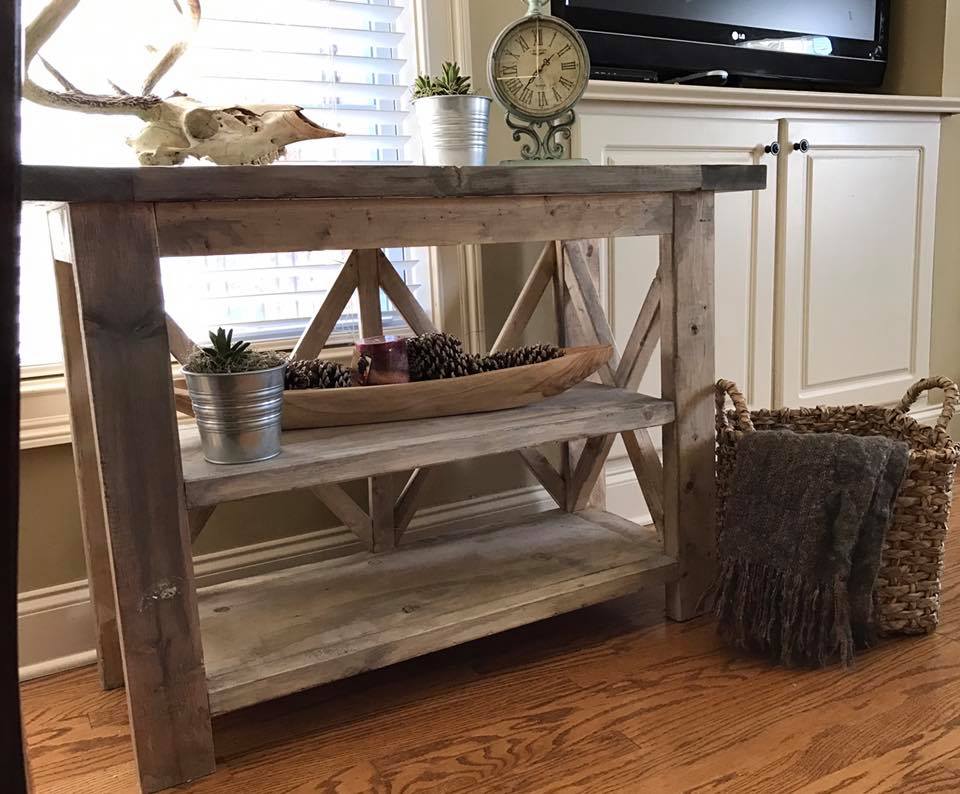
I just love this plan of the rustic X Console. You can create so meny versions from this one plan.
This one I made is 42" long, with two X in the back. The finish, is vinger and steal wool with a dash of black tea.
Thank you,
Rebecca
Built from Plan(s)
Estimated Cost
$30.00
Estimated Time Investment
Weekend Project (10-20 Hours)
Finish Used
Vinger and fine steal wool
Recommended Skill Level
Beginner
Outdoors Simple Modern Chair (dining size)
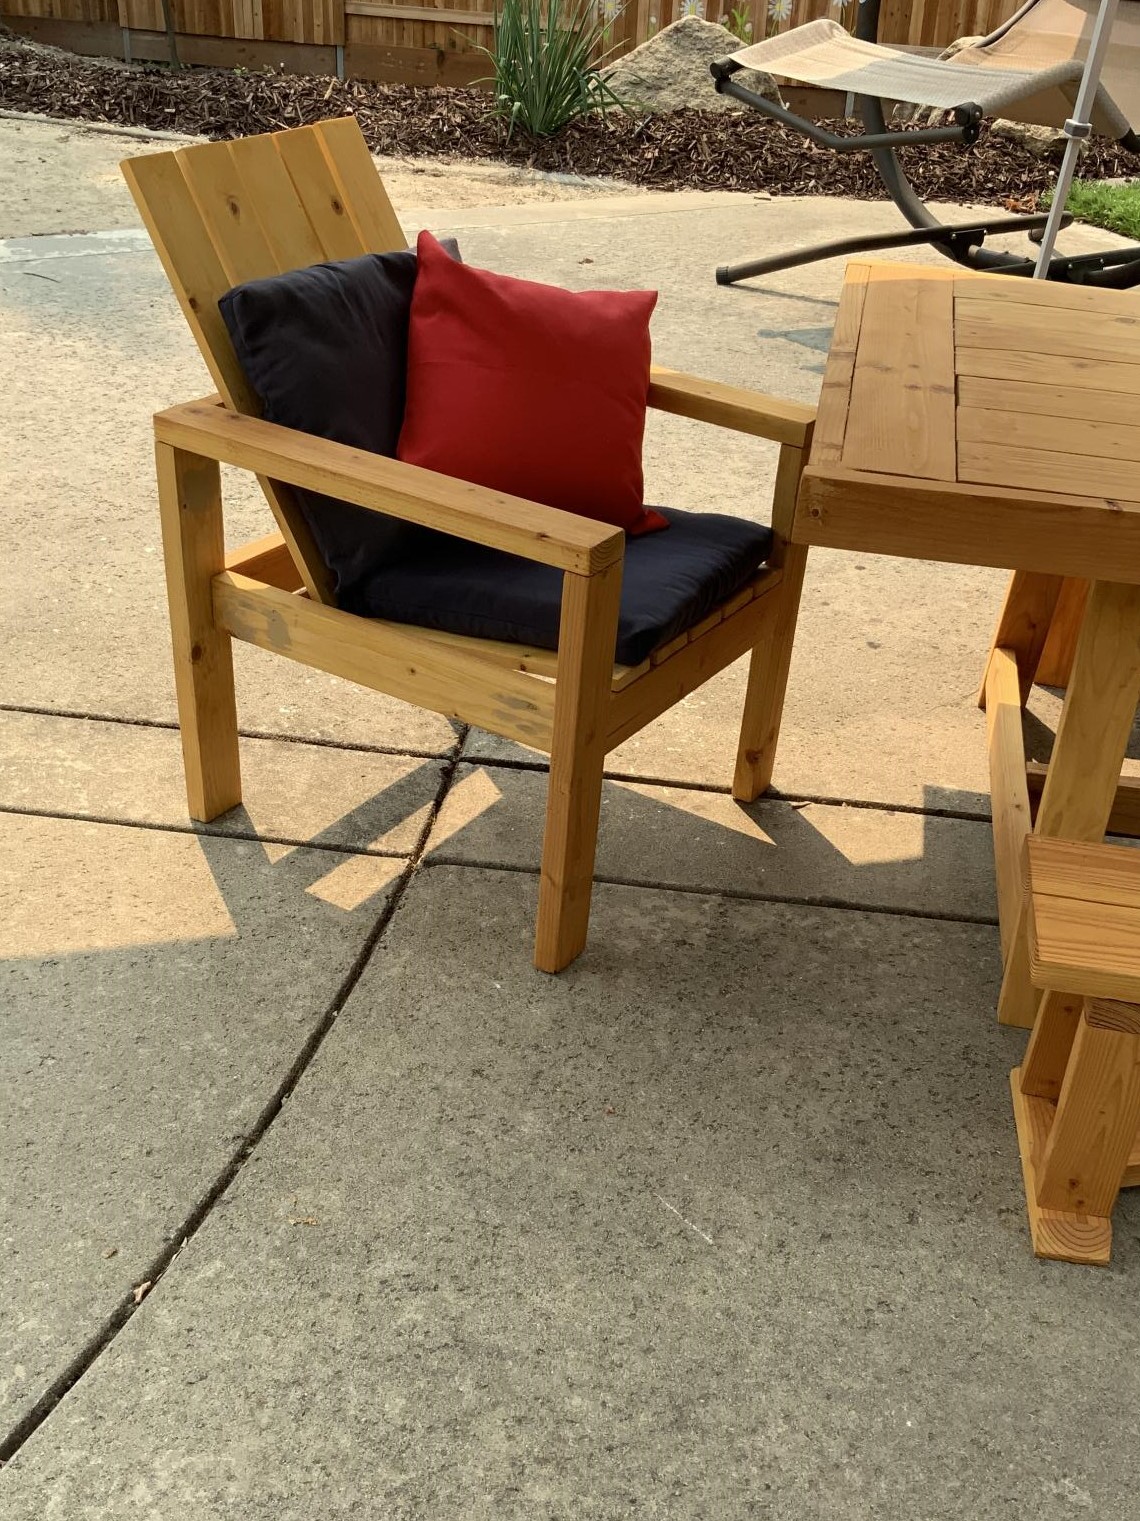
Finally the 3 rd piece made for the COVID-19 Birthday Celebration outdoors for my husband and his twin! “ all together but socially distant” I made the Oudoor Simple Modern Chair (dining size) for the ends of the 2 tables! Again...I’m a nurse never having touched Power tools, let alone knowing what they were called! Ana made it possible for me to create these to celebrate outdoors my husband and his twin for their birthday during a Pandemic!
Estimated Cost
$100 for 4
Finish Used
Matching deck stain and poly all in one Varathane Natural
Built in Closet Tower and Shelves
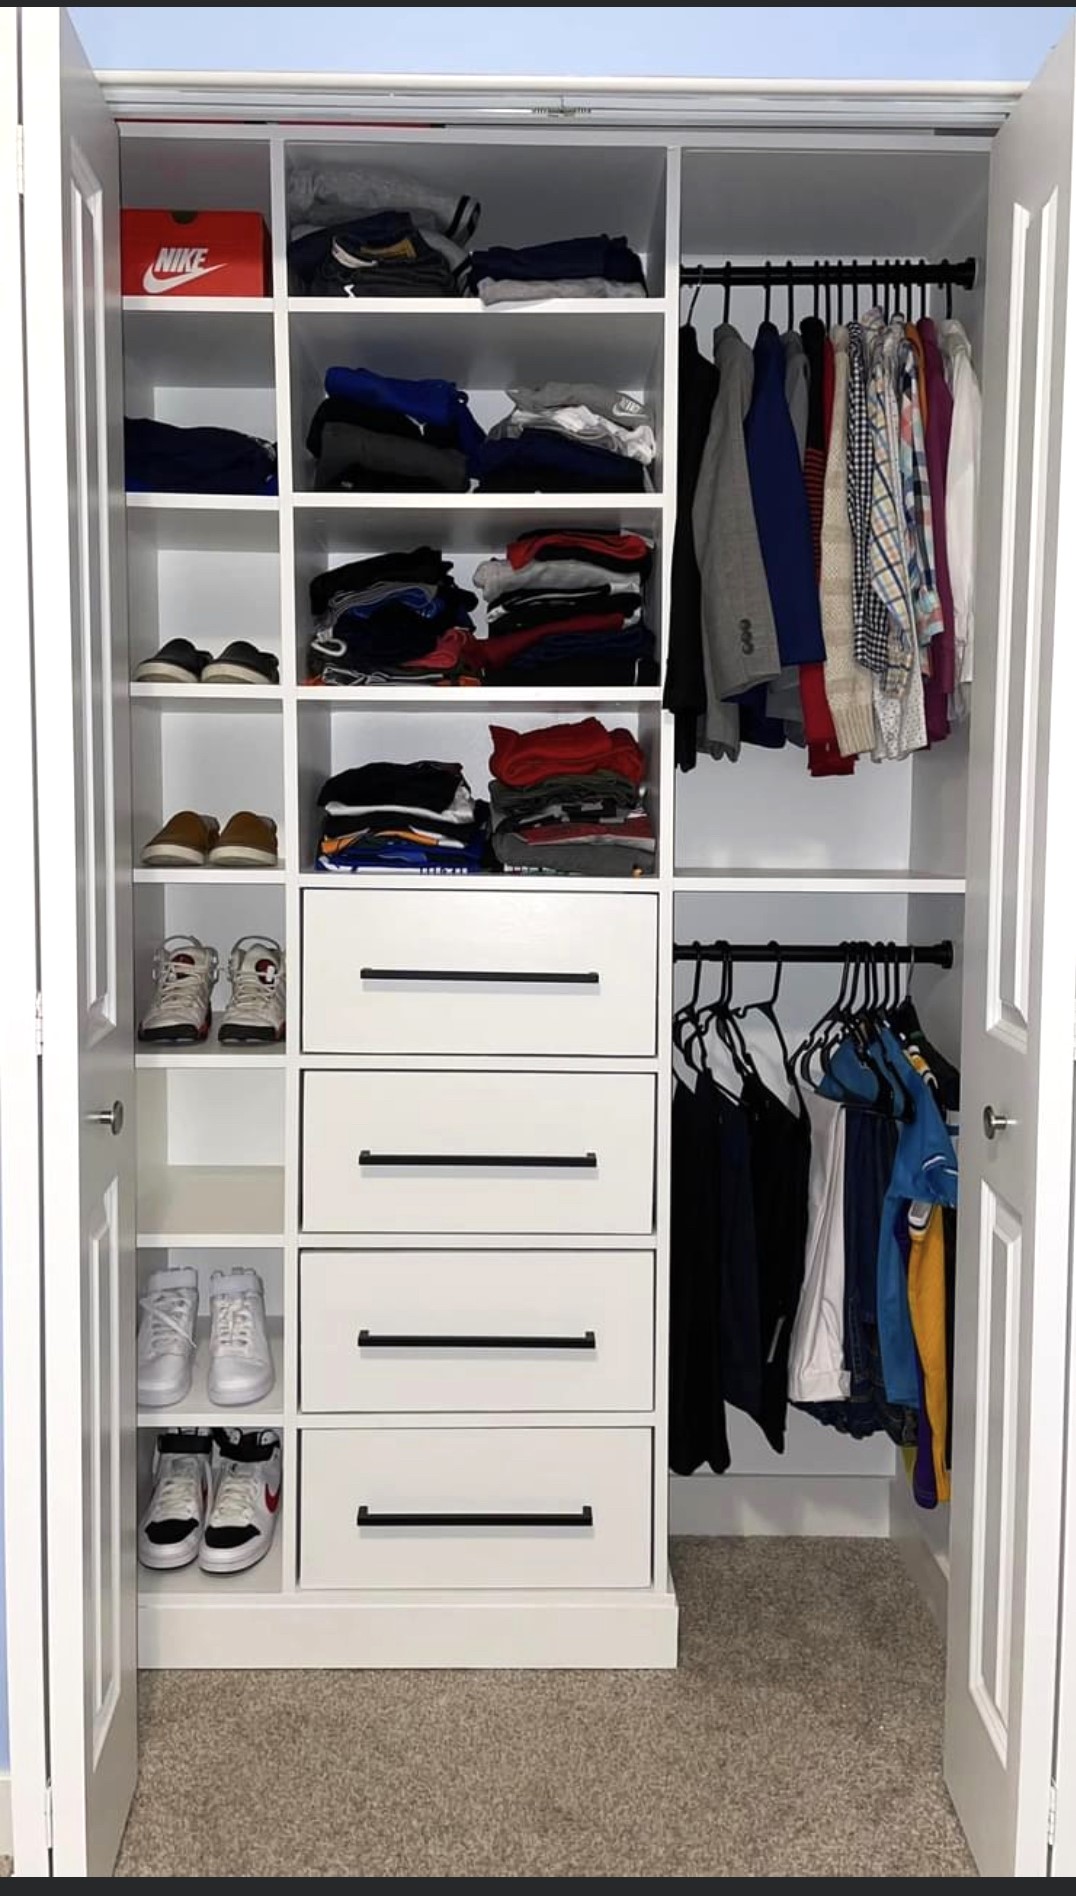
Custom built in closet layout. Easy, functional and sturdy design to accommodate clothing and shoe storage.
Christina Brooks
Built from Plan(s)