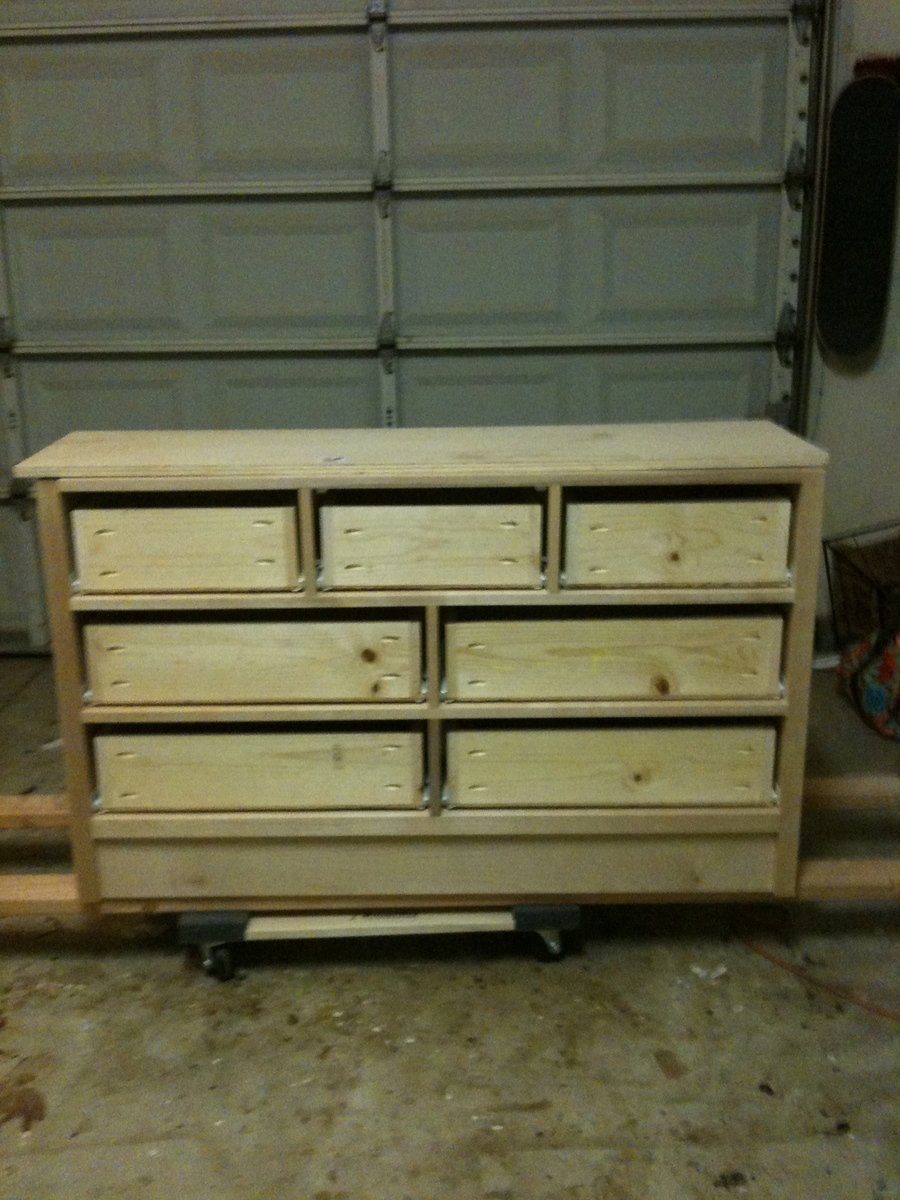
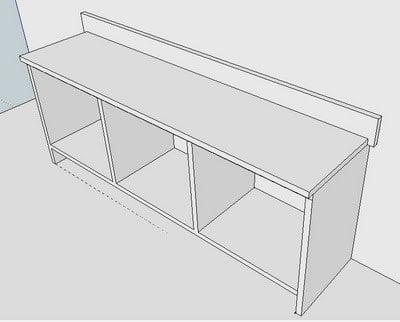
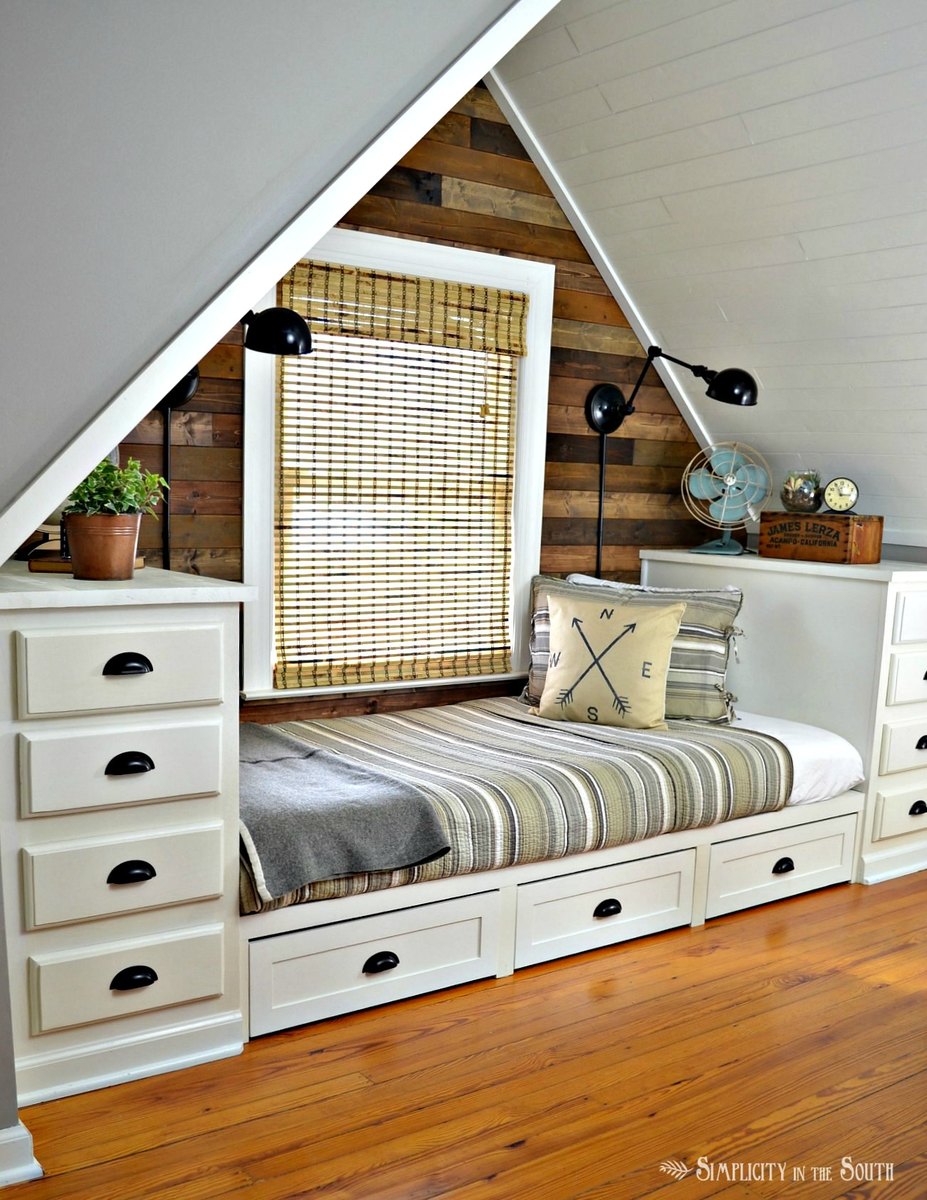
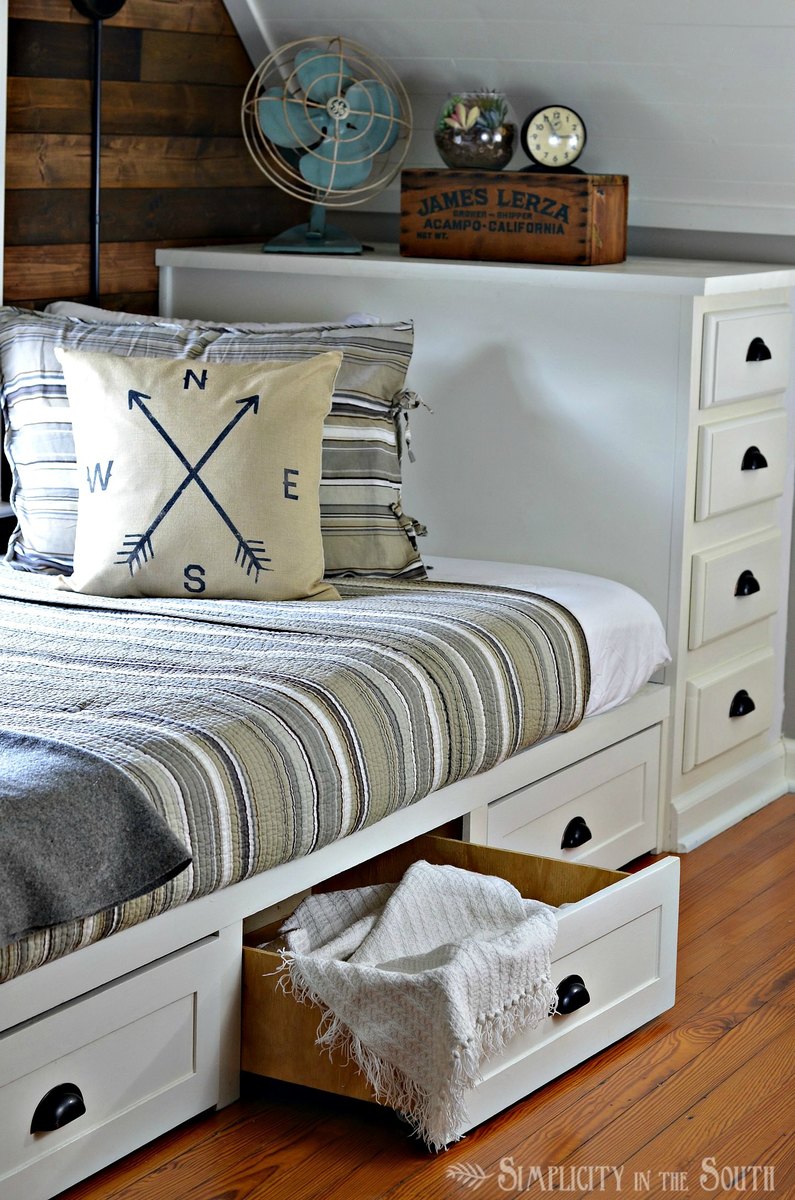
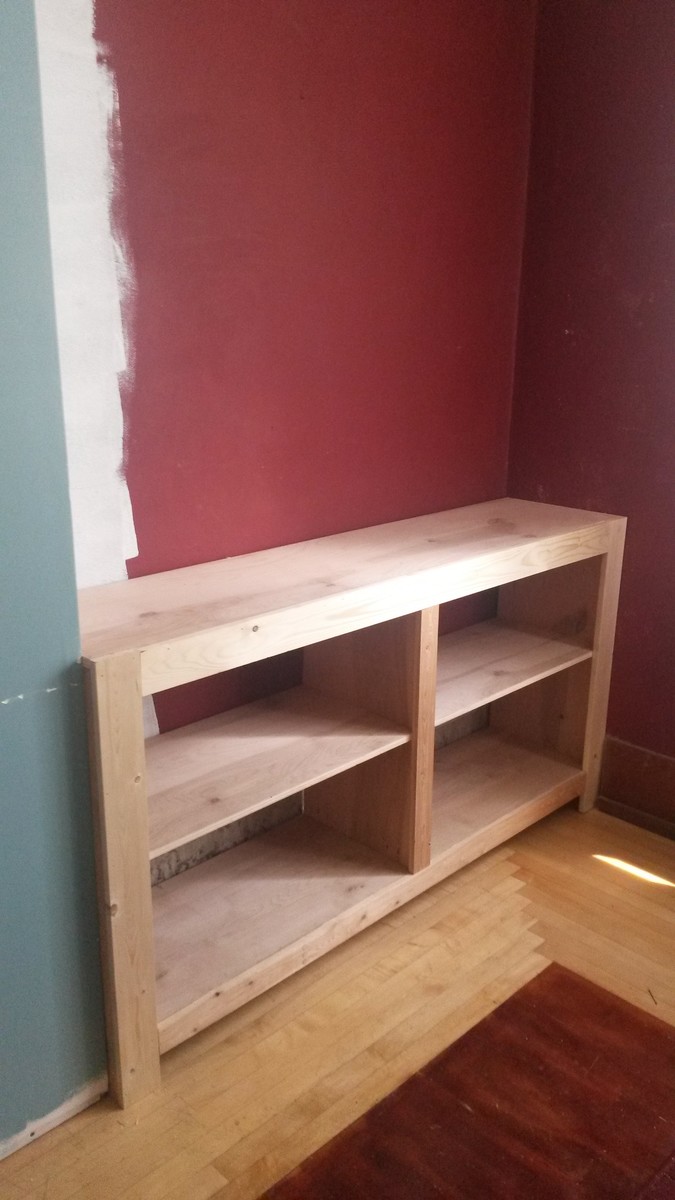
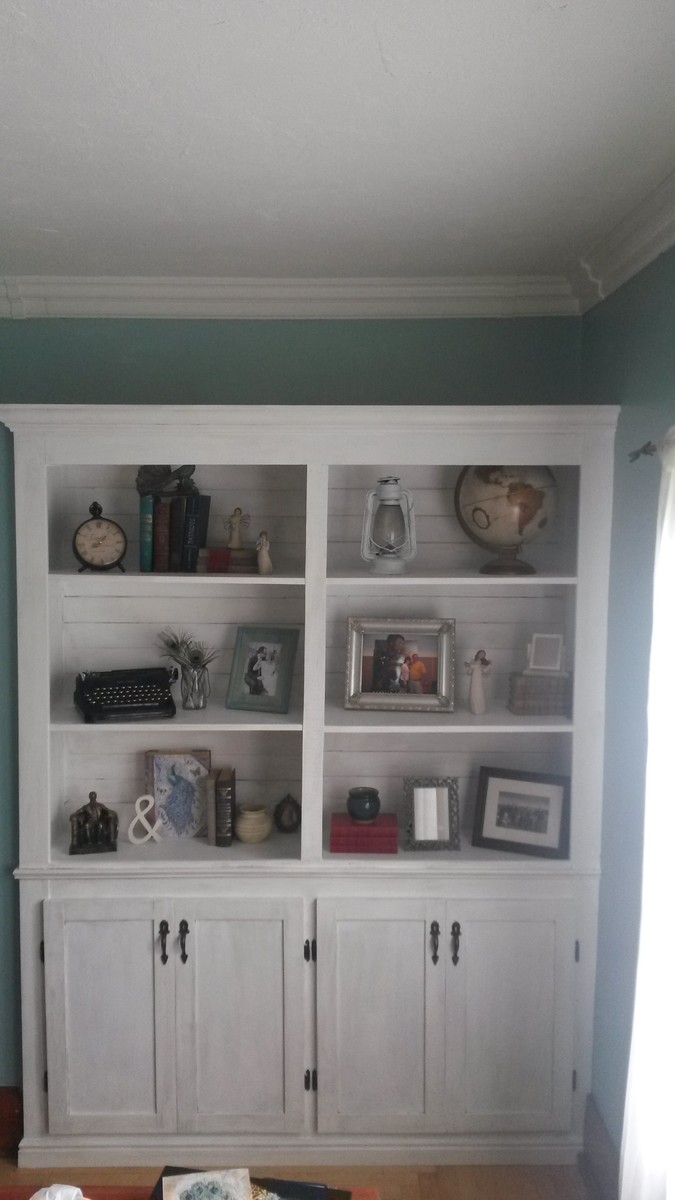
New Tryde Side Table
![](/sites/default/files/image_612.jpg)
New tryde side table to match a tryde coffee table I recently built. I love the simplicity of the design. Wife likes it too!
![](/sites/default/files/image_613.jpg)
Miniwax English Chestnut
2 Coats Satin Poly
New tryde side table to match a tryde coffee table I recently built. I love the simplicity of the design. Wife likes it too!
The well-laid out plans from this site made it a pleasure to build. I used pine for everything and stained with Rust-Oleum Early American. Also, I did three coats of Minwax Clear Satin Polycrylic. My wife and I decided to use 8 hooks because we have two young children who could not reach the top row of hooks.
Mon, 03/11/2013 - 13:42
This is awesome. There is something very fulfilling to have something this nice in your house that you made. Congrats
This was a great project to do. The hardest part was staining.
This was a fun project. Easy instructions great piece of furniture. It is very sturdy. I'm a beginner at DIY wood projects so this was a rewarding project.
I built the kitchen as a Christmas present. I still need to put the oven door on but still love how it all came out. I just started a blog and as I was posting my latest blog post I realized how obsessed I am with all of your plans!! Thanks so much :) I'm not sure how long it took to build because I only get to work in the garage an hour or two a few nights a week.
This was my first build. I followed Ana's plans. I used Eastern White Pine and applied a pre-stain because pine almost never stains evenly.
I finished the project with a white wash and then a quick water based stain that I wiped off almost immediately. I ended up with a pale tan/grey color with a very subtle peachy color that peeks through in a few places. It doesn't show in the photo very well, but the colors gave me a lot of depth without a ton of wood grain showing.
I made this table in one weekend with my 11 year old son. I was able to teach him how to use the Kreg jig and how to safely use the miter saw. It was a great bonding experience. And, on Monday it was so nice that all of his teachers at school were so impressed by his ability to make such a beautiful piece of furniture. We had seen similar custom-built tables for $2,000 and we made this for less than $150. Thank you so much for the plans and your site.
Katrina O'Con
Natchitoches, Louisiana
Love it! Very easy to build made with pressure treated wood so it can stay out in the winter.
Lynn L.
I've been drooling over those custom closet organizers for years, but they were either too expensive, not well made or some combination of not right for us. So seeing Ana's master closet plan really sent my imagination soaring. My challenge. My master closet is a small walk-in 5'x7' so I did have to do some adjusting. I love having a place for shoes and sweaters. One of my favorite parts is the continuous top shelf that connects all the parts together forming a big 'U'. I used my Kreg jig to connect each of those pieces. Anyway, thanks Ana White for the inspiration.
Now I know that this isn't exactly a build. It's more of an added trim but I thought I'd post it just in case any of you also have a black hole under your couch that swallows up pet fur and kids toys by the pound not to mention the tv remote on a daily basis! I was tired of moving the entire sectional ALL the time to find missing toys and vacuum dust bunnies so...I sanded, painted and attached some 1x2s just in front of the legs of the sectional. They come down to about 1/8" from the floor stopping almost everything from sliding under but still letting the couch rest on its legs. Cheap and easy!
Modern farmhouse bed frame from plan but mounted purebond plywood on headboard cleats instead of slats. Then aged red oak with the product referenced in plans, then whitewashed, and glued to plywood. Recommend laying out all pieces before gluing. Legs will be sore from a million squats to measure pieces.
Office cabinet with shelf. Made only from 1 by 4s and plywood for shelves (and feet).
Finished in Varathane Carrington and Matte Poly.
The plywood inserts in the doors are from the same piece. Both were treated with pre stain and the same stain but have turned out totally different shades. I might at some point make new doors (perhaps 2 thinner doors per side) but will live with the difference for now. I guess this is one of the things about hand made - two pieces will never look exactly the same.
Found Ana's plans online and can easily say, longest part of the process was watching paint dry! Very easy and simple build--looking forward to lounging here all summer long.
Giant slab of camphor. About 8' long, 23" - 36" wide and nearly 4" thick.
Sanded to 1000 grit, the bench has four coats of Danish Oil and two coats of wipe on poly. The latter was water based, and was not worth the time or money I put into it.
The whole project took about three weeks from start to finish.
I marked this project intermediate because I had to buy and use a belt sander and that may not be in everyone's took box.
Fri, 04/09/2021 - 12:10
OBTW, that think on the slab is a huge redwood burl.
Used basic plan, with some customization to the seat back and the tray area of the chair. Finished with white enamel paint, pine stain, and high gloss polyurethane to protect the wood.
Made this for a friend who does cuttings of her plants for others. I used the Simple 2x4 potting bench plan and modified it to hold an inset 7 gal. Commander tote box with snapping lid with two 2x4 @ 22" braces to support the tote on each side attached to the front and back aprons. She wanted something that would hold a medium size bag of potting soil with a lid to keep snakes and other critters out since she lives in the country. There are plenty of hooks to hang tools and other items.
Loved the chunky look of the bunk bed plans but needed space for toys and junk.
Raised the height and used lag screws for extra security .
Stella can't wait to go to bed at night , so I take that as a successful project.
I worked on this project a few hours a day, I made the cuts one day and then drilled the pocket holes and assembled the table. The difference for the table and the original plans was I did not use the turned legs from the plans. I used non treated 4x4's. Longest time was waiting between stain and poly to dry. I love being able to get find these plans on Ana's site! Thank you Ana.