Community Brag Posts
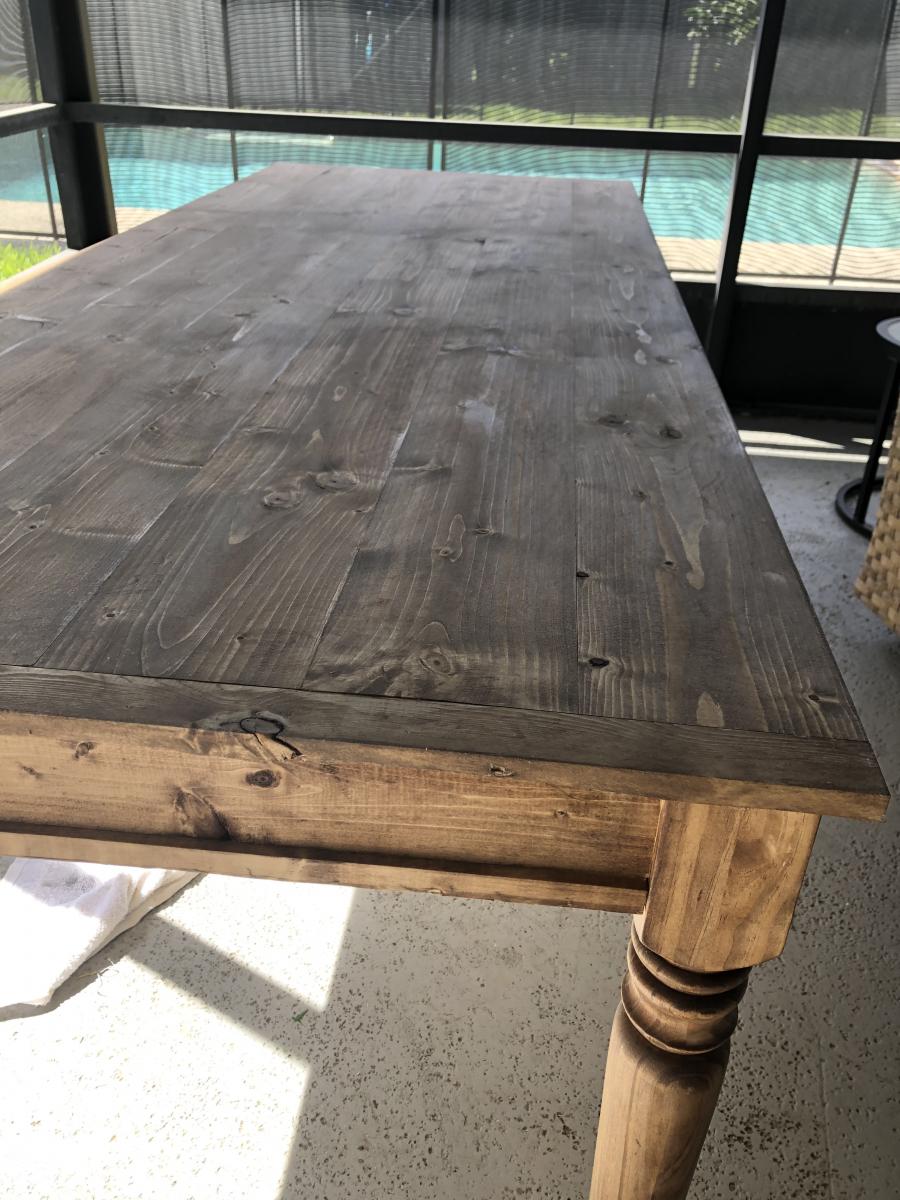
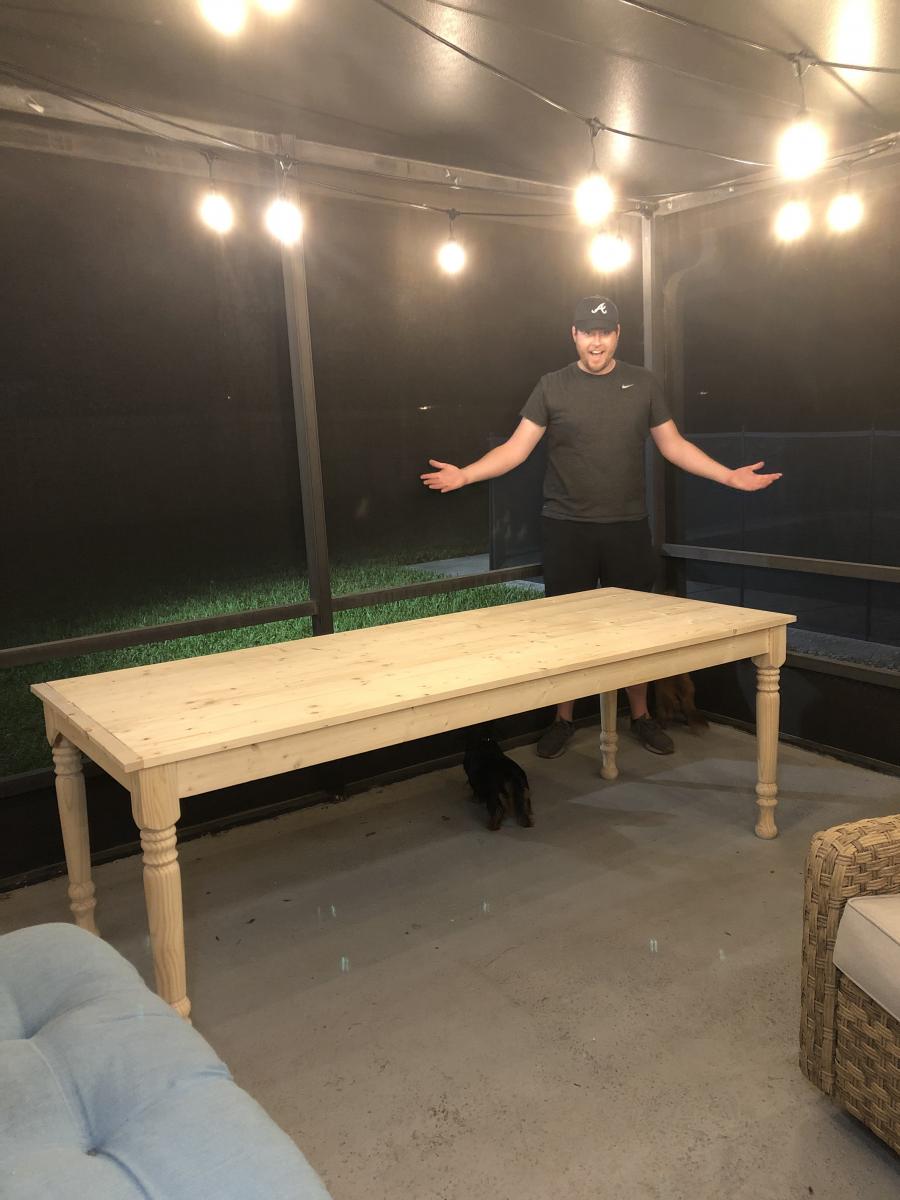
Large Old English Style Farmhouse Dining Table
My wife and I were wanting a large outdoor farmhouse table that looked stylish, and like it could have been bought at Pottery Barn or another high-end furniture store. We found this plan that Ana white had made "Small Old English Style Farmhouse Dining Table". We often host groups from our church and will have 15-20 people on our patio or around our pool area, so we needed a bigger table... I just made some modifications to make it longer (7ft) in length to better fit our space and allow for more people to sit.
To make this plan longer, I simply adjusted the cut-list on the long 1x2s, 1x4s, and 1x6; and added a crossbar to prevent the longer tabletop from sagging. I also added the diagonal corner struts to make the table a little sturdier.
Adjusted Shopping List:
4 - 1x2 @ 8ft
5 - 1x4 @ 8 ft
6 - 1x6 @ 8ft
Waterproof 1 1/4" Kreg screws (for outdoor use)
Minwax Weathered Oak
Minwax Vintage Grey
Adjusted Cut-List
• 2 - 1x2 @ 26.5"
• 2 - 1x2 @ 76.5"
• 2 - 1x2 @ ~33.25"
• 2 - 1x4 @ 26.5"
• 2 - 1x4 @ 76.5"
• 4 - 1x4 @ 7.25" w/ 45º miter (diagonal corner supports)
• 1 - 1x4 @ ~28" (Crossbar - I forget the exact measurement)
• 6 - 1x6 @ 82"
For seating we just bought some inexpensive farmhouse weather resistant chairs from Walmart:
https://www.walmart.com/ip/Yaheetech-Metal-Dinning-Chairs-Stackable-Cof…
Built from Plan(s)
Estimated Cost
$170
Estimated Time Investment
Day Project (6-9 Hours)
Finish Used
Minwax Early American (base), Minwax Weathered Grey (2nd coat)
(See more on outdoor use of stains: https://ana-white.com/blog/2019/05/outdoor-wood-furniture-finishing-secrets)
(See more on outdoor use of stains: https://ana-white.com/blog/2019/05/outdoor-wood-furniture-finishing-secrets)
Recommended Skill Level
Beginner
Comments
Tue, 03/02/2021 - 08:46
Beautiful!
Love the to see the increased length on this plan. thanks for sharing!
Providence Bench
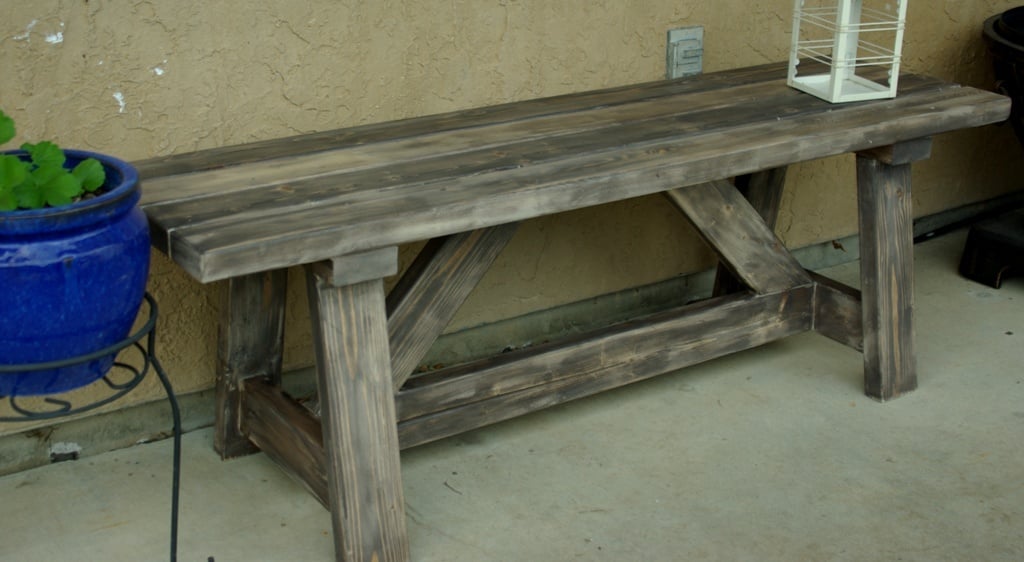
This bench is on my back porch. Its nice to have a few extra seats when entertaining!
Built from Plan(s)
Estimated Cost
$20-$30
Estimated Time Investment
Afternoon Project (3-6 Hours)
Finish Used
I wanted this bench to have a weathered look. So I first applied Sunbleached stain all over & then applied Kona stain after, in random spots. Last, I used spar varnish since it will be outside!
Recommended Skill Level
Beginner
Comments

Mobile Kitchen Pantry
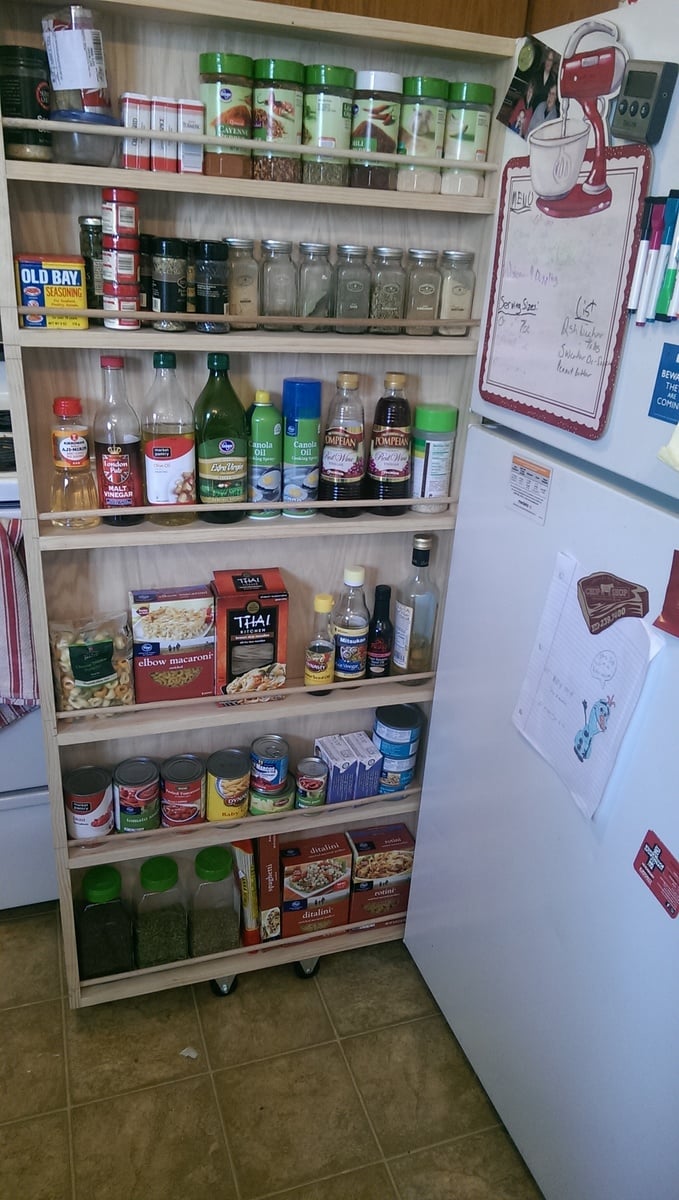
I made a version of the "DIY Rolling Pantry - Classy Clutter" project, but I sized my shelves differently than in the original photo. This is an easy starter project for just about anybody. It is full of counter-sunk butt joints and can be constructed in a single afternoon or evening.
We couldn't apply any finish because it is too damn cold.
The frame is 59"x26" to match the size of my fridge (minus the door). Add in the casters on the bottom and it matches my fridge perfectly.
Materials Used:
- 4, 1x4" select Pine boards
- 1, 4'x8' sheet of Red Oak plywood
- A bunch of 1 1/2" wood screws
- A bunch of nails
Built from Plan(s)
Estimated Cost
$50
Estimated Time Investment
Afternoon Project (3-6 Hours)
Finish Used
None at the time. It is too cold to finish in my garage shop right now.
Recommended Skill Level
Starter Project
Comments
Thu, 01/08/2015 - 13:33
Thank you!
To be perfectly honest, other than some stuff in shop class in middle school and the quick work table in my garage, I hadn't done any woodworking in my life. I have the tools, but I never just sat down and did it. It was a learning experience. I can't wait for my next project.

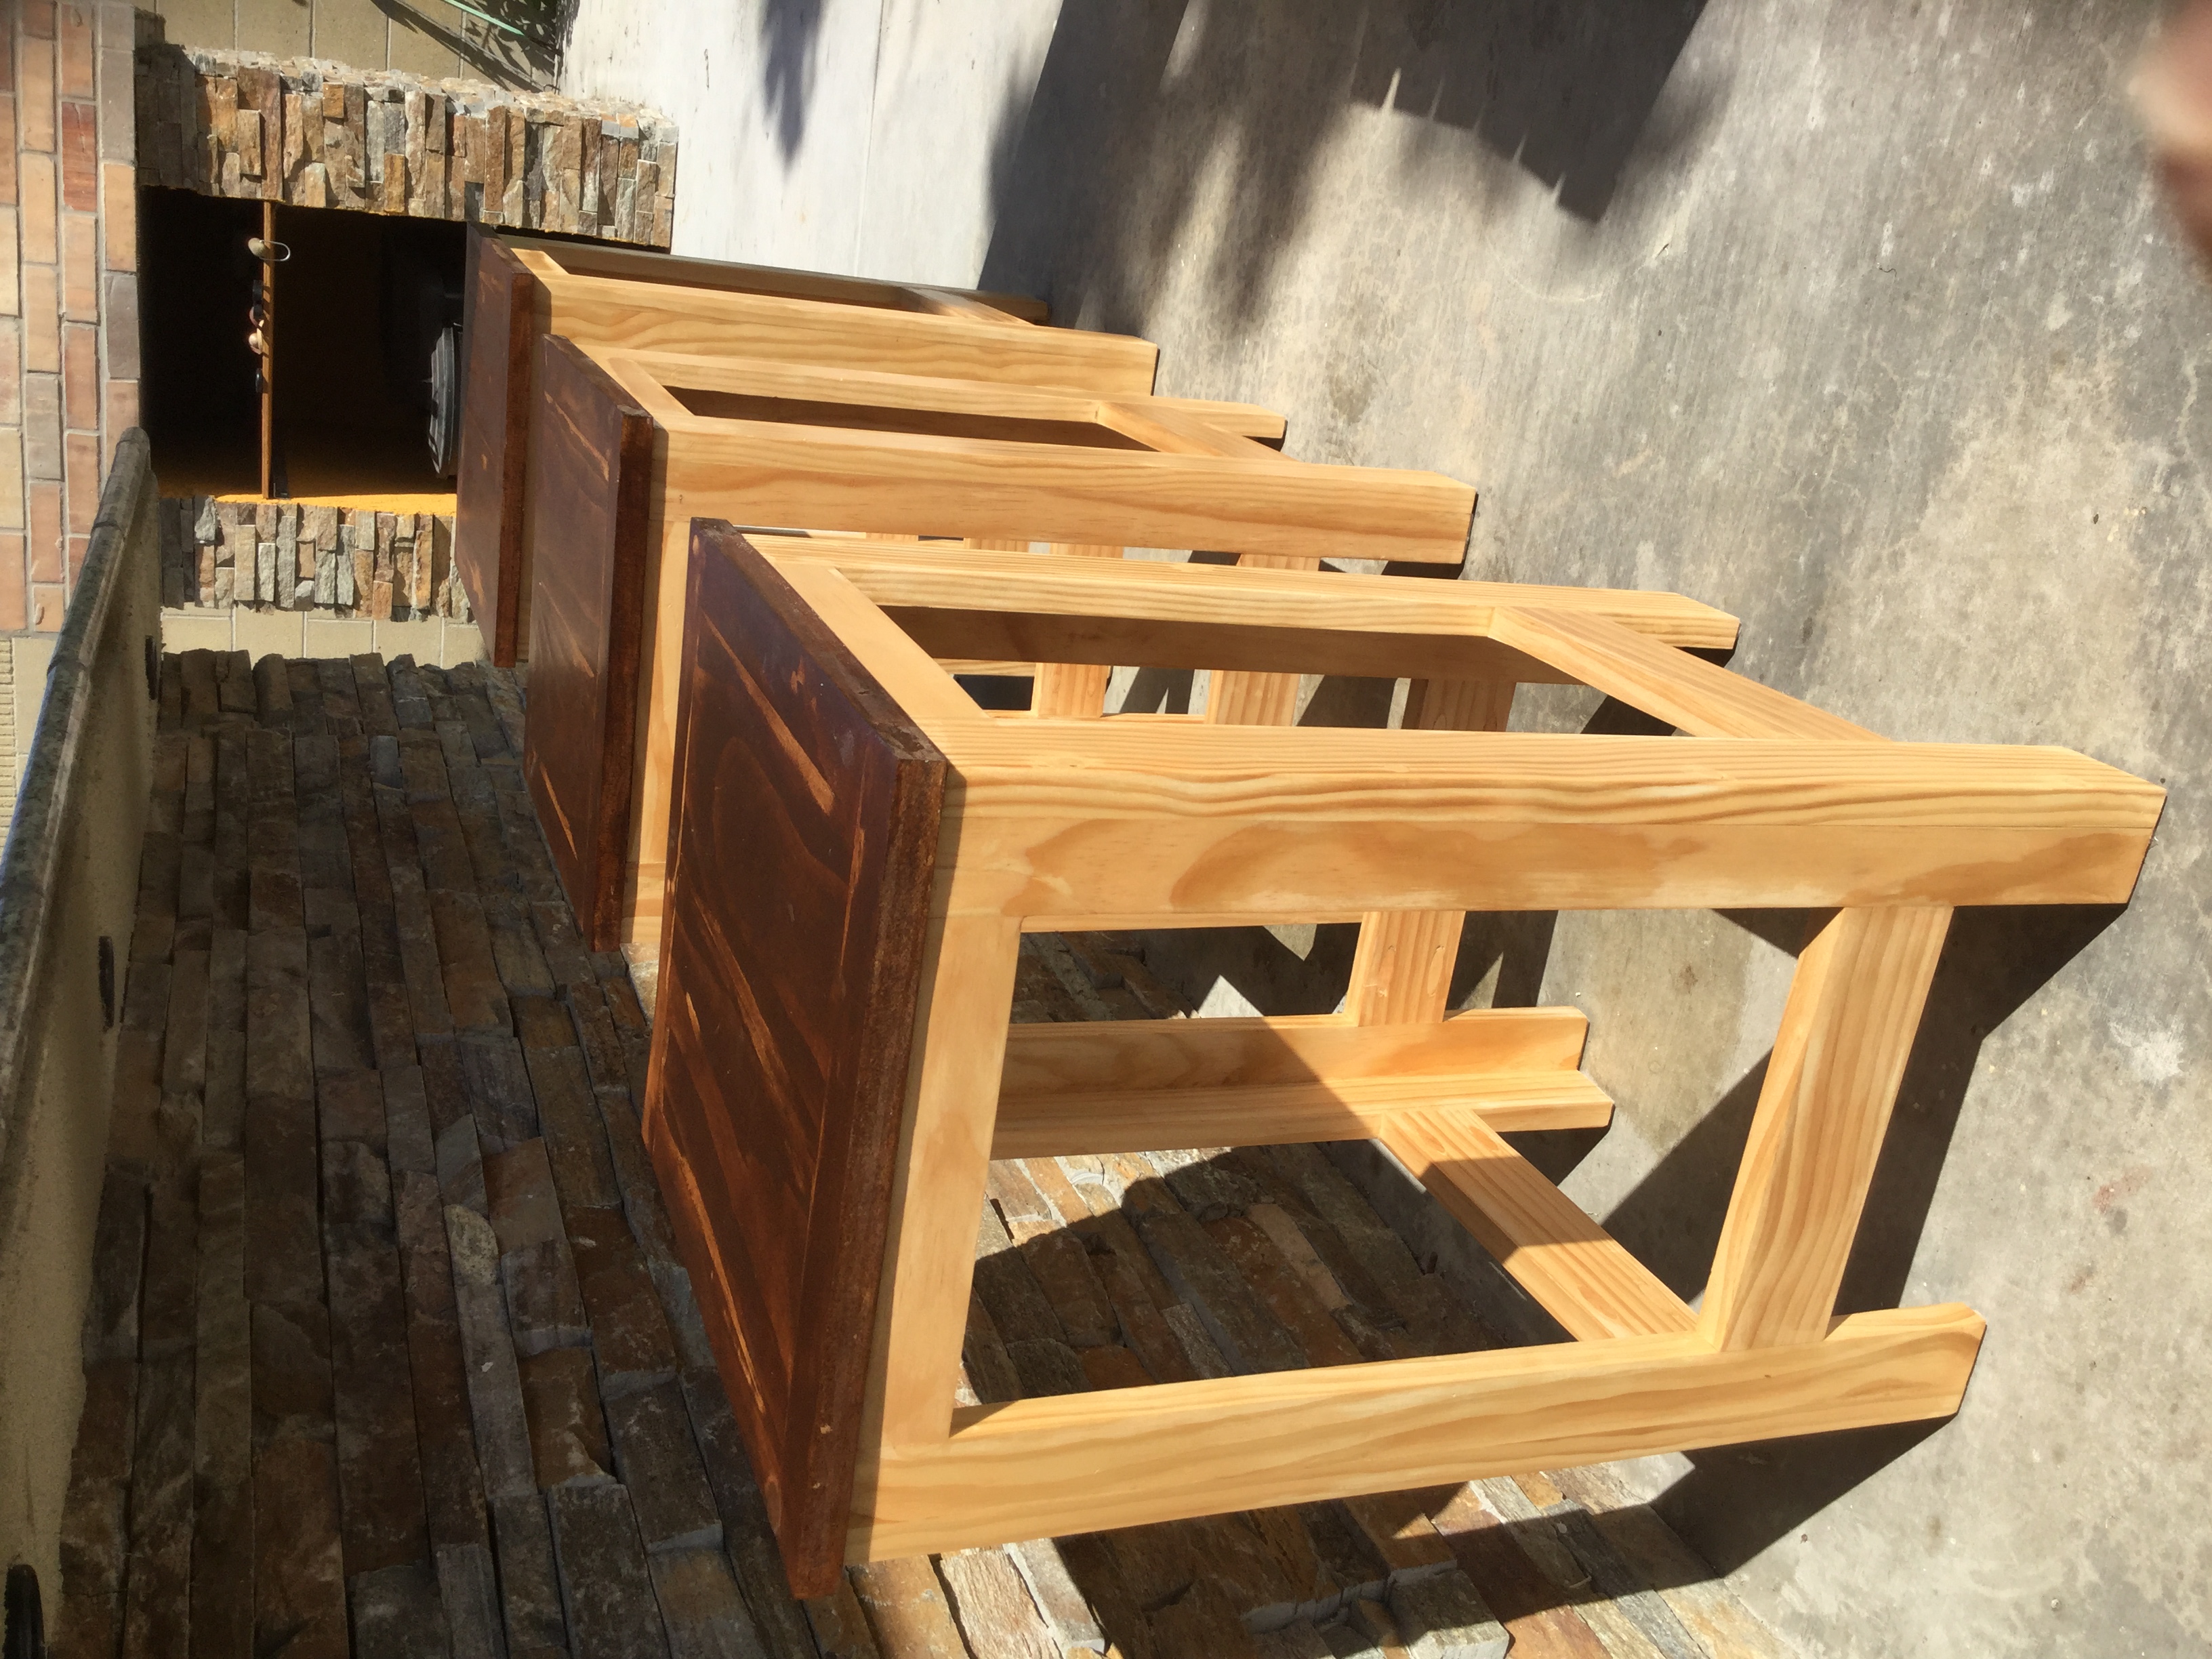
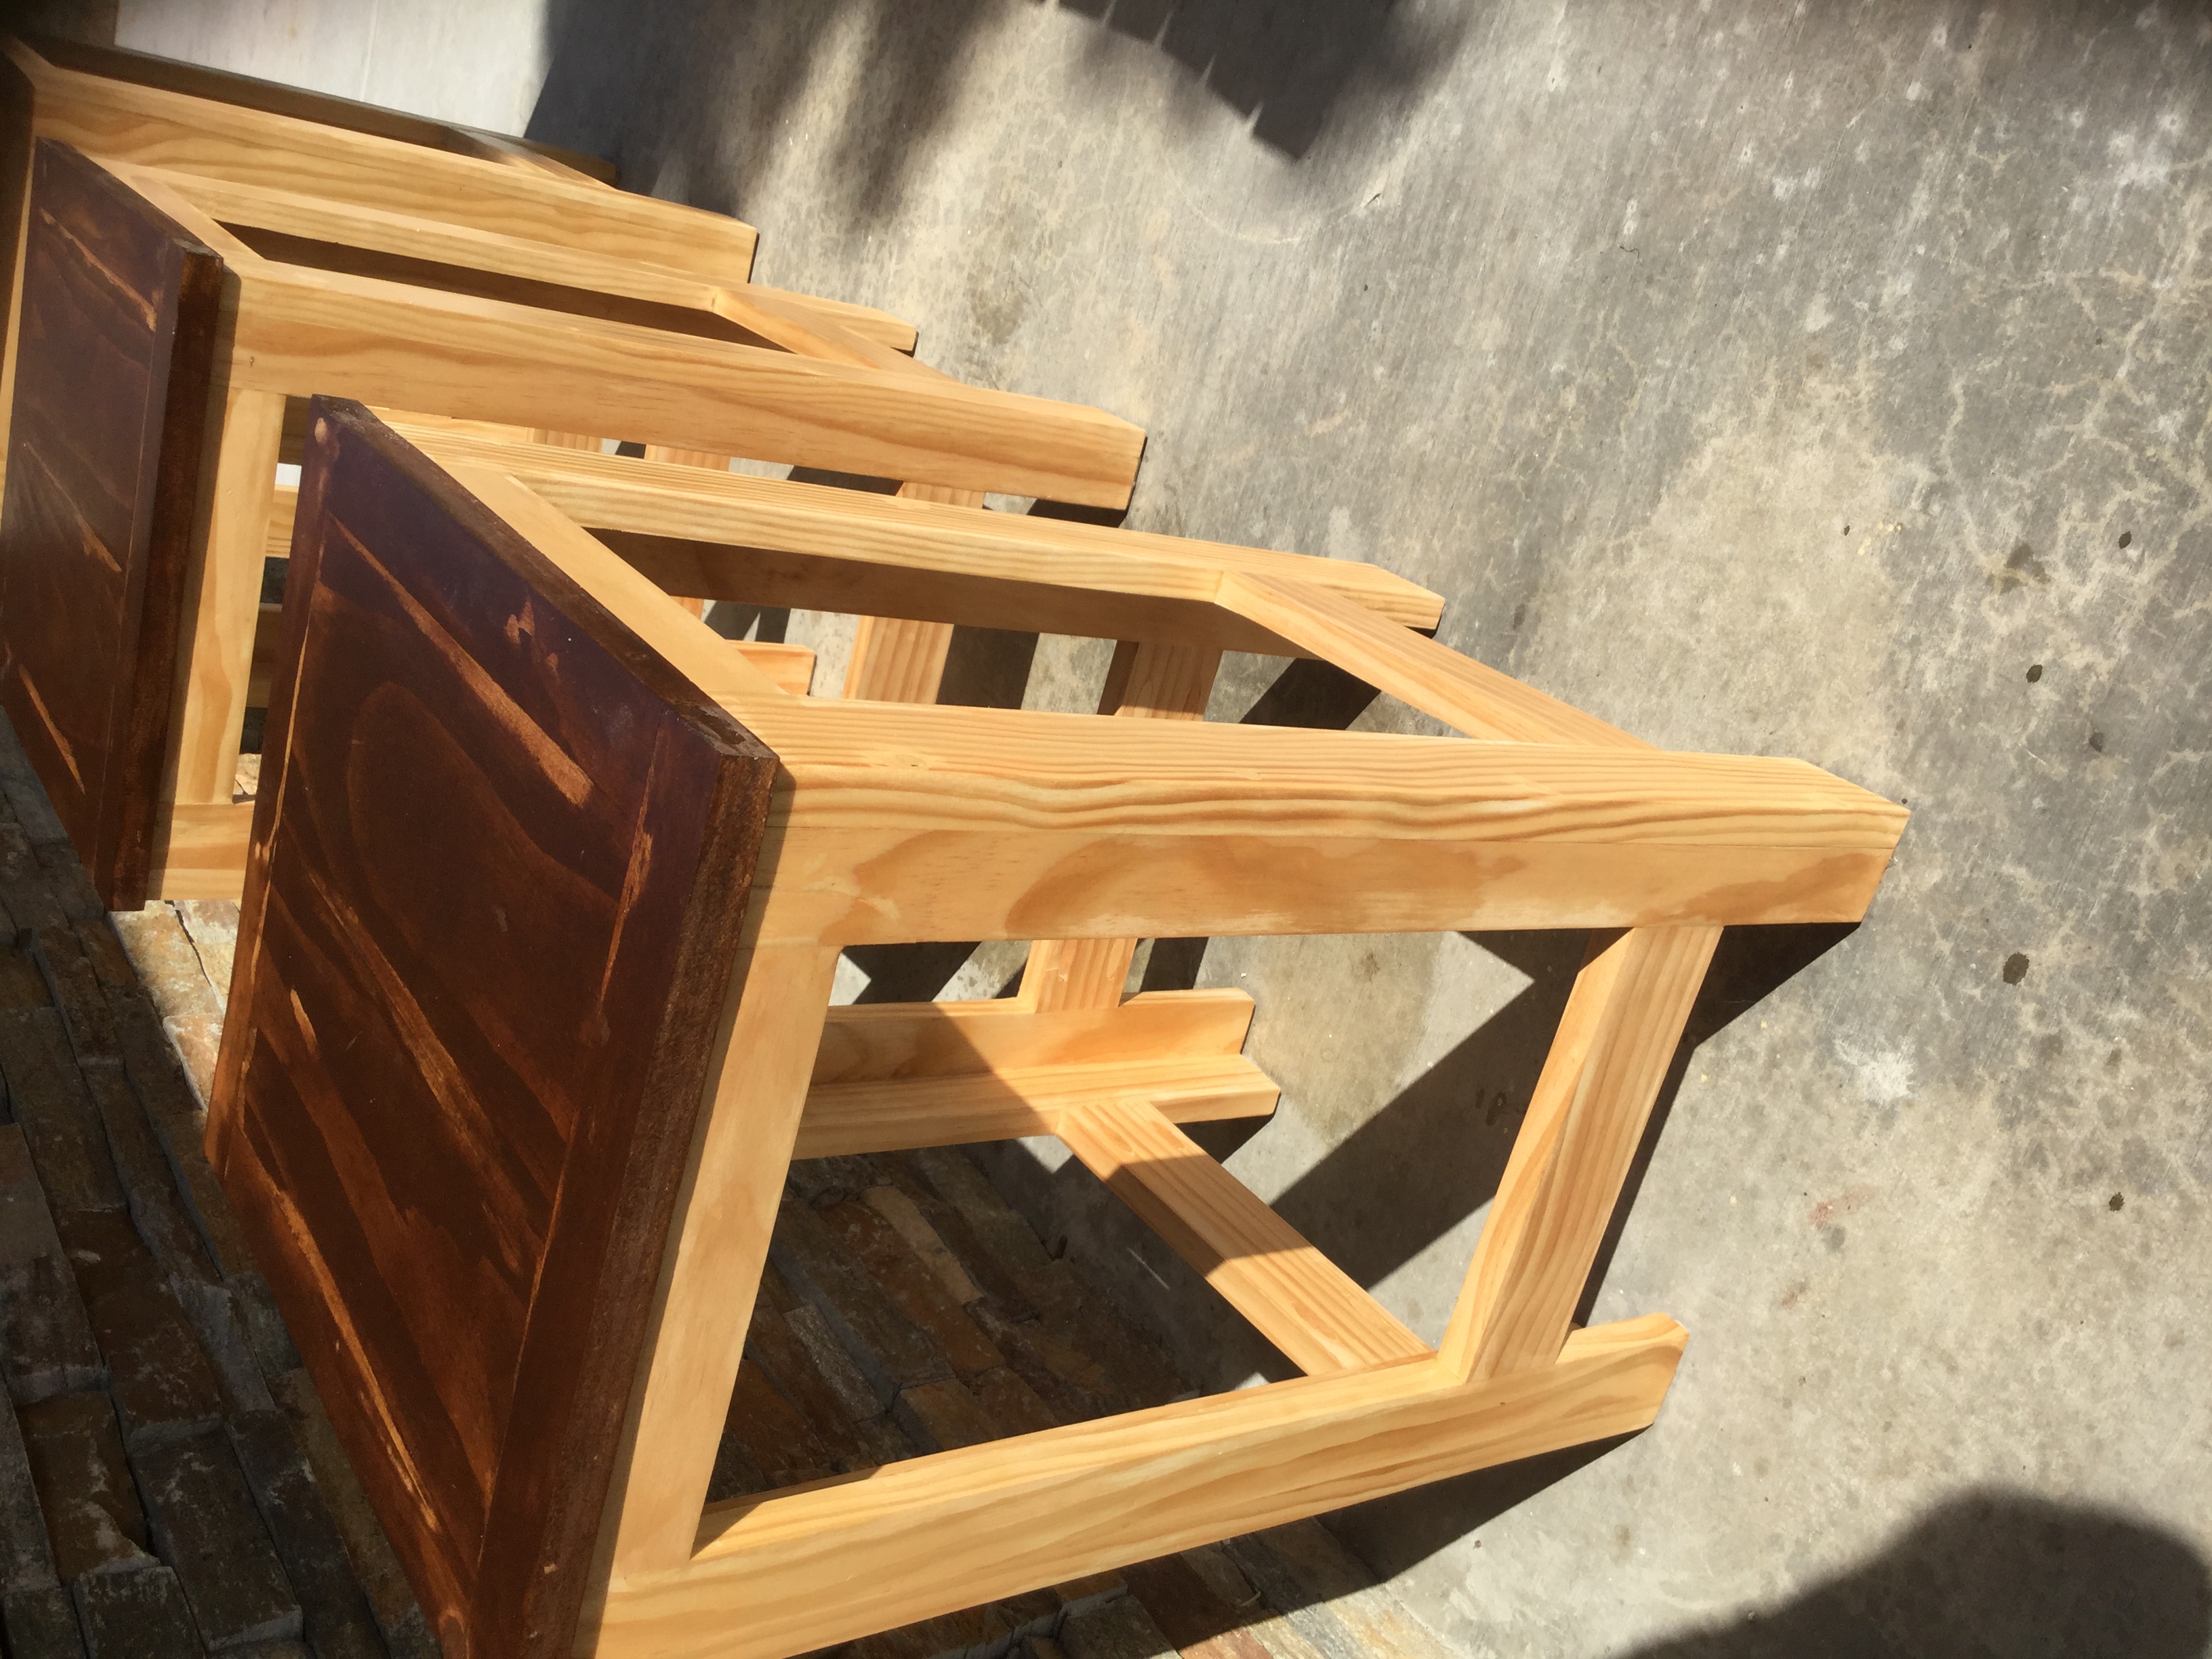
Counter stools for our breakfast bar
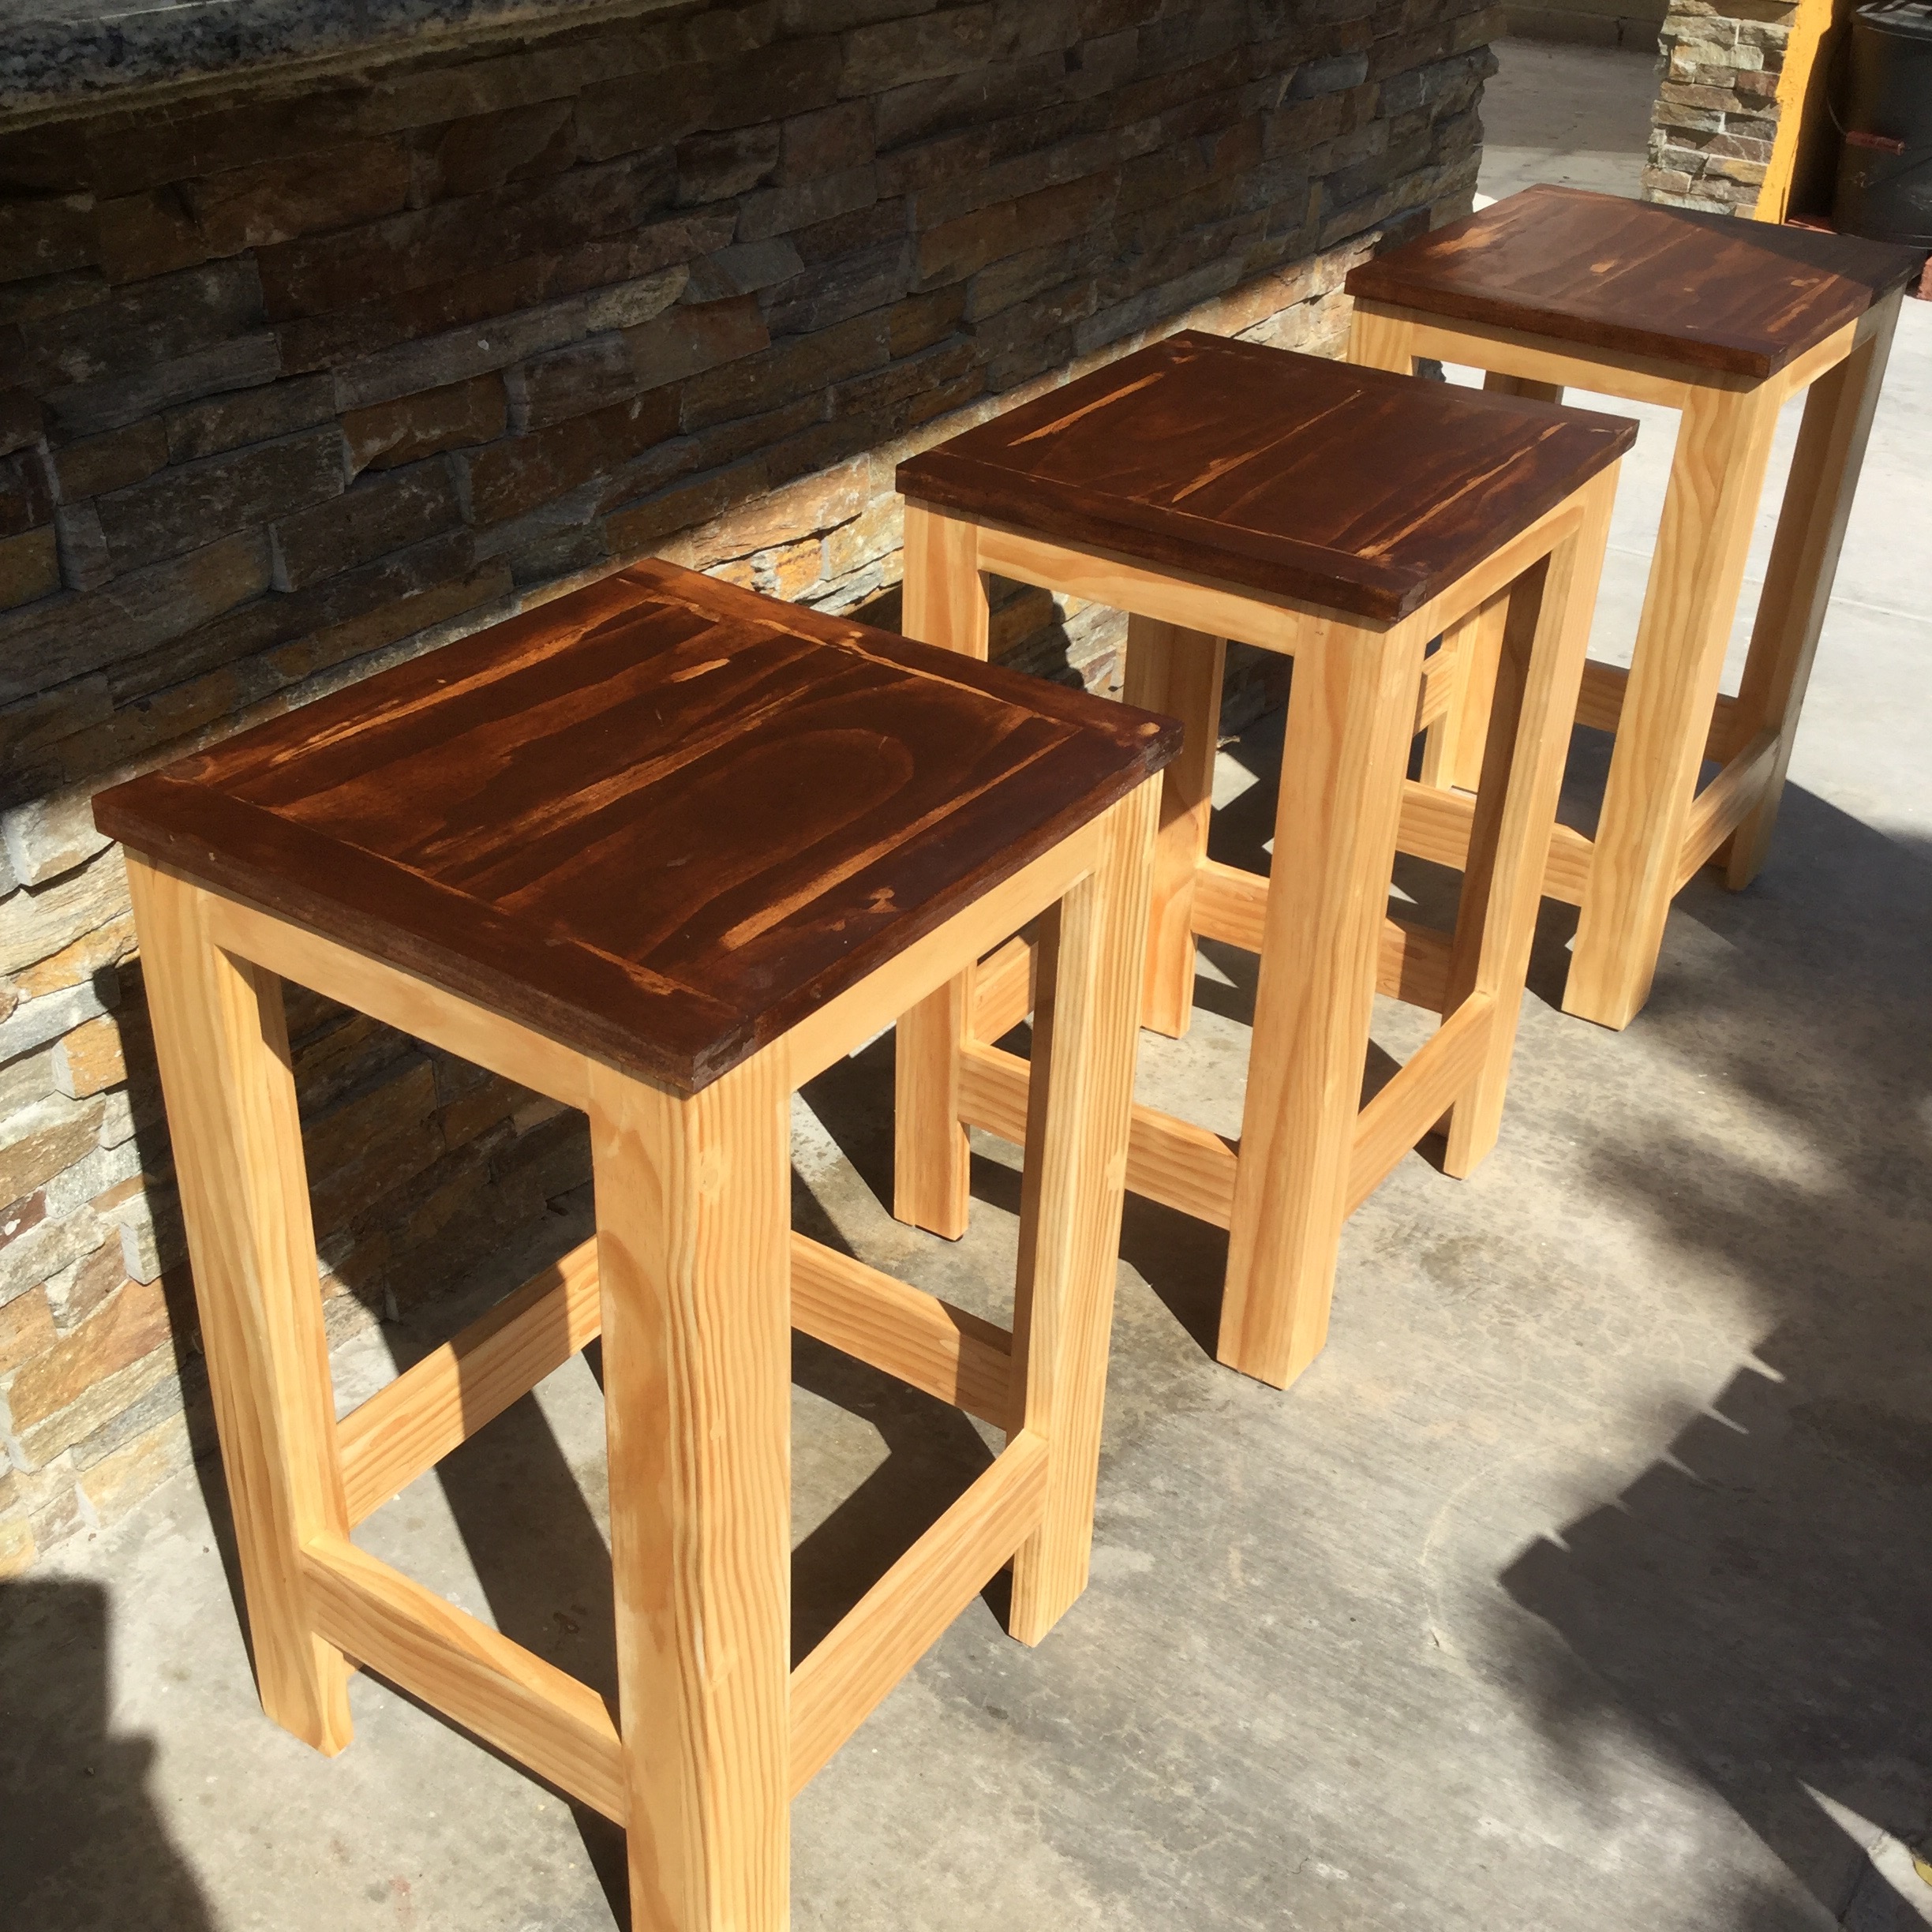
I made these to use as counter stools for our breakfast bar. They're shown in the pics at our outdoor grill island but that's only until the finish dries completely. I built the set of three in "assembly line" fashion - in other worlds I built 12 leg assemblies, 3 seats, etc and then assembled it all. Total it took me around 8 -10 hours to build all three. My 11 year old daughter even helped. I taught her how to use the drill press and had her drill and countersink all of the pilot holes on the legs. I used pocket holes to attach the cross braces and the seats are attached with just wood glue. A pretty easy project and we ended up with a nice, simple set of counter stools.
Built from Plan(s)
Estimated Cost
$30 per stool
Estimated Time Investment
Day Project (6-9 Hours)
Finish Used
Minwax colonial maple for base; Minwax English chestnut for seats. Three coats of poly coat. The distressed look of the seats was accidental but we decided it looked nice so we stuck with it. For some reason I had a weird piece of pine that wasn't taking stain well (it was not drying after 24 hours). I ended up re-sanding and re-doing the stain only to have the exact same results. This time I tried wiping off the stain that wasn't drying with mineral spirits and it gave me this distressed look, which my wife and I decided looked nice, so we kept it.
Recommended Skill Level
Beginner
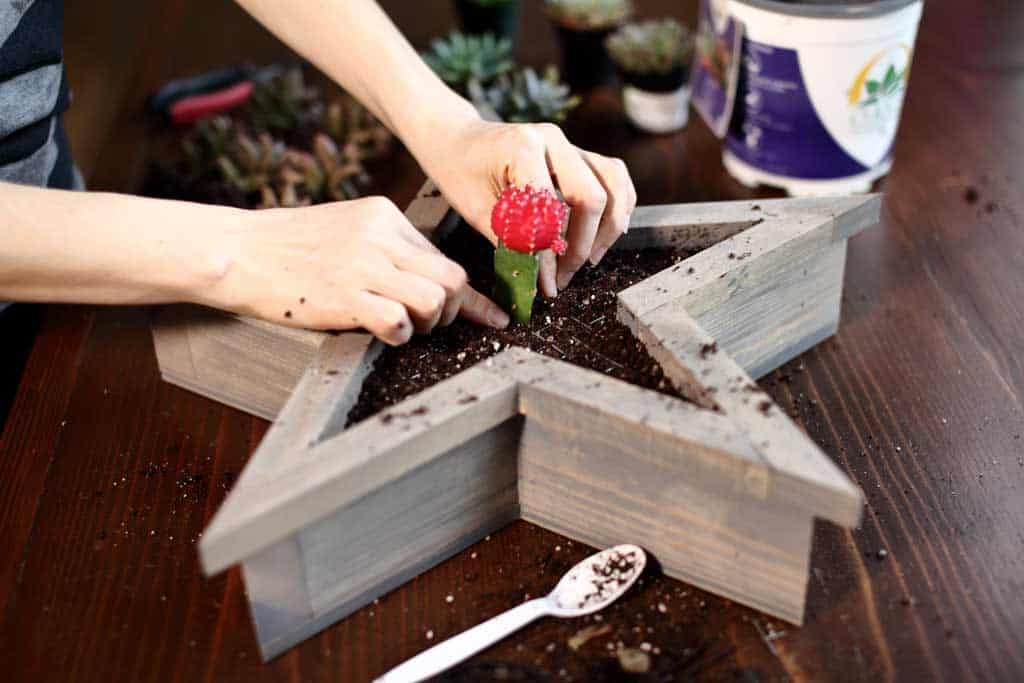
Vertical Star Planter for Succulents

Are you looking to make a small planter for your succulents? There are many different shapes and sizes out there that you could choose from. Some planters are easy to make and some are more complex. The planter in this tutorial looks a bit intimidating to make, but it’s actually quite simple. Follow my step-by-step plans on how to build a DIY Vertical Star Planter for Succulents.
Since this project does not require any large wood pieces, I’ve built it using scrap wood that I had in my scrap pile. The overall size of this star planter is about 18” wide. You could easily adjust these plans to make the star any size you want.
See my website for additional pictures and how I've built it, TheDIYPlan.com
Estimated Cost
$15
Estimated Time Investment
Afternoon Project (3-6 Hours)
Recommended Skill Level
Intermediate
Comments
Reclaimed Wood Farm Table

This table is made from beautiful reclaimed wood from local Washington DC buildings.
The matching benches are a great space saver for a small space!
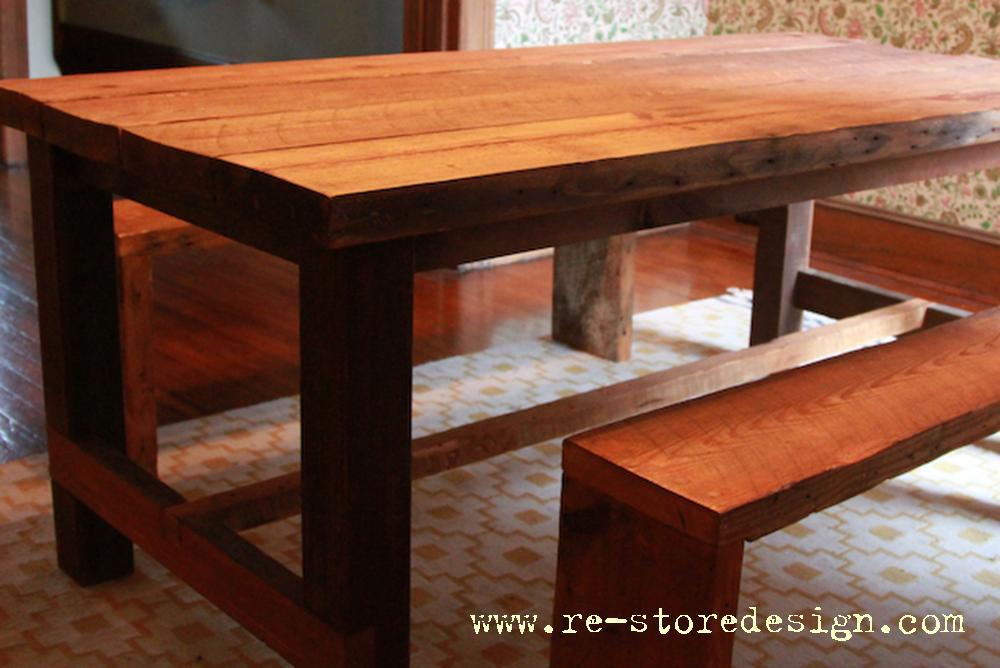


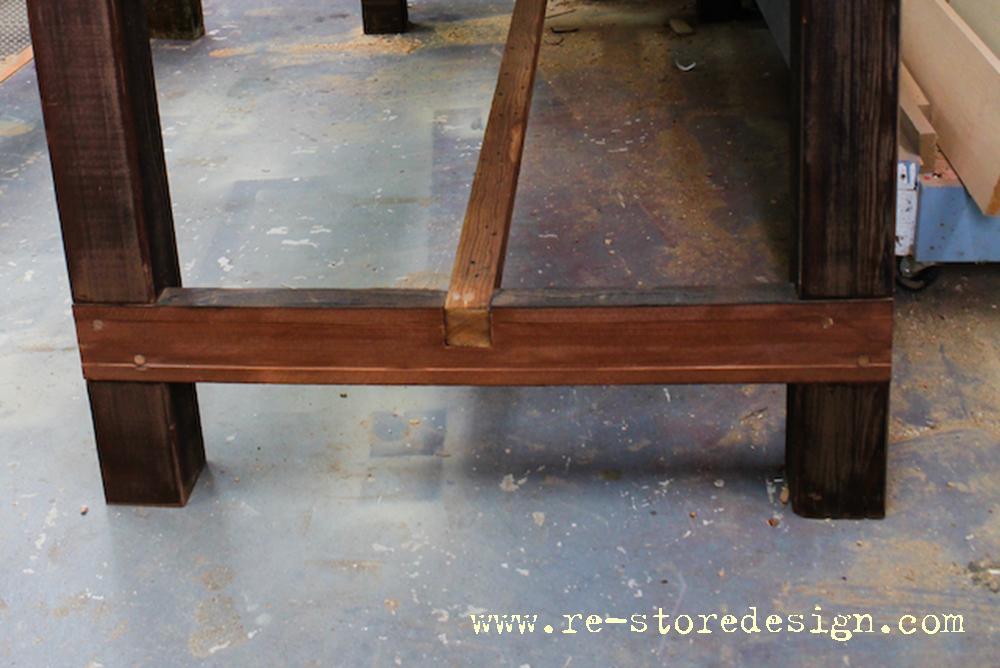
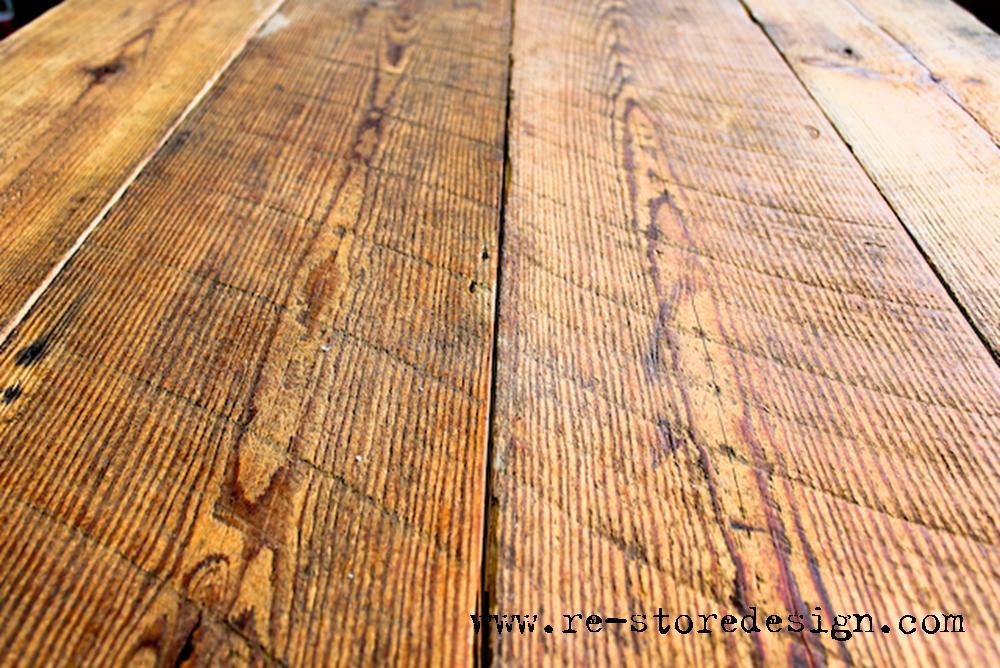
Built from Plan(s)
Estimated Cost
$80
Estimated Time Investment
Day Project (6-9 Hours)
Finish Used
Teak Oil
Recommended Skill Level
Beginner
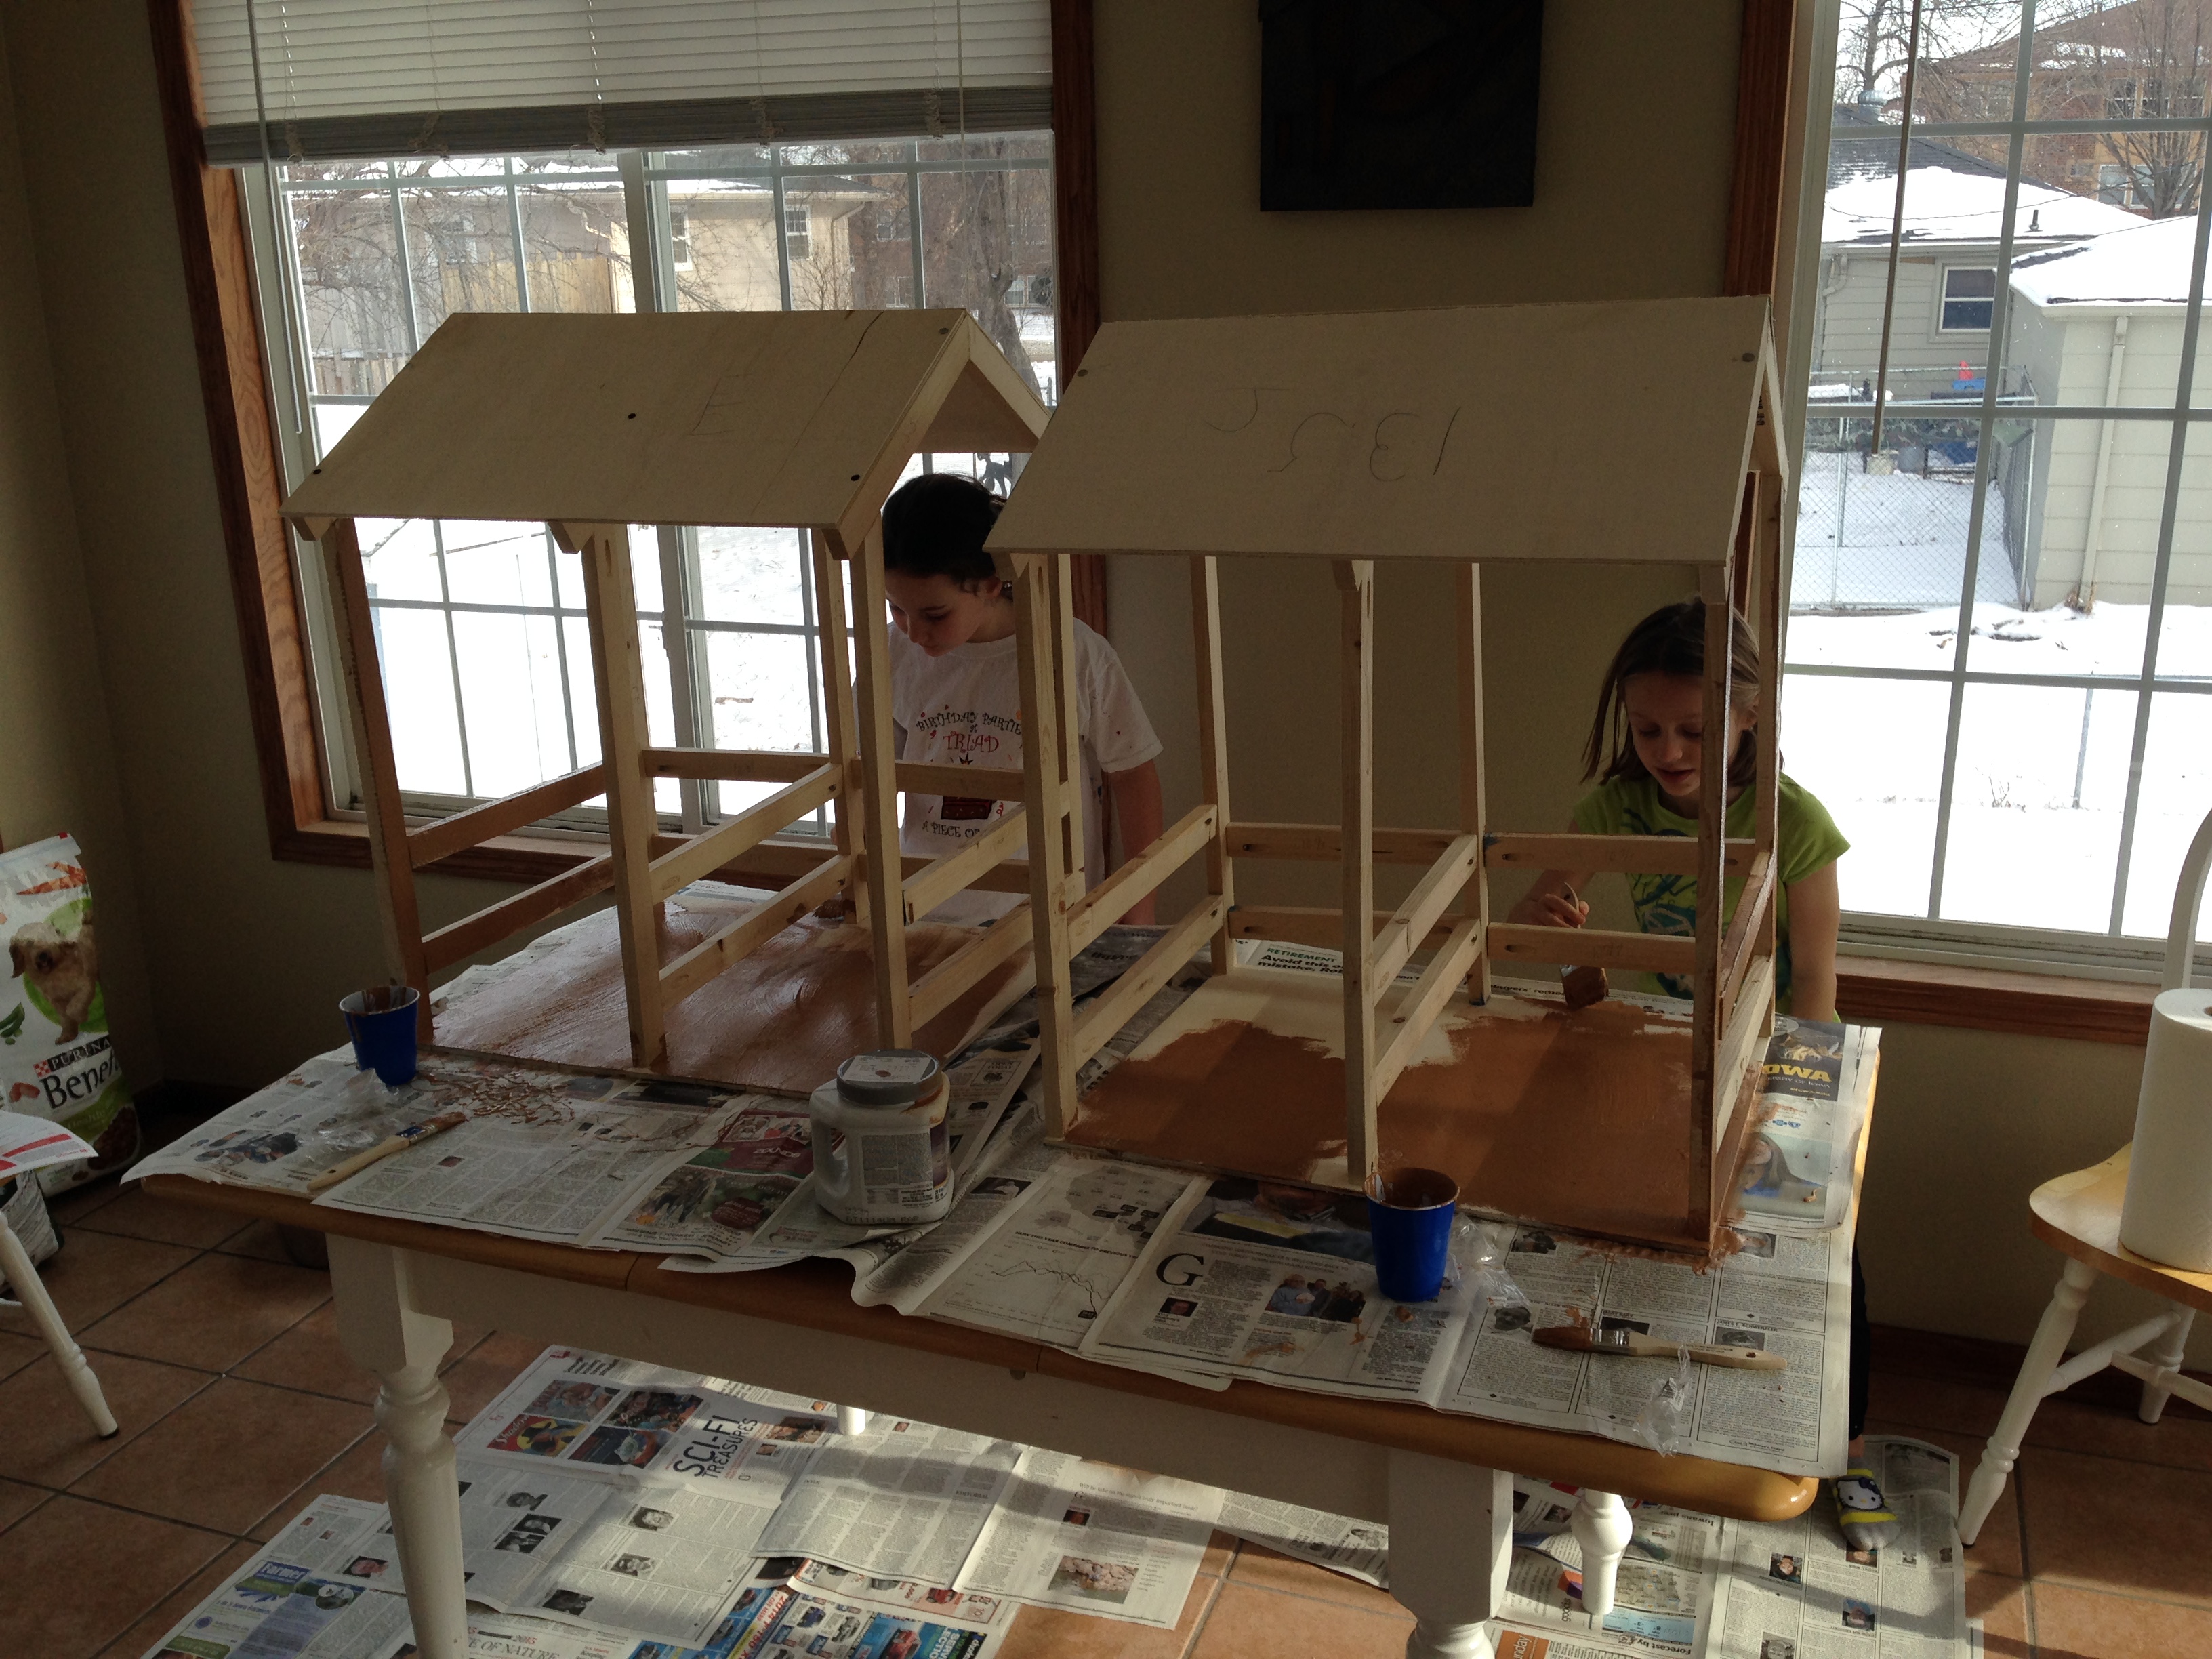
My daughter and niece's new stables, they painted them themselves
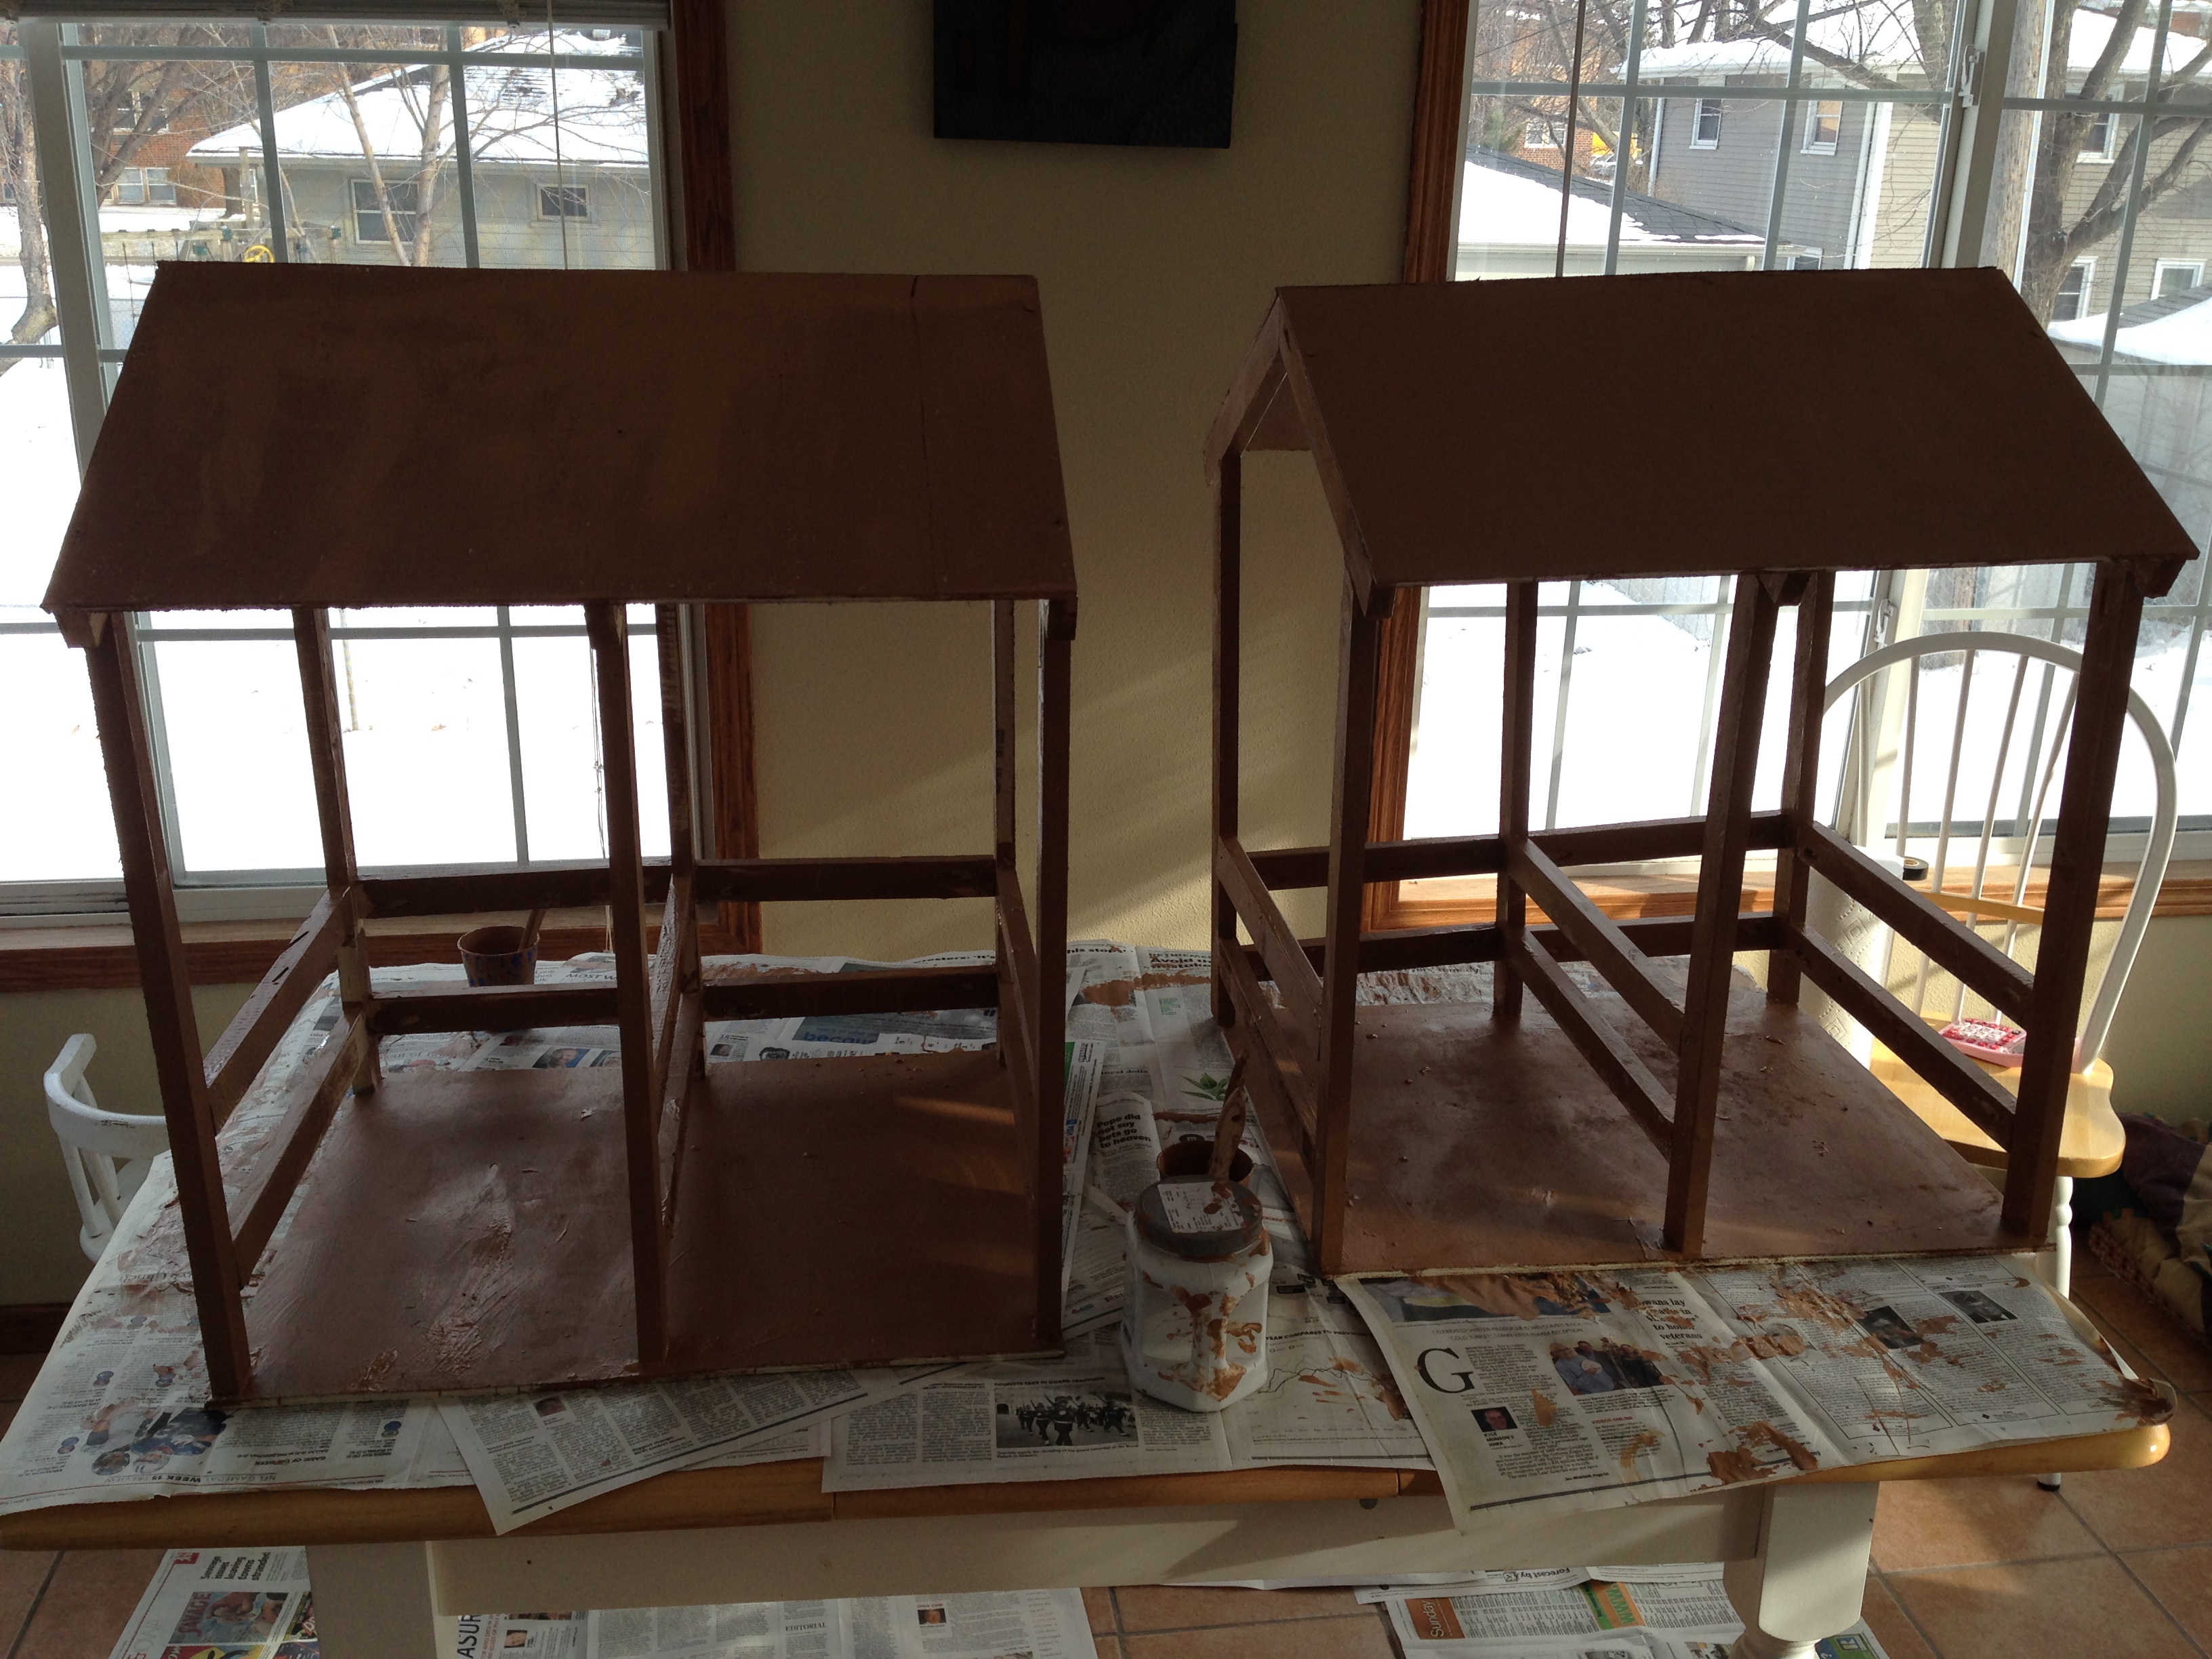
my first project, the second went a lot easier. We are still waiting on the doors to dry to hang them but the girls are excited for their horses to have a place to sleep.
Built from Plan(s)
Estimated Time Investment
Afternoon Project (3-6 Hours)
Recommended Skill Level
Beginner
Comments

Sun, 01/11/2015 - 01:49
That's so cool! I love it,
That's so cool! I love it, and thanks for sharing!
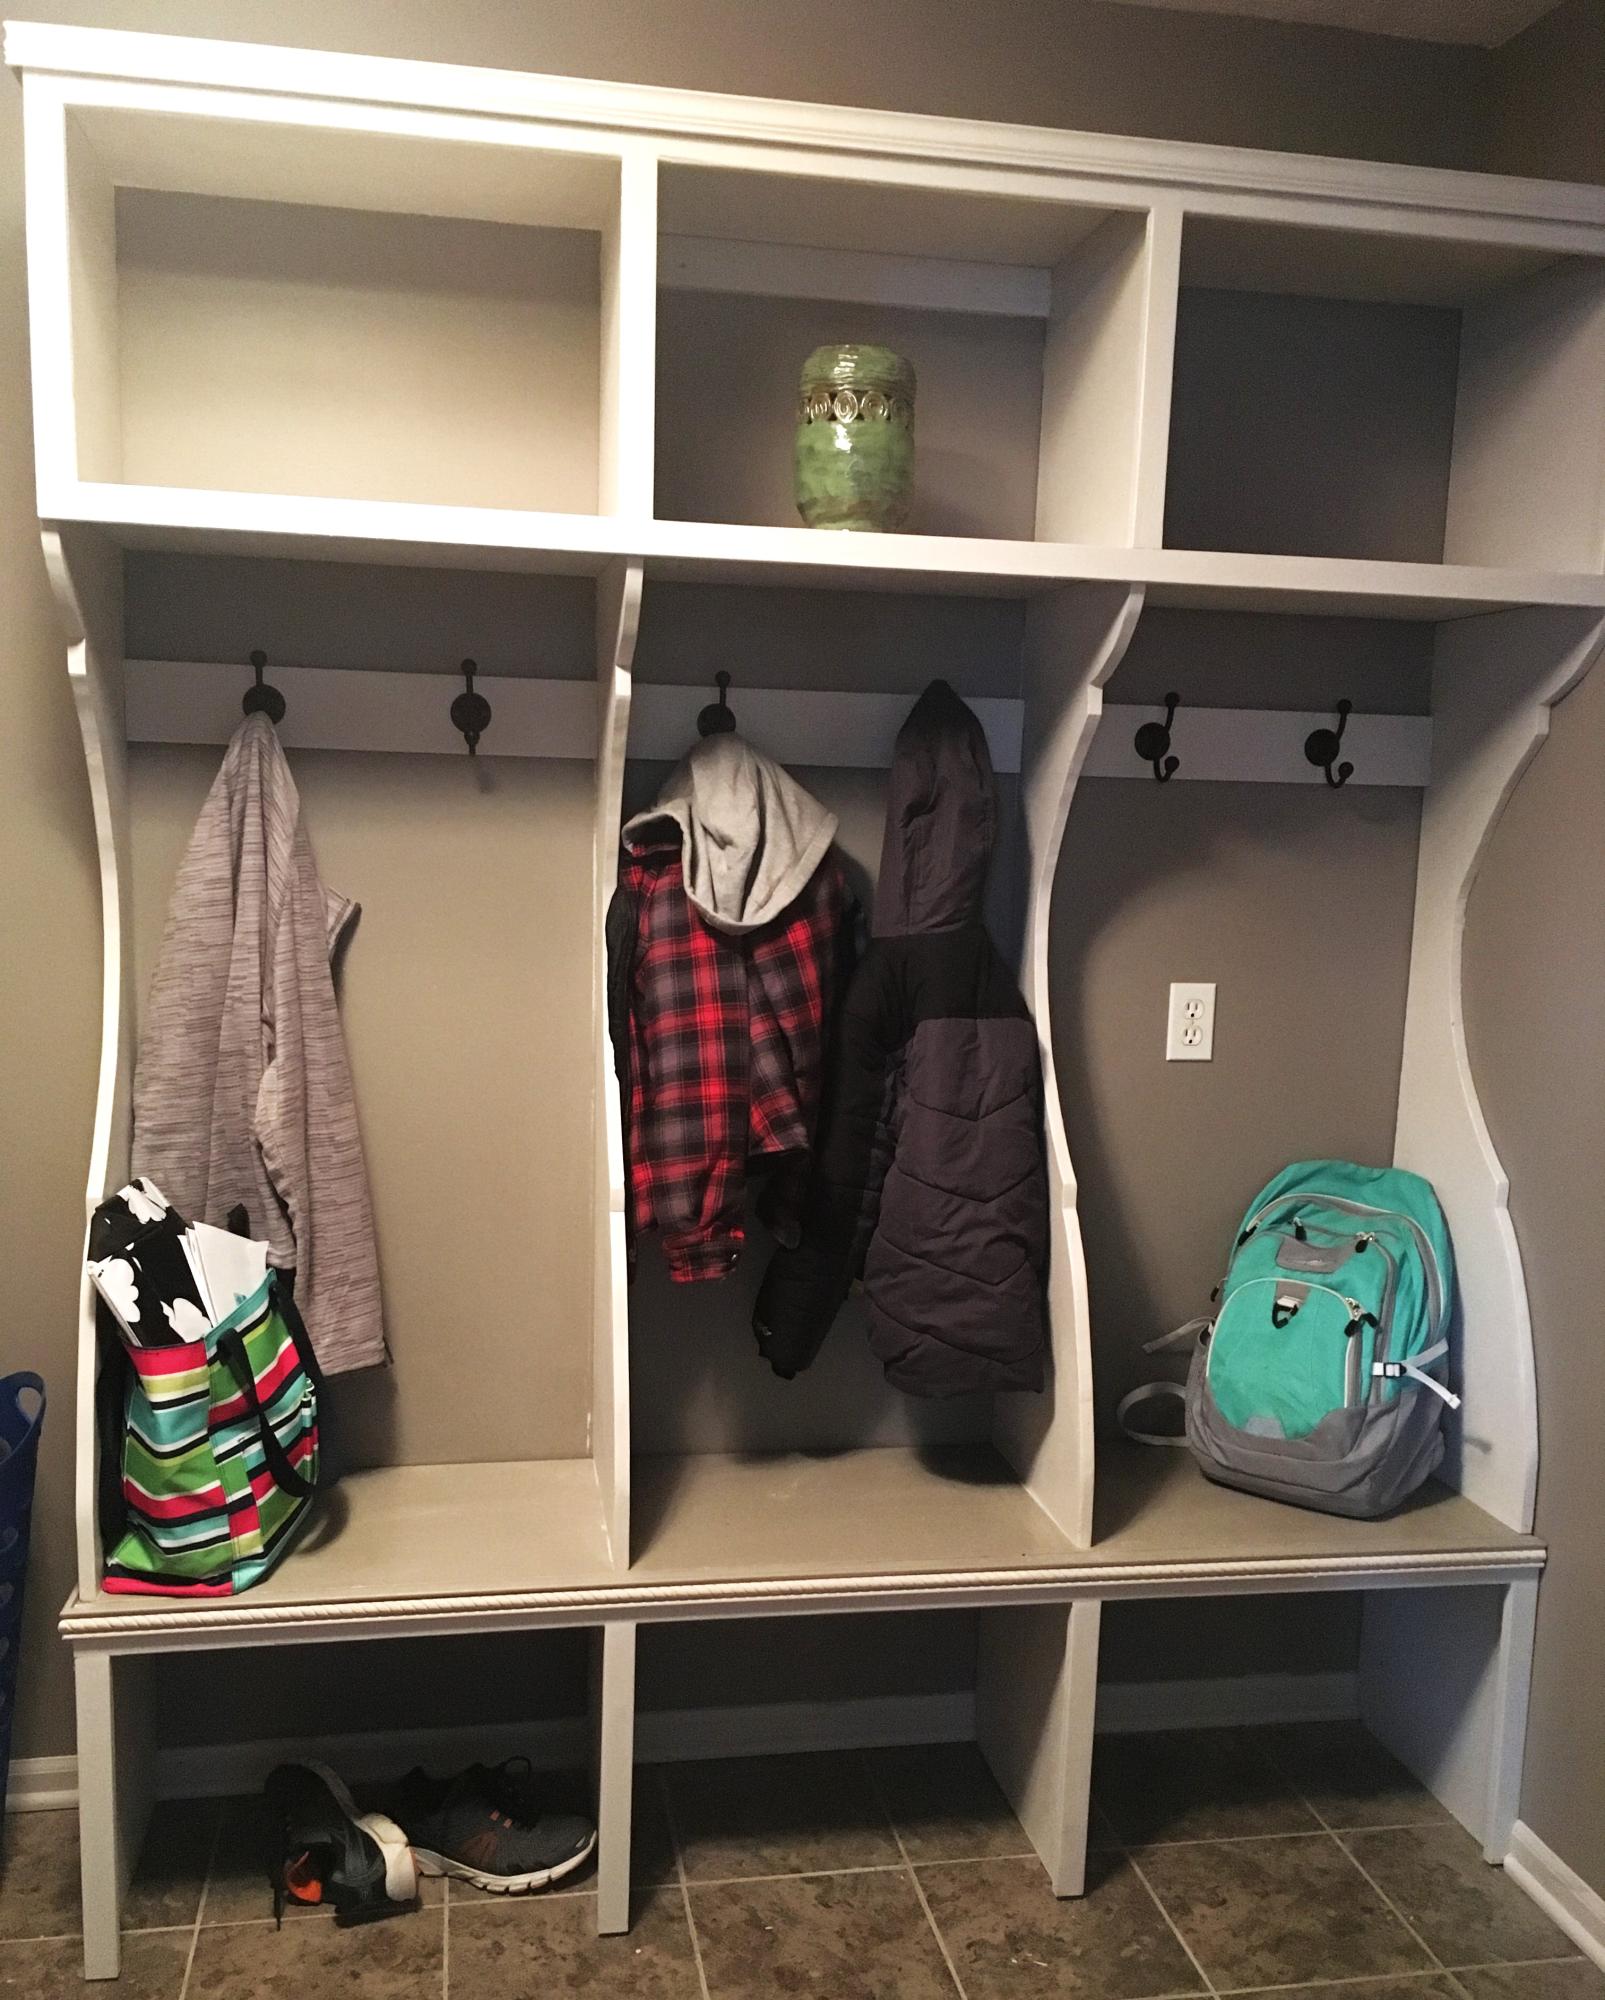
Mudroom bench and organizer
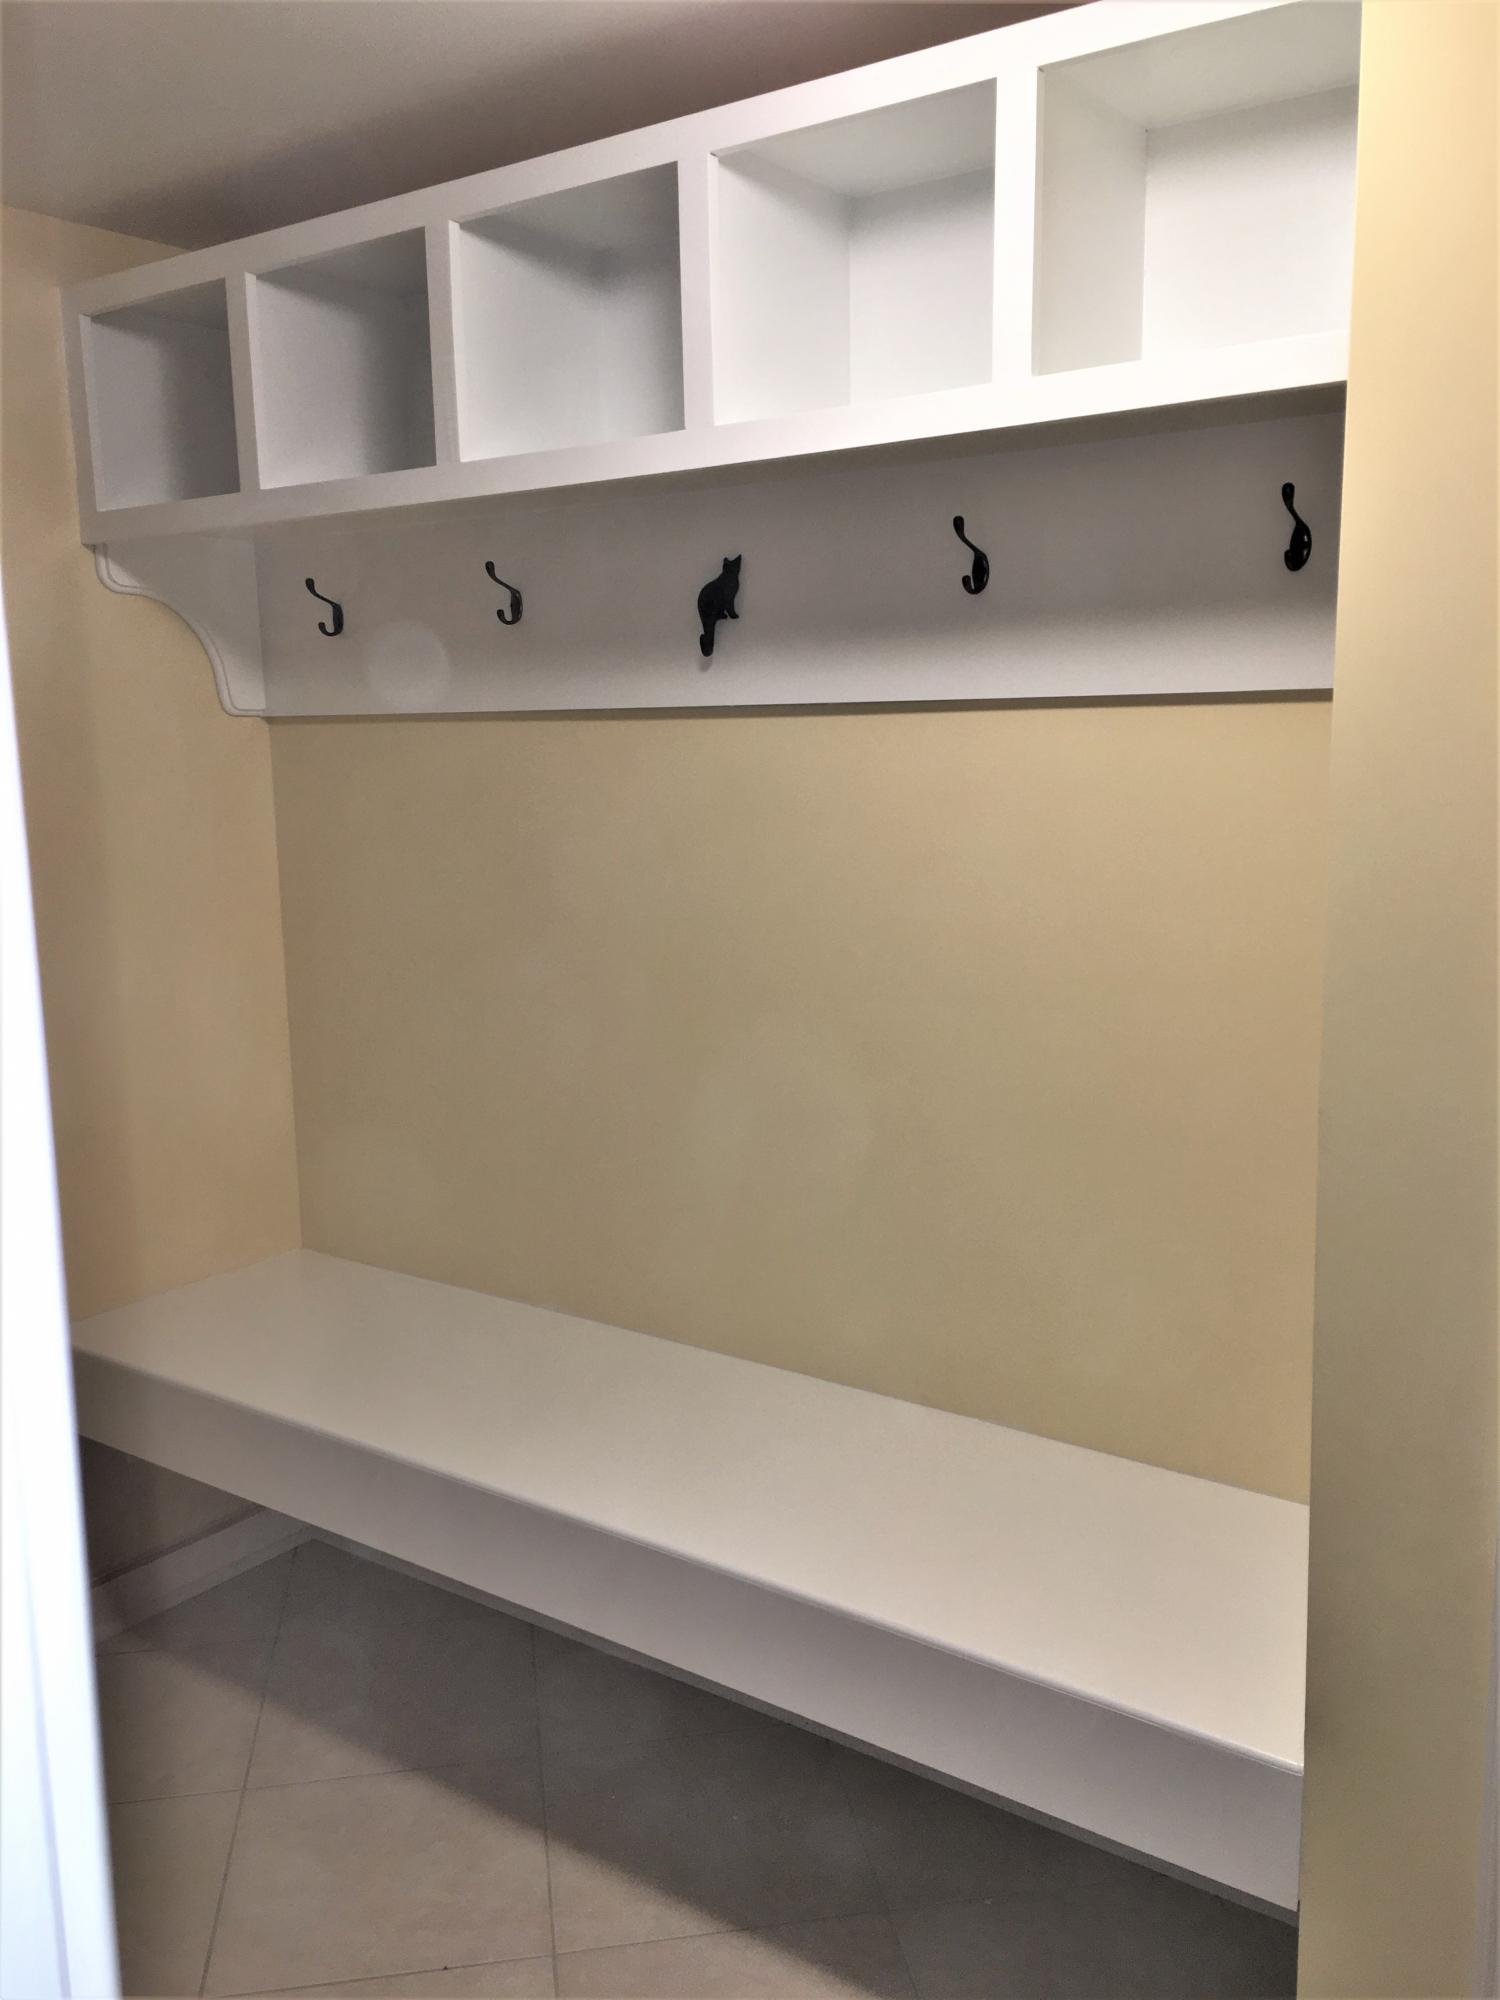
Mudroom bench and organizer.
Built from Plan(s)
Estimated Time Investment
Weekend Project (10-20 Hours)
Recommended Skill Level
Intermediate
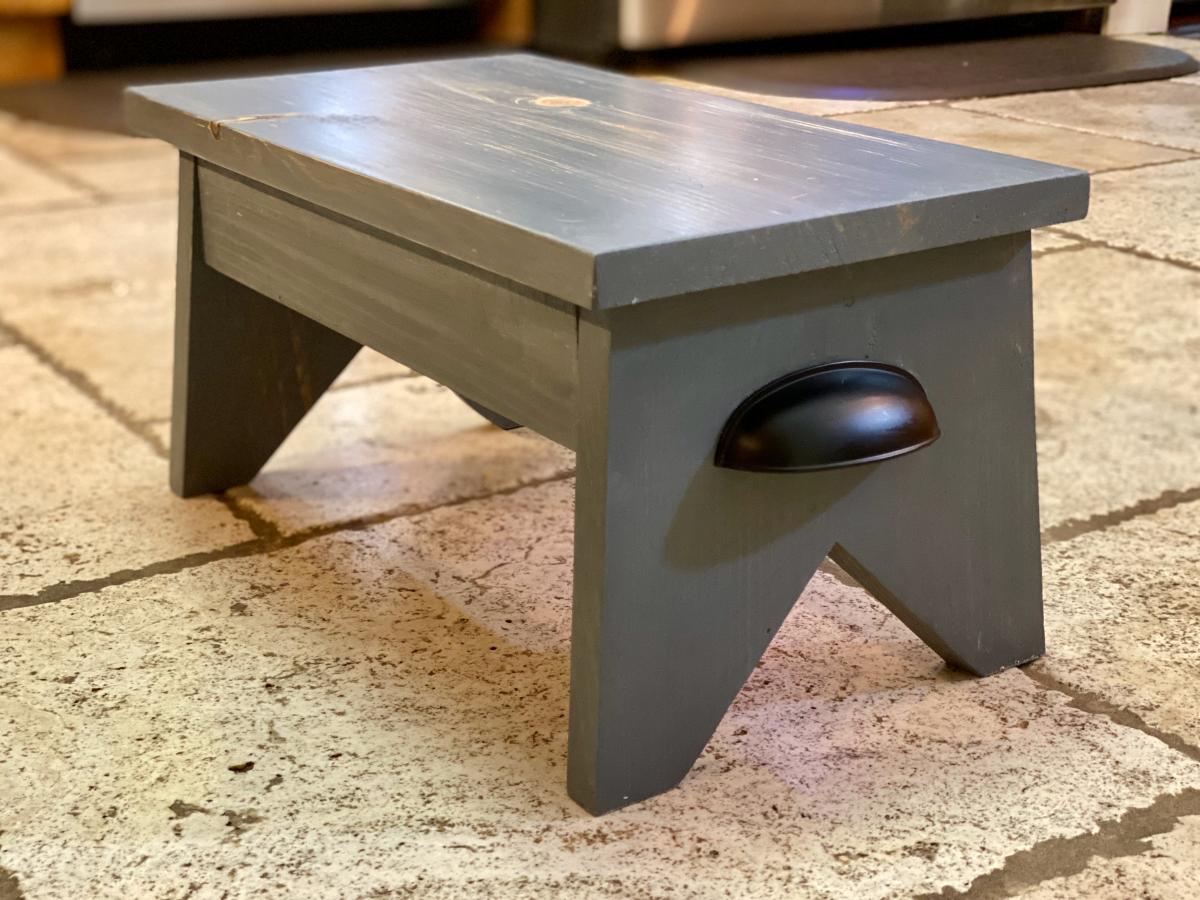
Step Stool

I built this step stool pretty quickly using the plans from Ana-White.com. I sanded the final project and stained it in weathered gray. I applied a couple of coats of polyurethane diluted with mineral spirits all over and a couple of extra coats on the top. Finished with a couple of dresser handles.
Built from Plan(s)
Estimated Cost
$20
Estimated Time Investment
Afternoon Project (3-6 Hours)
Finish Used
Verathane weathered gray. Polyurethane diluted to 50:50 with Mineral oil.
Recommended Skill Level
Beginner
Comments
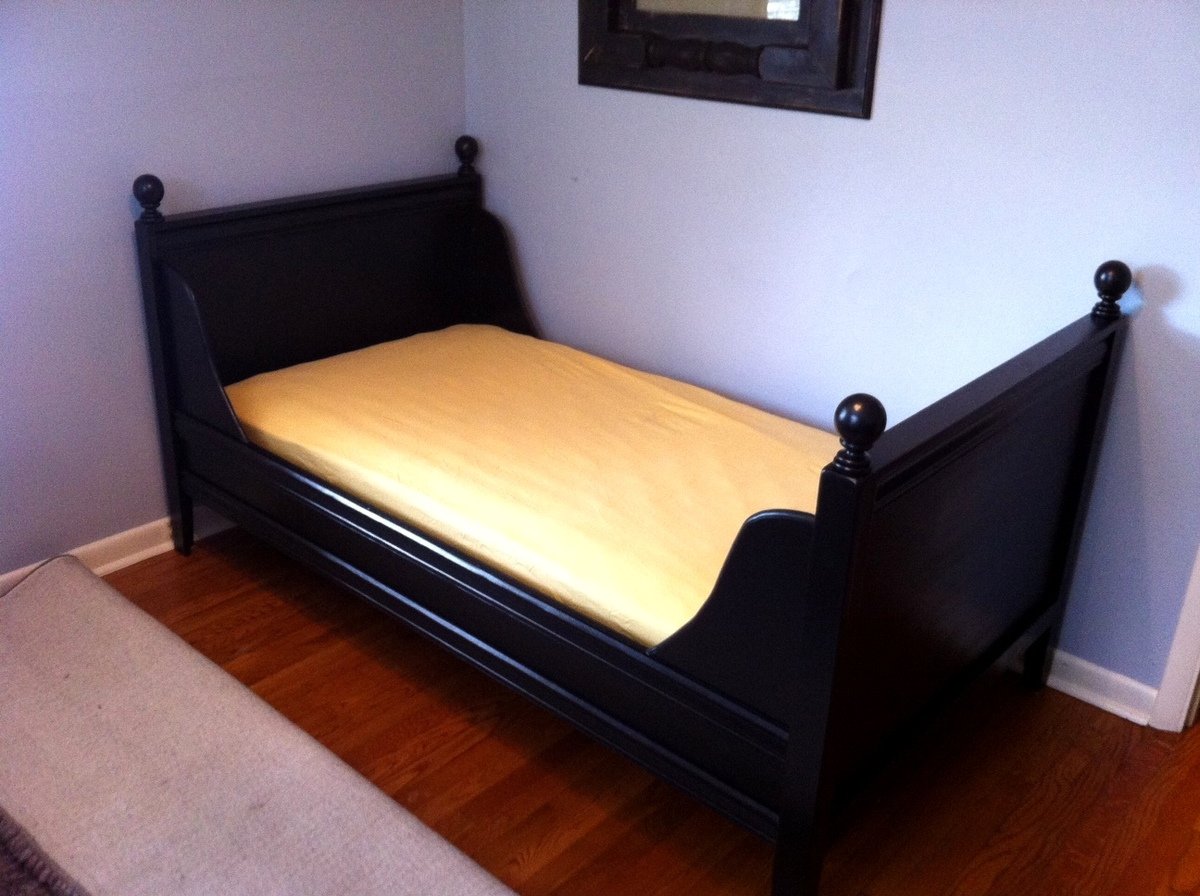
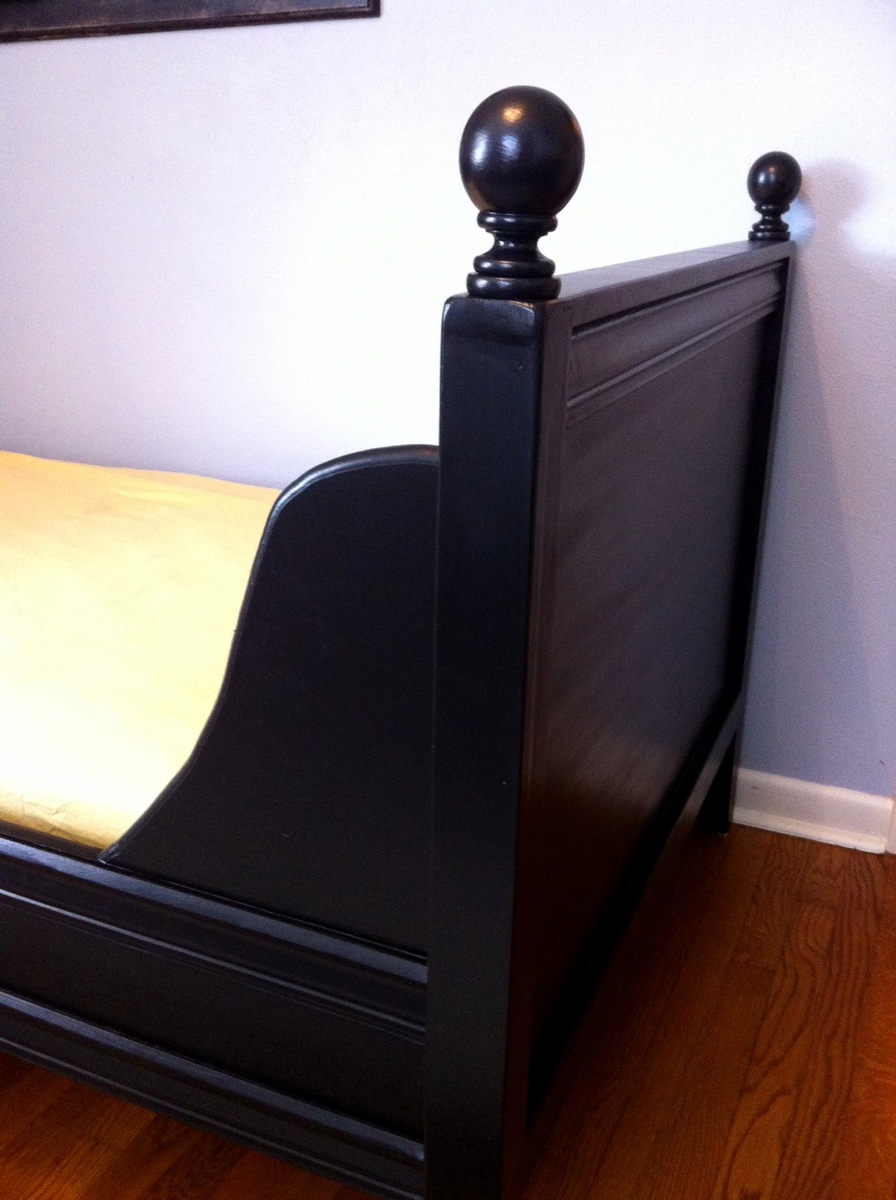
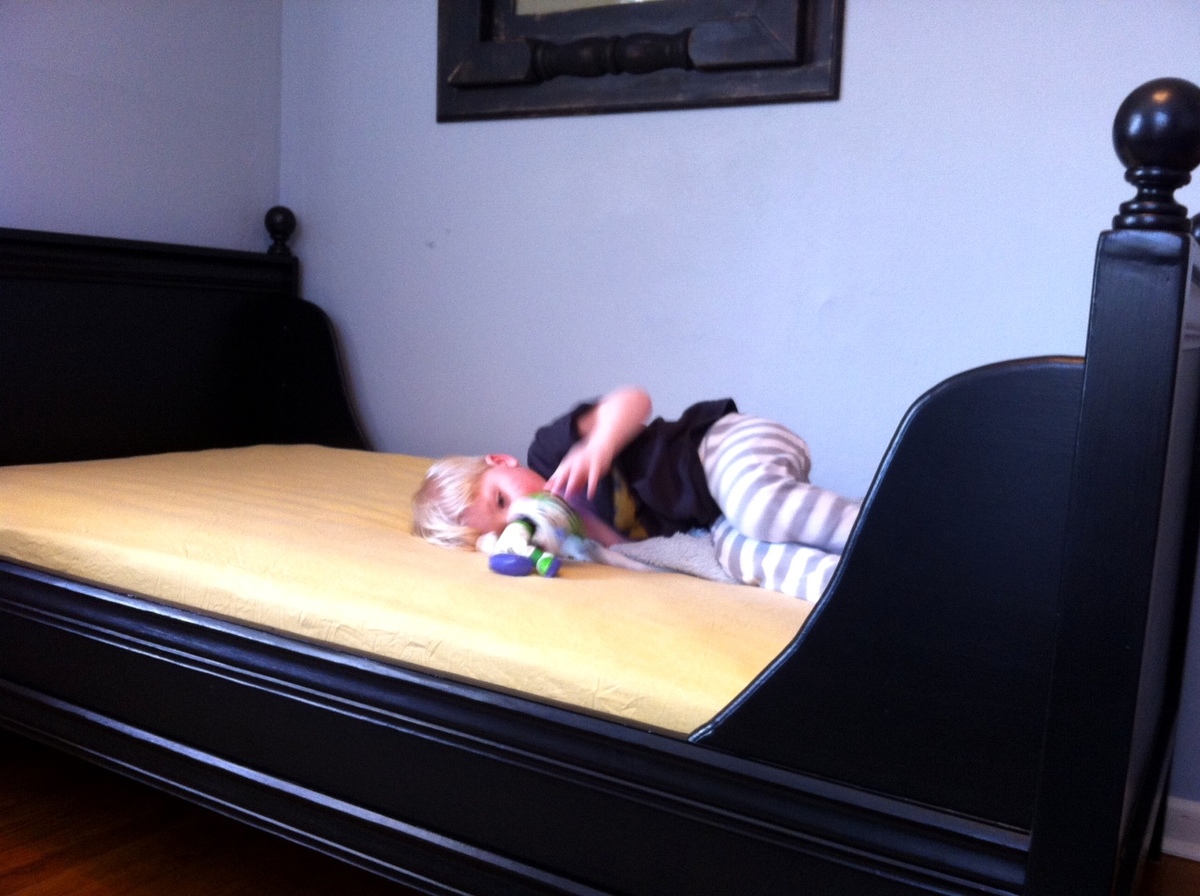
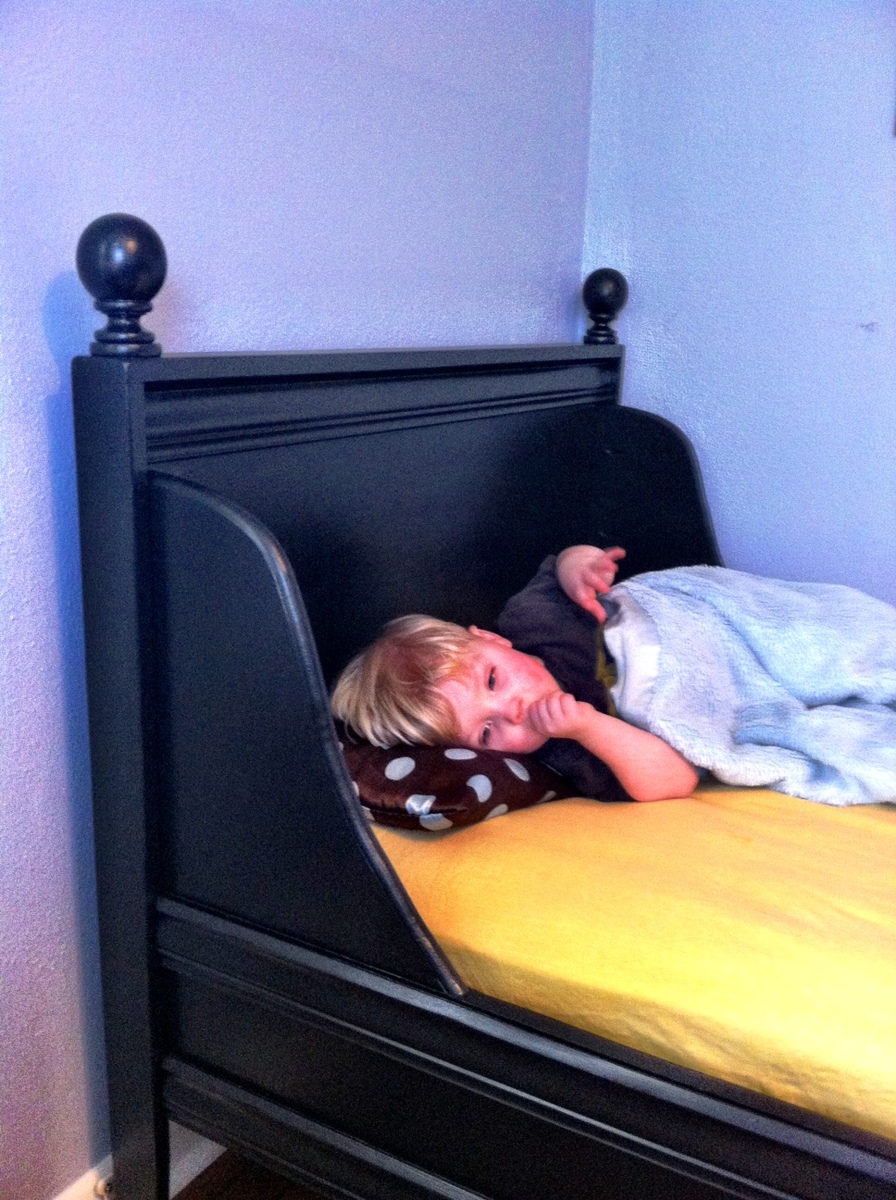
Lydia Daybed
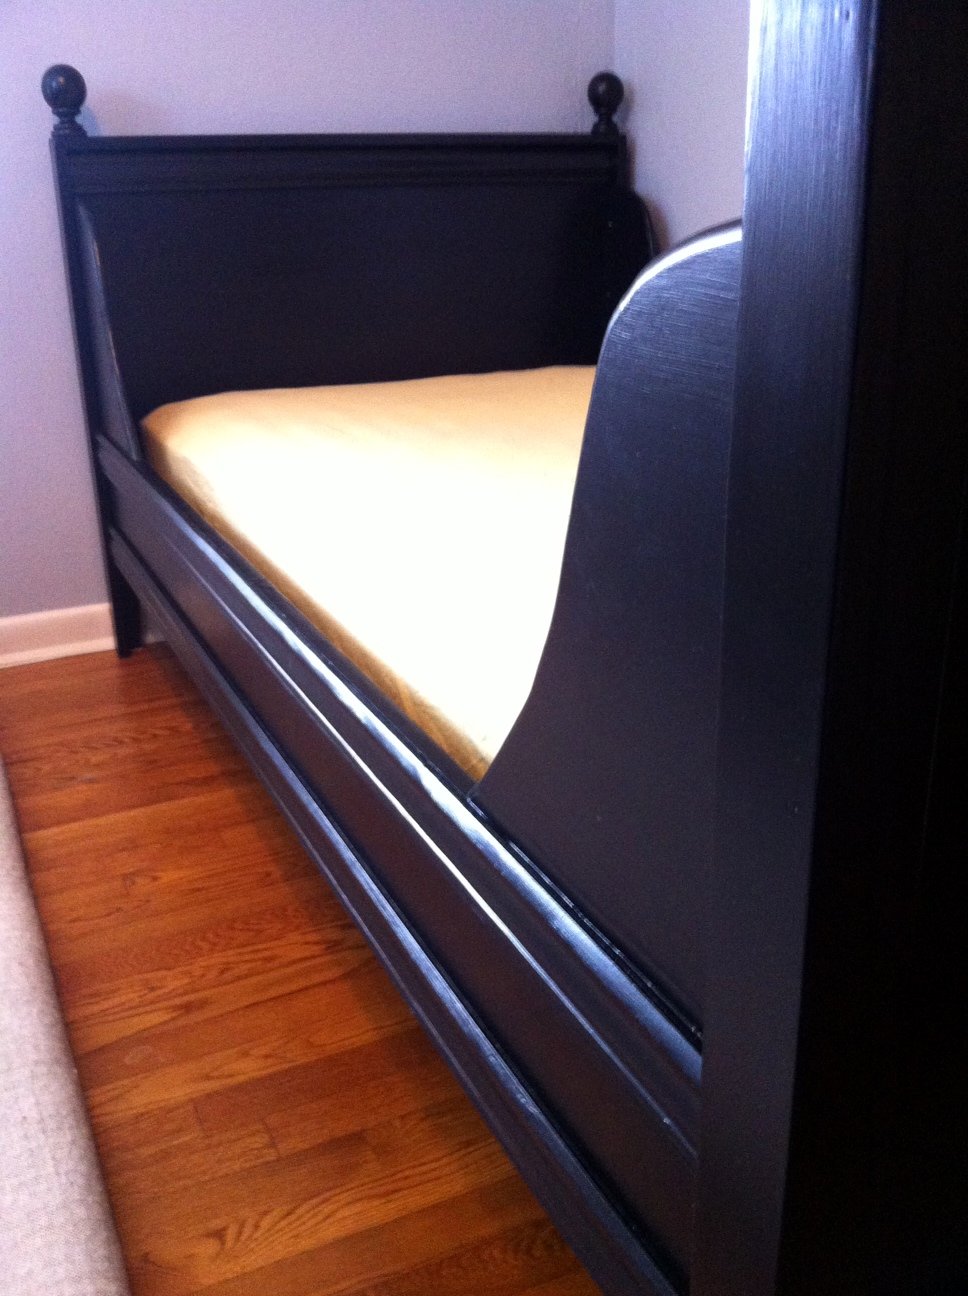
I built the Lydia Daybed for my nephew's new big boy bed. Was a little worried about doing the fancy decorative corner pieces, but just adapted the design a little so it was not such an intricate cut. Everything turned out great and there are a few more pictures on the blog, www.atouchofarkansas.com. Thanks! JM

Built from Plan(s)
Estimated Cost
160.00
Estimated Time Investment
Weekend Project (10-20 Hours)
Finish Used
Painted it black
Recommended Skill Level
Intermediate
Comments
Fri, 03/08/2013 - 18:58
Hey Jeff! The details on this
Hey Jeff!
The details on this Lydia Daybed are beautiful! Looks great!
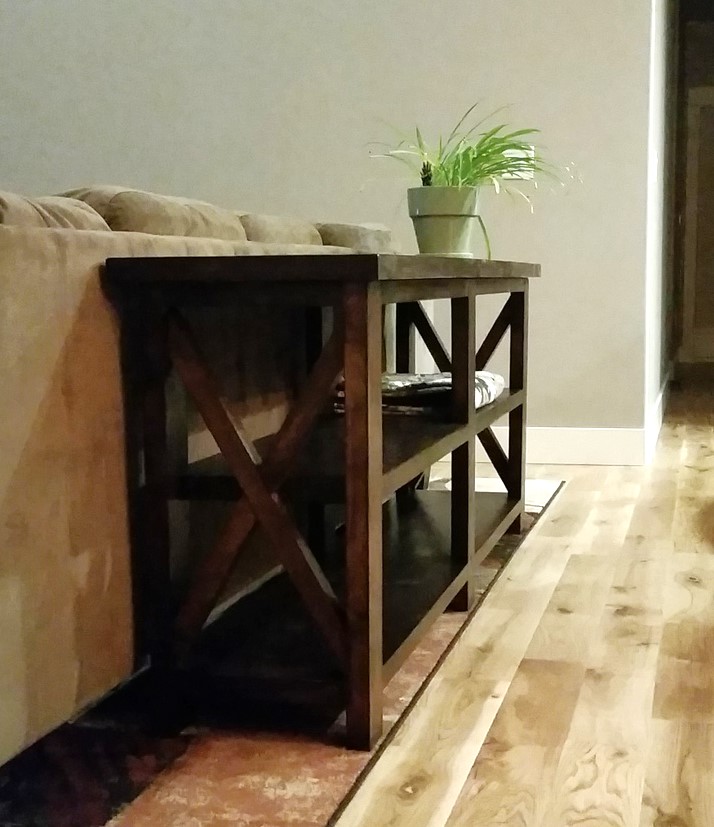
PotteryBarn Benchwright Console TAble
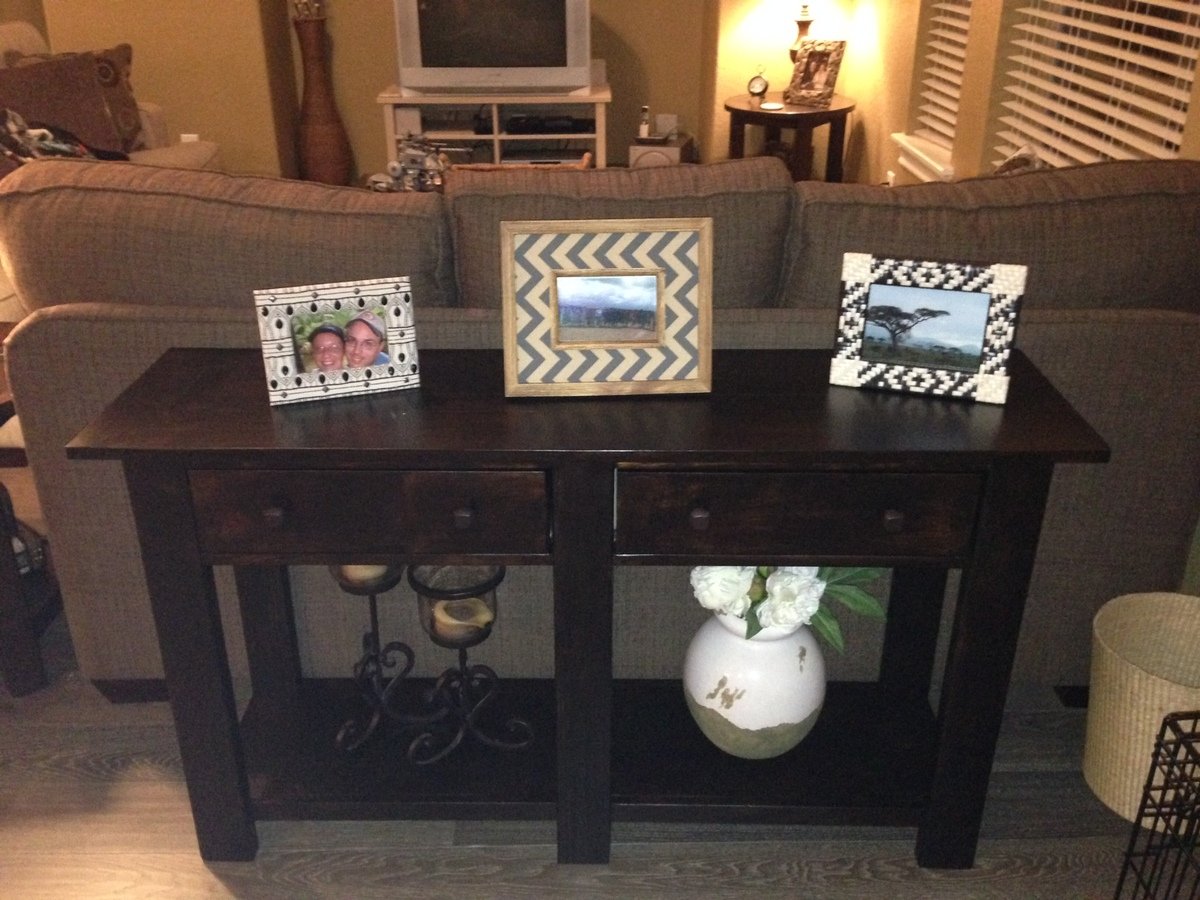
Great Plans for this project from Ana-White. Took about 1 day to fabricate, 1 day to sand/prep, and 1 day for stain. I used Espresso Stain finish (two coats), and knobs from Home Depot. Kreg Jig used for most all joints, including the breadboard top.
Built from Plan(s)
Estimated Cost
$160
Estimated Time Investment
Week Long Project (20 Hours or More)
Finish Used
Minwax "Espresso" Stain. Two coats.
Recommended Skill Level
Intermediate
Comments
Outdoor sectional couch
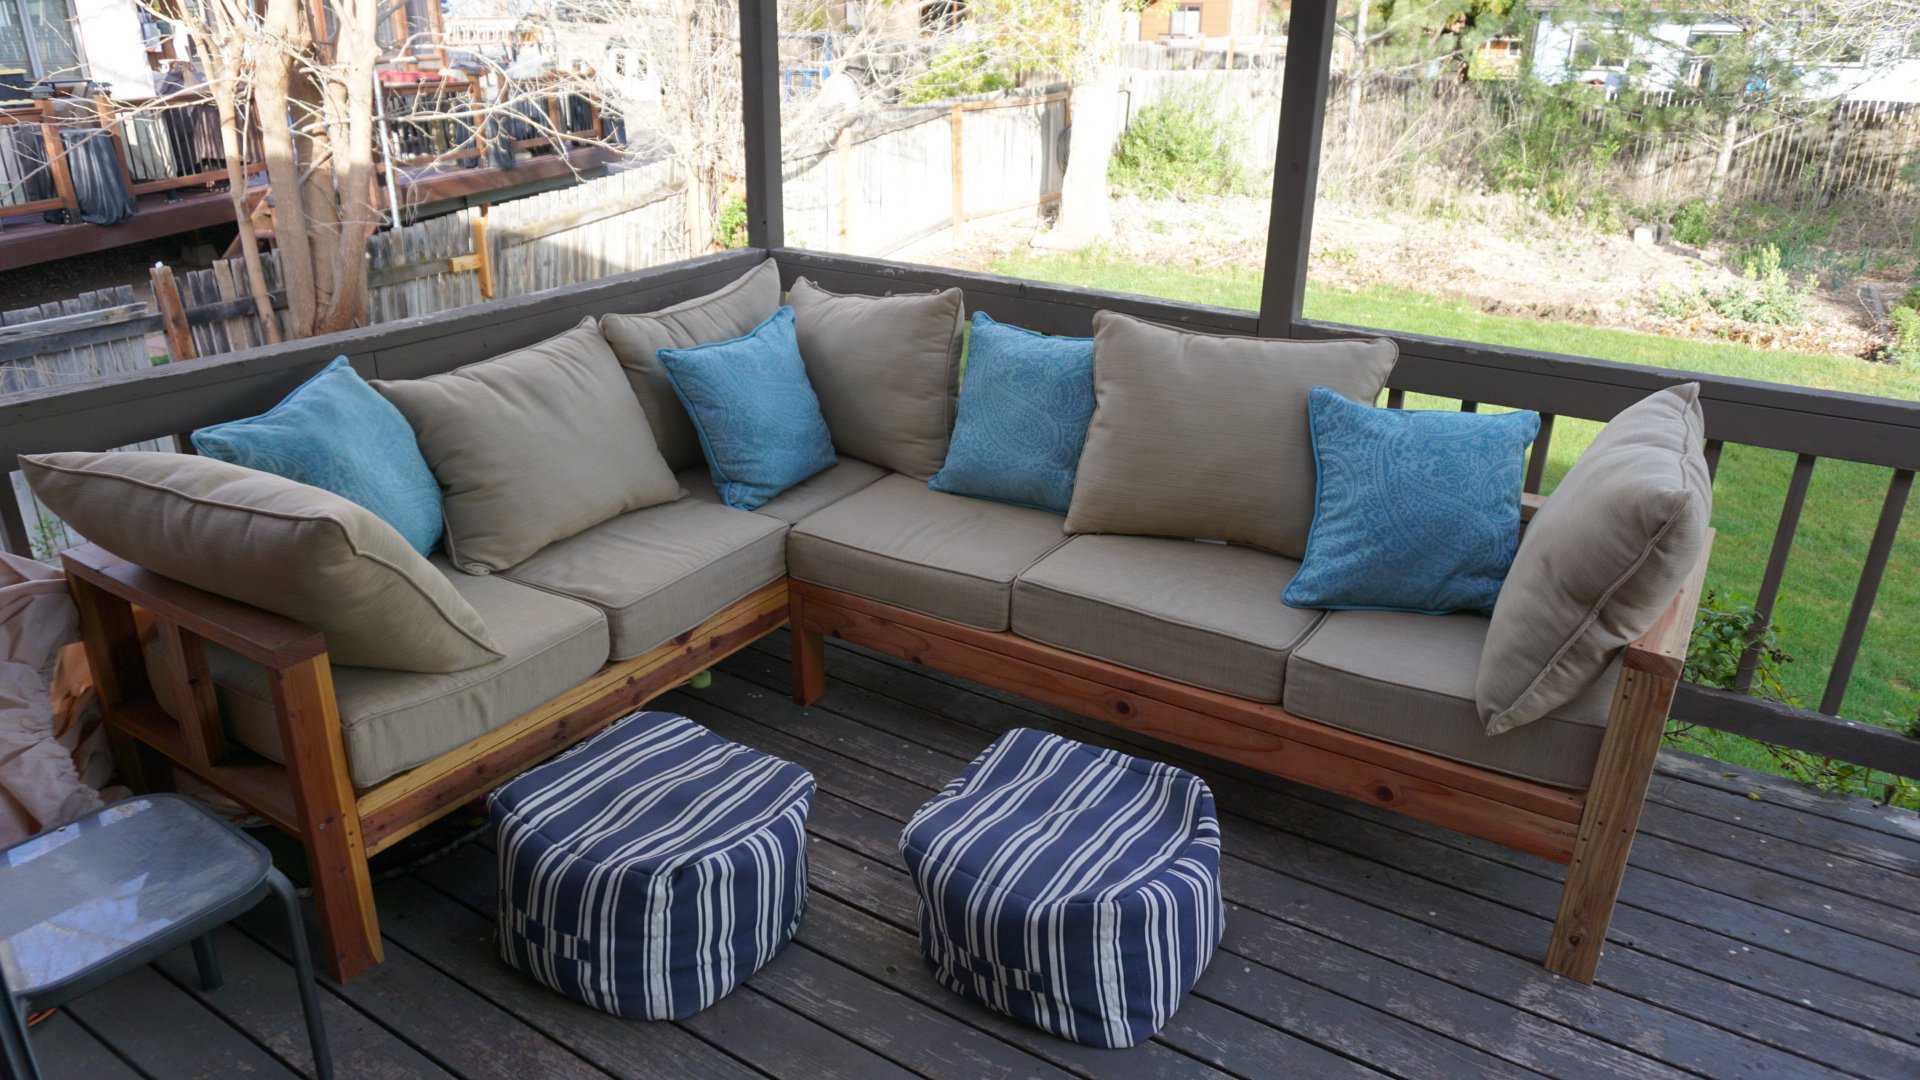
Thanks Ana for the plans, we love our new outdoor sectional. I was able to find Redwood for my project I think it gives it a lot of character. I have an idea to make a chair similar to this.
Estimated Cost
$800 for the whole thing
Estimated Time Investment
Weekend Project (10-20 Hours)
Finish Used
Preservation Wood oil stain and sealer. Clear
Recommended Skill Level
Beginner
Comments
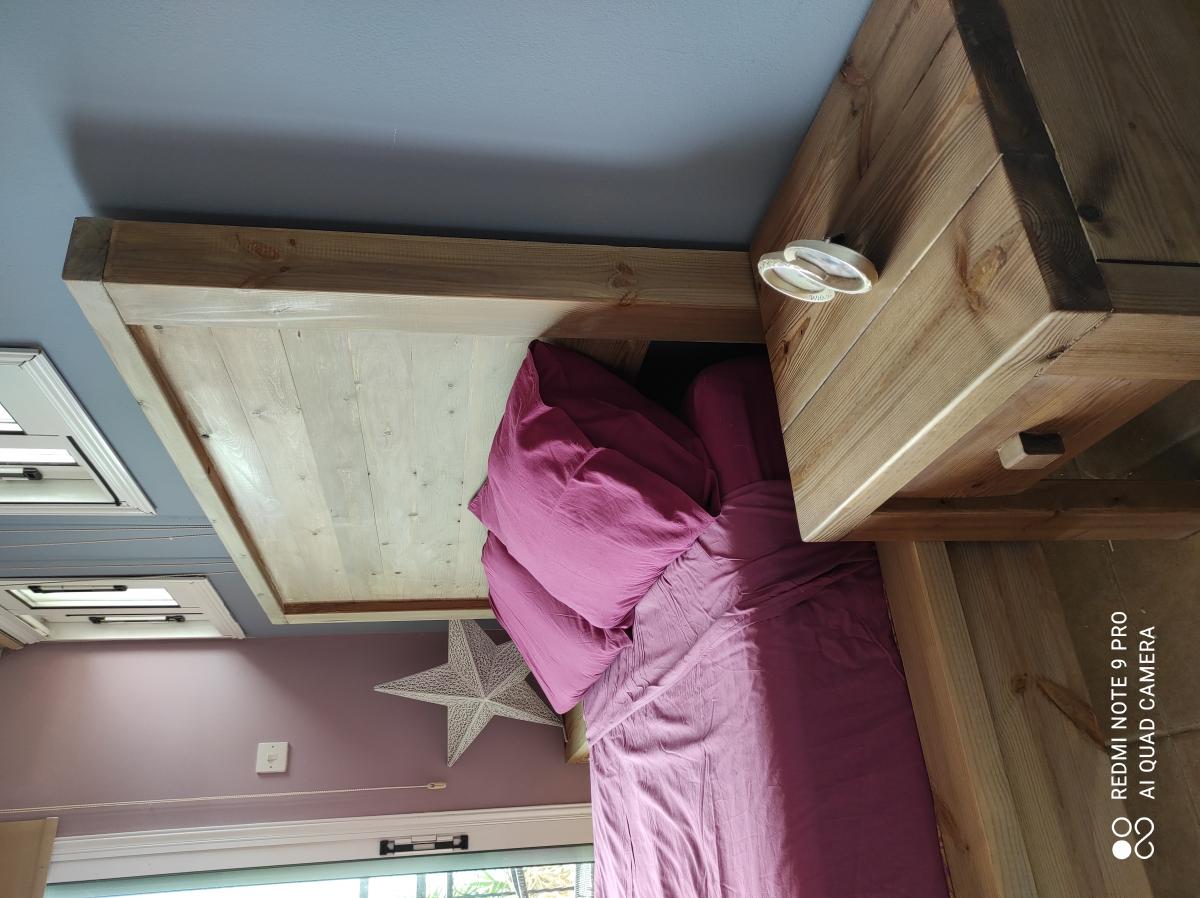
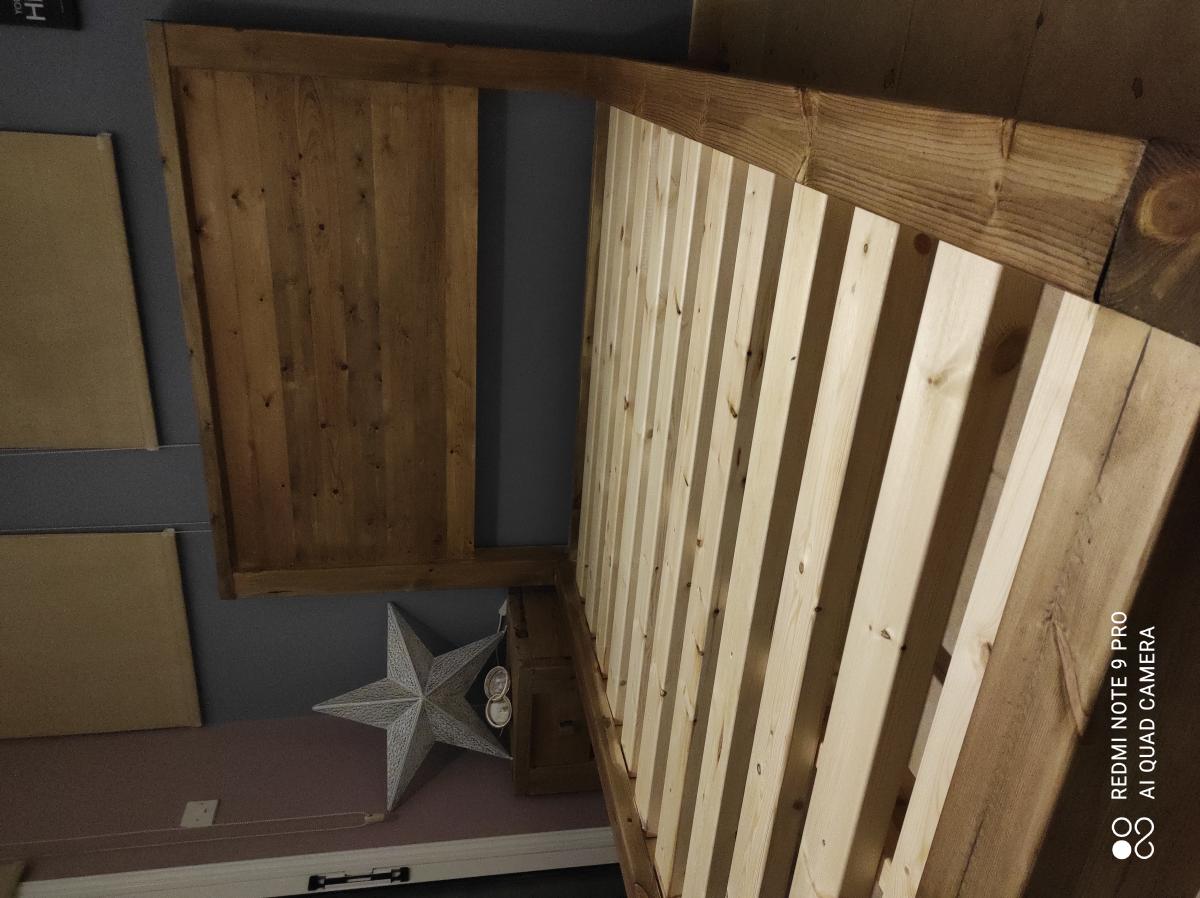
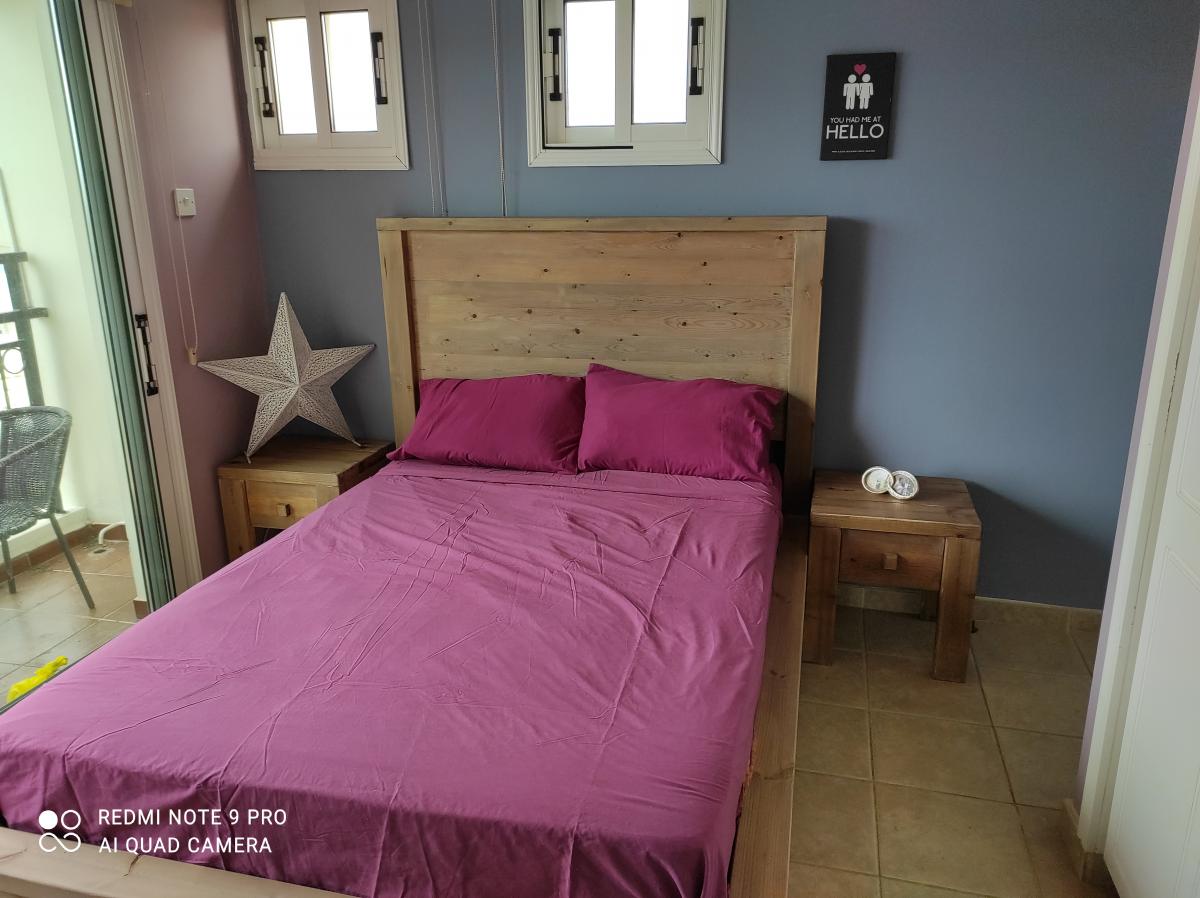
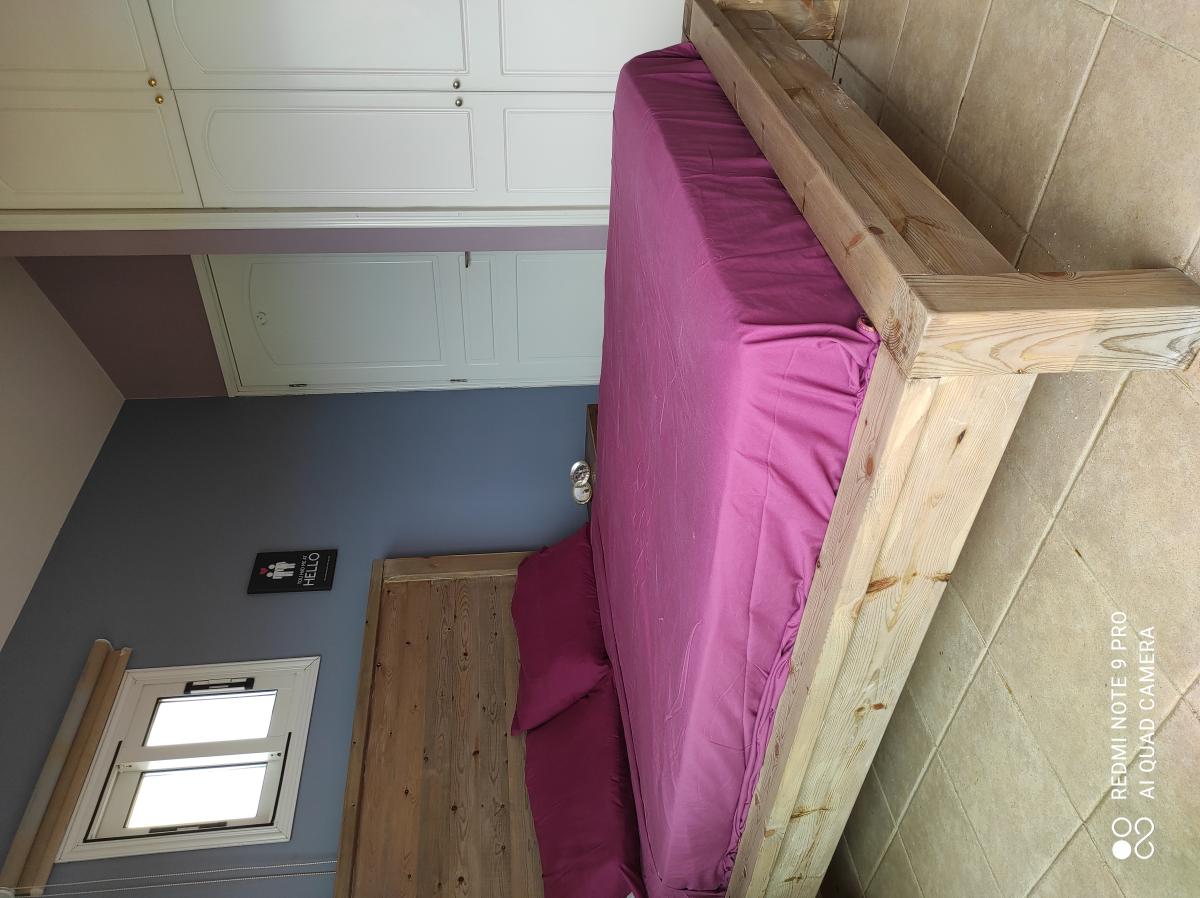
Modern farmhouse bed and nightstands
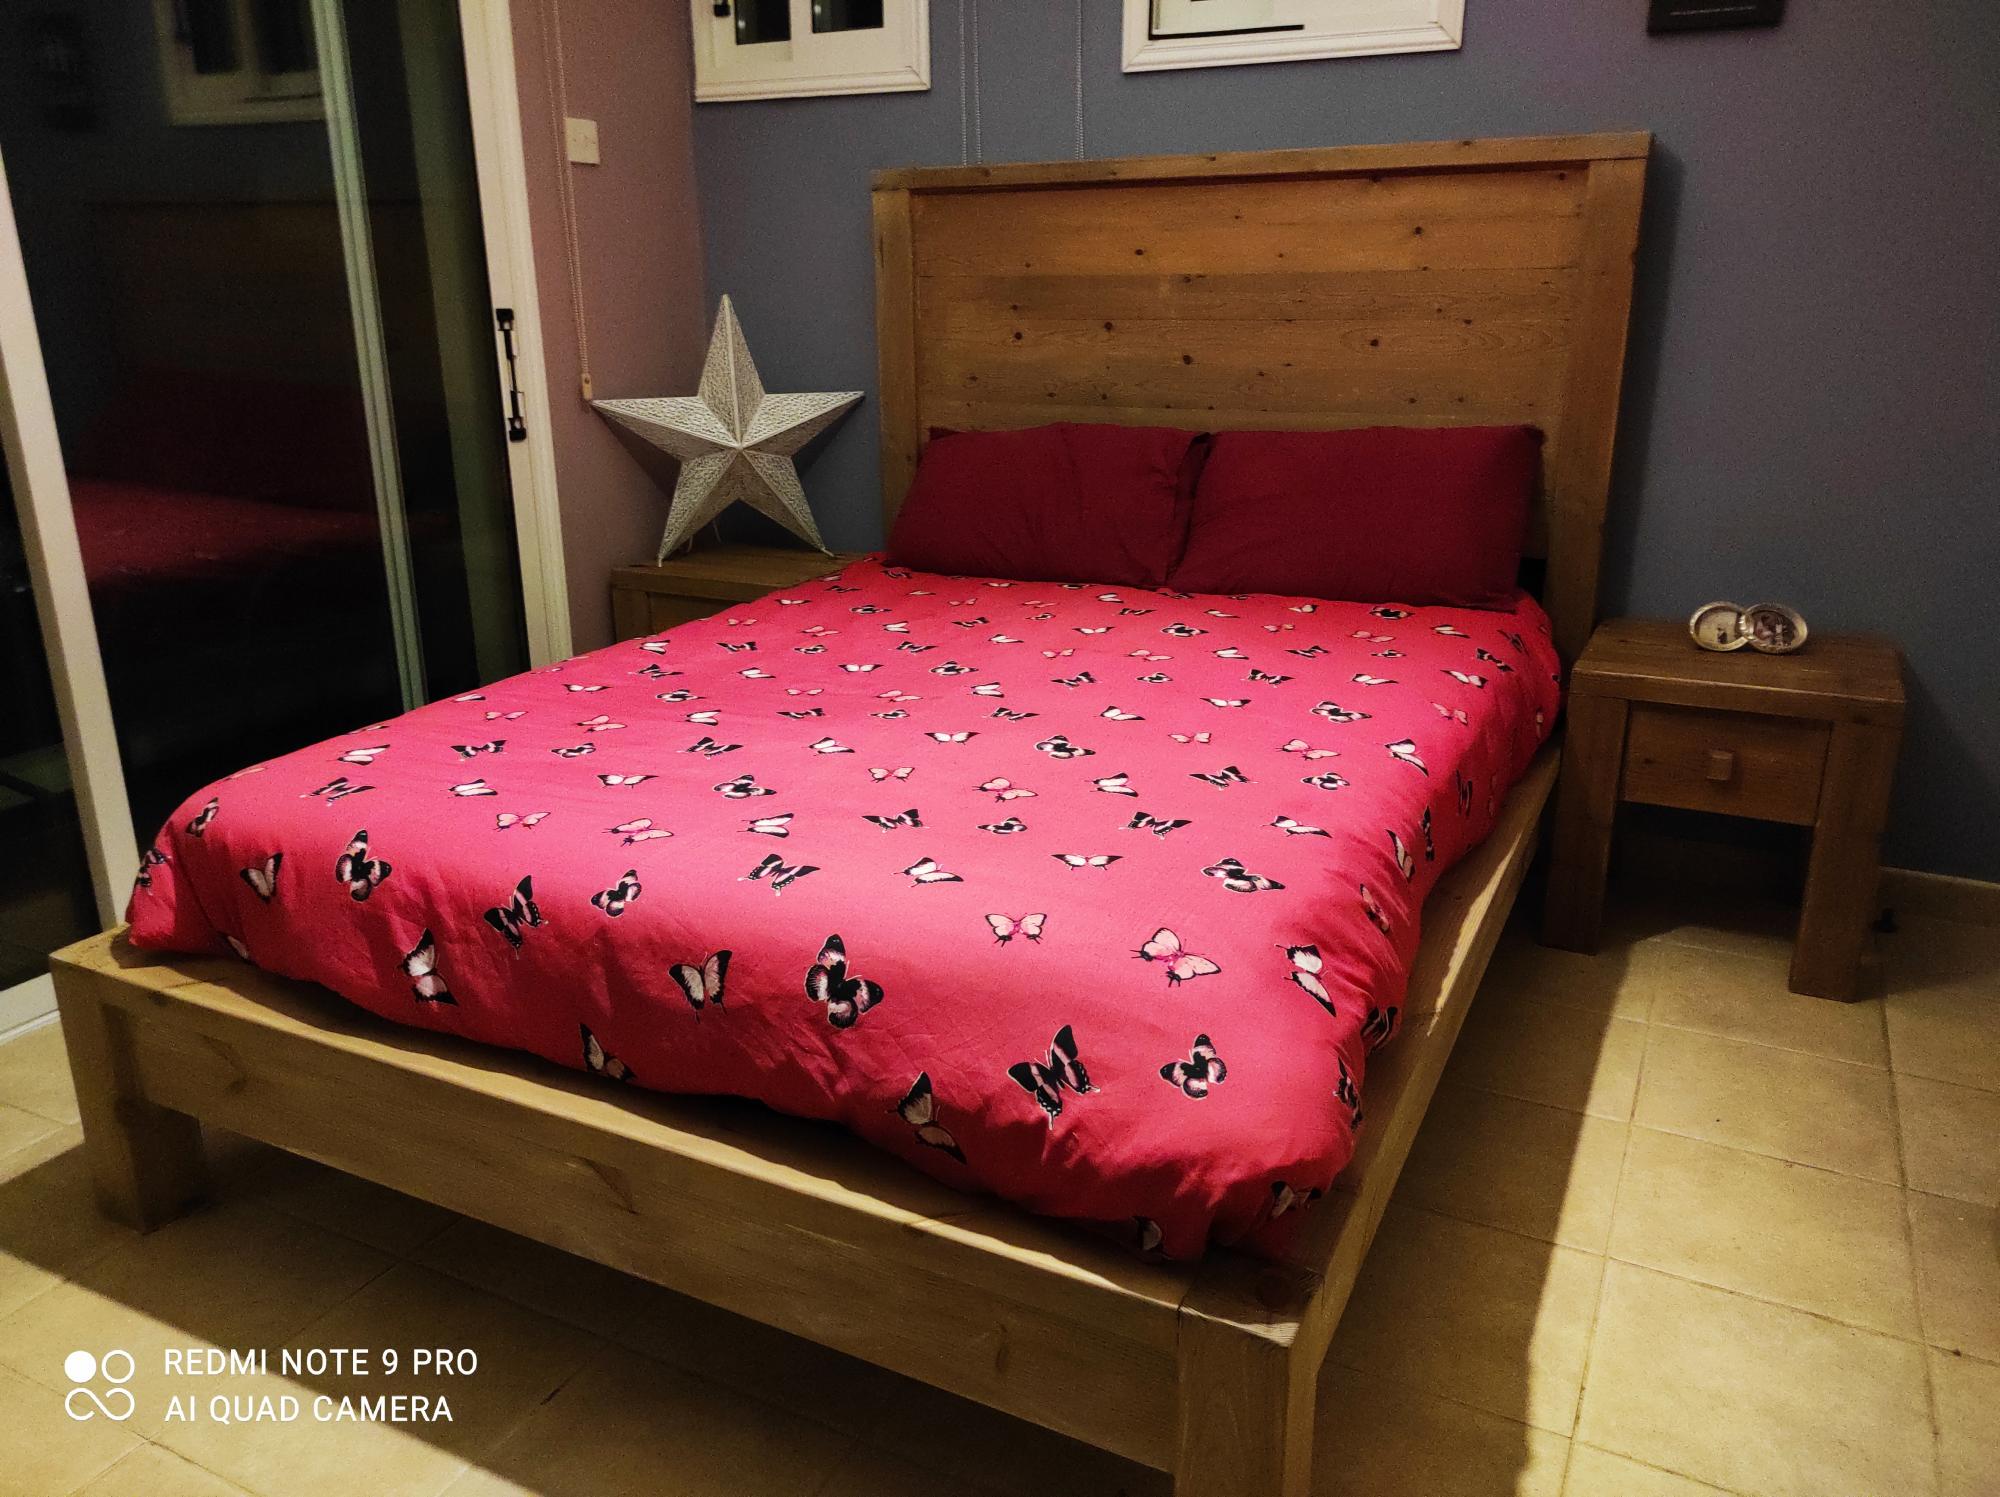
Having recently moved house our current bed was too big to fit so, I took a break from building Wendy houses to build this. The size of the room meant the nightstands couldn't be built as per the plan. Not wanting to alter the size of wood used, I opted to do away with the draw instead installing a solid base with a flip down front.
Built from Plan(s)
Estimated Cost
250
Estimated Time Investment
Day Project (6-9 Hours)
Finish Used
Homemade, a solution of white vinegar and steel wool to force oxidation of the wood, followed by rustolium clear wax.
Recommended Skill Level
Beginner
Comments
My coat tree build
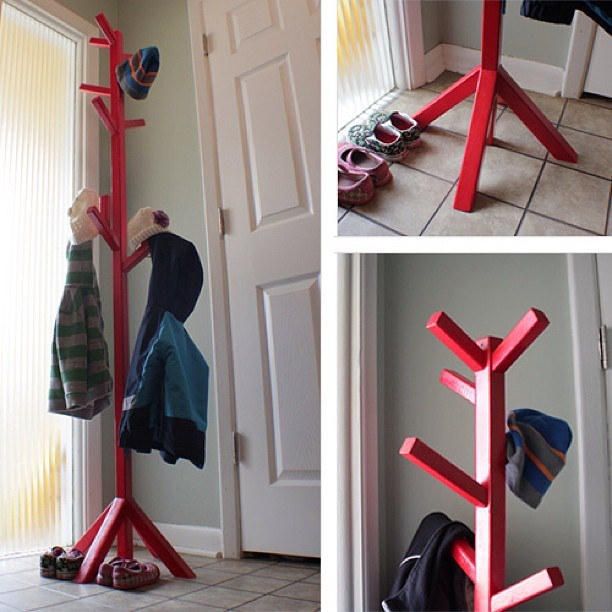
Such a great, simple project! Thanks for the plans Ana! I'm doing my best to send people your way via my blog, iliketomakestuff.com
Estimated Cost
$10
Estimated Time Investment
An Hour or Two (0-2 Hours)
Finish Used
High Gloss Spray paint
Recommended Skill Level
Beginner
Comments

Tue, 03/12/2013 - 22:56
Love the high gloss red
I made Ana's coat tree recently as well, but I painted mine white. I love that high gloss red that you used! It turns your coat tree into an accent piece. :)
Brothers media wall

My brother saw me making a bunch of stuff at my house and begged me To do something with his basement TV room. So after talking with him and seeing what Ana had to offer i settled on the smith media wall collection. I loved he way it turned out and I have happy brother to boot. I modified the plans to fit his bigger TV.


Built from Plan(s)
Estimated Cost
$550 for the total project.
Estimated Time Investment
Weekend Project (10-20 Hours)
Finish Used
Rustoleum stain. Kona
Recommended Skill Level
Intermediate
Comments
Mon, 01/19/2015 - 17:18
Wow! You're a great brother!
Wow! You're a great brother! This is an awesome project and I just love the way his came out! Thanks so much for sharing!
Garden planters
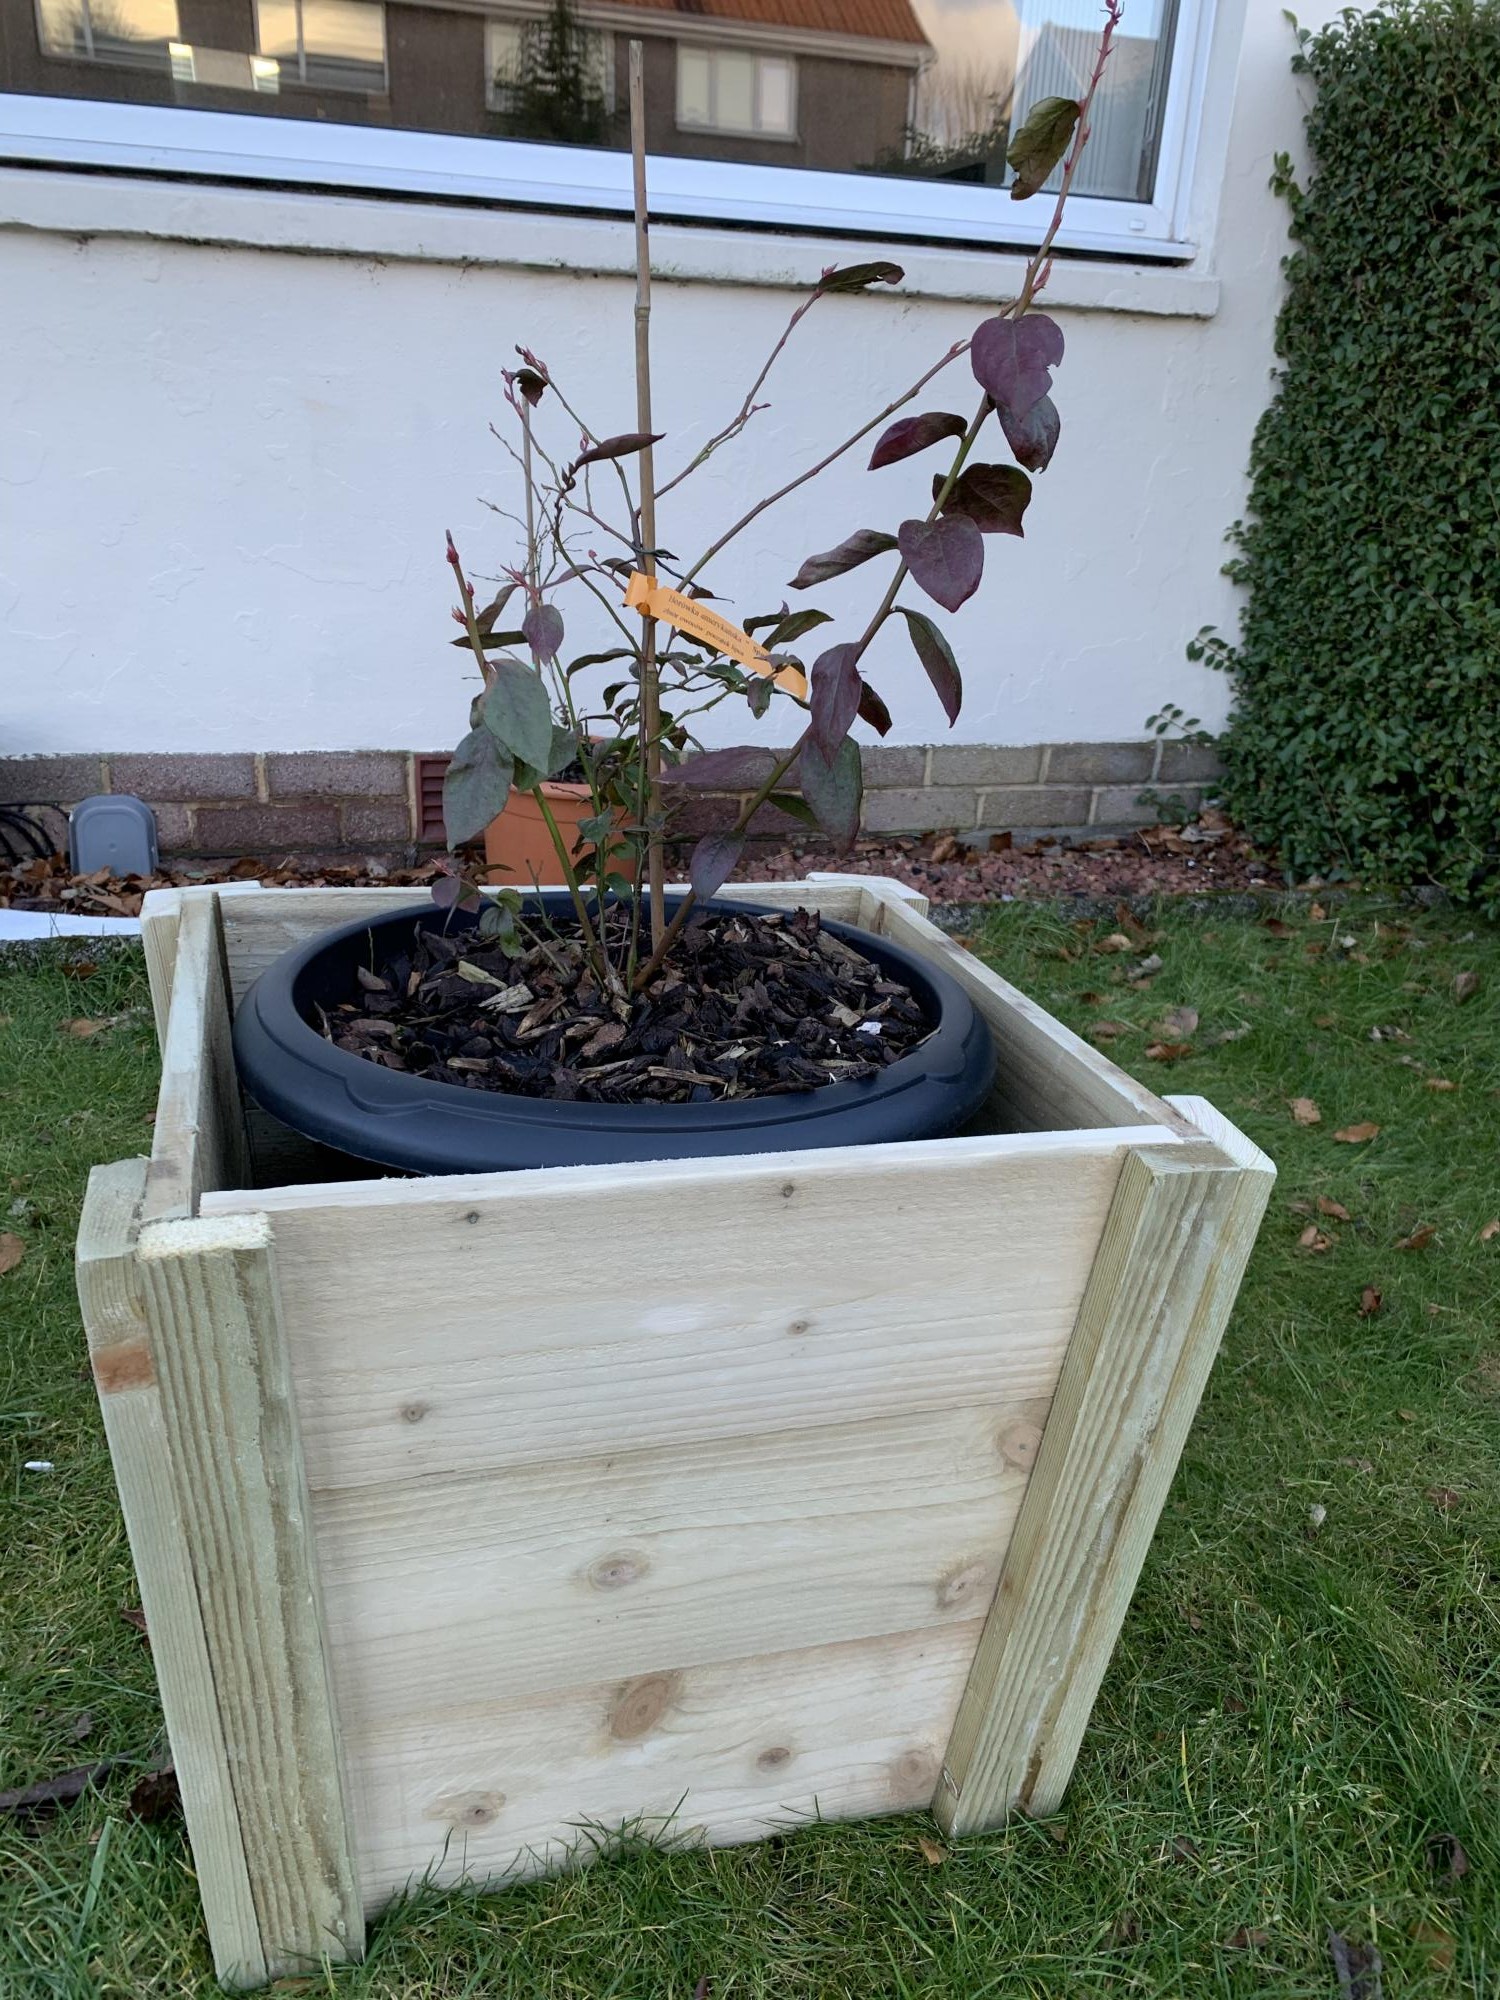
Great project to try and as you can see they turned out quite well
Built from Plan(s)
Estimated Time Investment
Afternoon Project (3-6 Hours)
Finish Used
Once assembled just use a course P80 sandpaper, then finish with finish with fine P120 sandpaper
Recommended Skill Level
Beginner
Comments
Dollhouse Bookcase
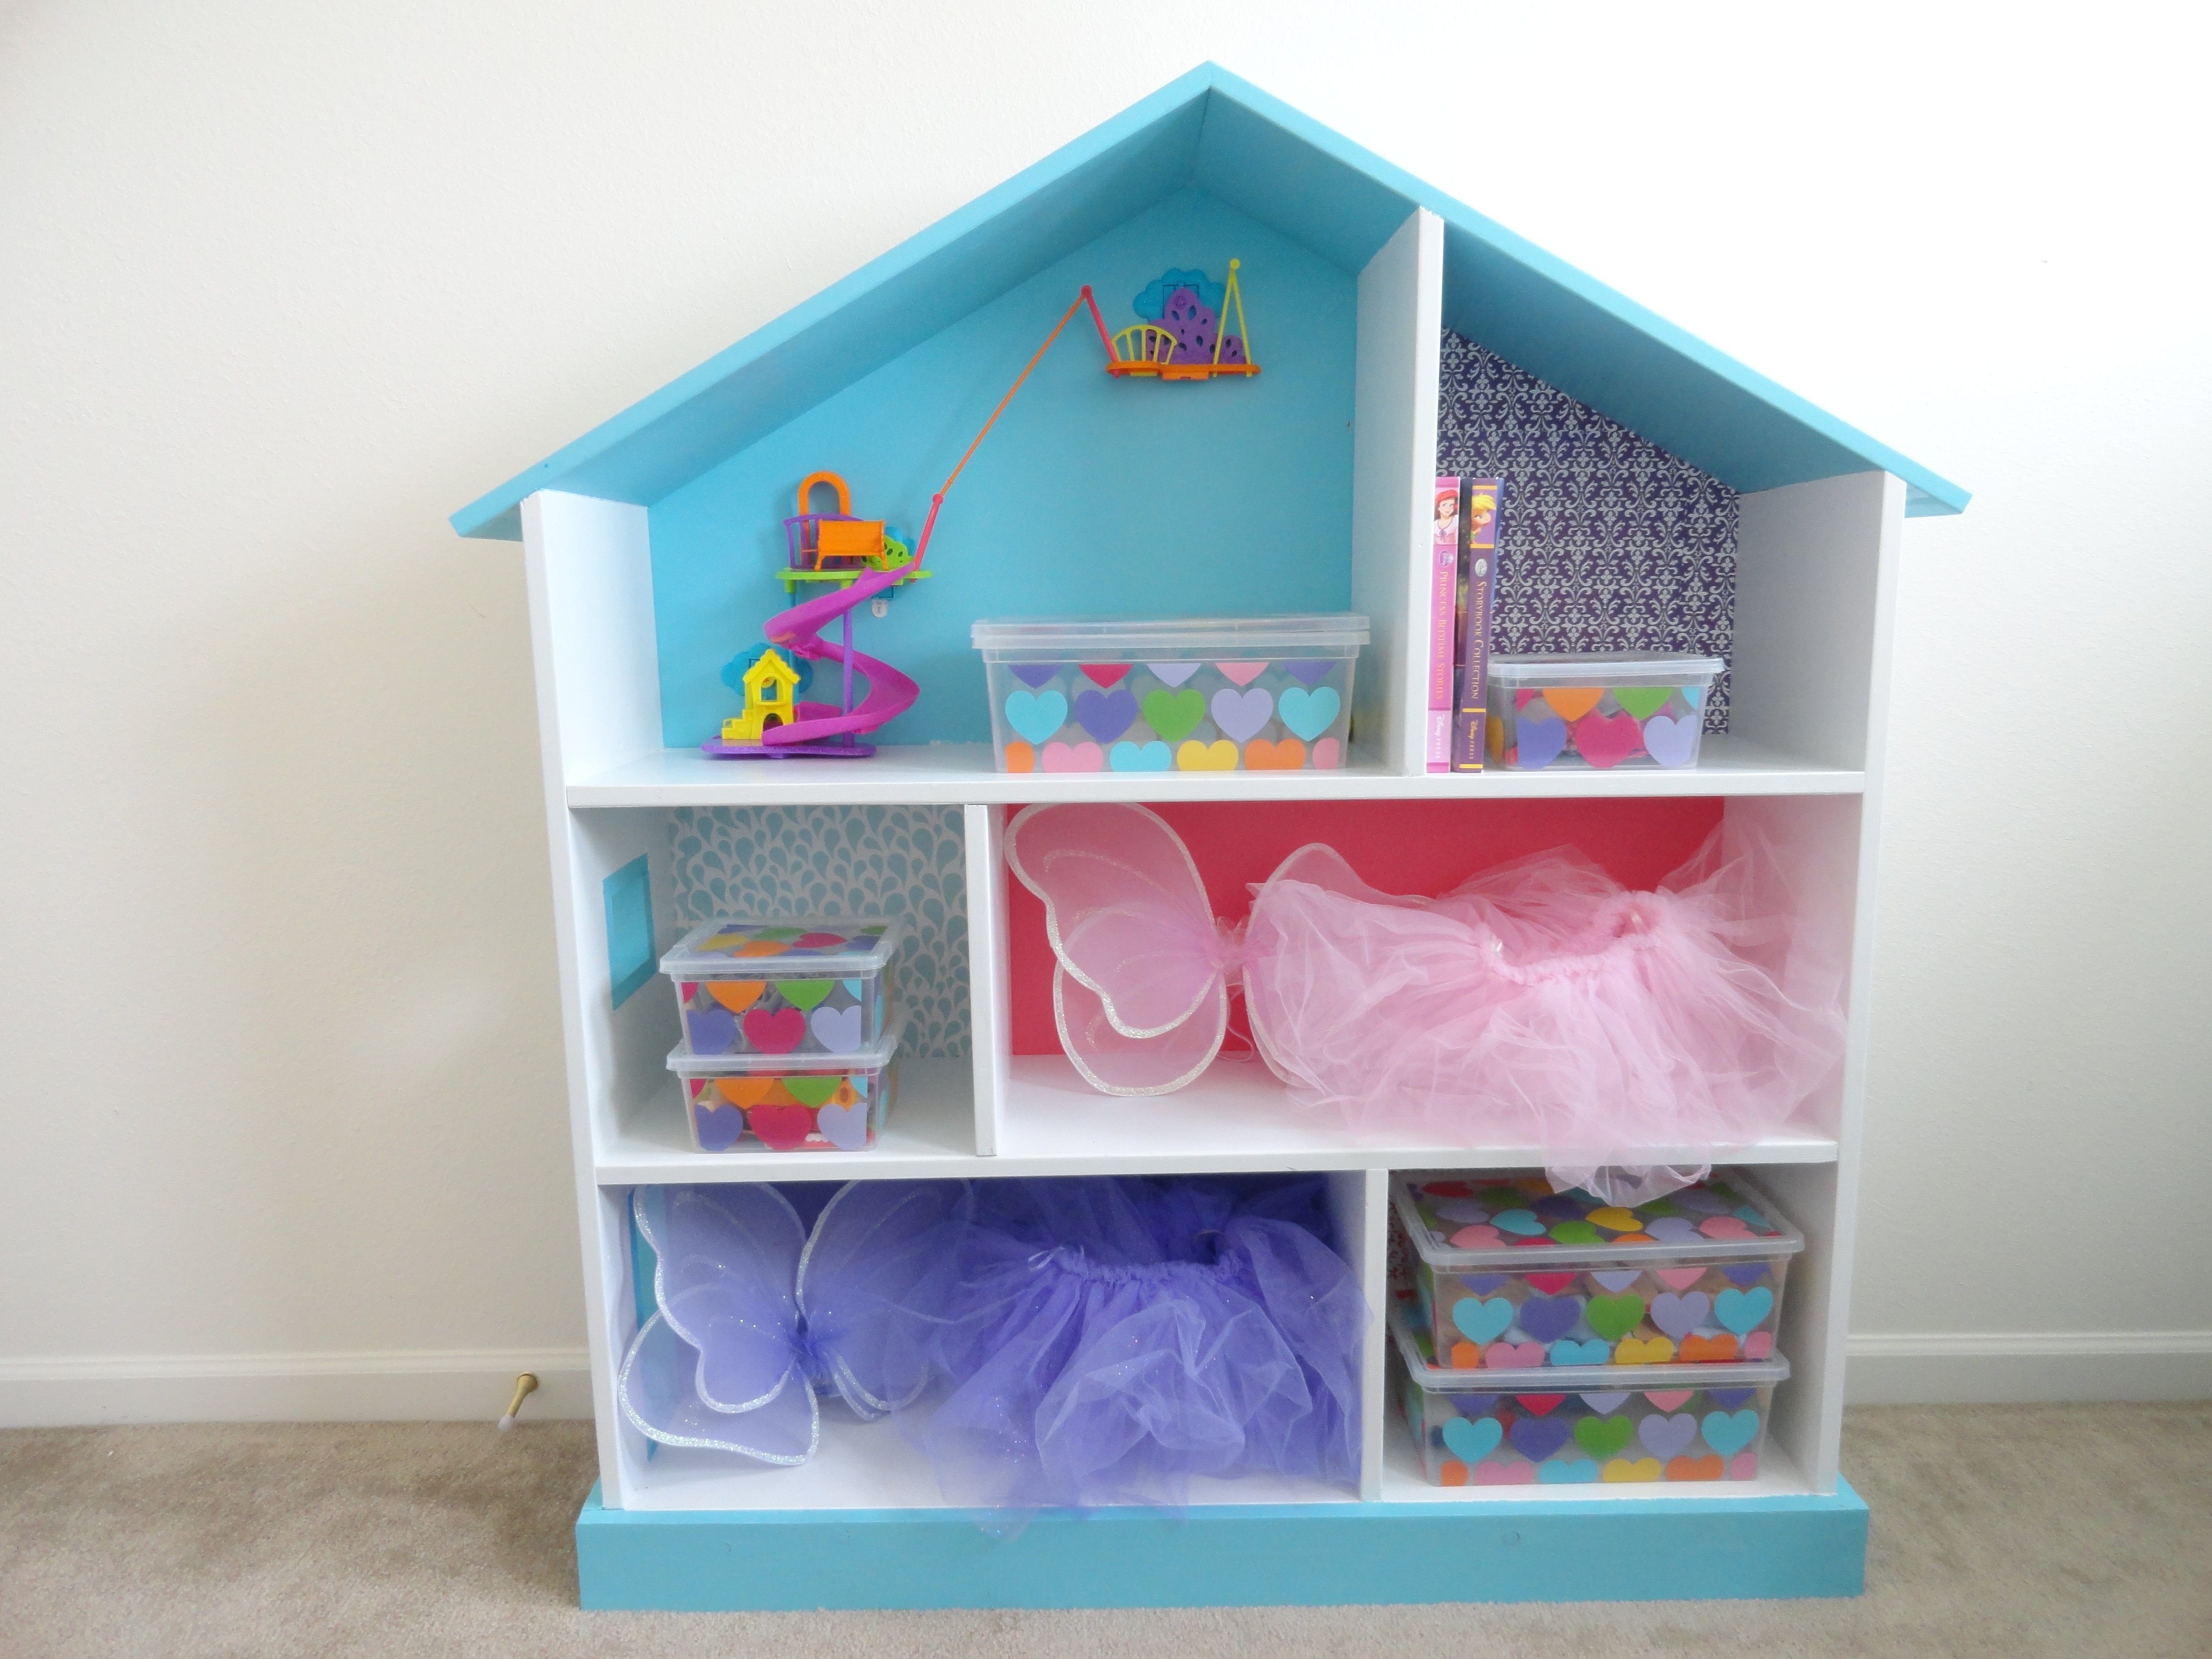
This bookcase was really easy to make and provides tons of storage! I am doing my girls playroom in blue, purple, and pink so I painted one room each color and also modge podged matching scrapbook paper into 3 of the rooms.

Built from Plan(s)
Estimated Time Investment
Afternoon Project (3-6 Hours)
Recommended Skill Level
Beginner
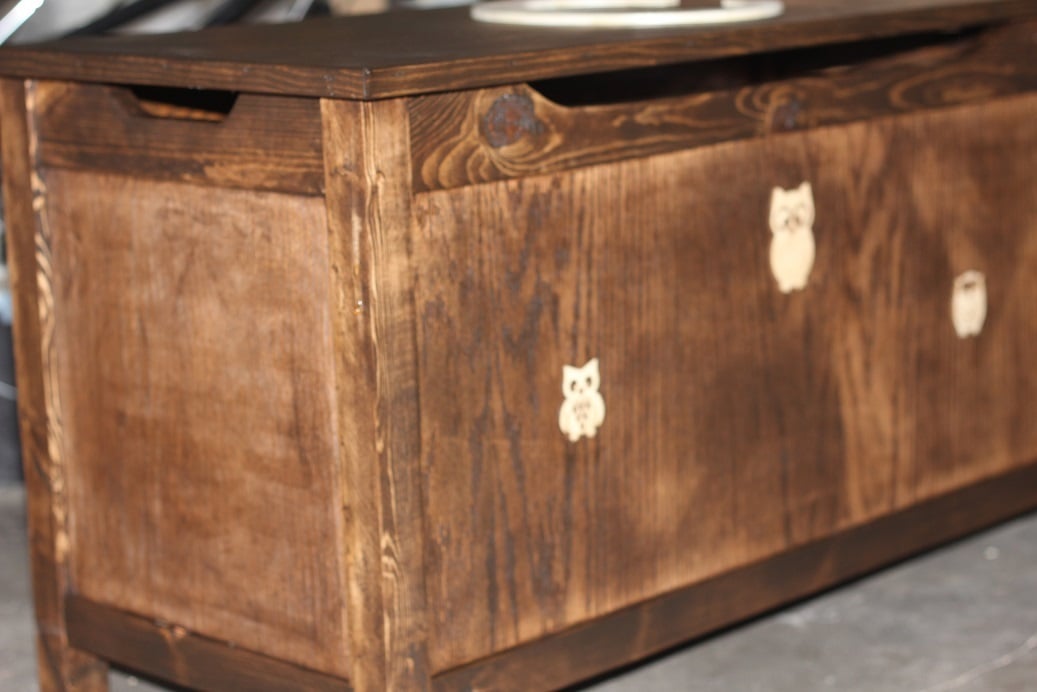
Toy Chest
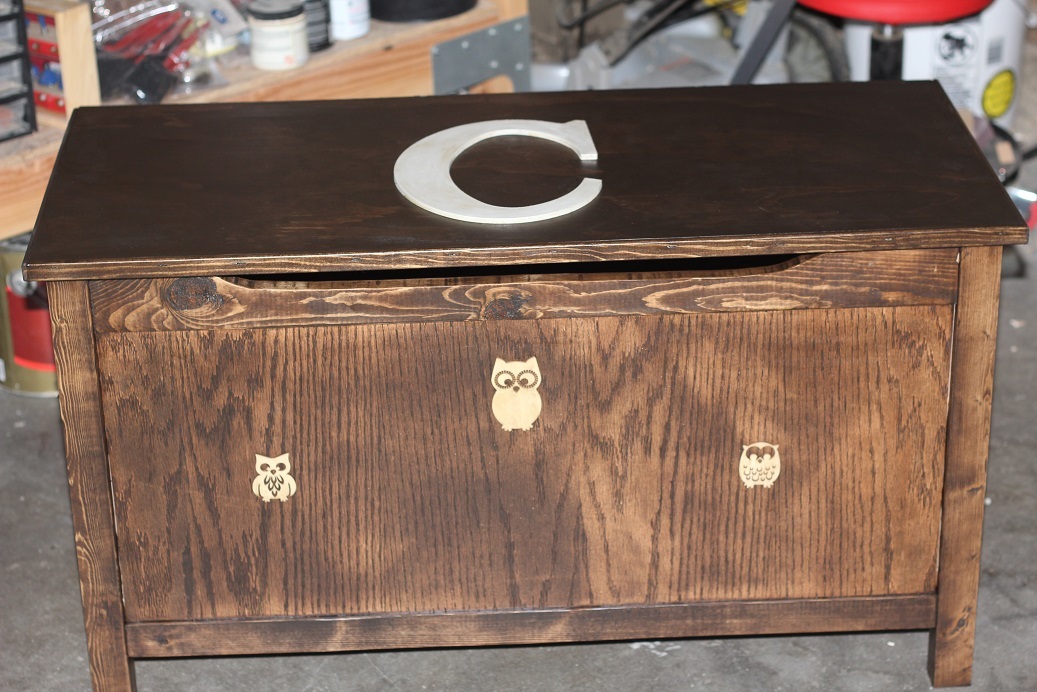
Made this toy chest for my niece this Christmas. Pretty easy build. Used some leftover wood and plywood for the top to cut down on cost. Instead of edge banding, I used some screen moulding. The wooden owls were purchased from Hobby Lobby and glued on to match her room, as well as the "C" on top. Cutouts routered on both front and sides to better protect fingers, and for looks.
Built from Plan(s)
Estimated Cost
$25
Estimated Time Investment
Day Project (6-9 Hours)
Finish Used
walnut stain, poly
Recommended Skill Level
Intermediate
Marine Ply Stools and Benches
I have been working on using my cad skills to make somthing using a CNC router so this is what I came up with. I designed it a a flat pack with minimal assembly. Very comfortable.
Estimated Cost
$20
Estimated Time Investment
Day Project (6-9 Hours)
Finish Used
Stain and Varnish
Recommended Skill Level
Advanced