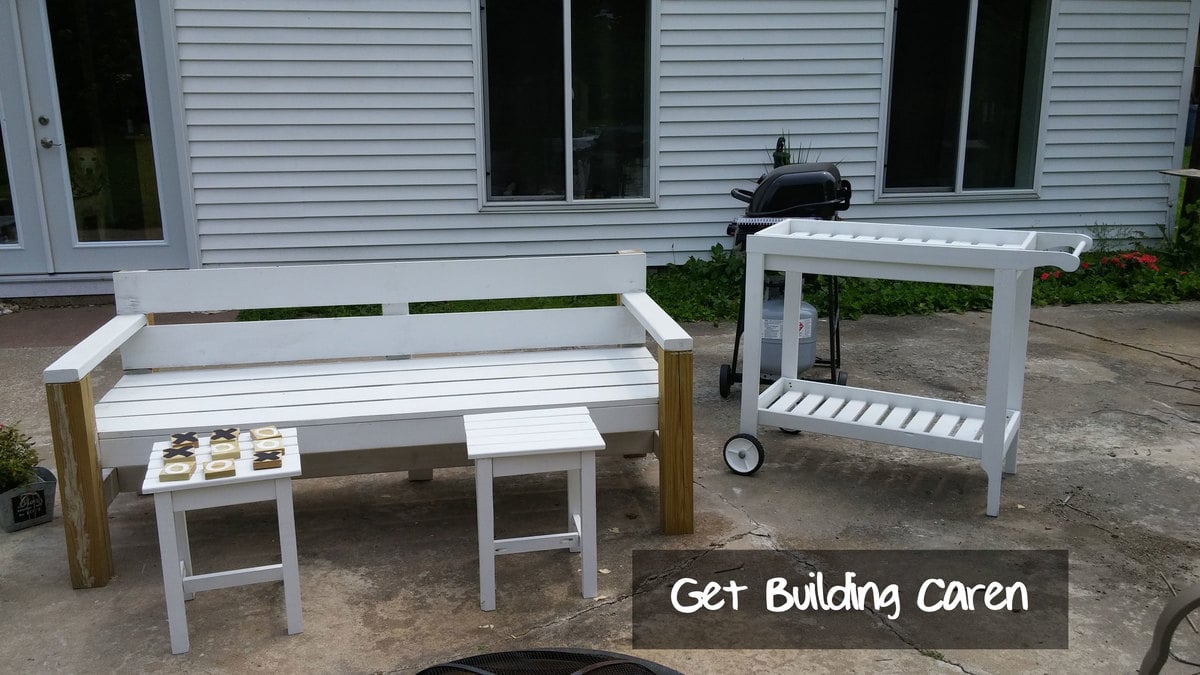
Community Brag Posts

End Tables

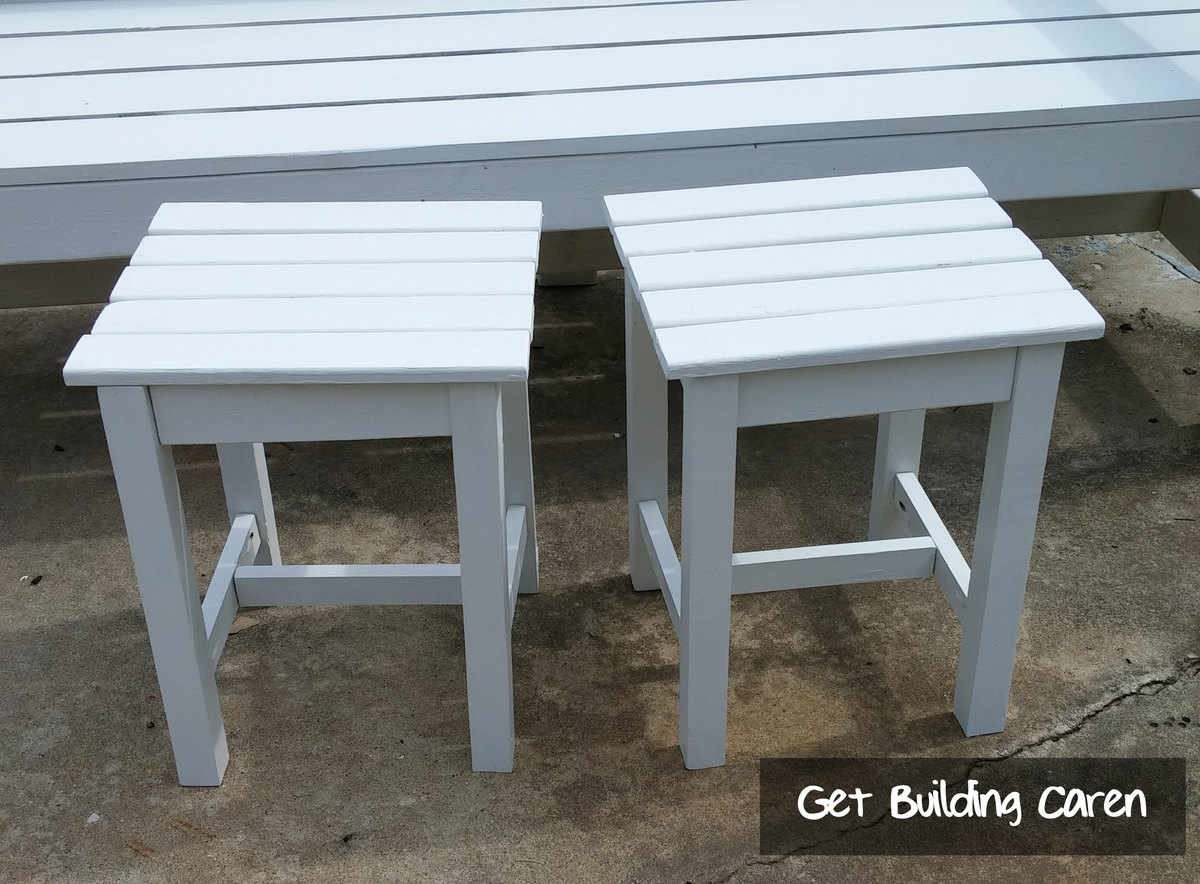
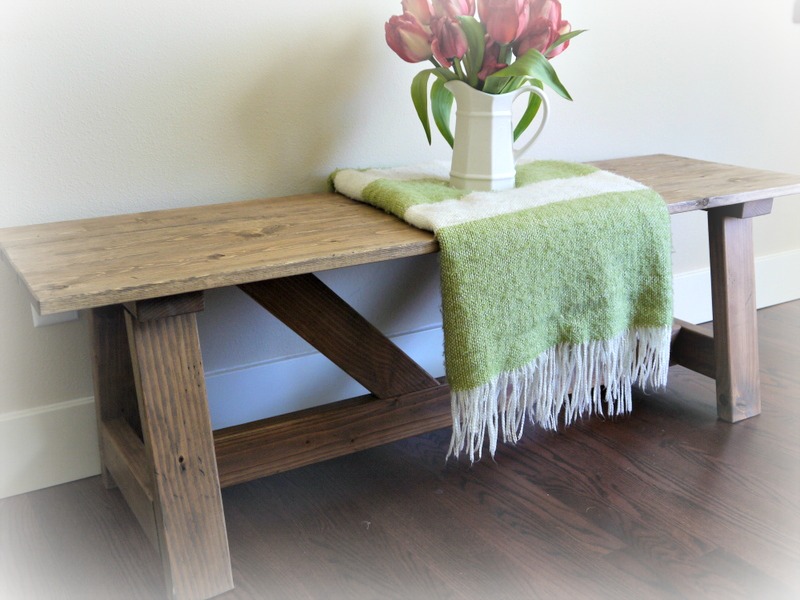
I built 2 end tables to go with my park bench. I had a lot of trouble with splitting wood, because the 1x2s where so thin. I'm used to more robust lumber. I tried something new. I drilled pocket holes, sanded, primed and painted everything before I assembled. I don't like painting as much, because I love using power tools. I psyched myself out by thinking I was giving it an elegant finish. Sounds so much nicer than slapping some paint on wood.

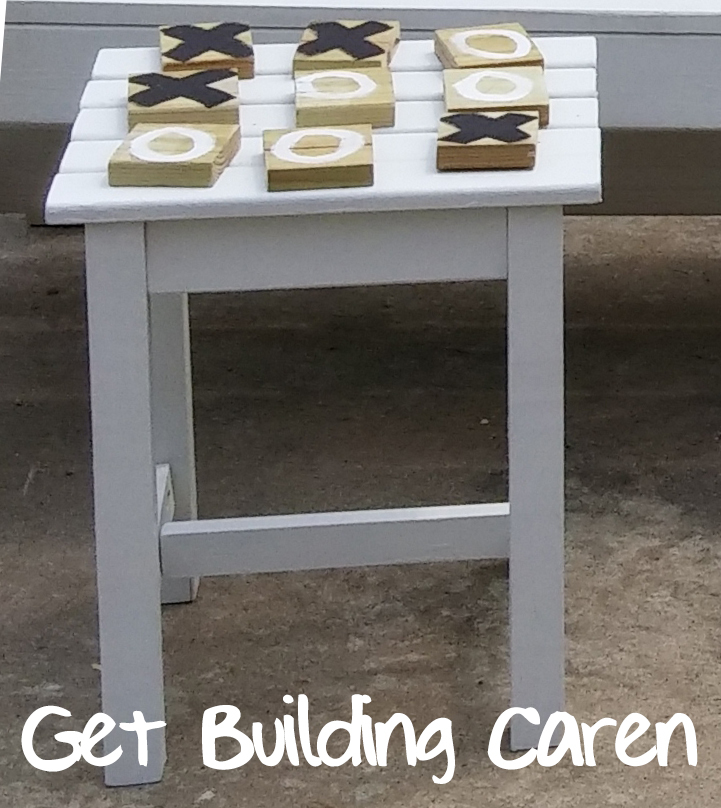
My son made some tic-tac-toe pieces from scrap treated lumber, by painting black X's on one side and white O's on the other. Now we can play on the end table!

Ana White's site is wonderful with downloadable, step-by-step shopping list, cut list and instructions.

#AnaWhite #GetBuilding2015

Built from Plan(s)
Estimated Cost
less than $20 for 2 end tables
Estimated Time Investment
Weekend Project (10-20 Hours)
Finish Used
White exterior latex paint.
Recommended Skill Level
Beginner

Farmhouse Table

Submitted by debbB78 on Sun, 01/07/2018 - 14:26
Build this table with provided plans but tweaked them a little to make the table a little wider. I used (4) 2x10's and (1) 2x12 in the middle to make the top. I build the base wider to accommodate the larger top. It's a beast but I love it! Brought the base in the house and attached the top in the dining room.
Estimated Cost
I honestly didn't keep track of what I spent but I'd sat around $250
Estimated Time Investment
Week Long Project (20 Hours or More)
Finish Used
Stained it with one layer of Minwax Special Walnut, let that dry over night then added a layer of Minwax Weathered Oak. 
Recommended Skill Level
Beginner

Narrow Console Table - Farmhouse Collection

I loved this project. Since I can't buy wood, I have to use wood from pallets, or where ever I can find free wood. In this case I used 2x4's from pallets, 1x4 oak slats from an old bed frame I acquired and 1x4's from a large solid maple dog crate I acquired. The top was made from cabinet grade plywood we had left over from cabinets my husband made two years ago when we remodeled the kitchen (so I have to say that was purchased). The maple dog crate had some awesome wood, even tho it had been broken in a couple places. Just had to plane down the reddish finish on it. Since it was going to be painted, I didn't care what kind of wood I used. The only thing I had to buy were the corner brackets. Even the screws were from pallets we acquired, just had to paint the heads black.

Comments

Crate Cart

You would think I would build this first because it was EXTREMLY easy. This was so fun to make and it's perfect for my daughters toys (junk). I used all reclaimed pallets except for the sides. The only reason it cost $8 is because the wheels were $5.

Built from Plan(s)
Estimated Cost
$8
Finish Used
Sanded
Recommended Skill Level
Starter Project

Variation on the Charging Table

We loved Ana's charging table, but didn't think we needed the holes for charging - what we really needed was just a side table to go next to our couch, but one with storage capacity (hence the shelves behind the doors on the bottom) and a place to put the remotes and game controllers for the TV (hence the shelf at the top). We decided to keep the "secret" compartment on top that flips up, like in the original plans, for storing messy things with cords like the headphones that you can see in the picture.

We also decided to replace the solid wood doors with a glass pane, and used glass paint to paint a square in the middle of the glass.

This was our very first - ever! - furniture-making project and we both really love how it came out. :-)

Estimated Time Investment
Weekend Project (10-20 Hours)
Finish Used
Golden Pecan Stain and three layers of a polyurethane finish
Recommended Skill Level
Starter Project

Outdoor Sectional

I scaled back the length of the sofa by a few inches and I made the sectional only one seat to fit my space on the deck. This was my first woodworking project that I did by myself. I got the cushions for more than 1/2 off at Ikea so the whole project cost about $150 ($80 for the cushions). It took me about a week to complete but the total time was less than 10 hours to build and stain. I'm pretty happy with how it turned out.

Estimated Cost
$150
Estimated Time Investment
Weekend Project (10-20 Hours)
Finish Used
Pittsburgh Paints Stain & Sealant in One for Decks, Fences, & Siding in Walnut. I brushed on the exterior stain just like a paint. I did the top part of the sofa first, then flipped it over and stained the bottom. Read instructions on the label.
Recommended Skill Level
Beginner

Comments

Love this nightstand

Submitted by ehrobson13 on Thu, 01/11/2018 - 11:39

We were looking for nightstand that would match our new mantle moulding headboard and stumbled across these plans.  It was a cinch to build.  I adjusted the height and width up a bit, as we have a platform bed that is higher than most nightstands.  It turned out beautifully!  


I also made a few modifications and additions, for my own purposes.  I cut out a square in the backer board and mounted a charging block to the underside of the top piece.  That way, my phone, kindle and fitbit charging cords can be tucked away in the storage bins and I don't have wires all across the top. And I purchased a piece of thin plexiglass that I'm using to protect the top of the table.  It looks great and will keep any coffee or water rings/spills from damaging the stand's surface.


Also, hardwood plywood is a BEAST.  Good gawd, the splinters are a nightmare.  You HAVE to have leather or some other really thick gloves.  But there are just some things that are tough to do wearing gloves. So for the second nightstand, we put a coat of primer on the sheet of hardwood before we even started measuring and cutting.  That has helped so much with the splinters.  


Built from Plan(s)
Estimated Cost
$85
Estimated Time Investment
Weekend Project (10-20 Hours)
Finish Used
2 coats of primer and 3 coats of latex semi-gloss
Recommended Skill Level
Beginner

Lawn Chairs

Submitted by Anonymous (not verified) on Tue, 12/28/2021 - 12:06

Built these for my daughters new home

Built from Plan(s)

Comments

Crate Caddy

Submitted by rhonit on Tue, 05/10/2011 - 14:25

Using old barn wood, too short for anything else. Love that four regular Mason jars can fit in it, and it is ideal for taking silverware outside for the BBQ's.
Cost was zero, all wood was from the scrap pile. Put together with a brad nailer, the is no finish on the wood. Actually build time was less then a hour. "Including clean up"

Estimated Cost
$0
Finish Used
none
Recommended Skill Level
Starter Project

Bookshelf wall unit

I fell in love with a set of bookshelves from a big box store (ahem, T@#get) but was disheartened to find that they would not help me get the corner shelf ordered to Canada from their website.

With inspiration from Ana, I decided to design and build the whole thing myself. It cost 1/3 the price, and as my first wood project, I'd say it turned out pretty well.

I made my design to work best with the wood available local to me, and to fit specifically in our room. The biggest challenge wasn't wood-related at all, but was actually dealing with the electrical outlet that I needed to attached to the base of one shelf.

Check it all out at my blog; http://projectjumanji.blogspot.ca

Built from Plan(s)
Estimated Cost
$350
Estimated Time Investment
Weekend Project (10-20 Hours)
Finish Used
Minwax Jacobean
Recommended Skill Level
Beginner

coffee table

this is a coffee table that i had build just by looking at a picture and taking measurements of my previous coffee table that i had, I'm very glad to show the table off!

Estimated Cost
roughly $80-$90
Estimated Time Investment
Week Long Project (20 Hours or More)
Finish Used
polyurethane
Recommended Skill Level
Intermediate

Farmhouse Bed

Submitted by mwg10 on Mon, 01/15/2018 - 07:57

I made a few modifications. 

I used shiplap instead of tongue and groove, raised the footboard by adding an extra 2 x 6 & used jacobean stain.

Thanks Ana for putting the plans and video on your site.


Built from Plan(s)
Estimated Time Investment
Weekend Project (10-20 Hours)
Finish Used
minwax jacobean
Recommended Skill Level
Beginner

Hall Tree with Drawers using a combination of 2 plans

Submitted by Anonymous (not verified) on Fri, 12/31/2021 - 19:40

We had an empty area at the bottom of our stairs that was just calling for a hall tree. I love watching and learning from Anna's videos. I really liked 2 of her plans: the Farmhouse Hall Tree and the Mudroom Bench with Easy Drawers. I decided to combine them to make my own unique hall tree. Our teenage daughter used the "window panes" in the back to paint a Japanese Maple tree. I think it turned out beautifully. This is the first of Anna's plans that I've used, but I plan to use many more! Thank you, Anna for your amazing videos and desire to share your knowledge. We appreciate it so much!

Comments

10 Dollar Ledge Shelves

Submitted by ValGal222 on Wed, 05/11/2011 - 20:40

Thanks Ana, I no longer "Think I Can"- I KNOW I CAN! : )

Estimated Time Investment
Afternoon Project (3-6 Hours)
Finish Used
None yet, need feedback on what color...
Recommended Skill Level
Starter Project

Red Hen Home's Modified Providence Bench

This is a slightly modified version of the Providence Bench. I used 1x wood rather than 2x wood, so the legs are slightly longer to make the bench come out to the same height. Made this to match a planked-top table. More photos on my blog: http://redhenhome.blogspot.com/2013/07/the-other-solomon-table-bench.ht…

Built from Plan(s)
Estimated Cost
50
Estimated Time Investment
An Hour or Two (0-2 Hours)
Finish Used
Custom mix of Minwax Weathered Oak and Antique Walnut stain, followed by hand-rubbed polyurethane.
Recommended Skill Level
Beginner

Comments

JW

Thu, 09/12/2013 - 05:46

I like the planked top! Great job on the finish - it's rustic without being overdone. It's one of the things i love about pottery barn furniture.

What is the hand-rubbed polyurethane? Is that just the wipe-on stuff I keep seeing at the store? Was it easy to use?

Farmhouse table

Submitted by Camberjak on Tue, 06/30/2015 - 20:23

First large wood working project my husband and I completed. In love with Projects and plans by Ana white !

Built from Plan(s)
Estimated Cost
150 dollars
Estimated Time Investment
Weekend Project (10-20 Hours)
Finish Used
Minwax dark walnut and table top was pure white and sanded down and minwax dark walnut was rubbed on with a rag
Recommended Skill Level
Beginner

Comments

Quick basement shelves

Submitted by Panda on Thu, 01/18/2018 - 14:22

What a great project! This is my first Ana White project and definitely won't be my last!


I modified the garage plans to fit our basement. We have two beams the shelves needed to fit between, so I made the length 10' and bought 2x4s at 10'. Otherwise, I didn't do any modifications.


The wood was cut at the store for the lengths needed, making it super easy to come home and assemble! We secured the shelves to the basement supports and along the back wall. It's pretty secure and stable.


Overall this probably took a few hours (we took a break while constructing it). Next time I would make the shelves a bit deeper. 17" was fine, but a few more inches would have made the bins fit a bit better.


I am looking forward to making more!

Estimated Cost
$140
Estimated Time Investment
Afternoon Project (3-6 Hours)
Recommended Skill Level
Beginner

Bench

Had a small bench that the previous owners of our house left. It was all made from 1x. Wanted something a little beefier to match the bed I built. So came up with this bench. Made from all pine.

Comments

Convertible Picnic Benches

With the condition of our inherited 6-sided picnic table in my mind, the idea of these picnic benches was too appealing to ignore!
I gave away our old picnic table, and bought some cedar 2x6 from the lumber mill down the road. (He had a pretty good price so I used 2x6 for everything)
I decided to make them 6feet long instead of 4, and with an overhang of 8 inches rather than two I was able to avoid making a third leg set.
I got everything cut and gave it all a coat of stain before I assembled anything and then screwed the boards together with cedar deck screws.
I discovered when I had the tabletop bolted on that the 2x6 caused some issue with the tilting, so I had to go back with a handsaw and trim the front top corners of the back legs so that the table could tilt to the bench mode.
I'm still puzzling out why I have a bit of play in the top when it's bolted in either configuration...
Now if only this chilly rainy weather would quit so we could put them outside and start enjoying them!

Estimated Cost
$150
Estimated Time Investment
Day Project (6-9 Hours)
Finish Used
Cedar Naturaltone Exterior Stain.
Recommended Skill Level
Intermediate

Bathroom Towel rack

Submitted by sean1023 on Tue, 07/09/2013 - 20:10

I kind of came up with this on my own. I used 1 x 3 furring strips for the legs and stops for the shelves. I used 1 x 8 for the shelves. I wanted a semi distressed look so I painted white and then painted the blue very messy making sure I missed certain areas.

Estimated Time Investment
Afternoon Project (3-6 Hours)
Recommended Skill Level
Beginner

Cottage End Table in Oak

Submitted by JanMarie63 on Mon, 07/06/2015 - 06:48

I loved making this Ana White's Narrow Cottage End Table plan after seeing it here on a search. I made it for my mother's 83rd birthday. She asked for oak and a light stain (Rust Oleum's Summer Oak Stain). Used three coats of wipe on Poly and one coat of Johnson's paste wax on the top. I bought the blue knob at Cost Plus World Market. The project took me two days. Will difinitely make another one but in pine this time.

Estimated Cost
$40, plus scrap wood on hand
Estimated Time Investment
Weekend Project (10-20 Hours)
Finish Used
Rust Oleum Summer Oak Stain, Minwax Wipe-on Poly (3 coats), Johnson Paste wax final coat for table top.
Recommended Skill Level
Intermediate

Comments