Community Brag Posts
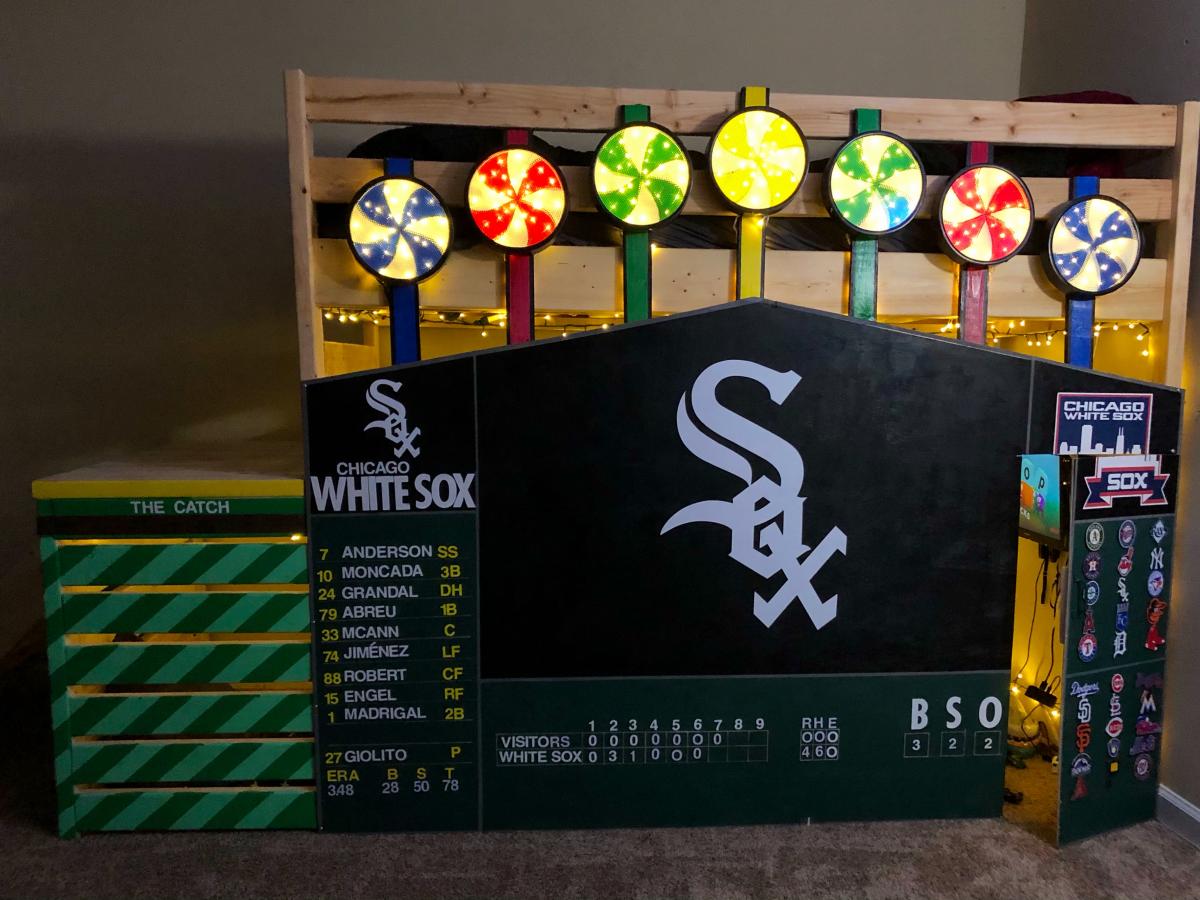
Chicago White sox replica scoreboard loft bed
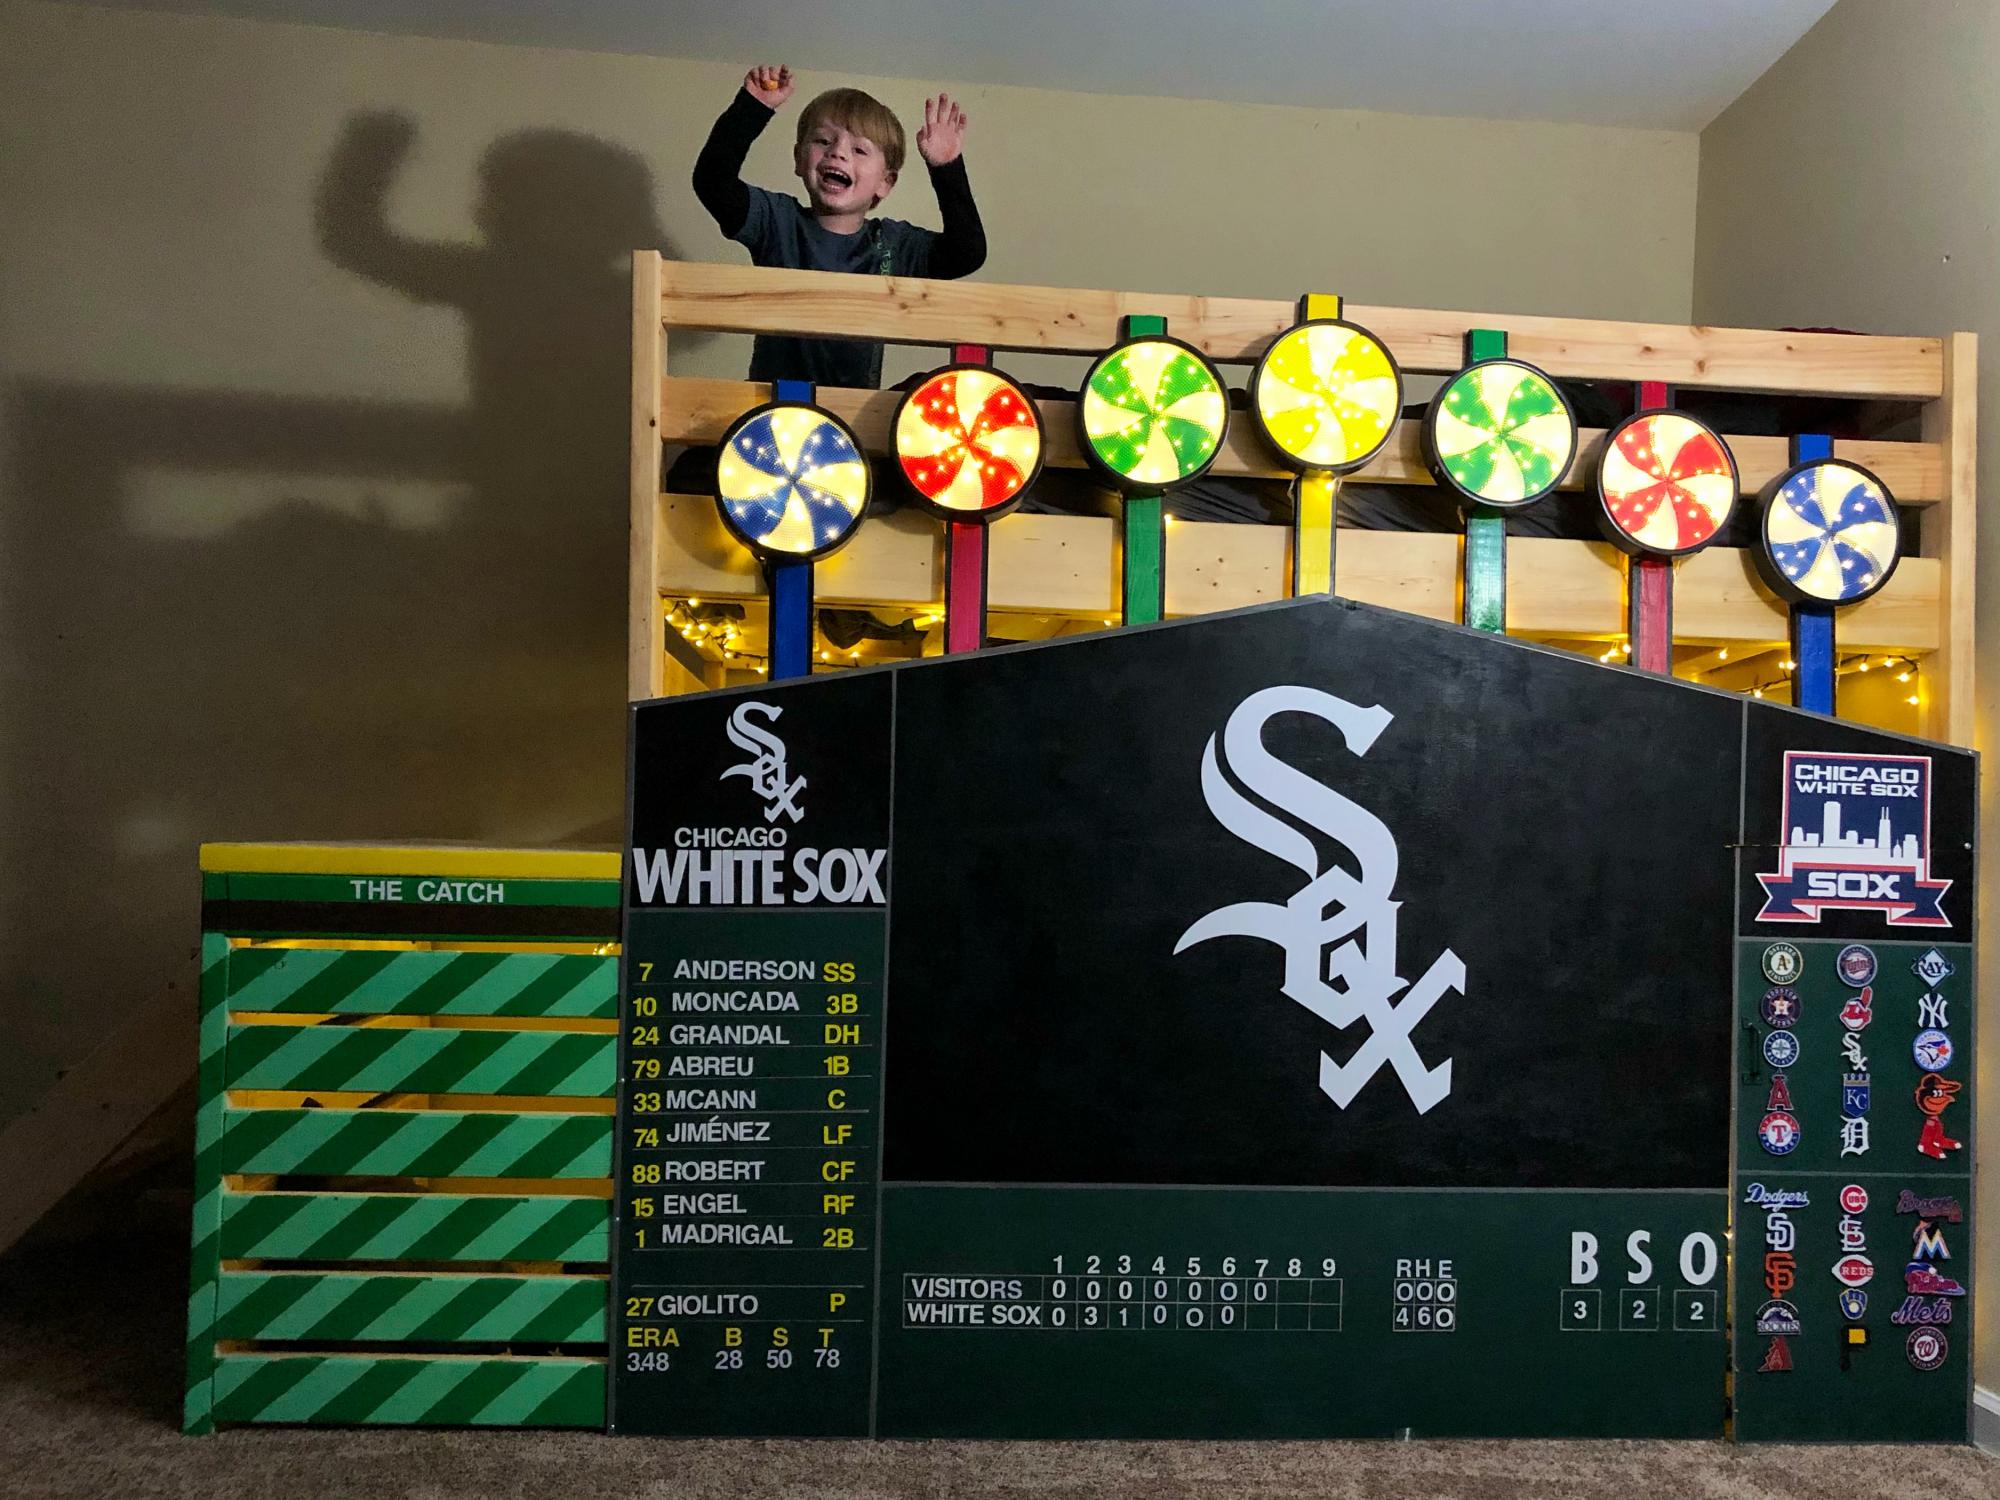
I started off building the loft bed. It was a lot of fun. I cut every single piece of this, and hand everything, other than the white sox and players decals. I made the light up pinwheel signs that light up whenever the white sox hit a home run. I had fond memories of the famous scoreboard going to games at the old comiskey park, and my 5 year old son loves the white sox, and this bed! There is a door as well that opens up and goes into the locker room. Underneath there is a rv, with a chair, and some other cool amenities good enough for a real major league player. I won’t tell the secret of how I designed the pinwheel light boxes, and the led lights. I had to get realllly creative. This was a huge project that completely consumed me for months. I love it though, and wanted to thank Ana for the great plans on the loft style bed! Thank you Ana white!!! Your the best
Built from Plan(s)
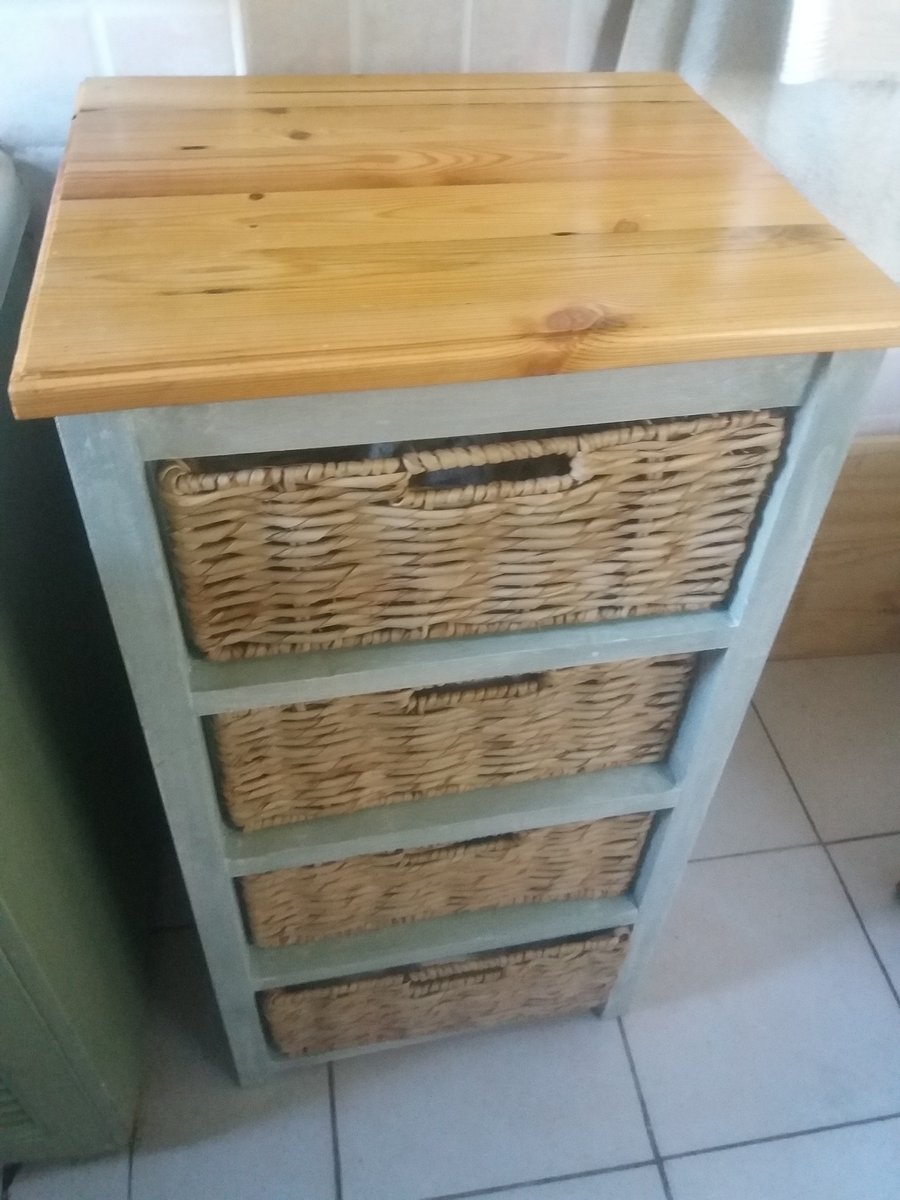
Playhouse Loft Bed with Storage Stairs
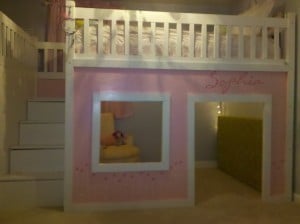
I changed this plan and made it into Full size. Feel free to contact me if you would like more information about how to do this too.
Built from Plan(s)
Estimated Cost
$350
Estimated Time Investment
Week Long Project (20 Hours or More)
Recommended Skill Level
Beginner
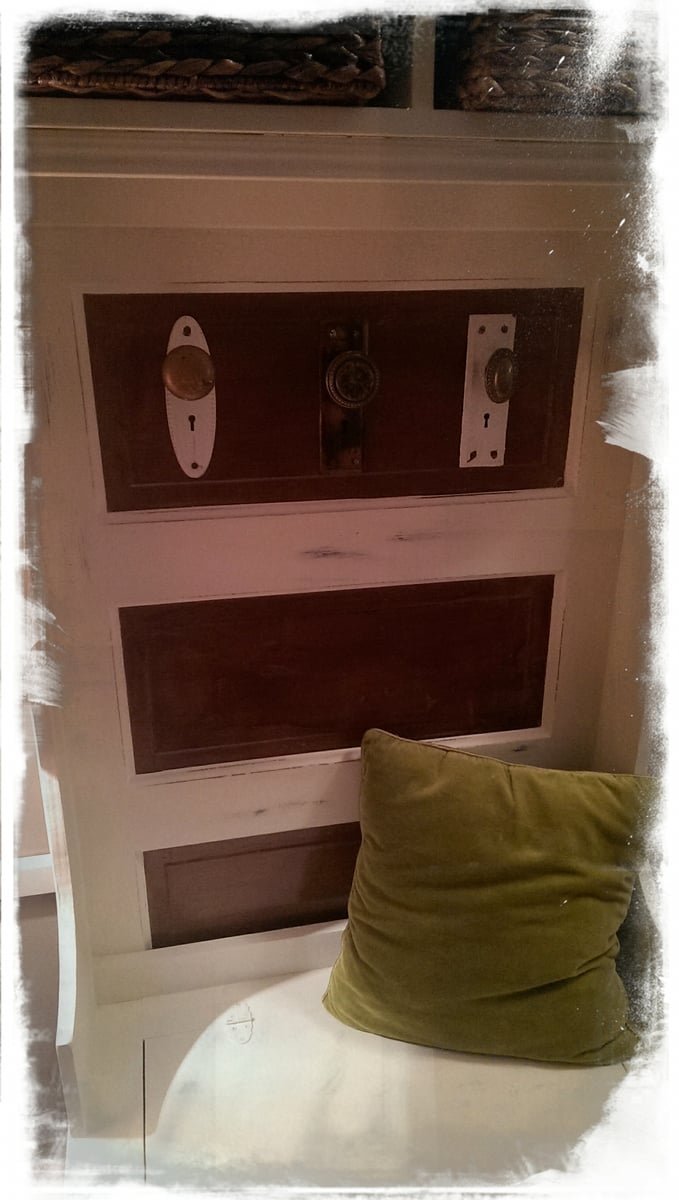
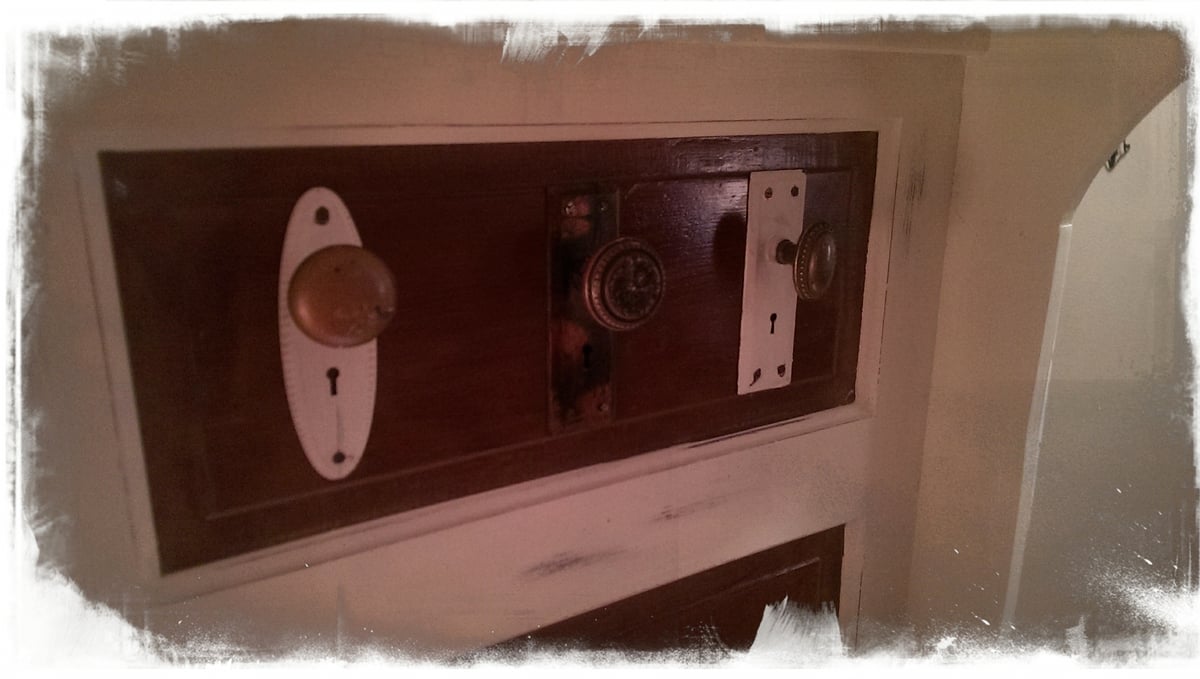
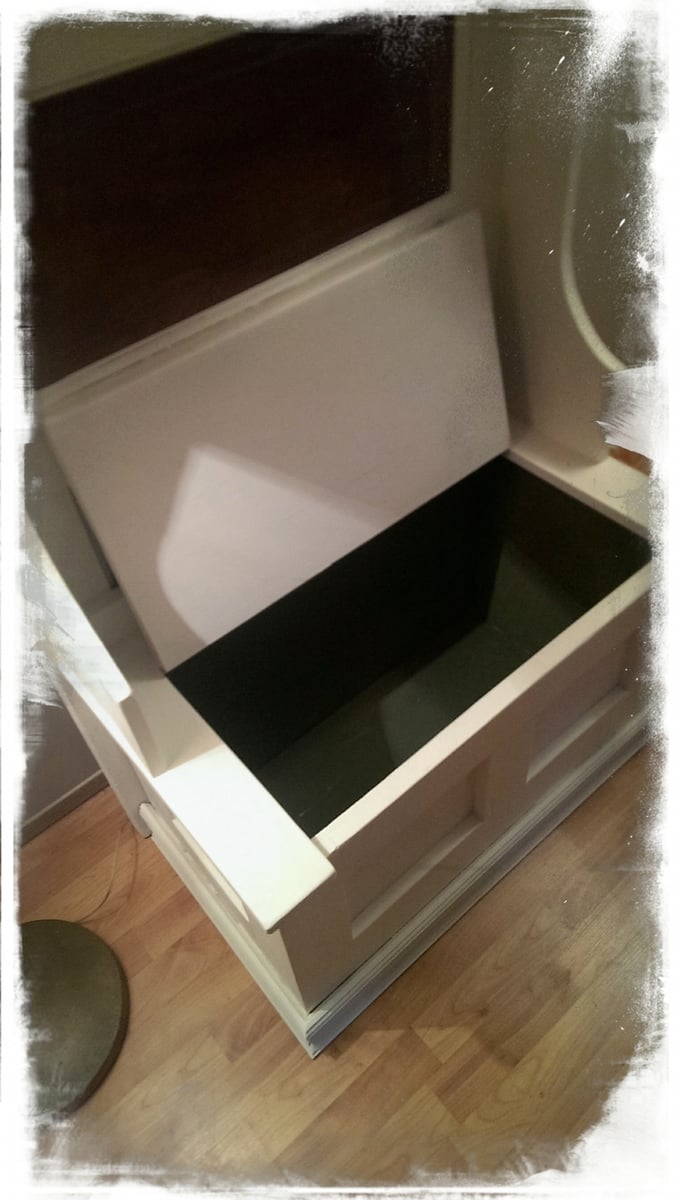
Hall Tree made from old door
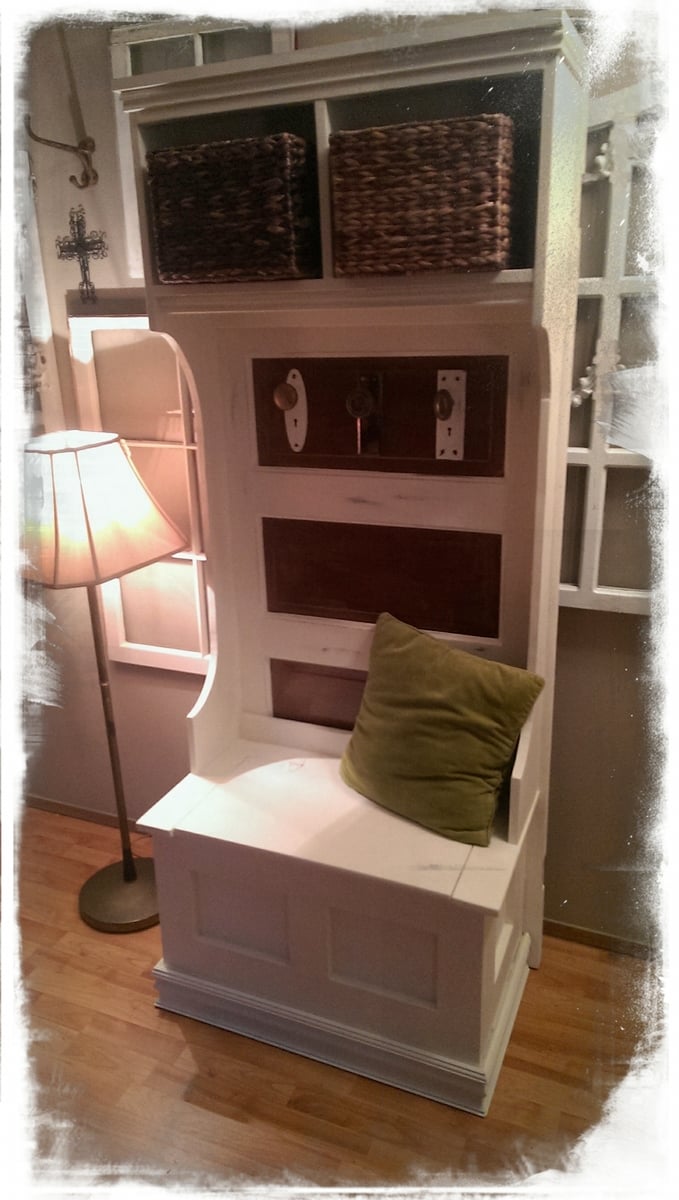
This is my first Ana-White build and I love it so much! I used a 100 year old door for the back and antique knobs for the hooks. I plan on making a farm house table next :)
Built from Plan(s)
Estimated Cost
120
Estimated Time Investment
Weekend Project (10-20 Hours)
Finish Used
Annie Sloan chalk paint in old white and olive on the inside. Waxed and lightly distressed.
Recommended Skill Level
Intermediate
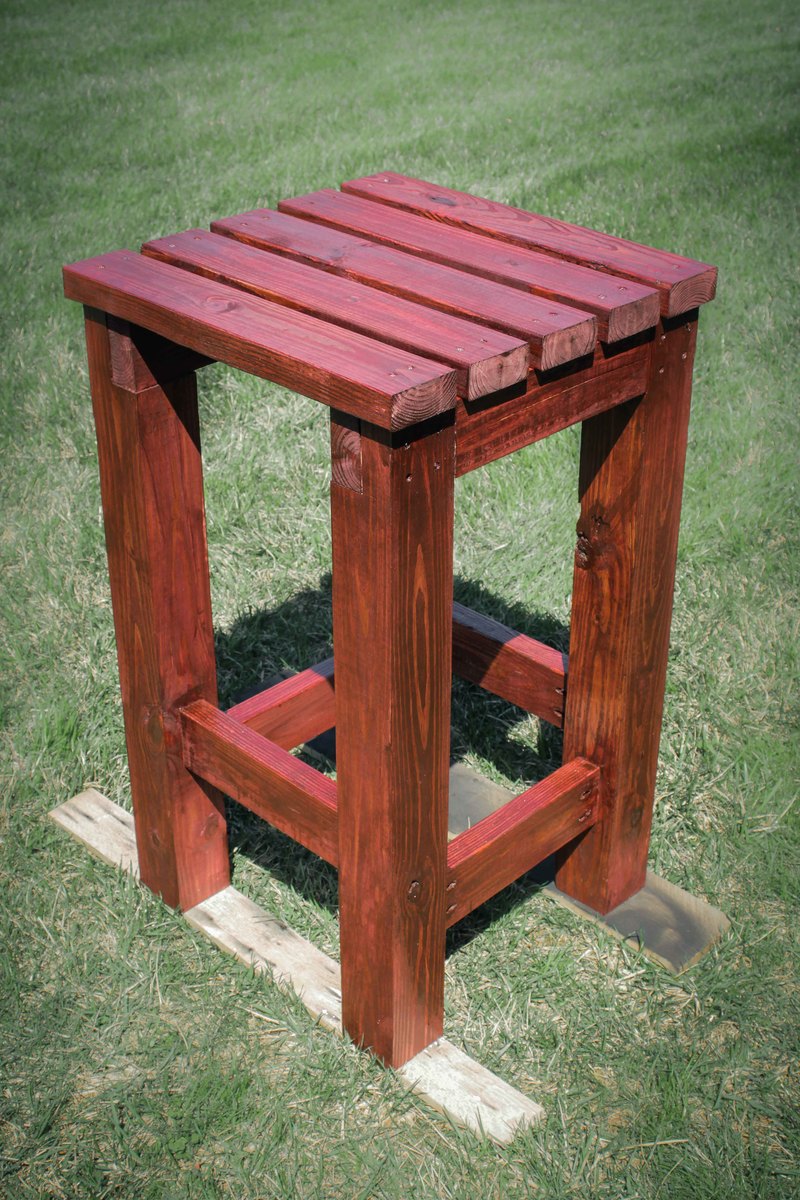
BBQ bench
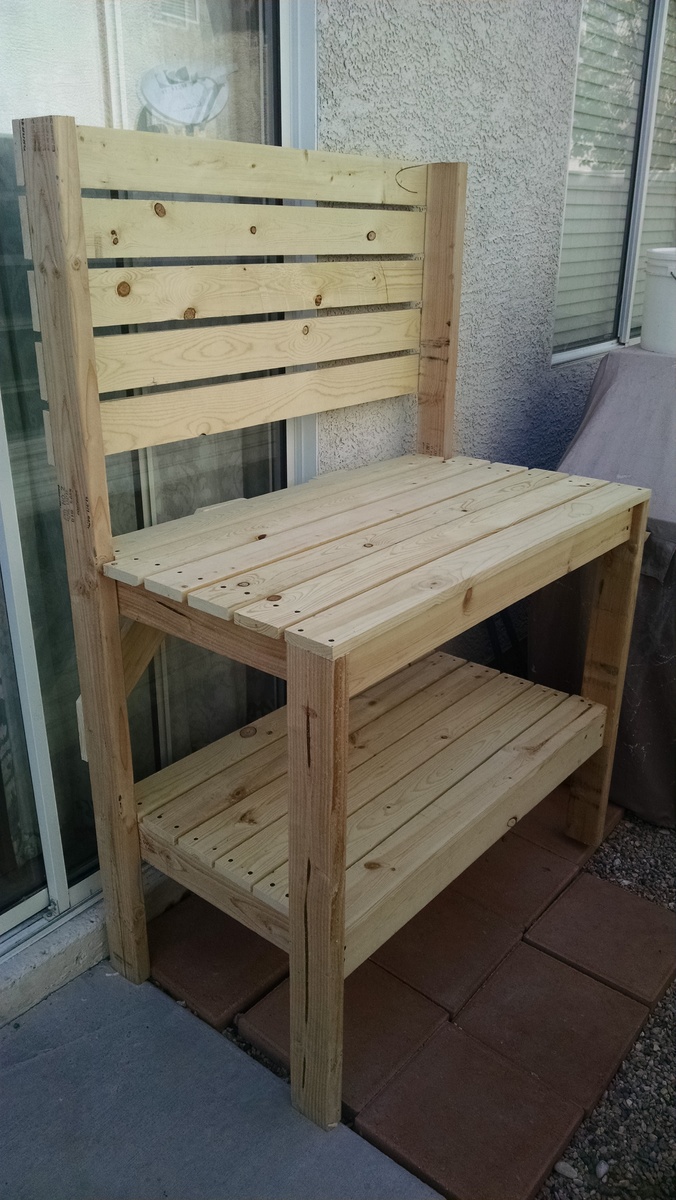
First project I tried from here. Not too bad. I have a Cordless miter saw (Ryobi)
Estimated Cost
under 40 bucks
Estimated Time Investment
An Hour or Two (0-2 Hours)
Recommended Skill Level
Beginner
Comments

Wed, 04/15/2015 - 15:48
This looks great. This is on
This looks great. This is on my todo list as well for holding my small gas grill. :)
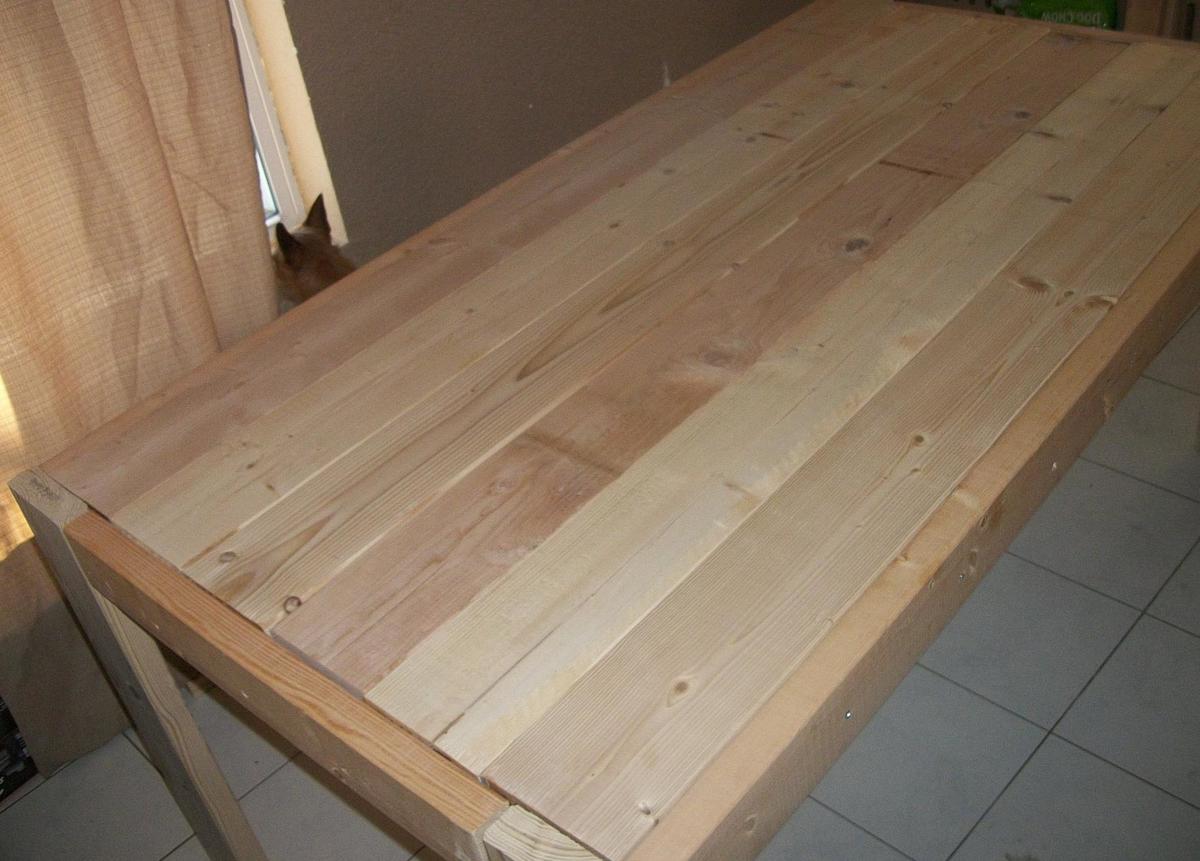
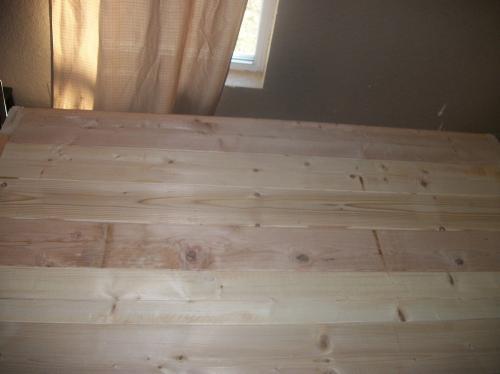
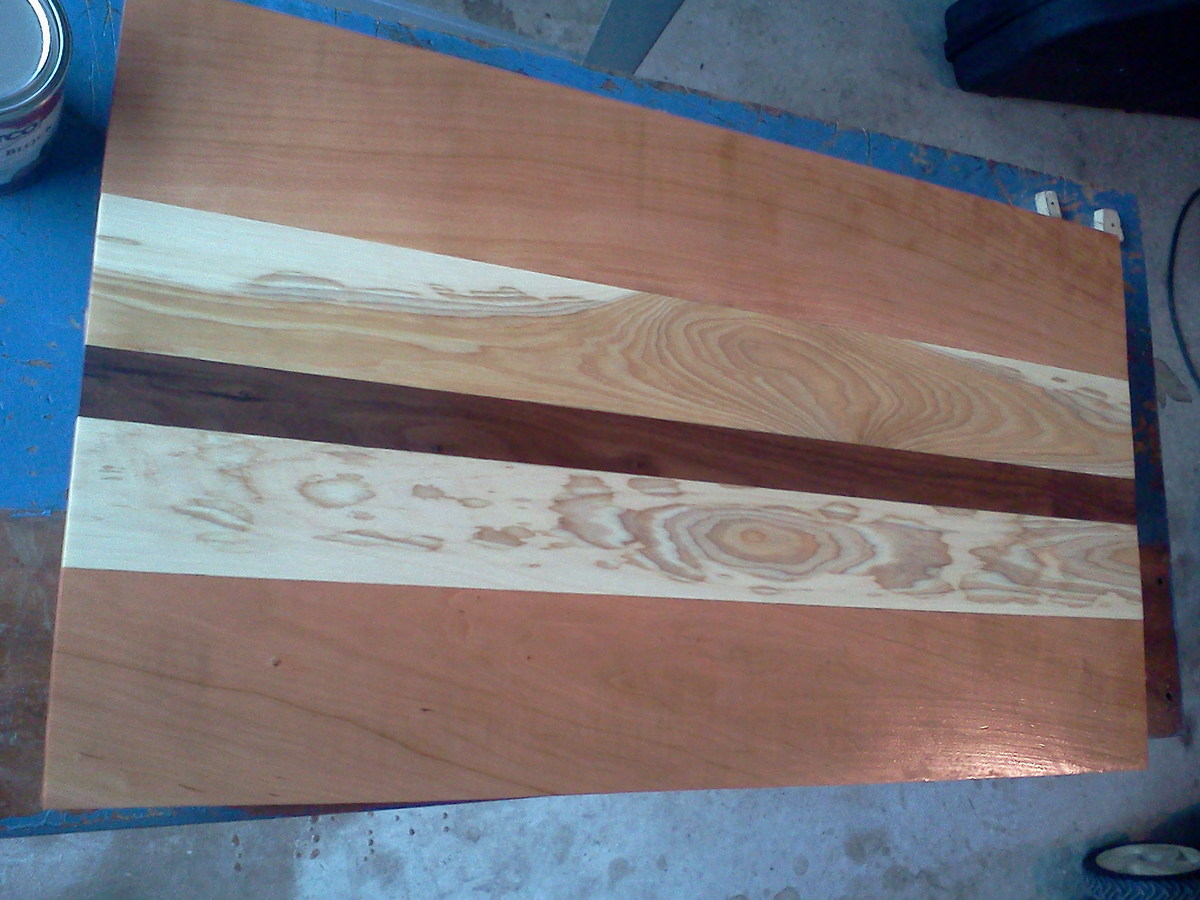
Southeast Alaska Rough Cut Farm House Bed
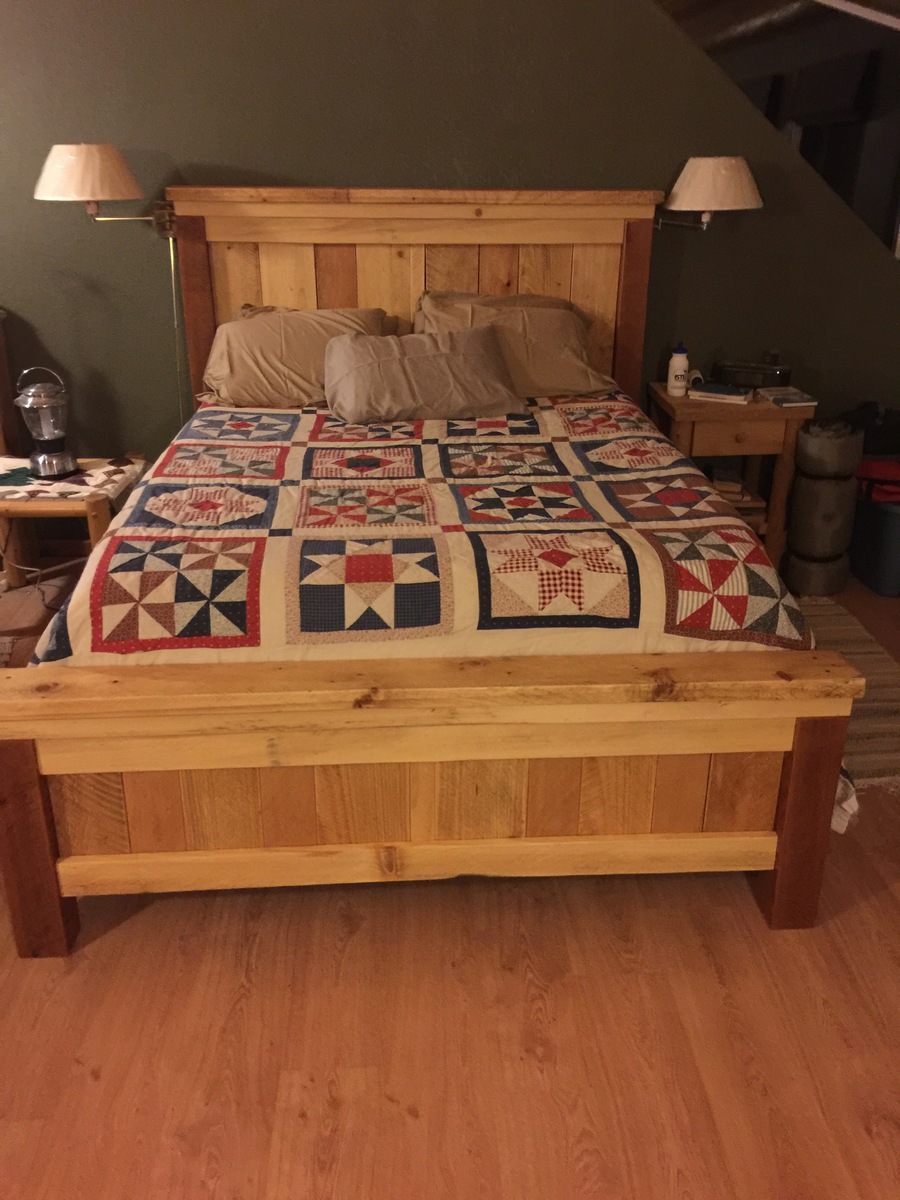
I used Ana's queen size bed plan with a few variations. I used my local red cedar and white spruce rough cut lumber scraps and lots of sandpaper. Rough cut lumber has differnt deminsions and it made for a very rustic sturdy bed with nice contrasting colors thoughour the projec. I love my new bed.
Built from Plan(s)
Estimated Cost
I spent $8.00 for side rail attachments from Amazon. I used left over materials for the rest of the project.
Estimated Time Investment
Weekend Project (10-20 Hours)
Finish Used
Satin Finish Clear Varathane
Recommended Skill Level
Beginner
Storage End Tables
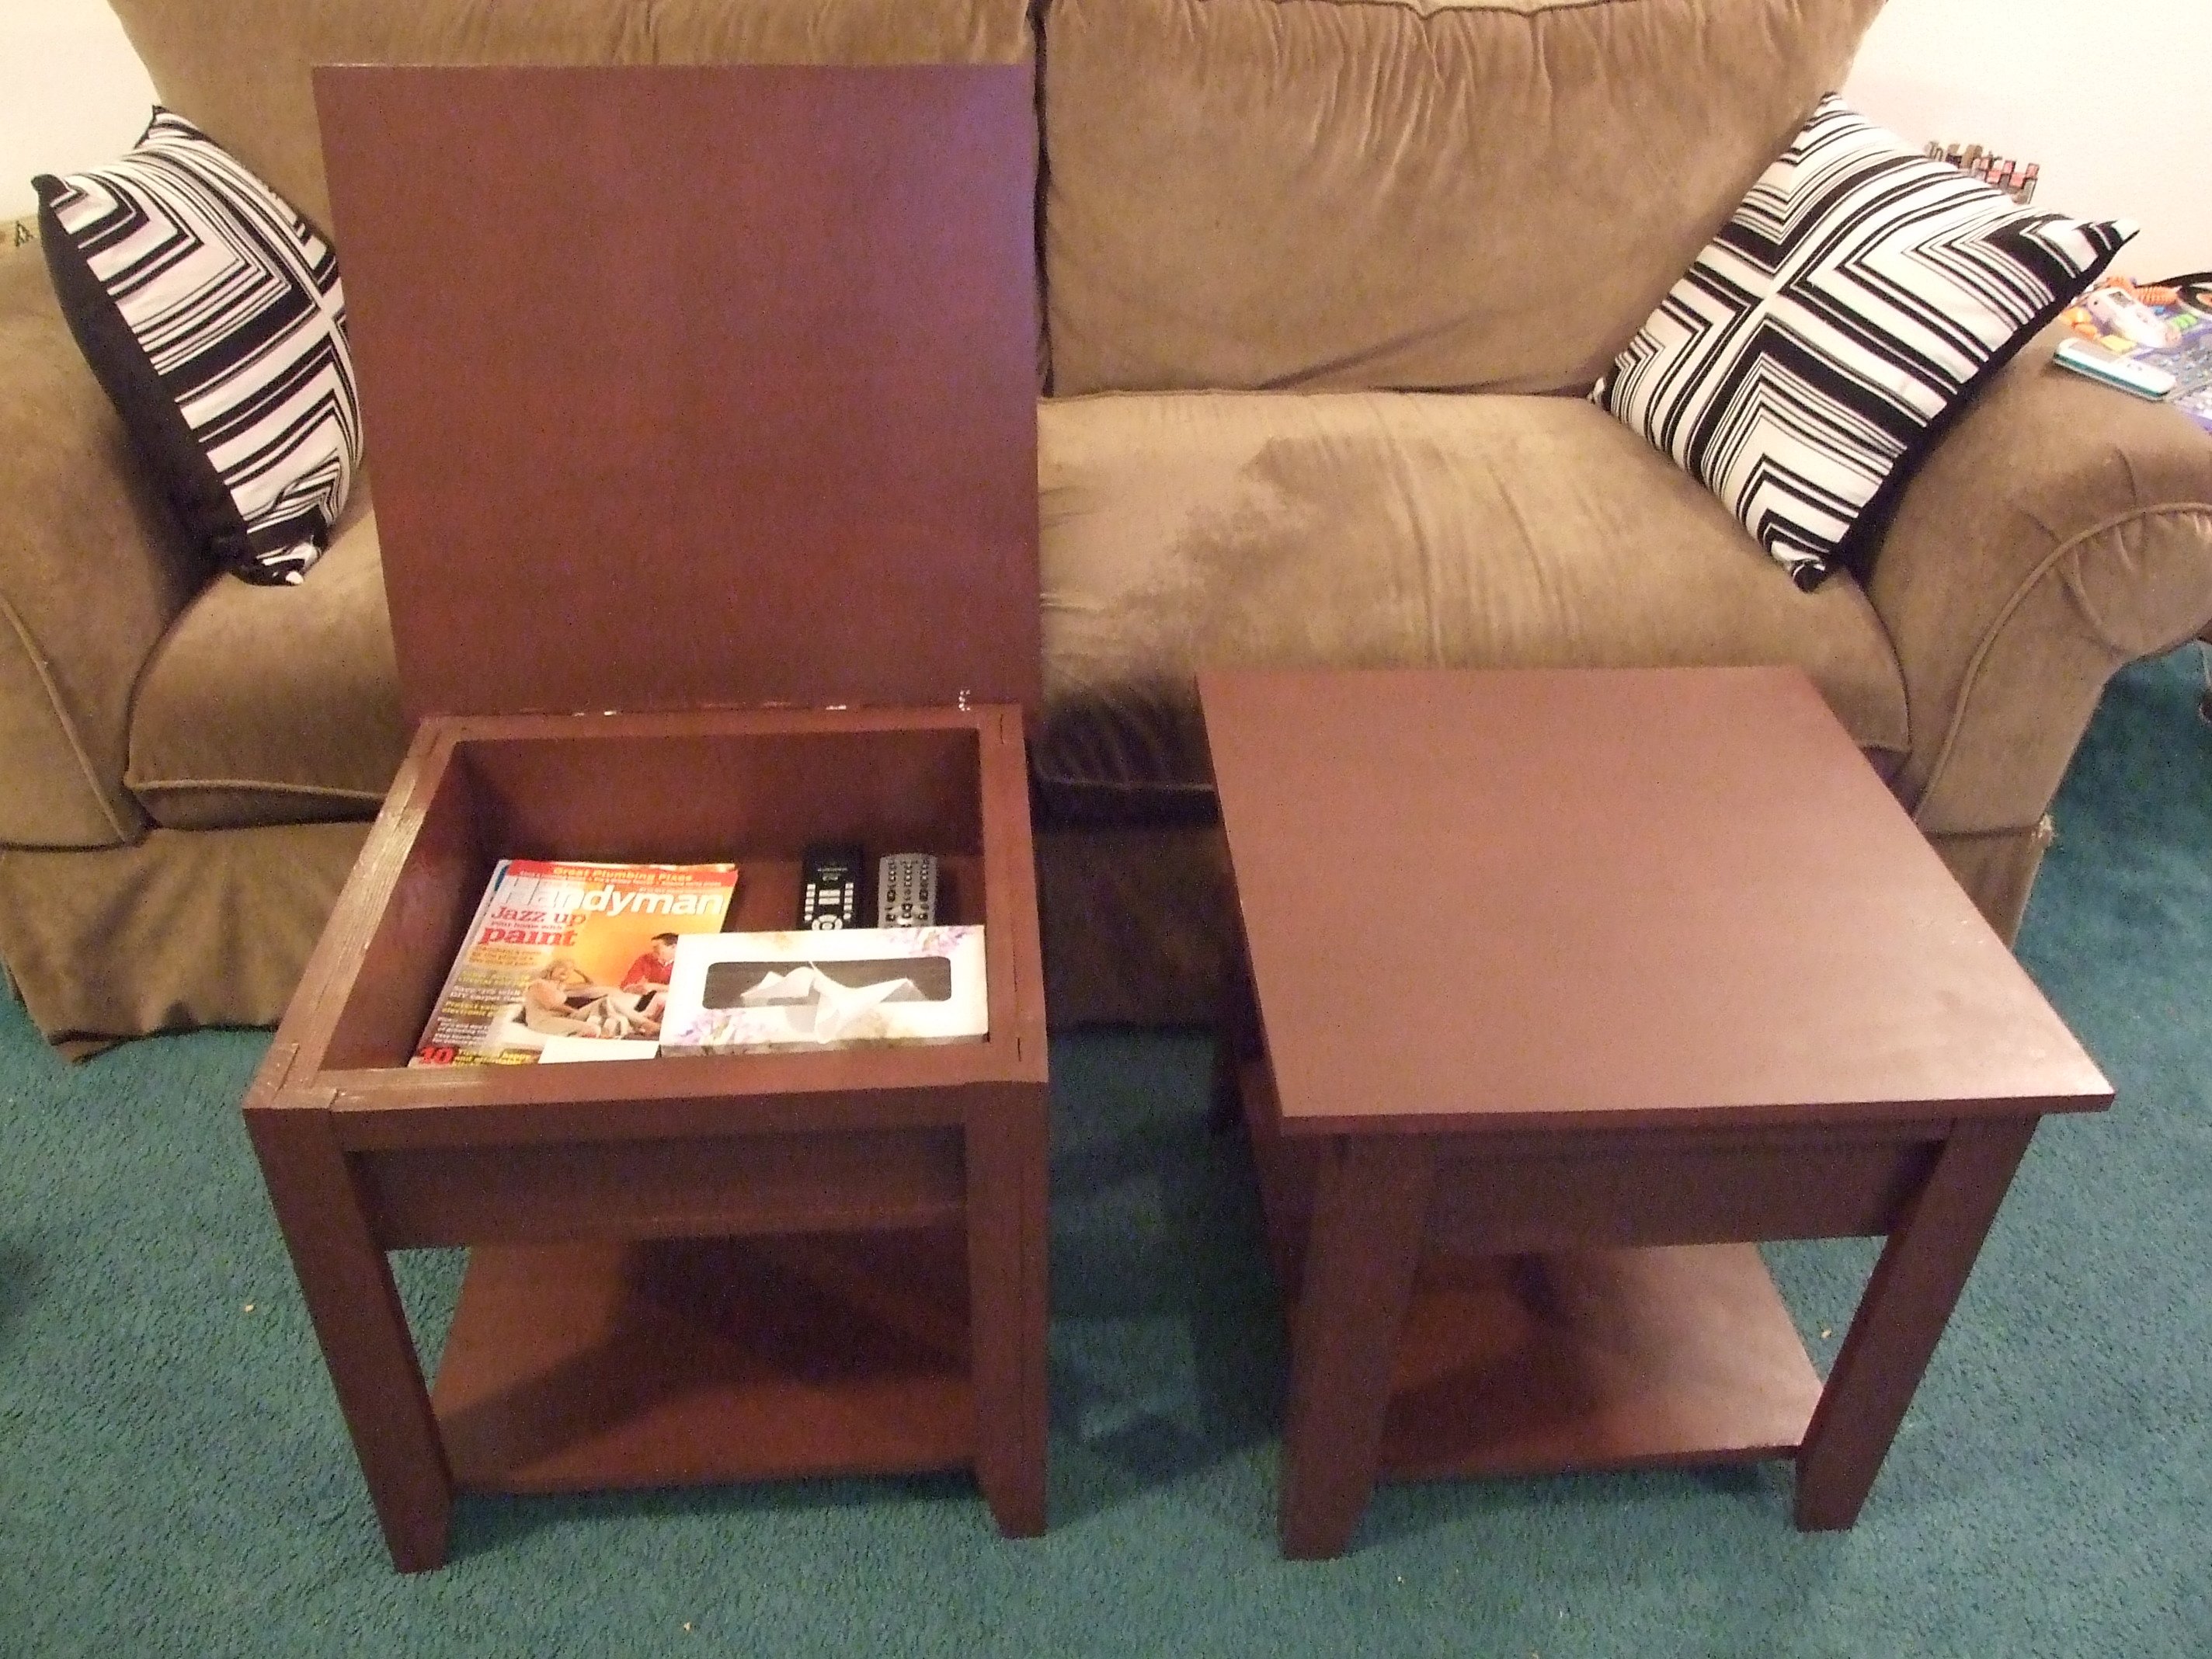
This was my first build ever. I loved the storage lego table, but it wouldn’t work well in our long, narrow living room so I decided to make them end tables instead. I also changed them so that the tops were hinged to the back. I love the way they turned out! Now on to the long list of other things I want to build from this site. Thanks so much Ana!
Built from Plan(s)
Estimated Cost
About $40 each
Estimated Time Investment
Afternoon Project (3-6 Hours)
Finish Used
One coat primer followed by three coats Behr "bear rug"
Recommended Skill Level
Starter Project
Rain Barrel Stand and Installation
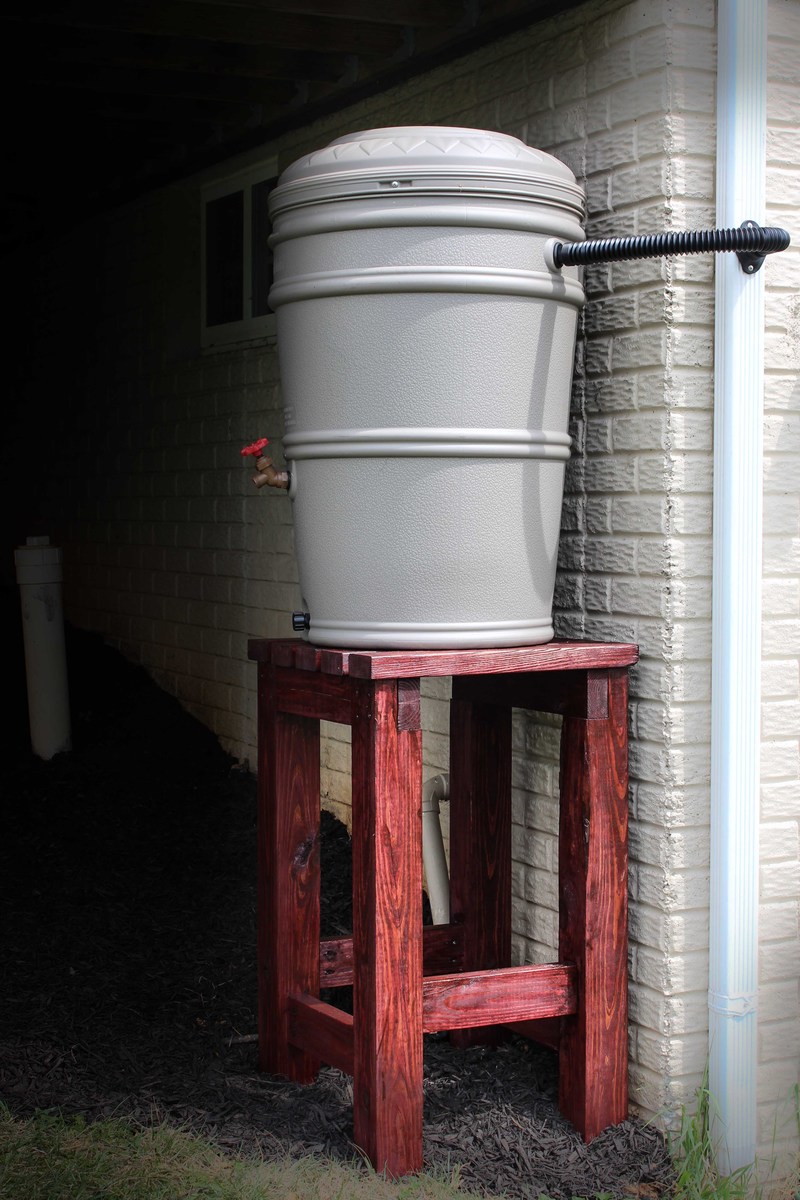
Build Instructions;
http://www.instructables.com/id/Rain-Barrel-Stand-and-Installation/
Video of Build:
Estimated Time Investment
Afternoon Project (3-6 Hours)
Finish Used
Stain
Recommended Skill Level
Starter Project
Miter Saw Stand
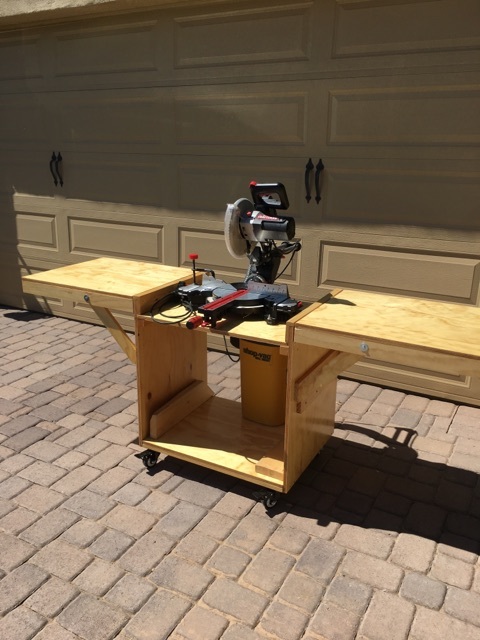
I copied your plans with just 2 exceptions. Instead of the shelf brackets to hold the wings up, I copied the idea from the Family Handyman Magazine. Also, the sides where the boards would rest would get all chipped up in use, so I made them 3/4" shorter and added a 1 x 2 to protect the plywood underneath.
Estimated Cost
$35.00
Estimated Time Investment
Weekend Project (10-20 Hours)
Finish Used
Min-wax oil based Polyurethane
Recommended Skill Level
Beginner
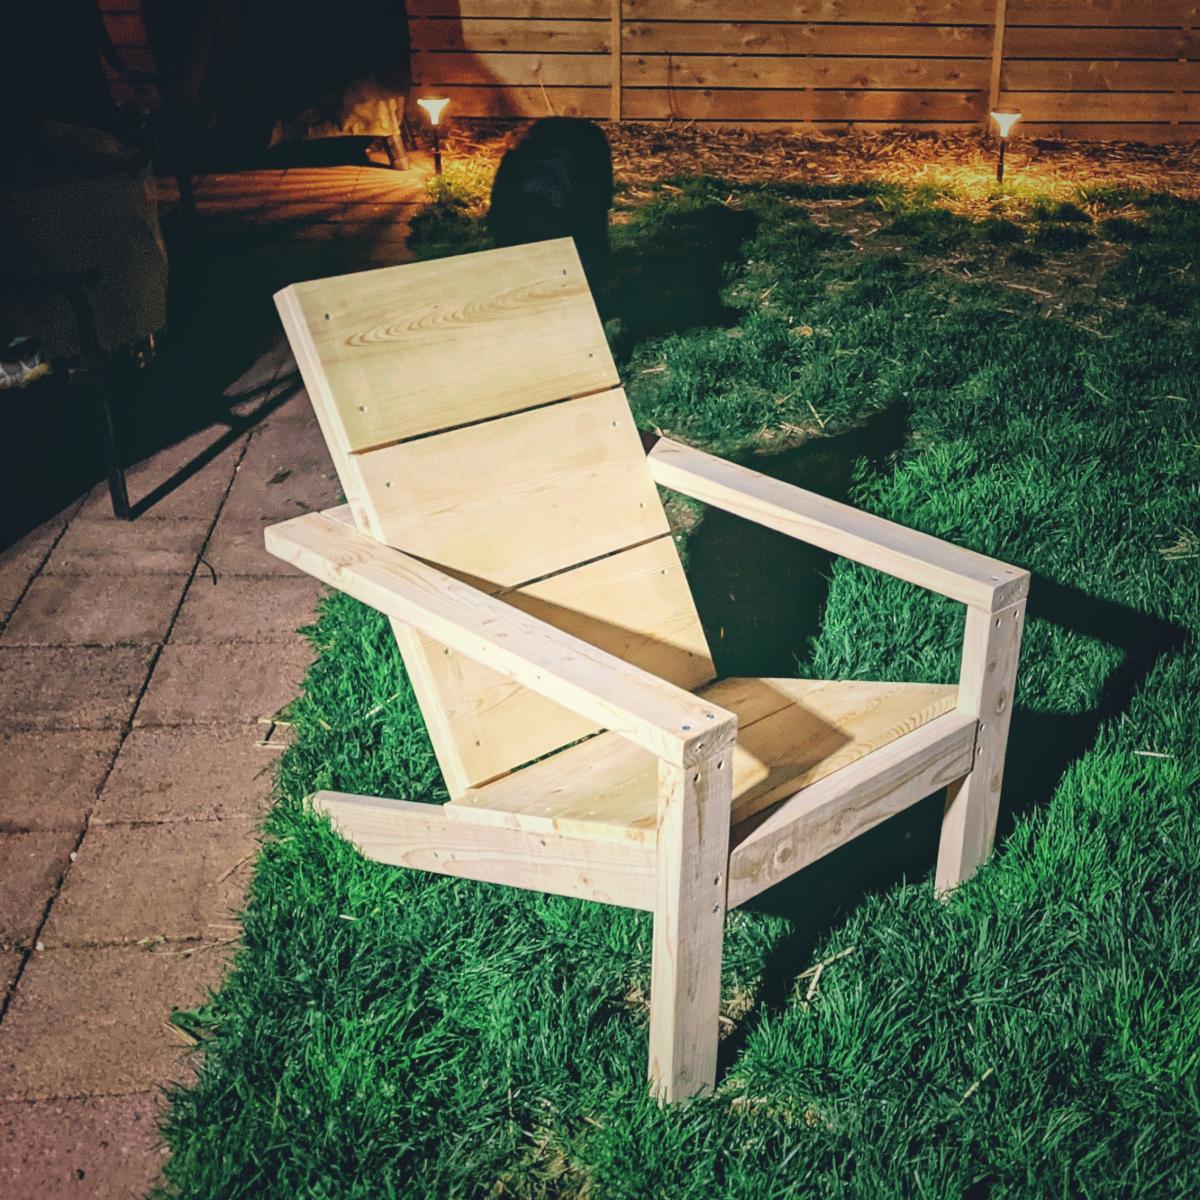
Modern adirondack chair
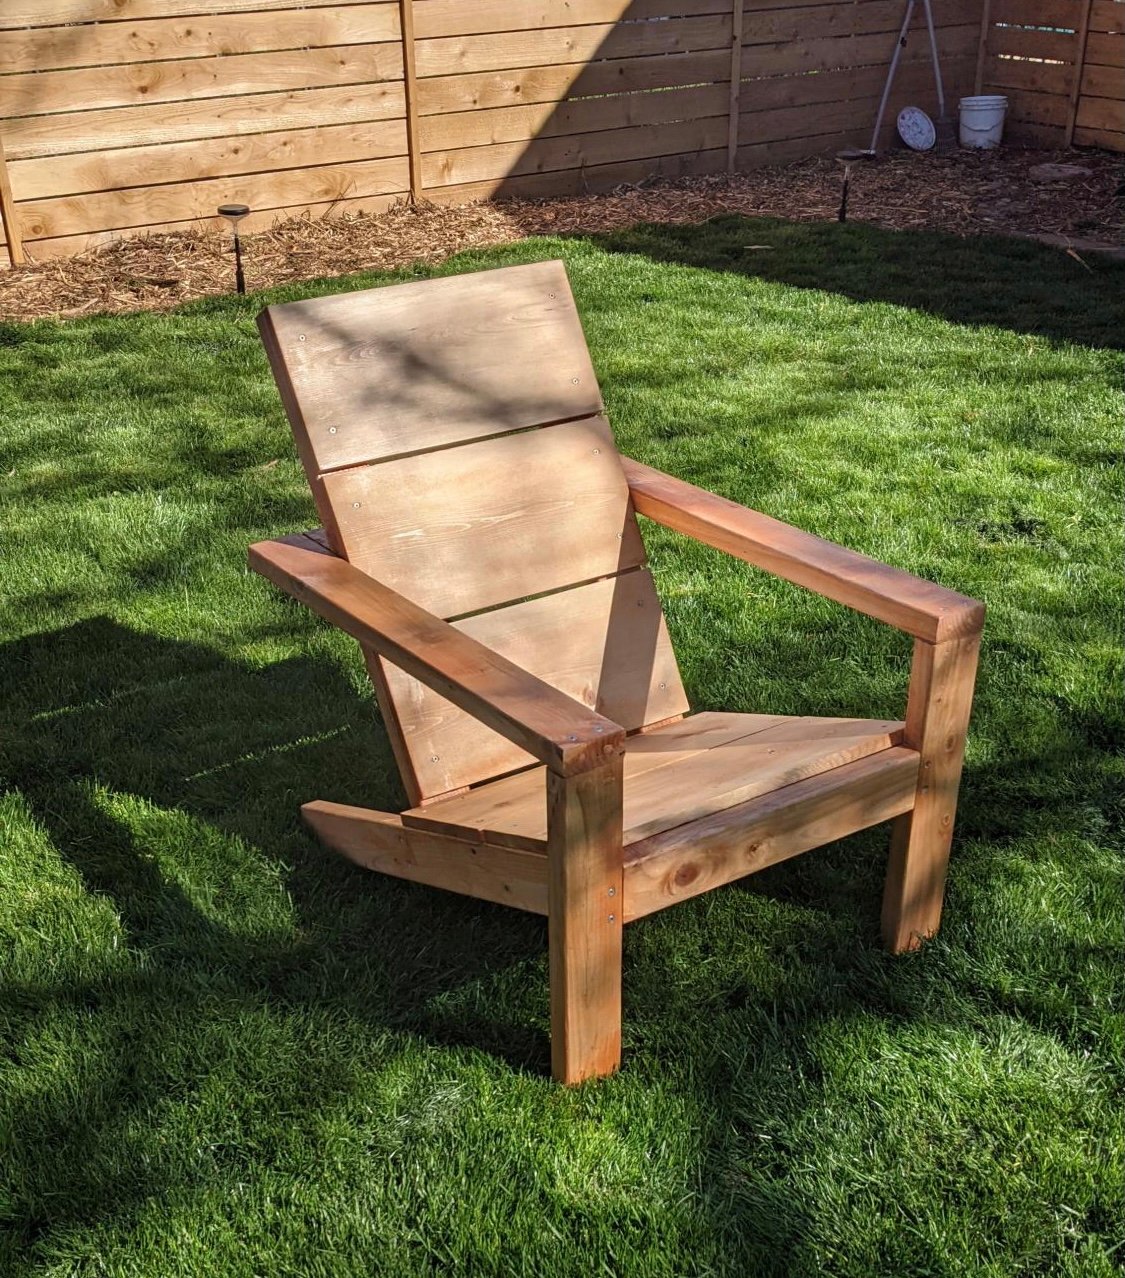
I've made 2 of the Modern adirondack chairs. Really enjoyed the plans and the video for help as I'm new to woodworking. I look for new plans all the time to see what I might build next
Built from Plan(s)
Comments
Big Kids Picnic Table
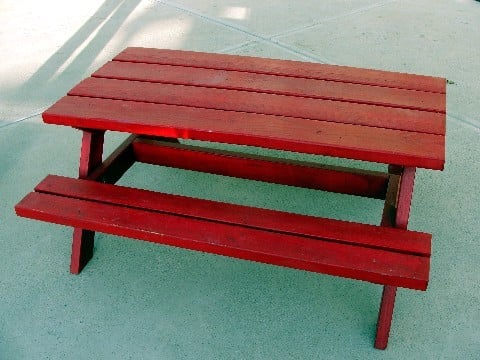
I made this last summer for my neice and nephew. I don't know why, but it did take me a long time. It's all done and cute now though.
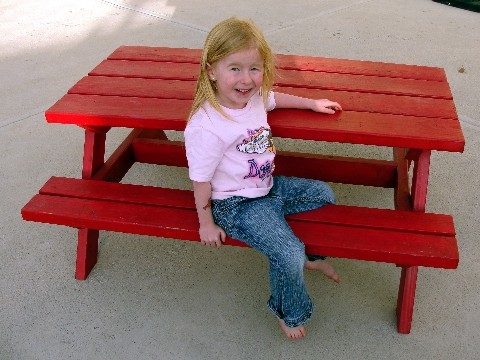
Built from Plan(s)
Estimated Cost
can't remember
Estimated Time Investment
Weekend Project (10-20 Hours)
Finish Used
My sister painted it red. It still needs it's second coat.
Recommended Skill Level
Intermediate
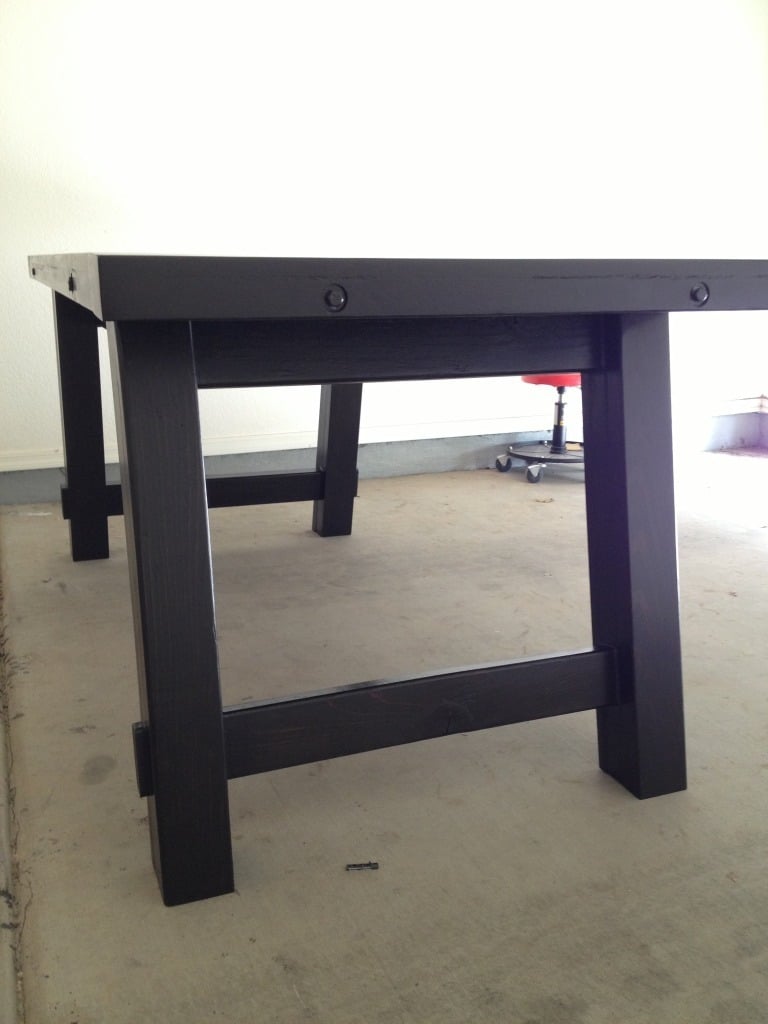
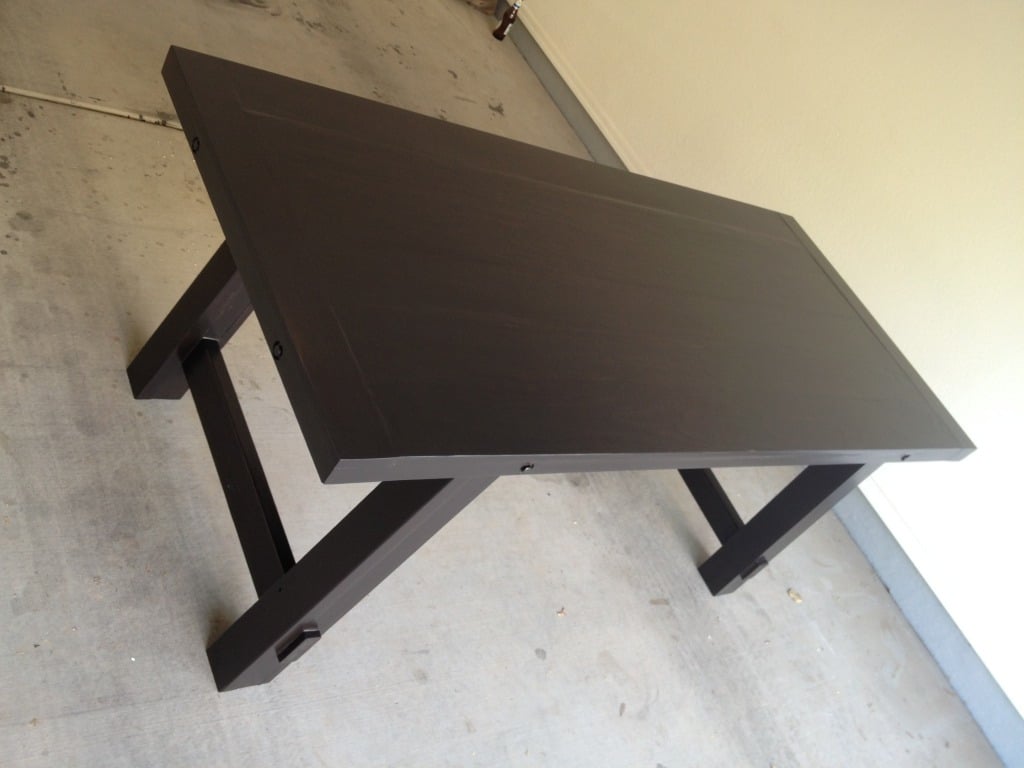
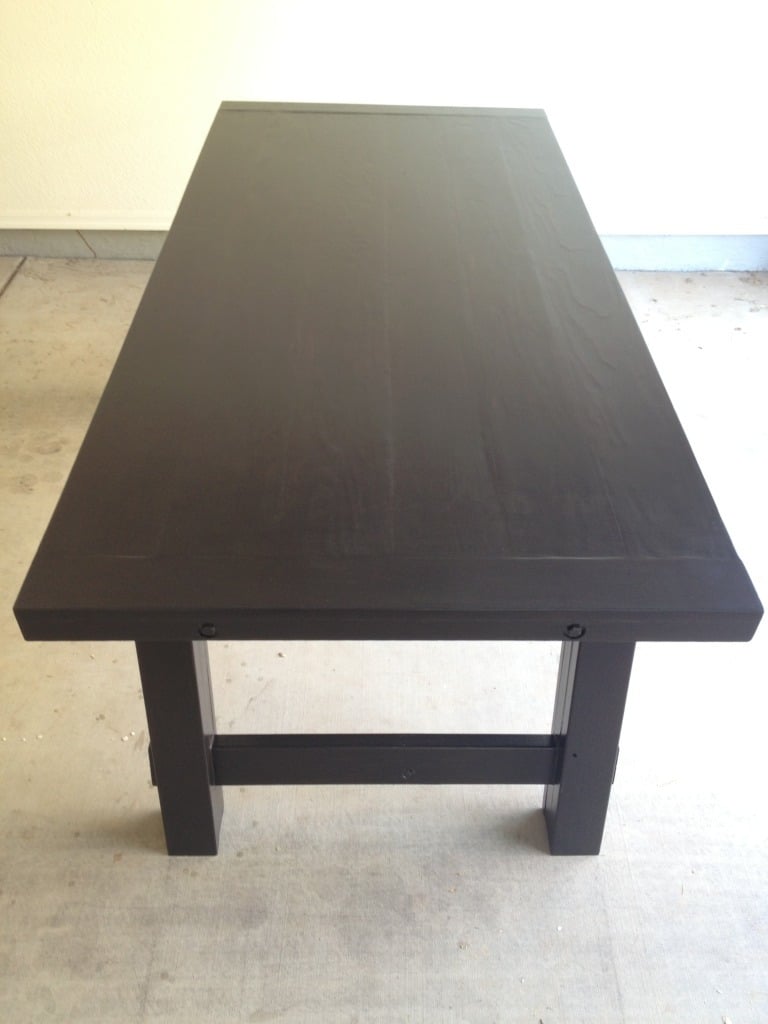
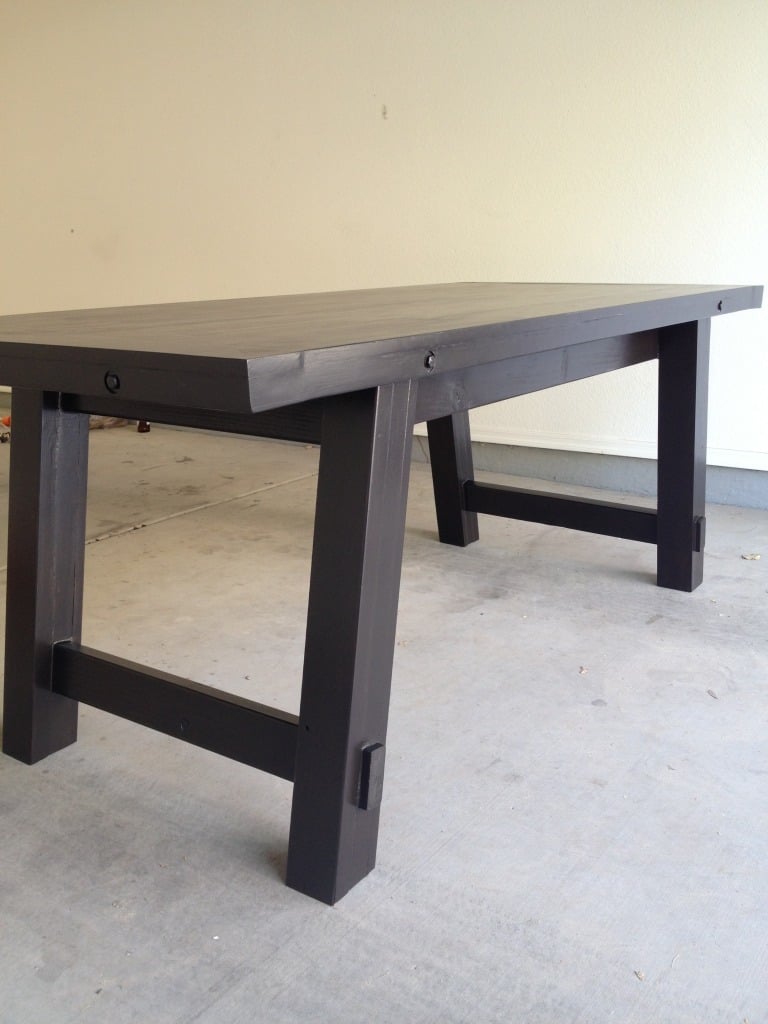
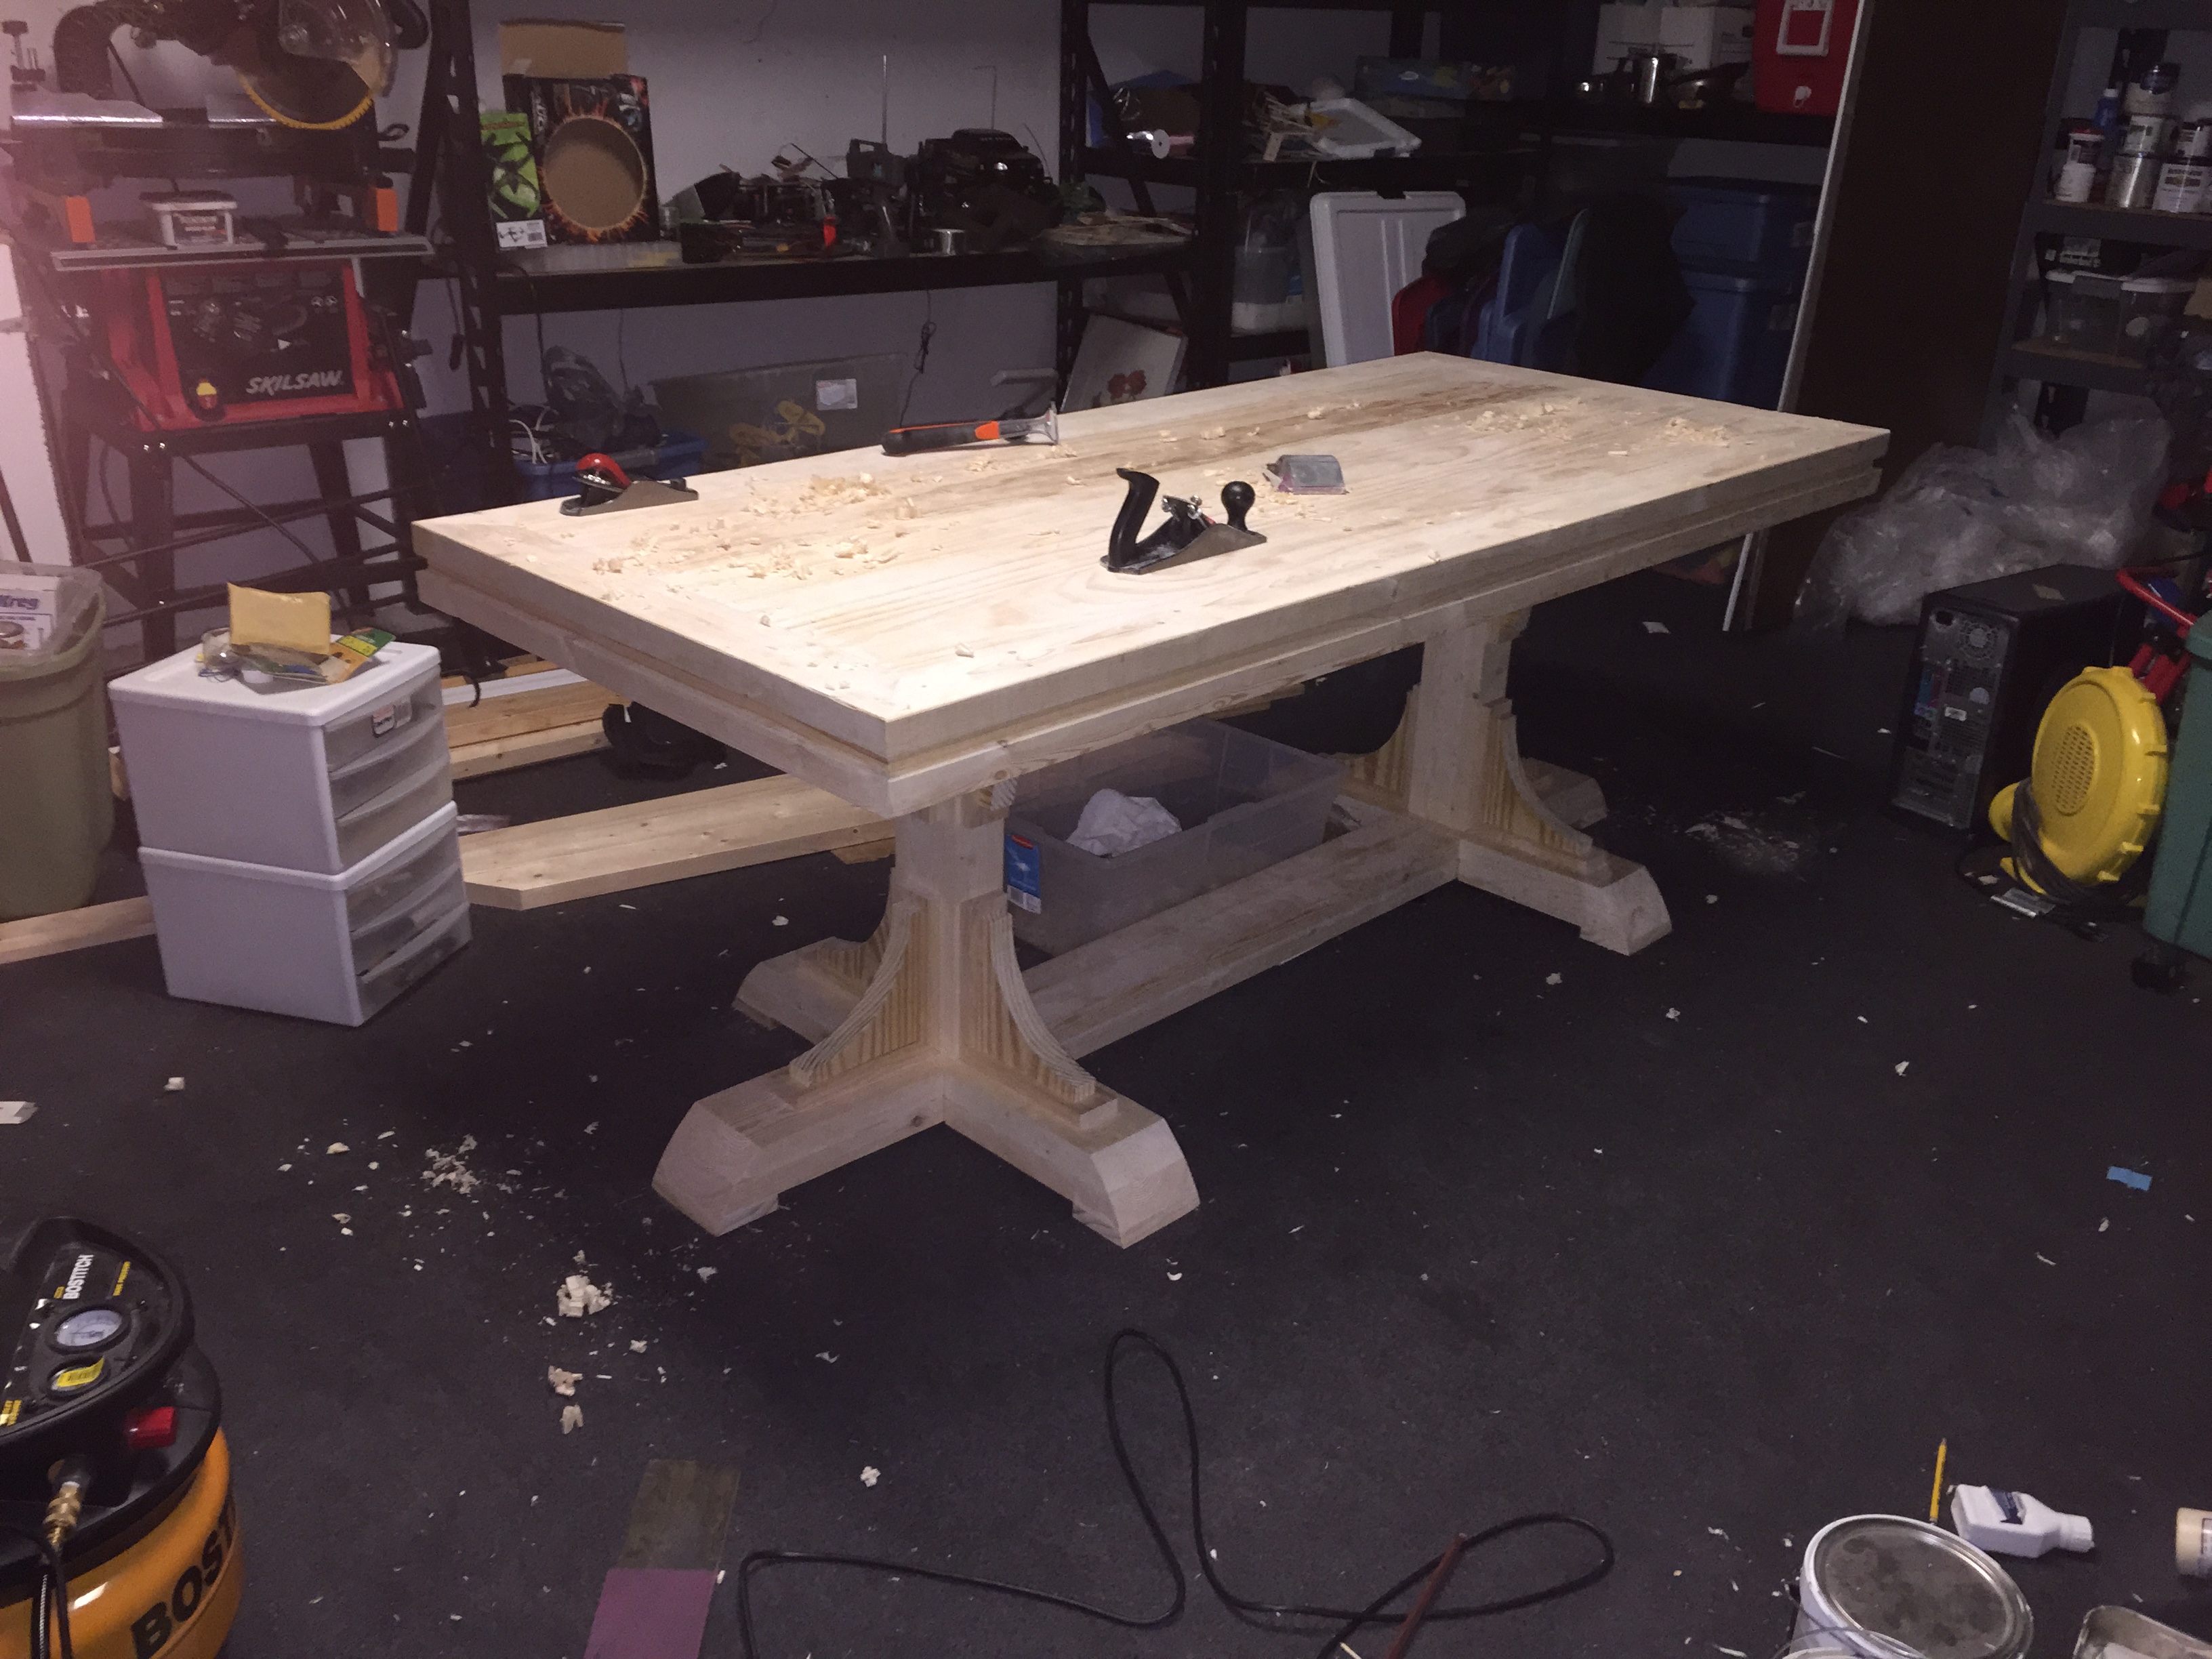
Farmhouse Benchright Table Build
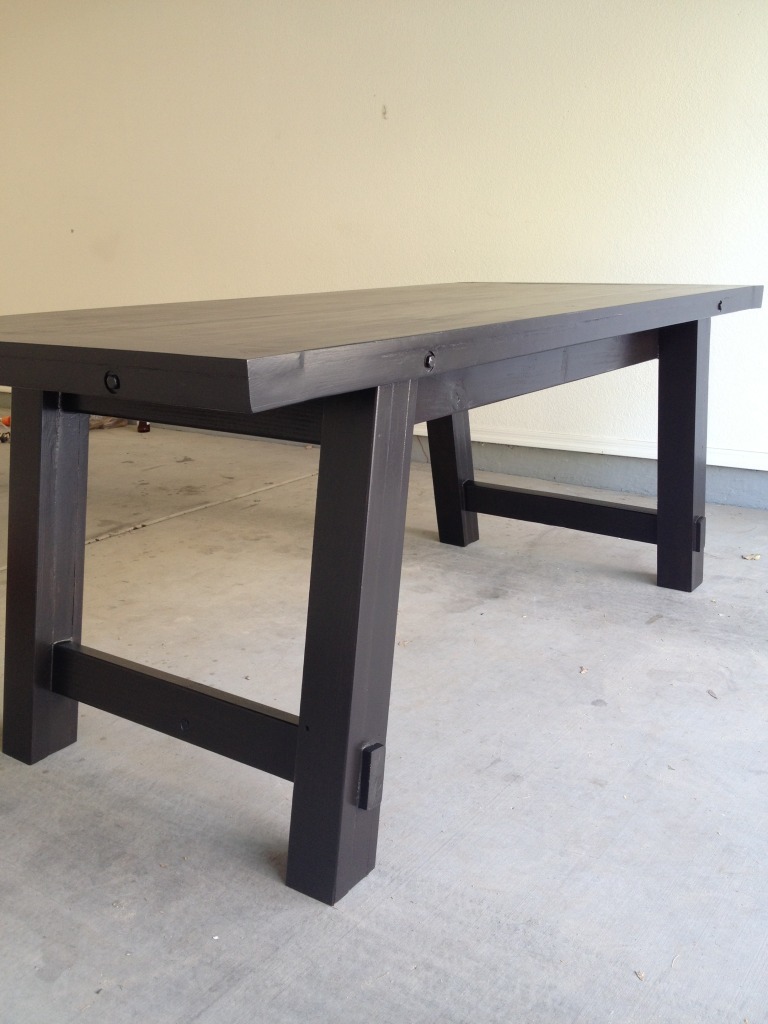
After doing my first build, pallet media center, I was hooked. My family and I desperately needed a dining room table. We wanted a rustic looking table and I was thankful I found the benchright table plan. Thanks Ana!! This build was fairly easy. I did mess up a couple times with the angle/bevel cuts. Totally ruining a couple boards. Which I had to run back to Lowes and purchase a couple more boards. I used 3/8 hardware bolts/washers/nuts in galvanized for the sides (3") and breadboards (6"). The stain basically painted them, which we love. I still need to add the hardware for the bottom (threaded rods, turnbuckle, nuts/bolts/washers, etc). The pics above really dont show the detail with the stain. The pics make the table look black. But you can actually see the wood grain on the table top. The table looks amazing in person, we love it!!! Thanks again Ana!!
Built from Plan(s)
Estimated Cost
250
Estimated Time Investment
Weekend Project (10-20 Hours)
Finish Used
Rustoleum Kona stain and Rustoleum Satin Polyurethane. 2 coats of stain and 3 coats of urethane.
Recommended Skill Level
Beginner
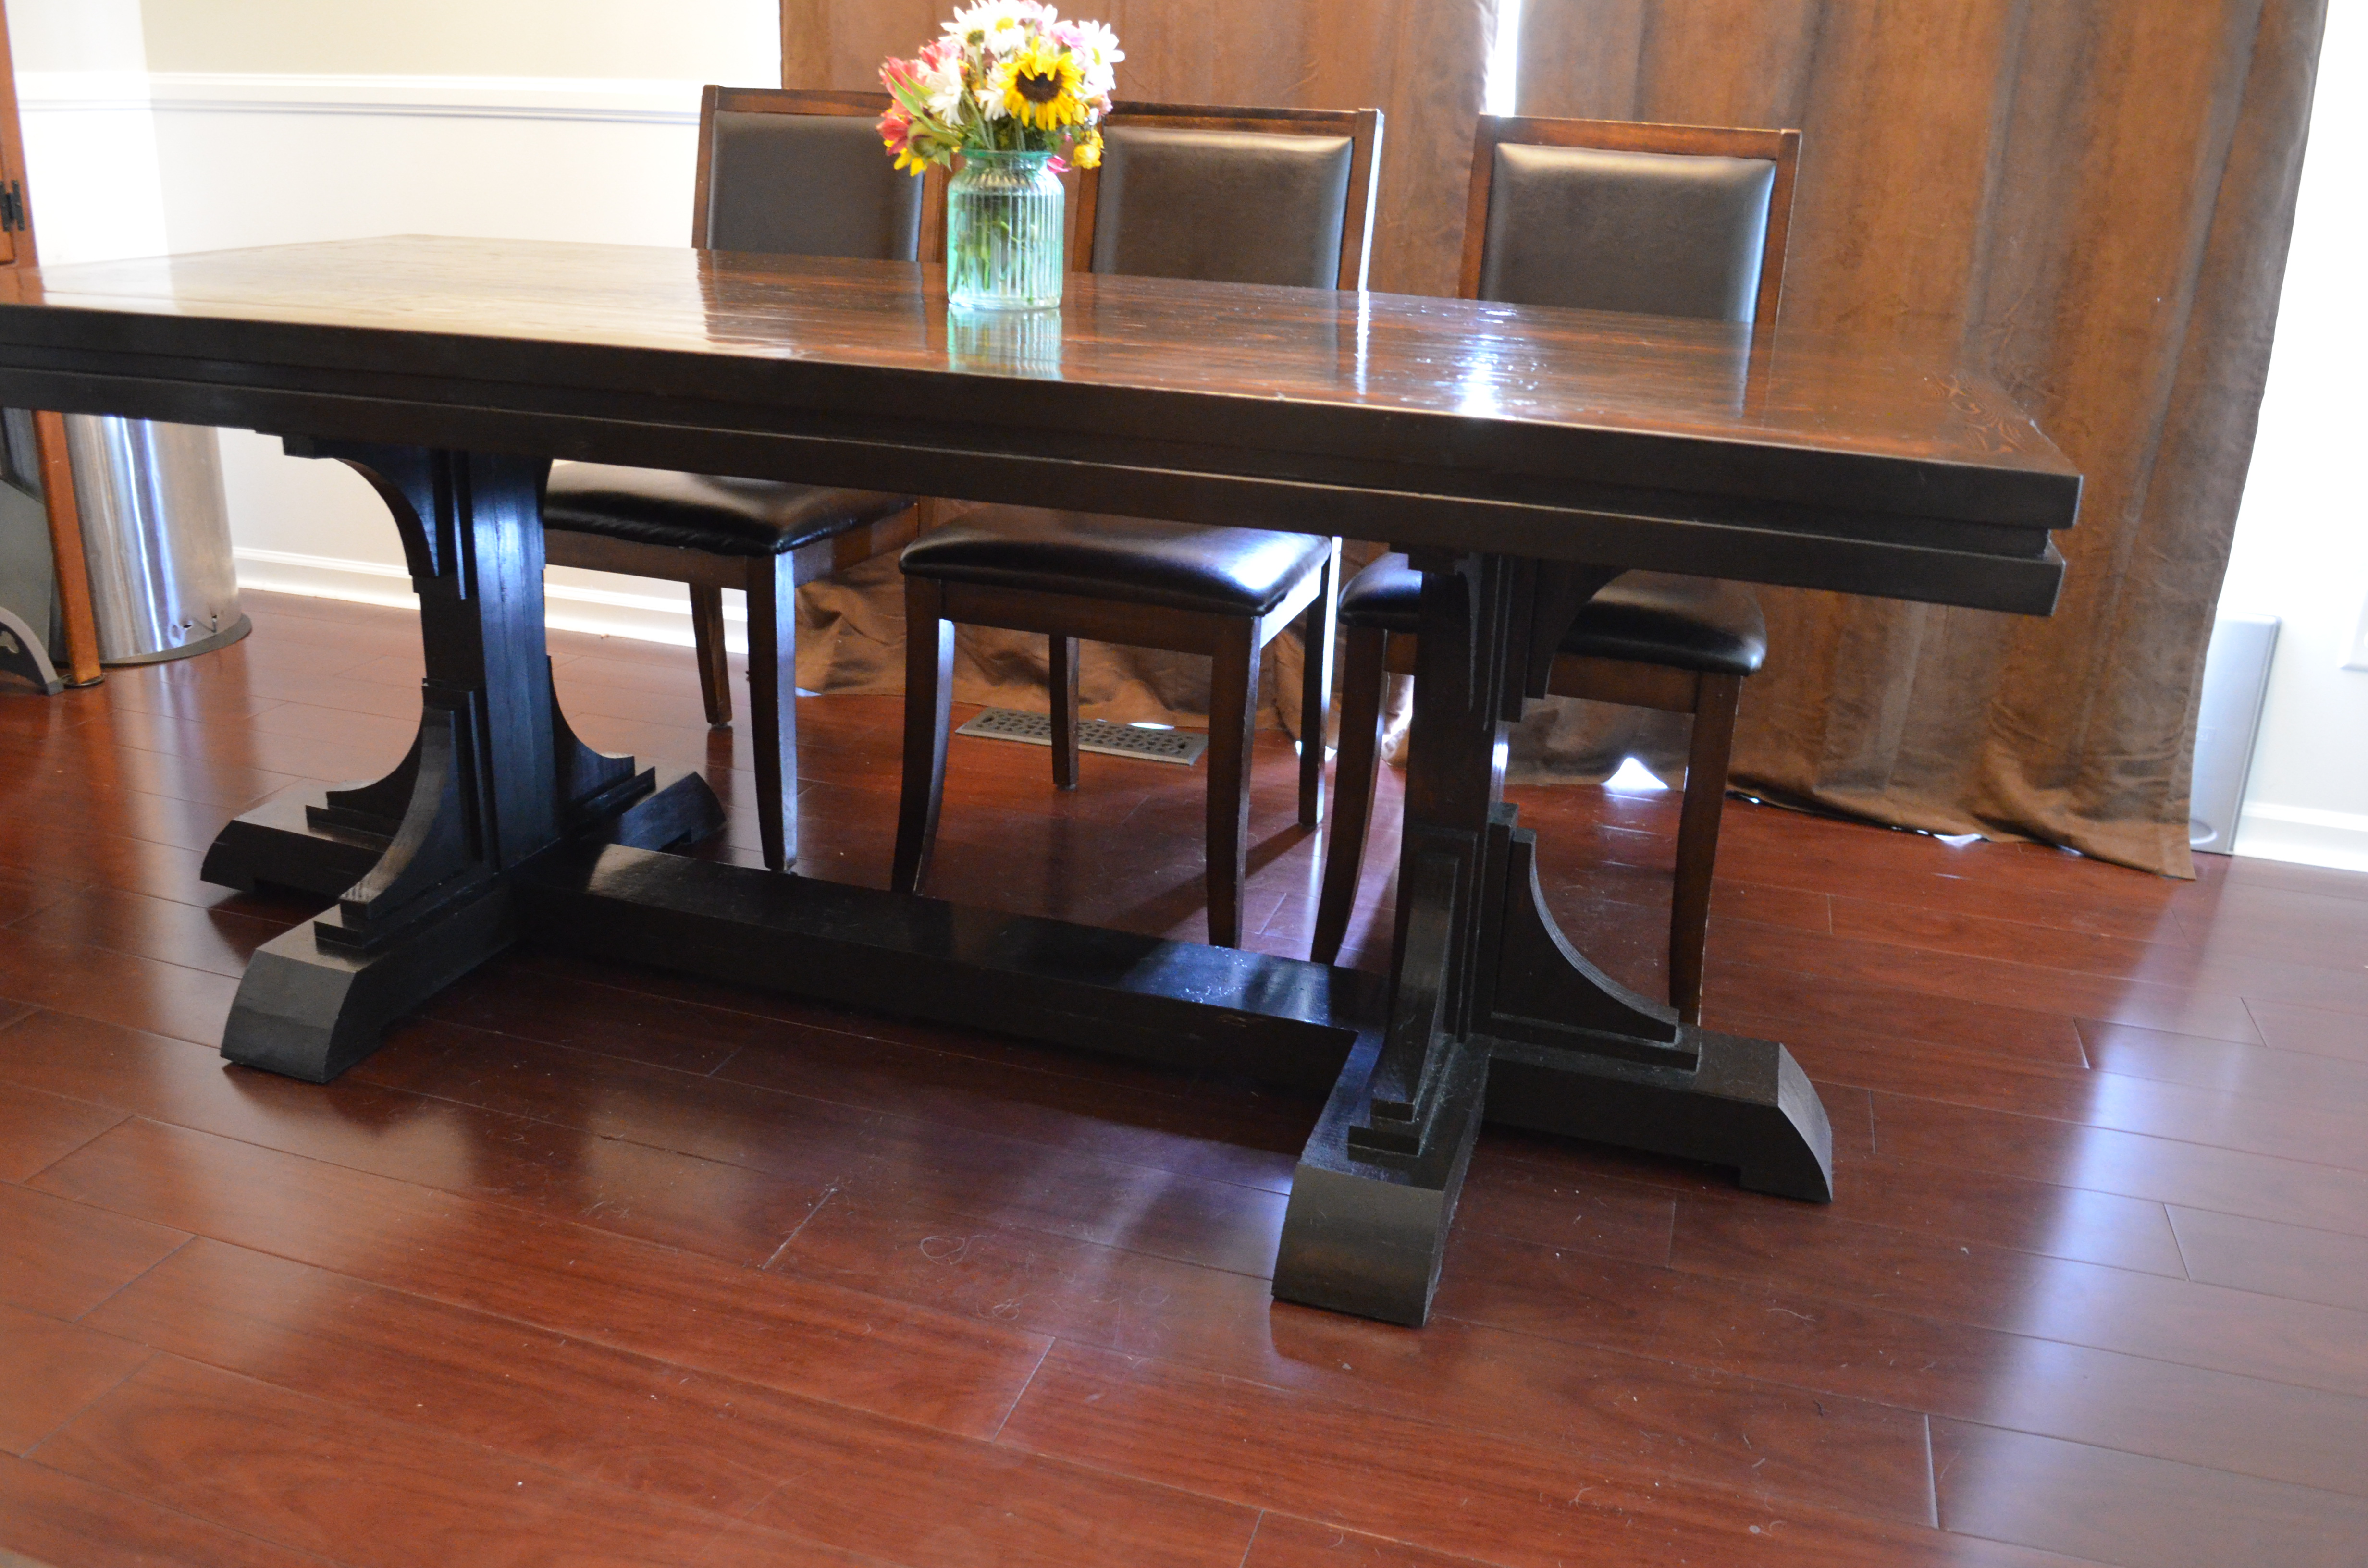
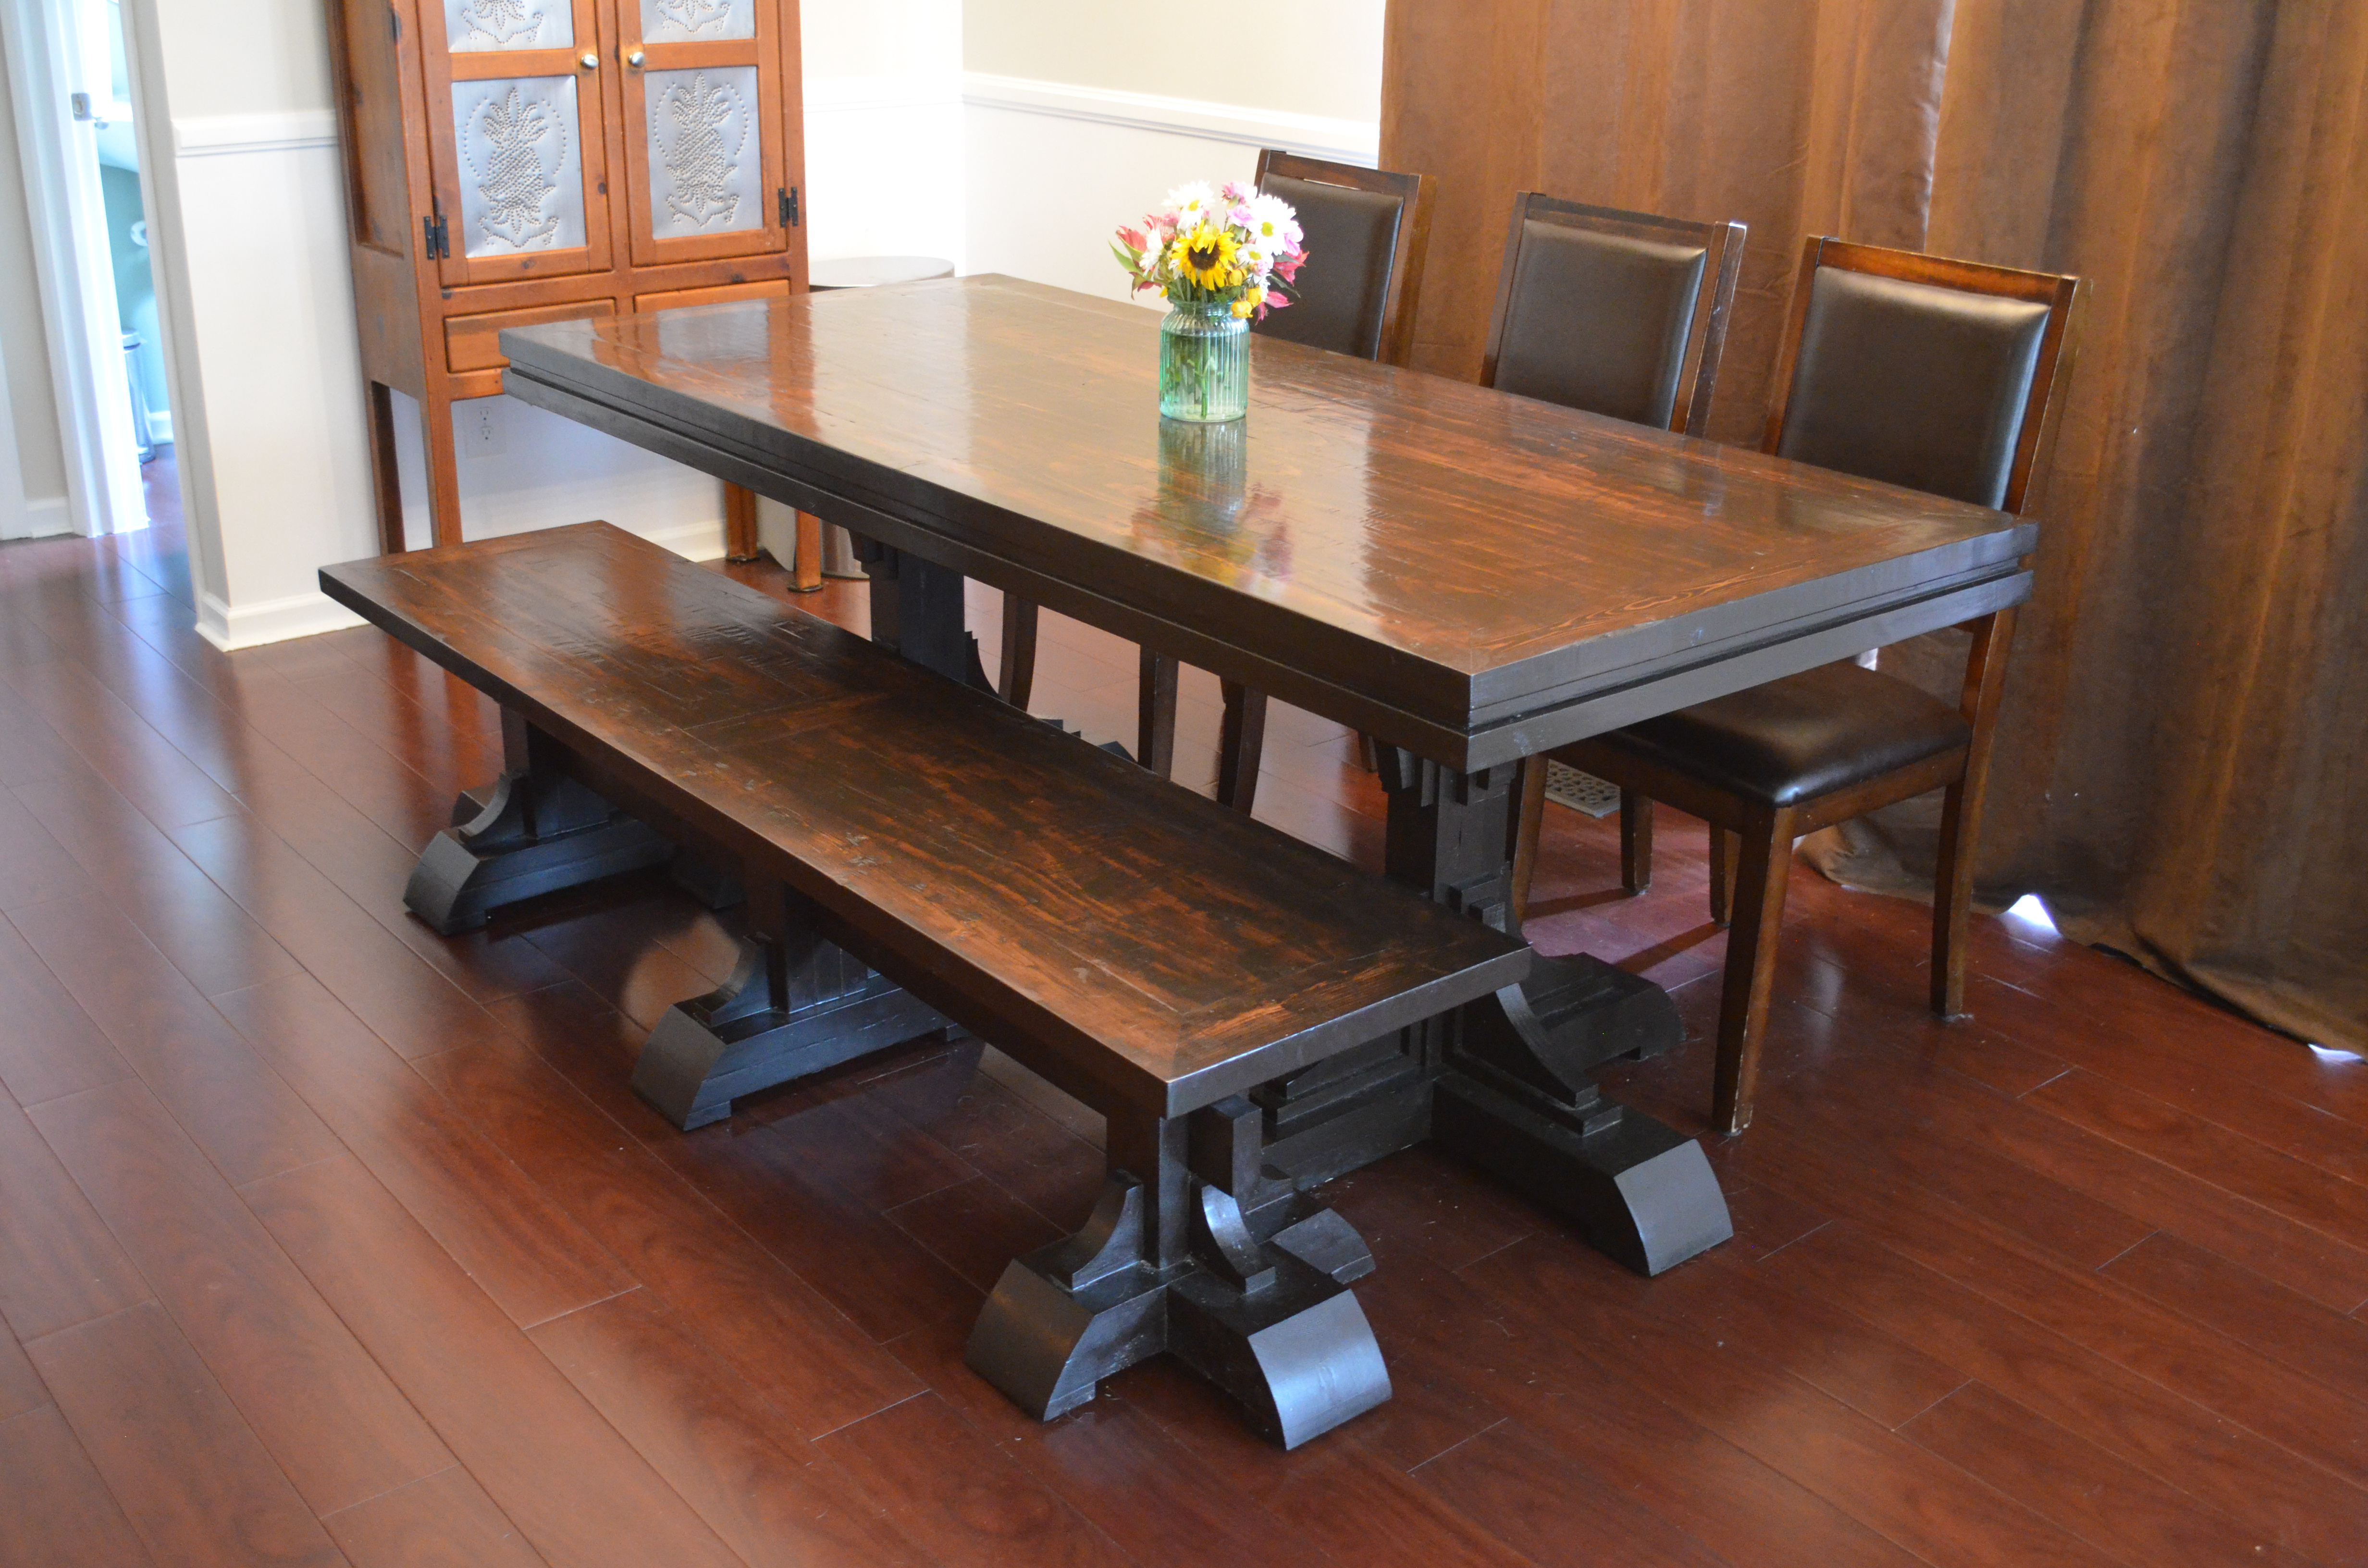
Triple foot farmhouse table with runner, triple pedestal bench
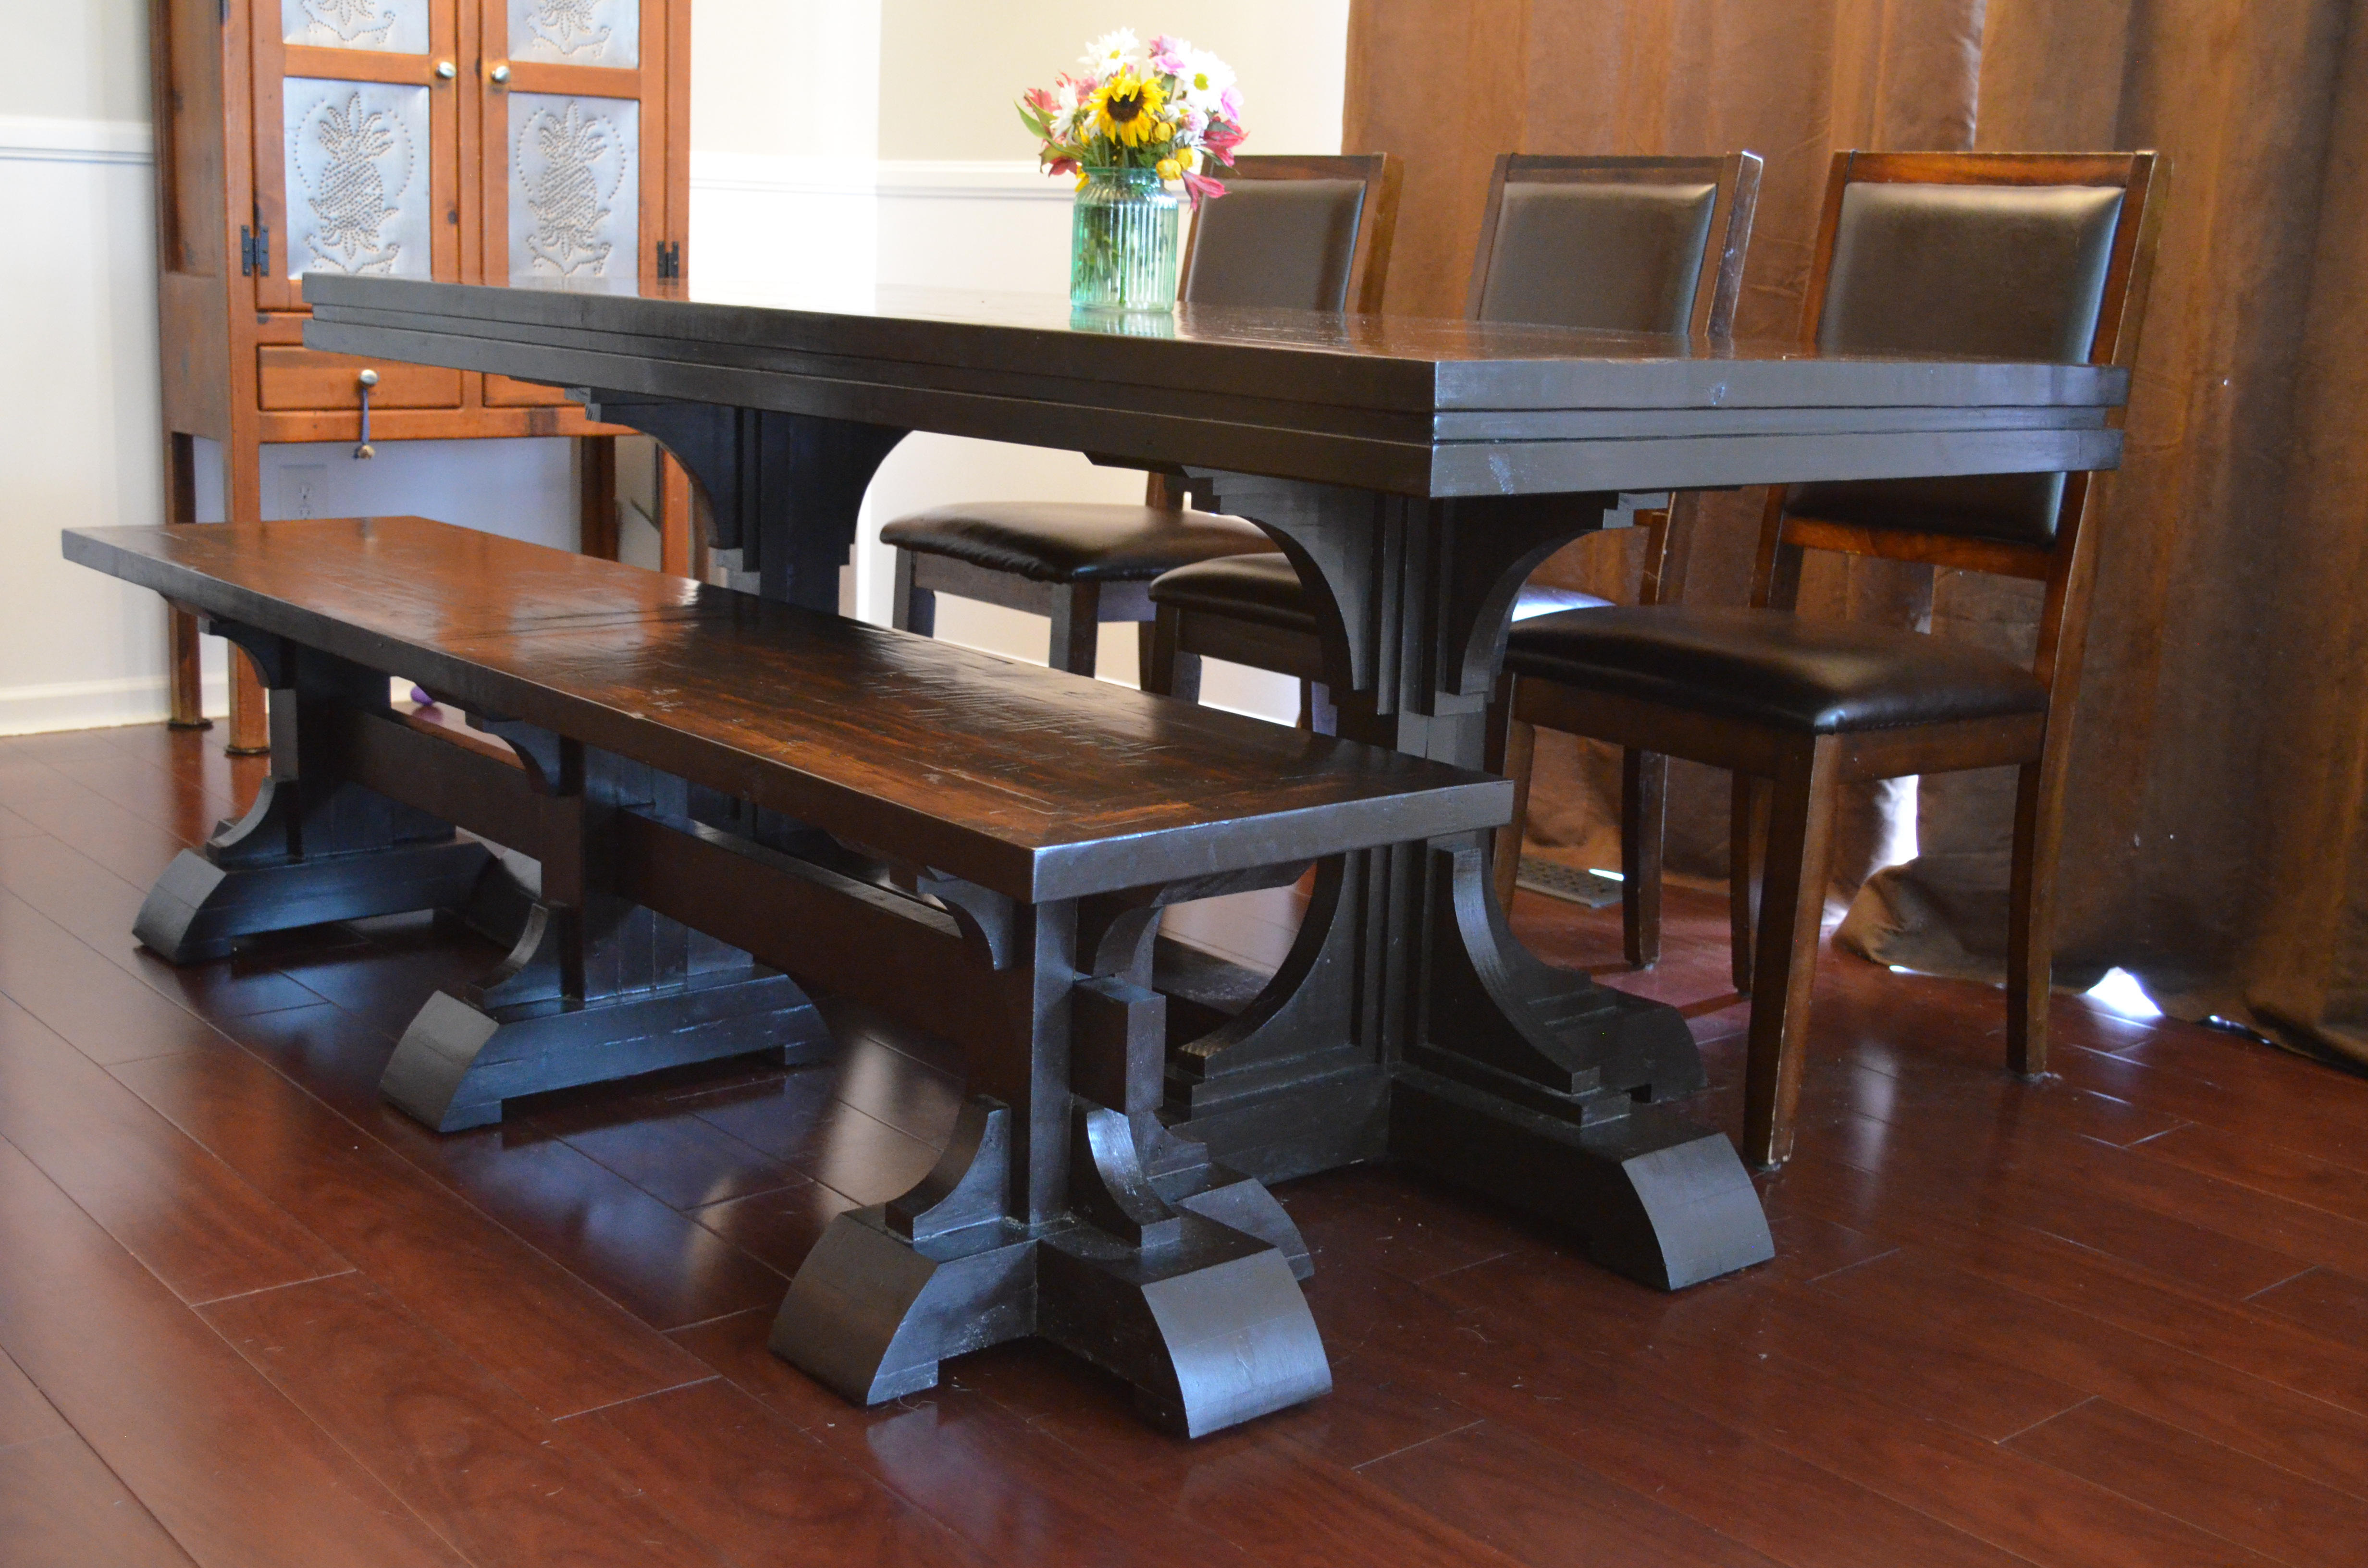
My first attempt at a real furniture project, I would have never tried this without all the plans and support here at Ana-White! These are 7' for the kitchen/breakfast area. Since the table is only 7', it has 2 pedestals. I modified these a bit from the triple pedestal farmhouse bench and table plans by using a runner along the floor instead of a stringer board on the table and adding triple feet on the outside pedestals. I also added 1x3 trim under the arches to add some detail and hide the grooves between the three 2x4 leg supports. The top has mitered 2x4s around the outside with 1x6s on the inside. One issue I ran into was that the 2x4s shrank a lot as they dried, while the kiln-dried 1x6s did not. To make an easier to clean surface I planed the top smooth, and then added minimal texture by hand scraping. My plan is to build a big 12' version of this table for the dining room.
Built from Plan(s)
Estimated Cost
Under $300 for both.
Estimated Time Investment
Week Long Project (20 Hours or More)
Finish Used
2 coats of kona stain, wiped more off the top than the legs. The top shows grain, the legs are almost solid brown. I used hand-rubbed satin poly. 3 coats on the bench turned out great. 6 coats on the table top turned out too shiny and easily scratches. I will refinish the table at some point, possibly with a softer finish.
Recommended Skill Level
Intermediate
Comments

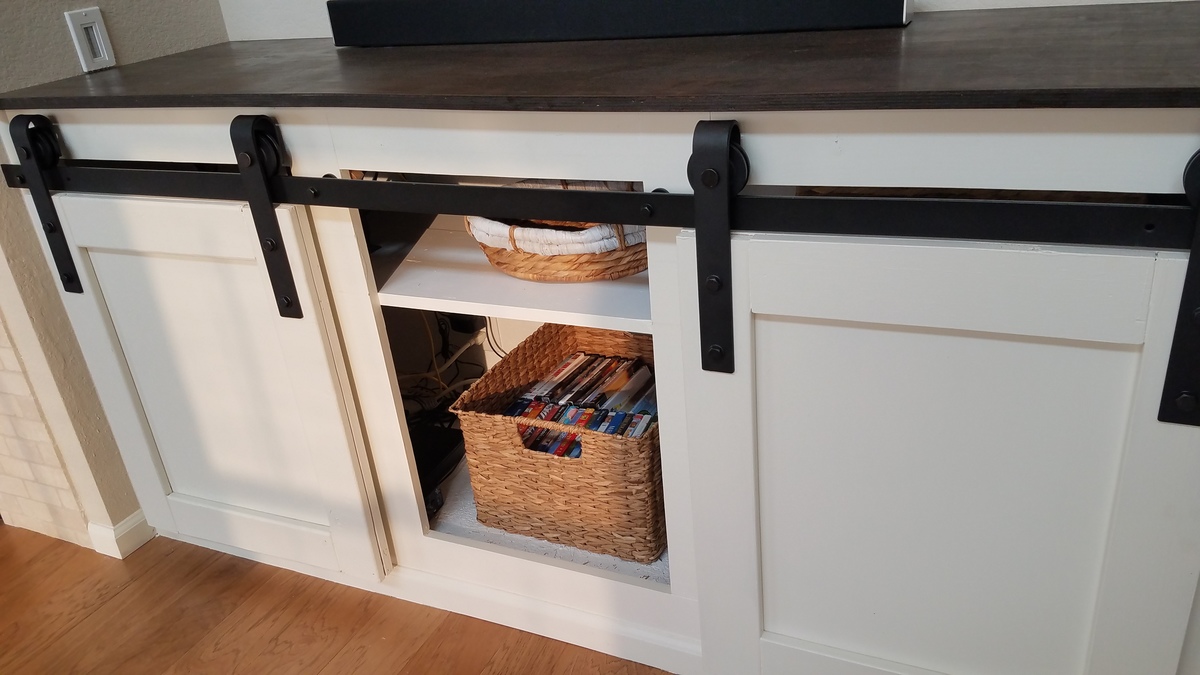
Built-in sliding door console
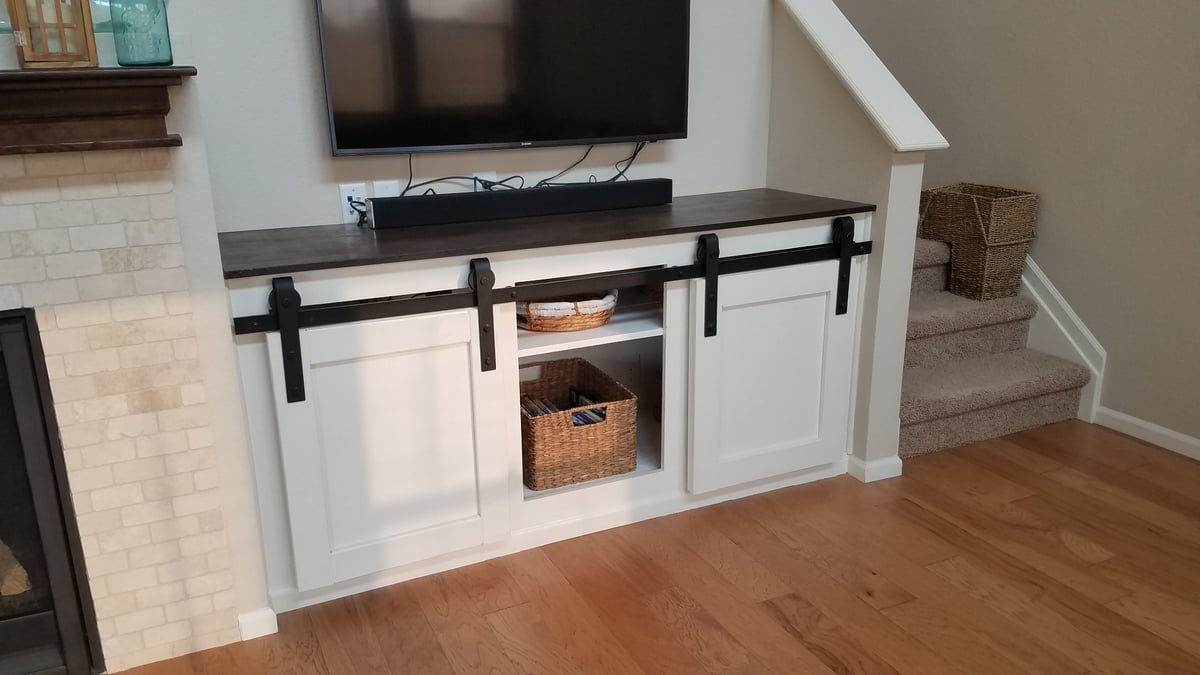
I wanted a sliding barn door concept but as a built-in piece. I had a drywall niche that the builders had made that I've always hated so I ripped that out, and used those measurements to create my version of the sliding door console from Nikki and Ana. This was a big project but so worth it! I ordered the door hardware from Amazon but had to drill my own holes because they did not line up where I needed them to be.
Built from Plan(s)
Estimated Cost
$200 including hardware
Estimated Time Investment
Weekend Project (10-20 Hours)
Recommended Skill Level
Intermediate
Walk mounted can organizer
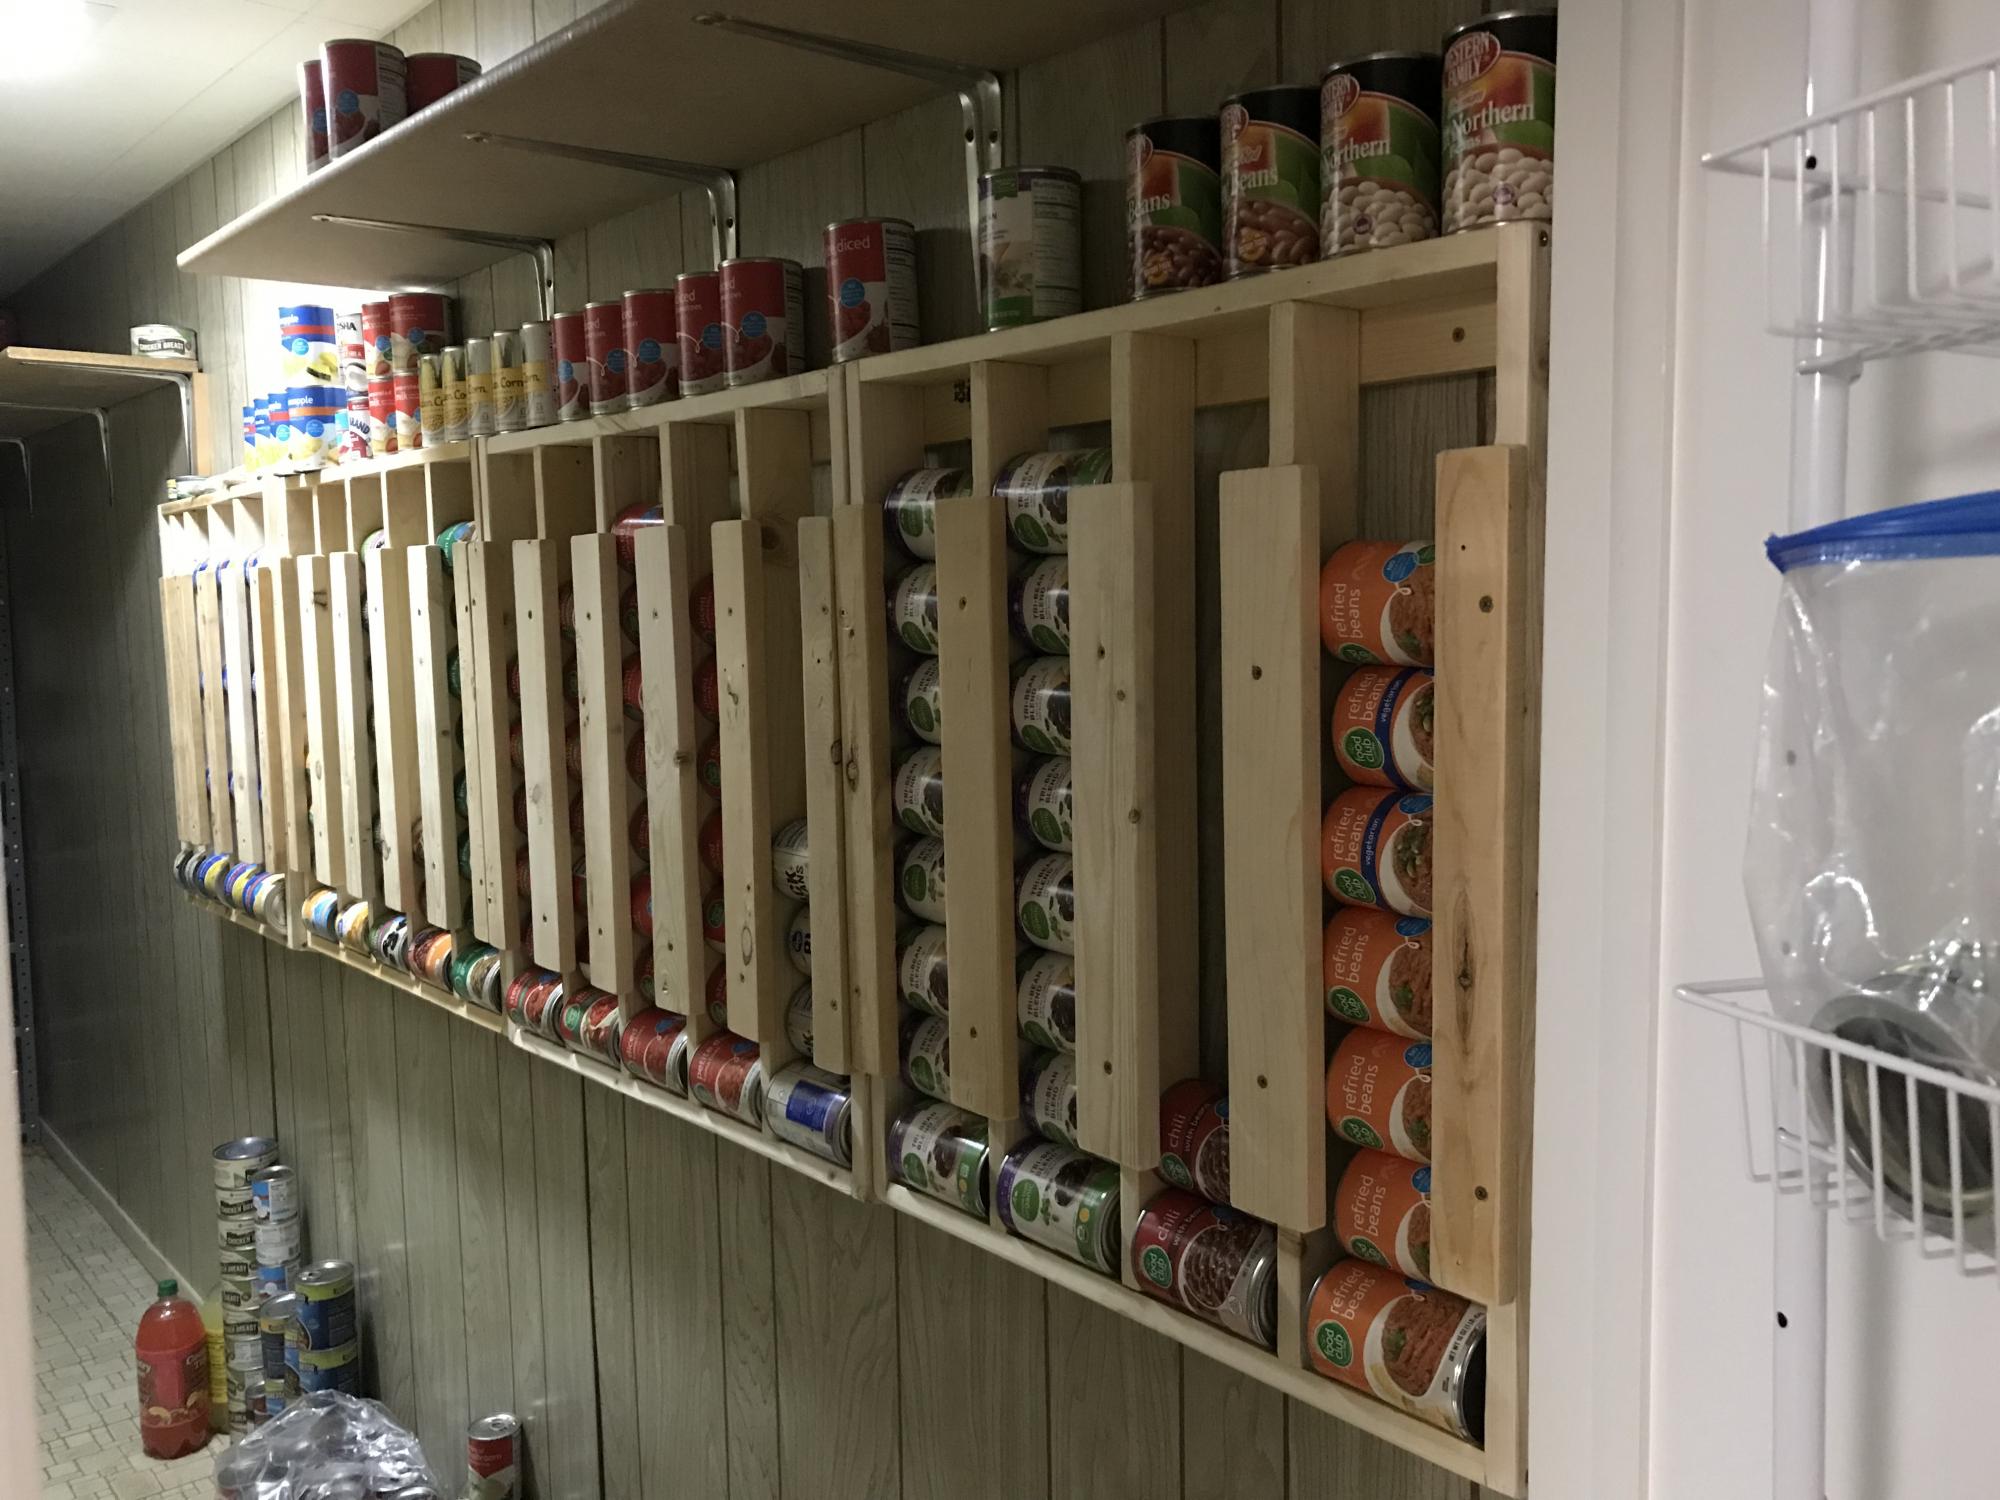
Love this! My husband used this project to help boys learn to use power tools and work with wood. They made one and he did the others. THANK YOU!
Built from Plan(s)
Comments
Wed, 10/06/2021 - 10:15
So much storage!
Great way to get the kids involved, it looks very nice, organized and functional! Thank you for sharing~
Our New Table...the table of my dreams!!
I have added hundreds of plans on my to do list, and some of them may have been a little easier, but I really wanted this table. Badly.
So, my husband and I, decided one weekend to build the Modern Farmhouse Table. Even though we have a saw, we decided since this was our first project, we would have Lowes cut our wood. Big mistake.
When we got home, we organized the wood as to what is what, and measured. It was while we were measuring, when we noticed that a lot of the wood was cut wrong :(
So let that be a lesson...ALWAYS CUT YOUR OWN WOOD!
We went ahead and put the table together, and even though there are some gaps, which I'm planning on filling, I am proud with it.
It's been 3 weeks since we've built the table, and I still have A LOT of sanding to do, and I still need to finish it, but I am proud of what my hubby and I built together so I have to brag!
Next on our list is to build the benches...

Built from Plan(s)
Estimated Time Investment
Week Long Project (20 Hours or More)
Recommended Skill Level
Starter Project
My Garden box

Built this with the help of my Dad! Learned about threads as I've never used them before. Because of all the controversy surrounding having pressure treated wood touch the veggies and because I could not afford or find cedar 4x4's I decided to use the left over cedar to build a little cover around the 4x4's so my soil and veggies will never come into contact with it. Love it and the veggies are growing great!
Built from Plan(s)
Estimated Cost
$50/60
Estimated Time Investment
Afternoon Project (3-6 Hours)
Finish Used
I forget the stain I used on the outside of cedar...something natural looking.
Recommended Skill Level
Beginner
Comments

Fri, 05/31/2013 - 04:22
awesome job
I'm glad you were able to follow my plans. I'm not a plan writer so I wasn't sure if I gave good enough instruction. It is a shame you can not get all cedar. Sealing the legs will definitly help them last longer and with all that work you certainly want them to last! Just a hint...you can make 3 for not much more than you spent making one....Great job and thanks for the brag post LOVE LOVE LOVE
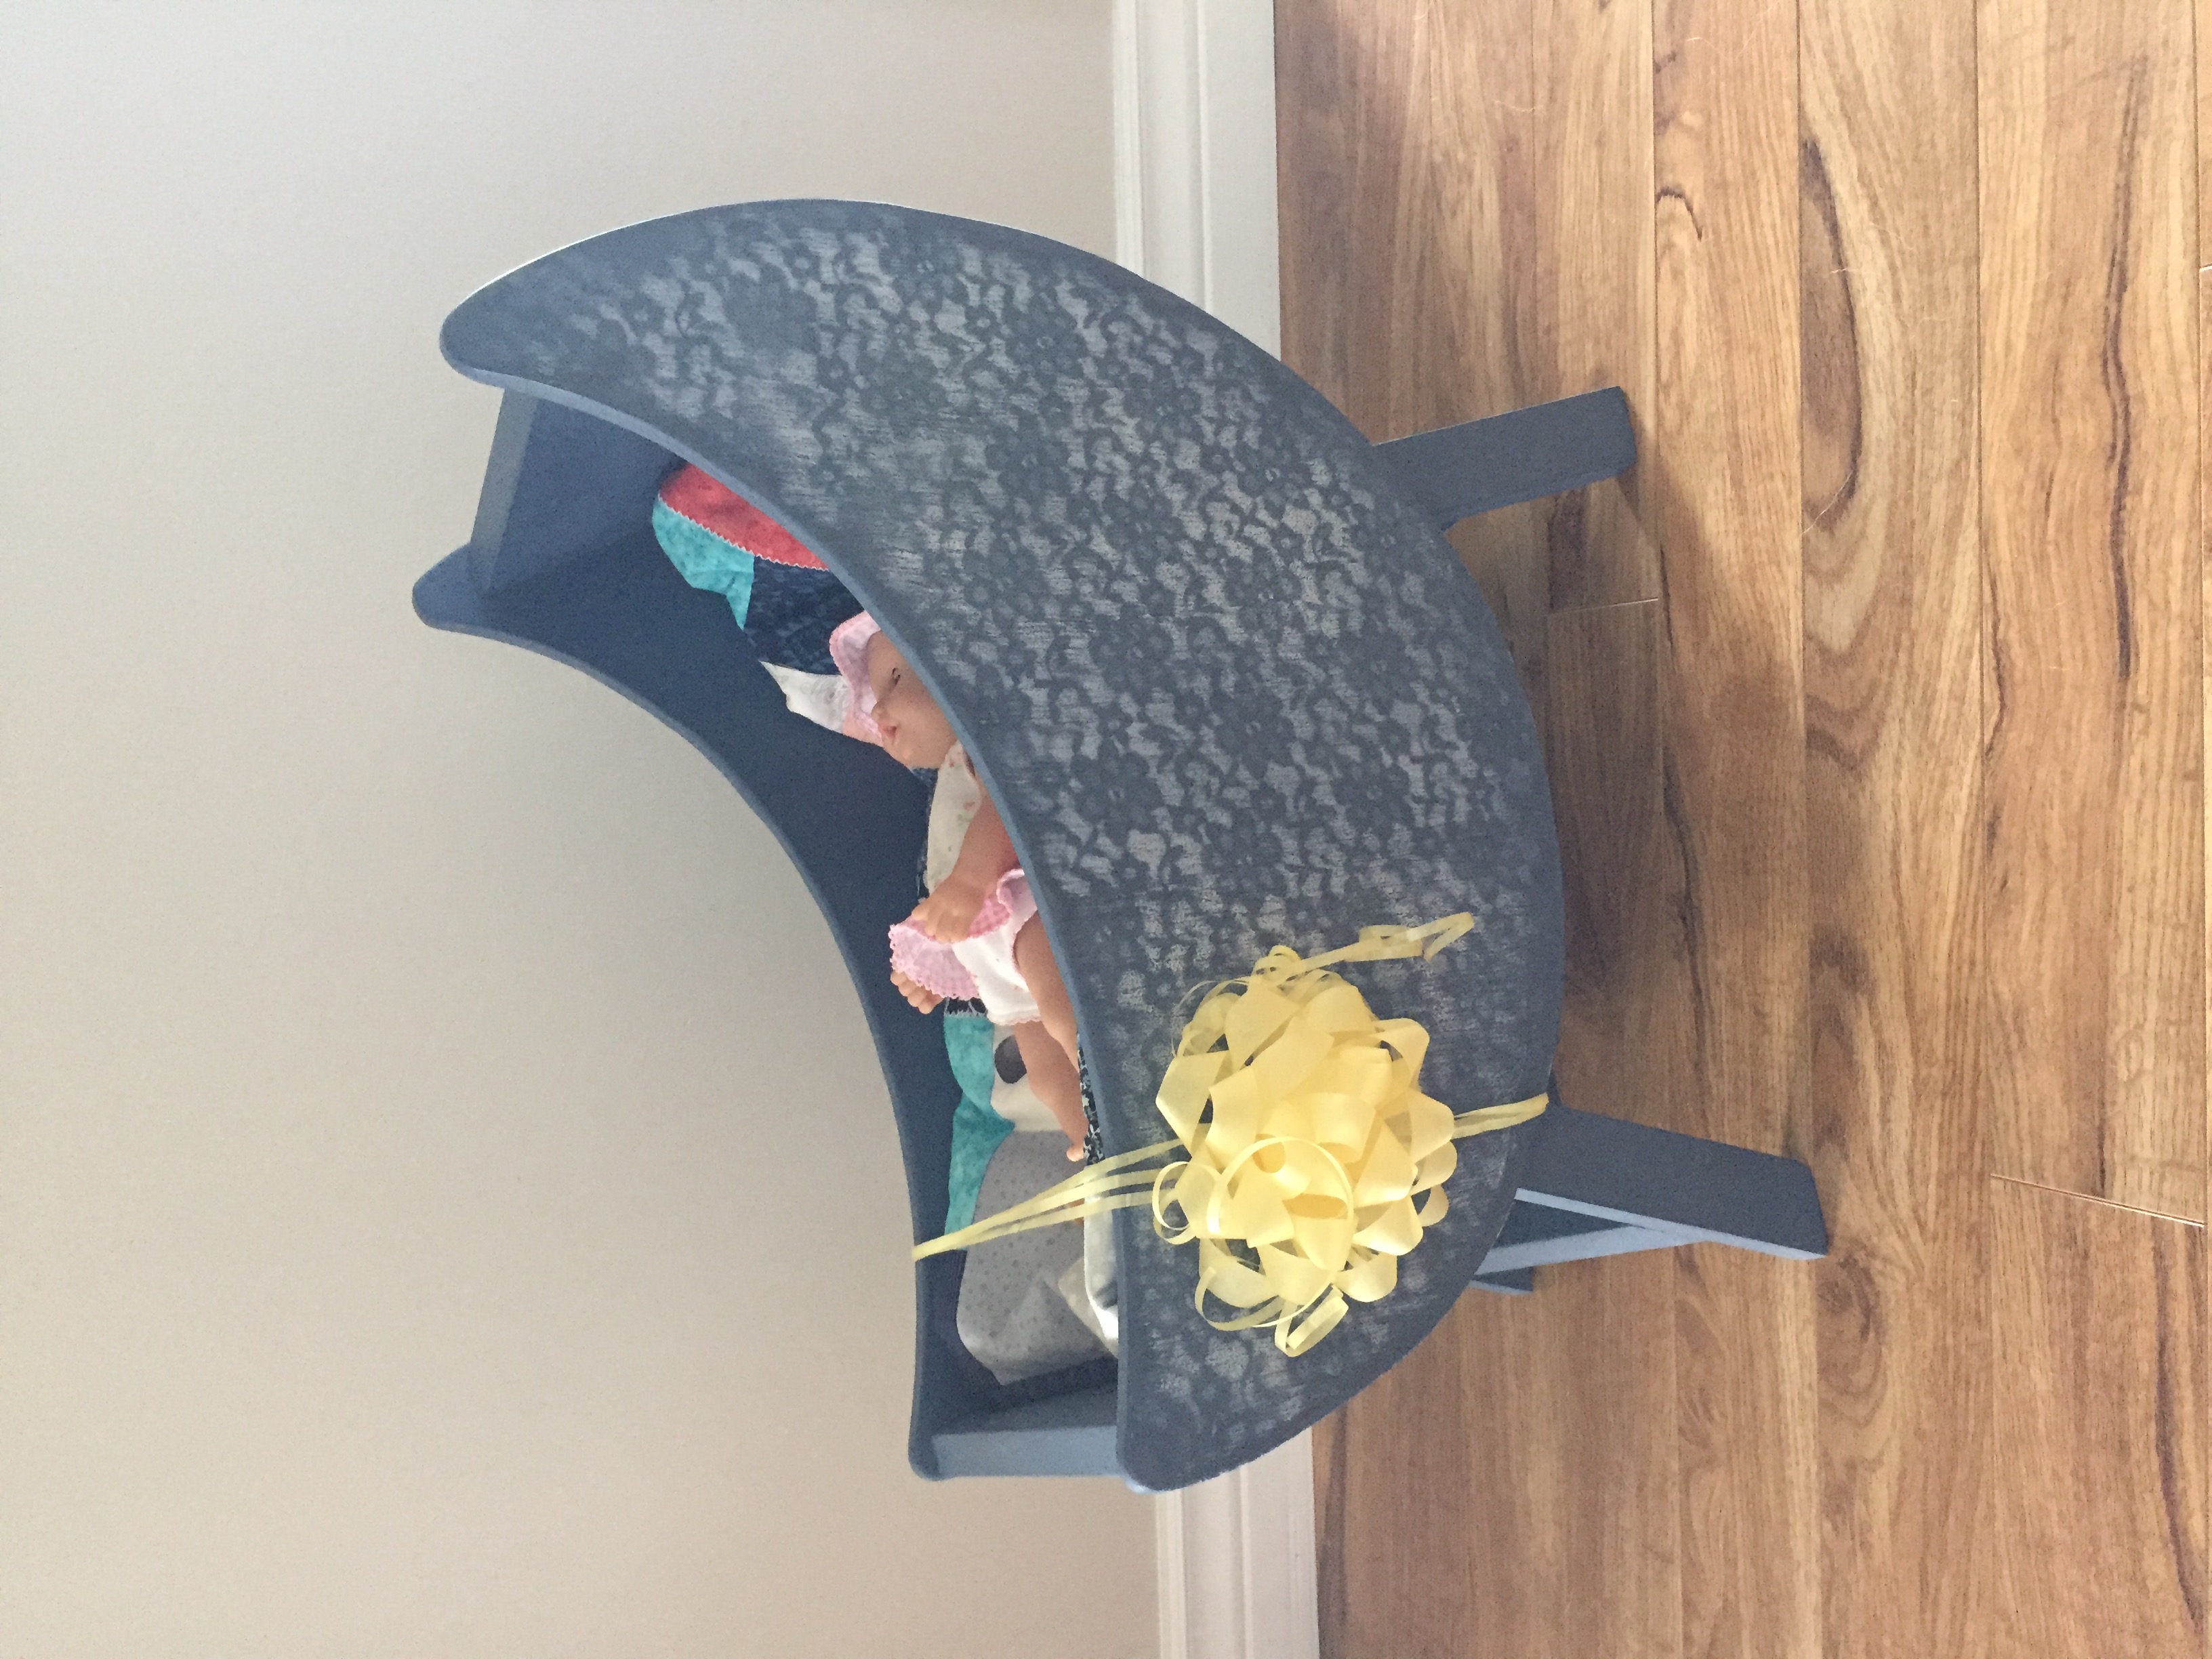
Doll Crib

Built for my daughters 2nd birthday.
Built from Plan(s)
Estimated Time Investment
Day Project (6-9 Hours)
Finish Used
Chalk paint, and white spray paint sprayed over lace. Distressed and dry brushed the blue chalk paint back over for a worn look.
Recommended Skill Level
Beginner