Community Brag Posts
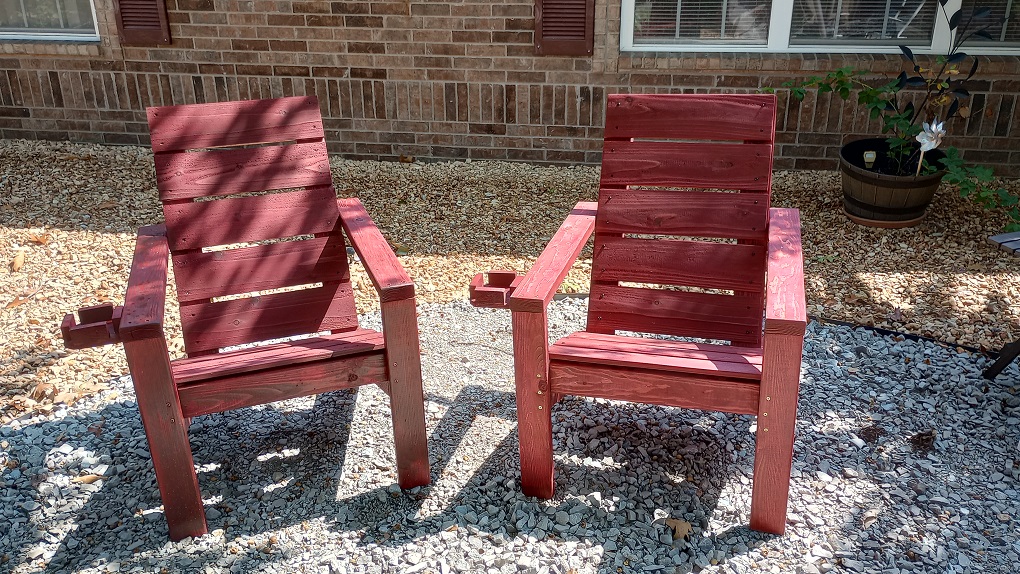
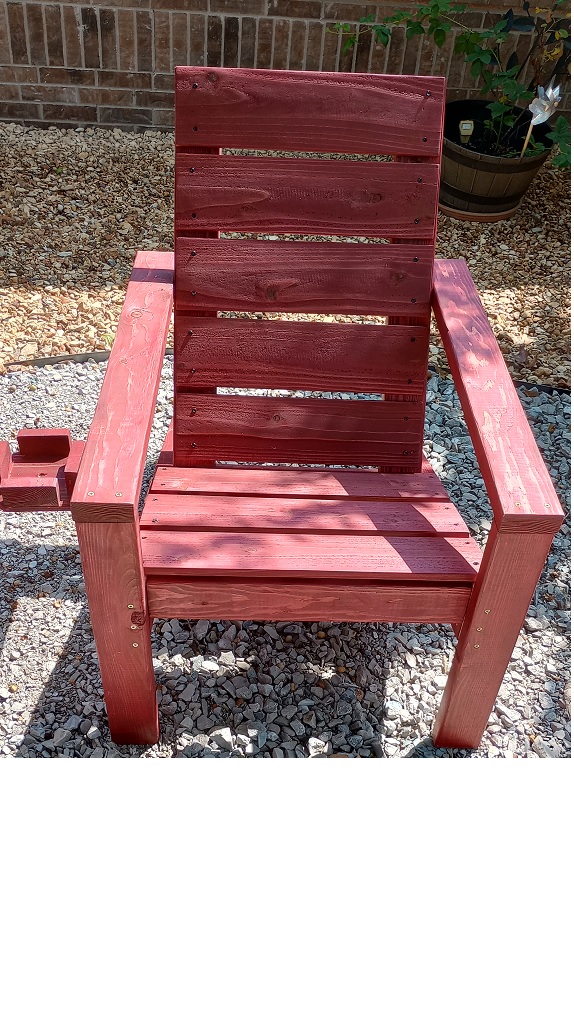
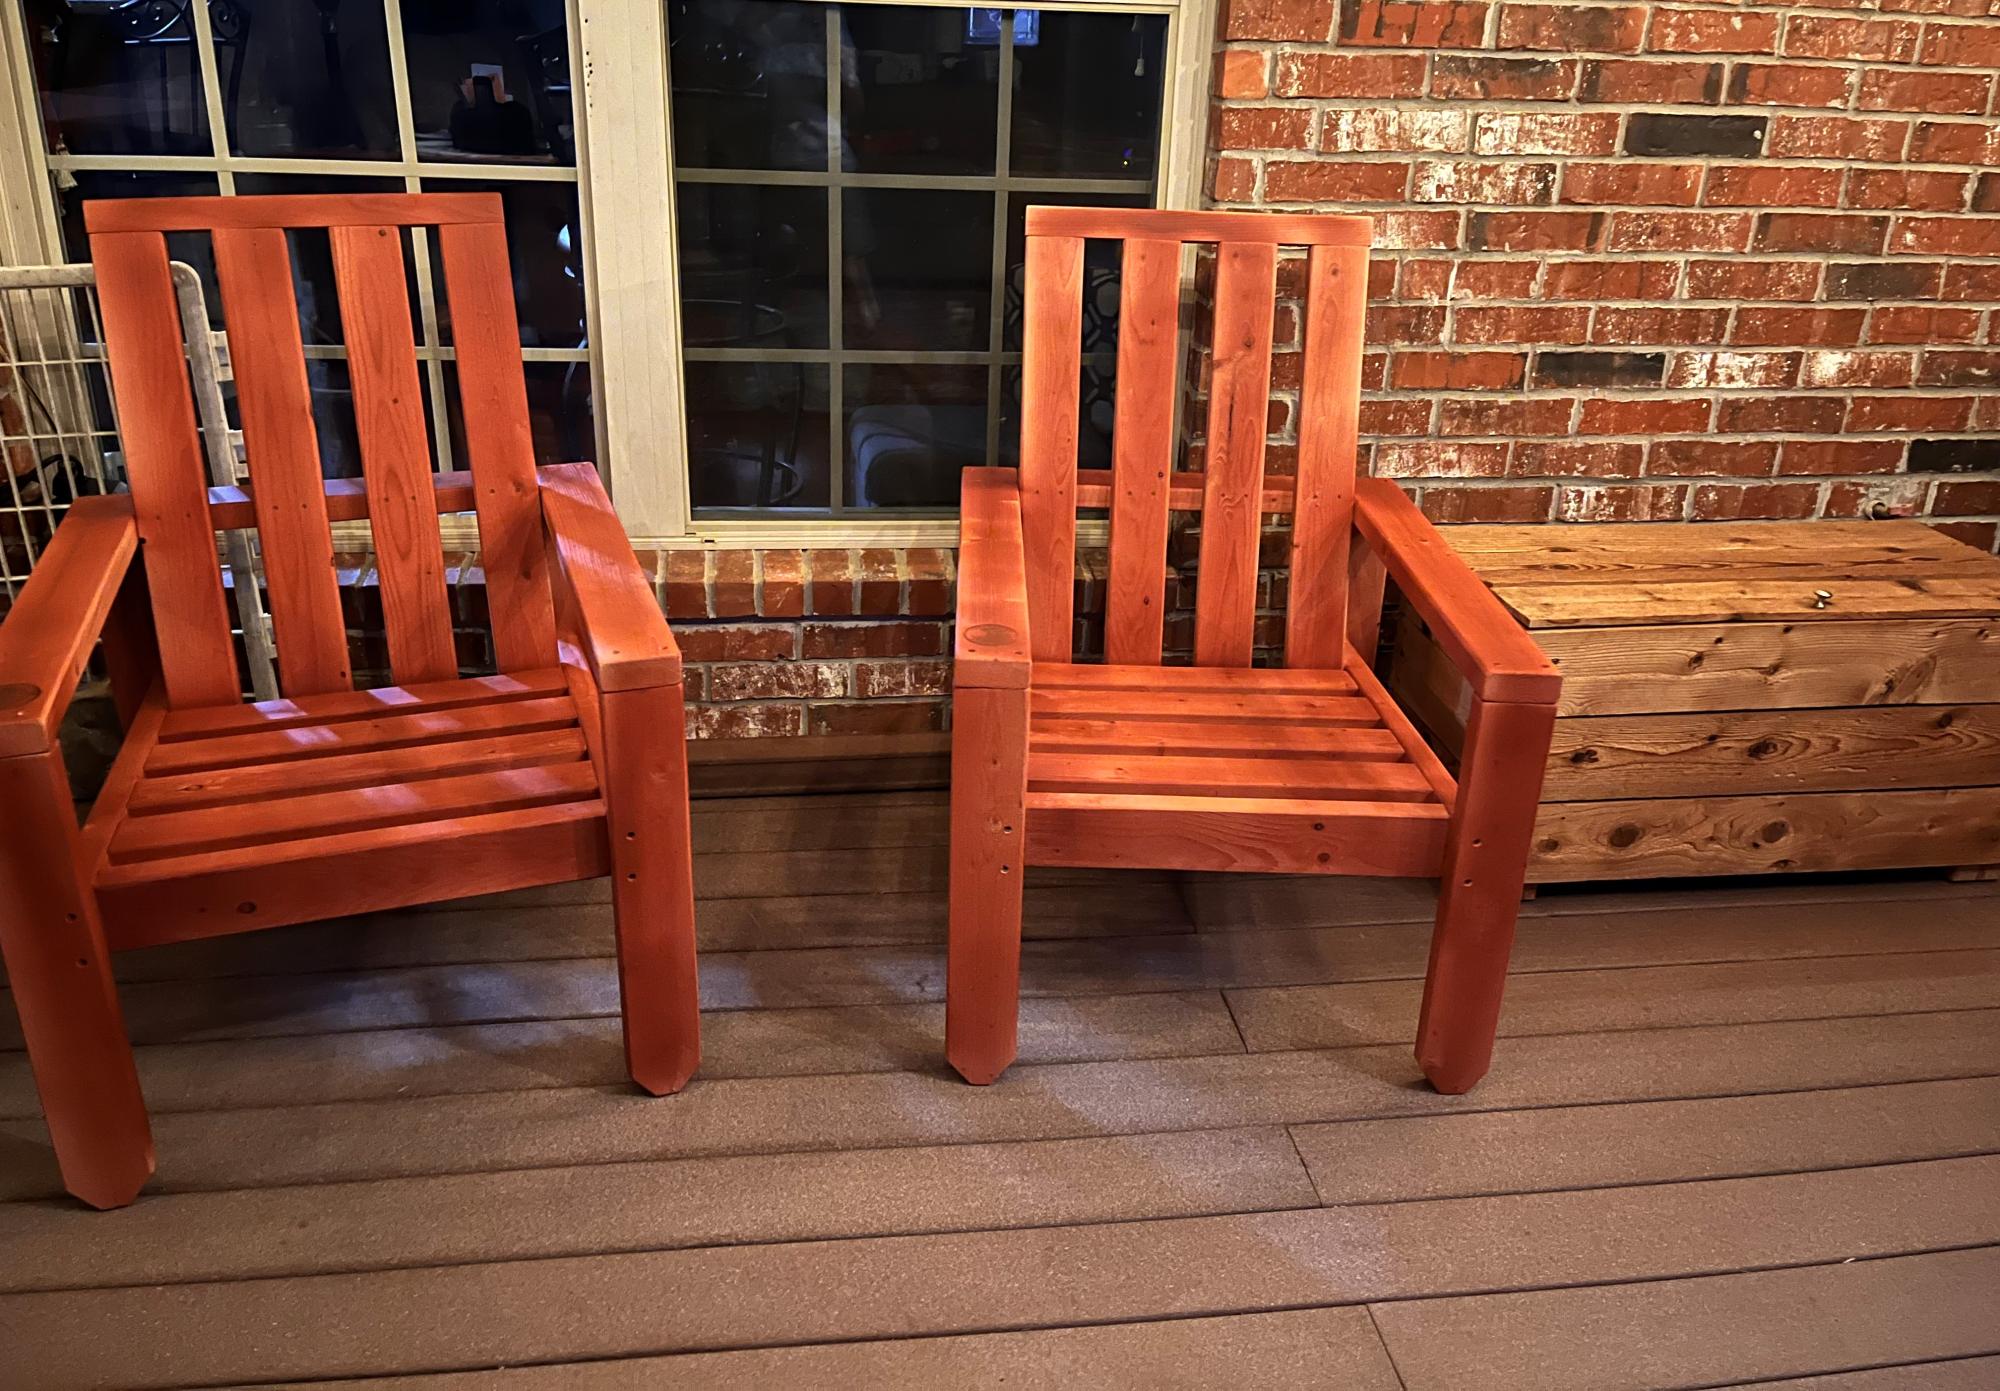
Essential Adirondack Chair - Brad's Mod

I modified the design to better suit my senior body.
I added 3 inches to the seat height by using 2x6s, made it 1 inch wider, and added clunky drink holders.
I also used cedar fence boards for the seats and backs because I like the look.
I went with Barn Red Stain and Thompson's Water Seal for the finish.
Thank you for this design. They are quite comfortable.
The cost was less than $40 each.
Built from Plan(s)
Shiplap Fireplace
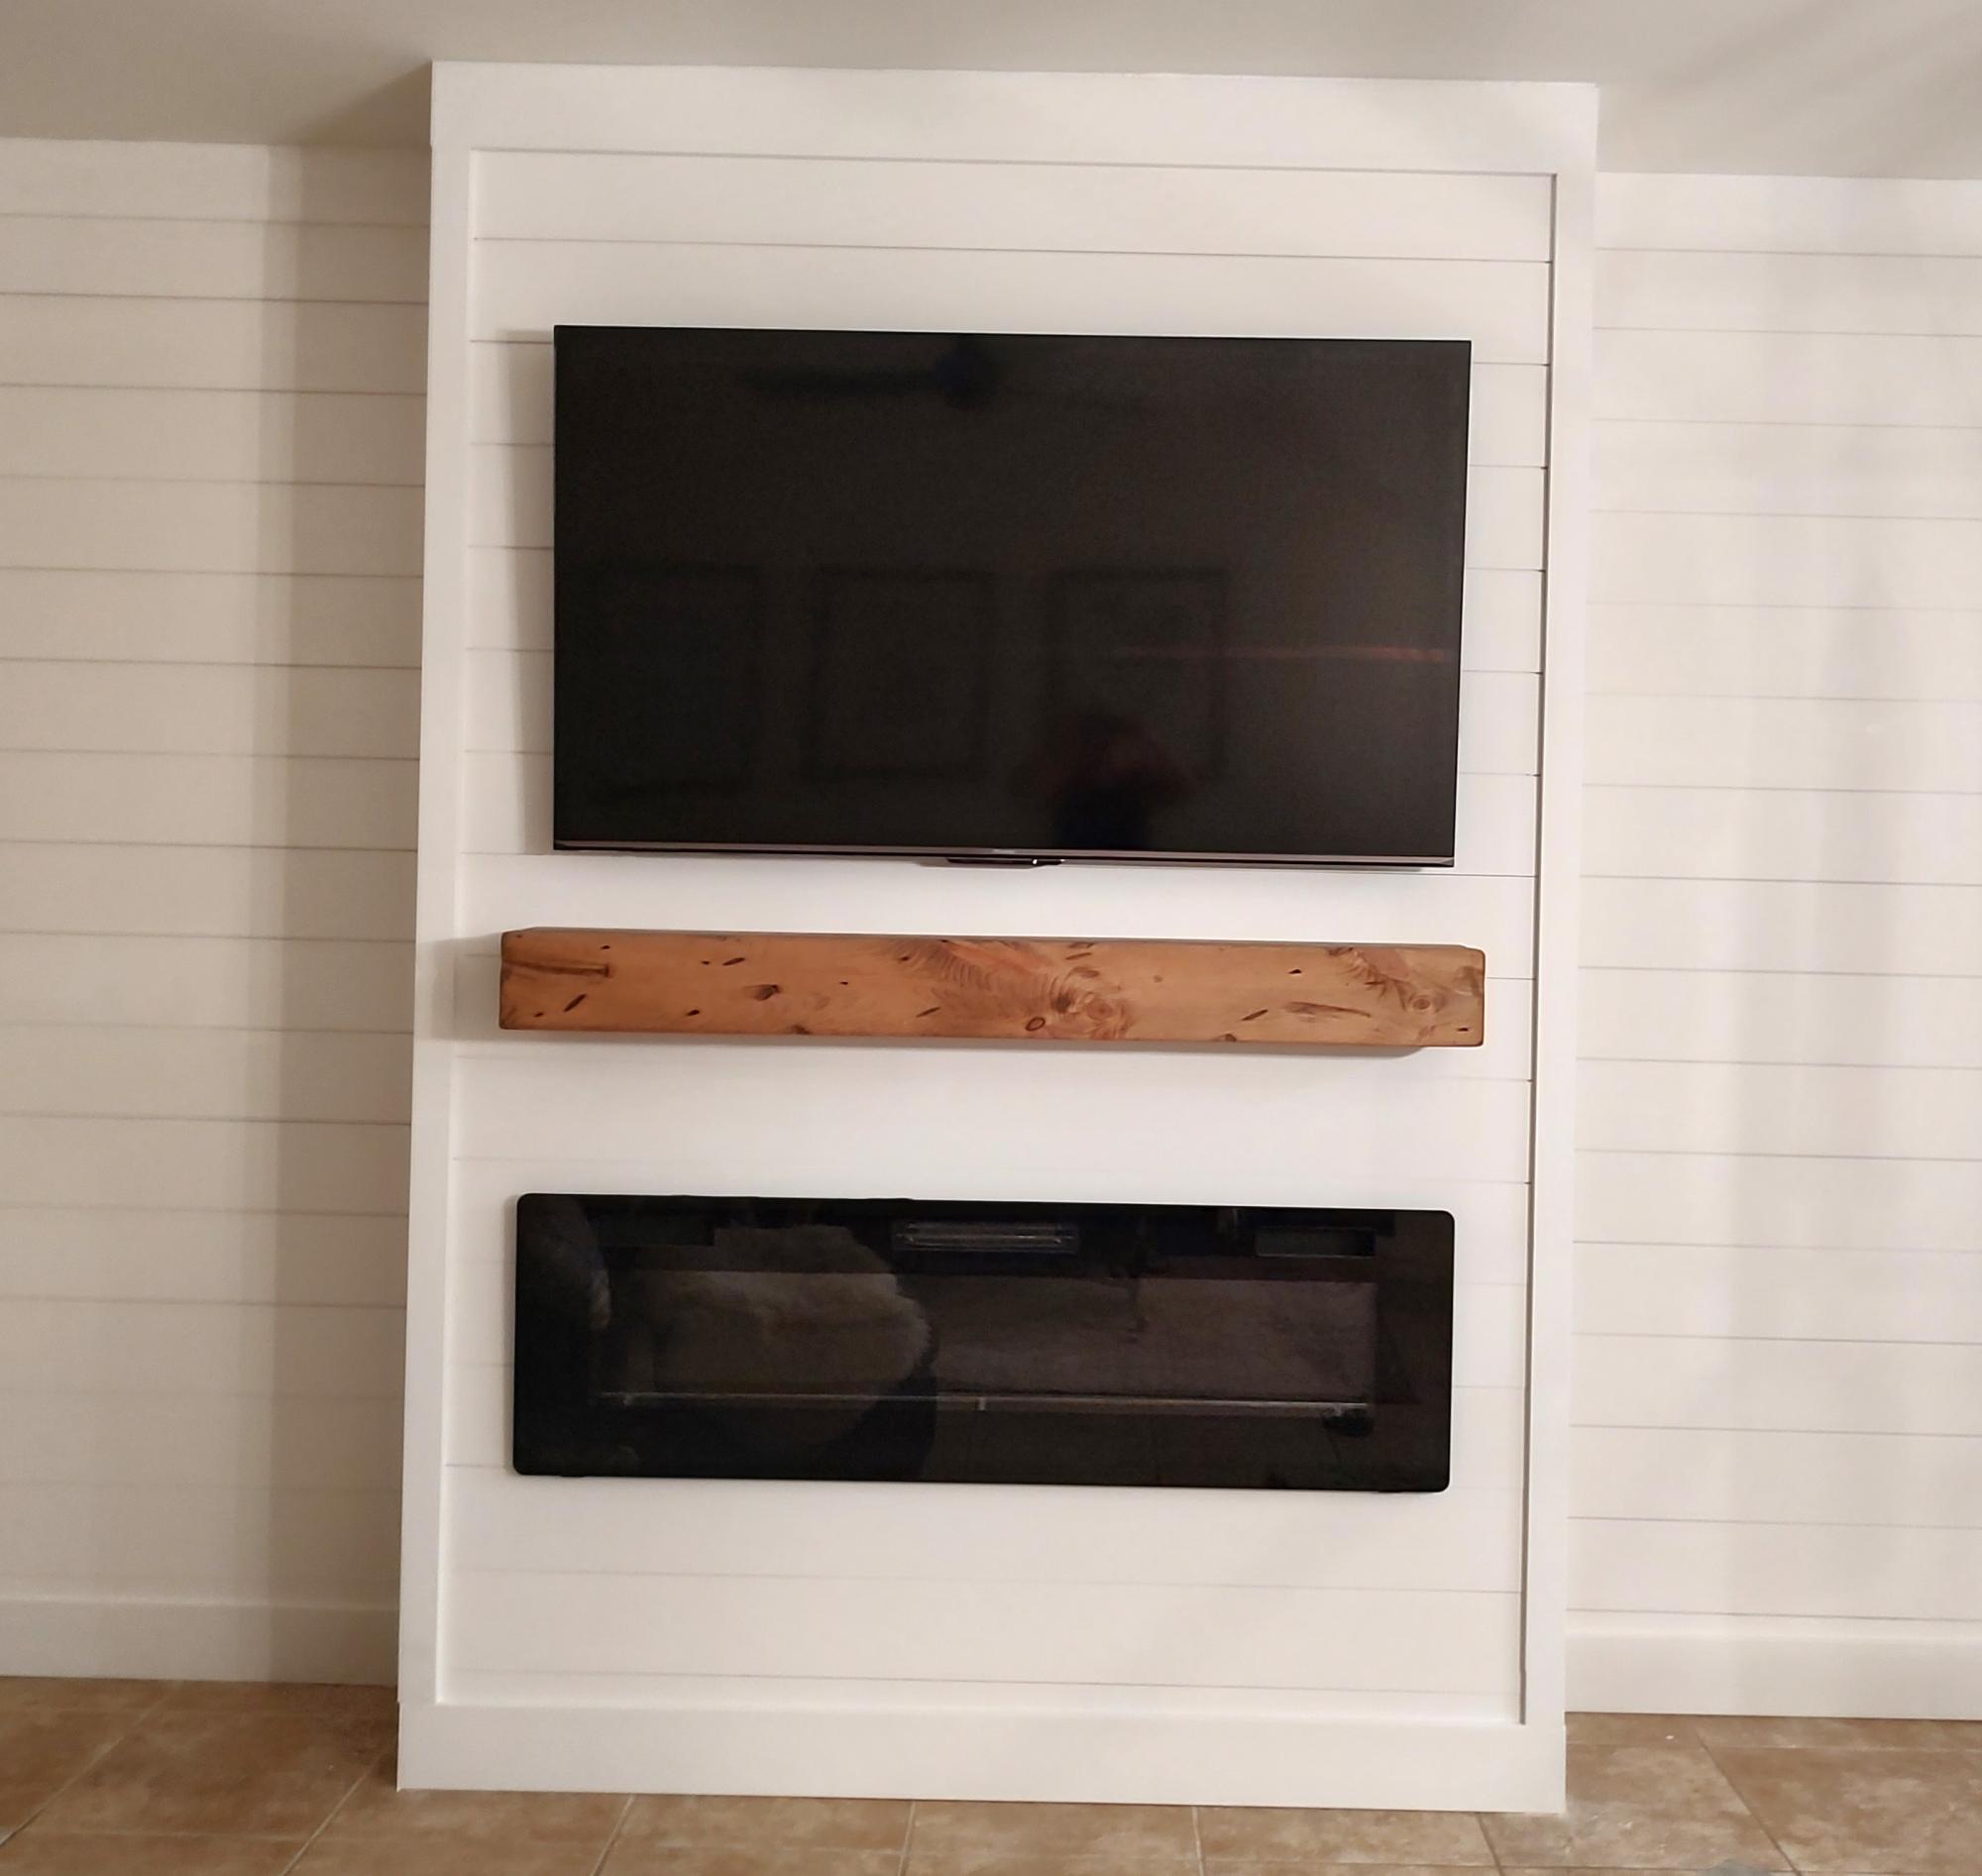
So excited for my new living room space thank you for your great tips!
Kandis white DeCarlo
Built from Plan(s)
Comments
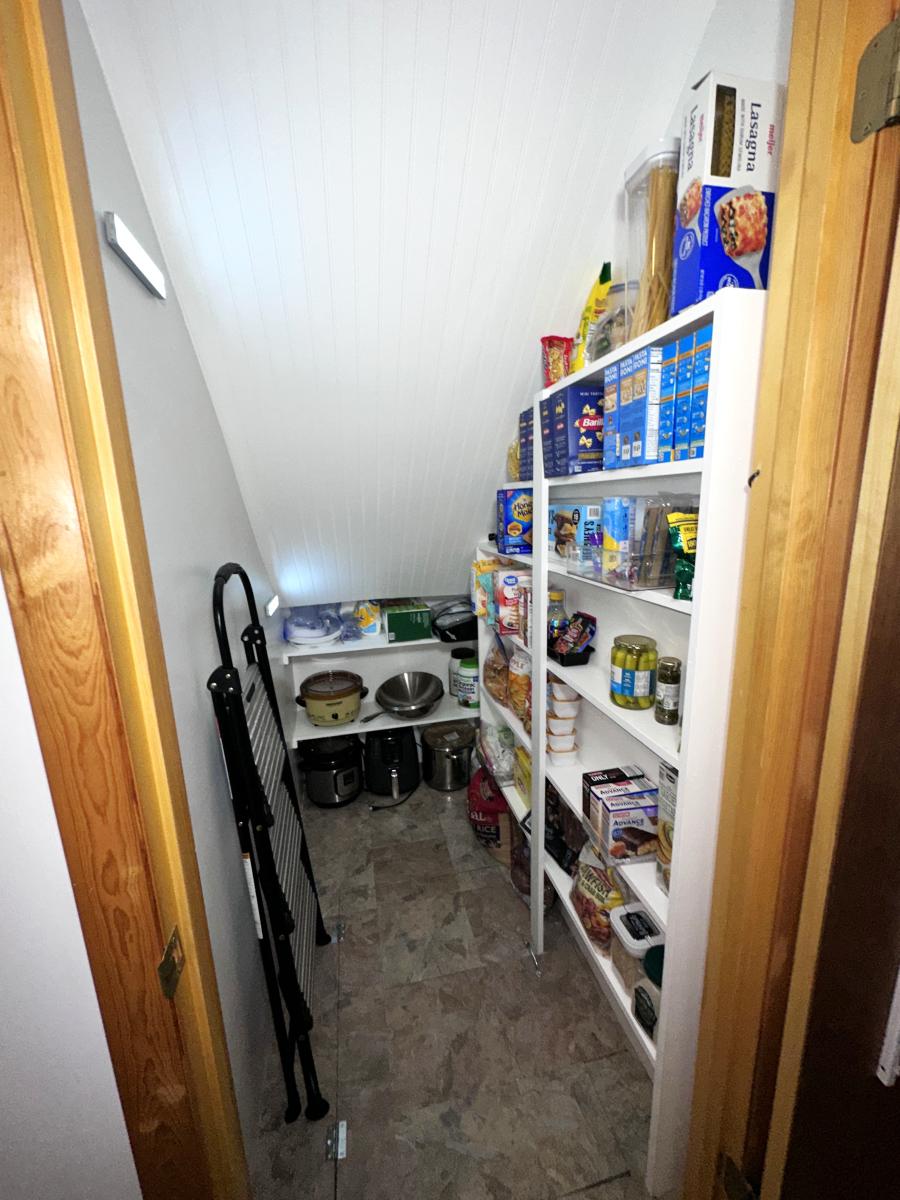
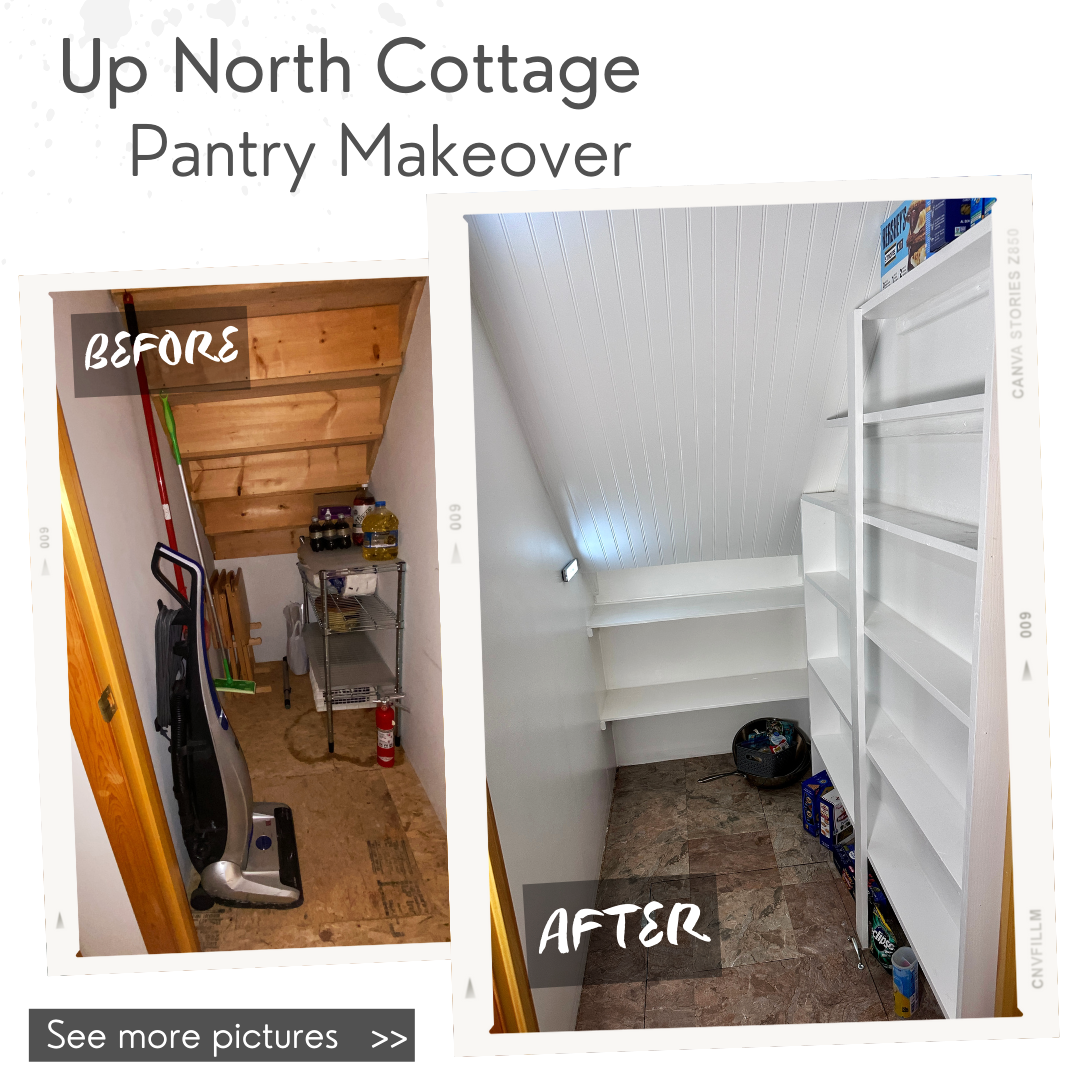
Under Stair Pantry
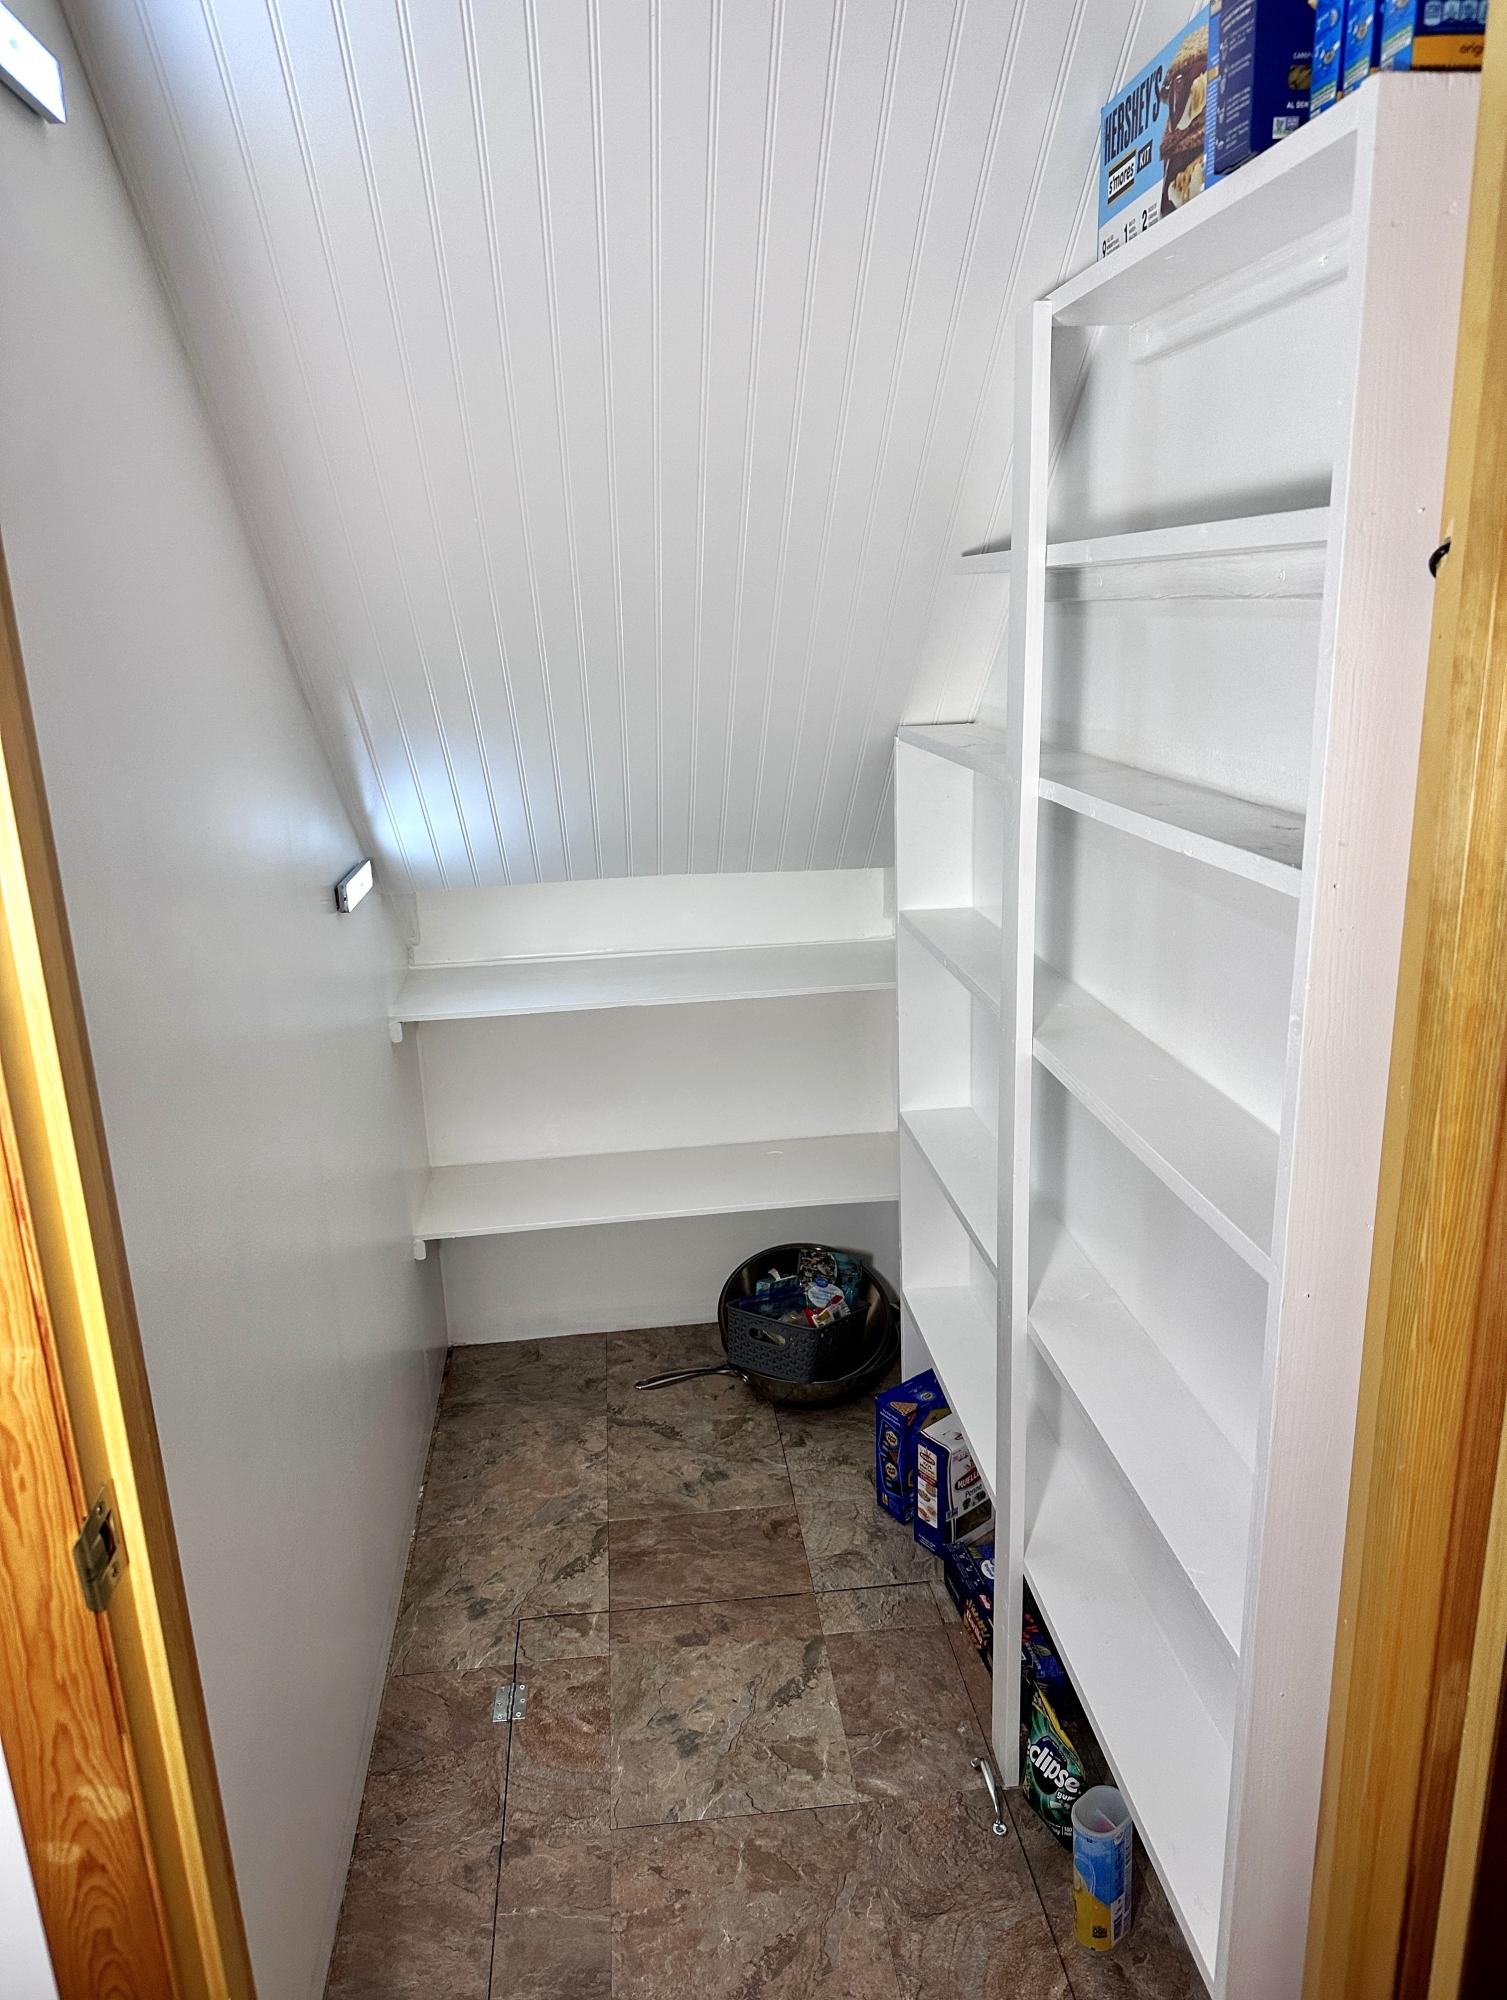
Our tiny cottage pantry is complete! We followed Ana-White's 2x4 Storage Shelving modified to fit.
Materials:
Paint: Behr Whisper White
Vinyl tile: Armstrong Terracotta Clay
Ceiling: Beadboard
Plans: Ana-White 2x4 Storage Shelving (modified)
Built from Plan(s)
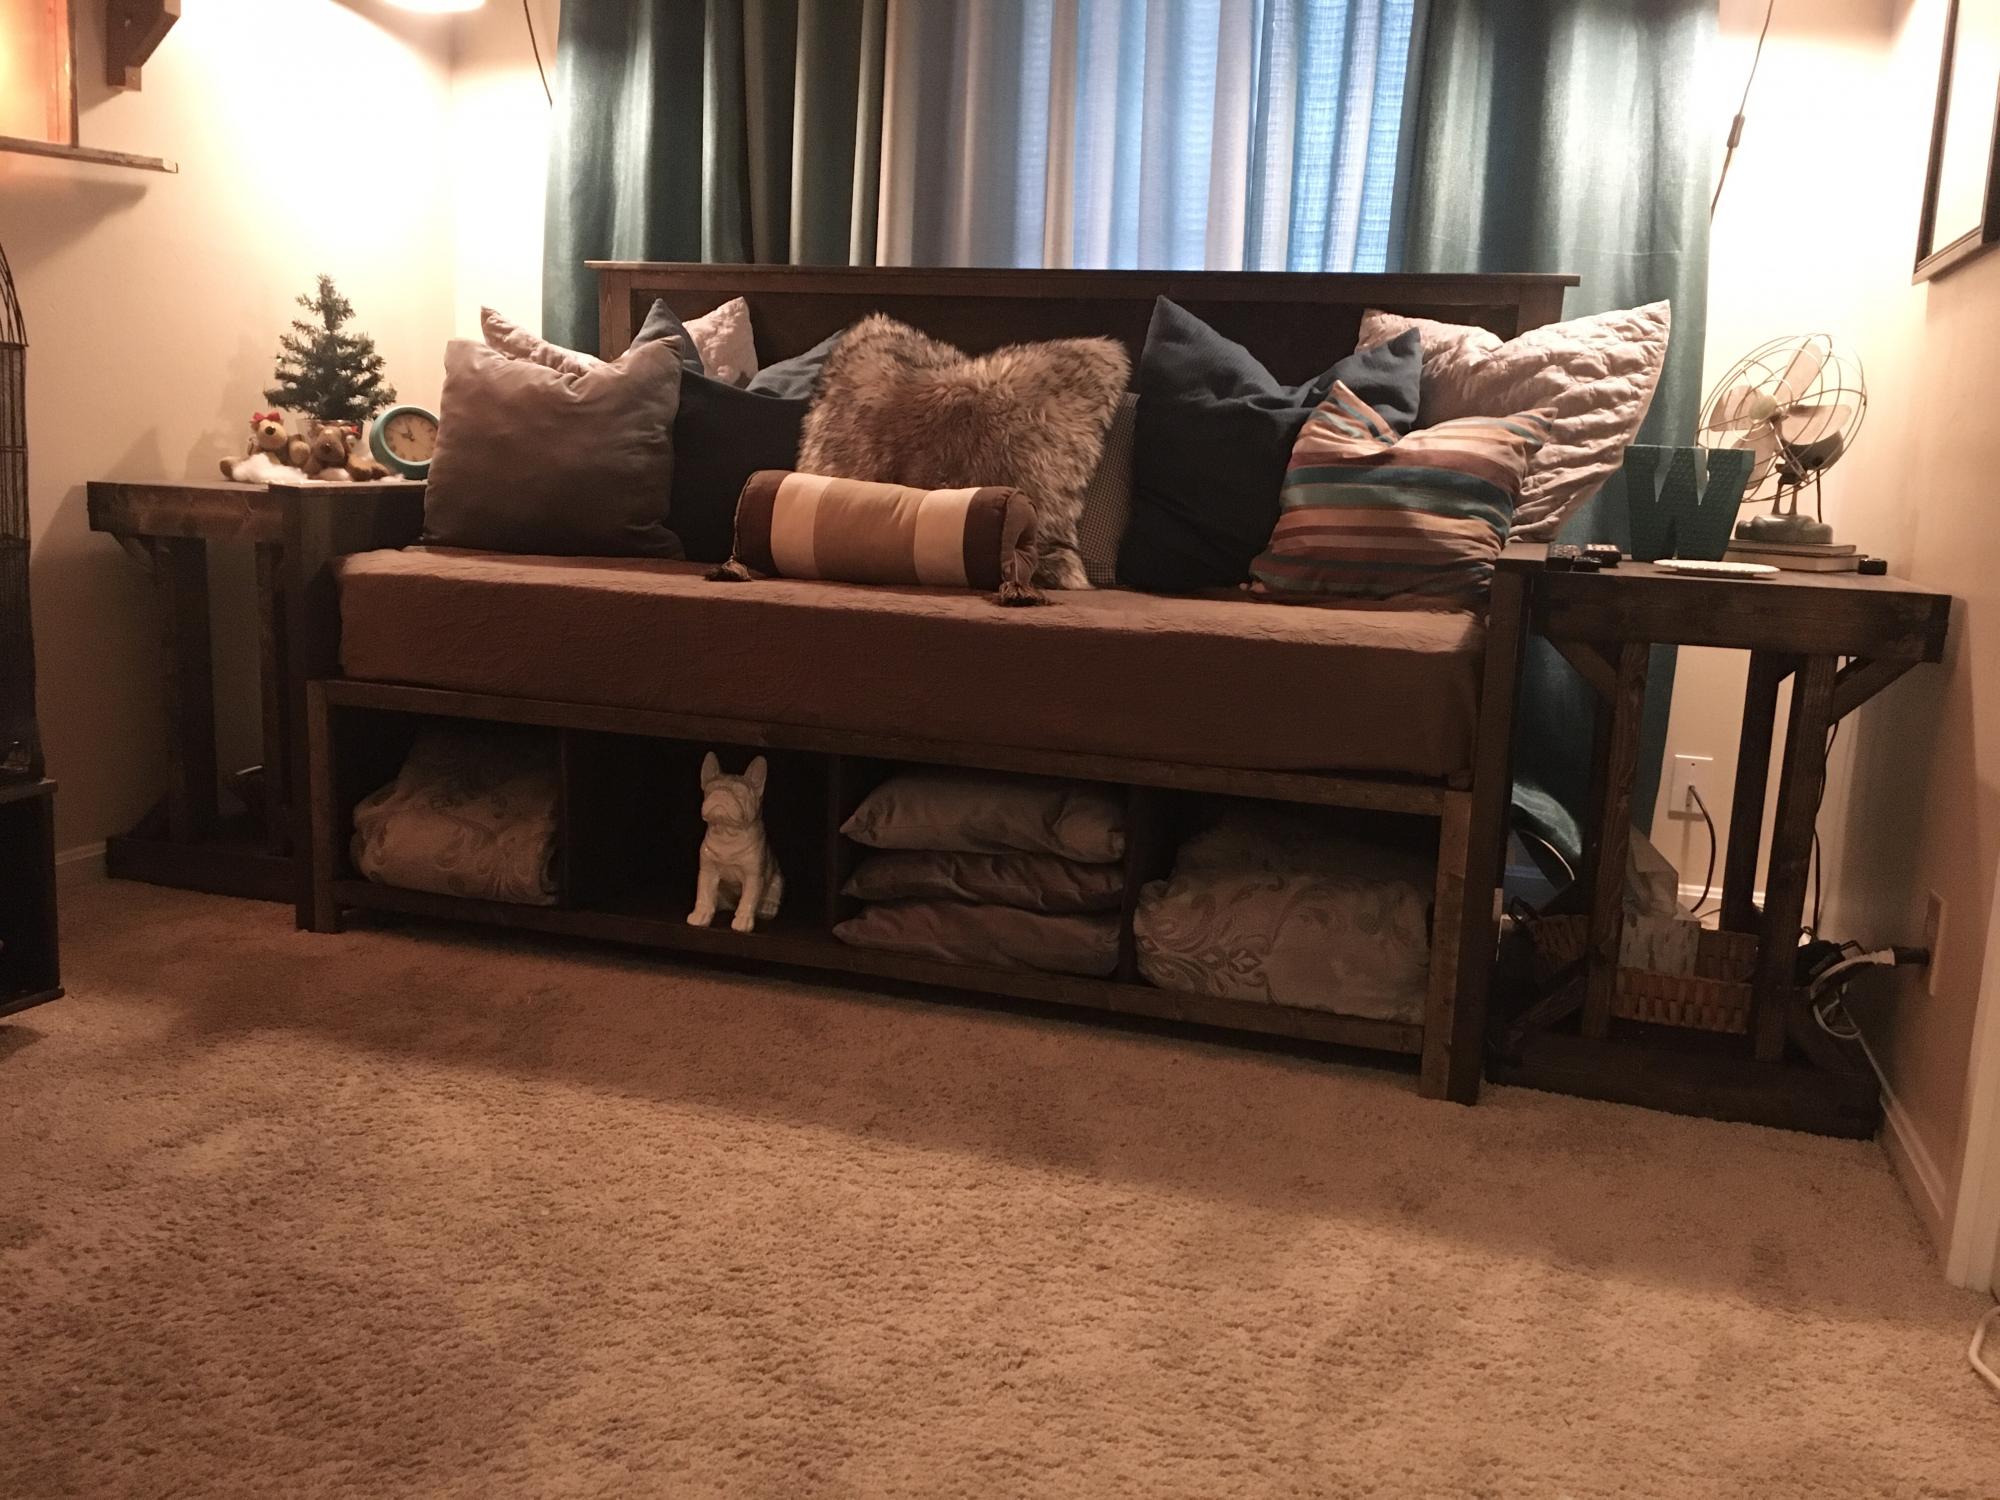
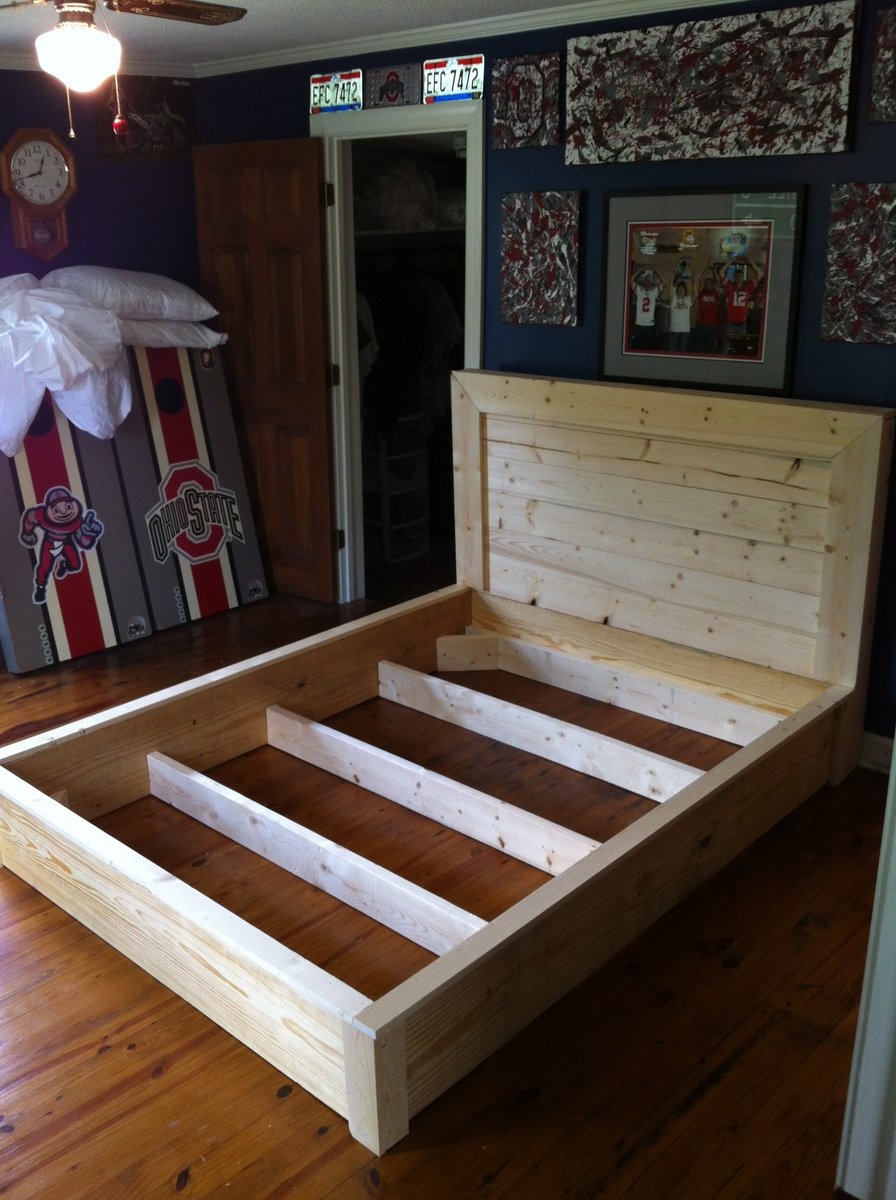
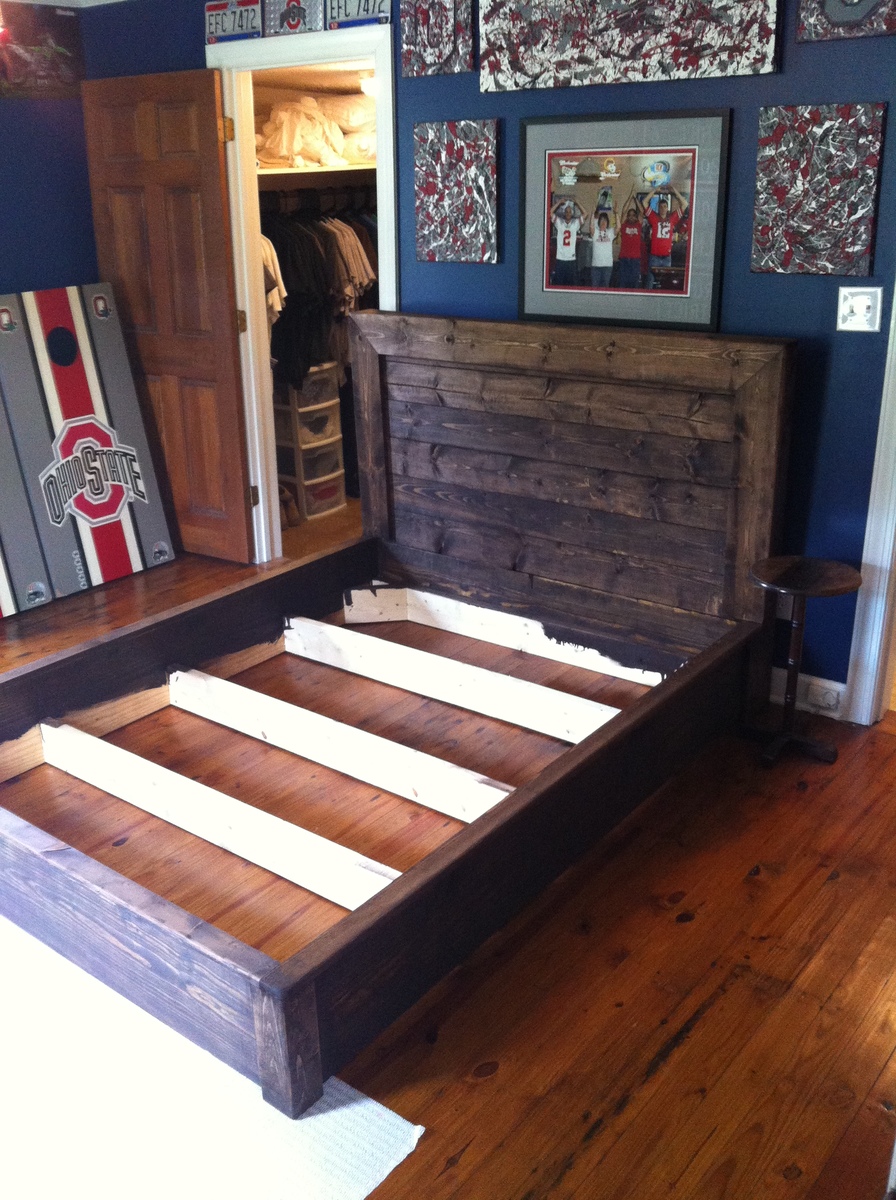
Platform inspired bed frame
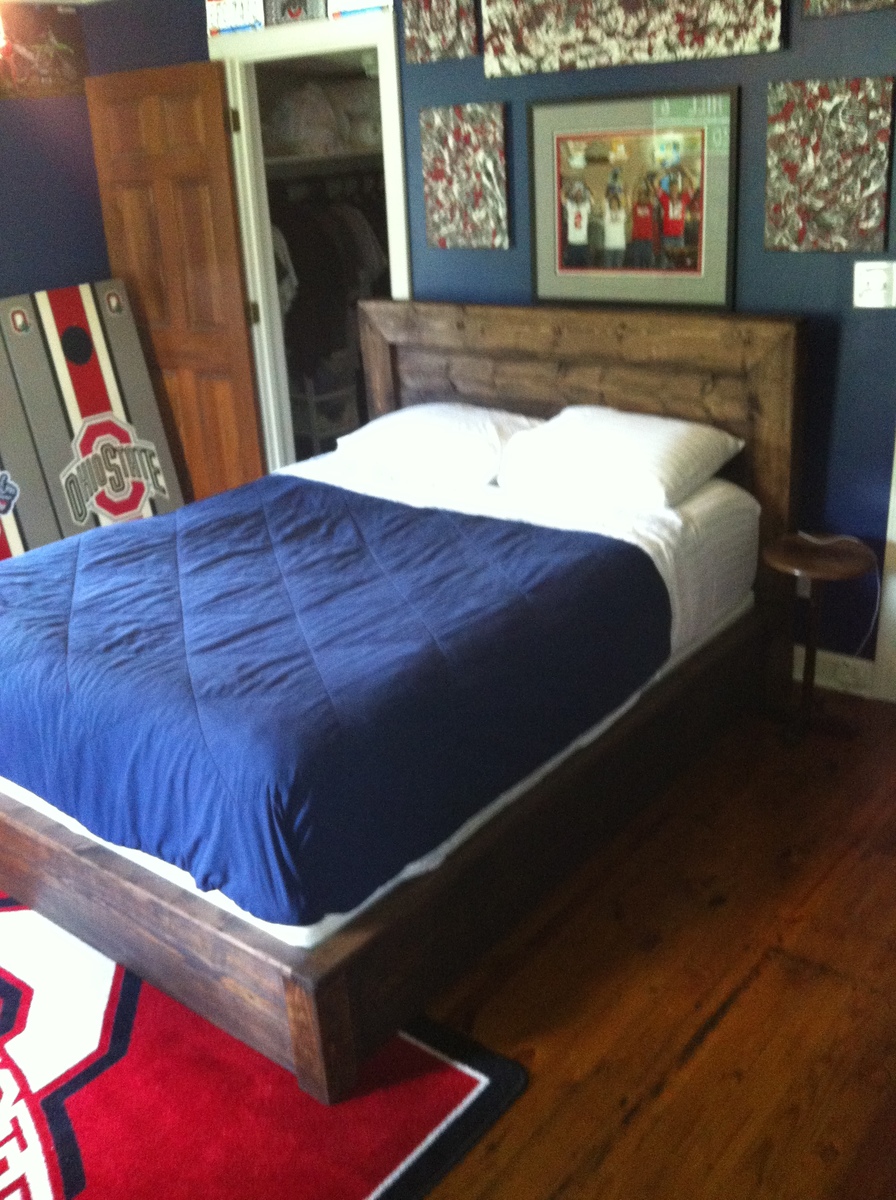
I had searched for a nice bed frame for the longest time. I wanted something that would last and the prices in furniture stores or antique shops were crazy. I found the plans for the platform bed/headboard and modified them a little. I used 2x12's for the frame and set my 2x6's down inside for my box spring. 2x6's for the headboard and trimmed it the same way as in the plans. I love it. Thanks for the plans Ana.
Built from Plan(s)
Estimated Cost
125
Estimated Time Investment
Day Project (6-9 Hours)
Finish Used
Rust oleum dark walnut. I didn't put polyurethane on it so it would have an older look.
Recommended Skill Level
Beginner
Comments
Fri, 05/30/2014 - 18:40
Inspired bed
Love your inspired bed! What size mattress is your frame for? I am looking to make a frame just like yours for a queen size bed. Do you have your measurements or are they pretty similar to the original post? Complete beginner here, any help is much appreciated!!
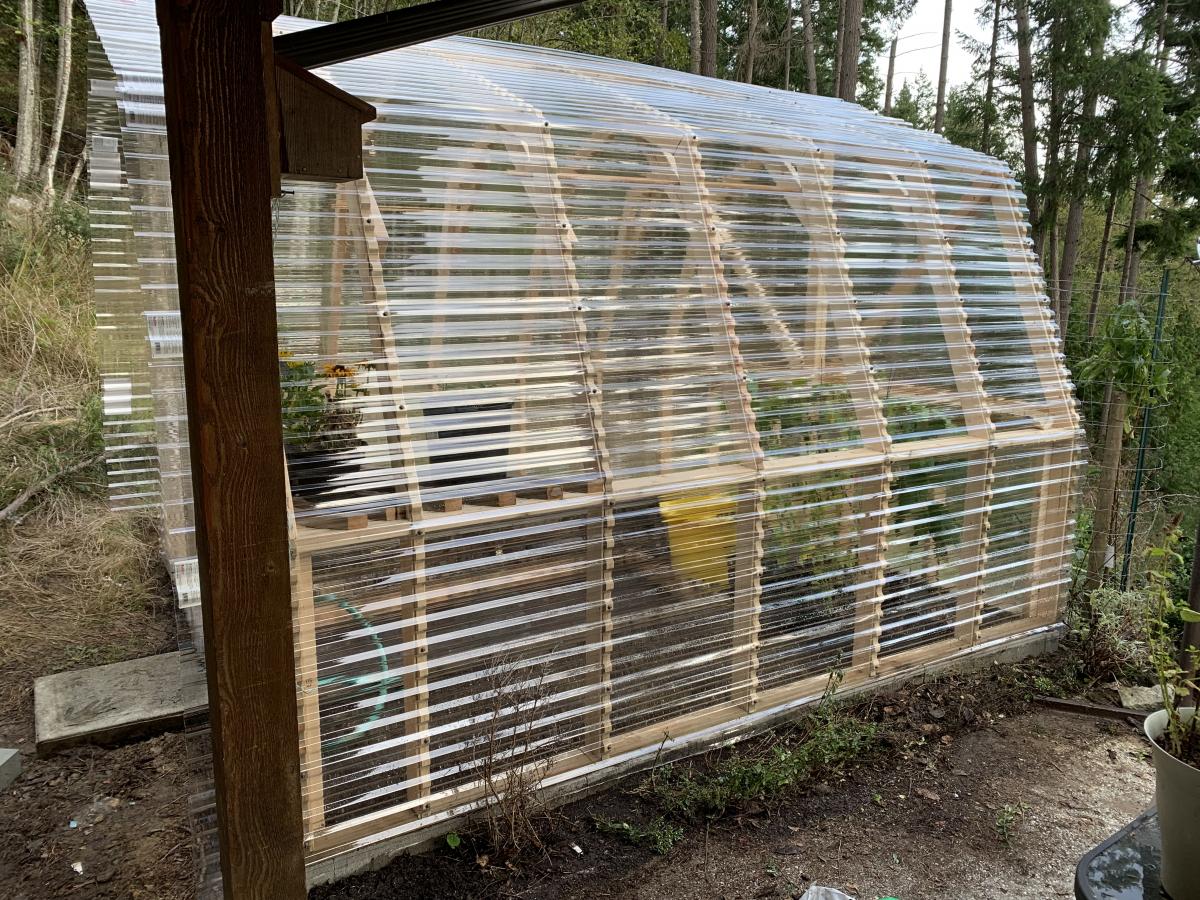
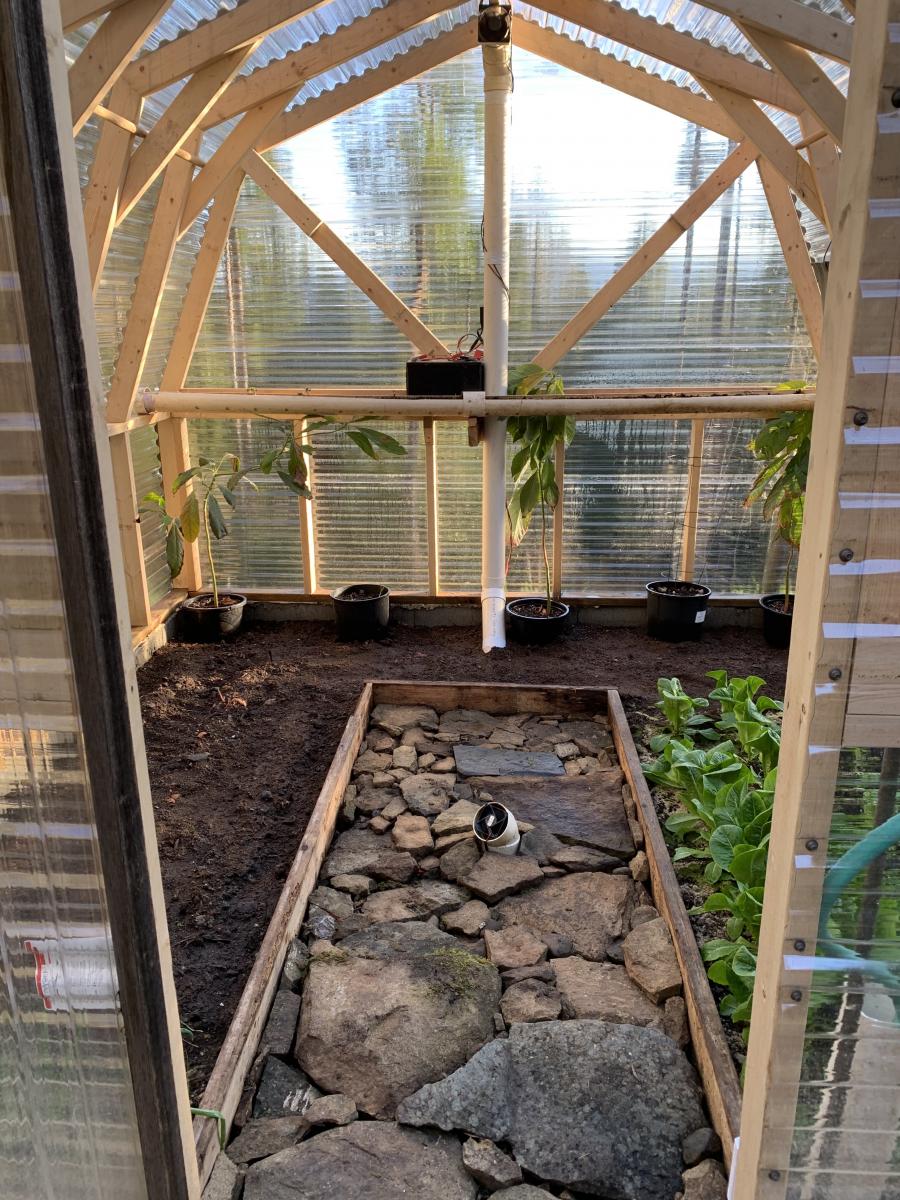
Green House
Great little project from your site!
I put PVC to the ground vs the metal siding and added a heat sink in the middle with some old computer fans.
Built from Plan(s)
Estimated Cost
$1,300
Estimated Time Investment
Weekend Project (10-20 Hours)
Finish Used
PVC
Recommended Skill Level
Intermediate
Comments
Sat, 05/23/2020 - 17:23
That PVC heat pipe intrigues…
That PVC heat pipe intrigues me. Can you share a little more about it? I'm assuming it pulls hot air from the upper vent, and cools it down via the section of pipe below ground, sort of like a natural A/C. Keeps things from gettting too hot during the summer months?
Kinda looks like you'd frequently trip over it though. I'd probably have run the lower exhaust right up by the edge of the door frame, or a corner.
Poolside Hightop Deck Chair
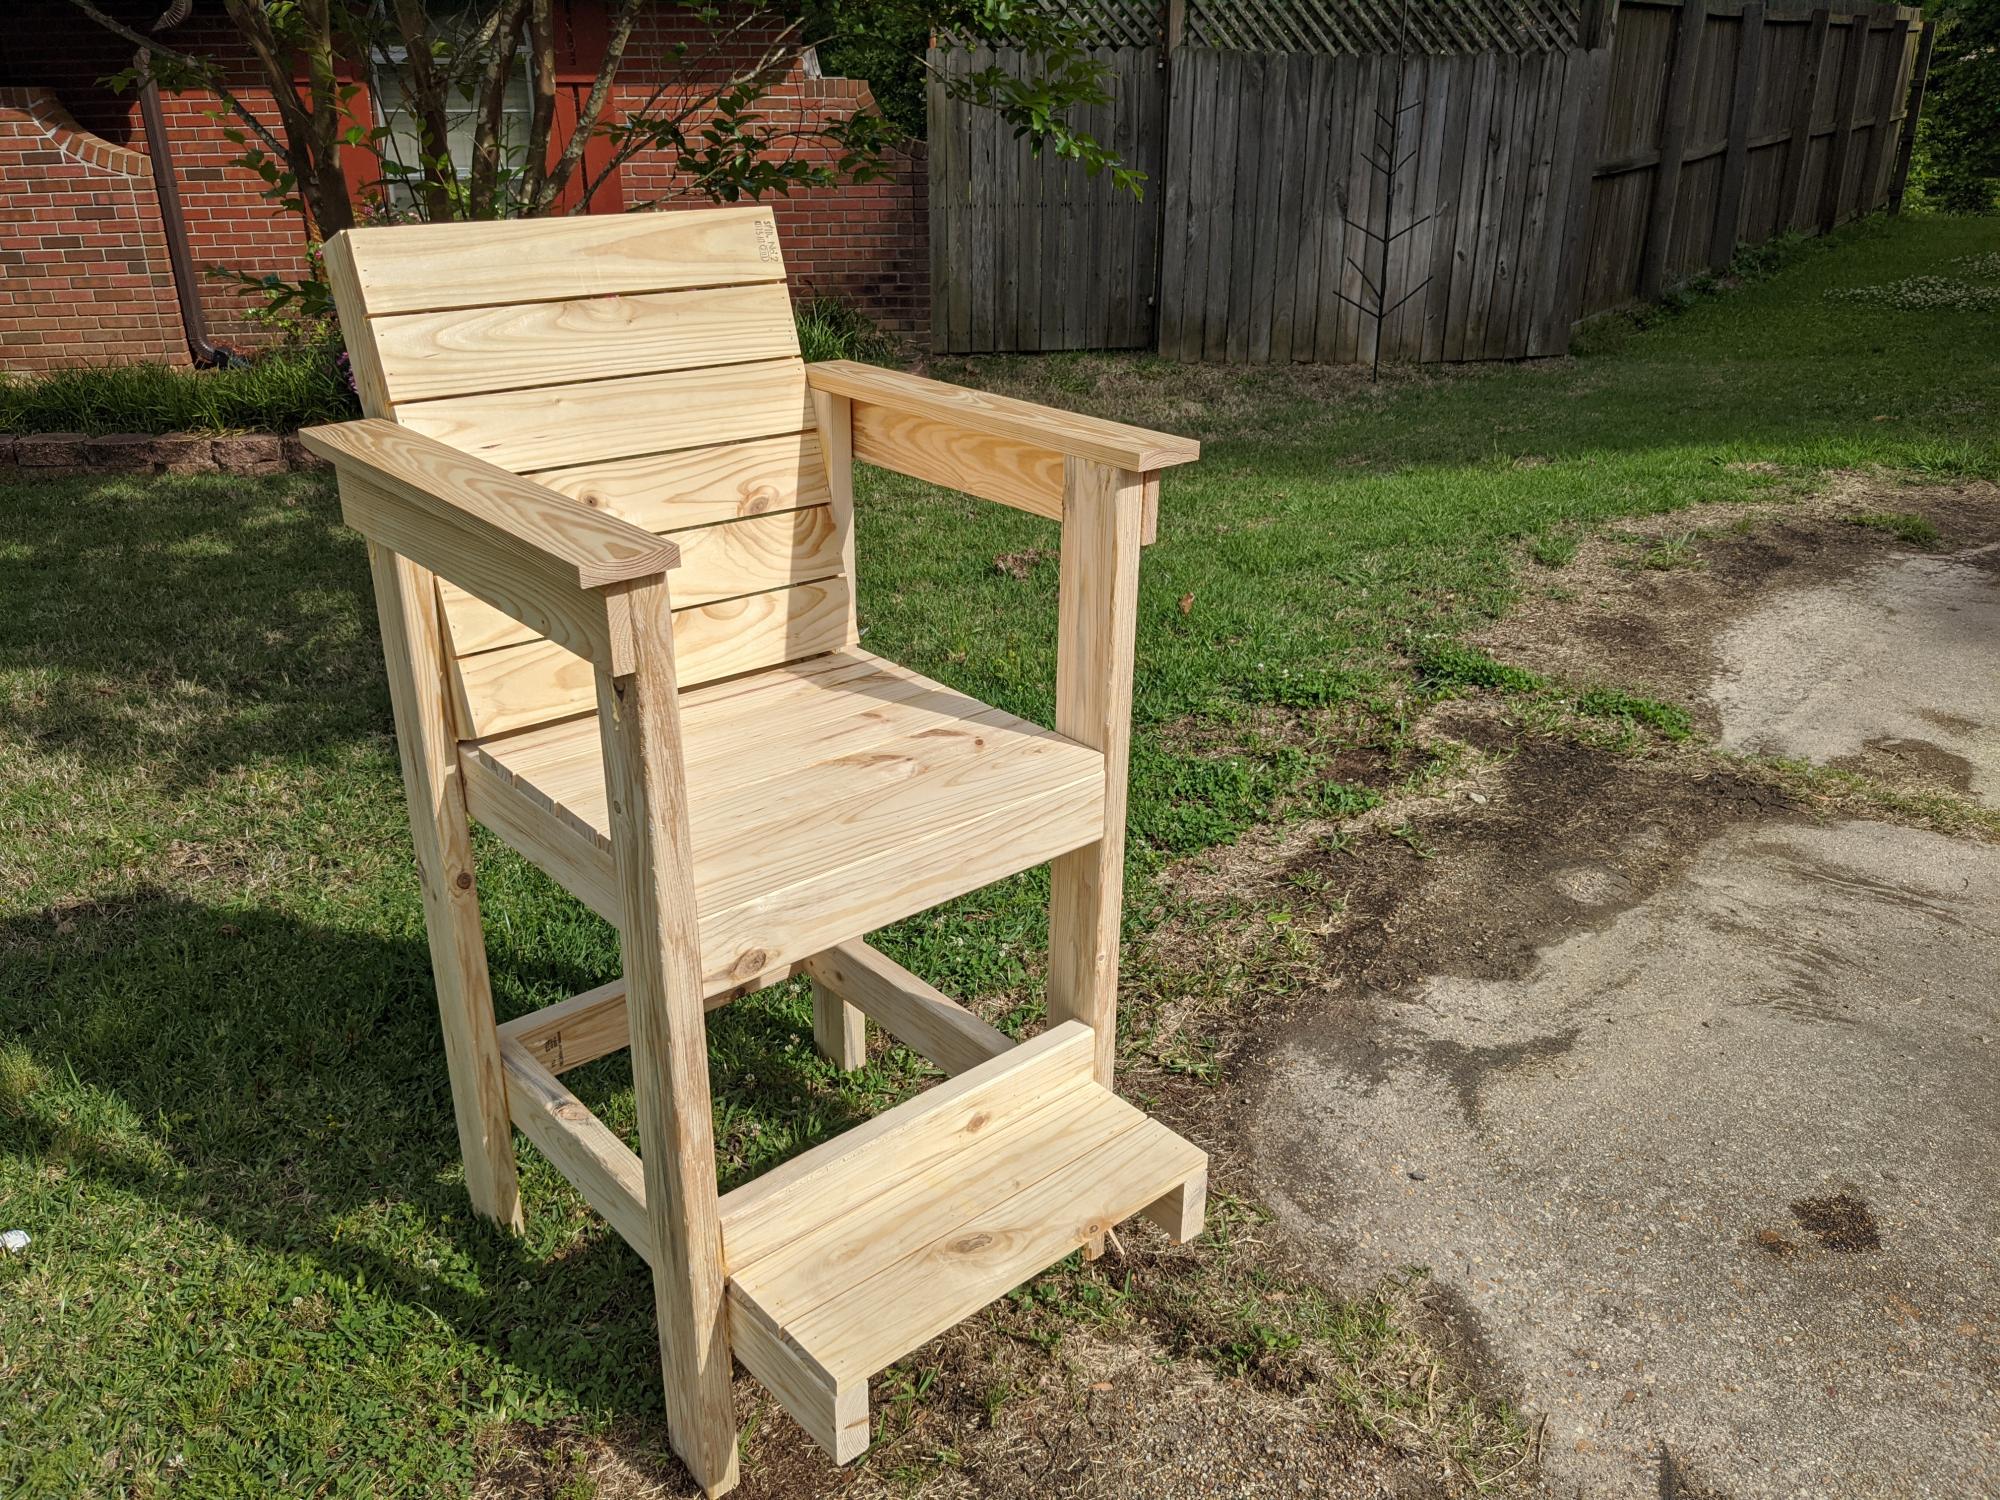
I have used so many of Ana's plans, I decided to design my own chair! I wanted a high top patio style chair that the back was angled and had a footrest. This is perfect for my outdoor patio. I think I need to update the plan already to include a cup holder! Appreciate any feedback or comments.
Estimated Cost
$50
Estimated Time Investment
Afternoon Project (3-6 Hours)
Finish Used
None
Recommended Skill Level
Beginner
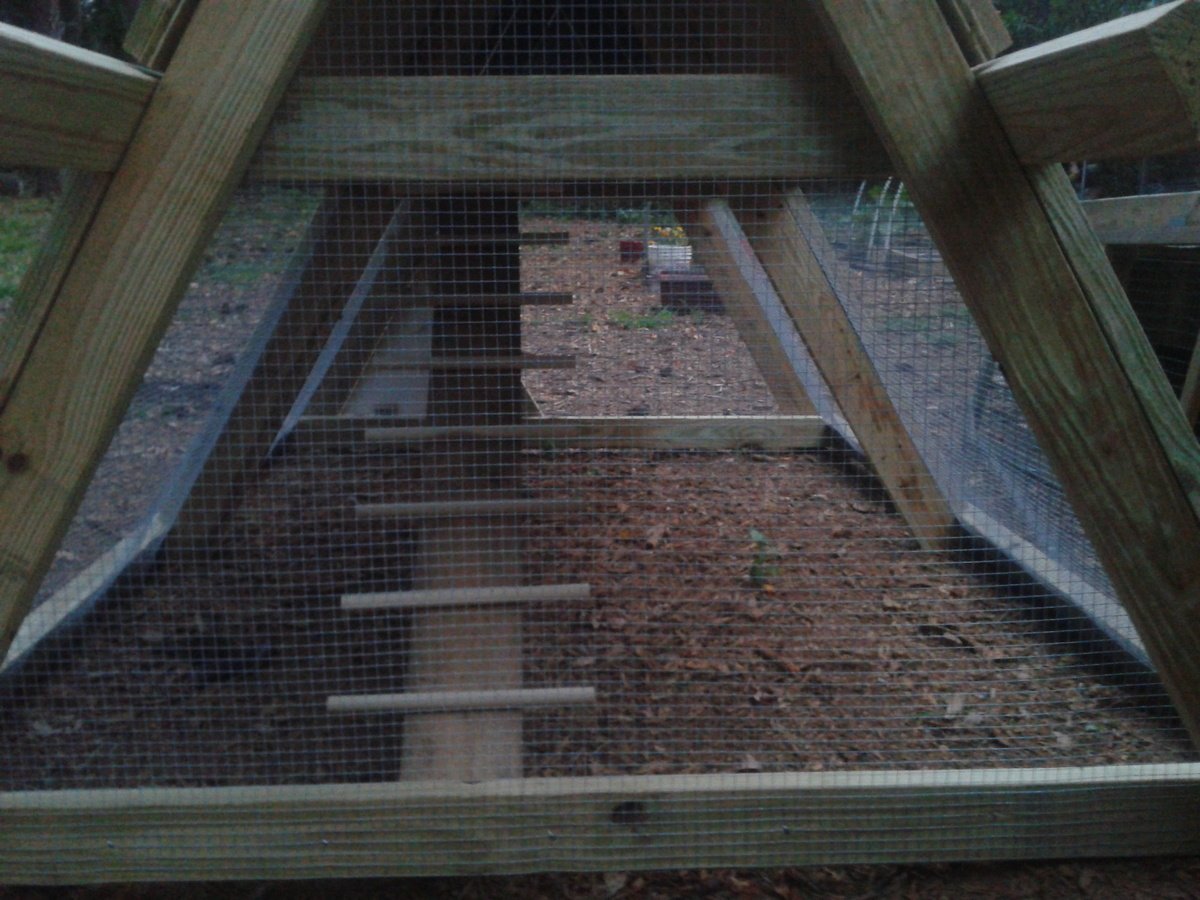
A-Frame Chicken Coop (with modifications)
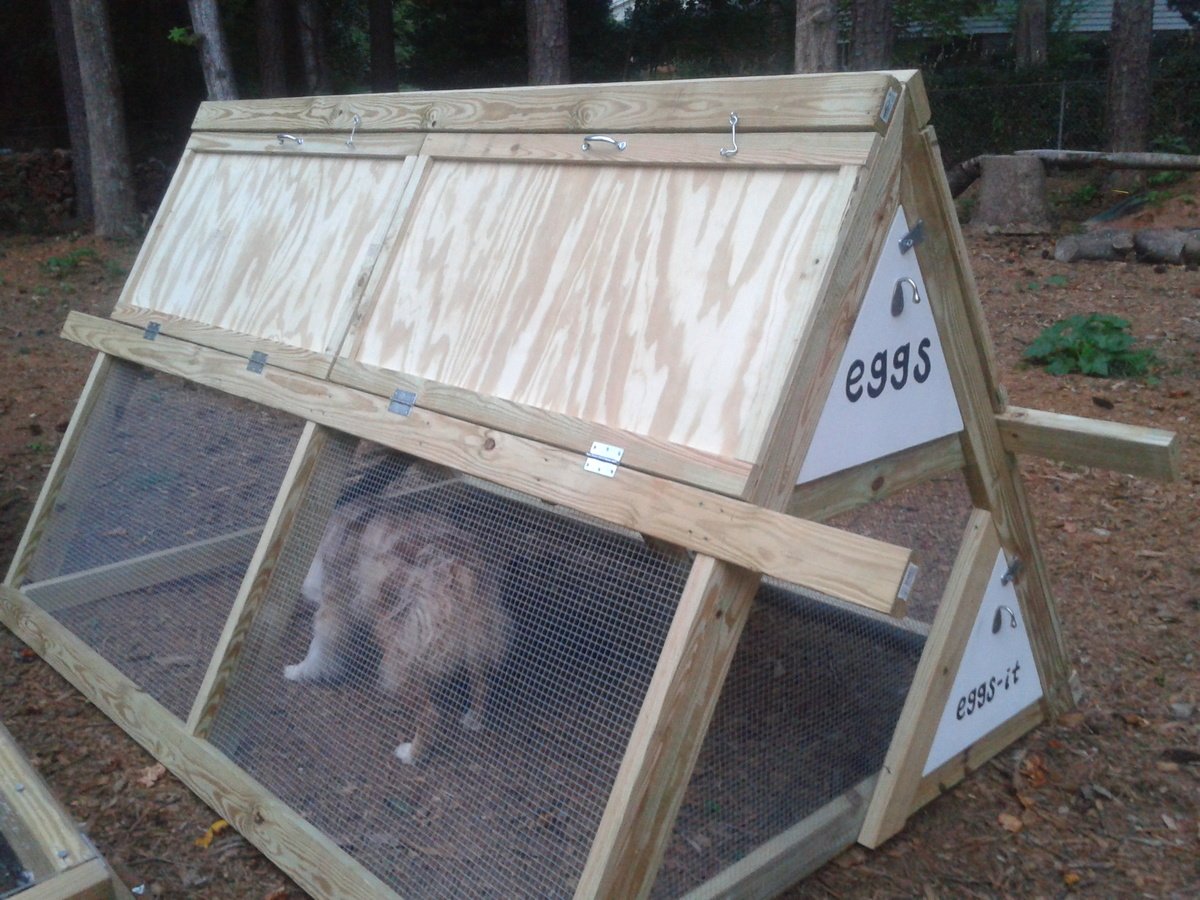
We followed the plans for the A-frame chicken coop very closely, and then modified it a bit at the end.
1. Trim was added to two doors on each side, as suggested. They are secured with latches at the top, more to keep them from falling open than to keep critters from getting in. We used 2x4x10's instead of 2x4x8's on the middle horizontal rail, giving us foot-long handles on each side. My husband and I are able to move the coop about 15 feet at a time, which is pretty good considering it is STURDY!
2. We used 1/2" galvanized hardware cloth instead of chicken wire, as suggested by one commenter (and lots of others in blogland).
3. I cut 1/4" plywood to fit the loft space and coated it with vinyl stick-on tile. This should make it easier to clean. We didn't screw down the plywood, so if we have to, we can remove it to hose it off/scrub it.
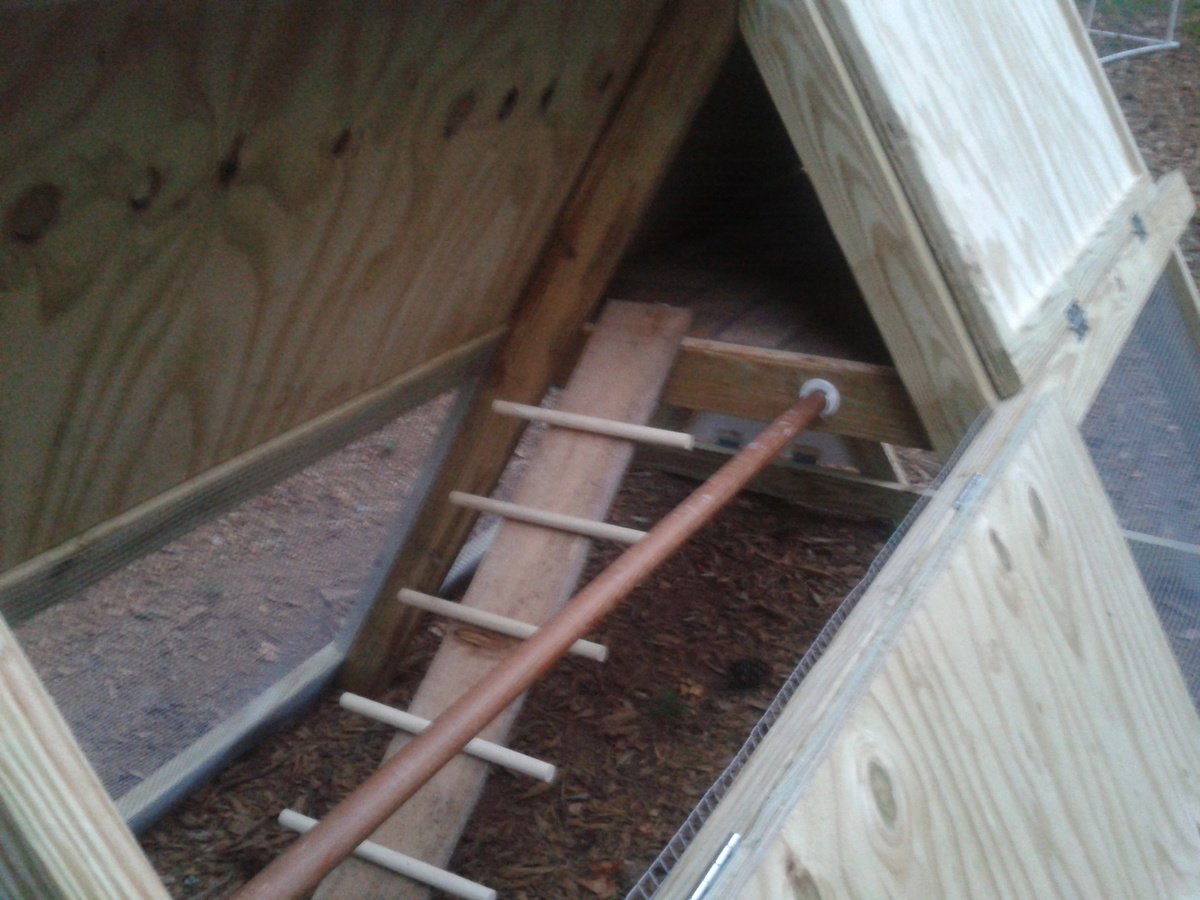
4. I cut a triangle of plywood to make an egg door at the end of the roost. It hinges at the bottom (with a 2x4 ripped into a 1x4 to cover the hardware cloth and provide a mounting spot for hinges) and latches at the top. I plan to use cotter pins or something to secure the latch. There is also a piece of untreated 1x4 held in place with tabs at the egg door to prevent bedding from falling out once it's converted to the nesting box (I'm planning to get pullets, not ready to lay yet, so they won't even have a tempting nest box)
5. There was no bottom door in the plans (to allow free-ranging), so I cut a piece of 2x4 to make a triangle against the bottom (same size as the egg door). It folds out (just like the egg door) and will allow the chickens easy access to the yard. We do have hawks in our neighborhood so free time will always be supervised. We also have a dog (who I coaxed into the coop for the main picture, haha!) who will need supervising. She's been around chickens before but you never know what will make her turn on them!
6. There was also no roost in the plans (although if you look at Ana's coop, there is a 2x4 across the middle of the side walls). I had a leftover closet rod, so I mounted that in the covered section parallel to the ladder. The ladder was shifted to the side. For the ladder, I just used a piece of cedar fencing and cut 2 48" dowels into 4 pieces each, and secured those with screws from the underside. I hope my chickens will be able to get up the ladder!
7. I also made a tube feeder from PVC and a dog bowl, and am working on a nipple waterer. Will update post when those are finished!
Now I just have to get some hens! I've been searching craigslist and can't wait!
Built from Plan(s)
Estimated Cost
200
Estimated Time Investment
Day Project (6-9 Hours)
Finish Used
Unfinished except for plywood floor (vinyl stick-on tile) and plywood doors (white exterior acrylic paint)
Recommended Skill Level
Intermediate
Comments
Thu, 09/20/2012 - 19:31
Great Modifications!
I really like the addition of the roosting bar and how you made the ladder. Your little chickens will be so happy! Good luck!
Outdoor Chairs and Cedar Storage Chest
Ana White chairs along side my Ana White cedar storage chest (one of my 1st builds). Ana, thank you for the plans & for inspiring us to build!
Keith from Springdale, AR
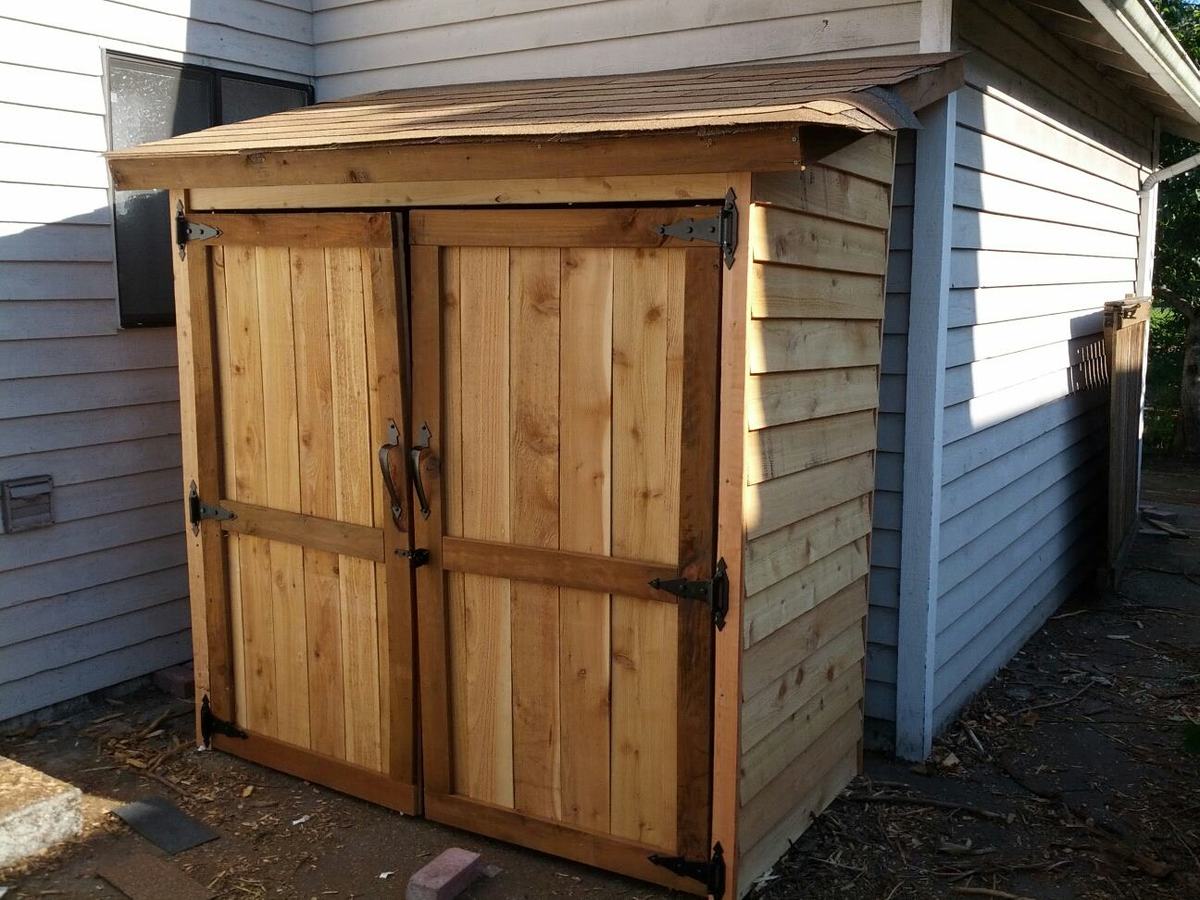
Storage Workbench
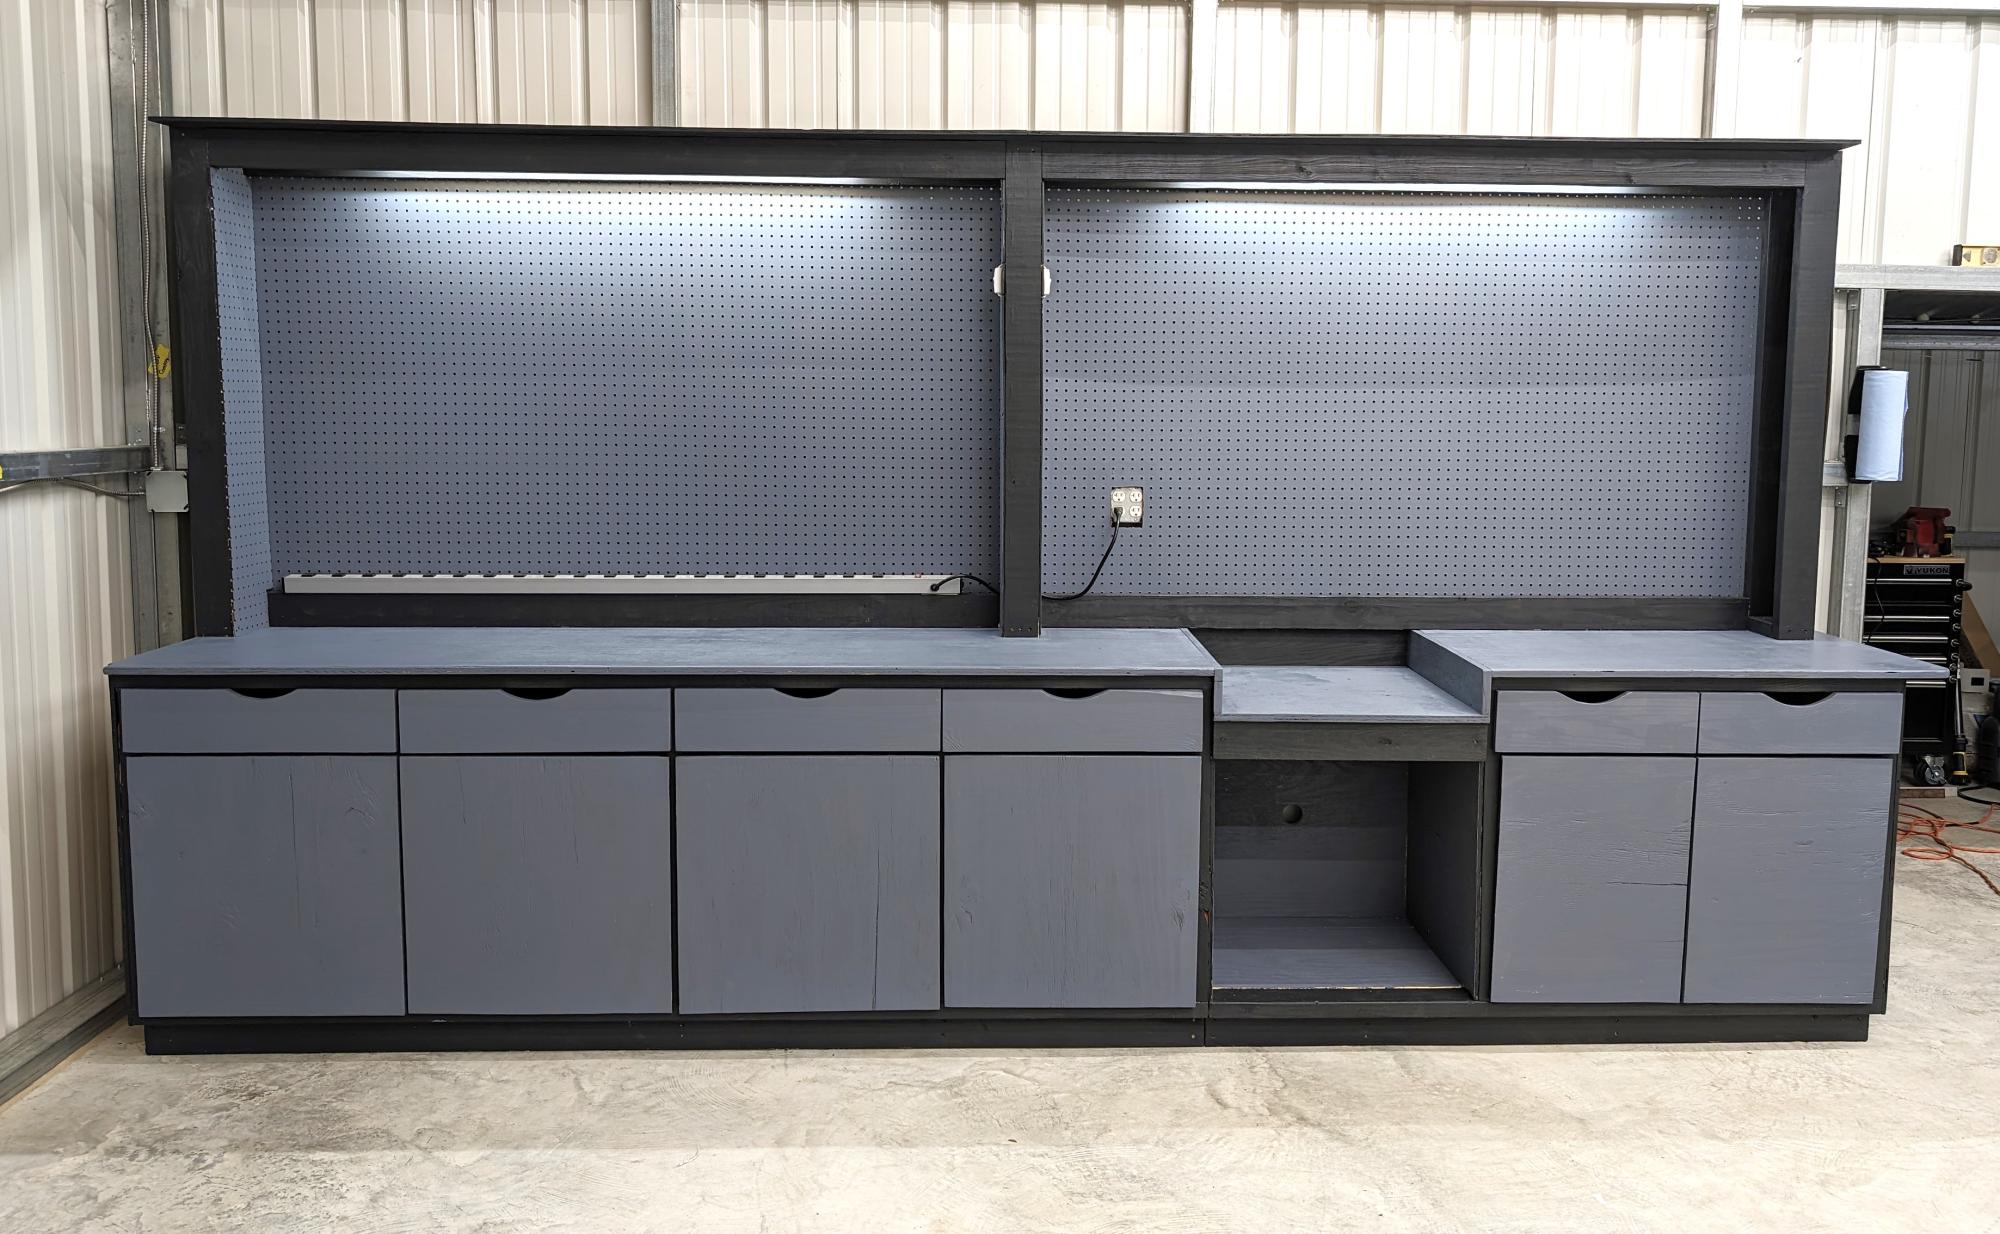
I took the pony wall idea and went with it.
Mazda Mitch
Built from Plan(s)
Simple Outhouse
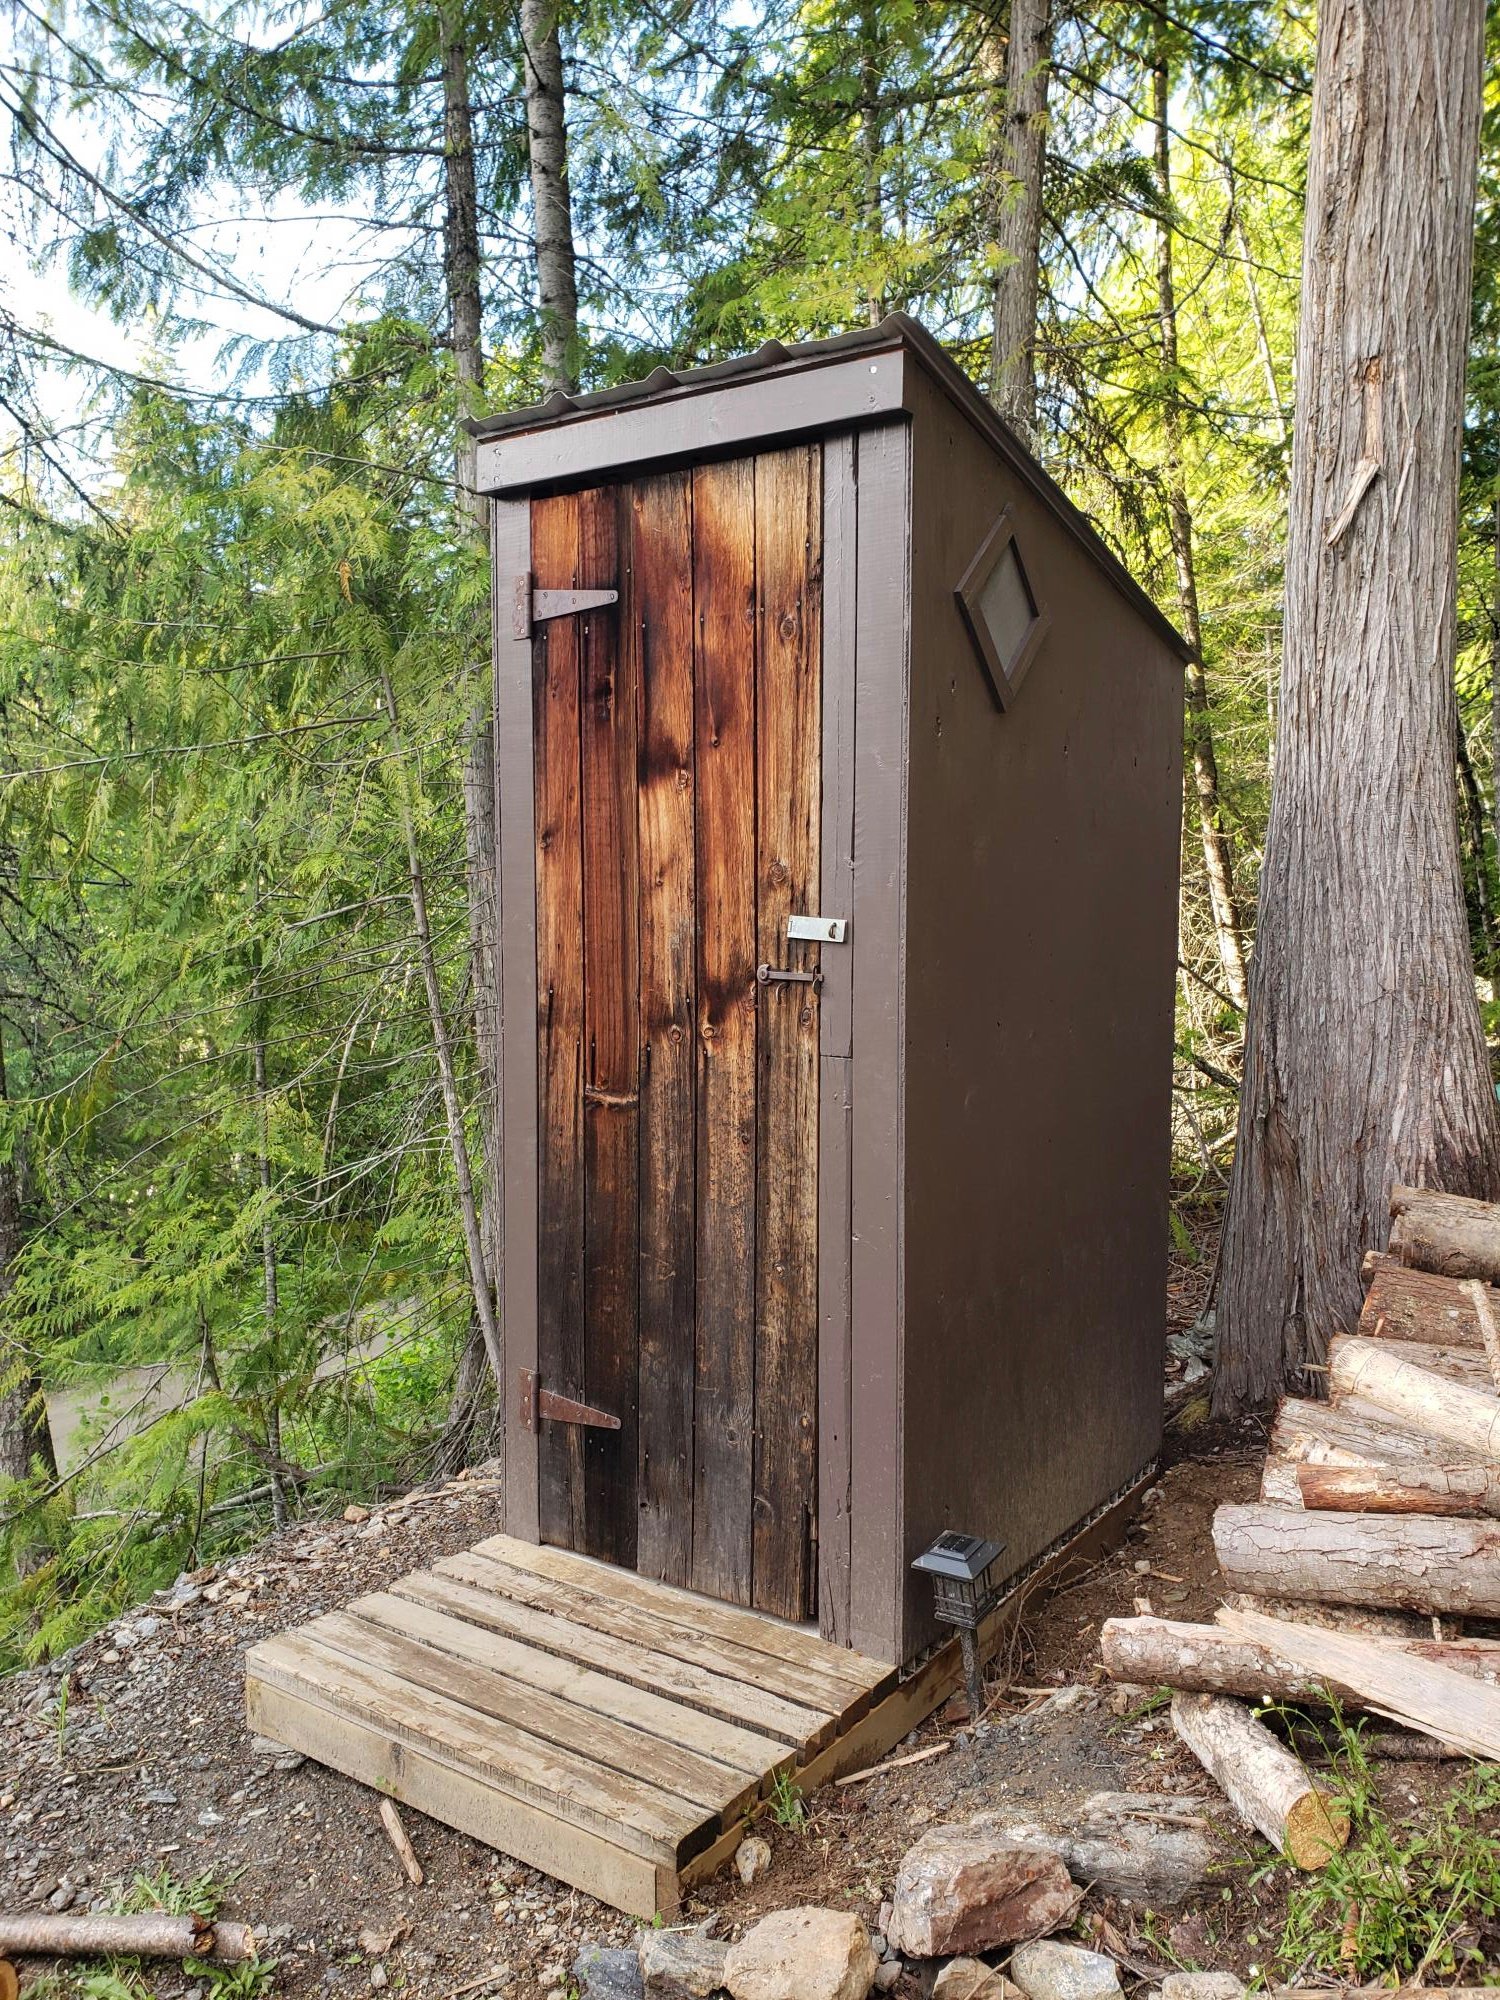
We used the plans from the Simple Outhouse to make a space to hold our porta potty. The door is a repurposed barn door and I think it looks amazing! These plans were perfect for us as we were able to build it in panels and reassemble on our property by the lake. Some screened windows to allow for ventilation and light were the finishing touches. Thanks Anna for the simple to follow plans!
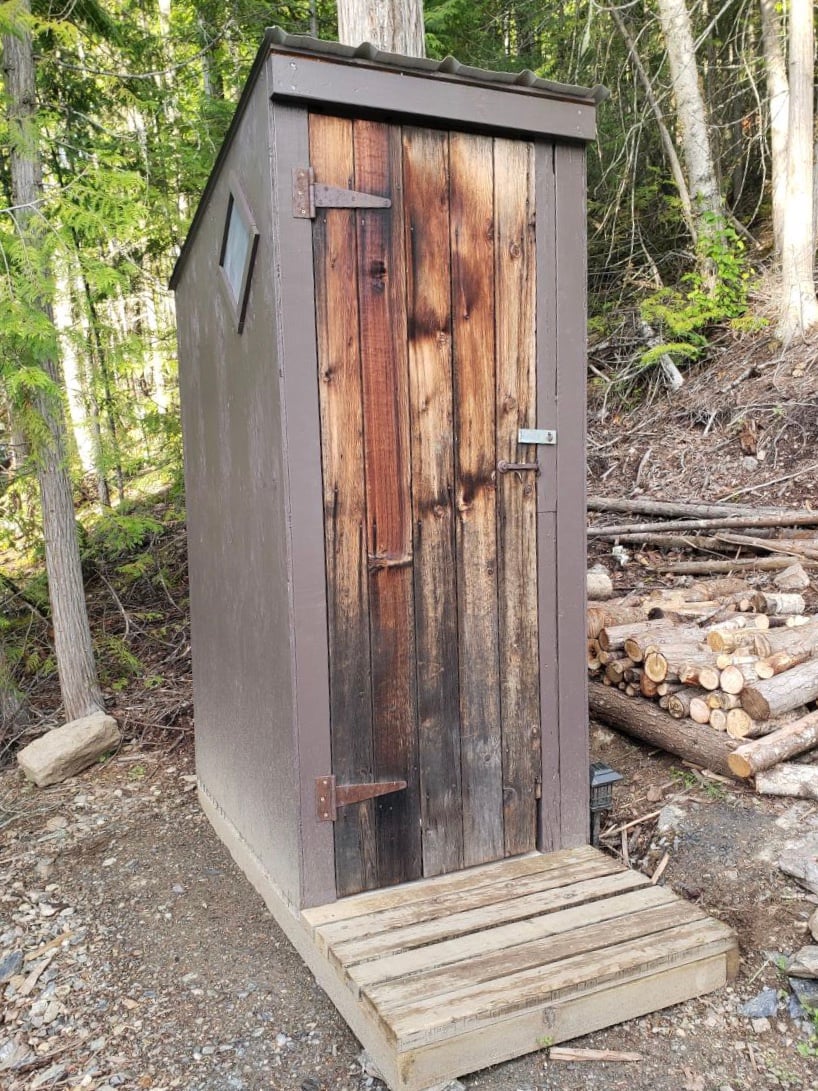

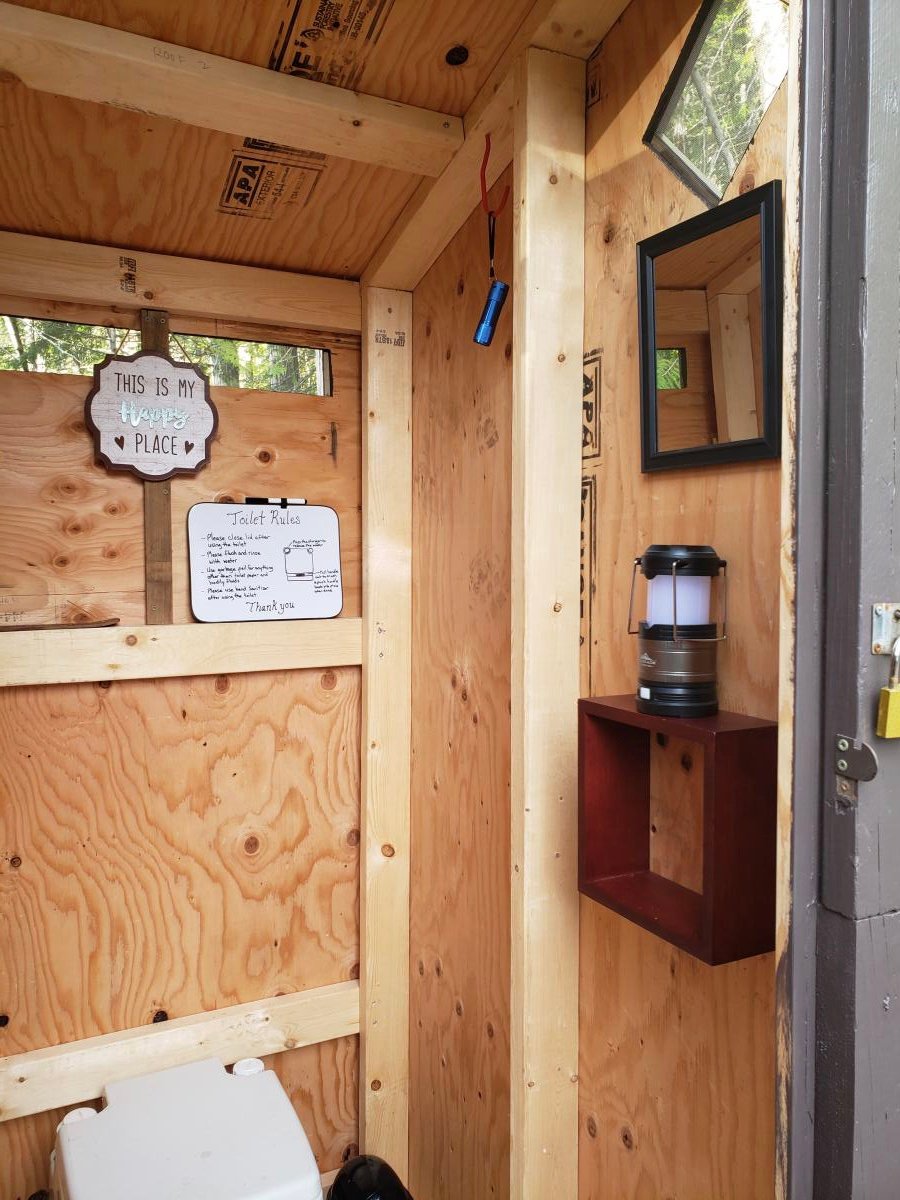
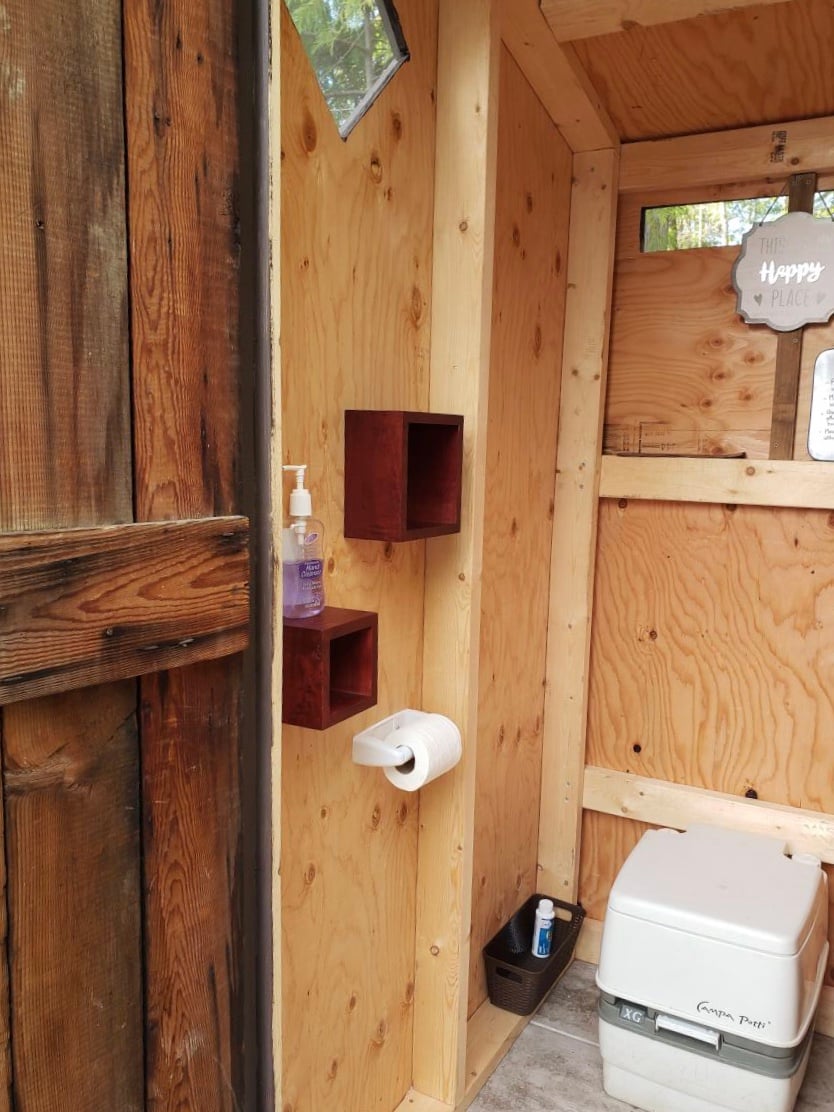
Built from Plan(s)
Estimated Cost
$200 Canadian
Estimated Time Investment
Weekend Project (10-20 Hours)
Finish Used
We used pressure treated wood for the base and deck. For inside, we repurposed some scraps of composite decking. Painted with exterior latex "driftwood".
Garden Shed
I have been dreaming about building so many things featured on this website, and I finally buckled down and built something. I figured that an outside garden shed would be a bit more forgiving than a project requiring a bit more precision, and from the picture, you can see that it's not perfect! I'm still working on trimming the shingles and I still have to stain/seal it. I've got to admit, when I first picked up the wood for the project at the store, I wondered what I had gotten myself into. But I just jumped in, and here it is.
Built from Plan(s)
Estimated Cost
$300
Estimated Time Investment
Weekend Project (10-20 Hours)
Finish Used
Plan to stain it with some sort of deck stain.
Recommended Skill Level
Beginner
Comments
Thu, 10/11/2012 - 10:45
Looks great!
What a perfect spot for it as well! Really good job with your first project.
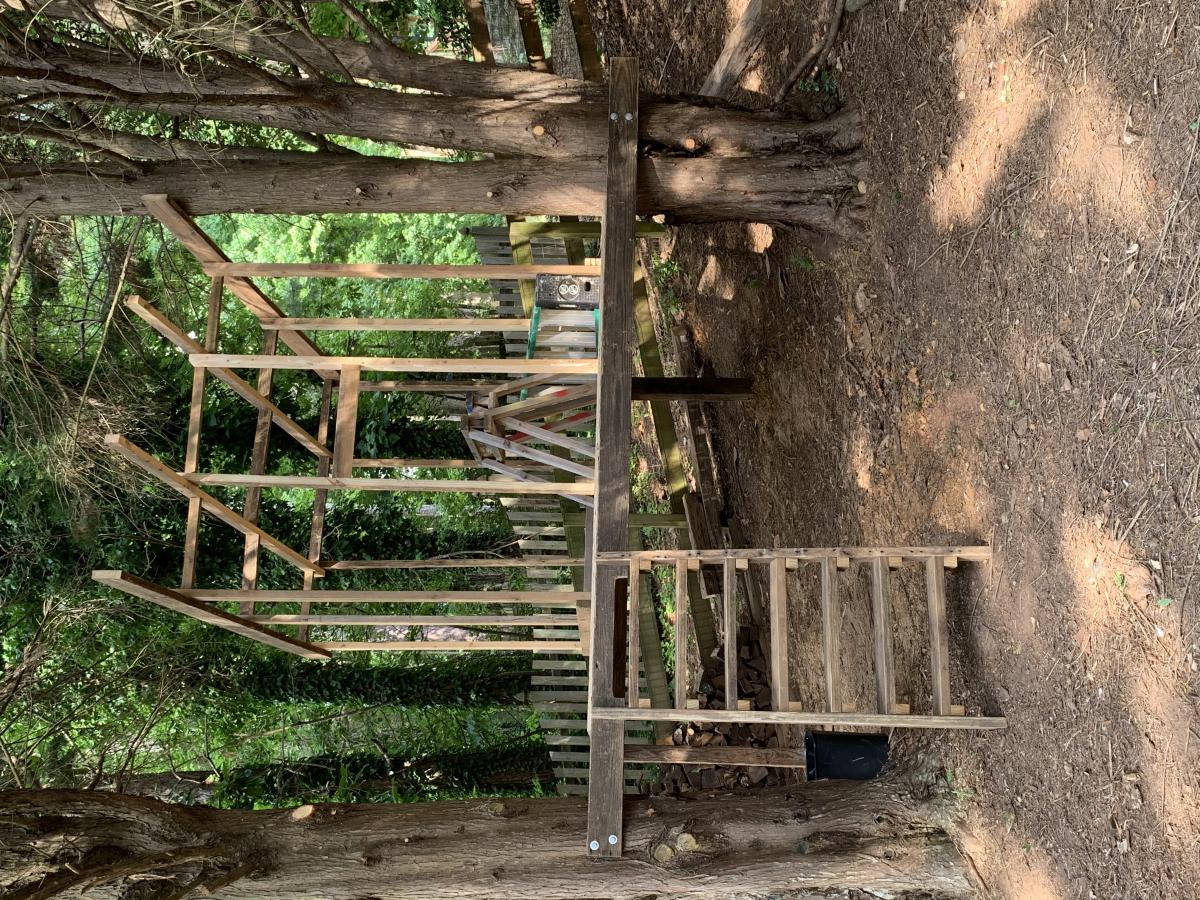
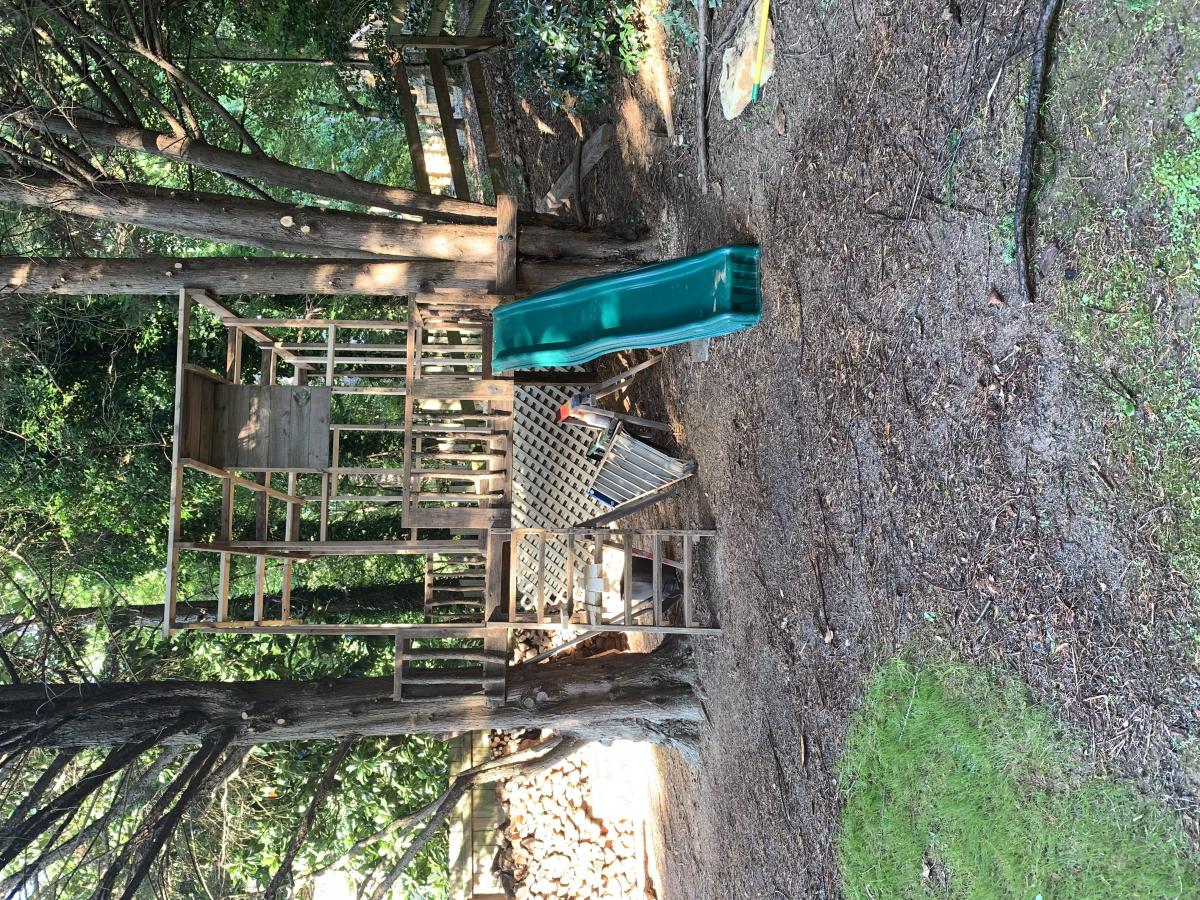
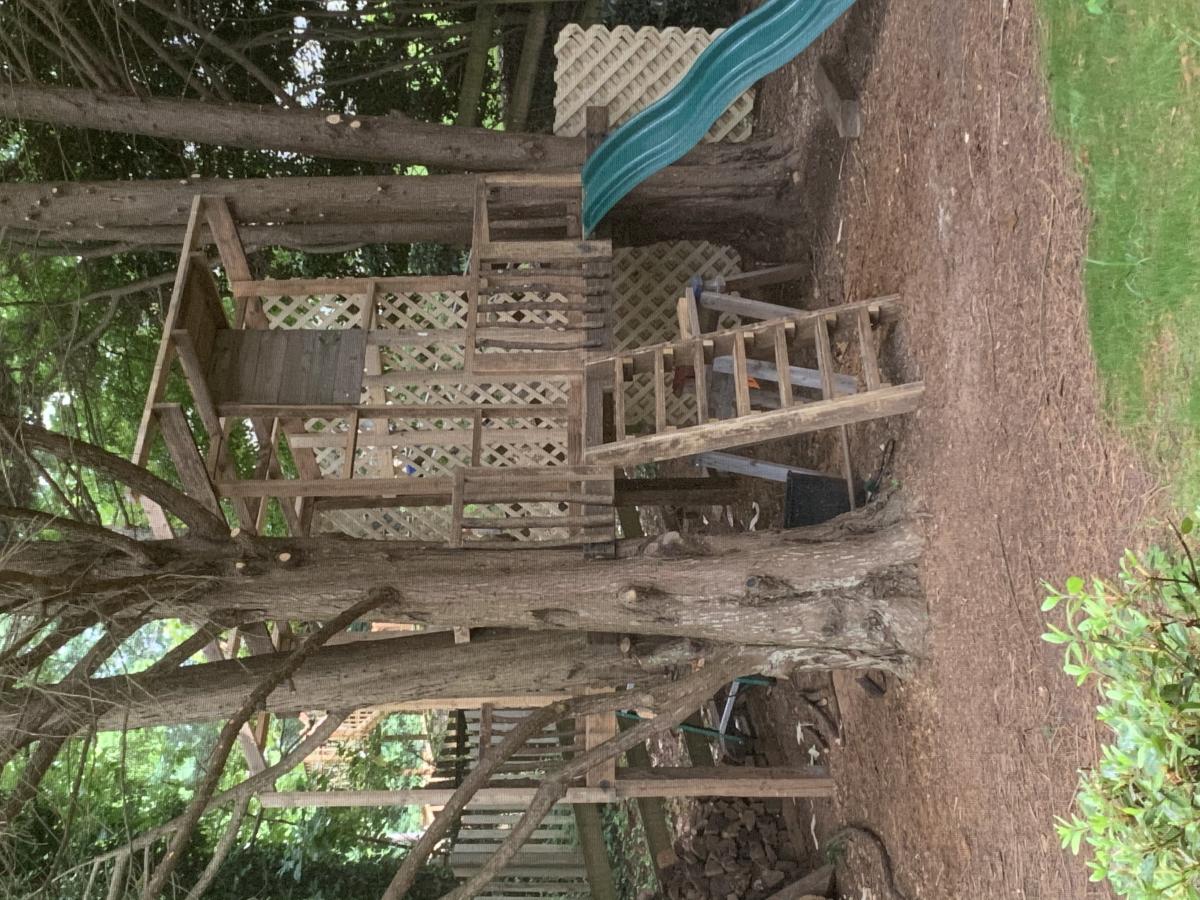
Papa’s Treehouse
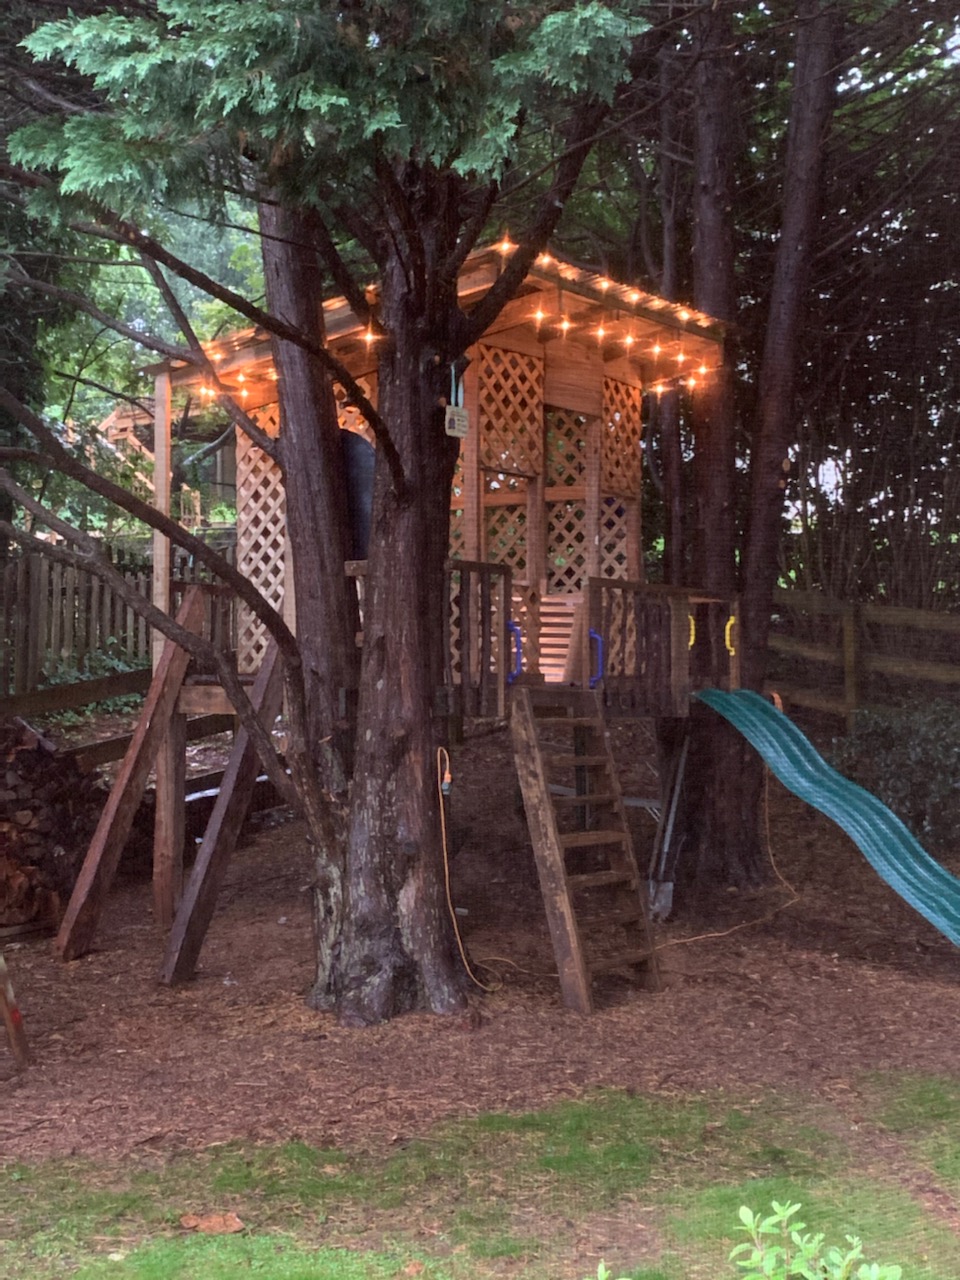
Have 3 granddaughters; 3, 2 and 6 months, so far 😉 Saw your treehouse video and made a modified version of your triangle platform using the trees I had available. Kinda went over the top a bit, but give you all the credit. Repurposed mostly old deck PT wood and rough hewn beams from neighbors.
Thanks!
Bill Magyar
Duluth GA
Estimated Time Investment
Week Long Project (20 Hours or More)
Finish Used
PT Wood patina and tea/vinegar aging solution on new.
Recommended Skill Level
Advanced
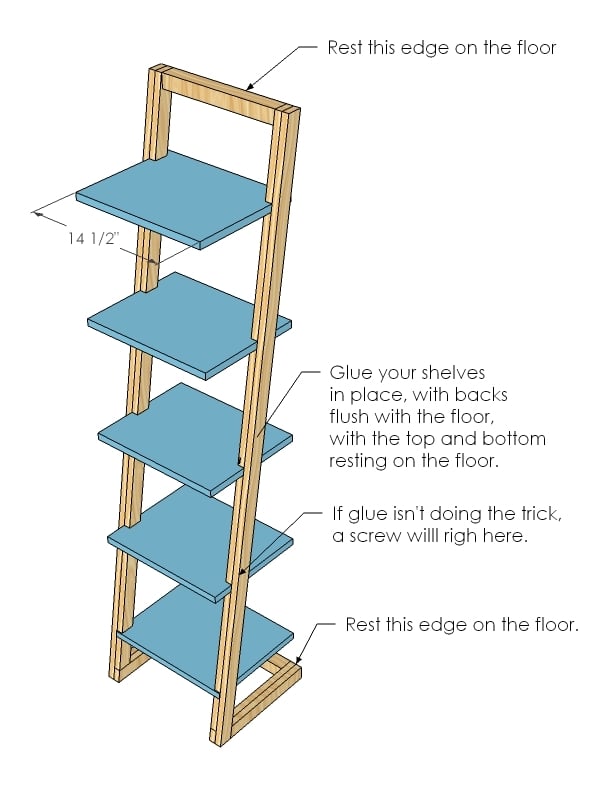
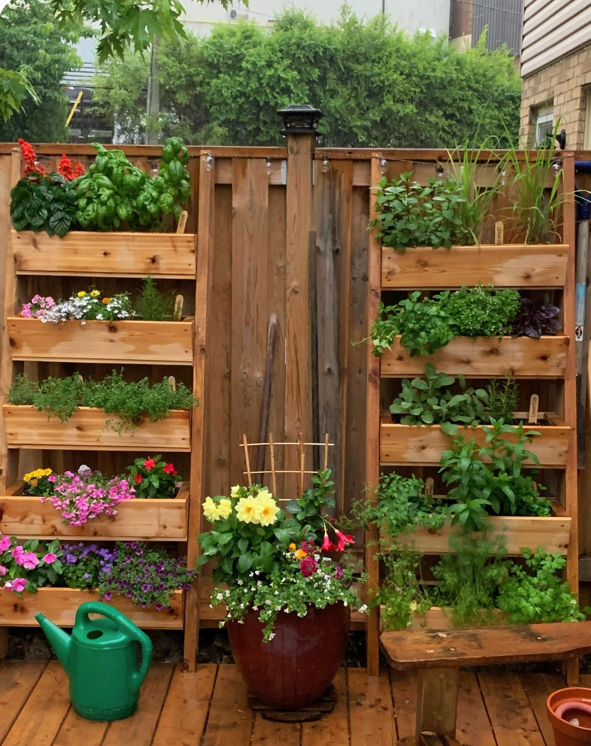
Leaning Ladder Planters
Farmhouse Island
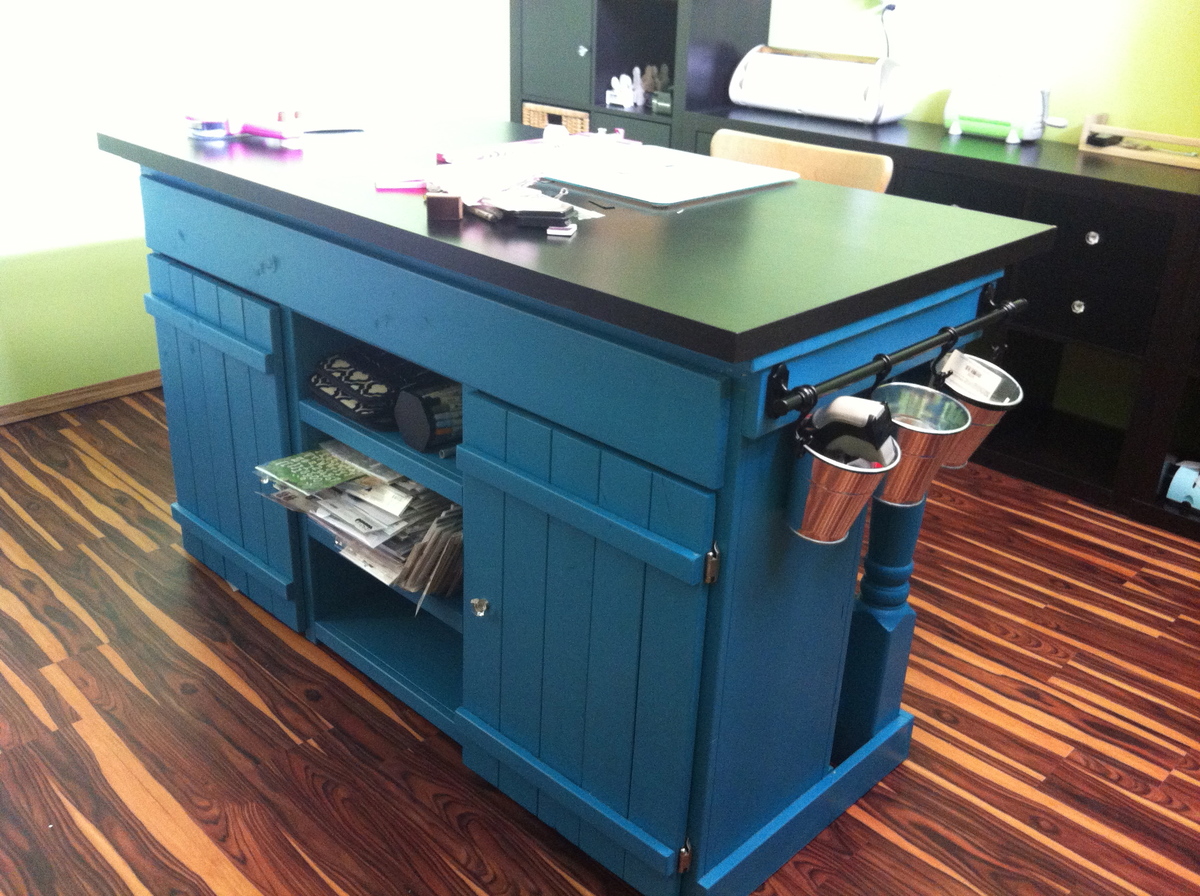
I loved everything about this island, and knew I needed it for my craft room.
This was my first try at furniture building, and the step by step instructions were amazing, and so simple. It took me about 5 hours to build, and another 2 to sand/paint.
For the top, I used a table top from Ikea, and also added the rod and baskets from Ikea to the end of the island for holding craft supplies.
Built from Plan(s)
Estimated Cost
$225
Estimated Time Investment
Day Project (6-9 Hours)
Finish Used
Latex Paint
Recommended Skill Level
Beginner
Comments


Very easy garage shelving
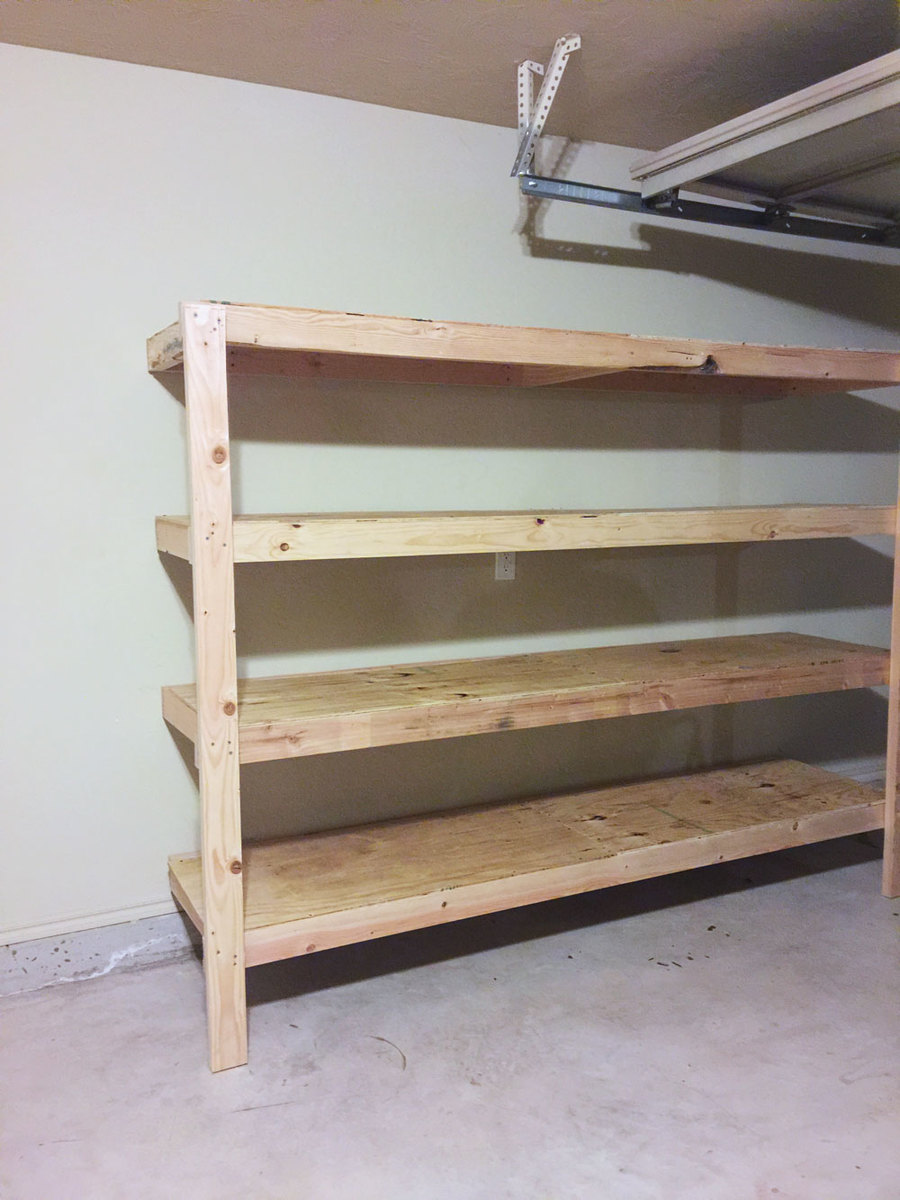
Wanted some easy storage shelving that didn't break the bank. These were perfect! $79 is what it cost for ours (which includes the $20 Kreg Jig). Lumber was only $58.68 and I bought and extra 8 foot 2x4, so it could have been slightly cheaper!
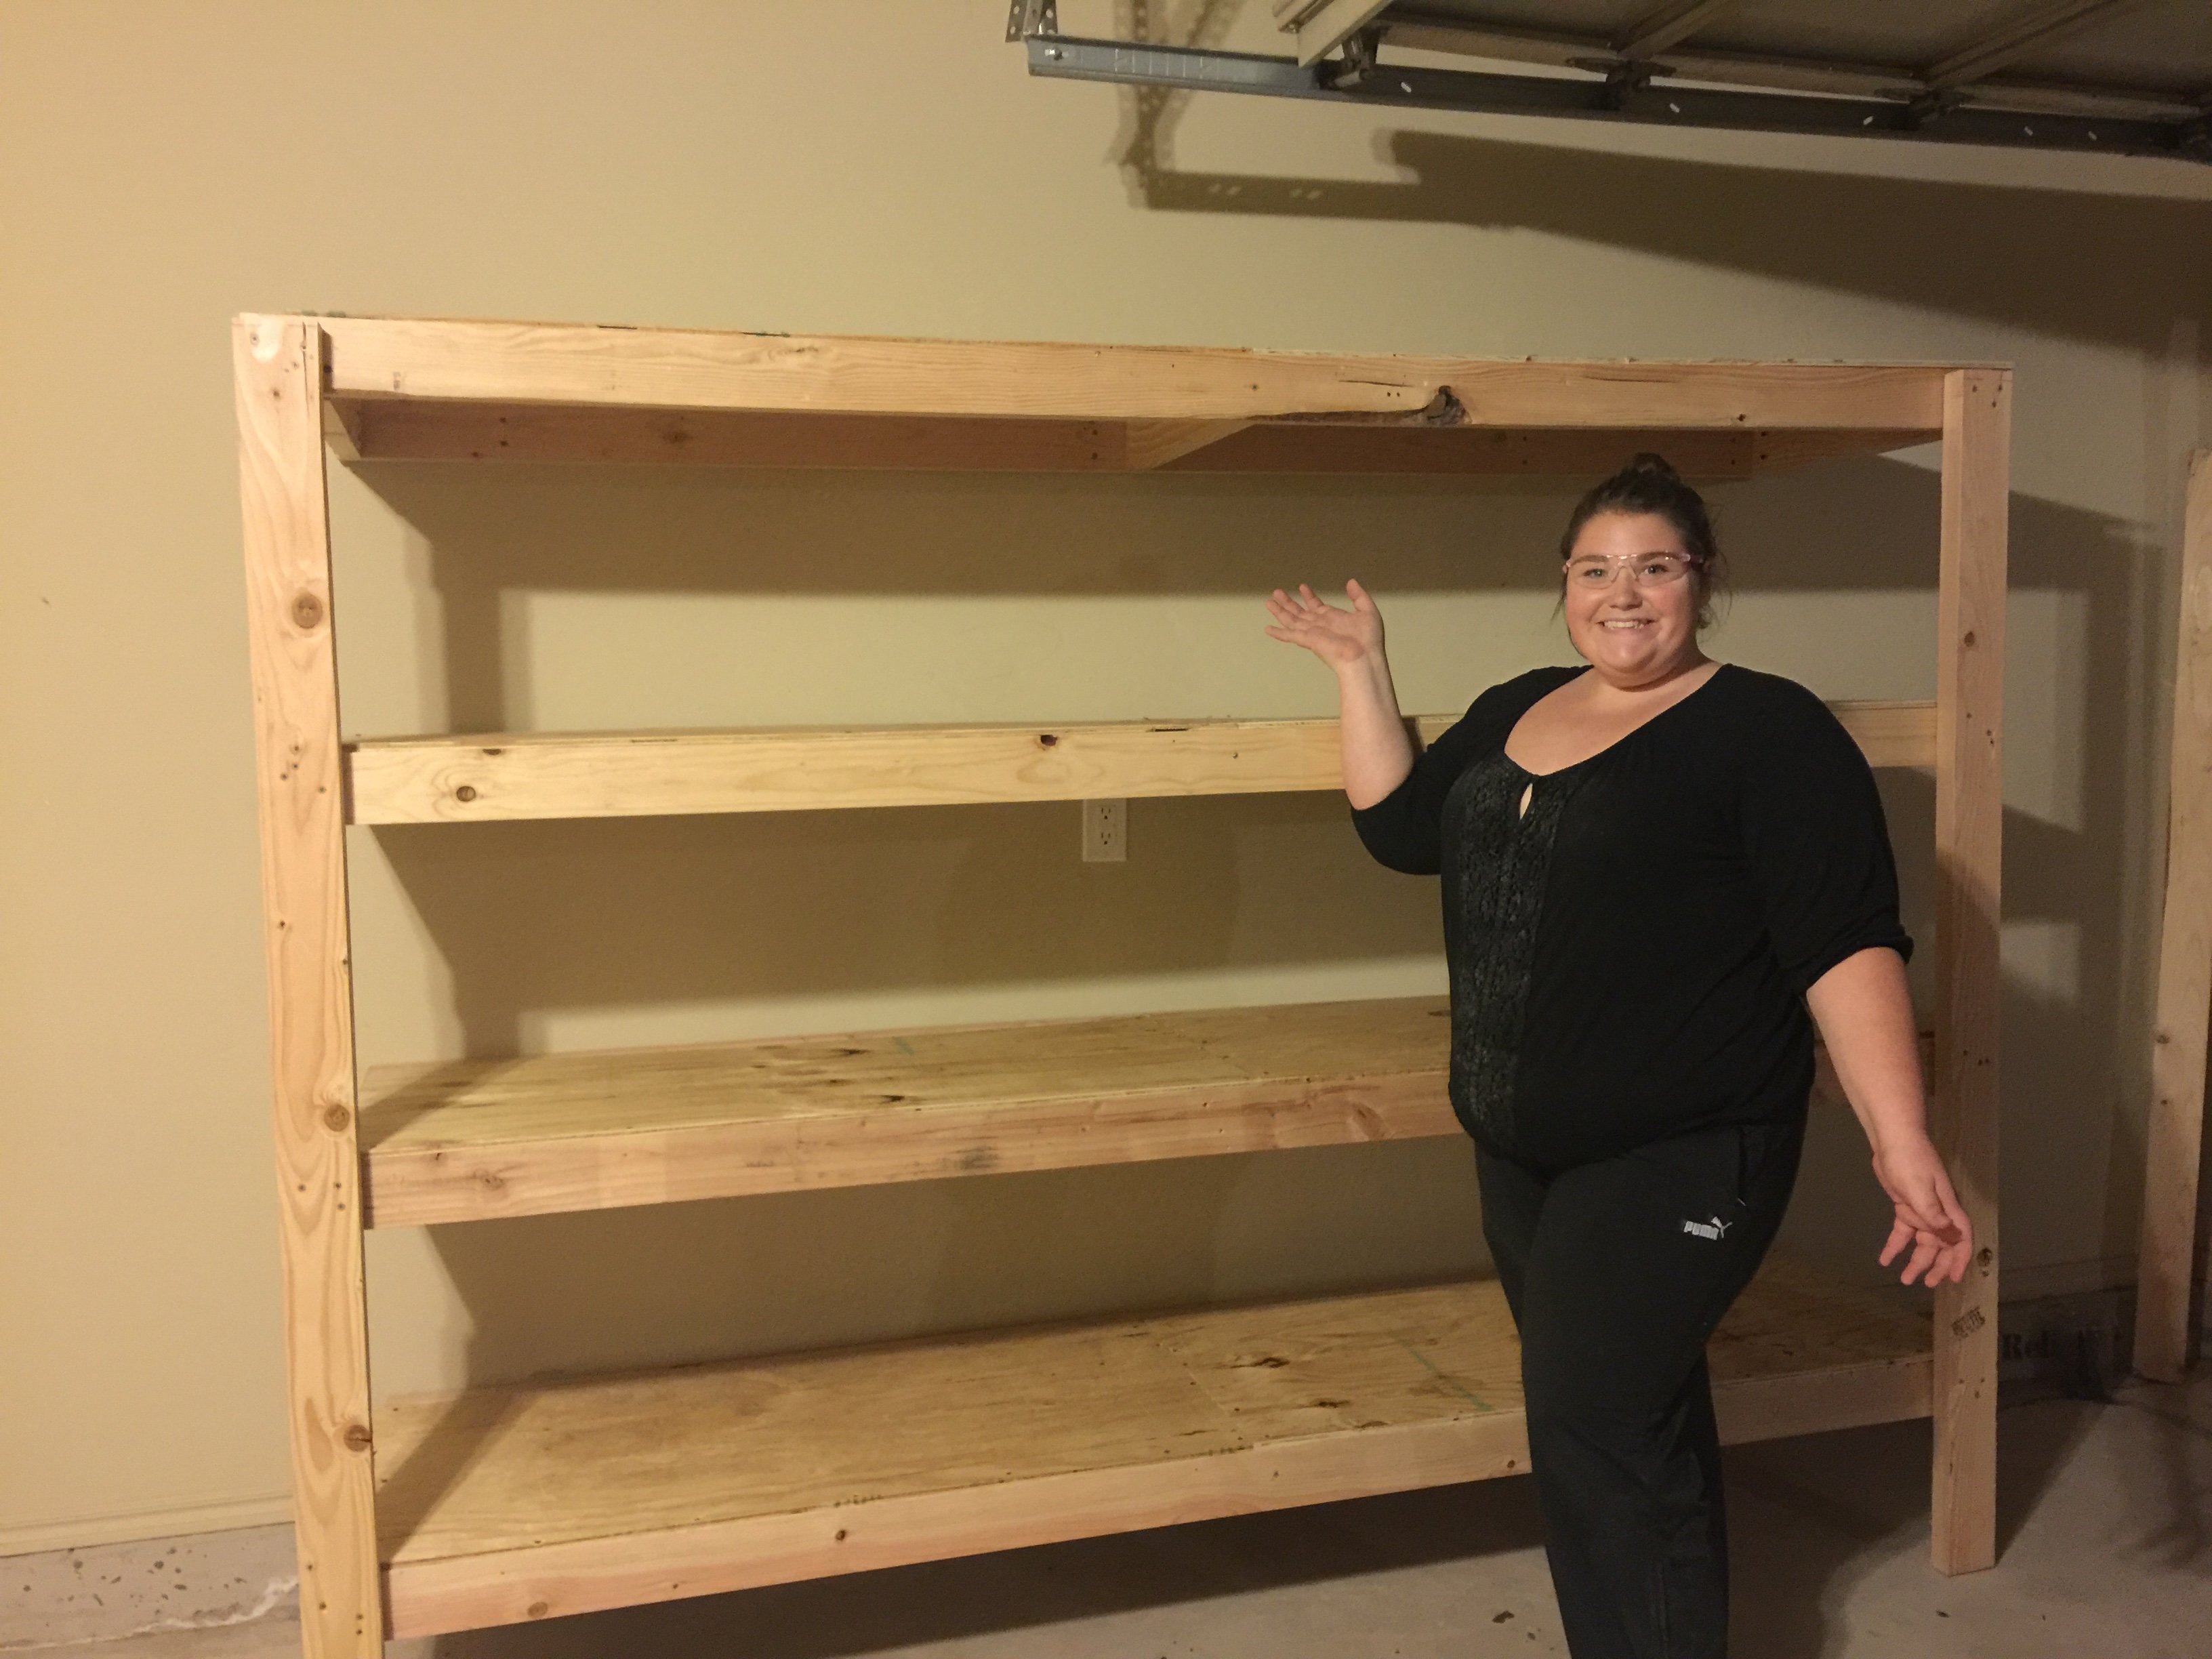
Built from Plan(s)
Estimated Cost
$60 for lumber
Estimated Time Investment
Afternoon Project (3-6 Hours)
Finish Used
Boxes, Totes, camping equiptment
Recommended Skill Level
Beginner
Modified Farmhouse X Desk
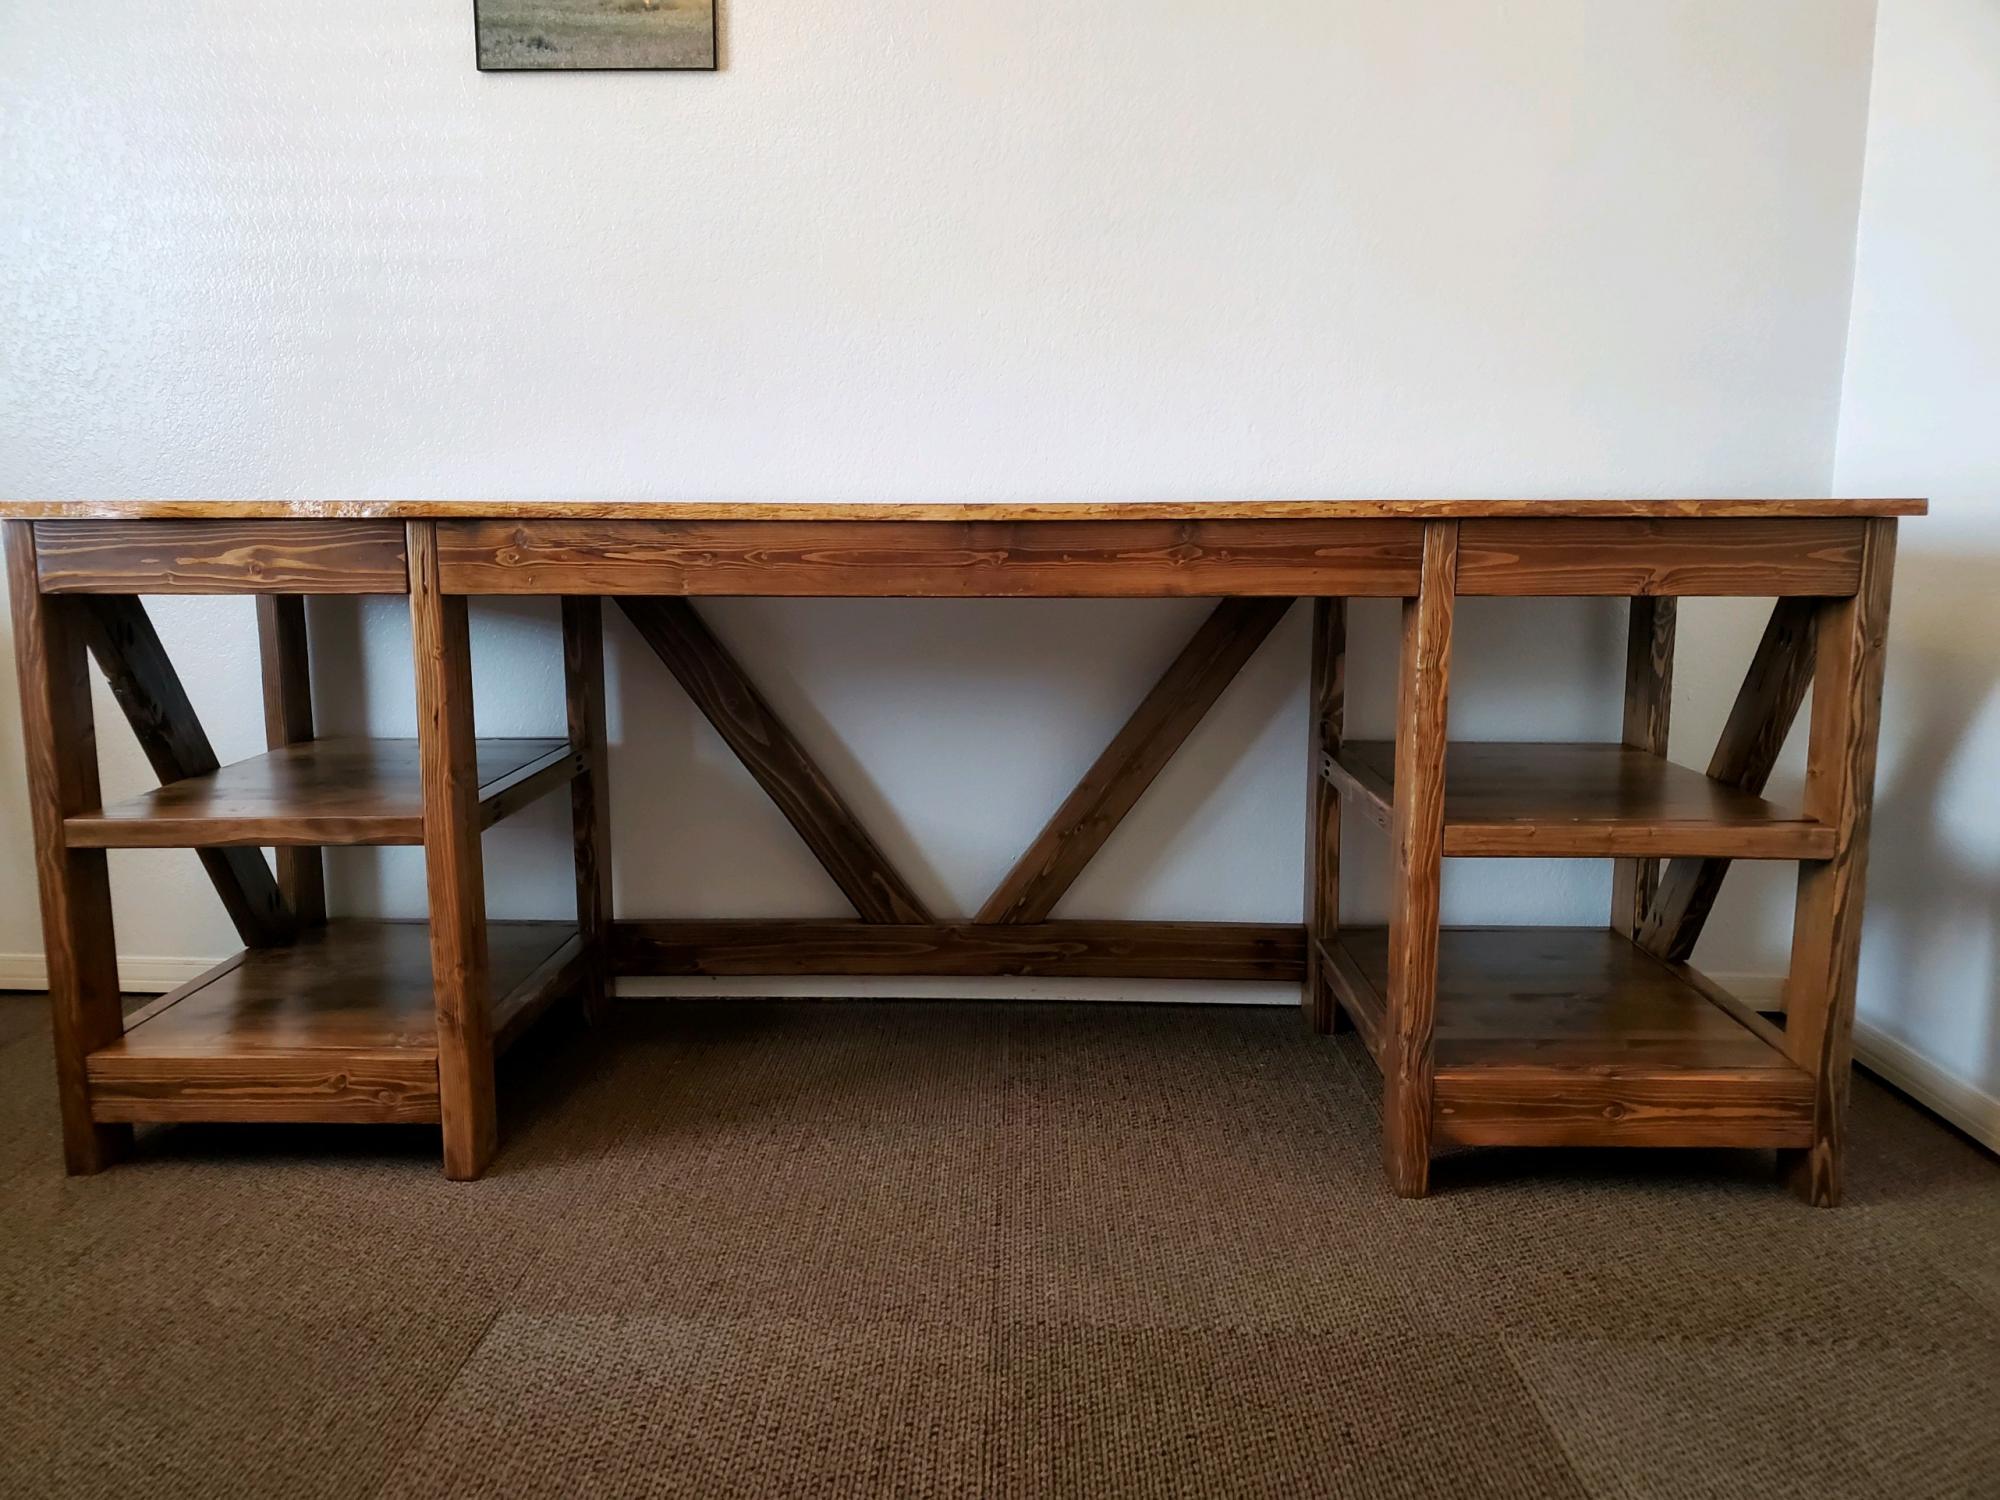
I modified the Farmhouse X Desk plan from Handmade Haven to add the shelving on both ends. I also have a Z on the end instead of the X as that was the way my husband preferred it (it is for him after all). The top is live edge wood which is tricky to work with since the thickness is different from board to board but I still like the way it turned out! The live edge top did add time to the build as well as staining and varnishing as opposed to painting the base.
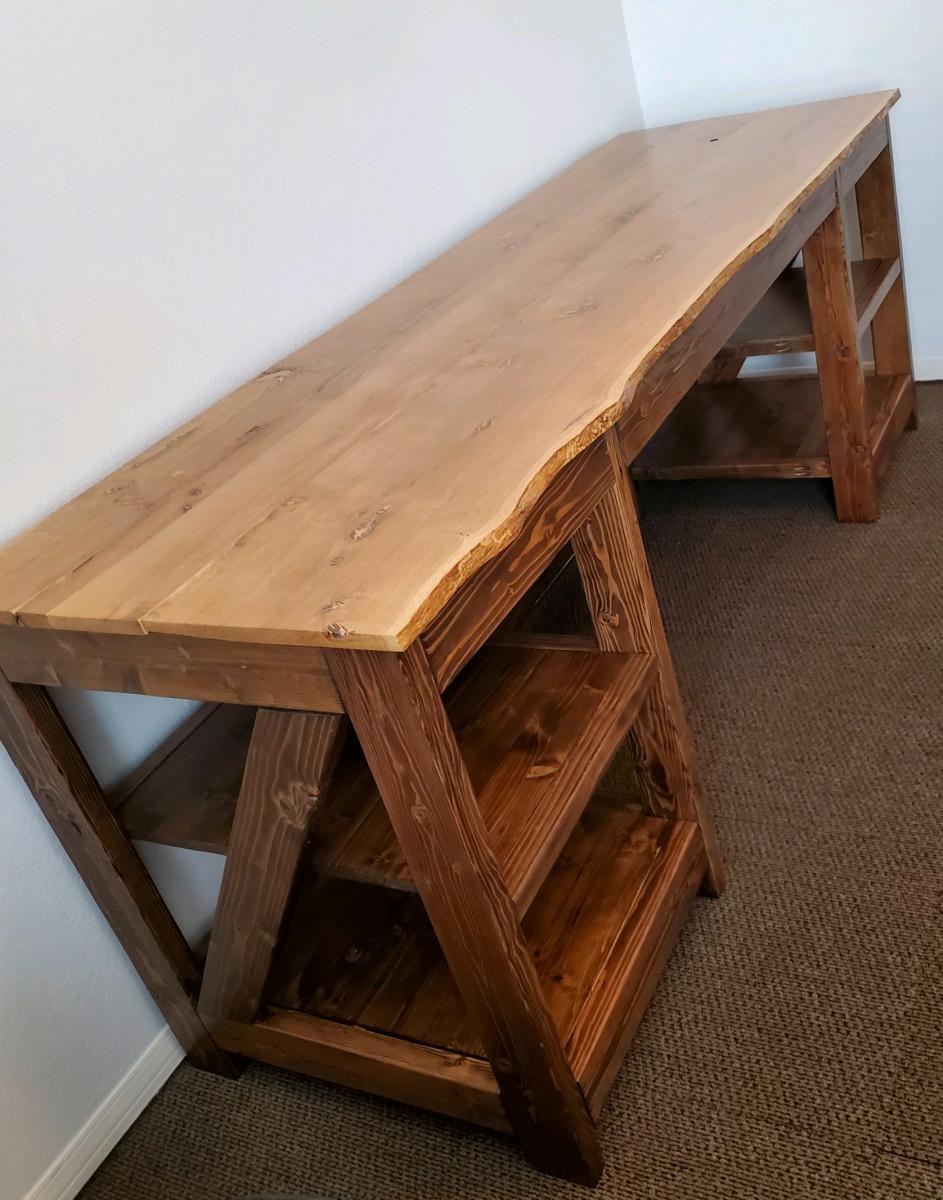
Built from Plan(s)
Estimated Time Investment
Week Long Project (20 Hours or More)
Finish Used
Minwax Jacobean stain mixed with Special Walnut (had a little of both on hand) for the base and left the top natural. Both coated with Minwax oil modified water based polyurethane.
Recommended Skill Level
Intermediate
Comments
Ladder Garden Planter
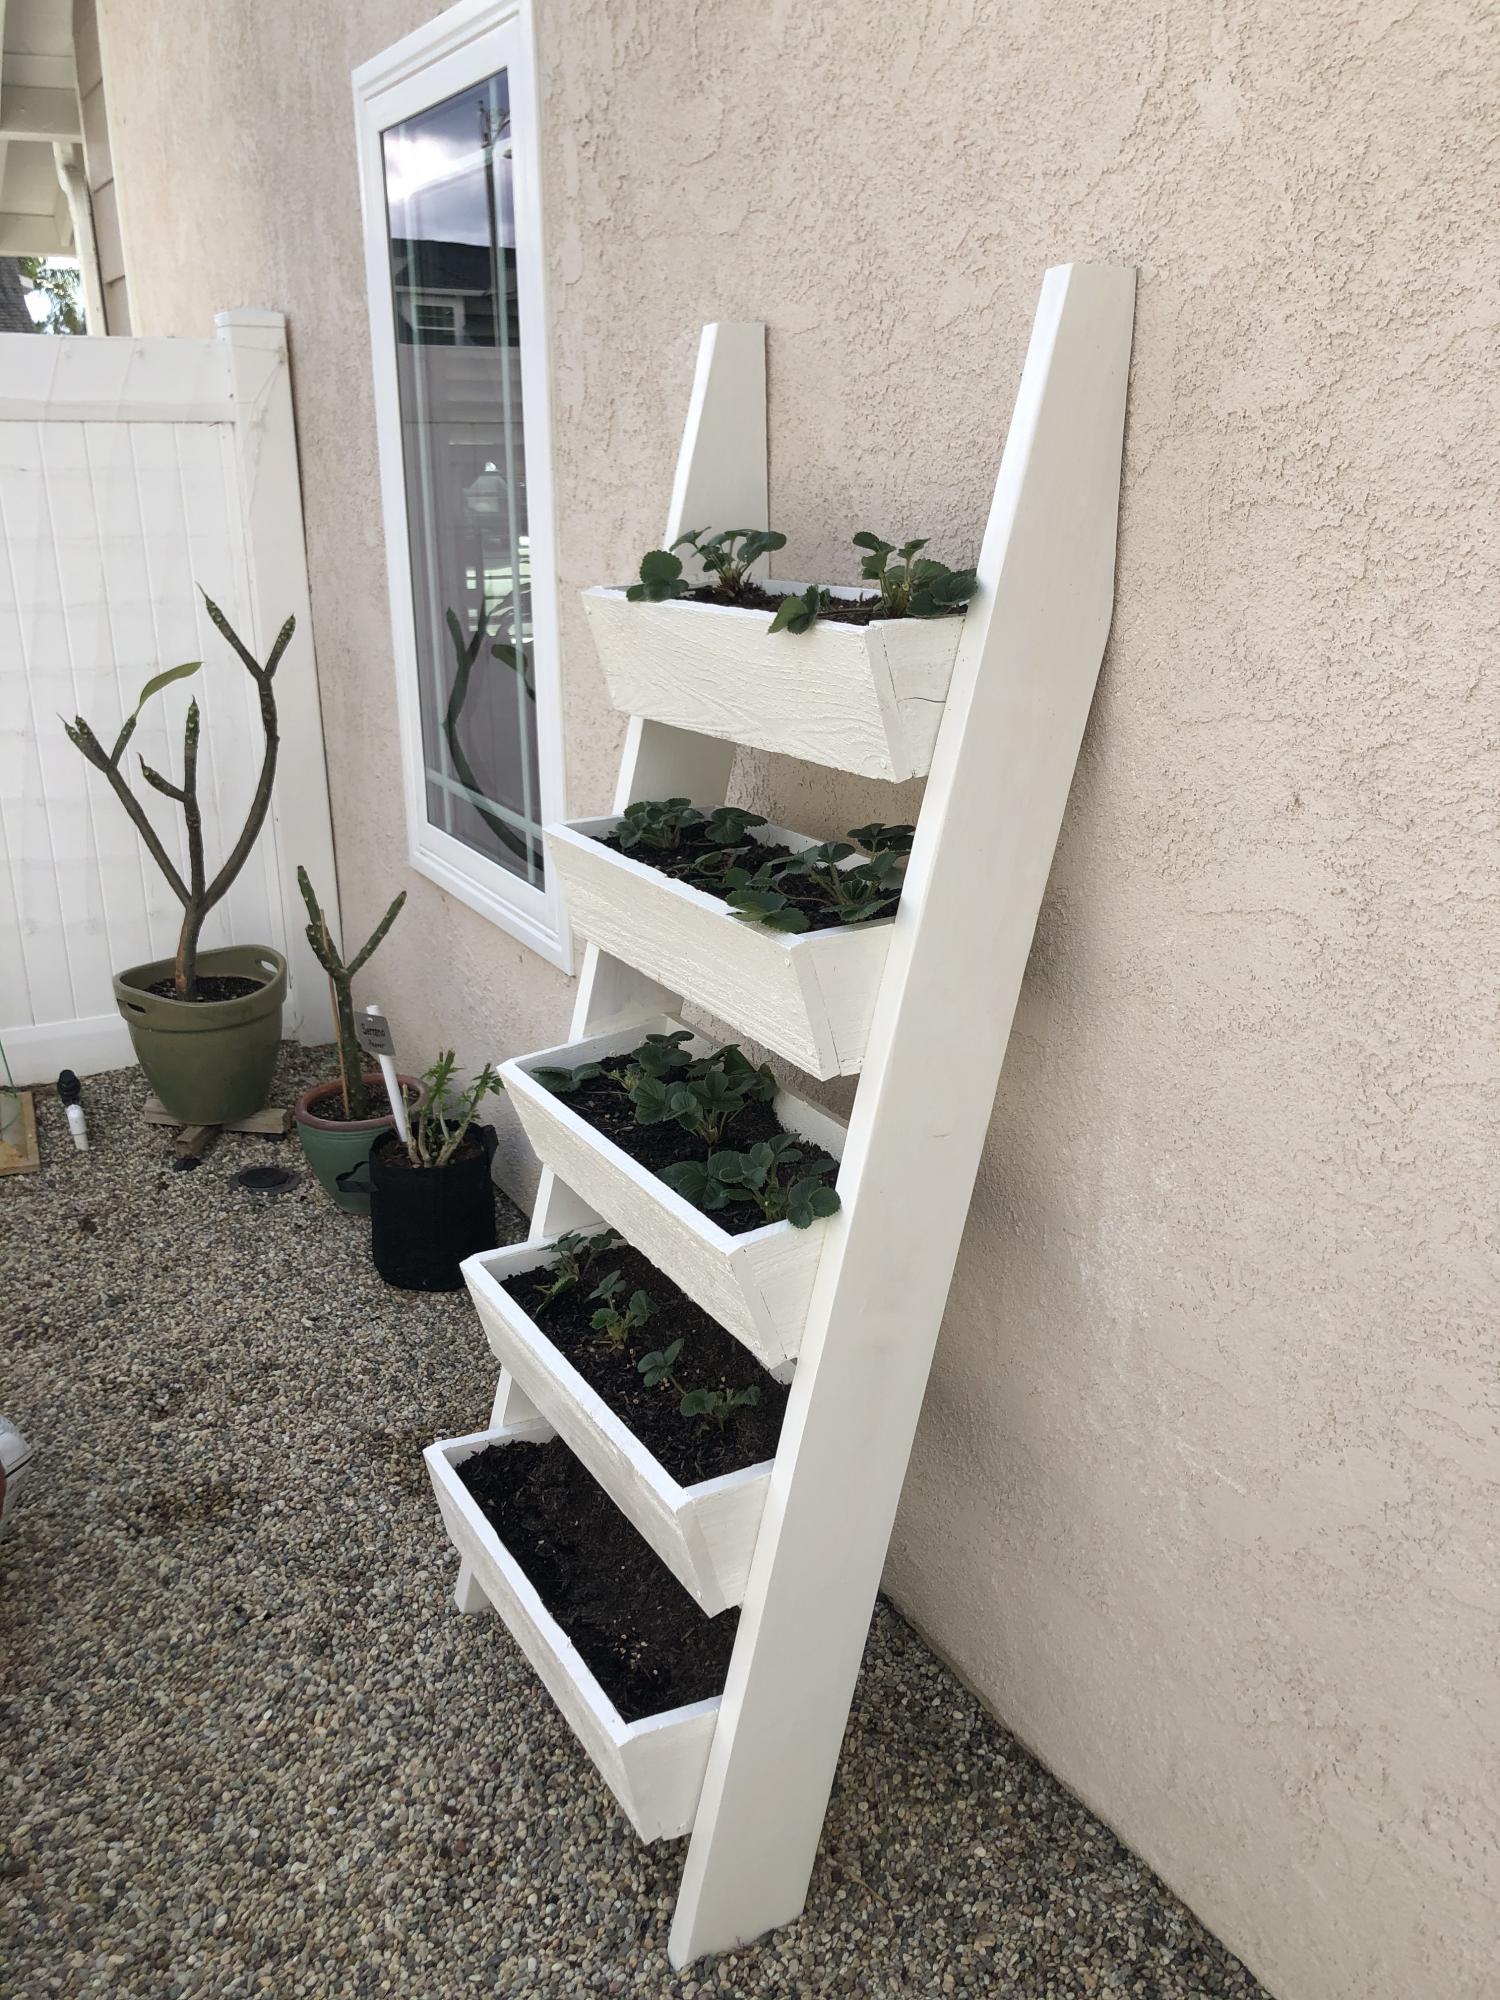
Finally! The cedar pieces for this planter have been cut for a few months, and I assembled it a couple weeks ago. Unfortunately I had to use a lot of wood filler & glue to hide imperfections so it was painted to match our house trim. My strawberry runners from last season were begging to be moved. They should love this new home. I'm learning! Next project is an outdoor coffee table. --Susan
Built from Plan(s)
Comments
corner shelf
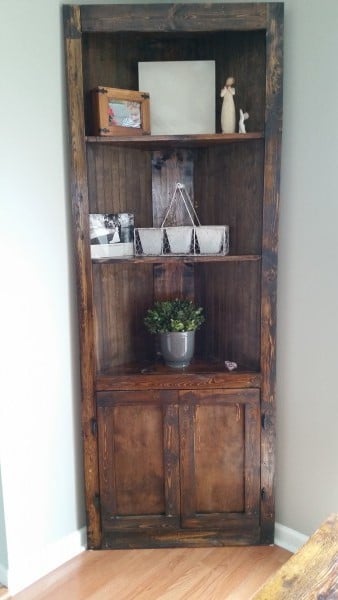
This was very easy to make. Stained with minwax dark walnut. It's very sturdy too.
Built from Plan(s)
Estimated Time Investment
Day Project (6-9 Hours)
Finish Used
Minwax dark walnut
Recommended Skill Level
Beginner
Comments
Kentwood bookcase - upsized
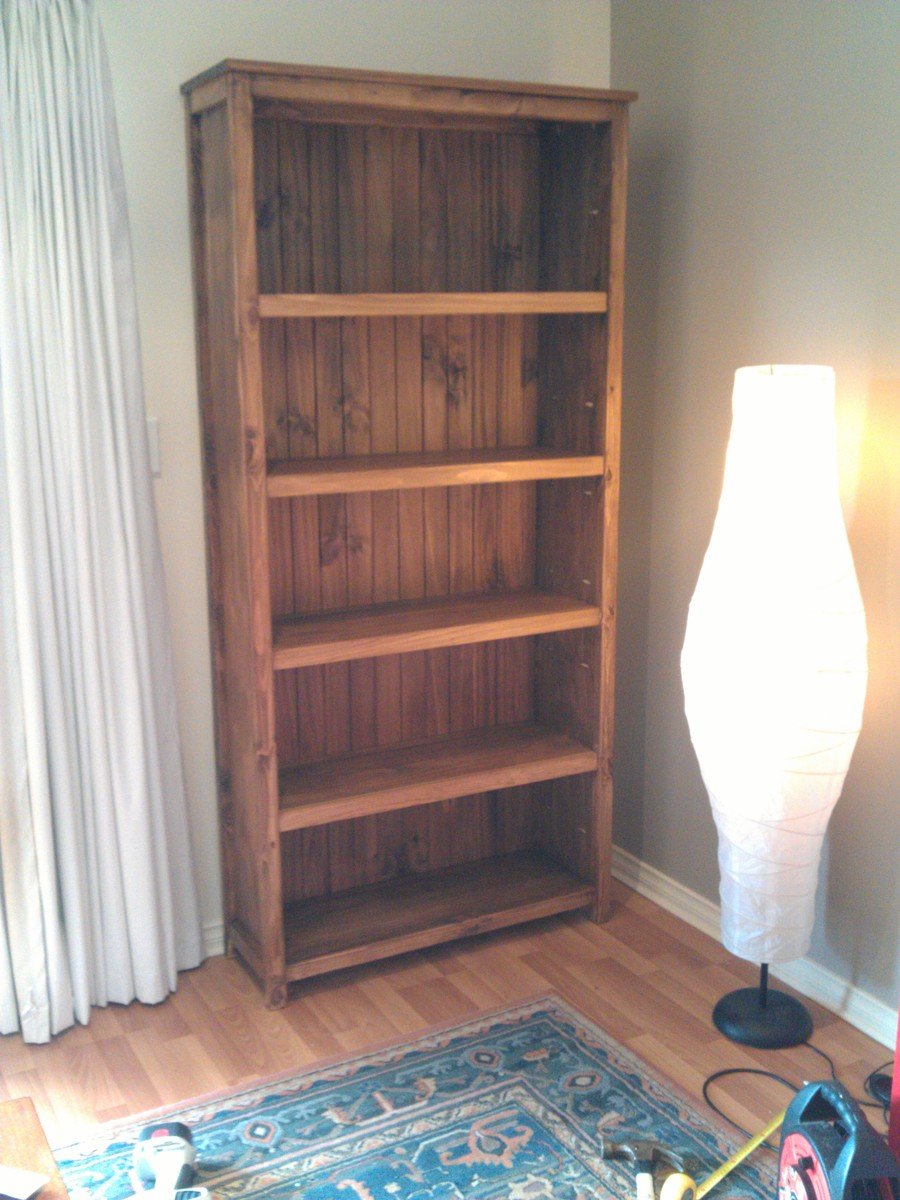
I made the original plan higher and wider, and added an extra shelf. Very pleased with the outcome!

Built from Plan(s)
Estimated Cost
AUD $200
Estimated Time Investment
Day Project (6-9 Hours)
Finish Used
Water-based stain (Walnut) & water-based satin varnish
Recommended Skill Level
Beginner
Comments
Wed, 02/12/2014 - 09:11
This looks sweet. Do you have
This looks sweet. Do you have the dimensions to this upsized kentwood bookshelf? I'm afraid I'll screw it up if I try to add lengths to the original plan.
Full over Full Bunk
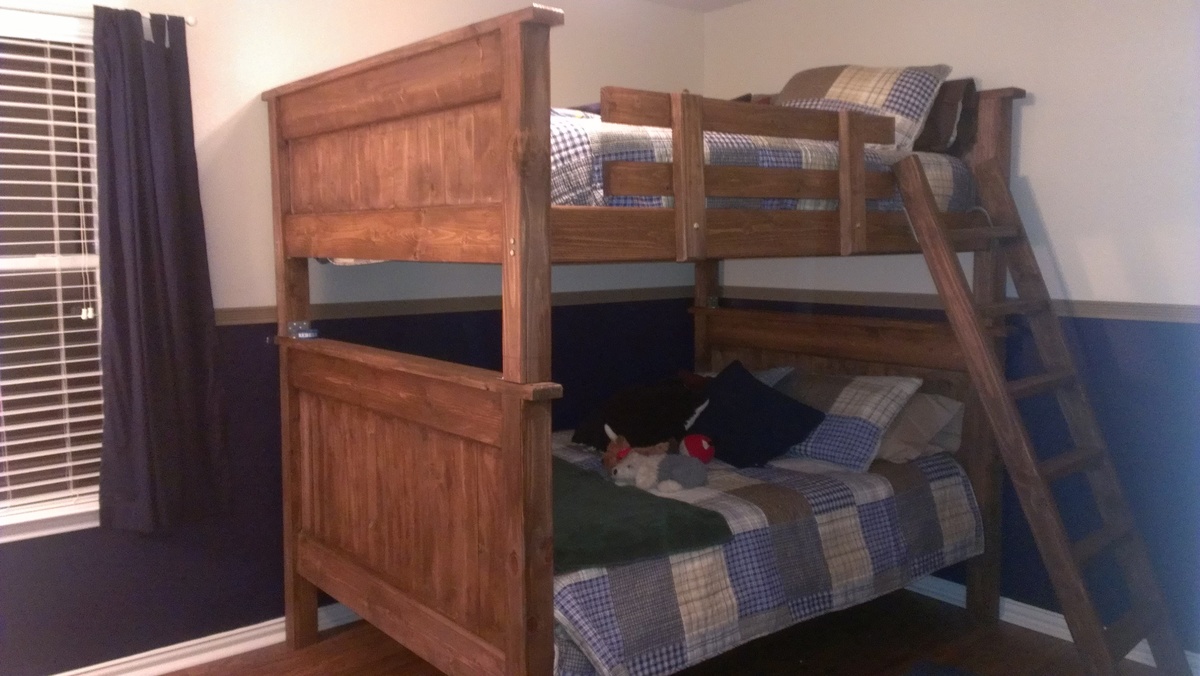
Used the Farmhouse Style bed plan and stacked them, two headboards for the bottom bed, two footboards for the top bunk bed
Built from Plan(s)
Estimated Time Investment
Weekend Project (10-20 Hours)
Recommended Skill Level
Intermediate
Comments


Wed, 04/13/2016 - 14:30
Do you have pans on this
I would like to build something like this for my boys and was wondering if you still have the plans and cut list for this job.