Community Brag Posts

L-Shaped Desk

Submitted by flyboy599 on Wed, 01/01/2014 - 08:16

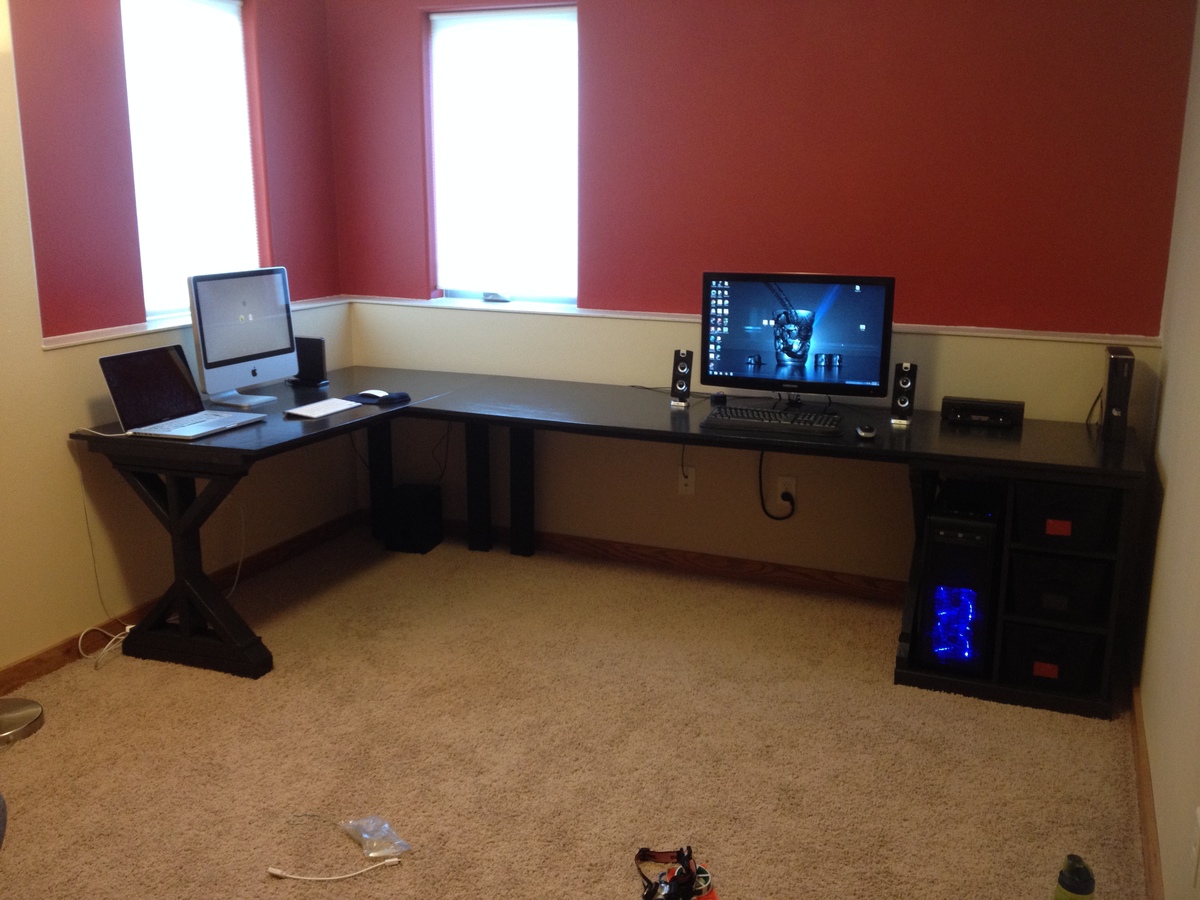
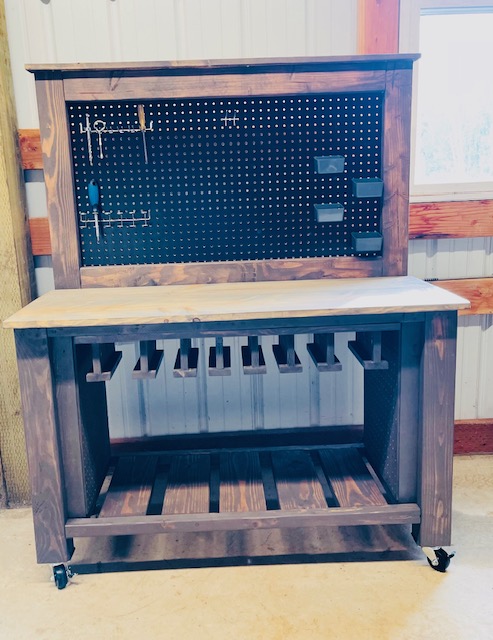
This desk was made using the "Fancy X Desk" and "Modular Office Base" plans. A CPU enclosure was added with a similar "X" design. The top is 3/4'' plywood with 1x2's and 2x2's providing the framing. A 1x4 runs down the back of the desk with a cord try to hide cables.

Estimated Time Investment
Weekend Project (10-20 Hours)
Finish Used
Black paint and primer in one with 5 coats of polyacrylic on the work surface.
Recommended Skill Level
Beginner

Comments

ksc70x

Thu, 01/07/2016 - 15:16

HI, The desk is awesome and I thought I would make this my first attemt at building something.

But I am unable to find the instructions.

Please help.


Thank you.

ksc70x

Sun, 01/10/2016 - 08:46

Ok after reading the subject matter I realized that this is the merging of two different desks.

Can you post a photo of how you joined them.

The support for such a long desk is my concern, with out it having any middle support or at the the corner?


Thank you.

ksc70x

Sun, 01/10/2016 - 08:47

Ok after reading the subject matter I realized that this is the merging of two different desks.

Can you post a photo of how you joined them.

The support for such a long desk is my concern, with out it having any middle support or at the the corner?


Thank you.

Double Vanity

Submitted by krmoon81 on Thu, 03/31/2016 - 22:30

Well to make a long story short I started out just replacing an old tub in the bathroom which turned into a whole remodel!! I’m talking new toilet, floor, lighting and heck while I was at it lets knock down a wall and make some room for a double vanity. After all in a few years three teenage girls  will be fighting for sink space!!! Honestly I just didn’t want to spend $800 - $1,000 on a double vanity so I decided to take matters into my own hands. This was my first time building any type of functional furniture. I made a ton of mistakes but I also learned many valuable lessons. I really took my time....about 3 weeks...ok, maybe 4. Building this vanity was like cutting 101 for me. #1 lesson I learned, MAKE SURE YOUR CUTS ARE STRAIGHT!!! I also learned the value in test cuts and having a lot of patience and extra wood on hand. Anyone can do this, just be willing to put the time and effort in…and do lots of research.

Estimated Time Investment
Week Long Project (20 Hours or More)
Finish Used
Paint
Recommended Skill Level
Beginner

Comments

Outdoor Sectional

We have been looking for a deal on an outdoor sectional for a whole year. Nothing. The cheapest we could find was $899 for one that was much smaller than this one and with thinner cushions. So we upped and drove to the lumber yard and purchased the lumber on the list and got to building. The total cost of lumber was $200, the Spax screws we already had on hand. We used pocket holes for the joints. The wife made the cushions herself. She had most of the fabric on hand, we just had to buy 3 yards for the back cushions, which are made of standard size pillows. They have been sprayed with fabric protectant for outdoor use (I think she used the Scotch brand). The seat cushions are 5 inches thick (they are wrapped in silk film to protect them from getting soaked when it rains or when someone who just got out of the pool sits on them), around $100 for both. It took her a couple of days to sew the box cushion covers.

Estimated Cost
$400
Estimated Time Investment
Weekend Project (10-20 Hours)
Recommended Skill Level
Beginner
Seasonal And Holiday

Farmhouse Nightstand

Submitted by rendall28 on Sun, 05/31/2020 - 14:10

This was my first furniture piece that I have made. I made two night stands, one for each side of the bed in our master bedroom. I chose to modify the plan so I could have ball bearing drawer slides.

Built from Plan(s)
Estimated Time Investment
Week Long Project (20 Hours or More)
Finish Used
Briarsmoke Stain for table top...Special order white paint to match the white woodwork in our home.

Modern Adirondack

Submitted by Anonymous (not verified) on Wed, 06/10/2020 - 10:10

My wife and I were tired of the cheap plastic chairs but not wanting to spend a fortune. I came across Ana’s site and these great plans so I gave it a shot. Everything was pretty straightforward. I decided to use 1x6’s for the seat and back slats instead of 1x10’s. I also used dowel rods instead of wood filler to close all of the screw holes and I Roy fed the edge of the front seat slat one the router. I’m currently working on a partner for this chair with some adjustments (Making it 2” wider and using pocket hole and other techniques to hide the screws).

Estimated Cost
$40
Estimated Time Investment
Afternoon Project (3-6 Hours)
Finish Used
Minwax English Chestnut stain.
Valspar clear deck/outdoor furniture sealant.
Recommended Skill Level
Beginner

Comments

My Greenhouse

I went from a 6 x 8 Harbor Freight Greenhouse to this one 10 x 12. I added a few windows...

Built from Plan(s)

Comments

Seasonal And Holiday

Corner computer cabinet

Submitted by Anonymous (not verified) on Thu, 09/22/2016 - 11:23

Flip down tray added for computer keyboard.

Built from Plan(s)
Recommended Skill Level
Beginner

Comments

Very easy garage shelving

Submitted by Anonymous (not verified) on Sat, 11/05/2016 - 23:22

Wanted some easy storage shelving that didn't break the bank.  These were perfect!  $79 is what it cost for ours (which includes the $20 Kreg Jig).  Lumber was only $58.68 and I bought and extra 8 foot 2x4, so it could have been slightly cheaper!  

Estimated Cost
$60 for lumber
Estimated Time Investment
Afternoon Project (3-6 Hours)
Finish Used
Boxes, Totes, camping equiptment
Recommended Skill Level
Beginner

Modified TV stand

Submitted by Sb1212 on Mon, 11/07/2016 - 22:49

This measures 70in wide. I added a second shelf as well. I used plexiglass in the doors. I really love how this turned out!

Built from Plan(s)
Estimated Cost
60
Estimated Time Investment
Weekend Project (10-20 Hours)
Finish Used
Valspar Olympic Black paint satin finish
Recommended Skill Level
Intermediate

Comments

Old English Style Farmhouse Dining Table

Submitted by Anonymous (not verified) on Sun, 11/27/2016 - 06:12

First table my husband and I have ever made, and it turned out beautifully!

Built from Plan(s)
Estimated Cost
$150
Estimated Time Investment
Afternoon Project (3-6 Hours)
Finish Used
Minwax Provincial Stain, 2 Coats
Recommended Skill Level
Beginner

modern park bench

Submitted by debinmi on Sun, 09/28/2014 - 11:50

Spent an hour or so an evening after work to make this bench .  Also made the umbrella stand but haven't drilled the hole for the umbrella yet so it' s still in the garage.  Love the bench, it's long & deep enough to lay down upon.  Made the arms from a 2x6 and rounded the front w/ a jig saw, made the other end the same size as the 2x4, and made them longer than the plan. Pretty simple, did use pocket holes in places. First major build & 1st brag.

Built from Plan(s)
Estimated Time Investment
Day Project (6-9 Hours)
Finish Used
Pittsburg exterior stain in Oxford Brown
Recommended Skill Level
Starter Project
Seasonal And Holiday

Tilt Out Trash Bin

This was my first project using an Ana White plan....Modified it a bit...quite happy with how it came out...it was very low cost to make and a lot of fun.

Estimated Time Investment
Weekend Project (10-20 Hours)
Finish Used
Varathane Stain....Spring Oak
Recommended Skill Level
Beginner

A More Traditional Modern Craft Table

Submitted by Anonymous (not verified) on Thu, 01/26/2017 - 18:37

This is my more traditional take on the modern craft table (I guess that means it isn't technically "modern"!).  We call it the "Lego Table" at our house.  I doubled up the ends like others have so that my two daughters can have their own sides.  My wife asked that the there be backs on the side shelves so that items aren't pushed off.   I also added trim around the tabletop and molding to give it a bit more traditional appearance.  Finally, I made the shelves adjustable.  

Built from Plan(s)
Estimated Time Investment
Week Long Project (20 Hours or More)
Recommended Skill Level
Intermediate

Basement Play Gym

Submitted by Anonymous (not verified) on Fri, 01/08/2021 - 05:51

With Christmas approaching and the realization that my three young boys had way too much “stuff”, I enrolled the help of my dad to build this amazing basement play area. When I found Ana’s plans for the play gym with monkey bars, I knew we were in business. I modified the design to fit our space and we were off. Such a fun build and my boys absolutely love spending time down there. Thanks so much for your continued inspiration and the confidence you give us mamas to build with the big boys, Ana!!

Estimated Cost
$1000
Estimated Time Investment
Week Long Project (20 Hours or More)
Recommended Skill Level
Intermediate

Comments

Farmhouse Workbench with Tool Storage

Submitted by vendo on Thu, 01/28/2021 - 10:47

I took Ana's Farmhouse potting bench plan and made it a workbench with some mods. I added the tool storage and adjusted it for different widths depending on the tools. I added some support under the tabletop to attach the tool storage piece. On the ends, instead of the X detail I built shelves for each end for added storage for screws and paint. Finally the pegboard back allows for more storage! The height is consistent with the height of my chop saw on my other workbench for when I need to chop longer boards. I am very happy with how this project turned out and it is now full and in use!

Built from Plan(s)
Finish Used
Briarsmoke by varathane
Recommended Skill Level
Starter Project

Comments

susan_c95

Mon, 02/01/2021 - 09:26

I agree totally with ladybug’13! What great modifications to this bench for tool storage and organization! I also love that it’s on casters to easily move it where needed. Great job!!!

Freestanding Bar

Submitted by Anonymous (not verified) on Mon, 04/10/2017 - 18:56

A twist for a smaller space, the stained wood is old heart pine reclaimed from a 1875 house in Savannah, GA. 

Built from Plan(s)
Estimated Cost
$120
Estimated Time Investment
Week Long Project (20 Hours or More)
Finish Used
Danish oil
Recommended Skill Level
Intermediate

Comments

Backyard Bliss!

Submitted by kdins31 on Mon, 01/12/2015 - 09:26

I built this outdoor play area for my kids this past summer.  The area under that portion of the deck was always messy and muddy and so I wanted to make use of it.  I built the deck and anchored it with lag bolts to the deck supports.  On the one side I used rubber mulch and on the other there is play sand.  I dug holes in various locations and filled with gravel to allow for drainage under the sand and mulch.  For the awning I used plain cedar shingles.  I added a shower that is just regular 1/2" metal pipe with a hose adaptor.  The shower wall and fence are just old pallets that I had for a while, cut to size, which was pretty much random but they came out great.  I added a misting system under the awning that works great, the kids love the cool mist on the hot days. Overall, a heavy job ripping up the grass, moving the wood, gravel, stones, sand and mulch, but a fun deck build and even better experience doing this with my kids by my side!  

Estimated Time Investment
Week Long Project (20 Hours or More)
Recommended Skill Level
Intermediate

Comments

Einman10

Tue, 12/29/2015 - 17:10

I'm extremely interested in the plans for the bathroom vanity with the step stool that pulls out for kids to be able to reach the sink.  Is there a way I can get those plans?

Our Daughter's Playhouse

Submitted by jhedlund on Fri, 03/22/2013 - 06:17

We built this in early 2013. We ended up turning the house 90 degrees on the deck, because the slide worked best off the backside of the deck due to the various heights around the deck. The sloped back yard caused some challenges, but in the end it's a very sturdy deck with the cross beams attached. Thanks for posting these plans online for us, our 3 daughters are loving the playhouse and swingset! Here are some more pics of the project: http://www.flickr.com/photos/11031534@N00/sets/72157633009259873/

Estimated Time Investment
Week Long Project (20 Hours or More)
Recommended Skill Level
Intermediate

Comments

sgilly

Fri, 03/22/2013 - 15:07

Of course your girls love it - it's fantastic! Great job.

Robinwood

Fri, 03/22/2013 - 16:39

Love this - my grandson's back yard is too small to build something like this; which is why we had to settle for his loft bed airport/clubhouse.

slug

Thu, 06/27/2013 - 05:24

I'm planning on building two A-Frames and no playhouse, so my questions are focused there.

Did you do any modifications to swing portion of the plans?
Is it sturdy enough for an adult to swing on as well?
It looks like you put the posts in the ground, did you cement them in too?
How high off the ground is the bottom of the support beam for the swing?
Is there any issue side-to-side swaying?

Seasonal And Holiday

I'm pretty proud of myself

Submitted by Anonymous (not verified) on Mon, 05/01/2017 - 10:17

Pretty straight forward plans.

Built from Plan(s)
Estimated Cost
$350
Estimated Time Investment
Weekend Project (10-20 Hours)
Finish Used
Shou Sugi Ban/ Tung oil
Recommended Skill Level
Beginner