Community Brag Posts

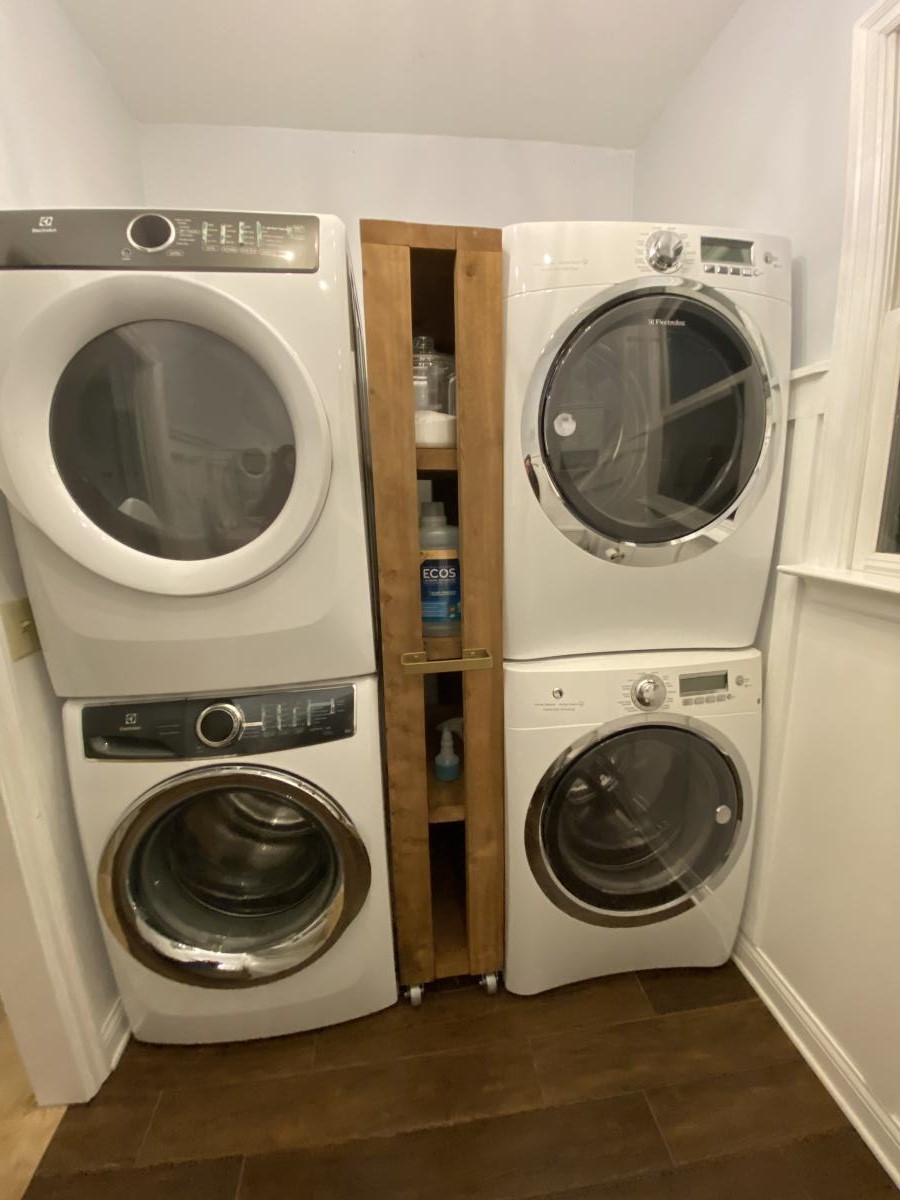
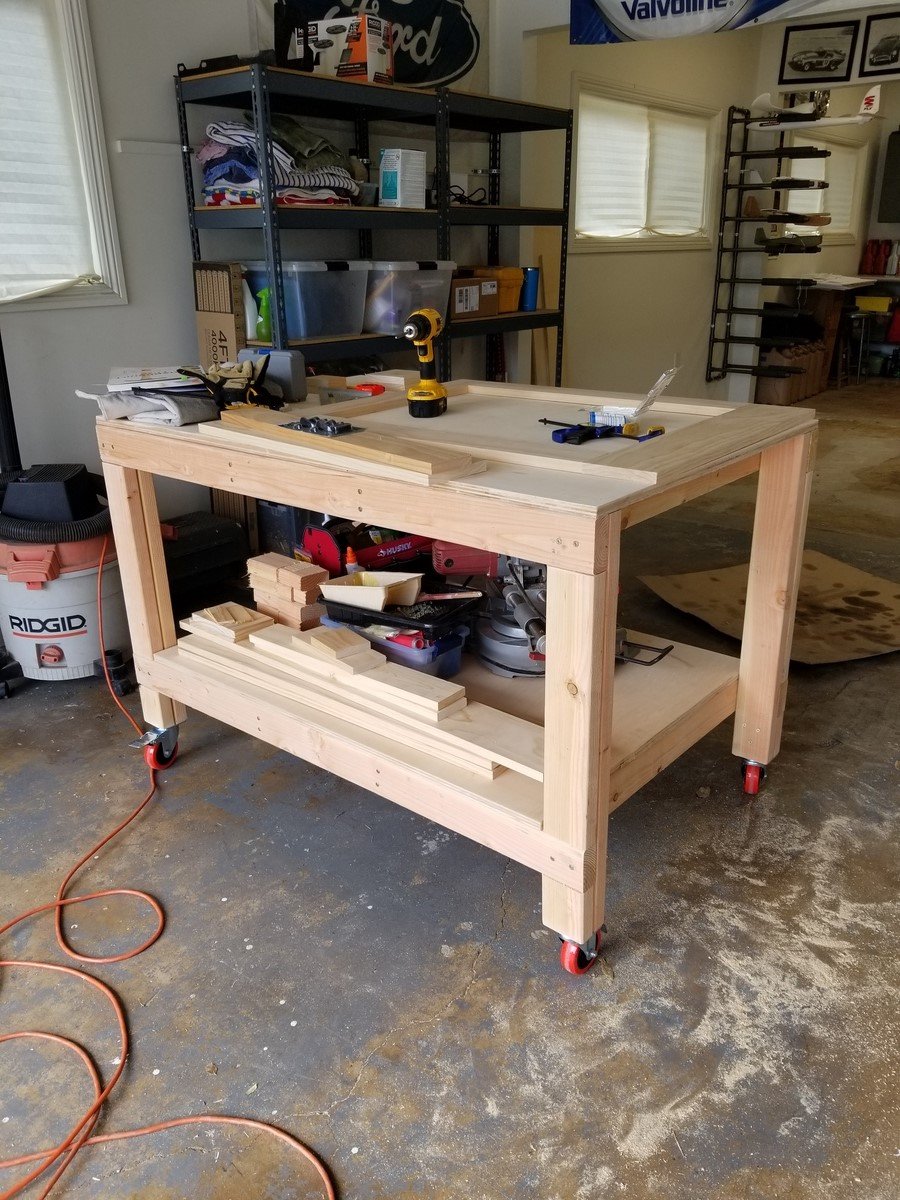
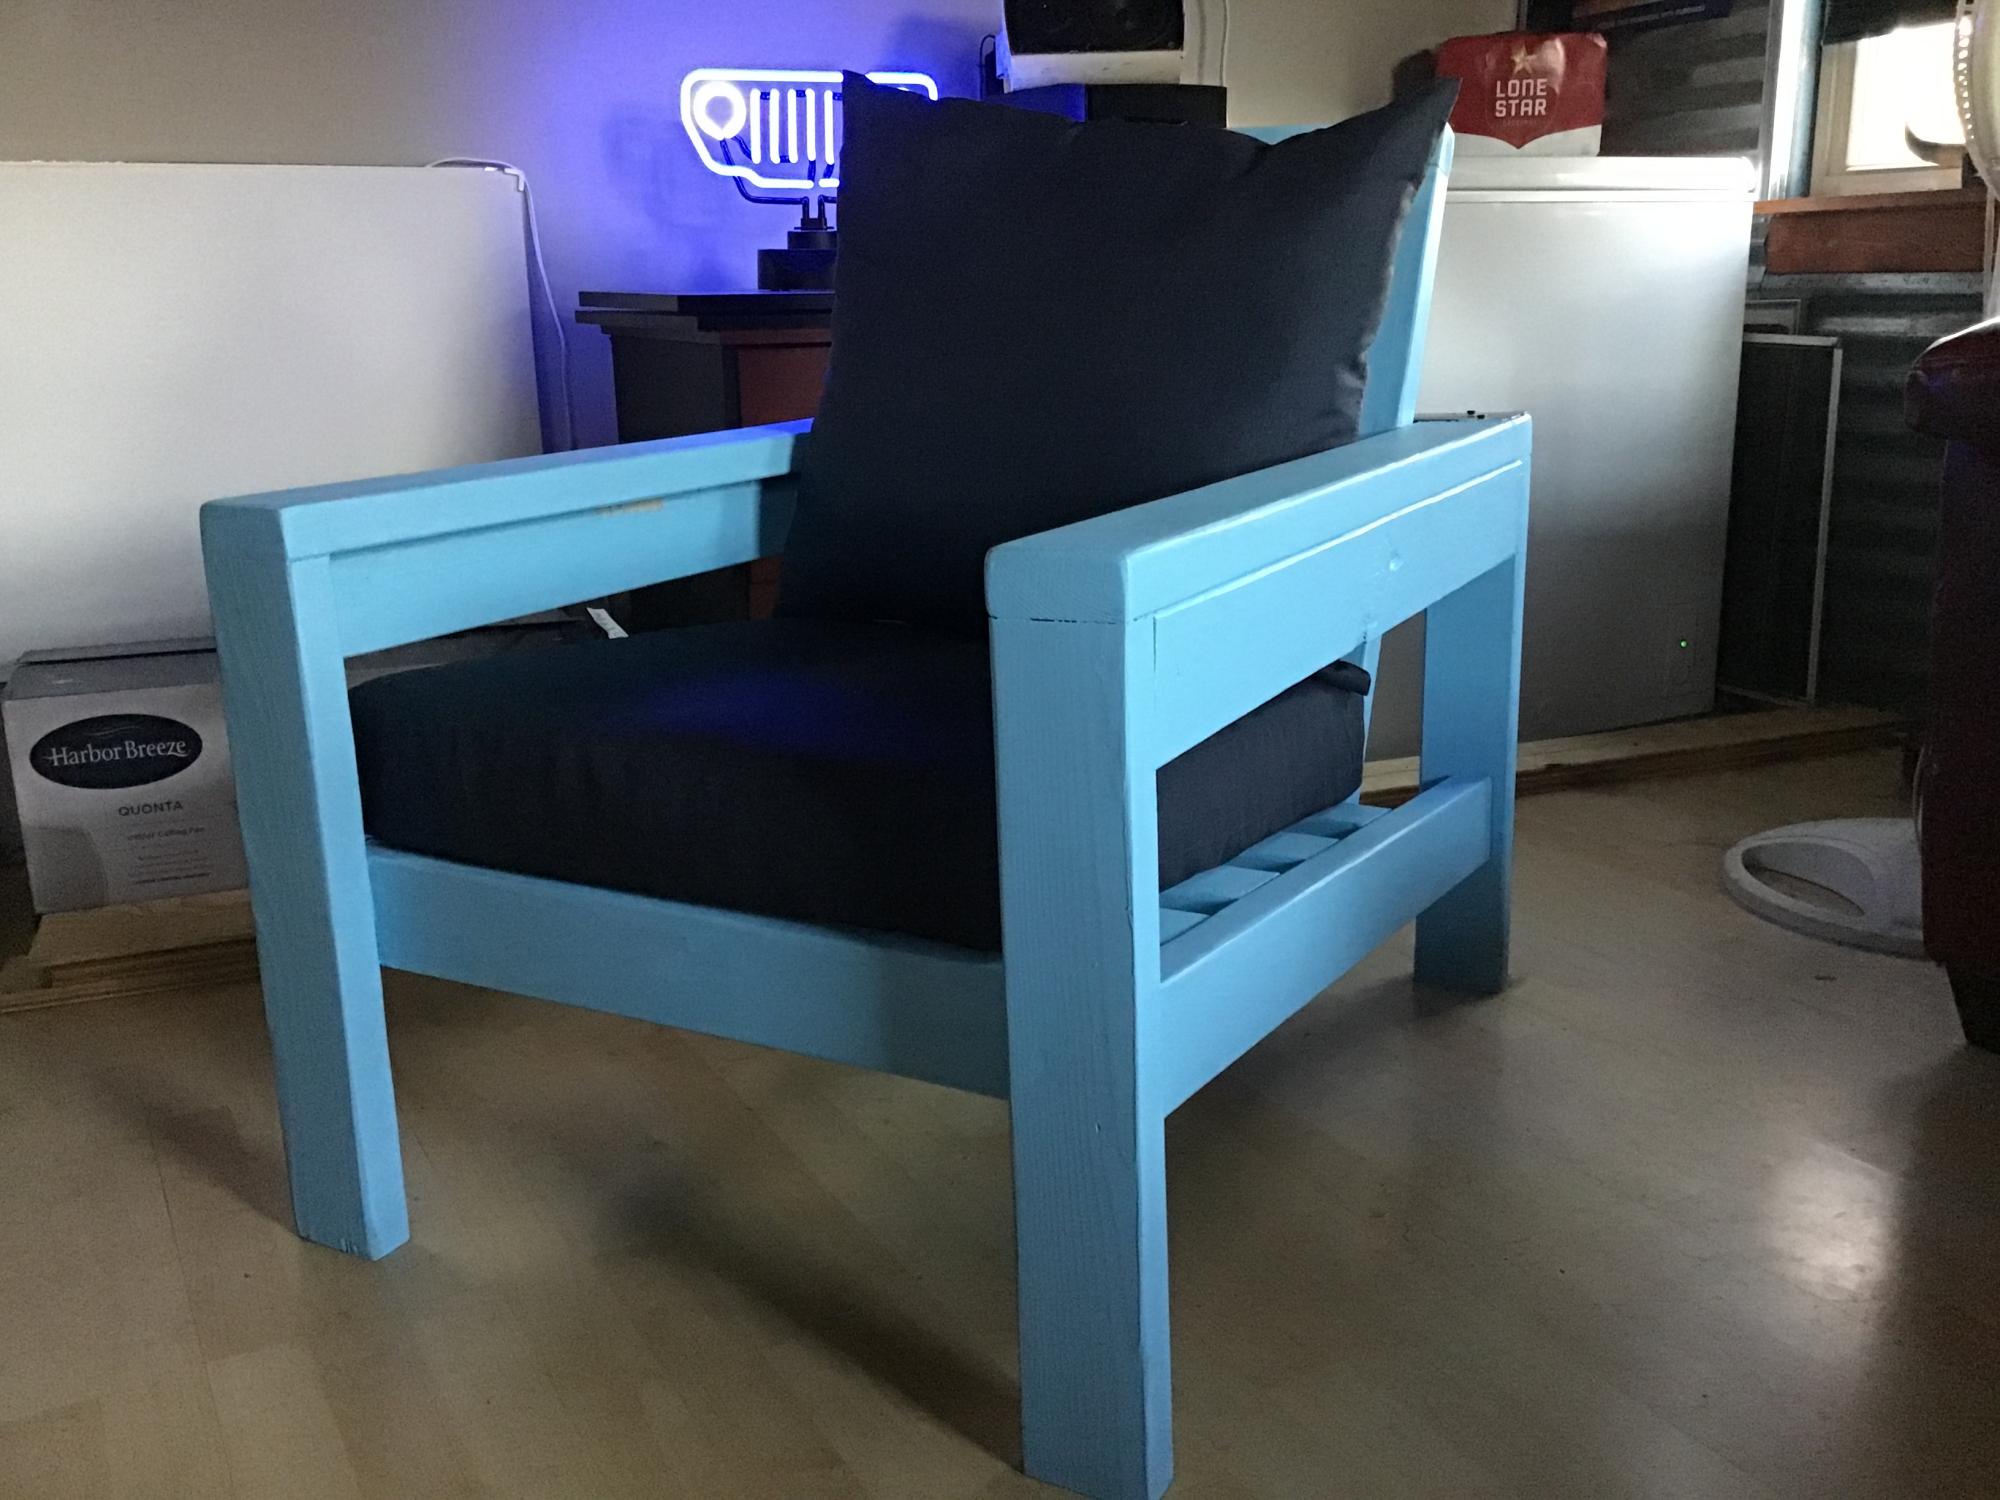
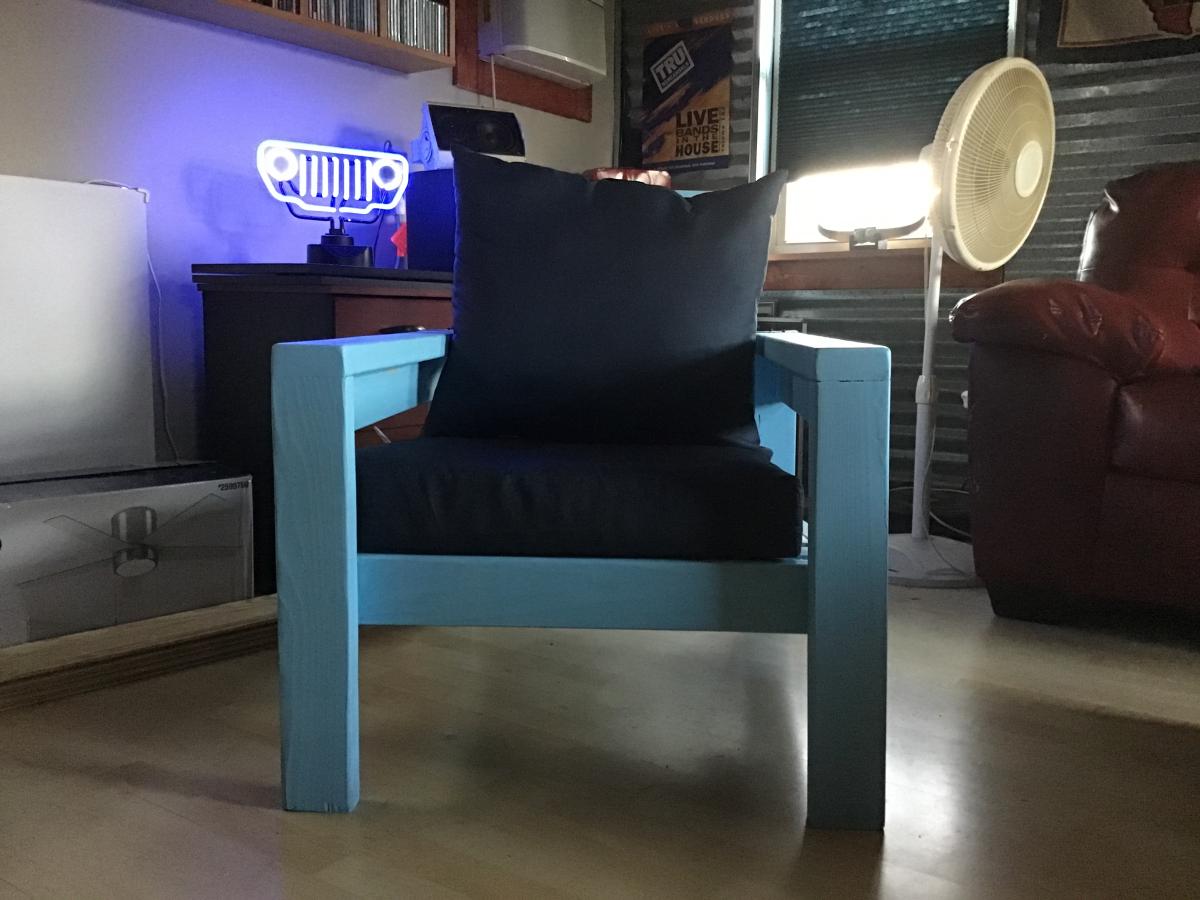
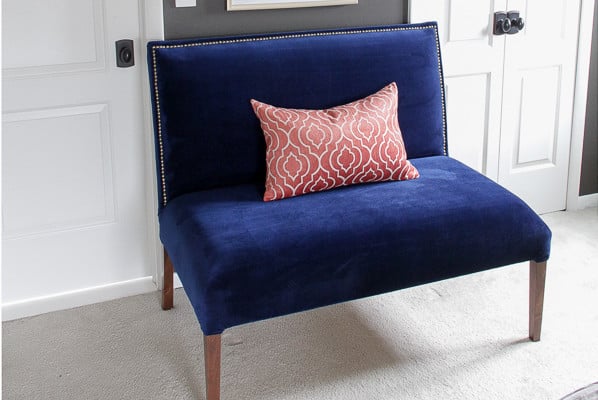
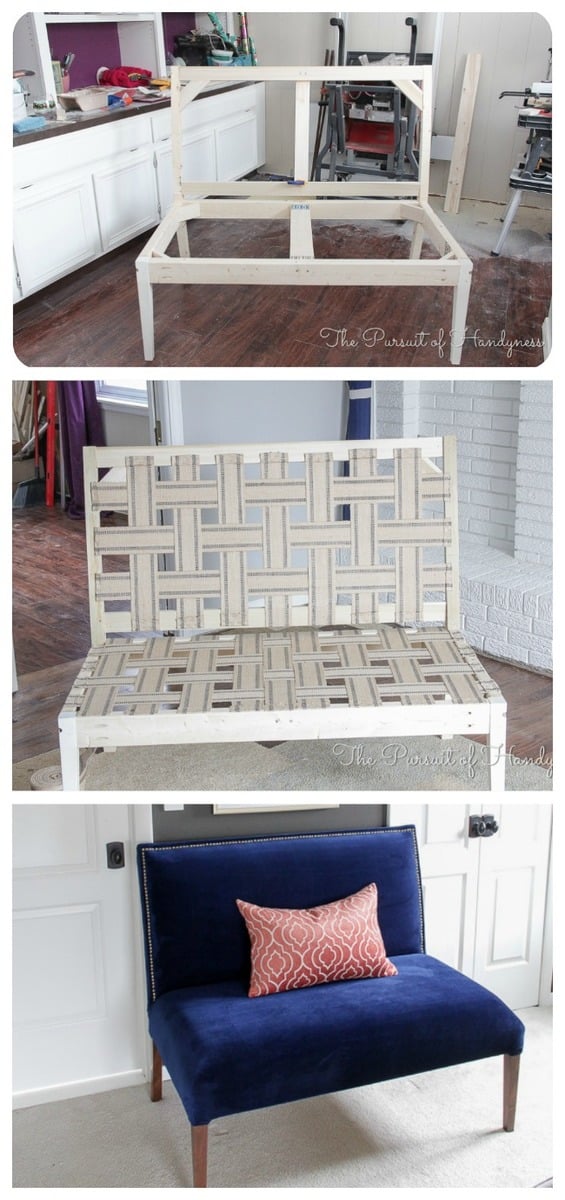
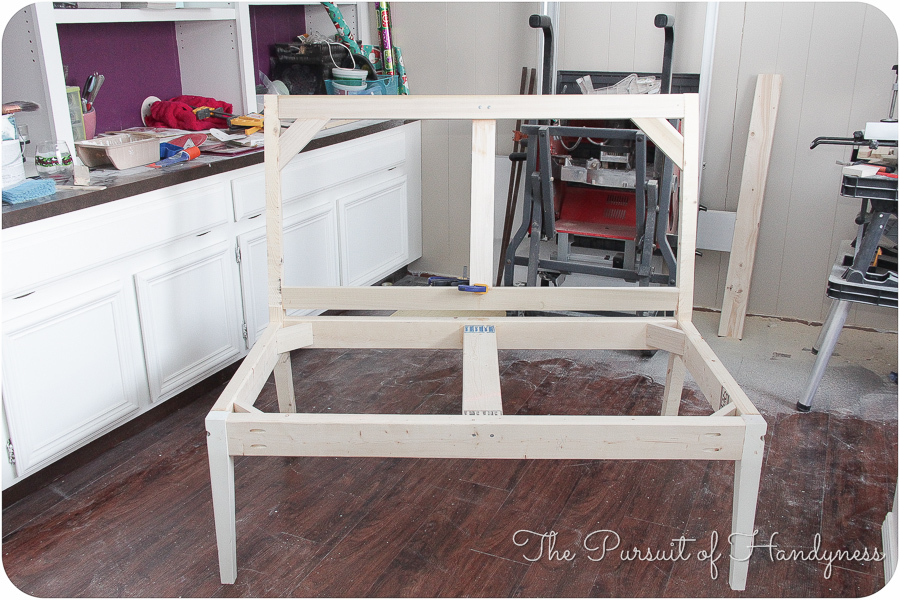
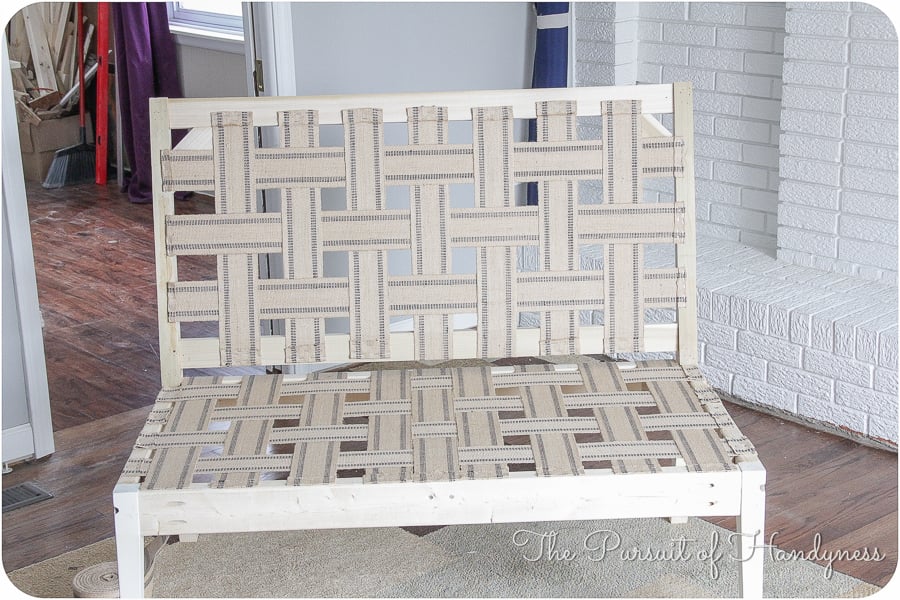
Rolling shelf turned laundry cart

Submitted by makermave on Sun, 11/21/2021 - 16:17

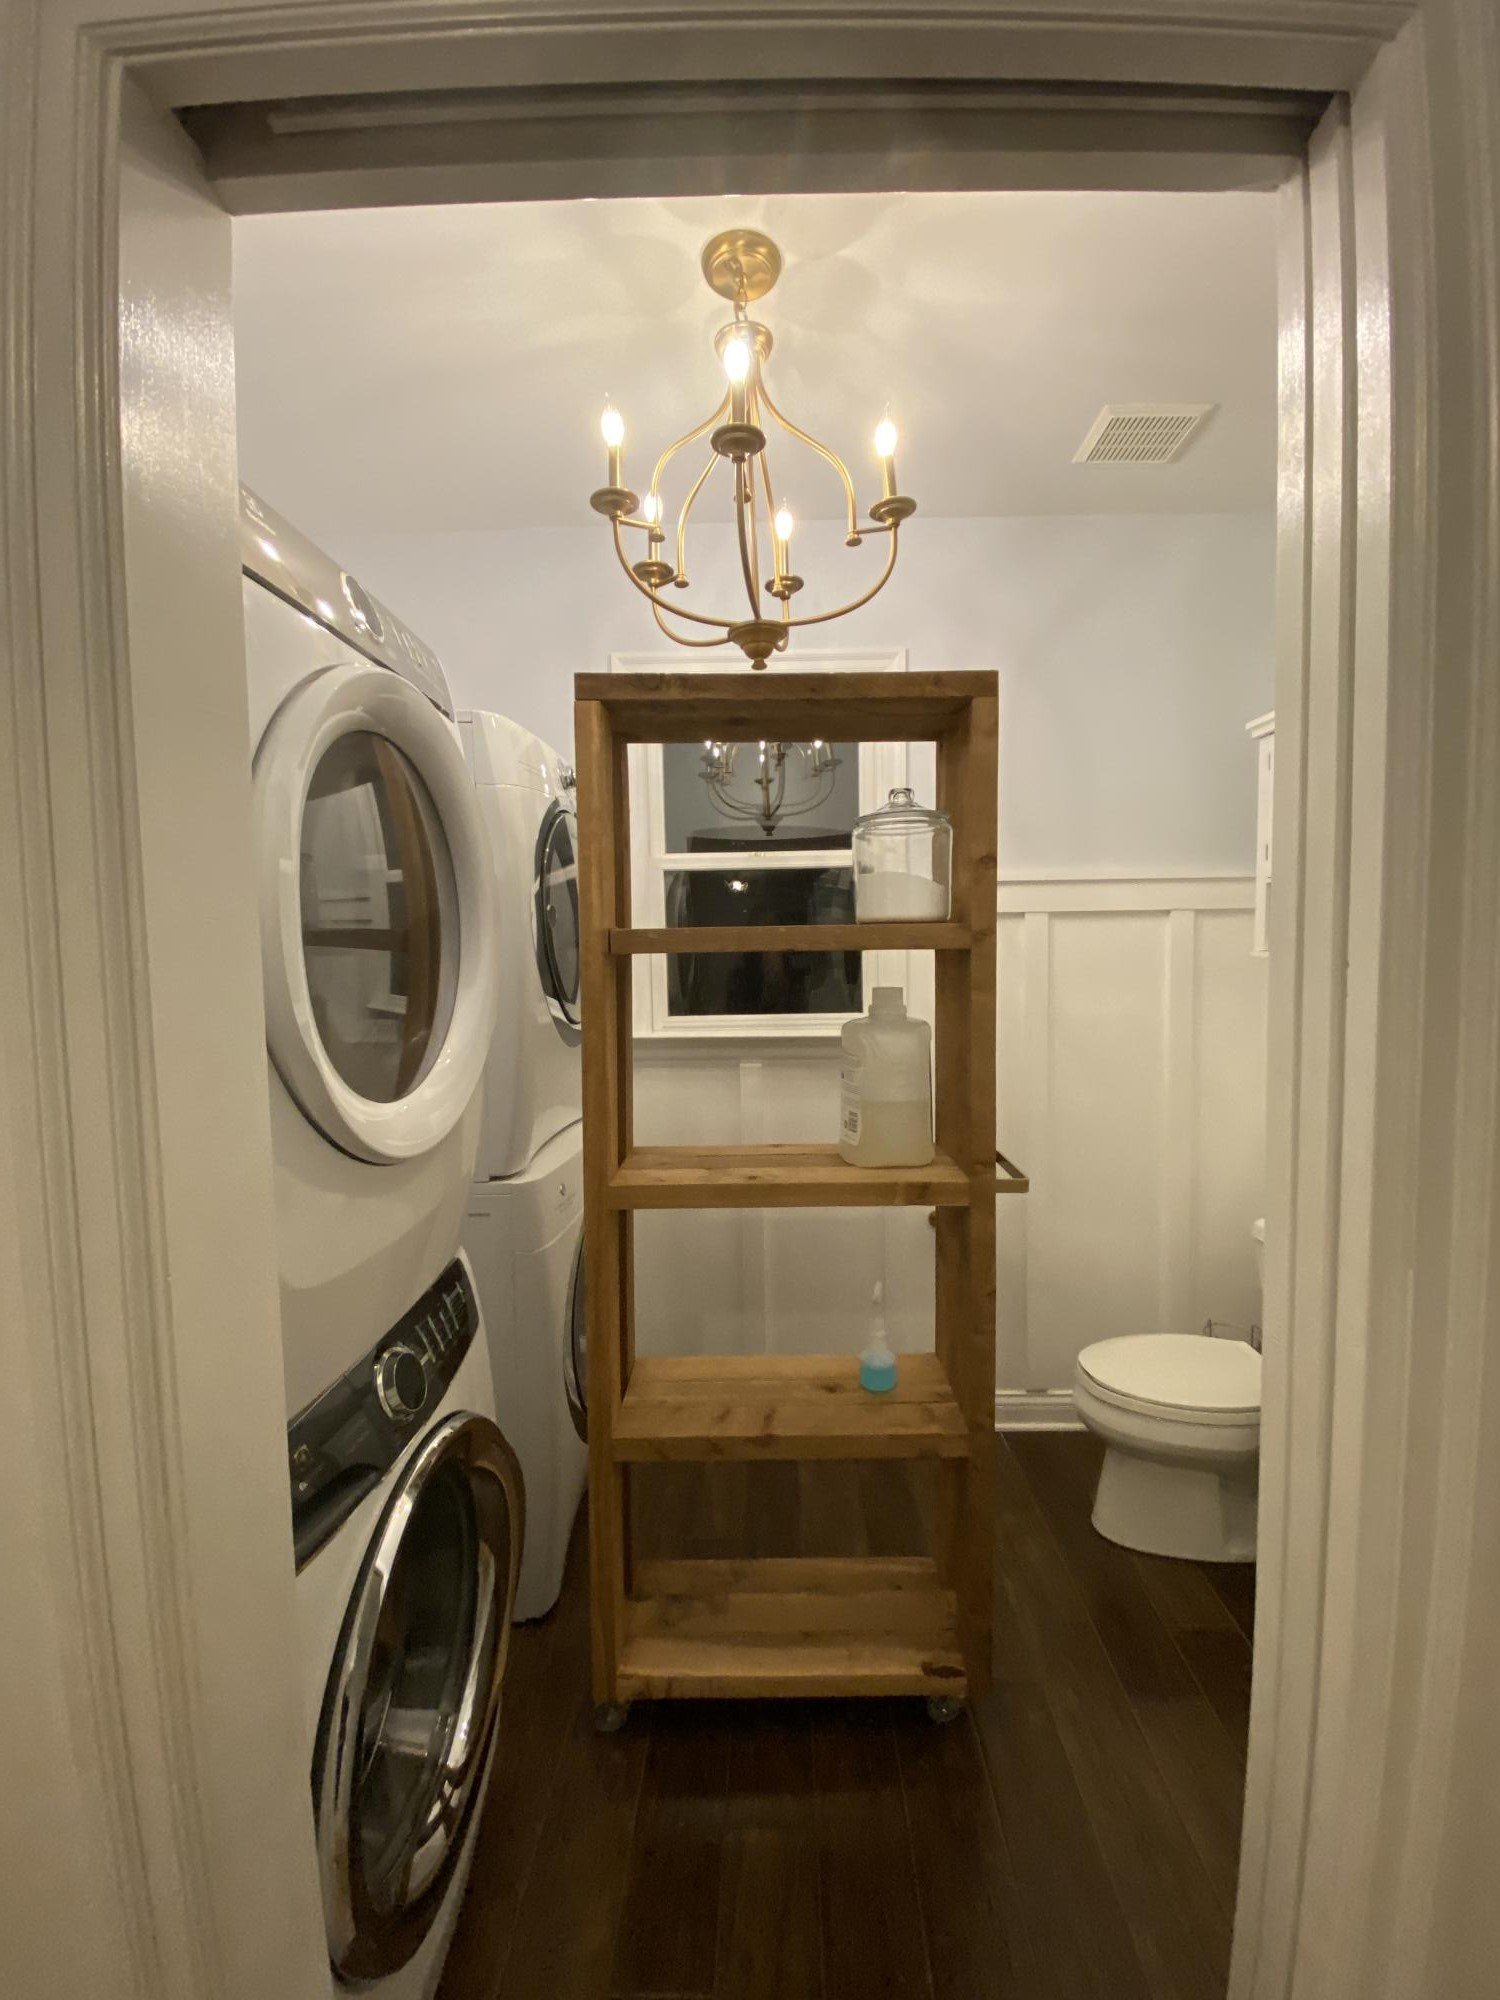
This is my first build! It came together really easily. I modified the dimensions to fit my space. I didn’t add the black pipes, simply because I couldn’t find all the pieces, or the corner brackets, and I think it looks great without them. I added a handle (a towel bar I found on Etsy) to pull it in and out. I used rough cut cedar, and have not finished it. I’m not sure if I will. I wanted to spray paint the wheels, but the person that helped me attach them (a.k.a. my dad) was ready to to help me before I had them painted! But I love it, and it really adds functionality and stoage to this little gap between our washers and dryers.

Built from Plan(s)

Comments

Faux Fireplace with Hearth

We made some modifications by adding a hearth for additional height (the room we have it in is very large and open) and joining 2x4s for the mantel and base which I stained grey for contrast. We decided to use thin brick for in the "firebox" to make it look more realistic. We also have a newborn and spent over two months putting it together a little at a time in our free moments so I'm not sure how long it would actually take to do at once, but cutting and putting up the brick was very time consuming. 

Estimated Cost
$250
Estimated Time Investment
Week Long Project (20 Hours or More)
Finish Used
White paint, Minwax "Classic Grey" stain
Recommended Skill Level
Beginner

Comments

westmoundstar

Thu, 08/27/2020 - 11:16

This looks great! I'm actually in the middle of this build with the hearth as well. Couple questions....
How did you connect the two pieces? Also, did you connect to the wall? I'm assuming you didn't leave the 5 1/2 inch gap on the bottom of the fireplace and connected direct to the hearth. Let me know, thanks!

Seasonal And Holiday

OUTDOOR SOFA

Decided to build Ana's outdoor sofa for our Master Balcony and love the results. I was a bit impatient to finish the build and therefore did not take the time to use pocket screws for a more finished result, (which I will do next time). Regardless, I love how the sofa turned out and would reccomend for anybody to build. The cheapest outdoor cushions I could find were from Ikea and we spent around $160.

Built from Plan(s)
Estimated Cost
$100 BUILD, $160 CUSHIONS
Estimated Time Investment
Afternoon Project (3-6 Hours)
Finish Used
OUTDOOR STAIN
Recommended Skill Level
Beginner

My take on the chicken coop design

Submitted by Anonymous (not verified) on Thu, 12/30/2021 - 13:01

When we became accidental chicken owners, we had to build a coop fast. I found the plans for Ana’s replica of the Williams Sonoma chicken coop and got to work. They were very easy to follow and easy to modify to fit our own needs and aesthetic. We decided to enlarge the coop and remove the planter in the original plans do we could accommodate more chickens while keeping the original footprint. Instead of plywood, we used cedar reclaimed from an old fence we had recently replaced. We also enlarged the rear door to make clean out as easy as possible. I cut pieces of corrugated plastic that fit inside the door and windows to winterize the coop when temps drop below freezing. The run is designed to follow the shape of the coop and is large enough to give our 5 chickens plenty of space. The planter box runs the length of the chicken run, providing some plants to munch on inside and shady vines that will eventually cover the outside. Thanks for the awesome plans!

Comments

Tall Bedroom Dresser

Had a blast with this project and am getting more confident with drawer slides. I built a matching dresser that is much shorter and wider. It can be found here: http://www.ana-white.com/2018/08/DIY_furniture/bedroom-dresser

Estimated Cost
$150-$200
Estimated Time Investment
Weekend Project (10-20 Hours)
Finish Used
Varathane Weathered Wood Accelerator, Varathane Poly
Recommended Skill Level
Advanced

Comments

hutchingslv

Thu, 08/12/2021 - 15:35

Any way to get a copy of these plans? I really like the look and want to give it a shot. Have to make a few of these if all goes well for all my boys.
Thanks

A Frame Chicken Coop

Submitted by emwasson on Sat, 11/14/2015 - 22:28

    I love how my co-op turned out! I added a few things. I made a door for egg collecting, I built 2 nesting boxes. I made a door for access to food and water and I made the middle 2x4s 10 feet so we found move it around the yard. It cost about $130 for me. I had some extra wood that I used for the boxes and ladder. The chickens and myself are enjoying the new coop.

Built from Plan(s)
Recommended Skill Level
Beginner

Comments

Workbench modified with casters

Submitted by ogie287 on Tue, 04/02/2019 - 20:06

I love this workbench! I added casters so I can move it around the garage, outside, wherever it's needed. I just took 4 inches off the bottom of the legs. My hubby is admiring my handy work and planning on making one for himself.

Estimated Cost
$130
Estimated Time Investment
Afternoon Project (3-6 Hours)
Finish Used
None
Recommended Skill Level
Beginner

Comments

JBeecher

Wed, 01/25/2023 - 14:31

Love this with the casters! So beautiful. I'm new here and wondering at what point you took 4 inches off the legs. Did you build the table and then just cut off the legs? Or did you adjust the measurements of the cuts? Thanks in advance! :)

JimCoz516

Mon, 01/30/2023 - 02:32

The overall height of a 4-inch caster wheel is a little over 5 inches with the mounting bracket, so that also needs to be taken in to consideration. 2nd photo shows the overall dimensions, but to me the bracket and brake area appear to be a bit more than 1.03 inches. https://amzn.to/3DkMKzB
I think the best bet would be to have and measure the overall wheel height, prior to measuring and cutting the lumber.

My simple Outhouse

Submitted by Anonymous (not verified) on Wed, 07/31/2019 - 17:14

<p>I worked on this for about 2 weeks in my free time. I modified the original plans from this site to accommodate my needs. I just wanted a “#1” only place near my pool so I didn’t have to dry off and walk all the way up to the house. The trash can is for the TP and I will just toss it when I need to. I used a traffic cone as a pee funnel and attached&nbsp;tubing to the end of the funnel&nbsp;that I buried down along the slope of my yard against the fence line.&nbsp;I ended up adding an area for boys since I didn’t want the inside all gross. I added solar deck lights to the outside and a light inside too.&nbsp; It turned out amazing!!!</p>

Built from Plan(s)
Estimated Cost
$300
Estimated Time Investment
Week Long Project (20 Hours or More)
Finish Used
Varathane Premium fast dry oil based stain in the color “Ipswich Pine” and Varathane Ultimate Spar Urethane oil based in clear satin. One coat of each.
Recommended Skill Level
Intermediate

Comments

Farm House Table and Bench

Submitted by Anonymous (not verified) on Fri, 05/05/2023 - 08:52

My first chair

Submitted by Anonymous (not verified) on Mon, 05/15/2023 - 05:16

Thank you Anna for designing such beautiful plans, and making them available for free. My husband likes the chair so much he doesn’t want it outside! I guess I’ll have to make a few more for our deck.

Comments

Kitchen Cabinets

Submitted by Anonymous (not verified) on Wed, 10/02/2019 - 21:30

I followed the kitchen cabinet building plans to build all new upper cabinets up to my ceiling. I built all new drawers with soft close drawer slides also and built the refrigerator enclosure cabinet.I did the entire remodel myself including the new doors out of MdF.

Finish Used
Emerald urethane paint
BIN Shellac Primer

Comments

Ana White

Tue, 11/05/2019 - 10:41

We are so thrilled to let you know your entry WON the Best Brag contest!  There were many amazing entries, and it was tough to choose.

Look out for an email from us shortly!

Farmhouse King Bed Frame

Since developing a love for woodworking I’ve began building things for other people. This particular bed frame I built for a couple who are rebuilding their home after it unfortunately burned down. It’s a beautiful farmhouse home out in the country, and this bed frame fits perfectly in their new home.

Estimated Cost
$250
Estimated Time Investment
Weekend Project (10-20 Hours)
Finish Used
I used minwax pre-stain to prepare the wood. I then stained it using special walnut by Varathane (got it from The Home Depot). Finally, I finished it using a clear satin polyurethane by Minwax.
Recommended Skill Level
Beginner

3 Square Picnic Tables!

I built 3 of the square picnic tables, as we have a large extended family. I enjoyed the project and the results. I did end up adding a cross brace and some metal clips, they added a little more strength for the table when it was full of people.

Thank you for sharing your plans.

Rick

Built from Plan(s)

The Gíaffe TV Stand

Submitted by Anonymous (not verified) on Thu, 02/06/2020 - 09:55

The Gíaffe Free Standing TV Mount. Handcrafted and engineered to use its center mass to deliver strength and balance for tv sizes 30-60". Display your television without detracting from your home's decor. The Gíaffe Free Standing TV Mount is the perfect solution and its rich finish will be perfect for any house/office room.

Estimated Cost
$109
Estimated Time Investment
Day Project (6-9 Hours)
Finish Used
Stain - Dark Walnut - Varathane - 2 Coats
Finish - Water Based Polyurethane - Varathane - 3 Coats
Recommended Skill Level
Intermediate

Comments

Concealed Wall Desk for Computer

Submitted by Gabie on Mon, 11/20/2023 - 10:51

I built this fold-up desk, out of sheer necessity. It's rather unassuming when closed, yet fully functional when open, with built-in power outlets and light, a large screen, a nook for the laptop and the chargers, etc. It's tailored to my needs and specific size limitations, but I think you could make a great general plan of it for anyone needing a small-space hideaway desk.

Apothecary Coffee Table

I am happy with how this turned out, but I did run into a couple of problems while building this. First of all there is a typo in the cut list. It says to cut the drawer sides 23 and a quarter inches, but they need to be 21 and 3/4 inches. I built the drawer to deep and then had to take it apart and cut the sides down. Then the drawer was ever so slightly too wide to fit under the table after I put the L-brackets on (which are definitely needed to make the table sturdy enough.) So I had to make a little room under the table by taking the sides back off and adding a little piece of wood as a spacer on either side.
Also I decided to use poplar for the top just to make it a little more dent resistant because poplar is a hard wood. But after I started staining it I learned that poplar acts like a soft wood and can be very blotchy when stained. I had to keep going darker with the stain to try and make it even. It came out okay in the end.

Estimated Cost
$120 for wood.
Estimated Time Investment
Weekend Project (10-20 Hours)
Finish Used
For top and inside of drawer: Minwax prestain, minwax special walnut - 3 coats, minwax poly in gloss - 3 coats. For the rest I used glidden white primer and white paint plus a coat of polycrylic.
Recommended Skill Level
Intermediate

Diy Upholstered Settee

I started off with Ana's plans and kinda went rogue from there. The idea of creating those curved back legs scared me so I thought I'd sacrifice an Ikea dining chair and use it as the legs. When I ruined one of the legs I decided that I'd come too far to back out and that I must continue. I adapted many conventional methods to make the settee but I'm super pleased with the outcome. For the full step by step on how I completed the settee, please check it out here Part 1 Part 2 Part 3


Built from Plan(s)
Estimated Cost
150
Estimated Time Investment
Weekend Project (10-20 Hours)
Finish Used
Rustoleum Ultimate in American Walnut, Rustoleum Ultimate Polyurethane in Satin.
Navy Blue Upholstery Velvet, French Natural Nailhead Trim.
Recommended Skill Level
Intermediate

Comments

Pallet Wood Planters

Submitted by Anonymous (not verified) on Mon, 04/01/2024 - 09:40

Did them for a friend that owns a bakery.
I don't have access to new lumber unfortunately.
The bulk of what I make is pallet. That's why there are four instead of 3 slats.
Same plan though. Pretty easy to follow.
I did add some handles to make it easier to move
since they will be brought in and out daily.

Yun

Outdoor sectional and coffee table

Submitted by Rynhffr on Mon, 07/06/2020 - 21:06

Loved these plans! Was my first project I tackled trying my hand with a new hobby of wood working to stave off quarantine craziness :-) finished project looked awesome and got me started working on other plans on the site.

**note**
Side table was just sanded and refinished, wasn't built just tried to match.

Estimated Cost
400
Estimated Time Investment
Weekend Project (10-20 Hours)
Recommended Skill Level
Beginner
Back