Community Brag Posts

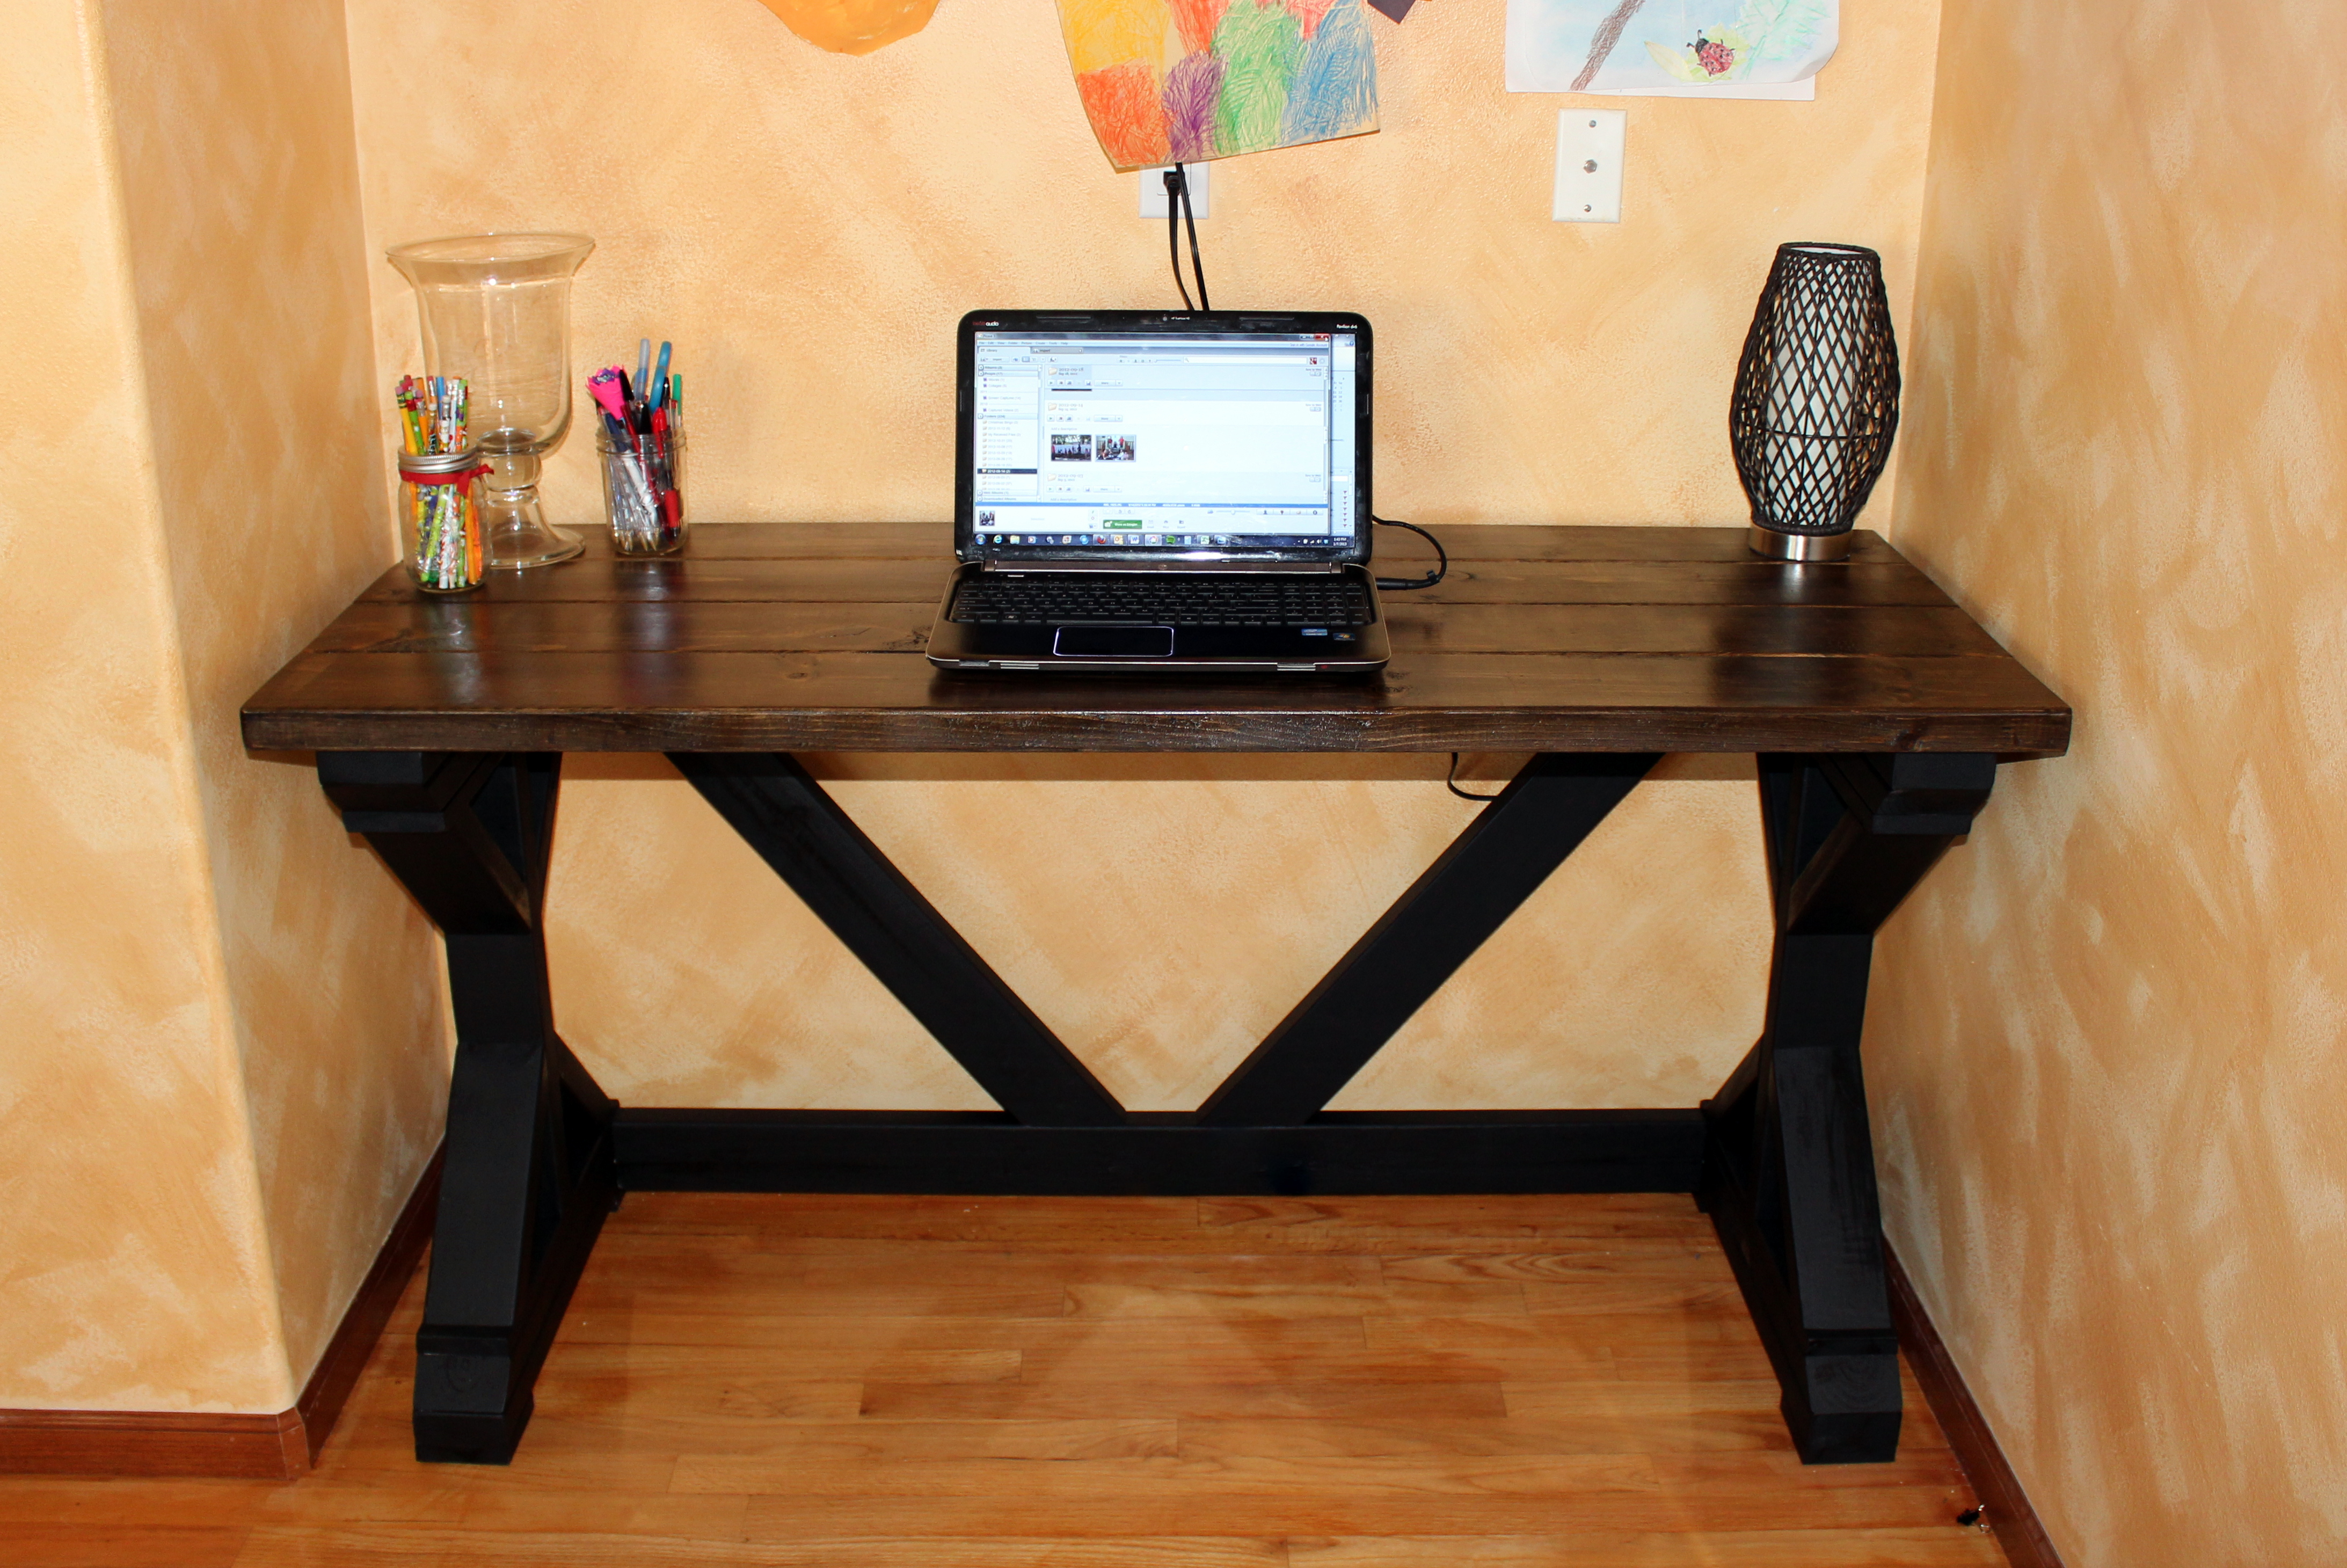
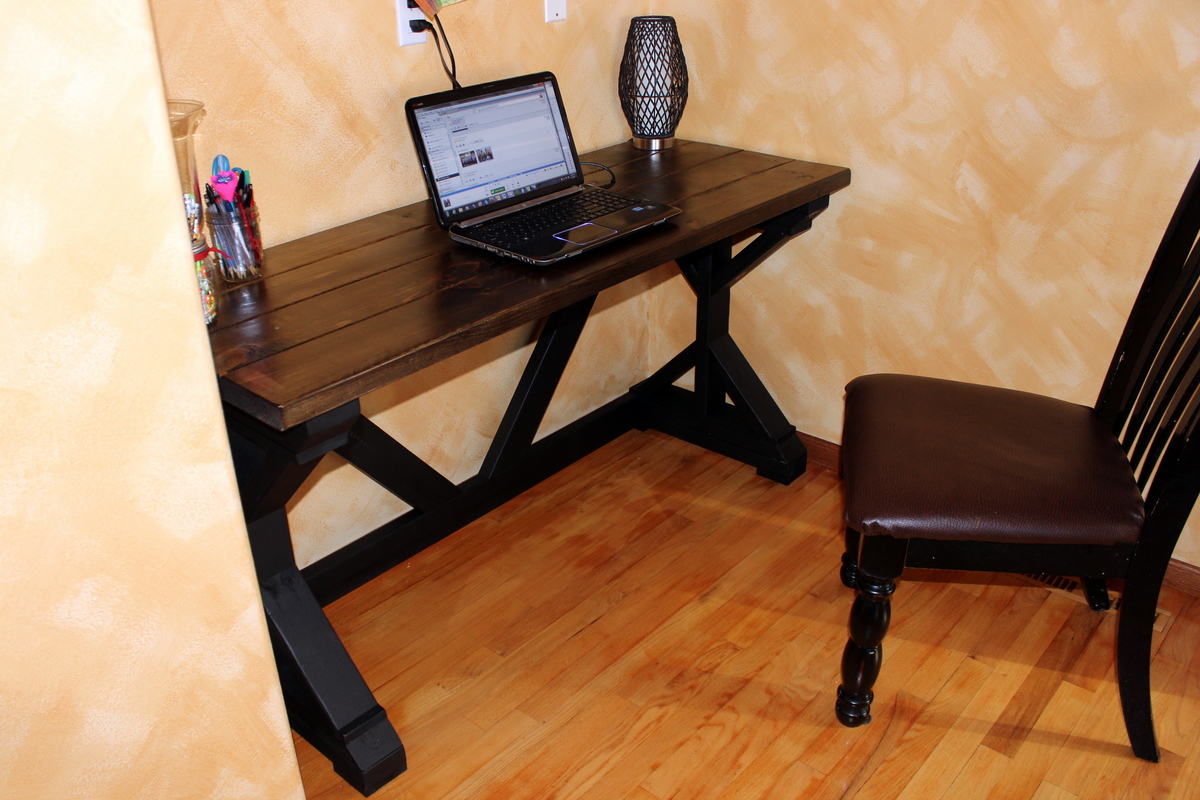
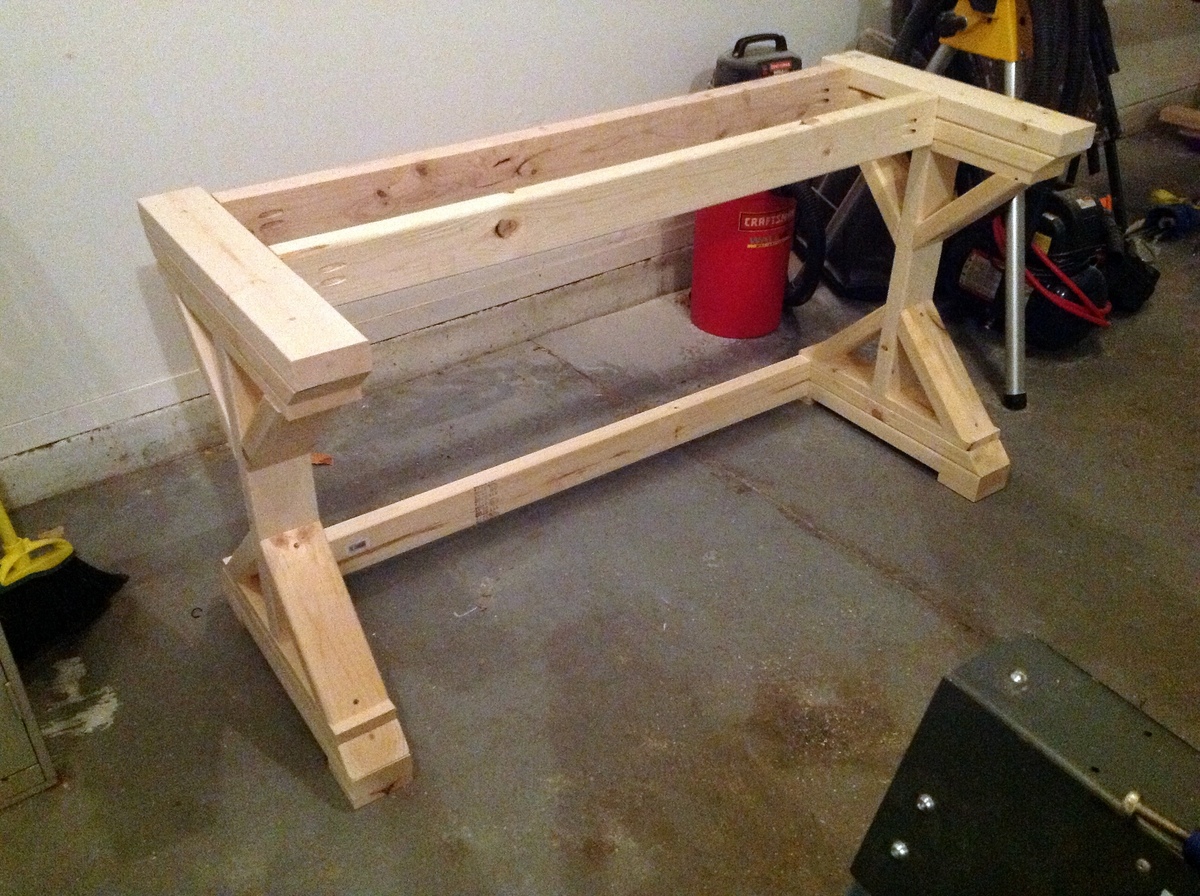
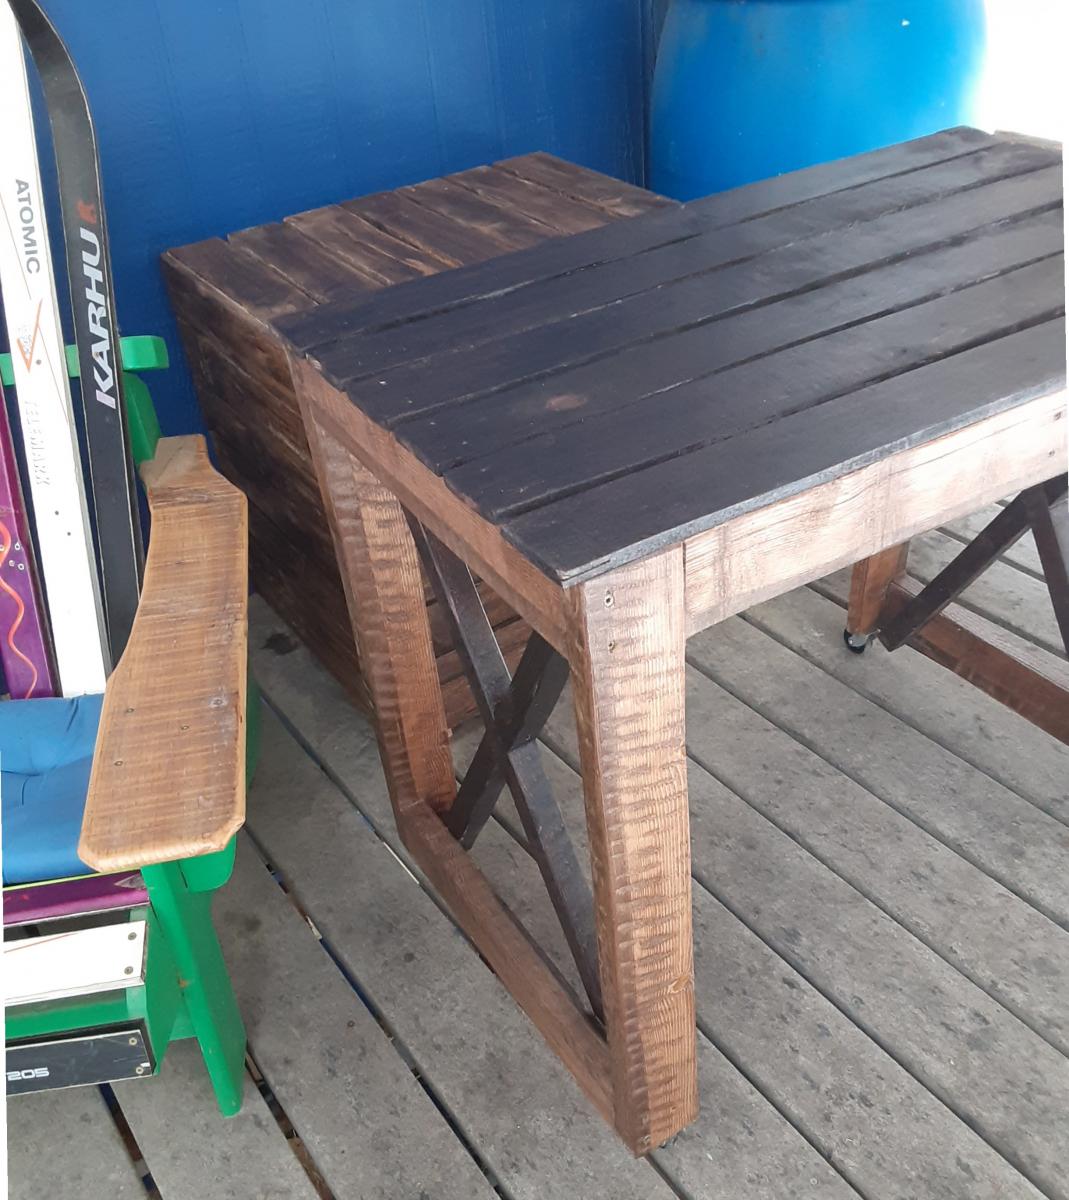
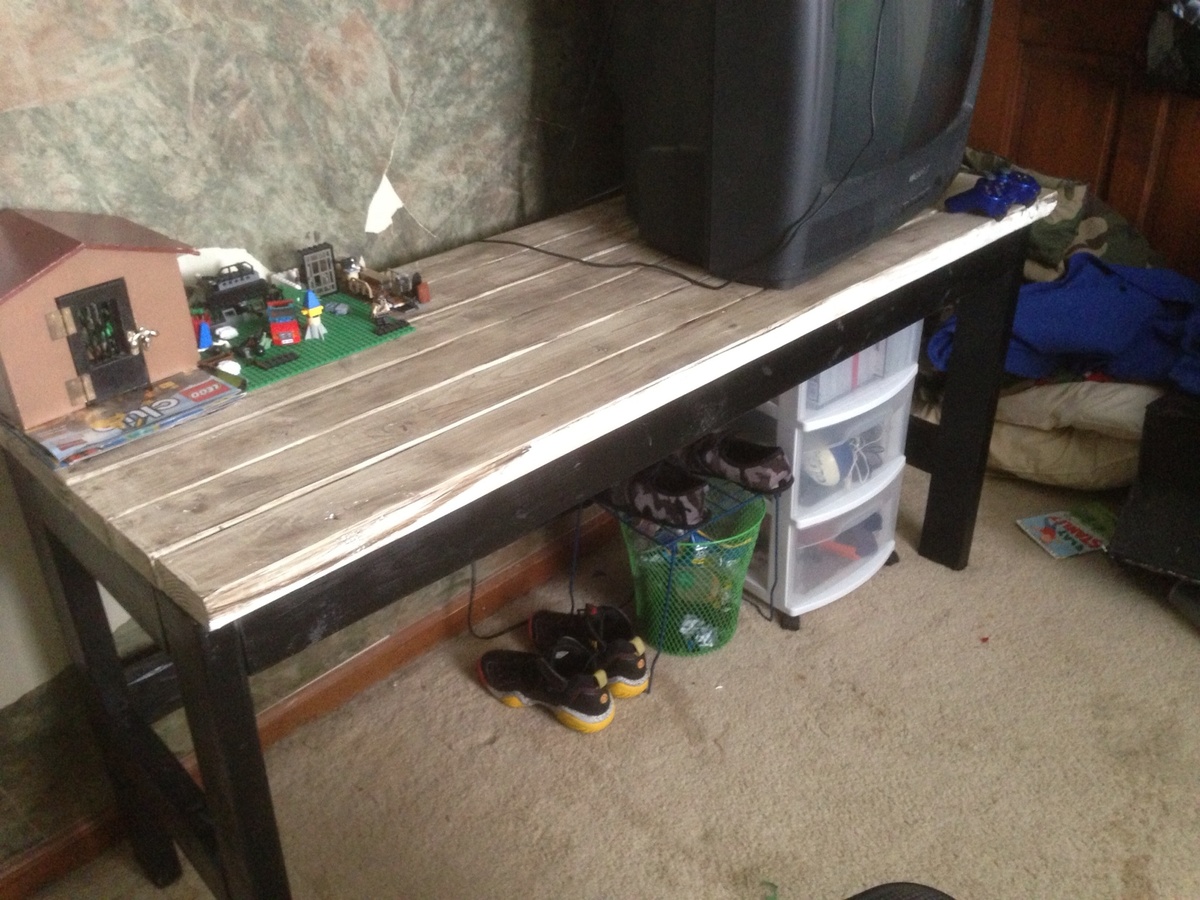
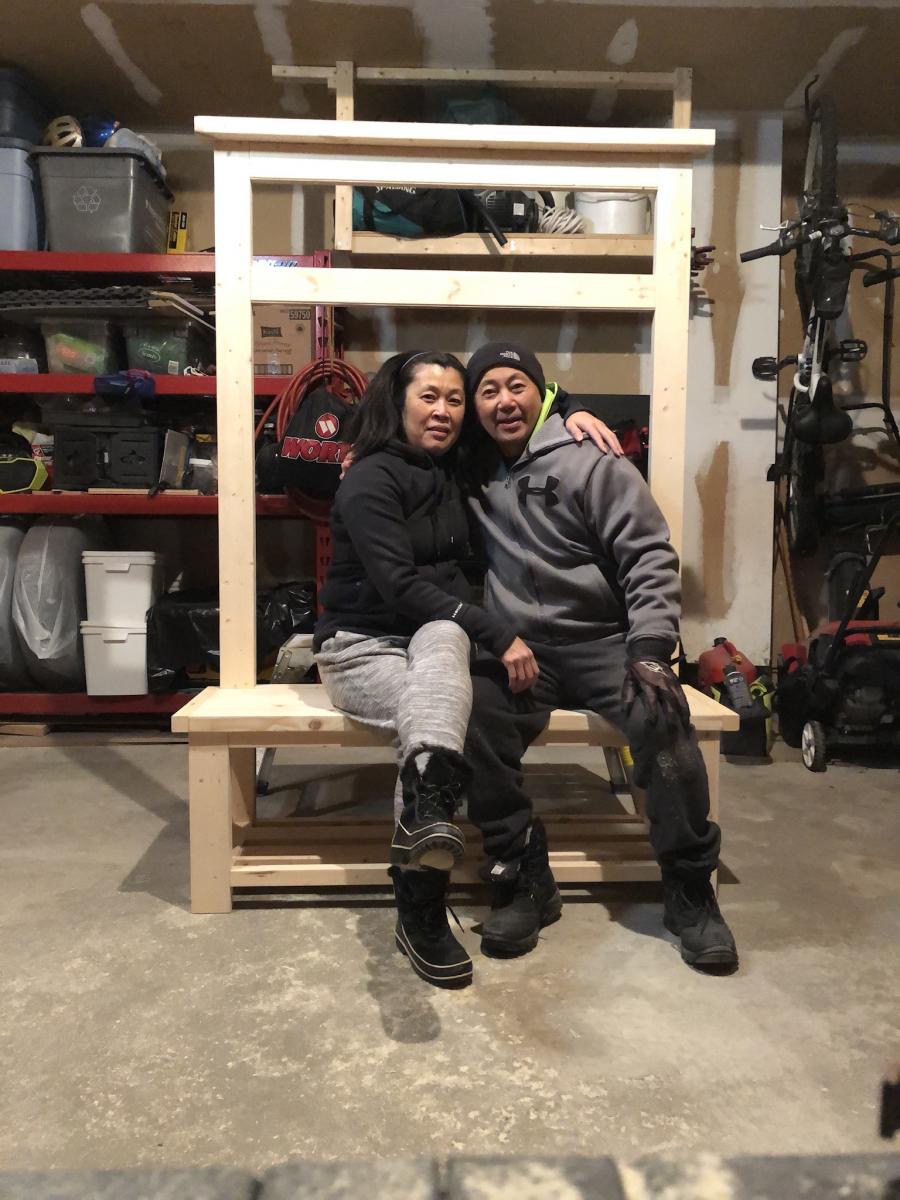
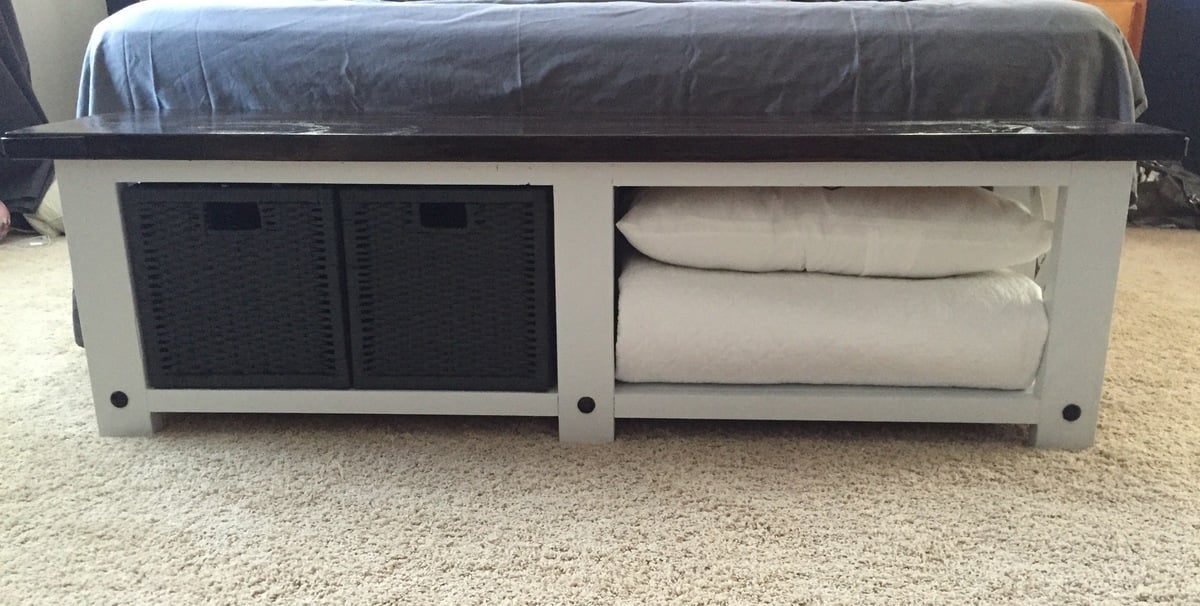
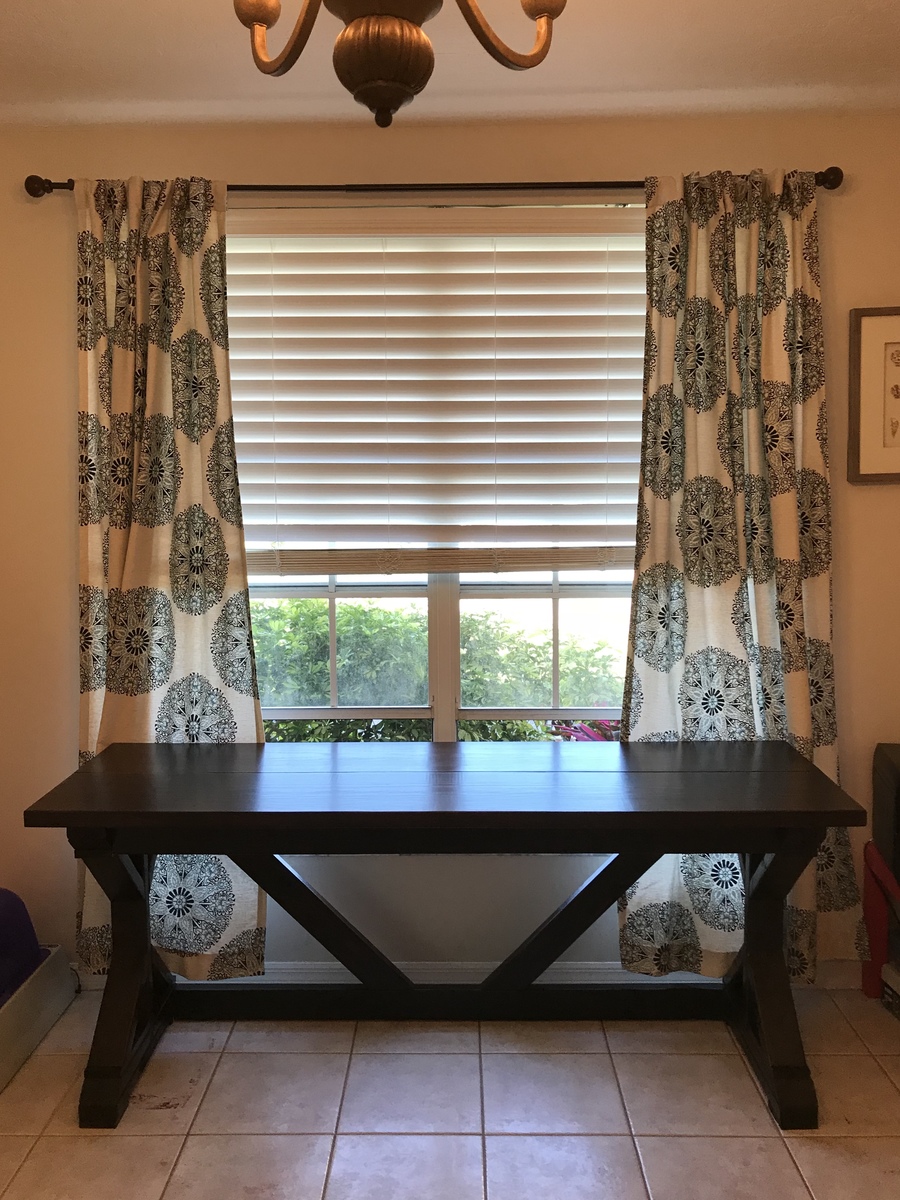
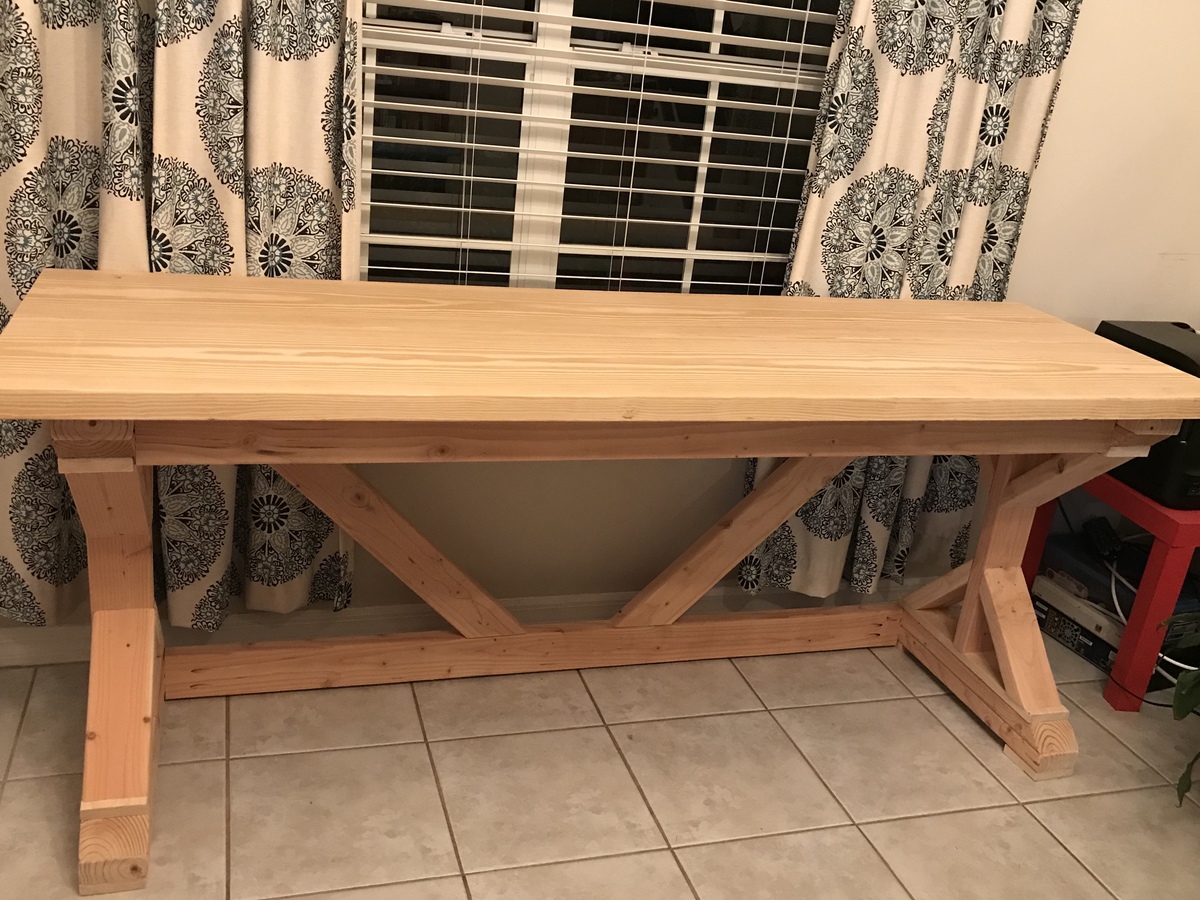
My First Build -- the $55 Fancy X Desk

This was my first build EVER. I had never even used a saw before, so if I can do this, so can YOU!

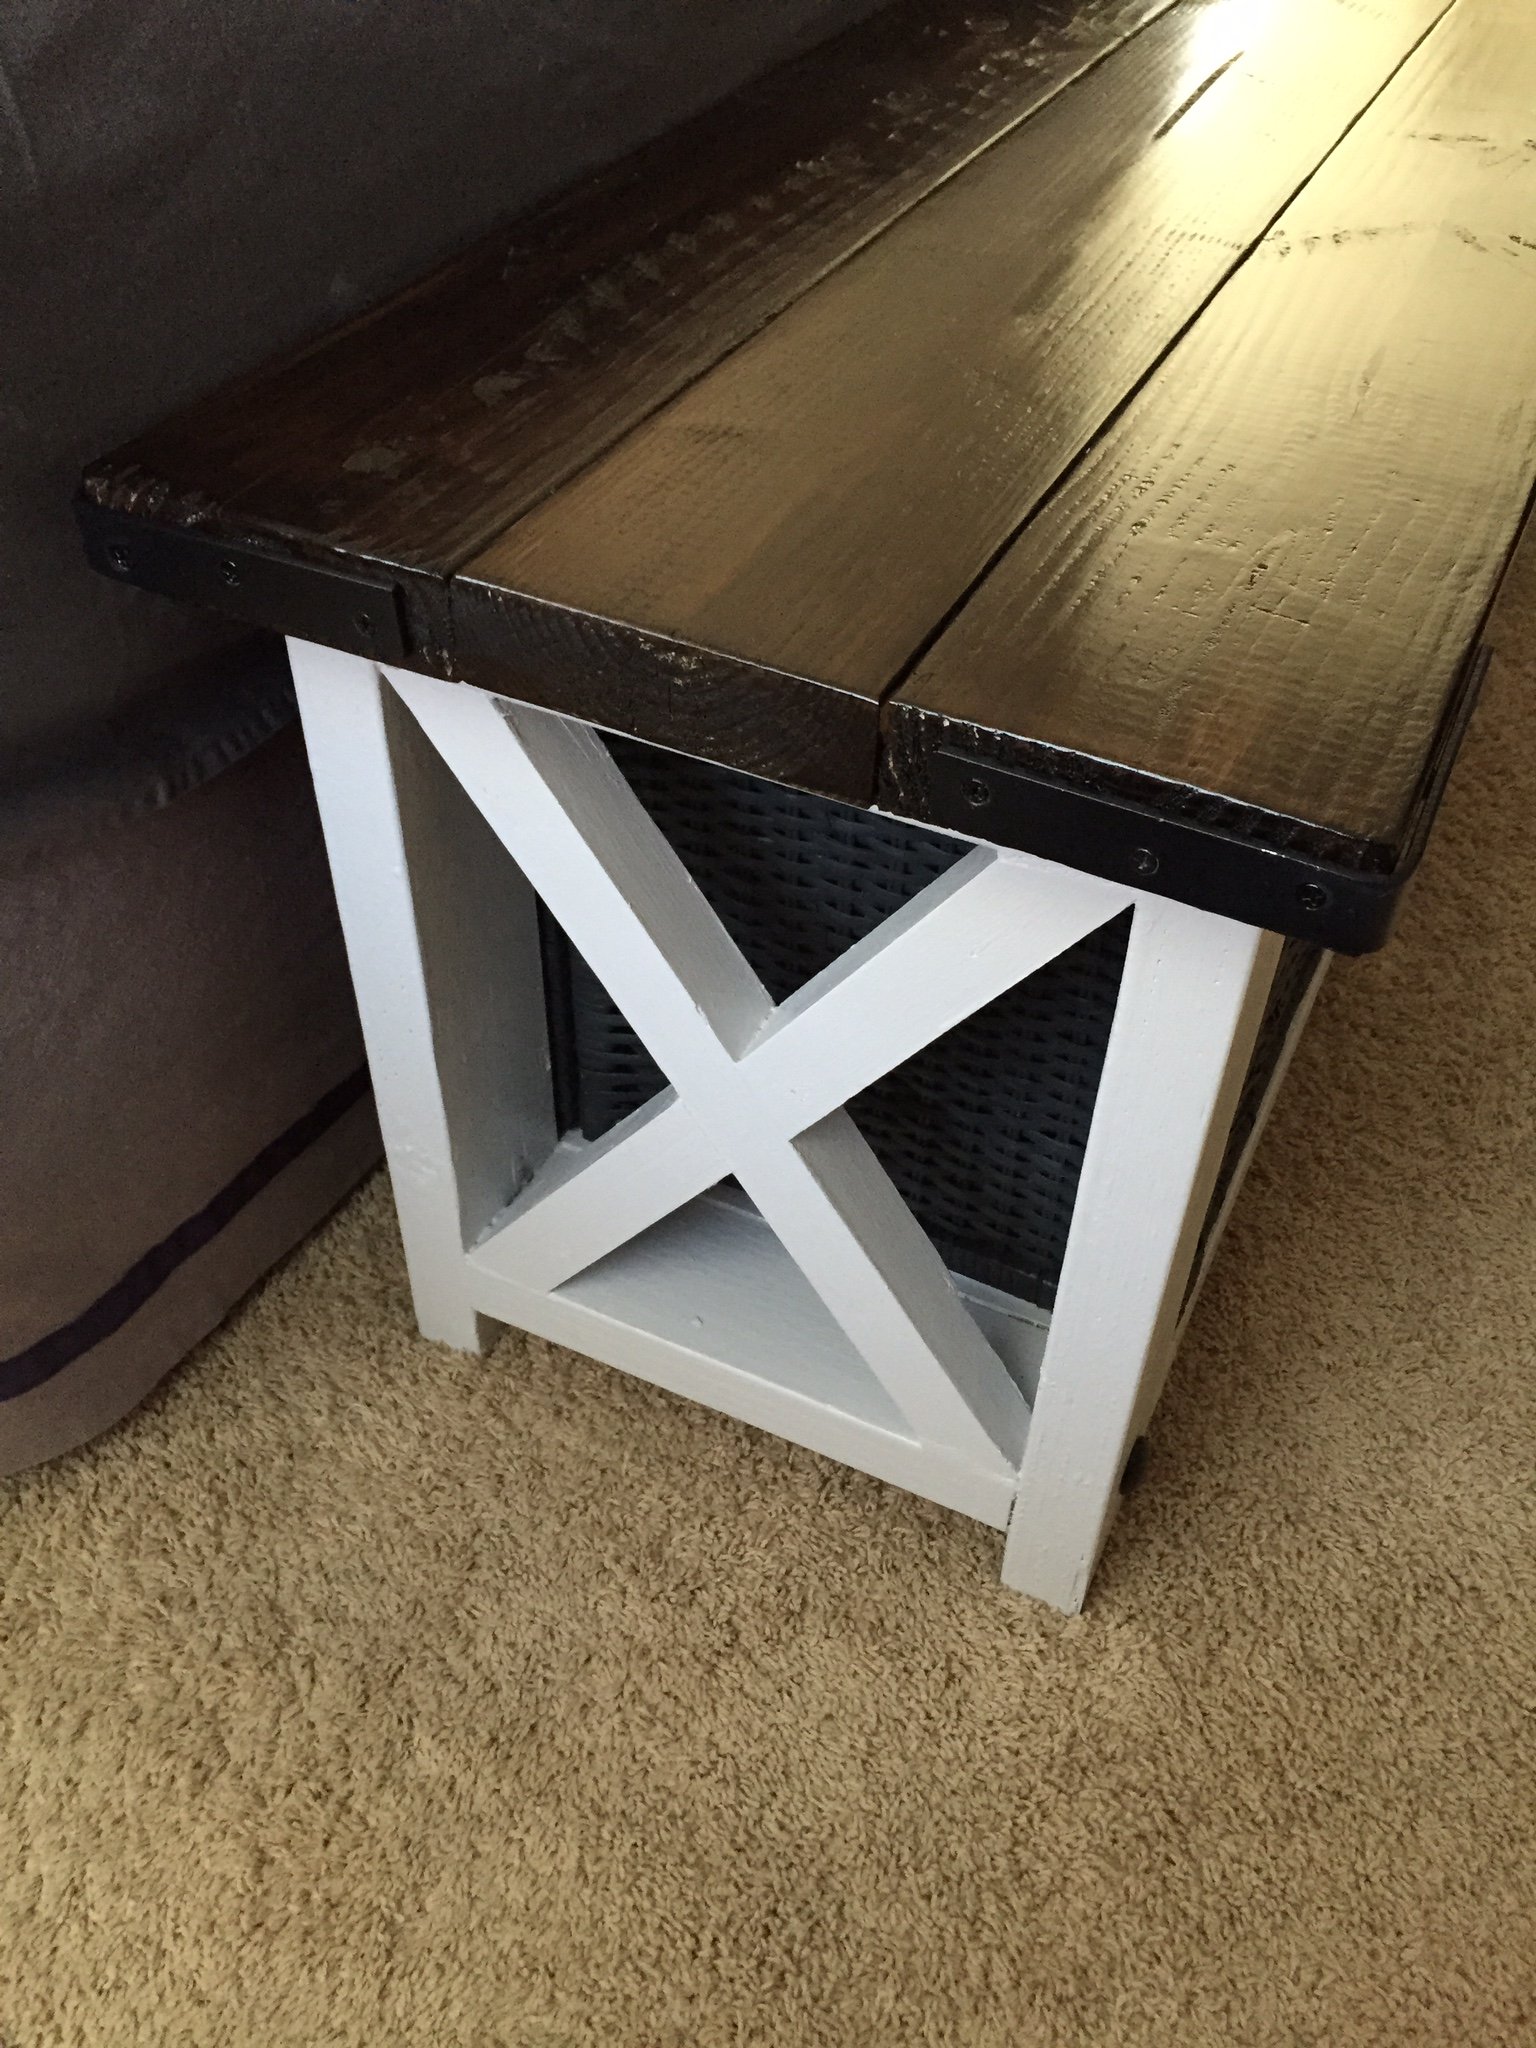
The original plans call for this desk to be 72" in length, but my space only allowed for a 60" desk, so I cut the 3 braces that go along the back down by 12", as well as the 2x6s that make the desktop. The cross-braces in the back were also cut down, but I did that by measuring for fit (as demonstrated by Ana in one of her videos where she made the x-bench).

I described this as a weekend project ONLY because of the time I had to allow between coats of paint, etc. I built it easily in one day (with kids at home!).

This was a GREAT experience and I am HOOKED! Thanks to Ana and Shanty-2-Chic for designing this!

Built from Plan(s)
Estimated Cost
$35
Estimated Time Investment
Weekend Project (10-20 Hours)
Finish Used
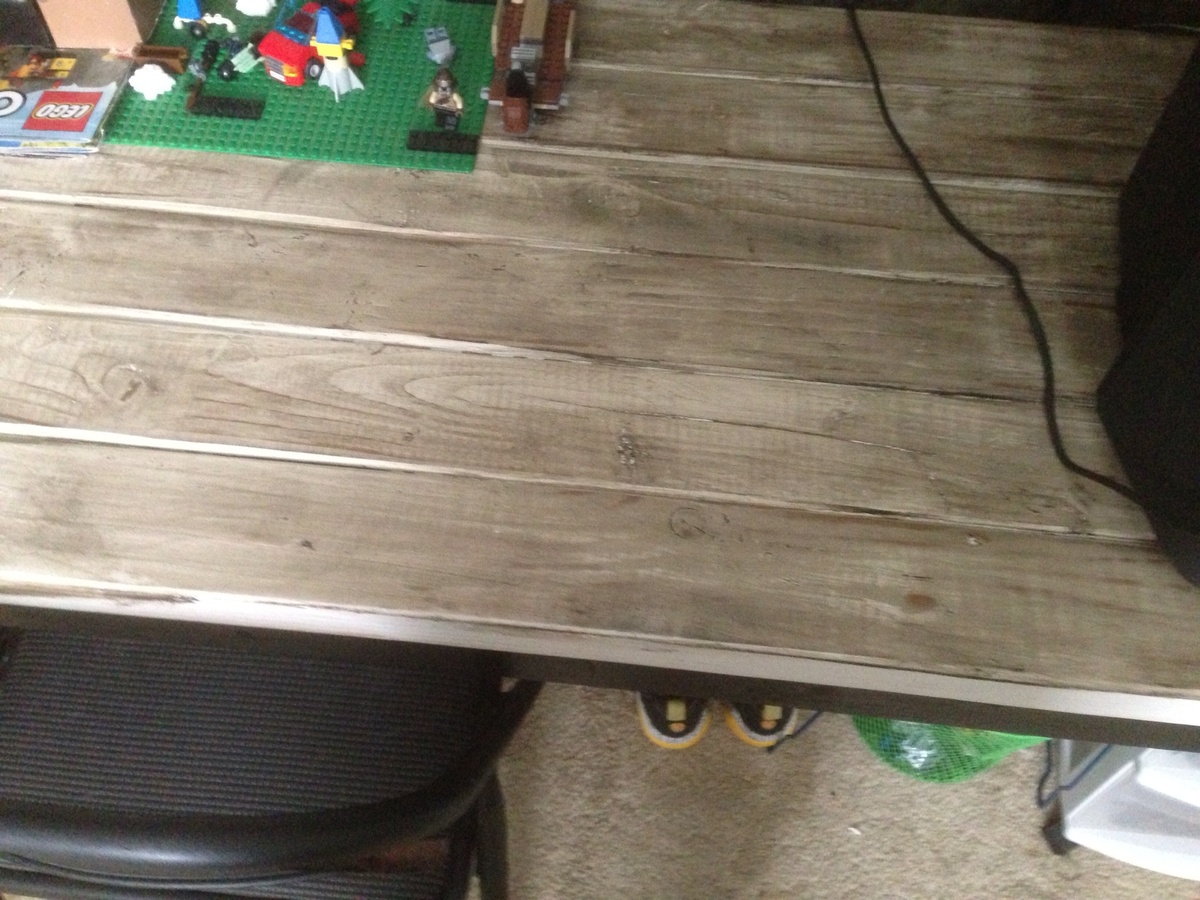
I painted the base with flat black paint, and the top of the desk with Minwax Jacobean stain (primed with the Wood Conditioner first, and finished with the Polcyrilic Spray that Ana recommends).
Recommended Skill Level
Intermediate

Comments

Lianna (not verified)

Tue, 01/08/2013 - 08:27

I hope to build this desk this week! Your post timing is great! AND your end result is gorgeous!!!

berryrach89

Thu, 01/10/2013 - 19:31

I absolutely love this. I've been searching for a new desk and I think I want to copy yours. Love it.

Jodye (not verified)

Fri, 01/11/2013 - 00:35

Well done...I too have been contemplating giving this ago. Our out door glass table exploded due to the heat here in Australia on monday...never going glass again...did I mention the nightmare clean up job :-((
Im building the big version....Im excited..you did it so I can too!

Nesting Grill Station

I was tired of seeing my propane bottle on the porch and this project was a perfect blending of camouflaged storage with lots of potential countertop workspace. My grill station is smaller and shorter than the original plans to better fit our family size and the porch space we have available. My husband has a bandsaw mill. When he was milling boards this fall, I asked for some 1/2" thick planks just for this project. I also had the knobs and wheels leftover from past salvaging work. I have been trying my best to use up "stock on hand" during this pandemic. Though I spent some time sanding the rough cut lumber, it still absorbed lots of stain. I wanted two tones of color, so that's good, but I still had to mix two stains together to have enough for the lighter parts.

Now we are looking forward to some cold weather BBQ meals!

Estimated Cost
$10 for screws, all else salvaged.
Estimated Time Investment
Weekend Project (10-20 Hours)
Finish Used
I stained the wood before joining it together so the two shades of stain wouldn't run together. For the darker parts I used Minwax Red Mahogany. On the lighter parts I mixed Minwax Early American with Natural (because I was running out). After staining I put the table together and finished it with Minwax Polycrylic, until that ran out, then Bona Mega satin floor finish. I put three coats of finish, sanding between coats.
Recommended Skill Level
Intermediate

Comments

mamasue72

Tue, 07/04/2023 - 08:38

Love this size. My deck is small so this is perfect. Thank you for posting the brag😊👌

Wine Rack

This is my first attempt at making a wine rack. It holds 18 bottles and 9-12 glasses. I made it from 1/2" red oak plywood and 1x3s. I used a drill press with a 3" hole bit and 1 1/2 bit for the neck supports. The one pic shows how I kreg jig the supports to a scrap piece of plywood so I could stain all sides of the pieces at once! Plus it allowed for a quicker drying time. I kreg jig all the supports from the back side with 1" PH screws and glue. I used my router and a straight edge to dado the top and bottom shelves to the side walls. This rack measures 5'Hx 15 1/4"w x 17" deep. The wine bottles do not stick out past the front at all. I stained it in a dark walnut to give it a country feel.

Estimated Cost
$100
Estimated Time Investment
Afternoon Project (3-6 Hours)
Finish Used
Dark Walnut
Recommended Skill Level
Intermediate

Two-Tone Adult Picnic Table

Submitted by Anonymous (not verified) on Sat, 02/25/2017 - 09:30

I wanted to make a black and brown picnic table, this one turned out really nice and it gets a lot of compliments.


I, also, reinforced the 2x6s used for the seats by boxing in 2x4s underneath.  I just cut 4 53" (probably could have been 54" honestly) and mounted them to the bottom of the seats and screwed them into the seat cross members.  This should keep them from flexing.

Estimated Cost
9 2x6 - 8' - $40,
9 2x4 - 8' - $30,
Screws - $25 (headlok and kreg),
8 cans of paint - $35,
(already had sand paper),

Total $130
Estimated Time Investment
Weekend Project (10-20 Hours)
Finish Used
8x valspar project perfect paint + primer Gloss Black (1 coat)
8x valspar color radiance paint + primer Dark Gloss Toast (1 coat)

I will probably also put a clear coat on it to help protect it some
Recommended Skill Level
Beginner

Comments

Modern Farmhouse Queen Bed Project in Texas. First time Making a bed

Submitted by Anonymous (not verified) on Mon, 12/28/2020 - 05:55

This was a lot of fun to build and not very difficult with the right tools.
The only thing I changed was adding a 2x6 to the top cap instead of the 2x4. I like the look.

Honestly, the thing that took me the longest was picking out the straightest lumber off the shelf. lol

The painting was a different subject lol. I painted a dark gray and after not liking it I decided to give it a light gray wash for the weathered look I was going for. I love it! Thanks, Ana for the inspiration!

I would say anyone with a passion for making things, how to read a tape measure and attention to detail can make this bed fairly easily.

AJ in Texas

Built from Plan(s)
Estimated Cost
$175
Estimated Time Investment
Day Project (6-9 Hours)
Recommended Skill Level
Intermediate

Comments

Backyard Bliss!

Submitted by kdins31 on Mon, 01/12/2015 - 09:26

I built this outdoor play area for my kids this past summer.  The area under that portion of the deck was always messy and muddy and so I wanted to make use of it.  I built the deck and anchored it with lag bolts to the deck supports.  On the one side I used rubber mulch and on the other there is play sand.  I dug holes in various locations and filled with gravel to allow for drainage under the sand and mulch.  For the awning I used plain cedar shingles.  I added a shower that is just regular 1/2" metal pipe with a hose adaptor.  The shower wall and fence are just old pallets that I had for a while, cut to size, which was pretty much random but they came out great.  I added a misting system under the awning that works great, the kids love the cool mist on the hot days. Overall, a heavy job ripping up the grass, moving the wood, gravel, stones, sand and mulch, but a fun deck build and even better experience doing this with my kids by my side!  

Estimated Time Investment
Week Long Project (20 Hours or More)
Recommended Skill Level
Intermediate

Comments

Einman10

Tue, 12/29/2015 - 17:10

I'm extremely interested in the plans for the bathroom vanity with the step stool that pulls out for kids to be able to reach the sink.  Is there a way I can get those plans?

Mini Night Stand

Submitted by Anonymous (not verified) on Mon, 04/24/2017 - 21:07

Took us 4 months cause we have kids so we have to work during naps and after bedtime and then we were hesitant to work on it for a while after a little stressful episode building the drawer. We had to lower our expectations for perfection when working with pine and no clamps. We're happy with how it turned out though! Reminds me of Van Gogh's "The Bedroom" for some reason. 

Estimated Cost
$25 wood
$8 paint
$22 Prestain, stain, poly
Estimated Time Investment
Weekend Project (10-20 Hours)
Finish Used
Minwax special walnut/ 3x water based poly
Americana indoor outdoor "patio" grey
Recommended Skill Level
Starter Project

Modified King Farmhouse Bed

Submitted by Anonymous (not verified) on Tue, 04/20/2021 - 15:31

We ended up deviating more than we were originally intending from the Farmhouse Bed plans. We started off planning to modify so that it was able to be disassembled (used metal brackets and to fit storage drawers at the foot of the bed. The my finance got a router, so we ended up with a lot of mortise and tenon and tongue and groove joints, and a fancier headboard. I LOVE the end result but we were definitely in over our heads at times!

Estimated Cost
400
Estimated Time Investment
Week Long Project (20 Hours or More)
Finish Used
Traditional Cherry and Black Cherry Oil Stain, Black Tea as Wood Conditioner and Poly Finish
Recommended Skill Level
Intermediate

Comments

Zach's new desk

Submitted by dinifam on Sat, 04/13/2013 - 13:28

I built this desk so my son would have a place for his old school tv and to do his homework! It was super easy and I love how the finish came out! His room is a huge work in progress but this is the first step:)

Built from Plan(s)
Estimated Cost
20.00 as I had scraps and finish supplies
Estimated Time Investment
Afternoon Project (3-6 Hours)
Finish Used
I sprayed the bottom with satin black paint The top I painted white then sanded it down with 80 grit and rubbed on then rubbed and wiped minwax poly espresso stain until I got the look desired. Easy!!!
Recommended Skill Level
Beginner

Kid’s Adirondack Chair Project

Submitted by David_1962 on Tue, 07/20/2021 - 07:54

This little chair turned out really well. The only significant changes I made to the plans were to cut the back slats in an arch, round the corners on the arm pieces, and round-over all of the exposed edges.

Built from Plan(s)
Estimated Cost
None, built from scrap deck boards
Estimated Time Investment
Day Project (6-9 Hours)
Finish Used
Ipe is an extremely heavy, dense tropical hardwood. It’s primarily used for making decks but is also excellent for outdoor furniture. I just sanded lightly, and applied a penetrating oil branded “Ipe Oil.”
Recommended Skill Level
Beginner

Comments

Mudroom Bench with Hutch

Submitted by calliher on Sun, 09/12/2021 - 18:45

This is my laundry room and it is about 12x10. It looked so bare with only the washer and dryer. So I thought making this a mudroom also. I live in the mountains and have snow 3 to 4 months a year. This will be perfect. I purchased an IKEA cabinet built it in and added the Ana White plans with two bays.

Comments

Pool equipment fence refresh

Submitted by Anonymous (not verified) on Thu, 07/06/2017 - 21:00

We love this fence refresh from the previous owner's solution to enclosing the pool equipment and a/c unit! It was the first time we fastened something to our house - drilling through stucco in the process. That was a big deal for us diy-ers! We made the frame out of 4x4's (which ended up being the most challenging part to the whole thing), applied the horizontal fencing boards and then used one of those $15 fence hardware kits - it was a great project that has made a huge difference in our backyard. Yay!

Estimated Cost
$300
Estimated Time Investment
Weekend Project (10-20 Hours)
Recommended Skill Level
Intermediate

Adirondack chair

Submitted by Gsmit96 on Sun, 05/19/2013 - 18:38

The only thing I did different to the plan was add 4.5 inches to the back slats so I could round the edges and 3 inches to the right arm rest so I could cut out a track to rest a wine glass. One thing I highly recommend is to create a stencil of the stringer. I did and now I have it for the next one so the next chair will be consistent. Thanks Ana white, this site is very therapeutic for me. Already built 3 projects in the last month.

Estimated Time Investment
Afternoon Project (3-6 Hours)
Finish Used
Haven't painted yet, will paint white soon
Recommended Skill Level
Beginner

Comments

sorese

Thu, 06/06/2013 - 06:38

The mods on this make me now want to build a set of these, the wine glass holder is genius! love the rounded front and back, so much better than original plans, thanks for inspiration!

Patio chair

Submitted by Anonymous (not verified) on Mon, 10/04/2021 - 16:56

I chose to make the chair which came out great although the plans were only for one chair I thought it waa easy to do.

Comments

Seasonal And Holiday

Mud bench

Submitted by Anonymous (not verified) on Tue, 10/05/2021 - 04:12

My husband and I love to build together as our hobby so we always look to Ana White for different plans.
It all started originally when I came across Ana’s closet organizer a few years ago and we haven’t stopped! Thanks Ana!

Built from Plan(s)

Rustic X Bench

I adjusted the measurements for the console to make a bed bench. The over all length is 66.5", making each horizontal 2x2 26" long. The 2x4 legs are now 18" heigh. Love the end result.

Built from Plan(s)
Estimated Cost
$50-80 depending on supplies on hand
Estimated Time Investment
Weekend Project (10-20 Hours)
Finish Used
Behr Shiny luster
Kona stain/poly
Recommended Skill Level
Intermediate

Comments

Richard6959

Thu, 01/30/2020 - 09:49

What was used for the decorative circles at the bottom of each leg? Its not mentioned anywhere in the plans and I can't tell from the pictures what was used. Please explain. Thanks. 

Toilet shelf

Submitted by Lukilla on Fri, 10/22/2021 - 17:54

We had someone ask us to make one of these for them, and we couldn't resist making one for ourselves. Fun easy build and adds some style to our bathroom.

Minwax early American stain on the finish

Comments

Kitchen Tower Cabinet

This is our first Ana White project and we're pretty happy with the results. We modified the plans a bit to use 1/4" plywood for the sides instead of the heavy 3/4" ply. Specifically built for our kitchen since we couldn't find one that we really liked or could afford. Pottery Barn seriously sells this for $1200?!?! Score!

Estimated Cost
$70 + finishing
Estimated Time Investment
Weekend Project (10-20 Hours)
Finish Used
DIY chalk paint and wax - distressed.
Recommended Skill Level
Intermediate

Fancy X Desk, Or my Chunky Medieval Desk

Submitted by Labumy on Sun, 03/04/2018 - 14:27

We estimate that the cost of this project was right around $50, but we had a lot of tools and materials already.  This was a fun project and a great piece for the cost. I would suggest staining as much as you can before assembling those legs!  Staining and applying poly was a pain in the butt!  We used a dark mahogany Minwax stain and 2 coats of Minwax poly. It took us a while to do it because we have a 11 month old that keeps us on our toes. 

Estimated Cost
$50
Estimated Time Investment
Week Long Project (20 Hours or More)
Finish Used
Minwax Mahogany and Minwax quick dry poly
Recommended Skill Level
Beginner

Comments