2x4 modern Adirondack Chair (modified)
I was so excited to find the plans for these awesome chairs, I’ve built 7 this season already—the modification happened as an accident, but I loved the result !
DIY Ladder Shelf to use as a plant stand on our courtyard deck.
We wanted our chickens to have plenty of room for when we ere not home and could not let them free range in the yard. One of the six was a rooster-- and long story-- but we don't have him any more-- so 5 chickens now enjoy this coop/run. It cost about $300 in supplies. It is 16 feet long.
I built this makeup vanity to fit a 40" wall. I was inspired by the design of the DIY breakfast bar. The hutch sits on the top and has plenty of storage. The front drawer fronts are hinged at the bottom, this storage space holds a hairdryer and iron or makeup with a cord pass through at the back. The stain is a mixture of three colours.
Sat, 11/05/2016 - 07:47
Can you link to the plans you based your inspiration off of? I can't seem to find it on the site. Thank you!
Full size storage bed with trundle. Three drawers and a trundle on one side and four drawers on the other. I started with the farmhouse design (headboard and footboard) and modified it to make it not so heavy and I designed the rest using SketchUp. See more photos in blog link.
Don't get in this bed swing unless you have time for a nap. This is a modified version of the "large modern porch swing". Very comfortable to lie down and swing. The mattresses are 2 baby crib mattresses that I found really cheap at a yard sale and on Craig's list. I probably should have shortened it several inches to fit the crib mattresses, had I known in the beginning that was what I was going to use. I made the swing myself, but had help with the A-frame. My friends are envious.
I really needed somewhere to park my rototiller and mower during the summer and ended up modifying the plans to include a lean-too/over hang area. This required flipping the shed to extend the roof line. I continued the 15• roofline and also then had to create and cover the soffits. I also reduced it to one door and placed it on a skid foundation so that technically it would be considered a temporary structure, no permits needed. I first used a semi transparent stain that looked much darker and grayer in the store but looked very blue and terribly streaky on the shed, see back wall area. I then restrained it with a solid stain, which I think looks much better and covered the streaky stain. Because I extended the roof and stained it twice, this really increased the cost, but I think it was well worth it. I can store all my yard and garden tools underneath and inside.
5 1/2W x 5 1/2L x 8H.
Ana made this project very easy for me. I did the main building while hubby cut the wood & helped drill in hard to reach areas. Thank you Ana for boosting my confidence. I’ve never done anything trike this.
This table filled two needs at once for us: we needed a dumbbell or free-weight rack ($50 and up retail), and we needed some kind of desk-like surface for our home gym area that could withstand us two jump-roping fiends (um, maybe that's just my husband). Basically, it needed to be able to hold a lot (a Lot) of heavy metal stuff and take a beating while NOT Falling Over. The trestle desk was my biggest inspiration, and I guess I just stole the metal stretcher idea from that Pottery Barn dining table. It doesn't even really seem to need the metal stretcher, though...this table is beyond-my-wildest-dreams sturdy, even though it is standard counter height. The metal bar was about $17, so that's a big savings, if you leave it out. You MUST use a compound miter saw for this project. OR...you must be flexible about working with irregular cuts and joints. Also, I'm not sure I'd attempt butt-jointed 2x4's without pocket holes (or biscuit joints, I guess?), but that might just be me. I think this project could have taken only a single day if I hadn't screwed up just about every step of the way. I'm not the only one, right? You can read about a lot of those lovely embarrassments on my blog :) If you'd like the SketchUp model, it is available in the 3D Warehouse as "Dumbbell Table".
I built this bookshelf for my husband's office. He wanted a shorter, wider shelf than the original plans, and this is what I came up with! :)
Sun, 03/24/2013 - 13:53
Romanweel, I'm so sorry, didn't see your comment! It is Polyshade in Mission Oak Gloss. And Countrysideworkshop, it is 15 deep by 33 wide by 32.25 high. Hope that helps! :)
In reply to Romanweel, I'm so sorry, by mamahowell
Mon, 01/30/2017 - 12:45
I love this! My dad asked me to make him a book shelf and this is it! Did you follow her instructions or tweak anything else!?
Mon, 03/23/2015 - 19:34
Where can I find the plans and materials list for your customized bookcase?
Mon, 02/26/2018 - 21:42
I having been searching for a bookcase just like it!!! I want the shelf space for decoration, but I am dying to have the wall space above for wedding pictures I have never built anything before, but need to start somewhere. Any chance you can share what you changed to make this book shelf instead of the super tall one : )
This is a wishing well I made for my sister for her wedding. It will be used during the wedding for people to drop "wish you well" cards into and afterward she can use it as a planter in her yard.
I followed ideas from multiple plans here on Ana-White.com, but I didn't follow any specific plan. Mostly I followed tips and instructions for cutting angles, drilling pocket holes and some finishing tips. This is the first "big" project I've done and I"m quite proud of it.
With everything, it measures 44.5 inches high. The well measures 21 inches across and 15 inches high. The roof measures 22.75 inches by 23.75 inches.
I hope y'all like it. I worked hard on this! :)
Thank you, Ana and everyone who contributes to this site. It's been so much fun and I've got lots of ideas for more stuff. If I was any good at all at Google Sketchup I'd put up the plans but I'm not. If anyone could help me with that, that would great. :)
Have a great day!
Mon, 07/21/2014 - 20:04
Anyway you can please tell me the angle for the boards ont the walls. I reallly like your well, and would like to build this for my wife but im not sure on what angles to use thank you
In reply to wishing well by bellows86
Sun, 07/10/2016 - 17:10
The 8 sided wishing well is going to be 22.5 degrees all the way around. hopes this helps
To say this was a complicated build is an understatement. Lots of pieces, lots of different angles and lots of screwing it together. It was really tough to keep everything perfectly square but in the end it turned out well. It is a very heavy table. I want to get it outside on a sunny day for some photos.
Sat, 05/29/2021 - 10:33
A picnic table that will last! Love your finish choices, thank you for sharing:)
My girlfriend and I just moved into our new apartment. It has hardly any storage space at all and very little closet space. So we built our own! It was a long day's work, but the reward of a beautiful Chifforobe is well worth it.
This was my first carpentry project, and I couldn't be happier with the way it turned out.
Tue, 03/10/2015 - 18:42
This is sooo awesome! You look like a professional!
We built these bunks for our boys, ages 4+6. The plans were super simple to follow. The frame was built out of scrap 2x6's and 2x4's. We did have to make a modificatioon on the ladder- it came up just short for some reason, so we added a 2x4 to the bottom.
Sat, 03/14/2015 - 20:26
Great job on the beds! That room looks awesome. I love the color selection.
In reply to Great job on the beds! That by handmadewithash
Sat, 06/20/2015 - 08:56
Thank you!
I built this project totally from pallet wood and leftover 2x4's. I already had the paint and stain from other projects, so the only cost was for the baskets, which were $6 a piece at Ikea. This project turned out even better than I expected and I couldn't be happier.
7 1/2 foot table using basic Ana White plans. I removed the stretcher to allow for more seating... but reinforced the underside to help make it structurally stronger. I also didn't add breadboards as the boss didn't like them. Painted the benches and legs of the table white.... stained the top with miniwax classic grey with a few coats of poly.
Easy to make 4x2 Patio Seating with Ikea style cushions.
Added the diagonal designs on the back.
Wed, 10/06/2021 - 10:40
Looks great, love the added back design element! Thanks for sharing!
Built this Folding Sewing Table for my daughter.
- 18 mm Baltic Birch
- Birch leds
I wanted to make a footbridge for my mom so she wouldn't get muddy when she crosses a small drainage ditch when goes walking on the trails behind her house. I didn't have a plan and this was my first build and I loved it! I just wanted to give everyone an idea of something to build. Can't wait to build more.
Very sturdy table and benches!
I love my dogs, but their wire kennels were an eyesore. Removing them completely was not an option, but I was tired of looking at them. I went back to my first-ever rehab project, and took it one step further to create a one-of-a-kind castle for my pups.
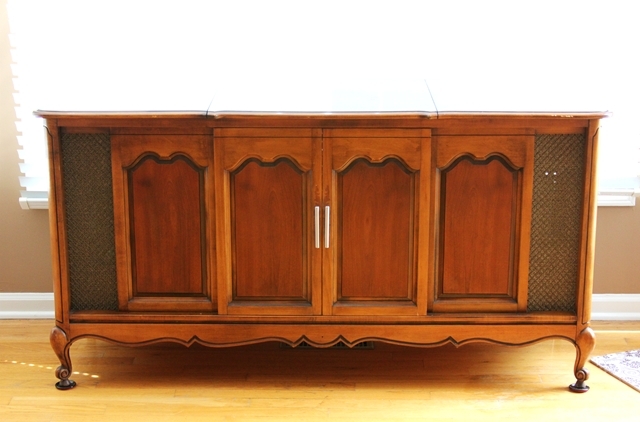
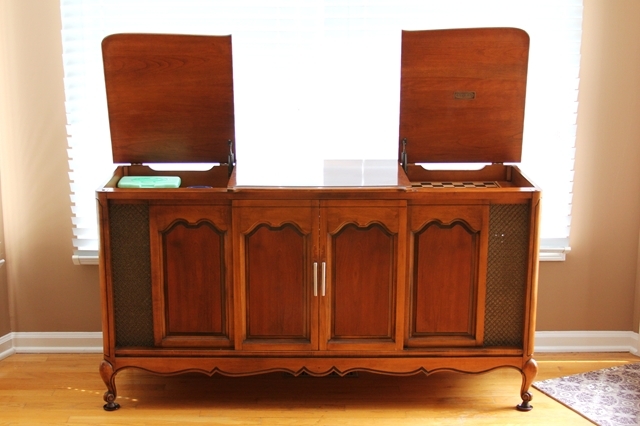
The original piece of furniture was an old console-style TV cabinet. Sliding doors on the front revealed the TV, and two lids on top contained the tuner and a turn-table.
Armed with screwdrivers, hammers and a dremmel, all components were removed form the cabinet, leaving just the shell. (PLEASE be sure you remove all sharp, potentially dangerous, screws, staples and what-not’s from the inside of the cabinets, to avoid injuring your pet! The dremmel allowed me to cut off and grind down stubborn screws.)
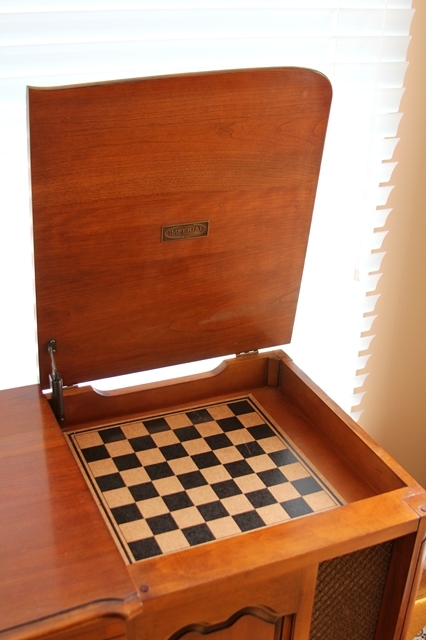
To cover the holes in the top cabinets, I used old checker boards. The cubbies are now a great place to store dog treats and leashes.
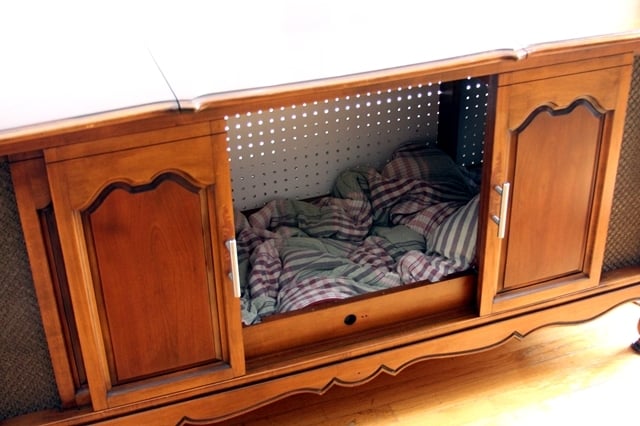
OPTIONAL: The back panel of the cabinet I used had holes from the TV components. I elected to replace the back board with a new sheet of peg board. (The peg board allows for much-needed ventilation.) In order to get the size perfect, I traced the old back onto the new and marked the original screw holes.
I vacuumed the inside to remove all construction debris and polished the exterior with Pledge. Then, I inserted an old comforter into the kennel, and stood back as my two pups launched themselves into their new abode.
The doors can stay open during the day for them to enter at their own will, and close for bedtime. And my eyes no longer hurt.
Thu, 08/11/2011 - 18:41
This was such a great idea. I love the old console. I love to build but I love it so much more when I can use old wood or repurpose parts of old furniture and industrial pieces. I feel creative. The checker boards are great. Do you have a blog?
Comments
Ana White
Thu, 03/04/2021 - 10:59
This is absolutely gorgeous!…
This is absolutely gorgeous! I love the modification!