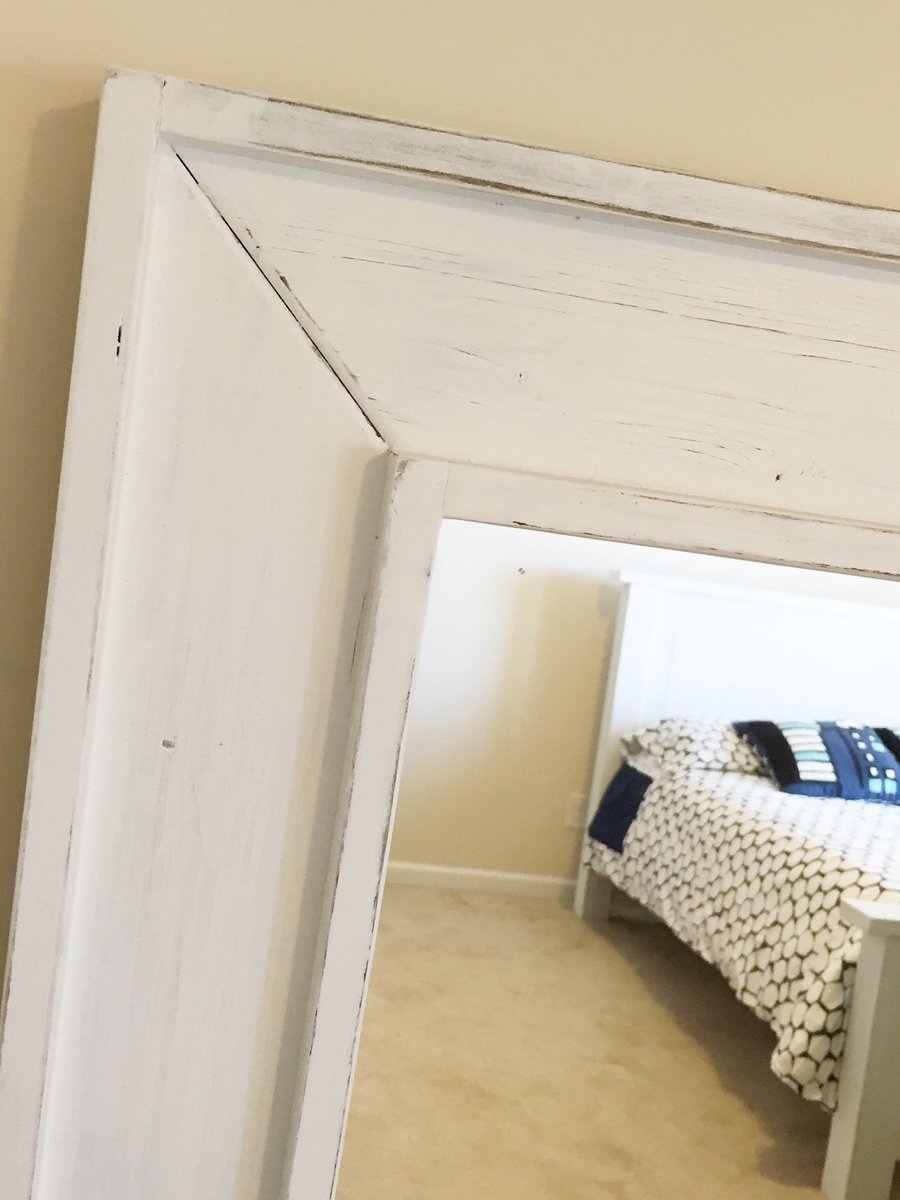
Community Brag Posts

Full Length Mirror

Submitted by AndyH on Wed, 03/09/2016 - 10:27

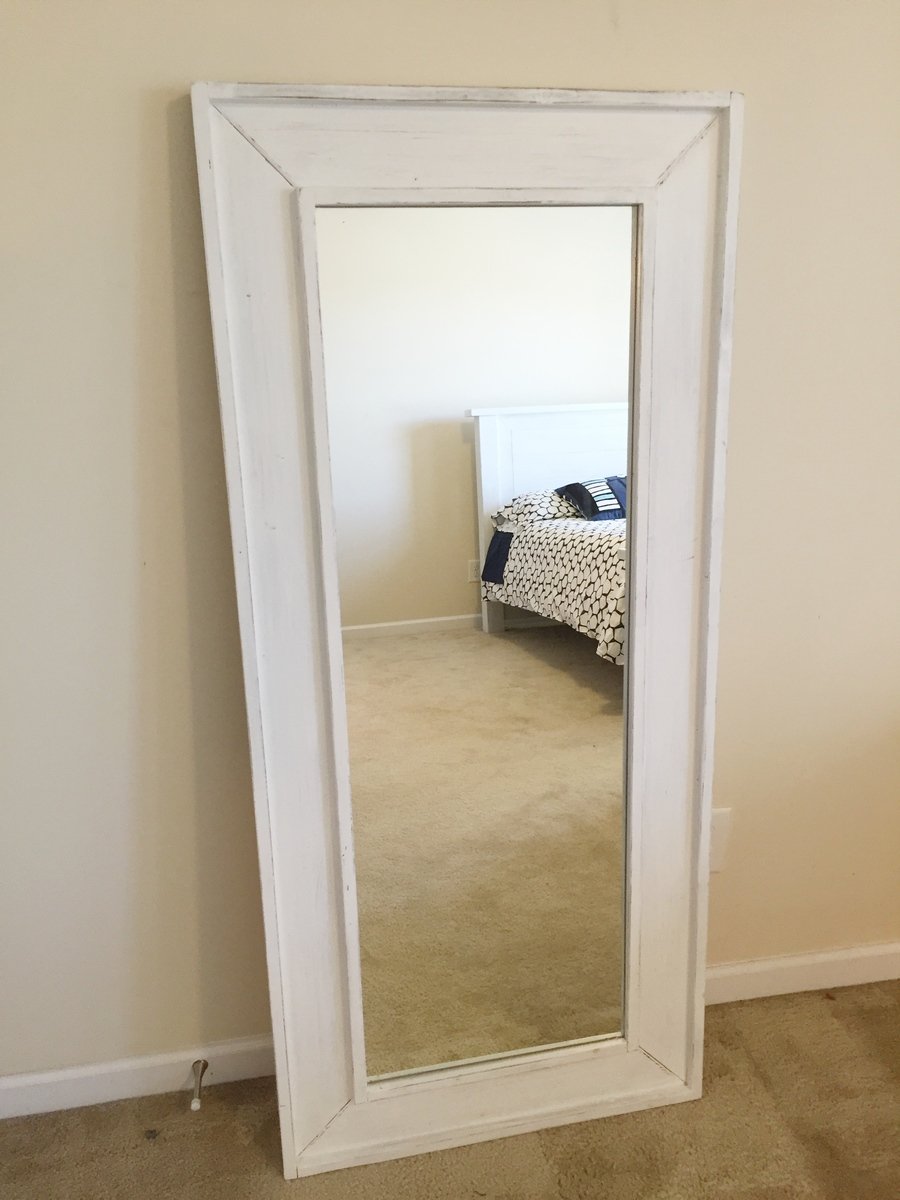
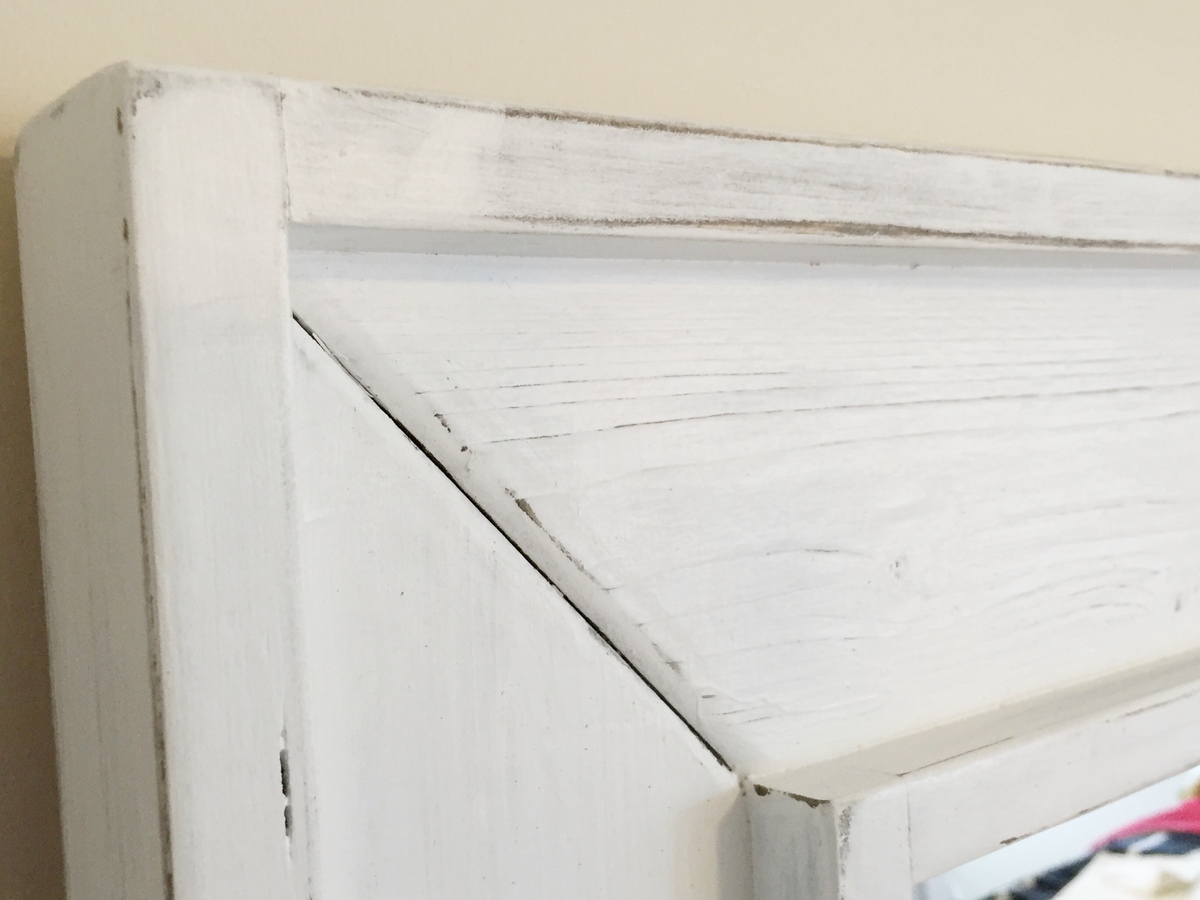
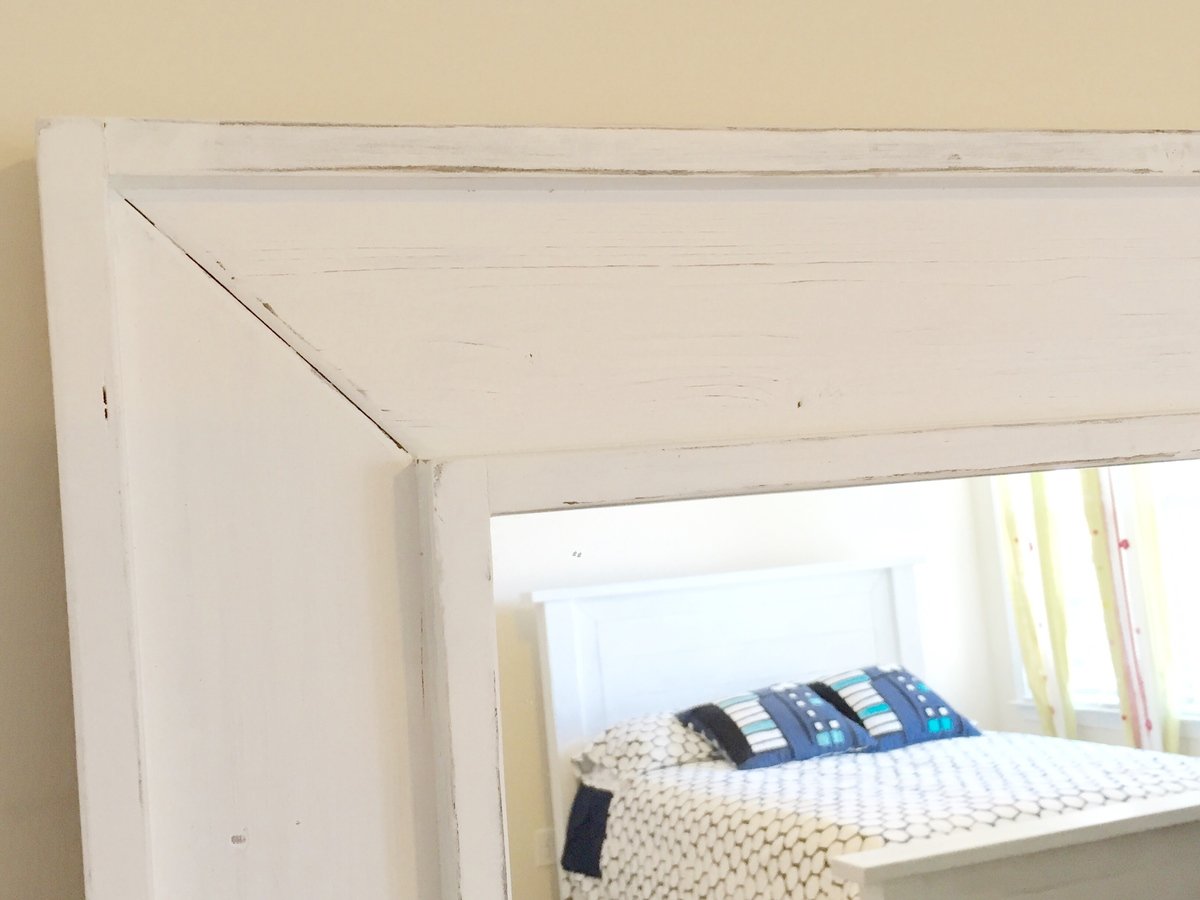
Full length mirror made from a cheap $10 unframed mirror from IKEA. Trimmed out with some 1 by 3, 1 by 4 and 1 by 2. Stained black and then painted white. sanded between coats of white to show some of black through and give antique worn look.

Estimated Cost
$35
Estimated Time Investment
Day Project (6-9 Hours)
Finish Used
Stained black and then painted white. sanded between coats of white to show some of black through and give antique worn look.
Recommended Skill Level
Beginner

Modern Farmhouse Bed Anniversary Gift

Submitted by Anonymous (not verified) on Sat, 10/19/2019 - 09:17

Built the Ana White designed modern farmhouse bed in a standard king size for my wife as a gift for our anniversary. This was a great weekend project and the final result was impressive! It’s the most solid and sturdy bed we’ve ever slept on. Thanks Ana for the plans and the inspiration! Night stands up next!

Estimated Cost
$200
Estimated Time Investment
Weekend Project (10-20 Hours)
Finish Used
Weathered Gray stain + poly in one by Varathane. Only needed one coat to get the look and feel I was going for. Sanded from 80 grit to 220 grit and lightly sanded with 220 after applying the first coat.
Recommended Skill Level
Intermediate

Full Size Bunk

Submitted by Anonymous (not verified) on Fri, 07/07/2023 - 11:30

Almost finished but I managed to alter the plans into a full over full! Just use 2×4 instead of 2×1 and use 2×6 for the legs.

Antonio

Built from Plan(s)

Modified Entryway Shelf

Submitted by bwconing on Sat, 02/25/2012 - 09:03

I made this shelf roughly from the entryway shelf plans. I modified it to meet our needs in our nursery. We hung it above the changing table/dresser (that we bought) and my wife put some nice pink polka-dot baskets in the cubbies. We use it to put baby accessories in (socks, lotion, rash cream, hair bows, etc.) This was my first project and it turned out better than I expected! It was an all day project for me, since it was my first, but shouldn't normally take that long.

Estimated Cost
$12
Estimated Time Investment
Day Project (6-9 Hours)
Finish Used
I just used white latex paint. It required 3 coats.
Recommended Skill Level
Beginner

Modified Wide Cabin Dresser

Submitted by pcdaugs on Sun, 12/29/2013 - 21:50

My wife saw this build about 2 years ago and fell in love with it. She decided we should try and find something we could by that was similar but just couldn't find it. Anyway after 9.5 months I finally finished the piece with a couple modifications. First, I added a second smaller open shelf for BlueRay players, video games, and cable box so the TV could be sitting on the top without any clutter.Second, I milled out the corner posts to exactly 2" X 2" square boards so there was little more presence on the side detail. I really like how it turned out and this piece will have a long time home here with. Especially after putting all that time into it!

Estimated Cost
$350 Dollars on Wood Alone
Estimated Time Investment
Week Long Project (20 Hours or More)
Finish Used
This piece will be used as a TV entertainment center.

We just stained it with three coats applied with a cloth and then 2 coats of poly.
Recommended Skill Level
Intermediate

Comments

Linda7

Tue, 01/07/2014 - 10:56

I love how you modified the plans to suit your needs. The wood grains on the sides are very attractive as are the drawer fronts; that doesn't always happen.
The finish is outstanding. I"m sure you're glad you took your time to get this build just right! Congratulations!

pcdaugs

Fri, 01/10/2014 - 15:40

It certainly was a project but in the end I really like what turned out. I can also say my wife was key in getting the finish just right as I am a terrible stainer.

snogirly7

Fri, 07/18/2014 - 17:50

can you post the changes in measurements you did to make this taller? and additional wood I would need to purchase? this looks amazing, great job! I hope I can do this just as well.

Rustic X Coffee Table

Submitted by Anonymous (not verified) on Sat, 03/12/2016 - 11:54

Followed the plan, pretty straight forward. 

Built from Plan(s)
Estimated Cost
$30 Wood
$8 Stain
$12 Poly
$5 Paint
Estimated Time Investment
Weekend Project (10-20 Hours)
Finish Used
Benjamin Moore - Kendall Charcoal
Varathane - Dark Walnut + Semi Gloss
Recommended Skill Level
Beginner

Toddler bed

Submitted by Anonymous (not verified) on Wed, 10/23/2019 - 09:35

Built this classic bed for my grandson. It was one of the easiest builds yet. All of Ana White's plans are super user friendly.

Built from Plan(s)
Estimated Time Investment
Day Project (6-9 Hours)
Finish Used
Minwax, dark walnut stain, polyurethane
Recommended Skill Level
Beginner

Comments

Toddler size loft bed

Submitted by jlandr on Tue, 02/28/2012 - 23:20

I built this loft bed for my daughter who is 3. It is built like the loft bed but the height of the fort bed since she is still little. The first night we were worried that she would somehow roll out since the mattress is thicker than I had realized making the side rails shorter, however she has not had any problems. I used 1x2s and a few 1x3s since that is what I had in the shop. If I were to do it again I would use more 1x3s for support or add plywood like the Fort bed.

Estimated Cost
$50 to $100, the lumber was purchased for another project that never made it out of design phase. Not sure how much we paid for it.
Estimated Time Investment
Weekend Project (10-20 Hours)
Finish Used
Spray lacquer. Only one coat. We should have used more coats and sanded it down more, especially the edges around the top of the ladder, I've noticed that it is a little sharper than I had intended. My husband is not a very patient man and we tried to build this with the 3 year old and 4 month old in the shop with us. It started out good but quickly became a bad situation because I had already taken her old bed out of the room and we needed to finish this one. Oops! I got a little excited!
Recommended Skill Level
Intermediate

Comments

leah47 (not verified)

Mon, 10/22/2012 - 13:35

I love this bed but I need it in a size that would fit a toddler sized mattress. This looks like it is toddler sized but are the plans for a twin?

leah47 (not verified)

Mon, 10/22/2012 - 13:53

Is there a plan that includes toddler dimensions for this bed. It appears the one pictured is a toddler bed but the plans seem to be for a twin.

leah47 (not verified)

Mon, 10/22/2012 - 13:54

SO sorry about the four posts... didn't see it go through so I tried too many times :(

Dining Table and Chairs

This was my first table - I added extensions by notching out the end 2x4's and making extensions that slide into the pockets. There were a few mistakes I made that will be corrected when I build my next.
I modified the length of the table down to 5 feet long, but with the extensions in it goes up to 8'. The table is also 34" tall due to a giant husband and Great Dane. The chairs were likewise modified in height and I made the backs a bit fancier using 1x2's and a nail gun.

Estimated Time Investment
Week Long Project (20 Hours or More)
Finish Used
Chairs are painted and waxed, table is stained and polyurethaned. When I do my next table it will be waxed.
Recommended Skill Level
Beginner

Loft Bed in a Day

Submitted by Anonymous (not verified) on Tue, 03/15/2016 - 06:21

Yes, really a bed in a day! It took 24 hours from the time we bought our supplies to completion. So much nicer than any store bought we looked at, these plans are really a breeze even though I had never tackled a project like this before.

Estimated Cost
$100
Estimated Time Investment
Weekend Project (10-20 Hours)
Recommended Skill Level
Beginner

Treehouse bed

Submitted by Anonymous (not verified) on Mon, 10/28/2019 - 14:19

Completed this for my grand daughter. Only extra I added was handle and step made from metal pipe. She just loves it. Looks perfect in her birch forest. 🙂

Estimated Cost
300.00

What's Your Sign

I've loved doing some custom signs lately. Since I didn't have anymore reclaimed plywood I let my boyfriend Kreg Jig do the work joining some boards together, and let me angle grinder do all the damage.

Estimated Time Investment
Afternoon Project (3-6 Hours)
Finish Used
beat up wood with angle grinder
Base coat with a mix of leftover blues and greens
sanded, over sanded
coat of leftover red mixed with some other acrylic reds
sanded and over sanded to reveal lots of that blue
used projector to throw my adobe file up there, traced with paint pen, then filled in. Sanded and distressed a tad more. Sealed with a coat of satin poly.
Recommended Skill Level
Beginner

Shoe Dresser

Submitted by flyboy599 on Wed, 01/01/2014 - 08:04

We started using the plans from the site while modifying some dimensions to best fit our space. To reduce the guesswork in aligning the drawers and drilling the dowel holes, we routered a slot in the side of the drawer (shown in the pictures) then drilled a 1/2'' hole in the inside of the frame to insert the dowel. Doing this allows us to easily insert and remove the drawers for adjustment or cleaning.

We attached nylon straps to the bottom of the bin to hide them and used some hardwood plywood to completely cover the back.

Built from Plan(s)
Estimated Time Investment
Week Long Project (20 Hours or More)
Finish Used
Minwax natural stain (w/ prestain) and two coats of semigloss poly.
Recommended Skill Level
Intermediate

Comments

abc1234

Mon, 02/19/2024 - 15:39

I like your idea with the dowels. I want to do the same but I thought the dowels would need to be closer to the front corner for the doors to open properly. Do you find your doors open ok?

Closet Organized!

Submitted by anne_c on Fri, 03/18/2016 - 12:21

I love the look of a nicely organized closet, but after moving into new house where closets weren't as big, organization became an issue. I love the look of this plan. The modifications I made were making it nice and tall and still fitting a full shelf in at the very top. Also, I didn't want to have to worry about redoing bars when my daughter had adult sized hangers and clothes, so I made sure that my clothes would fit in the top and bottom levels. I love how it turned out. Now to make over all the other closets in the house...

Built from Plan(s)
Estimated Cost
$50-$70
Estimated Time Investment
Afternoon Project (3-6 Hours)
Finish Used
white chalk paint with wax finish
Recommended Skill Level
Beginner

Stackable child-sized chairs

Chairs are hard.... when you don't use plans. 

I used Ana's plans for round 2 of these chairs. I actually feared for my children's safety with the first set I made using no plans at all. With plans in hand, these turned out excellent and were actually quite easy to build. 

I used 1x2s for the legs, 1x3s for the side supports and for the turquoise back panel, a 1x4 for the pink back panel, and scrap MDF board for the seat base. 

I regret using the MDF board, it chips easily. In hindsight, I should have used 1x3s for the seat bottom. 

Estimated Cost
$20
Estimated Time Investment
Afternoon Project (3-6 Hours)
Finish Used
White cabinet paint, pink and turquoise spray paint
Recommended Skill Level
Beginner

Sunny Cupcake Play Kitchen!

My friend and I built this out of white pine, using plans from here. We threw our own changes and special touches on it and used the fridge plans to build a pantry also. We painted it yellow, and used vintage inspired and cupcake fabric prints. I also found a miniature ice cream parlor set on Craigslist. I painted to table top and we upholstered the seats with the same cupcake fabric. A few kitchen accessory kits and VIOLA! My girls LOVE this and it cost under $200 to build. I would recommend building over buying ANYTIME you can! Thank you Ana White and my friend for making my girls' Christmas the best yet!

Estimated Cost
$200
Estimated Time Investment
Week Long Project (20 Hours or More)
Finish Used
Olympic One Paint+Primer in Golden Slumber. Semi-gloss.
Recommended Skill Level
Beginner

Comments

linzi_sparxxx

Wed, 03/07/2012 - 15:14

They stood there, one staring at the kitchen, one staring at the table set, for like 15 seconds with their jaws dropped. It was priceless. I had so much fun, and it's really so easy to do. As long as you have the tools!

linzi_sparxxx

Fri, 03/09/2012 - 07:55

Thank you! I absolutely love this kitchen. I recommend building over the cheaply mass produced ones you can buy at Walmart and Kmart. I'd like to see some pictures of yours too!

Momofmarlee

Tue, 12/03/2013 - 19:45

Hello, I am about to start building this project for my little girl. I am so excited! I was wondering how you did the knobs for the oven and stove. I love them. Do they turn? Did you find an already round piece of wood or did you have to cut it that way? I love love love your kitchen. So creative and so many great ideas! Lots of love went into that I can tell. Thank you for your help!

Tsu Dho Nimh

Wed, 12/04/2013 - 03:03

The knobs look like those "mushroom" cabinert pulls with a line painted on them for the temperature. They seem to have a round settings dial painted behind them.

If you want them to turn, just don't tighten the bolt completely.

Husky Farmhouse Table

My Sister thought this table would be a perfect edition to her new Farm House styled home that she was building. My sister asked a local wood turner if he had any old chunky legs sitting around...and he did! He sold these beauties to her for $20/each, steal of a deal.
We followed the Husky Farmhouse Table plan except with a few modifications. We used 5x 2″x8″x72″ pine boards instead of the 2″x6″ boards. I thought it was necessary to add some supports to stiffen up the table top, so we cut 3 pieces of 2″x4″ about 25″ long and glued and screwed those boards into the underside of the table top.
Next we substituted 1″x4″ furring strip board for the 2″x4″ skirt and eliminated the 1″x2″ trim and put a cute routed bead around the skirt. Since the table legs are round at the top instead of square, we changed the skirt attachment and screwed the legs to the table top. We cut the skirt boards to fit and screwed them in place.
The table turned out gorgeous, my sister adorned this table with fun ombre chairs. Thanks Ana for the plan.

FYI: tutorial for the silver travertine herringbone floors on blog:-)

Built from Plan(s)
Estimated Cost
$120
Estimated Time Investment
Day Project (6-9 Hours)
Finish Used
Minwax Espresso gloss, and Minwax Classic Black gloss. 2 wet coats of espresso gloss, followed by 2 wet coats of classic black. The Espresso went on with a redish color, the black made it very rich!
The legs and skirt are painted white, we plan on using antiquing glaze to get a more defined look.
Recommended Skill Level
Beginner

Comments

kristihw

Thu, 01/02/2014 - 15:41

I love this table. I have been enjoying a lot ever since my sister built it! Thanks Ana for giving us this great idea. I have received a lot of compliments from visitors. It wasn't too hard to build either. Definitely worth it!

Rustic X Console

Submitted by Anonymous (not verified) on Sun, 03/20/2016 - 15:50

The most time consuming part was staining the wood, and getting the Xs to fit properly.  We love how it came out and are making an outdoor bench and end tables to match.

Built from Plan(s)
Estimated Time Investment
Week Long Project (20 Hours or More)
Finish Used
homemade steel wool/vinegar stain
Recommended Skill Level
Starter Project
Back