Community Brag Posts

Our Twin Farmhouse Bed

My husband and I made this bed, using the twin farmhouse bed plans, for our daughter's third birthday. It was fairly easy to do and we got the building part done in one day. It was a big success!!

Built from Plan(s)
Estimated Cost
$100
Estimated Time Investment
Day Project (6-9 Hours)
Finish Used
We cleaned up the wood with wood putty, sanded it smooth and then painted it with a white paint and primer in one.
Recommended Skill Level
Beginner

Chris's Modified Washer/Dryer Pedestals

Submitted by MxChris on Sun, 02/08/2015 - 18:30

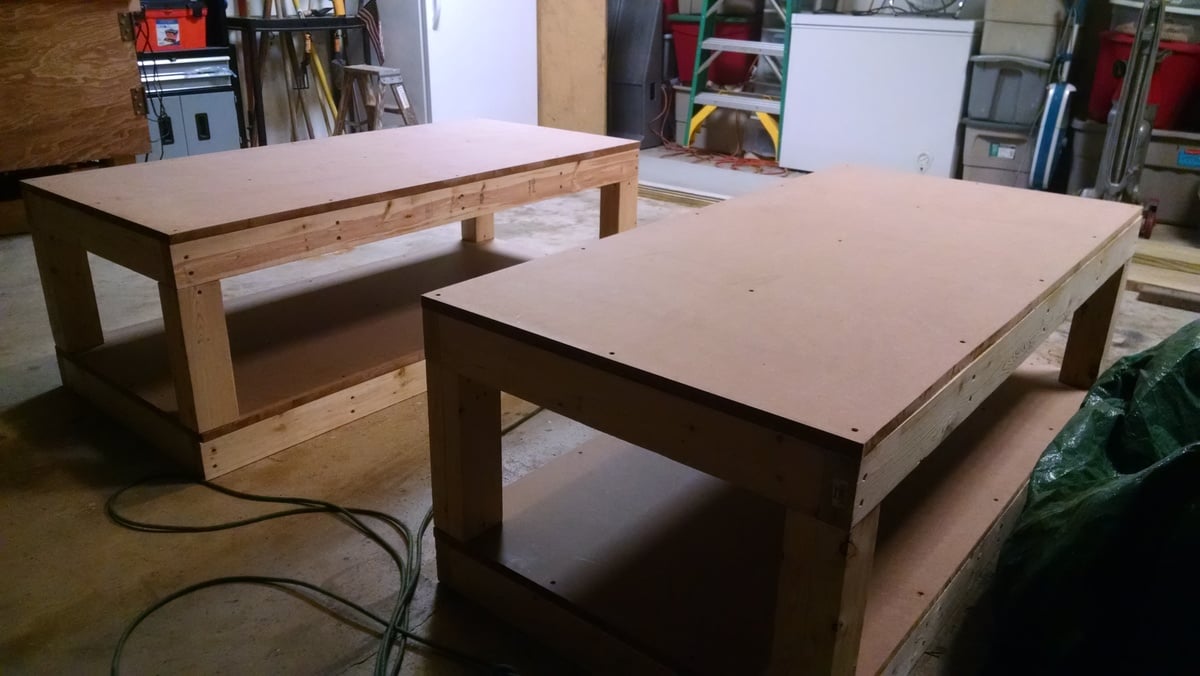
I ended up making three sets of these pedestals this month!

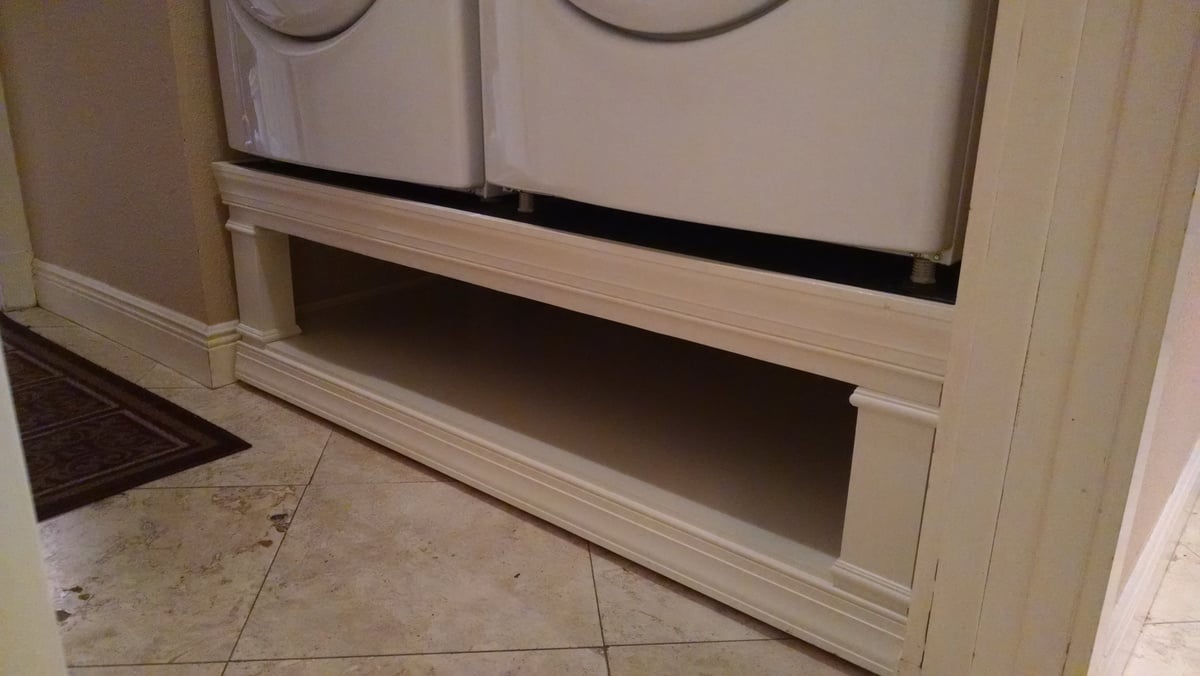
One set was for my In-laws, one for a friend and finally one for us. The two sets I gave away have a 12.5" opening underneath to accomodate two laundry baskets stacked inside each other for a total of six which is pretty good for most households. Our pedestal could only have a 9" opening due to the overhead cabinets in our laundry room so the shelf will not accomodate standard laundry baskets which is kind of a bummer.

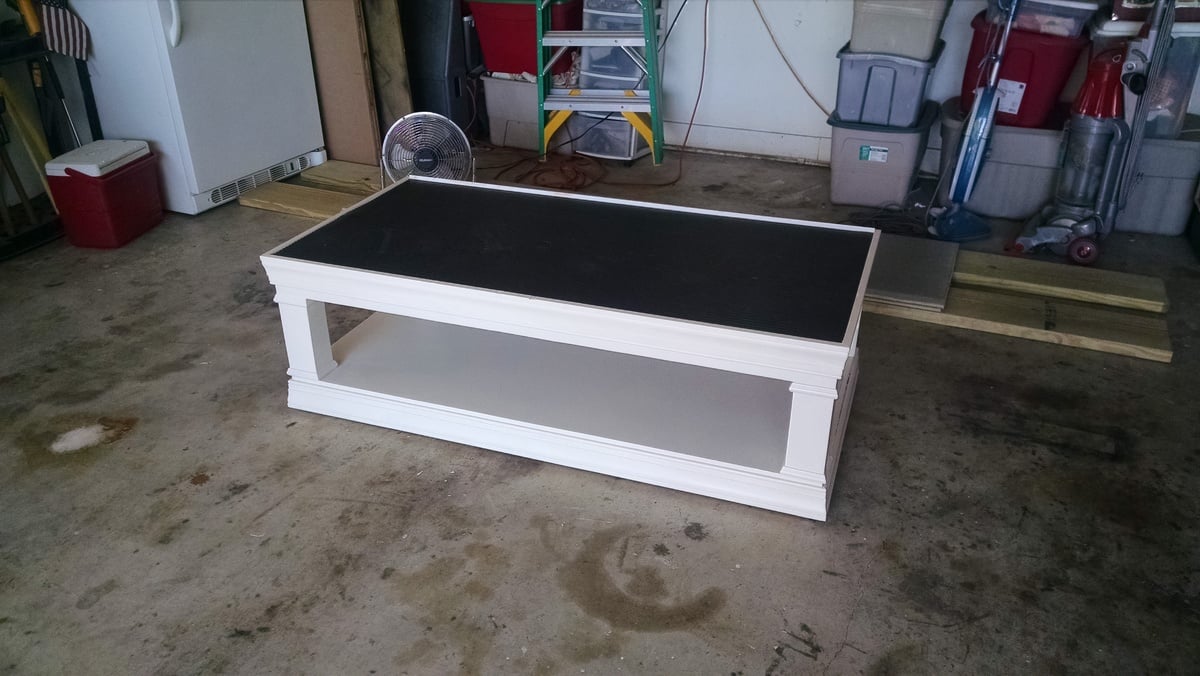
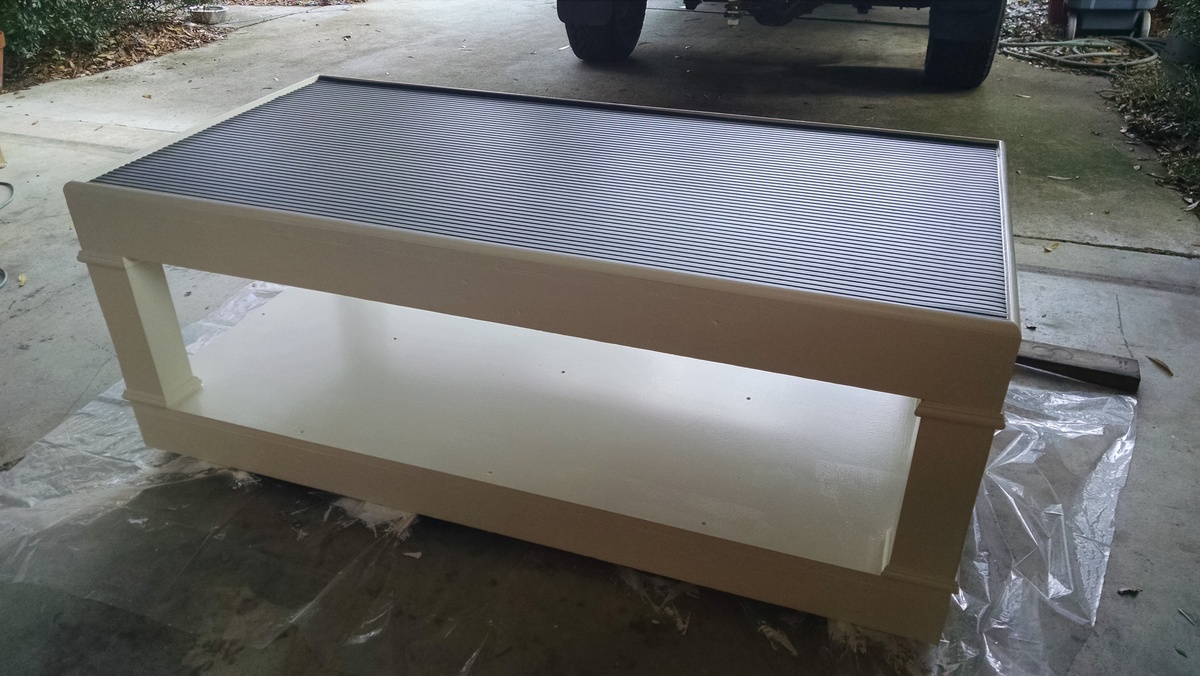
I kept one pedestal fairly minimalistic because it's going into a laundry room off an outside patio, I added a bit of quarter round trim all the way around the top edge to act as a guard rail just in case the washer or dryer tries to travel off the platform.

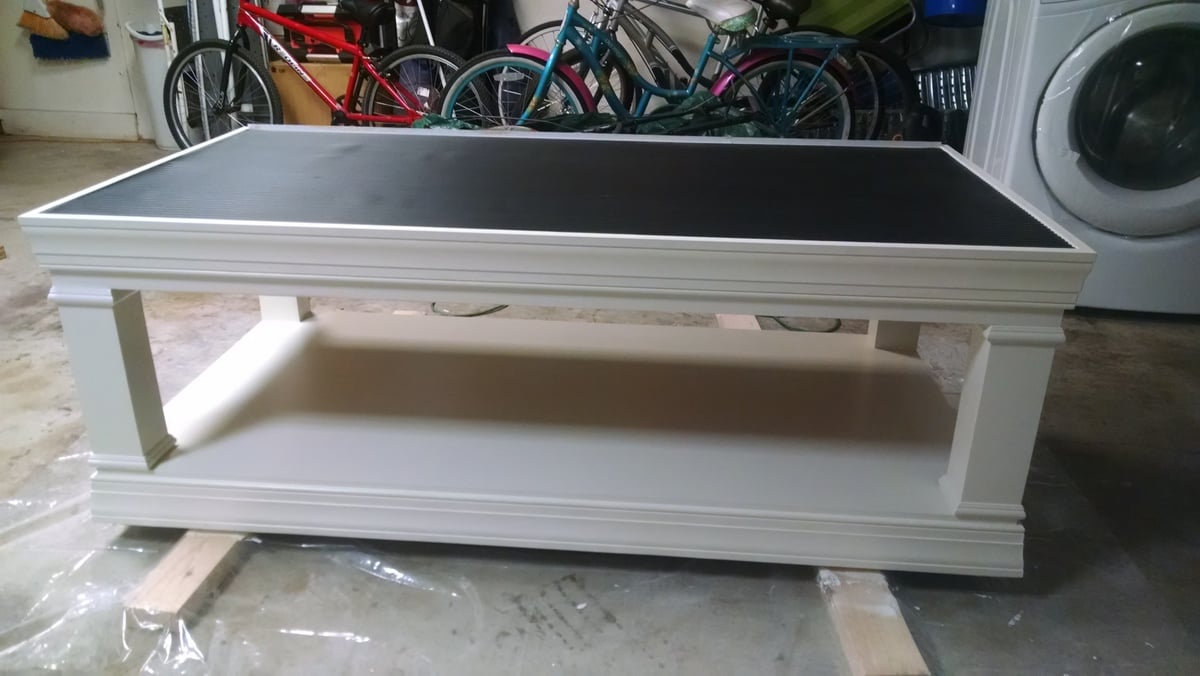
The other two I trimmed out identically they just have different post heights to fit the space they are intended for. I used a little more trim than on the first pedestal, I believe it's window sash trim. Just as on the first pedstal I wanted a guard rail of sorts so I left the window sash trim with about a 1/4" reveal on the three visible sides and used quartter round on the back.

I used a very heavy black rubber runner I found at Home Depot which is sold by the foot on top of each pedestal as an additional water barrier and vibration dampner. I think this finished it off and really works well, I'm very glad I decided to add that.

My version was inspired by Ryans modification of the original plan so thanks to Ryan and Ana for these awesome pedestals, my wife, In-laws and friend love them!


Estimated Time Investment
Week Long Project (20 Hours or More)
Finish Used
Two coats of Kilz primer and two coats of Behr Premium Latex paint + Primer (eggshell color)
Recommended Skill Level
Beginner

Comments

zoolander

Wed, 06/29/2016 - 14:17

Glad I could help.  Yours turned out great.  I should have thought of creating more than one while I was doing it.  Every time someone sees them, they ask me to make them one.  Ain't nobody got time for THAT!  :)

bclute

Sun, 01/29/2017 - 17:29

Thanks for sharing the detailed information of your builds.  It's been a while since you built, have you noticed any sagging?  They look solid!

Farmhouse Bench

Submitted by Anonymous (not verified) on Sun, 05/07/2017 - 22:39

Fancy X Farmhouse bench with pine base and poplar seat. Minwax Honey stain. 

Built from Plan(s)
Estimated Cost
$75
Estimated Time Investment
Afternoon Project (3-6 Hours)
Finish Used
Minwax Honey
Recommended Skill Level
Beginner

Barn Wood Bench

Submitted by KiraLynne on Wed, 02/11/2015 - 14:14

Loved this project! Bench made from old barn wood to put at the foot of your bed for extra storaage. 

Estimated Time Investment
Weekend Project (10-20 Hours)
Recommended Skill Level
Beginner

Comments

Toy storage bin box

Submitted by Anonymous (not verified) on Wed, 05/10/2017 - 16:40

I built this to hold my son's toys, which seem to multiply by the day.  It's very sturdy and has lots of storage room.  I printed out the lettering on paper, put the paper on top of the wood, and traced over it hard to create an impression on the wood.  I then used the feight lines as a guide to paint the name.  

Estimated Cost
$50
Recommended Skill Level
Intermediate

Val's Toy Box

Submitted by mariemule on Tue, 05/11/2021 - 02:39

Used 3/4 plywood cut to nominal size instead of stock lumber. I'm a newbie so I thought it turned out great!

Built from Plan(s)
Estimated Cost
free wood, $10 for paint.
Estimated Time Investment
Weekend Project (10-20 Hours)
Finish Used
Rustoleum satin finish in claret red.
Recommended Skill Level
Intermediate

Comments

Mod Bar

I made it to hold 6 large or small bottles.  Glasses can be set on the shelf.  

Built from Plan(s)
Estimated Time Investment
Weekend Project (10-20 Hours)
Finish Used
Golden Oak and Southern Pecan mixed on one. I forgot the name of the dark stain, Im not sure it could be jacobean .
Recommended Skill Level
Intermediate

Emma's cabin bed

Submitted by jiffyone on Sat, 05/13/2017 - 18:38

Made this for my granddaughter and worked on it 40+ hours. I borrowed the removable window boxes and shutters off another plan to girlie it up. If I were to make it again, then I would add an extra 2 inches on the sides, front and back to make it easier to make up the bed. It's so adorable and I can't wait for her to see it. 

Built from Plan(s)
Estimated Cost
$400.+
Estimated Time Investment
Week Long Project (20 Hours or More)
Finish Used
Paint from the big blue store.
Recommended Skill Level
Intermediate

Kentucky Fried Hilton Chicken Coop

Submitted by redtrek on Tue, 05/18/2021 - 23:12

I took the idea of the "small cedar shed" and decided to upsize it for a new chicken coop. Our old one was small enough that we had to let our six hens out to roam the yard. Chickens. Poop. Everywhere. I wanted one big enough to have them live in it. The nesting box is about 24 sf. The whole coop is 18' long, about 6-1/2' at the back with a 15° slope to the roof, and about 4' deep. I built the ladder up to their nesting box and made a mitre-cut panel under the nesting box for cleaning out, feeding, and watering. Total materials cost was about $1000, but a couple of local homebuilders helped by letting me scavenge the lumber for the nesting box from around houses that they were finished framing.

Built from Plan(s)
Estimated Cost
$1000-1200
Estimated Time Investment
Week Long Project (20 Hours or More)
Finish Used
Thompson's Clear Water Seal
Recommended Skill Level
Intermediate

Comments

Farmhouse Bench

Submitted by jasonD on Thu, 04/04/2013 - 17:46

Bench was an experiment. Wanted to see how the style looks in the kitchen. The wife loved it, so onto the farmhouse table.

Estimated Cost
$30
Estimated Time Investment
Afternoon Project (3-6 Hours)
Finish Used
watco danish oil dark walnut with a coat of poly for top.. Black paint for bottom.
Recommended Skill Level
Beginner

Coffee Table with 2 drawers

Submitted by AndyH on Tue, 02/17/2015 - 12:15

Small coffee table. Have to admit it and say messed up on this one as cut the sides wrong length and didn't realize until all glued up!!!

Ended up 3 inches wider than was supposed to be which then messed up my plans for the top.

Had to redesign the top and decided to use some 1 by 6 and 1 by 4 offcuts to fill in the middle part which was supposed to be one long 1 by 6 piece. Pretty pleased with how it turned out in the end.

Finished with Varathane Kona and three coats of Varathane Satin Poly.

Drawers were finished in Minwax Special Walnut.

Estimated Cost
Approx $40 of new wood as a lot of it was left over from other projects.
Estimated Time Investment
Weekend Project (10-20 Hours)
Finish Used
Finished with Varathane Kona and three coats of Varathane Satin Poly.

Drawers were finished in Minwax Special Walnut.
Recommended Skill Level
Beginner

Anna White Loft Bed with Stairs

Submitted by Anonymous (not verified) on Tue, 05/16/2017 - 12:51

I just want to thank Anna for inspiring me! I would've never thought that I could actually build my daughter a loft bed from scratch if it hadn't been for this website! This loft bed took about 3 weeks to build but the reason why it took me that long is because I did it in my spare time which was a couple of hours each alsmost everyday excluding the weekends, also this was my first time using my husbands table saw and drilling pilot holes but once I got the hang of it everything went smoothly. I wanted to save money so I purchased the Mini Kreg Jig which is about $20 from HD and let me tell you it is a must when your drilling pilot holes. I purchased my lumber from HD as well. It took me about an hour to pick out the wood. I decided to paint the loft bed with DecoArt Enamel craft paint because it's non-toxic, the paint cures into a hard finish, no primer, I didn't have to sand in between coats,  or put a protective finish. It also dries fast. I put 3 coats. This paint can get pricey if you pay full price but I just used a coupon everytime I went to Hobby Lobby. I used a tea, vinegar and steel wool mixture for the stairs, again because it's non toxic. I also raised the height of the 2x4 posts 6 inches so my 7 yr old daughter could walk under there without hitting her head. I'm so glad I decided go for it! Thanks again ANNA!

Estimated Cost
Wood $120 (including boards for mattress)
Kreg Jig $20
Paint $35
Estimated Time Investment
Weekend Project (10-20 Hours)
Finish Used
DECO ART Enamel paint in Pure White
Homemade stain
Recommended Skill Level
Beginner

Farmhouse Hall Tree

Submitted by brino on Sat, 05/29/2021 - 07:53

Added a shelf for plants at the top, coat hooks.
I mounted the back panel to the wall so I could remove the supports between the bench and the back panel.

Built from Plan(s)

Comments

Dining Room/ Home Office

Submitted by kristen on Sat, 02/21/2015 - 11:33

I didn't really follow any specific plan from Ana to build this project (I've become better at creating my own plans after putting together several of Ana's project plans--I owe Ana big time for getting me started in building!), but I did study her kitchen cabinet plans in order to put this together.  Up until now I've done mostly stand-alone projects and this was more like a small kitchen plan than anything I've done before.  This took a LOT of time to complete, but it has been a fantastic addition to our home for organization and aesthetic appeal. 

It is constructed of plywood and pine faceframes.  I used a Kreg Jig to construct most of it, including the drawer and door fronts.  The desktop has a 3/4" plywood base with a pine edge-glued panel on top of that with a pine edging. 

The estimated time investment was way more than 20 hours!  It took every minute of free time for 2.5 months to complete this.  But I was working alone, so you can cut that down significantly with help ;)

The link to my blog about this project contains links to all the posts I wrote up during this build. 

Estimated Cost
Approximately $900
Estimated Time Investment
Week Long Project (20 Hours or More)
Finish Used
White paint with a satin polycrylic topcoat. Sand well before the first coat and then with 220 grit sandpaper between each coat of paint (1 coat primer, 2 coats white paint). Sand with 320 grit between each coat of topcoat for 3 coats. I did use a HVLP sprayer (Woodcraft's $35 version with a large air compressor) but I have finished other projects using a foam roller and foam brush that gets really close to the spray finish--it just takes longer.
Recommended Skill Level
Advanced

Comments

Michael K

Mon, 02/23/2015 - 03:52

The time and effort you put in to this project was well worth it! I'm inspired.

Red Oak Gallery Shelves

Submitted by Anonymous (not verified) on Sun, 05/21/2017 - 14:10

Used the $10 ledge plans, to build 2 10' long and 2 5' long 6" deep shelves. Cost $39 each 10' 1x6 red oak; used 6 boards. Stained mission oak satin.

Built from Plan(s)
Estimated Cost
$260 including stain and mounting hardware
Estimated Time Investment
Weekend Project (10-20 Hours)
Finish Used
Poly shades mission oak satin hand rubbed three coats then polyurethane satin to seal.
Recommended Skill Level
Intermediate

Adirondack chairs

Submitted by hobbie8 on Wed, 06/02/2021 - 11:02

We built these chairs (and foot stools/tables) using Ana’s modern Adirondack chairs plan. Since we used pallet wood (heat treated oak pallets) and not 2x4’s, we did make modifications but her plan was great! The angle is very comfortable! Thank you Ana for the plans!

Comments

Camp Loft Bed

When we moved to our 3 bedroom apartment from our 4 bedroom townhome we knew having a place for all my daughter's stuff was going to be an issue. Finding this plan was the answer!! We extended the "porch" so we could put her bookcase up there and her tv. It's her pretty purple princess bed. = )

Estimated Time Investment
Weekend Project (10-20 Hours)
Recommended Skill Level
Intermediate

Comments

CandiD

Wed, 07/03/2013 - 12:10

I'm getting ready to build this bed (in a modified taller & for a full size mattress) for my 9 yr old, I've also been considering letting her have a tv in her room but wasn't sure where to place it. This looks like a perfect idea!

Lbjorn

Wed, 03/05/2014 - 14:49

I'm thinking about making this for my daughter but I'm curious how much longer the platform is than the original. We have an extra 14 inches from where the bed would bed and the wall so we figured we would extend the platform like you have done. Thanks for the great idea!

4x4 Truss Beam Table

We recently moved into our new house and had an empty dining room.  Instead of buying tons of furniture, I bought a compound miter saw, a drill, & a Kreg jig.  I'm the heavy lifting & my wife is the cosmetics.  We couldn't be happier with how the table and bench turned out.  We get complements constantly on the set.  

Built from Plan(s)
Estimated Cost
$75 - $100
Estimated Time Investment
Weekend Project (10-20 Hours)
Recommended Skill Level
Beginner

Comments

wjc129

Wed, 02/25/2015 - 10:18

Everything looks great ... what grade of wood did you use? My fear is if I use the cheap stuff from Lowes or HD that it will shrink up on me. I know the Kreg Jig will work to alleviate gaps, but I didn't know if you upgraded wood to help as well.

Sidebar with sliding barn doors.

Submitted by Daniel B on Wed, 06/09/2021 - 12:36

I built this sidebar from a plan I cooked up in my head, using the lesions I learned building the farmhouse table and bench. I sort of built it as I went along. It took me 40 or 50 hours and cost around $400.00 to $450.00 to finish. It matches the table and bench I made. Thank you Ana White for giving me the confidence, with your easy to follow plans, to under take such a project.

Estimated Cost
$400 -$450
Estimated Time Investment
Week Long Project (20 Hours or More)
Finish Used
Minwax stain (special walnut), Varathane polyurethane.
Recommended Skill Level
Intermediate

Comments

Loft Bed for the girls' room

My girls originally wanted a bunk bed but I didn't want to give up the storage that comes with the twin bed (it's an Ikea bed that has a lot of storage underneath the mattress). This loft bed was the perfect solution. I chose not to build a ladder as they use the lower bed and window sill, without any trouble, to get to the top. This was my first build.

Built from Plan(s)
Estimated Cost
$100
Estimated Time Investment
Weekend Project (10-20 Hours)
Finish Used
I used an off white paint from Behr (called Faux) and then hand distressed it to help disguise the beating it will take over the next few years.
Recommended Skill Level
Starter Project

Mid-Century Inspired Bed

Submitted by RunRVA08 on Sun, 03/01/2015 - 07:04

This was my first build. I modified the dimensions to fit a full sized bed and used 1x4's as the slats. Overall I am very happy with the outcome and learned a lot from the build. Of note these plans do not accommodate a box spring. This bed fits perfectly in my very small guest room and is very sturdy (and heavy!). I did not glue the corners for easier disasembly when I move.


This project took me a long time as I am a new builder. I would expect a more experienced builder could make the bed in a day.

Estimated Cost
$80-$90 including supplies. Wood was around $50.
Estimated Time Investment
Day Project (6-9 Hours)
Finish Used
Minwax Red Mahogany with Minwax Polyurethane
Recommended Skill Level
Starter Project

Comments

alexruzhyo

Fri, 09/16/2016 - 14:01

hey there! I'm interested in building this in a full size. I've never built anything before; would you be able to describe the modifications you used to make this fit a full?