Community Brag Posts
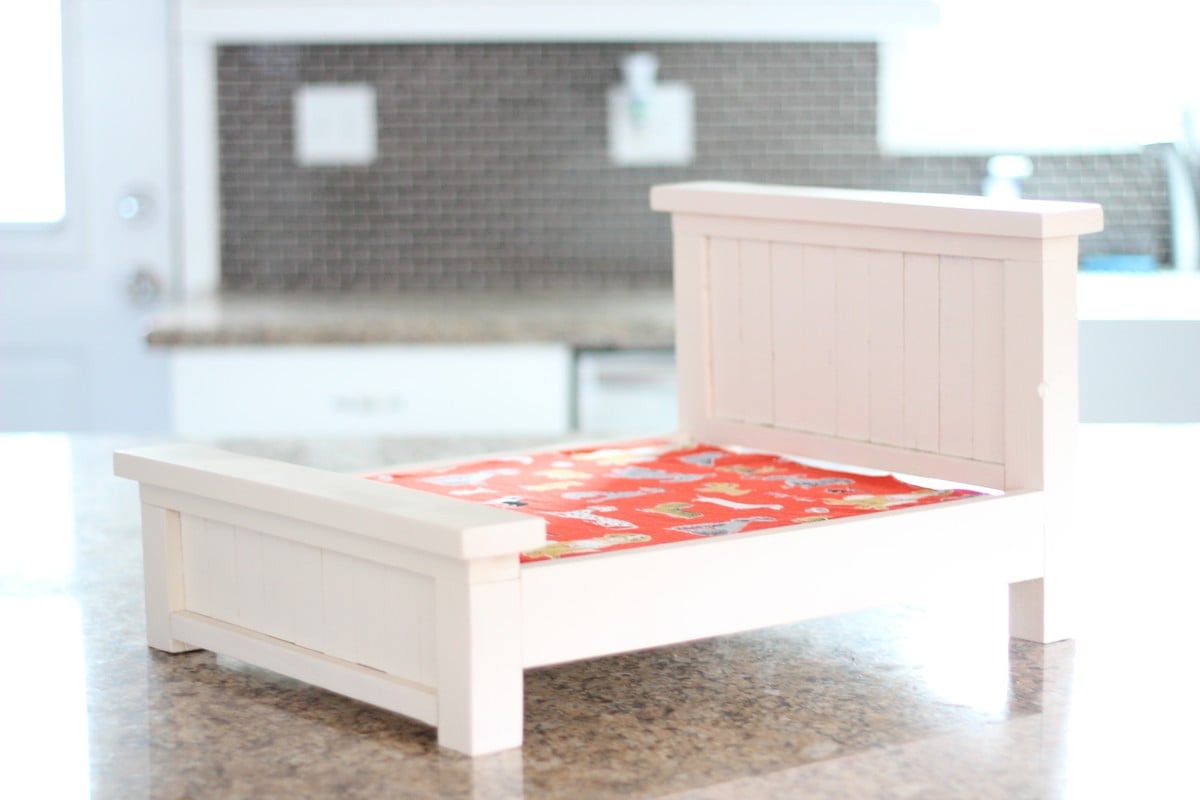
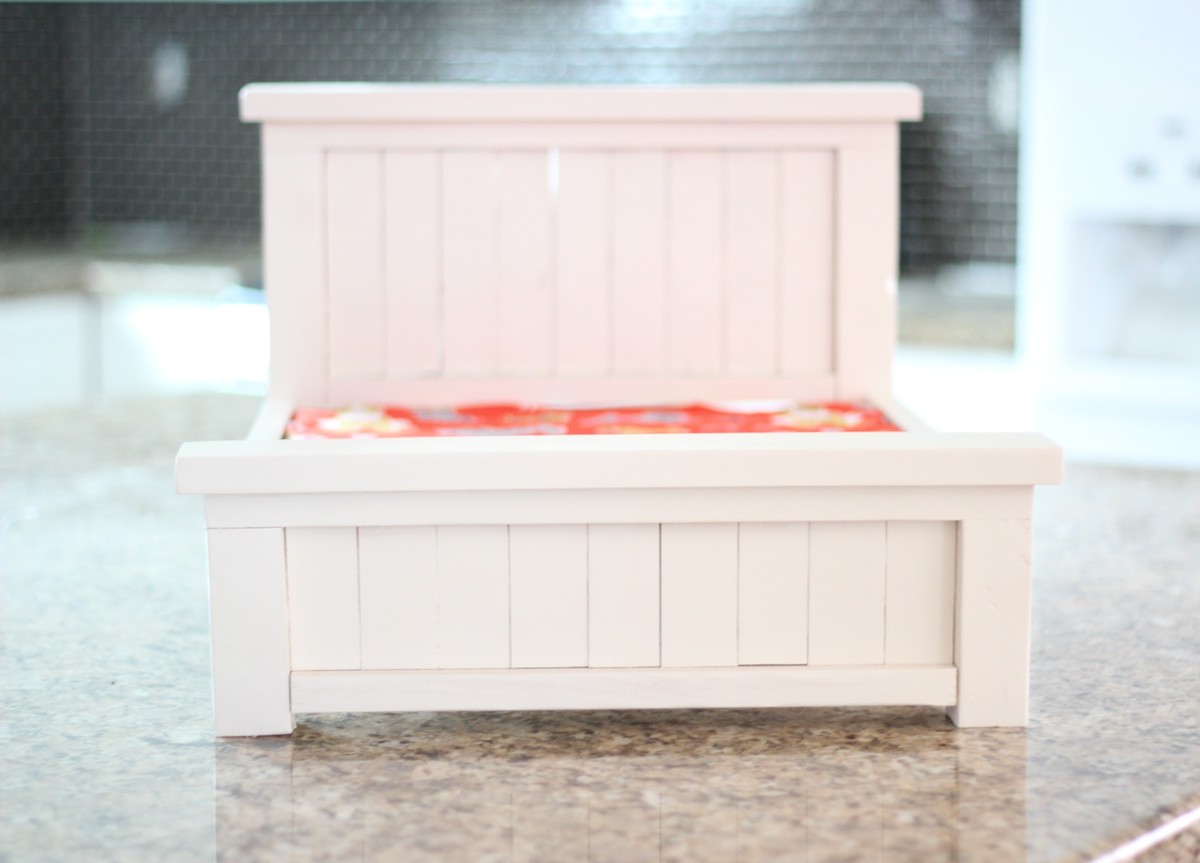
Small Dog Bed
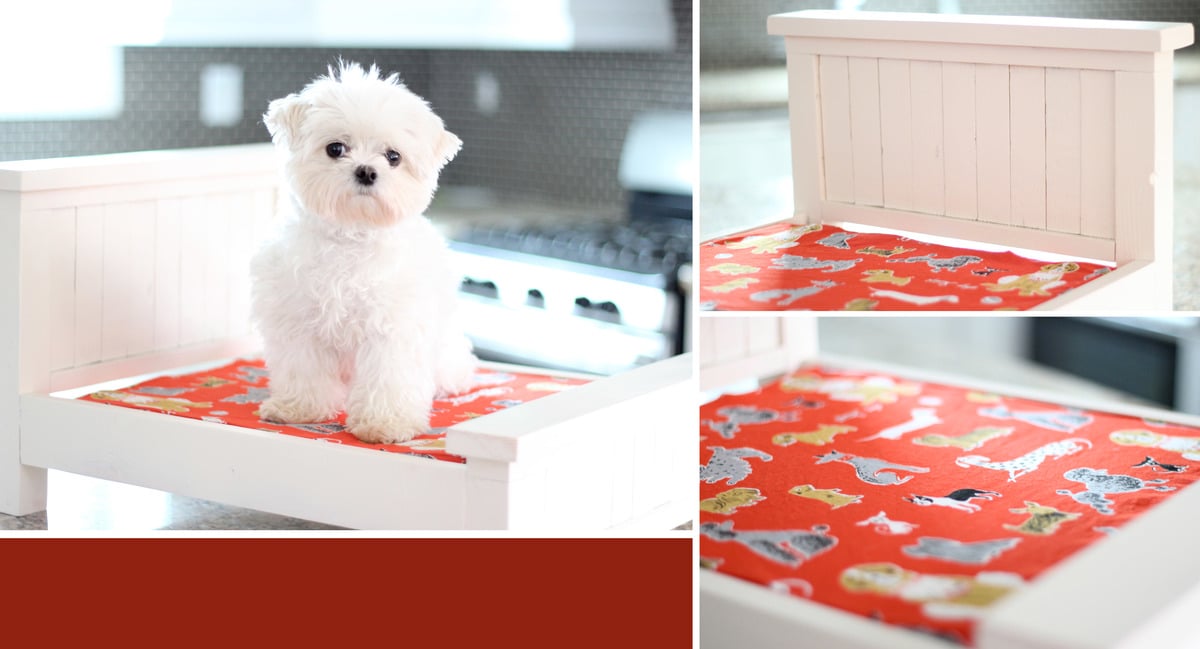
My mom really wanted me to build her a bed for her dog and was coming to visit in a week, so I jumped on the project immediately. (Although it is for her pup, mine is modeling the bed:-).) I took the Farmhouse Doll Bed plan and used that as a base for a modified version. I went to Joanns and grabbed a standard 15"x17" piece of 2" medium density foam for about $5 and built around it. Instead of using the 1x3s for the headboard, I used 9 1x2s to even out the space. This was also my first time ever sewing, so that was probably the most time consuming part of the project! (That's what took it over the edge from being an "hour or two project" to an "afternoon project".) I also modified the plans for Ana's Outdoor Cushions to fit the smaller piece of foam. (I fell in love with the dog fabric from Tonic Living, so I HAD to make my own!) I finished it off with 2 coats of spray paint.
Built from Plan(s)
Estimated Cost
$25 - including foam and fabric for cushion
Estimated Time Investment
Afternoon Project (3-6 Hours)
Finish Used
2 cans of Rustoleum Spray Paint in Antique White
Recommended Skill Level
Beginner
Child Size Beach Chair

This project goes together very easily. Had my adult son come by and make it for his daughter.
Did make one adjustment ... the supporting bar on the small frame ... the one that determines the opening angle ... at 6" the chair was too open ... at 6 1/2" it was more comfortable for the little ones. We used glue and air-gun brads for joining ... once dry I was able to sit in the chair without collapse!
Estimated Cost
$10
Estimated Time Investment
An Hour or Two (0-2 Hours)
Finish Used
ace hardware, clark & kensington, pale purple
Recommended Skill Level
Starter Project
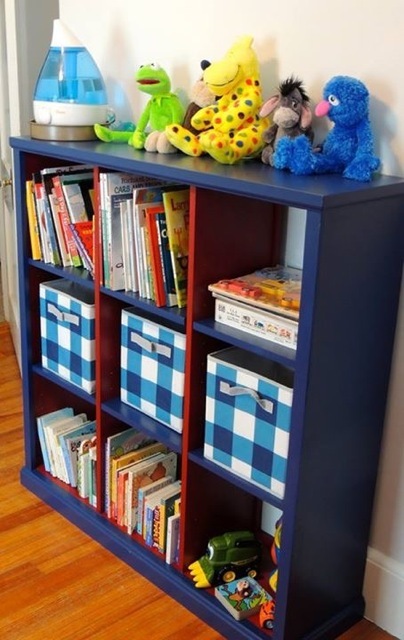
Large Cubby Bookshelf for nursery
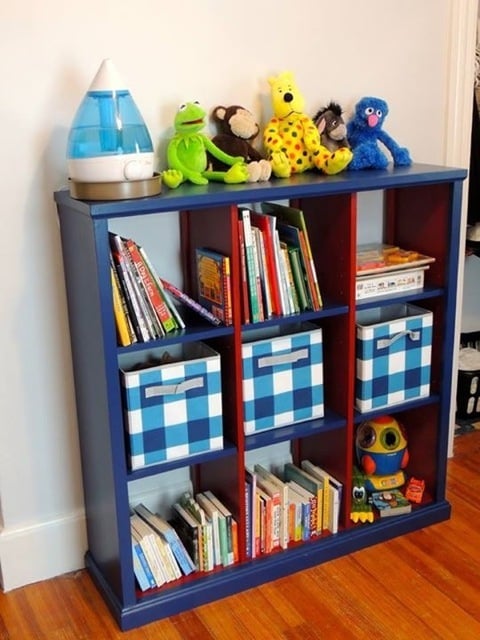
I wanted a bookcase for my son's room that would add some color and be a functional storage unit for his books and toys. I did not buy the highest grade of pine because it would have doubled the project cost and I knew I was going to paint it. The only trouble I had was that the boards were a little cupped so the shelves don't have an invisible fit. I used stock moulding and cut down the base trim to fit. In hind sight, I would have not done the adjustable shelves. I like the symmetrical look of this and can't see myself moving them. I did make a cleat to attach it securely to the wall so that a busy climbing boy wouldn't pull it down on himself.
Built from Plan(s)
Estimated Cost
This probably cost me $100 because I bought two paint colors.
Estimated Time Investment
Day Project (6-9 Hours)
Finish Used
Interior paintd
Recommended Skill Level
Beginner
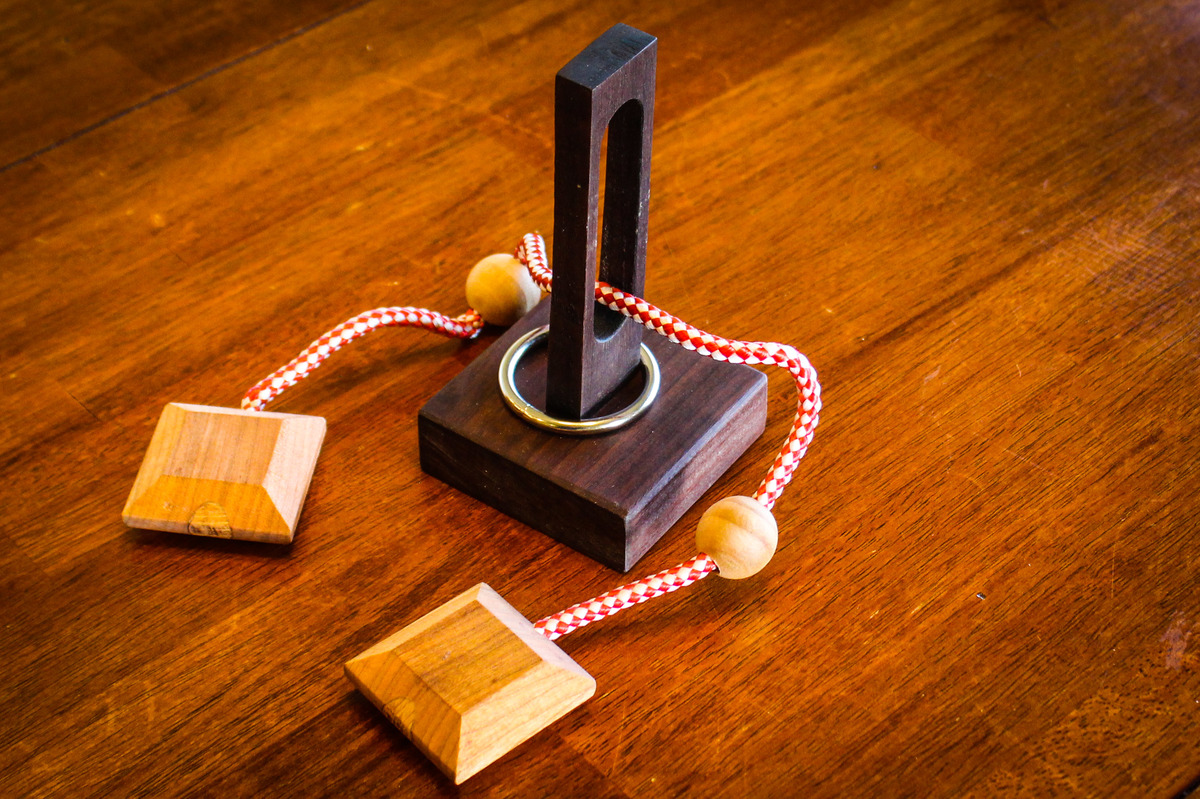
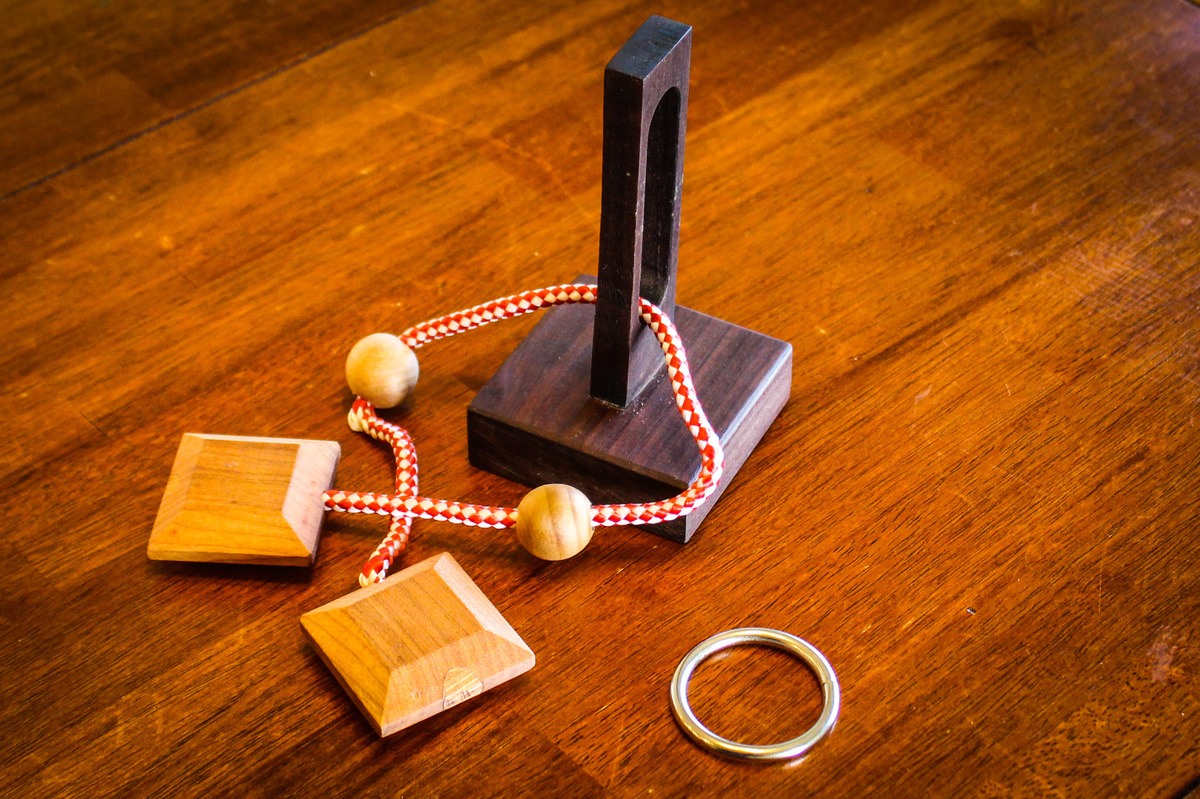
Oliver String Puzzle
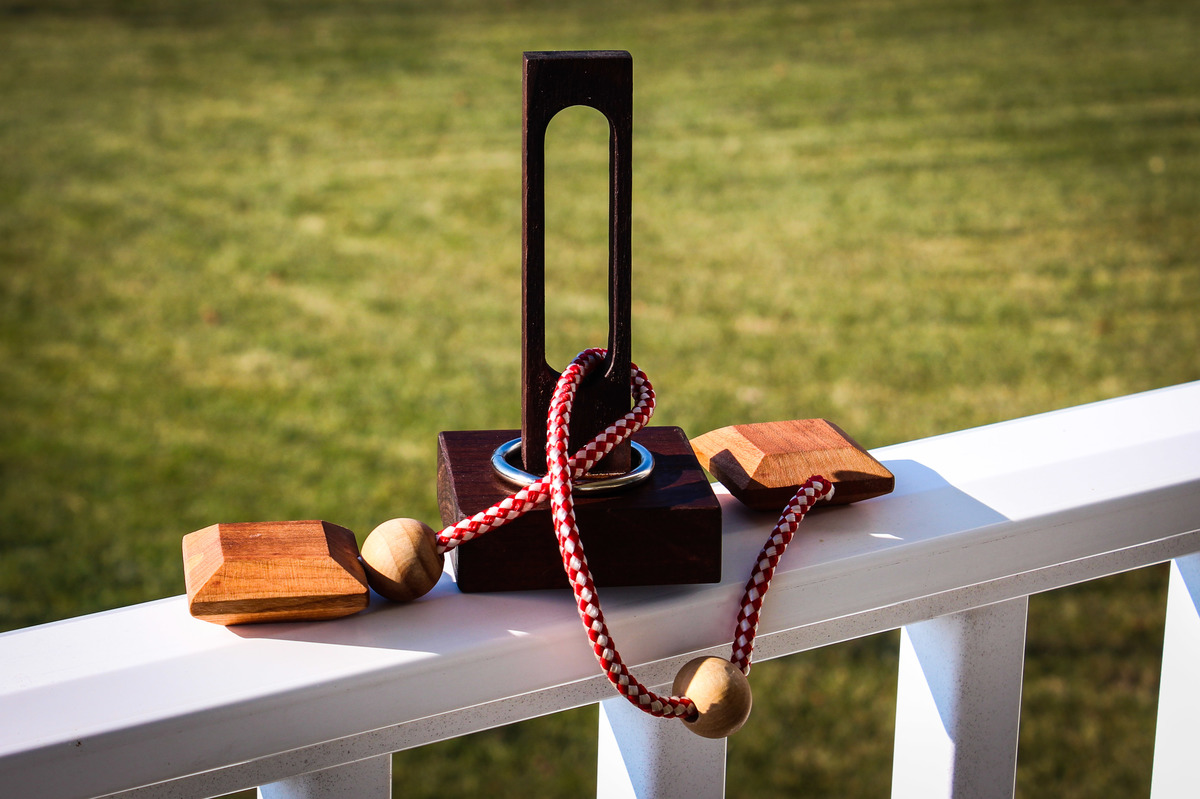
This is my take on the classic Oliver String Puzzle. It was built from scrap wood, a ring from a previous project, purchased wood beads and rope.
The goal is to remove the ring from the puzzle. My kids and wife found it quite challenging. I would rate the skill level at 3 out 5. If you can't figure it out from the pictures, refer to the video.
Build Instructions: https://www.instructables.com/id/Oliver-String-Puzzle/
Solution: https://youtu.be/VTb0IlMXSiU
Estimated Cost
$5
Estimated Time Investment
Afternoon Project (3-6 Hours)
Finish Used
Oil
Recommended Skill Level
Beginner
Kids clubhouse
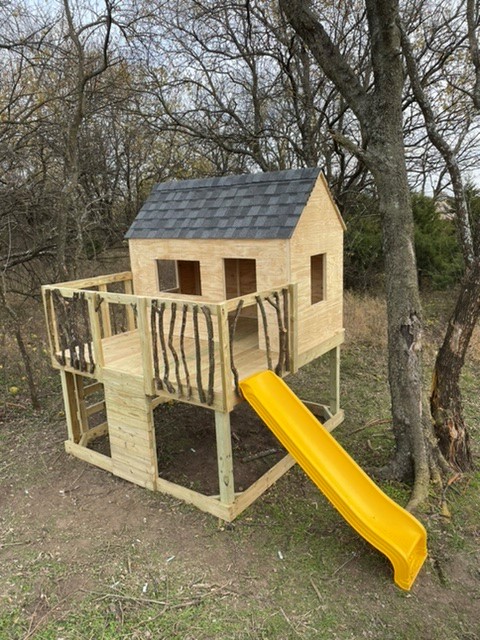
Here is how the clubhouse I built turned out! Still need to install trim, paint, and a do few other finishing touches.

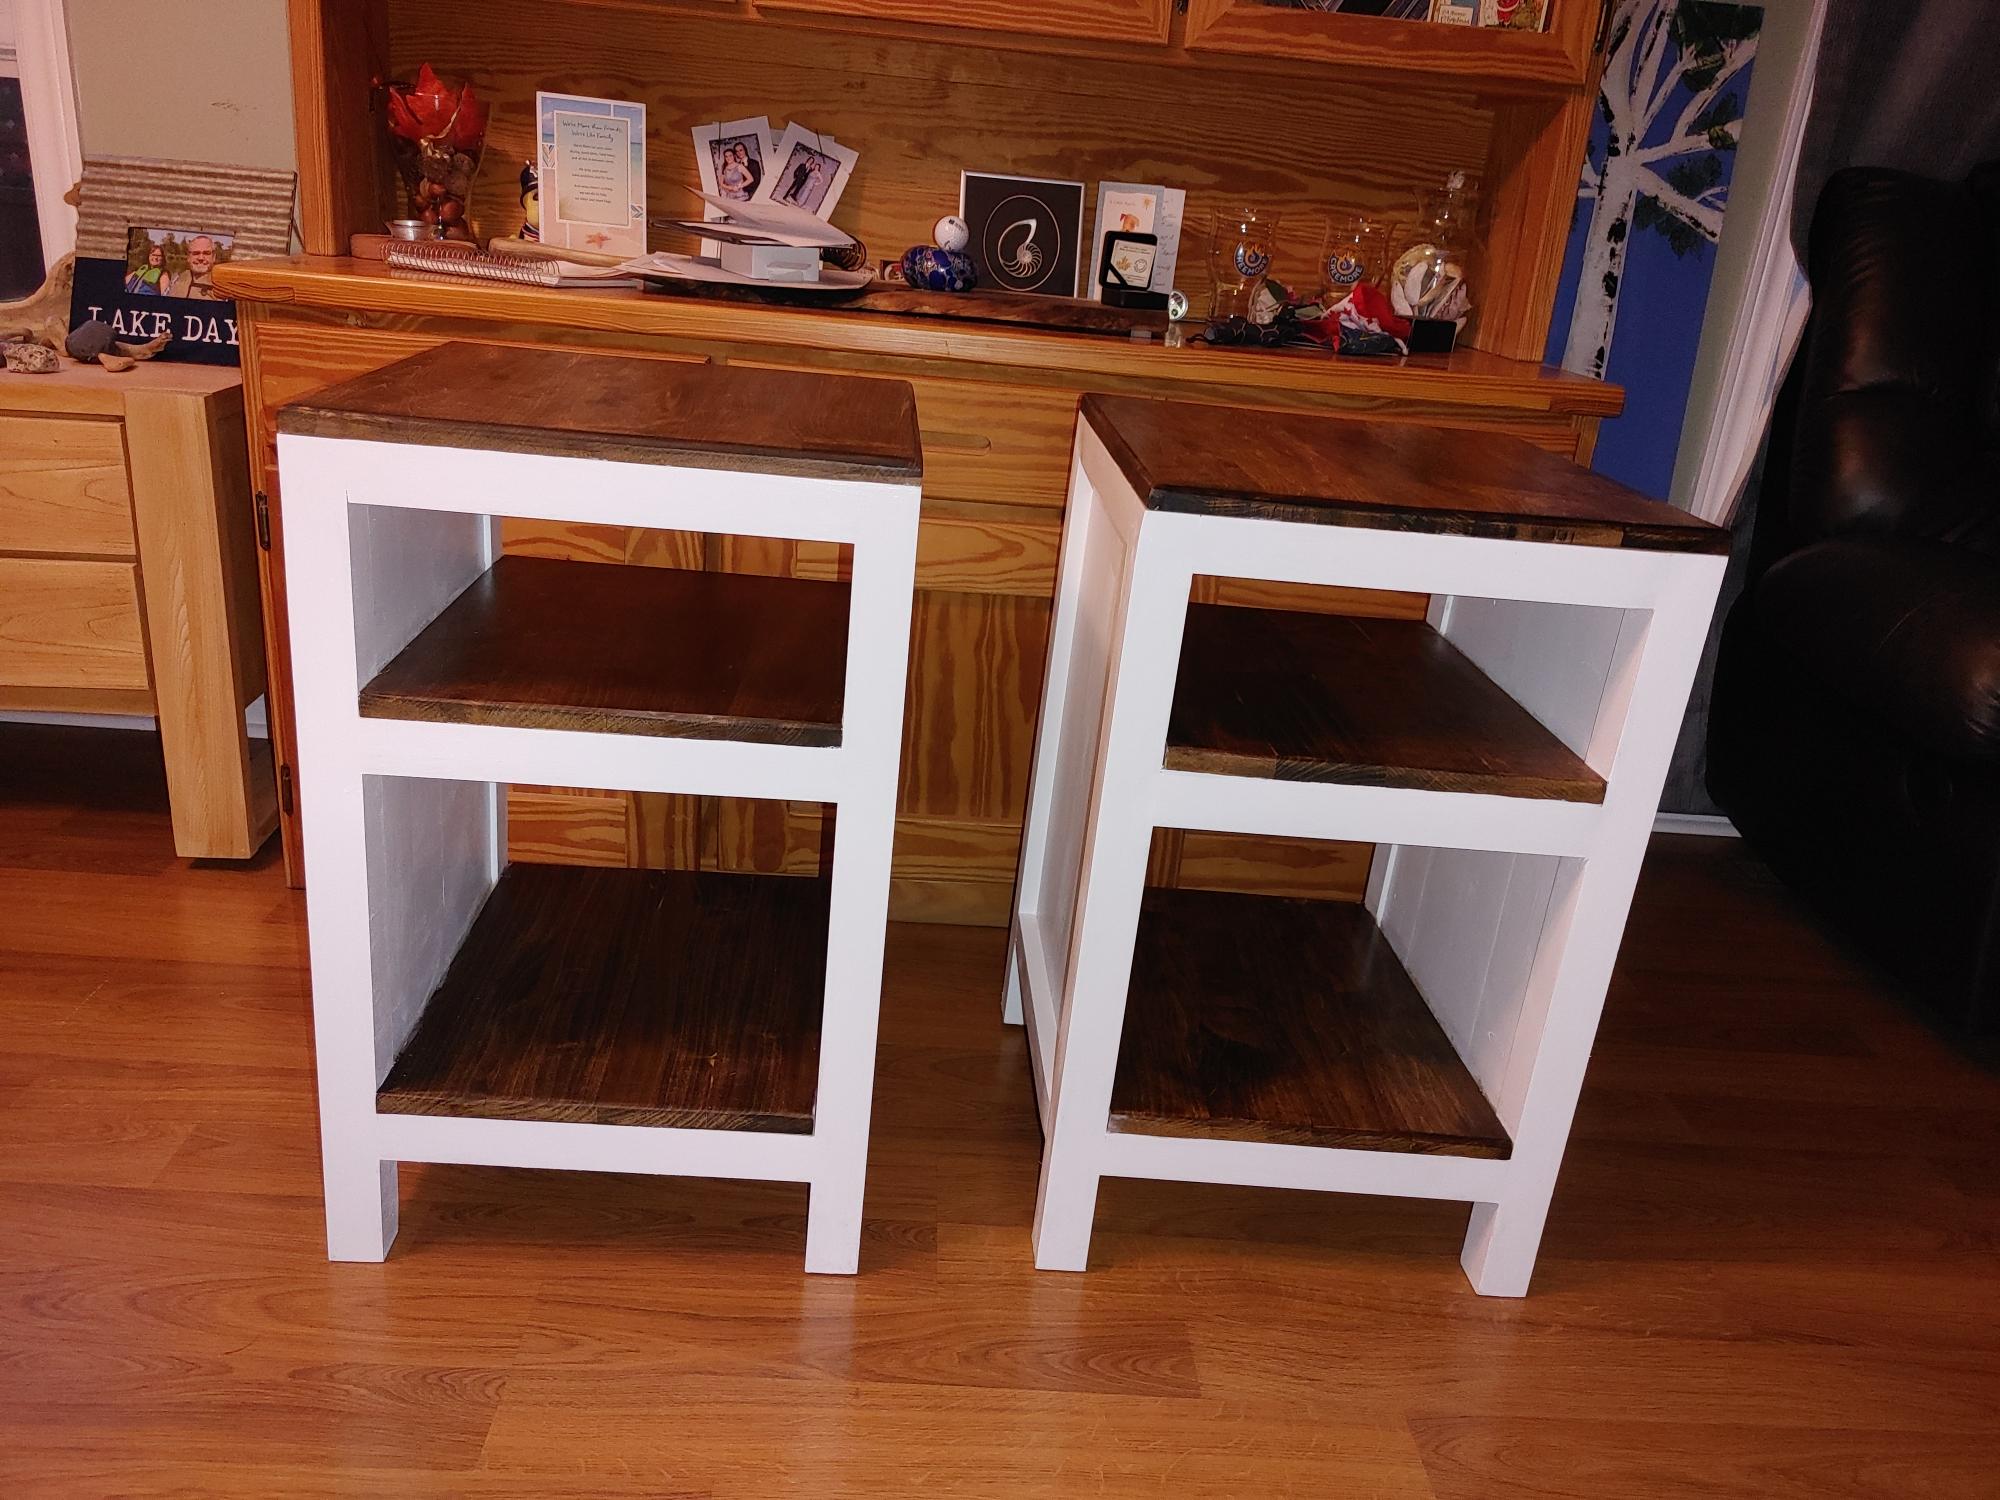
My version of the $10 ledge shelf
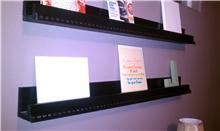
I built these shelves and wasn't pleased with the finished look. We went back and added a small piece of crown molding. It made the difference I was looking for.
Estimated Cost
$10
Estimated Time Investment
An Hour or Two (0-2 Hours)
Finish Used
black paint & a can of clear gloss spray paint from another project
Recommended Skill Level
Beginner
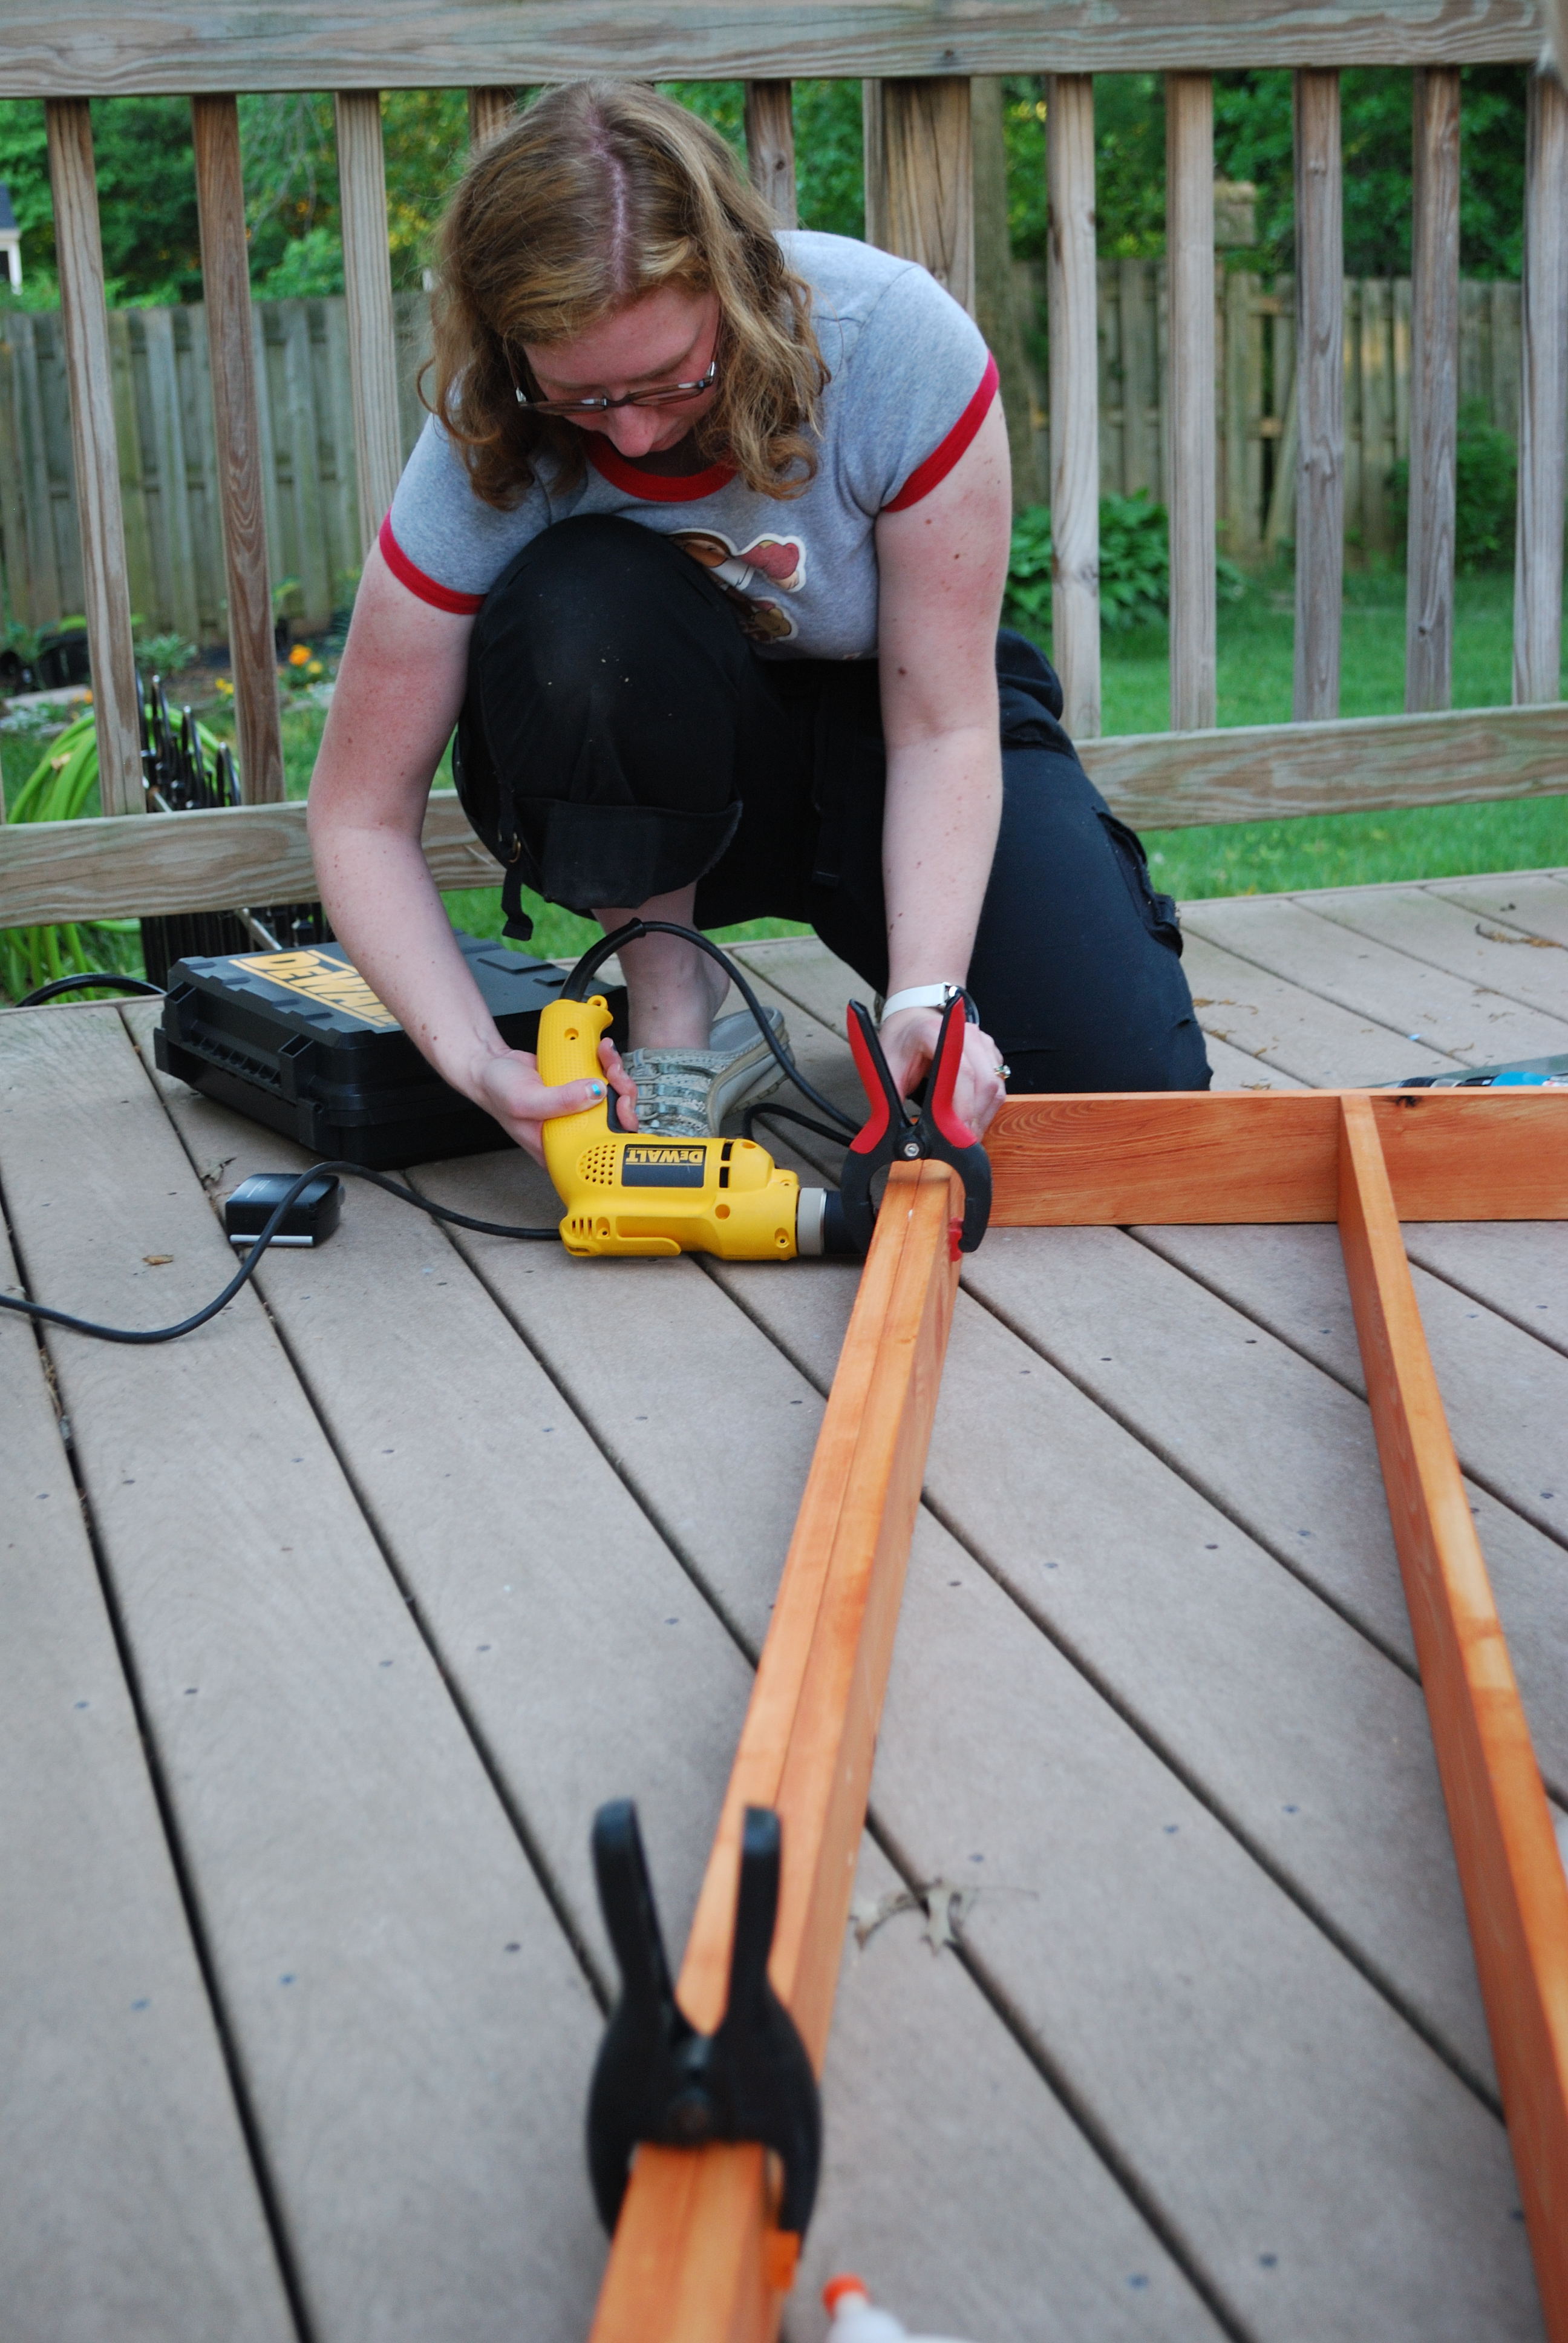
Foldable Farmhouse Table 2

I recently published my first foldable farmhouse table last week here: http://ana-white.com/2013/06/foldable-farmhouse-table The first one I made was very heavy because I used 2x6 tops and 4x4 legs. I decided to make another one that would be lighter and easier to transport. The plans are basically the same just instead I used 1x6 for the top and put 2x4s together for the legs. I also shorted the length by about a foot. The only issue with making the table shorter length is that the legs don't fold completely flush. You could easily make the legs short enough to fold flush, but then the table was a little too short from the ground up for us. The same as before I simply used kreg joints to join the top boards together. I then made a 2x4 frame and attached it to the bottom. I made each of the legs separately by joining 2x4s together and sanding everything down. Everything was stained before putting the legs on using Miniwax Dark walnut stain. I used 2 coats of Miniwax water based clear coat to seal it. A notch was cut out on each of the bottom 2x4 supports on the legs and I glued in a small piece of wood cut to size. These are so I can put in a 2x4 support board under the table so that the legs do not fold in on themselves when it is standing up. The legs are just attached using door hinges you can buy in packs in the hardware section. Be careful when screwing into the 1x6 top not to use too long of screws or else you will over screw and have them come through into your table top. Table design was by Amber Veatch Designs and photographed by Andi Mans Photography


Built from Plan(s)
Estimated Cost
120.00
Estimated Time Investment
Day Project (6-9 Hours)
Finish Used
Sand to finish and then used Miniax dark walnut stain followed by Miniwax water based clear coat.
Recommended Skill Level
Beginner
Comments

Tue, 07/07/2015 - 06:41
Wobble
We have built something very similar and we have a good bit of wobble at the top, even though the stretcher down the center of the table is holding solid in there and secred with clasps. Were thinking of some sort of sliding pin into the top of the leg to the apron. Anyone run into this before?
Seasonal And Holiday
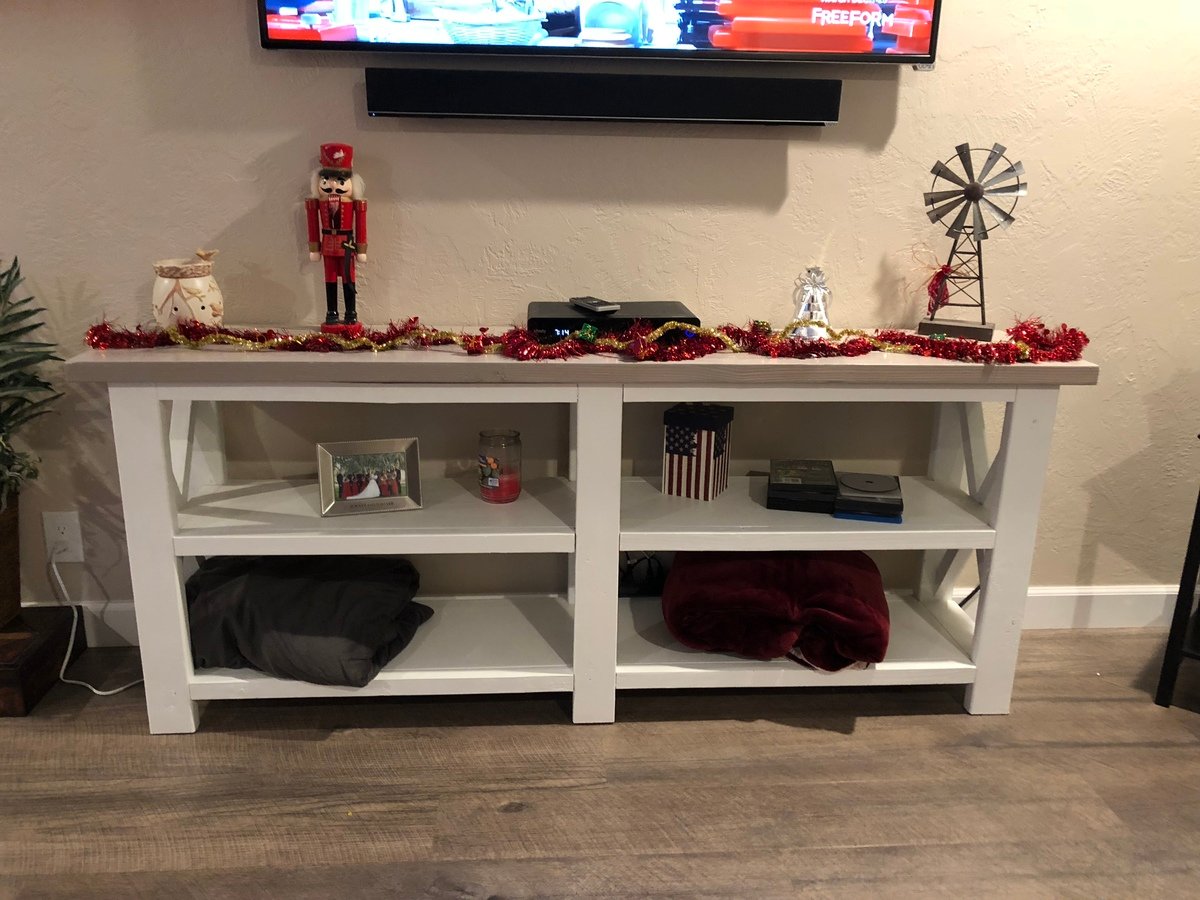
Modified Reclaimed Wood Console Table

I needed a console table that would fit in a fairly small spot and knew as soon as I saw this plan that I wanted to create something very similar in a scaled down version. Made a few modifications to the original other than size, like using a solid piece of wood for both the top and bottom panels.
The building plans are easy to follow and it all went together easily. I included the modified cuts on my blog if anyone else out there needs a little table like this one.


Built from Plan(s)
Estimated Cost
$30 (but I used wood from other projects which kept the cost down)
Estimated Time Investment
Weekend Project (10-20 Hours)
Finish Used
Behr Latex Paint for the body and a mix of Special Walnut and Dark Walnut stain from Minwax for the drawers and bottom panel.
Recommended Skill Level
Intermediate
X Console
A house warming present for my little brother and his wife
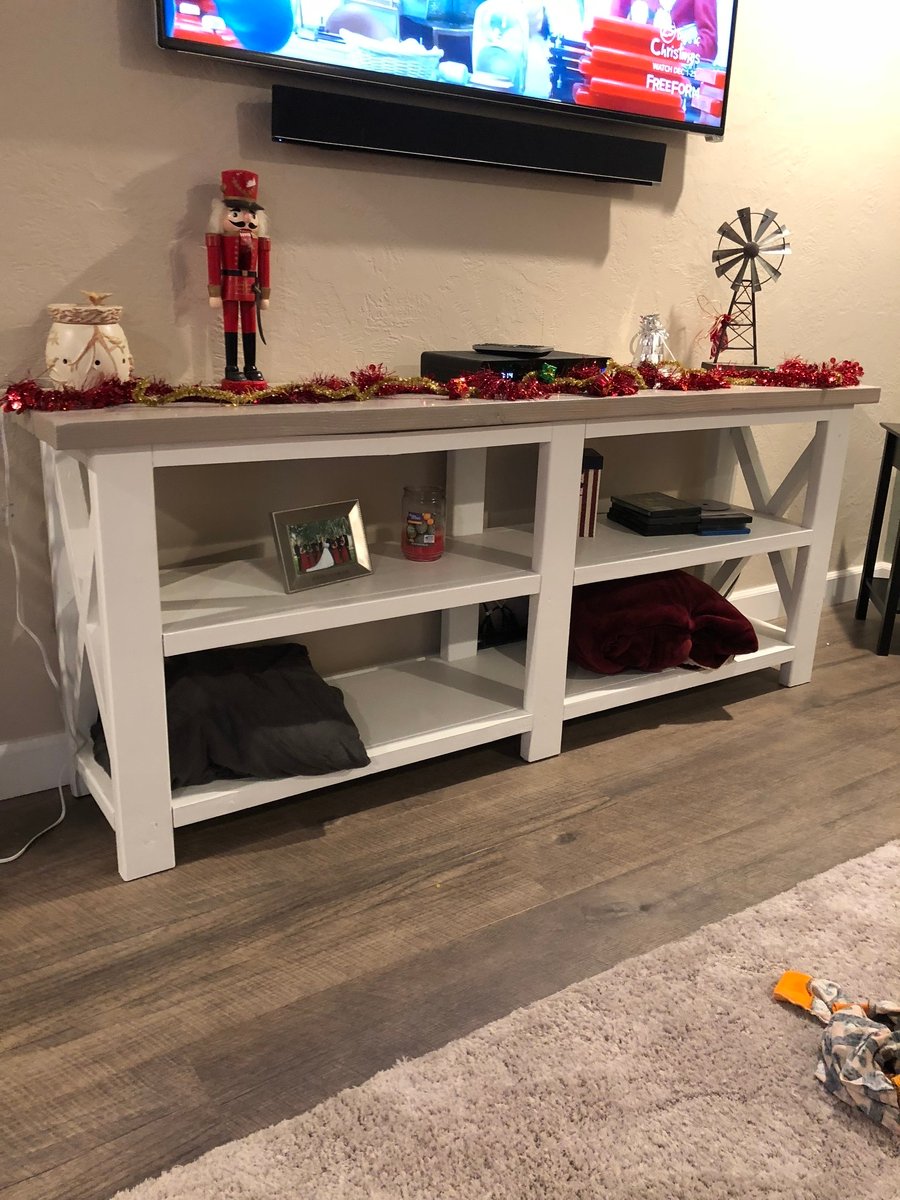
Built from Plan(s)
Estimated Cost
$100
Estimated Time Investment
Weekend Project (10-20 Hours)
Recommended Skill Level
Beginner
Timber Cabin Chicken Coop
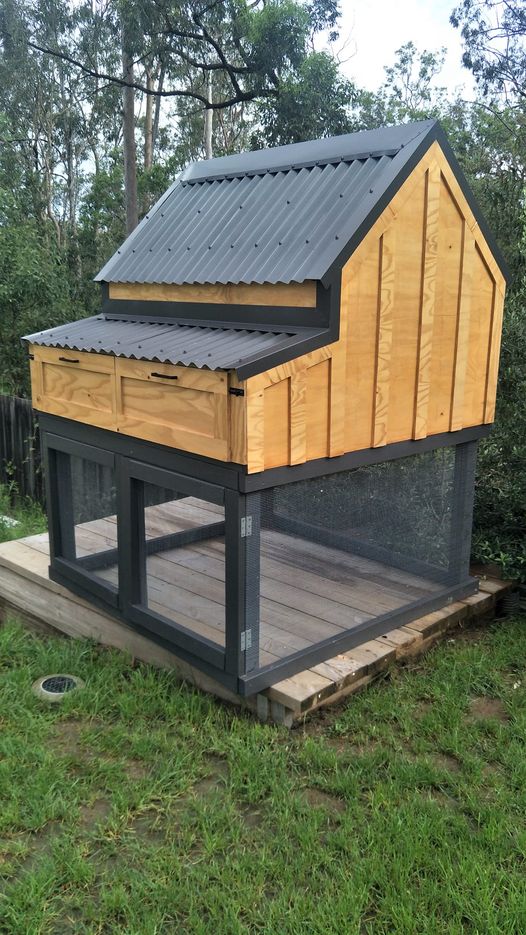
I had to convert all the measurements from inches to mm, but it was worth the brain drain. I didn't add the garden, but extended out the chicken coop. I am thrilled with the results! Thank you!
Built from Plan(s)
Comments
Fri, 12/03/2021 - 07:39
Super nice!
WOW, definitely worth the extra effort, just beautiful! I wish we could offer metric plans, may need to figure that out.
Wed, 03/23/2022 - 20:32
Did you change out the 2x4…
Did you change out the 2x4 and 2x6 on the lower half?
Our first build
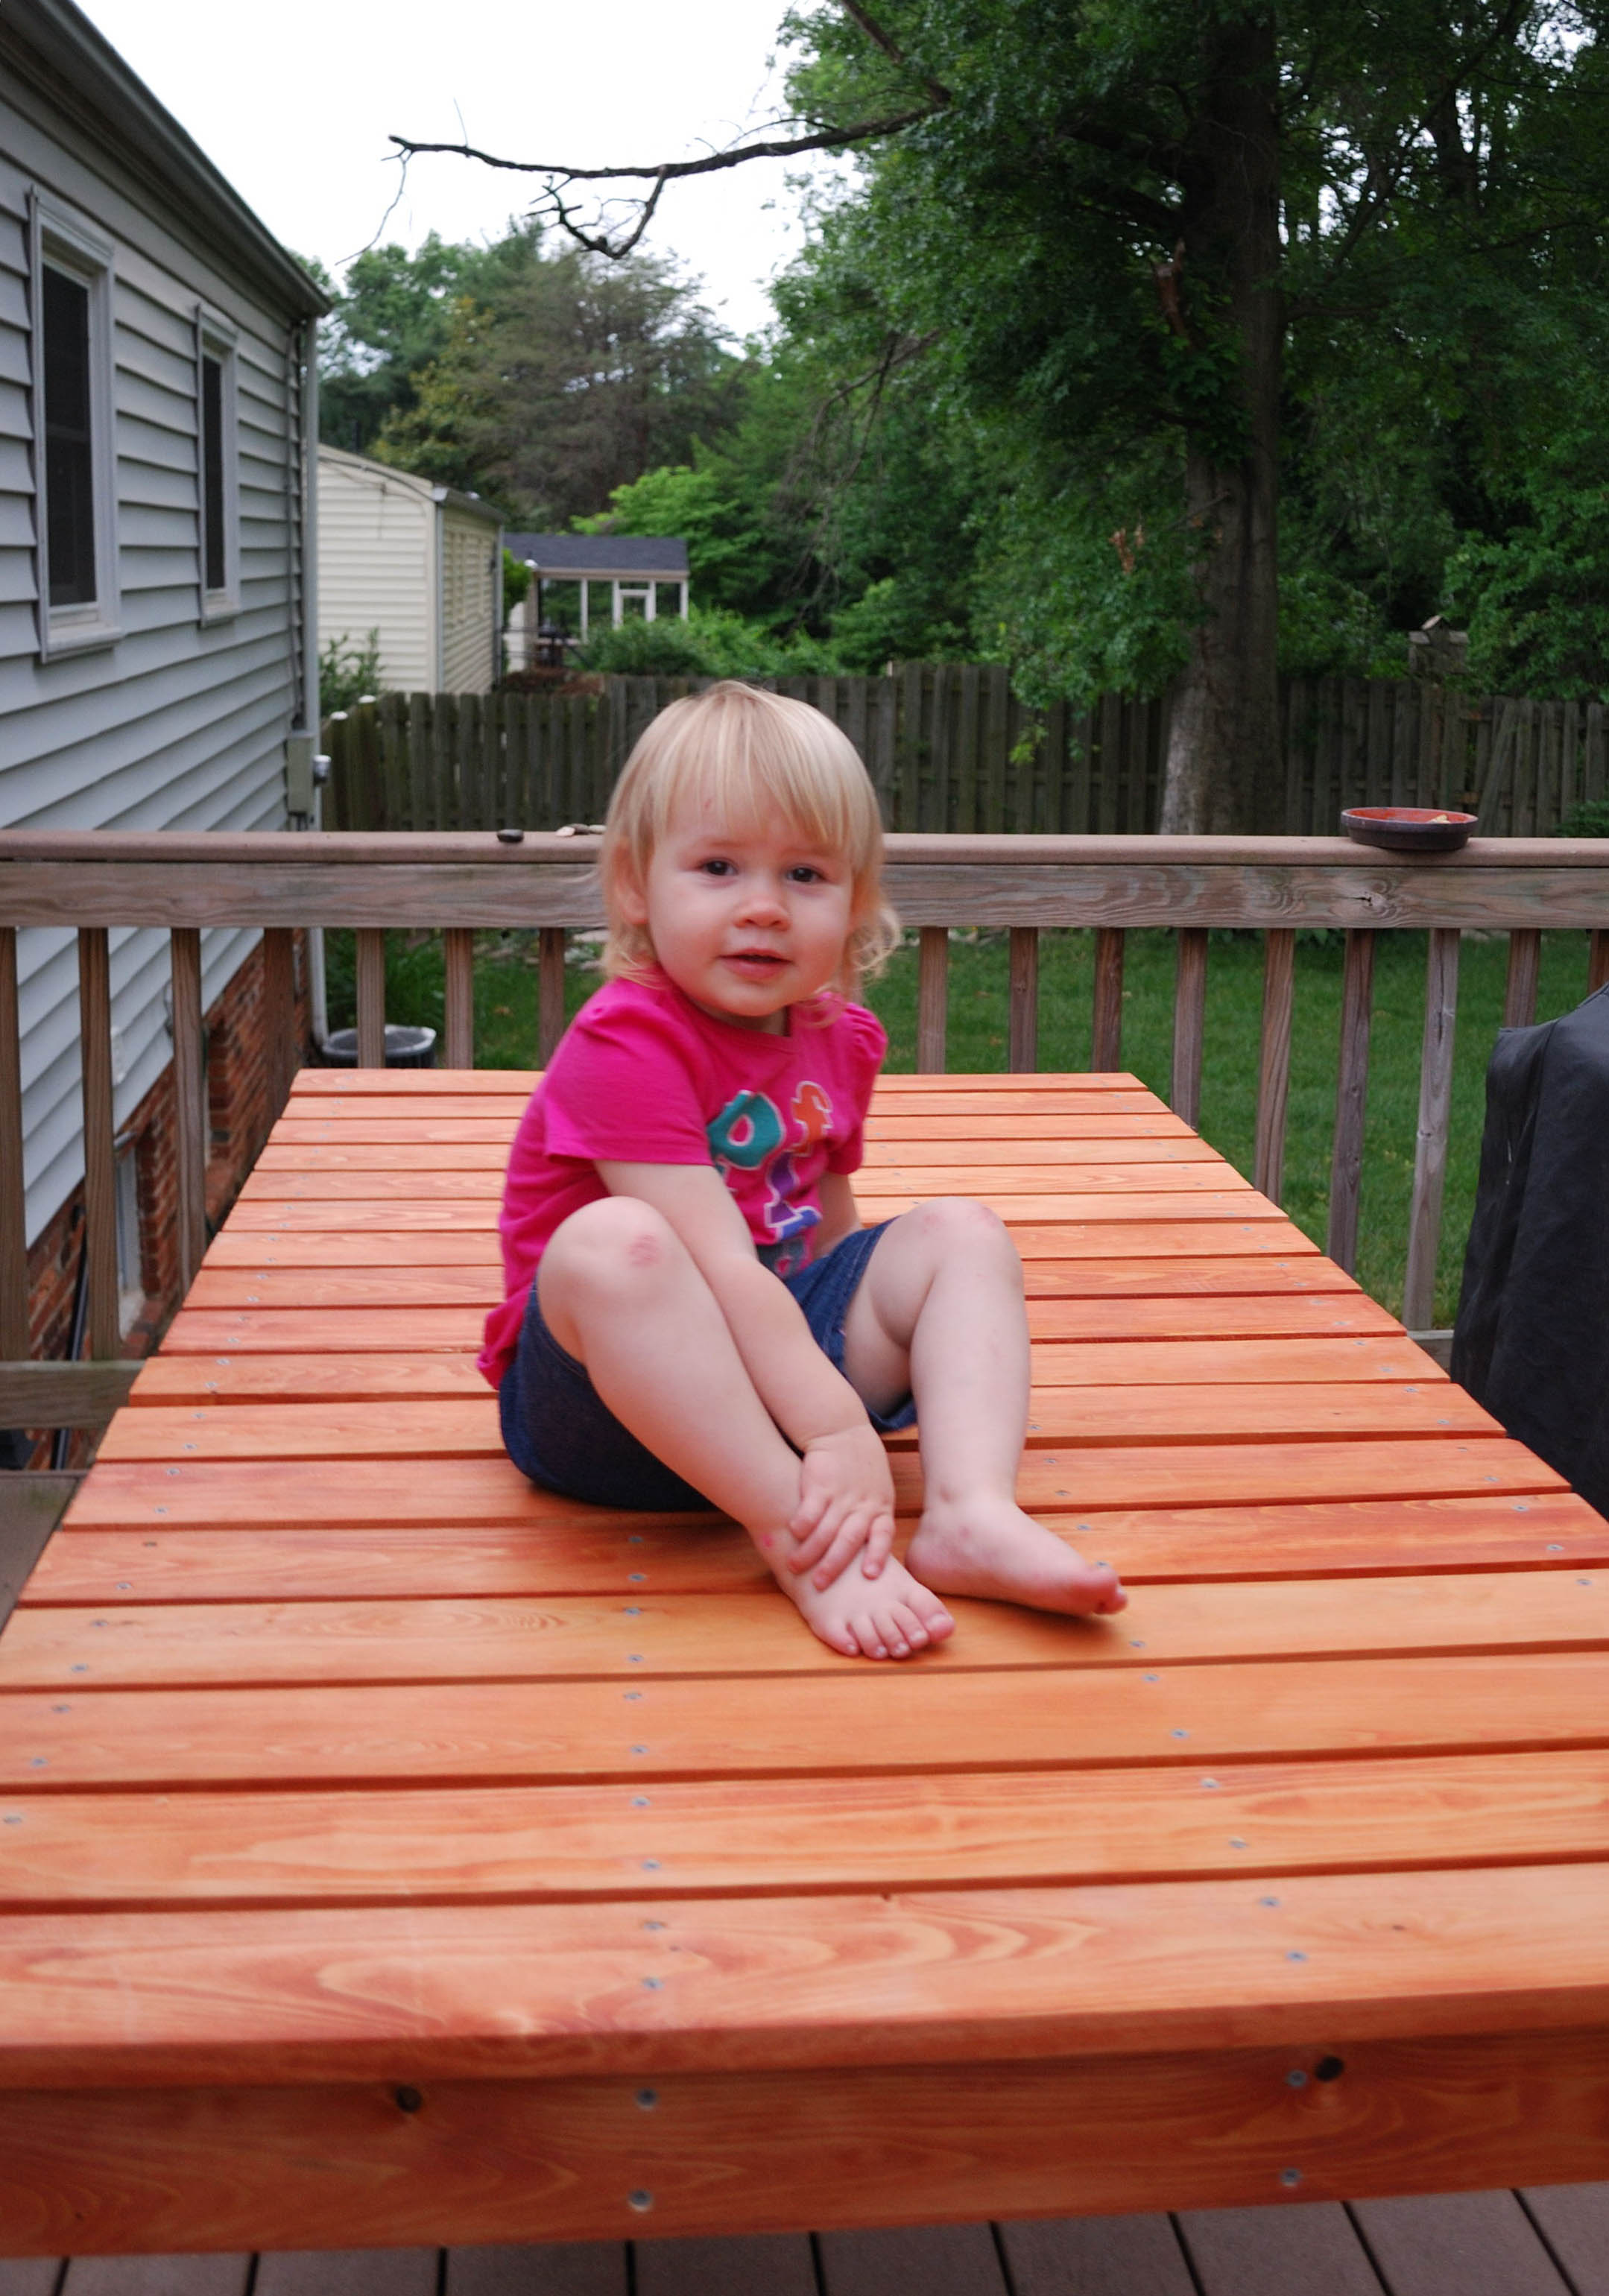
Actually built this last Summer, but just now getting around to posting it up. Made it with Cypress, if I remember correctly, which is cheaper than Teak or other woods, but it's hard to stain because of the natural oils, and tends to flake a bit. Didn't come out too badly, though, if I do say so myself. Here's my little girl helping to show it off.
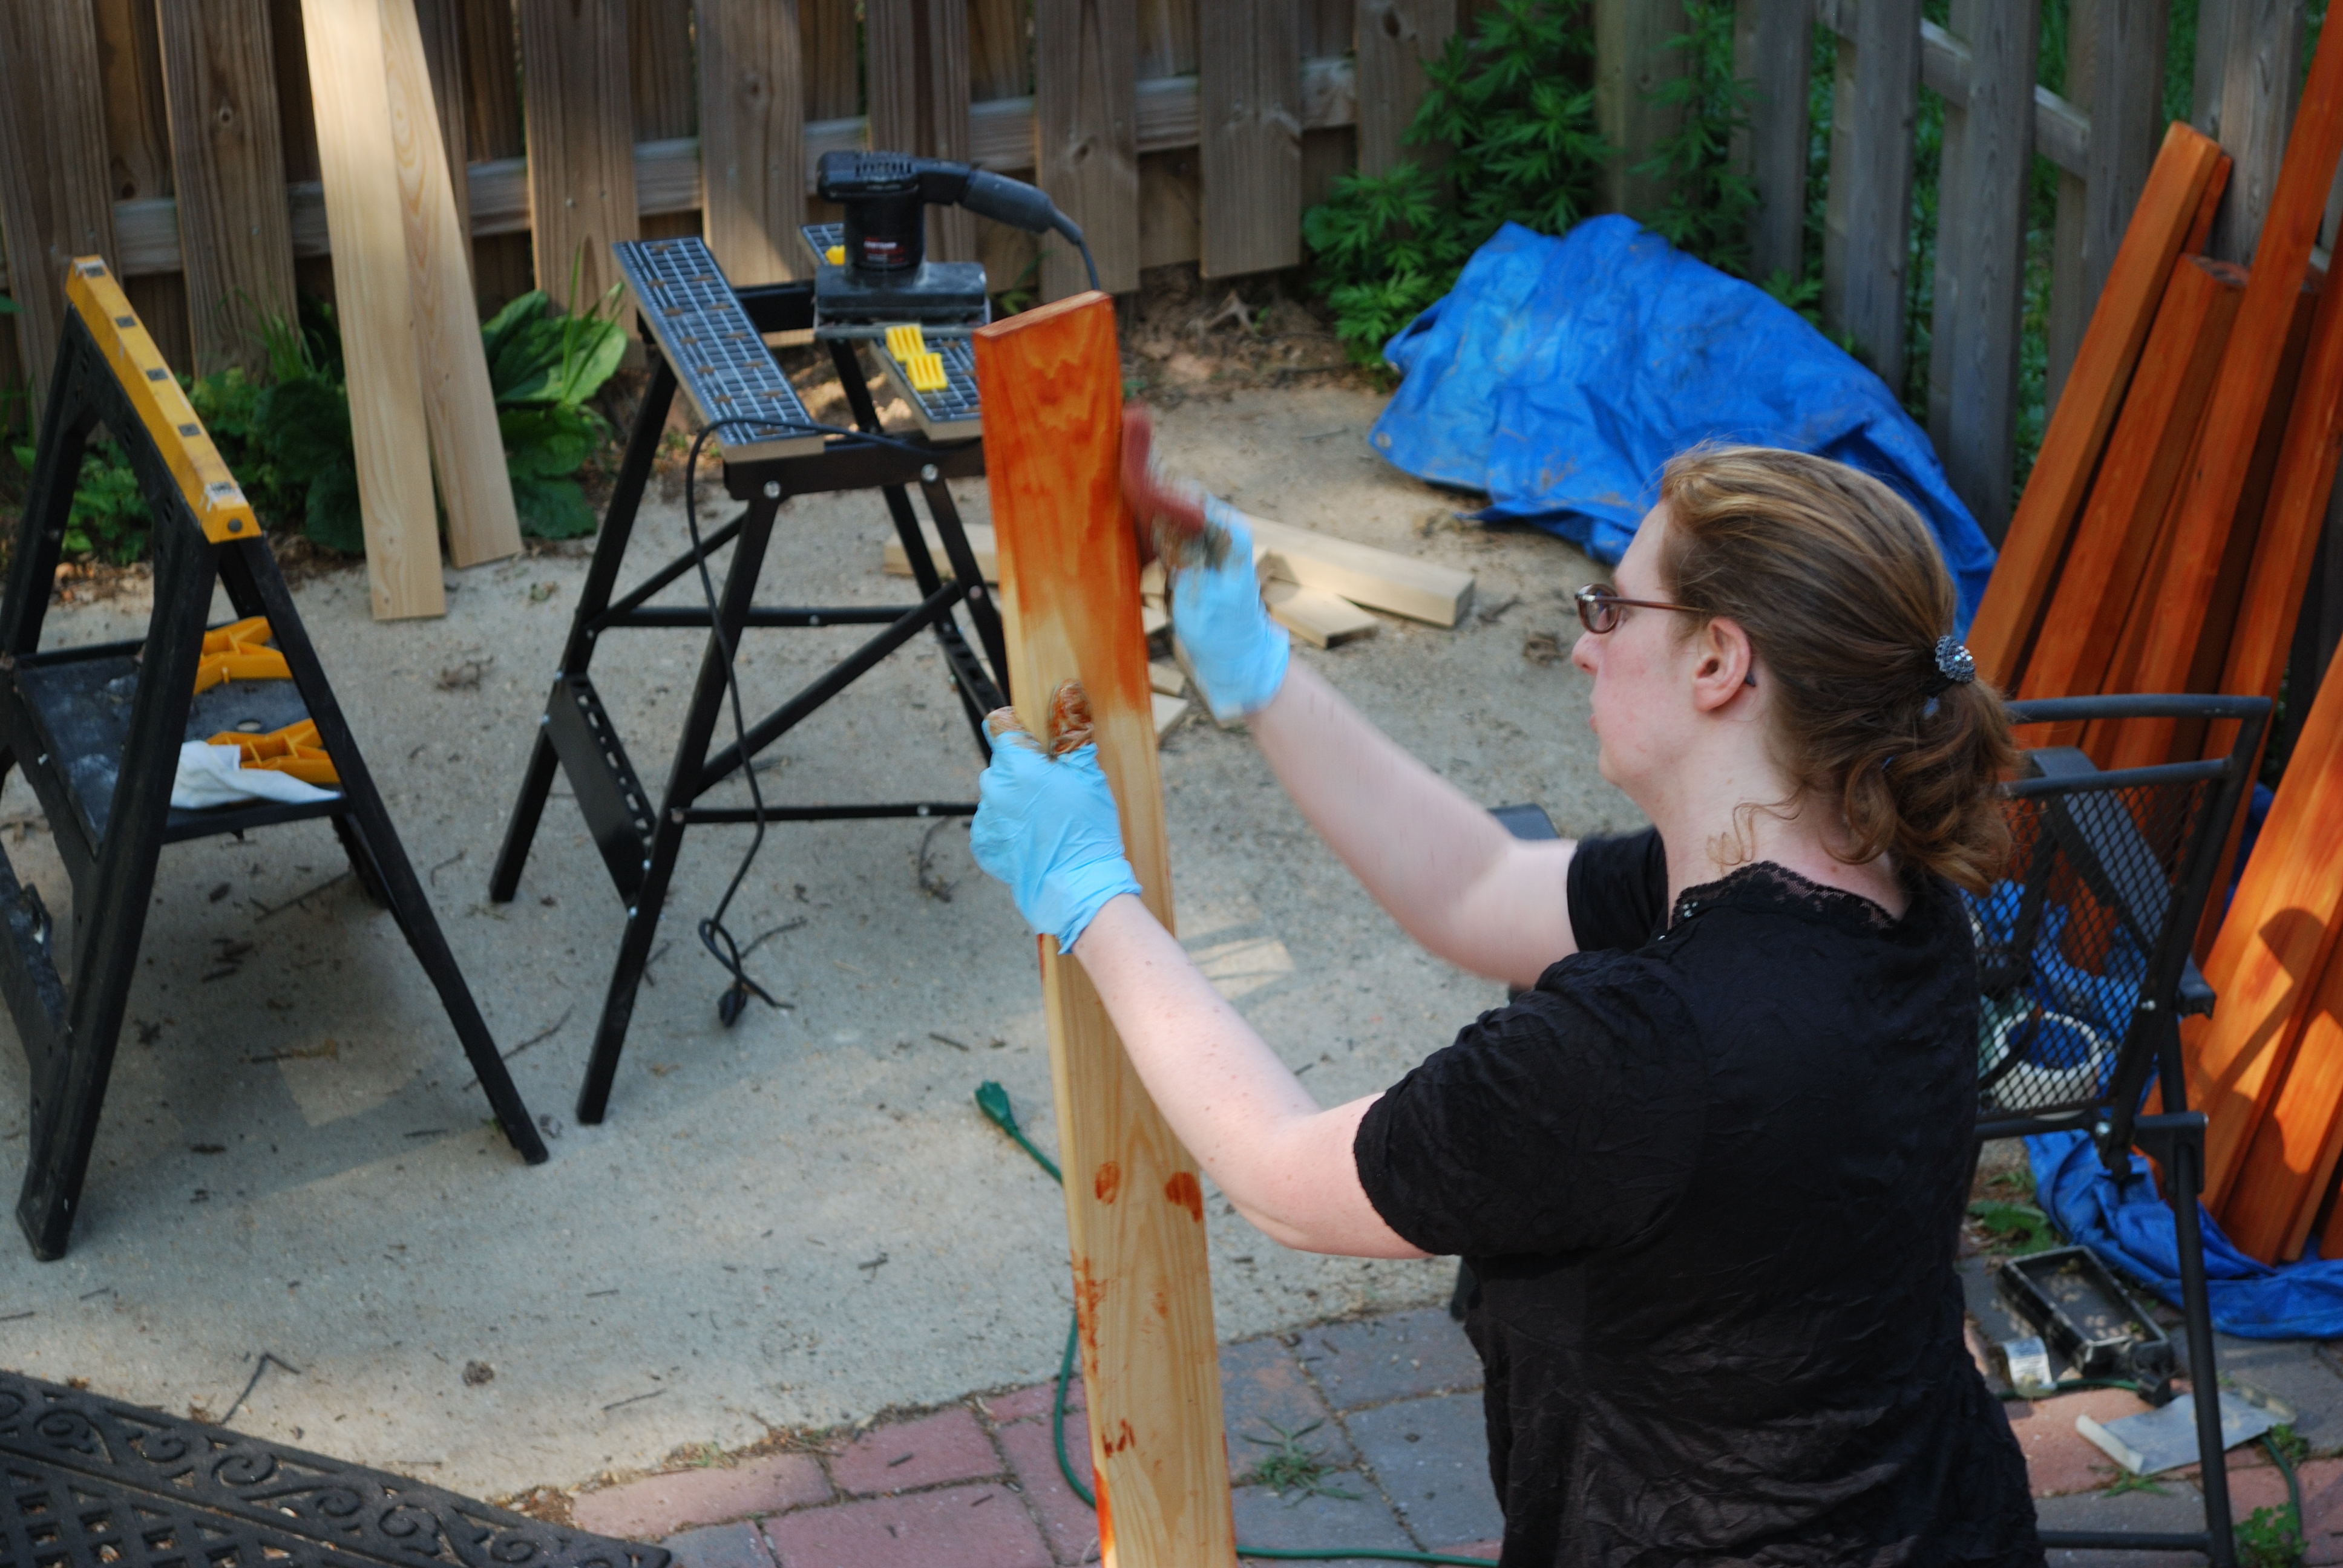
Built from Plan(s)
Estimated Time Investment
Weekend Project (10-20 Hours)
Finish Used
stain. Had to use something on the wood to prep it first to remove the natural oils
Recommended Skill Level
Beginner
"Barnwood" Head Board

This my version of the Farmhouse Bed.
http://ana-white.com/2010/03/farmhouse-bed-calif-king
A friend of mine wanted just a headboard and so I set out looking for a style that would compliment his home.
My lumber stash is primarily made up of reclaimed pallets and salvaged 2x4 lumber.
The only thing I had to buy was the 10' 4x4 post that I used for the legs.
I used star drive, self tapping, deck screws to assemble this beast. As the style is rustic I didn't bother trying to hide any of the holes.
Once assembled I sanded it twice and then "pickled" it to get that "barnwood" look.
The vinegar used in the pickling process should kill any microbes for those who would be concerned about using reclaimed lumber in a residential setting.


Estimated Cost
$11.00
Estimated Time Investment
Afternoon Project (3-6 Hours)
Finish Used
Pickling solution
Recommended Skill Level
Intermediate
Y Truss Round Table
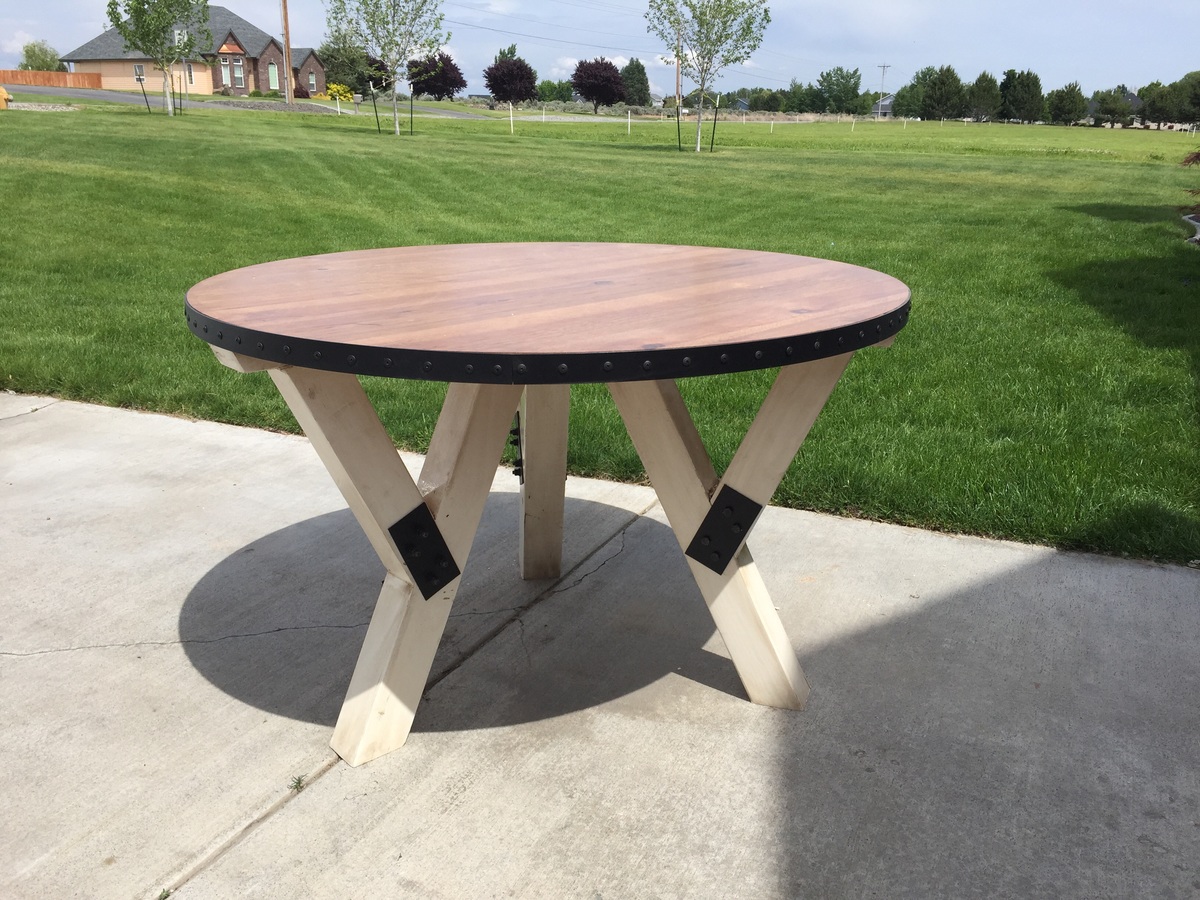
Using the "Y Truss Round Table" plans, I created a 48" table with metal accents.
Built from Plan(s)
Estimated Time Investment
Weekend Project (10-20 Hours)
Recommended Skill Level
Intermediate
Comments

Sun, 05/31/2015 - 01:31
Hi gcomfort I am in love with
Hi gcomfort I am in love with the top of your table! it is beautiful!! what wood did you use for to create the smooth surface?
Fri, 06/05/2015 - 08:11
Thanks
The table top is 1.5 inches thick made up of 2 layers of 3/4 inch think plywood. The top layer of the table top is hickory plywood (the top and bottom layers of the plywood are hickory). The base layer of the table top is 3/4 inch general plywood from Home Depot.
Thanks, again.
Sat, 08/29/2015 - 08:49
What is the metal accent?
I love this!!! Where did you buy the metal accent that goes around the perimeter of the table top? What is it?
Sat, 09/05/2015 - 07:30
Thanks! I bought it from
Thanks! I bought it from Lowes. It's just 1.5in Wide aluminum painted black and connected with a bunch of black, flat headed screws.
Sat, 09/05/2015 - 07:30
Thanks! I bought it from
Thanks! I bought it from Lowes. It's just 1.5in Wide aluminum painted black and connected with a bunch of black, flat headed screws.
Sat, 09/19/2015 - 11:18
Another Question
I actually looked at the hardware stores for something similar before you answered by comment. I wasn't able to find anything that I thought would work. Do you remember what the aluminum is used for in other jobs? Or what area you found it in?
A family member suggested using the metal stips that hold down the end of carpet, but it's not long enough for the table.
Thank you!
first project

I am a welder by trade and metal is what I do best. I have a few friend in the woodworking industry and they make it seem really easy. so with the help of a friend and my wife getting me a table saw I mad her this console. This was my first build and starting out I was walking around finding wood like I was looking for my lost mother. after a short weekend and learning from my mistakes and the plans from Ana White being sooo darn good to follow step by step my wife has this beautiful console in the living room.
Estimated Cost
$70 for the wood.
Being I was starting out I have a lot more in to it because I was also buying tools.
Being I was starting out I have a lot more in to it because I was also buying tools.
Estimated Time Investment
Day Project (6-9 Hours)
Finish Used
White paint/primer
Walnut stain on top and door (not pictured)
Barn door slider will be made by me.
Walnut stain on top and door (not pictured)
Barn door slider will be made by me.
Recommended Skill Level
Beginner
Desk top

I used Ana’s desktop plan to build this desk. I purchased black metal desk legs and added the bottom shelf.
Comments
Little Kids Picnic Table
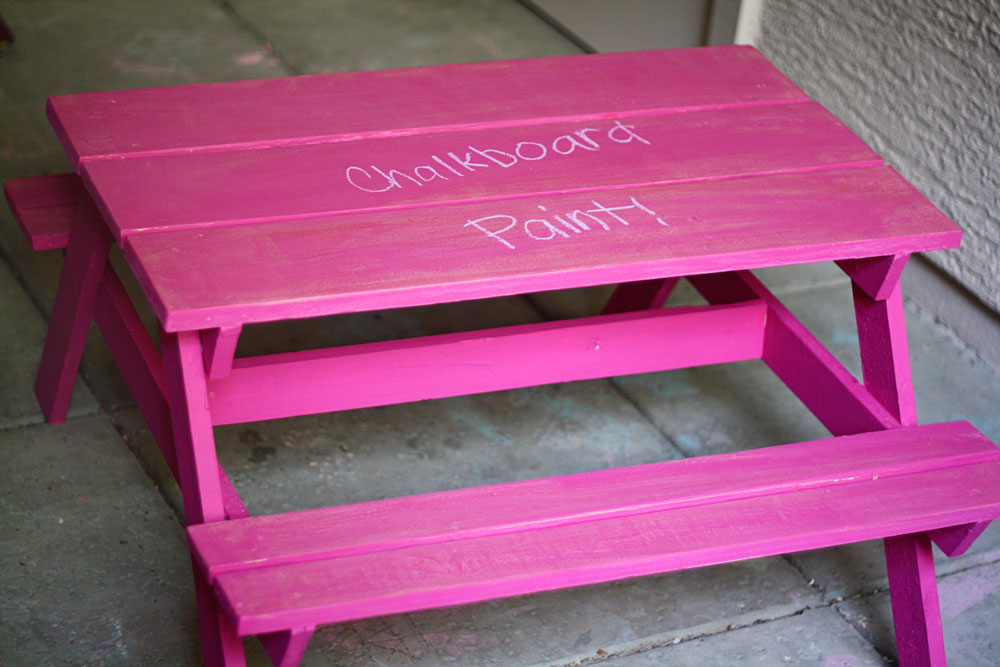
Thanks to LoriInVegas for her help with the legs on this project! My legs were so wobbly, even thought I was super careful to cut them evenly. So, I unscrewed all the screws besides one, in each leg, and then re-screwed everything in one by one, being sure it was steady after each screw. I built this for my 3 year old and 1 year old daughters. The table was a bit smaller than I had imagined, but it's sooooo cute! It will fit them both for now, but definitely no more than one child on each side, and I assume my 3 year old won't be able to fit comfortably much longer. I plan to build the Bigger Kids Picnic Table this weekend! I painted the entire table in chalkboard paint so that the kids could go crazy decorating it. I plan on putting a cute little basket in the middle of the table to hold their chalks.
Built from Plan(s)
Estimated Cost
$15
Estimated Time Investment
Afternoon Project (3-6 Hours)
Finish Used
Behr Paint, mix 1 cup paint with 2 tablespoons unsanded grout. Paint and let dry. Prime the surface for chalk by coloring entire surface with chalk and wiping clean with damp cloth before using.
Recommended Skill Level
Beginner
"Mirror" from Ana White's book, The Handbuilt Home, pg 37
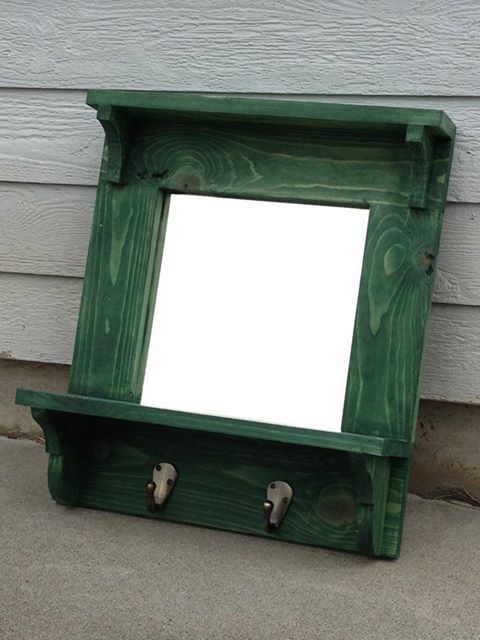
This was a great project to do - fairly easy. About the hardest thing on it was the scroll work for the shelf brackets, but that really wasn't bad.
I built this entry shelf from Ana's book (pg. 37) for a client who was looking for something to place his brothers ashes on - a memorial shelf as I'm calling it. I altered the dimensions of the project to fit the clients needs.
I used Minwax Color Express for the first time on this project and I was quite surprised with how easy it was to deal with. I do wish I had stained the pieces first, but because of how it came together, I really needed to put off the staining until the end.
Estimated Time Investment
Afternoon Project (3-6 Hours)
Finish Used
Minwax Color Express - in Emerald. No top coat, really doesn't need it!
Recommended Skill Level
Intermediate
Easy Build Planked Wood headboard
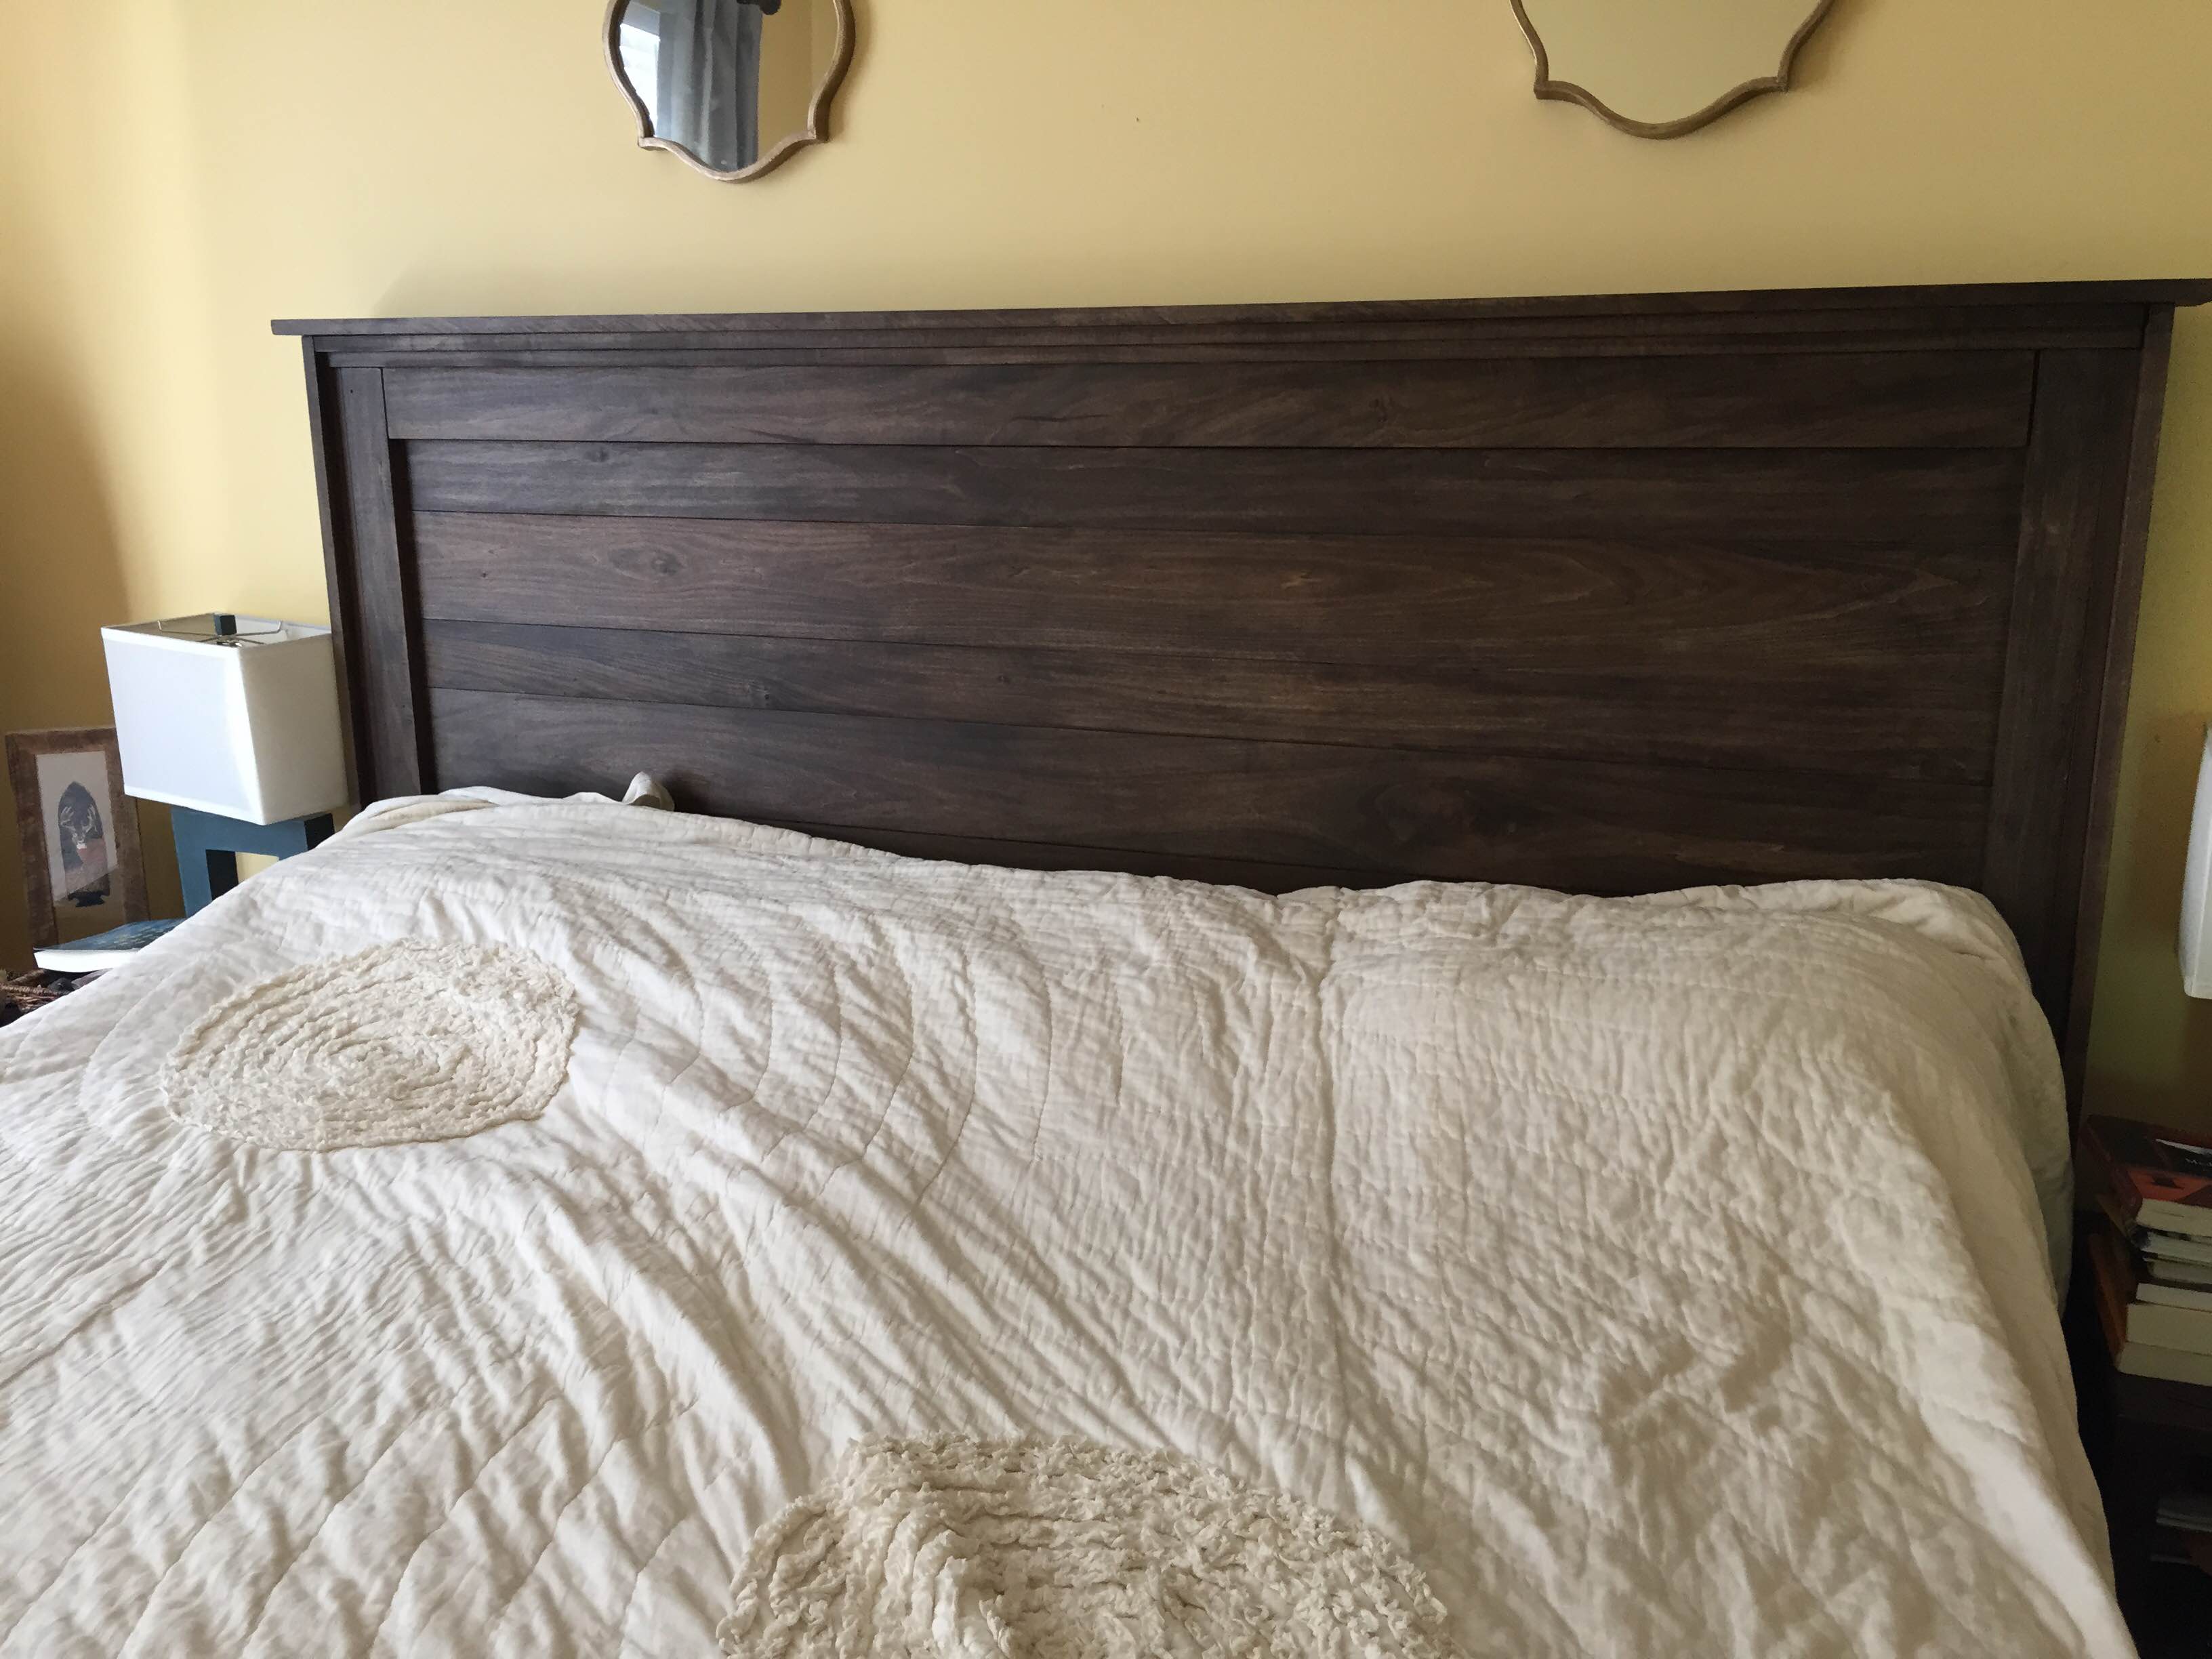
This one was very straightforward and pretty easy, and it gave me an excuse to finally buy an air compressor and finish nailer. i did the building, and my wife did the staining to give the new wood an older look. it turned out great we think.
Built from Plan(s)
Estimated Cost
150
Estimated Time Investment
Afternoon Project (3-6 Hours)
Recommended Skill Level
Beginner
Comments

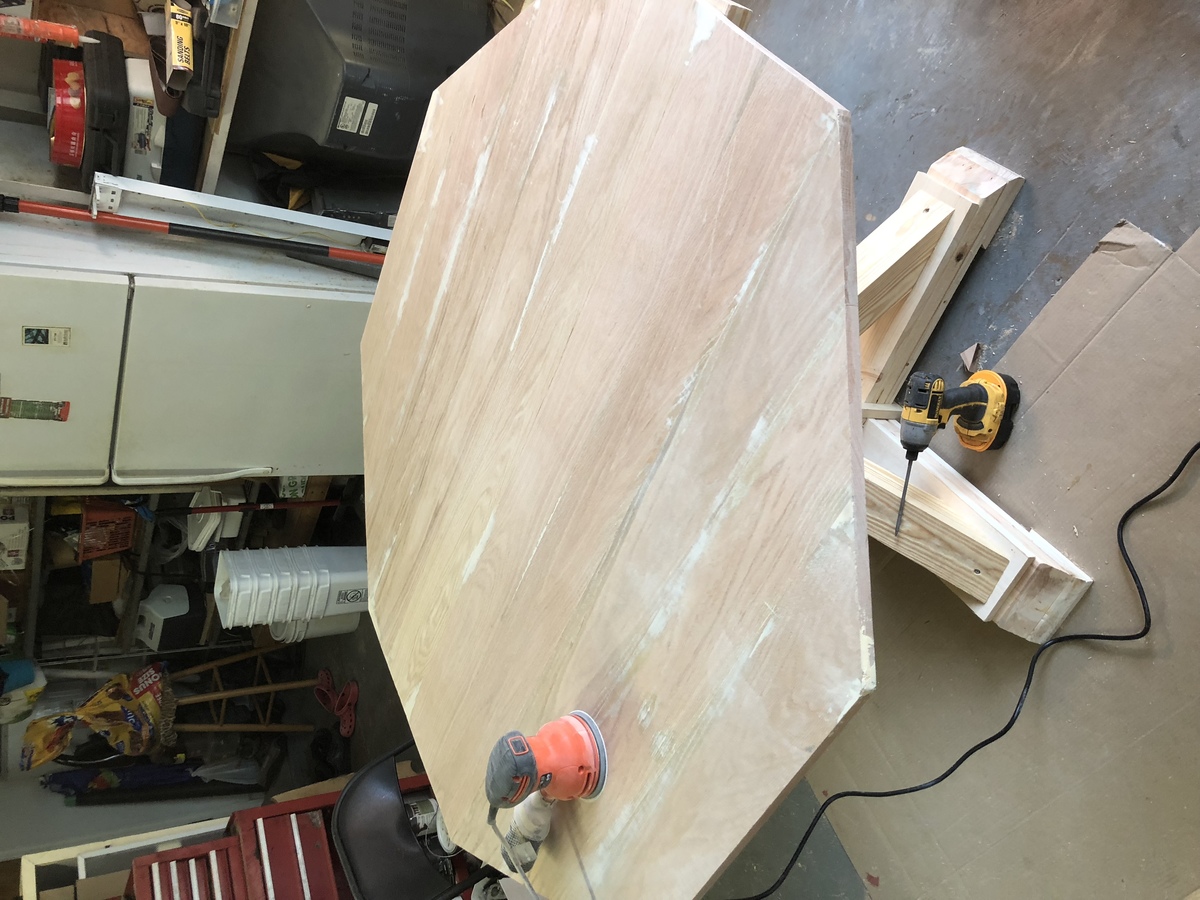
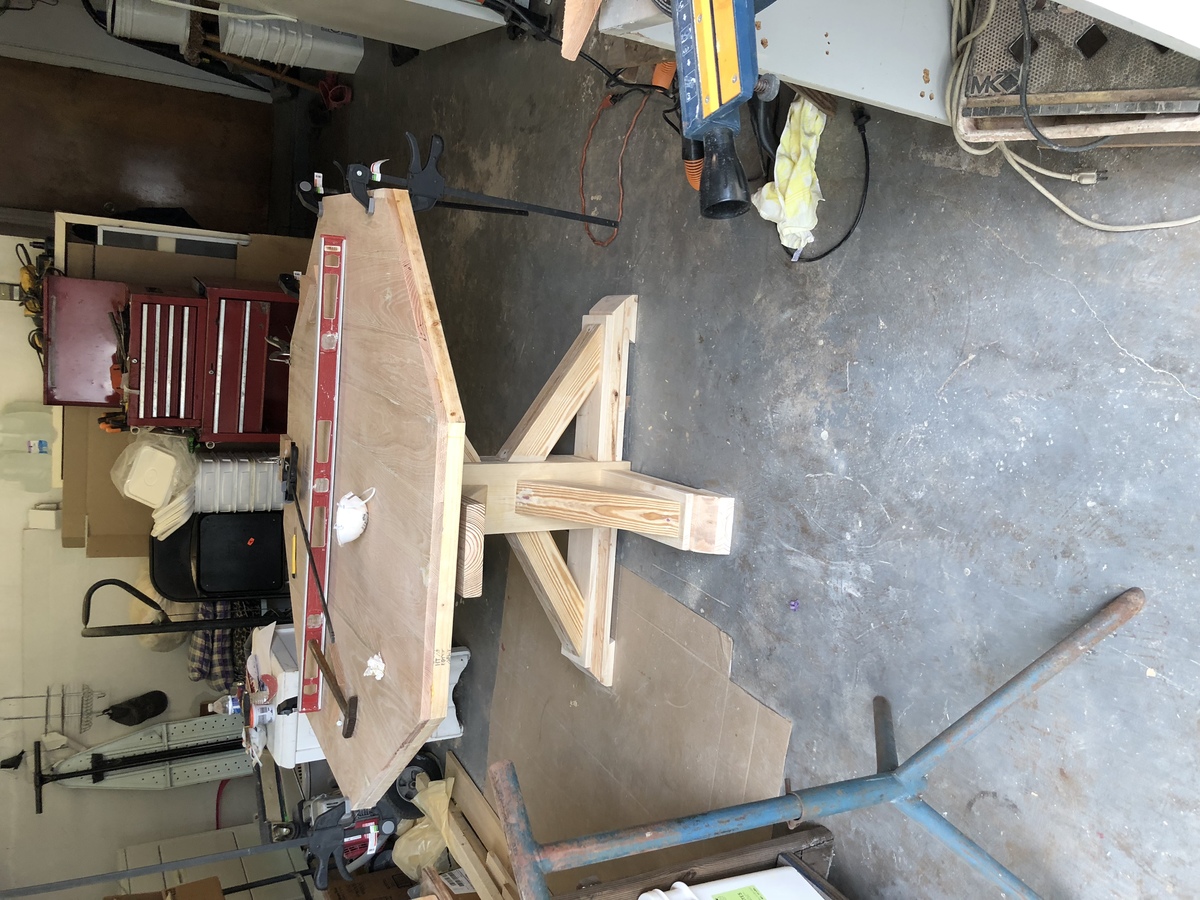
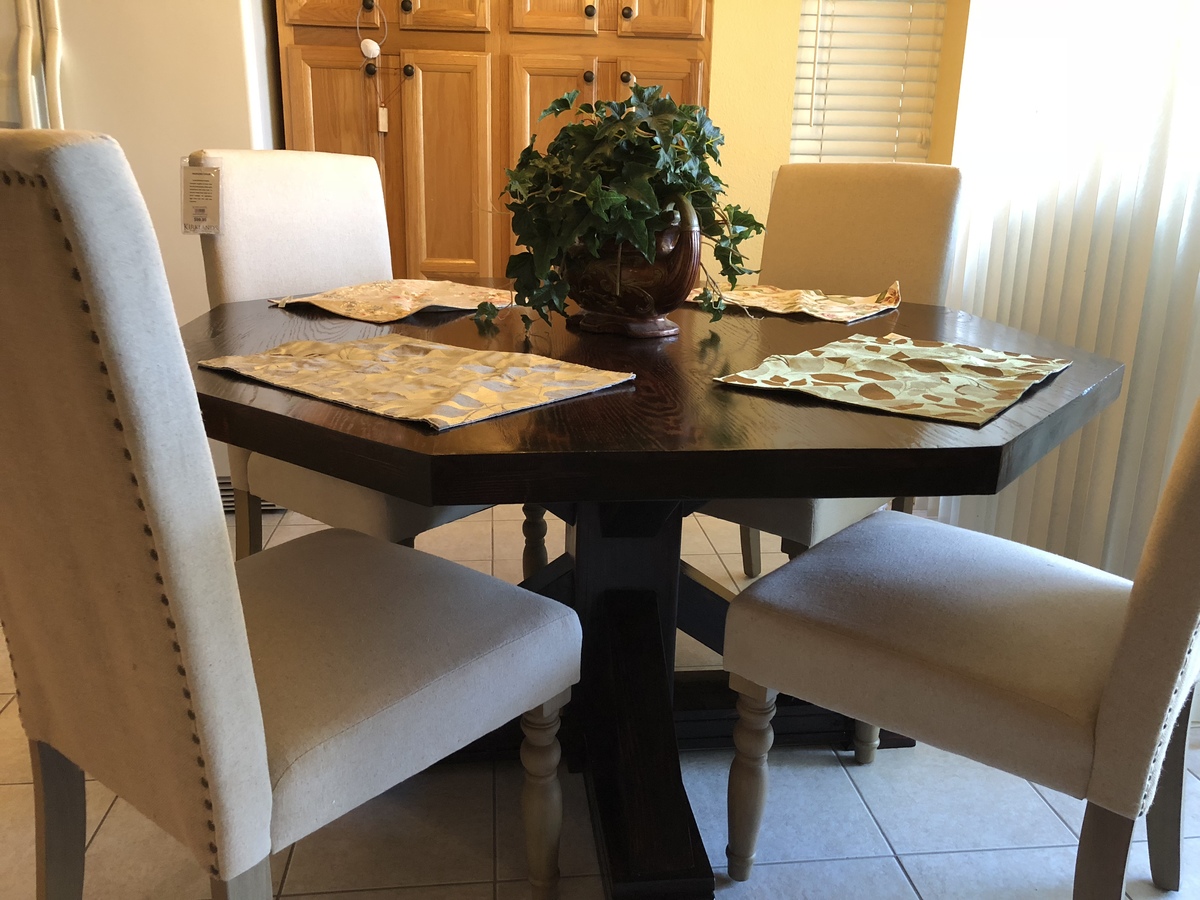
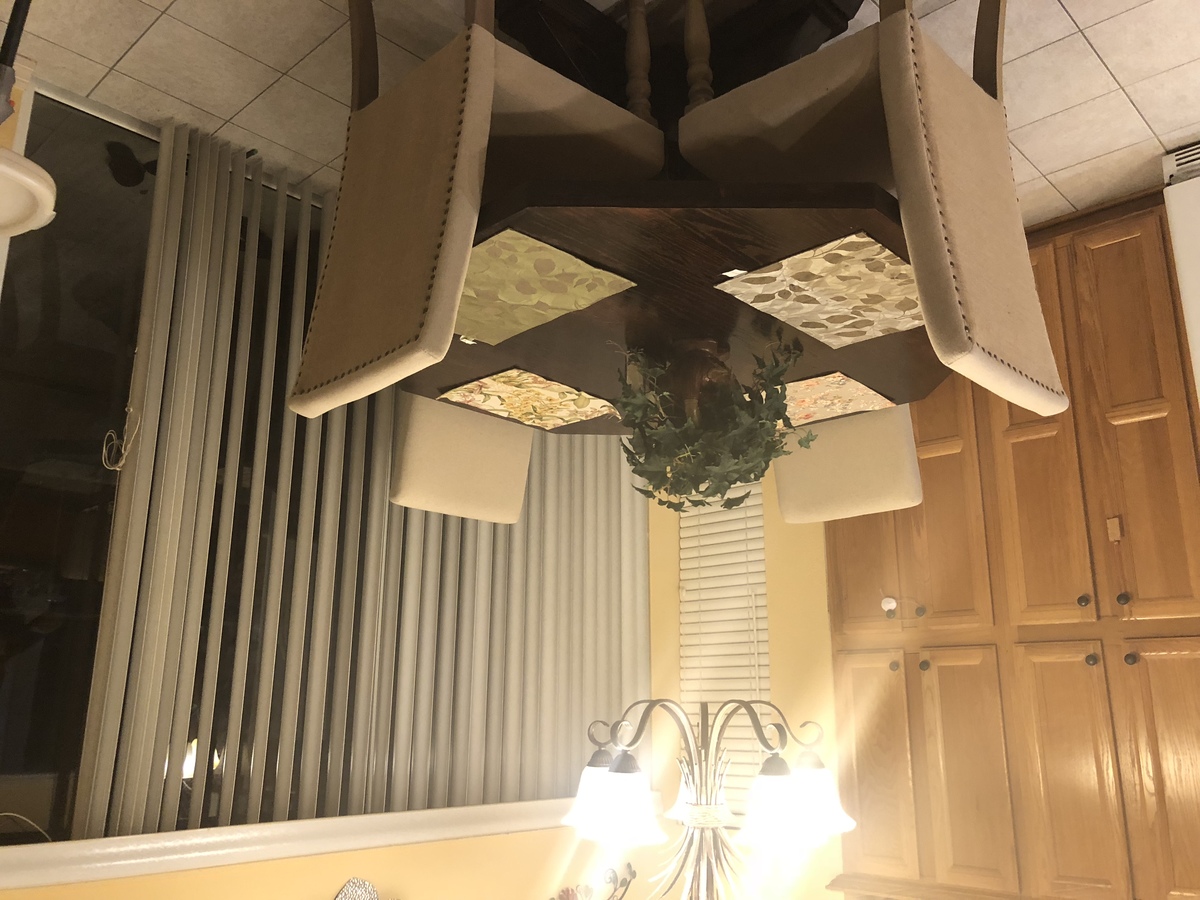
Octagon table
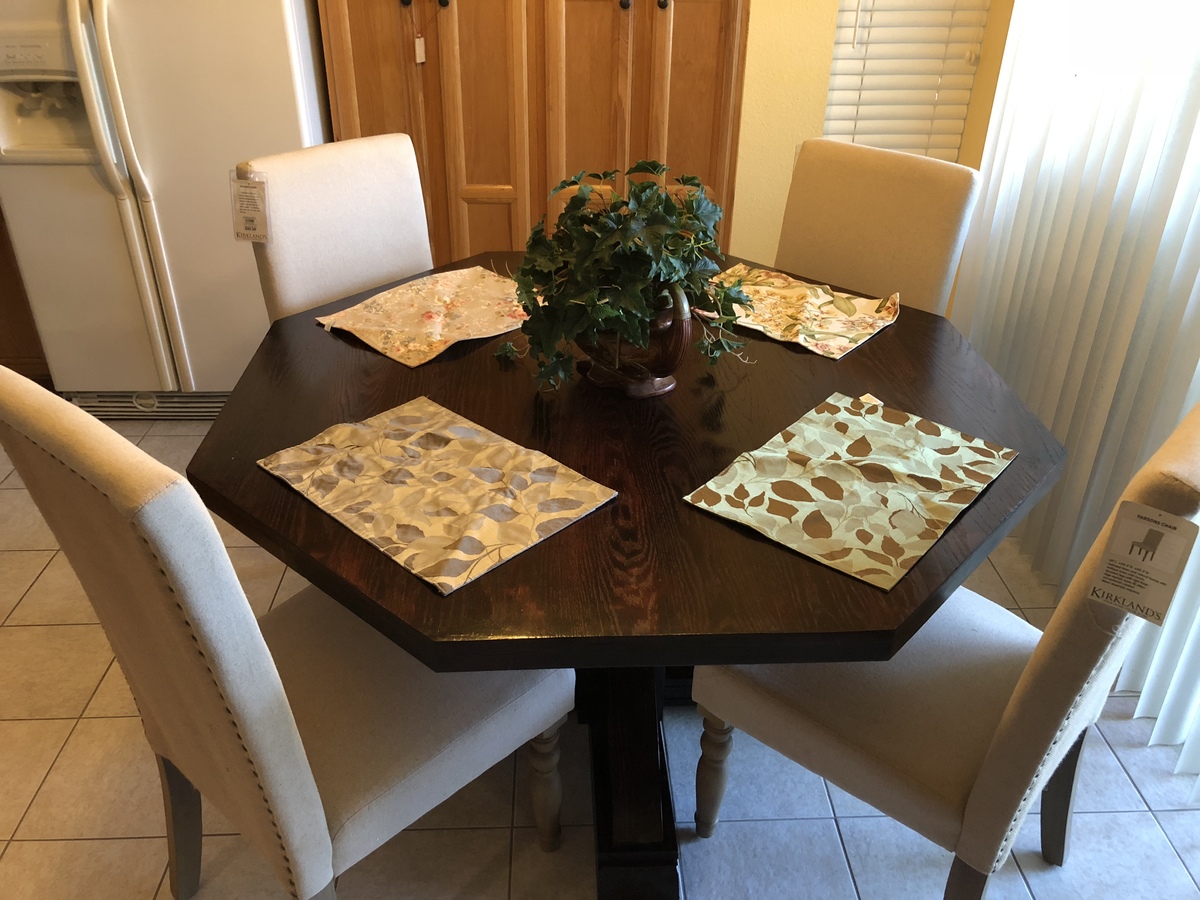
Took about 1 week to finish the project. I like the overall result.
Instead of using pocket hole to join the top, I use dowel and glue to join the board together. Clamp the top in sections then combine 2 large piece together.
using the speed squre to create the 45 degree angle and use the circular saw to cut out the angled section.
I used the table saw to cut off the round edge on 2x2 to create smooth Table apron.
Use wood filer to fill all the crack and hole from brad nail/joint.
apply 2 layer of stain. allow it to dry overnight. Then Thin out poly with minaral Spirit to wipe on 4-5 layers.
sand finish in between with 330 grit paper

Built from Plan(s)
Estimated Cost
300
Estimated Time Investment
Weekend Project (10-20 Hours)
Finish Used
Min-wax Red Mahogany with 4 layer of Min-wax polyurethane
Recommended Skill Level
Intermediate
I learned to use a Kreg Jig for the Rustic X hall tree
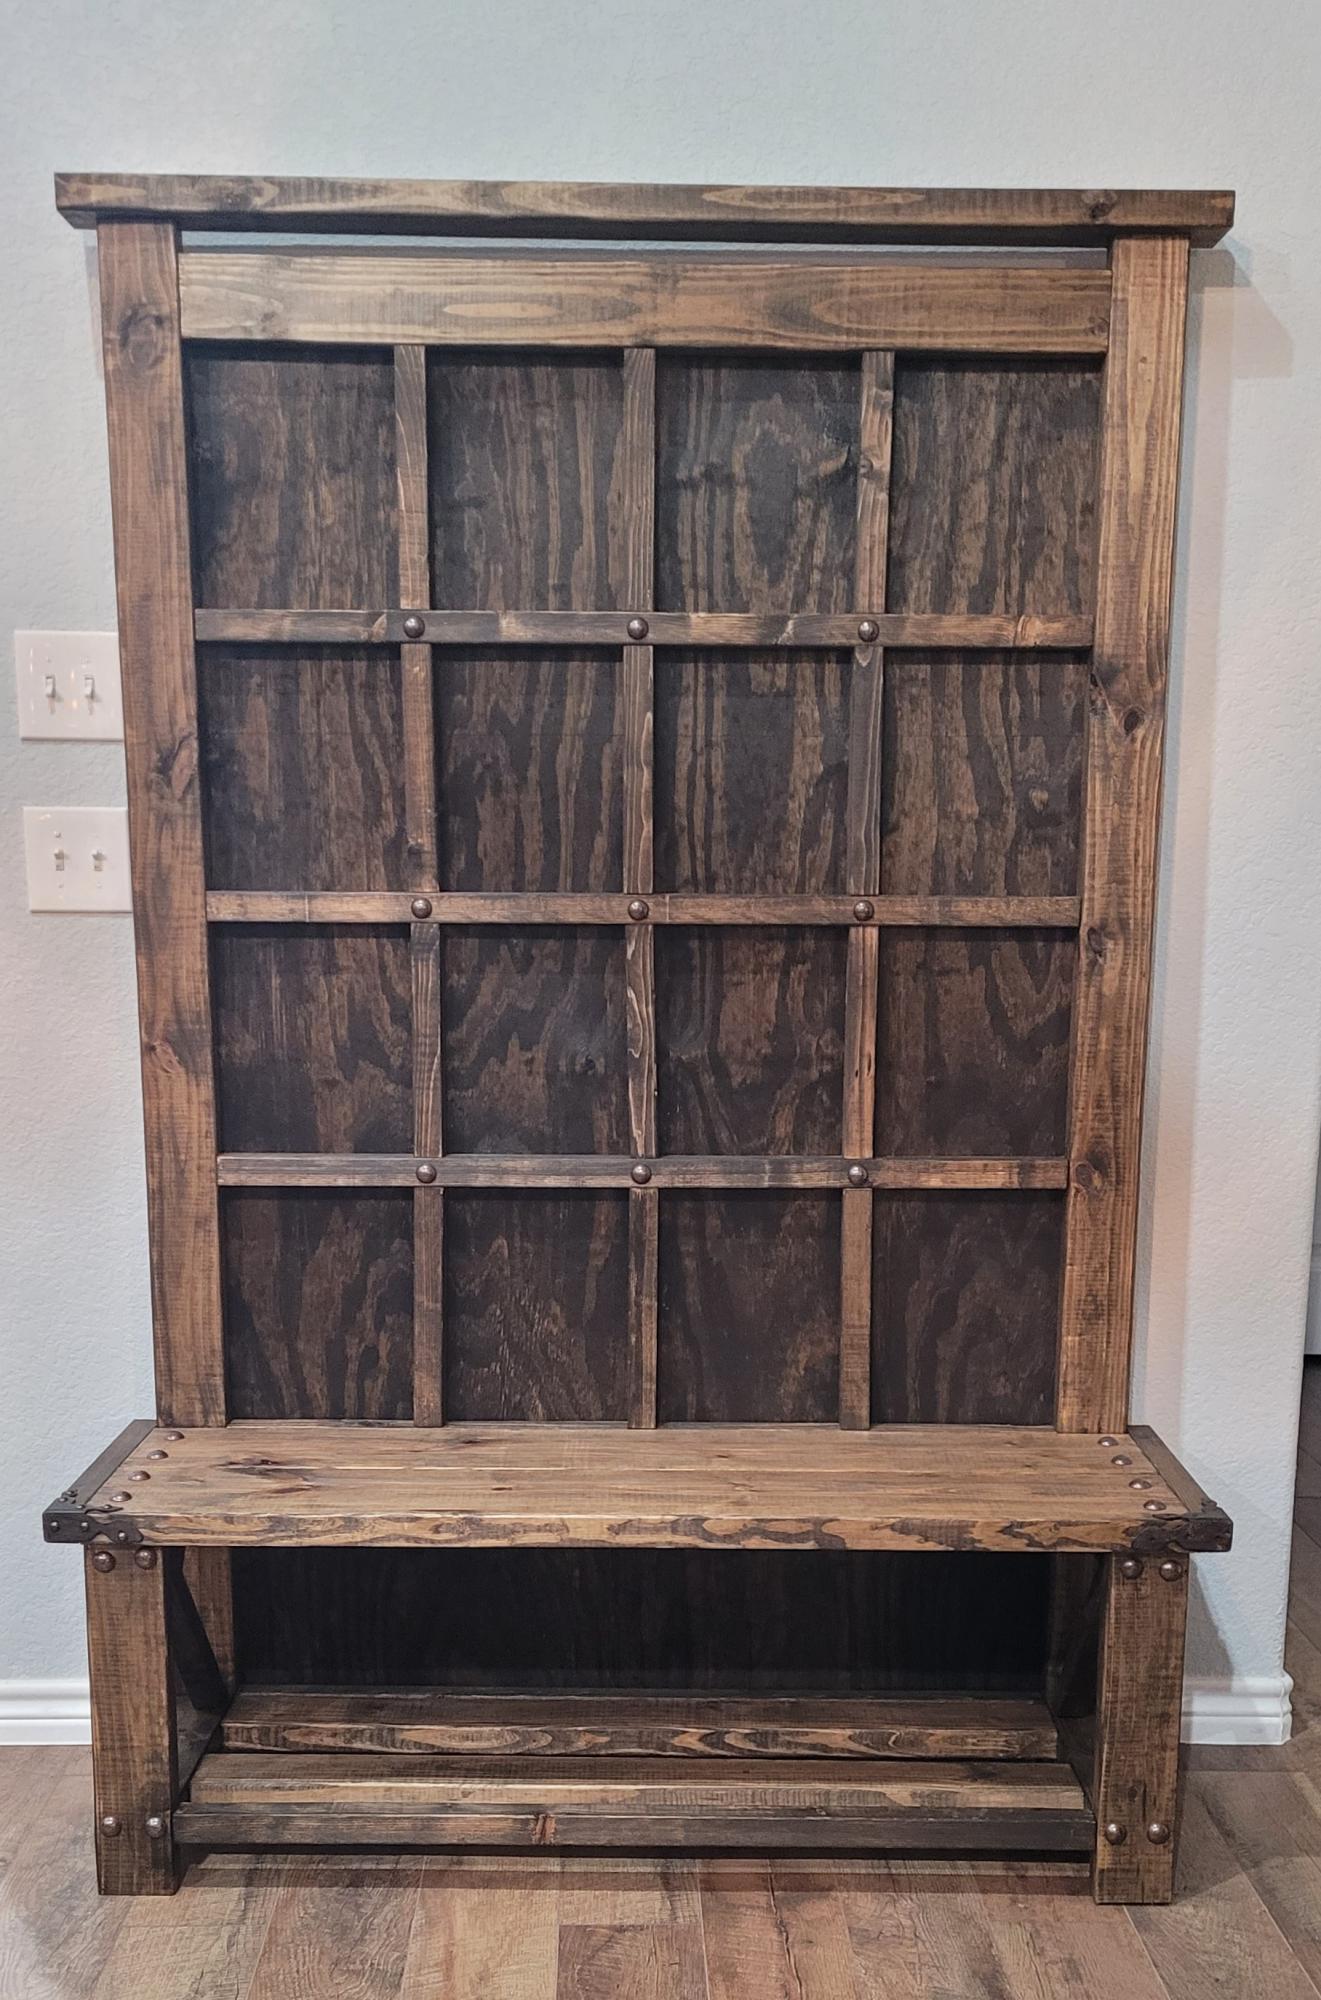
I made this headboard-inspired version of the rustic X hall tree in about 8 hours with the help of my hubby and son-in-law. I own a miter saw and basic tools, but no Kreg Jig. I thought I would be able to make it without one since I made a similar entry table just screwing the pieces together and hiding the screw heads under the dome-shaped clavos. I planned to do the same with this project but soon realized that the way the 2x4s were attached to one another it would not be possible. My son-in-law allowed me to borrow his Kreg Jig and showed me how to use it. I used the clavos and iron accents to match the sofa table and love the way my version of the rustic X hall tree turned out! The finish is Varathane Classic Wood Stain in Jacobean and the corner accents were purchased from Hobby Lobby.
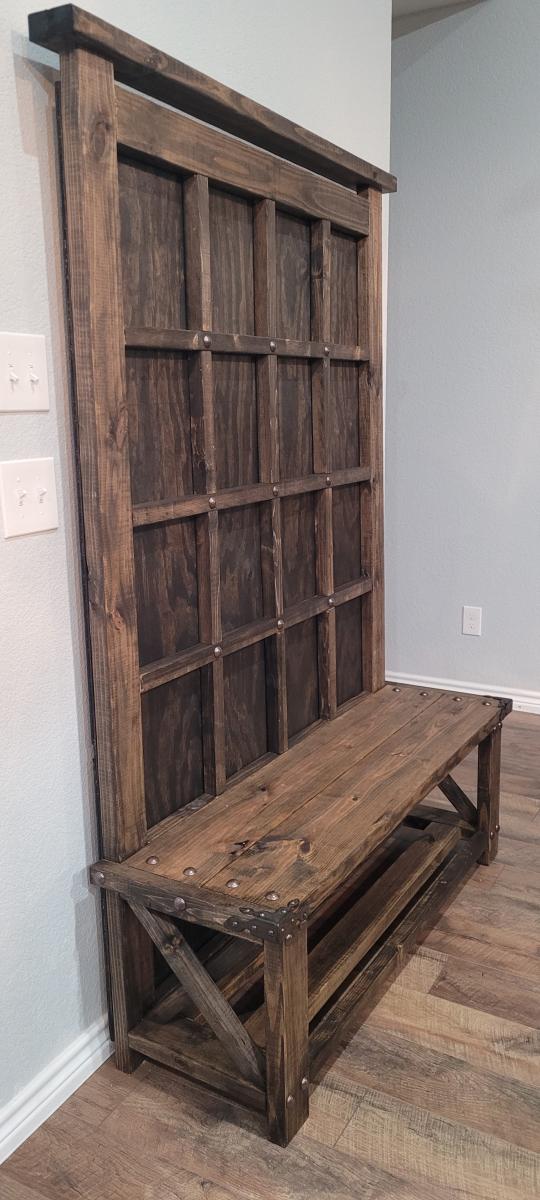
Built from Plan(s)
Comments
Ana White Admin
Sat, 11/13/2021 - 09:32
So Pretty!
Love the finish and look, thank you for sharing!