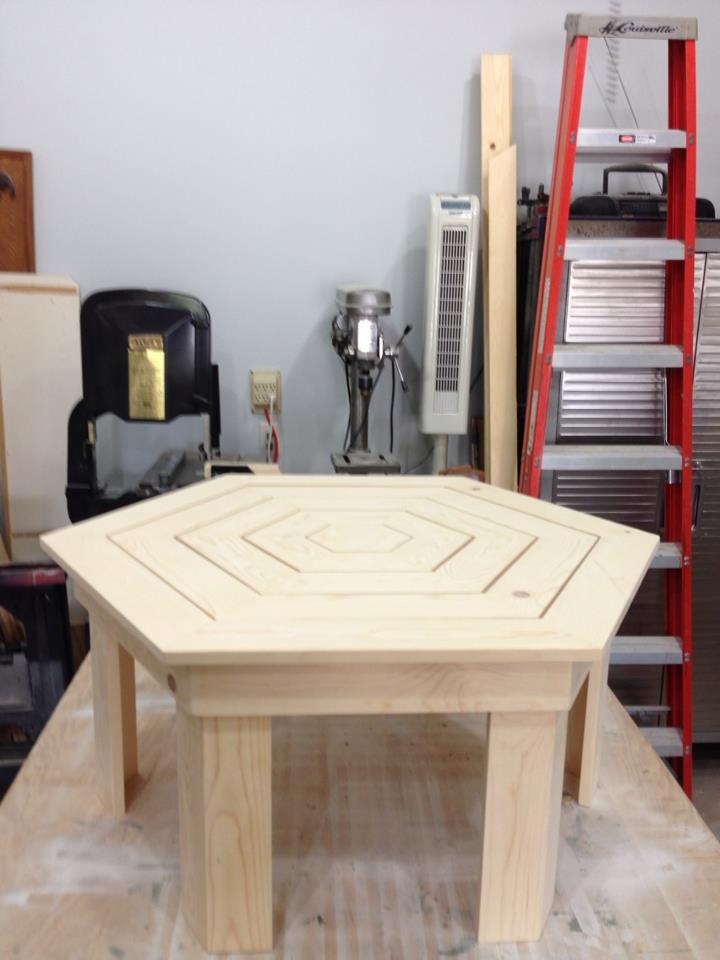
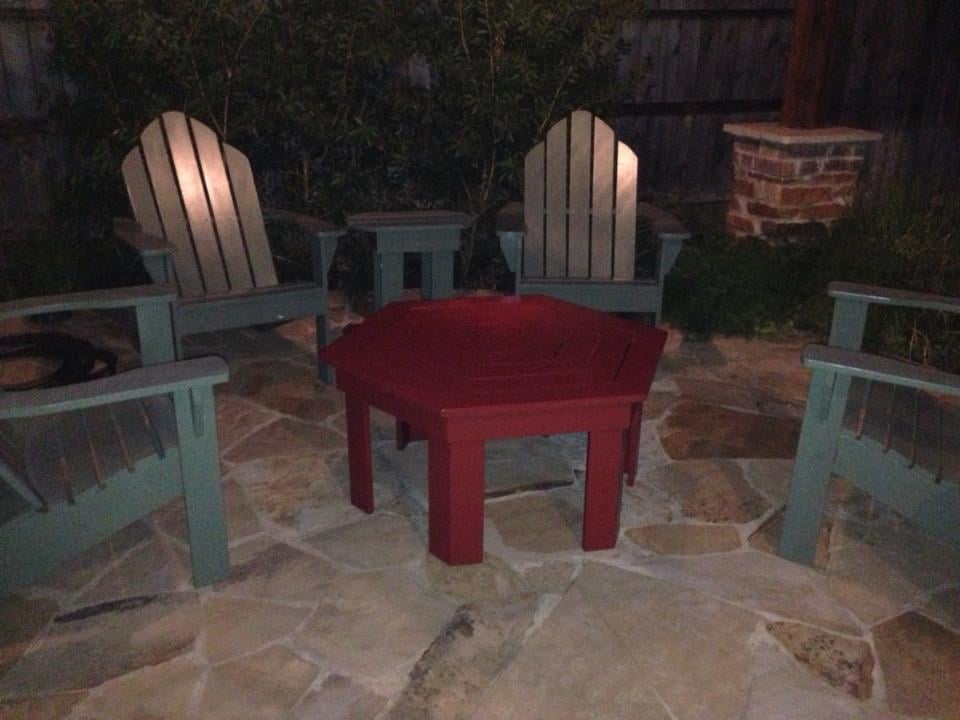
Community Brag Posts

DIY Farmhouse Bed wth Boxspring

Submitted by Anonymous (not verified) on Sun, 07/16/2023 - 10:49

Wood = Pine
Finish = Minwax Special Walnut (after Pre-Stain)

This was a pretty straight forward build, but nice to have an extra set of hands. On the top board of the head/footboard, a countersink bit was used to recess the screw heads (otherwise, all fasteners in the plan are concealed). Then a mixture of glue/sawdust was used to smooth over the countersink hole. The whole project was sanded starting with 60 working up to 220.

We followed the plan, and in the photo this is the height of the bed with box springs and mattress. The bed feels sturdy and comfortable. It was a fun project and my first shot at interior furniture.


Simplified Farmhouse Doll Bed

I love Ana's farmhouse doll bed. But I've made a couple beds/cribs, and I know how tedious it can be to make the slats, so I cheated and used a 1x6 across the headboard instead of the slats and a 1x3 (turned lengthwise) for the footboard. :) It was a gift for my daughter's friend who is using it for a stuffed animal, so we made it more narrow as well. Details on the changed dimensions can be found on my blog.

Estimated Cost
$1-6 depending on scraps you have around
Estimated Time Investment
An Hour or Two (0-2 Hours)
Finish Used
Zinsser primer, semi-gloss latex paint, and polyacrilic topcoat.
Recommended Skill Level
Beginner

First Project and PUMPED!!

Submitted by FongerB on Fri, 01/03/2014 - 07:57

This was my first project ever and I'm so excited how well it turned out!! However, I did modify the length and height for my space. The table is 40" long and 33" tall. The finish is Benjamin Moore Tawny Day Lily (awful name) with their high gloss wood finish. Thank you Ana!! You made this project seem easy and now I'm excited to build more!

Estimated Cost
40$
Estimated Time Investment
Afternoon Project (3-6 Hours)
Finish Used
Benjamin Moore Tawny Day Lily (3 coats) + Benjamin Moore High Gloss wood finish (2 coats)
Recommended Skill Level
Beginner

Comments

Washer/Dryer Pedestals with slight modifications

Submitted by Anonymous (not verified) on Tue, 03/22/2016 - 09:35

I similarly was looking for something to store laundry baskets underneath and didn't want to shell out $500+ for pedestals that were less functional. Without being particularly handy, this was a relatively easy DIY project that turned out great. Adding the baseboard trim made a big different in the overall look and the dark paint to match our cabinets helped in pulling it all together. We made the height 12" (instead of 11") for the storage component and cut the width by 2 inches to allow room for the baseboard trim to wrap around the side. Otherwise it was built the same as the original design without the extra trim.

Estimated Cost
~$200
Estimated Time Investment
Weekend Project (10-20 Hours)
Recommended Skill Level
Starter Project

Simple Panel King Bed

Submitted by Bradnag on Sun, 11/03/2019 - 09:43

Needed a quick and simple plan for a new king frame, so I went with the simple panel bed. Stuck mostly to Ana's directions, but used pocket holes on the back of the headboard to get the 1x8's really tightly flush against each other. Since I was assembling it myself I definitely followed Ana's tip about cutting some spacers to prop up the sideboard while securing them to the headboard. Even with as minimal as these plans are, the bed is pretty heavy and very sturdy.

Estimated Cost
75.00
Estimated Time Investment
Weekend Project (10-20 Hours)
Finish Used
Minwax Polyshades
Recommended Skill Level
Intermediate

Tidy Up Coffee Table

Finished our tidy up table! A couple of tweaks: I didn't want to kreg jig the boards together because I have a tendency to split 1x's when using a lot of joins. I tried drilling from below, but the 2x2 furring strips were so soft that I couldn't get my warped 1x6's to suck down without the screws popping through, even when changing to 1 1/4" ones. So, I countersunk two holes on each end of each board, and used 3/8" buttons to fill them to provide a decorative element. I LOVE THEM! Not only are all my boards flush, but the top is now so pretty. I secured the middle by screwing in from below with 2" screws, but since I didn't need to make them so tight to get my boards flush they no longer popped out. I hope that makes sense.

Also, the sides are pretty wobbly without the trundle in there, so my husband suggested adding L brackets to each corner. Success! It's now solid as a rock. We screwed in from the outside and filled with more buttons. For those of you who don't like the raised look, they also have flat button hole plugs. They take stain so much better than wood putty.

Lastly, I chose 1 5/8" casters that move in all directions. Bad idea. It gives the proper 2" height, but makes the trundle difficult to maneuver. Going to try and find some fixed-side one-way casters to replace them. Other than that, it's fantastic!

Estimated Cost
$85 (includes lumber, plugs, brackets and casters)
Estimated Time Investment
Weekend Project (10-20 Hours)
Finish Used
We used my Husky air brushing system for the first time, with Rustoleum Ultimate Stain in Golden Oak. I love this stain because I've never had to wipe it off, and it gives a very even, rich finish. This is the first time I used an air compressor with sprayer for stain, and it was so easy. 10 minutes and I've got an even coat on both the top and trundle. I followed it up with 3 coats of poly on exterior and interior. Will probably add a few more coats on just the top for added protection.
Recommended Skill Level
Beginner

Comments

Bunnie1978

Tue, 03/13/2012 - 13:42

OK, I'm curious... tell me all about it. :)
I love the buttons, they are adorable. The finish does look very natural and charming.

Queen Size Farmhouse Bed

Submitted by Koji on Sun, 01/05/2014 - 12:09

Started off as the rustic farmhouse bed, but I couldn't help adding bits to it - dentil moulding, panels on the headboard and footboard.

Estimated Time Investment
Week Long Project (20 Hours or More)
Finish Used
Minwax Special Walnut over minwax stain base. Helps to keep the staining to a minimum with less soaking in and dark spots.
Recommended Skill Level
Intermediate

Good ol kitchen island

Submitted by Anonymous (not verified) on Sat, 03/26/2016 - 17:22

I saw the plans for this project and decided I wanted to do something of the sort. I tweaked the plans a bit and made it longer and took out the drawer. My favorite part about it is Annie sloans chalk paint. Look into it, it's great stuff. 

Estimated Cost
200$
Estimated Time Investment
Week Long Project (20 Hours or More)
Finish Used
Polyurethane, Annie Sloan waxing paint, cherry stain. To get the rustic color Google Annie Sloan, she has a ton of YouTube videos.
Recommended Skill Level
Intermediate

Box Frame Console with Bottom Shelf

Submitted by Anonymous (not verified) on Mon, 07/24/2023 - 13:46

Entry Way Table with Slatted Bottom!

by Missy J Zee on Facebook

Built from Plan(s)

Comments

Recycled pallet crates

Submitted by tull0032 on Sat, 03/17/2012 - 07:18

I had some left over pallets from another project I was doing and decided to make some recycled wood planter boxes to liven up our decking area. The whole project only took a few hours to make both boxes and used entirely reclaimed pallet wood aside from the two end pieces.

Estimated Cost
$3
Estimated Time Investment
An Hour or Two (0-2 Hours)
Finish Used
Sanded back pallet wood
Recommended Skill Level
Starter Project

Comments

Customized Hailey storage bed

I got tired of the aluminum framed bunk beds in my kids room, and wanted to build something they can enjoy for years to come.

My 7 year old didn't have the luxury of one of our dogs jumping up on his bed, as he was on the top bunk, and my wife and I didn't interact with him as much as we would have liked during his reading time prior to bed.

Only one thing to do....build the boys some beds. Although they have a little less room in their bedroom, they have their own individual beds and storage nooks.

In an effort to reduce wasted space, I took a similar page out of birdsandsoap's book by hinging the footboard to create easy access to the void under the slats.

The head and footboards were 'tiled' by simply cutting 1x2 and 1x3 pieces and attaching them with wood glue.

Between the sanding, staining, and poly coats, it took about a week (on and off) to complete the set, but overall am very happy with the finished project.

Only 1 bed is included in the pics, as the other one is identical.

Built from Plan(s)
Estimated Time Investment
Week Long Project (20 Hours or More)
Recommended Skill Level
Beginner

Comments

Knot Good with Wood

Thu, 01/09/2014 - 04:05

I was unsure exactly how I wanted to design and finish, so I just looked through tons of brags on here. I think they are very cool now that they are done, and my kids end up using the hinged footboard to gain access to build small forts.....

Thanks for the great feedback!

handcrafted amish style side table

Submitted by Anonymous (not verified) on Tue, 03/29/2016 - 10:46

Handcrafted amish side table. Easy to do

Estimated Cost
$25.
Estimated Time Investment
Afternoon Project (3-6 Hours)
Finish Used
Provincall stain and black satin paint
Recommended Skill Level
Intermediate

Comments

rburmania

Tue, 03/29/2016 - 11:29

i also do these table completely stained, i would love to do some beautiful stuff for anyone. We do shipping if you would like, please check out our facebook page R&L Custom Creations of West Michigan

Rustic X coffee table

Submitted by LampAtFeet on Fri, 11/22/2019 - 13:57

I built this coffee table for my son's first apartment, along with the rustic X end table. It's a very sturdy table and the plans were easy to follow! It's so much fun being able to build my kids furniture!

Built from Plan(s)
Estimated Cost
$50
Estimated Time Investment
Afternoon Project (3-6 Hours)
Finish Used
Dark Walnut stain, then a coat of satin wipe on polyurethane to seal it.
Recommended Skill Level
Intermediate

Round Accent Table

Submitted by Anonymous (not verified) on Sun, 07/30/2023 - 14:29

This is my very first build ever! I learned so much from this project. I also bought my first power drill and brad nailer for this project. My husband helped me cut the wood pieces to my measurements and I did everything else. I never knew how fun woodworking can be!

Emily Mangiaracina

Benchright Coffee Table

Submitted by mactanya on Mon, 03/19/2012 - 17:46

Made the Benchright Coffee table. Costs too much - time to make it myself.

Built from Plan(s)
Estimated Time Investment
Week Long Project (20 Hours or More)
Finish Used
minwax jacobean and minwax polycrilic
Recommended Skill Level
Intermediate

Comments

mactanya

Tue, 03/20/2012 - 20:07

Thanks Megan.
Couple of my next projects are going to be the matching TV stand and the buffet for which I drew up plans. It'll be probably another month or two before I can find time to do it.

Doll bunkbeds

Submitted by Benjies on Thu, 01/09/2014 - 11:44

This was really a quick project. It's sized to fit a standard American girl doll. I tag-teamed with my mother to make a Christmas gift for my 4-year old daughter. I built the bed and she sewed the mattresses, reversible blankets, and pillows. My daughter loved them. My only regret was using plywood instead of backboard for the box springs. The plywood was too thick making it a tight squeeze to get the dolls in the bed with the pillows and mattresses.

Estimated Cost
>$15
Estimated Time Investment
Afternoon Project (3-6 Hours)
Finish Used
I used krylon white spray paint with a gloss finish. I then did a couple of clear coats of a gloss enamel for protection.
Recommended Skill Level
Starter Project

Grandy Sliding Door Console

Submitted by lseib262 on Thu, 03/31/2016 - 15:49

I used the plans here and the hardware plans that are linked in the comments (with the 1-1/2 inch pulleys). In retrospect, it wasn't that hard, although I built it up to be so since I was doing so many things for the first time, including cutting and drilling metal. With the right blades and drill bits, it was a breeze. This took me a few months to actually finish, but if I were to do it again start to finish, I'd say one person could do it in 3-4 days. I got the reclaimed barnwood from a local salvage place. I used the tea/steel wool/vinegar stain for the top and regular paint for the body. Total cost was somewhere in the low $200's. I absolutely love it and am so grateful that a site like this exists! Thank you!!

Built from Plan(s)
Estimated Time Investment
Week Long Project (20 Hours or More)
Recommended Skill Level
Intermediate

Comments

tgrott

Sat, 04/02/2016 - 16:02

You did an amazing job! It looks beautiful! Also love the dog wall!!! :))) Can you email me the instructions on how to make the hardware at [email protected] or post them? 

Super easy farmhouse dining table !

Submitted by Anonymous (not verified) on Wed, 11/27/2019 - 07:15

This was our first project like this .. was last minute cost about $64 with lumber and screws , we already had the stain and paint .. only took 2 days ! I’m so happy !!! The only thing different I would do is put pocket holes in which we might add . Perfect project for a beginner !

Estimated Cost
$64
Estimated Time Investment
Weekend Project (10-20 Hours)
Finish Used
We didn’t use any finish yet as we are still deciding lol
Recommended Skill Level
Beginner

Narrow Farmhouse Table

I was looking for a desk/table for a wall in my bedroom, especially after I created the wall art that was now free floating on a huge expanse of wall. I needed something to anchor it. I saw the Narrow Farmhouse Table and loved it. I knew I could modify for the space so I used some extra boards I had around the house and mocked it up so that I could take measurements and ensure the table did not block the traffic flow in my home.

I loved the way http://deuxmaison.blogspot.com/2010/07/knock-offwoodcom-narrow-farmhous… the table was done in this blog, so I used the new measurements and took a few tips from deuxmaison to make this desk/table.

I completed the table top and the base as separate projects. Check out my blog for details and a special link on "How to Make a Tapering Jig"

http://singlemomthriving.wordpress.com/2012/03/13/adventures-in-table-m…

http://singlemomthriving.wordpress.com/2012/03/19/adventures-in-table-m…

http://singlemomthriving.wordpress.com/2012/03/21/adventures-in-table-m…

I love how this table turned out. Thanks for great plans, Ana!

Built from Plan(s)
Estimated Cost
$110
Estimated Time Investment
Afternoon Project (3-6 Hours)
Finish Used
Golden Pecan/Cherry/Poly
Satin Ivory Silk/Matte Clear
Recommended Skill Level
Beginner

Farmhouse bed Queen

Submitted by fdfp84 on Sat, 04/02/2016 - 17:33

I built this for my youngest daughter, she loved it

Estimated Cost
250.00
Estimated Time Investment
Weekend Project (10-20 Hours)
Recommended Skill Level
Beginner
Back