Community Brag Posts
Ana's Adirondack Chair and side table
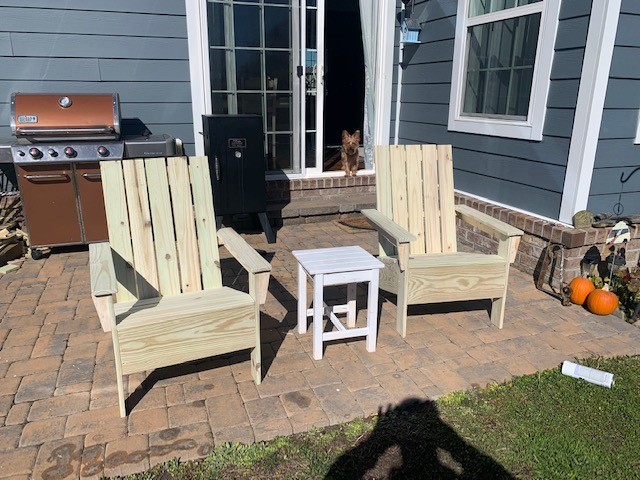
Been looking for a while for some simple looking Adirondack chairs. I found these and they turned out great. Will be finishing them with a white paint. Thanks for the plans Ana!
Estimated Cost
65 dollars for 2
Estimated Time Investment
Afternoon Project (3-6 Hours)
Recommended Skill Level
Beginner
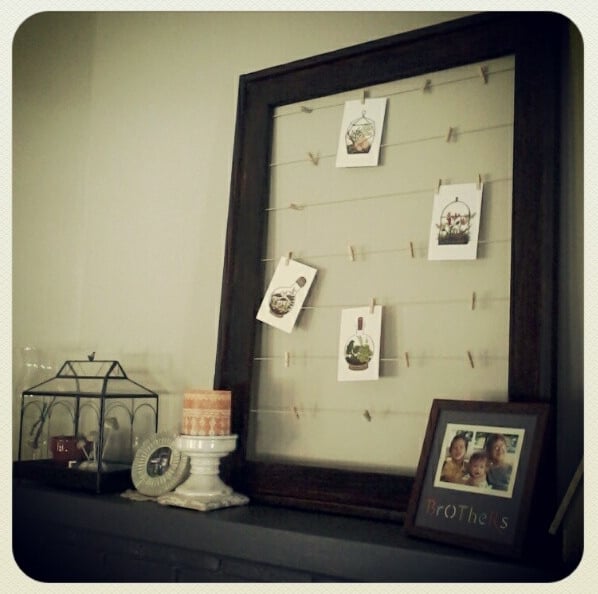
Clothesline Frame

When I saw this, I knew it would be perfect for our mantle. I need to add photos to it, but I love it! I plan on changing things out for each season... I can see autumn photos of the kids hanging beside pressed leaves in the fall, christmas cards hanging here during the holidays, etc. So many possibilities. Very simple to make. Love it!
Estimated Cost
$8
Estimated Time Investment
An Hour or Two (0-2 Hours)
Recommended Skill Level
Starter Project
Entry Table
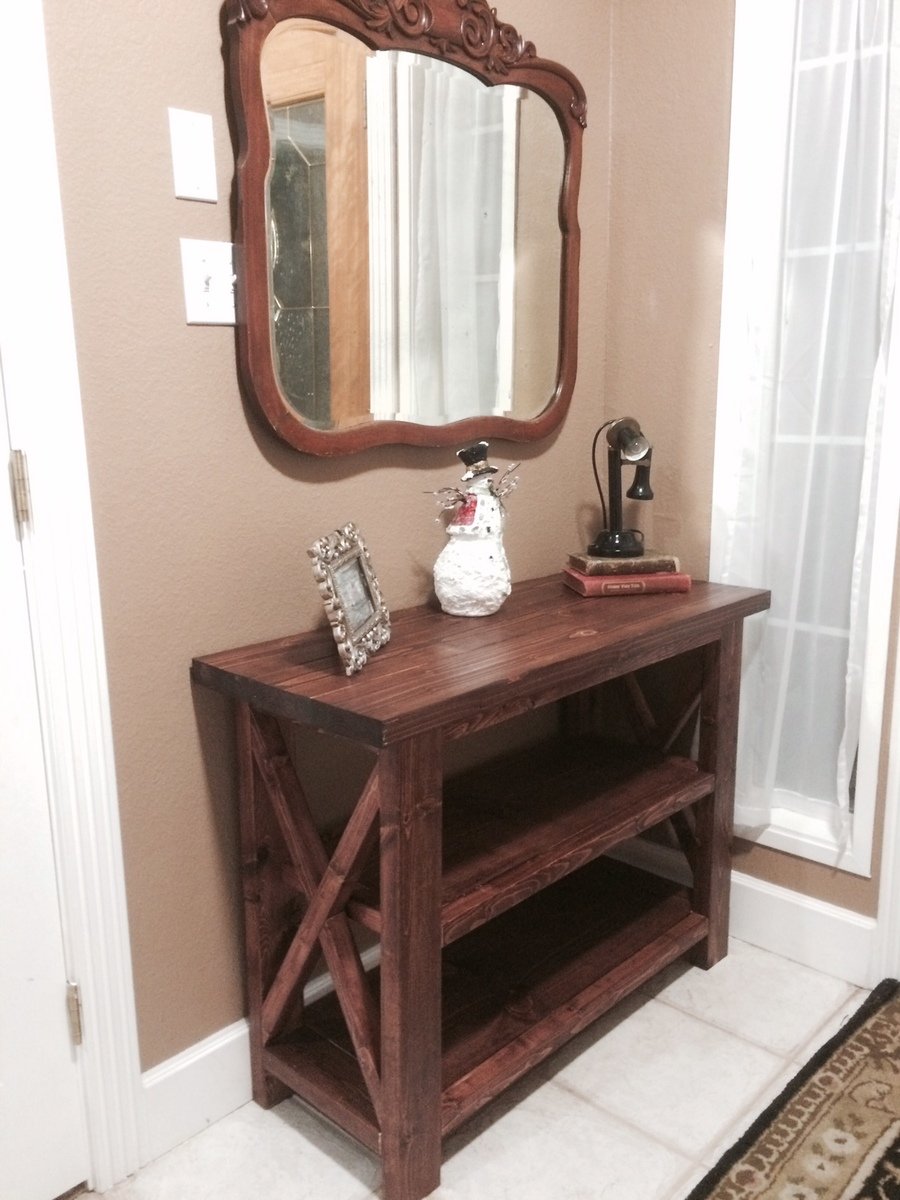
Well after completing the console table I decided to change the sizes a little and create an entry table and stain it to match my great great grandmothers mirror that we have. That mirror has to weigh 50lbs. It turned out great and I did sanding and staining before putting it together which saved a lot of time trying to get into all of the corners. Then just had to ploy and stain the edges of the top once finished.
This is approximately half the width of the console table so calculations were fairly easy to figure out.
Built from Plan(s)
Estimated Cost
$50
Finish Used
Used dark Walnut with a satin polyurethane
Recommended Skill Level
Beginner
Comments
Heavy duty log peeling stations
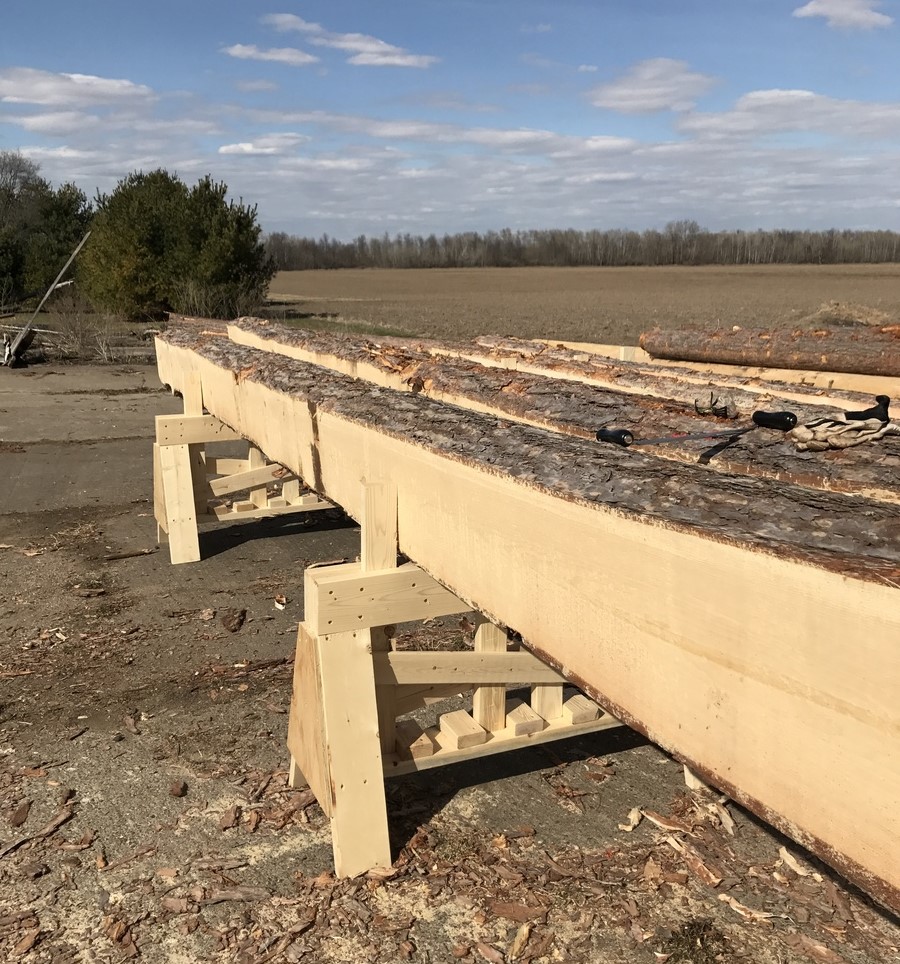
I modified Anna's plans to make these heavy duty saw horses.
Estimated Cost
$120
Estimated Time Investment
Day Project (6-9 Hours)
Finish Used
2 of these sawhorses can support 2 1500lb logs, I can peel the bark off then rotate the logs. I added vertical removable supports to support the logs when they are on the sawhorses. Thanks for the ideas.
Recommended Skill Level
Beginner
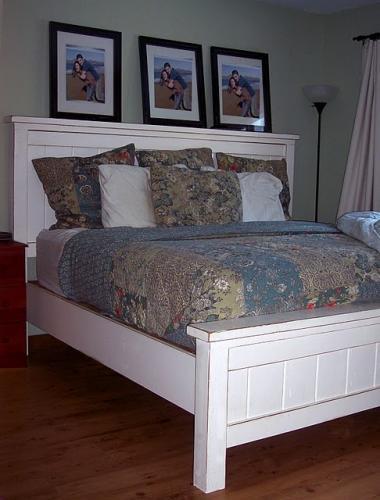
Hall Tree for Mudroom

I made this to fit the room and to help organize and cleanup the laundry / mud room. After searching for plans online I just sat down with pencil and paper and drew up my own plans, cut sheets and design from a combo of numerous projects I found in Pinterest.

Estimated Cost
500.00
Estimated Time Investment
Week Long Project (20 Hours or More)
Finish Used
All wood primed with Sherwin Williams Preprite Problock Primer and finish painting with SW ProClassic Waterbased Acrylic-Alkyd Satin finish in Dover White
Recommended Skill Level
Intermediate
Comments
Thu, 02/18/2021 - 15:43
Very cool design and build!
Love the option of open and closed storage, it looks amazing!

In reply to Very cool design and build! by Ana White Admin
Fri, 02/19/2021 - 08:44
Thanks! We have some items…
Thanks! We have some items like a steam mop and electric broom that go in one of the enclosed storage areas. I can post plans, construction pics and cut sheet if there is a place to do that.
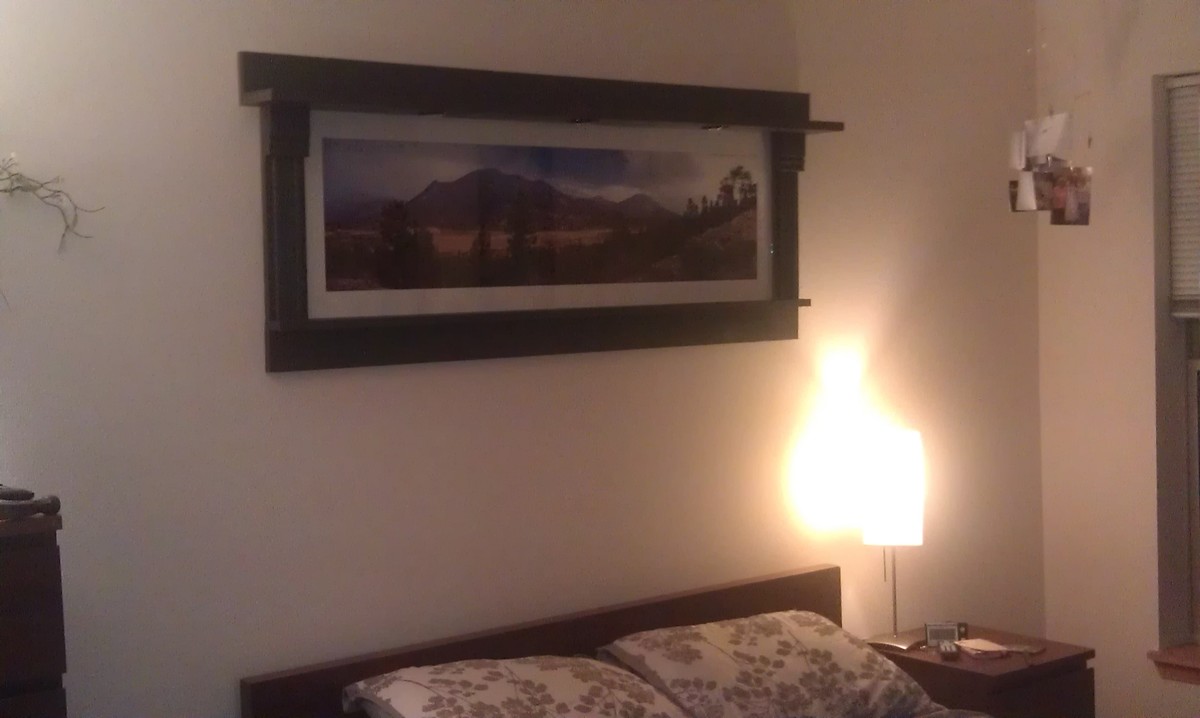
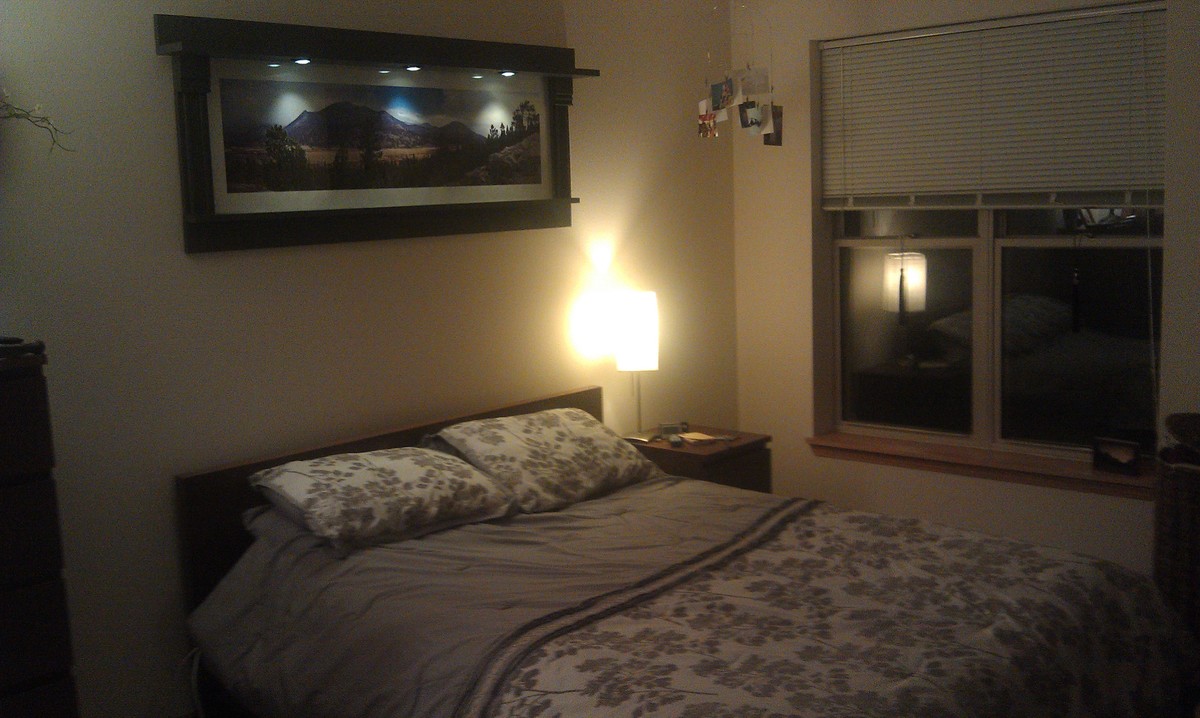
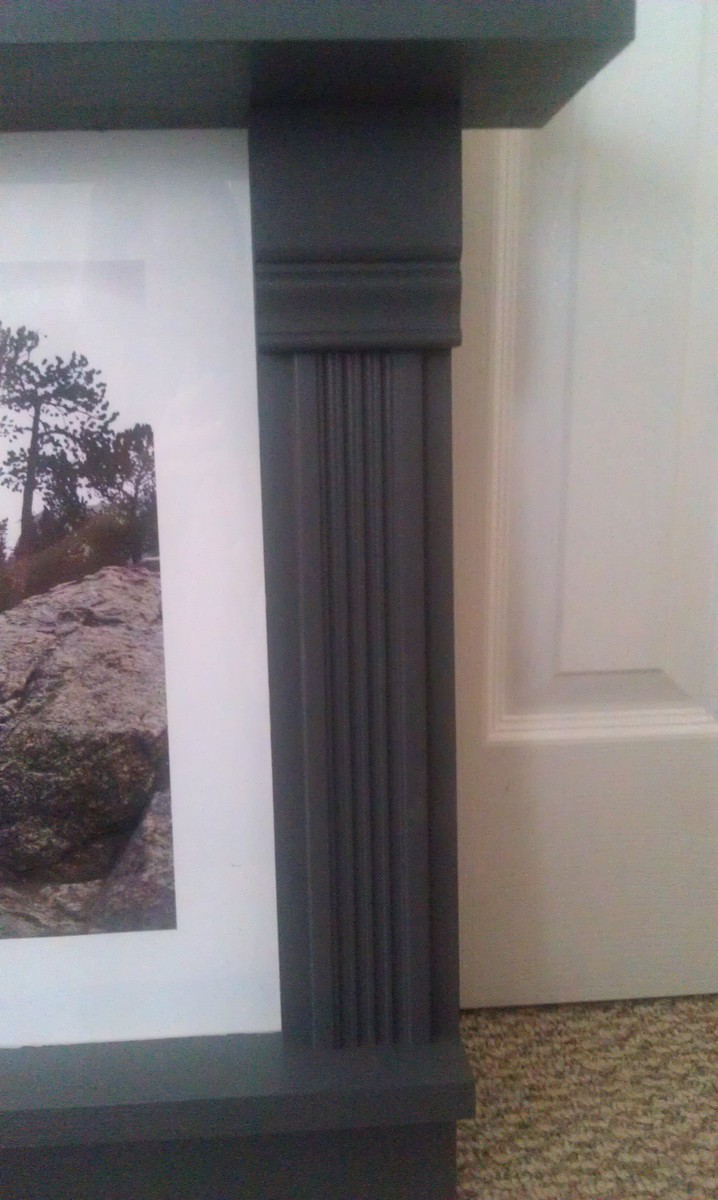
Lighted Panoramic Craftsman Frame
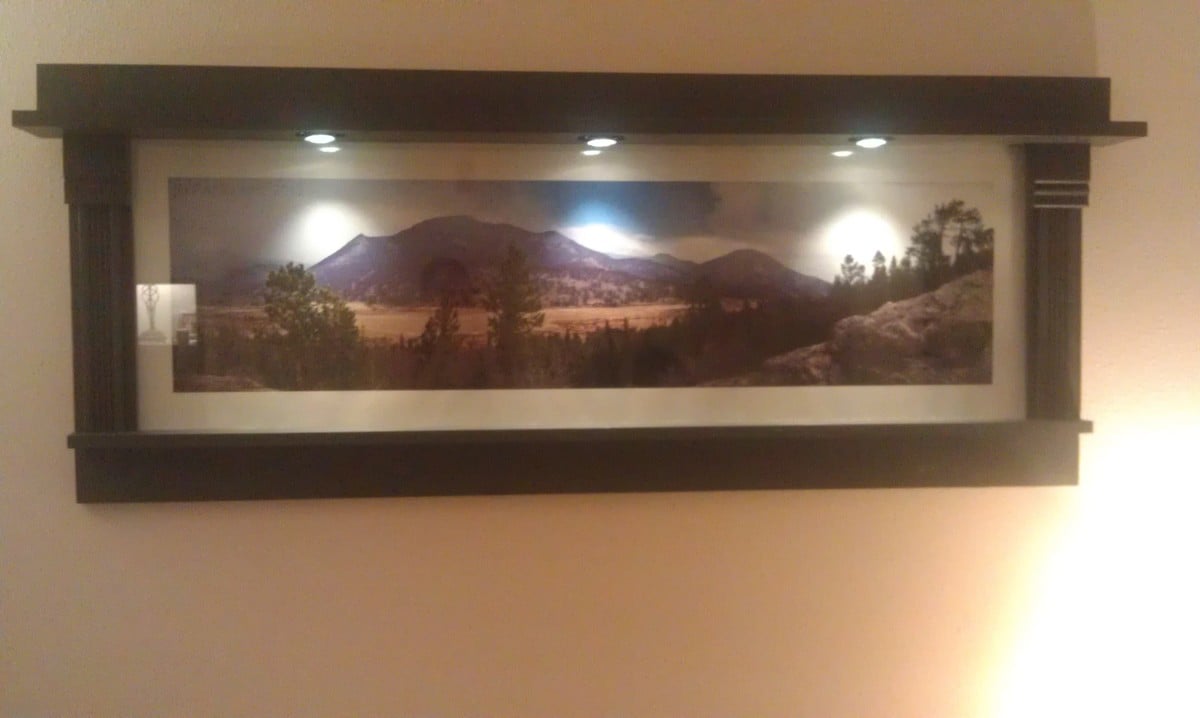
Let me first preface this by saying that the only similarity between my little creation here and the Craftsman Frame is the actual structure of the frame. I altered just about everything else about it, but since the idea was born with this plan I figured I would post it here! :)
A friend of mine just moved into her first apartment after graduating college and is quickly realizing she is in need of décor. For Valentine's Day, her boyfriend (a photographer) gave her a photo he had taken of the mountains in Colorado, a trip they had taken together earlier that year. The picture is absolutely stunning; the only problem is that it is a panoramic photo, measuring a whopping 18"x55". A quick Google search revealed that even a cheap poster frame with these dimensions would cost $110 at minimum; not to mention that it would have zero character. And a custom frame? psssh, don't even go there...this girl wants to decorate her apartment, but come on she still has to be able to afford groceries! :)
Anyway, as the new owner of a miter saw I saw an opportunity and I'm so glad she let me give it a go. We discussed the plans I had and ventured off to our local Lowe's. About 2 hours--and lots of laughs--later we walked out with all supplies in hand (who knew two girls in their young 20's could spend so much time at Lowe's?! We had a blast).
I loved the base idea of the Craftsman Frame, but since she doesn't have a lot of other décor yet (and isn't allowed to paint the walls of her rental), I really wanted this piece to be a focal point. She listened to my ideas like a trooper and, to my surprise loved every one of them. We thought about making a collage frame so she can display additional photos from this trip, but instead decided to frame only this photo and to use a 1x6" board (rather than a 1x2" as in the original plans) so she can use it as a shelf to for her other photos. Since this piece will be a focal point above her bed, I wanted it to look almost like the mantel of a fireplace, so we picked out some accent pieces to achieve this look on the sides (we really had no method to this; my only suggestion is to go wild and try things in the store that you normally wouldn't). We also purchased some LED lights (battery operated, since she doesn't have an outlet nearby) for ambient lighting. I wanted these to be as invisible as possible, so I fashioned holes in the top shelf for them to fit into!
Honestly, the toughest part of this project was finding glass large enough for my frame and making it fit. I had to call several local custom shops and was very pleased with the final result. (my sliced-up fingertips however, do have one suggestion to offer: if you get glass custom-cut...PLEASE make sure you are wearing gloves when inserting it into the frame--OUCH!) The original plans for this frame include just finding a way to attach the picture to the back side of the frame. Since I was using glass in this frame, I simply used a router to create a groove on the back side for the glass and photo to sit inside.
Overall, we are both thrilled with how this turned out! Time for my next challenge...

Built from Plan(s)
Estimated Time Investment
Weekend Project (10-20 Hours)
Finish Used
Since the décor in this room is mostly light gray and khaki, she wanted something that wouldn't match those muted tones exactly. We ended up purchasing two sample-sized (7.12 fl oz) cans of Olympic paint in Knight's Armor (D58-5). They were running a 2-for-1 deal that day so we got both but only needed one in the end. Overall, I think I applied 3-4 coats to ensure an even coverage.
Recommended Skill Level
Beginner
Comments

Wed, 02/27/2013 - 14:46
Thank you! I had a blast
Thank you! I had a blast doing it! (It helps to have such a beautiful photo to work with!)
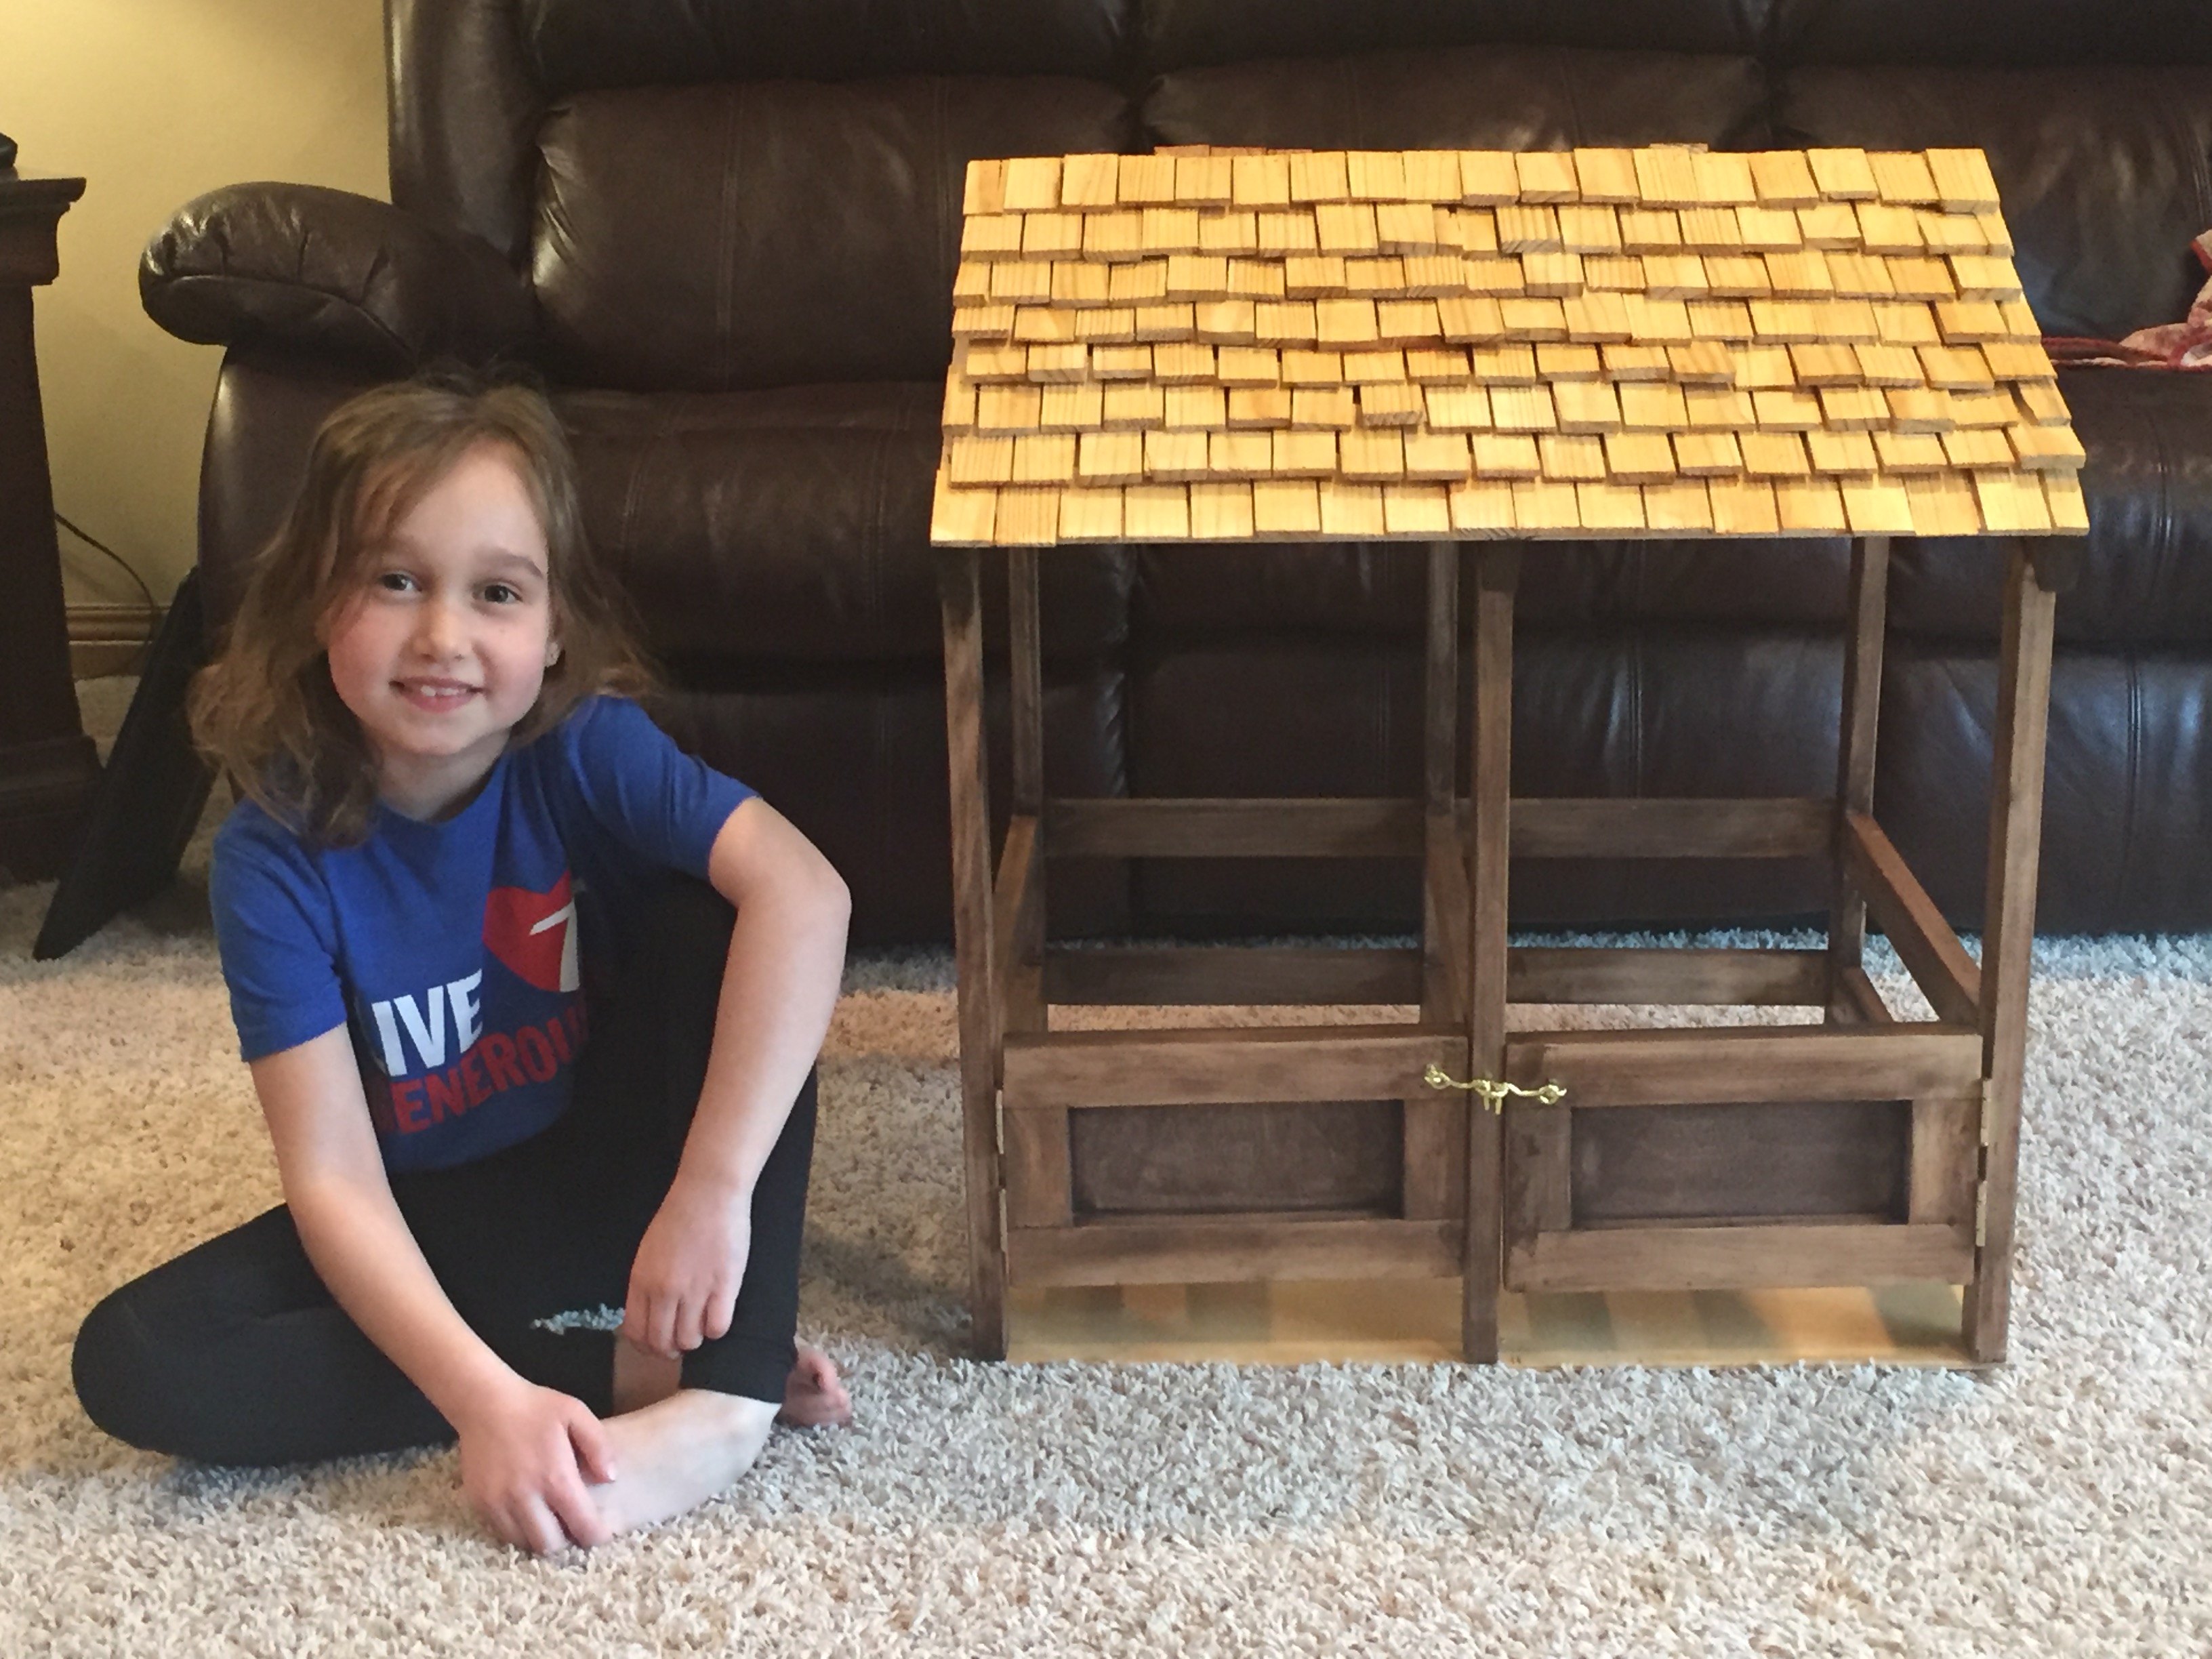
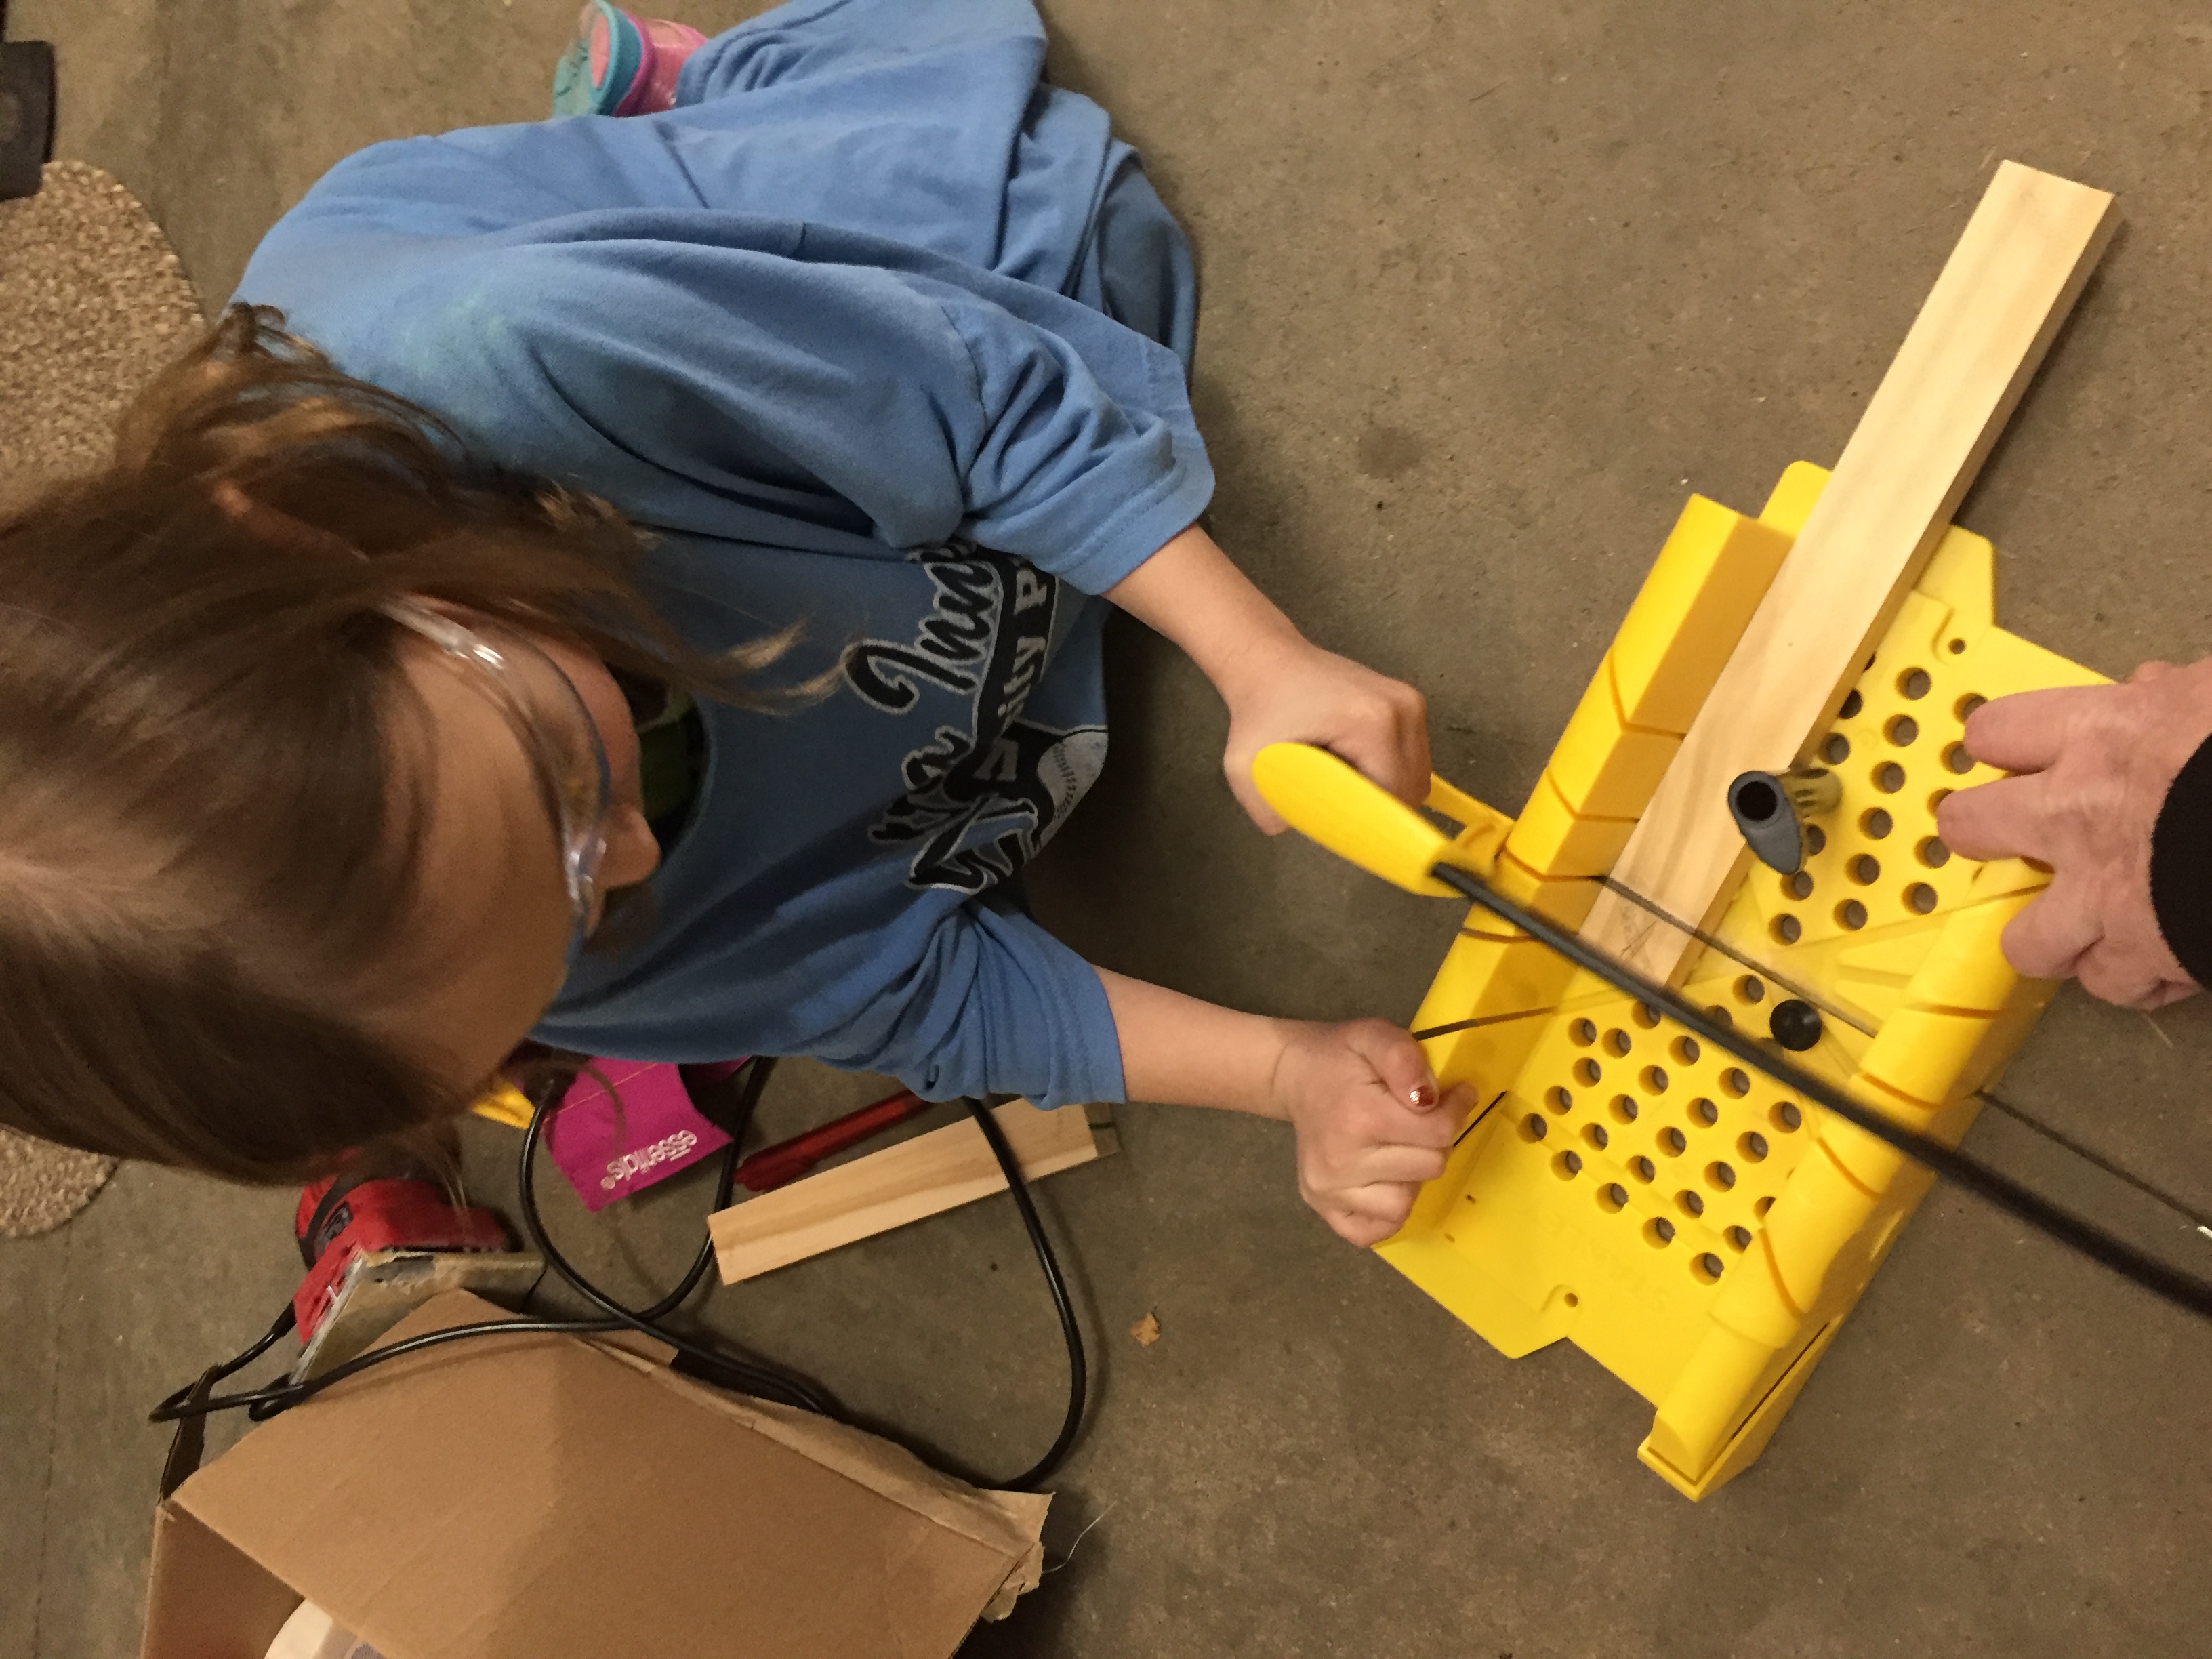
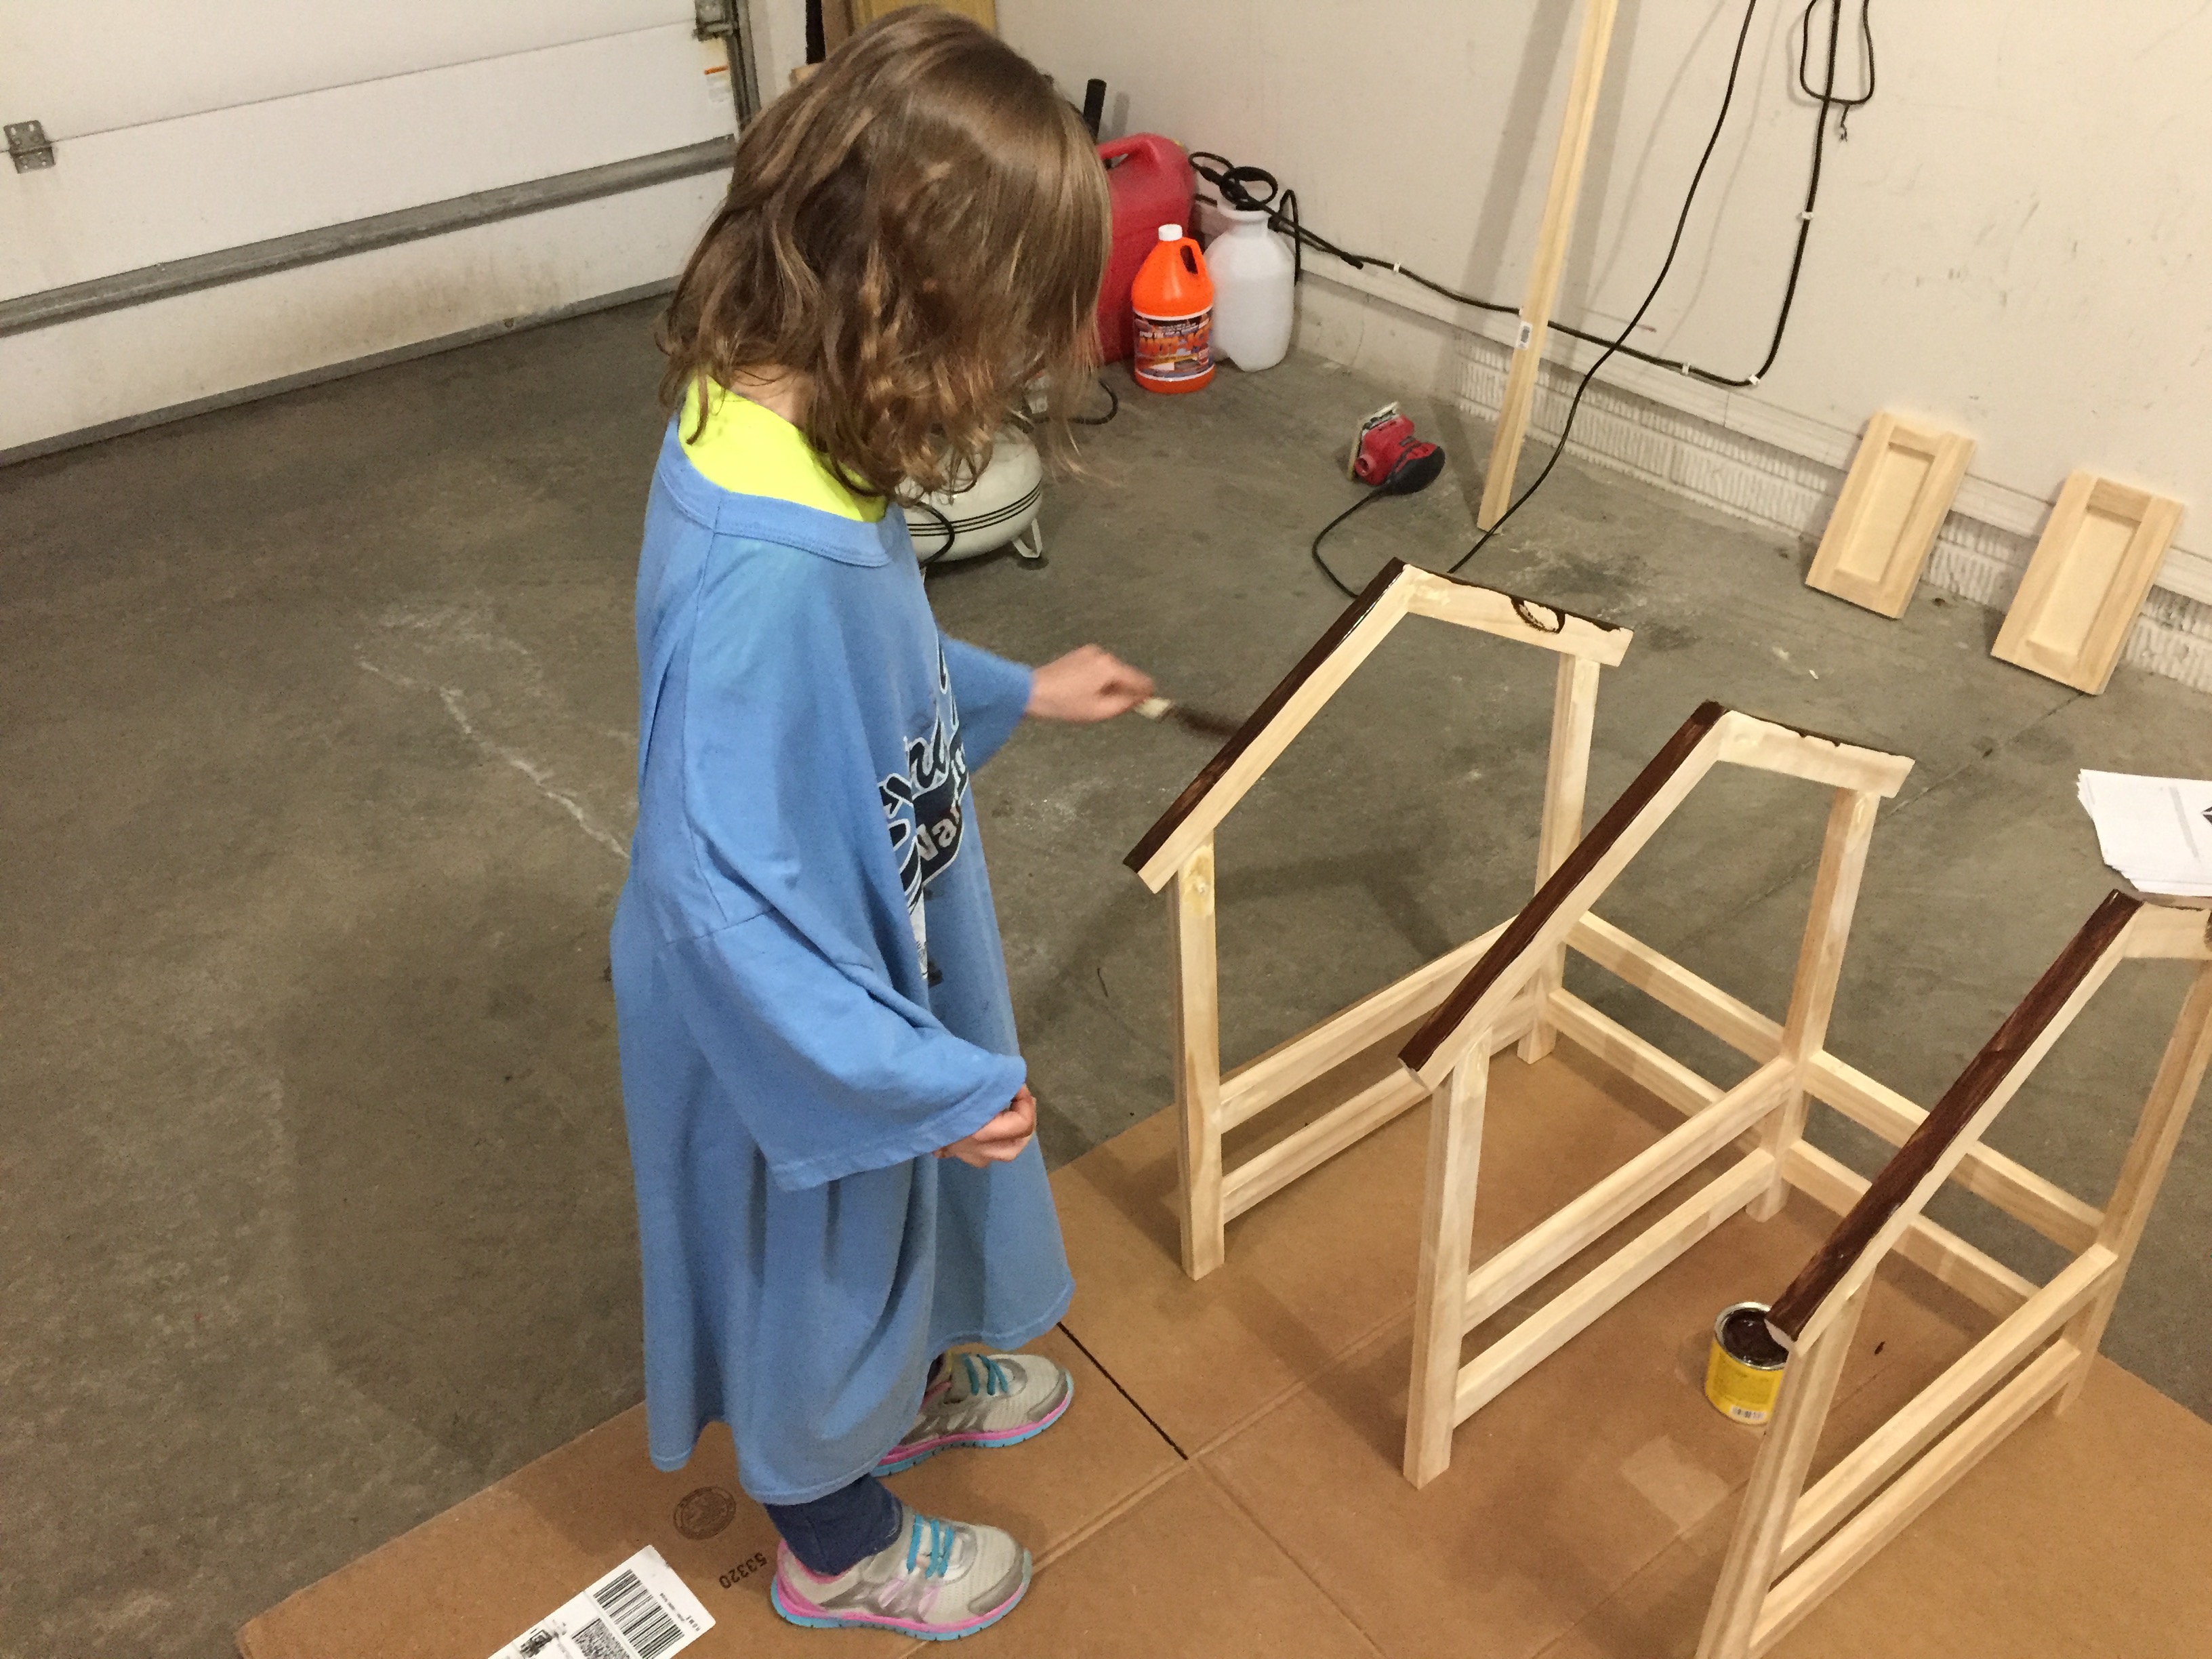
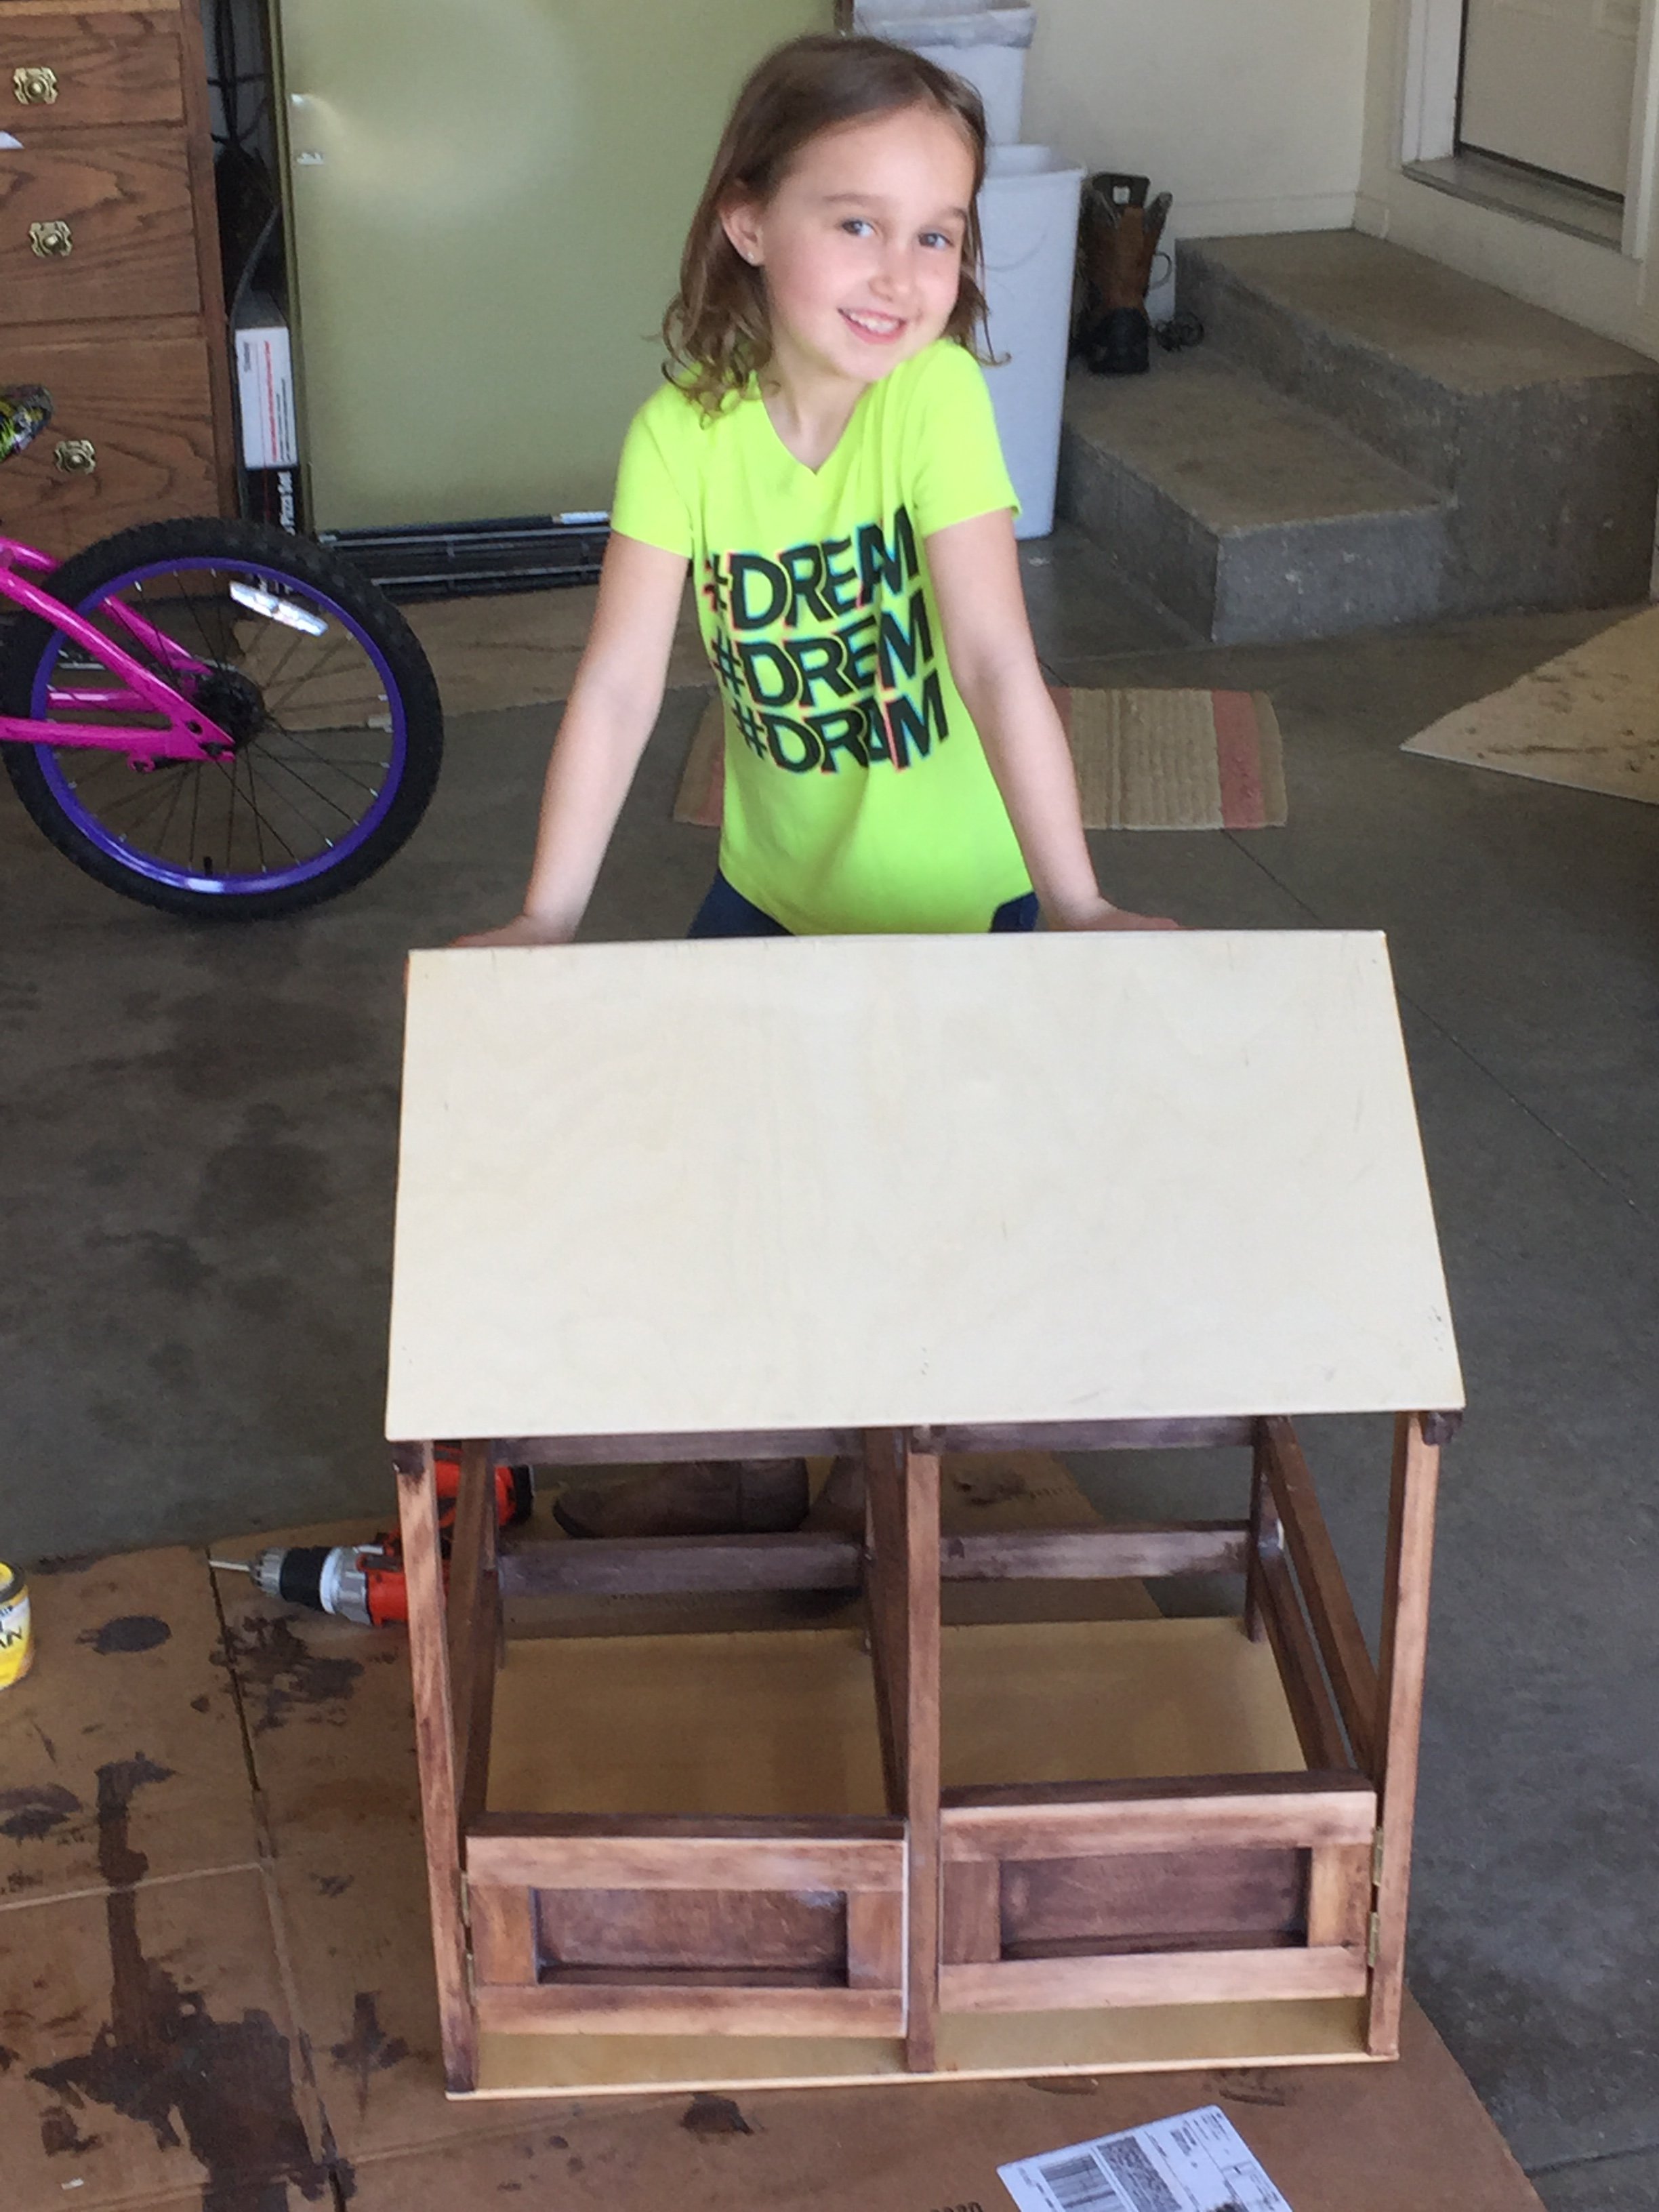
American Girl Doll Horse Stable
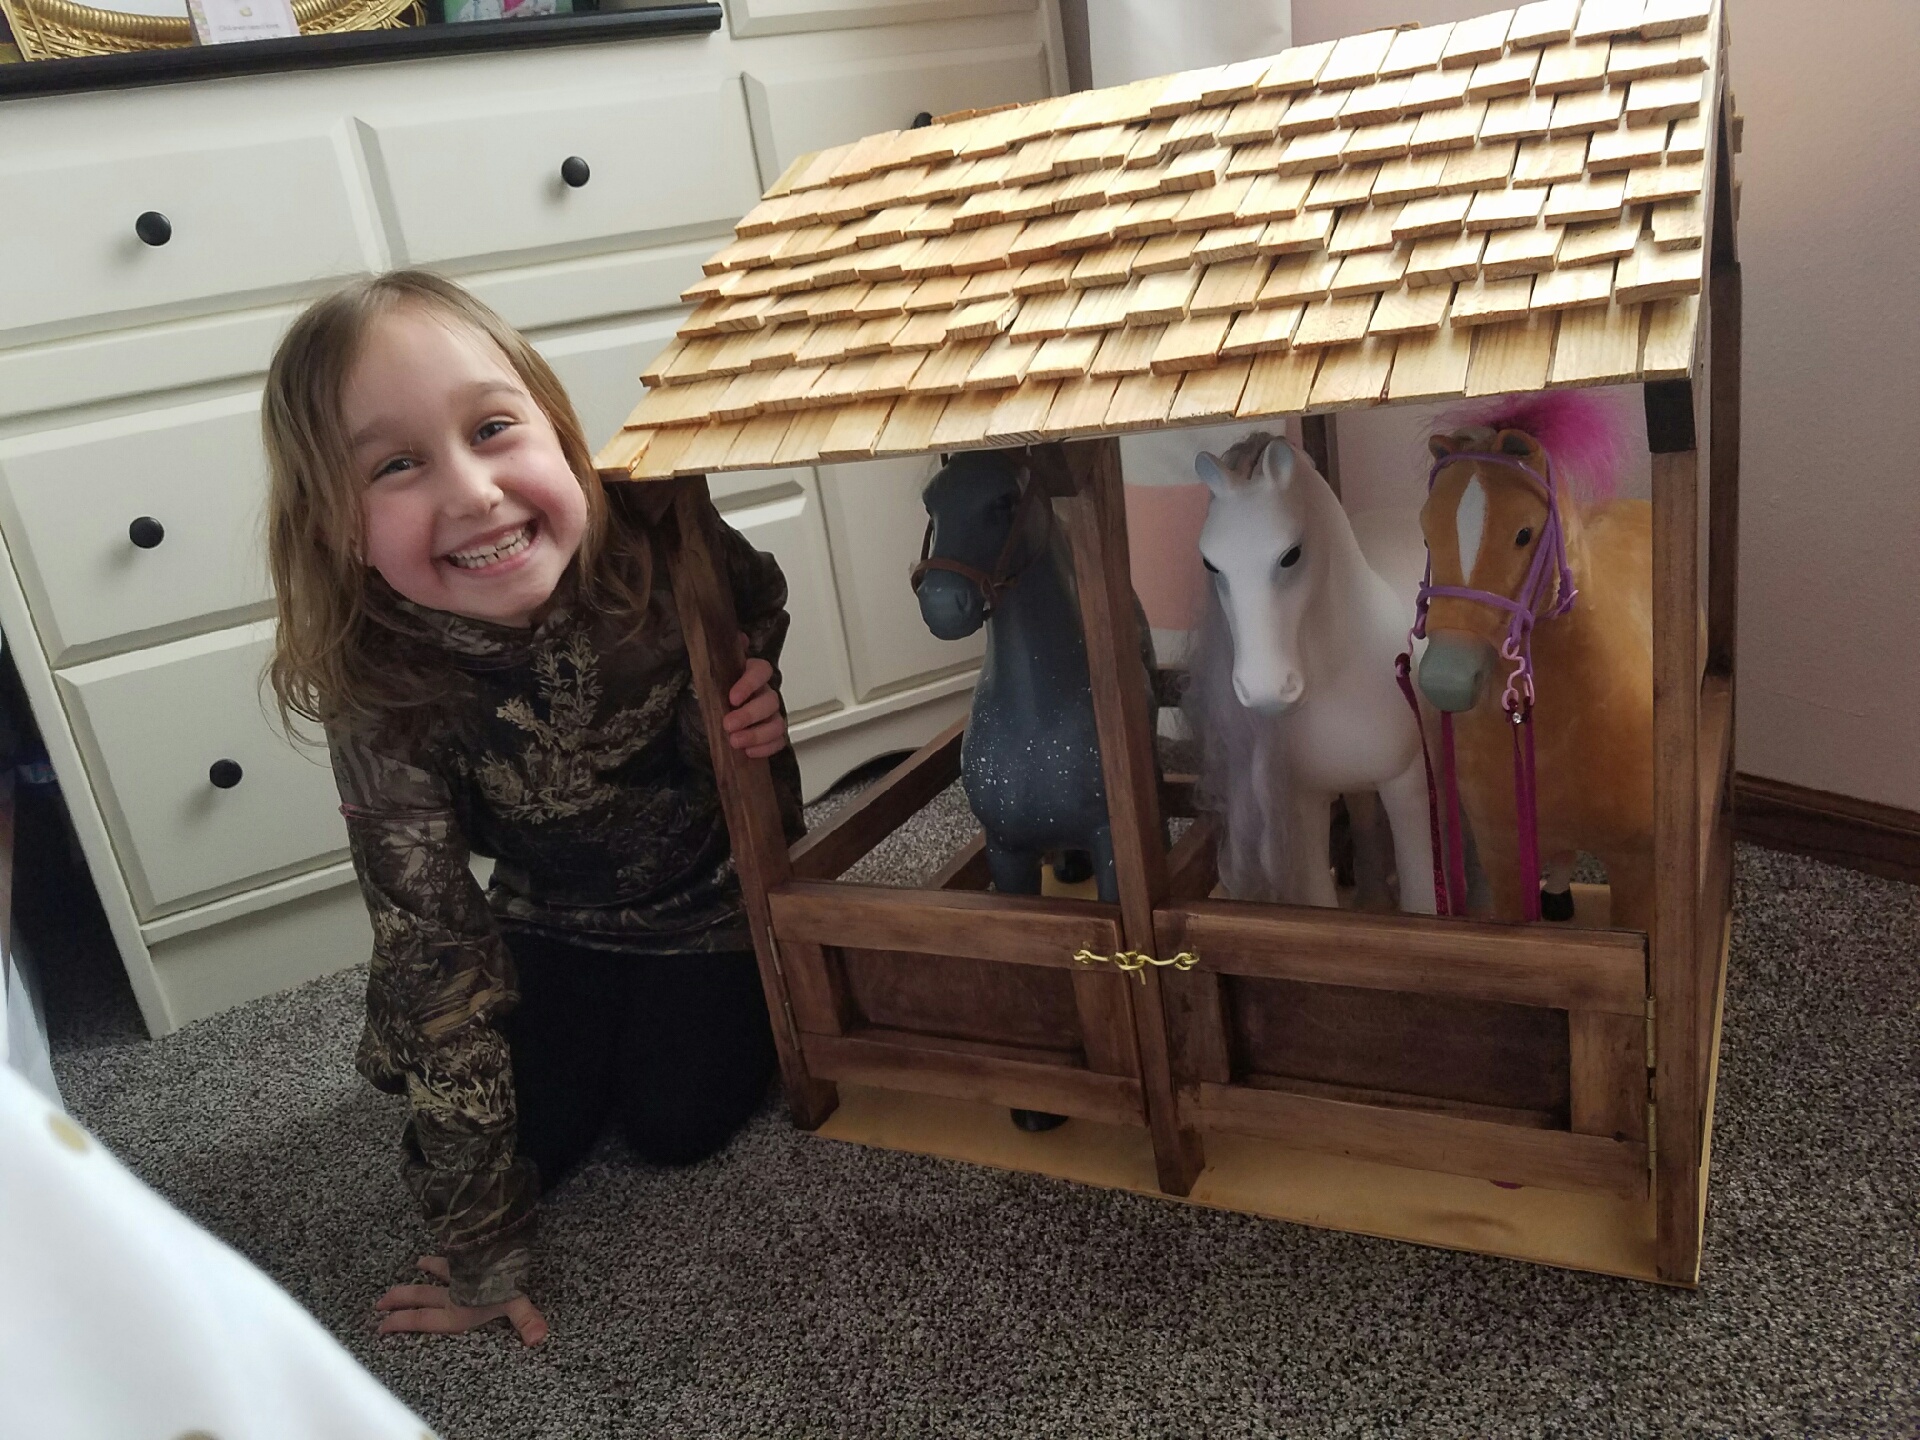
This was my first project with my daughter. After a divorce, I wanted something fun to do with my daughter-something where she would learn, have fun, and see a project from start to finish.
I did a lot of pre-cutting and prepping, but she did some cutting with a handsaw and mitre box, drilled holes with the Kreg jig, stained, used the nail gun, and glued. I installed the shingles, and touch up staining, but she did a lot of work for this project!
Since then, we have built a collapsible corral (fence) for her three horses, and next is the farmhouse bed for her doll!
Thank you for the great instructions, my daughter thinks I'm the greatest person on earth because of these projects!
Built from Plan(s)
Estimated Cost
I bought the Kreg jig, so my cost was a lot higher, but less than $75 prior to the purchase of Kreg jig (additional $40 with clamp).
Estimated Time Investment
Weekend Project (10-20 Hours)
Finish Used
Honey maple and dark maple
Recommended Skill Level
Beginner
My first ever project!
This was my very first experience ever building anything. I’d barely used a saw before this! I probably did a few things wonky, and it has some flaws. BUT it’s level and doesn’t wobble!!
Estimated Cost
$50 (for wood and screws)
Estimated Time Investment
Day Project (6-9 Hours)
Finish Used
Minwax Dark Walnut with a glossy clear coat.
Recommended Skill Level
Beginner
Comments
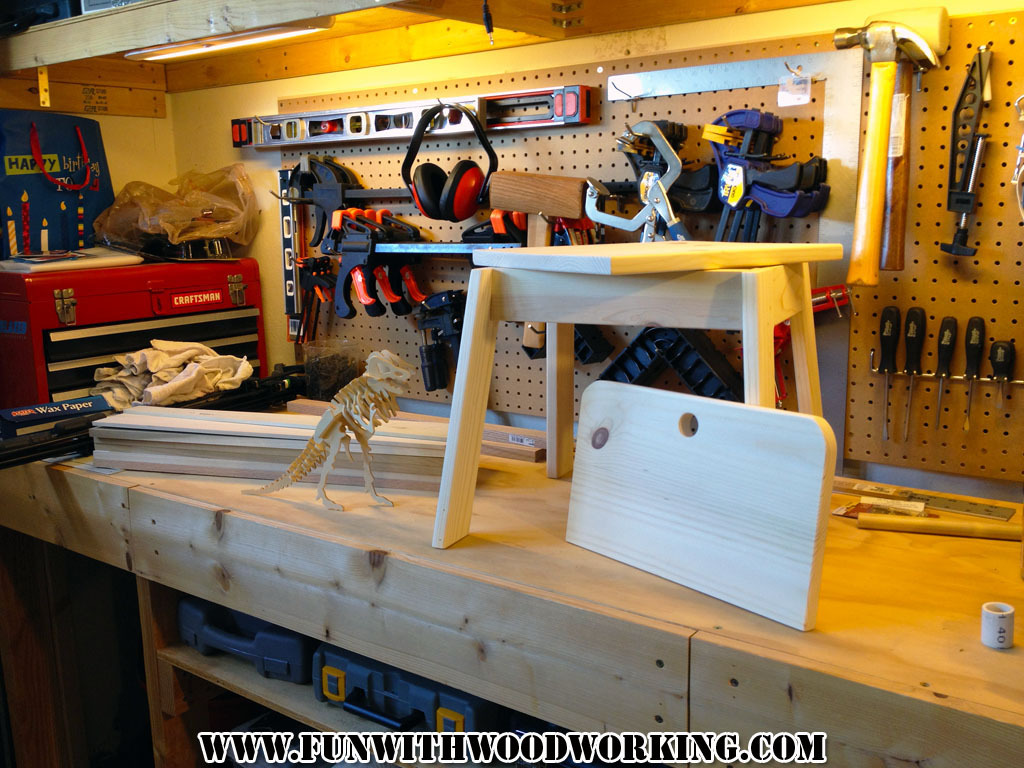
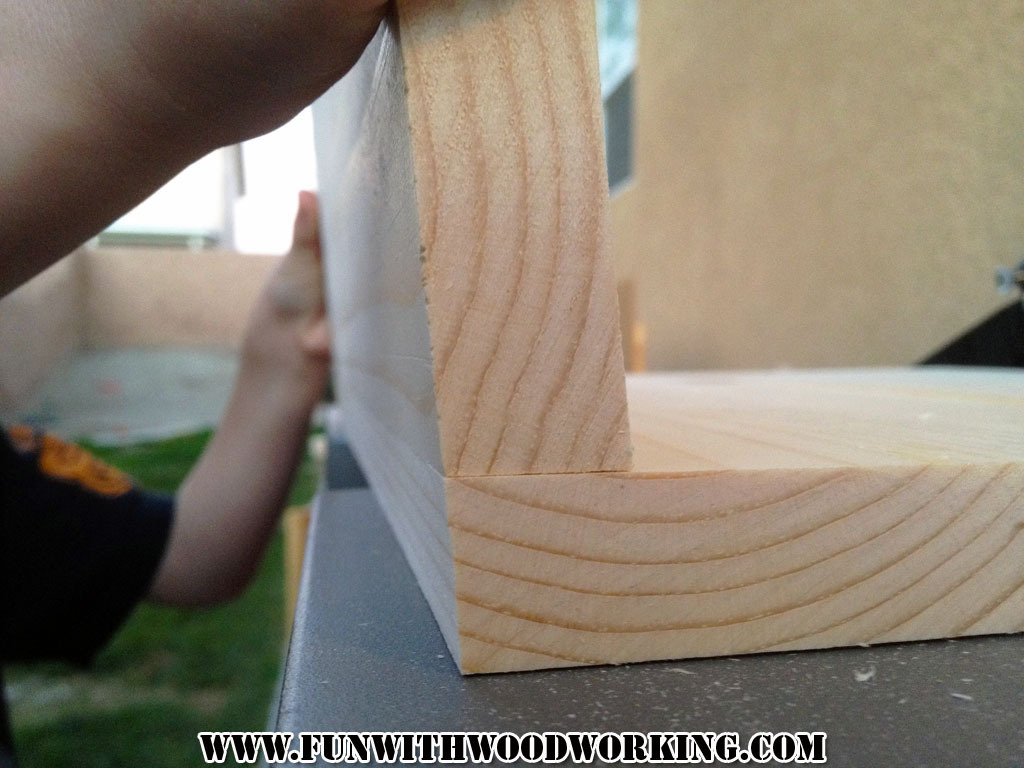
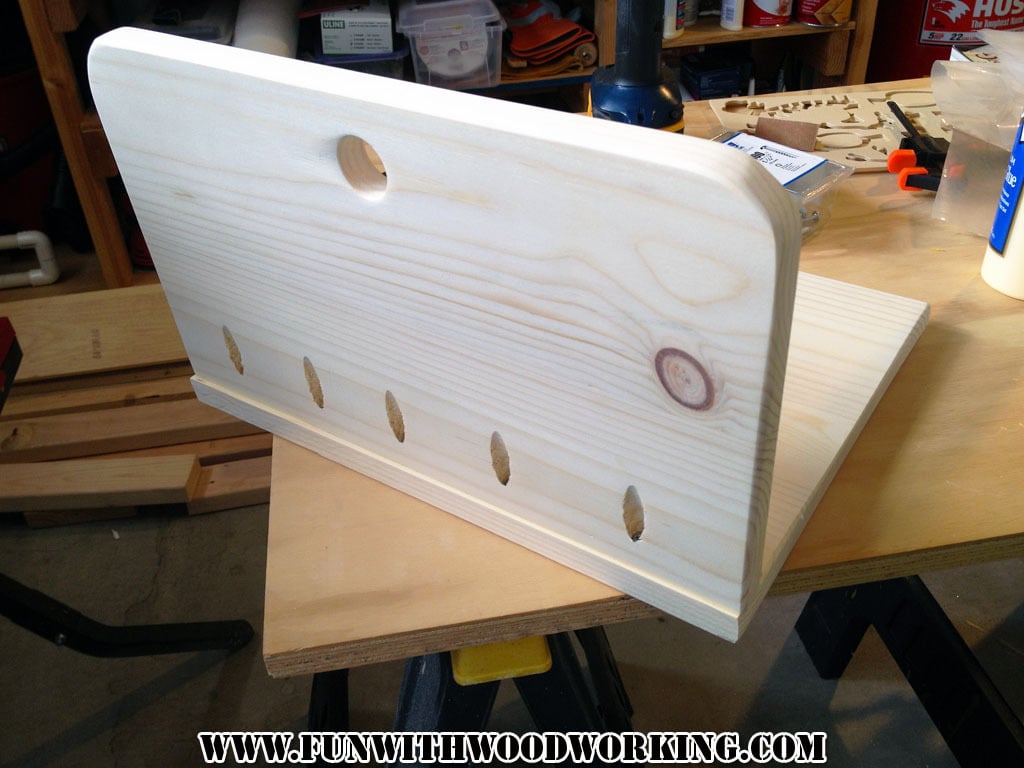
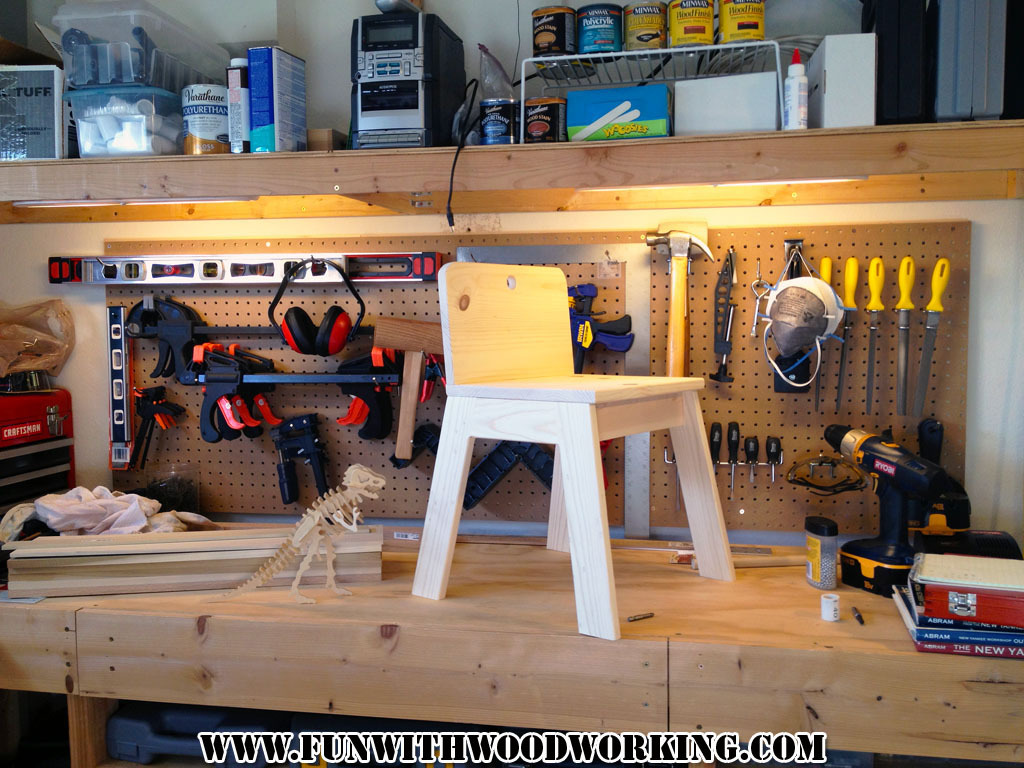
Thumb Chair
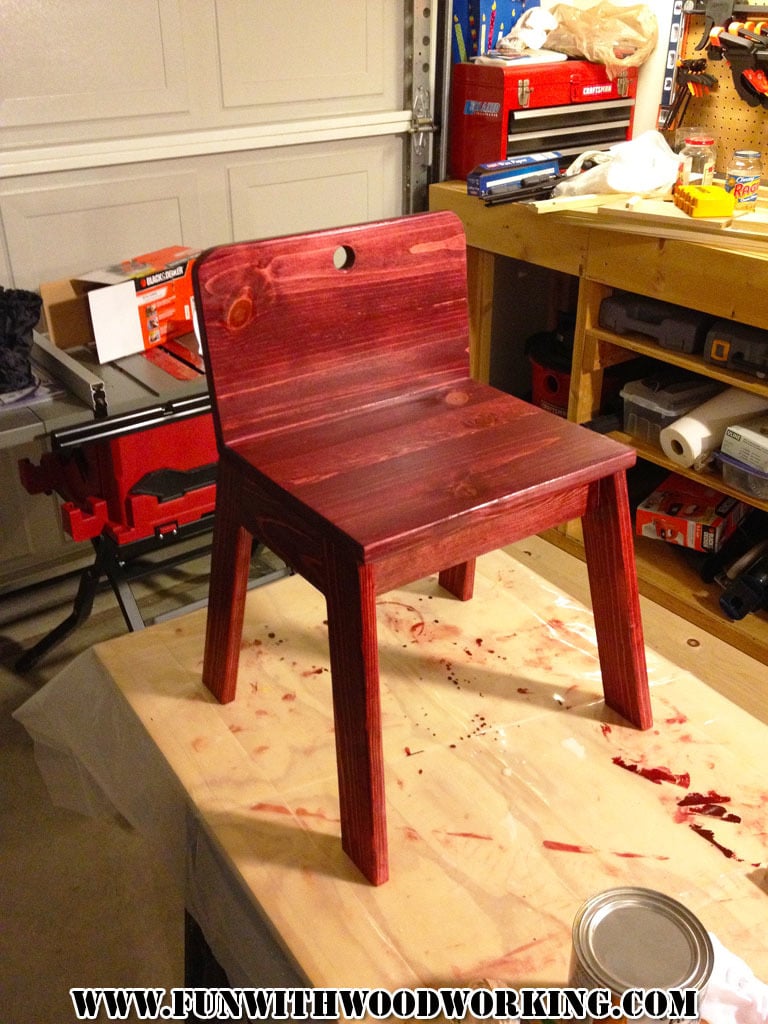
I found this plan on your site and fell in love with it. I followed all the directions but added a bevel to the rear of the seat match the the seat back and I rounded over all the edges on my router table. I also stained it and gave it 3 coats of polyurethane. My 6 year old son loves his chair and he is going to help me make one for his 3 year old brother.
You can follow the build on my blog at :
http://funwithwoodworkingtoo.blogspot.com/2013/01/lets-make-thumb-chair…
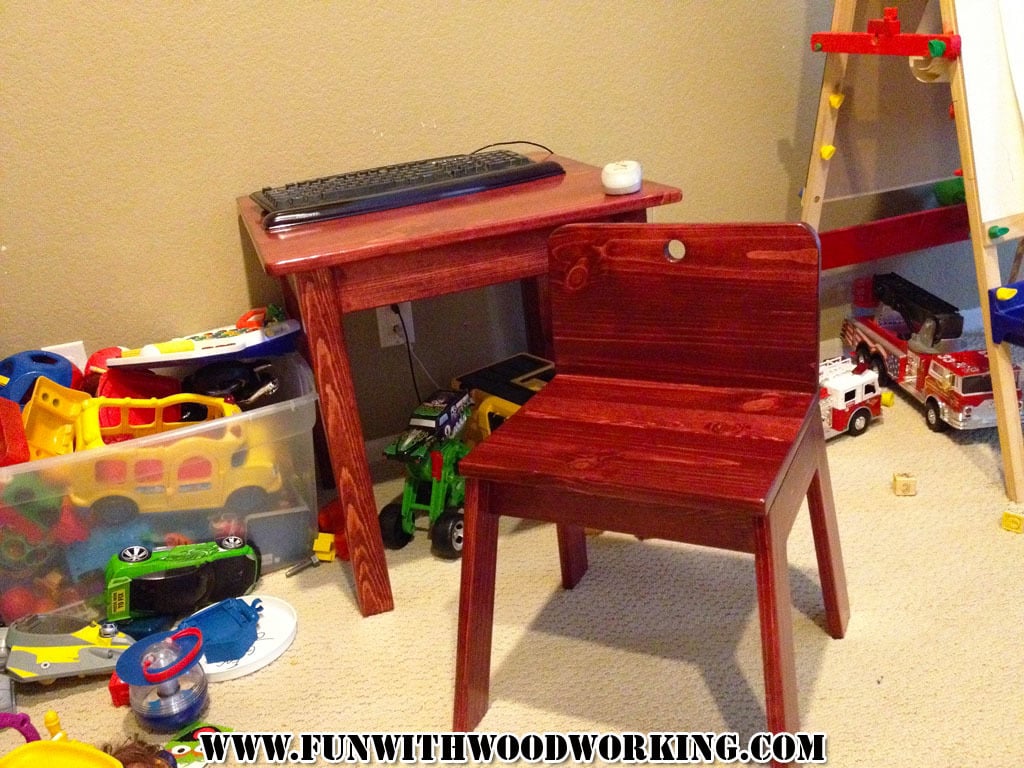
Built from Plan(s)
Estimated Cost
$10
Estimated Time Investment
Afternoon Project (3-6 Hours)
Finish Used
1 coat of Varathane stain applied with a rag and allowed to dry over night. 3 coats of Varathane water based polyurethane applied to entire project top and bottom with a light sanding between each coat with 220 grit sandpaper.
Recommended Skill Level
Beginner
Pet Kennel
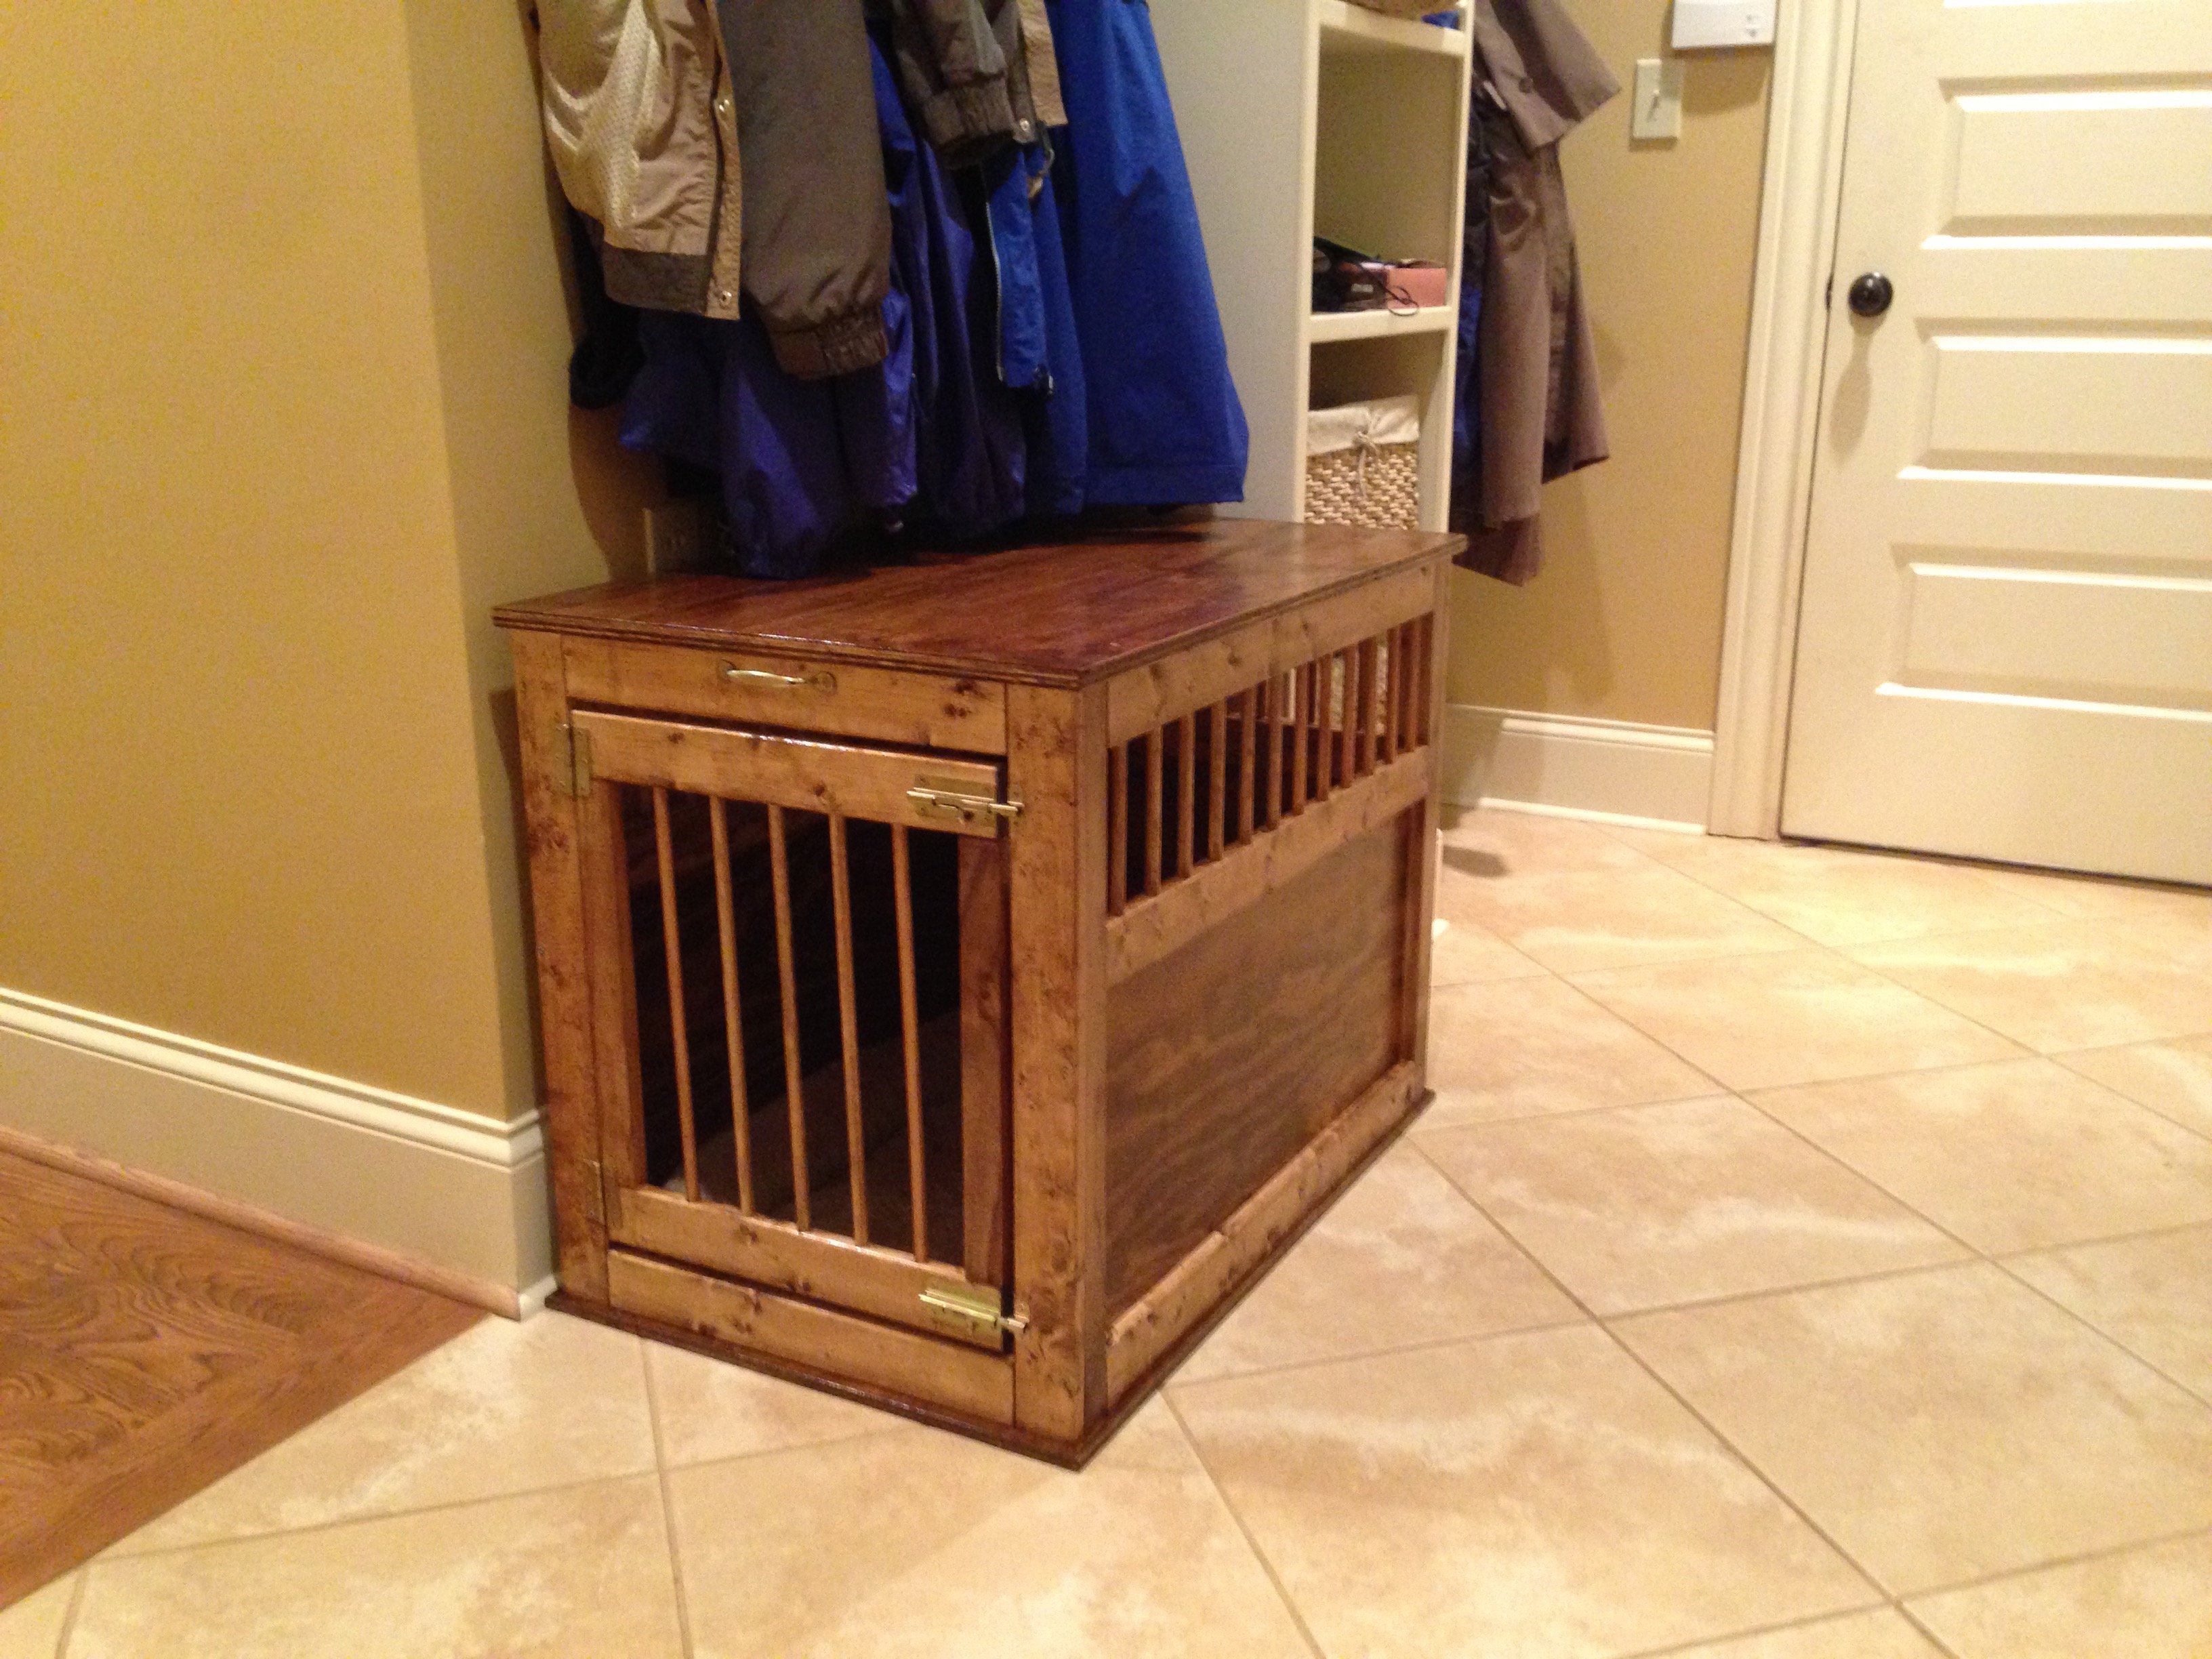
This is my first post. I have used a few of the plans off of here before but I thought this one turned out really well and wanted to share. I used dowel rods to give it a more open feel and think it looks good. My dog loves it! Thanks.
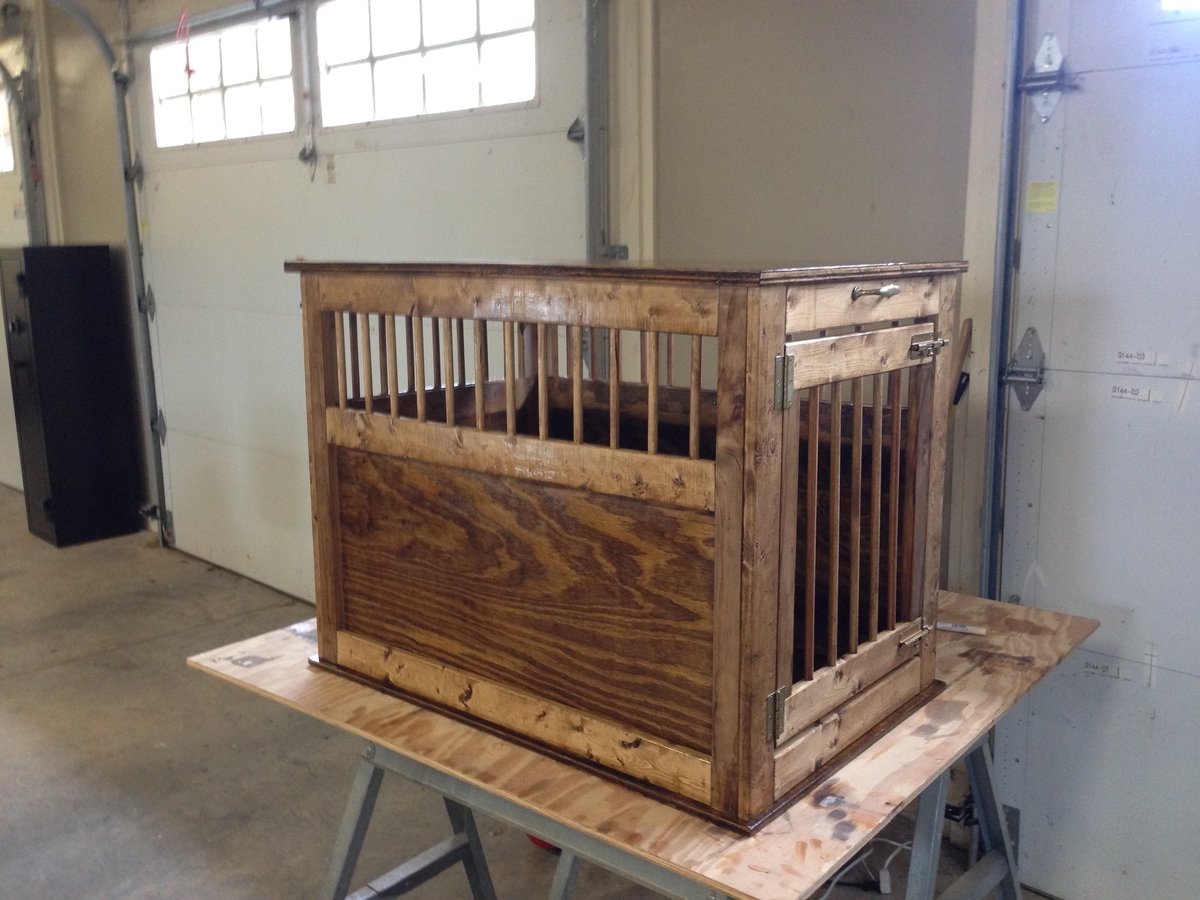
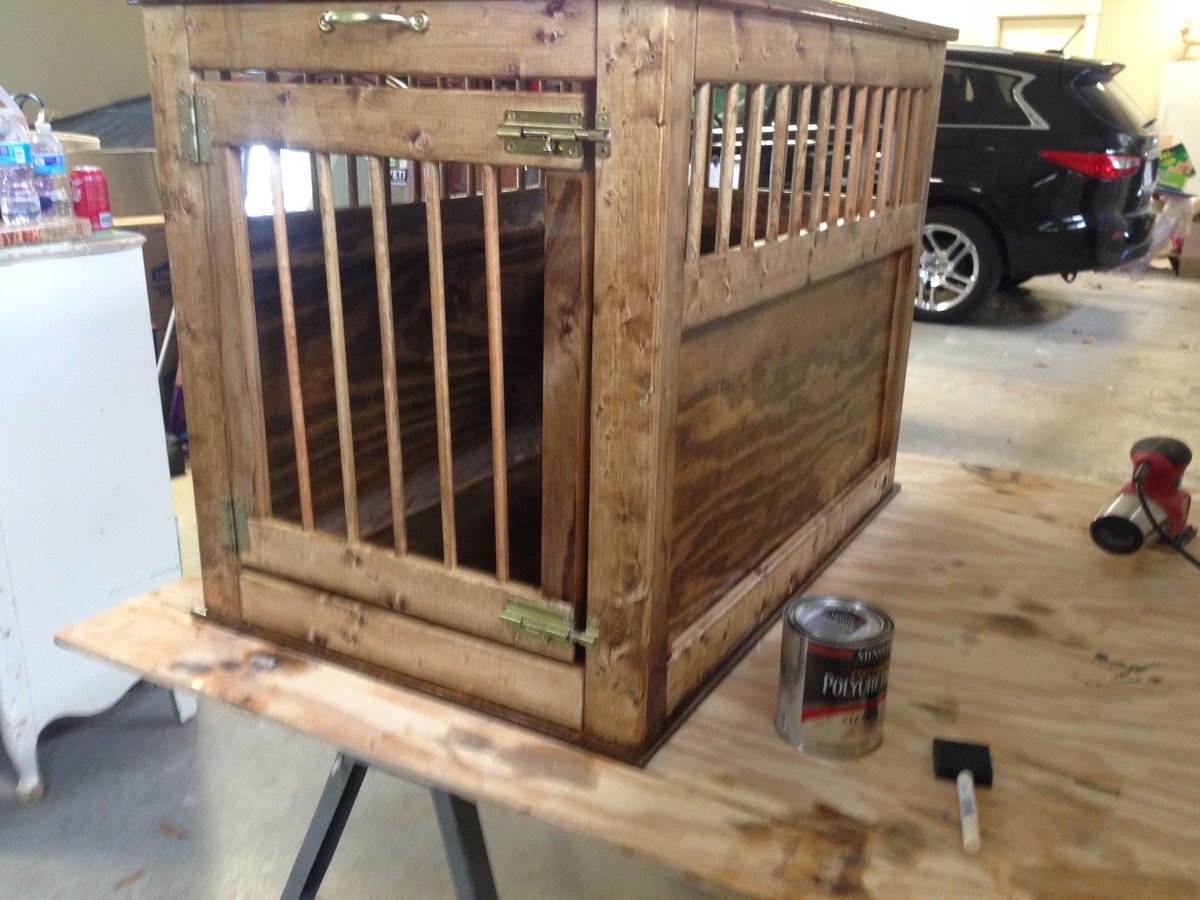
Built from Plan(s)
Estimated Time Investment
Day Project (6-9 Hours)
Finish Used
Minwax special walnut stain and polyurethane
Recommended Skill Level
Beginner
My X Farmhouse Table
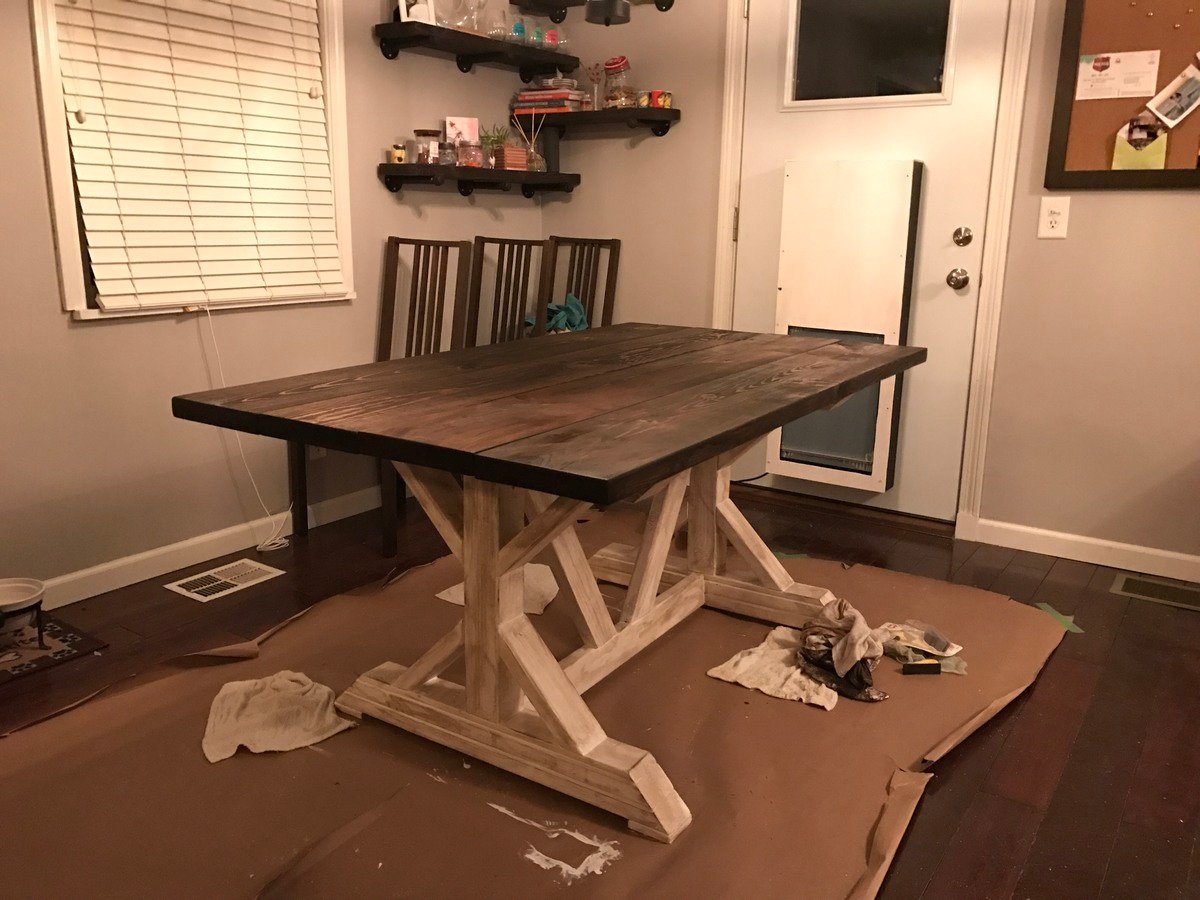
I had to alter some of the measurements to a smaller size for our dining room. 66" long 2x10's on the top. & 39" 2x4's across the base.

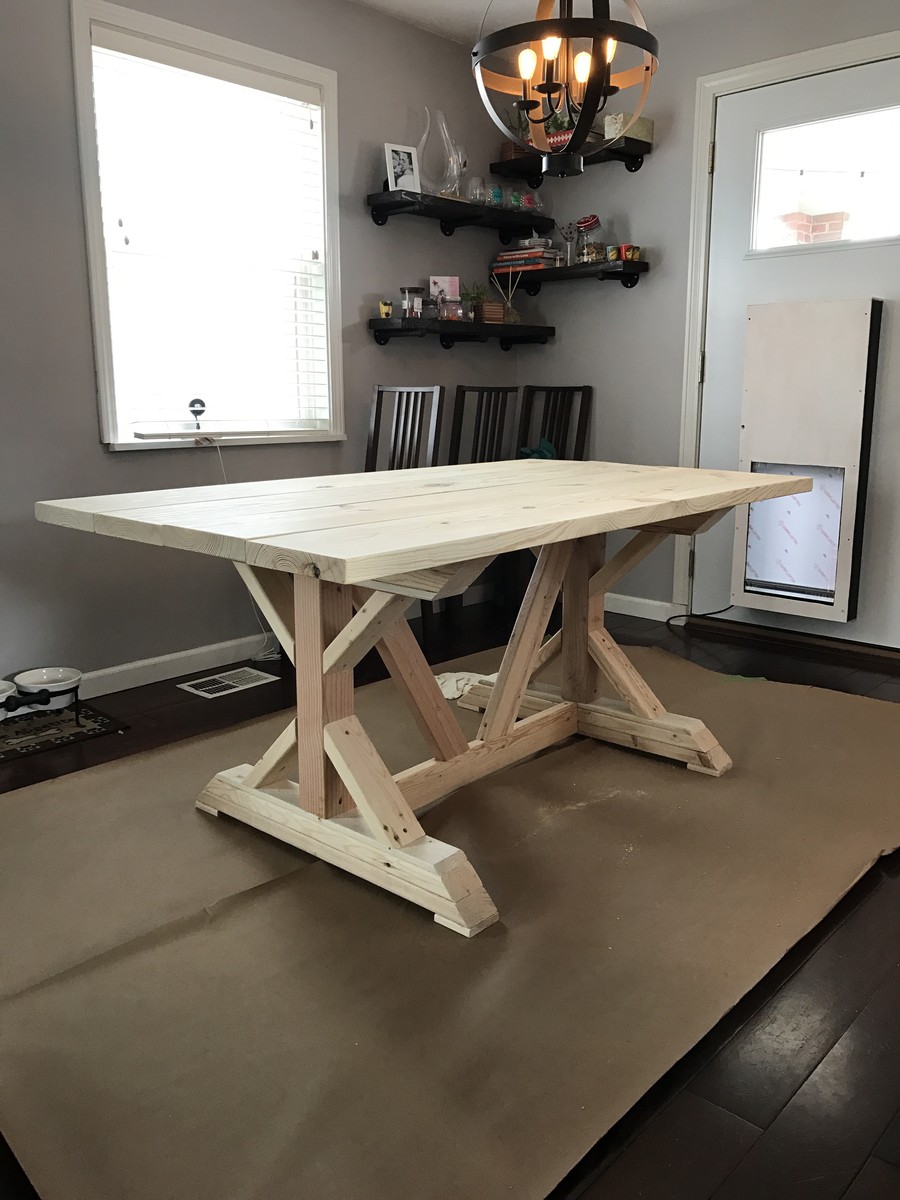
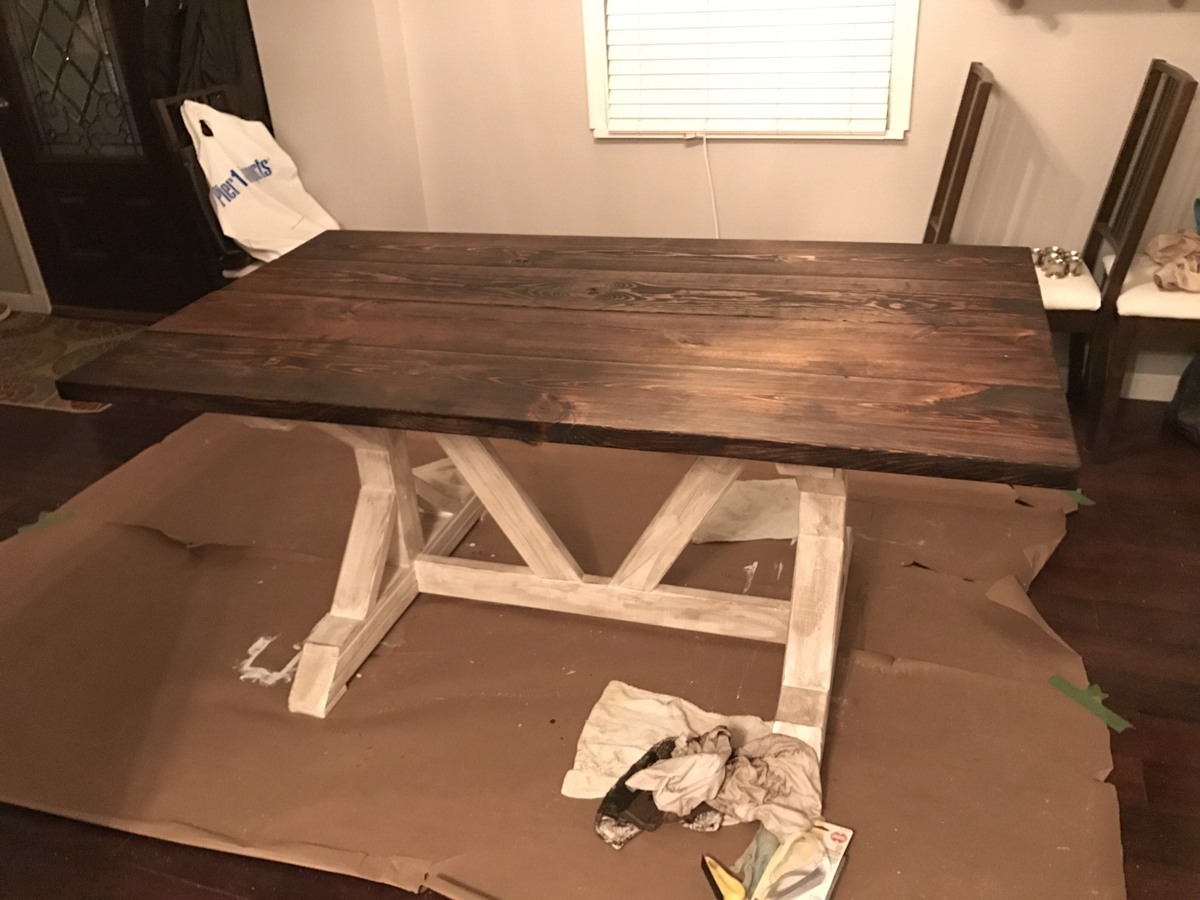
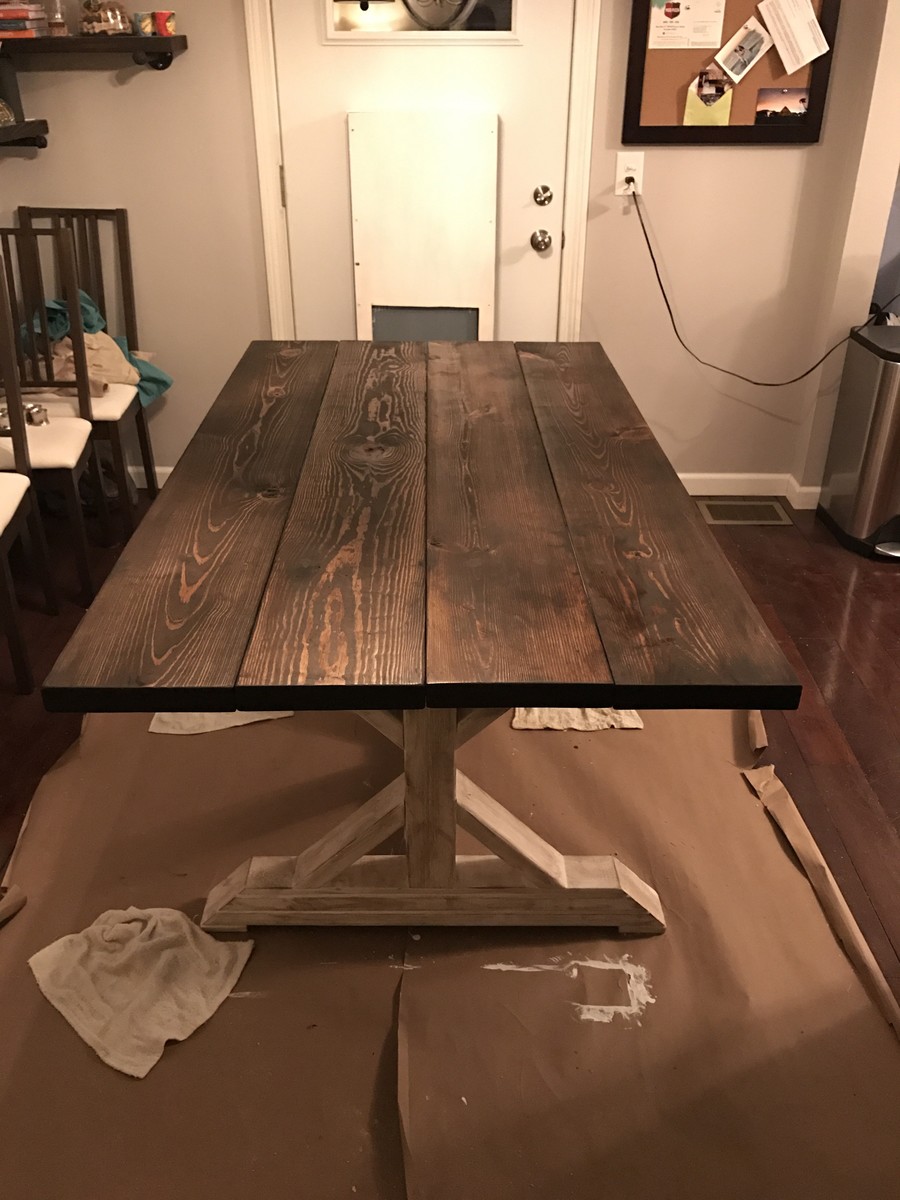
Built from Plan(s)
Estimated Cost
~ $70
Estimated Time Investment
Weekend Project (10-20 Hours)
Recommended Skill Level
Intermediate
Winter chairs
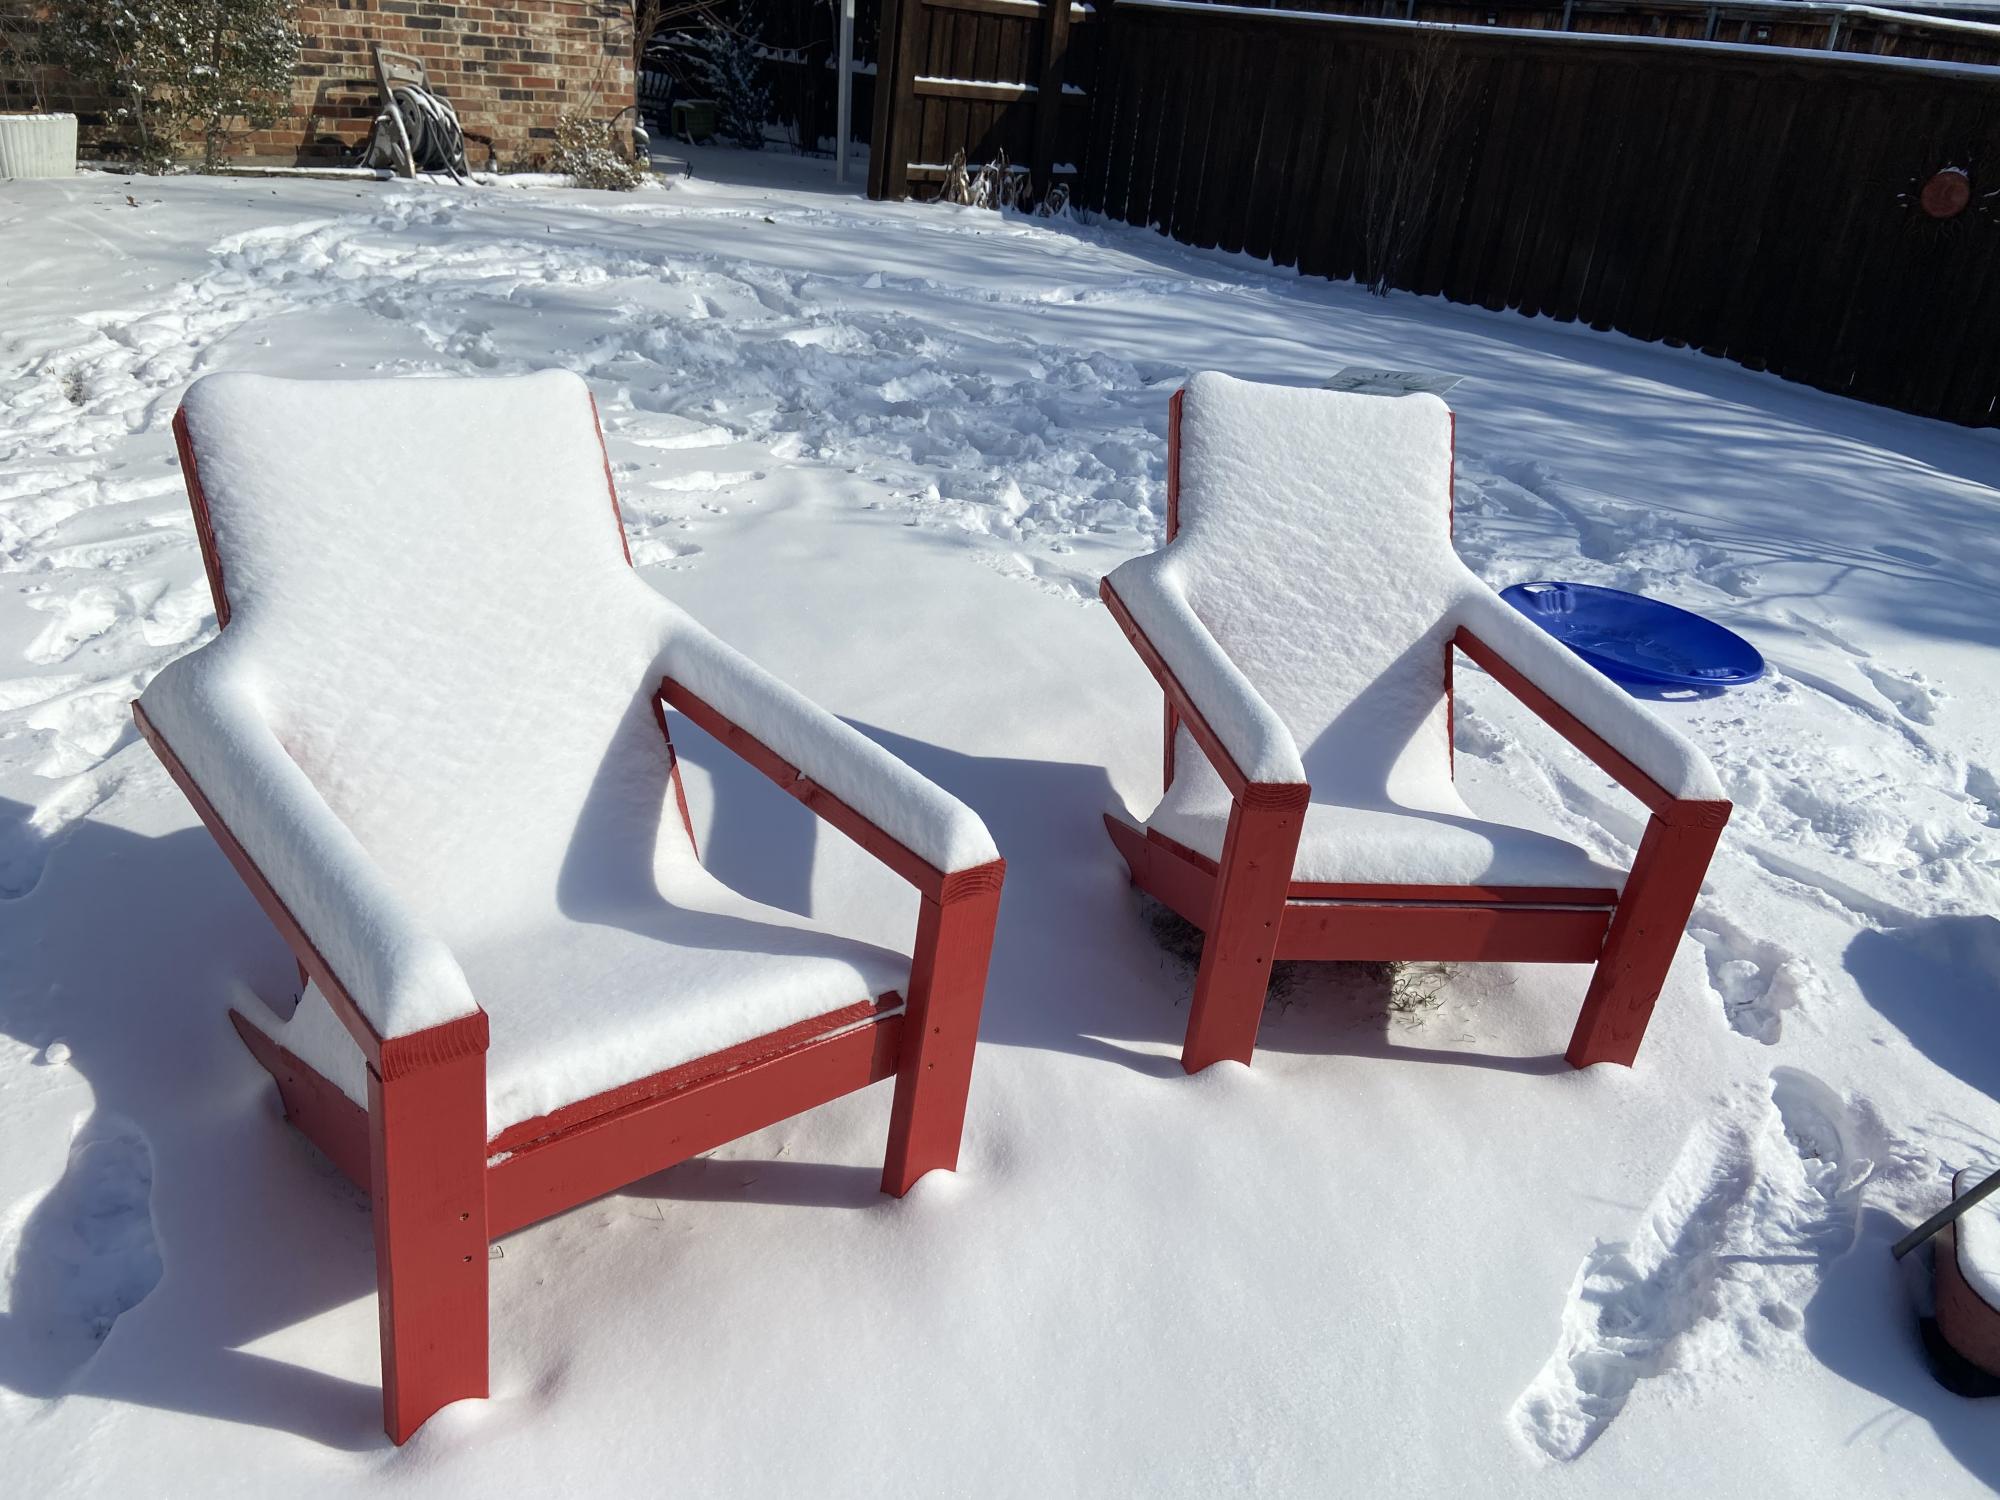
A nice blanket of snow on the Adirondack chairs in Texas
Comments
Fri, 03/05/2021 - 11:02
That's something you don't see everyday!
Looks refreshing, lol! Thanks for sharing, love the color choice!
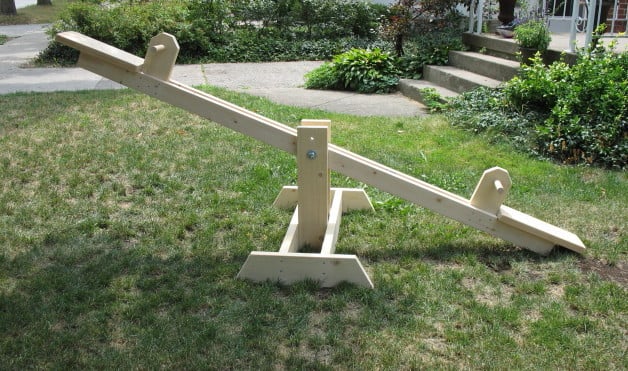
birthday see saw
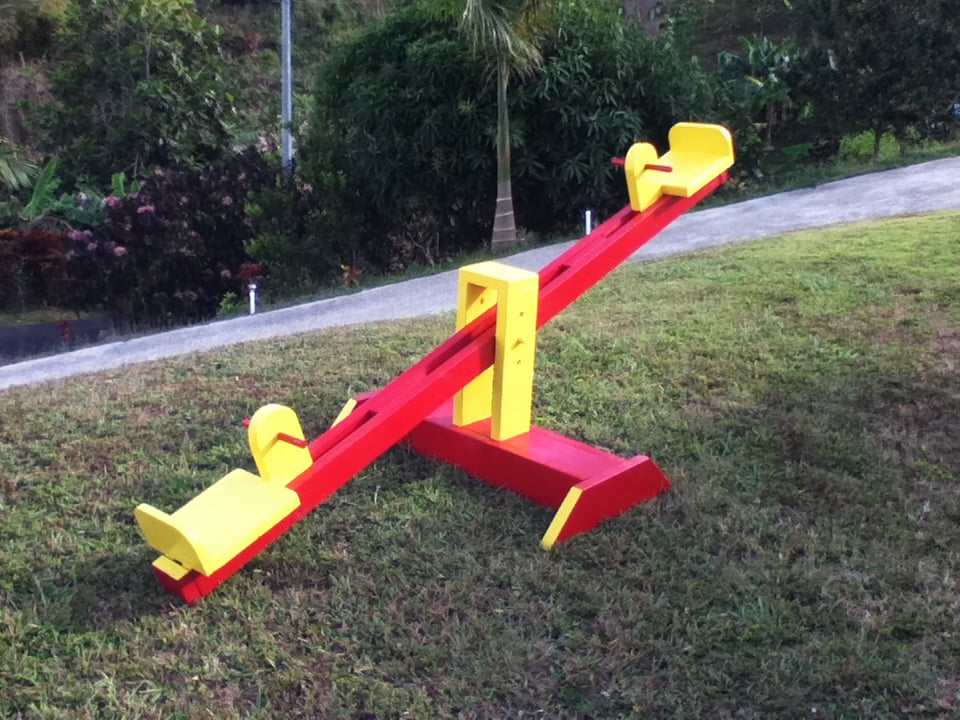
had lots of fun building this project for my grandauther, she's only a year and a half old and I'm pretty sure she will enjoy this see saw for a long time.
Built from Plan(s)
Estimated Time Investment
Day Project (6-9 Hours)
Finish Used
paint
Recommended Skill Level
Beginner
My Outdoor Sofa
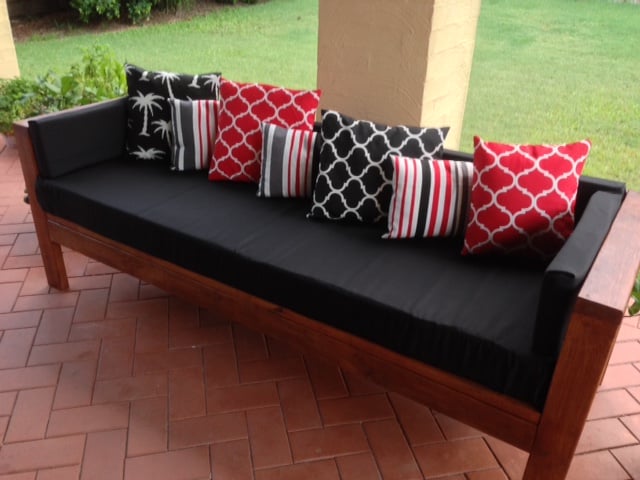
Hi Ana
I would like to share my experience making this Outdoor sofa (see attached link). http://ana-white.com/2014/07/plans/outdoor-sofa-2x4s-ryobi-nation
The sofa is supposed to be made using 2x4 boards, but these are not a standard size in Australia so I substituted with 90 x 45mm pine boards. No other changes to measurements were necessary. I followed Ana's instructions and definitely recommend using wide clamps to hold the base when screwing together. I only had short clamps so was rather difficult keeping everything firmly in place when drilling the screws in.
Next step was preparation for staining. I used Cabot's pine filler to fill major holes, knots etc, then sanded lightly paying extra attention to the arms.
I stained using Cabot Exterior Varnish Stain (teak colour). This turned out a beautiful warm colour that I just love.
Finally the cushions....
For the base I purchased a 5inch thick foam single mattress (on sale $61 so worked out to be really cheap foam). I measured to fit base and cut using an electric knife - worked a treat! I had enough left over to do a cushion along the back plus two small side cushions to go along the arms.
Next step was covering the base and side cushions. I purchased some outdoor Decorating fabric from spotlight as sofa will be exposed to some QLD weather. For the base, I used a similar process to the Censational Girl box cushion cover using Velcro instead of zips.
http://www.centsationalgirl.com/2012/10/simple-sew-box-cushion-cover/
For the side and back cushion I made up 3 sides of the cover, then inserted foam and sewed the last end closed (cheating I know but just too awkward to do proper box ends).
Lastly, the throw cushions.....these were really easy I made envelope cushions from a single piece of fabric....once again no zips (hoorah!). They only took 10minutes each to make and look great. See tutorial below.
http://thehappyhousie.com/simple-speedy-stuffed-sewing-tutorial-diy-envelope-pillows/
My first build so extremely happy with the result!
Estimated Cost
$100 for wood, $25 for stain
Estimated Time Investment
Weekend Project (10-20 Hours)
Finish Used
Cabot Exterior Varnish Stain (teak colour
Recommended Skill Level
Beginner
Comments

Fri, 01/09/2015 - 17:12
Beautiful! I love that color
Beautiful! I love that color scheme and was going to ask where you bought the fabric, but it's probably not available here in the US.
Fri, 01/16/2015 - 03:08
Thanks Pam, the fabric is a
Thanks Pam, the fabric is a water and fade resistant polyester and was very easy to ses as it is not heavy like a canvas. I bought it from Spotlight here in Australia so may not be available in US. There doesn't seem to be a lot to choose from here in Australia (at least doe inexpensive fabrics) in comparison to US on-line stores such as Fabric.com.
Tue, 03/17/2015 - 04:28
Plan query
well done your project Jennyec -looks great and I'm going to attempt for my 2nd project.... I'm just a bit confused about the total timber needed for this project as my reading of the plans is 11 - 2x4x10' - did you use 11 pieces of 90x45mmx2.4m? Thanks heaps
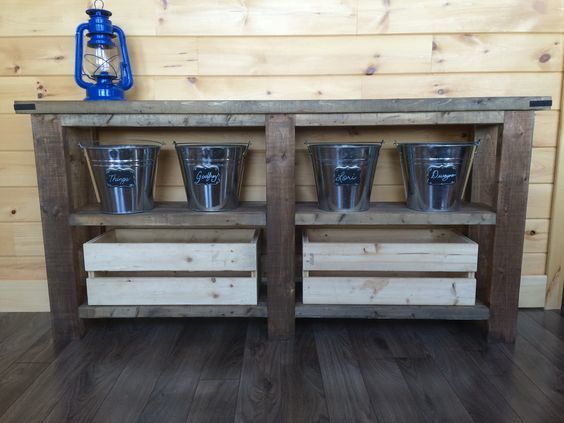
Easiest Industrial Cart
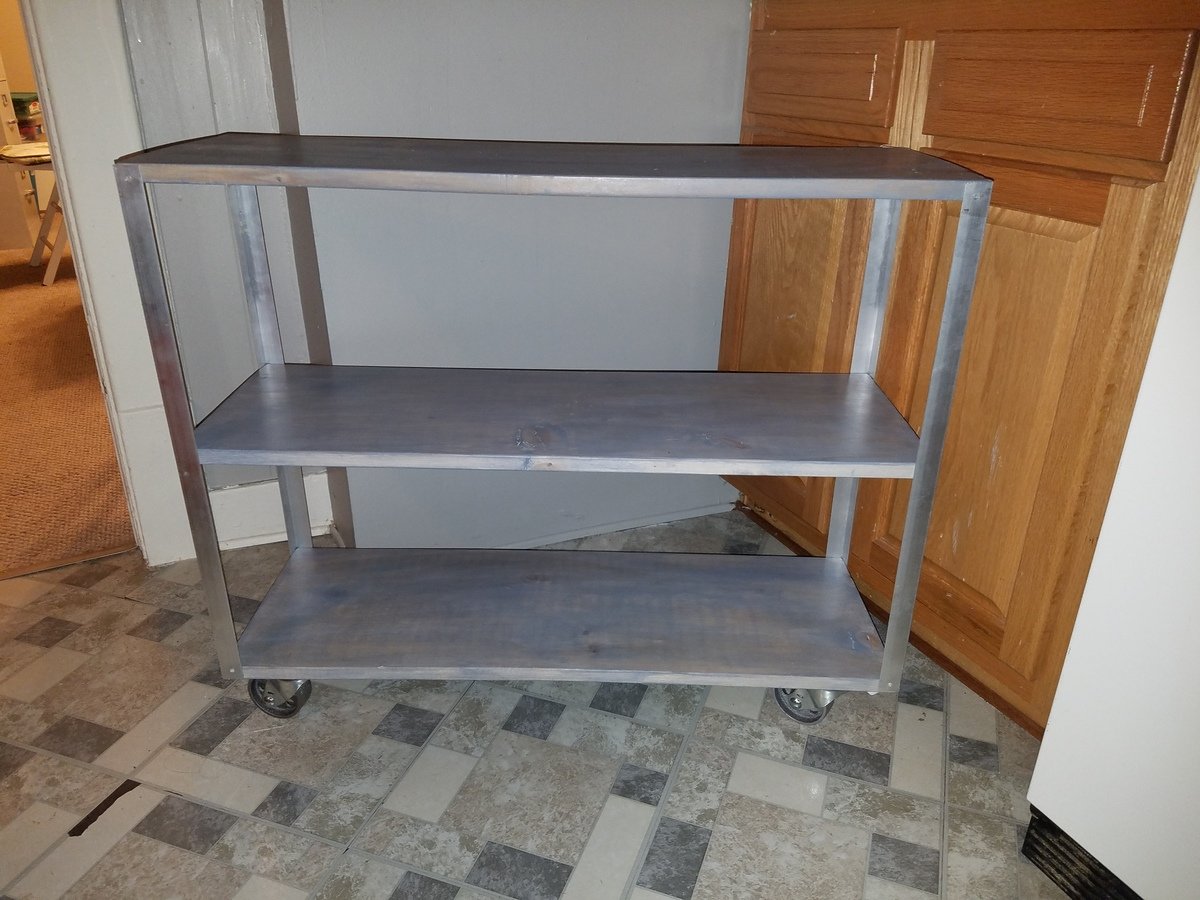
Thank you for the project idea! We used your Easiest Industrial Cart plans. Since this is our first project building anything ever; so please excuse any "mistakes" you may notice. We tried going with a blue stain instead of just brown, but we ended up giving the wood more character by staining over with my husband's "Warhammer Paints"...lol...
Built from Plan(s)
Estimated Time Investment
Weekend Project (10-20 Hours)
Finish Used
Behr "Gettysburg Blue" stain and sealer. Then went over it with dark "Warhammer Paints" stain.
Recommended Skill Level
Starter Project
Chicken coop
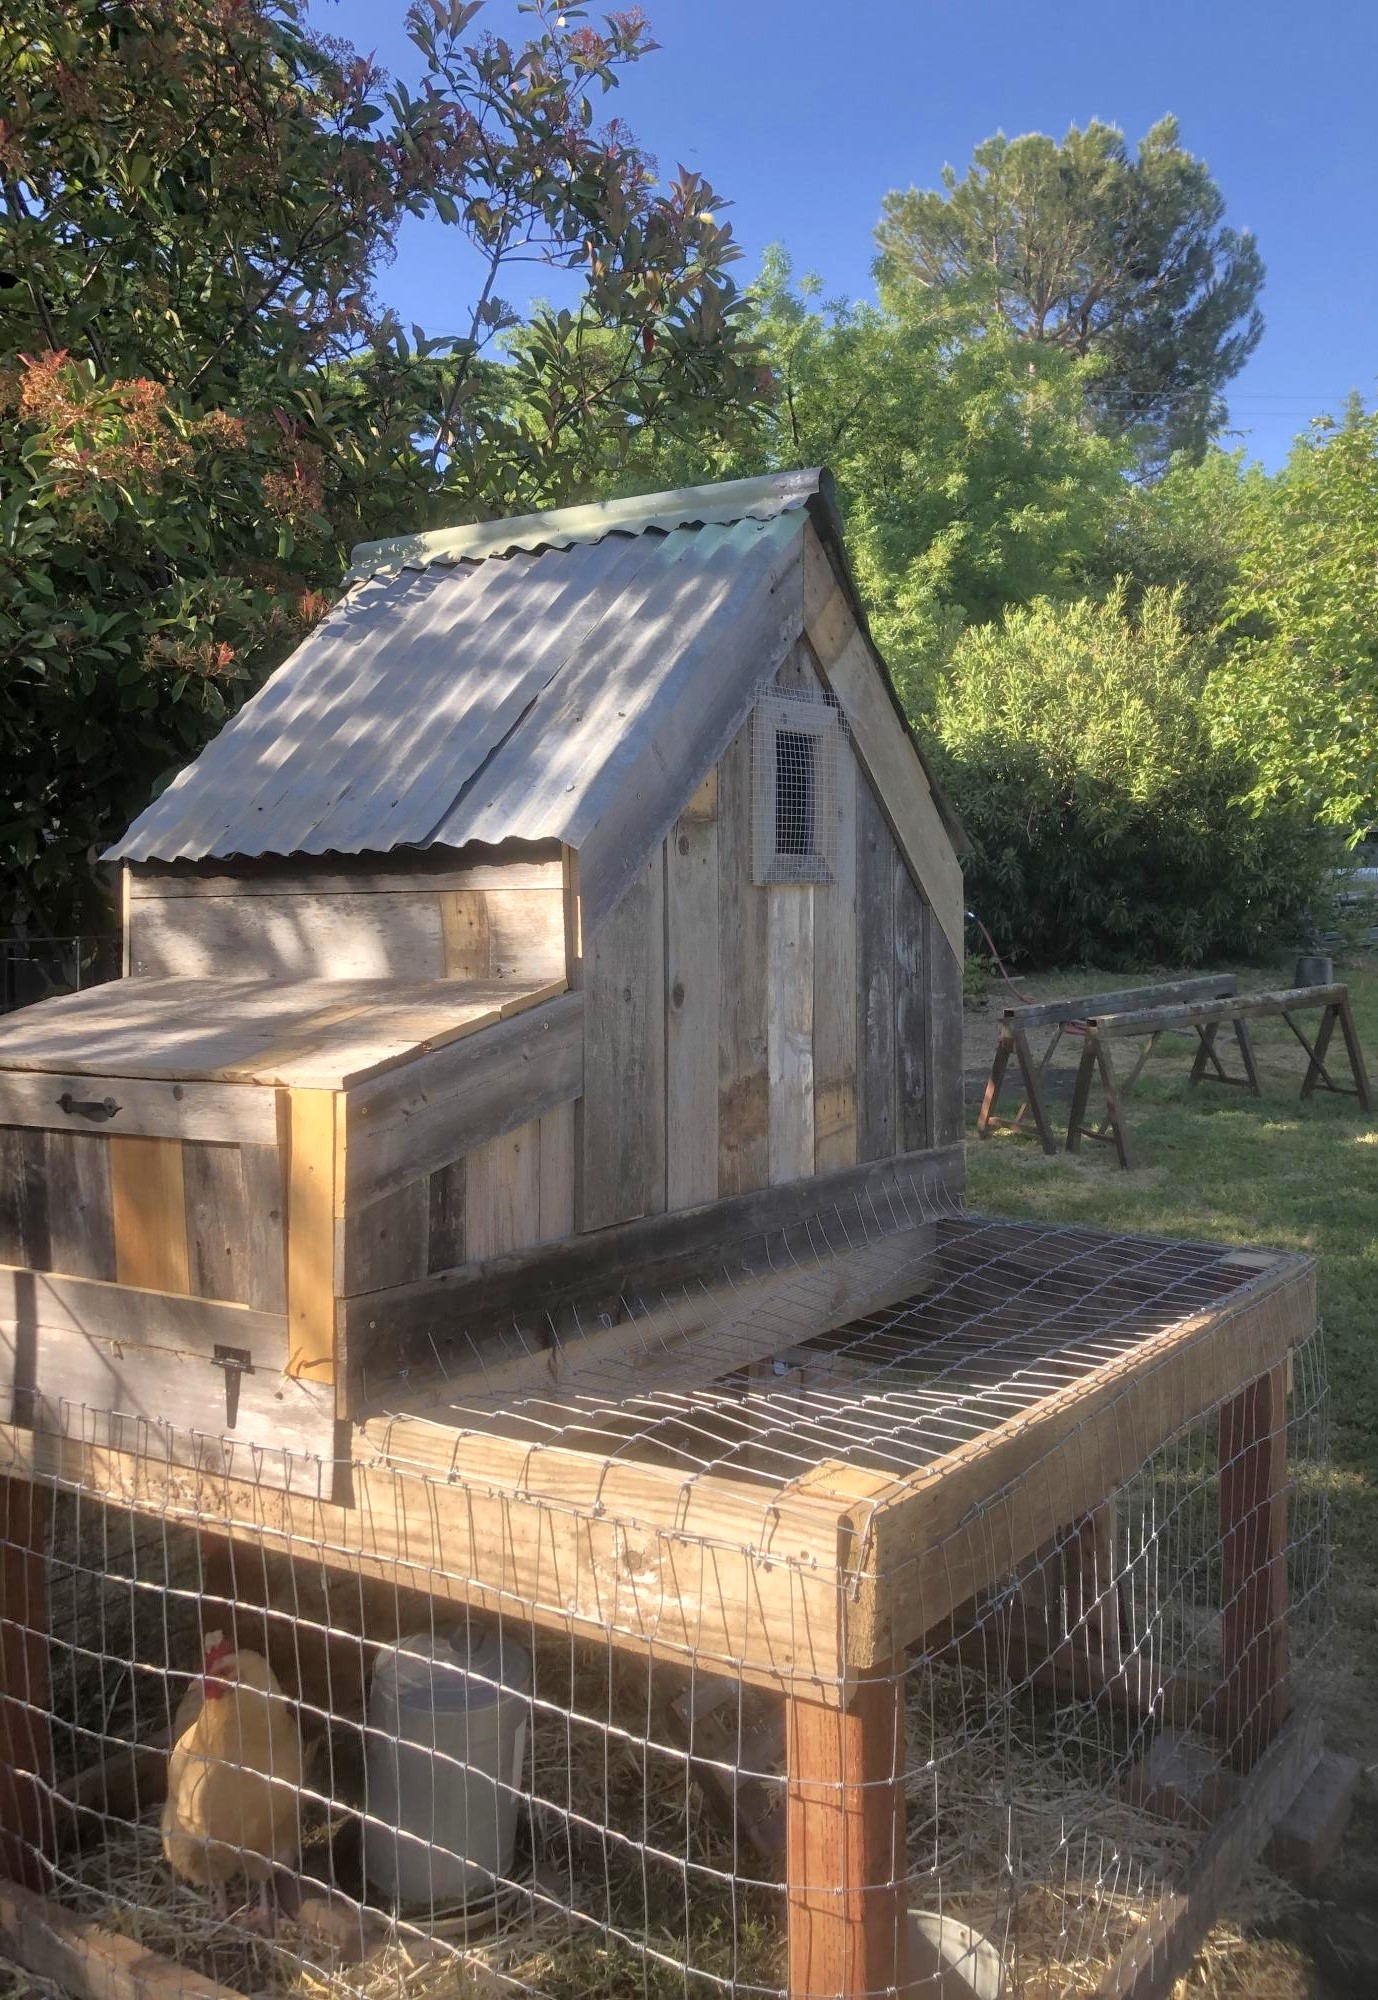
This is a coop I built from plans on the site. I modified by covering the ply with old cedar boards and used tin for a more rustic look. I opted not to add the planter just covered it with wire.
Love your plans! So easy to follow!
Built from Plan(s)
Estimated Cost
Since I used recycled materials the overall cost was about $50
Estimated Time Investment
Weekend Project (10-20 Hours)
Finish Used
I just did the outside like a jigsaw puzzle. Cutting to fit as I went. Be sure to use nails or staples that do not protrude the inside when attaching siding.
Recommended Skill Level
Intermediate
Fairies Do Ride Teeter-Totters
This was a very quick project. Only took 5.5 hours from start to finish, including dragging out and putting all the tools away afterwards!
I left the teeter-totter unfinished, not sure how it will make it through the winter. I may decide to paint it this summer.
I used a length of copper pipe for the bolt to ride through, along with some washers between all the pivot points. This should help keep the boards from wearing away over time.
This has been the BEST outdoor toy around! It gets used EVERY day in the nice weather.
Thanks Ana for the great plans!
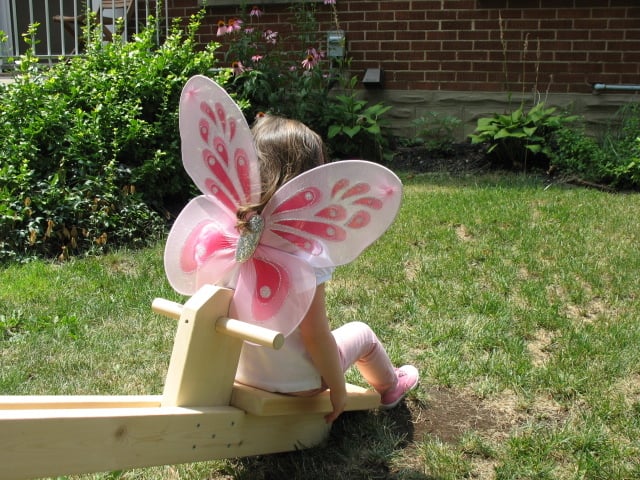
Built from Plan(s)
Estimated Cost
Total of $20.52 without screws ($14.20 for wood, $6.32 for washers, bolt, and nut)
Estimated Time Investment
Afternoon Project (3-6 Hours)
Recommended Skill Level
Beginner
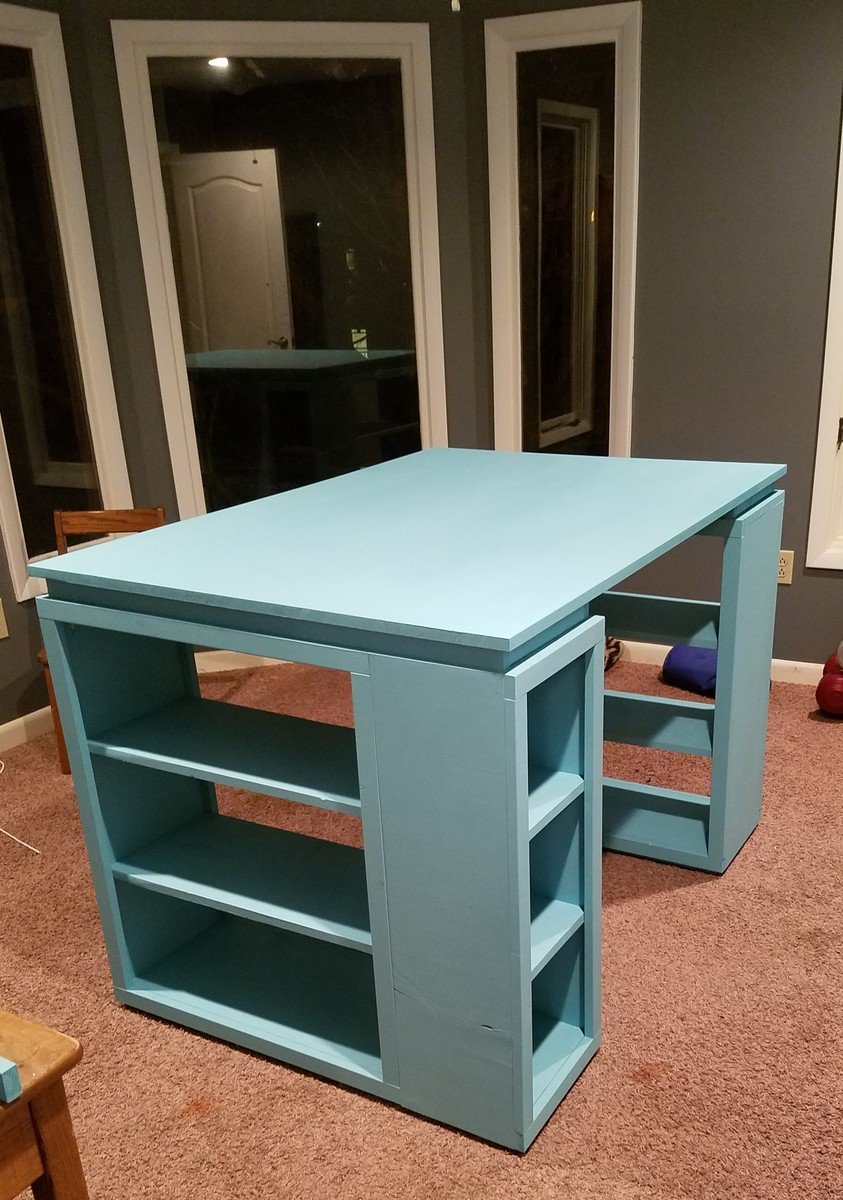
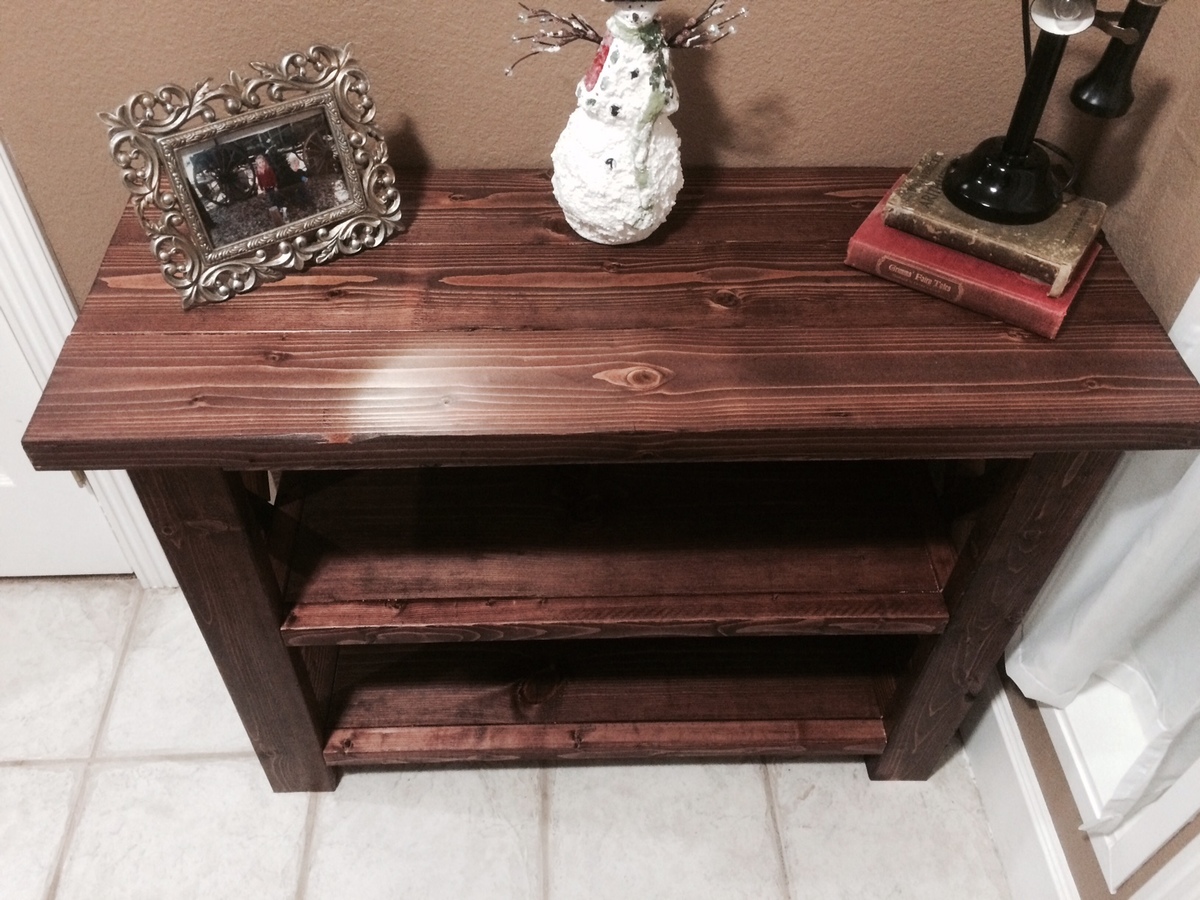
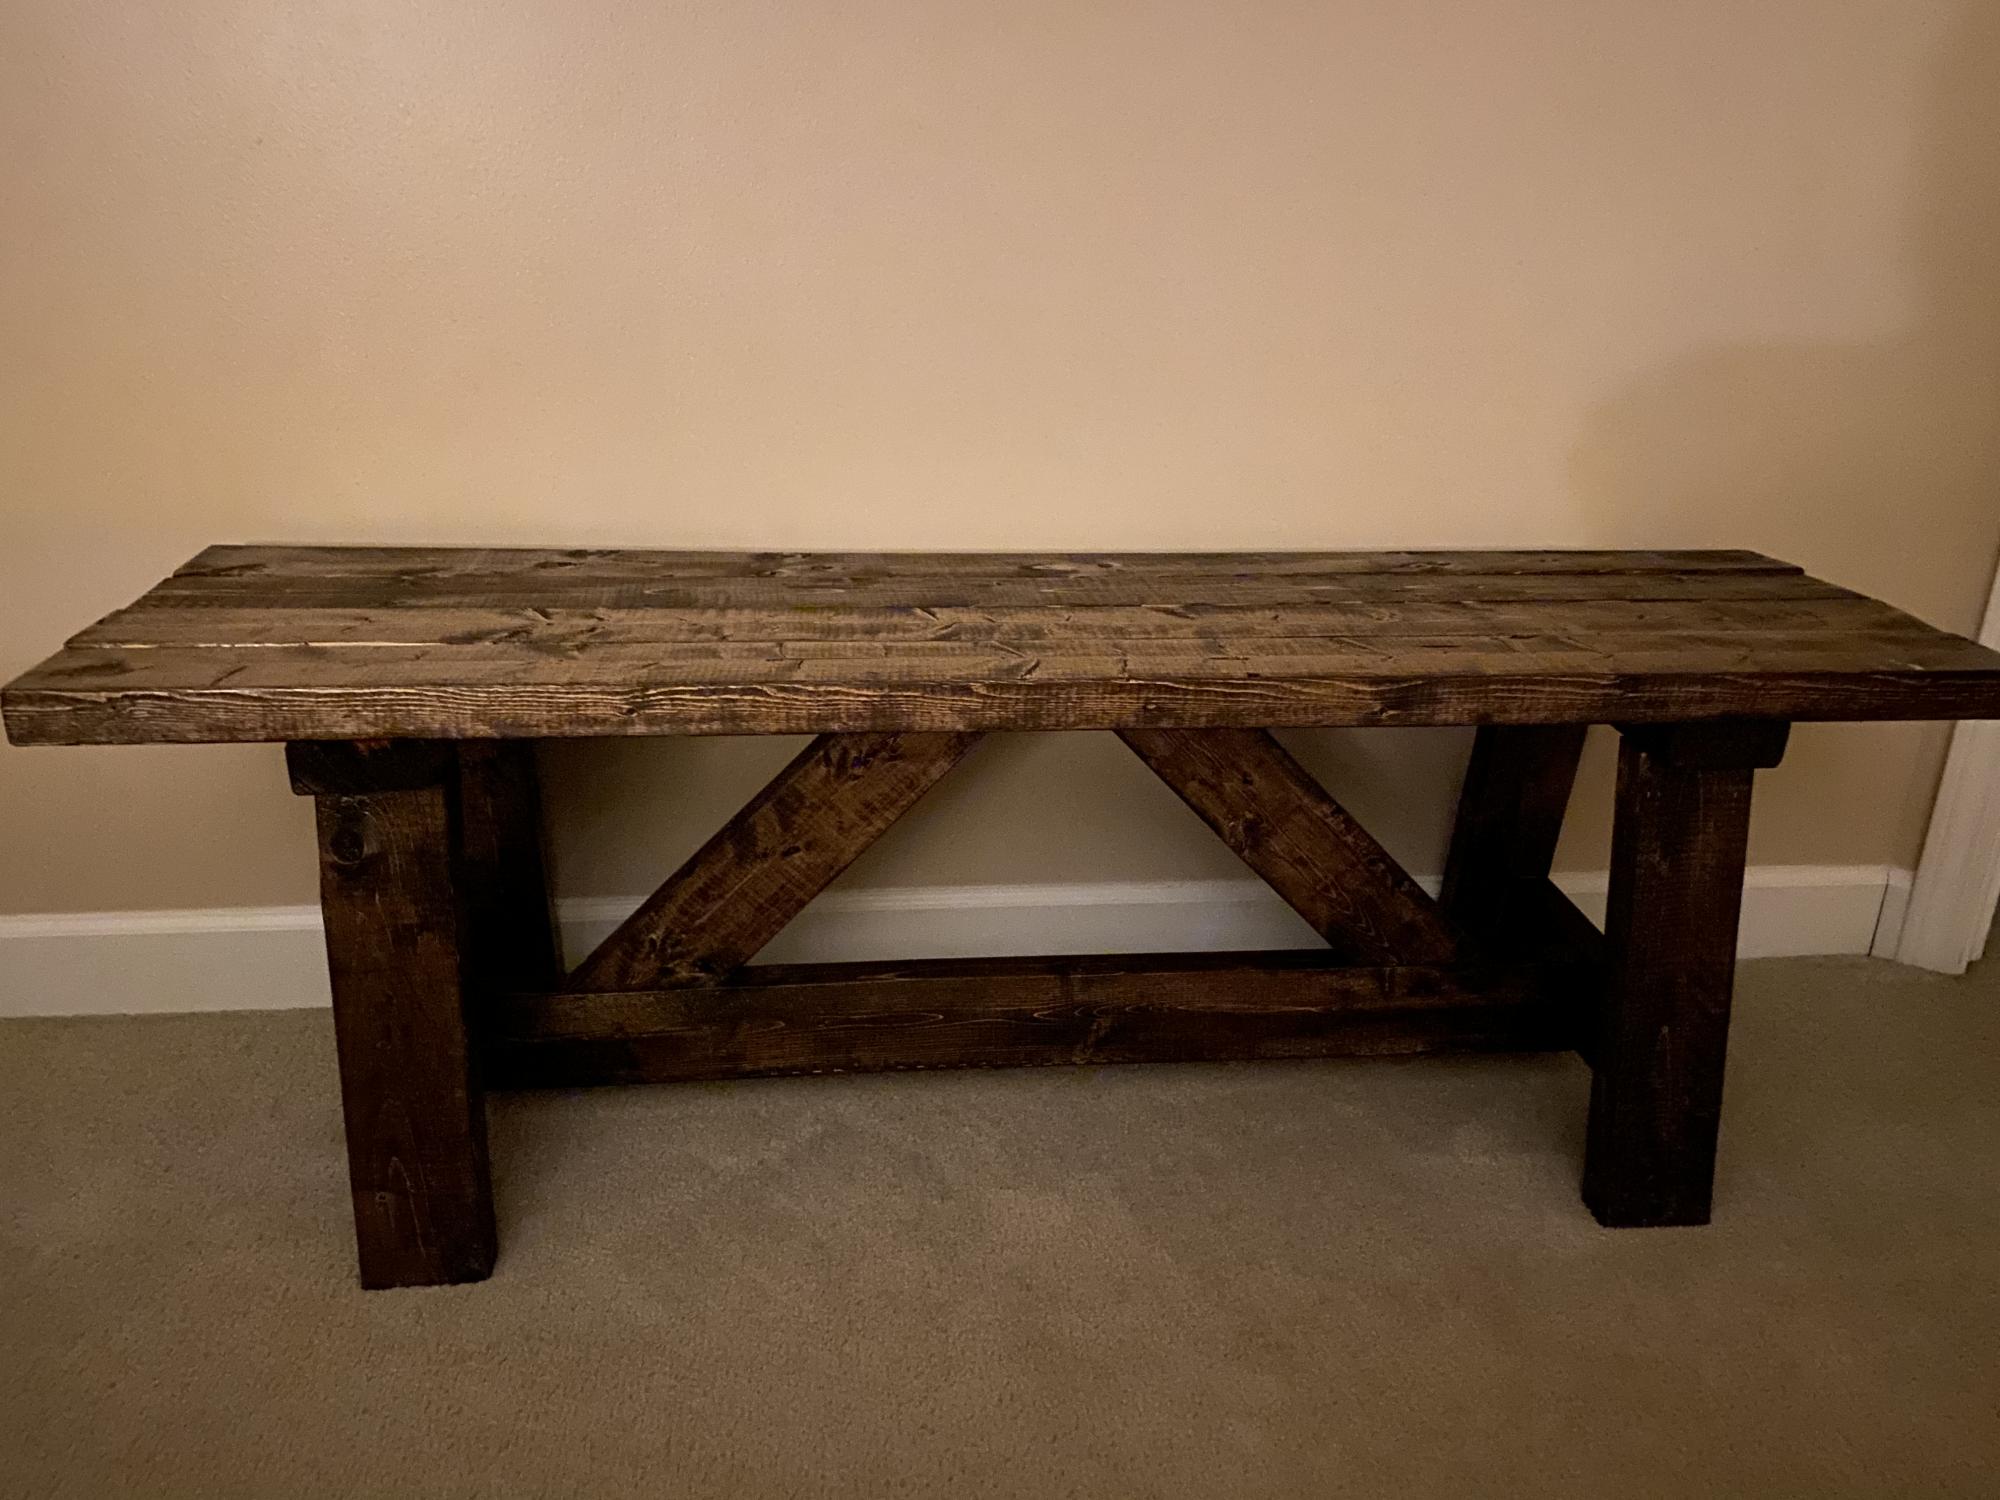
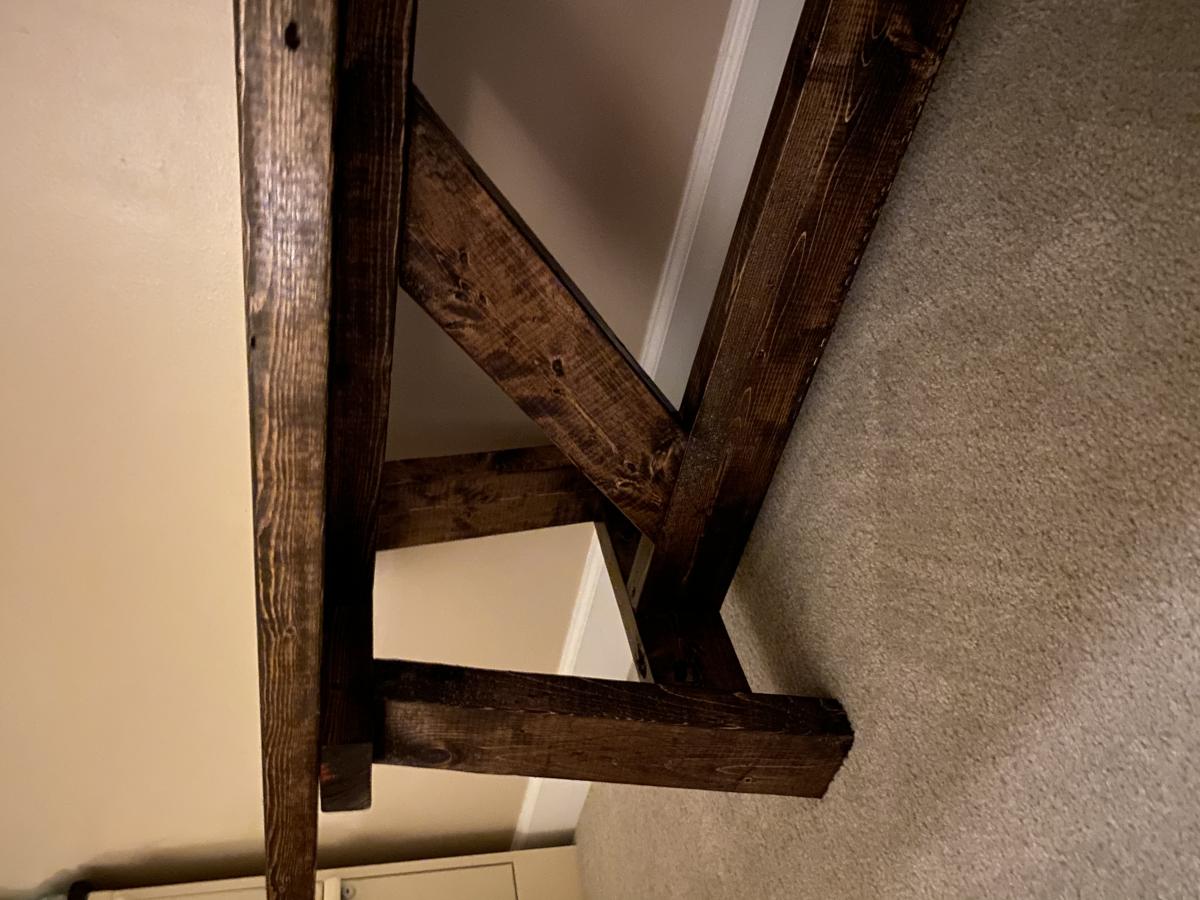
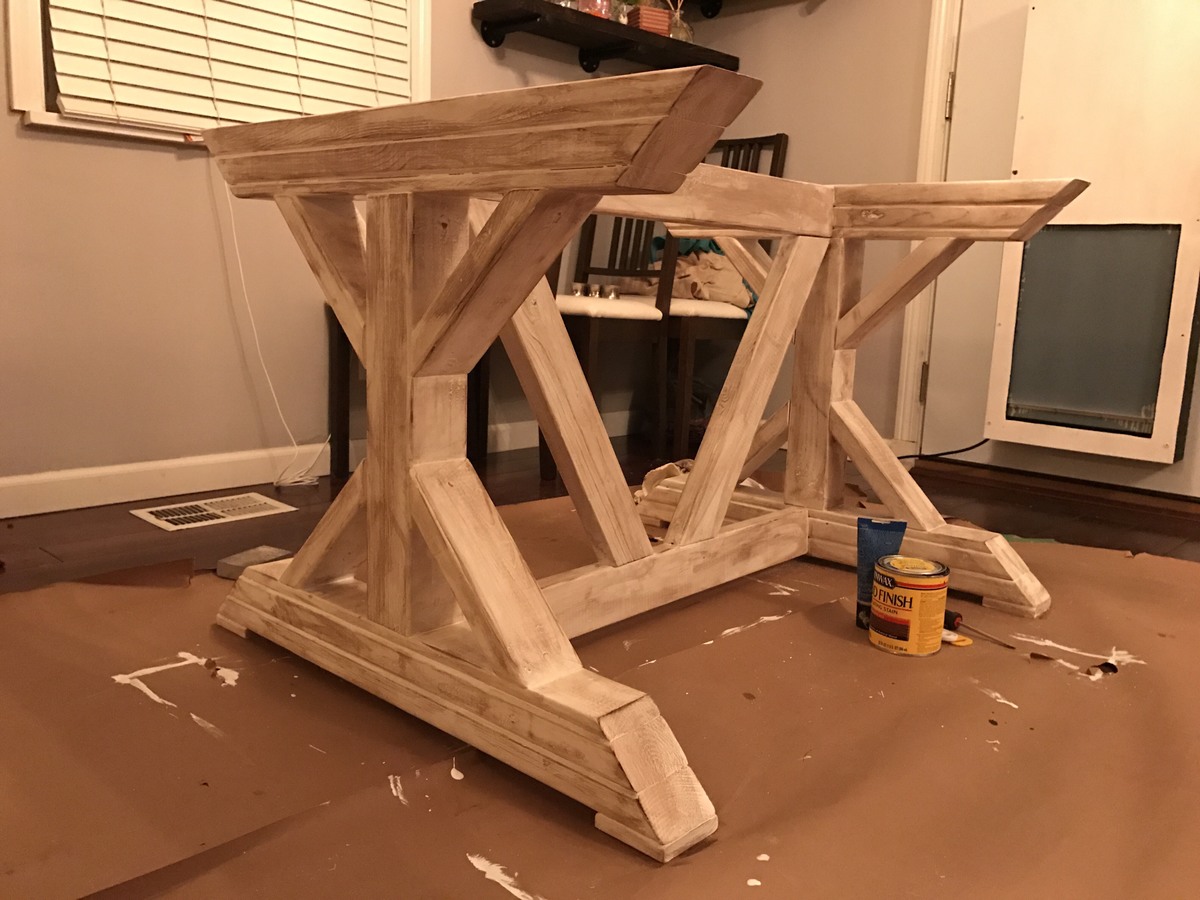
Adjusted for less projection
I adjusted the projection of the table by using just 2 2X6's and adjusting the shelves accordingly. Planning on making the coffee table very soon. I used tea then vinegar/steel wool to stain. The top is waxed to make dusting easier. I then screwed on 2 right angle mending brackets for looks.
Estimated Cost
$50
Estimated Time Investment
Day Project (6-9 Hours)
Recommended Skill Level
Beginner
Playroom Desk
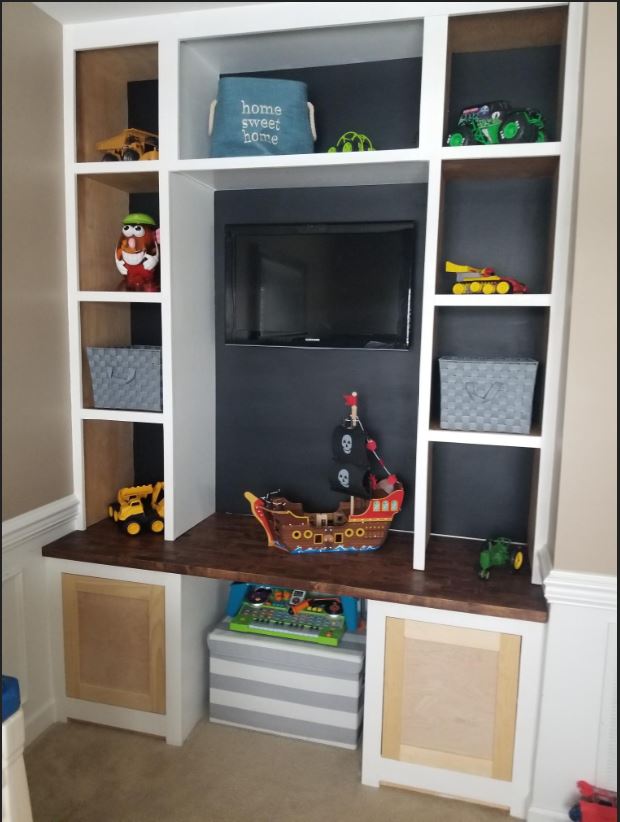
My son is growing up to be a big boy and wanted a fancy new office like I have at home so now he has a big boy desk and some storage for him as he gets older! Used some inspiration from a few other plans from AnaWhite and have started branching out a bit! The latest does not show the finished painted cabinet doors and handles but overall it looks great, and is ALREADY filled with toys!!
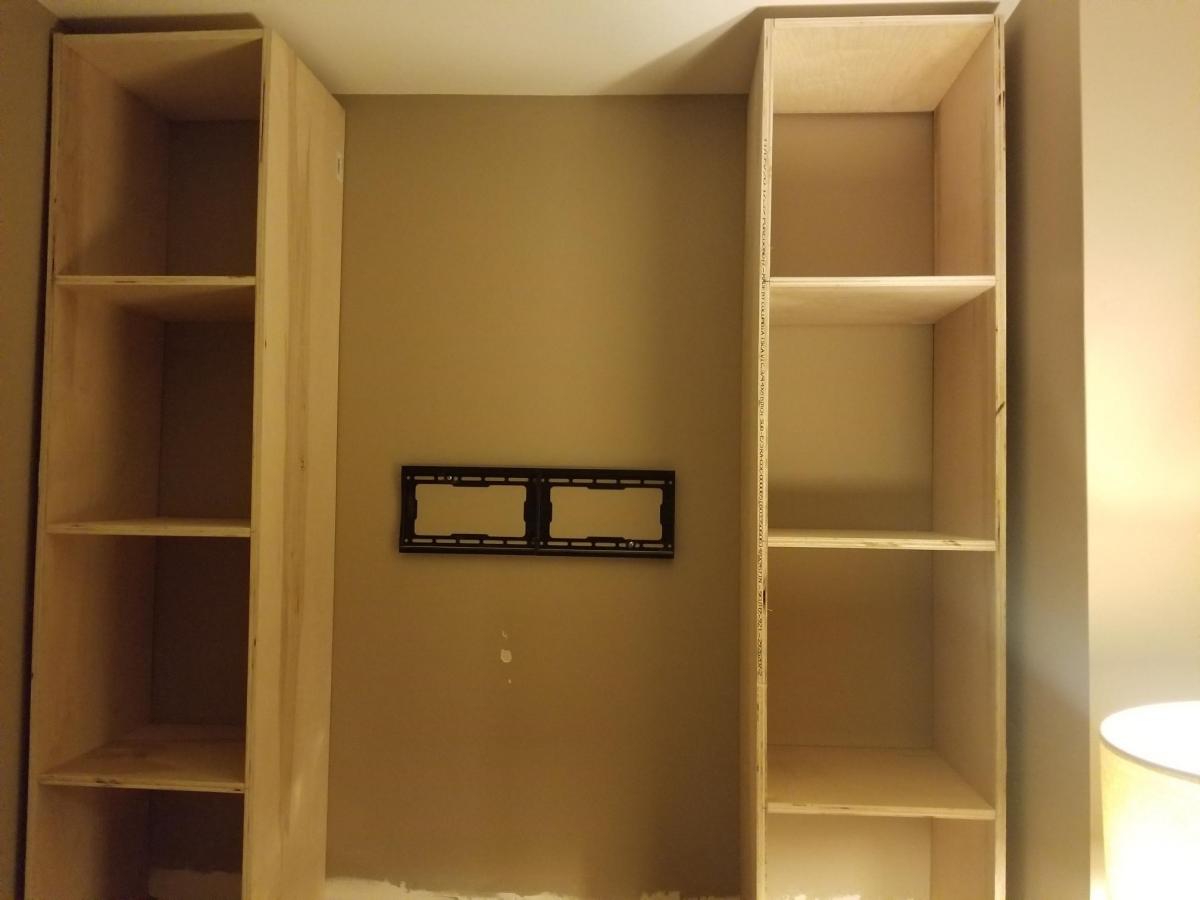
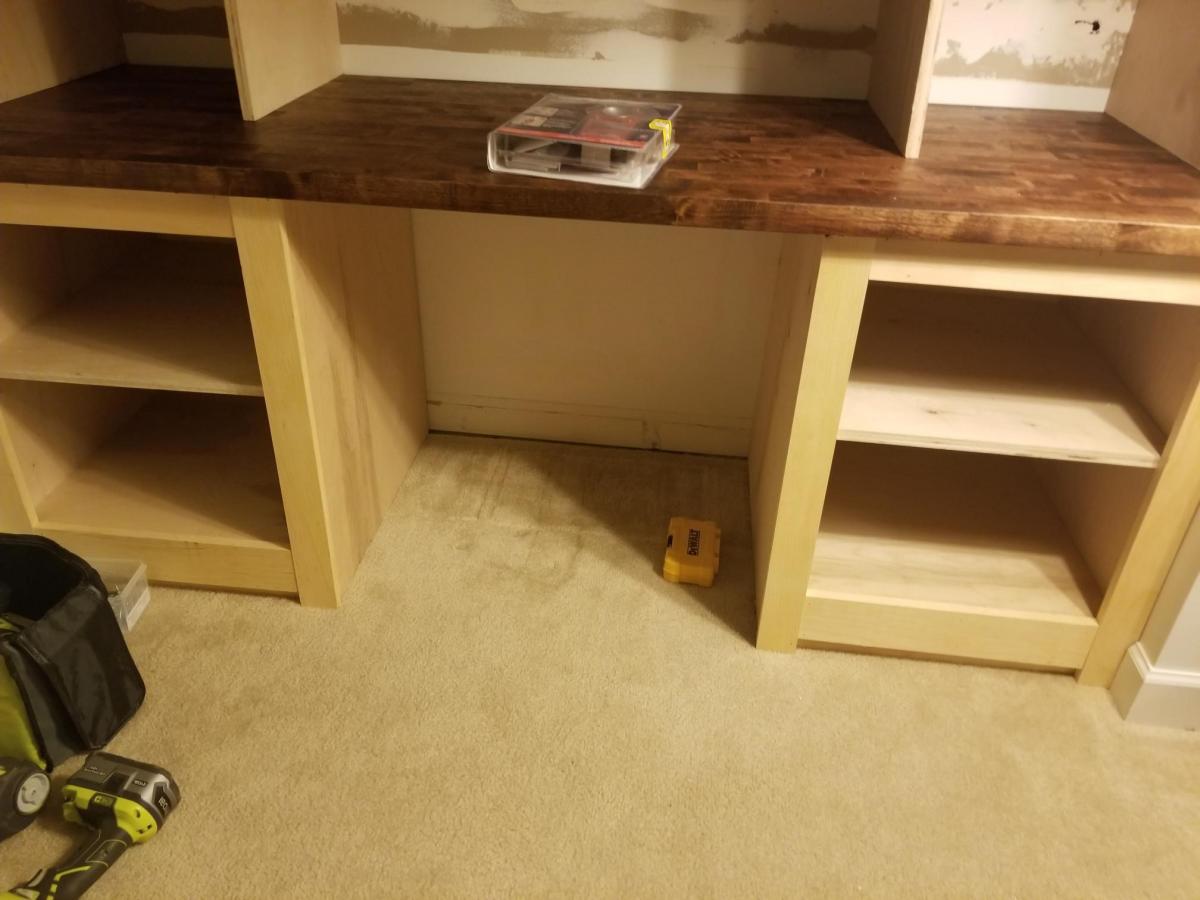
Built from Plan(s)
Estimated Cost
$700
Estimated Time Investment
Weekend Project (10-20 Hours)
Recommended Skill Level
Intermediate
Comments
Wed, 03/17/2021 - 05:41
Thank you! Your website has…
Thank you! Your website has given me a lot of great ideas and tutorials that i've used to learn some of this stuff!