Community Brag Posts
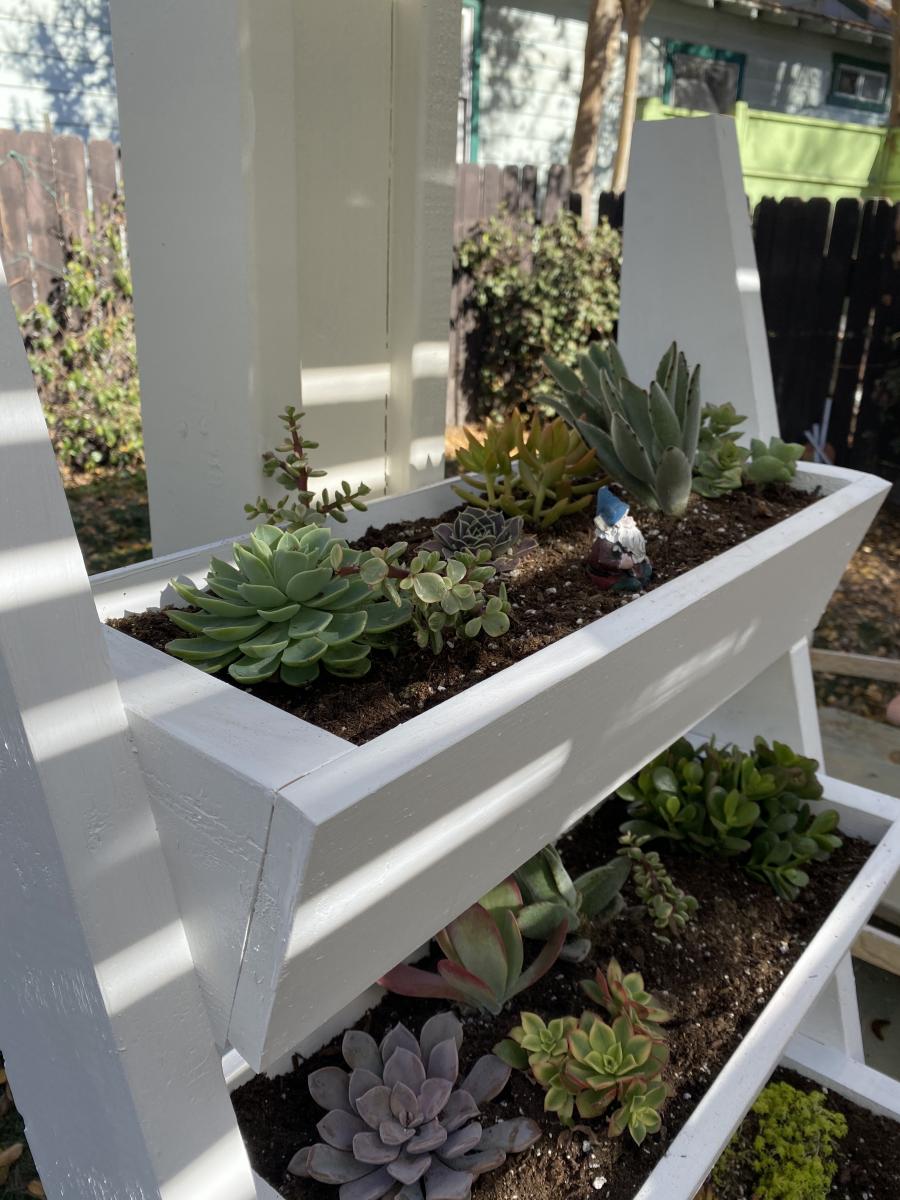
Vertical Planter w/ Succulents + White Opaque Stain
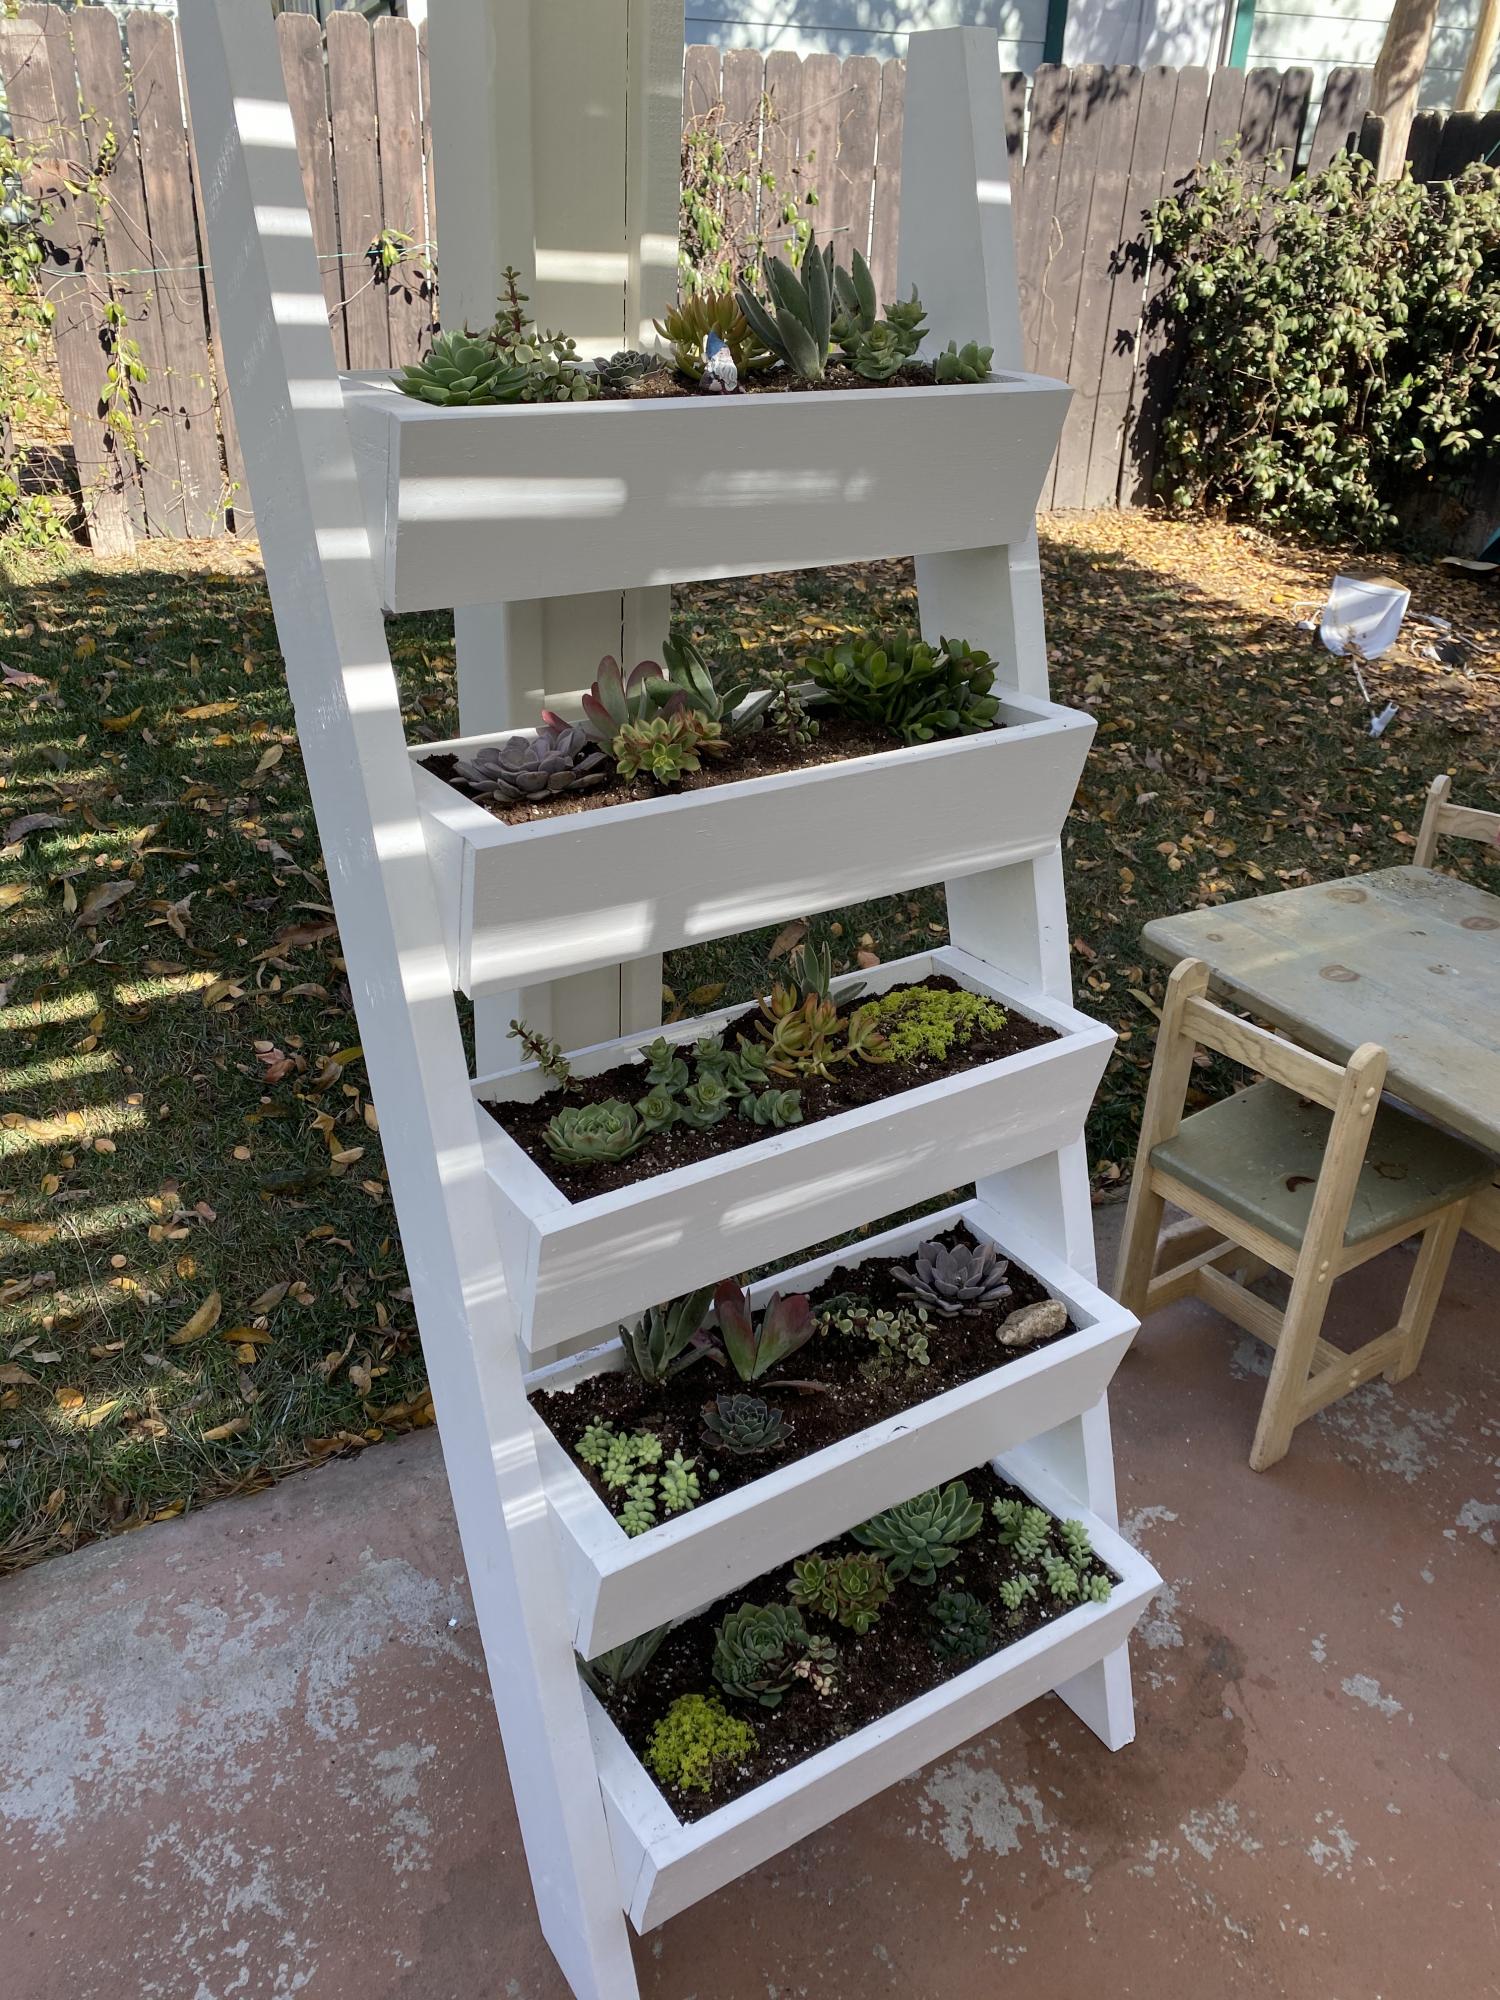
Made this over a few afternoons during the interesting year that is/was 2020! First DIY project and really enjoyed it! I used an opaque white stain and it's filled with succulents from our local nursery (Lincoln Nursery in Pasadena, CA). Painting took the longest as one coat of the stain still let some of the knots in the wood show through. Thanks so much for the plan and inspiration!
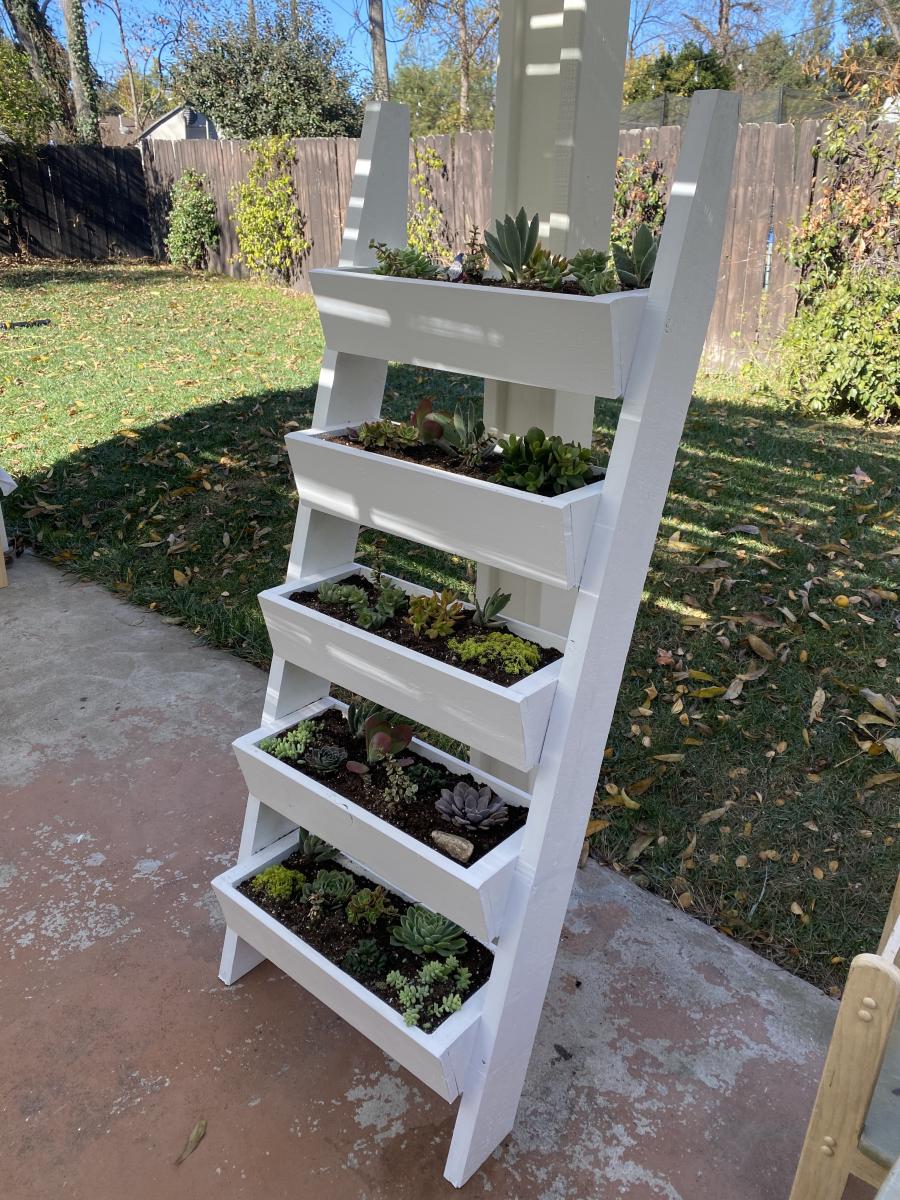
Built from Plan(s)
Estimated Time Investment
Day Project (6-9 Hours)
Finish Used
Opaque white Behr outdoor stain
Recommended Skill Level
Beginner
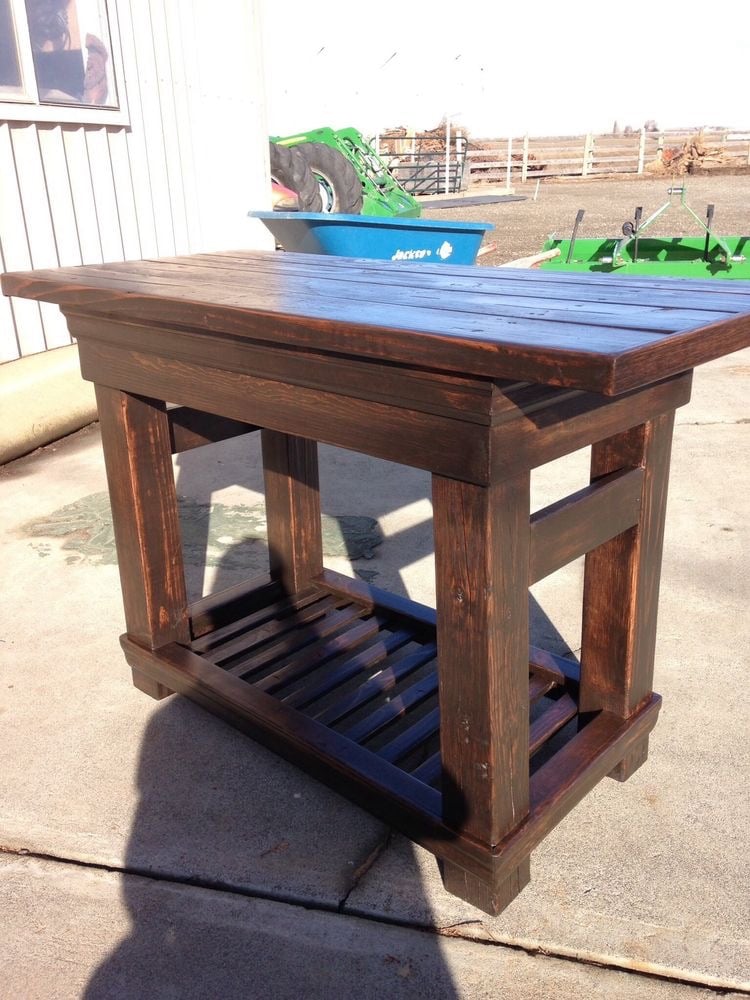
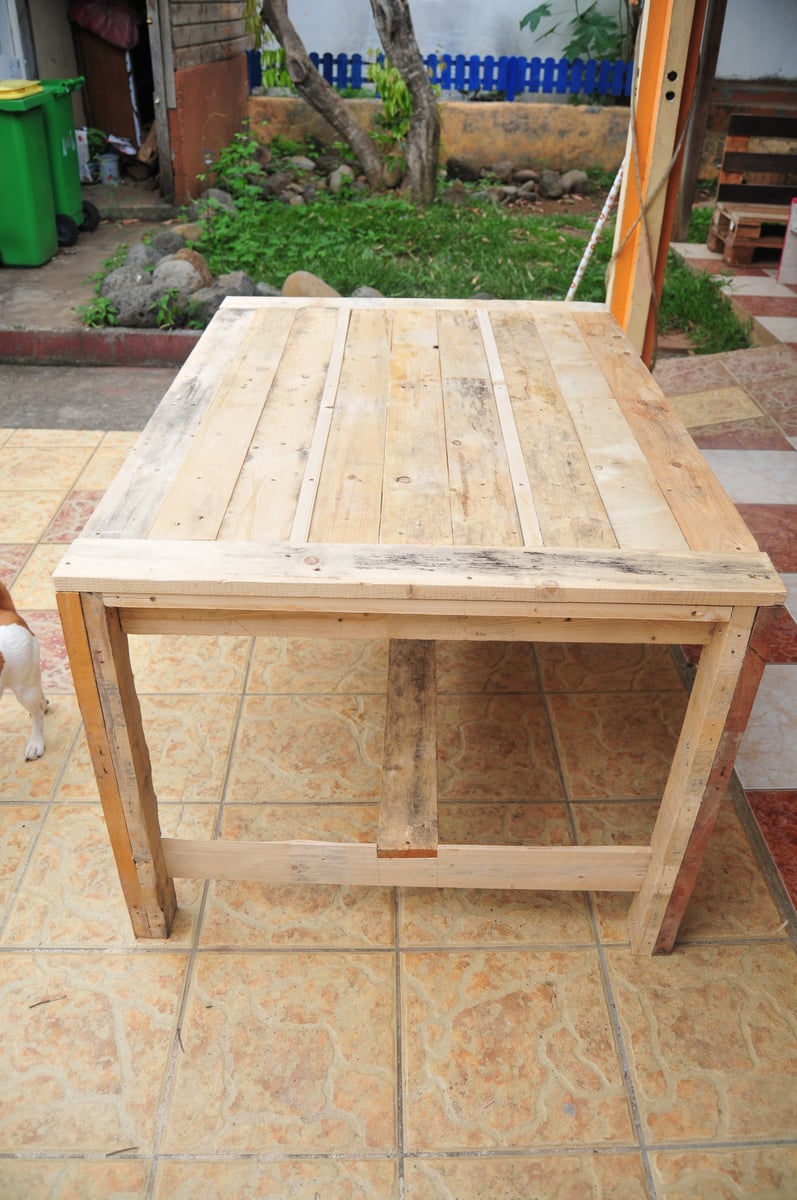
Farmhouse Table (wooden pallets)
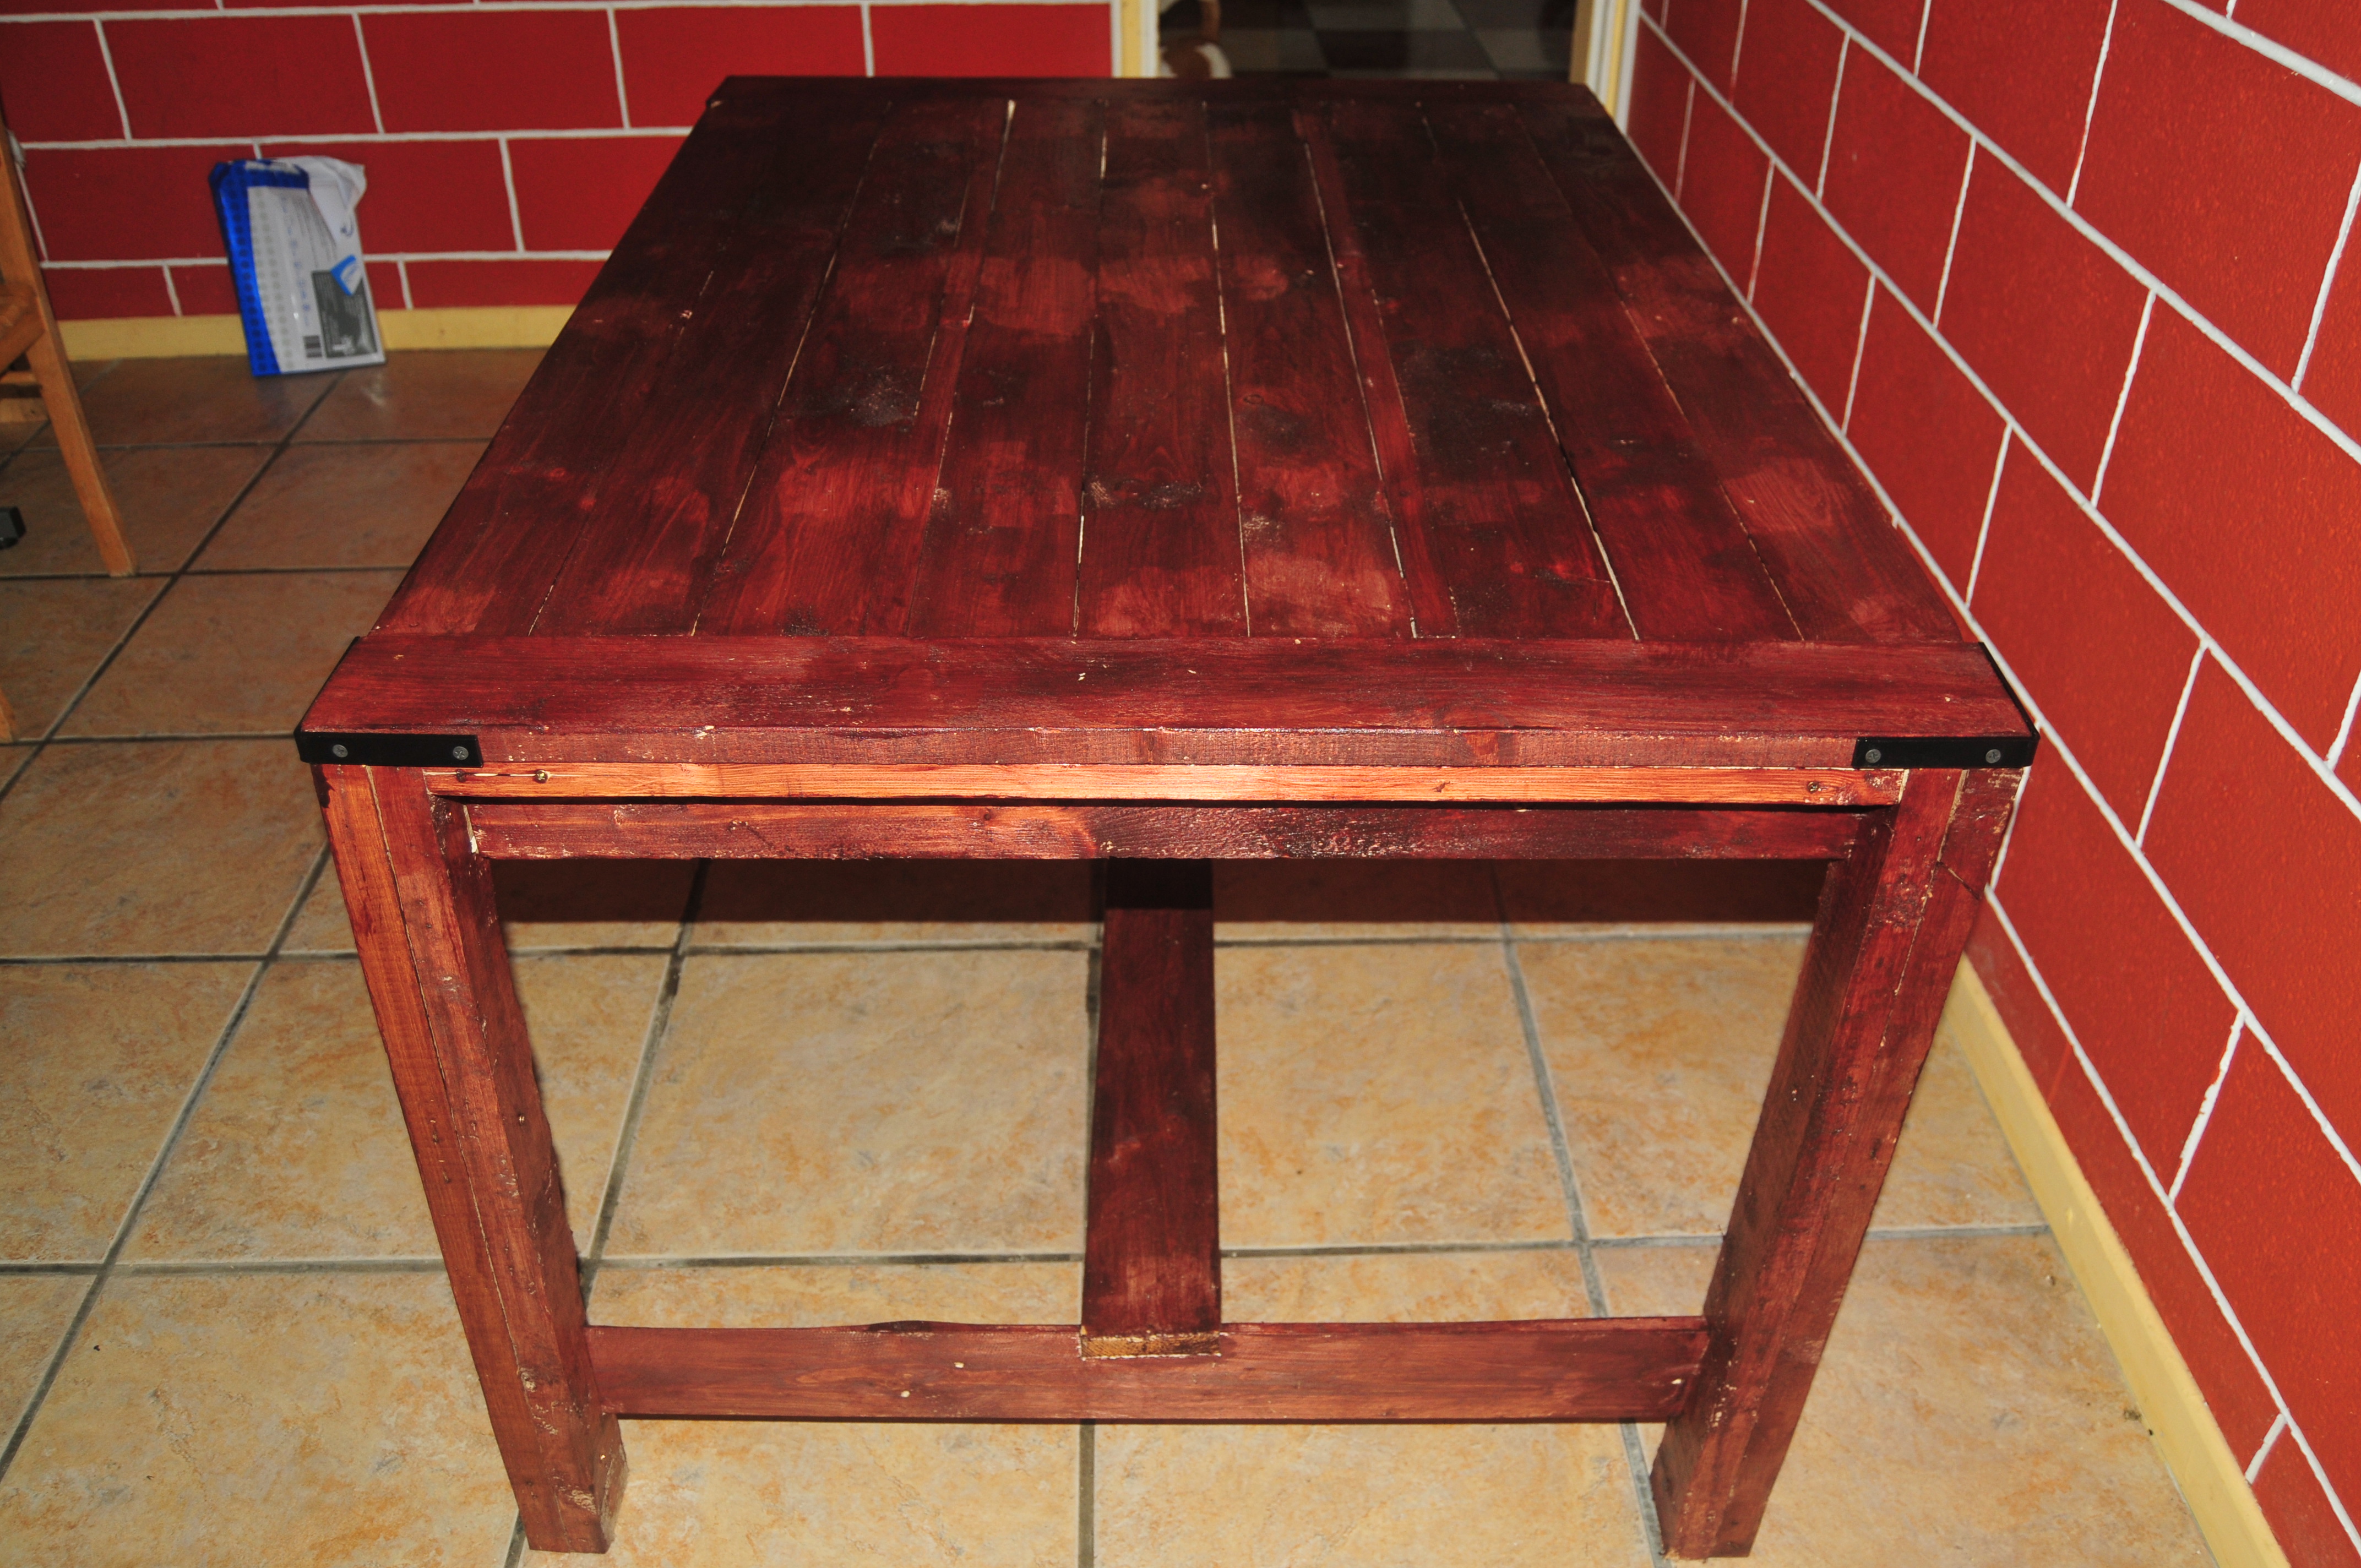
Hello, I'm doing furniture with wooden pallets and I found your awesome website with nice explanations and plans so I decided to make this nice farmhouse table but with wood from shipment wooden pallets.
Thank you very much for all your work and plans !
I will make other furnitures from your plans with wooden pallets :D and post the brags here soon.

Built from Plan(s)
Estimated Time Investment
Afternoon Project (3-6 Hours)
Finish Used
mahogany wax
Recommended Skill Level
Beginner
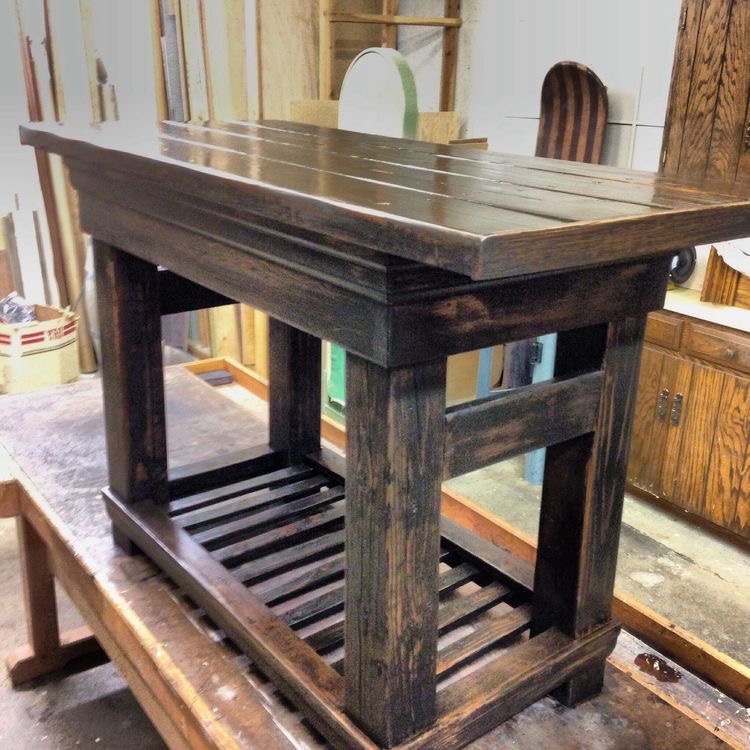
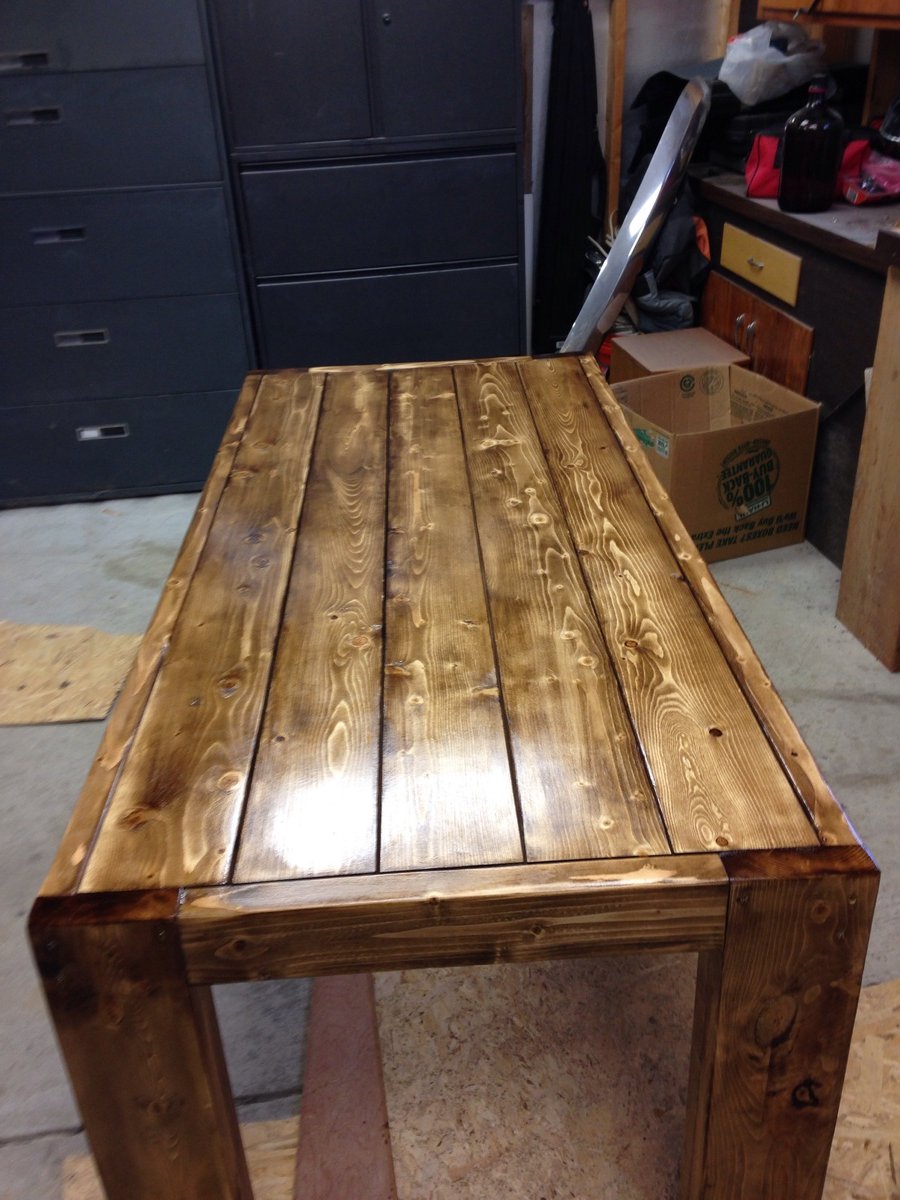
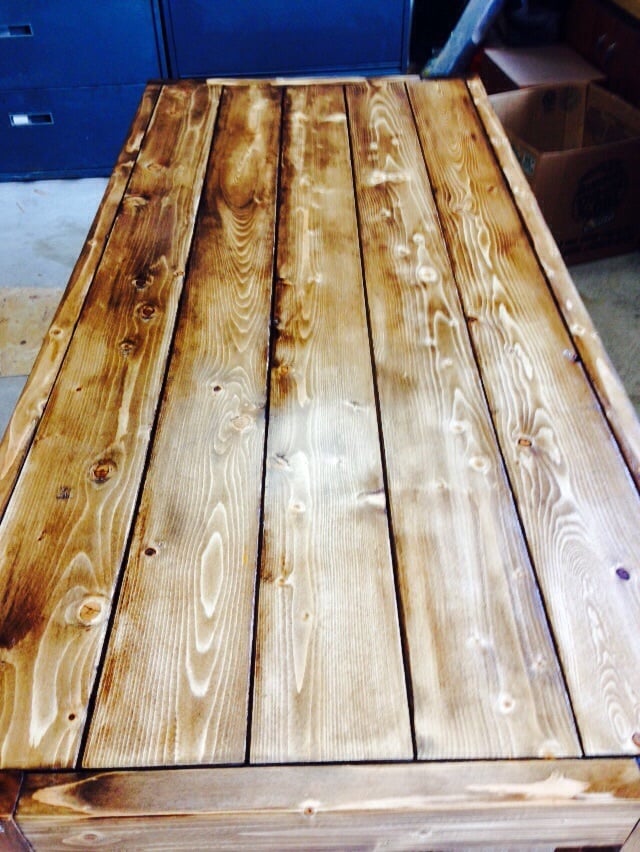
Modern Farm Table
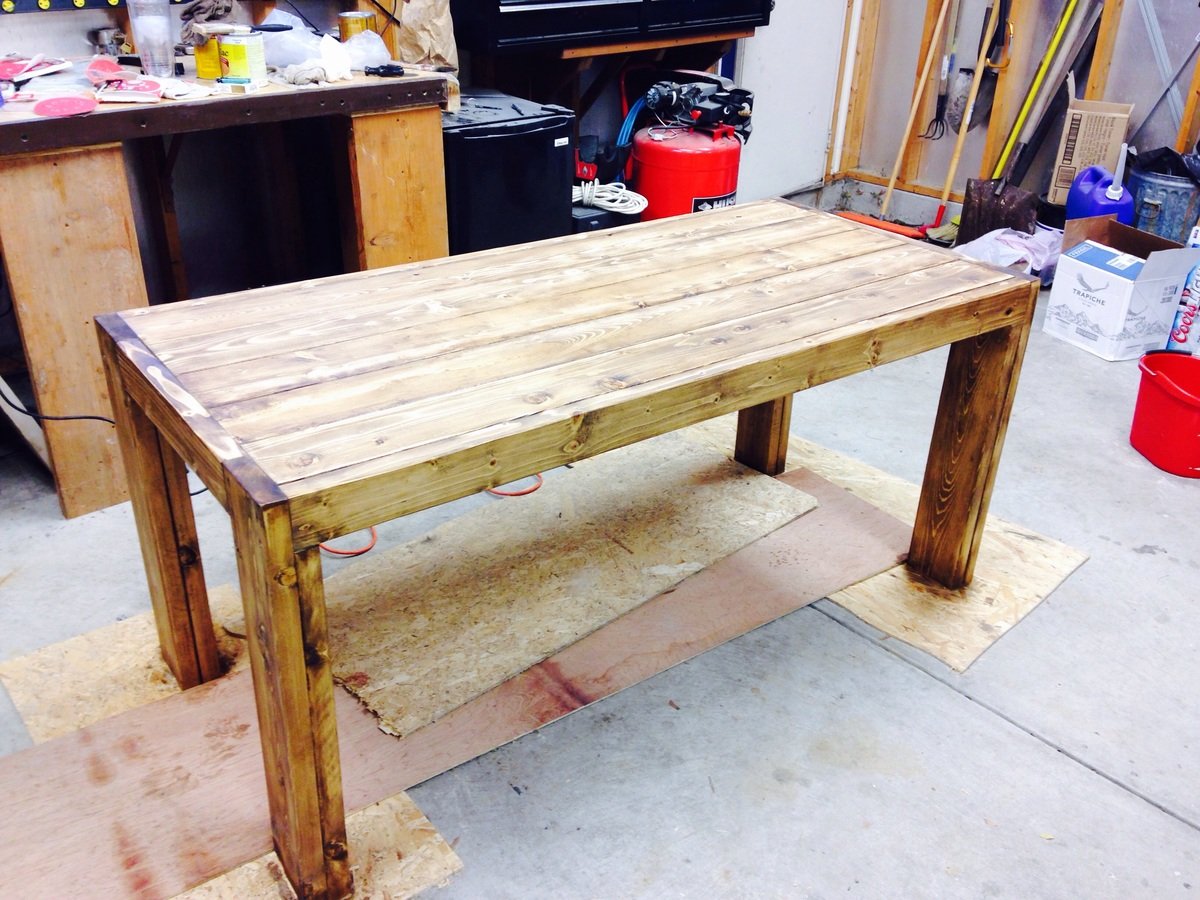
I modified the plns for this table a little bit. I couldnt have the table as wide as the plans so I left out a 2x6 for the table top. I also beefed up the legs and added another 2x6.
Built from Plan(s)
Estimated Cost
$50
Estimated Time Investment
Day Project (6-9 Hours)
Finish Used
Stain and Shellac
Recommended Skill Level
Beginner
Comments

Thu, 12/04/2014 - 22:50
This is really nice! I love
This is really nice! I love the stain that you chose!
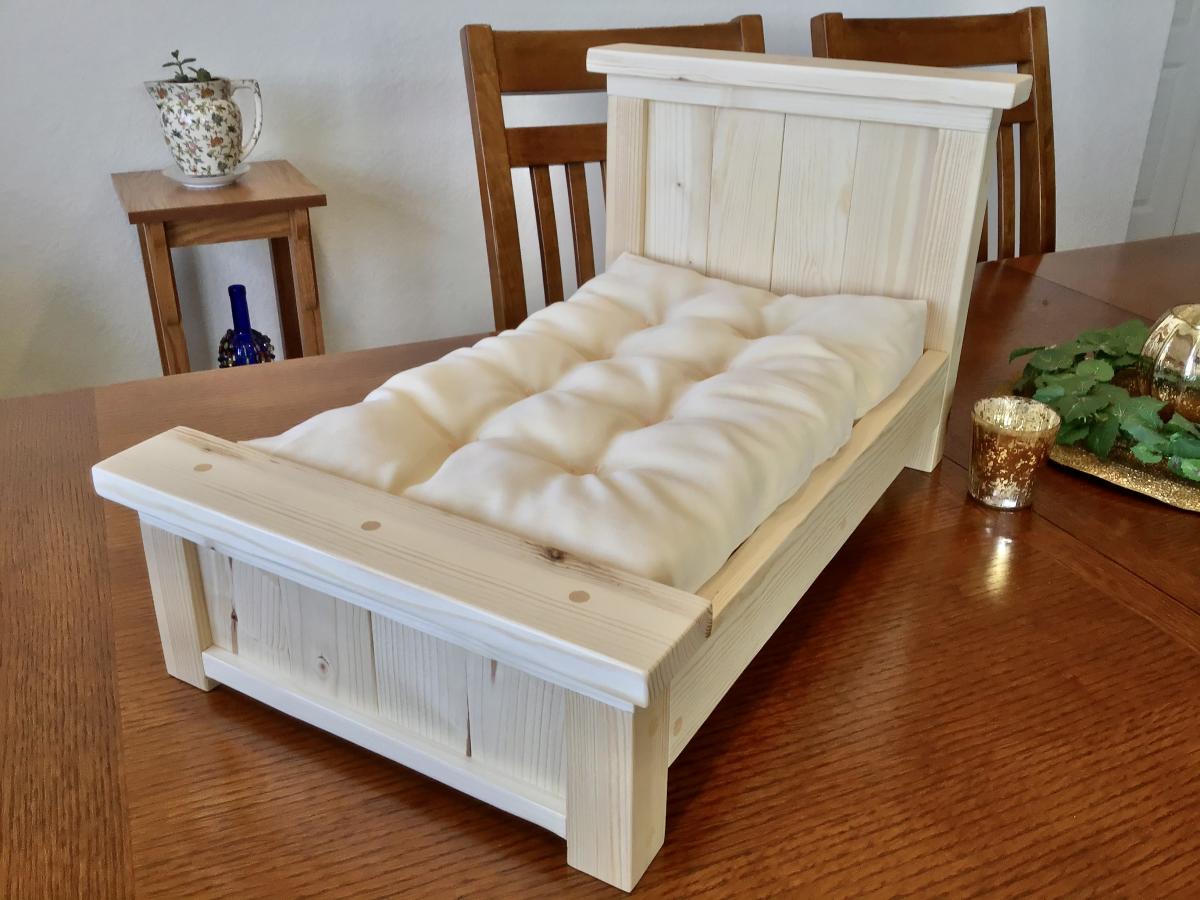
Farmhouse Doll Bed and Doll Mattress
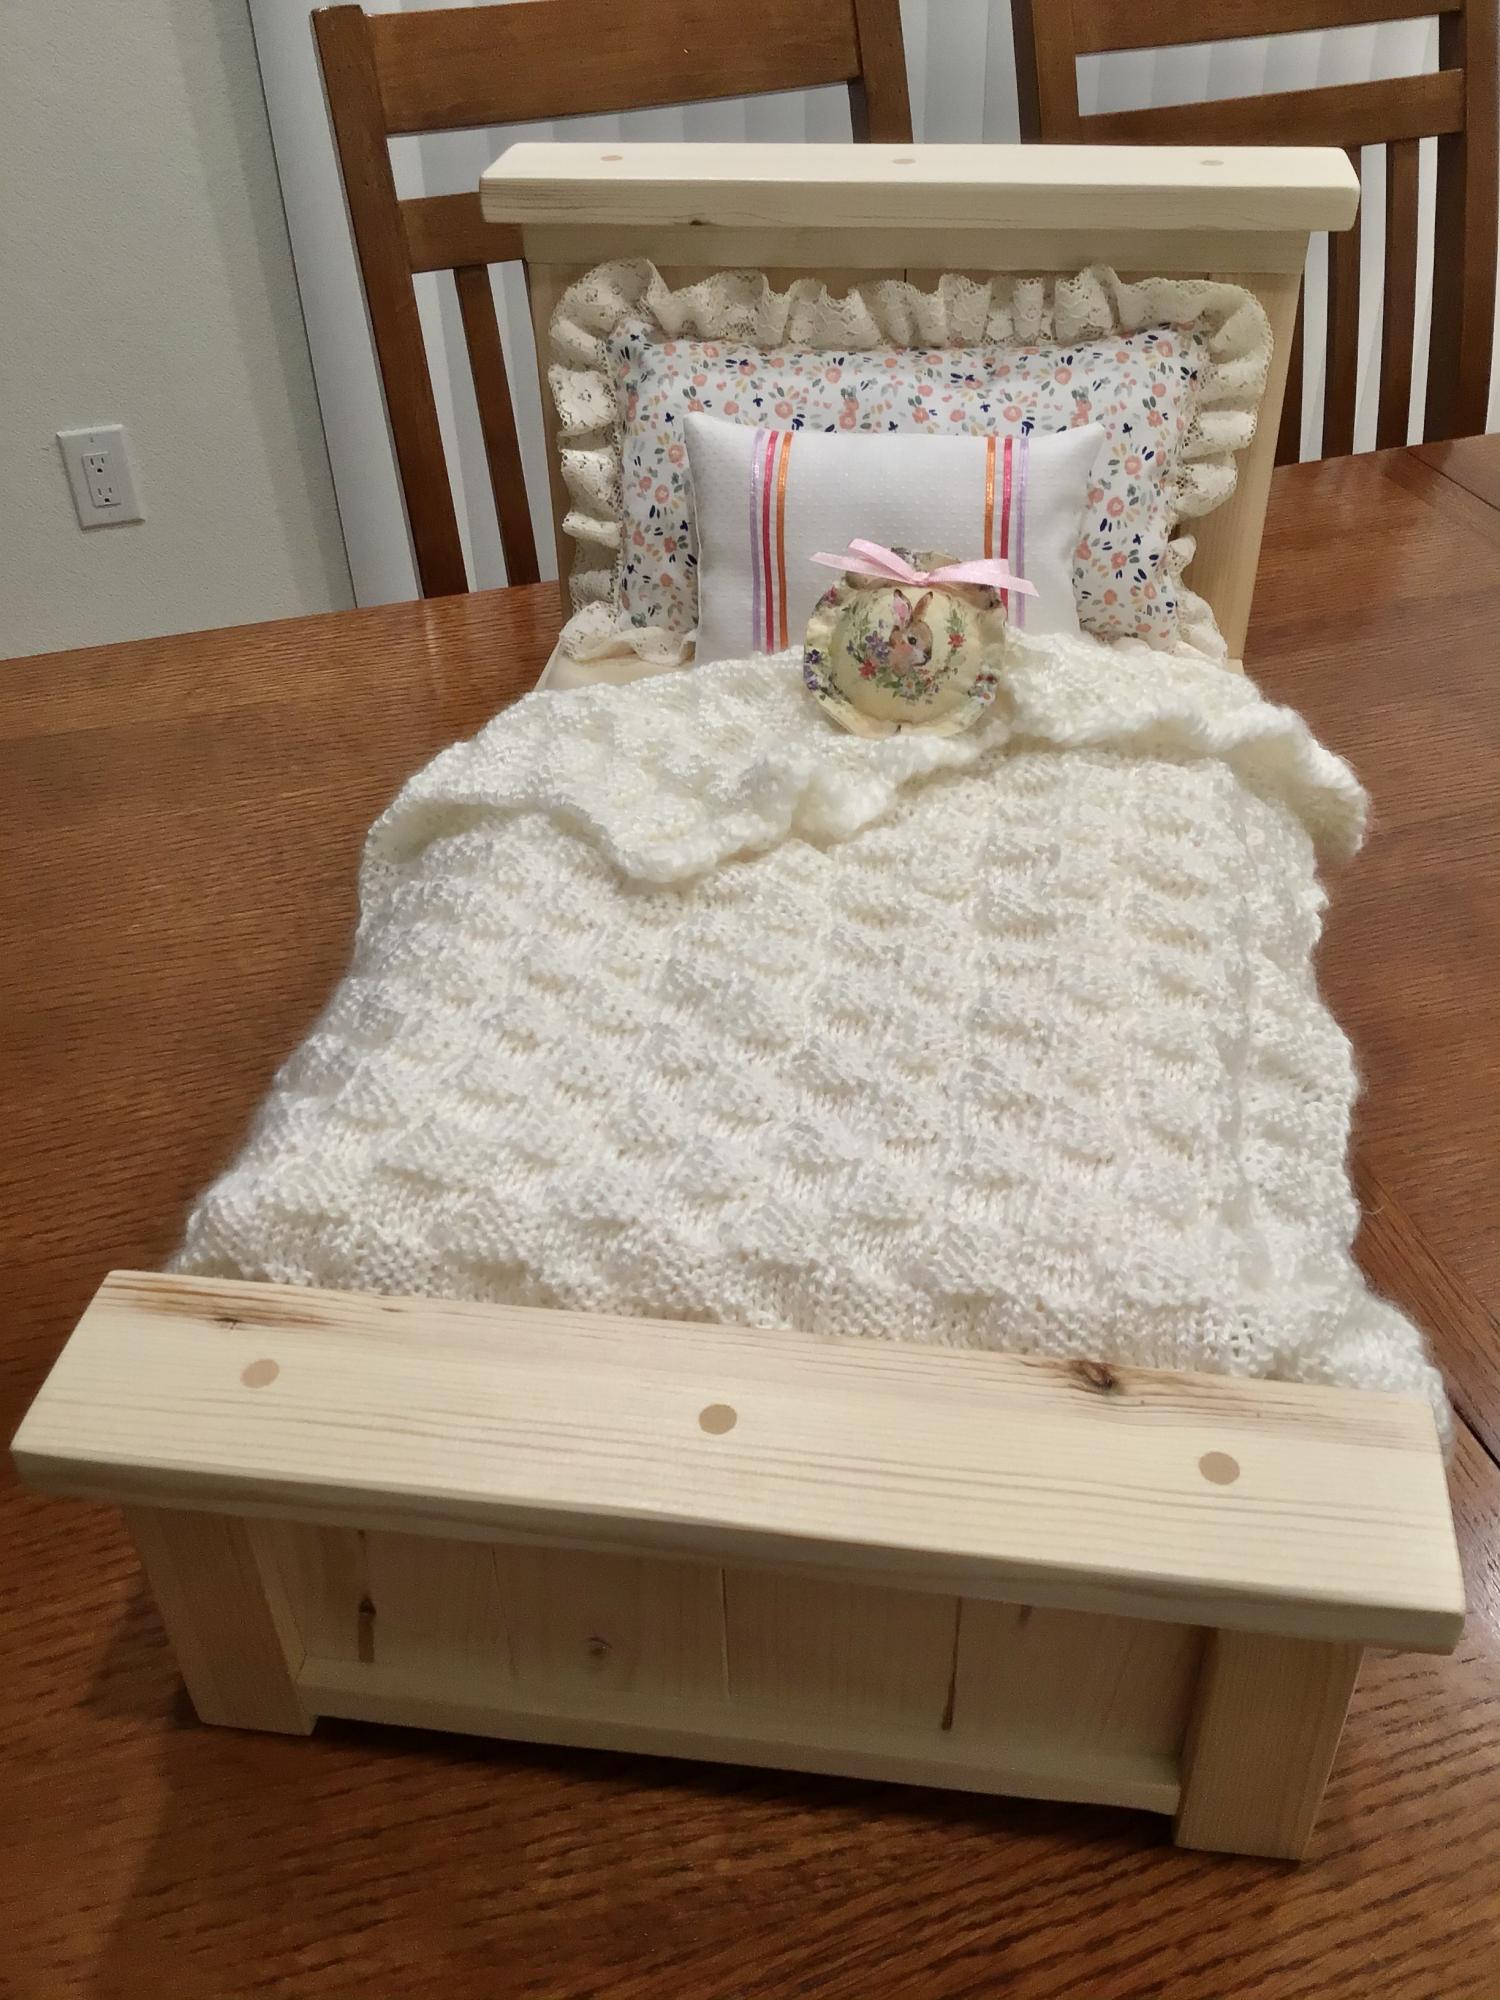
Well ... we found this farmhouse bed pattern as two play kitchen set were being constructed. Irresistible design; we decided that we HAD to also make the doll bed! And the bed came together very quickly. Two changes: per other comments, removed one vertical slat from the headboard/footboard (wanted the narrower width), and put an extra brace in the middle of the bed (just in case it gets stepped on or sat on).
Also used the pattern for the 18” Doll Mattress Tutorial. Skipped the buttons for tufting and simply sewed in 8 little Xs with embroidery floss.
This bed is for a granddaughter with a birthday in a few days .... and I’ve already started cutting out a second set for a granddaughter with a birthday in a couple of months. Happy to say that all of the bedding/linens are handmade; the pillows include lace and ribbons from two family weddings. You just can’t help but smile when you look at one of these finished farmhouse beds!
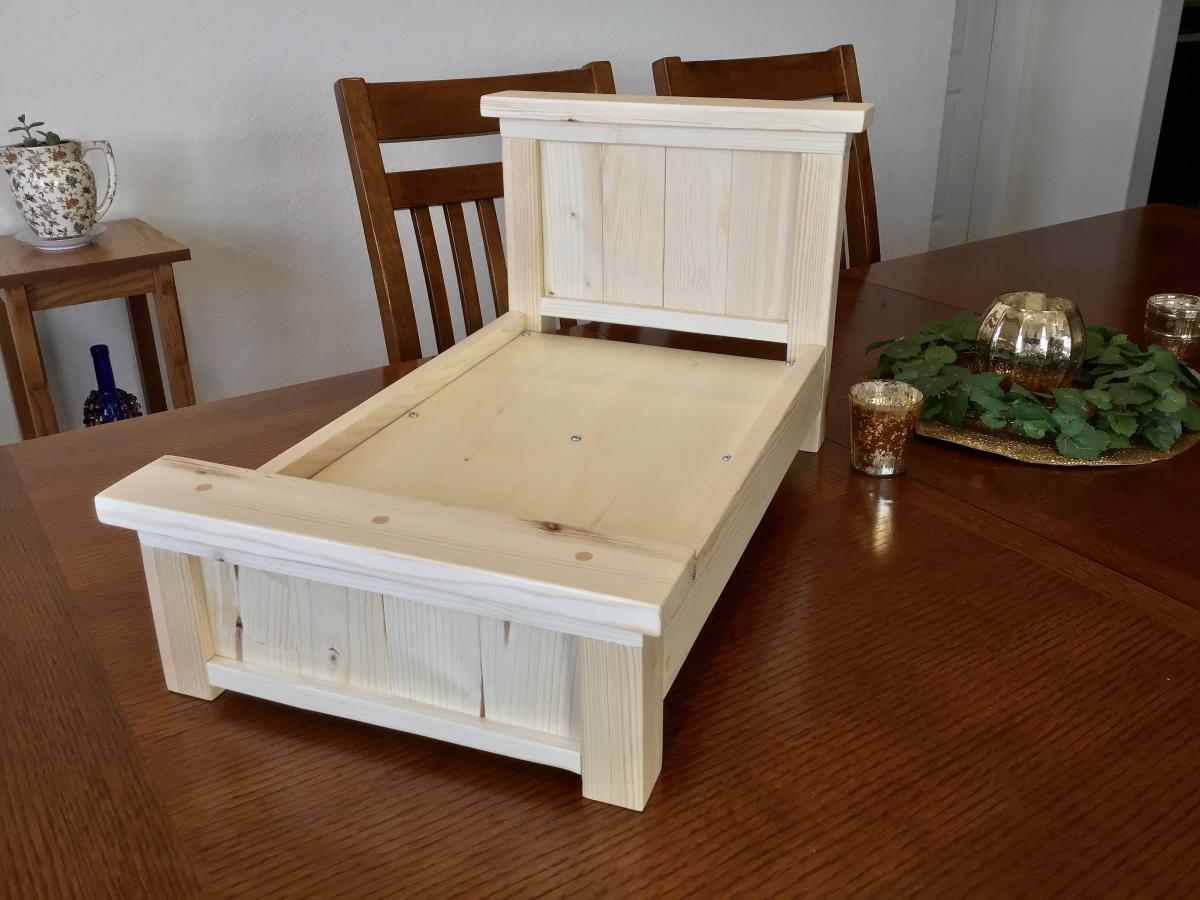
Built from Plan(s)
Estimated Time Investment
Weekend Project (10-20 Hours)
Finish Used
Polyurethane
Recommended Skill Level
Beginner
Laundry Orgainized
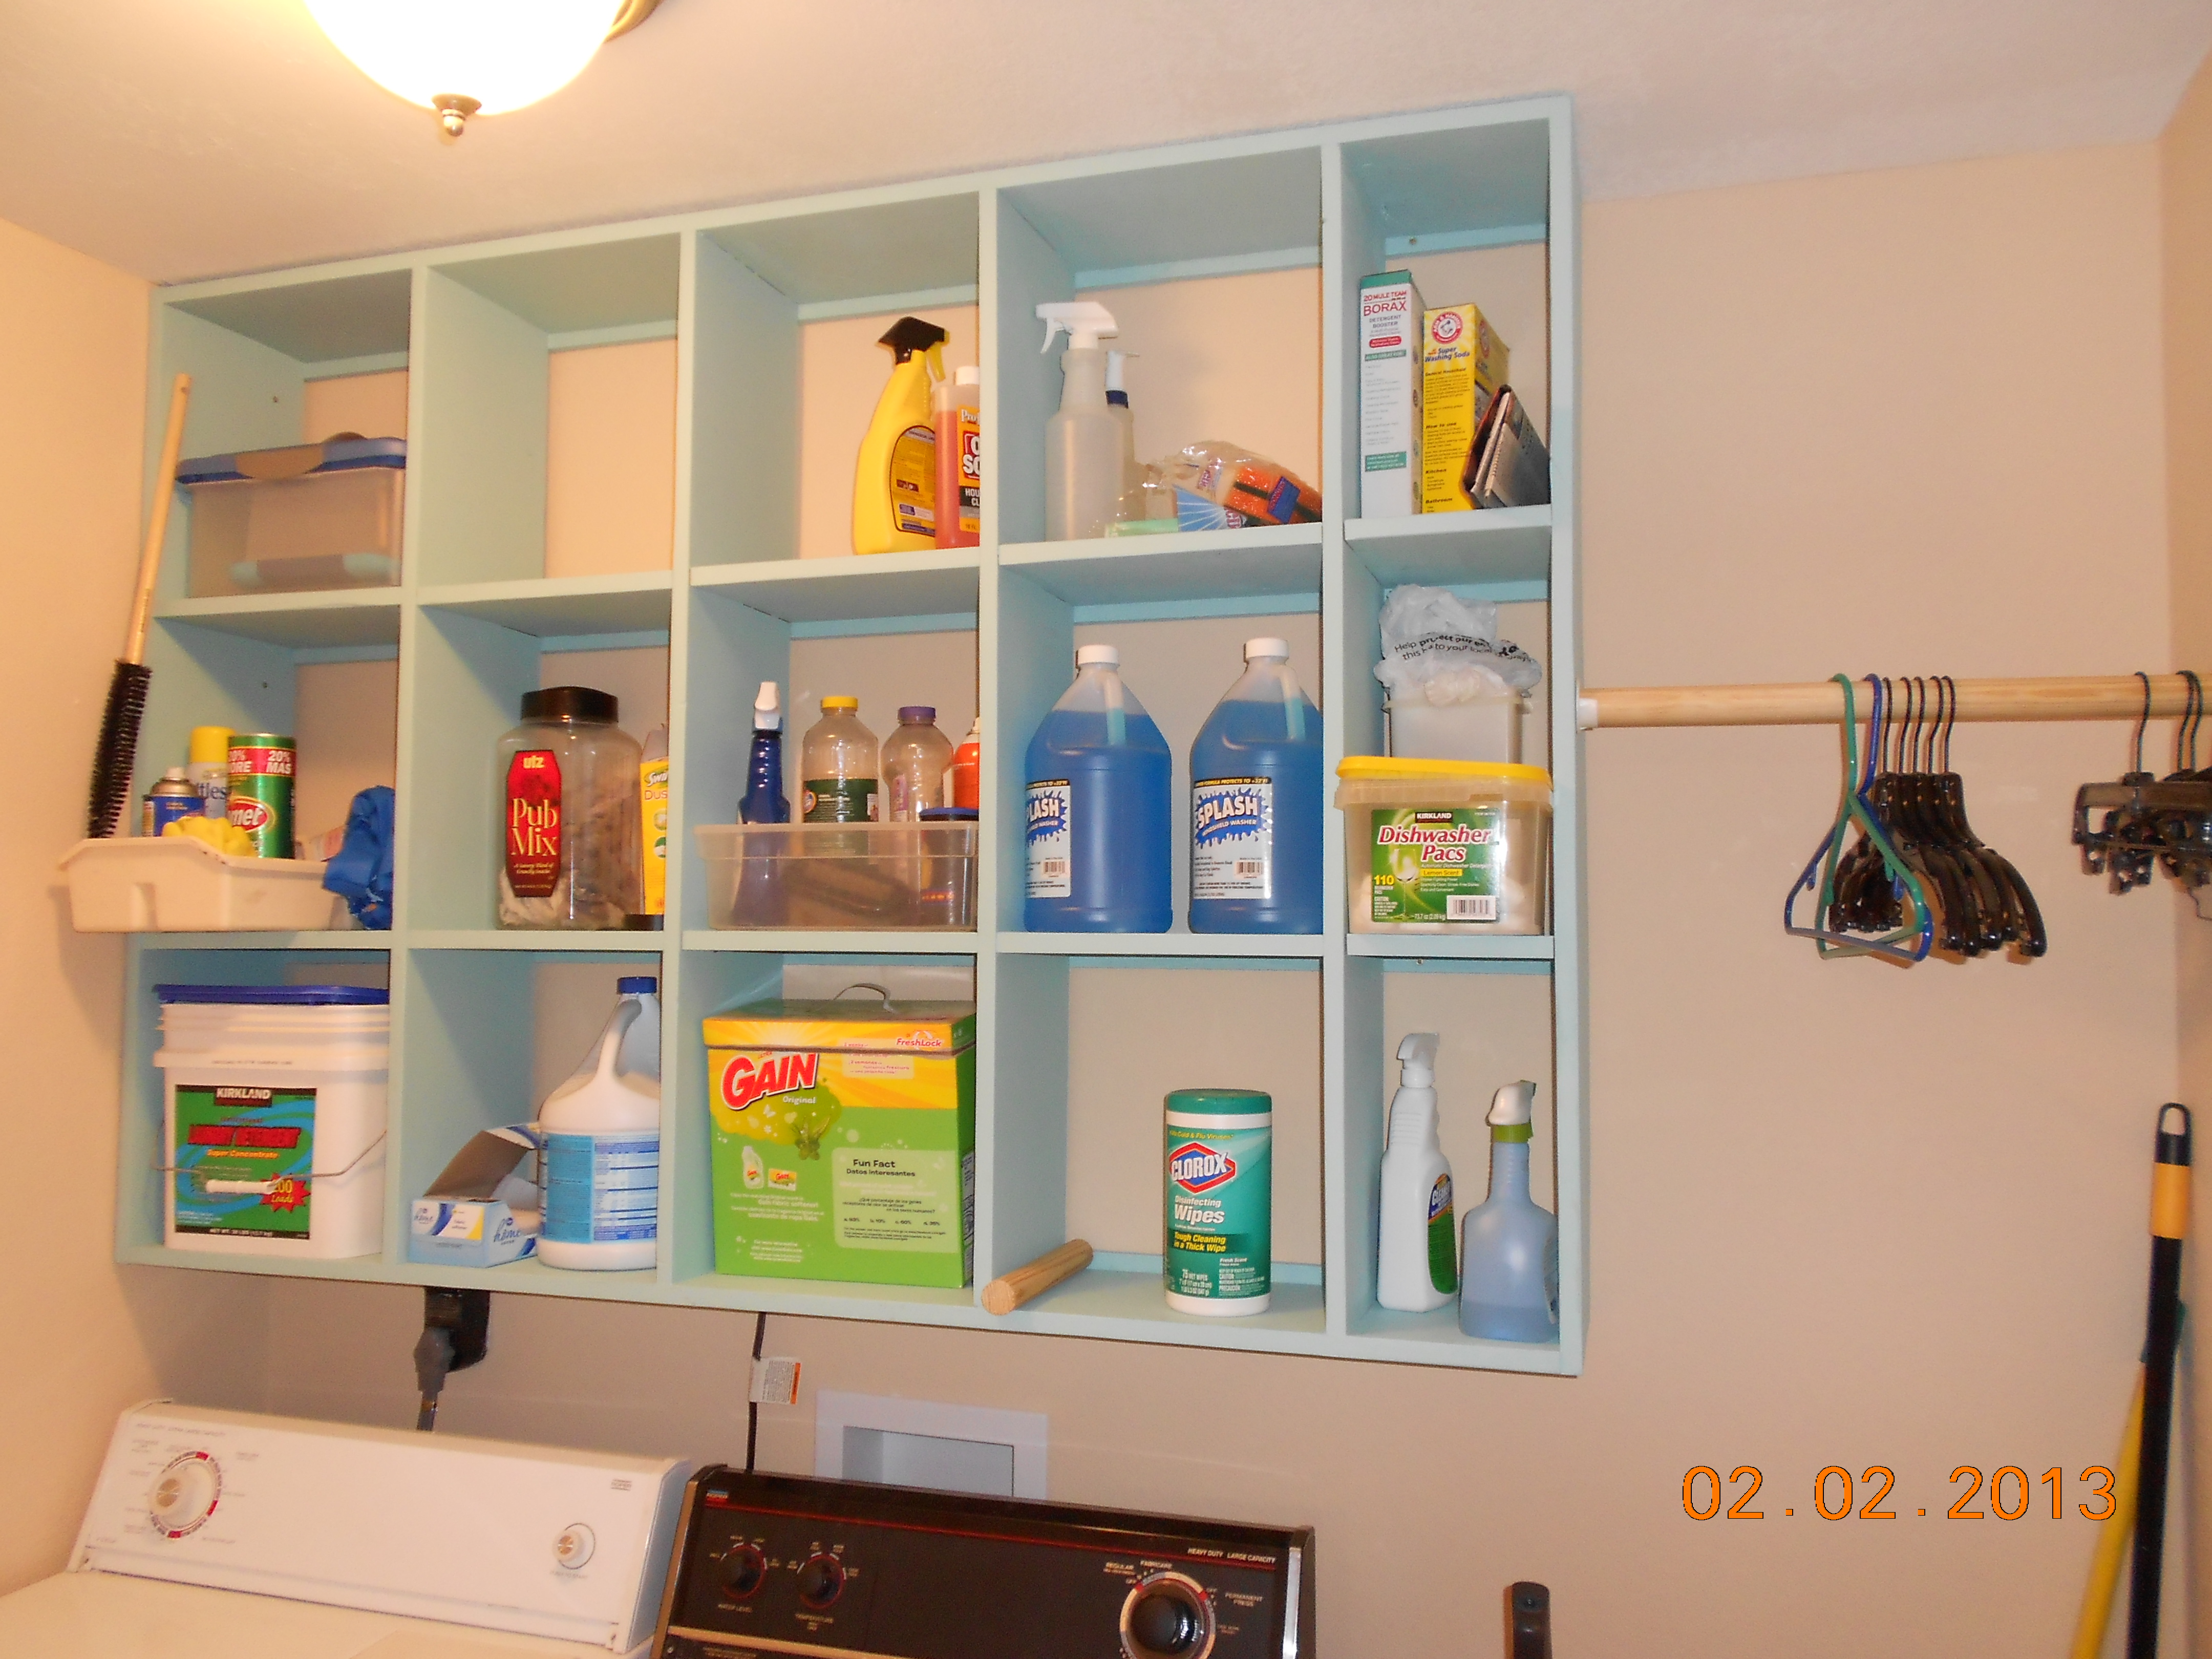
We needed to organize in the laundry room. This was the perfect idea.
Estimated Time Investment
Weekend Project (10-20 Hours)
Finish Used
This was easy and fun to do. My husband and I worked on it together and we are both alive to brag about it.
Recommended Skill Level
Beginner
Comments

Sun, 02/03/2013 - 18:50
Nicely done! Makes me wish I
Nicely done! Makes me wish I had room in my laundry area for one like it.
Farmhouse Doll Bed
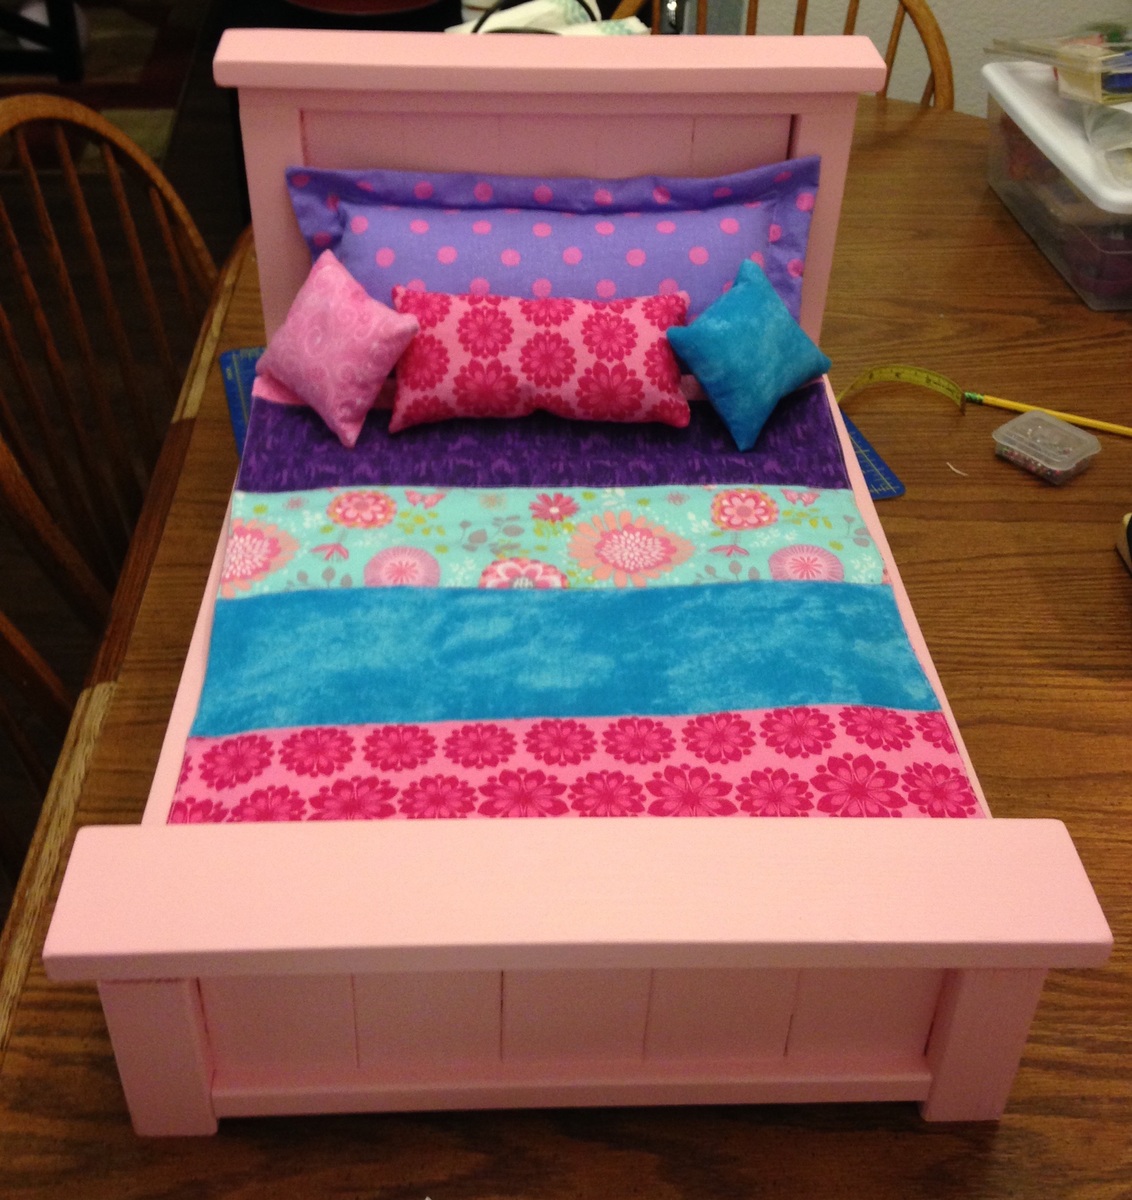
These are my first two farmhouse beds. The pink bed was my very first woodworking project since high school. We're not gonna say how long ago that was. Haha!
Thank you for sharing your plans. My daughter and my cousin's daughter love their new little beds.
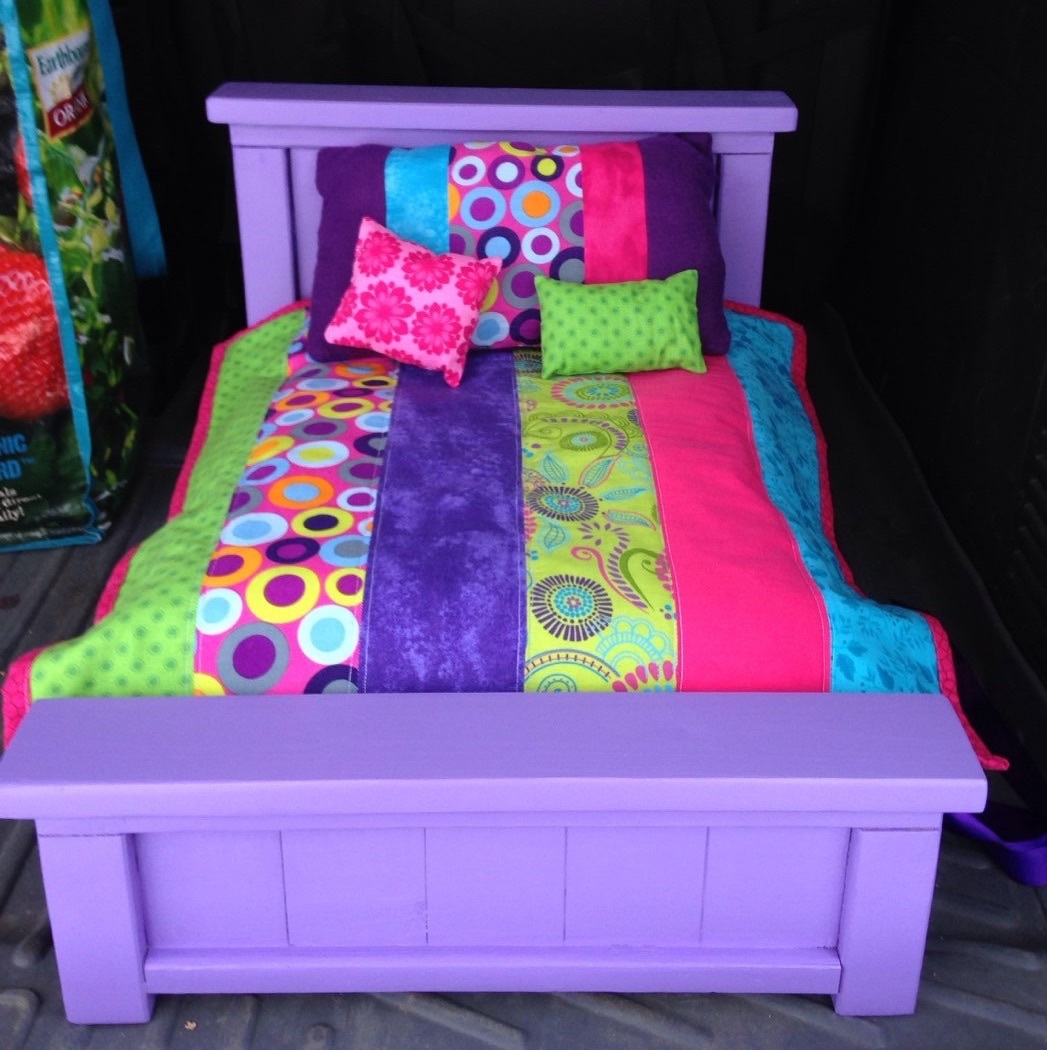
Built from Plan(s)
Recommended Skill Level
Beginner
Hudson's Rustic Changing Table
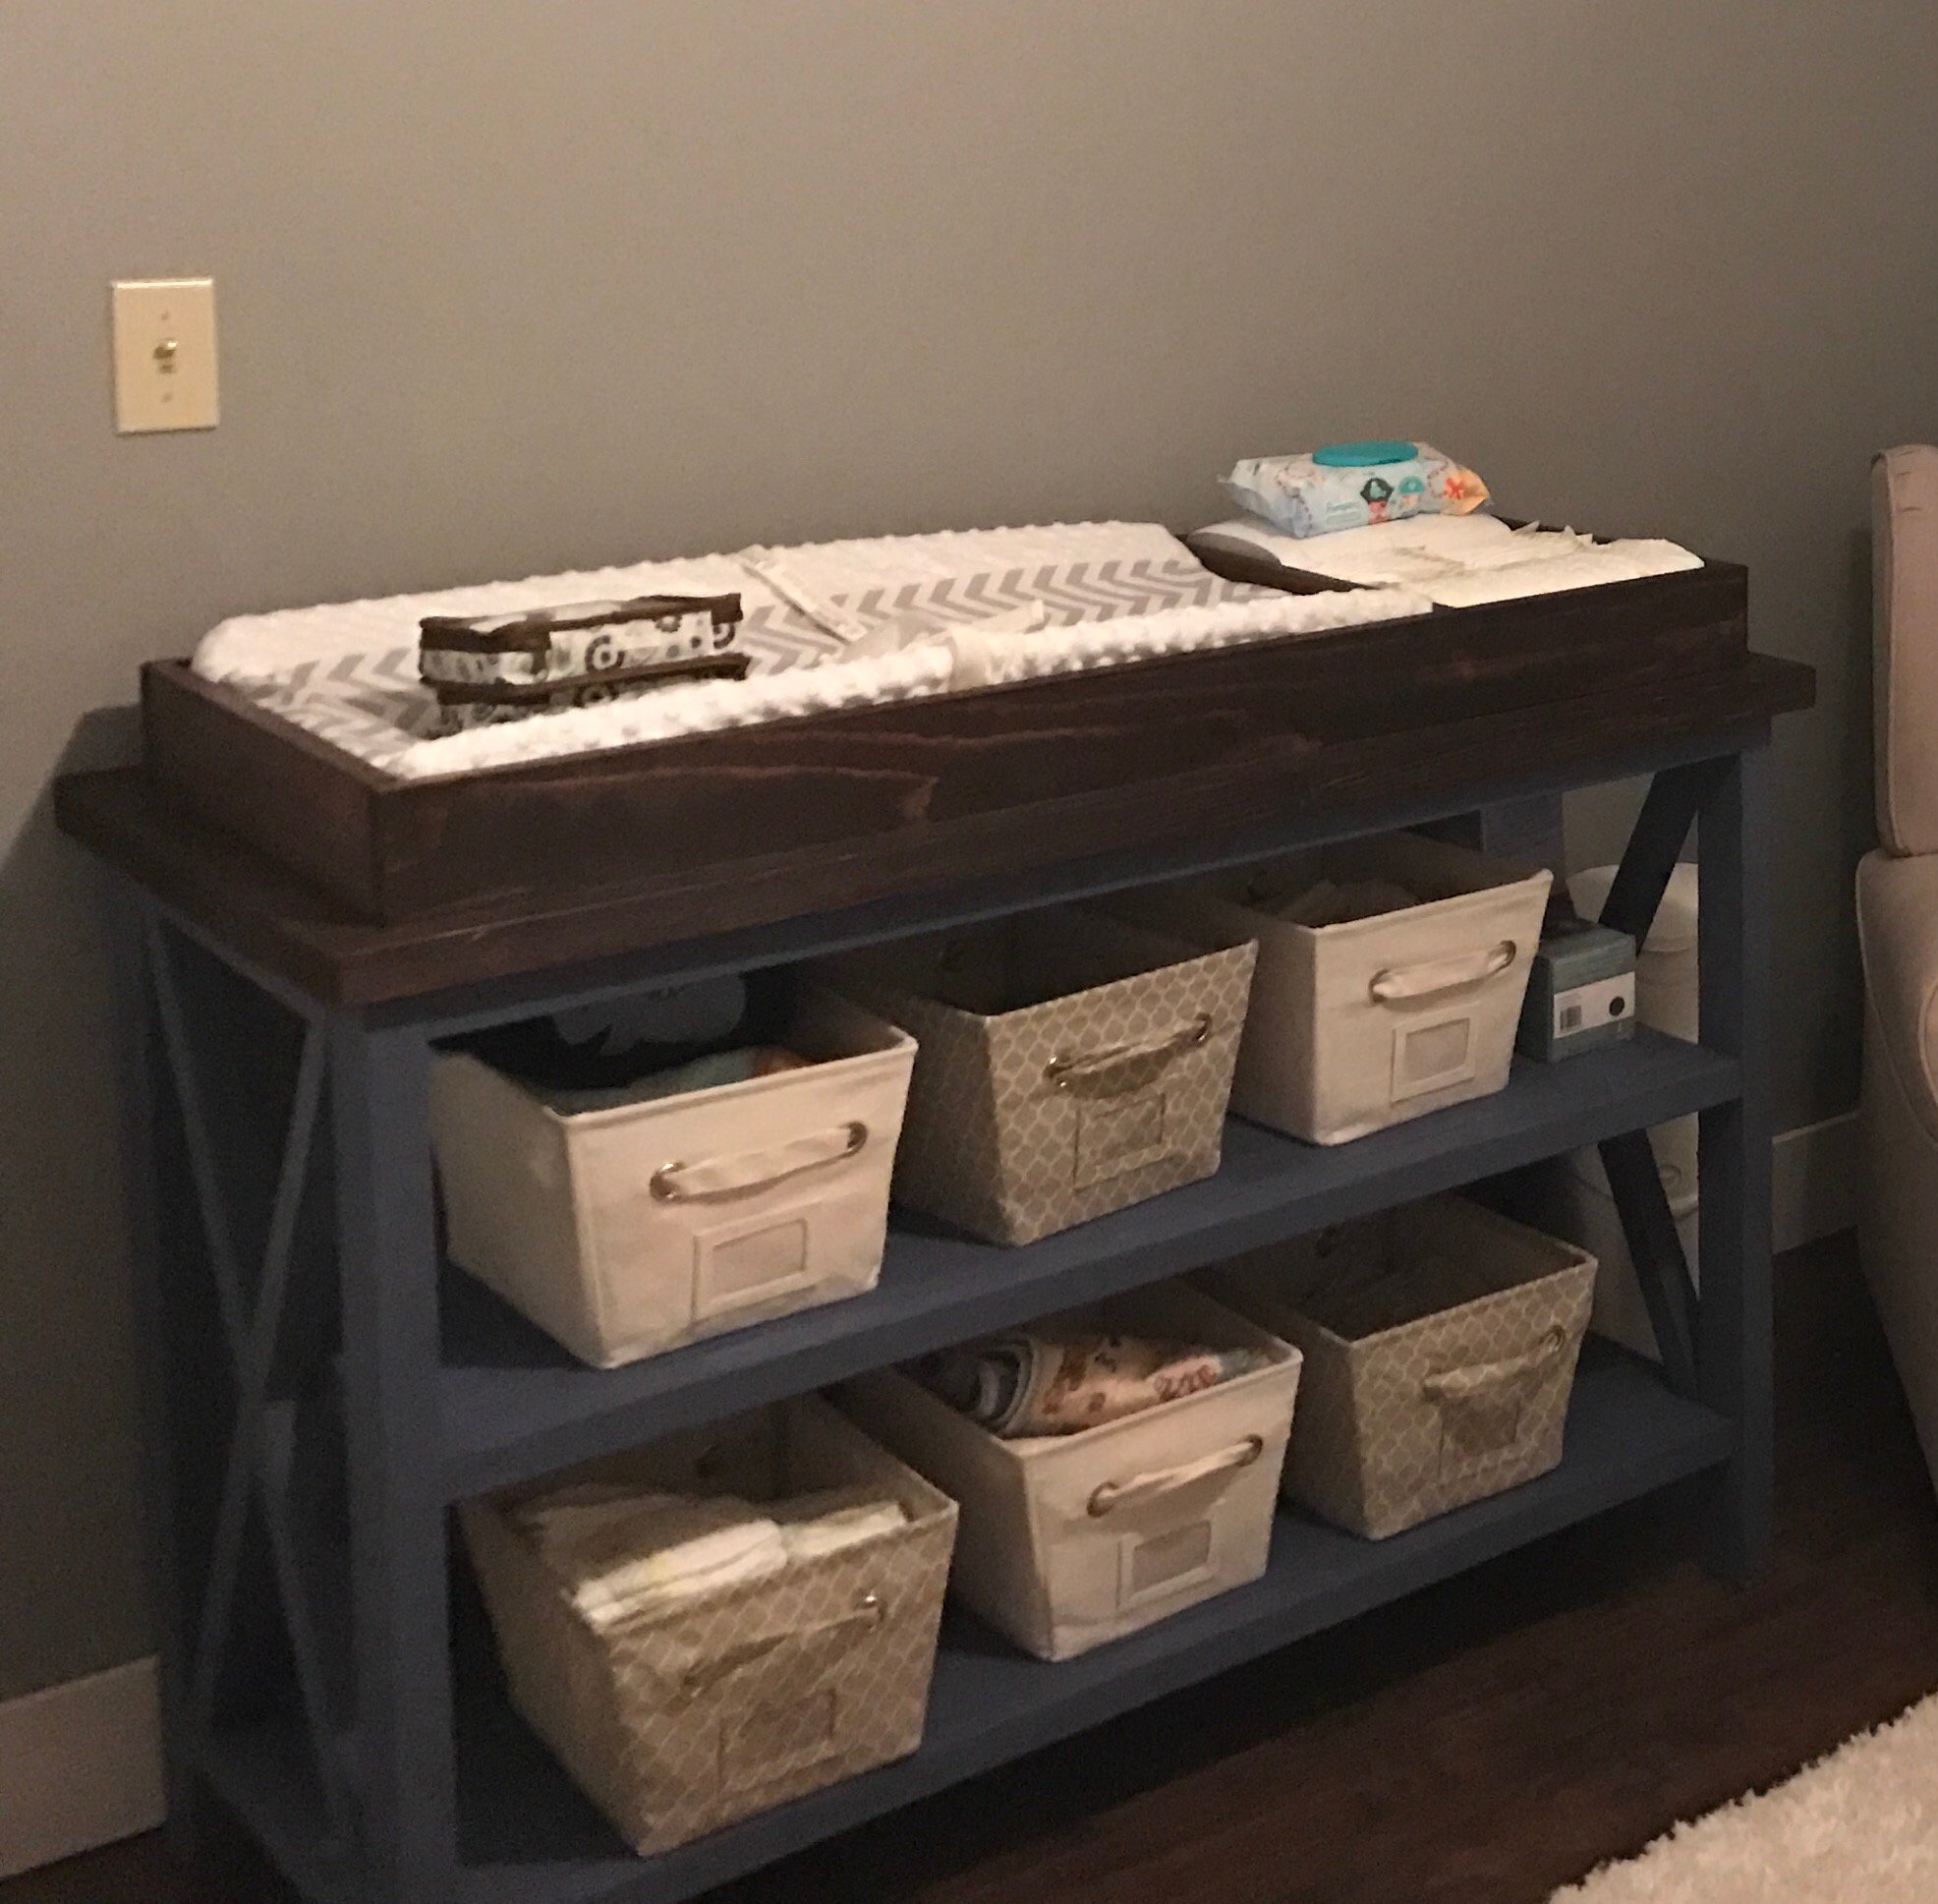
Used Minwax stain in Dark Walnut and Coastal Gray chalk paint from Rustoleum
Built from Plan(s)
Estimated Cost
$125
Estimated Time Investment
Day Project (6-9 Hours)
Recommended Skill Level
Intermediate
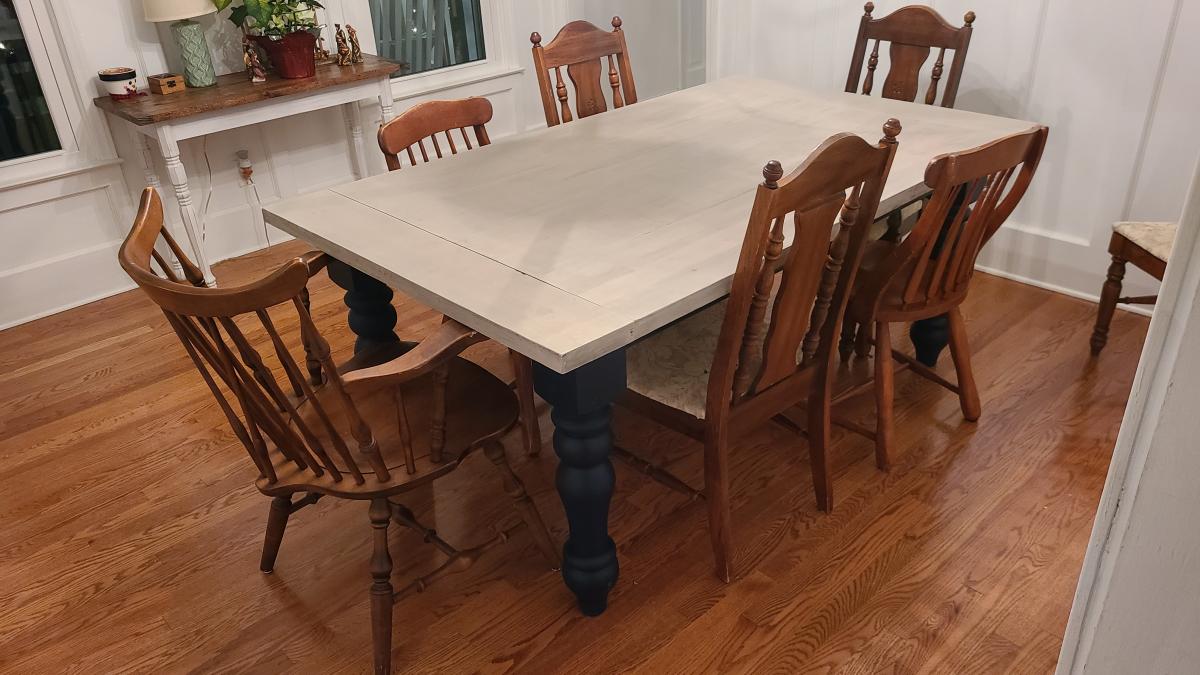
Chunky leg farmhouse table
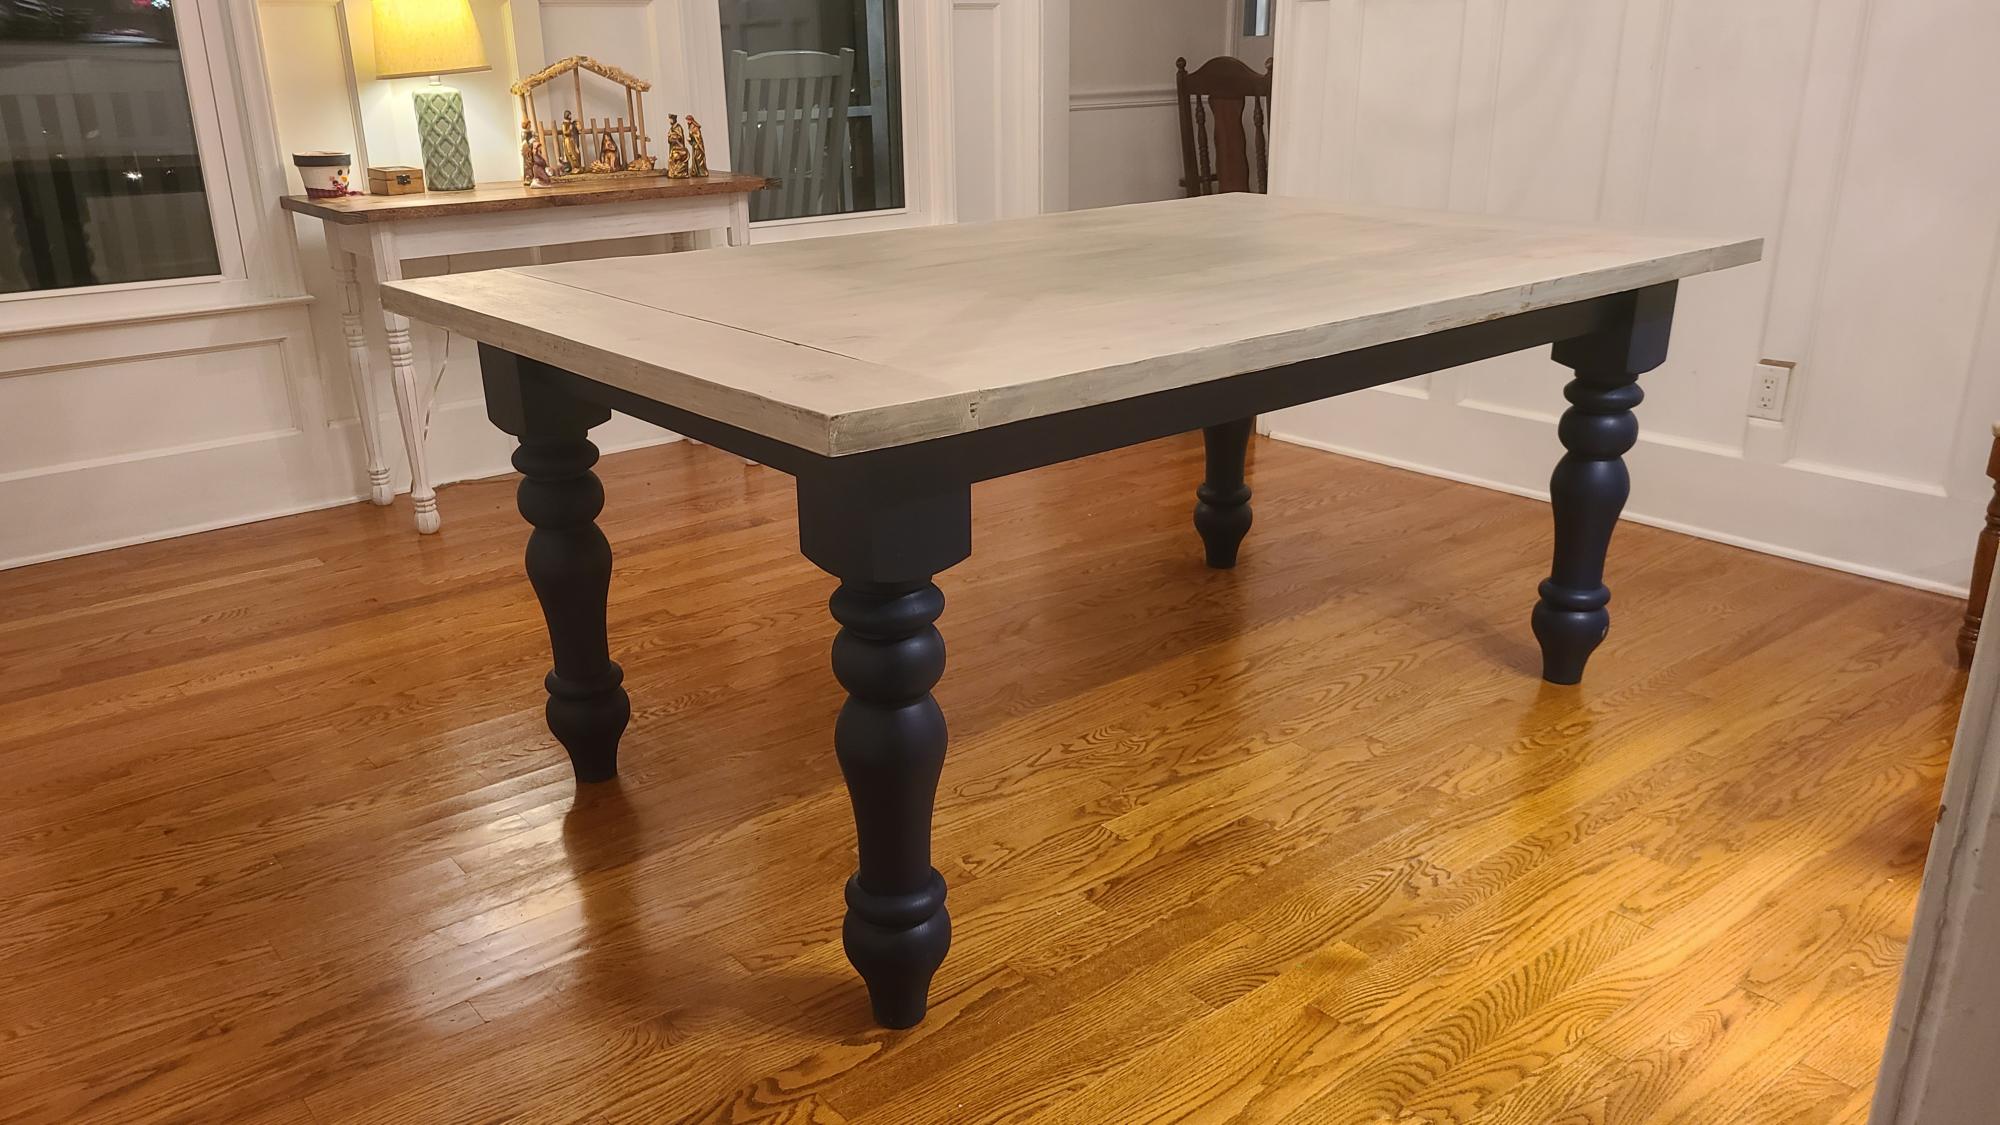
This is a chunky leg farmhouse table I just finished. We wanted to do something a little different with the color scheme, so we did something a little more colonial with a custom stain and paint blended grey top, and painted the legs a deep navy blue.
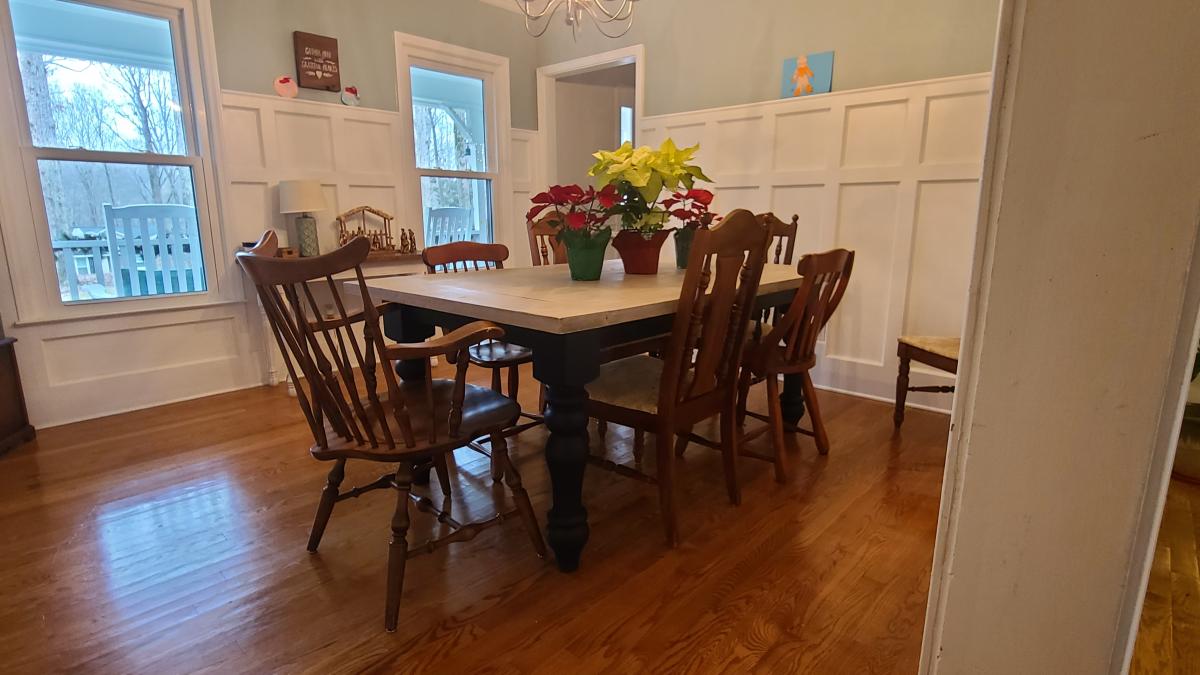
Estimated Cost
$400
Estimated Time Investment
Weekend Project (10-20 Hours)
Finish Used
Custom stain paint combo on the top.
Sherwin Williams deep navy blue paint on the legs and skirt
Sherwin Williams deep navy blue paint on the legs and skirt
Recommended Skill Level
Intermediate
Customized Kentwood Bookshelf
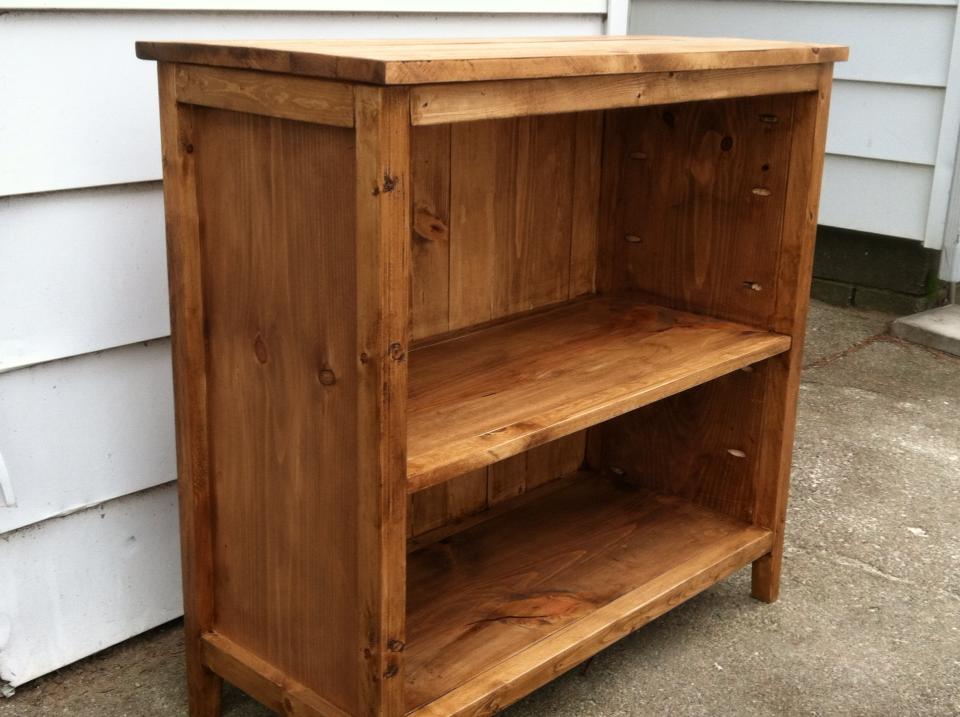
I built this bookshelf for my husband's office. He wanted a shorter, wider shelf than the original plans, and this is what I came up with! :)
Built from Plan(s)
Estimated Cost
Around $50
Estimated Time Investment
Day Project (6-9 Hours)
Finish Used
I used Minwax PolyShades
Recommended Skill Level
Intermediate
Comments

Sun, 03/24/2013 - 13:53
Romanweel, I'm so sorry,
Romanweel, I'm so sorry, didn't see your comment! It is Polyshade in Mission Oak Gloss. And Countrysideworkshop, it is 15 deep by 33 wide by 32.25 high. Hope that helps! :)

In reply to Romanweel, I'm so sorry, by mamahowell
Mon, 01/30/2017 - 12:45
Love!
I love this! My dad asked me to make him a book shelf and this is it! Did you follow her instructions or tweak anything else!?
Mon, 03/23/2015 - 19:34
Where can I find the plans
Where can I find the plans and materials list for your customized bookcase?
Mon, 02/26/2018 - 21:42
Intrested as well
I having been searching for a bookcase just like it!!! I want the shelf space for decoration, but I am dying to have the wall space above for wedding pictures I have never built anything before, but need to start somewhere. Any chance you can share what you changed to make this book shelf instead of the super tall one : )
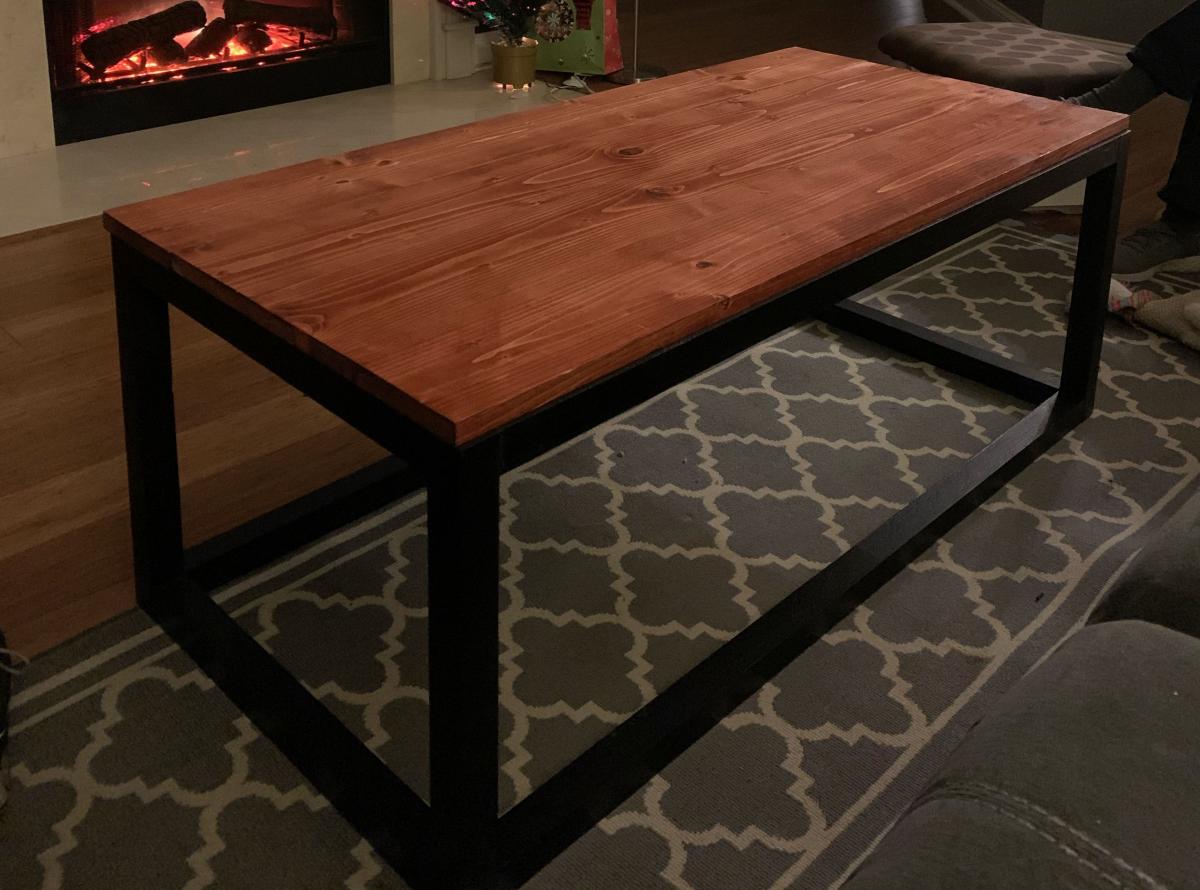
Box Frame Coffee Table with Lift Top
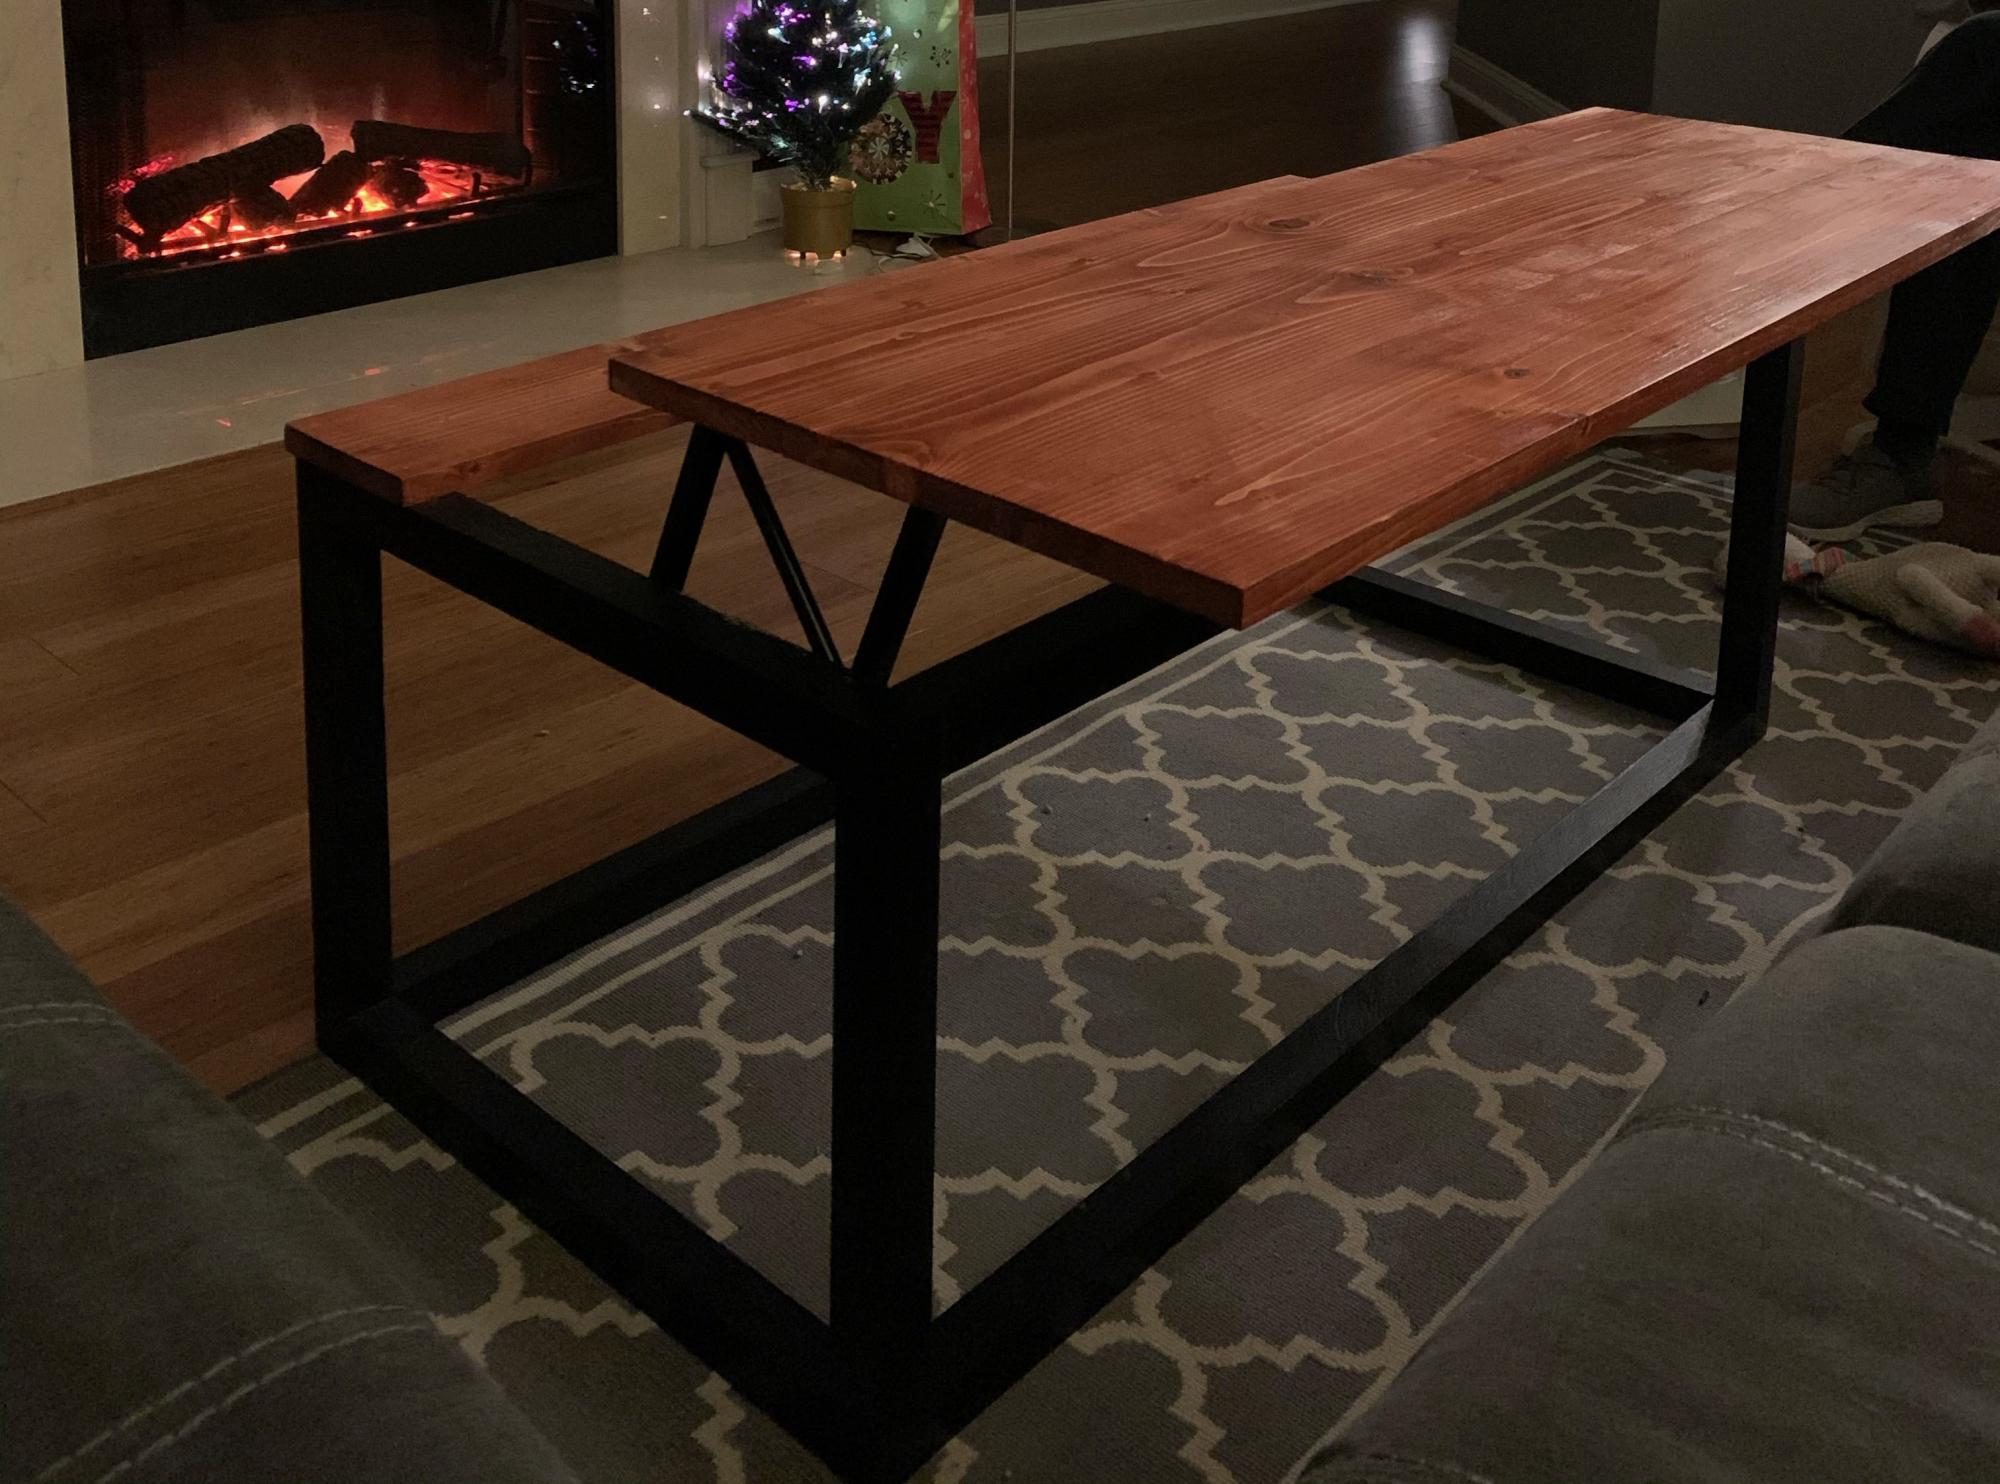
Really fun coffee table - my first foray into furniture! I think I will be adding the bottom shelf for added weight and storage to keep the table top tidy.
Built from Plan(s)
Estimated Cost
$80
Estimated Time Investment
Weekend Project (10-20 Hours)
Finish Used
black matte paint and cherry stain
Recommended Skill Level
Intermediate
Comments
Pallet Christmas Trees

I have some pallet wood and decided to make some Christmas trees. They were really fast and easy. I cut them at a 45° and just glued and nailed them together.
Estimated Cost
Free
Estimated Time Investment
An Hour or Two (0-2 Hours)
Finish Used
None
Recommended Skill Level
Starter Project
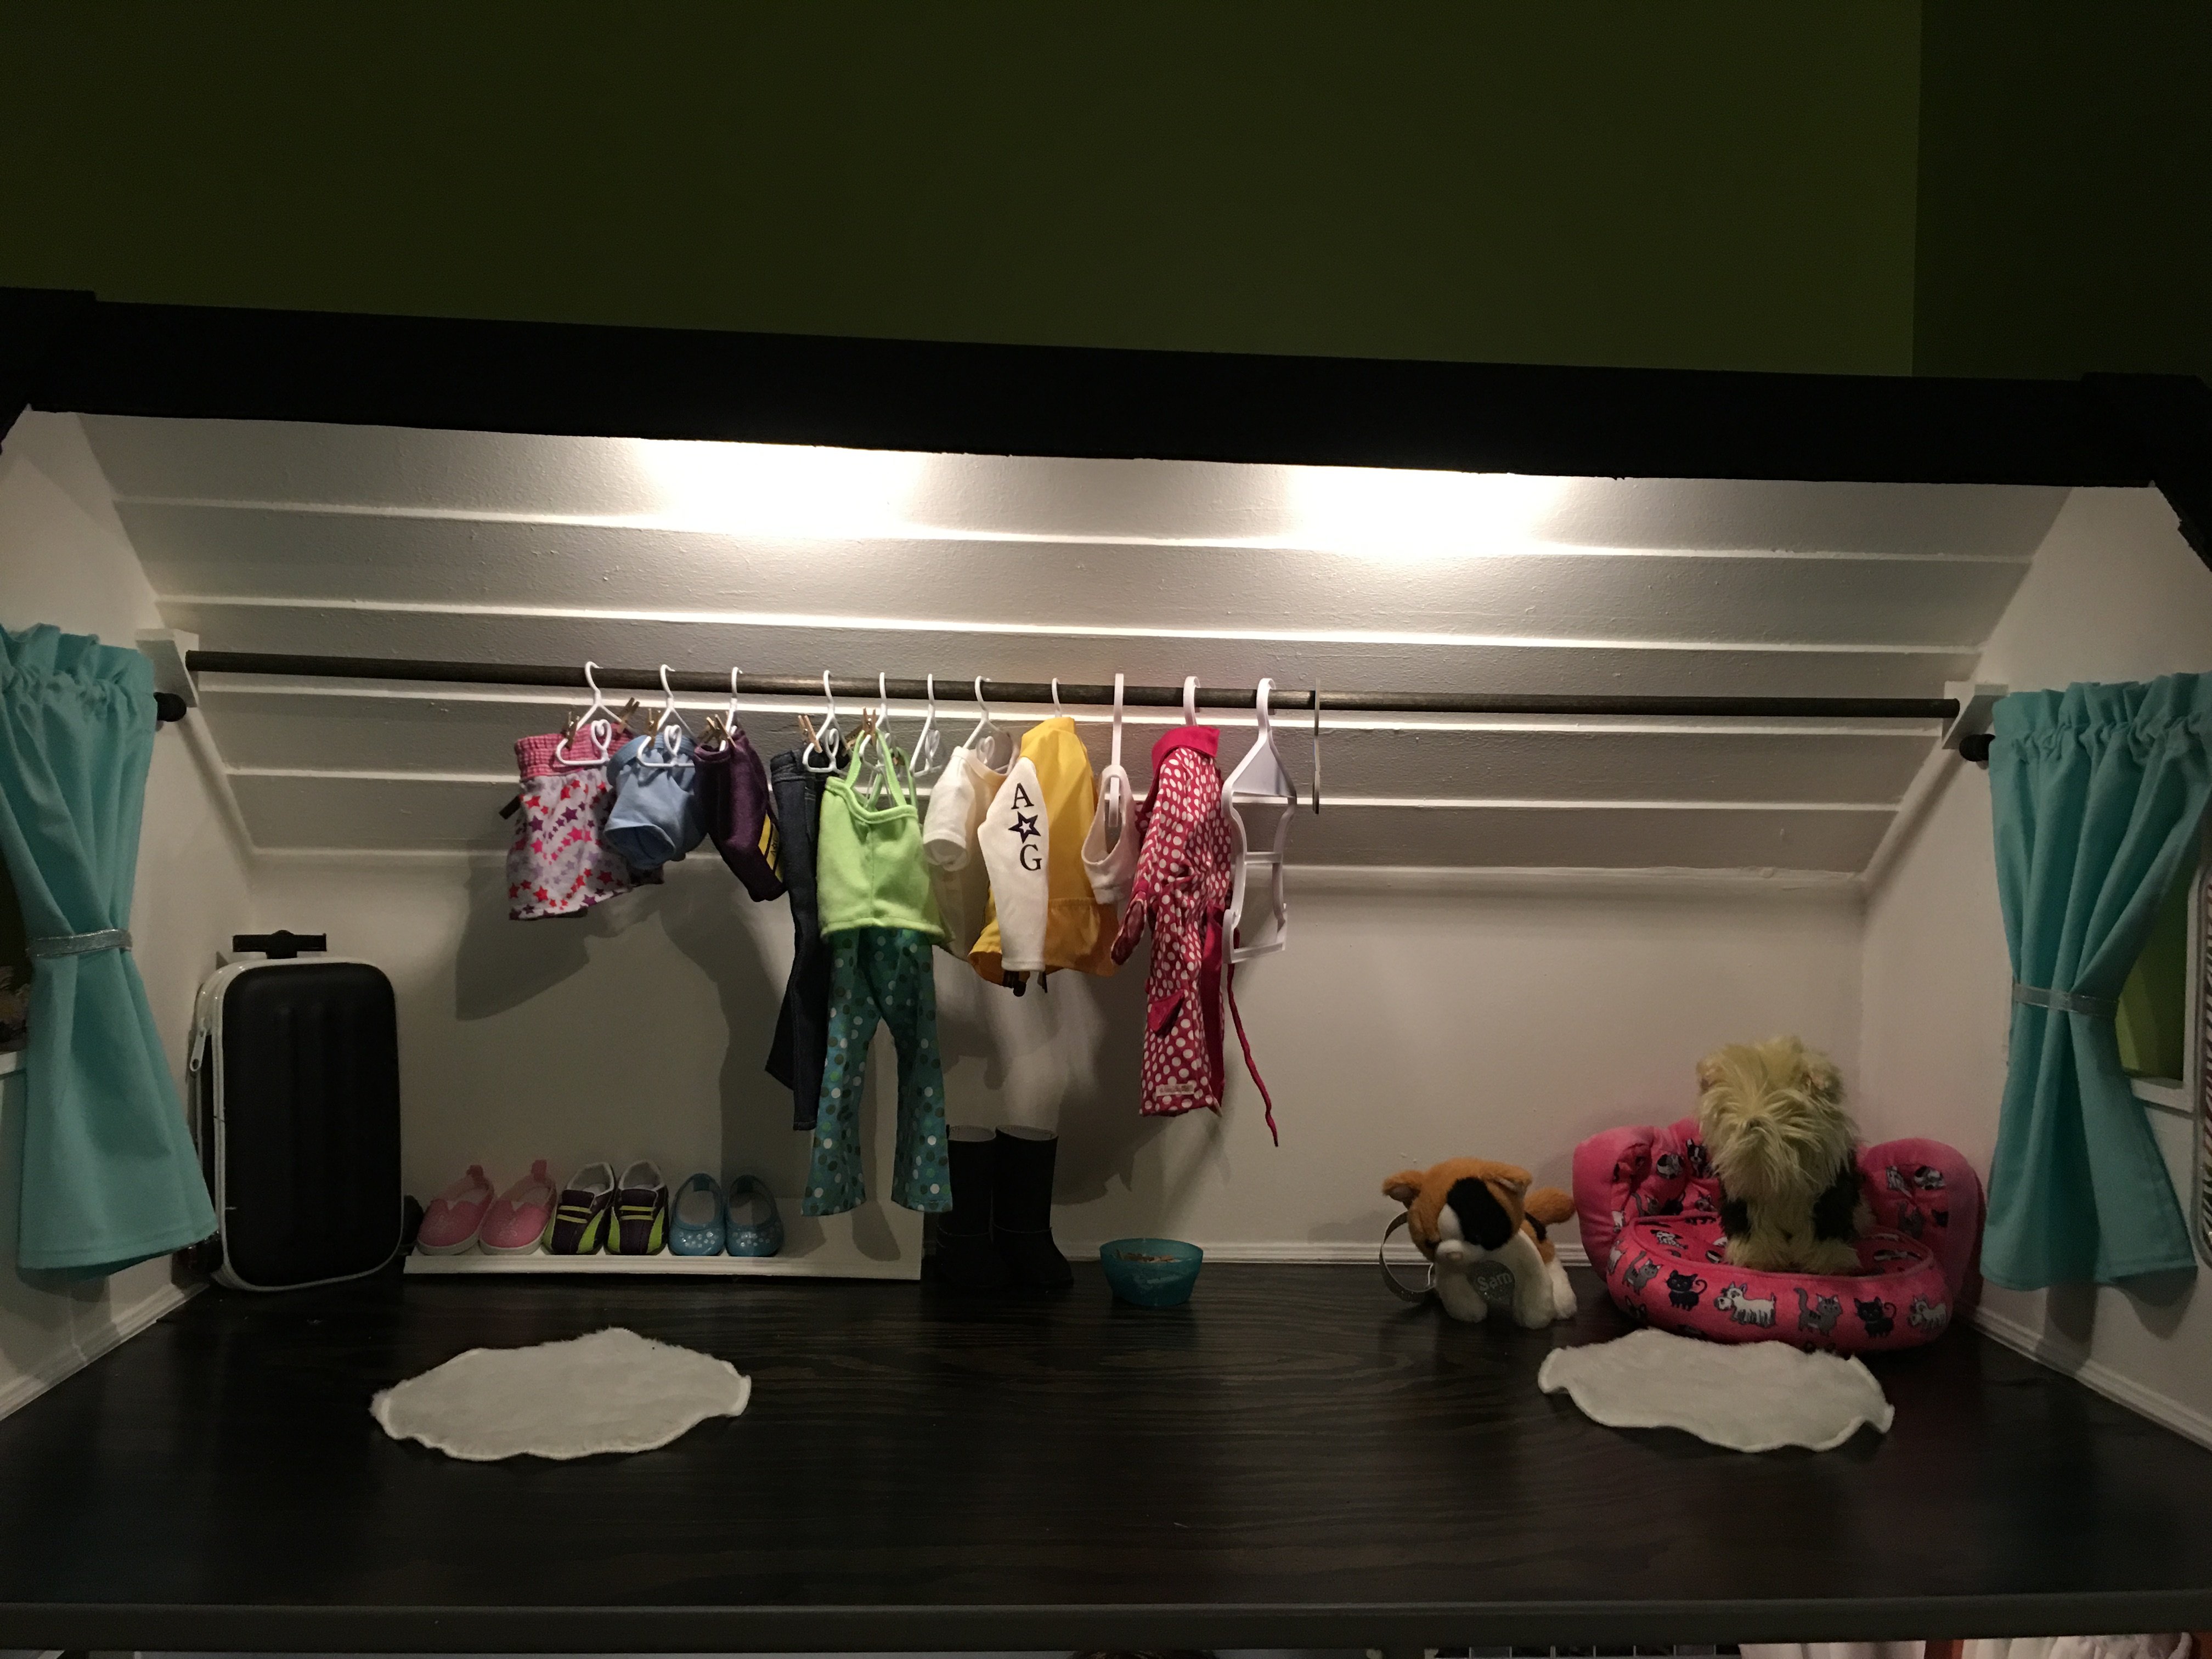
American Girl Dollhouse Masterpiece!
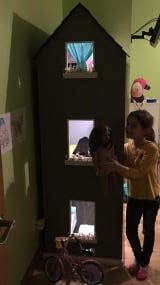
This dollhouse was super easy to make! Harper (the doll) wanted an open concept living/kitchen, and that is the first floor. Second floor are the bedroom and bathroom. Top floor is the closet. The roof is made from 3.5" slats of luan glued together and painted with black sanded paint. Notice the baseboards and crown molding? My granddaughter helped cut windows out with a jig saw. I still owe my granddaughter a garage and patio with pergola, and kitchen appliances and chairs, but that will wait until summer when she can help craft/build them.
Harper's bed is modeled after the farmhouse bed plans available on this site, but I used smaller scrap lumber. I wanted milk paint but was unwilling to pay the high price, so I bought a sample jar of antique ivory paint and watered it down. It turned out great!
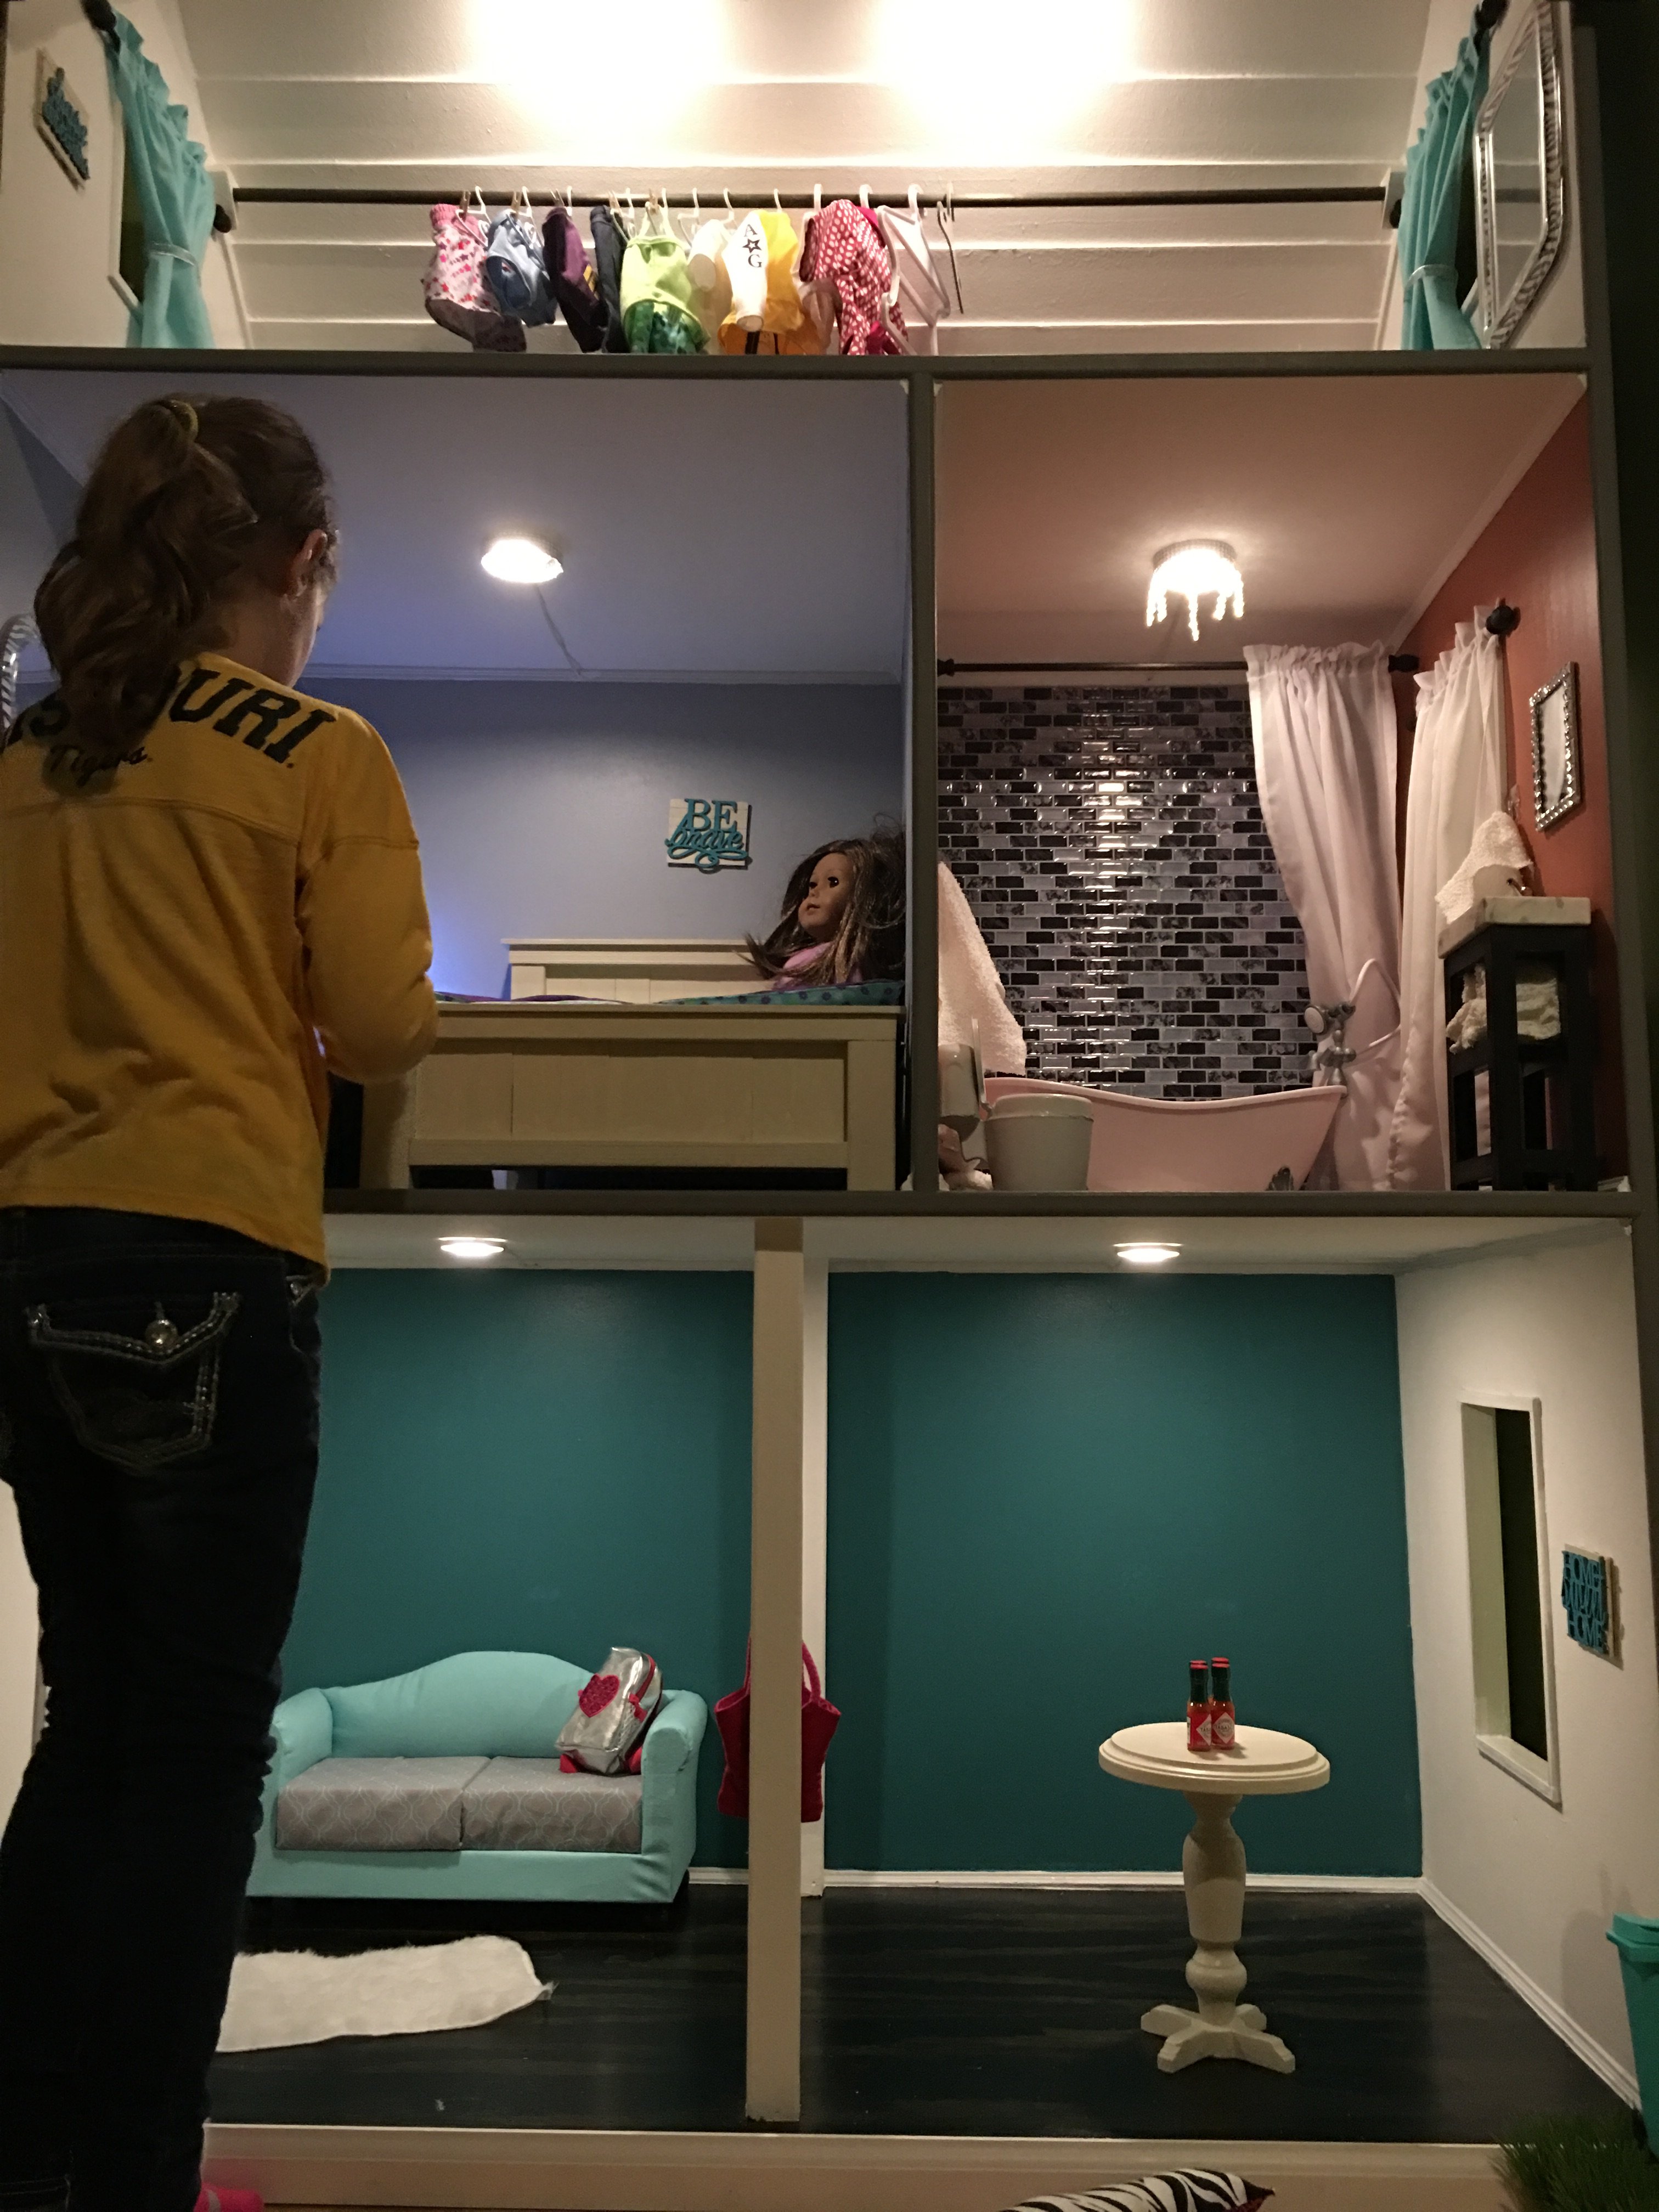
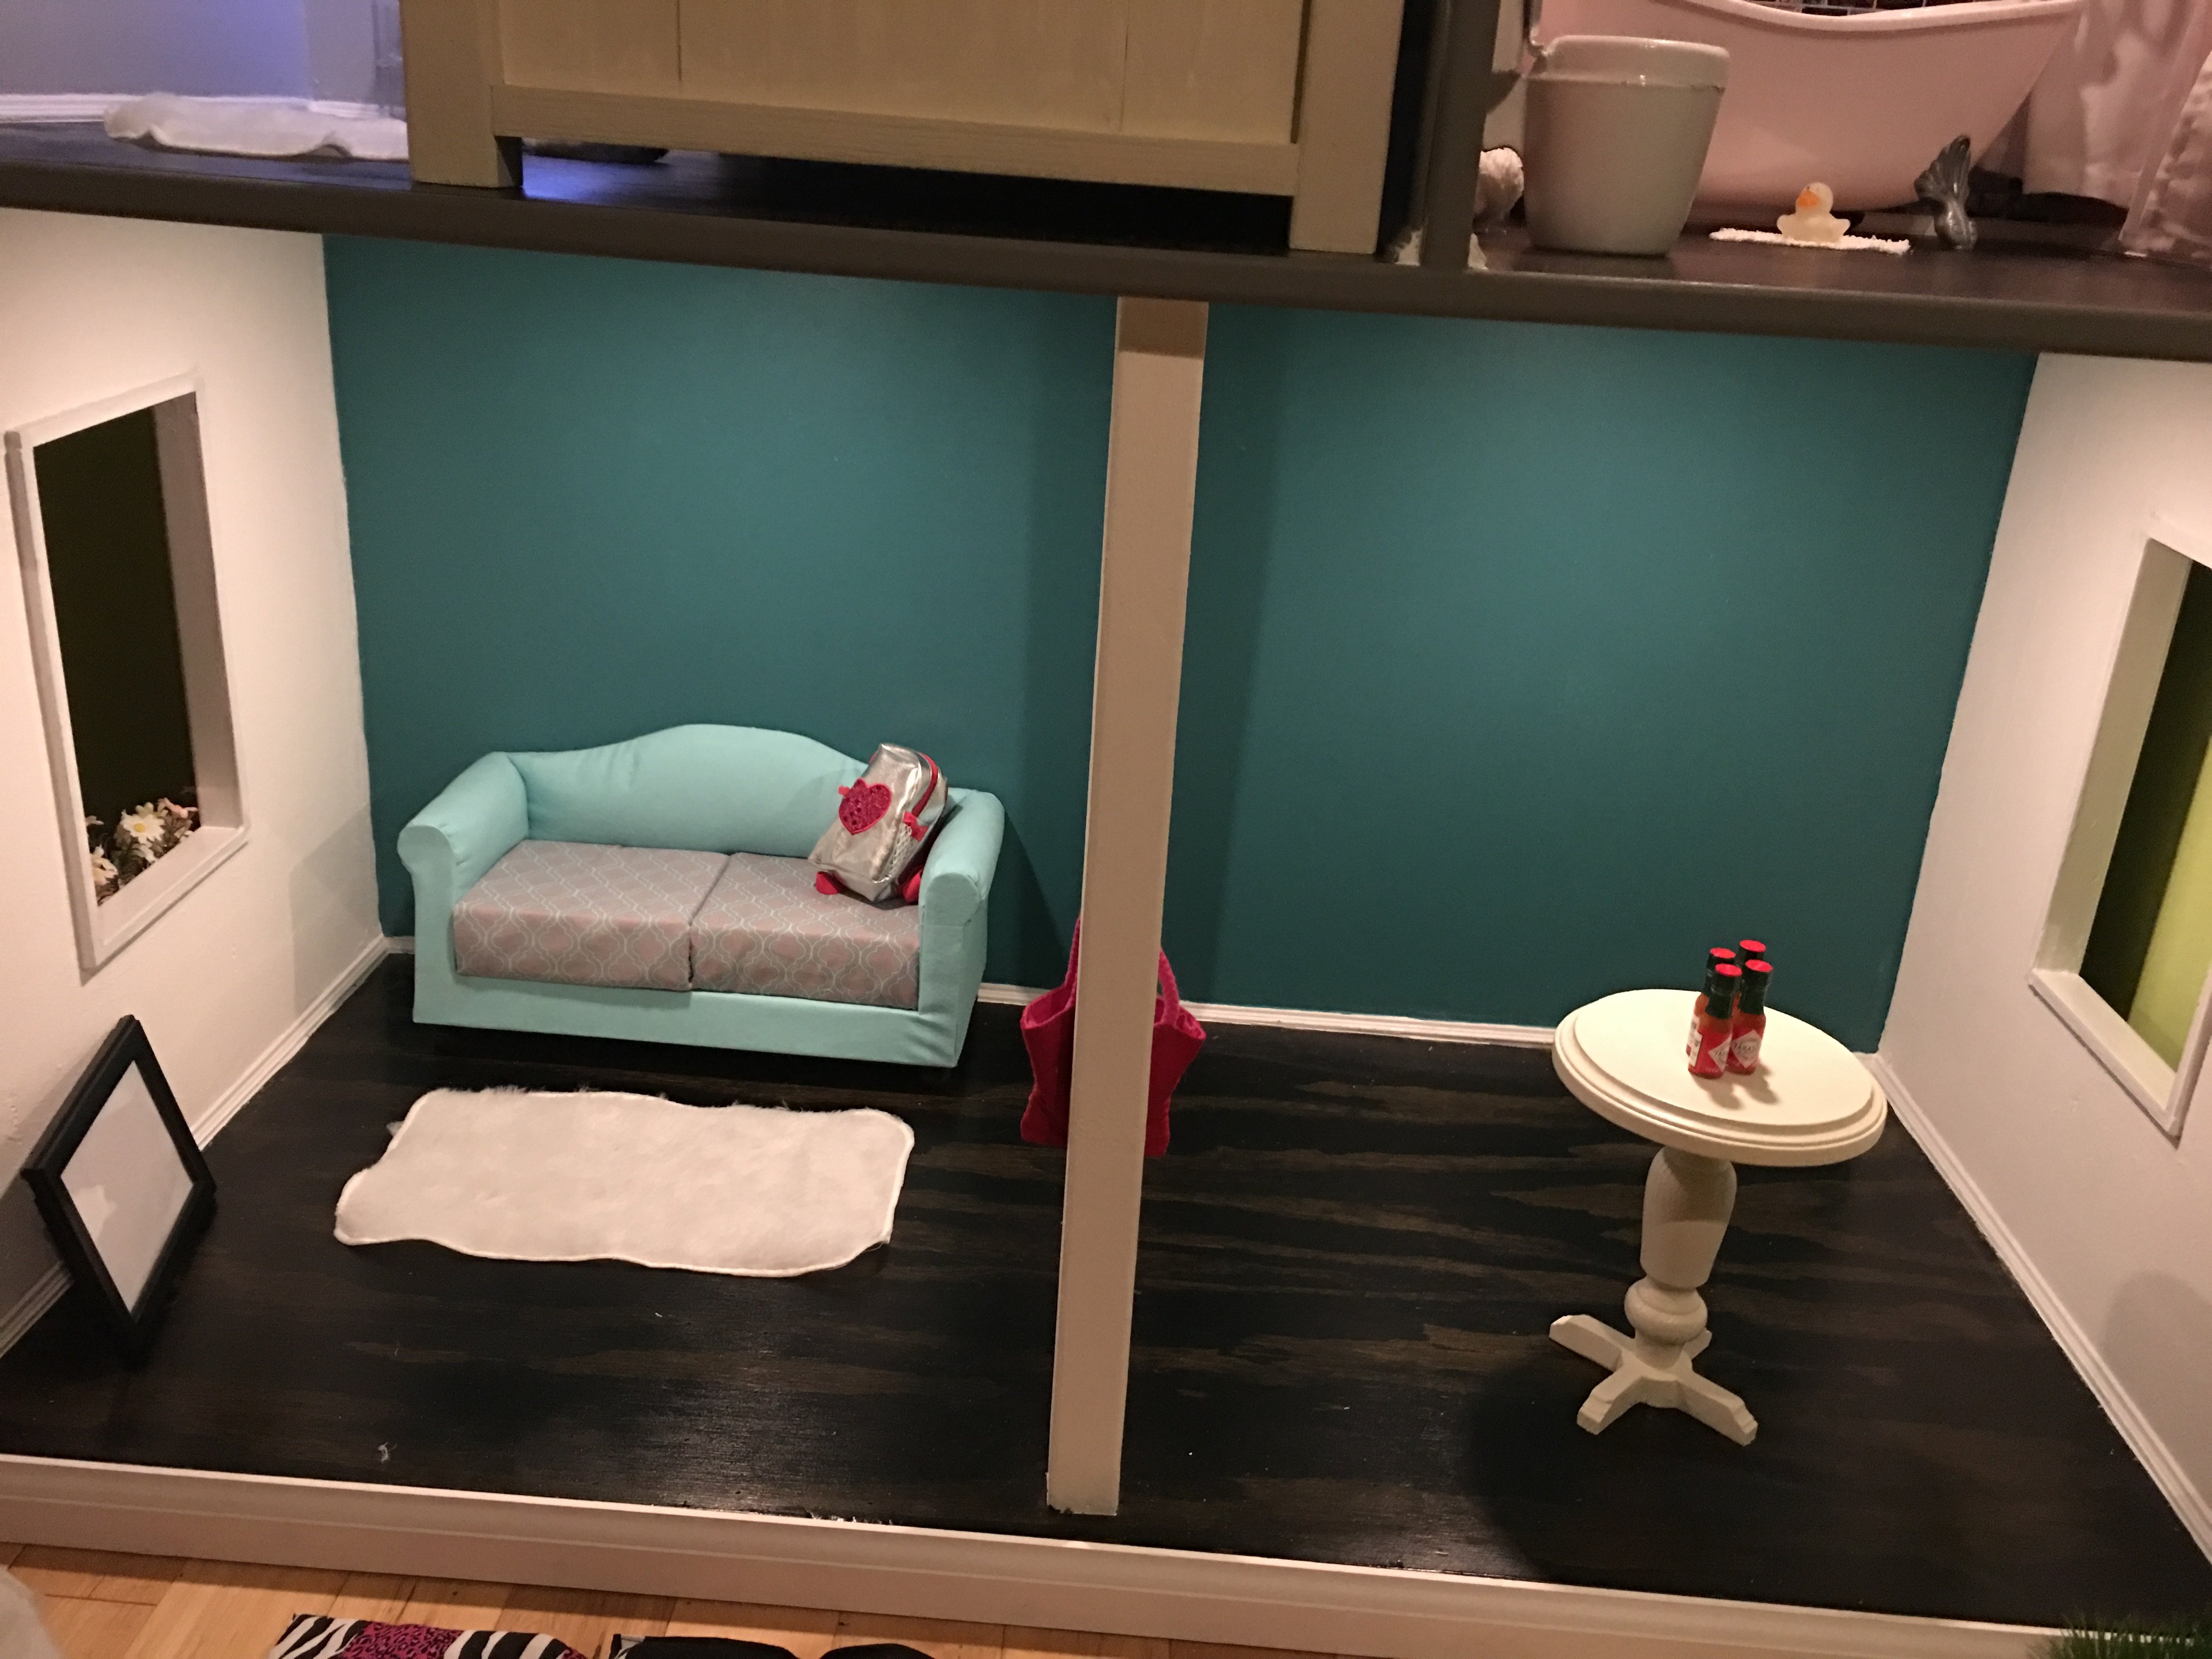
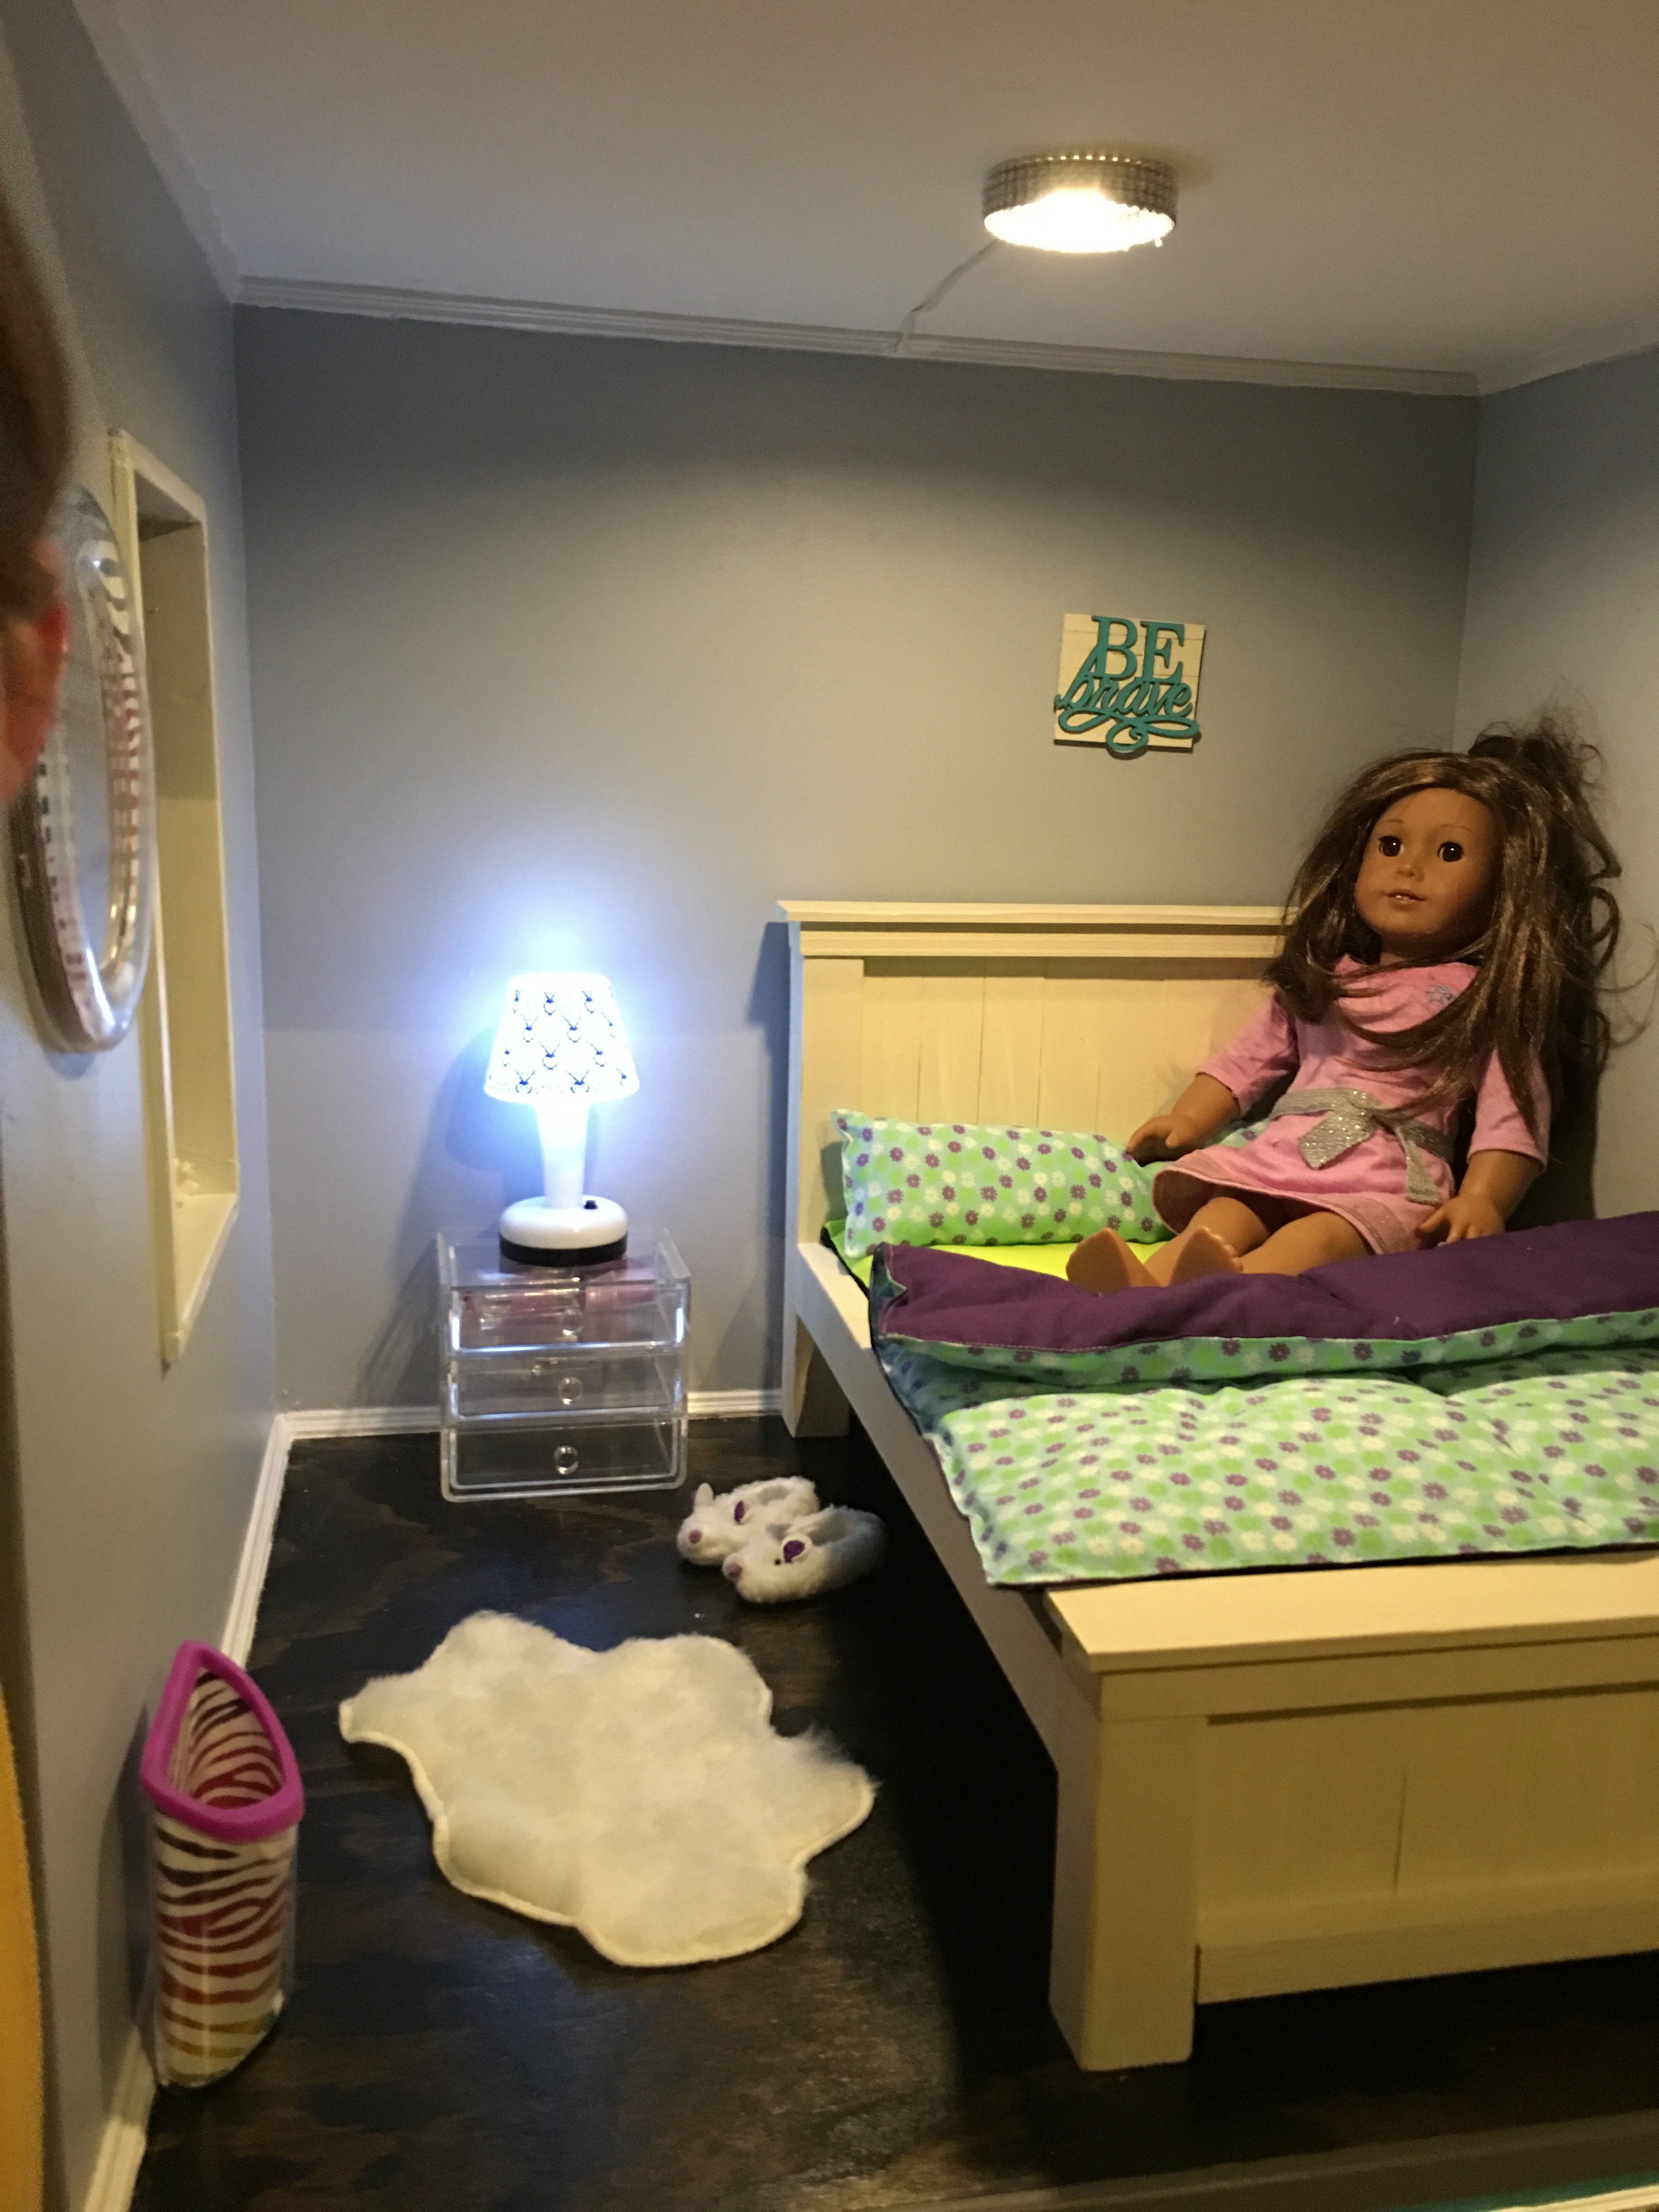

Built from Plan(s)
Estimated Time Investment
Week Long Project (20 Hours or More)
Finish Used
Kilz primer, Behr satin indoor paint (leftovers from our house)
Recommended Skill Level
Intermediate
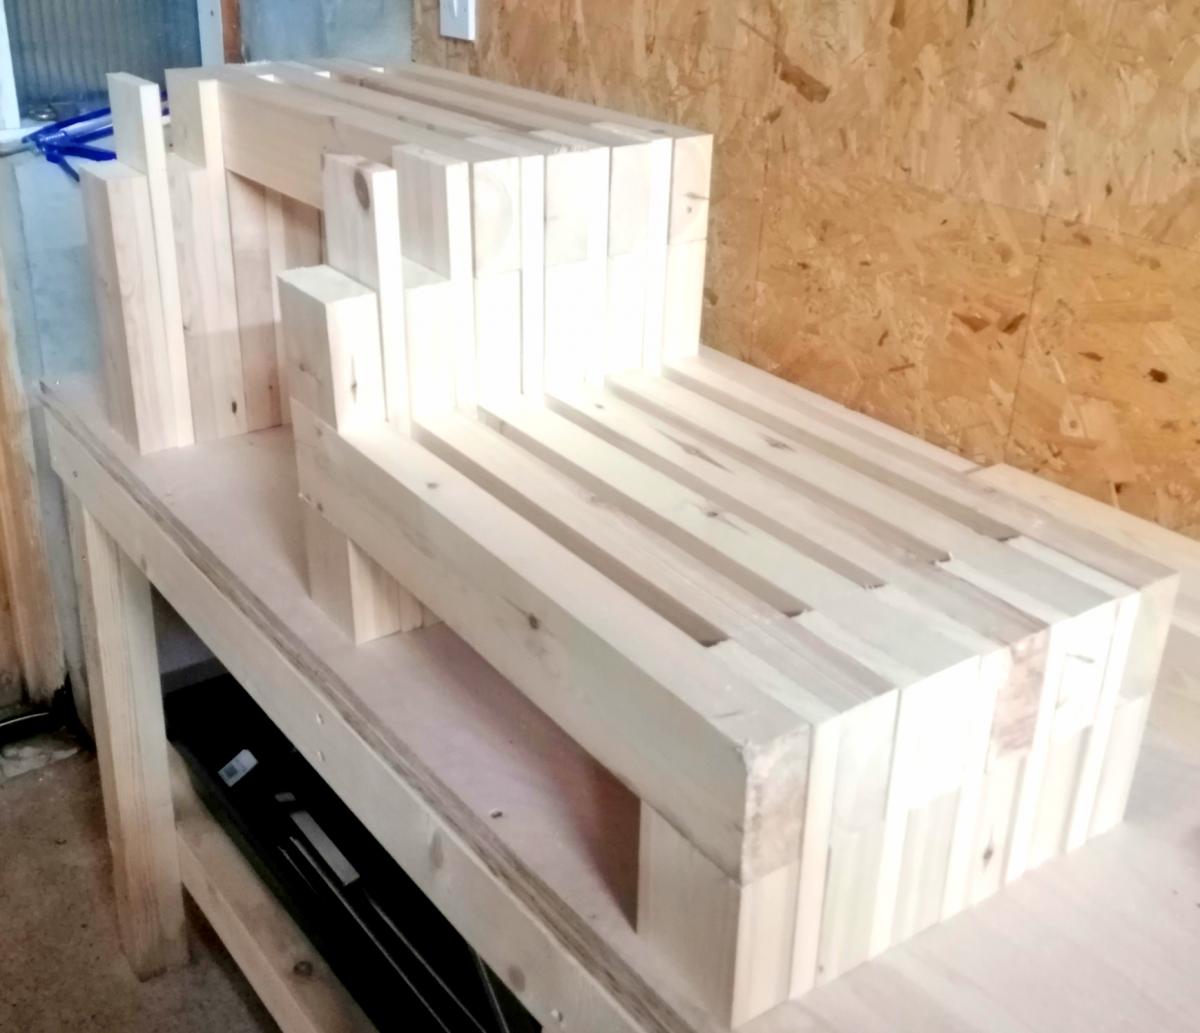
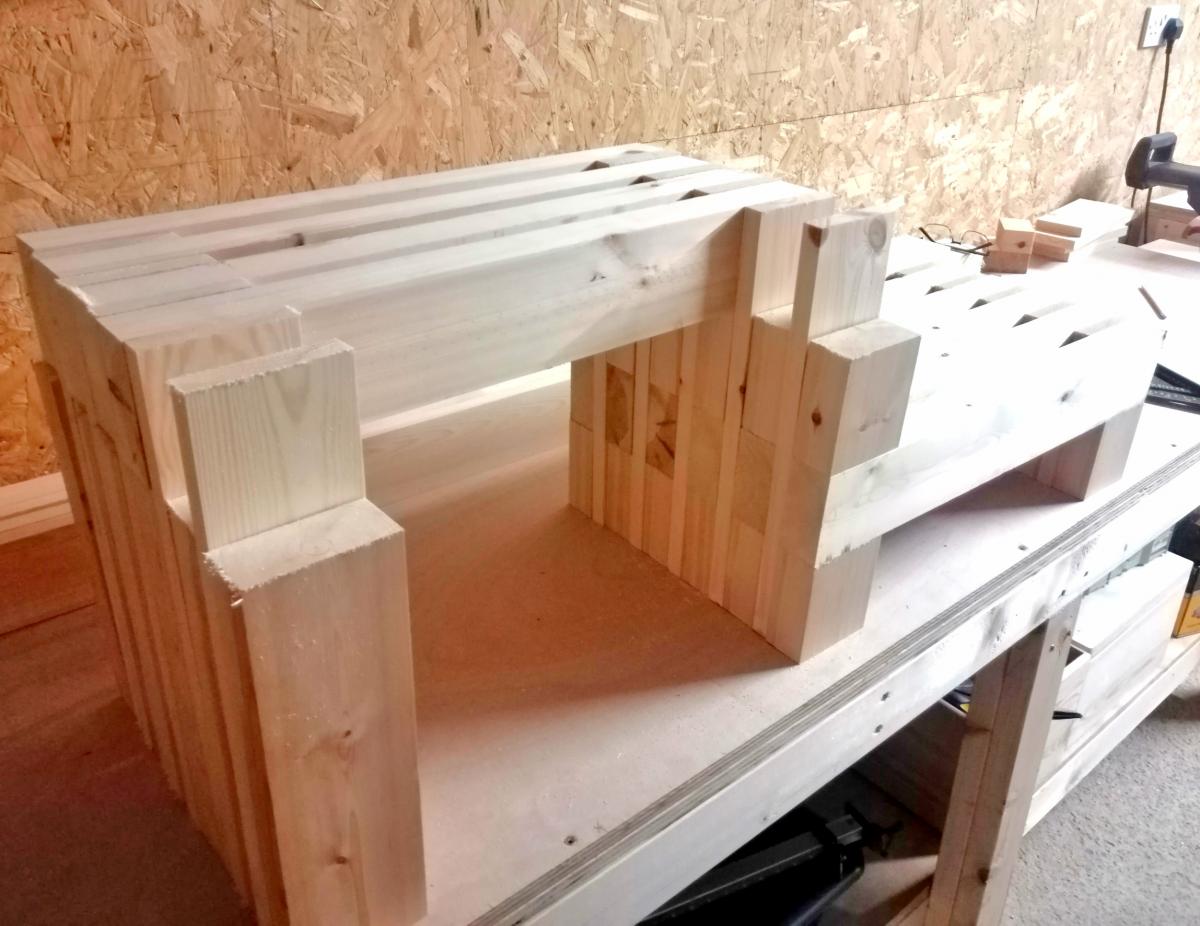
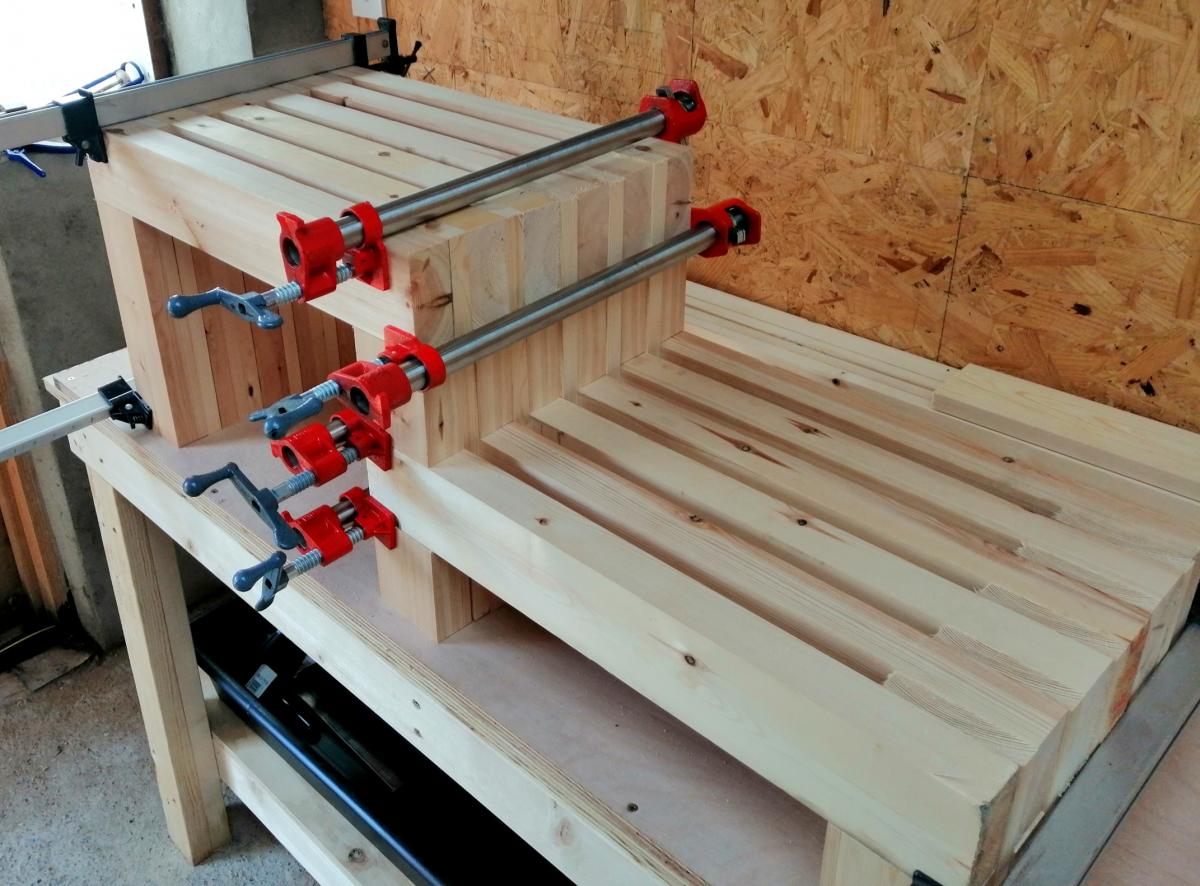
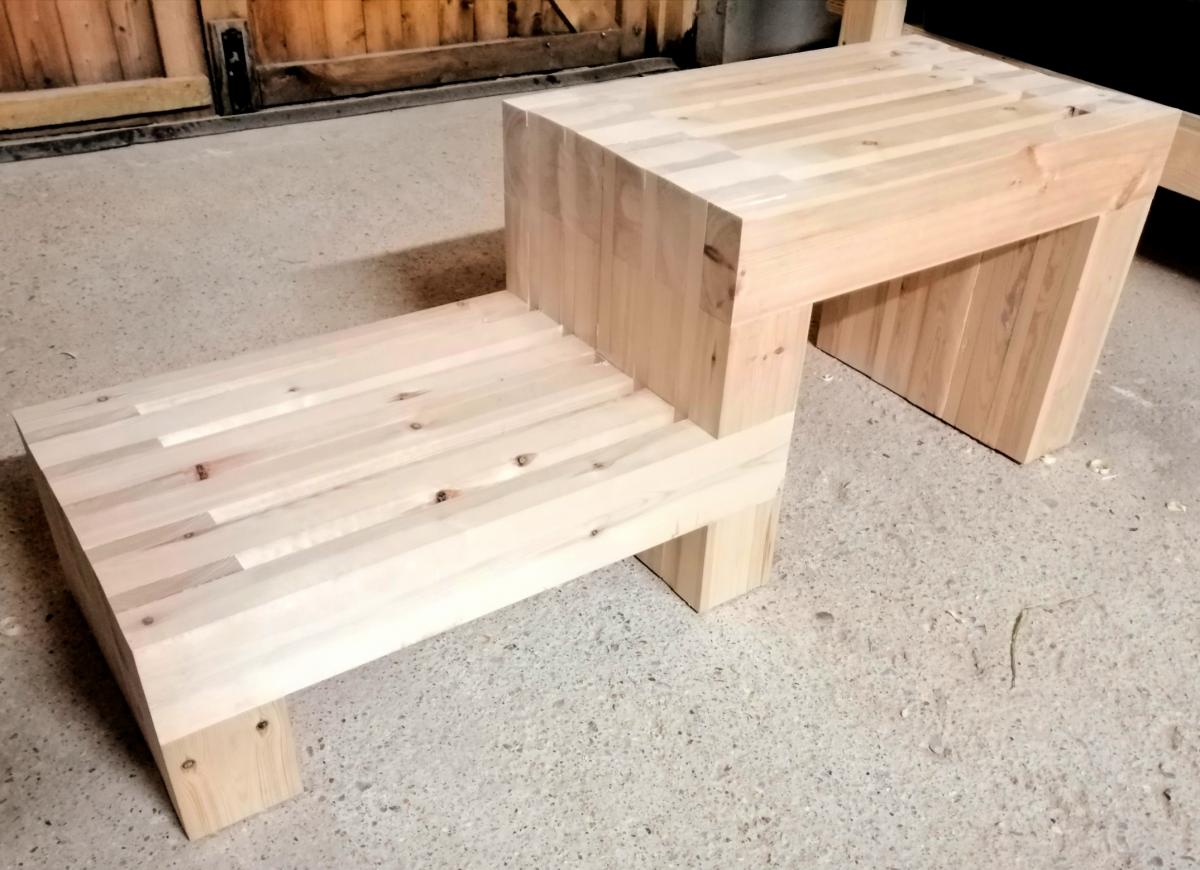
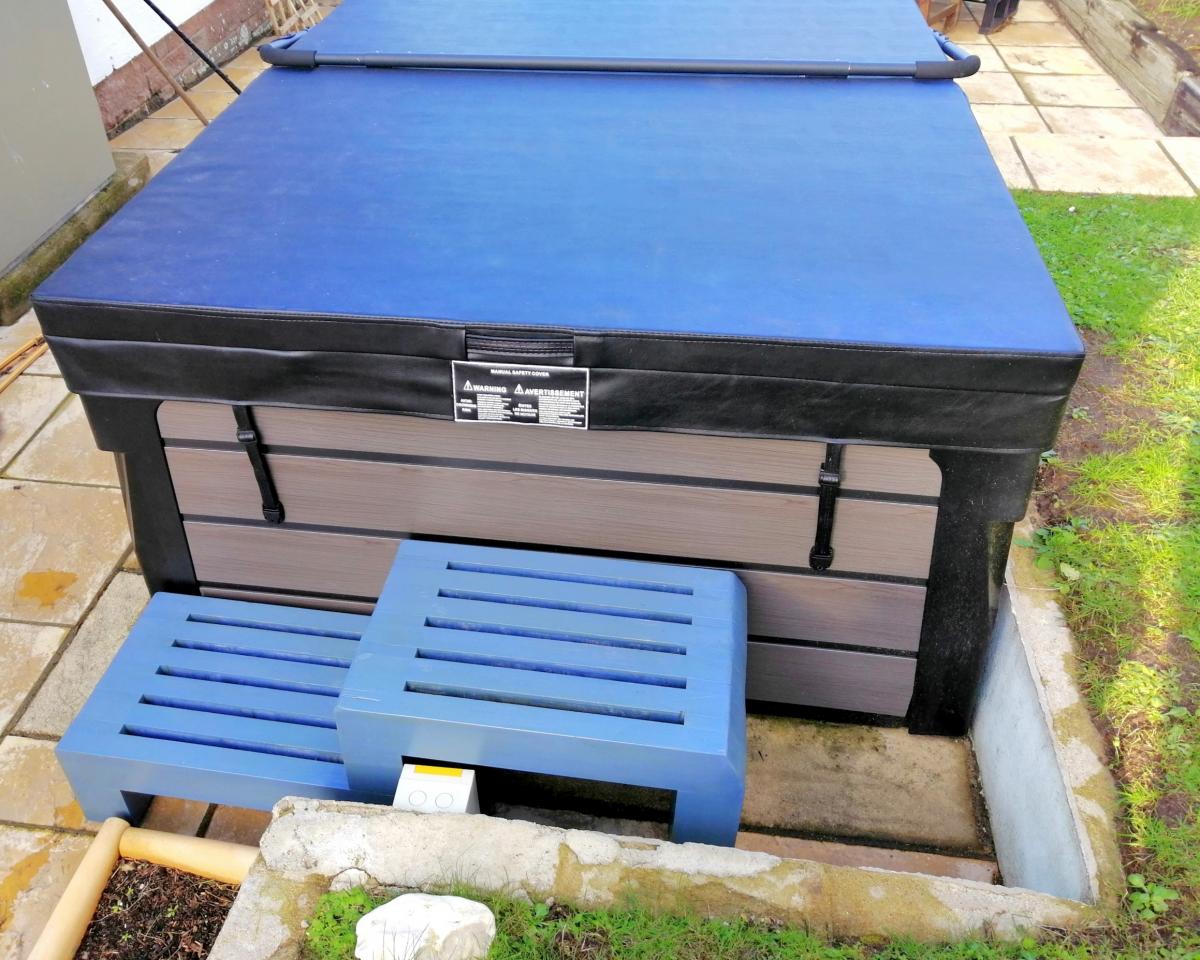
Slatted Bench / Steps
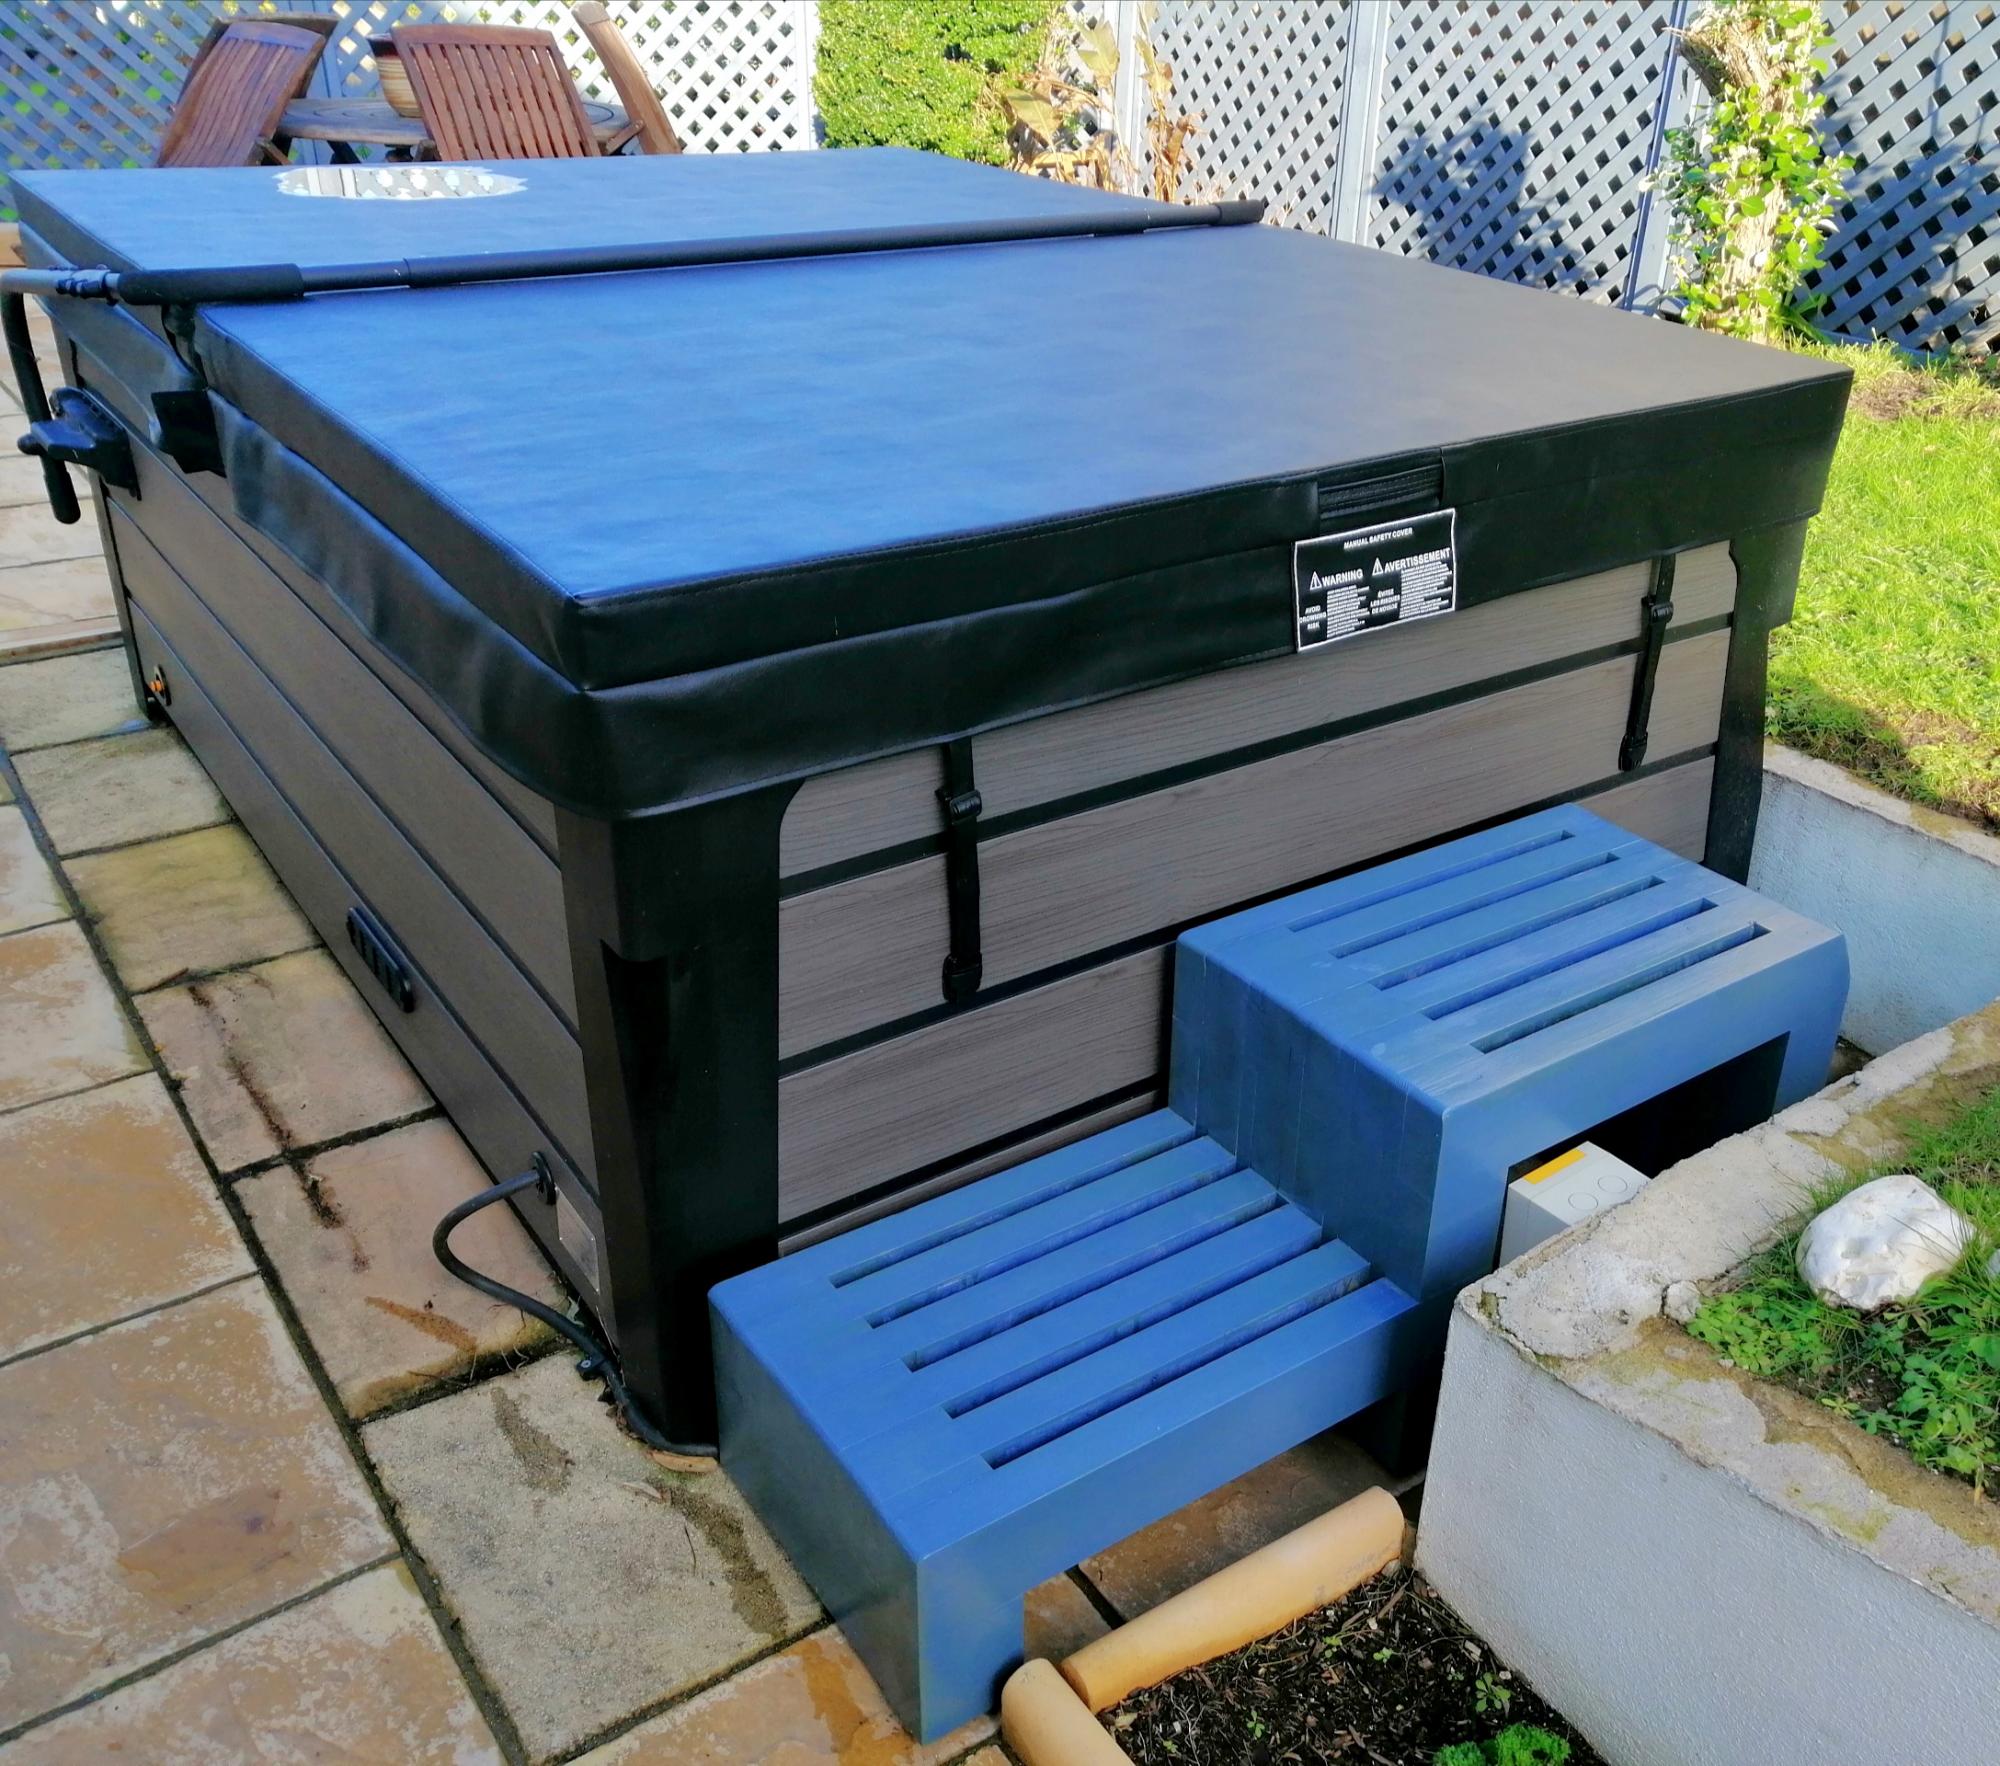
I saw Anna's slatted bench (and other members brags) and thought I could adjust the design for some hot tub steps.
The design is simple but effective, (but very heavy).
It is slightly more complex and the cuts need to be pretty accurate, (which mine weren't), but you can sand away most mistakes.
I ended up putting adjustable height feet on each leg. This assists with height but also keeps standing water off the wood.
Anyway, I put see through grip tape on the steps to avoid accidents and overall it does the job.
Built from Plan(s)
Estimated Time Investment
Weekend Project (10-20 Hours)
Finish Used
I used a preservative fence paint and then re-covered with 3 coats of external yacht varnish.
Recommended Skill Level
Starter Project
Comments
Loft Bed
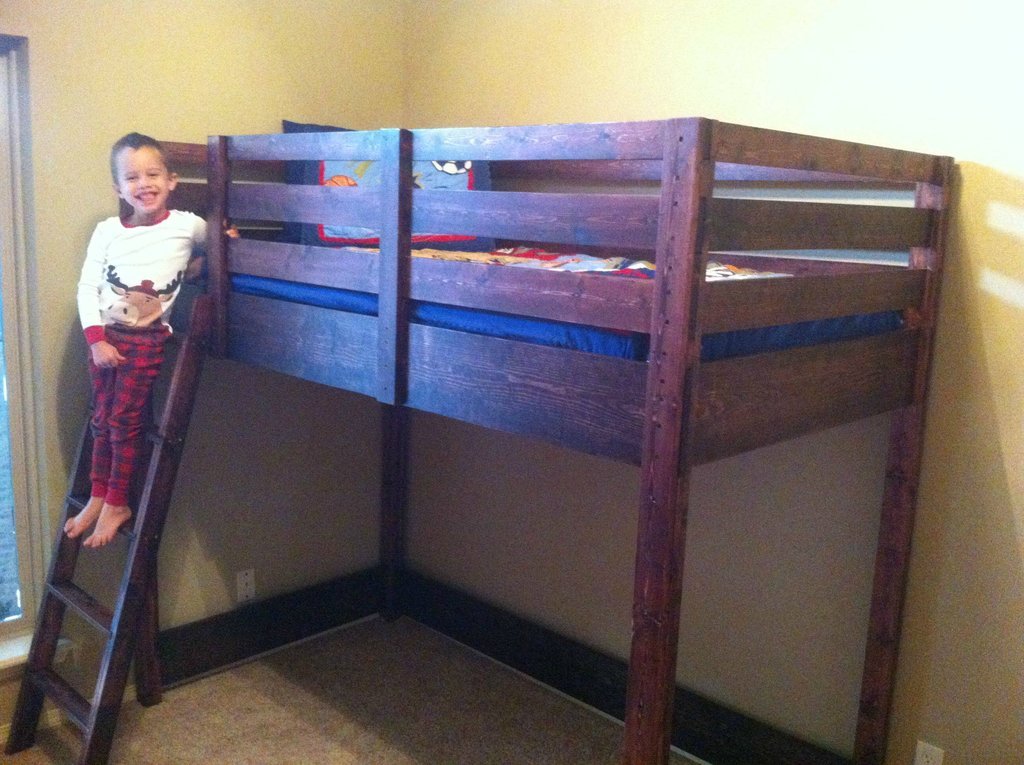
My wife and I completed our son's loft bed in December for his Christmas present. My wife found this bed on Pottery Barn's website and I found these plans on Ana White. Everything was pretty straight-forward. It was a great project and we had a lot of fun building something together. We made a few mods to the plans like height and the railings. I really like how it comes apart for moving and our son loves sleeping up there! Protip: Be careful with the wood glue where the bed is designed to come apart. I got a little sloppy and had to do some hammering to disassemble for staining/sealing. Everything went back together very easily, though.
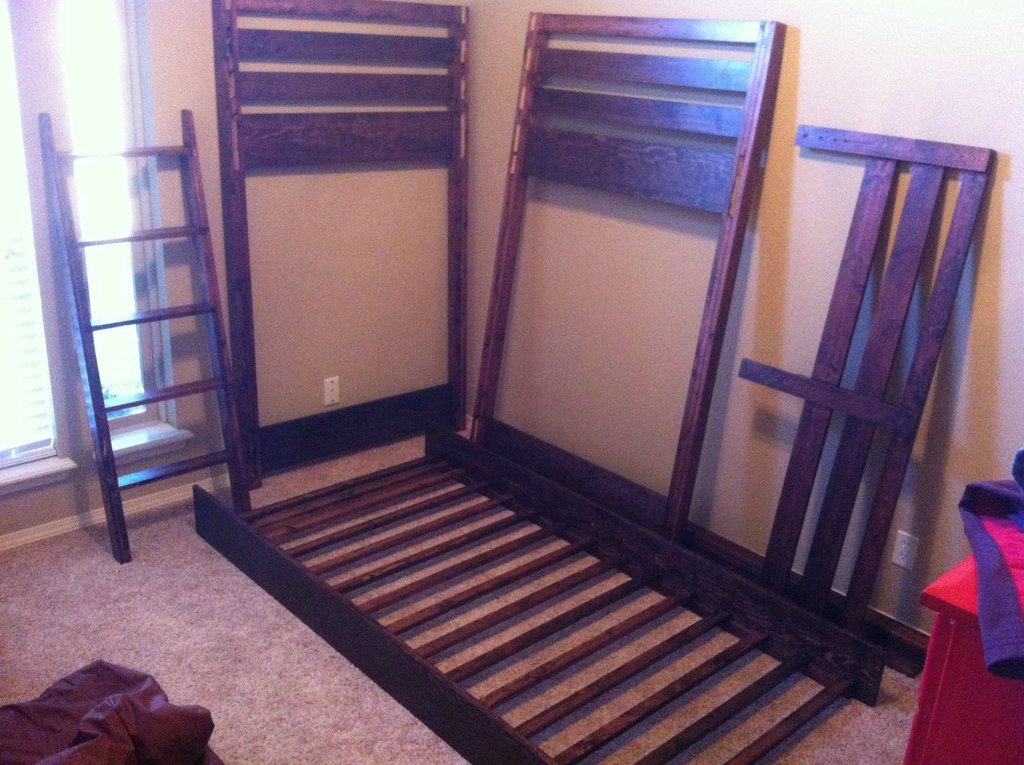
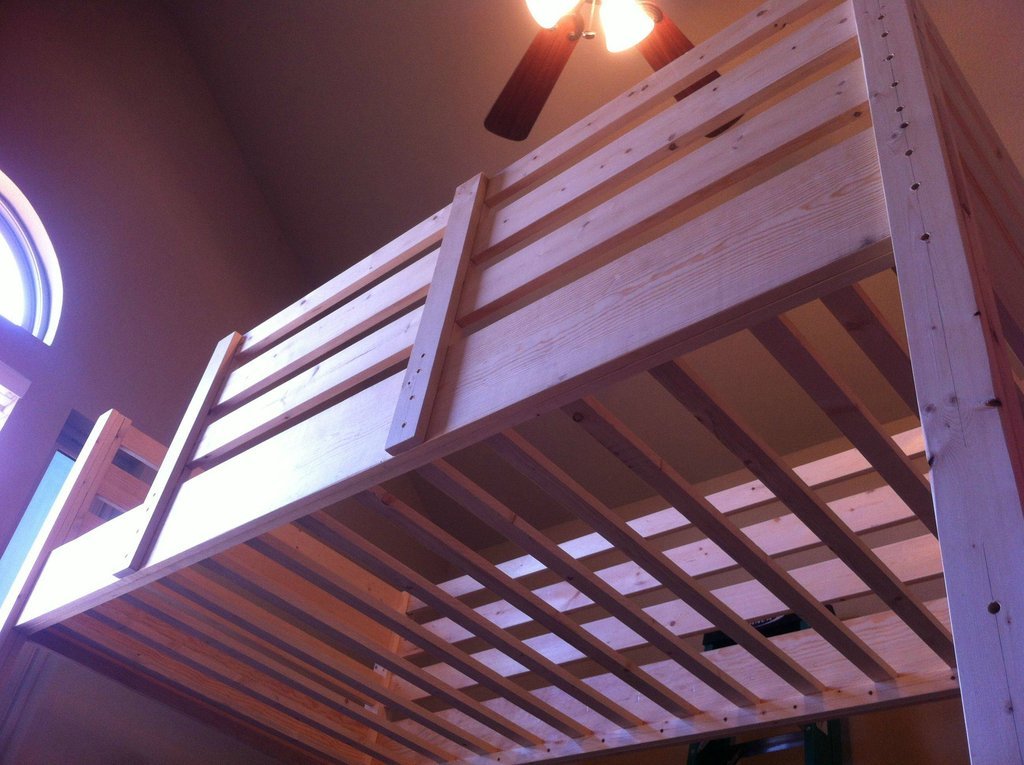
Built from Plan(s)
Estimated Cost
$275
Estimated Time Investment
Week Long Project (20 Hours or More)
Finish Used
Minwax Red Mahogany stain and Minwax Clear Satin Polyurethane. Sand before sealing then wipe down with mineral spirits repeat between coats. We only did 2 coats.
Recommended Skill Level
Beginner
Study Room Cabinet
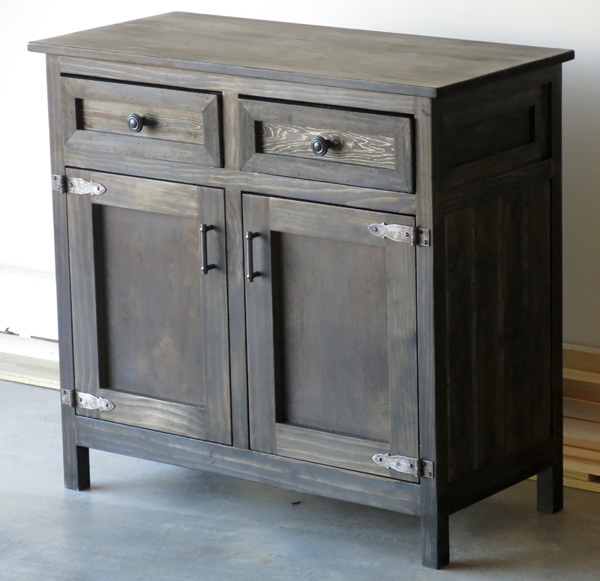
Cabinet from my own design. I built one for us and a relative saw it and liked it so much asked me to build them one the same.
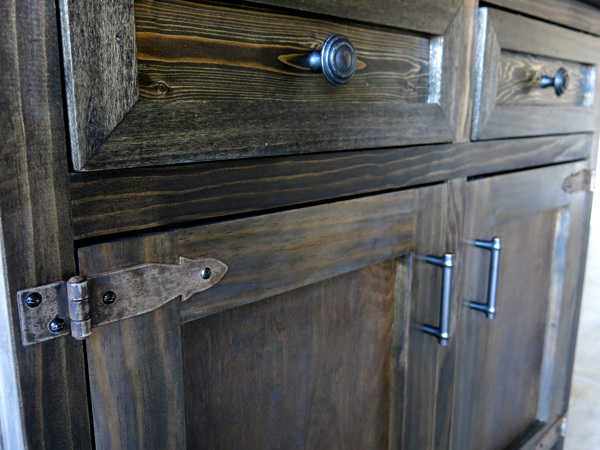
Estimated Cost
$200
Estimated Time Investment
Weekend Project (10-20 Hours)
Finish Used
Minwax Ebony, Satin Poly and Wax finish.
Recommended Skill Level
Beginner
Comments

In reply to Love it! by Ana White Admin
Mon, 12/15/2014 - 12:57
Happy to share the plan...
Hi Ana. I'm happy to share the plans for this but all I have is the main sketchup drawing and my cut list in excel. Not sure if there is an easy way to create the exploded diagrams you normally have? Happy to give something back to you and the rest of your fans.

Thu, 12/18/2014 - 07:57
Awesome!
I love everything about this....the design, the different wood grain on the drawers, the color, the finish, and especially the hardware. Can I ask you to share where you got the hinges and how you got that finish? I hope you're able to post the plans because it's awesome.
Workbench
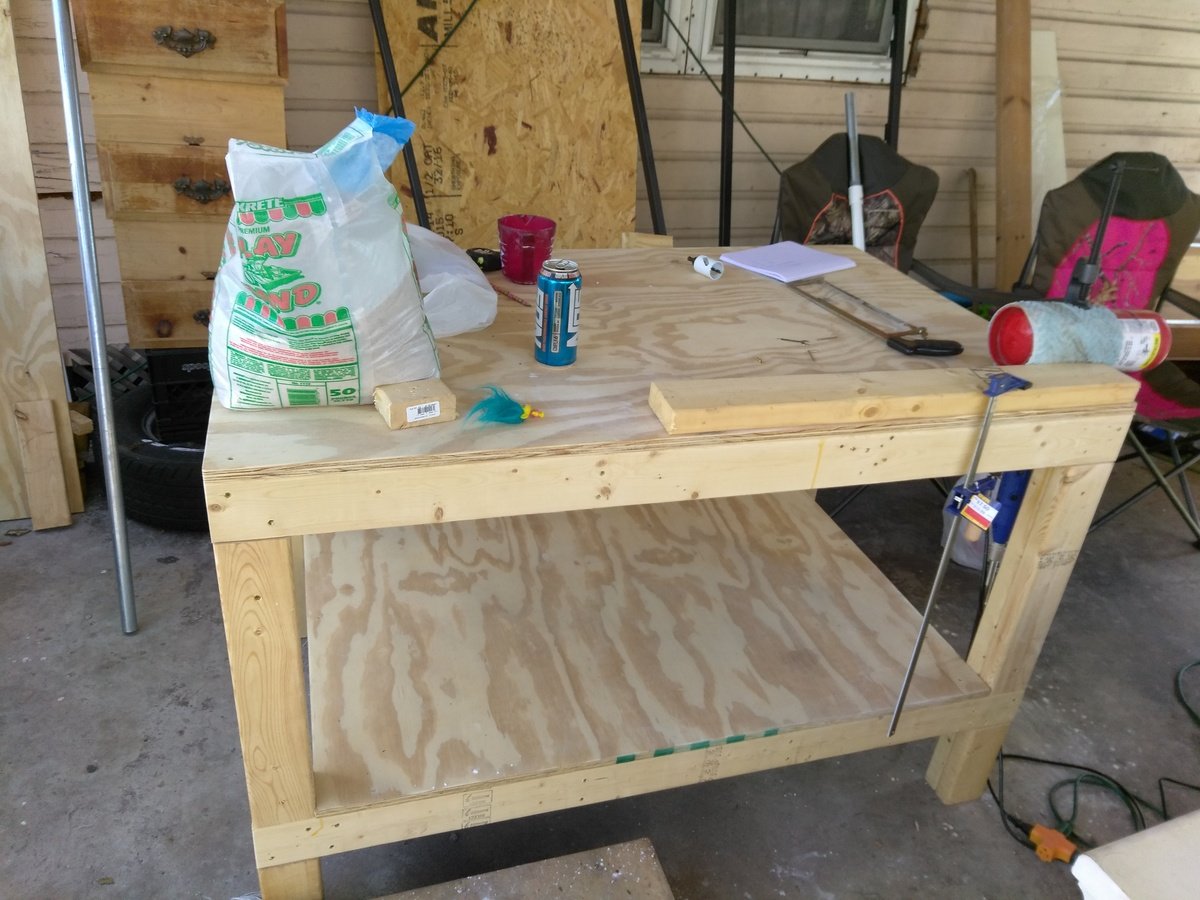
I have added a few things to make this workbench comprehensive. I added a paper towel holder, go Jo holder, cord hooks, electric bar, and I enclosed the sides and put a door on the front and a hinged pegboard on the back which makes it able for me to store all of my tools and lock them up.
Built from Plan(s)
Estimated Cost
100.00
Estimated Time Investment
Day Project (6-9 Hours)
Finish Used
No finish
Recommended Skill Level
Beginner
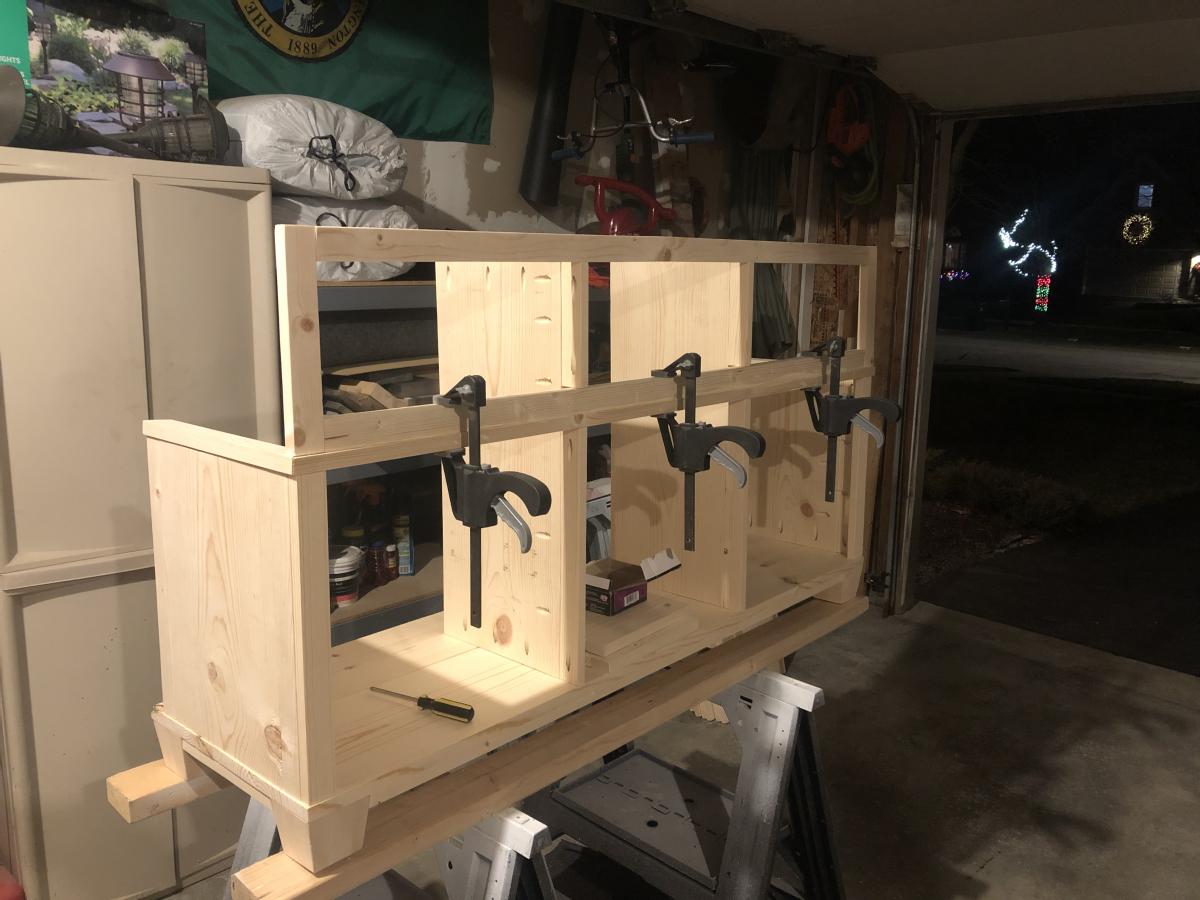
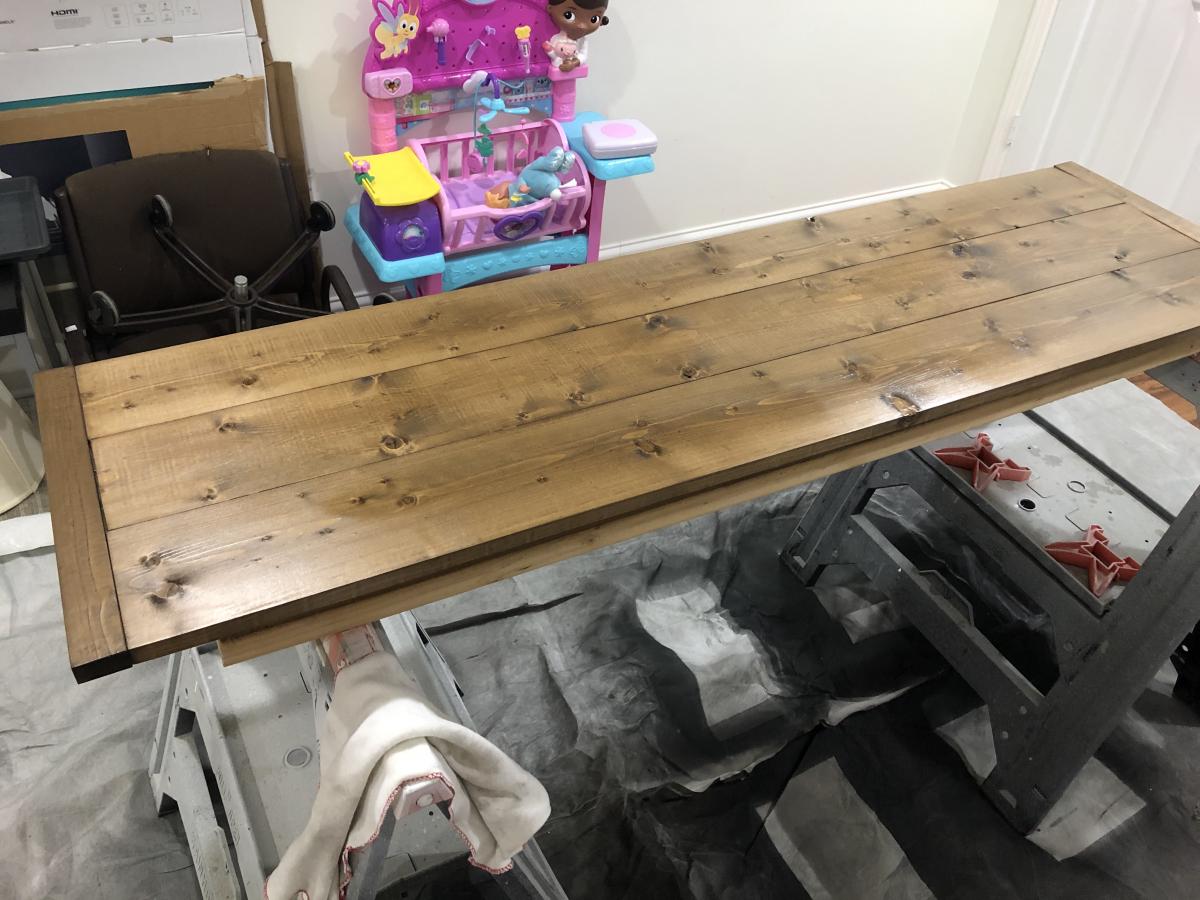
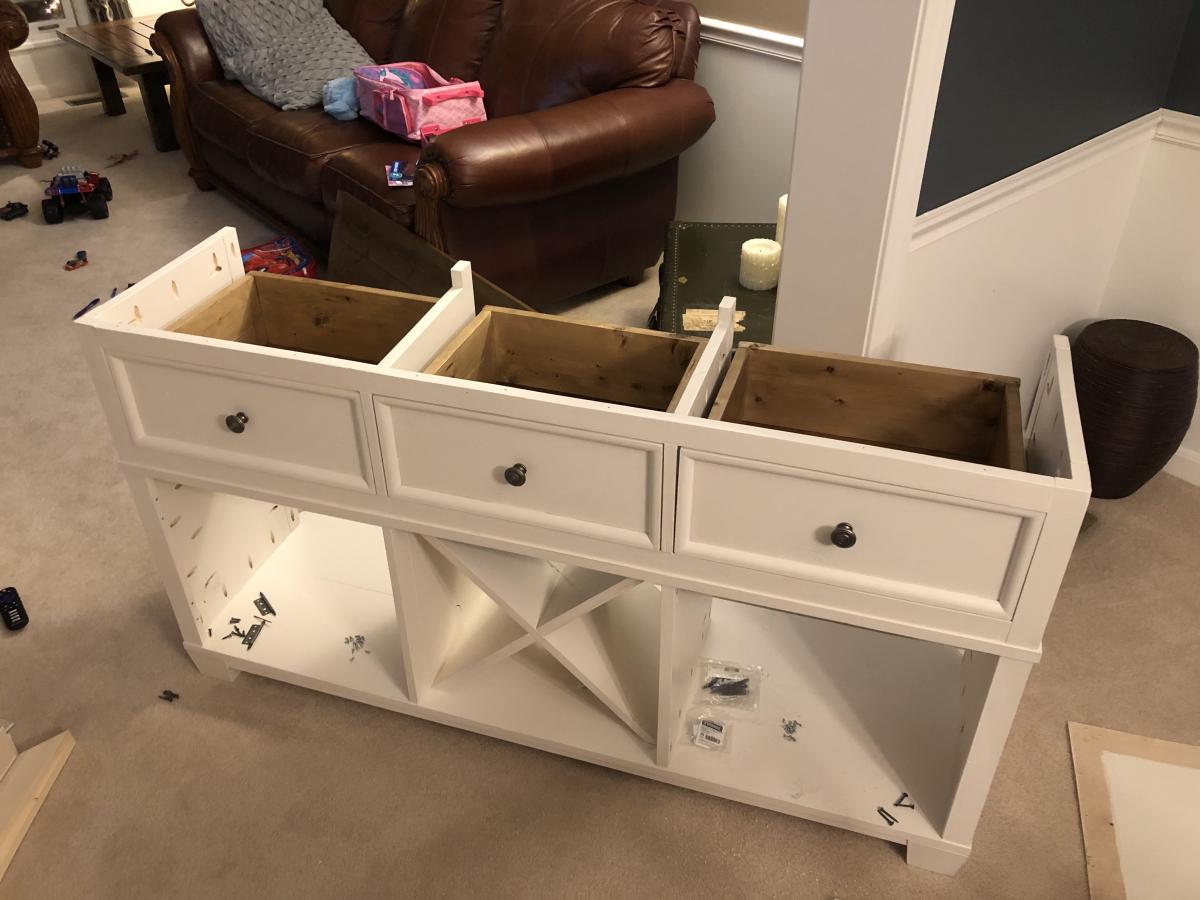
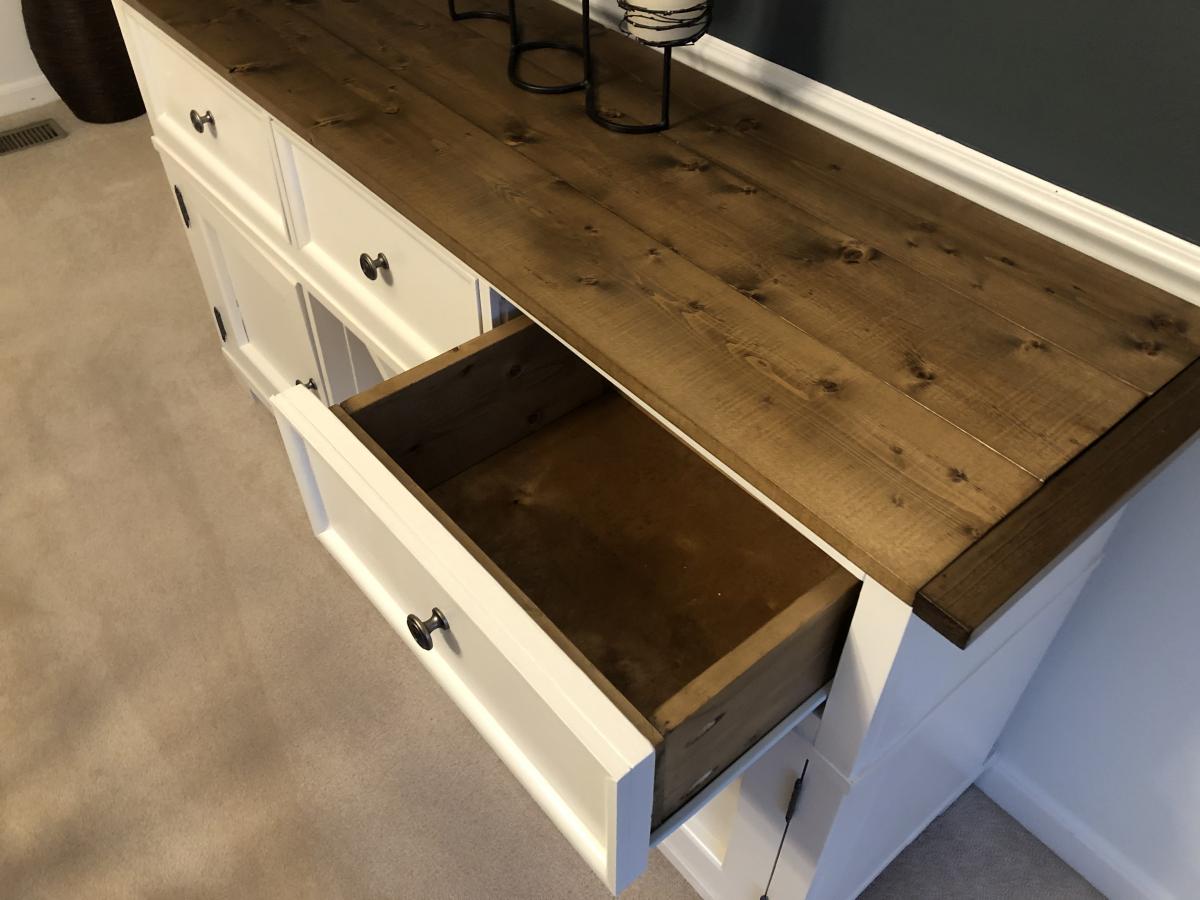
Salsa Console/Buffet Table
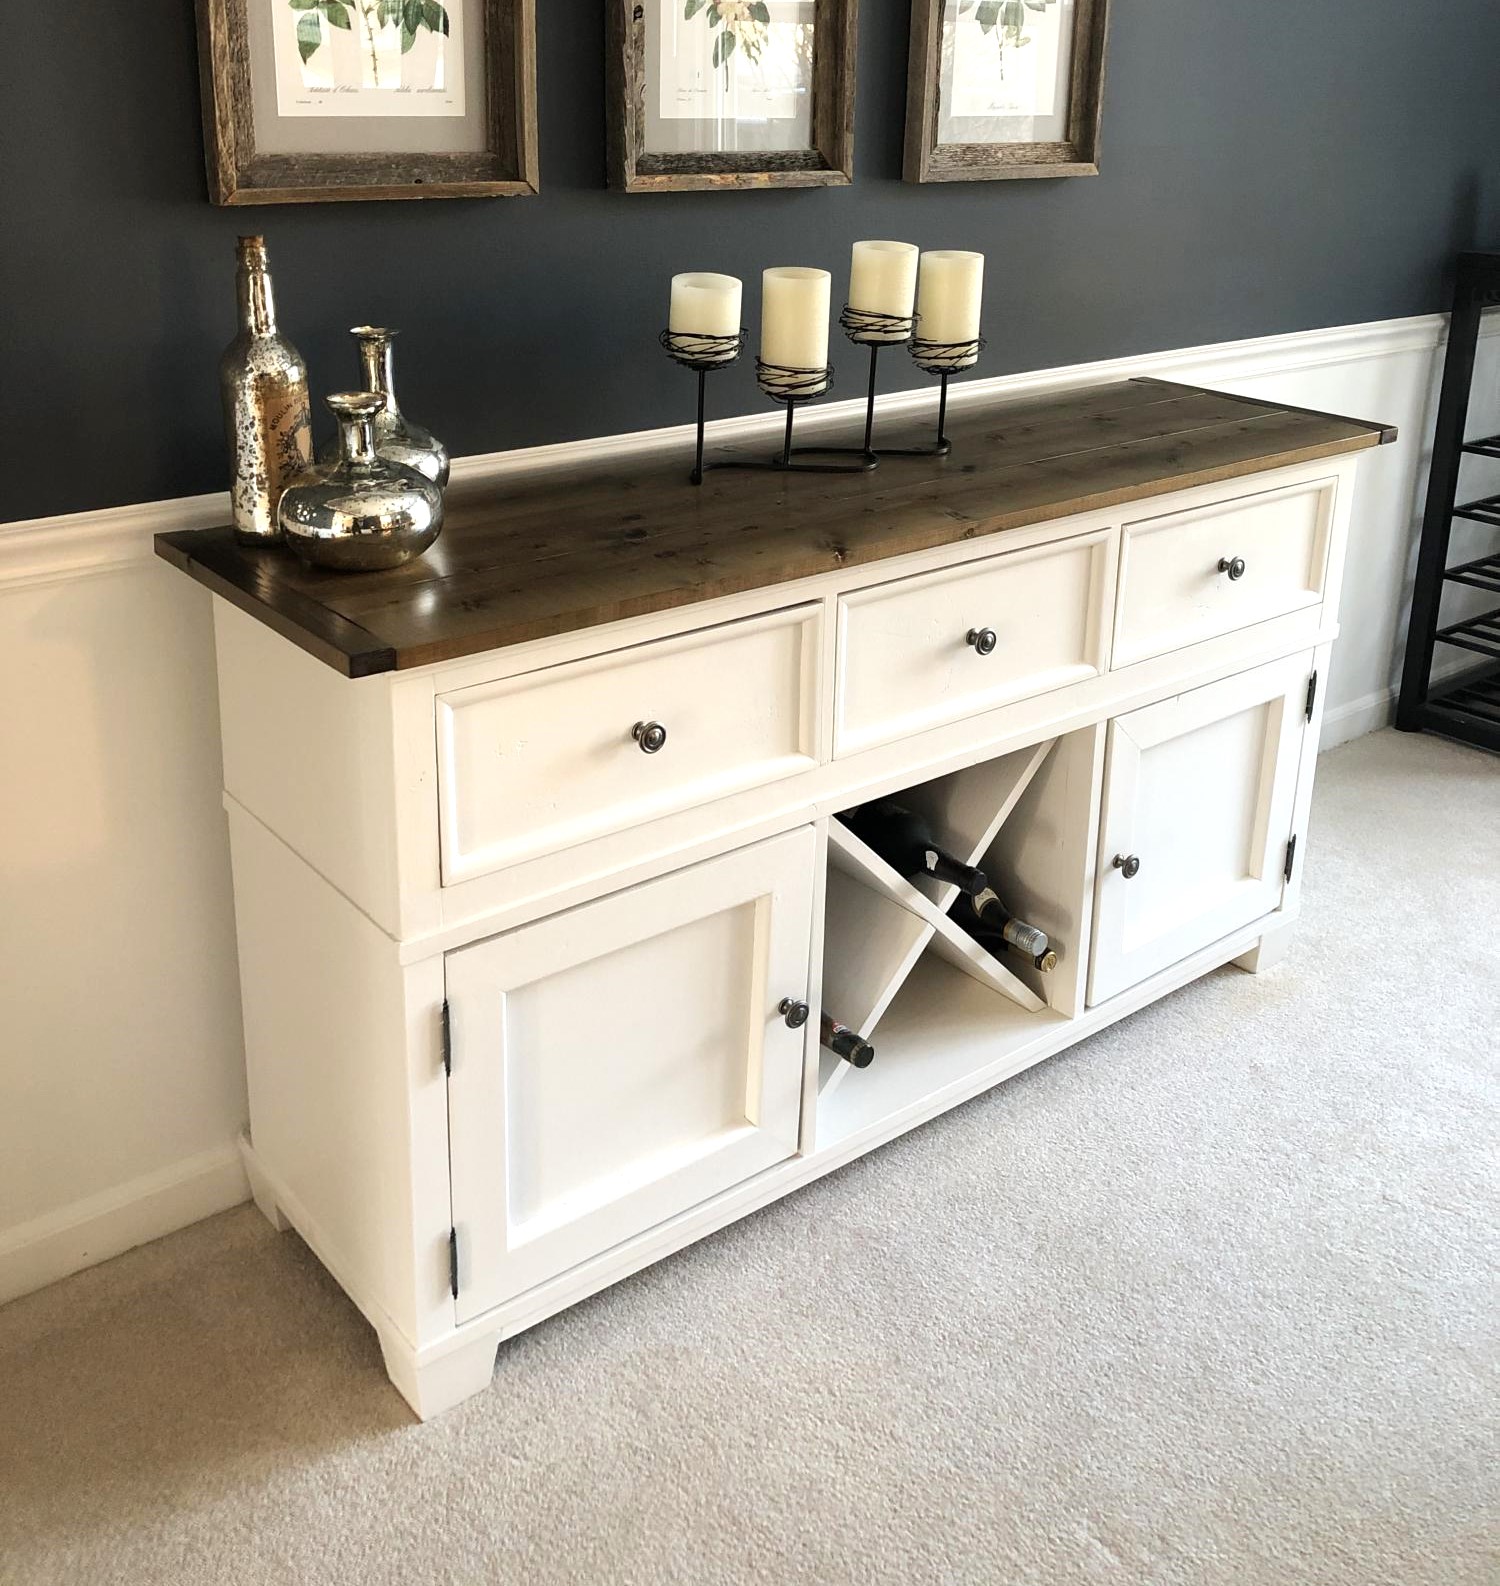
This is by far the most complex piece that I've built off of Ana's site, and the first time I've done drawers or doors on anything. Thanks so much for the awesome plans! Be sure to check the supplies list carefully - I ended up bringing a lot of lumber back to Home Depot. But this is by far my biggest "win" in furniture making so far!

Built from Plan(s)
Estimated Cost
200
Estimated Time Investment
Week Long Project (20 Hours or More)
Finish Used
Behr white deck stain (Smokey White) (base)
Varathane Aged Wood Accelerator (top, drawer interiors)
Varathane Water-based Poly (Oil-based will add a yellow tint when applied onto white stain/paint)
Varathane Aged Wood Accelerator (top, drawer interiors)
Varathane Water-based Poly (Oil-based will add a yellow tint when applied onto white stain/paint)
Recommended Skill Level
Intermediate
Comments

Wed, 01/13/2021 - 09:31
That looks great! It looks…
That looks great! It looks like it was meant to be in that spot. Nice work!
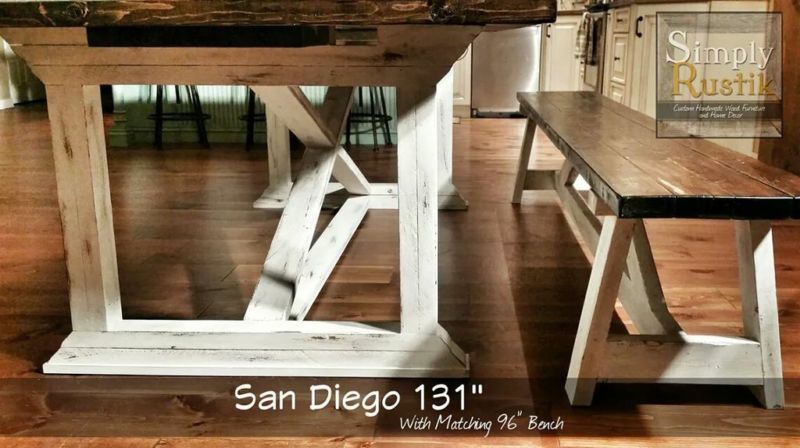
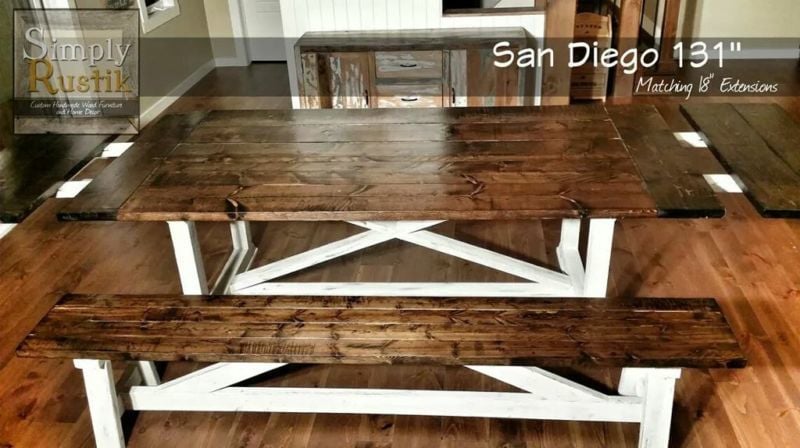
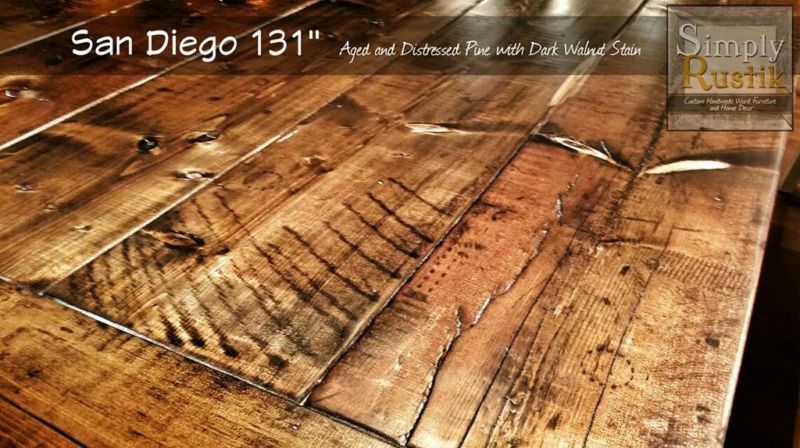
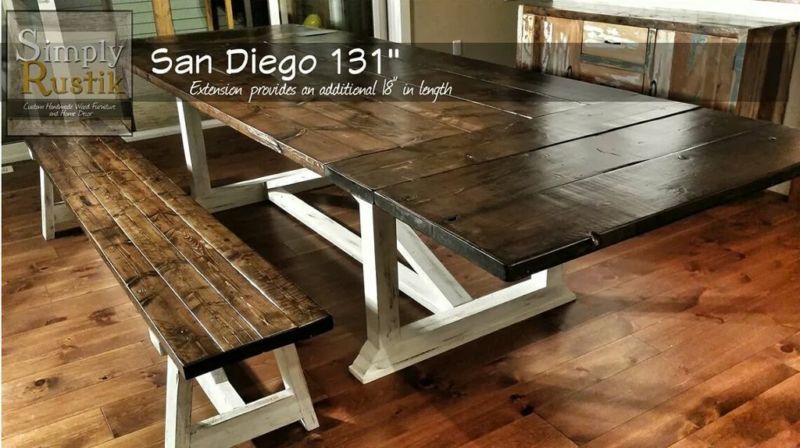
11-Foot Rekourt Dining Table w/ Extensions
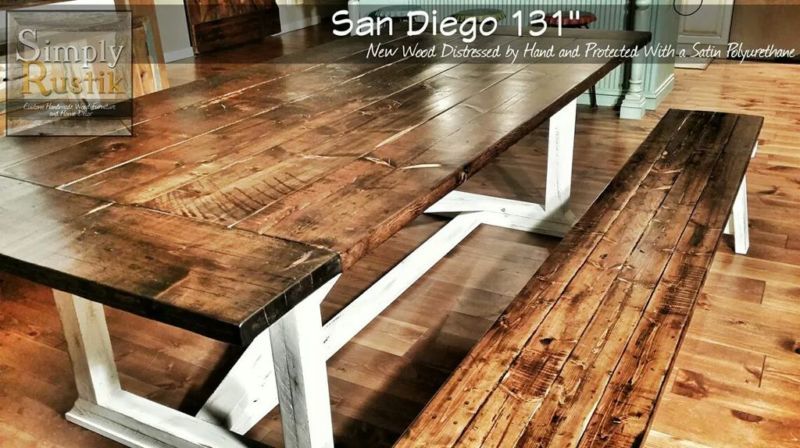
This Rekourt dining table was a slightly more complicated build as it involved planning for removable extensions. I finished the base using a slightly off-white milk paint from Homestead House Paint Company (Canadian) with a distressed finish.
The tabletop was stained using a process of Orange Pekoe Tea solution, followed Steel Wool and White Vinegar solution, stained with Minwax's Dark Walnut stain and finished with an oil-based satin polyurethane from Varathane (Canadian subsidiary of Rust-Oleum).
To achieve the distressed and antiqued look on the base, I first applied stain on the edges of the base and on some middle parts where I knew I would sand down. I then applied vaseline on certain spots that I had stained which created a beautiful effect of crackling paint. I then painted the entire base using VOC-free milk paint from the Homestead House Paint Company. I even went over the vaseline spots. As soon as the paint dried, the spots that had vaseline, you could immediately notice that the paint had not adhered to the wood and it started cracking which made these wood pieces appear old and weathered.
For the extensions, I carefully cut out two openings on the first leg braces that touch the bottom of the tabletop. These were JUST wide enough to allow two 2x4's to slide in and out with a bit of force, but without being too tight. I made sure I left enough space for when the wood would expand. The extensions are basically two 2x4's support pieces with a two 10" board planked together for addition breadboards. I used the same width of boards as the breadboards to maintain a consistent look. I painted the support pieces white to contrast with the tabletop and to match the base.
I really enjoyed this one as it challenged me to modify the plan and come up with my own solutions/designs.
To see my other projects, make sure to visit my facebook page (only after you have spent enough time on Ana's site!)
www.facebook.com/simplyrustik
.

Built from Plan(s)
Estimated Cost
Table ($140)
Bench ($25)
Bench ($25)
Estimated Time Investment
Week Long Project (20 Hours or More)
Finish Used
Orange Pekoe Tea;
Steel Wool (#0000) and White Vinegar;
Minwax Dark Walnut Oil-based Stain;
Varathane Pro Satin Oil-Based Polyurethane
Limestone Milk Paint (from Homestead House Paint Company)
Steel Wool (#0000) and White Vinegar;
Minwax Dark Walnut Oil-based Stain;
Varathane Pro Satin Oil-Based Polyurethane
Limestone Milk Paint (from Homestead House Paint Company)
Recommended Skill Level
Intermediate
Comments

Tue, 12/16/2014 - 15:36
I looooove the finish of your
I looooove the finish of your table top. So pretty! Great job!

In reply to I looooove the finish of your by handmadewithash
Wed, 12/17/2014 - 08:09
Thanks for the comment!
Thanks for the comment!
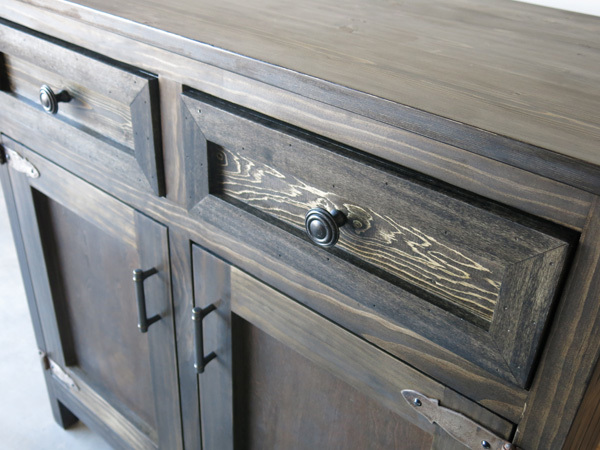
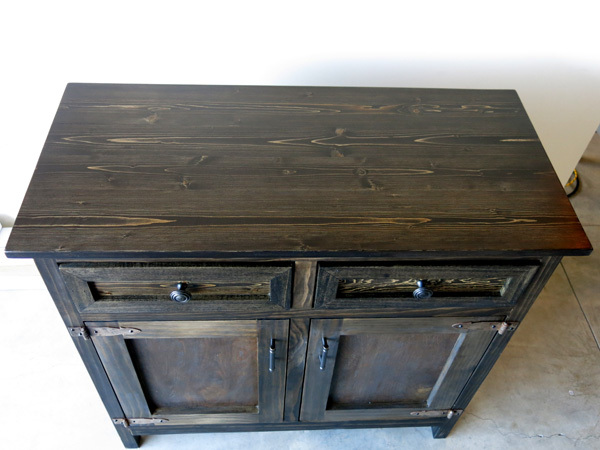
My Rustic Console Table!
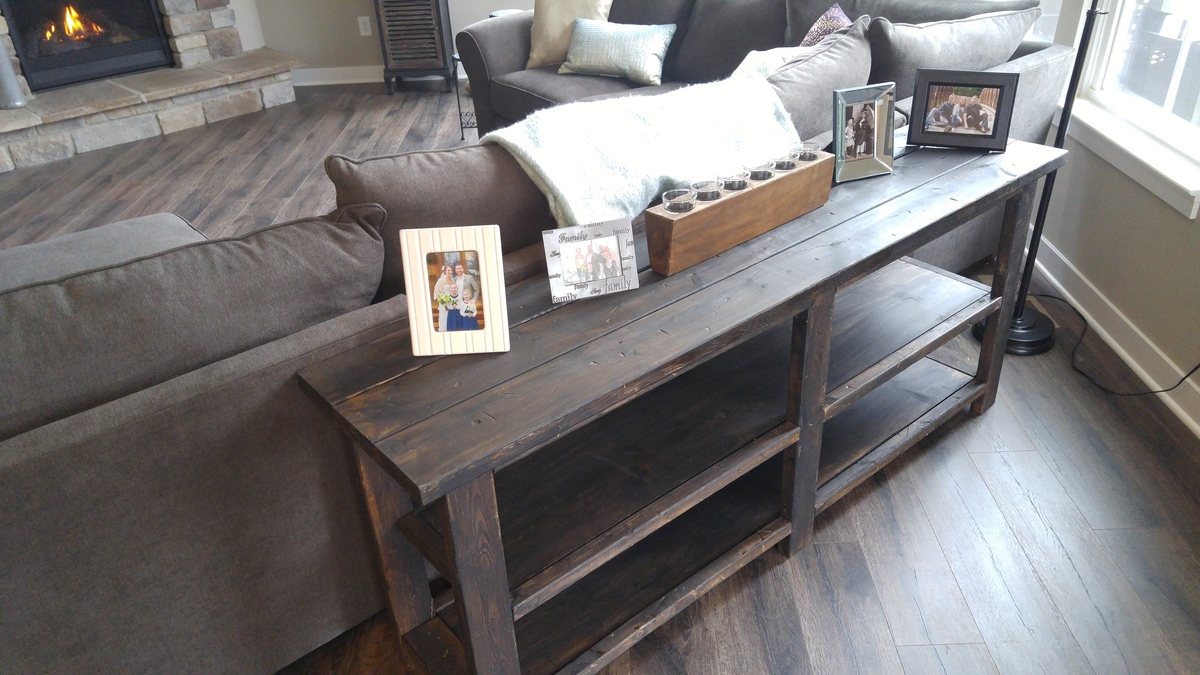
Couldn't be happier with how this turned out! I was going for a rustic look so I beat up and scratched up all my boards before staining. I built with pine. I used walnut stain, then rubbed on a thin layer of black paint to achieve the color.
I tried a few combinations of paint and stain with scrap, then let my wife choose which color combo she loved best!
Built from Plan(s)
Estimated Cost
$150
Estimated Time Investment
Weekend Project (10-20 Hours)
Finish Used
I used walnut stain, then rubbed on a thin layer of black paint with a rag to achieve the color.
Recommended Skill Level
Intermediate
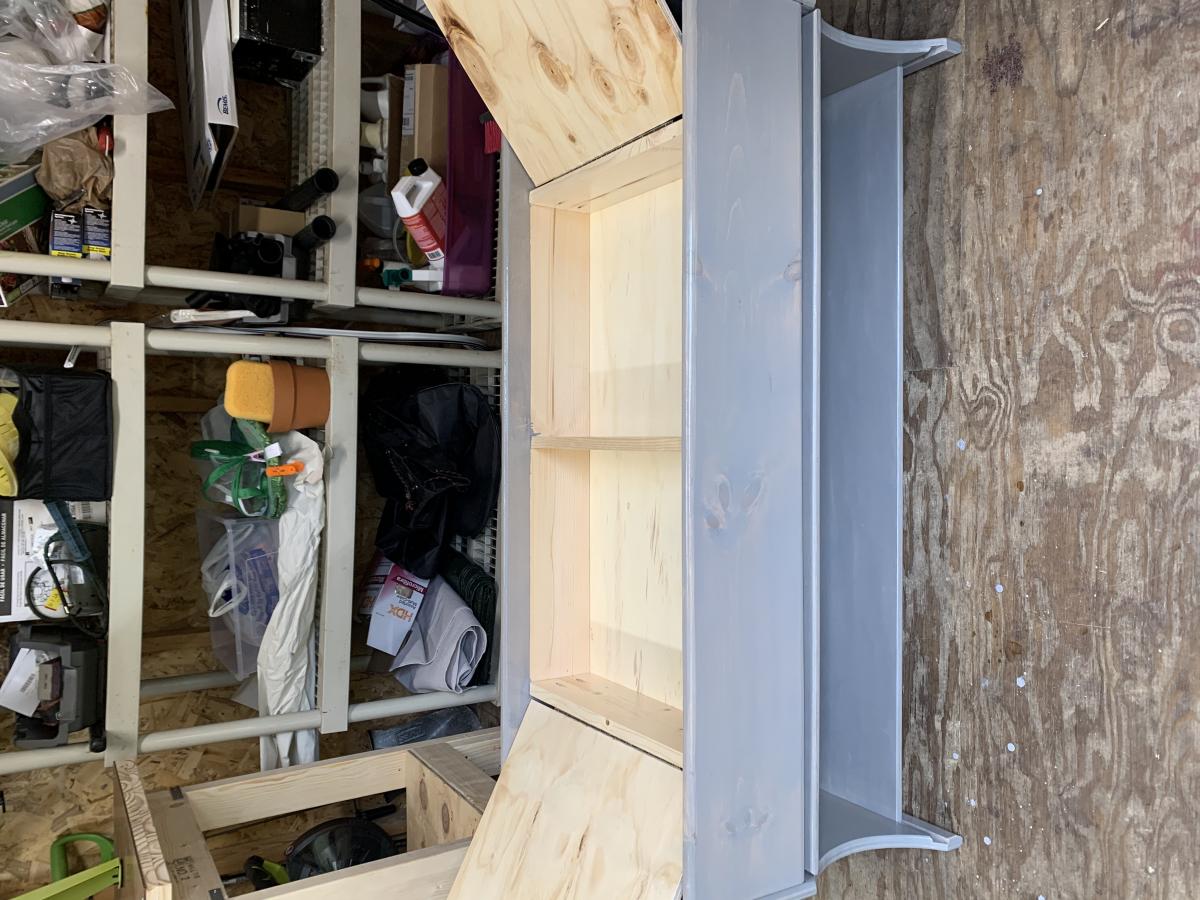
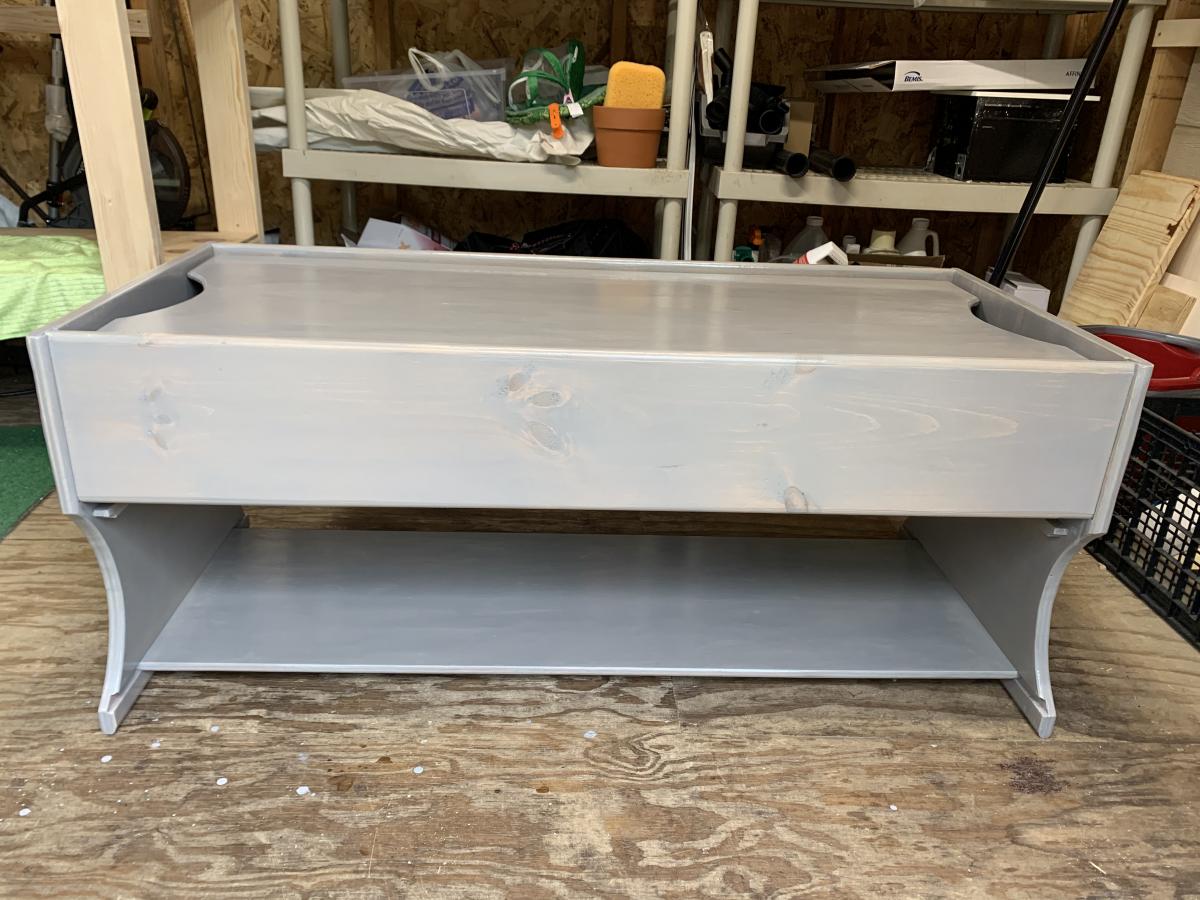
Lego table with hidden storage and shelf
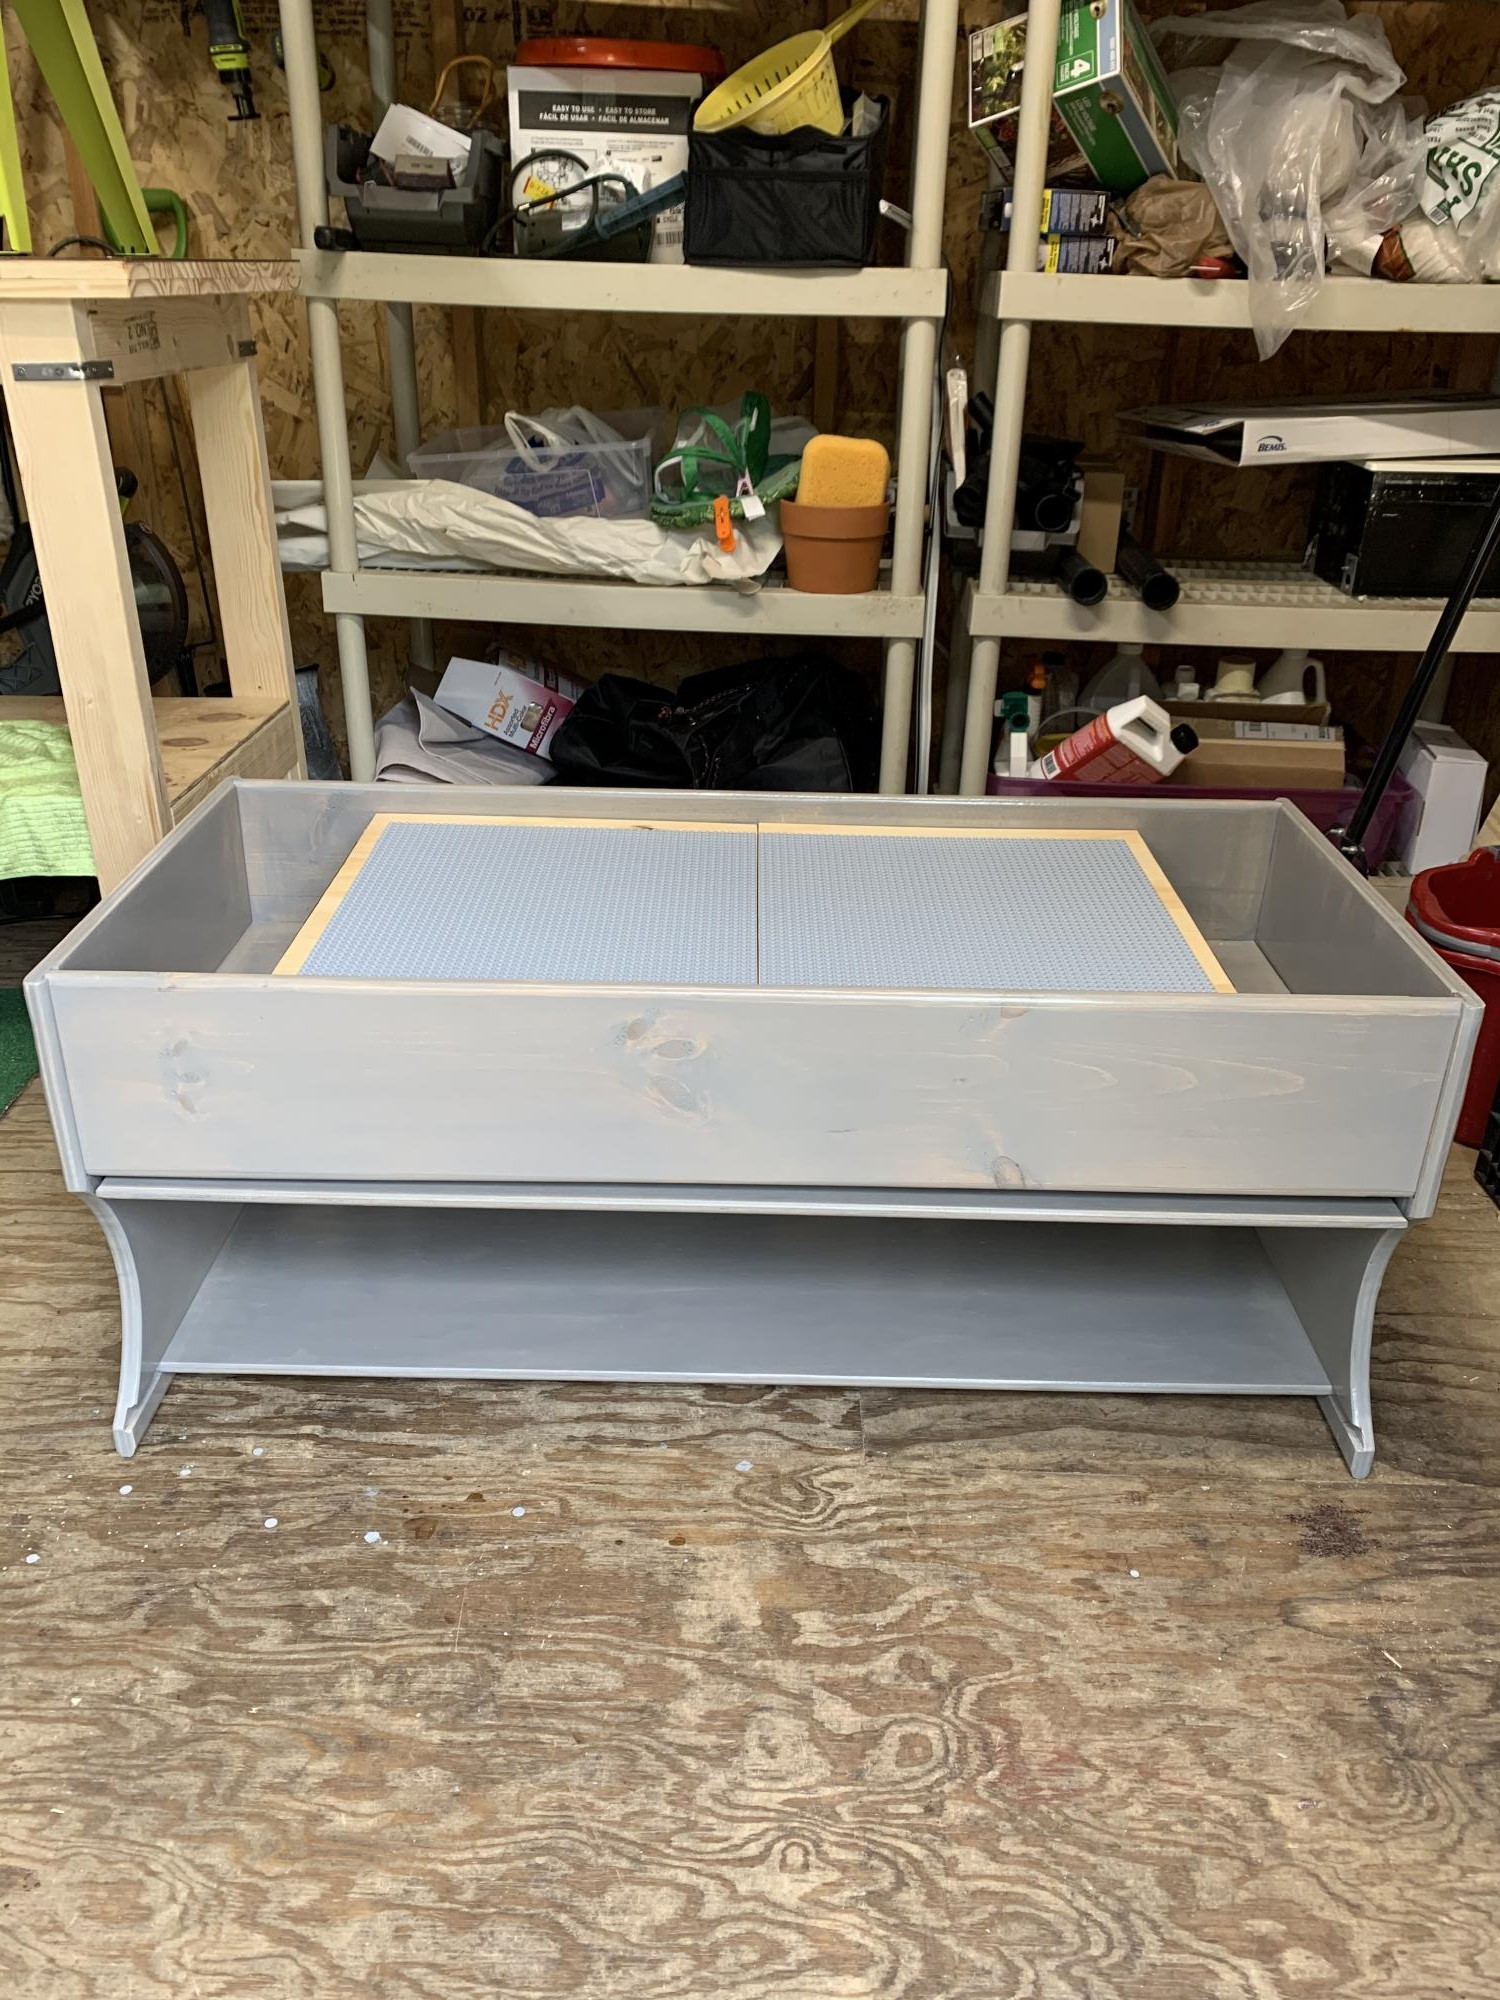
Lego table with removable top, hidden storage, shelf. 44.5”w X 20” deep X 18.5”h
Estimated Cost
$100-125
Estimated Time Investment
Weekend Project (10-20 Hours)
Finish Used
Willow Grey stain, water based polyurethane
Recommended Skill Level
Beginner