Community Brag Posts


PROVIDENCE BENCH
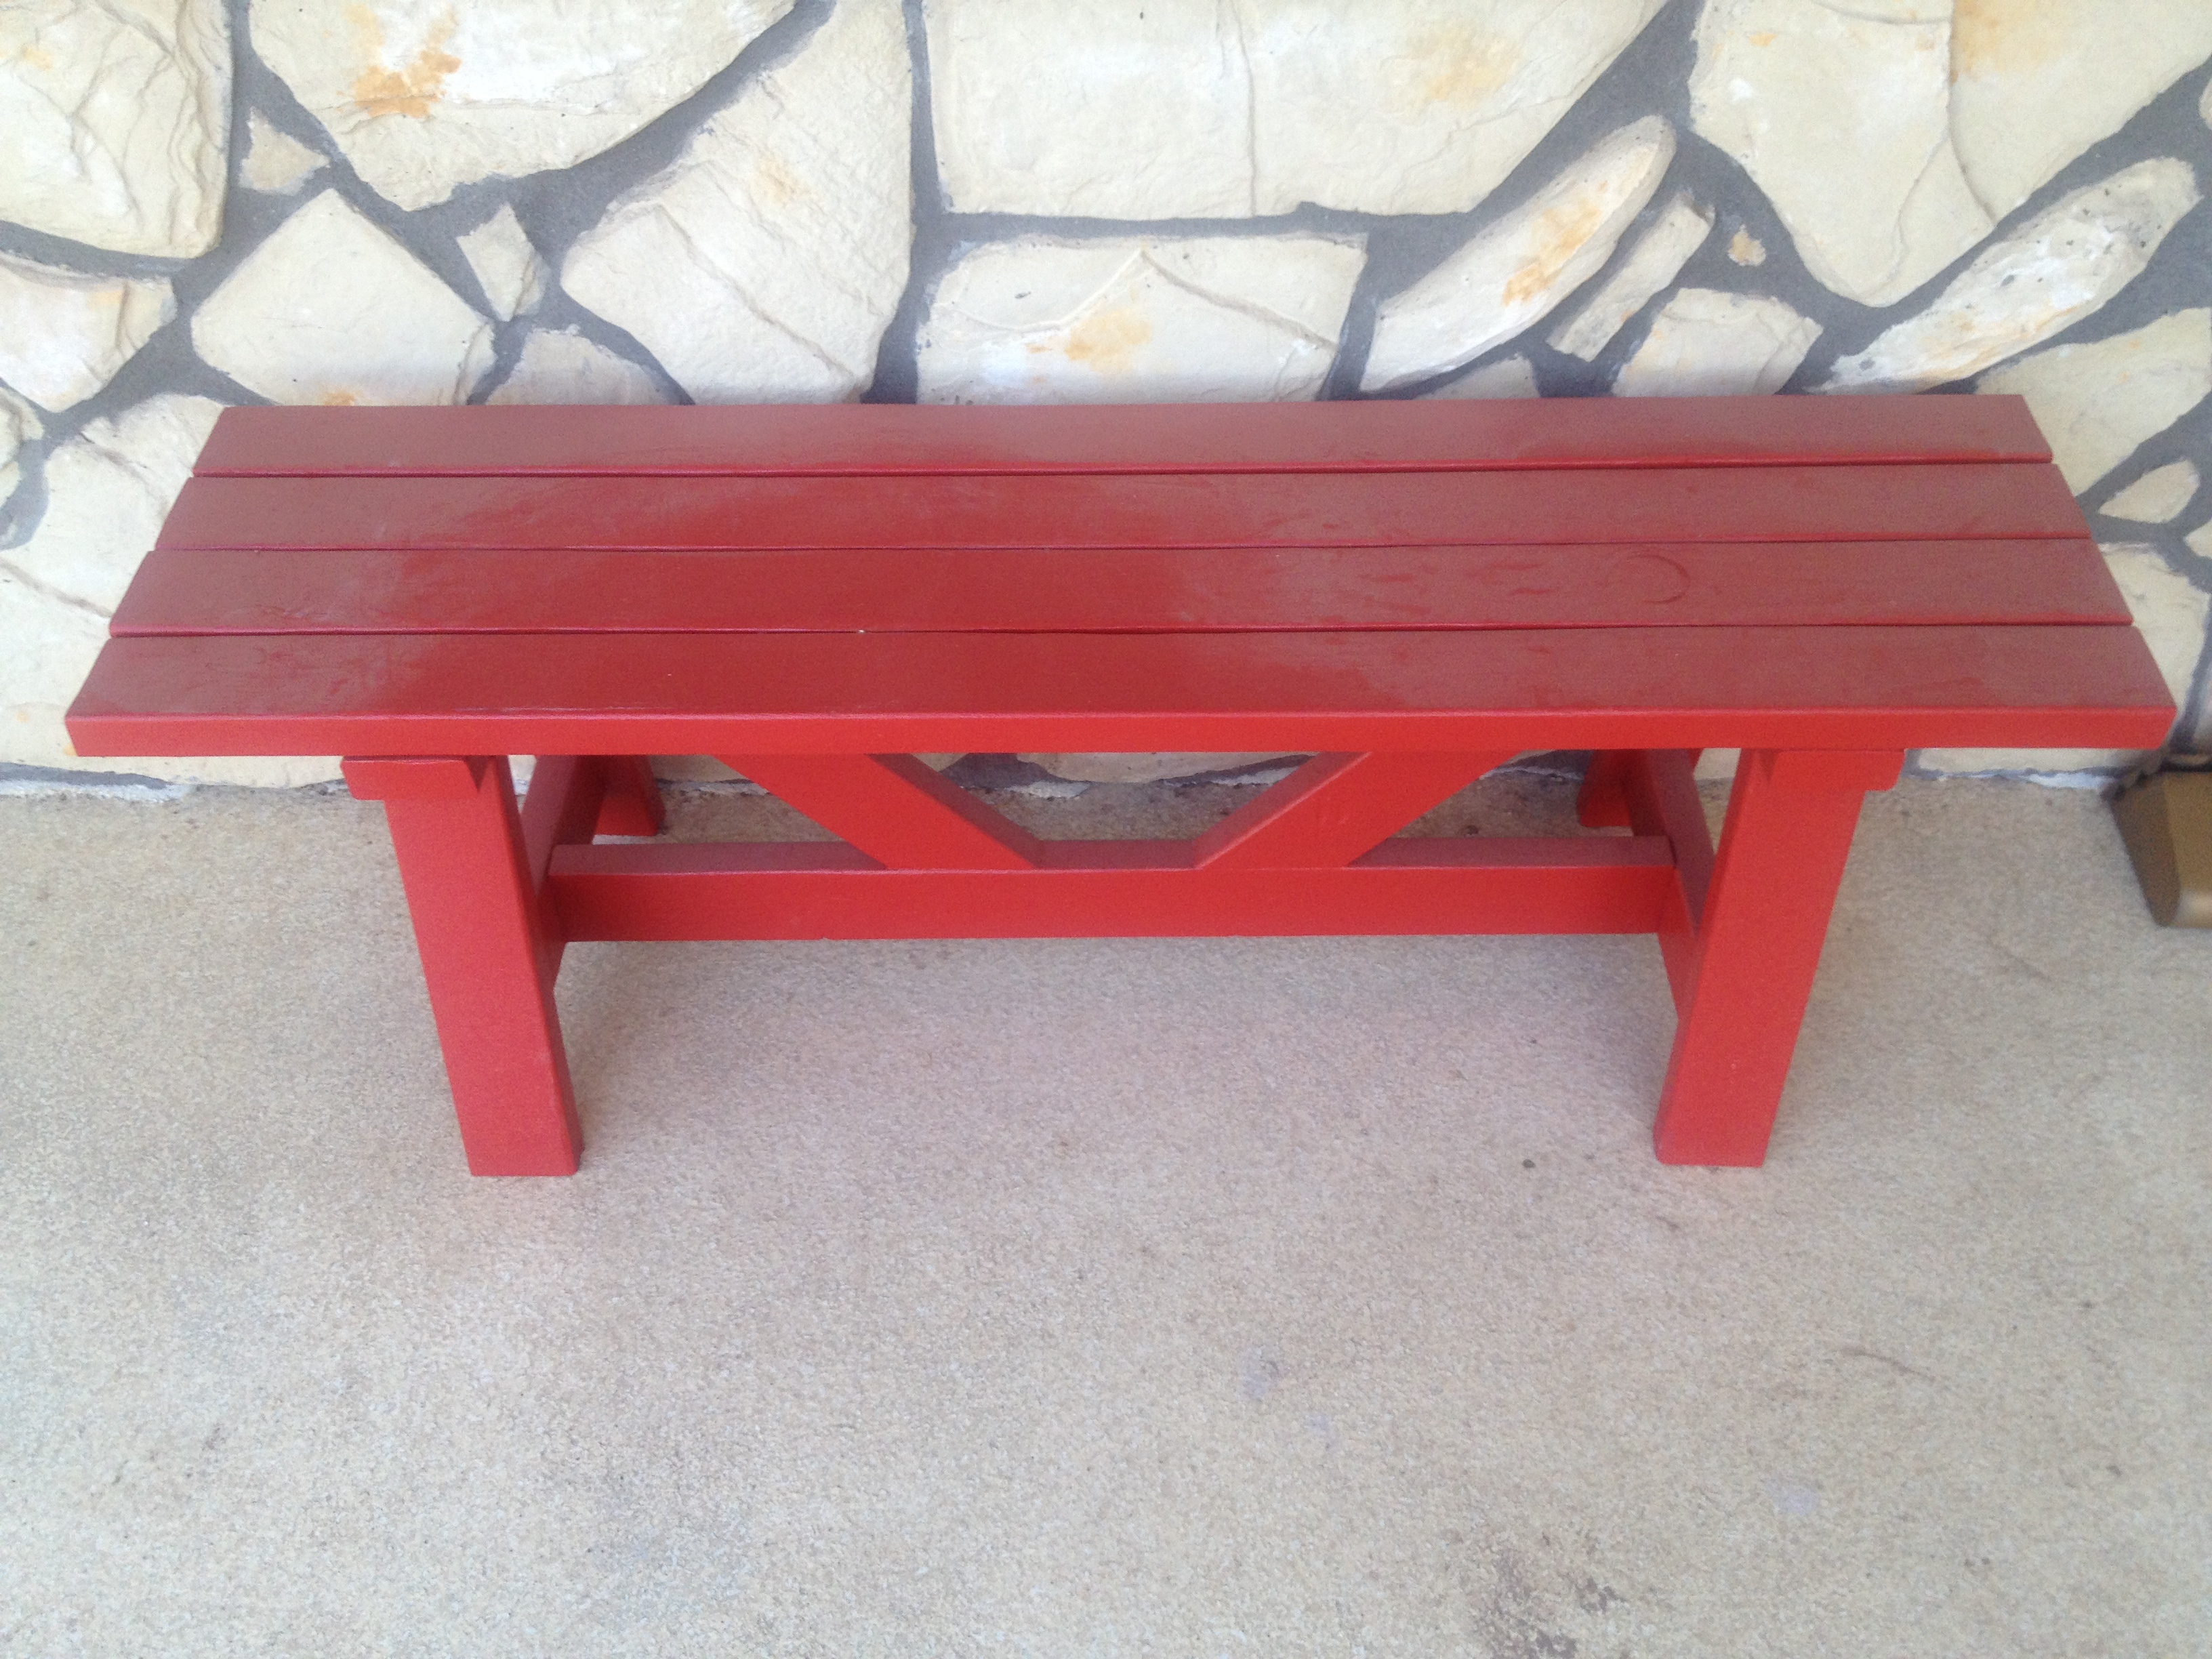
This is a slightly modified version of Ana's Providence bench.
http://ana-white.com/2012/04/plans/providence-bench
In Step 1, instead of having the bottom supports flush with the end, I decided to center them on the 2x4s.
This means the bottom rail needs to be shortened accordingly.
I sanded everything down with 120, and 220 grit sand paper.
I find it easier and quicker to sand larger pieces of lumber than smaller pieces.
Next everything was cut to size, and then primed. I let the primer dry for a few hours, and added the second coat of primer.
I primed all the surfaces, exposed and unexposed. Now some of you may think this was overkill. But since I live in Arizona, I didn't want the wood warping. This also protects if from all the elements.
Next day, it was all assembled, this took a few hours, we used a kreg jig to make most of the holes, I didn't have the right kreg screws, so I just used outdoor deck screws.
Finishing:
I filled all the holes with wood putty. This needed to be done several times, because putty shrinks, more so in the heat here.
Eventually, sanded it all down with 220 grit lightly, just so that there were no tell tale signs.
Next painted the bench red a few times. I needed about 2 coats to get it just right..
My contractor commented on how sturdy this bench was, coming from him, that's quite a compliment, it turned out to be A LOT sturdier than I thought it would be based on how flimsy those angled supports were...
It matches my red front door and is a great place to have my morning coffee and put my shoes on.
Built from Plan(s)
Estimated Time Investment
Weekend Project (10-20 Hours)
Finish Used
primer and paint.
Recommended Skill Level
Beginner
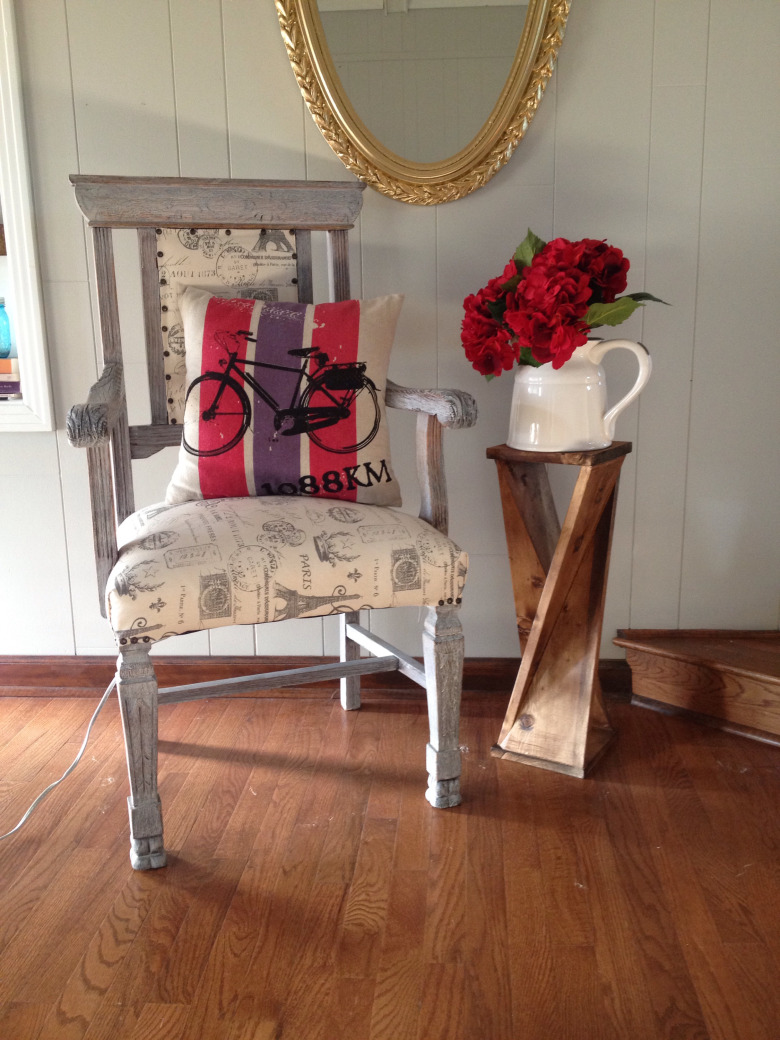
Twisted End Table
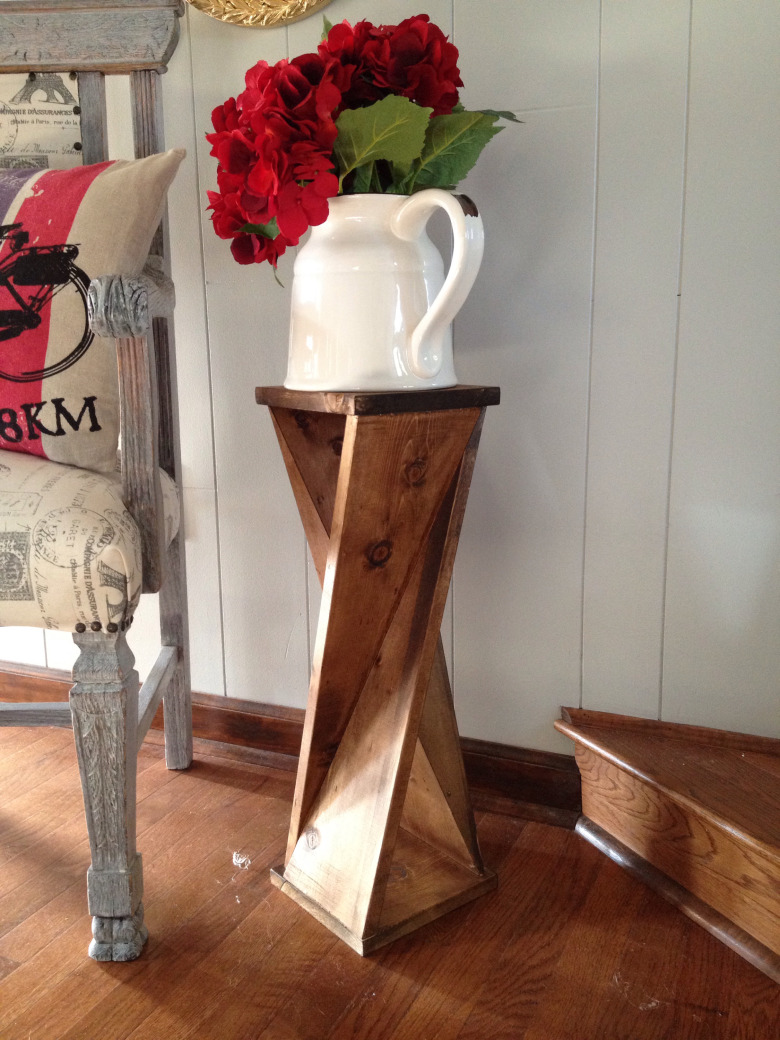
I made this twisted end table for my #oneboardchallenge project. It was a learning experience and I'm honestly surprised that it turned out as well as it did! There are so many good #oneboardchallenge projects being submitted, I don't know if mine will get lost among the crowd. Either way, it wont get lost around my house :) It is a good conversation piece!
Estimated Time Investment
Afternoon Project (3-6 Hours)
Recommended Skill Level
Intermediate
Comments

Mon, 10/26/2020 - 01:40
Twisted table plan
Are the plans for this on your site?
As a new wood worker I am very appreciative of your site and plans. It's my go to source for ideas.
Thanks
Bench

this was my first furniture piece that I have built. Next is a round farmhouse kitchen table super excited to make it.
Estimated Cost
I honestly don’t know I bought a 2 x 4 ripped it to 2x2’s but also ripped the rounded sides off the slats I ripped from s scrap piece of 2x6 I had laying around cut them to just over a quarter inch.
Recommended Skill Level
Beginner
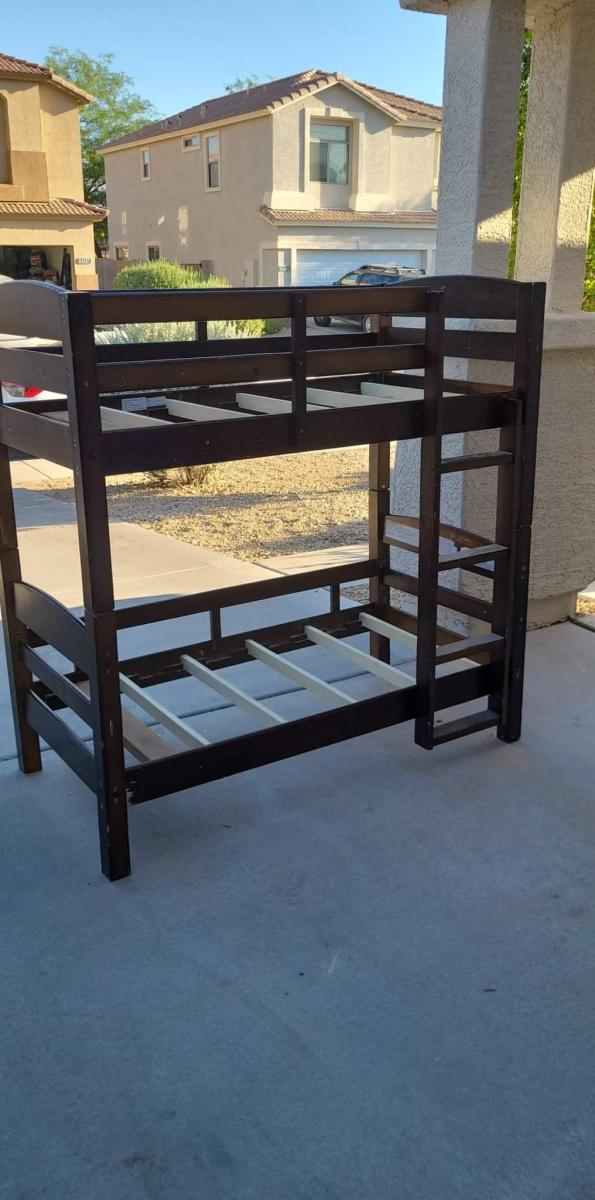
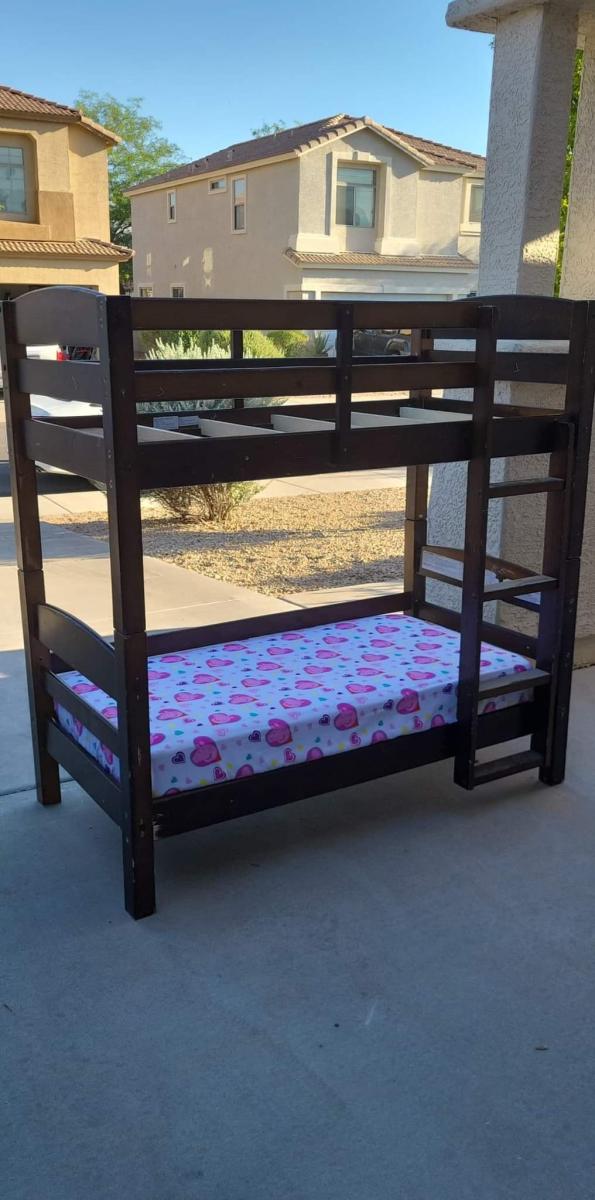
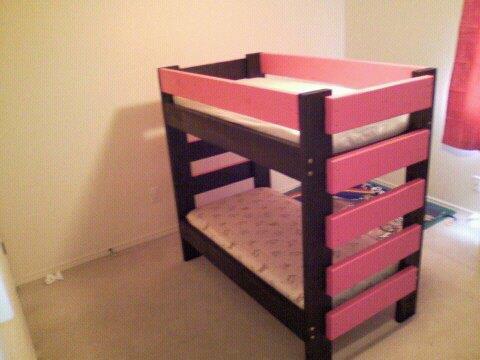
Crib Mattress Bunk Beds

We took existing twin size bunk beds and modified the measurements to fit for 2 crib size mattresses. 1 for my 3.5yr old and the bottom for my soon to be 2yr old. It took us 12 ours to build from start to finish then about another 1hr to place in room and set it up completely. All in all they love them and sleep thru the night in there own beds lol. I also have a 7mth old in my room too...


Comments
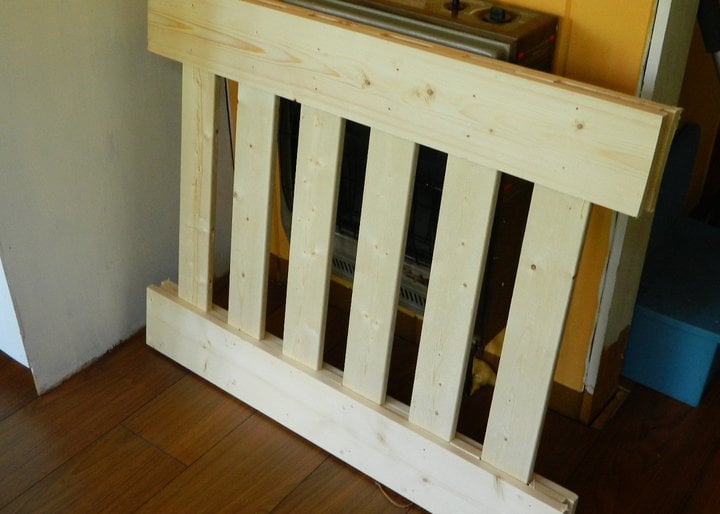
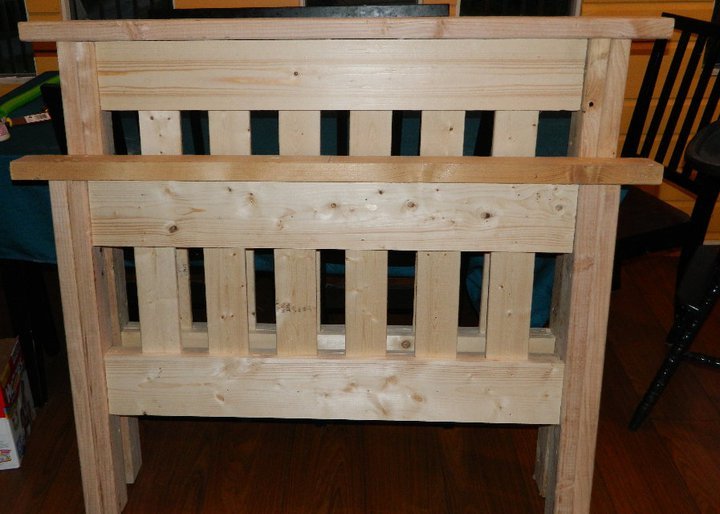
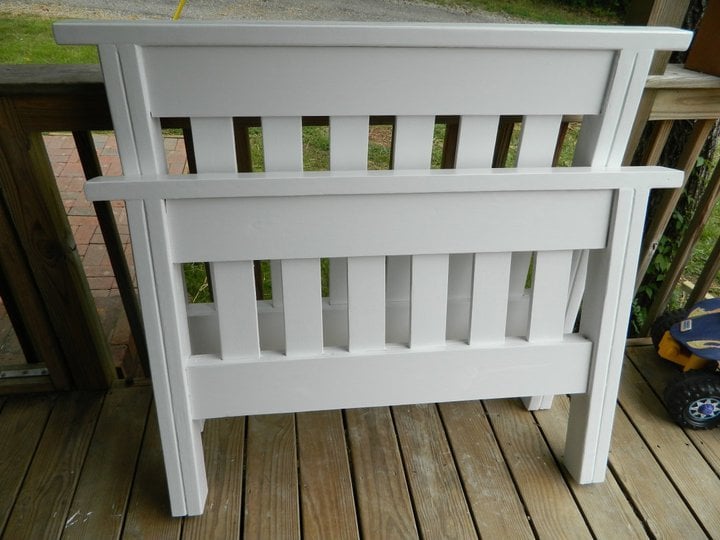
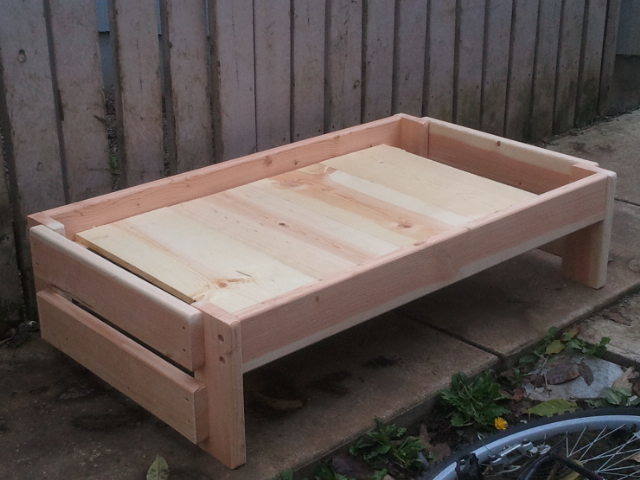
My first build, the simple twin bed
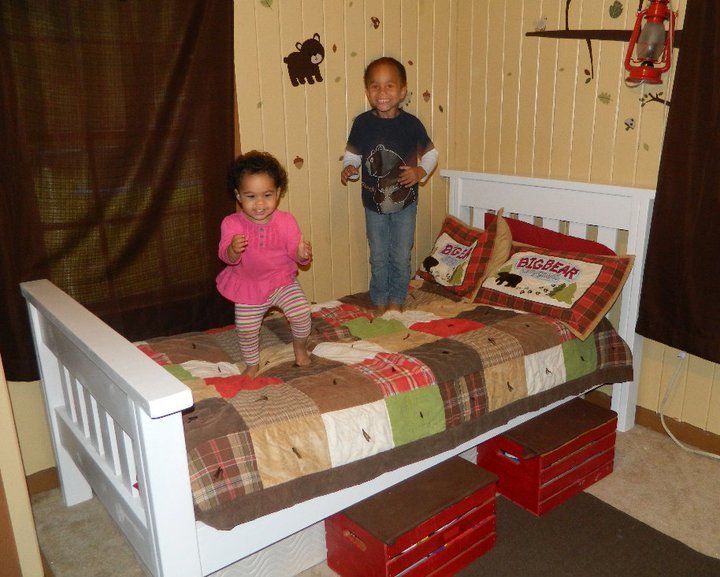
As my daughter got older she refused to sleep in her crib, so I decided I wanted matching beds for her and my son. We live in a small 2 bedroom house so they have to share. So while looking up ideas for nice beds at a cheap cost I followed links until I reached ana-white.com and I was amazed. I sat on my computer for hours yelling at my husband to "COME LOOK AT THIS" (which I still do today). So I picked a plan and started on in. With some help cutting from my dad I had the first bed done in a couple days. Sadly I have not finished the second due to a random mind and trying to find a way to make my boy and girl room a little more grown up and uni-sex friendly.
Built from Plan(s)
Estimated Cost
$80
Estimated Time Investment
Weekend Project (10-20 Hours)
Recommended Skill Level
Beginner
Comments

Sat, 07/30/2011 - 08:15
You did an Awesome Job!
Doesn't matter who helped - you did it! Can't wait to see the finished look when the room is all done - please keep us posted!

Parson desk
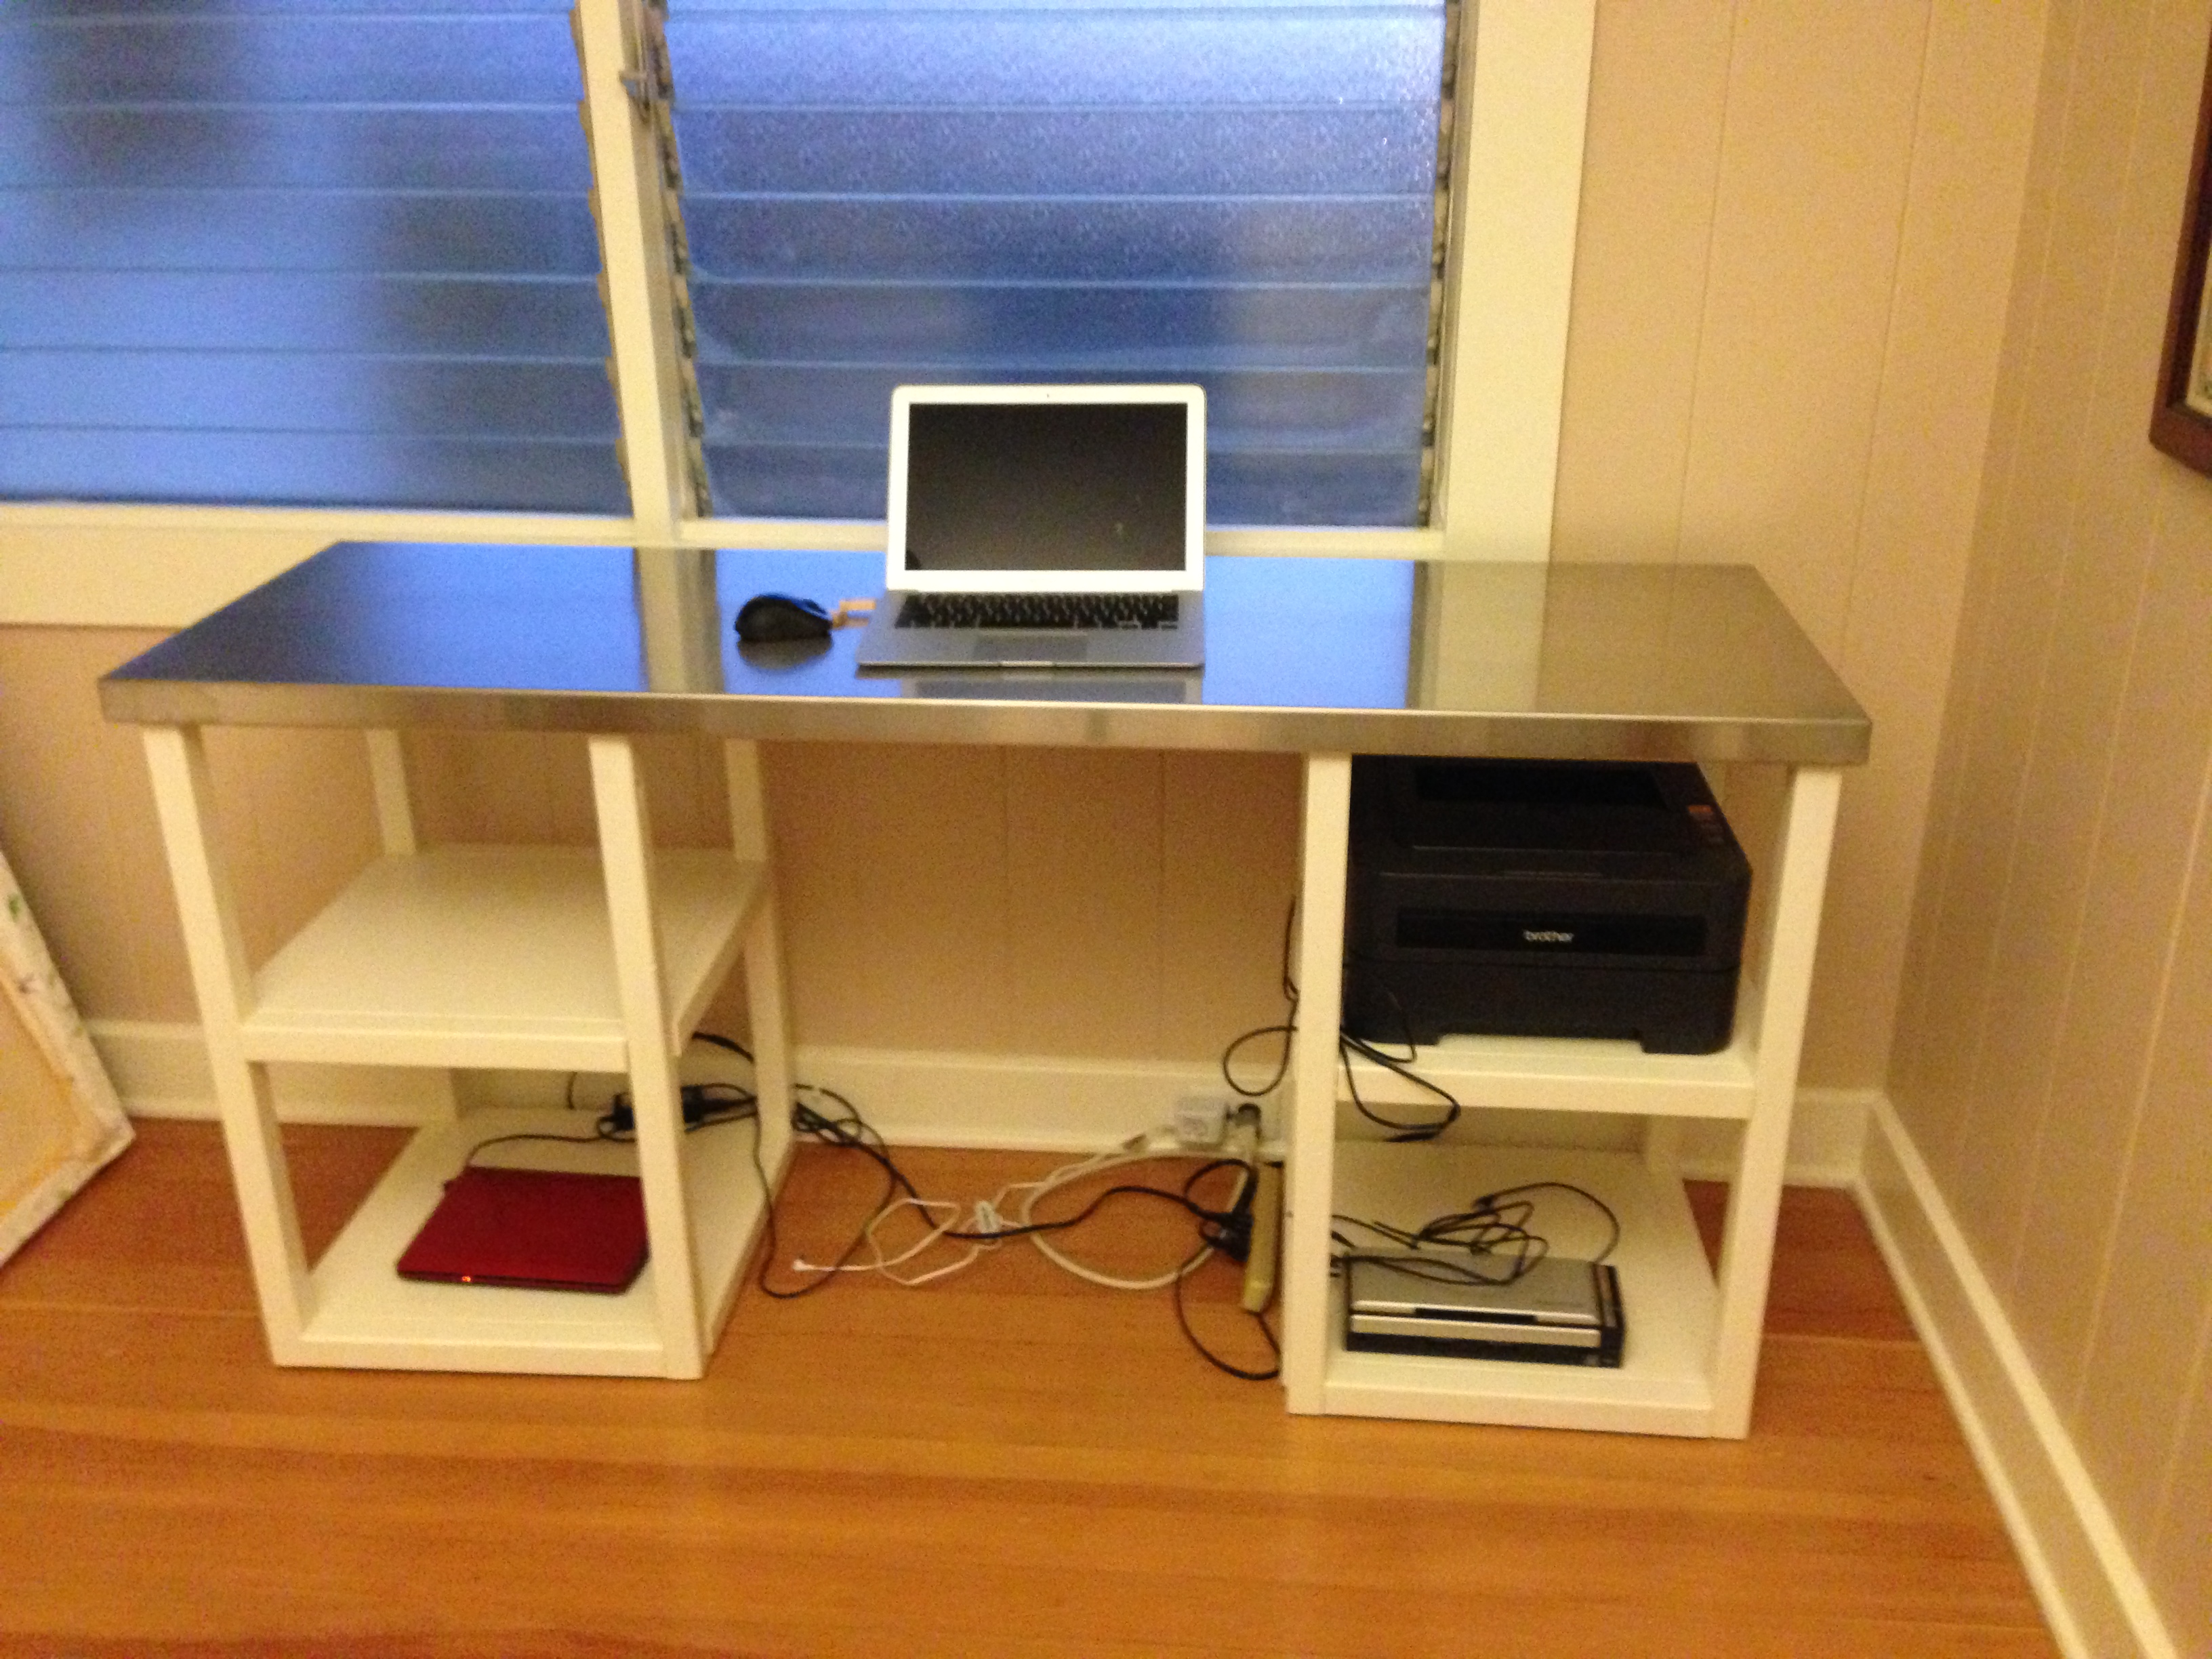
I adored this desk, but wanted a stainless steel top to match the vibe in the rest of the room. Thanks to another Anna white post about killer b designs (i think!) building her own dream kitchen, I realized I could get a local welder to fabricate a top, just like she got them to fabricate the top of her island. They built a sleeve that drops right on top of the wood top, and creating about a 3/4" overhang all the way around the desk; it cost about $275. Otherwise, I followed Ana's directions and painted it an off-white color that's the same as the trim in the room. Love it! Thanks Ana!
Built from Plan(s)
Estimated Cost
$300
Estimated Time Investment
Day Project (6-9 Hours)
Finish Used
Benjamin Moore off-white color
Recommended Skill Level
Beginner
Comments

Rustic X Coffee Table Brag

Rustic X Coffee Table Brag! Thank you so much for the plans Ana! Keep building everyone :)
Built from Plan(s)
Estimated Cost
$80.00
Estimated Time Investment
Day Project (6-9 Hours)
Finish Used
Steel Wool & Vinegar Mixture
Recommended Skill Level
Beginner
Comments
Sat, 10/10/2015 - 18:59
Steel wool dilution rate
Did you use any tea before you used the steel wool? What was your steel wool and vinegar mixture rate? I really like the color of this! Thanks!
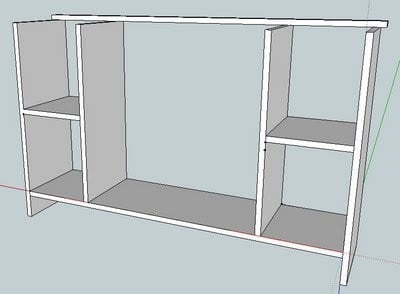
Media console
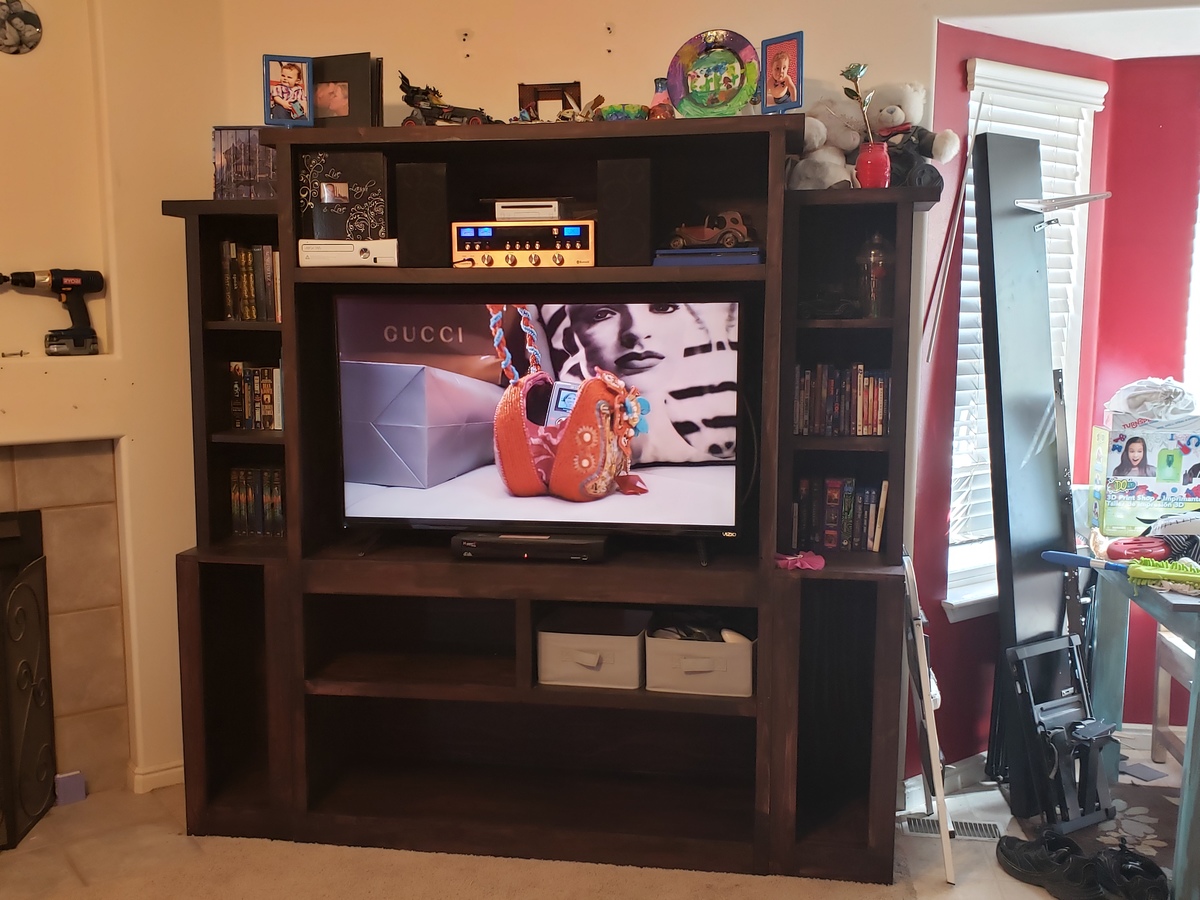
We built this piece exactly to fit our space. We needed more storage and wanted something that would hold our TV so it didn't have to be mounted any more. We used Behr paint to finish it. It is made out of pine and is very sturdy. It took us about a week to build but could have been done In a few days if we could have dedicated 100% of our time to it.
Built from Plan(s)
Estimated Cost
200 to 250
Estimated Time Investment
Week Long Project (20 Hours or More)
Finish Used
Behr ultra
Recommended Skill Level
Intermediate
Arbor bench from leftover trellis
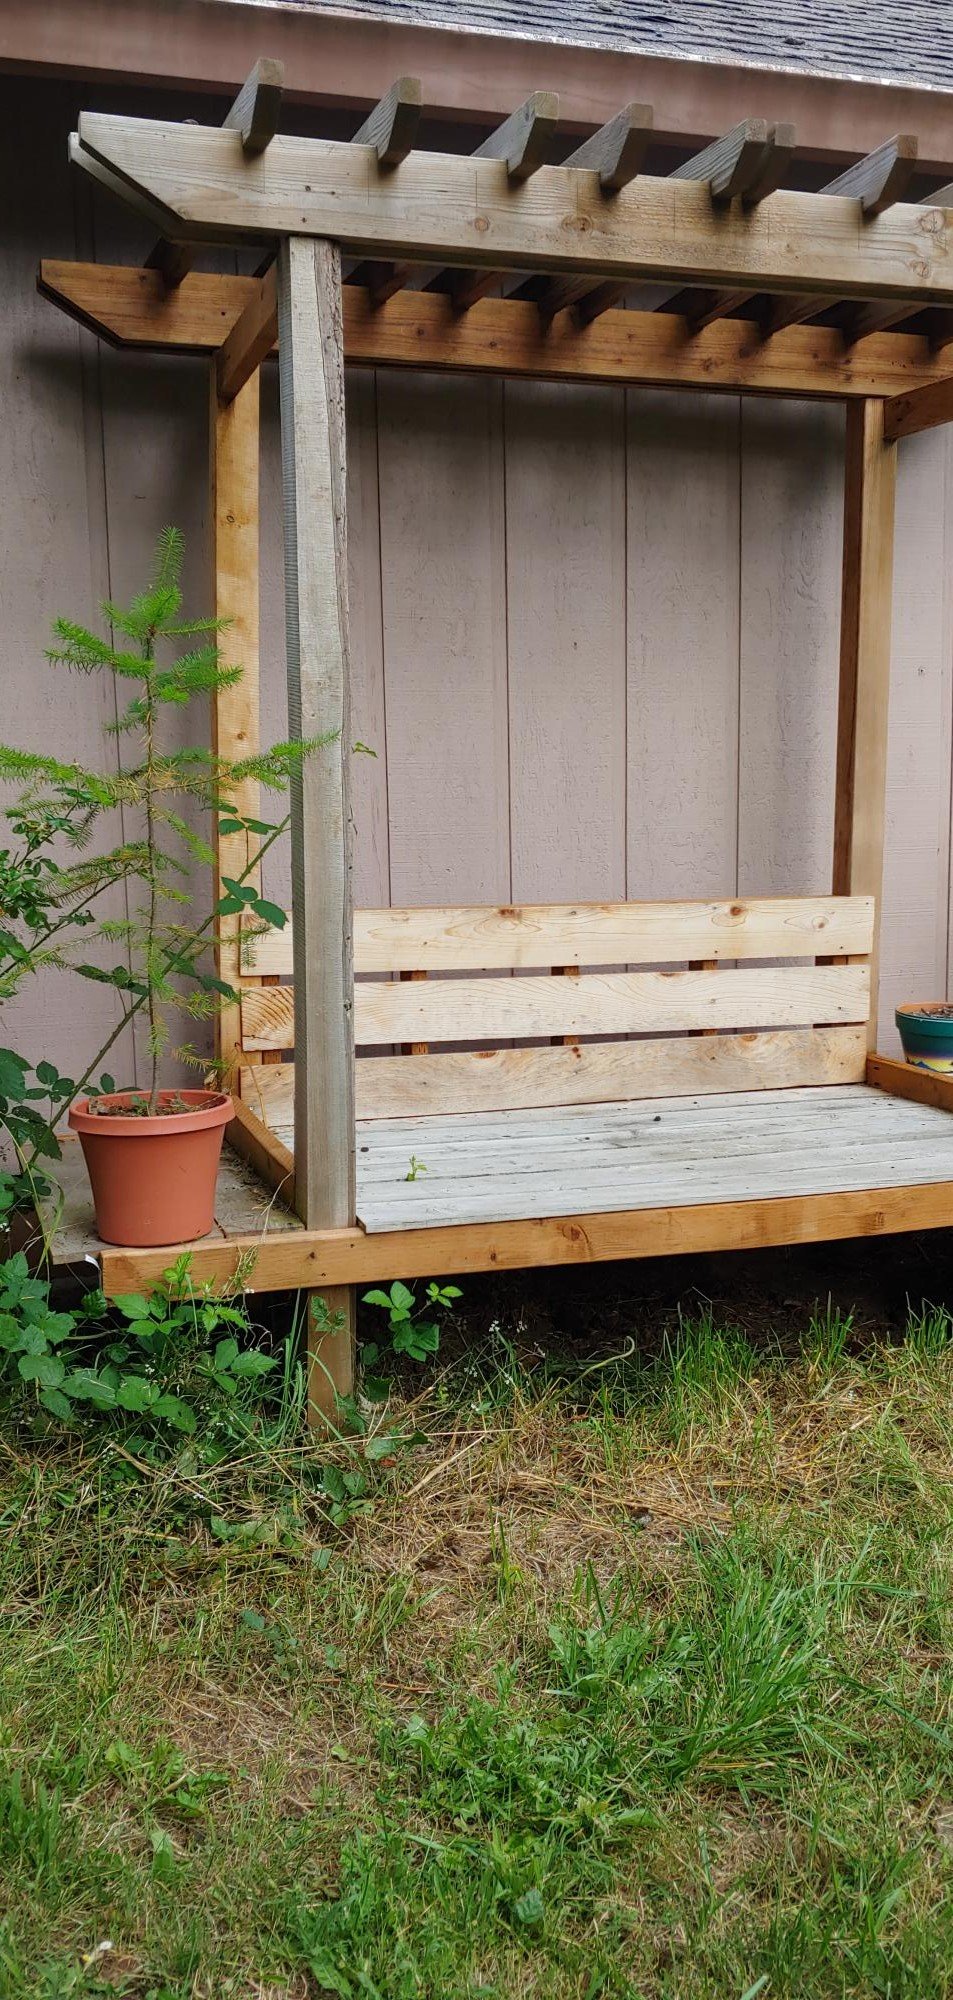
The previous owners planned to built a rose Arbor, and left the pieces in our barn. Using the Arbor bench plan I was able to use all the pieces to build this version. Great summer hangout!
Built from Plan(s)
Comments
Shoe Bench
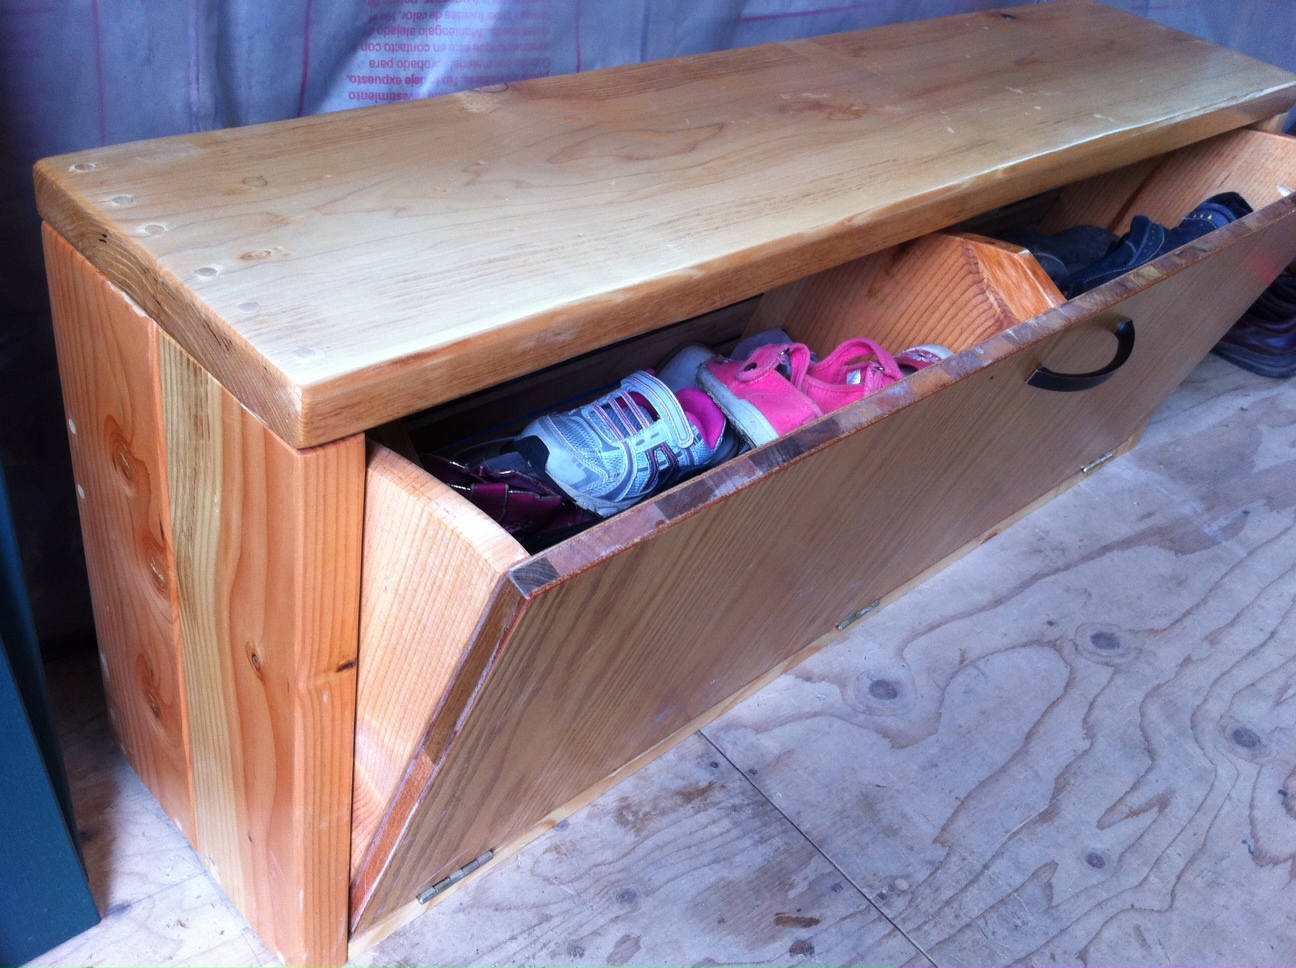
I saw the shoe dresser plans and liked the idea of getting the shoes out of sight! Then I decided to modify that plan and turn it into a bench that you could sit on while putting on your shoes! So this is what I came up with using a 2x12 for the top and 2x6's for the legs. The drawer part is pretty much the same as in the shoe dresser plans. It's 4 feet long and 19 inches high. It's already been in use and we love it! With 4 kids, the number of shoes can add up quickly! I have a second bench sanded and ready for assembly!
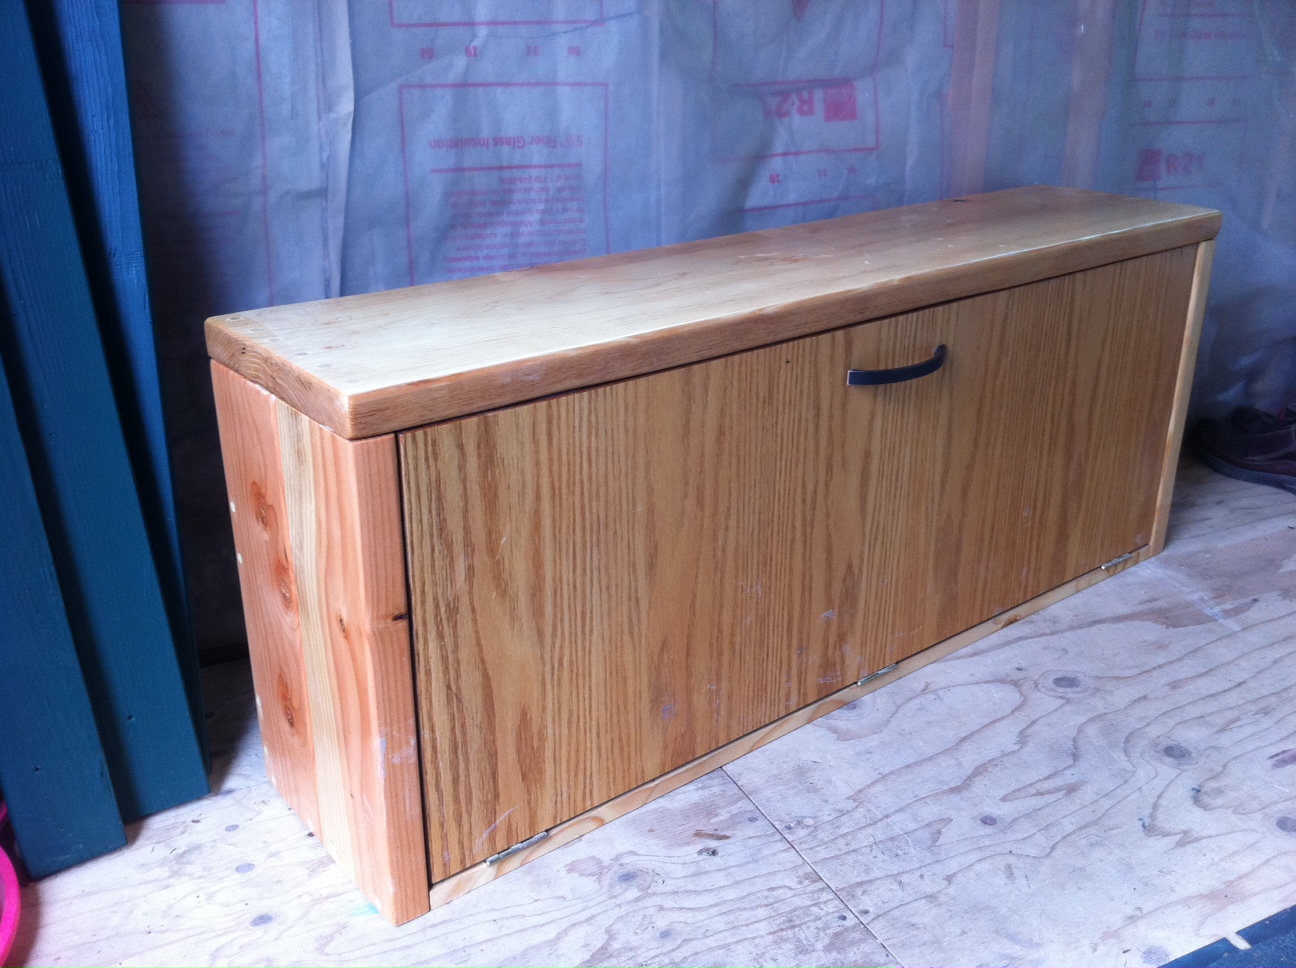

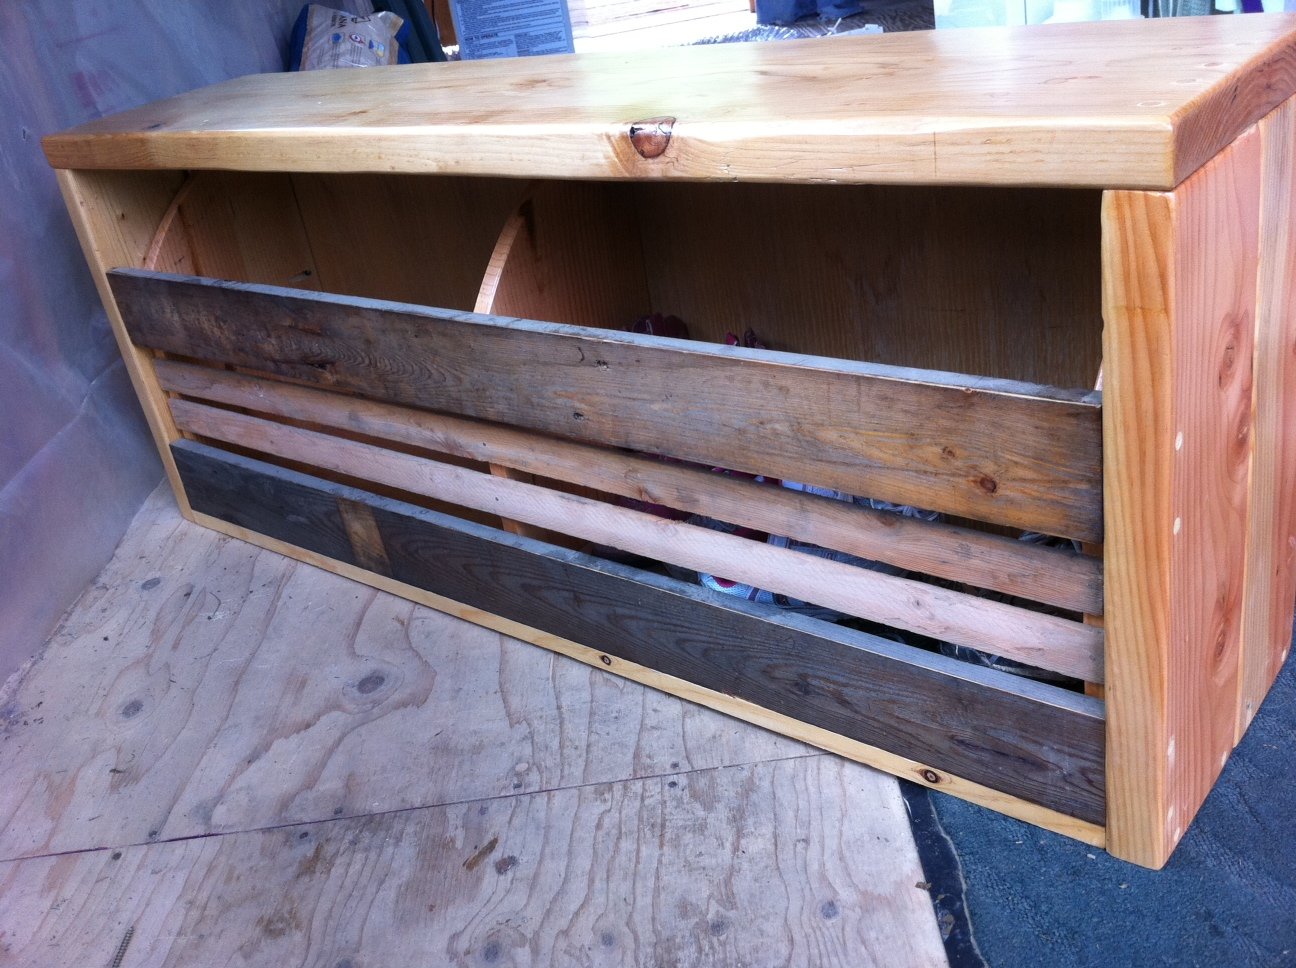
Built from Plan(s)
Estimated Time Investment
Day Project (6-9 Hours)
Finish Used
Polyurethane - 3 coats
Recommended Skill Level
Starter Project
Comments
Toddler beds,Toddler bunk beds,Toddler lofts
Building Bunk beds and custom beds is what i do. I router the corners so that they are rounded, plane the face's of the boards,and sand to perfection. then i glue and screw it all together. you can check out the site at http://www.dreamworksbunkbeds.com

Built from Plan(s)
Estimated Time Investment
Afternoon Project (3-6 Hours)
Finish Used
all my products come with no finish just natural.
Recommended Skill Level
Beginner
For a co worker...
A co worker reeeeally wanted this and asked me to build it. It is only my second build.

Built from Plan(s)
Estimated Cost
150-200
Finish Used
Varathane Spar Varnish in satin, Varathane Dark Walnut
Recommended Skill Level
Beginner
Doll House

I made this house using oak plywood for the floors a using a straight edge and paper knife to score it to look like planks and made the lengths vary by using a chisel. The roof is made from 1/4" underlayment painted with red oil base paint and cut to make it look like shingles. It is on heavy duty 4" casters. I have made two identical houses for the same lady who purchased them for an aging aunt. This is the first of the two and was lost in a house fire. The second one was to replace this one. If I make another house I will be installing working lights in it. This is a very large house and fun to build


Estimated Time Investment
Weekend Project (10-20 Hours)
Finish Used
Red oil-based paint, white paint and Special Oak wood stain
Recommended Skill Level
Intermediate
Comments

Mon, 11/05/2018 - 11:29
Fantastic build! I'm sorry
Fantastic build! I'm sorry to hear about the fire, glad you could make another one!
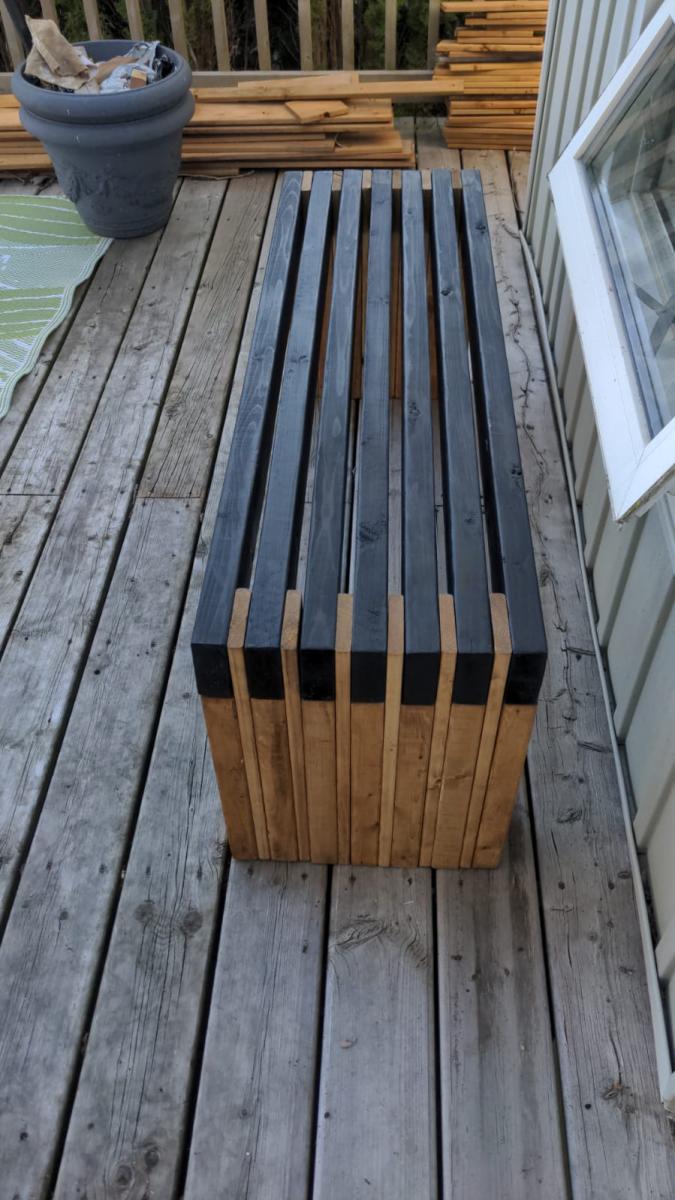
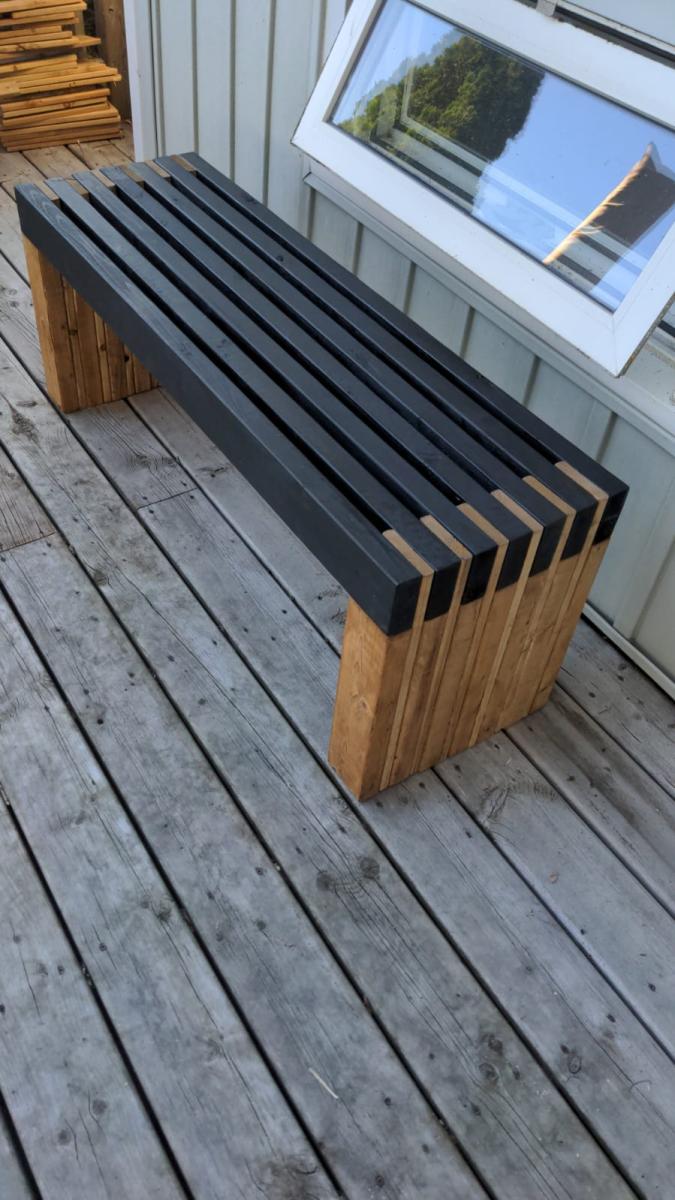
Modern Slatted Bench
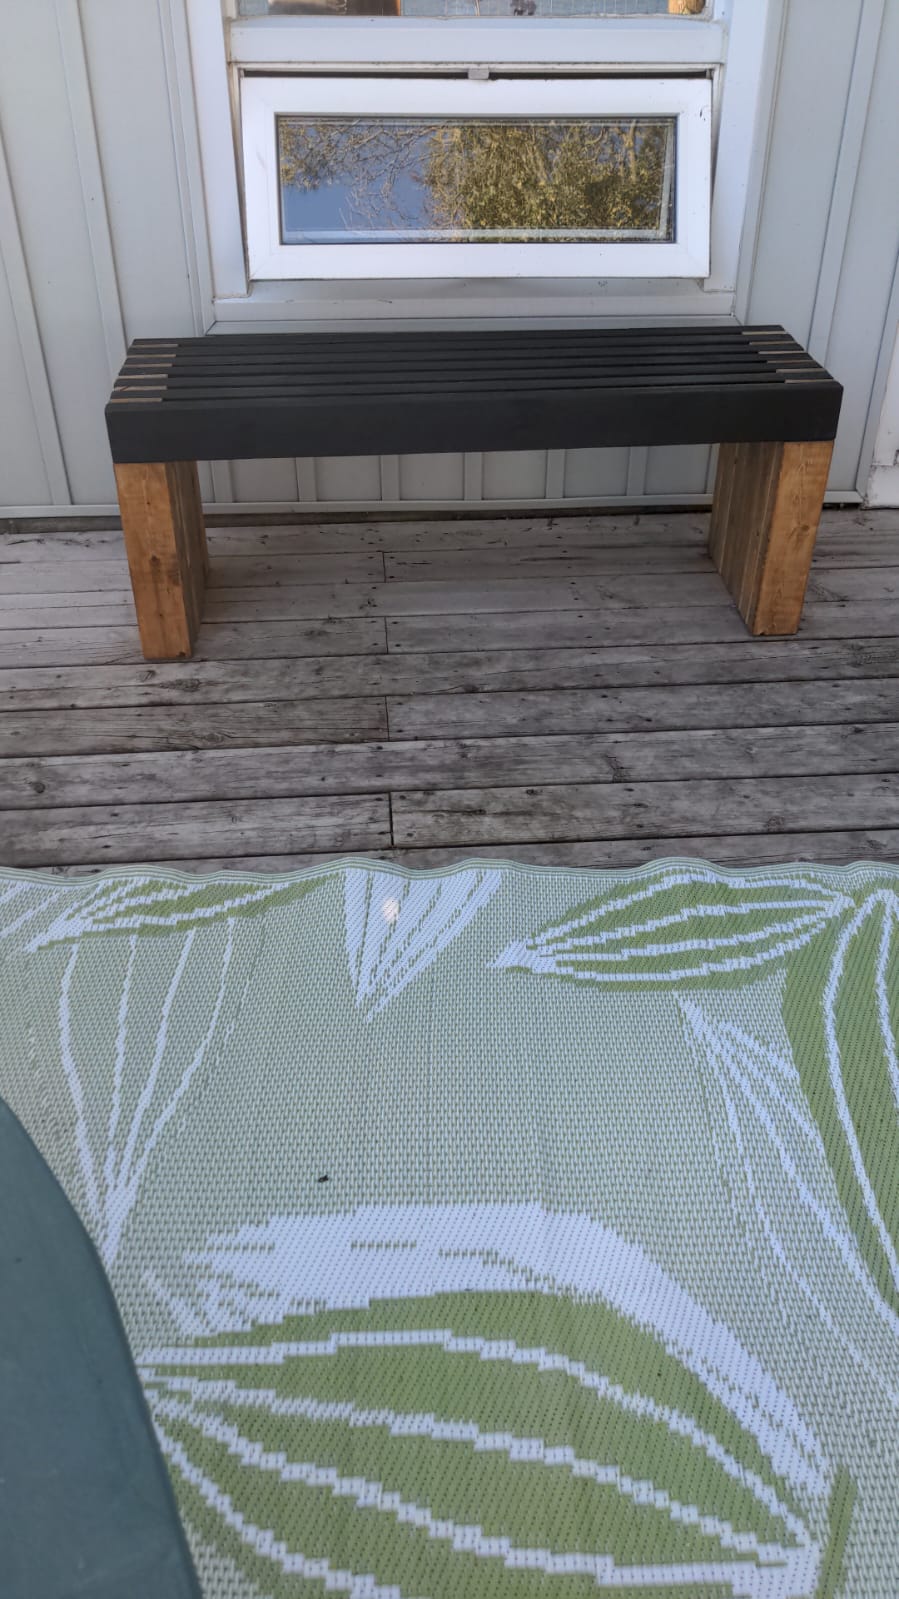
Loved making this bench! Simple enough using a stop block on my mitre saw.
Followed directions except made it shorter in width. I got so many compliments!
Built from Plan(s)
Comments
Kids Table

I modified from the Clara table plans.

Built from Plan(s)
Estimated Time Investment
An Hour or Two (0-2 Hours)
Recommended Skill Level
Starter Project
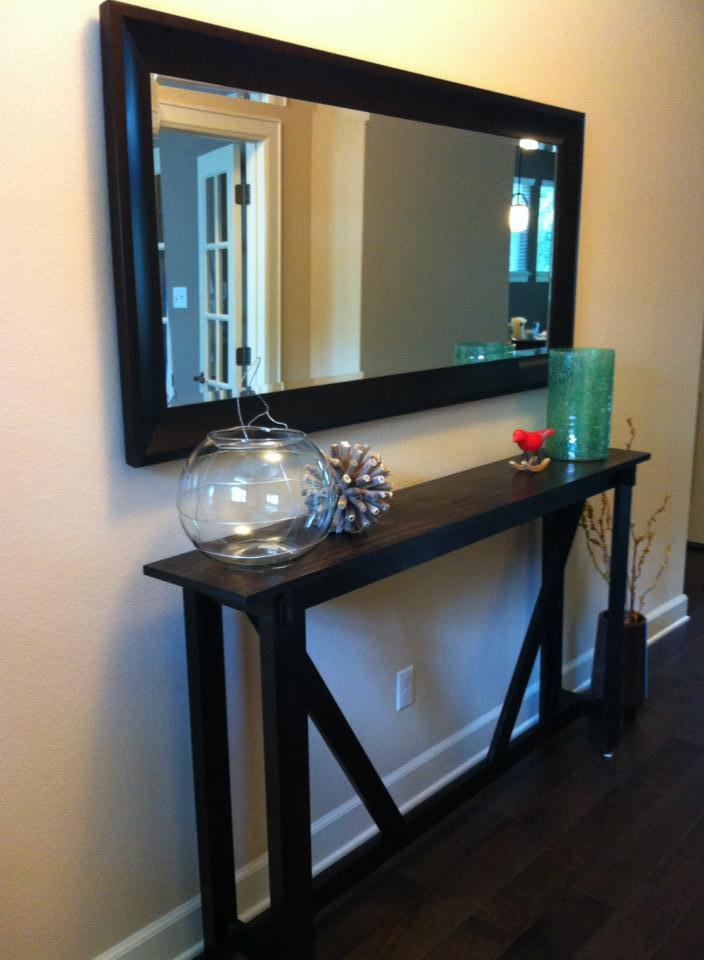
Rustic Bench turned into an Entry Table!

I loved the look of the Rustic X Bench but wanted to modify to be an entry table. I took the exact plans, but made it longer and taller. The X bracing didn't match up exactly, but I like it with the separation. The stain is a Minwax Espresso finish. I added adjustable glides to the bottom so I could adjust if needed. It was an excellent first project and it fits in our home PERFECT! Thanks Ana for the inspiration to create, build and be a mommy at the same time :)
Built from Plan(s)
Estimated Cost
$150
Estimated Time Investment
Weekend Project (10-20 Hours)
Finish Used
Minwax Stain - Espresso Finish
Recommended Skill Level
Starter Project
Comments

Fri, 08/30/2013 - 16:18
Great modification for your needs!
Beautiful. I love the mix of rustic and modern that your modification exudes (to me). :)
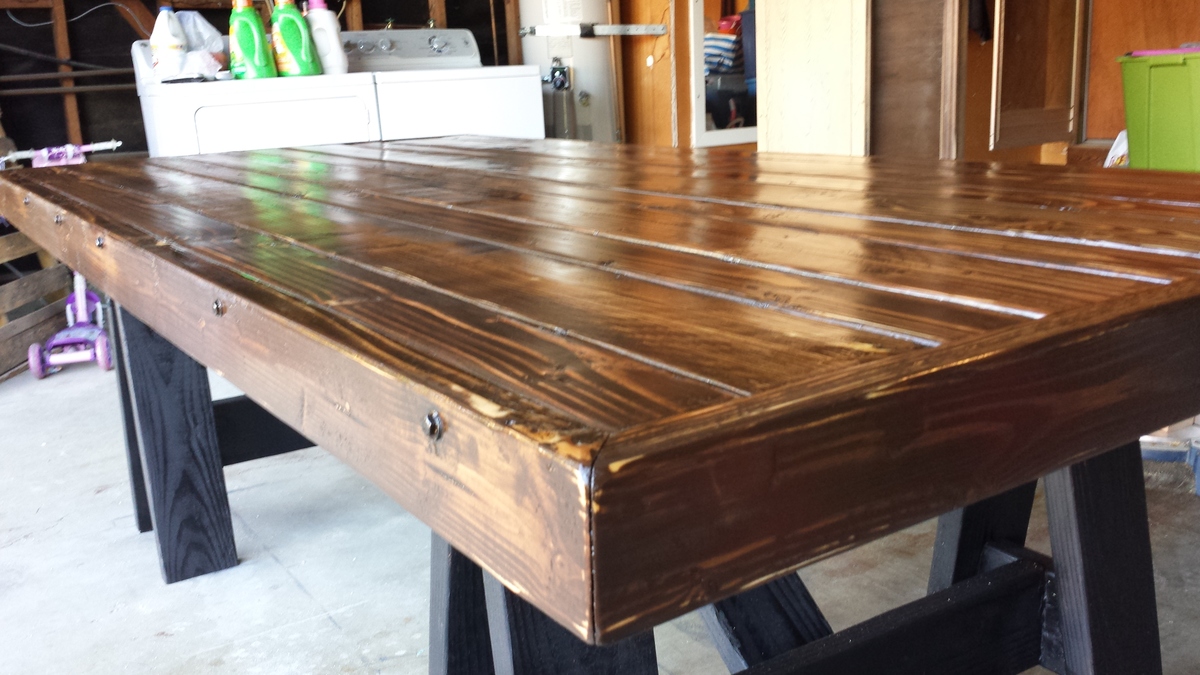
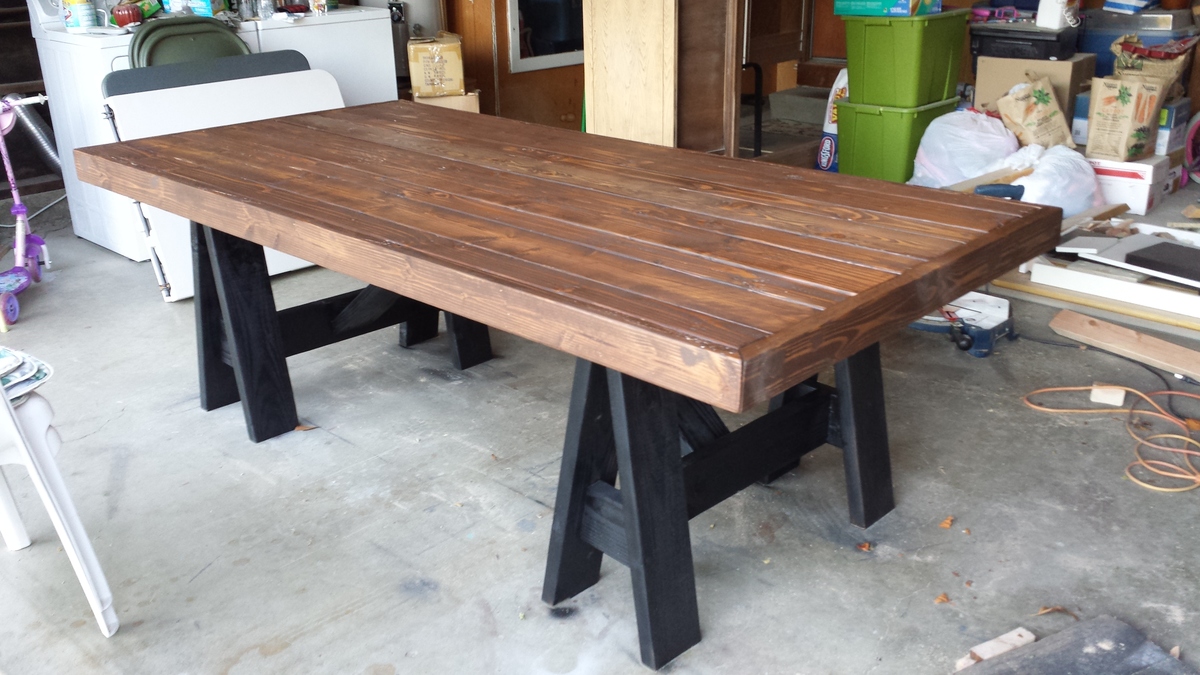
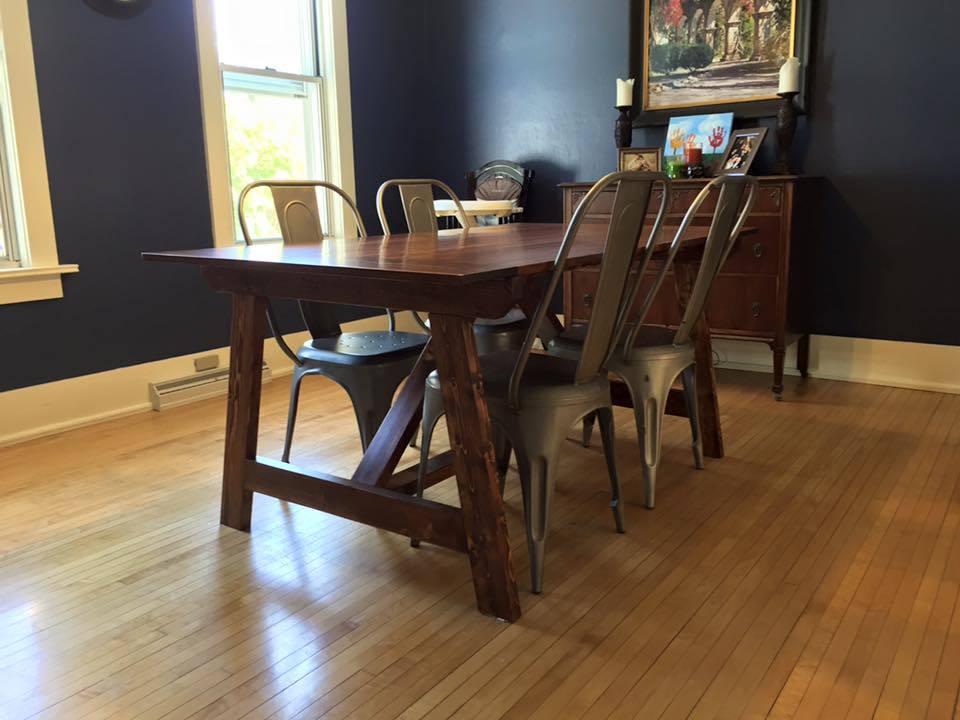
2x4 Truss Table - Modified
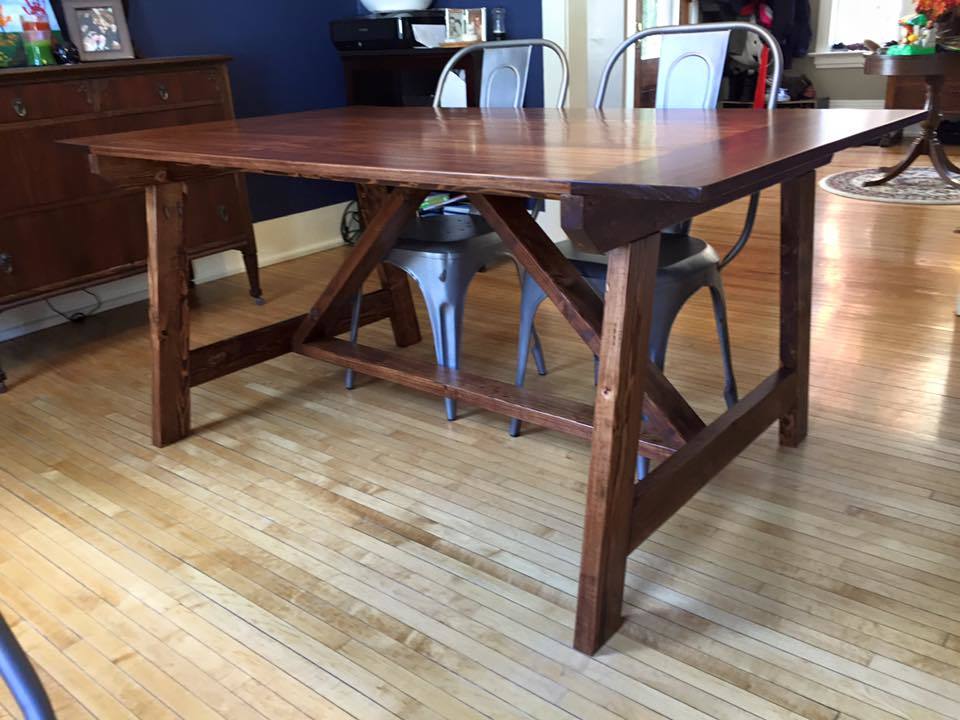
Since our dining room is small I modifed this table to 66" long. It is 50" between legs. Also, I do not have a table saw, so I could not get the 10 degree angle on the legs. I actually think that having them at 90 worked out better since this table was scaled down. We love it and think it is really great in the room.
Built from Plan(s)
Estimated Cost
About $100 in wood and $50 in other materials.
Estimated Time Investment
Week Long Project (20 Hours or More)
Finish Used
Varathane Dark Walnut
Recommended Skill Level
Intermediate
Comments
mantel moulding headboard
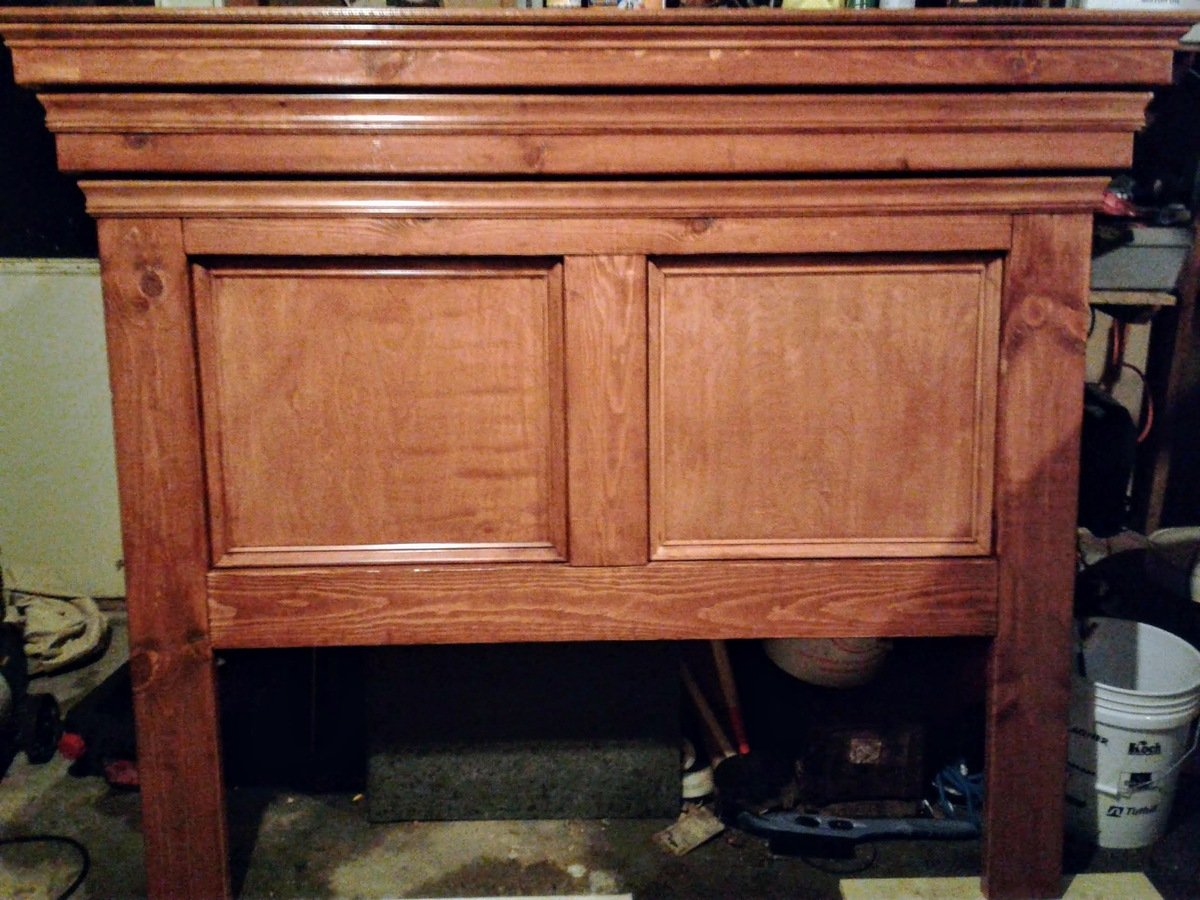
Mantle moulding plan modified with a center 2 X 4 and used sanded plywood for the back. Finished with a few different mouldings but turned out great. Nice plan. With pre-stain, stain and poly, project extended to about a week.
Built from Plan(s)
Estimated Cost
$80
Estimated Time Investment
Weekend Project (10-20 Hours)
Finish Used
Varathane Water based pre-stain, Varathane American Walnut fast drying stain, Varathane water based polyurethane
Recommended Skill Level
Intermediate
Essential Outdoor Wood Chair for standard cushion
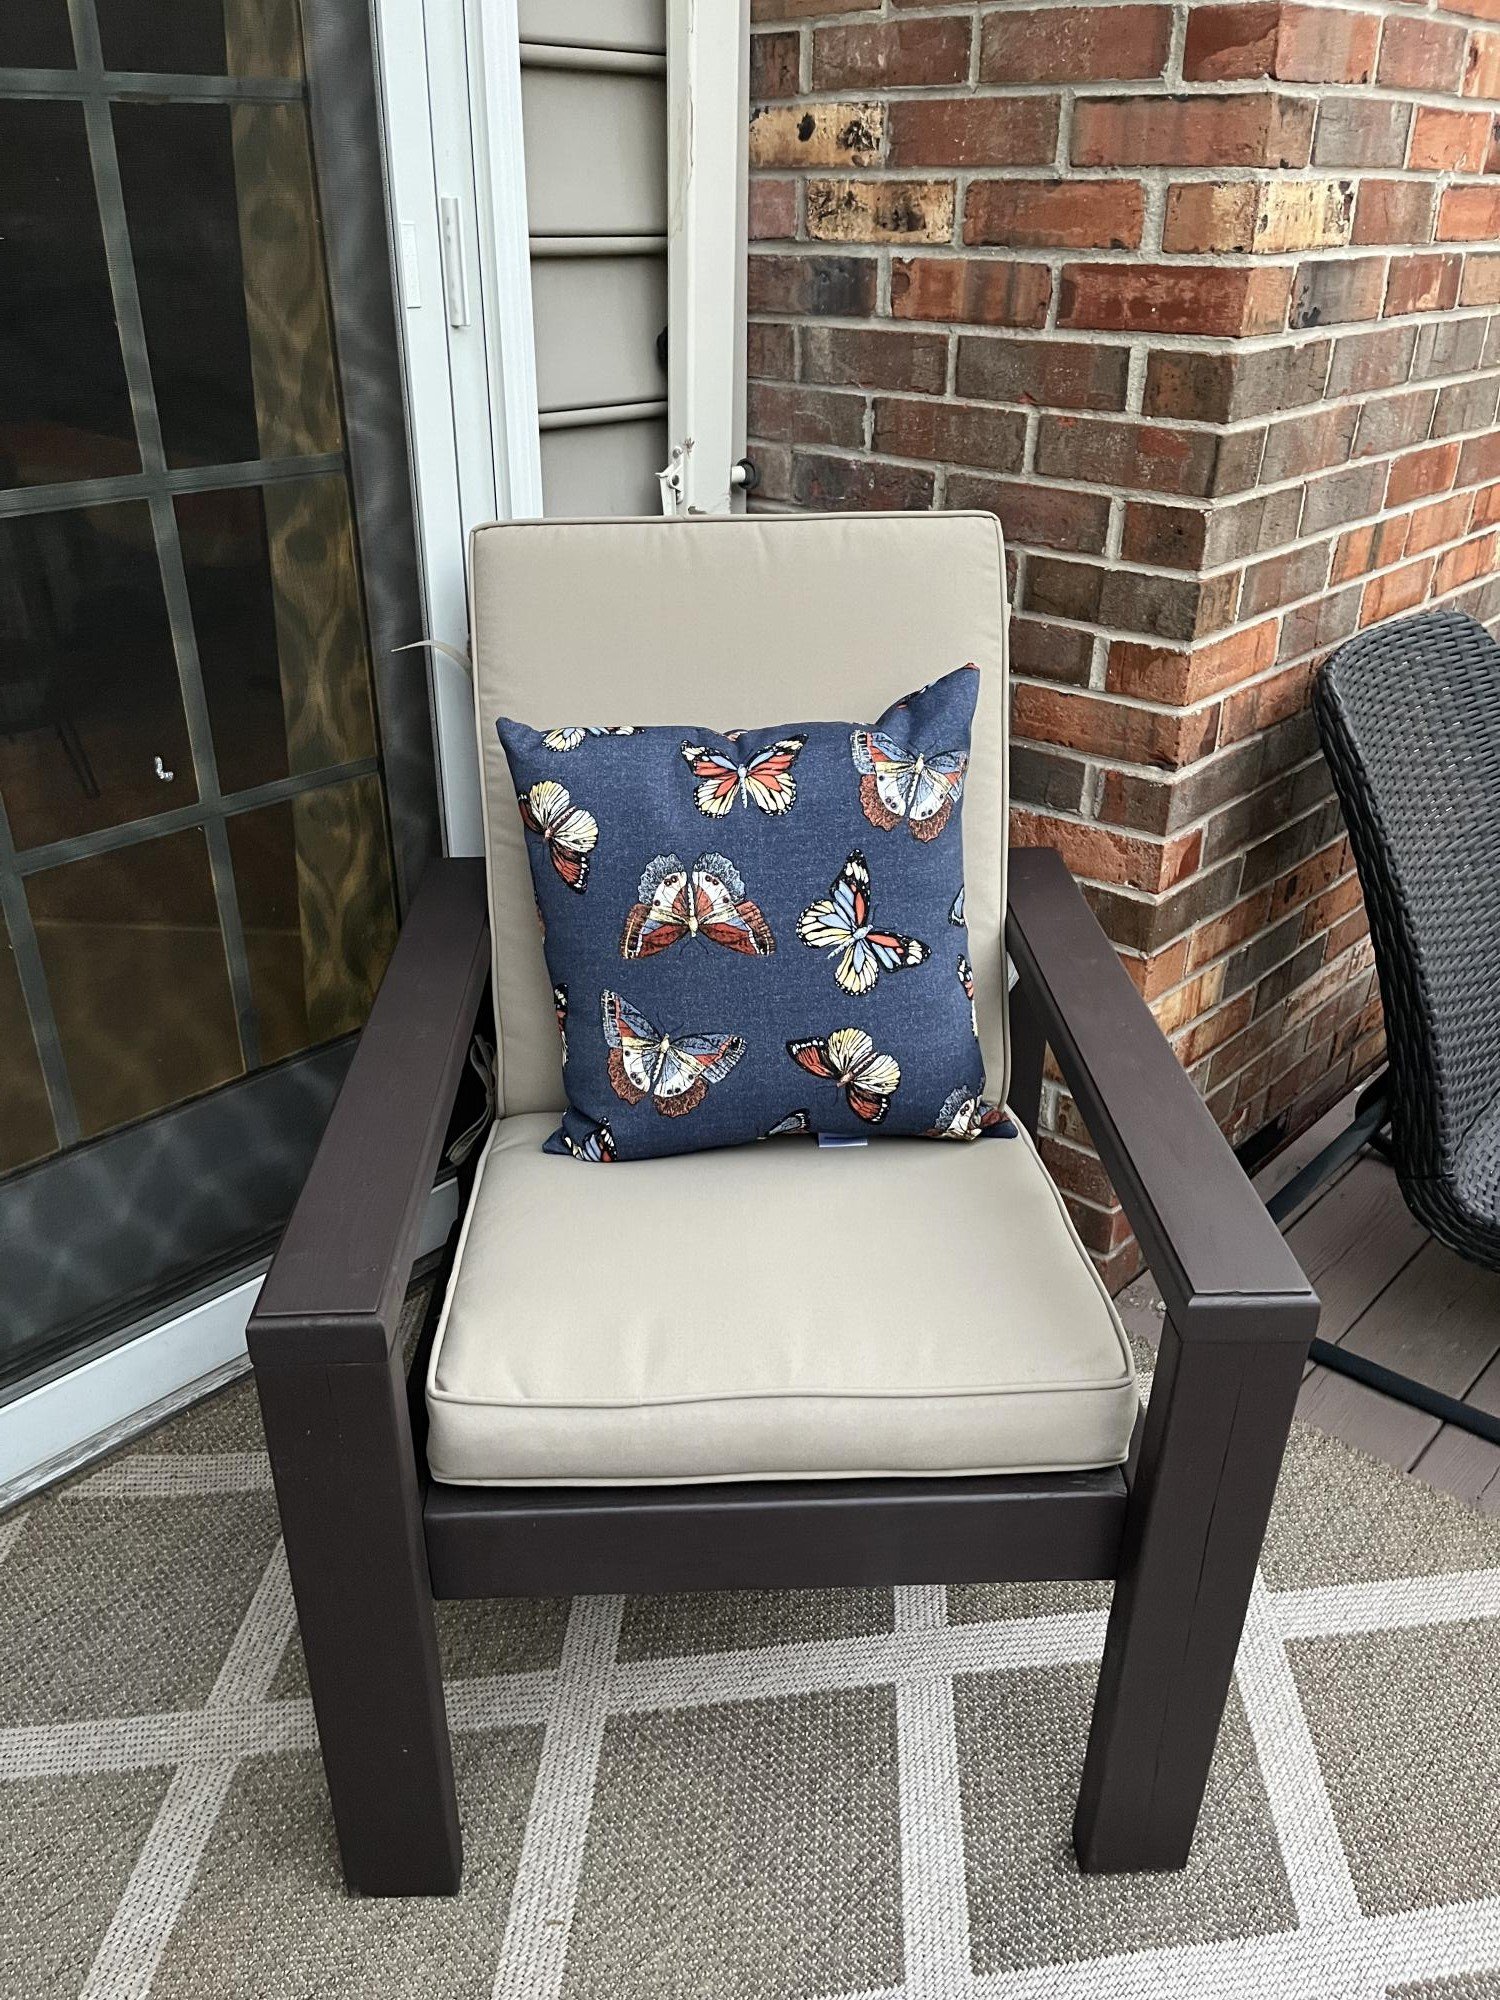
I was so excited to try this plan! It was the perfect size for this corner! Now I need to make a few of the chairs for the deep seat cushions! Thank you for these great plans, Ana!
Built from Plan(s)
Comments
Vintage Style Step Stool - Distressed
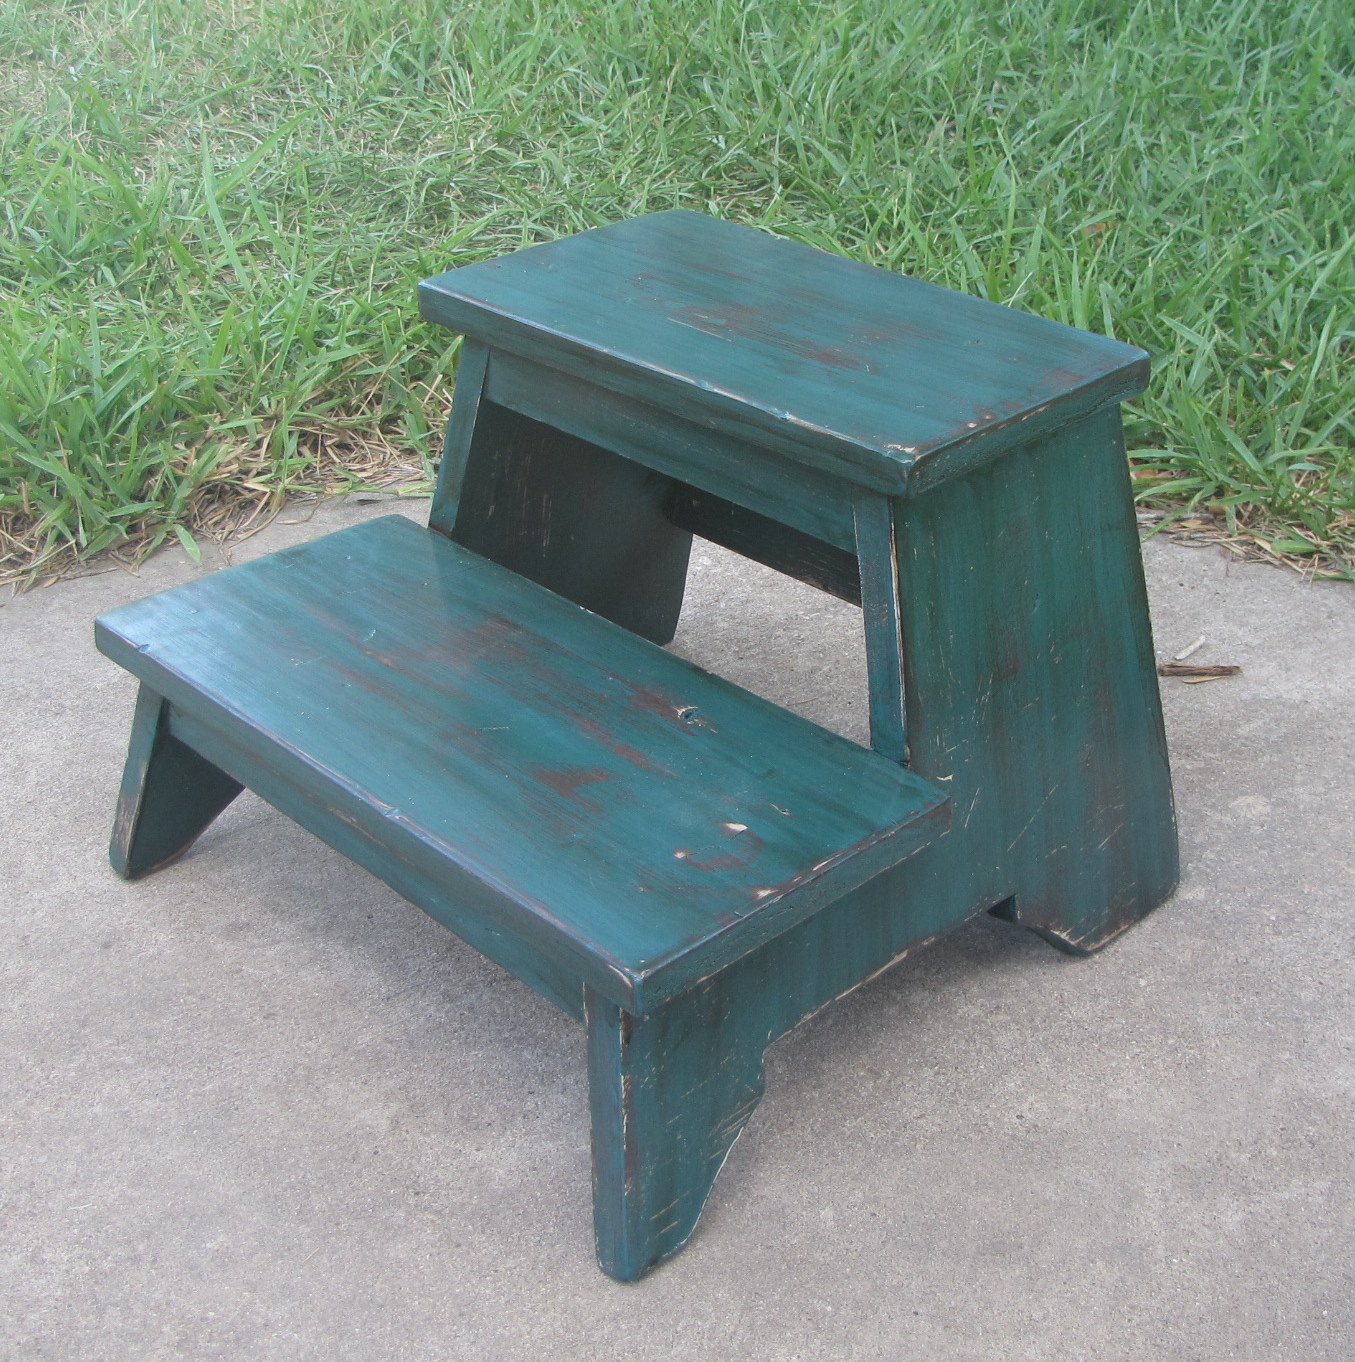
I love this stool. I used the plan as is, except for creating the angles similar to those shown on the stool photos in the plan. If you follow the plans directly, your stool will be standing completely straight vs the slight angle shown in the photos. If you are not comfortable with cutting angles, I would definitely stick with the plan. I had to play around with mine until I finally got everything right.
The time allotted is more due to waiting for paint to dry versus actual build time. The stool goes together quickly, but sanding & drying time do eat up the hours.
Thank you Ana for the great plans! I have more of these planned for the future, so cute & they'll make great gifts!


Estimated Cost
$10-20
Estimated Time Investment
Weekend Project (10-20 Hours)
Finish Used
To create this distressed finish...one coat primer, one coat dark brown (oops paint sample, so I don't know actual name), then random thin layers of poly to keep next coat of paint from sticking in those areas, one coat teal (also oops paint sample), glaze in a dark brown & then clear poly on top. You sand in-between all paint layers & then do a final sanding to create distressed look before applying glaze or poly.
Recommended Skill Level
Beginner