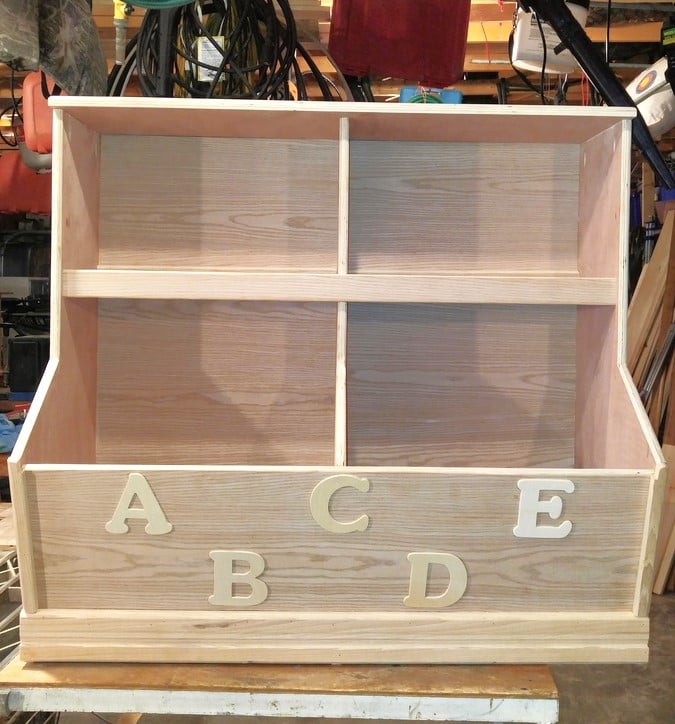
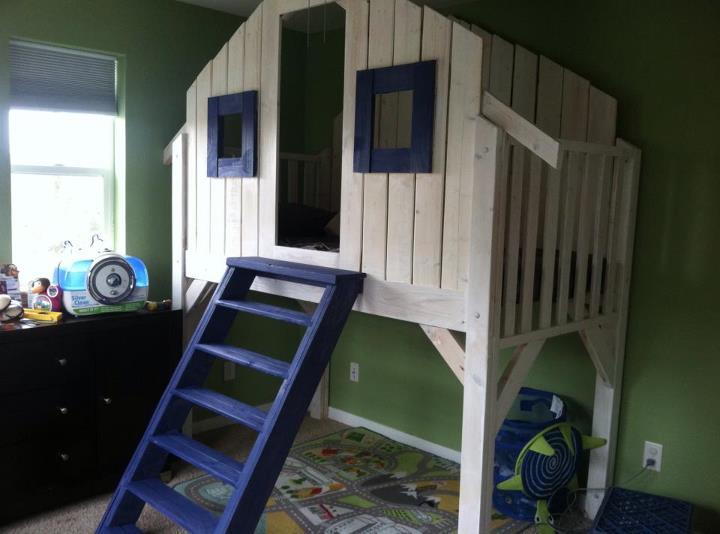
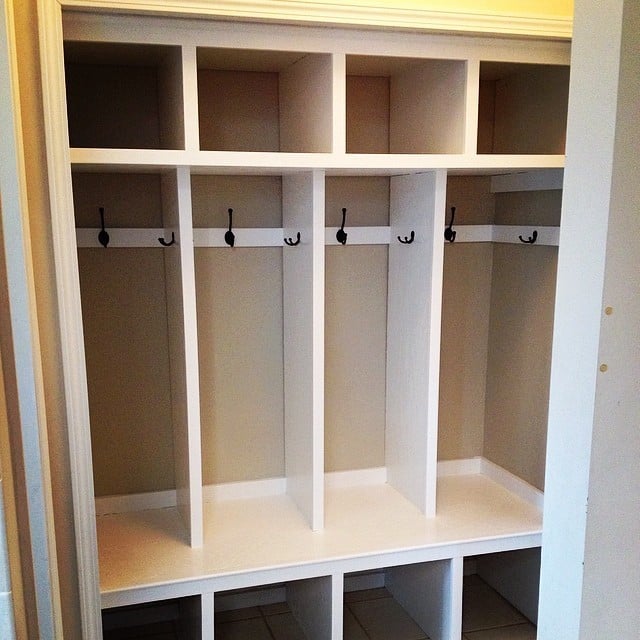
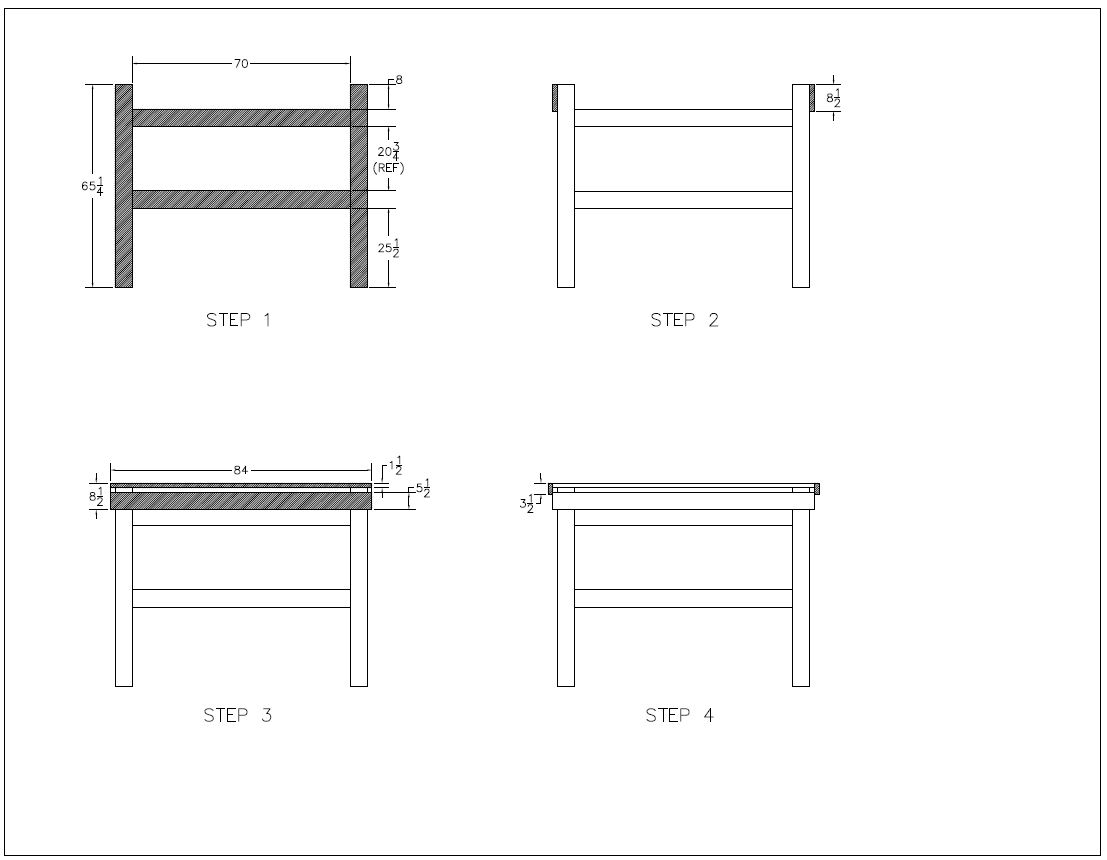
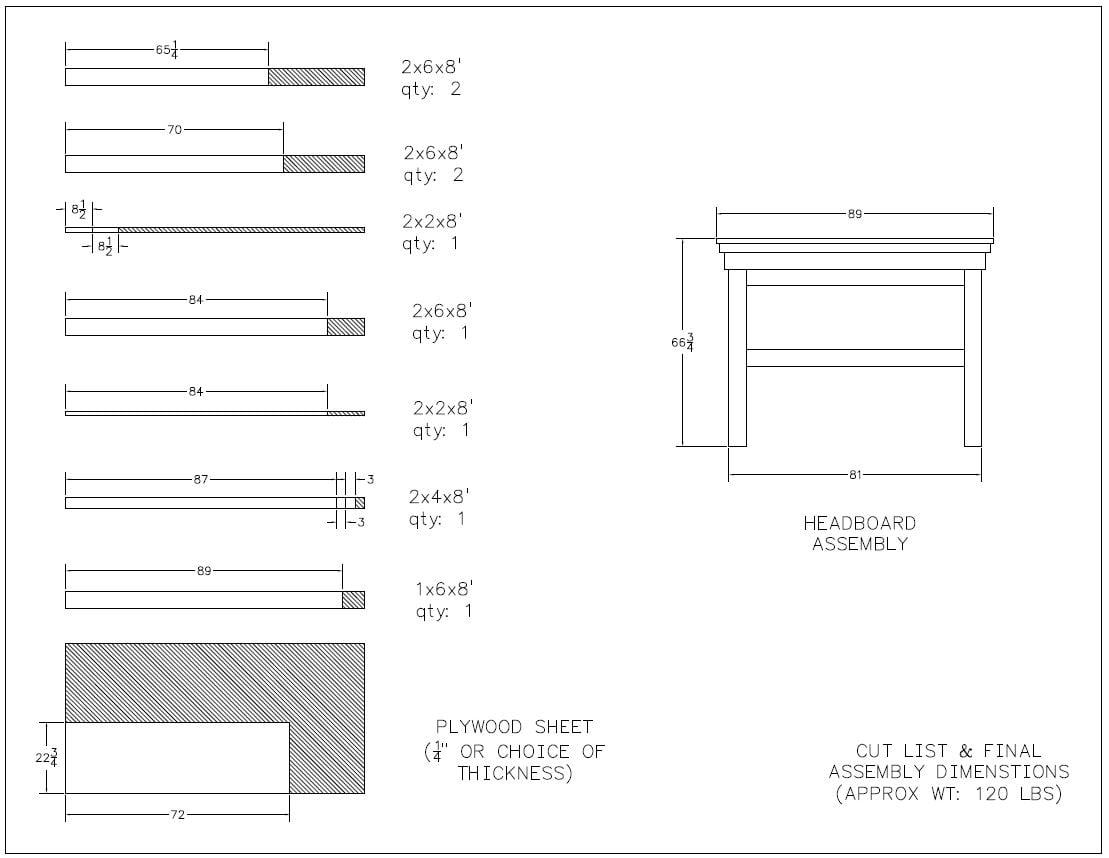
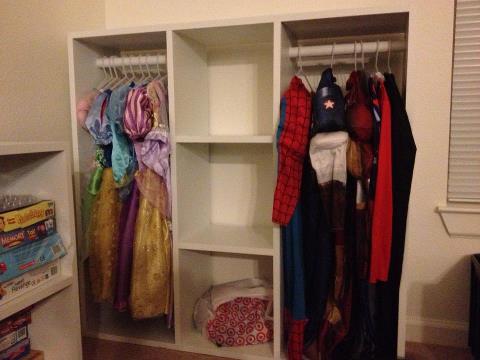
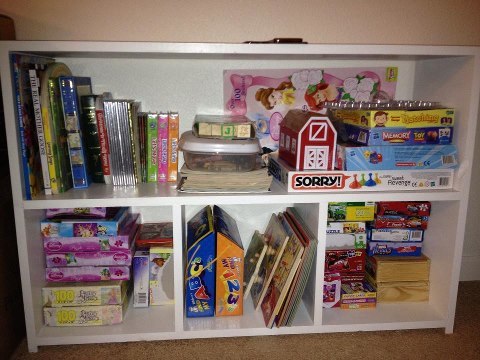
Community Brag Posts
modern Adirondack chairs
![](/sites/default/files/45677992-C001-4B21-A481-CAE058C1D4B9.jpeg)
After a cabin remodel I had some left over 1X6 red cedar that I wanted to use and these chairs looked like a great project. After buying some white cedar 2X4's , here's my first 2. Thanks for the plans.
Comments
Fancy X Farmhouse Table
My husband and I fell in love with this table when we found the plan on Ana White. He did the building, I did the staining and painting. We built the matching bench and found the chairs on Craig's List. It was perfect for our outdoor space.
![](/sites/default/files/3154824233_1363981055.jpg)
Guest Room Stair Baluster Accent Table
We wanted a narrow console table that would fit next to the bed in our guest room. This accent table is less than 12 inches wide. I came across a stair baluster plan and made it my own. The balusters and top are red oak, the aprons and bottom shelf are poplar. I used white semigloss for the body and red mohagany stain for the top to try and match the doors in the room. Came pretty close! I'm very happy with the two toned look and the project overall. This is my third furniture project! I'm addicted.
Miniwax Satin Polyurethane
Plywood shoe dresser
![](/sites/default/files/IMG_20170501_230650_101.jpg)
Based my design off the shoe bench version of dresser. Used old leather belts to keep bins from falling out. Am considering adding legs but currently without legs the dresser doesnt fall forward when bins are open. Added a third support in the middle - dresser seems strong enough to seat 1 person but the idea isnt that its extra seating, more like another surface for a lamp and some plants. Used a long nail on either side of bins to keek bins aligned when open. A hinge would work better though, I got lazy. Great way to store shoes!
Truss Style Farm Bench
![](/sites/default/files/Truss%20Style%20Farm%20Bench10%2015inch%20deep%20seat.jpg)
I call my bench, Modern Farm style bench. I joint the edges and plain the faces of each 2x4. this creates a bench seat that looks likes a solid piece. I use pocket hole screws and glue to make the bench seat. Typical stain the bench seat and paint the bench frame.
![](/sites/default/files/Truss%20Style%20Farm%20Bench01%2015inch%20deep%20seat.jpg)
![](/sites/default/files/Truss%20Style%20Farm%20Bench01.jpg)
![](/sites/default/files/Truss%20Style%20Farm%20Bench02%2015inch%20deep%20seat.jpg)
![](/sites/default/files/Truss%20Style%20Farm%20Bench02.jpg)
![](/sites/default/files/Truss%20Style%20Farm%20Bench03.jpg)
My First Project - 6 Cube Bookshelf
![](/sites/default/files/3154824373_1364289029.jpg)
I desperately needed some storage in my workroom and finally decided to make this! It's from the 6 Cube Bookshelf plan and it works perfectly in this space I've got in my workroom.
I would've rather used real wood throughout, but this is my first proper project and to keep the cost down I used MDF for the main boards (all cut to size by my local B&Q, yay!) and planed whitewood 1x2s.
I definitely learnt a lot on this project, but most of the mistakes are hidden under the paint :-) and in the end I'm really pleased.
I wanted an off-white finish and, after a baffling time in the paint aisle, chose a very pale grey, it sits in the room perfectly! I'm hoping to make some fabric boxes for it, but not sure what colours I want yet.
Now for the next project...
Comments
Tue, 03/26/2013 - 03:35
Great work on your first
Great work on your first project. :) Light grey lends itself to all color possibilities, so I understand how it will be tricky to choose your fabric. :)
Window Shutters
![](/sites/default/files/2_41.jpg)
I really wanted to add a layer of depth to the front of our house, and my favorite option was adding new shutters! I used fence boards to keep cost low and to be sure that the wood would stand up to all weather conditions. I protected the wood with an oil-based sealant made for exterior use. I attached the cross braces with chunky screws and painted those black. I love how they turned out!
![](/sites/default/files/5_22.jpg)
Red Hen Home's Gray Providence Bench
![](/sites/default/files/3154824541_1364523717.jpg)
Providence Bench with a top made of three 2x6's rather than 2x4's. Tried to get it to stain gray, but had BAD luck with stain, so it has a multi-layered painted finish.
![](/sites/default/files/3154824542_1364523717.jpg)
![](/sites/default/files/3154824543_1364523717.jpg)
![](/sites/default/files/3154824544_1364523717.jpg)
Ended up dry-brushing on white and gray paint, and glazing with Minwax Ebony stain.
Comments
Fri, 03/29/2013 - 16:25
your "fail" is beautiful
I love the finish, i just love the rustic look. I want to build one now... :)
Day Bed
![](/sites/default/files/Daybed%20Queen%20w%20Trundle%20Cl.jpeg)
Queen size Day Bed with Full size trundle made of yellow pine and dark stain from Homedepot
![](/sites/default/files/Daybed%20Queen%20w%20Trundle.jpeg)
Comments
Wed, 02/11/2015 - 10:37
This is on my "to-do" list,
This is on my "to-do" list, including the trundle underneath, for my guestroom. Glad to see that it turns out so well.
Sat, 10/24/2020 - 00:05
Twin XL daybed with trundle plans?
Please may I have the plans for this bed? I want to build it in a twin XL size. 39x80. The mattresses are 10” thick. I have tried adapting several of your daybed/ farmhouse bed plans to include a trundle and to be long enough to accommodate the XL mattresses and have been stumped. I like the lower arms of the Hailey and simple daybed and wish this bed had a back piece. But this would be the closest “jumping off point” to get what I’m looking for. (I think) Any help would be greatly appreciated.
Queen Size Headboard
This was pretty easy to follow based on the instructions. It took me a little longer than expected becuase of the weather, I had to run back and forth to cut the wood from where I was building it.
Beautiful Headboard
![](/sites/default/files/3154824695_1364749522.jpeg)
This was my first project from this site, and I couldn't be happier with it! It was easy and fun. I didn't have ANY supplies outside of a hammer, so my cost was a little higher since I had to purchase everything - nails, wood conditioner, stain, polyurethane, sand paper, etc.
Overall, very happy with how it turned out!
![](/sites/default/files/3154824697_1364749522.jpeg)
![](/sites/default/files/3154824698_1364749522.jpeg)
Greenhouse
![](/sites/default/files/IMG_20170408_200406.jpg)
It was a Mother's day gift for my mom. My sister and I built it from the plan except we doubled the length and made the walls 38 inch total height no we didn't have to cut metal down and we made the door a 36 inch door.
(Vintage X) Back Step Stool End Table
![](/sites/default/files/IMG_20210514_080503_2.jpg)
I was looking for a plant table and fell in love with the vintage x plan. And it was perfect to get rid of some of my waste wood from other projects.
I love to work with Ana's plans :-)
Comments
Fri, 05/14/2021 - 11:16
I love this little stool/end table!
Thank you for sharing your build, it looks awesome!
King farmhouse bed, black distressed finish
![](/sites/default/files/3154824843_1364966668.jpg)
After seeing one in the brag posts and reading pretty much every one of the farmhouse bed plans,I too modified the original farmhouse king plans to create a four poster bed. The 4x4s are untreated Douglas fir. I cut each 4x4 only once. The top posts are 35in. and the bottom are 61in. I personally think the bottom posts are too tall but my husband really likes them the way they are.Since this bed was his birthday present, he wins :) The post caps are 1x6s cut to 4.5 and 5.5 squares then stacked on each other.
I used 1x4 furring strips to make the headboard and footboard panels instead of 1x8s. I made the wide center panel from a 1x8 I had on hand. This made the total width of the headboard and footboard 76 in. (between the 4x4 posts) As I did not wish to use a box spring, I used 2x6s for the side rails with 2x4s spanning the width of the bed. I then ran a a 2x4 down the center and mounted a 5th leg, made from a 4x4, under the center of the bed. The 2x6 side rails are covered by a painted and distressed 1x10.
Comments
Wed, 04/03/2013 - 22:55
Thank you
Thanks :) We're very happy with it. I finished it a couple weeks ago.
I also built the nightstand on the right side of the bed (left in the picture) from the mini farmhouse table plans. I modified it so I could use scrap wood I already had and to fit the odd angled wall of our bedroom.I also did not want to make another trip to the store since its a 50 mile round trip for me.
I absolutely love Ana and the plans on this site!! My to-do list is a mile long ...
Patio Cooler
This was one of my first DIY projects - while the "perfectionist" in my is not overjoyed by the final product, I think it's pretty good for a newbie. It's a gift, so I'm sure my brother-in-law will like it. Plus, I learned a lot about what do do in the future!
One main change I made was with the drain. I had a hard time getting a good seal with the plans provided. So instead, I got a smaller hose (1/2-inch OUTER DIAMETER) and put it through the cooler drain instead of on the outside. This still caused a seal issue, but I used rubber/putty cement around the inside of the cooler drain & hose, as well as where the hose entered the wood cooler on the inside. This only allowed the water to exit the drain or stay in the cooler until it passed through the drain.
I skipped the side shelf, but added the little steel bucket to catch bottle caps. And while I live in Texas, I had to give a shoutout to my Wisconsin roots (notice the bottle opener says "Drink Wisconsinbly".
All in all, I think it was a fairly good project for a DIY newcomer. Looking forward to figuring out what my next project will be!
Comments
Mon, 02/16/2015 - 13:17
I bet your brother-in-law
I bet your brother-in-law loves it! That's super fun!
fancy X inspired hallway table, slate tile inlay, turnbuckle tensioners
![](/sites/default/files/IMG_20170508_222057.jpg)
Just finished this for our front hallway.
All made from one ripped down 8ft 2x10 board of fir. (table saw to cut 2 strips at 2.5 inch wide (top rails), and 2 at 1.5inch wide (legs), and one at 3/4 inch (stretcher).
Leg braces are angled 20deg / 70 deg to make them more upright and give a sleek profile.
Stretcher goes through the legs and is held in place by wedged shims.
Stainless tension wires and turnbuckles underneath to keep it all tight - and give an industrial look. Need a lot of strength to crush teh ferrules onto the wire.
Top surface is 2 of 12" x 24" bathroom slate tile inlaid into a recess that was cut into the top rails.
finish is 3 coats of minwax glassic grey, and 2 coats polyurethane, sanded deeply in some parts to weather it.
Took me about 8 hours.
I can provide more instructions if anyone is interested.
Austin
![](/sites/default/files/IMG_20170508_221854.jpg)
![](/sites/default/files/IMG_20170508_222138.jpg)
![](/sites/default/files/IMG_20170508_222021_0.jpg)
![](/sites/default/files/IMG_20170508_222148.jpg)
![](/sites/default/files/IMG_20170508_222541.jpg)
turnbuckles, stainless wire and fittings- $20.
2 bathroom tiles: $4
8 hours in my garage: priceless.
minwax polyurethane
Farmhouse Table 1
![](/sites/default/files/2021-05-02%2010.56.55_0.jpg)
Used the plans here to make the table. Modified the dimensions slightly to fit my space by re-drawing the plans in AutoCAD 3D. Added stainless steel adjustable feet to the legs for leveling. Wanted to keep the wood up off the ground since this table sits on my back patio. Amazon link for feet: https://www.amazon.com/gp/product/B08VRPCDNL/ref=ppx_yo_dt_b_asin_title…
![](/sites/default/files/2021-05-02%2011.00.57.jpg)
![](/sites/default/files/2021-05-02%2010.57.16_0.jpg)
![](/sites/default/files/2021-05-02%2010.57.23_0.jpg)
Minwax Satin Polyurethane on top
Sherwin Williams Exterior Latex Paint - White on base
Comments
Upholstered Bed
![](/sites/default/files/3154824999_1365181382.jpg)
I used your chunky bed plans with Big Box Detox's plans for upholstery. It wasn't hard, we just spent a lot of time thinking and not doing. Ha. I wrote a little blog about our adveture. http://thepreppyparent.blogspot.com/2013/04/making-bed.html
Kitchen Island
![](/sites/default/files/20150216_134019.jpg)
First ever building project!!! I am beginner, you can do it too! Got the Kreg Jig R3 for my birthday and conquered my first build! I wasn't about to try the drawers maybe next time! Adjusted the measurements for the length I needed and only have one shelf trying to decide if I'll add the top shelf. I have been reading ana-white for years and finally did it!
![](/sites/default/files/20150216_150844.jpg)