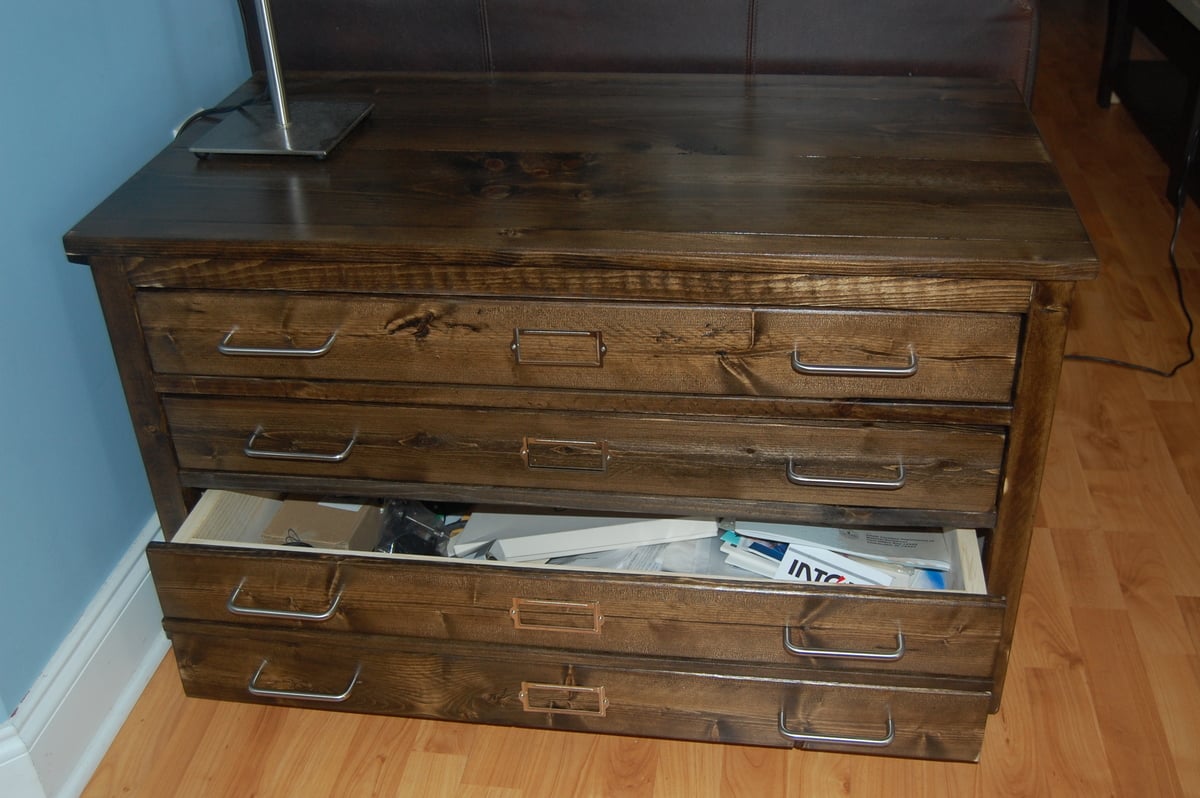
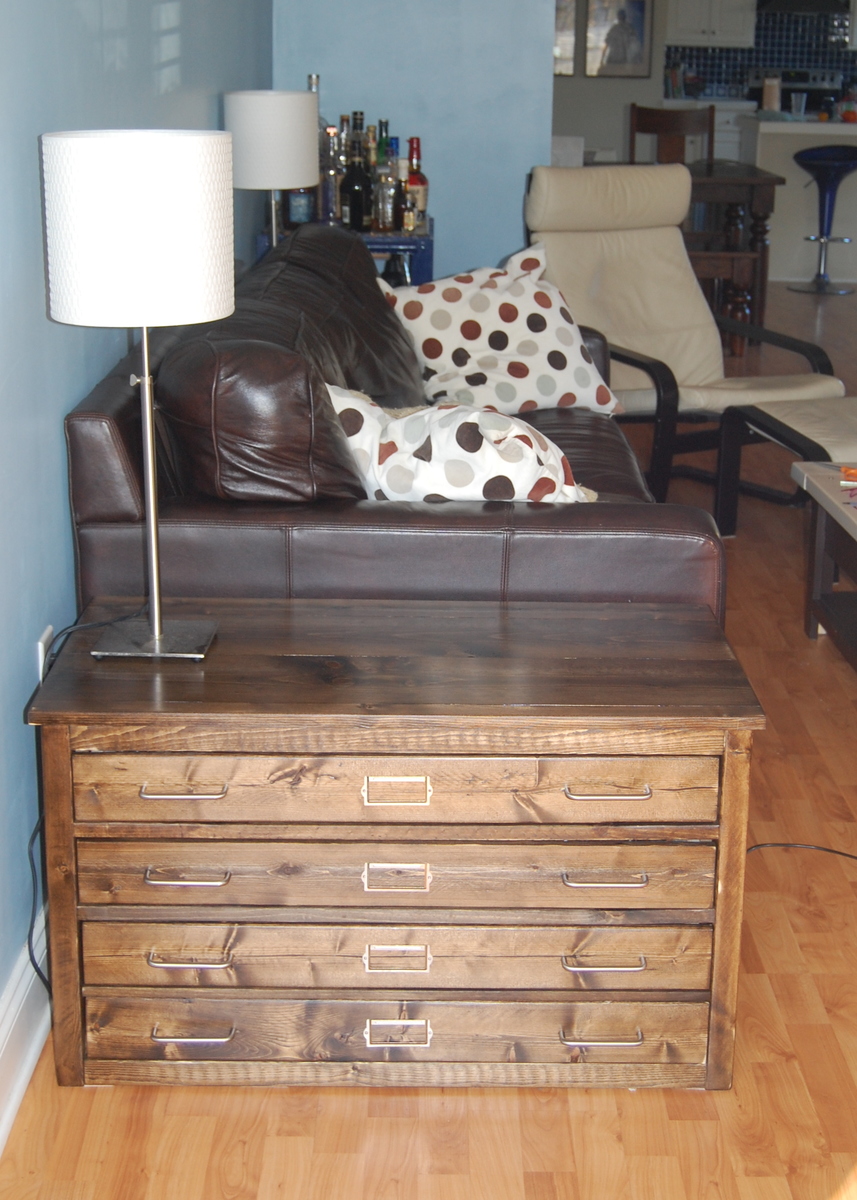
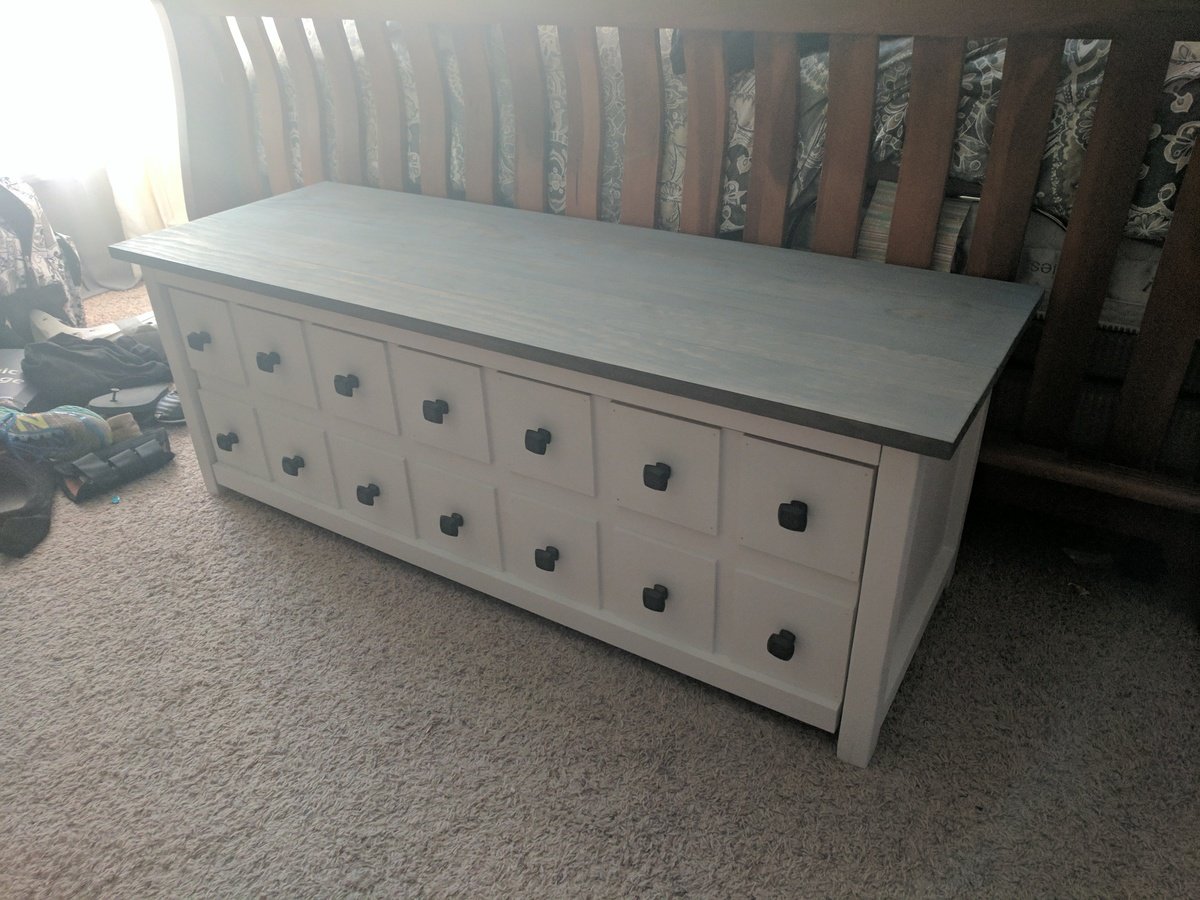
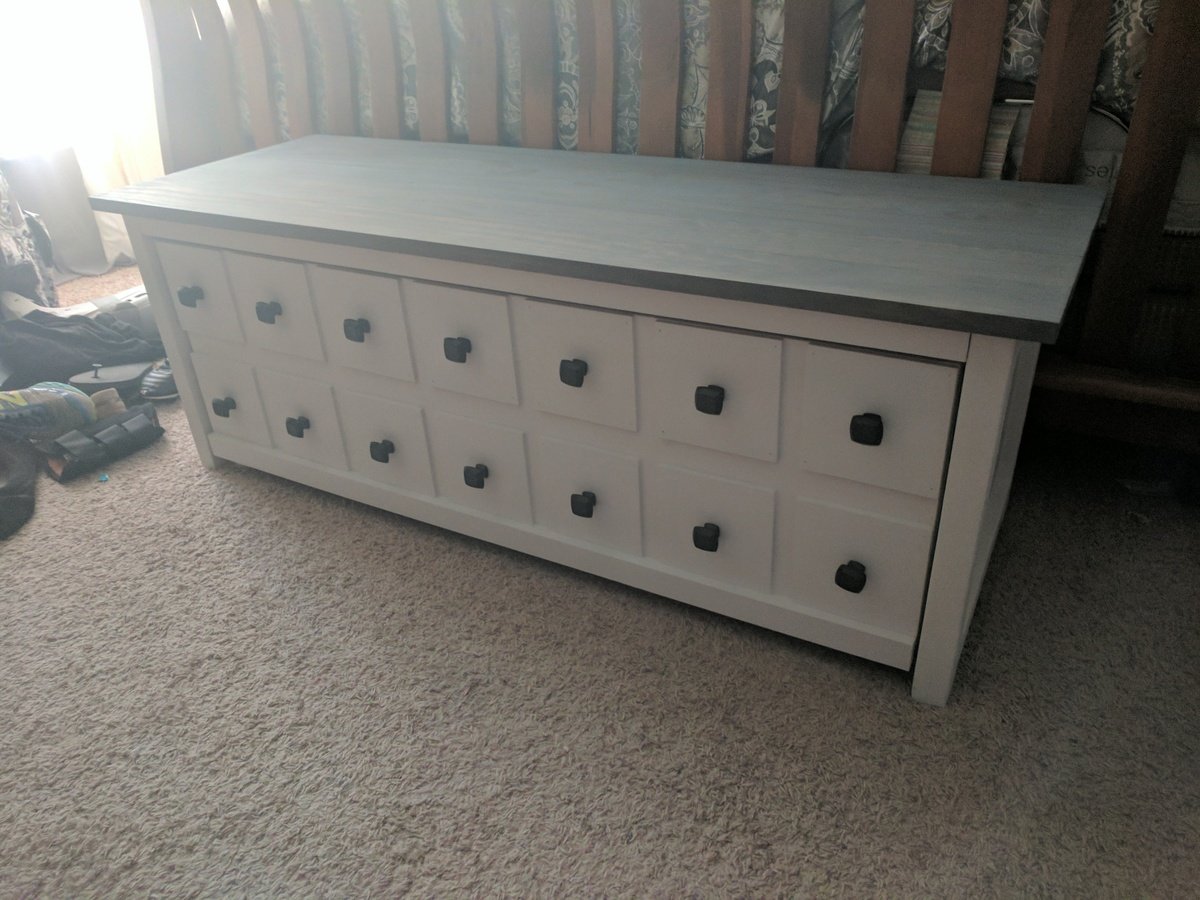
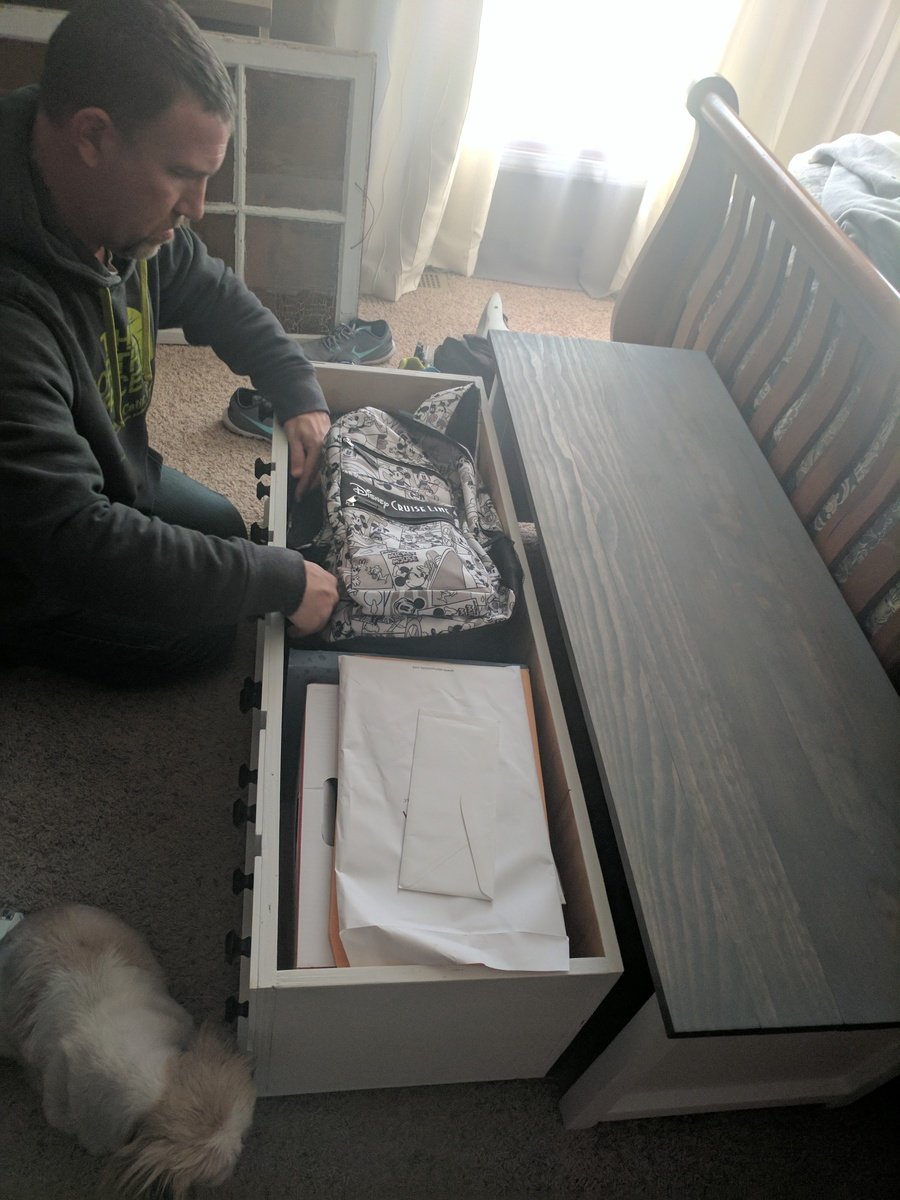
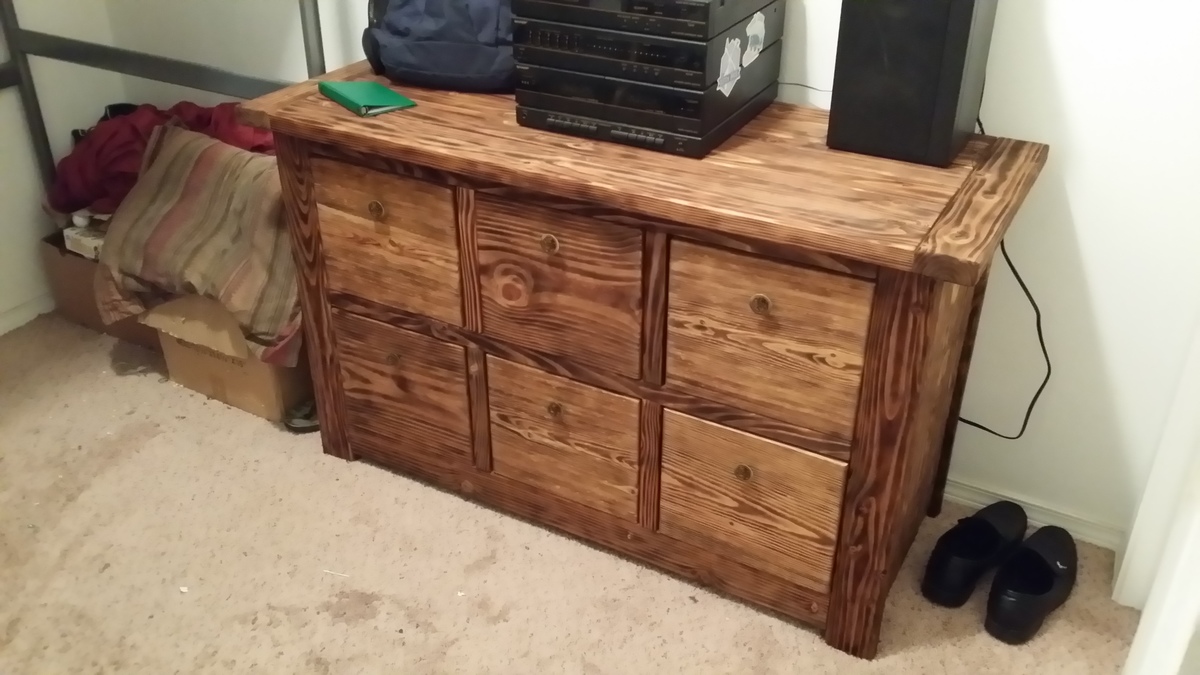
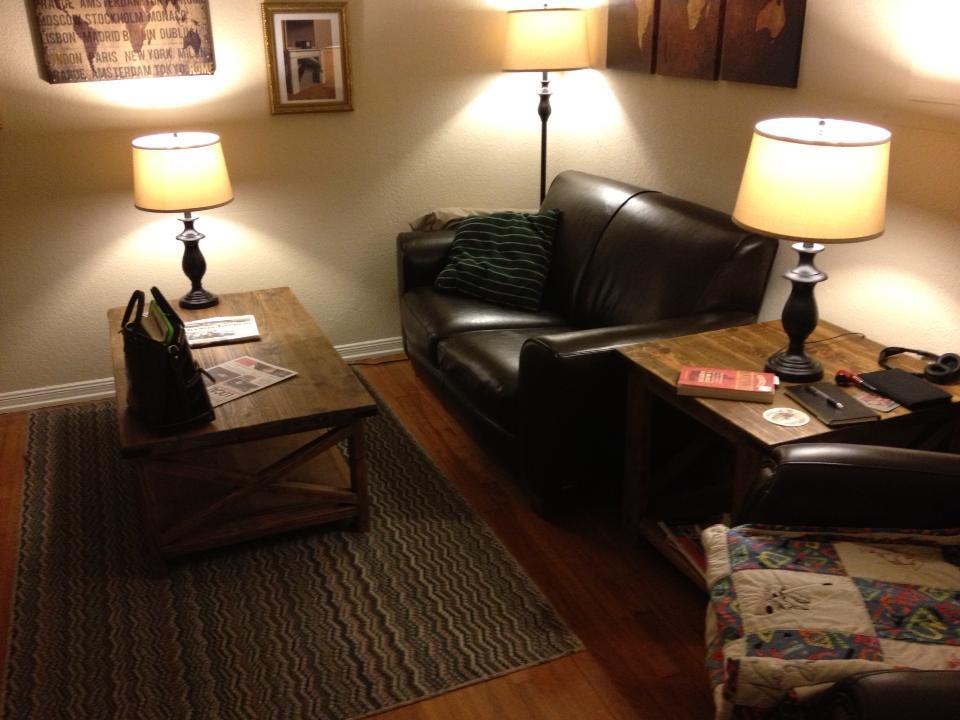
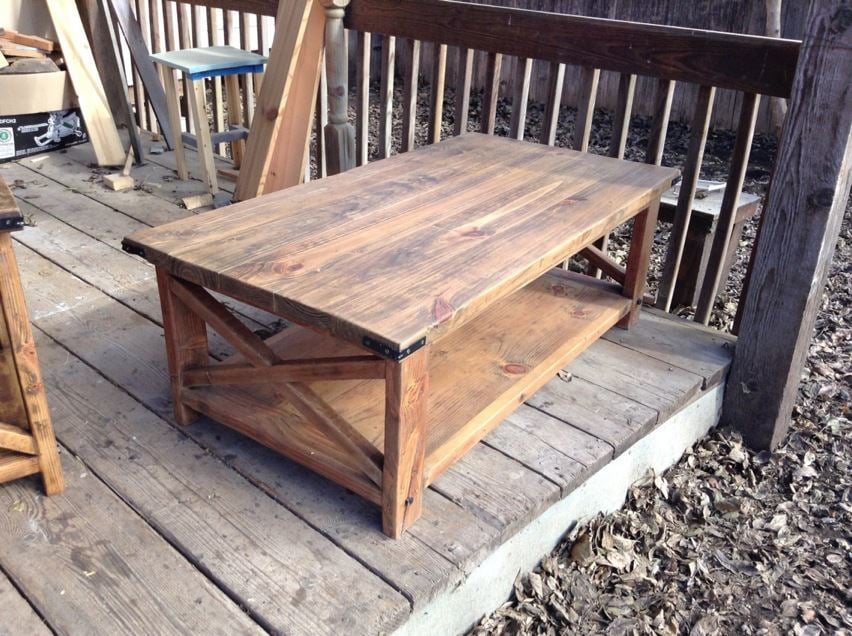
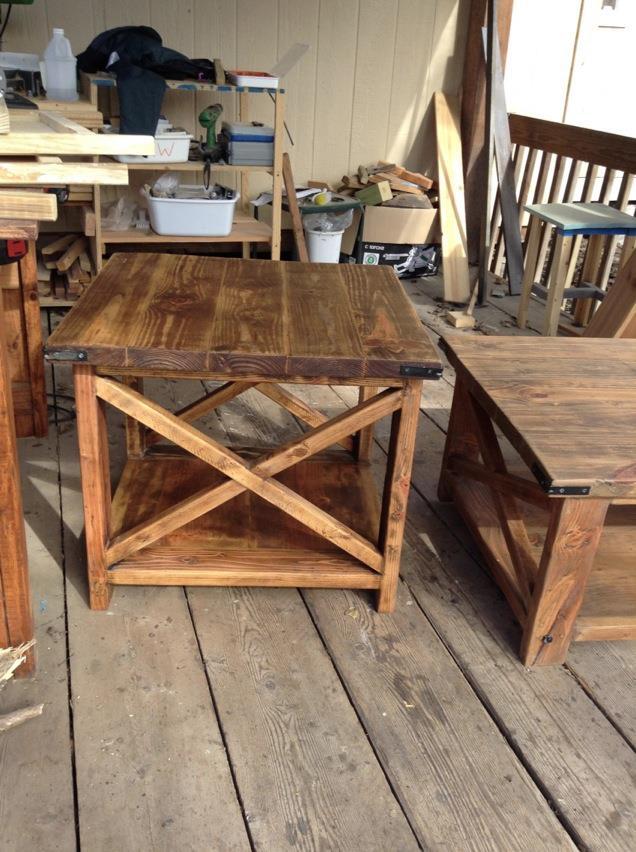
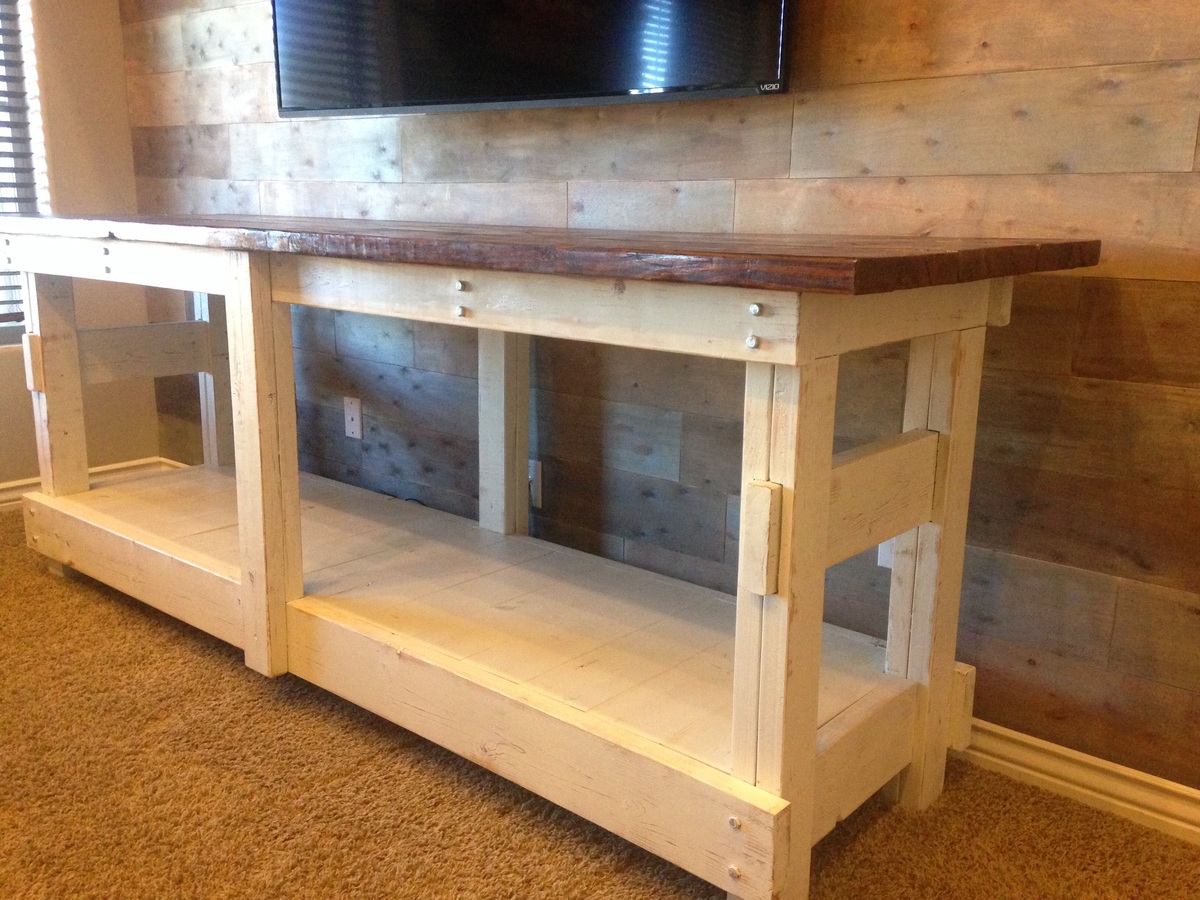
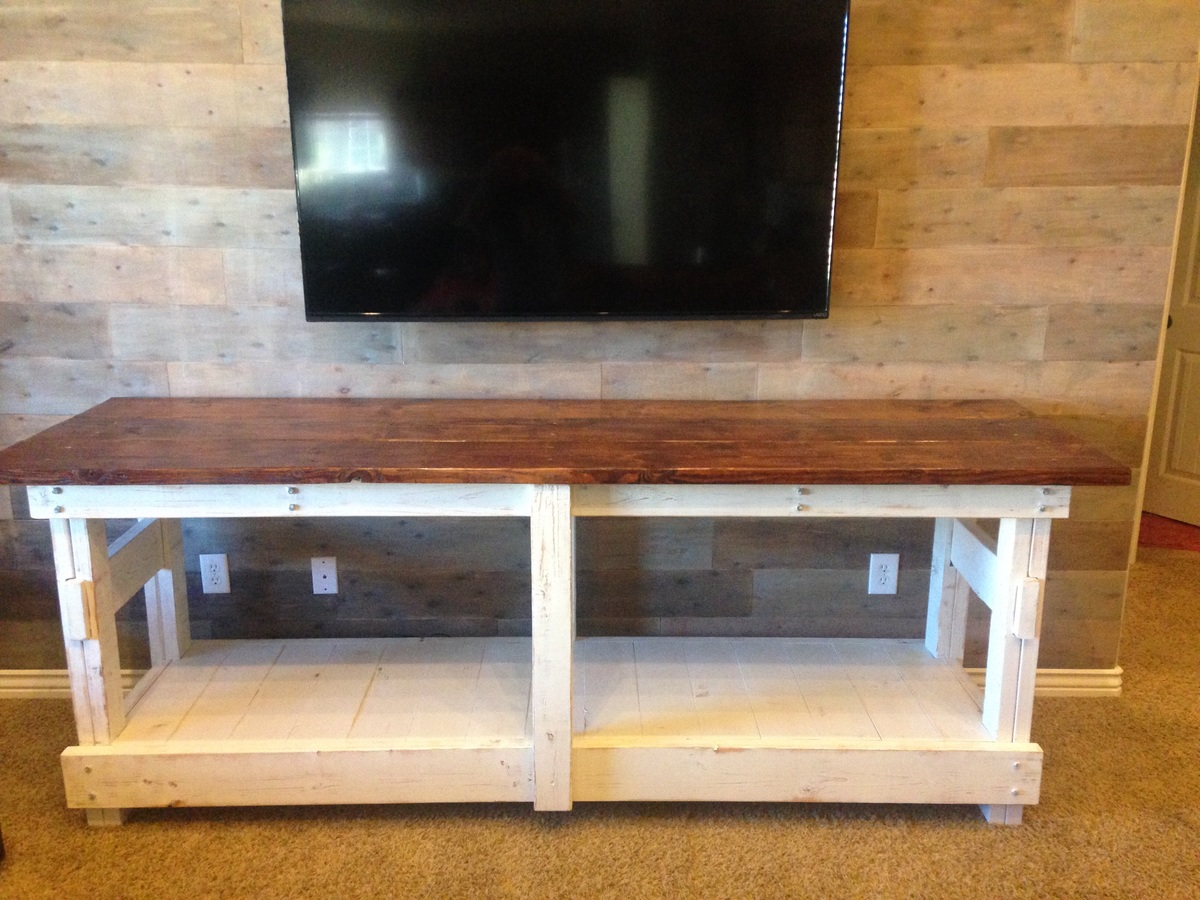
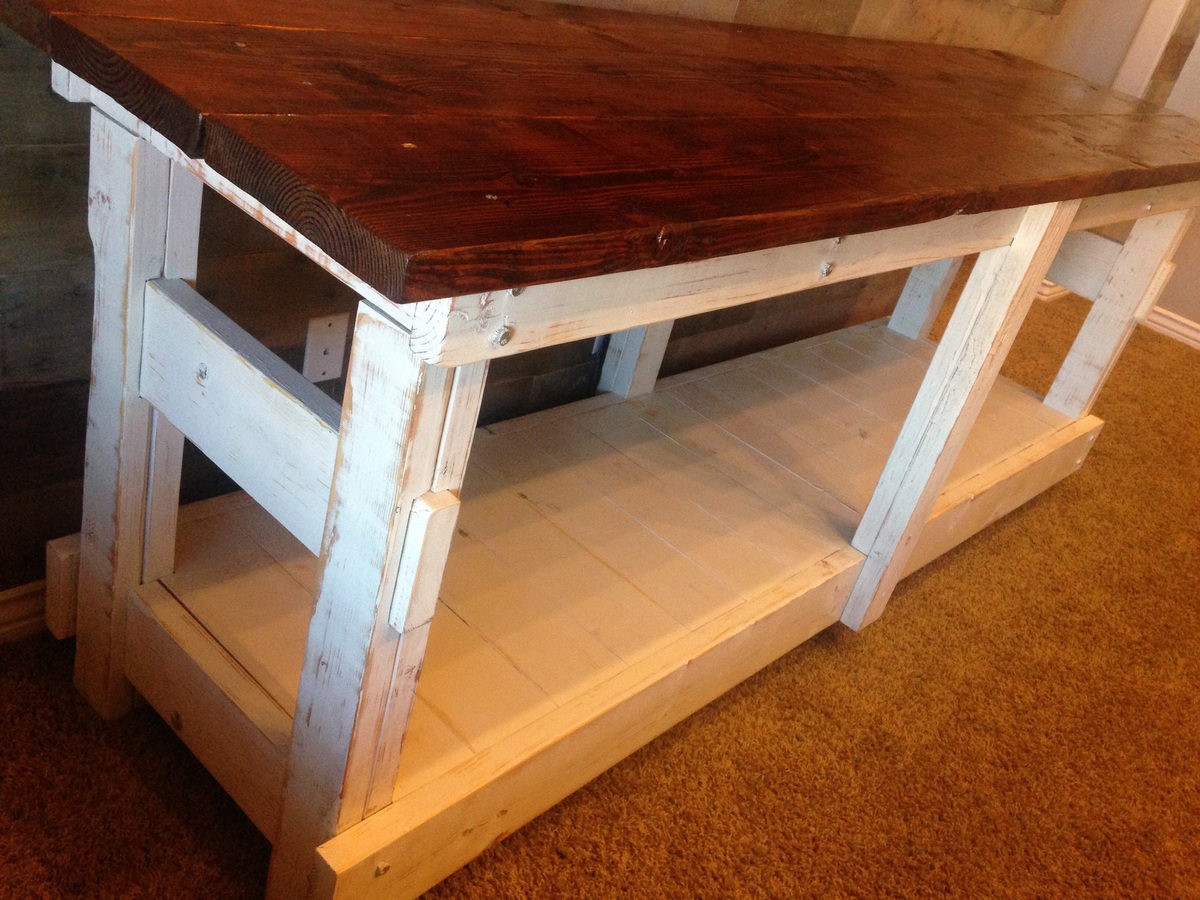
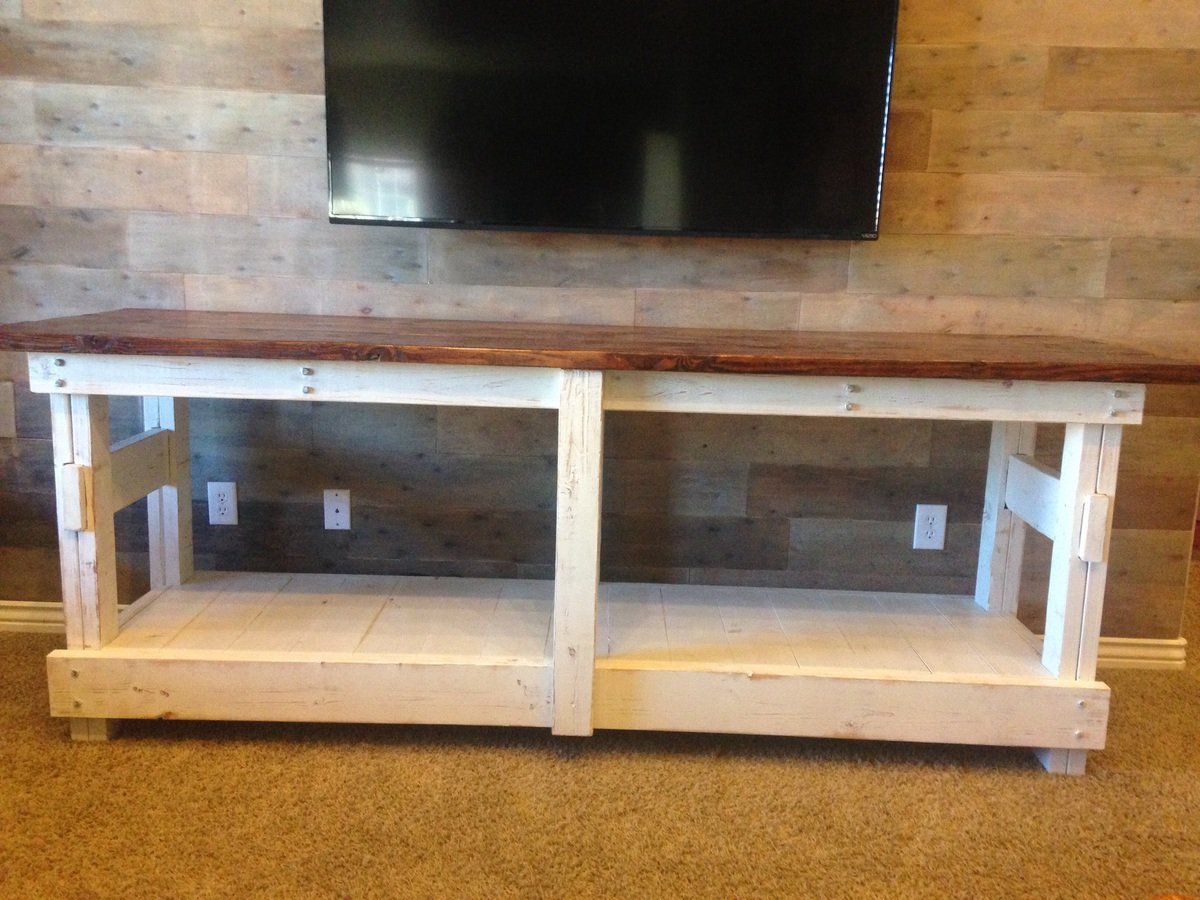
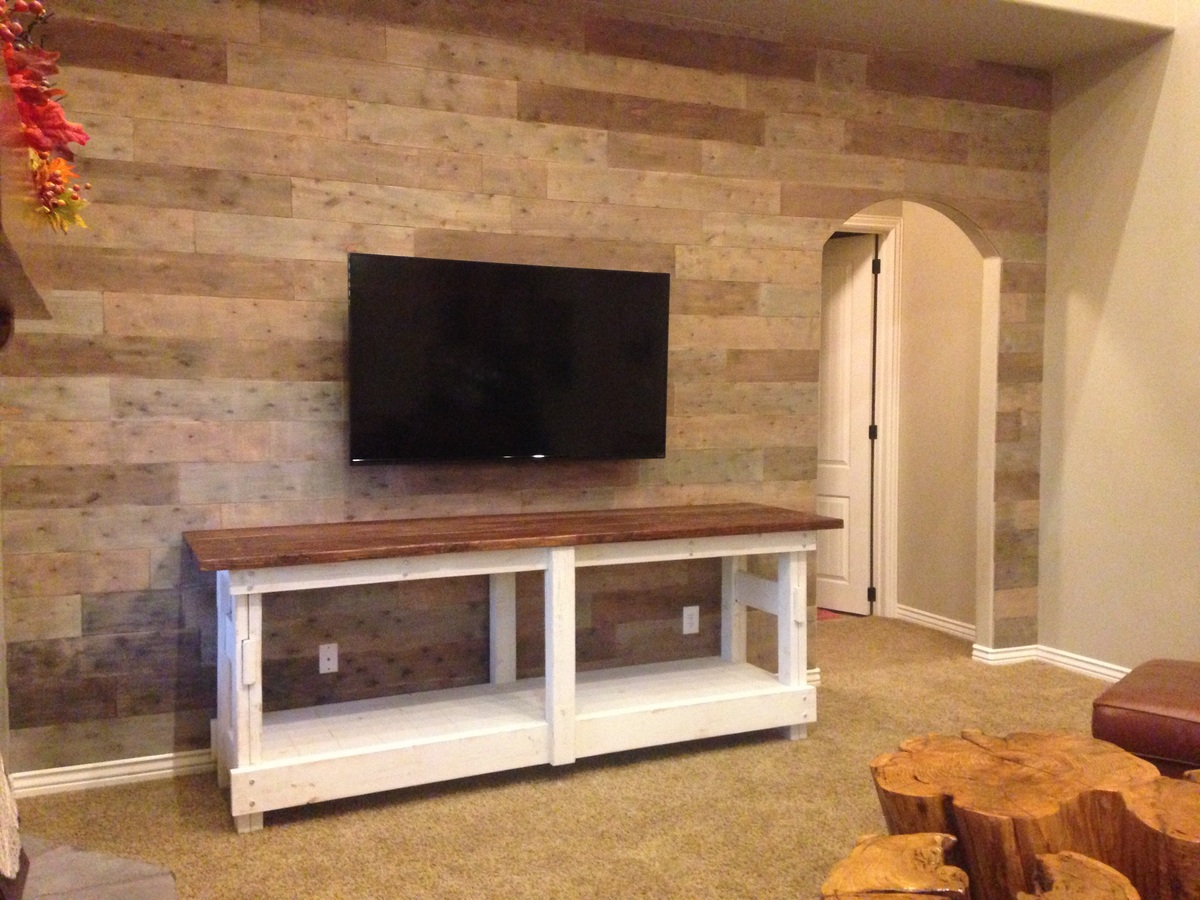
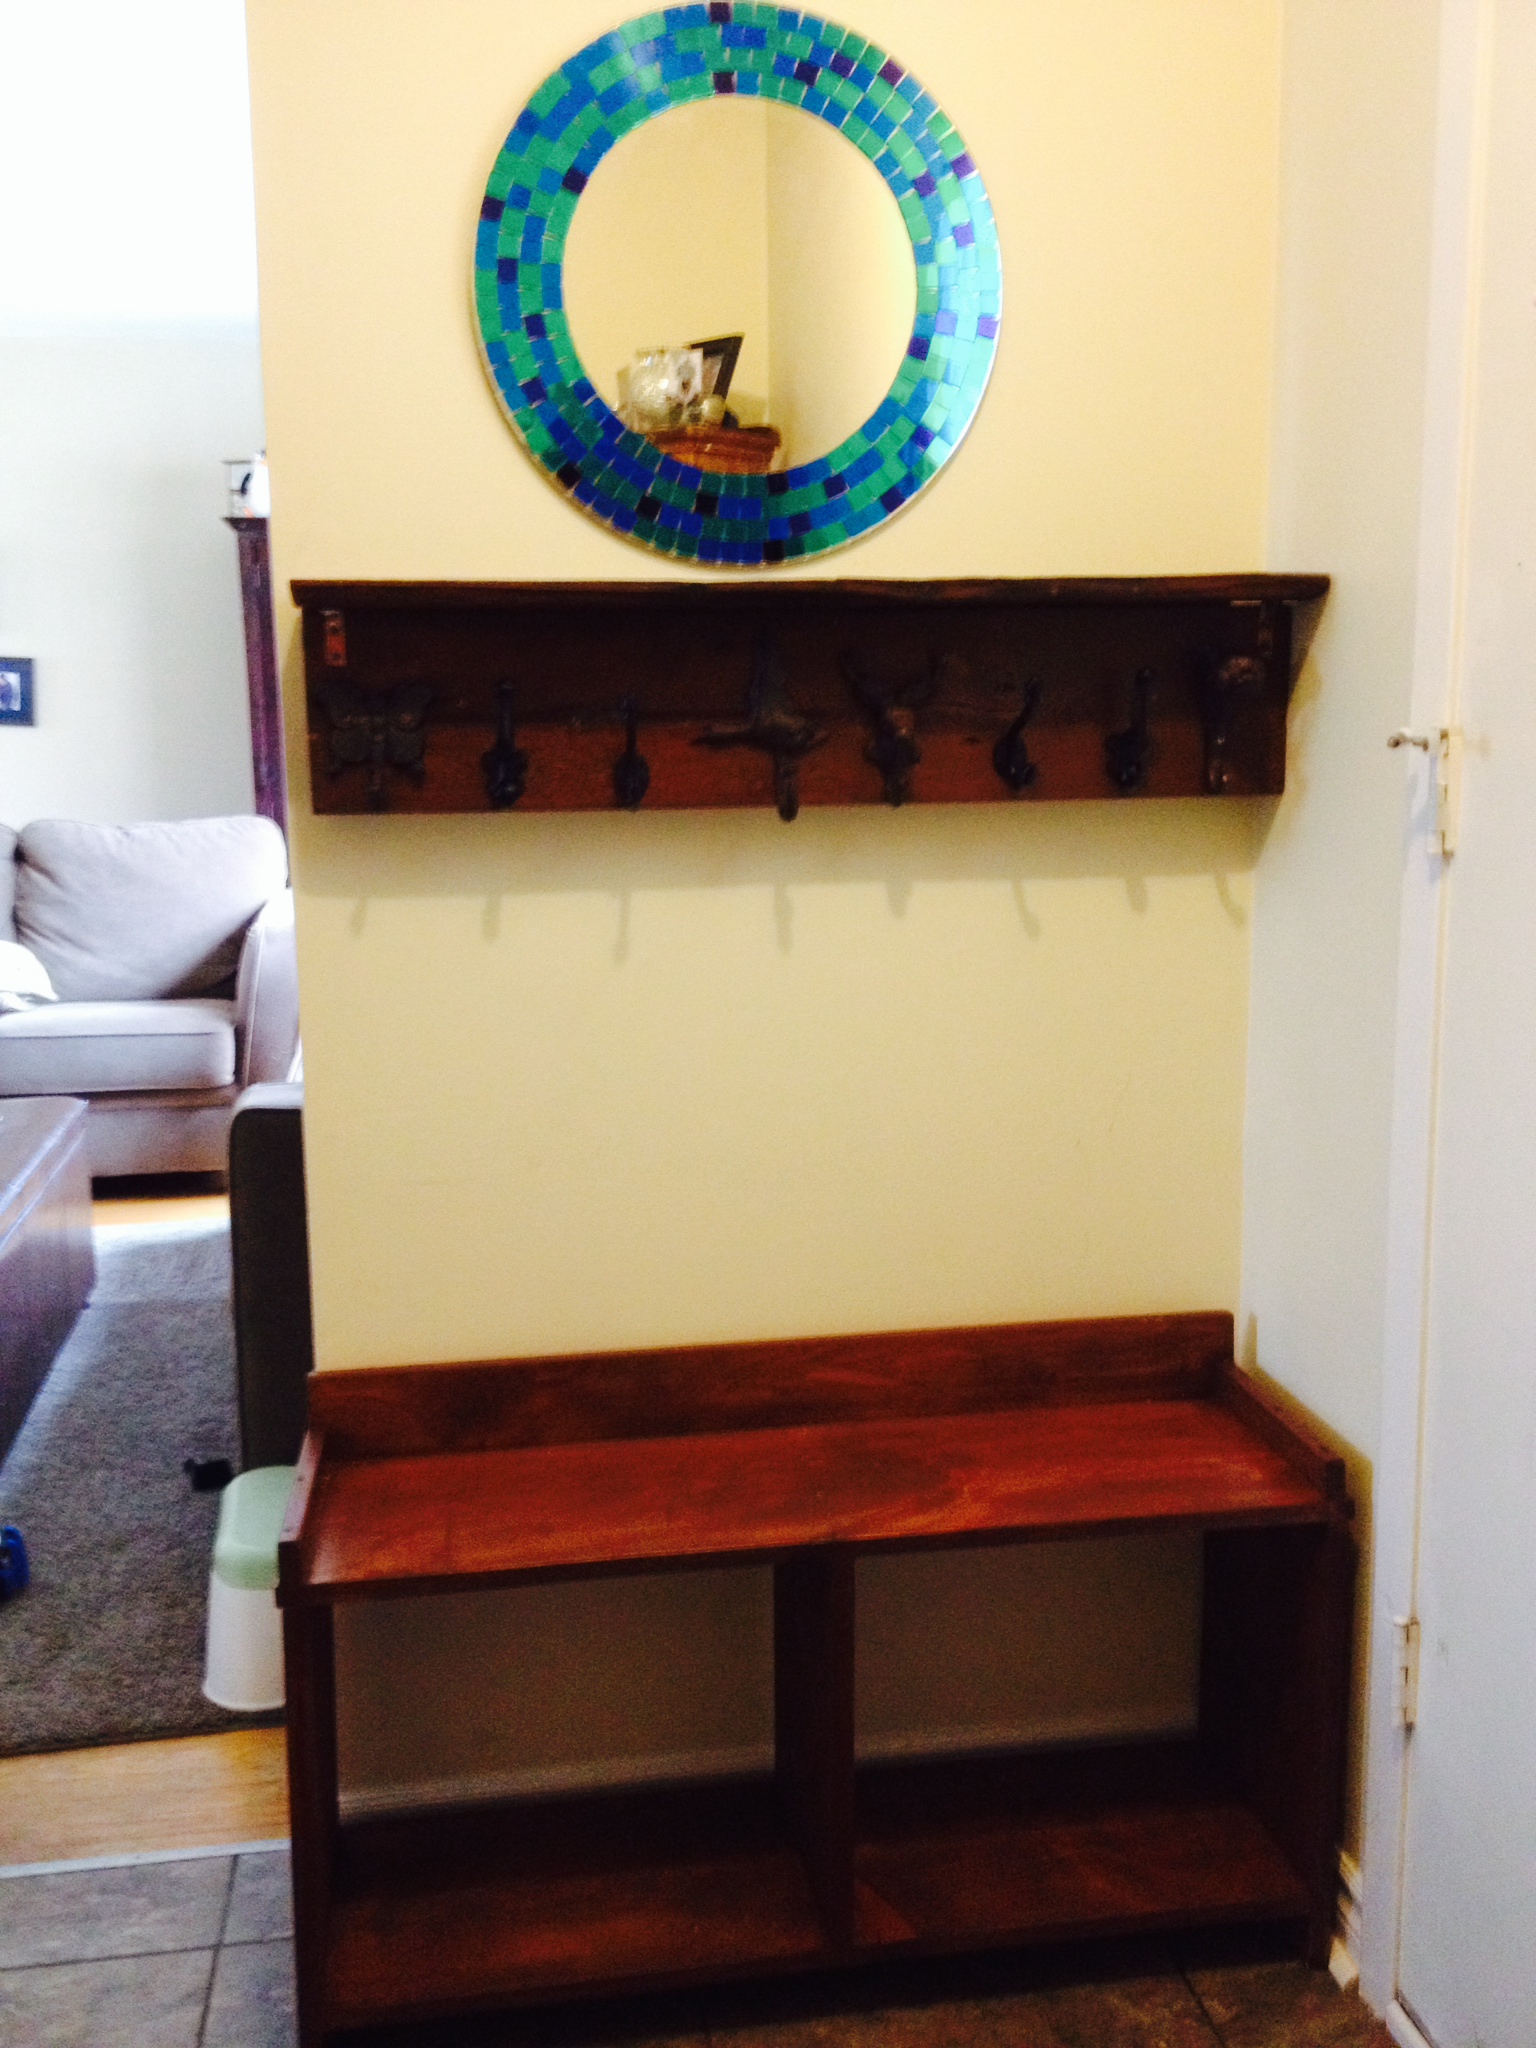
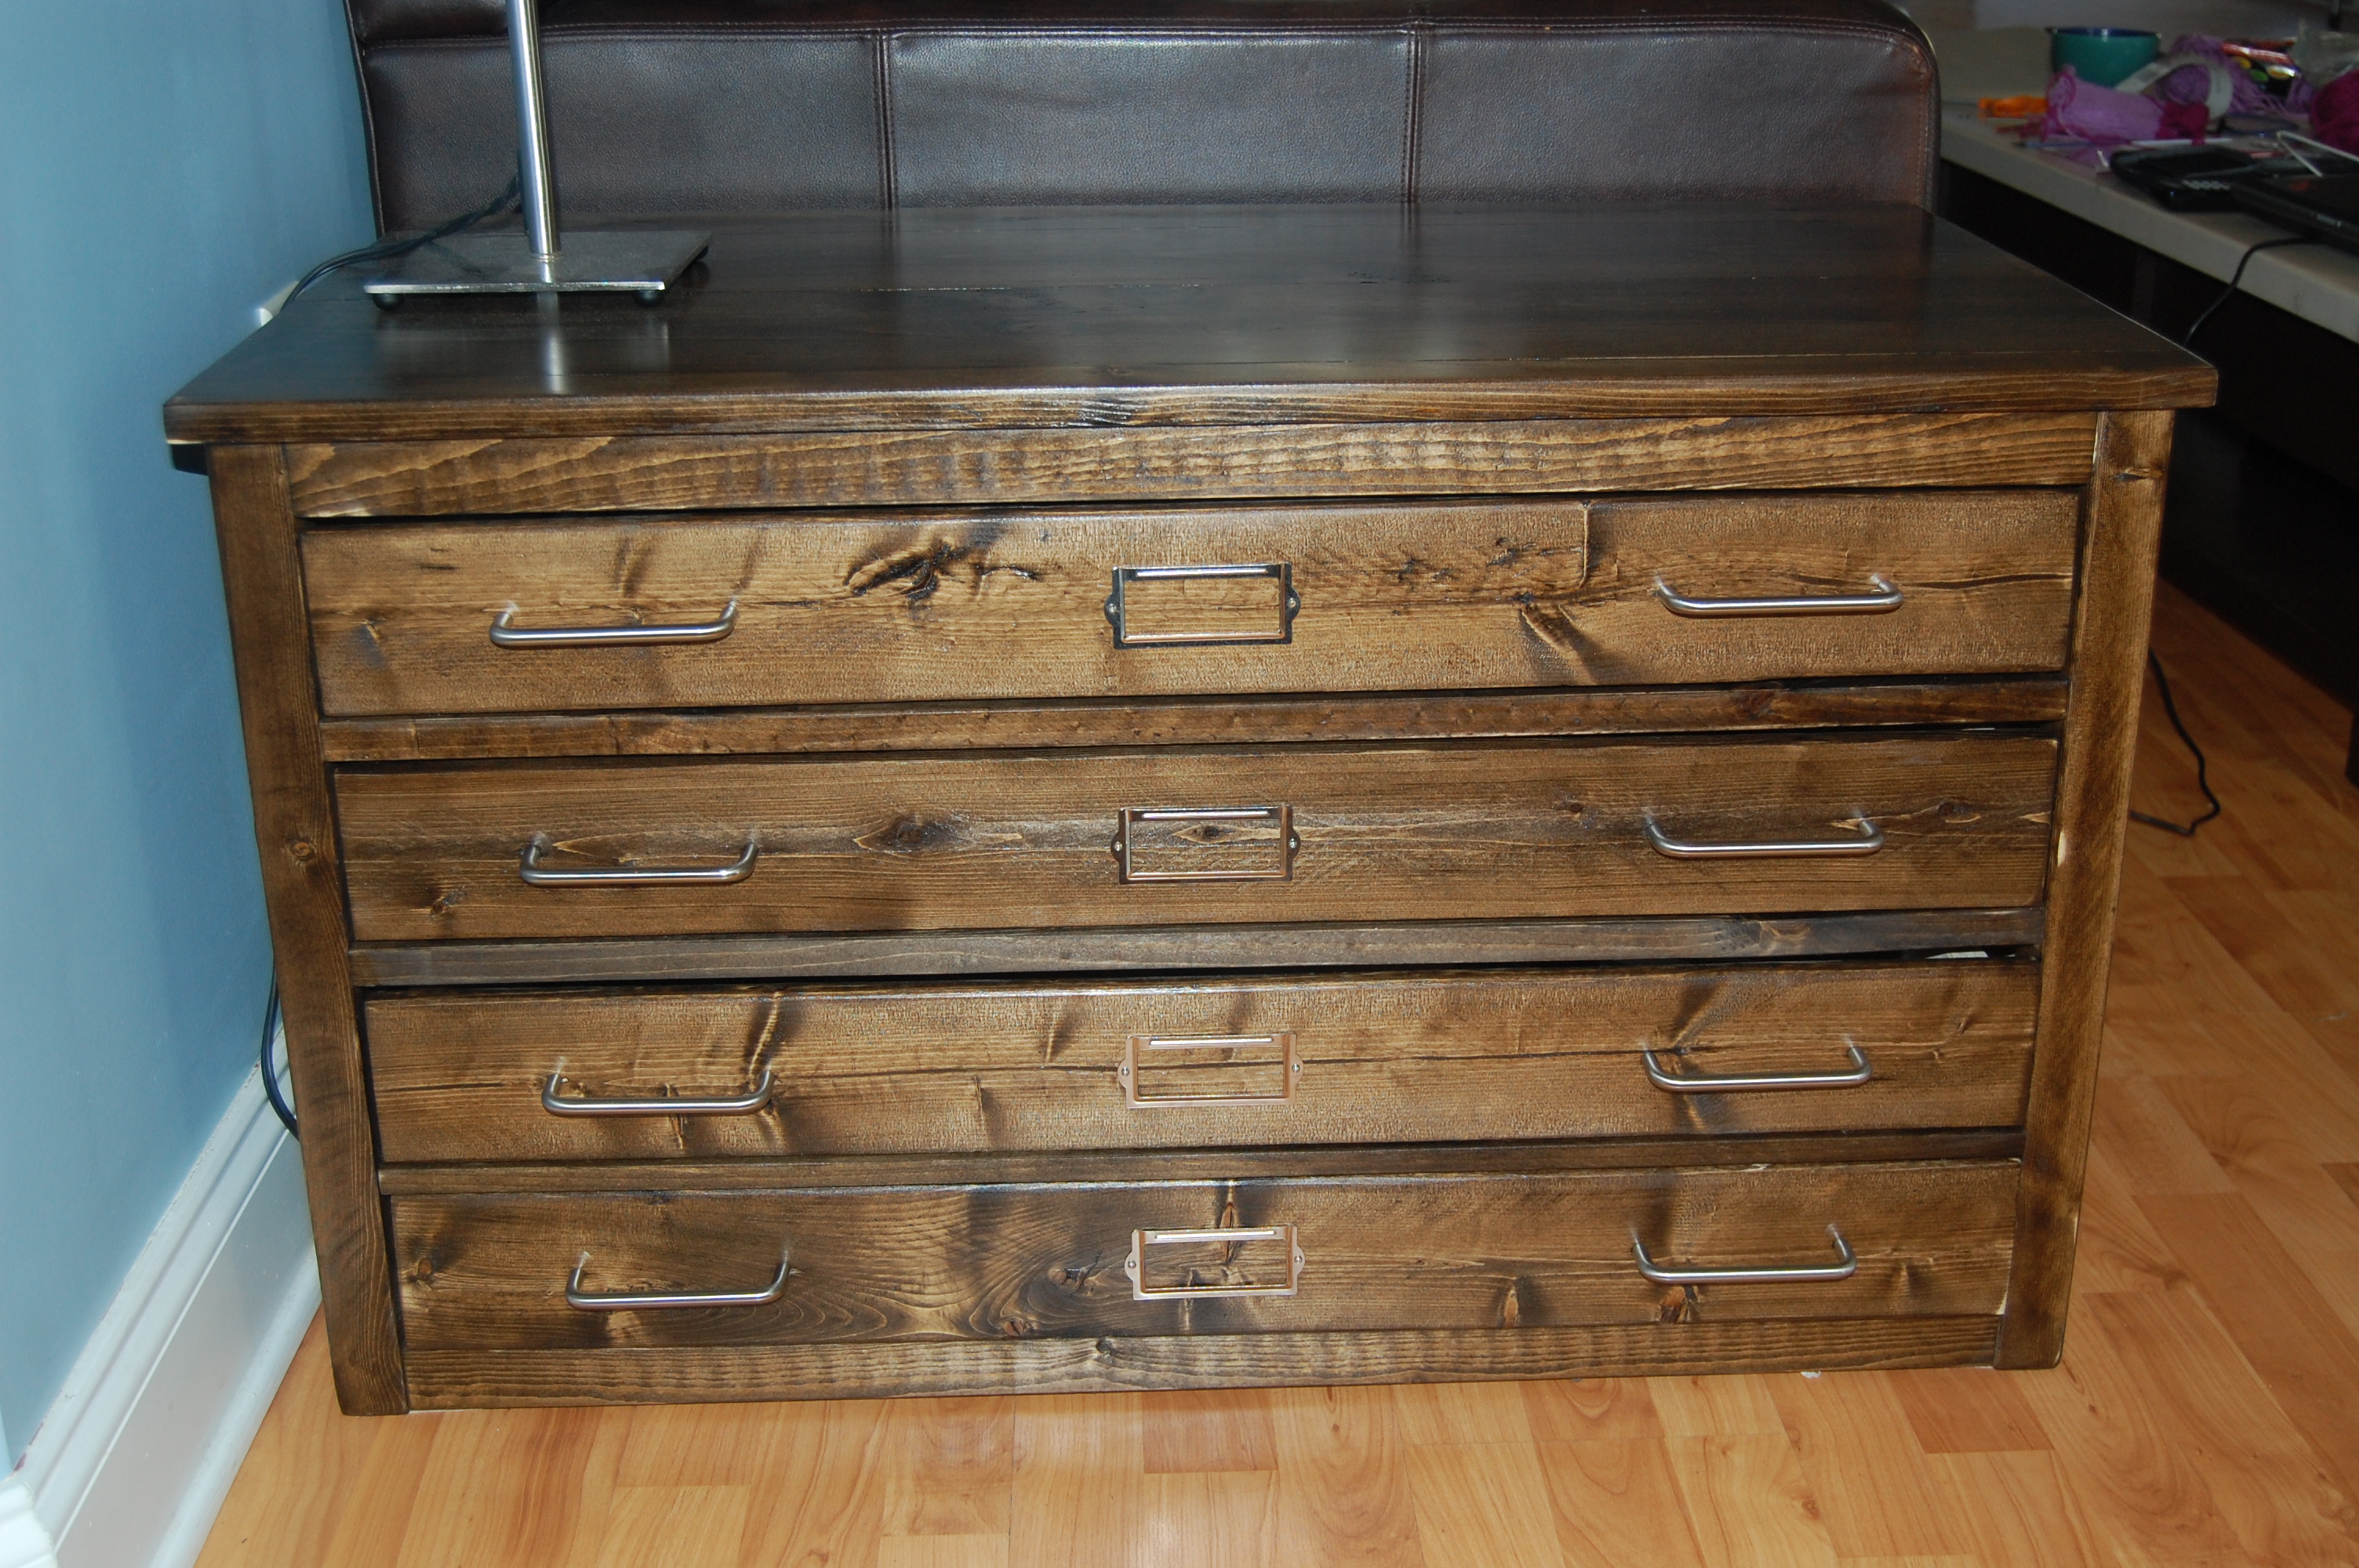
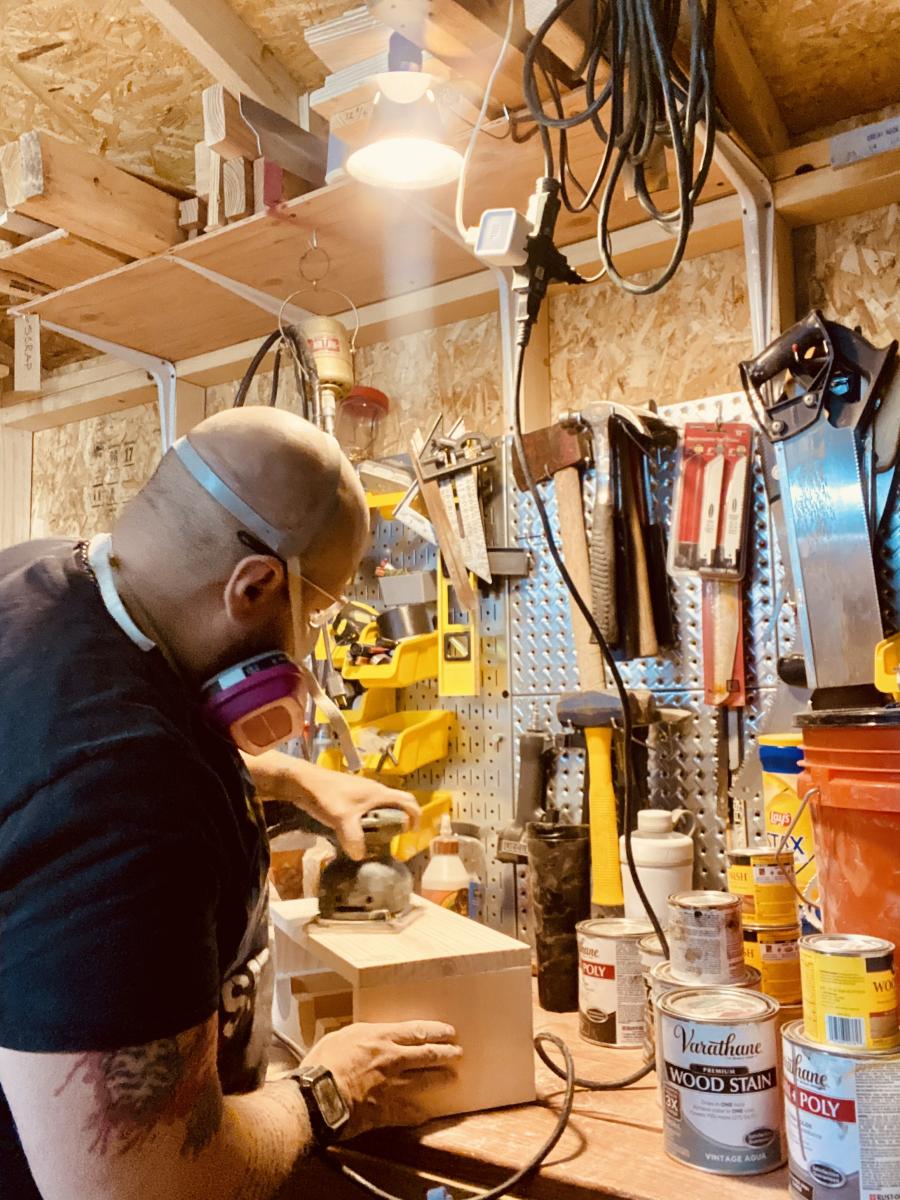
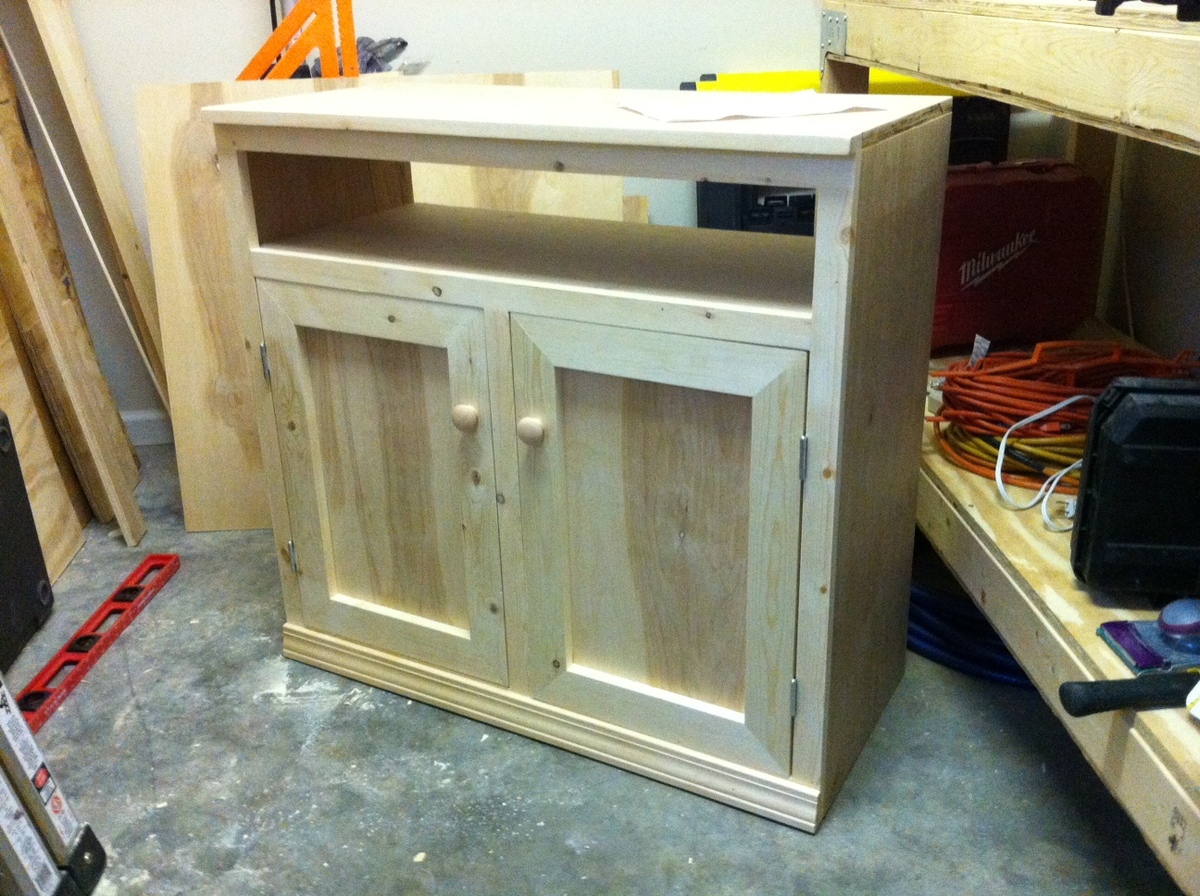
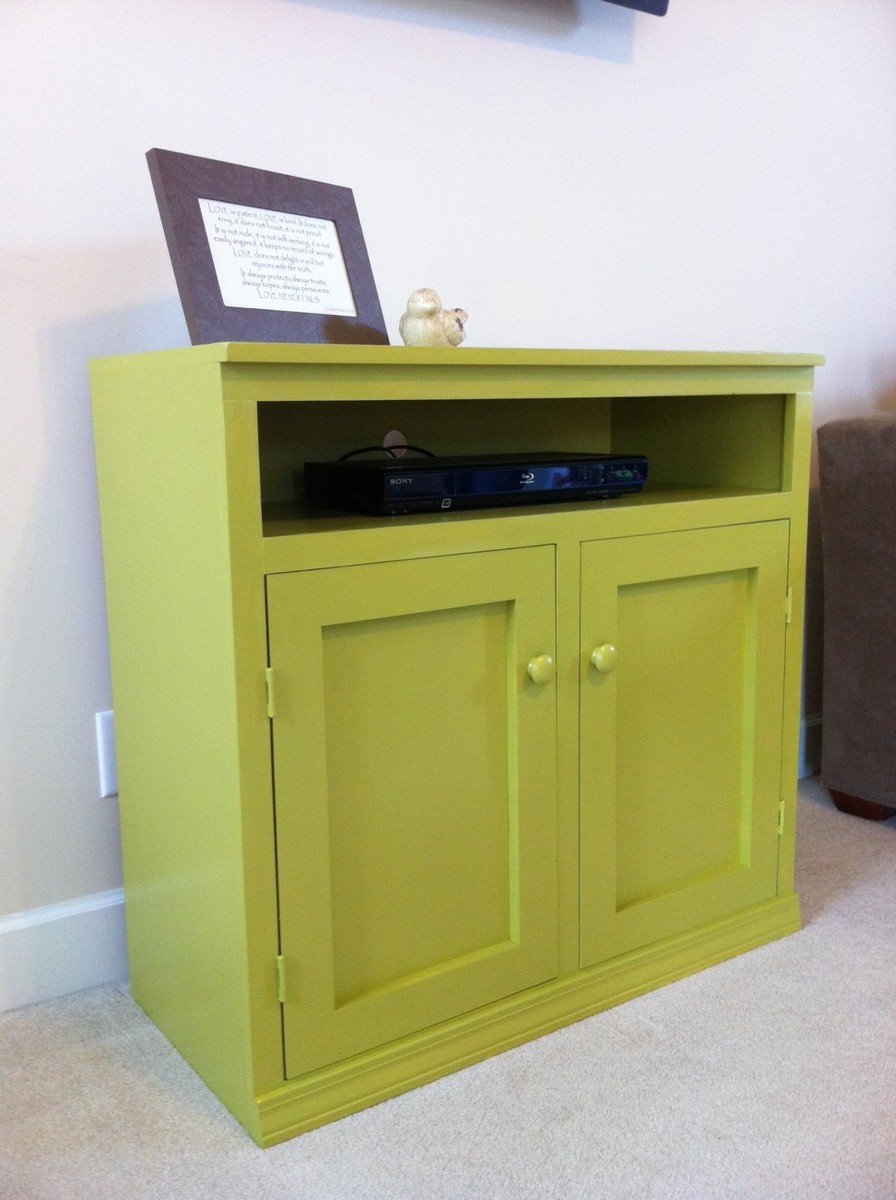
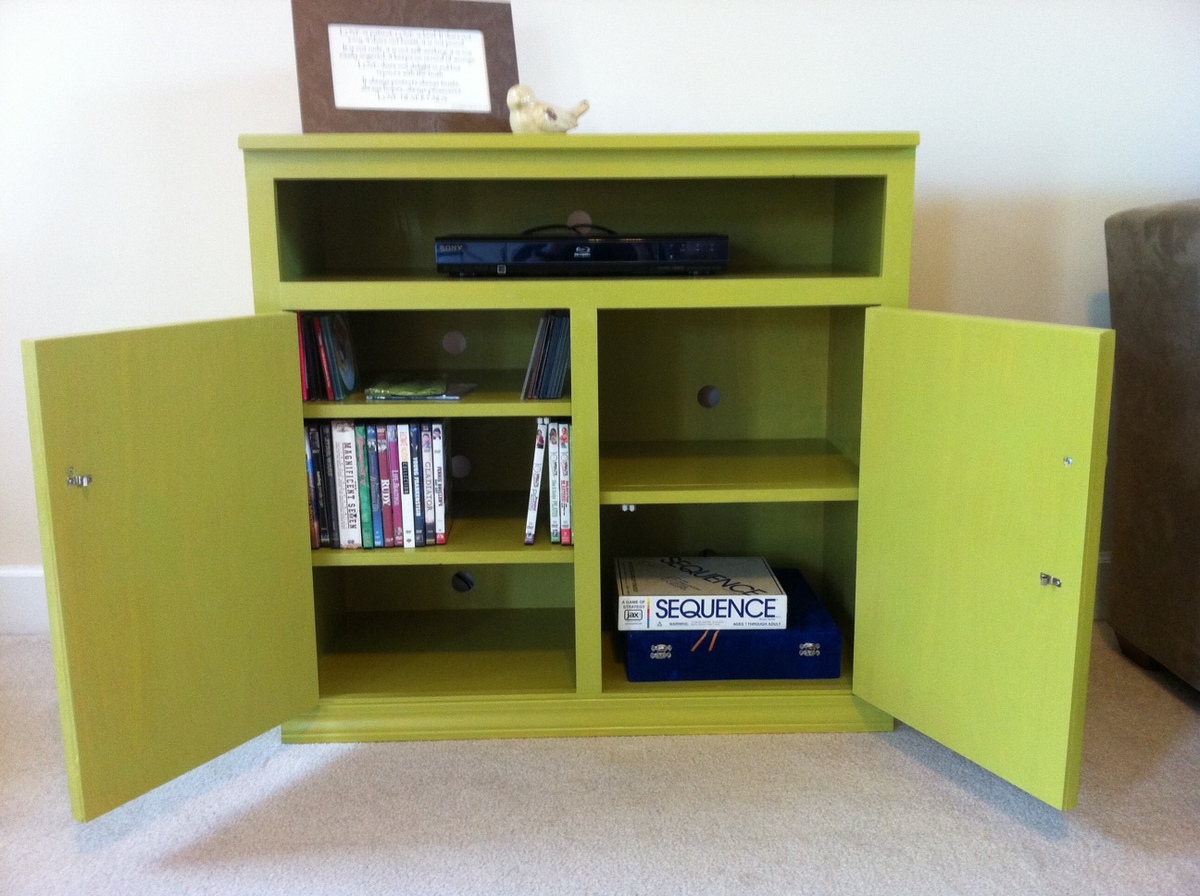
Community Brag Posts

Custom Modern Chicken Coop

Submitted by Anonymous (not verified) on Wed, 08/30/2023 - 08:49

I made this coop twice as wide like Ana suggested since I have 4 chickens and wanted to make sure there was some extra wiggle room in case “chicken math” got the best of us. I made a nesting box to mount on the outside. I also used plywood for the sides like Ana did in the video. I installed a Run Chicken automatic door that opens at sunrise and closes at sunset. I added some hasps and clasps to make sure all my doors would close tightly. I put hardware cloth across the top before installing the roof panels. I stapled and buried hardware cloth around the perimeter for predator protection. I also spray painted the hardware cloth flat black so that it would be easier for us to see inside the coop. I stained the rest of the wood with Varathane Semi-Transparent stain, color “Carbon Gray.” I also added some roosts and cedar shingle siding for some extra protection during our New England winters at to match our house. Working 2-4 hours a day, off and on, with a bum shoulder and weak hands, this took me about a week! Thanks for the great plan, Ana!

Comments

Seasonal And Holiday

BBQ caddy

Submitted by Milhouse on Sat, 04/07/2012 - 22:59

I had some pallet wood laying around and felt like taking on a small project. The boards were warped, but after fighting with them a bit, it turned out well. I was going for the reclaimed, rustic look anyhow :) I find it a little heavy to actually use as a caddy, so it's more for decoration. I think I might plant a few herbs in it, for a little portable herb garden.

Built from Plan(s)
Estimated Cost
Free - made from scraps
Estimated Time Investment
An Hour or Two (0-2 Hours)
Finish Used
I stained it with Minwax Jacobean, but it turned out super dark. So I dry brushed some white paint over it, and it turned out 'old and reclaimed' looking!
Recommended Skill Level
Beginner

Comments

handystanley

Mon, 06/18/2012 - 13:26

How many times do you go outside to eat and have to carry everything awkwardly. This is a great idea...I love the rustic look!! Great idea on how to finish it.

Rustic X Coffee Table

Submitted by dsteinberg on Wed, 01/22/2014 - 09:11

- made directly from the plans
- decorative hardware was spray painted "flat black"
- there are decorative bolts in the legs, they were installed after these pictures were taken.

Built from Plan(s)
Estimated Time Investment
Day Project (6-9 Hours)
Finish Used
- Brushed on black tea
- Brushed on solution of vinegar and steel wool that sat for 72 hours
- Vermont Natural Coatings Wipe on PolyWhey
Recommended Skill Level
Beginner

Large dog table crate

Submitted by Kimly831 on Fri, 04/15/2016 - 14:23

I am so ridiculously proud of myself... This was my first wood building project and now I think I'm addicted !!!! Next project a bookshelf!!

Built from Plan(s)
Estimated Cost
$165
Estimated Time Investment
Weekend Project (10-20 Hours)
Finish Used
Cherry mahogany
Recommended Skill Level
Starter Project

Full-size Farmhouse Bed

Submitted by Anonymous (not verified) on Sat, 12/28/2019 - 17:08

Such a great sturdy bed! Daughter loves it.

Built from Plan(s)
Estimated Cost
208.00 for wood
Finish Used
We primed and painted with BM Alabaster. I then sanded edges and grooves and applied Matte Poly.

Cubby Bookcase for a big girl!

Submitted by ferbit on Mon, 04/09/2012 - 18:36

My youngest needed a new bookcase so bad! All she had was an old baby bookcase that hardly fit her books anymore. I was so excited to see Ana's plans for the simple cubby bookcase. Yay! I made it a smidge narrower to fit the space and taller so she could have more adjustable cubbies. :)

I used pine 1x12 boards for the box and pine 1x2's for the trim. I used my Jig-It Adjustable Shelving Jig and drilled every other hole. Didn't feel like I needed quite as much "adjustability" for books. :-)

I wanted a more rustic look, so I left a lot of brush strokes on purpose and didn't fill any obvious knots in the wood. I really like how it turned out. :) When we were putting all of the shelves in, my daughter was so cute - she made sure all of the knots were facing OUTWARD so she could see them. She thought it looked neat that way.

Estimated Cost
$60
Estimated Time Investment
Day Project (6-9 Hours)
Finish Used
Behr semi-gloss off-white
Recommended Skill Level
Beginner

Custom Bird Cage Stand

Submitted by Mamabear2 on Thu, 01/23/2014 - 10:33

I wanted our bird's cage up higher and on something that the kids wouldn't be able to tip over. So my Husband came up with this. Its car siding. and stained. it has 2 hinged doors and a shelf.

Estimated Time Investment
Weekend Project (10-20 Hours)
Finish Used
I purchased a stain in color of choice and clear coat
Recommended Skill Level
Starter Project

Modified folding table/benches

Loved doing this build, I have been thinking of making these for a while.

Based off of a few of the comments I read, I modified the plans a little bit. Instead of using three 2 x 6s for the benches, I used two 2x4s with one 2 x 6 in the centre. Shortened up the bench support length by 3" to make up for the difference. This allowed for a smaller seat, which is easier to get in and out of when in table mode, but still plenty to sit on when used as a bench.

I am trying to come up with an alternate system for pinning the table in each position. I have found that after only a few uses, the table has some wiggle in the top, most likely from the bolts going in and out repeatedly. I would love some ideas on how to get these to hold nice and snug when in each position!

I posted a few pictures of these on my Facebook page, where I now have been asked how much I am selling them for and have about 3 orders already placed! Looks like the spring will be busier than expected!

Estimated Cost
For the two, 8 foot benches, about $80 for the lumber, and $10 bucks for the hardware. So totaled at about $90.00 Canadian for the 2, prior to any staining.
Estimated Time Investment
Afternoon Project (3-6 Hours)
Recommended Skill Level
Beginner

My version kids play grillKids wood play grill

As in a lot of plans I made them to fit my needs. This one was no different. I love Anna and her site. Sometimes things are not always clear. With simple knowledge you can solve most of the problems. I made this version for my 5 year old niece for Christmas. I decided to use 1x12 in place of the plywood . It was easier  to work with and made it much stronger With the solid wood I think I lost 1/4 inch in height. I also had extra 1x3 boards I used them for bottom shelf. For the dials I used what I had. I used my hole saw and filled in center with filler. It was cheaper than buying a dowel. I think it is easier to mount the shelf before you put the sides on. Top grill I stayed with 1x2 I thought it looked much vetter that 1x4 board. I finished it off with castors I think that put the icing on the cate and made it even better. She loved it.

Built from Plan(s)
Estimated Cost
$70
Estimated Time Investment
Weekend Project (10-20 Hours)
Finish Used
Satin Spray paint
Recommended Skill Level
Intermediate

Home Gym Yoga Nook

Submitted by kellystern on Thu, 09/07/2023 - 11:06

Exercise/Yoga nook. Built using the base plans from Ana's Shoe Bench Front with Hidden Storage and Easy to Build Floating Shelves.


Comments

My Bookshelf Dollhouse

Submitted by wmaughan on Wed, 04/11/2012 - 22:26

After much deliberation, I decided to make a dollhouse for my daughters Christmas gift. The aesthetics of the bookshelf-style dollhouse appealed to me over the more intricate and fancy designs. I took the literal meaning of the style and incorporated an actual bookshelf/DVD rack into the dollhouse. On the apposing side I built a magnet board for my daughters given that my refrigerator is not magnetic. About the project: I knew my design would end up being heavy so I started by building a basic frame out of construction grade 2x4's. The frame is placed on four casters and is concealed by the baseboard. When on carpet, the casters are not visible and have come in handy. Working upward, the majority of the construction consists of 3/4" cabinet grade plywood which you can find at Home Depot. The "carpet" I chose was an inexpensive bathroom rug that I purchased at Walmart. The scale & thickness of the berber seemed appropriate for the dollhouse and I attached it using carpet glue. For added security I tacked the perimeter with some staples. For the bathroom tiles, I cut some groutable adhesive tiles into squares on the table saw (use a cross cut sled if you have one) and attached them to the bathroom floor. Make sure your surface is free of dust, and a heat gun or a propane heater will accelerate the drying process and create a better bond. Make sure to use unsanded grout for the joints. To make the shingles, I cut a 4'x8' (used about 2/3 of the sheet) piece of 1/4" mahogany veneer into 2.5"x4' strips. The cuts were made perpendicular to the wood grain to give the desired aesthetic. This gave me a robust shingle construction with the look of shake shingles. I then cut about 3/4 of the way through the strips with approximately 1 1/4" separation between each shingle. Attaching the shingles was easy. I didn't want to wait for glue to dry so in addition to some wood glue, I also tacked the row of shingles in place with 3/8" brad nails. When placing the shingles, make sure to start at the bottom and work your way up to the pitch of the roof. This will allow you to overlap the shingles about 3/4" to cover the uncut portion to give it the appearance of individual shingles. You will also want to offset your rows to change the vertical alignment of the shingle spaces. I marked each row with a pencil prior to cutting the final width. You may also consider which side of the shingles you want facing up. I opted for the rough side to give it a more weathered look. With some of the extra shingle material I made hardwood floors for the kitchen.The veneer I purchased was mahogany on one side, and oak on the other which allowed me to alternated sides and give it a unique look. Attach the floor using wood glue and allow 24hrs before sanding. Place weights on the floor to secure it while drying. I applied both a stain (Minwax Golden Oak) and some wipe-op polyurethane for the finish. The storage bins are Ikea boxes that can be easily removed to allow for additional play areas. The piece of sheet metal I used for the magnet board was already cut to the desired size at Home Depot. I attached it using some 3M spray adhesive, then secured it with some poplar strips. I also used the 3M construction adhesive to attach the craft paper/wallpaper. With all of the chaos surrounding Christmas I wasn't able to quite finish it. Here is still what's in progress: - Painted white ladder to loft - Stained mahogany stairs to family room - Kitchen cabinets - Cobblestone chimney - Closet doors

Built from Plan(s)
Estimated Cost
120
Estimated Time Investment
Week Long Project (20 Hours or More)
Finish Used
Stain for shingles & wood floor was Minwax Golden Oak. Wipe-on poly for wood floors. Paint was Behr paint.
Recommended Skill Level
Intermediate

Comments

ferbit

Thu, 04/12/2012 - 08:29

Oh WOW!!! This turned out amazing! So jealous my kids are too old for a bookcase like this! You did a fantastic job!

jeff womack (not verified)

Fri, 04/13/2012 - 15:18

How did you make the railing? It looks great, but wouldn't it be fragile? What did you use for trim and molding throughout the house? Did you use a dremel to work with the small details? This is an amazing looking doll house that my daughter would love. I just may need to do this sometime before Christmas.

birdsandsoap

Fri, 04/13/2012 - 20:38

Looks like an intricate design, and whoa! All of those little shingles by hand? Good job. I love how you incorporated the bin storage into the bottom.

wmaughan

Mon, 04/16/2012 - 17:32

It gives the appearance of individual shingles, but I actually just cut strips with grooves in them. I have seen several dollhouses with shingles that have fallen off so I wanted to avoid that :)

Milca (not verified)

Fri, 06/08/2012 - 20:32

Super duper good job on it :) Wish I had time to make one like that for my 4 yo. She's so particular, can't let her see the pictures ah ah. Lucky girls! Talented mama!

Wide Cabin Dresser

Submitted by Amynikkel on Sun, 01/26/2014 - 20:03

Wide cabin dresser from pine, charcoal grey wood stain, soft-close drawer slides, and turquoise hardware.

Recommended Skill Level
Beginner

Comments

Ladybug chair

Submitted by Anonymous (not verified) on Thu, 04/21/2016 - 03:18

This was a true joy to build. I plan on making at least three to four more of these. Couple tips I learned though: I used pocket hole screw where I could to prevent drilling so many holes that would need to be filled: Ft board, Rear boards, and a couple others. Also I routed the edge of the very front board where the child's legs will be dangling from, as well as the inside/outside edges of the arm rests. Smoother the better I thought with little kids. Lastly, I painted all the boards and then put it together as recommended. However, I would go through the plans and only paint the surfaces that you know will either touch and will be difficult to get to or sides that won't be drilled out; unless you don't plan on filling the holes and painting over them. It will save you paint and time if you plan out what sides of what boards you'll paint first than doing them all at once.

Built from Plan(s)
Estimated Cost
~$35
Estimated Time Investment
Weekend Project (10-20 Hours)
Finish Used
Exterior latex paint
Recommended Skill Level
Intermediate

Stove Top Cover to Increase Counter Space

Submitted by Anonymous (not verified) on Mon, 09/11/2023 - 12:35

A honey do project to increase our countertop space in our kitchen, for family gatherings. The cherry wood stove cover was created with wood I had milled from our property.

Mark Gilles

10 dollar ledges

Submitted by a.stauff on Sun, 04/15/2012 - 09:40

Our take on the 10 dollar ledges. We definitely wanted a rustic look. I love them!

Built from Plan(s)
Estimated Time Investment
Afternoon Project (3-6 Hours)
Recommended Skill Level
Beginner

Comments

Felisia Me (not verified)

Mon, 10/08/2012 - 00:37

Hello, these are gorgeous! What kind of stain/finish and in what color was used on these shelves? Really love it and would like to know how to make them look liek this.

Spice Rack (Built-In)

Submitted by bhammond on Tue, 01/28/2014 - 21:00

I followed the spice rack plans but put this right inside my wall and added a face frame. I love the detail in the carved wood!

Built from Plan(s)
Estimated Cost
$10
Finish Used
White paint and white caulk in cracks. The detailed carved wood was bought from Home Depot.
Recommended Skill Level
Starter Project

Rustic X coffee table

Submitted by Malka on Tue, 04/26/2016 - 01:39

This was my 4th build, and only took a few weekends to do, working on it a few hours at a time each day. Pretty easy, though I didn't include the X braces on the sides due to miscutting them (just got the angles backwards). I used Minwax Provincial and Minwax polyurethane. Excuse the mess in the photos.

Built from Plan(s)
Estimated Cost
$80
Estimated Time Investment
Weekend Project (10-20 Hours)
Finish Used
Minwax Provincial and Minwax Polyurethane
Recommended Skill Level
Beginner

Window Bench for Our New Study

Submitted by Anonymous (not verified) on Fri, 01/17/2020 - 13:20

Ana White, you inspired me! My husband bought me a miter saw for Christmas but I was too afraid to use it for all of my woodworking dreams...and then I found your blog!

I am a mother of six young kids but I watched your videos over and over and I reworked your plans to fit our little build-out and voila! We are beyond thrilled with the results! We have a new bed for overnight guests and a great reading nook for 2-3 people at a time!

Thank you for empowering women in the BEST way. My husband was there to help me with the heavy lifting and to cheer me on when I needed it. But if I hadn’t found you, I’m not sure I would have tackled it in the first place. Thank you and God bless your family!!

Built from Plan(s)
Estimated Cost
$300
Estimated Time Investment
Week Long Project (20 Hours or More)
Finish Used
I ordered drawer slides and the unique drawer pulls from Amazon. The finish is Behr Swiss Coffee to match the window trim. I followed Ana’s instructions to the “T” when installing the drawer slides.
Recommended Skill Level
Beginner

Comments

marti2629

Sat, 03/14/2020 - 14:11

We are building a bed for my son with drawers. Would you mind giving the dimensions of the drawers you mad? Thank you

Back