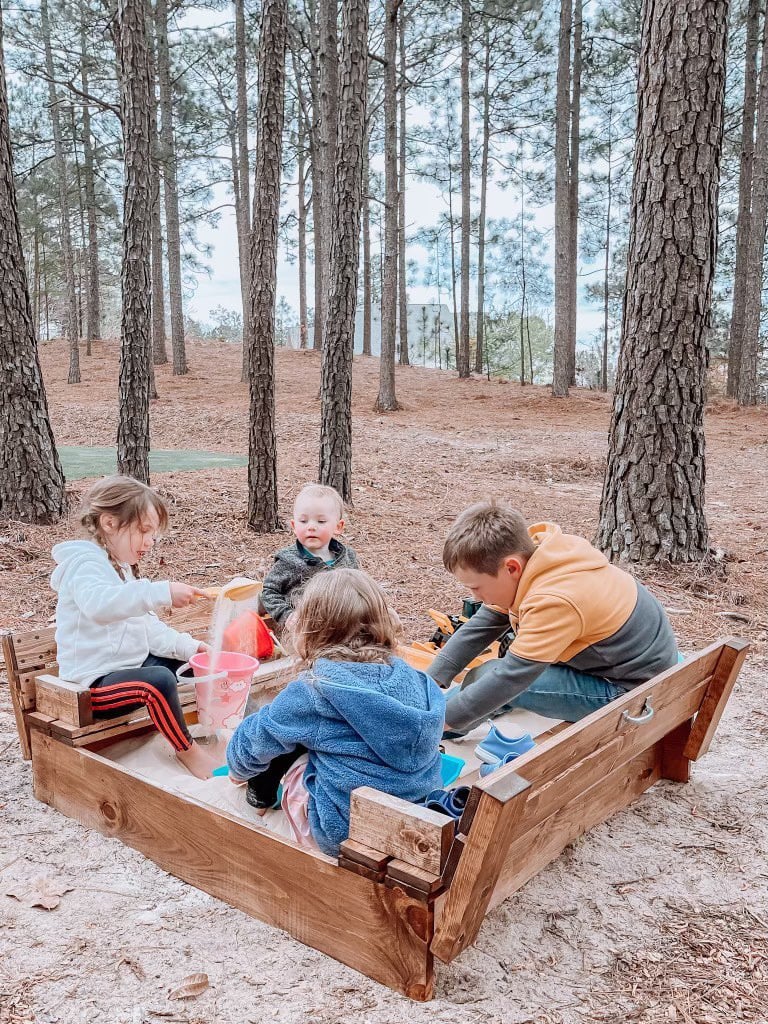
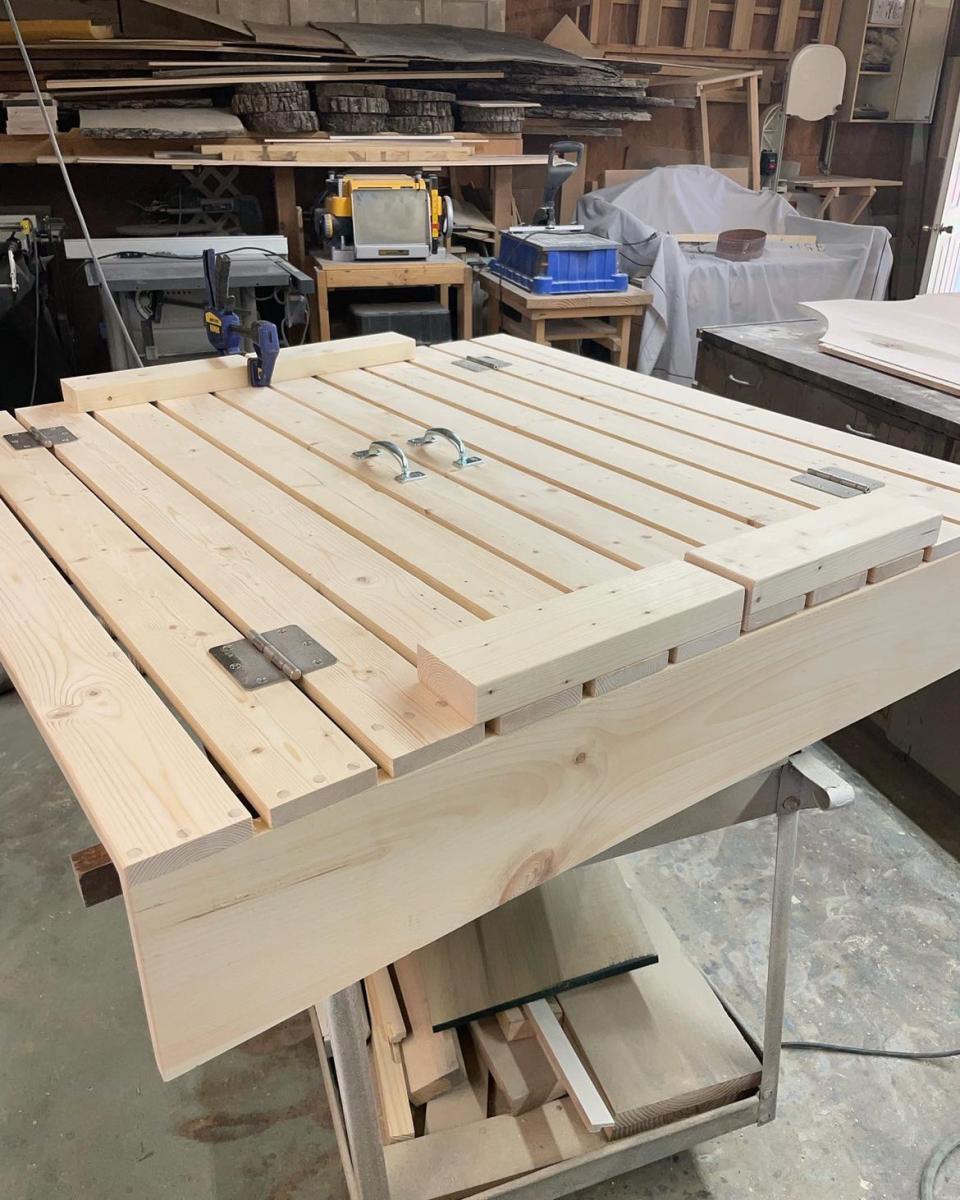
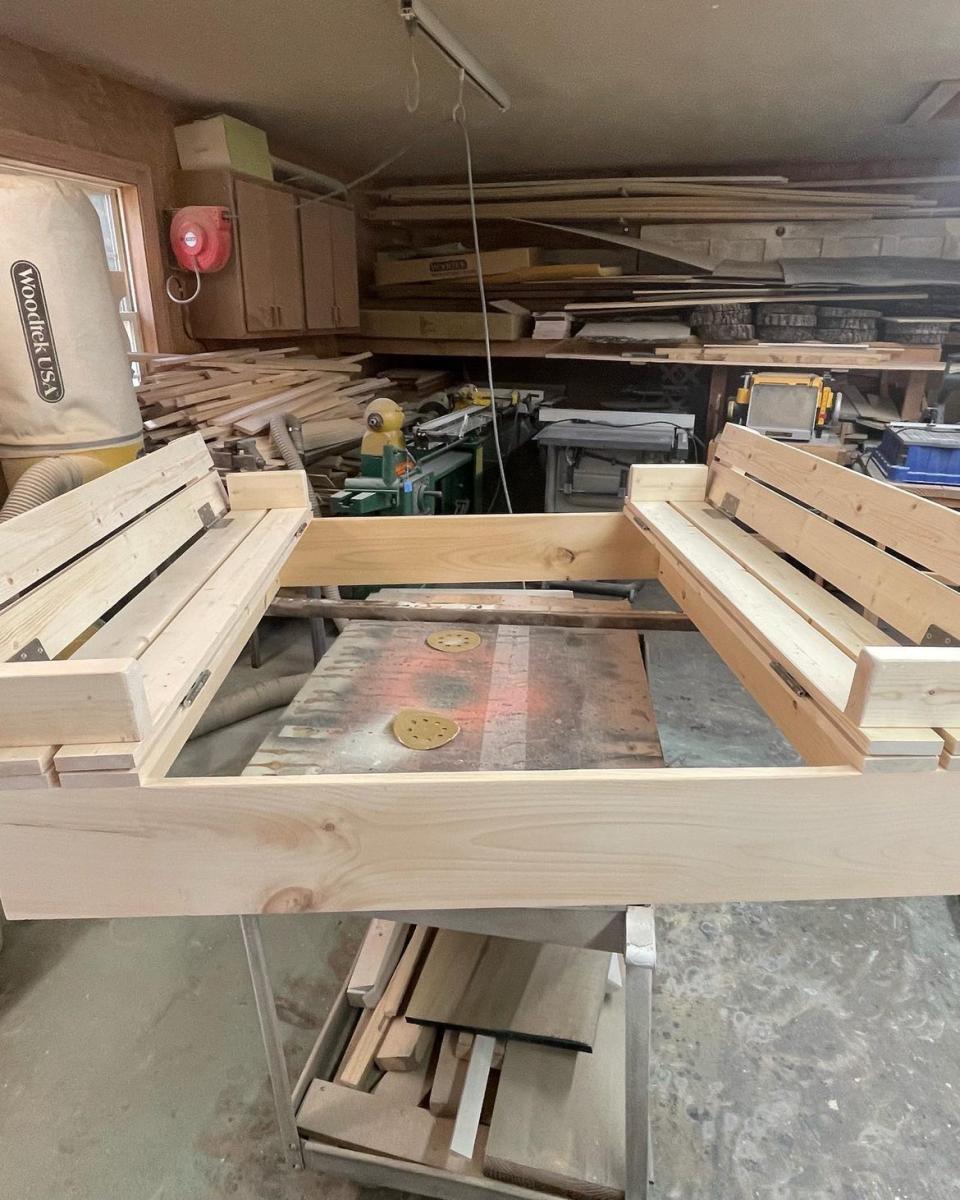
Sturdy Workbench Sink
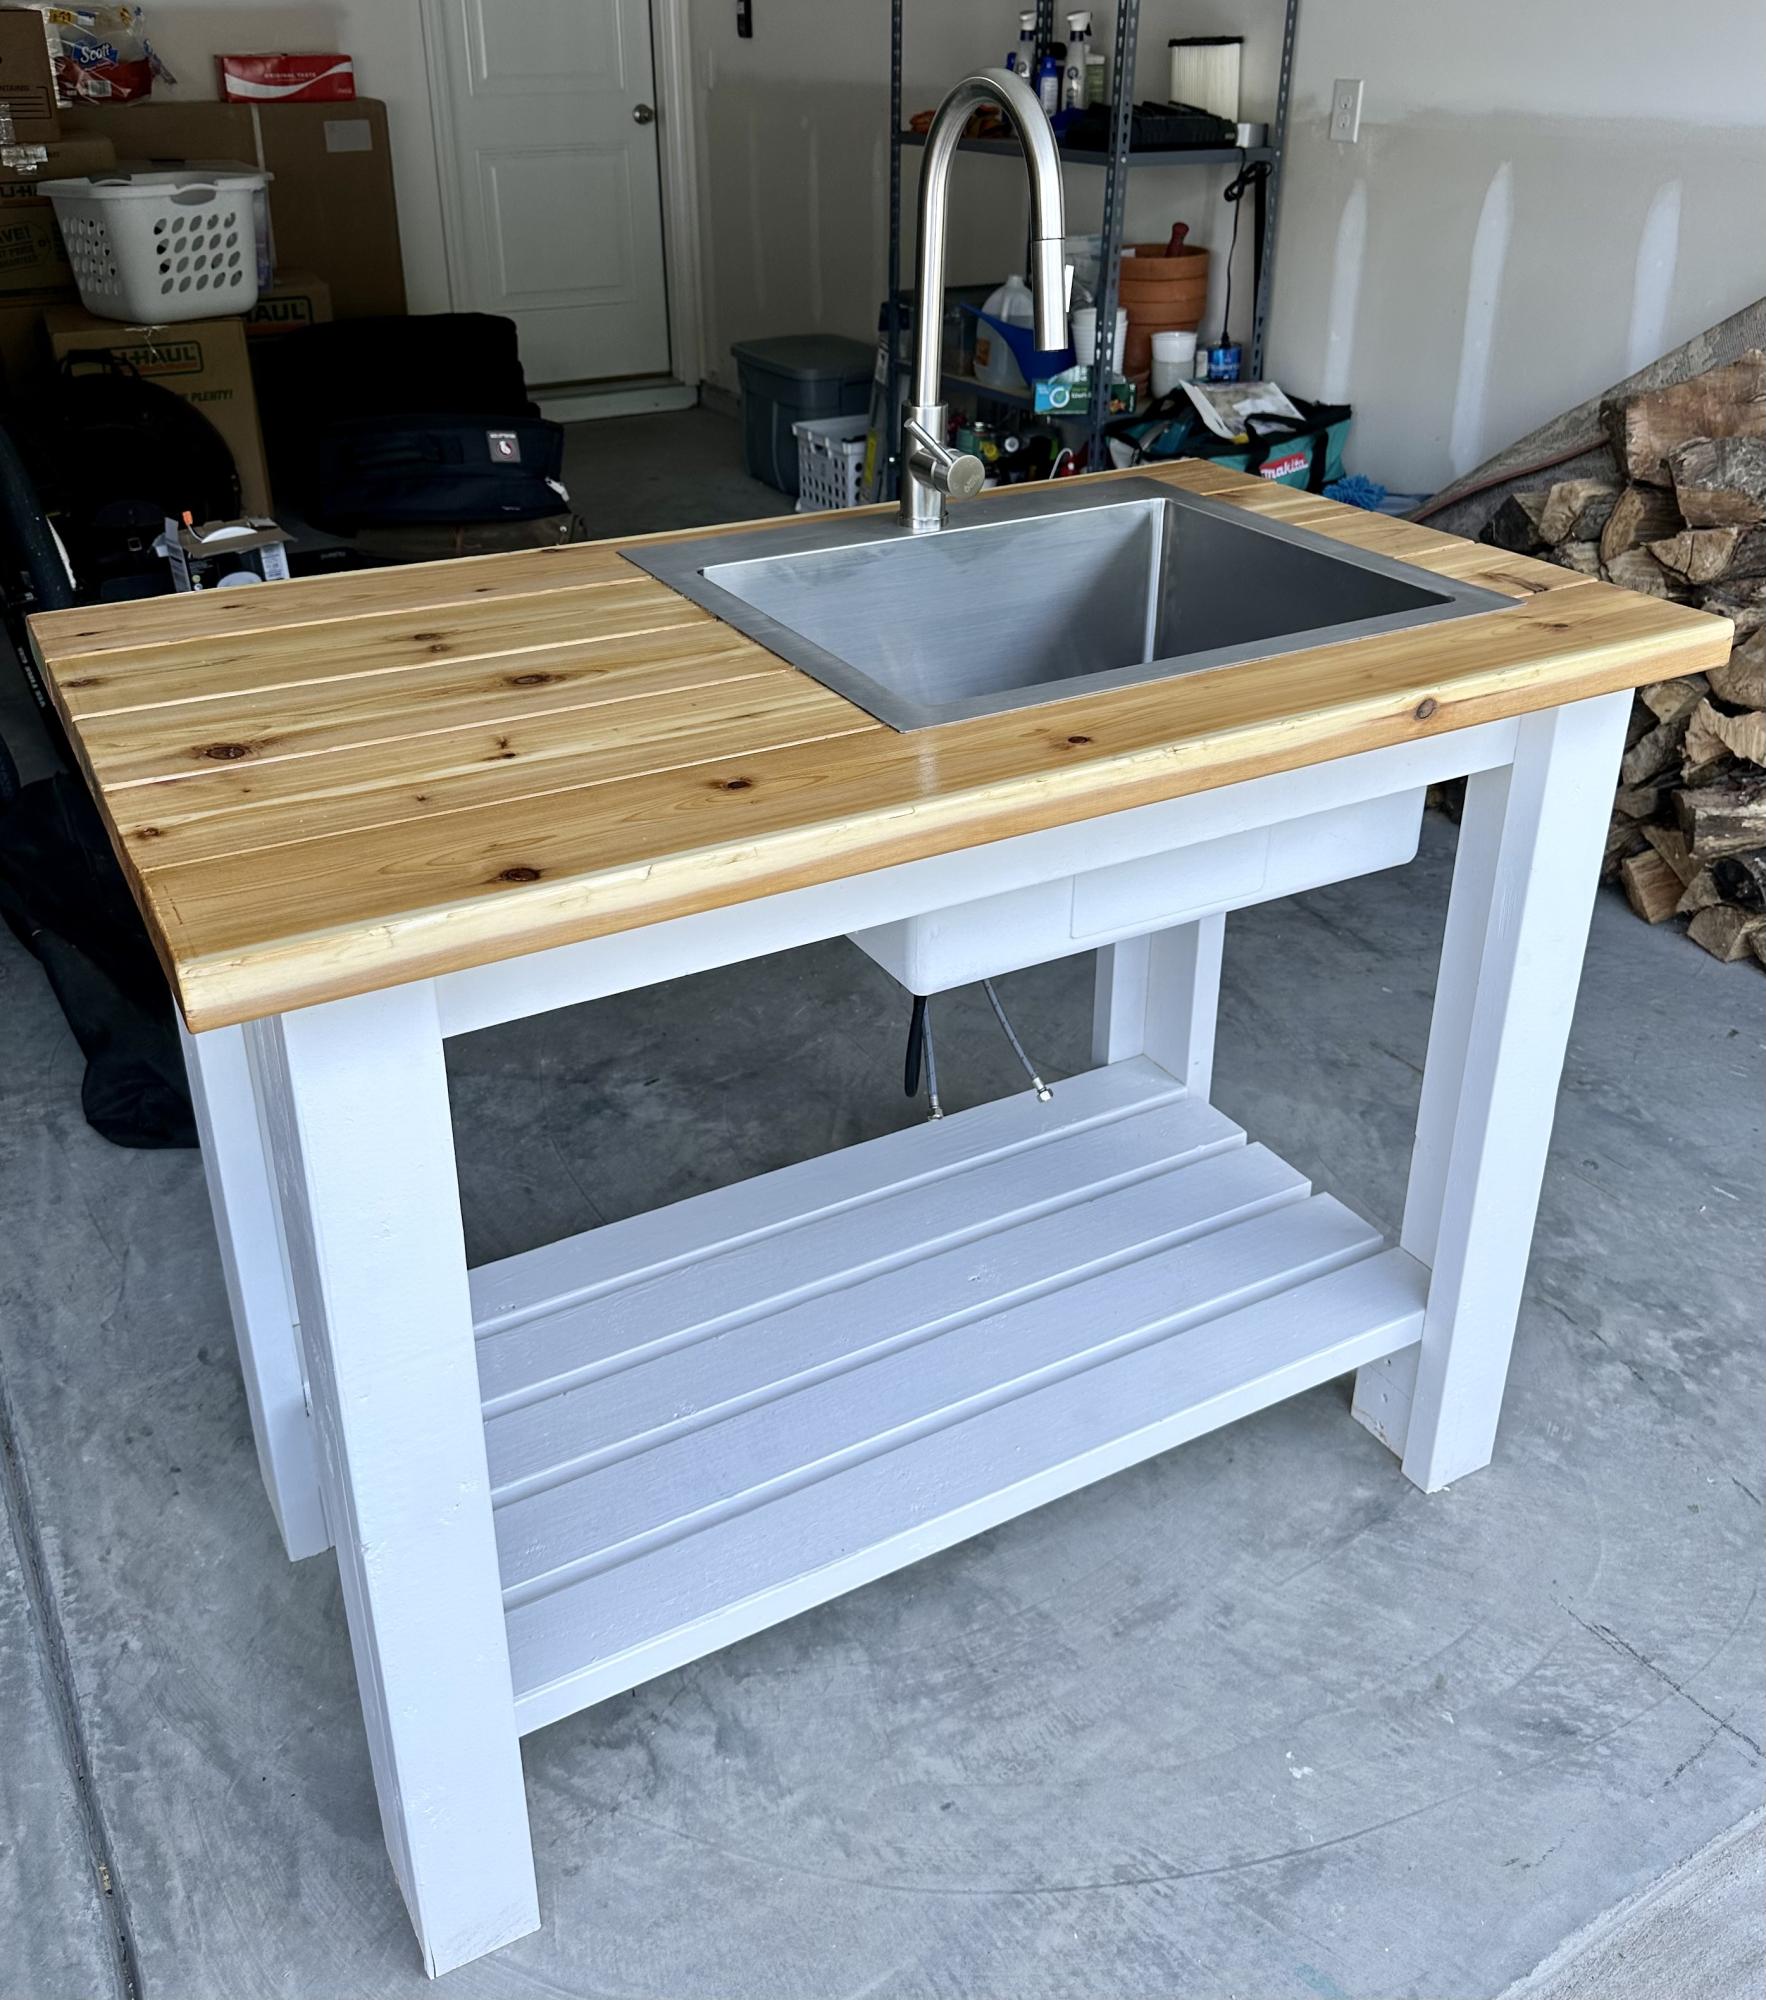
Used sturdy workbench plans with 2x6 cedar top for outdoor sink. Turned out much better than I expected!!
Built from Plan(s)
Used sturdy workbench plans with 2x6 cedar top for outdoor sink. Turned out much better than I expected!!
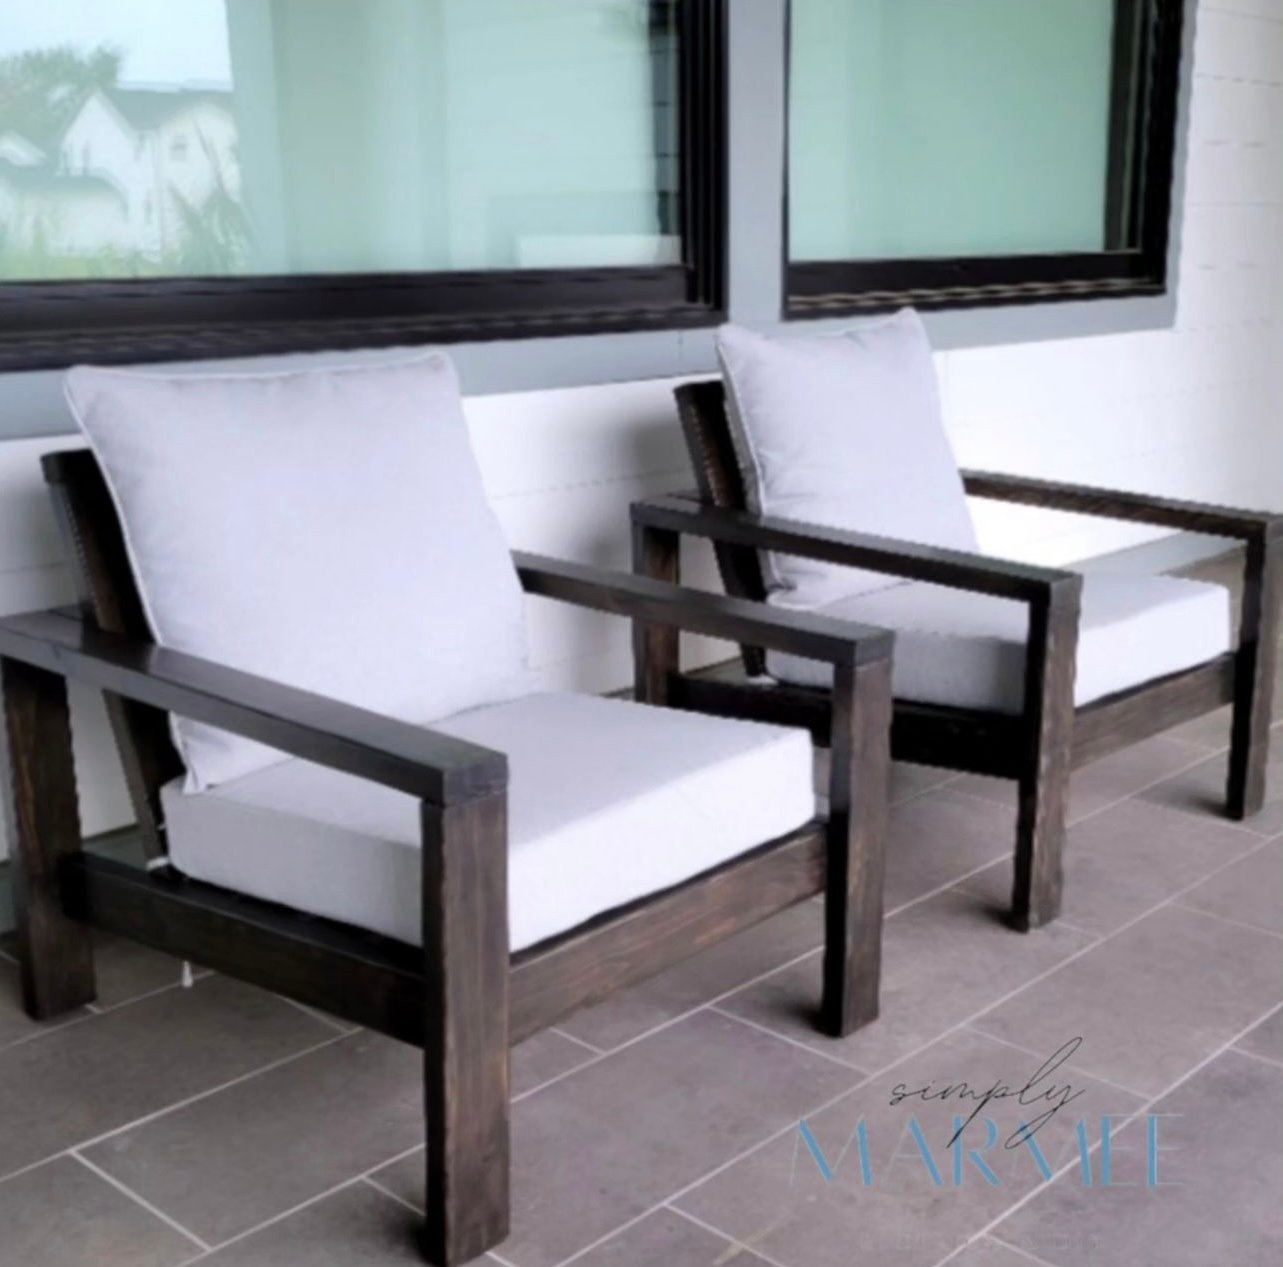
Using just basic tools, I was able to build this super comfy outdoor chair for the fraction of the cost. With a couple of modifications, Ana White's design plan made for a perfect fit for the new deep seat cushions I had found on fb marketplace.
First shot at using plans from Ana, and thought it was great! Can’t wait to try another!

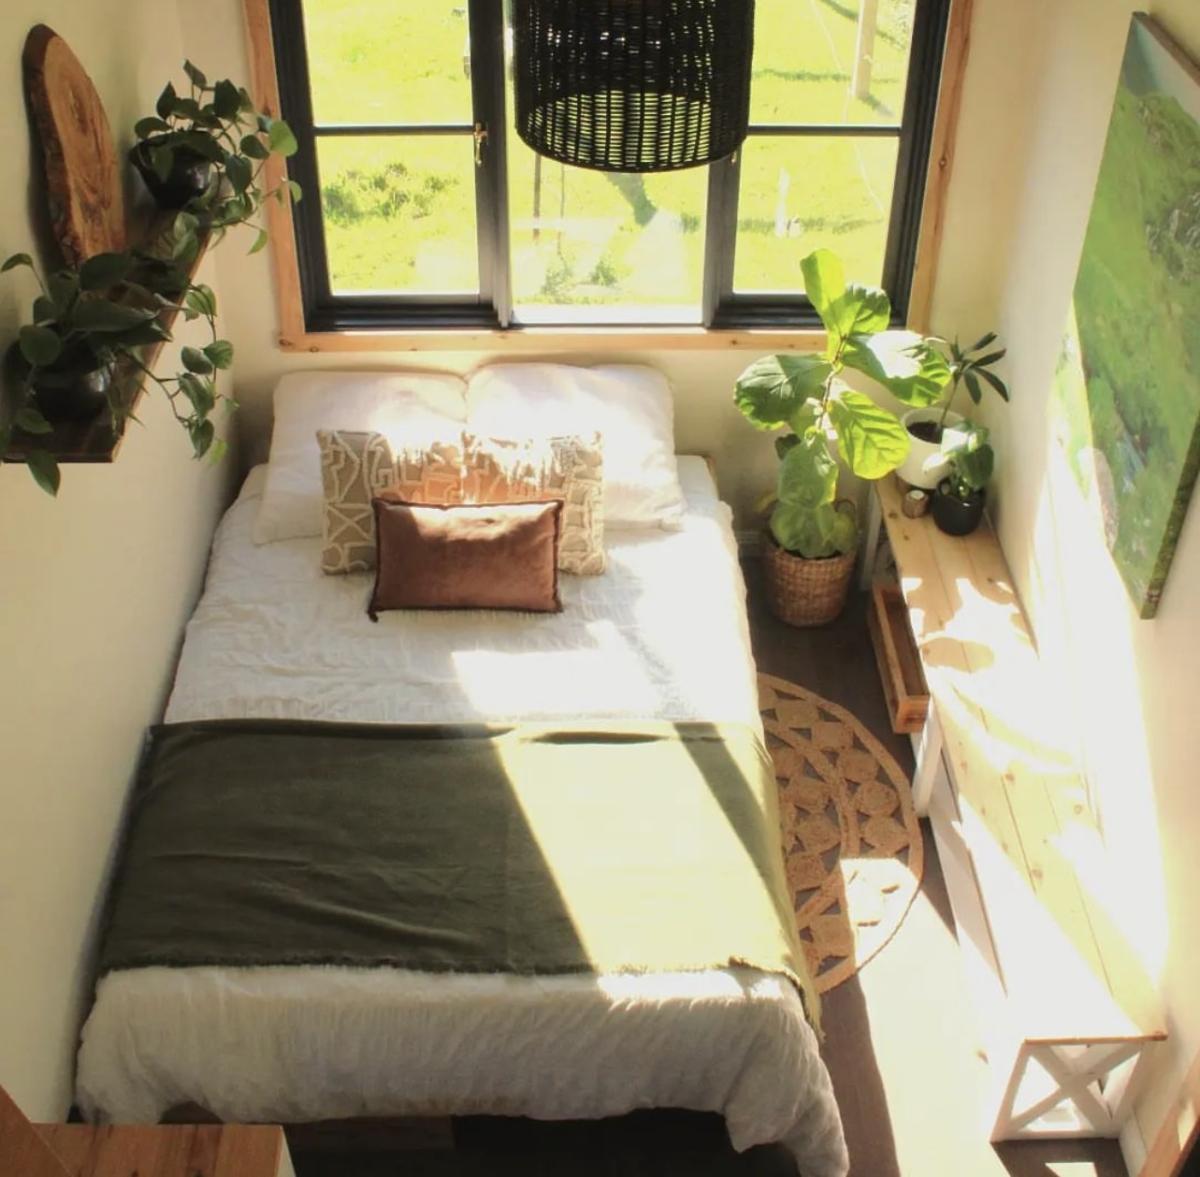
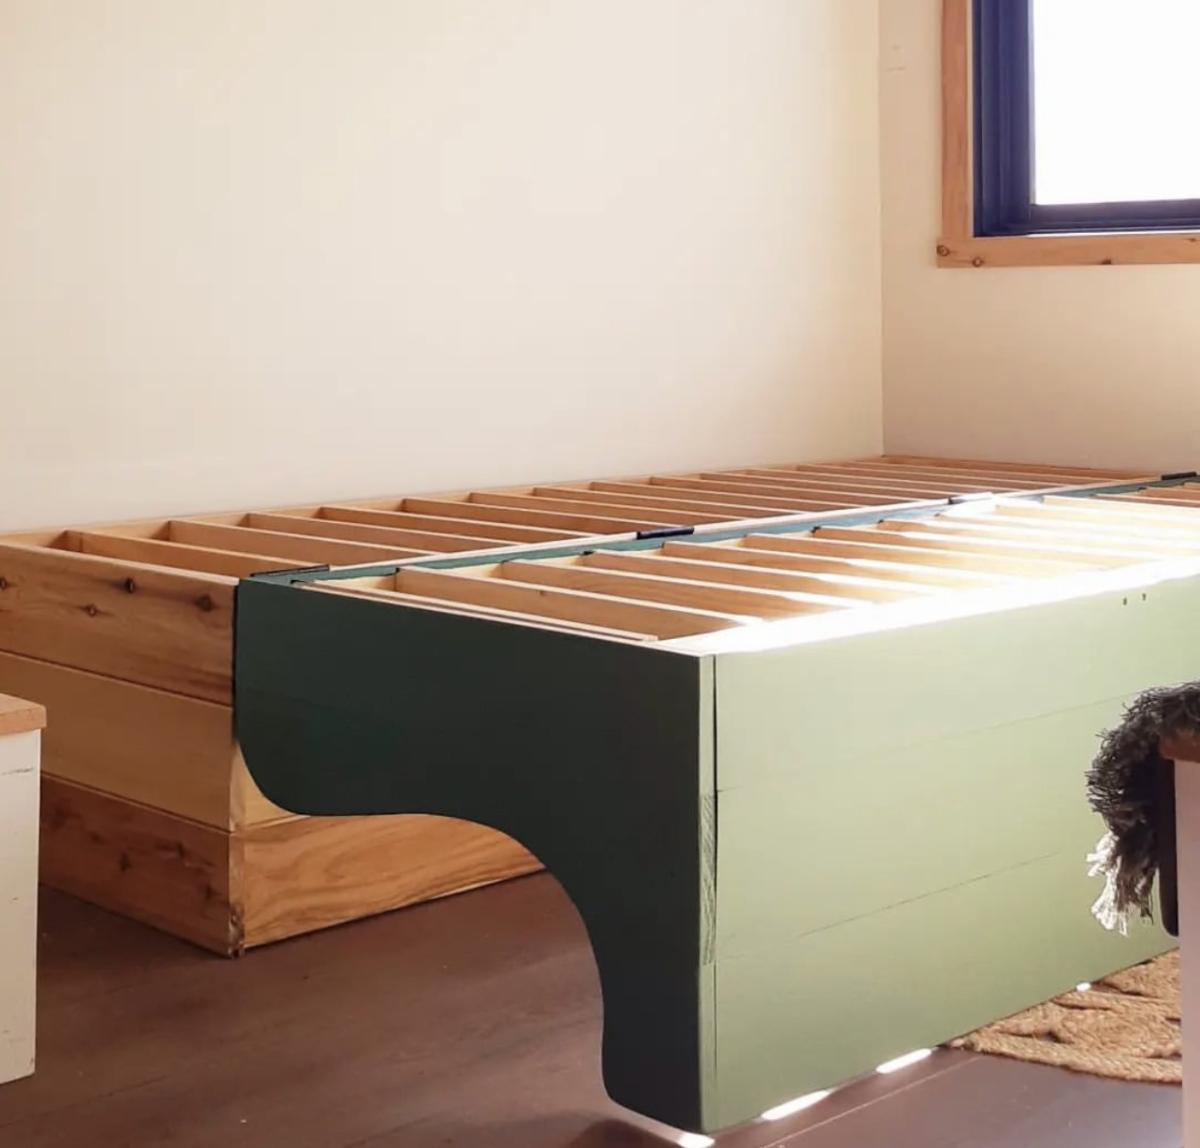
Modified from our twin sleeper chair plan, this amazing hinged sofa bed was built and shared by #tinybuilderau
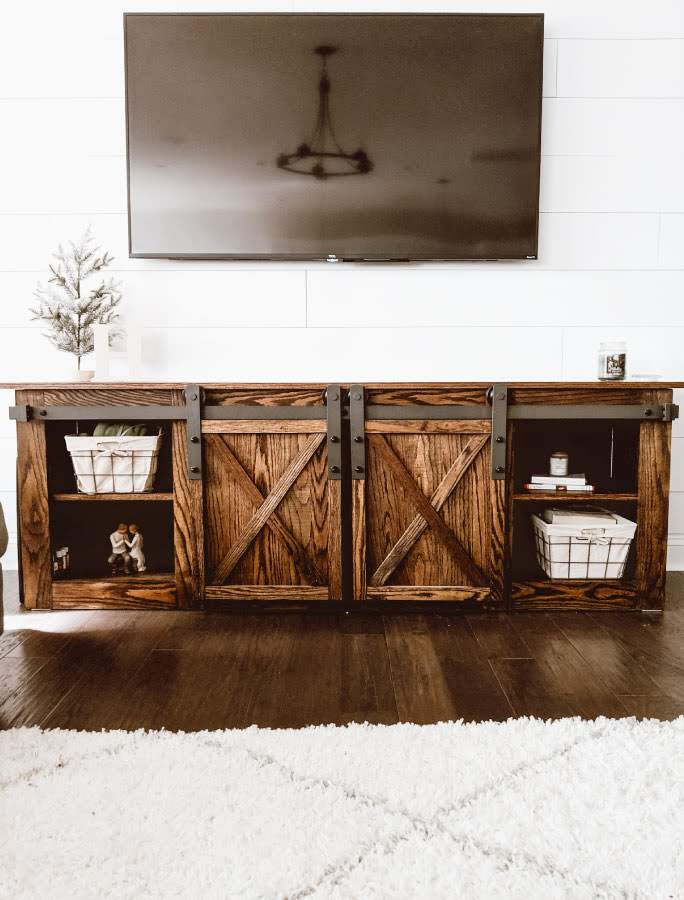
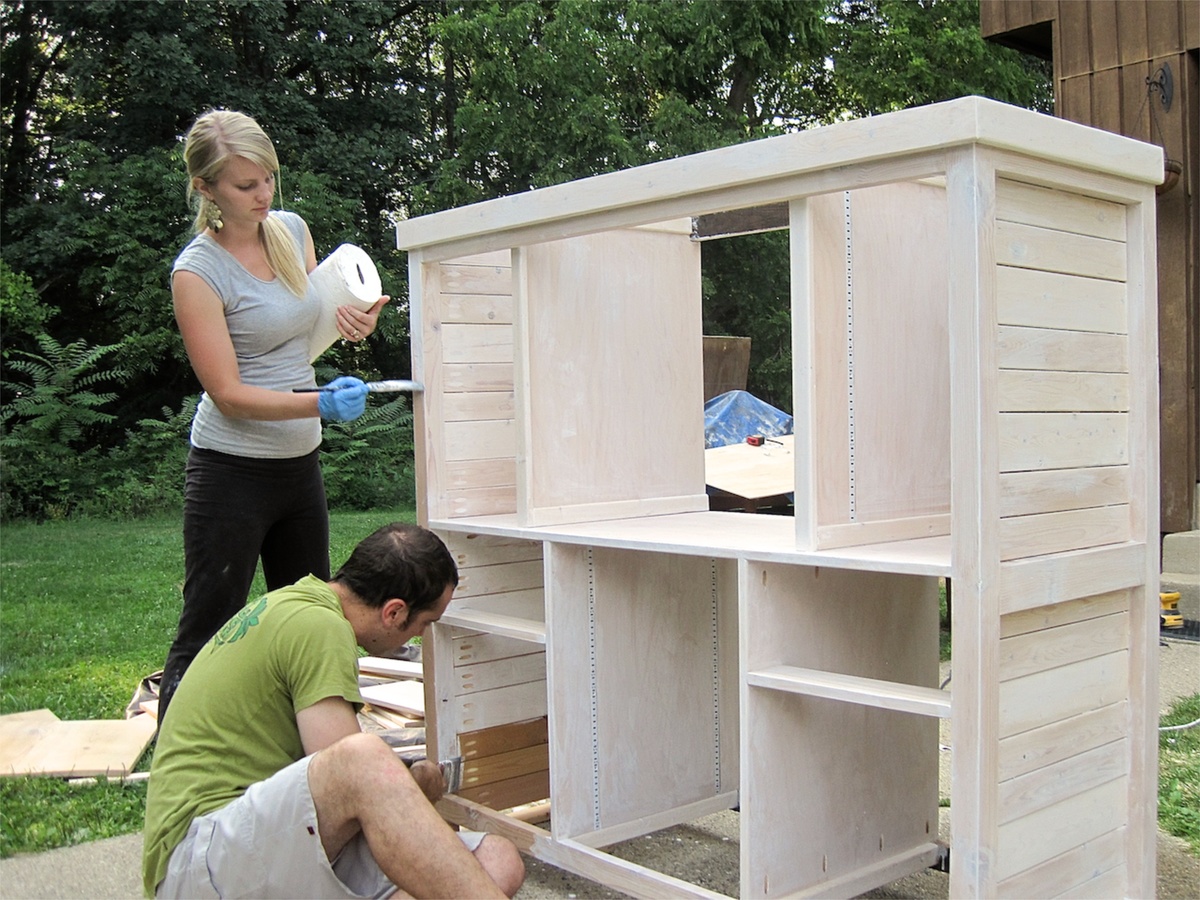
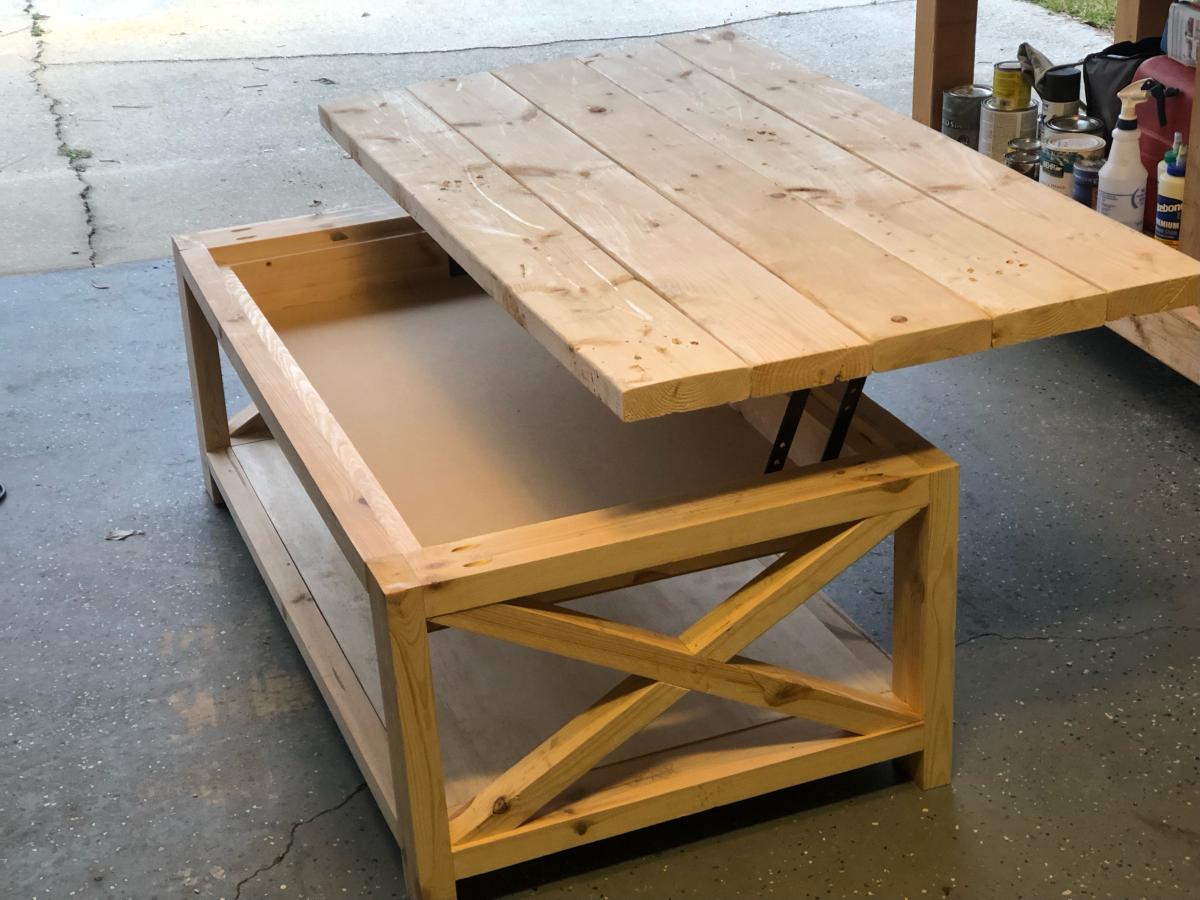
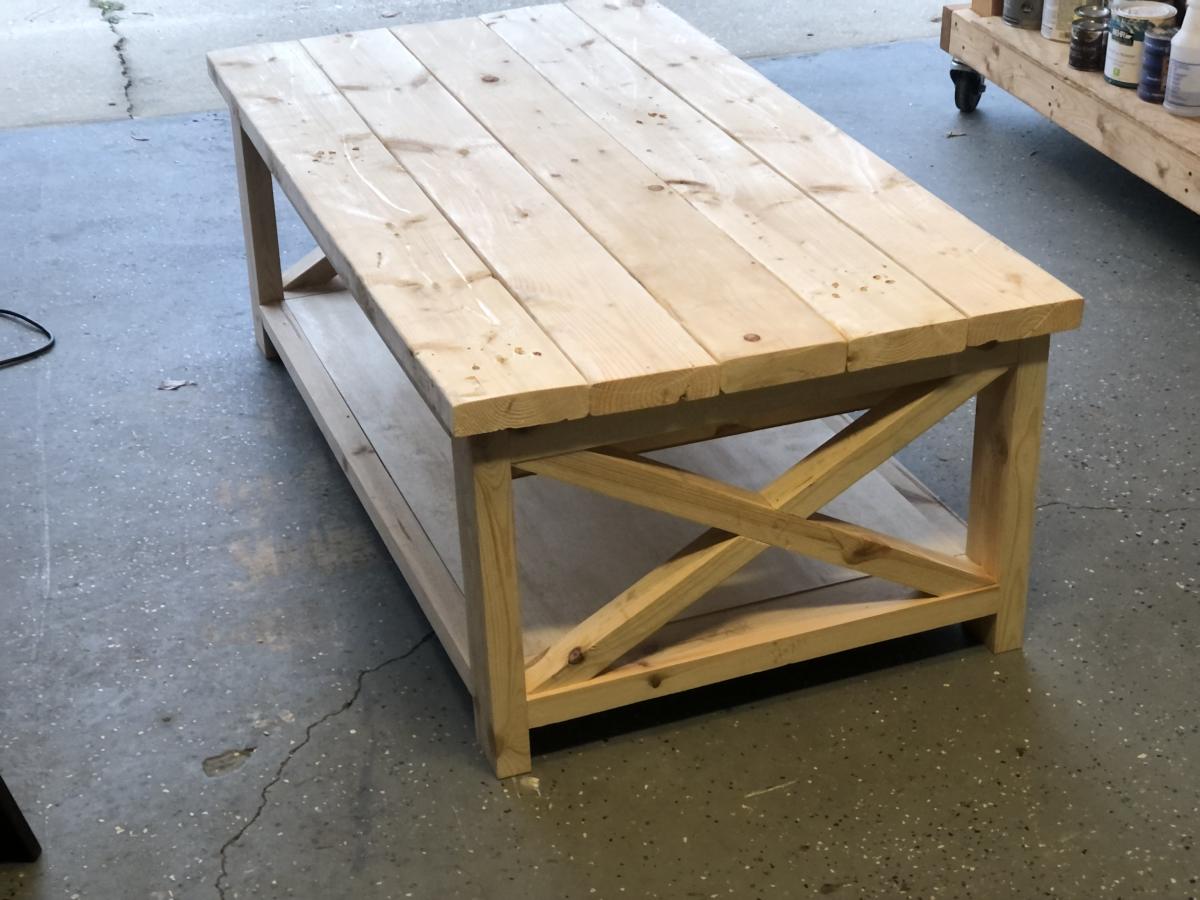
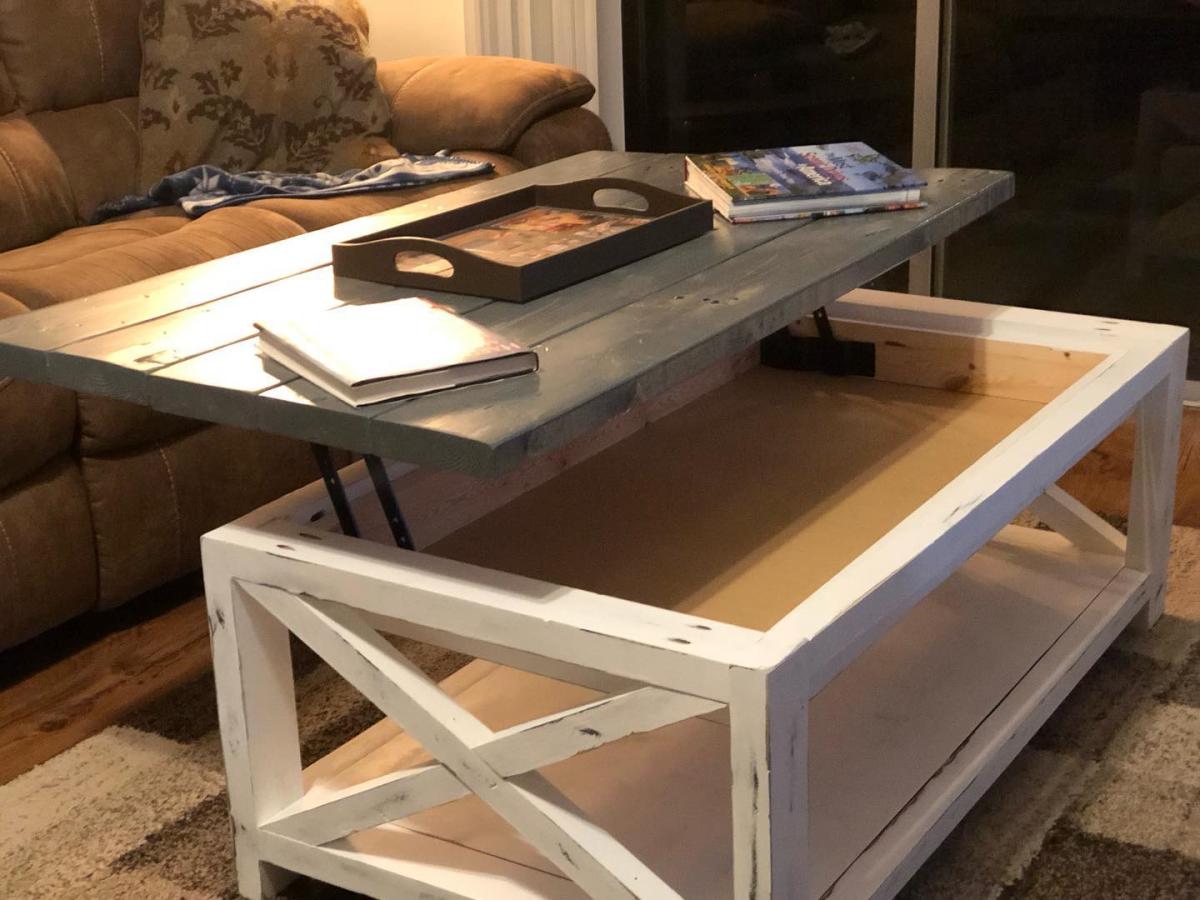
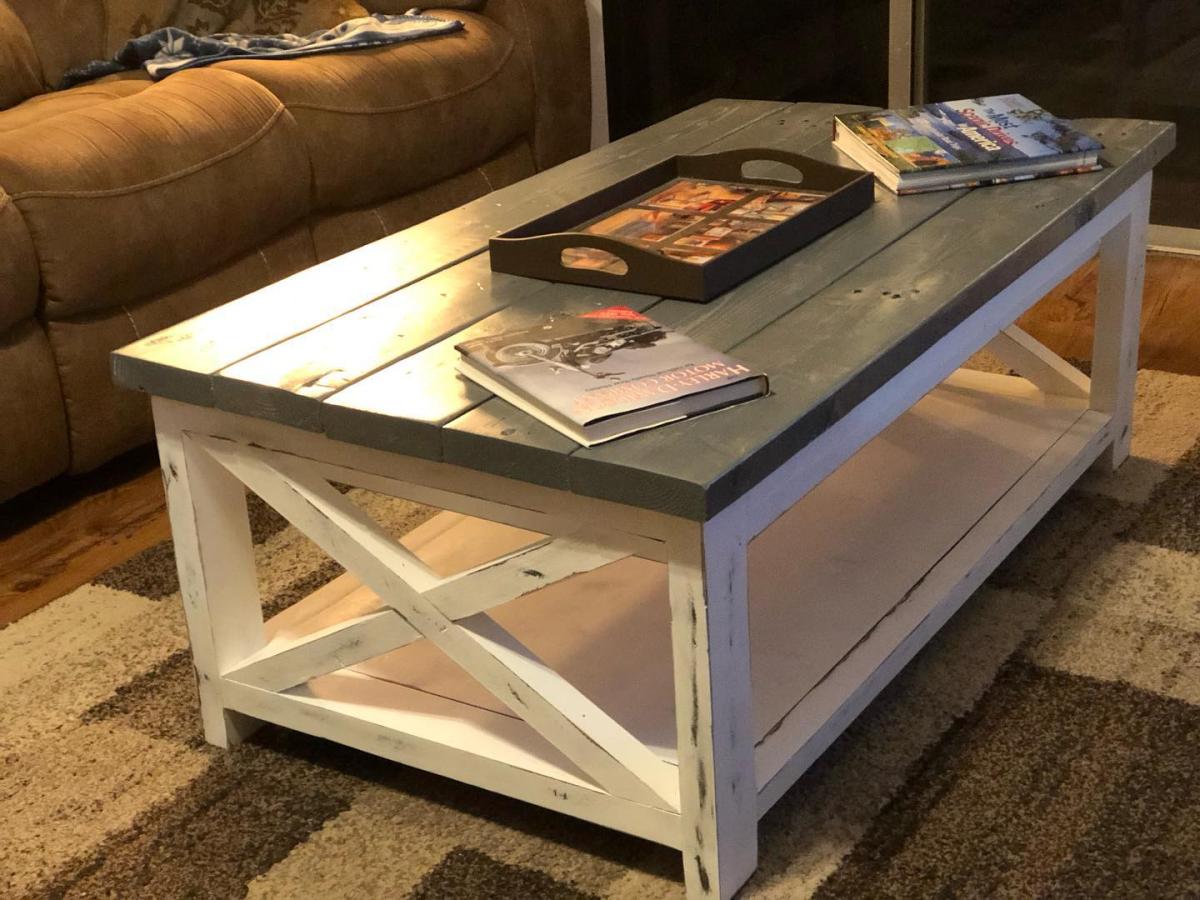
This was the second piece of furniture that my husband and I ever made. We had built a coffee table that had a lift up top so that we could eat dinner on the couch and store all of our board games. Once we tackled that, I thought we could conquer the world (even though the table was pretty basic). So when my now-husband was about to move into his first apartment without a roommate and I saw it as an opportunity to decorate my own place (even though I wasn’t living there). Luckily,he agreed it was time to get rid of his tiny Ikea TV stand that was probably 2ft off the ground and not a great height for a TV, and agreed to build this awesome TV console with me. To this day, it’s still my favorite piece of furniture in our house.
Sat, 11/09/2019 - 14:12
Love this, needing one in my front entry way. How long did it take?
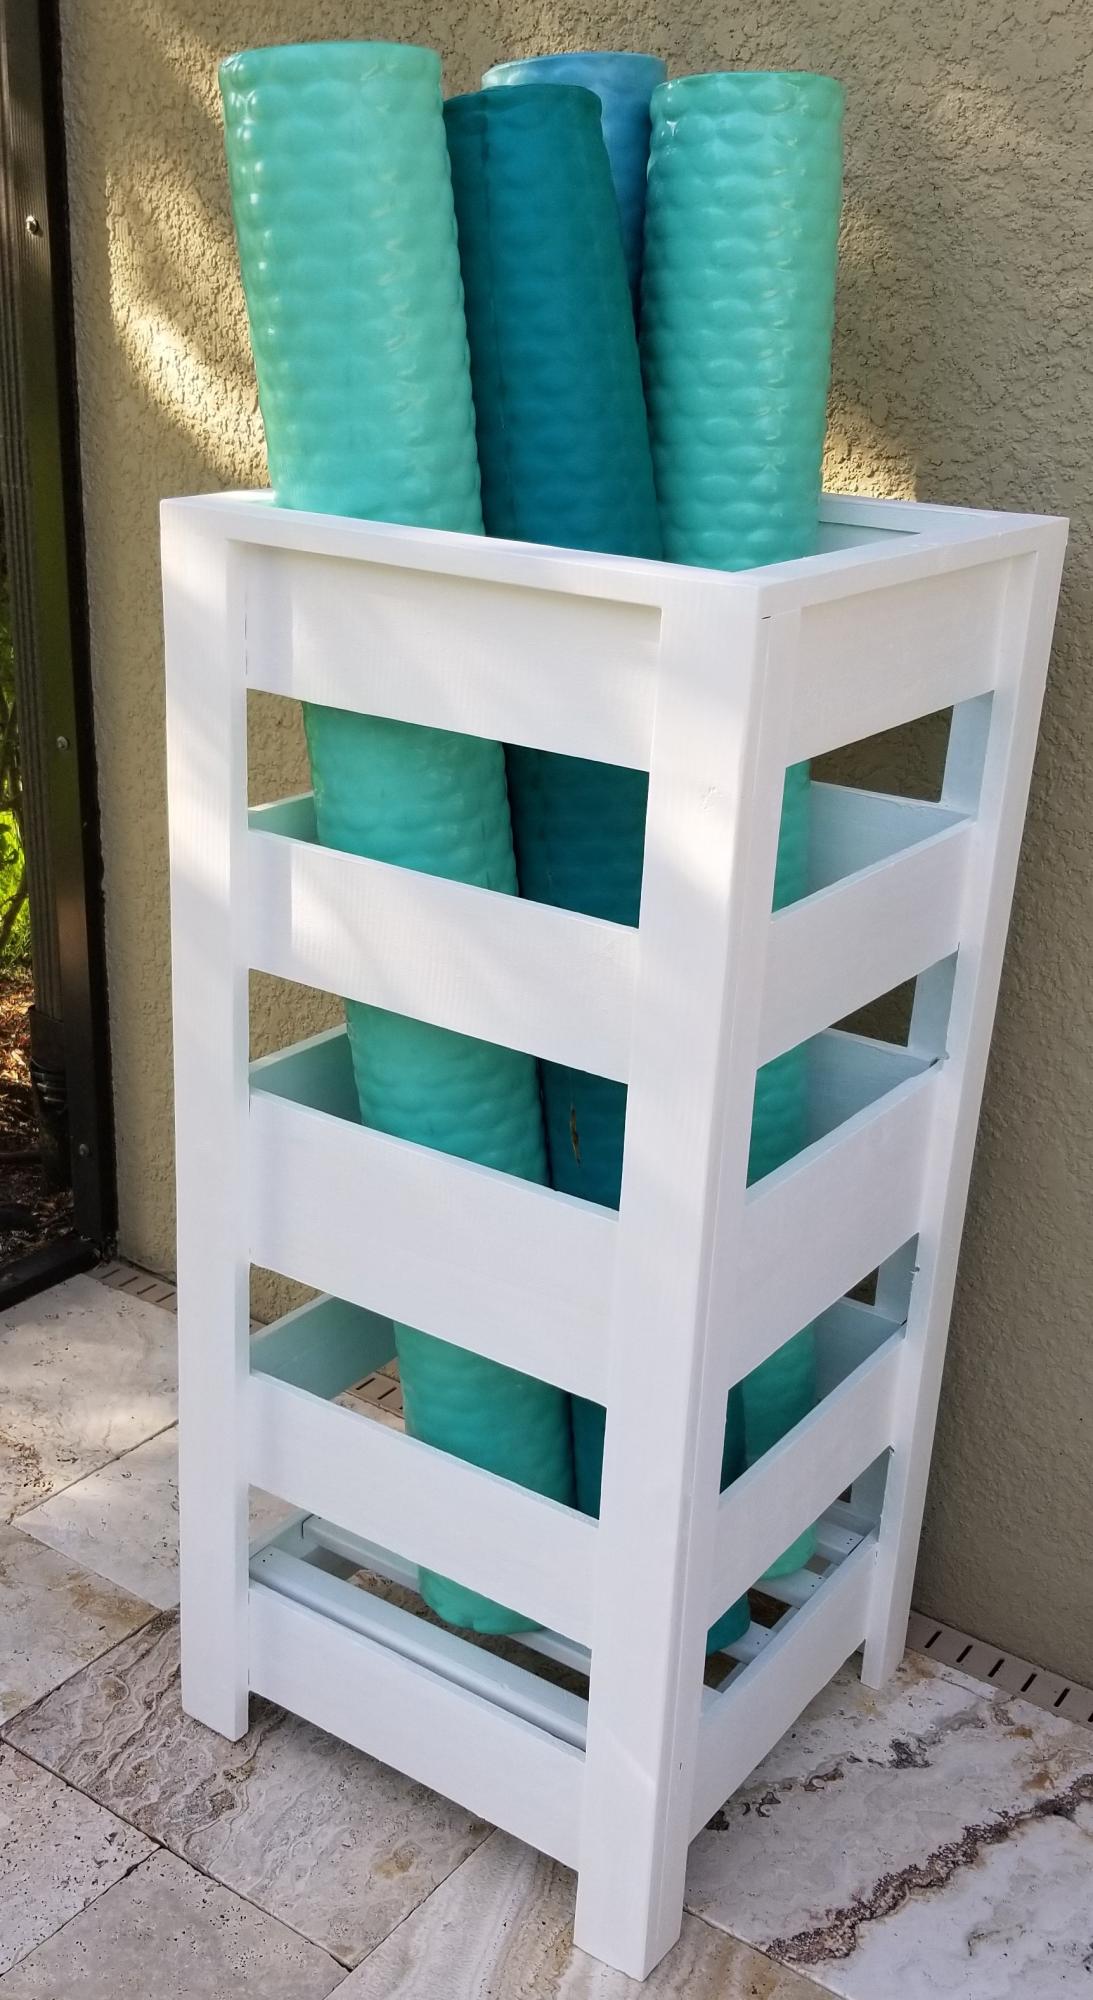
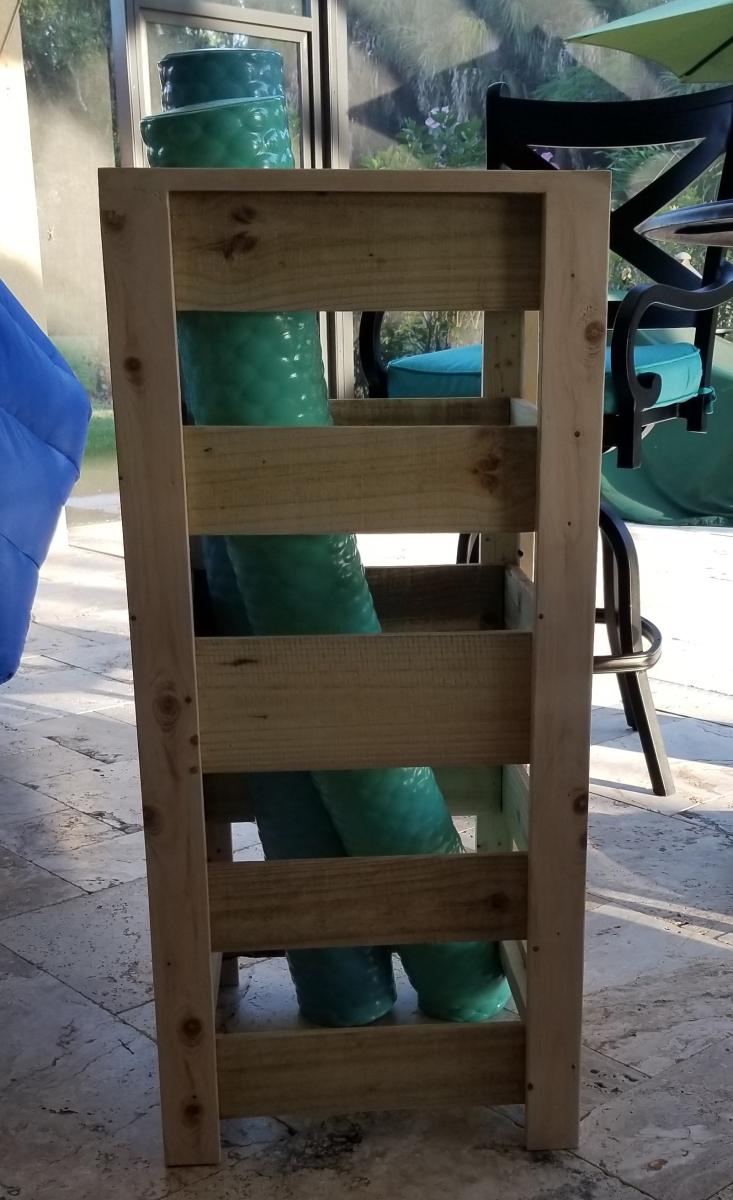
I modified the plans for the planter box to make a holder for Pool Noodles. I made it 40" tall and used 4-4" fence pickets and 1-5.5" fence pickets. I used a 4" spacer and the openings worked out perfect. I stained inside and out since it would show with 2 coats of the solid stain. It is perfect! Thank you so much for the inspiration and plans!
Mon, 06/06/2022 - 14:04
This is so smart and looks great too, thank you for sharing!
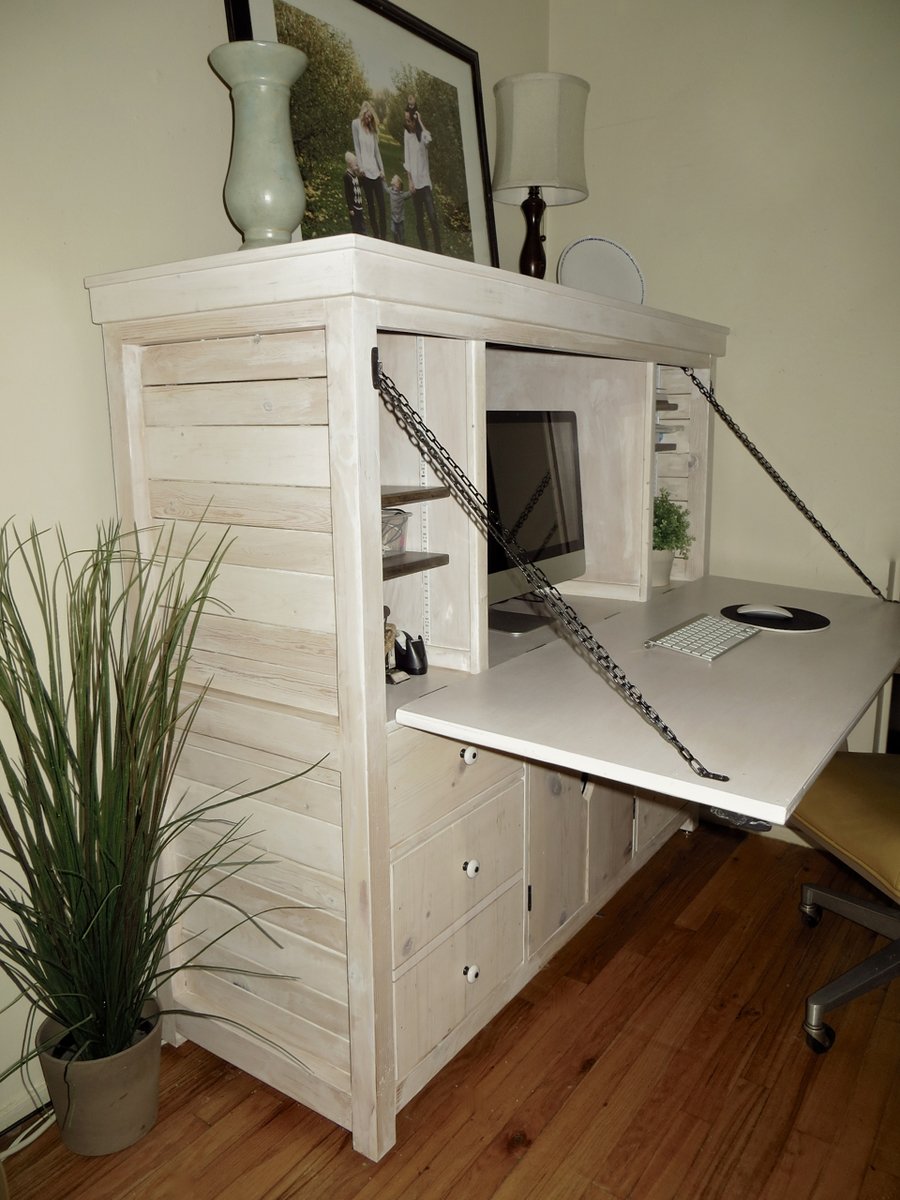
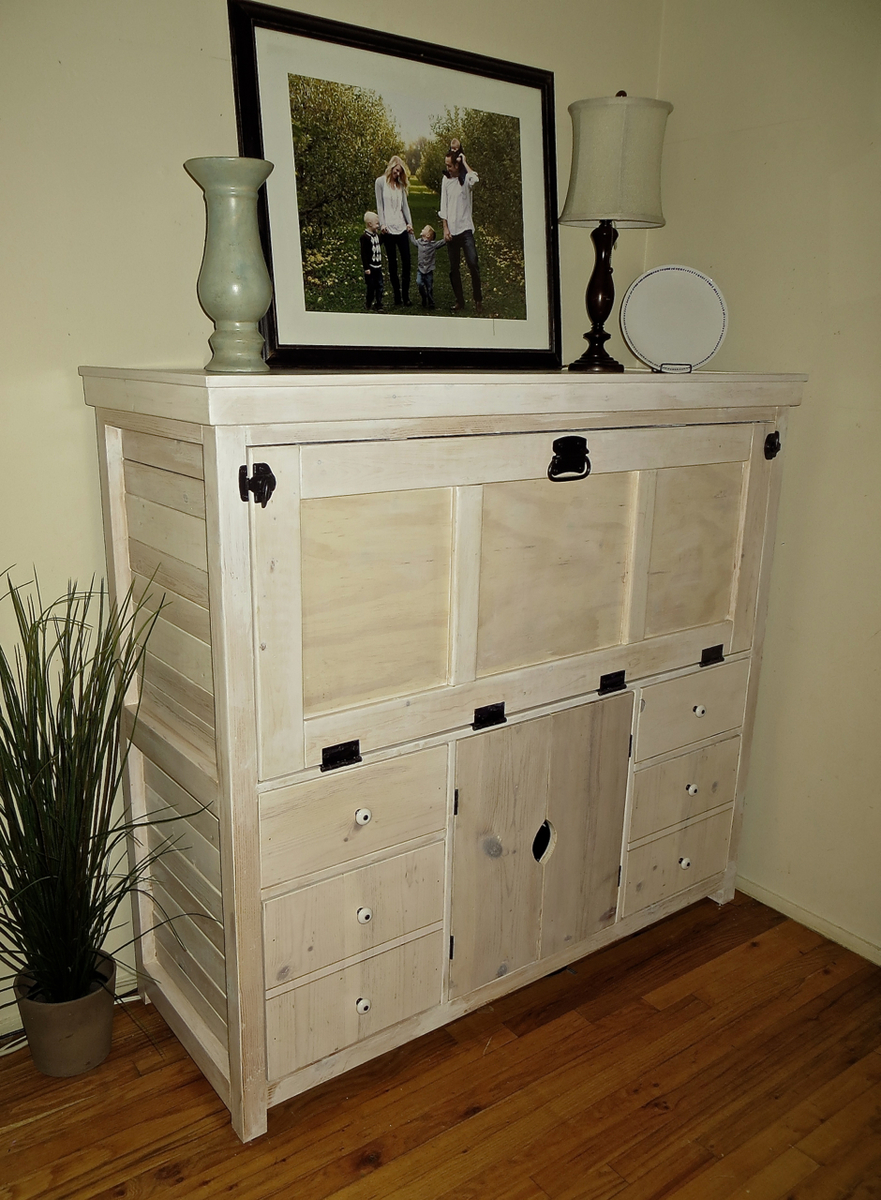
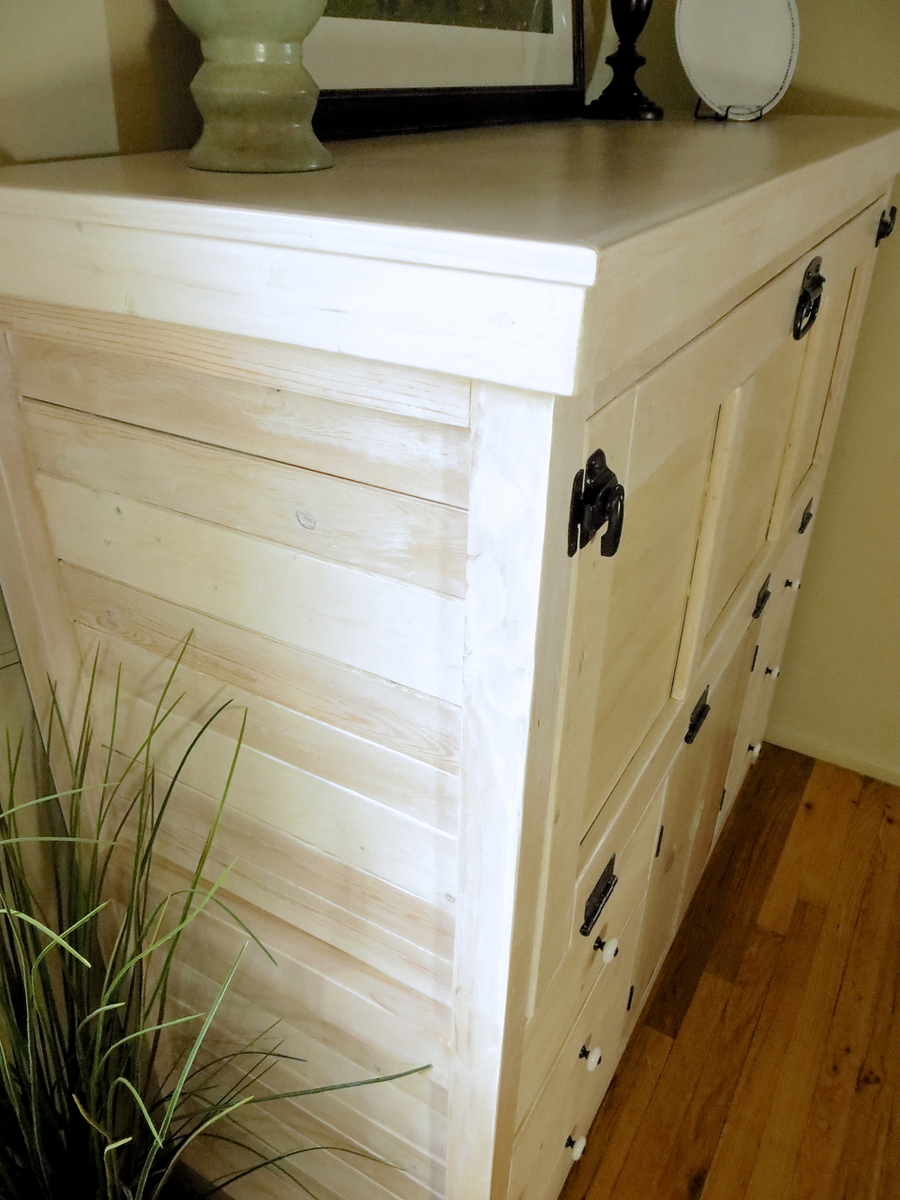
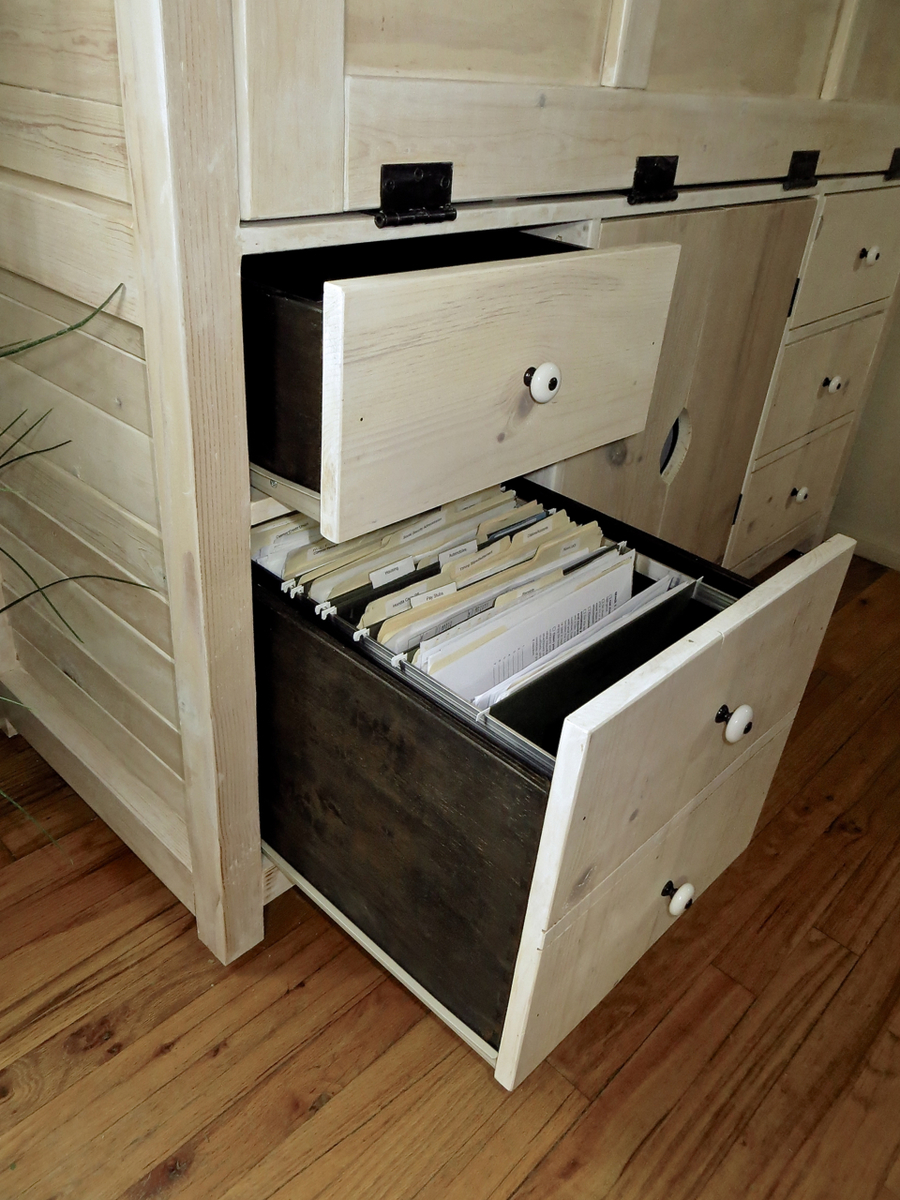
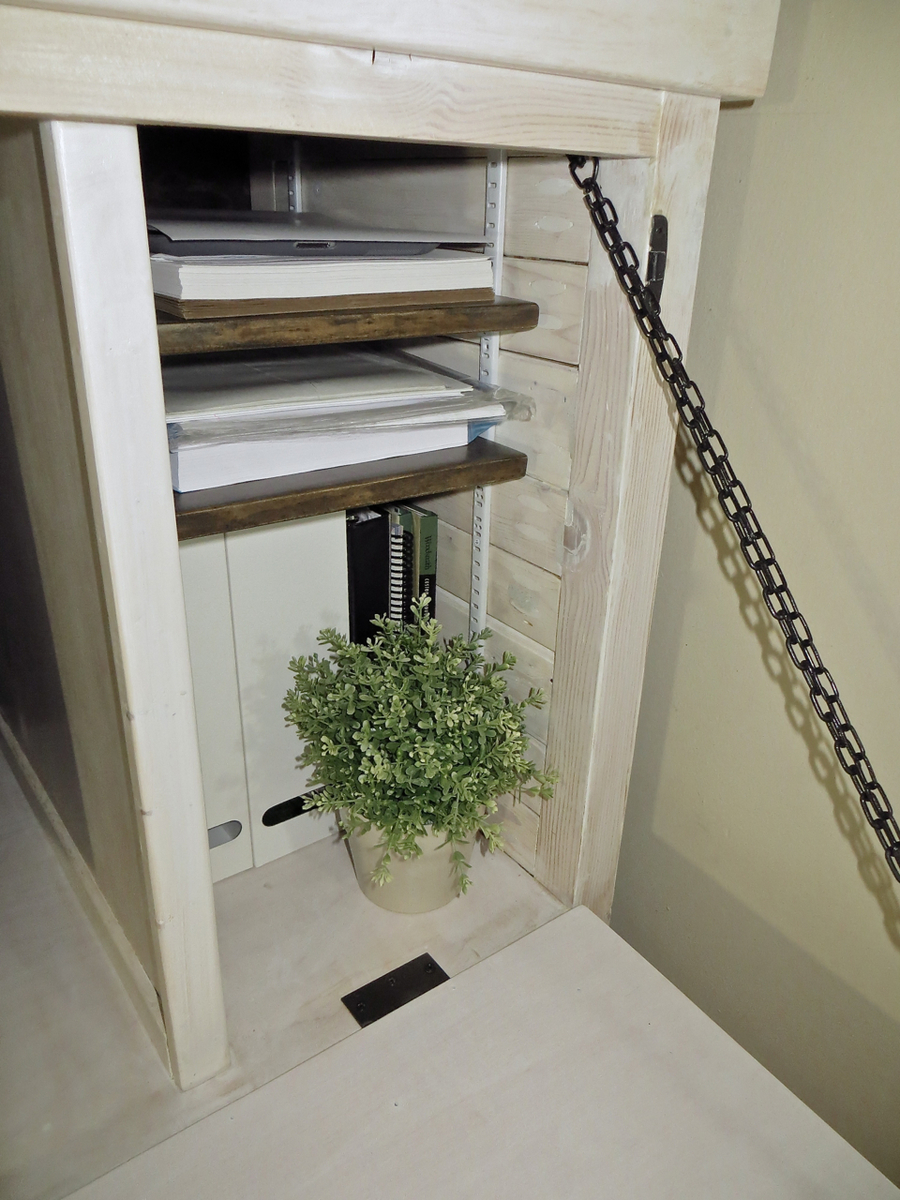
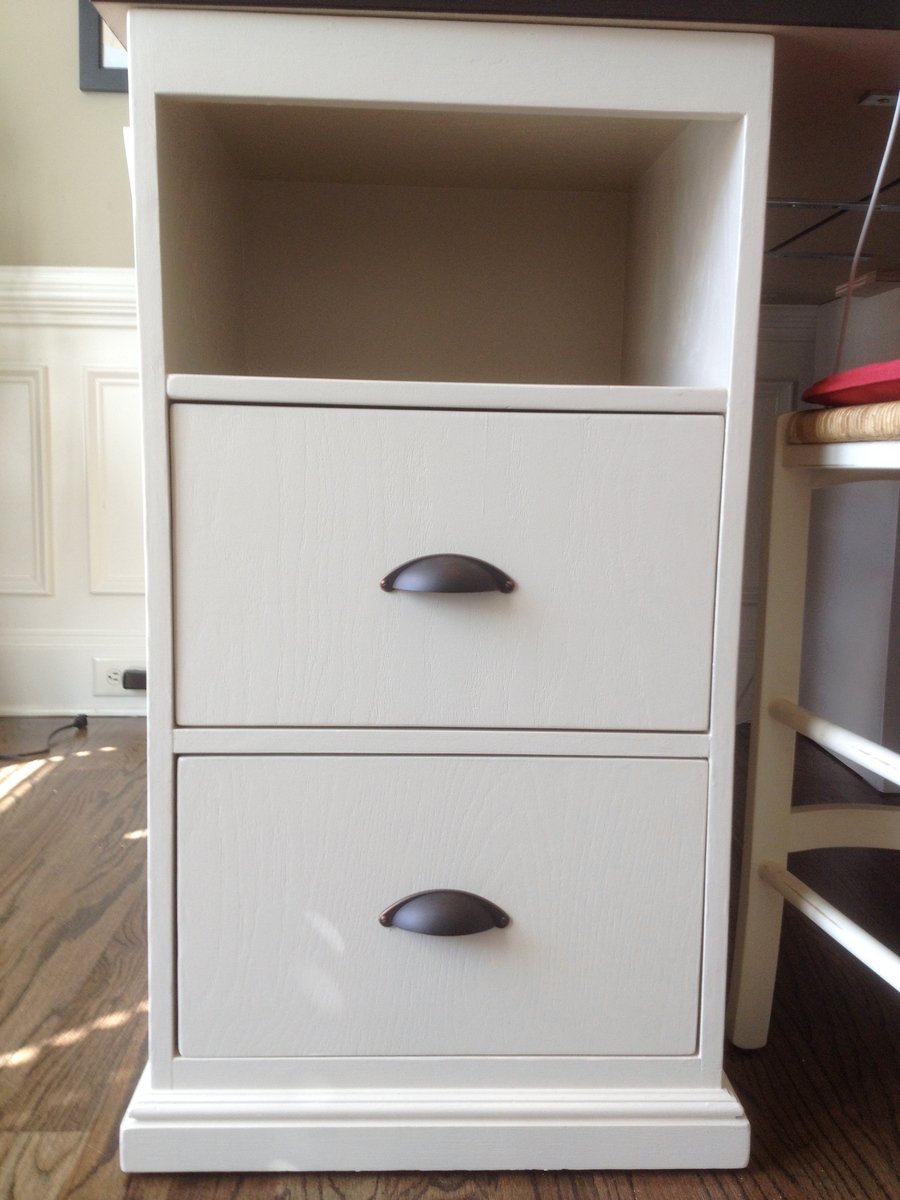
I designed this desk and created a building plan using Google Sketchup. It has 2 file drawers, 2 smaller drawers, 2 large adjustable shelves and a pullout shelf in the bottom, 4 small adjustable shelves on the top and a large space for a computer monitor. The large door drops open for a large work space. When you're done, put the door up and you have a beautiful piece of furniture!
I consider myself an advanced-beginner when it comes to building. I have just enough knowledge to get me by. If you have time, patience and the right tools you can build this too! It took me 10 days to build, working as much as my kids would allow.
It took me countless hours to perfect the building plan - probably just as much work to design it as it was to build it :)
I really scrounged around to build this desk. I used a large beam my friend cut up into 2x2's for the main posts/legs, pine furring strips for the side boards and around the top for moulding (lots of scraps I already had), 3/4" plywood for the inside dividers/panels & desktop, 1/2" plywood for the drawer boxes, drop-down door & top, 1/4" plywood for drawer bottoms & backing-board. I used 3/4" pine boards for the drawer faces and small doors on the bottom. I used drawer slides from an old dresser I found by our dumpster and vintage knobs I bought online. The other black hardware (hinges, pull handle, and clasps for door) I bought from a big box store and is categorized as gate hardware.

Sun, 09/01/2013 - 15:52
Wow! Nice job, this is beautiful. I love the whitewashed finish. Cool hardware too!
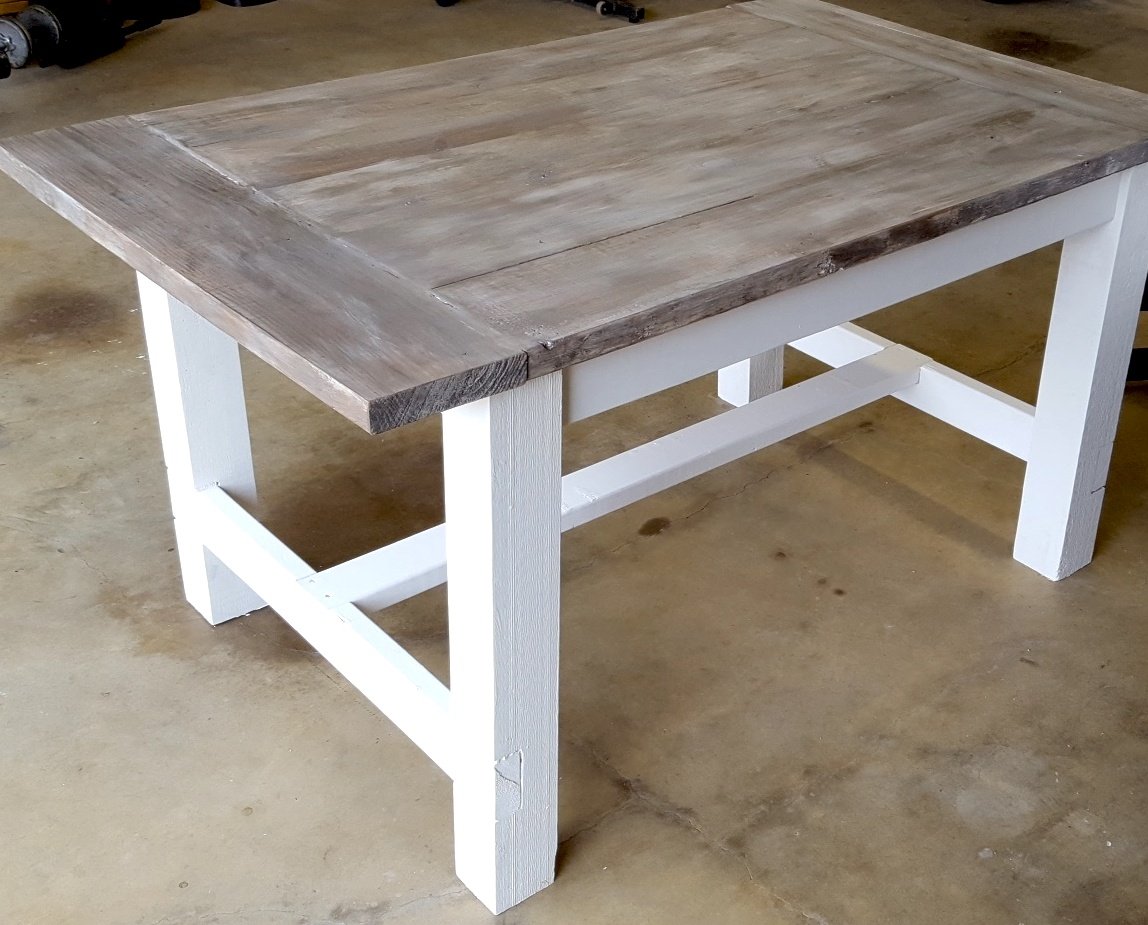
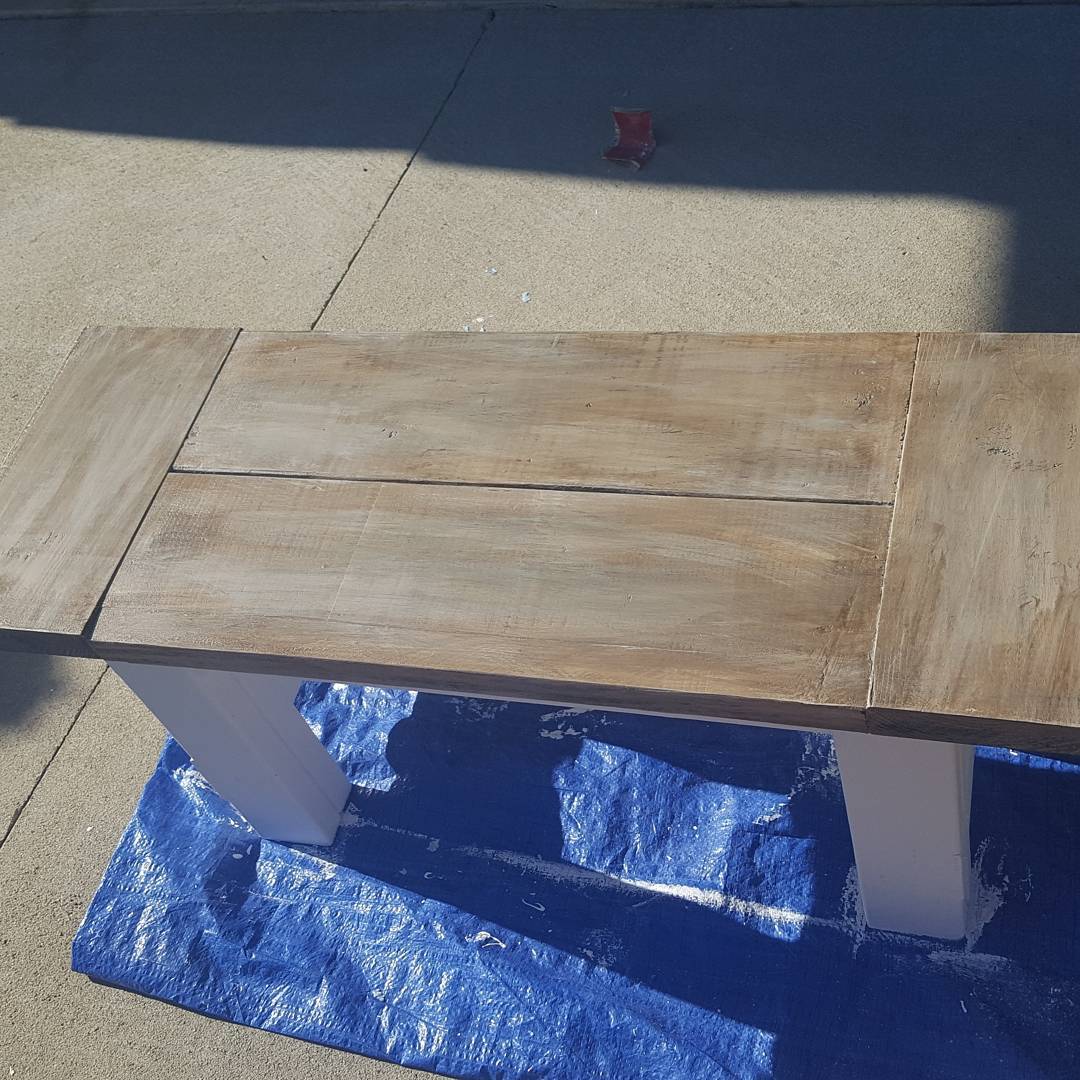
This project was made from reclaimed wood from my office where they had built a temporary safety railing out of 2x4s and 2x6s. I added a compartment for storage. The top is stained in a classic grey. I painted the body in black followed by white. I then sanded the body to allow the black to bleed through for a distressed look.


I only needed one step up, but replacing the old, cracked, weird, faux concrete step with the new planter box worked great!

Fri, 07/12/2019 - 19:36
This is perfect for your front door ! Love how you tied it in with your house colors.
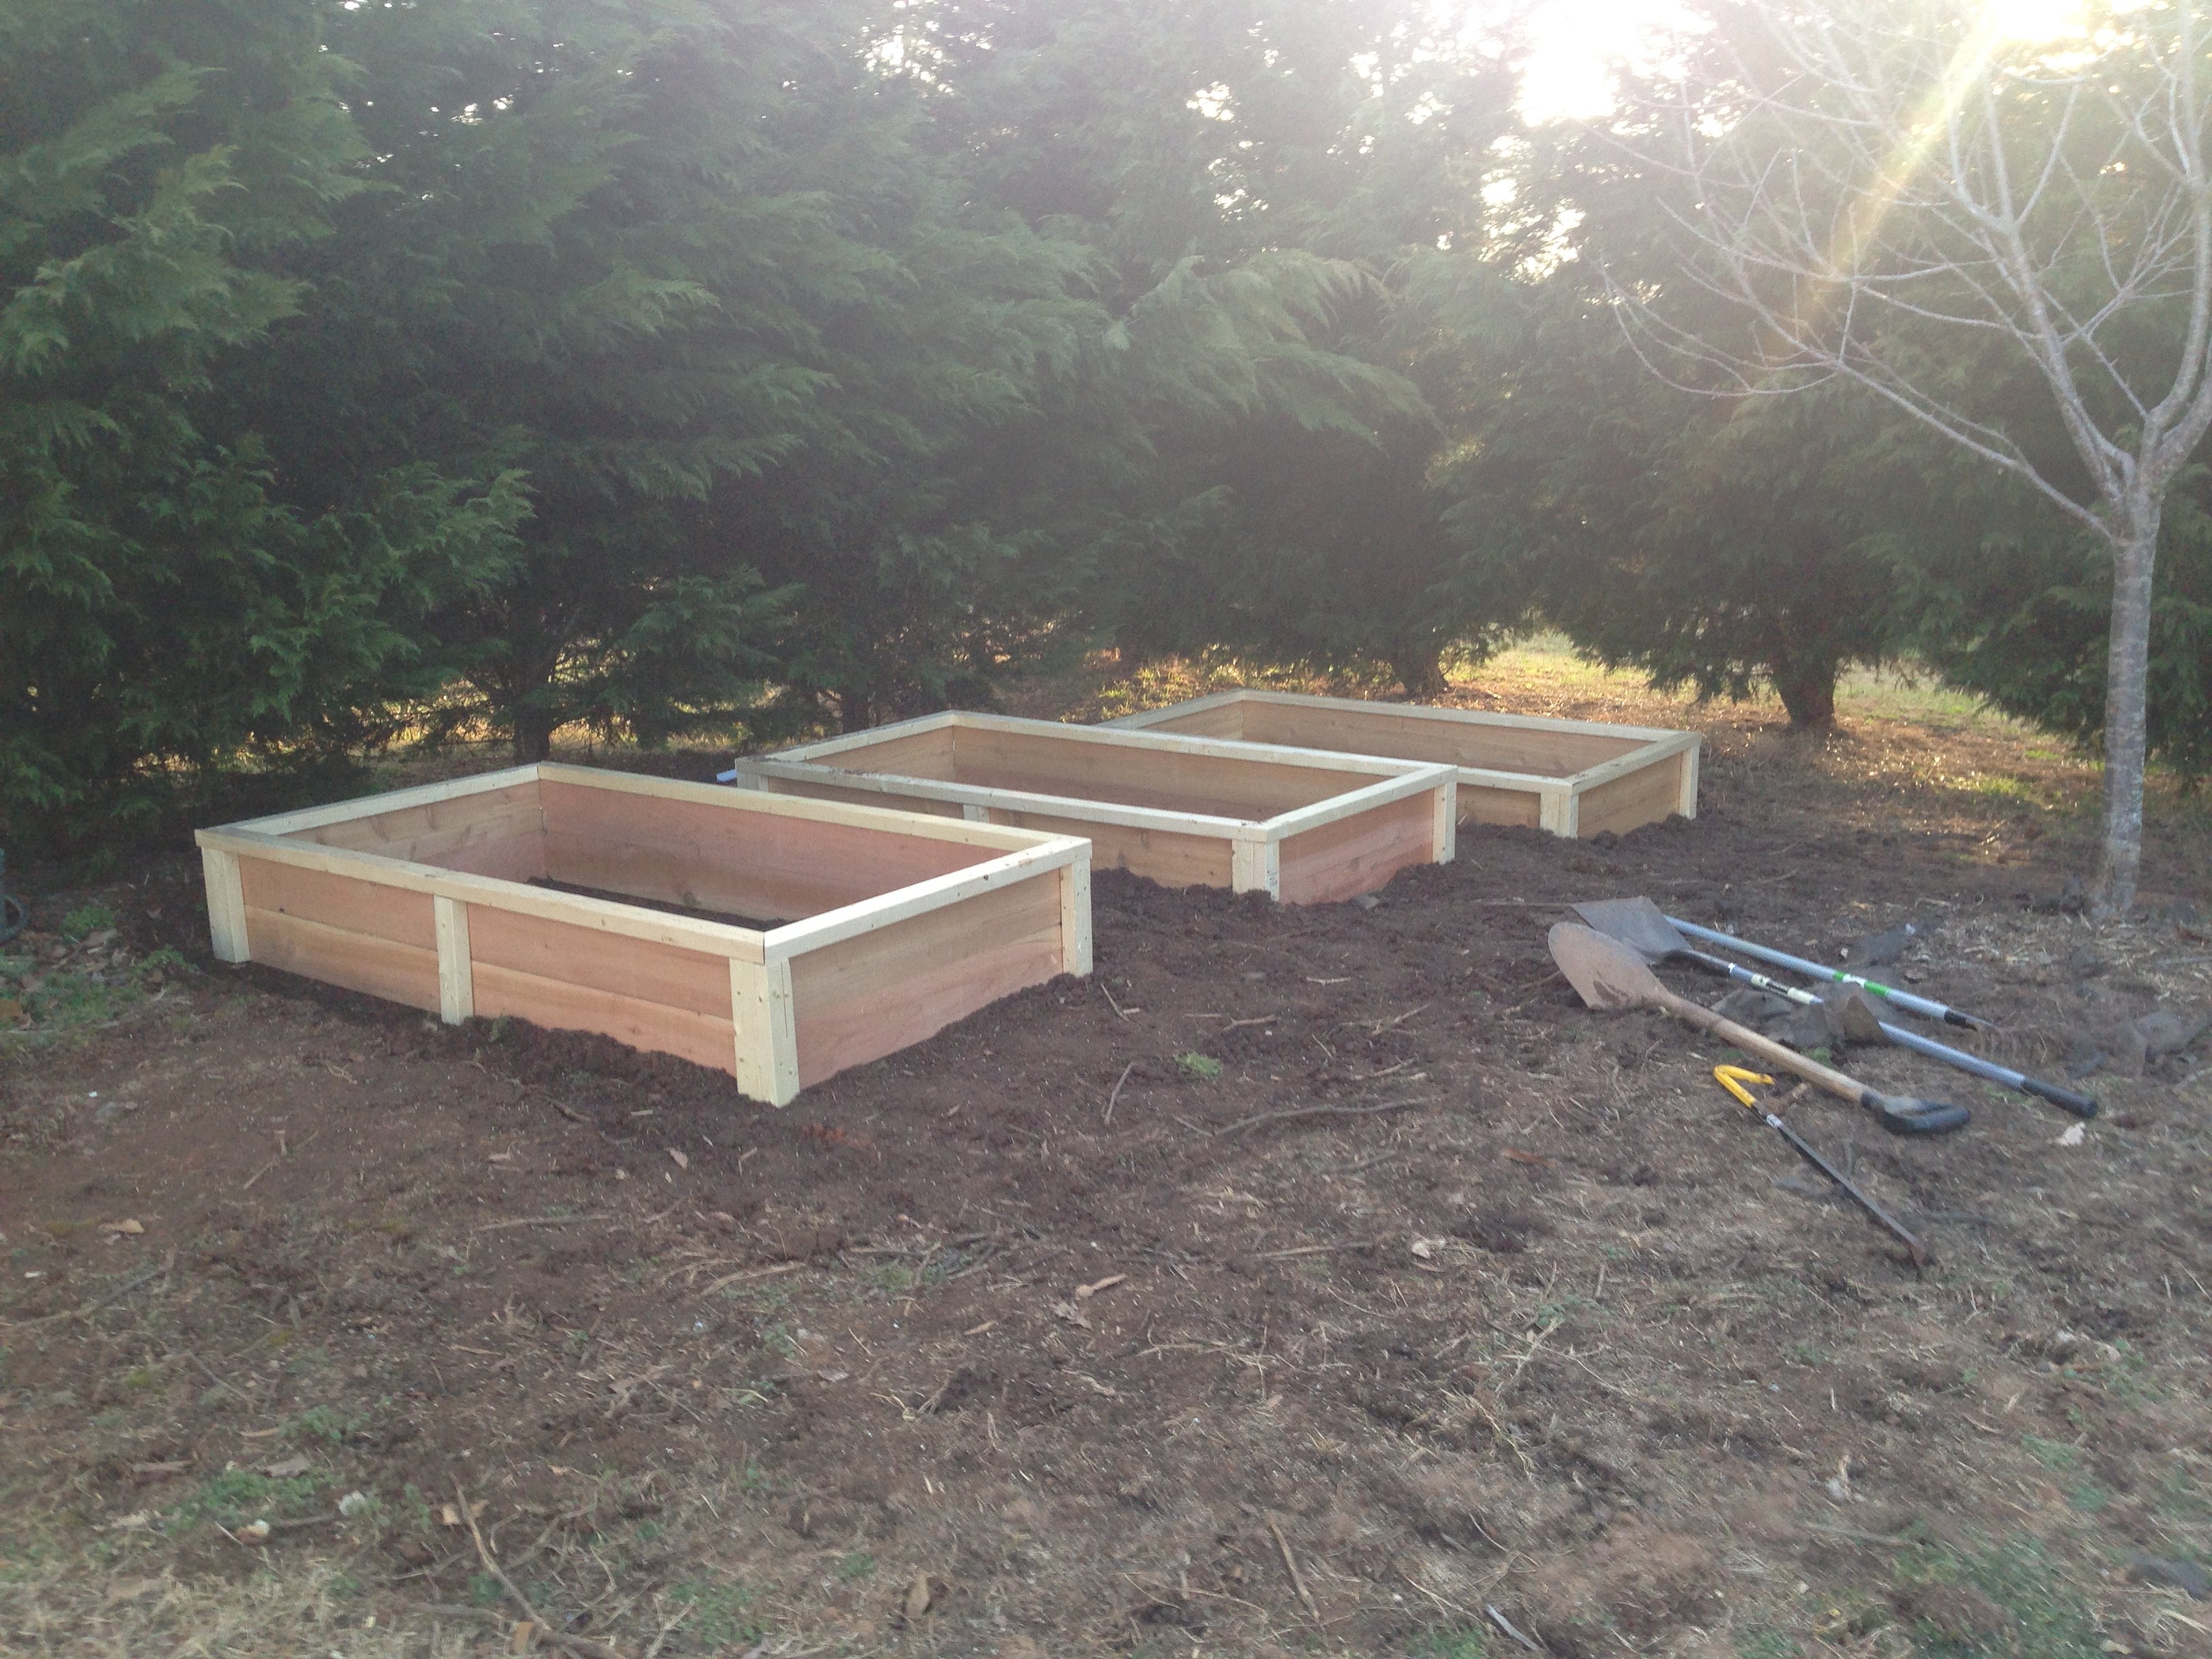
Using Ana's 10 dollar raised garden planter box idea, I made my own using the cedar fence boards and then used 2 x 3 x 8 studs for the L corner supports and mid center support along with top rail. This photo is the first 3, I will have a total of 6 boxes. Will post more as I progress.
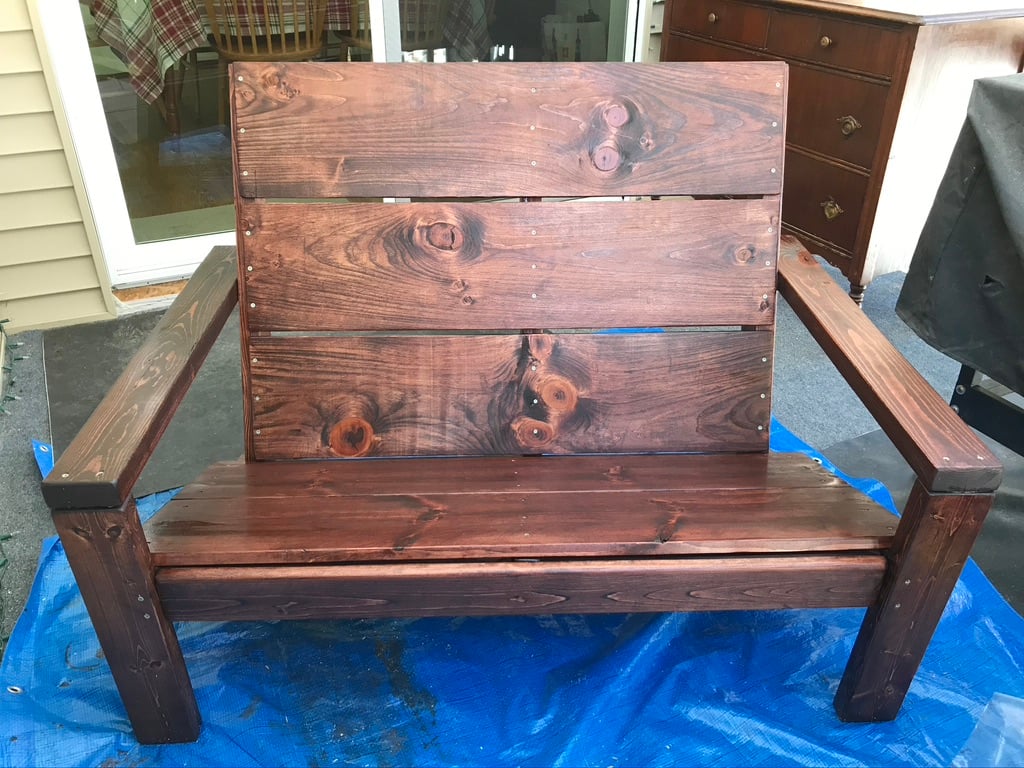
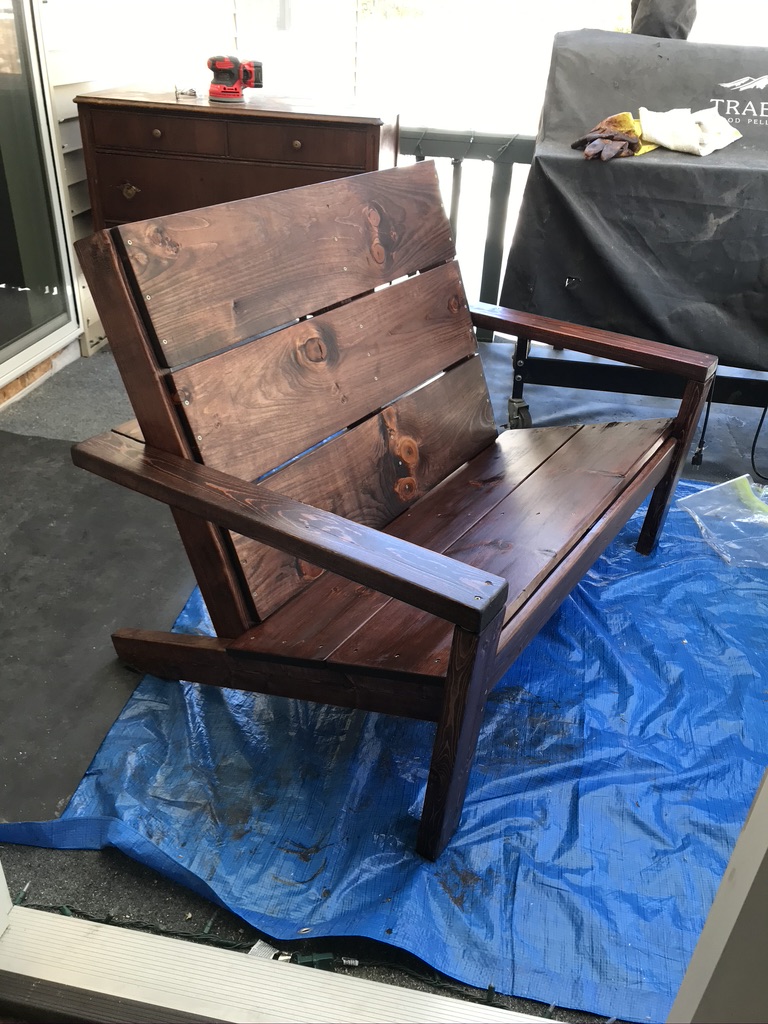
I loved the Rustic Adirondack Chair so much I felt I needed to make a bench in the same style. I had to be a little creative with the chair plans and modify them to make my bench work. I am absolutely thrilled with how it came out! I already have a friend who has requested a chair and bench (love seat) for his son's wedding gift!
Mon, 08/16/2021 - 10:51
Can someone tell me the dimensions of the wood (1x10) for the bench and the dimensions for the frame (2x4)
Please
Thank you
Fri, 08/20/2021 - 16:37
You can make the 1x10 in any length you want. I’m planning on making a loveseat too and The measurements I chose for the seating area will be 48” long (which is the size for 2 seat cushions).
The Step 1 in Ana’s plan, all measurements will be the same.
Step 2: The two 2x4 horizontal supports will be cut at 48”.
Step 3: the two 1x10 seat panels will be 3 inches longer than the horizontal supports. So you will cut the 1x10 seat panels at 51”.
Step 4: Instead of two, you will need THREE seat supports. So cut three 2x4’s @ 32 3/4”. The third seat support will go in the middle of the other seat supports, drilled to the horizontal back support.
Step 5: Attach your back bottom horizontal support which will be a 2x4 at 48”.
Step 6: Attach the 1x10 seat back panels. You will cut (3) 1x10 @ 48”.
Here is the cut list for the loveseat version of Ana’s Adirondack plan. These are the lengths I chose. So with this cut list your loveseat should be big enough for two 24x24” seat cushions. I plan to add cushions for extra comfort.
My cut list:
(2) 2x4 @ 31 3/4”
(2) 2x4 @ 19 1/2”
(2) 2x4 @ 33 1/4” Cut at 20 degrees as per Ana’s plan.
(3) 2x4 @ 48” Horizontal supports. One goes behind your calves.
The other connects the end frames/arm rests at the back.
(2) 1x10 @ 51” Seat panels.
(3) 2x4 @ 32 3/4” Vertical supports for the back panels.
(3) 1x10 @ 48” The back panels.
Fri, 08/20/2021 - 17:32
P.S.
You will also need an extra support attached underneath the seat panels in the middle for extra support and keep the long seat panels from bowing.
Loved this build had to make it smaller but wow.
Paula
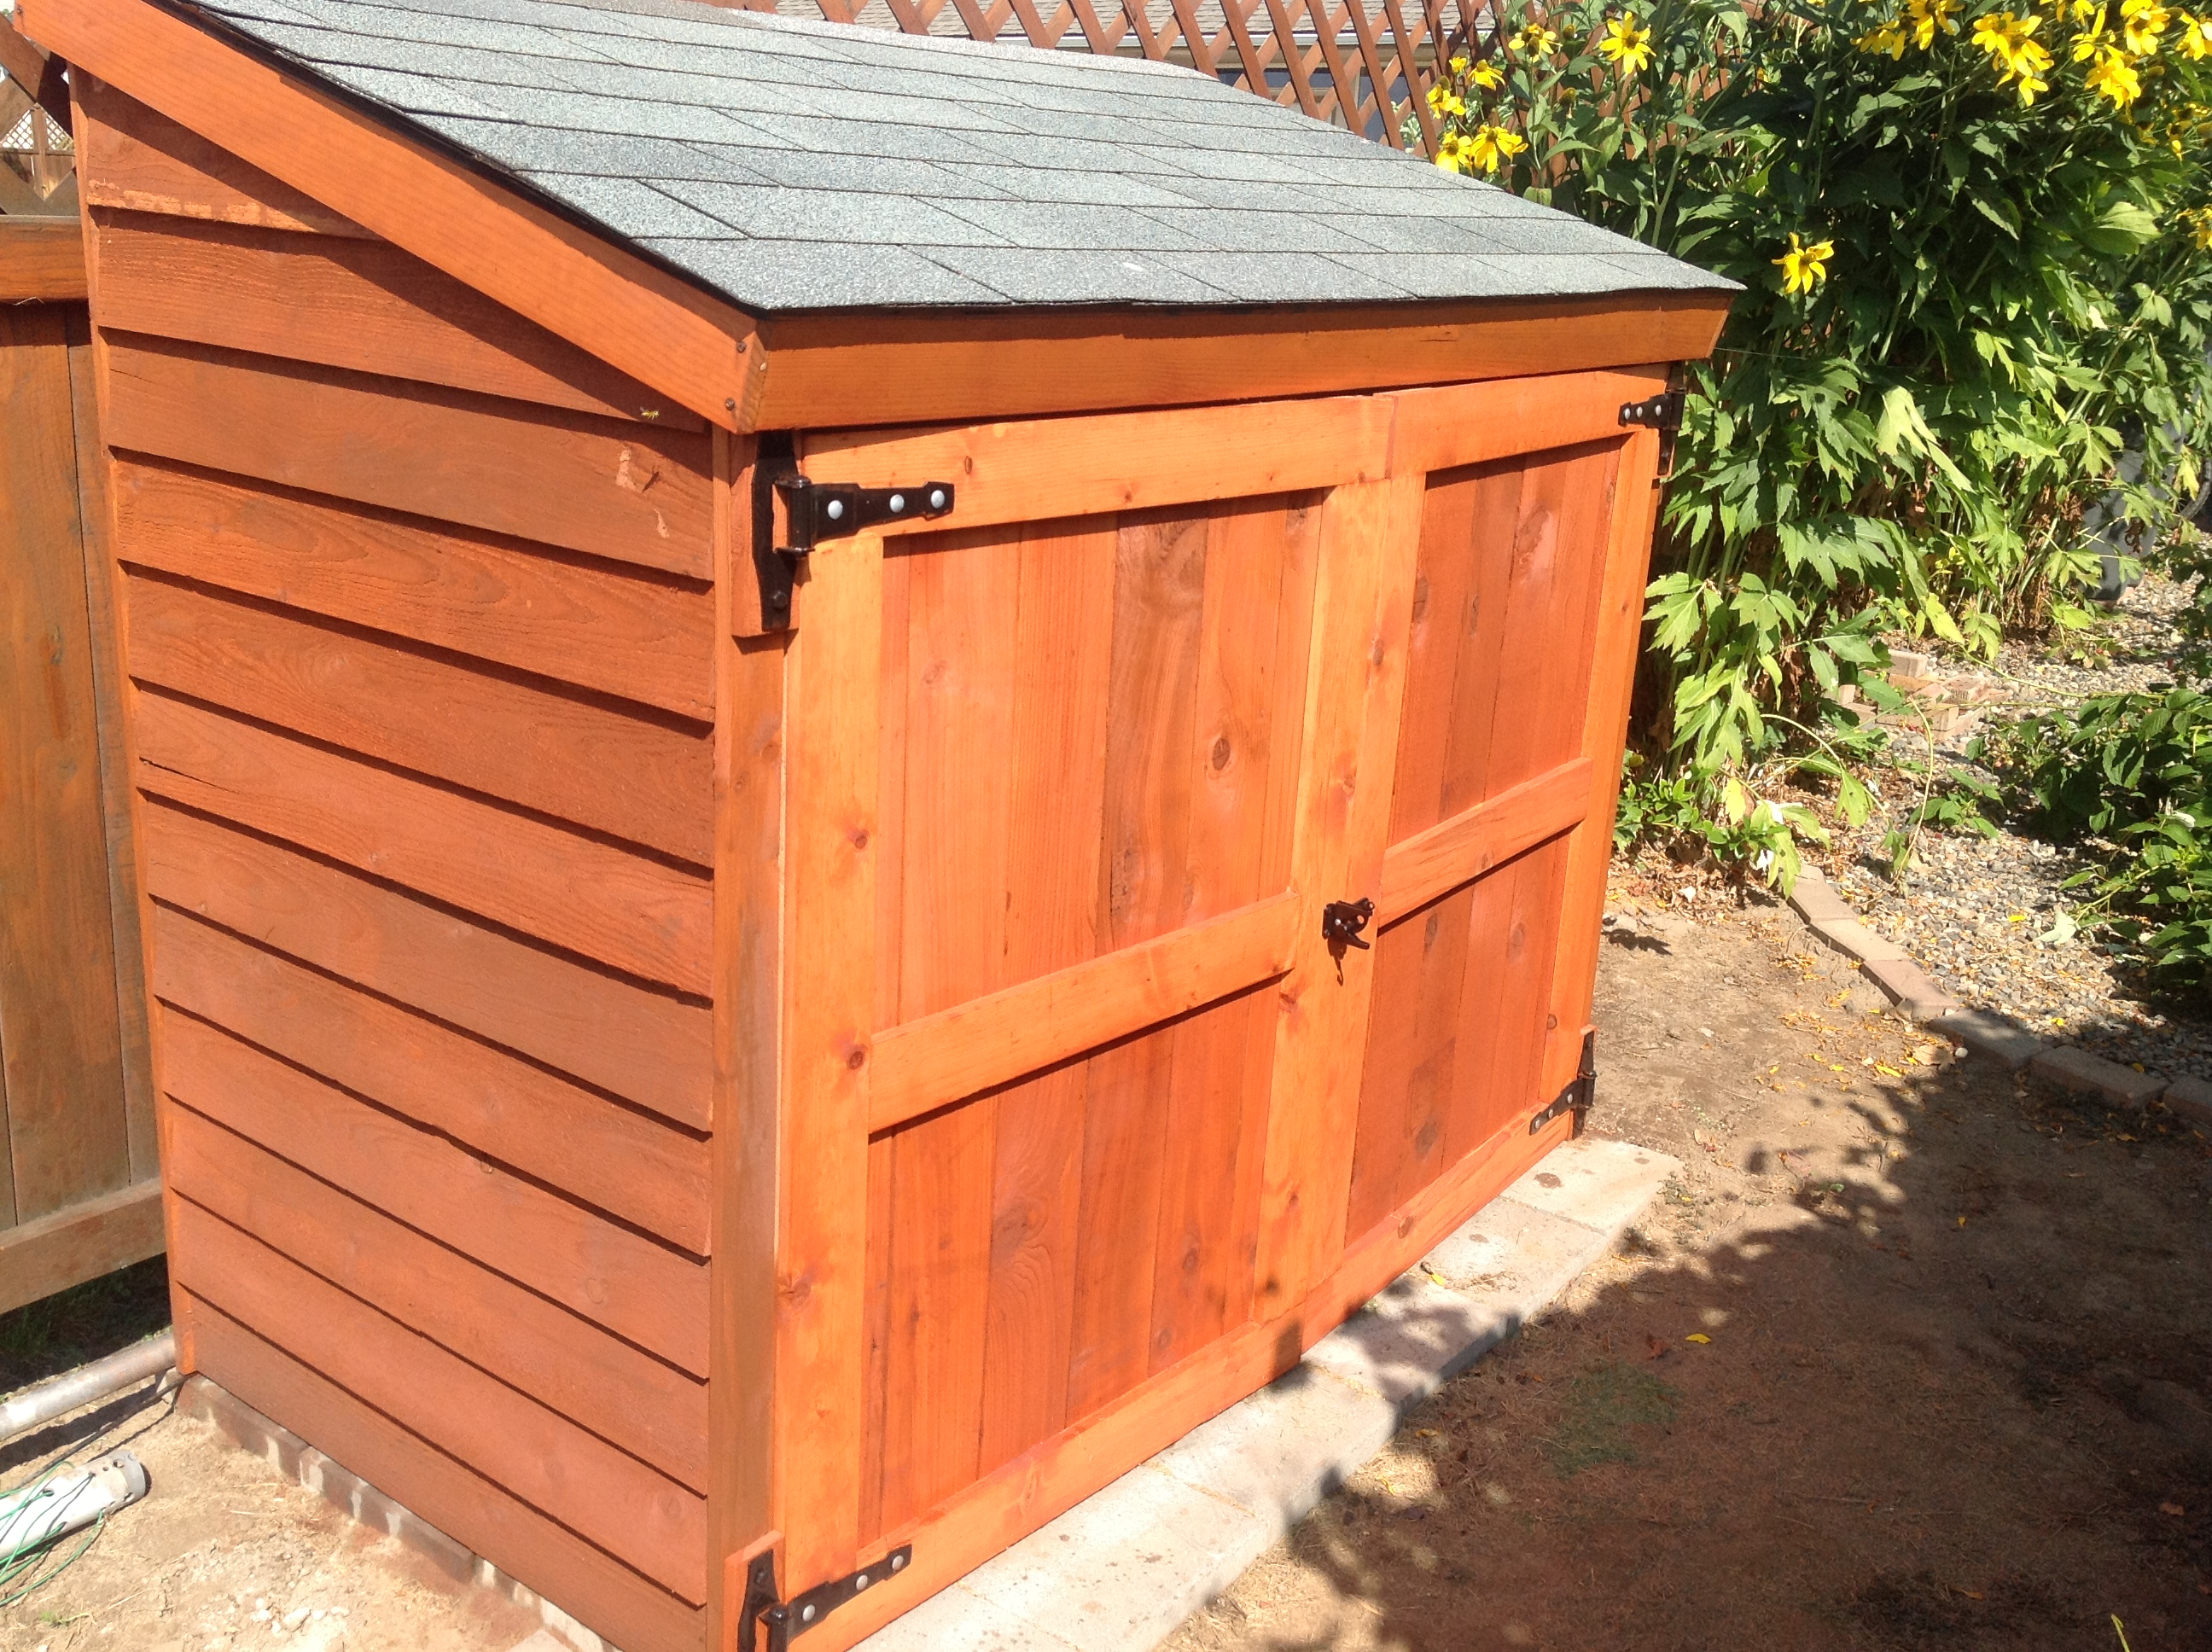
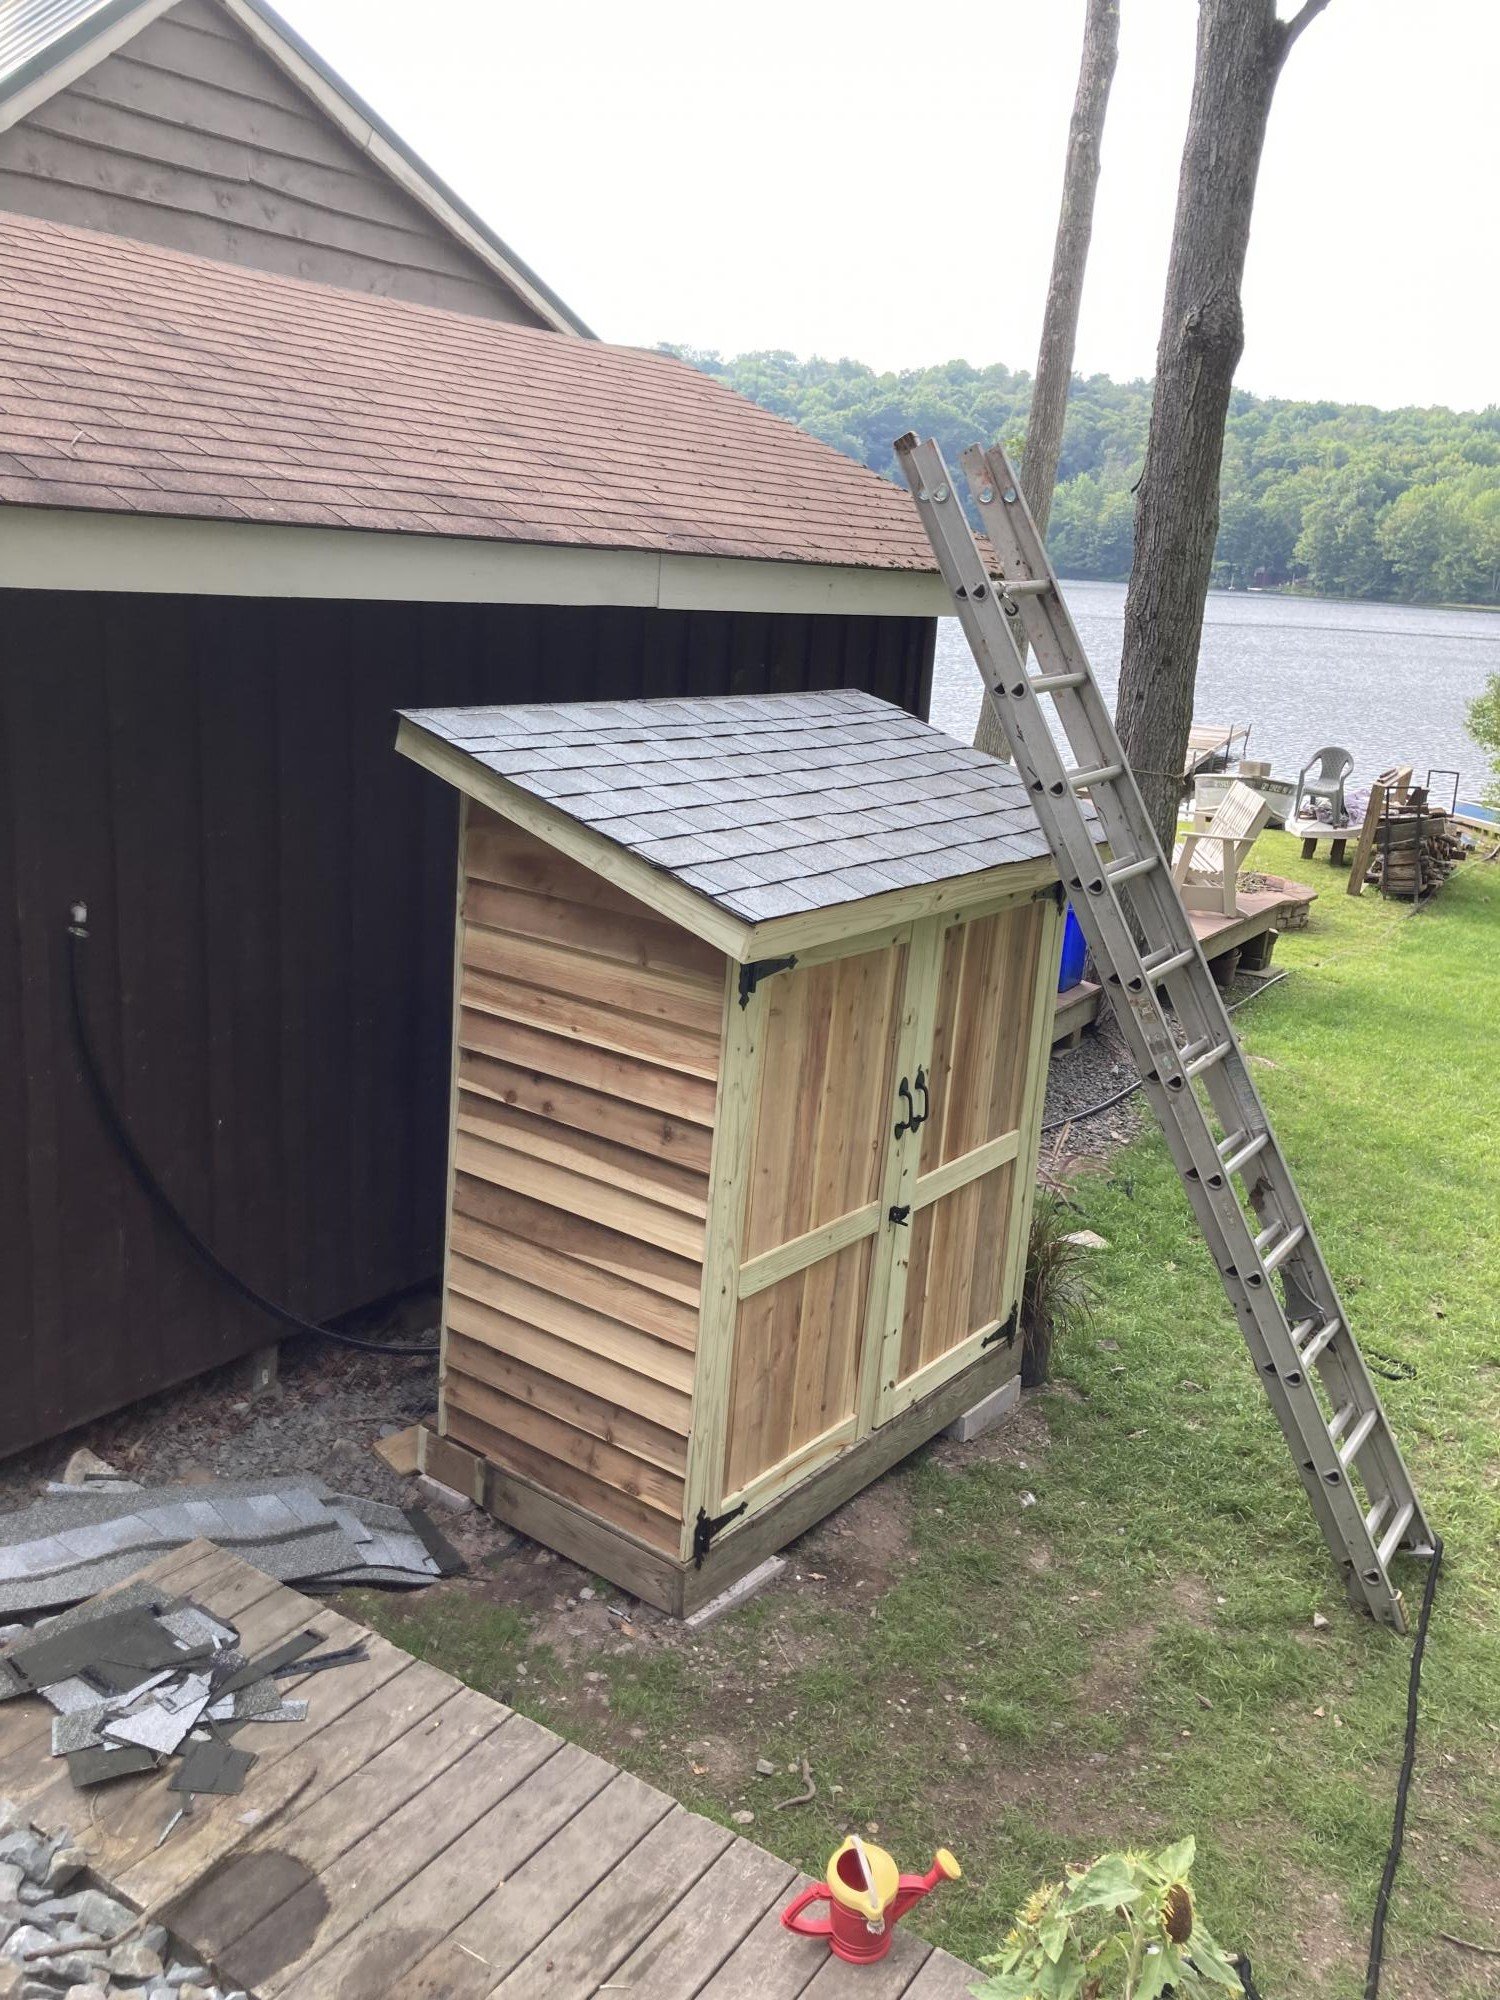
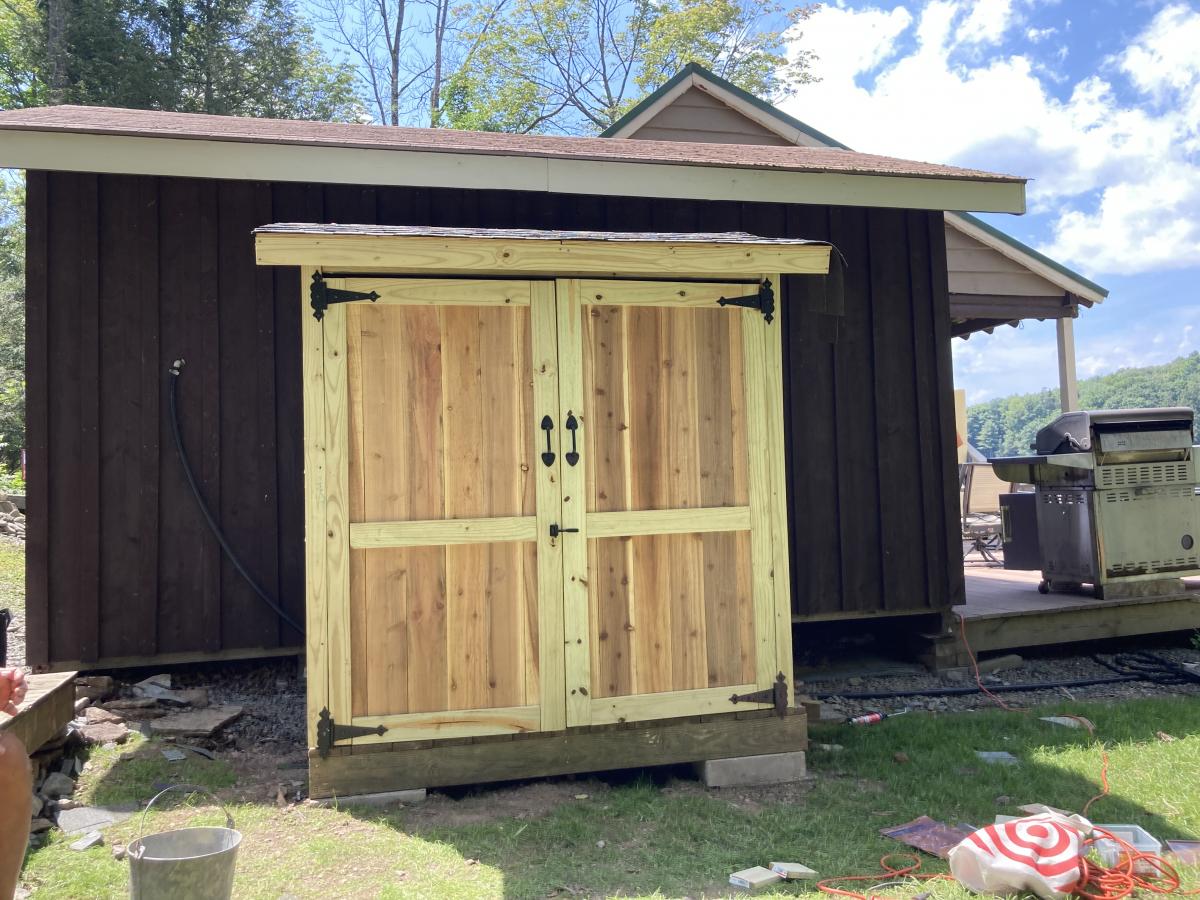
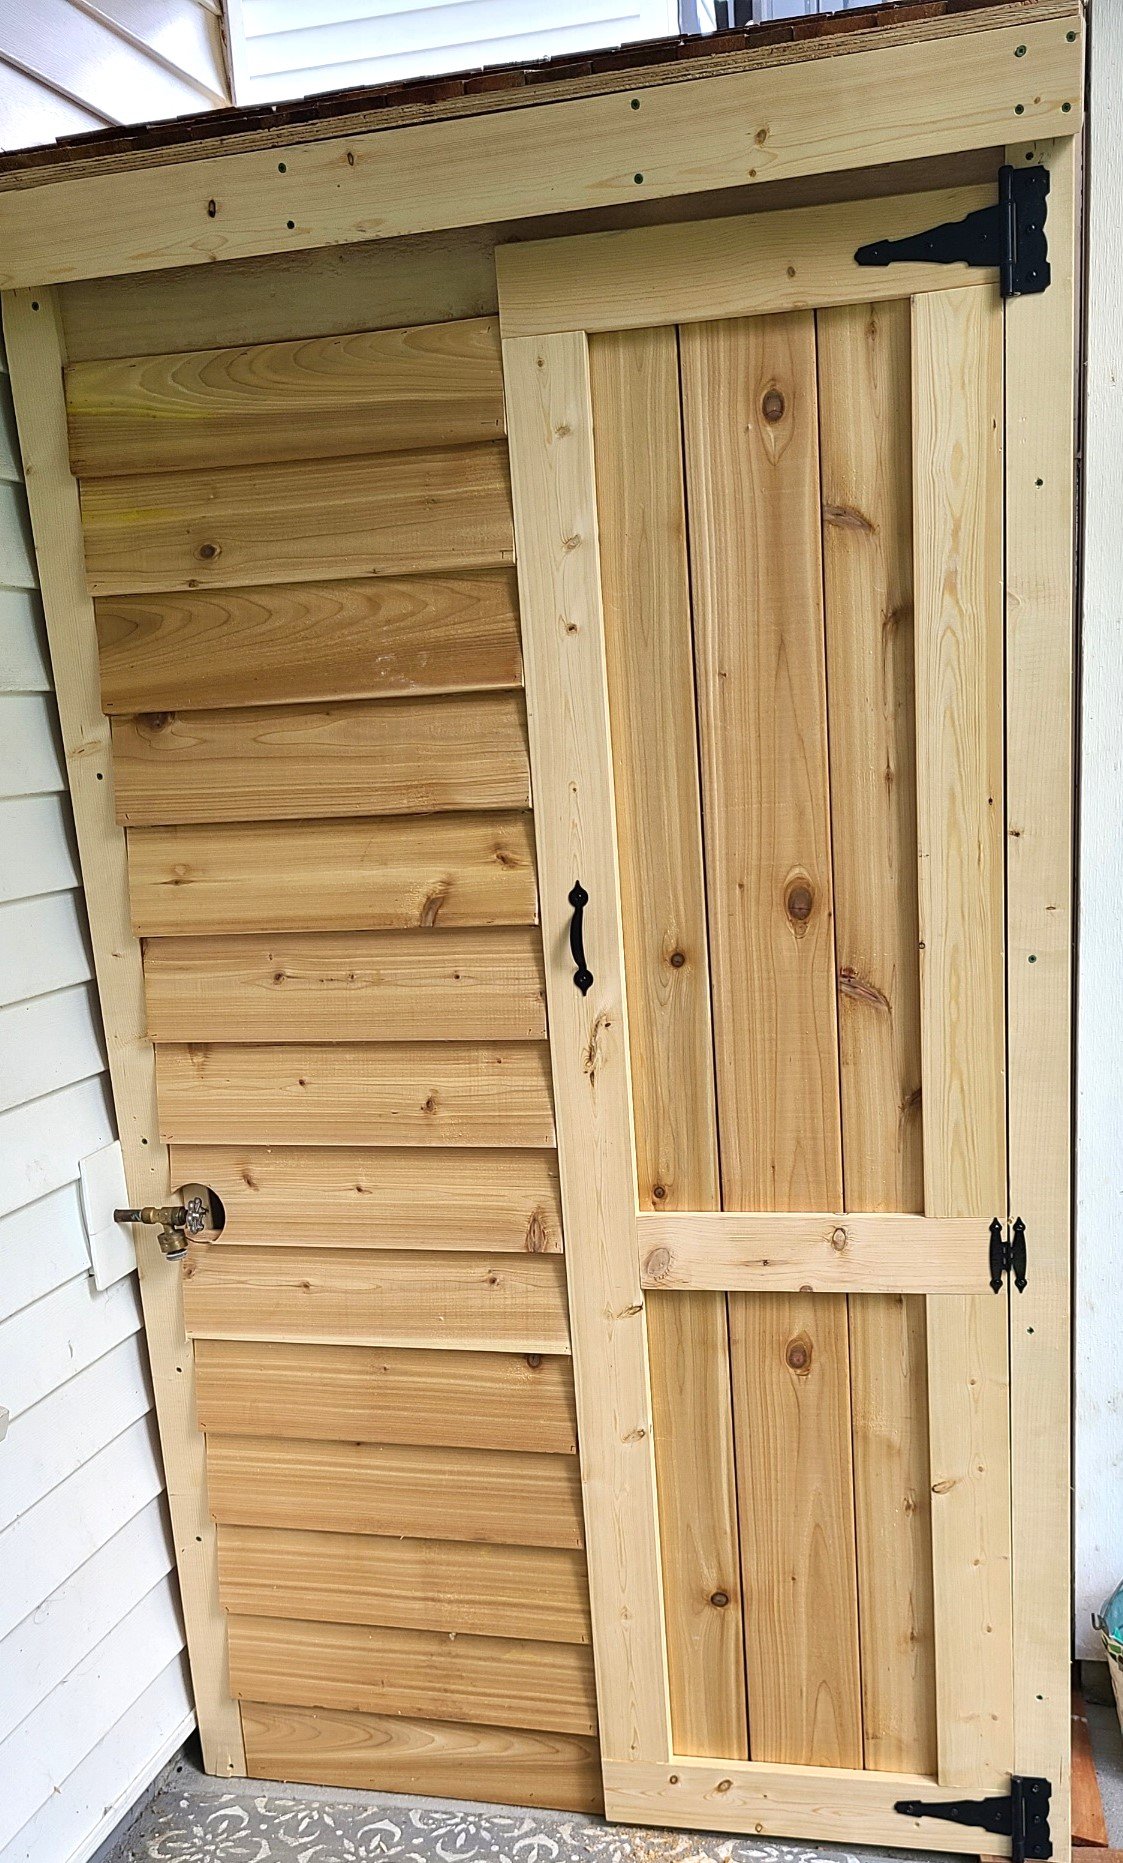
I loved the plan for the cedar picket shed. It was tall enough to block my neighbor's view, so I shaved 20 inches off the height. It is the perfect size for a mower. We made a floor out of 12 inch blocks. The ground we have here packs very well, so I think it'll be good for a long time. We also have a lot of wind, but this thing isn't going anywhere!! It is solid. I also like the fact that it takes a stain right along with the fence and there is no painting involved! The hinges you recommended were great.
We went off the Farmhouse table and bench design but had to customize the length of the table and bench so that it fit in our kitchen space. The table was our first ever project and we made a few mistakes but learned from them and built the bench and are hoping to move up to the Farmhouse bed and then the fullstorage bed.

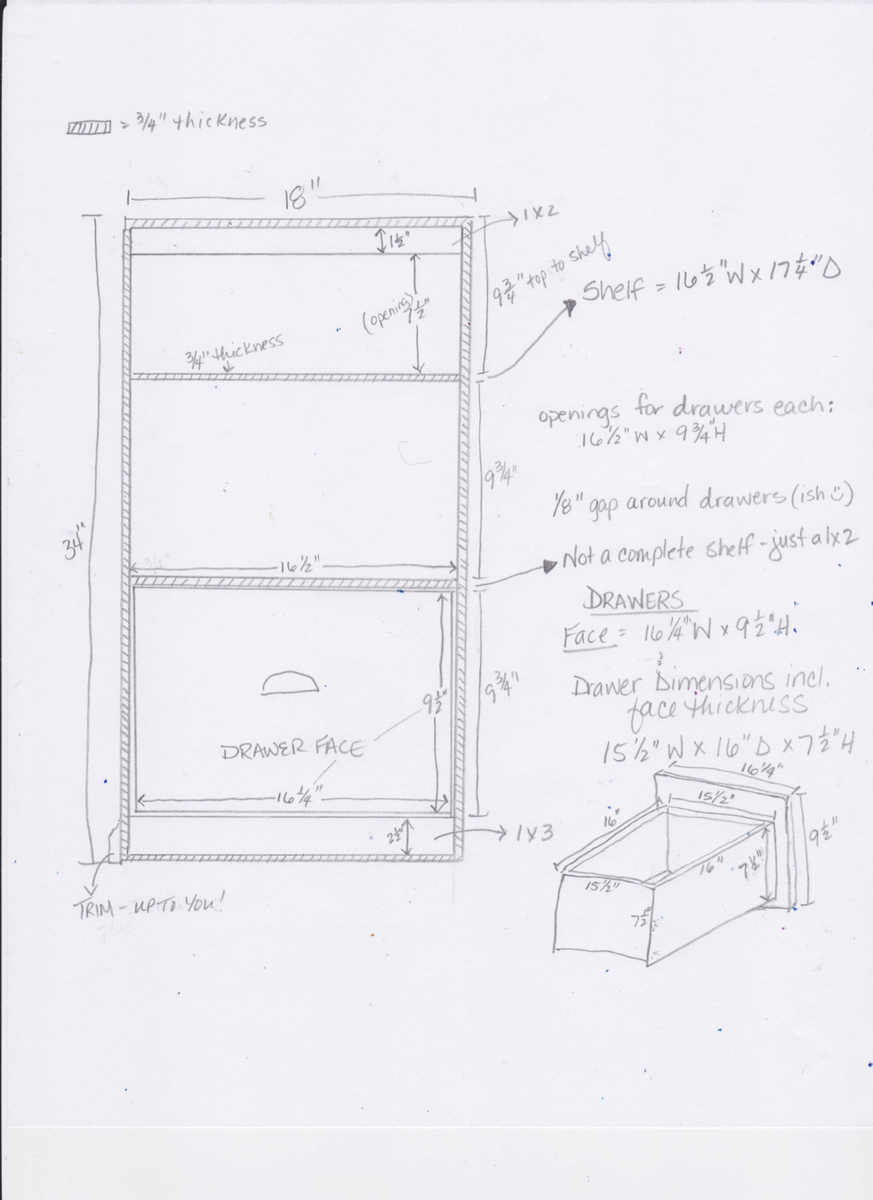
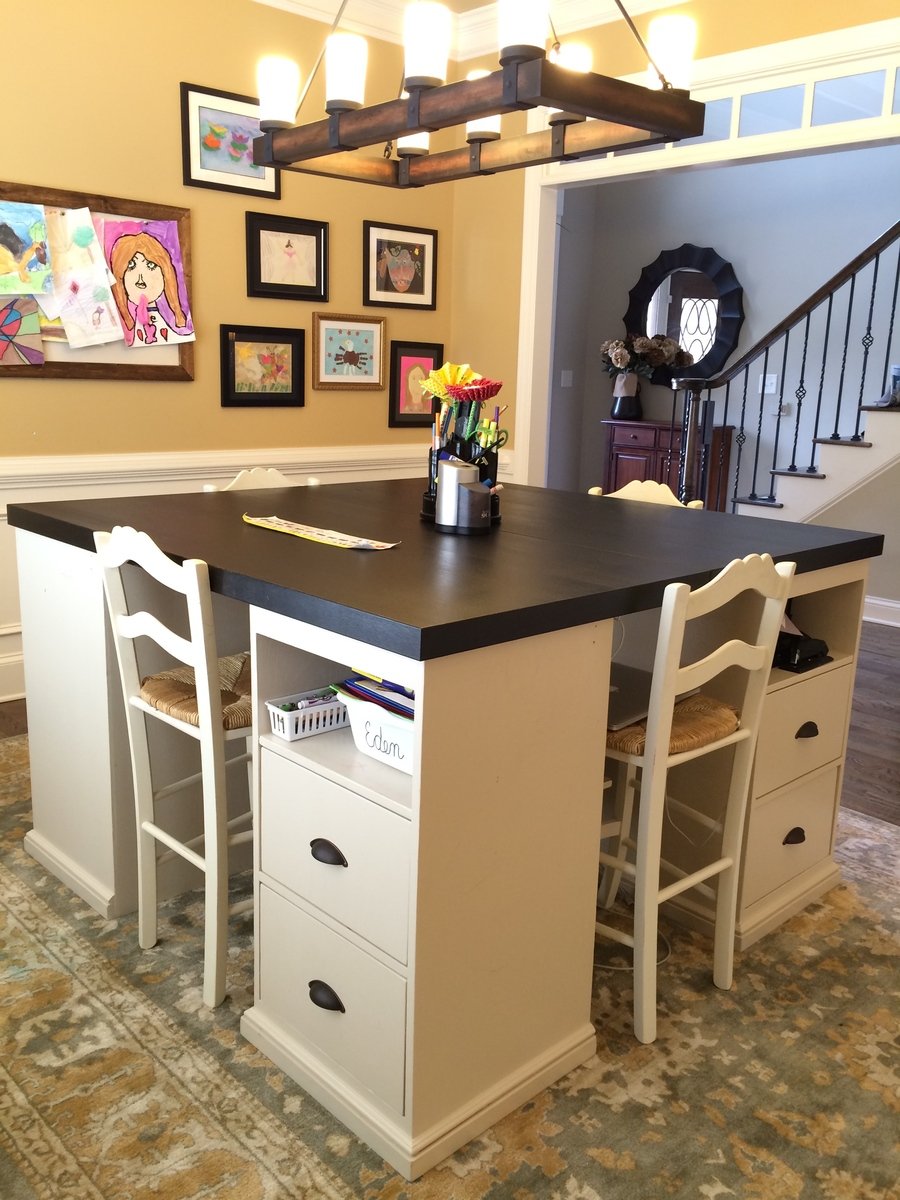
I really liked the PB mega desk, but I didn't want to spend $1600 on it. After seeing someone's post here (a couple years ago...) asking for plans on that desk, I decided to do it myself. I took these two plans and made 4 base units. They are 18" square at the top and 34" tall. I used 2 IKEA table tops connected underneath for the top, to make a total height of 36" - counter stool height. I constructed them a little differently than the plans, but no matter how you make them, the idea is the same. The plan is to take them apart and make 2 desks once everyone is too old and cool to do homework/artwork together.

Mon, 03/16/2015 - 20:39
this is really awesome! What a cool work area :)

Sun, 08/02/2015 - 11:39
Where did you get the chairs to complete your project? And how much were they?
Sat, 08/15/2015 - 04:33
Just seeing your comment...sorry for the delay! I got the stools and the light fixture at a Ballard Backroom (outlet) store near me. 3 of the stools ended up being about $40 each with the sale they had at the time, and the 4th was $60? - bought at a later time than the first 3.
Sun, 08/30/2015 - 13:54
Could we get more detail on how this was built? The base units, for instance.
Thanks!
Wed, 11/04/2015 - 07:40
How did you connect the table tops from the bottom so that the tables were secure together? I'm curious what's the best way to do this. Since two of the four seats will be where the seam is, I want to make sure I secure it properly so it's not wobbly. Thanks so much.
Sat, 01/09/2016 - 05:06
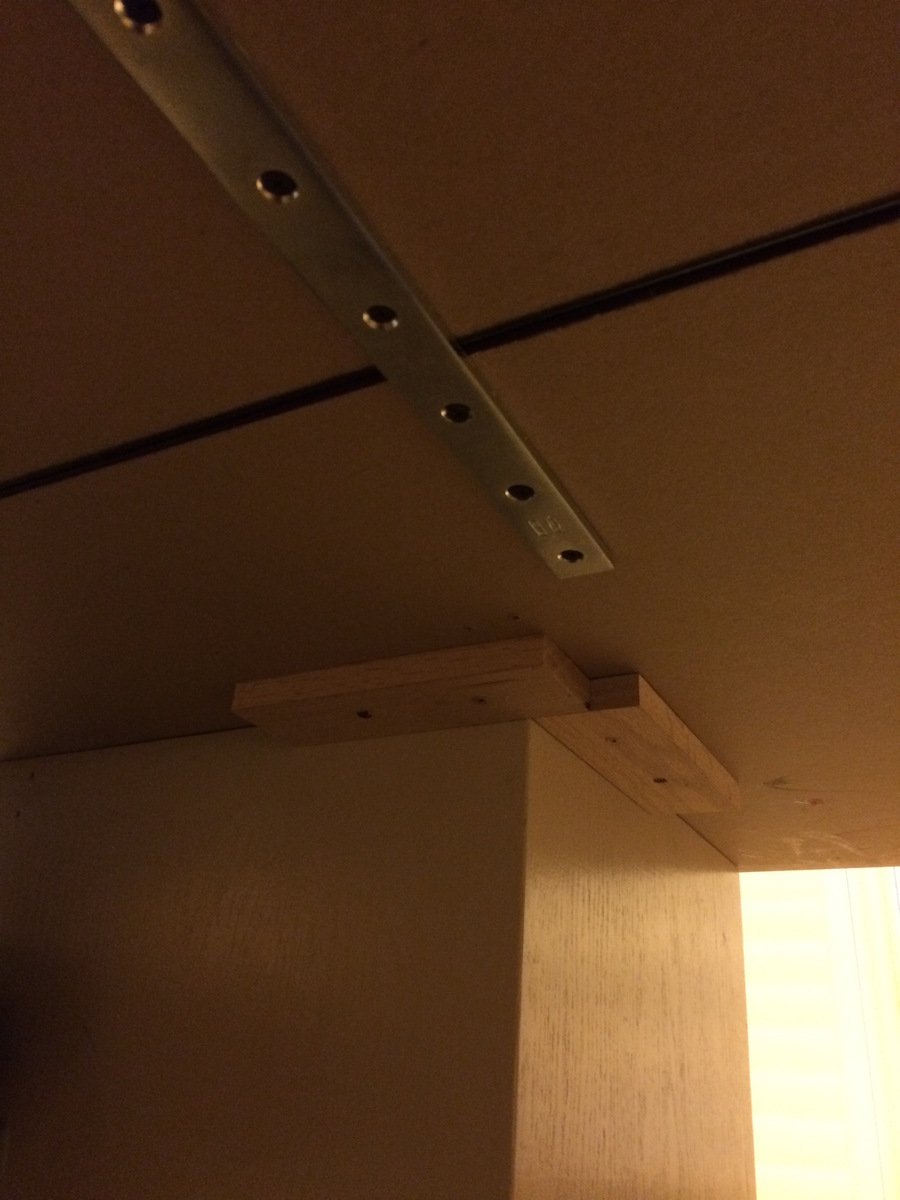
I'm just seeing these latest comments for the first time, so you may have long finished this project already! The tops were surprisingly sturdy but I did reinforce them. I placed the tops on the floor upside down and screwed some metal brackets (about 12" long each) across the joint in four places. I just screwed them in through holes already in the brackets. This wasn't the most stable because those tops are particle board and don't hold screws very well... But since it was already pretty sturdy, I figured it would do. It has been fine, even with standing on the top (kids who get up there and me hanging the light fixture above).
Once the tops were joined, I placed the bases so there was about a 1" overhang on the top. To hold the top in place, I used small pieces of wood screwed to the underside of the top at the inside corner to act as a placement stop. The top is pretty big and heavy even though they are IKEA tops, so they don't have a tendency to move or slide at all anyway. I'm going to try to figure out how to post another picture of the braces and corner stops...we'll see if I can do it! Let me know if you have any more questions...again, sorry I didn't see this in a more timely manner!
Sat, 01/02/2016 - 05:55
Is the photo above the Pottery Barn version or your product result? I'm trying to figure out the dimensions for the drawer and shelf configurations. Thanks! BTW, I'm totally addicted to your style and personality...my husband loves the productivity inspiration I've received. :-)
Sat, 01/09/2016 - 10:17
Hi!
I'm glad you like the desk! The one in the picture is the one I built, not the pottery barn one! My dimensions were a good bit different than the PB desk - square bases instead of rectangular and counter stool height instead of desk/table height. So, I have no idea if I have my plans for this anymore, so I went and measured it again for you!
So each base is 18" x 18" square and 34" high so that with the 2" top the total height is 36".
Each base was made of oak plywood that made with 3 sides, a top and a bottom. All edges were rabbit joints (3/8" deep in thickness of boards and probably 3/8" wide - not 100% on width of rabbits). It's kind of a pain to do rabbit joints if you don't have a dado blade for your table saw, so you could use pocket hole screws instead. I glued and nailed these joints with a finish nailer, I believe.
I figured a diagram with measurements would be easier than trying to write descriptions...so I'm adding another pic with the dimensions outlined. Drawing is NOT to scale, so sorry about that! I really need to learn to use SketchUp. Let me know if you have any questions!
Sat, 01/09/2016 - 07:57
Hi!
I'm glad you like the desk! The one in the picture is the one I built, not the pottery barn one! My dimensions were a good bit different than the PB desk - square bases instead of rectangular and counter stool height instead of desk/table height. So, I have no idea if I have my plans for this anymore, so I went and measured it again for you!
So each base is 18" x 18" square and 34" high so that with the 2" top the total height is 36".
Each base was made of oak plywood that made with 3 sides, a top and a bottom. All edges were rabbit joints (3/8" deep in thickness of boards and probably 3/8" wide - not 100% on width of rabbits). It's kind of a pain to do rabbit joints if you don't have a dado blade for your table saw, so you could use pocket hole screws instead. I glued and nailed these joints with a finish nailer, I believe.
I figured a diagram with measurements would be easier than trying to write descriptions...so I'm adding another pic with the dimensions outlined. Drawing is NOT to scale, so sorry about that! I really need to learn to use SketchUp. Let me know if you have any questions!
Wed, 06/22/2016 - 15:26
Can you buy the bases from ikea? or did you build them from scratch?
Thu, 07/28/2016 - 14:13
No you can't buy them from Ikea. I bought the table tops from Ikea, but I built the bases. The dimensions for the bases are in one of the additional pictures with the post if you want to see them!
Mon, 10/10/2016 - 07:41
What are the total dimensions of the table top? Thinking of building something like this, but want to make sure it will fit in my space.
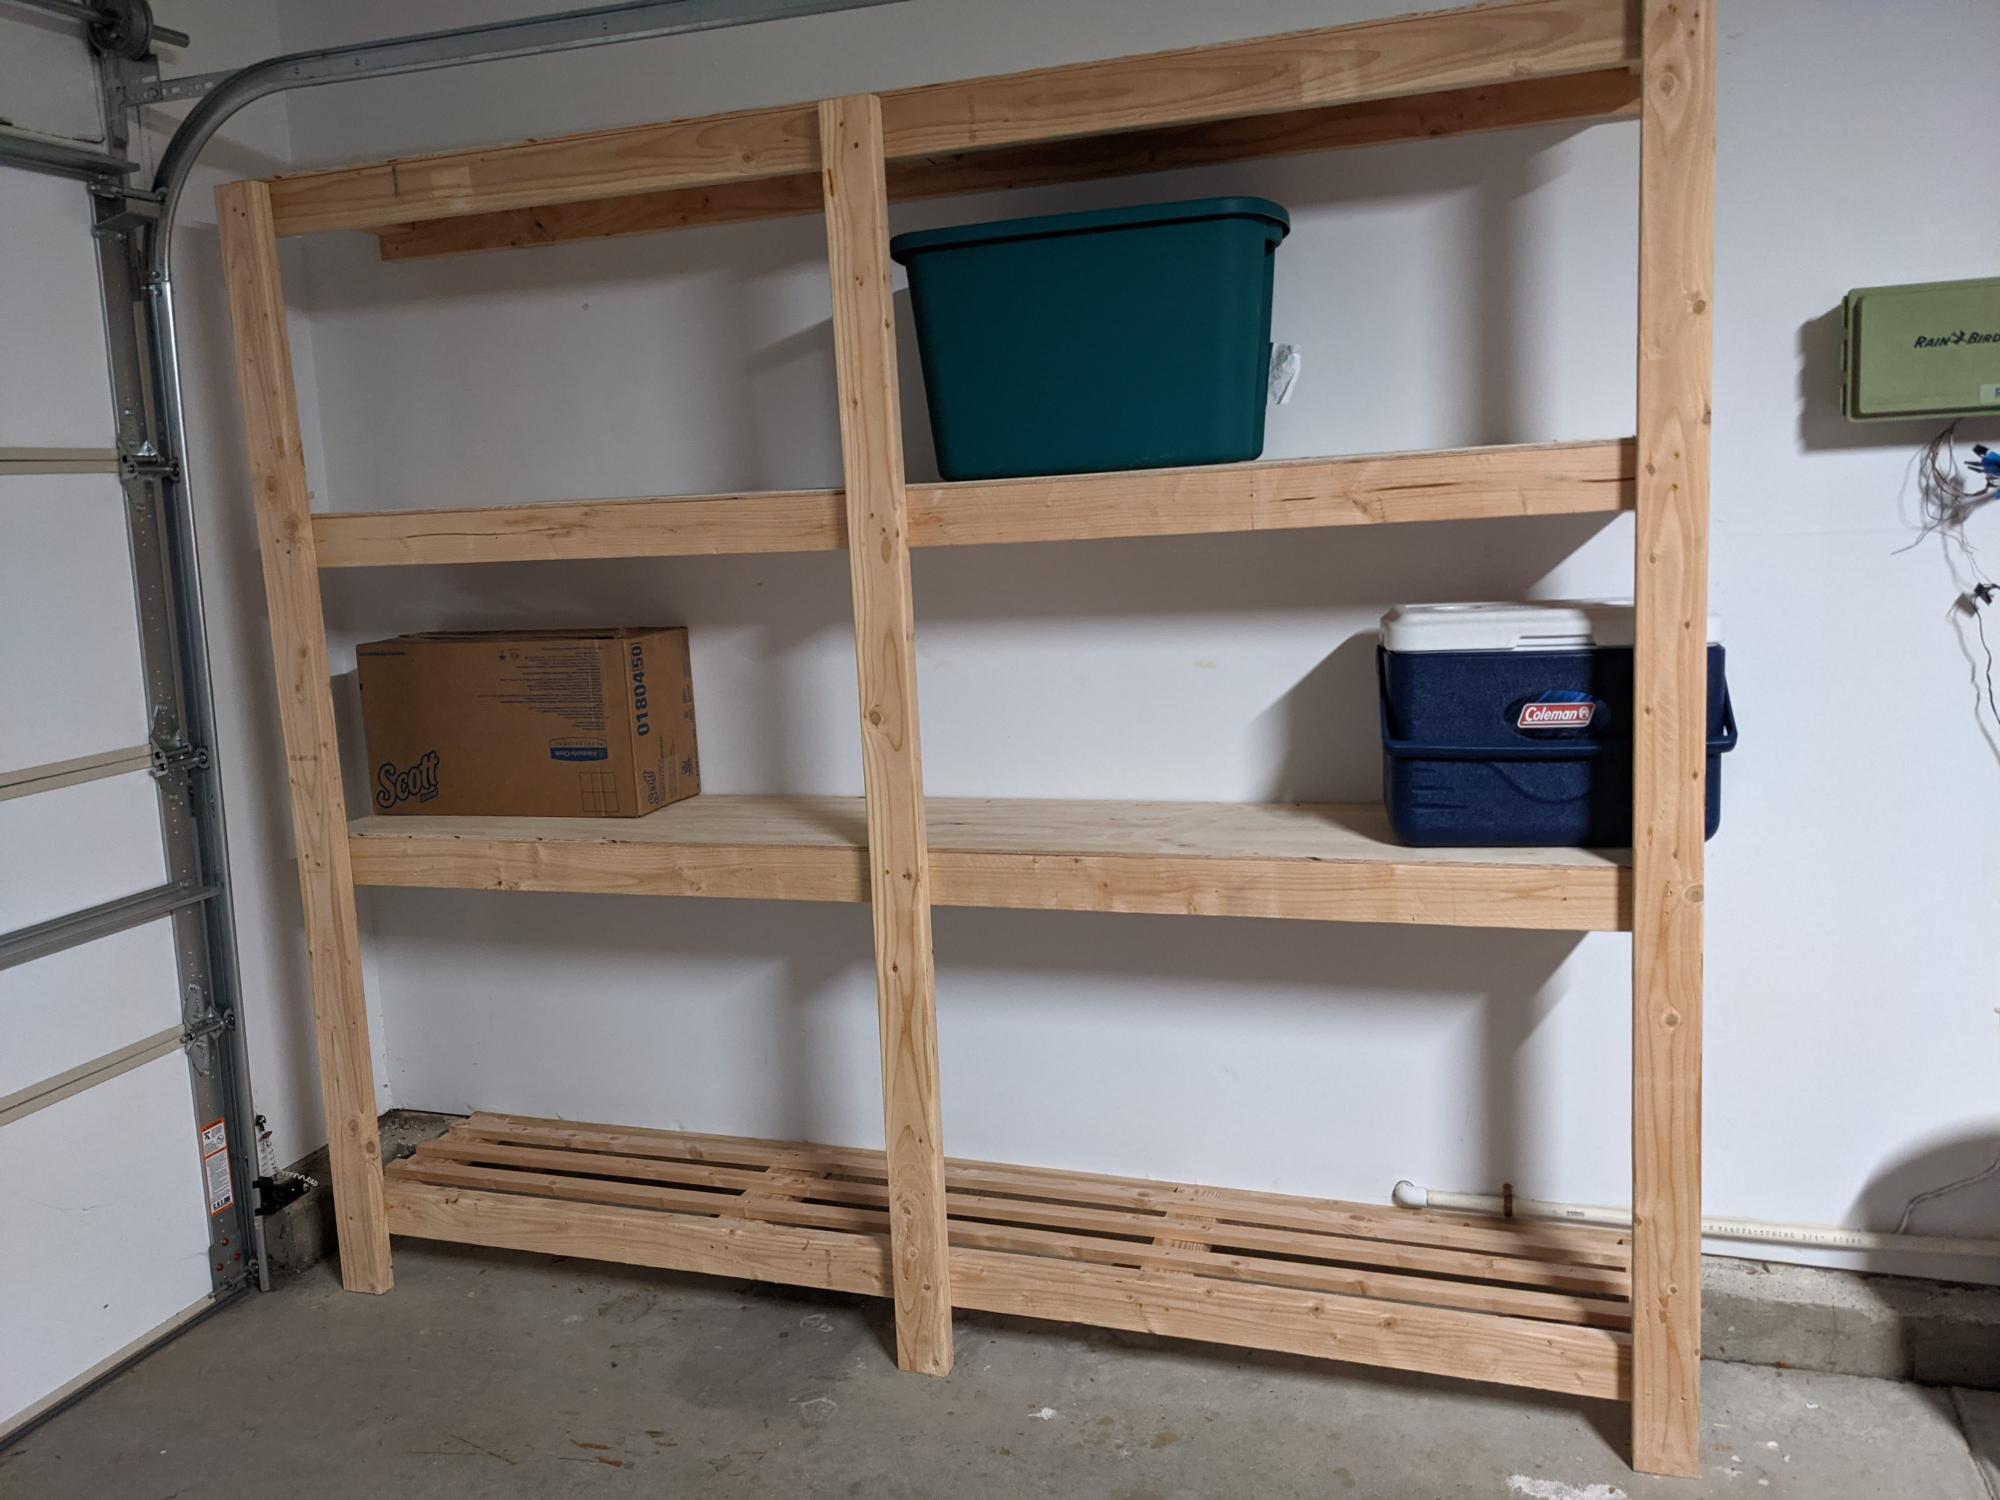
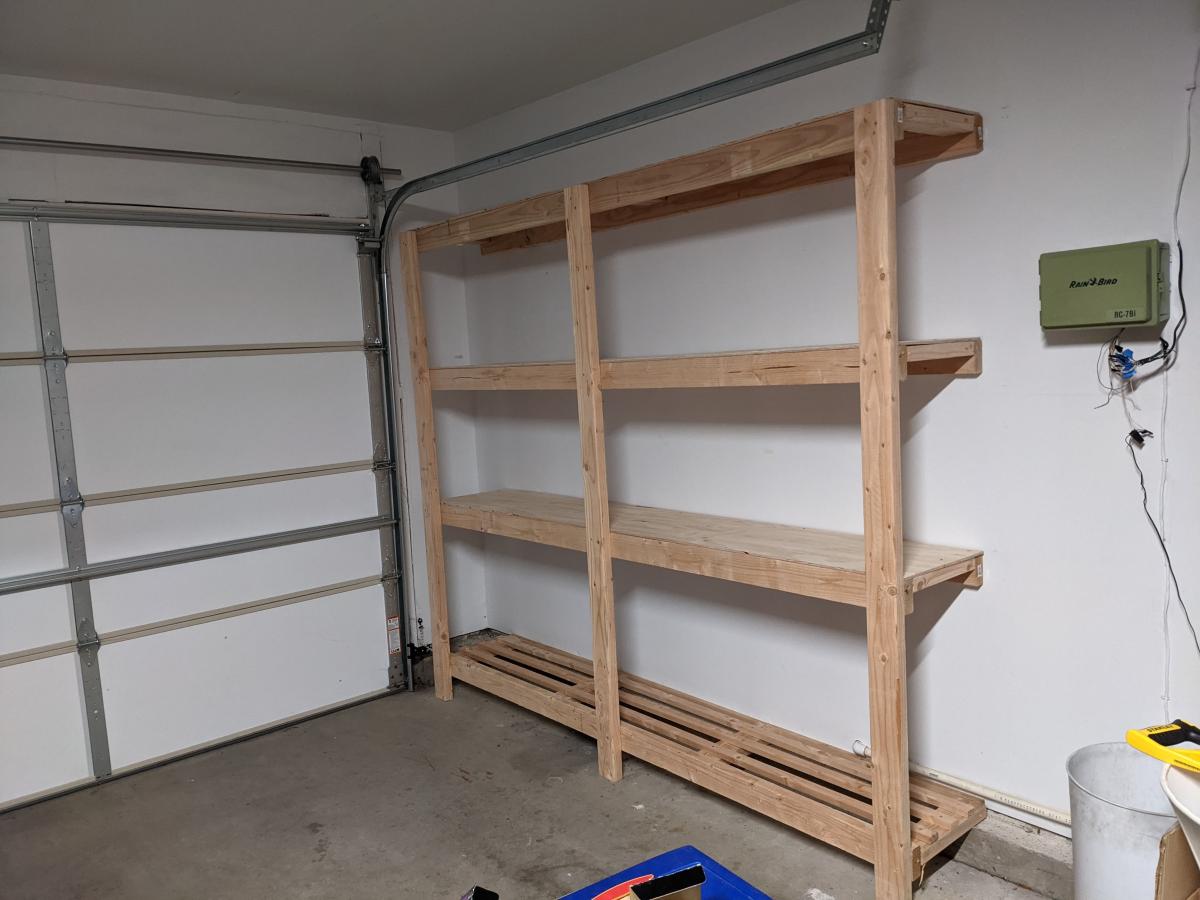
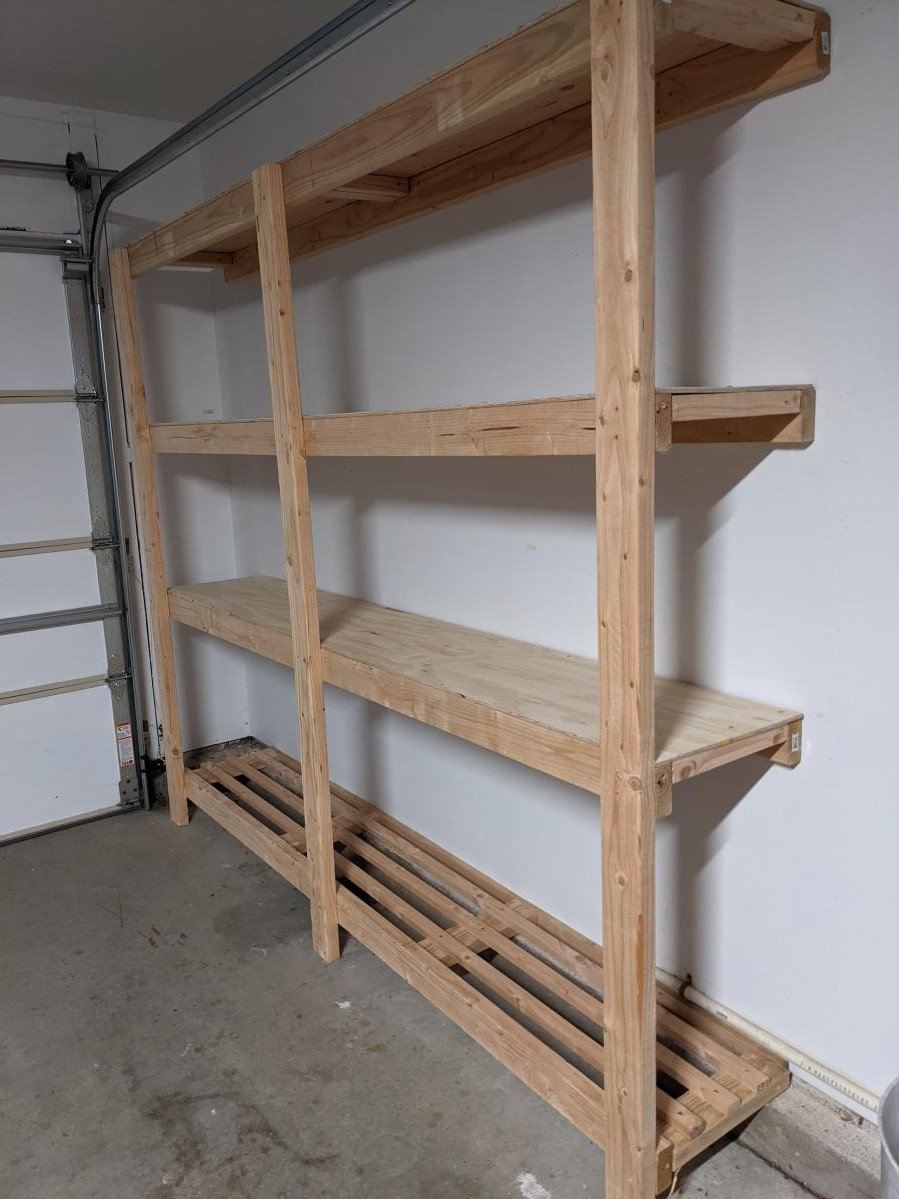
I just made this shelf using 2x4s 8 ft long wood. It is very strong and looks great. My garage size required the shelf to be max 16 in deep, so I used a 1 plywood sheet divided by 3 equal parts for the upper 3 shelfs. Since I made a 4th shelf, I used 3 1x2s for the 4th bottom shelf instead of a new plywood sheet and avoided having extra 2/3 of the sheet around and also saved like 30$ since the 2x1s were only 2$ea. That touch makes it look a bit stylish too so a win win. If you do that, here's a tip: use the outer 2x4s as rails - make sure that the cleats on the lower shelf are placed a bit lower ~ 1in. In such way, you can place the three 1x2 rails at the same level as the outer 2x4s and this you end up having 5 rails total in the shelf. Do use the wooden screws with star head if you can, they were muuuuuch easier to use compared with the regular ones. Note, this shelf is very strong, probably too strong for my needs. For a 8ft long, and my storage needs (camping, Christmas stuff, other lighter things), I'd probably use 2x2s instead of 2x4s. That would save costs, specially since wood isn't cheap these days( I spent ~$150 in materials Jan 2022).
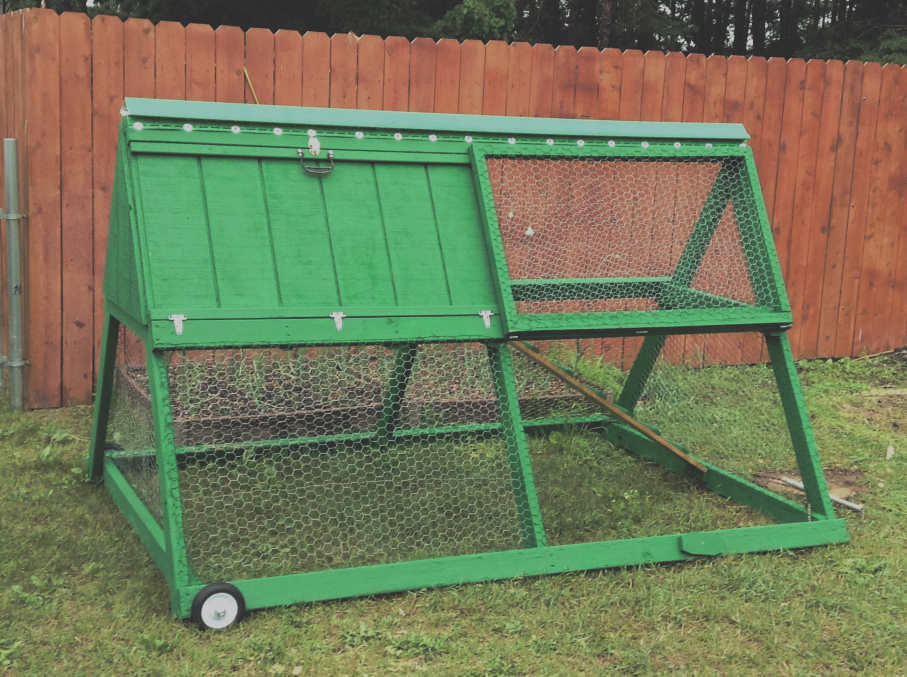
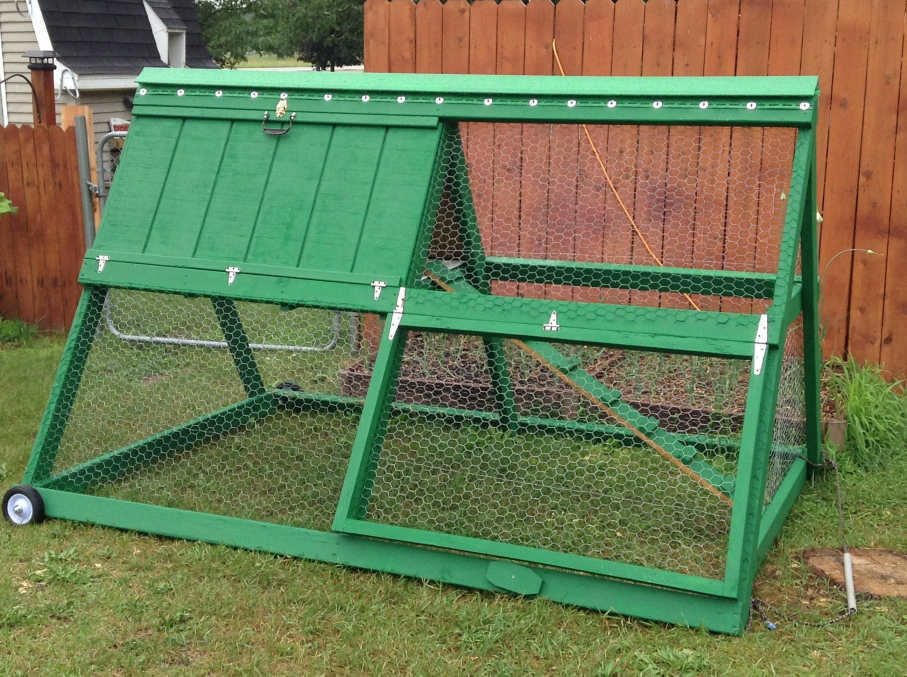
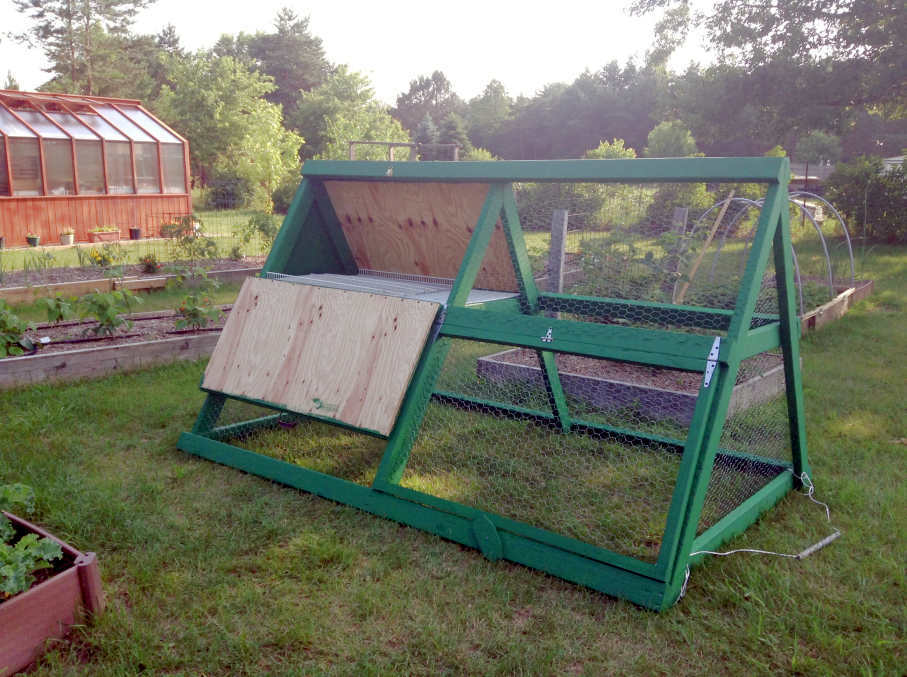
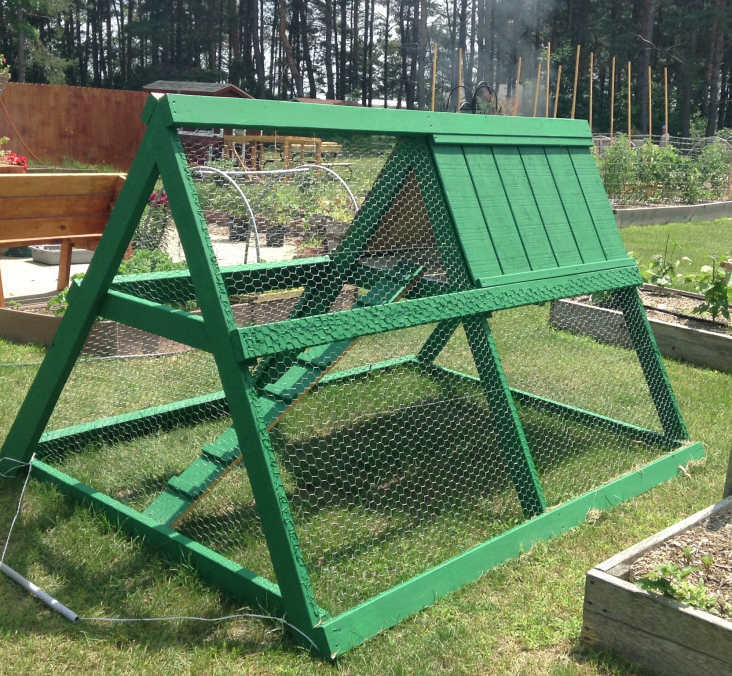
New to raising chickens, but eager to jump right in to it.
We bought a pre-made coop for the main home for our new chicks and it's very nice, not something I could do myself since I'm not yet at that level, but I saw this chicken tractor and thought it would come in handy for what I have in mind so I made up my mind to build it.
The lumber, chicken wire, staples, and wheels are all store bought new and came to about $75. The materials we had on hand were the screws, hinges, plastic coated metal shelving (used in the nesting area, I thought that would make it easy to clean), paint, and the corner piece of vinyl siding for the roof cap (hubby's brilliant idea, and I painted it green with spray paint for vinyl).
I did not try to build it quickly, I don't really know how much time it took me, but if I had to guess I'd guess total time would amount to about 3 afternoons, by myself.
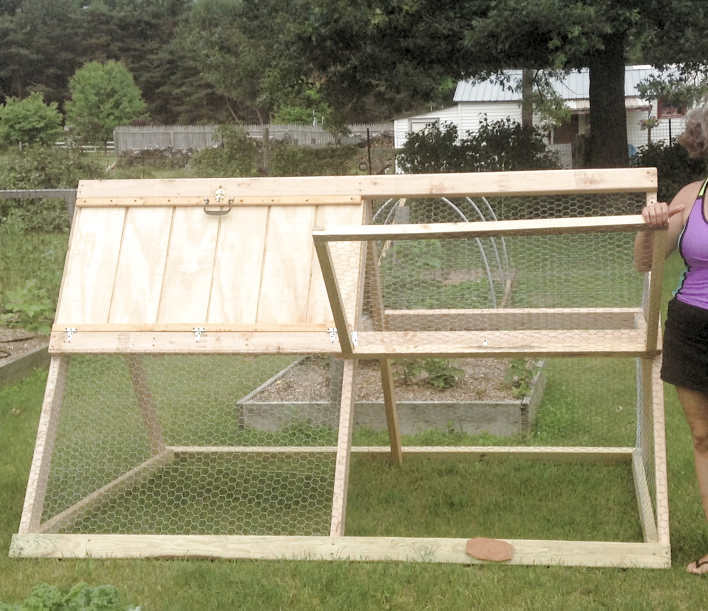
I wanted to leave the top on the one side open with the option to slap on the other boards if/when the need arises. I have the other t1-11 panels that can sit right in those areas because I stapled the chicken wire in a way that would allow it.
I also added a flip up panel as seen in the pictures for access. I didn't want a small door that I would have a hard time getting to things in there. I'm so glad I added this feature, it sure gives plenty of room for me to maintain the food and water dispensers as well as get in there and catch the little chickies :)
I wanted it green to blend into the wooded background in our backyard. I didn't want to take any beauty away from the cedar greenhouse and fencing we added last year, and this tractor would be moved from time to time and I felt this green that we had on hand was perfect to help it blend in rather than stand out.
This thing is heavy! I have a hard time moving it around and usually need my husband to move it so I won't hurt myself. I am considering some options... I don't like the rope I have on it to pull it, any suggestions would be appreciated.
As with the other items I've made with Ana's plans, this was fun and pretty easy to make. I love this site! Soon I will take on my next project, I've bought and gathered the materials, I'm anxious to get started :)
Thank you for looking :)

See more photos and details here https://instagram.com/tom_morgan_nc?igshid=YmMyMTA2M2Y=
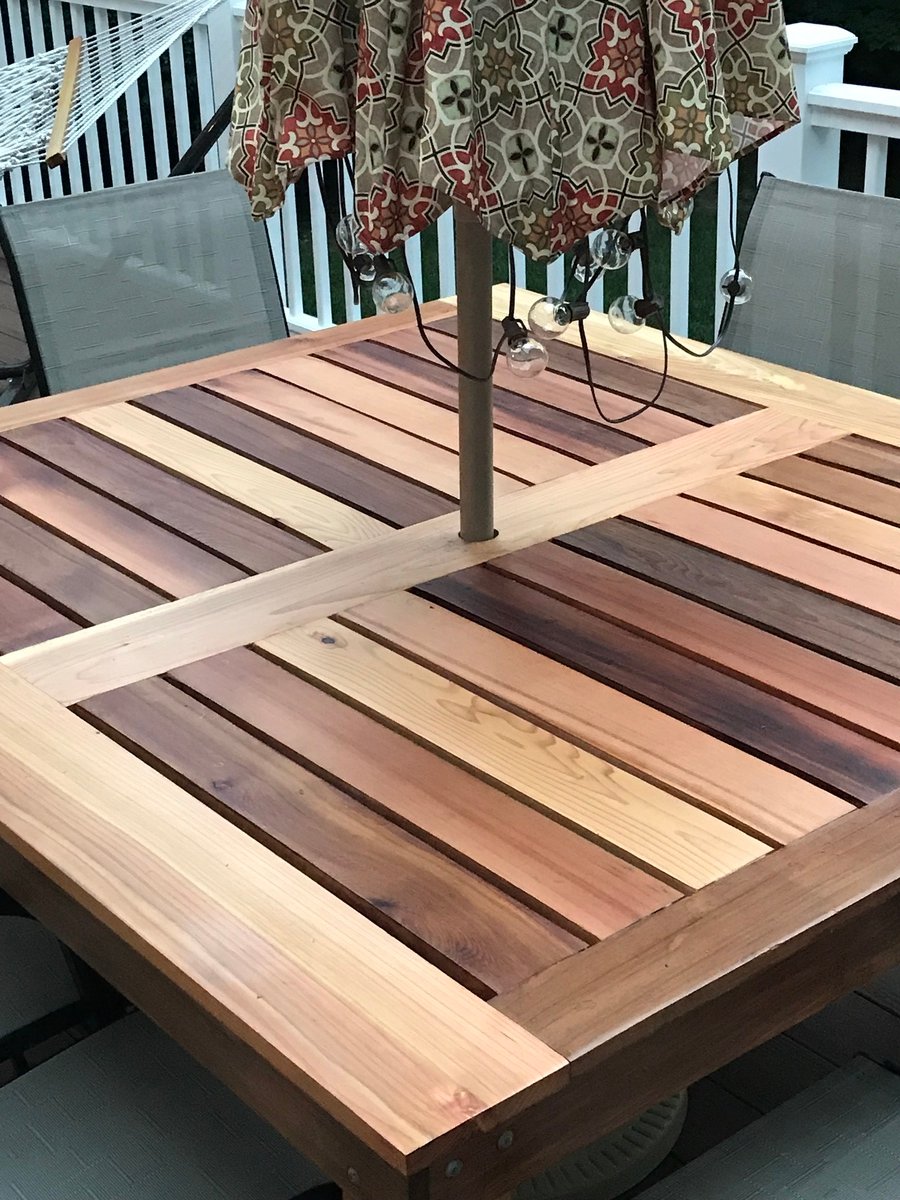
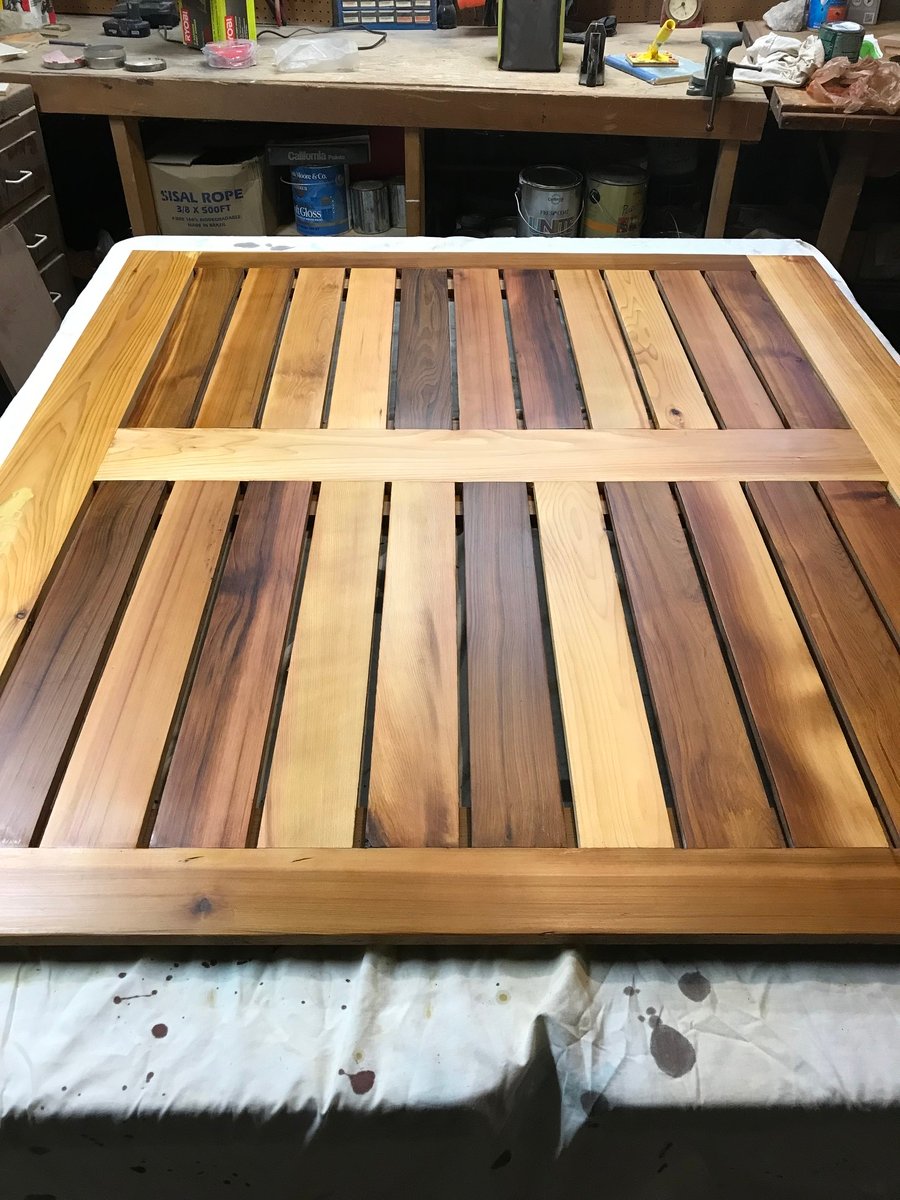
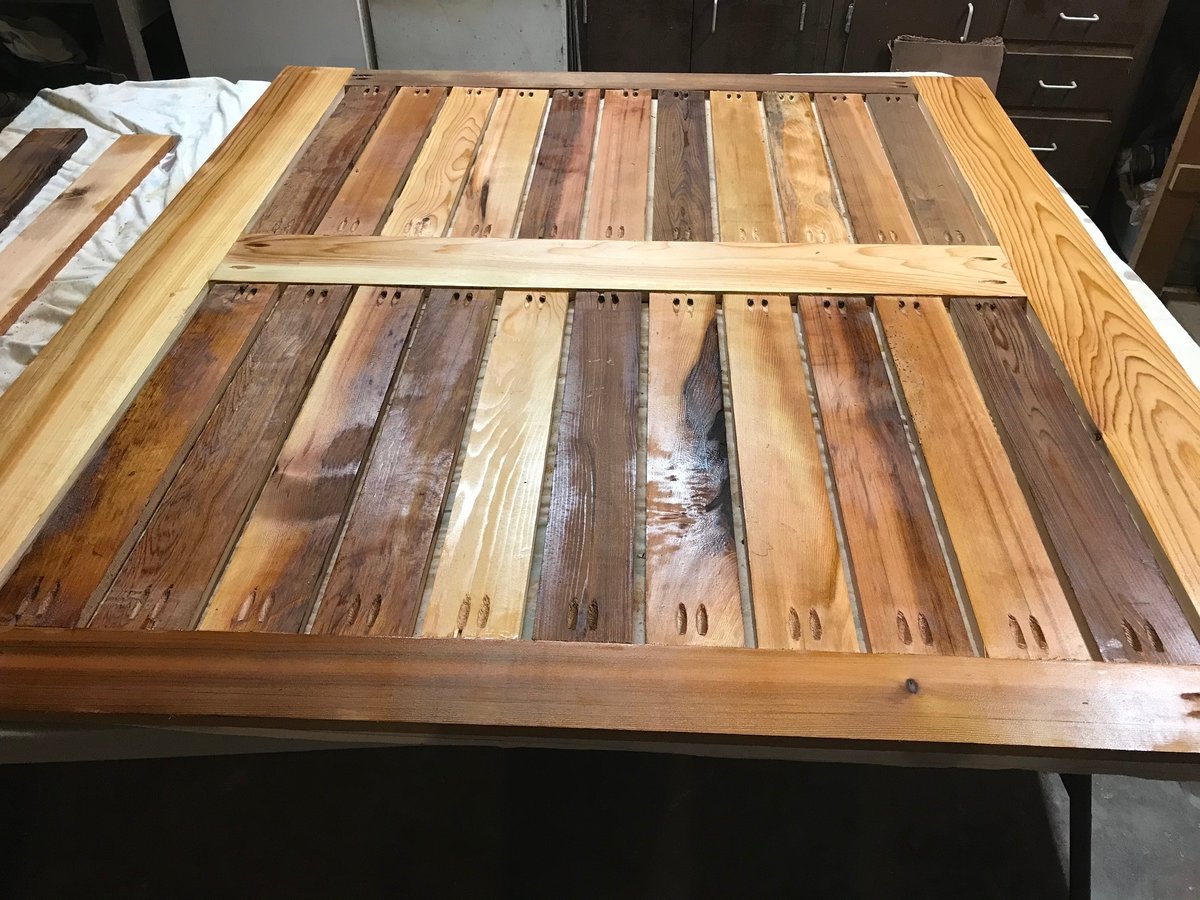
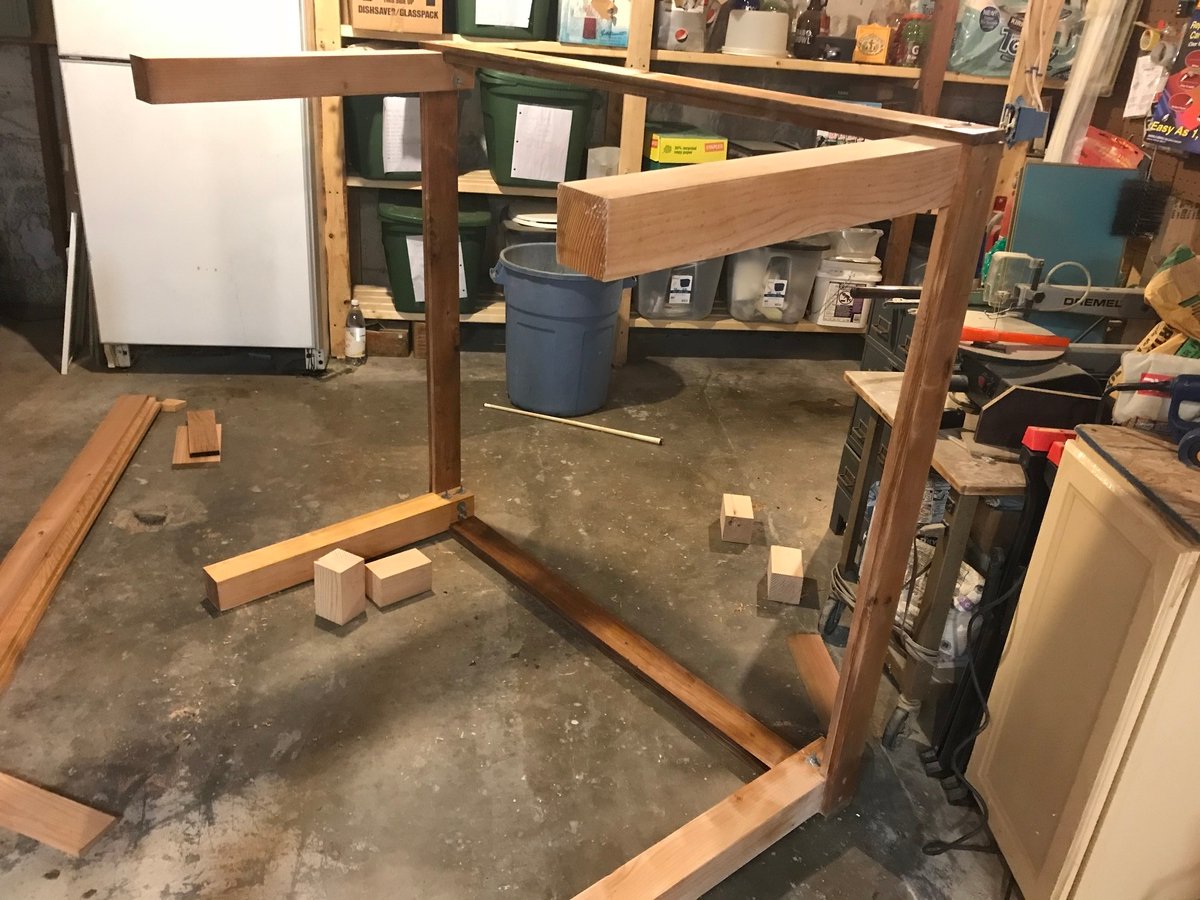
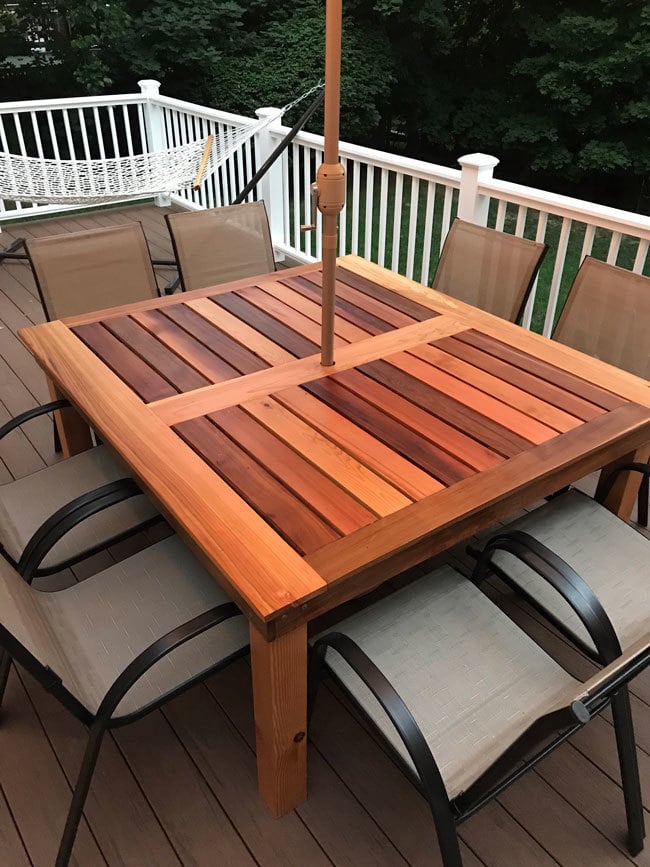
Modifications to the simple outdoor table plan thanks to Finn’s dad.
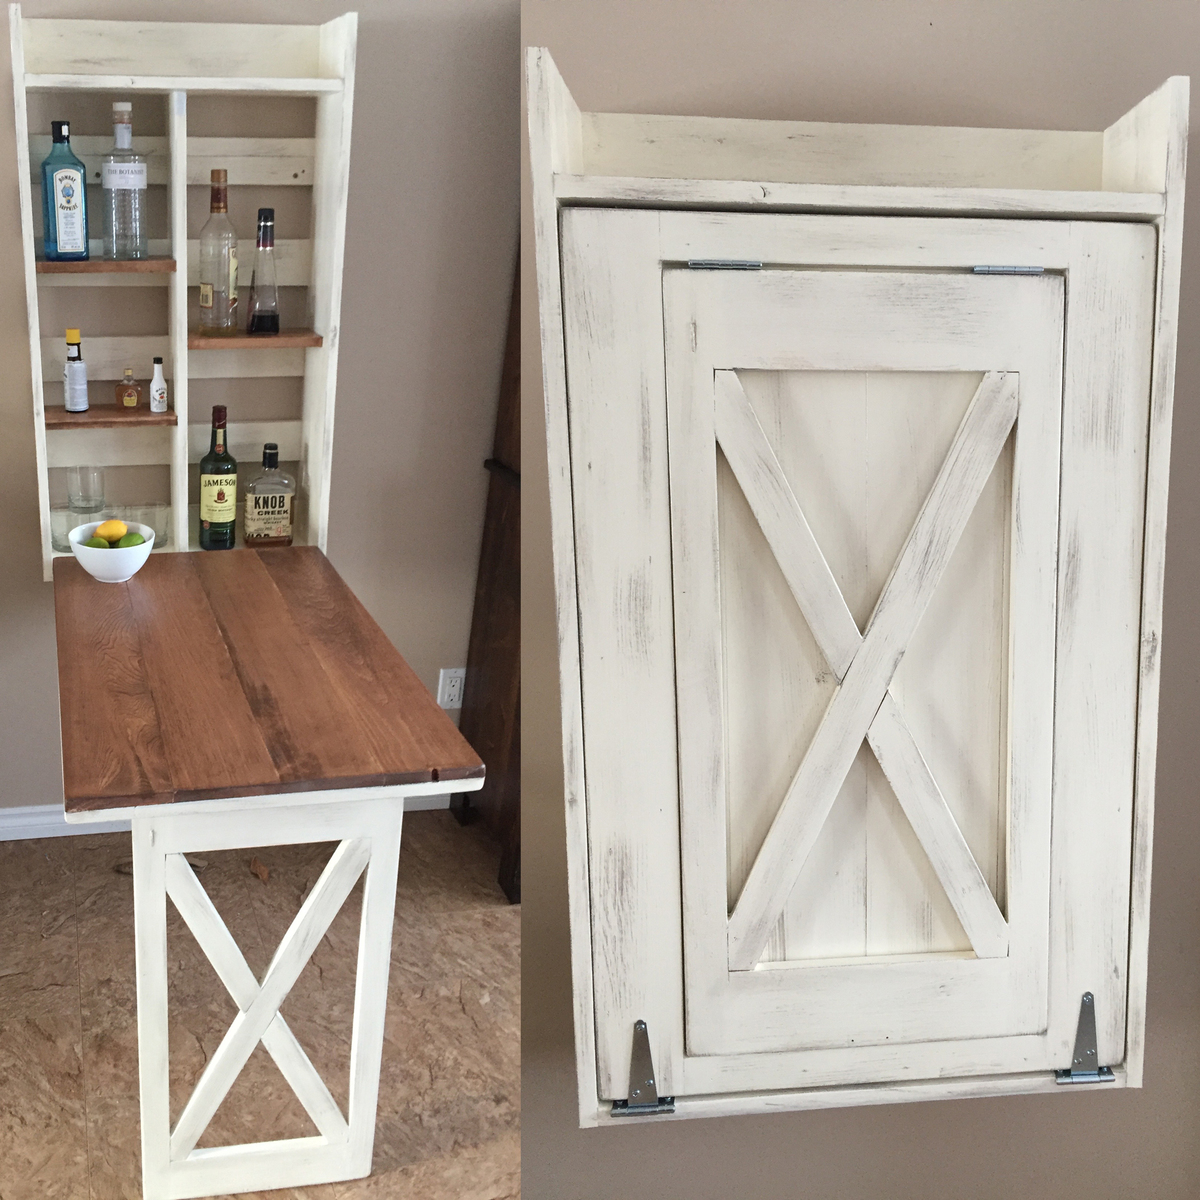
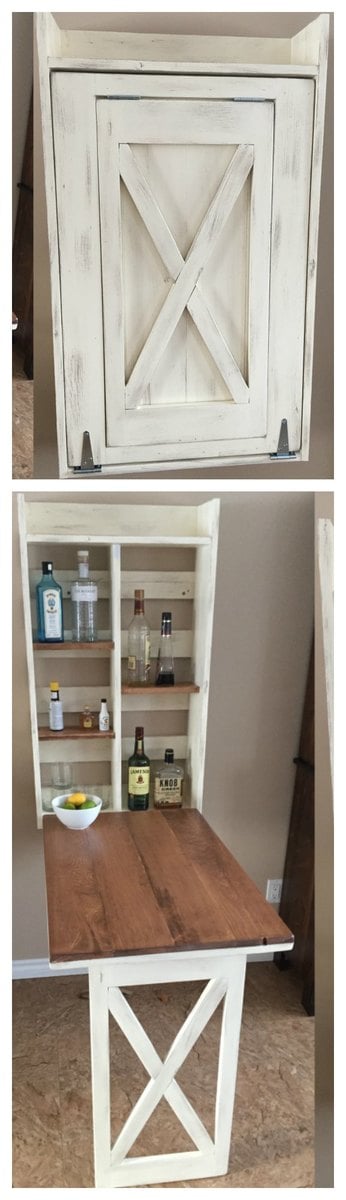
My attempt at the murphy bar featured on this site. Still have to add the sash locks. Added pallet crossmembers at the back, an x in the leg, and a french cleat to mount to the wall.
Tue, 12/31/2019 - 11:49
This looks awesome! I want to help my friend build this for his kitchen. I've looked at the plans in the link & I'm wondering what modifications you made for the X pattern-- how much did it alter the material & cut list?
Would you please share your material & cut list for this?
Fri, 08/14/2020 - 09:28
I don't understand why I cannot find the material list or the instructions for this every link takes me back to the pictures
Wed, 12/08/2021 - 00:27
It is perfect wall management which is used it in small space
Sun, 01/29/2023 - 13:16
Are there plans for this? I'd love to make this. Thanks
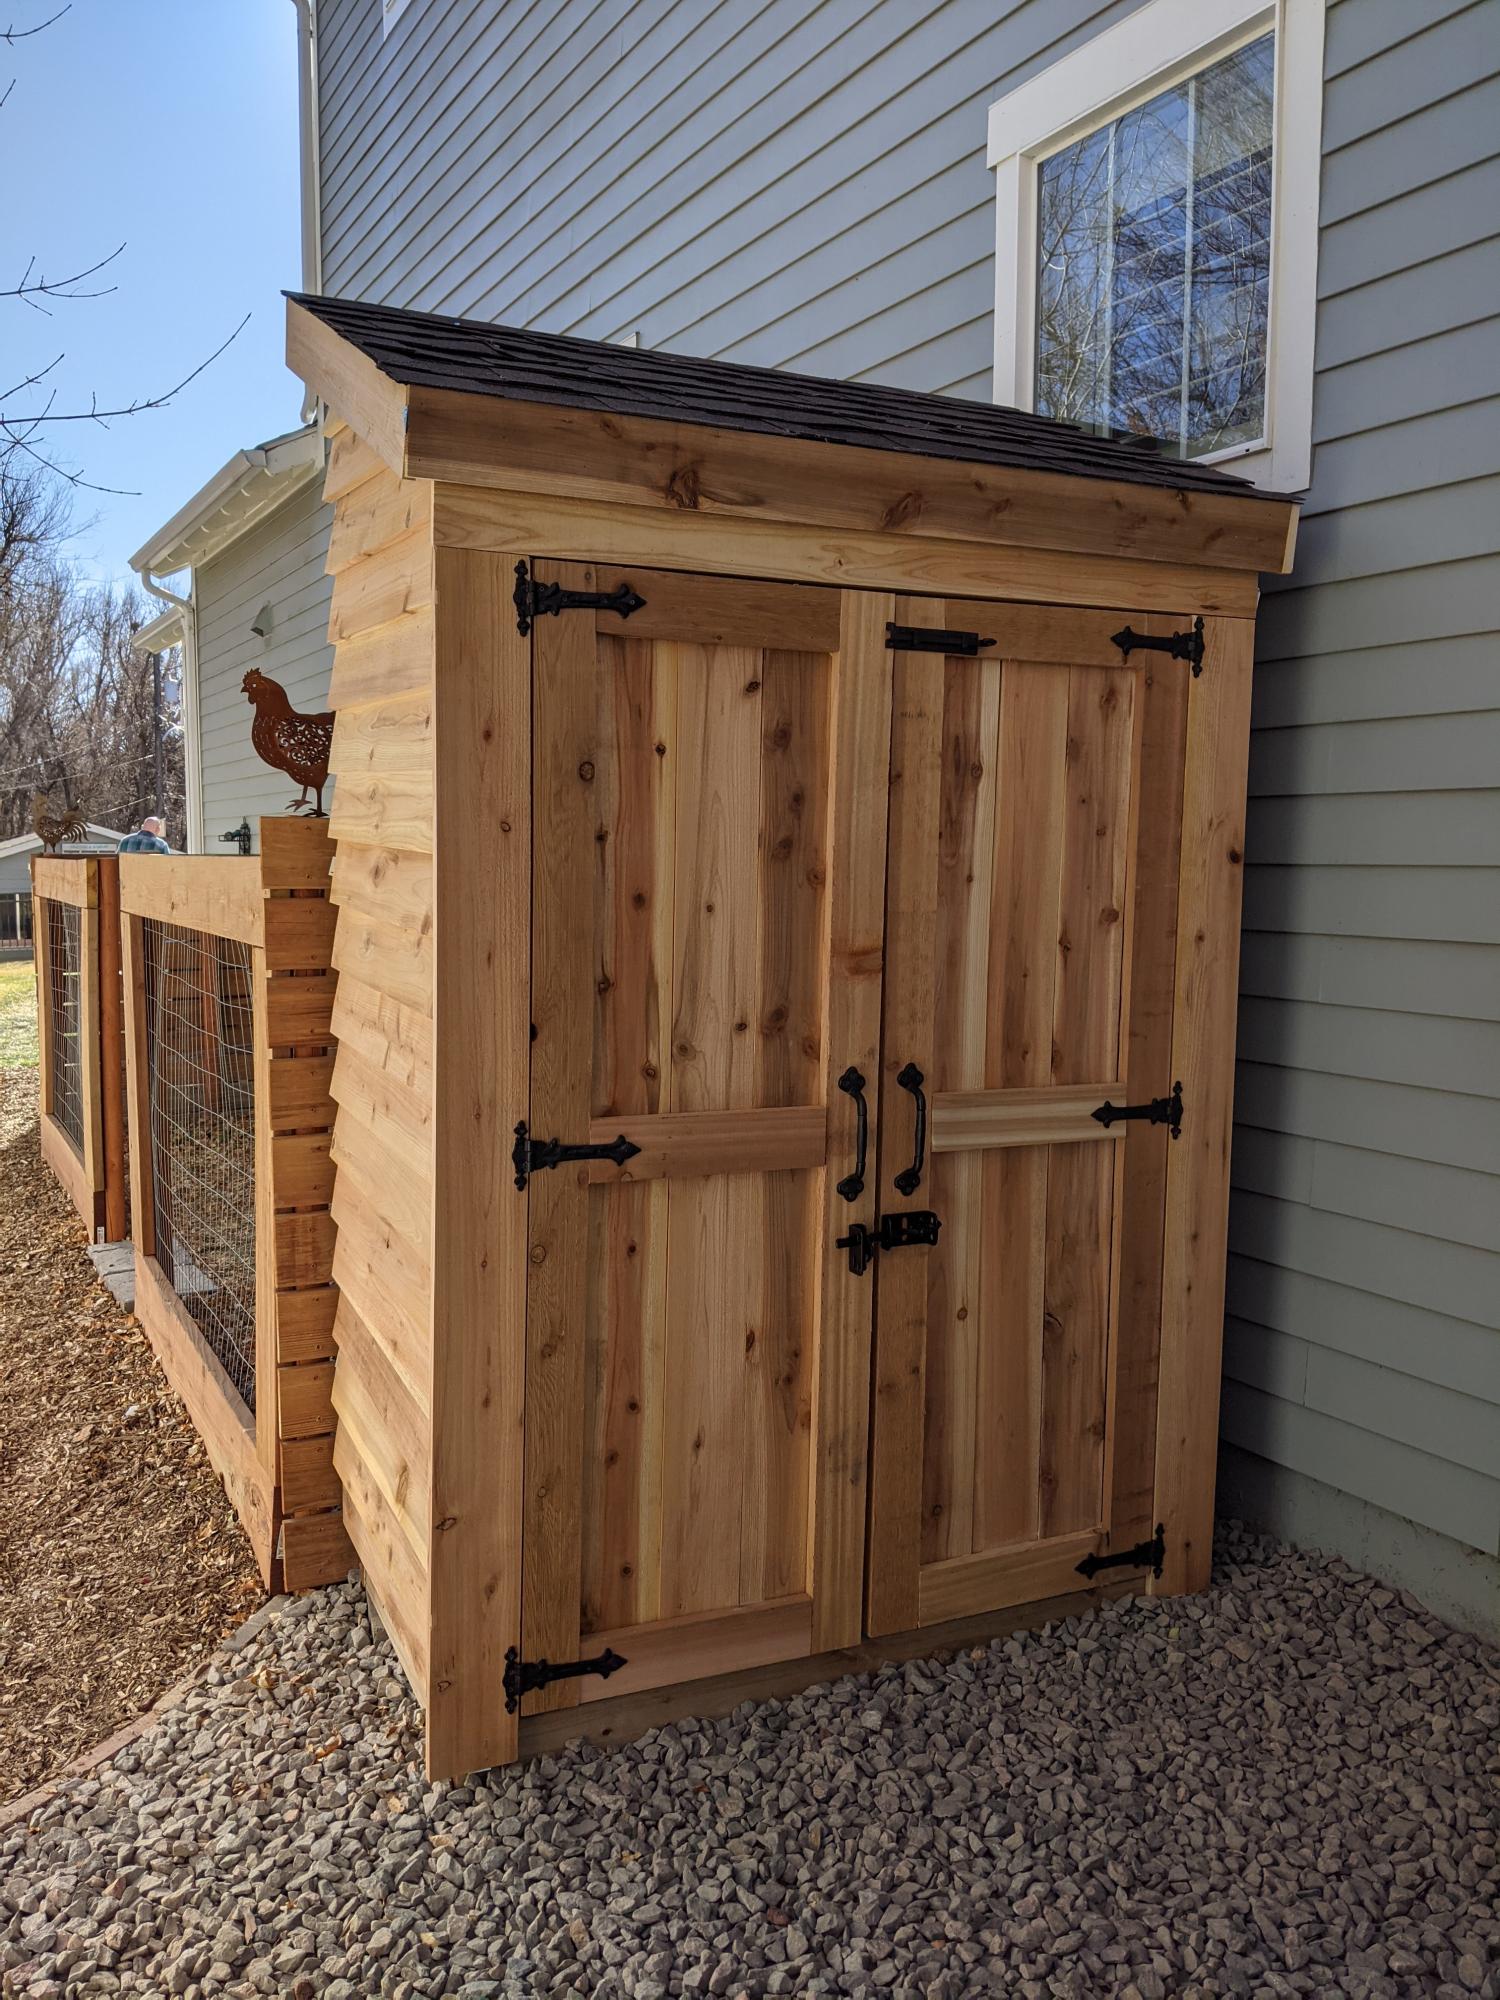
Our take on the small garden shed. Ours is 4 1/2 by 7 feet. We used cedar fence pickets and 2x4 construction. Left over shingles from when our house was built. We are definitely not roofers or framers, also chasing around a 3 year old didn't make things easier. Turned out beautiful for what we want it for. Just rustic enough. Great intermediate project.
Mon, 11/30/2020 - 11:14
You did a great job, the 3 year olds add just the perfect amount of challenge to really appreciate a completed project!:)


Comments
Ana White Admin
Tue, 05/02/2023 - 07:09
This is so great!
Way to go, it is beautiful and functional! Thanks for sharing.