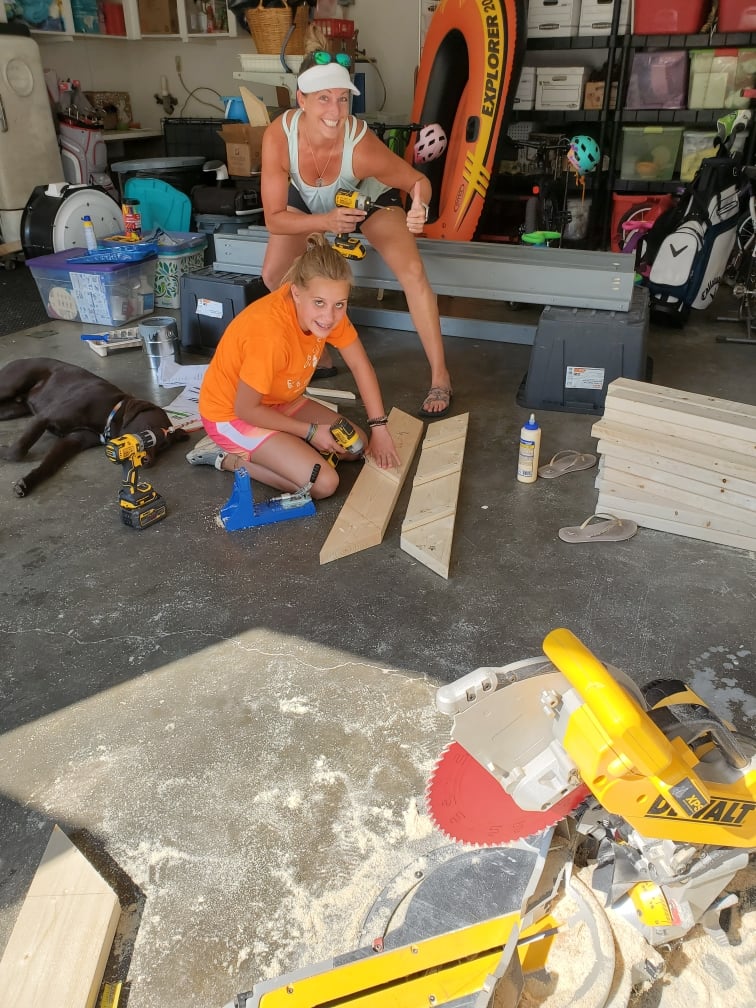
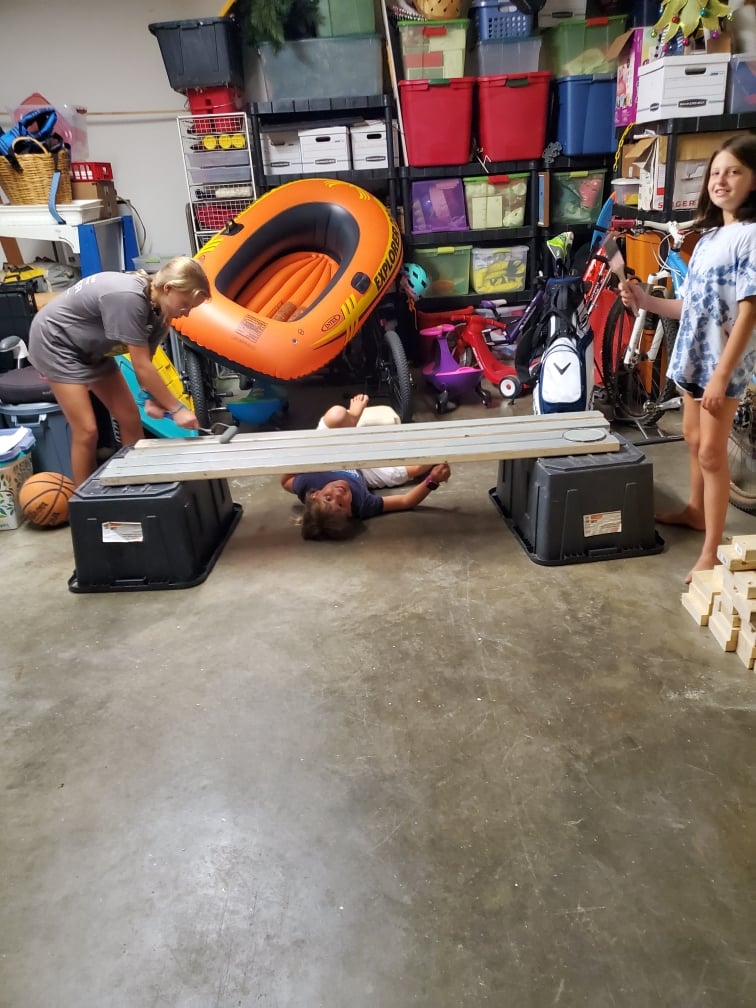
Community Brag Posts


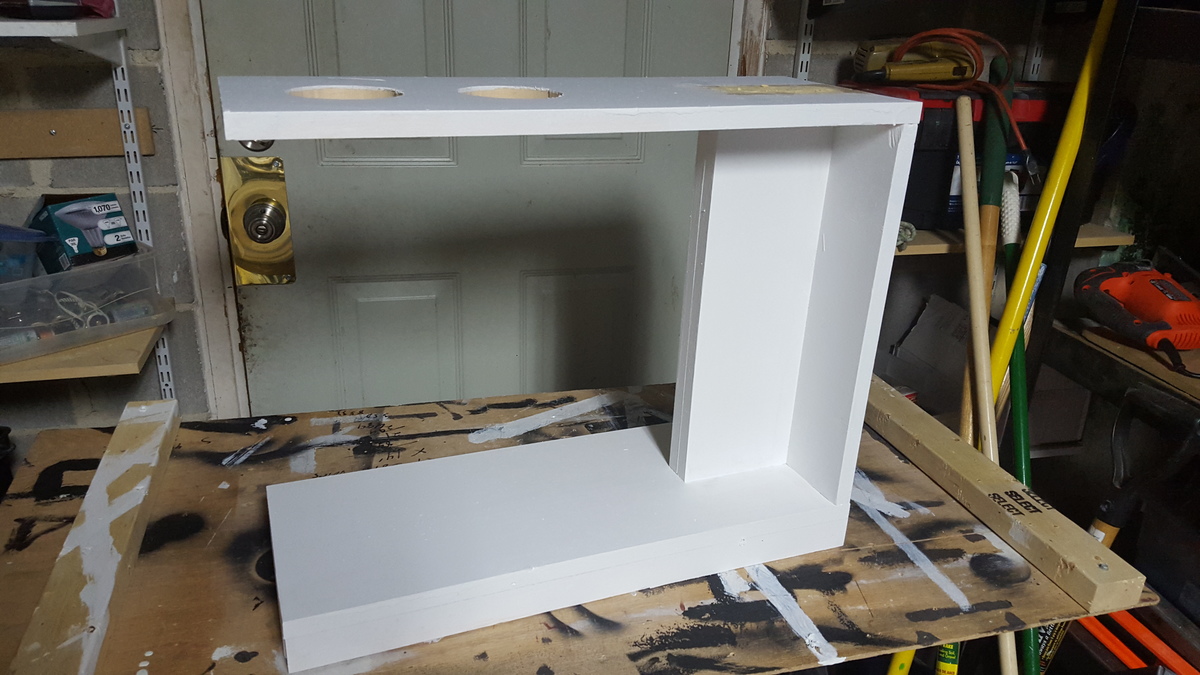
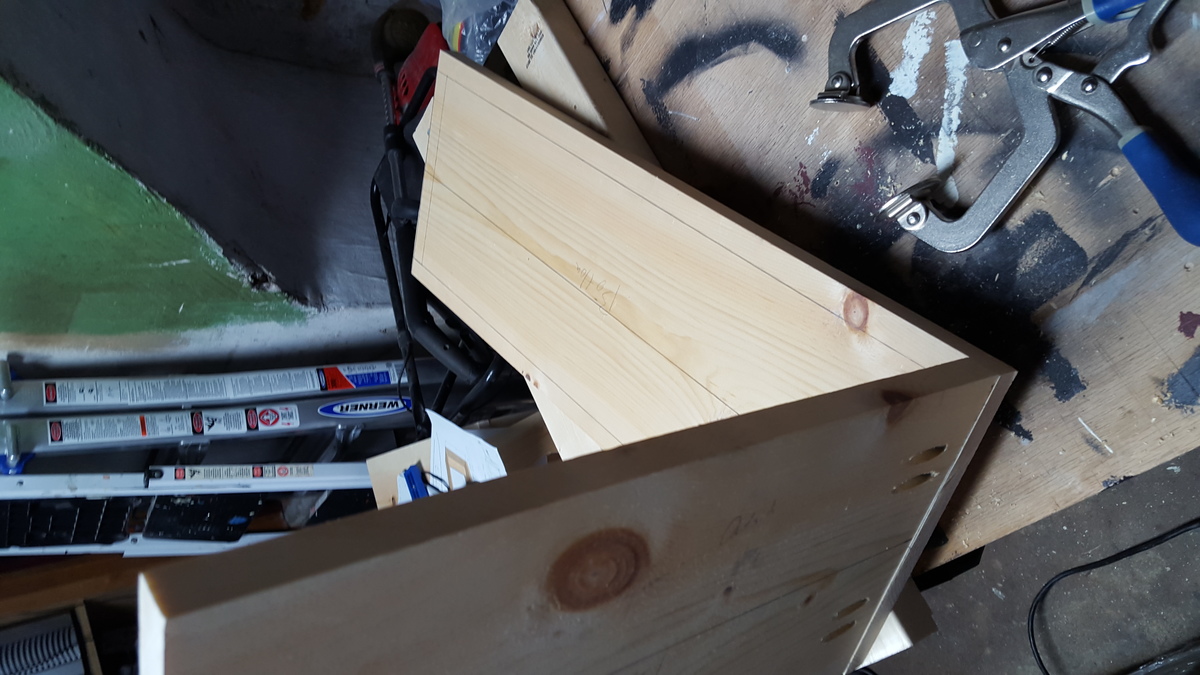
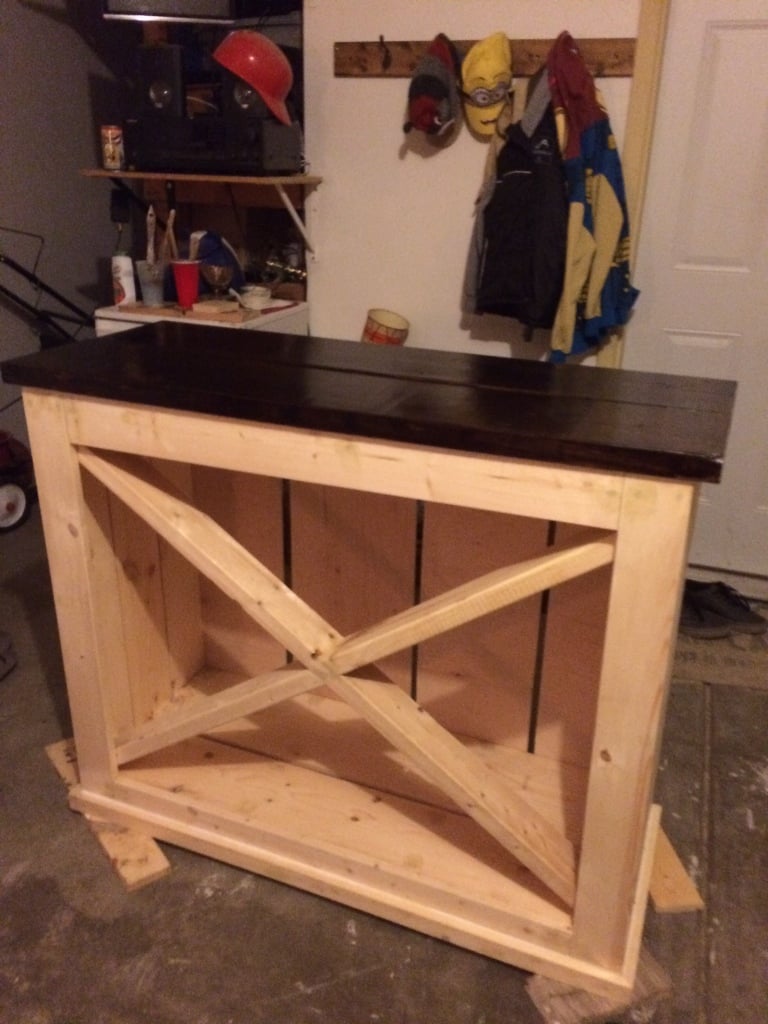
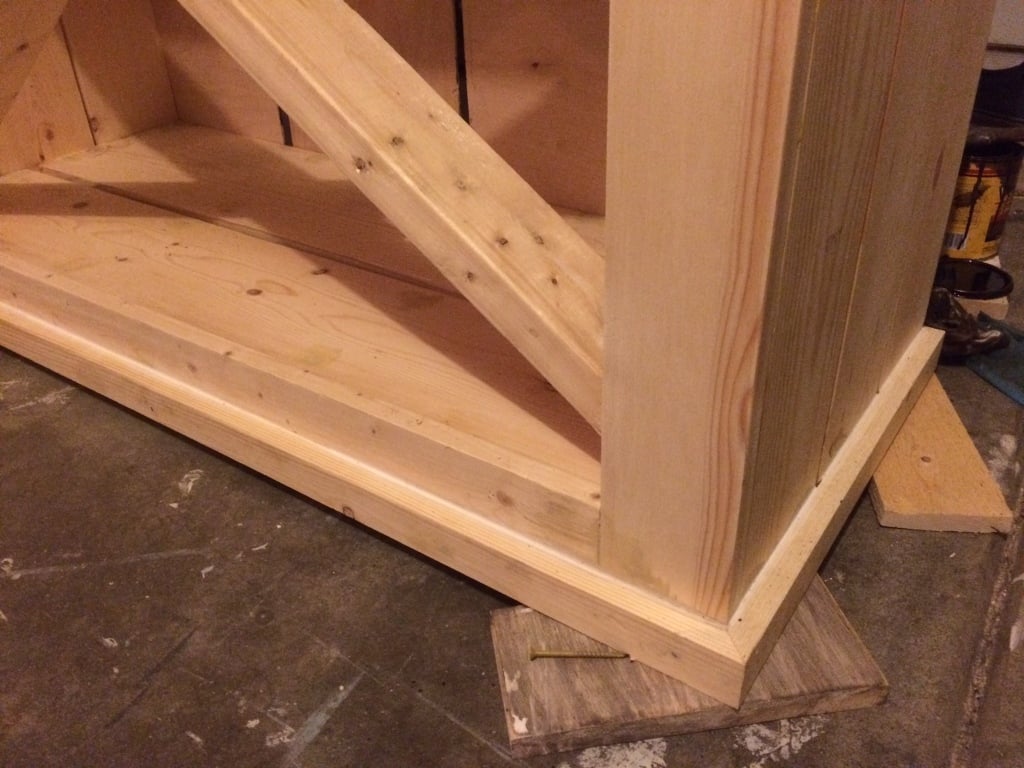
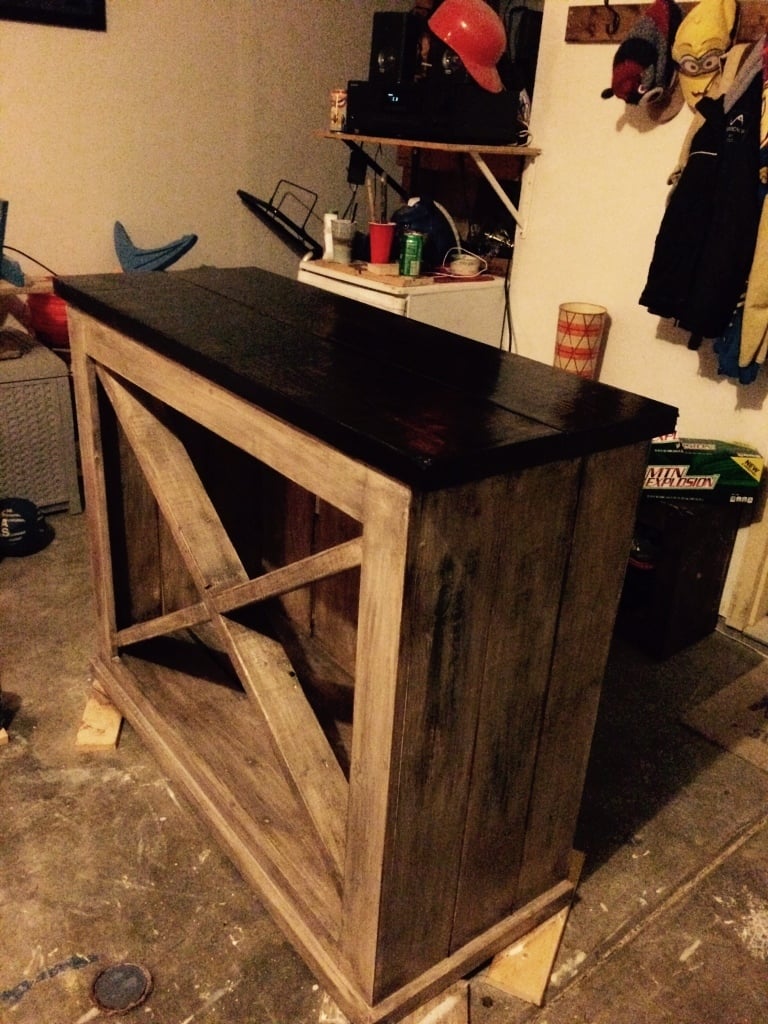
C Cart for Home Theatre
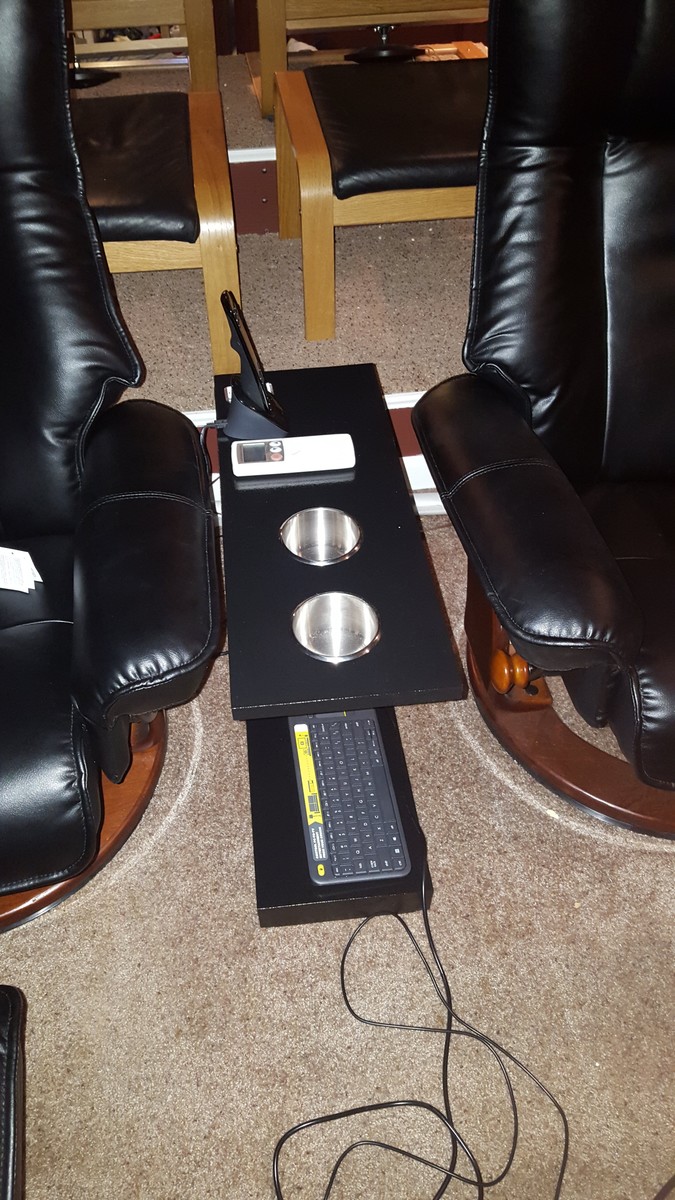
I modified the Rolling C Cart Plan to build this center console for my home theater. My dimensions are a bit different than Ana's. 24" long and 19" high. In order to keep the center of gravity back I doubled the center splines to give it a bit more heft aft of the cup holders. It was made from 1x10's as to not be too wide. I skipped the rolling wheels as it isn't going to be moved once in place. I used 2 coats primer, 3 coats semi-gloss black, and 3 coats of Minwax PolyCrylic to finish it off. All with light sanding with 240 grit paper on my Bosch Oscillating tools to smooth out each layer. It took about 4 days with all the painting, sanding, and drying time involved. I love this build and plan to build 2 more for the back row of theatre seats.
Built from Plan(s)
Estimated Time Investment
Week Long Project (20 Hours or More)
Finish Used
Black Semi-Gloss, with Polycrylic Satin on the top
Recommended Skill Level
Beginner
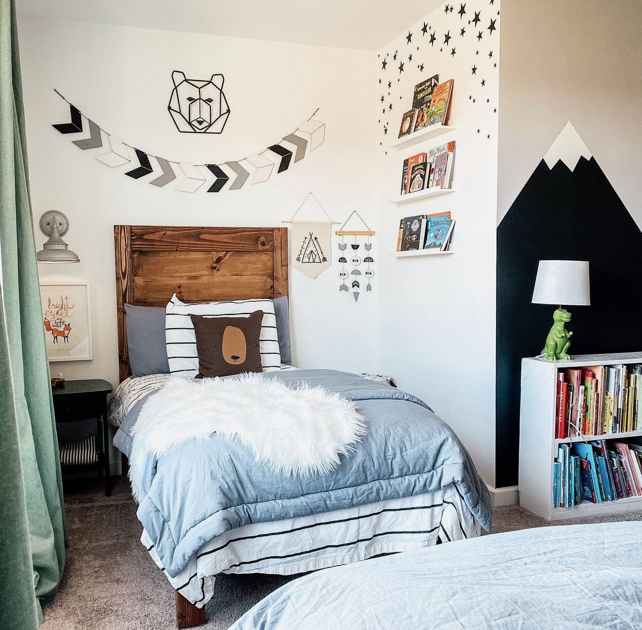
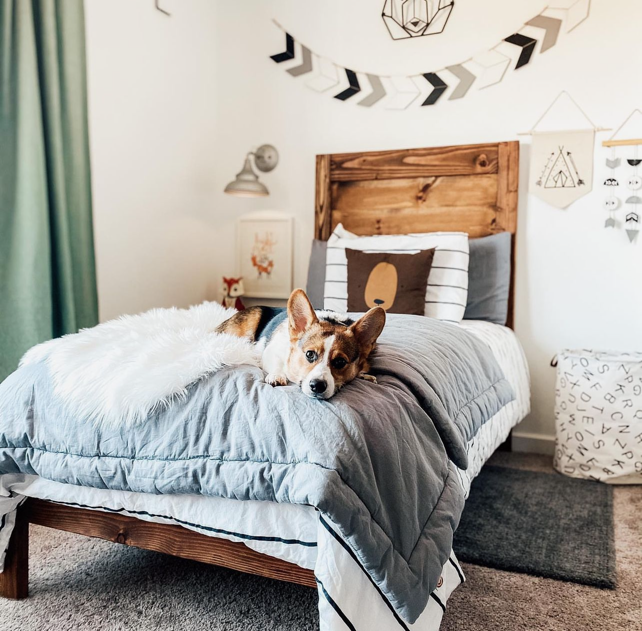
Jill's Simple Bed
Simple bed built by Jill and shared on our Facebook page
Built from Plan(s)
Recommended Skill Level
Beginner
Simple Wood Kid's Bed
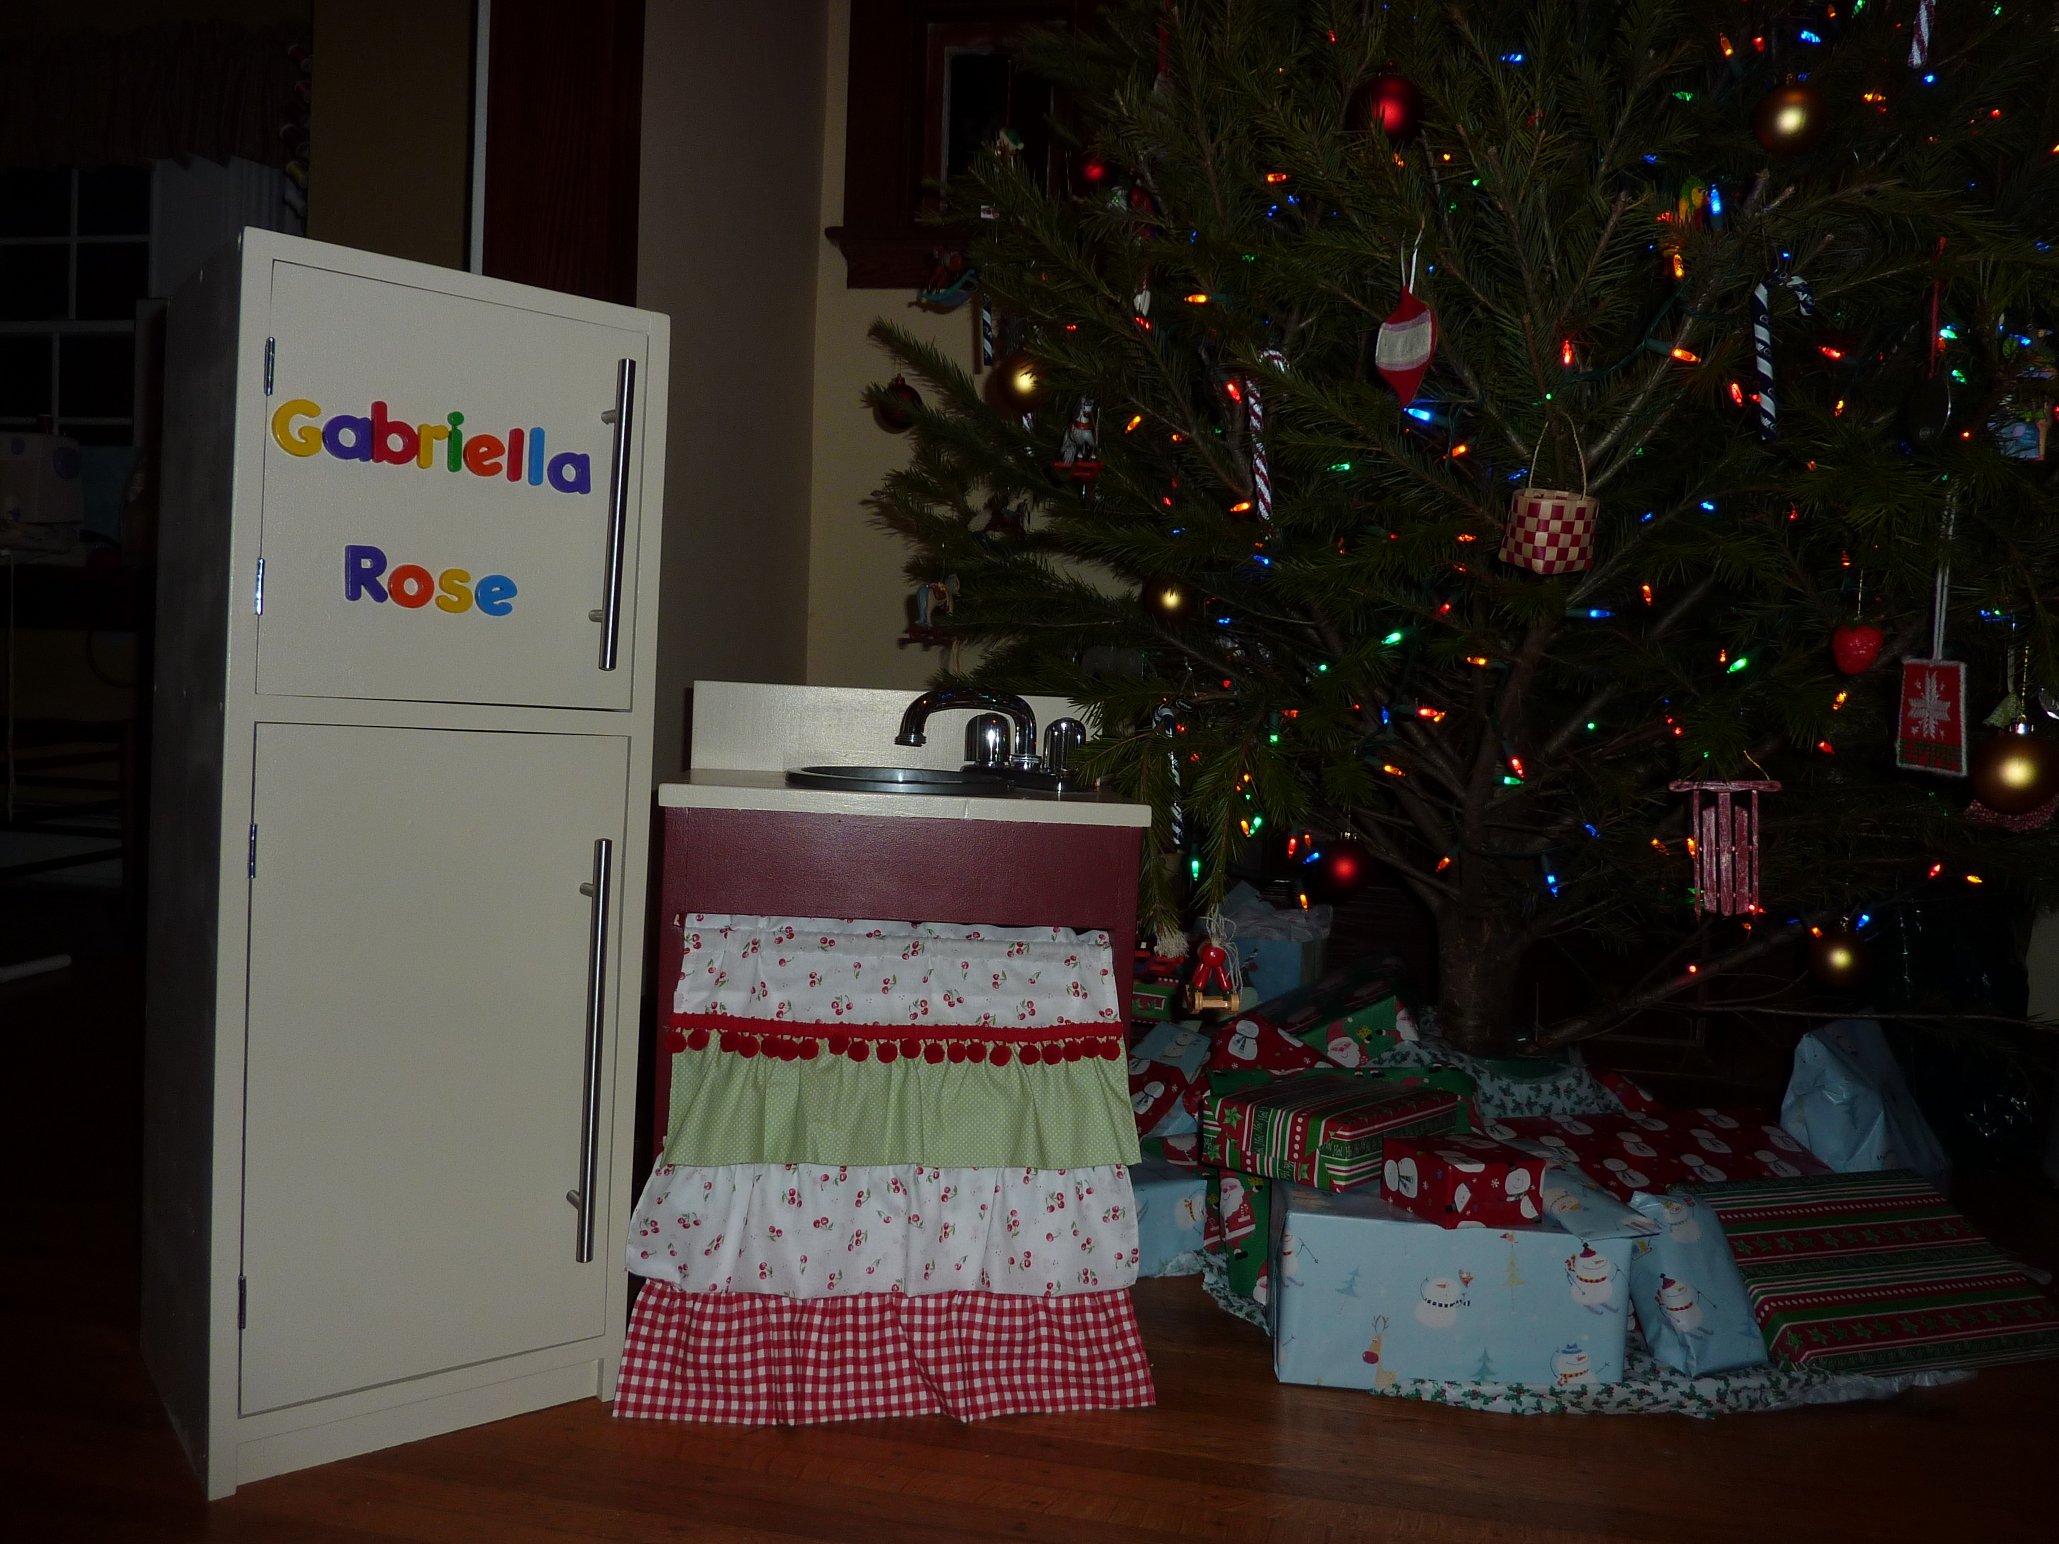
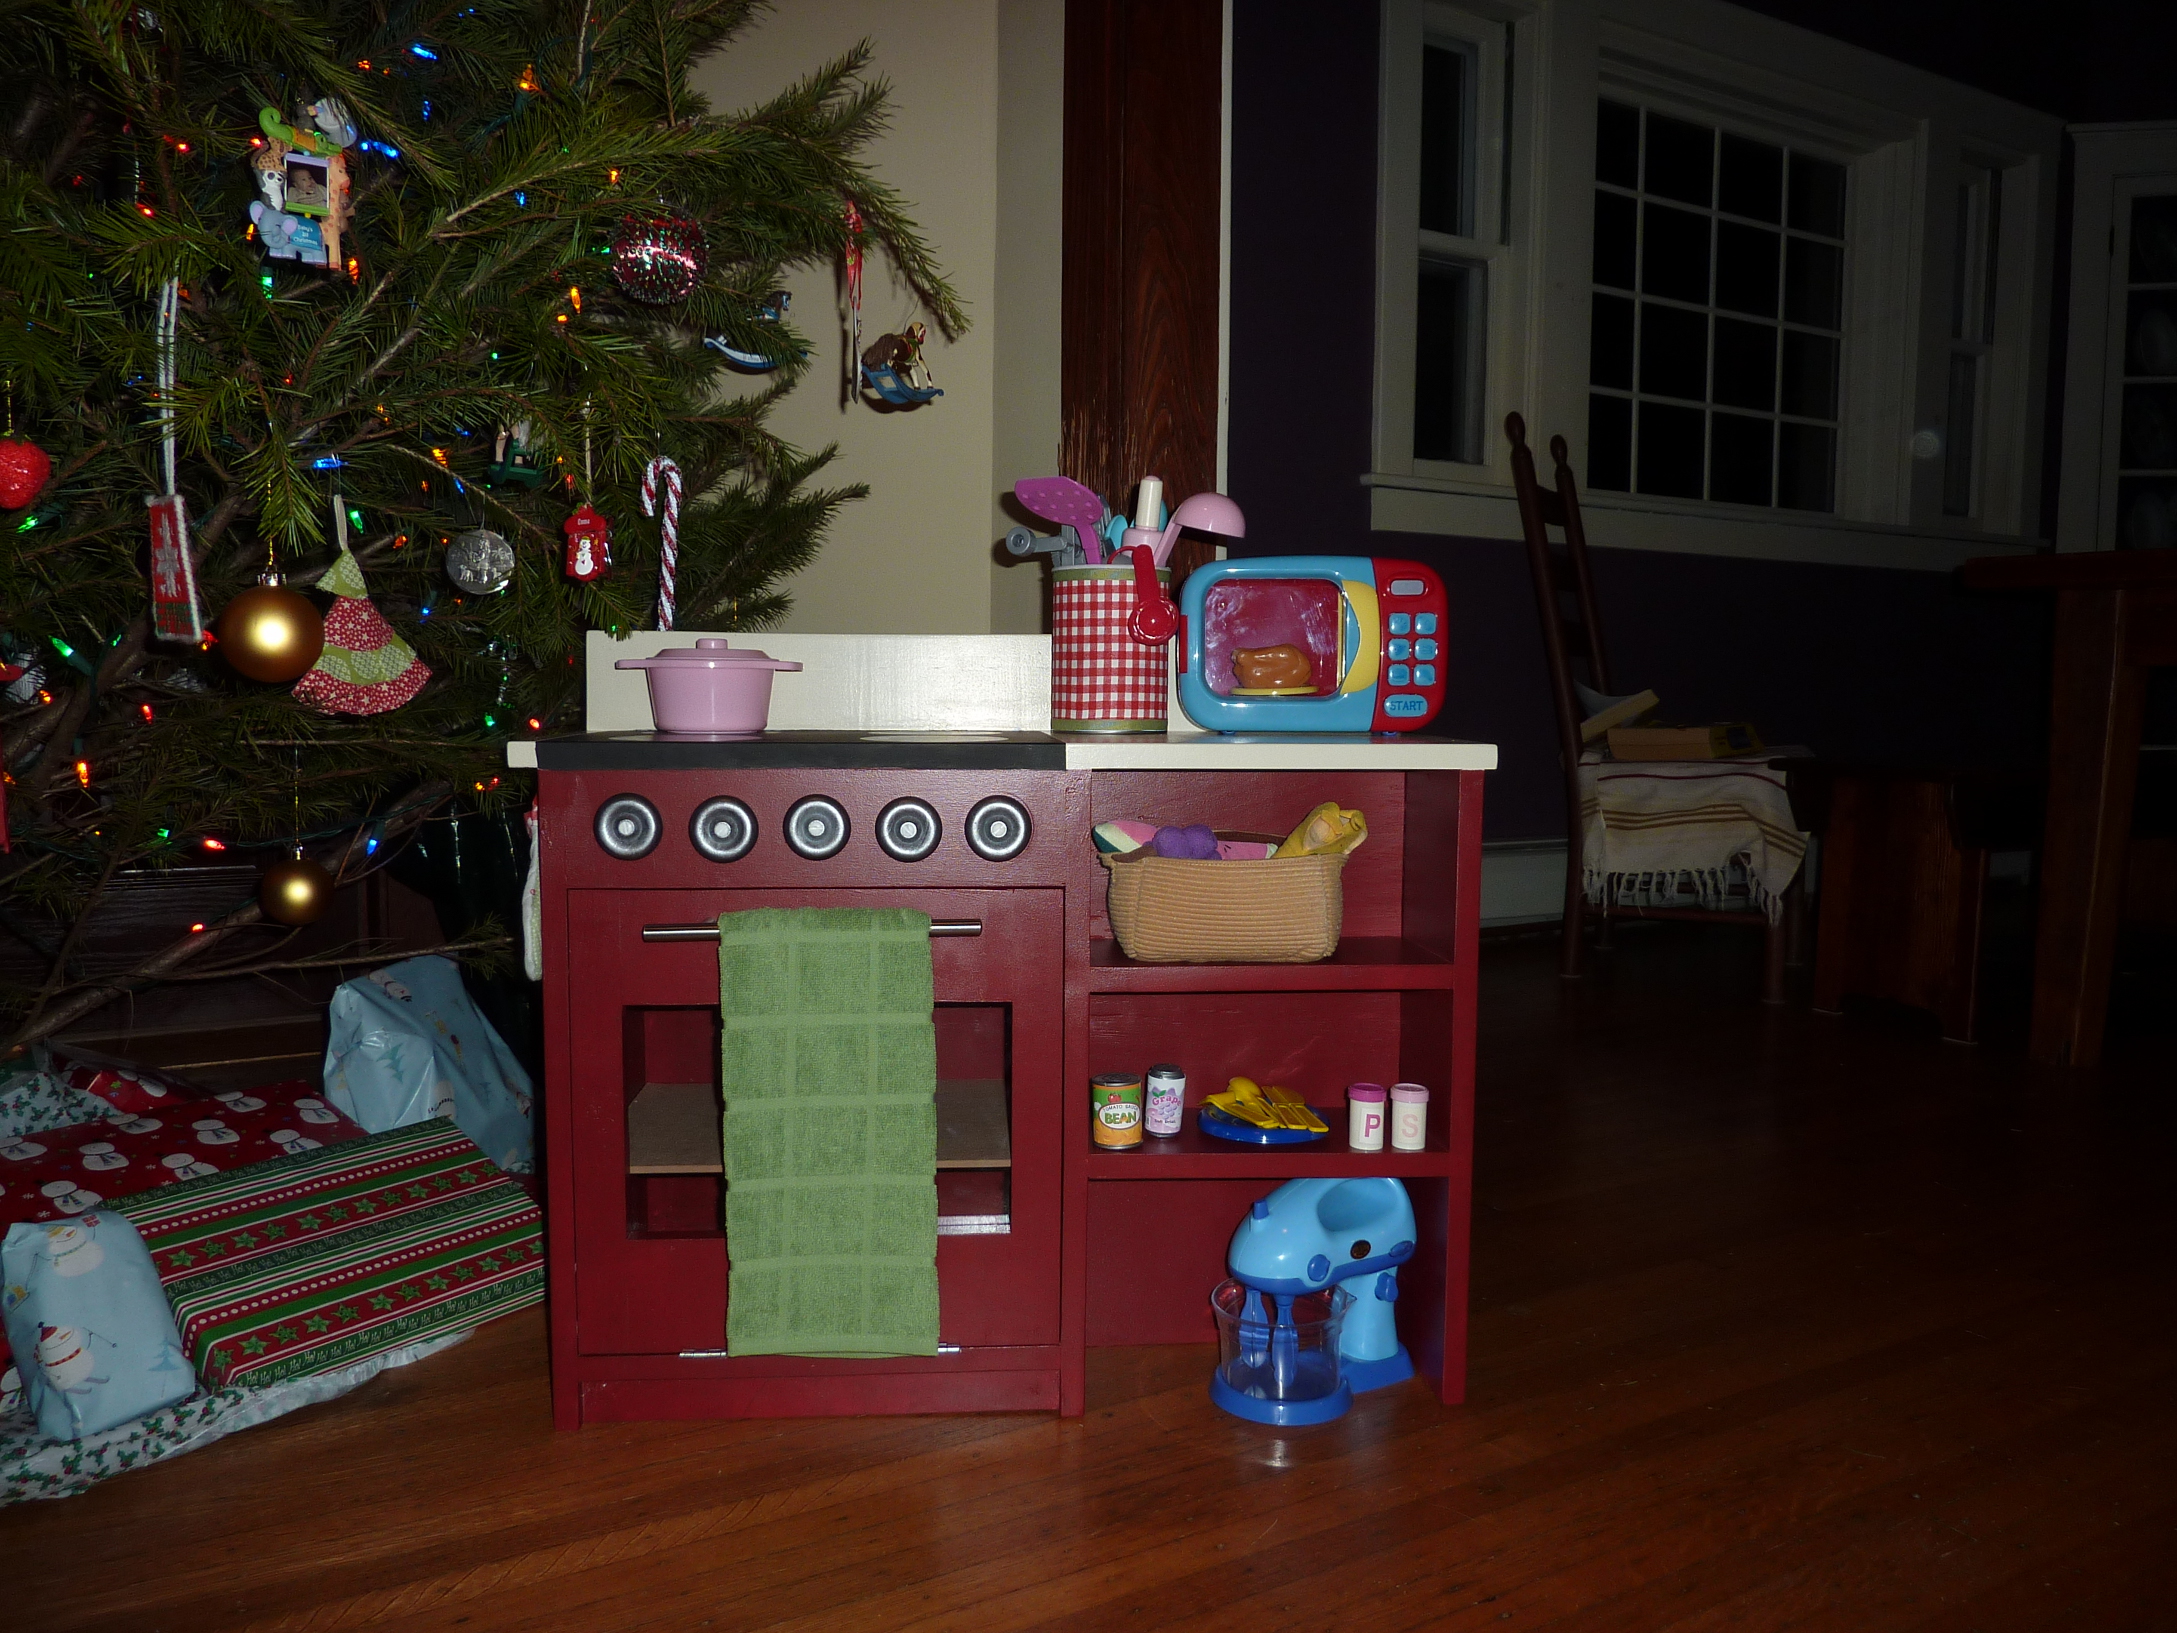
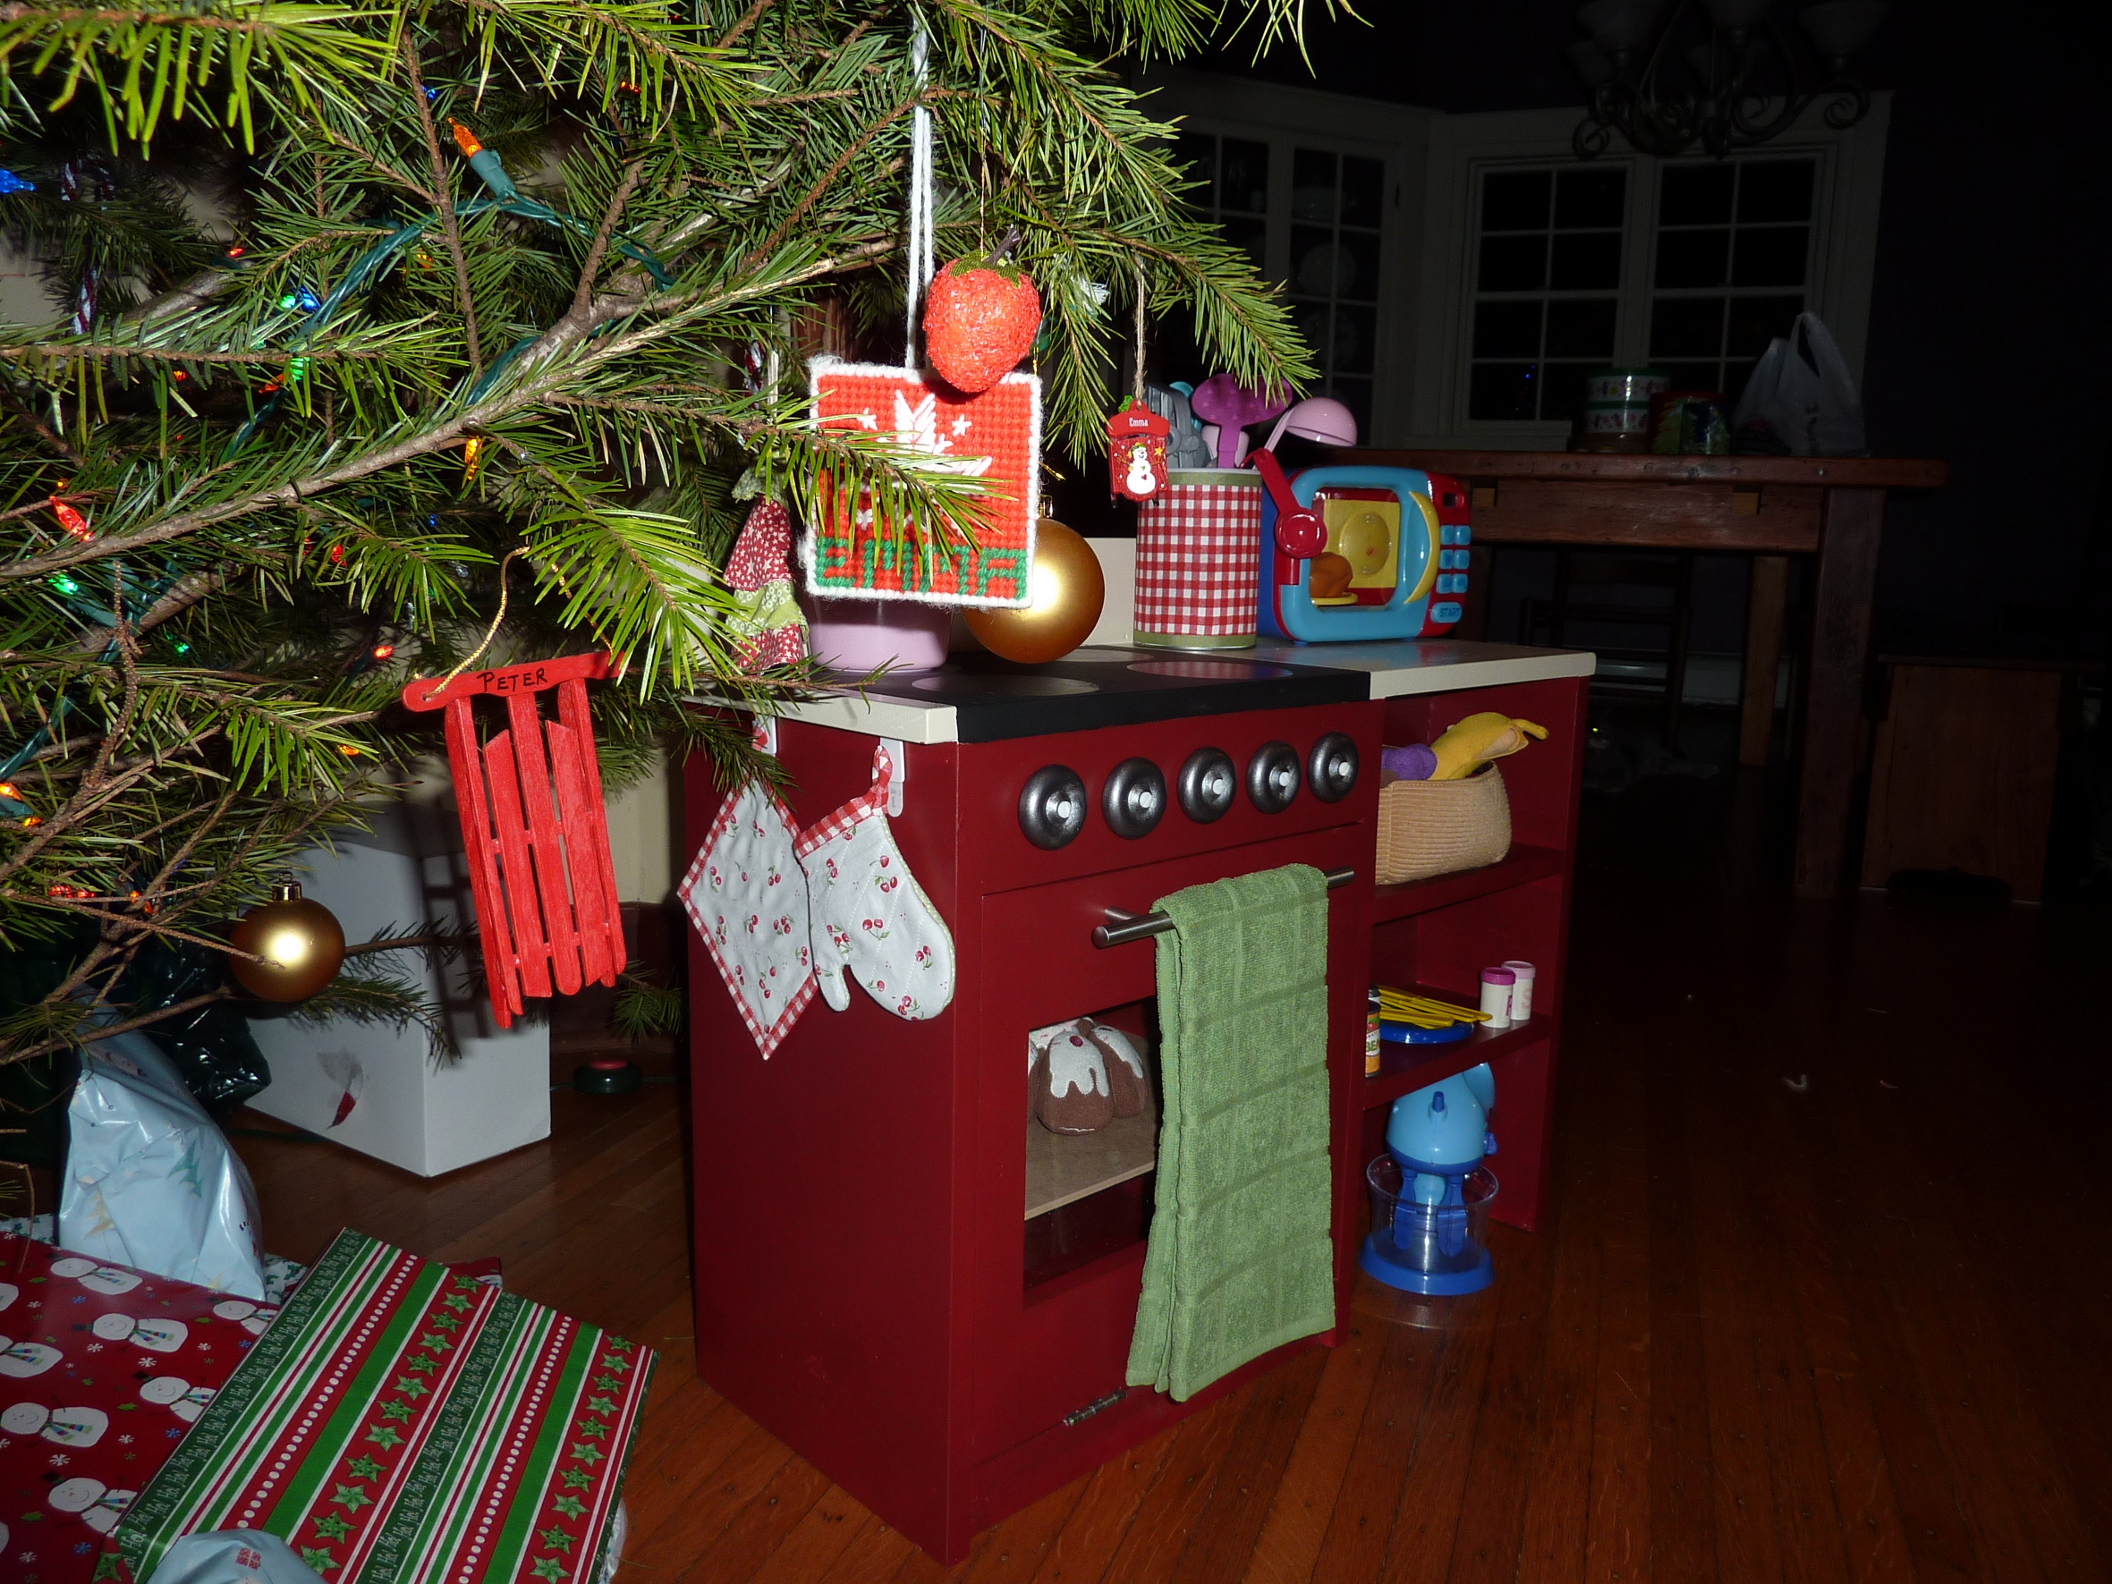
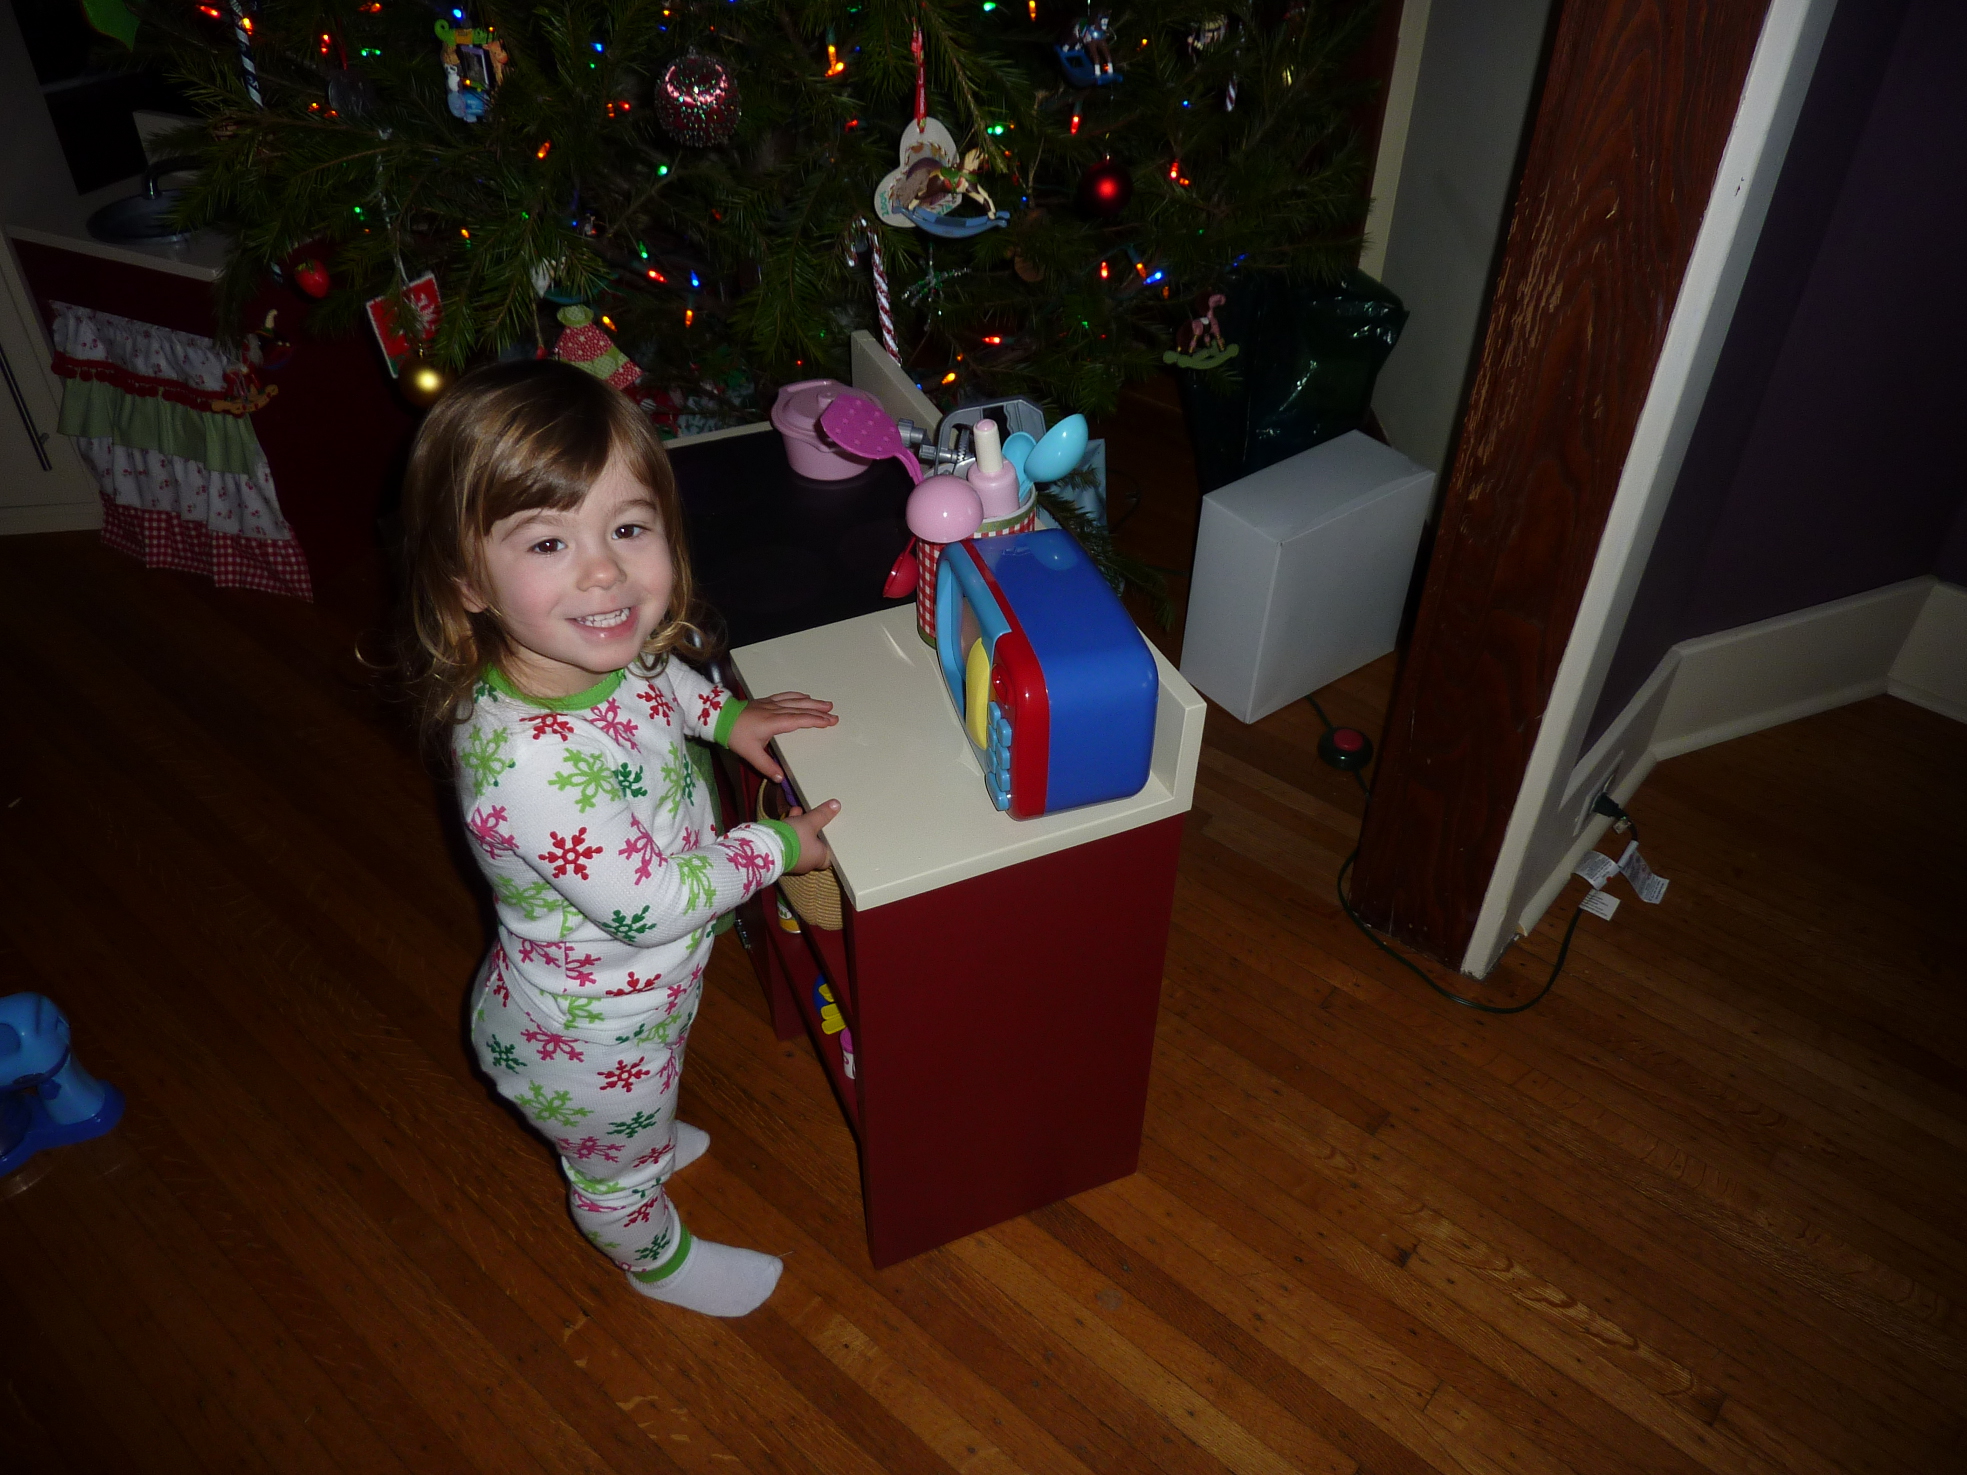
Christmas Play Kitchen
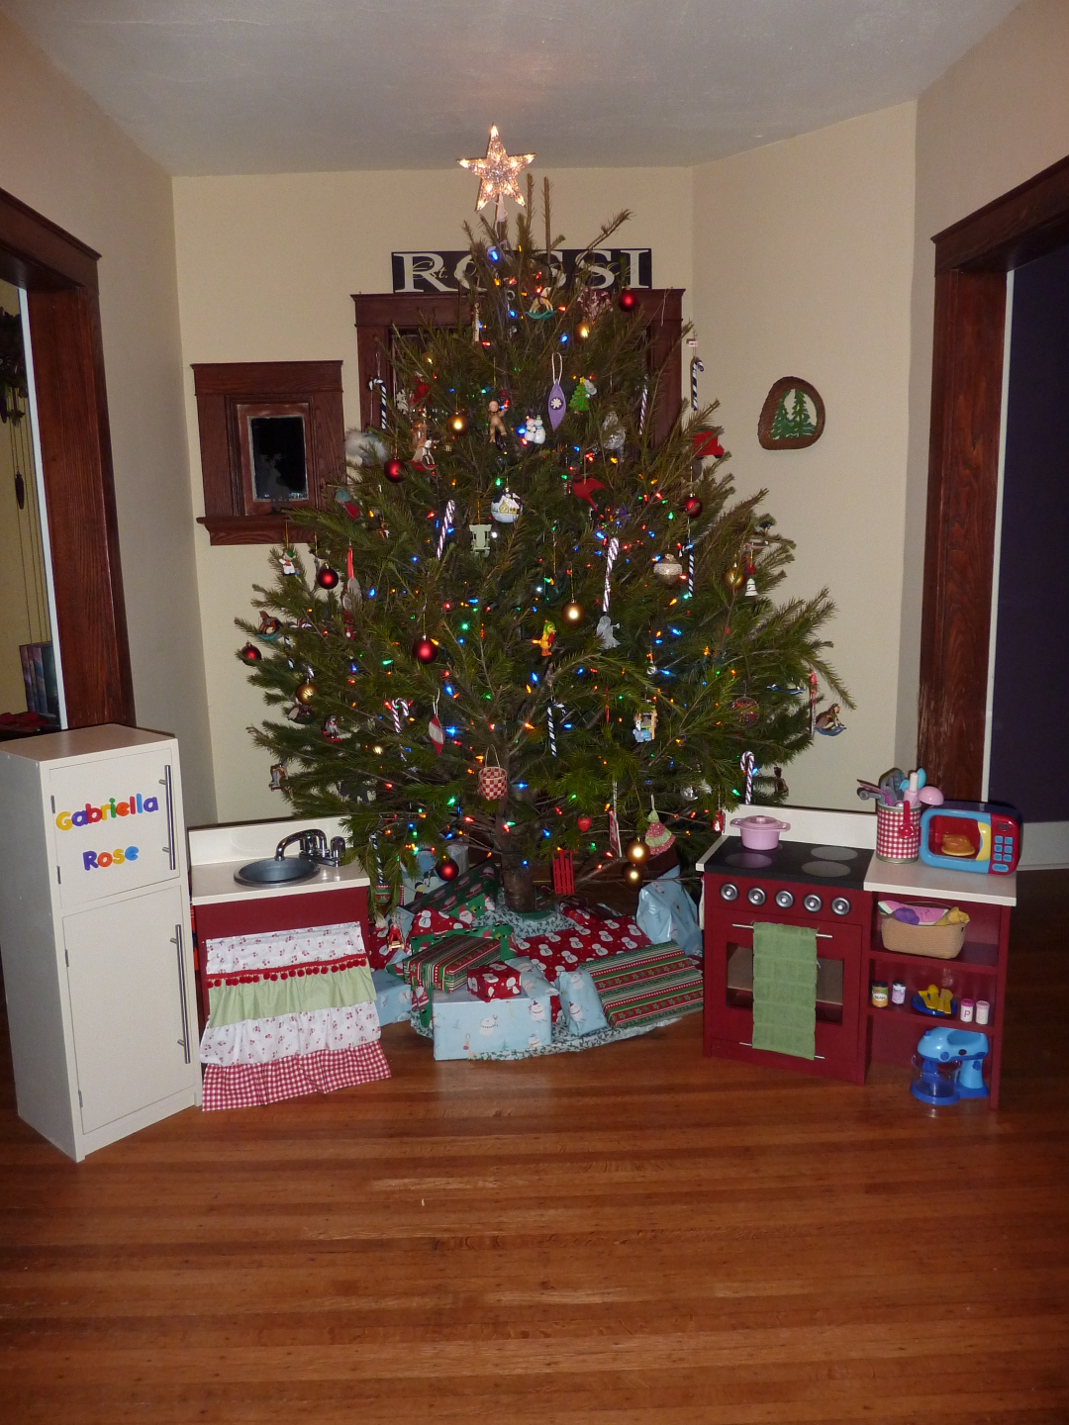
My daughter loves "cooking" so we made her this play kitchen for Christmas. I had so much fun making it that it was worth it even if she never plays with it. Of course, she's been playing with it since yesterday morning.
Built from Plan(s)
Estimated Cost
$150.00
Estimated Time Investment
Week Long Project (20 Hours or More)
Finish Used
3 coats Rustoleum magnetic primer for the refrigerator doors
1 coat Kilz primer on everything else
2-3 coats Behr eggshell in Cinnamon Cherry on the red portions
2 coats Behr semi-gloss in an Oops mix on the cream portions.
1 coat Kilz primer on everything else
2-3 coats Behr eggshell in Cinnamon Cherry on the red portions
2 coats Behr semi-gloss in an Oops mix on the cream portions.
Recommended Skill Level
Beginner
Comments
Mon, 12/26/2011 - 10:22
Magnetic paint
I ALMOST did the exact same thing to my daughter's fridge doors! I thought about it a lot, but just didn't have the resources or the time to get it by Christmas to do the doors....maybe I will now though :) I love the addition you did to the stove it is adorable and awesome! I also love the little knobs you have on the front of the stove - what did you use for them? Would love to see a picture of the top of the stove as well as the actual sink. I like to see how others do theirs so if I want to make another one for a friend I can have other ideas :)
Fantastic job!
Mon, 12/26/2011 - 11:00
Looks great!
It looks amazing and I am sure your daughter loves it! I was thinking of doing the magnetic paint on my daughter's fridge and now wish I had after seeing your kitchen. I think we got the same pulls :)

Mon, 12/26/2011 - 11:31
Great Job!
You did a fantastic job! I am sure your daughter will love it for years to come!
Fri, 08/16/2013 - 21:00
Nice!
I love the personal touches you created! Did you scale the pieces up or use original dimensions? And I HAVE to know how you did the extension of counter space on the oven with the shelves! That is exactly what I have been looking for. A girl can't have to much counter space at any age!
Mid-Century Dresser
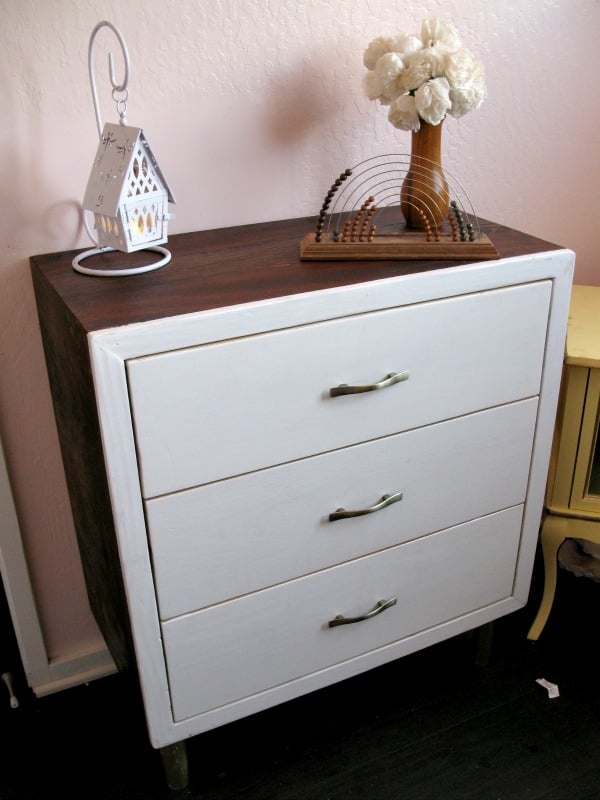
Inspired by Dwell Studio's Mid Century Dresser, I built a smaller version for my daughter's small room. Working on showing photos of the building process on my little blog this weekend. =D
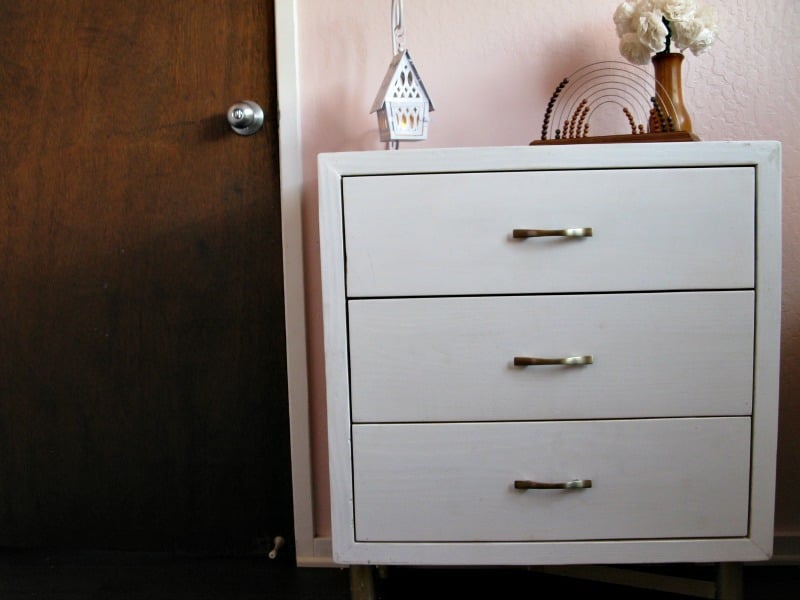
Estimated Cost
$47
Estimated Time Investment
Week Long Project (20 Hours or More)
Finish Used
Watco Danish Oil - Dark Walnut stain
Olympic Semi-Gloss White (No VOC)
Rustoleum Gold Spray paint (for legs and x-feature)
Olympic Semi-Gloss White (No VOC)
Rustoleum Gold Spray paint (for legs and x-feature)
Recommended Skill Level
Intermediate
Comments

Fri, 11/15/2013 - 19:00
Gorgeous dresser!
This looks fab! It's beautifully done and finished. I like it better than the inspiration piece! A perfect dresser for a little girl's room. :)

In reply to Gorgeous dresser! by JoanneS
Sat, 11/16/2013 - 08:45
Thank you, Joanne!
I am pleased with how it turned out and I learned new techniques making it! Your support and tips along the way helped me immensely!
Chicken Coop with run
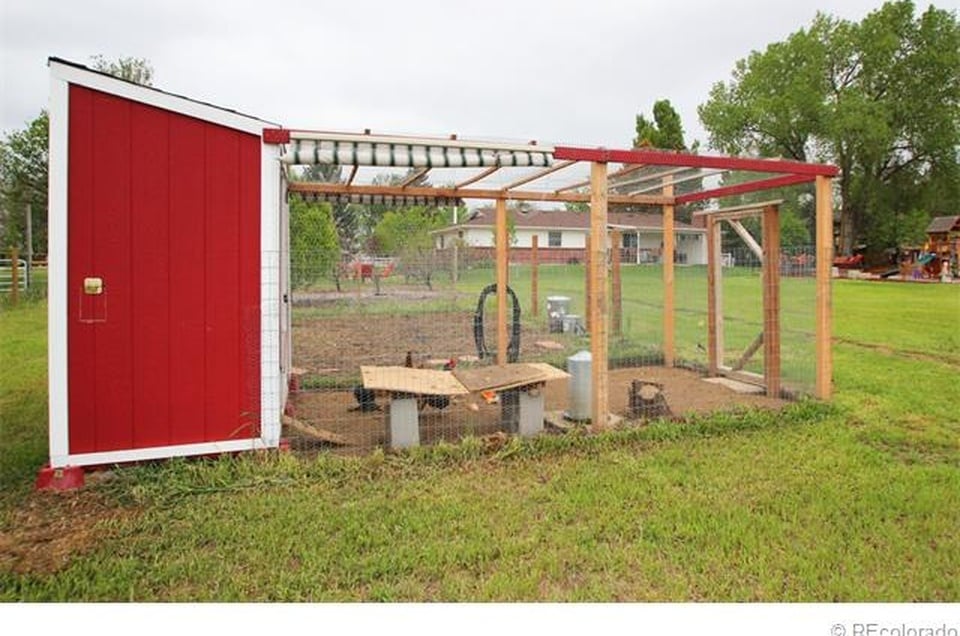
It took a while to come together and made several modifications but it is a great coop and was a major selling point of the house when we were relocated. I had added a main tray under the roosts and a door to srape the poop out. This made keeping the coop clean very easy.
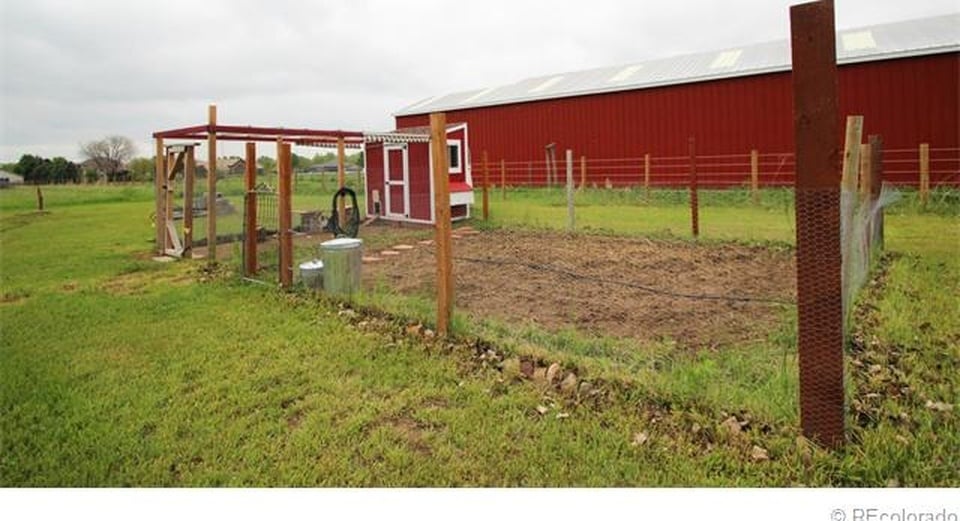
Built from Plan(s)
Estimated Cost
$800
Estimated Time Investment
Week Long Project (20 Hours or More)
Finish Used
Chicken Coop
Recommended Skill Level
Intermediate
Finally made a bench to sit on by the firepit
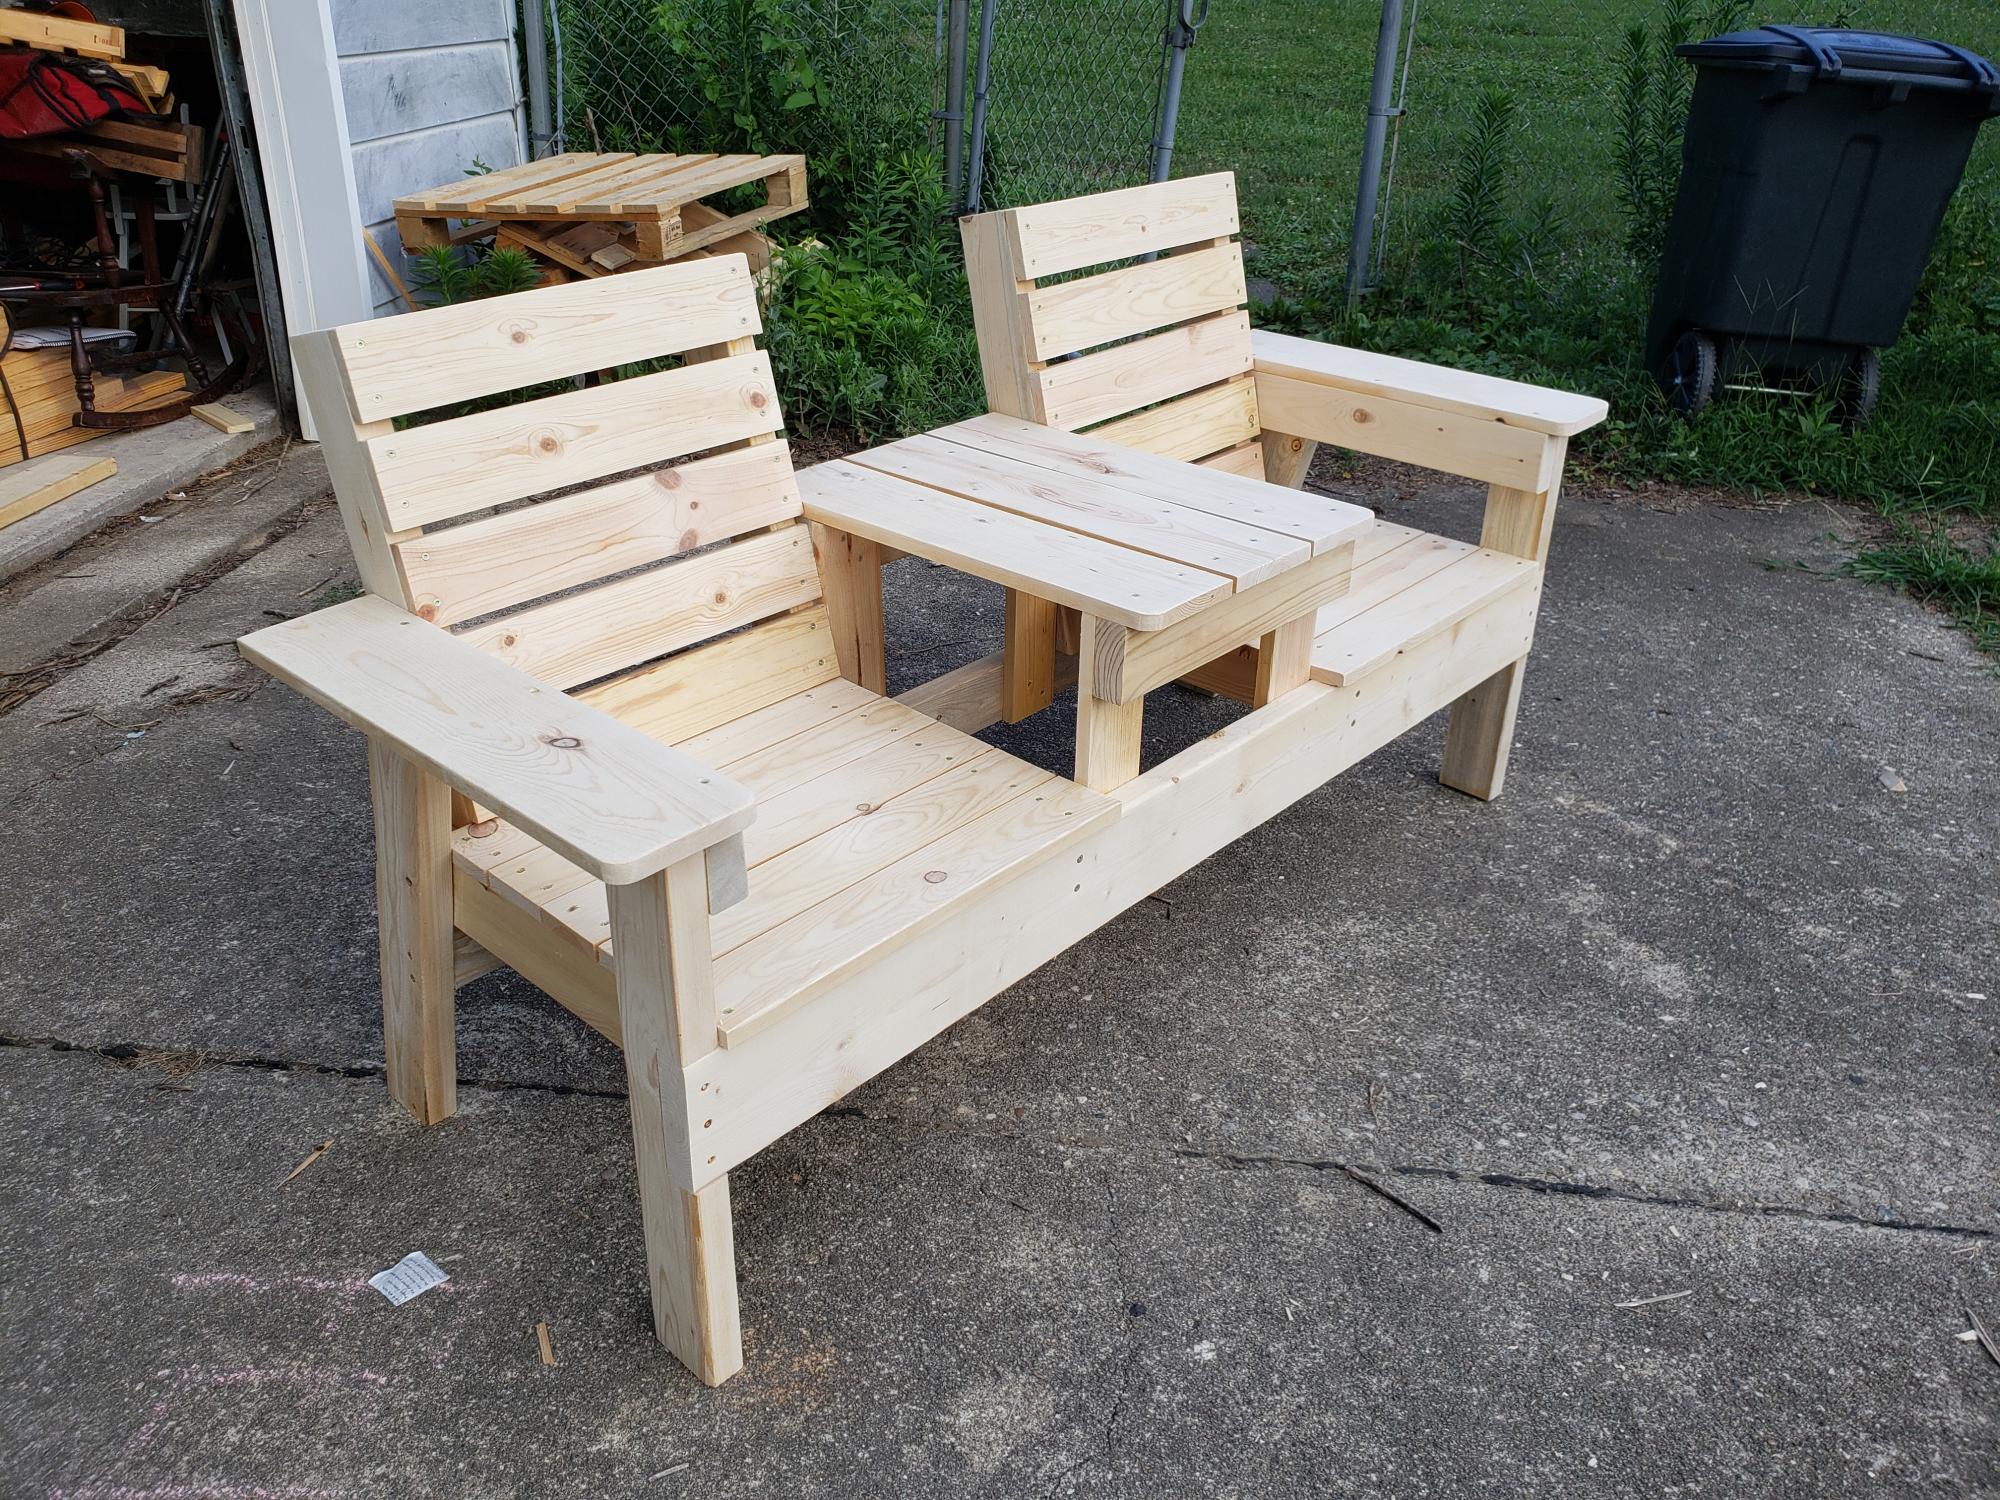
Plans by DIY with Pete
Estimated Time Investment
Day Project (6-9 Hours)
Recommended Skill Level
Beginner
Comments
Stick on drawer organizer for laptops

Our family uses the dining table for homework and work with laptops. I have drawers in a window seat, so I added the stick on dividers to create laptop storage in the drawer. This was super quick and easy.
I used ripped 1/2” thick plywood pieces.
loved the results! So easy and exactly what I needed!


Built from Plan(s)
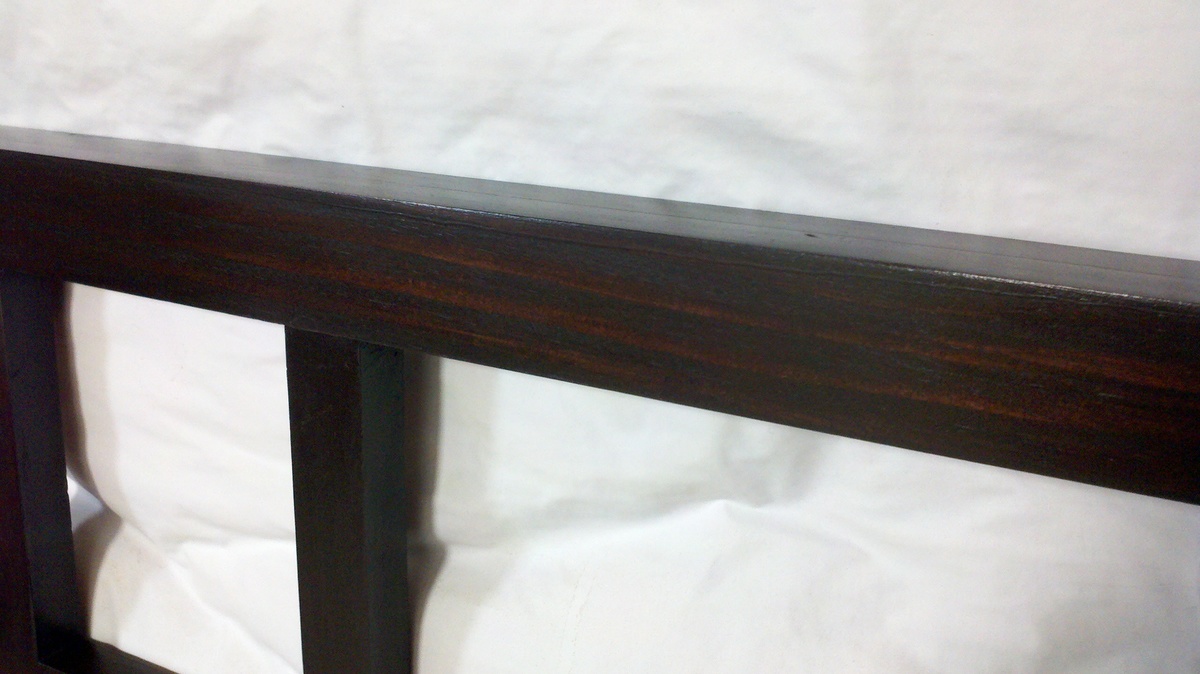
modified headboard
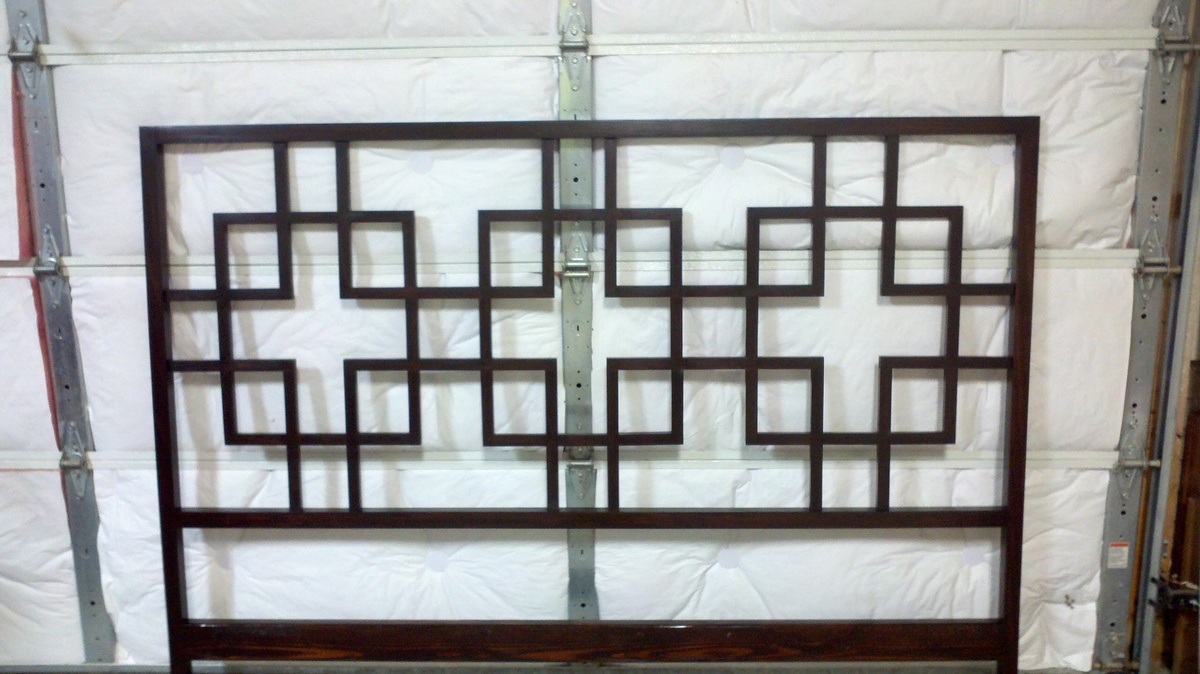
Thanks to this site my wife found this headboard design. I modified the plan to suit our king size bed. We chose popular with a java stain.
Estimated Time Investment
Week Long Project (20 Hours or More)
Finish Used
General Finishes wood conditioner, General Finishes Java gel stain, Shellac, and wax.
Recommended Skill Level
Beginner
Comments
Sat, 12/31/2011 - 04:30
Love, love, love it! Just
Love, love, love it! Just love the modern look of it and great job!
Fri, 08/10/2012 - 07:30
King Plans
Any chance you still have the demensions? Im making this bed this weekend and would greatly appreciate the help with what dimensions you used for the king sized bed.....:)
Fri, 08/10/2012 - 07:29
king size plans
king size plans, I see you altered the plans for your king sized bed. Any chance you can provide the dimensions, making it this weekend.
Thanks! :)
Joli's desk
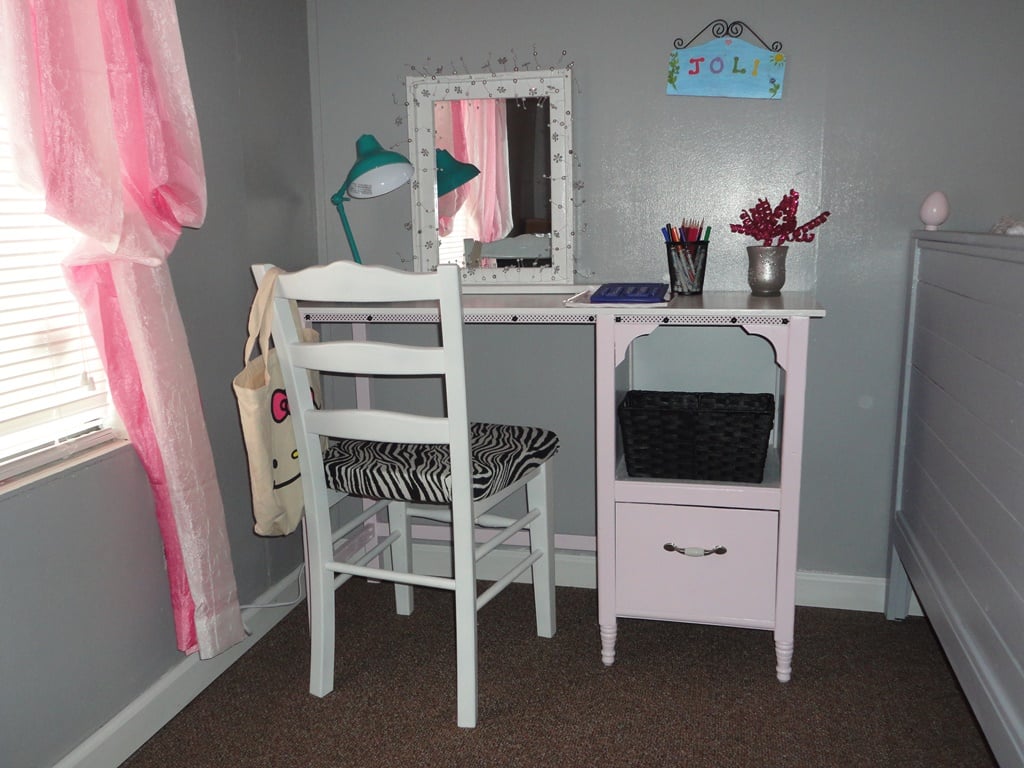
I built this desk by combining a modified Julia nightstand and the schoolhouse desk. I added a little ribbon and some upholstery tacks around the upper edge. I rescued the chair from Goodwill and added the zebra cover. I also made the mirror using the barnwood frame plan.
Built from Plan(s)
Estimated Time Investment
Day Project (6-9 Hours)
Recommended Skill Level
Intermediate
Beadboard Storage Bed
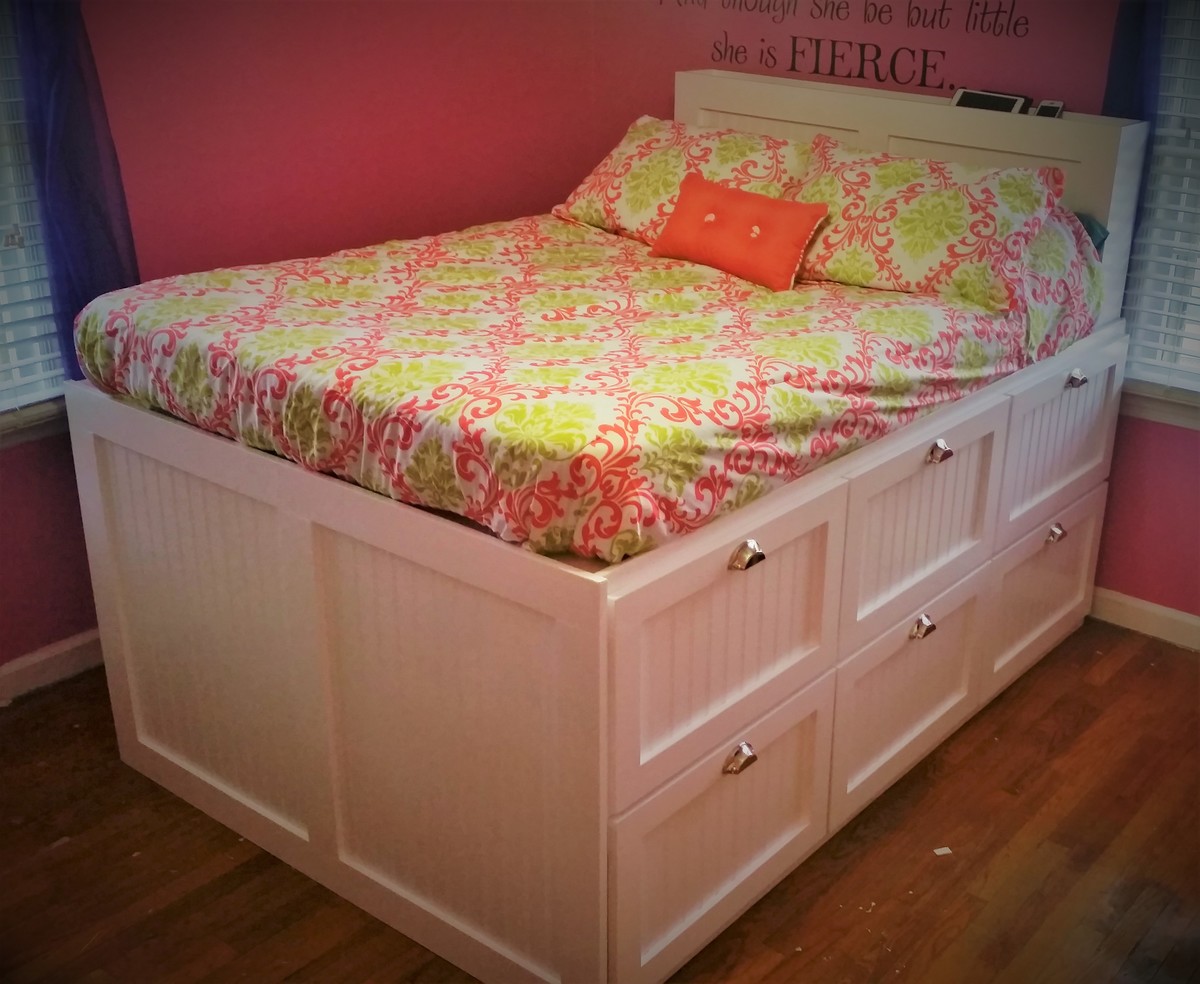
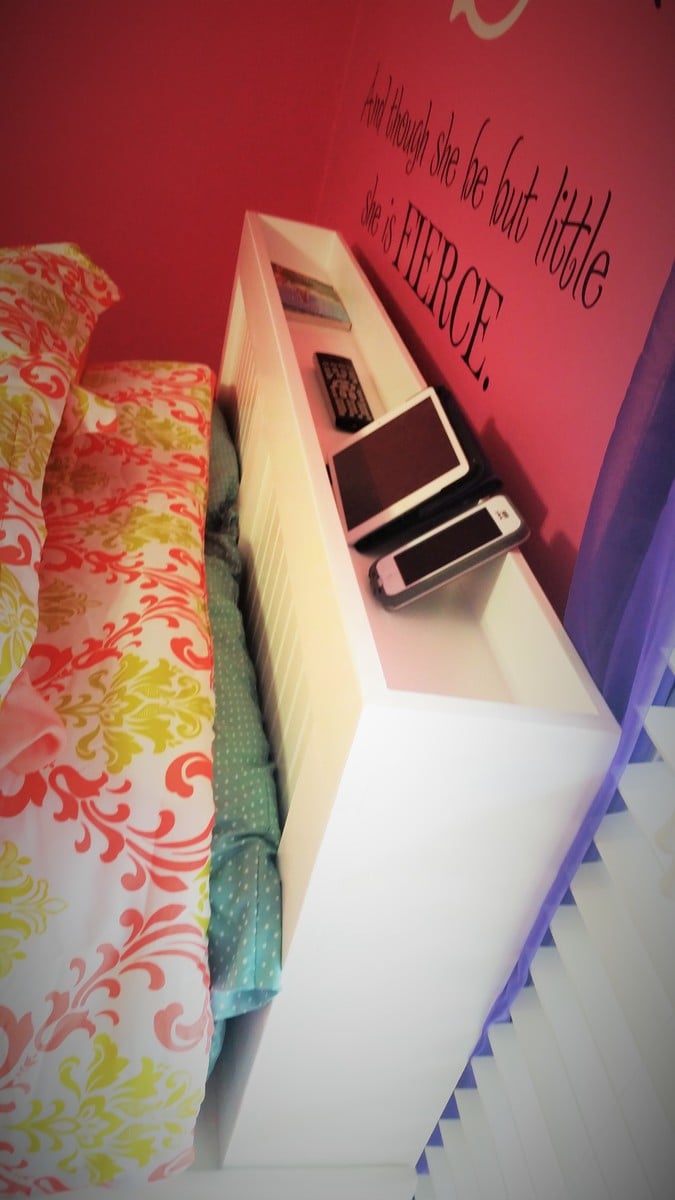
It was time to upgrade our daughter's bed to something bigger. I have always loved the idea of platform beds and went searching the Ana White site for ideas. Needless to say, I made several modifications to allow for a huge amount of storage. The bed is designed to fit up to a queen mattress, but we went with full size since her room is a bit tight. Each drawer is 24"x24"x12" deep and mounted on 100 lbs. full extension slides. This allowed us to eliminate both dressers in her bedroom plus the hamper since one of the drawers is now for dirty clothes. I built this as two 80" cabinets and used a 3/4" plywood spacer to bridge the gap. What you can't see is the six 24"x24"x12" cubbies on the far side of the bed which allowed us to remove her bookcase and toy box. Once in place, I measured and built the footboard panel with 1x4 dimensional pine and beadboard and it is attached with screws from inside the cabinet. The headboard was last as I wanted to give her a shelf for her chargers, remote, phine, ipad, etc. This allowed us to remove her nightstand. Her small bedroom feels much larger now that this is the only piece of furniture she needs once I get her tv mounted on the wall.
Built from Plan(s)
Estimated Cost
I would estimate I invested $300 in material and paint on this one not counting the new mattress.
Estimated Time Investment
Week Long Project (20 Hours or More)
Finish Used
Behr Ultra
Recommended Skill Level
Intermediate
Comments
Wed, 04/12/2017 - 07:16
How Tall Is Your Bed?
I want to make double the storage as you have done but am curious how tall your bed is from floor to mattress?
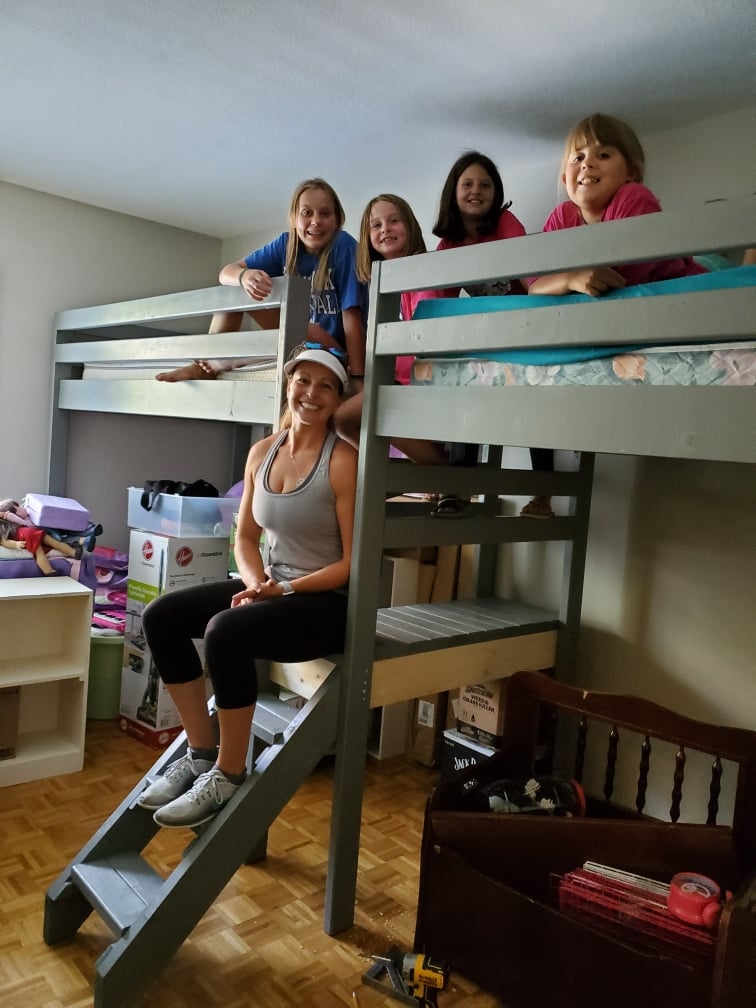
Camp loft bed
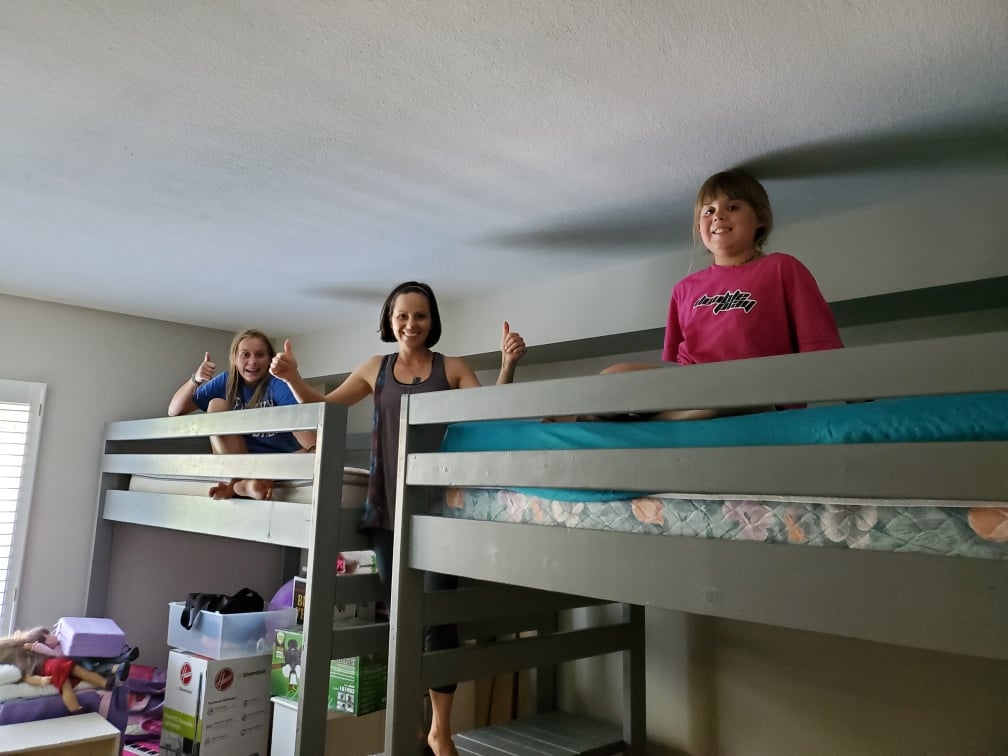
My very good friend was down sizing, and now her girls would be sharing a room. Since these girls are a little older I made the over all height 10” taller. We also had to modify the platform size to accommodate the space, and just have to paint the platform frame... but the girls love it. We even had the girls help assemble, sand and paint! They learned so much, and appreciate the beds that much more!
Estimated Time Investment
Weekend Project (10-20 Hours)
Recommended Skill Level
Beginner
Retail Display Shelf
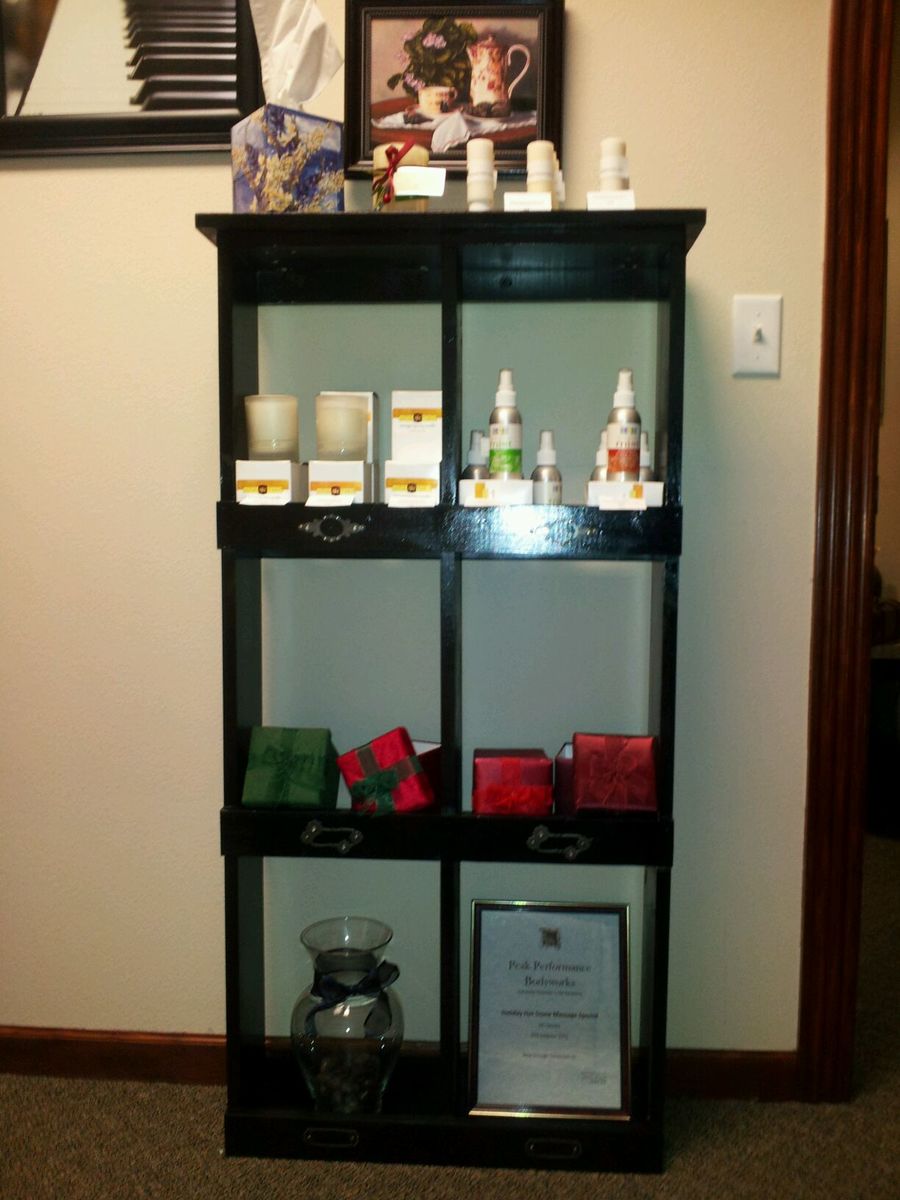
My daughter needed a custom sized shelf to display her retail products in her busy day spa. The shelf needed to be narrow to not block walk around access to the massage table. It needed to be functional without looking like a book shelf. Ana's plan for the General Store Cubbies was just what I was looking for. I sized it down to fit the space and it turned out great.
Built from Plan(s)
Estimated Time Investment
Afternoon Project (3-6 Hours)
Finish Used
Black Krylon spray paint and shelf tags from the scrapbook section of the craft store.
Recommended Skill Level
Beginner
Interior Wood Rack
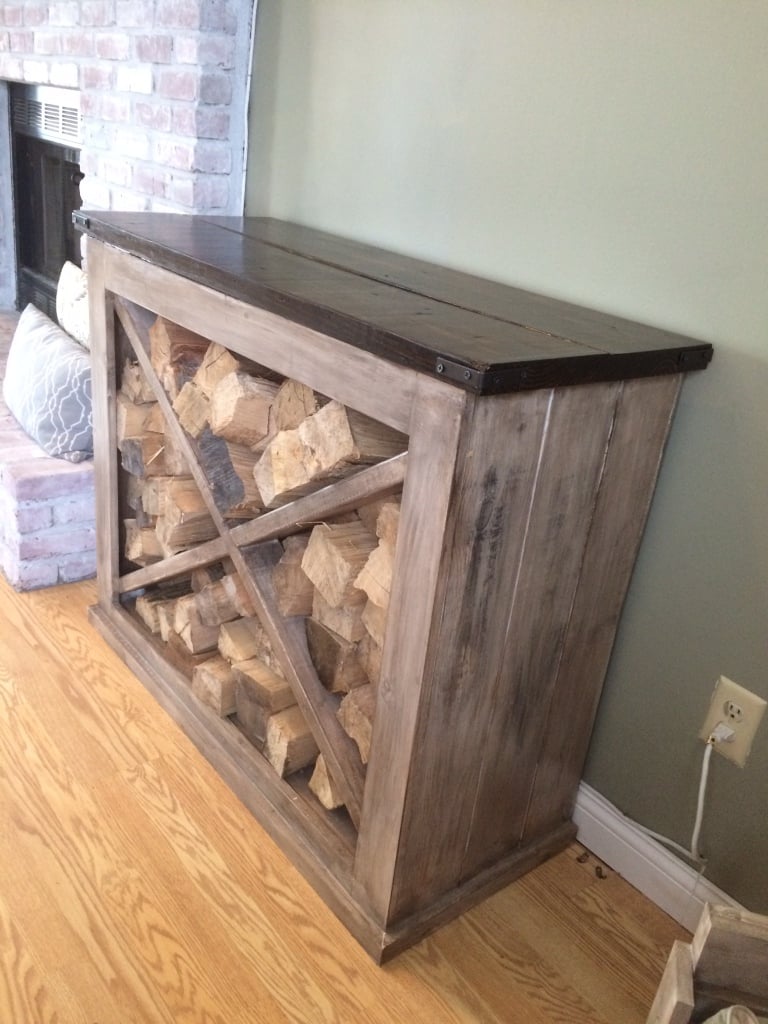
My brother just bought house and has a large living room with a large fireplace. He needed something that would hold firewood and also was decorative. We came up with this plan after I built the Grandy Sliding Door Console. Instead of putting in shelves or doors, we put a bottom on and a back on and add the x (2x4's) in the center. We didn't know what to expect, but after finishing it and delivering it to his house, it turned out great.


Built from Plan(s)
Estimated Cost
$75-$100. Depending on what paint/screws you have on hand. If you have to buy all paint, stain, and screws, probably closer to $100. The back we used leftover ply wood from the Grandy sliding door console.
Estimated Time Investment
Weekend Project (10-20 Hours)
Finish Used
Minwax, dark walknut for the top. Then 3 coats of poly. The base is a white paint, distressed with a small amount of dark walnut stain. The base was sealed with Minwax Polycrylic.
Recommended Skill Level
Beginner
Comments
Mon, 04/25/2016 - 07:36
Do you have a full DIY plan
Do you have a full DIY plan for this project? Thank you!
Mon, 05/30/2016 - 00:02
I do not have the full plans
I do not have the full plans exactly. I originally built the grandy sliding media console from this site. Then I got the idea to make this firewood holder with the same concept. The only thing I did different was I didn't add any shelving inside except the very bottom shelf, and I didn't add any doors. I just used 2x4s in the center for the x's. Sorry for the late response. Hope this helps.

Tue, 02/02/2021 - 12:11
Beautiful! Wish there were…
Beautiful! Wish there were plans of some sort for this. Haven't seen it anywhere else.
Outdoor Sectional
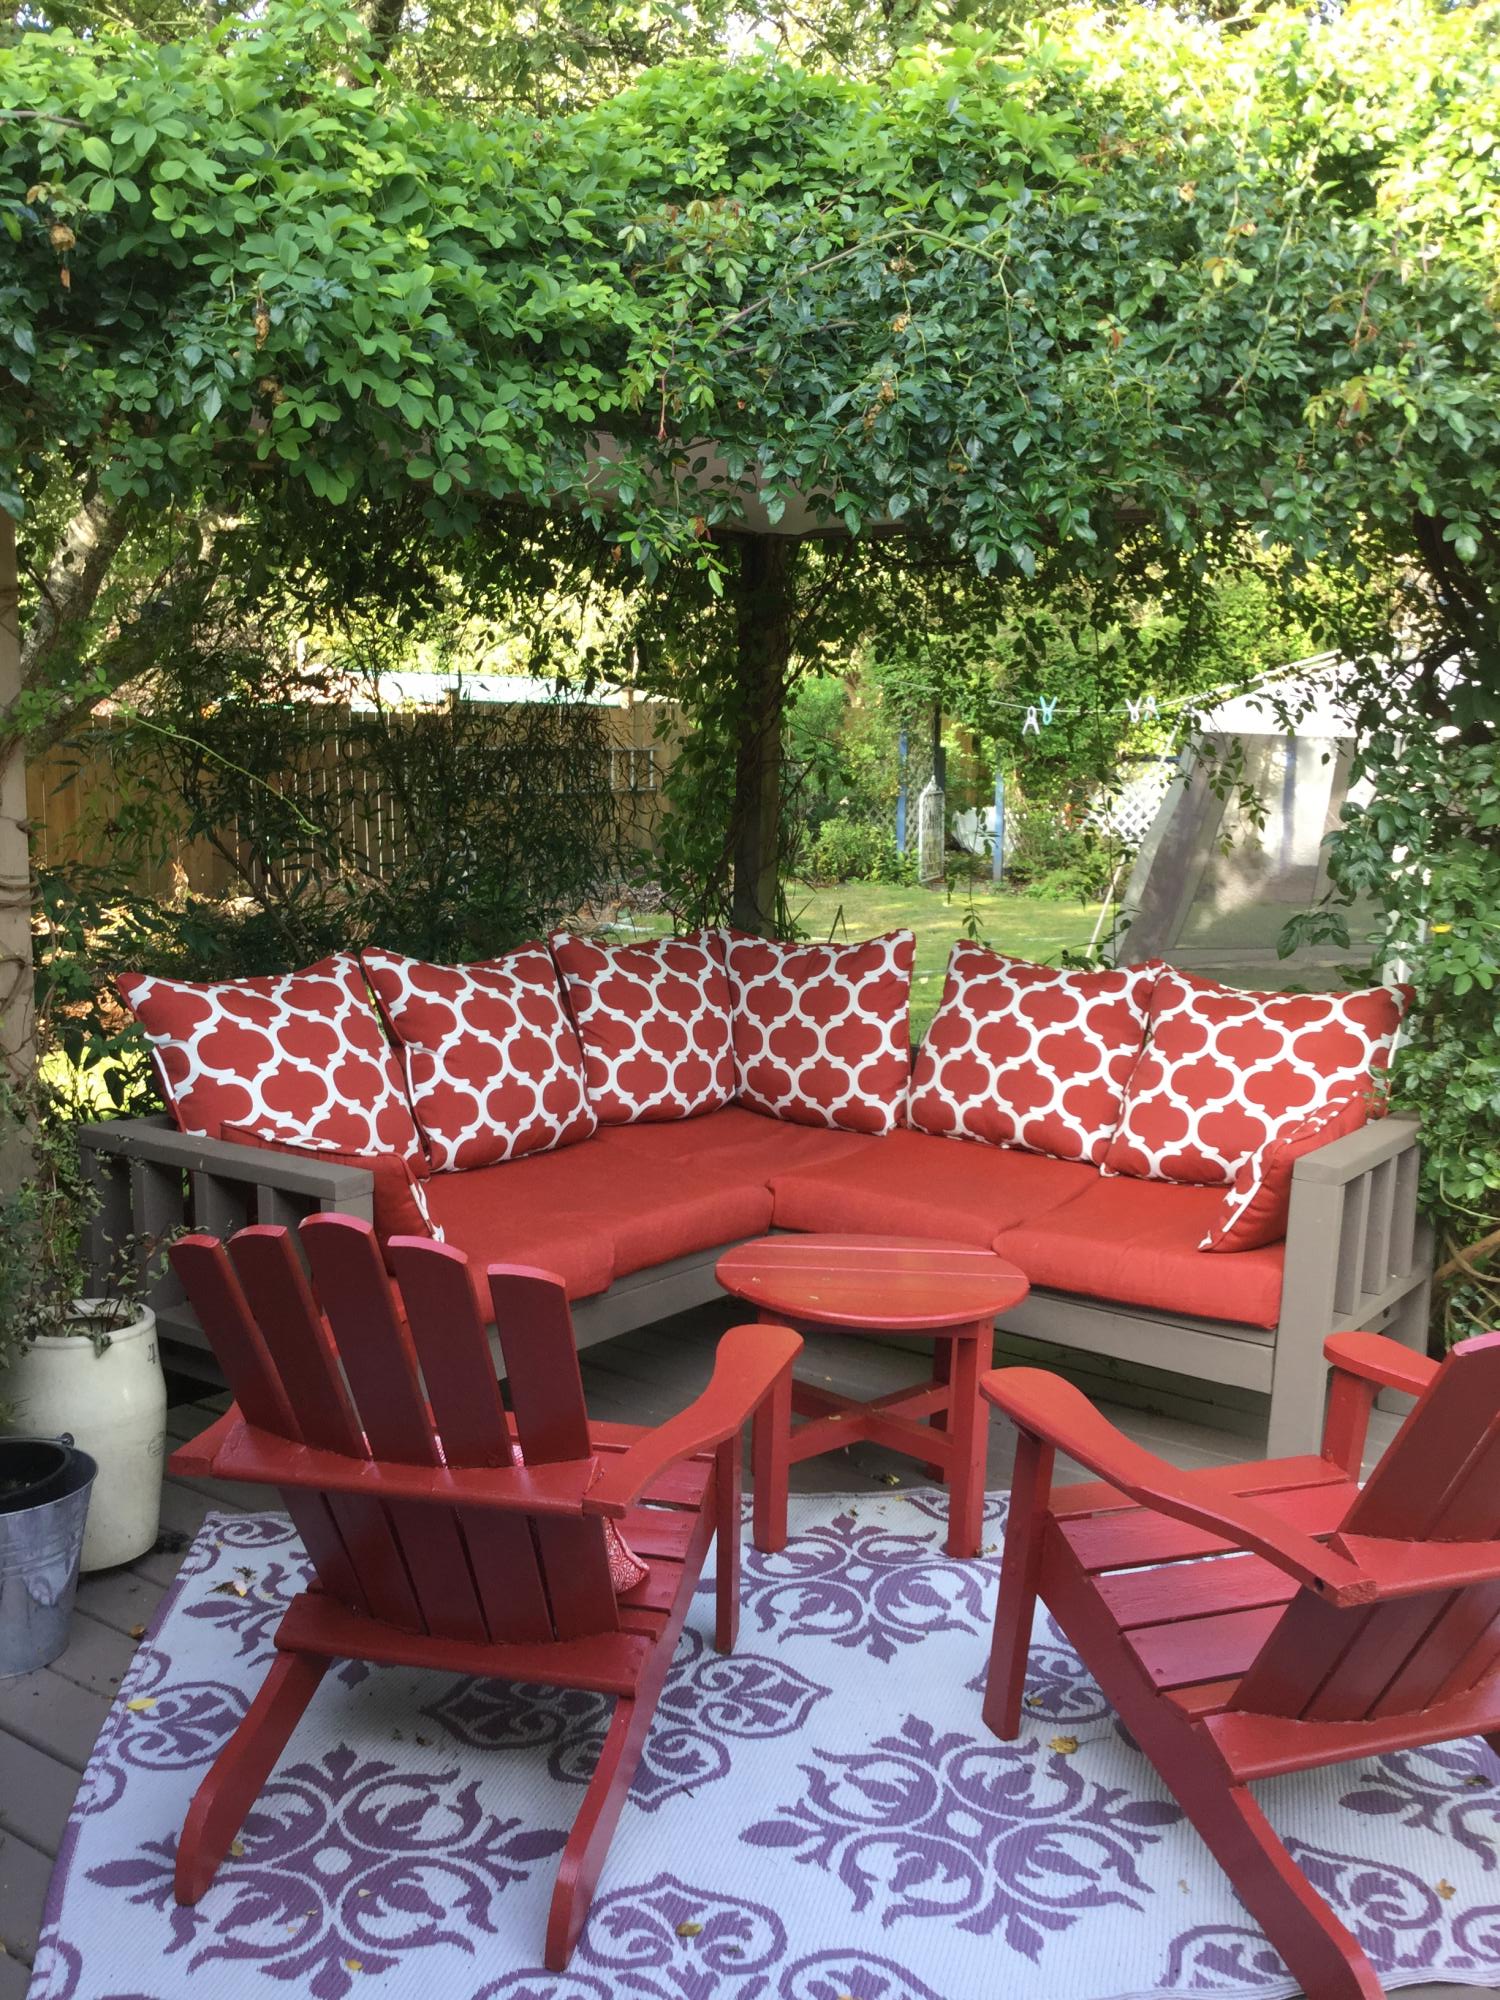
We Love our deck sectional!! We changed the pattern arms a bit and made it to fit our outdoor space and stained it to match our deck stain. Cushions from Home Depot on sale. I move them around regularly to extend their life. I LIVE on the deck in the summer now and we have plans for an outdoor fireplace next. Thanks Ana!!
Built from Plan(s)
Estimated Cost
$600
Estimated Time Investment
Weekend Project (10-20 Hours)
Comments

Mon, 08/19/2019 - 12:02
Thank you so much for…
Thank you so much for sending a brag post our way! We love it! The red color really pops!
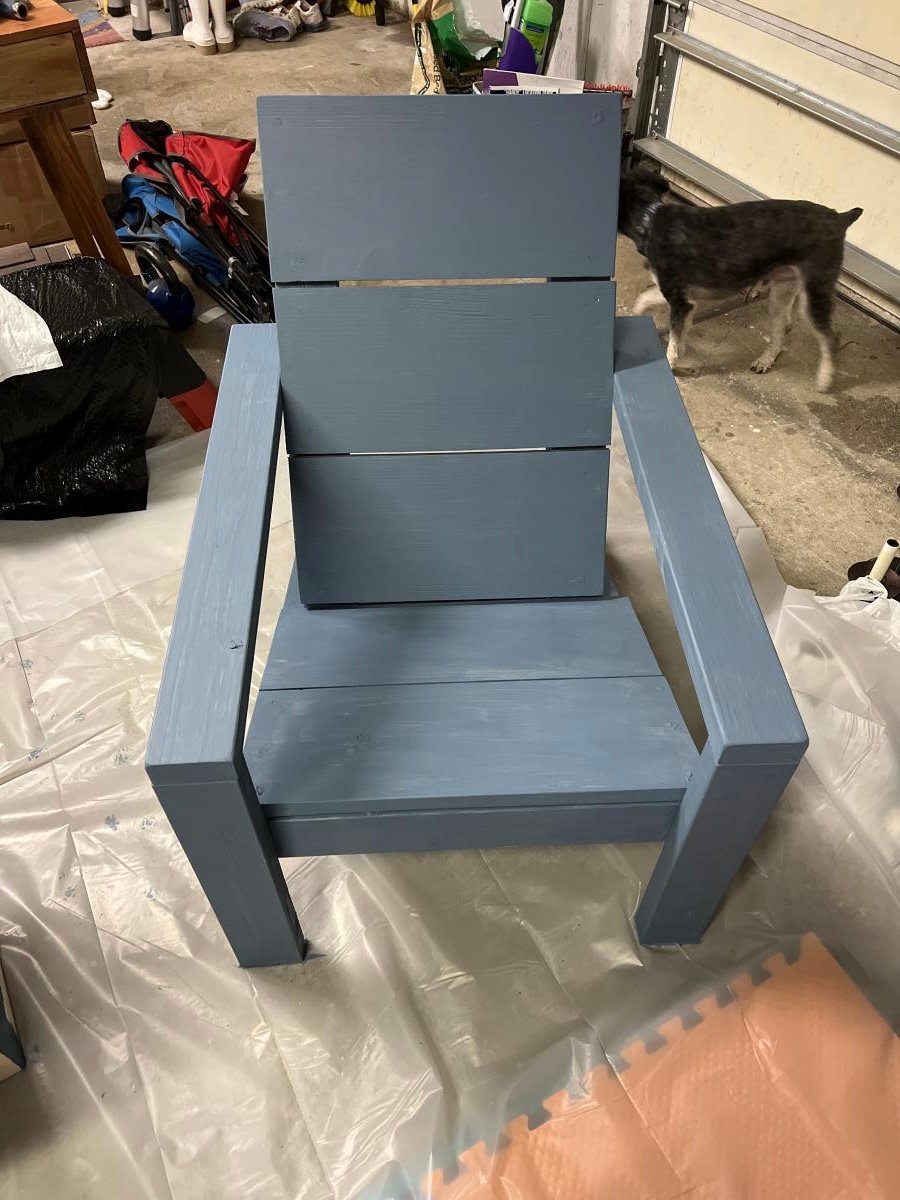
Adirondack chairs

So I followed the plan except I tried to use more pocket hole screws. I managed to use them for all parts except the seat and back. Looking at them I see how I can use them for those areas too ( just a little pre planning next time)
I’m using Behr Wedgwood waterproofing stain and sealer to complete the project.
I love all your plans and can’t wait for my next project.
Built from Plan(s)
Comments
Sat, 05/06/2023 - 07:39
Nice build!
The chairs loolk really great, love the finish! Thanks for sharing.
Amelia's Play Kitchen
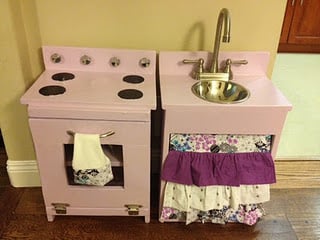
A play kitchen stove and sink for my 1.5 year old daughter for Christmas!
This was my second woodworking project ever. It was VERY involved. It took me about 3-6 months of planning, ordering, buying, figuring out, and finally building the thing.
I used magnetic primer on most of it. Some magnets do stick to it, but I learned some very important lessons: Magnetic primer is MESSY and it doesn't sand very well, so when you paint it on, it should be done in the smoothest possible way in the smallest area. I primed with it using a roller and when I sanded it, got metal shaving dust EVERYWHERE (because the metal shavings in the primer keep it magnetic, obviously).
Made the curtain and matching towel. Next on the list: Matching apron and kids oven mitts!

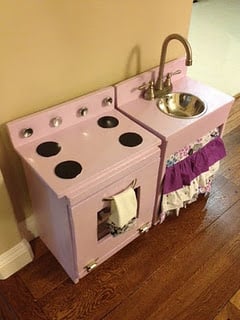
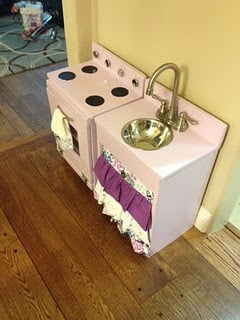
Built from Plan(s)
Estimated Cost
$215
Estimated Time Investment
Week Long Project (20 Hours or More)
Finish Used
2 coats of magnetic primer, primer, 3 coats of paint, 1 coat polyurethane
Recommended Skill Level
Beginner
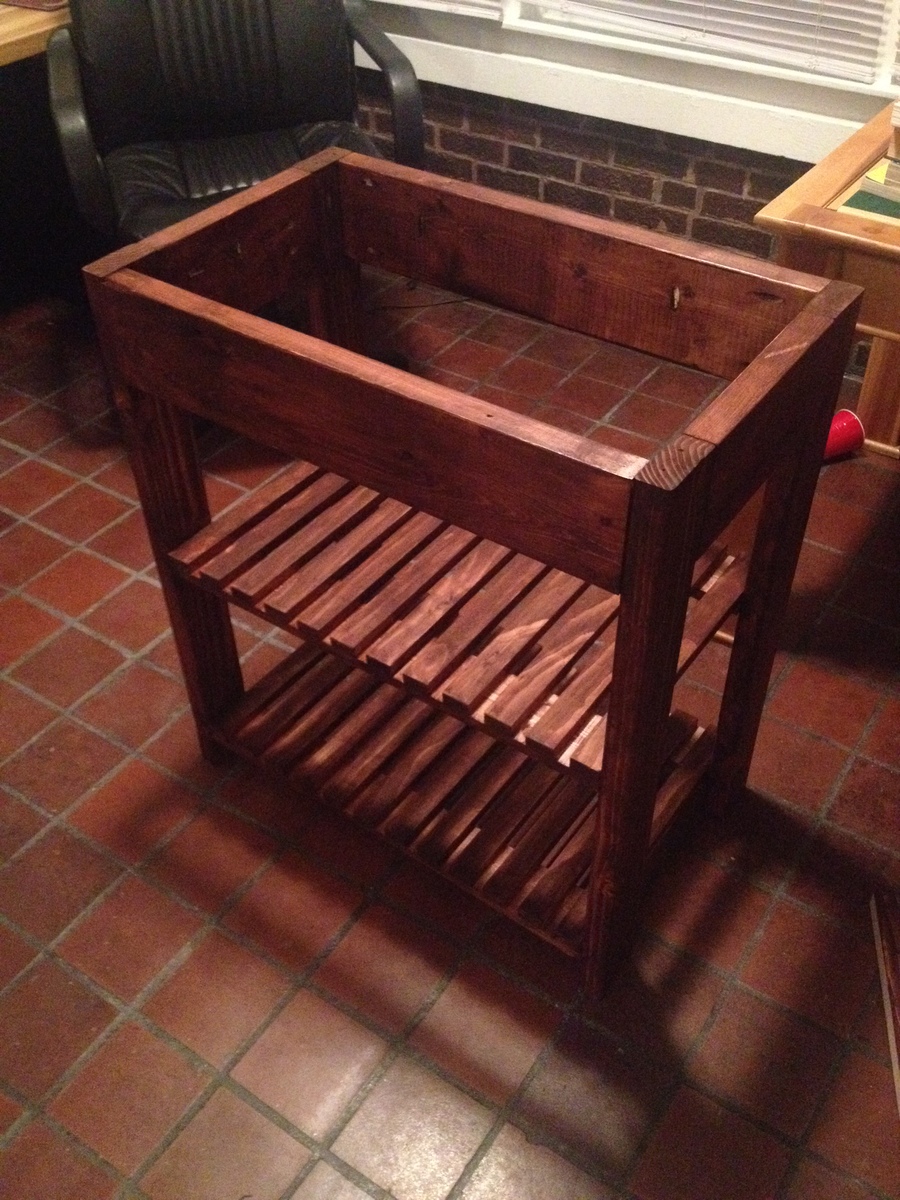
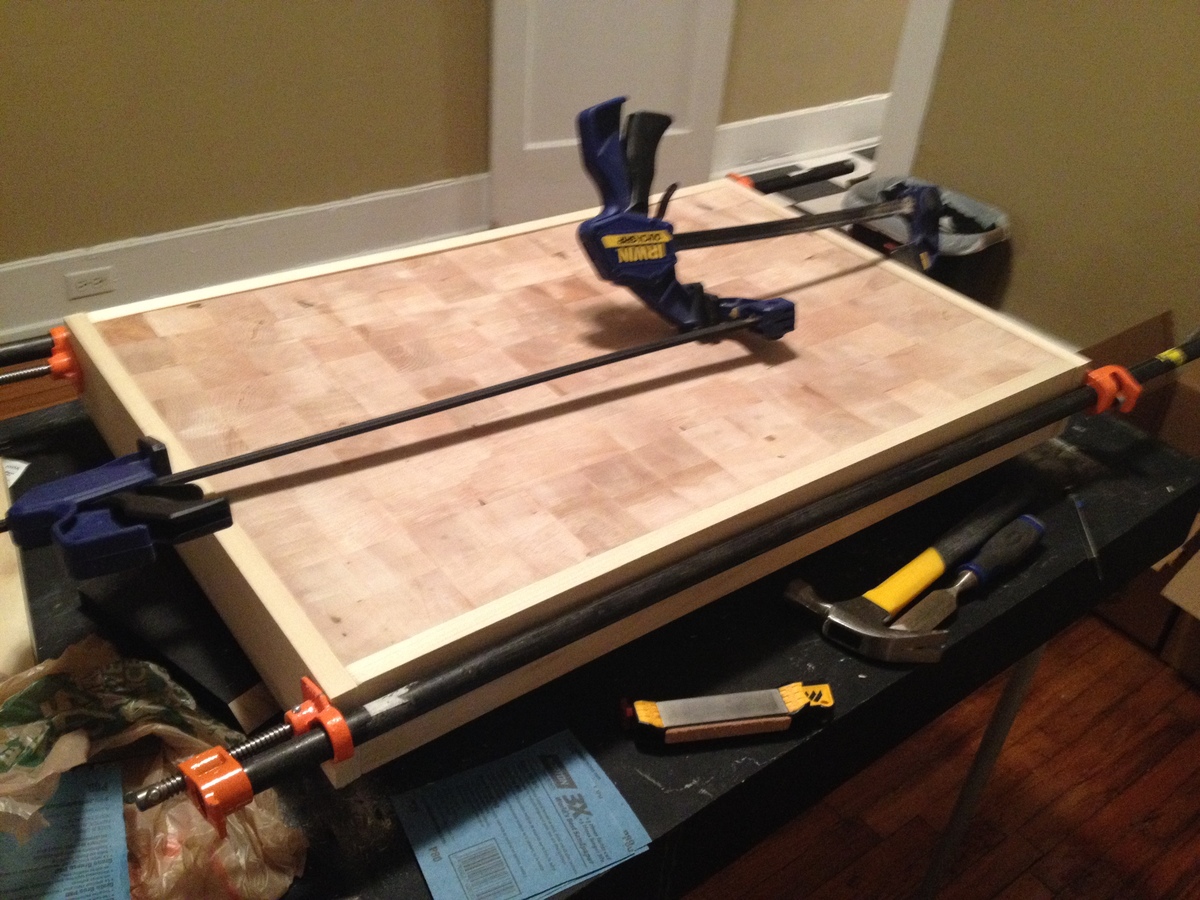
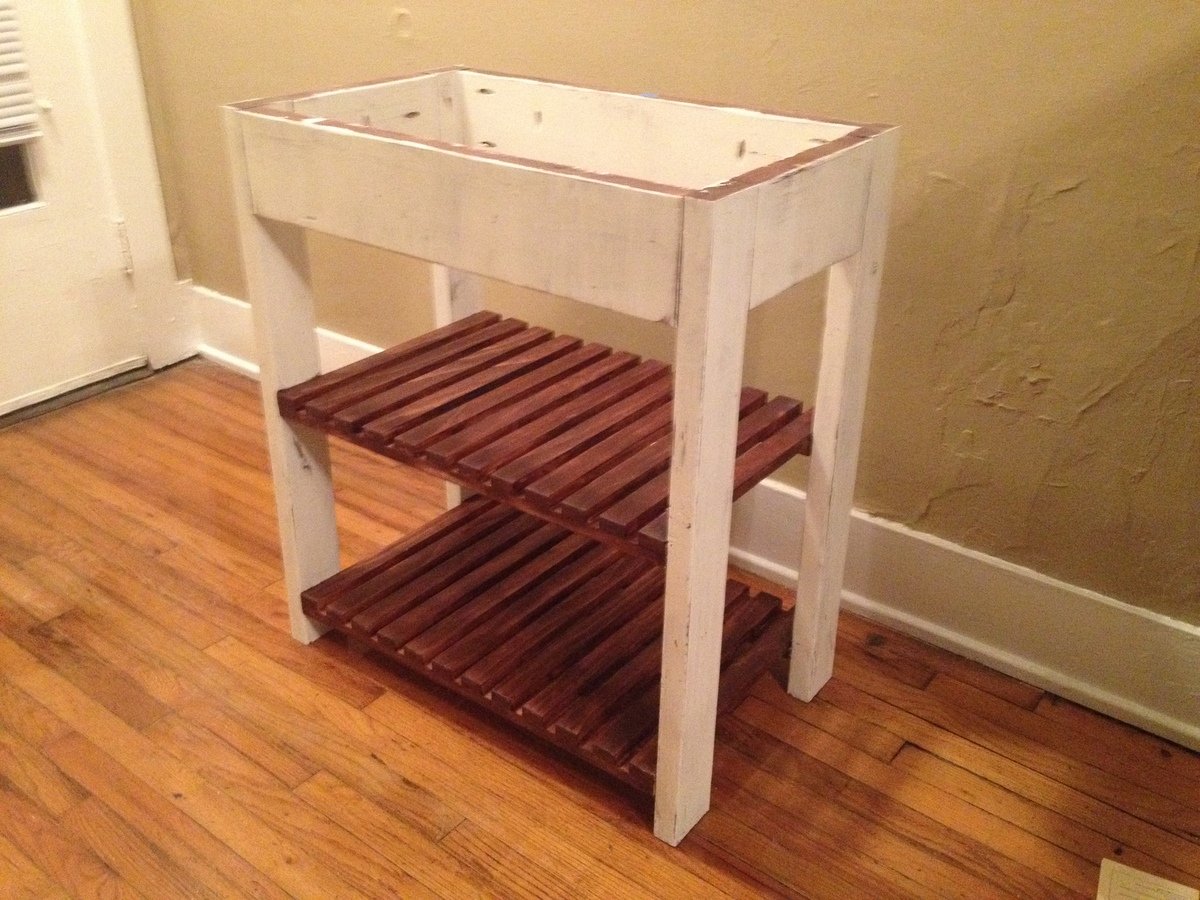
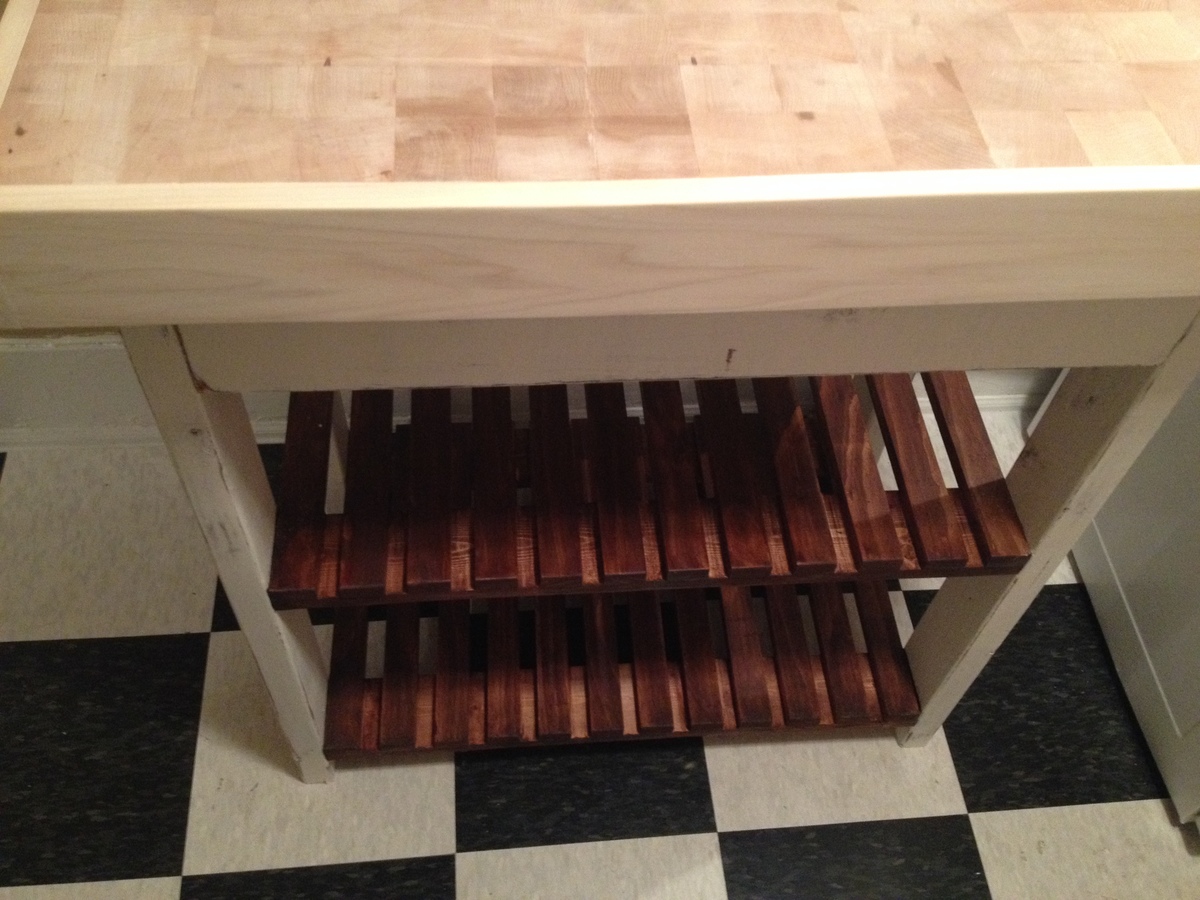
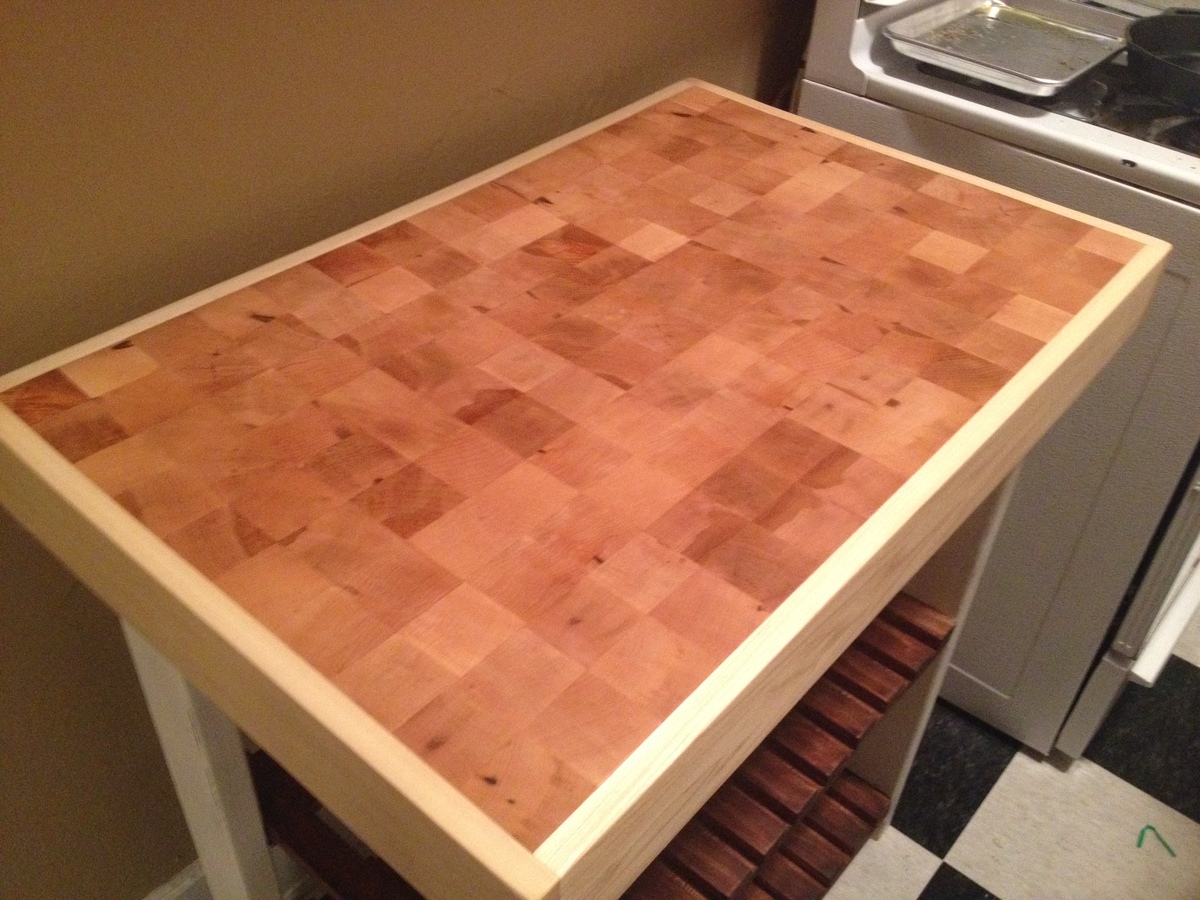
Kitchen Island Butcher Block
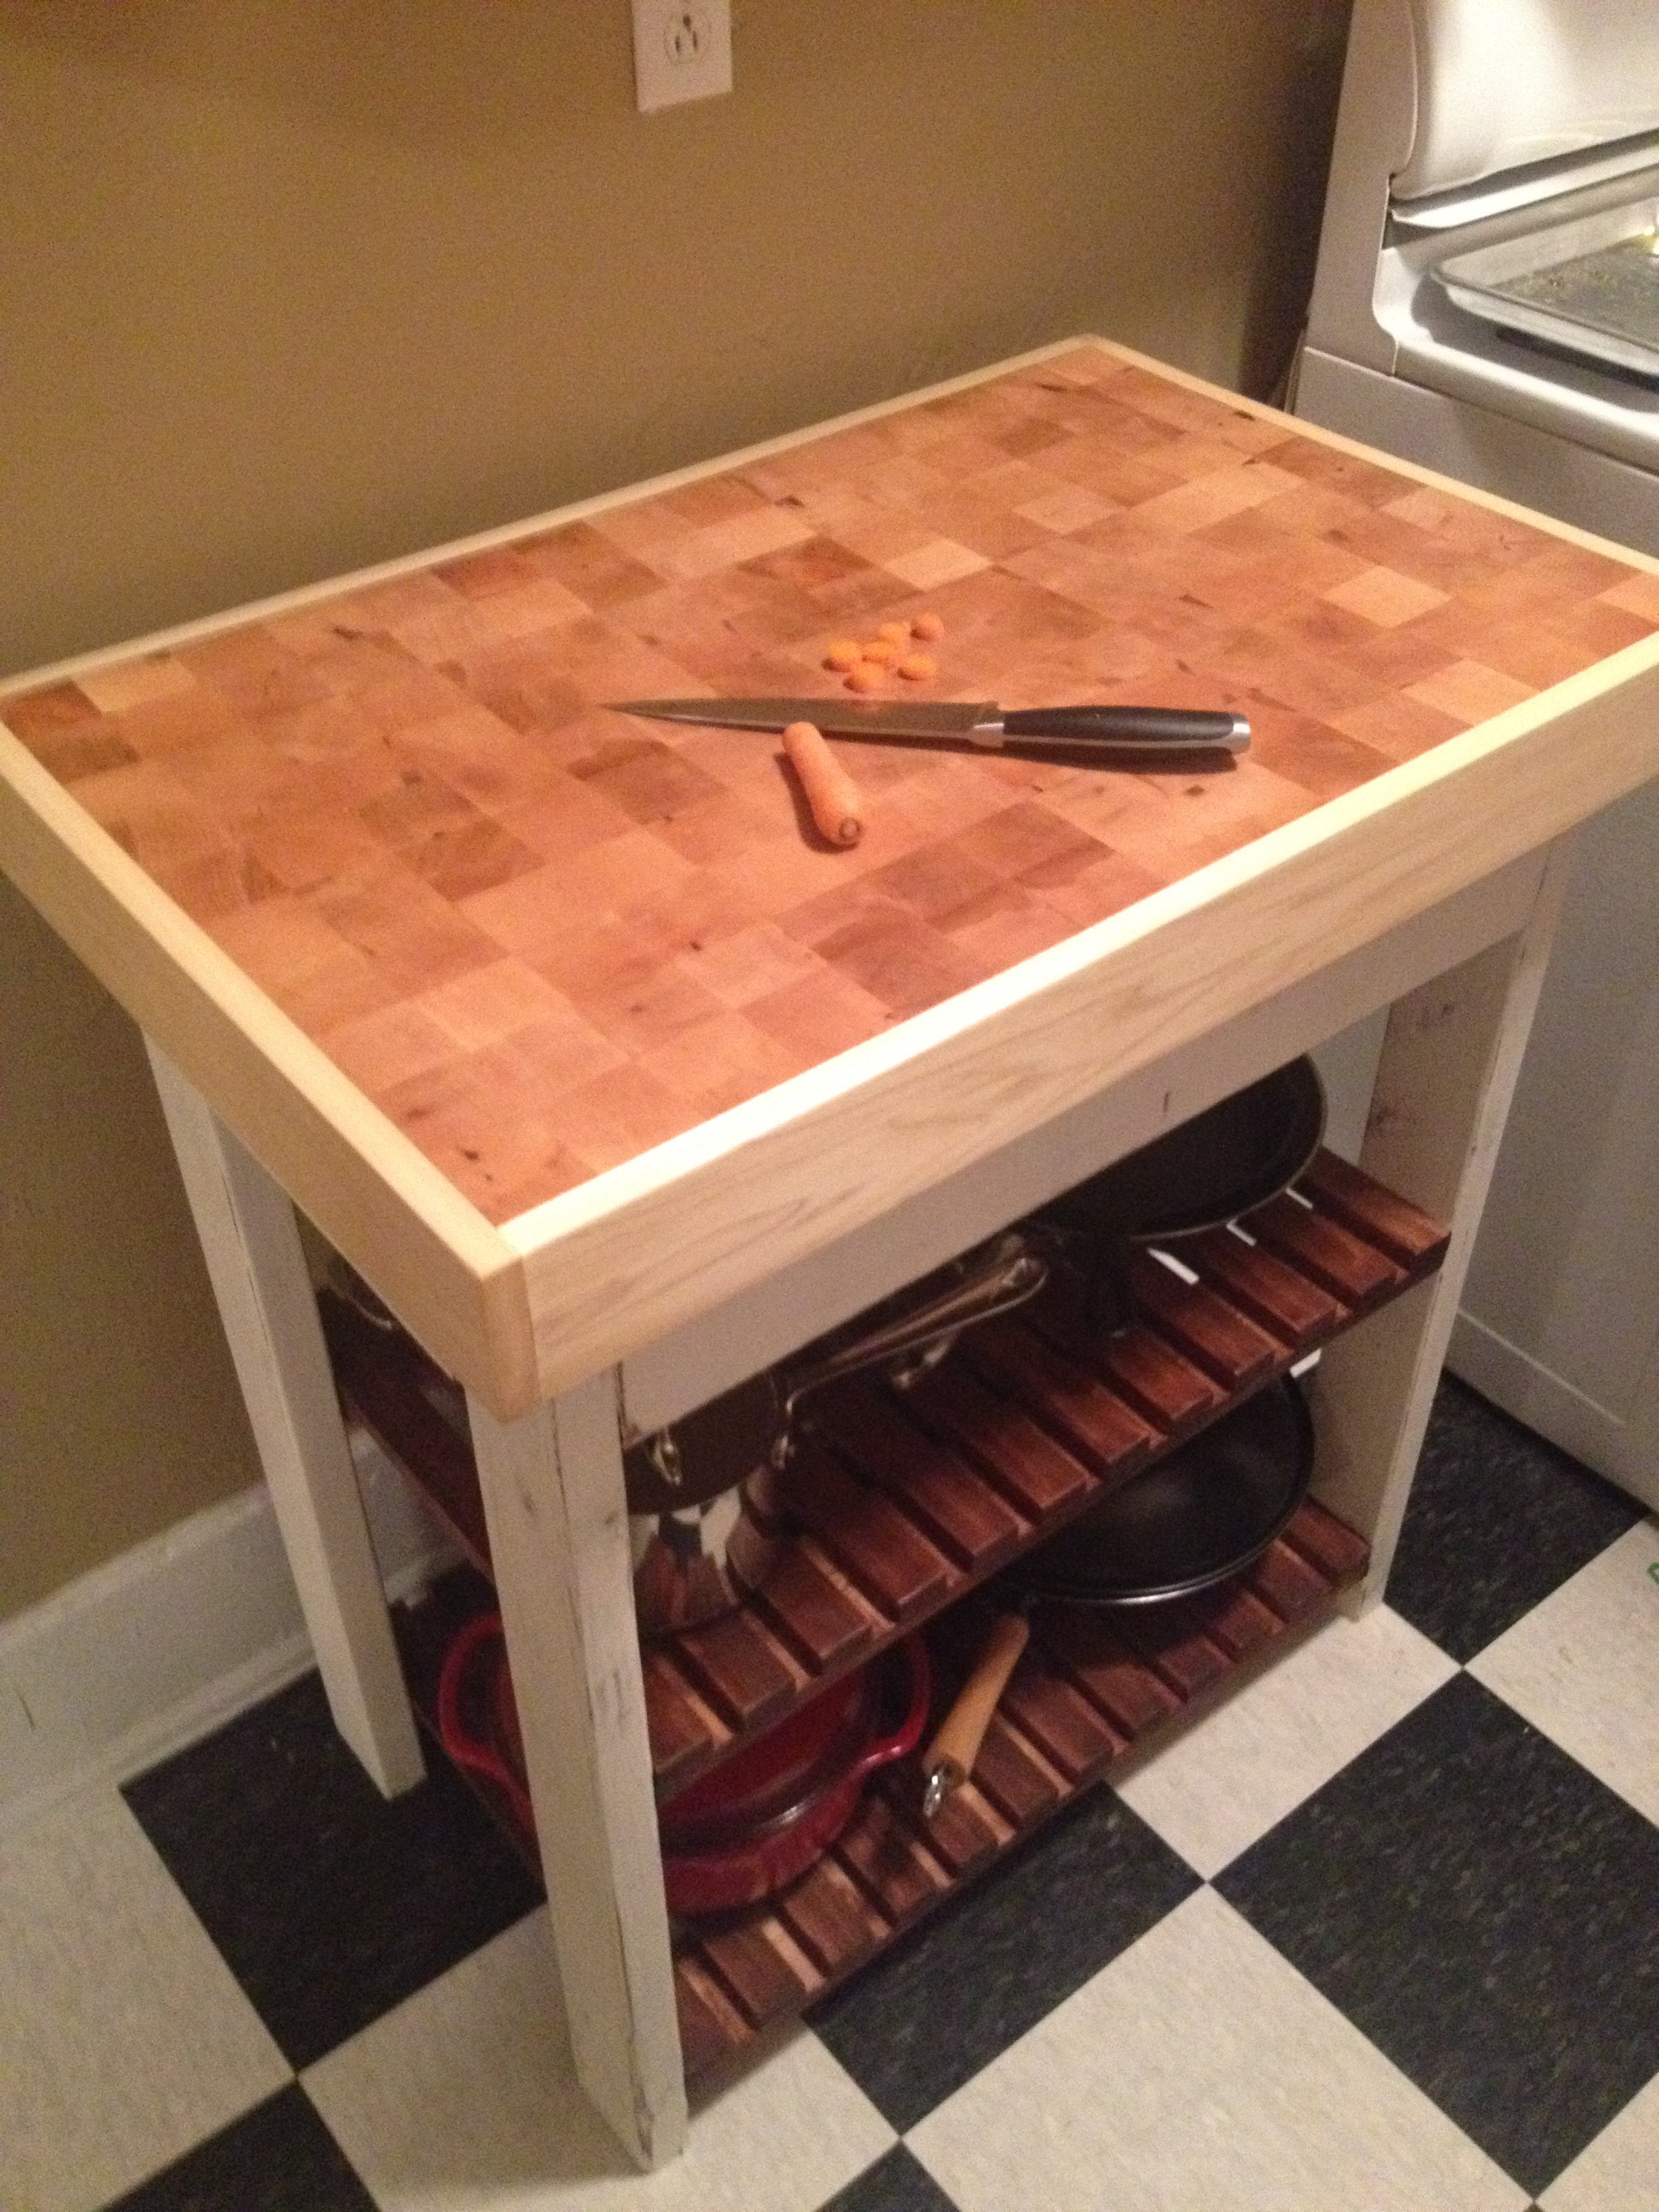
This "island" was inspired by the plans for the Easy Kitchen Island, with a bit of a twist. My roommate is really into cooking, and had a little butcher block that he wanted to upgrade. Our kitchen is fairly narrow, but there was a huge bare spot underneath some cabinets that was begging to be used. Our cabinets were overflowing and we needed more storage space. The kitchen island-butcher block combo solved both problems and fit nicely under our cabinet.
After a little research, we decided to go with an end-grain board made with maple. We looked around and ended up getting a bunch of wood off of eBay for about 65 bucks. The butcher block turned out to be a bear of a project. Without access to a table saw (not going to happen in this apartment) it took some sanding, then more sanding, then a trip to my dad's to use a table saw after all, then more sanding, then more...well, you get the picture. Once all the pieces were assembled, we glued a 1"x4" poplar border onto the sides to give it a more uniform appearance from the sides, as well as to hide the connection to the structure.
Finally the block was complete and it was time to build the structure of the island. The cuts and the assembly of the main pieces took a grand total of an hour and a half - a great relief after spending weeks on the butcher block. We decided to glue the slats onto the supports to make life easier. Once we got done with that it was time to finish the structure.
We decided to follow Ana's directions on crackled milk paint. We tried to follow them exactly, but weren't able to get the same amount of crackling on ours. No worries, though, we just sanded down some edges and gave the whole thing a good coat of Polycrylic.
Once all that was done, we screwed the block on and construction was complete! We gave the block and the poplar several coats of Boos Block Mystery Oil as the conditioner and we were done. The oil really brought out the color and the body of the wood, and we couldn't be happier with the results. Can't wait to chop a turkey on it!
Built from Plan(s)
Estimated Cost
145
Estimated Time Investment
Week Long Project (20 Hours or More)
Finish Used
Minwax Gel Stain, Minwax Polycrylic, Old Fashioned Milk Paint, Boos Block Mystery Oil
Recommended Skill Level
Intermediate
Comments
Fri, 11/22/2013 - 15:38
Wow!
This looks super! I'm intrigued by your butcher block top. The squares look so perfect and even. It looks like a tremendous amount of work went into it, and it's absolutely beautiful! Love the paint and stain used on the island structure too!
Wall Jewelry Cabinet
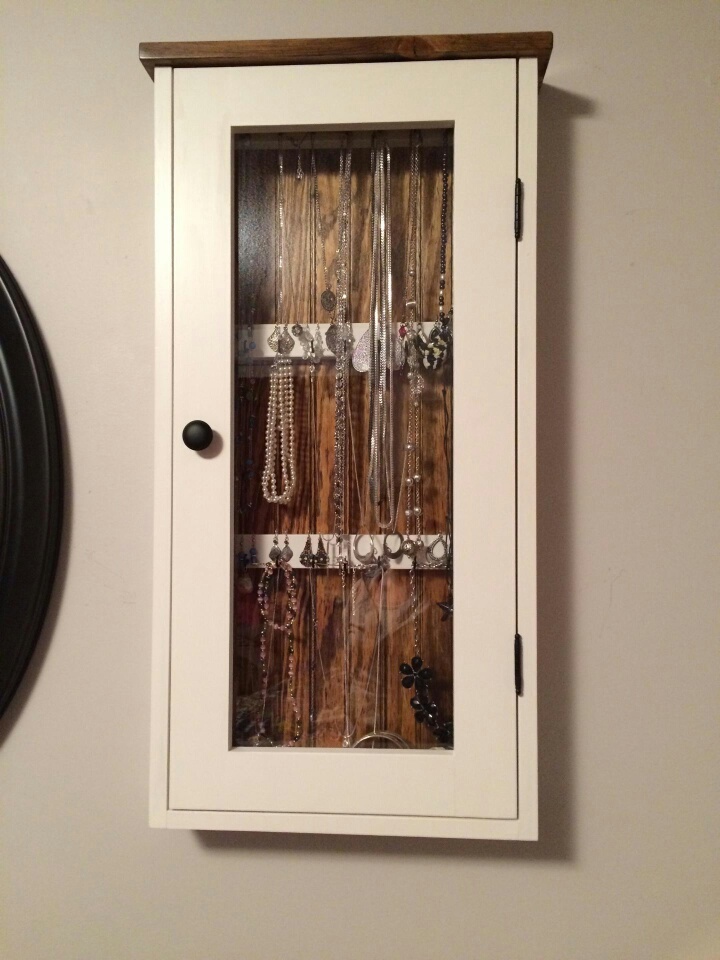
I built this for Girlfriend this Christmas. It was fun to surprise her. I put some jewelry in it, wrapped it, and put it under the tree. I think it turned out really nice. I installed a recessed bead-board back and 1/8" glass in the door. All black hardware and a two tone finish. She loves it but she filled it up real quick. I guess I could have built it bigger! ![]()
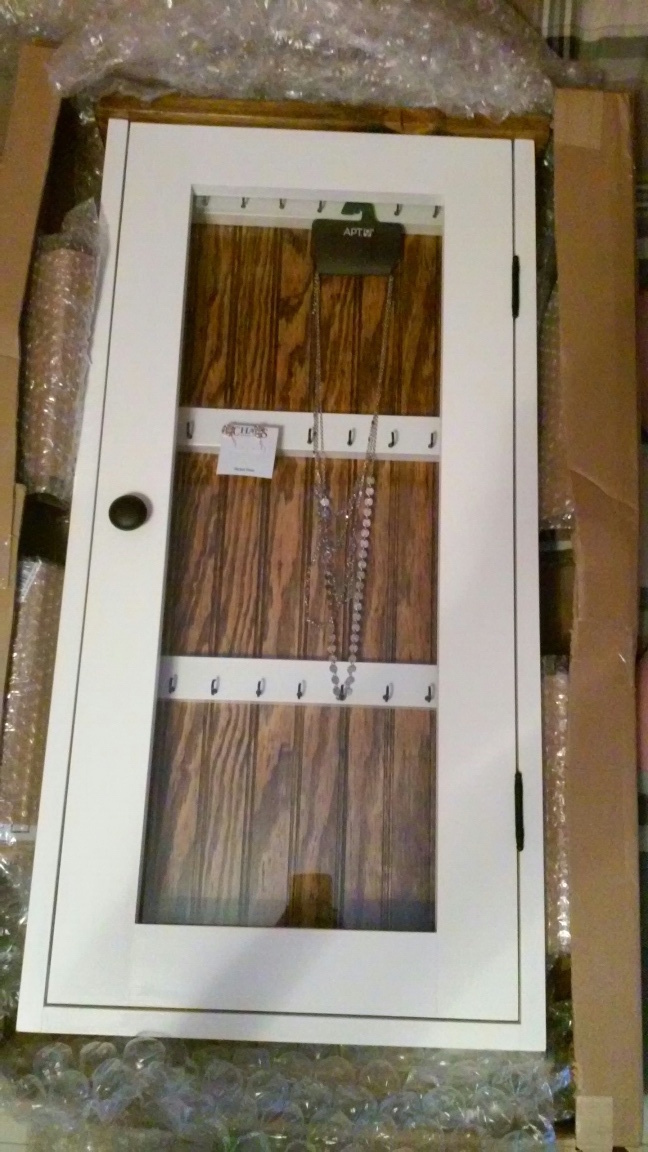

Built from Plan(s)
Estimated Cost
$70-$90 including lumber, paint, stain, glass, and hardware
Estimated Time Investment
Weekend Project (10-20 Hours)
Finish Used
Swiss Chalk Paint and Minwax pre-stain conditioner, Dark Walnut stain and Satin Polyurethane
Recommended Skill Level
Intermediate
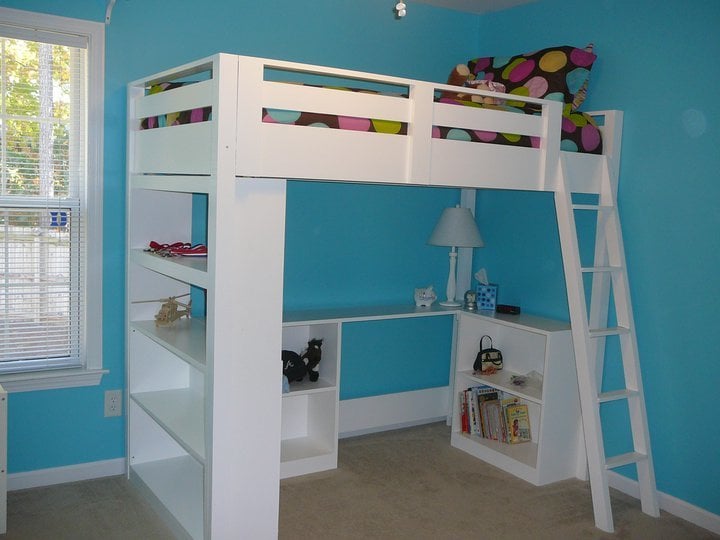
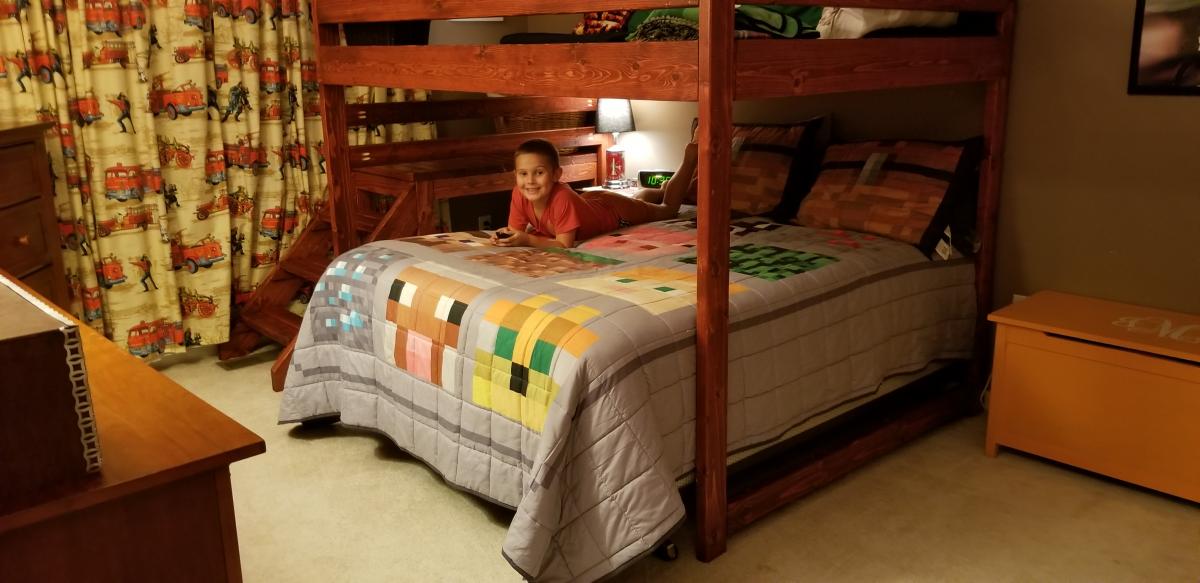
Full Size Jr. Loft Bed
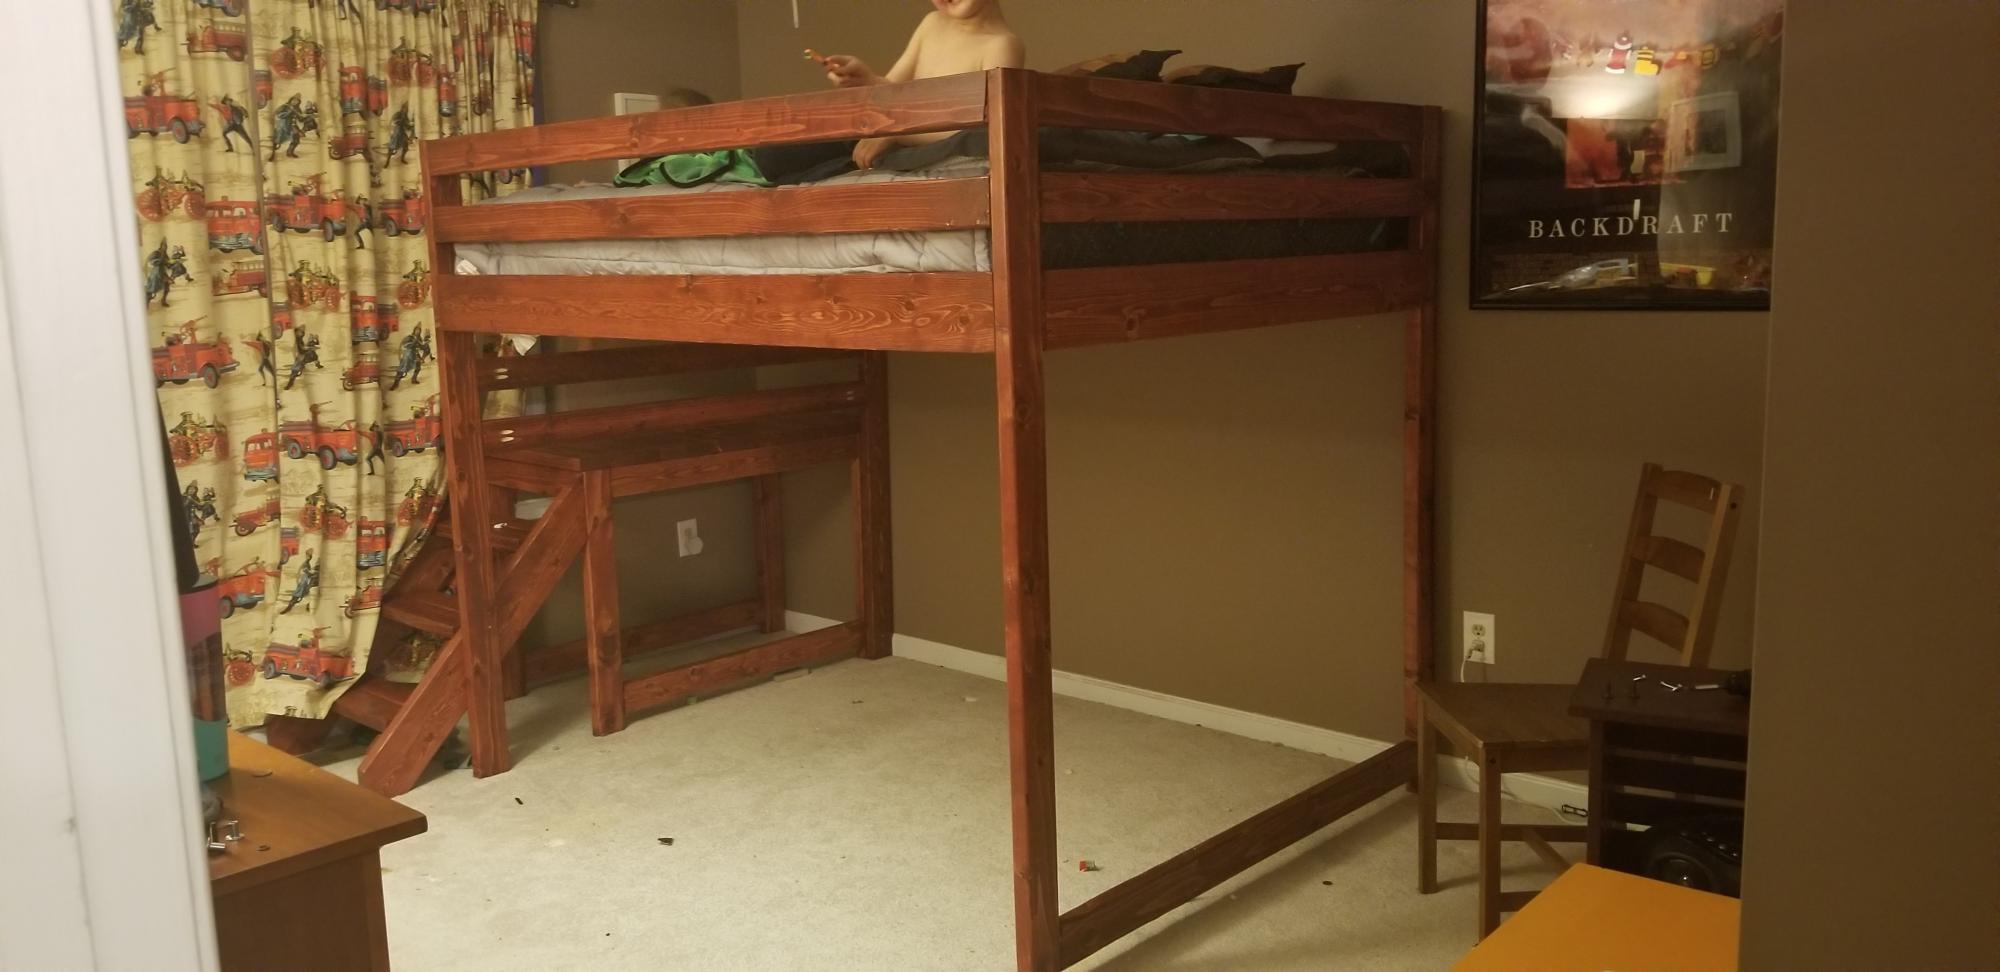
Initially, I made this loft bed so my son would have more room to play on the floor, but what I found out was that he was playing in his bed and sleeping on the floor. About 3 months after having the bed in his room, we put his bed underneath, on a frame, and I put plywood and wood looking wall paneling on the bottom to make a floor. We moved the twin mattress from the floor to the loft, so now he has a place to play with his friends.

Built from Plan(s)
Estimated Time Investment
Week Long Project (20 Hours or More)
Recommended Skill Level
Intermediate
Comments
Mon, 07/11/2022 - 14:26
Full size changes?
What adjustments did you make to the slats. I’m wanting to build a slightly oversized full loft bed for my daughter. The extra space is for a reading chair and maybe shelves. Dimension would be ~100 x60. I’m nervous about the slats spanning the 60 inches and what I need to modify from the junior loft instructions