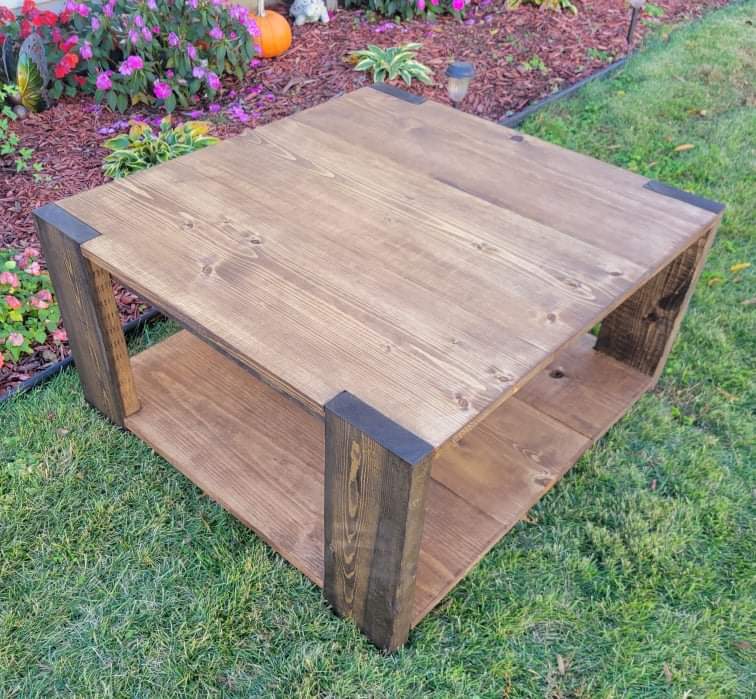
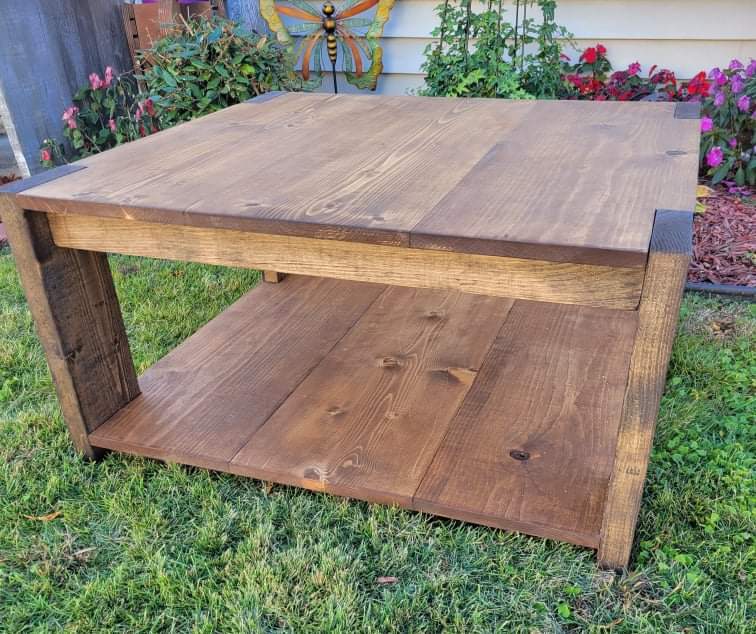
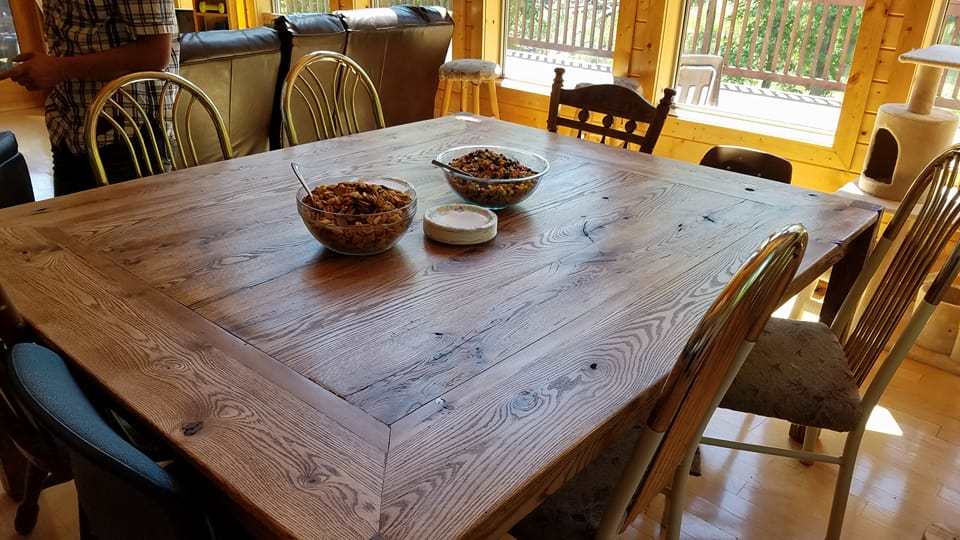
Tryde Media Console
This was my second build. Sorry for all the crap on it. Straightforward and no drama. I learned from this build to paint as much as you reasonably can before assembling.
My wife and I recently upgraded from a queen to a king bed, so we needed a new bedframe. I came across this website and saw the plans for the farmhouse king. After looking at everyone's brag posts, I set about making plans for our bed based upon what Ana had provided and what I (meaning my wife) wanted.
While I had sketched out a plan and bought all my lumber based on that plan, I ended up modifying things as I progressed along...which meant additional trips to the store! There was some lumber that I didn't like once I put it together and had to start over (at least this happened in the very beginning!).
Basically, the head and foot boards are identical with the exception of the length of the posts attached. Since I couldn't find any 4x4 posts that weren't treated lumber, I had to make my posts by gluing two 2x4's together and then securing them with screws.
I spent quite a bit more money that intended, but that was because instead of using boards to line the head and footboards, I chose to use 3/4" sanded plywood. And since my wife wanted a large footboard to go along with the headboard, I ended up having to buy two sheets at around $50 a sheet. I trimmed that with 1x4's and then added a nice molding to the inside edges. It was that molding which was the single most expensive part. I think I bought 12 pieces for a little over $12 bucks a pop (I added it to the head/footboards and side rails). The funny thing is, that adding this was an afterthought and wasn't in the original plans, but I believe it's what makes the bed!
As far as getting the bed in the box, I incorporated a ledge on each of the side rails, footboard, and attached a ledge the bottom of the headboard. I also have a floating support that sits in the middle of the frame. Since this is a king, I've got two box springs and they're both well supported. I don't think any of my pictures show it, but I ended up getting bed rail hooks to attach the side rails to the head/footboards. I had to chisel out a spot for these 5 inch long hooks and receptacles on each end of the side rails and head/foot board. So, the bed comes together and apart very easily and quickly.
It took me a month and a half to build this, but that was off and on. I'd work on it for a few hours after I got home from work if I had time and I'd pick a day on the weekend. If I worked on this straight through, I would say it would have taken me a week and a half.
Thu, 04/24/2014 - 12:10
Love this bed. My sister is moving near me and I told her about this site so we could refurnish her home (and give me more things to build). The 1st thing we talked about building is a king size bed and I knew the plans would come from Ana's farmhouse bed. But I wanted it different and use plywood instead of the boards, like yours. I saw your bed and new it was the one. What won me over was the molding. It looks like a bed from a furniture store. Great job.
Thu, 04/24/2014 - 14:02
Thank you! I got the molding at Lowes and while it put me over my initial budget, I can't imagine the bed without it now! I just glued them down and put in 1" finish nails. I countersunk the nails using a small hammer and a punch. This way, I didn't damage the molding. I wish I could put up more pictures to show how it all went together.
The bed is quite heavy, so I'm glad I installed steel bed rail fasteners. It make it easy to tear down and put together without too much help.
Thu, 04/24/2014 - 13:28
This turned out great! They're great looking head/footboard but that moulding really does take up another notch...definitely worth the extra investment. The finish turned out very nice as well. great job!
Fri, 04/25/2014 - 16:53
Yeah, I was really pleased with how the molding turned out! I liked the bed unstained just as much as it is stained. I lost some of wood grain color variations when I stained it that I was hoping would show through, but oh well. My family, as well as the neighbor across the street, have put in bed/headboard requests! I might try some other molding variations and I'll post pics of those of course!
Tue, 09/13/2016 - 10:57
Your bed turned out beautiful! I love the modifications you made. I am wondering what size boards you used for your topper? From the pictures I am guessing maybe a 2x6 on top of a 2x4, both routered?
Live-edge garden bench made of solid black cherry. Bench top is made from a book-matched pair of 1-1/2 inch thick slabs. Leg and support pieces are made from the same log and feature pinned mortise & tenon joints on each end. The entire bench was treated with hand rubbed teak oil, and is finished in four layers of weather resistant oil-based polyurethane. Two round 1-1/4 inch chrome furniture glides are attached to the base of each leg.
This was a fun build. I let my daughter design the slats on the headboard, and as long as all slats are either 90 or 45 degrees, the cuts and application are simple. Thanks, Ana!
I was recently divorced and decided to fully transform my bedroom. It's not quite done in this picture - but the bed is! This is Ana's King farmbed, and it's amazing.
Mon, 01/15/2024 - 18:22
It looks like a great start to a "new Room"! Thanks for sharing.:)
I made this step stool for my two little guys during nap time. It took me about 2 hours to build and then an hour or so to paint. Tip for footprints: Paint foot and hold child to put foot down and press. If you don't get the footprint you like then wipe it off right away with a wet paper towel. Dry the area, repaint foot and try again. As long as you wipe it off quickly you won't have to repaint to be able to do another footprint. Believe it or not it only took a couple tries each with a wiggly two year old and 6 month old to get my footprints! I used a toothpick dipped in paint to write the names.
I have completed a few projects but this is my favorite so far. I love it!!
Tons of fun to build! I wanted a firmer base so I used 4x4s instead of 2x4s. I also tried a new staining method for me. I laid down a light coat of special walnut. Once that was dry, I rubbed on a somewhat thicker coat of classic grey. It kind of has a marbled effect now! I also stained the letter "C" for my friends last name using a black Walnut color. I think she turned out alright!
Wanted to make these for my son and daughter-in-law for their anniversary. Hope they like them!
I moved into a new house and needed a new chicken coop. I am retired and not a woodworker but these plans were easy to build. Thanks Ana.
Doug Lamm
I went a little out of control on the week of the 4th of July - I set out to build a picnic table, 4 sling chairs, a deck and a playhouse - and I did!!!! I owe Ana a great debt of gratitude for these amazing plans and empowering me to do it! I built the picnic table and the sling chairs as I was waiting for primer and paint to dry on the frame, inside and outside of the house. For the shutters - I scrounged around the garage and found some leftover wainscoting, and put a leftover 1x2 on them. The door frame wasn't straight - so I added a piece of leftover trim from my daughters bed I built. My only next step is curtains for the windows. I even moved the full kitchen set I built the kids a few christmas's ago into their. They have only been playing with it for 2 days and I can't drag them out of it!!!
My husband and I built this together. Well, I helped! It was my first time using power tools. I'm the one who designs and picks out themes/colors and he does the manual labor but I wanted to learn a few things this time.
We modified the Shirley Console table and combined a few features from some of the other console tables. As you can see we modified the front of the drawers. We wanted the table to match our decor but also wanted some of the wood to show. I said, "I wish they made gray stain!" Miniwax does! This was our first experience. It was challenging because it dries so quickly and you are threatened with an uneven look but we love the way it turned out. We also bought pine instead of plywood so i cost a bit more but it was worth it! It also took us a bit longer because this was our first project and we modified the measurements to fit our entryway.
I chose these drawer pulls to match my gray and white damask curtains that hang nearby. I purchased them in brushed nickel from Home Depot for ~$3 each and spray painted them white. When I told people what I was doing I got negative feedback but I think they turned out great! Now to decorate it and make a matching entertainment center!
Also the Kreg Jig was a HUGE help...it really makes the piece look professionally made!! Thanks ana-white.com!!
Tue, 04/29/2014 - 08:44
That looks great. I understand getting negative feedback. Most people think you have to have special training to build. I used to be skeptical until I began building. I hope your build let them know they can do it also. Keep it up...
Tue, 10/14/2014 - 09:35
I love your modified version. I am going to build this as well. I absolutely love the modification that you made on the drawer faces. Can you provide any instructions/hints to help me achieve the same look on the drawer faces? Thanks!
Thu, 10/30/2014 - 15:32
I know that some of the wood measurements were not available at our local hardware store, which resulted in the sides being "trimmed out," so we decided to make the drawers match. We built the drawers like the plan, except we subtracted 1/4" from the depth of the drawers. We made the drawers (minus the trim pieces), slid them in the table, and while in place, nailed 1-1/2" x 1/4" trim pieces around the perimeter of the drawer faces using a finishing nail gun. This made the trim pieces flush with the face of the table.
Not sure if that made sense or not...I'm not good at explaining things in writing. If it doesn't, just let me know and I'll try again. And thanks for the compliment on the table!
Wed, 01/20/2016 - 08:59
Thanks for your feedback on my post a while ago. I finally build this piece and are absolutely happy with it. We used your technique for the drawer faces, and my wife was so obssessed with your drawer pulls, that she tracked them down and special ordered them from our local Menards. I have uploaded a Brag and gave you credit for the idea. Thanks for the inspiration!
2x4ncoffee table
First bed I have made (did it alone). I used the plan but made some modifications - added depth to the headboard for running lights and independent light switches on each side, added upholstered panels and raised the footboard.
I've been searching for a pet food bin for a while now, and started looking for something cuter than an ugly plastic bin. I found a few things on Etsy but none were big enough and also cost a lot of $$$. I took the Modern Cedar Outdoor Storage Bench plans, and modified the size to fit large bags of dog and cat food from Costco, or pet food bins. I'm 55 years old and have fixed things around the house, but this was my first time building something.
I am so happy with how this turned out! I found the dog bone handle online and my daughter painted the paw prints. Way cuter than what I found online and I built it using reclaimed wood I had laying around - my only cost was the handle. Thanks Ana!
Heather Durand https://www.facebook.com/pinkprincesshc
This is the first project I tried, and it really took a whole lot longer than it should have. I started it without all the tools I really needed to do it the way that I wanted to, so it sat upstairs with no trim on it being used for probably 2-3 months. I managed to pick up a sander, and then I finally saw a sale at Lowe's for a finish nailer and air compressor combo that was too good to pass up, and was ready to put the trim on it. Then when I finally had everything, I was able to finish it in about a week, between the sanding and the sanding and the sanding.. and then the sanding! The stain and finish took a few days too. I definitely learned a lot from this project, definitely check for square to cut down on sanding time to make things line up, and go easy on the wood glue. Trying to sand it off of the exposed parts of the wood are a real pain. Then a big thing I learned the hard way was to be careful with the stainable wood putty, I read that it would be good to use a Qtip to put wood putty in the holes. Sanding all of the excess putty off the wood was a really time consuming process, but I do think that mistake did make for an extra smooth finish, I must have spent an entire day sanding all the excess wood putty off that was dried on from my original mistakes. All in all it was a great learning experience, and I really did have a lot of fun with this one. Can't wait to start my next project, thanks a lot Ana! You really are an inspiration to those of us who are still learning, and I can't wait to explore my new hobby a little further in the future and see where I can go with it.
I been wanting to make this for a long time and today I just went out to my work shop and did it. It was fun to make. I didnt have any 1x6s so I used 9 1x4 and 1/8" spacing it worked and looks amazing!
These lounge chairs were made from 100% redwood. The cushions were from Pottery Barn and were about $130 each.
I went off Ana's plans but also had inspiration from other sources.
We live in an old house with lots of windows in the kitchen but not much storage space. Having previously tackled a kitchen island with the help of ana-white.com, I knew that the Under Sink Kitchen Organizer Shelf would be a much simpler project. We already had the tools and screws, so I picked up a couple of 3-foot 1x8s for about $7. The organizer is 20 inches high, 15 inches wide, and 7-1/4 inches deep. The shelf is only about 6-1/2 inches deep because I used 1x8 for the back, but it works.
I based my bed off of the Fillman Platform Bed plans. Just bumped the dimensions up to fit my mattress and added the mid supports. The frame was built using 2x6 boards taken from a fallen barn. I ripped 2 2x6 boards down the center to make the the supports for the slats. My feet are 3 2x6's screwed together and then attached to the frame. Next time I will cut a notch out of the feet so that I can rest the bed on them and then try to find some old lag bolts to attach them to the bed. The frame was put together using a Kreg Jig. I put the Cedar boards on to dress the front and sides up some and to help keep the slats from showing when the sheets were tucked in. My finish is 1 coat of Linseed Oil and 2 coats of Teak Oil.
Let me know if you have any further questions on this build. As soon as I find some doors I will be building a head board for this bed.