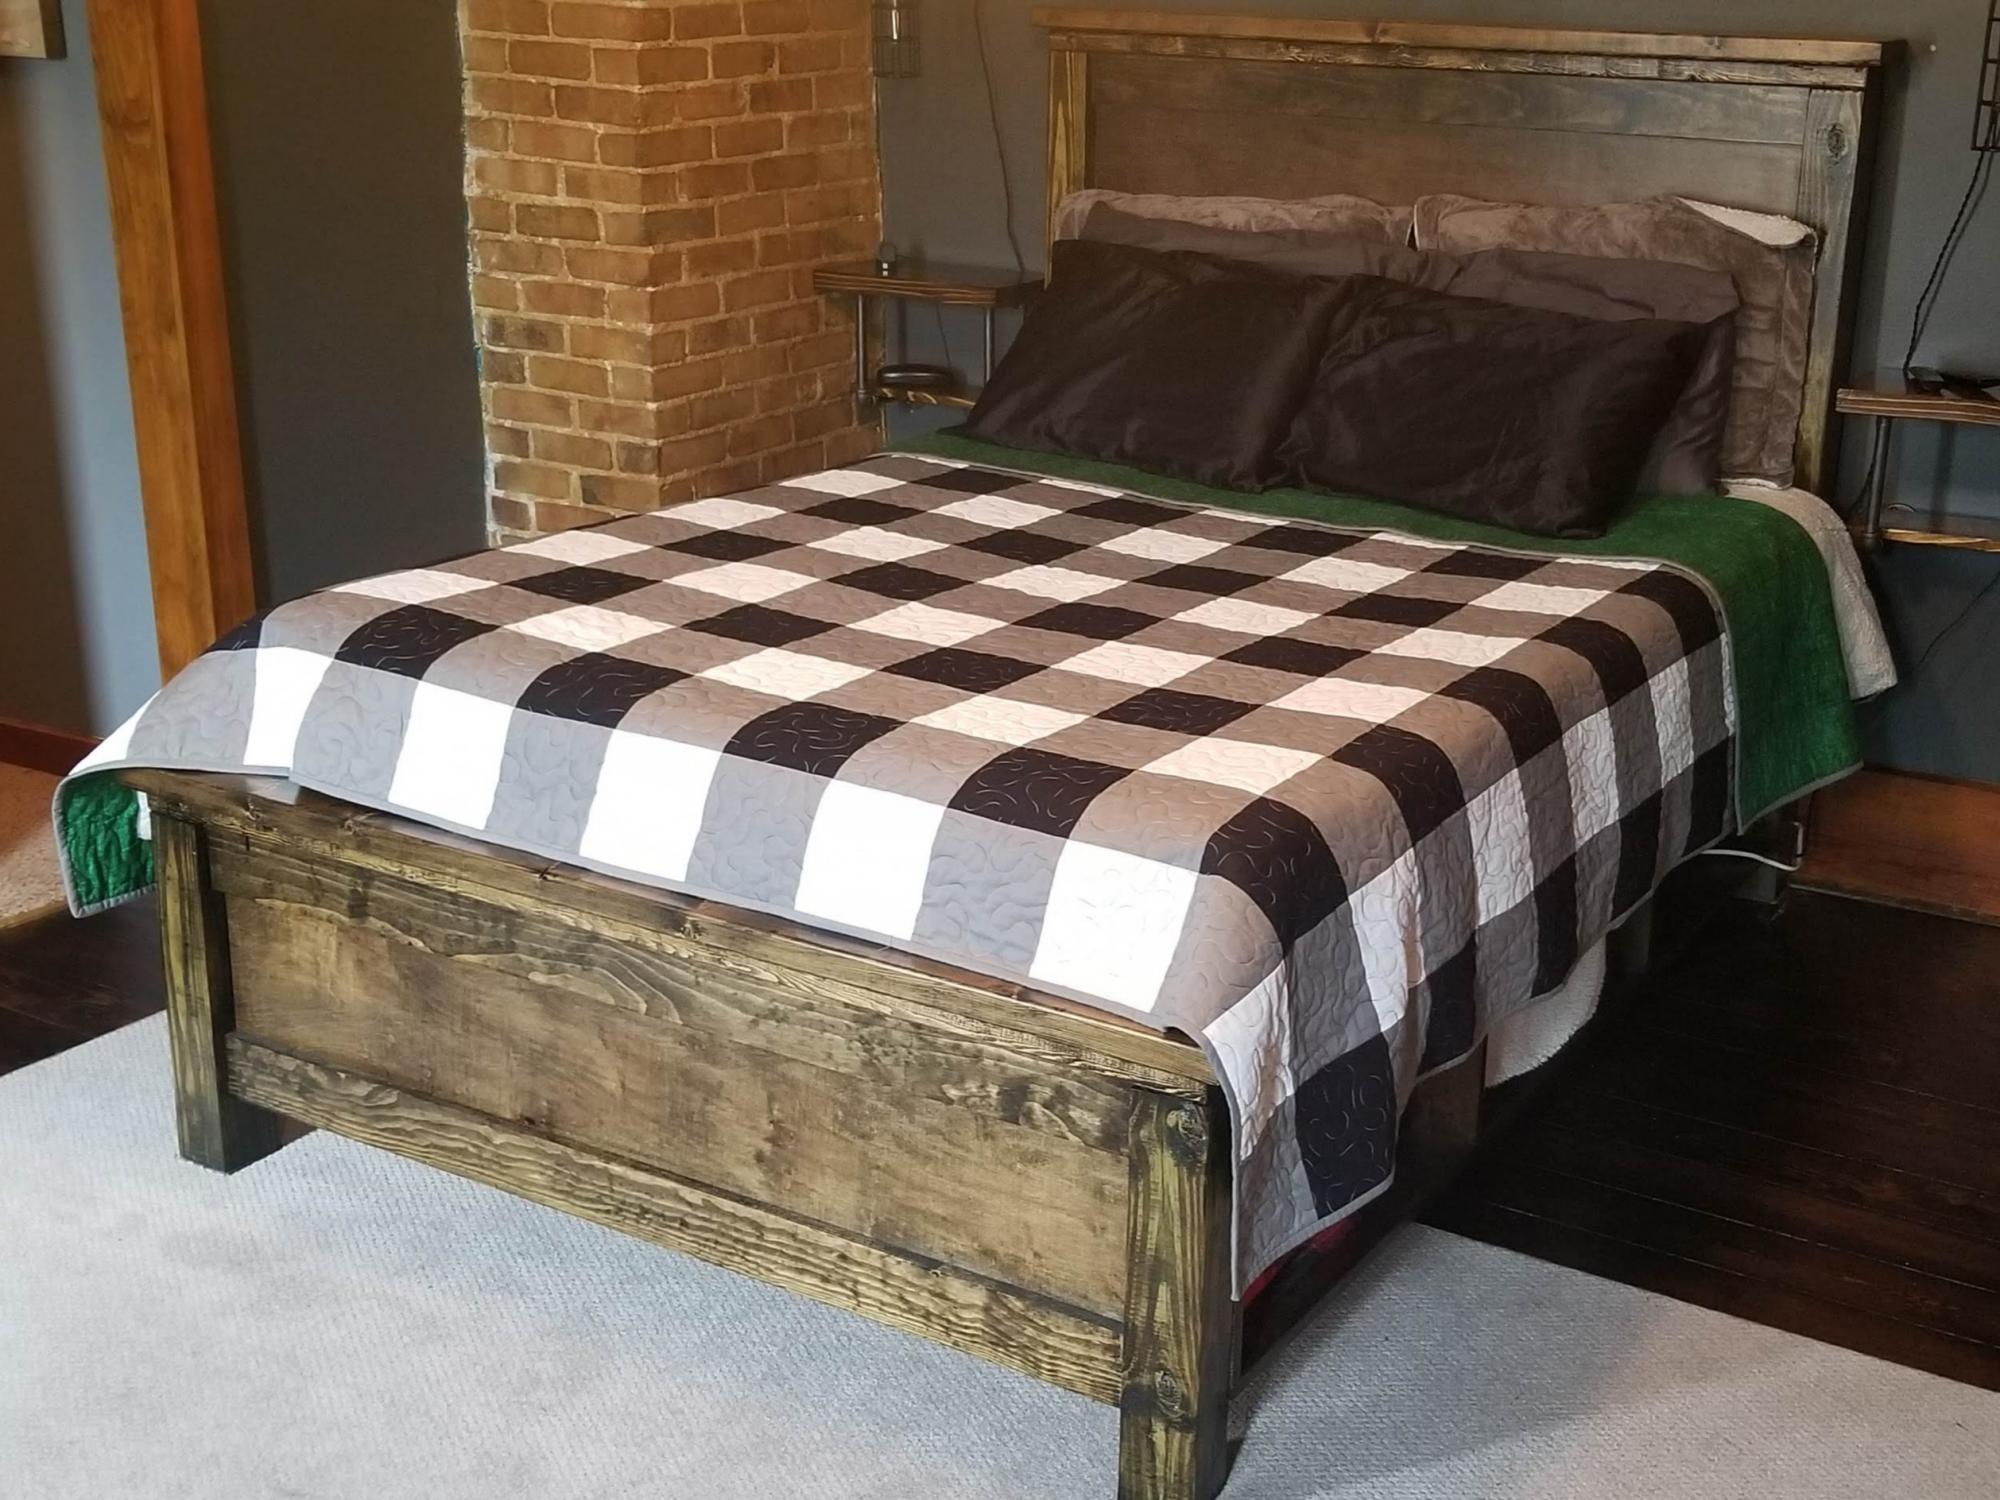
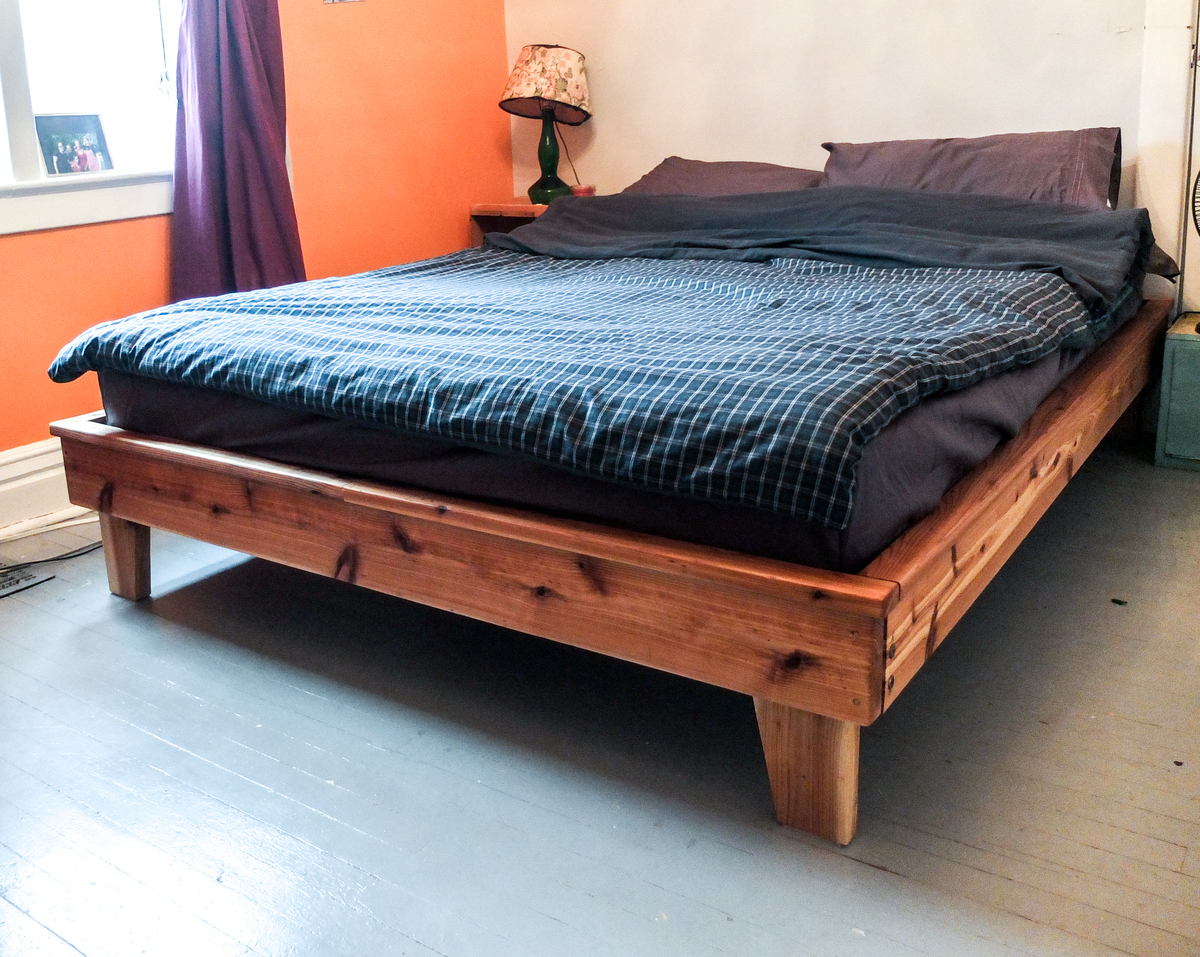
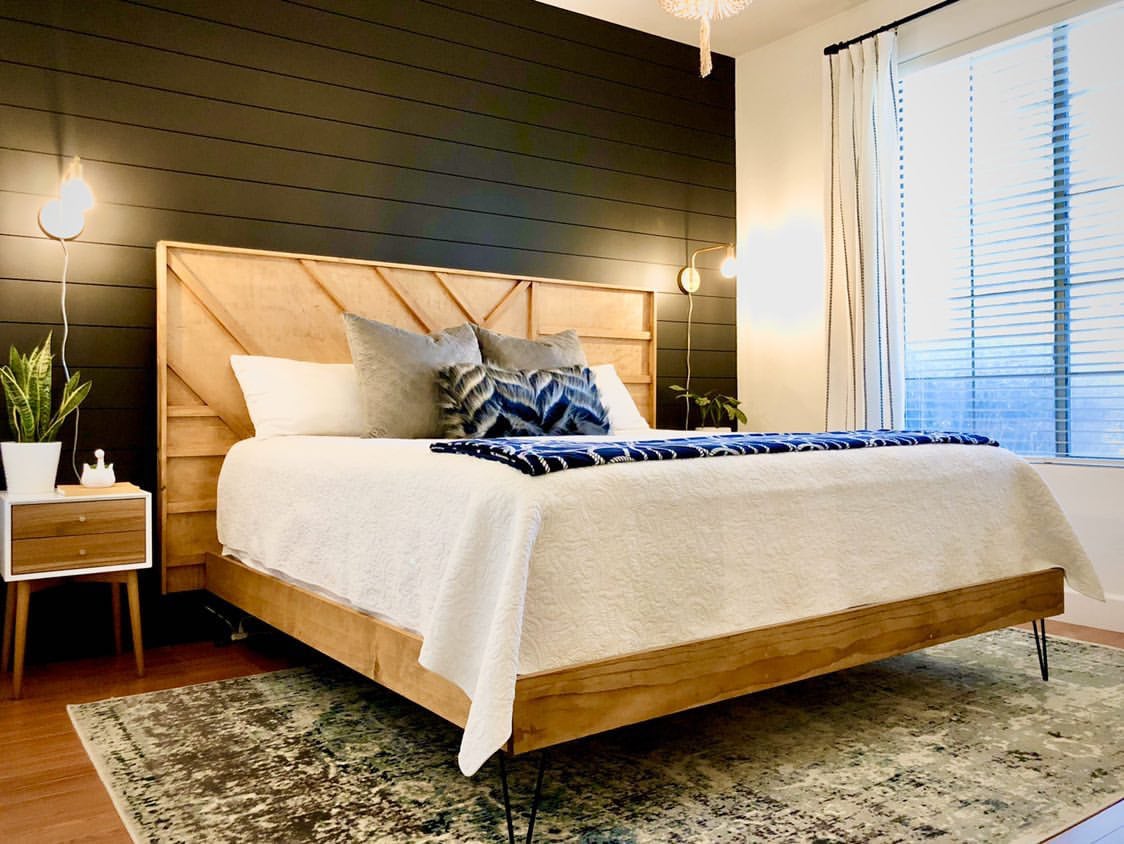
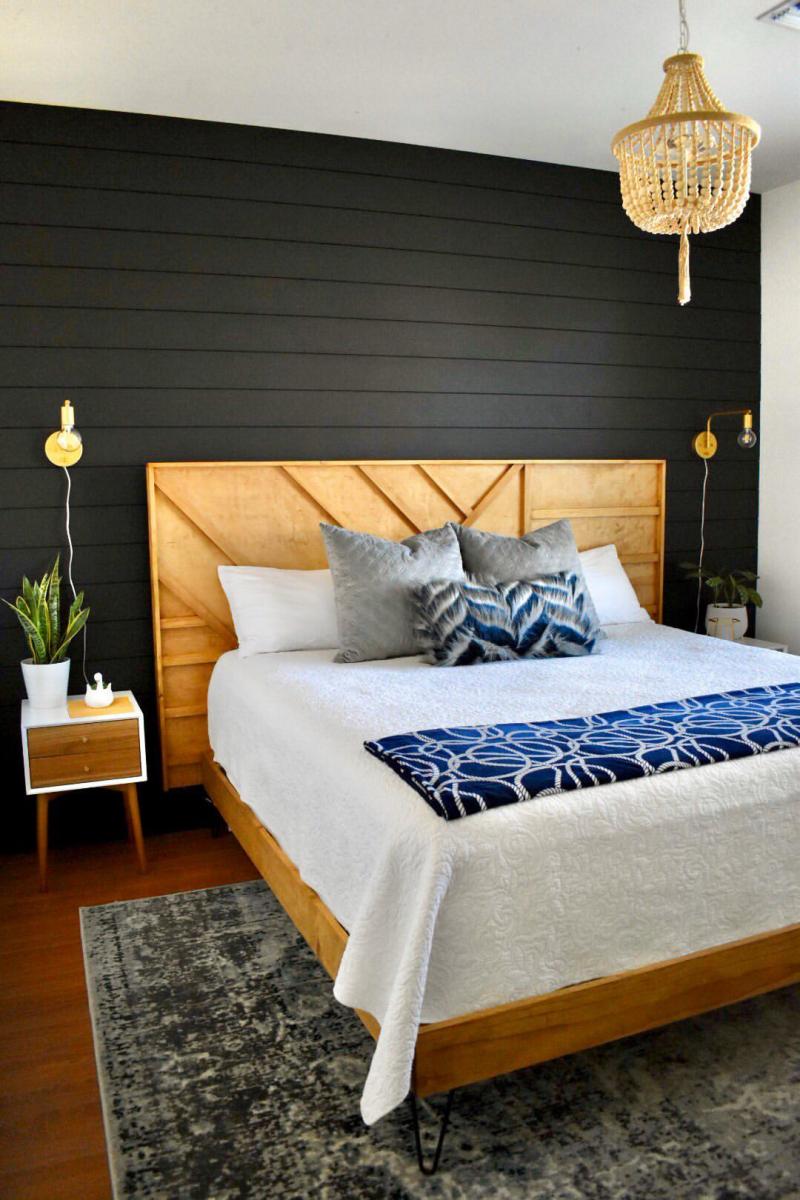
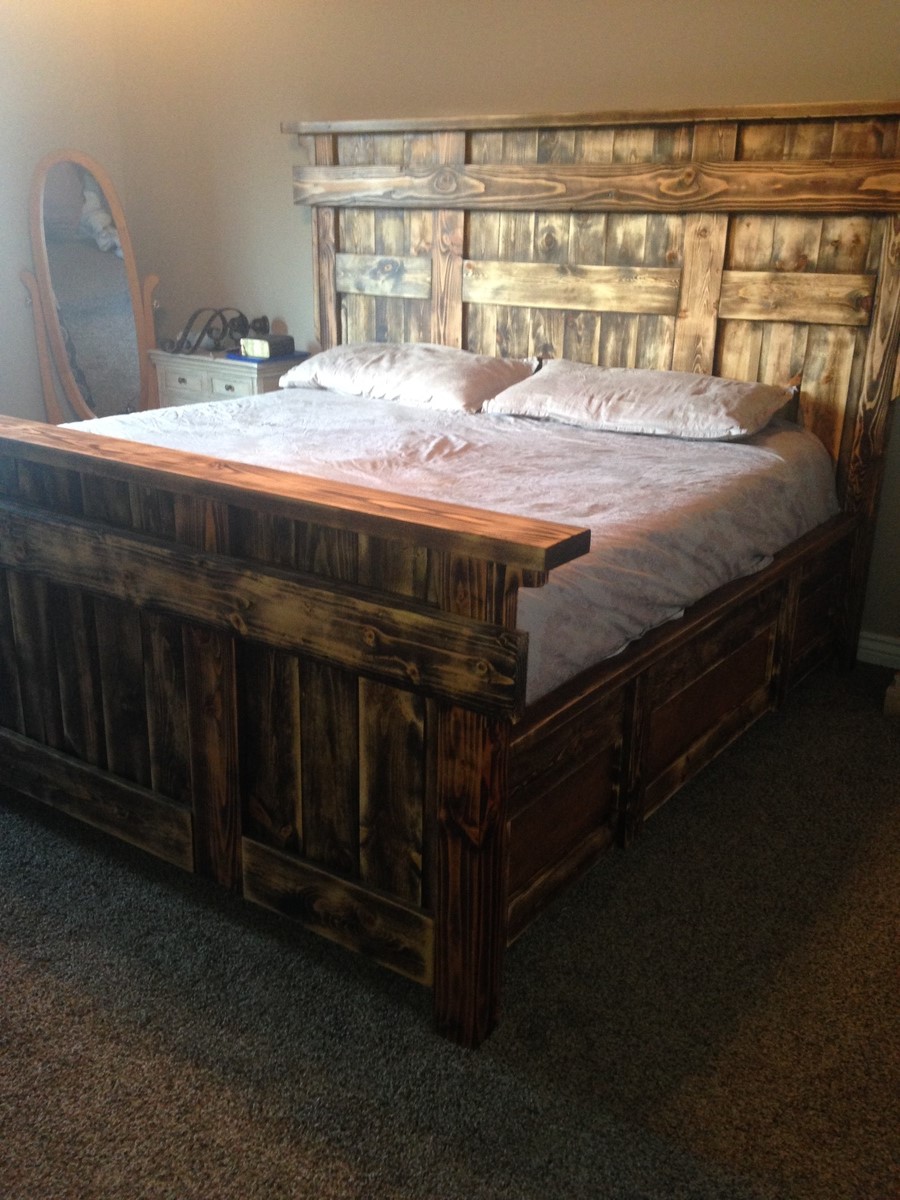
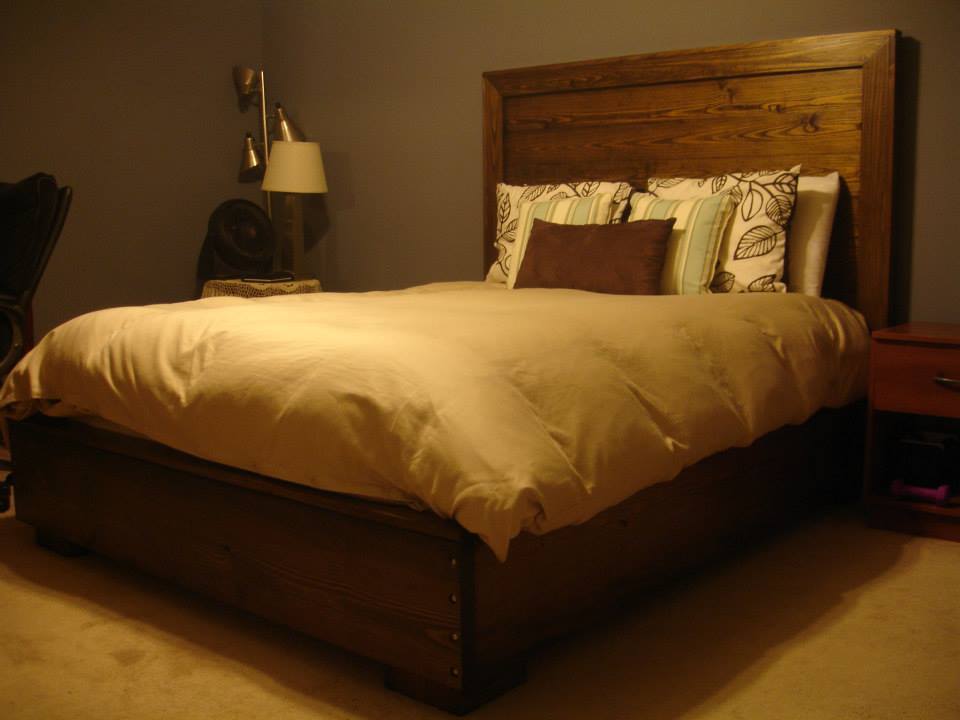
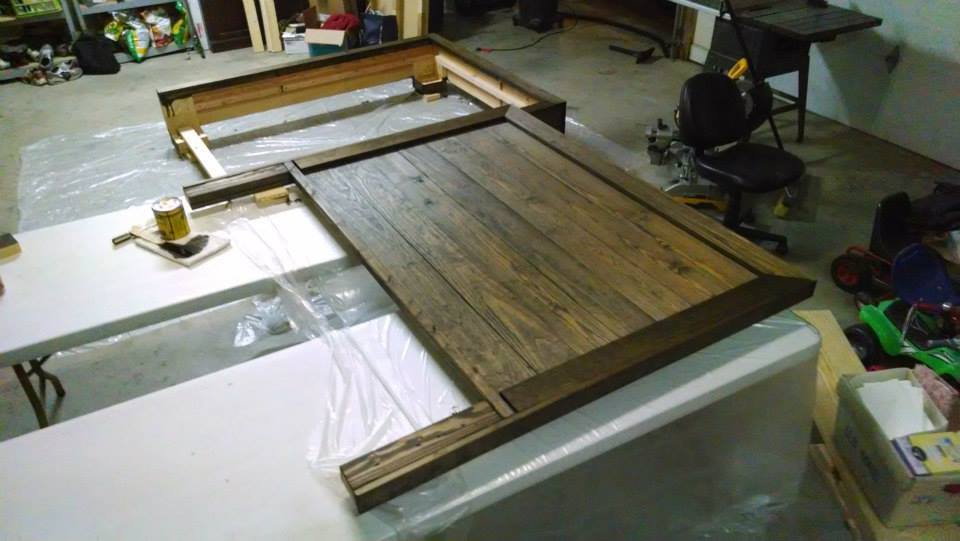
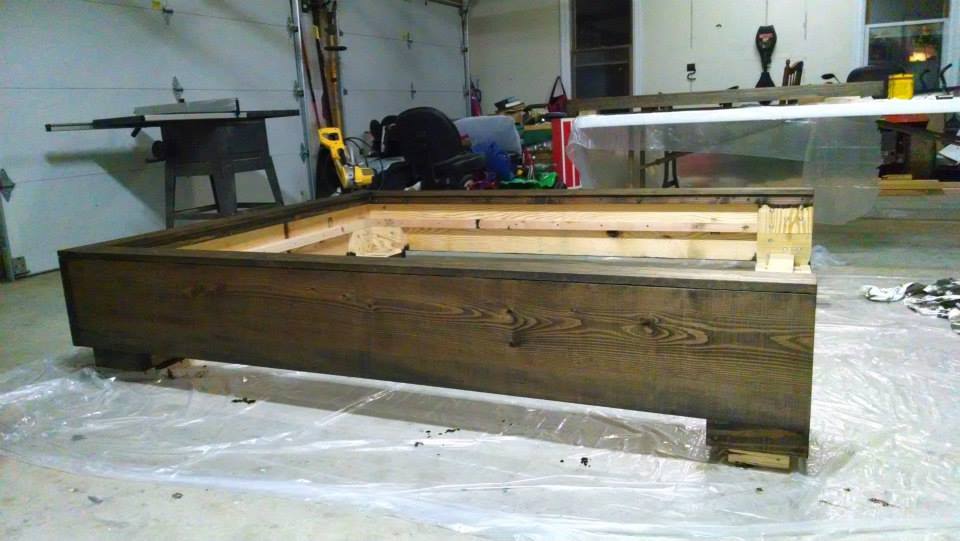
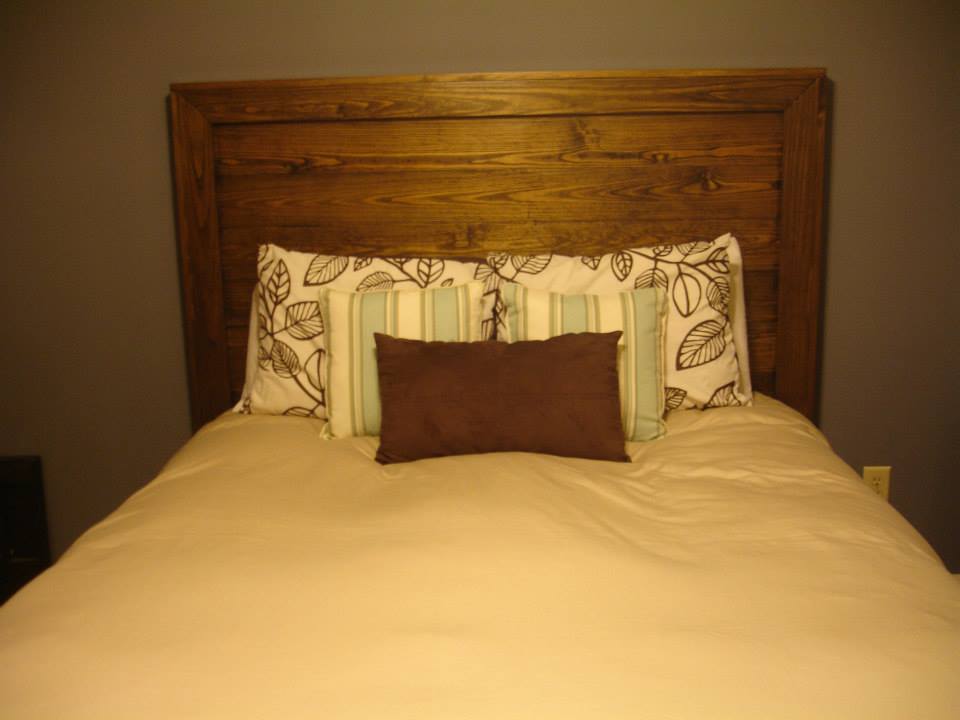
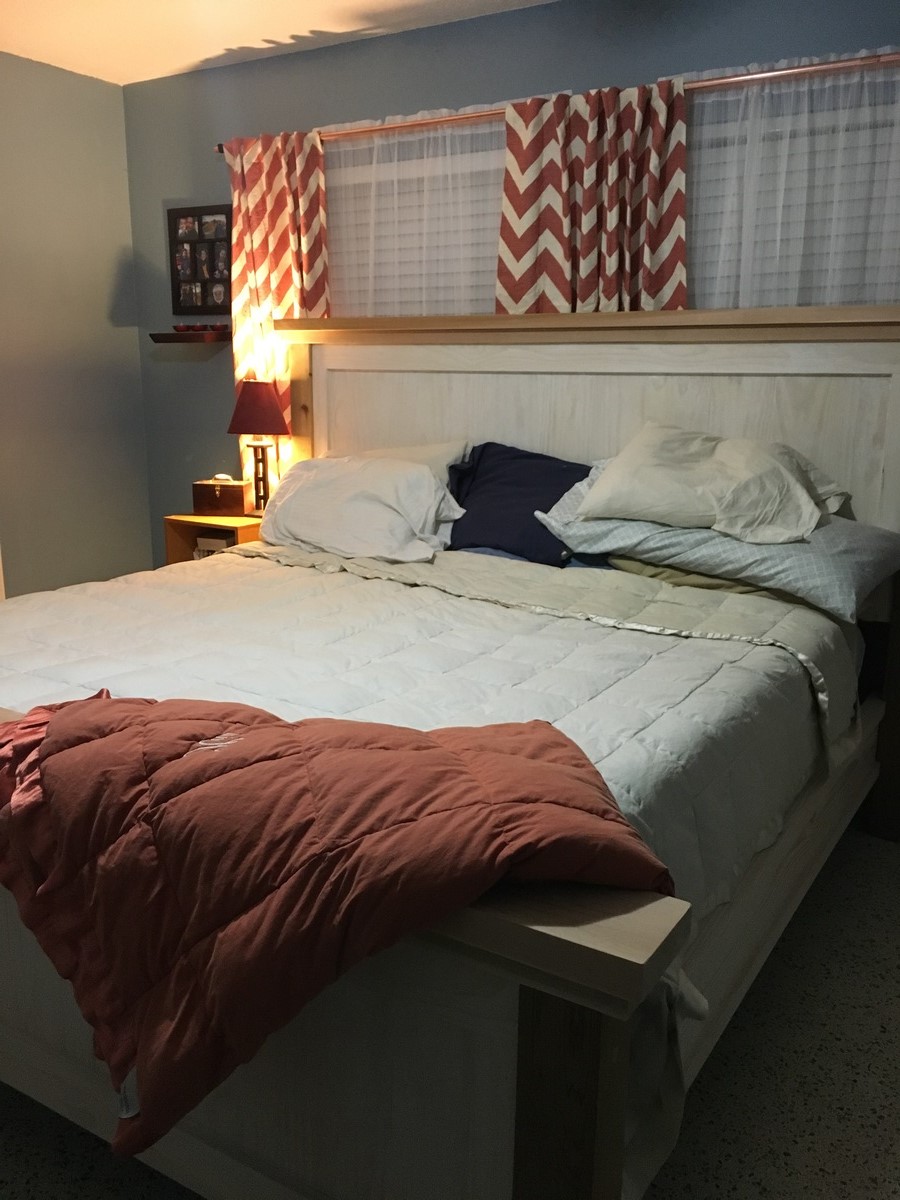
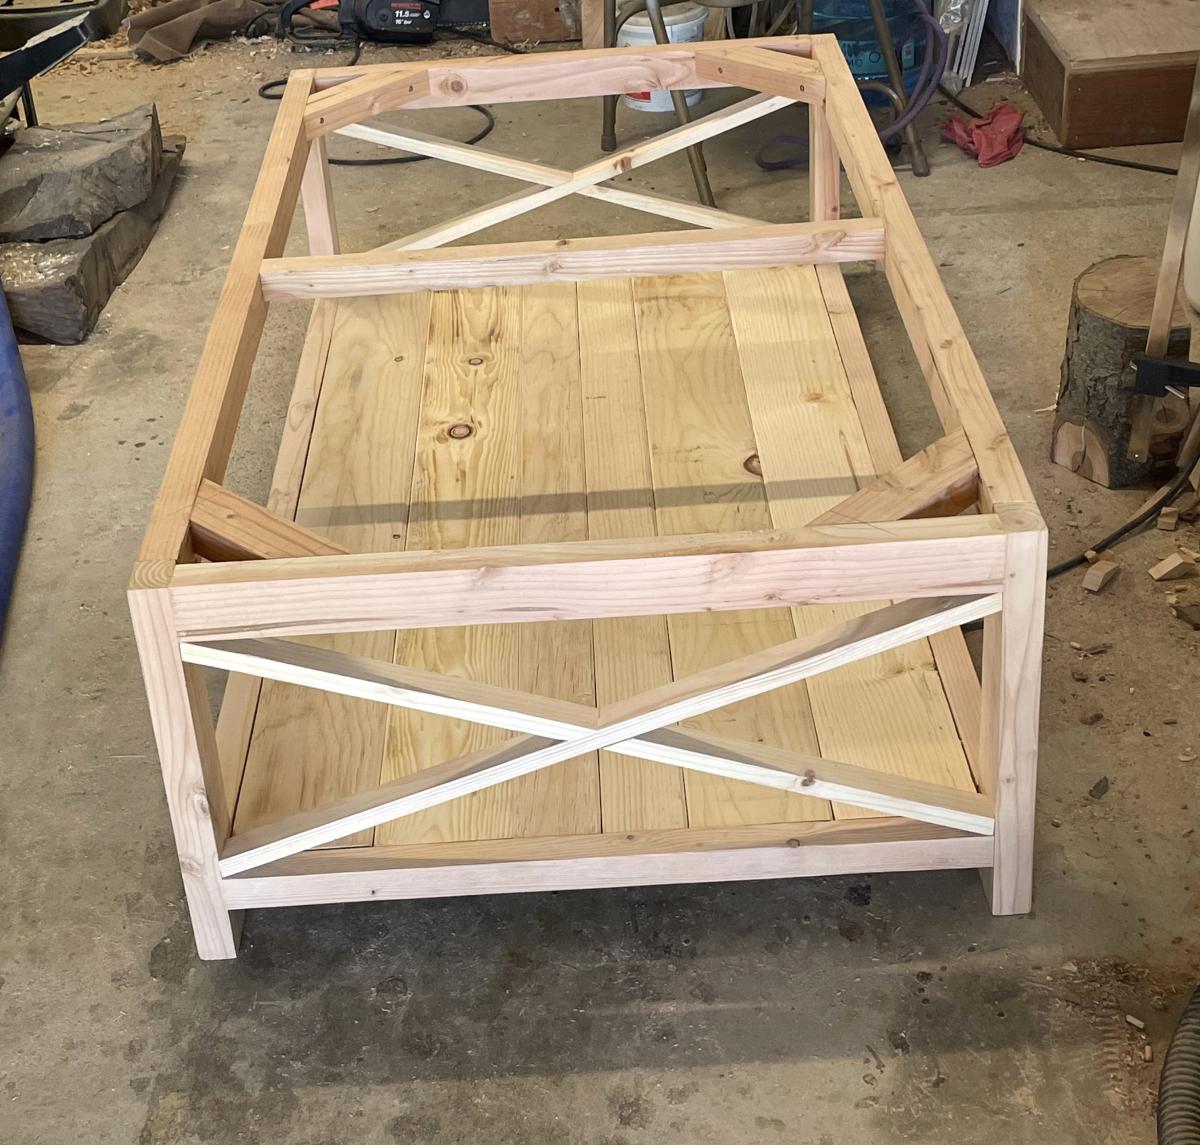
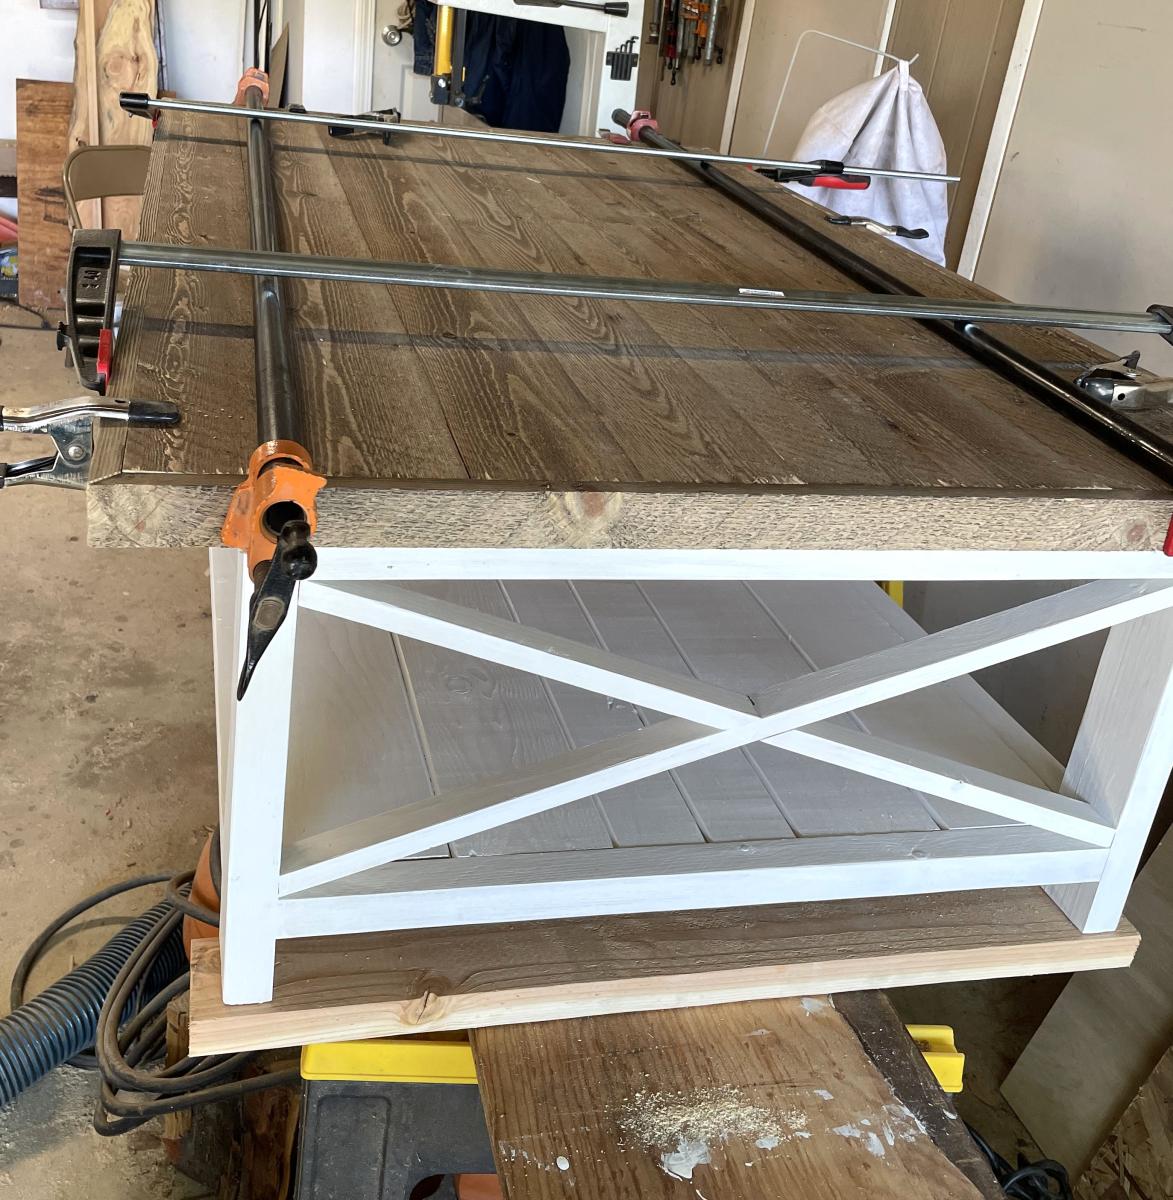
Tablet retro holder TV set
![](/sites/default/files/IMG_20191112_091756_540.jpg)
Made a mini TV set for my son and as soon as my older daughter saw that she had to have one too.
![](/sites/default/files/IMG_20191111_173703_573.jpg)
![](/sites/default/files/IMG_20191111_173703_576.jpg)
Made a mini TV set for my son and as soon as my older daughter saw that she had to have one too.
After building the small dresser from the cabin (or camp) collection, we wanted a side table to match. Pottery barn makes one, and there were some similar plans on Ana's site, so we kind of made it up as we went, following the same basic design as the dresser, only with modified dimensions, and less drawers, etc. This was a super quick build after the dresser, and we made it all from scraps we had lying around - only things were purchased were the hardward for the drawer, and 1 square dowel for the drawer slides - less than 5 bucks! Used left over paint from the dresser as well.
Fri, 03/16/2012 - 15:19
Your room is so sweet. It makes me want to have more babies so I can build a room just like it... though I think it's supposed to go the other way around. :)
After finally getting fed up with having our mattress on one of those cheap metal "frames", and no headboard, I decided to try my hand at a platform bed and plank headboard.
I followed the headboard plans to a T, with the exception of using 1x4's for the front trim instead of molding (at HD/Lowe's, the cheapest option would have set me back $40), and making it higher and wider to fit my bed plans. Everything came together very easily.
For the bed, I drew up the plans myself. I wanted clean lines and a modern look, with short wide legs. Instead of having the mattress rest on slats, I elected to hide the box spring within the wood frame, with the mattress sunk down 4" below the lip of the frame.
Total cost for headboard: $100
Total cost for bed: $80
Do NOT waste your time going to Lowe's or HD to buy any of the 1x's. The only frustrating part of this project was finding un-warped wood, and the big box stores had me pulling my hair out. Find a local wood place in your area, give them a call, and ask if they sell to non-contractors. My local yard was actually cheaper than the big box stores, and their wood was straight as a board, as it should be.
Mon, 03/10/2014 - 04:29
This looks great! Can I ask, is it a solid board at the bottom, or two boards? What did you use for the nail heads that you can see connecting the bottom boards? I'm fairly new at this. Is that just decorative or are they the screws holding it together? How do you get that look?
Thanks! I am going to try to do something like this.
Made these for my both my daughters and they love them. I think I may make some to sell as so many people seem to like them. I used a routered edge on my tops which deviates from plans a bit. I also used a biscuit jointer and glued in some biscuits to create my top made from 1x6 and 1x4 boards. Great plans and thanks for doing what you on this amazing website.
Fri, 10/21/2022 - 05:44
These are really beautiful. I love the white wainscot (?) in contrast with the natural wood top. I wonder if this design can be stretched upward and elongated into a cat little box cabinet enclosure? My mom could use one that's easy to open up to clean tall enough for a bit of enclosed storage, and a table top height for a place the cat can relax away from the dogs.
This is a kids work bench that I saw on pinterest. I couldn't find plans anywhere so I just winged it. If anyone knows who I should give credit to, I would be happy to do that.
This is made from pine studs. The dimensions are 24" wide x 42.5" back height, 19.75 bench height, 19" deep. The peg board is 24" x 18".
I used Early American stain with dark wax finish. I painted the peg board with Rustoleum Navy spray paint.
I used a plan from Jen WoodHouse for the red tool box.
I eliminated the bottom floor and created a shorter storage area instead. To make the project more manageable for one person, I chose 1/2" birch plywood, however, I think 5/8" would have been a bit more sturdy for this project. I love the plans and found them very easy to customize to fit my project.
My wife and I loved the original plan, but we needed the shelves to be wider.
So, I adjusted the plan to taper like a tree.
I used plywood and my wife painted it up.
The dimensions changed to 9 inches between shelves.
I wanted my top to be a lift top, so I used 1x3's adding breadboard ends. I ordered the lifts from Amazon. I applied a single coat of stain and then sanded it down to give it a more rustic look before applying a satin poly coat.
A. Henry
After completing the Queen Farmhouse headboard, we wanted tables to go with the set. Our guest room is small, so we opted for the mini-farmhouse table rather than the normal size that Ana has listed. It was quite a process, the little drawers are harder than they look! We do love the end result though!
Wanted to build matching nightstands based on the Kentwood design which I liked. I also wanted to make sure the doors were hung for the appropriate side of the bed for easy opening. Hopefully guests will love these in their room!
My Brandy Scrap bed with drawers, with a coastal theme. Made from scrap left over from an accent cedar wall. Originally stained with vinegar and steel wool and added some white wash and blue wash for color!
This was my first furniture build, and my 20 year old daughter did it with me! We made some rookie mistakes, but we love it! Super excited to make some matching end tables and or coffee table!
Fri, 04/17/2020 - 11:16
Great first project, love that your daughter is working with you!!!
We just finished building this room and decided to finish it off with Ana's loft bed. It's mounted at height of 6 feet in order to accommodate our 18 year old.
Renae Gilford
The bed was modified to allow room for a trundle, but decided we didn't want the trundle after all. The extra space does allow for more storage area and our daughter uses a stool since the bed sits up a bit higher. Brackets were added so that the bed could be taken down and moved easily. So glad the brackets were added, they made the bed solid for lots of little girls jumping. Decorative trim and accents were added to dress it up. Pratt & Lambert's Ovation Paint was used. I used a latex base coat and then applied the metallic pearl finish. The metallic finish needed to be sprayed on and ran easily, but what a beautiful finish!
Sun, 04/08/2012 - 22:46
How much clearance did you have to add for the trundle? I am going to make my daughter this daybed and I would like for it to have a trundle beneath. Thanks for your help!
We used the farmhouse table plans from this website, and modified the length and width. The finished length is about 8 1/3' long (100") and 45" wide.
This was our first build and my husband and I learned a lot! We could not find untreated 4x4s ANYWHERE in our area. We searched for days and called probably 10-15 places. We were just going to build with 2x4s, but my husband's work ended up having some pallets that used 4x4s come in with a shipment. They were not in the best shape, but we wanted it to look rustic so we weren't too concerned. Also, our 2x6s were a little warped, so they bow down at the ends. We searched through piles and we didn't really notice until they were on (breadboards). We did buy a Kreg Jig Kit and are so glad we did! We have used it for other projects and can't wait to use it for more. Such a great purchase!
I learned to ALWAYS do a test piece of stain first. This was new to us. We stained it the first time, and then had it spray coated with polyurethane (my stepfather does cabinets). I hated the finish! So I ended up spending an entire day (from 8 in the morning until midnight) stripping the 3 coats of polyurethane and stain. We could not get it all out, but got most of it. We then re-stained it with a lighter color (custom stain left over from our kitchen) and finished it with Minwax Wipe-On Poly. I like the more natural finish much better. If I could talk my husband into it, I would build another one so I could get the stain right.
Overall, I'm pleased with how it came out! The plans were easy to follow, and not hard to modify using a little math.
Thu, 05/21/2015 - 08:00
I'm new to this. Did your apron cuts/measurements change when you increased the length and width of the table? By the way, your table looks beautiful!
I took the Grandy Sliding Door Console plans and added another middle section to make the entire plan fit the nook in my man cave. I manipulated the plans to have openings without shelves to fit a mini fridge and an area for blankets (currently in the wash). Total length is 12 ft and height is 37.5 inches high (36 inches + the top). I tried to stain it to match another table in the room and it worked out pretty well.
First project in my back porch turned into a makeshift wood shop
I built this console table for my son's room, and added a matching hutch for additional storage and display. It's a versatile piece of furniture. He uses it for games, books and collectibles, but it would be great for a tv and game system too. Thanks for the plans!
Wed, 01/15/2014 - 11:06
I love how this looks! Very nice job! Can you please tell me what the total height is once you added your hutch?
Wed, 01/15/2014 - 11:41
Thank you! I just checked and it measures at 63 inches. It's sitting on thick carpet so it may actually be more like 63.5 inches.
Wed, 01/15/2014 - 12:52
Great! Thank you so much! I think this will be the perfect size for what I need. Yours looks so nice that I'd like to copy it. Did you use any plans to build the hutch or did you just make it up? I just love how yours looks! Thank you so much for posting!
Wed, 01/15/2014 - 14:09
Moosmani, I made it up just based on a very simple hutch. Two days later, Ana posted plans for the School Desk Hutch. :/ A plan to follow would have been nice but honestly, the hutch was a very easy build. Good luck building yours and I look forward to seeing pics.
This is our first real furniture project. We wanted a large enough table to be able to sit 10 people comfortably around without the table legs getting in the way of the people on the corners. We are really happy with the way this turned out. Each leg was joined with a double floating mortise & tennon. The overall dimensions are 47" wide by 80" long by 31.5" tall.
Mon, 04/11/2016 - 12:48
Sure. I'd be happy to. I drew it up on Sketchup. Would that work or would you prefer just a pdf? Feel free to email me: [email protected]
Mon, 04/11/2016 - 12:51
Table legs are mounted using steel plates routed flush with the bottom of the table.
This plan was so easy to follow. I love my new workbench!